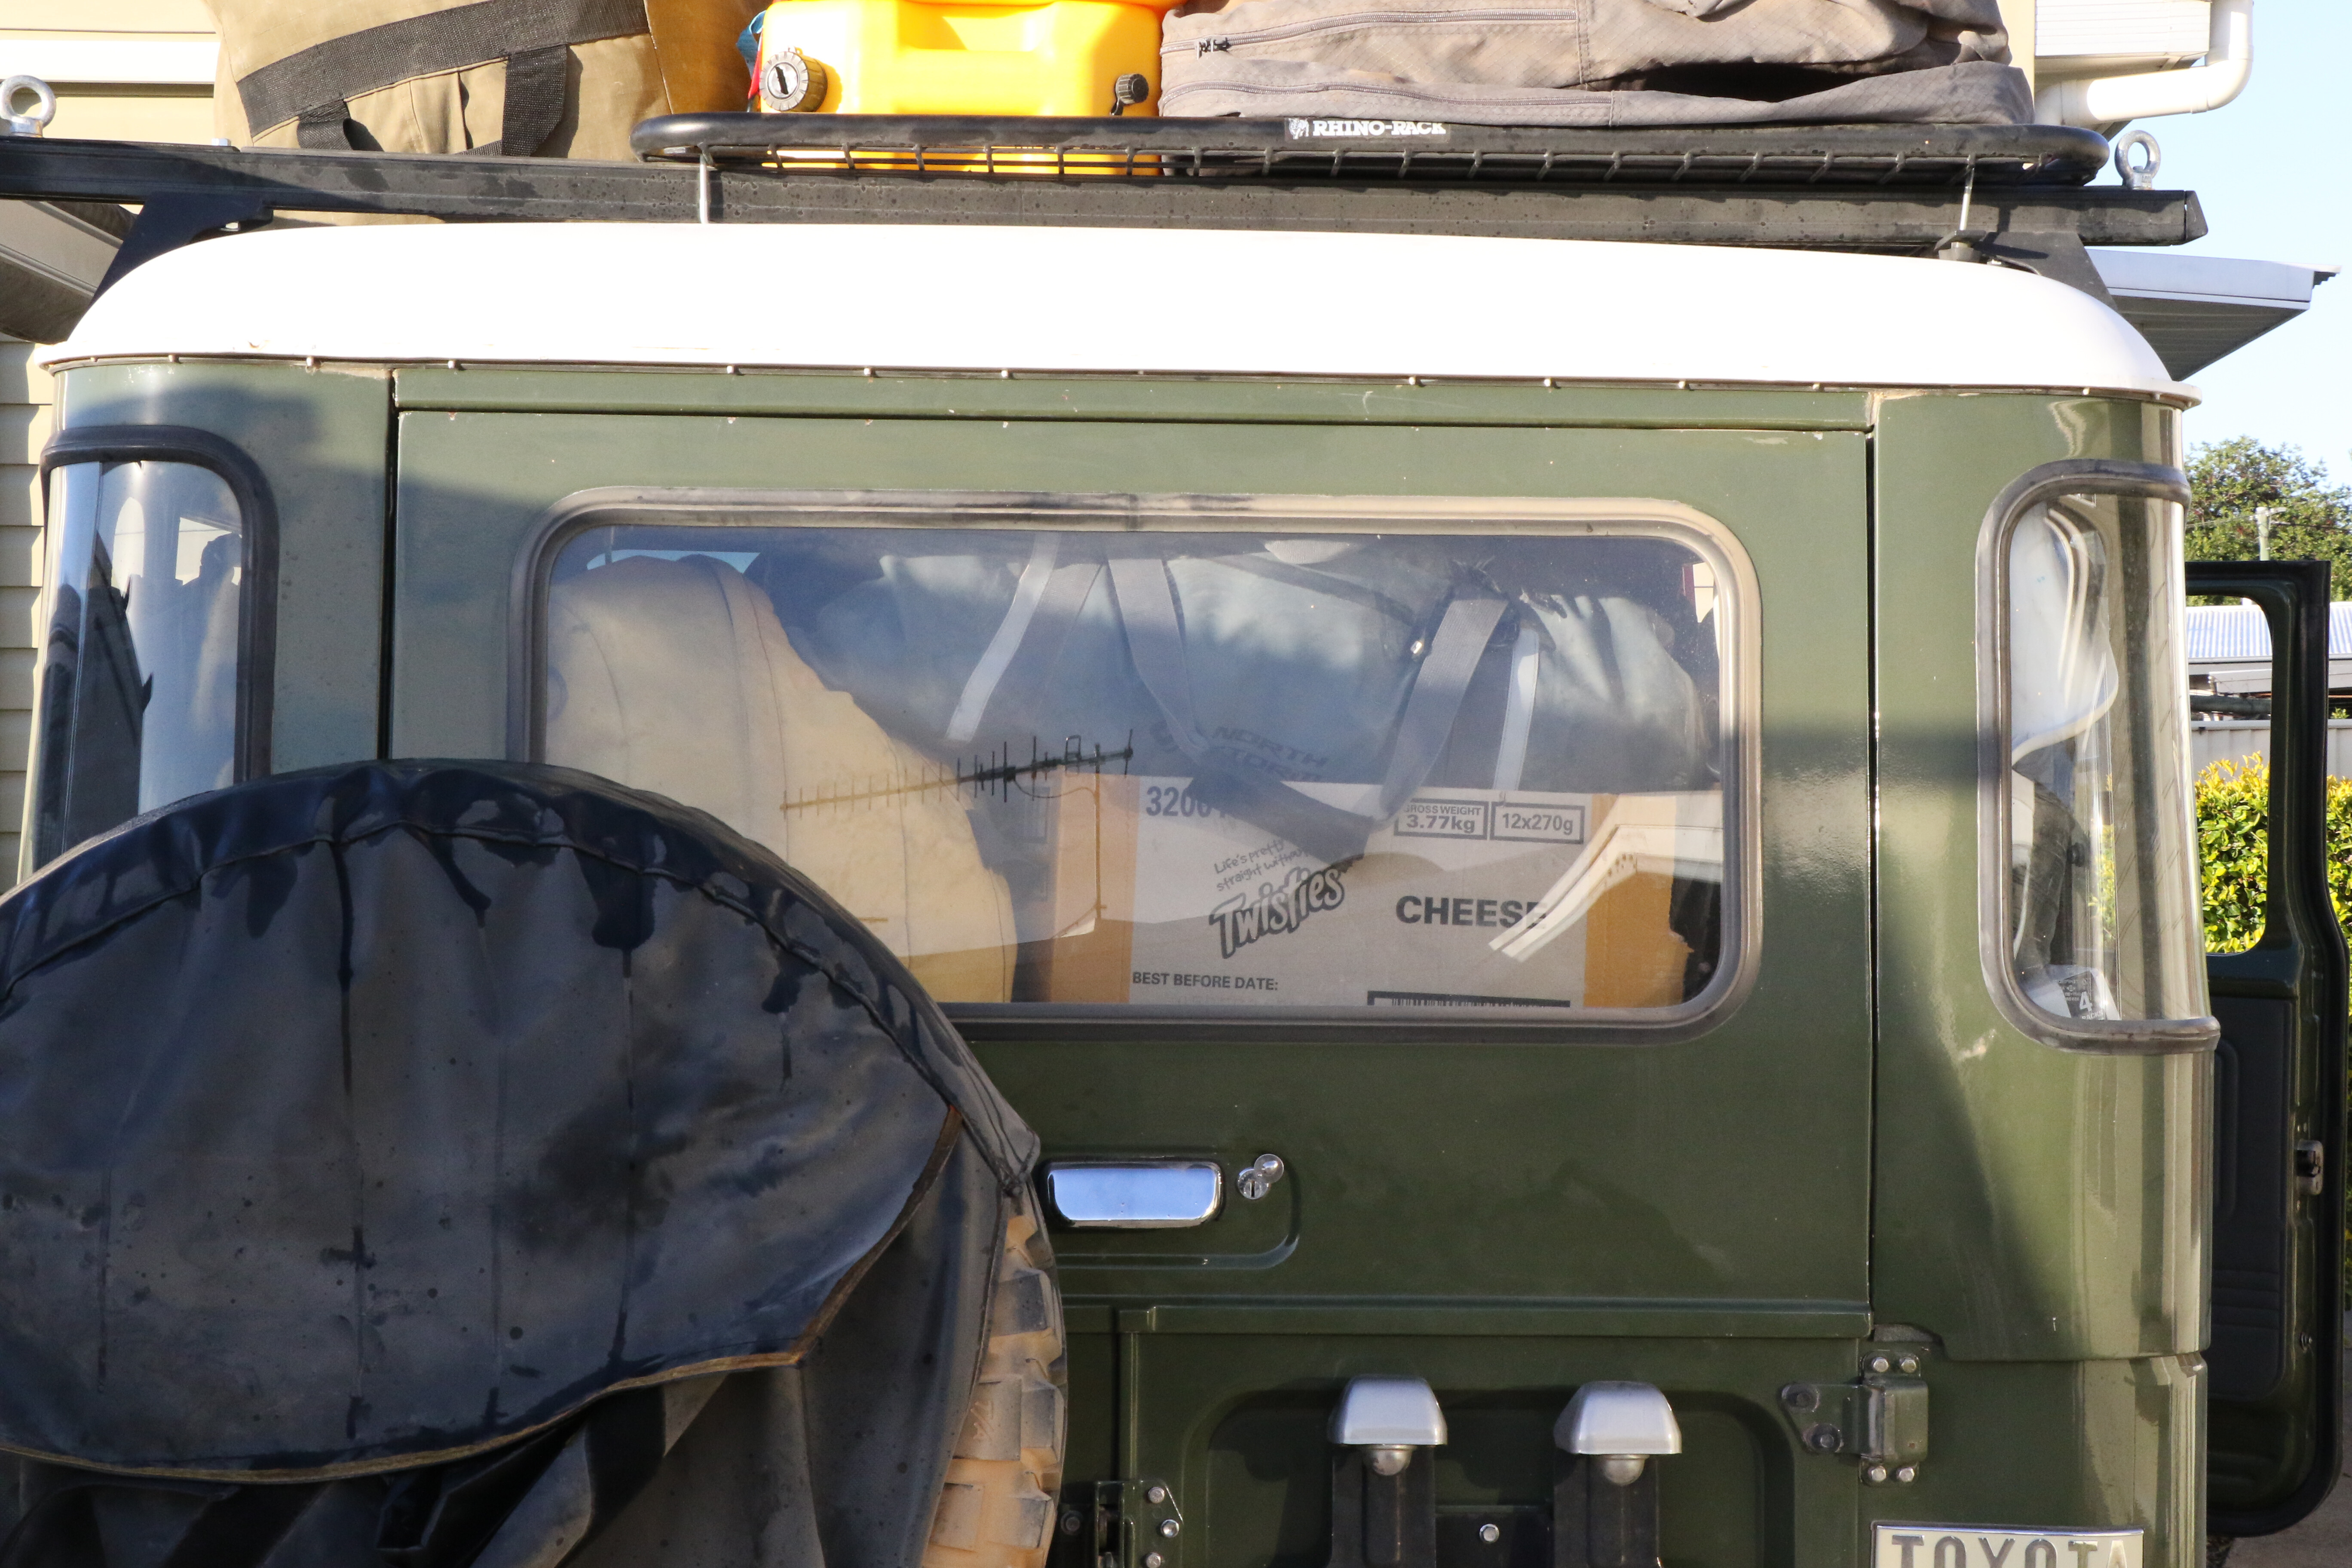
- Update 1: Accidental upgrade
- Update 2: Box fresh
- Update 3: Under pressure
- Update 4: Tough lovin’
- Update 5: Shock therapy
- Update 6: Patrol gets tougher
- Update 7: Dirty tricks
Update 1: Accidental upgrade
Ron’s trusty old steed loses a rear leg in the Vic High Country, prompting a thorough replacement of worn parts.
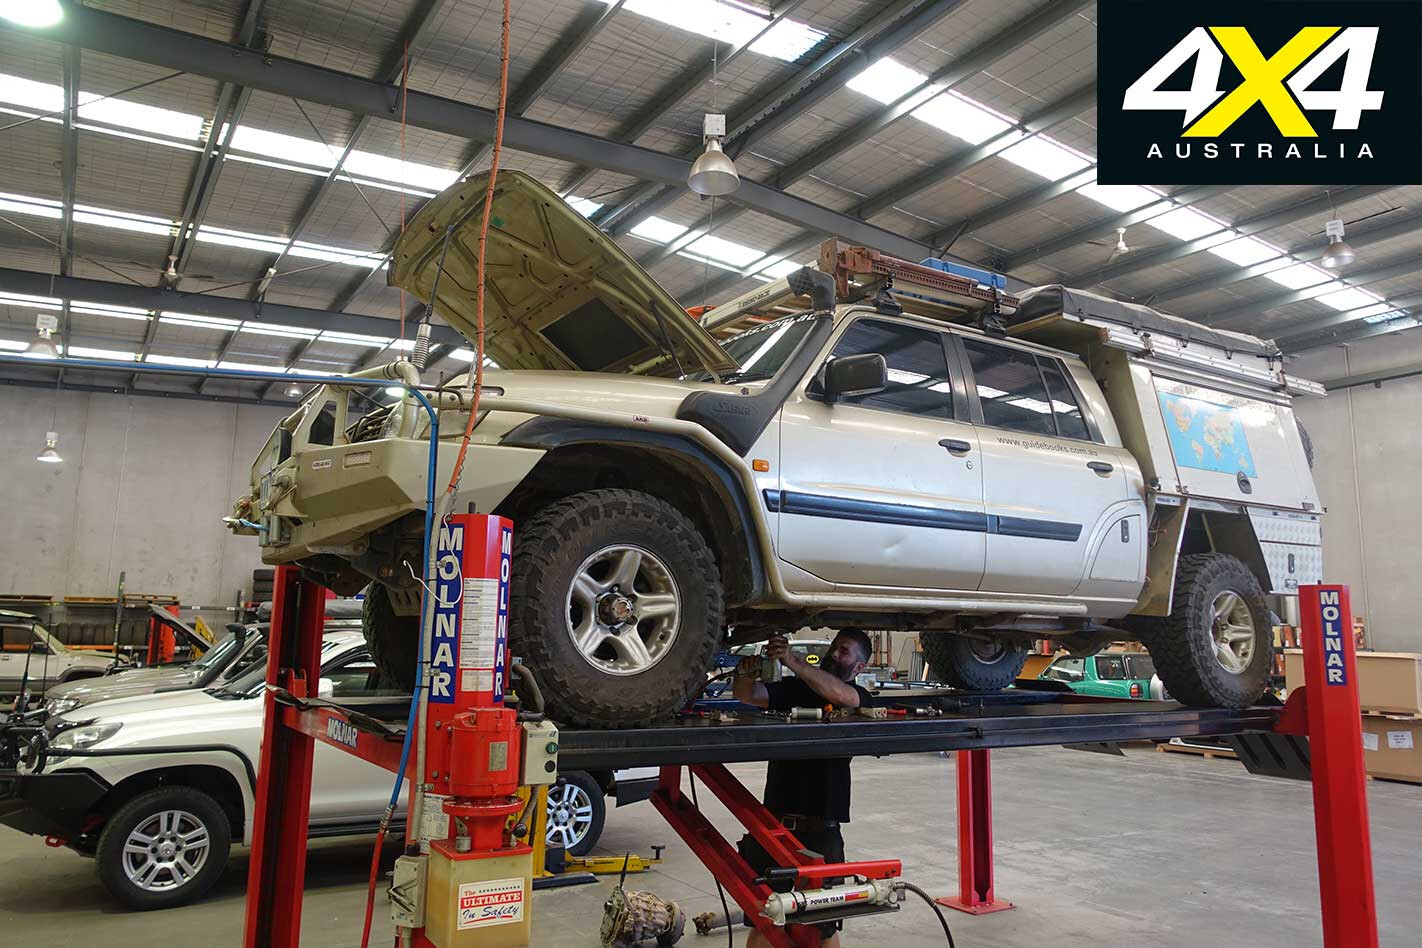
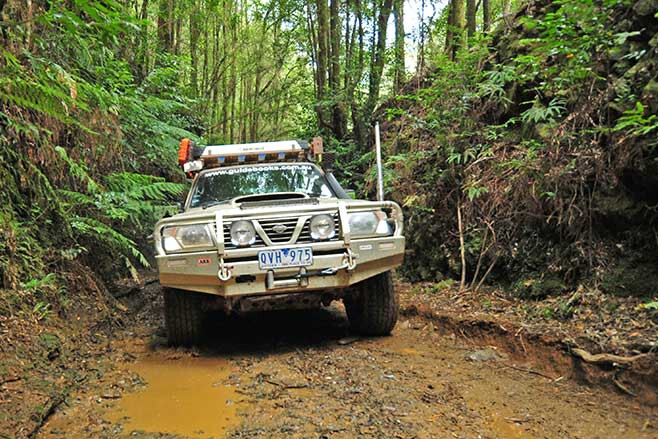
The old Patrol let me down recently, both literally and figuratively. We were coming home from an enjoyable weekend up in the Vic High Country and had just got onto the Crooked River Road, when with hardly any warning the rear wheel on the Patrol parted company with the rest of the vehicle. Talk about being dumped.
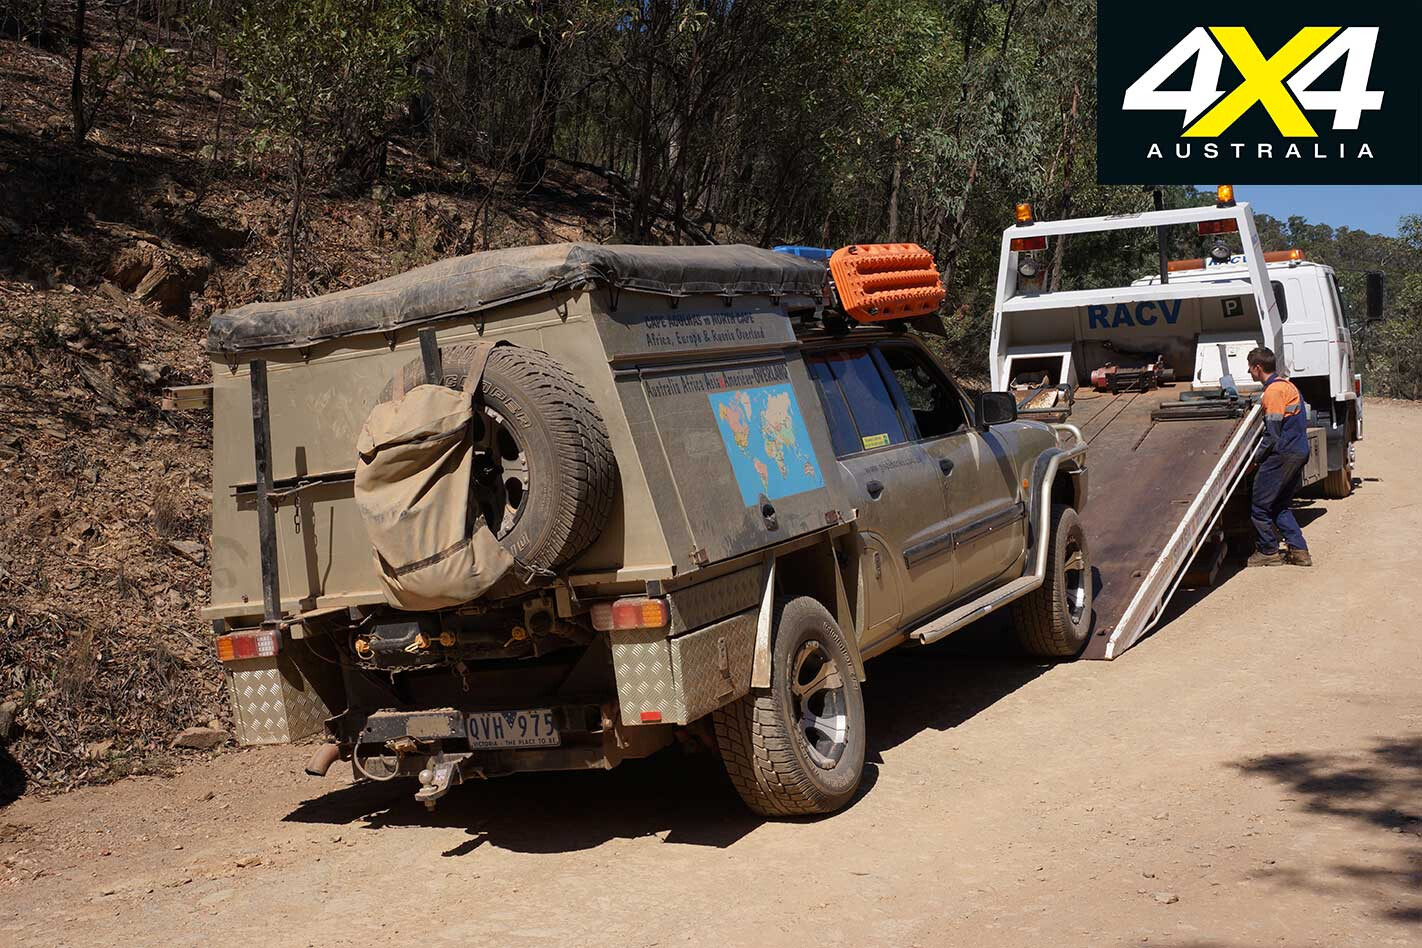
I could have repaired it myself as I had spare wheel studs onboard, but being inherently lazy and so close to civilisation I opted for a recovery and a repair job, and the boys at ARB Bairnsdale helped us out at a moment’s notice.
Then it was back to Outback 4WD in Bayswater, where they replaced all the studs on all the wheels. By all accounts studs can stretch after years of hard work and changing rims and, sooner or later, they break; and if you don’t do the wheel nuts up correctly, wheels can part company. Patrols, it seems, are more liable to do that than some other vehicles; I guess I was lucky I was on a major dirt road and not halfway up Billy Goat Bluff.
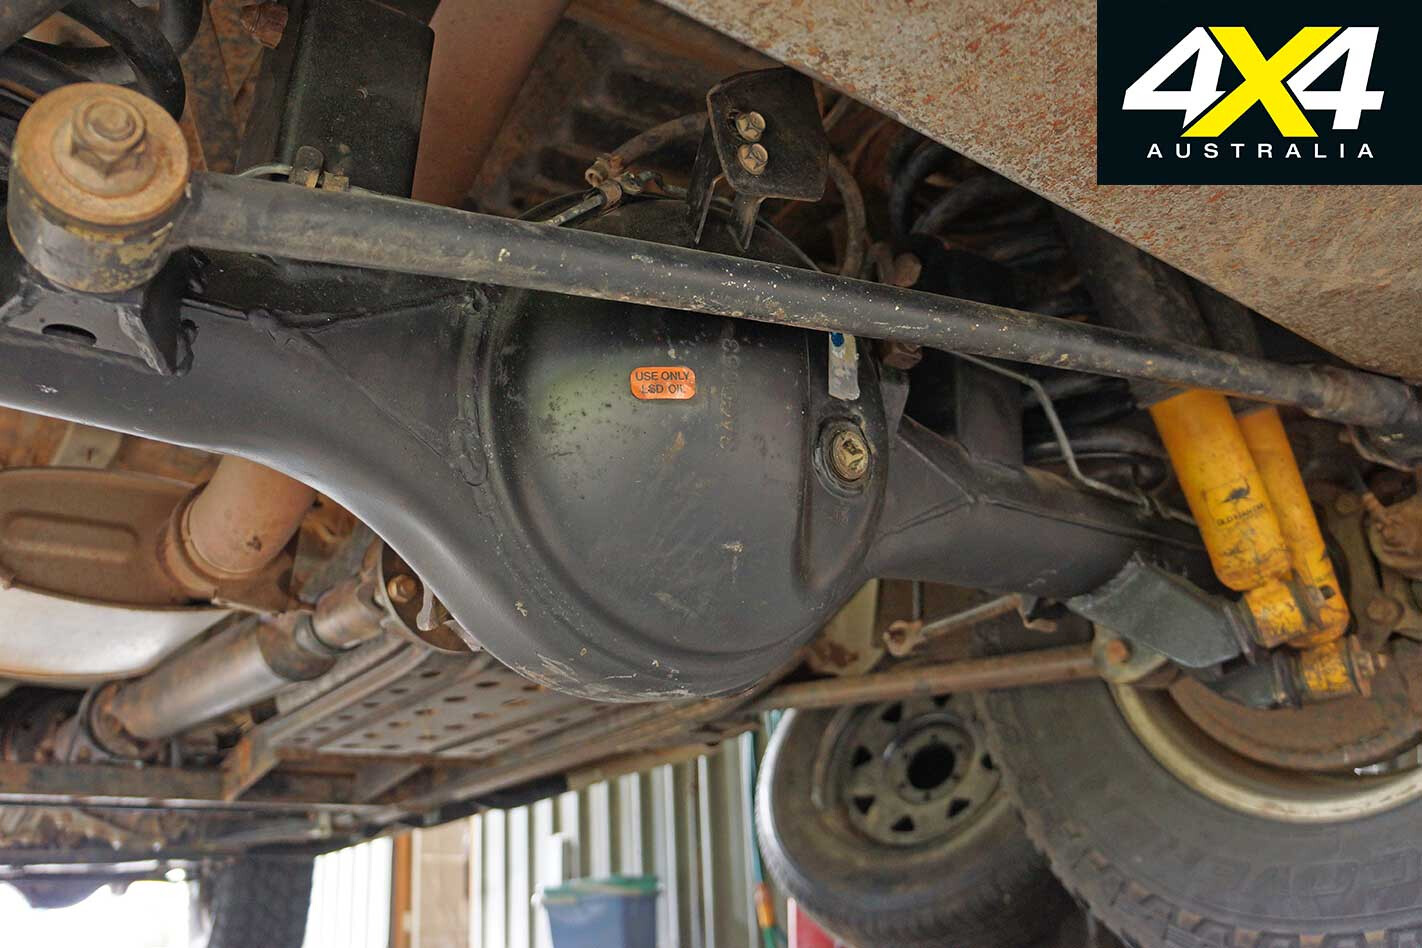
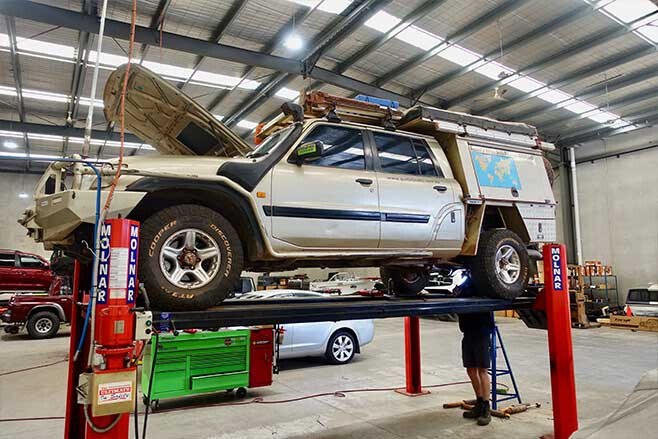
It’s been a while since the old girl has been in the mag, and we’ve done a bit of preventative maintenance over the past few months, not the least of which was a new rear diff housing. I had cracked the original back at about the 200K mark, and I had it welded more than once between then and the 400K the Patrol has now done. With another welding job required, I decided it was best to replace it.
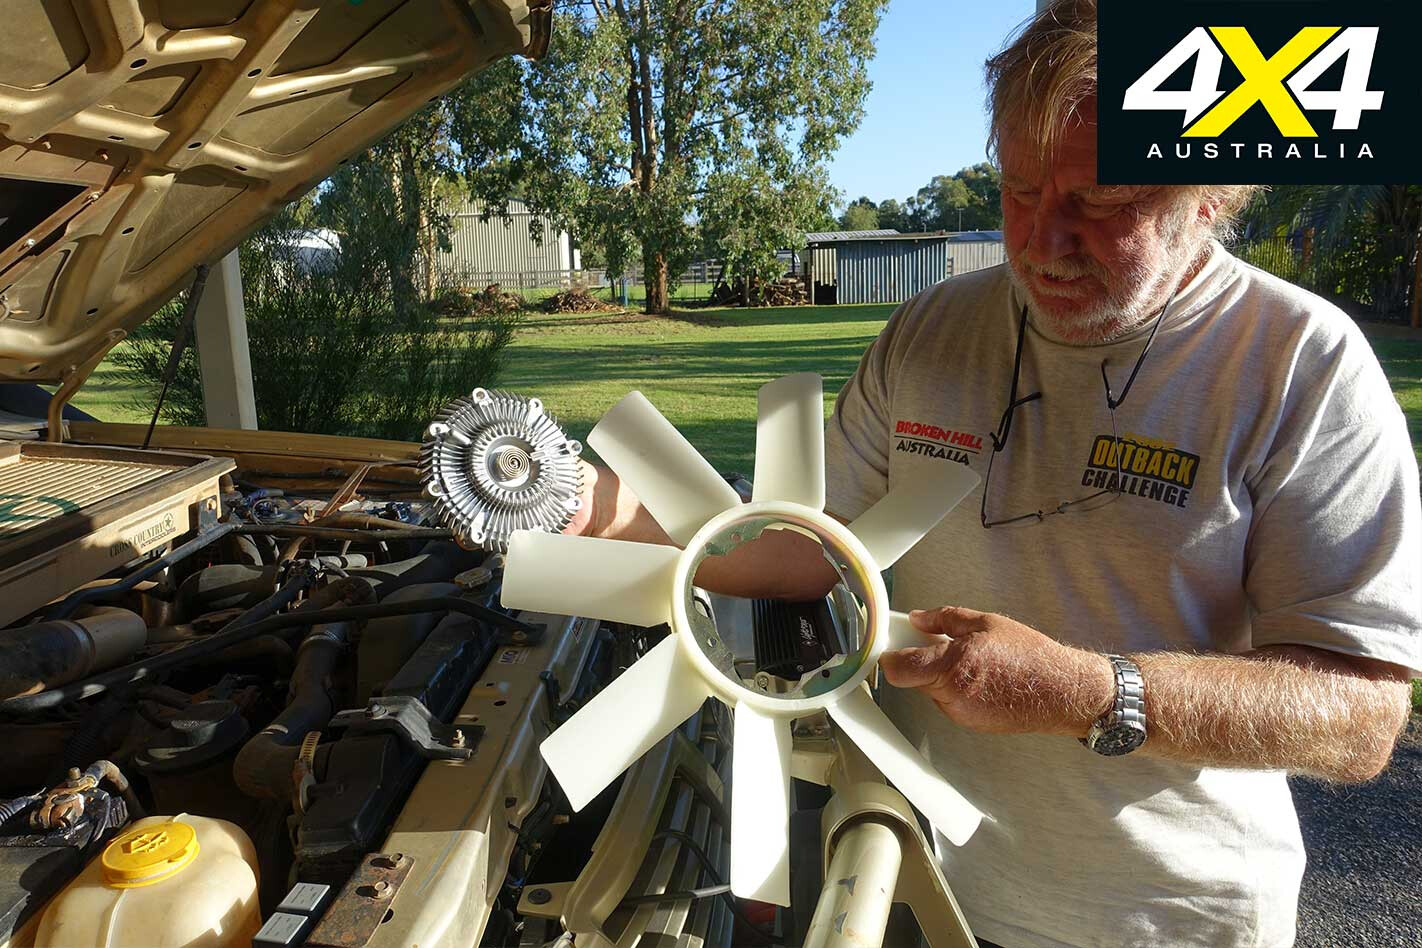
Around the same time I had Outback 4WD replace all the rubbers and bushes on trailing arms and the like, as well as fit braided brake lines to all the brakes. To help with the cooling of the radiator we fitted a GQ fan and drive hub; the fans shift more air than a standard GU fan but make more noise in the process.
I replaced the light bar that had been sitting on top of my ARB bullbar with a more discreet Lightforce single-row light bar fitted with combo spot and flood LEDs. It might be smaller and draw less power, but the light output is amazing. Wanting to improve the standard headlights, I opted for a replacement Narva Ultima LED globes which are a direct replacement for halogen globes.
As many of you would know you can easily opt for a high-performance halogen globe and, while they throw a better light, you sacrifice longevity. With the new LED light you get a bright white light coupled to a stated life of 30,000 hours. I’d be more than happy with a third of that.
Now with better lights, new studs so the wheels don’t come off, and with a full service and oil change, the Patrol is ready to hit the road and the bush tracks once more.
DATE ACQUIRED: 2001 PRICE: $44,000 TOTAL KILOMETRES: 393,000km AVERAGE FUEL USE: 17L/100km
Update 2: Box fresh
Ron’s Patrol cops a well-earned service, with a rebuilt gearbox and new transfer box among the changes.
Over the past few months the 2001 Nissan Patrol has been having a holiday on the south coast of NSW and up in the high country of Victoria.
On these trips the gearbox occasionally growled at me and, as we clocked up more kilometres, it became more regular. With 400,000km on the clock I guess I shouldn’t complain, so before it expired on me completely and left me stranded somewhere in the scrub I thought I’d better do something about it.
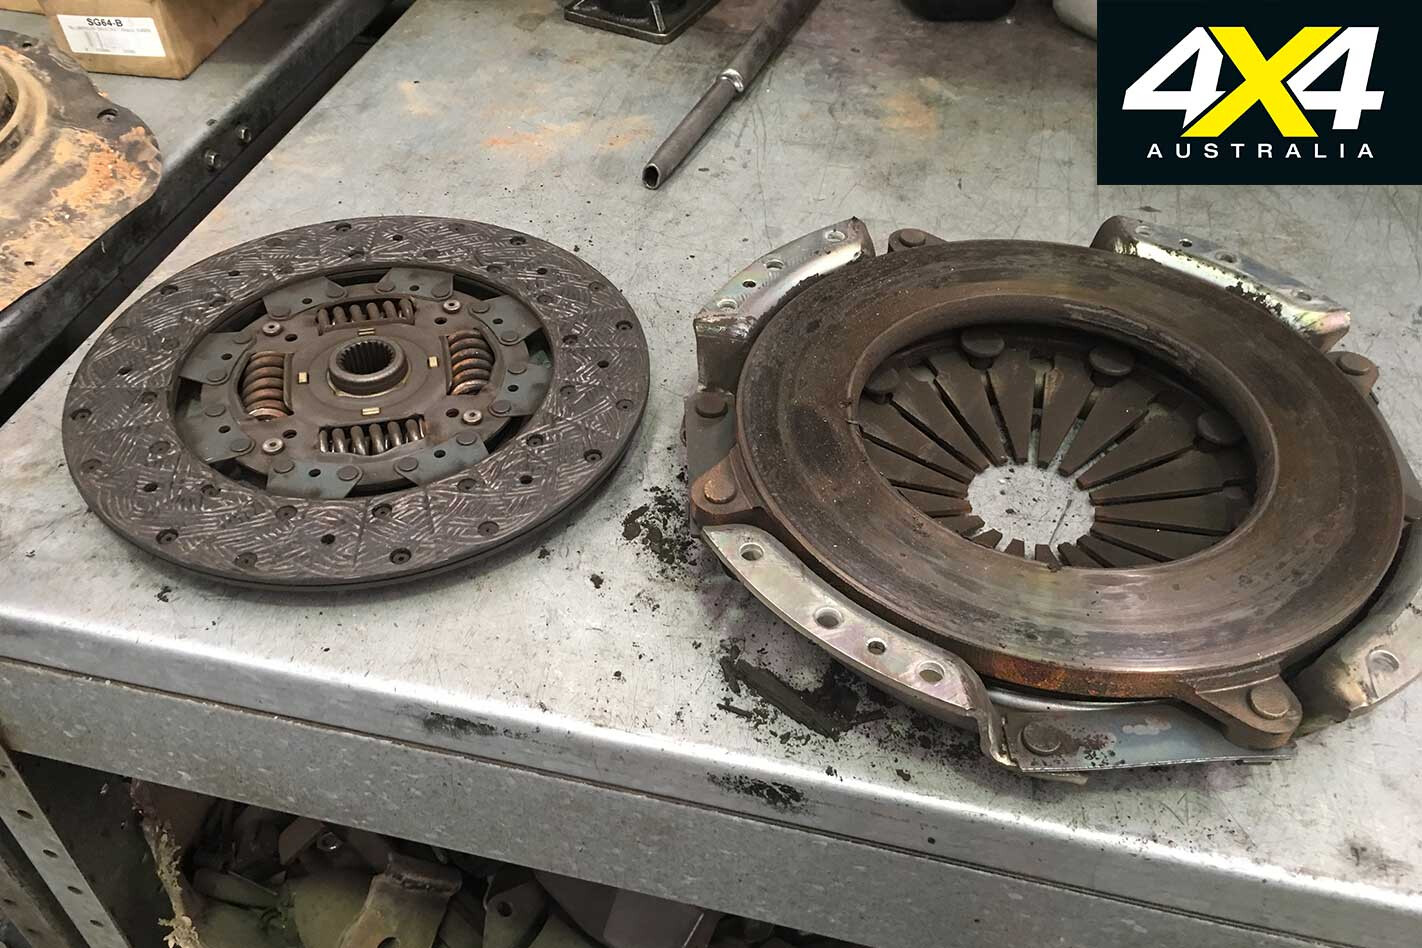
Off we went to Outback 4WD in Bayswater (Vic) and they soon had the gearbox out and sent off for a rebuild. It turned out that all the bearings were showing signs of wear, while the gears themselves were pretty good; so a few grand later we had the ’box back at the workshop and ready to go back in.
While the ’box was out we also machined the flywheel and fitted a new clutch. Again I went for a Safari Tuff clutch from Exedy, as the previous Safari unit had performed faultlessly over the last 250,000km or so in all sorts of terrain and towing different sized vans and campers. The clutch was still okay and wasn’t causing any problems – and it probably would have lasted another 20-30,000km – but it made sense to drop in a new one while the ’box was out.
Previously, I had learned my lesson with two OE clutches failing in the first 150,000km, so I knew they weren’t the units I wanted. Exedy claim the Safari clutch offers 25 per cent more clamping pressure without any noticeable effort on your part, and I’ve certainly found that. I had also been warned on both occasions that the clutch can rattle and be a bit noisy, but, again, I haven’t noticed that… maybe it’s because I’m deaf in one ear.
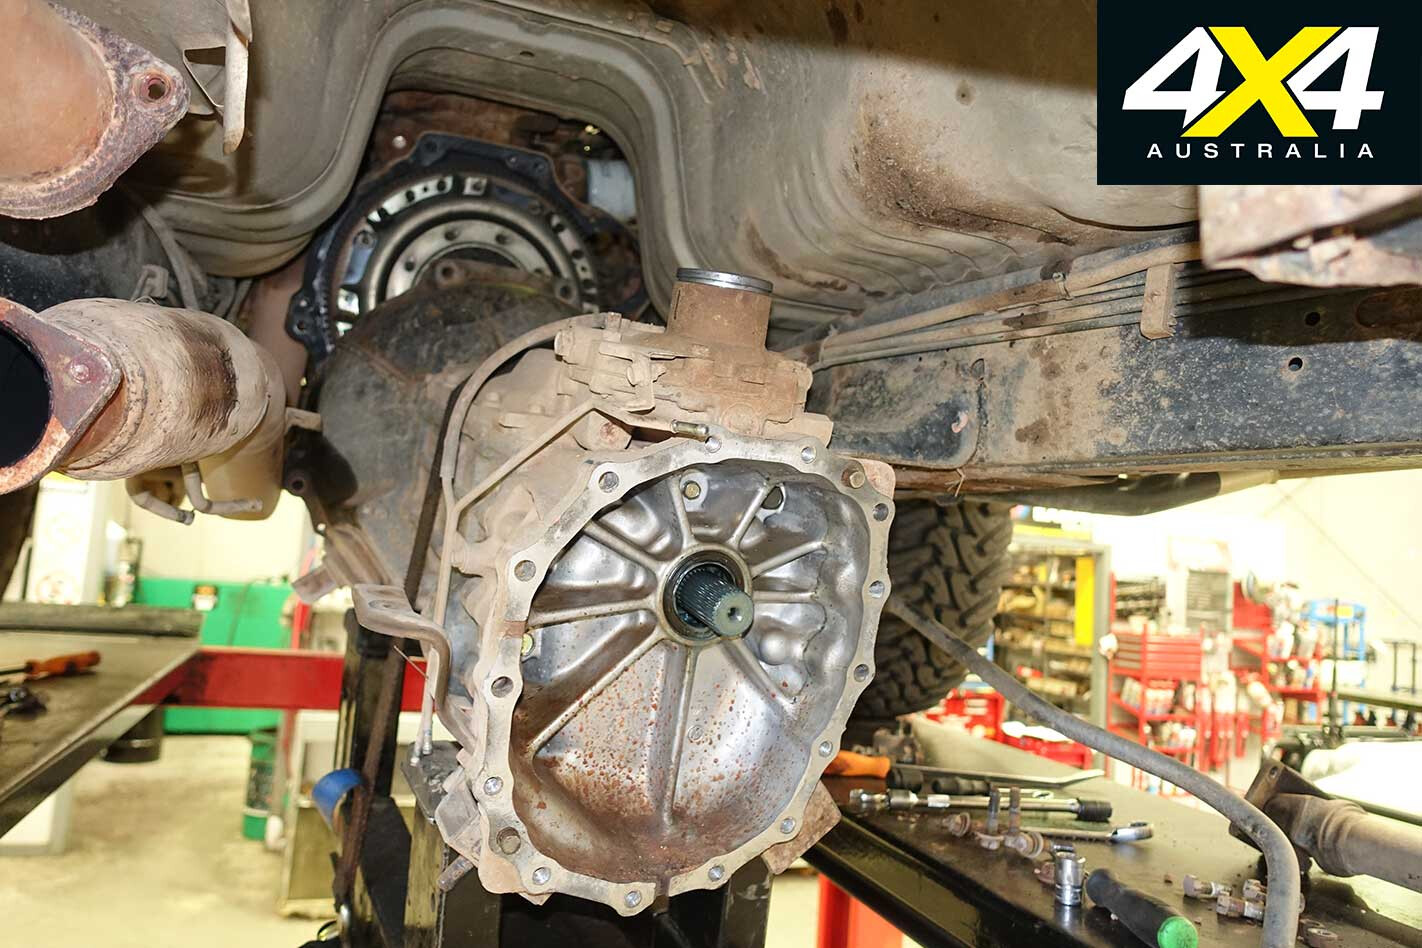
The transfer box with the Marks 4WD Adaptors low-range gearing in it was also overhauled with new bearings; although, again, it wasn’t really necessary. I’ve found the extra-low range gearing the Marks 4WD Adaptors mod has given me is handy when I’m towing in the really rough stuff, as the extra torque available and the low speed you can enter an obstacle with is not only handy, but there is less chance of doing damage to panels and vital underneath components.
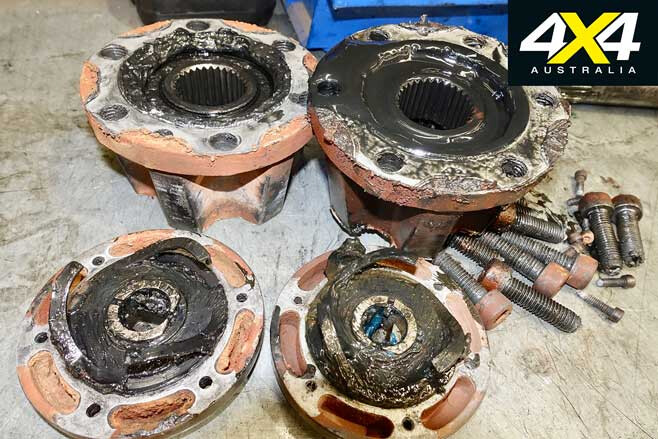
As well as the gearbox and transfer box the crew at Outback overhauled the front axle CV joints, swivel hub seals and bearings. With the exhaust showing signs of wear and tear and a few broken brackets, we patched it up for another round or two in the scrub.
However, it won’t be long before we’ll have to source a replacement unit and, at this stage, I have no idea which one to go for. As I intend to keep the old girl for a few more years, perhaps a stainless steel unit is the way to go. If anyone has a recommendation, let us know.
Finally, with a service the old Patrol rolled out of the workshop ready to hit the road once more, the first trip being a quick run up to the scrub beyond Broken Hill at Easter.
We might see you on the road.
TOTAL KILOMETRES: 413,000km KILOMETRES SINCE LAST UPDATE: 20,000km AVERAGE FUEL USE: 16L-17L/100km
Update 3: Under pressure
It’s far from plain-sailing for Ron’s Patrol over the past few months.
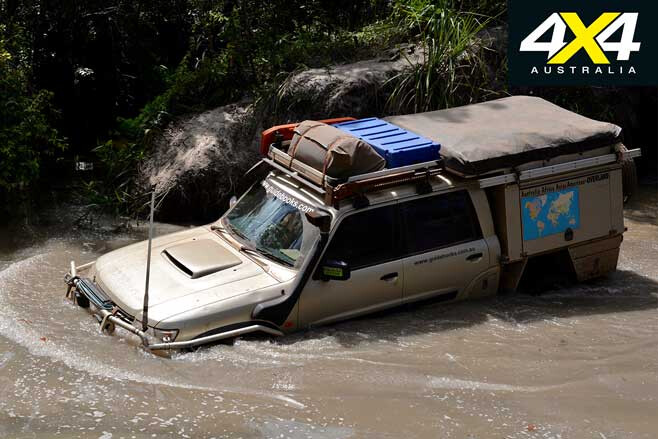
We’ve had a few hard months in the ol’ Patrol. First we headed for Central Australia and explored the East MacDonnell Ranges, before wandering along the Plenty Highway and then down the Hay River Track into the Simpson and on to Birdsville.
With hardly time to catch my breath, or for the Patrol to have a rest, we turned around and followed my son and his Moon Tours trip across the Madigan Line back to Alice Springs. Without any further ado we then headed to Cairns and up to Cape York, running all the hard tracks including Frenchman’s, the OTL and the Old Coach Road to Maytown.
Before setting out we fitted a new set of Cooper AT3 XLT tyres, but the tyre-fitting place replaced some of the wheel nuts with the wrong ones, which kinda buggered the threads on the studs. Luckily the crew at Outback 4WD picked up on the fault while the rig was being serviced and undertaking a pre-trip inspection, otherwise I’m sure I would have lost a wheel or more.
Anyway, the AT3s are performing beautifully and we’ve punished them in all sorts of terrain over the last 12,000km or so, from desert sand to Cape York mud to rocky trails. They are quiet, responsive and steer well on both blacktop and dirt, while the fuel economy has improved over the more aggressive ST Maxx tyres we had been running for some time. Well, you’d hope that’s the case when you go to a less aggressive tyre.
However, we’ve had our fair share of issues while on the road. In the Eastern Macs I had a ‘knock’ coming from the front wheel which turned out to be a castor bush flogging out. A quick phone call to the ARB Alice Springs crew and a trip into town and we were soon on our merry way.
North of the Plenty Highway, where we went wandering and exploring, the Patrol developed a coolant leak from the bottom hose on the radiator. It turned out to be just a faulty hose clamp but it again highlighted the importance of regularly checking the vehicle when on an outback trip.
Then, while wandering over the floodplain of the Diamantina south of Birdsville, I noticed a couple of missing bolts on one of my free-wheeling hubs, with the hub very loose. That seems to have left the hub damaged and noisy at times, but it got us home.
The next thing, during the course of the two crossings of the Simpson Desert, I noticed the front-end was bouncing more than normal. With no time, we waited until we got to Cairns and had the rig serviced by Wayne Boylett Mechanical (wayneboylett.com.au), where he picked up on the two (!) busted front springs. No wonder we were bouncing. Another rushed call, this time to ARB Cairns, for a couple of OME springs and we were soon on our way.
The Cape York trip was pretty uneventful for the Patrol; although, a few other vehicles in our group had issues which kept us on our toes and working into the night to keep them going, but that is another story. Suffice to say, the Patrol is now back at Outback 4WD (outback4wd.com.au) in Bayswater, getting a good going over and a major revamp.
TOTAL KILOMETRES: 428,000km KILOMETRES SINCE LAST UPDATE: 15,000km AVERAGE FUEL USE: 15L-16L/100km
Update 4: Tough lovin’
Ronnie’s Patrol gets new CVs, shocks and free-wheeling hubs… well, when they finally arrive.
The ol’ Patrol was in more dire straits than we originally thought.
I knew something was wrong as we clambered out of a canyon that had formed at the Palm Creek crossing up on Cape York. The ol’ girl got hung-up at the top of the bank and it was noted then that, even with front locker engaged, there was no drive going to one of the wheels; a bad sign.
We mucked around with the hub and got some semblance of drive out of it, and we continued on the OTL track and then the Laura-Mayfield road without any further issues, barring the occasional growl from the front end. Still, she got us home with barely a whimper … well, maybe a snarl or an occasional clatter from the front end, but that was all.
When looking for the growl back at Outback 4WD, it became obvious it was more than a noisy free-wheeling hub.
It was then I learnt from the experienced gurus at Outback 4WD that while there are good free-wheeling hubs, there are better ones. After a bit of deliberation I ordered a set of genuine Nissan manual free-wheeling hubs (no auto-lock facility) as found on the Nissan GU cab-chassis. They’re not particularly cheap, and as we go to press we’re still waiting for them to come in – maybe they are on back-order from Japan!
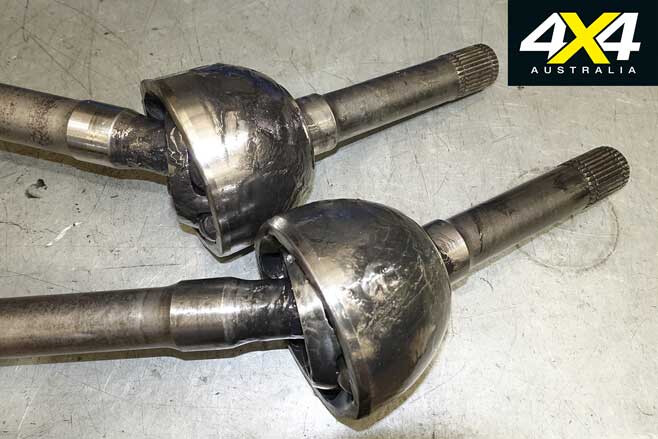
In the meantime we had a good look at the axles and CV joints. While neither of the CVs featured broken teeth, busted cages or worn balls, one of the CVs was decidedly stiff in its articulation, so we thought we’d change both. The axles again had nothing really wrong with them but were showing the strain of more than 430,000km of travel, so we changed both. Again we opted for a set of genuine axles and nothing super-duper or costing a grand or more. The diff itself was still in fine form, so we let that be.
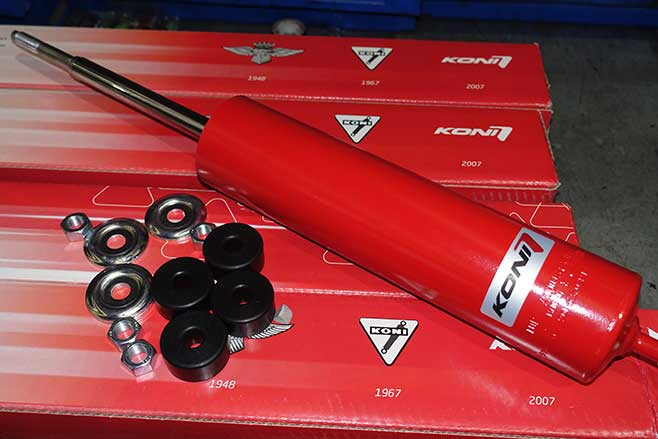
While we were giving the Patrol a good going-over, I also decided to change the shocks. I’ve had OME Sport shocks on for a number of years now and, while I’ve been more than happy with them, I thought I’d fit a set of Koni 90 Series Raid shocks to each corner.
It’s been a long time since I’ve had Konis on my 4WD (the last was on my 75 Series Troopy more than 25 years ago) and as yet I haven’t even driven out of the driveway with the new shocks, so I’ll wait until I’ve used them on a rough track or two before I let you know more about them. Suffice to say, they are more expensive than many other brands on the market; but going on my previous experience, if you want a good shock that will go the distance and you don’t want to go to a remote canister set-up, then the Konis are worth looking at.
Check them out at: www.toperformance.com.au
TOTAL KILOMETRES: 428,000km KILOMETRES SINCE LAST UPDATE: 0km AVERAGE FUEL USE: 15L-16L/100km
Update 5: Shock therapy
New shocks for an old warrior.
I have always been a fan of KONI shocks on a 4WD vehicle, ever since I had them on my old 47 Series Cruiser and then again on my younger (but old now) 75 Series Troopy.
Last year in the desert I met up with a mate of mine who once owned a major 4WD service centre, and he had just swapped to a set of KONI 88 Raid shocks on his Patrol ute. Knowing more than the average Joe about suspension and shocks I took his positive words and accolades to heart. Then with the recent on-going maintenance on the Patrol’s suspension I decided I’d bite the bullet and fit a set of KONI 90 Raid shocks to the battle-hardened Patrol.
For the money, or for not much more, you may ask why I didn’t go for a set of remote canister shocks, but I’m not a great lover of them. They seem to me, at least, to be just another item that hangs underneath a vehicle that will get damaged – or have a hose ripped off – when in the rough stuff or going cross country. And I have had remote canister shocks in the past, so I’m not coming from a completely unfamiliar or unknown point of view.
The 90 Series Raid shocks from KONI are based on the damper used in its military and truck and bus applications, and they’re made from highly refined and quality materials in its dedicated factory in the Netherlands. Each shock is valved and refined for the vehicle they are sold for, but if you’ve changed springs or had a GVM upgrade, etc., then these shocks are adjustable as well… more on that later.
These KONI shocks are of a twin-tube hydraulic design with an outer tube thickness of 2.5mm, meaning the inner reservoir tube and working area of the shock is well protected from the impact of rocks and other debris that is often flung around beneath a 4WD vehicle.
The body diameter is a big 70mm and that means more space for more oilfor much better cooling, higher efficiency and much less chance of shocker fade occurring. For added strength and reliability there is a 42mm diameter piston and an 18mm hard-chromed rod doing all the hard work; while high quality seals and solid robust fitting attachments, welded all around, add to the overall reliability score.
In addition to the adjustable rebound, these shocks feature an internal bump stop which adds extra security in case of savage compression impact.
There are a couple of other attractions that make the KONI a shock of choice for many outback travellers. One, they can be rebuilt if and whenever required; although, I’ve never had to resort to that in the past.
The big thing with these shocks is you can adjust the rebound force in order to adapt the shocks to your springs and the loads you carry. This takes just a bit of fiddling – temporary removal of the rubber bump stop – and if you can make sense of the guide that is supplied with each shock, you are doing well; better to head to YouTube for a short video on how to do the adjustment. It’s easy once you know how!
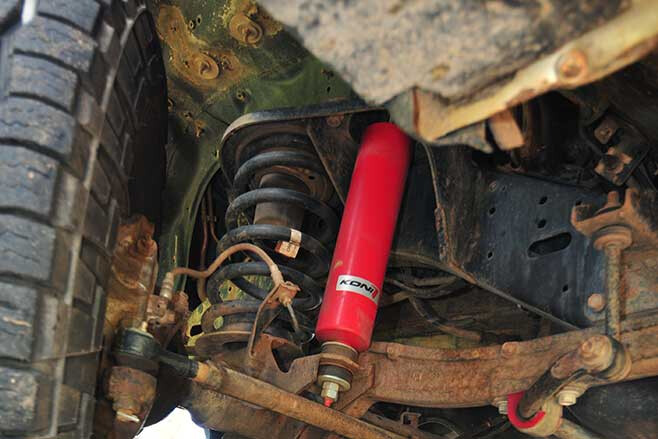
The crew at Outback 4WD set all the shocks before fitting them to the Patrol. Out of the box the shocks come with the valving set as low as they go to give, for many, a pretty soft and suitable ride. We cranked ours up to Stage 2 (two clicks clockwise, each click requires a turn through 180°) all around. Don’t forget to put the rubber stopper back in place!
Then the crew fit the shocks to the Patrol. Once again it’s all pretty easy, but do not tighten the mounting nuts and squash the shock mounting rubbers too much; take note of the supplied diagram.
So, what were the results and how did he Patrol drive, on- and off-road? Our recent trip to Tassie answered many of the questions. On winding mountain roads, the shocks allowed the vehicle to handle well, being comfortable through speed humps, potholes and the like, while keeping body roll to a pleasant minimum. Still, I’ve got a bit of adjustment to do, so I’ll make them ride a bit firmer to see if I prefer that.
In the rougher stuff the suspension articulated really well – much more than when I had the dual shocks fitted to the rear (more from the way they were mounted than anything else). Now the Patrol can really stretch its legs while keeping sudden jolts to a minimum.
We never had any long sections of corrugations to test the shocks over while In Tassie, but from past experience on the Gunbarrel and other long-distance, corrugated desert roads, these shocks never got hot to the touch and never experienced any shocker fade.
As far as price goes we’ve listed the RRP, but you may get them a little cheaper if you shop around. Finally, the shocks come with an unlimited kilometre, three-year warranty, which is bloody good. So, my final thoughts?
Well, I would not have gone to these shocks if I wasn’t sure of what I was getting. I’m super pleased with them and I’m looking forward to many kilometres of dependable and pleasant travelling.
WHERE: www.toperformance.com.au RRP: Front (pair) – $1194; Rear (pair) – $1236 WE SAY: Great shock. Reliable and durable, with excellent ride characteristics.
Update 6: Patrol gets tougher
A bent rear axle housing gets straightened.
After our workout and heavy recovery job down on the west coast of Tassie, I had the Patrol back at Outback 4WD for a going over and a good service.
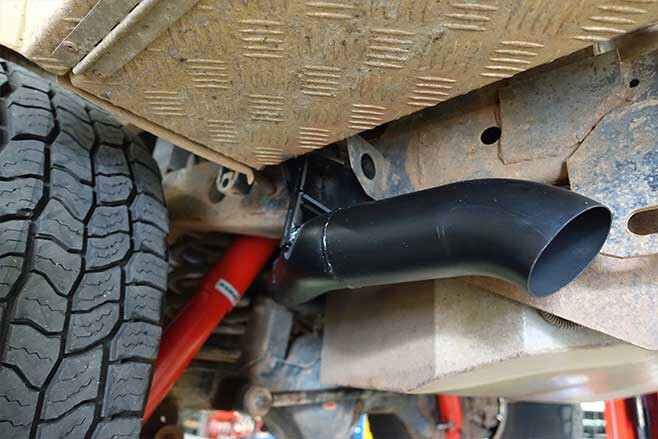
We had done a lot of work on the ol’ girl before we went down to our Island State, which included a new three-inch mandrel-bent exhaust system; a new steering damper; new panhard, sway-bar and lower radius arm bushes; along with a new steering arm rod.
We also adjusted the engine valve clearance as well as a few minor jobs to keep the Patrol reliable and performing well. While we were down in Tassie we also staked a tyre on one of the tracks and the spare was an oldy, so once back home I took the opportunity to fit a couple of new Cooper AT3 XLT tyres.
I’ve got Cooper S/T Maxx tyres on the Cruiser and on my Ram 2500, but after having driven on the AT3s for some time now I really liked the handling and quietness of these tyres and their off-road ability in all conditions. Sure, they don’t have the mud-flinging ability of a genuine mud tyre, but they are a bloody good all-round compromise.
We also adjusted the new Konis we had fitted before Tassie, to make them a bit firmer, but I’ve got to say I’m very happy with their performance and the ride they offer under all conditions.
But the biggest job was one I’ve been wanting to do for a while now and the recovery and tow job we performed on a very heavy 6WD vehicle highlighted the bent rear axle housing. I’m not sure when that started but it got to the stage where we had to do something.
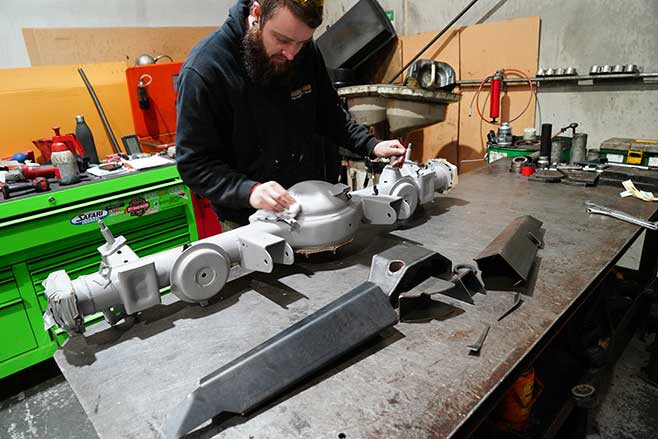
First up we rolled the rear suspension out from underneath the Patrol and then went and found a replacement axle housing, making sure it was perfectly straight. Then we went looking for a strengthening kit for said housing.
Superior Engineering in southern Queensland offer a wide range of accessories and equipment to upgrade suspensions and drivelines, so we opted for one of its axle kits. It wasn’t particularly cheap but it is well-designed and made, and it fitted the housing perfectly.
The brackets and supporting infrastructure were all welded into place by the crew at Outback 4WD, and during this process you have to ensure the axle housing doesn’t get too hot and deforms, even slightly. Then the internals were refitted and the axle rolled back under the Patrol, everything reconnected and the diff filled with oil.
That sort of rounds out the strengthening process on the Patrol, which was started years ago when I stretched the chassis to make the Patrol into a dual cab. Then also strengthening the shock and spring towers.
We are also about to fit a new and larger 1800W full-sine wave Projecta Inverter. You have to run some dedicated wiring for a unit of this size, so we’ll let you know the details in a further update on the ol’ girl.
The Patrol is back on the road and all we’re waiting for is the gates to open here in Victoria and we’ll be out on the tracks. What was going to be a desert trip for the Patrol’s next sojourn looks like it’ll be a High Country tour.
TOTAL KILOMETRES: 435,000km KILOMETRES SINCE LAST UPDATE: 6500km AVERAGE FUEL USE: 15-16L/100km
Update 7: Dirty tricks
Mud and slurry cost us a fortune.
We’ve just returned from a six-month, 20,000km trip that took us across the Simpson and around Central Australia, before returning home for a quick stop and to pick up our camper.
Then we headed to the west coast of SA and through the deserts up along the Beadell Roads to Wiluna, before cutting across the Pilbara to the coast at Ningaloo Station.
From there, we wandered back through the goldfields region of WA before heading to Victoria and fleeing, with the threat of a COVID closure upon us, to Queensland and Cape York. It was a hell of a trip and the ol’ Patrol revelled in its long hauls and dusty delights.
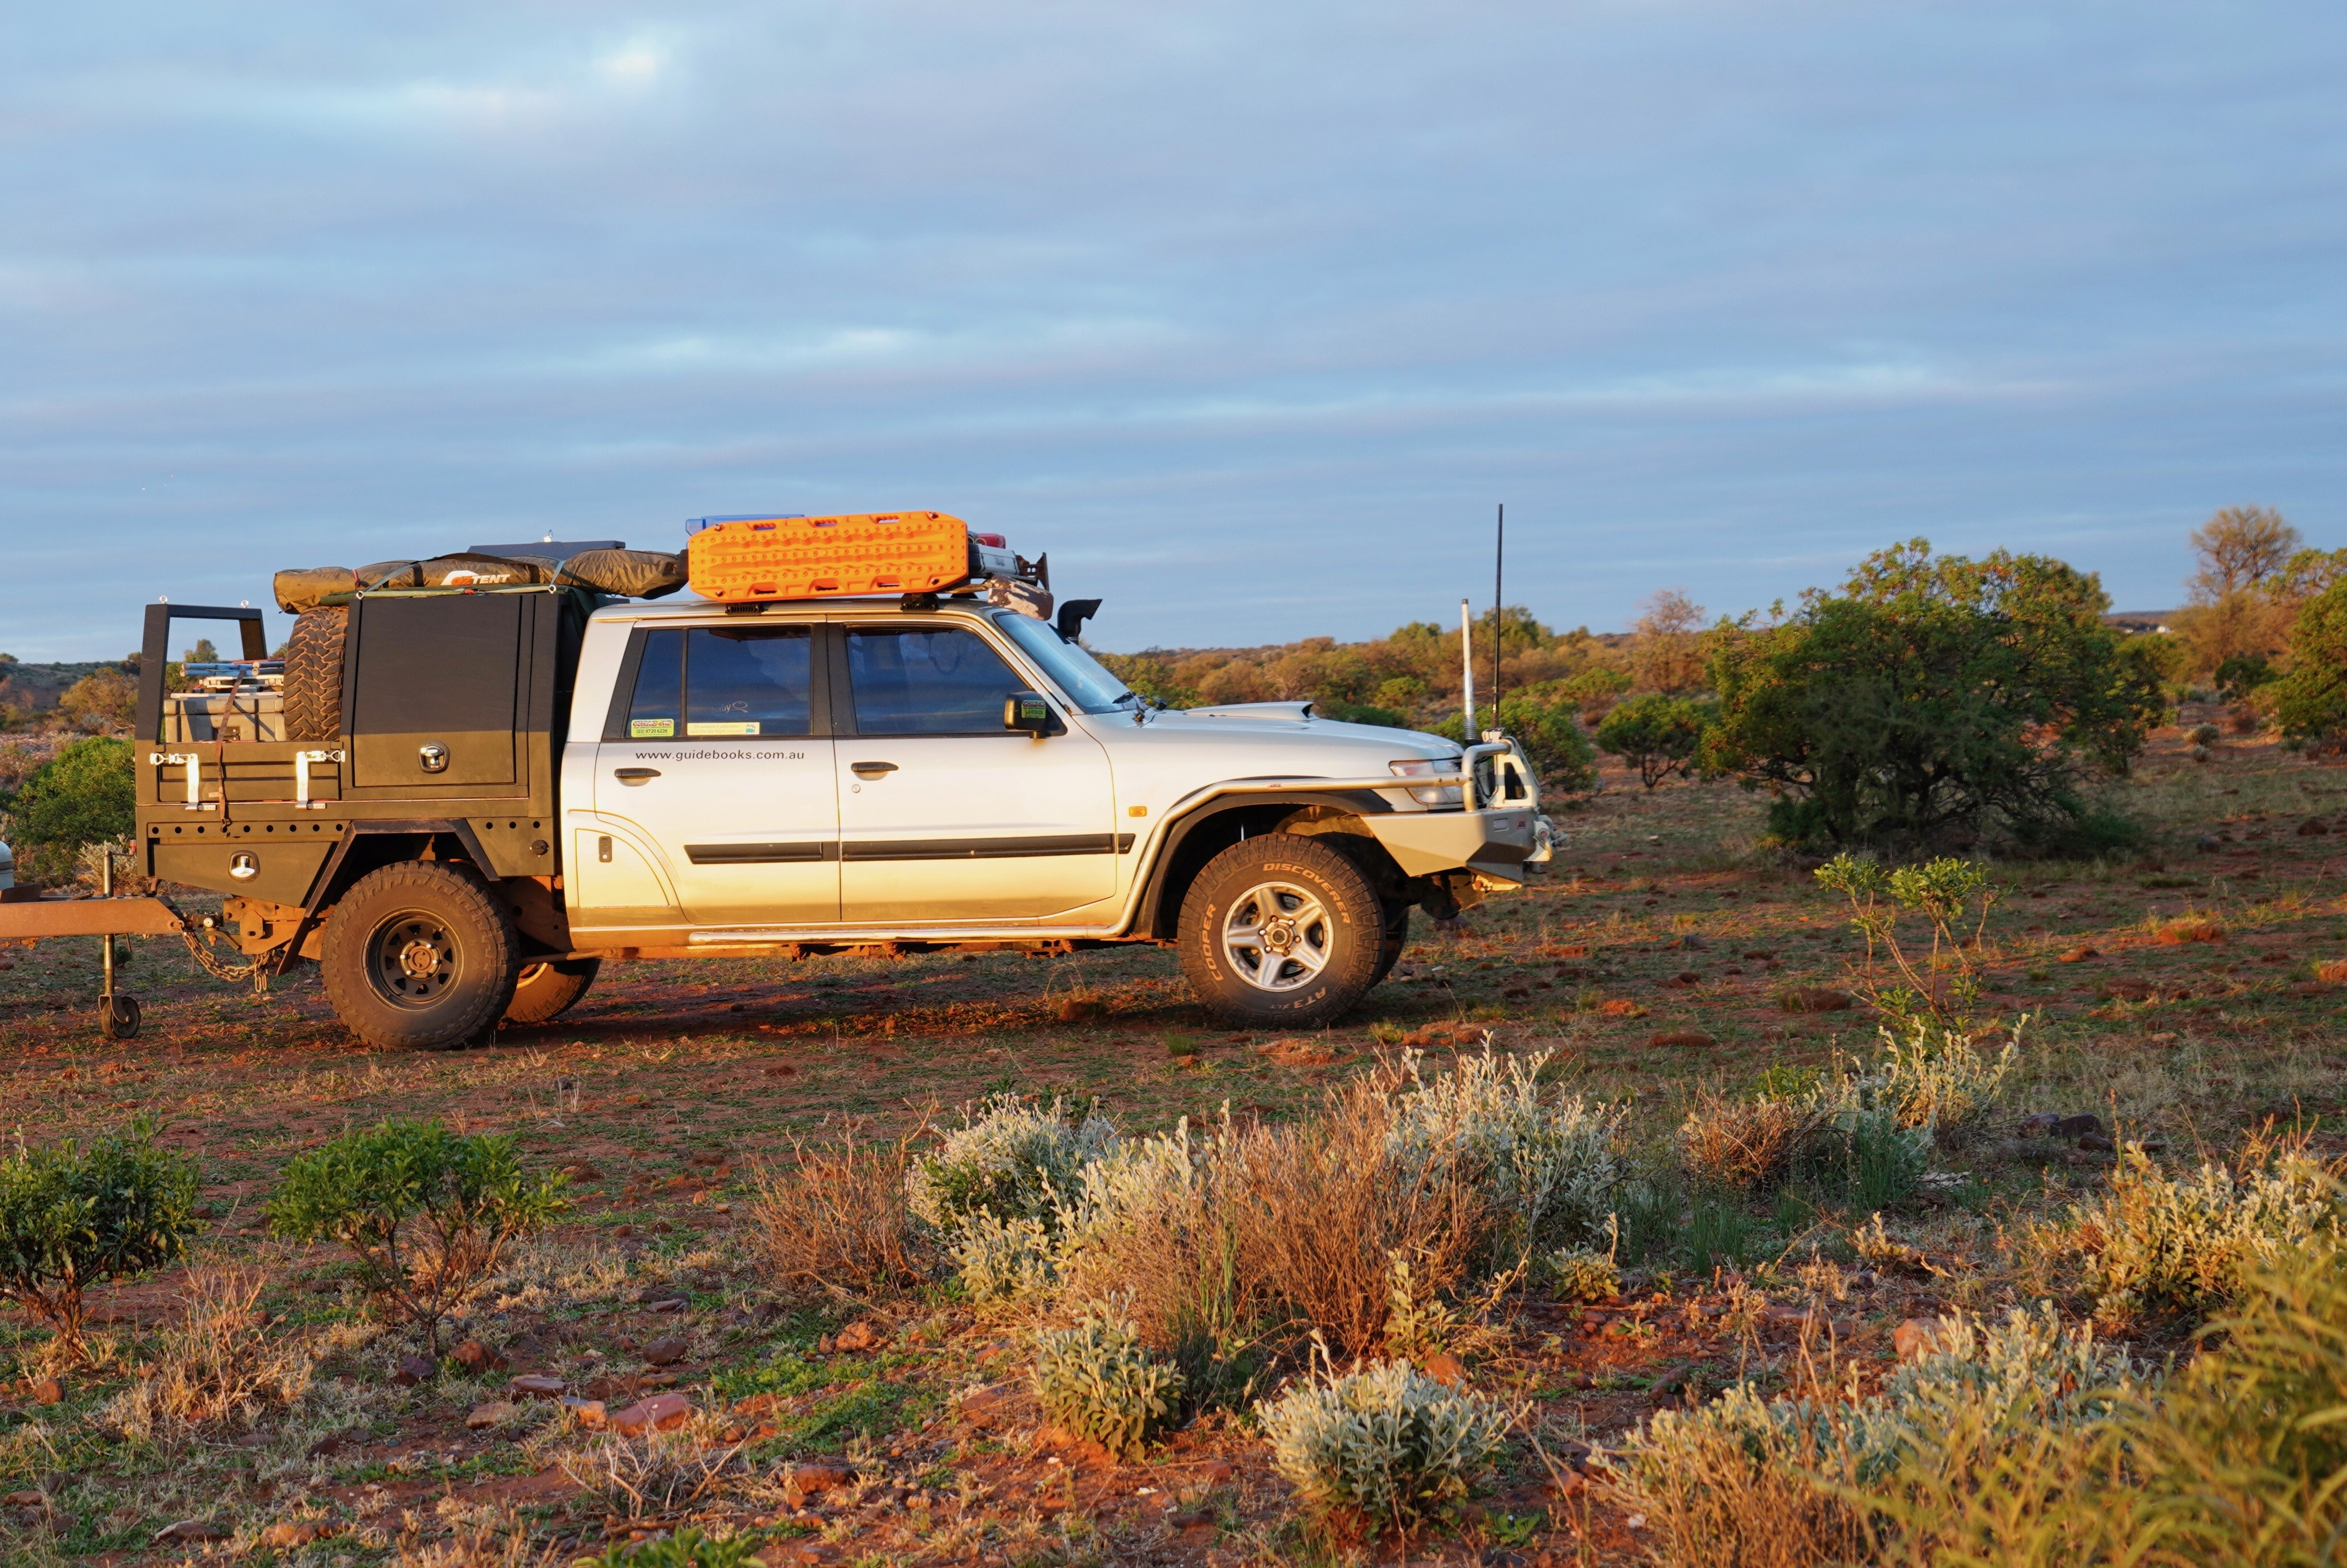
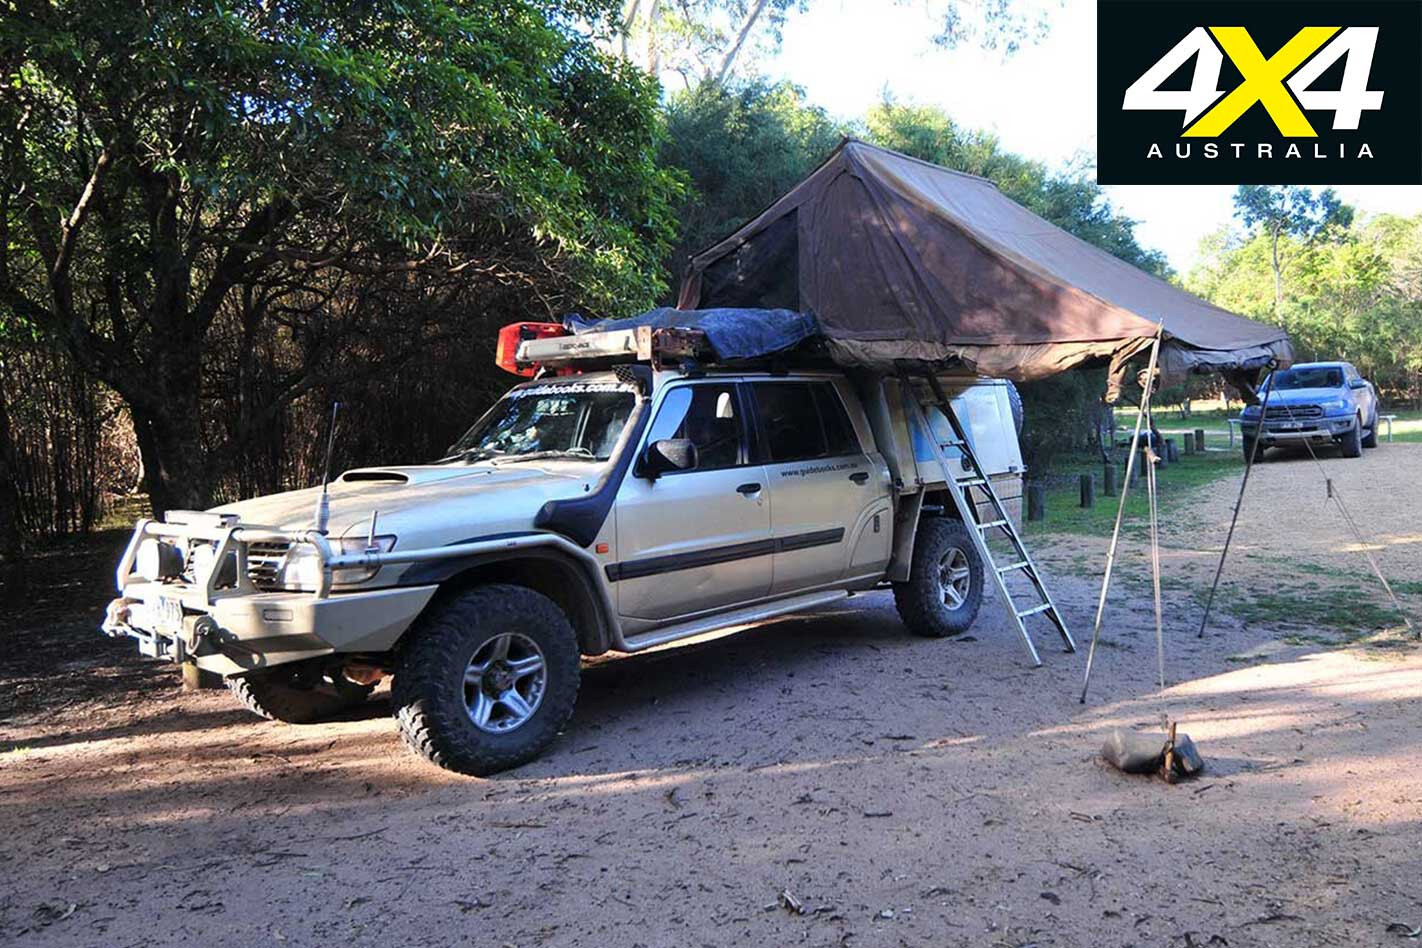
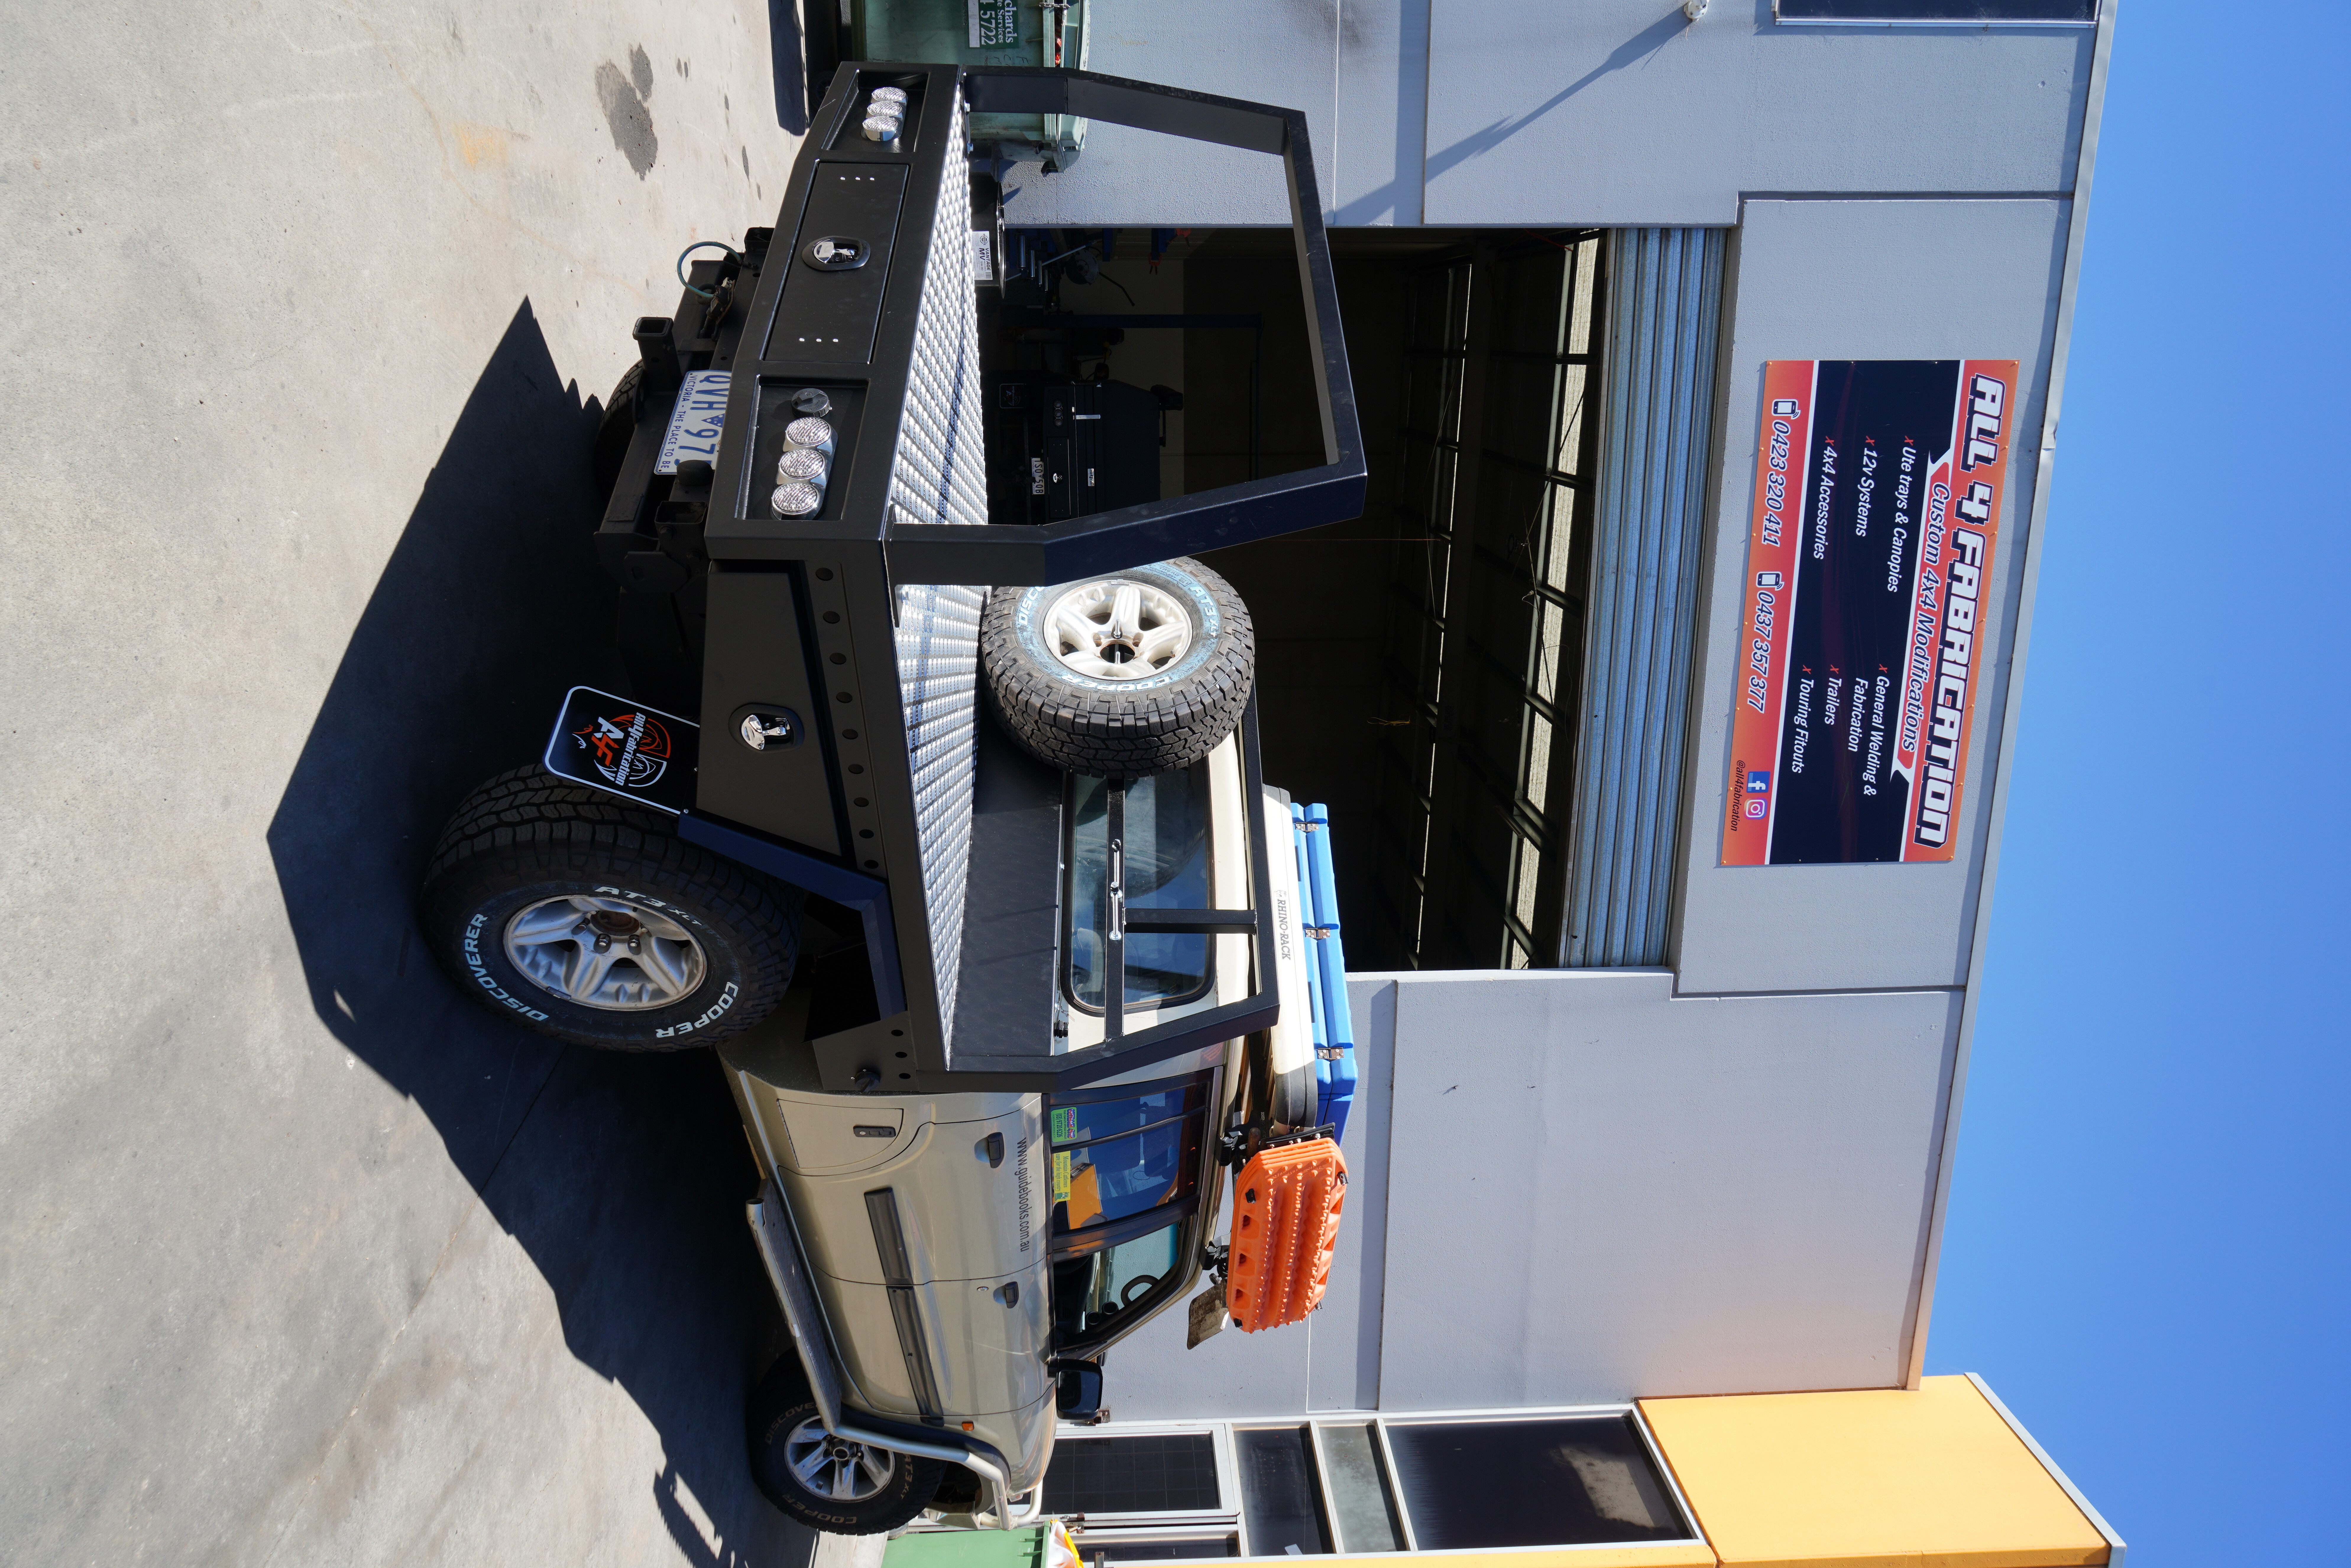
After our trips last year, we decided the Candy Camper canopy was coming off and we replaced it with a new steel frame-cum-alloy tray and fridge box from All4Fabrication.
Based in Pakenham, Victoria, the crew did a great job and built in a 40-litre plastic water tank to the headboard, while under the tray is a full-length slide-out drawer, with under-body boxes gracing each side of the tray. We wired in connections for a fridge, some interior lights and added an exhaust fan, a drop-down fridge slide and a Projecta Pro-Wave 600W inverter.
Before we left, we had the Patrol back at Outback 4WD for a pre-trip inspection and a good service. Discovering a fuel leak from the injector pump, and with a spare injector pump on hand (doesn’t everybody have a spare pump on hand?), we got MTQ Engine Systems in Dandenong to fit and calibrate the overhauled pump along with a set of overhauled injectors. The ol’ girl didn’t know she could run as smooth and as powerful as she now did!
During our Simpson Desert crossing and the ensuing exit from the desert, we got caught in heavy rain and flooded roads, with the abrasive slurry of slushy gravel roads resulting in the chewing-out of the brake pads. That wasn’t all, as we were to find out … it ended up being a very expensive wet drive and another reason I hate driving in mud!
Before we left Alice we gave the Patrol a grease and replaced the front brake pads; but, back in Melbourne, to pick up Viv and our caravan, the crew at Outback 4WD found more brake damage, with the end result being the need to replace all rotors, brake pads (again!) and even the front brake calipers.
Sourcing those new calipers was a trial, as we had changed them much earlier for the bigger, more efficient calipers found on the 4.5-litre petrol GU Patrols. These are pretty rare, as everybody who upgrades the engines and/or performance of diesel Patrols needs those calipers for the modified vehicle to be ‘engineer’ roadworthy. After much searching, Australia-wide, we found a brand-new set at Patrol specialist, Atoc Auto Repairs in the bushy suburb of Belgrave South.
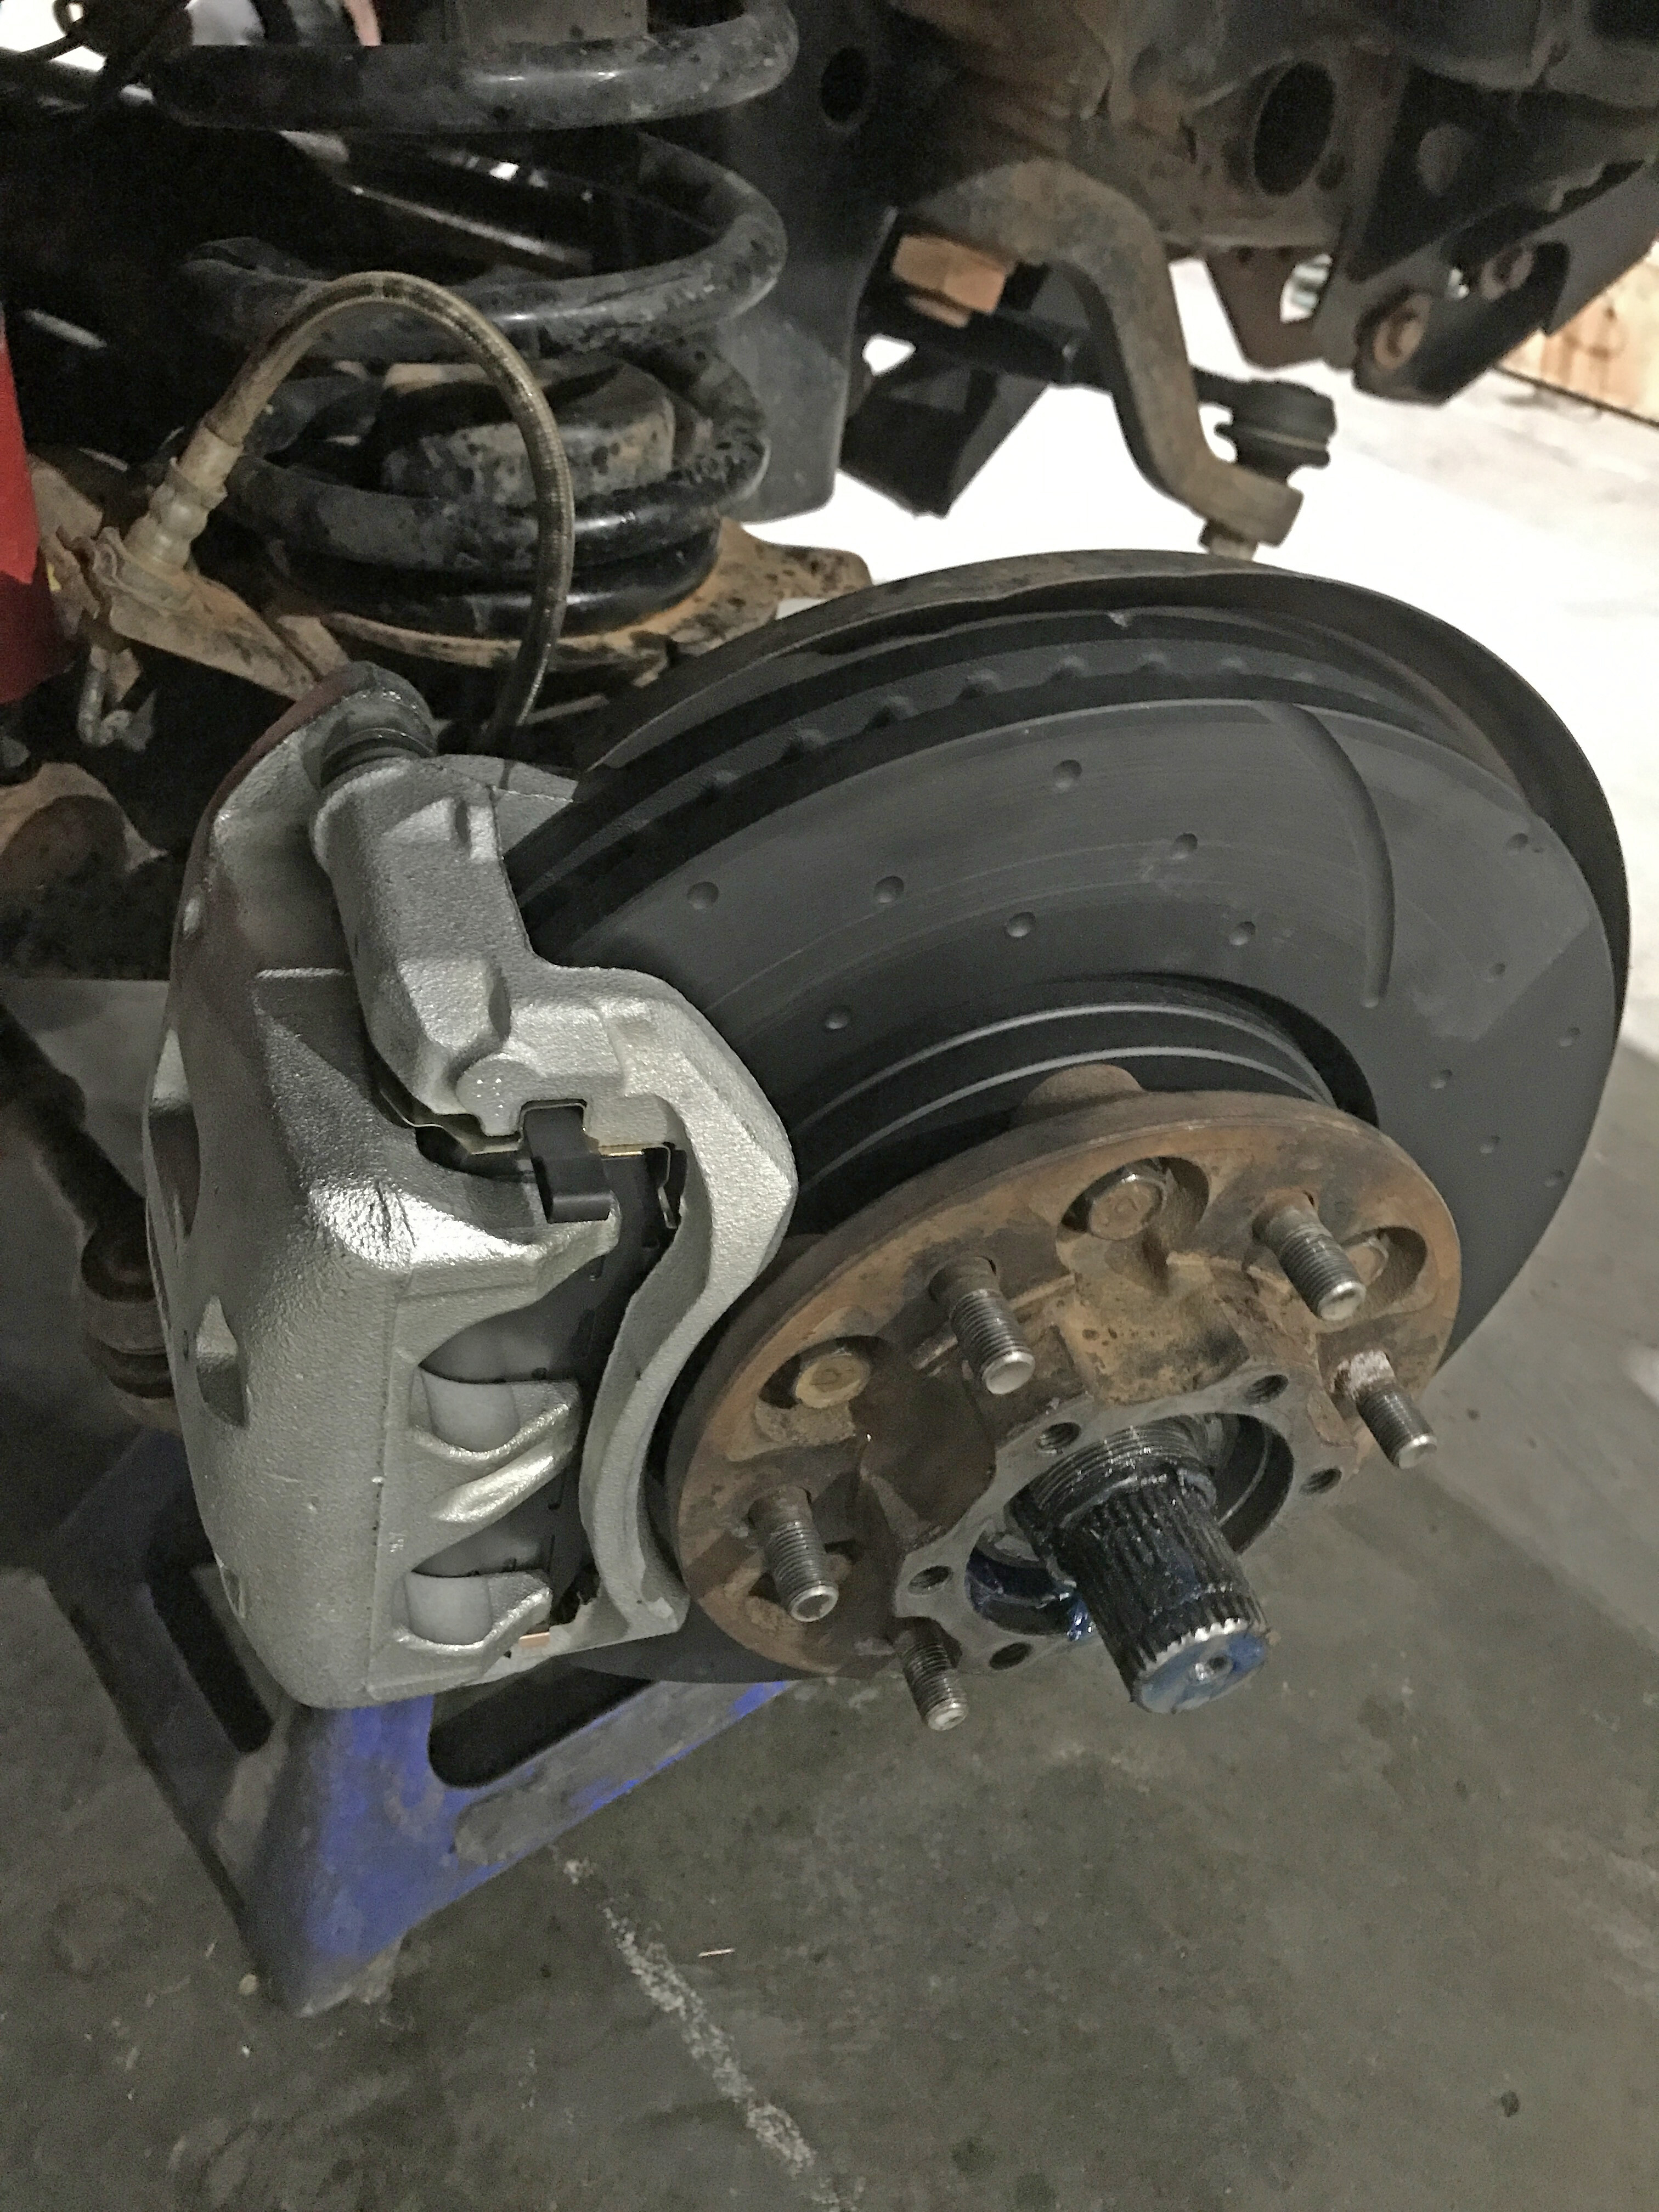
With the brake repairs underway, we also changed the front wheel bearings and then discovered the pinion seal on the rear diff had been chewed out by the slurry we had driven through. We also realised that the pinion flange had been worn. We didn’t muck around and overhauled the rear diff.
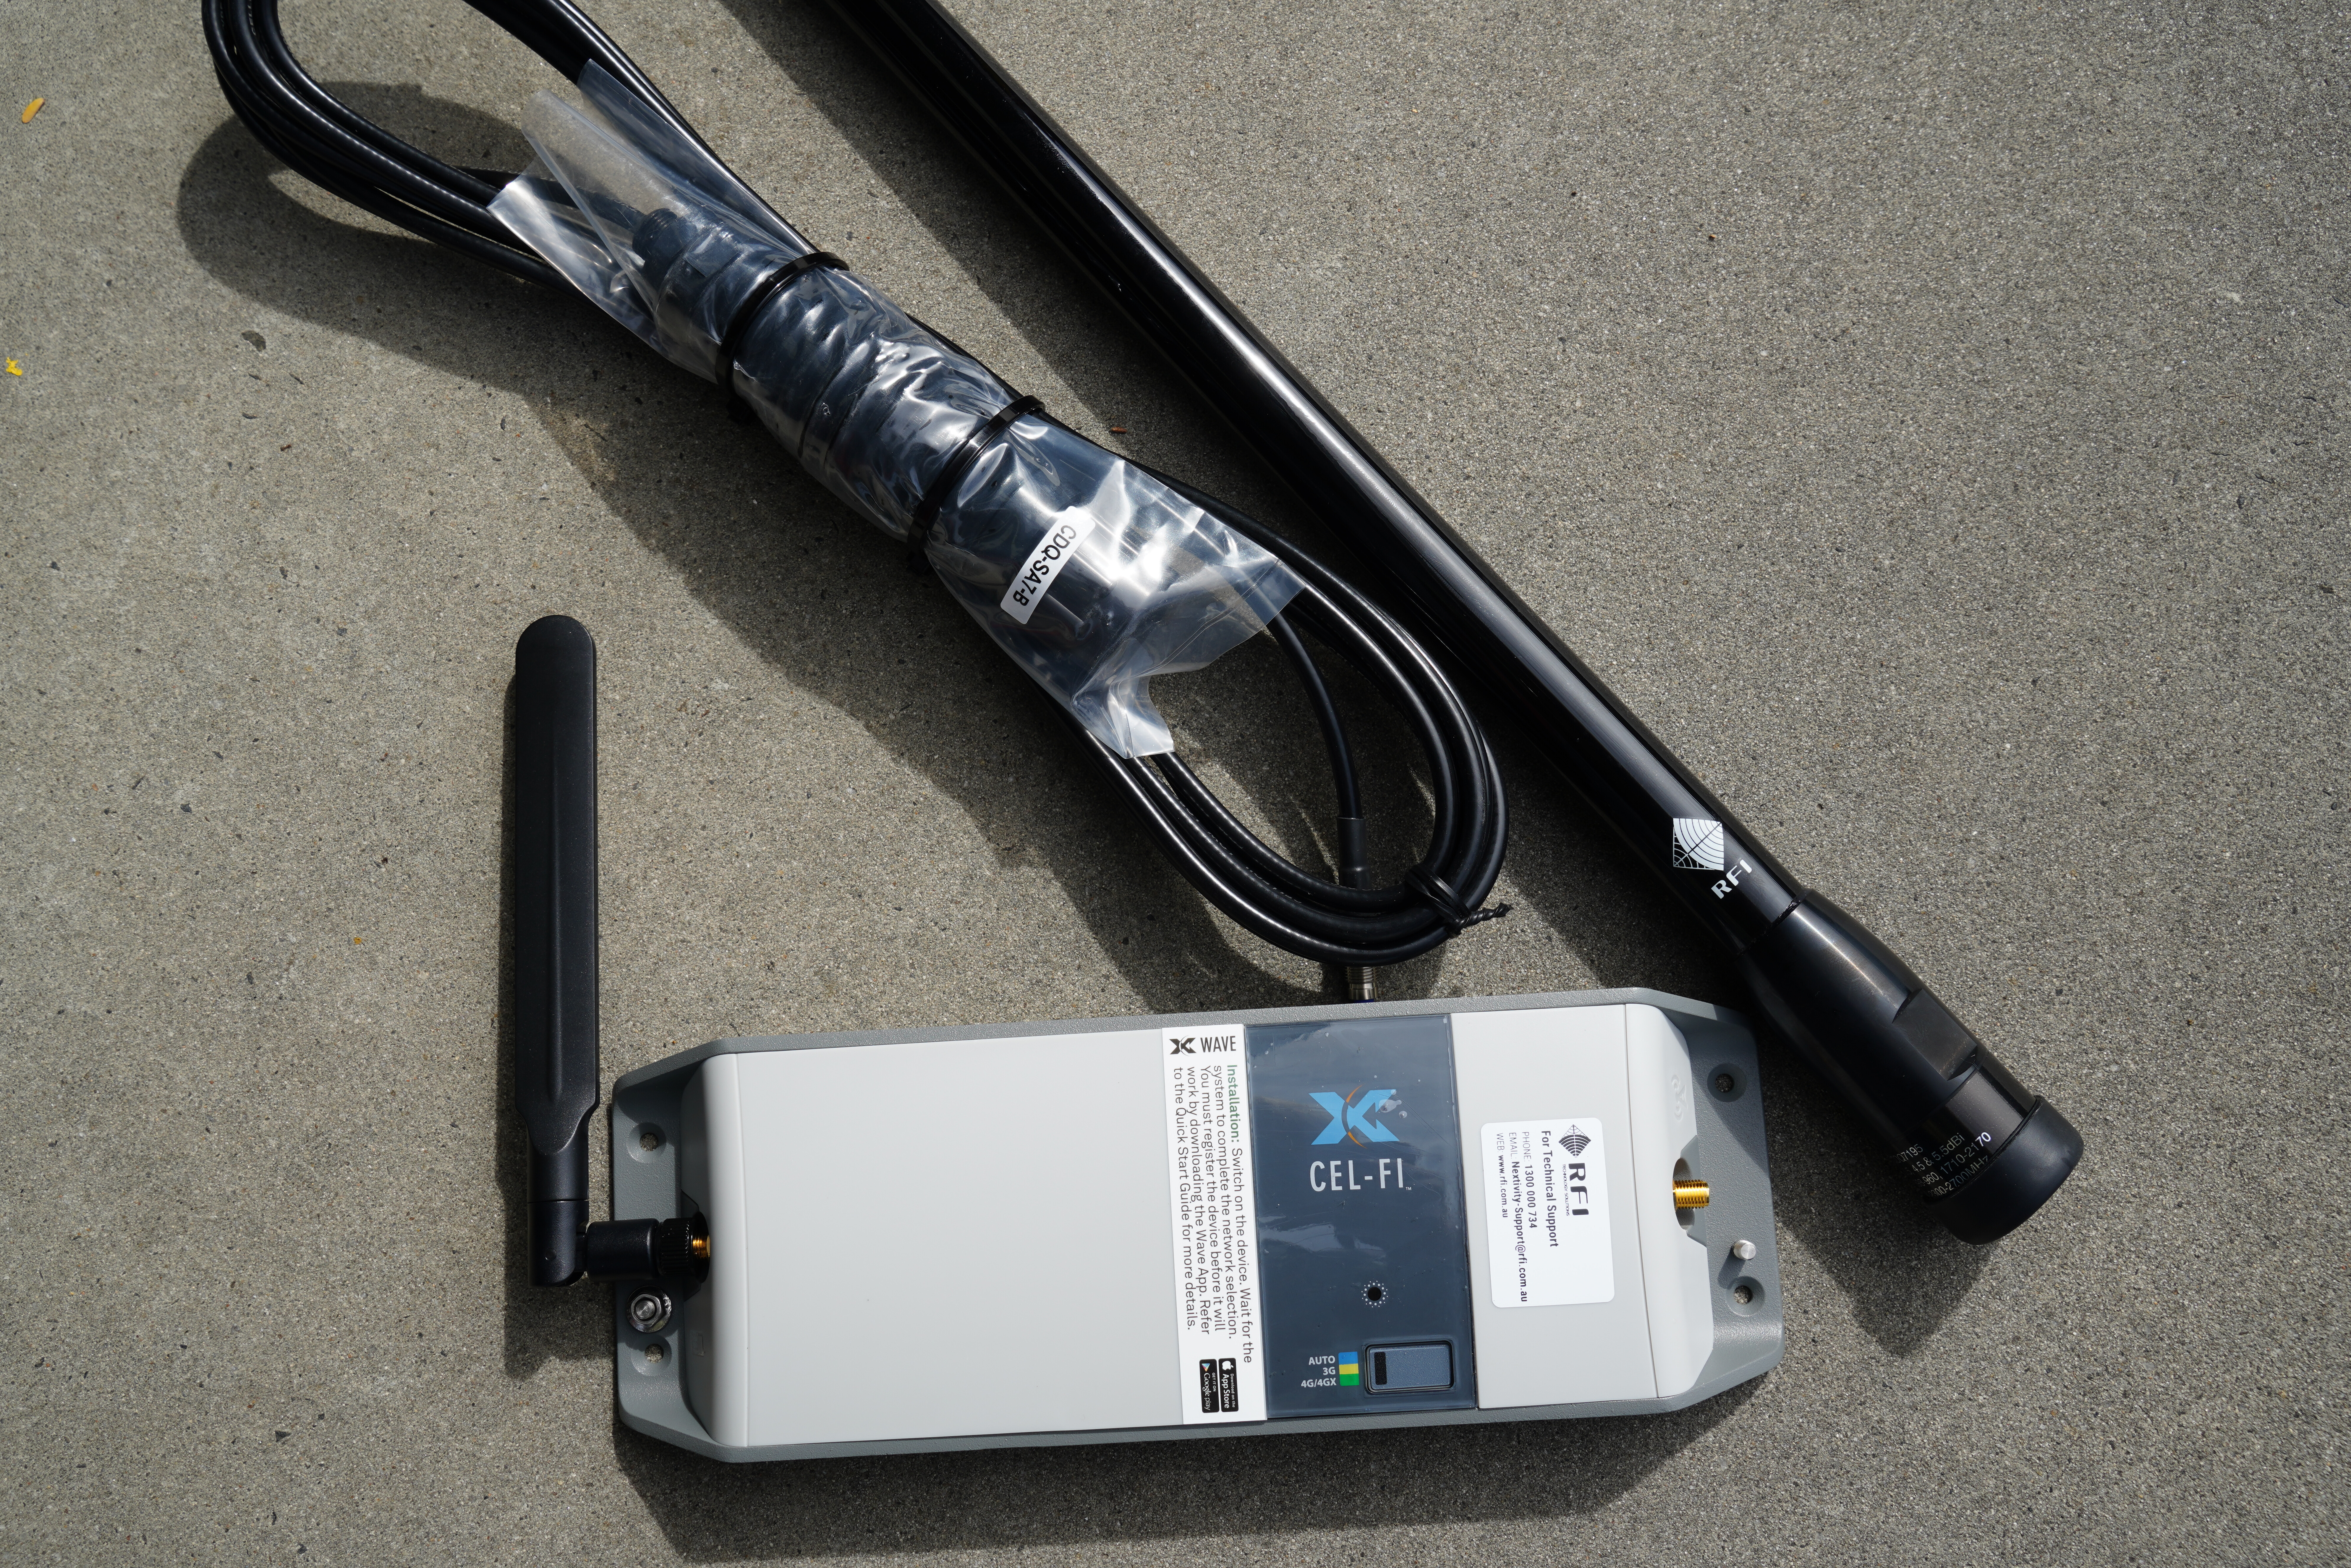
While all this was going on, we fitted a Cel-Fi Go 3G/4G reception booster to the Patrol for our Telstra mobile phones. This was fitted by the guys at Cranbourne Car Sound who can supply all your UHF and sat phone needs as well. We’ve used one of these Cel-Fi units before and I was pretty impressed with them, so bit the bullet and fitted one.
After all that work, our trip to WA and Queensland was pretty much trouble-free. We did in a couple of tyres – two in five minutes, in fact – both with railway spikes as we drove along the rough track near the Trans-Australia Railway line.
It had been an expensive, muddy lesson, topped off with two near-new tyres being staked. I put it all down to the cost of outback adventure!
TOTAL KILOMETRES: 461,000km KILOMETRES SINCE LAST UPDATE: 26,000km AVERAGE FUEL USE: 17-21L/100km
Snapshot
- D-Max SX Single Cab Chassis 4×2 3.0-litre manual now just under $40,000 drive-away
- Rebates previously brought it down to $29,990 drive-away
- 1.9-litre diesel now features as entry-level variant
One of Isuzu’s cheapest D-Max variants has been given a price increase, with the manufacturer dropping rebates for its former entry-level grade.
Up until last month, the D-Max SX Single Cab Chassis 4×2 manual was available to buy for $29,990 drive-away when fitted with a 3.0-litre, turbo-diesel engine after rebates from Isuzu undercut its own list price of $33,200.
However, with the introduction of a new 1.9-litre, turbo-diesel engine in November, the 3.0 has now been replaced on the bottom rung, with the rebates only applying to the smaller capacity ute, bringing its drive-away price up to $39,719.
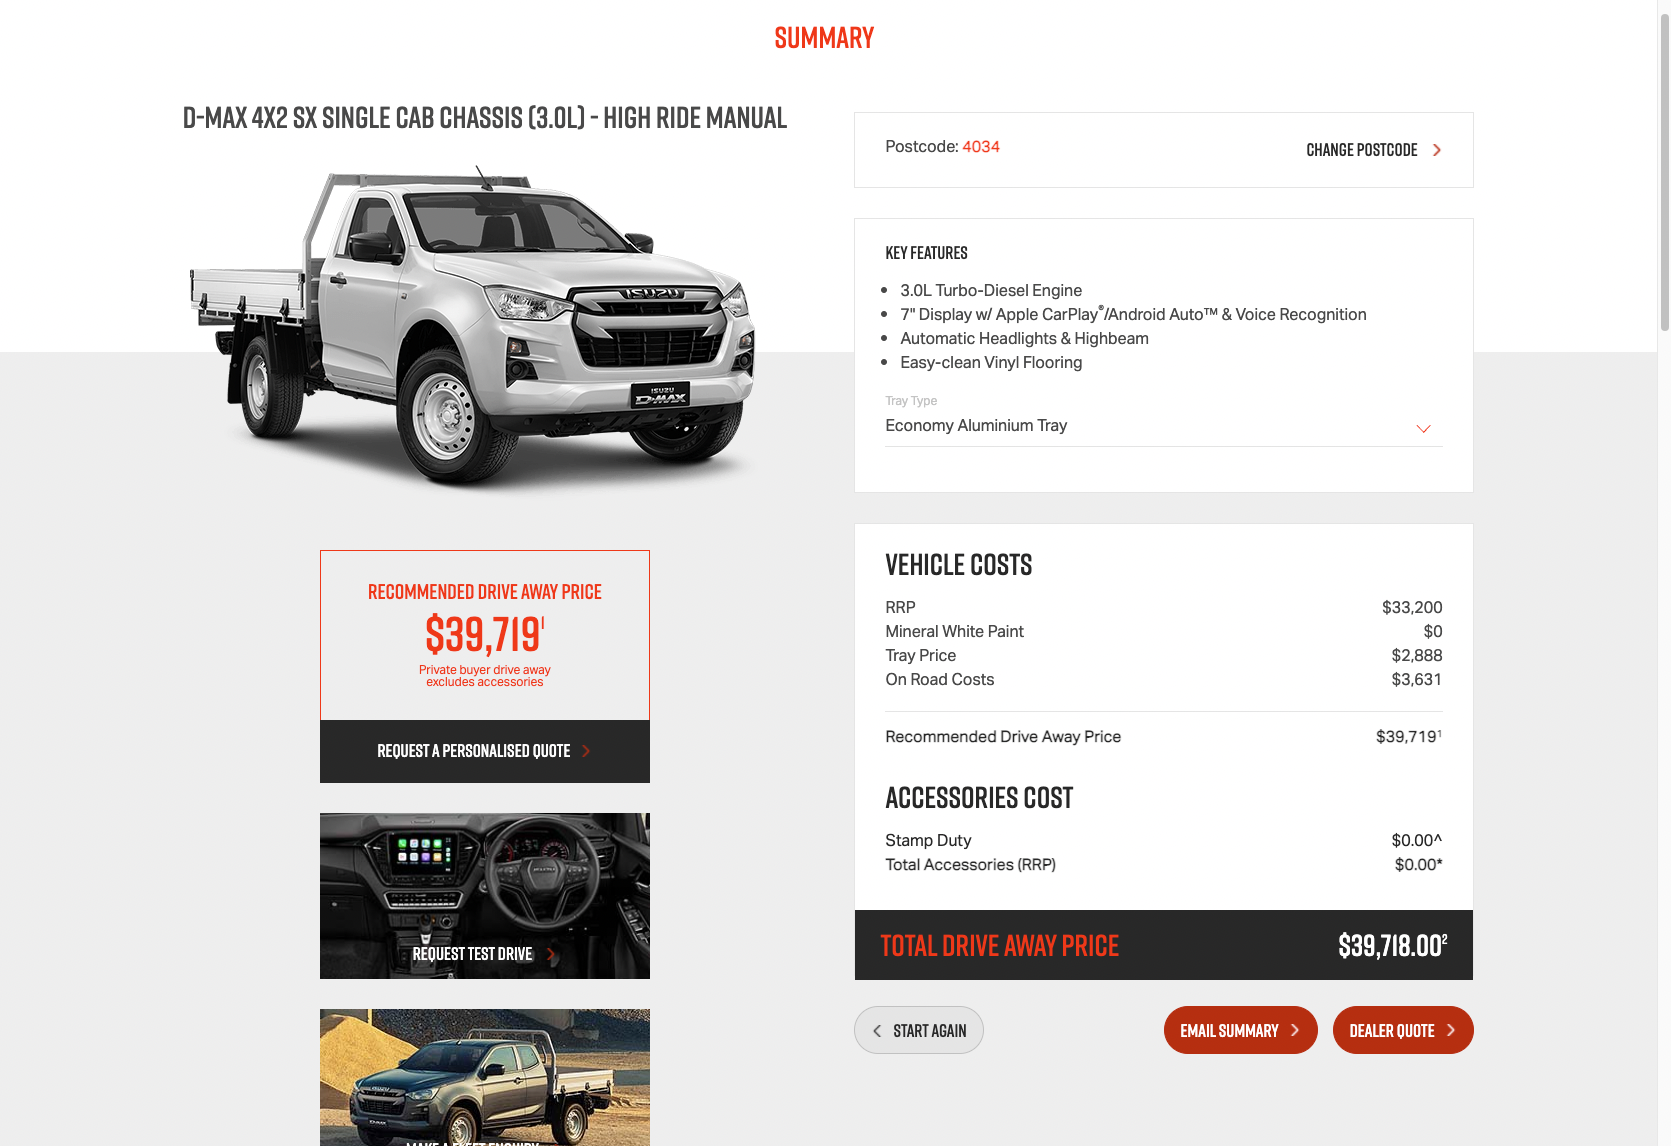
While its list price is unchanged, the basic economy aluminium tray adds a $2888 premium, with on-road costs adding up to $3631 when configured for Queensland, attributing to its higher final price.
However, if you want a D-Max for under $30,000, the newly-introduced 1.9-litre SX Single Cab Chassis 4×2 manual takes over the 3.0-litre’s place and pricing, with the same rebates applying to bring its drive-away cost down to $29,990 in its most basic form.
The D-Max 4×2 is the second-highest selling model in its class, with 5943 sales so far this year accounting for 20 per cent of all 4×2 ute sales in 2021, while the 4×4 drops to third in its segment on 17,164 units sold, behind only the Ford Ranger and Toyota HiLux.
If you ever go off-road driving by yourself, you’d be mad not to carry at least one pair of recovery boards with you; they are, without a doubt, one of the most effective vehicle recovery tools you can carry in your 4×4. And not only are they effective, they are also affordable and easy to use.
Recovery boards are nothing new and have, in fact, been around for as long as the wheel itself. In its most basic form, a recovery board is simply a flat object such as a piece of wood that can be wedged underneath the wheel of a stuck vehicle – whether that be a wheelbarrow, a horse-drawn cart, a car, a truck or, more relevant to us, a four-wheel drive – to get it out of its stuck situation.
Recovery boards have developed over the years from lumps of wood to lengths of steel or aluminium, and interwoven bits of rubber or rubber mats. Prior to the development of modern recovery boards, the most common type used for vehicle recovery since WWII were manufactured from aluminium, due to their combination of strength and light weight, and these were commonly referred to as sand ladders.
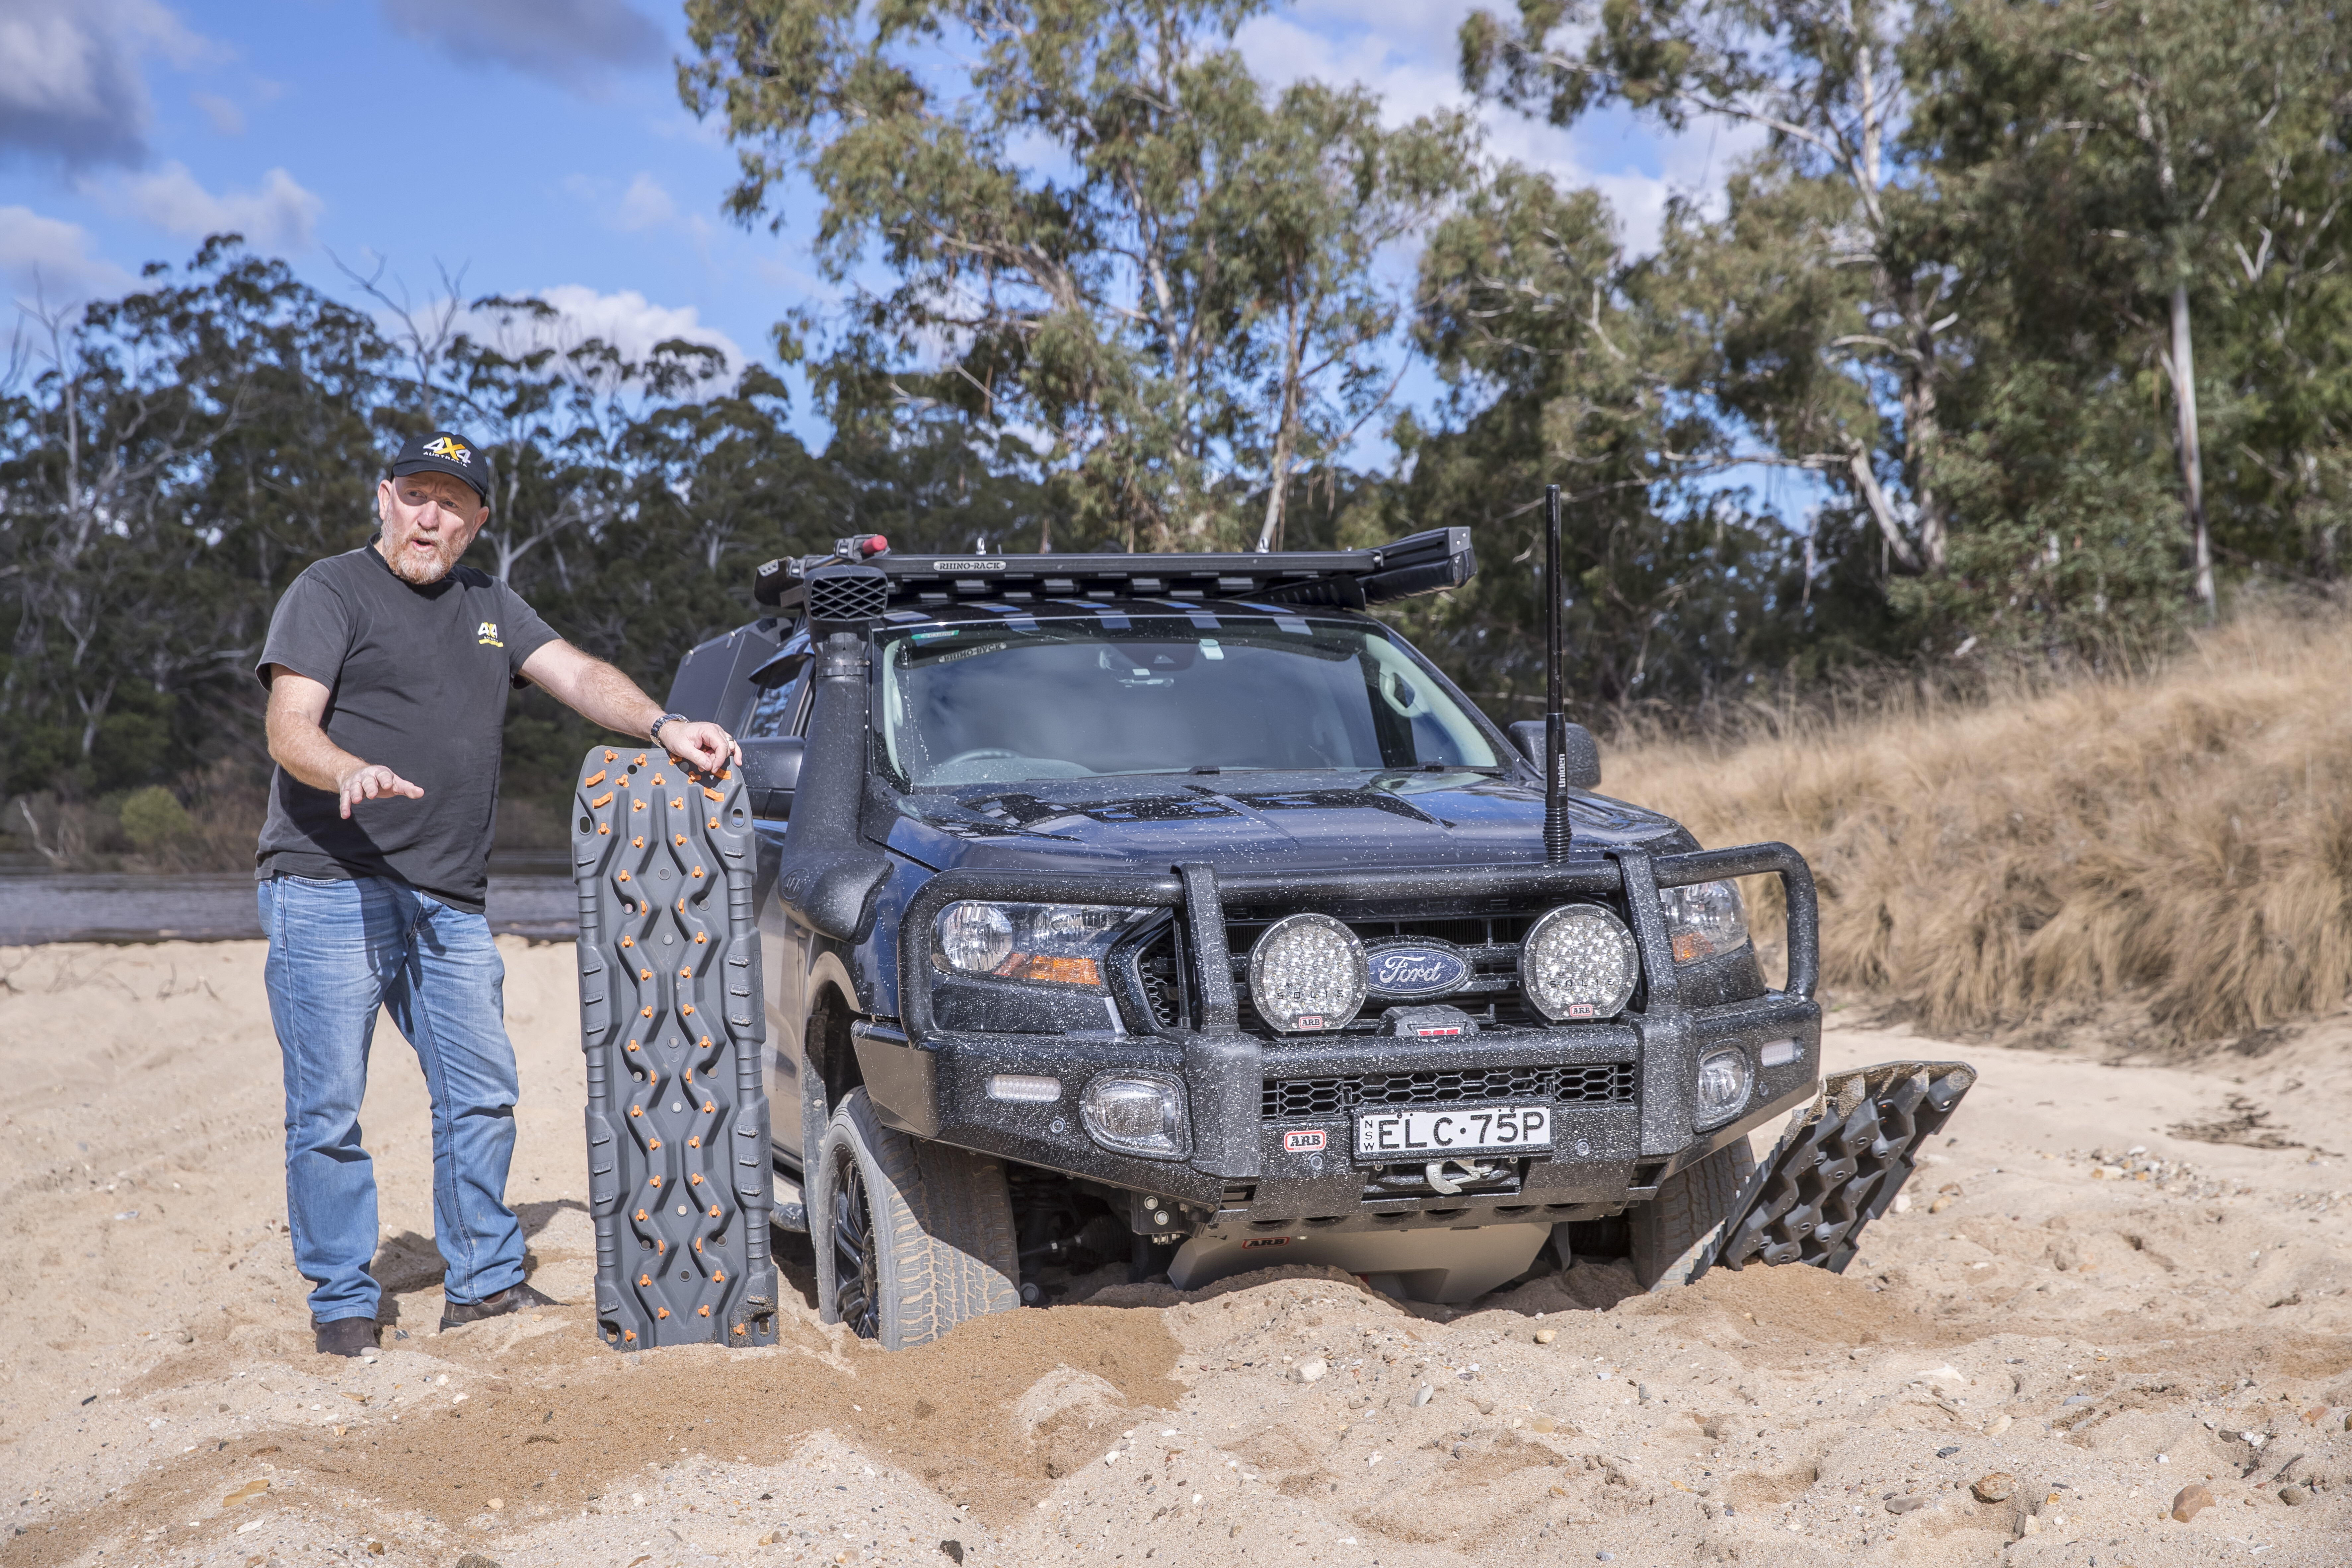
But sand ladders have their drawbacks; they are bulky and inflexible, and as they have a smooth surface, they don’t allow tyres to gain easy purchase.
Four-wheel drive guidebook author, Brad McCarthy, developed the first ‘modern’ recovery board manufactured from engineering grade reinforced nylon. Called MaxTrax, he launched the product in 2005 after four years of development. His inspiration? Researching for a book, Brad found himself bogged on a remote beach in Queensland; he spent six hours recovering his vehicle with a hand winch, and afterwards he thought to himself, “There’s got to be an easier way.”
When launched, MaxTrax had many unique features that made it more effective for vehicle recoveries than previous devices such as sand ladders. MaxTrax featured large cleats so tyres could gain purchase; it had handles so it was easy to grip; it had a shovel shape at each end so it could be used to remove debris from around tyres and under vehicles; it was stackable for easy storage; and it was light.

Since MaxTrax was launched, several other companies have developed similar recovery boards also manufactured from reinforced nylon, including TRED, Exitrax and others. Each has a unique design and features, but all are essentially designed to function in the same way that MaxTrax does.
Since the first MaxTrax, Brad McCarthy has further developed the product, and the latest incarnation is called MaxTrax Xtreme, which features 88 replaceable anodised alloy teeth.
They might not be designed for it, but recovery boards have several other handy uses other than getting your vehicle out of a bog: they can provide a handy, stable base for a jack; they can be used under trailer jockey wheels; they can be used as bridging ramps; they can be used as traction aids on steep, slippery climbs; they can aid in turning a vehicle when winching by placing them under the steering wheels; and, of course, they can be used as a shovel around the campsite. We’re sure there are plenty of other uses for recovery boards that we haven’t even considered.
HOW TO USE RECOVERY BOARDS?
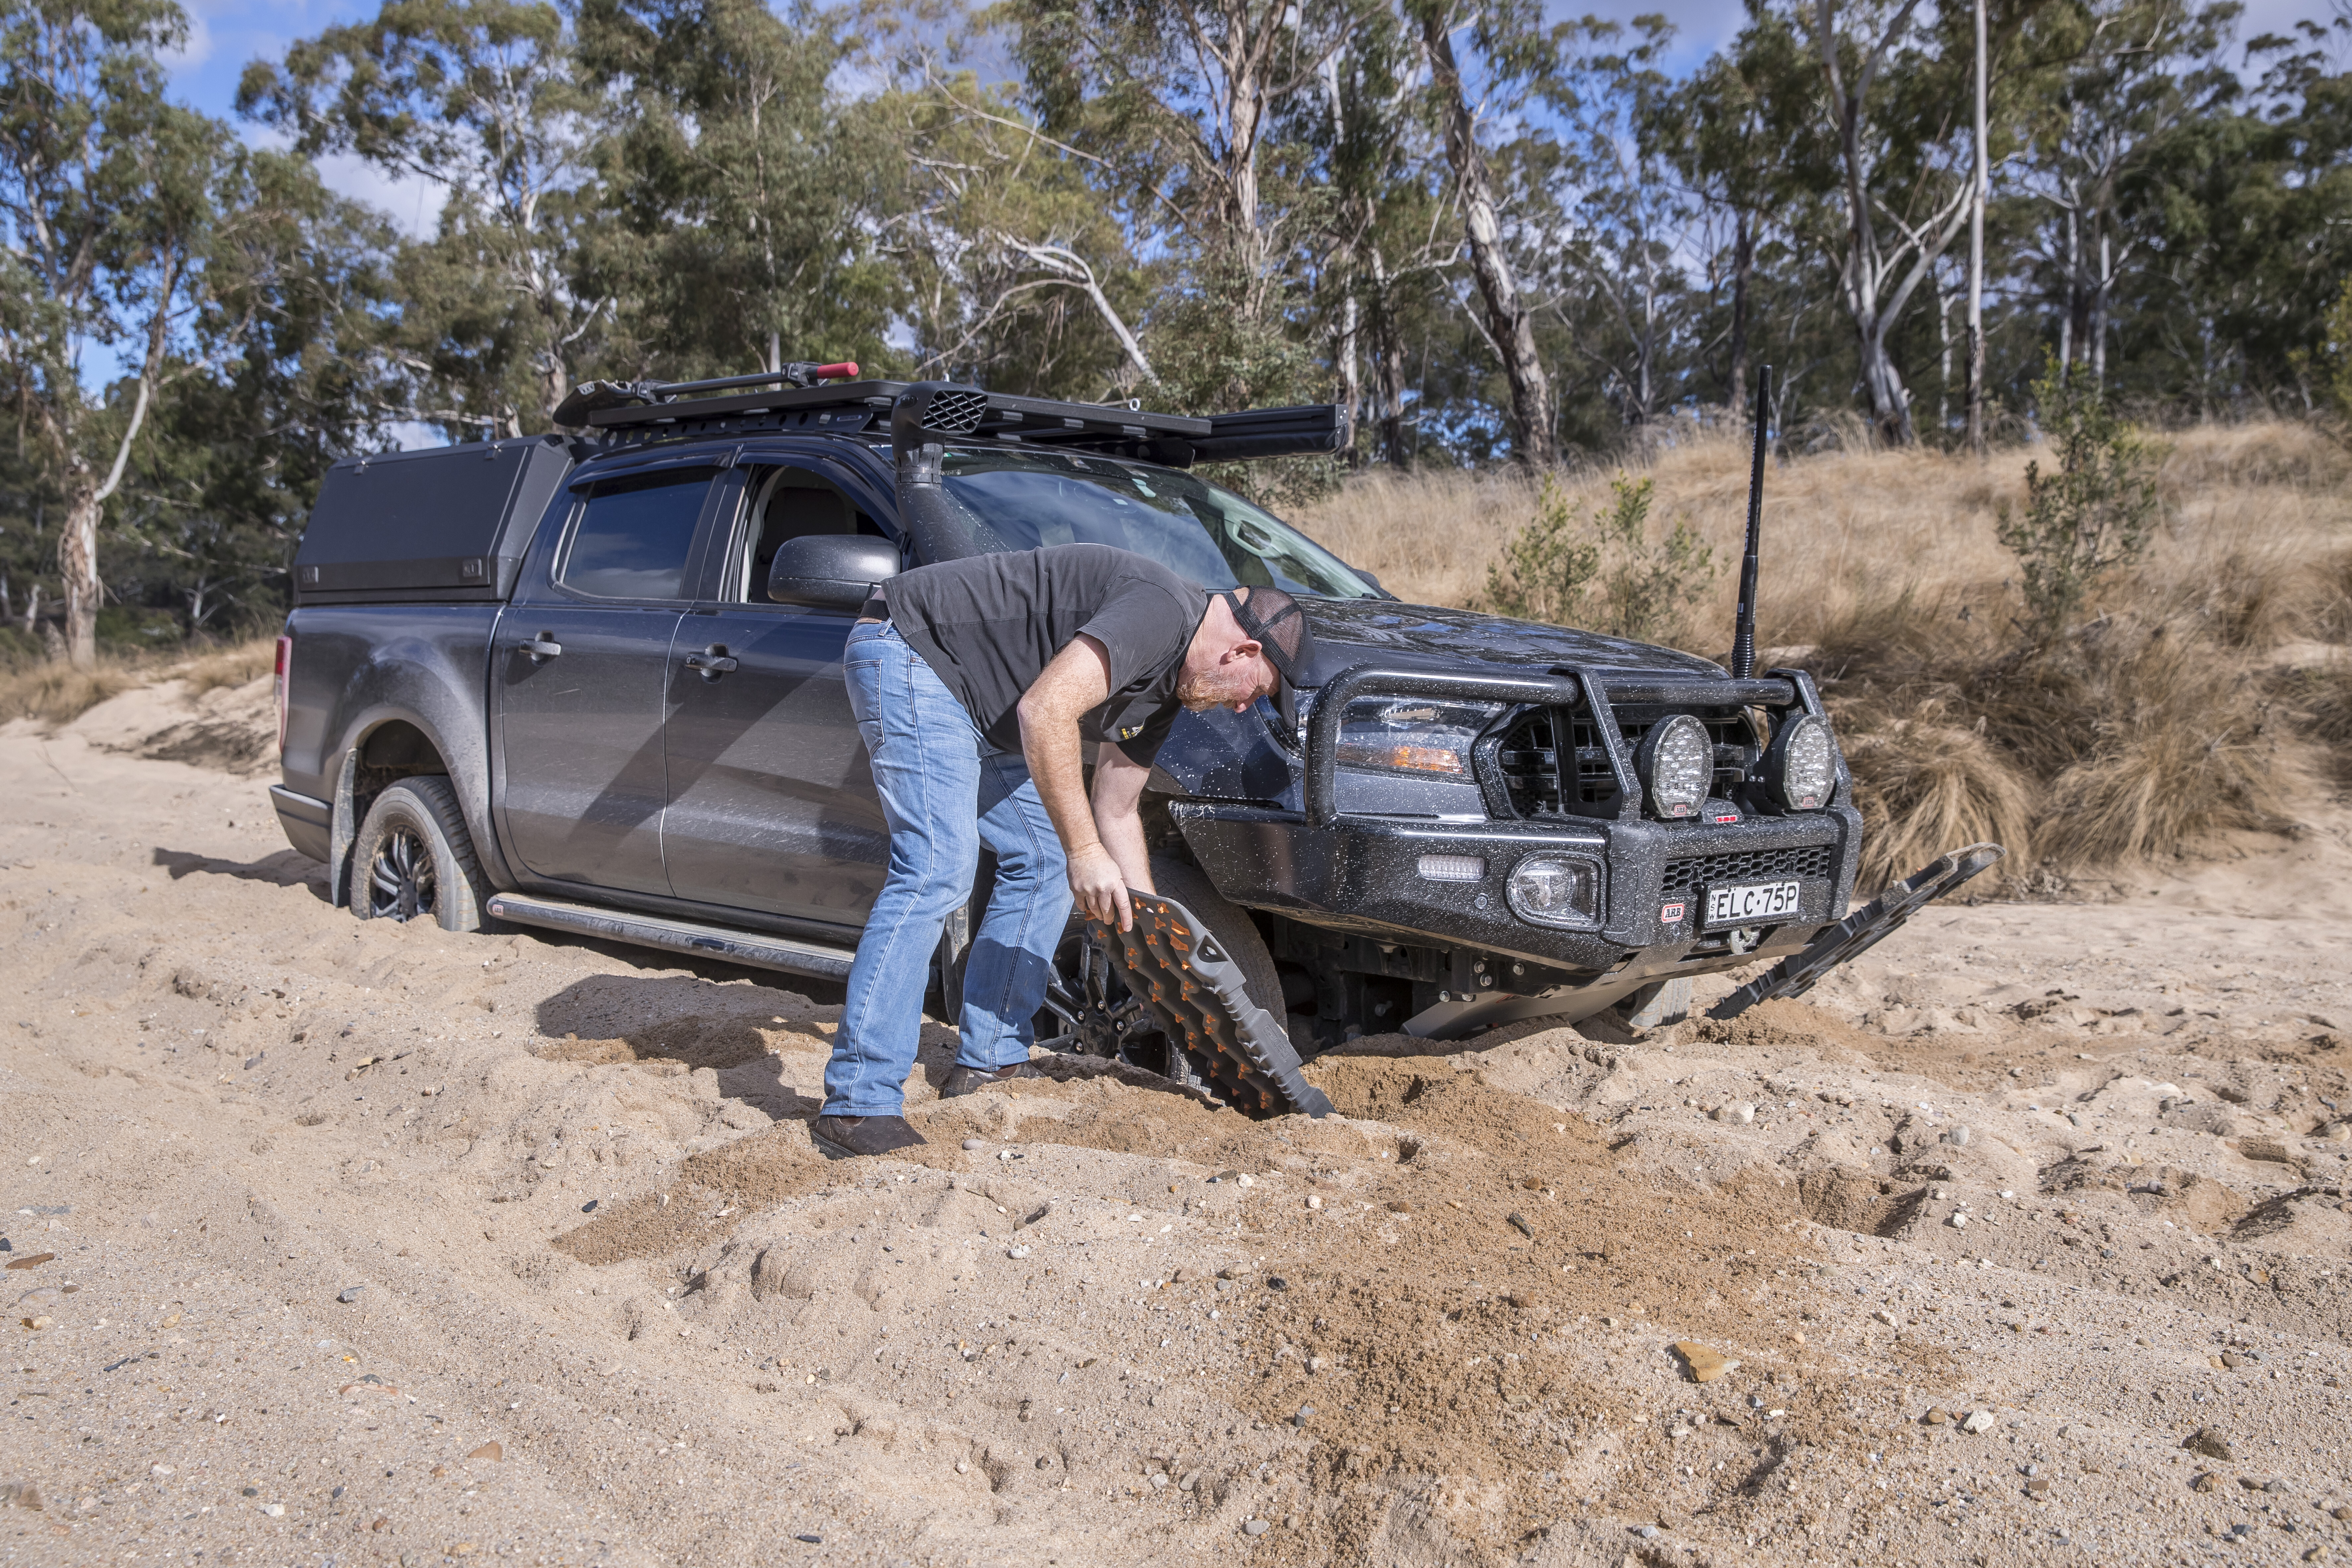
Recovery boards can be used in various off-road situations, but the most common usage is when you become bogged in sand or mud.
In the accompanying video, we used the example of a vehicle bogged in sand, but when bogged in mud, the recovery process is pretty much the same, just messier. Here’s how you do it …
First, you’ll want to make sure you’re running the correct tyre pressures for the off-road driving situation you’re in. As well as allowing the tyres the best chance to gain traction in off-road terrain, lowering pressures also allows them a better chance of gaining traction on the recovery boards themselves, so if you haven’t already, drop tyre pressures to give you the best chance of getting out … with minimal effort.
The next step is to shovel away any built-up debris (sand or mud) from in front of the vehicle’s tyres, at both the front and rear. You should also shovel away any built-up debris from in front of the vehicle. If you have a long-handle shovel, this is the best tool for the job, but if not, you can use the shovel end of the recovery board to do this task. You want to dig quite deep in front of the tyres so you can wedge the recovery boards under them as far as possible.
Some recovery boards are the same at each end, while others such as TREDs have a shovel end and a ramp end. Make sure you wedge the ramp end under the tyres as far as possible so the tyres can gain purchase on the cleats (or lugs) that stick out from the top of the boards. If you’re only using two boards, you’ll want to wedge them under the front tyres. If you have four boards, use them – it will make the recovery process even easier.
Once the recovery boards are in place, you’ll want them sticking up at about a 45-degree angle. To achieve this, you might have to pack some sand or mud under the boards to help support them. The reason you want the boards poking out at a 45-degree angle is that you essentially want to drive up and over the boards, lifting the vehicle out of its stuck predicament.
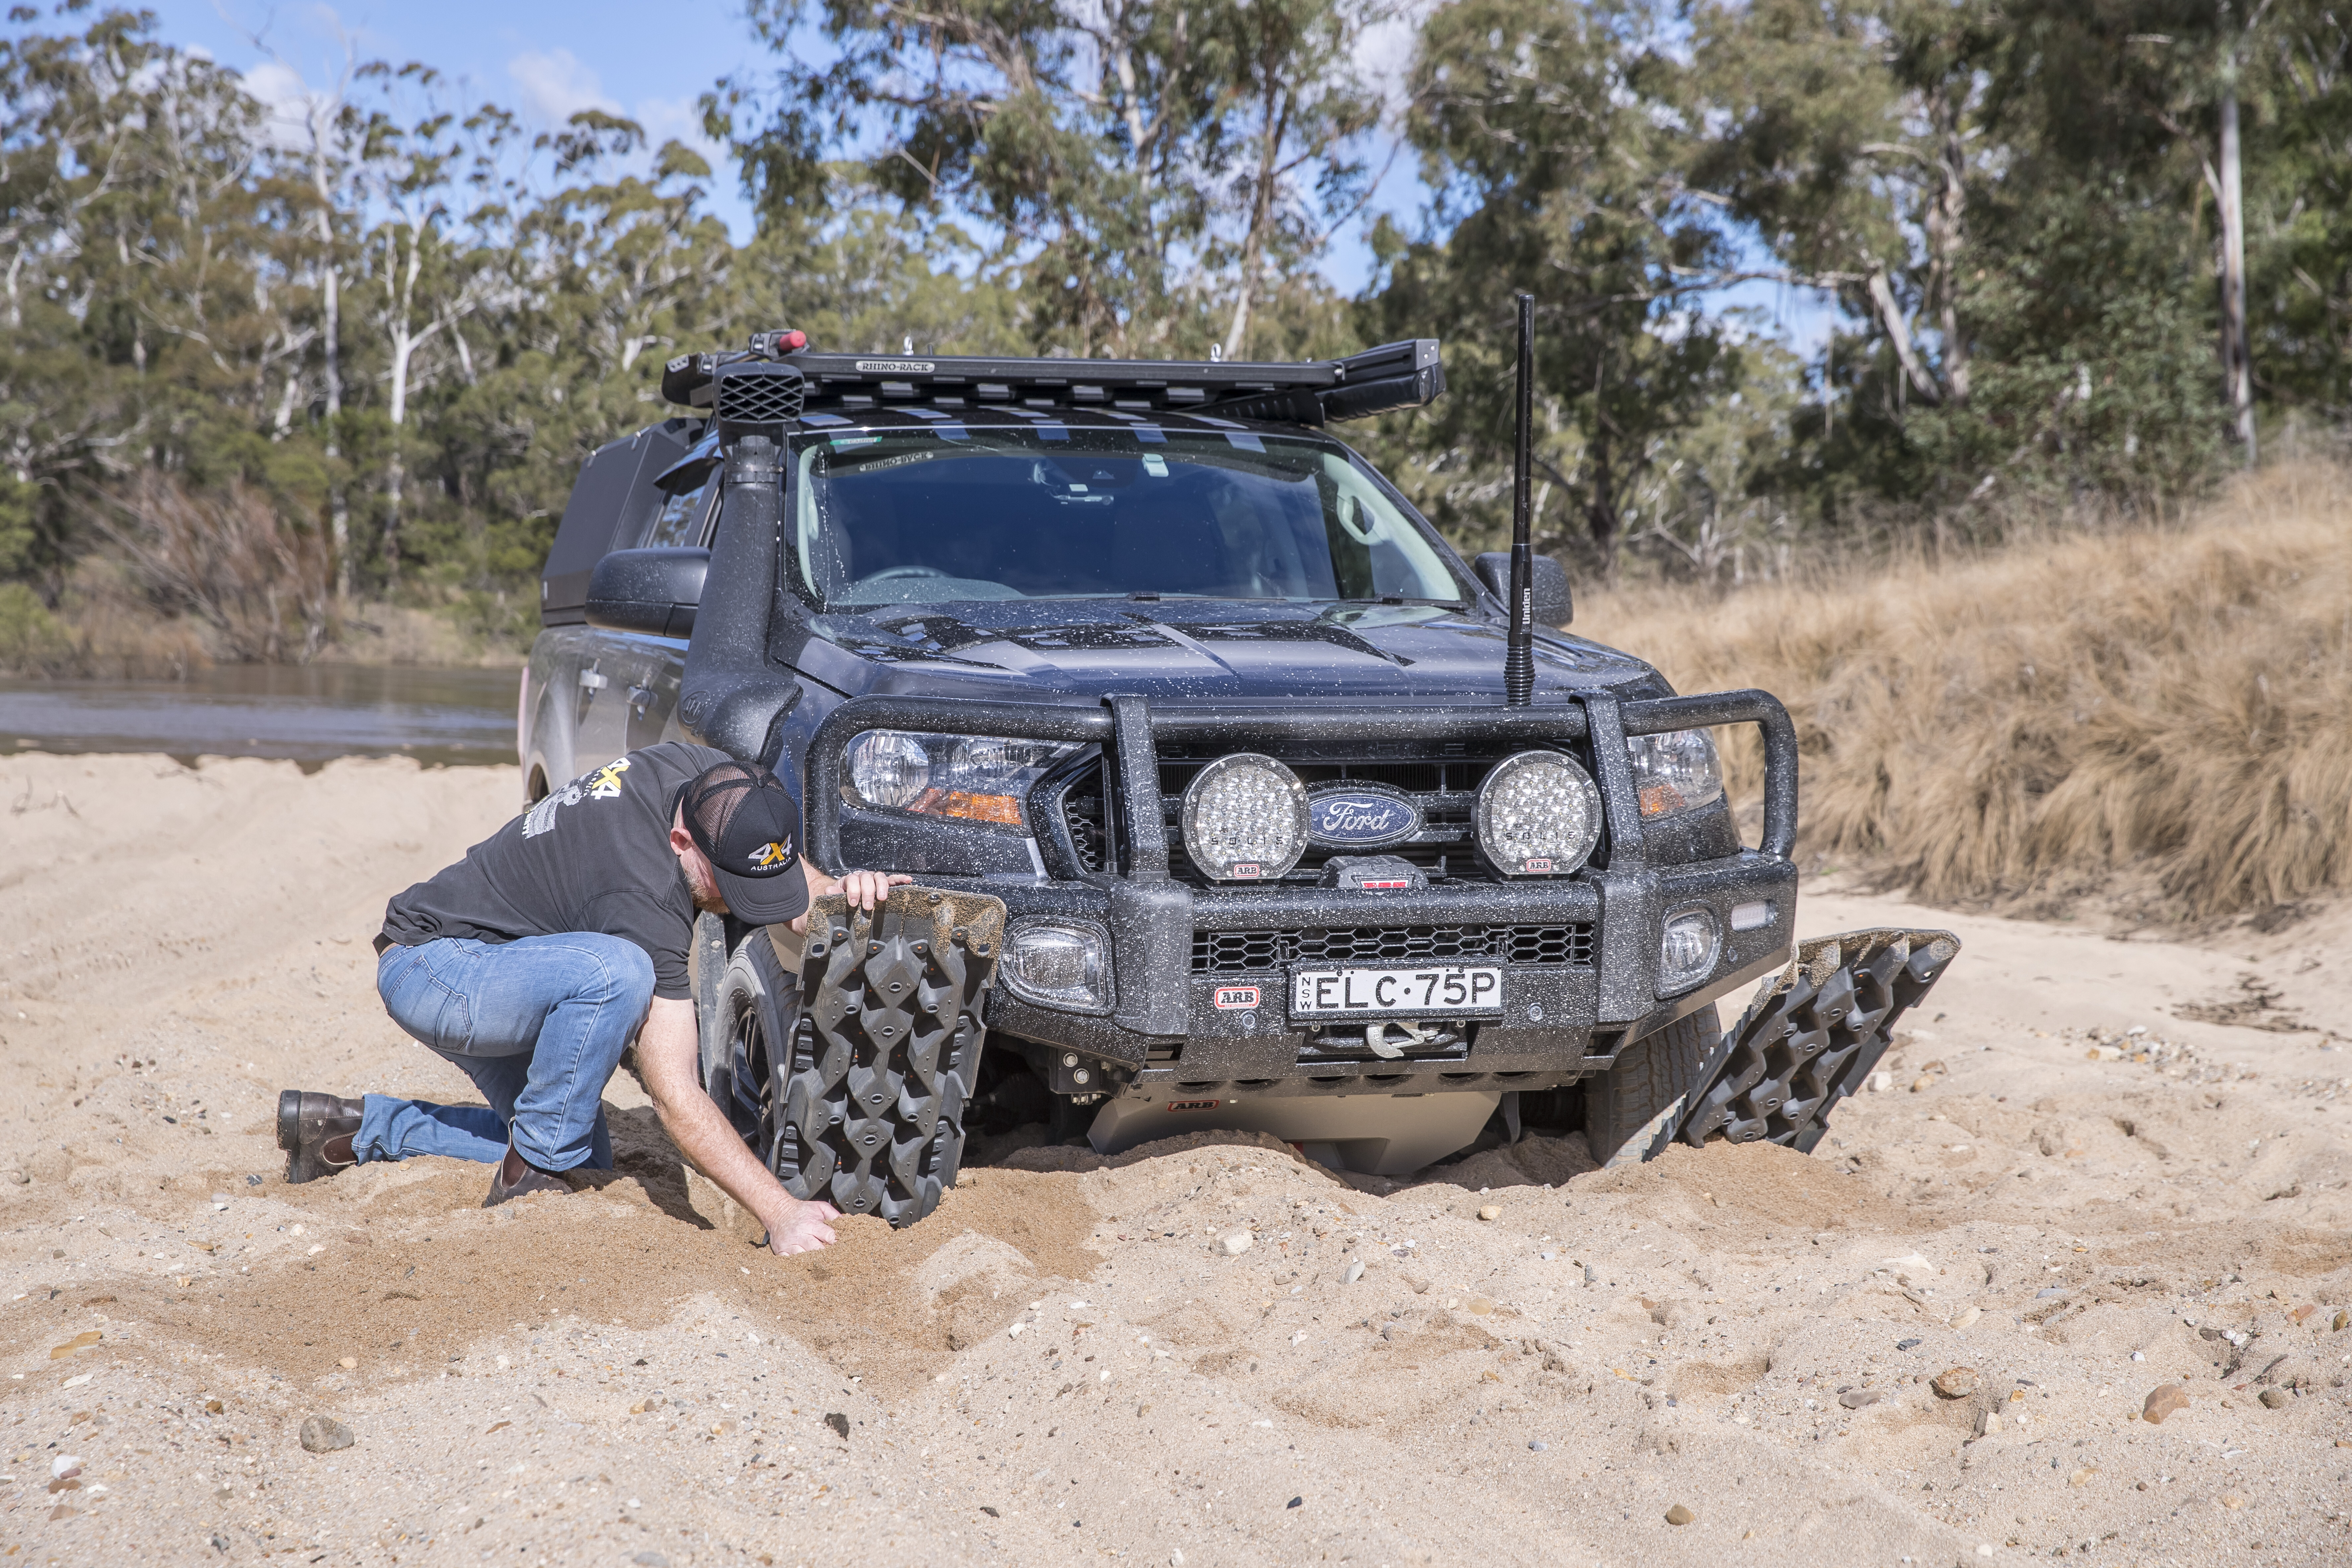
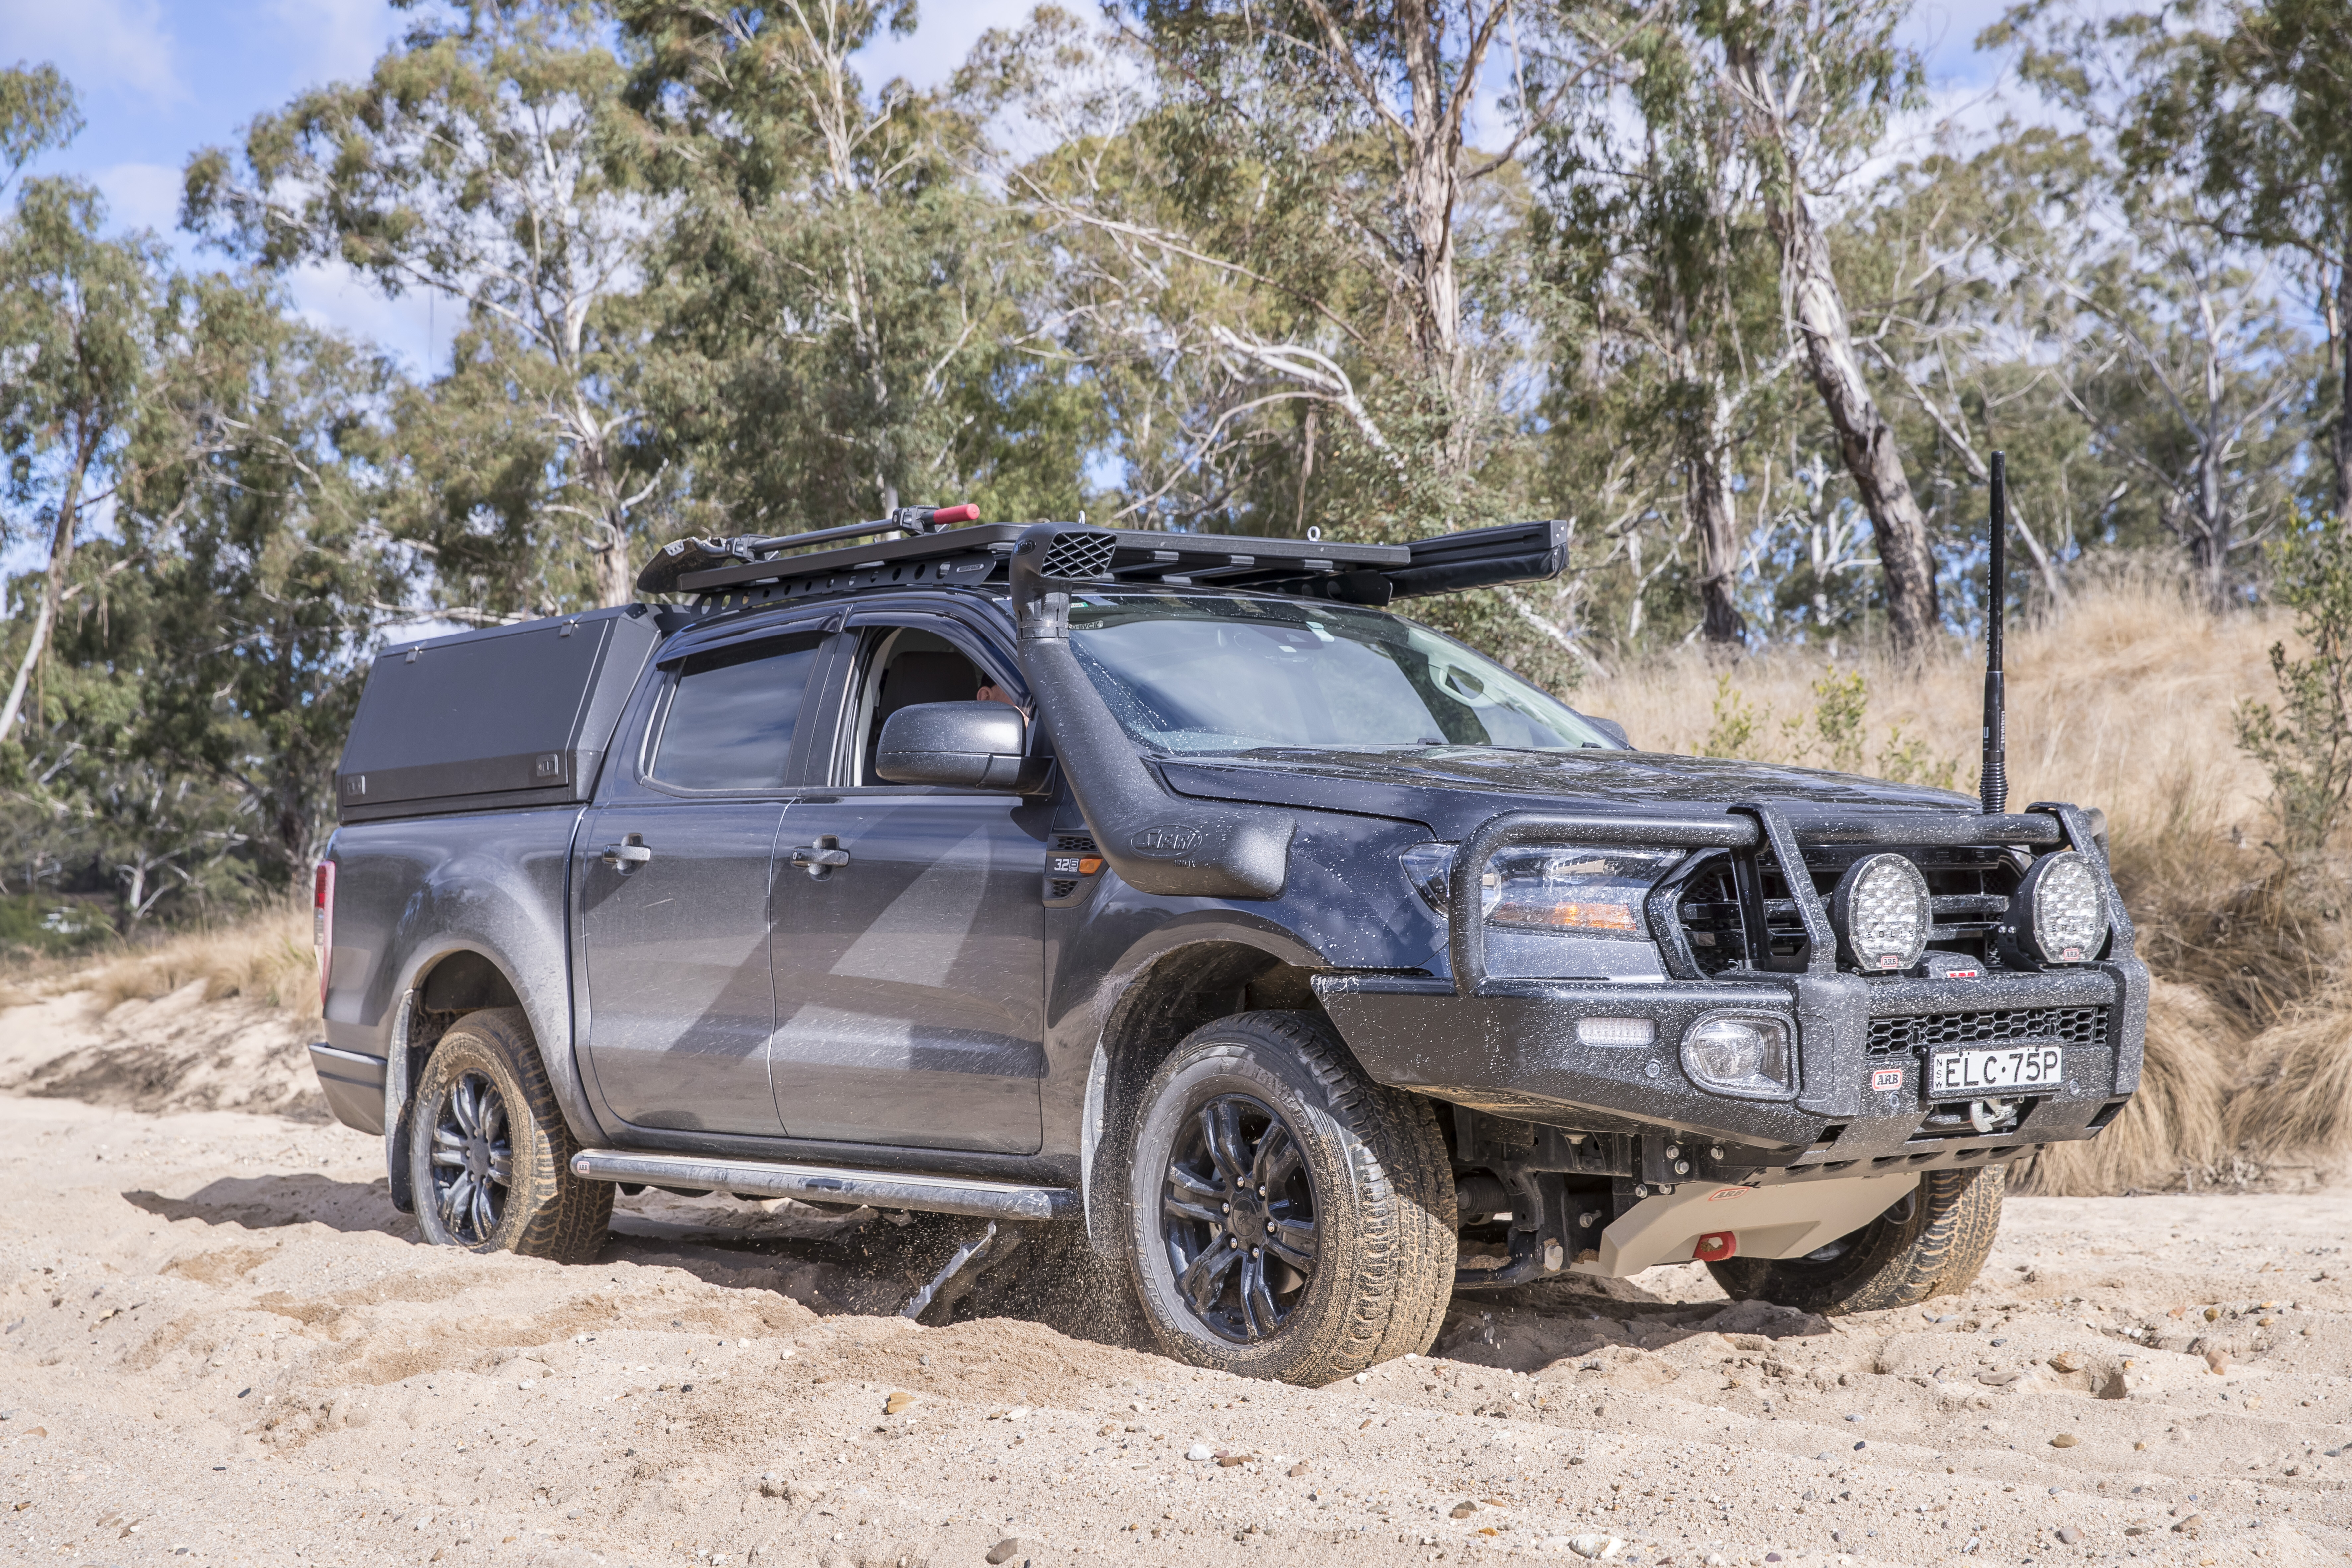
Once the recovery boards are in place, make sure your vehicle is in low-range first gear before driving forward. Go easy on the throttle and, with any luck, the vehicle will simply drive up the boards and out of its predicament. Don’t apply too much throttle or be tempted to go too fast, because any wheelspin can rip the cleats (or lugs) off the top surface of the recovery boards. Once the vehicle has lifted out of its situation and is clear of the recovery boards, you can then apply more throttle if necessary to build and maintain momentum until you are out of strife.
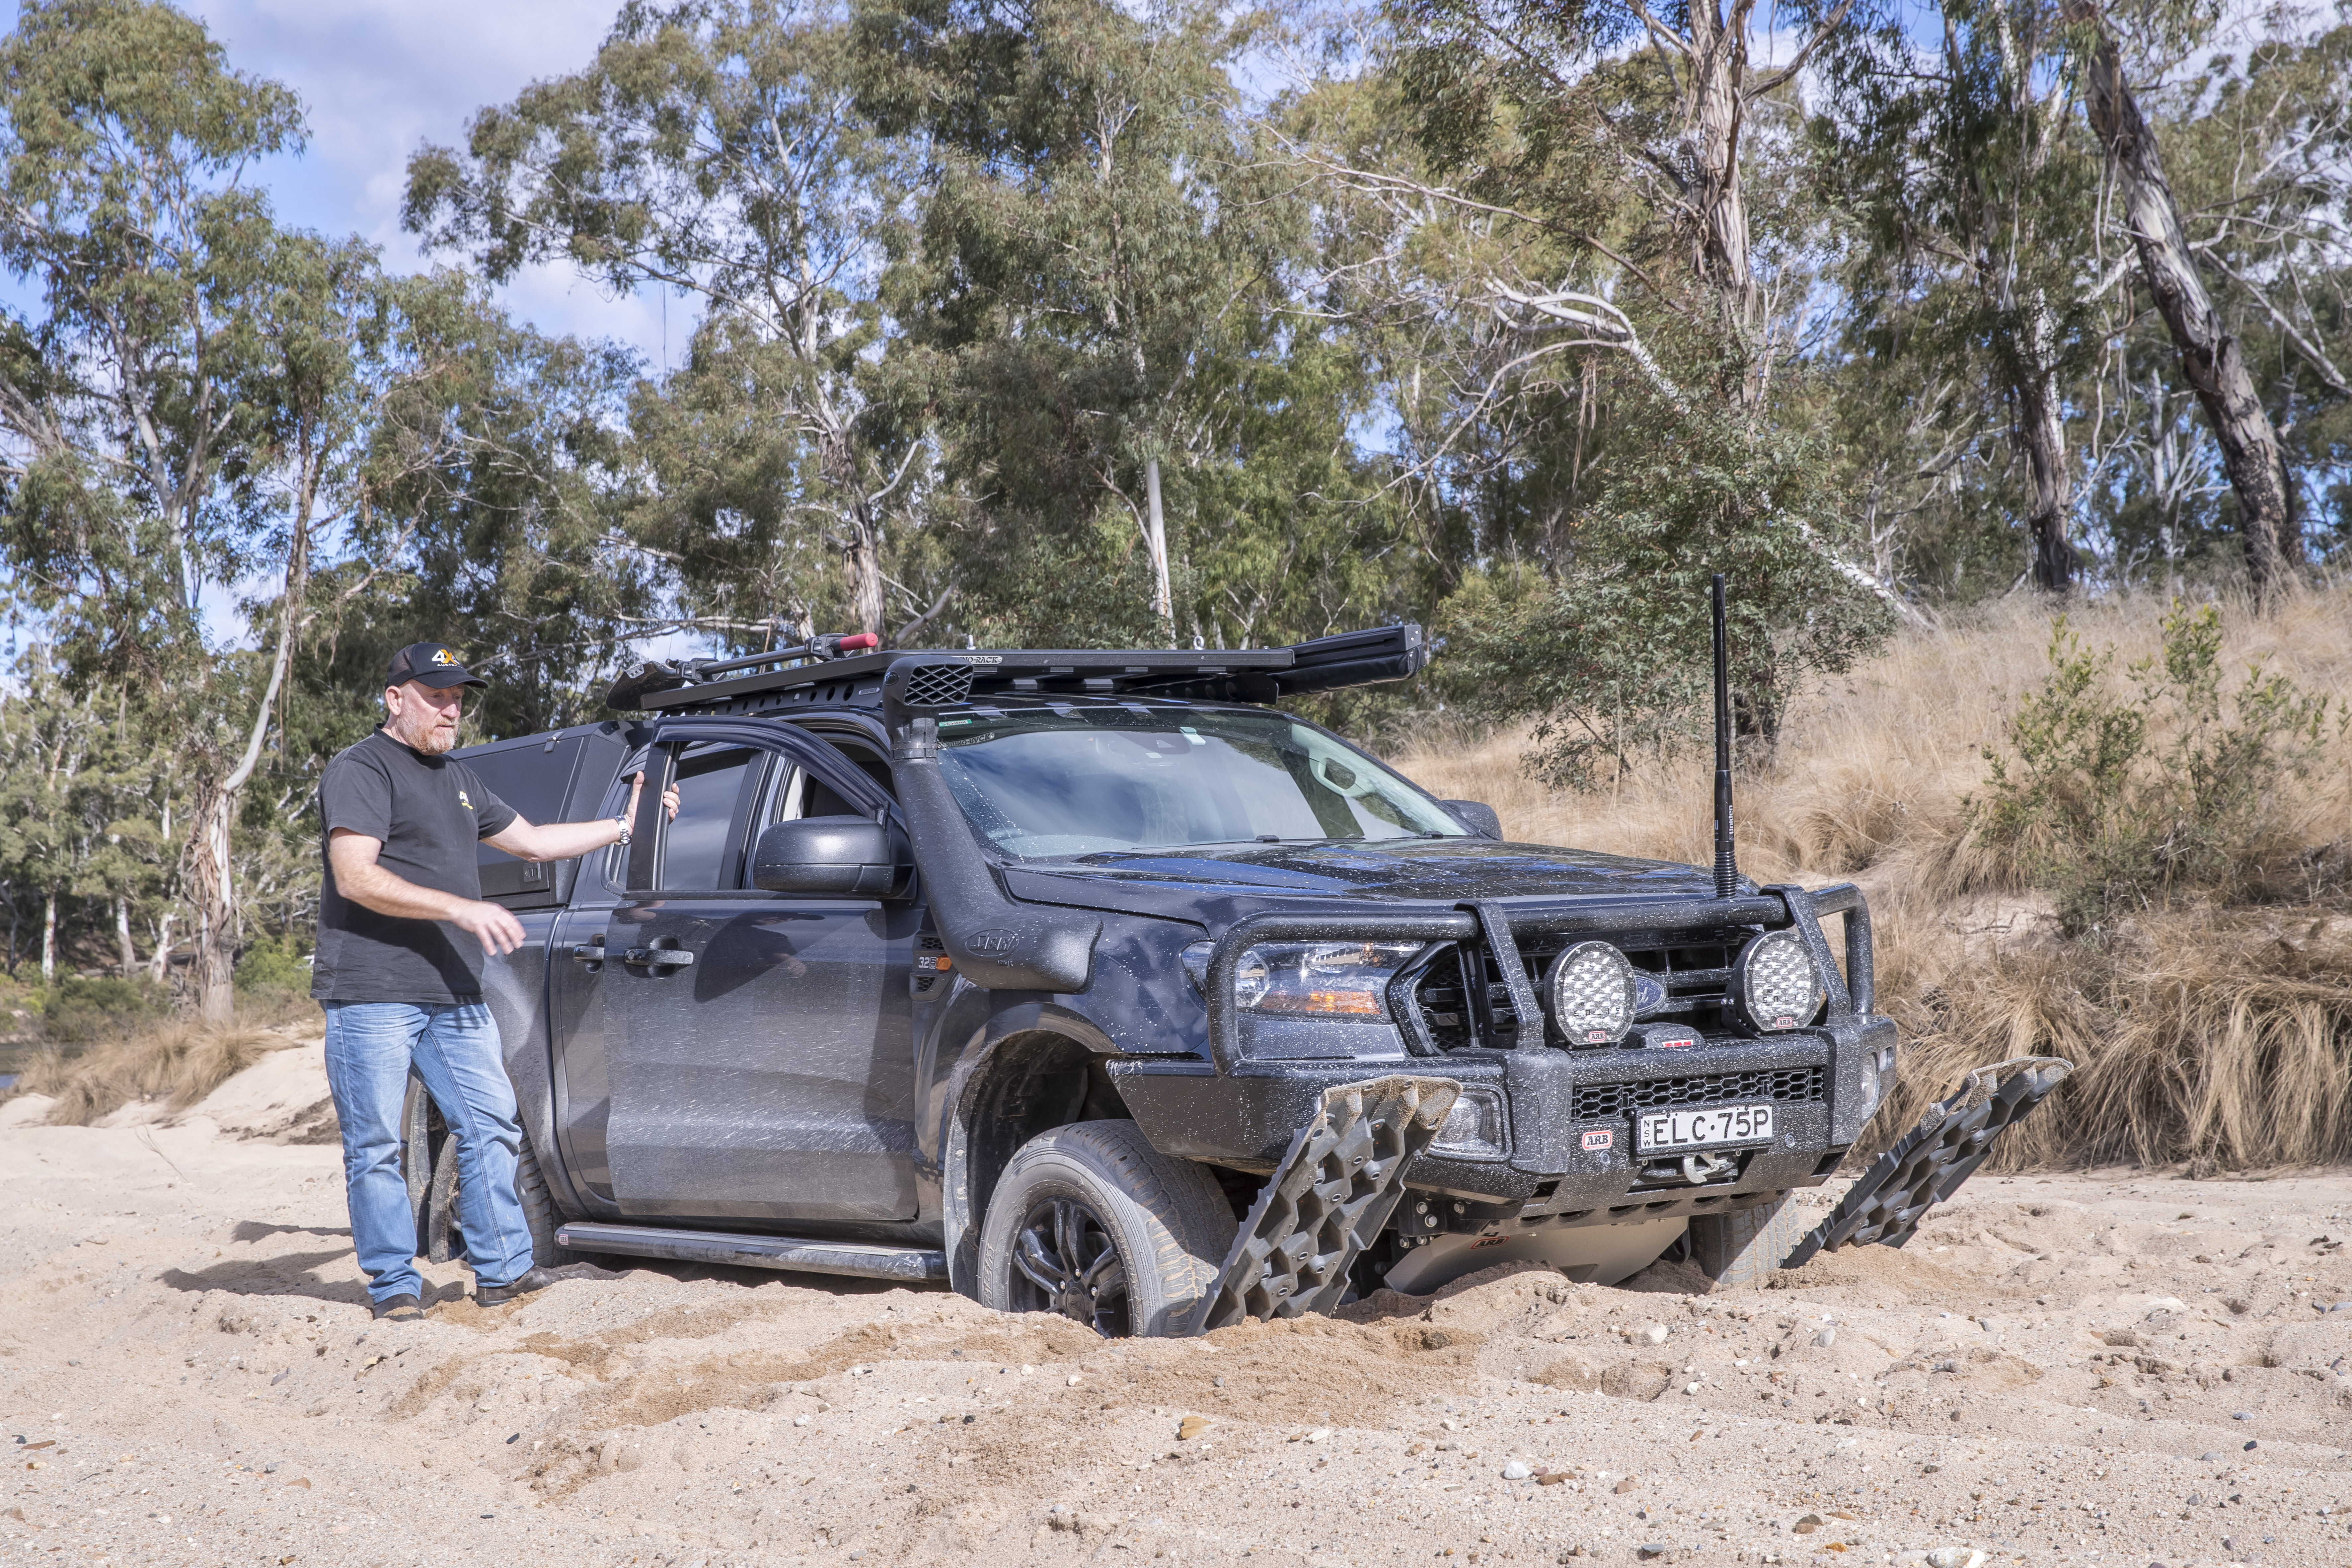
If the vehicle bogs down again once it has cleared the recovery boards, simply repeat the recovery process over again until you have reached solid ground. If you have several recovery boards available to you, you can lay out a track on which you can hopefully drive to solid ground.
The last step? Make sure you remember to grab your recovery boards once your vehicle is out of strife, whack them against each other to shake off any loose sand or excess mud, and then secure them to your vehicle. There are plenty of products on the market designed specifically for mounting recovery boards to your vehicle – up on a set of roof racks, on a tailgate-mounted spare tyre or even directly to a ute canopy – so there’s really no excuse for leaving them at home the next time you go four-wheel driving.
TRAINING
As with any vehicle recovery method, the best way to learn how to safely use recovery equipment is by attending a nationally recognised training course, either operated by a private company or through an accredited 4×4 club.
DOs
• Always carry them when off-road driving • Lower tyre pressures to suit conditions • Shovel around tyres and vehicle to remove debris • Wedge boards under tyres as far as possible • Have boards poking out at 45-degree angle
DONT’s
* Attempt recovery without shovelling first * Stow recovery boards where you can’t access them * Don’t use too much throttle and spin tyres * Forget to grab your boards before driving off * Leave them unlocked on your roof rack
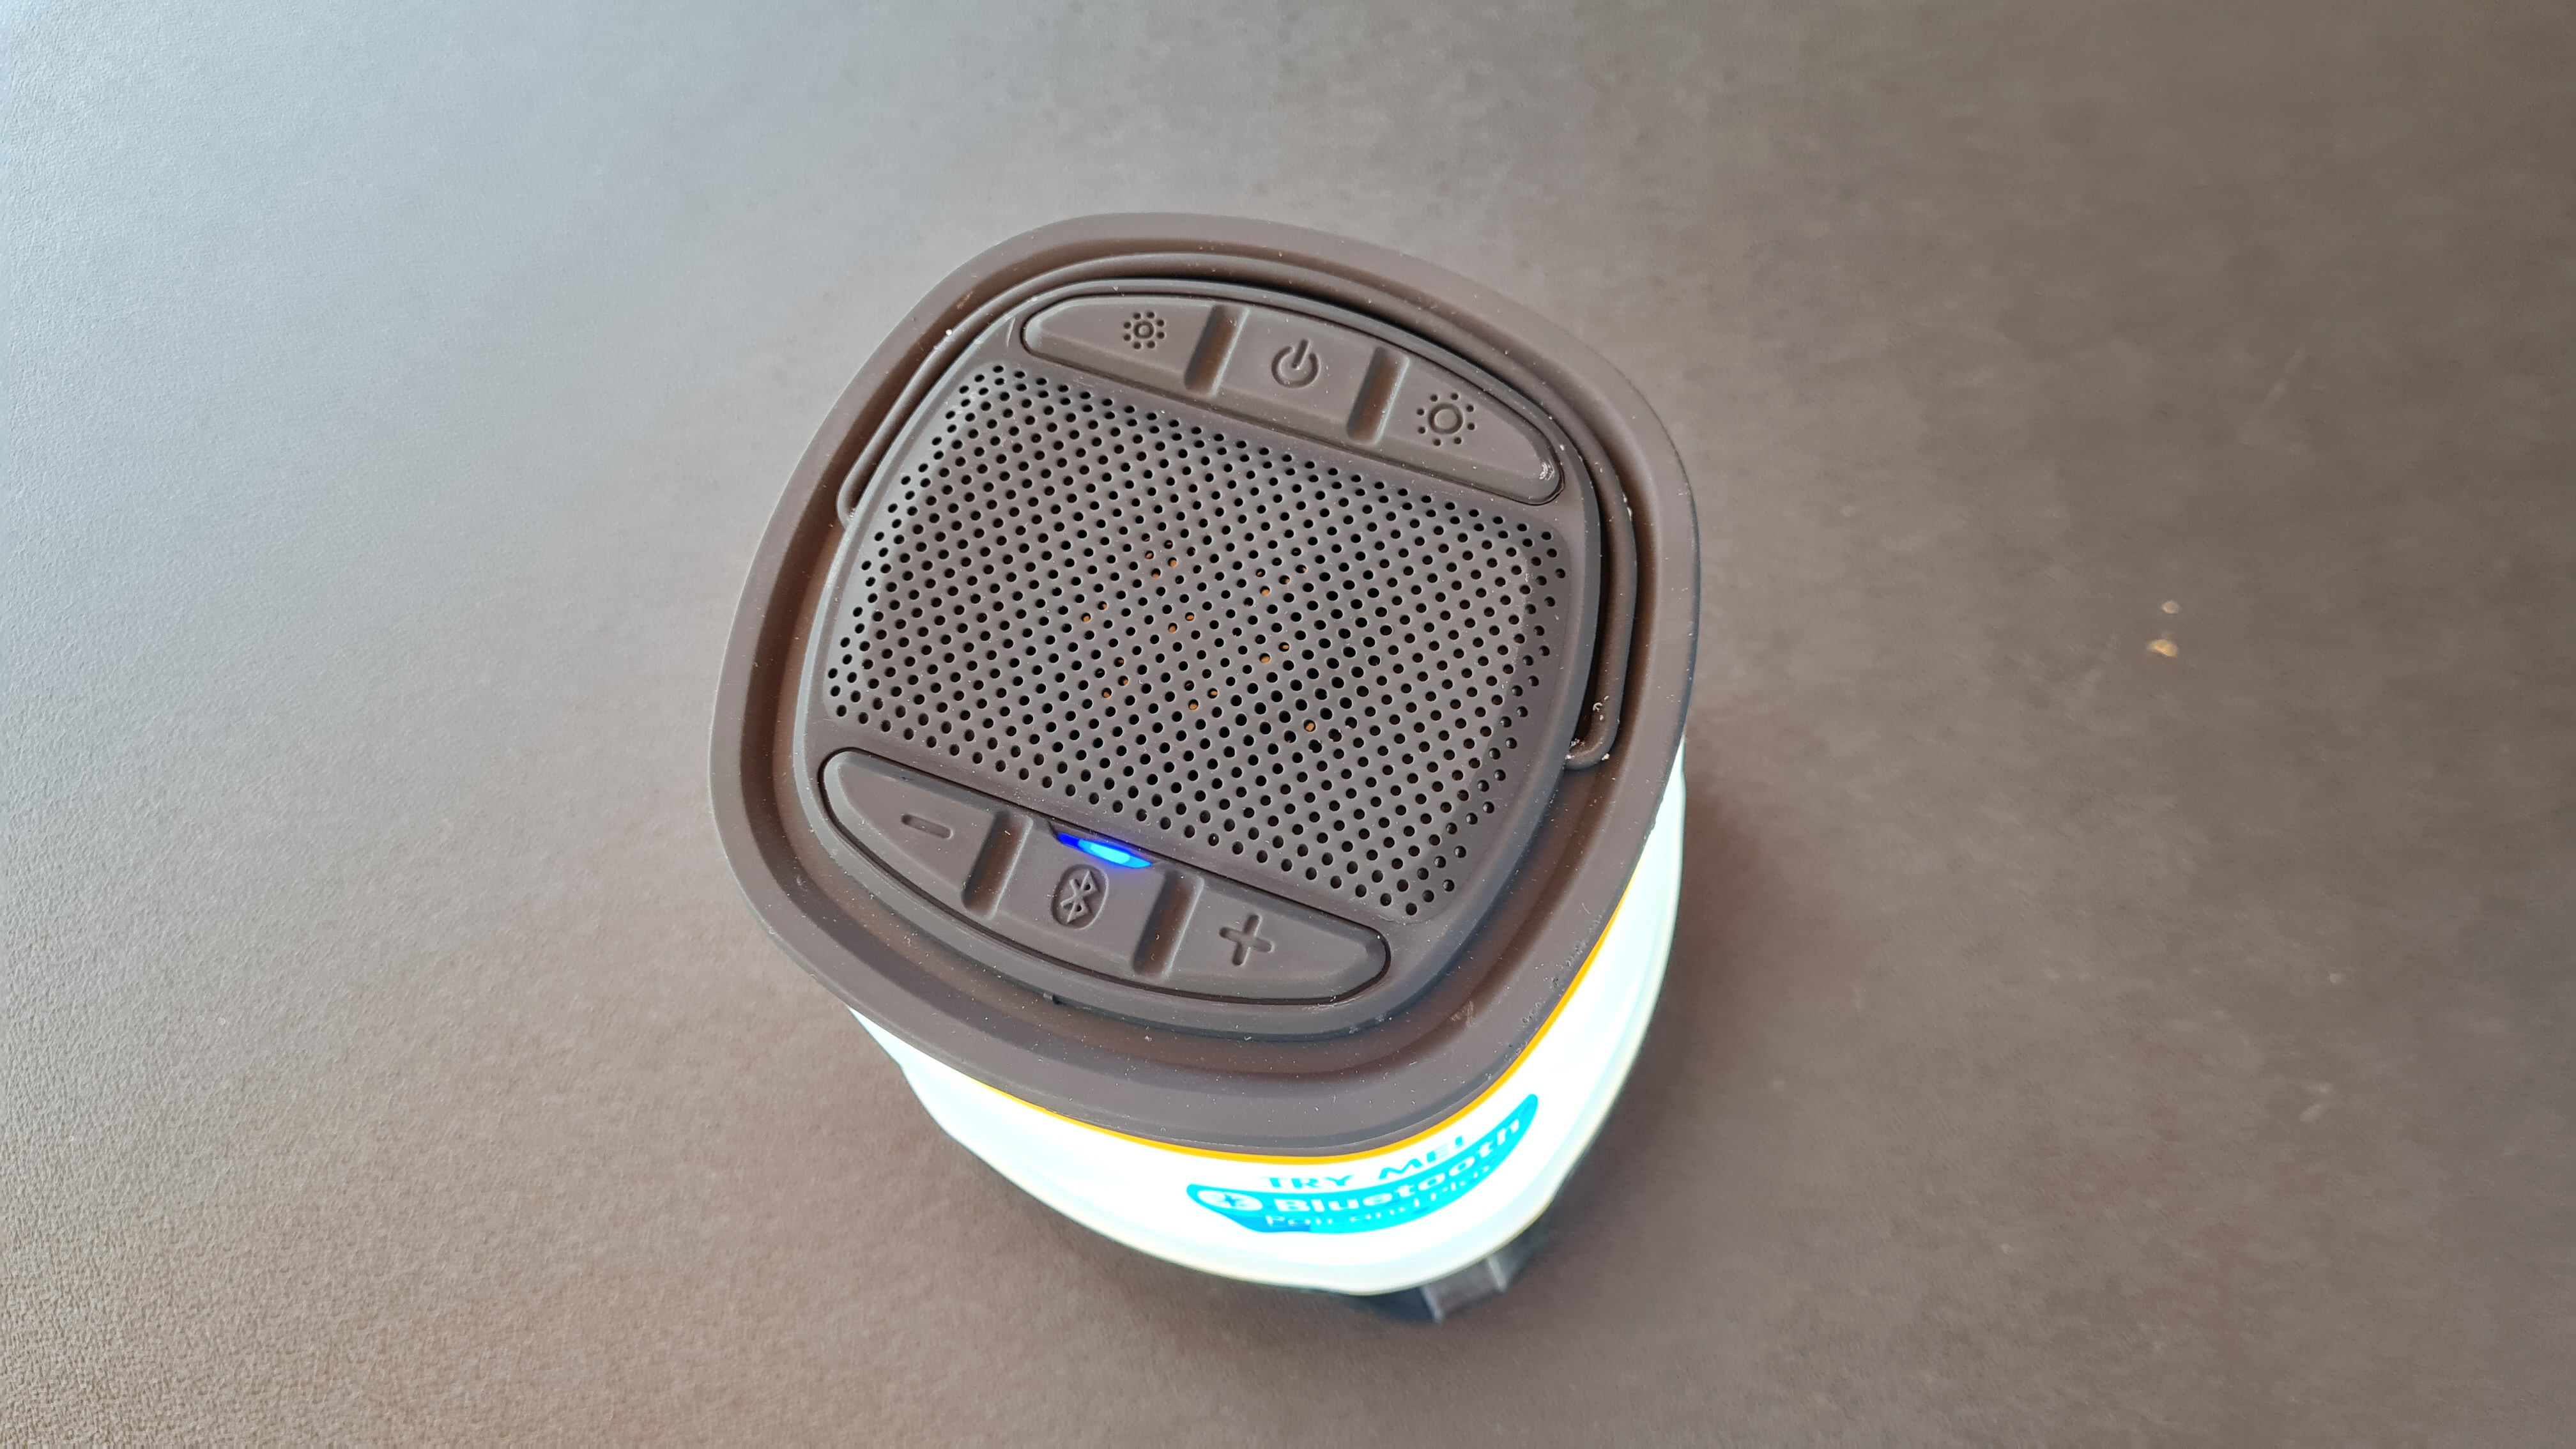
An adjustable 1000 lumen camping light and Bluetooth speaker built into one? That’s exactly what OzTrail’s new Ignite 1000L Rechargeable Speaker Lantern is capable of, and we were super keen to try it.
We grabbed two of these lanterns and gave them a test during an overnight camping trip last winter and were amazed at how useful they were.
Anybody who has been camping in the long nights of winter knows how important campsite lighting is, because there’s nothing worse than trying to set up camp or cook dinner in the dark.
First up, the lighting side of things. The lantern features five adjustable light settings, so you don’t have to blind yourself. OzTrail say you’ll get five hours of runtime on high and a whopping 32 hours on low settings, in-between charges thanks to the lithium battery.
The body has hooks top and bottom, so you can hang it from just about anywhere, and the sturdy feet mean you’ve got to put a fair bit of effort in to knock it over.
The feature that sets this lantern apart from the rest is the Bluetooth speaker. It’s even easier to pair to your phone than most modern infotainment systems, and you can adjust the volume from your device with ease.
Despite the size, the speaker quality is surprisingly good. There’s no distortion if you’re into your doof-doof bass tunes, and if you have more than one lantern on site then you can pair them both to the same phone for a neat surround-sound experience. Sure, you won’t give a nightclub a run for its money with overall volume, but when you’re out on the middle of the whisper-quiet bush there’s really no need.
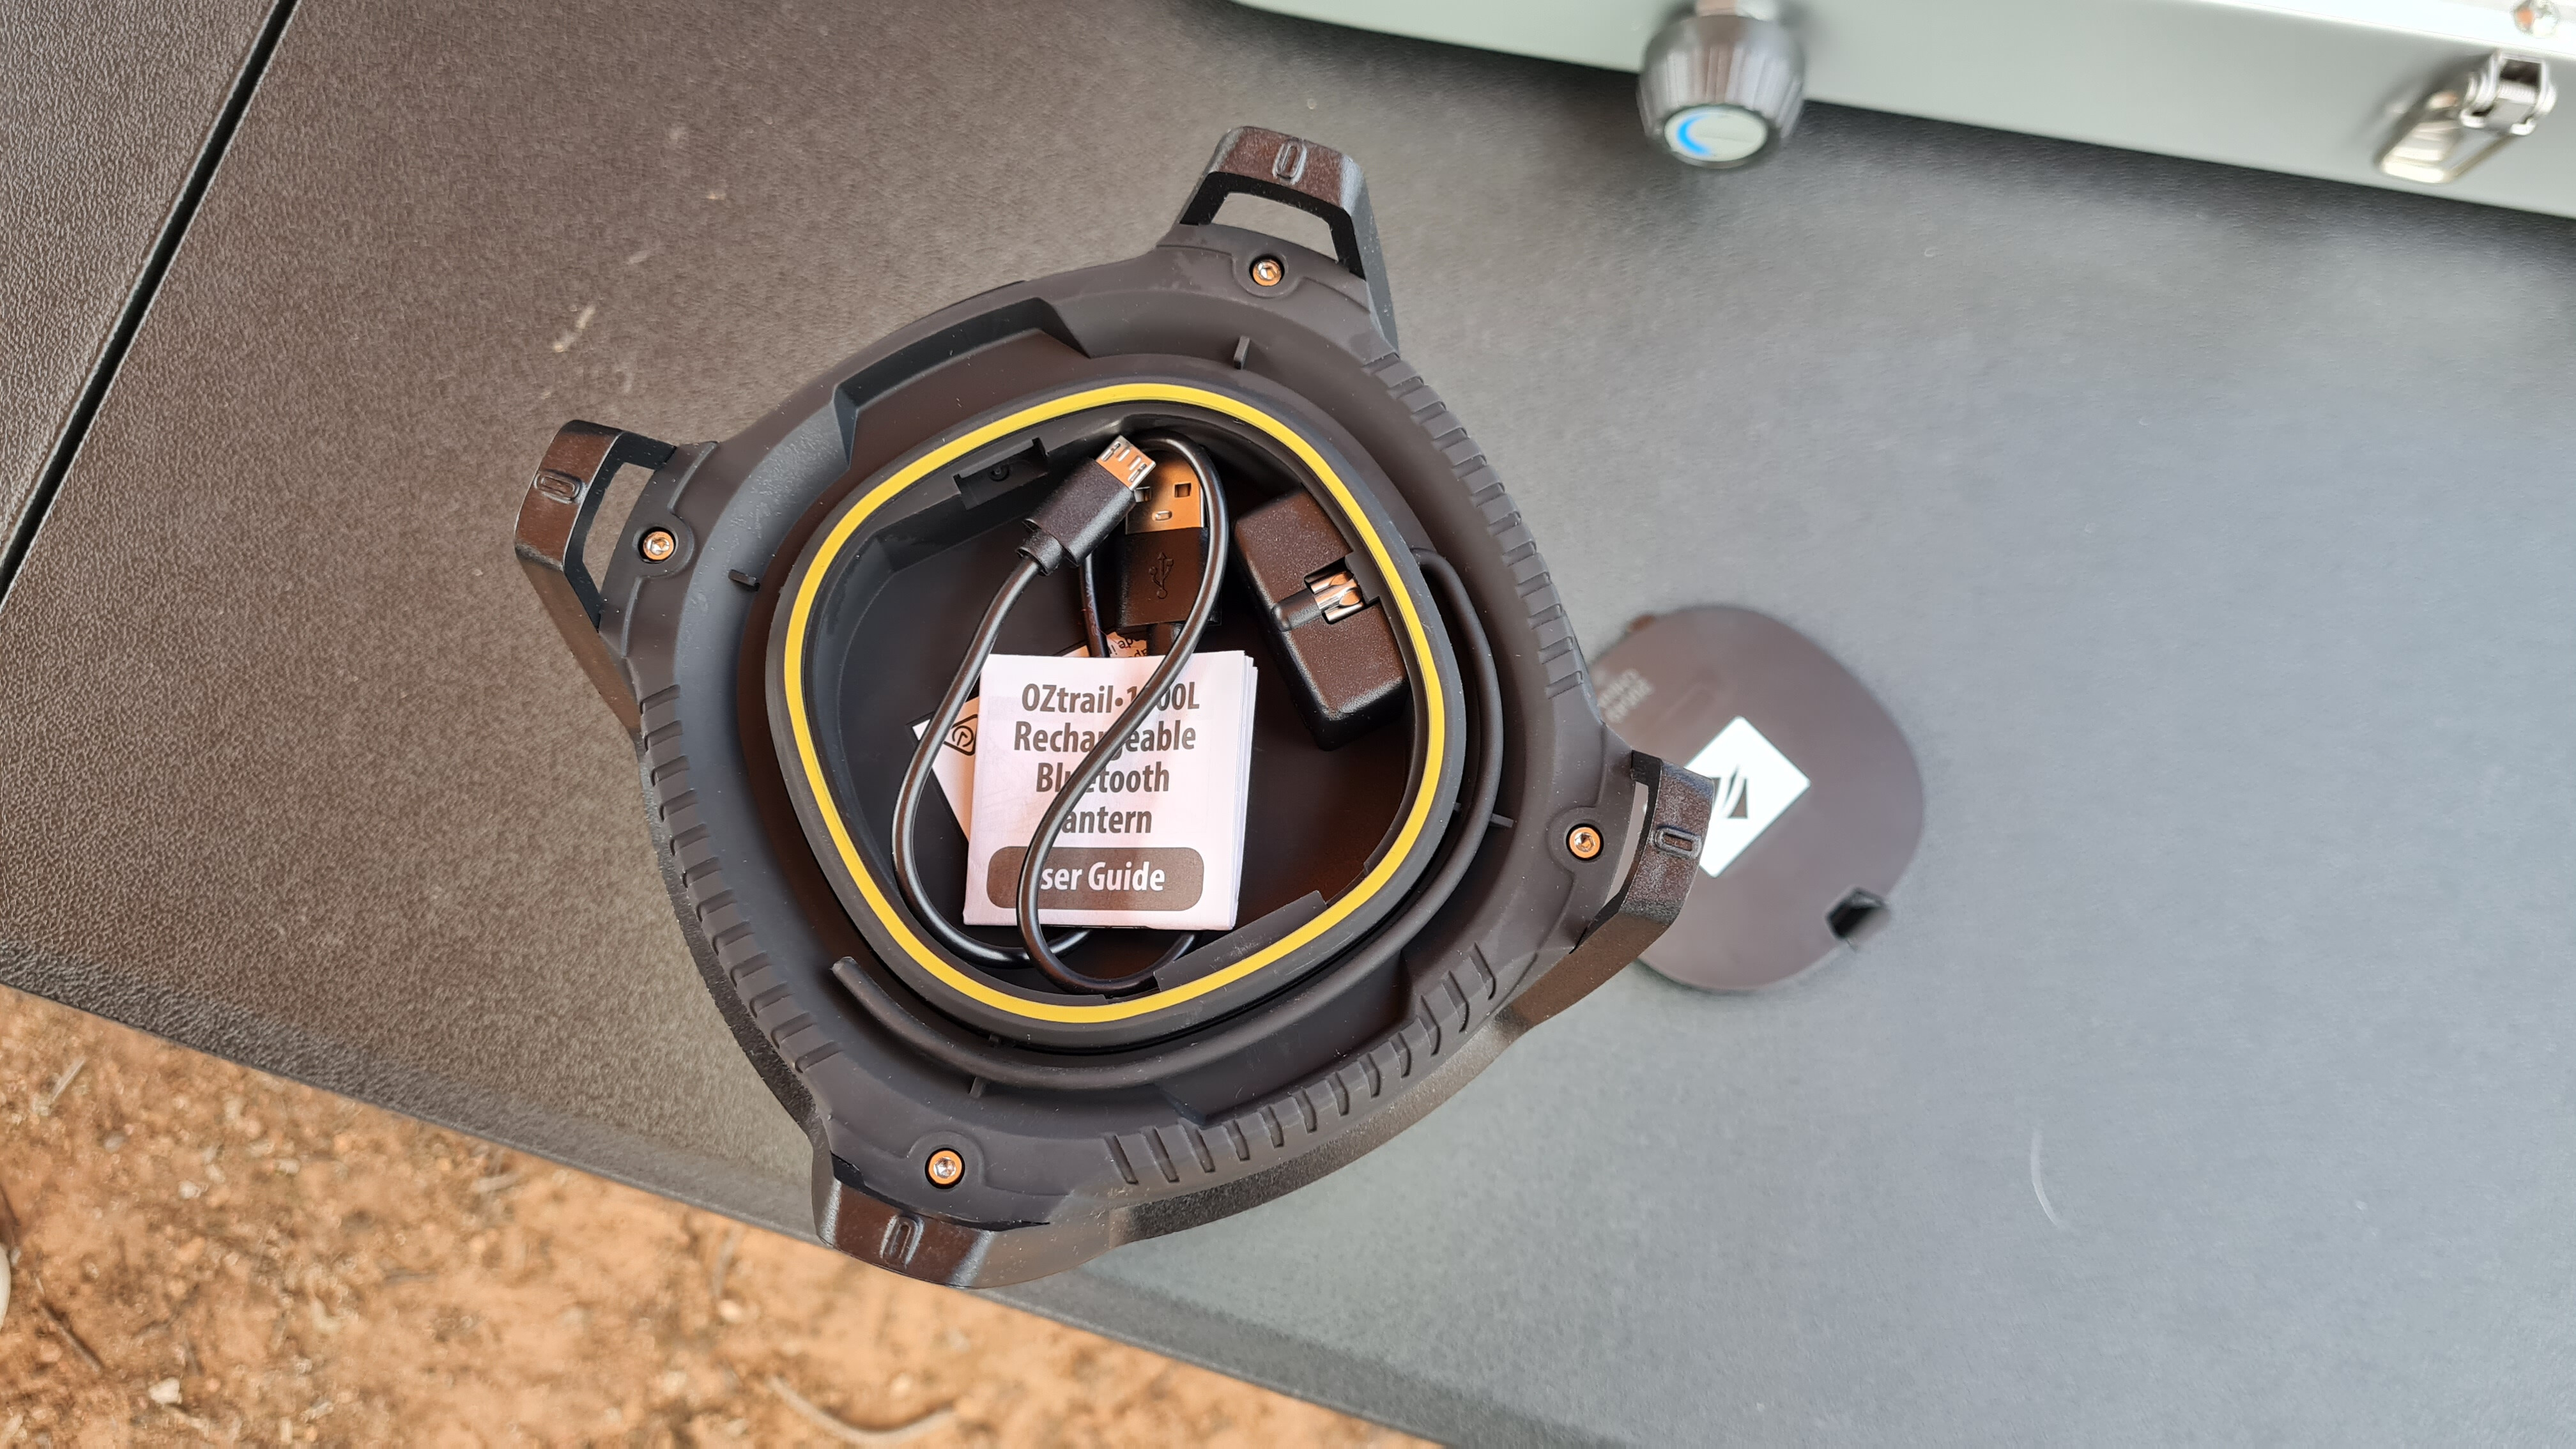
The lanterns are splash-proof, so you don’t have to worry if you get a bit of rain on them. They also come with their own USB charging cables, and there’s even a USB port on the back that makes the lanterns double as a power pack – so you can charge your phone while jamming out to some mad tunes!
We love these things. At $120 a pop, they’re no more expensive than any other good-quality Bluetooth speaker, but they also double as some seriously powerful lanterns and can even be used as a basic power pack in a pinch. Really, how can you lose?
AVAILABLE FROM: Oztrail.com.au RRP: $119.99
OZTRAIL RV DIRECTOR’S CHAIR

After a hard slog taming off-road tracks all day, it’s nice to rest up at camp around the fire in a comfortable chair. OzTrail’s new RV Director’s Chair has a wide, powder-coated steel frame and sturdy fabric with a padded seat and backrest, so it’s not only comfy but durable to boot. It’s king size means it’ll house portly folks too, and it folds flat for easy storage within a 4×4. It also comes with a sturdy side table with a cupholder that easily folds away when not in use. RRP: $149.99
OZTRAIL SUN LOUNGE

A comfy camp chair is one of the best remedies after a day spent bouncing on corrugations that would put vertebrae out of place. The new Sun Lounge Jumbo from OzTrail is a reclining, padded chair (extra wide padded seat and backrest), with an ergonomically shaped armrest that’s perfect for such occasions. It also features a side table with drink holder, adjustable headrest and a strong 19mm high-tensile steel tube frame.
OZTRAIL LUMOS 10P TENT
This 10-person tent is ideal for the next family getaway. With three large bedrooms sized to fit queen, double stretchers and airbeds, this tent provides adequate space to sleep the family in comfort. Features include integrated LED lighting built into the Fast Frame system; BlockOut coating on the fly; a Triple Hub Frame system; 3000mm waterhead rated Ripstop polyester fly; and Heavy-duty PVC-coated Polyoxford floor. Head to the OzTrail website for a full list of features. RRP: $1249.99
OZTRAIL IGNITE SPEAKER LANTERN
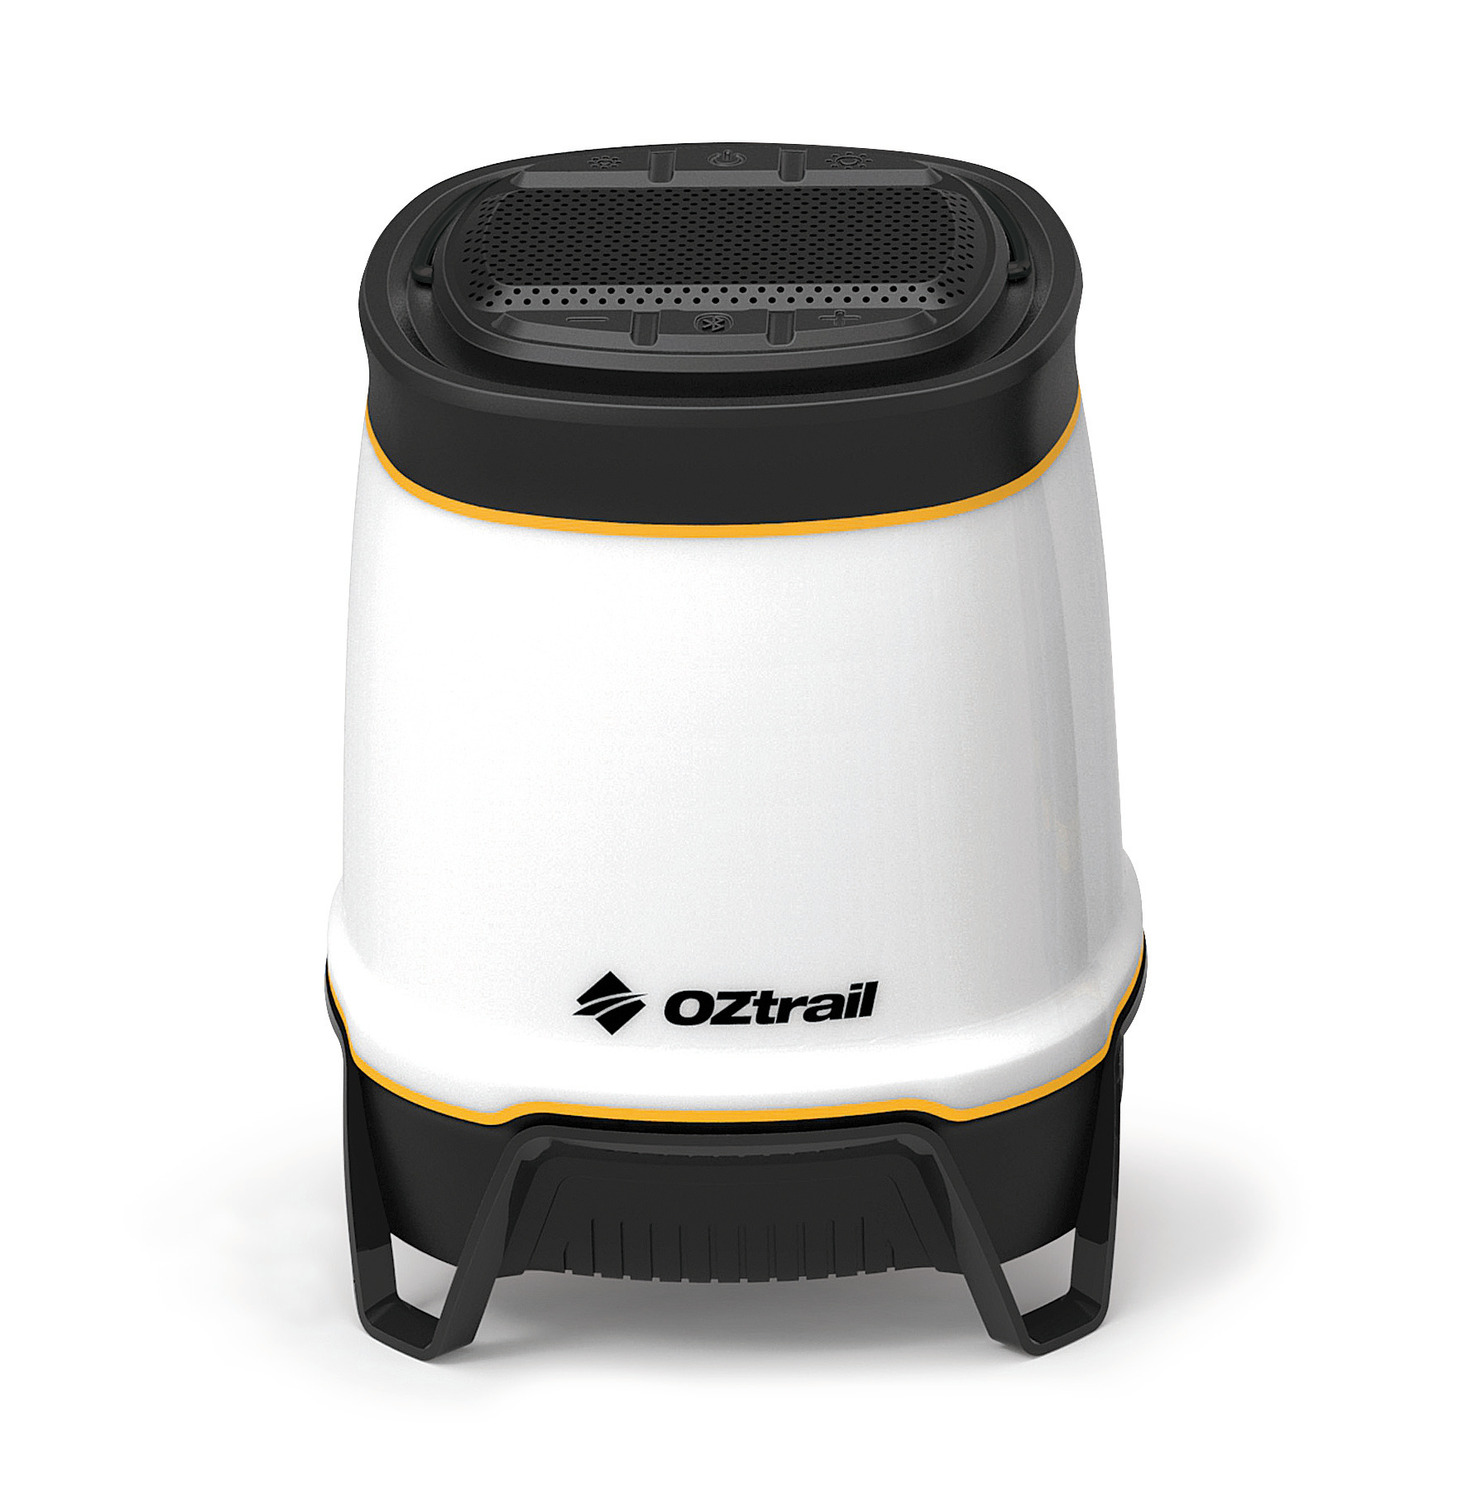
Your camp lantern is no longer just that with this new jobbie from OZtrail. The Ignite Speaker Lantern provides a hefty 1000 Lumens of bright white light, courtesy of its multiple LEDs, but it also acts as a campsite nightclub, thanks to the 3W RMS Bluetooth speaker. As well, it can be used as a powerbank, to recharge electronic devices. The recharging comes via its grunty internal 4000mAh rechargeable lithium-ion battery. OZtrail claims up to a five-hour run-time if on the highest of the five light levels, and up to 32 hours if you set it to the lowest light output. As per OZtrail gear, this thing is built to withstand around-camp treatment and has an IPX4 (splashproof) protection rating. The carry handle helps make short work of the 672g weight, and it is also easily packed in your rig, measuring only 125mm x 176mm. RRP: $120
OZTRAIL CAPE SERIES BAMBOO TABLE
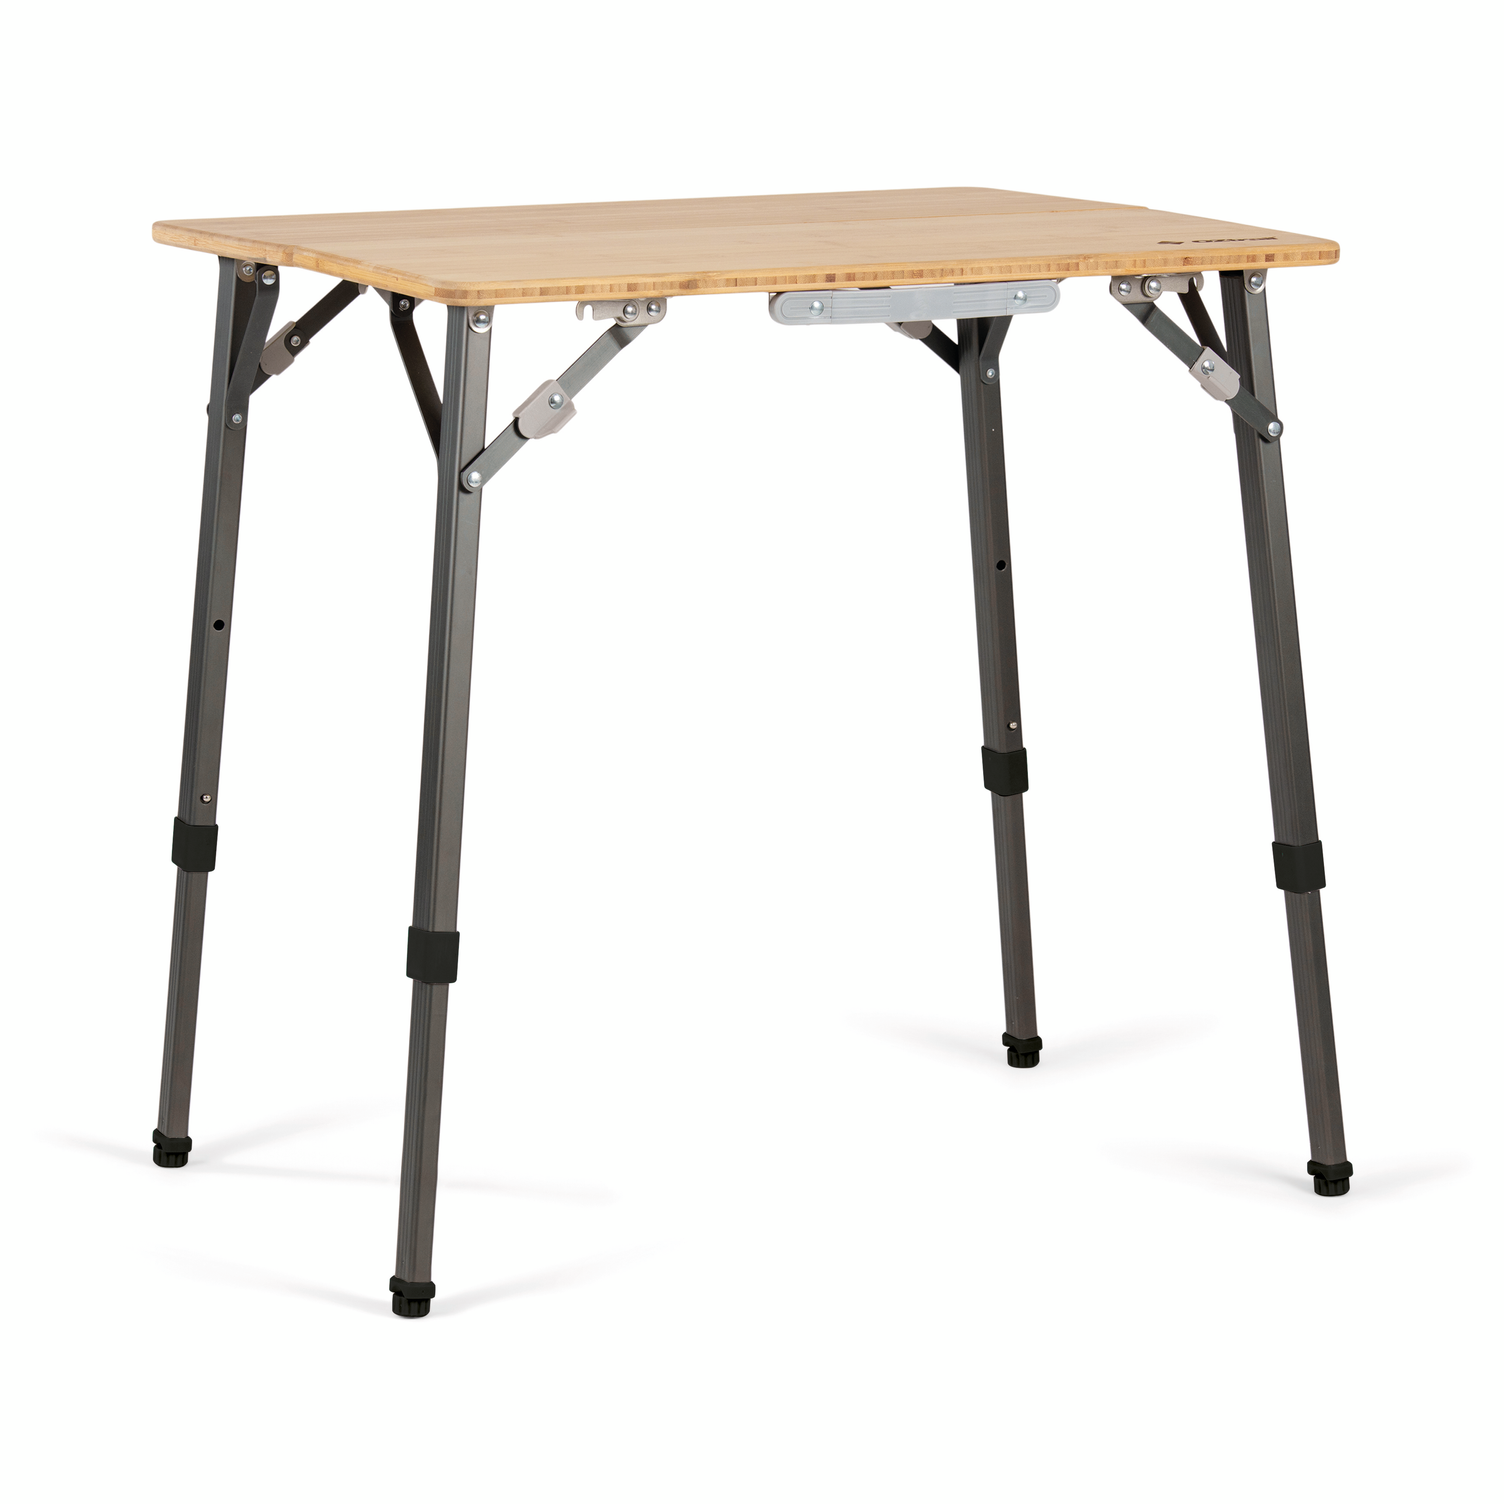
Be the envy of others at camp with this quality Cape Series bamboo table. The new Camp Series range of outdoor furniture features sustainably sourced bamboo that is weather resistant, easy to clean and environmentally friendly. This table in particular, has a lightweight aluminium frame; a two-panel design for maximum stability; adjustable legs for three table heights; adjustable feet for uneven surfaces; and leg locks with easy locking thumb tabs. The table is available in two sizes. RRP: $169.99 to $229.99
MORE INFO
COMPANION 45L TRANSIT FRIDGE
Outdoor adventure brand Companion recently released its new 45-litre Transit fridge, a lightweight and portable fridge/freezer tailor-made for camping and recreational use. The unit, constructed using tough-yet-lightweight polypropylene, features a dual-speed LG compressor, a three-stage battery monitor, strong carry handles, internal LED lighting, a digital display control panel, and AC and DC operation (240V and 12V/24V) – an AC power adaptor is included. The fridge/freezer is said to have an average power usage of 1amp per hour. It comes with a three-year warranty. RRP: $599.99
COMPANION AQUAHEAT GAS SHOWER
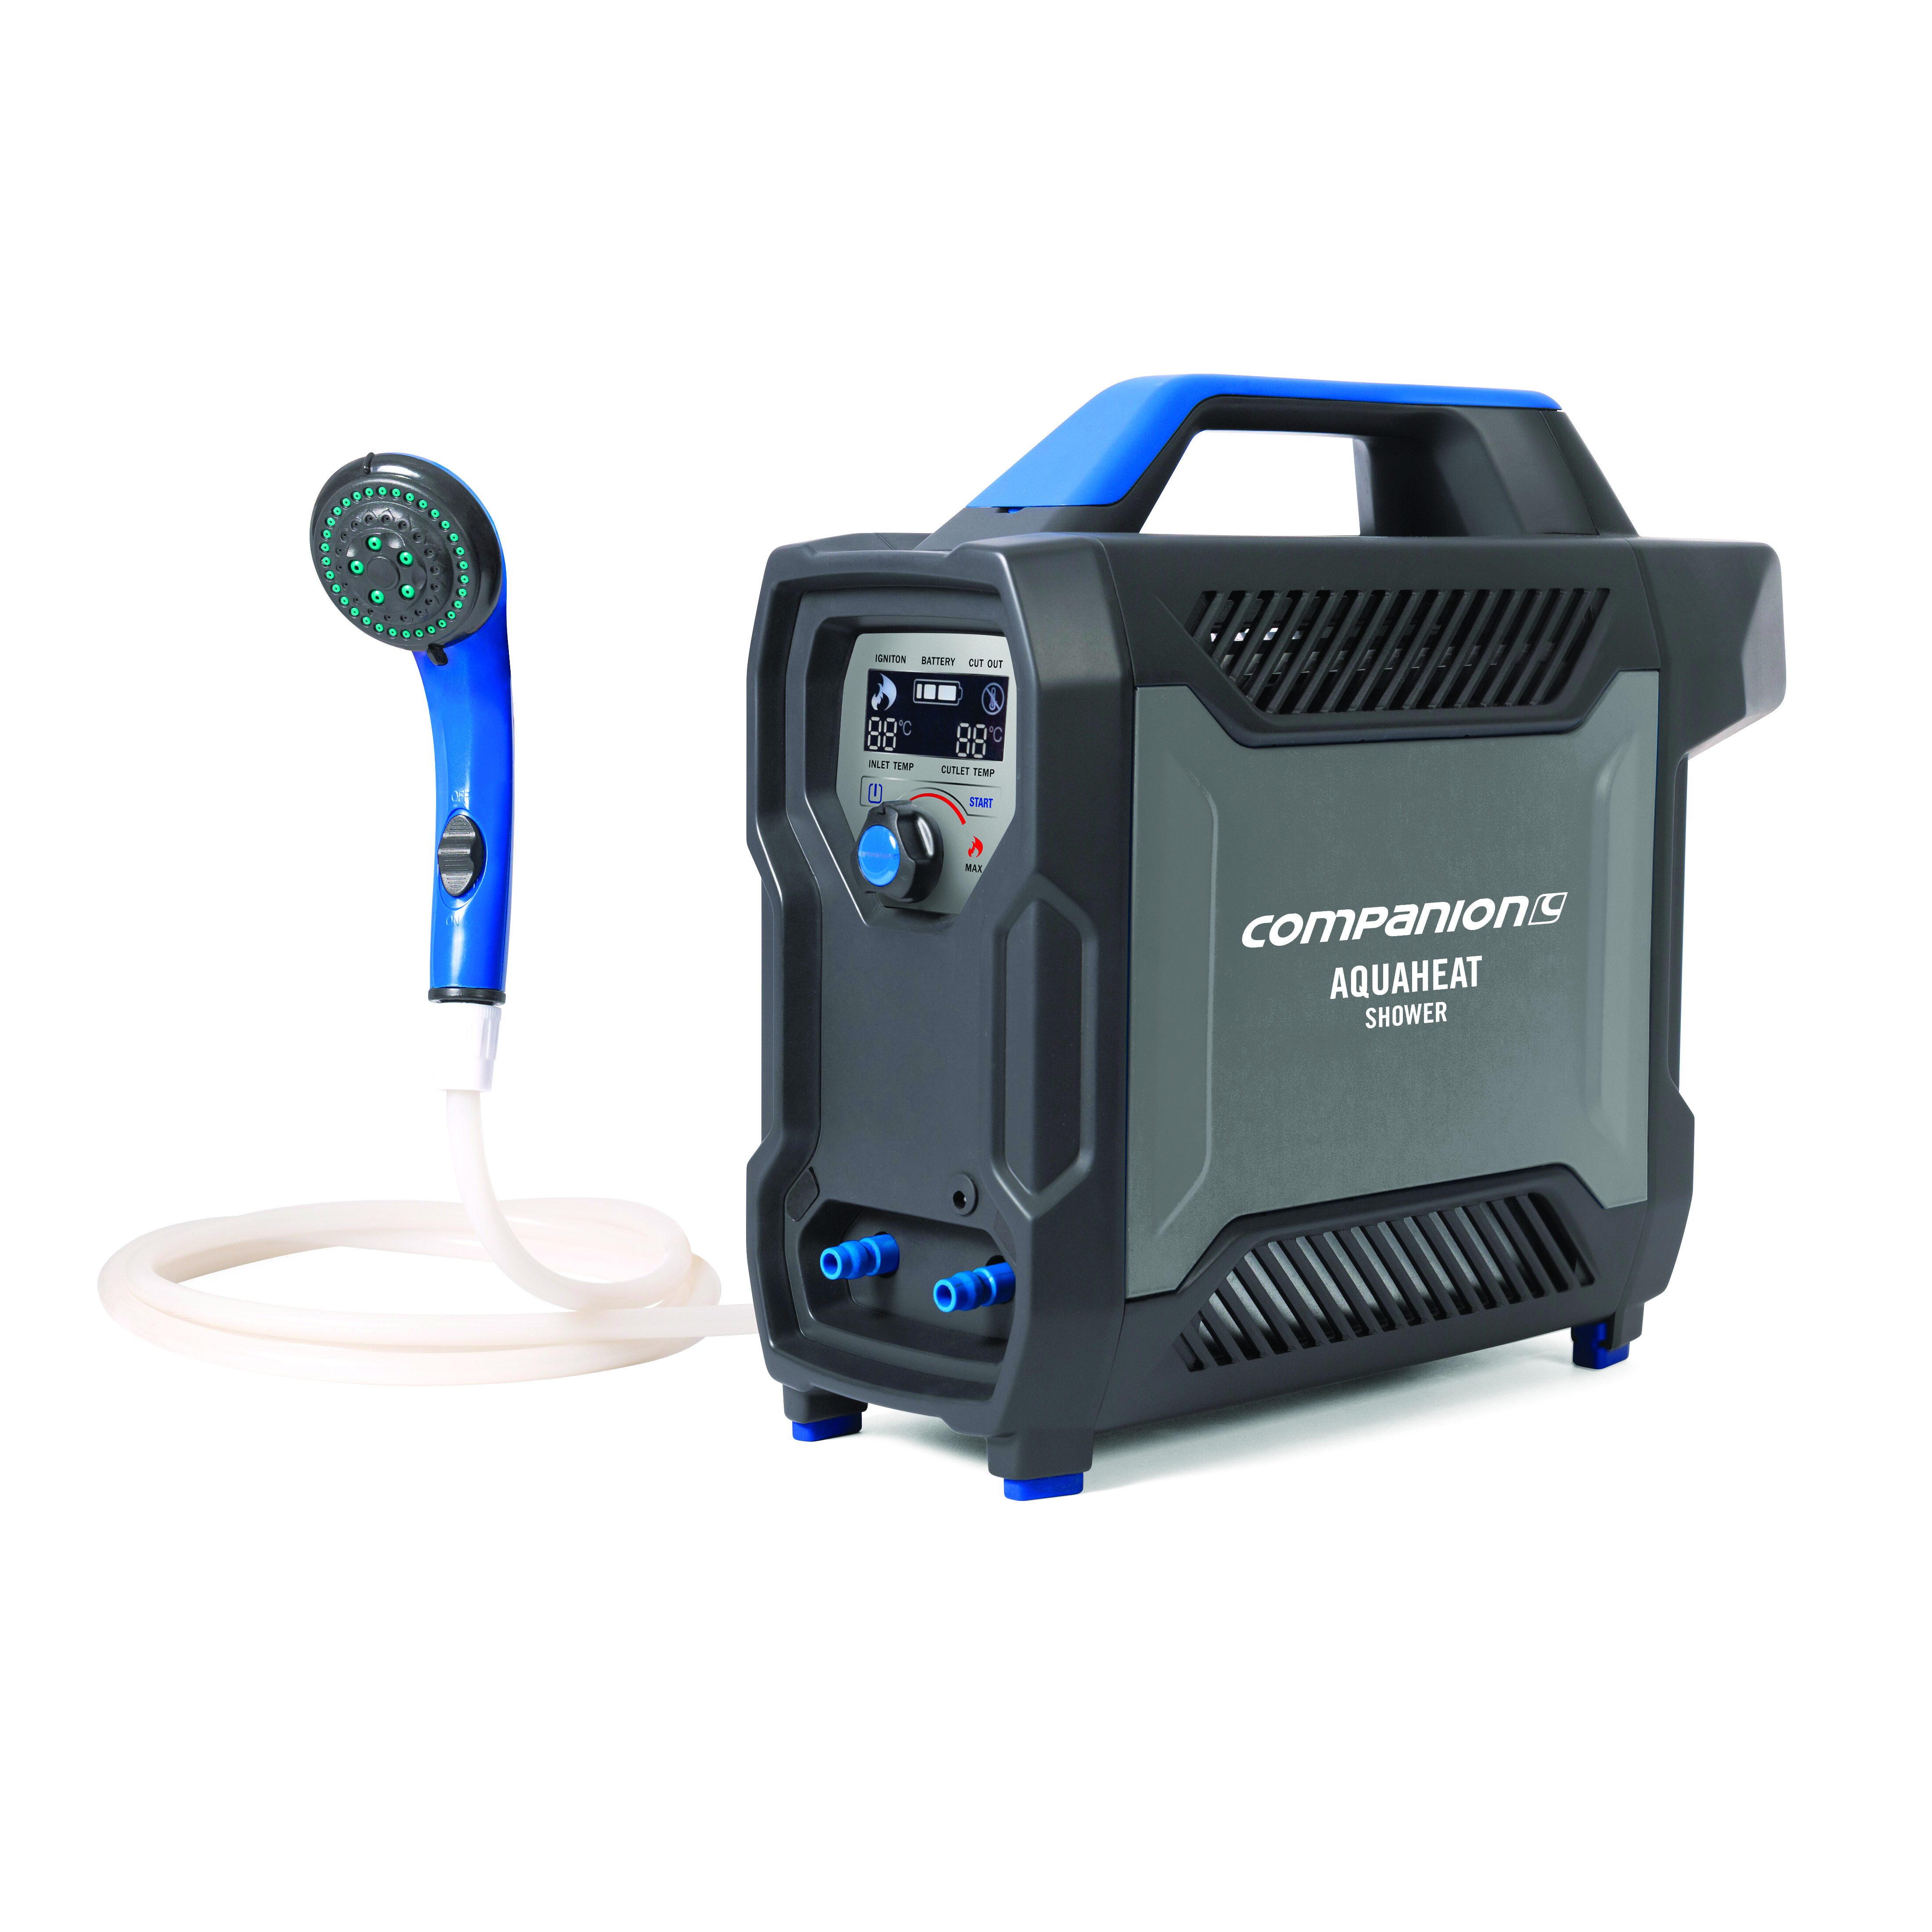
Spoil yourself with hot water anywhere, anytime, with the AquaHeat shower. The portable outdoor shower provides hot water in seconds and features an integrated rechargeable lithium battery, which can charge when the shower is in use via DC lead or AC adaptor (sold separately); a digital display control panel; a one-touch shower head control; quick-connect fittings; a built-in gas regulator with BOM connection; a Unique slimline design; and a brushless pump. RRP $524.99
COMPANION PROHEAT 2-BURNER STOVE

Aussie camp-stove specialist, Companion, has released this all-new low-profile stove for use in camper-trailer kitchens. Reflecting the brand’s knowledge of what’s required in a touring stove, this unit features a larger-than-usual cooking area, which makes using two pots at once a lot easier (and with less burnt fingers). The stove includes an impressive 18,000 total BTU output, easy heat adjustment, dual ignition, a handy LED cooking light, built-in windshields and a heavy-duty pot privet. It is bayonet-ready, and you also get a low-pressure hose and regulator. RRP: $240
COMPANION LITHIUM 75L FRIDGE/FREEZER
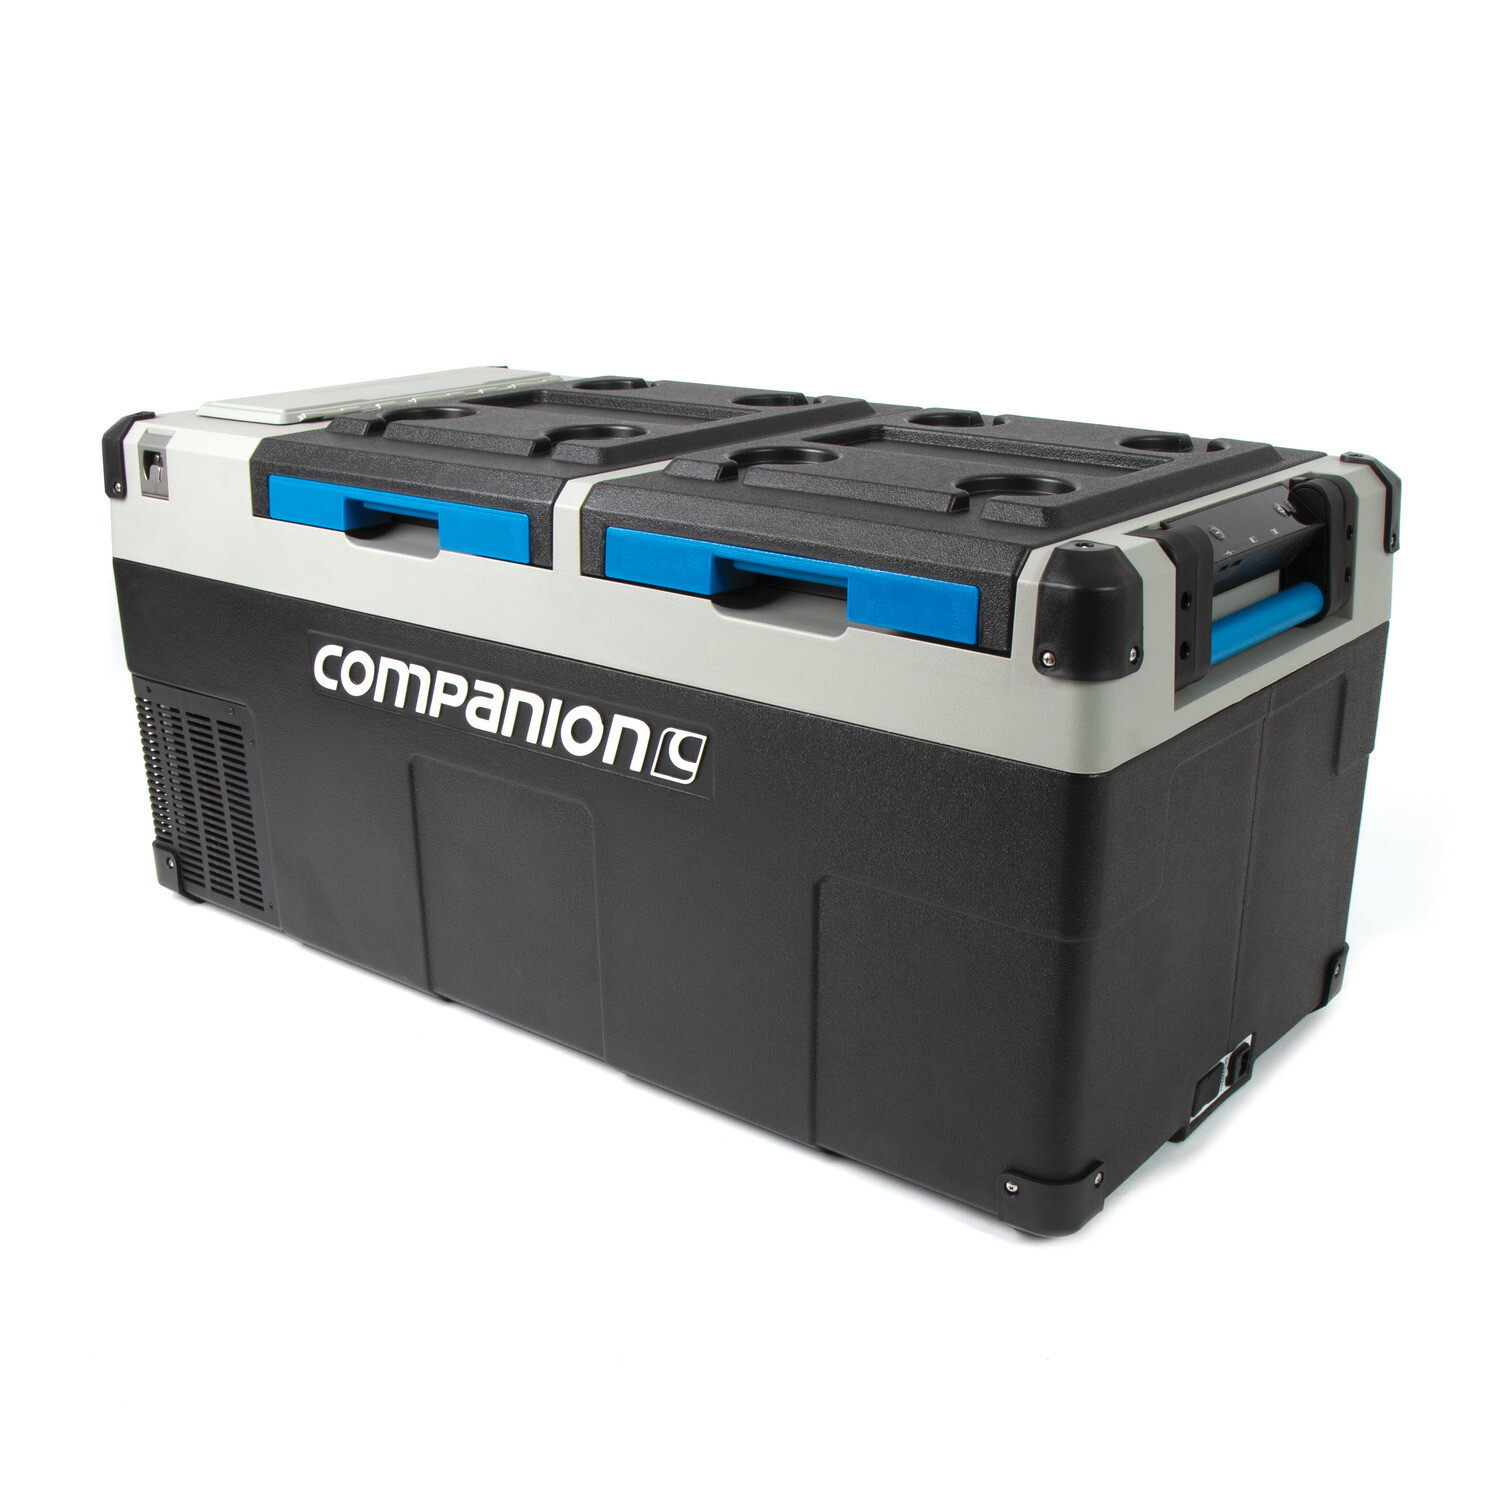
This robust unit from Companion features more than 24 hours of battery life from a single charge, thanks to its integrated/removable 12V 42amp/h lithium-ion battery. Said battery doubles as a power pack, with two USB ports. The fridge/freezer also features direct solar connections for an extended runtime; a dual-speed SECOP compressor; three-stage battery monitor; AC and DC operation (240V and 12V/24V); a digital LED display control panel; dual direction lids; internal LED lighting; and much more. The unit comes with a three-year warranty. RRP: $1779.99
CAMPFIRE 8L POTJIE POT
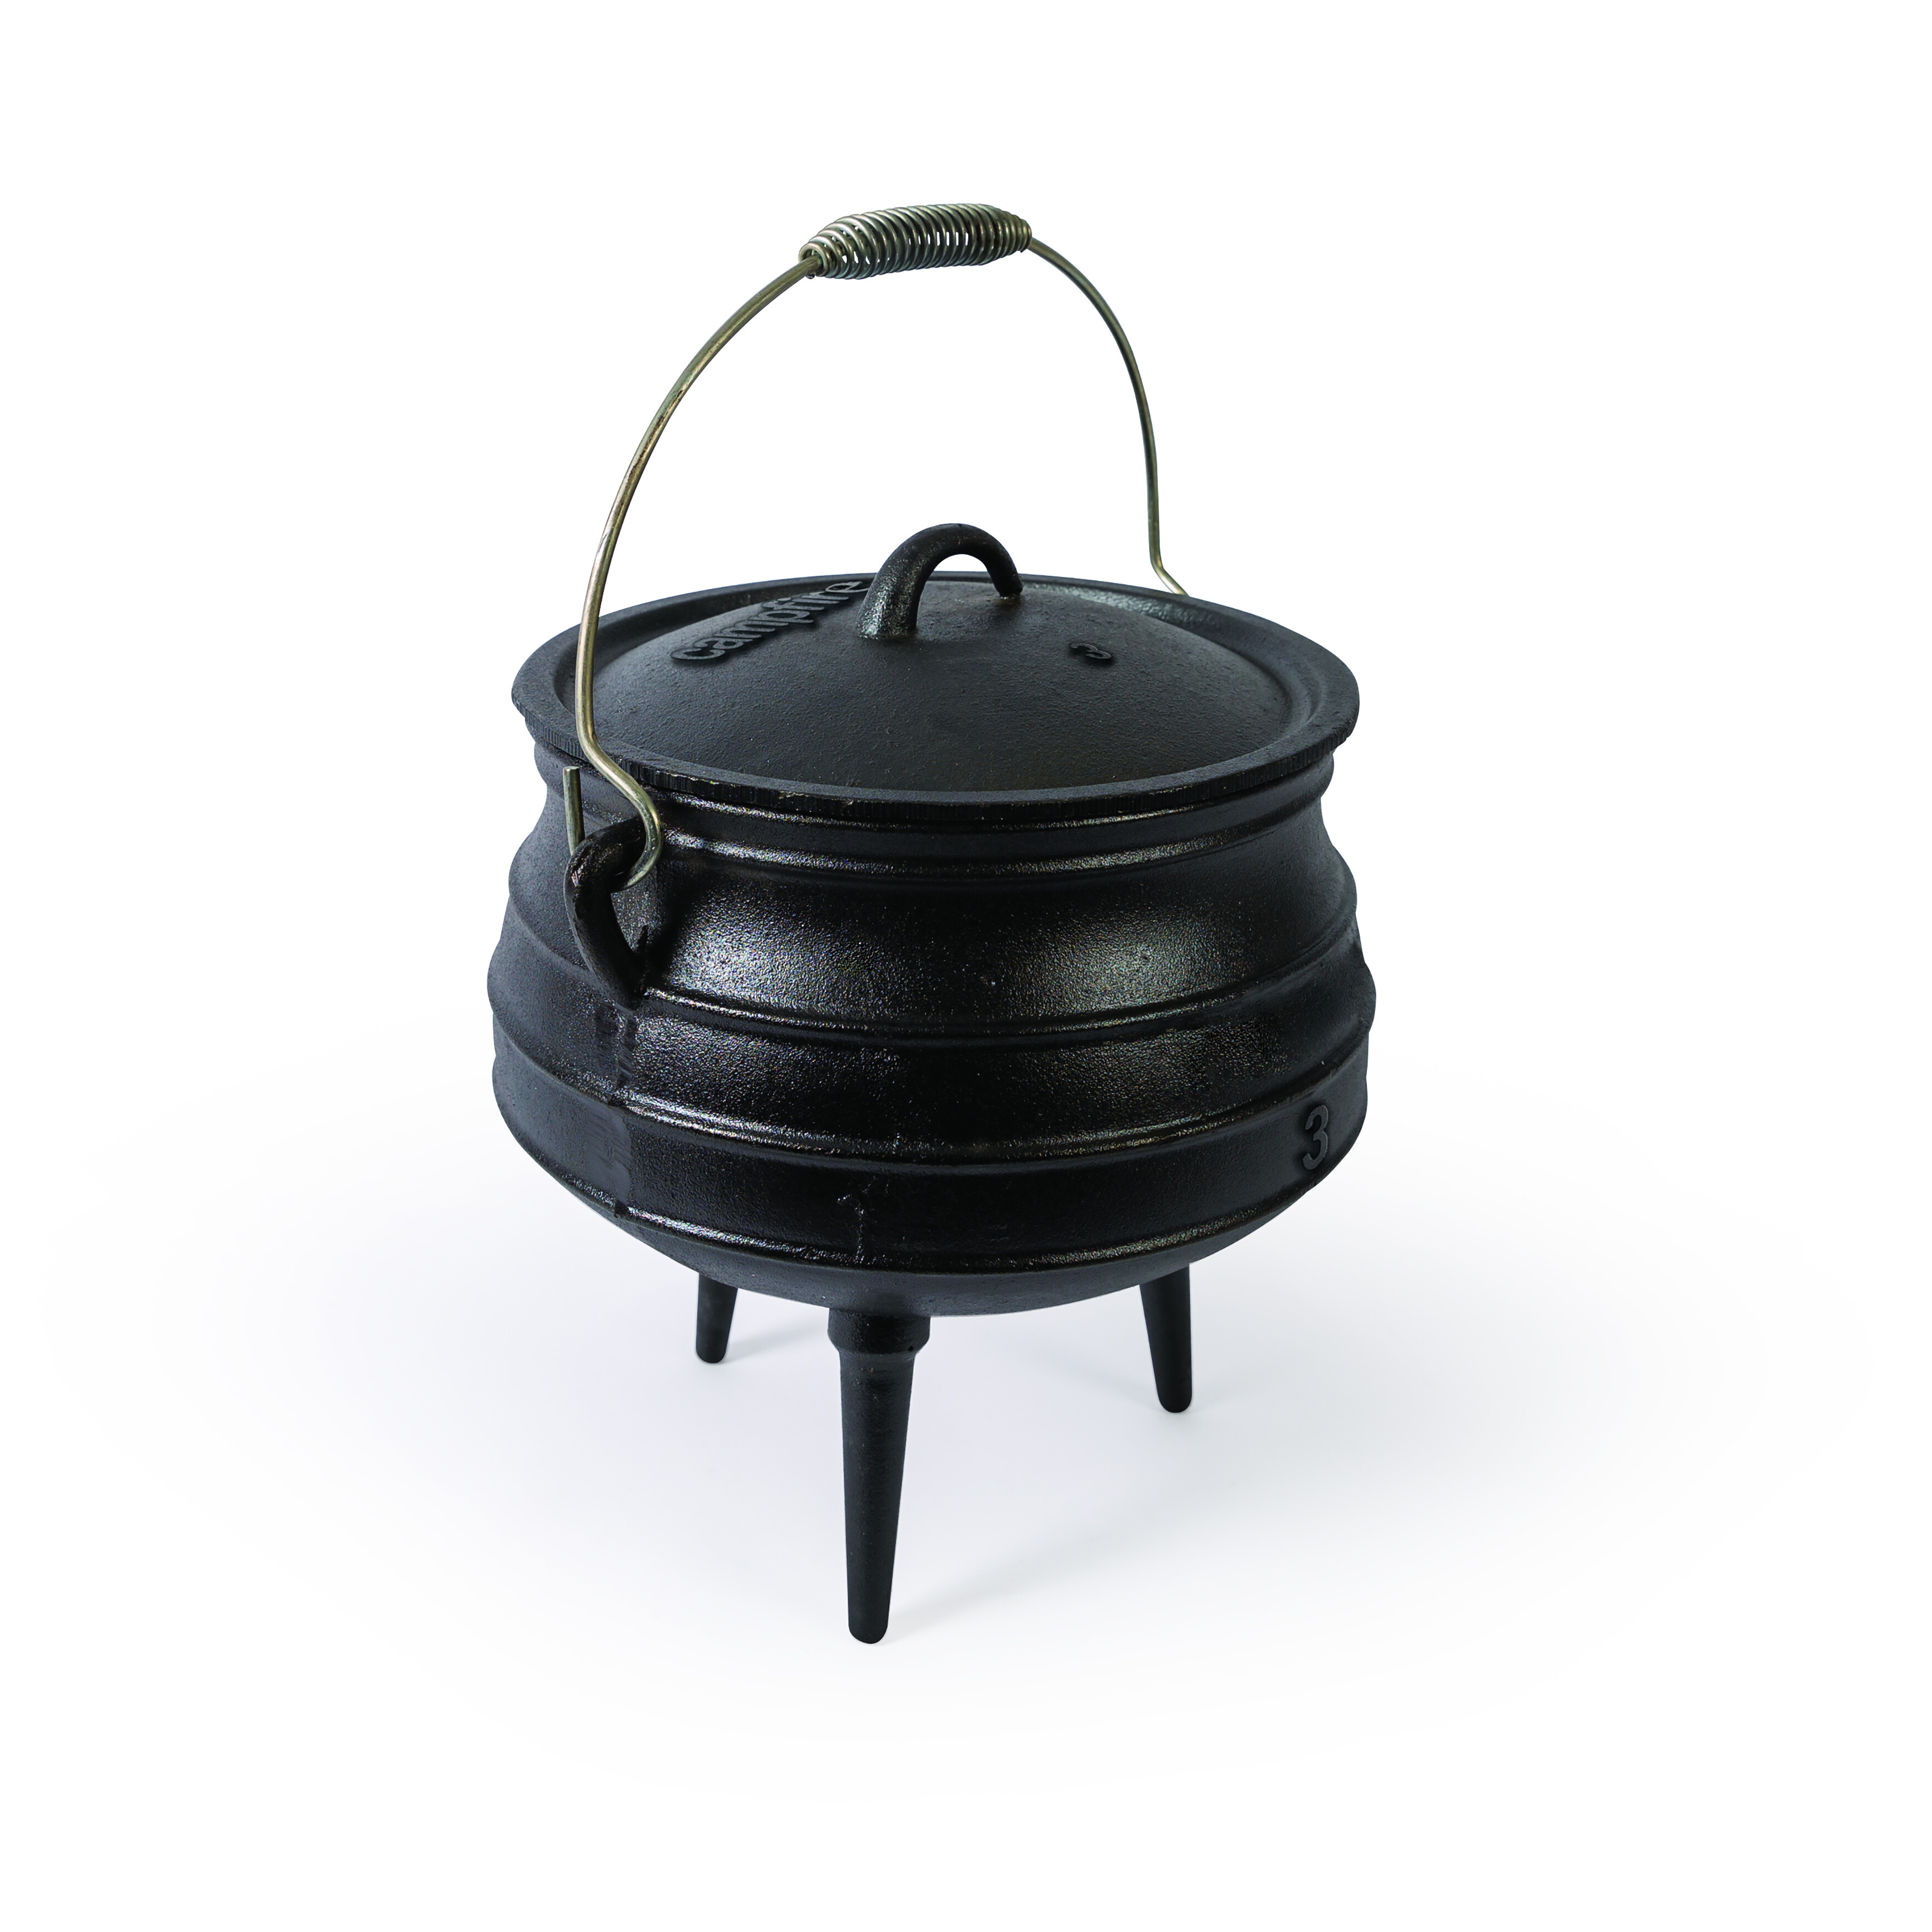
Just because you’re embarking on an off-road adventure doesn’t mean you always have to sacrifice a hearty, home-cooked meal. This 8-litre Potjie Pot is pre-seasoned and ready to use, so it’ll be kicking taste buds in to overdrive in no time. The pot features built-in cast iron legs to position in the fire coals; heavy-duty base and walls to provide even heat distribution; and a comfortable steel spiral carry handle. The pot also comes with a wooden storage box with rope carry handles for convenience. RRP: $189.99
MORE INFO
W: www.companionoutdoor.com W: www.campfirecook.com
Part 1: Woody buys an FJ40 Part 2: Minimalist outback touring
PART 1: WOODY BUYS AN FJ40
It seems being a Land Rover nut and then buying a classic LandCruiser is akin to barracking for both Carlton and Collingwood at the same time, or, if you’re into that other game, the Doggies and the Rabbitohs.
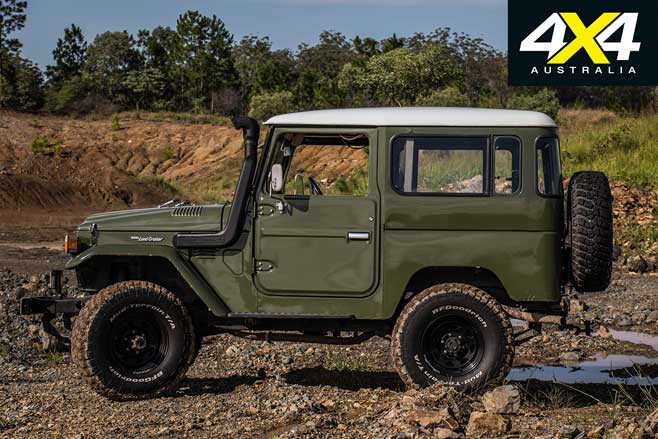
But while old Land Rovers seem to be popular with Instagram hipsters these days, I’ve always had a thing for old Toyota Land Cruisers. Growing up in the bush surrounded by them is probably the reason why, with trayback 45s and shorty 40s seeming to be on the periphery of my life for the past three or four decades. That said, I’ve never actually owned one.
Stateside, prices for old FJ Toyotas have gone nuts, but the sheer volume of Toyota tin on the ground locally has seen Aussie prices remain a little more realistic for the average enthusiast. I’ve always wanted one and have been keeping an eye on the market.
The thing is, I wanted a stock FJ, which is harder to find than you may think. I’d noticed really good examples were getting hard to find and had some pretty serious asking prices. Everything else with a realistic price tag was deep in the heart of project territory.
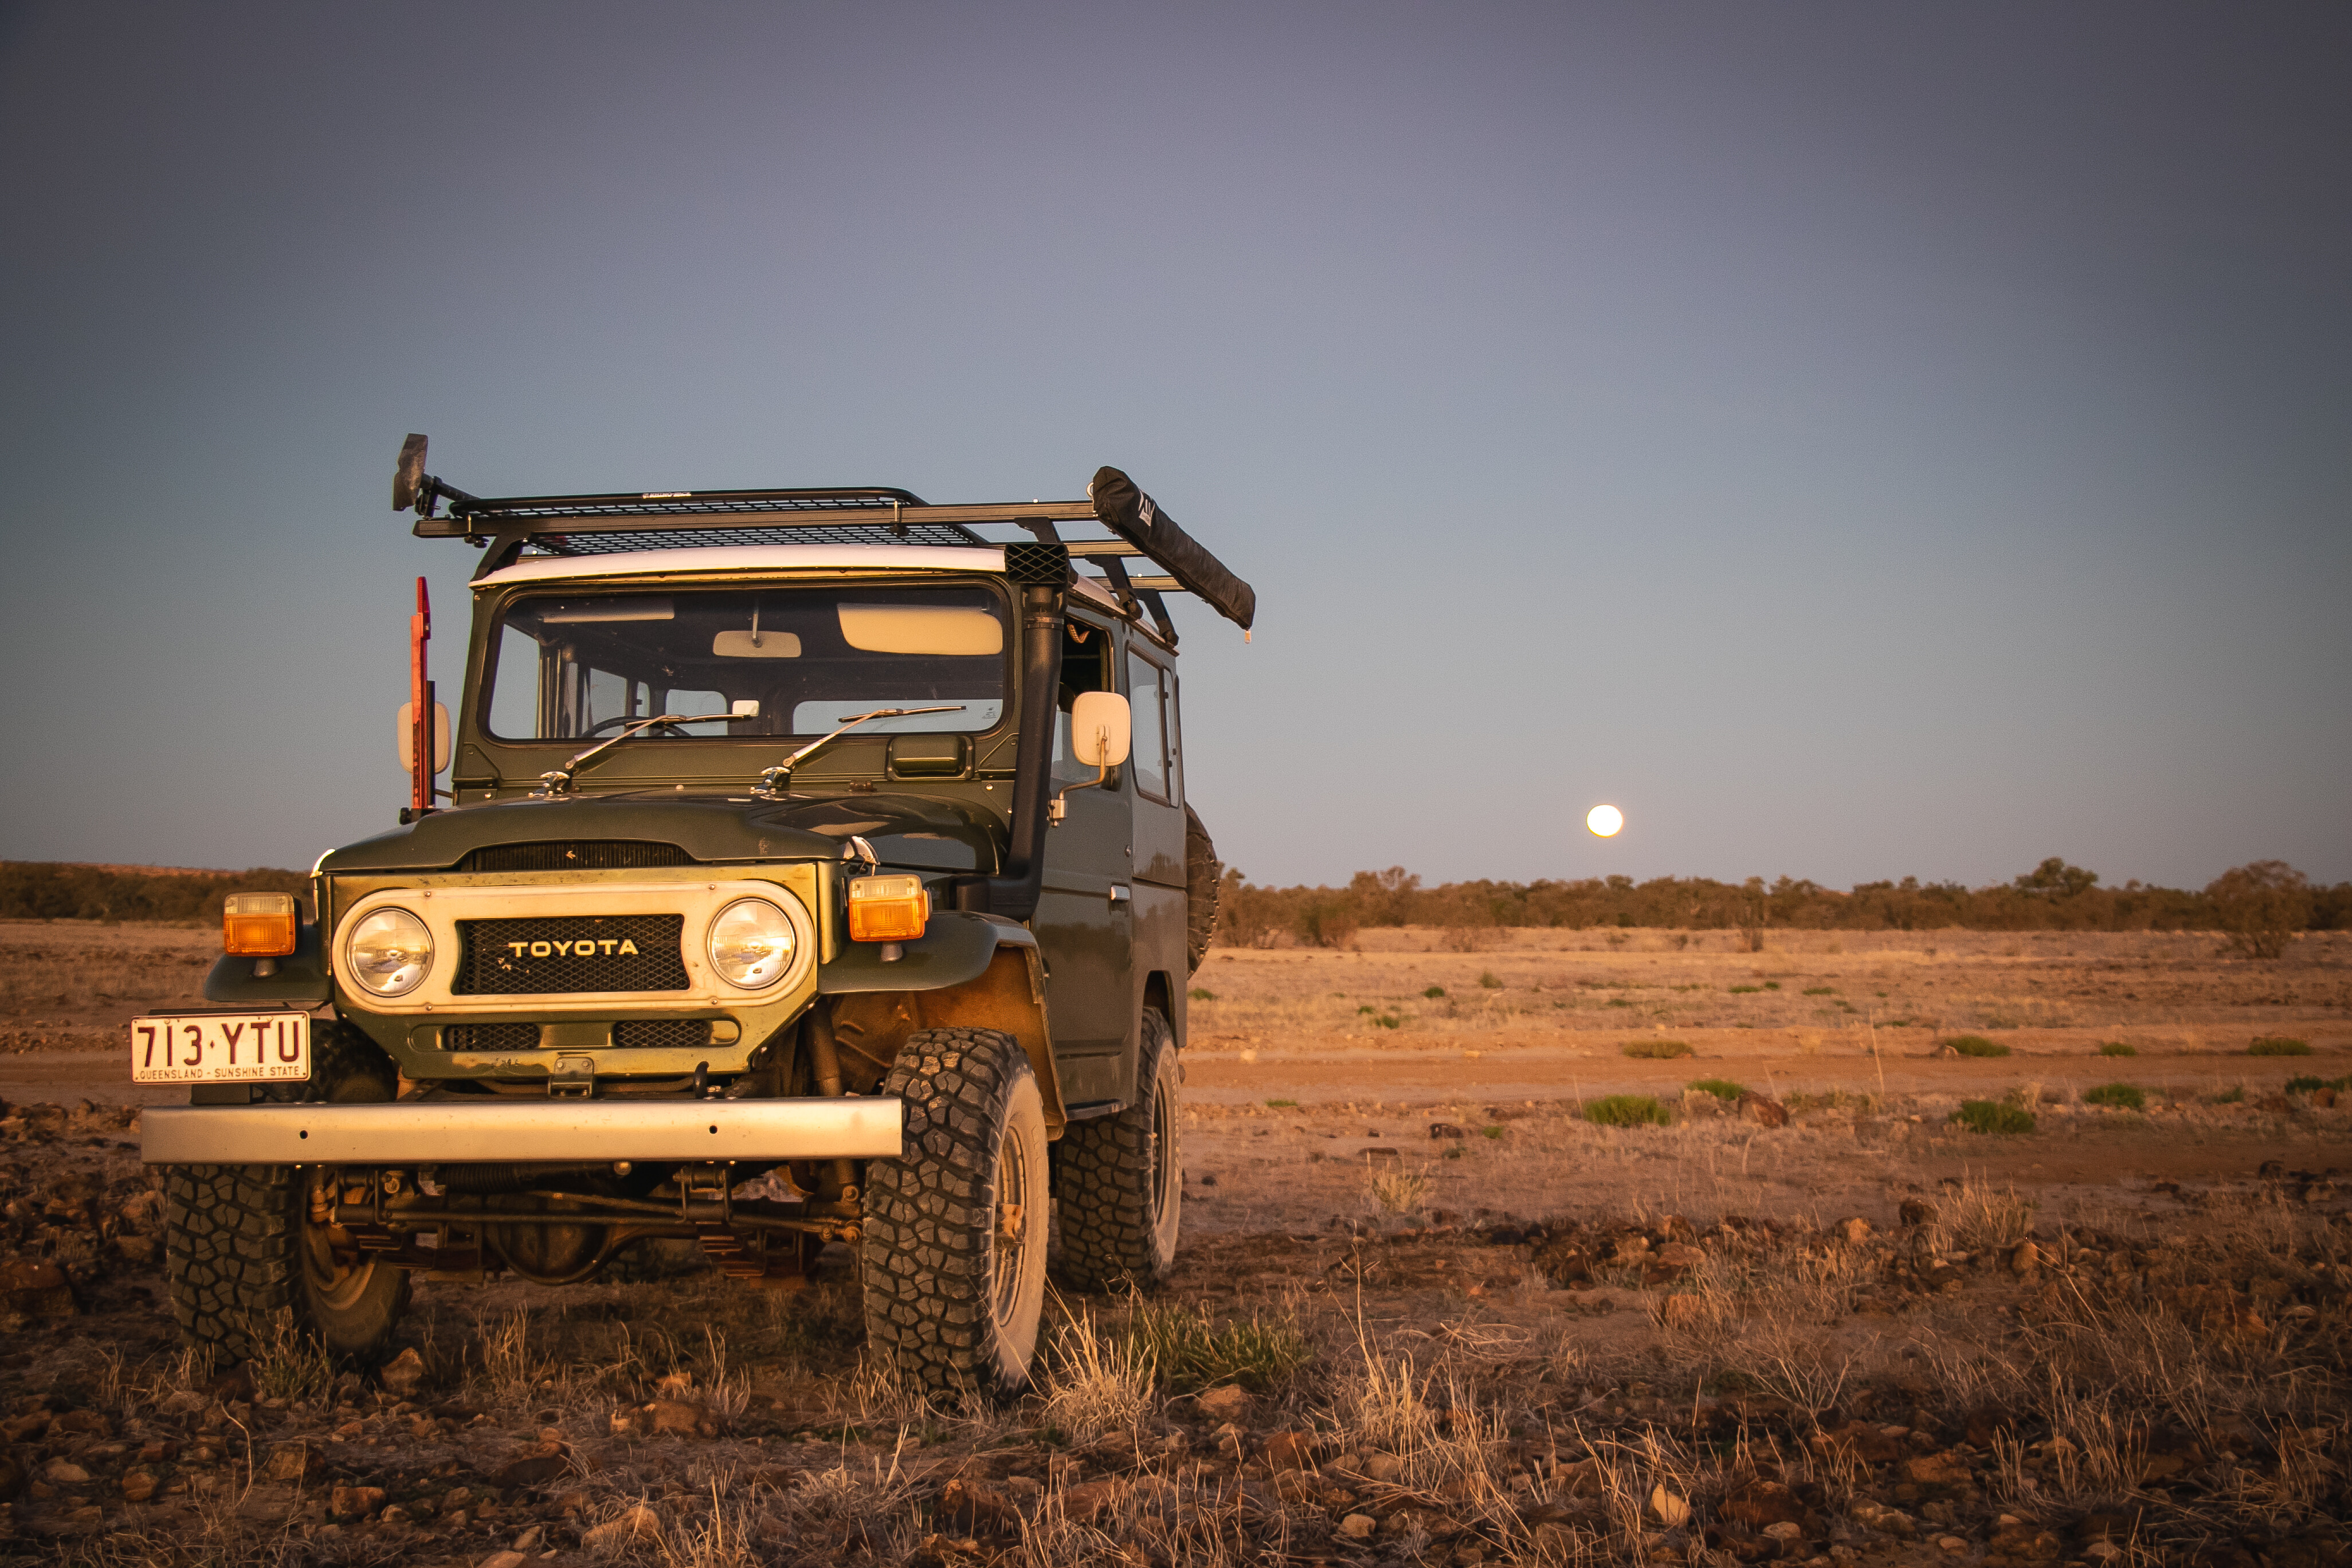
After a couple of false starts – which nearly saw me buy a diesel Series 1 Land Rover and a late-70s F100 4×4 with a period-correct motorhome installed on its chassis – the FJ40 you see on these pages appeared on my internet browser.
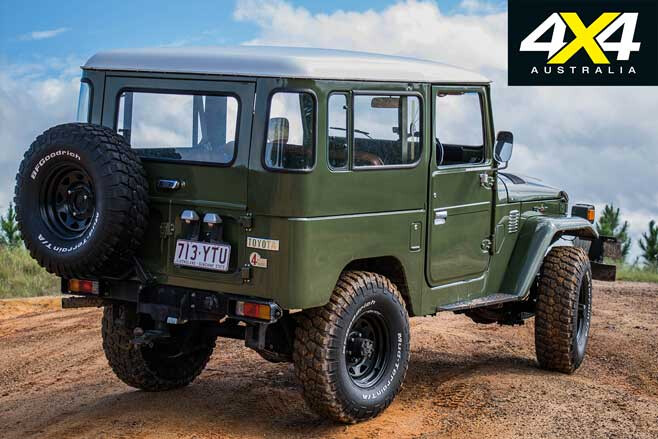
The young bloke I bought it off couldn’t tell me anything about its history, as he’d only owned it for 18 months. To me it looked like an older resto that was never quite finished, but, importantly, it wasn’t rusty or full of bog. It was presentable and I loved the FJ Cruiser Army Green hue, so I managed to negotiate quite a few grand off the hefty asking price and the deal was done.
Getting it on the road required a few minor bits and bobs like bulbs and lenses, an exhaust repair and new wheel cylinders. This truck originally had drum brakes all around, but somewhere along the line someone has thrown later model disc brakes on the front.
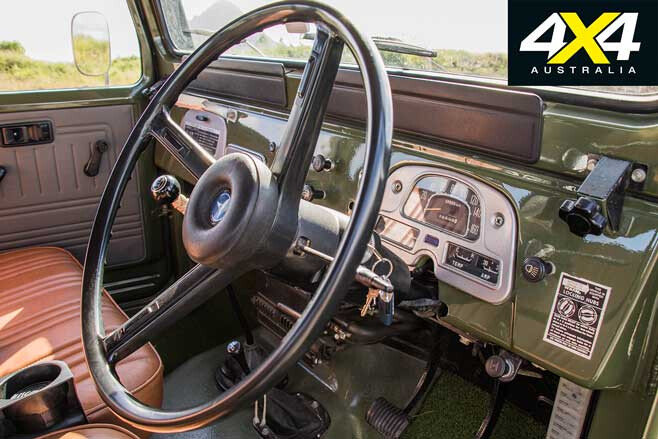
As luck would have it, I have an FJ Toyota guru about one kilometre from my house. Ray Saggal at Hendra Motors, Queensland, is an FJ nut, a bloody good mechanic and, as it turns out, a really nice bloke. Ray handled the brake work and, while we were at it, an electronic ignition was installed.
So now I get to bob along on my cart-sprung Shorty, constantly twitching the wheel to compensate for all the bendy bits and linkages that make up the FJ’s “unique” road-holding equipment. I’d say I’m doing so with a grin, but the smile usually only lasts until the next servo – that 4.2-litre 2F petrol engine may be tough, torquey and reliable, but it drinks like an old-school motoring journo.
If I’m to take this old banger any distance in the future, I reckon a long-range fuel tank may be on the cards. In the meantime, I’ll need to look at finishing off the interior and installing some sound deadening, because those 33-inch BFG muddies make this thing bloody loud.
I do plan to get it dirty, just carefully dirty. I’ve found there’s something quite stressful about taking a restored 4×4 off-road. So, for the most part it’s a mall crawler. That said, this truck attracts commentary wherever it goes; like so many classic cars, everyone seems to have an FJ Land Cruiser story. I get the feeling that this one’s a keeper. The garage is full, but I did see an awesome FJ55 the other day…
PART 2: MINIMALIST OUTBACK TOURING
Having nice things and being allowed out to use them isn’t something any of us can really take for granted at the moment.
Thankfully a window of opportunity presented itself recently, and both myself and my saintly wife threw some gear in to the shorty and bolted west for an outback adventure. Why saintly, you may ask? She not only tolerated nearly 4000km of outback travel in a short wheelbase, leaf-sprung tin can, she reckons she actually had fun.
You may point out that surely my diesel Perentie was the smarter option for eating outback miles, but until I tackle the high-range issues in the LT95, the little ’Yota is our only bush-driving option.
Anyone who owns a classic car will be familiar with the conversations they generate when you’re out and about. So, you can imagine the amount of old Toyota anecdotes I was assailed with in Western Queensland, from old ringers to former railways workers to other travellers lamenting that they’d sold theirs years ago.
As my significant other hails from the UK, she’s never really seen much of outback Australia, so my plan was to head west out of Brisbane in to the channel country, up through Diamantina Lakes National Park and … er … make the rest up from there.
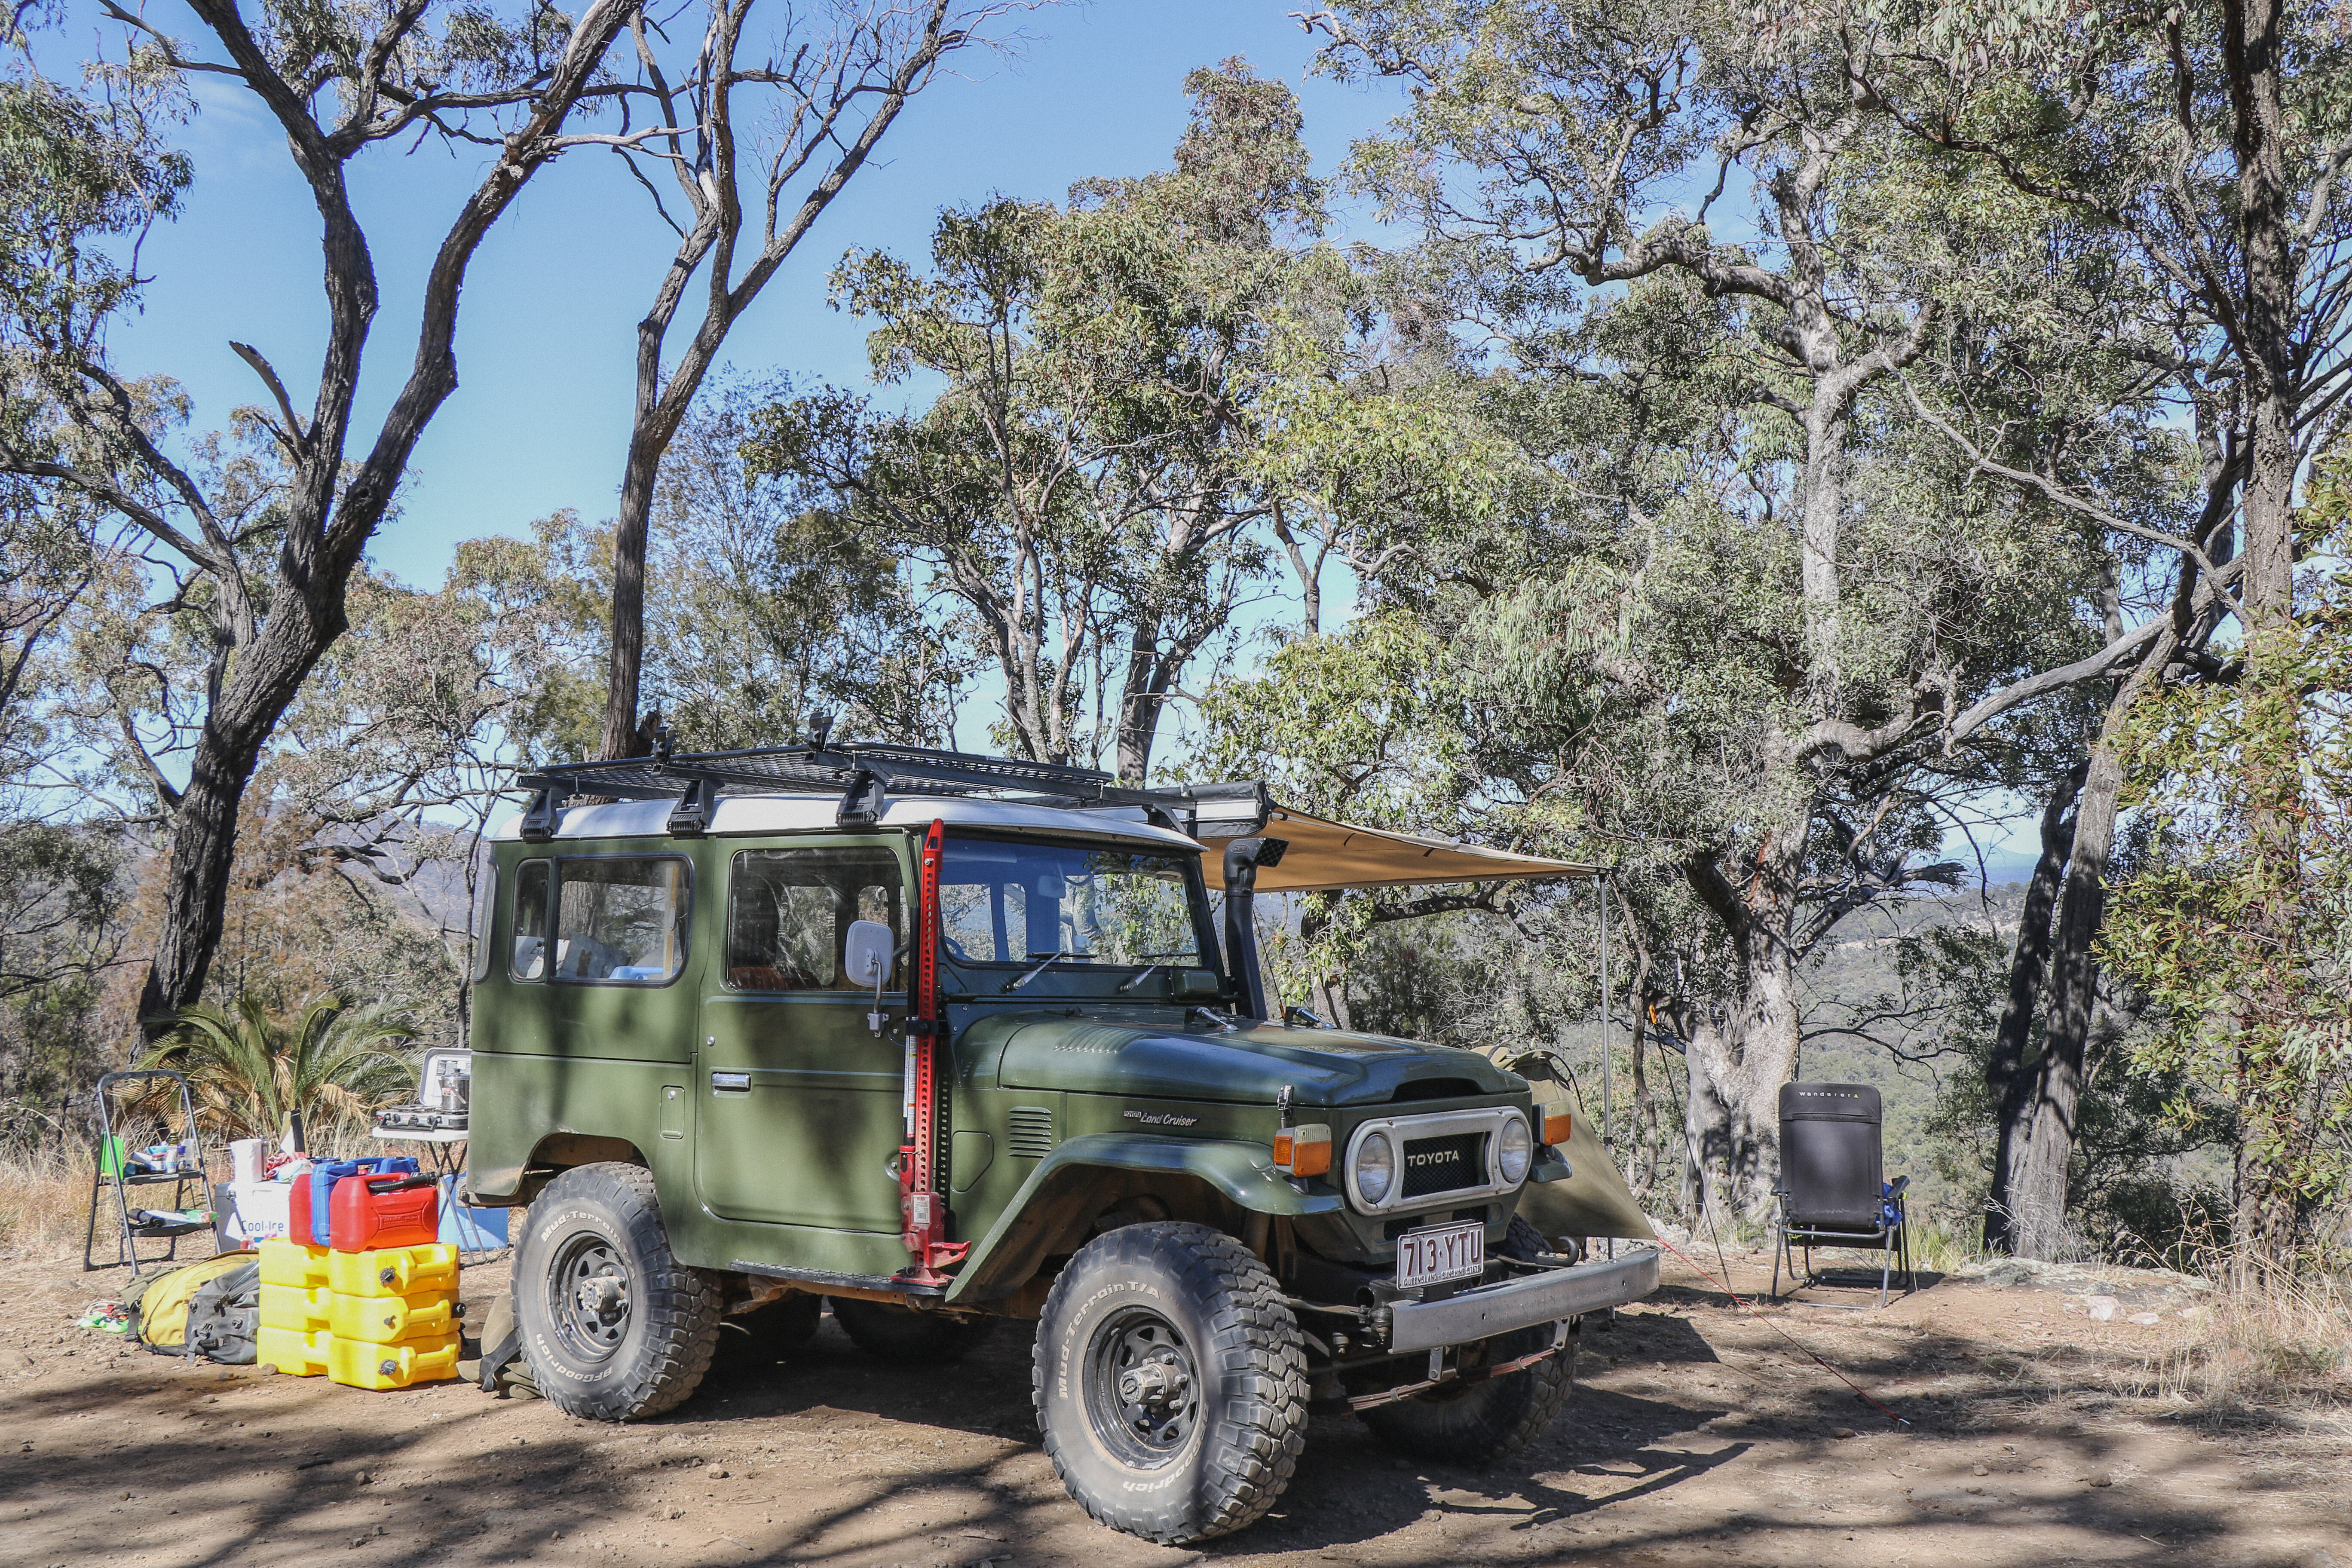
But as anyone who owns a short-wheelbase 4×4 will tell you, setting up for an extended trip can make packing seem like an extreme sport. I’m not a huge fan of new-style roof racks on old cars, but practicality had to kick in at some stage. It also made fitting an awning possible and gave a spot to stash the swag.
The 2F-powered FJ also provided other challenges in the range and storage department. Being pretty much stock, the shorty is only equipped with a 60-litre under-seat fuel tank.
With the 4×4 accessories industry being flat knacker at the moment, picking up an aftermarket long-range tank wasn’t going to happen in my desired time frame. I ended up dependent on way too many jerry cans, which, unfortunately, all ended up on the roof rack, which isn’t great for vehicle dynamics on- or off-road.
A new water pump and stainless-steel exhaust system were fitted before hitting the road. I also gave the old girl a grease, oil change and a good check over before turning a wheel.
After a few days on the road in a SWB, you get in to a rhythm of unpacking and setting up. It really is amazing just how much you can fit in if you need to.
The sense of being remote didn’t hit us until we were trundling across Davenport Downs Station, as the cattle-specked horizon shimmered in the gibber plain heat haze. The Hunter Gorge campsite on the Diamantina is a great (if busy) spot to roll out the swag for a couple of days when there’s water in the system. The abundant birdlife wheels and dives against the backdrop of the Goyder and Hamilton ranges.
The shorty developed a misfire, which turned out to be as simple as a loose plug lead. After a visit to Boulia (and showers) we turned east and slowly wound our way towards a part of Queensland I’d never explored, the Central Highlands. The road from Injune to Mt Moffatt (Carnarvon National Park) is okay and sealed for about 100 or so kays, but quickly turns to an unsealed, rutted mess that had us crawling along in places.
The 4×4-only access track that leads to the Top Rotary campsite saw me lose a jerry can off the roof at one stage, but when you reach the site it provides stunning views south across the Great Dividing Range. It’s one of the best sites I’ve stayed at. The day-use lookout area above is accessed by a pretty gnarly climb that requires some commitment to scale in an old banger like mine; but once you get there, you have an awesome northern vantage point back towards Carnarvon Gorge.
While packing and unpacking requires a little time and effort, there’s something quite rewarding about travelling simply. A 50-litre fridge and an AGM-equipped battery box were our only real mod cons. There’s a freedom to just rolling out a swag, lighting a fire and cooking a roast on a shovel.
The Cruiser unsurprisingly did what Cruisers do; reliably, simply and maybe lacking a little finesse. Also unsurprisingly it used a lot of fuel, a fuel average of 27L/100km, with a highway cruising speed of 85km/h. A long-range fuel tank is most definitely in our future!
Total kilometres: 88,806km Date acquired: July 2020 Price (as tested): $18,500 Kilometres since last update: 3851km Average fuel use: 27L/100km
Excessive. It’s an interesting concept. In a land with thousands of different styles of 4x4s between the two coasts – dream builds that range from $5K Sierras with swags thrown in the back, to $200,000 Rams with carbon-composite canopies – every individual’s idea of excessive is going to be different.
The one thing we can all agree on, though, is it’s pushing the boundaries of the way things can and should be done. A bit bigger tyres, a bit more power, a bit more time painstakingly managing cables to make a dual-battery install. Excessive.
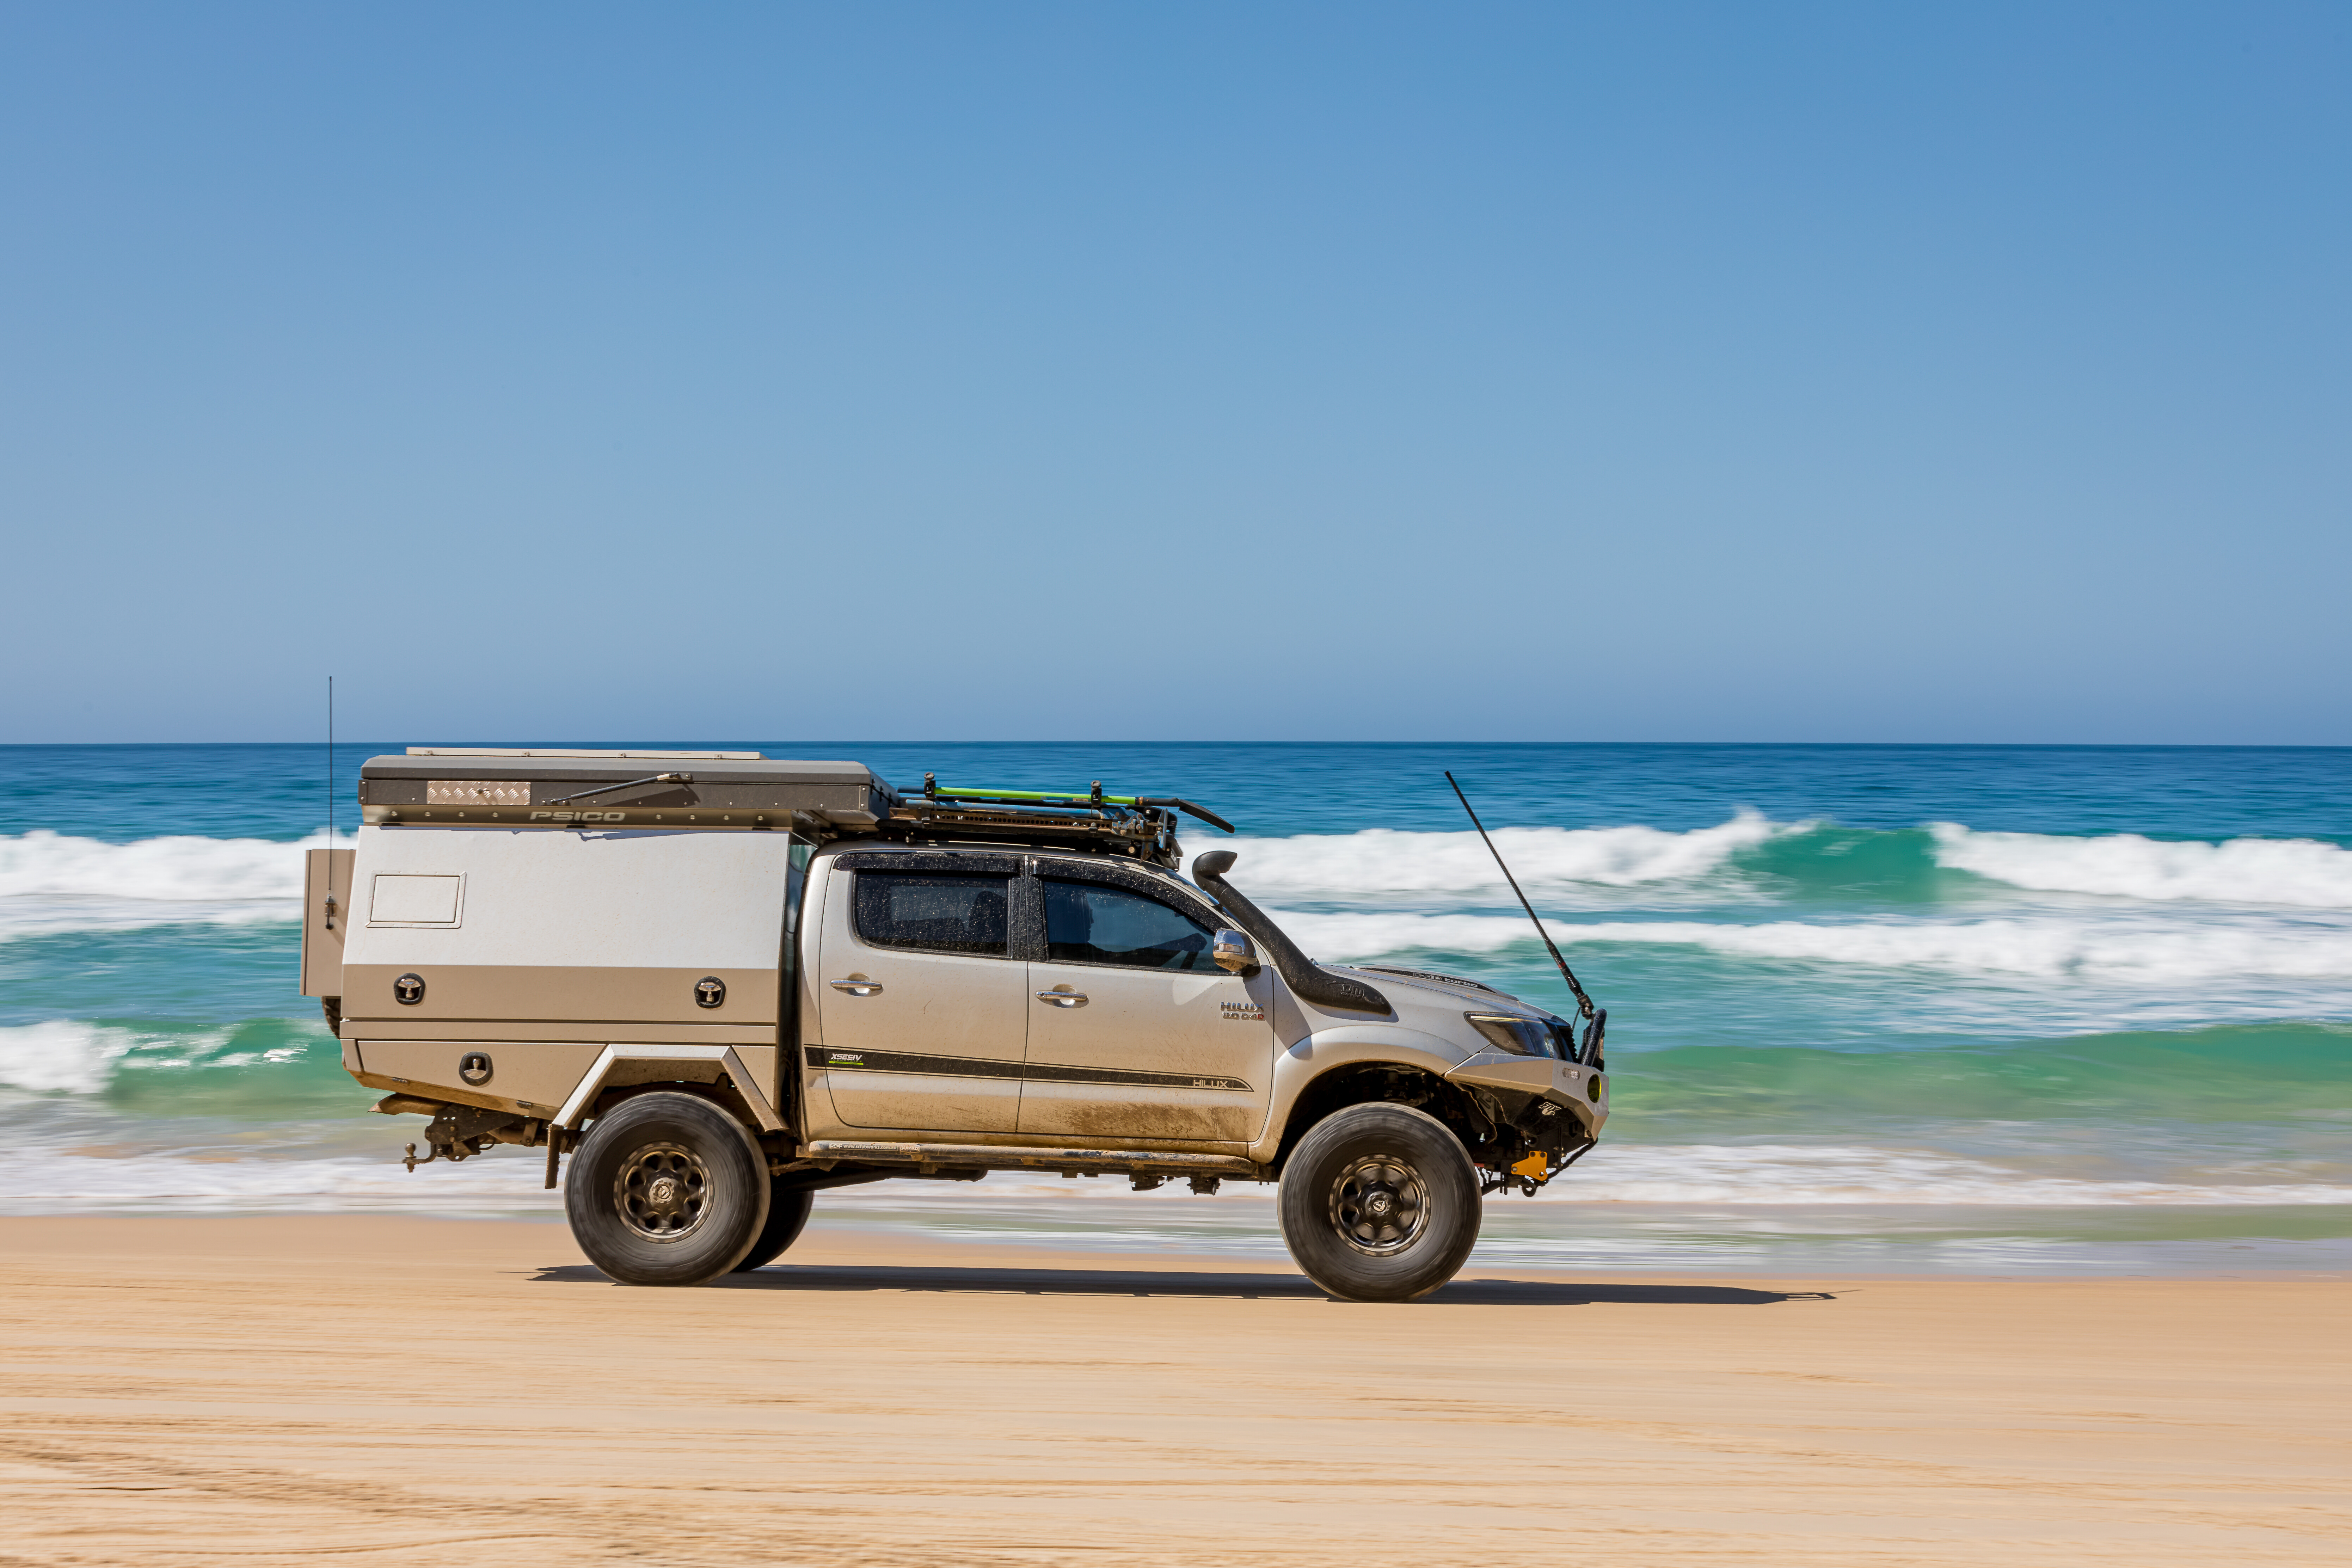
The 2014 SR5 Toyota Hilux you’re looking at now is one man’s idea of excessive. A concept pushed to the nth degree with painstaking attention to detail; making a vehicle his own personal work of art, where every cable clip is something to be proud of.
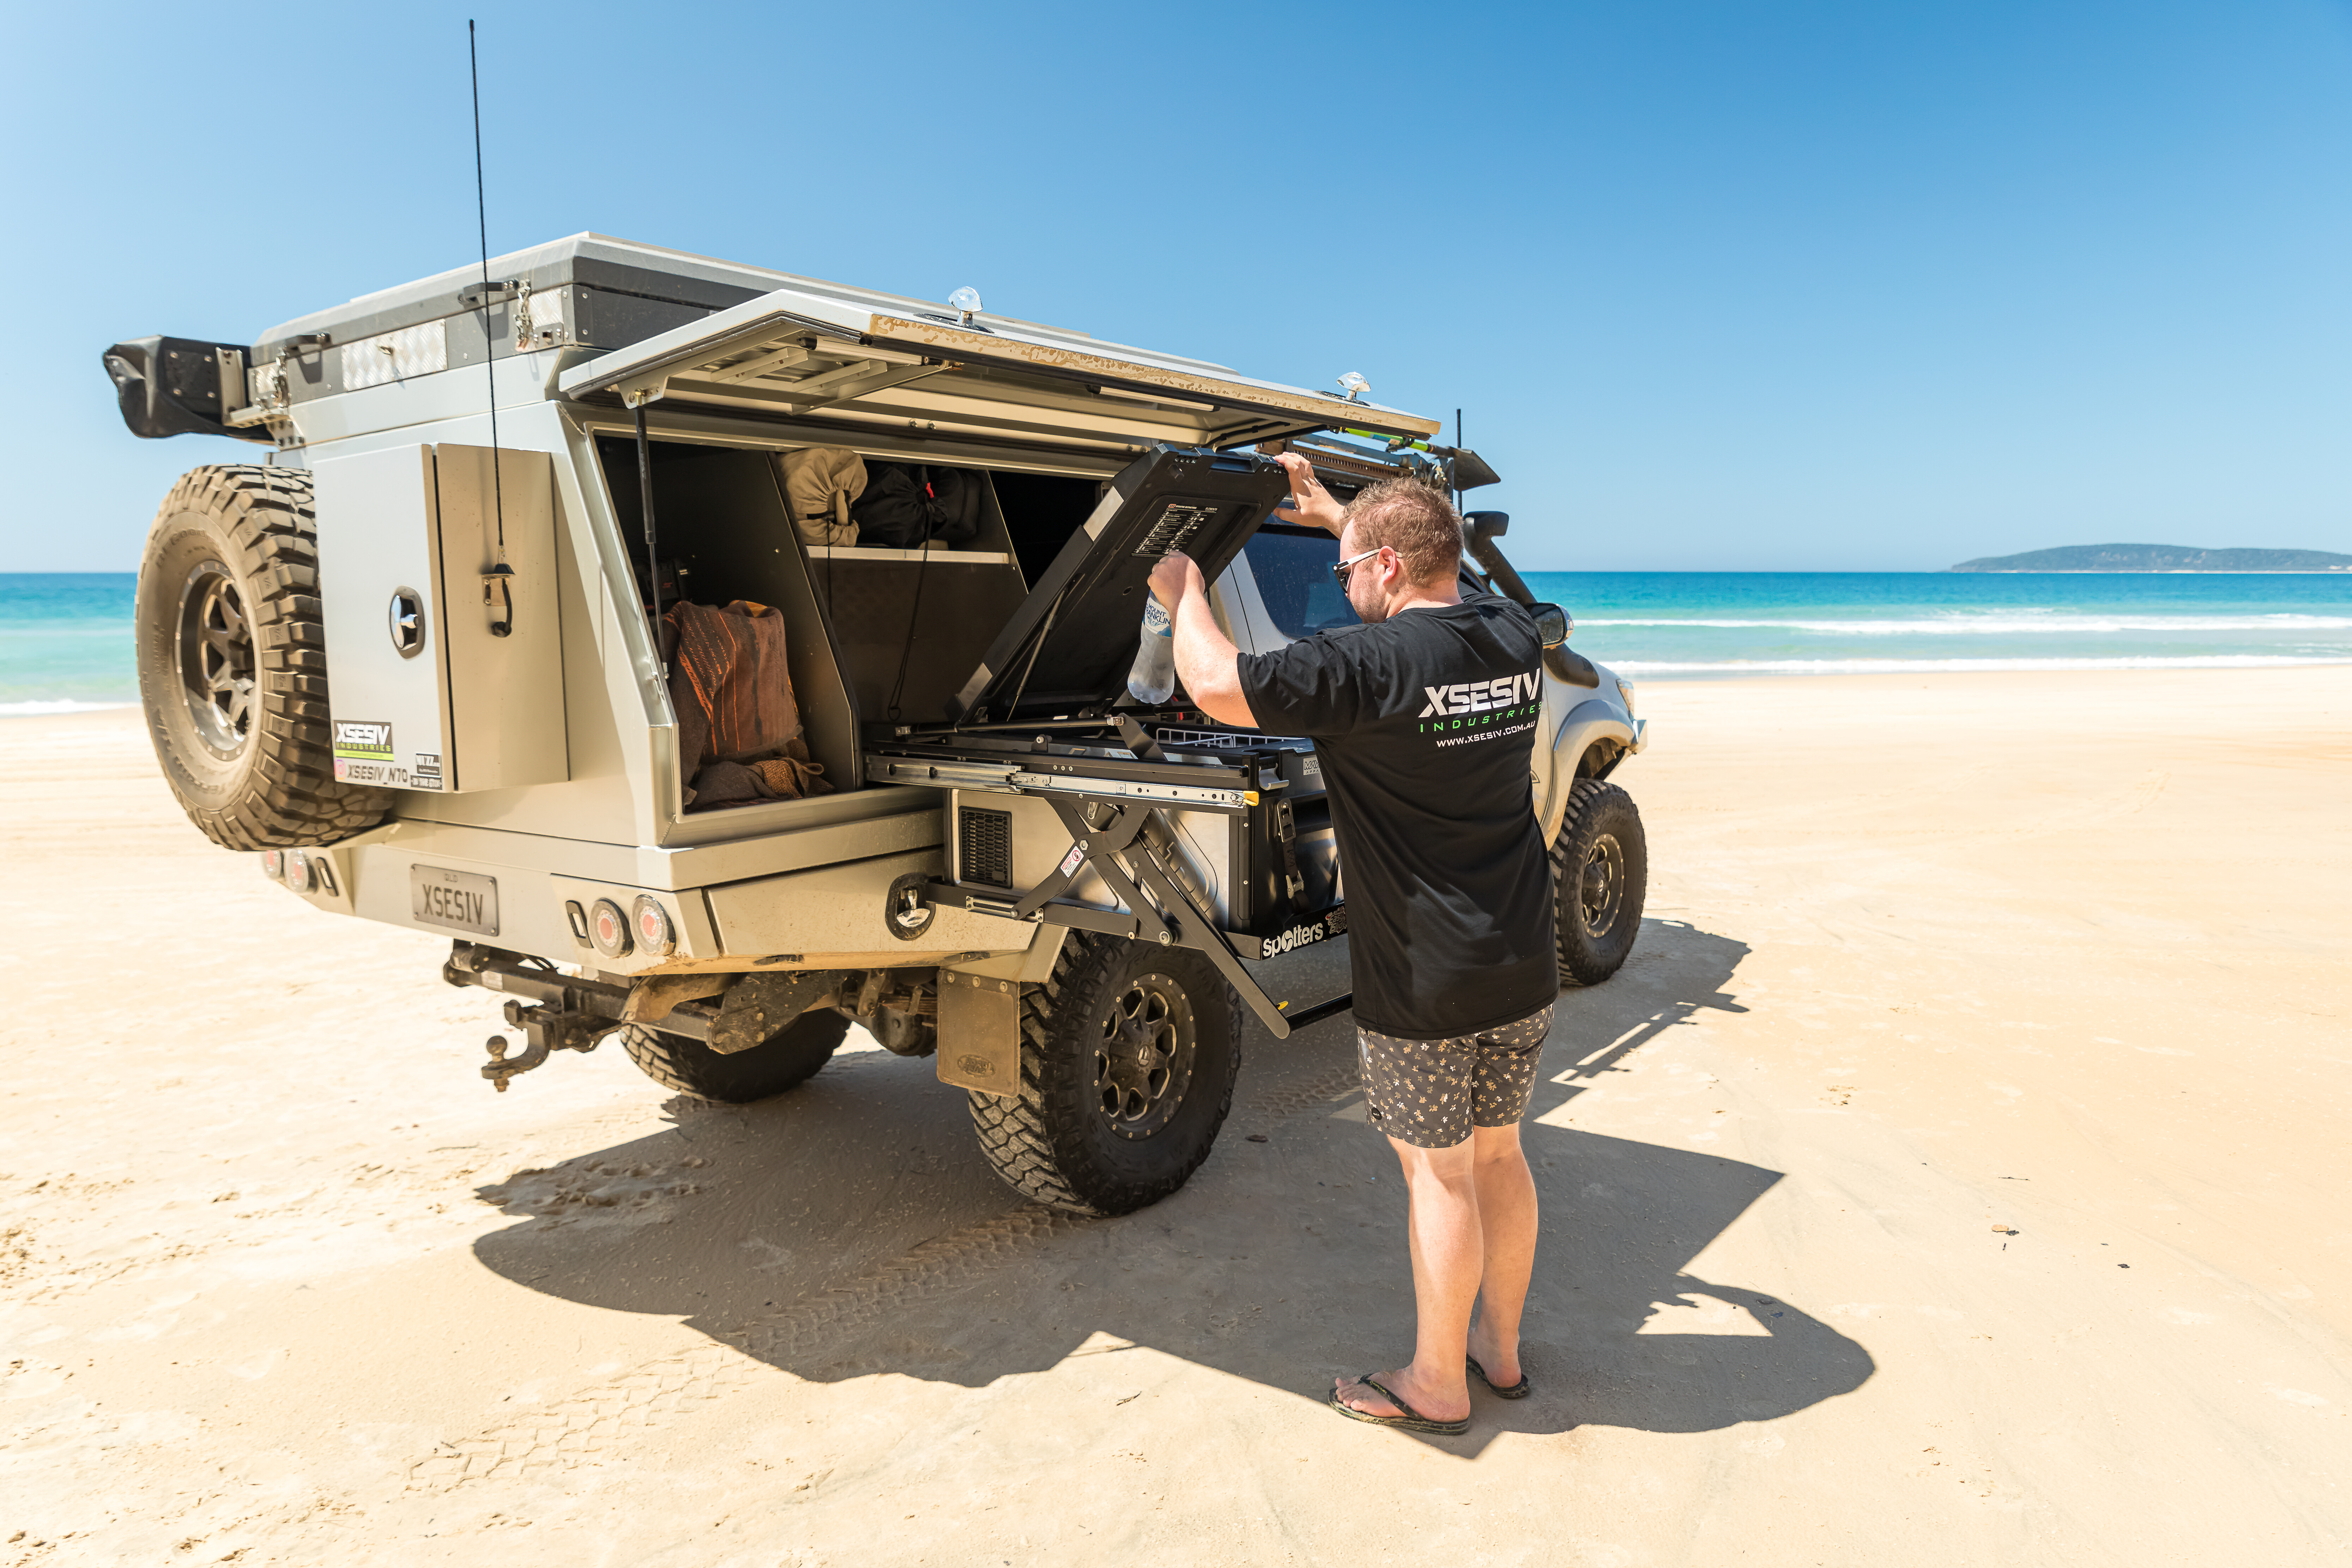
Jeremy Landt is the proud owner of this rig, and after buying it brand-new back in 2014, it’s not hard to see where the ‘XSESIV’ plates came from.
STOCK TO HOT
While the outside of the Hilux is impressive, under the bonnet is where things really get out of hand. Off the factory floor the 1KD turbo-diesel four-cylinder would have put out around 75kW and a little over 400Nm through a five-speed manual. Jeremy’s set-up now pushes out a monster 184kW and 656Nm thanks to an extensive list of modifications.

Sucking air in through the TJM snorkel, a Psico airbox and high-flow filter keep the F55 turbo fed. It then pushes through a hard-pipe kit and Psico front-mount intercooler. From here, an ECU=Shop Monster Max engine control unit and throttle control team up with +30 injectors before the spent gasses are fired backwards out a three-inch mandrel-bent exhaust.
The manual gearbox was swapped out for a factory-looking auto conversion due to strength concerns, and that’s tightened up further with an MV Autos HD torque convertor and HD valve body with a stand-alone YRS transmission control unit. PWR Coolers help keep the trans temps under control and Pajero Sport paddle shifters have been installed to help Jeremy bang through the gears.
SPRINGS ’N’ THINGS
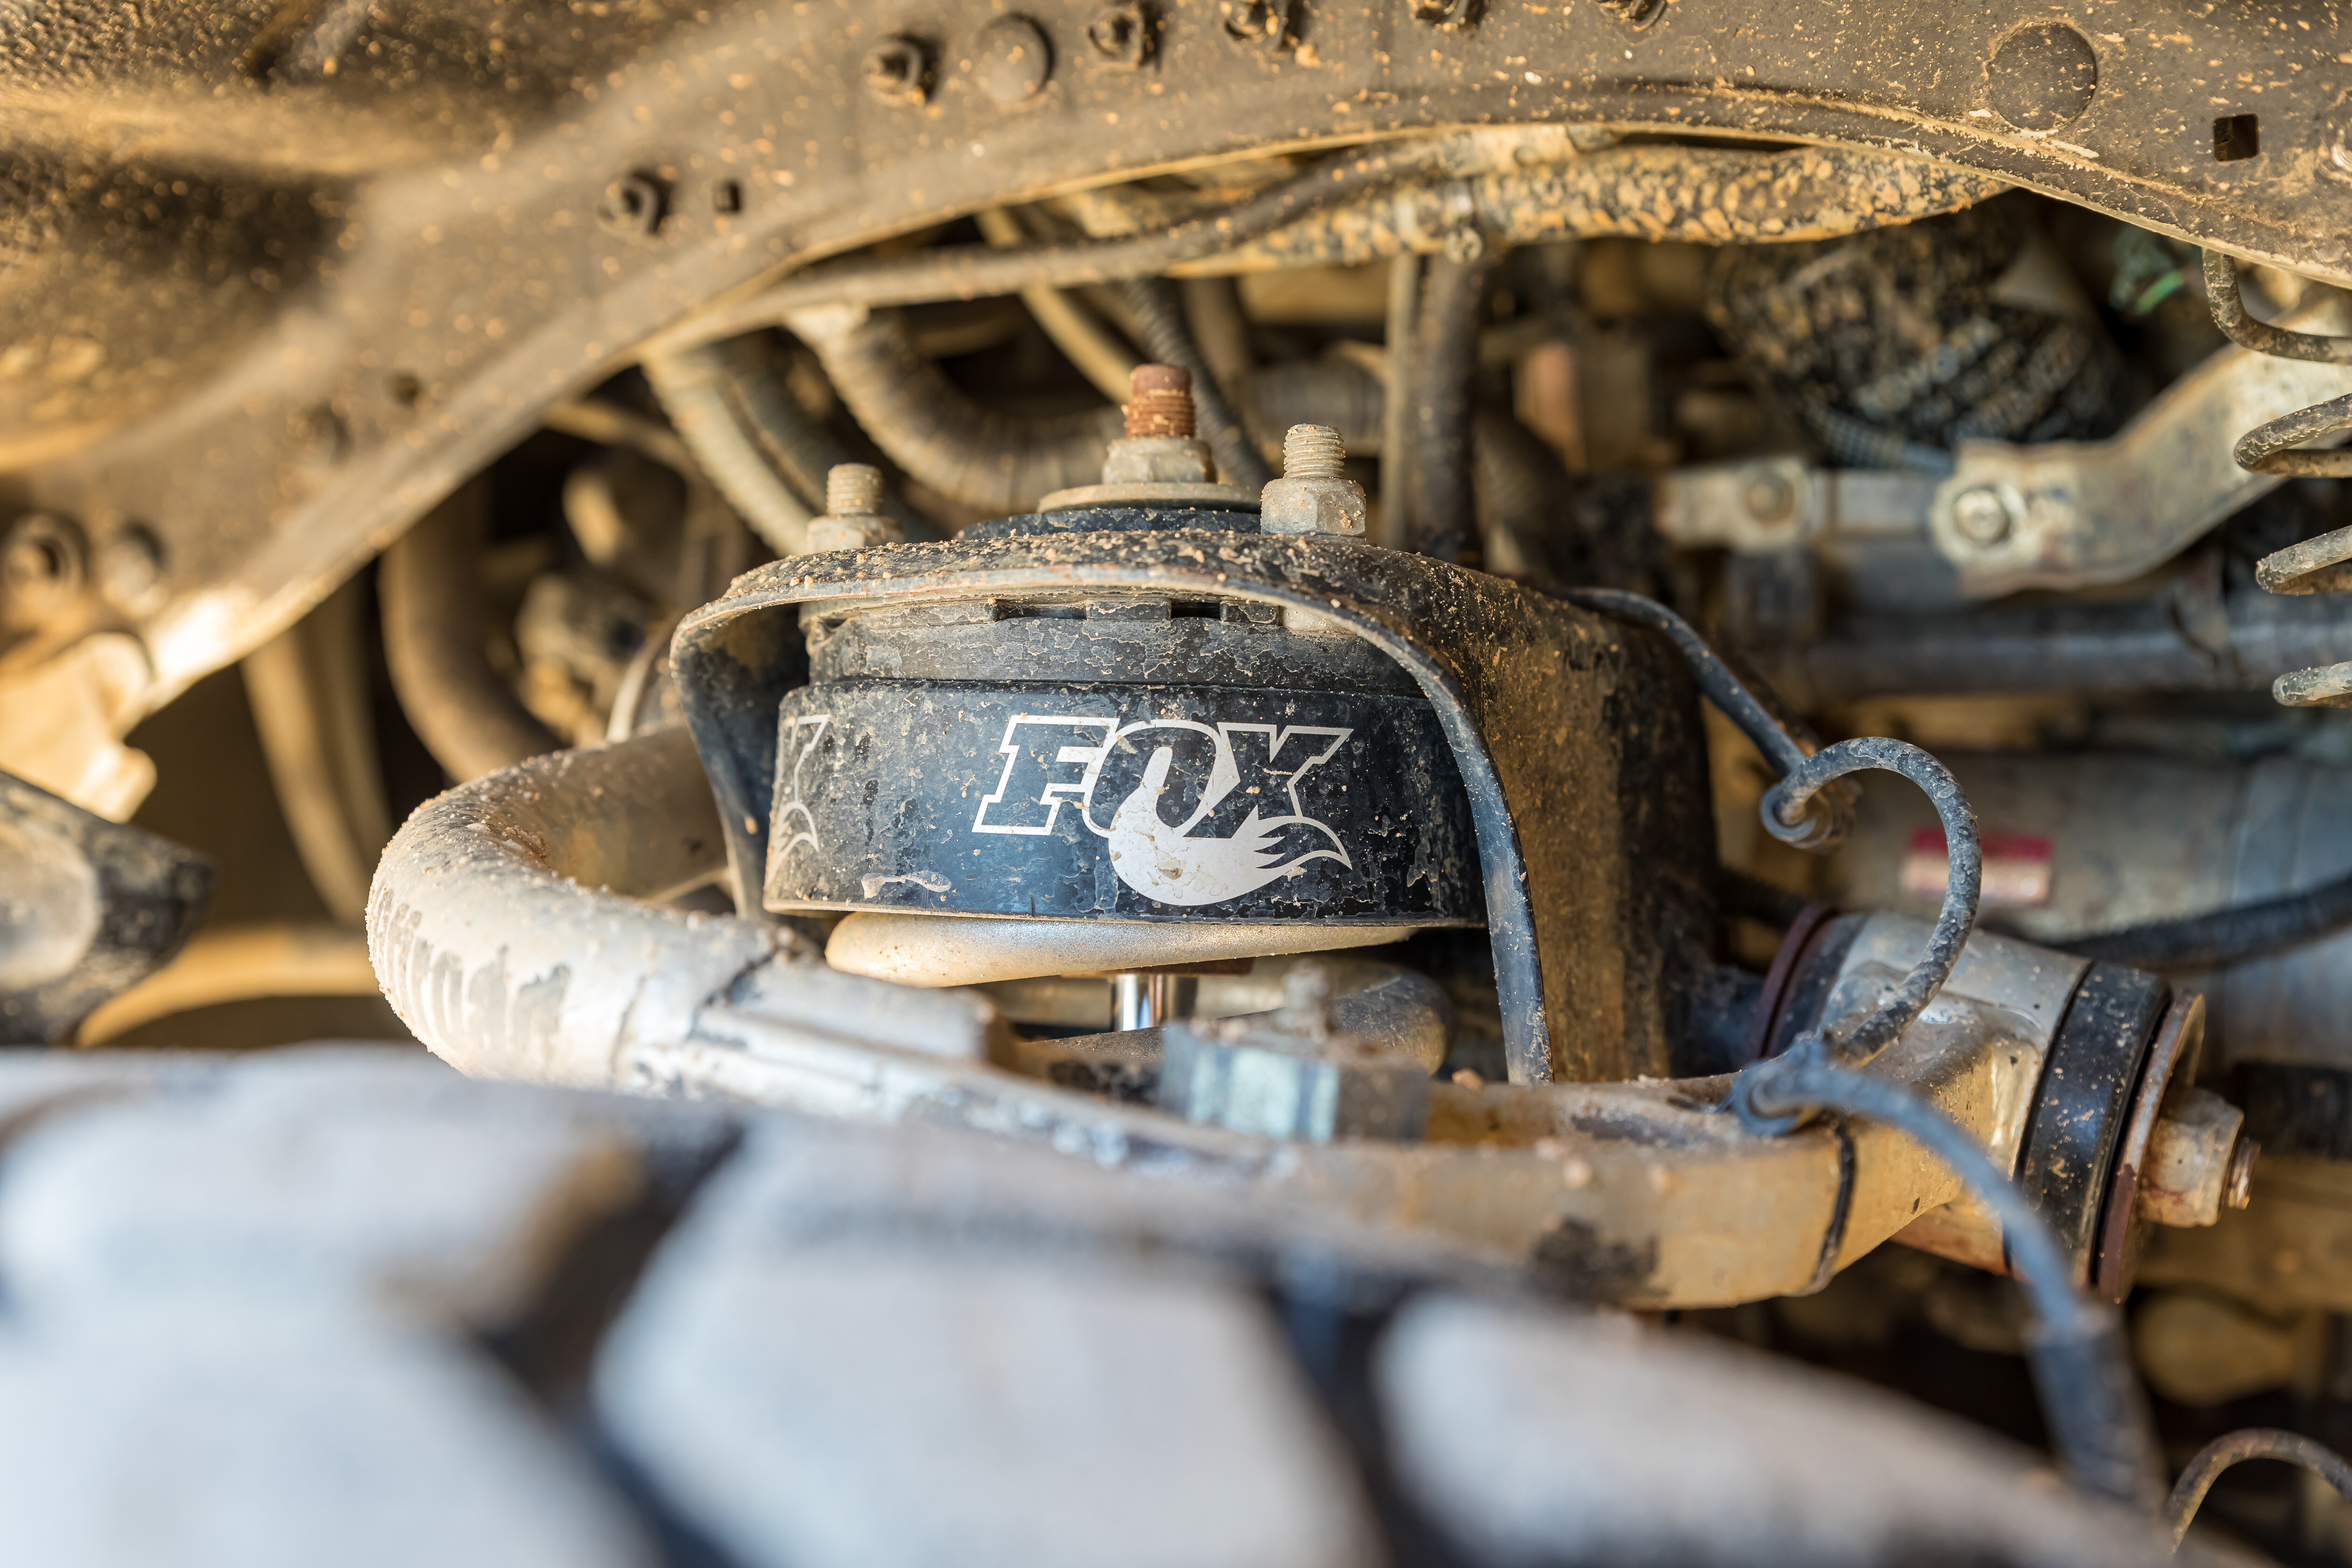
On the suspension front, Jeremy has perfectly straddled the fine line between weekend warrior and hardcore tourer. Up front, Fox Shocks two-inch lifted struts give a boost in ride quality and altitude. To save the CV joints from grenading themselves under assault from 656Nm, Jeremy has fitted a Phat Bars diff drop to get the CVs back on a safer angle. They’re paired up with CalOffroad tube upper control arms, and PSR high-clearance CV boots let the suspension extend to full droop without anything rubbing.
Moving up the back, the stock springs have been replaced with 600kg constant-load-carrying leaf springs from EFS, while an airbag load helper allows Jeremy to dial the ride height in perfectly and level the rear suspension at camp. While the welder was out, a hybrid 80 Series/Hilux rear axle was pieced together, and a PSR chassis brace kit installed for maximum strength. A pair of matching Fox Shocks in the rear smooth out the bumps.
Shoehorned in to the wheel arches are 35-inch Maxxis RAZR Mud Terrains wrapped around 16×8 0-offset Fuel Boost alloy wheels – a 50mm body-lift kit giving the necessary clearance. DBA upgraded brakes help reign in the big mud tyres, with drilled and slotted rotors up front and upgraded drums in the rear.
Back on the outside and the Hilux has had an extensive overhaul with no expense spared. The tip of the spear is the iconic Muzz Bar up front. It’s colour-coded to the OEM Toyota silver with a blacked-out radiator hoop. Taking pride of place up top are a pair of laser beams disguised as driving lights, with a pair of Baja Designs LP9s front and centre.
Hiding beneath it, tucked inside the bar, is a matching Baja Designs S8 20-inch light bar ensuring Jeremy has ample light no matter how dark the tracks get. Poking out from the polished alloy fairlead is a synthetic winch line wrapped around 12,000lb of Runva pulling power.
Moving along the flanks, Jeremy has extensively up-armoured the Hilux. High-clearance bash plates from Phat Bars cover the Toyota’s soft bits, while Southern Cross Fabworks rock sliders sit high and tight to the body to not only make entry and exit easier but also guard vulnerable sill panels.
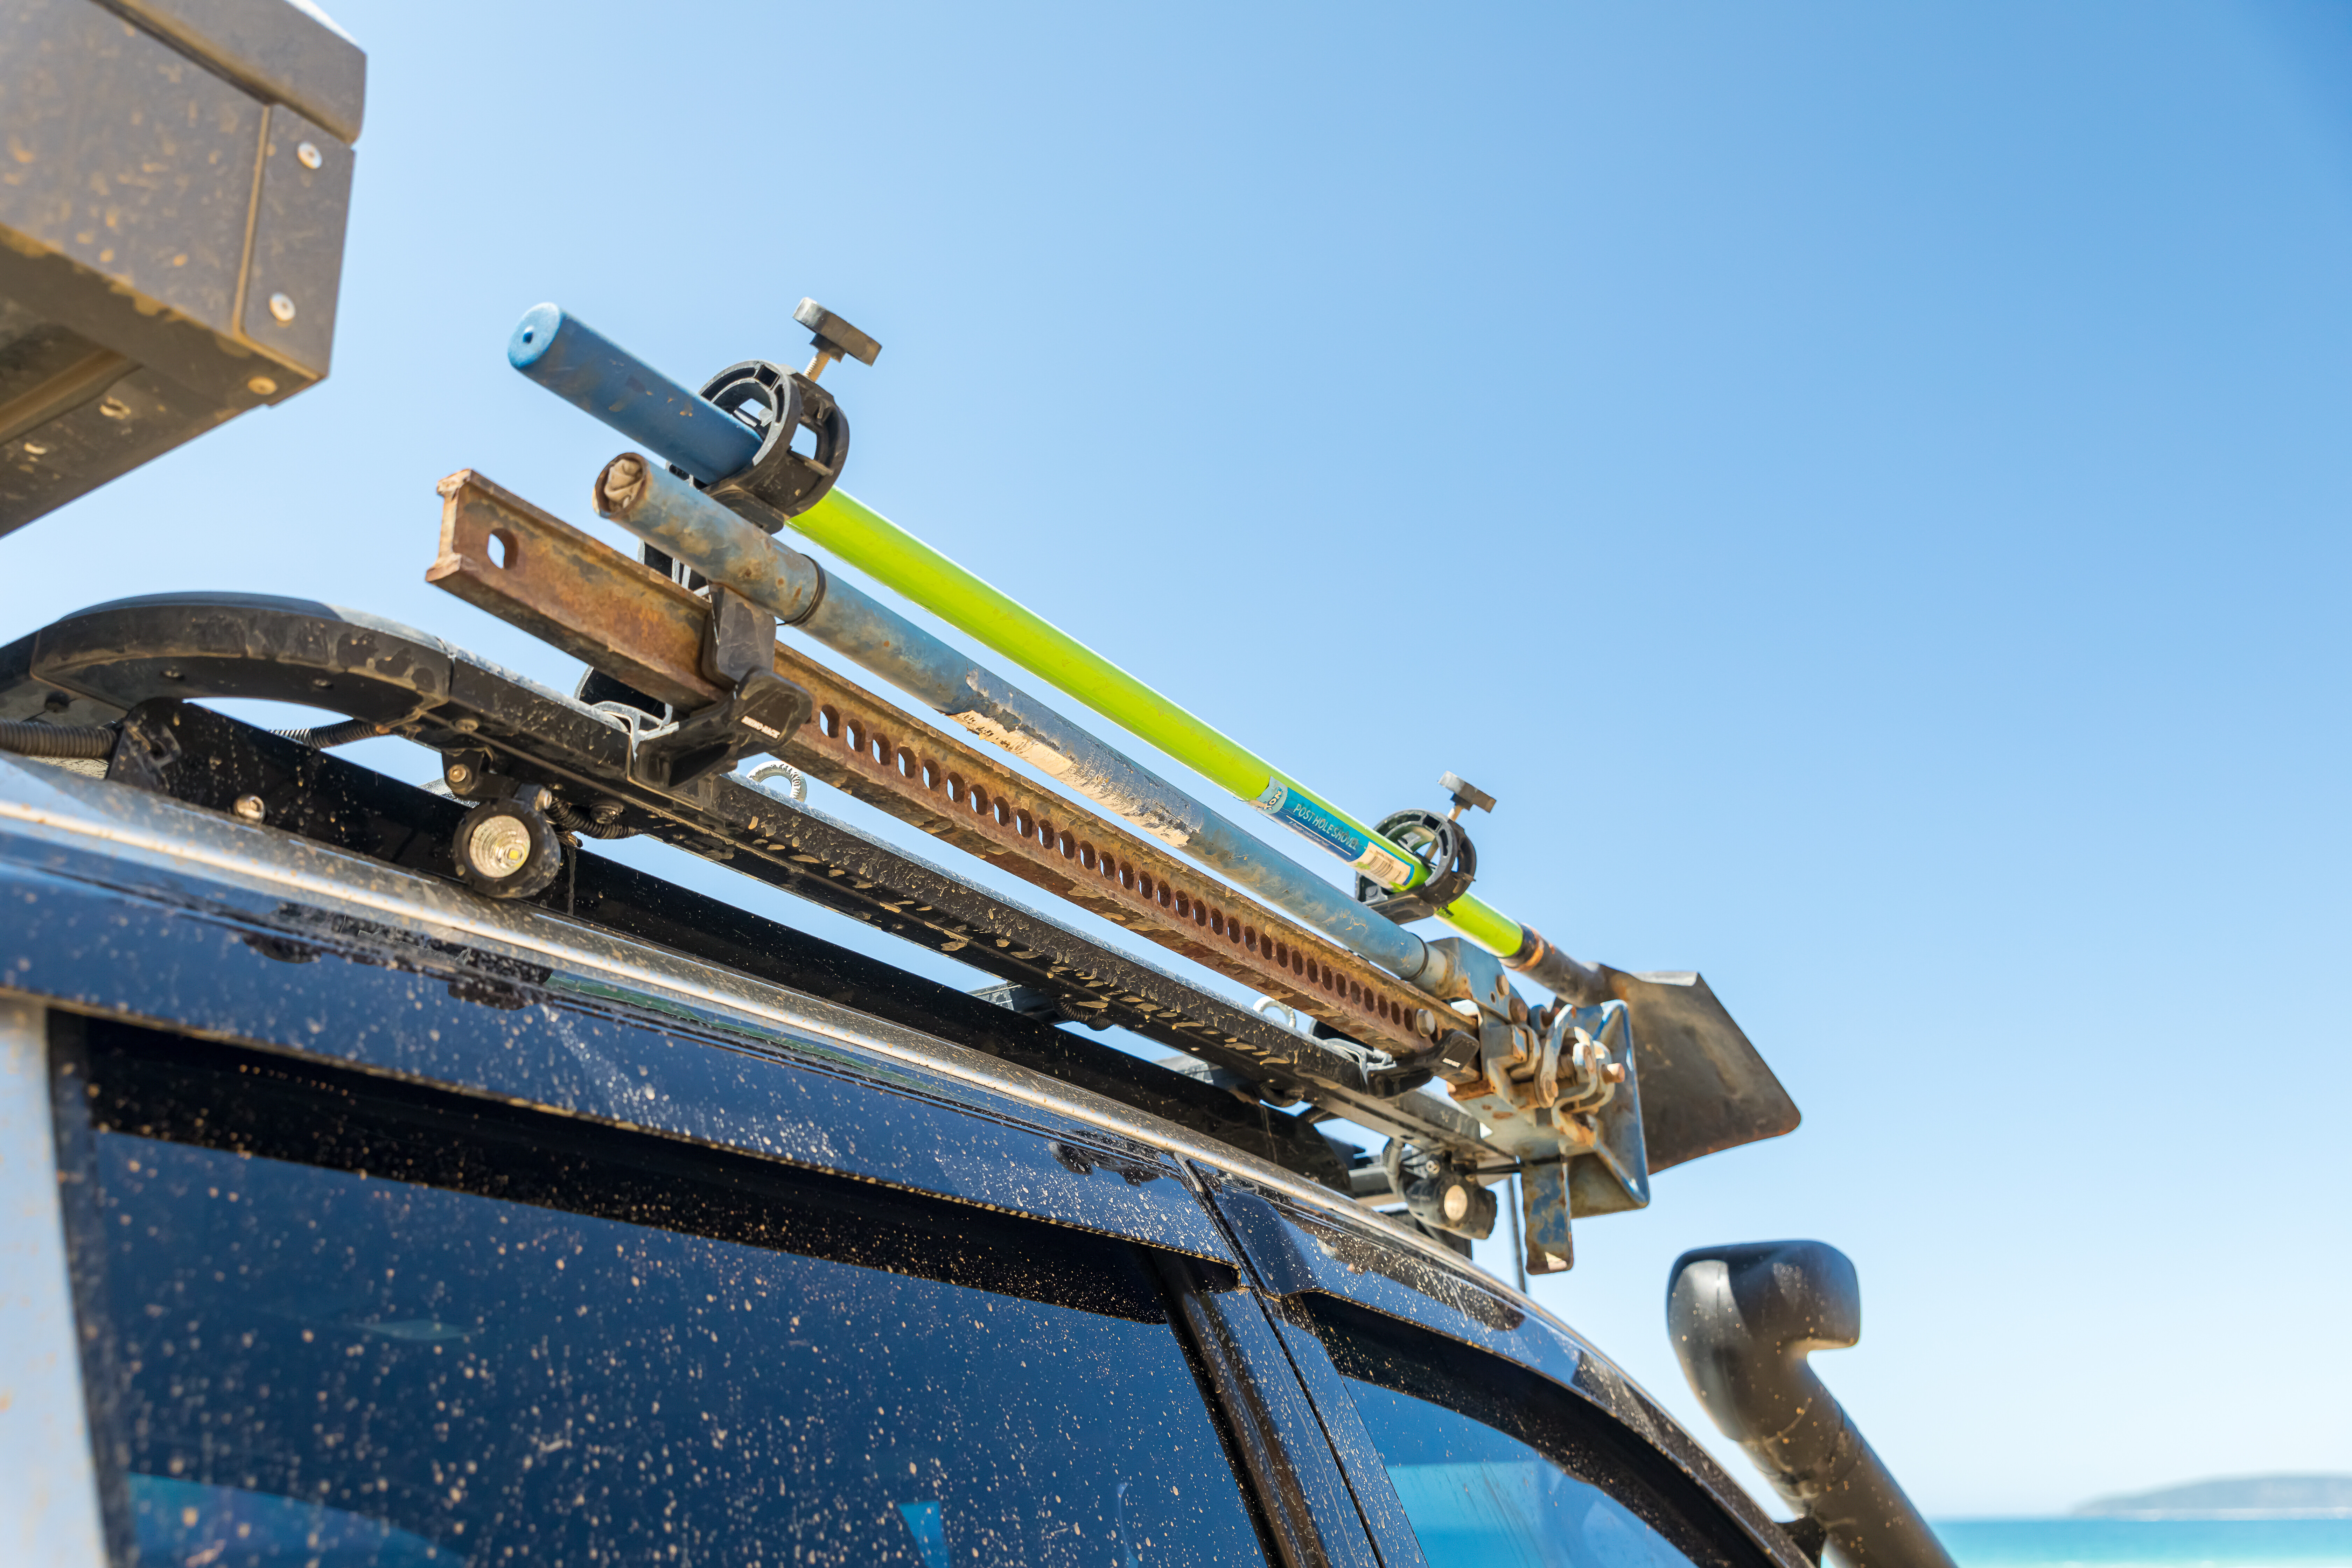
Up top, a flat rack from Rhino-Rack provides additional storage as well as housing many permanent accessories. A 40-inch Baja Designs S8 light bar occupies the front spot, while MaxTrax, a high-lift jack, shovel and Stedi camp lights fill out the rest of the rack.
PSICO BABBLE
Moving to the rear and the stock tub has been binned, in its place now lives a Psico canopy that’s every bit as modified as the Hilux it’s bolted to. On the nearside, the custom carpeted drawer system not only houses the pots and pans, but a full slide-out kitchen set-up from Dometic.
The trick unit houses a three-burner gas cooker no different than you’d find in a camper or caravan – there’s also a kitchen sink in there ensuring you’re never wanting for cooking gear. Moving back past the stereo set-up and there’s a Travel Buddy oven resting above a 12V coffee machine complete with milk frother.
Moving around to the far side and there’s bulk storage with the dog box, and an ARB Elements fridge on a Clearview drop slide. Back on the outside and shelter is provided under a 30 Second 270-degree wraparound awning, while camping duties are handled by a hard-shell Bush Company rooftop tent.
Eagle-eyed readers will spot the custom box mounted next to the spare tyre on the rear. It’s where the Joolca hot-water system lives, bringing all the comforts of home to wherever the Hilux is parked up for the night. It’s fed by an 80L stainless-steel water tank.
Keeping the whole system running late into the night is an extensive 12V set-up, so neat it looks factory fitted. The brain of the system is a Simarine vehicle monitoring system Jeremy has set up to give him info on everything from fridge temperatures and water tank levels to how much of an angle the Hilux was on when coming in to camp. The grunt of the system is a 200amp/h lithium battery from Hard Korr, kept charged by twin Projecta chargers.
The 25amp DC to DC charger keeps it topped up when the Hilux is moving, while a seven-stage 240V charger keeps it topped up at home. When the Hilux is parked up at camp a Victron solar regulator feeds juice in to the battery bank from the twin 120W solar panels mounted up on the roof. Jeremy has wired multiple 12V outlets throughout the canopy and tent, and 240V outlets fed by a PROJECTA 2000W invertor.
IN EXCESS
On the inside, Jeremy has taken that same excessive mentality to ensure he’s got everything he could possibly want all within arm’s reach. Taking pride of place is the factory-looking centre console where the manual gear shifter used to be. Strapped to the side are the various aftermarket control units, as well as a gear indicator.
Directly above it is a roof console from Department of the Interior. It houses the airbag and compressor controls, as well as an easy-to-read gauge so Jeremy knows exactly what’s going on up the back. There’s a full suite of Redarc gauges too, monitoring exhaust gas temps, trans temps, boost levels and oil pressure.
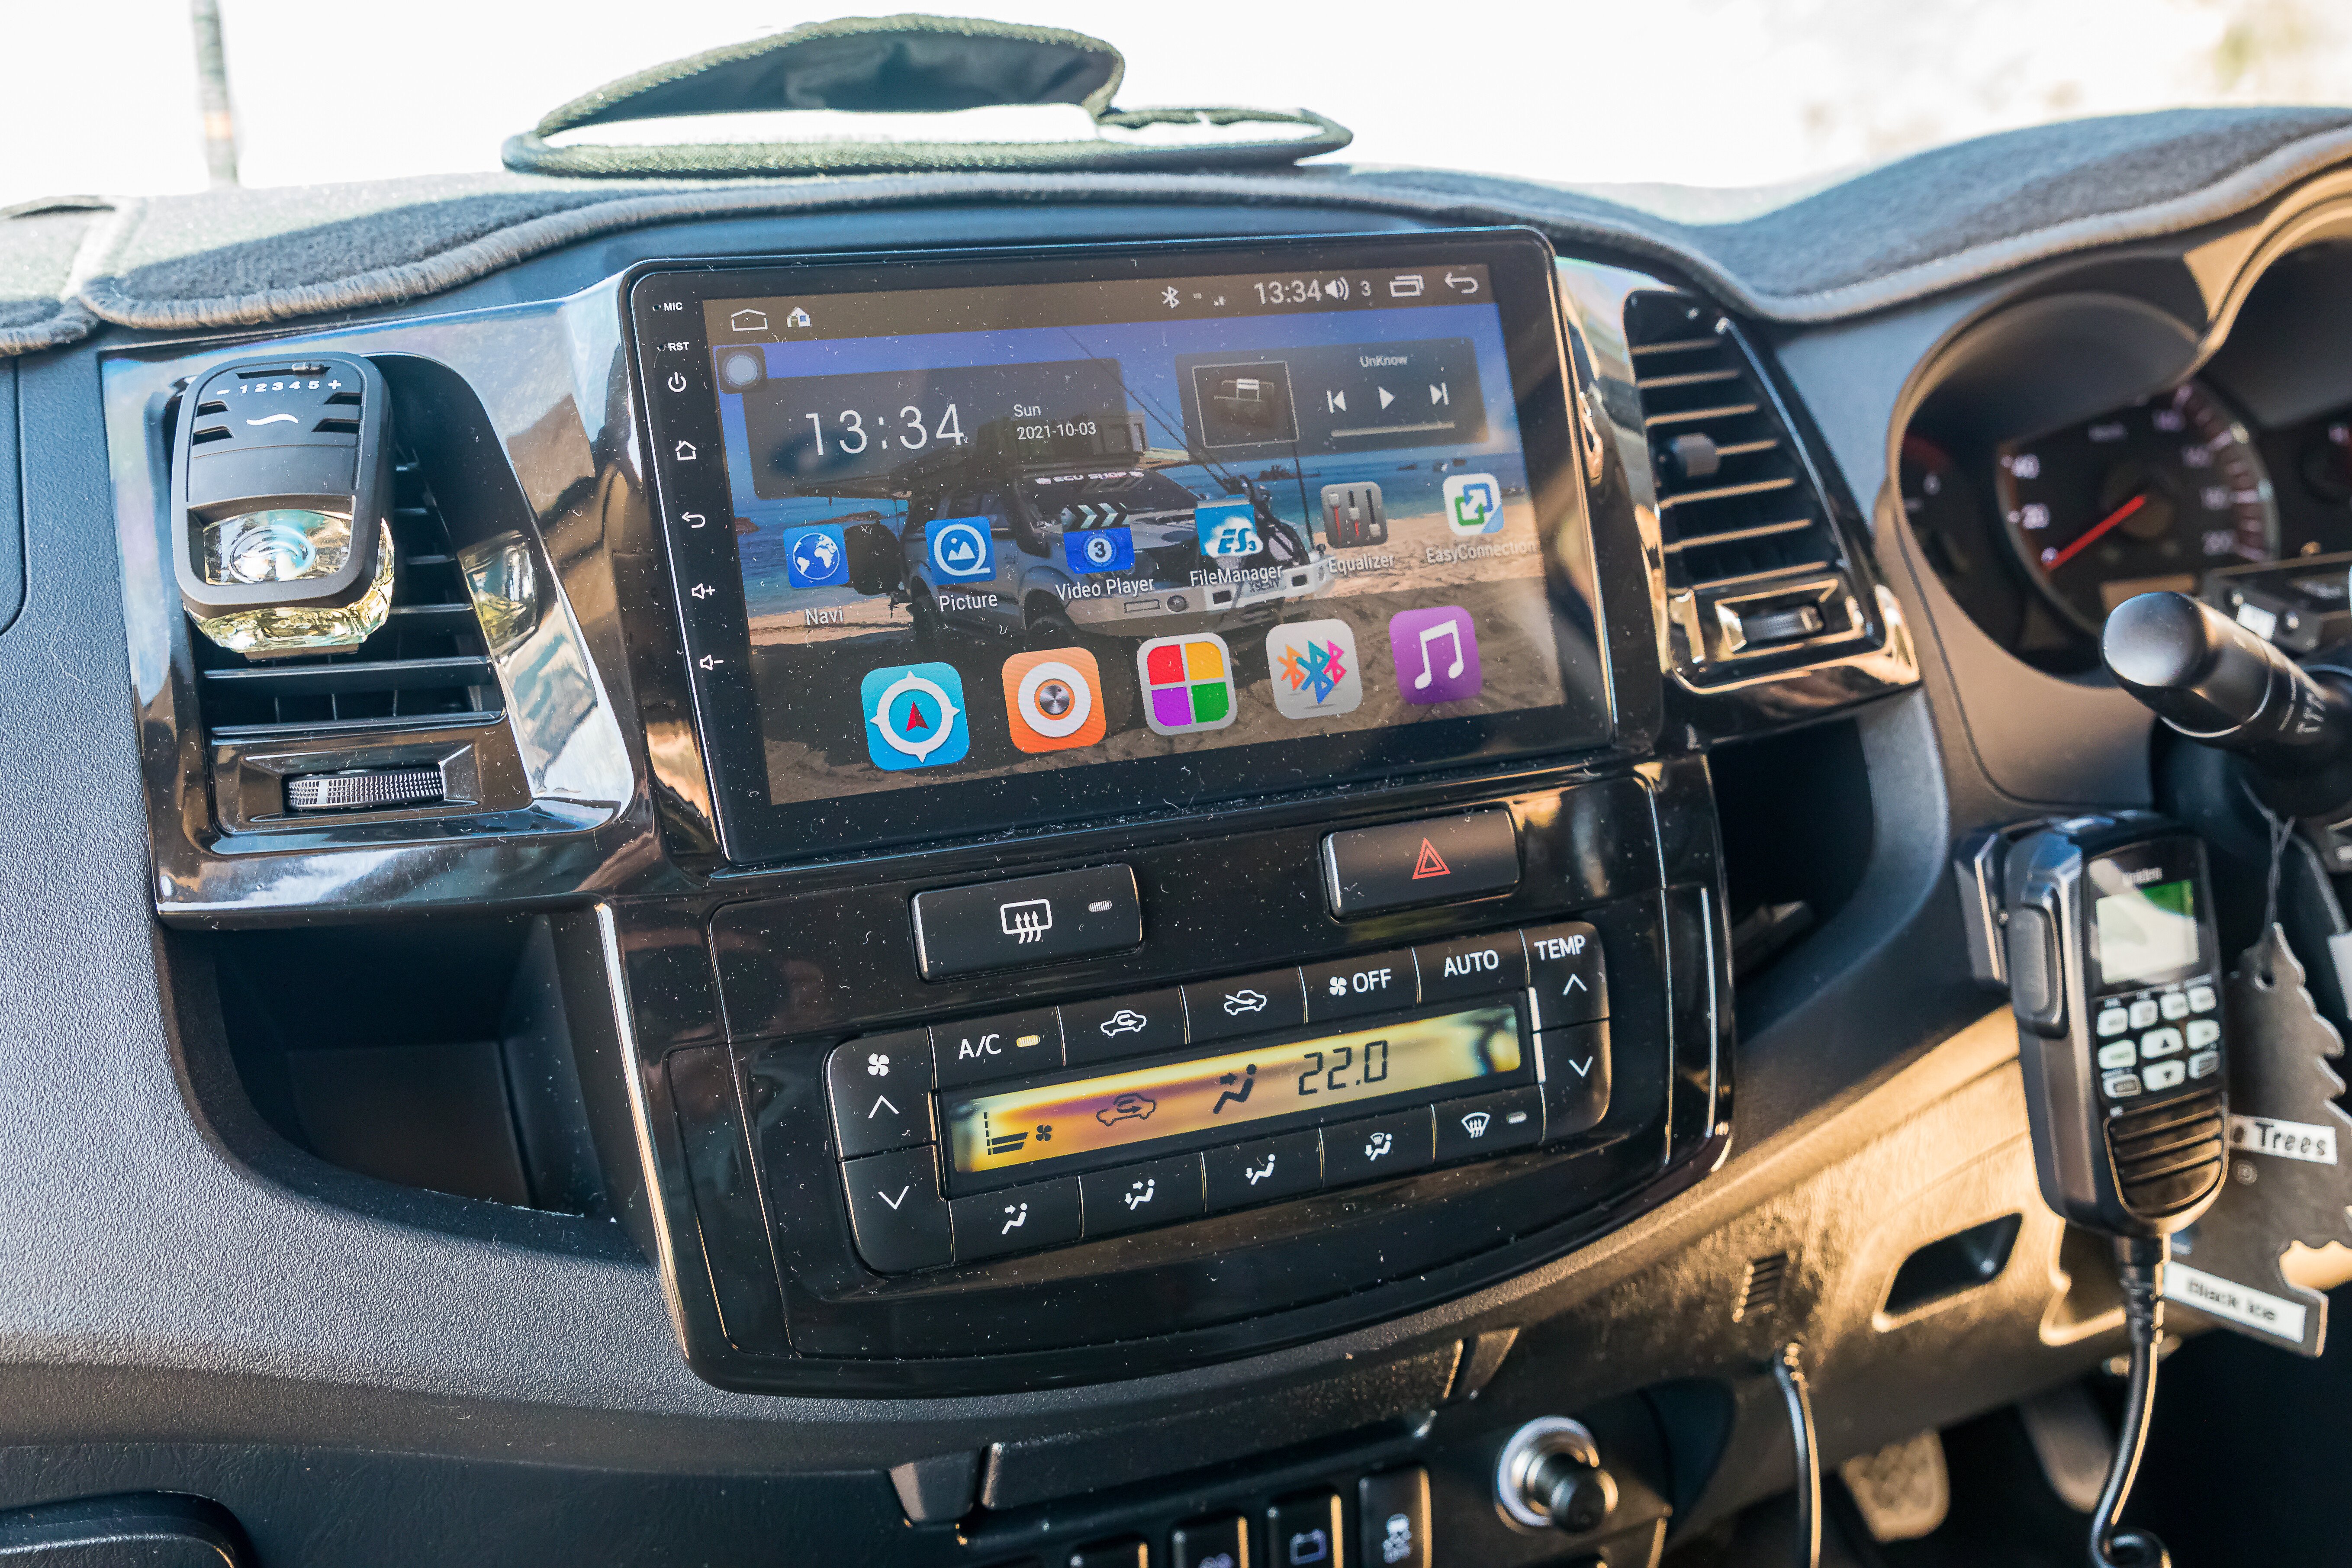
Up on the dash, a trick rear-view screen replaces the rear-view mirror with a second switchable camera pointing at the tow ball. A huge aftermarket stereo also got the nod, with a combination of Focal and Rockford Fosgate gear all being fed tunes from the PVS head unit.
Seeing the attentional to detail and constant pushing for that next-level gear, it should come as no surprise to see that XSESIV license plate turn in to a business doing plug-and-play 12V systems for 4x4s. If Jeremy’s personal rig is anything to go by, it’ll be a name you’ll hear more of over the coming years.
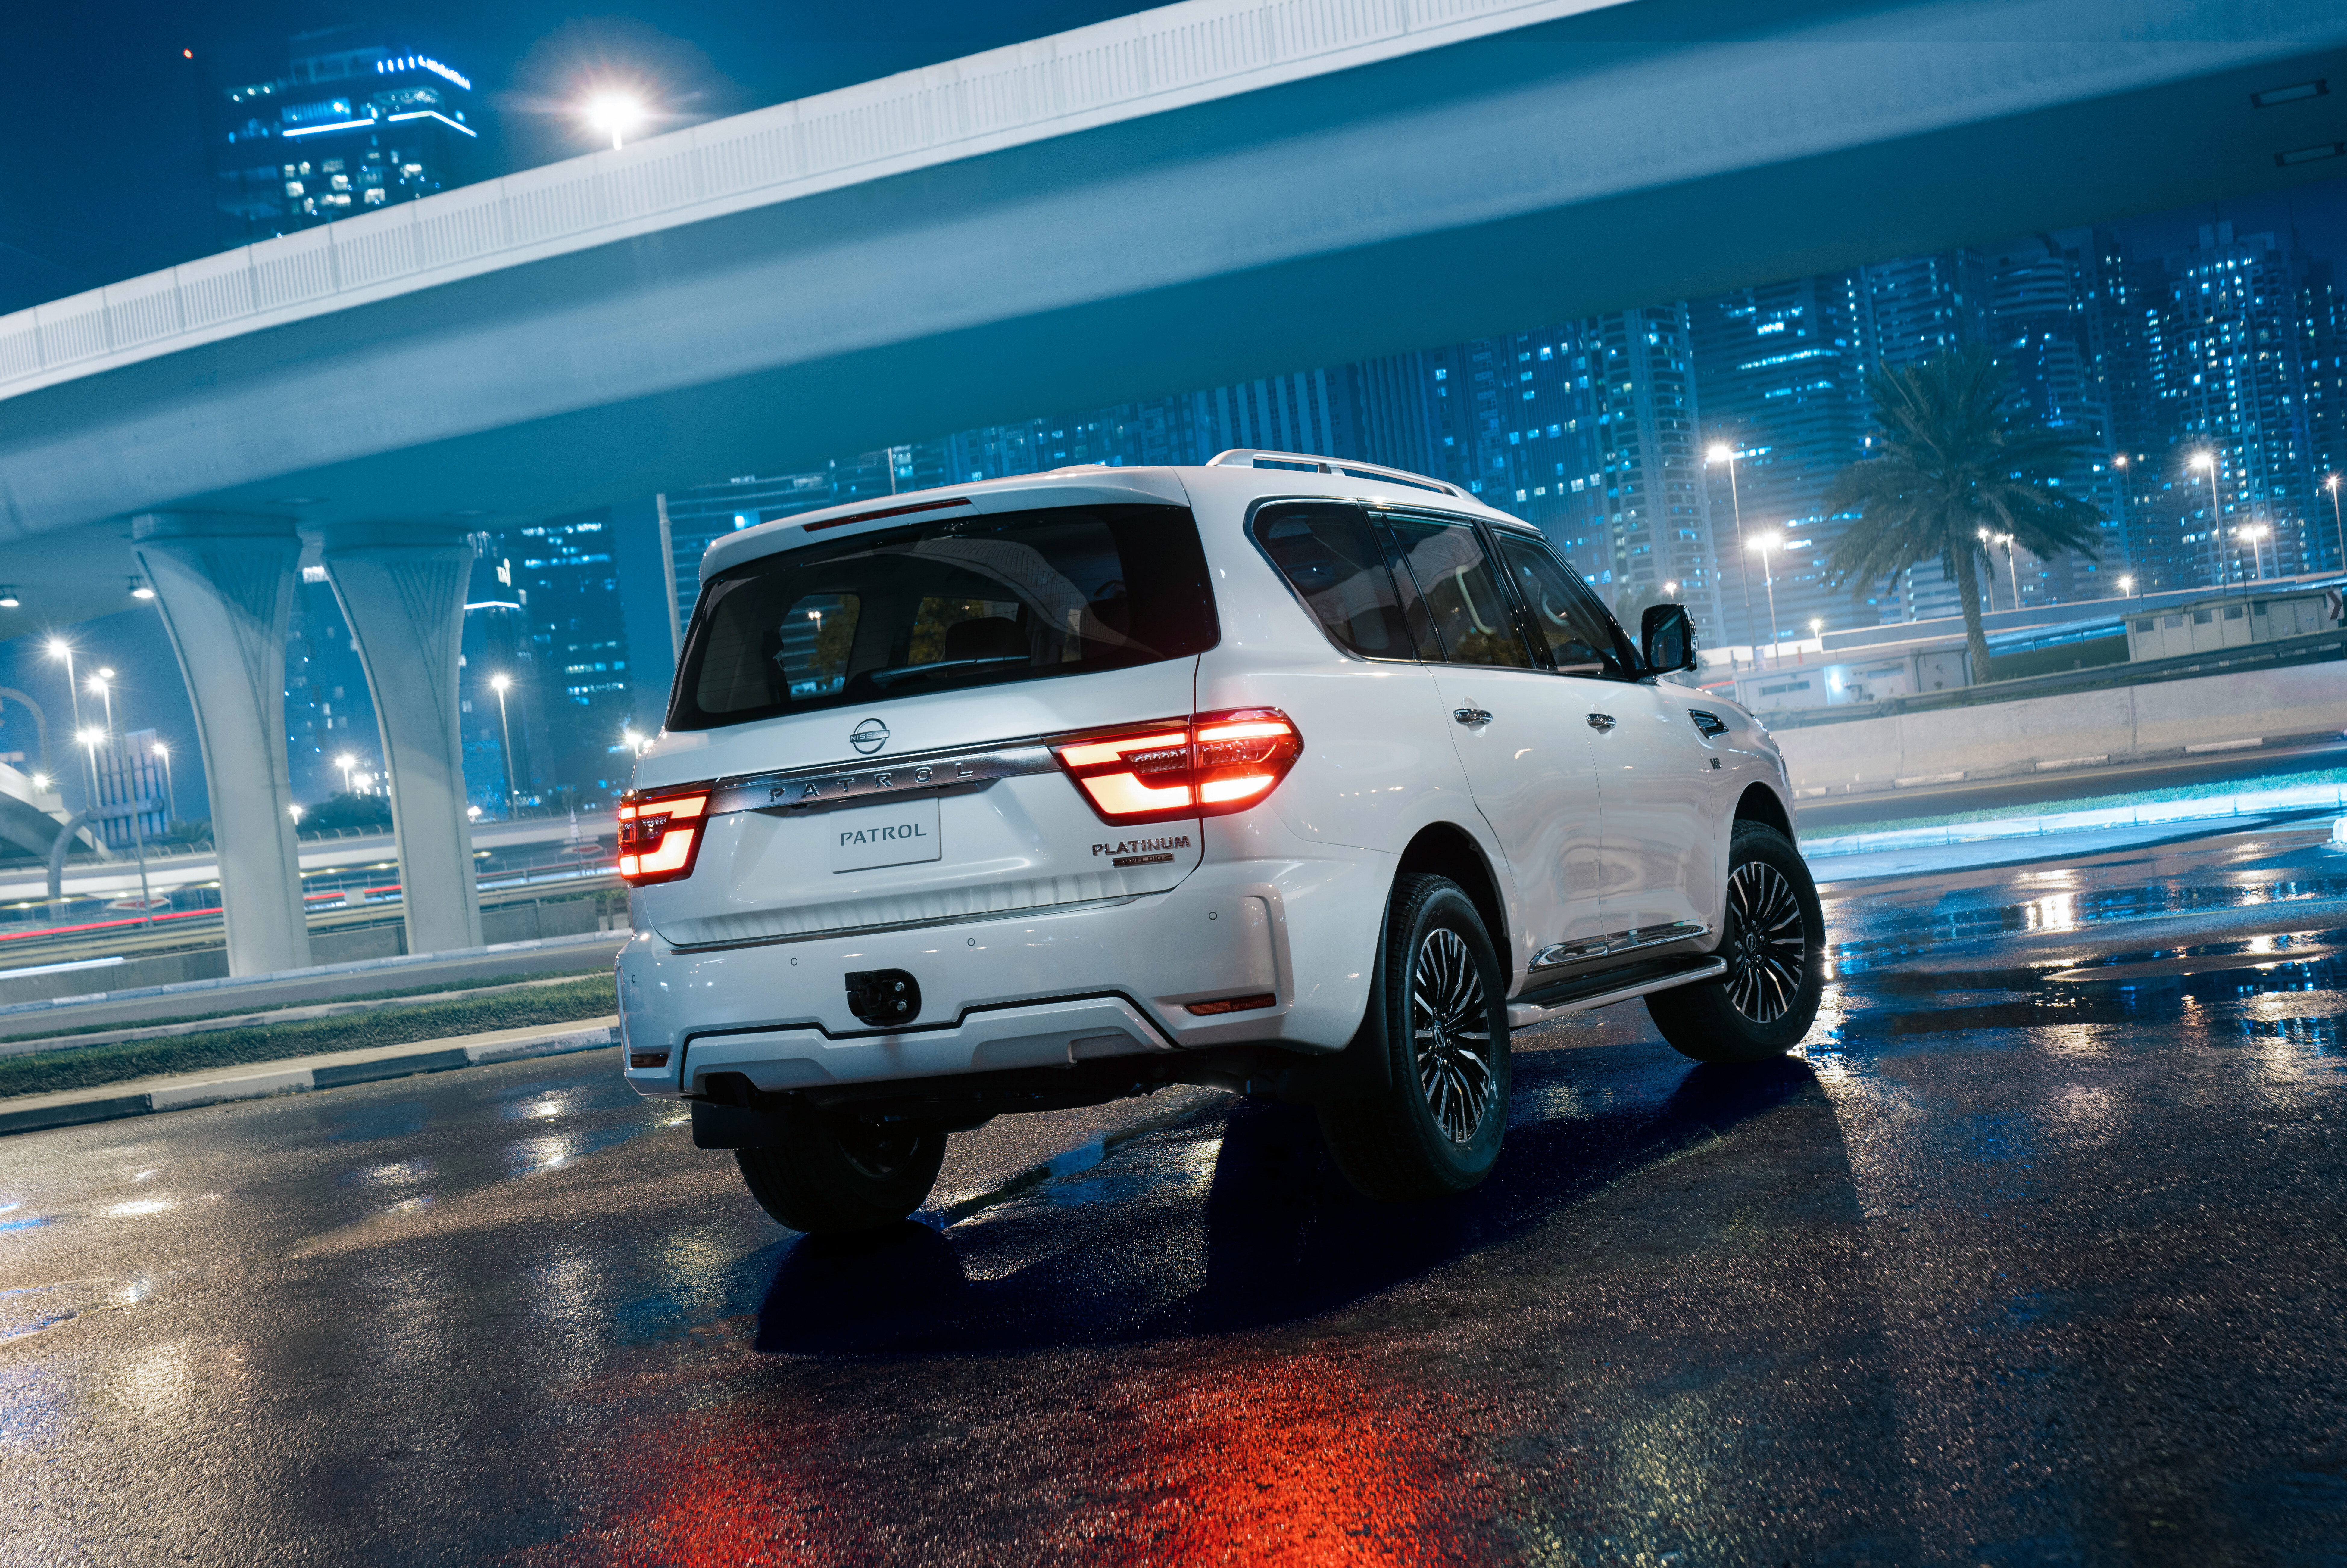
Nissan has unwrapped a new special edition variant of the Patrol in the Middle East to mark the nameplate’s 70th anniversary.
Initially based on the Willys Jeep, the Patrol first launched in Japan in 1951, before expanding to additional markets over the next decade – with the Gulf region receiving the off-roader in 1956.
Exclusive to the Middle East, the anniversary model is headlined by a number of additional styling and technological enhancements to set it apart from the regular Patrol.
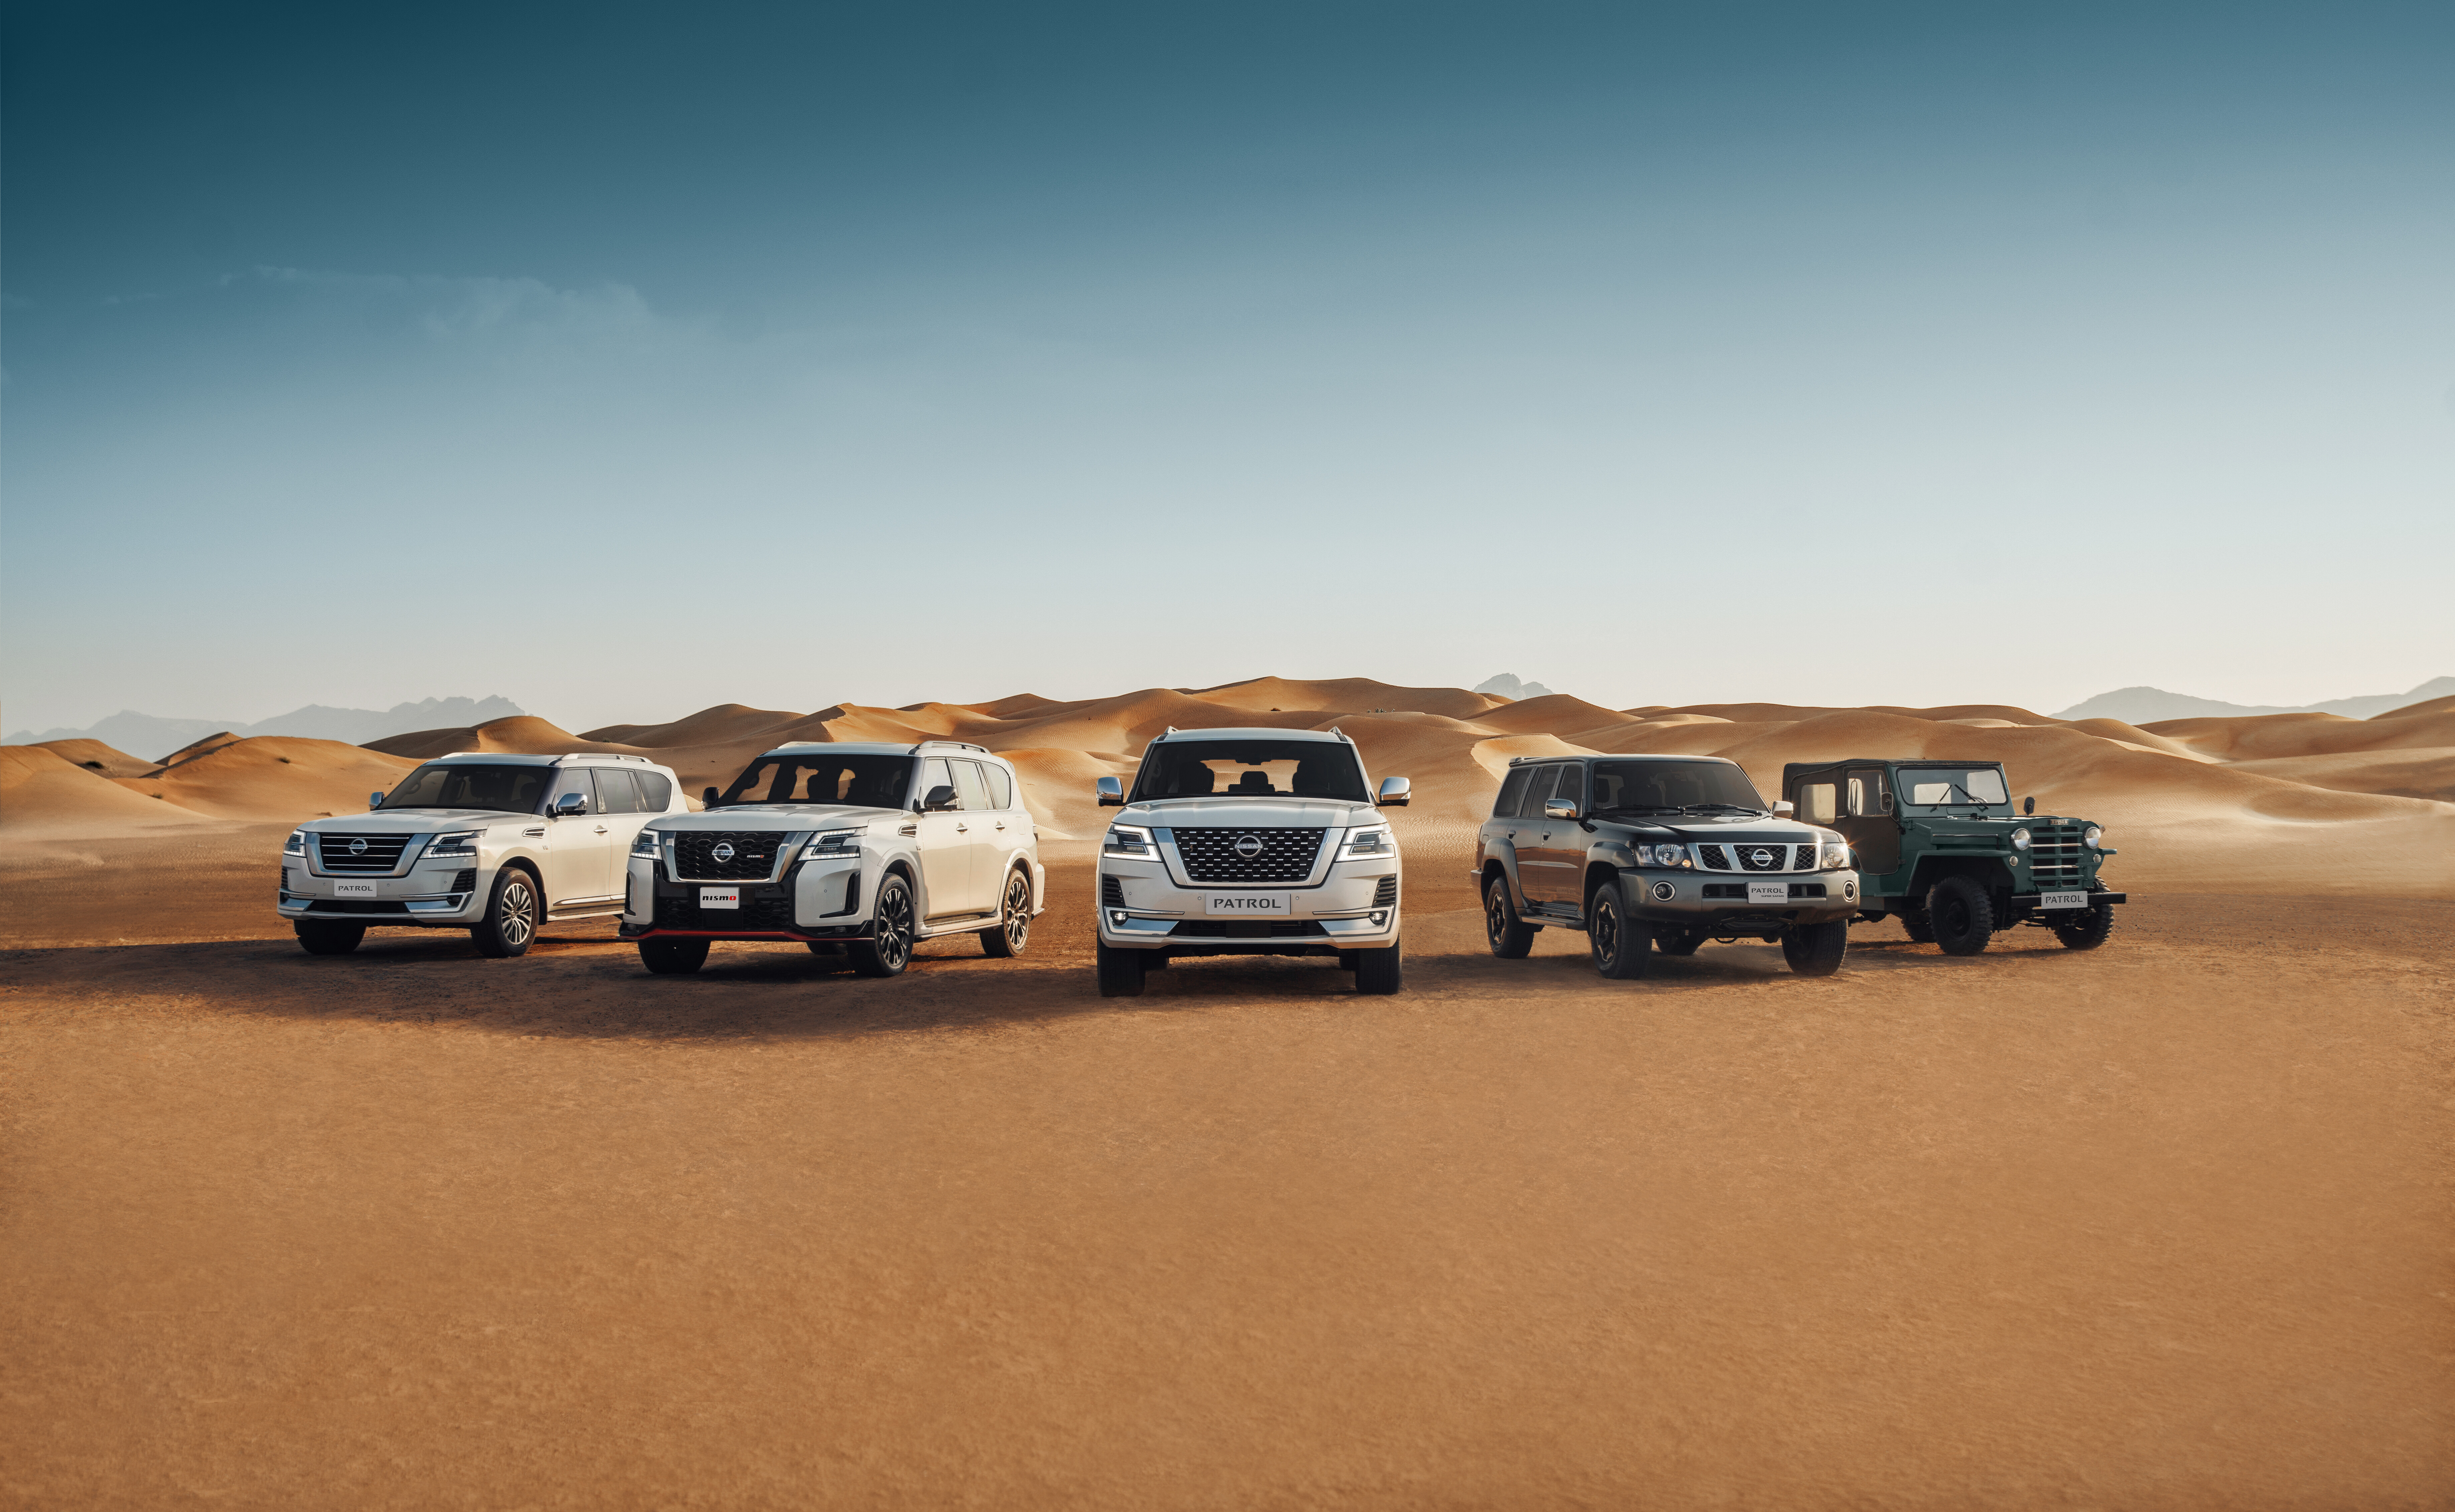
These upgrades include; a bolder front grille, new-design 20-inch alloy wheels, extra chrome trimmings and a unique 70th Anniversary badge on the side vent. Additionally, the vehicle gains burgundy diamond-stitched quilted leather inside.
As for the broader 2022 Patrol range in left-hand-drive markets, the large SUV has picked up the same revisions as the recently-facelifted Armada sold in North America.
This includes a redesigned centre console with a larger 12.3-inch infotainment system featuring wireless Apple CarPlay and Android Auto – as well as updated Nissan badging to reflect the marque’s new branding.
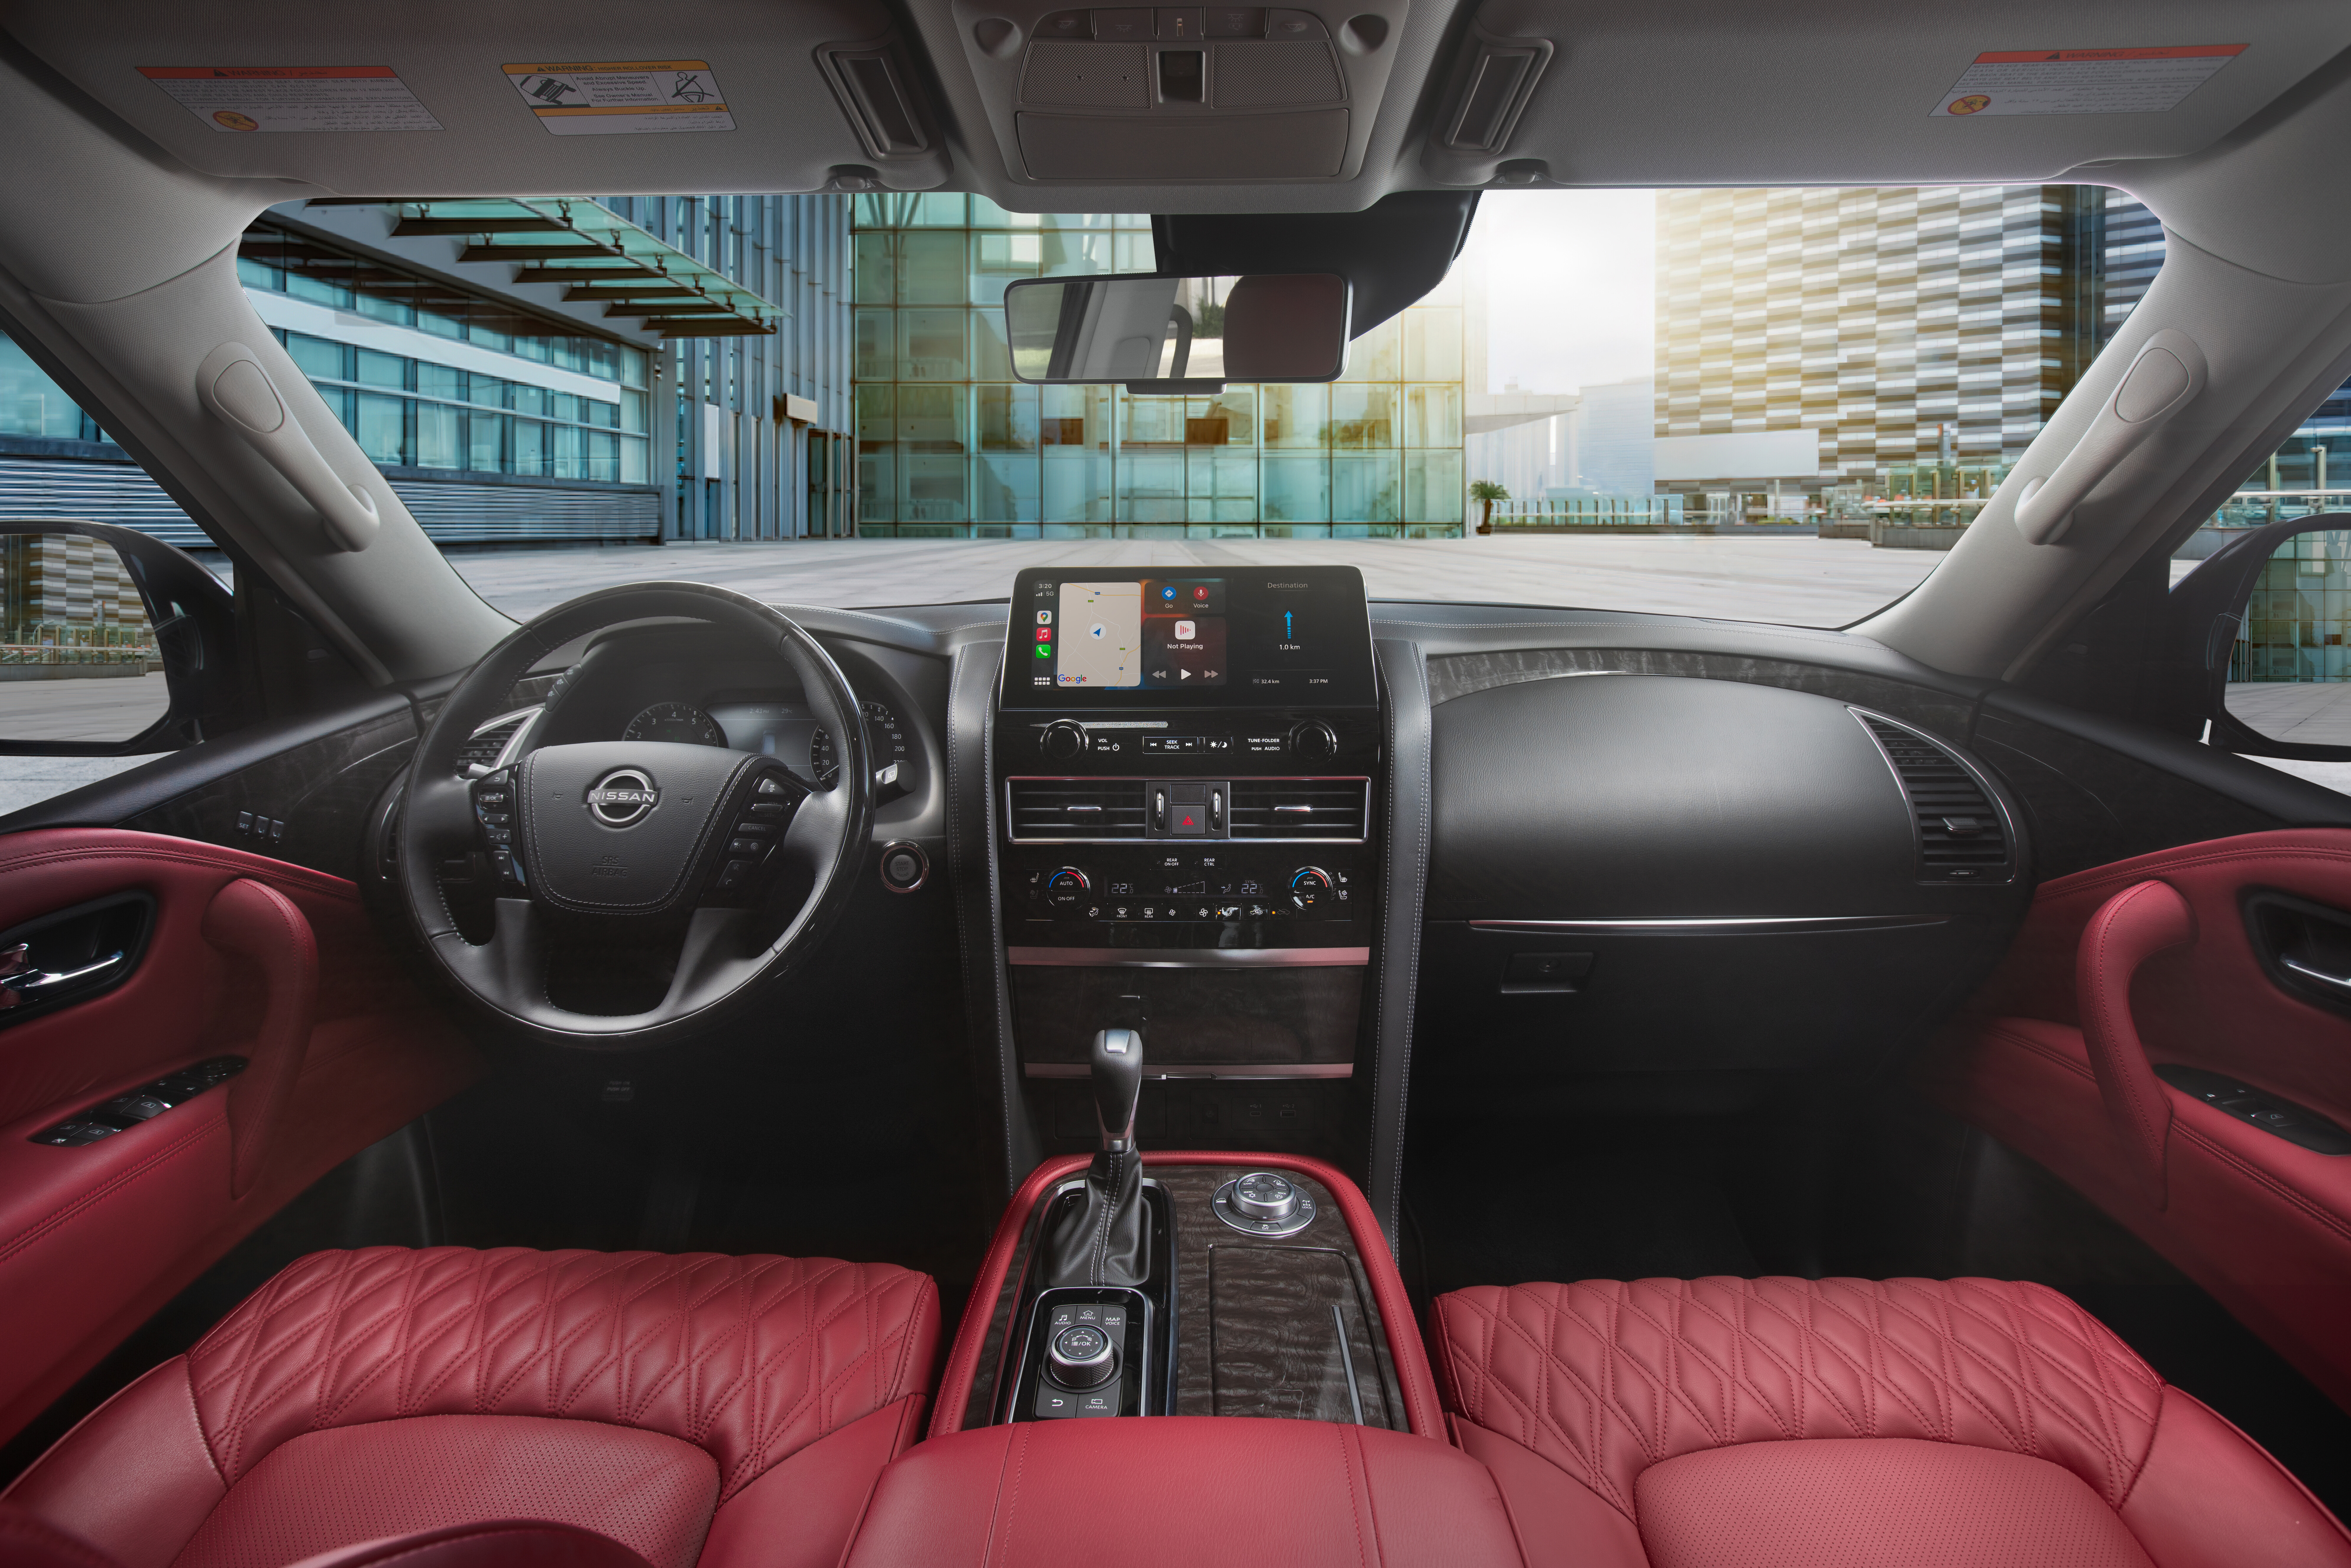
An improved set of 10.1-inch rear entertainment screens is also new for model-year 2022, with wireless headphones and screen mirroring options. An inductive smartphone charger is also available for the front seat passengers.
Unfortunately, constraints surrounding right-hand-drive production mean Australian buyers of the Patrol aren’t so lucky, with local examples likely to miss out on any major interior revisions for at least another two years.
The refreshed interior design is the second major change for the Middle East since 2011, with the large external facelift revealed in 2019 – which did arrive in Australia – also bringing larger screens and smartphone mirroring overseas.
Right-hand-drive units continue to largely utilise the same interior design as that found in the pre-facelift Patrol, which dates back more than 10 years – meaning technologies such as Apple CarPlay and Android Auto remain unavailable.
Under the bonnet, the petrol-only 70th Anniversary range can be selected with either a 4.0-litre naturally-aspirated V6 producing 202kW of power and 394Nm of torque, or the same 5.6-litre V8 found in the local Y62 Patrol, which boasts more-powerful outputs of 294kW/560Nm.
UPDATE, September 13, 2022: New Ford Everest on sale, and we’ve driven it!
The new-generation 2023 Ford Everest is finally on sale in Australia, and our man Matt Raudonikis has driven it. Get the full story, and our first-drive video, at the link below.
The story to here
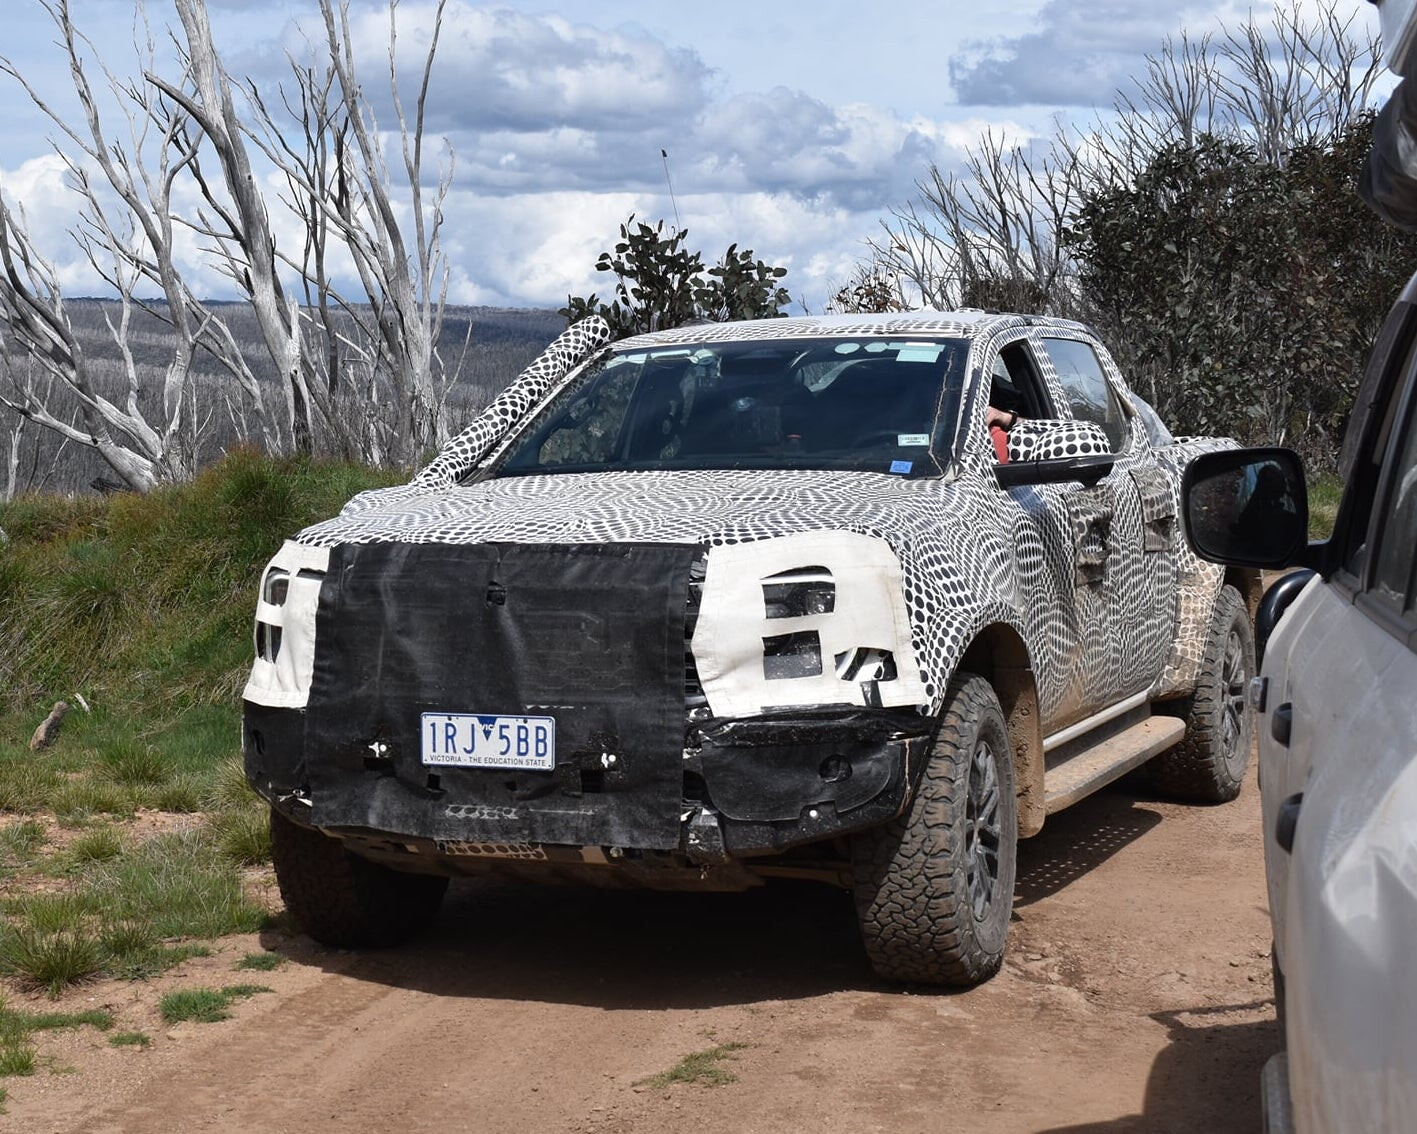
UPDATE, December 13: The 2022 Ford Everest has been seen driving on the streets of Thailand, with more of its front-end spied.
The latest Everest images, posted by the Kurdistan Automotive Blog, show the SUV in greater detail following the unveiling of its Ranger ute sibling late last month.
Ford manufactures both the Everest and the Ranger in Thailand, with the company investing $1.26 billion to upgrade its manufacturing facilities to help increase its annual output.
https://www.instagram.com/p/CXYq8Srsghn/
It’s believed to be the first time the Everest has been seen in Thailand, suggesting the model is nearing production readiness – though prototypes have been spied in both the US and Australia, including off-roading in the Victorian High Country alongside a camouflaged Ranger Raptor.
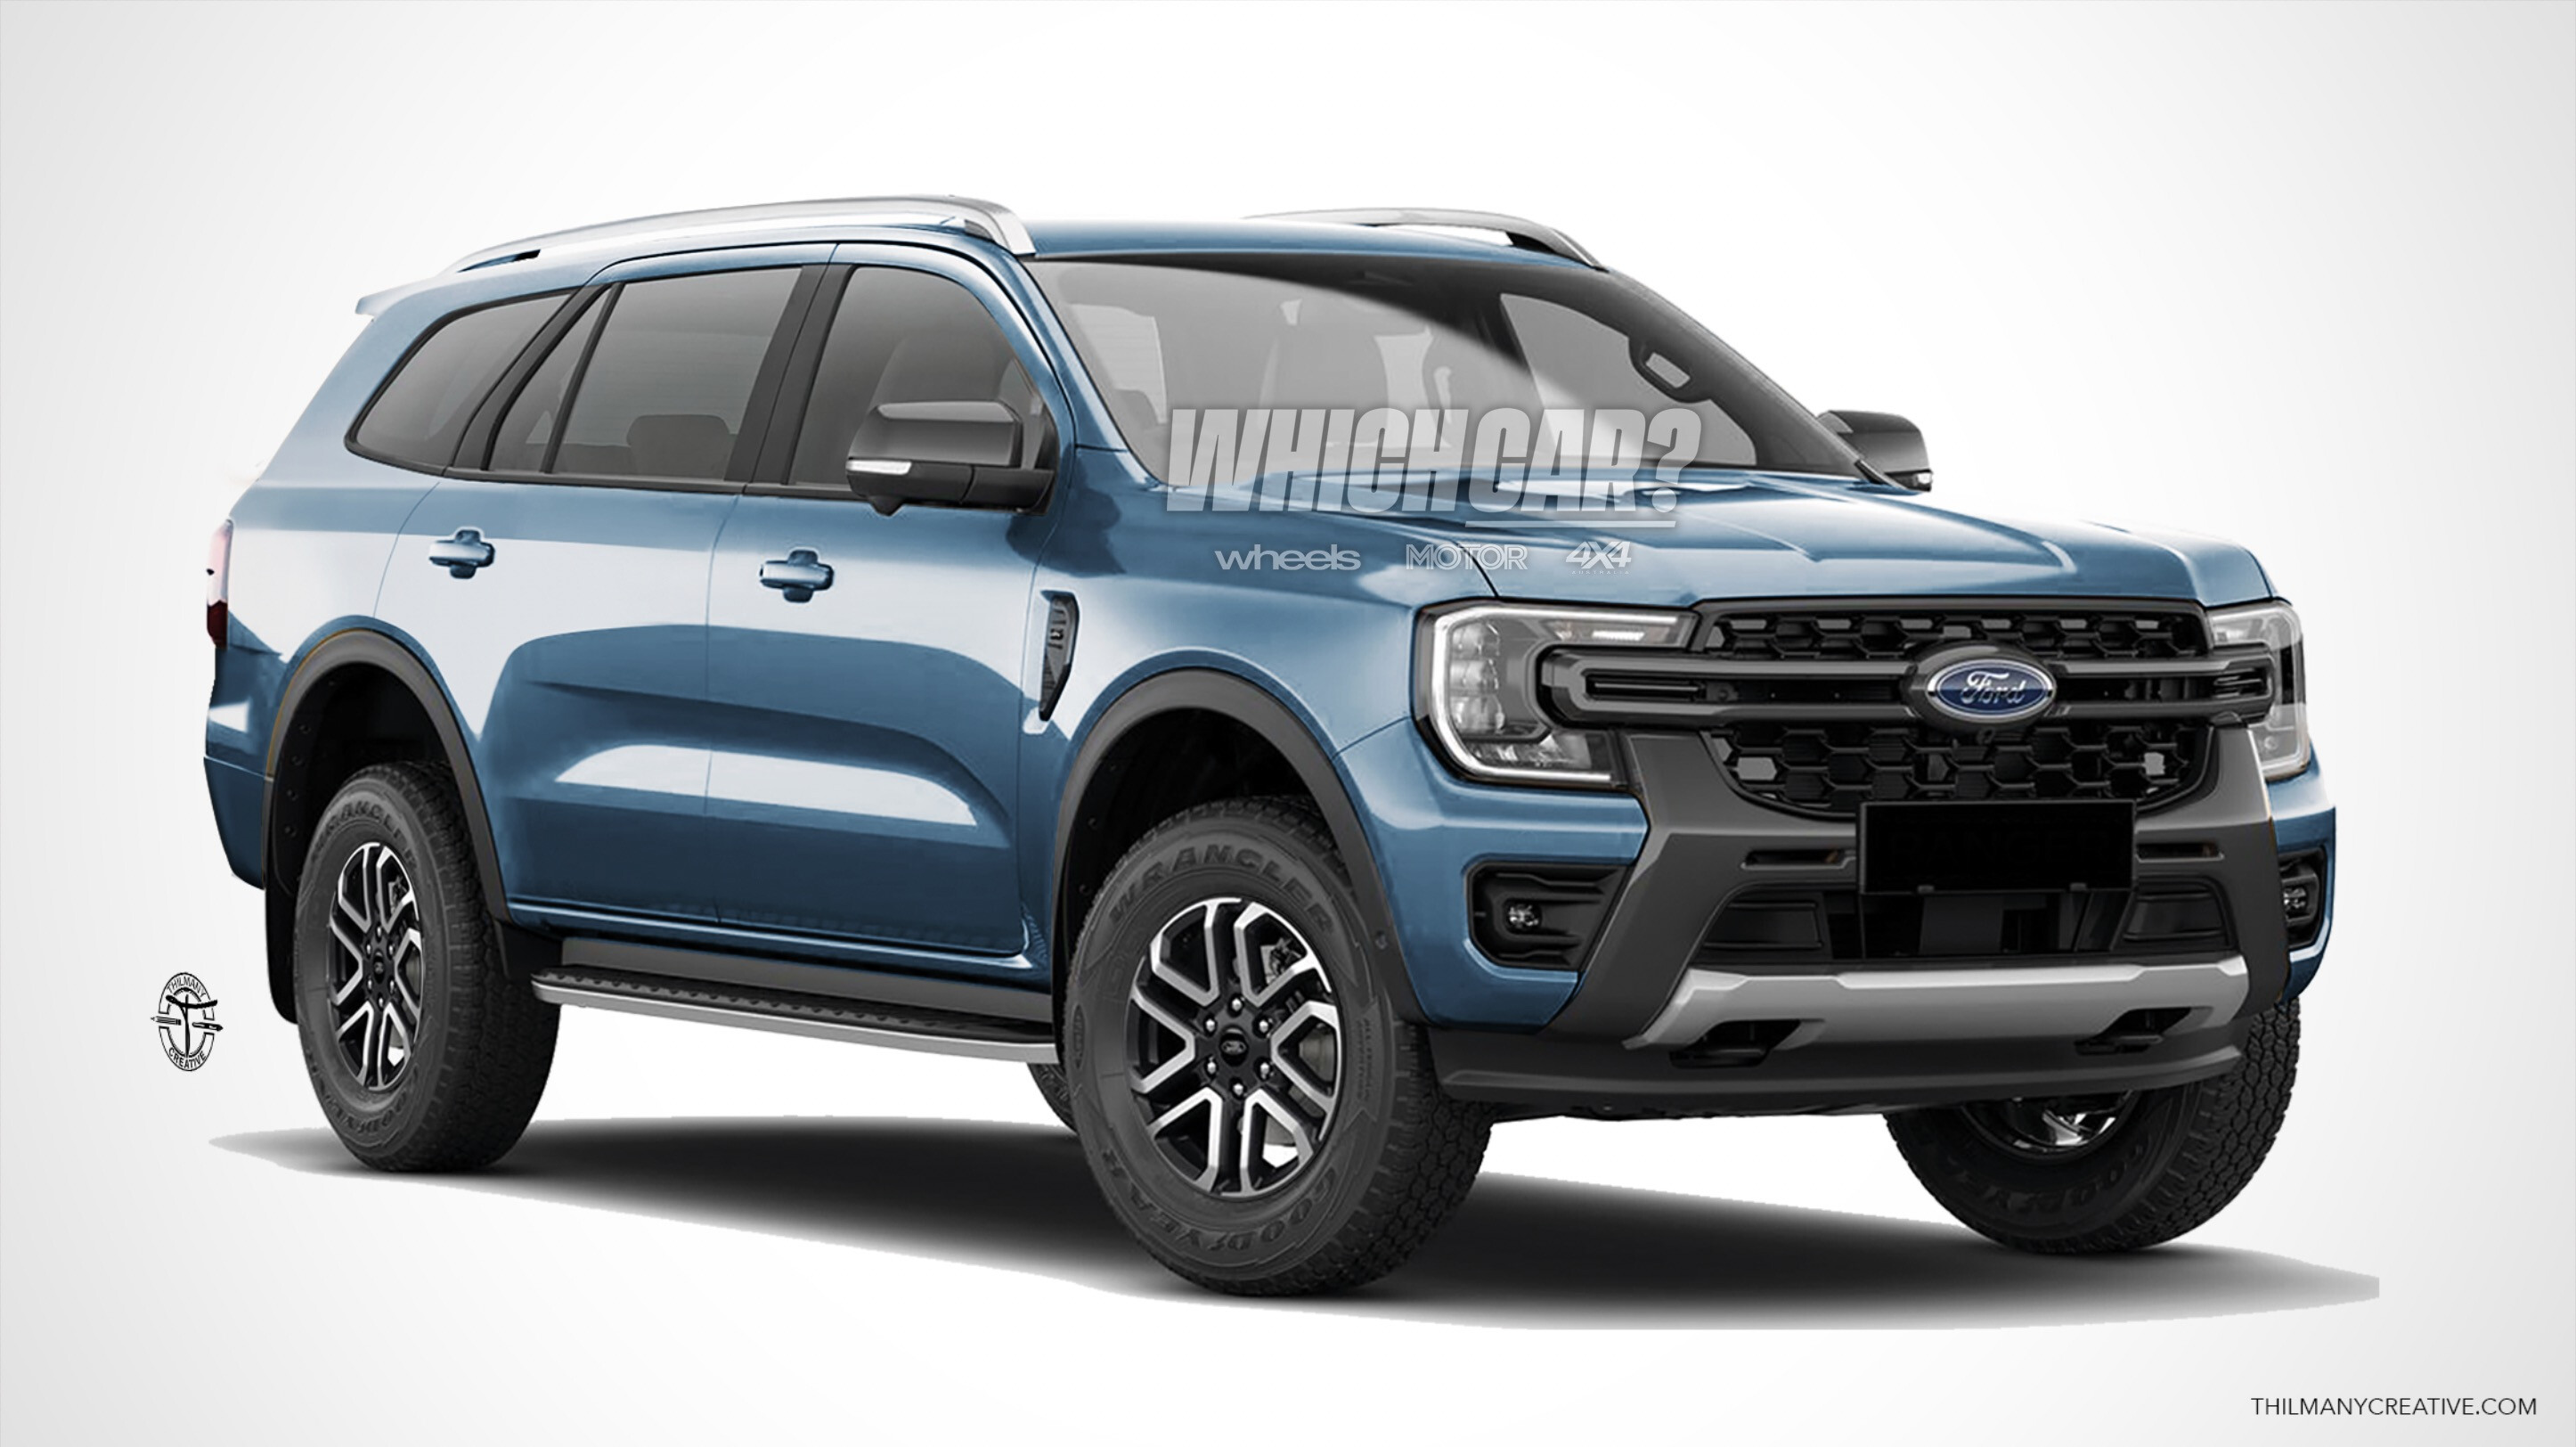
In recent days, artist Sascha Thilmany created digital renderings based on camouflaged spy photos, providing a glimpse of what we can expect when the Everest makes its debut.
The story to here
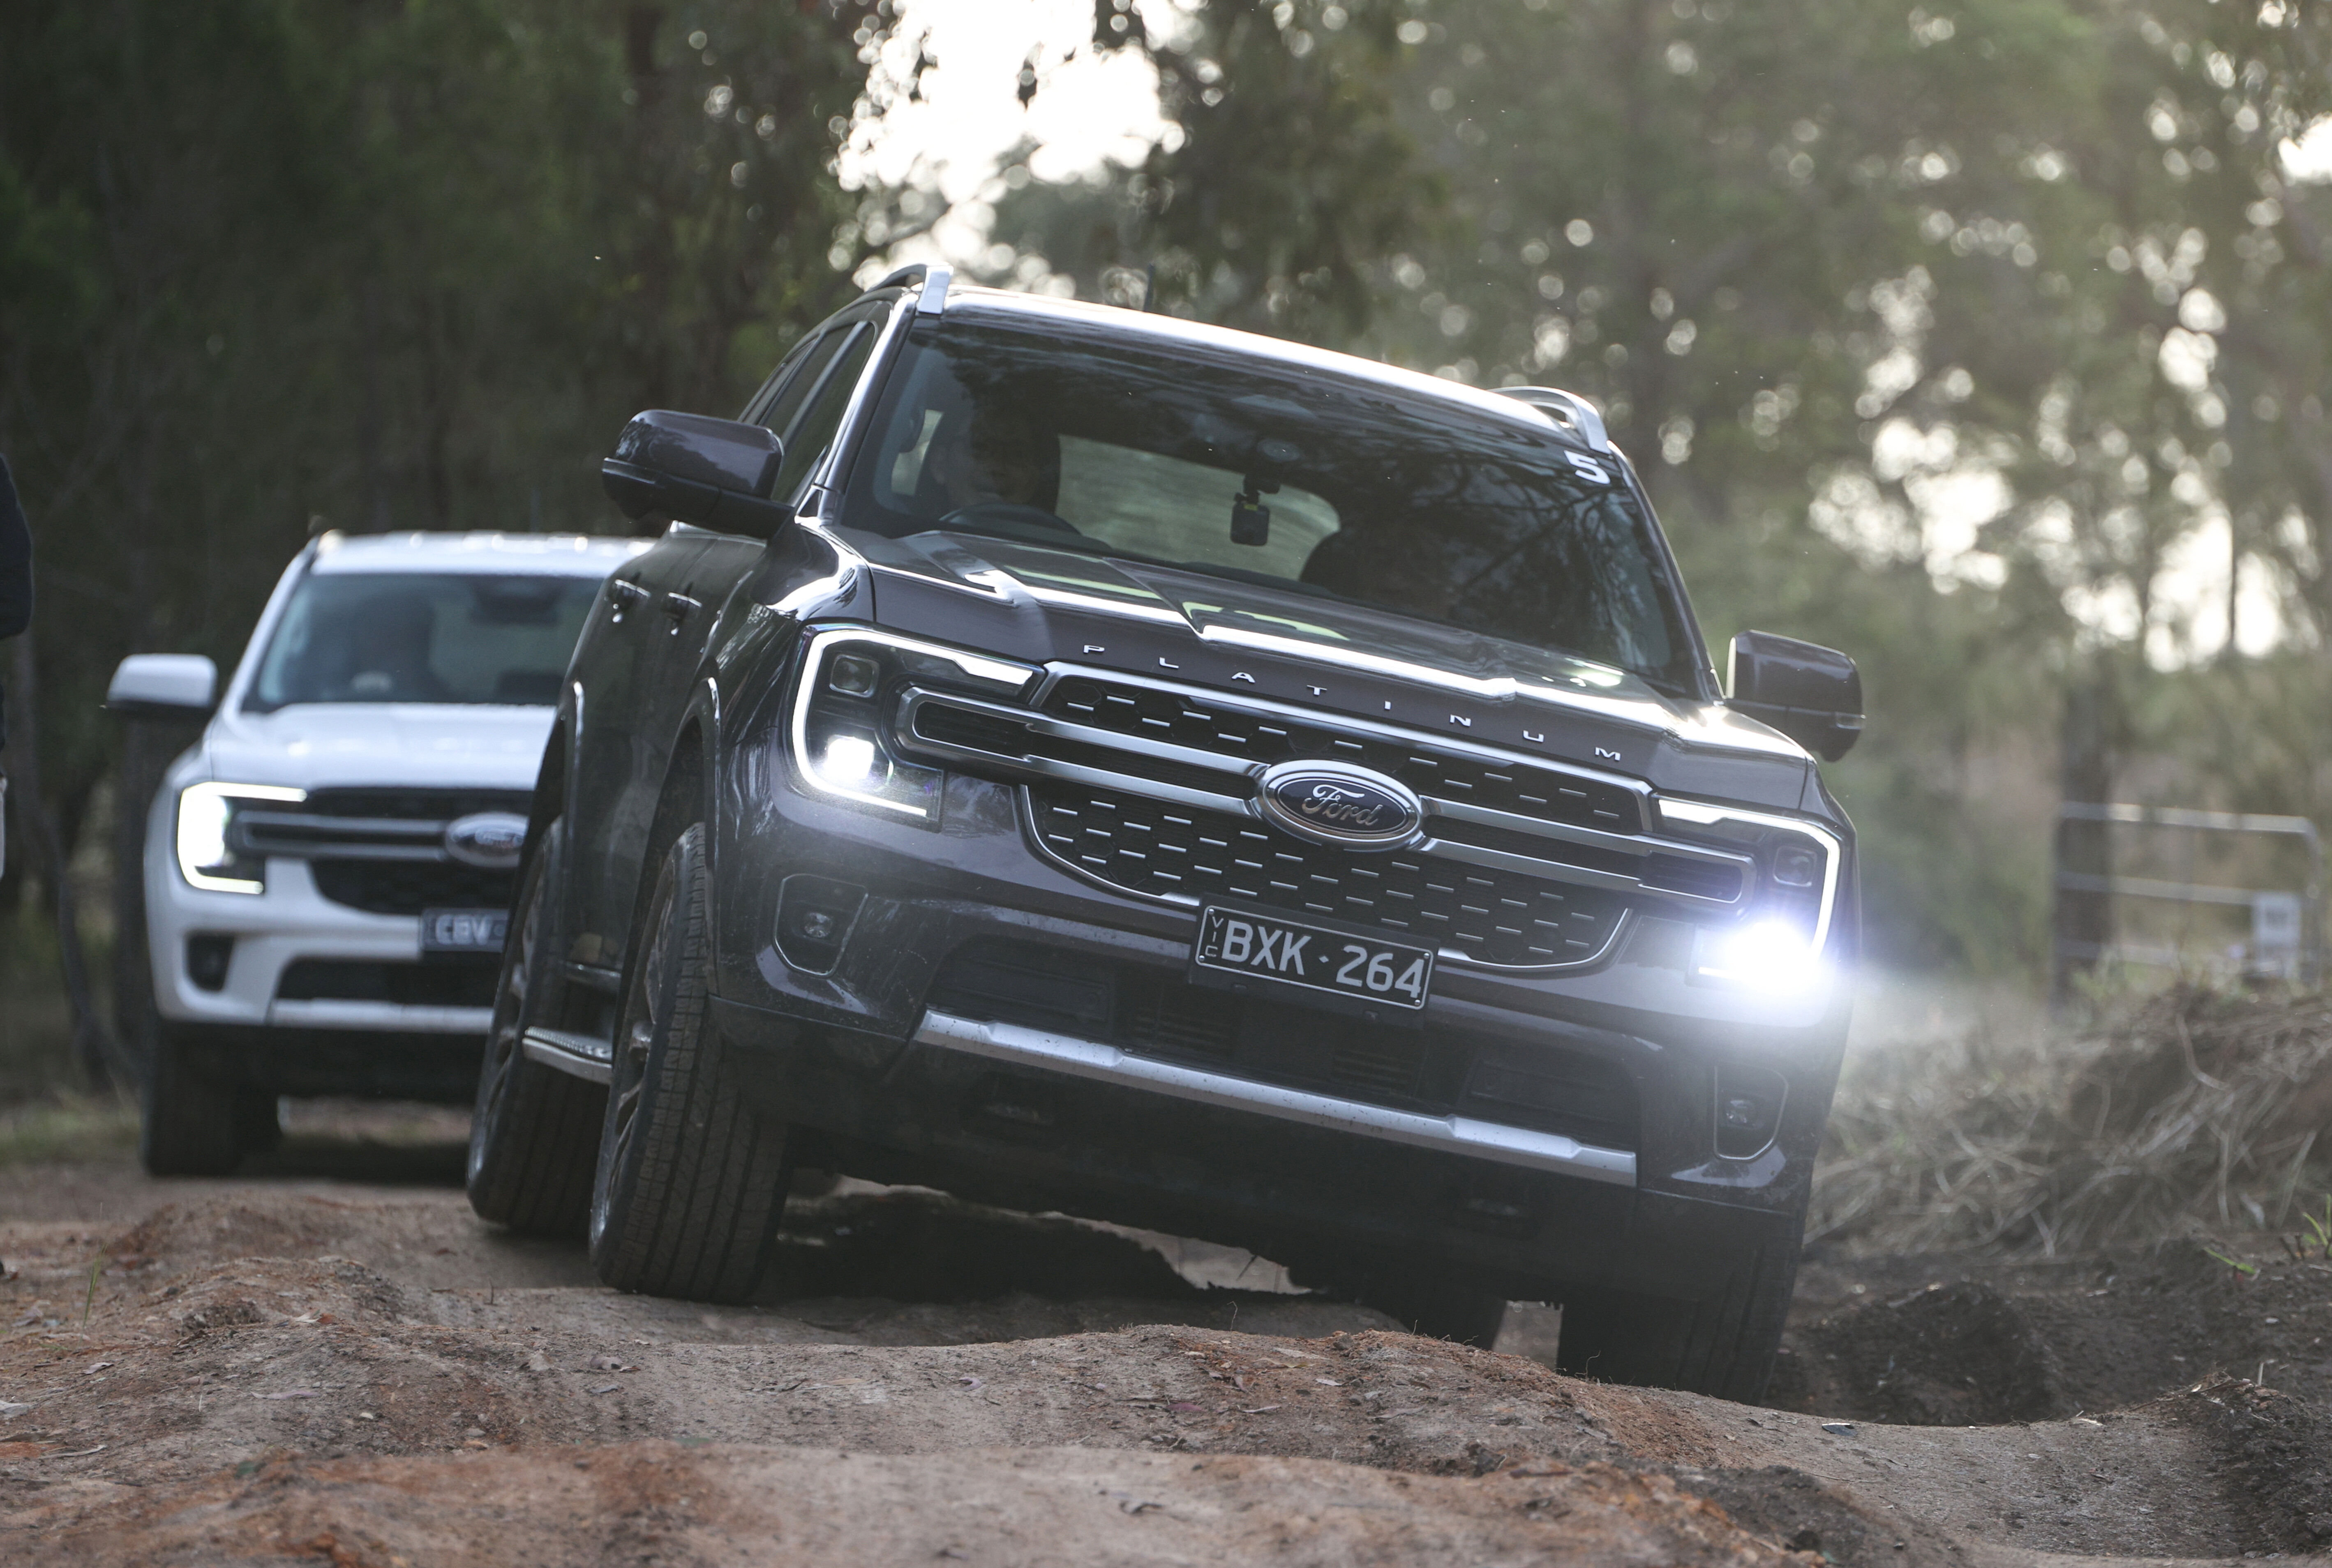
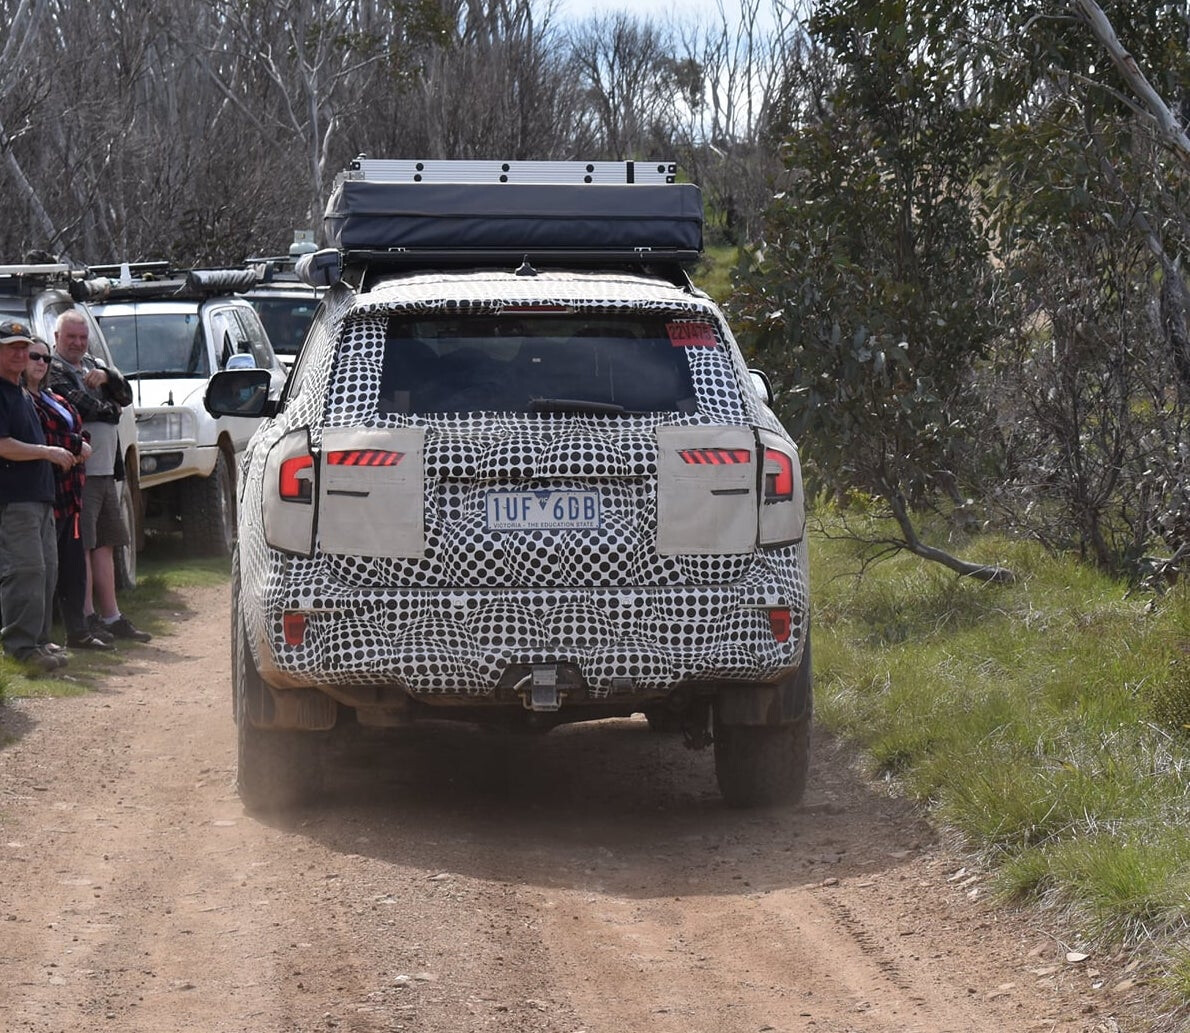
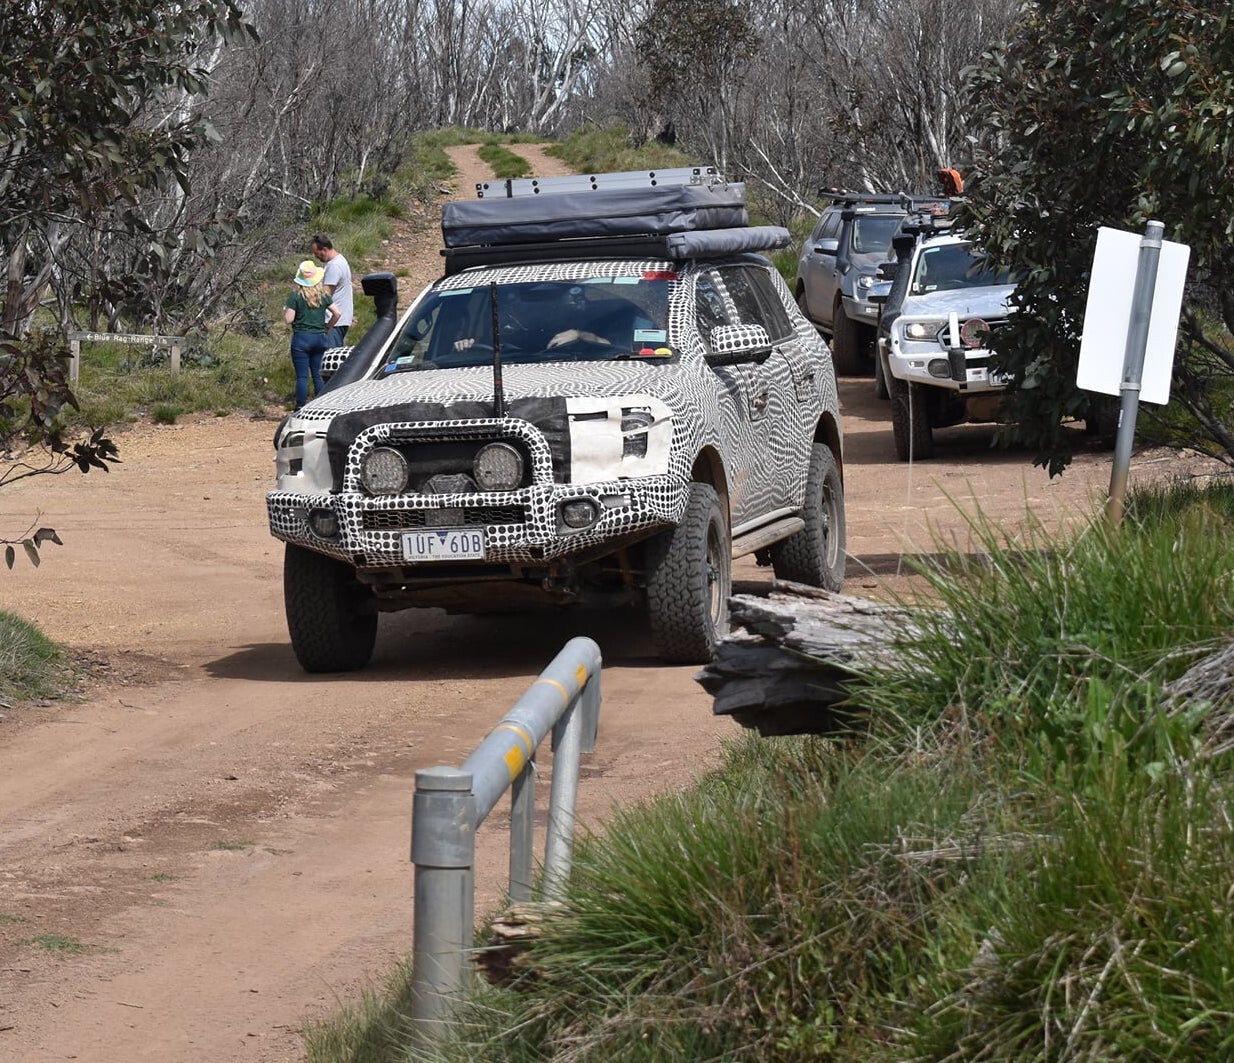
November 15: The 2022 Ford Ranger Raptor and Everest have been spied testing in Victoria’s rugged High Country, ahead of the reveal of the standard Ranger on November 24.
These photos, posted to the Vic High Country Trips, Info, Vehicle Setups Facebook group by user Warren, show the new Ranger and Everest testing a suite of ARB accessories – in addition to a left-hand drive Ranger Raptor.

The thinly-disguised Ranger and Everest models were fitted with a number of off-road parts, including; a front bull-bar, LED spotlights, antenna, snorkel, roof racks and tow bar. Meanwhile, the Ranger Raptor remained stock – apart from the addition of a snorkel – during the trip along the steep Blue Rag Range Track, near Dargo and Mount Hotham in East Gippsland, this week.
These spy photos follow an announcement by Ford Australia earlier this year that it will partner with ARB to supply accessories from the aftermarket giant for the Ranger and Everest through its dealership network, covered by the manufacturer’s full five-year/unlimited kilometre warranty.
Providing our best look yet at the 2022 Ranger Raptor, we can see a set of chunky off-road tyres similar in design to the 285/70 R17 wheels on the current Raptor, as well as Fox suspension shocks.
In addition, the larger flared guards, high-strength aluminium side steps, unique F-O-R-D grille and separate black bumper bar are also set to carry over into the next-generation model.
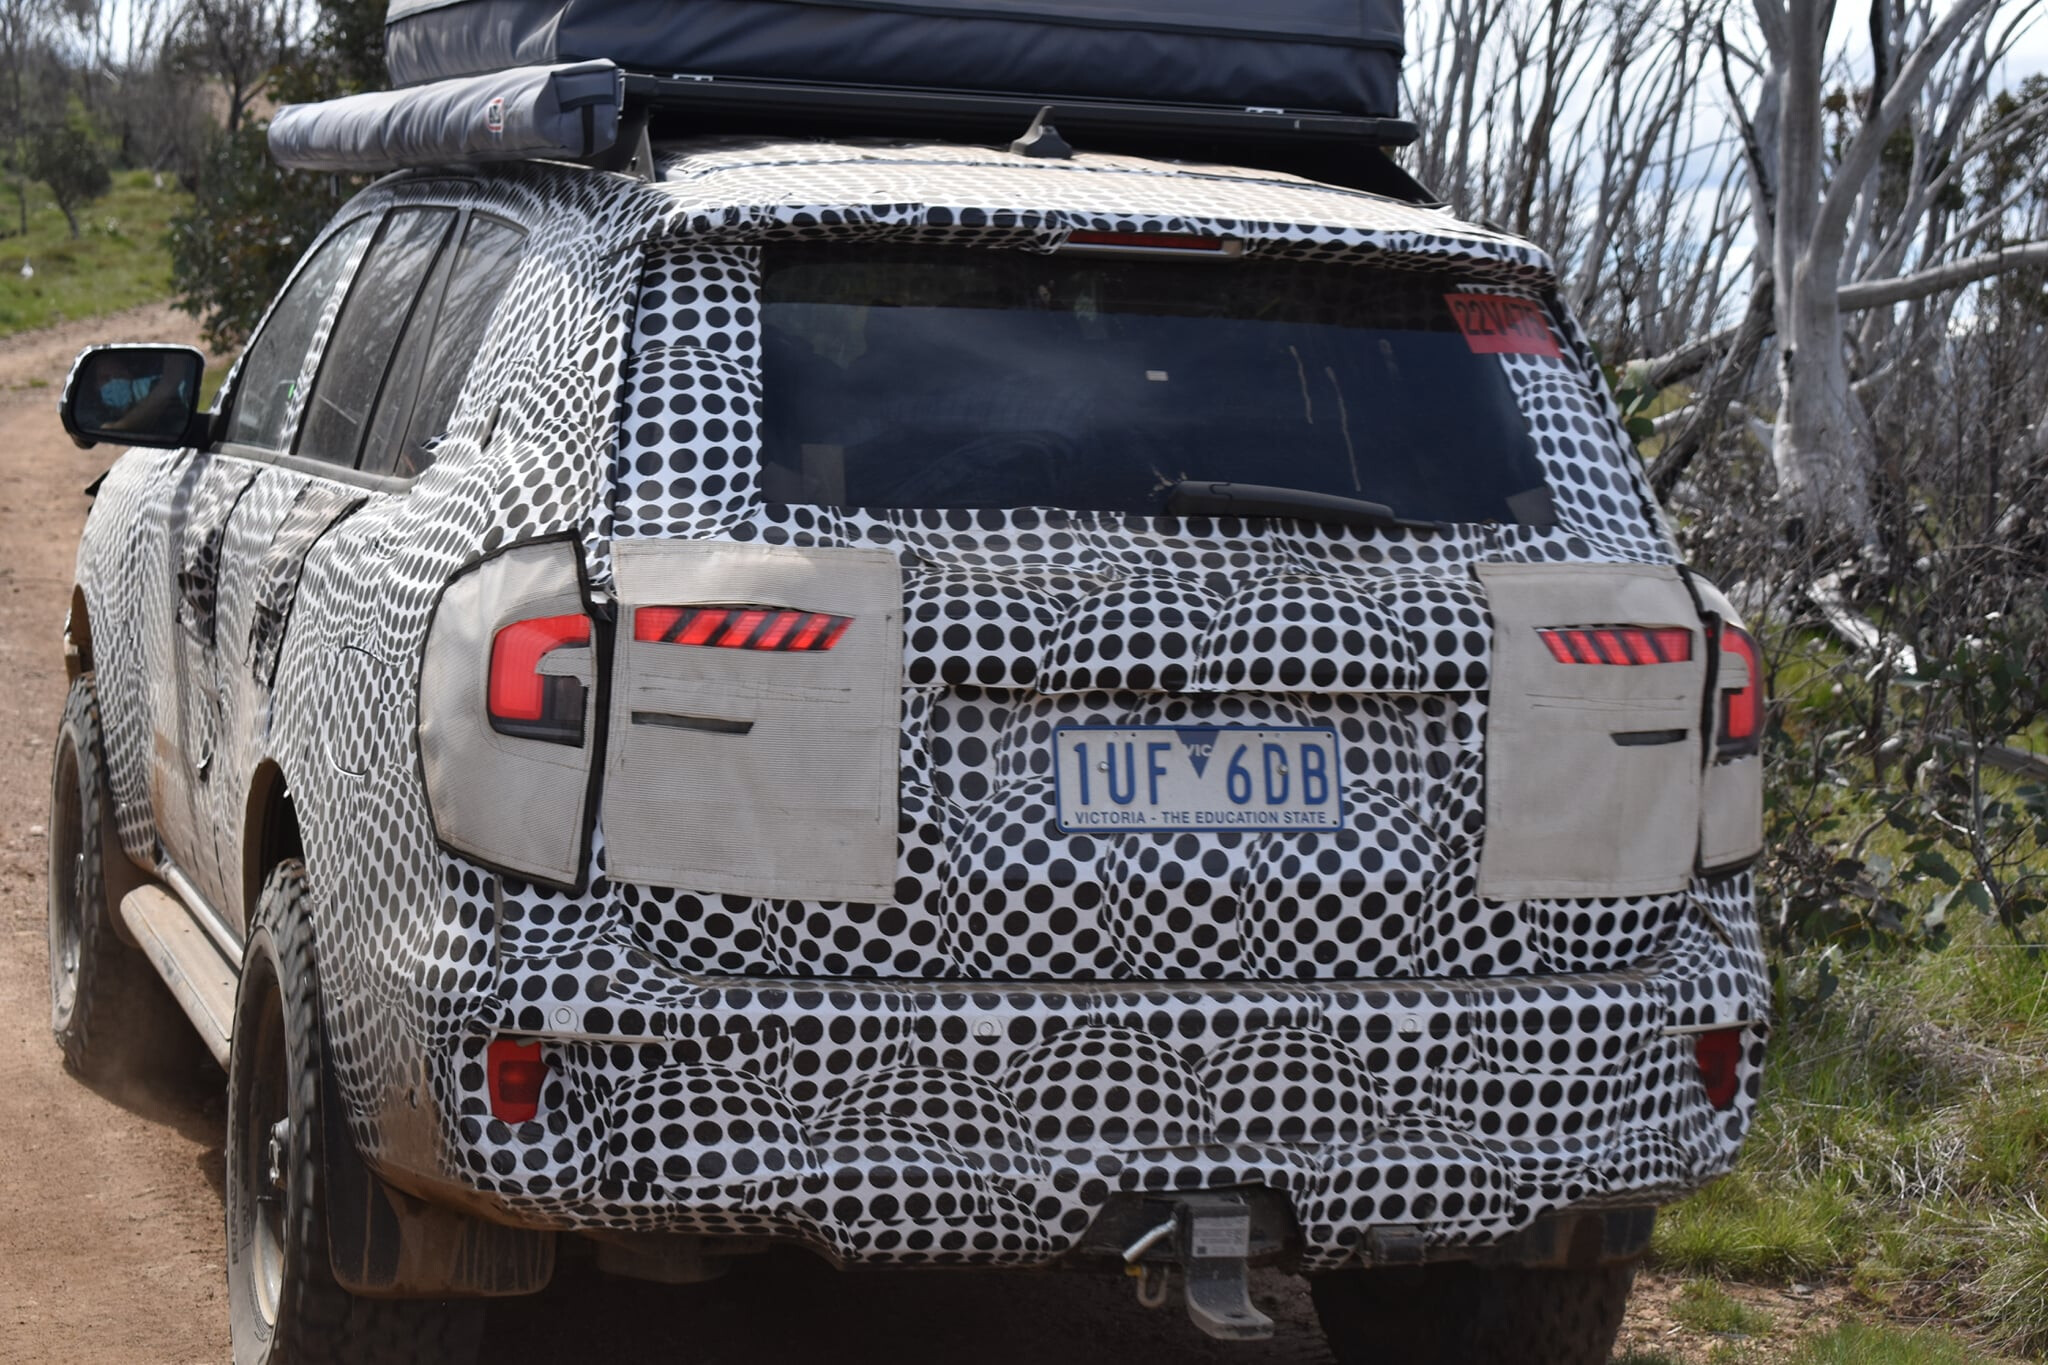
Meanwhile, the camouflaged 2022 Everest is equipped with a set of bigger BF Goodrich all-terrain tyres and steel wheels in comparison to the regular tyres and alloy wheels that will be fitted to the production Everest in stock form, which is expected to be unveiled in early 2022.
Design wise, an evolution of the current rear-end design is seen underneath the camouflage, with LED tail-lamps and a larger tailgate.
As with the current Everest, the front of the next-generation model is virtually identical to the Ranger – albeit with a redesigned grille.
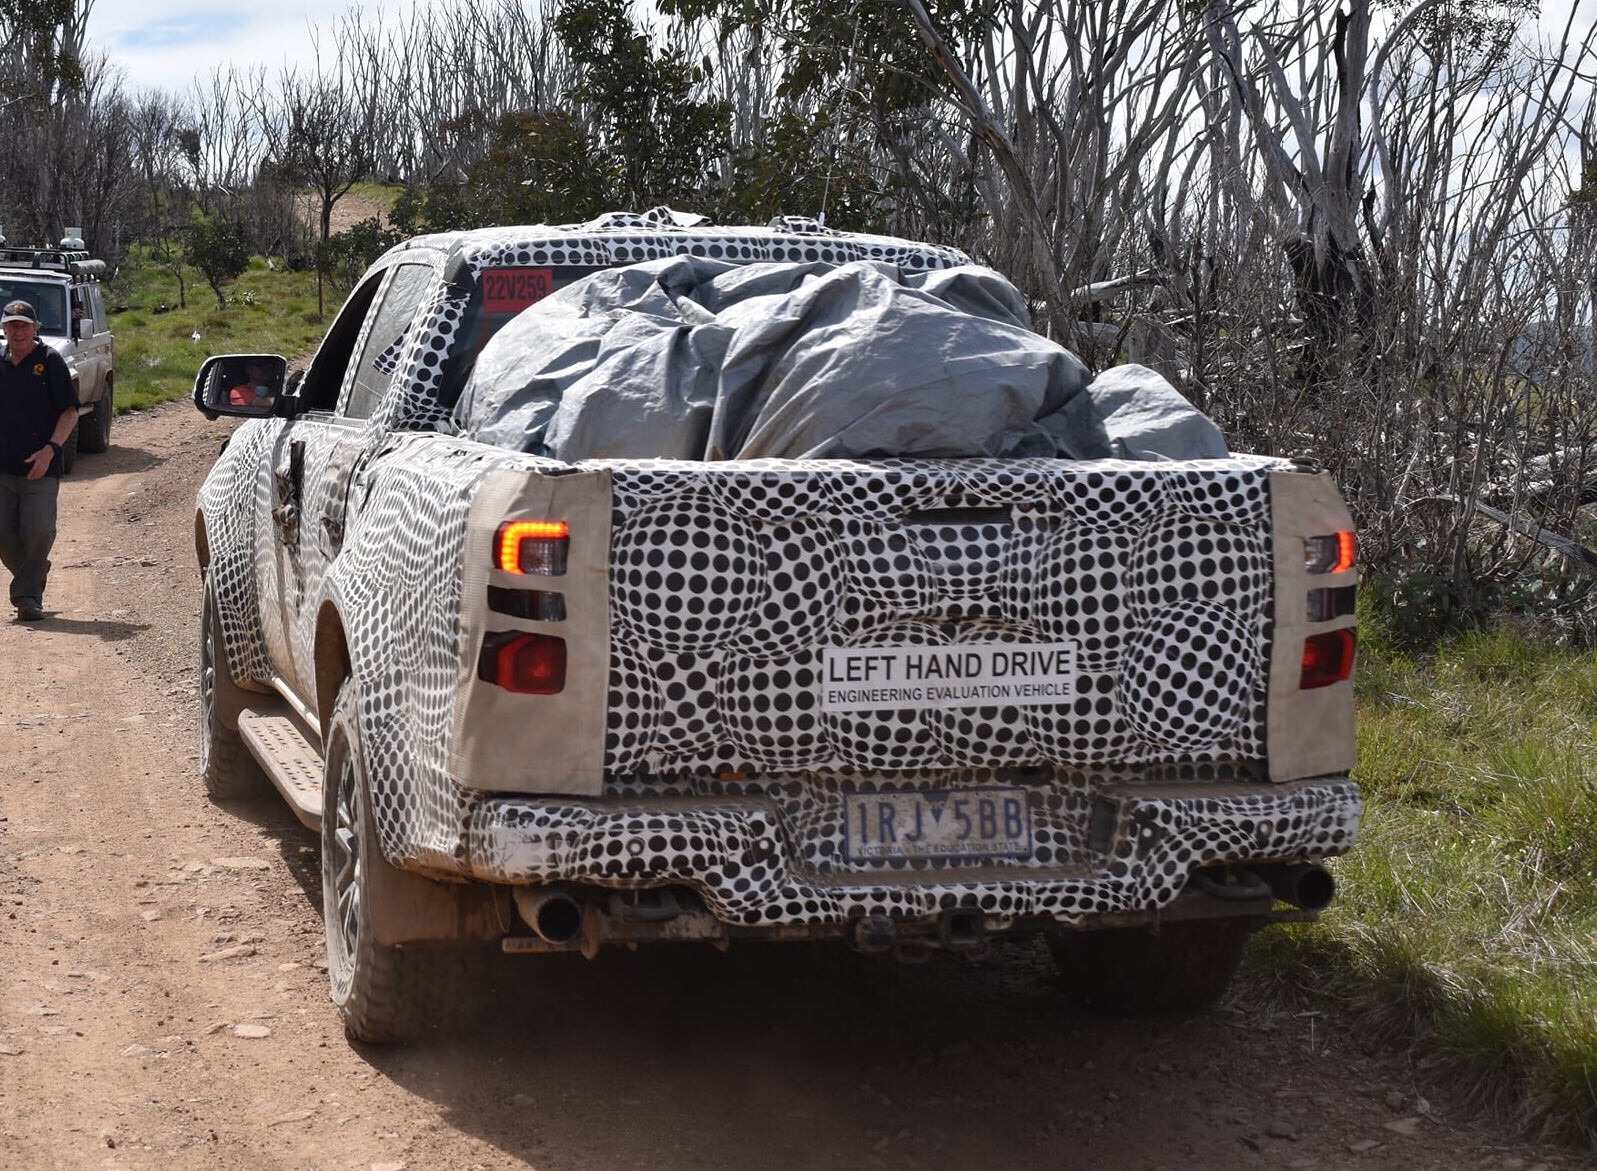
A set of twin exhaust pipes can be seen on the Ranger Raptor, which is rumoured to be fitted with the 3.0-litre turbocharged diesel V6 found in the F-150, producing around 185kW of power and 600Nm of torque, for the Australian market.
The 2.7-litre turbocharged petrol found in the Bronco is also expected to feature on the Ranger Raptor bound for the North American market, meaning this left-hand drive example could instead feature petrol V6 power – rather than the diesel V6 bound for Australia.
While the diesel V6 is likely to be available on selected Ranger and Everest variants, the 157kW/500Nm 2.0-litre twin-turbocharged four-cylinder diesel from the current model is tipped to carry over largely unchanged across the broader line-up.
A single turbo version of the 2.0-litre diesel engine is also expected to replace the ageing 2.2-litre mill found in the outgoing Ranger, while the 3.2-litre five-cylinder diesel will also be dropped from the next-generation range.
The engines are expected to be mated to a 10-speed automatic transmission, with no word on whether, or where, a manual transmission will be available.
Our earlier coverage of the next-generation Ranger and Everest indicates each model might pick up a rotary gear shifter, where drivers shift from ‘park’ to ‘drive’ in a clockwise motion.
An electronic parking brake will also be fitted on selected Ranger variants and across the Everest range, owing to the expected fitment of rear disc brakes.
Lower-grade Ranger variants are tipped to forego the modern rotary dial and electronic parking brake, instead offering a regular shifter and manual hand brake lever.
A large portrait-orientated touch screen featuring Ford’s latest ‘Sync 4’ infotainment system is also anticipated on upper grades of the Ranger and Everest.
Stay tuned to 4X4 Australia on November 24 as the covers come off the next-generation Ranger (6pm AEDT).