• Voucher can only be redeemed through www.maxtrax.com.au
• When using the voucher, any outstanding balance can be paid as normal.
• If you don’t spend the whole thing, the remaining balance can be used on your account in the future.
• The voucher will expire 3 years from the date of activation.
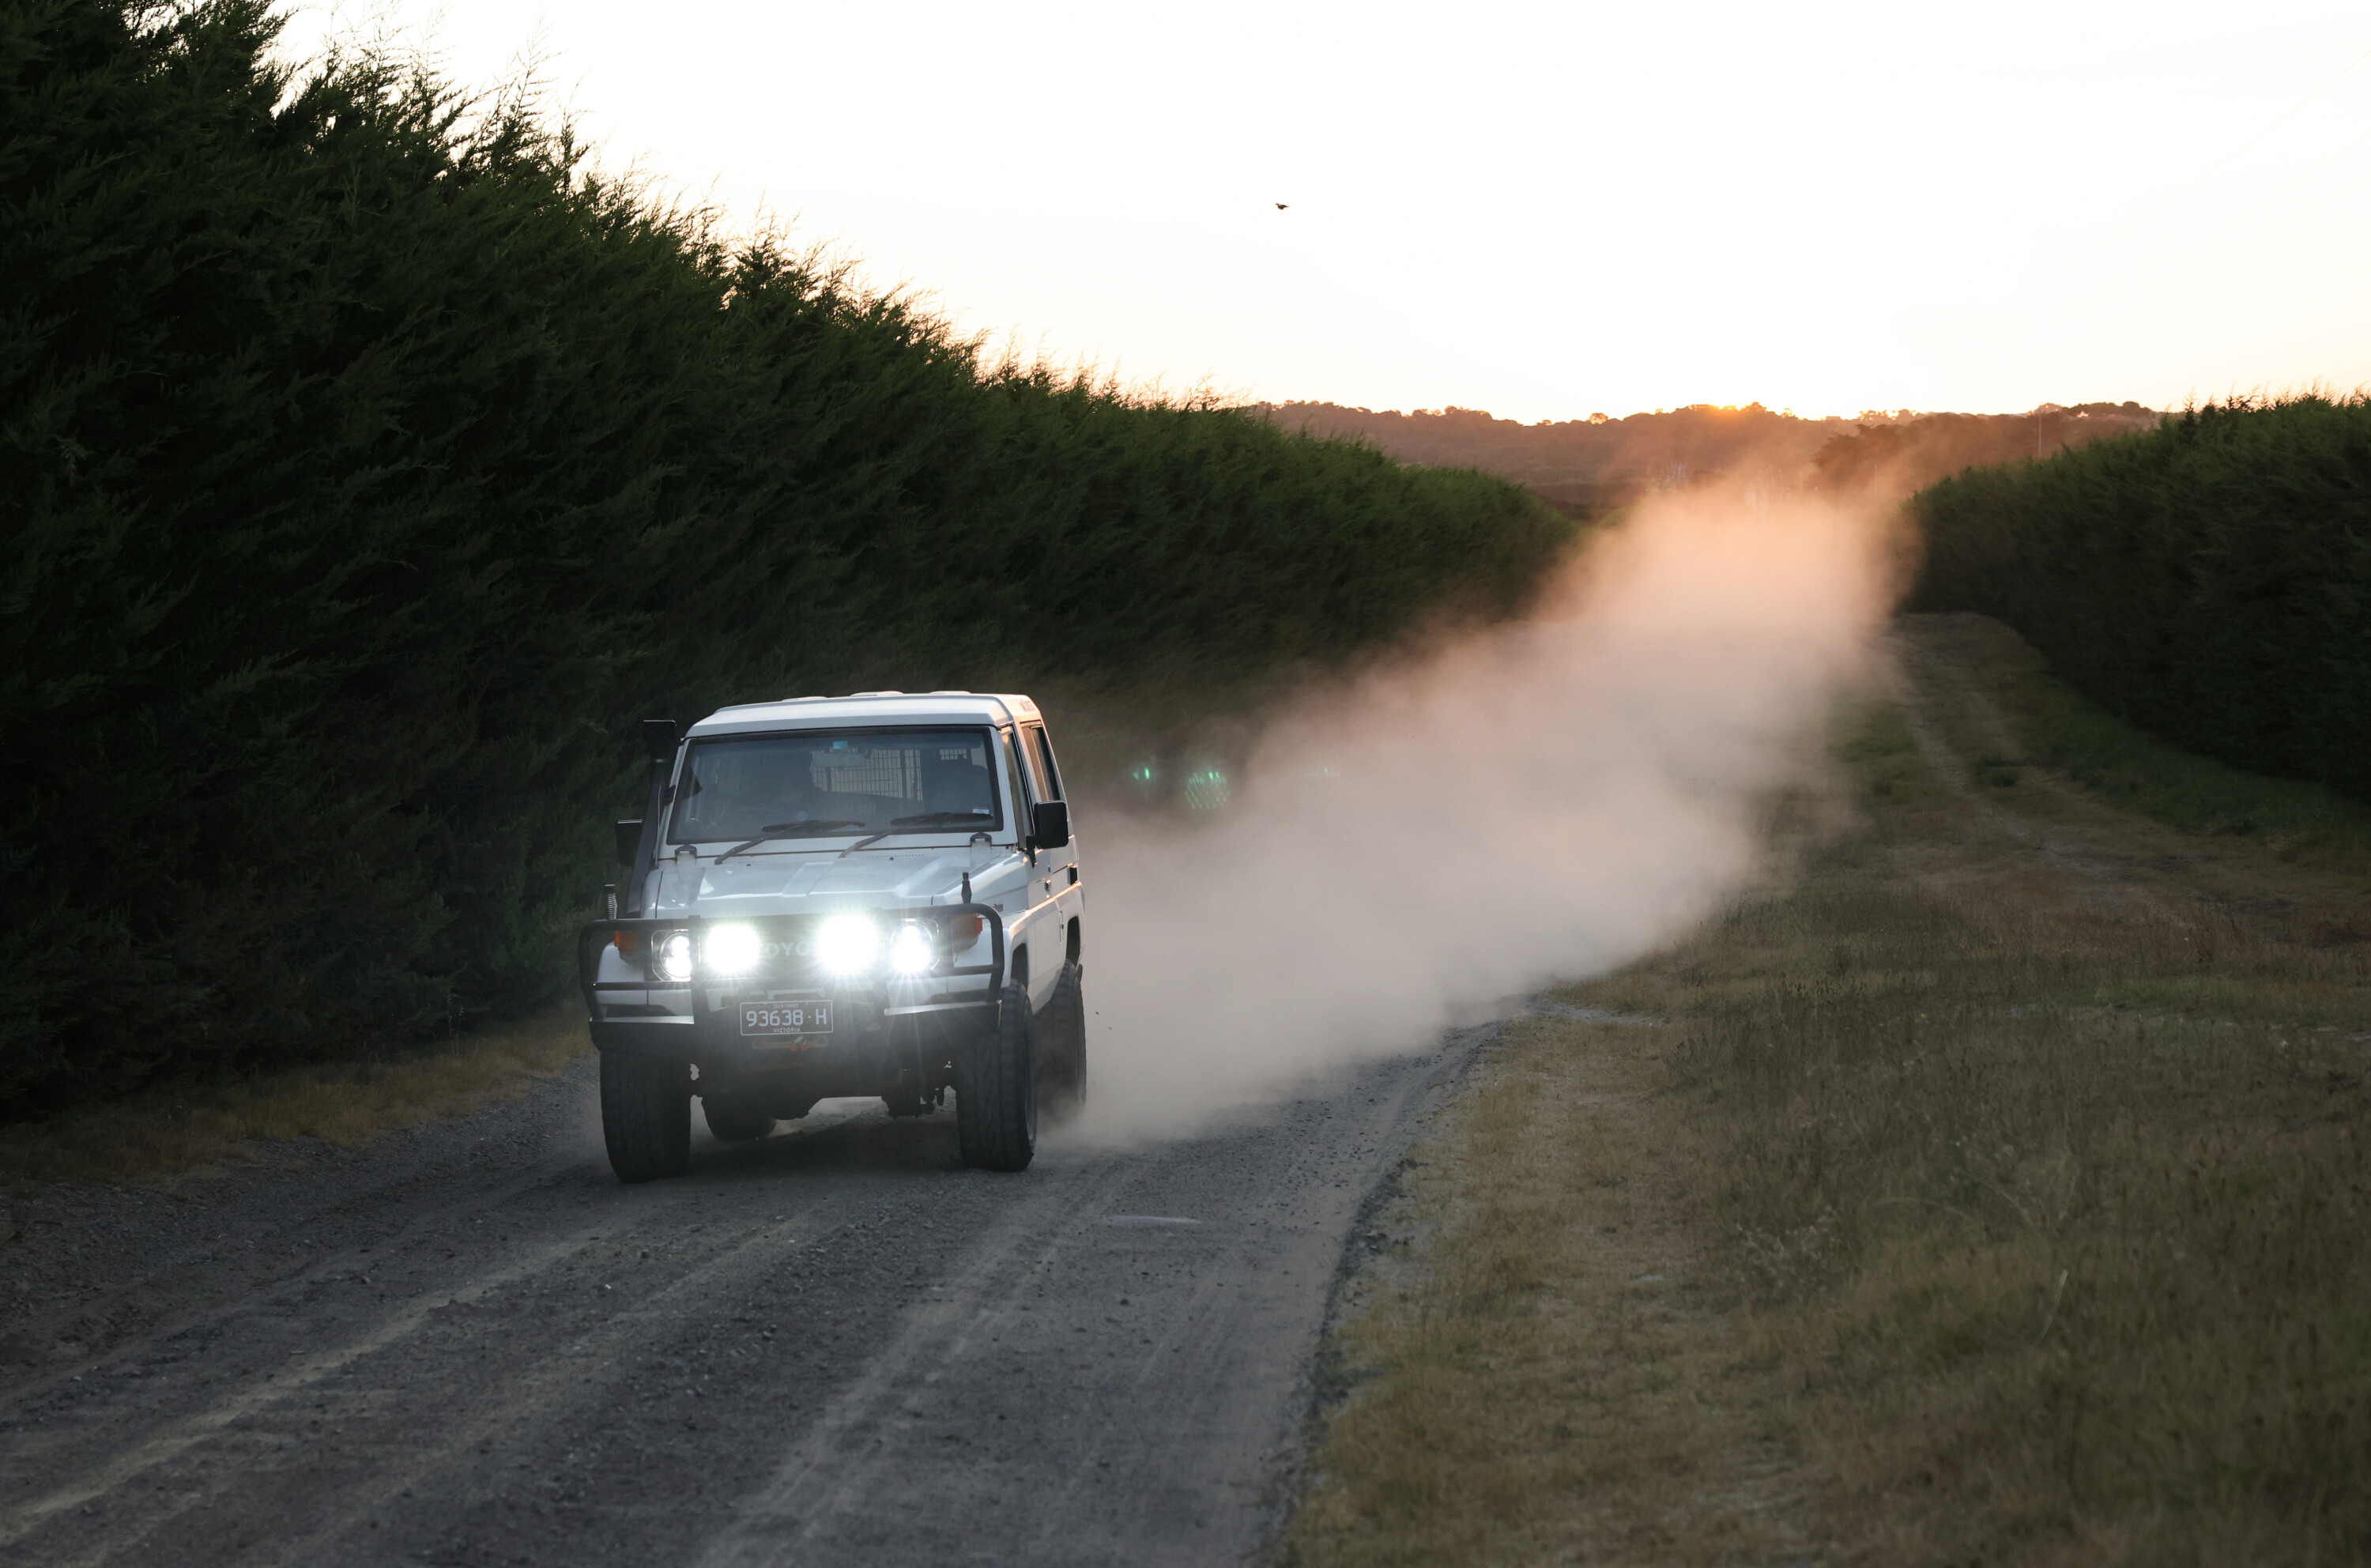
Australians love their 4x4s, but many don’t feel comfortable using their off-roader in the bush without any experience or without some form of back-up.
Isuzu has devised a solution: 4WD trips for Isuzu 4x4s called I-Venture Club. Would an ex-4×4 journo like me be able to lock his mental hubs for long enough to report on this three-day I-Venture Club trip in the Flinders Ranges? When I began my 4×4 journalism career, we were still listening to cassettes.
1
Offering a variety of tag-along tours, from beginner four-wheel driving day courses to three-day adventures for more experienced drivers, these I-Venture Club trips give Isuzu owners the chance to explore the capabilities of their vehicles off-road with experienced trainers at the ready to help out if needed.
I-Venture Club began almost 10 years ago. This concept is not new, but Isuzu has kept it up much longer than any other manufacturer. Owners get a partly subsidised trip with off-road training and back-up if things go south, while Isuzu gets to showcase its products in the environment they’re designed for.
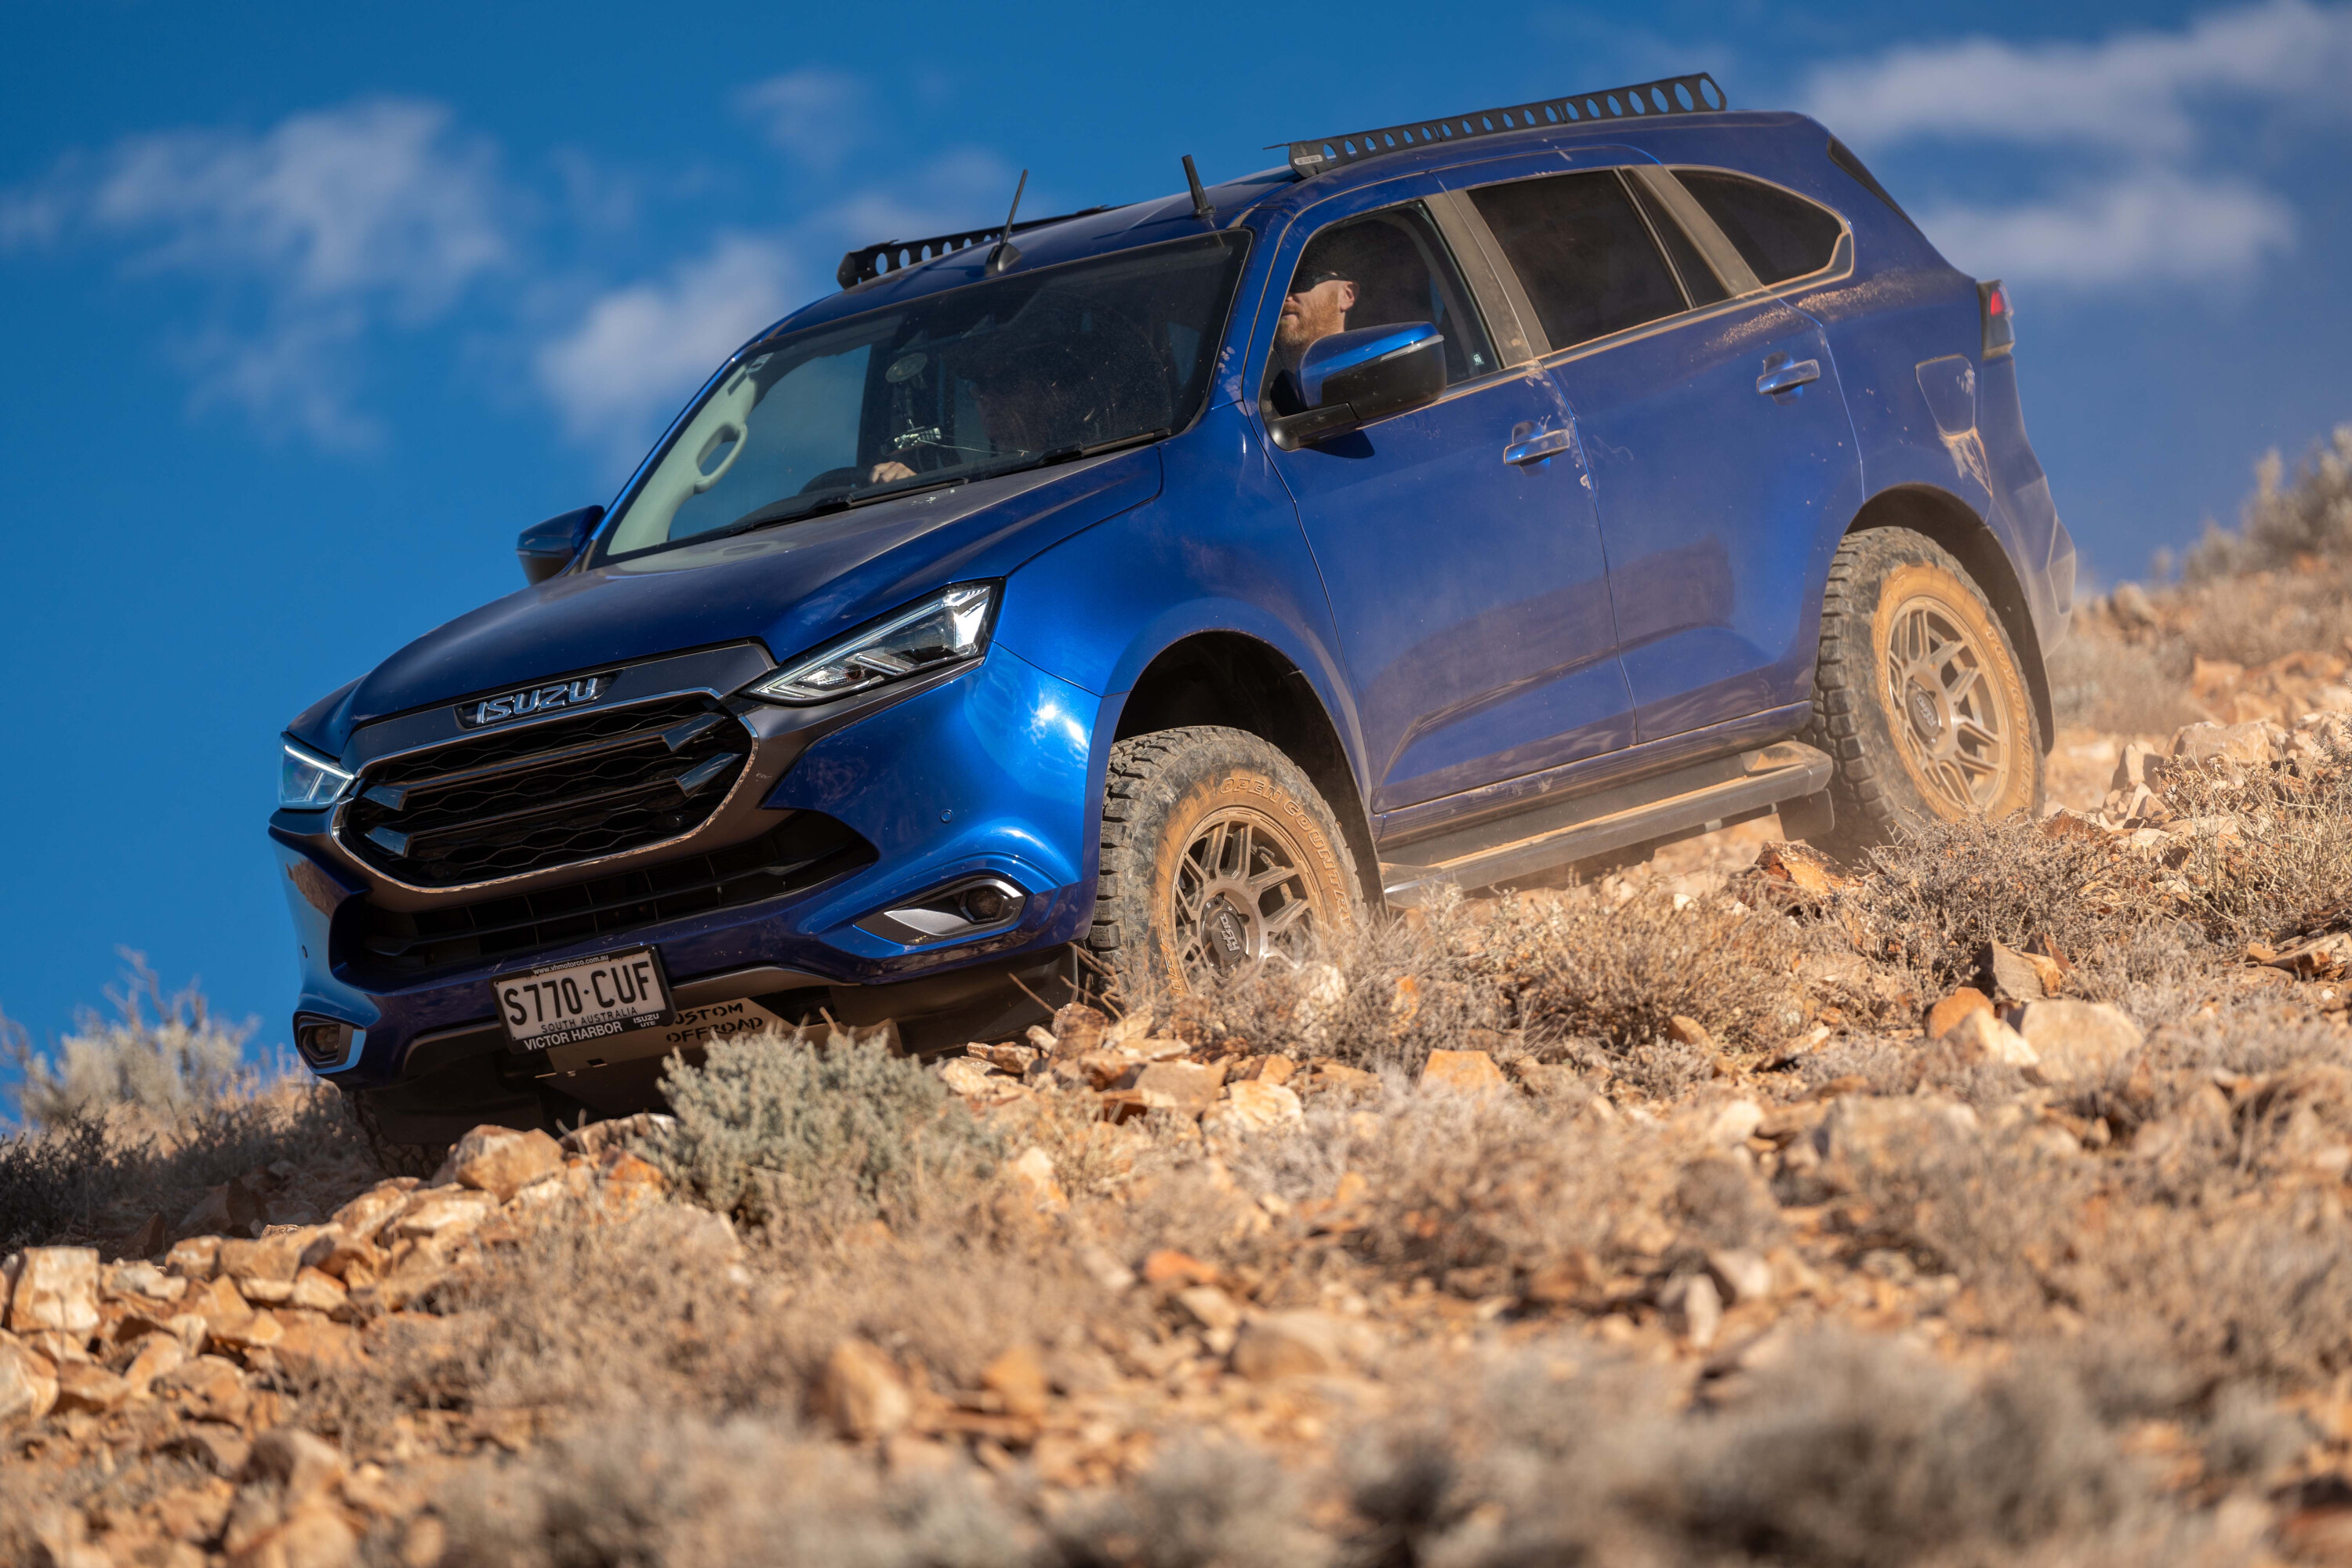
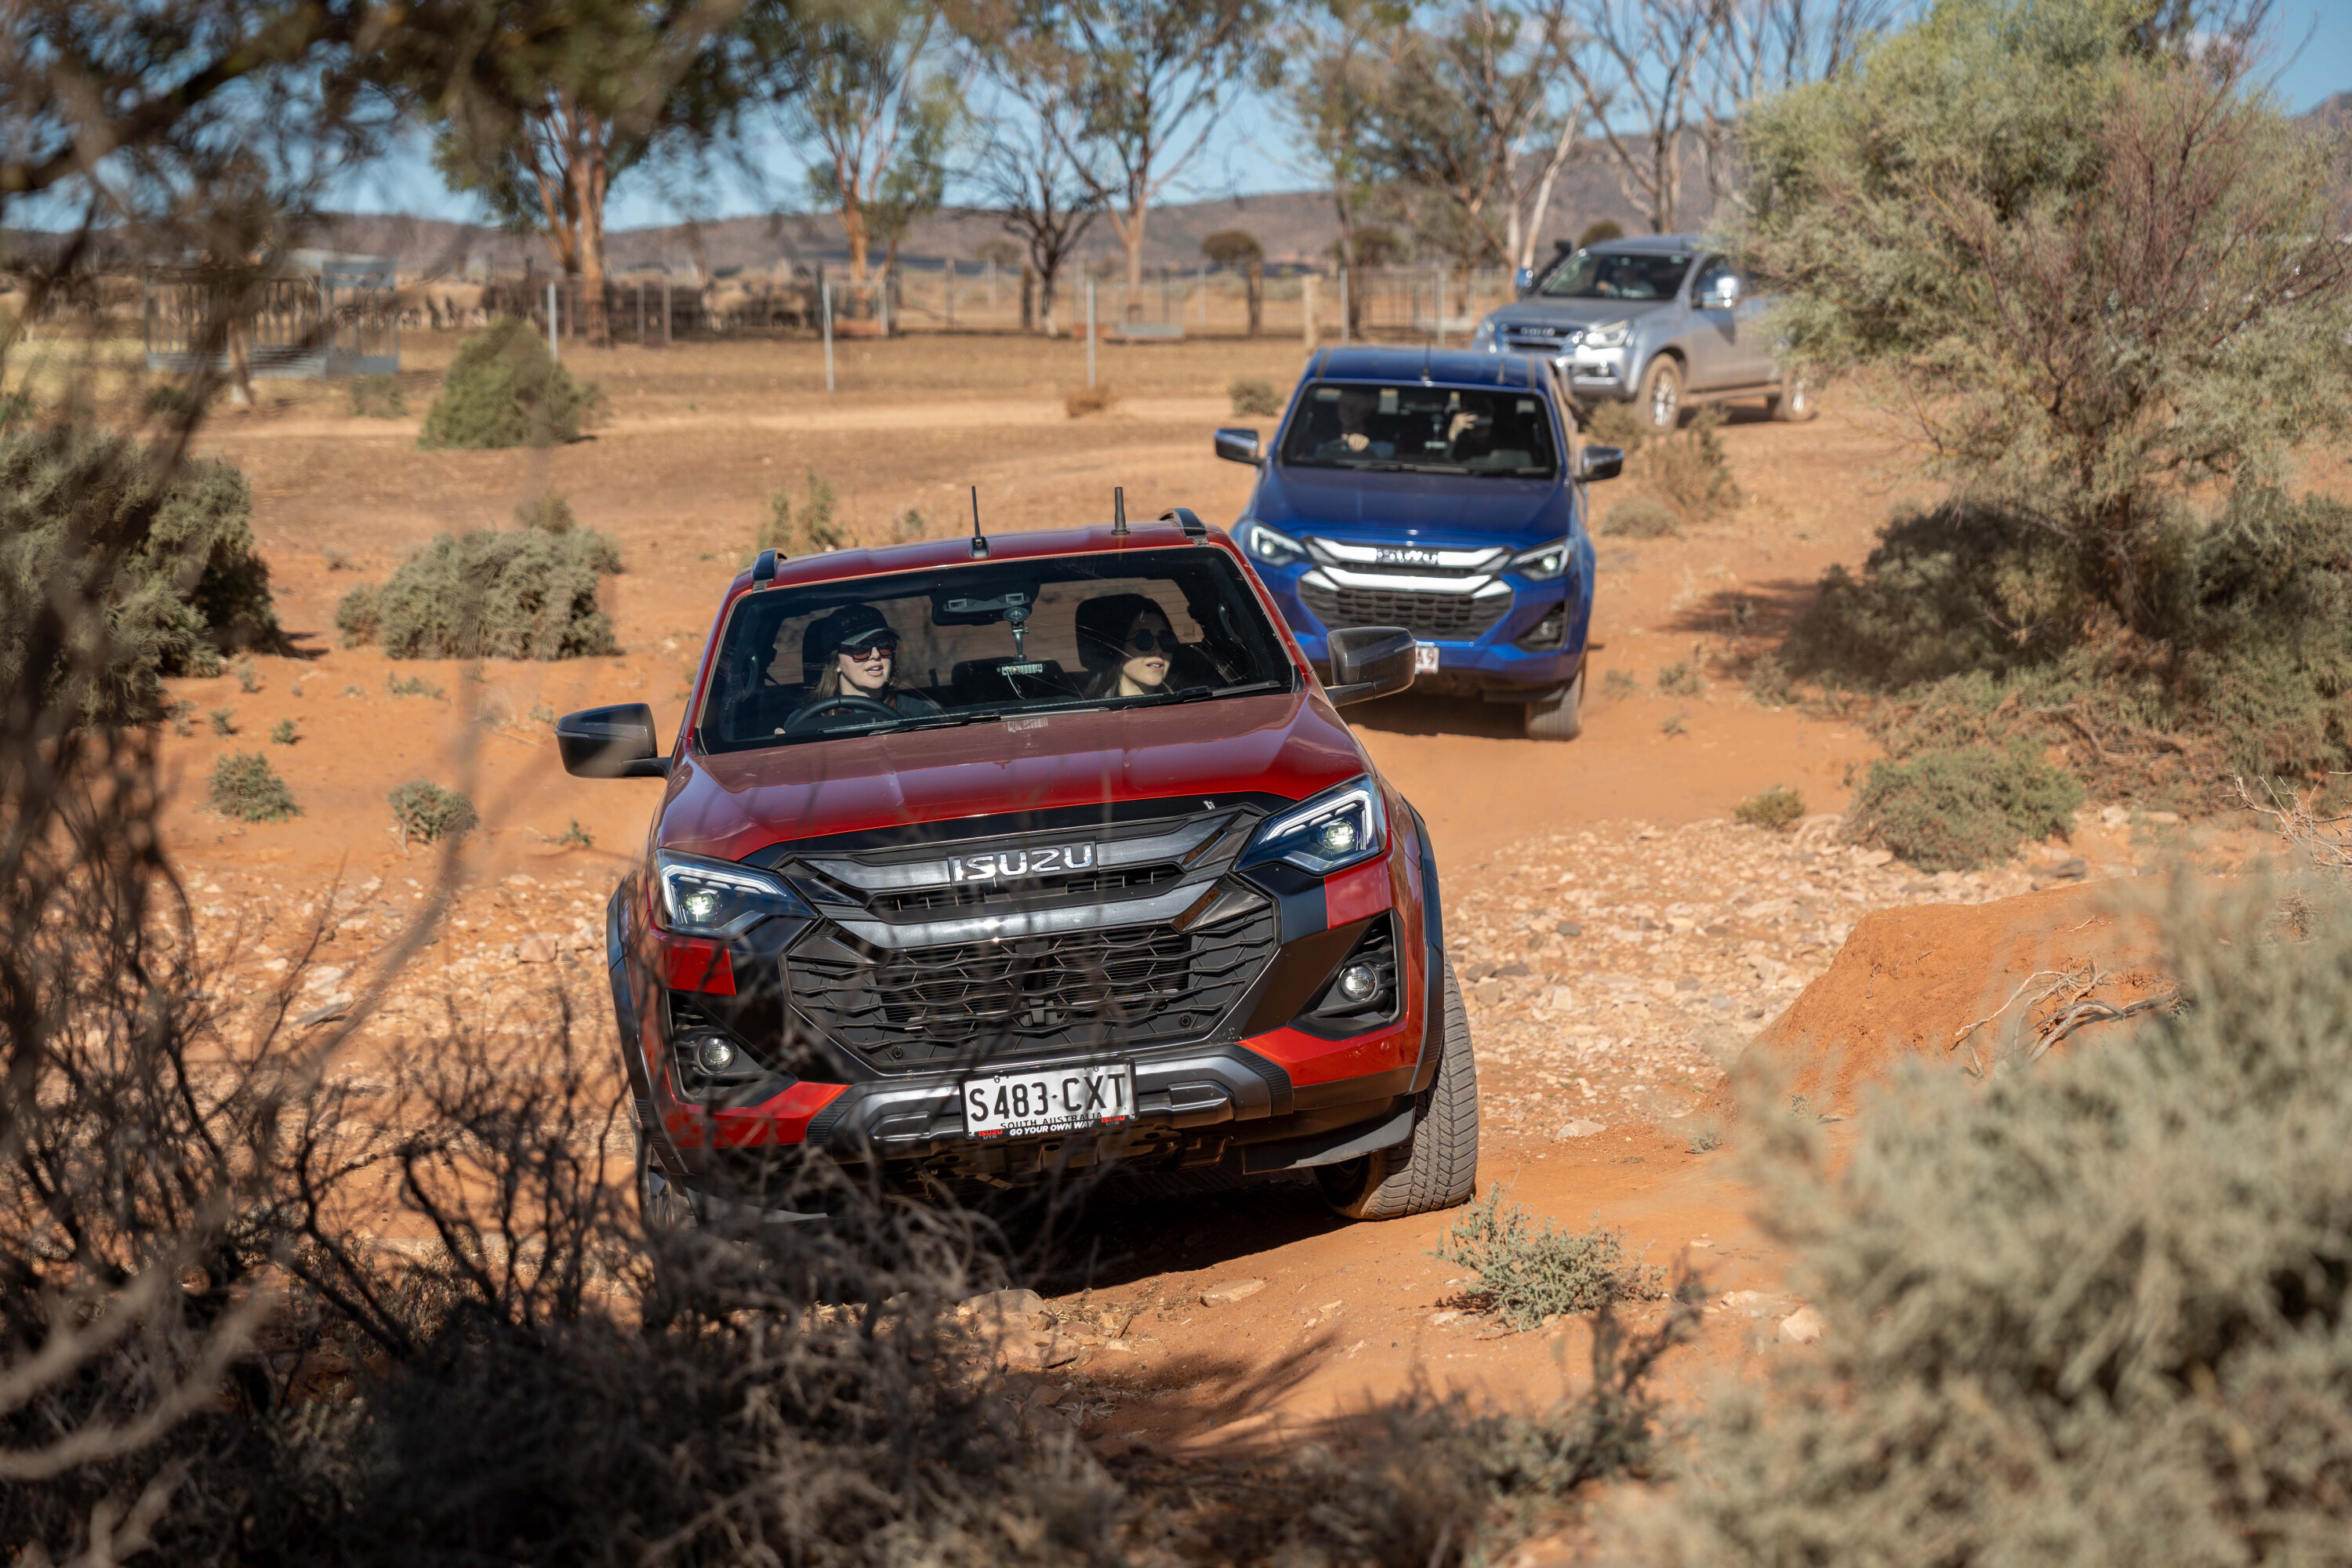
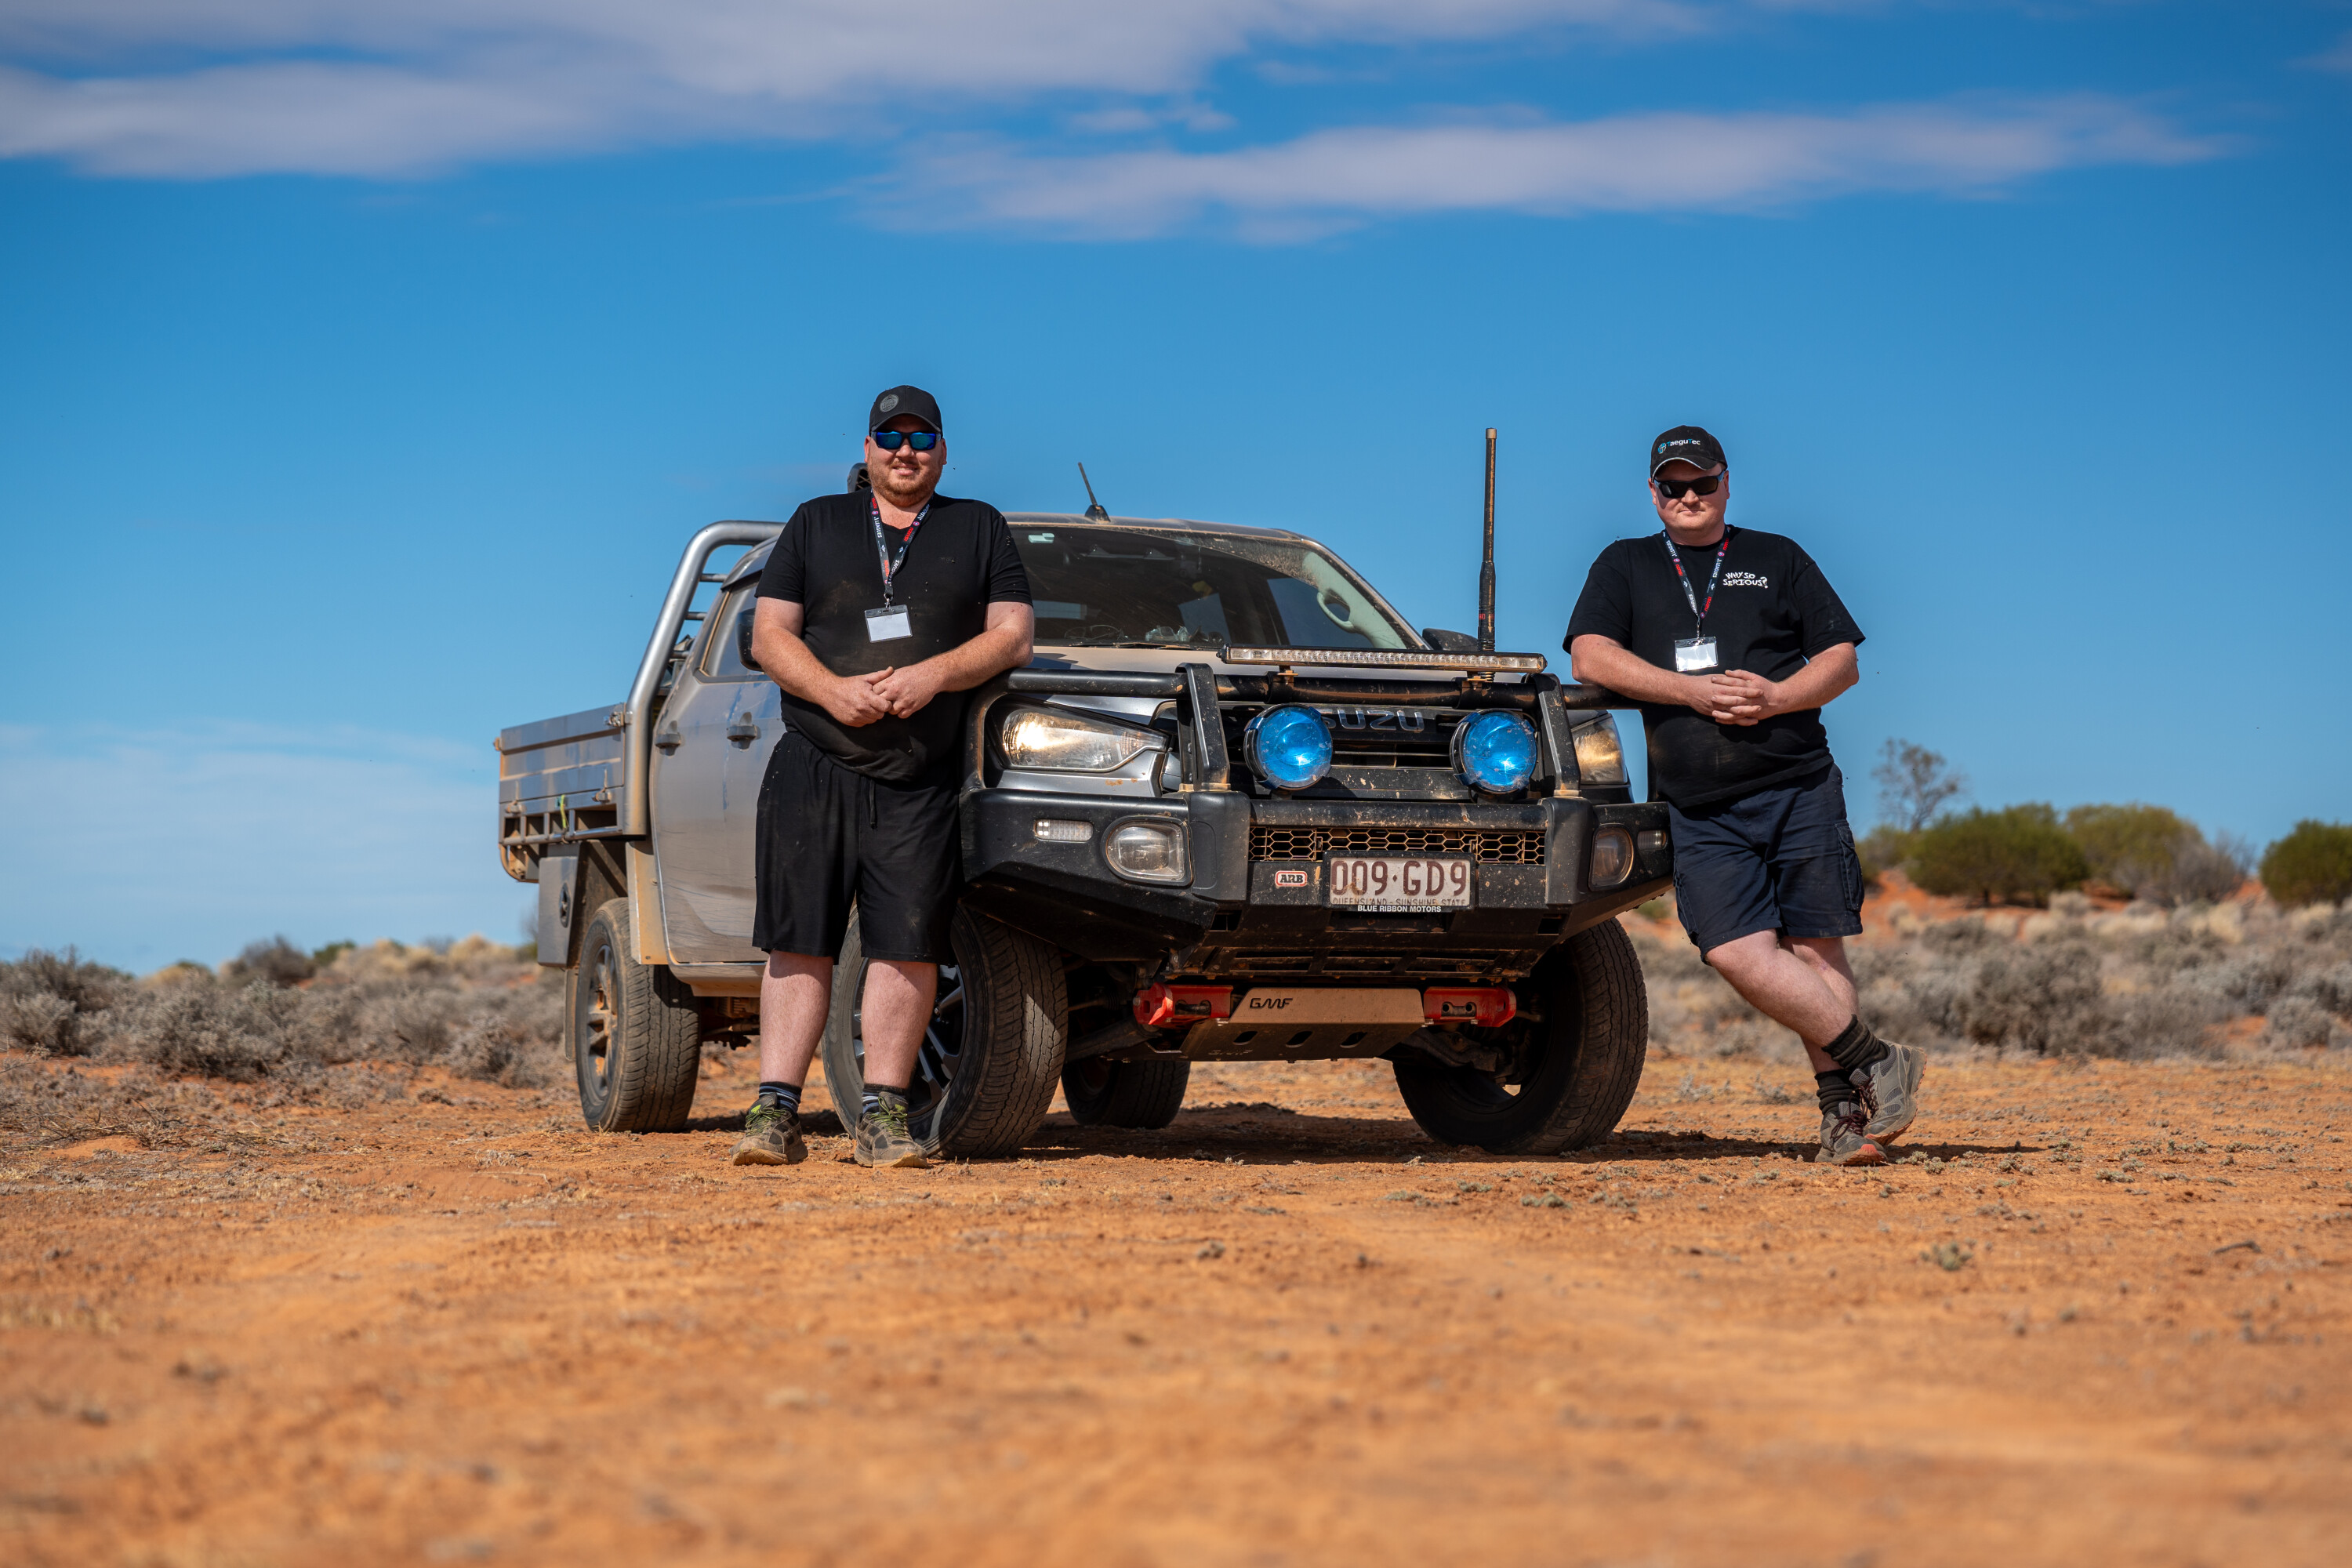
The 2024 Isuzu I-Venture Flinders Ranges trip started officially at a lunch stop at Hawker, where media and customers met David Wilson, a 4×4 driver trainer who has been leading the I-Venture team for 10 years. The dozen or so customers were driving everything from a 2014 MU-X to an almost factory-fresh 2023 D-MAX. They were a really interesting and easy-going bunch of people.
1
With our convoy of new friends, we drove the blacktop from Hawker straight to Merna Mora Station. We were aiming for the Station’s Wowee Track, on the western side of the Range. After choking though the billowing dust on the access track we were presented with the Wowee Track ascent. With tyre pressures dropped to 20psi, it was steep but not difficult in low range and no traction control or diff locks were required.
The one heart-stopping moment on the Zig-Zag Ridge climb was a steep descent littered with loose shale, enough to give low range-first and hill descent control a solid workout.
2
With the setting sun still lighting peaks to the east, the outlook from our vantage point on the highest part of the Wowee Track offered a view that looked like a watercolour painting; one colour bleeding into another daubed on the canvas of the Flinders Ranges. This is just one of the rewards of having a 4×4 to delve into country like this.
We headed back down in the valley and, after airing up, we were ready to head to Wilpena Pound, our base for the next three nights. The combination of high-speed tarmac and dirt didn’t phase the D-MAX, even though the engine has the typical diesel clatter, when revved the ample midrange torque makes it an easy touring companion. Plus it’s quiet sitting at highway speeds.
1
The next morning the convoy headed through the stunning Brachina Gorge and then on to Nilpina Station.
Here we got to play in the red desert dunes on the corner of the Station, and with a drop in tyre pressures again, we headed onto the sand. Wanting to try this new invention called recovery boards, I worked at getting the D-MAX bogged. Mission accomplished, and with Isuzu PR man Mark Harman instructing yours truly on recovery board operation, I eventually extricated myself. These recovery boards make getting unstuck a whole lot easier in sand than digging a spare wheel and hand winching, or spending half a day shovelling sand.
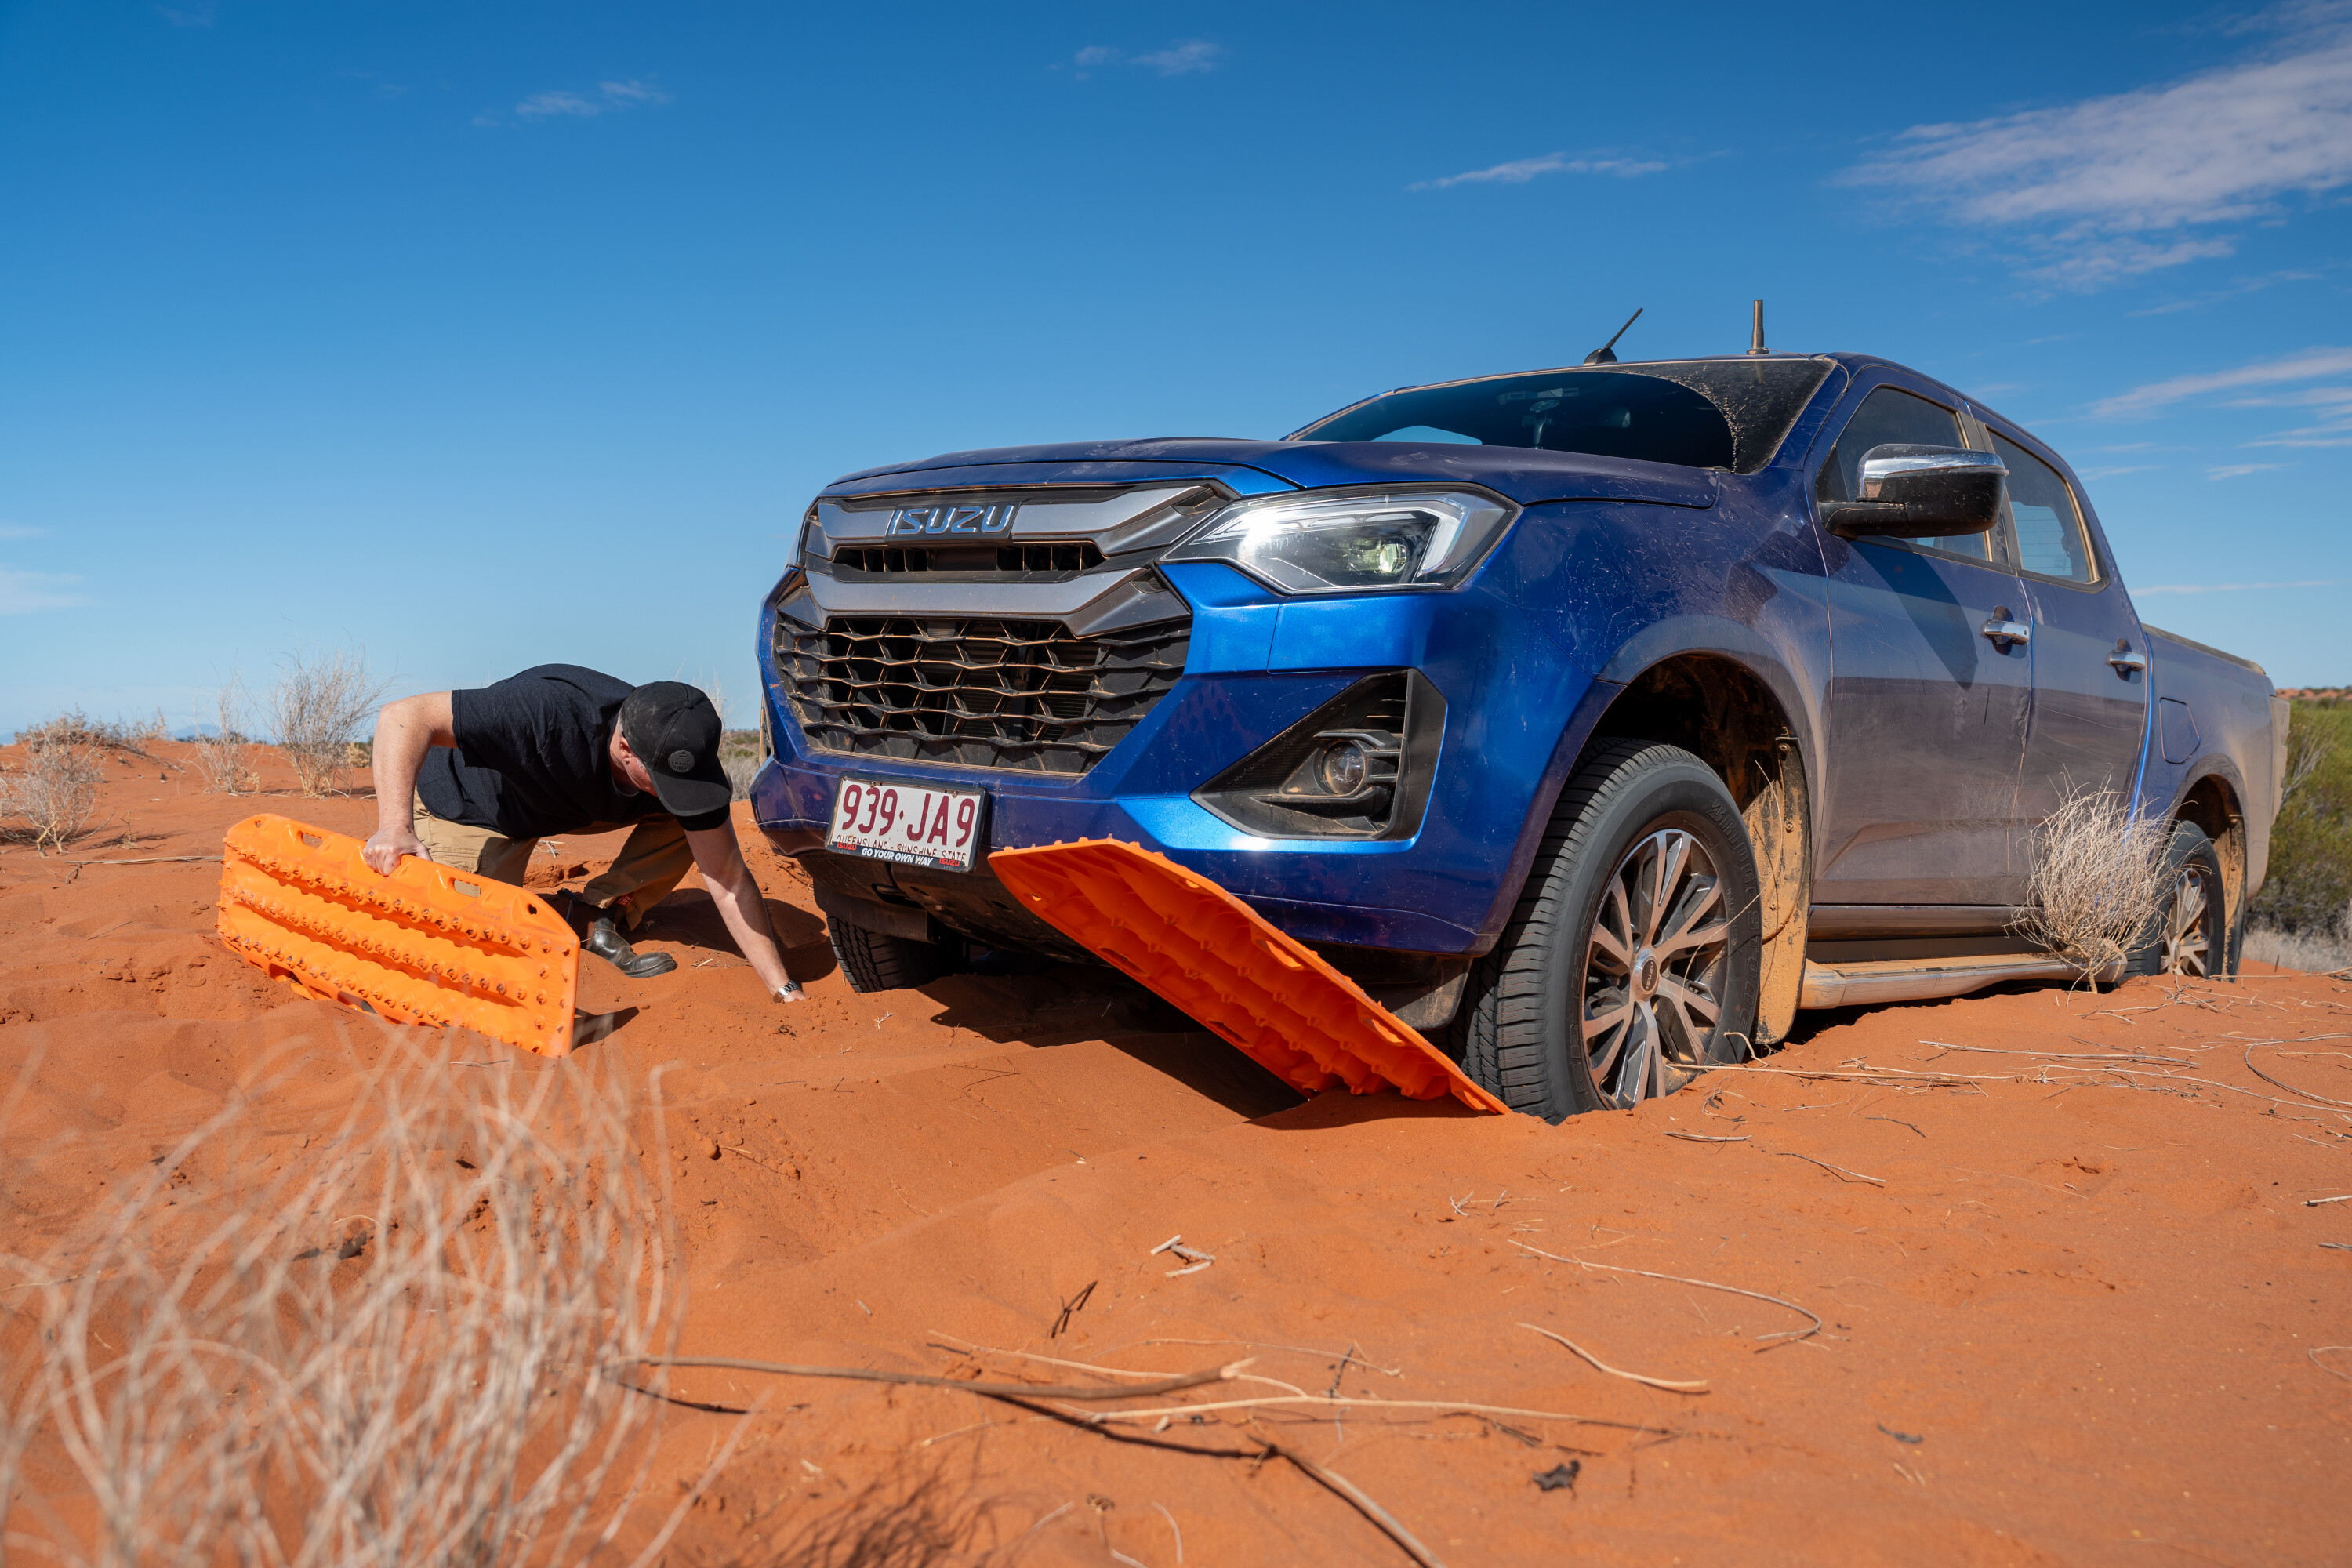
1
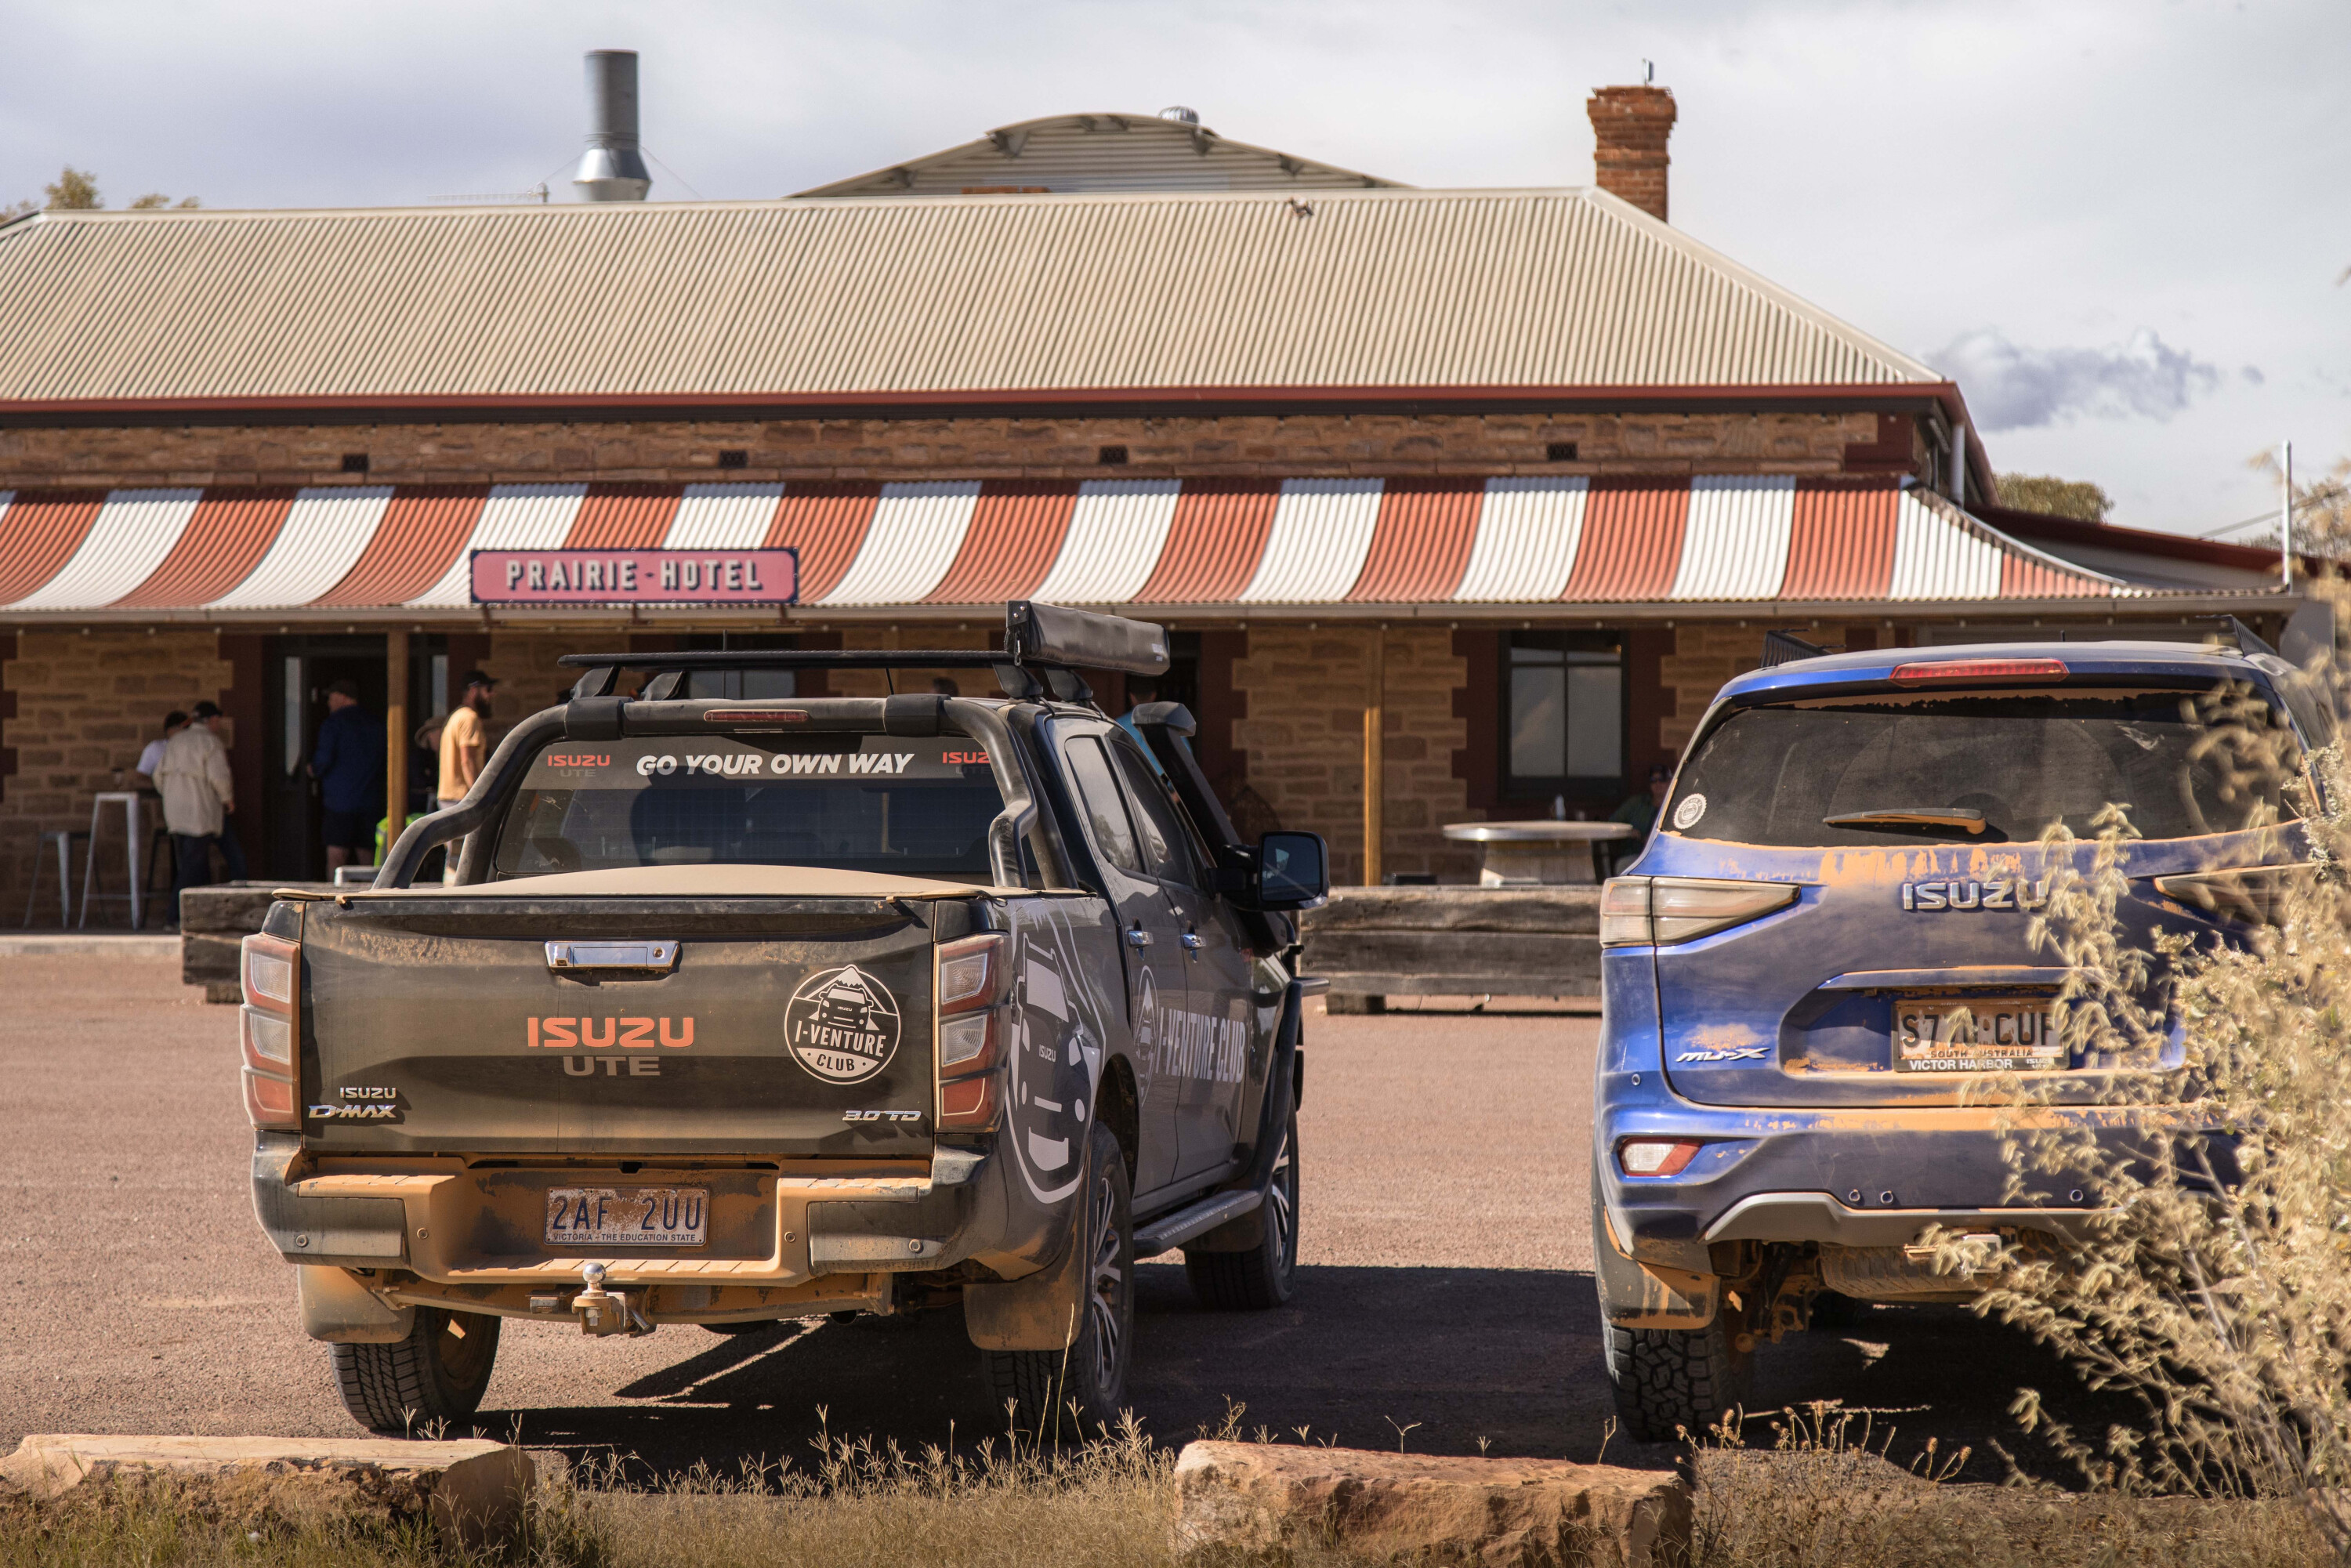
With sand fun over and tyres quickly aired-up, we headed off the Station for a break at the Prairie Hotel at Parachilna for lunch, before the return to Wilpena Pound.
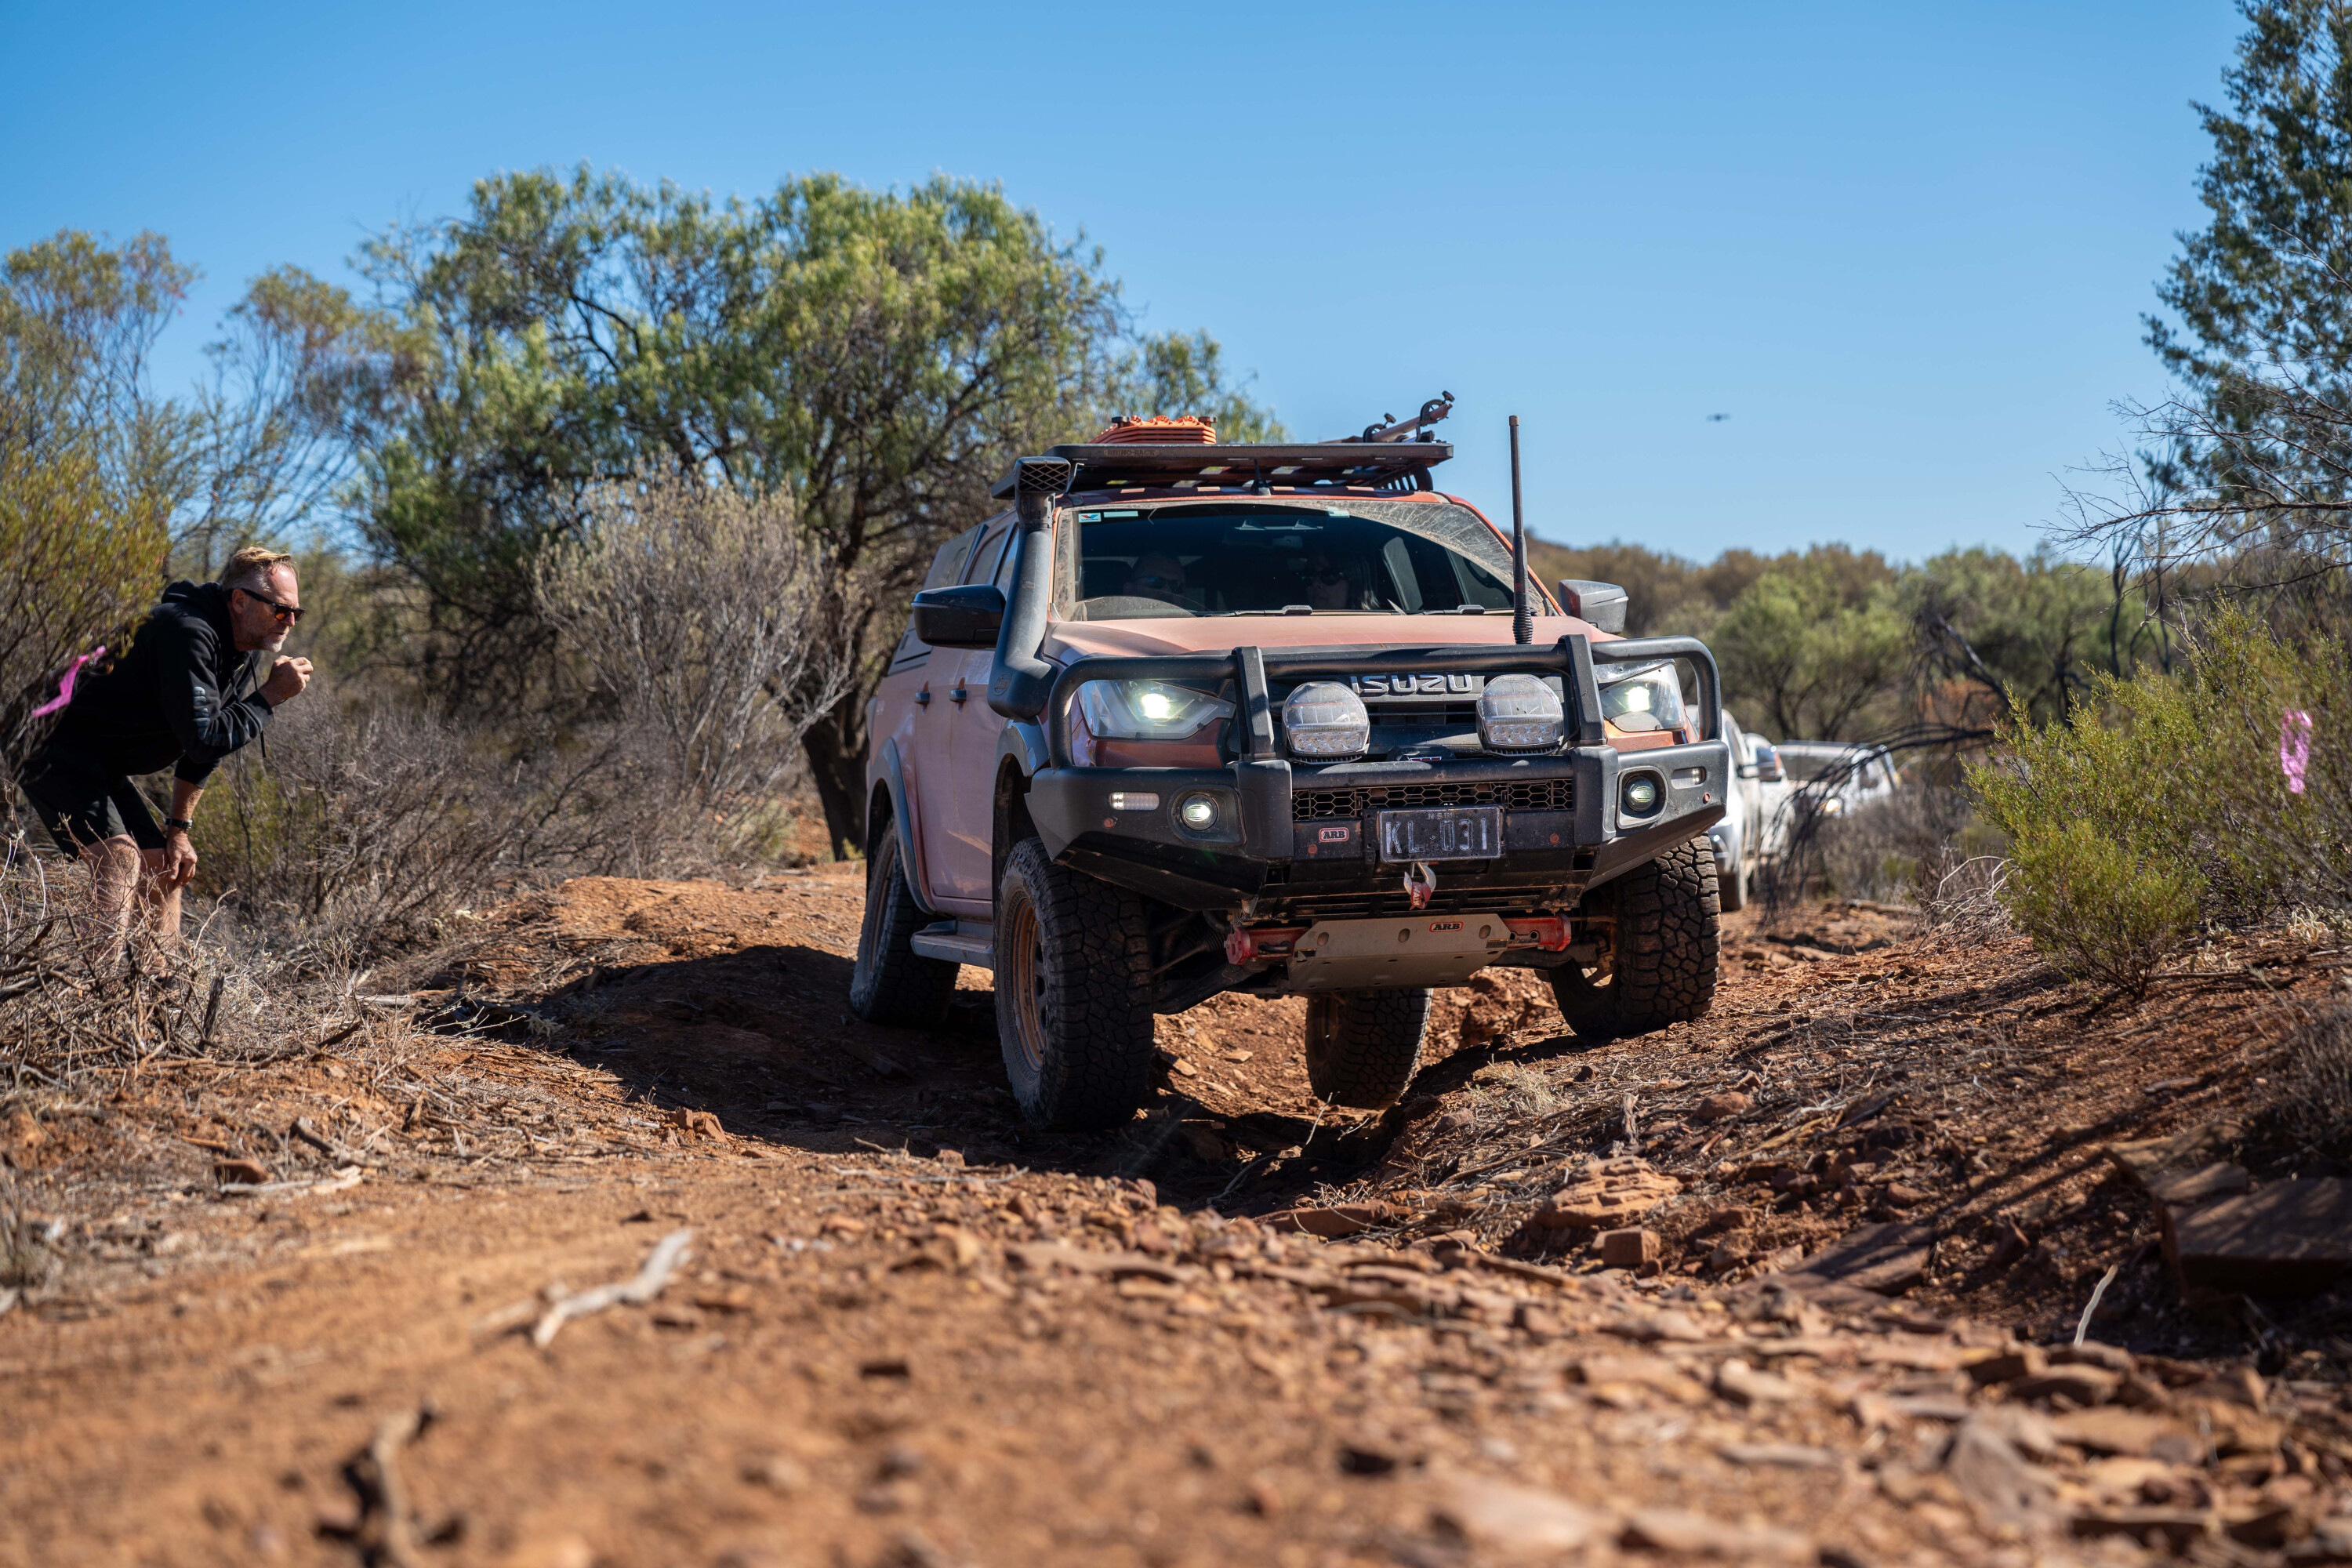
Day three saw us head to Stokes Hill Lookout, giving a different perspective on the Ranges. From there, we headed for Carey Hill Lookout, via Blinman. The I-Venture Club team had done a recce weeks before to make a track up to Carey Hill, and they loaded up some interesting technical sections for us on the often-rough, washed-out terrain.
1
It was slow-going, but with David talking us through the more difficult sections we eventually made it to the final climb to the lookout.
And what a climb it was. Step-ups over broken rock and loose stones on the steep climb provided an opportunity to put the new Rough Terrain mode in the D-MAX to work. With just relatively gentle throttle pressure in low-range first, the traction control did its noisy thing containing wheelspin and we were up and over the steep terrain.
Yet another stunning vista from Carey Hill Lookout capped off a tagalong tour that mixed in the fascinating geological history of the Flinders Ranges with a lot of fun four-wheel driving. With only one flat tyre in three days and nothing broken or hopelessly bogged in that time, the Flinders Ranges I-Venture tag-along was a success.
1
Owner profile: Stephen Hall
Stephen Hall and his brother Matt made their way from Queensland’s Darling Downs region to join the I-Venture Club trip in the Flinders.
The Toowoomba-based boilermaker says Isuzu vehicles go back a long way in his family: “Dad had a 1999 TF Holden Rodeo in about 2004 and it was the family car back then.”
Stephen and his younger brother Matt grew up with the Rodeo as the family car, and soon after he started driving Stephen would borrow his Dad’s Rodeo for camping weekends and so on. With a RA dual-cab D-MAX he bought in 2009, Stephen’s view of Isuzu reliability for his purposes were cemented. It had 135,000km when he bought it, Stephen adding more than 400,000km to the clock.
1
Stephen’s latest silver D-MAX SX was delivered from the dealer with bullbar and snorkel already fitted.
Then the modification process began, as Stephen explained: “I had a tray builder in Toowoomba, Ozmac, build the tray with under-tray drawer, the under-tray battery boxes, dual-battery system and an onboard air compressor … then the heavier upgrades happened, like the Fulcrum steering correction kit. Also I had a new two-inch lift suspension fitted, with Bilstein shocks, Kings Springs at the front, and Tough Dog Constant 300s at the rear.”
Stephen hopes his ‘new’ work ute will also get him to some iconic Aussie Outback destinations in his free time, such as Cape York and Cameron Corner.
MORE
Everything Isuzu Ute
A mammoth three-way comparison headlines another epic issue of 4X4 Australia magazine, which is out now!
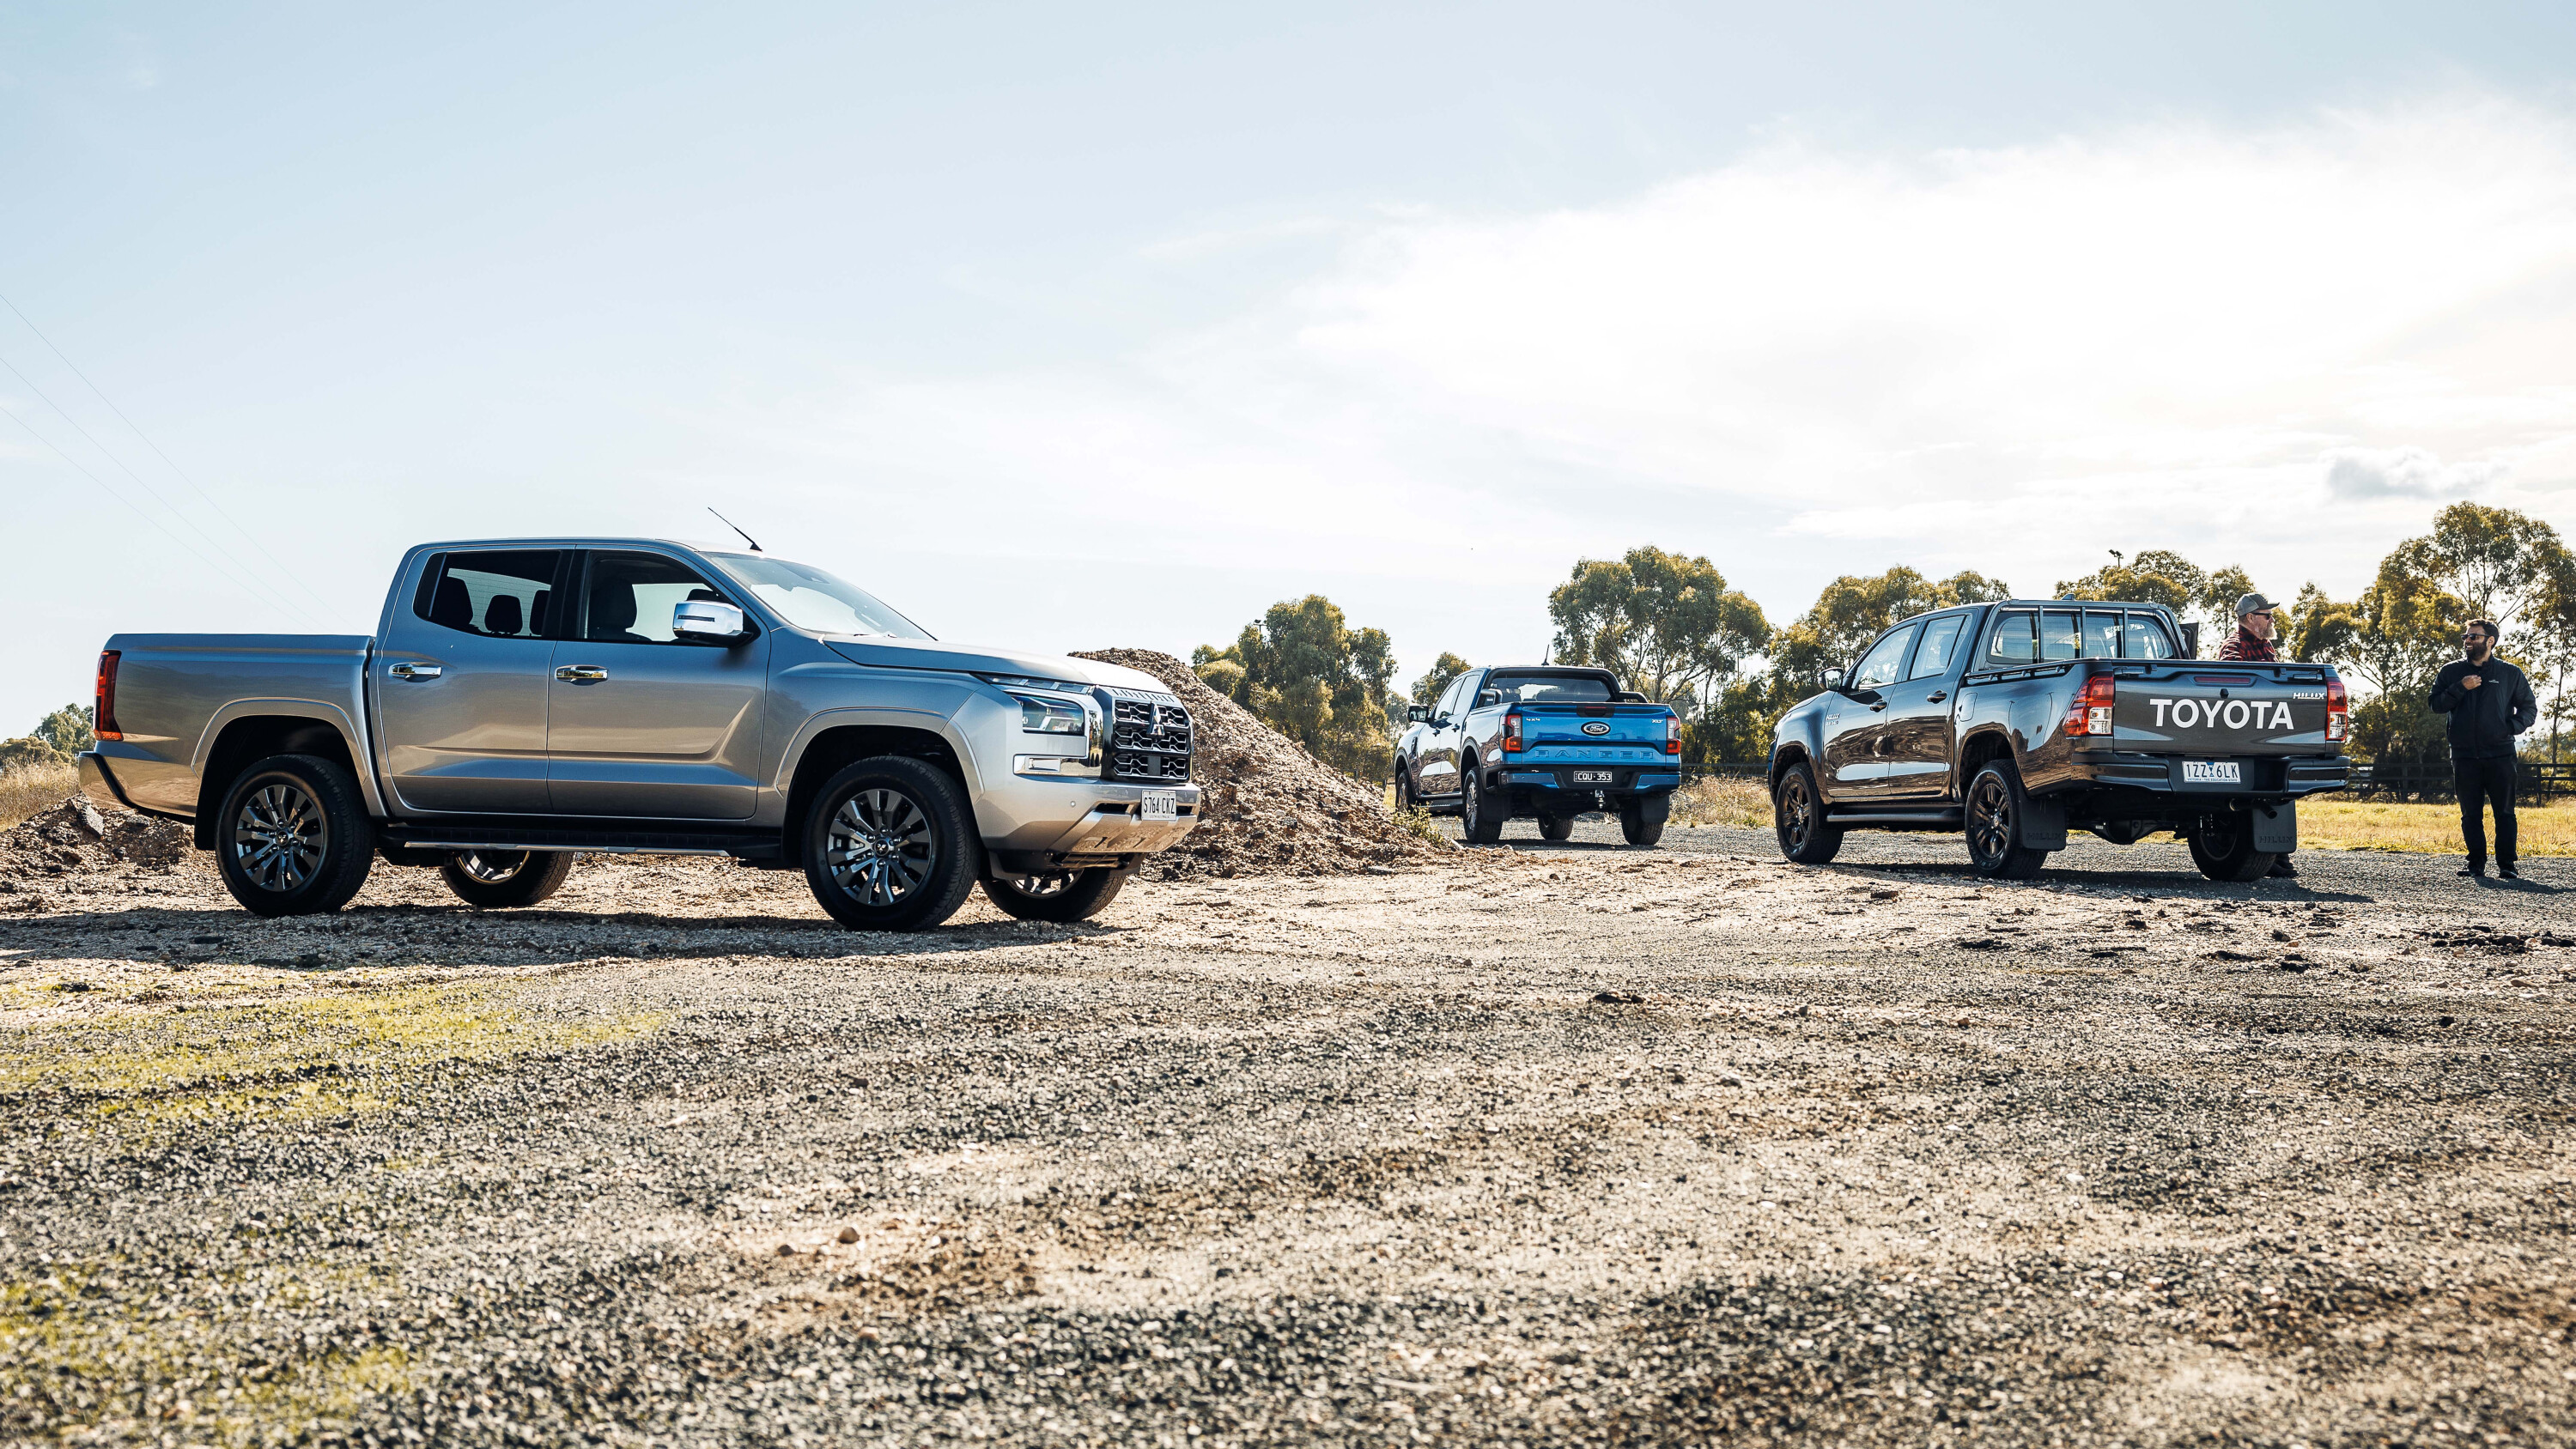
The all-new Mitsubishi Triton is bigger and better than its predecessor in just about every aspect, but is it ready to take down the two best-selling and most popular 4x4s in Australia? To find out, we lined a Triton GLS up against a Ranger XLT 2.0 and an also-new-to-market HiLux SR 48V. Following a thorough on- and off-road test, the battle is definitely closer than ever before.
1
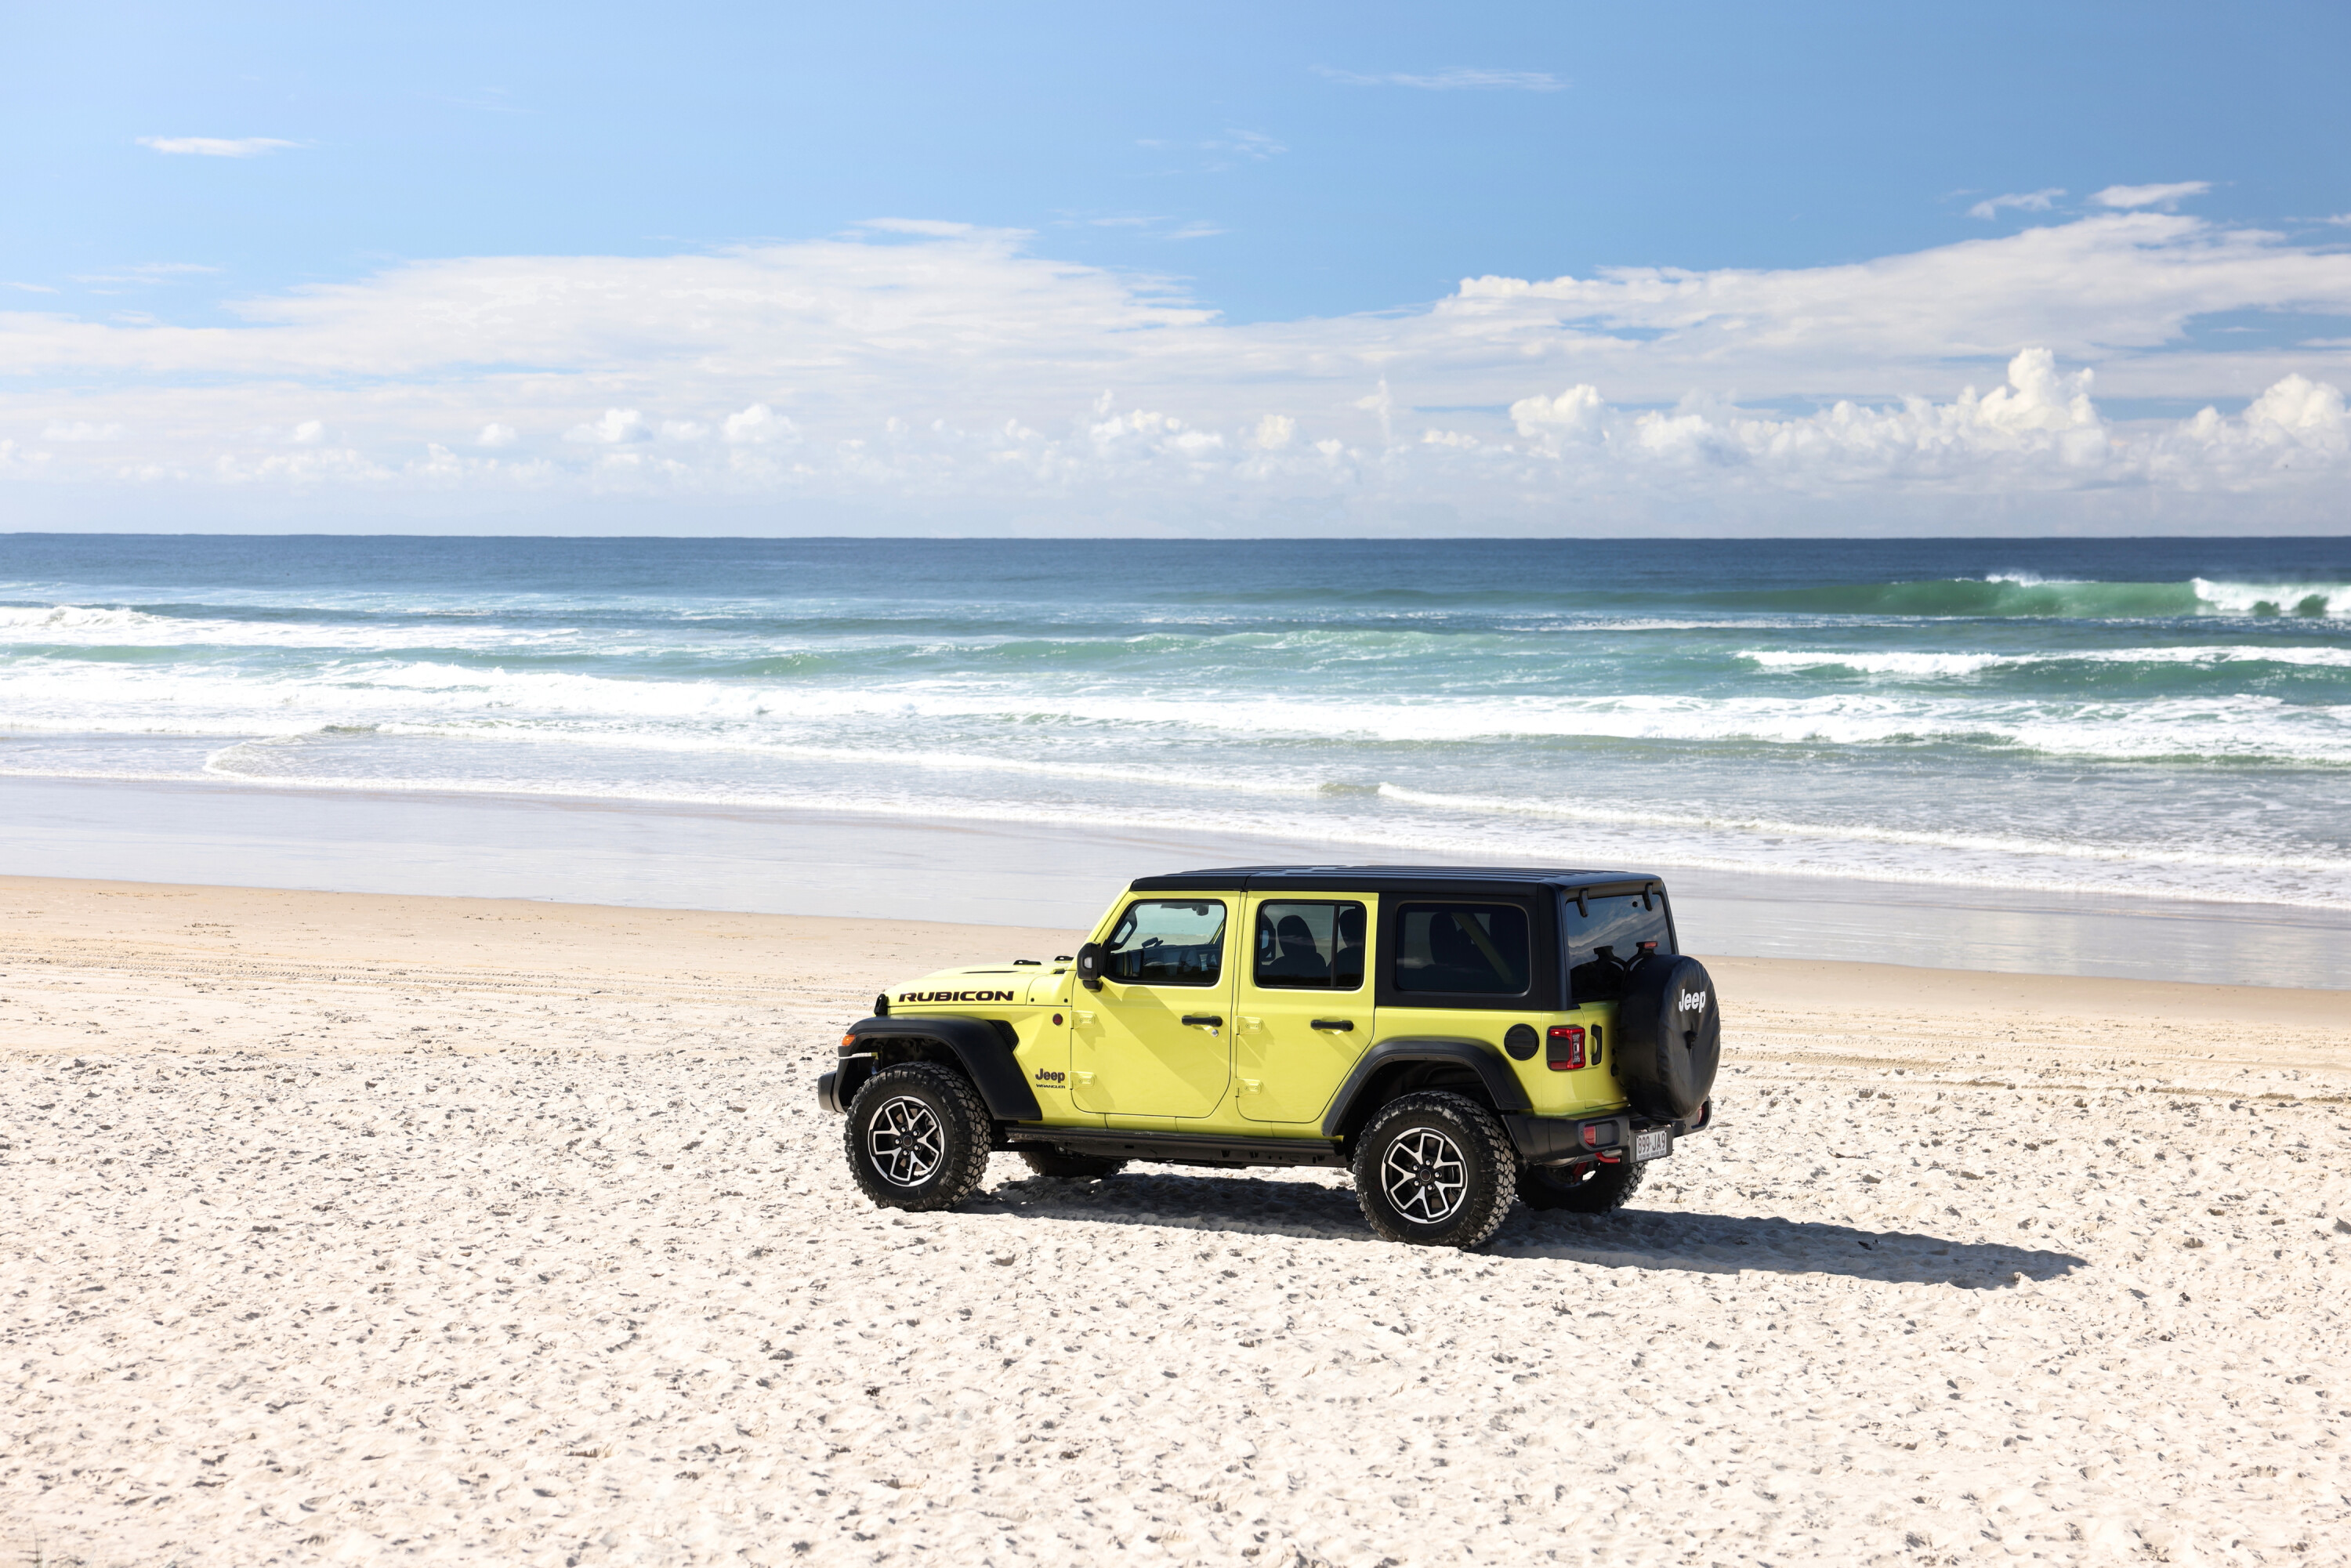
Another vehicle that has been significantly revised in 2024 is the Jeep Wrangler, with the venerable off-roader switching from a naturally aspirated V6 to a turbocharged 2.0-litre four-cylinder petrol engine. In addition, the model received new safety and tech upgrades. We took the brand’s off-road hero – a Wrangler Rubicon – off-road to seriously test its mettle.
1
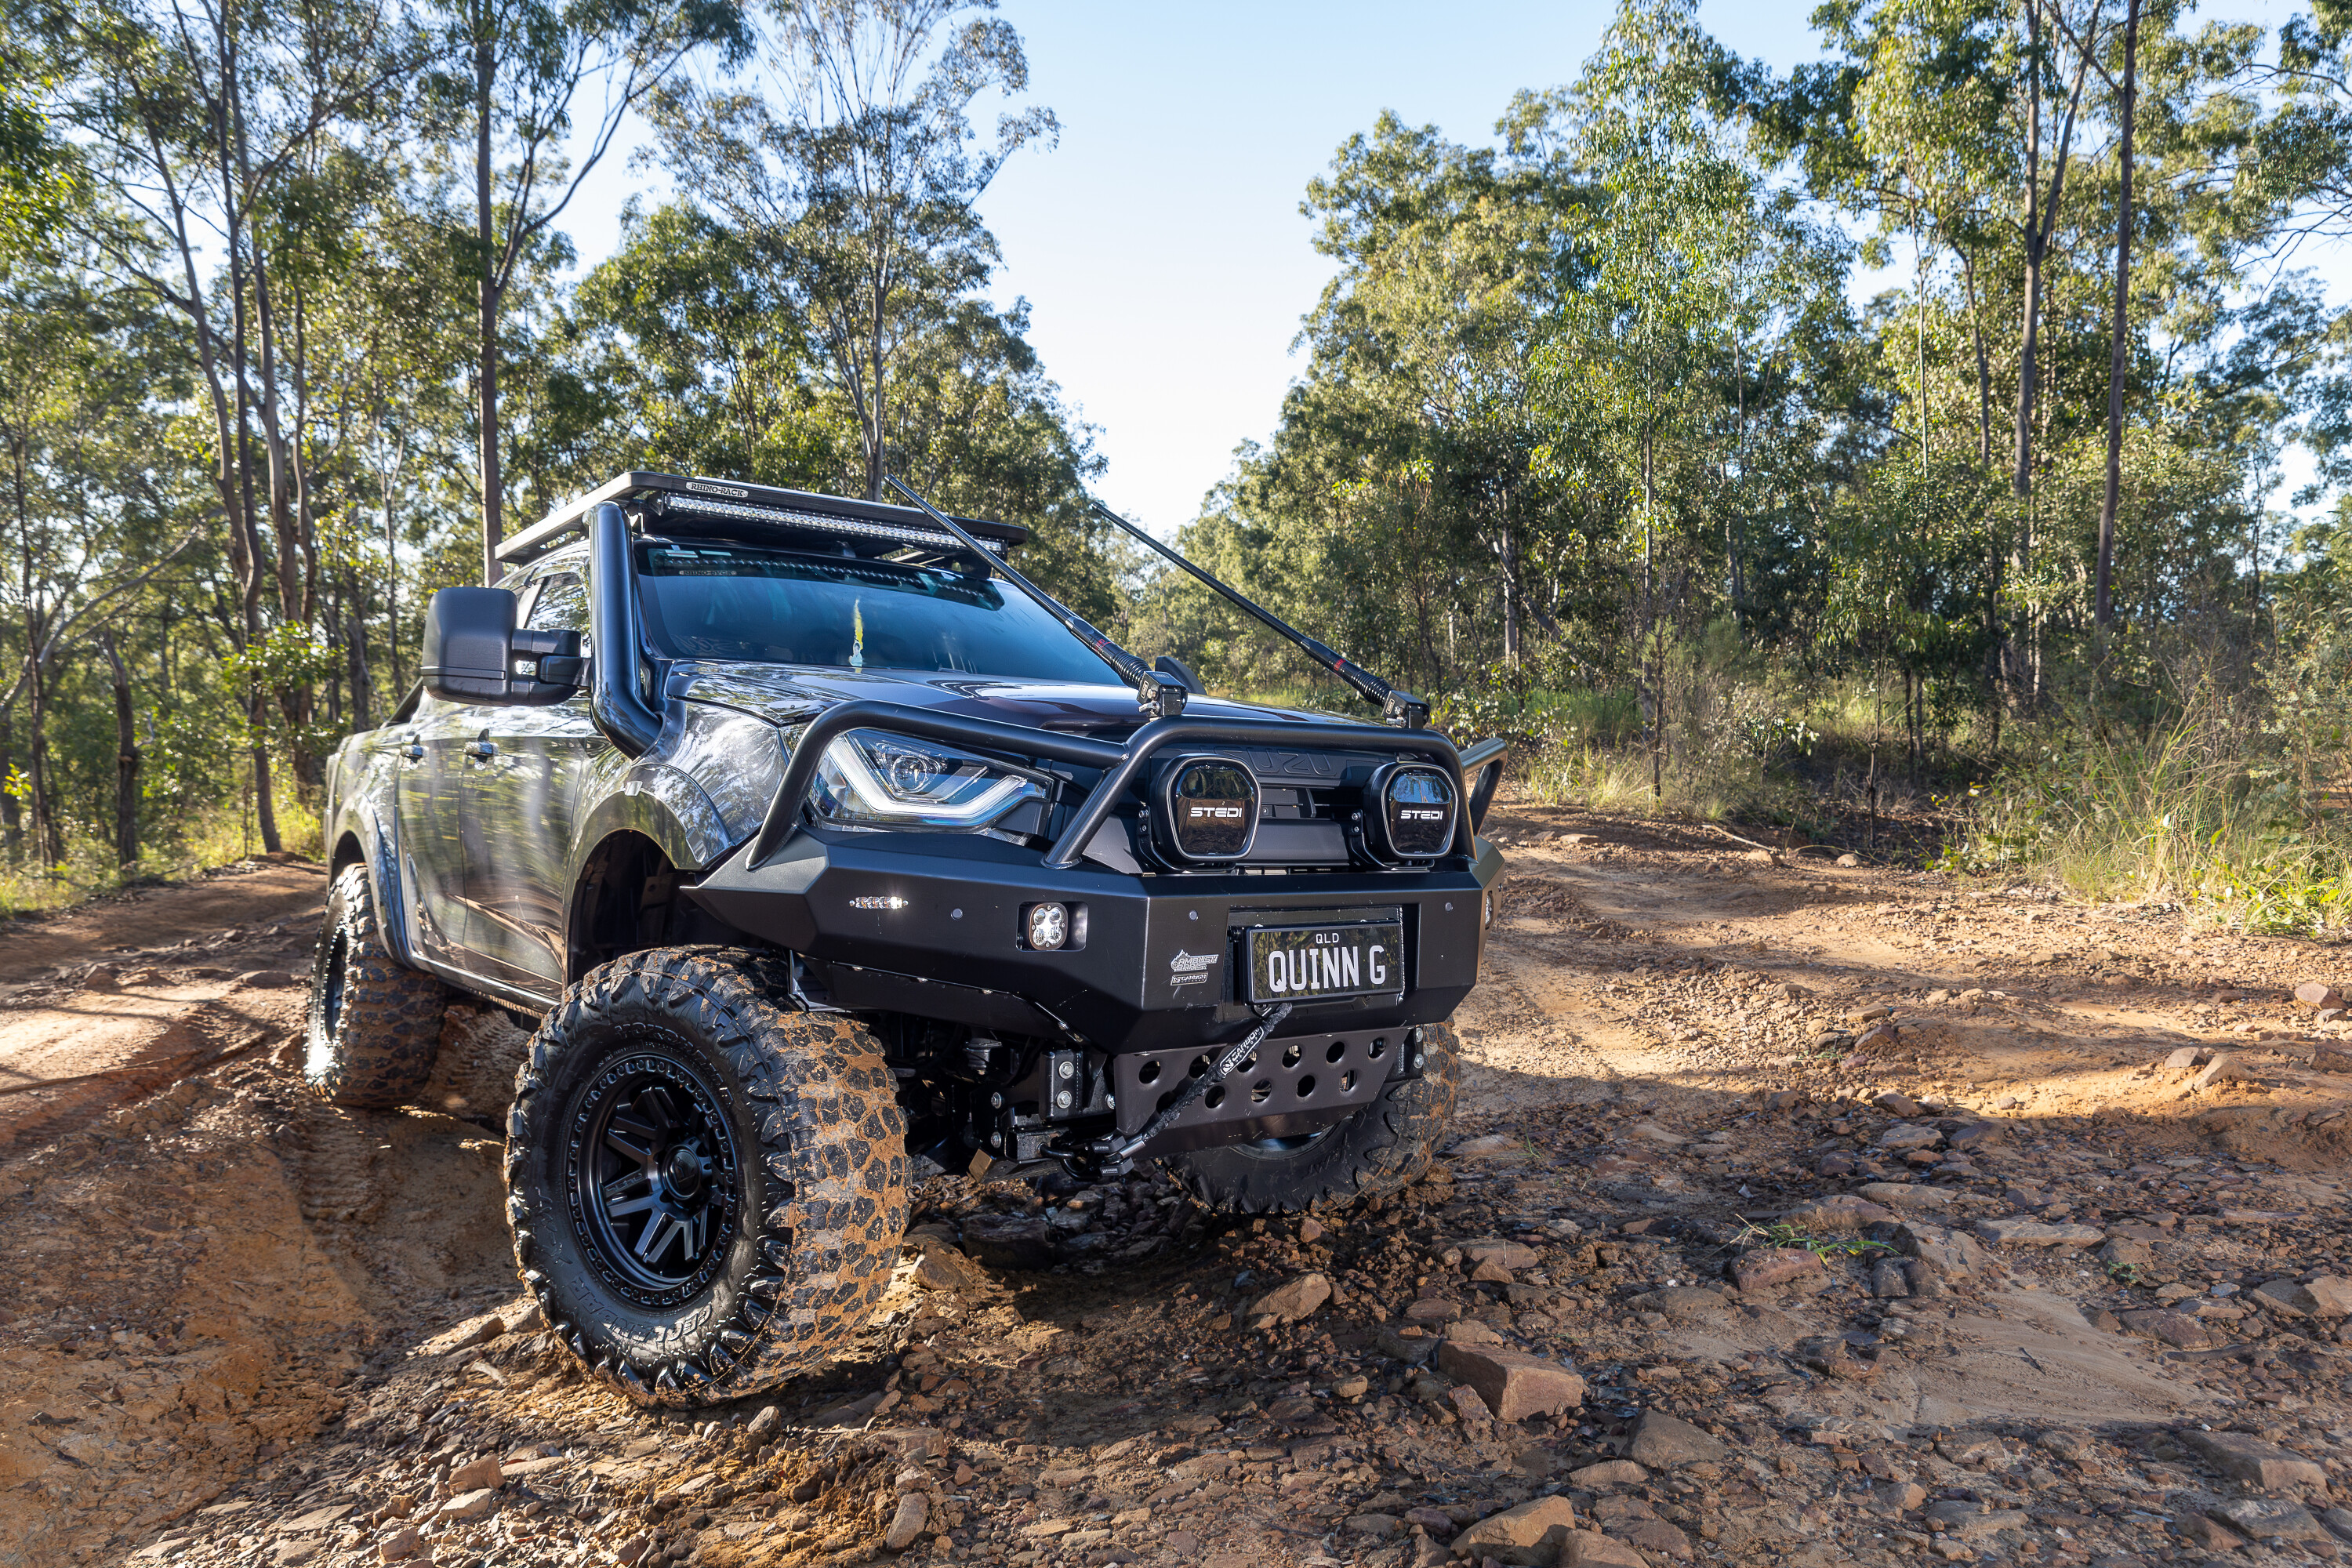
We peeked beneath the bonnets of two immaculate custom creations this month. The first is a lifted D-MAX running 35-inch 315/70R17 Yokohama Geolandar muddies and dressed front to back in premium aftermarket equipment. The second equally impressive 4×4 is a BT-50 purposefully pieced together to be a capable remote-area tourer. Can we have both, please?
2
Our own project builds are ticking along nicely, with the Everest Ambiente recently receiving an AFN bull bar, Kaymar rear bar and swing-outs, and a pair of MSA 4×4 towing mirrors. The Tradie Triton might be nearing the finish line, but before we shut up shop we’ve thrown on a set of MSA 4×4 seat covers for a bit of extra protection … and storage.
1
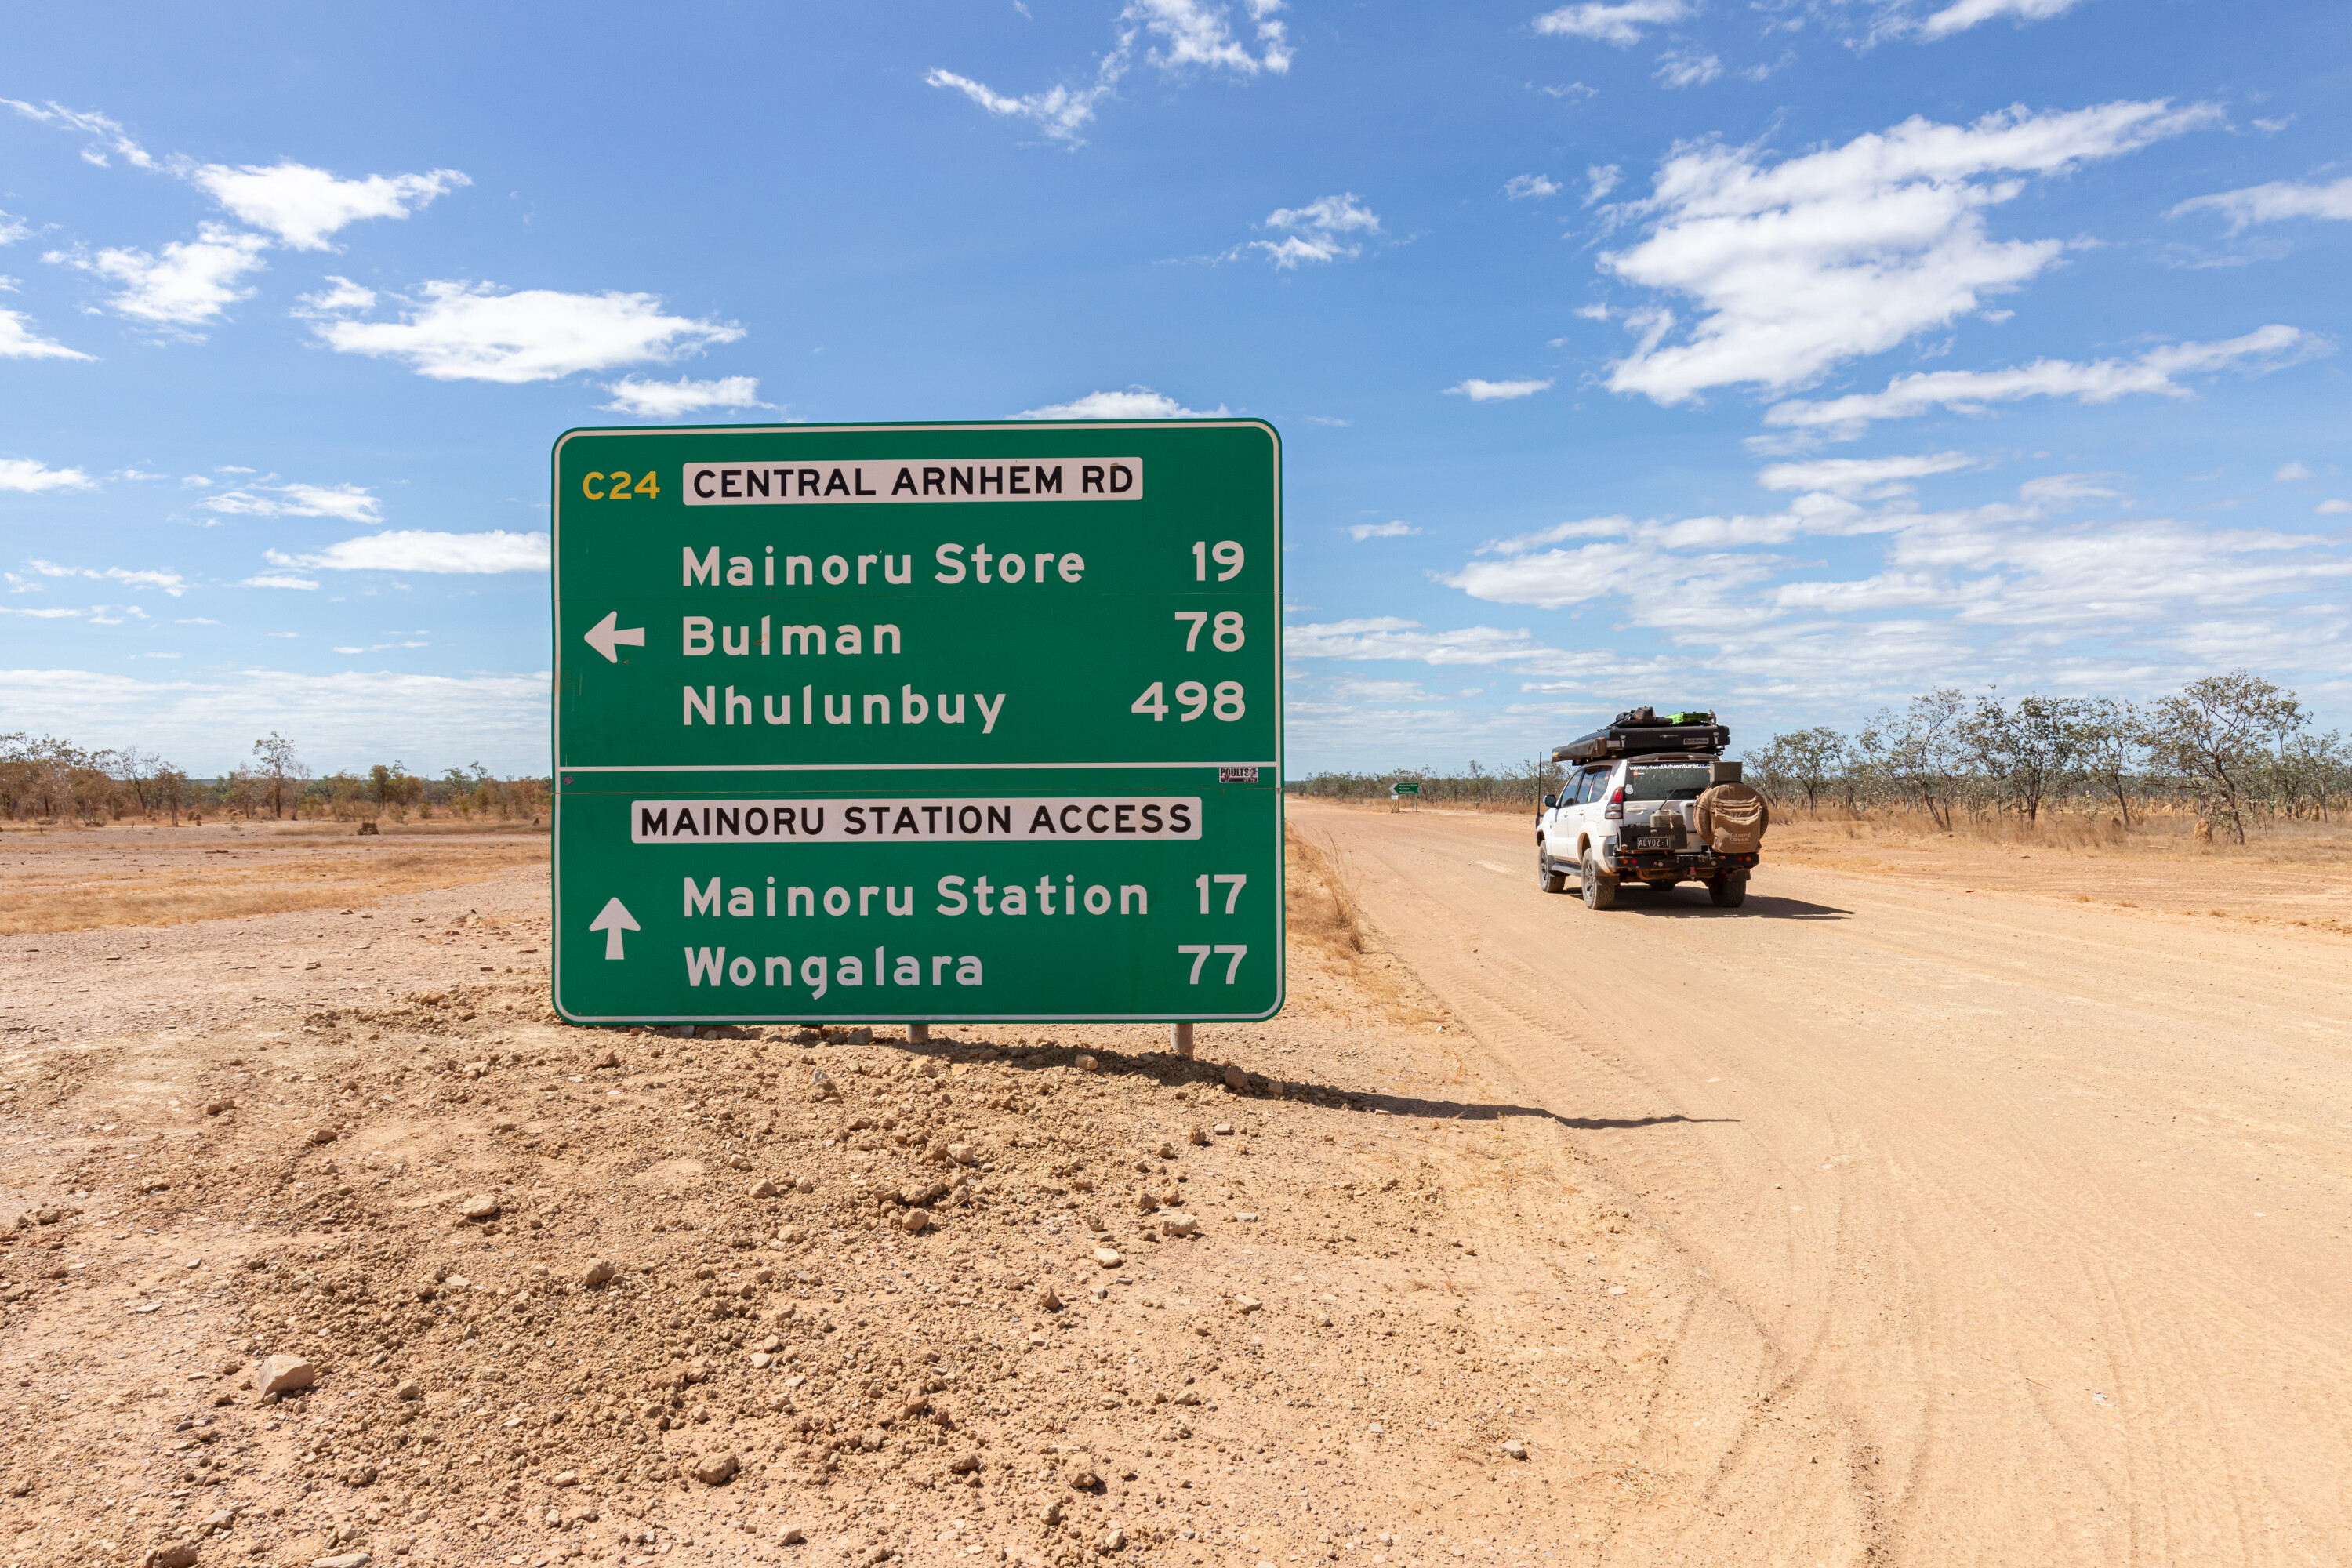
On the travel front, we headed to remote destinations in Western Australia and the Northern Territory. Kev Smith explored the Kalumburu area of the Kimberley, while Glenn Marshall took a top-end retreat to the Gove Peninsula within East Arnhem Land.
1
Keen to embark on a similar off-grid adventure? Maybe for the first time? We’ve also included in this issue a comprehensive guide on how to set up, plan and prepare for an extended remote-area trip to ensure you’re self-sufficient, remain safe, and are ready to handle the unexpected.
What else is there?
- Readers’ Rigs
- All 4×4 specs and prices
- The latest news + more!
The July 2024 issue of 4X4 Australia is out now.
The look of a bull bar can make or break the appearance of your new 4×4.
Sure it’s there to serve a purpose, and that is to offer protection for the front of the vehicle and your cooling system in the event of an animal strike or scrapes in the bush, but when you’ve just shelled out $70k or more on a shiny new 4×4, the last thing you want to do is sticky a dodgy looking bar on it.
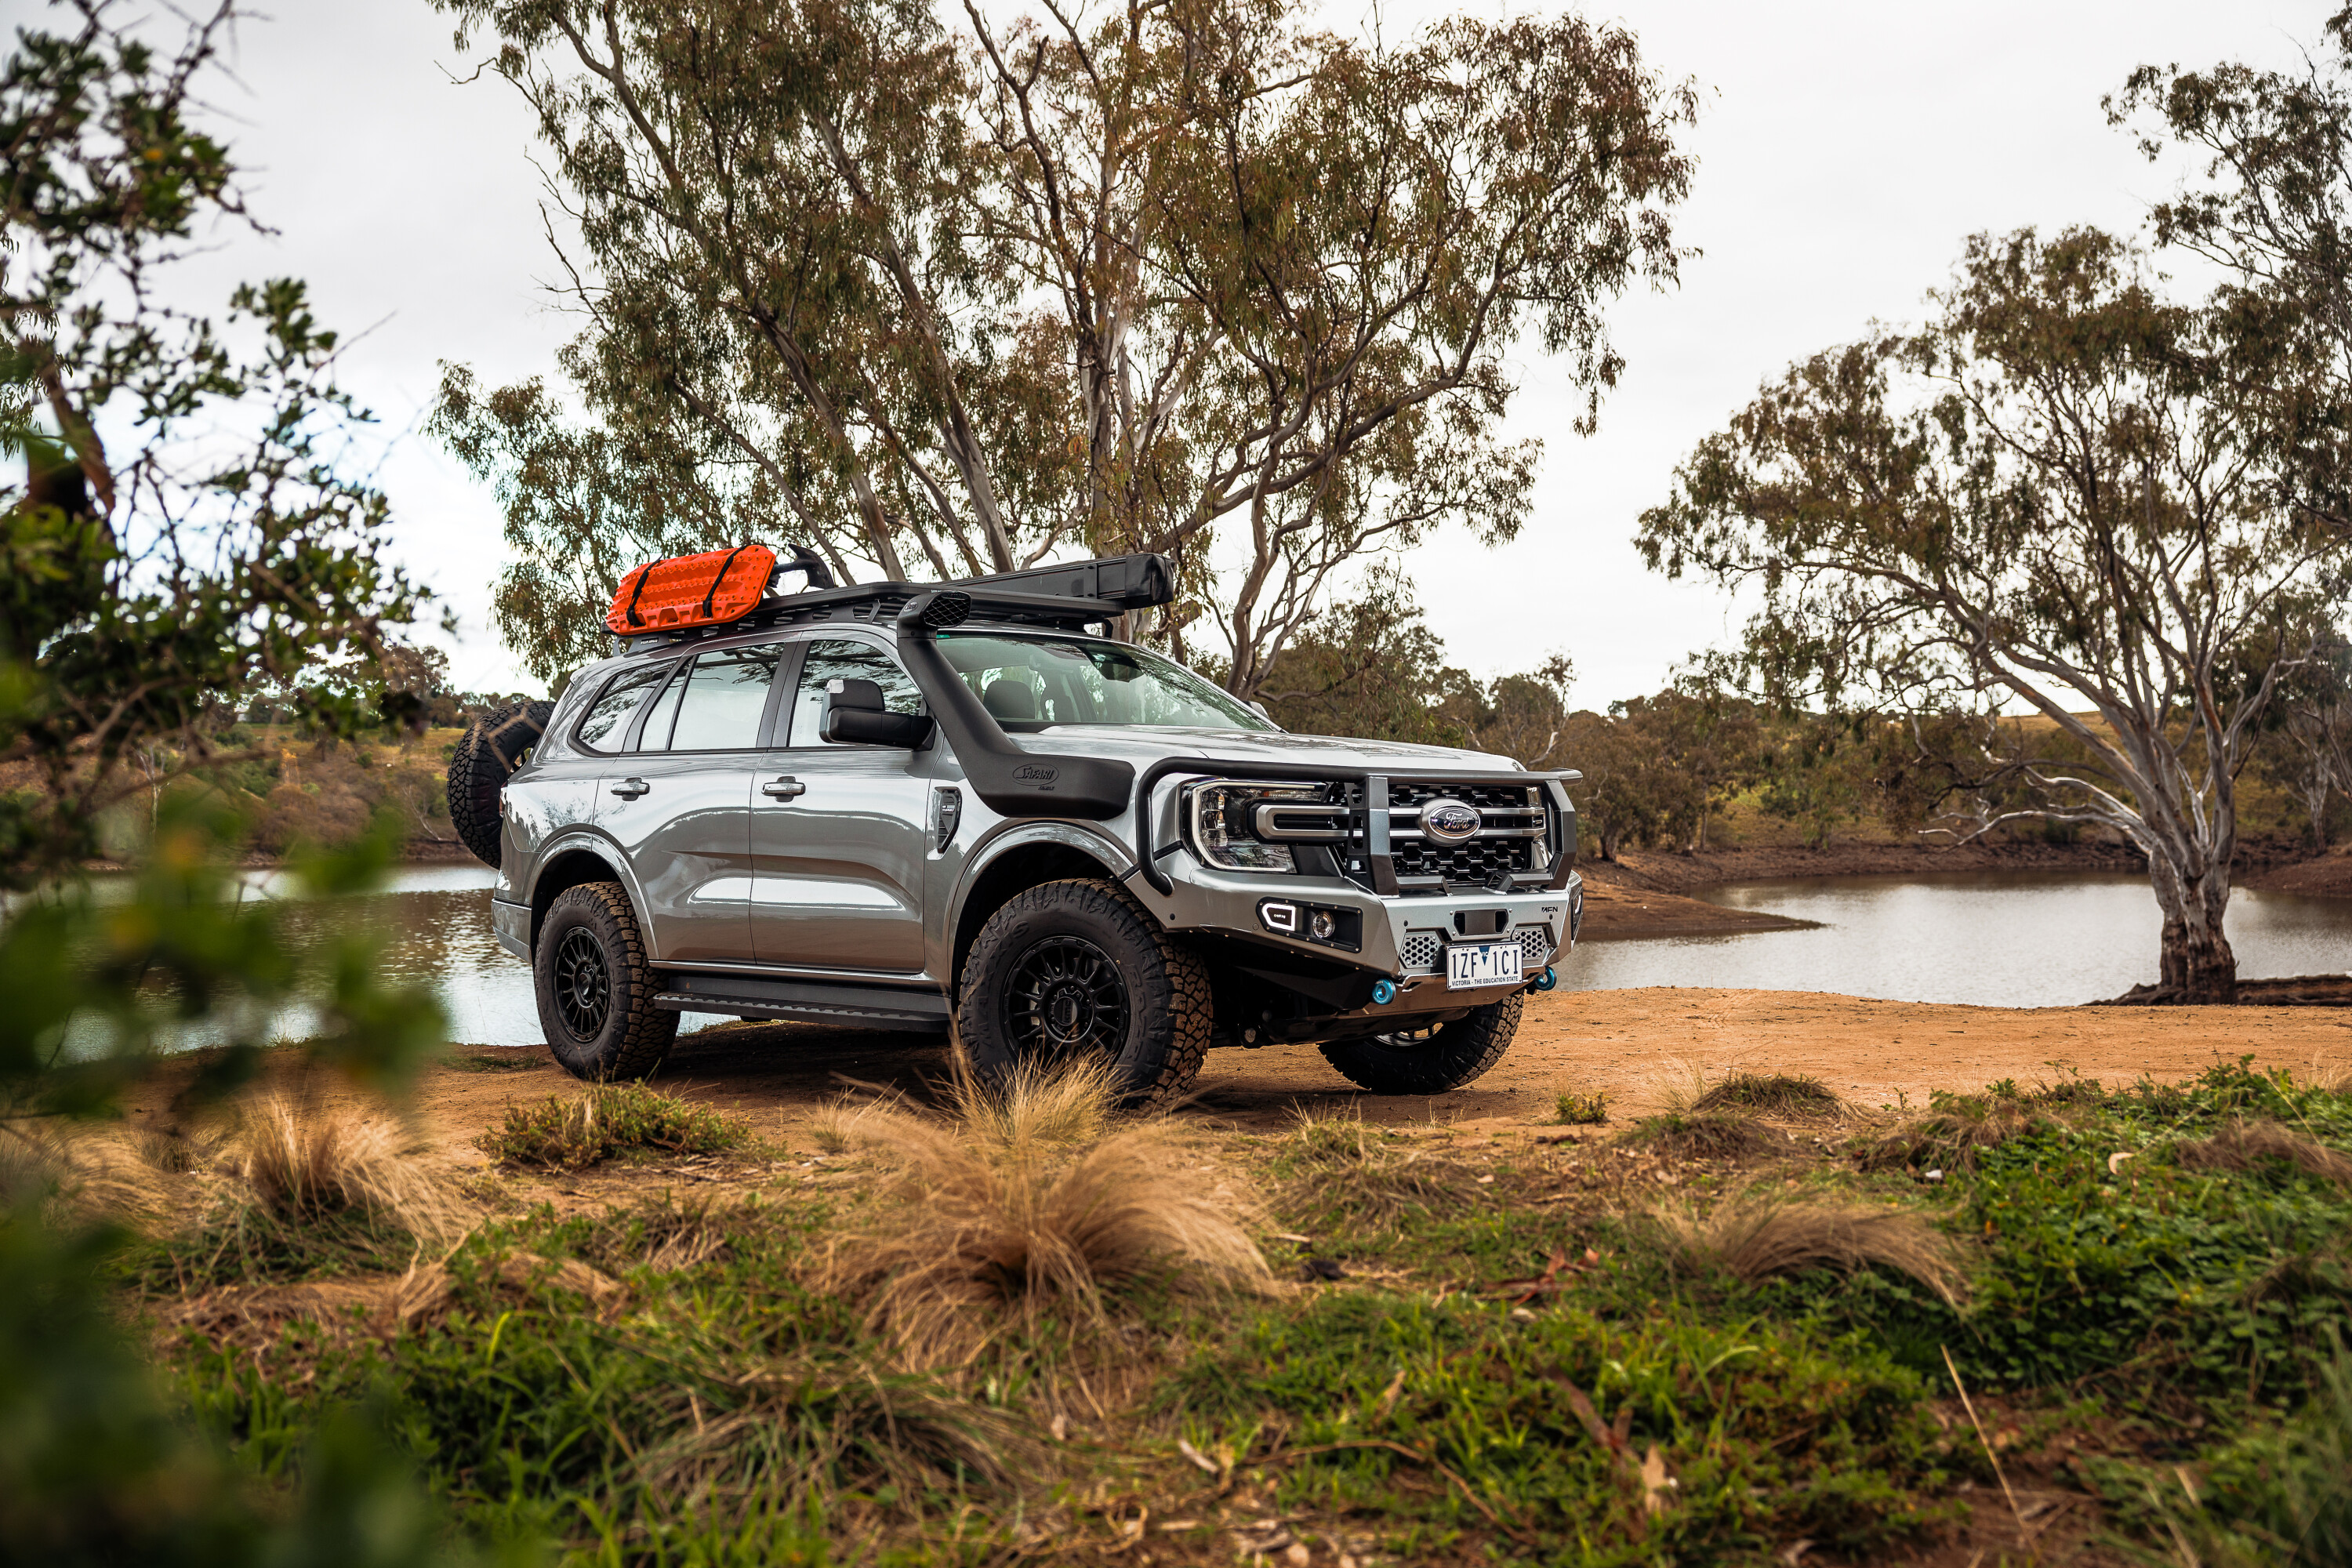
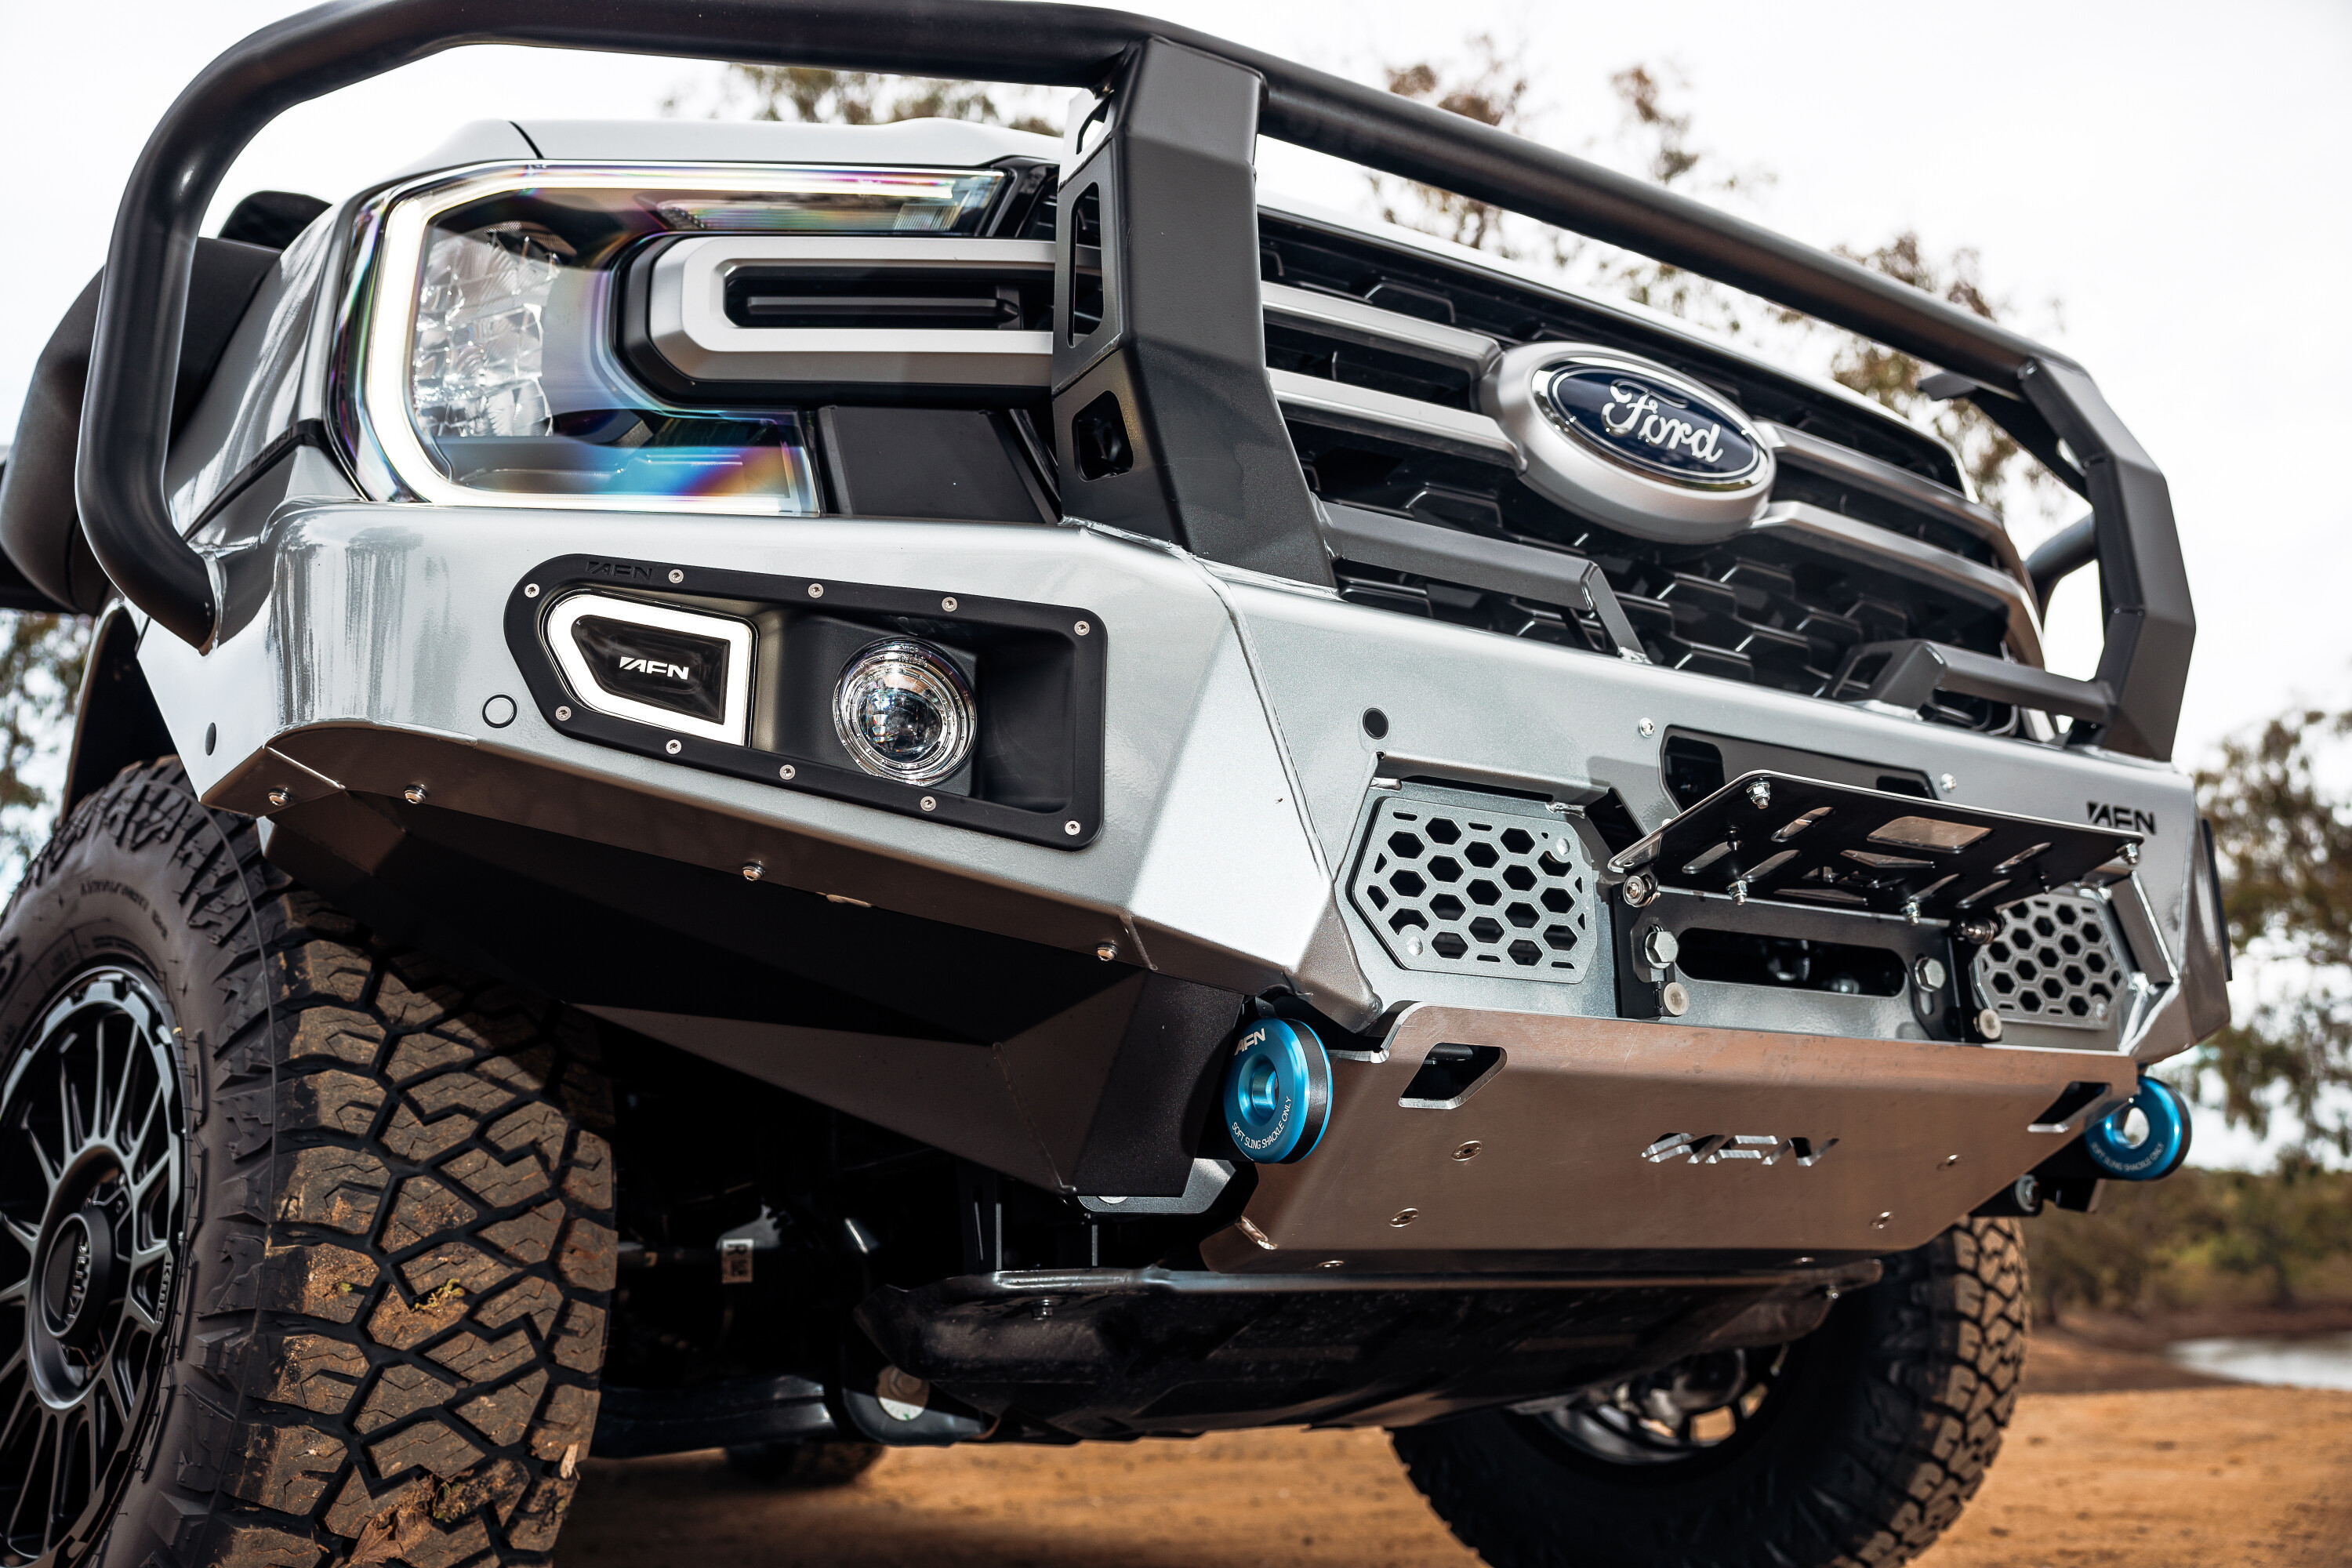
So we were super excited to fit a new bull bar from AFN 4×4 Australia to our Ford Everest project. We previously had a loopless AFN bar on our PX3 Ranger build but we wanted a full bar for this one, and we’re impressed with the look of the company’s product for the new Ranger.
1
AFN had not previously fitted the Ranger bar to a new Everest before this, so when it came to the installation it was a case of ‘let’s see how this works’. The fitting and colour-coding was professionally performed by Paul and the team at Statewide 4×4 in the Melbourne suburb of Keilor East.
The front end of the Everest and Ranger are essentially the same so the installation proved relatively simple. To aid installation, everything is included with the bar including all hardware, lighting and a plug-and-play wiring harness. That said, the guys at Statewide 4×4 cautiously did a test fit first before sending the bar away for colour-matching. As standard, the AFN bull bar is finished in a durable matt-black powdercoat but we had the lower section of our bar painted to match the aluminium-colour Ford.
1
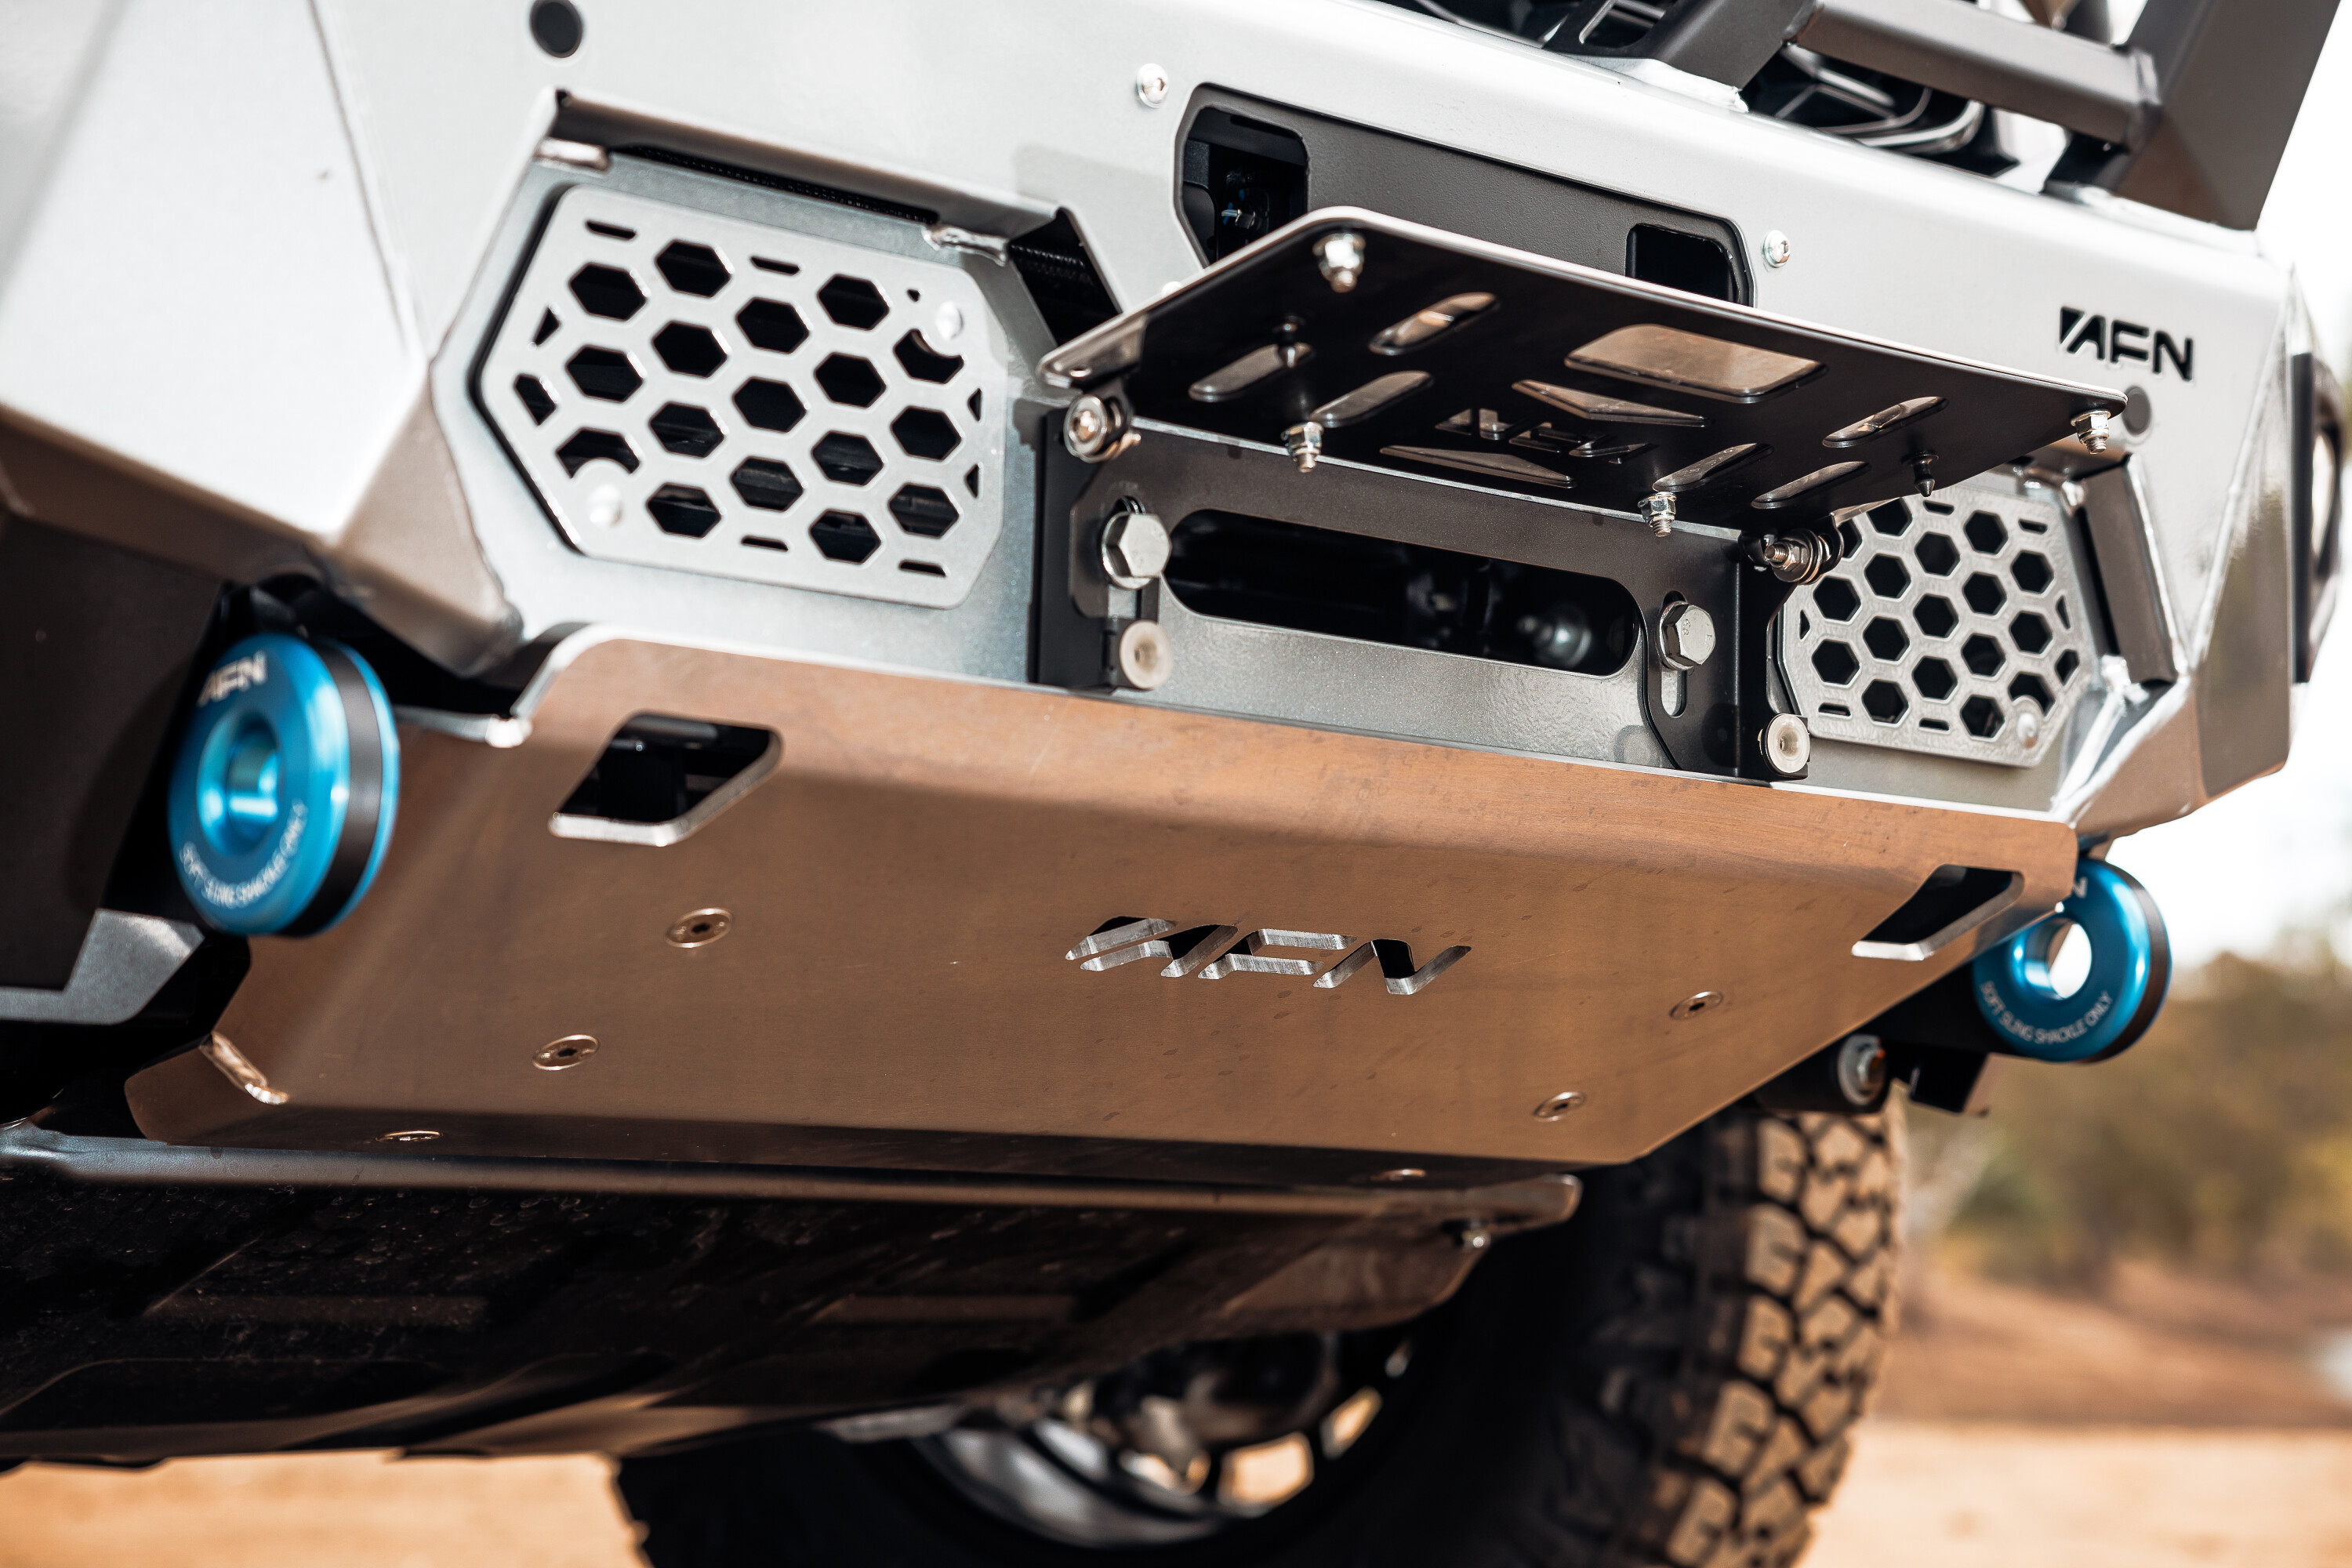
The AFN bull bar is a full bumper replacement piece meaning there’s no cutting and reusing the OE plastic bumper. The bull bar is all steel with various thicknesses used in different sections; 12mm steel in the standard winch cradle, and 4mm and 6mm on the lighter-duty parts of the bar. There’s an internal chassis structure that adds support and strength to the entire bar assembly.
Other standard inclusions on the AFN bar are a pair of antenna mounts, rated recovery points, a front underbody protection plate, high-lift jacking points, LED fog lights and LED indicators.
A feature we hadn’t previously seen on AFN bars is the recovery point soft shackle inserts. These aluminium inserts are a press fit into the steel recovery point holes and they have smooth rounded edges to protect soft shackles. They look super cool and are a clever addition, as we’re all using soft shackles for vehicle recoveries these days. These inserts are a $100 option which must be ordered with the bull bar and can be fitted to any new AFN bar. We reckon they are well worth the extra coin for the looks alone.
2
It’s the little details like these that make the AFN bull bar stand out from the many others on the market. Other notable features are the neat finishing edges where the bar meets the front guards with a compression rubber, the LED indicator enclosures and the indicators themselves, which are directional.
The AFN product is well finished and complements the look of any new 4×4 vehicle. As you would expect of such a quality product, it is made and tested to comply with all ADR requirements and all driver-assistance features and parking sensors are retained and operational. The plug-and-play wiring harness adapts to all these safety features. The AFN bar is covered by a two-year warranty for structural faults and the surface coating.
The AFN bull bar for the Ford Ranger and Everest sells for $3350 plus fitting, colour-coding and the extra $100 for the soft shackle recovery point inserts. AFN 4×4 Australia is based in Brisbane but ships nationwide and has approved installers around the country. AFN is based in Portugal where it specialises in equipping and armouring vehicles for military use, as well as in products for recreational 4x4s.
As mentioned, this is our second front bar from AFN and the fit and finish of the product continues to improve.
Pricing (RRP)
- AFN 4×4 bull bar: $3350 (plus fitting and colour coding)
- Soft shackle inserts: $100
With the TroopCarrier now wearing an ARB bull bar and a Carbon winch up front, and a Kaymar rear-step towbar down the back end, and with drawers and a water tank to come, I knew I had to upgrade the suspension.
Even though Toyota has upped the ante as far as GVM is concerned with this model, it is just a token upgrade, and like most people who set up their rigs for outback touring, I needed more in the way of load carrying capability.
In recent years parabolic springs have become a popular choice for those wanting to replace their standard leaf springs. Parabolic spring packs typically contain fewer leaves than normal leaf spring packs, so less unsprung weight, and they provide better flex and articulation, the latter sorely needed in 70 Series Cruisers.
In addition, the tapered design of each leaf in a parabolic spring pack allows forces to be more evenly distributed, and each leaf can work independently of each other with enhanced flex and, importantly, without sacrificing load-carrying capacity.
My son Trent has so far been impressed with the parabolic springs in his 79 Cruiser, having already run them on several tough trips while heavily loaded as part of his tour company’s travels to Cape York, across the Simpson and western deserts, and into the Victorian High Country. As a result, a set of parabolic springs for the rear of my Troopy were soon on my wanted list.
Lucky for me, Terrain Tamer released a GVM upgrade for the 70 Series Cruiser late last year that included parabolic springs. In this kit the GVM is increased from 3300kg to 3950kg. While the Troopy has a kerb weight of 2308kg, that does not include (as per normal with any kerb weight figure) any fuel, passengers or additions such as bullbars, dual batteries, etc.

1
The Terrain Tamer GVM upgrade kit, designed in conjunction with well-known and respected Multridrive Technology (multidrive.com.au) based in Geelong, Victoria, includes new springs and shocks front and rear, along with a new sway bar for the rear, plus shackles and poly bushes. It also comes with all the necessary paperwork that needs to be completed as part of any GVM upgrade, and a sticker to go on the driver’s side B-pillar informing those who need to know of said GVM upgrade.
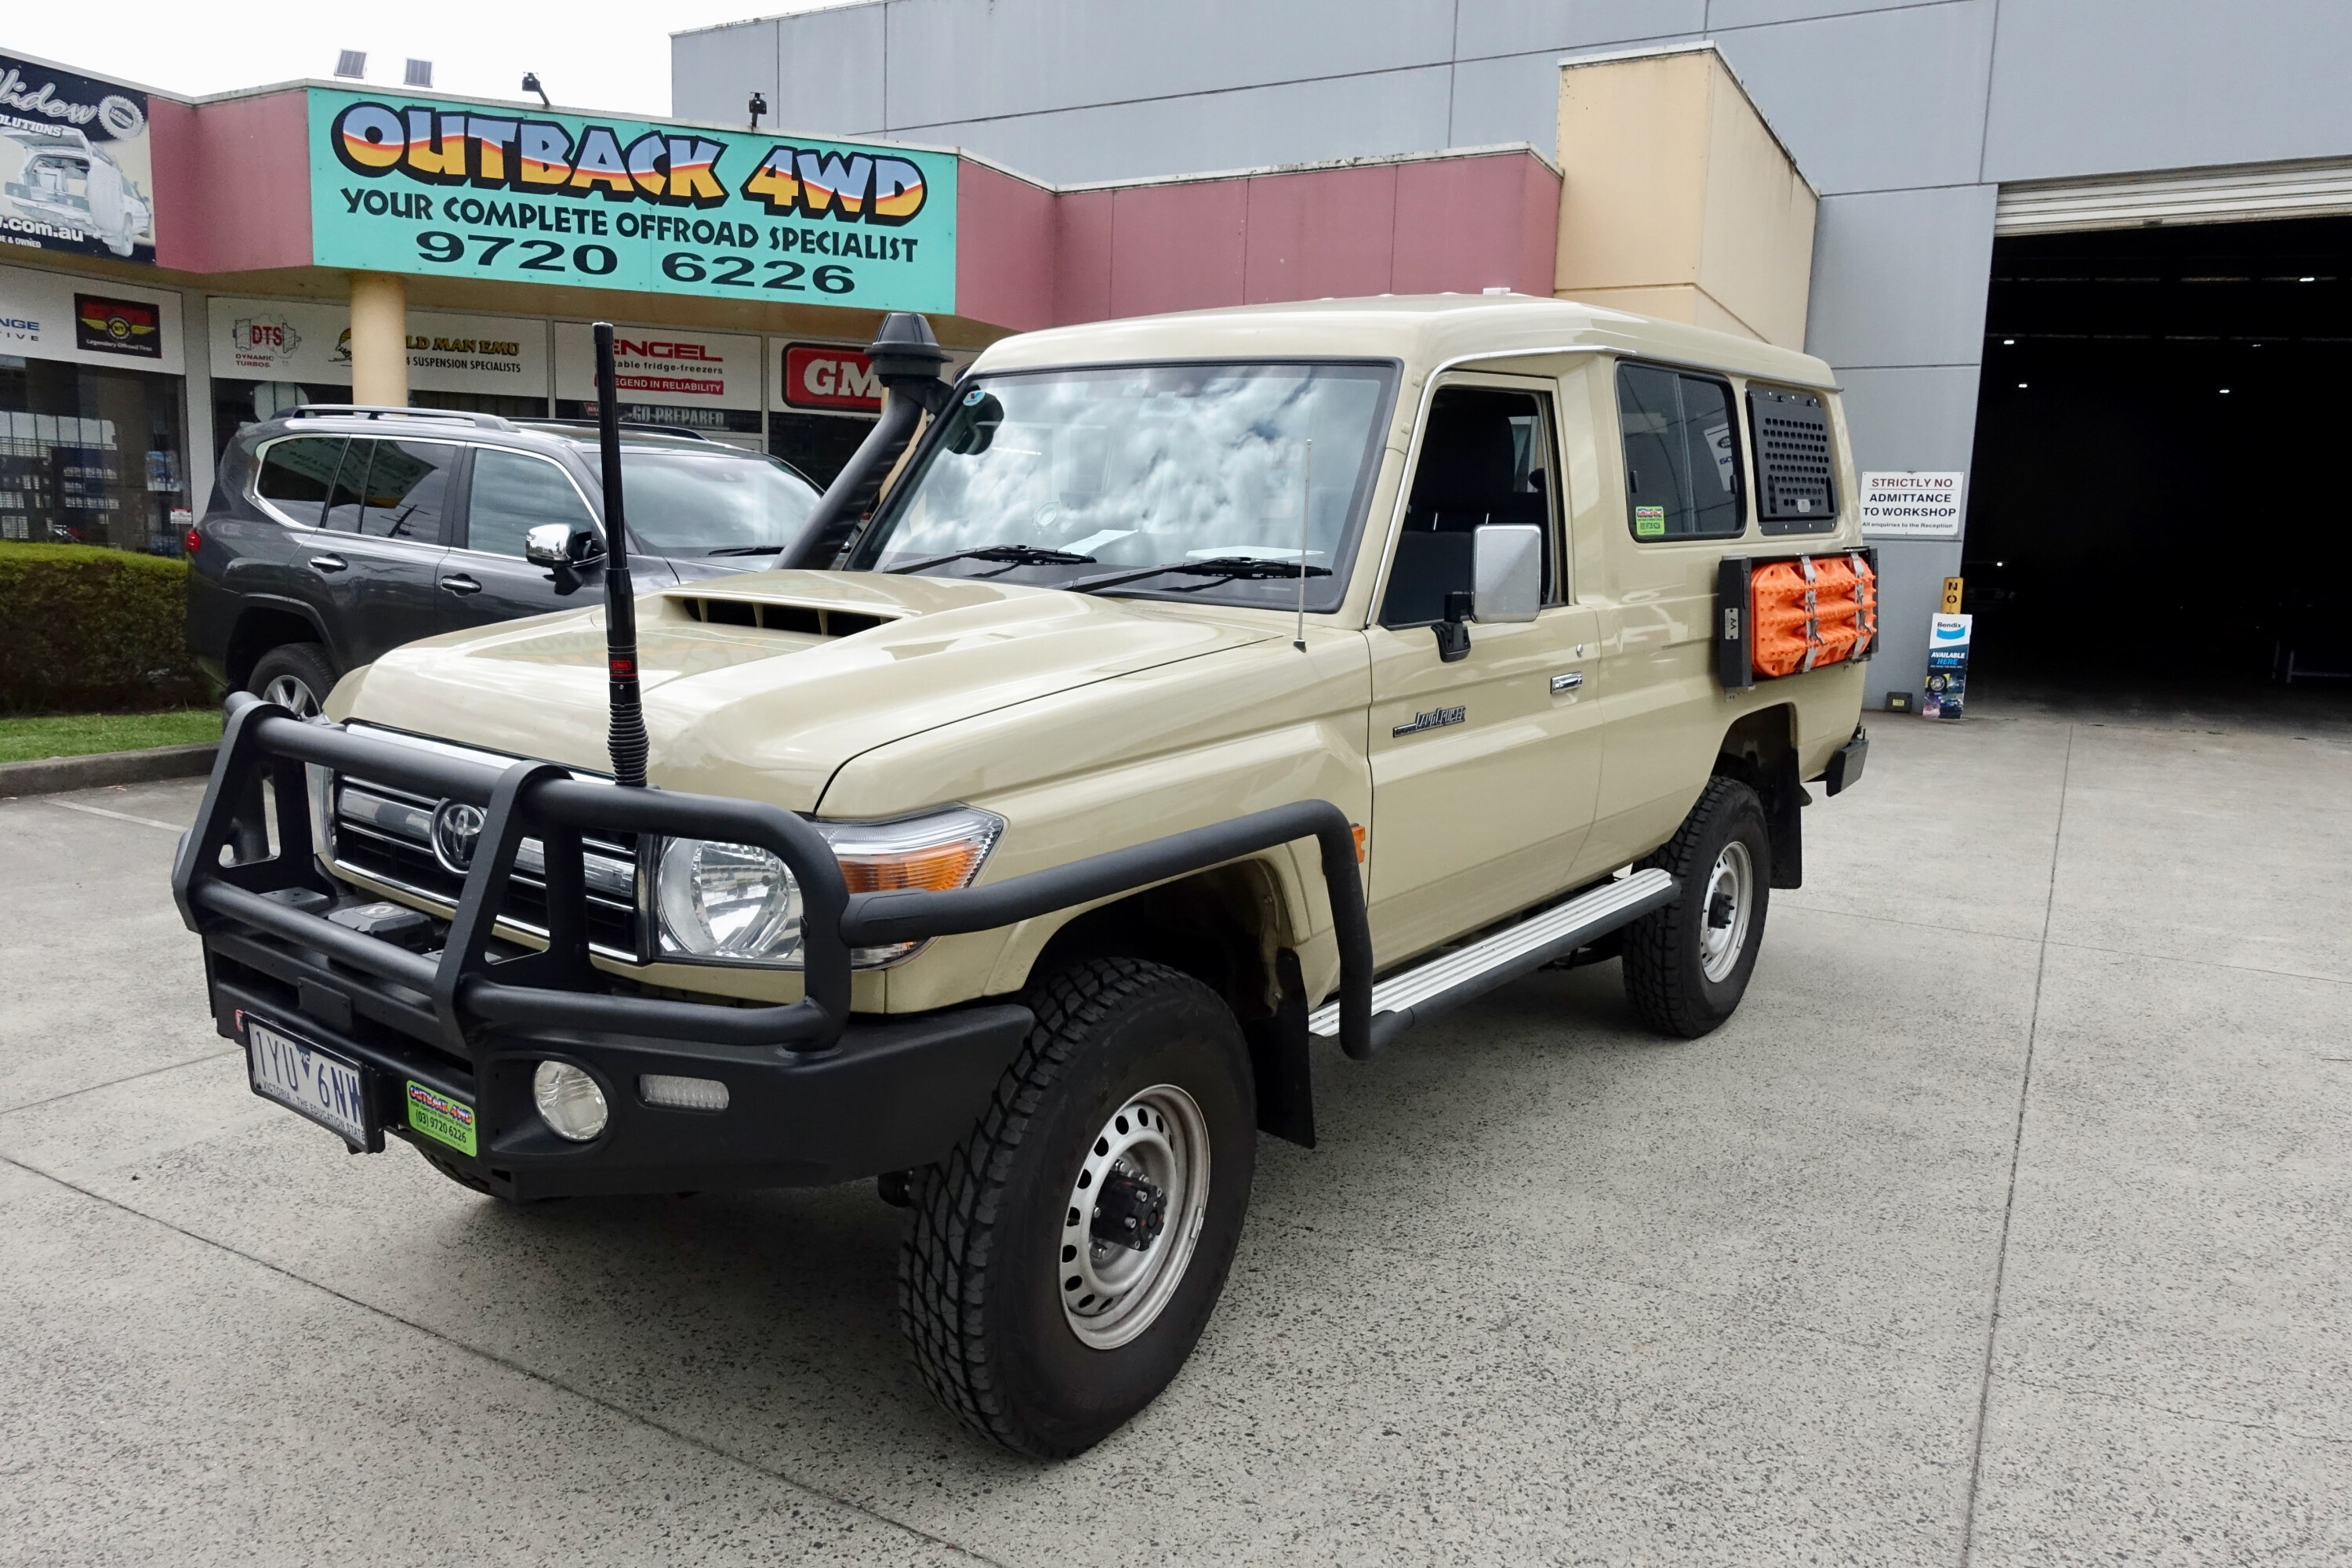
It’s a lengthy process to change a suspension with some heavy lifting involved that really necessitates a well set up workshop and equipment, so I left the job to the crew at Outback 4WD in Bayswater, Victoria (www.outback4wd.com.au).
The front suspension is relatively easy to fit with the original coil springs and shocks painlessly replaced with new Terrain Tamer items. The biggest issue at the front end is replacing the castor bushes on the trailing arms, which requires the use of a gutsy hydraulic press, both to remove the old bushes and to fit the new ones.
1
Down the back a couple of people and a few support stands are required to safely extract the old leaf springs and fit the new parabolic springs. Once the new springs are in, the new shocks can go in and the new heavier duty sway bar can be fitted.
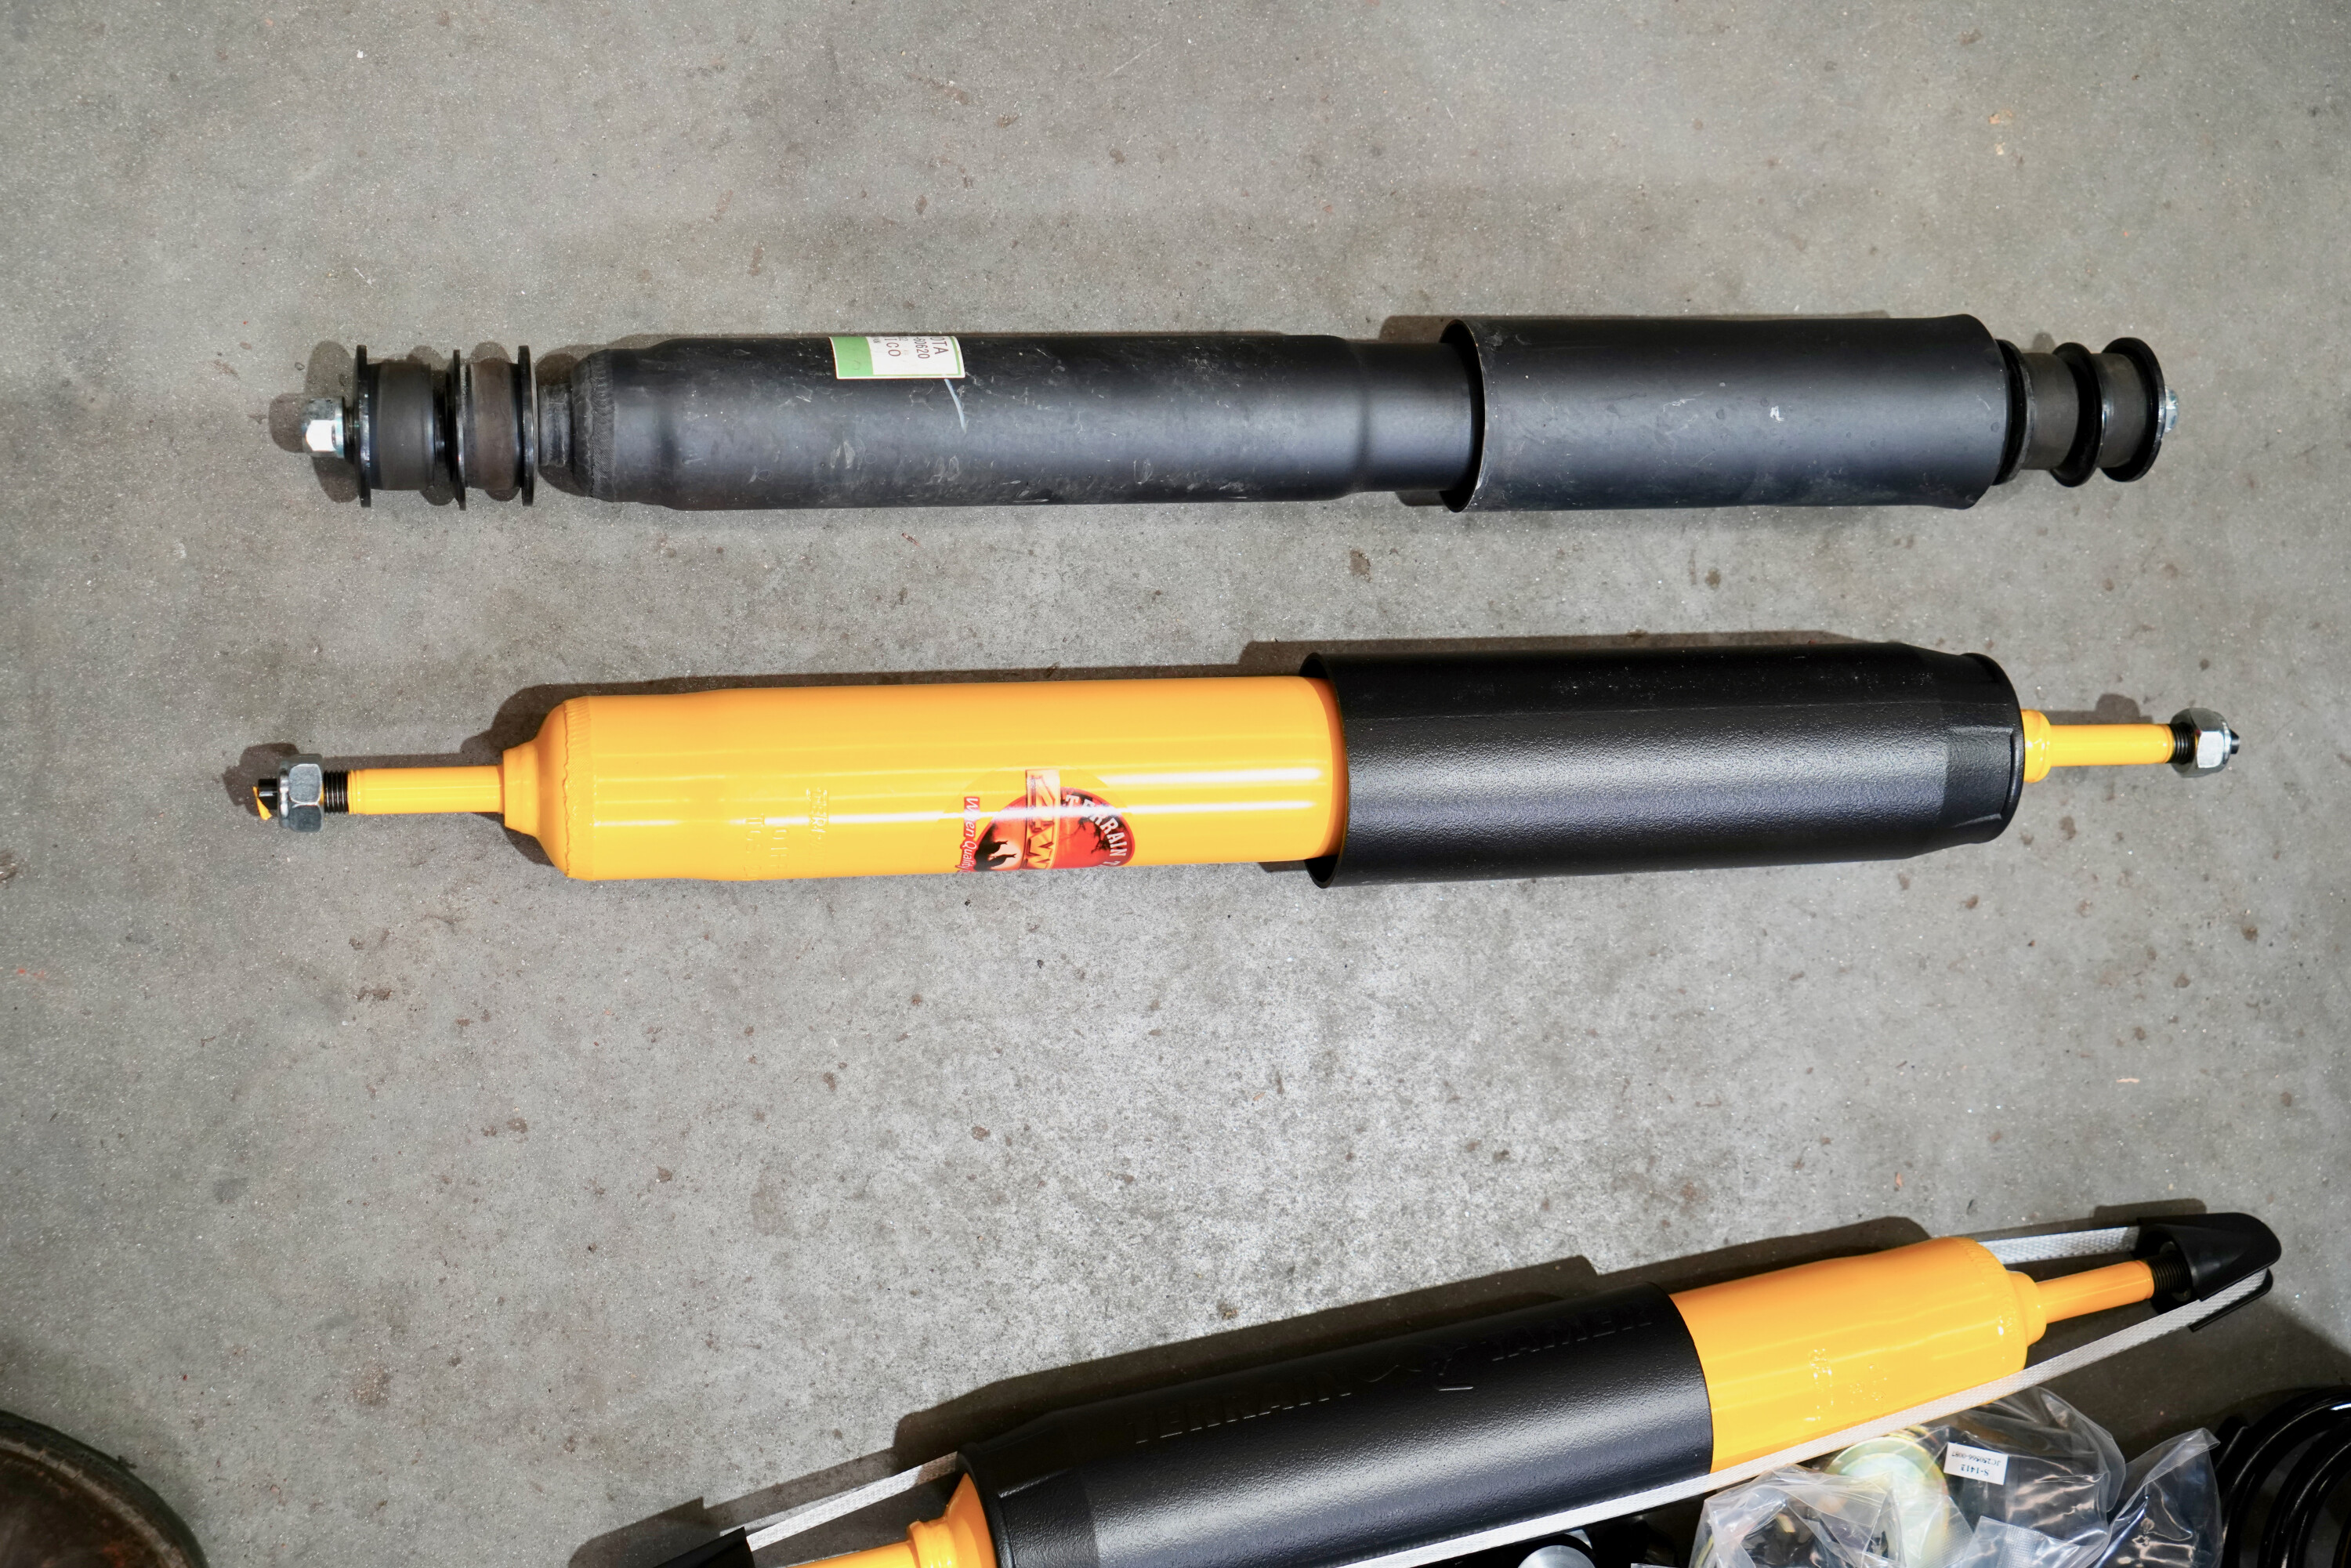
The Terrain Tamer TGS Series twin-tube shocks are bigger than the OE versions and they feature a 40mm bore and 20mm chrome hardened shaft. A bigger body allows more oil in the shock, which is a good thing as this minimises heat build-up while driving over corrugations and rough roads, while the shock ends feature double welded eyelets for added strength.
A multi-stage valving system is designed to provide a responsive but comfortable ride, and German-made nitrile seals keep the oil where it should be. The rear shocks are not only bigger but are more firmly valved than what would be required for a normal leaf-spring pack, as parabolic springs do not offer frictional resistance to oscillations of standard leaf springs.
1
While we were at it, we also fitted a new steering damper to the Cruiser. What we didn’t have to fit as part of the GVM upgrade was bigger indicators; these are required on earlier model 70 Series to comply with ADRs, but our late-model rig already had the correct size lights.
With the new suspension fitted the Cruiser sits a lot taller than it did before, especially in the rear, but it will settle once the water tank and storage drawer system have been fitted. Nevertheless, even when empty, the ride quality is much improved compared to the standard setup, and I’m looking forward to loading up and hitting the tracks to see how it handles with some decent weight on board. According to Trent, I’m going to be impressed.
The Terrain Tamer shocks are covered by a three-year warranty while the parabolic springs are covered by an owner’s lifetime warranty.
We all have that one mate who manages to get in to strife on every 4×4 trip, whether they are the first one to get bogged, roll the car or just get lost.
Well, here’s your chance to show the world their embarrassing predicaments and give yourself a chance to win a $300 voucher for MAXTRAX recovery gear, just like Dwayne!
To get involved, please send a few pics of your embarrassing 4×4 moment to [email protected] or alternatively via a private message on our Facebook page!
Dwayne Martin was indulging in some off-road antics in his twin-locked 2011 Nissan GU Patrol, on his mate’s property at Mendooran – about 50 minutes drive north-east of Dubbo or approximately five hours drive north-west of Sydney – when he got stifled in a mud trap.
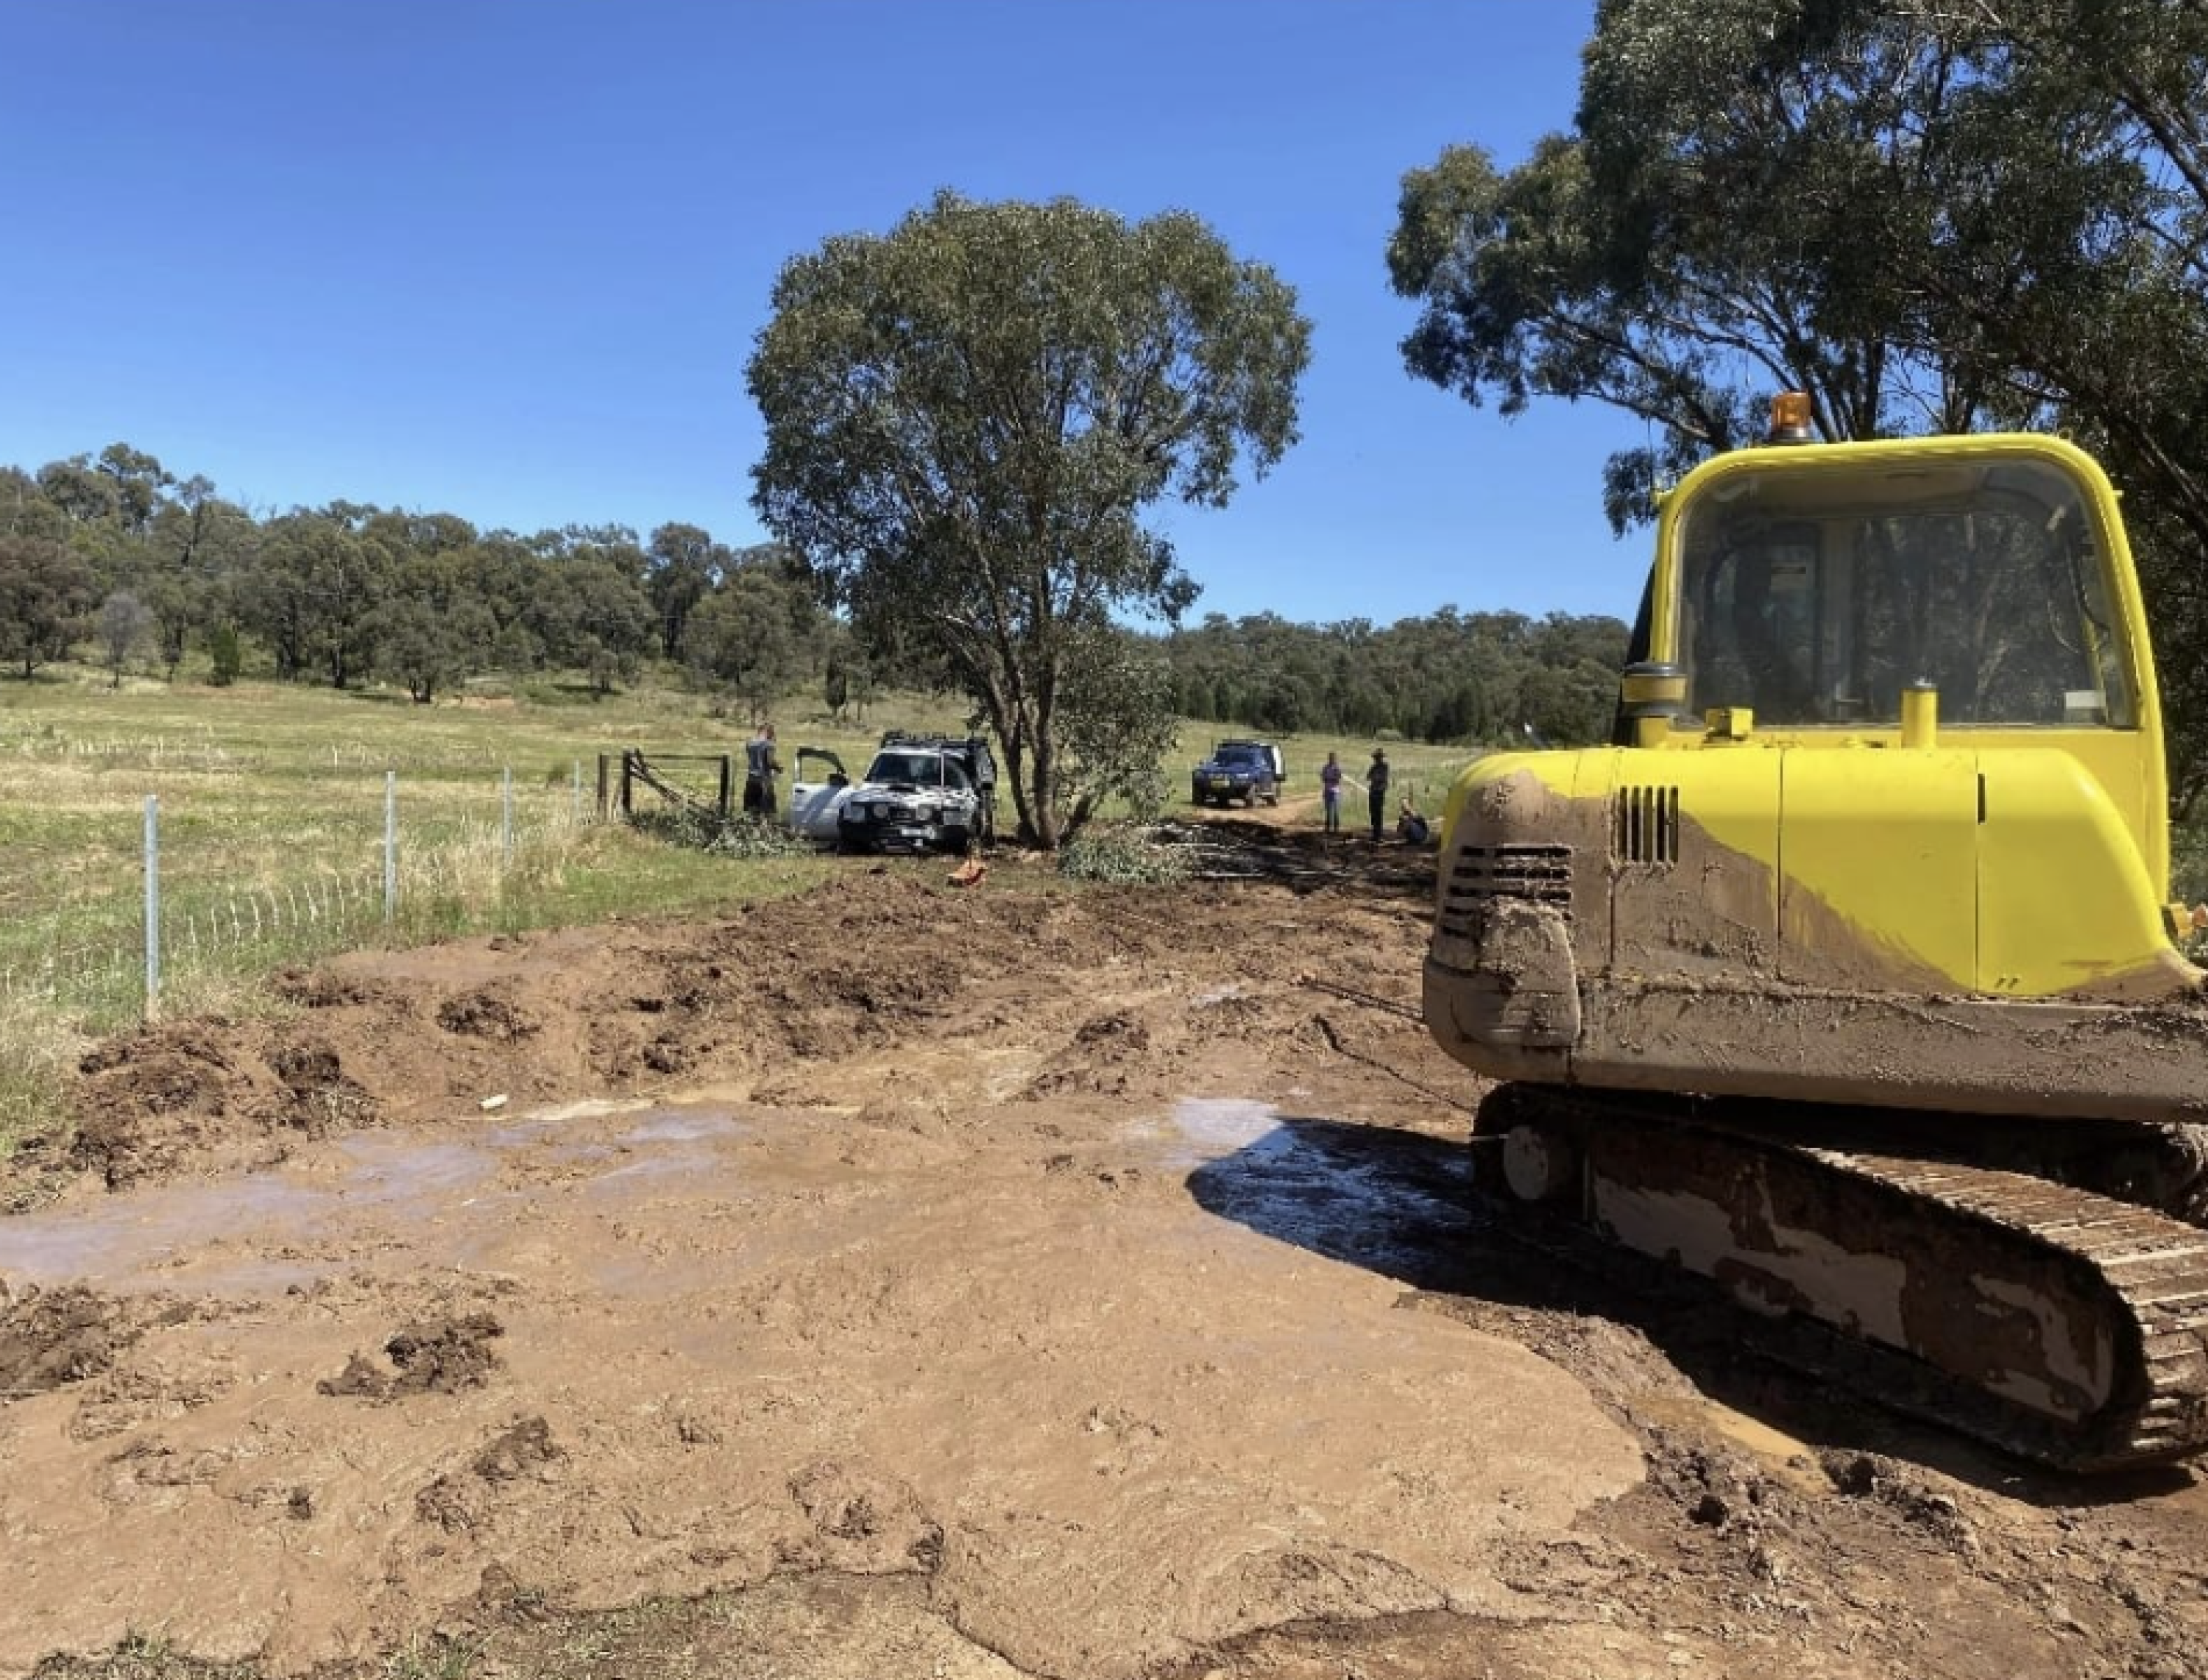
2
“We hadn’t left the main track, but we had a shit-tonne of rain prior,” Dwayne told 4X4 Australia of the bogging. “We had to leave it in the mud overnight so that we could get a dozer – so it was a two-day recovery.”
In the end, the dozer was the only vehicle with enough grunt to get the Patrol out of the gooey stuff, and plenty of digging was required with the excavator.
“I managed to get stuck once or twice,” Dwayne added, “it was just like quicksand.”
Hopefully Dwayne can put his new set of Maxtrax to good use!
To get involved, please send a few pics of your embarrassing 4×4 moment to [email protected] or alternatively via a private message on our Facebook page!
T&Cs
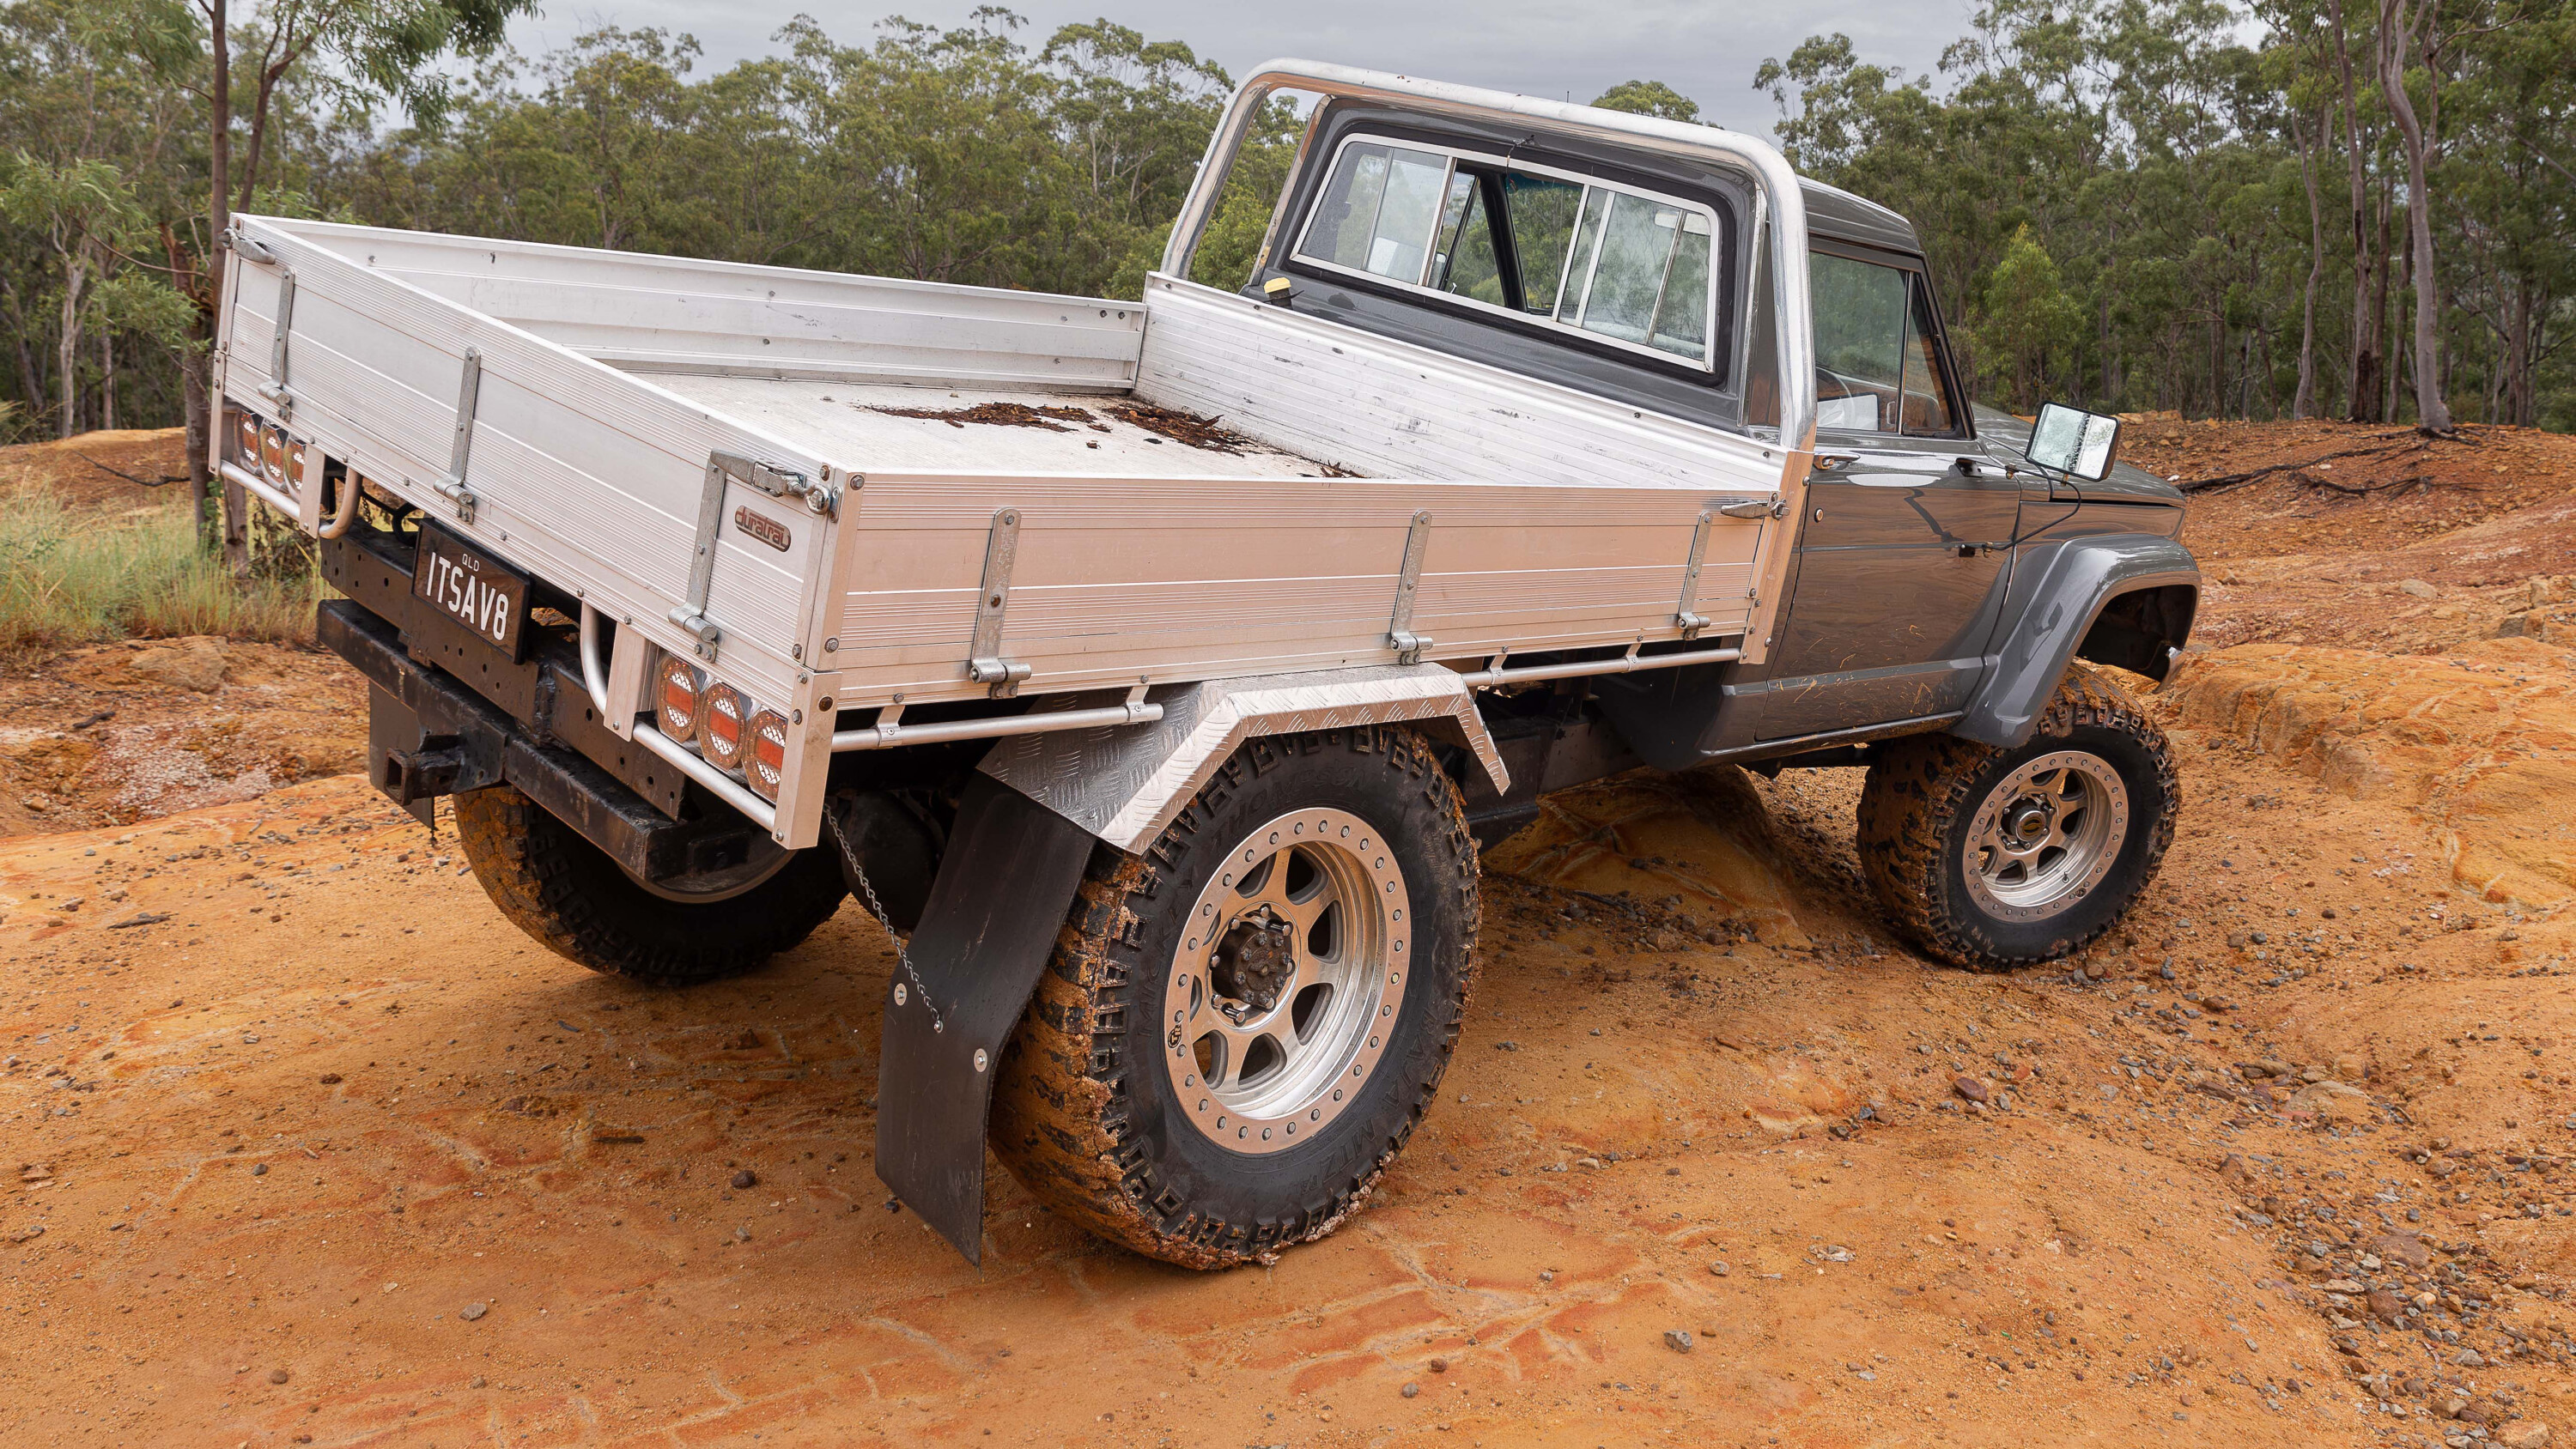
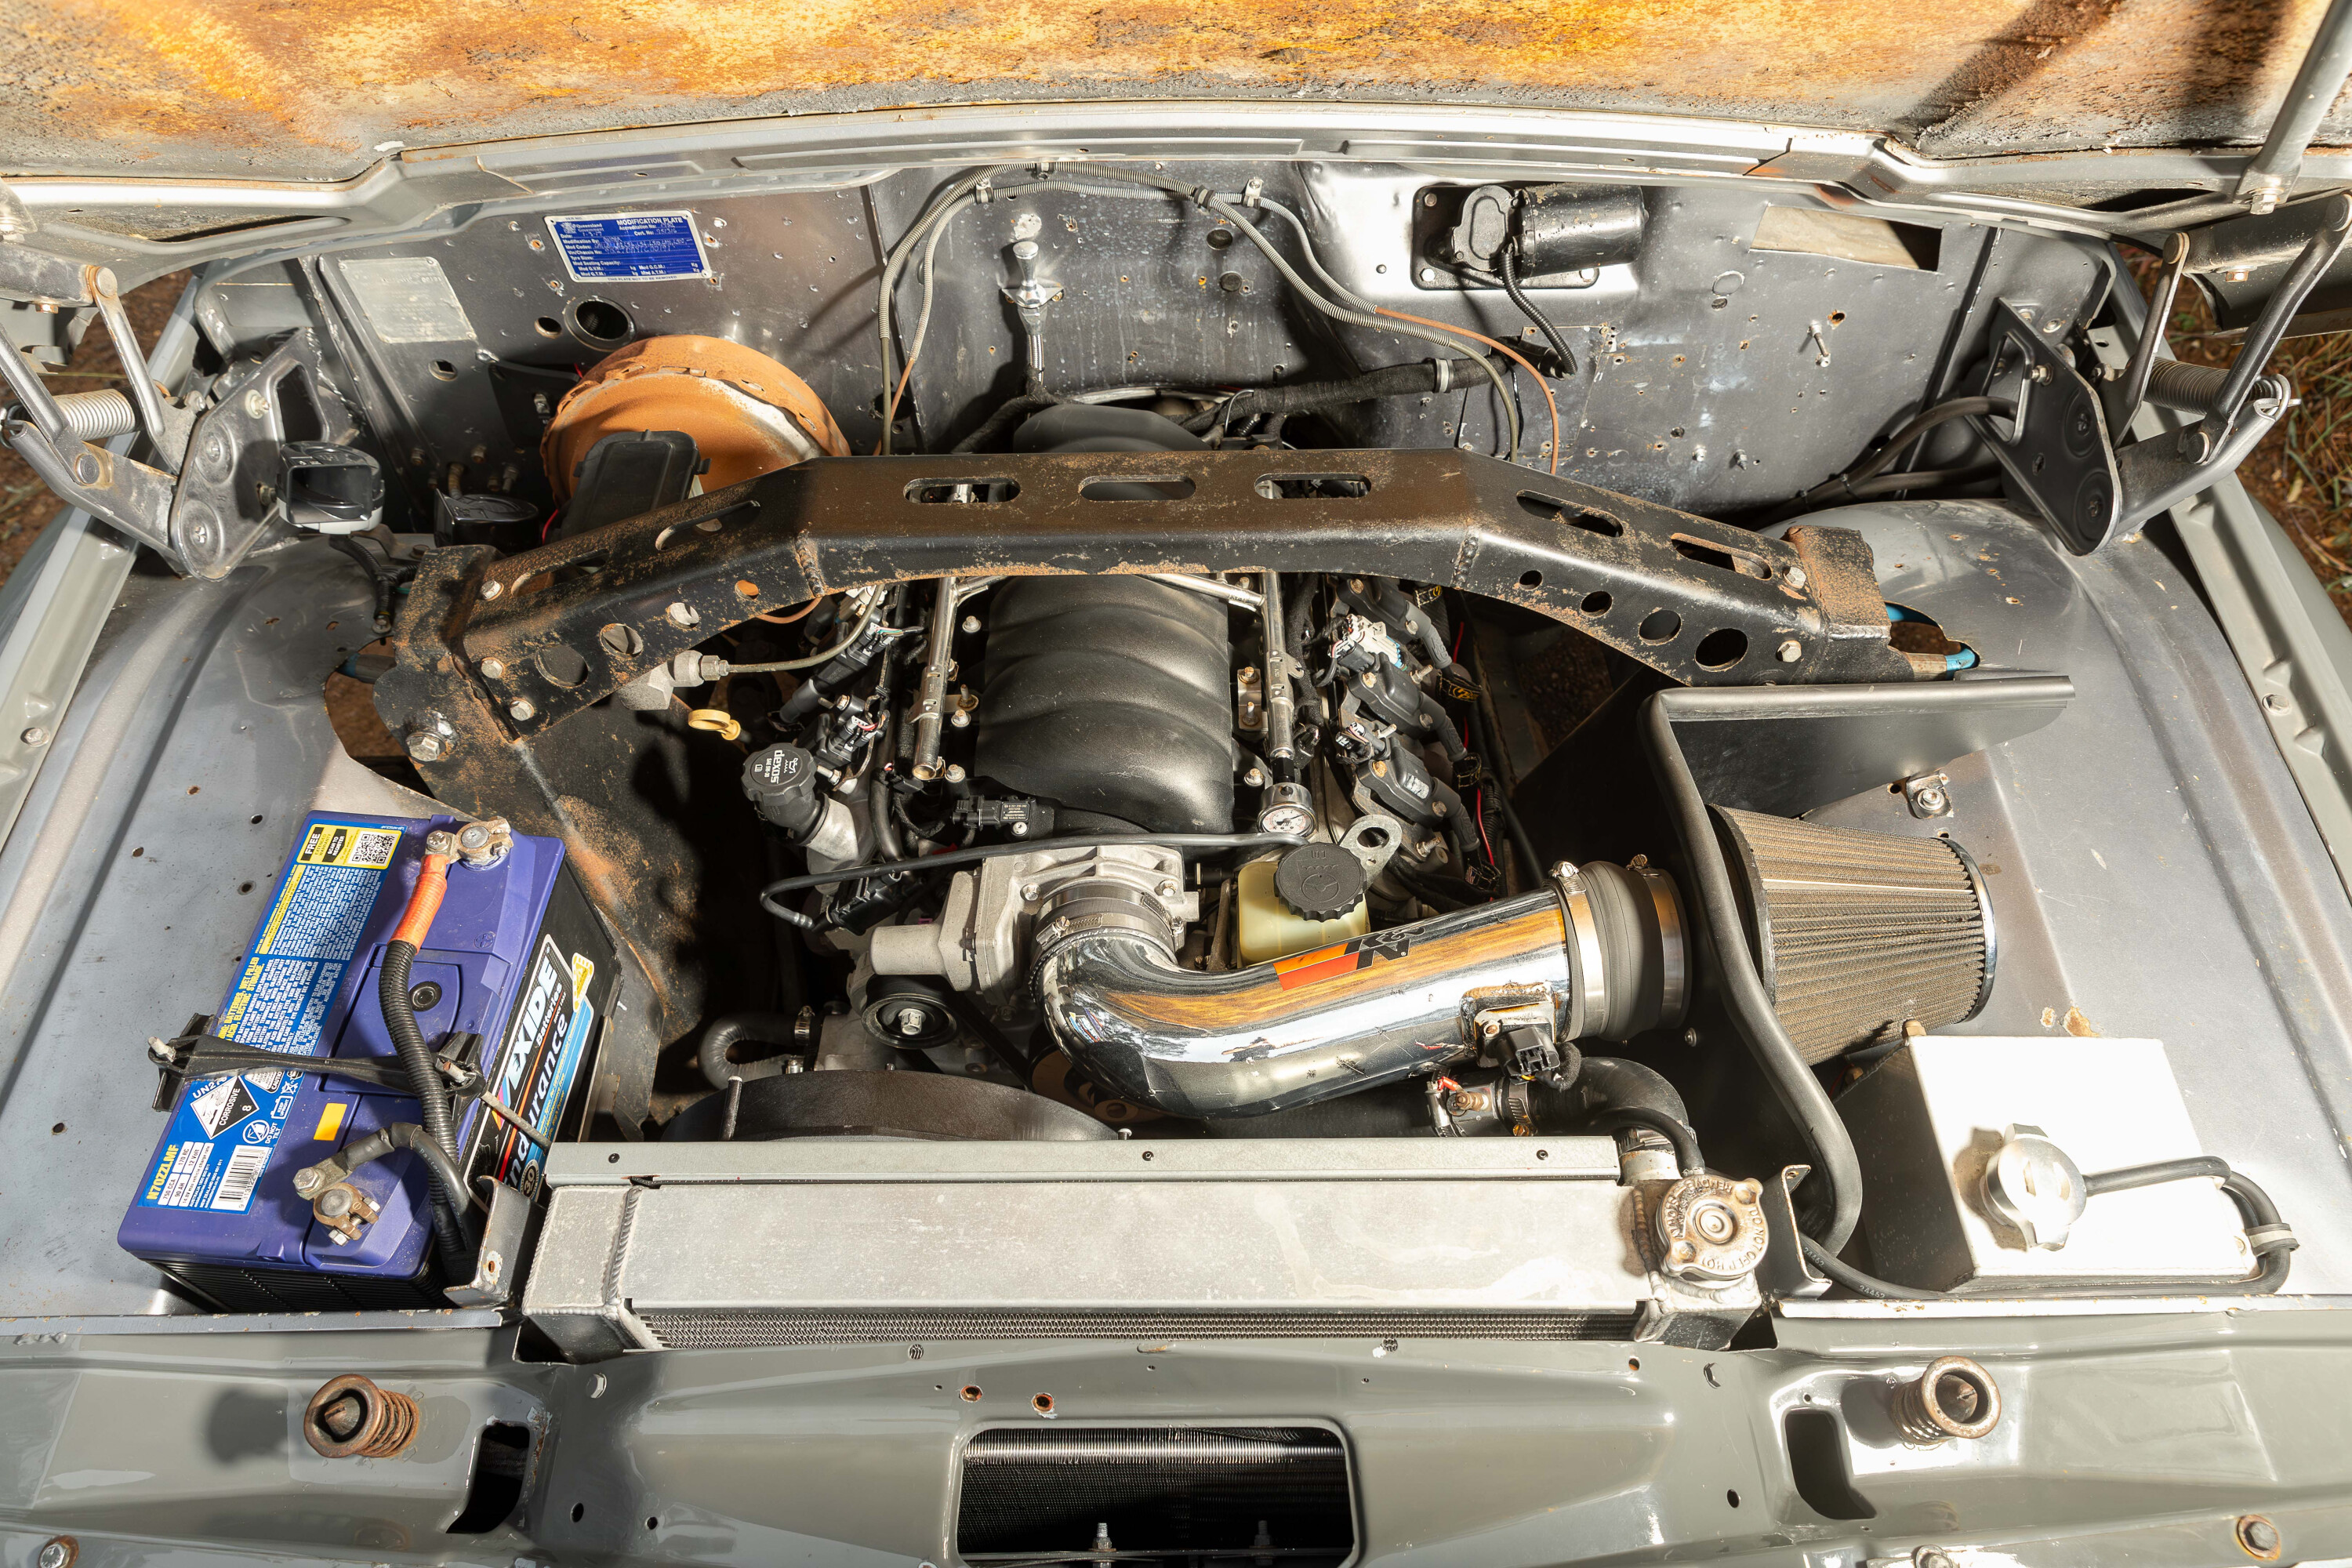
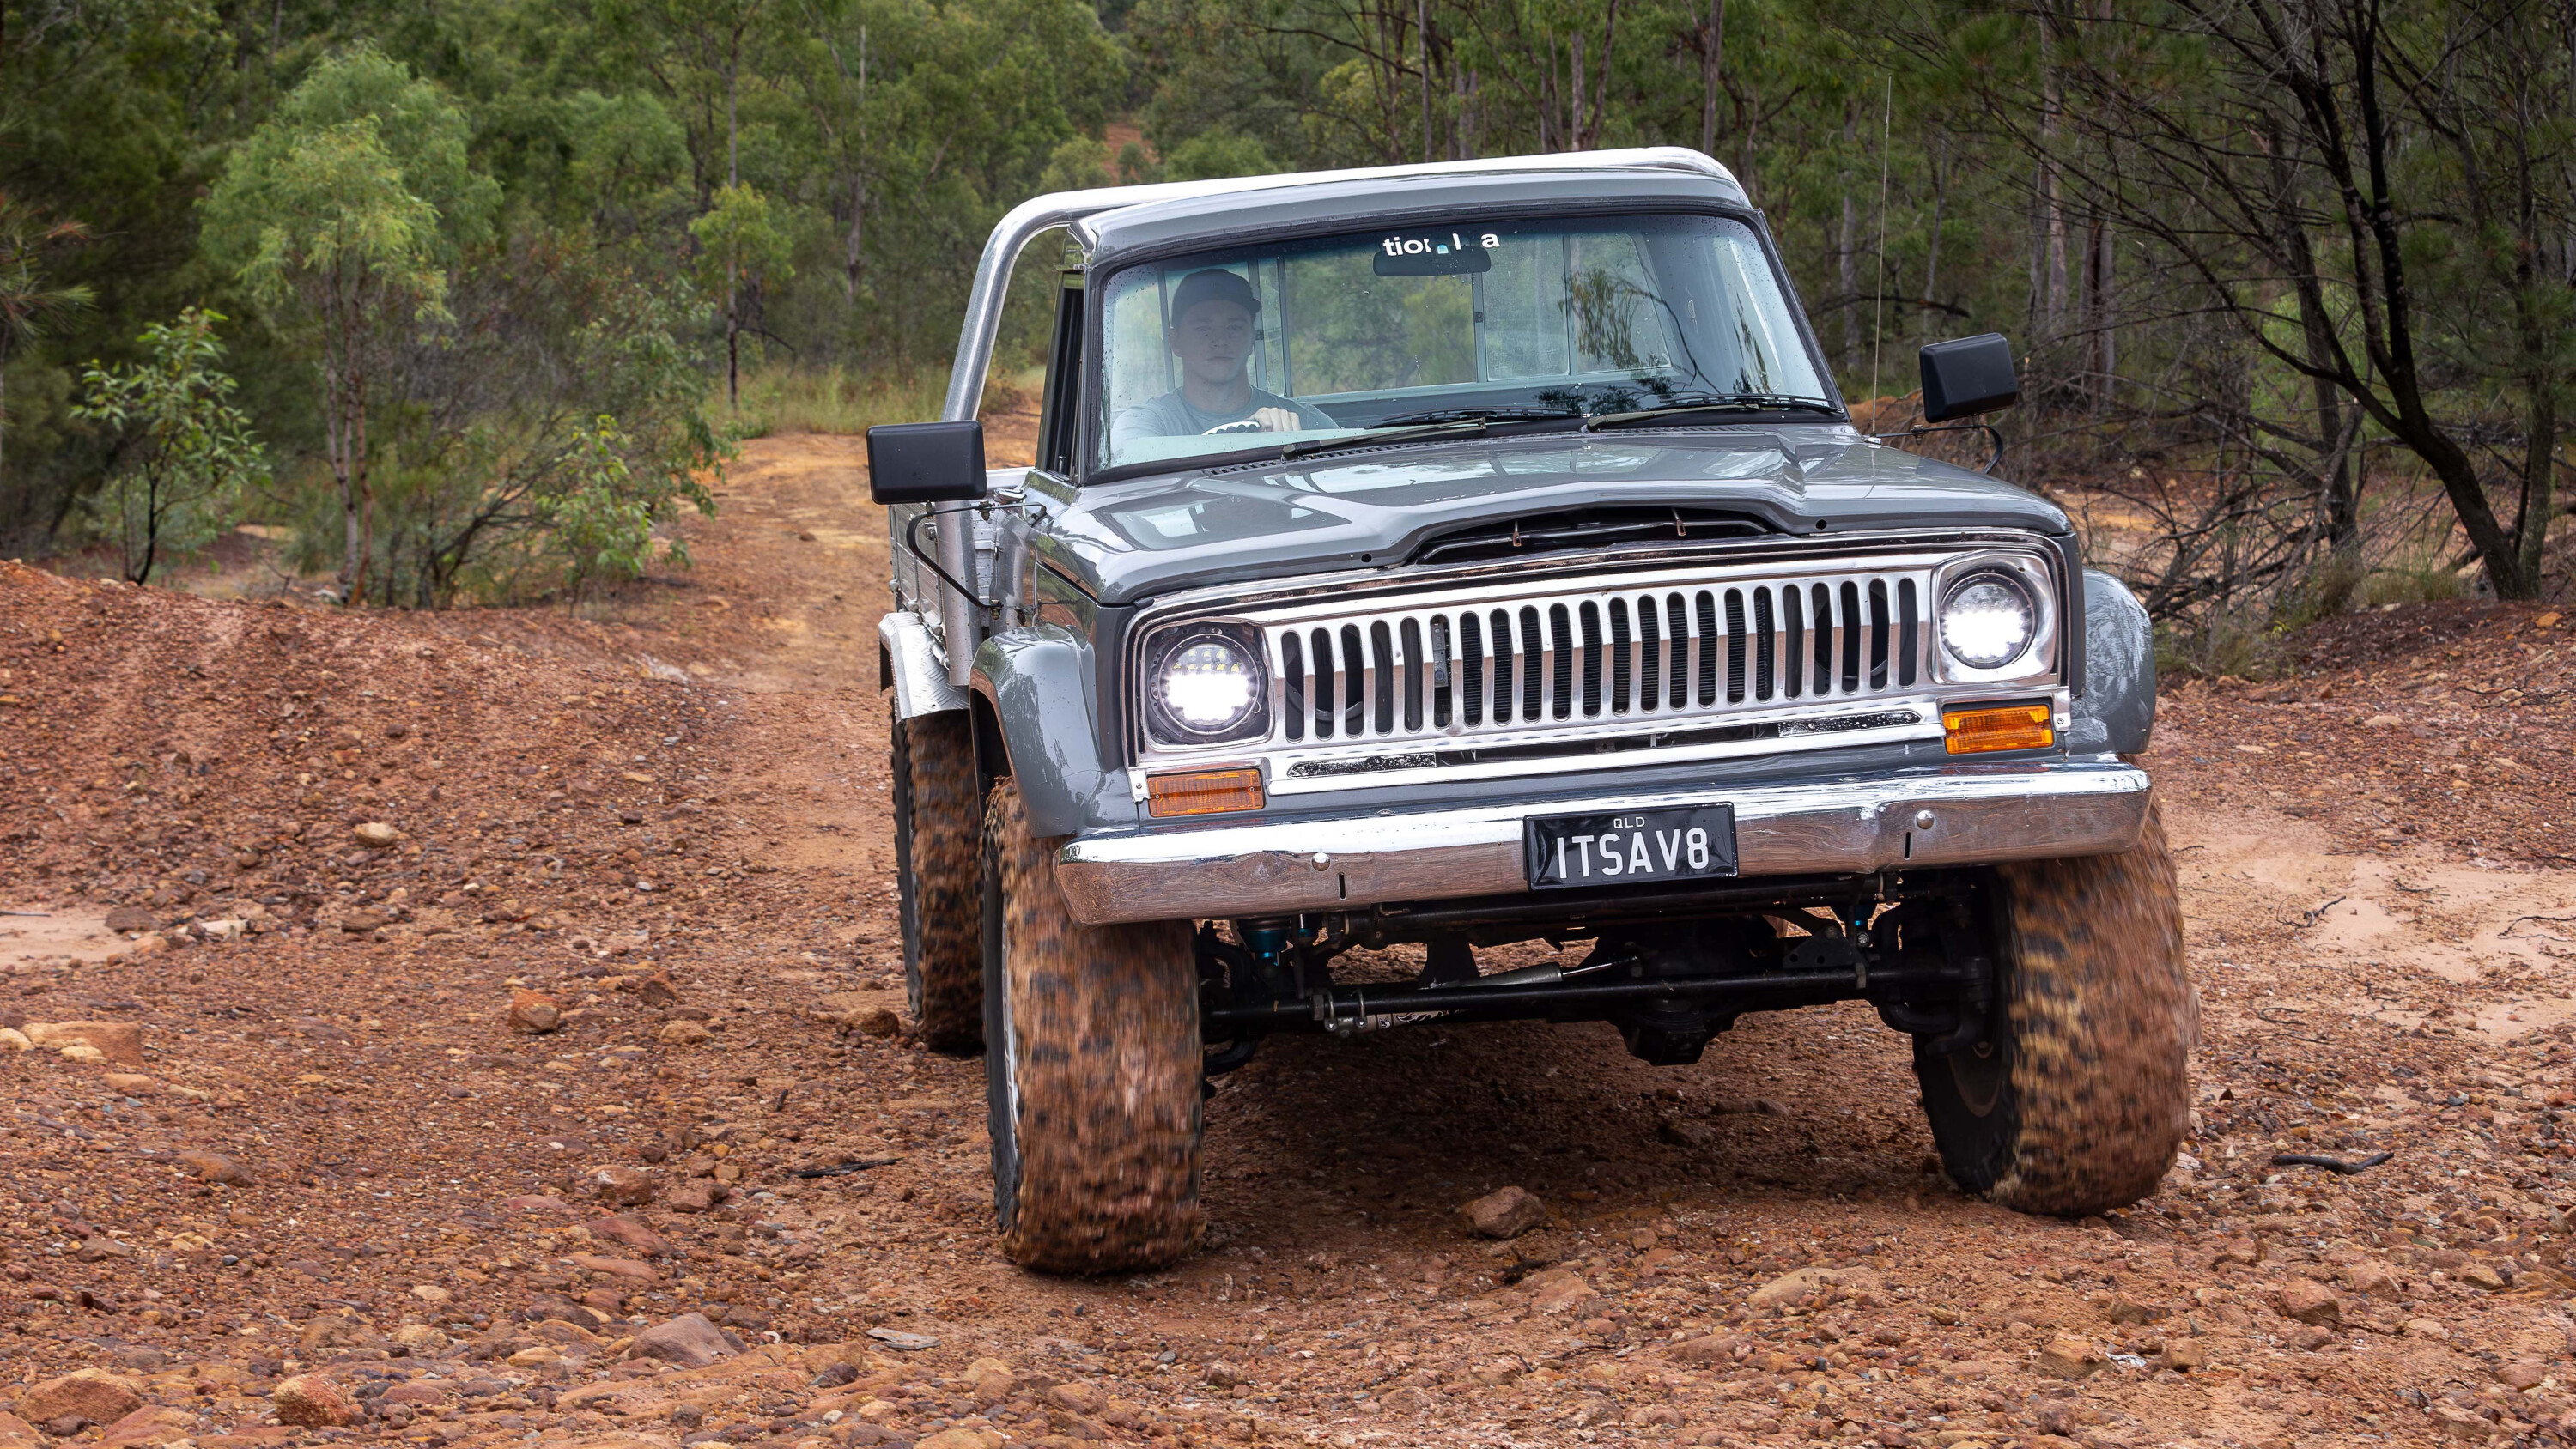
This 1981 Jeep J20 is Sam Kovac’s daily. You see, Sam is a self-confessed sucker for a good project.
His usual method is to find a half-finished build that has had a lot of the difficult work already completed, then he comes in, snaps it up, finishes it off for a fraction of what it would’ve cost him if he started from scratch, then sells it for a tidy little profit. Wash, rinse and repeat.
That was the plan with this old school Jeep truck too, which he found as a rolling shell with no driveline (other than the old engine) or wiring. The thing was, Sam kind of liked this one, different to the usual Patrols and Cruisers, and has held onto it for a lot longer than he usually does, daily driving it for the past couple of years as well as blasting up the sand on the islands and beaches around SEQ… as you would, given the lengths he’s gone to, and the sheer fun of piloting a 370kW full-size rig over the dunes.
1
Oh, in case you weren’t already aware, Jeep utes have been around since the 40s, and were called the Gladiator in the US (sorry JL owners, your Gladiator is far from the original).
Built to compete with the Fords, Dodges and Chevys of the 60s, 70s and 80s, the Jeeps were a solid unit overall, but ultimately couldn’t hang with the sheer sales numbers of the Big Three, and eventually were discontinued by the late 80s.
But back to Sam’s J20, which has everything most folks could want in a 4X4: power, comfort and off-road ability by the imperial gallon. If you can’t see yourself punting this down the beach, V8 singing, big rubber floating over the soft sections, enjoying every second of it, you may need to seek counselling. Or you’re just grumpy. Either way, keep your chin up, champ.
1
It’d be rude not to
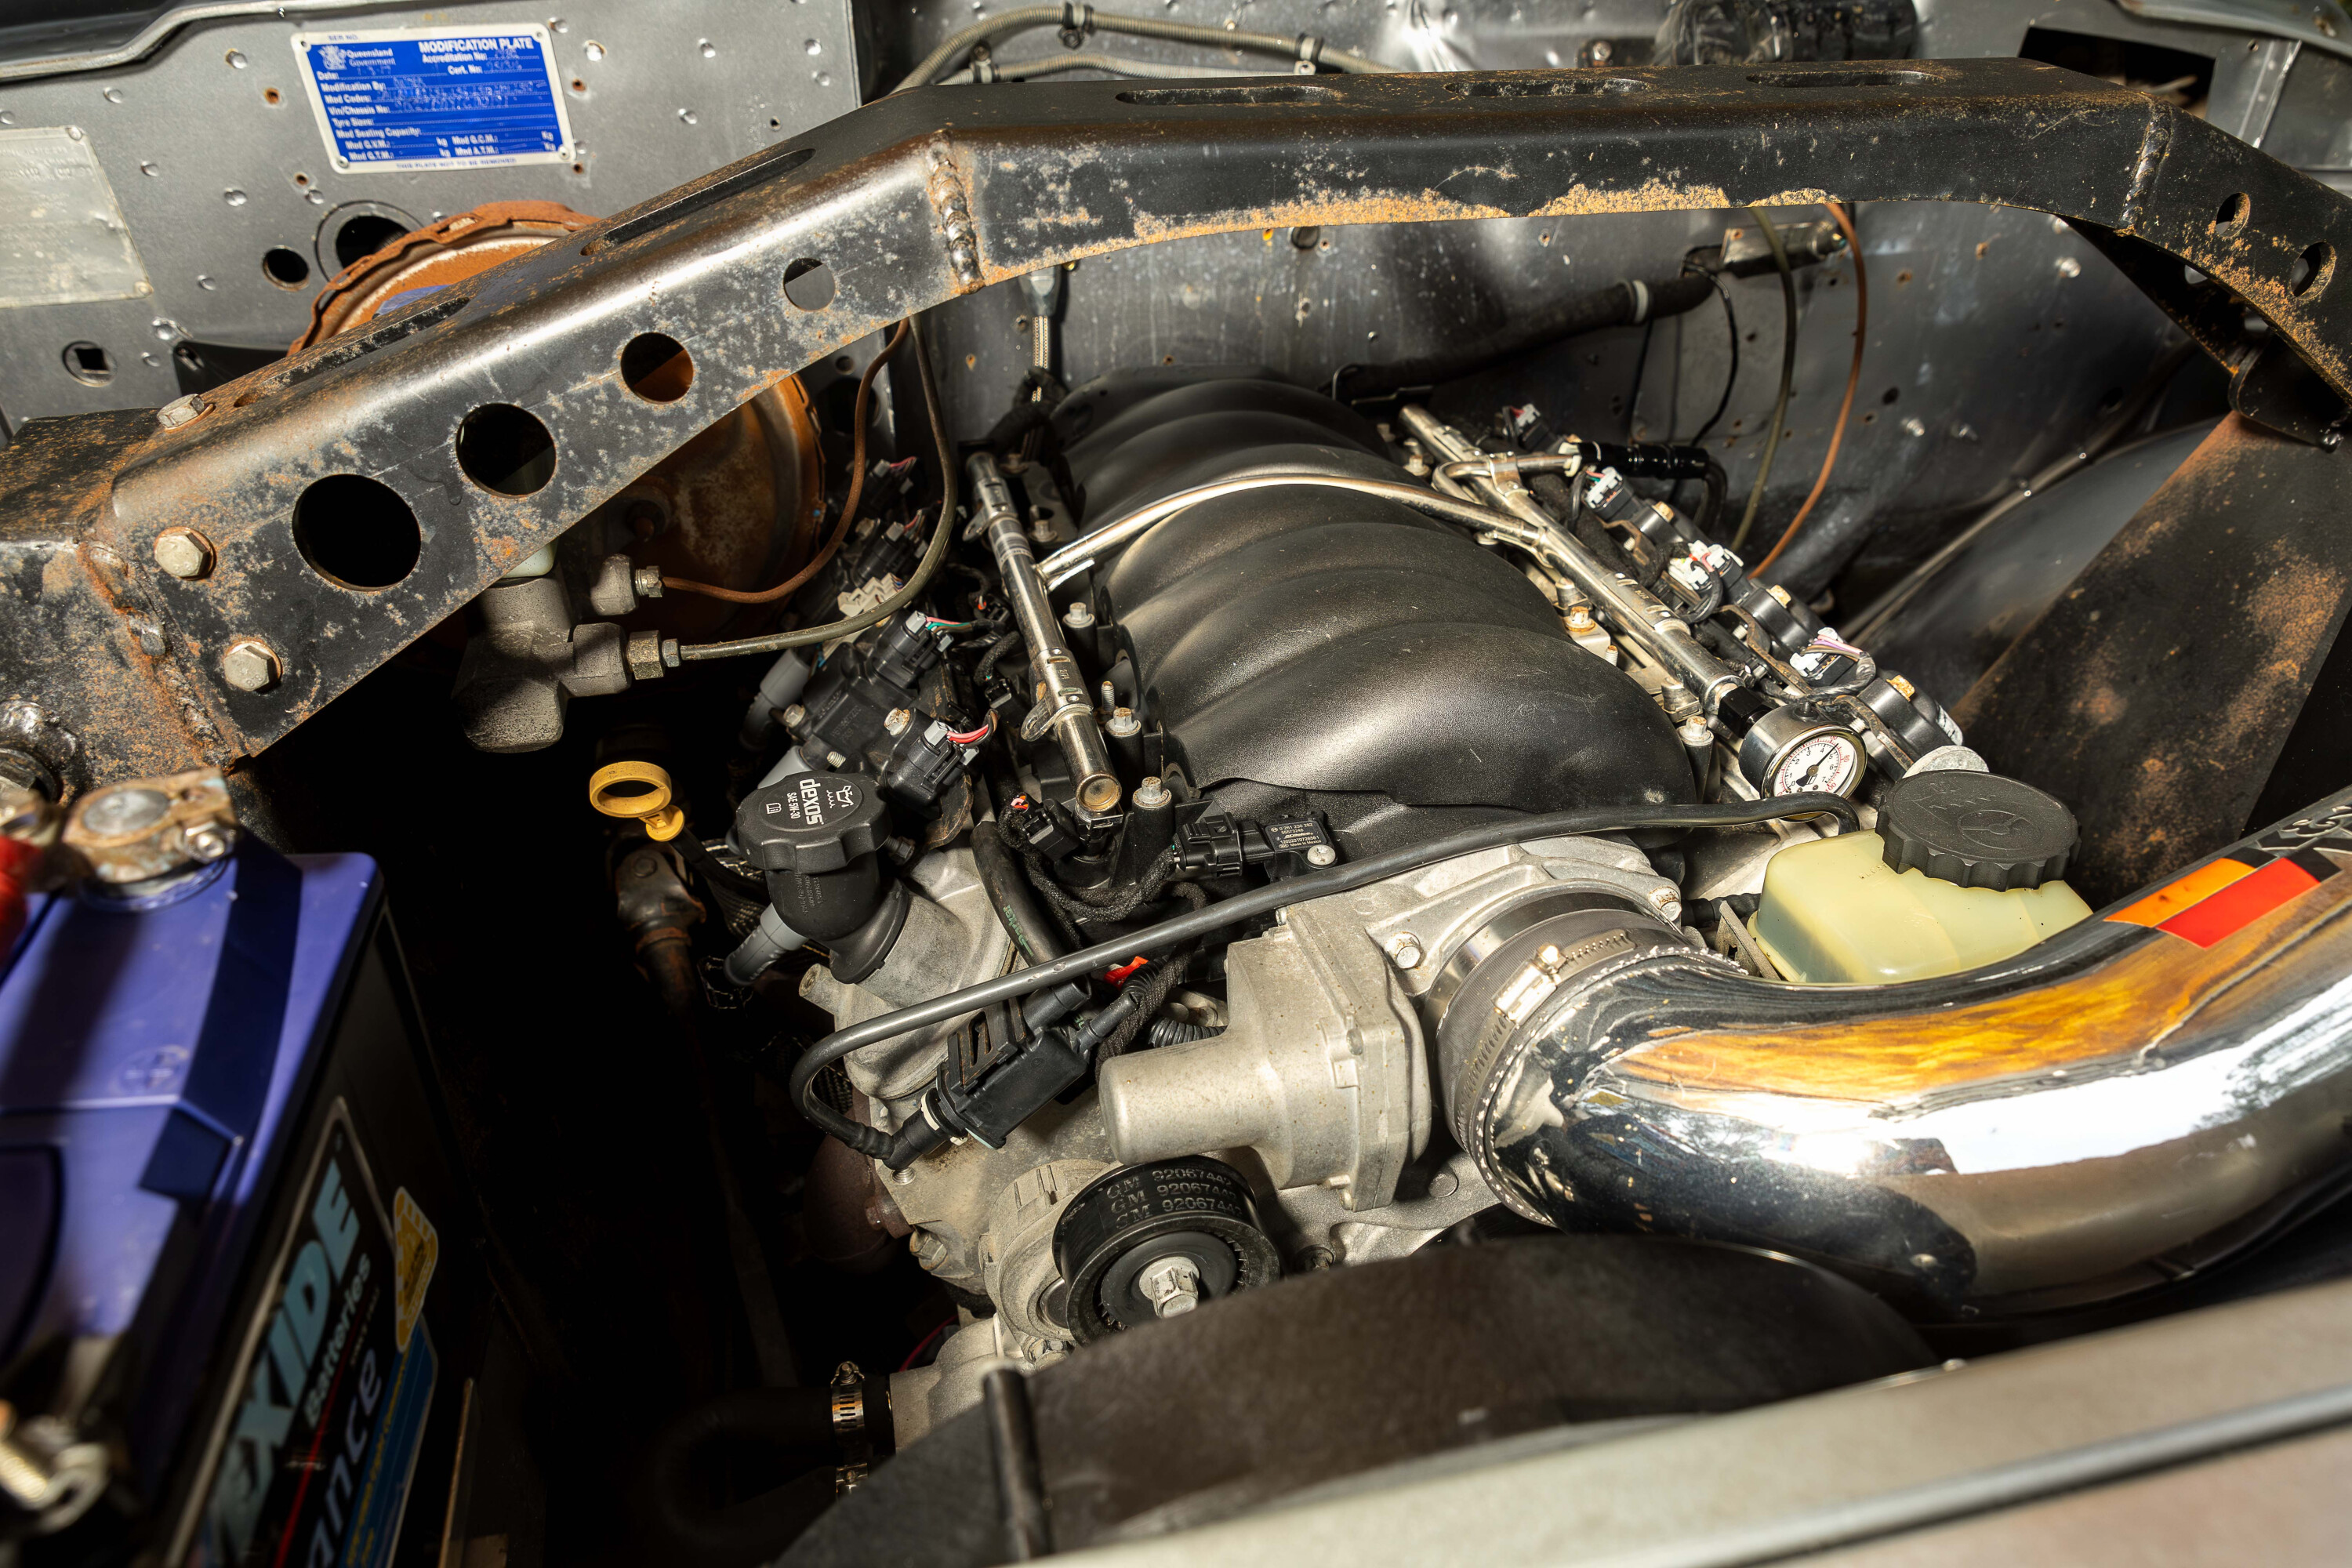
When you’re building a classic full-size American truck, it’d be downright impolite not to throw a big, corn-fed hunk of Uncle Sam’s finest engine in between the rails.
Luckily, Sam was raised right, so he shoehorned in a crate LS3. For those unfamiliar with arguably the finest engine series out of the GM stable, the LSX engines are pushrod, fuel injected V8s.
The LS3 is a hefty 6.2L and is capable of some massive numbers when worked. Other than a GM hot cam and tune though, Sam is more than happy with the relatively stock 370kW and 620Nm output figures.
1
Being no stranger to the mighty LS, with an LS1 79 Cruiser, an LS1 dual-cab HiLux and an LS2 Luxy under his belt, Sam had the engine in without too many dramas. However, as with so many conversions, getting it mounted was the easy part.
The six-speed auto was sourced from a Chevrolet Silverado, so bolted right up, however the transmission’s computer and the engine’s computer decided they didn’t like each other and refused to talk.
After a frustrating hunt trying to find someone local to sort out the software incompatibility, Sam latched onto Ultimate Conversion Wiring down in NSW, who he sent both ECU and TCM to. Within a few minutes they had the problem solved, the control units were back in the vehicle and Sam could focus on tuning, which he did himself with HP Tuners software.
1
Interestingly, the J20 retains the stock Jeep transfer case, which is bolted to the Silverado ’box via a Novak adapter. Sam reckons it’s held up so far, but it’s a rare beast these days so if it ever does let go, he says he’ll replace it with a much easier to find Patrol transfer case.
The transfer case crossmember is made from 12mm steel and is butch enough to jack the entire vehicle up from, while also serving as a bit of underbody protection. Both tailshafts also needed to be lengthened/shortened to accommodate the new powertrain dimensions.
Making the big V8 sound like it should is the exhaust that measures a gnarly 4-inches in diameter from the headers back. Keeping things cool is the largest alloy radiator that Sam could fit, and a pair of Delta PAG thermo fans.
1
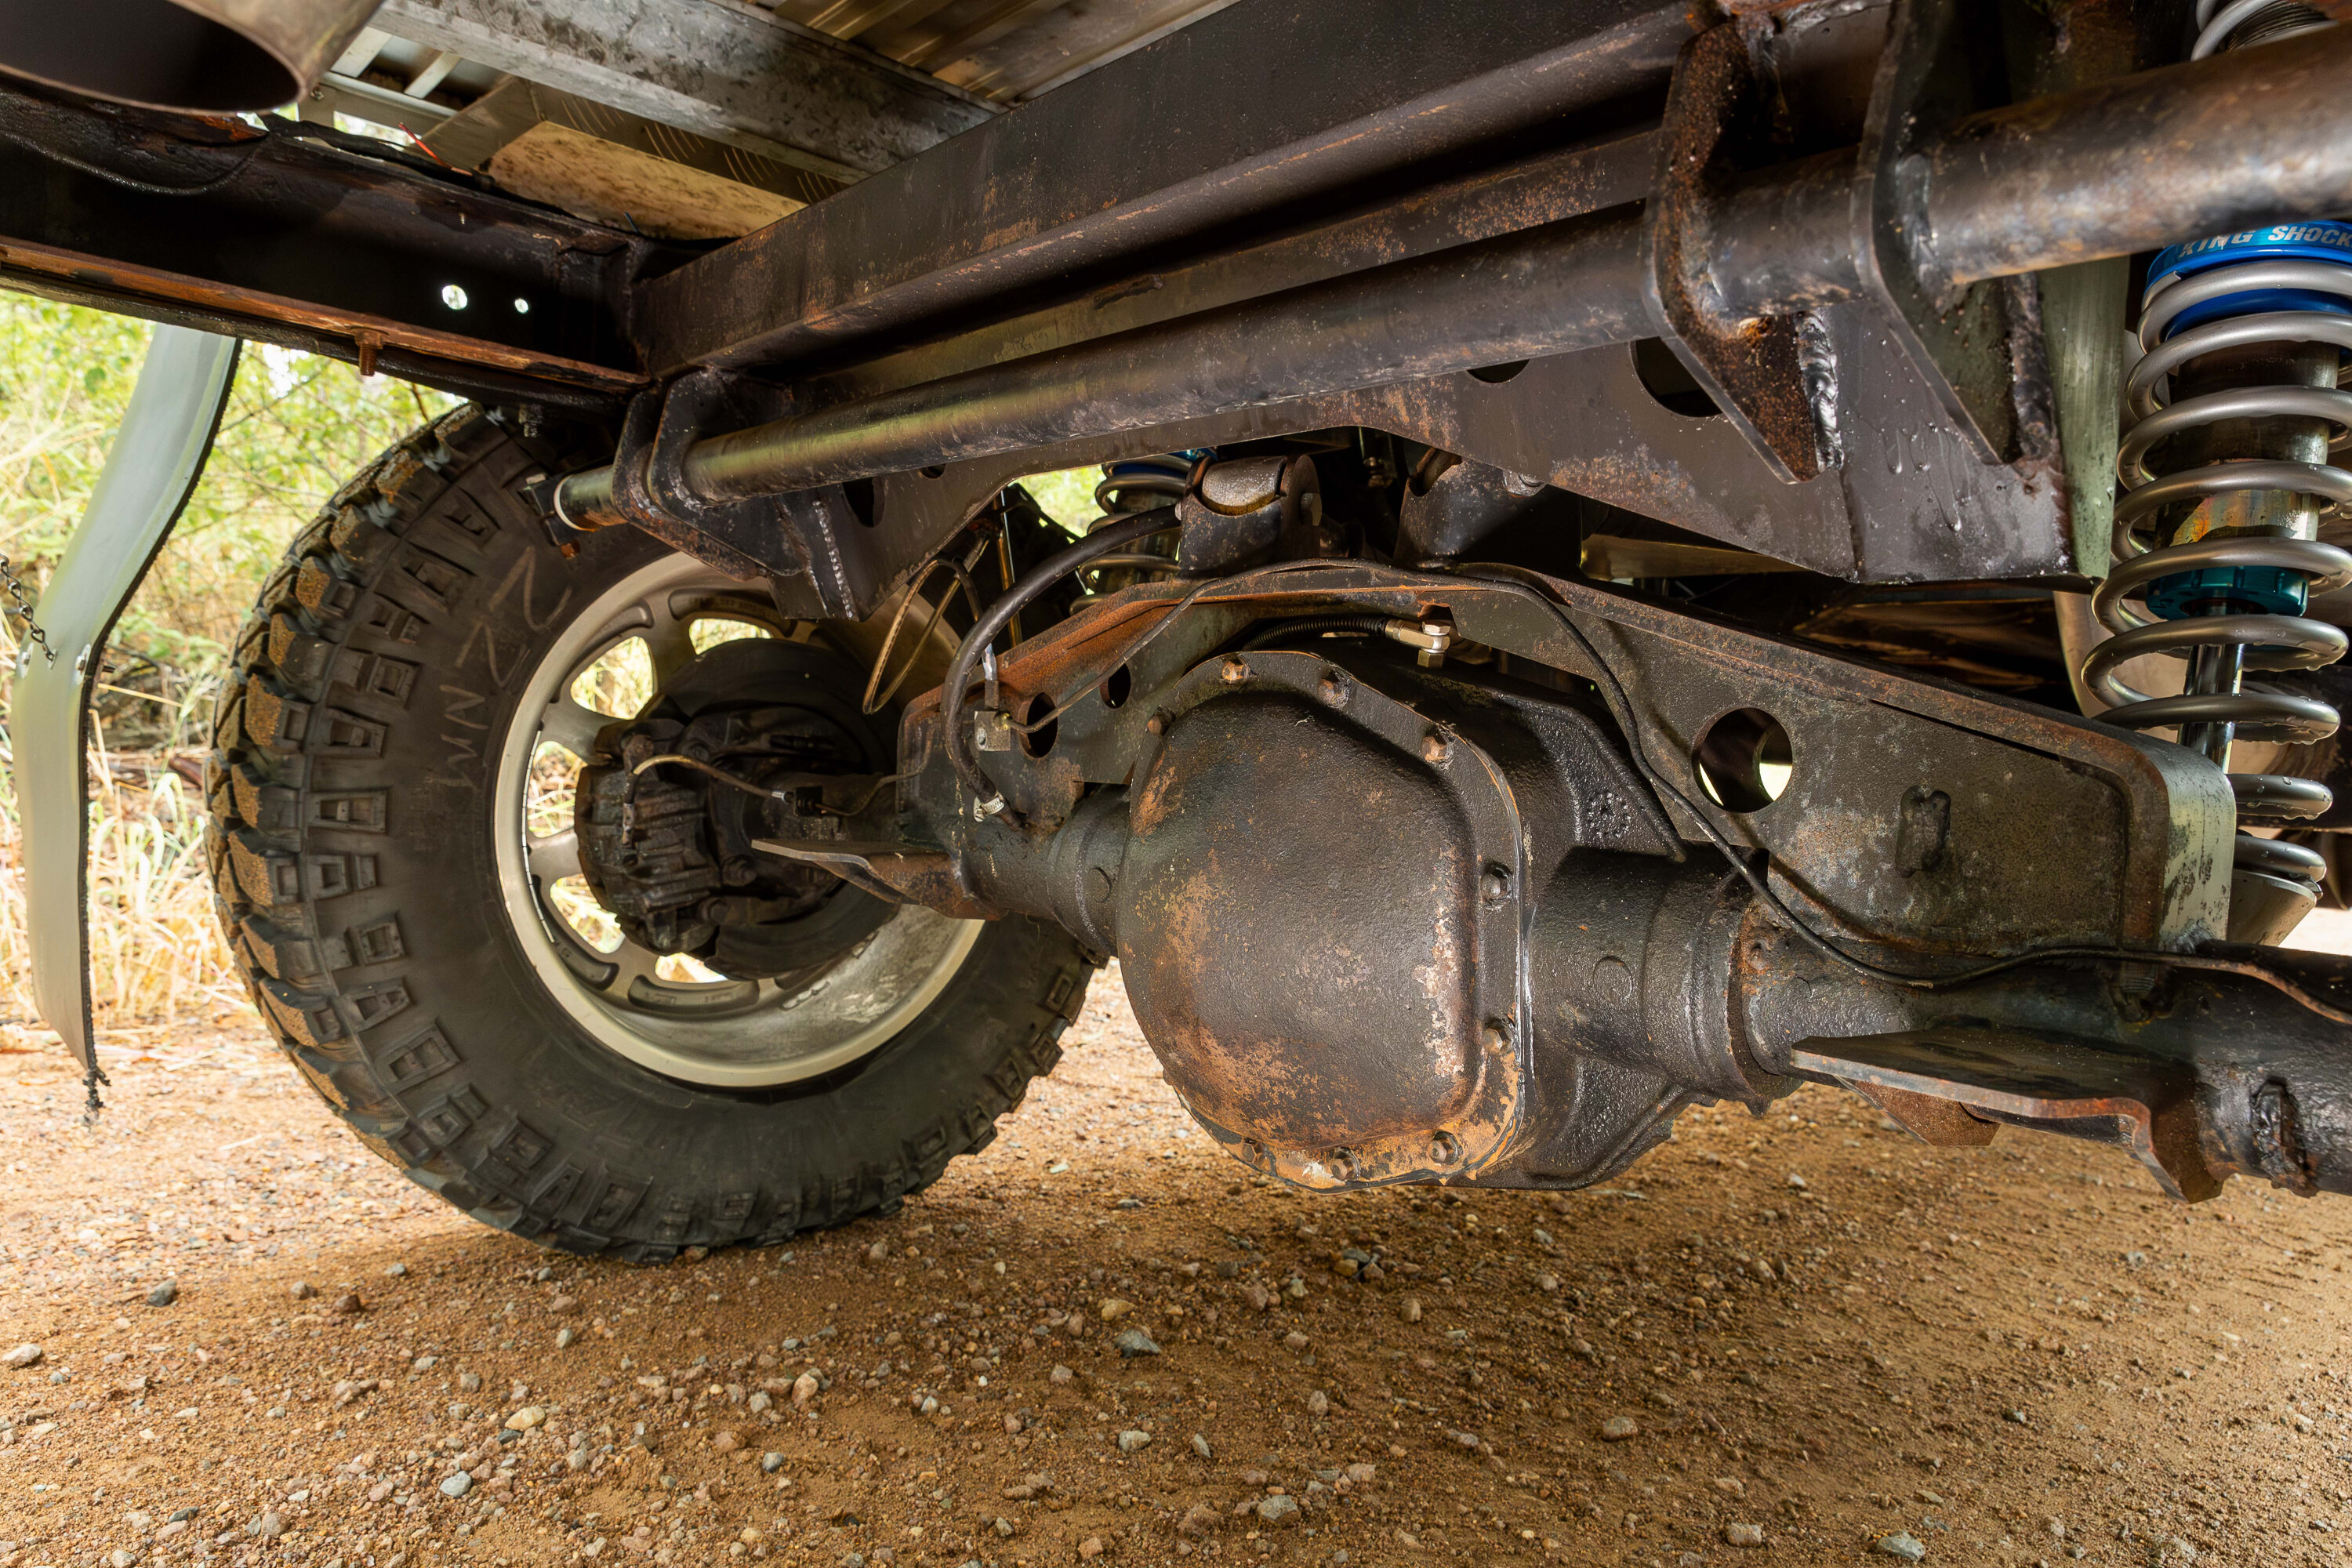
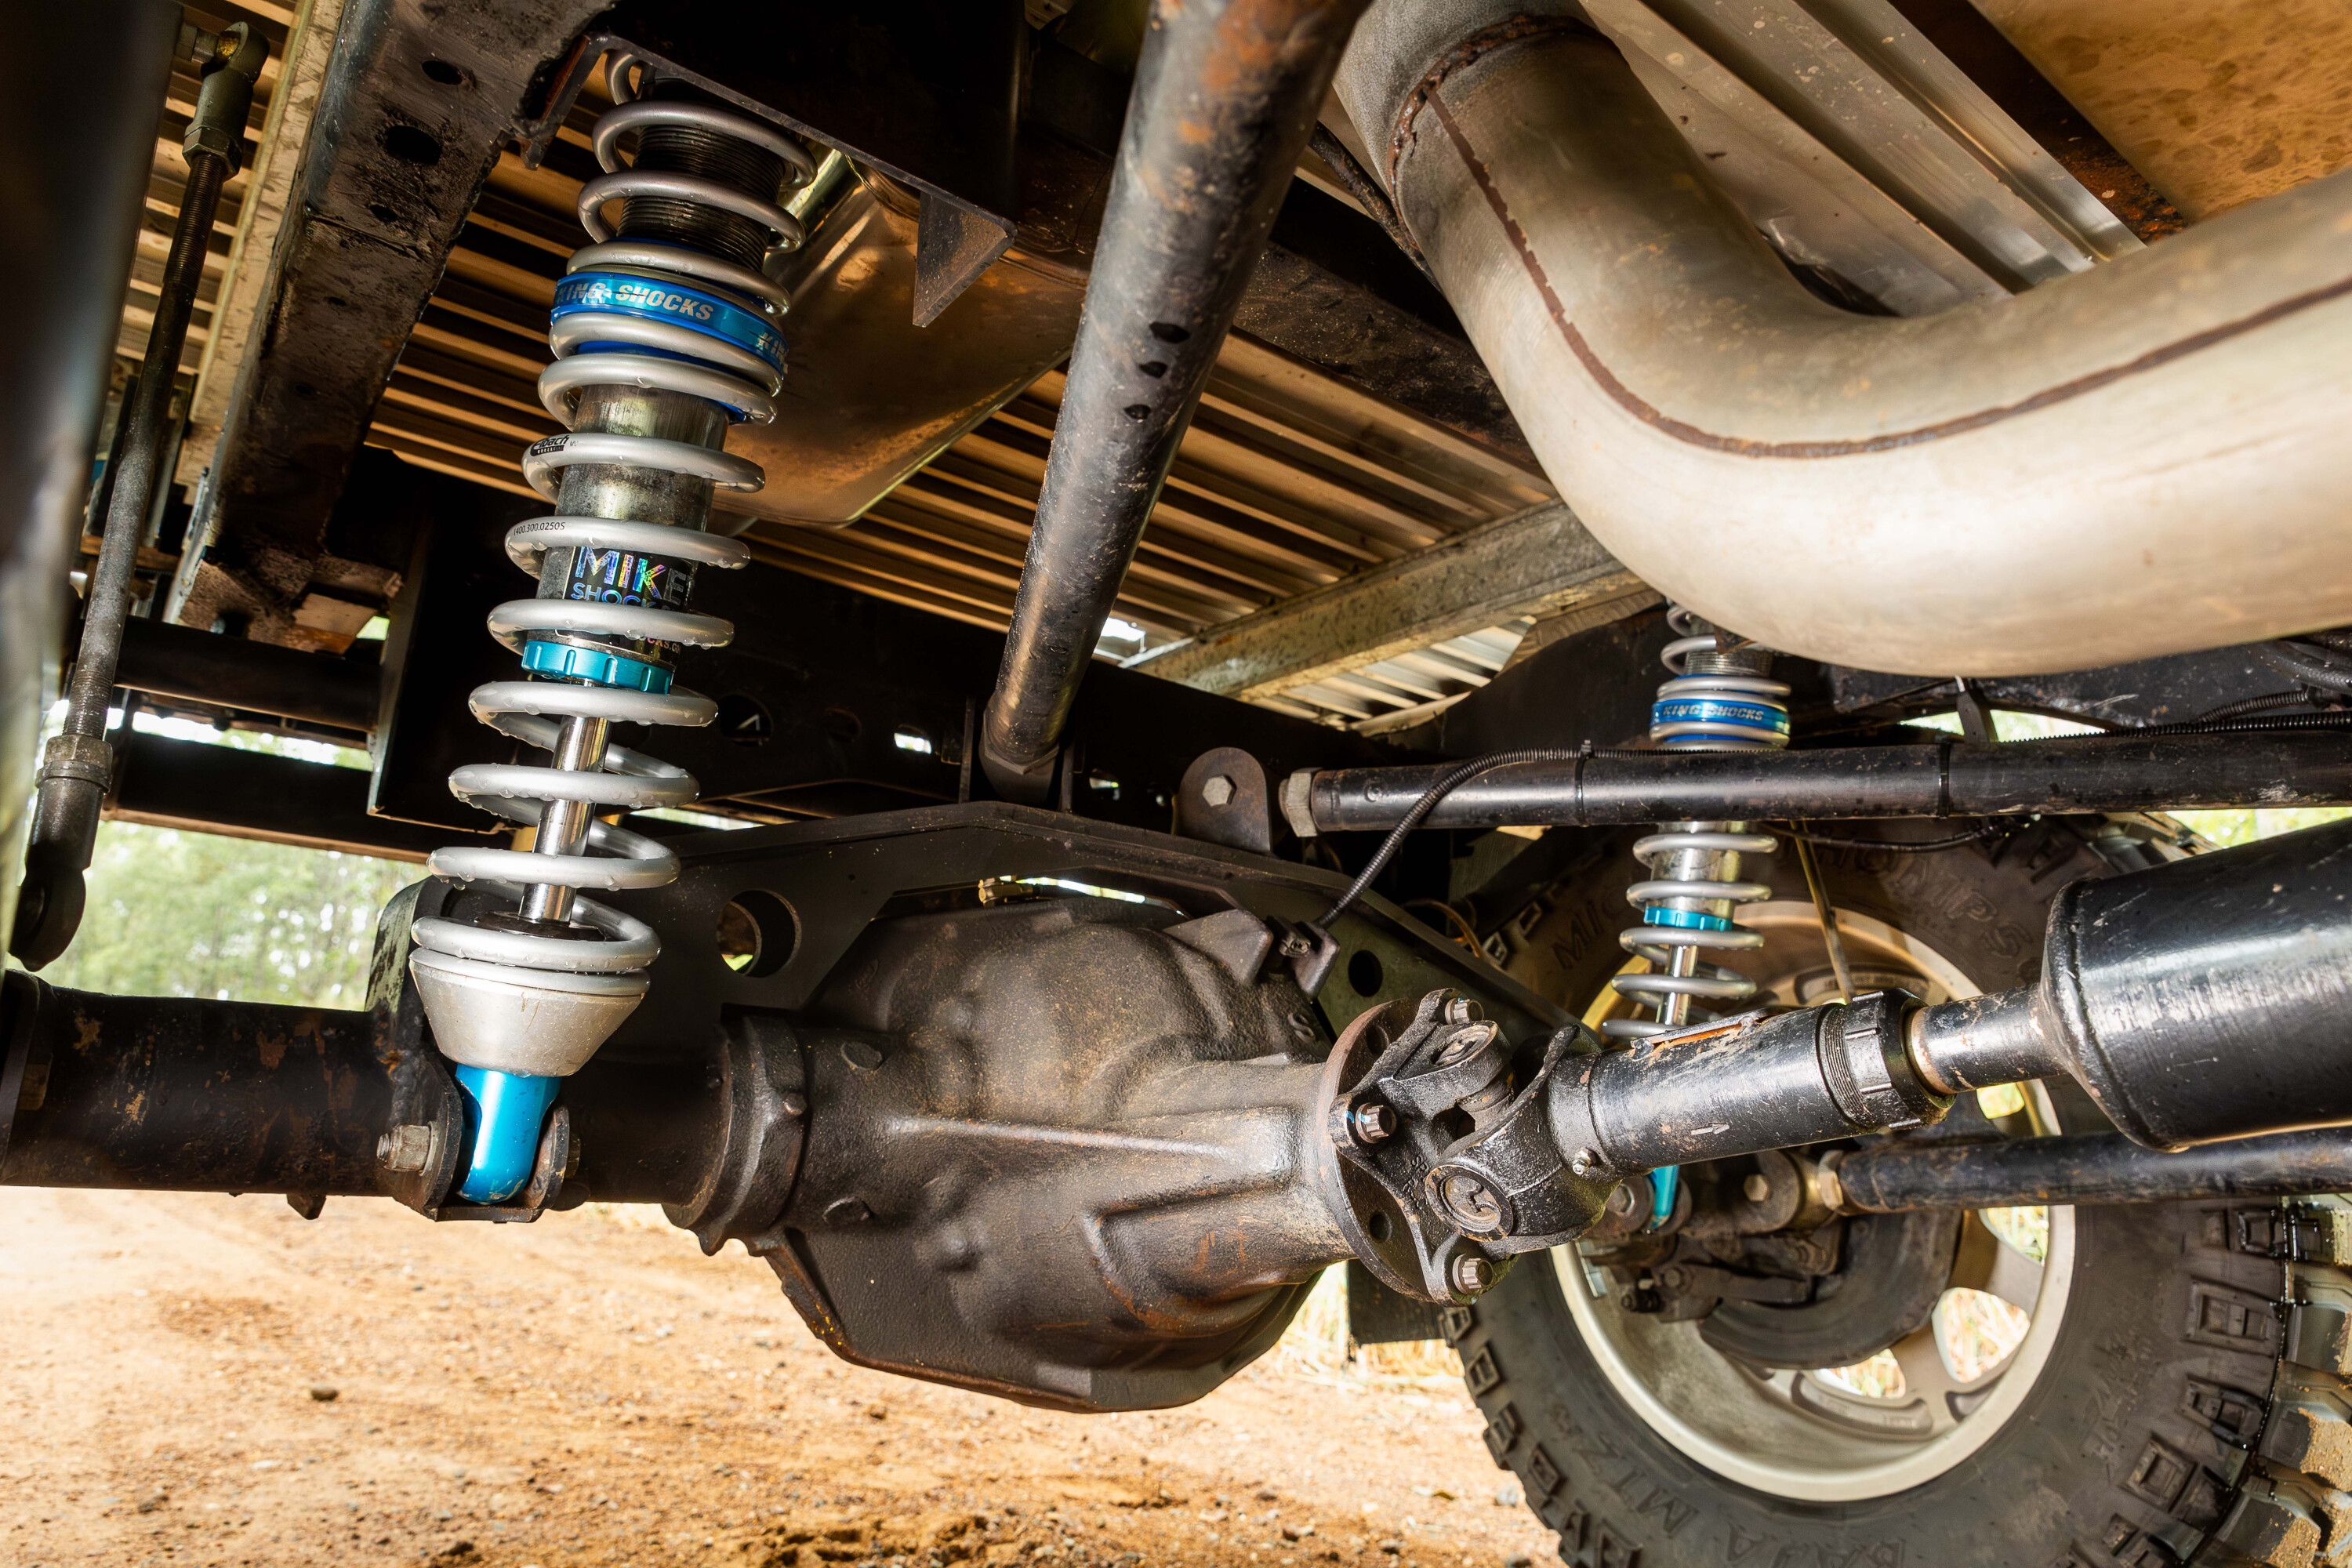
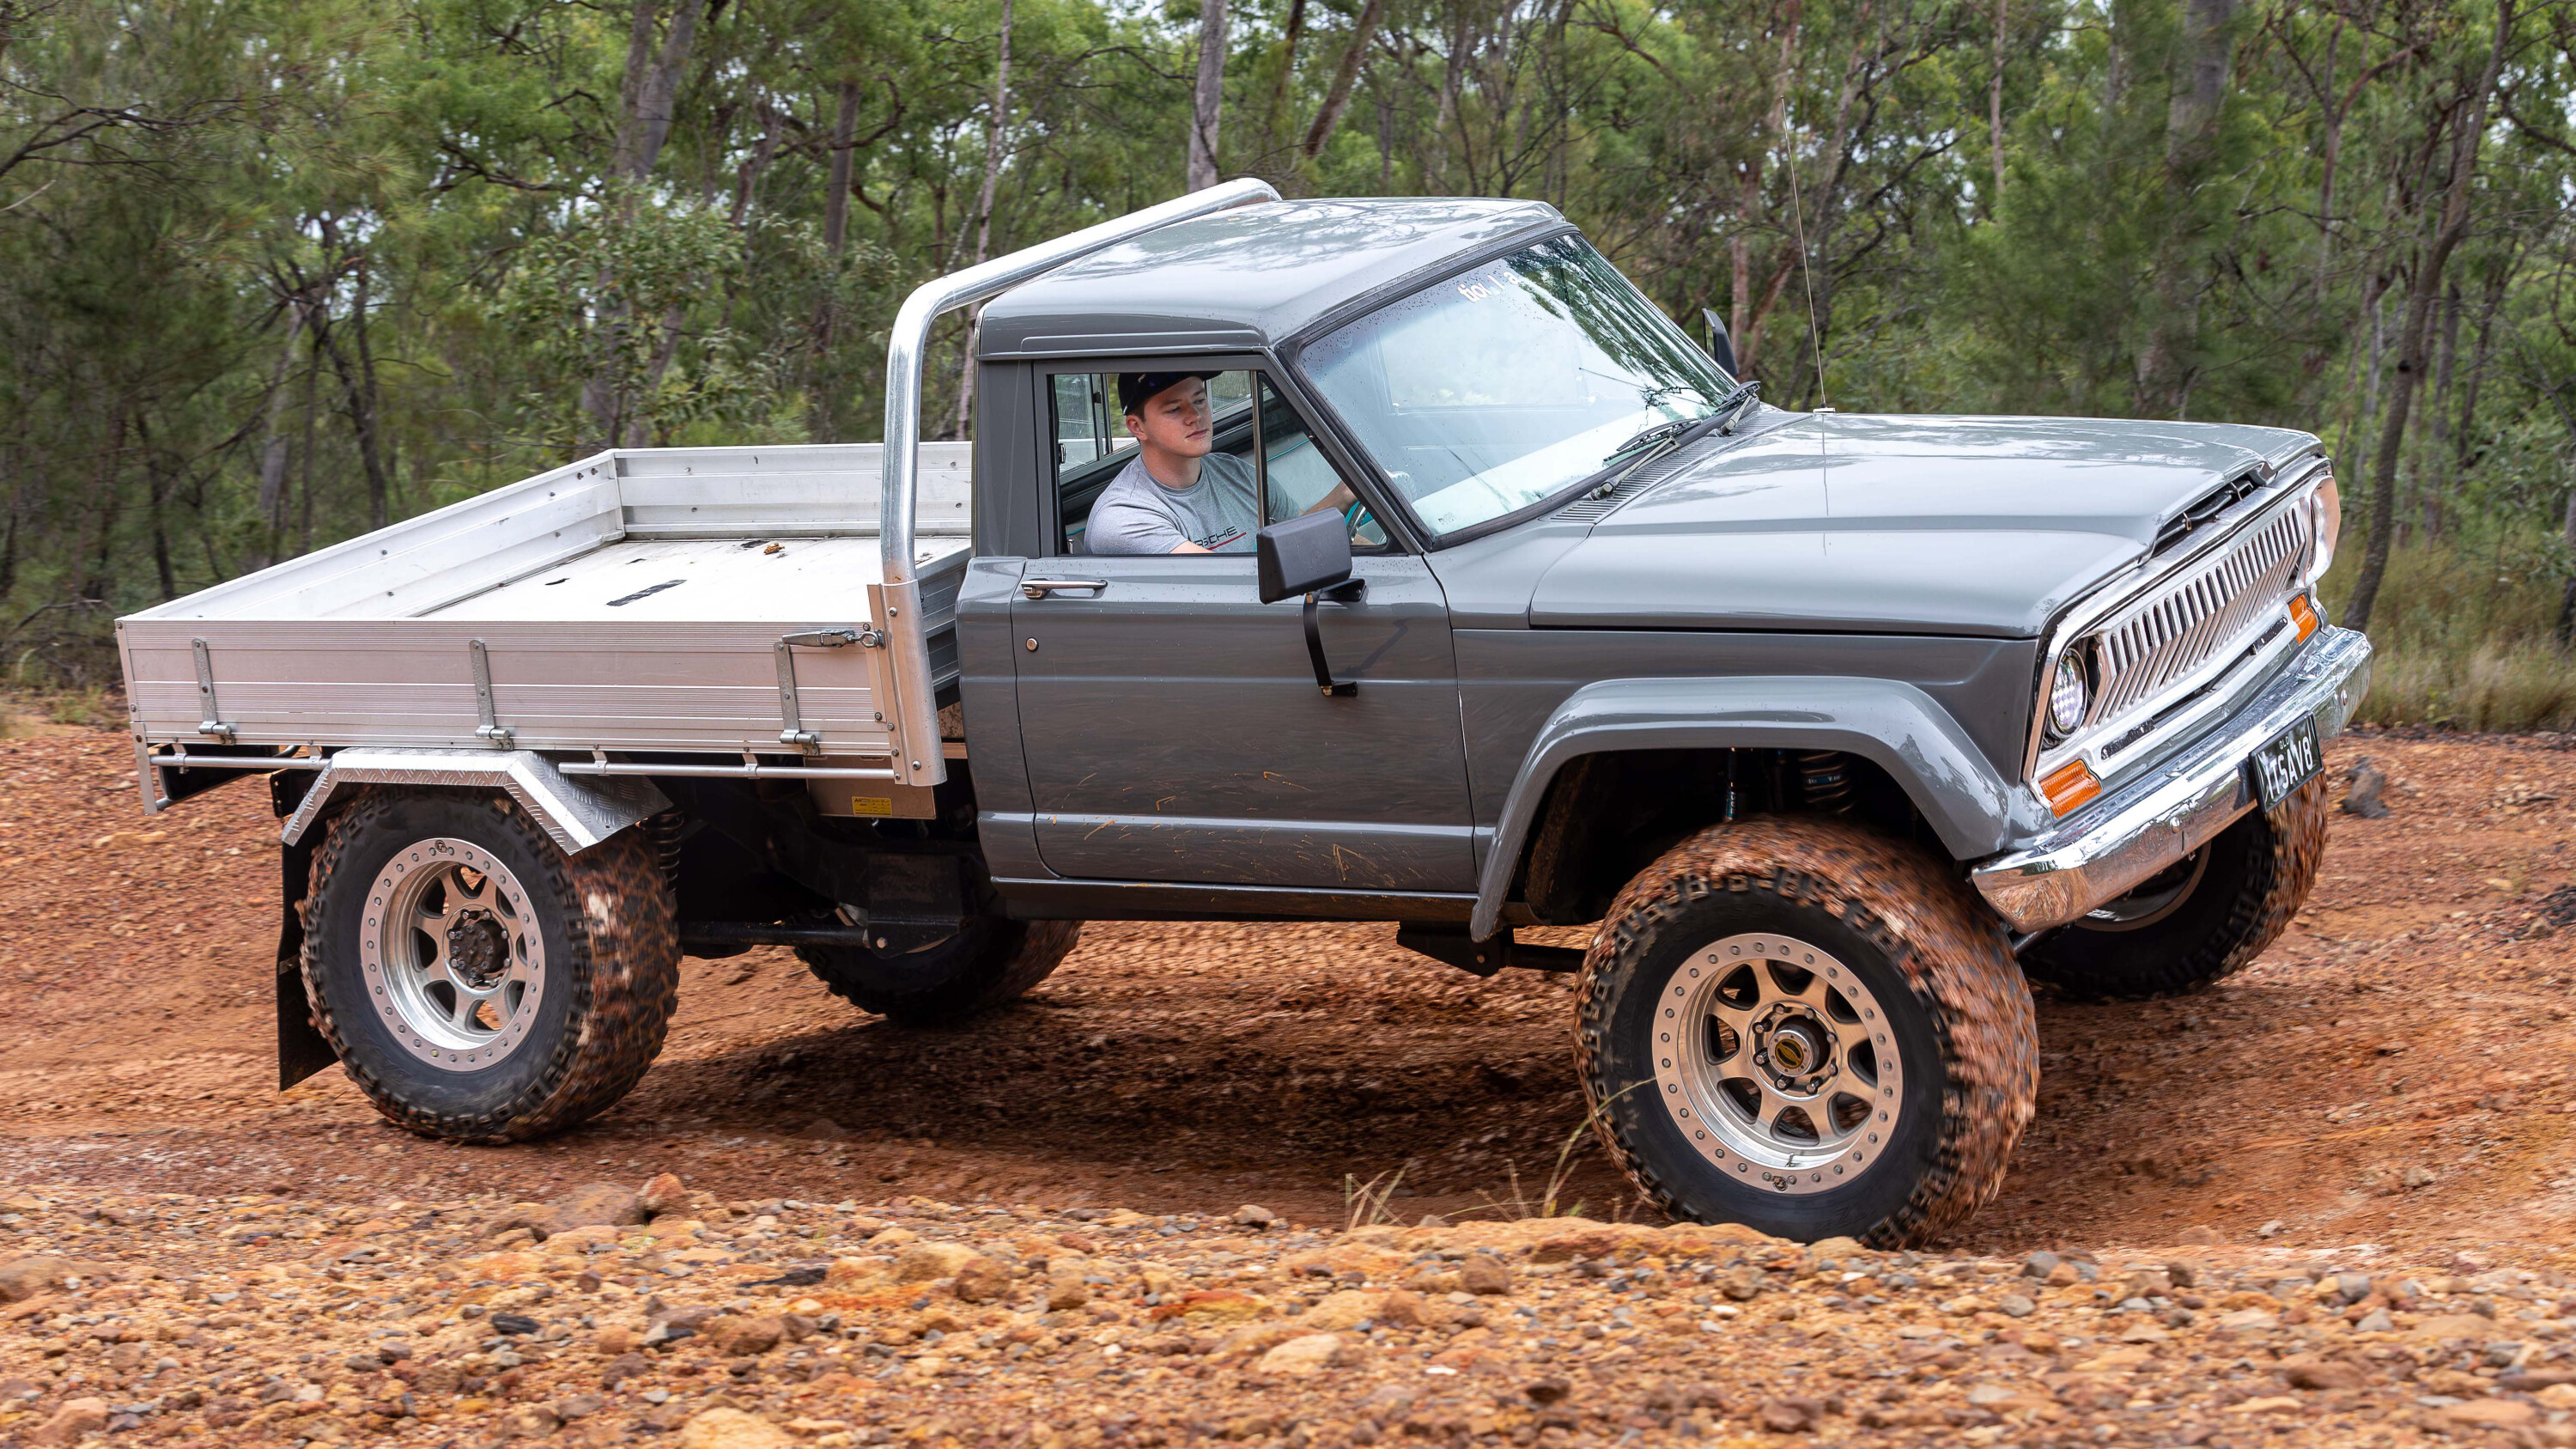
Leaf springs? Yeah, nah
Solid axles and leaf springs. A combo that’s been around forever, and still works, as long as you don’t mind a rough ride and limited flex (without some serious modifications).
While the J20 came standard with the old beams and semi-ellipticals, this one has been not only modified but modernised with a suspension and diff set-up more commonly seen on an Ultra4 off-roader than a daily driven ute.
The rear axle is a 10.5-inch Stirling from an F-250 that’s been fitted with a Yukon selectable Zip Locker for supplying guaranteed drive to the 37×13.5×20 Mickey T Baja MTZs, that are fitted up to drool-worthy 20-inch TrailReady alloy beadlock rims.
1
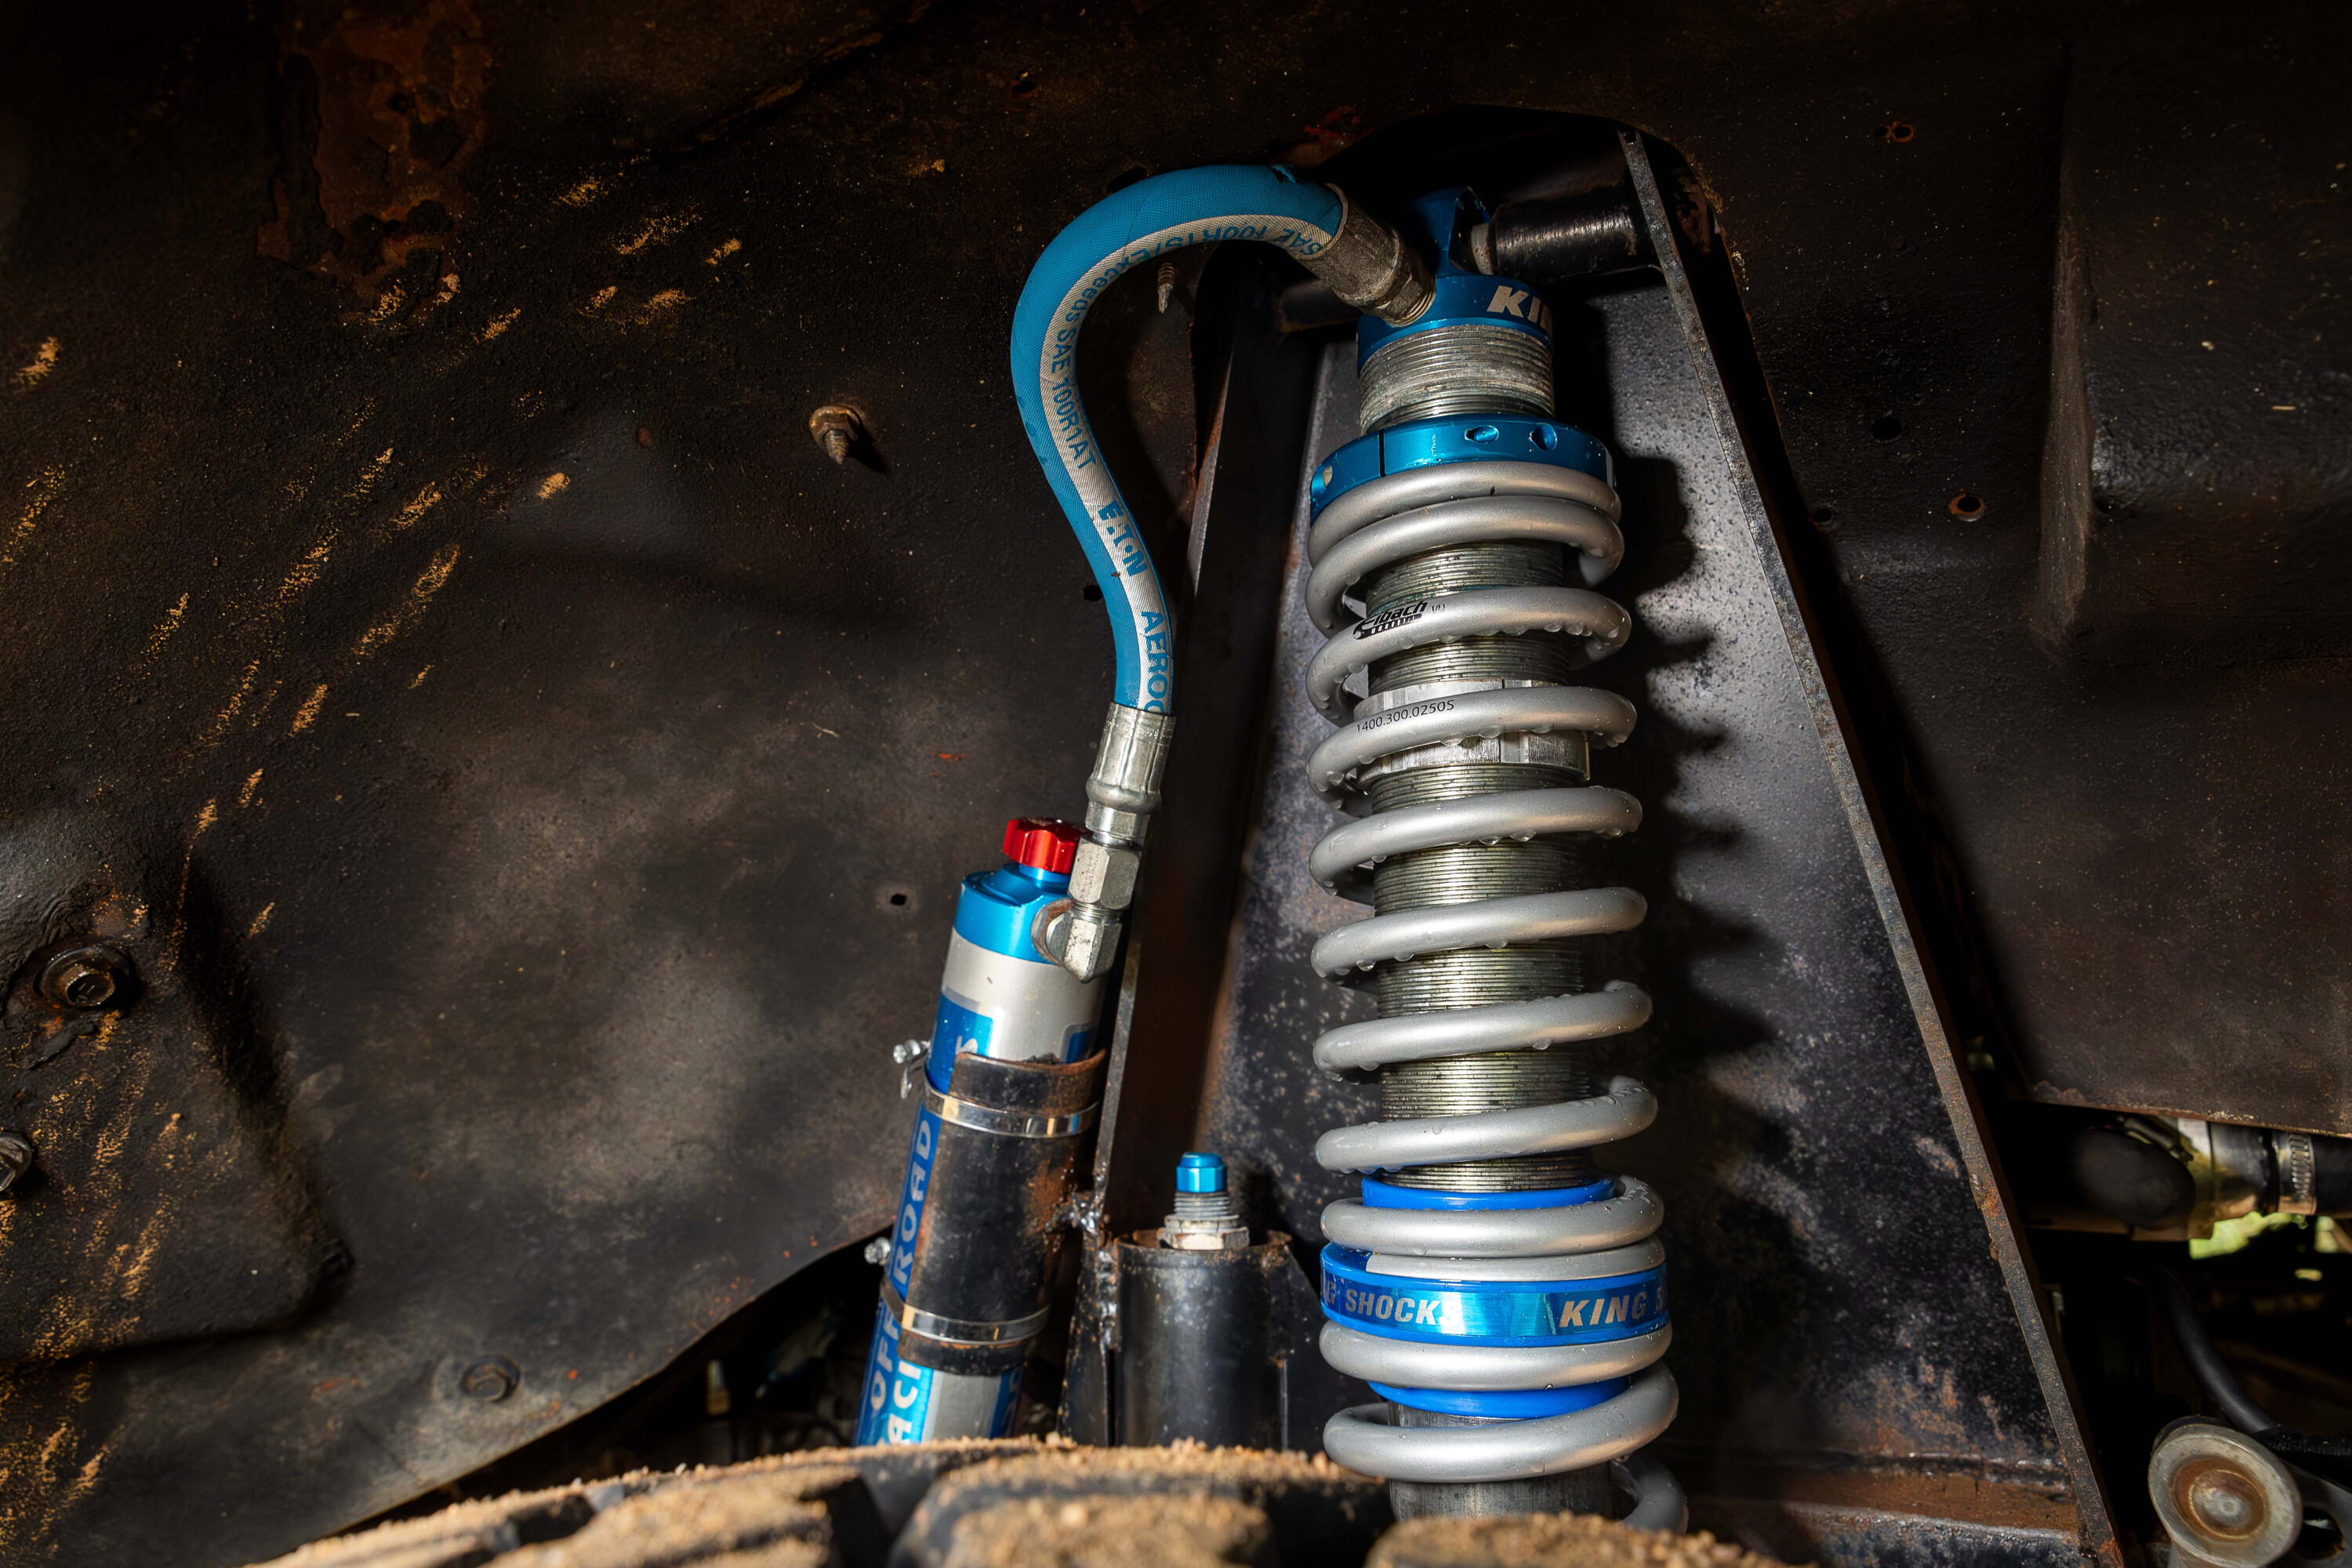
The rear suspension is a triangulated four-link supported by Kings 2.5 remote-res 12-inch coilovers and Kings hydro-bumps.
Meanwhile, the front diff is a Zip-locked Currie RockJock 60, an ultra-strong aftermarket fabricated housing that uses heavy duty axle shafts and the bombproof Dana 60 centre. King 2.5 remote-res 14-inch coilovers supply the compression and rebound while the three-link and Panhard arrangement allows maximum flex without compromising handling.
If you were to take your own rig to a suspension specialist and said “give me the best of everything” you’d likely get something pretty close to this back.
1
Old dog, new tricks
Despite the classic appearance, there’s actually a bunch of modern touches on the J20.
The front fenders, for example, are moulded fiberglass, and there’s LED lighting at either end to bring after-dark visibility forward a few decades.
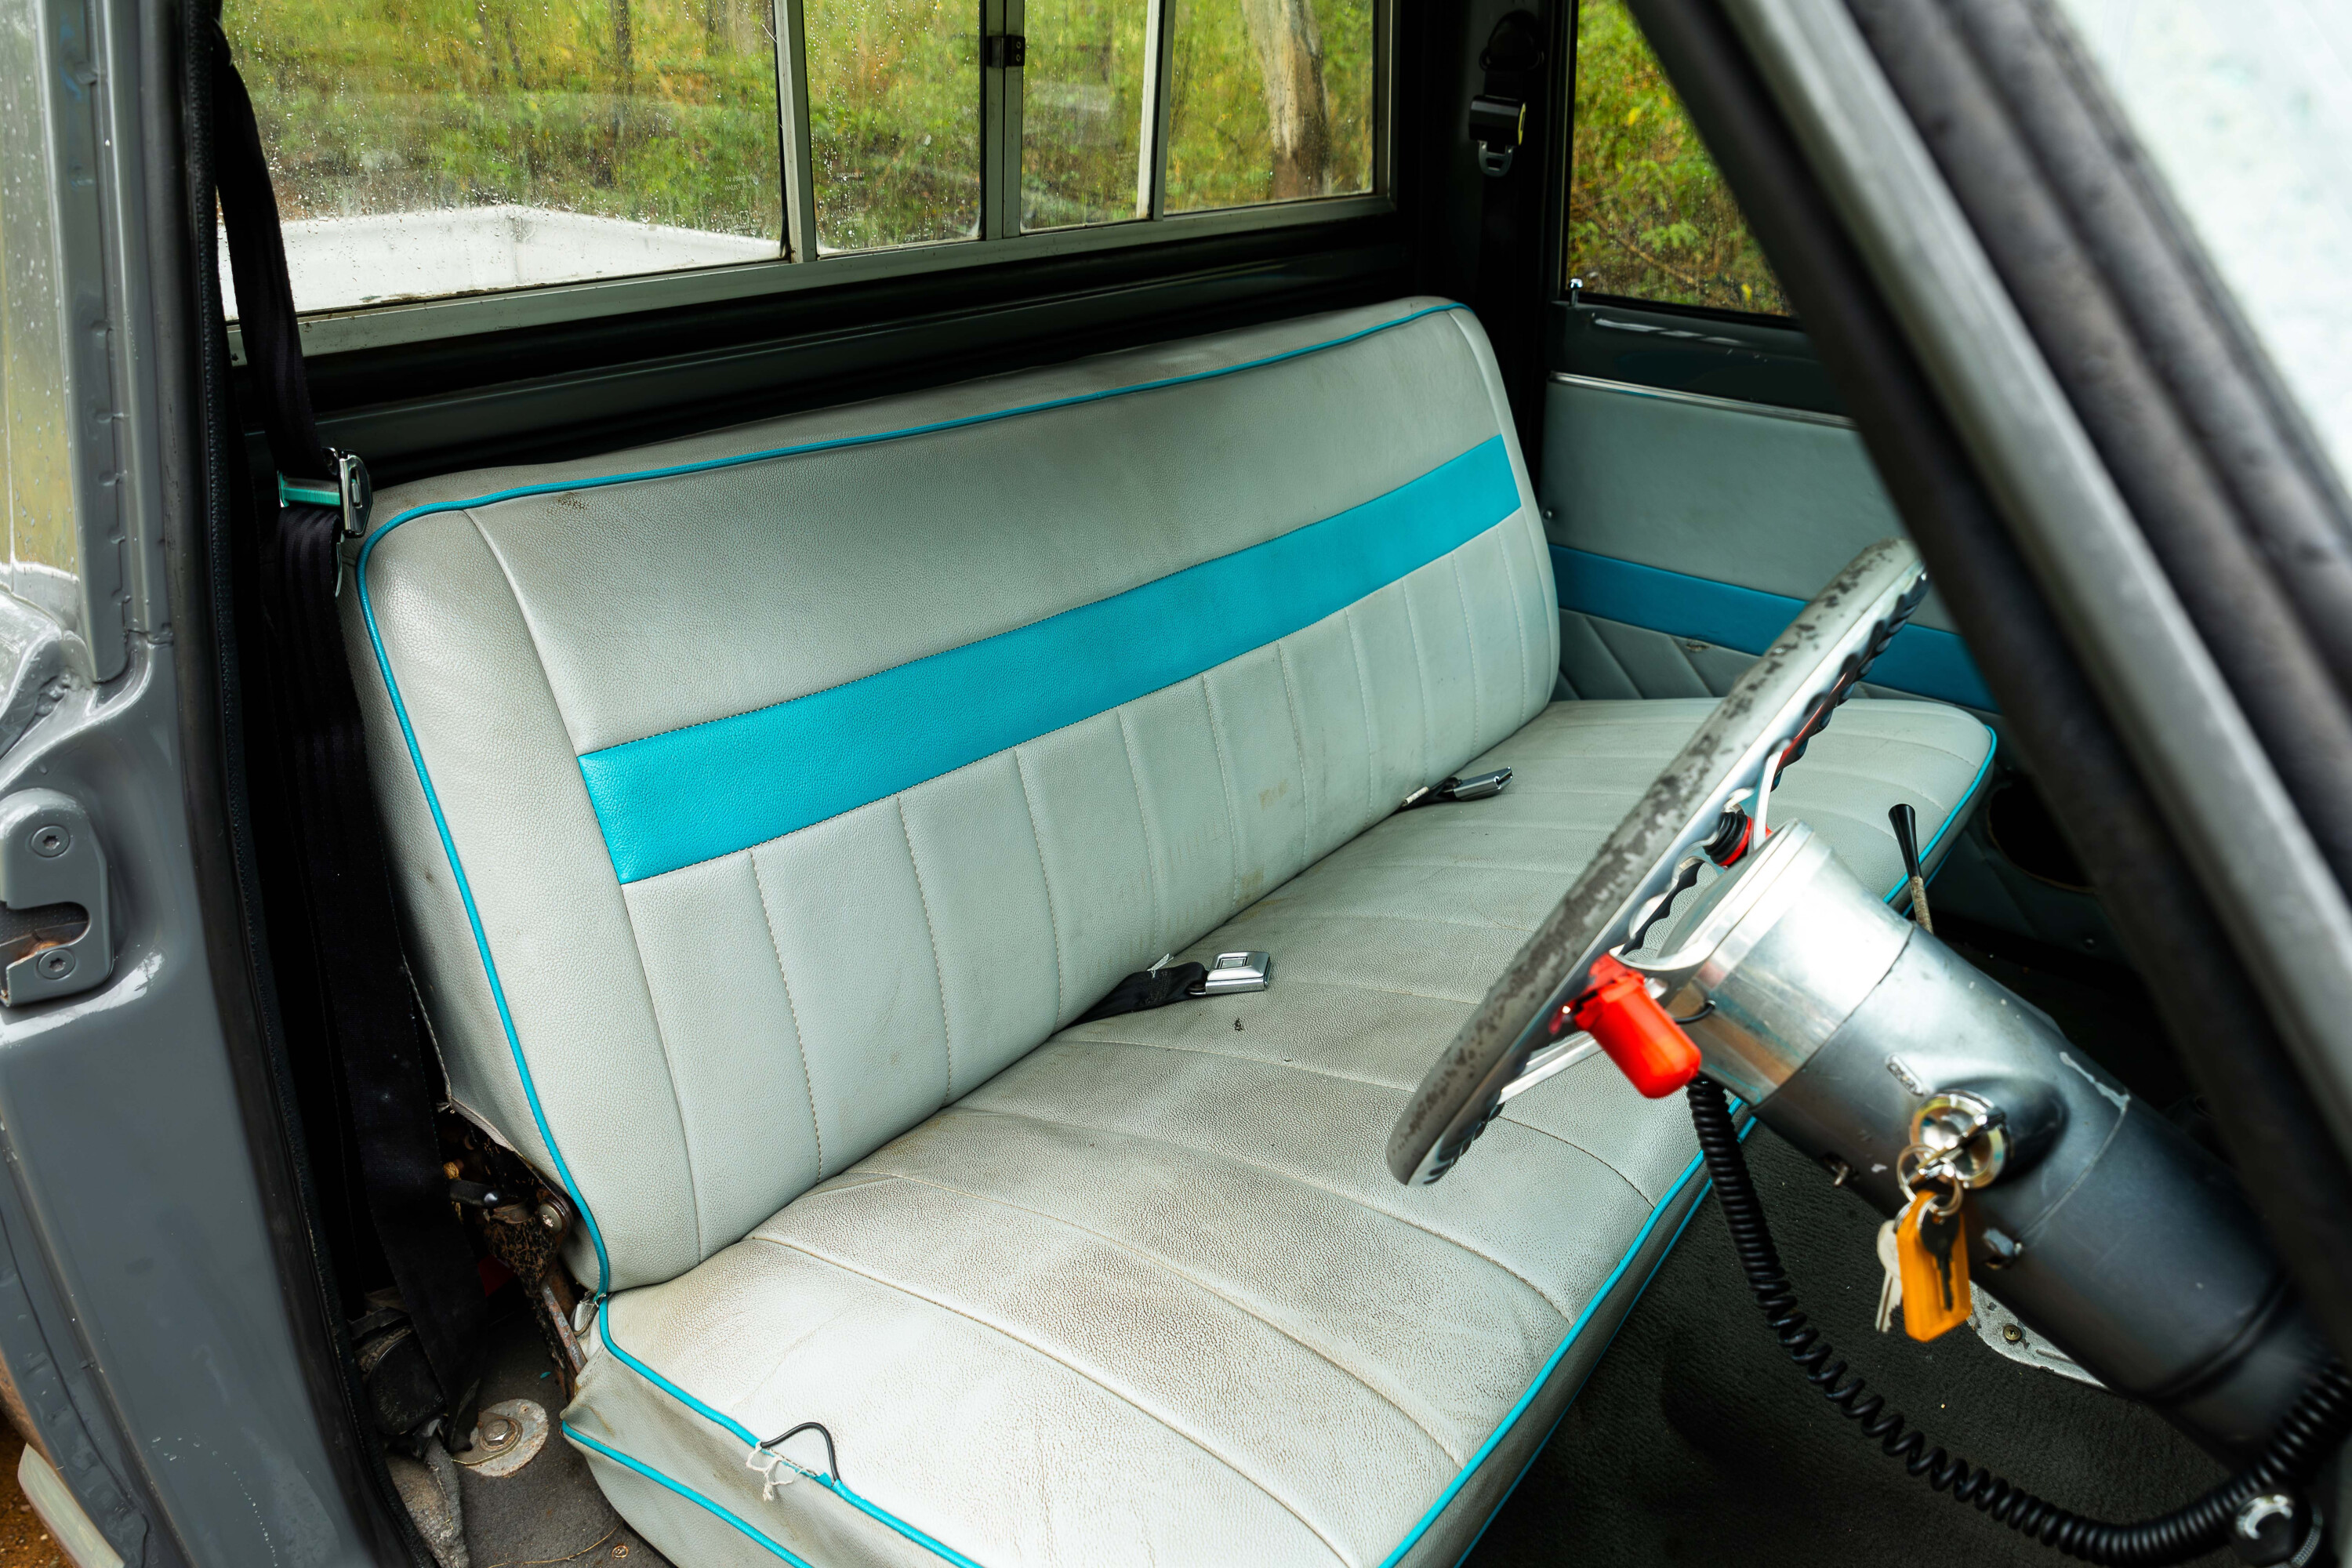
While the interior is largely stock, with the original bench seat and trim, Sam has included a Pioneer stereo and a Power Tune digital dash, which relays everything from the engine’s CANBUS system. The 7-inch screen is housed in a custom 3D-printed housing that Sam did himself.
1
In fact, Sam has 3D modelled and printed a bunch of stuff, including the under-dash AC evaporator unit.
Anything that’s been printed in prototype form by Sam is left in red, then when it’s deemed to be suitable for use it gets sent off to be printed in black UV resistant material. Pretty nifty if you ask us.
Sam also made the custom buttons on the steering wheel, which are his take on paddle shifting – one button for shifting up, one for shifting down. Apparently it works a treat, too. All up, it’s an incredibly impressive and unique build and has to be one of the coolest dailies we’ve seen in quite a while.
1
What’s next?
Sam did mention that for now he’s pretty happy blasting the J20 up and down the coast and enjoying the hell out of what he’s achieved.
With that said, he’s pumped to get started on a new project, so don’t be surprised if you see the big Jeep on the market before long. If you’re keen on a linked and coil-overed American truck with power for days, reach out and we can put you in touch with Sam.
Thanks
Sam wanted to shout out to Marko from Southern District Auto Centre in Hillcrest, Qld who has been instrumental in giving him a helping hand on anything he wasn’t comfy with tackling himself. Good on ya mate!
Phone: (07) 3800 5140
Email: [email protected]
Website: www.sdac.com.au [↗️]
MORE
Everything Jeep
The Cruiser sat idle through most of last winter with an electrical gremlin.
I parked it after a day out driving in the hills and when I went to start it again both batteries were dead. I fitted another battery and found that once running it was charging at 18.5 to 19 volts.
It had a new Terrain Tamer alternator fitted earlier in the year so that shouldn’t have been the problem. I went to the regulator and adjusted it to be charging at a more sensible 14 volts. It was all good for a week but then it started charging at more than 18 volts again, so I readjusted the regulator and it was good again… for a few days, before shooting back up again.
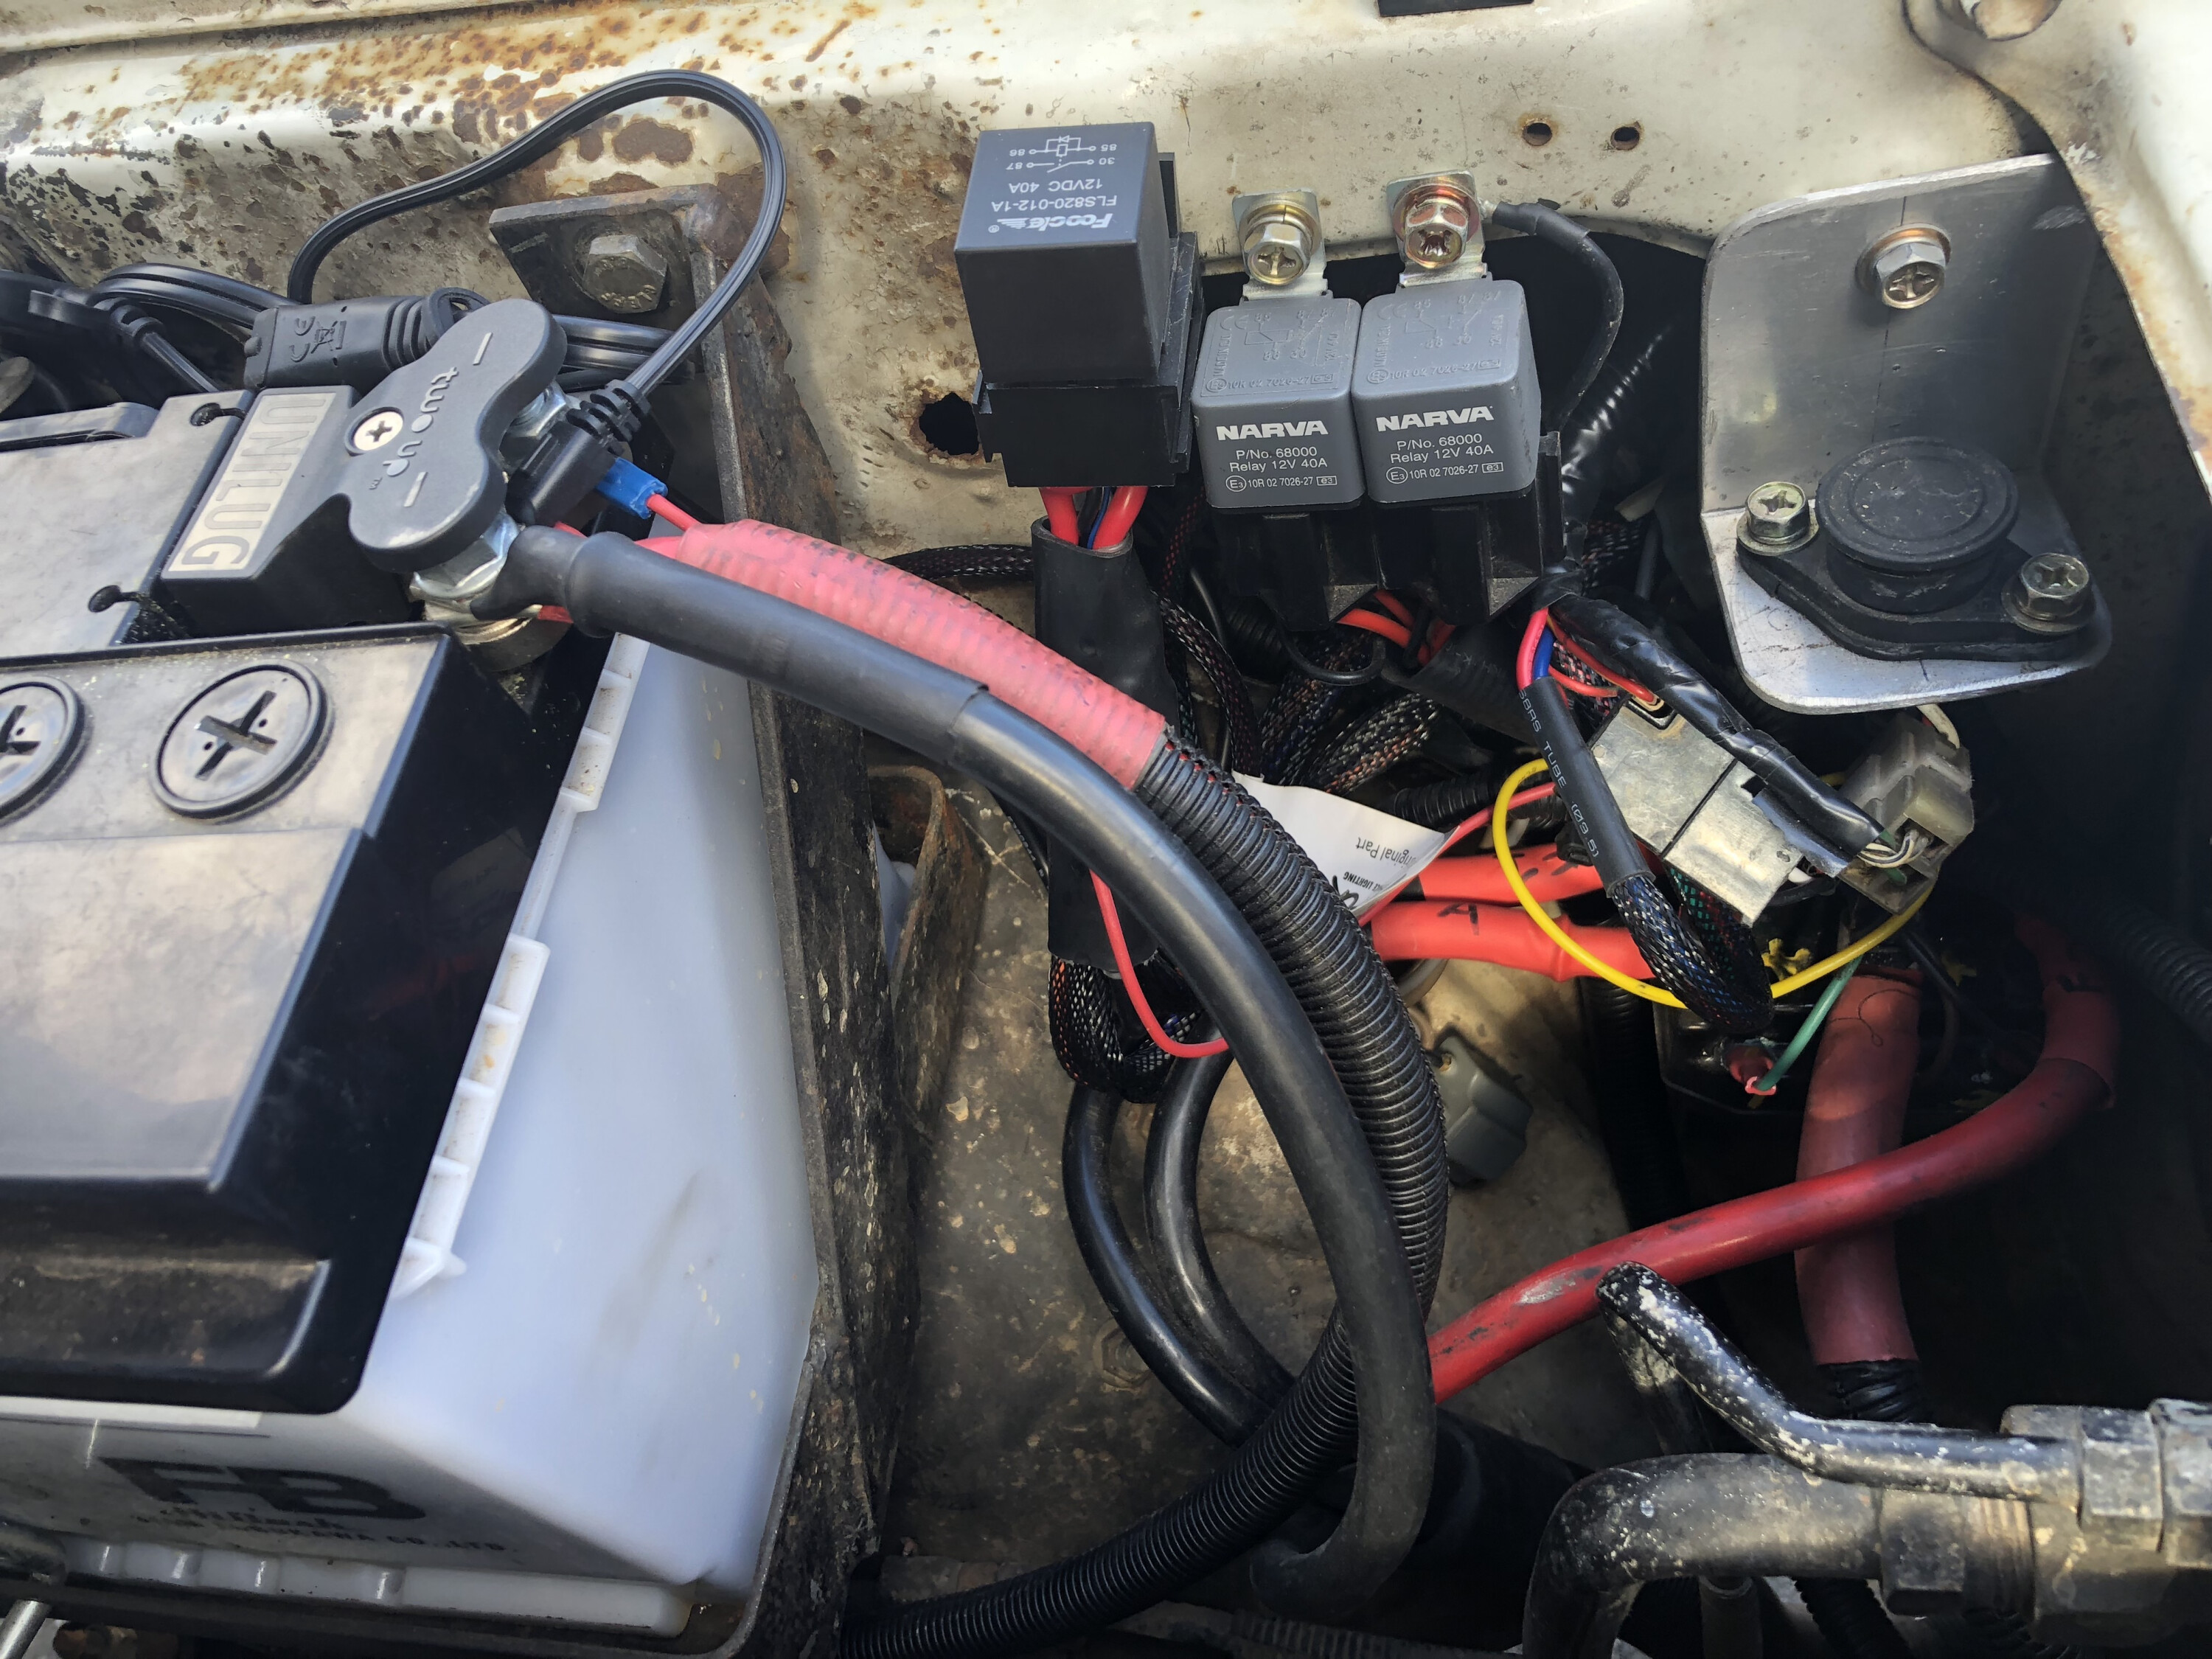
3
The more I looked into the wiring in the engine bay the more I realised it needed a thorough tidy up and after removing 30 years worth of added accessory wiring that was now redundant, there was more work to do, as well as to find the source of the charging issue.
I handed the Cruiser over to Sam the auto electrician to fix the charging problem, tidy up all the engine bay wiring and fit a new solenoid pack for the winch, as it had been intermittently playing up as well.
Sam mounted a new Albright winch solenoid in the engine bay, replaced all the battery cables, earth straps and terminals, and gave the electrical system a good once over, but the irregular charging couldn’t be traced at first. It wasn’t until he was looking at something else that he found a bad connection that was shorting out on the chassis and causing the regulator to overcharge. With that sorted, a couple of new batteries fitted and a tidier engine bay, I certainly enjoyed using the Cruiser over the summer months.

1
After all the mundane new vehicles I get to drive there’s a lot to be said for getting behind the wheel of an old 4×4 like the BJ. You need to pay attention when driving a live axle, leaf sprung truck like this, as they are slow to react to steering input yet will be quick to throw you off the road if you’re not paying attention. It’s truly an interactive experience whenever I drive it and I love the analogue feel of being behind the wheel of the Cruiser.
I have added some modern accessories in recent times in the form of a new stereo with a Bluetooth connection, and while it might be loud, it still can’t overpower the roar of the 3.4-litre, four-cylinder turbo- diesel engine as it redlines at 3000rpm.
1
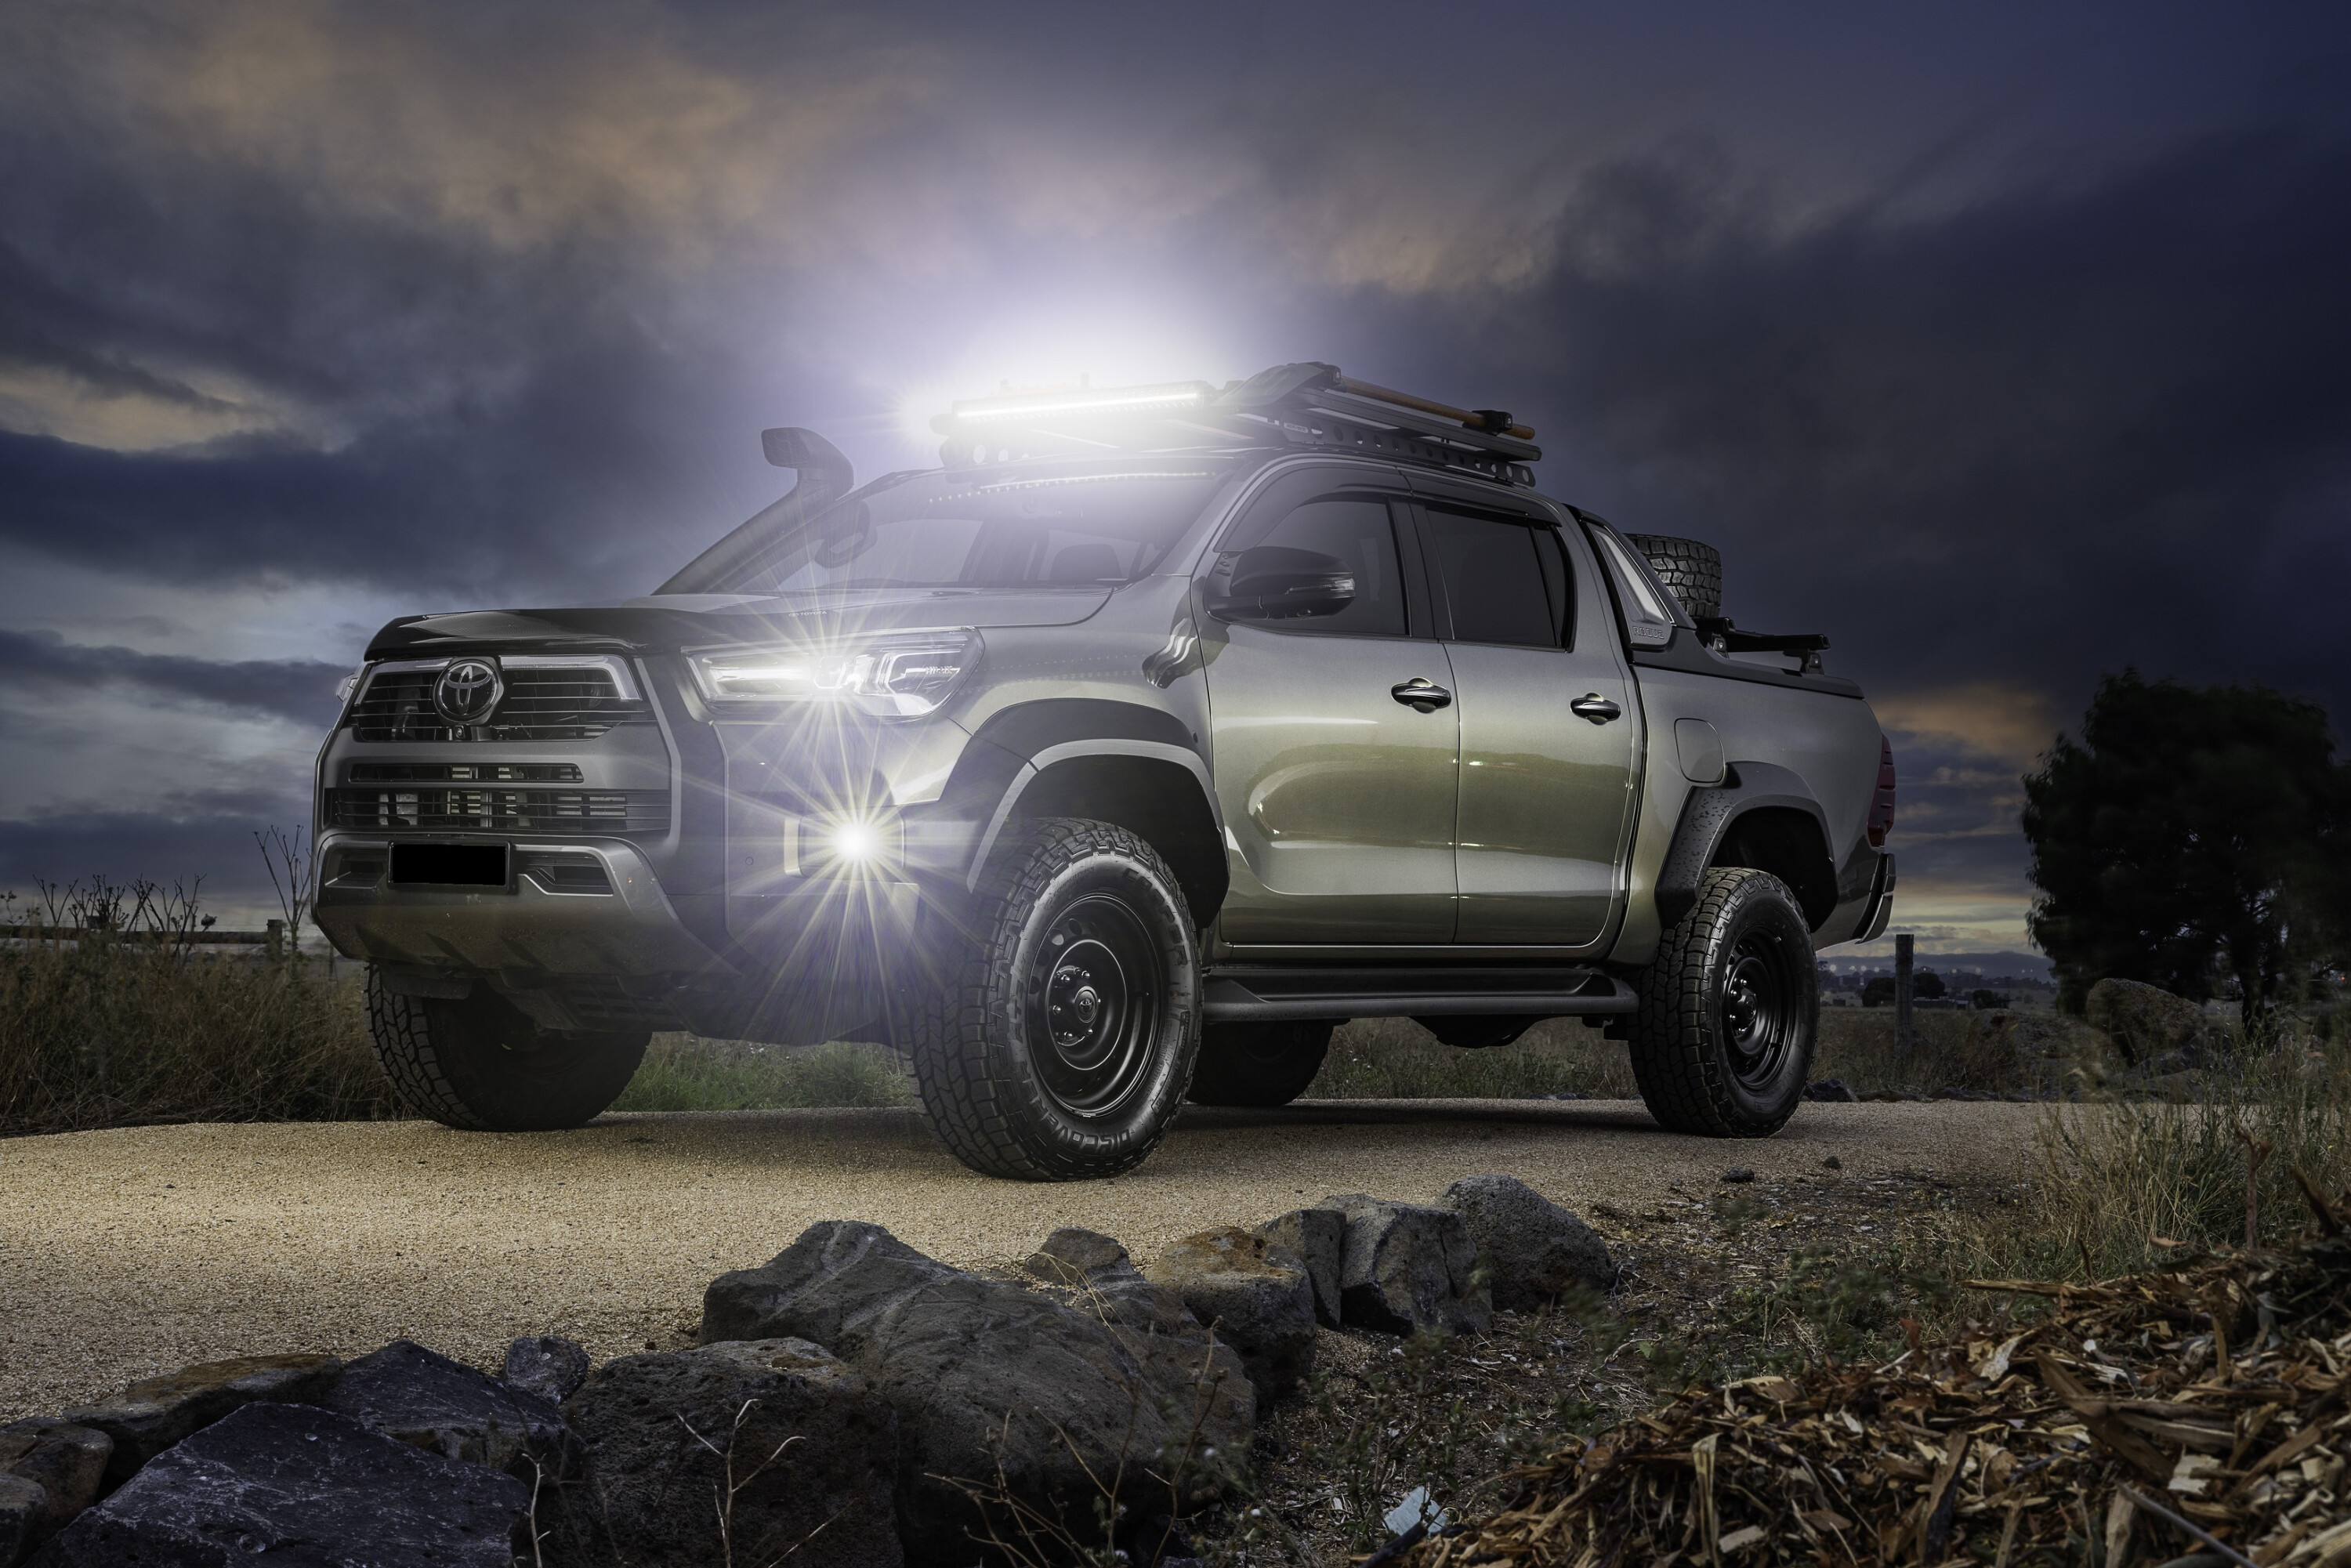
The new ‘Beast’ LED driving lights from Lightforce are also pretty high tech compared to the Cruiser itself. They punch out a bright light that is still easy on the eyes over long drives, and having the ability to switch between wide and spot beams at the touch of a button is a nice luxury. Combined with the replacement LED headlights, they have certainly upgraded the night vision.
As much as I love the old Cruiser, I do concede that it can be better with the addition of a few modern upgrades.
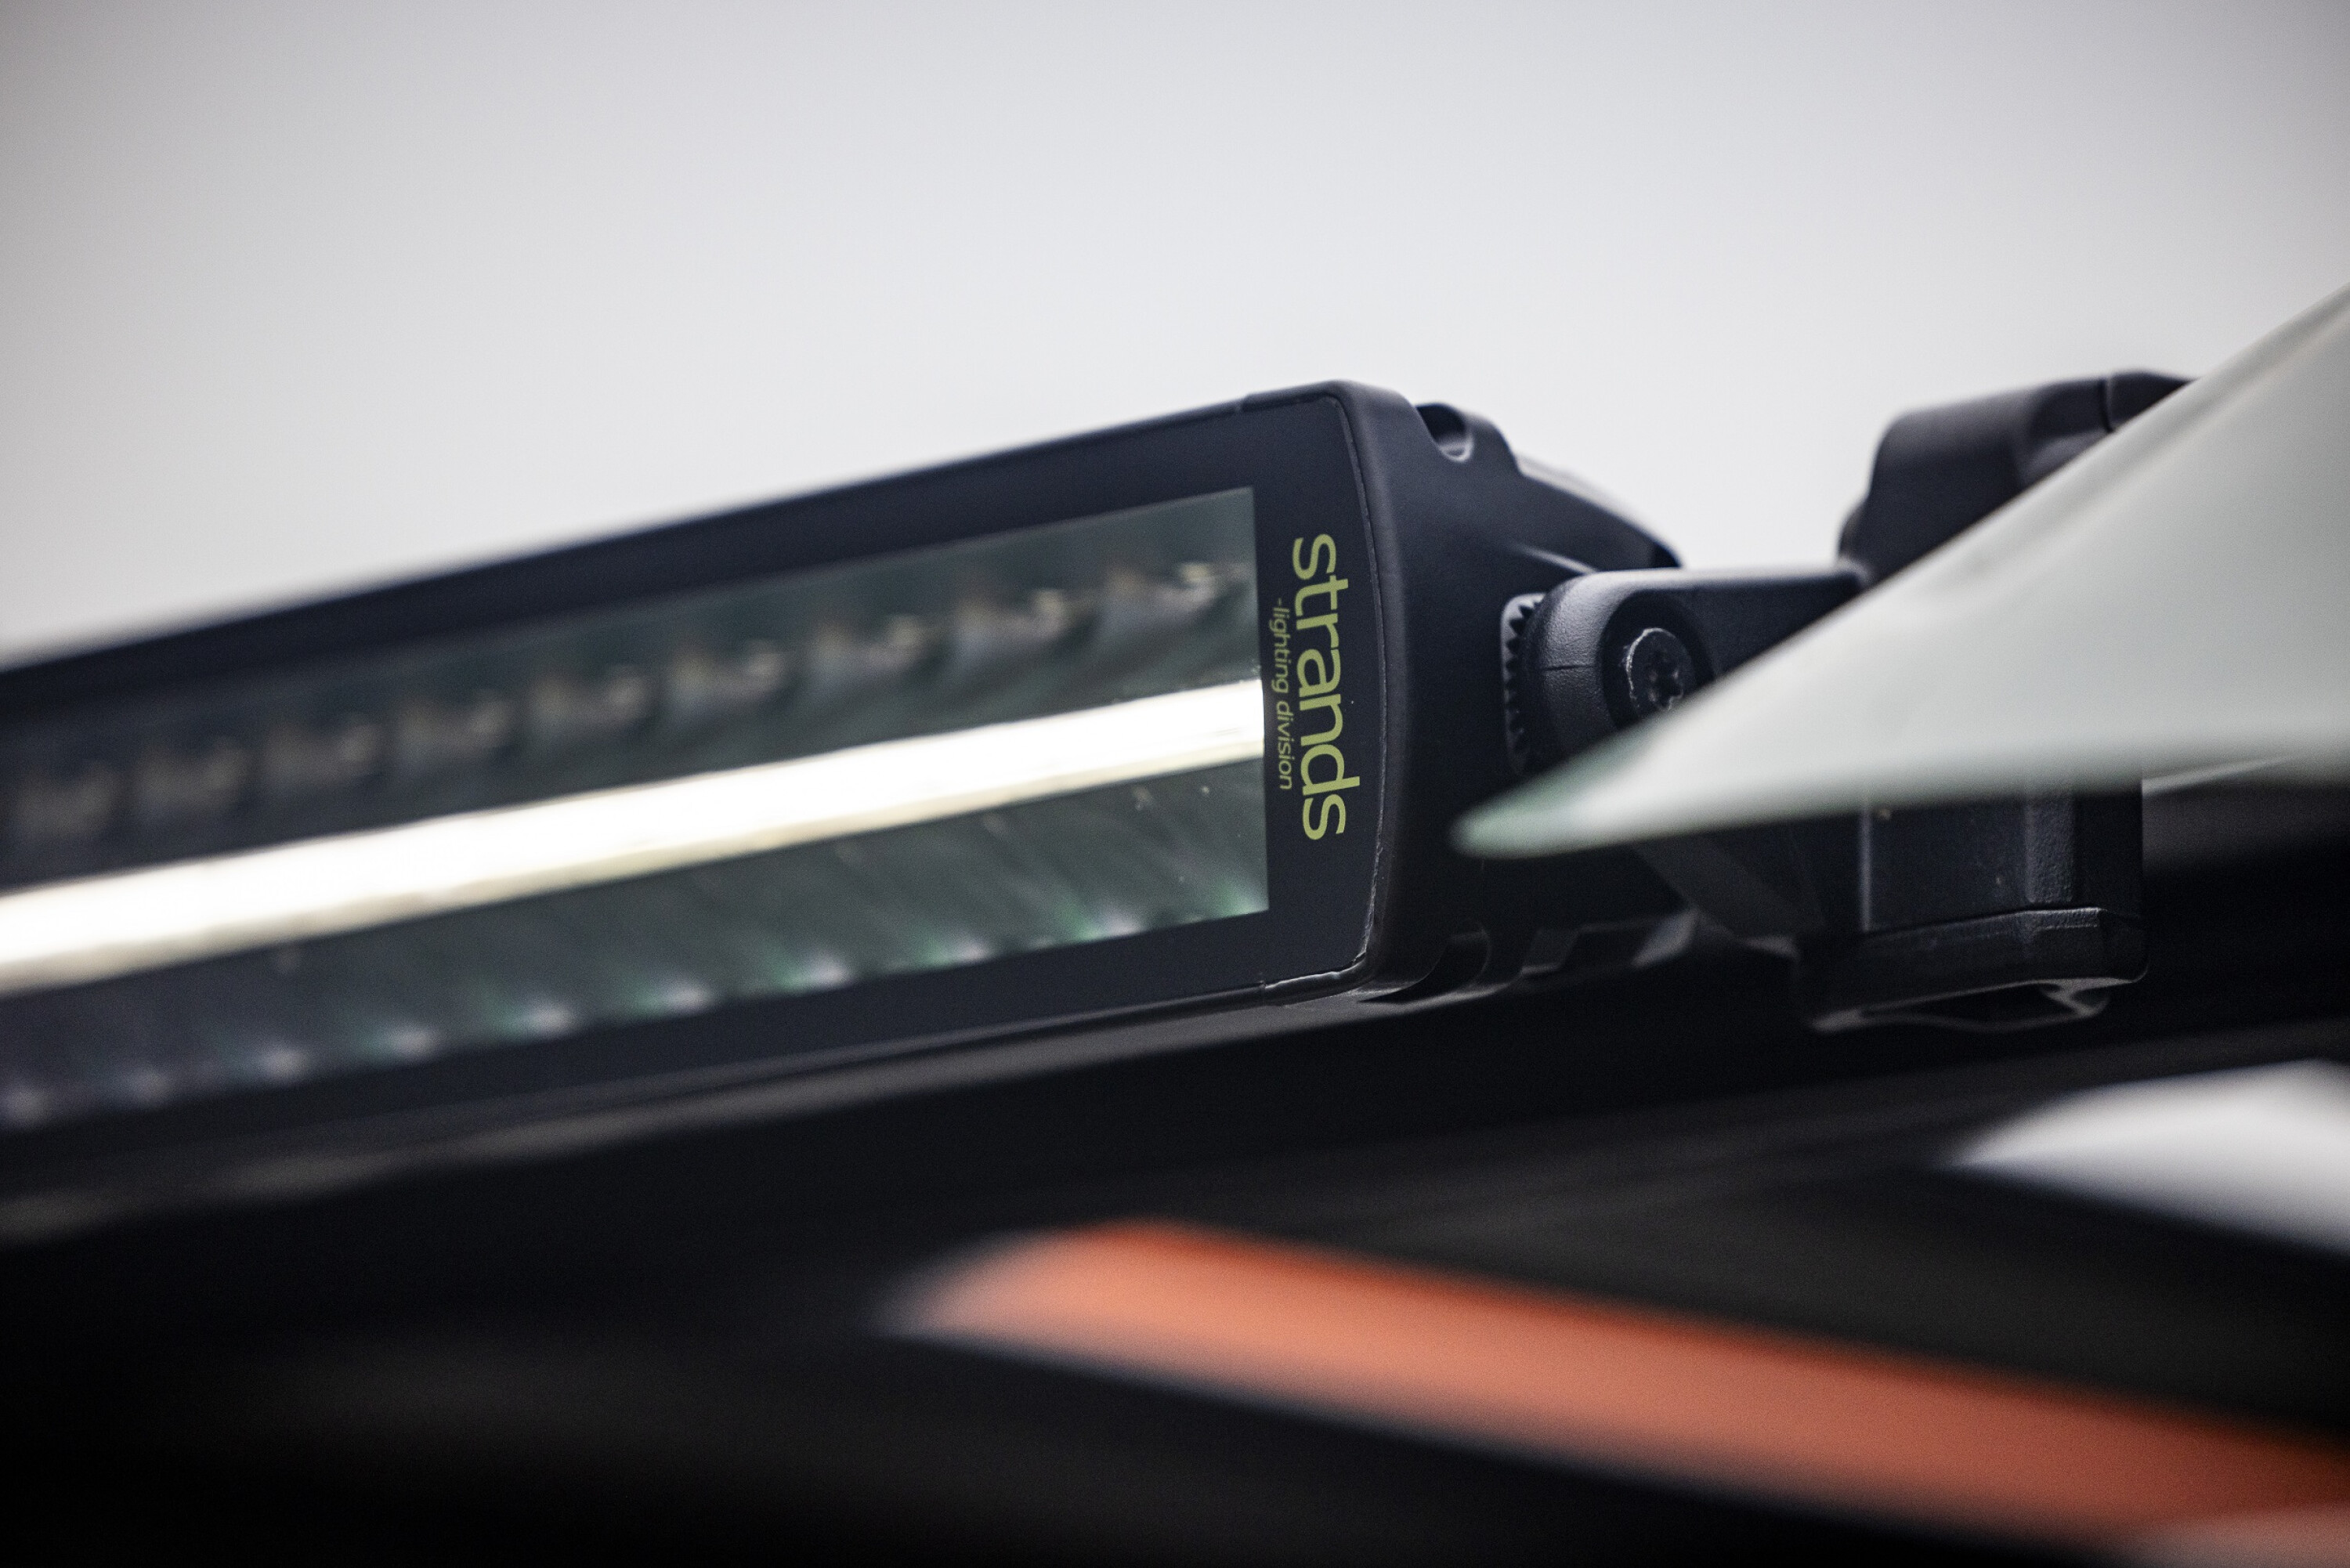
Launching in Australia in 2023, Strands Lighting has now released its flagship Siberia Outlaw 32-inch LED light bar.
The model pushes the boundaries and redefines premium lighting performance. Plus it’s coupled with sleek looks and easy mounting options that will improve the look of your 4WD.
“The Siberia Outlaw 32-inch LED bar will tick a lot of boxes for recreational off-roaders, as well as on-road users who regularly travel in remote and poorly lit areas looking for a premium lighting solution,” said Dale McBride, Marketing Manager at Brown & Watson International (BWI).
2
“The model combines a generous light output with durability and sharp styling. This is an LED bar that’s well-suited for fitment to a range of vehicles including four-wheel-drives, light commercial vehicles, larger trucks and prestige SUVs,” added McBride.
Strands Lighting is one of Europe’s most popular automotive lighting brands, and the Siberia Outlaw range sits at the summit of the company’s light bar offerings. The 32-inch double-row LED light bar produces an impressive one lux of light at 1466 metres, while also featuring an attractive position light between both LED rows so that users can alternate between white and amber colour outputs.
As well as utilising some of the most powerful LEDs available, the Siberia Outlaw is equipped with an advanced reflector design that better harnesses the LED light and directs it down the road in a spot-beam pattern, delivering a wall of bright white light.
Other premium components of the Siberia Outlaw include aluminium housing (sealed to IP67 and IP69K), tough polycarbonate lens material, and premium circuit board and diodes, allowing this LED light bar to operate across extreme temperature ranges of between -20°C to +45°C.
1
Included with the Siberia Outlaw is 2500mm of cable. Wiring and bracket kits can be purchased separately, allowing users to select hardware that best suits their installation preference, whether on existing bar work, on the roof, or even mounted on a grille.
The latest Siberia Outlaw light bar is ECE R10-compliant for electromagnetic compatibility and is covered by a three-year warranty.
Pricing: $1399 (includes shipping)
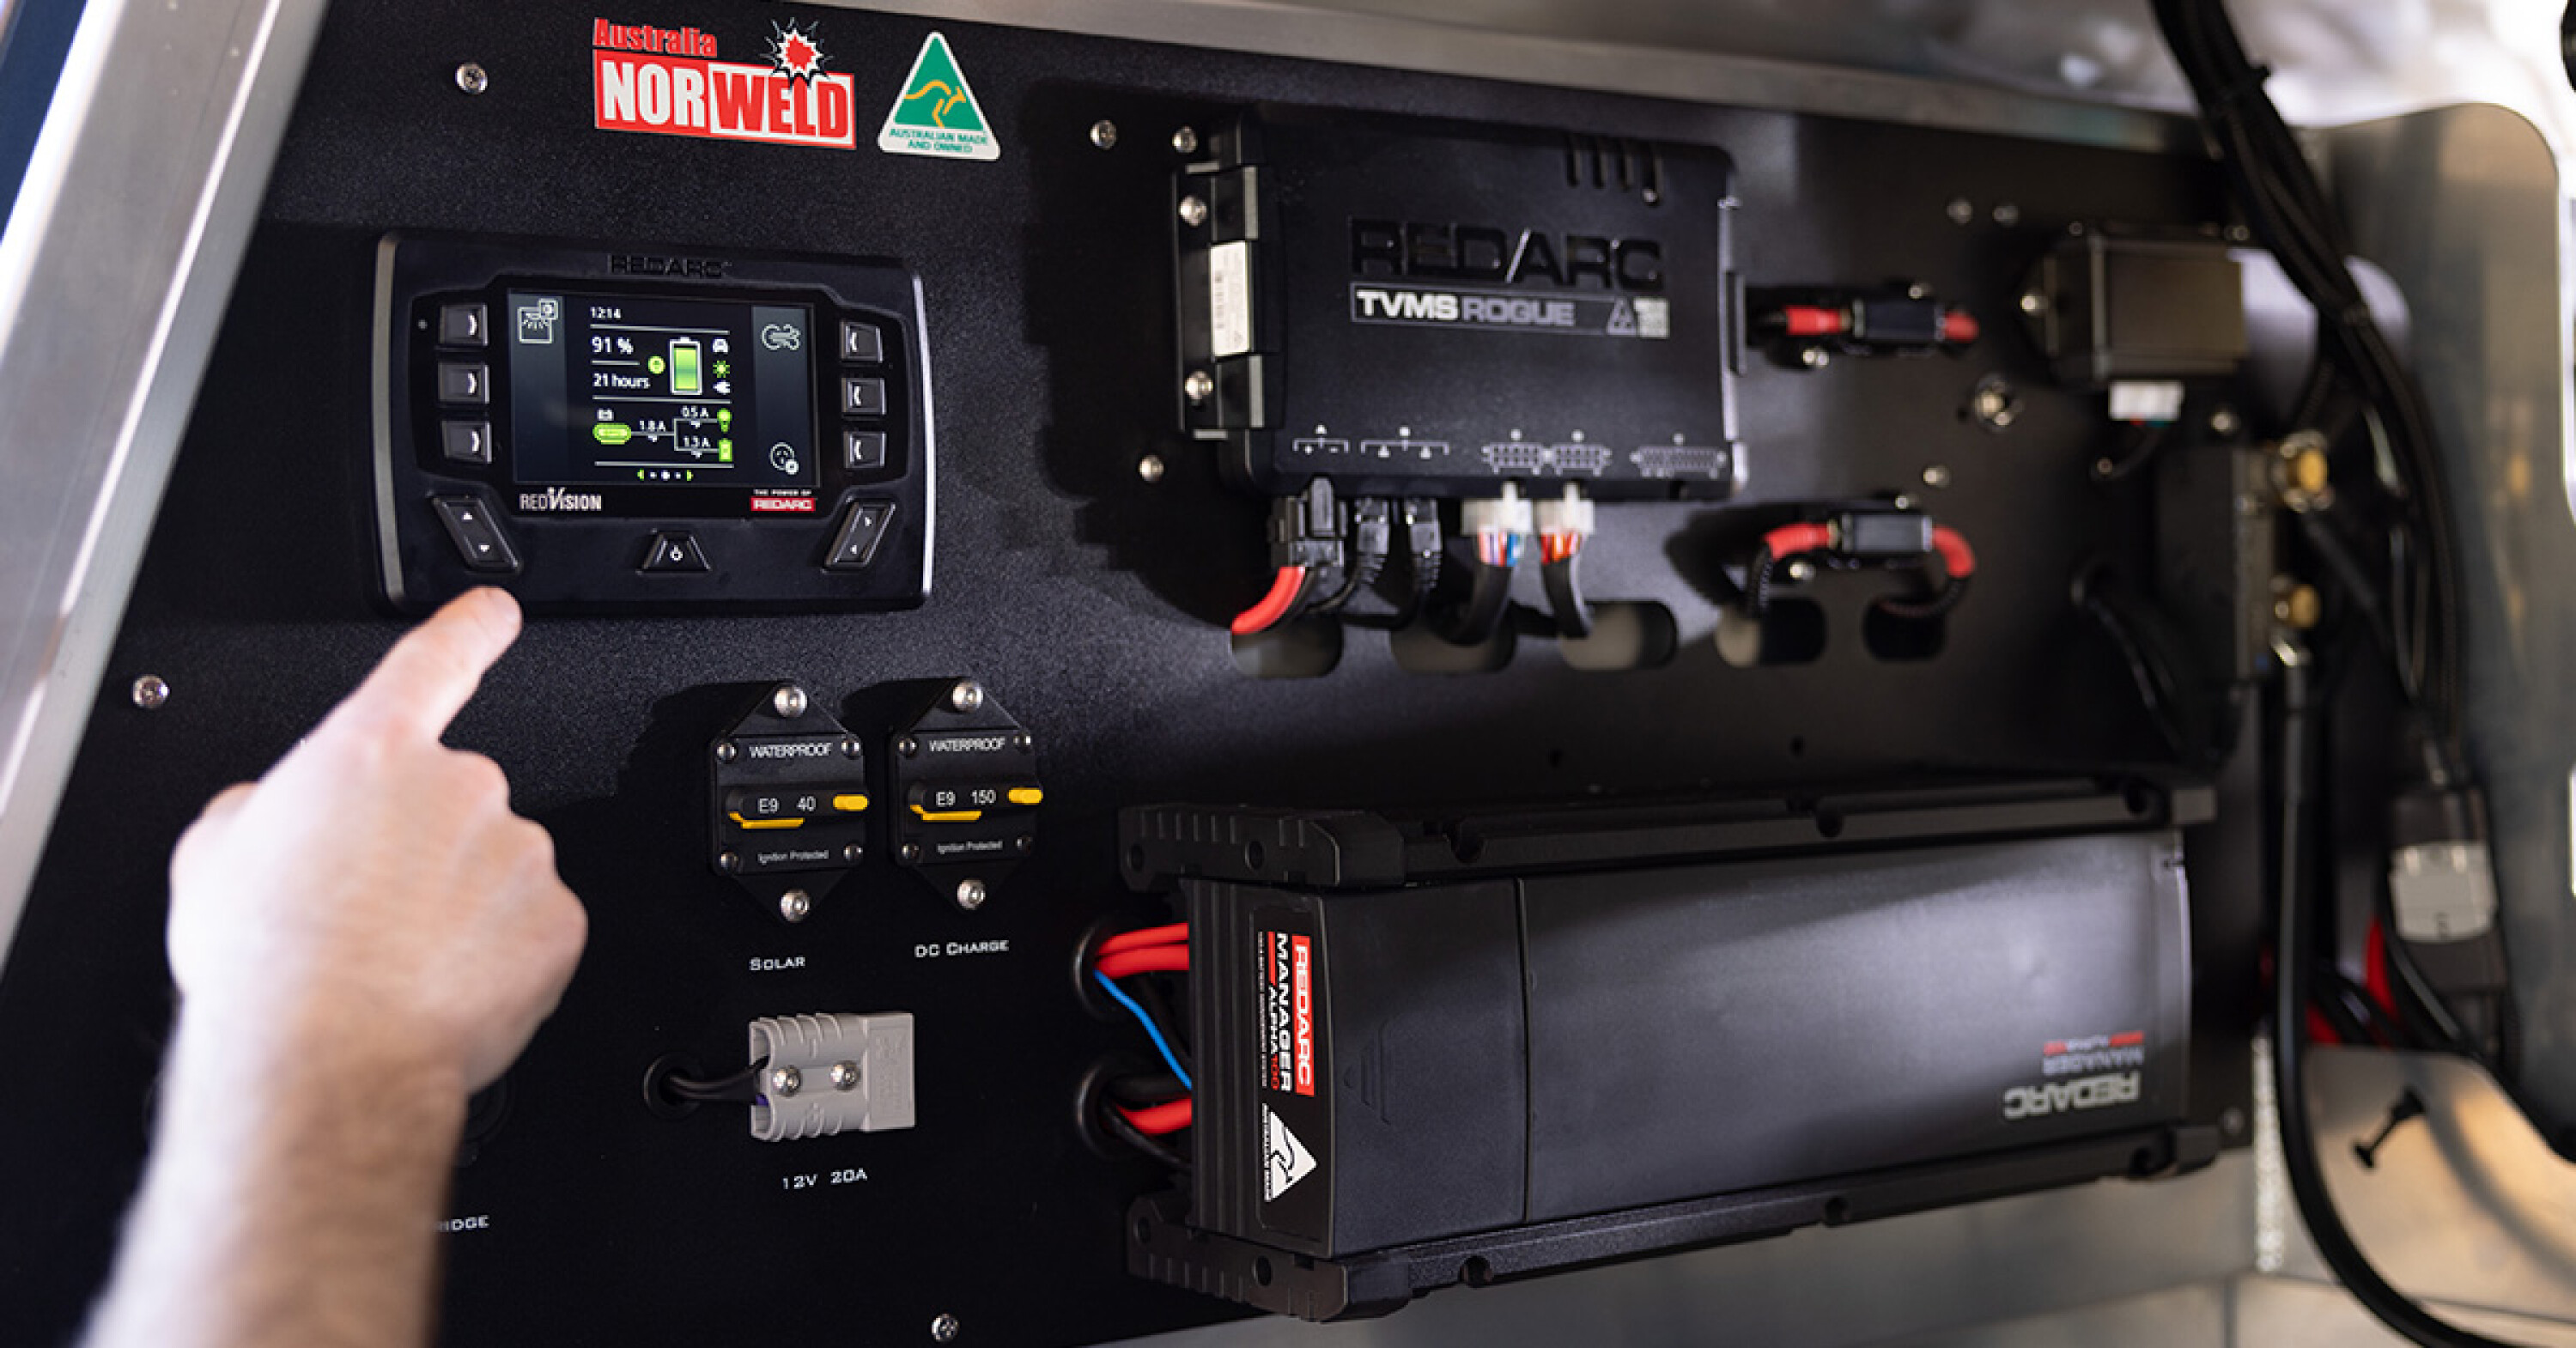
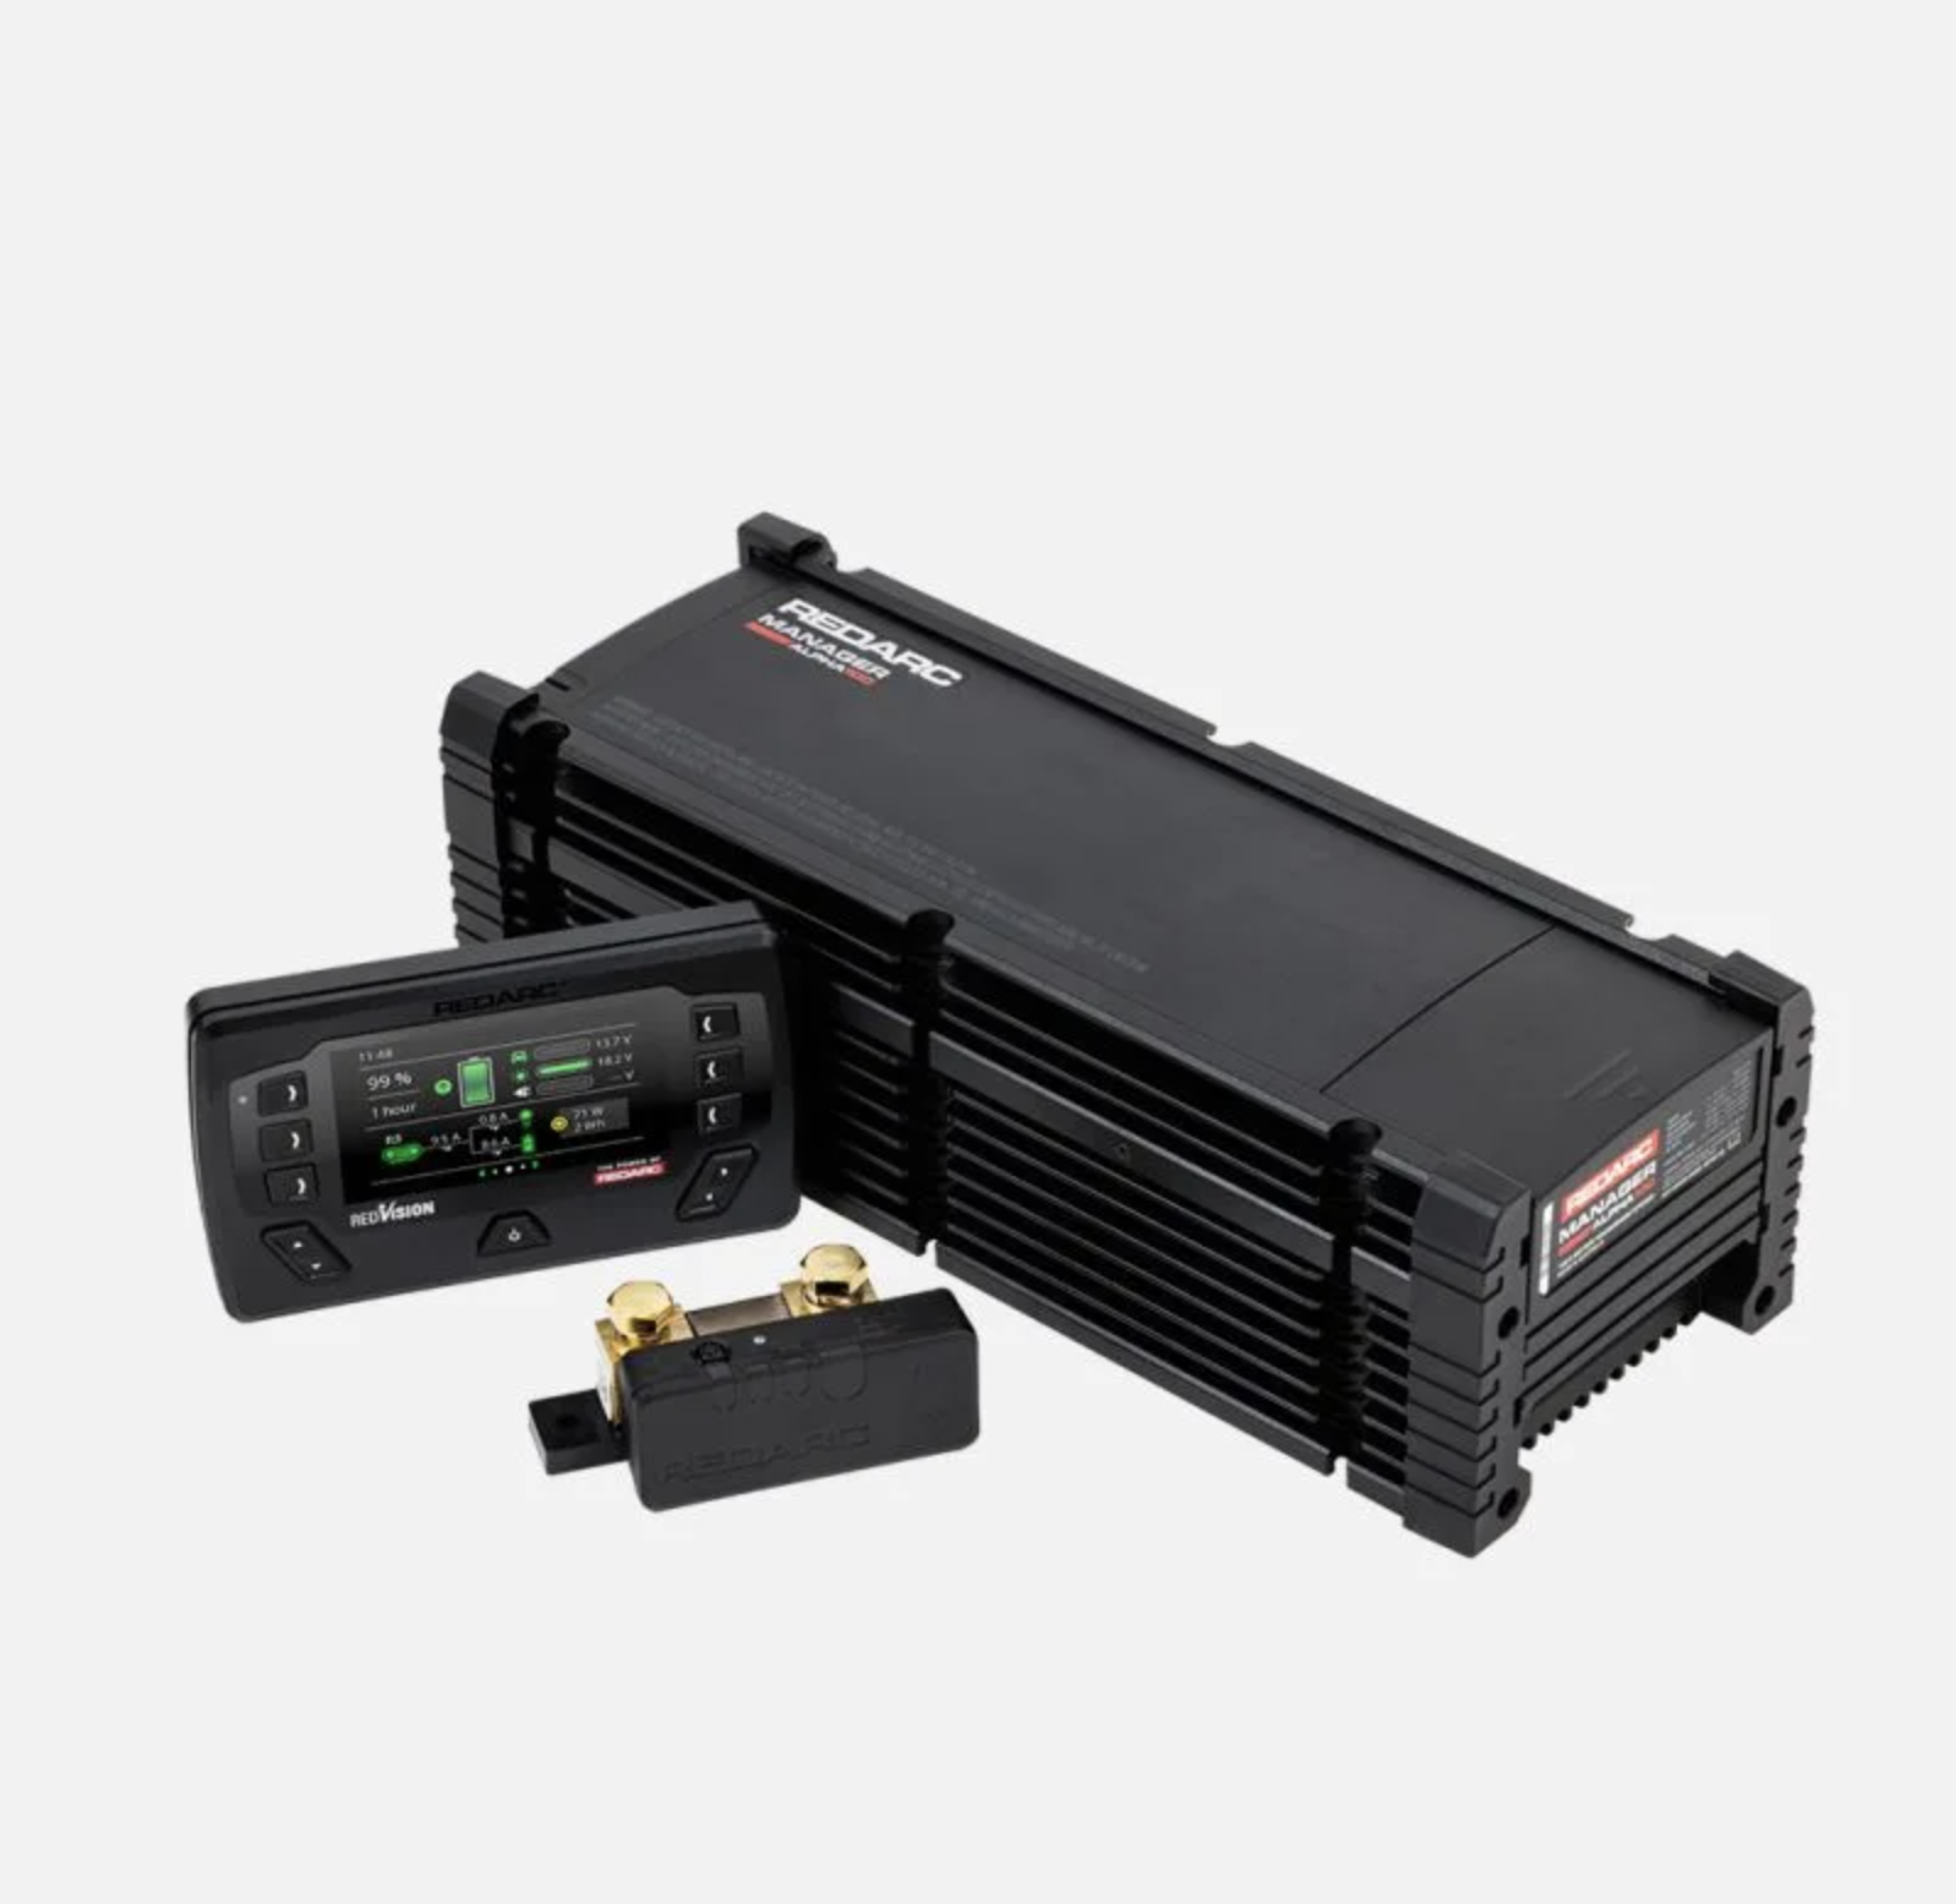
When it comes to charging your auxiliary batteries, REDARC has been Australia’s leading company in providing solutions for your 4WD.
REDARC has just released the Manager Alpha that allows you to charge from a combination of vehicle (DC), mains (AC) and solar simultaneously, which means your battery has the best chance of being fully charged at all times.
The Manager Alpha is available in 50A, 75A, and 100A variants and is compatible with all battery types. With this much power on tap, you can power everything from induction cooktops and fridges to coffee machines while charging your batteries faster than you can drain them. This makes it an ideal bit of gear for when you are on the move, remote camping or at home.
2
Key features of the Manager Alpha include ultra-fast charging with charge rates of up to 100A available, which ensures batteries are charged quickly and efficiently. The charging options are also versatile with the ability to charge from a mix of DC, AC and solar simultaneously, providing flexibility and convenience no matter the situation.
The Manager Alpha has advanced charging features that automatically utilise excess solar power to keep your starter battery charged. With the touch of a button, the Manager Alpha can also revive your starter battery, so you will never be left stranded after leaving your lights on. A user-friendly interface means you can stay informed and in control with RedVision, offering accurate real-time monitoring of your system’s state of charge, remaining charge and current flow.
2
With a compact design combining AC, DC, and solar into a single unit, the Manager Alpha is 55 per cent smaller and 28 per cent lighter than comparable competitor systems. Built in Australia these units have been tested to the toughest vibration standards in the world, so the Manager Alpha is ready for adventure.
Dylan Pinkard, REDARC’s New Product Development Manager, says the Manager Alpha is a testament to REDARC’s commitment to innovative solutions that meet customer needs. “Our customers demand more power than ever, and the Manager delivers this in spades. Its innovative design allows for recovery or maintenance of the vehicle’s start battery, meaning one less thing to worry about while remote firmware updates ensure you’re always up to date with the latest features.”
The 50A unit weighs 5.8kg, the 75A unit weighs 6kg and the 100A unit weighs 6.1kg. Each of the units has the same footprint with dimensions of 400mm L x 154mm W x 120mm H. The Manager Alpha is backed by nationwide support and includes a hassle-free two-year warranty, REDNetwork certified installer network and after-sales service.
Pricing
- Manager Alpha with RedVision (50A): $3999
- Manager Alpha with RedVision (75A): $4899
- Manager Alpha with RedVision (100A): $5899
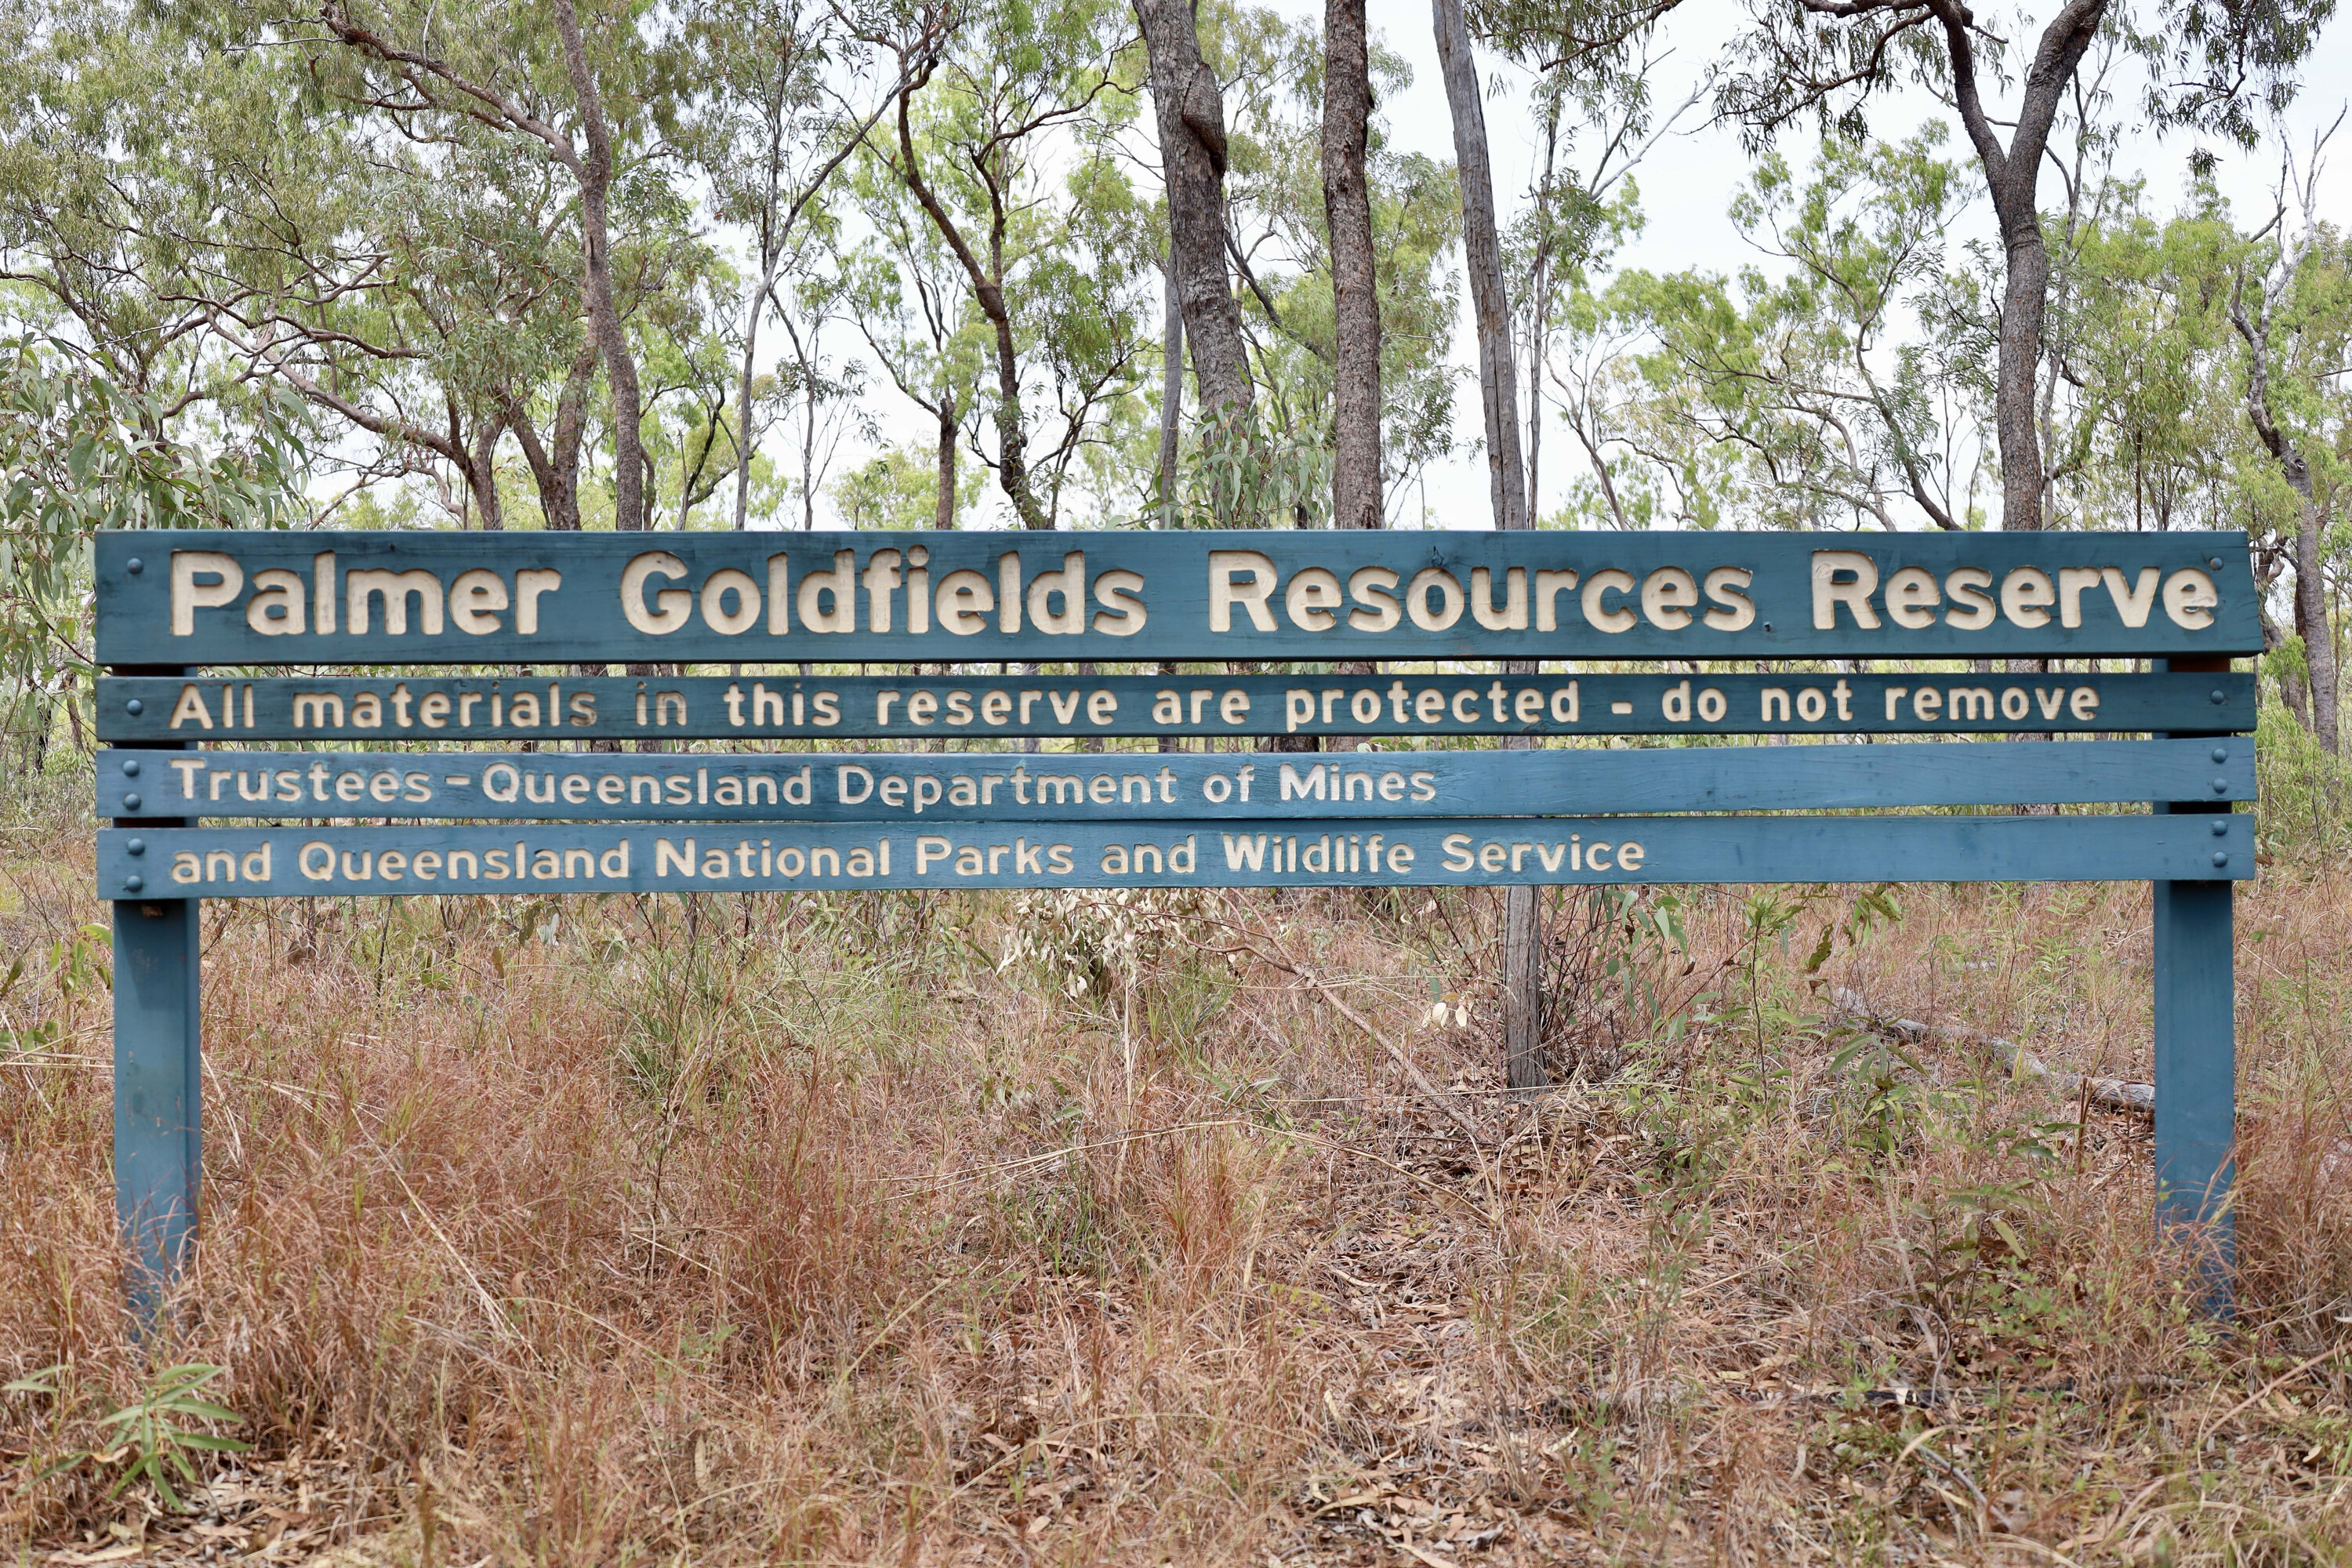
Imagine the harsh reality for those gold prospectors who left their lives behind to head to Cape York after the discovery of the precious metal there in the mid-1800s.
Walking for weeks into inhospitable country where there was no food and little water, but reports of cannibal inhabitants, all with no guarantee of finding the gold they had come looking for, and after having spent months aboard a boat to get to Australia in the first place.
Curiosity got the better of me after reading a book titled The Rivers of Gold that portrayed the riches and hardships of thousands of prospectors who made their way to the Cape seeking fortune. I decided to head across to Cape York myself on a recent trip to try to get a feeling for the hardship and isolation that these people endured.
It was explorer William Hann who found gold in the isolated hills 200km west of Cooktown in the Palmer River around 1874, and a year later a prospecting party found payable gold. Word quickly spread and the rush was on.
1
A fellow by the name of James Mulligan was an experienced and well-respected explorer who made his way to north Queensland in the early 1870s to lead exploration parties into new areas looking for gold.
He had an amazing success rate and literally opened the Palmer River Goldfields for other prospectors to hunt for their fortunes. Mulligan was supported by the government through grants and rewards to open new areas such as the Hodgkinson goldfields, and to work in other areas.
Heading 200km out to the goldfields caused all sorts of issues due to a lack of food, and Mulligan is quoted as saying, “Any man who heads out towards the Palmer with less than two weeks supply – will surely perish”. Not only that, but the terrain also was challenging, and several indigenous tribes were known to be on the hunt.
1
When word got out about the gold, barges and ships from around the world began arriving at Cooktown, the existence of which began with just a few tents pitched on the banks of the Endeavour River.
But Cooktown was soon a bustling port, and it grew quickly with the new arrivals, with some reports claiming there were up to 47 licensed drinking premises, several brothels, two newspapers, Chinese opium houses, a number bakeries and official government houses. In a short amount of time the town swelled with nearly 30,000 people passing through on their way to the goldfields, the majority of whom were Chinese.
The Chinese had a strong presence through the goldfields and were much hated by other diggers, and conflict would regularly break out, but it is reported they were much loved by the local cannibals for their sweet taste.
1
Hard working and quiet, the Chinese did well on the Palmer through prospecting, as well as by establishing market gardens that supplied the town and goldfields with fresh produce and rice. Even today there is a strong Asian influence in Cooktown.
With the goldfields swelling to capacity over time there was constant hunt for new gold. Lone miners moved away from the crowded river and creeks only to find themselves hunted by the local tribes, or their camps raided by other miners looking for free gold.
The Palmer River Goldfields were some of the most isolated in the country and challenges included wet season flooding where bridges and tracks simply washed away, supplies often took weeks to arrive, and there was a lack of medical practitioners.
1
The goldfields consisted rich alluvial fields and lucky diggers had the opportunity to get rich quickly.
Many of those who struck gold would head back to Cooktown to spread their wealth, some miners spending it in the ale houses and brothels, others cashing in and leaving, while some would buy more supplies and trudge back to the Palmer.
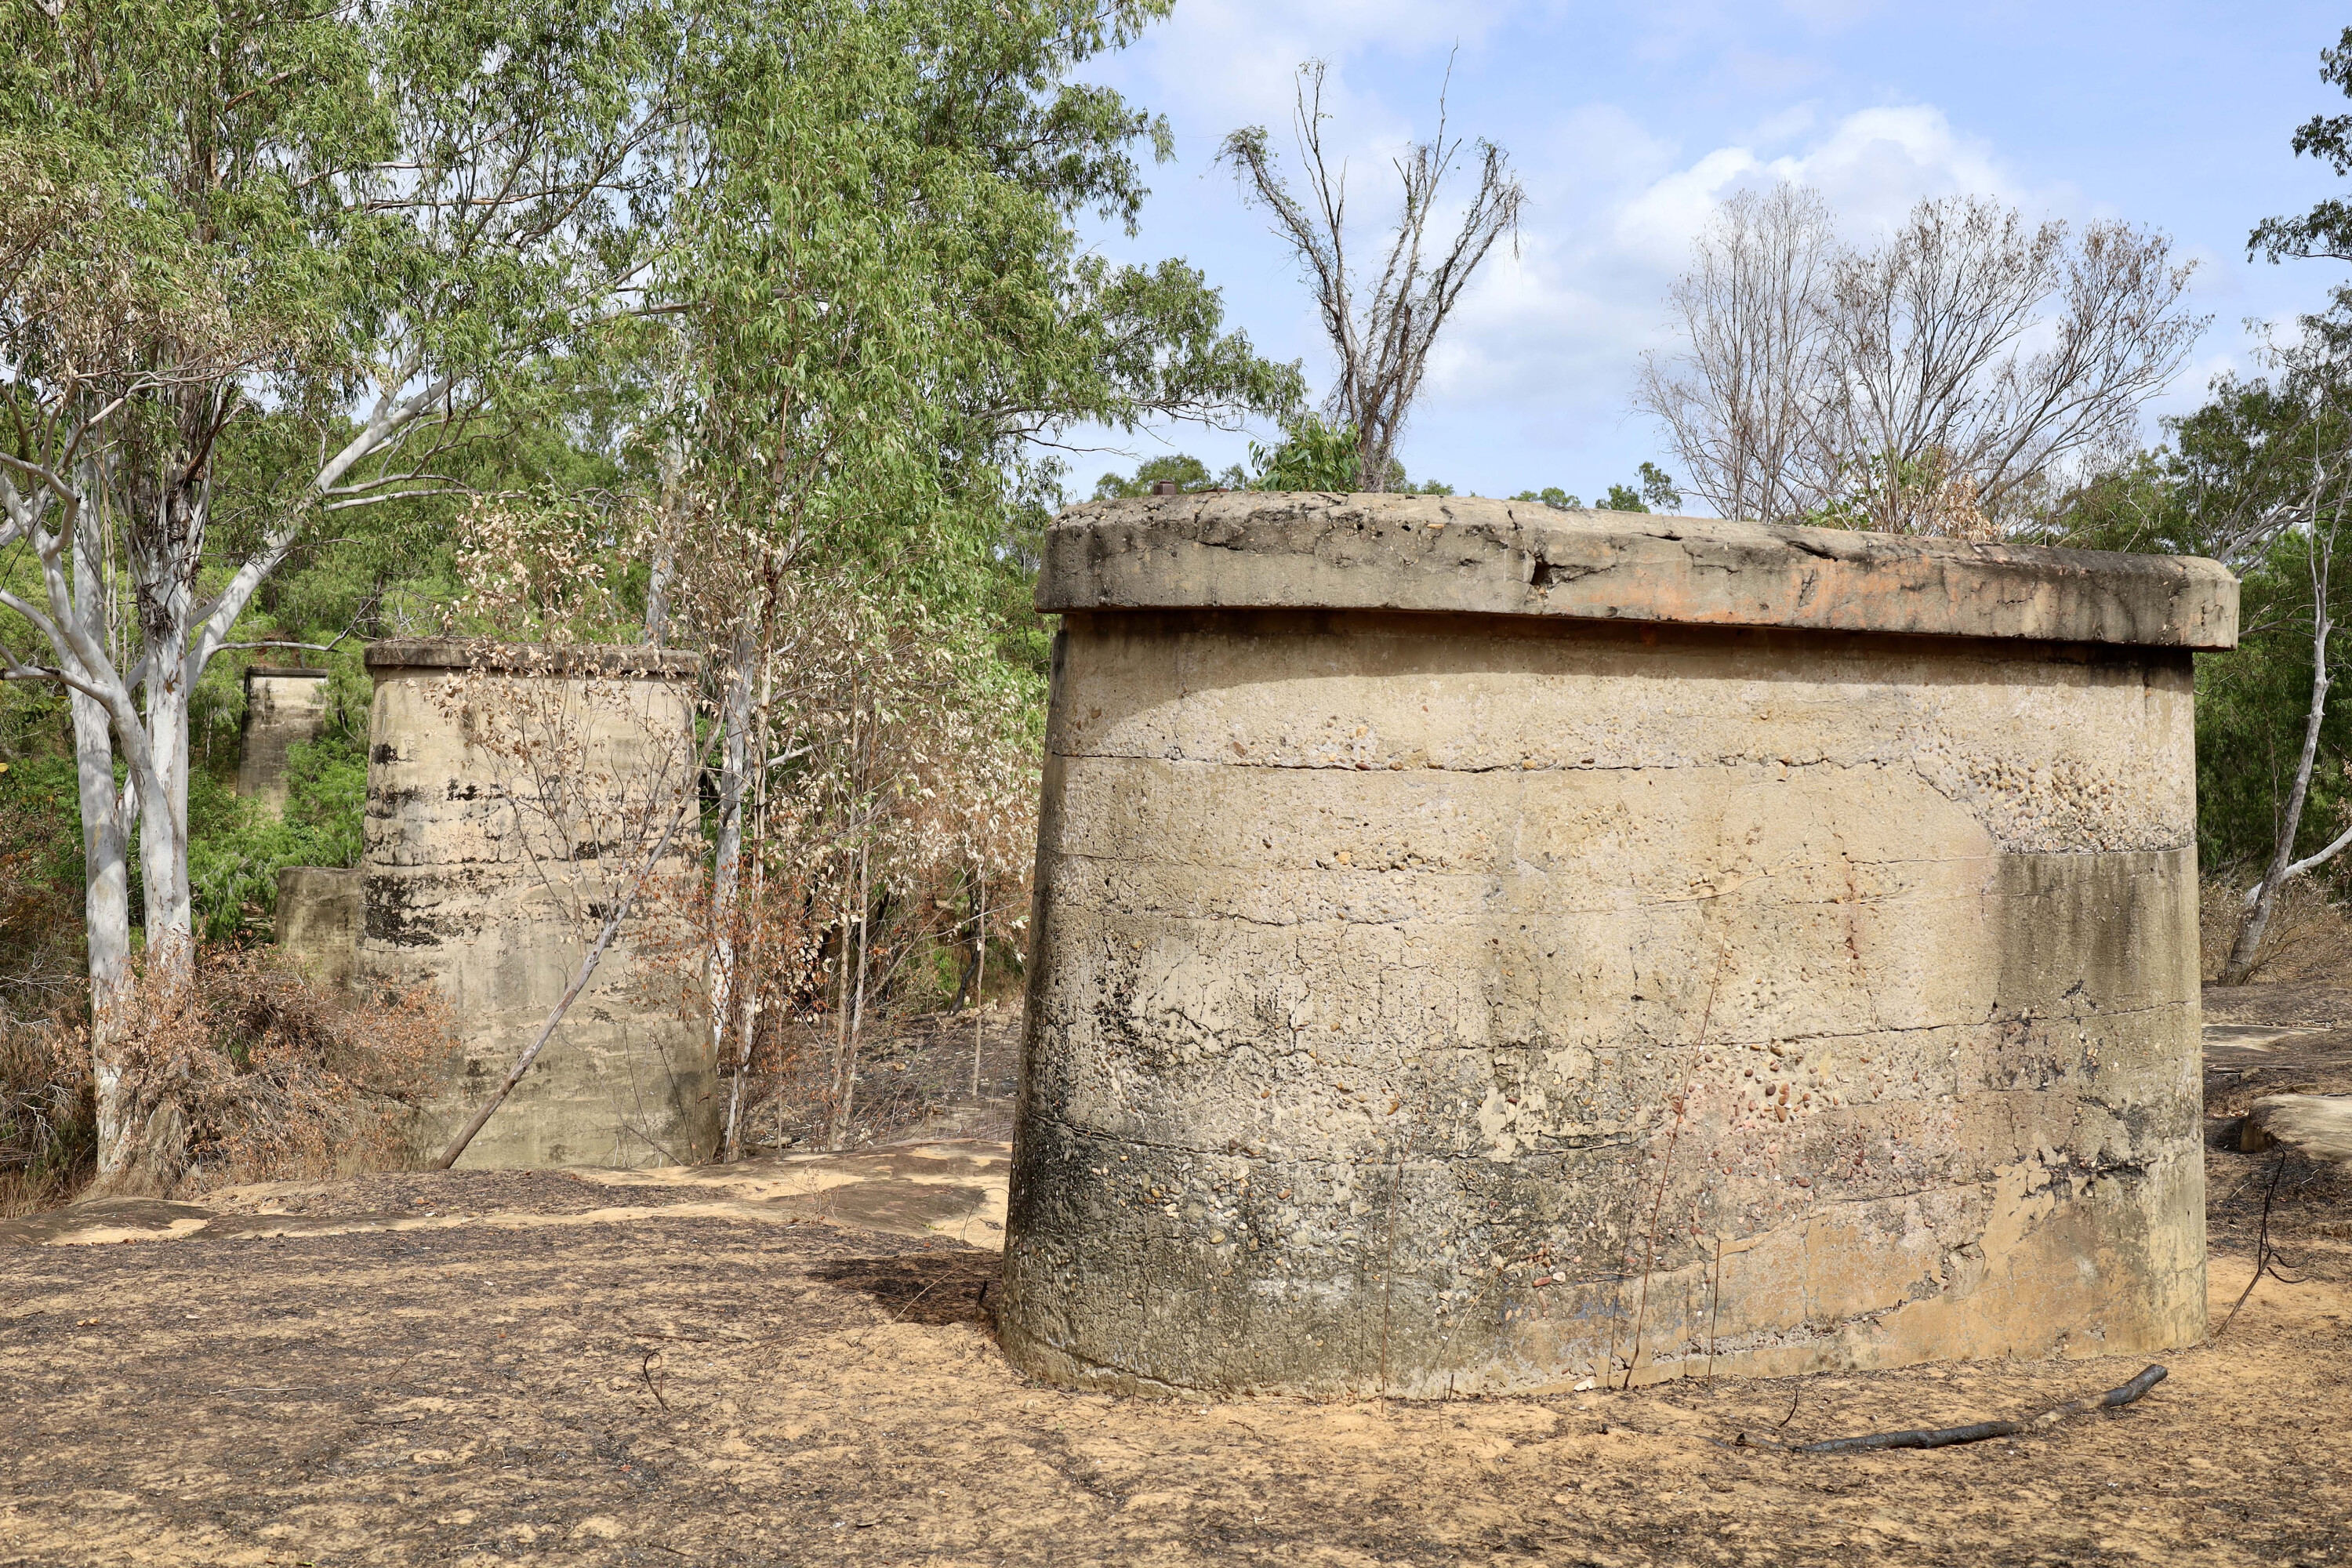
There was a proposal to put in a railway line from Cooktown out to the now established Maytown, but with a lack of workers and gold petering out, the line never extended past Laura, just 108 km away. Today, massive bridge piers can be found near the Laura River, and this section of the line is now called the track to nowhere, because it never reached Maytown.
1
The Palmer River Goldfields only boomed for a short time as the gold became harder and harder to find. Miners left and shopkeepers closed, following the miners to new fields.
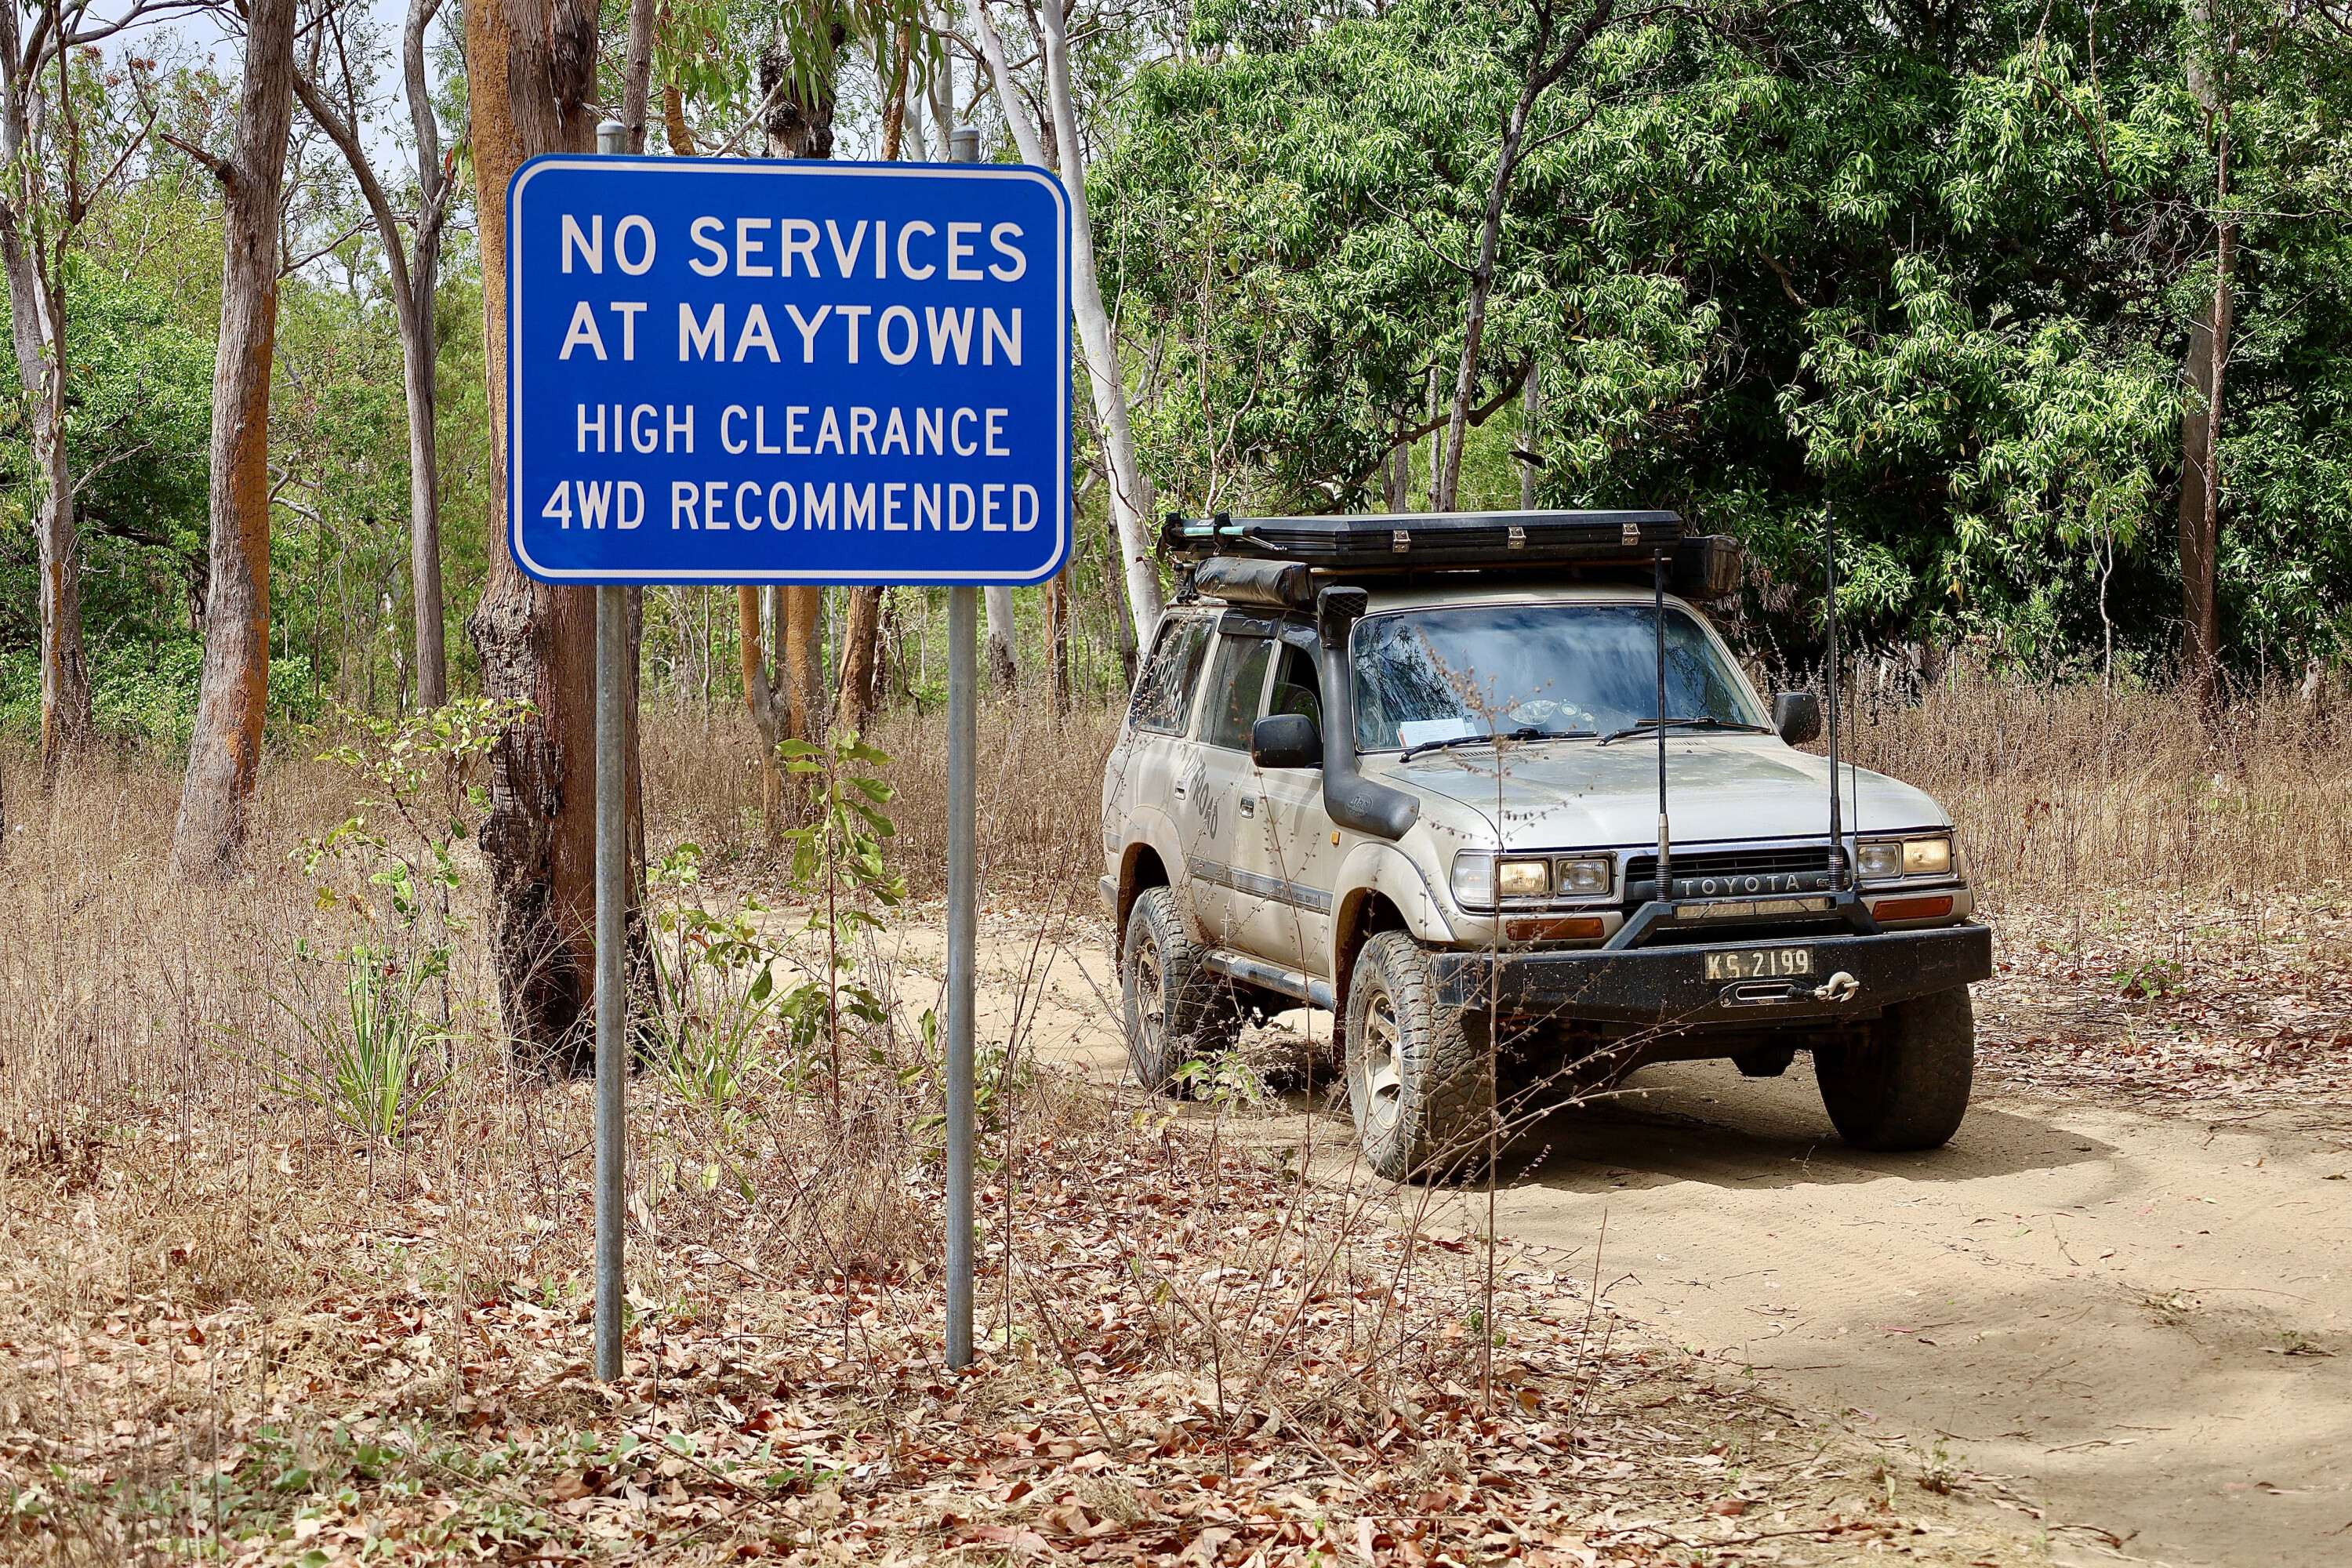
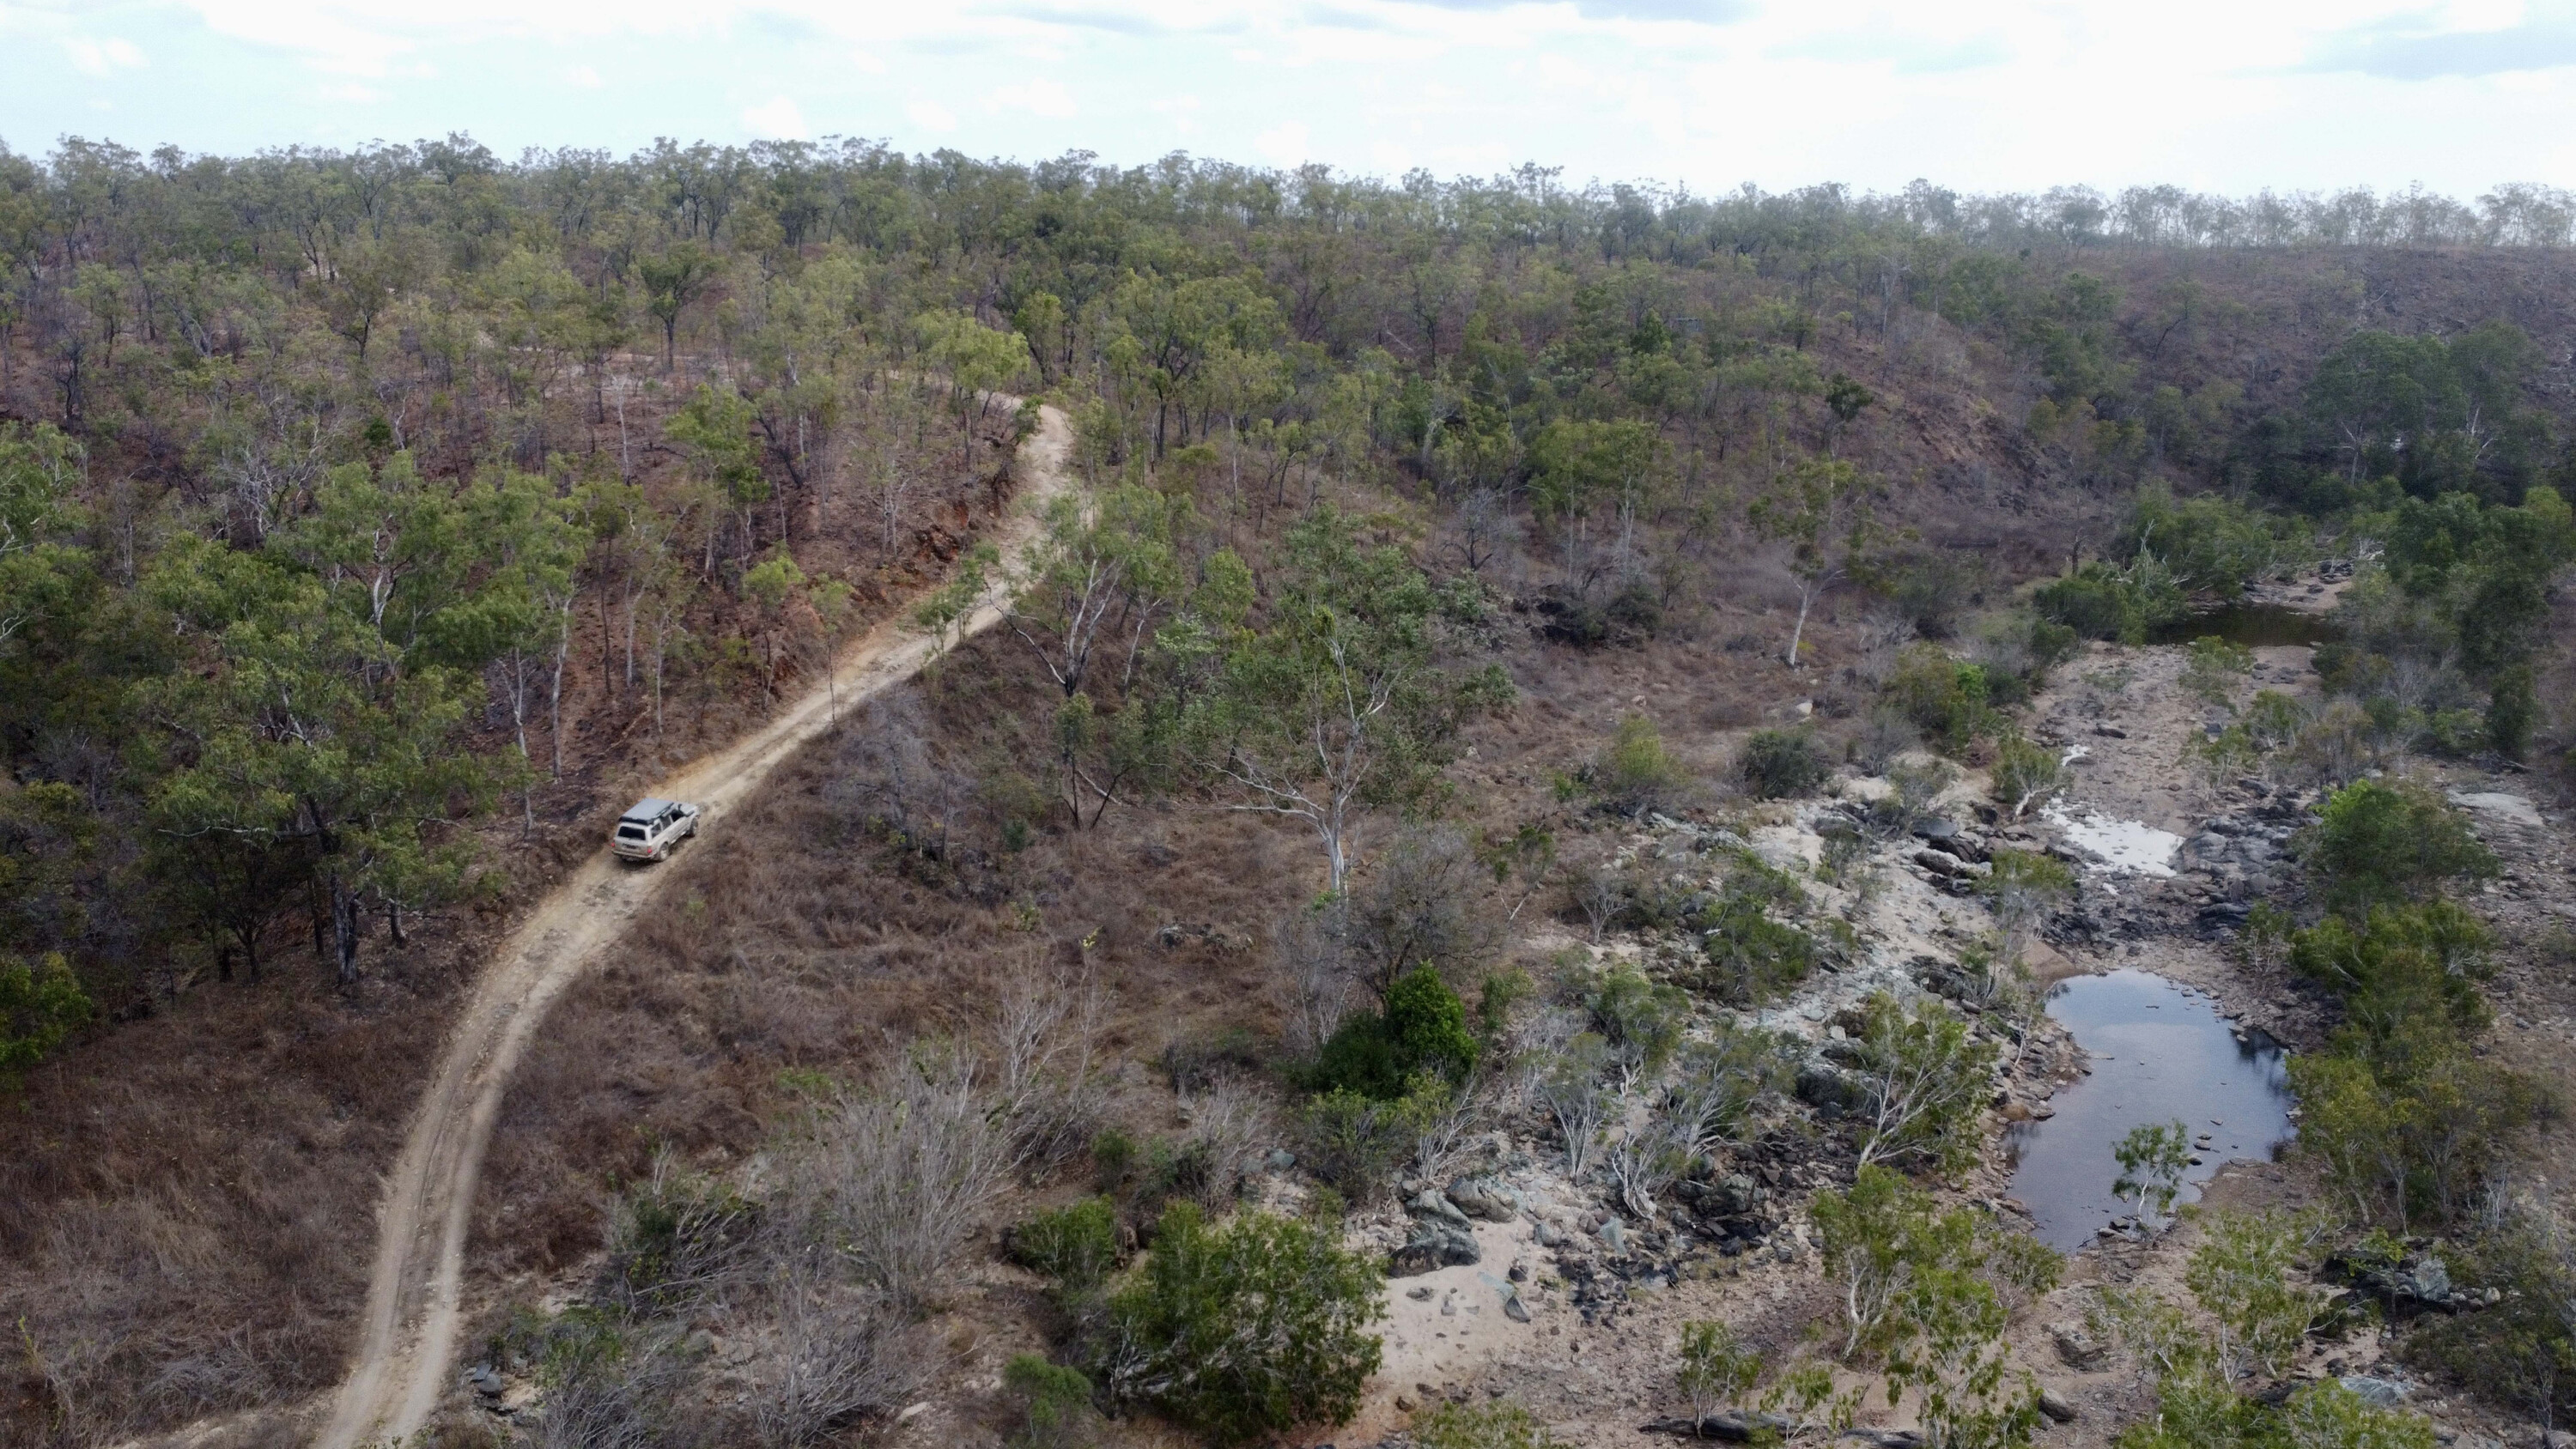
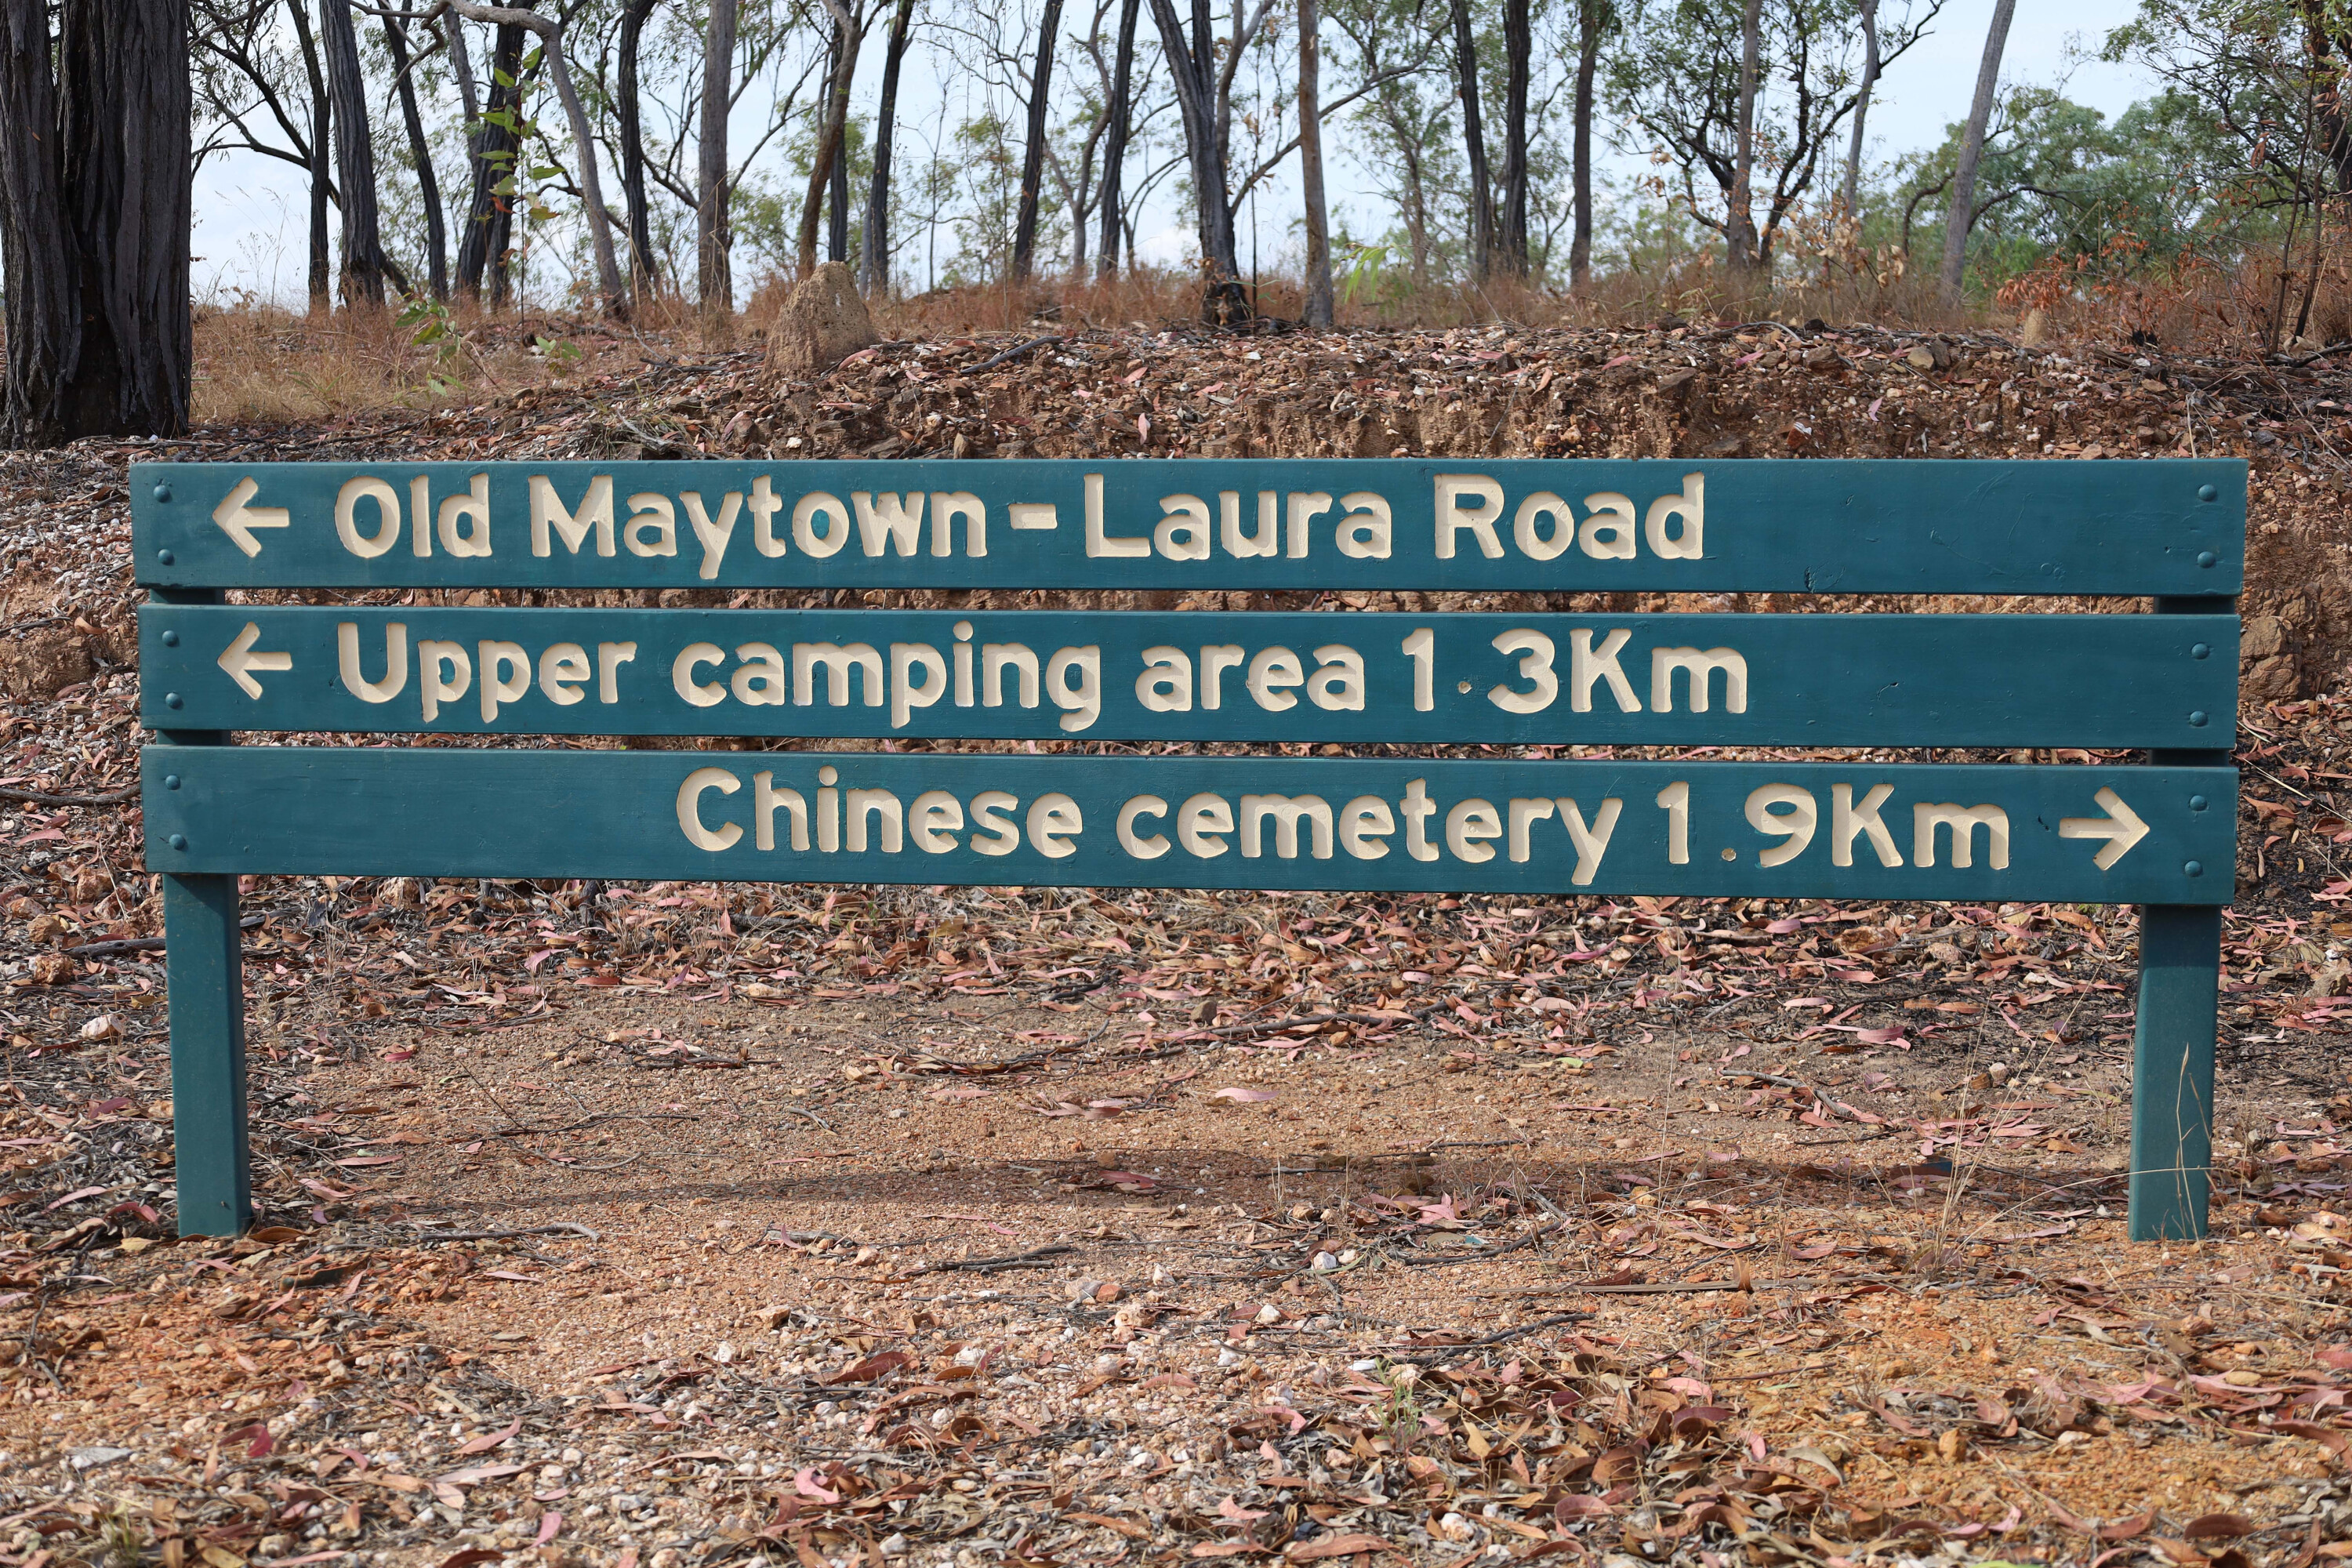
Today and the Palmer River area is a quiet place apart from four-wheel drivers, prospectors with metal detectors, and history buffs all seeking to explore the area. My journey into this historical area started at Laura, about 350km north of Cairns, and this would be my only stop for fuel for several days.
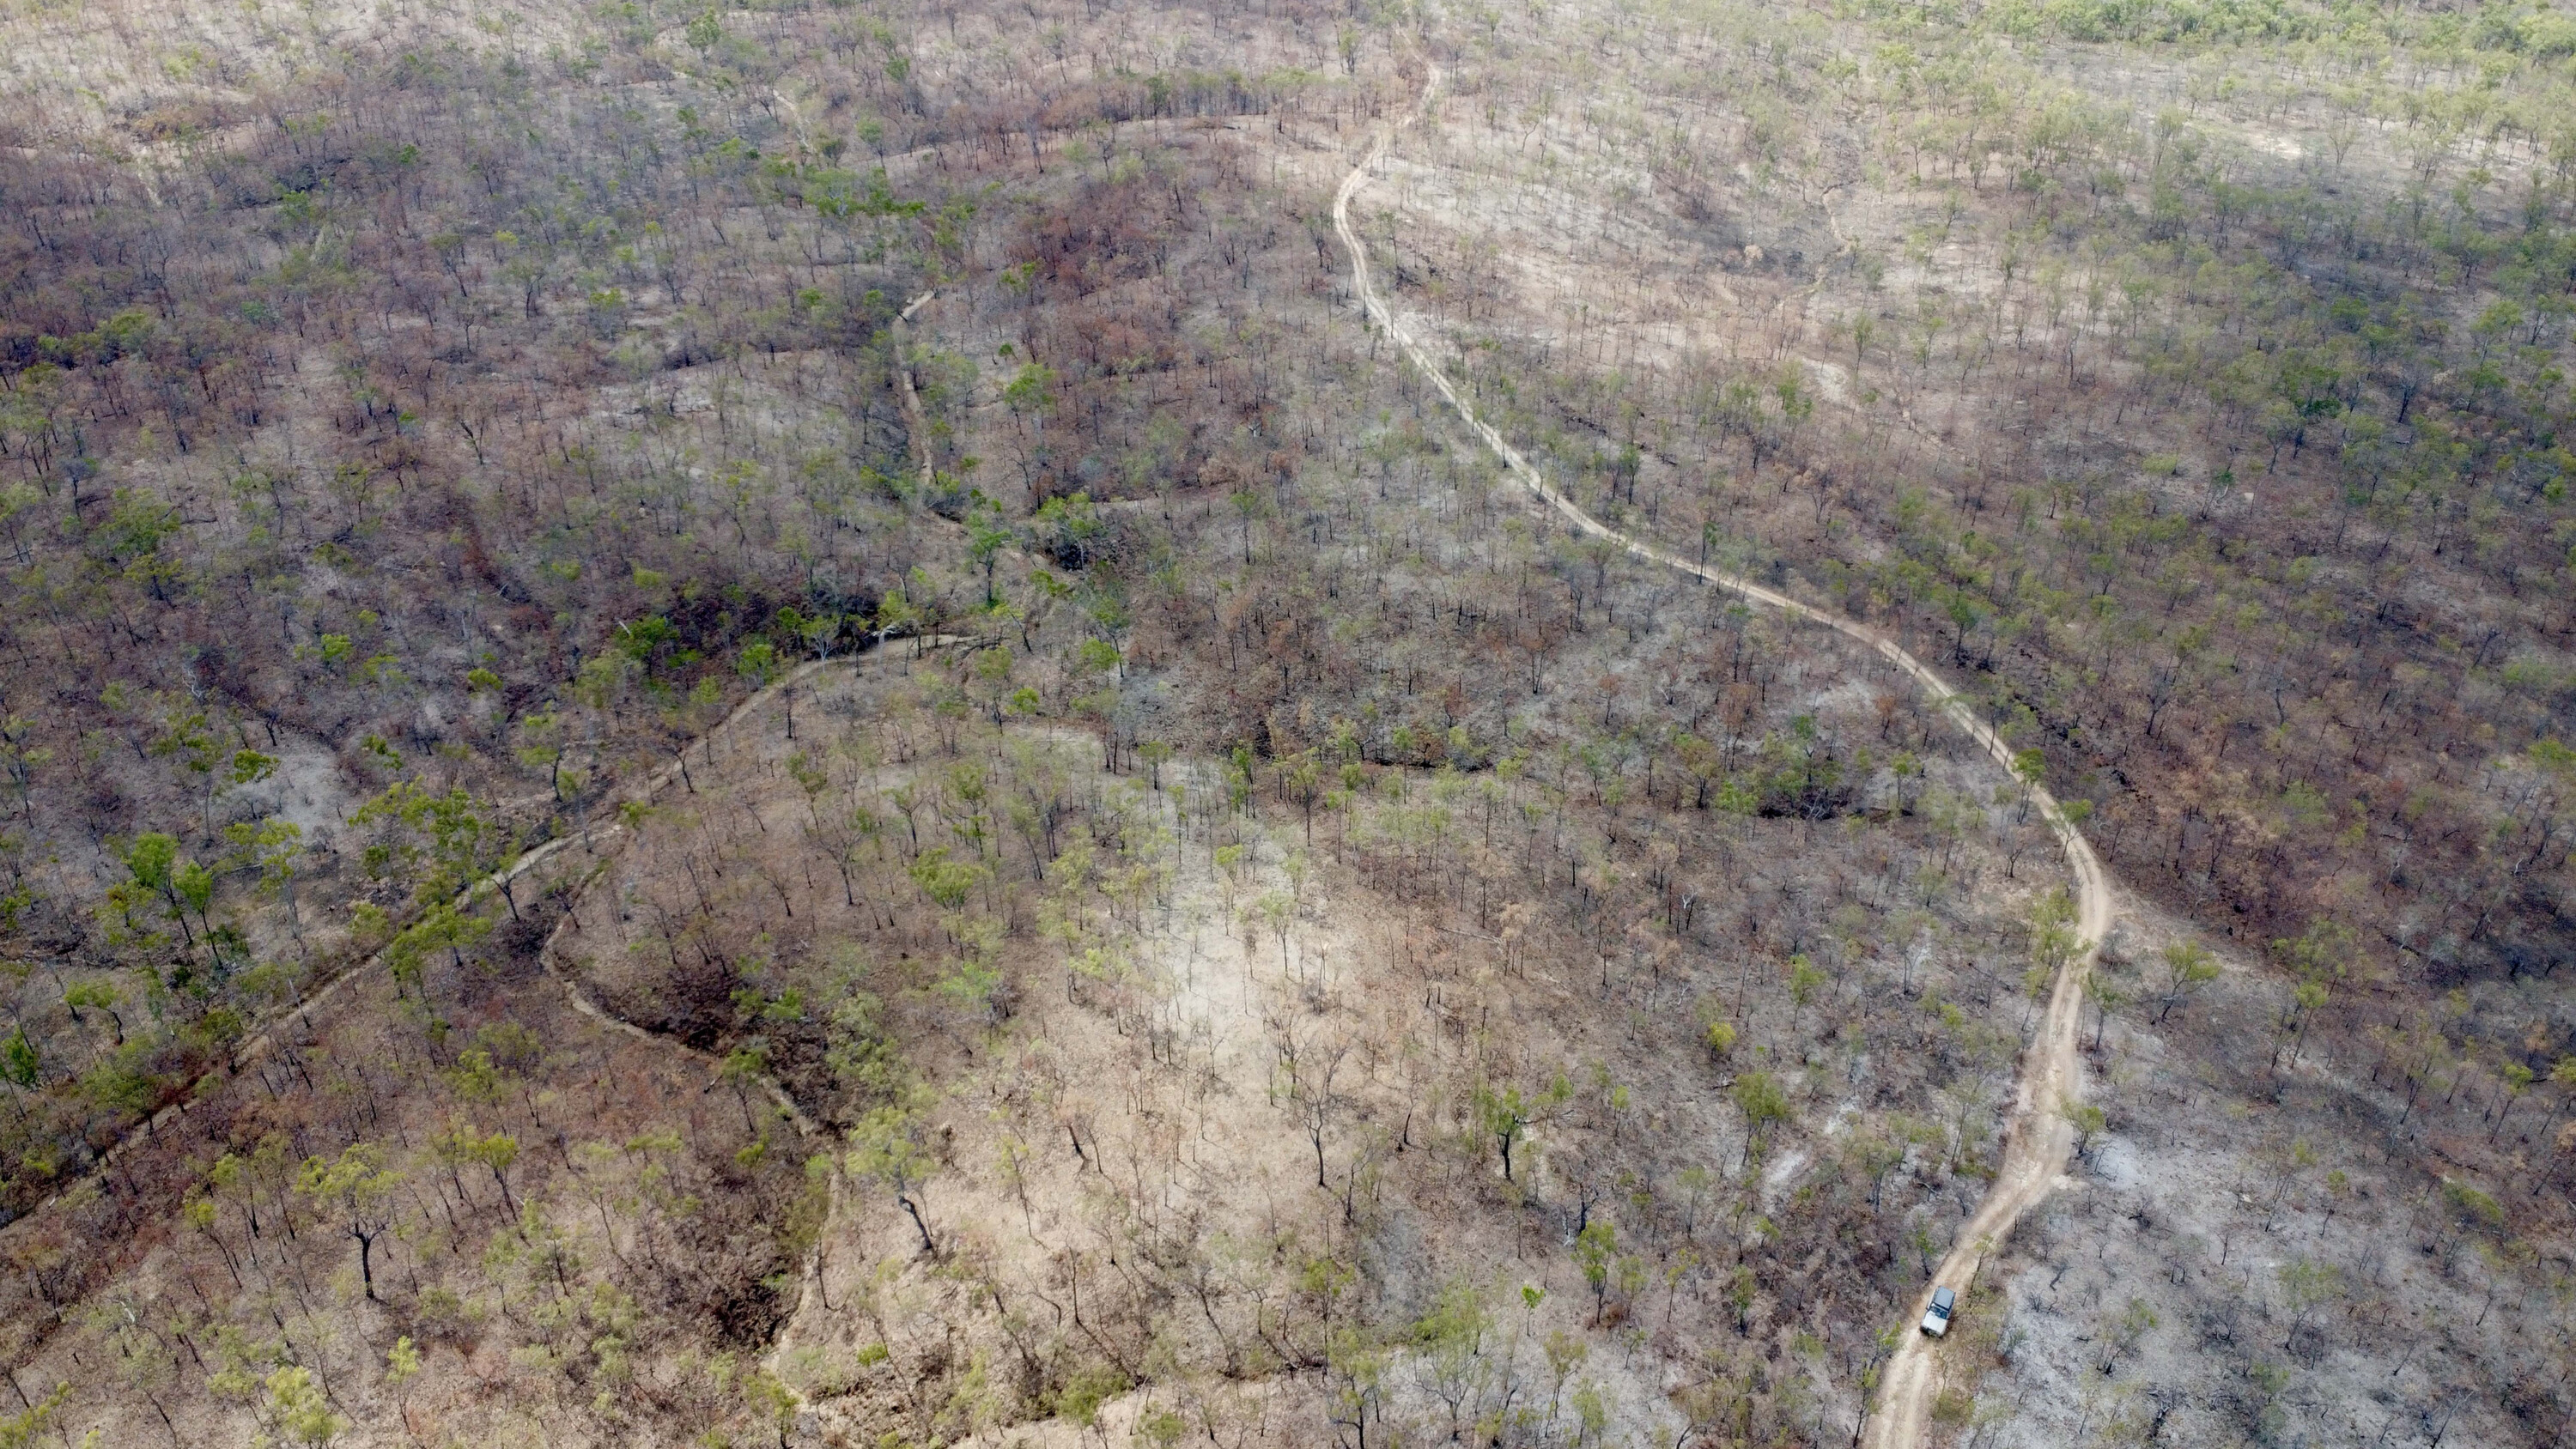
Finding the turnoff to Maytown is as easy as heading down the maintained Palmerville Road until the Maytown sign, and taking the Old Coach Road, which is regarded as one of the hardest and most challenging tracks in Cape York.
1
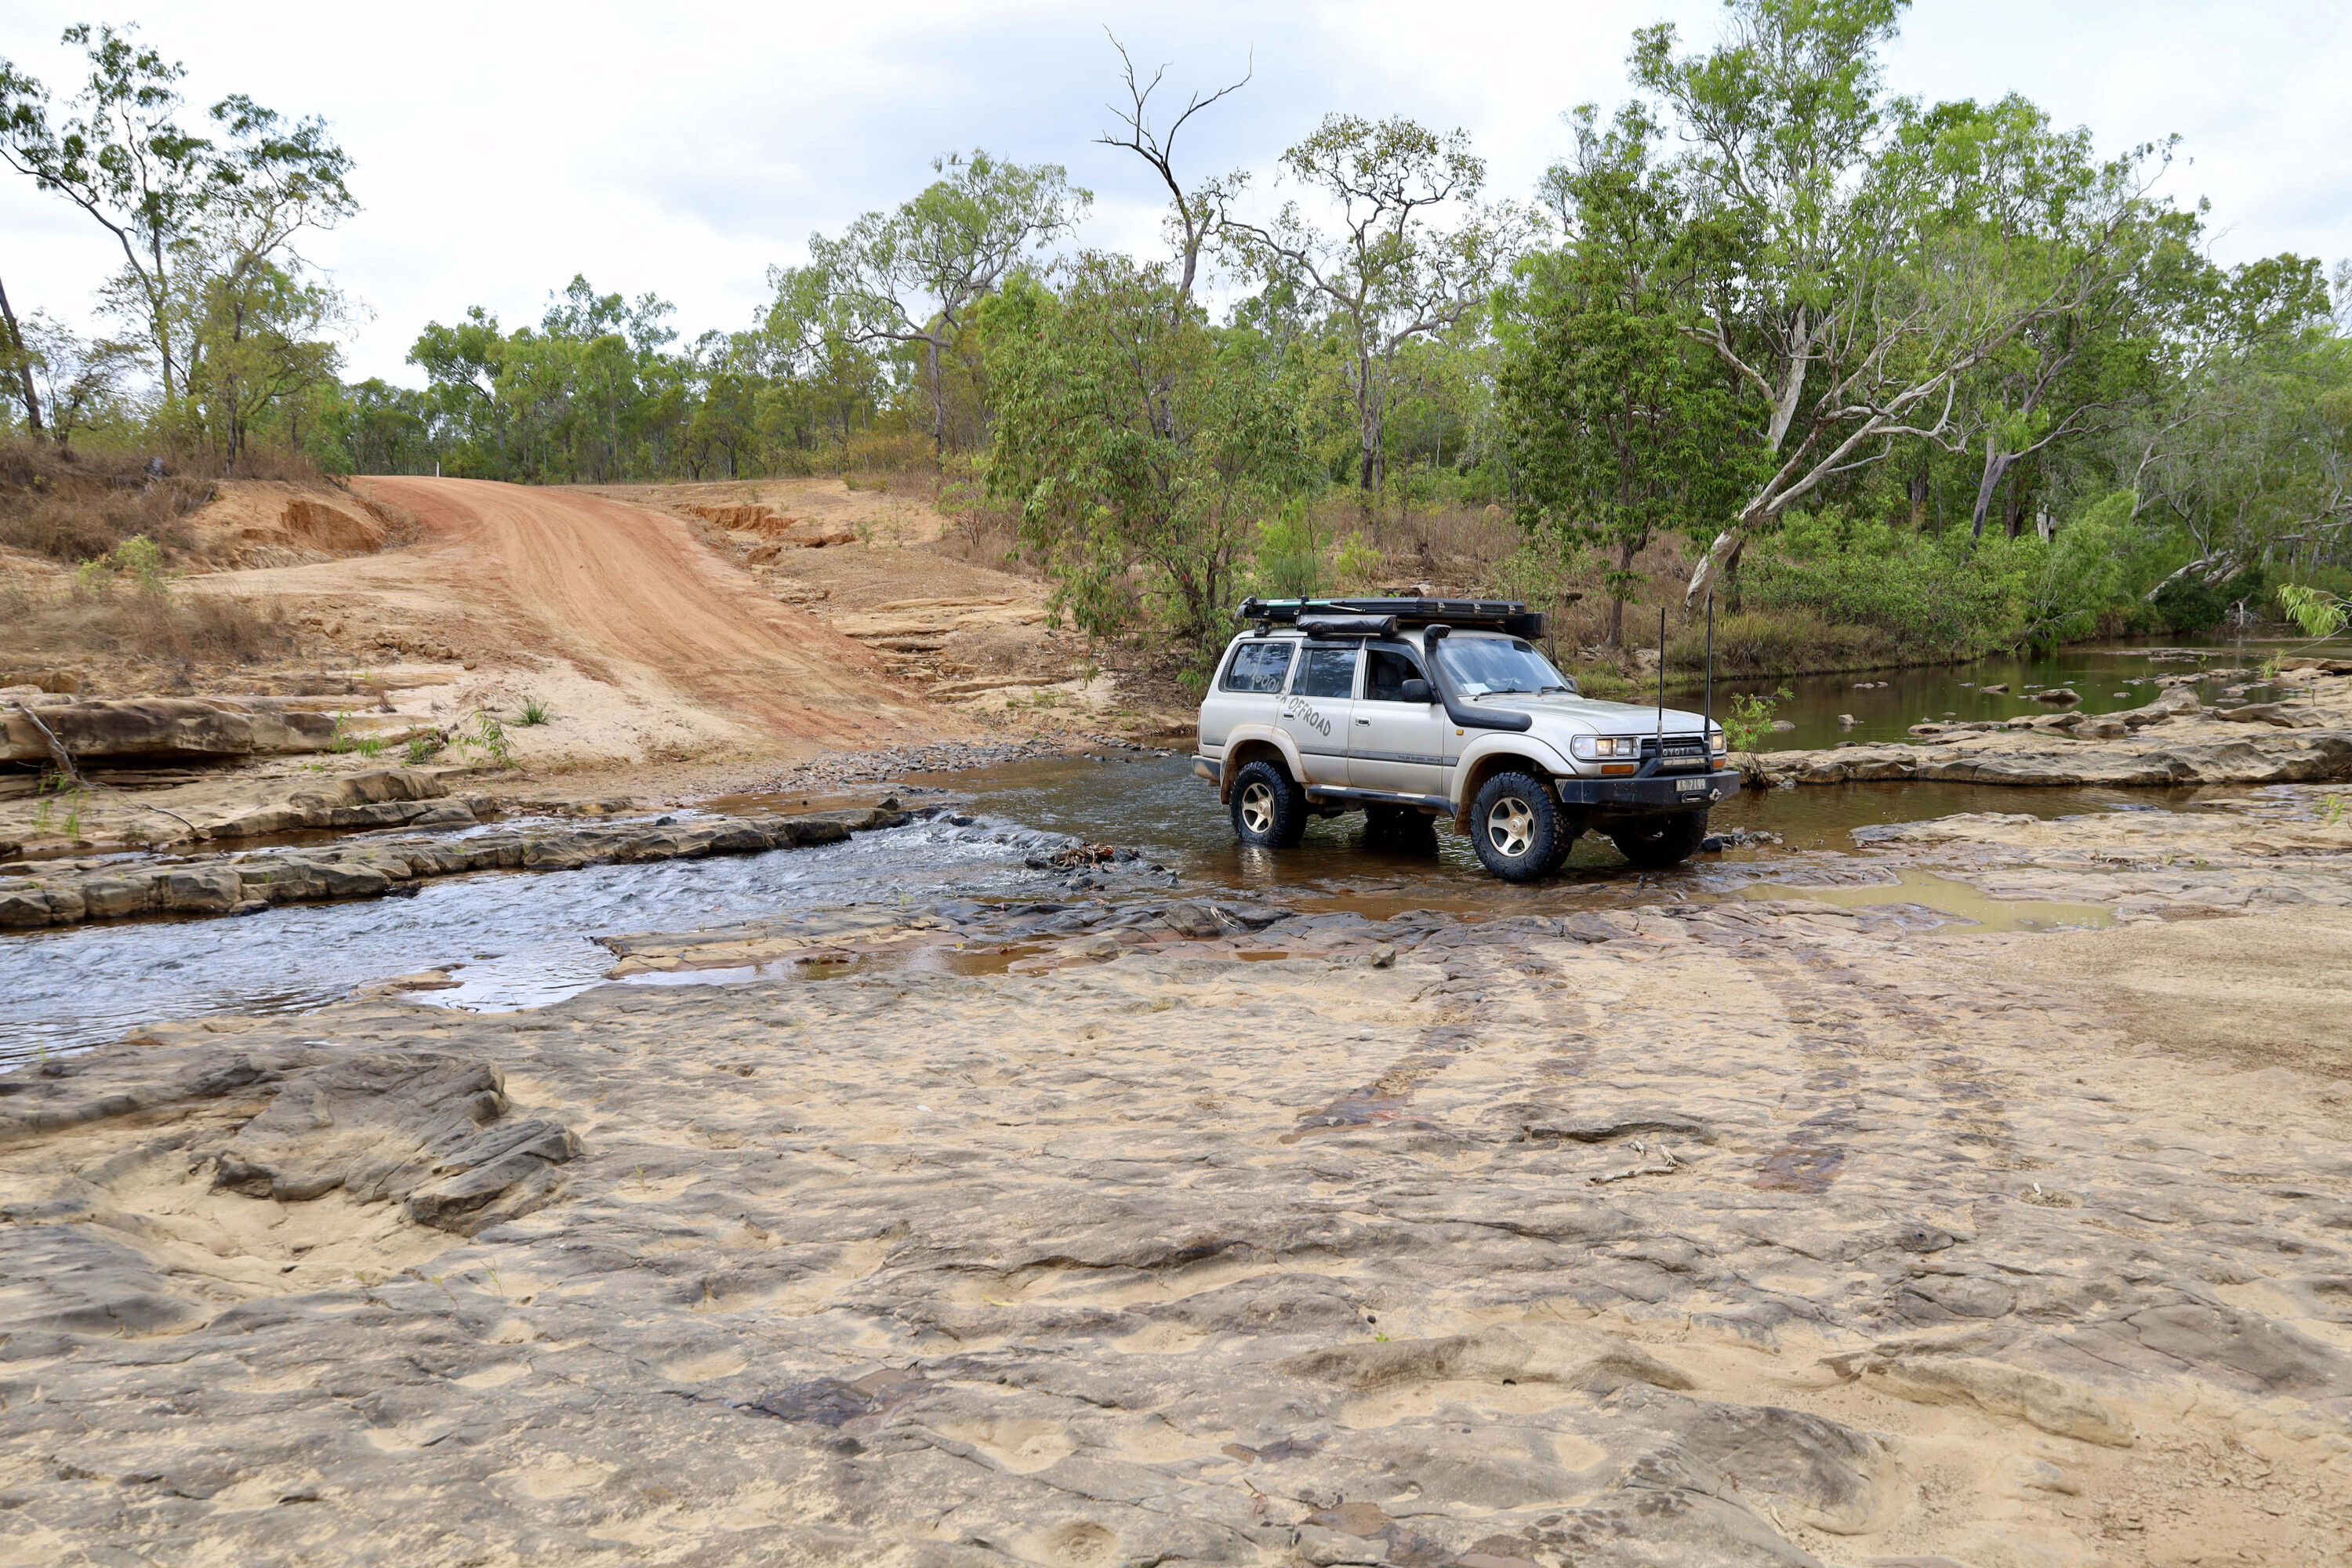
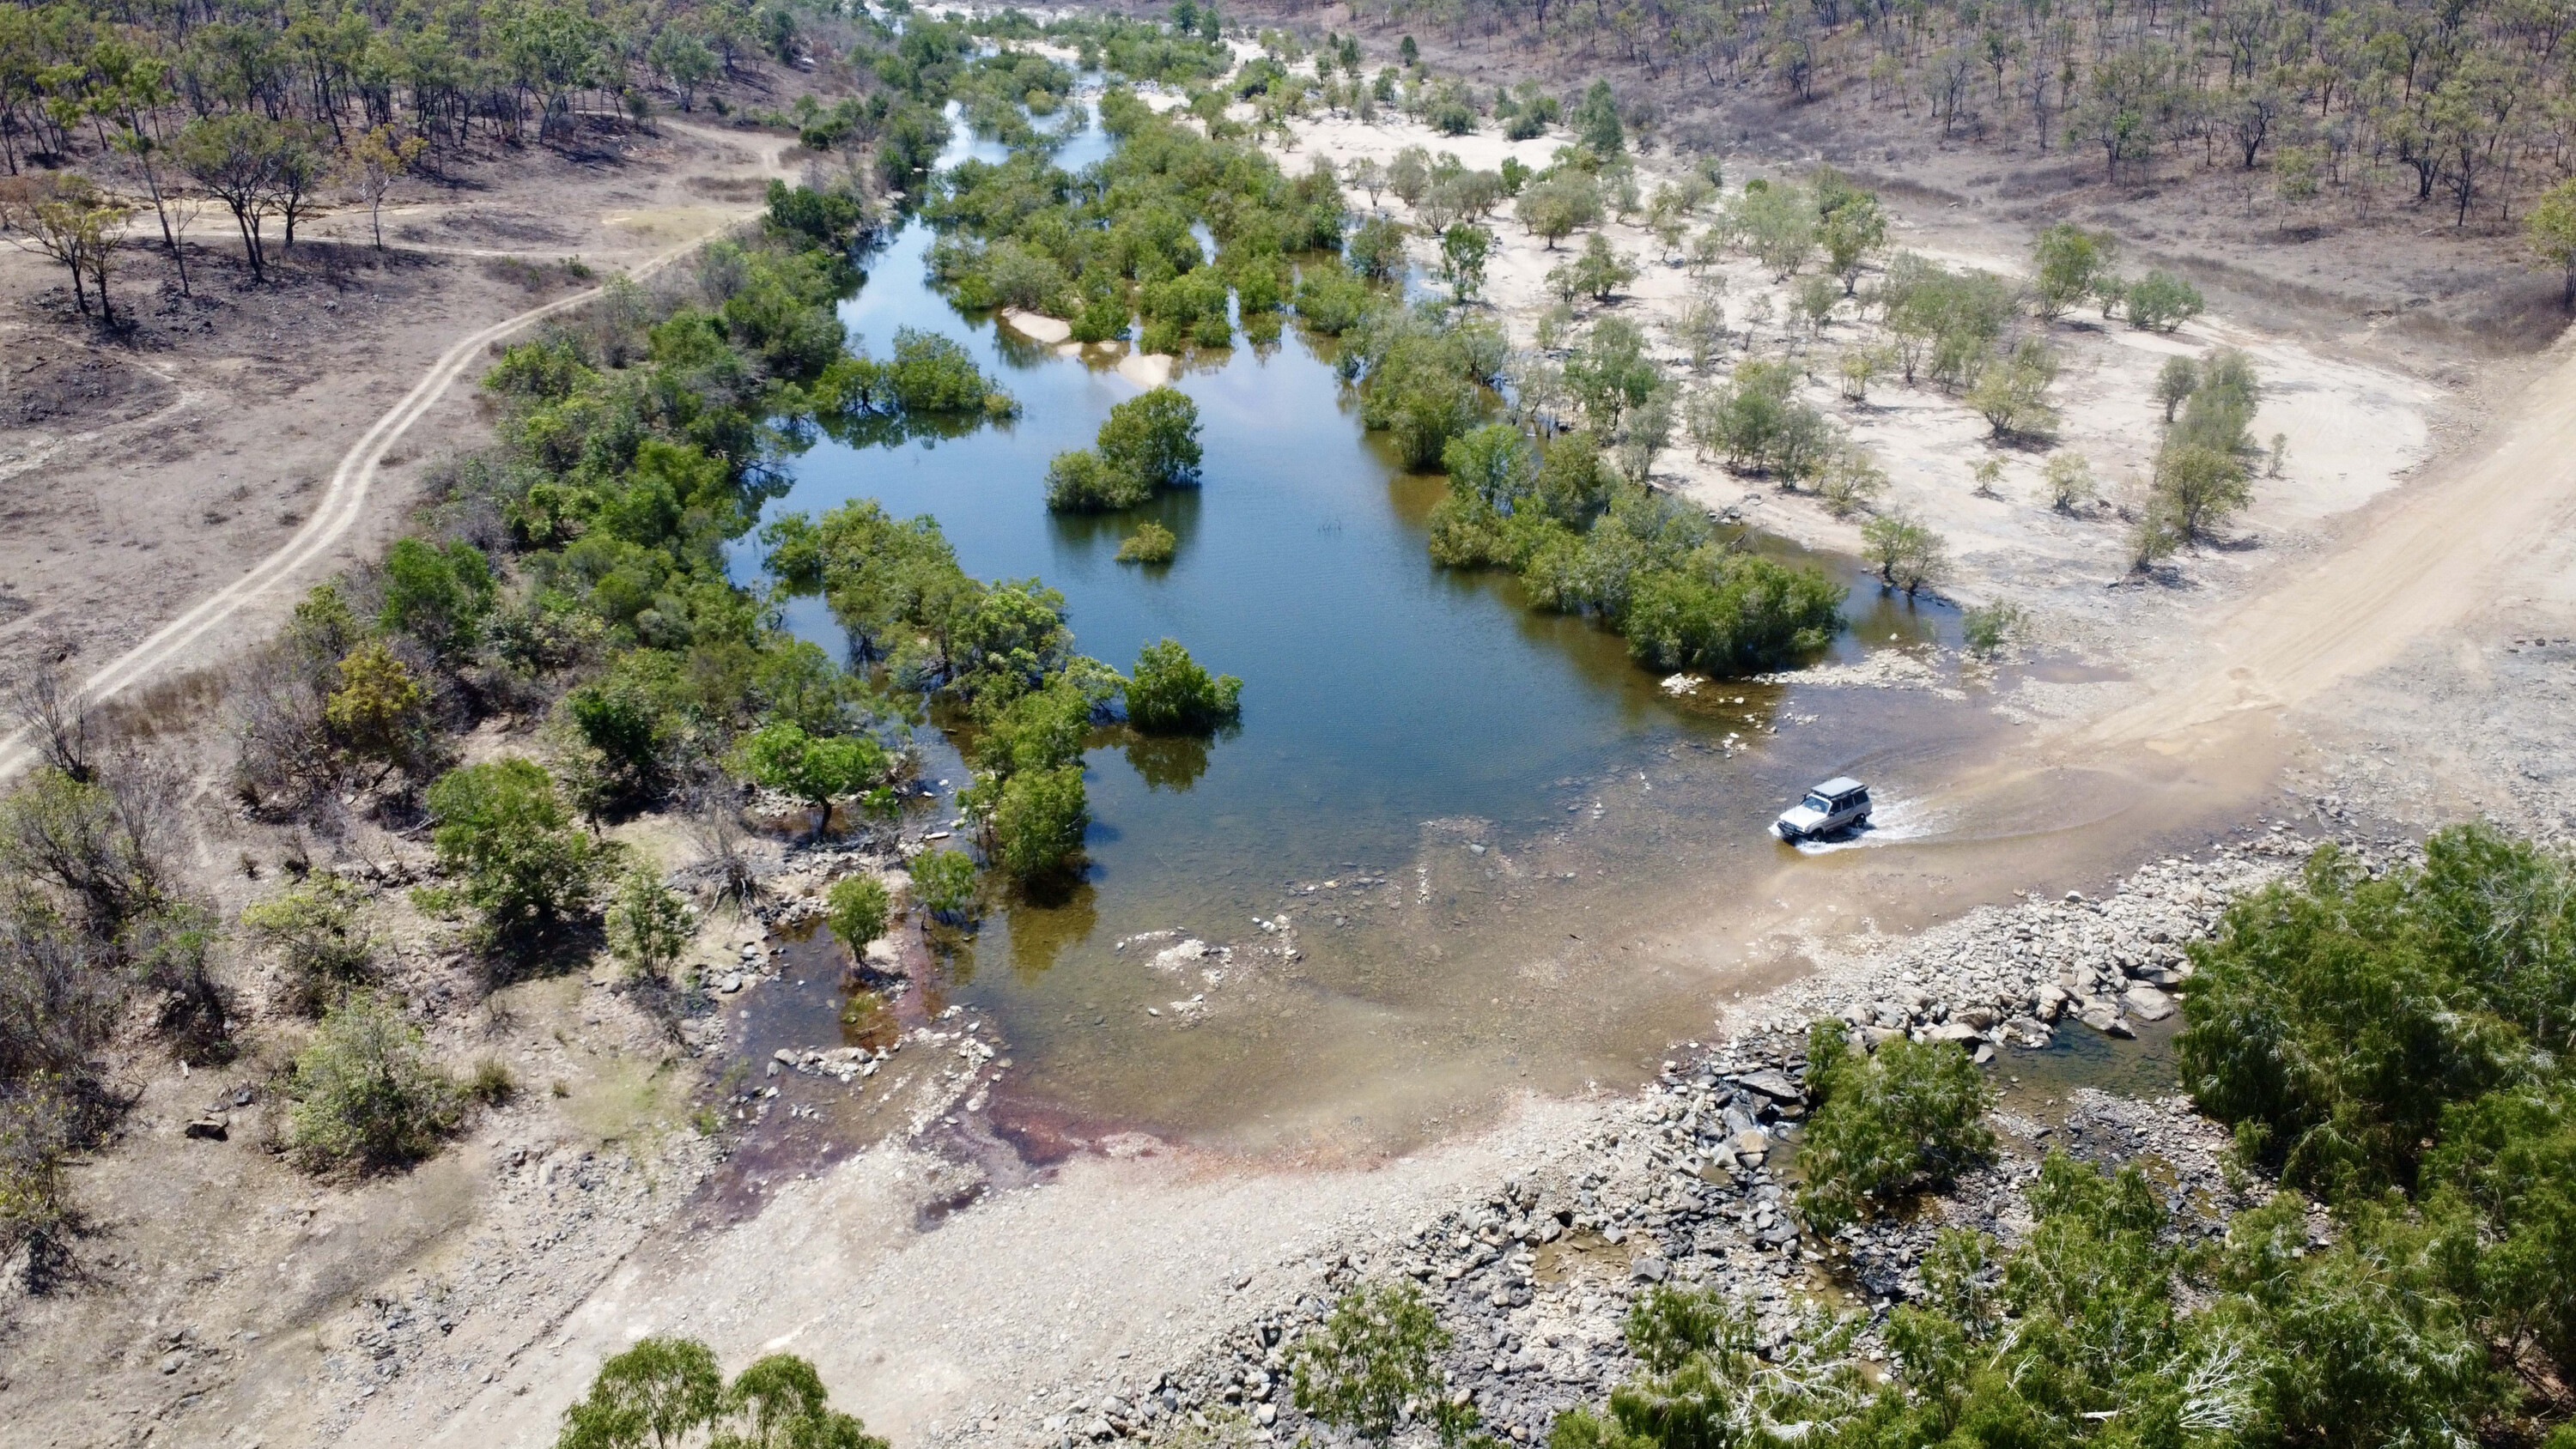
Right from the start, the Old Coach Road was challenging, with steep drop-offs, rocky sections, ruts that criss-crossed the road, and rocks strewn everywhere.
It took me nearly eight hours to cover 90km, and sections of the road were barely wider than my LandCruiser, and often with a steep drop on one side and high cliffs on the other. Despite visiting in the dry season, there was still water in the Palmer and Old Palmer rivers, which made for a nice break in the drive, while panoramic views from high points along the way offered a glimpse into how hard and inhospitable this land is.
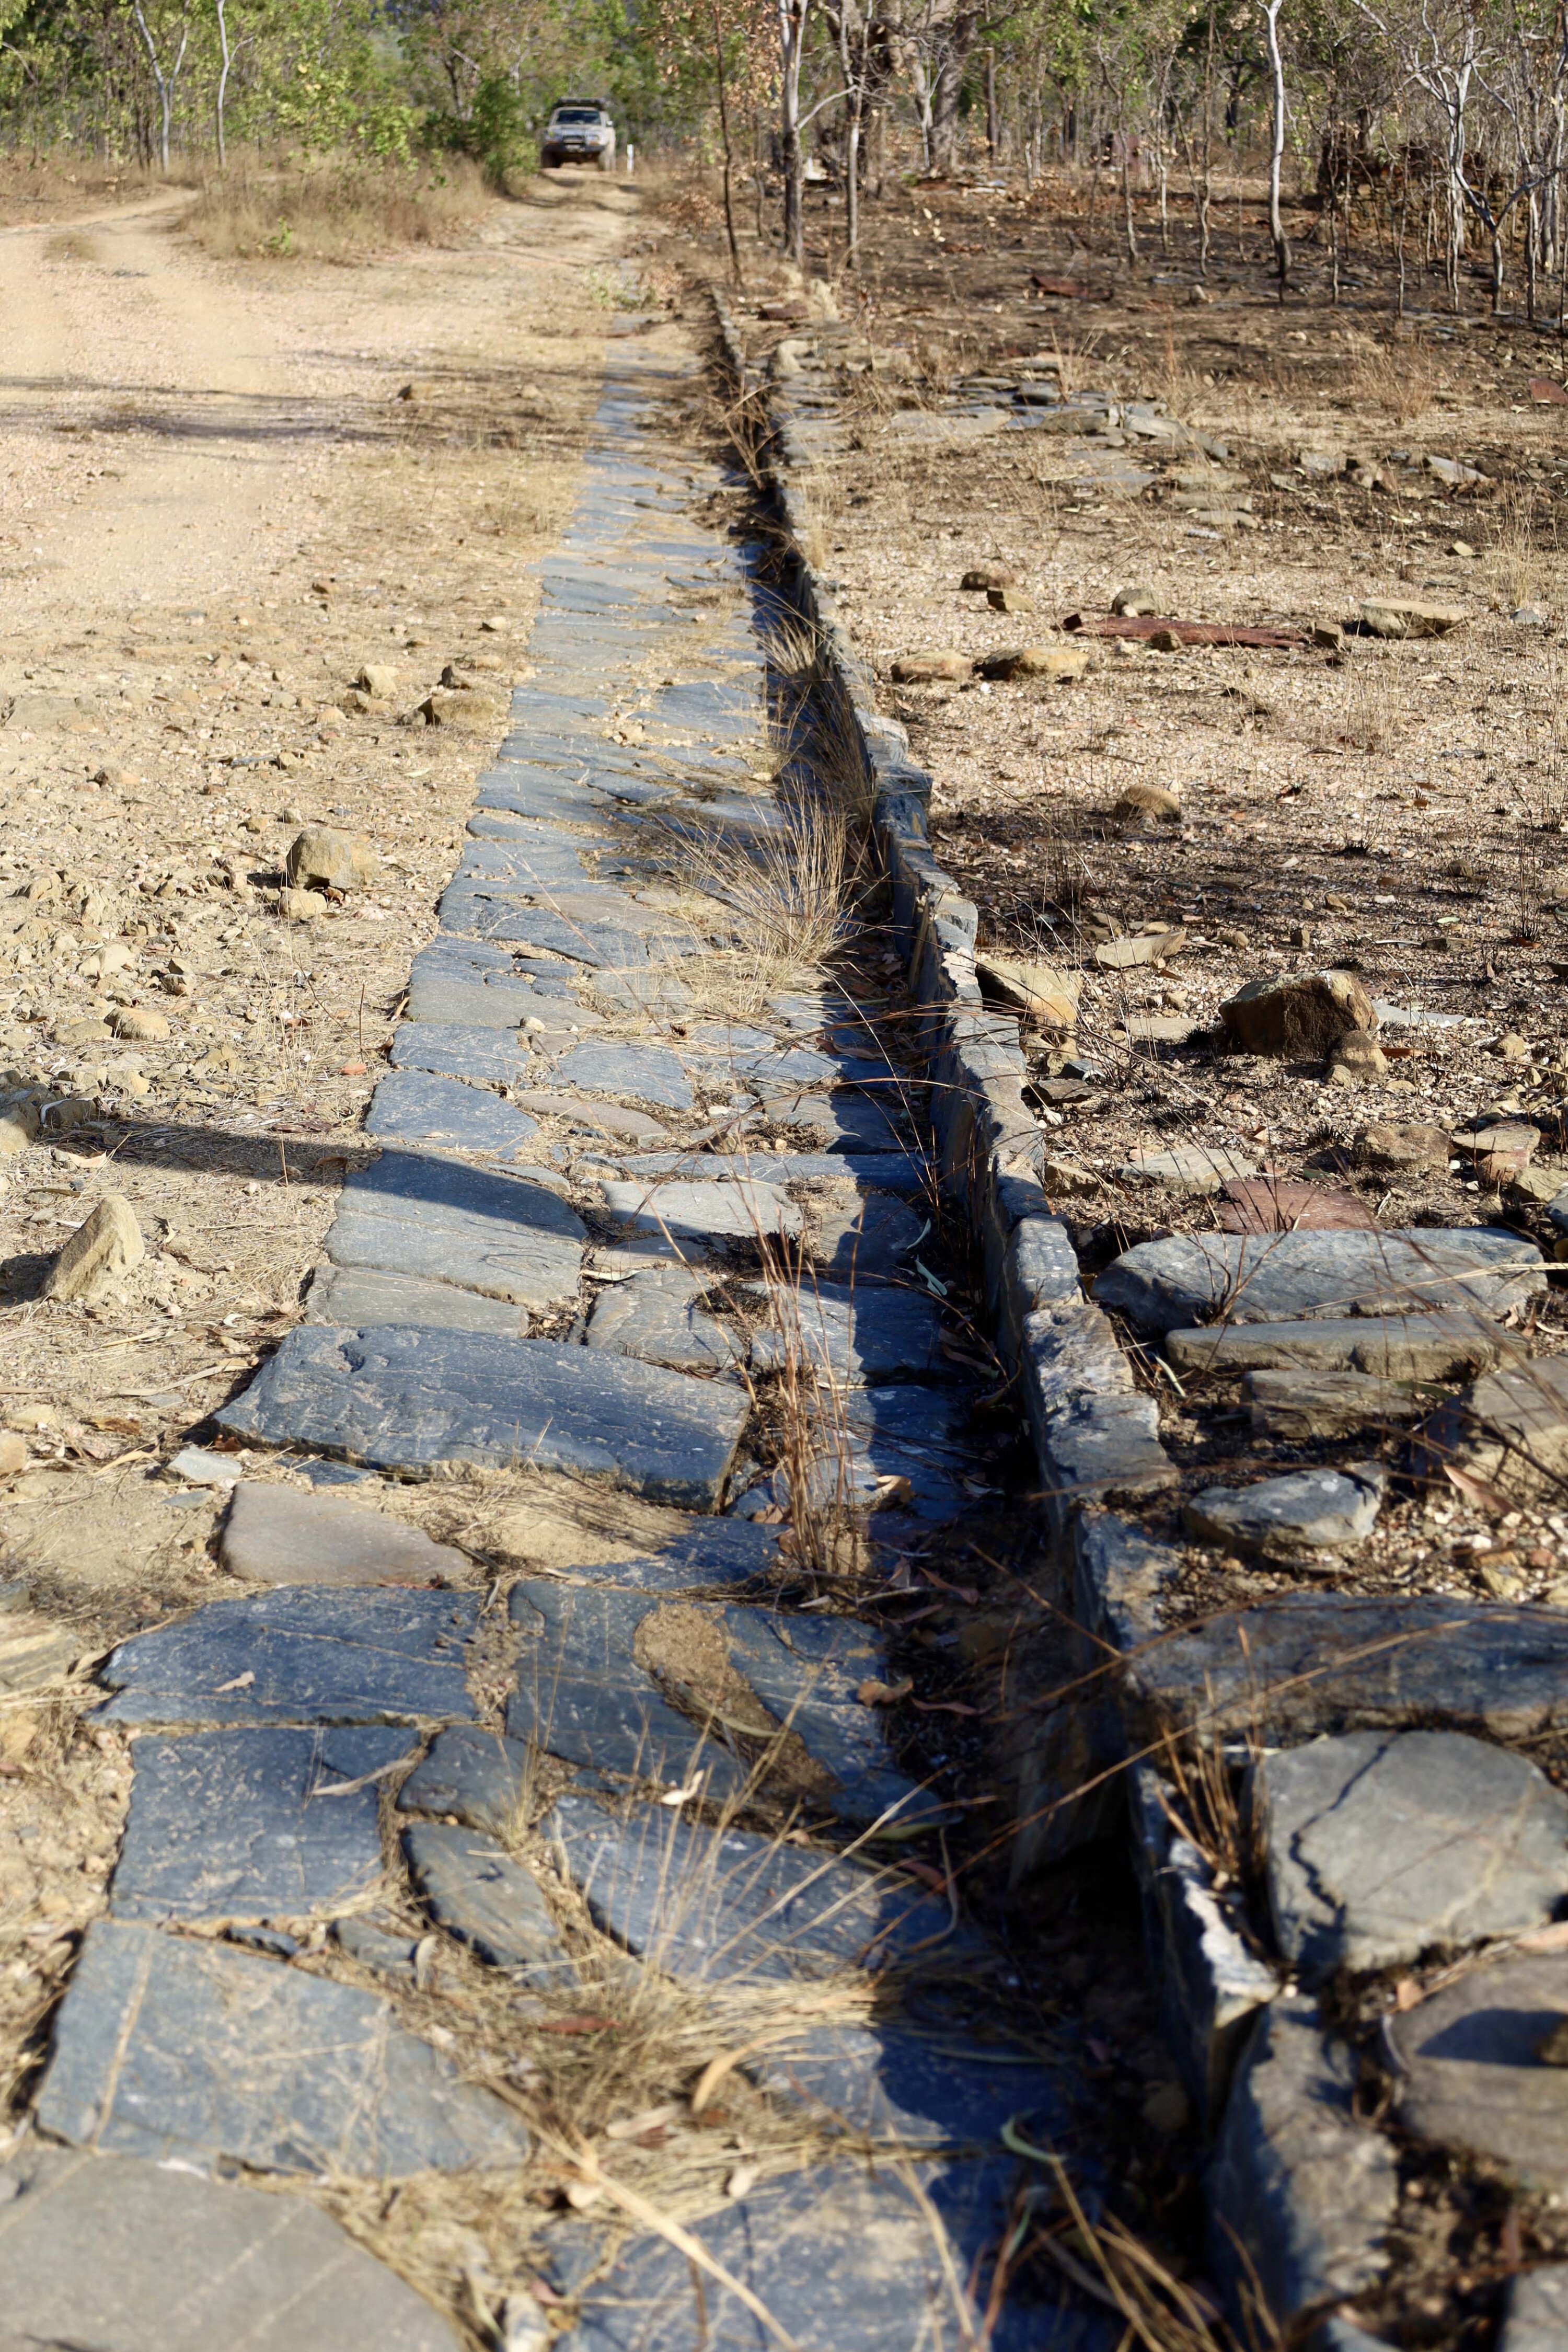
Maytown is today littered with an array of historical ruins including stone walls and rusted and weathered pieces of metal, but one of the main attractions is the cobblestone kerbs and walkways that can still be found, and were made mainly from local slate.
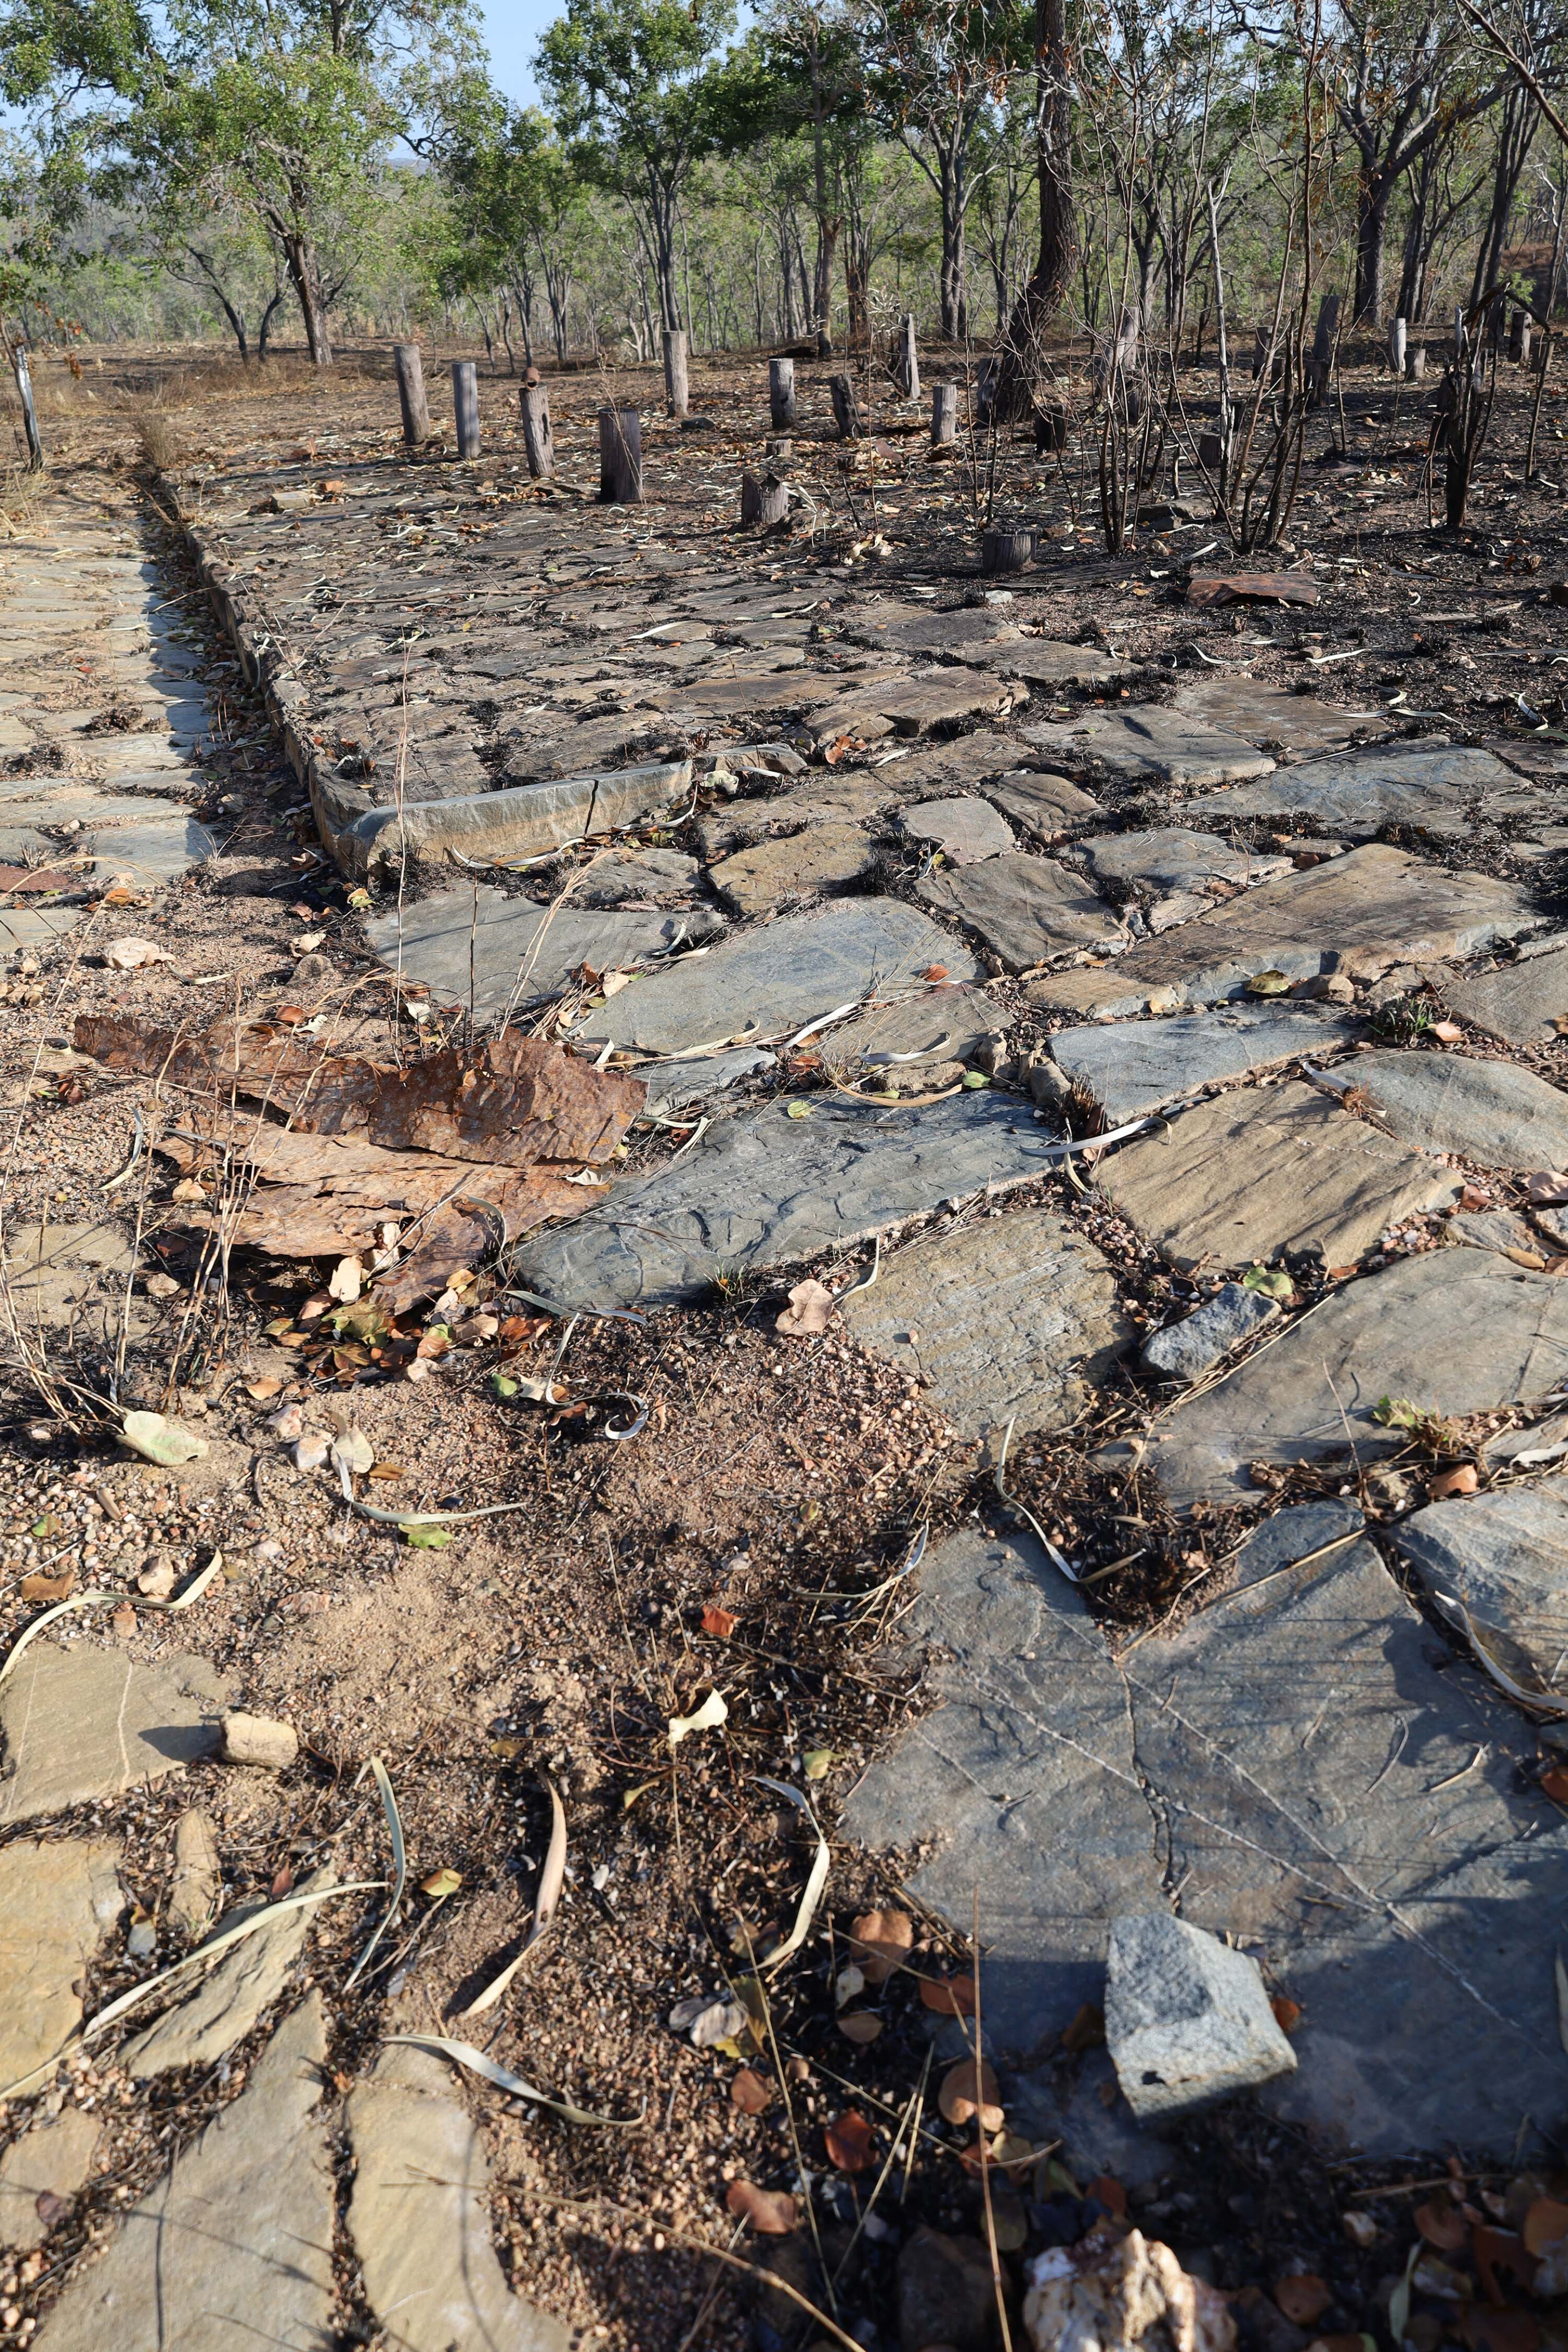
1
The integrity of the laid rock is impressive all along the main street and some of the old shops have the same stonework right up to where there doorways would have been.
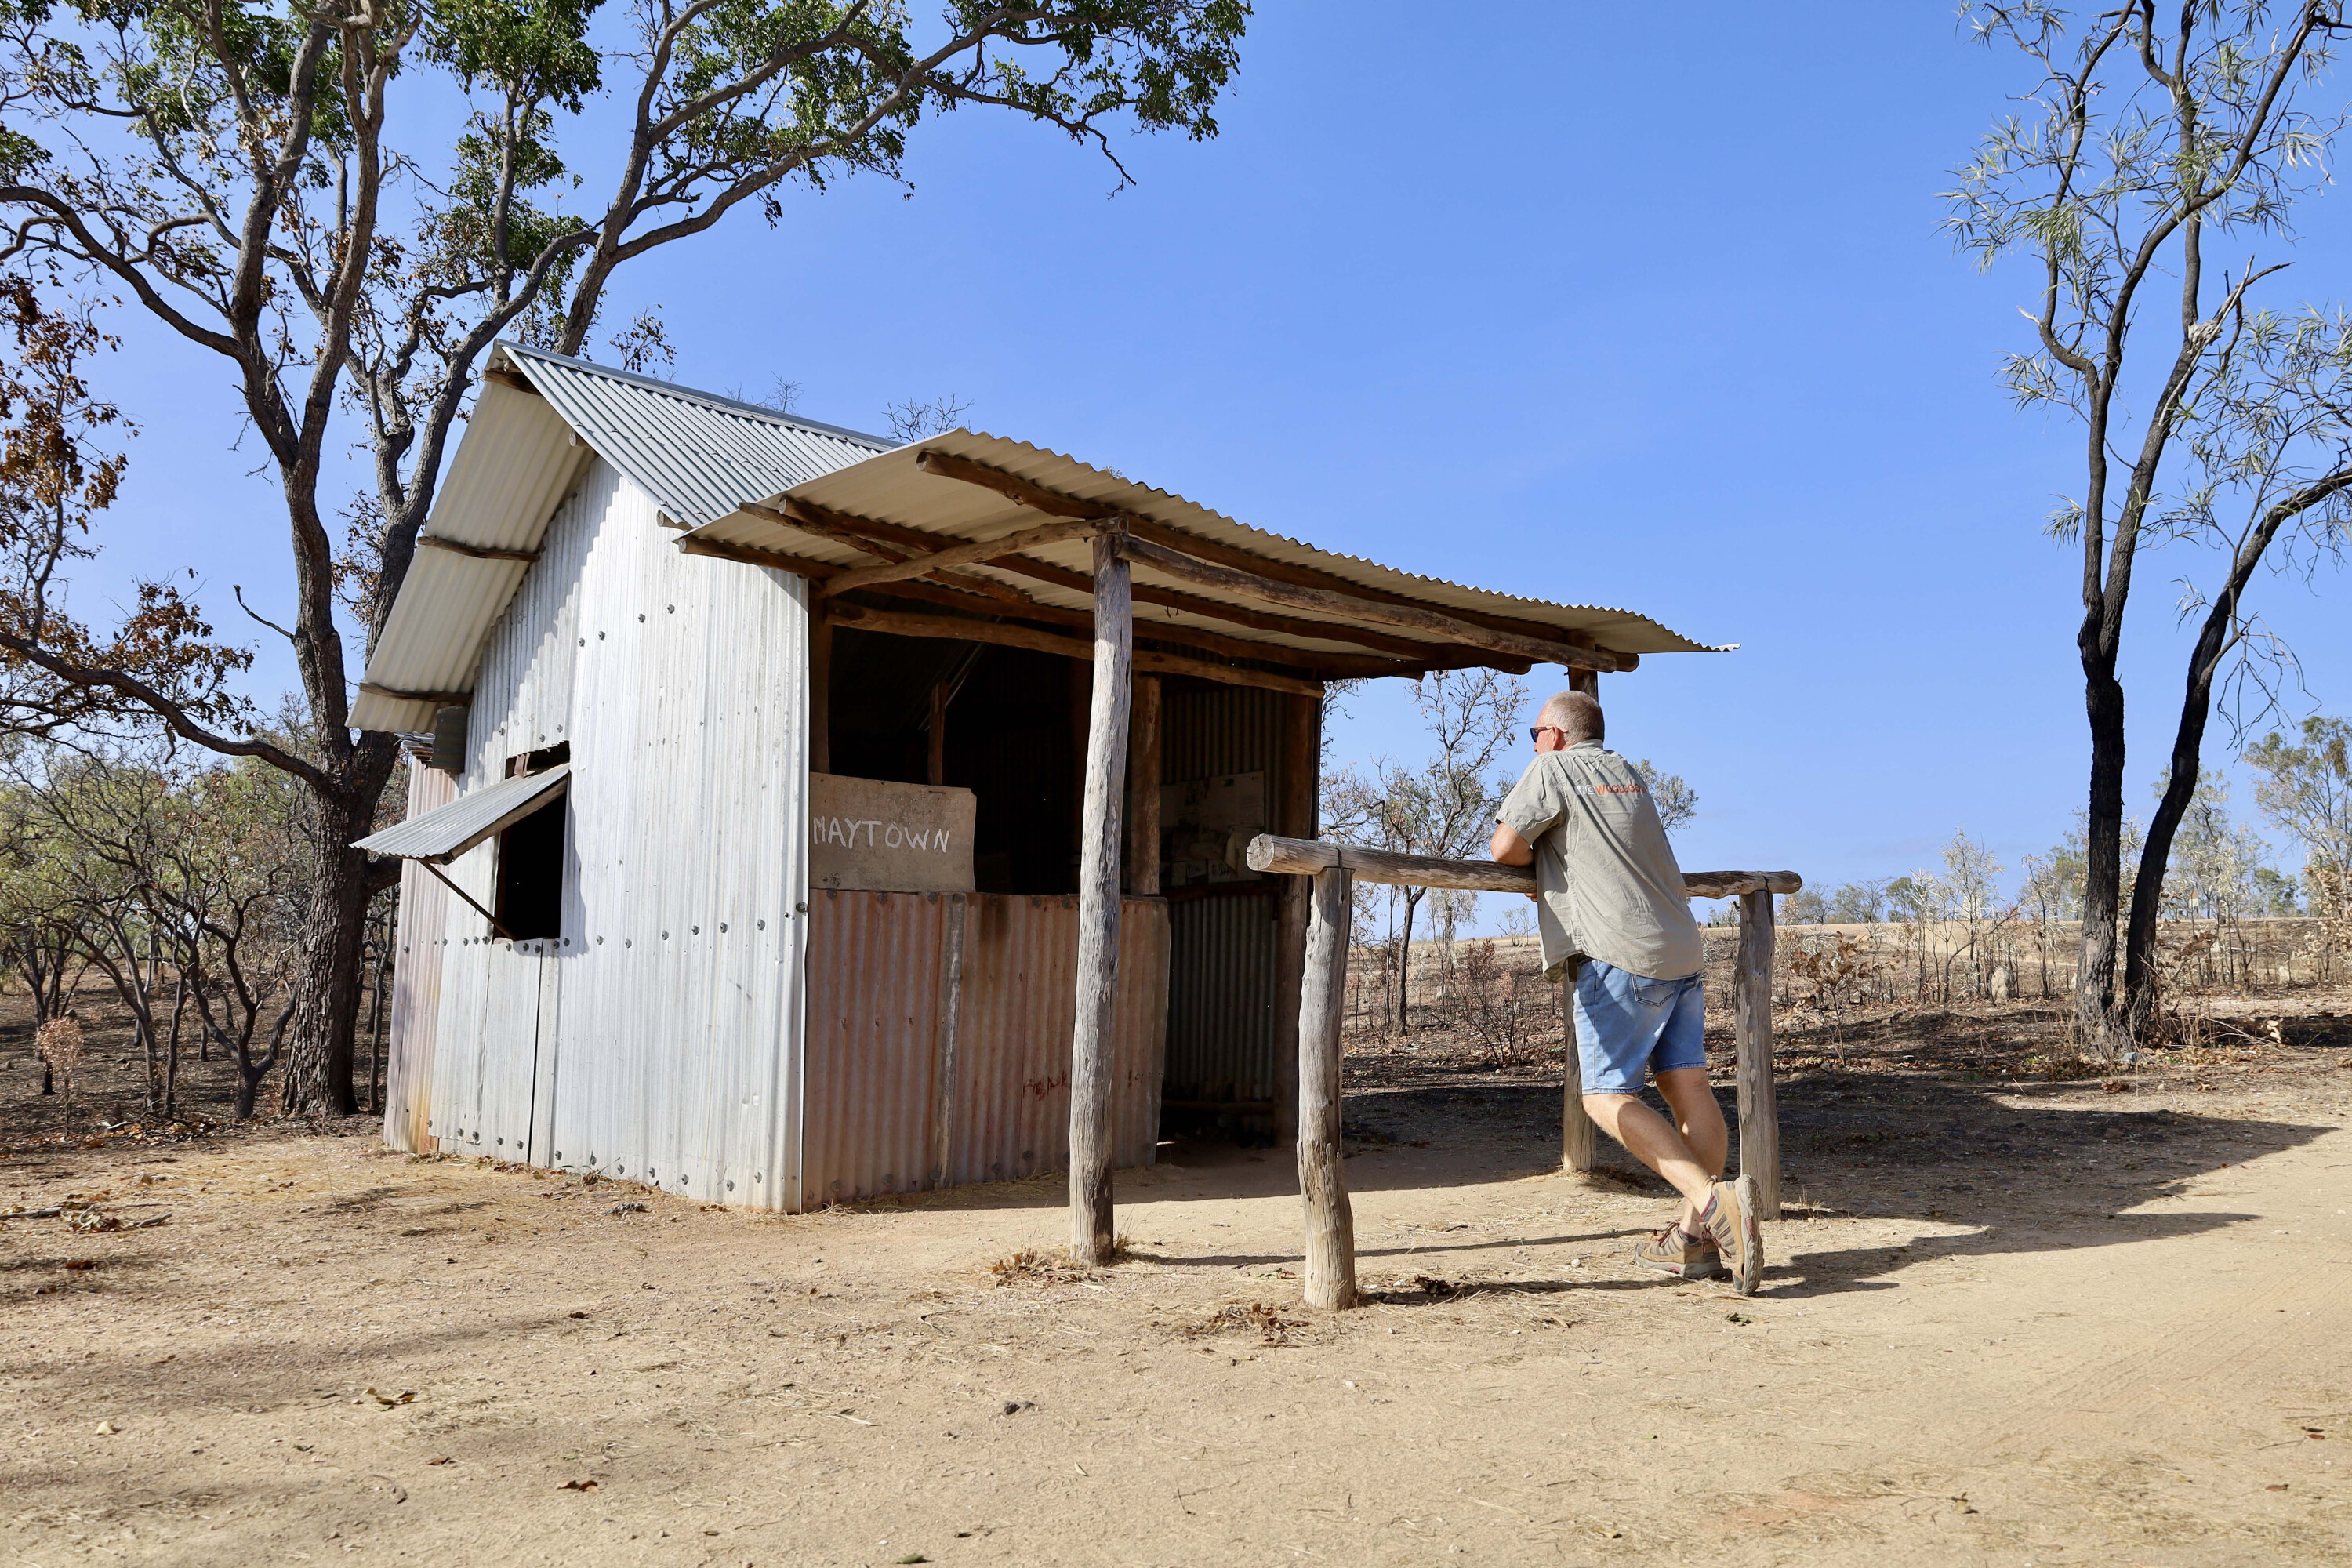
It was good to see plaques indicating the names of shop owners and their type of businesses, and nearby a replica miner’s hut has been built, and it is full of relics and memorabilia from the area.
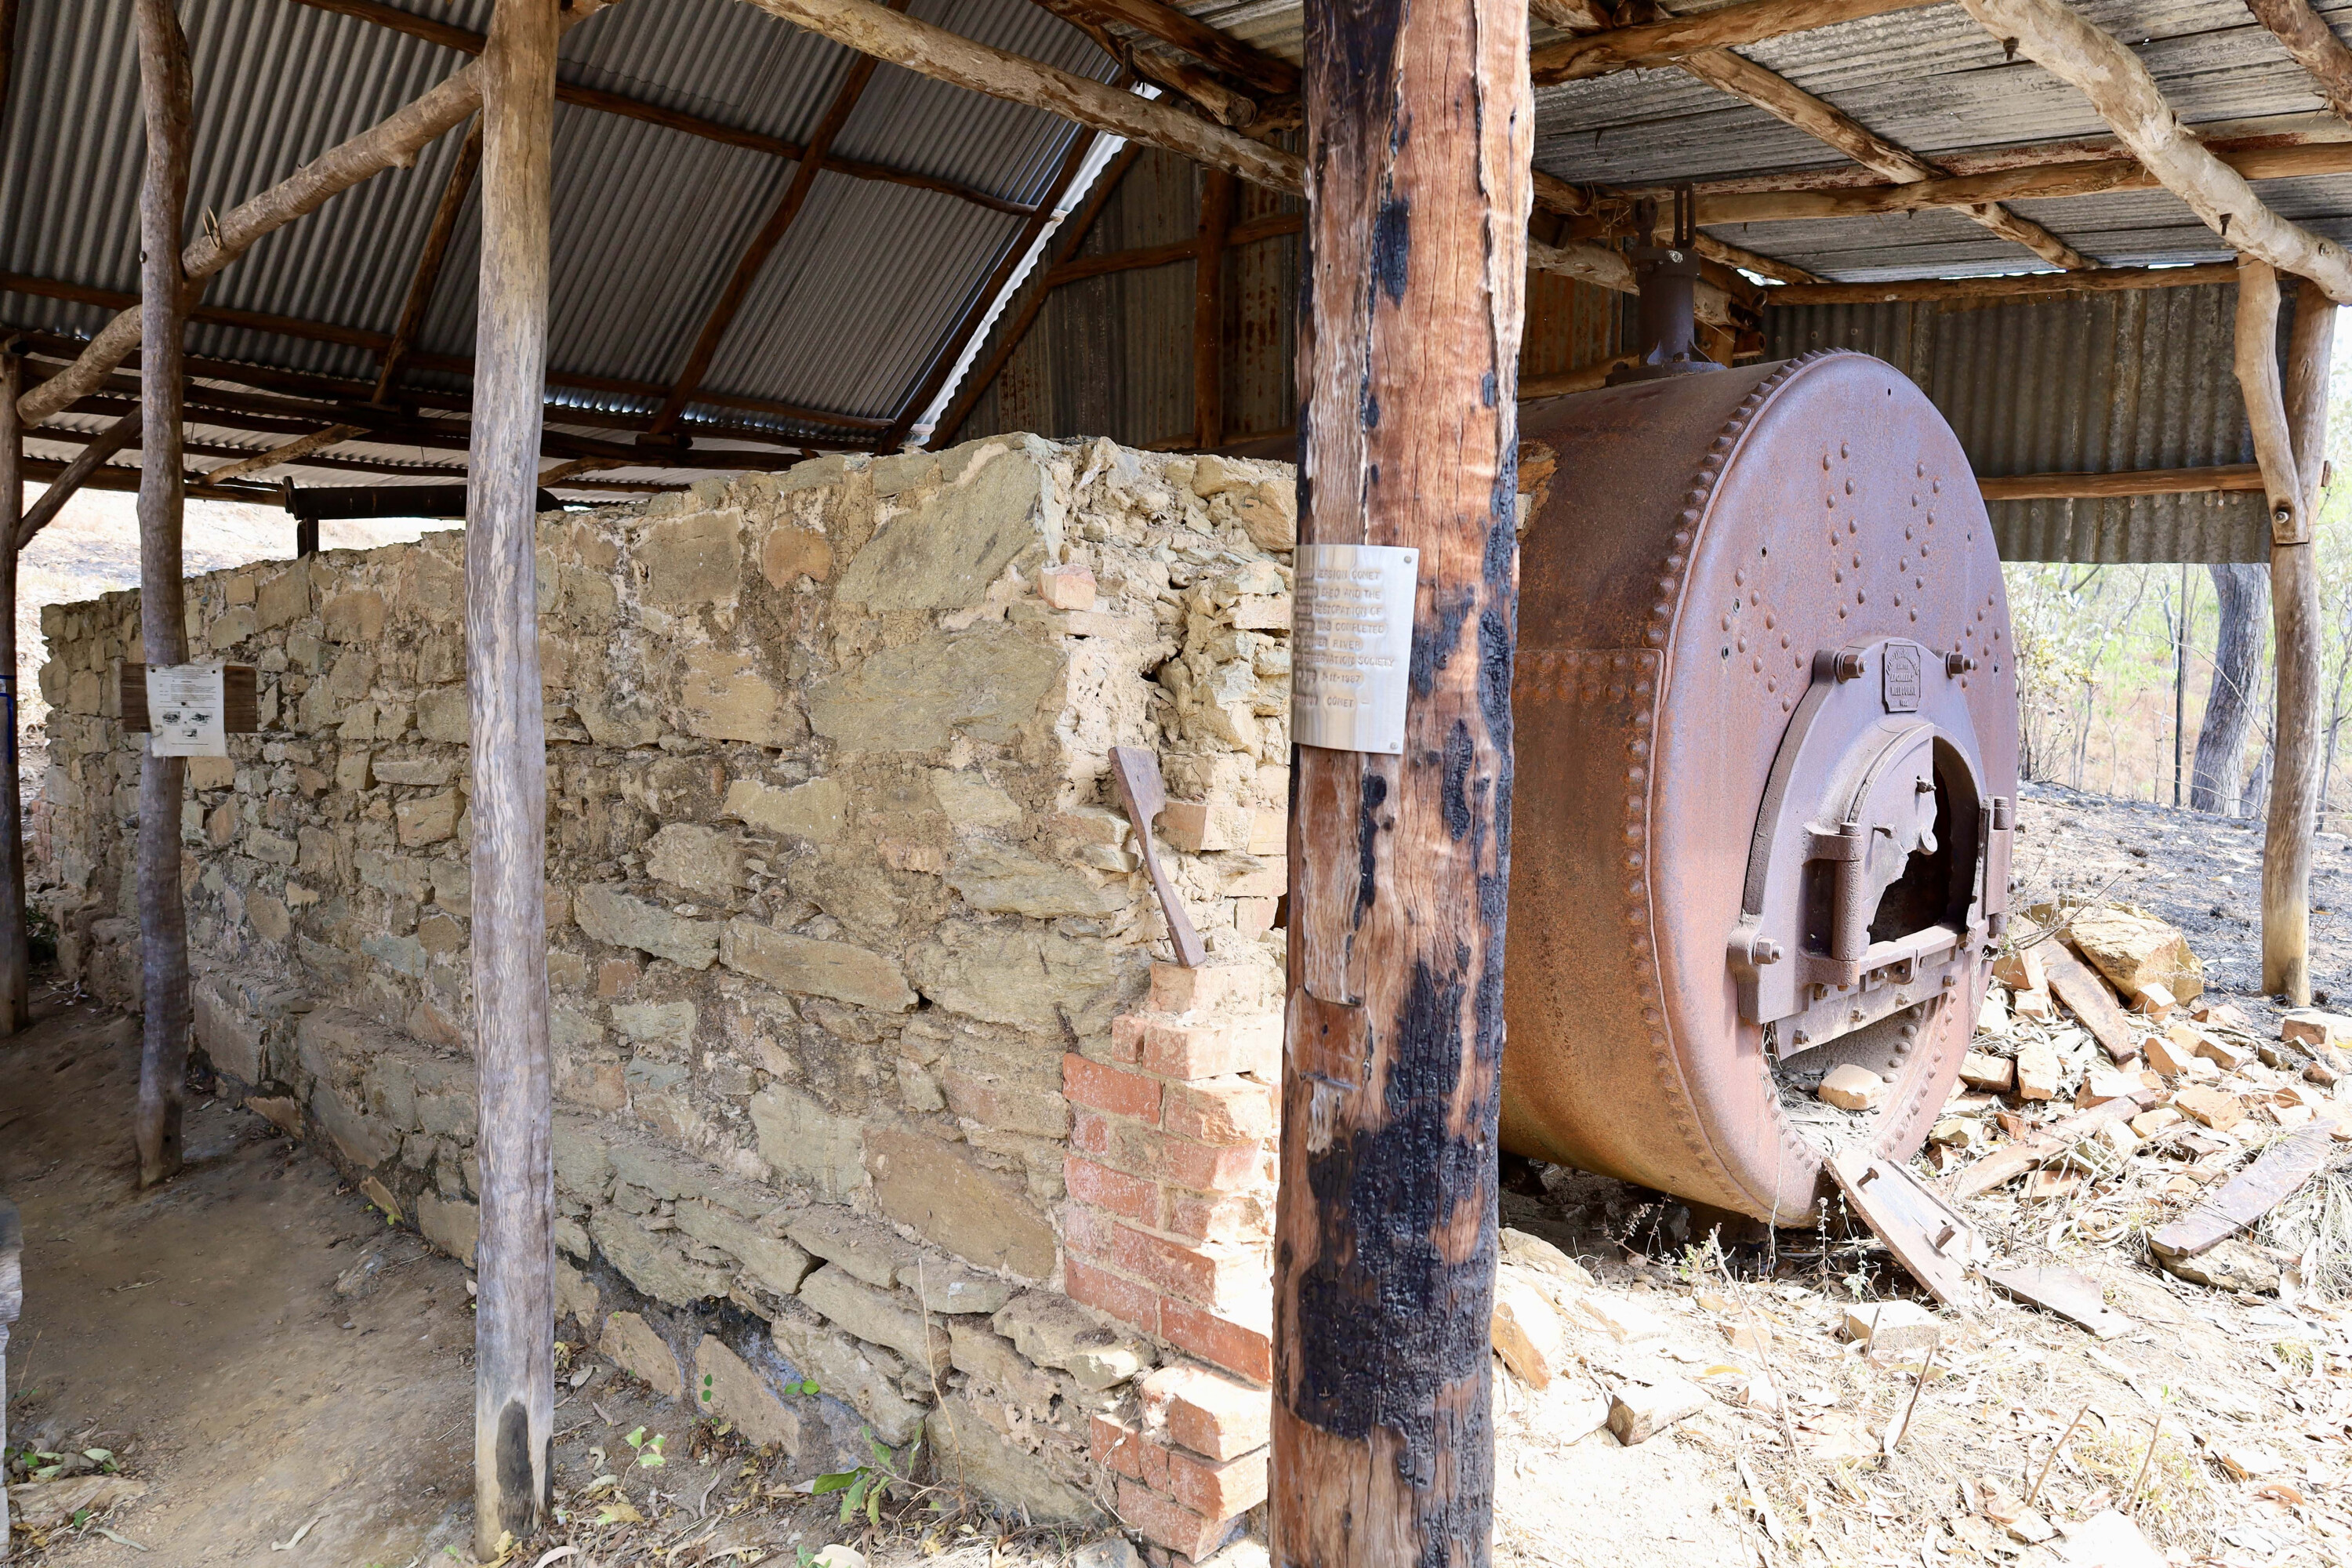
I spent the day exploring the old mine sites where stampers, boilers and massive pieces of broken steel lay on the ground. Deep mines that were once a hive of activity now lay abandoned, and are fenced off, while information signs describe how hard mining life was due to the isolation and the lack of water.
1
One of the most significant sites was the Comet Mill and mine; part of the National Estate Register this site has been persevered for the future as it’s one of the largest intact original collections of 19th century mining equipment.
The Comet was huge for its day with a massive boiler and a 10-head stamper with 25hp engines. Unfortunately, water was an issue again, with none of it available during the dry season but too much of it during the wet season, resulting in flooding.
Walking around I was amazed to see a lot of equipment stamped with ‘Made in Melbourne 1882’, making my trip here seem comparatively easy driving a modern vehicle.
1
After spending a few days exploring Maytown, camping on the beautiful Palmer River and tackling the Old Coach Road, it was time to head south.
Crossing the river it’s a good 80km drive back out towards the Palmer River Roadhouse along Whites Creek Road and to civilisation.
Like any book that describes conflicts, exploration and riches from days long gone, there might be a little fiction mixed in with the facts regarding the history of Maytown, but one thing is for sure, this is a fabulous place to visit for anyone interested in taking a journey to into our colonial past.
1
Where’s Maytown?
Maytown and the Palmer River Goldfields are in Cape York in far north Queensland.
Once known as the largest and richest goldfields in Australia, it’s now a remote, deserted and isolated region where a capable 4×4 is necessary to get around. Nearly 600km north of Cairns, there is plenty to see and do for the avid adventurer, gold hunter and historian.
1
What to see, do and expect
This harsh region used to make or break good men, but today it’s a go to area in Cape York for gold hunters seeking riches.
The Old Coach Road on the northern side of Maytown is a four-wheel driver’s dream; it takes a full day to complete the 80km drive. You’ll need a good two to three days in here to wander around the old town, find the mills and stampers, and to enjoy the serenity at the camps on the Palmer River.
There are no services once you leave Laura, so you must be well equipped and supplied.
1
Other facts
This is a very remote part of Cape York and the Old Coach Road is regarded a difficult track.
A high-clearance vehicle is needed and towing a trailer would be tough on the track from Maytown to Laura due to steep angles, narrow cuttings and big ruts.
You will need a decent map of Cape York or a good GPS. Most tracks and points of interest are marked along the way. The old Maytown town site is a great place to spend a few hours wandering around looking at relics.
The best time of the year to go is in the cooler months after the wet season has passed.