Quick quiz: What do electric vehicles, hybrid vehicles, plug-in hybrids, mild hybrids and even some mobility scooters have in common? Some sort of electric motor, you suggest? Well, yes, you’re half right, but the correct answer is an electric motor/generator unit.
So just what is an electric motor/generator? Put simply, it’s something that can convert electrical energy to mechanical energy (that’s the motor ‘part’) or alternately, convert mechanical energy to electrical energy (that’s the generator ‘part’). Operating as a motor, it uses electrical energy stored in the battery to produce mechanical energy to propel the vehicle; while as a generator, it can harness the mechanical energy of the vehicle’s momentum to produce electricity, which is then stored back in the battery.
In an EV (or a mobility scooter for that matter) a motor/generator is all you have to power the vehicle. Obviously. All hybrids then combine the motor/generator with an internal-combustion (IC) engine – again, obviously – but vary in the significance of the roles the motor/generator and IC engine play in the vehicle’s operation.
The motor/generator plays the most significant role in a plug-in hybrid, a lesser role in a conventional hybrid (e.g. Toyota Prius) and only a minor role in a so-called mild hybrid like the Land Rover Defender.
Plug-in hybrids, such as Mitsubishi’s Outlander PHEV, have a motor/generator unit that can play a significant role in the vehicle’s operation, simply because the external charging (from the electricity grid or similar) allows it to have a much bigger battery than a conventional hybrid that can only charge its battery via the motor-generator unit. This effectively limits the size of the battery and the overall role the electric side of the powertrain can play in the vehicle’s operation.
In practice, this means a plug-in hybrid has more scope to be used as an electric-only vehicle without relying on the IC engine at all. The EV-only range afforded by a plug-in hybrid can be anything from 50 to 100km, and with reasonable performance. A recently tested Range Rover Sport PHEV had a 70km EV-mode-only range with easy highway driving, although the IC engine (petrol turbo four-cylinder) would automatically kick in under heavier acceleration or hill-climbing loads.
Conventional hybrids also typically have an EV-only mode, but this is generally very limited in speed (below 40km/h or so) and very limited in range (a few kilometres at best). With a conventional hybrid, the IC engine is still the main game, with the electric motor/generator playing an assisting role primarily with acceleration off the mark and at lower speeds, where the electric motor’s strong low-rpm torque serves it well.
With a mild hybrid, such as the Land Rover Defender P400, the electrical side of the powertrain can’t power the vehicle by itself nor contribute a significant part of the available power. With a mild hybrid, the motor/generator is notably much smaller than it is in a conventional hybrid and serves essentially as the IC engine’s starter motor and to charge the battery.
With the Defender, that’s a significant role, as its electrical system not only has to cope with the usual high electrical demands of a modern 4×4 that has electrical operation for near everything, but it also has to power the engine’s electric supercharger (which supplements its turbocharger) and power the electrically assisted steering.
The motor/generator of the Defender mild hybrid still feeds some mechanical energy back into the drivetrain, but only a very quick assistance just to help the initial transition from standing still to moving. With the Defender’s automatic engine stop-start function, the motor/generator is already engaged with the drivetrain at this point, so it’s a seamless interaction to also help get the car rolling.
Hybrids of all types will become a broader part of the automotive landscape as we transition to seemingly inevitable fully electric vehicles, most likely powered by batteries rather than hydrogen fuel cells due to the relative ease of delivery-infrastructure rollout, but plug-in hybrids are the only ones that point towards the future. Conventional hybrids and mild hybrids are just another way to make a more efficient petrol or diesel burner.
Travel restrictions over the past two years have seen folks who wouldn’t normally consider owning a 4×4, buying and equipping four-wheel drive vehicles for domestic travel because international travel was effectively banned. However, border closures within the country have stymied travels at home.
Still, it’s been a good time for the 4×4 accessories industry, stock shortage issues aside, as most of the shops I’ve spoken to have been flat-out during this time fitting out mainly new vehicles.
As we roll in to 2022, it’s easier to travel to the USA than it is to Western Australia, while travel among Australia’s eastern states seems to be a free for all. It has seen a lot of folks out on the roads over the New Year and popular camp spots are filling up fast.

Have you ever considered an overlanding or off-road trip overseas and, if so, where is it you’d want to go? There are some incredible off-road challenges to be had through South-East Asia, endless sand dunes to explore through the Middle East, and an abundance of national parks and natural wonders to explore in the USA.
The USA is a particularly easy one for Aussies, as it’s a single flight from most of our capital cities to Los Angeles, from where you can hit the road and explore for as long as your budget allows.
A few years back, I turned south from LA and headed in to Mexico to explore the Baja Peninsula and it was an epic two-week trip. I wish I had more time there, but after years of watching off-road racing from Baja and reading countless surfing stories from there, I grabbed this opportunity to visit.
The chance was made easier when regular contributor to the magazine, Chris Collard, offered to show me around Baja. Chis has been travelling to Baja for decades and knows the place well, so he was the perfect guide.
After picking me up from LAX, we were across the border in to Mexico and sipping tequila in Ensenada within hours. It was the start of 10 days zigzagging up and down the peninsula, avoiding the sealed roads, chasing race cars, camping on remote beaches and meeting great people.
After being such a great travel companion on this trip, I asked Chris to put together a guide for others thinking about making a similar trip, and you’ll find it in our Jan 2022 issue – in stores January 6.
Speaking of the great people we met on the trip, two of them were Lucky and Cindy and we stayed at their place on the East Cape. Lucky has a Suzuki Samurai (Sierra) which we took for a run down the beach, while Cindy drives a mint CJ7 Jeep which she has owned since new.
The car that wasn’t there when we visited was Lucky’s ex-ambulance Power Wagon and, after he told me about it, I had to see it. A few years on and Chris caught up with Lucky while he was driving it in the USA and photographed it for the Jan 2022 issue.
Great people, amazing places and cool 4x4s – there’s so much to see when you travel by 4×4, whether it’s home or abroad. What’s stopping you
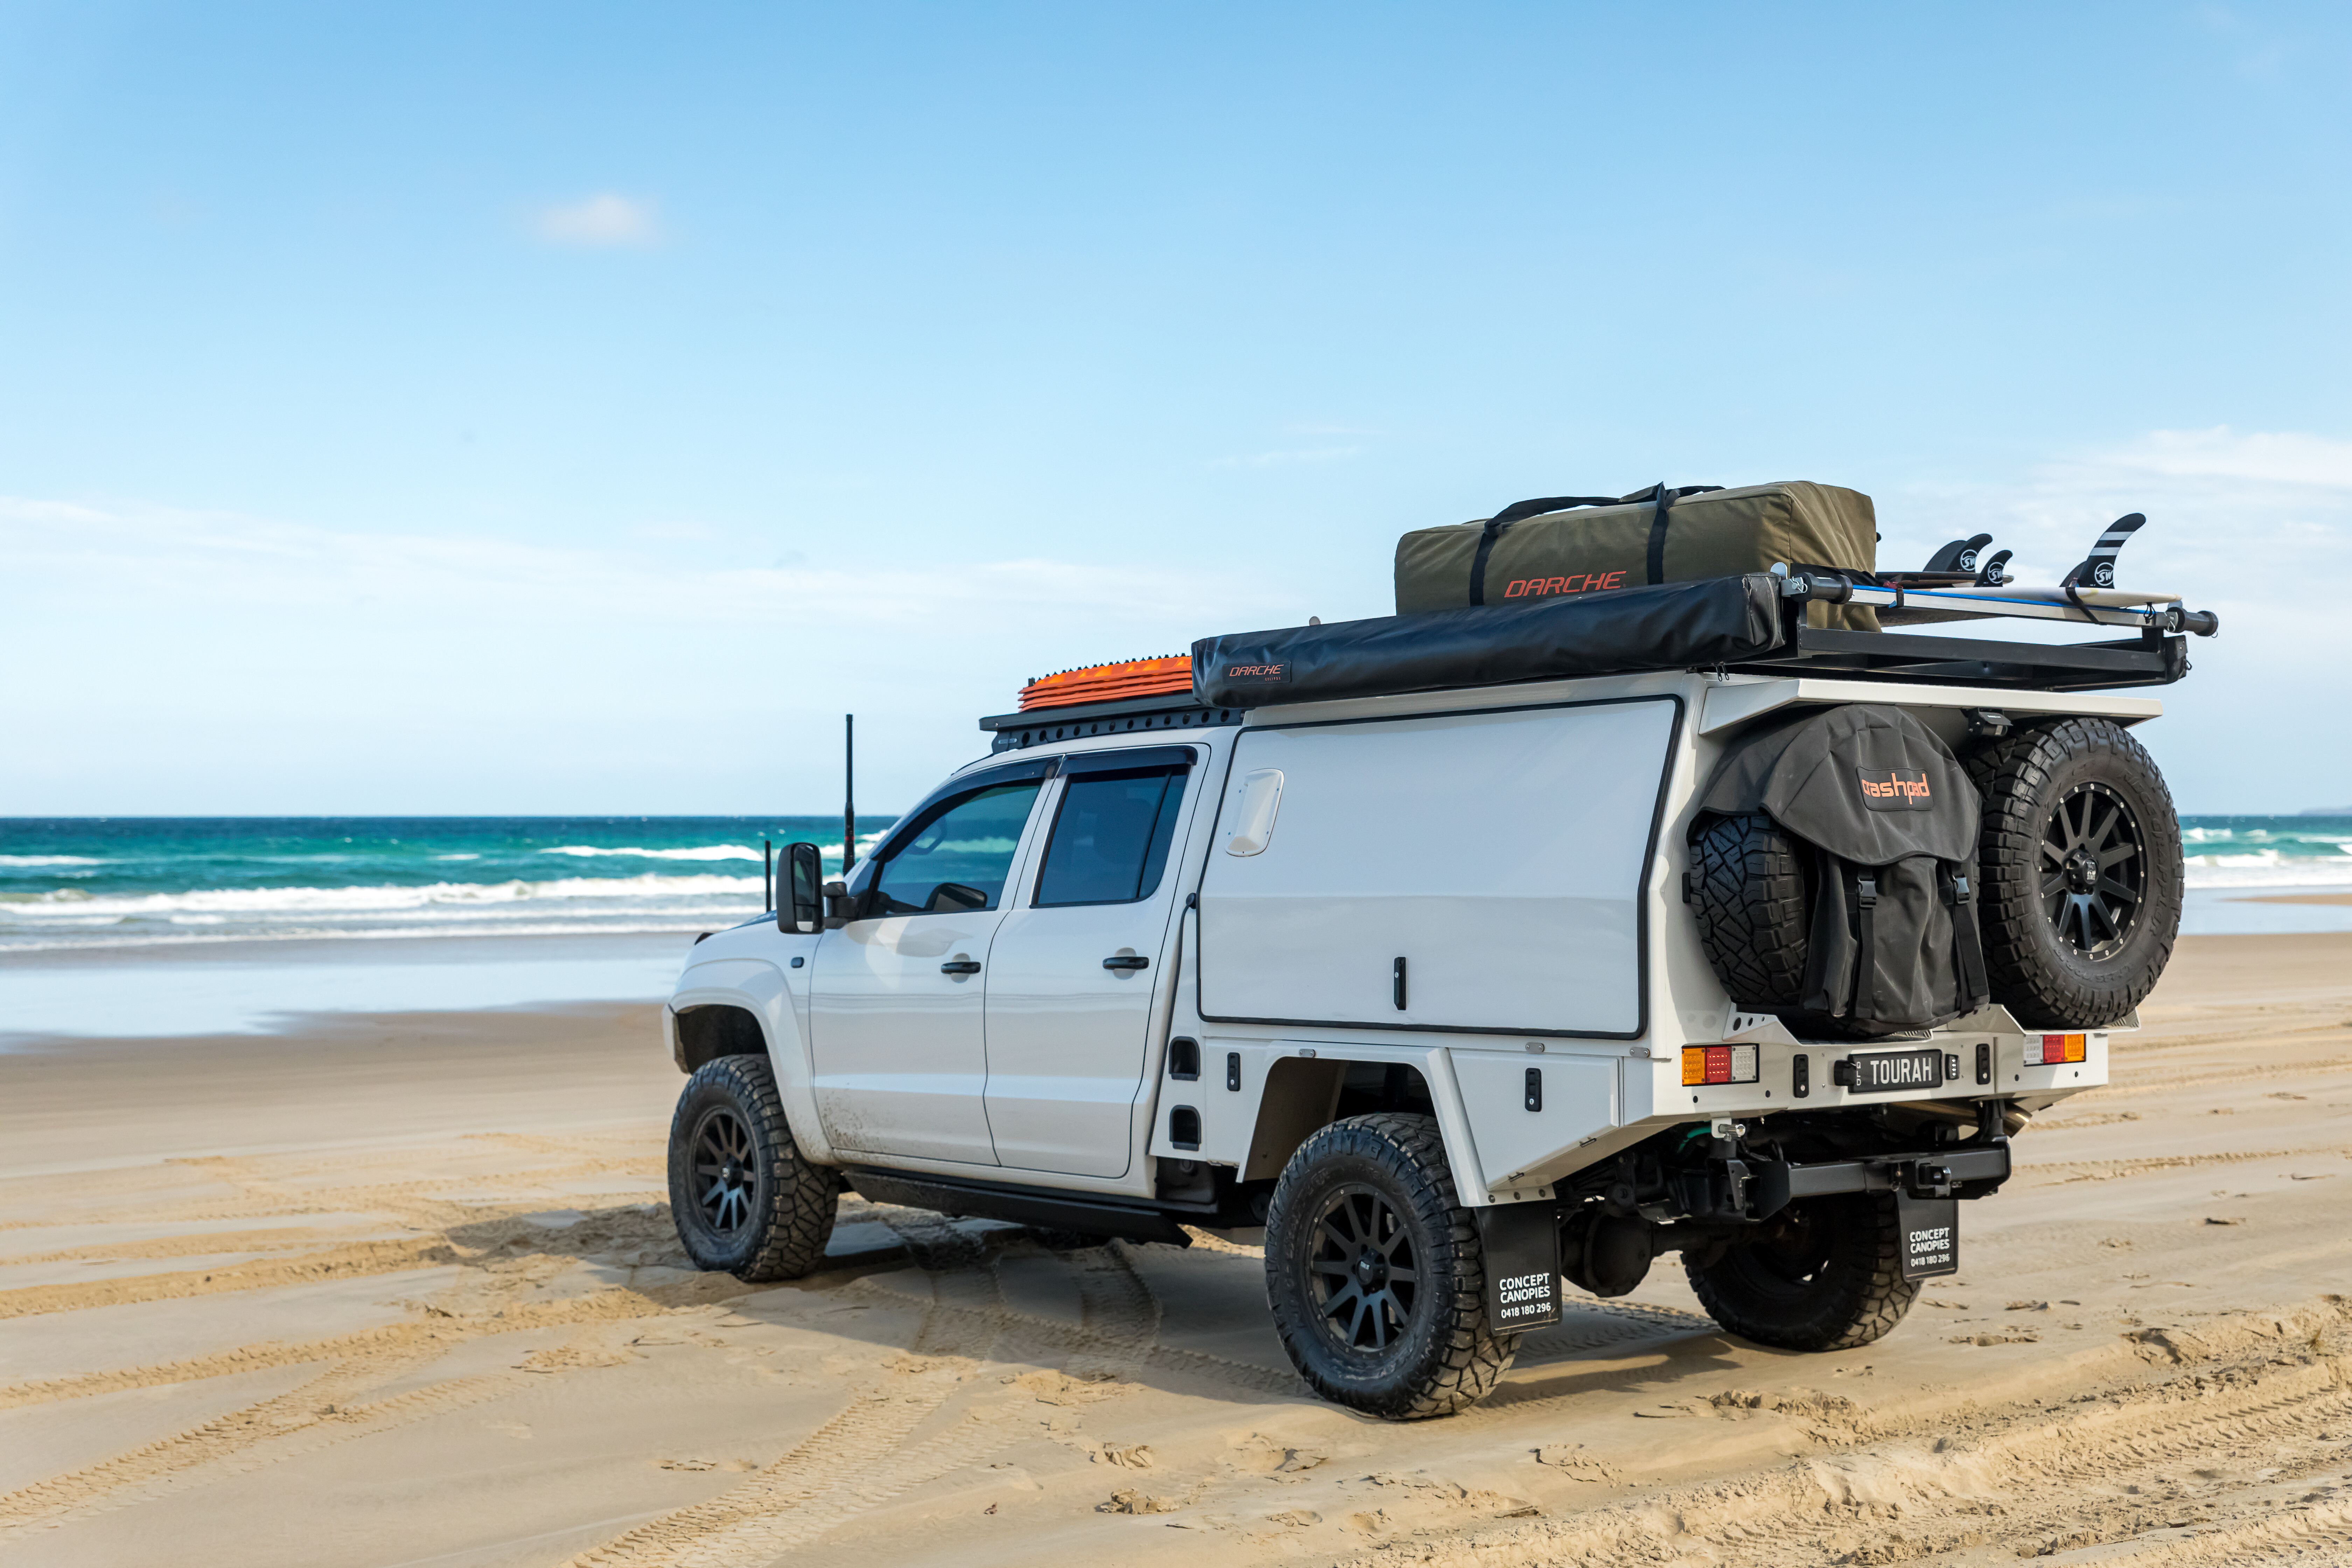
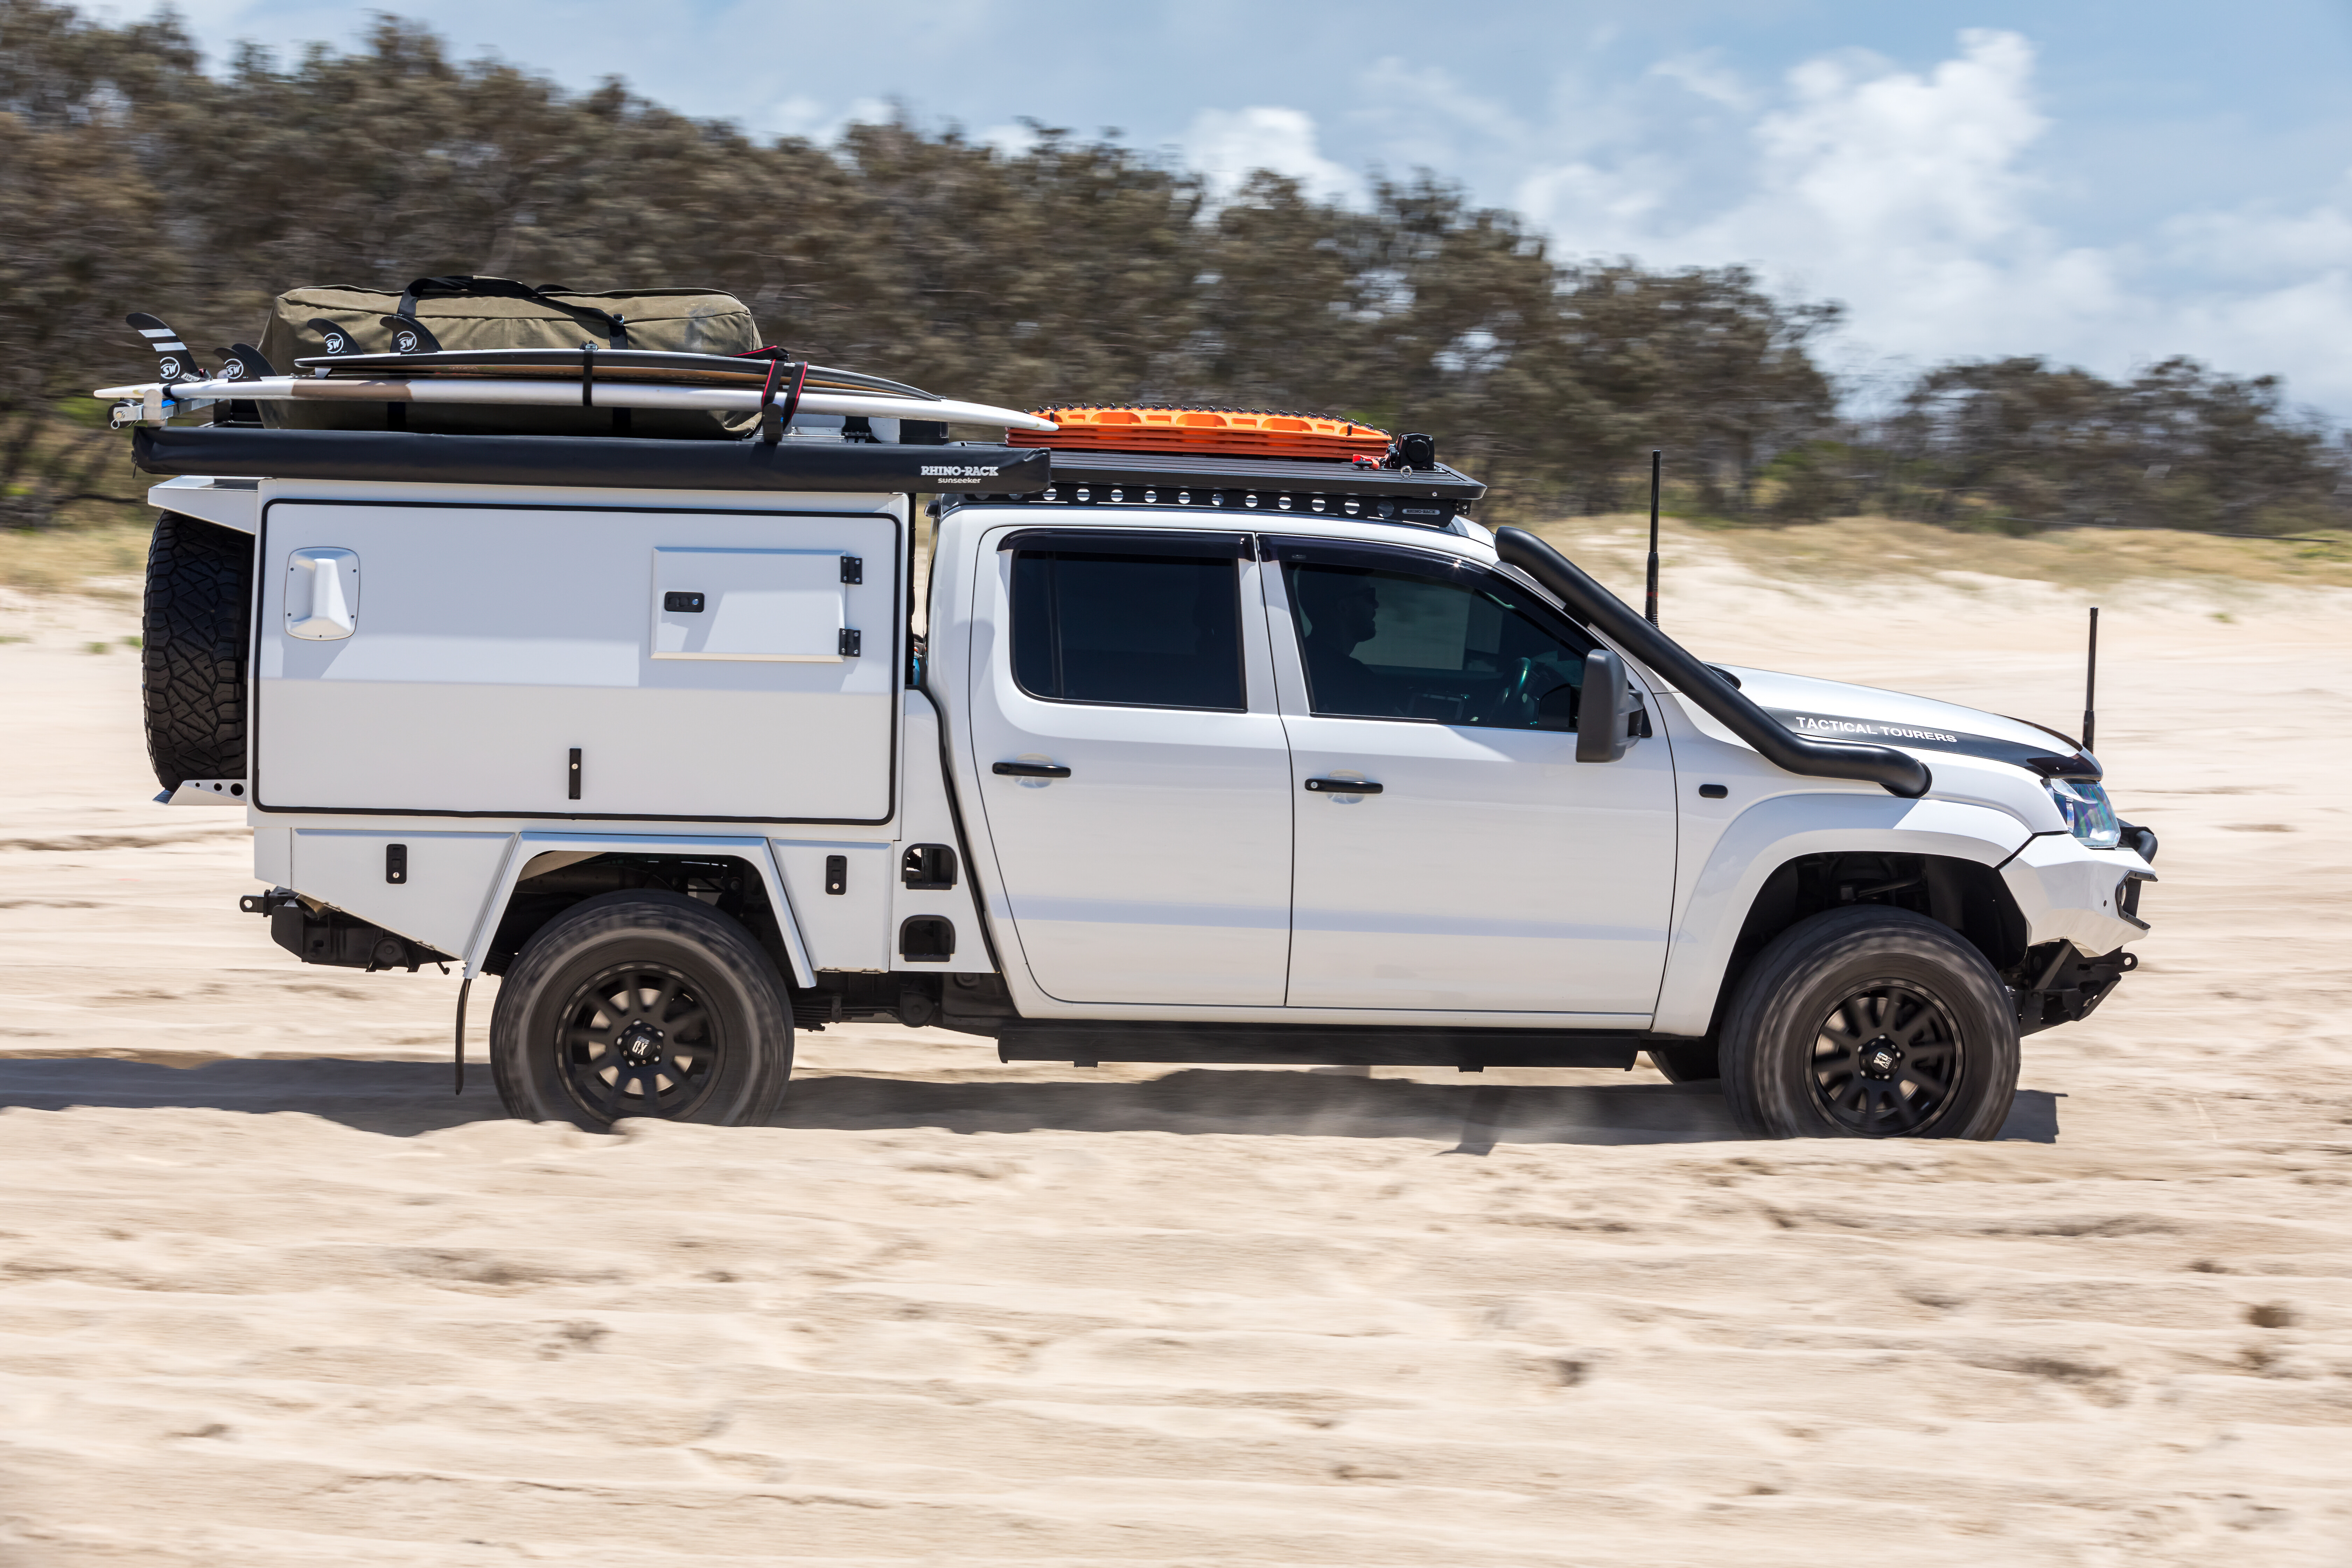
Some people just want to do things differently, be that for the challenge, to stand out from the crowd or just because they don’t like more mainstream offerings available. Ken Miller is one of those people that really just wanted to try something a bit different for his next 4×4 project.
After previously owning a 200 Series Cruiser, Ford Ranger, a chopped dual-cab GQ Patrol and a wild LS3-powered GU Patrol (among other fourbies), the VW Amarok seems like a bit of an ‘out there’ choice, but in Ken’s own words, it’s perfect for his needs. So much so, this is actually his second Amarok. It’s safe to say he’s impressed with the platform, even though he’d love to build a Ram 2500 as a dream tourer, if someone was to make a decent offer on his Amarok … just saying.
When asked why he decided to start with an Amarok, Ken had this to say: “The Amarok is capable, comfortable and it’s just a bit different in Australia to see one so modified.
“I’m rapt with how the build turned out; it makes both short- and long-distance travel nothing but easy and enjoyable.
“I like to be different and don’t like to follow the crowd; I had been liaising with Jake from Tactical Tourers in regard to building me something special, something we could comfortably tour in, carry our boat, tow our van and most importantly, something we could live out of for a day at the beach or a month on the road.”
Now while that seems like an almost impossible task, it goes to show that if you plan right and involve the right people, you can create amazing vehicles that are built with an end goal in mind. The results certainly speak for themselves.
As we all know, every project has its challenges, and Ken’s Amarok is no different. When we asked him about any issues he experienced, it seems like things went as well as possible.
“The main thing to overcome was weight. I was very mindful of what I was adding to the vehicle, and keeping it under the upgraded 3500kg GVM,” Ken says.
“The Concept Canopy is an all-alloy construction, and offers high quality in my opinion, yet is still light. The 350mm chassis extension helps here, as it changes the driving experience, and distributes the weight so much better. It’s a pleasure to drive, and I actually use it as a daily driver and open road cruiser.”
FEELING STRETCHED
350mm was added to Ken’s Amarok, which also allowed for a 3500kg GVM upgrade. Ken also has the chassis braced, and a custom tail-shaft made up to handle the extra length, weight and power of the custom VW.
The wheelbase extension was handled by the skilled team at Creative Conversions, who Ken says did a great job of the process. While 350mm might not seem like a lot, it makes a huge difference to the way the vehicle drives and handles weight without being a monster on the tracks.
POWERED UP
The V6 Amarok is no slouch performance-wise from the factory, but we all know it’s possible to make a good thing even better. Ken paid a visit to Steve at Coolum Motors who has made a name for himself tuning Amaroks (and all diesel 4x4s) with great success.
And the results? Well, how does 201kW of power and 750Nm of torque at the wheels sound? Yeah, pretty sweet if you ask us. Best of all, post tune, the V6 is sipping just 11L/100km, a seriously impressive result.
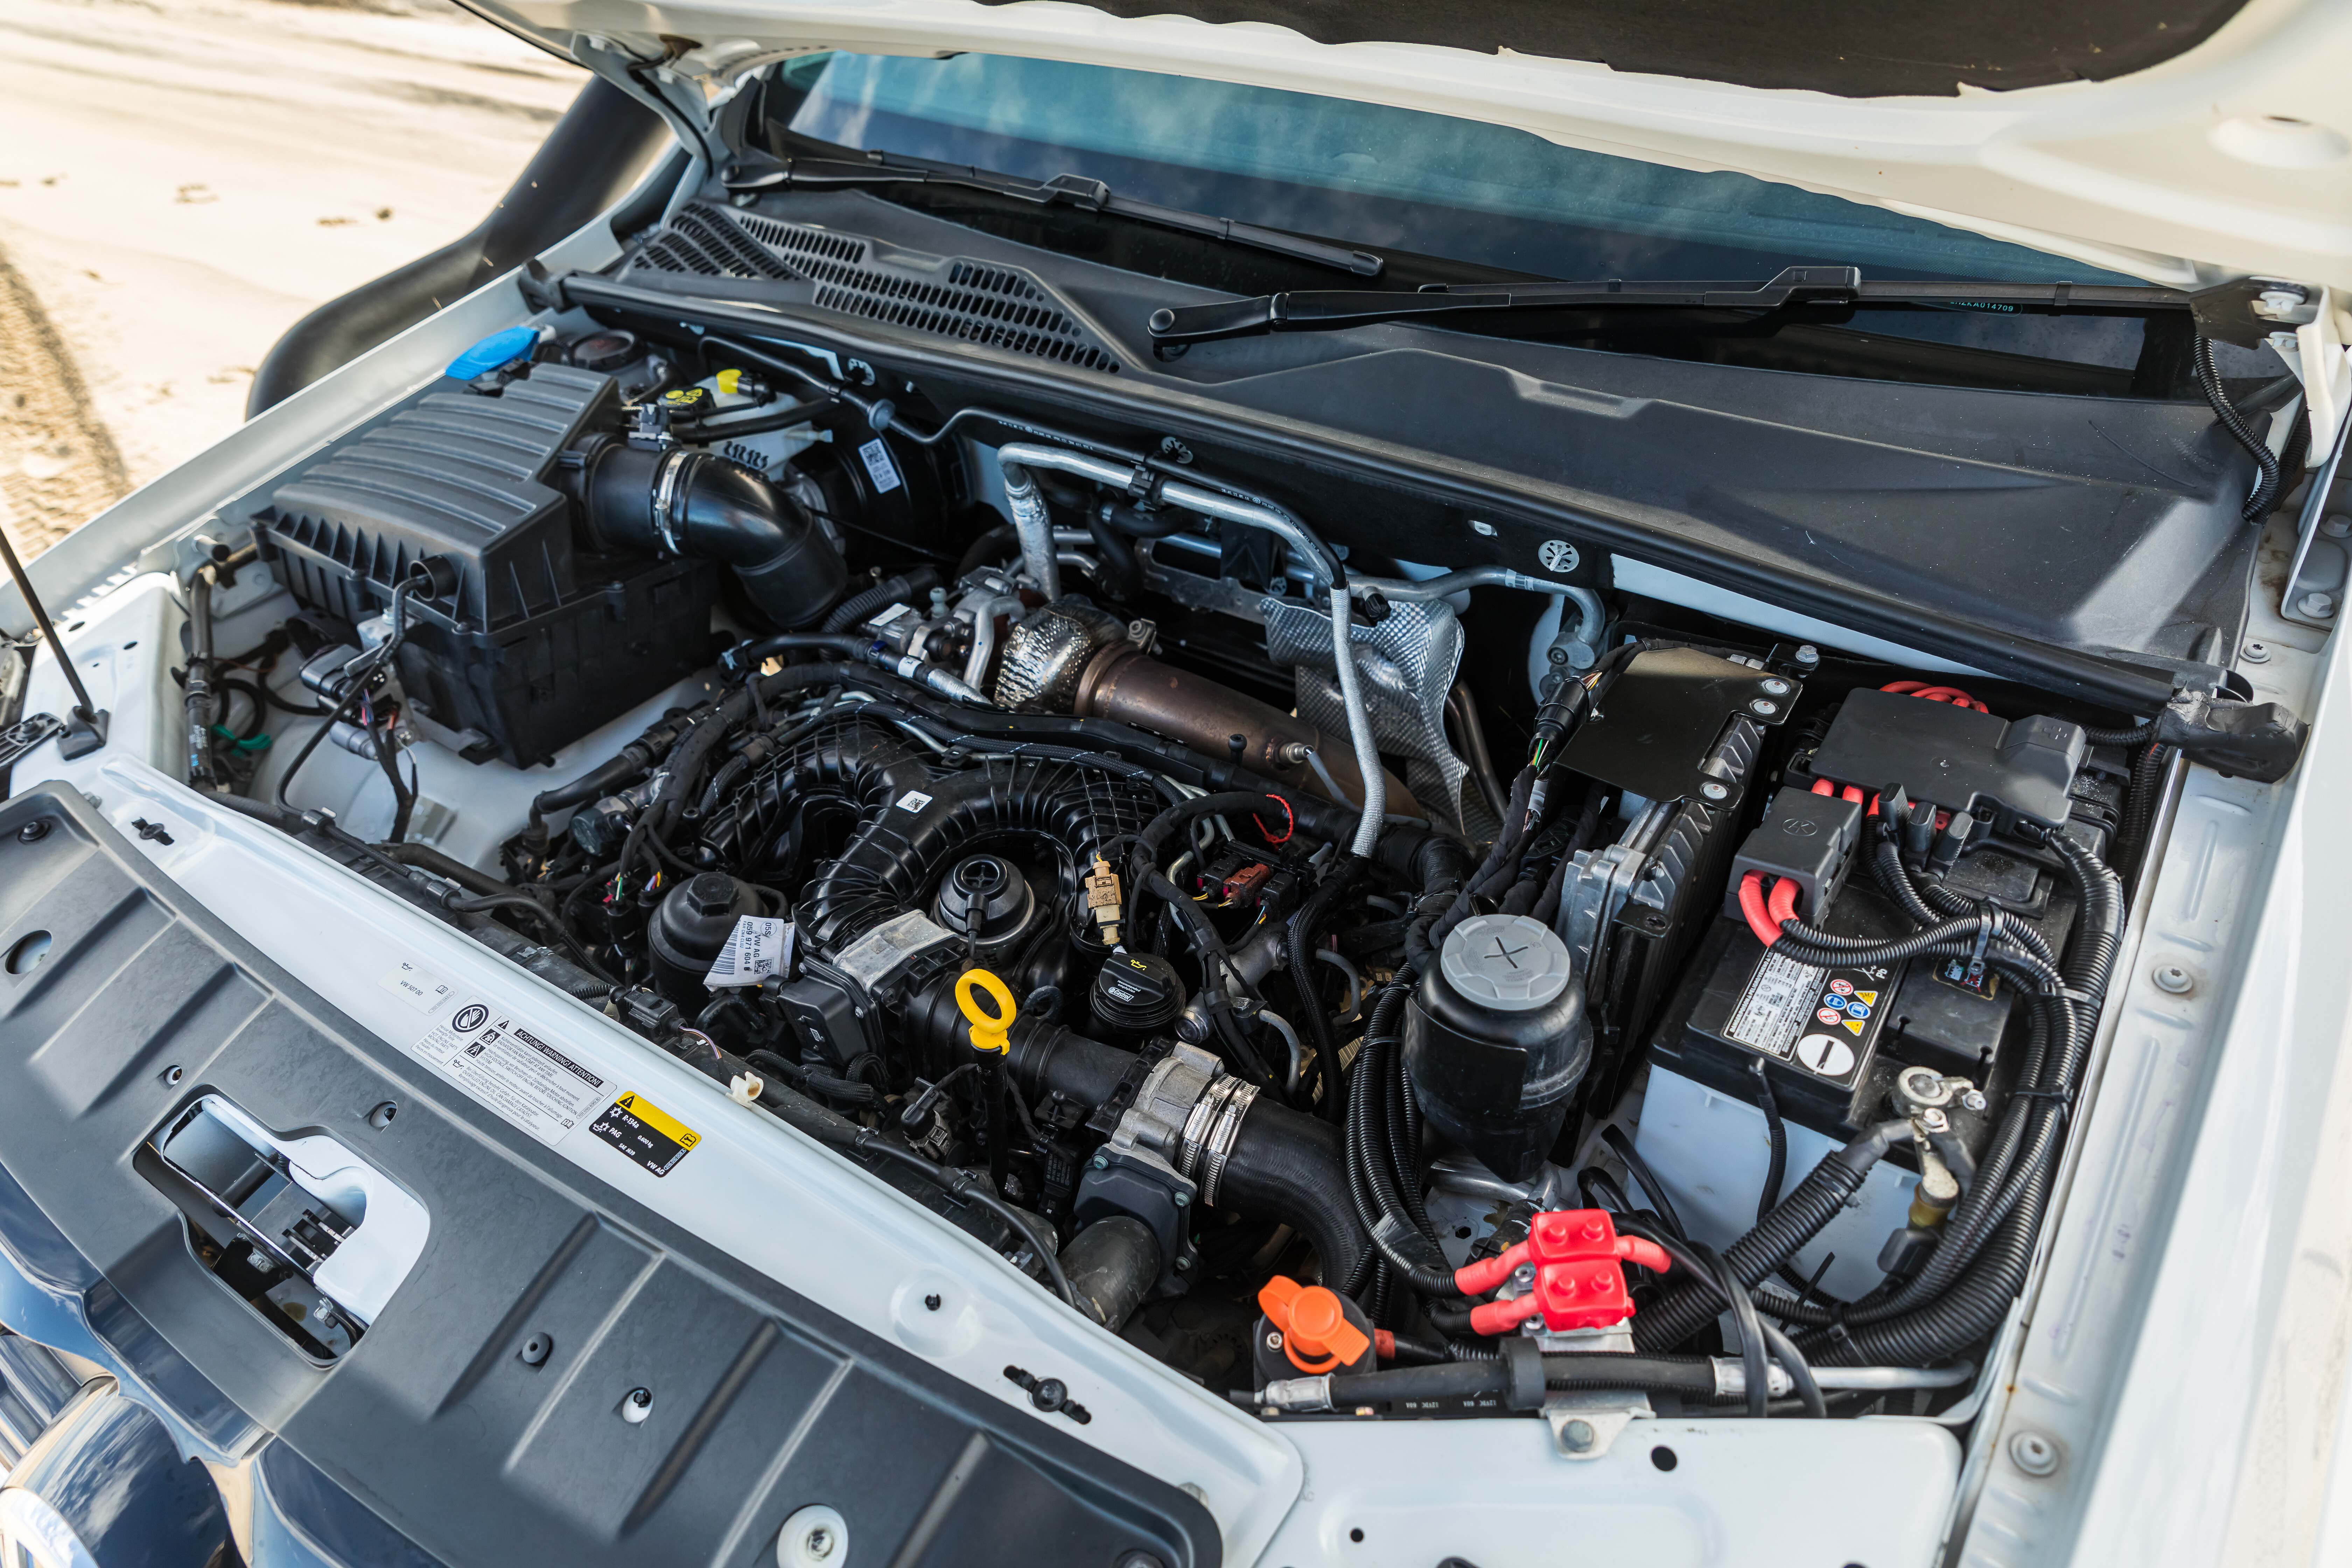
This power number was achieved with a custom dyno tune, as well as a suite of custom performance parts to make the most of the tune. Starting with a 3.5-inch turbo-back exhaust system to expel waste gases, custom-made out of stainless steel specifically for Ken’s Rok. Getting air in to the V6 is a four-inch Elite Exhausts stainless-steel snorkel with a black seamless finish. One would imagine you’d hear Ken’s air intake before you could see the vehicle, and there’s nothing bad about that.
To remove any lag from the Amarok’s throttle, Ken also added a Torqit throttle controller, which is handy both on- and off-road. While the tools were out, Ken also opted for a Wagner upgraded intercooler kit that has significantly reduced intake temps over the stock VW unit.
ROLLING STOCK
After adding a two-inch Outback Armour suspension kit with aftermarket upper control arms, and raising the Amarok a further two inches via a body lift kit, there was plenty of space for larger rubber. Ken has chosen to run the increasingly popular 295x70R17 sized rubber, in the form of Nitto Ridge Grapplers. These have been fitted to XD Heist alloy wheels; six in total counting the two spares Ken carries on the back of the canopy.
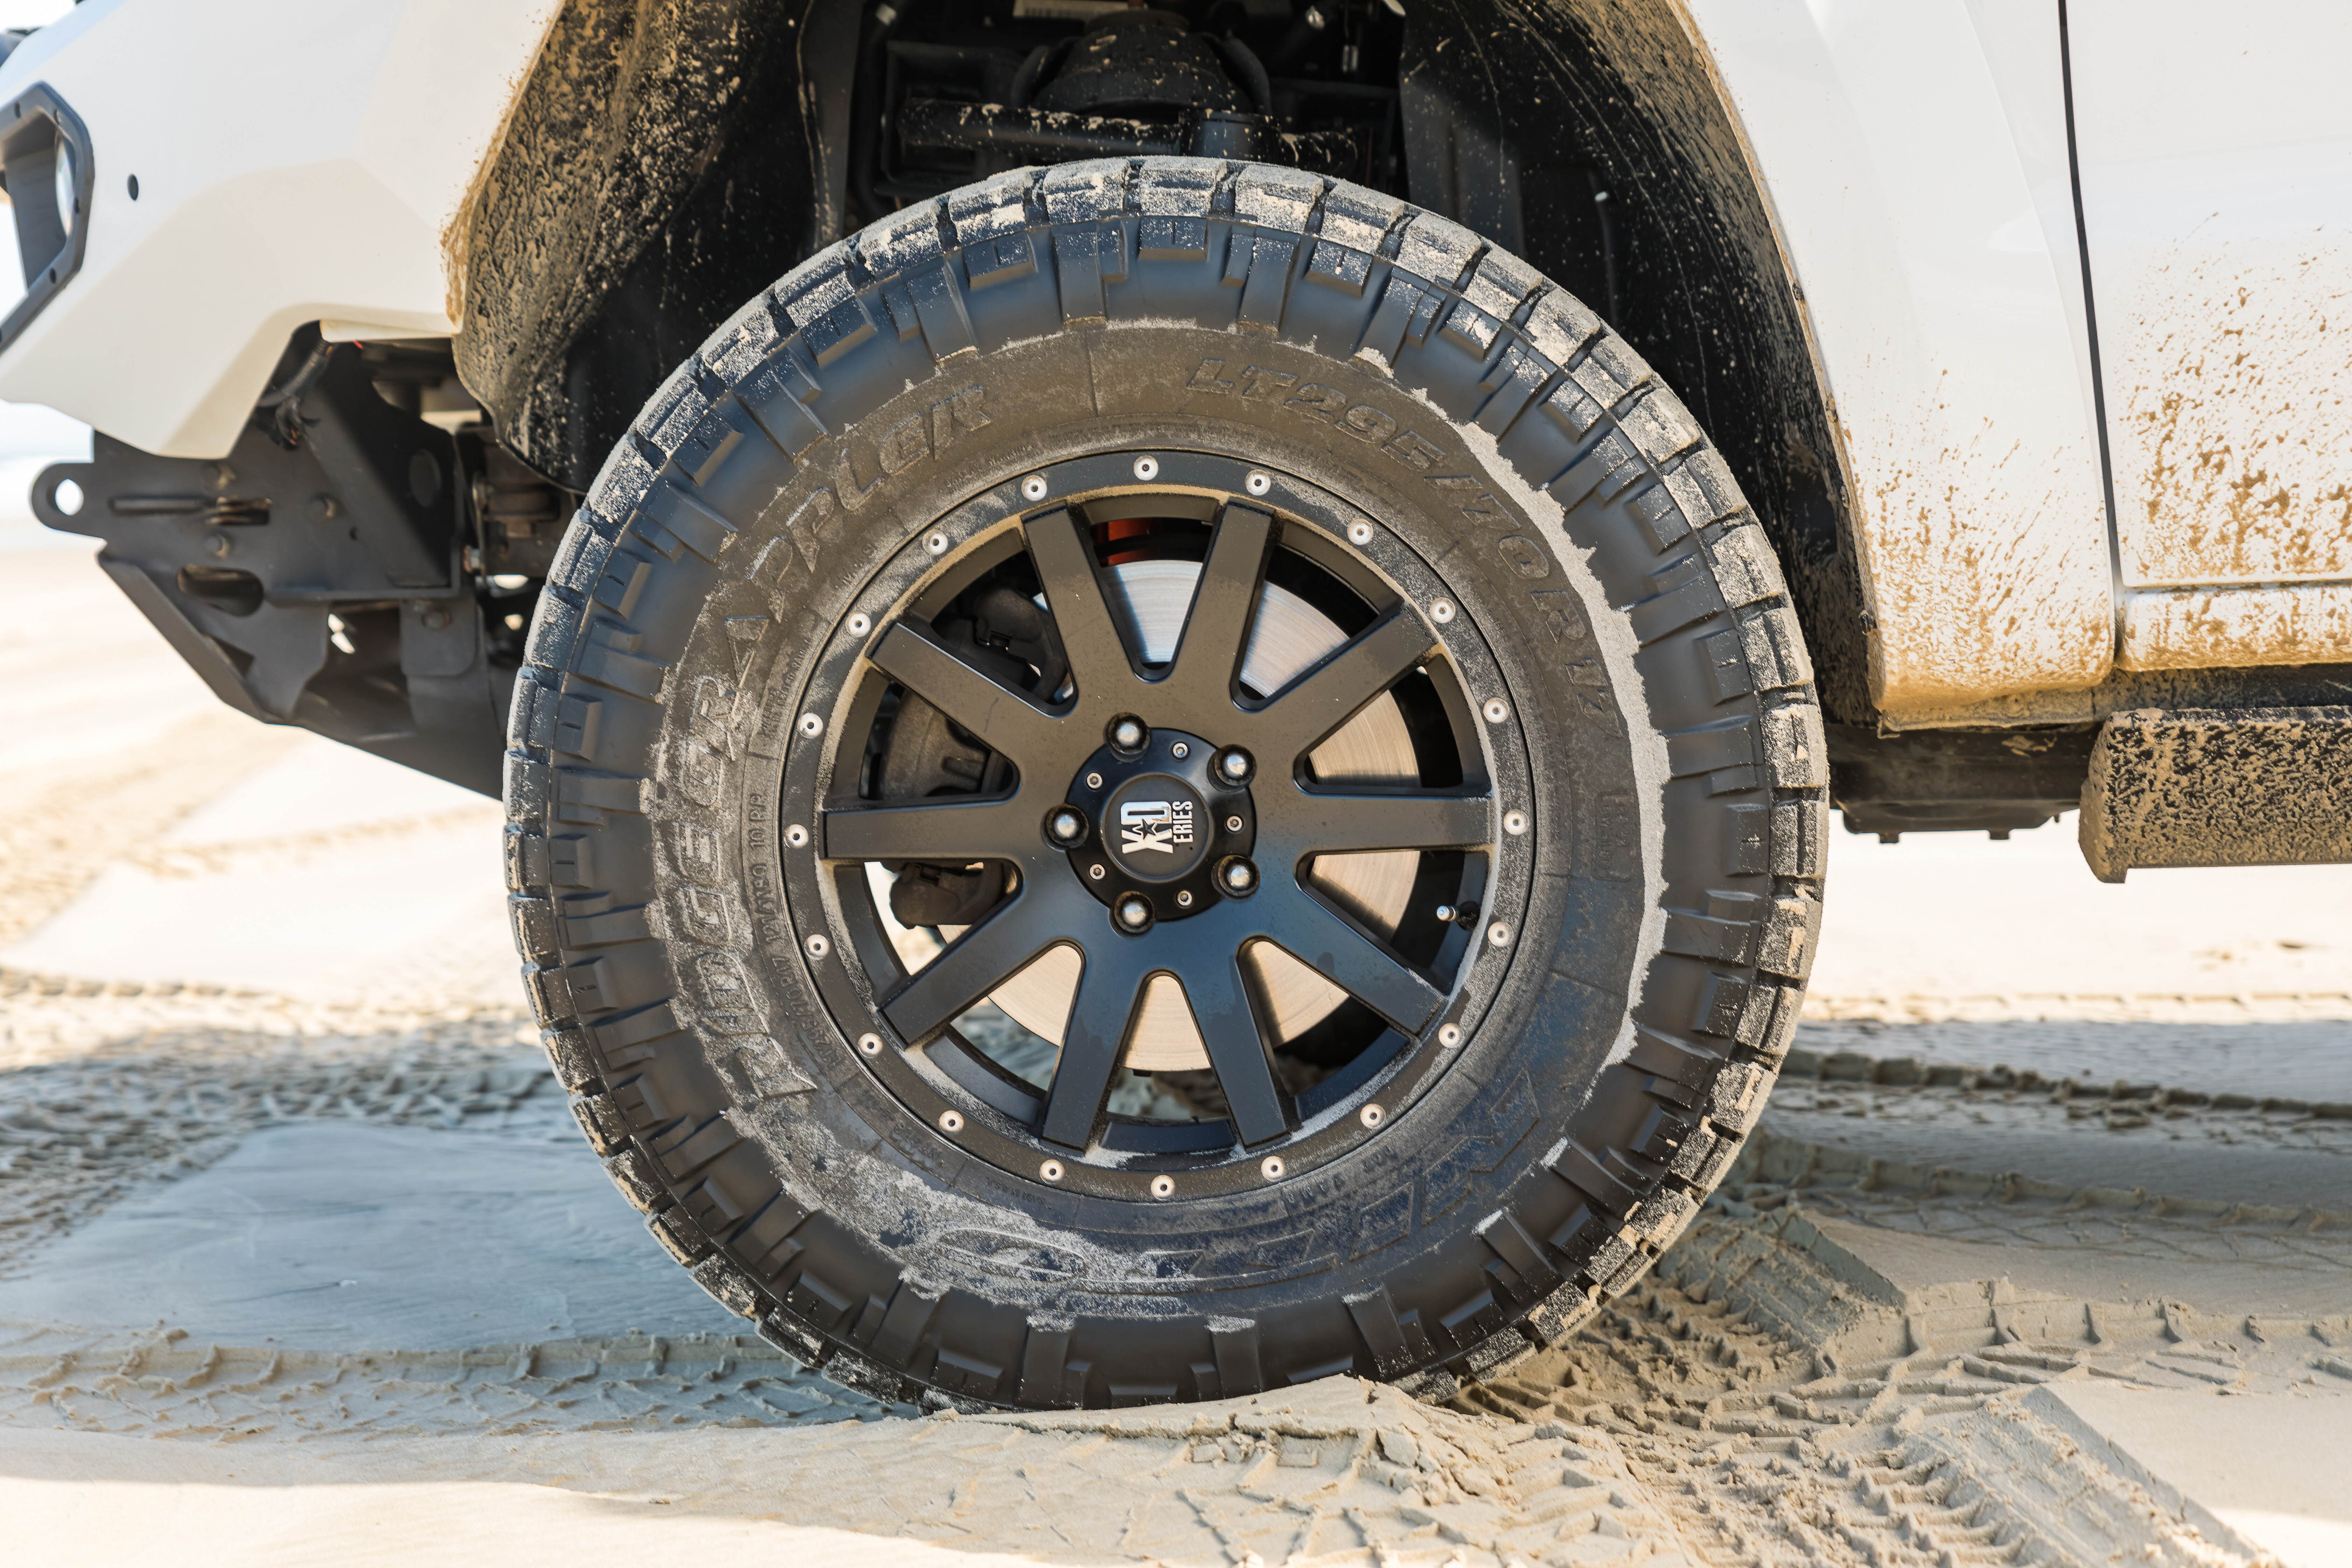
So far, this set-up has proven to be super reliable, although Ken admits to carrying a spare (unused) CV joint in the event something goes bang. With the weight of the additional accessories and canopy, Ken has also opted to fit a pair of Airbag Man airbags, with in-cab control. This allows him to tailor the spring rate and ride height of the Amarok, depending on the load he’s carrying.
TOURING MODS
Starting at the front of Ken’s Amarok, he fitted a Rhino 4×4 bar and one of their 12,000lb winches with synthetic rope. Stock Amarok headlights could at best be described as crap (sorry, but you know it’s true). As such, Ken has thrown the Stedi catalogue at his vehicle, with their HID replacement headlight bulb upgrade, as well as a roof-mounted LED light bar, and a smaller light bar mounted to the front bar.
On the roof of his Amarok, Ken decided on a Rhino-Rack platform, and has added more lighting with a few well-placed Stedi work lights for camp lighting. There are also two awnings bolted to the rack: a Darche 270-degree unit as well as a Rhino-Rack Sunseeker for ultimate coverage when the weather turns sour.
Even though this Amarok drinks so little diesel, Ken had a 140L Long Ranger fuel tank installed, giving him a massive boost in touring range. Considering he no longer has to stop that often for fuel, he decided to upgrade the front seats with comfy leather items, which also look mint in the interior. Other cabin upgrades include, a custom roof console, Redarc Tow-Pro Elite, GME XRS Connect UHF, LED interior lighting, and upgraded speakers with sound deadening in the doors.
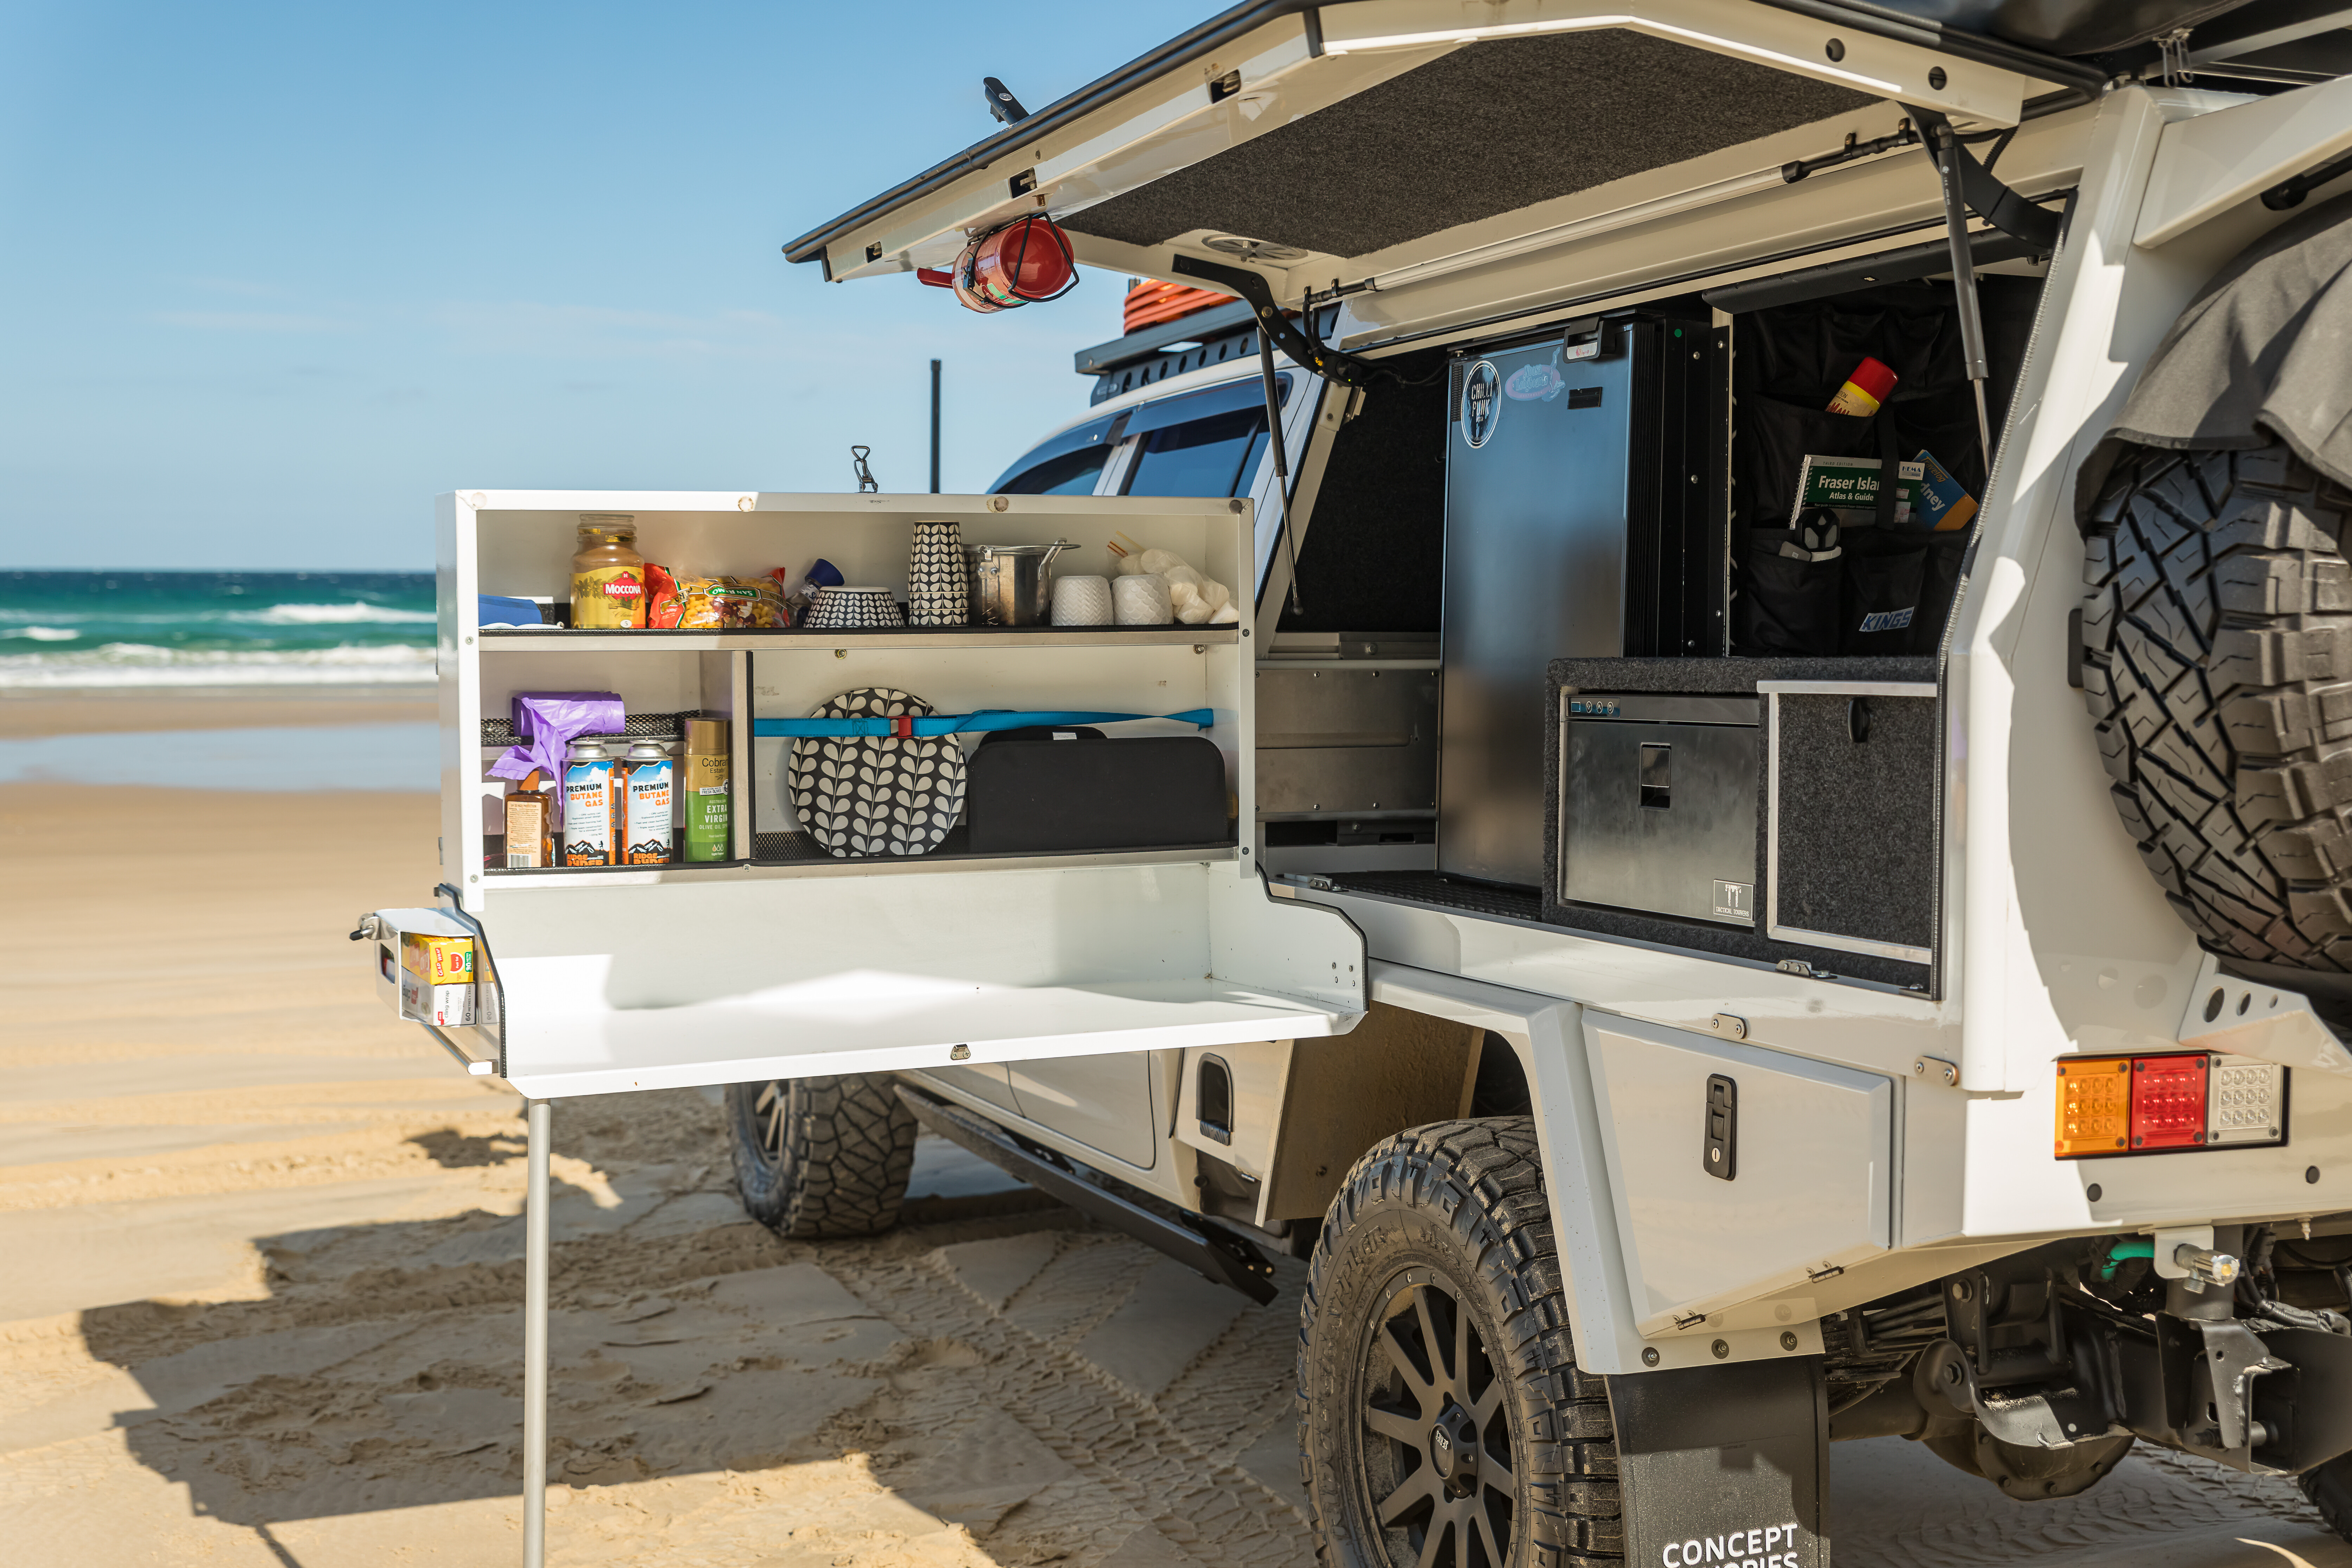
The main talking point of this Amarok would have to be the Concept Canopies chassis-mounted alloy canopy. Complete with boat loader and roof-mounted winch for easy loading of the tinny. Inside the canopy, you’ll find a Travel Buddy pie oven, Cel-Fi mobile booster, multiple charging outlets and a twin ARB compressor with hose reel.
The 12V systems are important to get right in any touring 4×4, and Ken has taken no chances, fitting a range of Enerdrive gear including 200amp of lithium battery charged via an Enerdrive charger and 300W of solar when parked up at camp. There’s also a 1000W Enerdrive inverter to power 240V gear, and let’s not forget two fridges to keep food and drinks cool while out exploring. Ken has his priorities in life sorted it seems.
The second-generation Land Rover Defender is due to hit the streets and bush in convertible form next year, a nod to the original soft-top version – but in a much fancier guise.
The product of coachbuilder Niels van Roij Design, the Dutch company’s Heritage Customs arm has previewed the drop-top version of its Valiance – itself a modified version of the new Defender.

However, just five units will be produced, and at a price in Europe that’s equivalent to around $220,000.
Called the Valiance Convertible, it will be based on the short-wheelbase Defender 90 with the lower half of the body identical to the factory model, but a fabric top replaces the greenhouse with a hard lid.

So far, three of the customer Valiance Convertibles have been detailed and previewed.
The first is named ‘Cote d’Azur’, featuring bespoke blue paint and whitewall tyres, while the ‘Solihull sand’ version is an homage to the original 1948 model. The third model shown is the ‘Kokkini Paralia’ with dark matte red exterior paint. All feature bespoke detailing, customised interiors and magic metal interior and exterior packs.
Heritage Customs claims buyers can “work closely with the team of specialist designers and craftspeople via the personal commission guide called Architecture”. In this program customers can create or enhance their own unique Heritage Customs vehicle.
When we plan for a trip, our mind begins to picture what that trip will look like. Either camping with friends, kicking back around a campfire telling tall tales and having a laugh, or sitting with the family toasting marshmallows as the sun sets over the mountains.
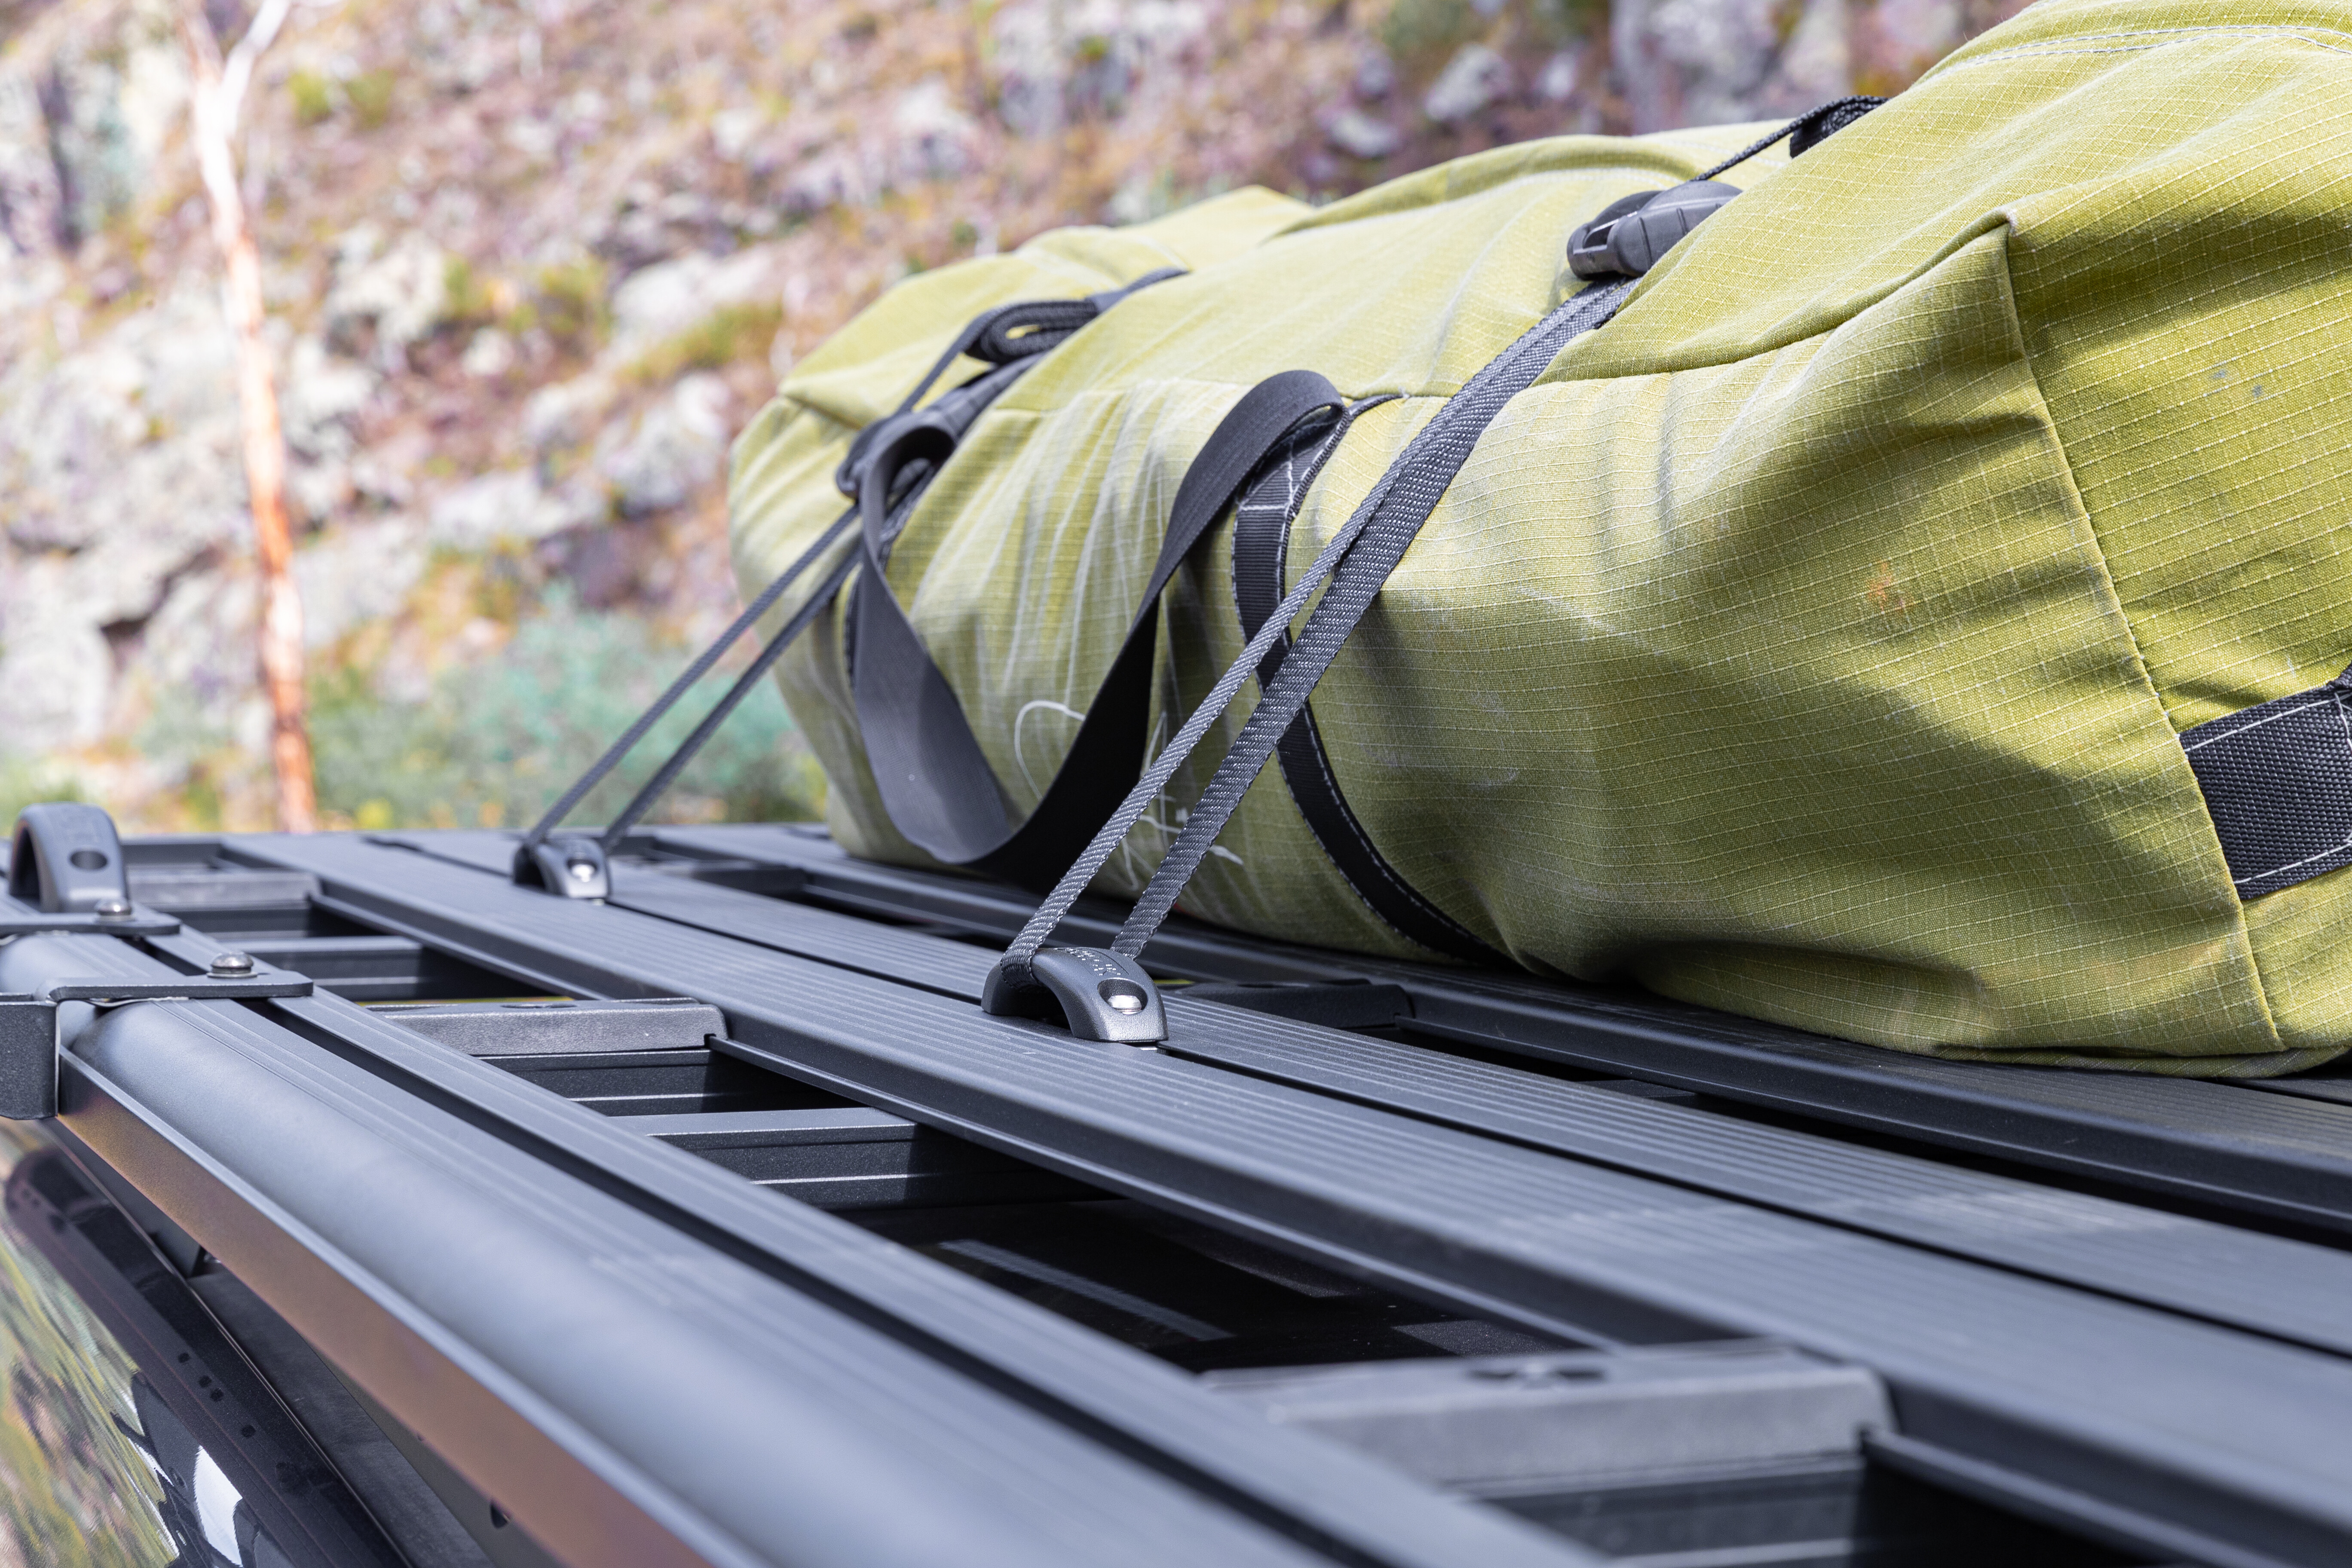
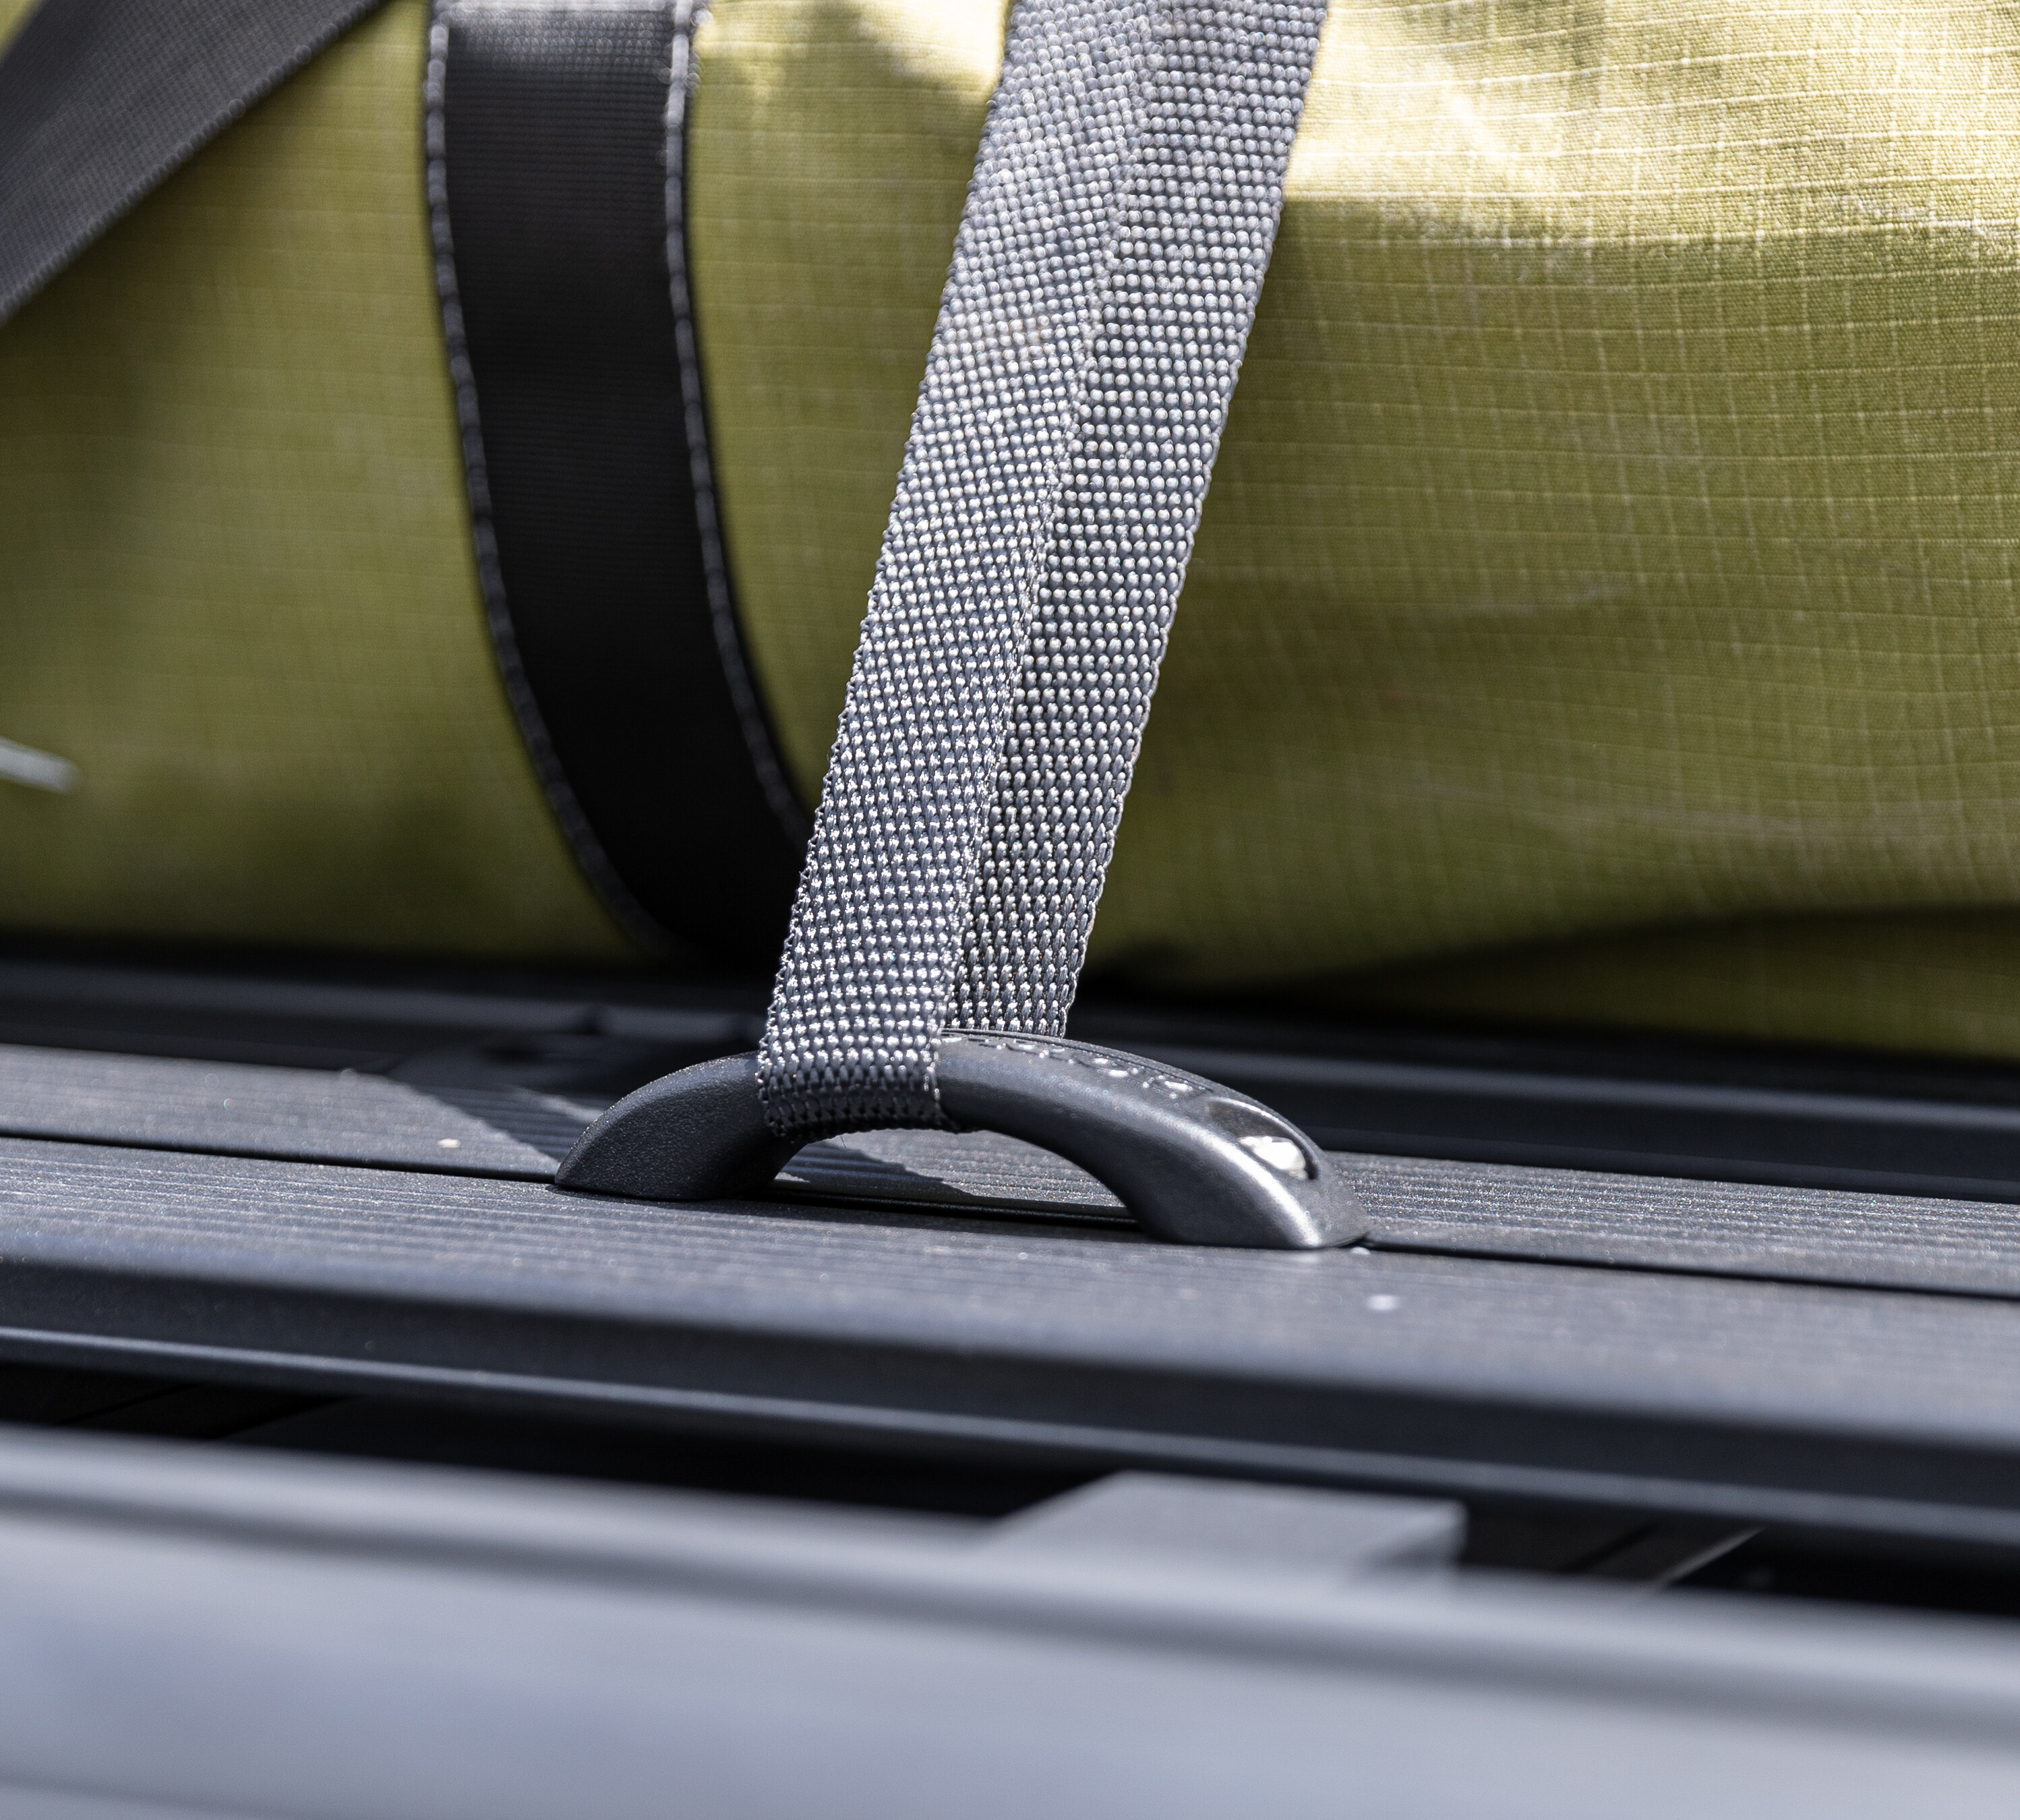
What we rarely consider is the nitty gritty of the components needed to get our equipment there. You could imagine a roof rack loaded with gear, but you will probably never picture a tie-down strap securing the load.
Some of us may give a cursory thought to what we need, but, beyond that, we rarely think about how to secure the load and the best way to go about it. It’s hardly glamorous or exciting.
Tie-down straps are crucial to many a trip, and it never ceases to amaze me how many people use the wrong strap, or even lose their load before they make it to the end of the street.
I followed a camper trailer being towed up the highway once with a foldout table strapped to the top. Sure enough, a gust of wind took it completely off the trailer, launched it 50 feet in the air before it came skidding down on the road in front of me. That could have killed someone or at least caused a terrible accident. So, what are your options?
A tie-down strap is a length of webbing tensioned and used for securing cargo. They come in many shapes and sizes. An occy strap is not a tie-down and, despite your father using one to take the surfboards to the beach for 20-odd years without incident, they should not be used to secure loads, particularly when securing a load while off-road.
Occy straps have give and not even Governor Arnie, in his body-building heyday, could manage to stretch one out adequately to stop it from stretching further on a bumpy track. Once it stretches enough, your gear slides out and is all over the road. They also have no load rating.
Proper tie-downs, as described above, come in various lengths, with two ratings to indicate break strength and working strength. The break strength describes the maximum comfortable weight that can be supported before the strap fails, and working load describes the maximum weight that a tie-down can support with regular day-to-day use without becoming damaged.
They are not one and the same. The working load is generally calculated as one-third of the break strength. So, with that in mind, a strap with a 250kg break point should only be used to secure 75kg of load. Remember, that when off-road, inertia can cause a load to shift considerably and put more strain on any tie-downs, so it is best to err on the side of caution when choosing a tie-down strap for that reason.
Generally, the wider the strap, or webbing, the stronger the strap will be.Straps are generally good for securing all types of loads from spare tyres to tarps and swags. They can even be used to secure fridges in vehicles. The type of strap you use will be determined by where you are going and what you are carrying.
WHICH STRAP FOR ME?
Standard light-duty straps or lashing straps are typically used when you are securing a load that does not require a lot of strength to stay in place and is unlikely to slide around. They feature a gator clip which clamps down on the webbing when you pull it tight. They are your small-load straps.
For example, a set of MaxTrax or a swag secured on a roof rack driving on mainly tarred roads and or graded dirt. Neither weighs a lot, maybe, so this strap is perfect.
Next up is the Cam Buckle strap. These are lighter-duty than ratchet straps but heavier-duty than lashing straps. They have a higher rating and are perfect for heavier items such as dirt bikes and ATVs. Again, I would not use one to secure a load when doing heavy off-roading.
For heavy loads and loads that you cannot afford to have shift around, such as spare tyres on a rack or anything when off-road, the ratchet strap is the best option. These straps come in a variety of sizes, from light- to heavy-duty. They can also be purchased in stainless steel for an additional price; anyone working in a marine environment will know what that is about.
Ratchet straps can be tightened down with a mechanical buckle that ensures the strap is at maximum tension and tight enough that your load has no chance of moving. Therefore, I would recommend them for all off-roading. The two previous straps, no matter who you are, cannot be tightened enough manually.
There are other straps, but these will be your primary go-to options. They can wear over time too, so what should you look out for?
All of these straps are made of webbing with a metal buckle. The webbing can fray if the strap gets a nick in it, so check them regularly. A frayed or half-cut strap should be thrown away. Similarly, the nylon and polyester fibres in straps will eventually break down under UV rays, so essentially the sun will wear out your straps. Check them often.
Also, do not store them wet in a box for next time, because there will not be a next time. They may go mouldy and rot. Finally, for the ratchets themselves, treat them with some lubricant like WD-40 after each use, to prolong their service life.
All this talk of tie-downs is great, but your tie-down is only as good as its anchor point. Make sure you are securing them to something secure. I have secured a fridge in a trailer once when moving house and put the strap around a thin piece of metal. Suffice to say, the metal broke, and so did the fridge − an expensive lesson.
QUALITY PAYS
There are so many types of tie-downs that a trip to any store that sells these straps can be daunting. For a simple standard lashing strap, you want to ensure that the buckle is of good quality. It should feel solid, with a strong spring in place that brings the buckle down on the strap.
Cheap options can use inferior quality springs, so make sure you know that they will stay secure when tied around any loads. I have been using a set of Rhino-Rack standard-duty tie-downs for a few years now and found them to be a good basic option.
Cam Buckle straps are similar in that you want to look for quality hardware and a secure buckle. Ratchet straps come in an amazing variety of colours and price points. Like anything, you can get away with the cheap ones, but when you tighten them, sometimes the buckle cannot cope with the load. I always recommend buying a quality strap over a Bunnings’ special. You may pay a little more, but, if looked after, it should provide plenty of service.
THE WRAP UP
While tie-downs may not be a glamorous subject, even less glamorous is standing on the side of a track or road picking up all your gear while other motorists gawk at you. Don’t be that guy, use the right strap and buy quality ones.
The tow bar. You see it everywhere in Australia, and more than likely that tow bar attached to the back of that four-wheel drive wagon or ute will have a famous Aussie brand-name stamped on it: Hayman Reese.
The brand is celebrating its 70th anniversary this year and, for most of us, it is like it has always been prevalent in the local motoring scene, to the point where the name is literally a byword for a tow bar. It’s amazing really, when you think of where it all began …
A BEGINNING YOU’D NEVER GUESS
It’s all about happenstance, coincidence and wanting to help out a mate when it comes to the beginnings of an aftermarket brand that is now an icon of the Australian motoring scene. It is an origin story that is, if not quirky, certainly memorable and amazing rolled in to one.
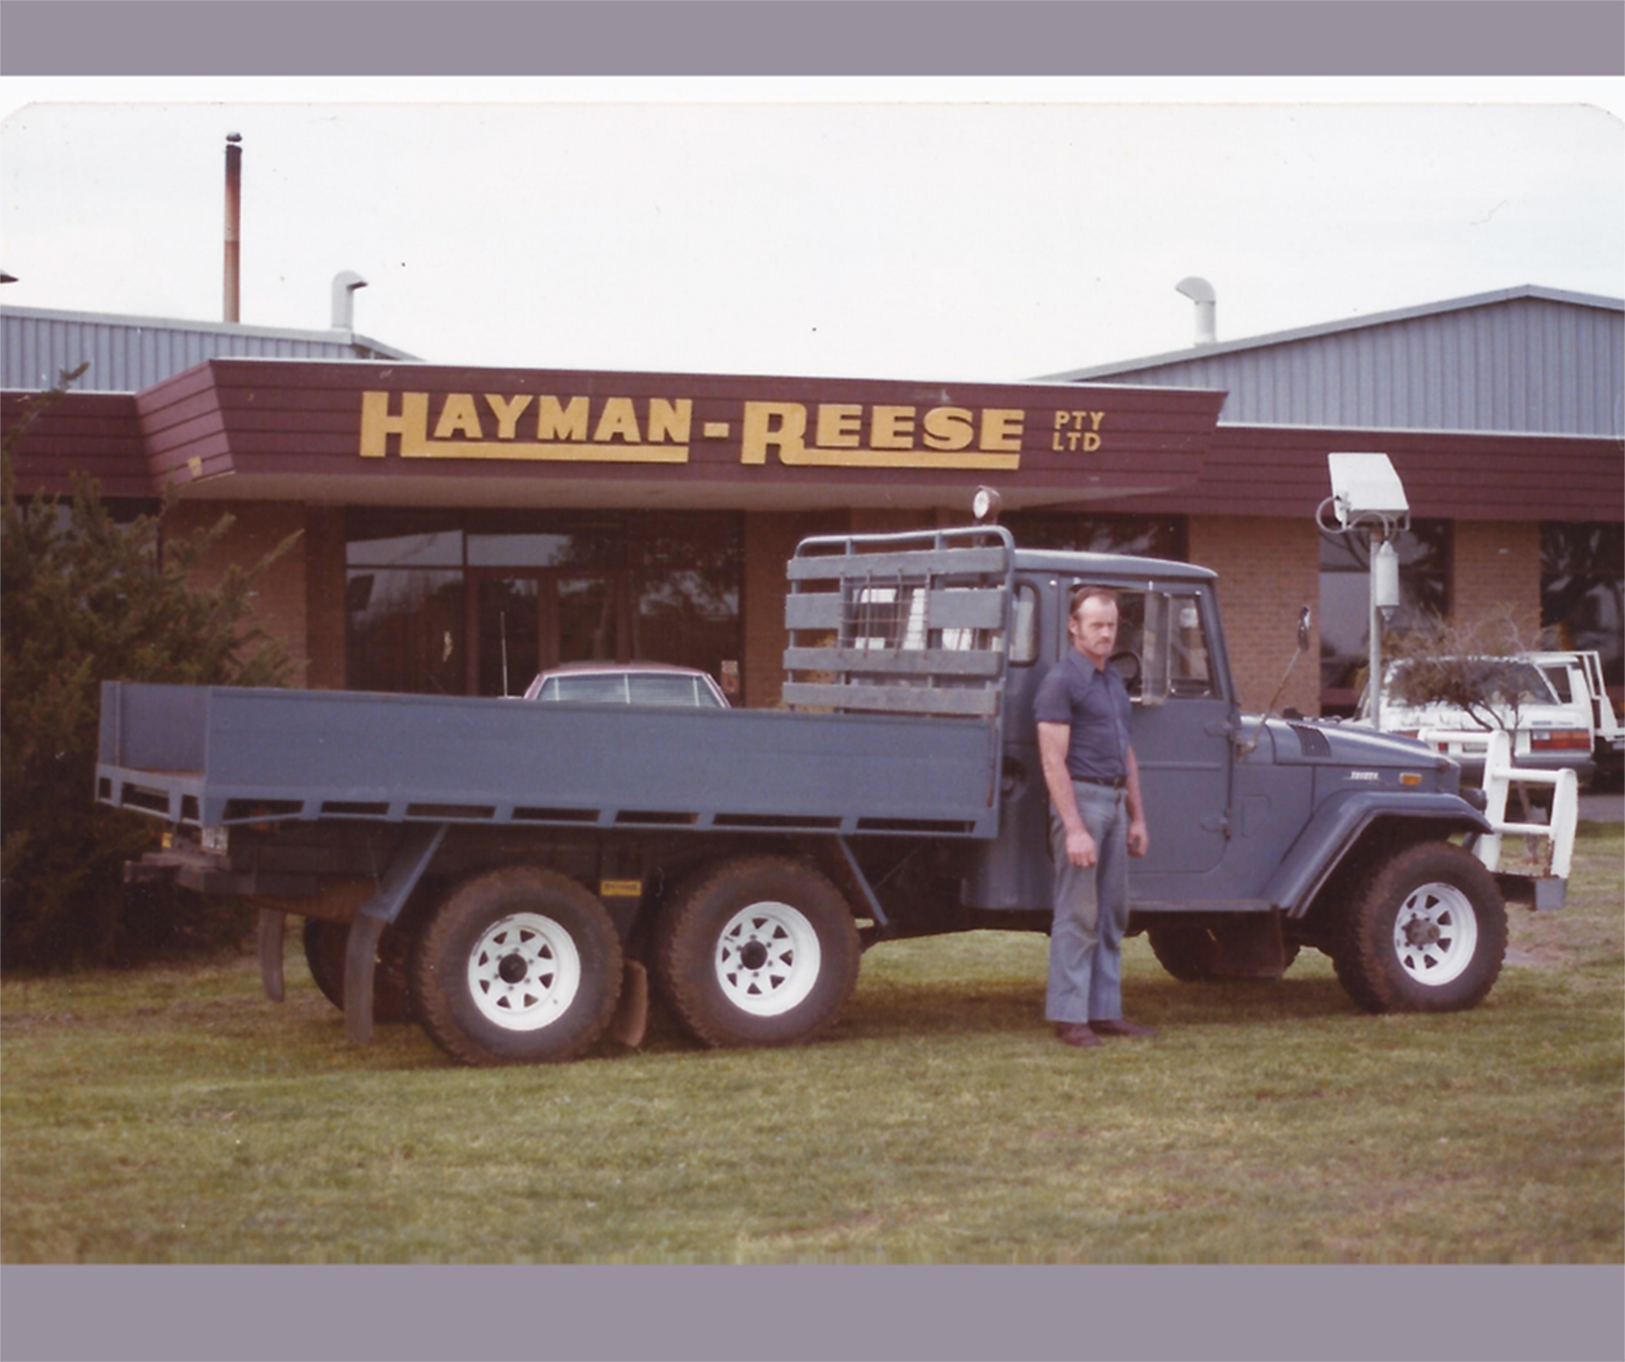
The quirky part? Before Eric Hayman answered a mate’s request for a tow bar, he worked making bicycle spokes in South Melbourne – yep, that’s right, pushy spokes. No, we can’t see the correlation either, but we (like millions of towing Aussies) sure are glad that Hayman’s original two tow bars (one went to his mate, the other he sold at a country show) soon became a whole lot more.
The successful sale (and the knowledge there was an untapped market out there) changed Hayman’s direction of work, seeing the establishment of a business that has expanded – and innovated, along the way – its product line and is now celebrating seven decades at the forefront of towing technology.
FROM ‘JUST TOWING’ TO SOMETHING MORE
For anyone over a certain age, their memories of towing are of a relatively simple but time-consuming process. Back in the 1960s and early ’70s, the tow bar was far from the quick and easy fix/detach set-up it is now (thanks to the 50mm square hitch – more on that later), with most tow bars bolted on to the vehicle, as Craig Smith, marketing manager of Cequent (the owners of Hayman Reese) recalls.“I actually remember seeing tow bars bolted on to the underneath of the car,” he laughs. “I remember Dad getting ready for holidays; he’d pull the tongue out of the boot or the shed … and climb under the car and bolt it on. You sort of look back to think, shit, that’s pretty bloody archaic.”
And it was, but in the ’70s that all changed, with what Smith calls one of the big historical changing points at Hayman Reese: the development of the two-inch (50mm x 50mm) hitch, which allowed for the tow bar to be easily detached when not in use.
The development and introduction of the two-inch hitch was the result of the company being bought out by USA-based Reese Products (hence the name change from Hayman to Hayman Reese).
It was accompanied by a new weight-distribution system, owing to the fact caravans were getting longer, larger and heavier, as were the vehicles towing them, as Smith explains: “That was a game-changer – the 50mm by 50mm hitch – and that’s seen as being a Hayman Reese proprietary.
“Obviously it’s not, but it identifies really close with the company,” he continued. “ The other thing is the weight-distribution side business and that’s a lot of stuff we introduced from America and modified to local conditions.”
These significant developments were just the first in what has become a veritable conga line of innovative towing products aimed at keeping up with the advancement in not only vehicle tech but user demands, ranging from ever-larger caravans/campers, to off-road towing, to families throwing a bike carrier on the back of their sedan or compact SUV.
Thankfully, Hayman Reese has been more than up to any challenge, thanks to a number of factors, including the major one of – still, today – designing, testing and manufacturing its products completely in-house at its Keysborough factory.
This is the company’s third premises; the original South Melbourne factory was superseded by a Dandenong site in the early ’70s, with Hayman Reese now notching up 10 years at Keysborough. It’s a complete in-house operation (with a staff count of around 300) and offers a huge advantage in terms of development times for new products.
HOW IT GOES DOWN, IN DA HOUSE
“Things get done in almost real time,” says Gregor Brown, sales and marketing director. “You don’t have the waiting for product to move from a different site or a different country. It comes off a computer, the CAD design is done downstairs and then the parts could be manufactured on the line within days.”
The Hayman Reese tow bars come with a lifetime warranty, so extensive testing is essential throughout the design and prototype stage, where the prototypes are thoroughly tested in a lab (and then on-vehicle), ensuring that when the consumer finally fits that new hitch/tow bar set-up to their rig, they can do so with optimum assurance.
The quality control around a Hayman Reese product is exceptional and harks back to the company’s ethos of continuing to improve and fine-tune a design right through to the moment it is ticked off for production, as Brown explains.“Once a vehicle’s been launched, we would bring a vehicle in. We’ll measure it; we’ll fit it with a trial fitment. That’s where you do the tweaking. There’s so much that can be done in CAD and design, but then the tweaking comes from physically putting a bar on that vehicle and that’s when it’s a millimetre here and a millimeter there to be tweaked.”This attention to detail has seen Hayman Reese improve even the basics of tow bars, such as the product’s resistance to corrosion. From the ‘old days’ of the bar’s raw metal being simply painted over, each bar is shot-blasted, then given a protective coat, before being powder-coated.
Being so ‘local’ in its manufacturing and product applications also meant Hayman Reese was able to respond quickly to the unique towing (and recovery) requirements of 4×4-based touring – as well as the environment in which these vehicles are towing – as this pastime exploded in popularity, with the release of its popular X-Bar in 2018.
Designed to offer a towing and recovery solution for tourers, the ADR-compliant X-Bar sits higher up on the rear of the vehicle, ensuring departure angles are not affected (and often, are improved compared to competitor products) and is rated to 8000kg rear recovery.For Hayman Reese, it’s another product opportunity that reflects Craig Smith’s comment around the “company starting out as a tow bar company, and now it’s very much a towing solution company”, and also how it has adapted its knowledge to that new challenge.“I think X-Bars are really the example of products where you’re taking the traditional product (the tow bar) and then adapting and modifying it to needs as they change,” he says. “And more people are heading off-road and wanting to be able to tow, but also wanting to be able to four-wheel drive as well. We’ve been able to by-product both those needs.”The X-Bar is just one of those adaptions and changes the company has been at the forefront of …
ON TOP OF TOWING TECHNOLOGY, WITHOUT FORGETTING THE PAST
As motor vehicles have become more complex, so have the demands on towing systems. From brake controllers to simple things like indicators still functioning on your camper/trailer/van, the abundance of technology in today’s vehicles has meant plenty of development at Hayman Reese to ensure its tow systems function in tandem with the tow vehicle itself.This began in the early 2000s with the launch of the SmartClick wiring system, a vehicle-specific loom that ensures fitment and function of all related elements. Set-up is straightforward, through to its very impressive SmartCode system. As Gregor Brown explains, tech is, indeed, king in today’s towing world.
“That’s a huge piece now with what we refer to as ‘smart vehicles’,” he says. “So certain vehicles, you need to then code them once the towbar has been fitted. We have a tool that allows us to do that and that then means that all the functionality that is with that car is then maintained when you are towing.

“If you go and buy a new Ranger – or you buy a VW Touareg – they’re smart cars; they’ve got a lot of intelligence and as soon as you connect the trailer plug, the car then knows it’s towing. Whether it’s your parking sensors turning off, so you stick it in reverse and you don’t get deafened by a scream, because it thinks you’ve backed in to something.
It could also be the lane-departure warning system, or it could be a gearshift ratio change when you engage trailer mode. If you don’t tell the vehicle that it’s pulling a trailer, it won’t engage the right gear-shift profile.”This focus on keeping ahead of vehicles as they continue to grow ‘smarter’ is testament to a company that is always looking forward but, at the same time, is not forgetting its core attributes – or, for that matter, it’s past.After all this talk about the latest towing tech, readers may be amazed (and impressed) by the fact that, due mainly to Hayman Reese always creating its products in-house, it can still deliver a brand-new tow bar for a vehicle that is far from shiny and new, building it off the original (often hand-drawn, for very old vehicles) blueprints. And yep, that even applies to vehicles from the 1950s …“If there’s a vehicle out there, if it’s an old Falcon, old Commodore, or old whatever, we’ve got the ability to make that tow bar,” Brown says. “We’ve got jigs … we’ve got what’s referred to as the Jig Jungle, where we have got all the back history for all these vehicles. If you were doing a restoration, or you happen to have that vehicle and you want a tow bar, we have got the ability to provide a towbar for it now.”
Yep, we agree, that’s pretty damn cool.
THE FUTURE IS ALWAYS NOW
It’s been 70 years but Hayman Reese shows no sign of slowing down. It’s factory pumps out thousands of towing products each week and its designers and engineers are constantly working on even more ways to improve the towing process, whether that is to continue to improve its highly regarded weight-distribution system (which, itself, has undergone a number of changes as a result of changes in caravan design over the years; the company still produces its original trunnion-style spring bar set-up alongside its ‘newer’ round-bar spring-bar set-up, to cater for different weight ranges) or to continue to keep up to date with the latest electronic wizardry installed as standard equipment in new vehicles.
Plus, it will also (as it always has done) keep an eye on how the towing market changes, in regards to the vehicle types used, and what type of towing they’re used for, something Gregor Brown notes when asked about the future.

“People want to tow, but the car park has shifted,” he affirms. “There’s a higher share of what we call light commercial vehicles and SUVs in the market now compared to what there was 10 years ago. I think that’s evident if you look ’round the car park when you’re driving down the highway; you don’t see the old Commodore ute any more – it has become a Ranger, and the Ranger has got more towing ability.“From towing, we’re continually looking at where the future is, how the car park’s changing, and what the needs of towing are. We will continue to look at that. We will continue in SmartCode. That will get bigger and bigger as we work with the vehicles that come to market and understand how they evolve.“That’s where we see the market going. Our focus is on that space of keeping on top and up to speed with the changes in vehicle capability and requirement.”
It’s both comforting and exciting to see such an established and highly regarded brand not wanting to sit on its considerable laurels when talk turns to the future.
AVAILABLE FROM: www.haymanreese.com.au WE SAY: We reckon us Aussies will be wandering around the back of our rigs to attach that camper, caravan or bike rack to a tow bar with ‘Hayman Reese’ stamped on its side for many years to come.
The 2023 SsangYong Musso could return to its roots, with a new report suggesting the model is set to become an SUV once again.
While SsangYong continues to sell the Musso in Australia, the badge was retired in its native country of South Korea in 2005, where the ute is sold as a Rexton Sports Khan.
Local publication Daum cites a recent study showing Koreans would like to see the Musso nameplate make a return, with an expectation the J100 concept car will adopt the moniker when it’s unveiled in its production guise in July 2022.
The Rexton will remain as SsangYong’s range-topping model, while the new-generation Musso will sit below it as a mid-size SUV – rumoured to be getting some off-road capabilities to match its rugged looks.
The J100 will follow the Korando E-Motion – the carmaker’s first all-electric model – which will launch in South Korea in the first quarter of the year. As reported by Wheels earlier this month, the E-Motion will be coming to Australia in early 2022 for evaluation by the company’s local arm.
The Korando E-Motion is the first of five electric models planned by 2025, with the J100 likely to be a candidate for a zero-emissions powertrain – possibly named the Musso E-Motion.
It’s all part of a ‘corporate rehabilitation’ for SsangYong, after filing for bankruptcy one year ago. A group of investors led by Edison Motors was successful in its takeover offer of US$260 million (AU$350m) in October, however the offer was adjusted down to US$256 million in recent weeks following closer scrutiny of the organisation’s accounts.
The Seoul Rehabilitation Court is overseeing the process, with SsangYong required to submit a feasibility plan to prove it can overcome its financial woes by March 1, 2022.
If the J100 does end up being badged as the Musso, it means SsangYong’s ute could be forced to undergo a name change in the Australian market.
- Update 1: Accidental upgrade
- Update 2: Box fresh
- Update 3: Under pressure
- Update 4: Tough lovin’
- Update 5: Shock therapy
- Update 6: Patrol gets tougher
- Update 7: Dirty tricks
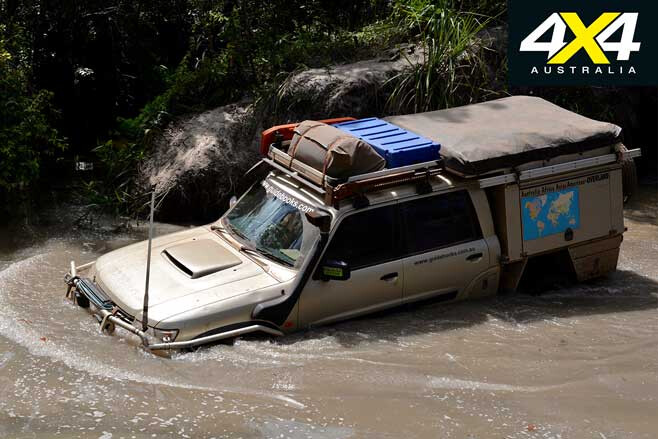
Update 1: Accidental upgrade
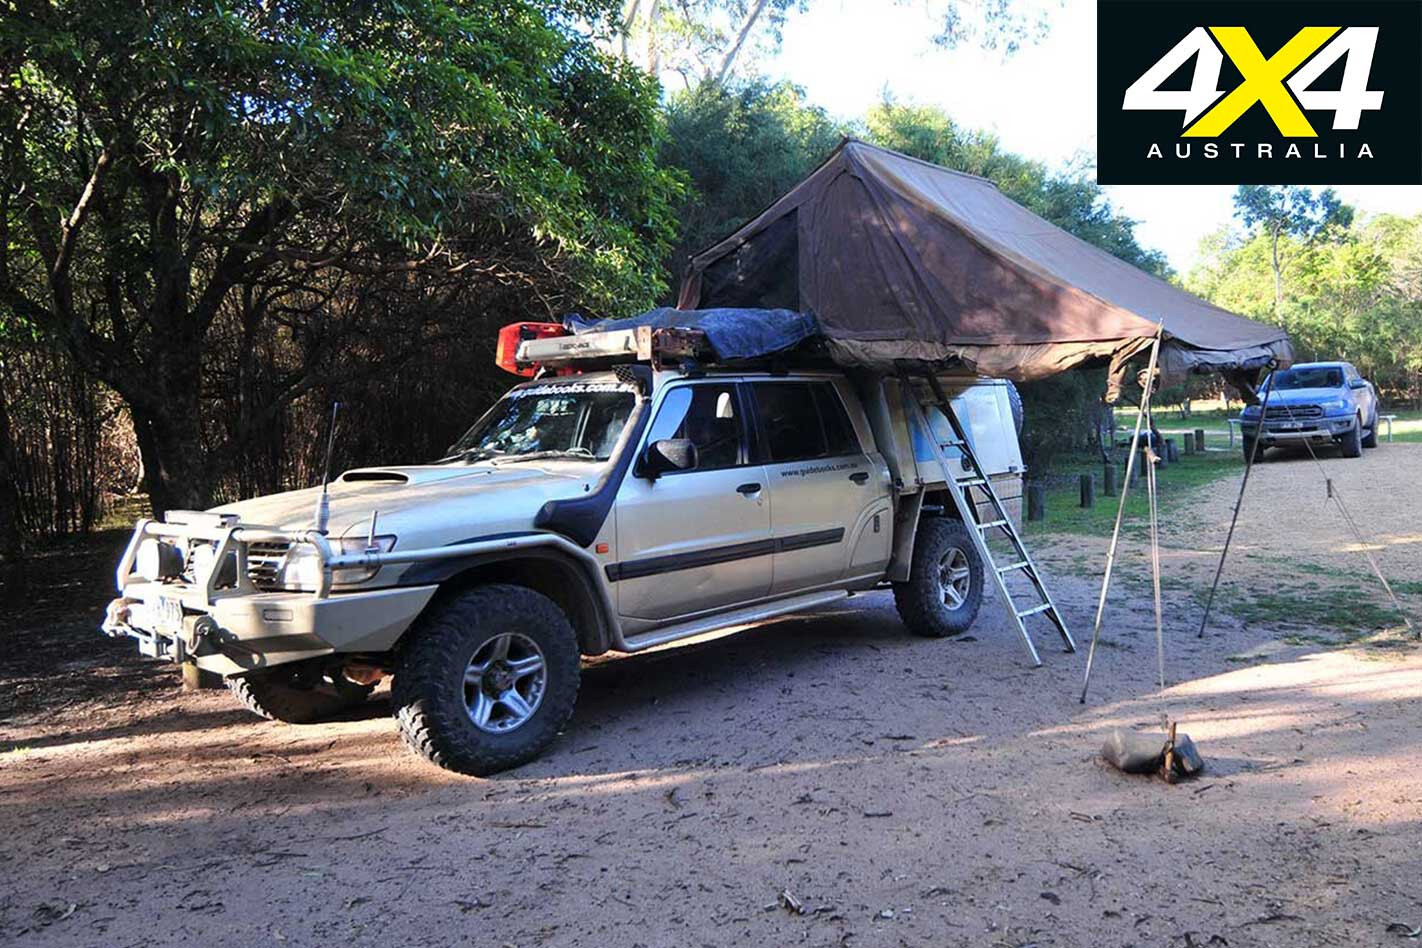
Ron’s trusty old steed loses a rear leg in the Vic High Country, prompting a thorough replacement of worn parts.
The old Patrol let me down recently, both literally and figuratively. We were coming home from an enjoyable weekend up in the Vic High Country and had just got onto the Crooked River Road, when with hardly any warning the rear wheel on the Patrol parted company with the rest of the vehicle. Talk about being dumped.
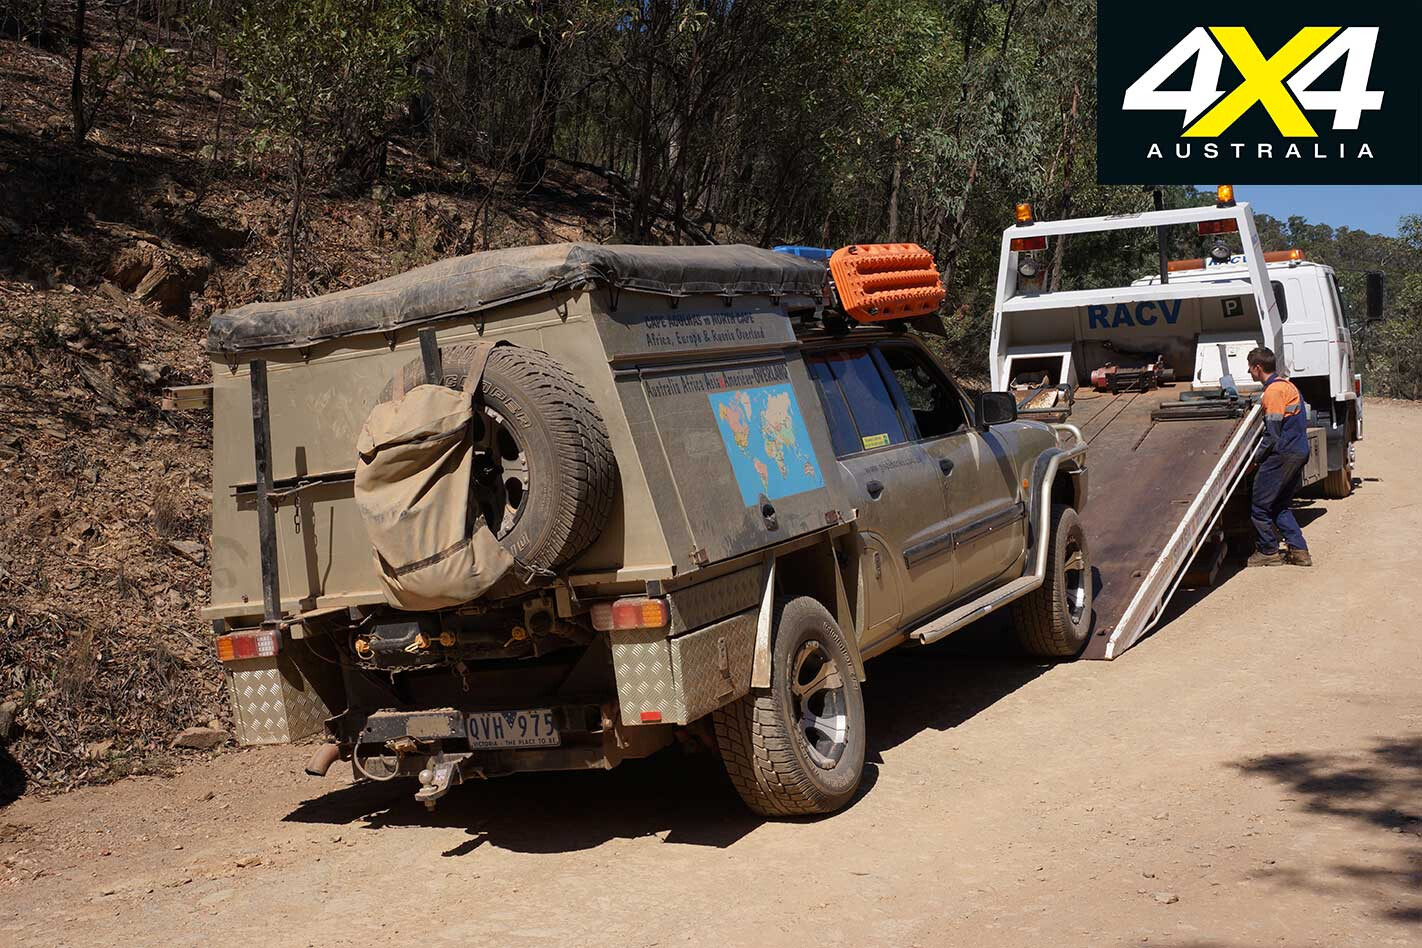
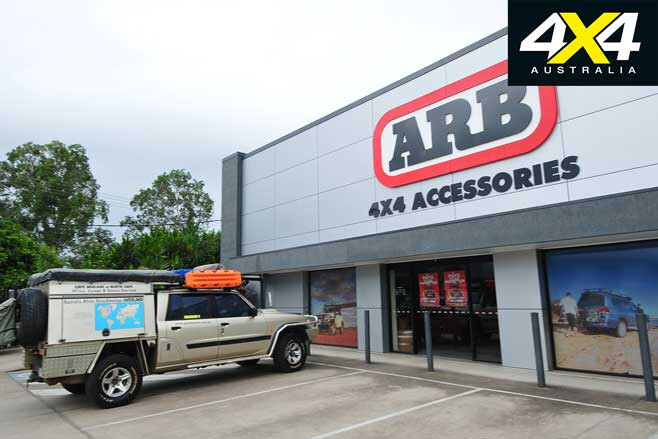
I could have repaired it myself as I had spare wheel studs onboard, but being inherently lazy and so close to civilisation I opted for a recovery and a repair job, and the boys at ARB Bairnsdale helped us out at a moment’s notice.
Then it was back to Outback 4WD in Bayswater, where they replaced all the studs on all the wheels. By all accounts studs can stretch after years of hard work and changing rims and, sooner or later, they break; and if you don’t do the wheel nuts up correctly, wheels can part company. Patrols, it seems, are more liable to do that than some other vehicles; I guess I was lucky I was on a major dirt road and not halfway up Billy Goat Bluff.
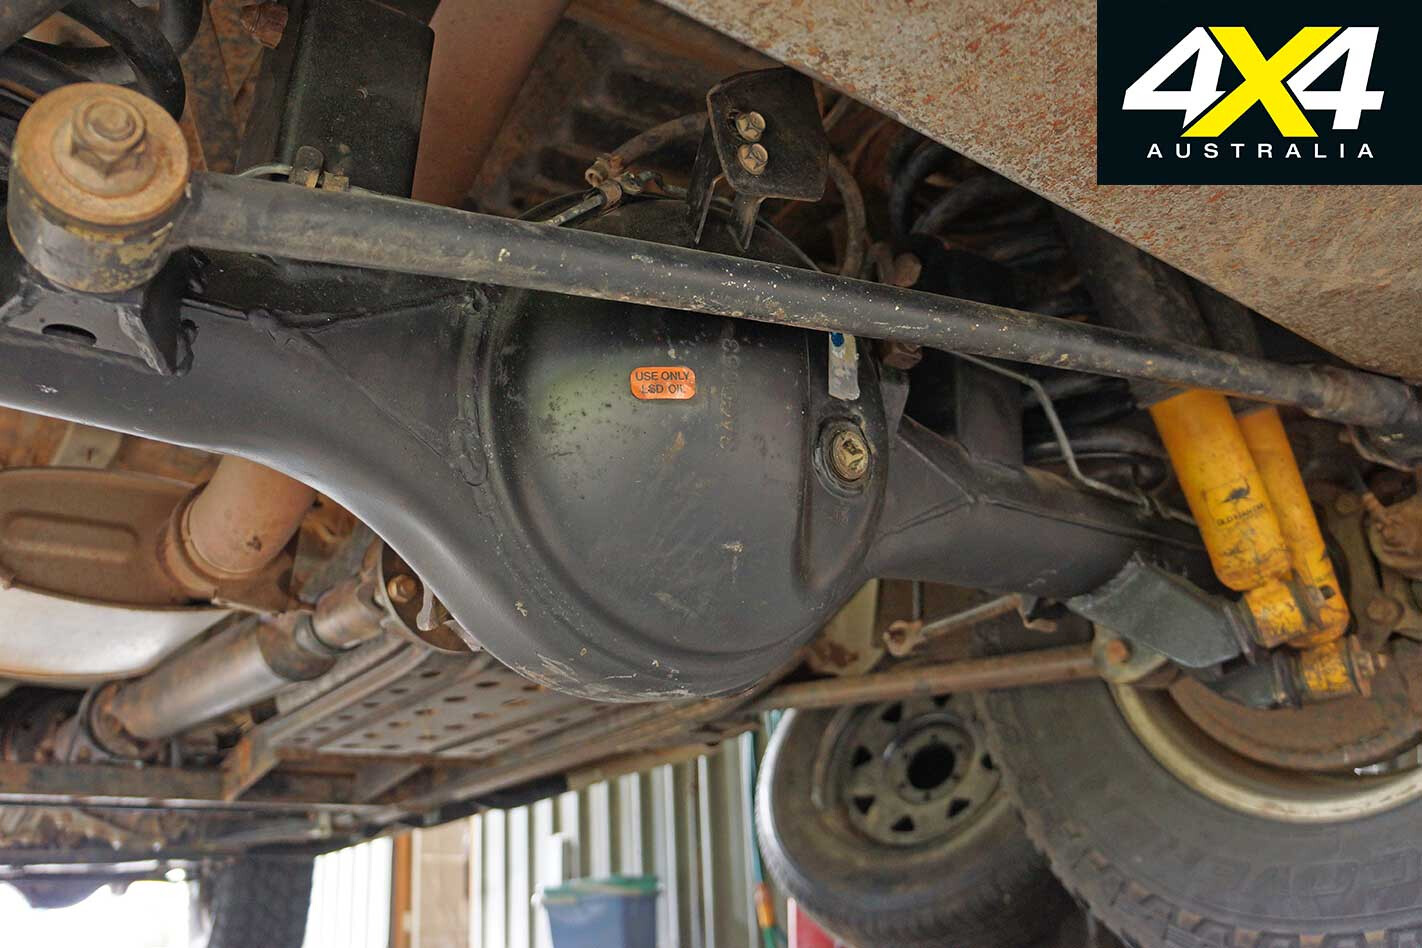
It’s been a while since the old girl has been in the mag, and we’ve done a bit of preventative maintenance over the past few months, not the least of which was a new rear diff housing. I had cracked the original back at about the 200K mark, and I had it welded more than once between then and the 400K the Patrol has now done. With another welding job required, I decided it was best to replace it.
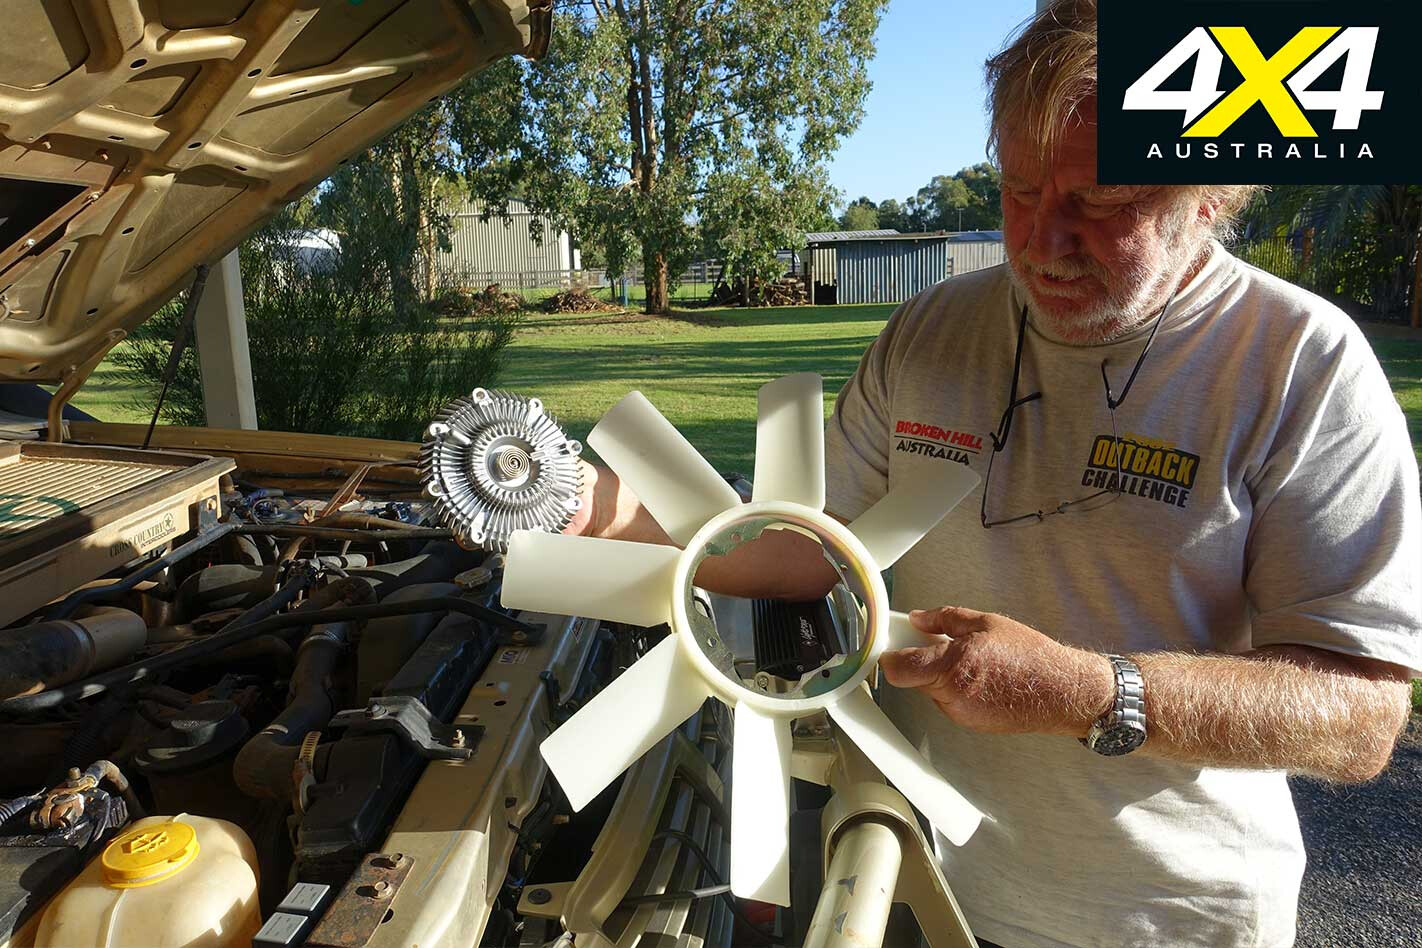
Around the same time I had Outback 4WD replace all the rubbers and bushes on trailing arms and the like, as well as fit braided brake lines to all the brakes. To help with the cooling of the radiator we fitted a GQ fan and drive hub; the fans shift more air than a standard GU fan but make more noise in the process.
I replaced the light bar that had been sitting on top of my ARB bullbar with a more discreet Lightforce single-row light bar fitted with combo spot and flood LEDs. It might be smaller and draw less power, but the light output is amazing. Wanting to improve the standard headlights, I opted for a replacement Narva Ultima LED globes which are a direct replacement for halogen globes.
As many of you would know you can easily opt for a high-performance halogen globe and, while they throw a better light, you sacrifice longevity. With the new LED light you get a bright white light coupled to a stated life of 30,000 hours. I’d be more than happy with a third of that.
Now with better lights, new studs so the wheels don’t come off, and with a full service and oil change, the Patrol is ready to hit the road and the bush tracks once more.
DATE ACQUIRED: 2001 PRICE: $44,000 TOTAL KILOMETRES: 393,000km AVERAGE FUEL USE: 17L/100km
Update 2: Box fresh
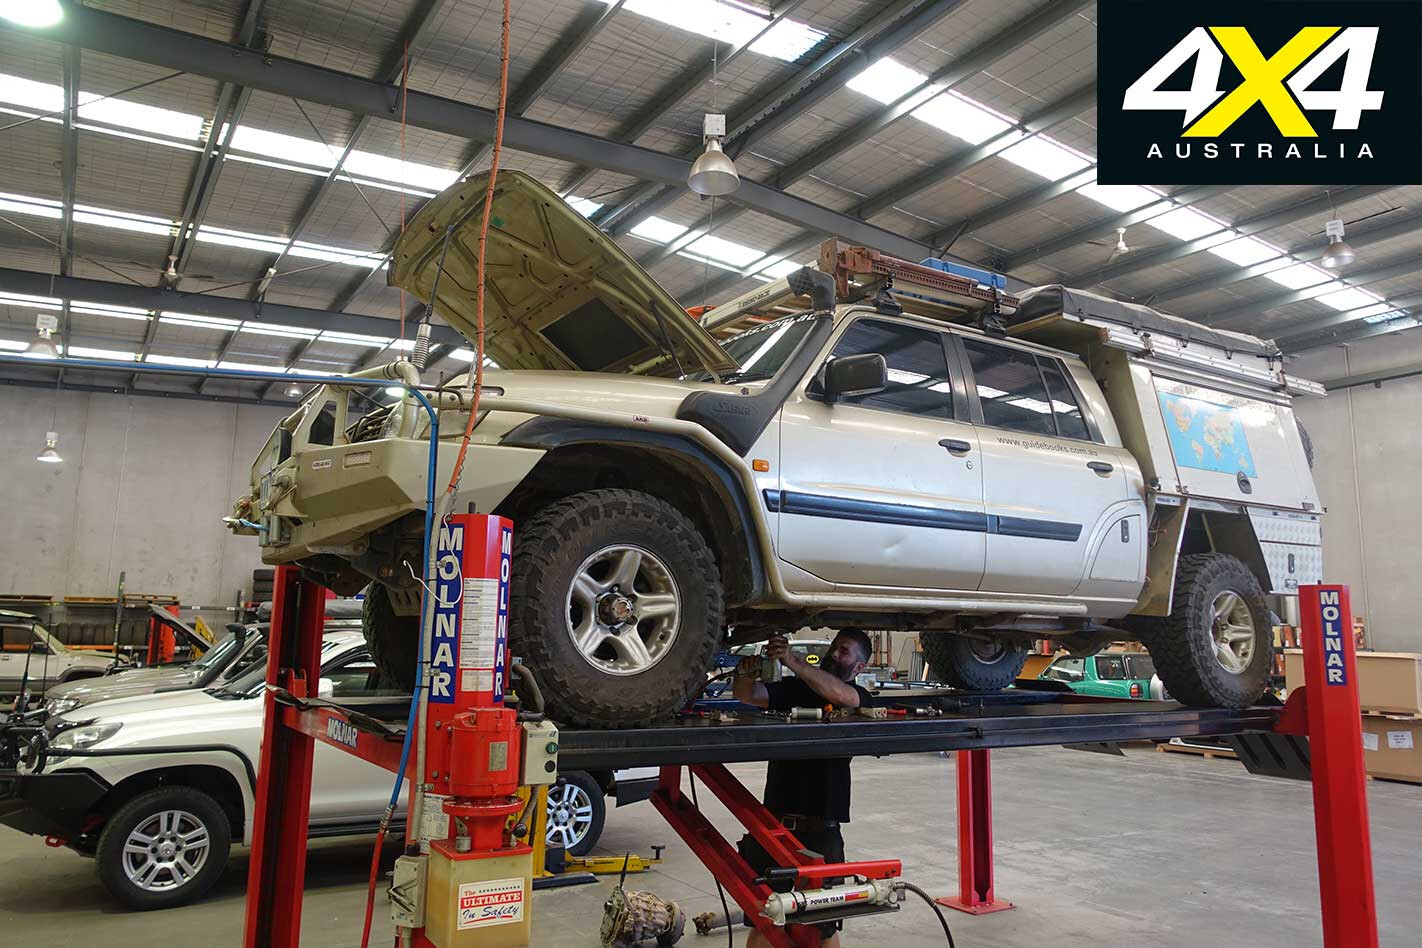
Ron’s Patrol cops a well-earned service, with a rebuilt gearbox and new transfer box among the changes.
Over the past few months the 2001 Nissan Patrol has been having a holiday on the south coast of NSW and up in the high country of Victoria.
On these trips the gearbox occasionally growled at me and, as we clocked up more kilometres, it became more regular. With 400,000km on the clock I guess I shouldn’t complain, so before it expired on me completely and left me stranded somewhere in the scrub I thought I’d better do something about it.
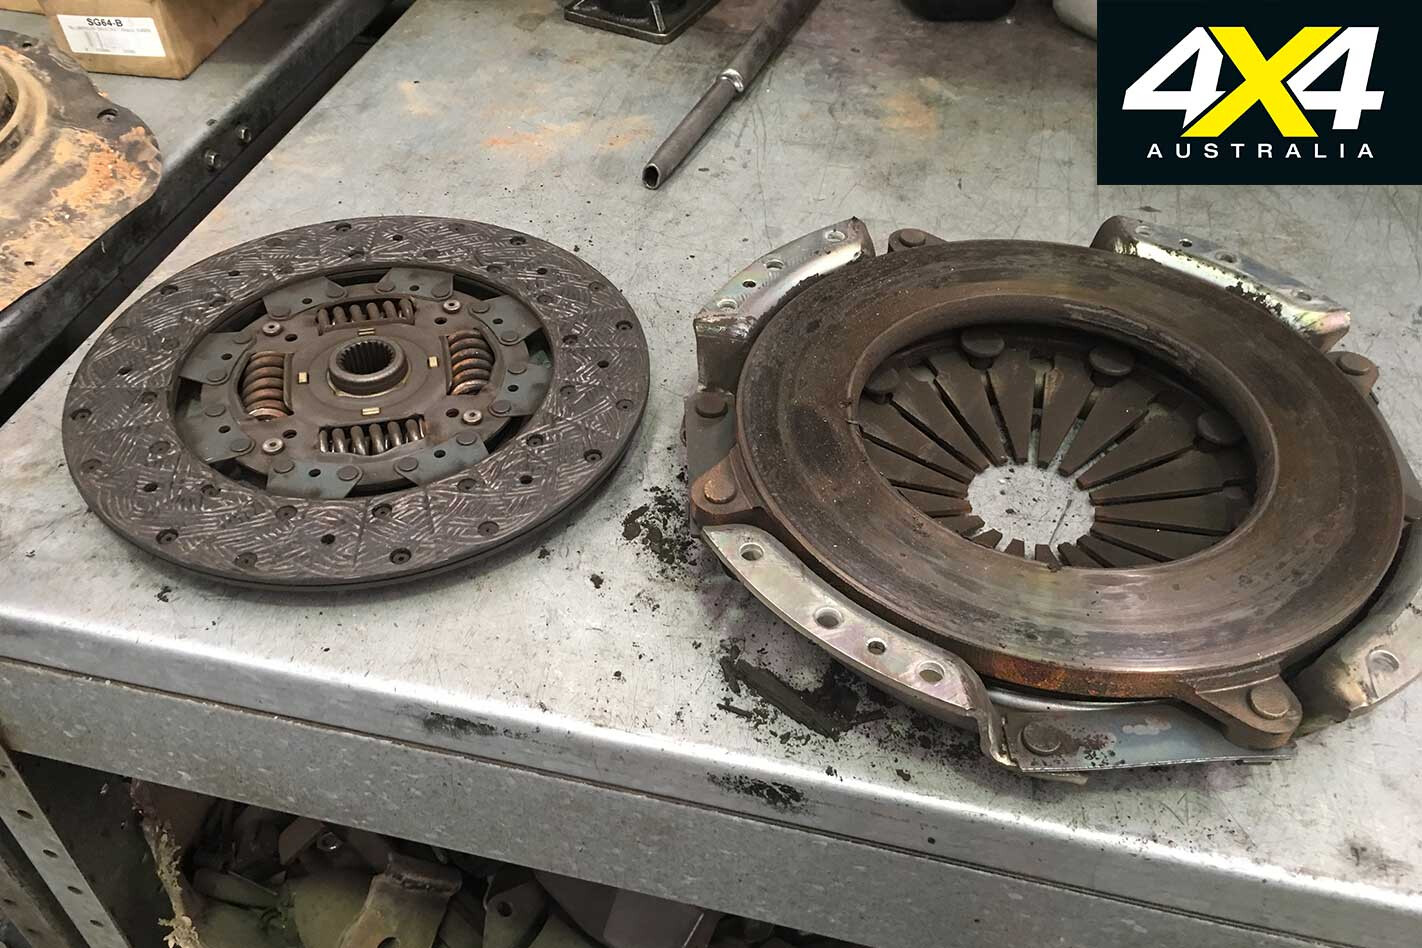
Off we went to Outback 4WD in Bayswater (Vic) and they soon had the gearbox out and sent off for a rebuild. It turned out that all the bearings were showing signs of wear, while the gears themselves were pretty good; so a few grand later we had the ’box back at the workshop and ready to go back in.
While the ’box was out we also machined the flywheel and fitted a new clutch. Again I went for a Safari Tuff clutch from Exedy, as the previous Safari unit had performed faultlessly over the last 250,000km or so in all sorts of terrain and towing different sized vans and campers. The clutch was still okay and wasn’t causing any problems – and it probably would have lasted another 20-30,000km – but it made sense to drop in a new one while the ’box was out.
Previously, I had learned my lesson with two OE clutches failing in the first 150,000km, so I knew they weren’t the units I wanted. Exedy claim the Safari clutch offers 25 per cent more clamping pressure without any noticeable effort on your part, and I’ve certainly found that. I had also been warned on both occasions that the clutch can rattle and be a bit noisy, but, again, I haven’t noticed that… maybe it’s because I’m deaf in one ear.
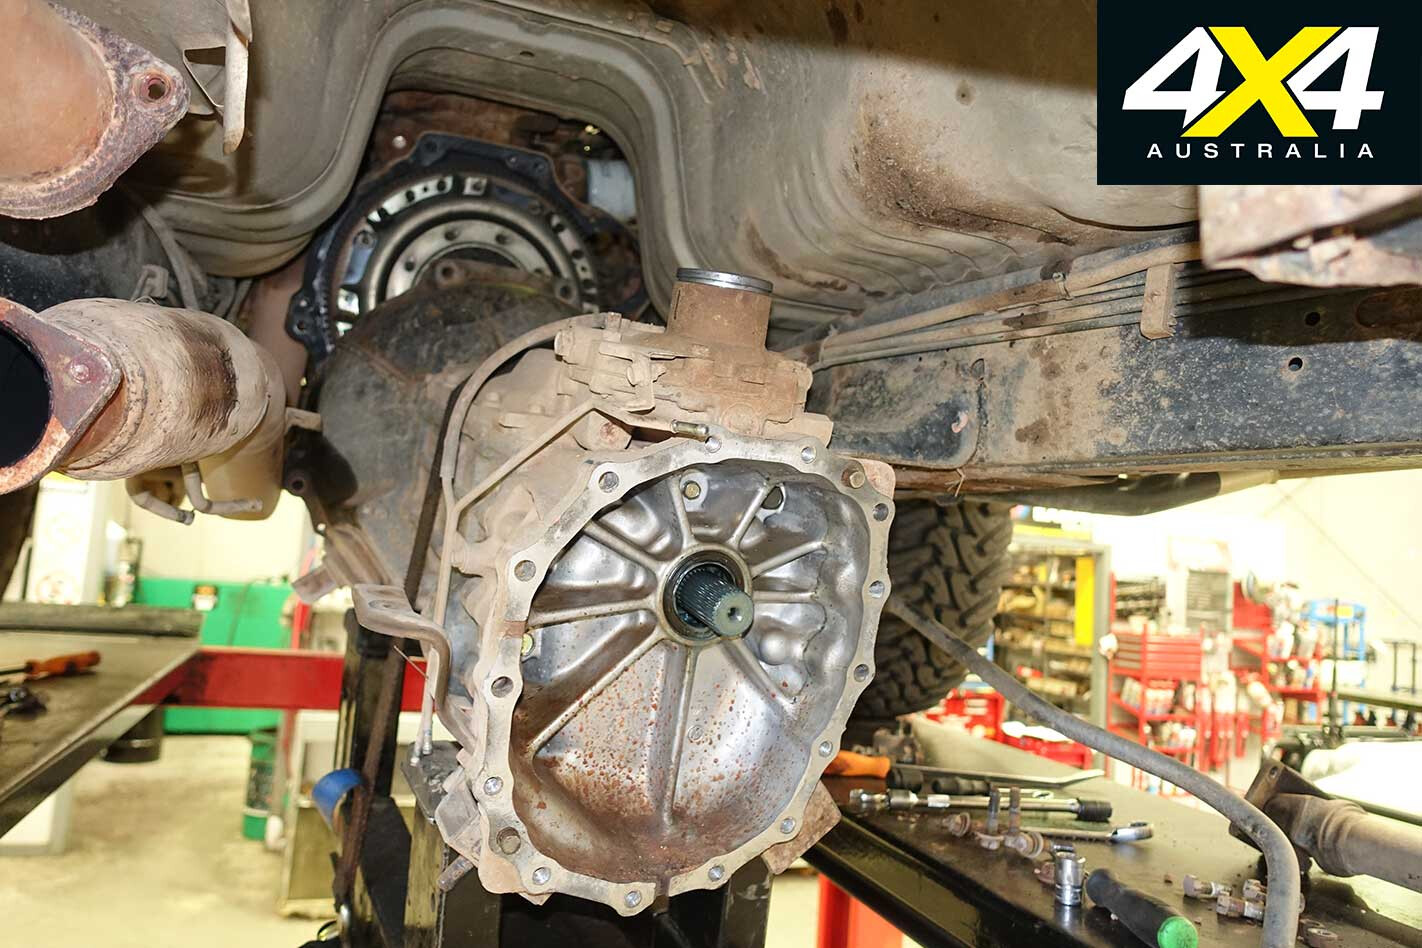
The transfer box with the Marks 4WD Adaptors low-range gearing in it was also overhauled with new bearings; although, again, it wasn’t really necessary. I’ve found the extra-low range gearing the Marks 4WD Adaptors mod has given me is handy when I’m towing in the really rough stuff, as the extra torque available and the low speed you can enter an obstacle with is not only handy, but there is less chance of doing damage to panels and vital underneath components.
As well as the gearbox and transfer box the crew at Outback overhauled the front axle CV joints, swivel hub seals and bearings. With the exhaust showing signs of wear and tear and a few broken brackets, we patched it up for another round or two in the scrub.
However, it won’t be long before we’ll have to source a replacement unit and, at this stage, I have no idea which one to go for. As I intend to keep the old girl for a few more years, perhaps a stainless steel unit is the way to go. If anyone has a recommendation, let us know.
Finally, with a service the old Patrol rolled out of the workshop ready to hit the road once more, the first trip being a quick run up to the scrub beyond Broken Hill at Easter.
We might see you on the road.
TOTAL KILOMETRES: 413,000km KILOMETRES SINCE LAST UPDATE: 20,000km AVERAGE FUEL USE: 16L-17L/100km
Update 3: Under pressure
It’s far from plain-sailing for Ron’s Patrol over the past few months.
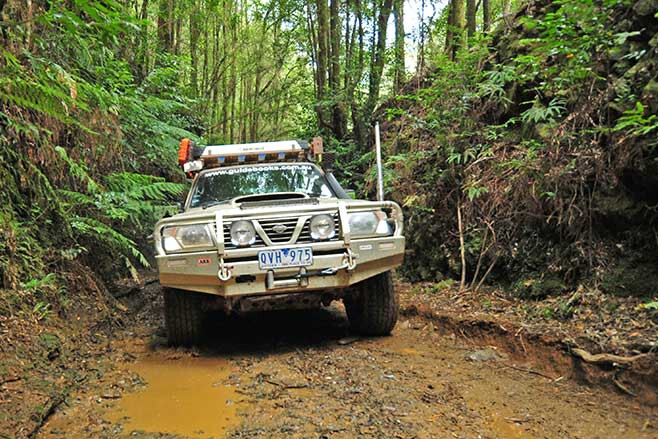
We’ve had a few hard months in the ol’ Patrol. First we headed for Central Australia and explored the East MacDonnell Ranges, before wandering along the Plenty Highway and then down the Hay River Track into the Simpson and on to Birdsville.
With hardly time to catch my breath, or for the Patrol to have a rest, we turned around and followed my son and his Moon Tours trip across the Madigan Line back to Alice Springs. Without any further ado we then headed to Cairns and up to Cape York, running all the hard tracks including Frenchman’s, the OTL and the Old Coach Road to Maytown.
Before setting out we fitted a new set of Cooper AT3 XLT tyres, but the tyre-fitting place replaced some of the wheel nuts with the wrong ones, which kinda buggered the threads on the studs. Luckily the crew at Outback 4WD picked up on the fault while the rig was being serviced and undertaking a pre-trip inspection, otherwise I’m sure I would have lost a wheel or more.
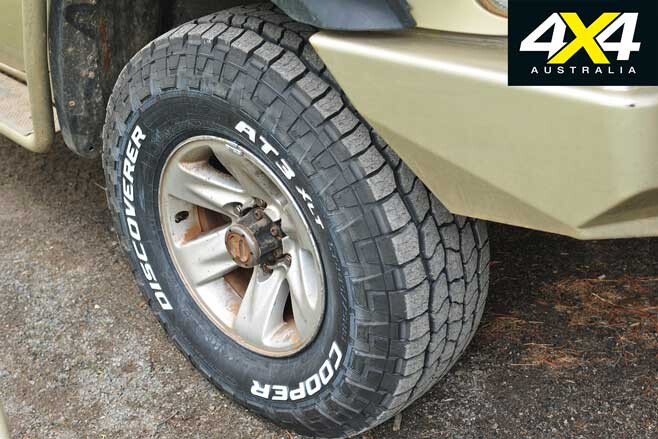
Anyway, the AT3s are performing beautifully and we’ve punished them in all sorts of terrain over the last 12,000km or so, from desert sand to Cape York mud to rocky trails. They are quiet, responsive and steer well on both blacktop and dirt, while the fuel economy has improved over the more aggressive ST Maxx tyres we had been running for some time. Well, you’d hope that’s the case when you go to a less aggressive tyre.
However, we’ve had our fair share of issues while on the road. In the Eastern Macs I had a ‘knock’ coming from the front wheel which turned out to be a castor bush flogging out. A quick phone call to the ARB Alice Springs crew and a trip into town and we were soon on our merry way.
North of the Plenty Highway, where we went wandering and exploring, the Patrol developed a coolant leak from the bottom hose on the radiator. It turned out to be just a faulty hose clamp but it again highlighted the importance of regularly checking the vehicle when on an outback trip.
Then, while wandering over the floodplain of the Diamantina south of Birdsville, I noticed a couple of missing bolts on one of my free-wheeling hubs, with the hub very loose. That seems to have left the hub damaged and noisy at times, but it got us home.
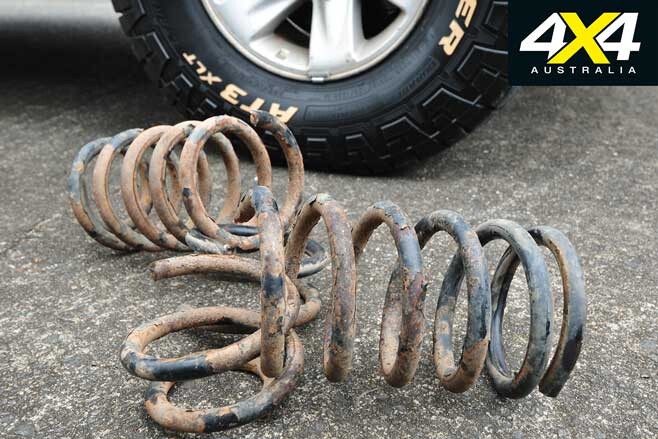
The next thing, during the course of the two crossings of the Simpson Desert, I noticed the front-end was bouncing more than normal. With no time, we waited until we got to Cairns and had the rig serviced by Wayne Boylett Mechanical (wayneboylett.com.au), where he picked up on the two (!) busted front springs. No wonder we were bouncing. Another rushed call, this time to ARB Cairns, for a couple of OME springs and we were soon on our way.
The Cape York trip was pretty uneventful for the Patrol; although, a few other vehicles in our group had issues which kept us on our toes and working into the night to keep them going, but that is another story. Suffice to say, the Patrol is now back at Outback 4WD (outback4wd.com.au) in Bayswater, getting a good going over and a major revamp.
TOTAL KILOMETRES: 428,000km KILOMETRES SINCE LAST UPDATE: 15,000km AVERAGE FUEL USE: 15L-16L/100km
Update 4: Tough lovin’
Ronnie’s Patrol gets new CVs, shocks and free-wheeling hubs… well, when they finally arrive.
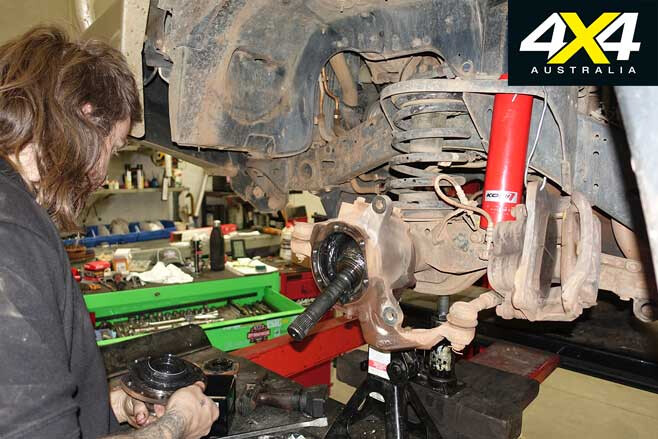
The ol’ Patrol was in more dire straits than we originally thought.
I knew something was wrong as we clambered out of a canyon that had formed at the Palm Creek crossing up on Cape York. The ol’ girl got hung-up at the top of the bank and it was noted then that, even with front locker engaged, there was no drive going to one of the wheels; a bad sign.
We mucked around with the hub and got some semblance of drive out of it, and we continued on the OTL track and then the Laura-Mayfield road without any further issues, barring the occasional growl from the front end. Still, she got us home with barely a whimper … well, maybe a snarl or an occasional clatter from the front end, but that was all.
When looking for the growl back at Outback 4WD, it became obvious it was more than a noisy free-wheeling hub.
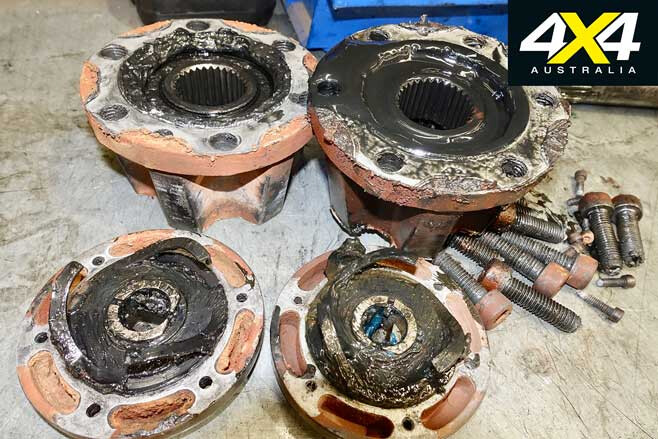
It was then I learnt from the experienced gurus at Outback 4WD that while there are good free-wheeling hubs, there are better ones. After a bit of deliberation I ordered a set of genuine Nissan manual free-wheeling hubs (no auto-lock facility) as found on the Nissan GU cab-chassis. They’re not particularly cheap, and as we go to press we’re still waiting for them to come in – maybe they are on back-order from Japan!
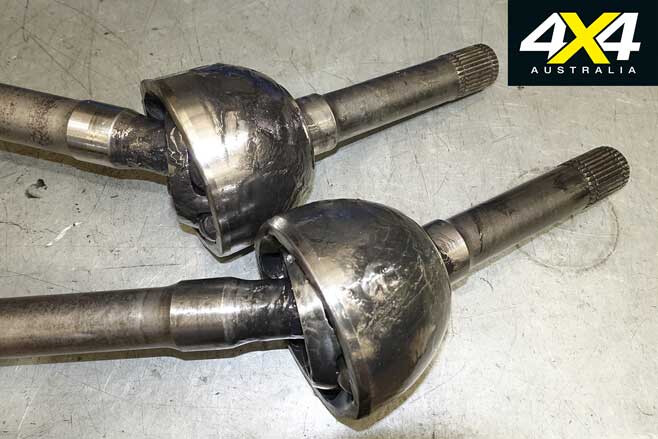
In the meantime we had a good look at the axles and CV joints. While neither of the CVs featured broken teeth, busted cages or worn balls, one of the CVs was decidedly stiff in its articulation, so we thought we’d change both. The axles again had nothing really wrong with them but were showing the strain of more than 430,000km of travel, so we changed both. Again we opted for a set of genuine axles and nothing super-duper or costing a grand or more. The diff itself was still in fine form, so we let that be.
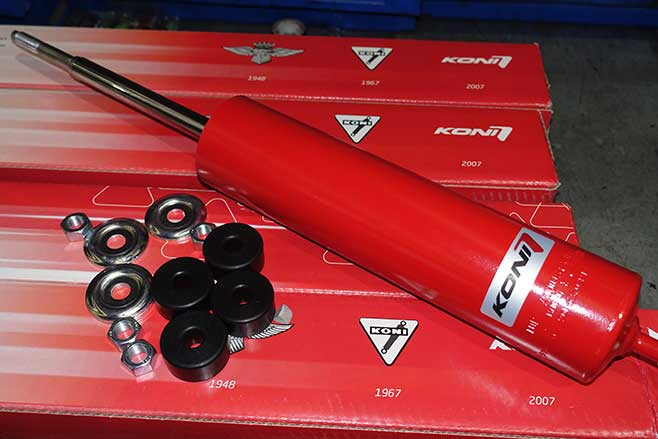
While we were giving the Patrol a good going-over, I also decided to change the shocks. I’ve had OME Sport shocks on for a number of years now and, while I’ve been more than happy with them, I thought I’d fit a set of Koni 90 Series Raid shocks to each corner.
It’s been a long time since I’ve had Konis on my 4WD (the last was on my 75 Series Troopy more than 25 years ago) and as yet I haven’t even driven out of the driveway with the new shocks, so I’ll wait until I’ve used them on a rough track or two before I let you know more about them. Suffice to say, they are more expensive than many other brands on the market; but going on my previous experience, if you want a good shock that will go the distance and you don’t want to go to a remote canister set-up, then the Konis are worth looking at.
Check them out at: www.toperformance.com.au
TOTAL KILOMETRES: 428,000km KILOMETRES SINCE LAST UPDATE: 0km AVERAGE FUEL USE: 15L-16L/100km
Update 5: Shock therapy
New shocks for an old warrior.
I have always been a fan of KONI shocks on a 4WD vehicle, ever since I had them on my old 47 Series Cruiser and then again on my younger (but old now) 75 Series Troopy.
Last year in the desert I met up with a mate of mine who once owned a major 4WD service centre, and he had just swapped to a set of KONI 88 Raid shocks on his Patrol ute. Knowing more than the average Joe about suspension and shocks I took his positive words and accolades to heart. Then with the recent on-going maintenance on the Patrol’s suspension I decided I’d bite the bullet and fit a set of KONI 90 Raid shocks to the battle-hardened Patrol.
For the money, or for not much more, you may ask why I didn’t go for a set of remote canister shocks, but I’m not a great lover of them. They seem to me, at least, to be just another item that hangs underneath a vehicle that will get damaged – or have a hose ripped off – when in the rough stuff or going cross country. And I have had remote canister shocks in the past, so I’m not coming from a completely unfamiliar or unknown point of view.
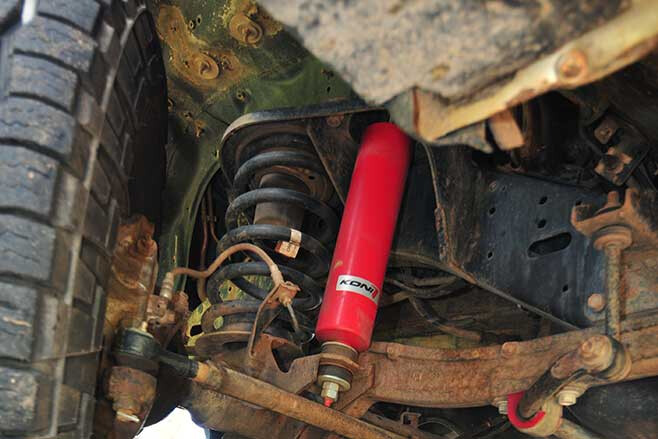
The 90 Series Raid shocks from KONI are based on the damper used in its military and truck and bus applications, and they’re made from highly refined and quality materials in its dedicated factory in the Netherlands. Each shock is valved and refined for the vehicle they are sold for, but if you’ve changed springs or had a GVM upgrade, etc., then these shocks are adjustable as well… more on that later.
These KONI shocks are of a twin-tube hydraulic design with an outer tube thickness of 2.5mm, meaning the inner reservoir tube and working area of the shock is well protected from the impact of rocks and other debris that is often flung around beneath a 4WD vehicle.
The body diameter is a big 70mm and that means more space for more oilfor much better cooling, higher efficiency and much less chance of shocker fade occurring. For added strength and reliability there is a 42mm diameter piston and an 18mm hard-chromed rod doing all the hard work; while high quality seals and solid robust fitting attachments, welded all around, add to the overall reliability score.
In addition to the adjustable rebound, these shocks feature an internal bump stop which adds extra security in case of savage compression impact.
There are a couple of other attractions that make the KONI a shock of choice for many outback travellers. One, they can be rebuilt if and whenever required; although, I’ve never had to resort to that in the past.
The big thing with these shocks is you can adjust the rebound force in order to adapt the shocks to your springs and the loads you carry. This takes just a bit of fiddling – temporary removal of the rubber bump stop – and if you can make sense of the guide that is supplied with each shock, you are doing well; better to head to YouTube for a short video on how to do the adjustment. It’s easy once you know how!
The crew at Outback 4WD set all the shocks before fitting them to the Patrol. Out of the box the shocks come with the valving set as low as they go to give, for many, a pretty soft and suitable ride. We cranked ours up to Stage 2 (two clicks clockwise, each click requires a turn through 180°) all around. Don’t forget to put the rubber stopper back in place!
Then the crew fit the shocks to the Patrol. Once again it’s all pretty easy, but do not tighten the mounting nuts and squash the shock mounting rubbers too much; take note of the supplied diagram.
So, what were the results and how did he Patrol drive, on- and off-road? Our recent trip to Tassie answered many of the questions. On winding mountain roads, the shocks allowed the vehicle to handle well, being comfortable through speed humps, potholes and the like, while keeping body roll to a pleasant minimum. Still, I’ve got a bit of adjustment to do, so I’ll make them ride a bit firmer to see if I prefer that.
In the rougher stuff the suspension articulated really well – much more than when I had the dual shocks fitted to the rear (more from the way they were mounted than anything else). Now the Patrol can really stretch its legs while keeping sudden jolts to a minimum.
We never had any long sections of corrugations to test the shocks over while In Tassie, but from past experience on the Gunbarrel and other long-distance, corrugated desert roads, these shocks never got hot to the touch and never experienced any shocker fade.
As far as price goes we’ve listed the RRP, but you may get them a little cheaper if you shop around. Finally, the shocks come with an unlimited kilometre, three-year warranty, which is bloody good. So, my final thoughts?
Well, I would not have gone to these shocks if I wasn’t sure of what I was getting. I’m super pleased with them and I’m looking forward to many kilometres of dependable and pleasant travelling.
WHERE: www.toperformance.com.au RRP: Front (pair) – $1194; Rear (pair) – $1236 WE SAY: Great shock. Reliable and durable, with excellent ride characteristics.
Update 6: Patrol gets tougher
A bent rear axle housing gets straightened.
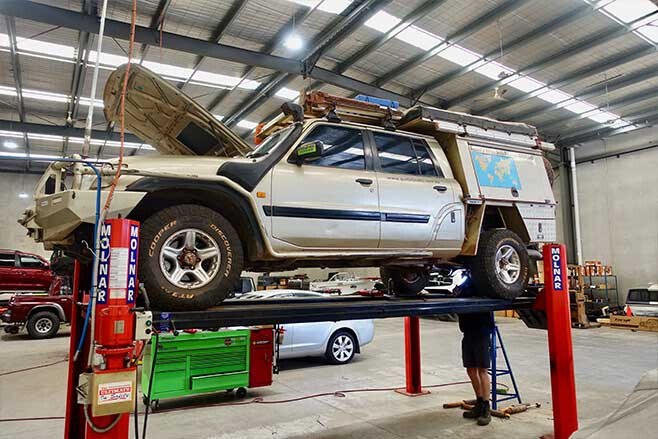
After our workout and heavy recovery job down on the west coast of Tassie, I had the Patrol back at Outback 4WD for a going over and a good service.
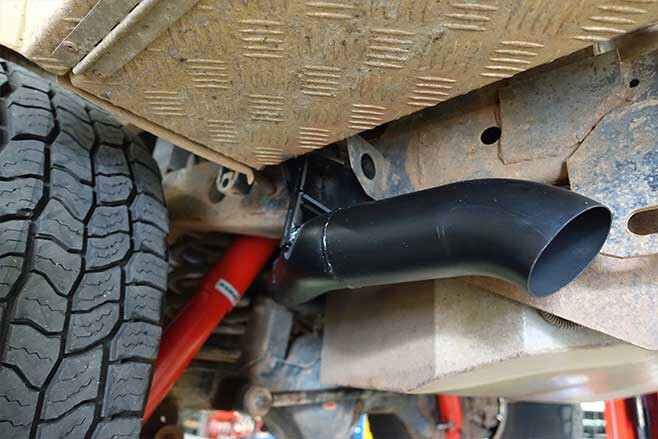
We had done a lot of work on the ol’ girl before we went down to our Island State, which included a new three-inch mandrel-bent exhaust system; a new steering damper; new panhard, sway-bar and lower radius arm bushes; along with a new steering arm rod.
We also adjusted the engine valve clearance as well as a few minor jobs to keep the Patrol reliable and performing well. While we were down in Tassie we also staked a tyre on one of the tracks and the spare was an oldy, so once back home I took the opportunity to fit a couple of new Cooper AT3 XLT tyres.
I’ve got Cooper S/T Maxx tyres on the Cruiser and on my Ram 2500, but after having driven on the AT3s for some time now I really liked the handling and quietness of these tyres and their off-road ability in all conditions. Sure, they don’t have the mud-flinging ability of a genuine mud tyre, but they are a bloody good all-round compromise.
We also adjusted the new Konis we had fitted before Tassie, to make them a bit firmer, but I’ve got to say I’m very happy with their performance and the ride they offer under all conditions.
But the biggest job was one I’ve been wanting to do for a while now and the recovery and tow job we performed on a very heavy 6WD vehicle highlighted the bent rear axle housing. I’m not sure when that started but it got to the stage where we had to do something.
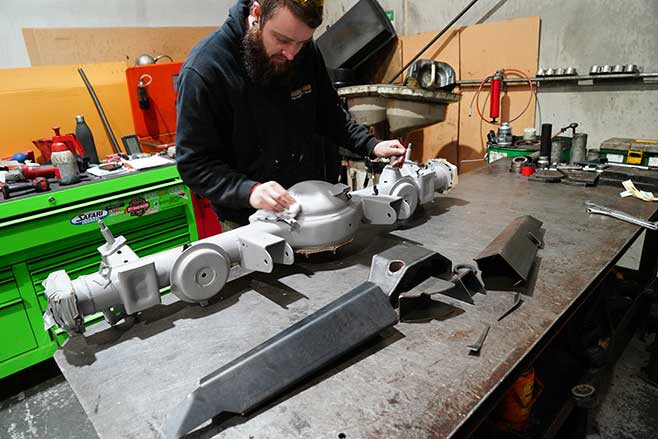
First up we rolled the rear suspension out from underneath the Patrol and then went and found a replacement axle housing, making sure it was perfectly straight. Then we went looking for a strengthening kit for said housing.
Superior Engineering in southern Queensland offer a wide range of accessories and equipment to upgrade suspensions and drivelines, so we opted for one of its axle kits. It wasn’t particularly cheap but it is well-designed and made, and it fitted the housing perfectly.
The brackets and supporting infrastructure were all welded into place by the crew at Outback 4WD, and during this process you have to ensure the axle housing doesn’t get too hot and deforms, even slightly. Then the internals were refitted and the axle rolled back under the Patrol, everything reconnected and the diff filled with oil.
That sort of rounds out the strengthening process on the Patrol, which was started years ago when I stretched the chassis to make the Patrol into a dual cab. Then also strengthening the shock and spring towers.
We are also about to fit a new and larger 1800W full-sine wave Projecta Inverter. You have to run some dedicated wiring for a unit of this size, so we’ll let you know the details in a further update on the ol’ girl.
The Patrol is back on the road and all we’re waiting for is the gates to open here in Victoria and we’ll be out on the tracks. What was going to be a desert trip for the Patrol’s next sojourn looks like it’ll be a High Country tour.
TOTAL KILOMETRES: 435,000km KILOMETRES SINCE LAST UPDATE: 6500km AVERAGE FUEL USE: 15-16L/100km
Update 7: Dirty tricks
Mud and slurry cost us a fortune.
We’ve just returned from a six-month, 20,000km trip that took us across the Simpson and around Central Australia, before returning home for a quick stop and to pick up our camper.
Then we headed to the west coast of SA and through the deserts up along the Beadell Roads to Wiluna, before cutting across the Pilbara to the coast at Ningaloo Station.
From there, we wandered back through the goldfields region of WA before heading to Victoria and fleeing, with the threat of a COVID closure upon us, to Queensland and Cape York. It was a hell of a trip and the ol’ Patrol revelled in its long hauls and dusty delights.
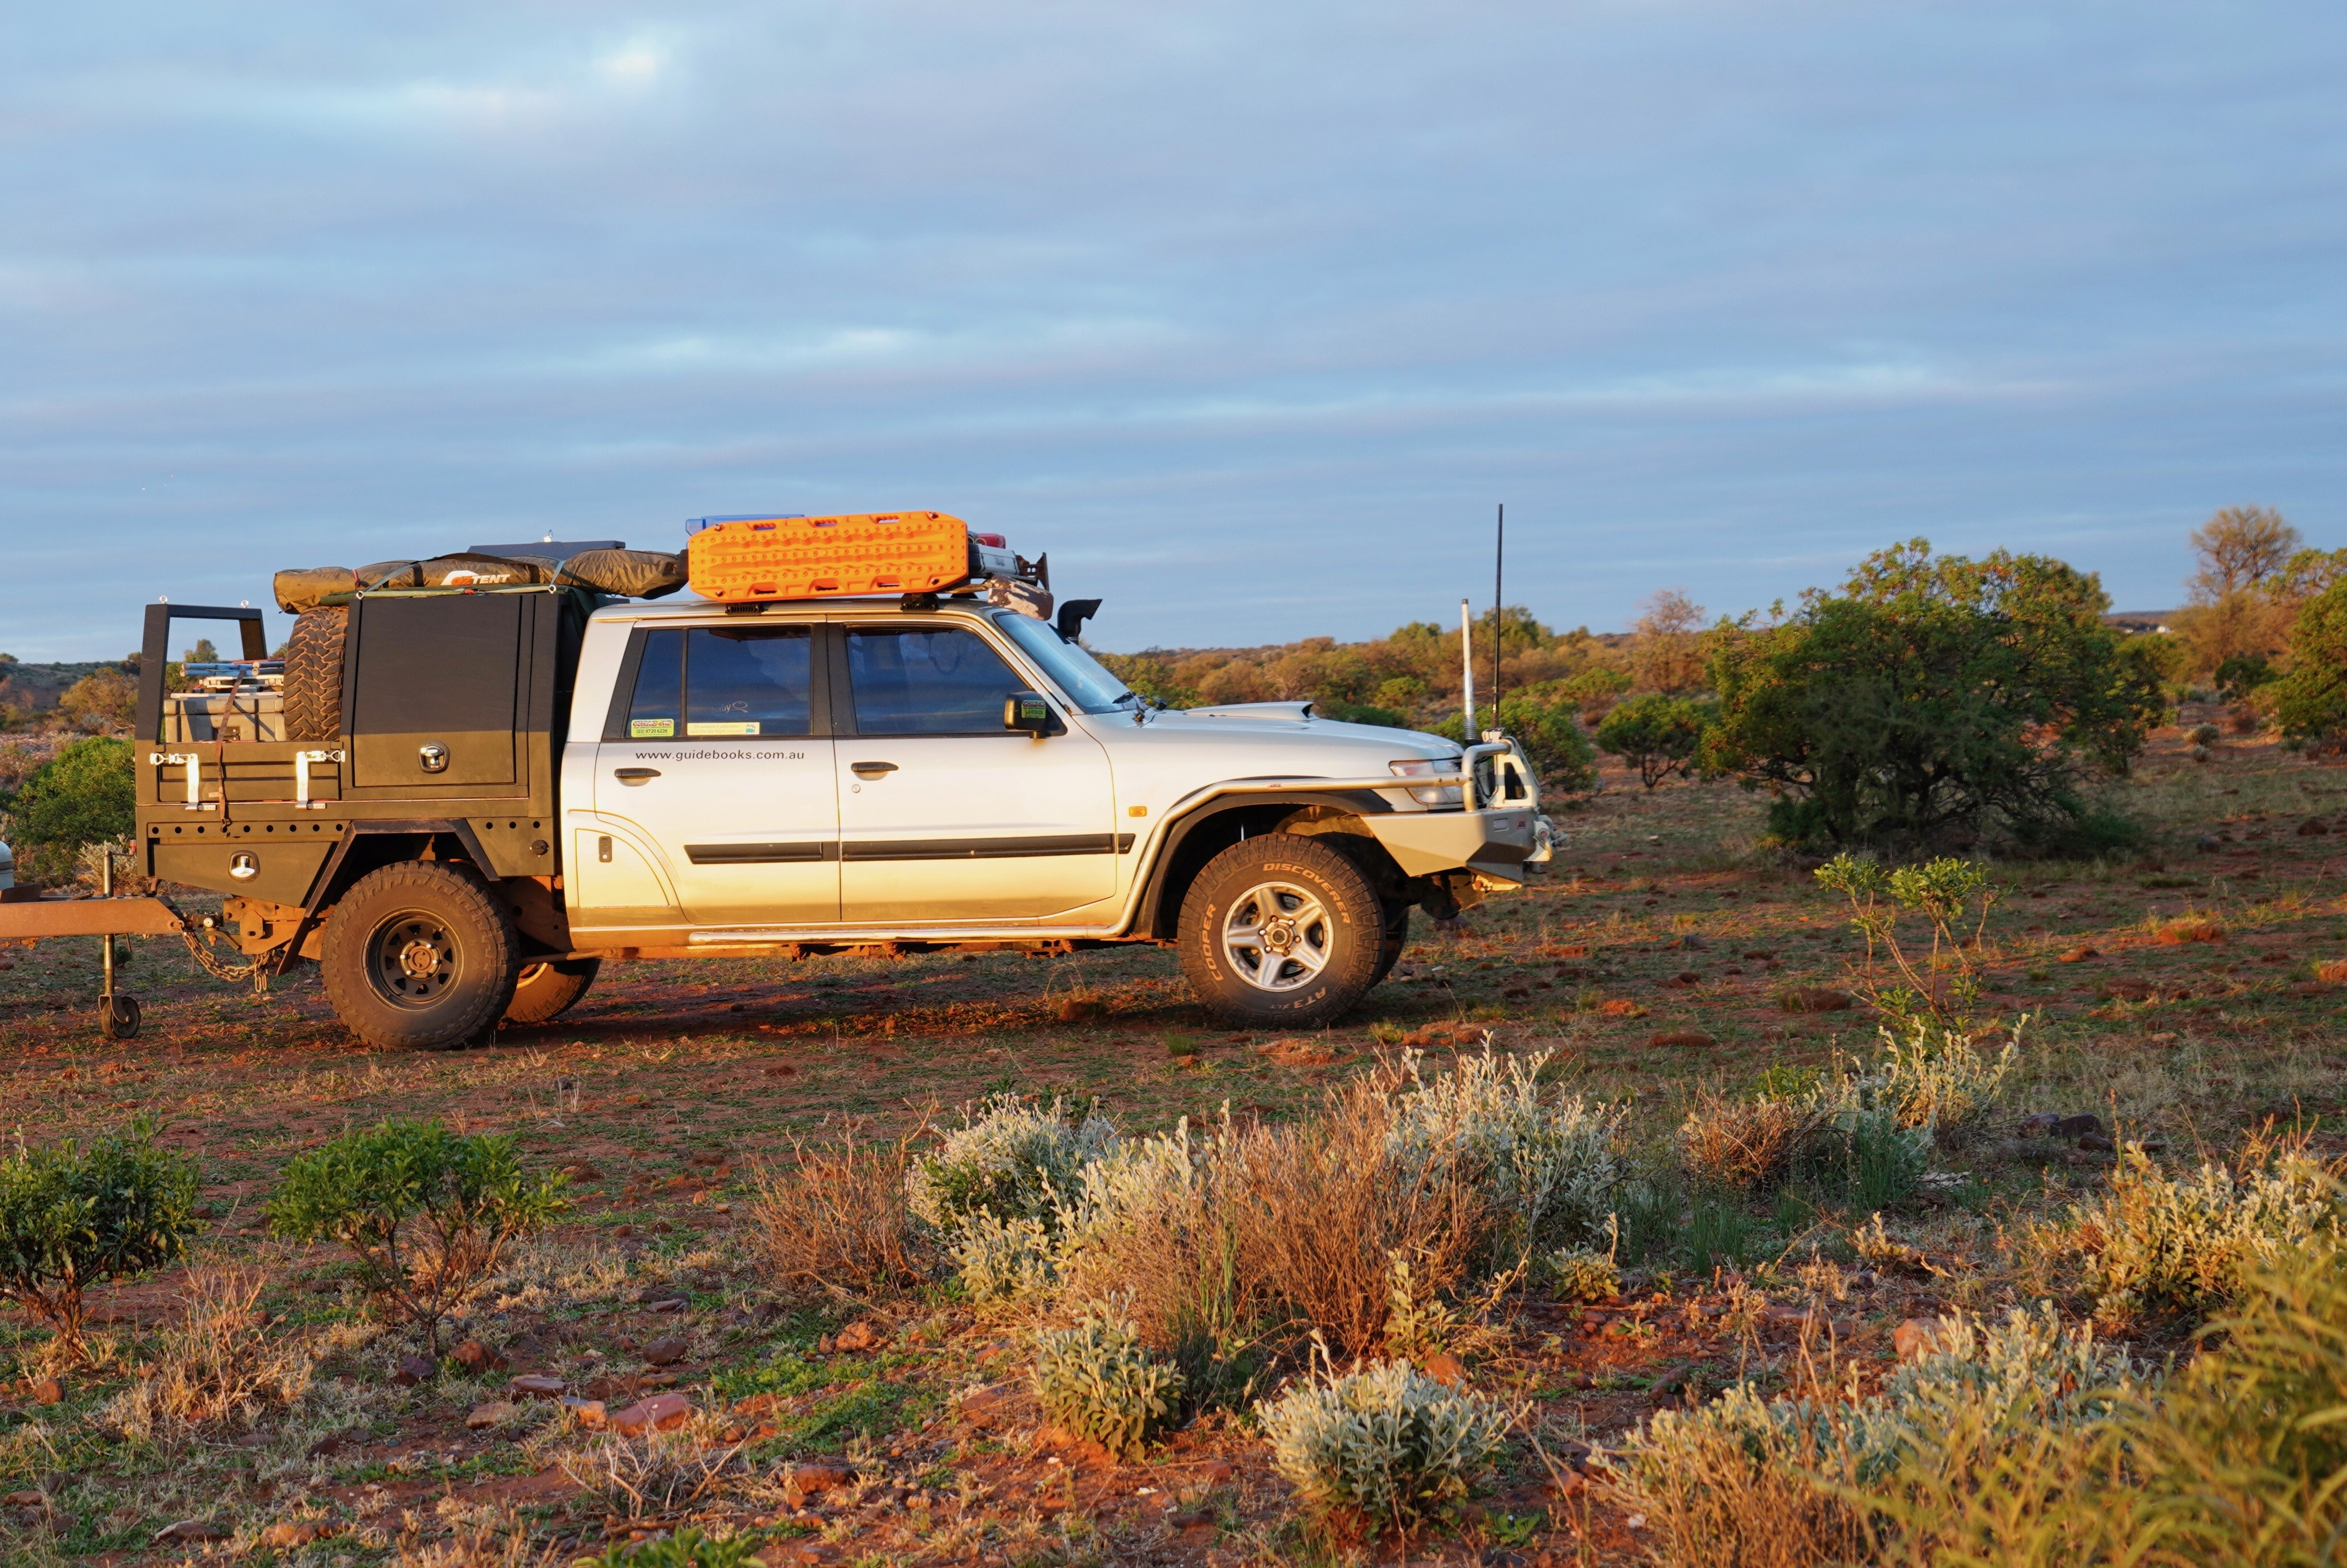
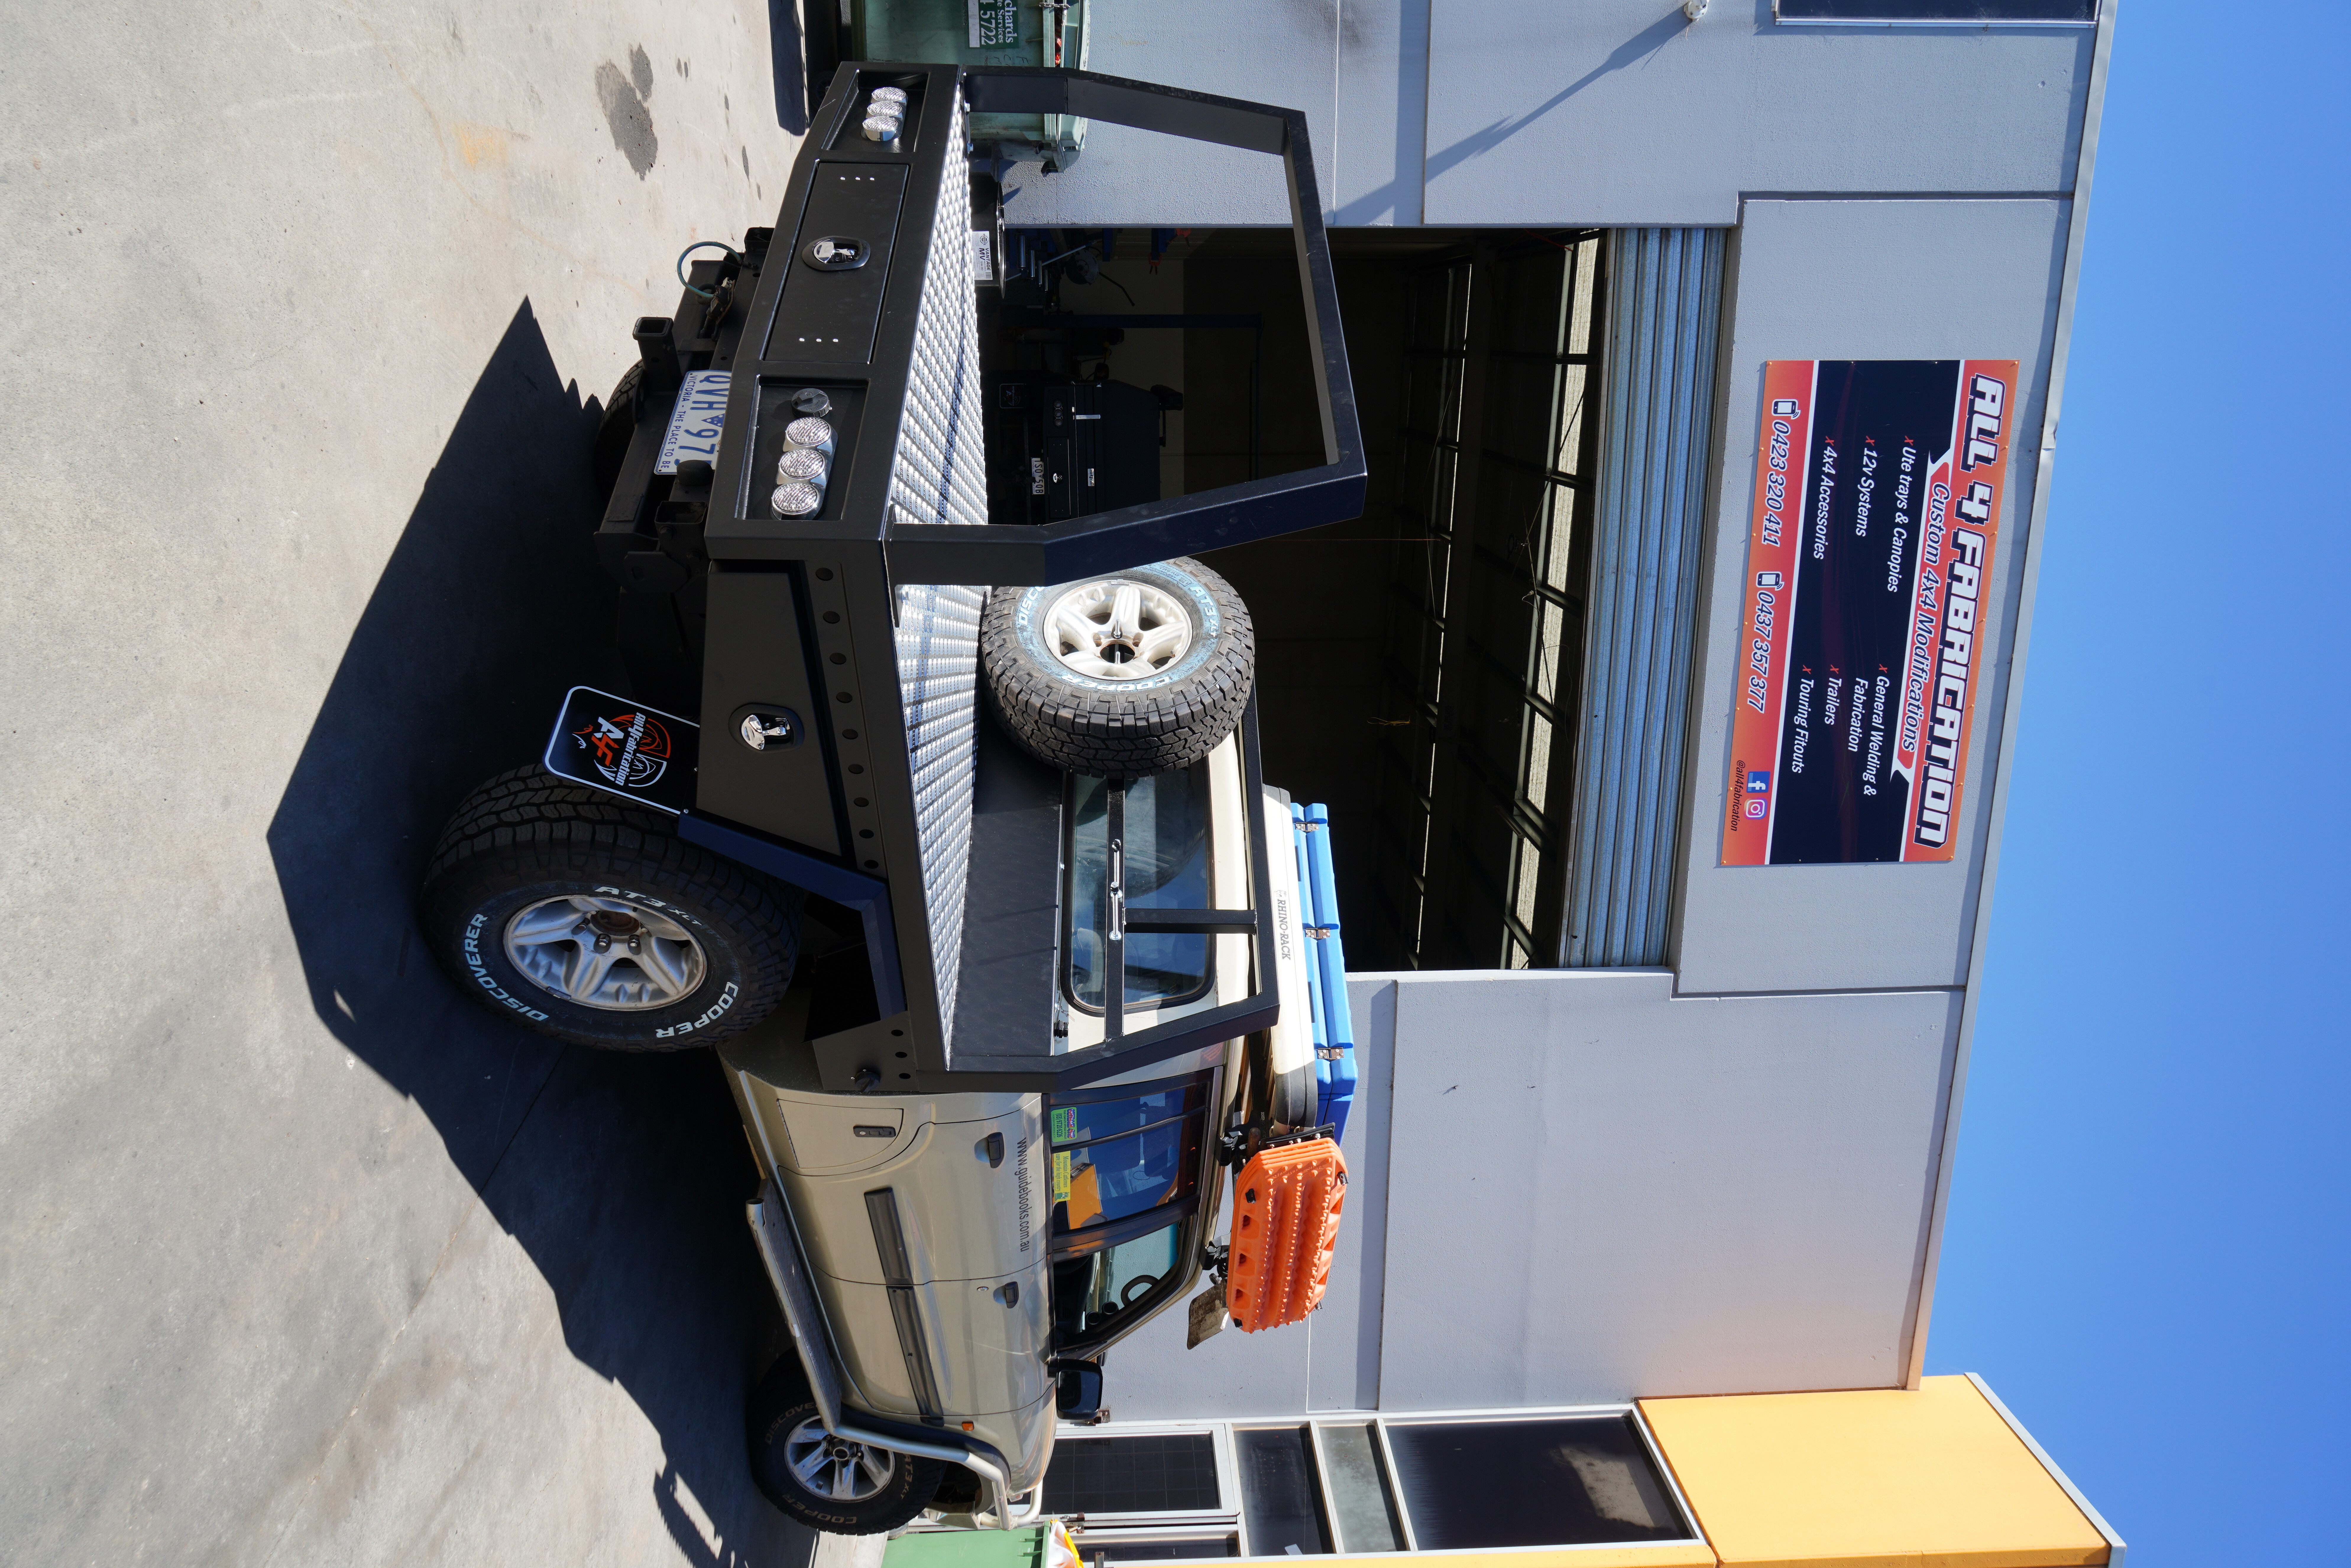
After our trips last year, we decided the Candy Camper canopy was coming off and we replaced it with a new steel frame-cum-alloy tray and fridge box from All4Fabrication.
Based in Pakenham, Victoria, the crew did a great job and built in a 40-litre plastic water tank to the headboard, while under the tray is a full-length slide-out drawer, with under-body boxes gracing each side of the tray. We wired in connections for a fridge, some interior lights and added an exhaust fan, a drop-down fridge slide and a Projecta Pro-Wave 600W inverter.
Before we left, we had the Patrol back at Outback 4WD for a pre-trip inspection and a good service. Discovering a fuel leak from the injector pump, and with a spare injector pump on hand (doesn’t everybody have a spare pump on hand?), we got MTQ Engine Systems in Dandenong to fit and calibrate the overhauled pump along with a set of overhauled injectors. The ol’ girl didn’t know she could run as smooth and as powerful as she now did!
During our Simpson Desert crossing and the ensuing exit from the desert, we got caught in heavy rain and flooded roads, with the abrasive slurry of slushy gravel roads resulting in the chewing-out of the brake pads. That wasn’t all, as we were to find out … it ended up being a very expensive wet drive and another reason I hate driving in mud!
Before we left Alice we gave the Patrol a grease and replaced the front brake pads; but, back in Melbourne, to pick up Viv and our caravan, the crew at Outback 4WD found more brake damage, with the end result being the need to replace all rotors, brake pads (again!) and even the front brake calipers.
Sourcing those new calipers was a trial, as we had changed them much earlier for the bigger, more efficient calipers found on the 4.5-litre petrol GU Patrols. These are pretty rare, as everybody who upgrades the engines and/or performance of diesel Patrols needs those calipers for the modified vehicle to be ‘engineer’ roadworthy. After much searching, Australia-wide, we found a brand-new set at Patrol specialist, Atoc Auto Repairs in the bushy suburb of Belgrave South.
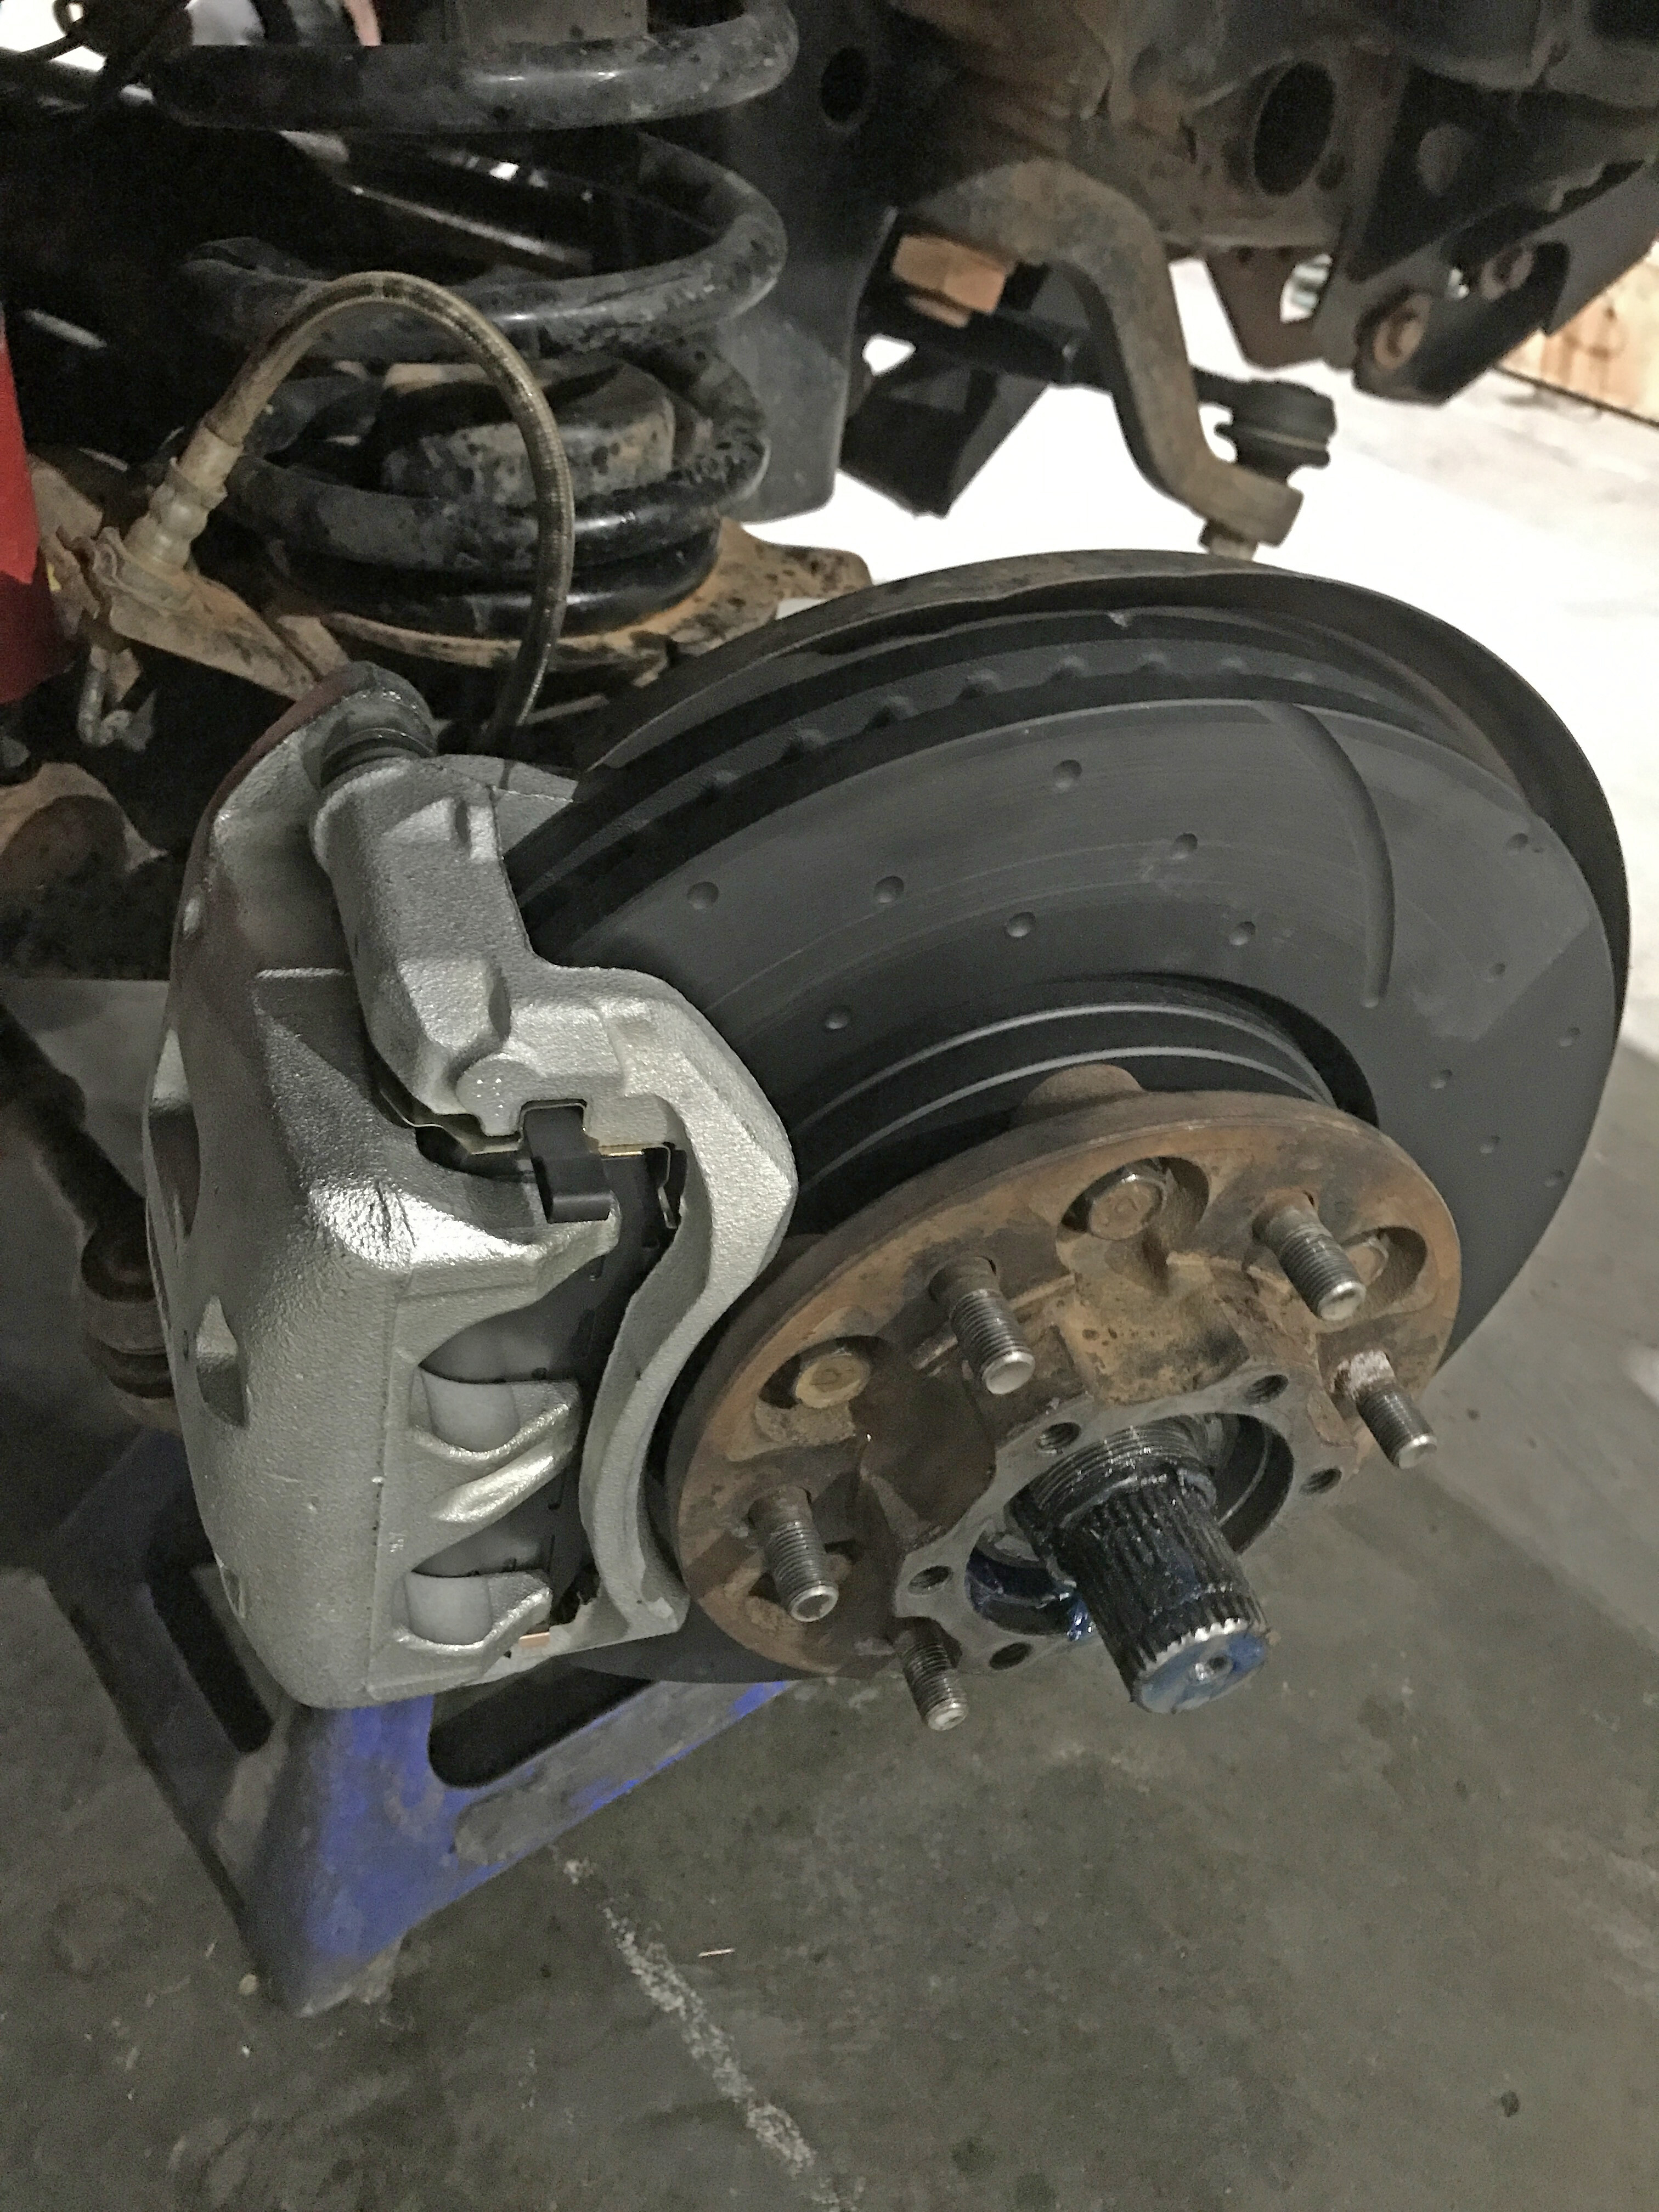
With the brake repairs underway, we also changed the front wheel bearings and then discovered the pinion seal on the rear diff had been chewed out by the slurry we had driven through. We also realised that the pinion flange had been worn. We didn’t muck around and overhauled the rear diff.
While all this was going on, we fitted a Cel-Fi Go 3G/4G reception booster to the Patrol for our Telstra mobile phones. This was fitted by the guys at Cranbourne Car Sound who can supply all your UHF and sat phone needs as well. We’ve used one of these Cel-Fi units before and I was pretty impressed with them, so bit the bullet and fitted one.
After all that work, our trip to WA and Queensland was pretty much trouble-free. We did in a couple of tyres – two in five minutes, in fact – both with railway spikes as we drove along the rough track near the Trans-Australia Railway line.
It had been an expensive, muddy lesson, topped off with two near-new tyres being staked. I put it all down to the cost of outback adventure!
TOTAL KILOMETRES: 461,000km KILOMETRES SINCE LAST UPDATE: 26,000km AVERAGE FUEL USE: 17-21L/100km
Snapshot
- D-Max SX Single Cab Chassis 4×2 3.0-litre manual now just under $40,000 drive-away
- Rebates previously brought it down to $29,990 drive-away
- 1.9-litre diesel now features as entry-level variant
One of Isuzu’s cheapest D-Max variants has been given a price increase, with the manufacturer dropping rebates for its former entry-level grade.
Up until last month, the D-Max SX Single Cab Chassis 4×2 manual was available to buy for $29,990 drive-away when fitted with a 3.0-litre, turbo-diesel engine after rebates from Isuzu undercut its own list price of $33,200.
However, with the introduction of a new 1.9-litre, turbo-diesel engine in November, the 3.0 has now been replaced on the bottom rung, with the rebates only applying to the smaller capacity ute, bringing its drive-away price up to $39,719.
While its list price is unchanged, the basic economy aluminium tray adds a $2888 premium, with on-road costs adding up to $3631 when configured for Queensland, attributing to its higher final price.
However, if you want a D-Max for under $30,000, the newly-introduced 1.9-litre SX Single Cab Chassis 4×2 manual takes over the 3.0-litre’s place and pricing, with the same rebates applying to bring its drive-away cost down to $29,990 in its most basic form.
The D-Max 4×2 is the second-highest selling model in its class, with 5943 sales so far this year accounting for 20 per cent of all 4×2 ute sales in 2021, while the 4×4 drops to third in its segment on 17,164 units sold, behind only the Ford Ranger and Toyota HiLux.
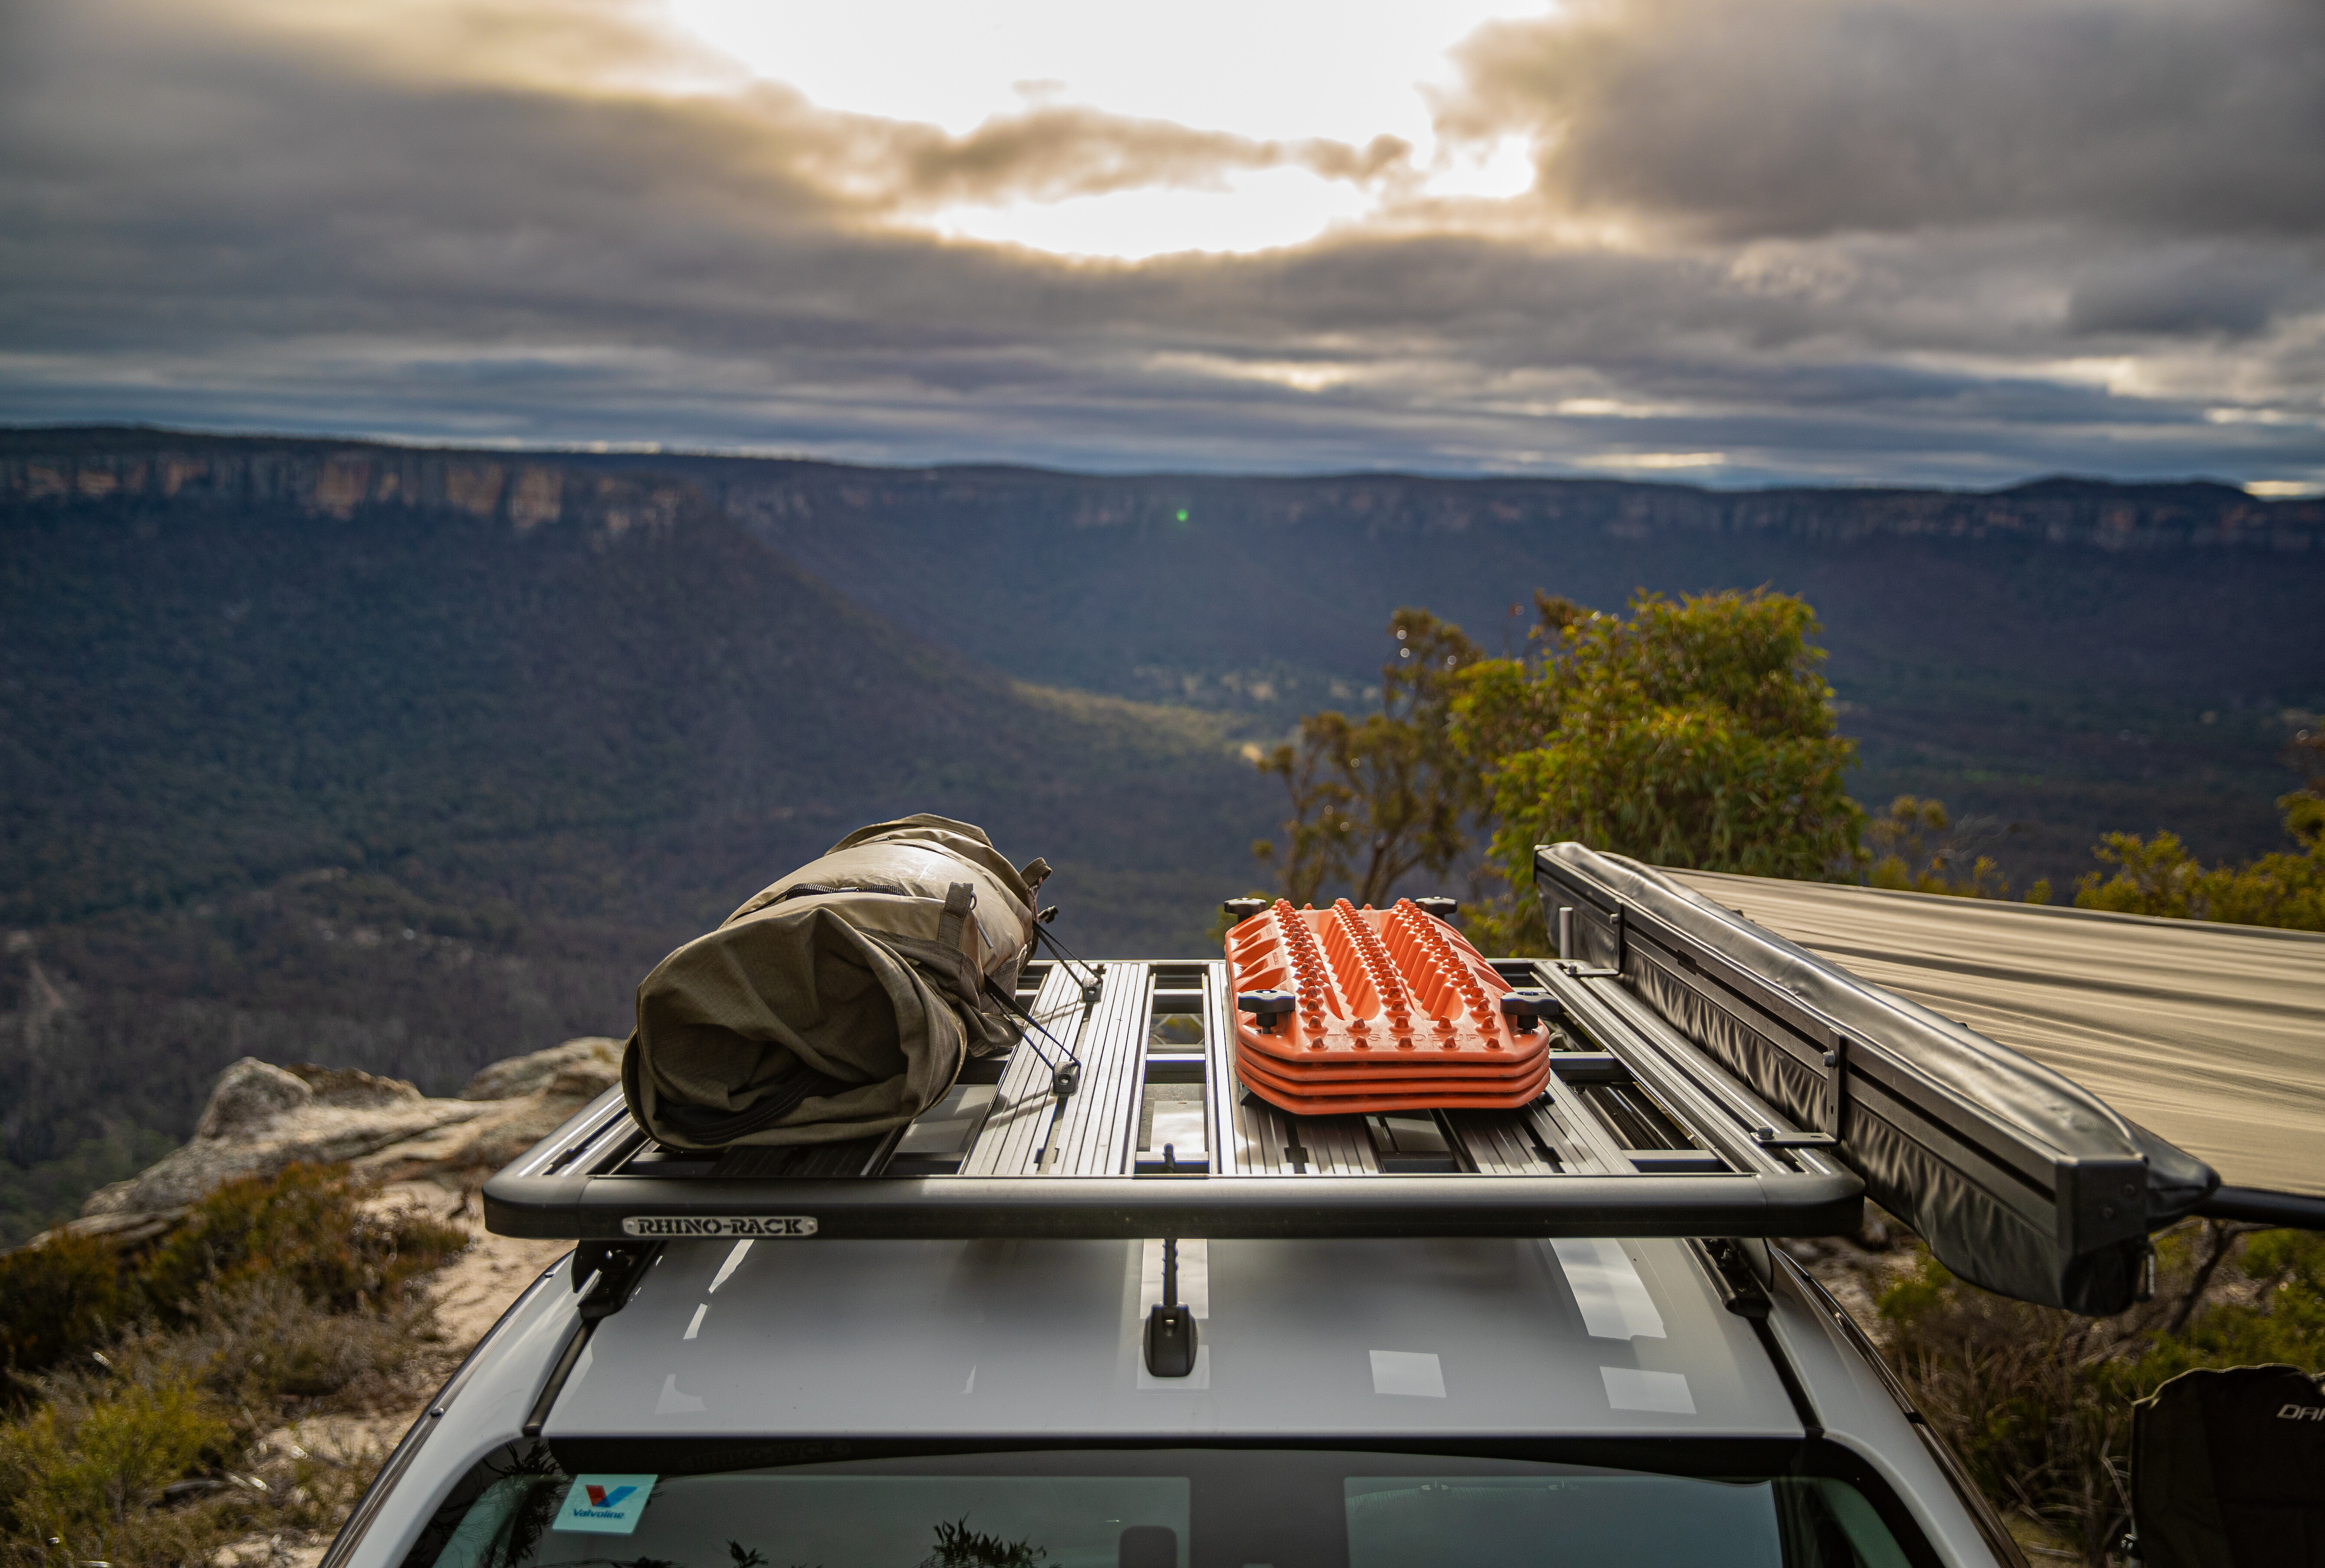
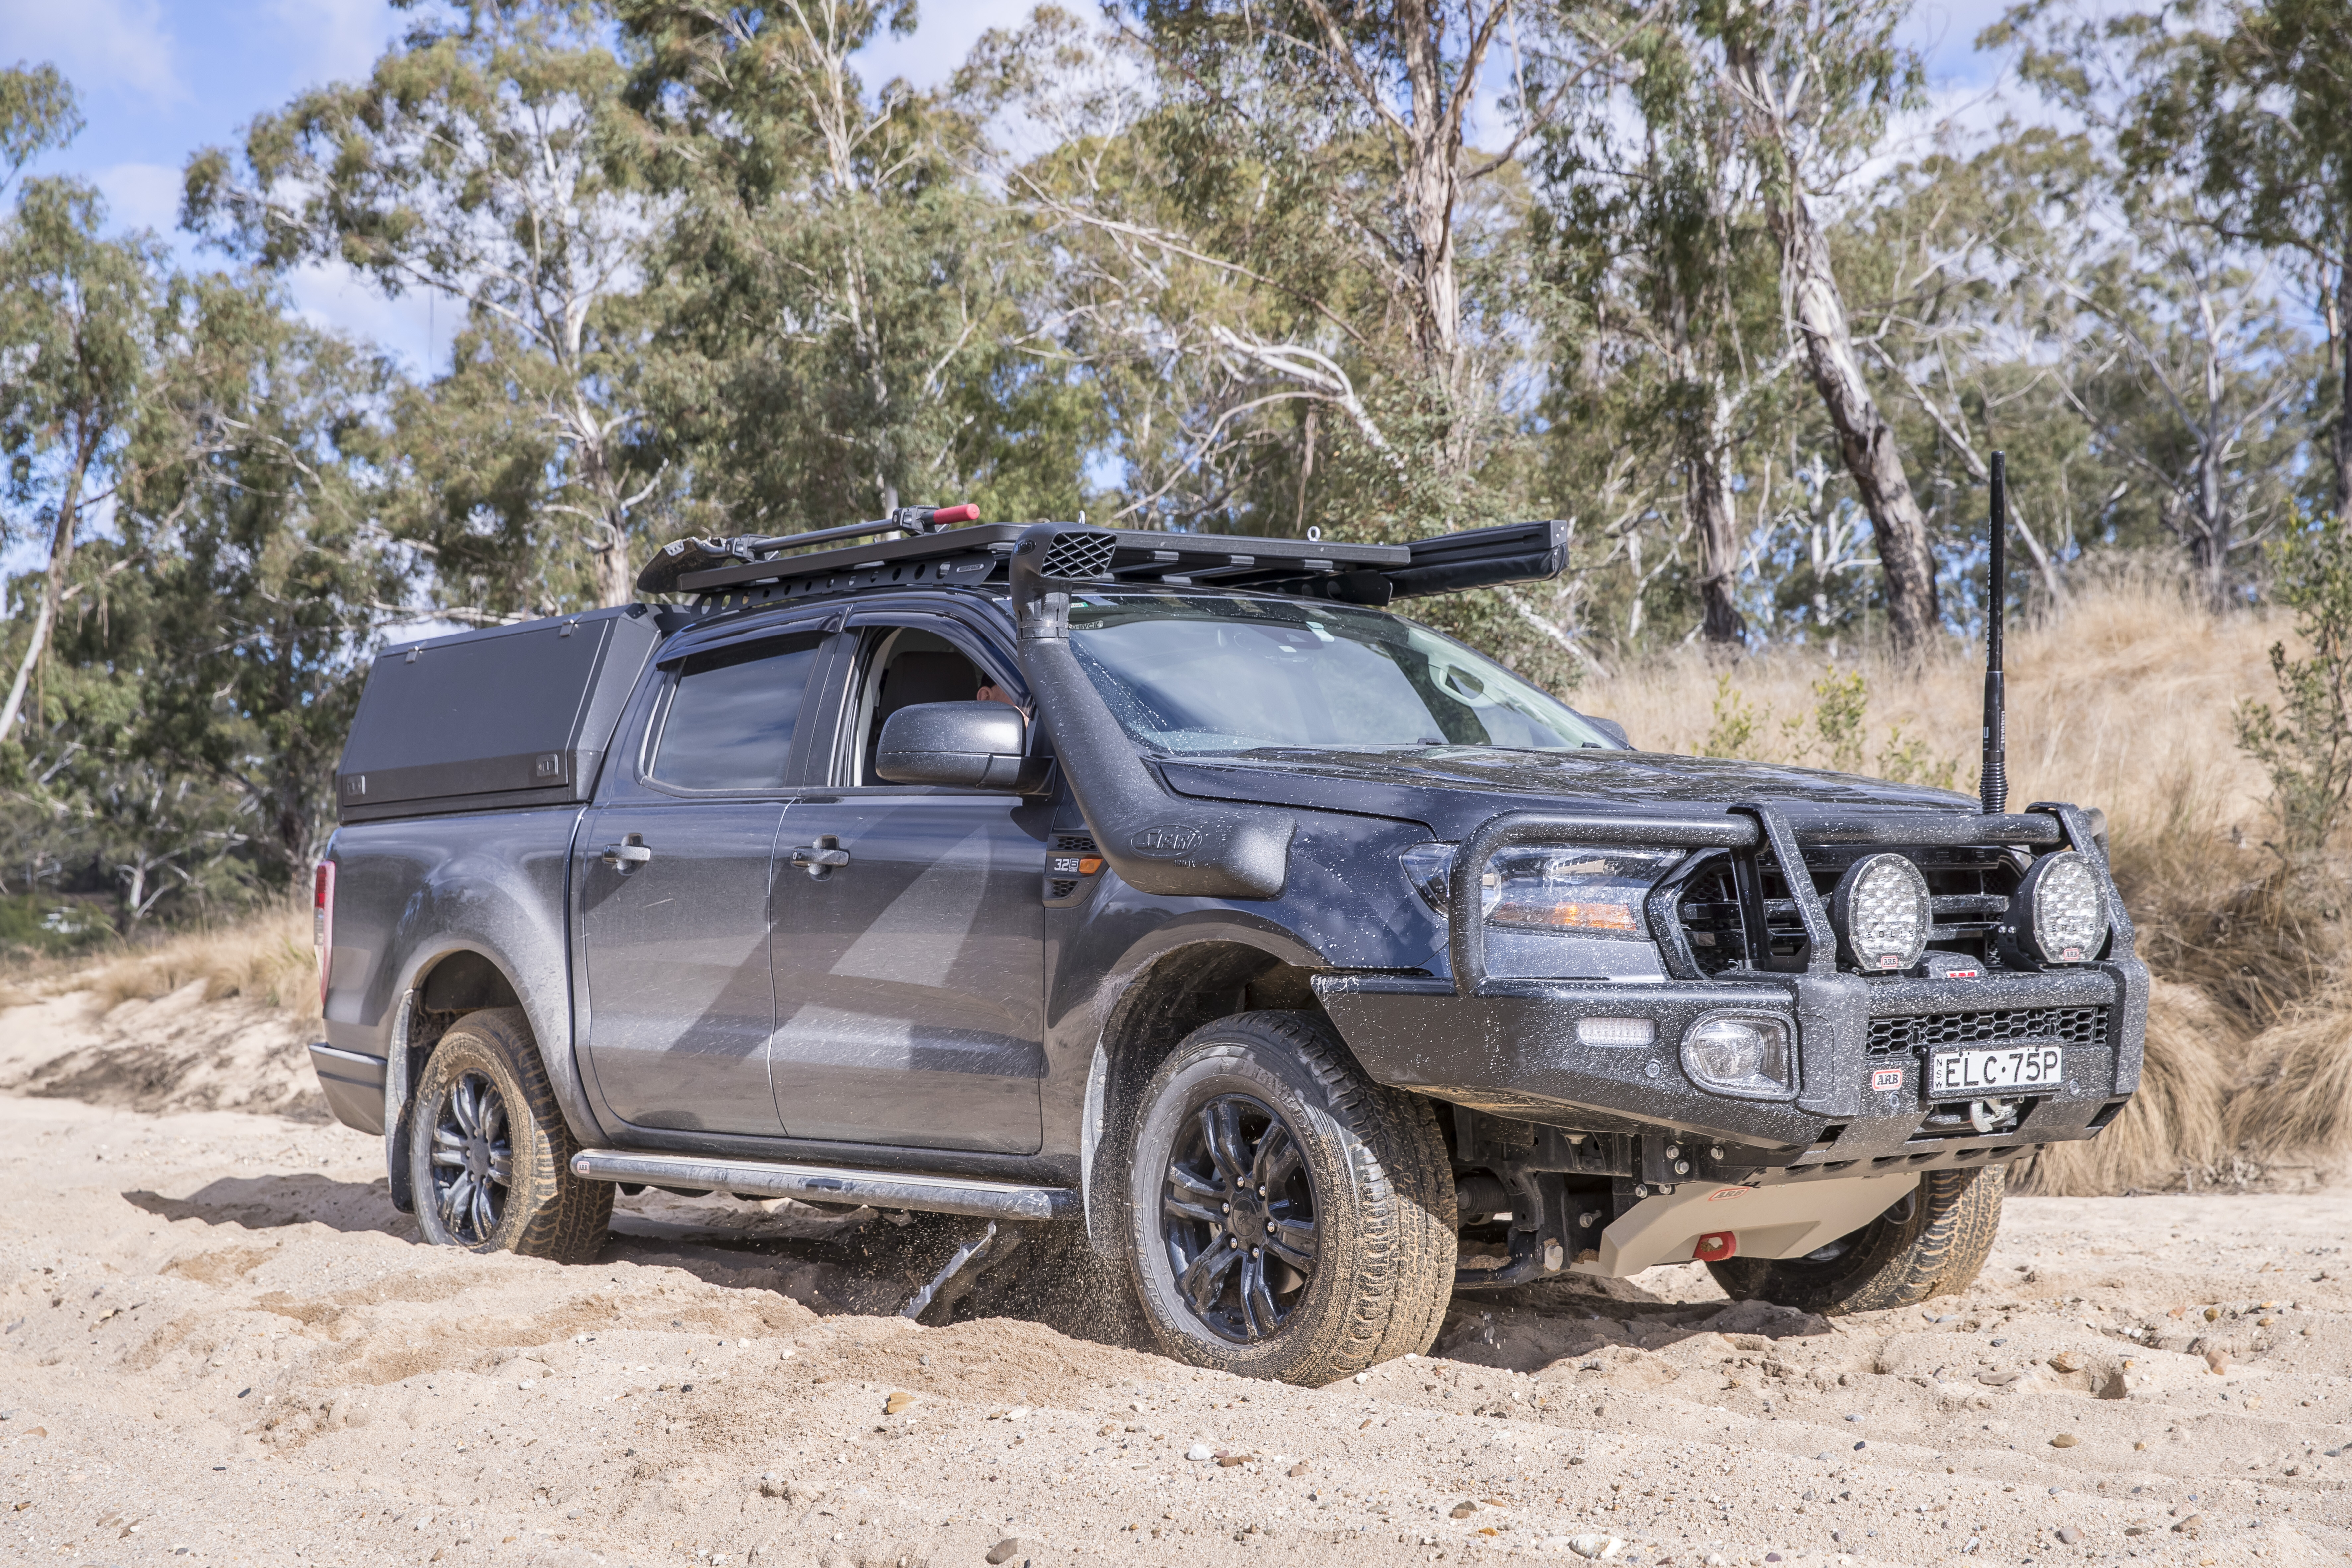
If you ever go off-road driving by yourself, you’d be mad not to carry at least one pair of recovery boards with you; they are, without a doubt, one of the most effective vehicle recovery tools you can carry in your 4×4. And not only are they effective, they are also affordable and easy to use.
Recovery boards are nothing new and have, in fact, been around for as long as the wheel itself. In its most basic form, a recovery board is simply a flat object such as a piece of wood that can be wedged underneath the wheel of a stuck vehicle – whether that be a wheelbarrow, a horse-drawn cart, a car, a truck or, more relevant to us, a four-wheel drive – to get it out of its stuck situation.
Recovery boards have developed over the years from lumps of wood to lengths of steel or aluminium, and interwoven bits of rubber or rubber mats. Prior to the development of modern recovery boards, the most common type used for vehicle recovery since WWII were manufactured from aluminium, due to their combination of strength and light weight, and these were commonly referred to as sand ladders.
But sand ladders have their drawbacks; they are bulky and inflexible, and as they have a smooth surface, they don’t allow tyres to gain easy purchase.
Four-wheel drive guidebook author, Brad McCarthy, developed the first ‘modern’ recovery board manufactured from engineering grade reinforced nylon. Called MaxTrax, he launched the product in 2005 after four years of development. His inspiration? Researching for a book, Brad found himself bogged on a remote beach in Queensland; he spent six hours recovering his vehicle with a hand winch, and afterwards he thought to himself, “There’s got to be an easier way.”
When launched, MaxTrax had many unique features that made it more effective for vehicle recoveries than previous devices such as sand ladders. MaxTrax featured large cleats so tyres could gain purchase; it had handles so it was easy to grip; it had a shovel shape at each end so it could be used to remove debris from around tyres and under vehicles; it was stackable for easy storage; and it was light.

Since MaxTrax was launched, several other companies have developed similar recovery boards also manufactured from reinforced nylon, including TRED, Exitrax and others. Each has a unique design and features, but all are essentially designed to function in the same way that MaxTrax does.
Since the first MaxTrax, Brad McCarthy has further developed the product, and the latest incarnation is called MaxTrax Xtreme, which features 88 replaceable anodised alloy teeth.
They might not be designed for it, but recovery boards have several other handy uses other than getting your vehicle out of a bog: they can provide a handy, stable base for a jack; they can be used under trailer jockey wheels; they can be used as bridging ramps; they can be used as traction aids on steep, slippery climbs; they can aid in turning a vehicle when winching by placing them under the steering wheels; and, of course, they can be used as a shovel around the campsite. We’re sure there are plenty of other uses for recovery boards that we haven’t even considered.
HOW TO USE RECOVERY BOARDS?
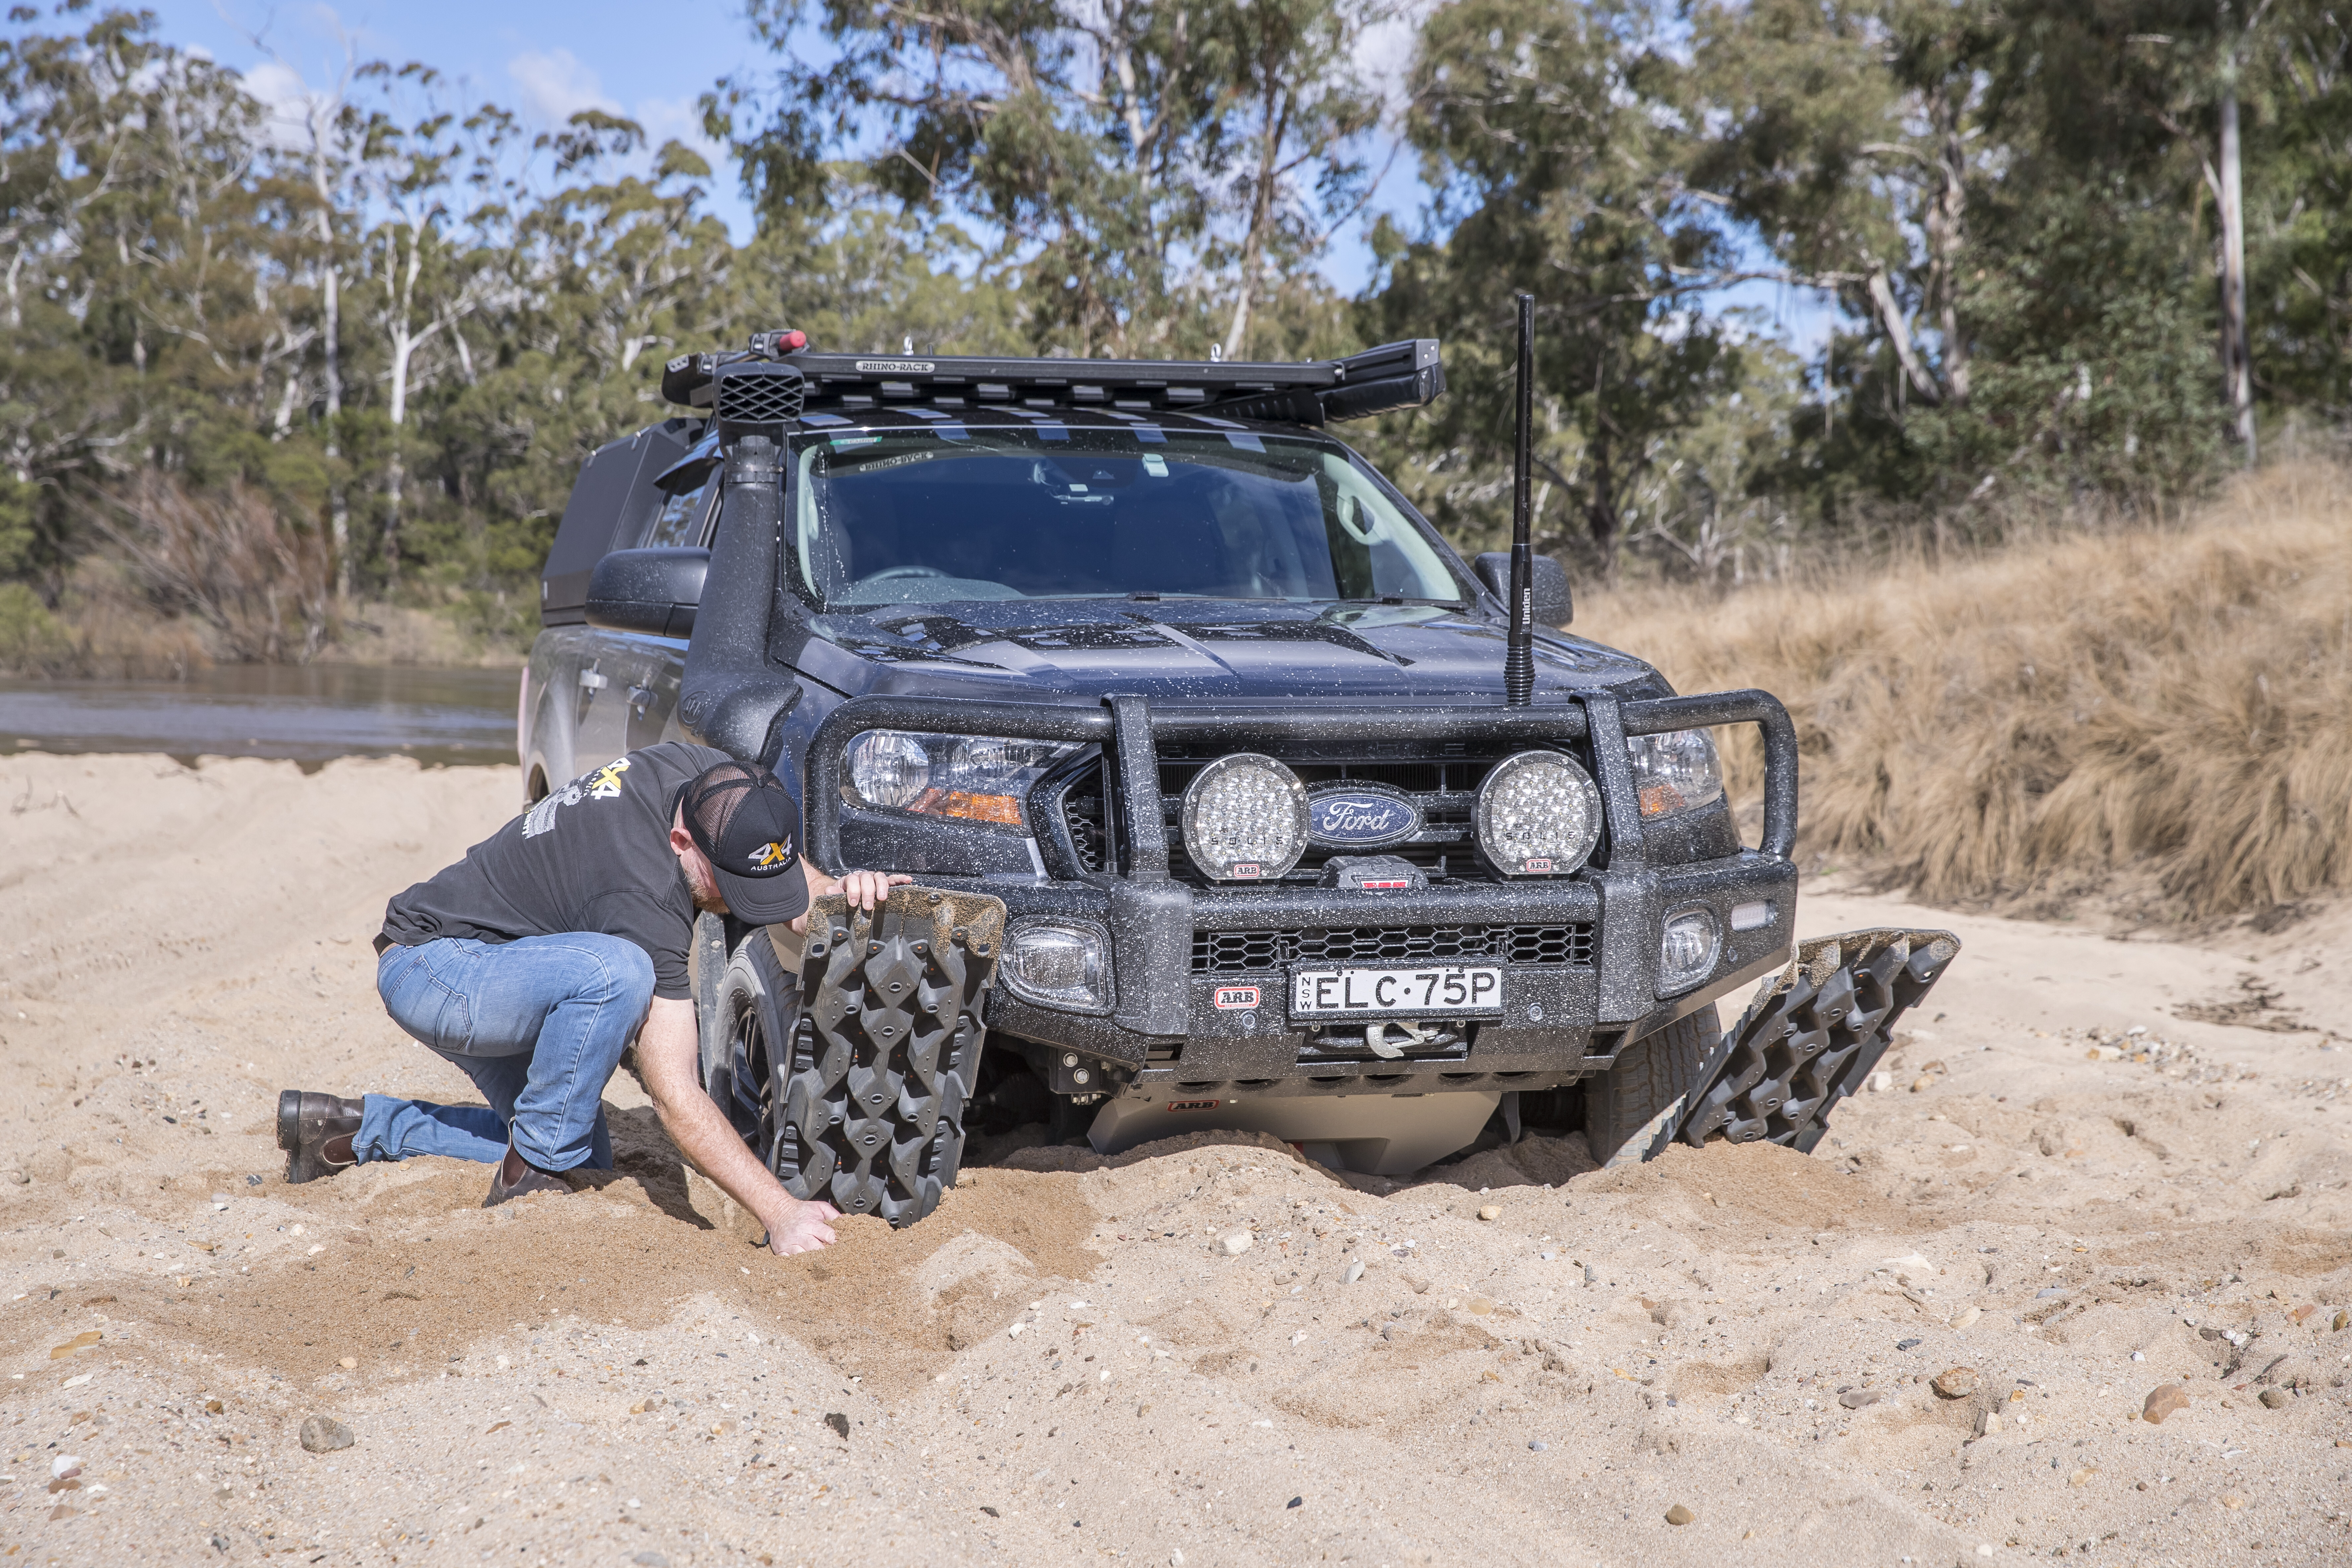
Recovery boards can be used in various off-road situations, but the most common usage is when you become bogged in sand or mud.
In the accompanying video, we used the example of a vehicle bogged in sand, but when bogged in mud, the recovery process is pretty much the same, just messier. Here’s how you do it …
First, you’ll want to make sure you’re running the correct tyre pressures for the off-road driving situation you’re in. As well as allowing the tyres the best chance to gain traction in off-road terrain, lowering pressures also allows them a better chance of gaining traction on the recovery boards themselves, so if you haven’t already, drop tyre pressures to give you the best chance of getting out … with minimal effort.
The next step is to shovel away any built-up debris (sand or mud) from in front of the vehicle’s tyres, at both the front and rear. You should also shovel away any built-up debris from in front of the vehicle. If you have a long-handle shovel, this is the best tool for the job, but if not, you can use the shovel end of the recovery board to do this task. You want to dig quite deep in front of the tyres so you can wedge the recovery boards under them as far as possible.
Some recovery boards are the same at each end, while others such as TREDs have a shovel end and a ramp end. Make sure you wedge the ramp end under the tyres as far as possible so the tyres can gain purchase on the cleats (or lugs) that stick out from the top of the boards. If you’re only using two boards, you’ll want to wedge them under the front tyres. If you have four boards, use them – it will make the recovery process even easier.
Once the recovery boards are in place, you’ll want them sticking up at about a 45-degree angle. To achieve this, you might have to pack some sand or mud under the boards to help support them. The reason you want the boards poking out at a 45-degree angle is that you essentially want to drive up and over the boards, lifting the vehicle out of its stuck predicament.
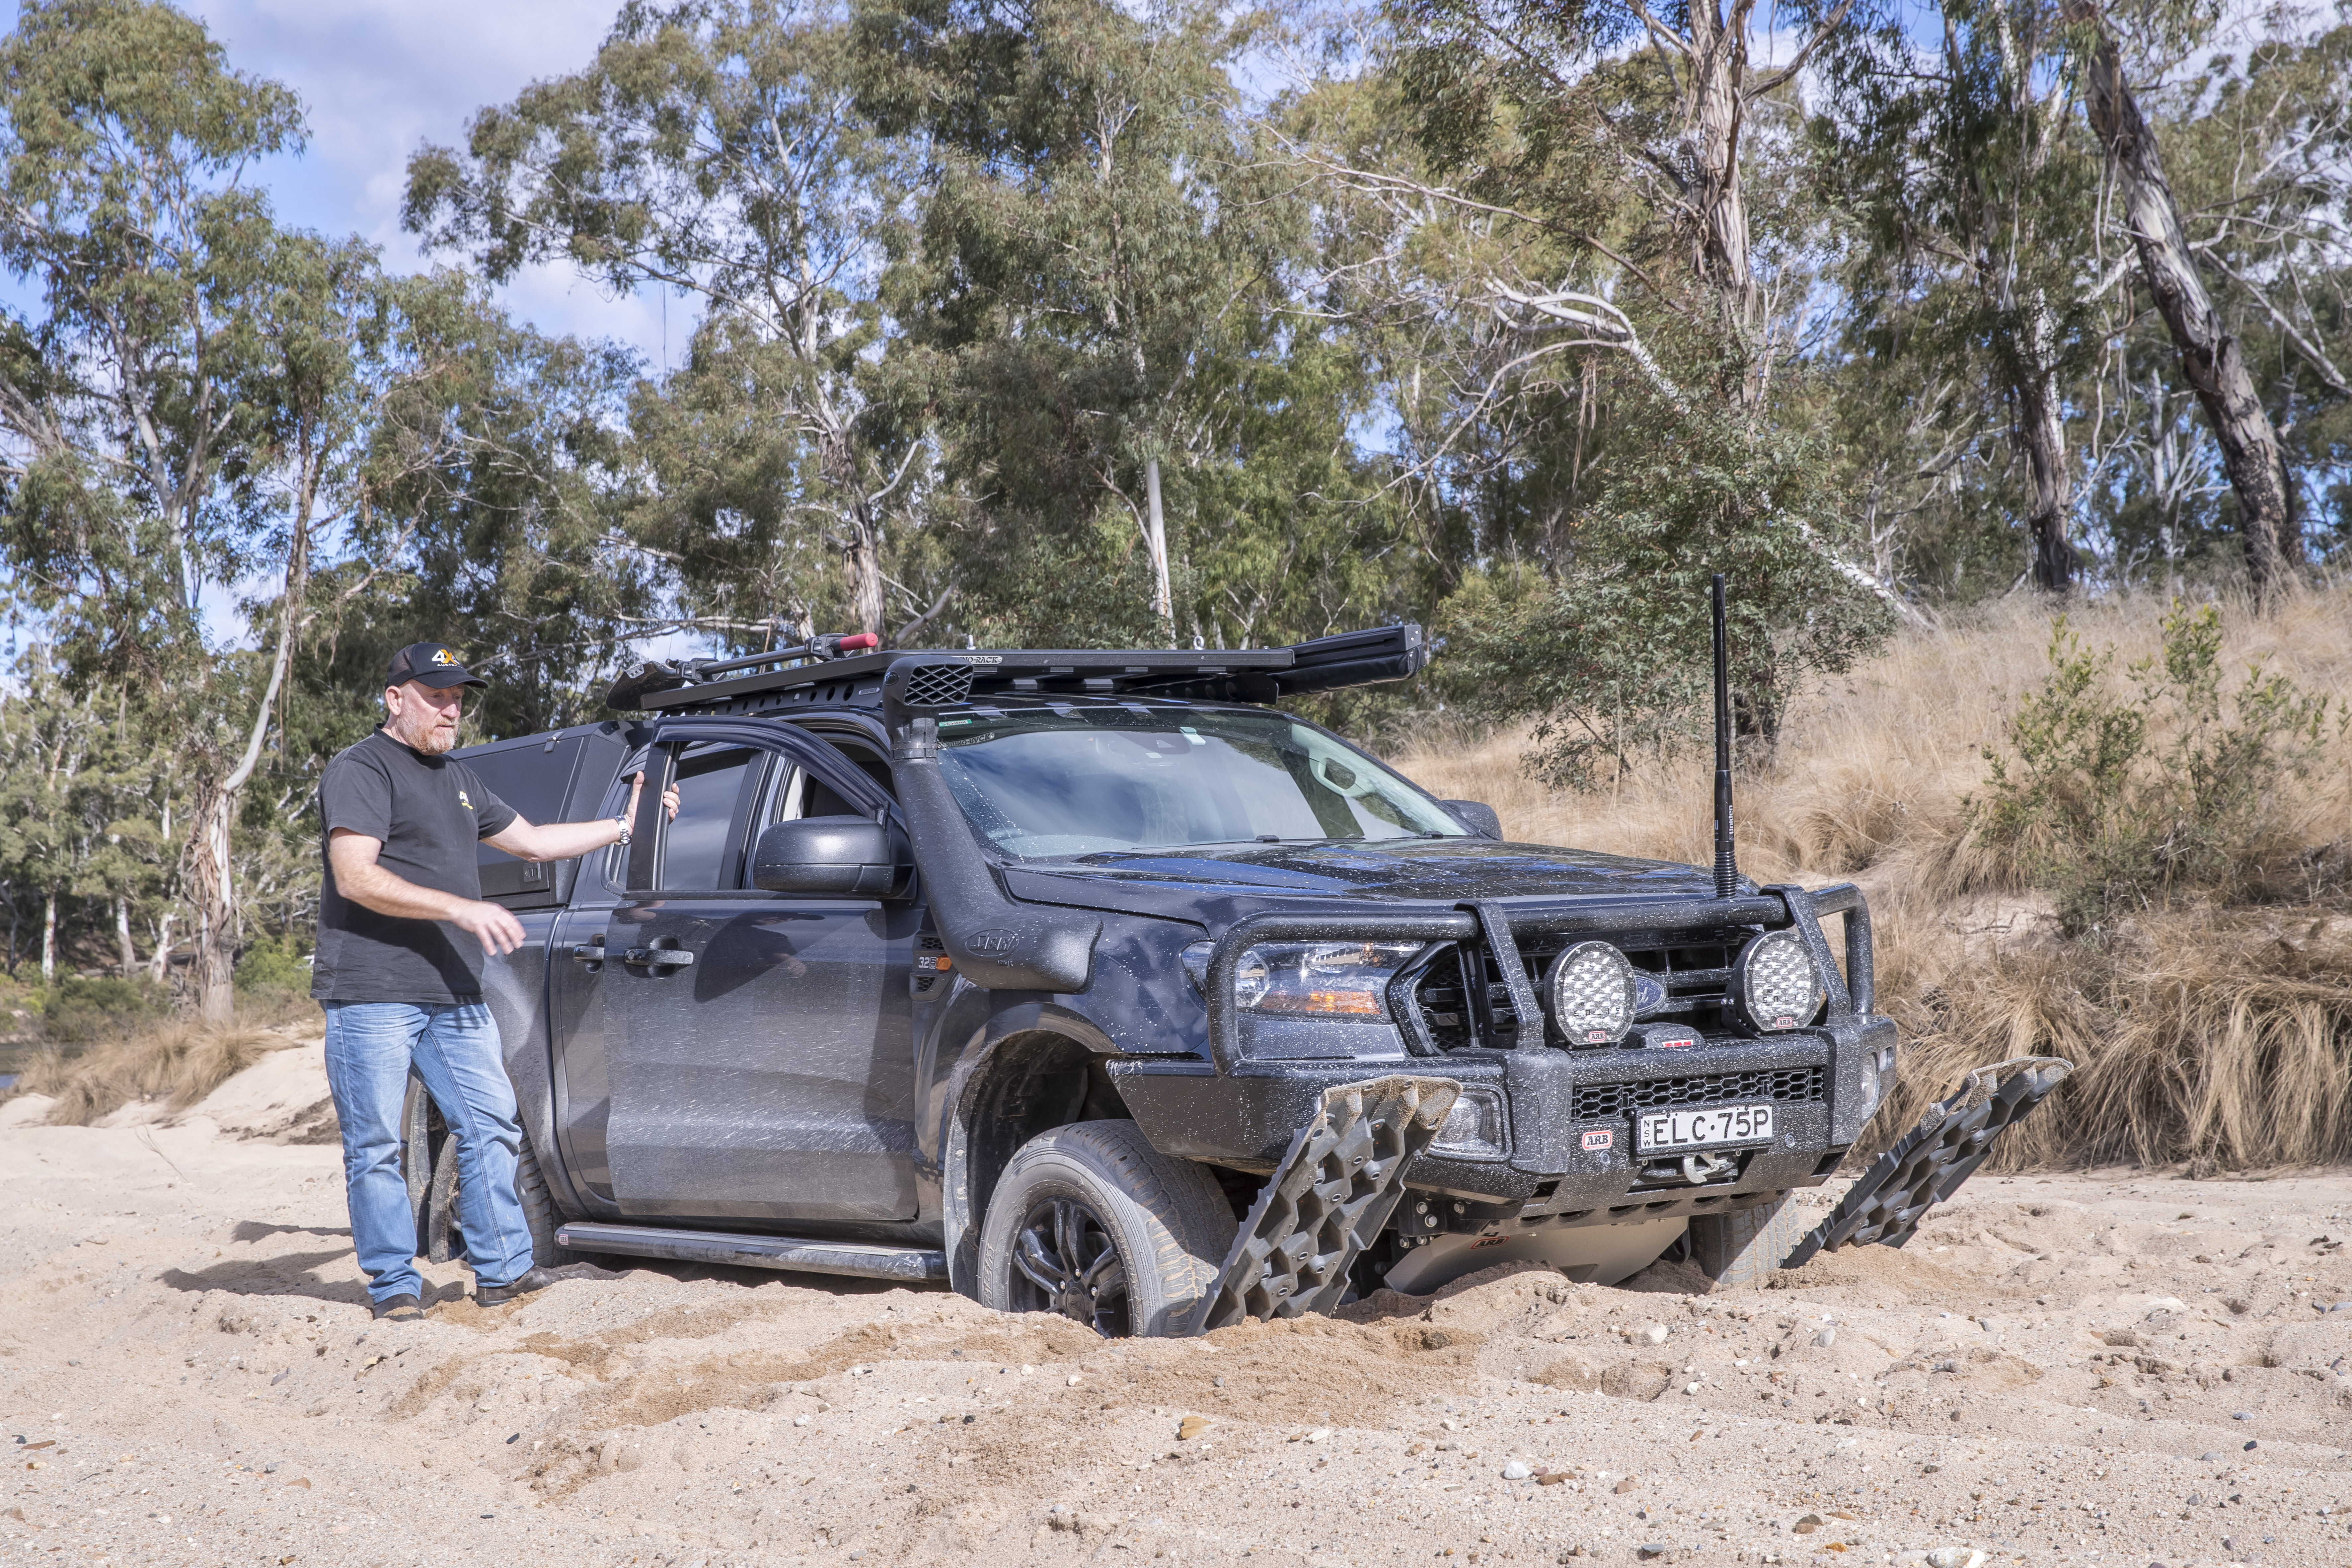
Once the recovery boards are in place, make sure your vehicle is in low-range first gear before driving forward. Go easy on the throttle and, with any luck, the vehicle will simply drive up the boards and out of its predicament. Don’t apply too much throttle or be tempted to go too fast, because any wheelspin can rip the cleats (or lugs) off the top surface of the recovery boards. Once the vehicle has lifted out of its situation and is clear of the recovery boards, you can then apply more throttle if necessary to build and maintain momentum until you are out of strife.
If the vehicle bogs down again once it has cleared the recovery boards, simply repeat the recovery process over again until you have reached solid ground. If you have several recovery boards available to you, you can lay out a track on which you can hopefully drive to solid ground.
The last step? Make sure you remember to grab your recovery boards once your vehicle is out of strife, whack them against each other to shake off any loose sand or excess mud, and then secure them to your vehicle. There are plenty of products on the market designed specifically for mounting recovery boards to your vehicle – up on a set of roof racks, on a tailgate-mounted spare tyre or even directly to a ute canopy – so there’s really no excuse for leaving them at home the next time you go four-wheel driving.
TRAINING
As with any vehicle recovery method, the best way to learn how to safely use recovery equipment is by attending a nationally recognised training course, either operated by a private company or through an accredited 4×4 club.
DOs
• Always carry them when off-road driving • Lower tyre pressures to suit conditions • Shovel around tyres and vehicle to remove debris • Wedge boards under tyres as far as possible • Have boards poking out at 45-degree angle
DONT’s
* Attempt recovery without shovelling first * Stow recovery boards where you can’t access them * Don’t use too much throttle and spin tyres * Forget to grab your boards before driving off * Leave them unlocked on your roof rack