Towing mirrors have come a long way over the years. Gone are those clunky old things you’d strap to your doors or existing mirrors to extend their reach and improve the view behind your 4WD and trailer.
In their place are mirrors designed and made specifically to replace the original mirrors and do a much better job of showing the driver what’s behind them, as well as looking like they are meant to be part of the car.
Leading the way has been Clearview Accessories, a business that came about when Mike Cowan grafted a set of big American pickup truck mirrors on to his 80 Series LandCruiser to improve the view behind his caravan. They worked and when demand grew from others who wanted a set for themselves, Clearview became a business.
That was more than 10 years ago, and the original Clearview towing mirrors have evolved in to the Next-Gen Clearview mirrors and, more recently, the Clearview Compact towing mirrors. Not everyone likes the look of oversized American-style mirrors – I was one of them – so when these compact units came out I wanted to give them a try.
The Clearview Compacts are available for most popular 4×4 vehicles, and the number of models is growing every day. They certainly had a set that fit my LandCruiser 200 Series, but there were still options relating to power folding, black or chrome, heated mirrors, and ones with indicators on them.
The 200 doesn’t have all the blind-spot and lane-control features that most new cars have, but it still has heated and power-folding mirrors. I ordered black mirrors to go on the white Cruiser.
The mirrors arrived and were reasonably easy to fit at home without any dramas. Choosing the right mirrors for the model of car ensures that the wiring and plugs all match and it’s a simple plug-and-play job once you have the standard mirrors off. Thankfully, they fitted with my weather shields and the Safari snorkel.
The mirrors sit lower on the door than the stock mirrors and this took a bit of getting used to, but the larger size of the mirrors more than makes up for this. Something else that took some getting used to was the indicators, which are on the back edge of the mirrors and are a distraction when driving. At least you’ll never be that guy driving along with his blinker left on!
Unlike the original and Next-Gen Clearview mirrors, the Compact unit has a single mirror and not two mirrors like the bigger ones. But one lens is enough and there’s plenty of adjustment to show you what you need. The power adjustment still operates using the standard LandCruiser mirror switch.
The clarity of the Clearview glass is much better than the Toyota mirrors too, further improving the view behind.
With the mirrors in their unextended position, they don’t protrude any more than the old Toyota ones, but the bigger size of them does stop them from folding in as far as the standard ones – but that’s not really a problem.
They are big enough that they give plenty of view behind the 22-foot caravan, even without extending them. Pulling them out only improves that rear-view vision; plus, there’s no vibration at all, even at full extension. They are also handy when towing my wide double-jetski trailer and reversing down the boat ramp.
The best thing is that when I’m not towing, which is most of the time, the Clearview Compacts are small enough to look like they are factory fitted to the car and all factory functions are retained. No more fussing with bolt-on towing mirrors when I need them, and no oversize towing mirrors when I don’t. They’re not cheap but are a quality product that do the job they are made for.
AVAILABLE FROM: www.clearviewaccessories.com.au RRP: $1385
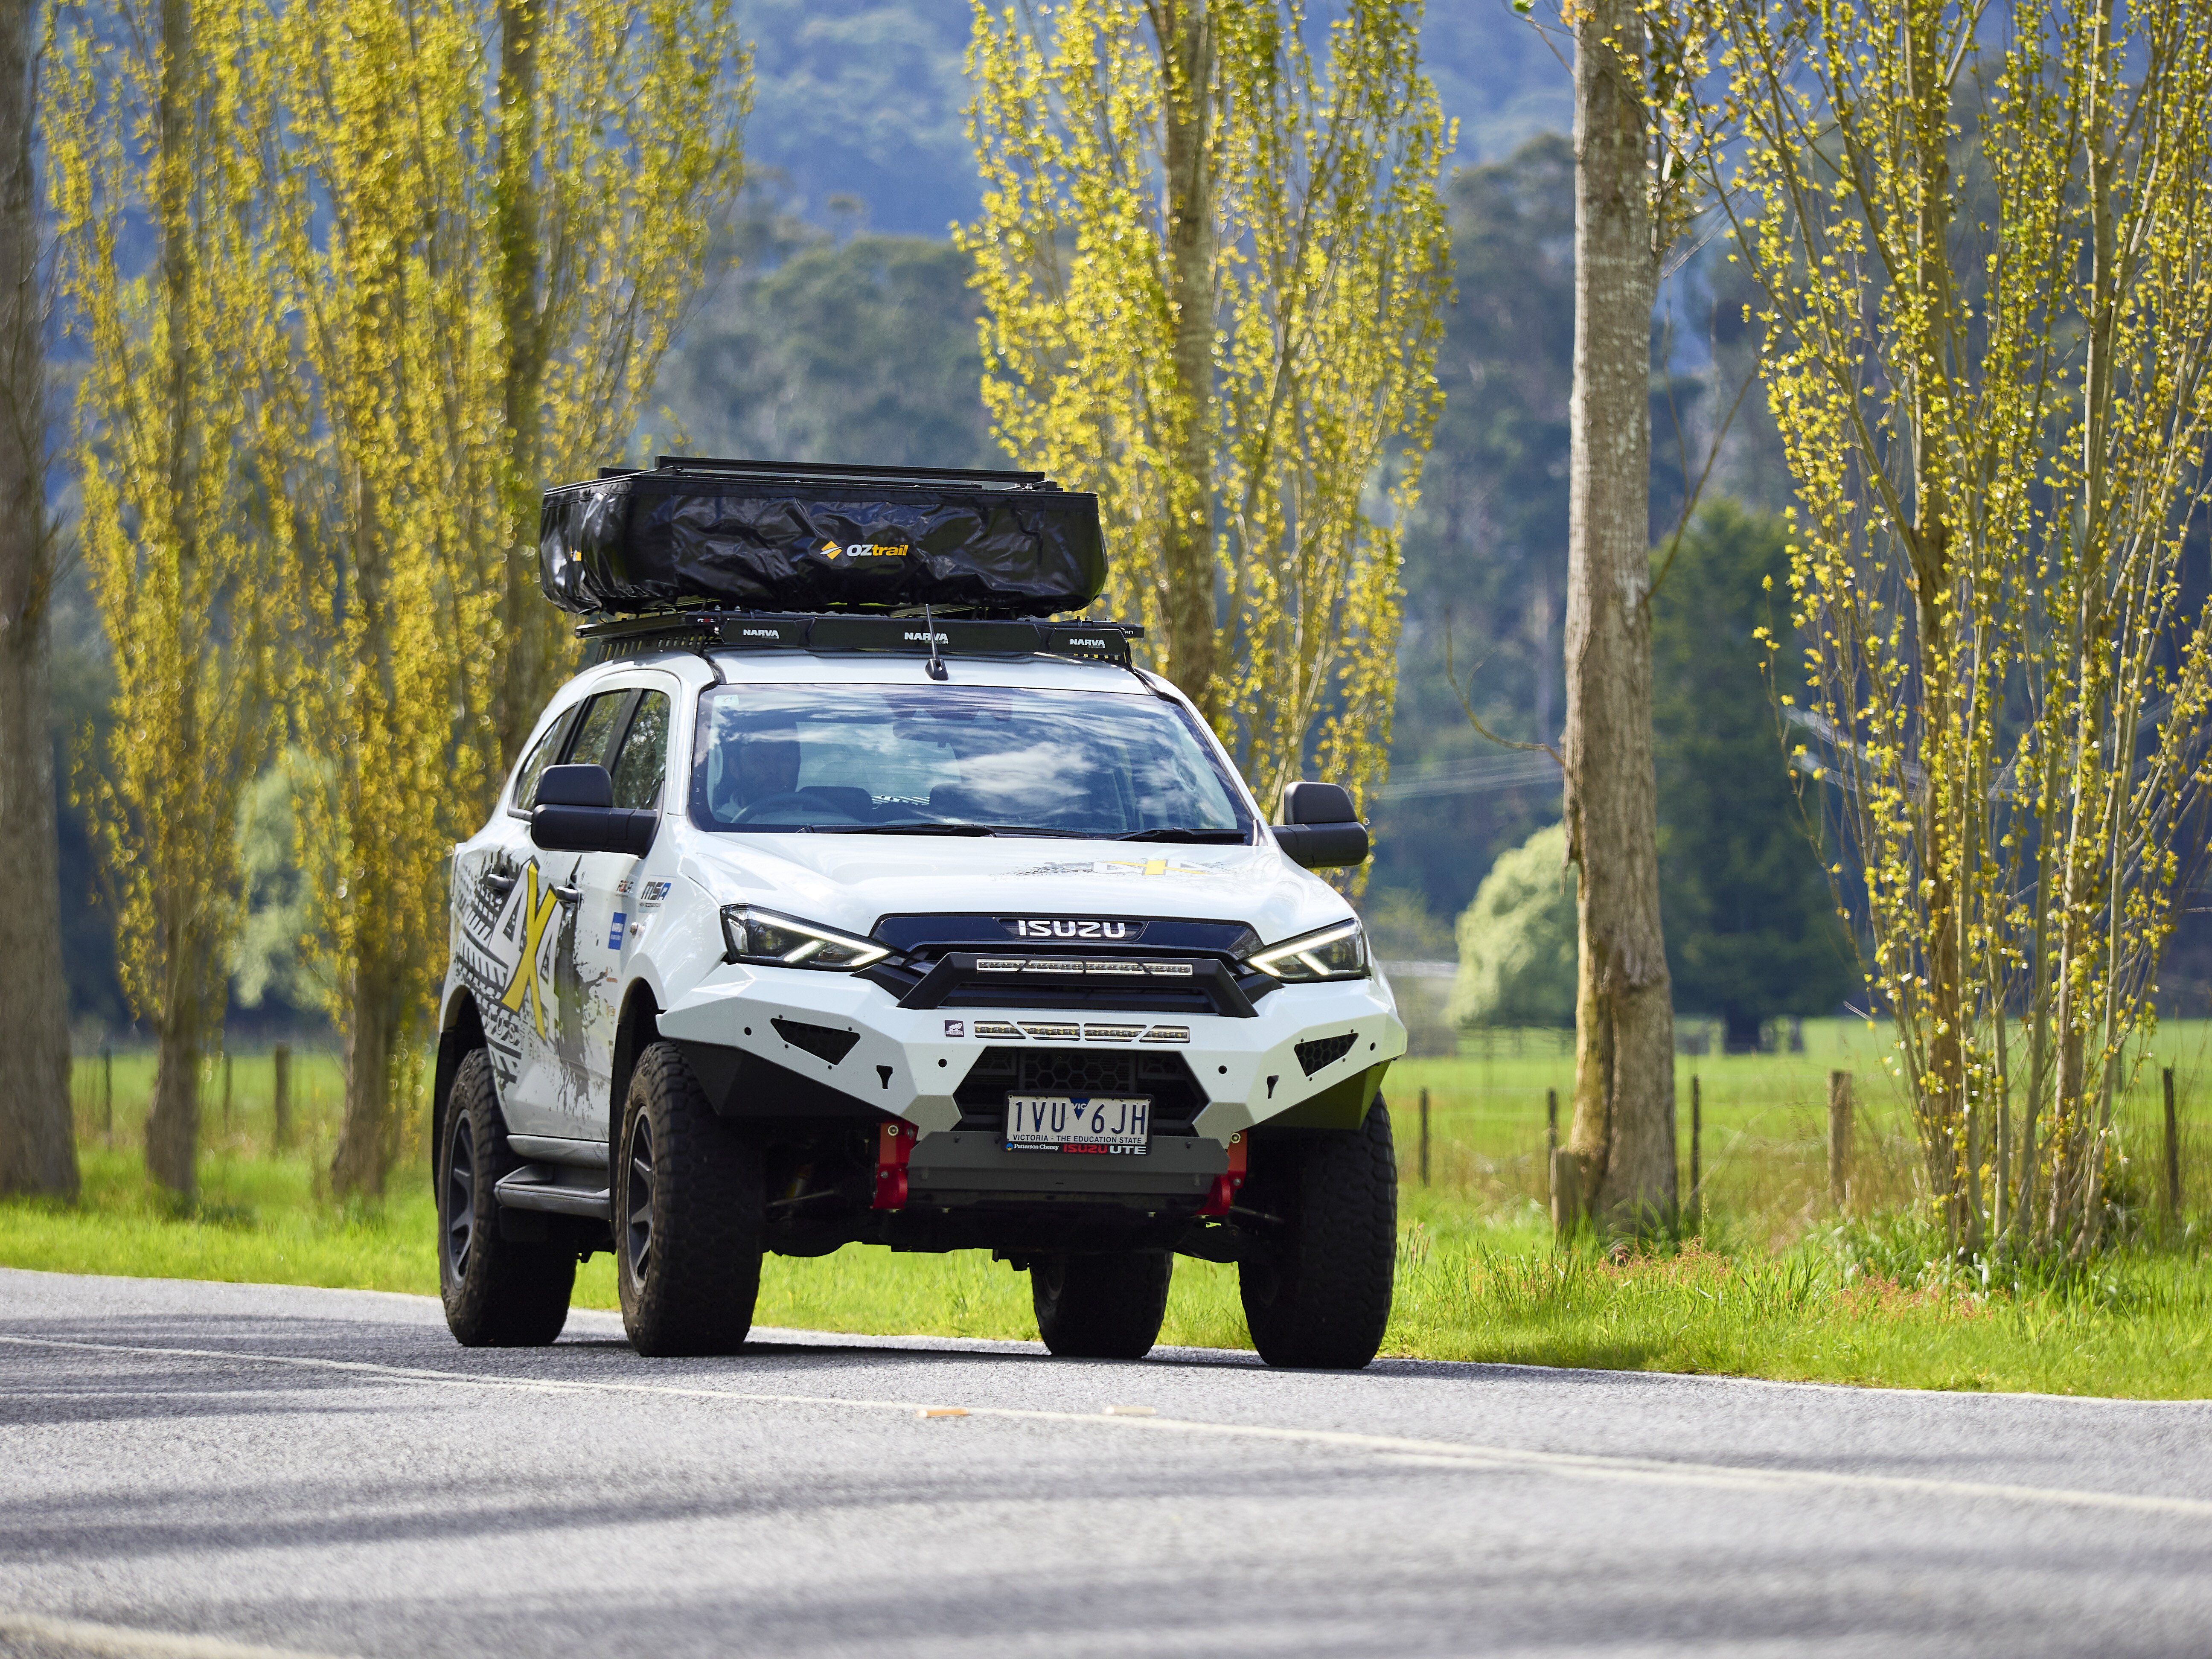
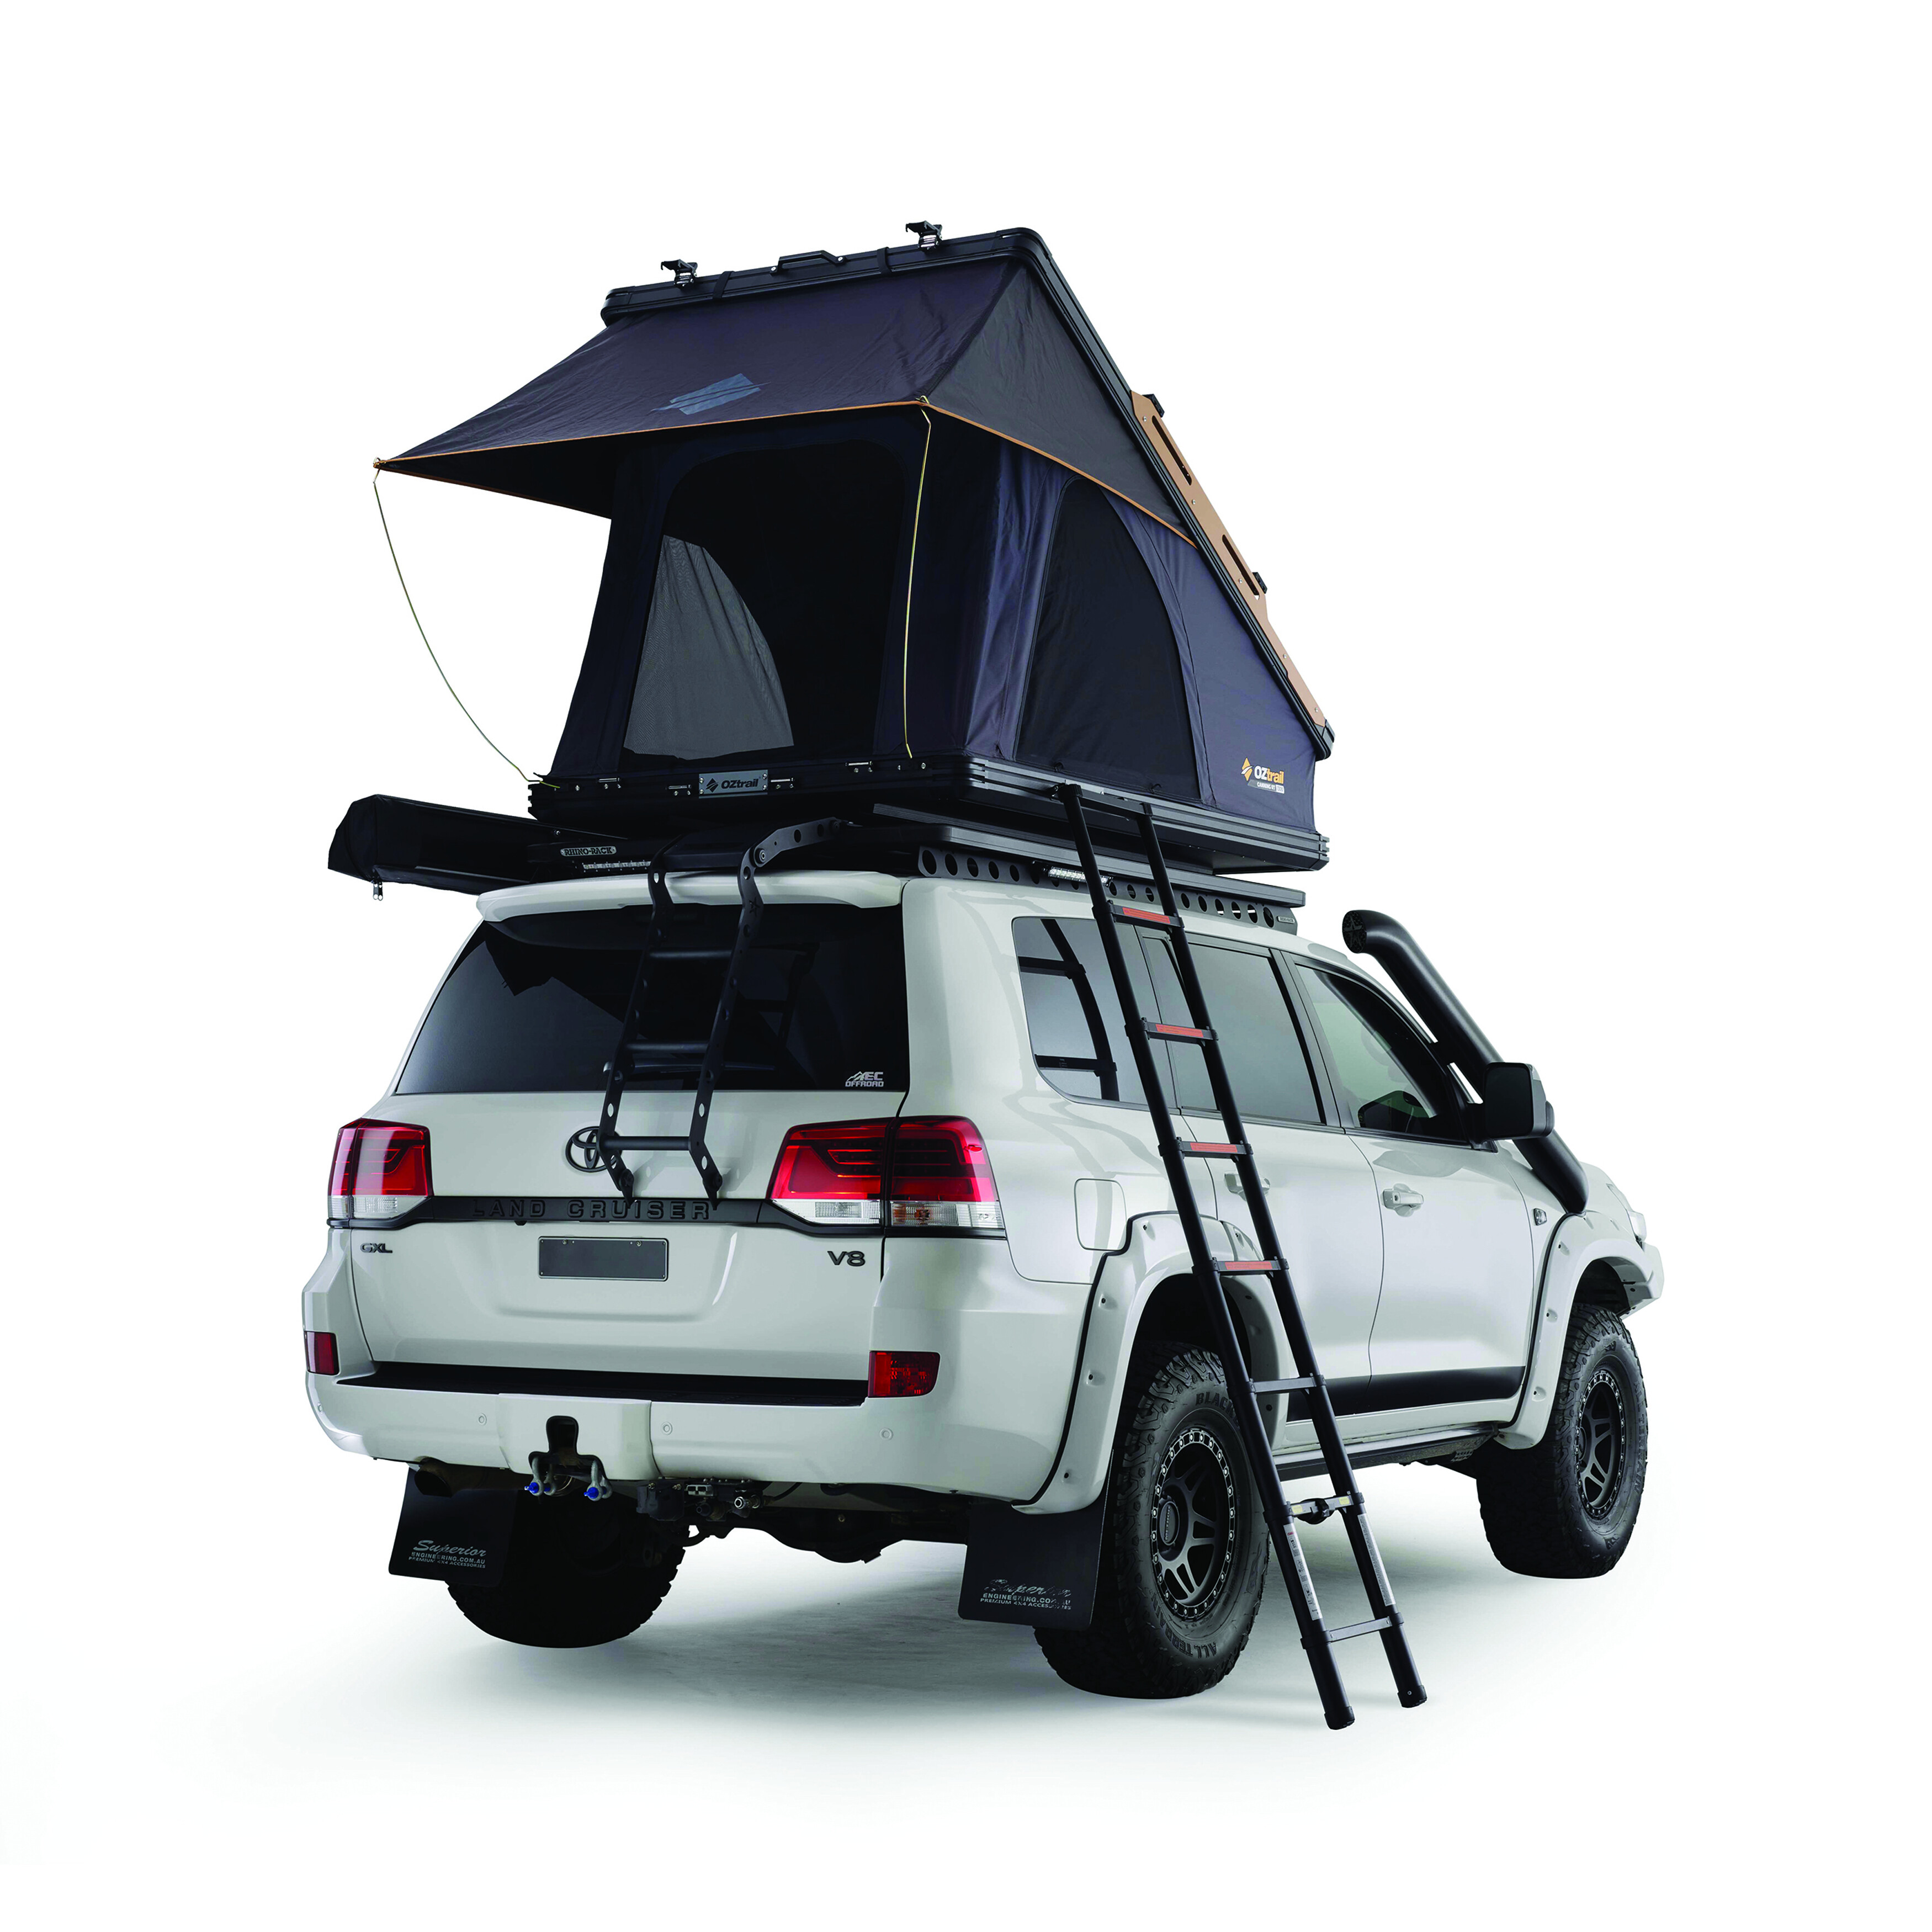
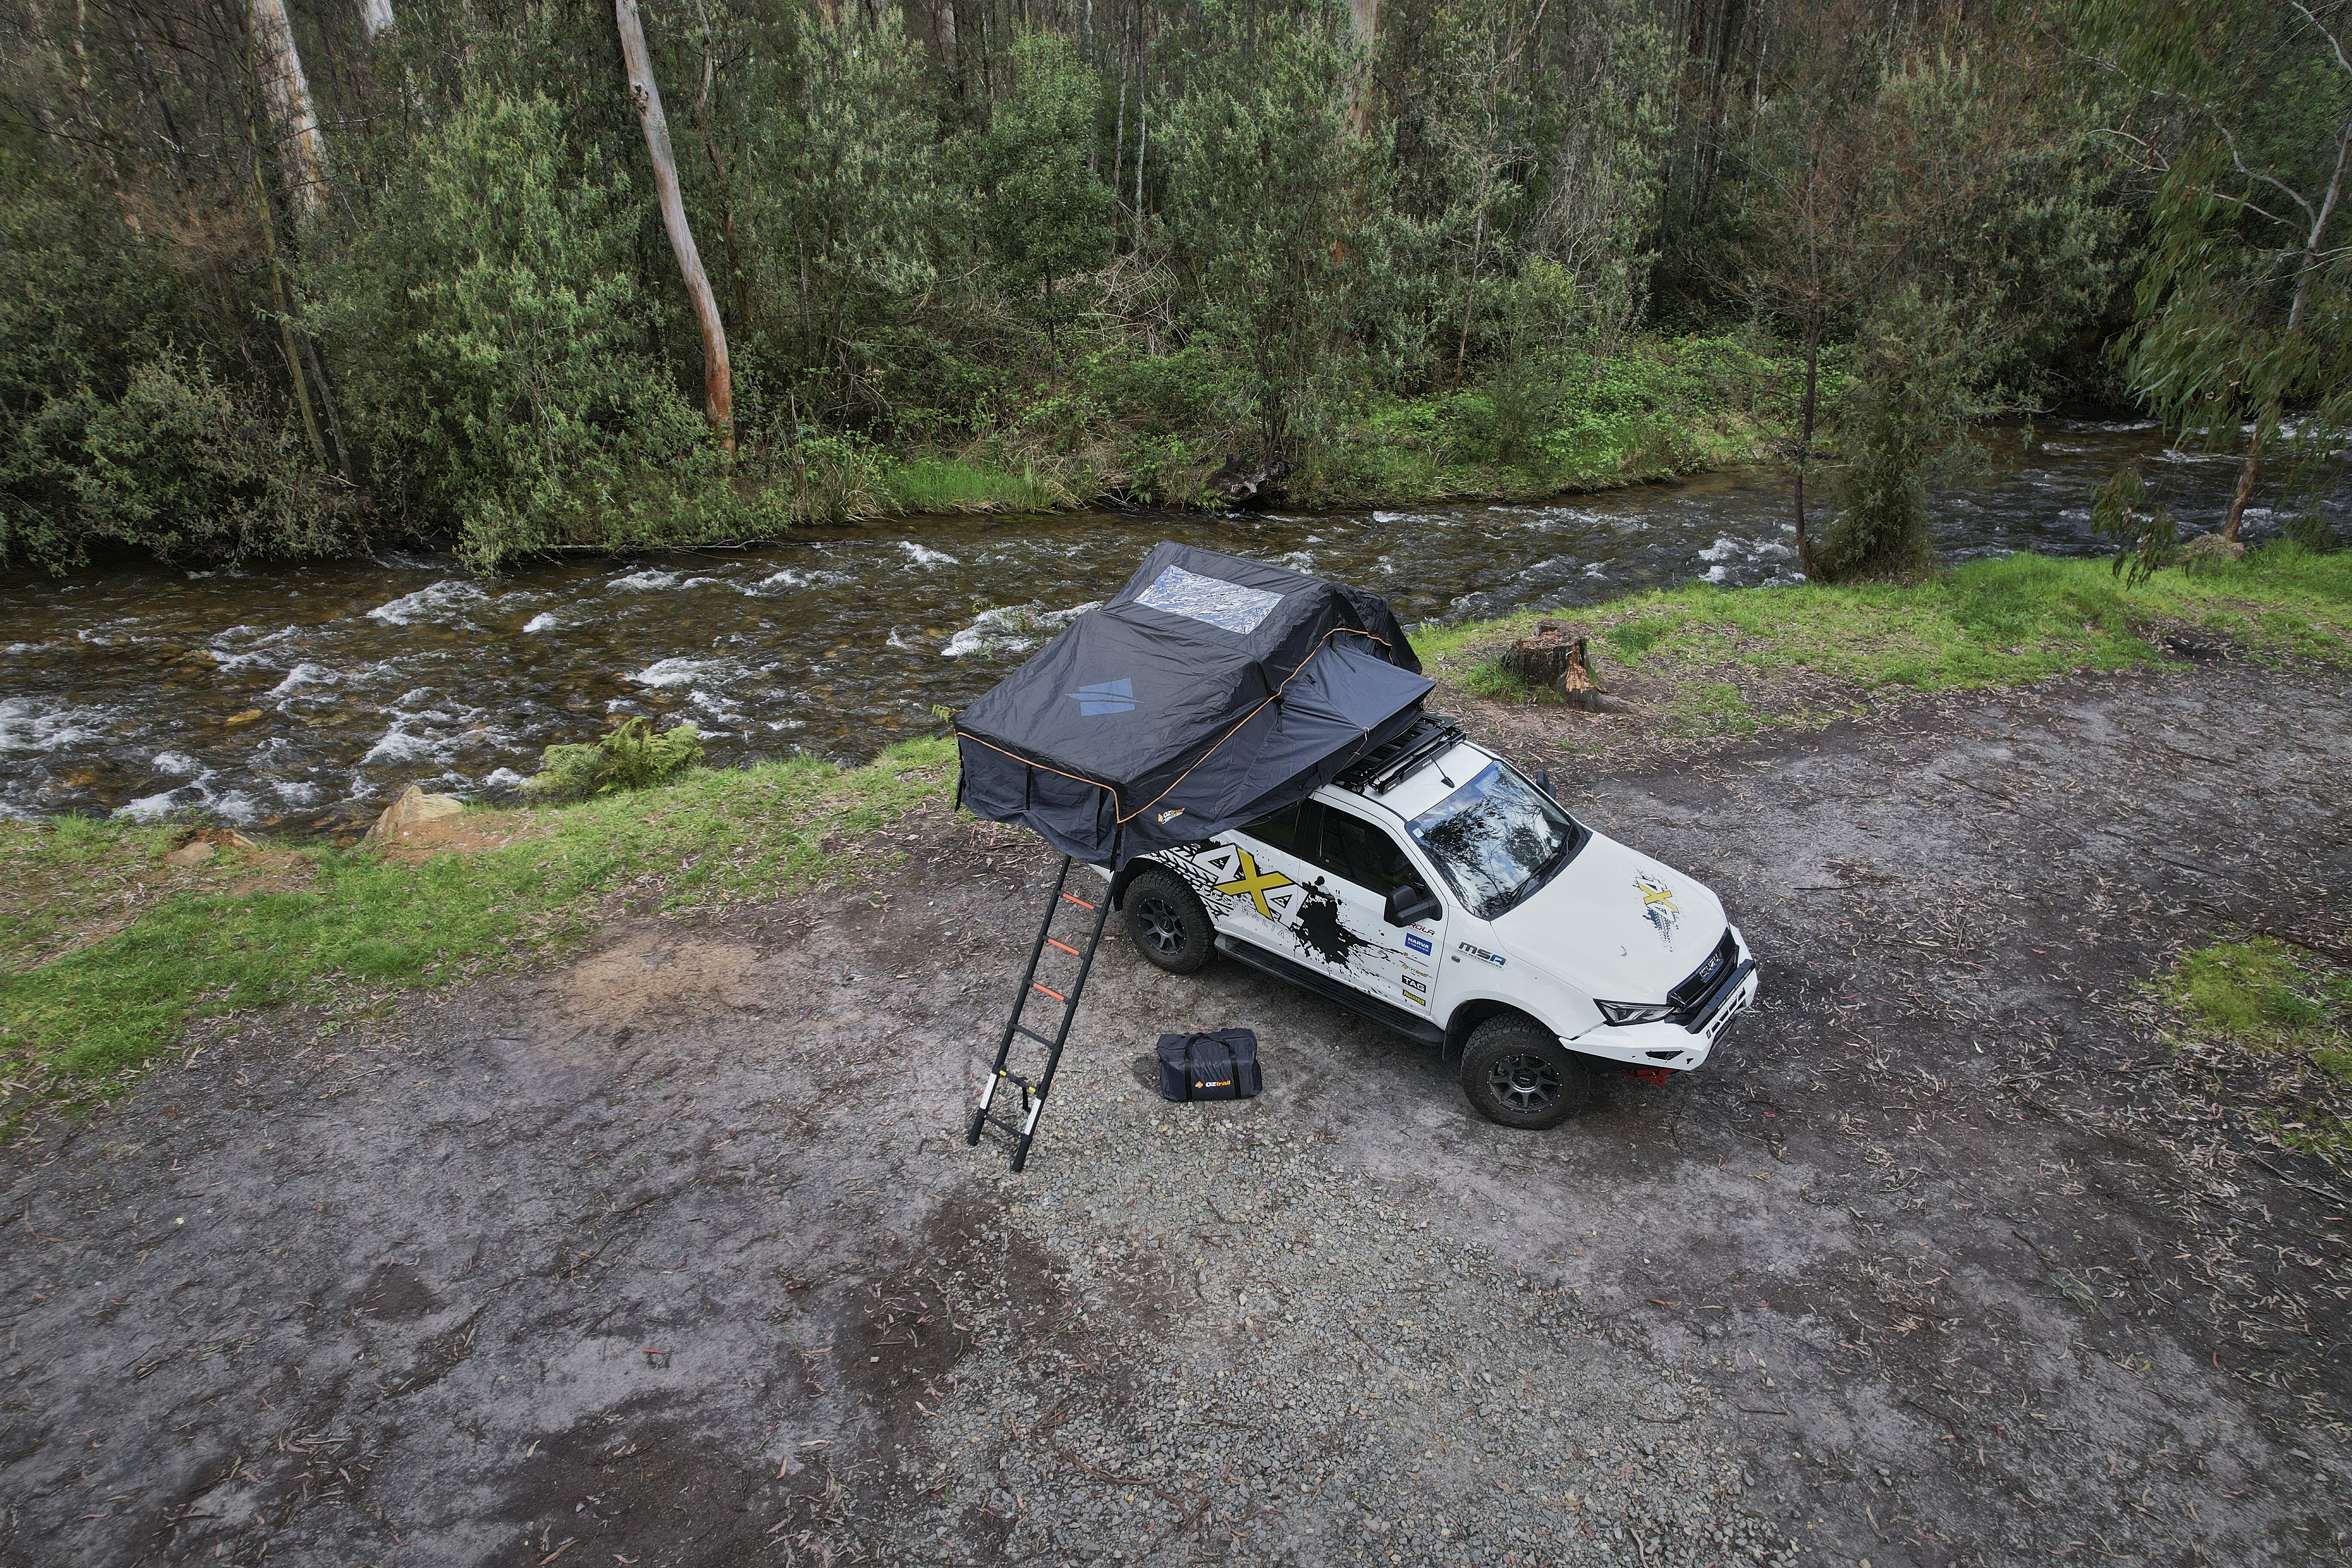
A recent addition to the OZtrail Overlander range is the all-new Birdsville 1400 rooftop tent, a hybrid tent that combines aspects of hard- and soft-shell design. The best of both worlds, you could say. And when the opportunity arose to install it to our ever-blossoming MU-X and take it camping, we didn’t hesitate.
The hard-shell component of the design consists of an aluminium pack top with roof bars, positioned above the packed-down tent. This provides additional storage options should you have the capacity to load recovery boards and the like. Something we didn’t have the luxury of, unfortunately.
With the Rola roof rack already eating into the 100kg roof-load capacity of the MU-X, we had to be extremely diligent when selecting what tent to install. We settled on the Birdsville 1400 RTT, as its 71.5kg total weight (excluding ladder) just squeezed in. Had we opted for the range-topping Canning 1300 RTT (85.5kg), we would have exceeded the vehicle’s roof-load capacity.
Once we were comfortable with the weight, the model was ticked off and the skilled team at Roof Rack Superstore in Epping, Victoria, bolted the tent atop the Rola tray. The tent is supplied with all of the necessary mounting brackets, hardware and instructions to suit most roof-rack systems, and Roof Rack Superstore’s Cameron White told us that a professional installation is highly recommended. It took his team around 30 minutes to secure the tent down.

The first thing you notice is how high the Birdsville RTT sits when unopened and housed within its heavy-duty 550gsm PVC transit cover. At 1.43m (L) x 1.23m (W) x 0.31m (H) – plus an extra few inches between the roof rack and the base of the tent itself – the RTT towers above the vehicle and is hard to ignore when cruising on freeways at 100 clicks. As such, it noticeably impacts fuel usage because of this; but what rooftop tent doesn’t?
Folks below six-foot tall are going to have a difficult time setting up and packing down due to the height of the tent – and if you don’t have side-steps, forget about it. We had to resort to using a step ladder to reach particular tie-down straps, and to pull down the ladder itself.
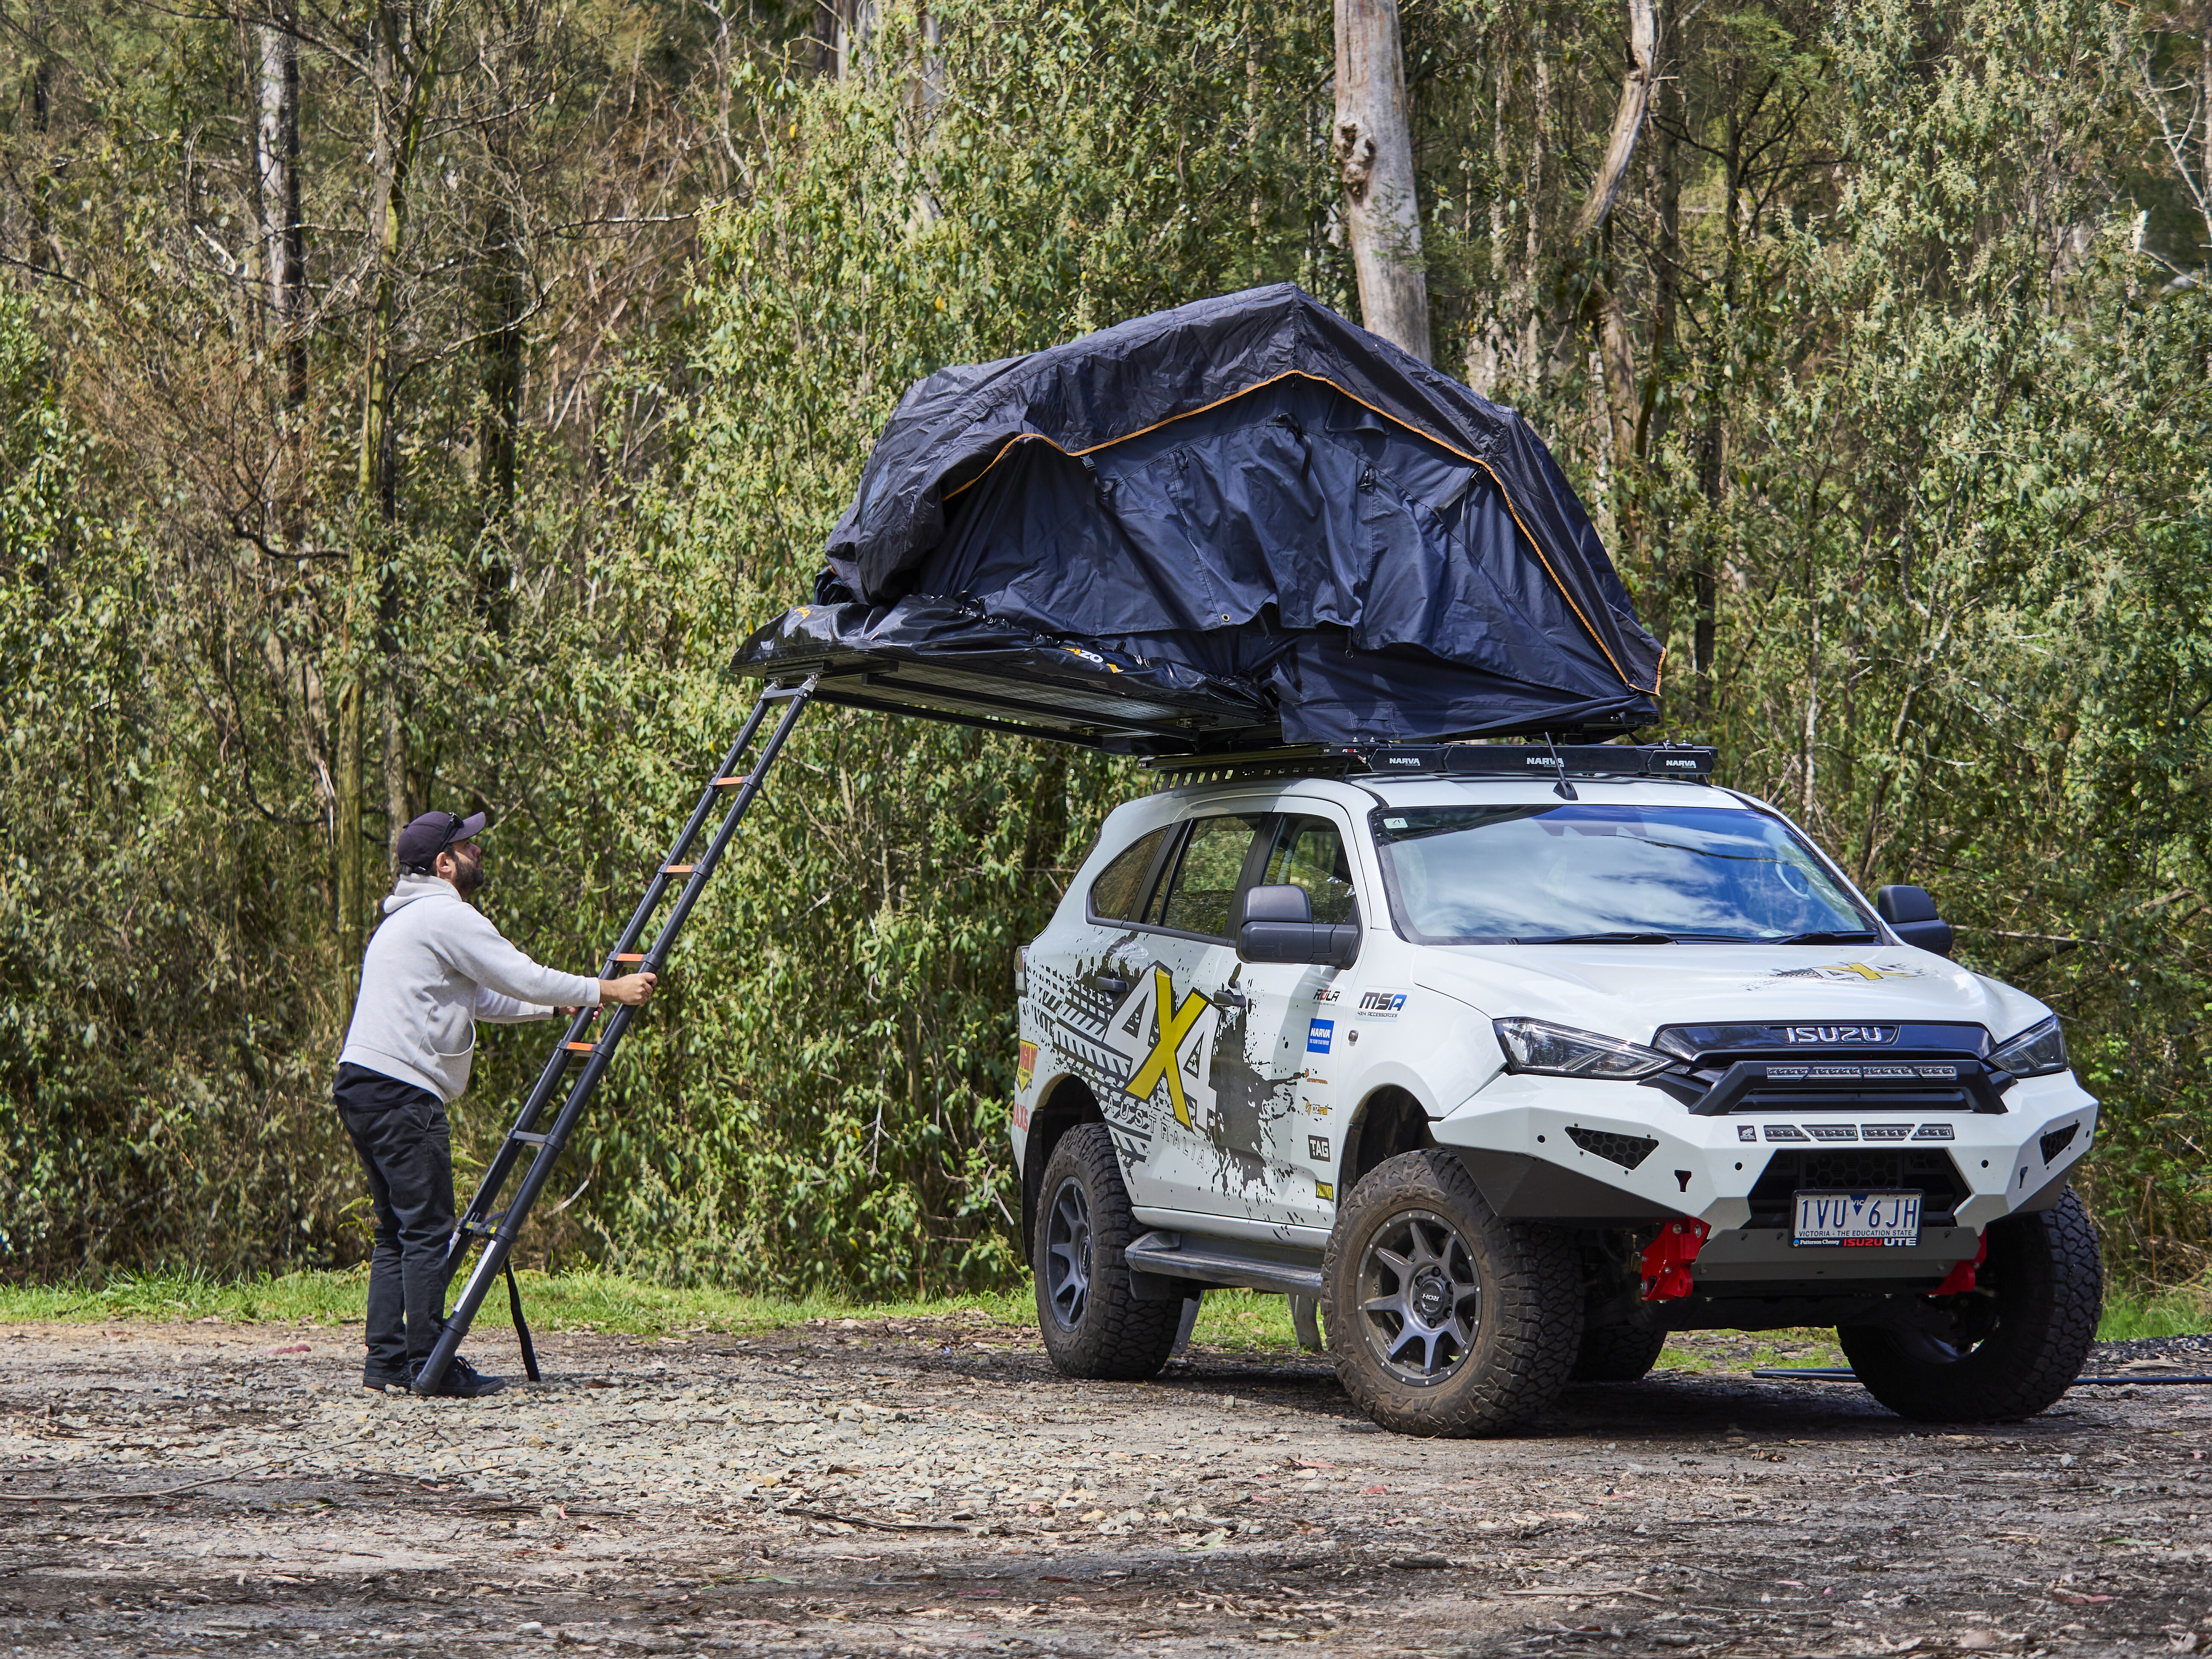
The 2.3m adjustable ladder is designed to fit larger vehicles and trailers, but it needs to be stowed away after use and cannot be left connected atop the tent when packed down. It’s something to consider if cabin space is at a pinch.
Despite these issues, set-up and pack-down is reasonably straightforward and should take 10 to 15 minutes – however, with a bit of practice, you can probably be set-up at camp within five minutes.
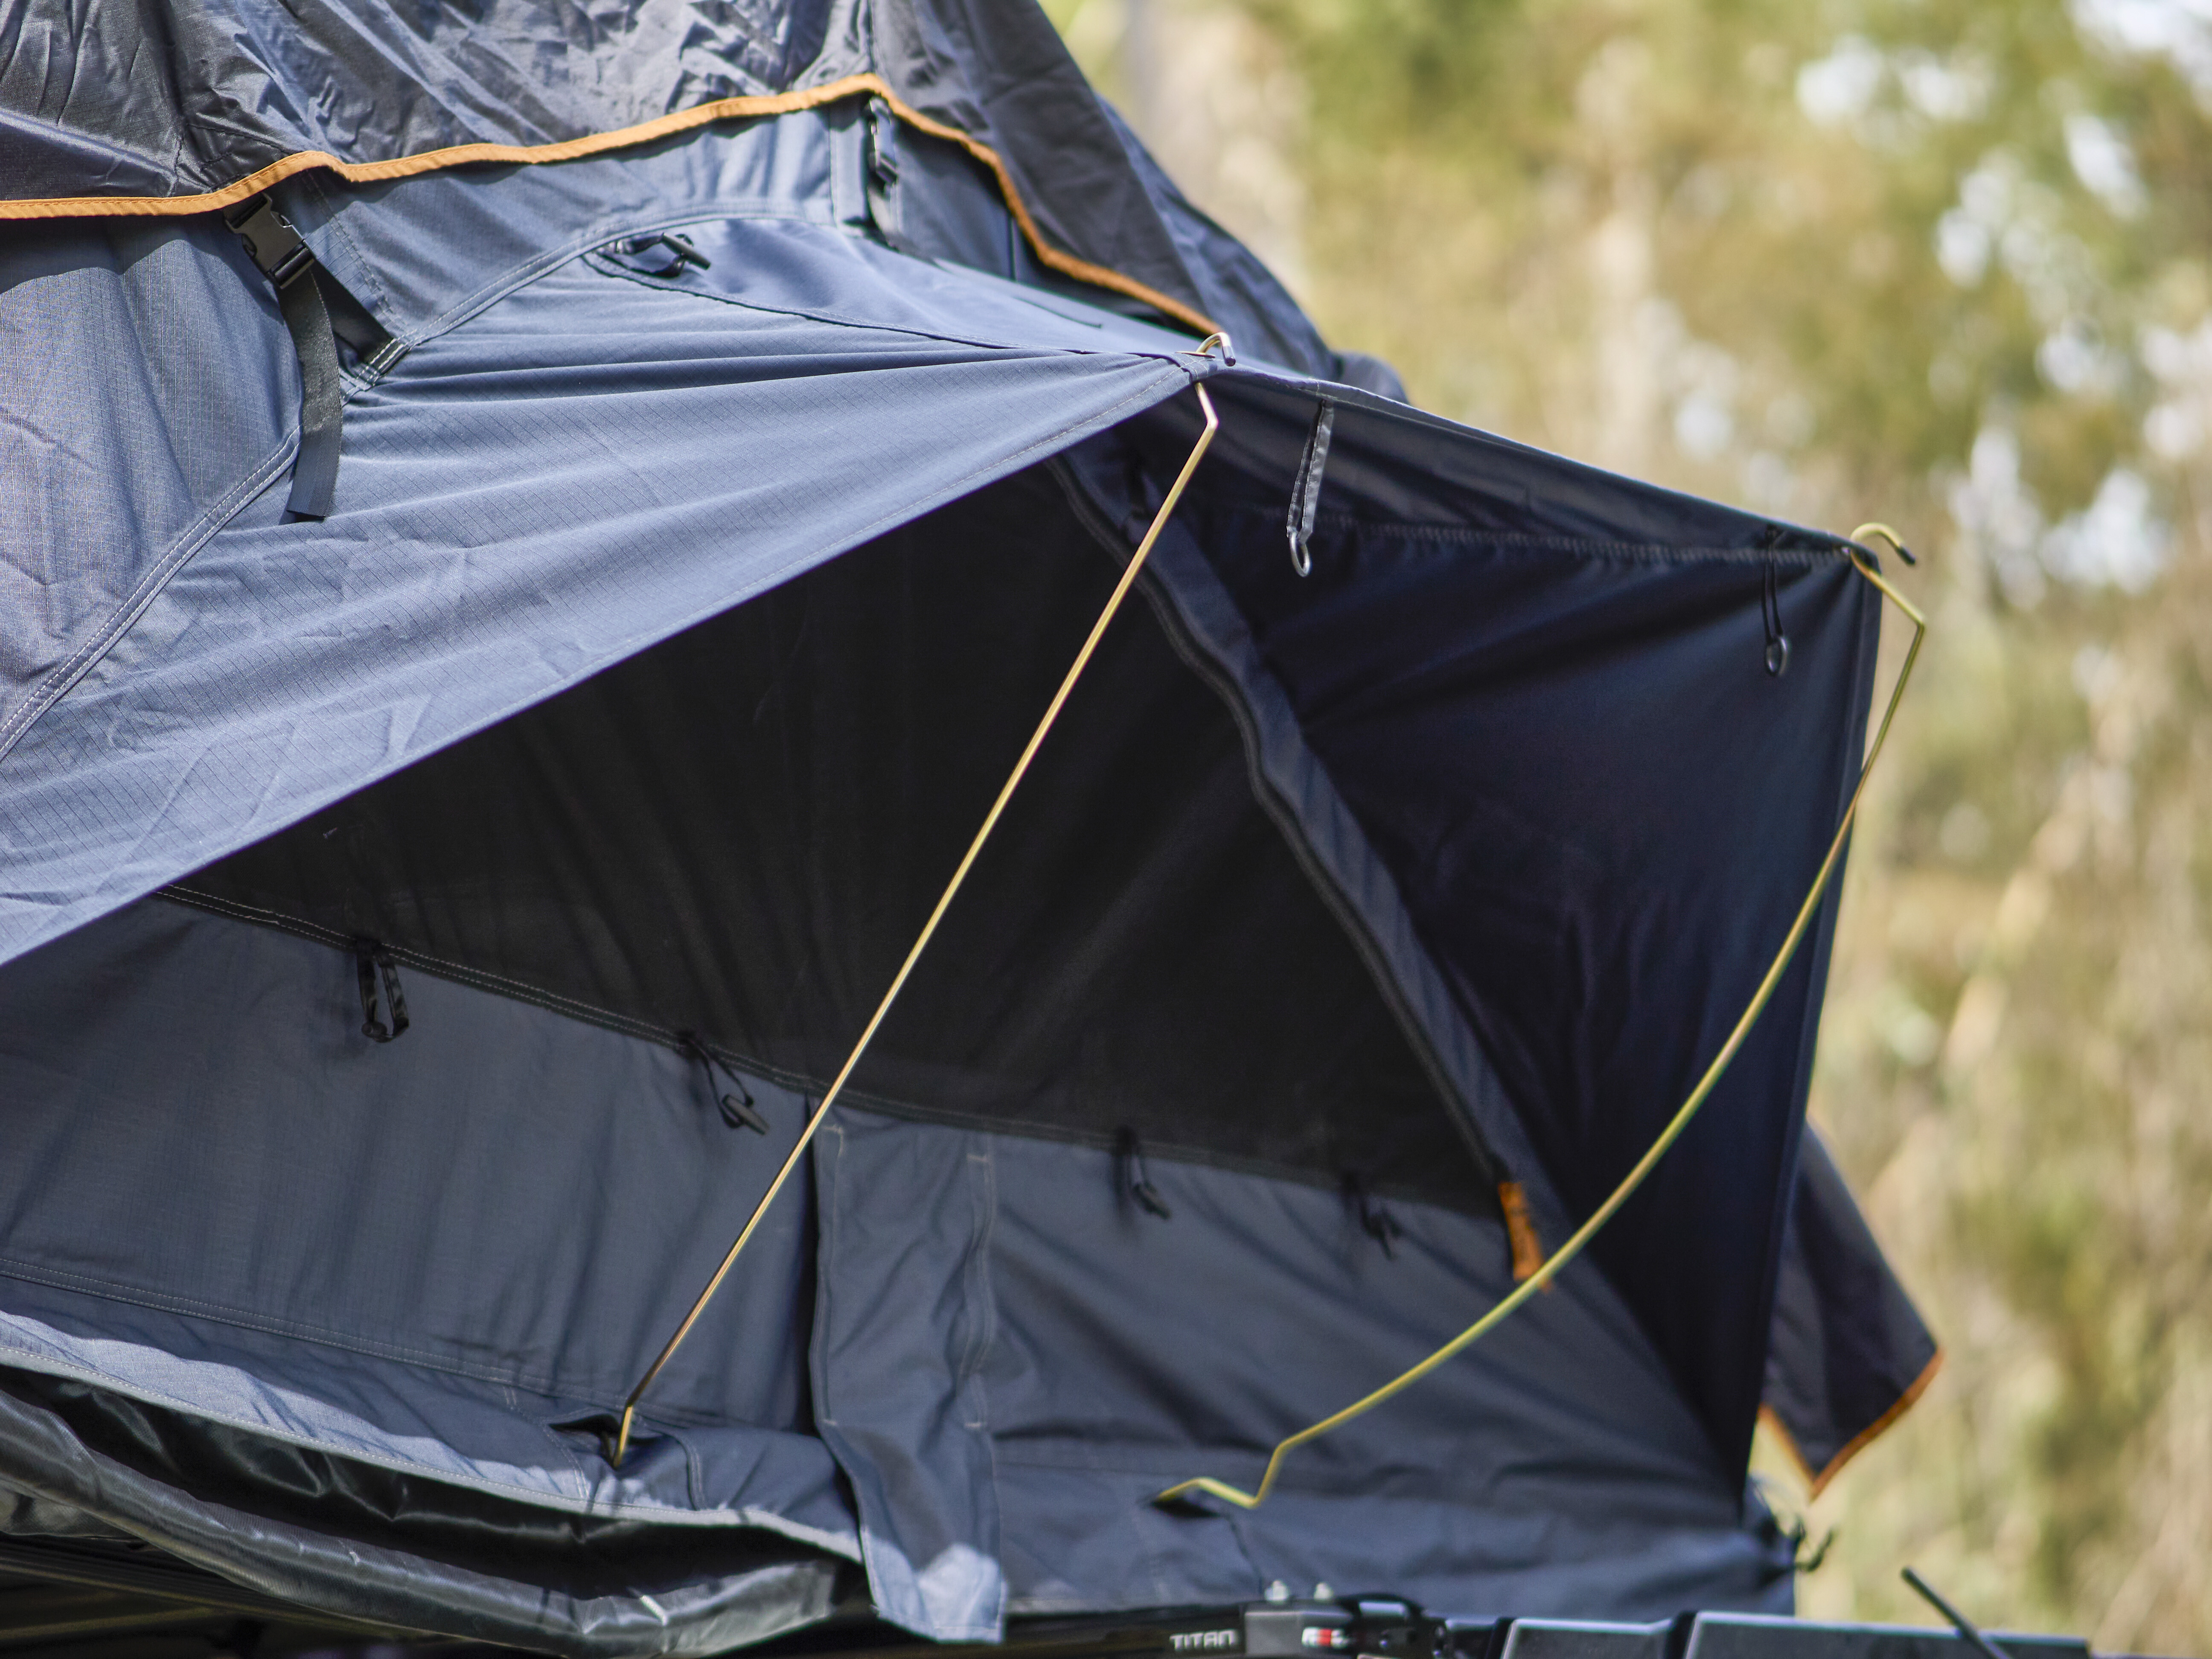
The tent itself is constructed from heavy-duty 280gsm ripstop polycotton canvas, with a 210D seam-sealed ripstop polyoxford fly positioned over the top, designed to keep occupants warm and dry. An extended fly positioned over the ladder ensures you’ll stay dry during entry and exit, and multiple fly tension poles for the windows – located either side and to the rear of the tent – are included and a cinch to erect.
The tent also comes with an optional Birdsville annex for an extra $399.99. The annex provides extra space and is tailored for vehicle’s up to 2.2m tall.
Close inspection of the tent seams indicates quality workmanship, and multiple tie-down straps and clips around the tent’s perimeter ensure the tent doesn’t flap around when the wind picks up. When all doors and windows are zippered up, the tent is pitch-black inside, making it ideal for those who prefer to sleep in on cold winter mornings. The robust tent remains stable when occupied, and its cavernous internal size can easily accommodate two adults.
Inside, the tent has two SkyMesh panels on the ceiling, enabling users to gaze at the stars while they drift off. These panels – in tandem with the large windows – help to control ventilation and temperatures in harsh Aussie climates.
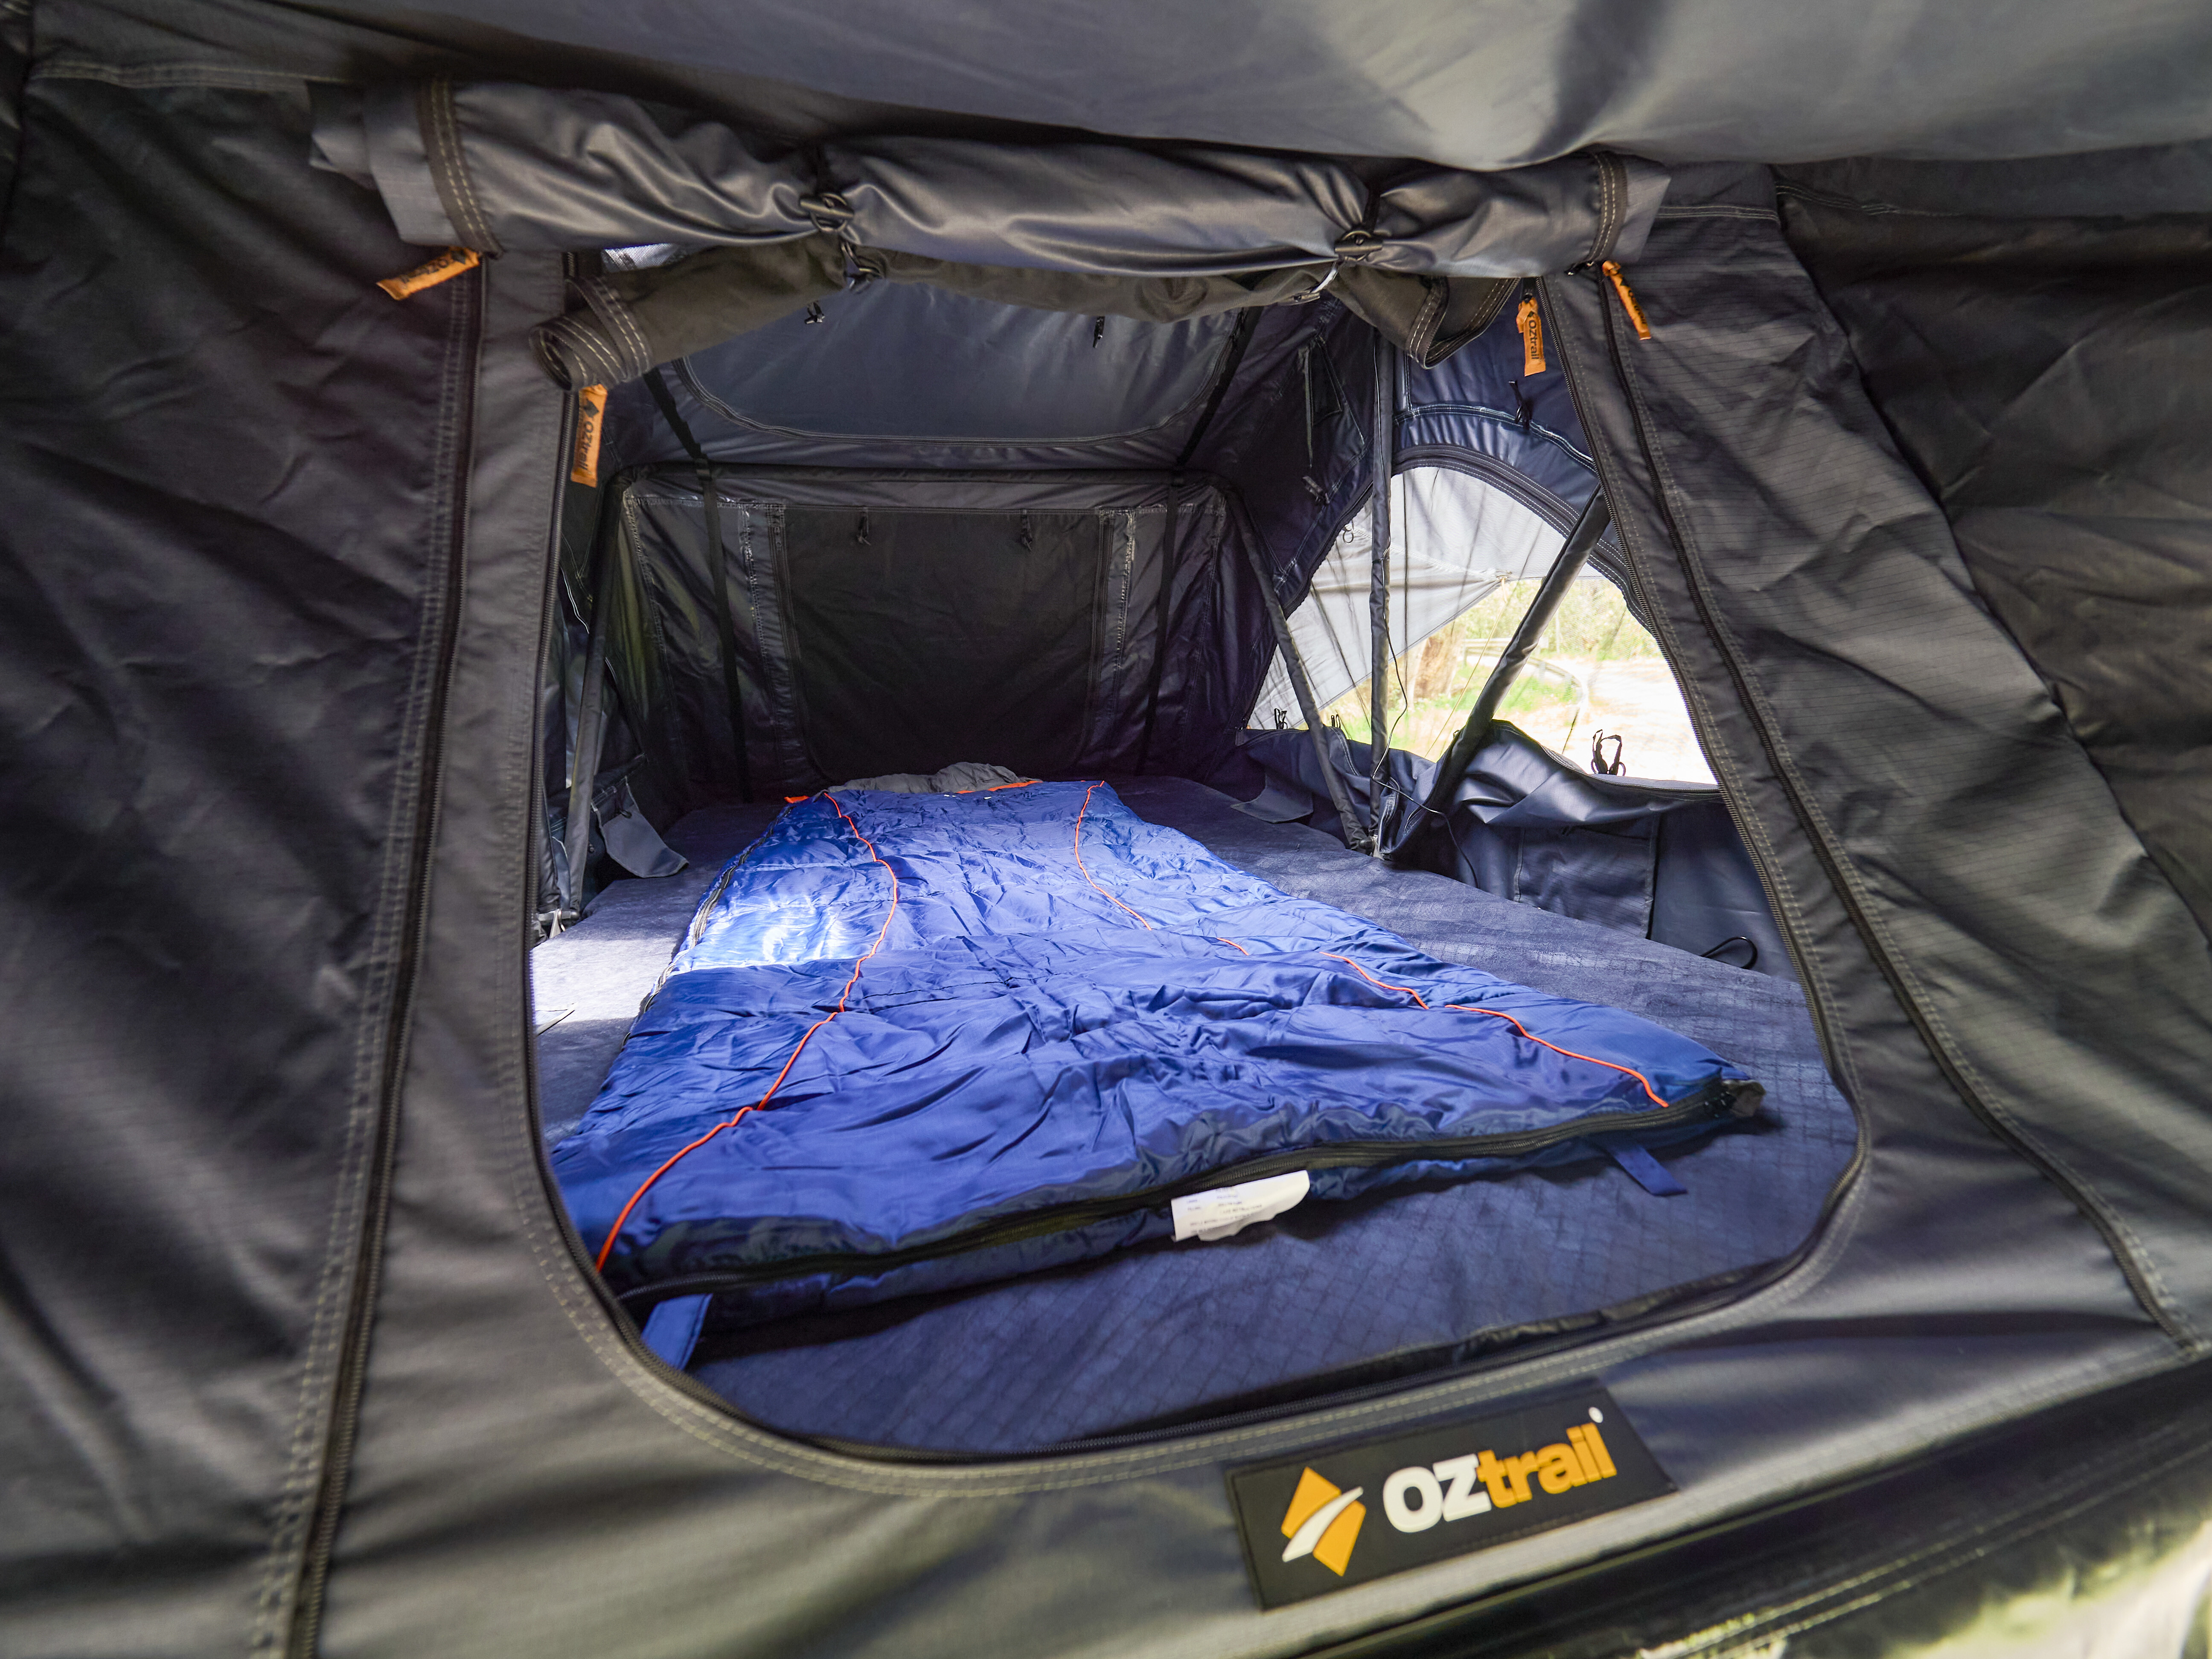
LED lighting strips, powered by OZtrail’s own Lumos tech, illuminate the interior once the sun dips below the horizon, and these are connected via a USB cable – we ran ours off a power bank. Convenient storage pockets located beside the mattress are handy for phones, wallets, water bottles, and other bits and pieces you’d normally have on your bedside table.
For those who like to camp in comfort – some call it glamping – the 60mm memory foam mattress features a removable luxe-comfort flannel cover. Beneath the mattress is an anti-condensation mat, which promotes airflow and prevents moisture and thus mould from breeding. To say it’s comfortable is an understatement, and the mattress is perfect for a night’s rest after a day spent driving on bulldust tracks.
With high-quality materials, clever design touches, an uber-comfortable mattress and ample storage options, the Birdsville 1400 RTT is a compelling proposition for campers inclined to rest up at a campsite for days on end.
Overlander rooftop tent range
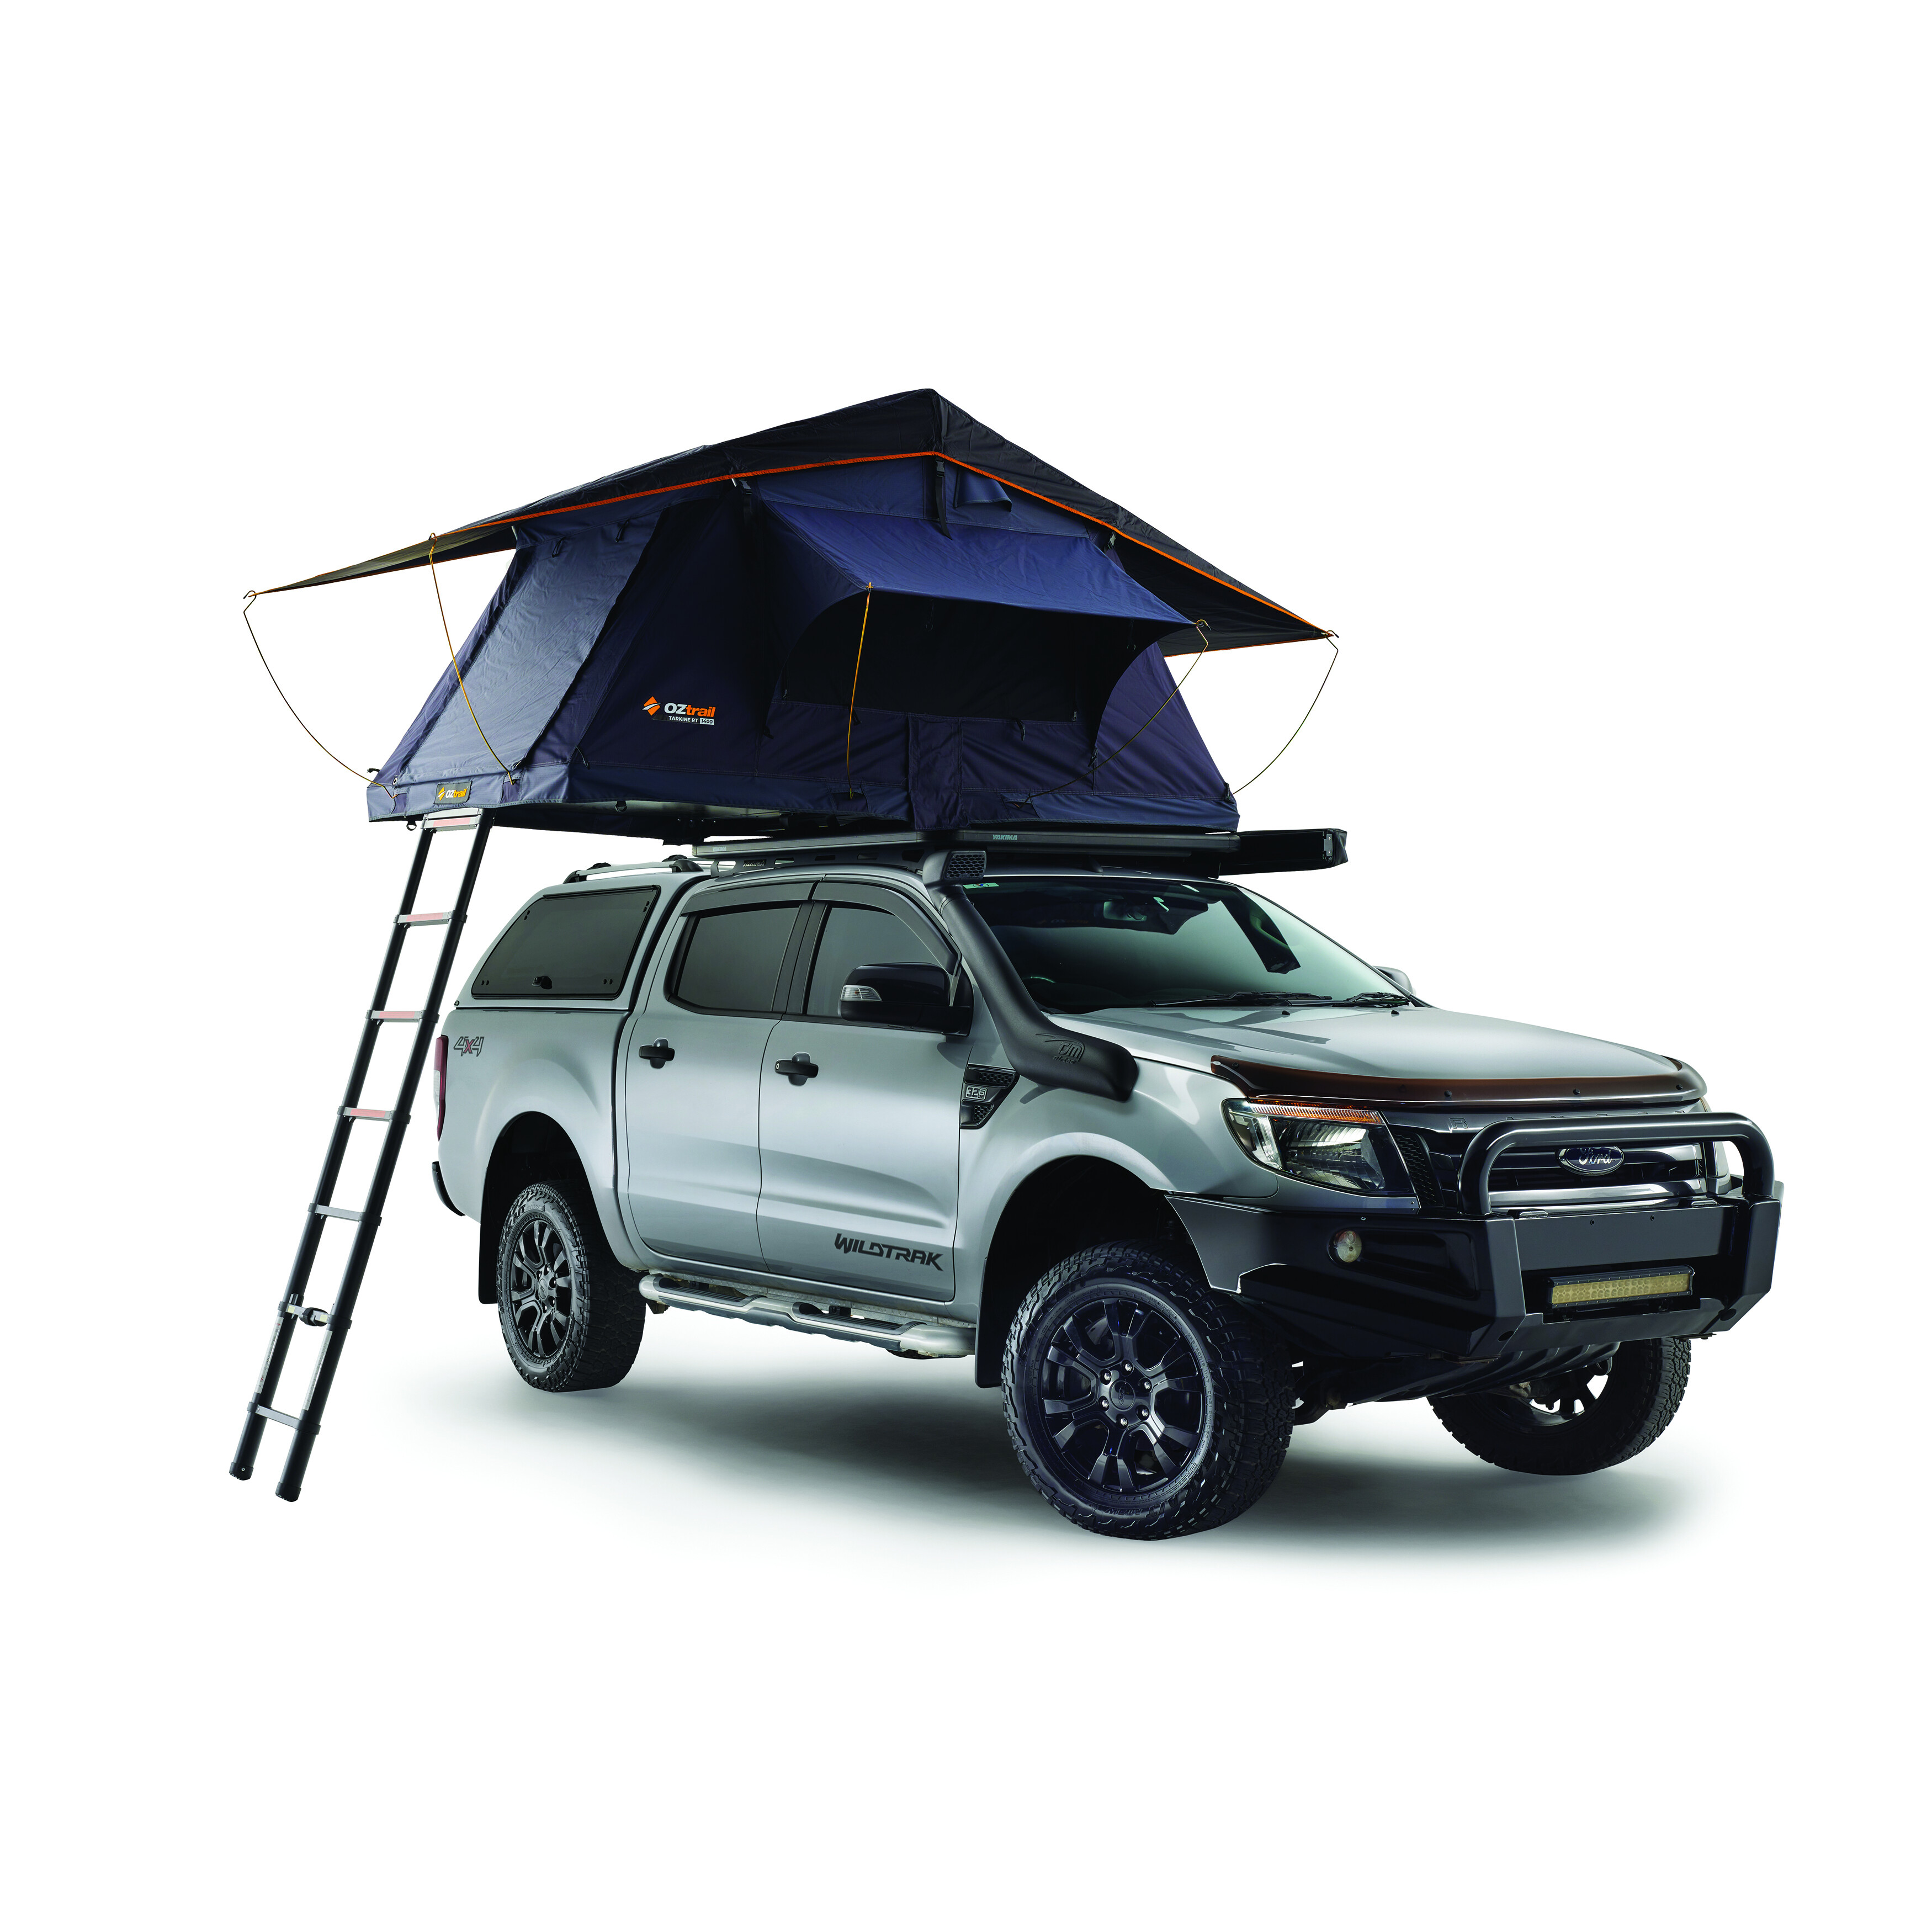
OZtrail has two more roof-top tents in its Overlander catalogue: the Tarkine 1400 and the range-topping Canning 1300.
At $3999.99, the Canning is a premium hard-shell tent with an aluminium, slimline exterior and a four-point scissor frame design. Gas struts simplify set-up and pack-down, and a 50mm memory foam mattress is included. The Canning weighs 85.5kg (excluding roof bars and ladder) or 95kg (with roof bars fitted). It measures 2.1m x 1.3m x 1.43m when open (2.1m x 1.3m x 0.21m when closed).
Priced at $1499.99, the Tarkine’s soft-shell construction is lightweight and its size means it’s suitable for smaller 4x4s. It weighs 59kg when set-up (inc. ladder) and measures 2.4m x 1.43m x 1.3m when open (1.43m x 1.23m x 0.31m when closed). A 60mm high-density foam mattress is included. All tents are made with 280gsm Ripstop polycotton canvas and 210D polyoxford flysheet.
Pricing
Birdsville 1400 rooftop tent: $2499.99 Available from: www.oztrail.com.au
Part 1: Top-dollar FJ Part 2: Something borrowed, something new Part 3: First big trip Part 4: Bargain hunter
Part 1: Top-dollar FJ
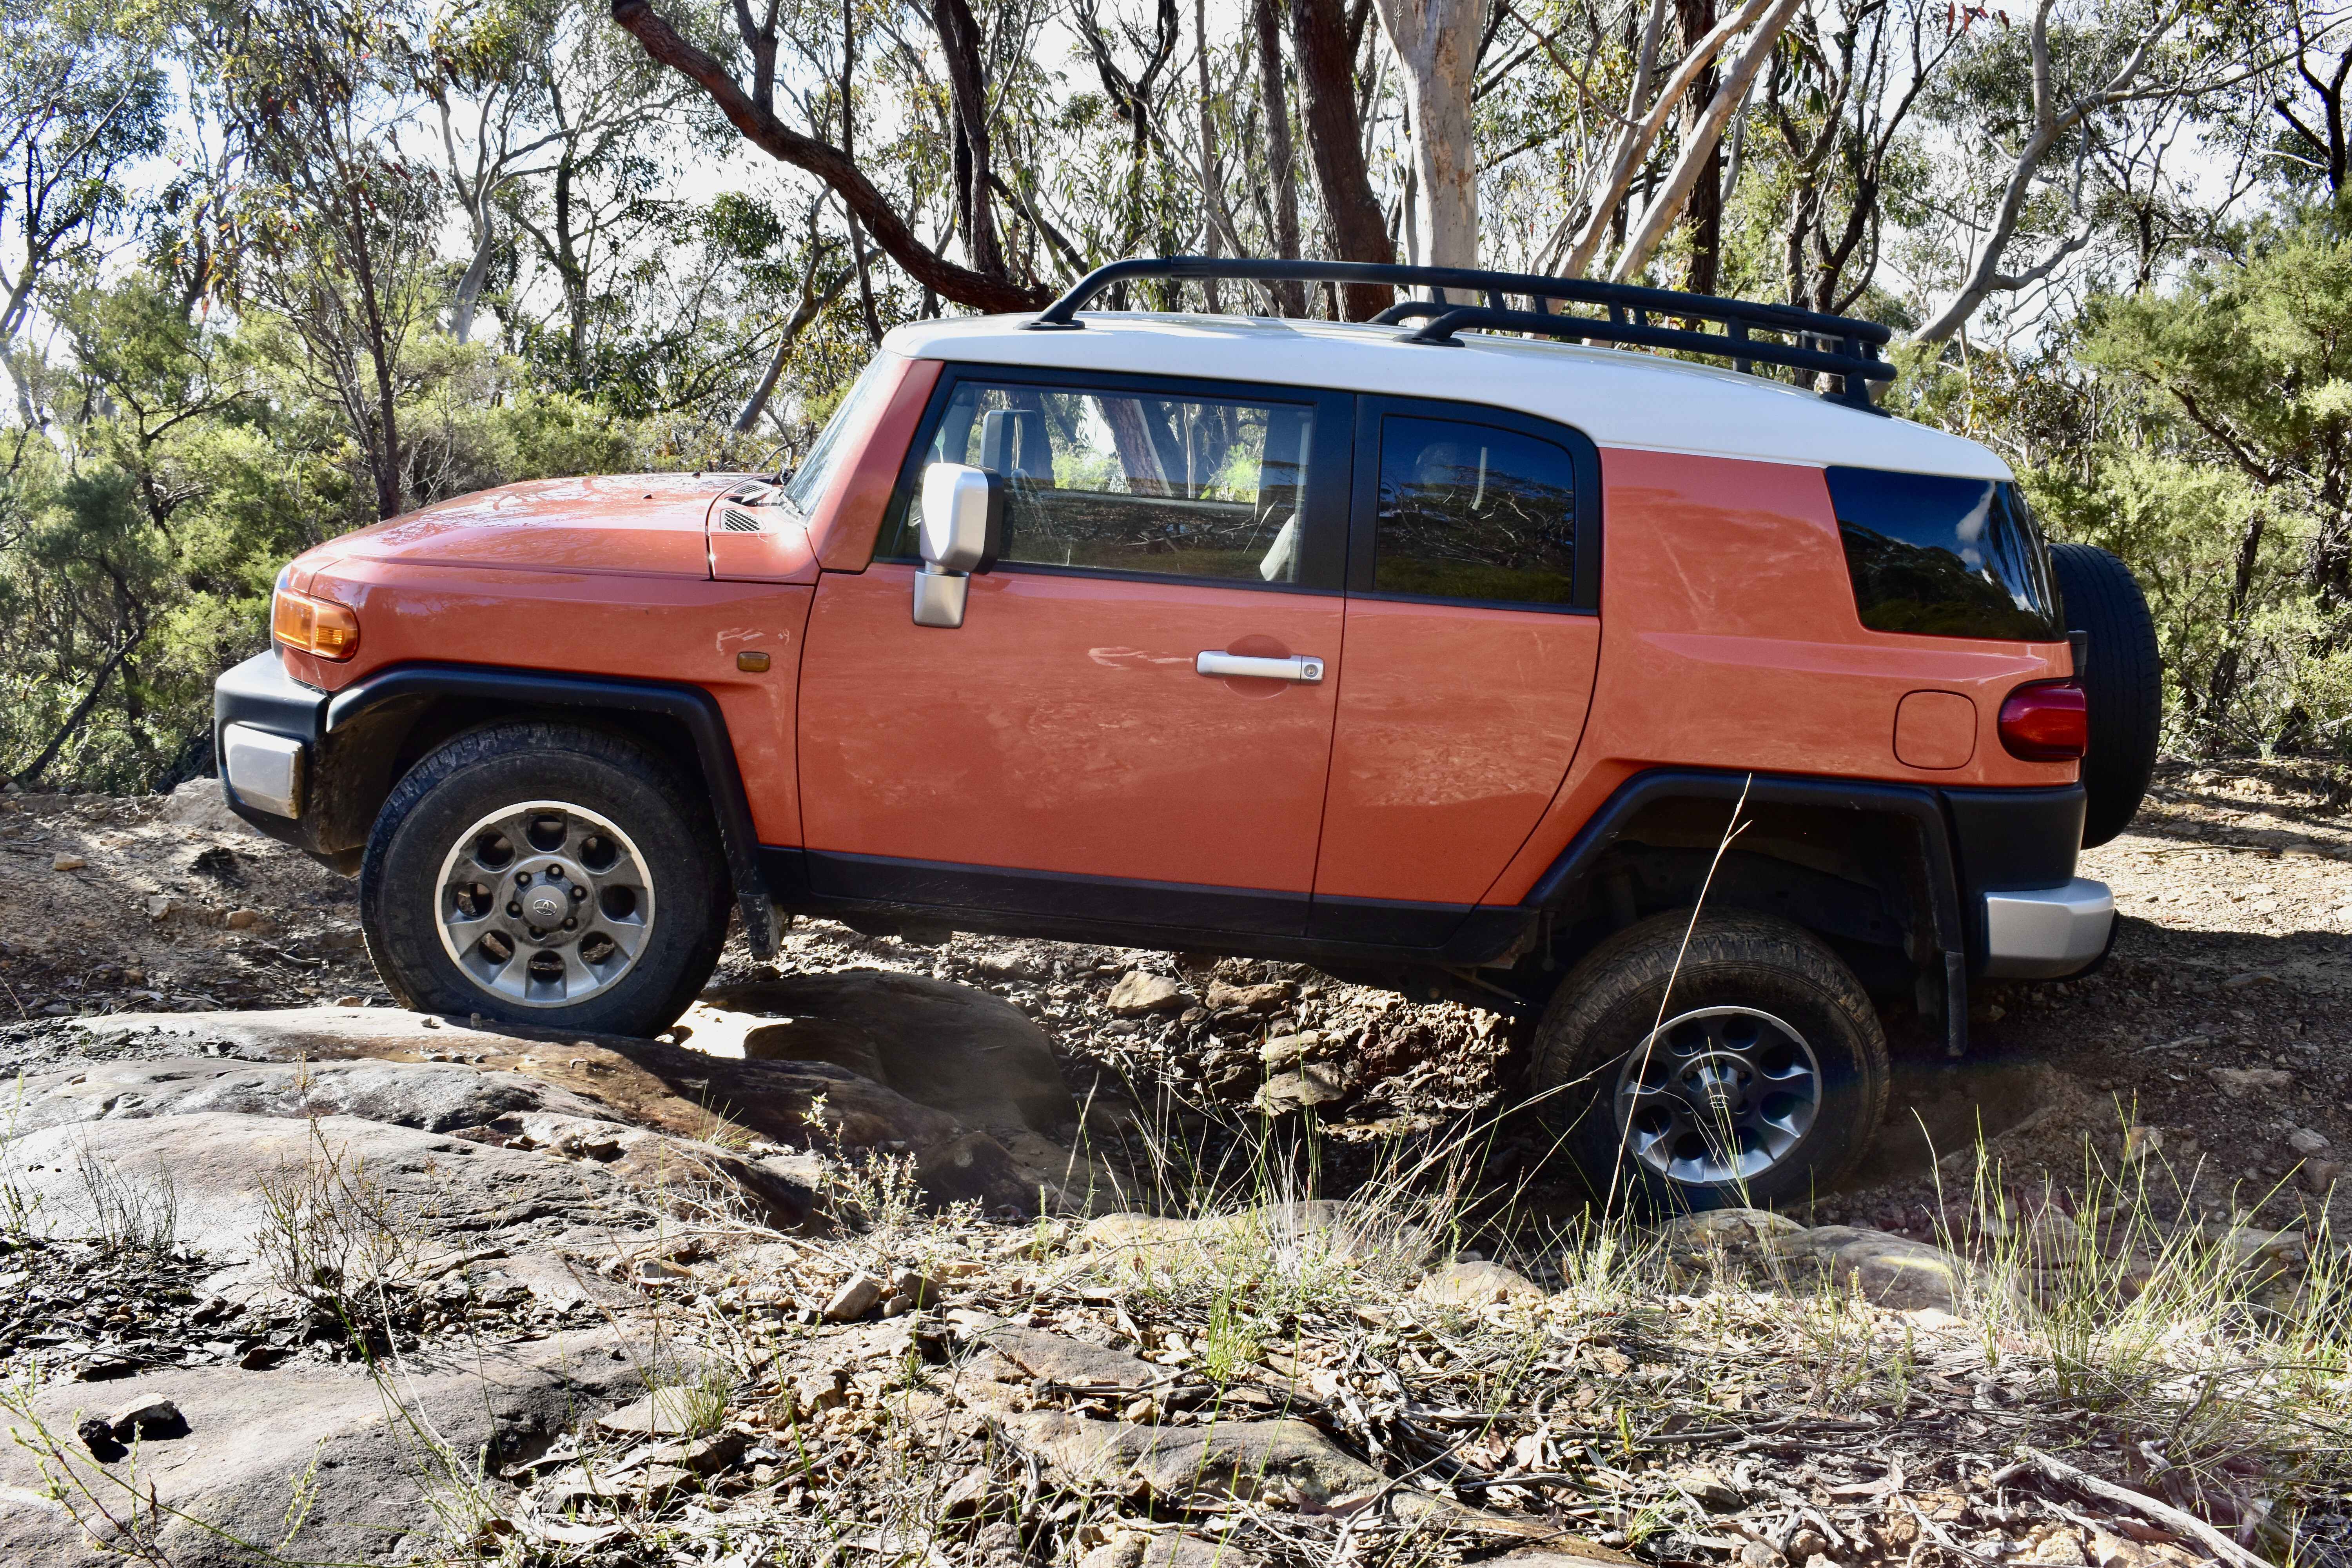
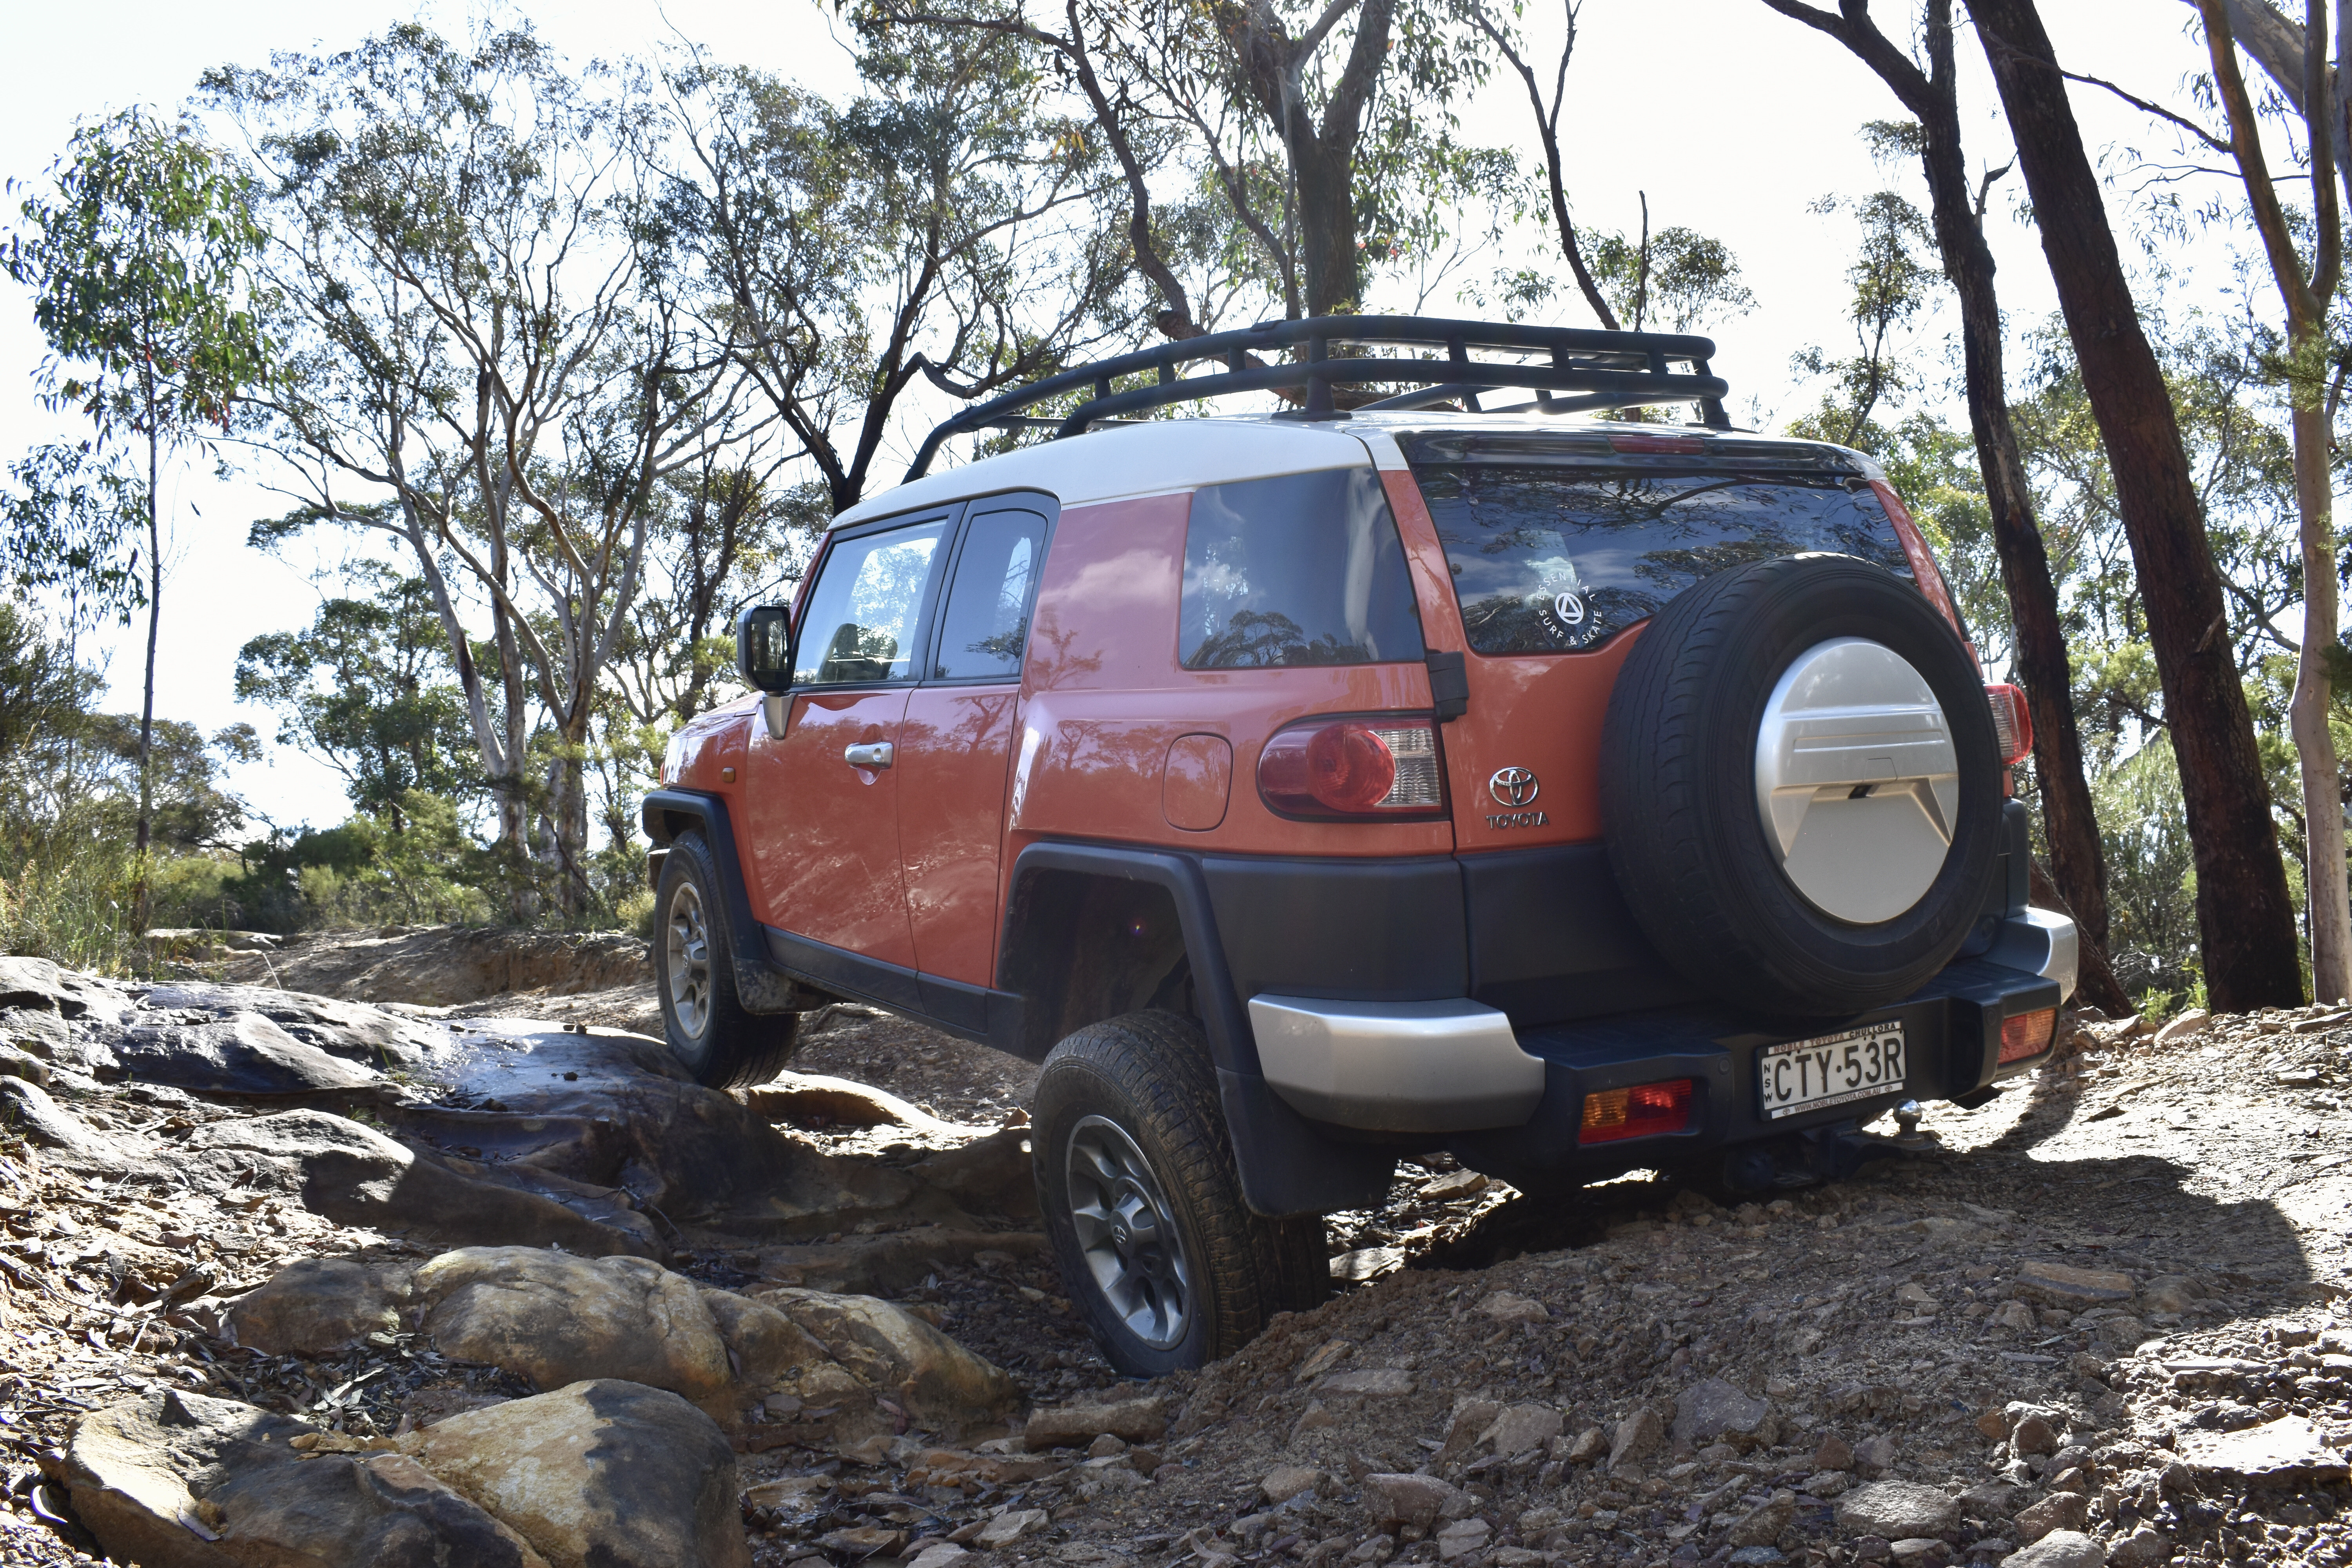
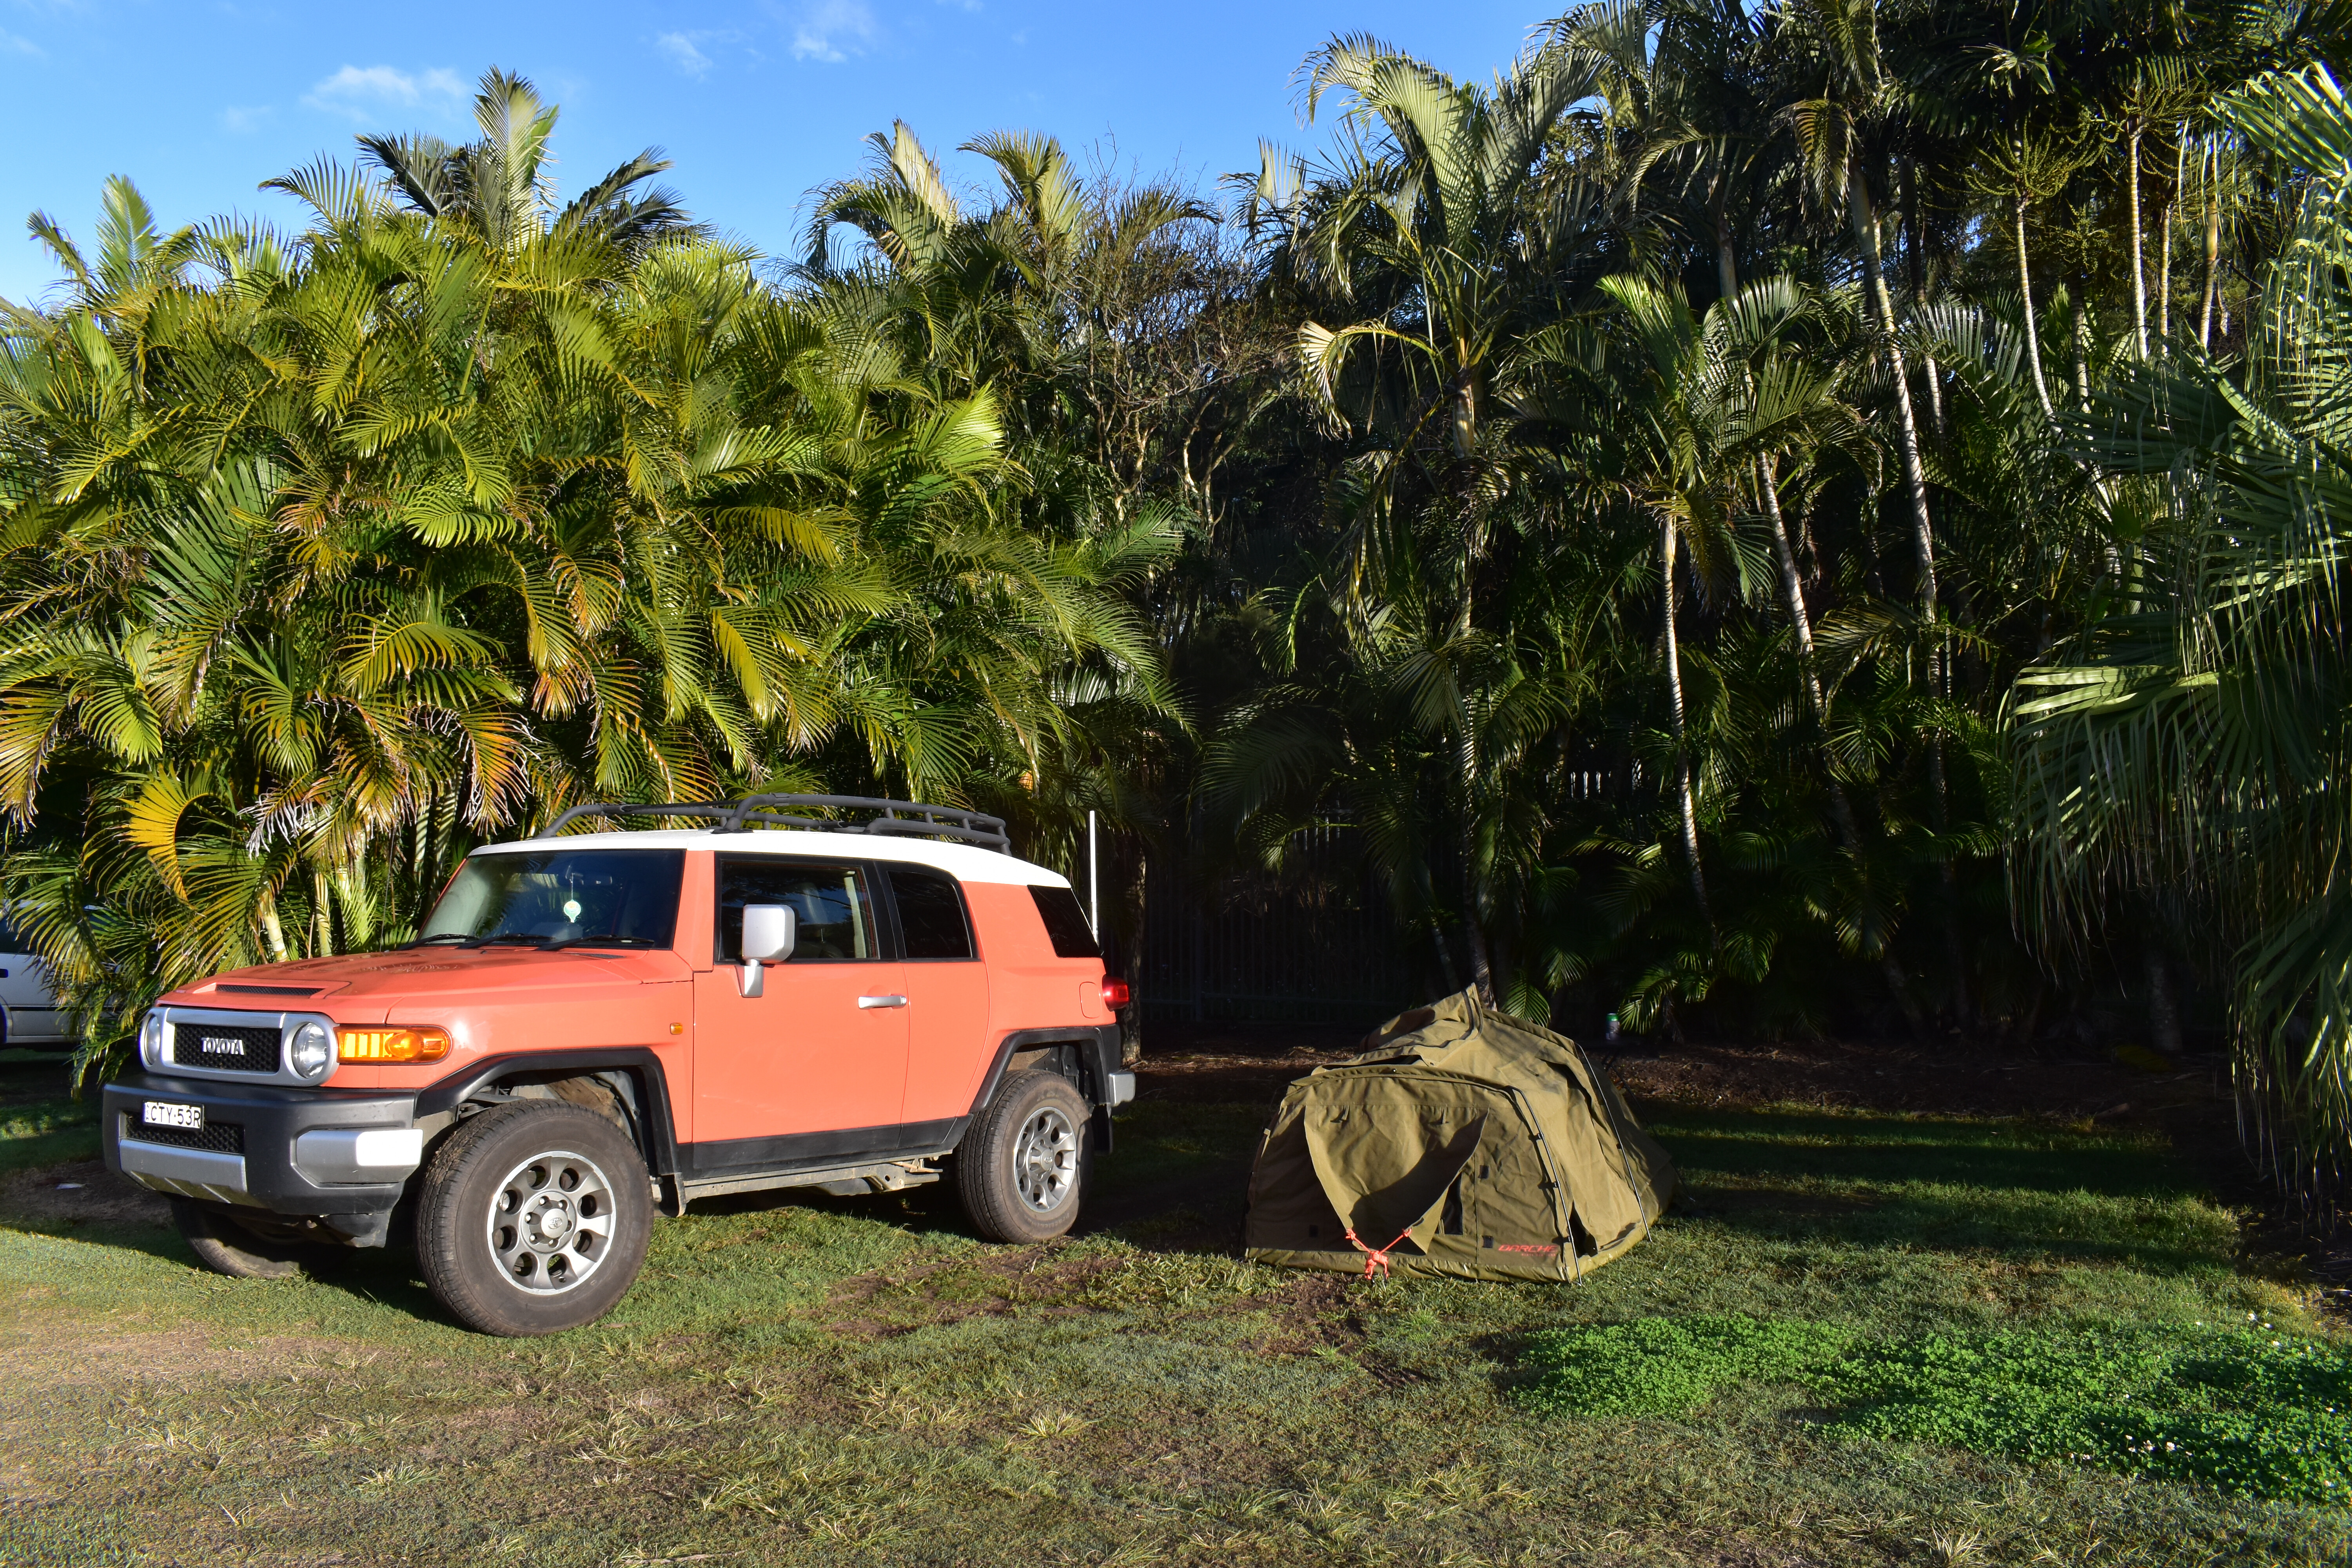
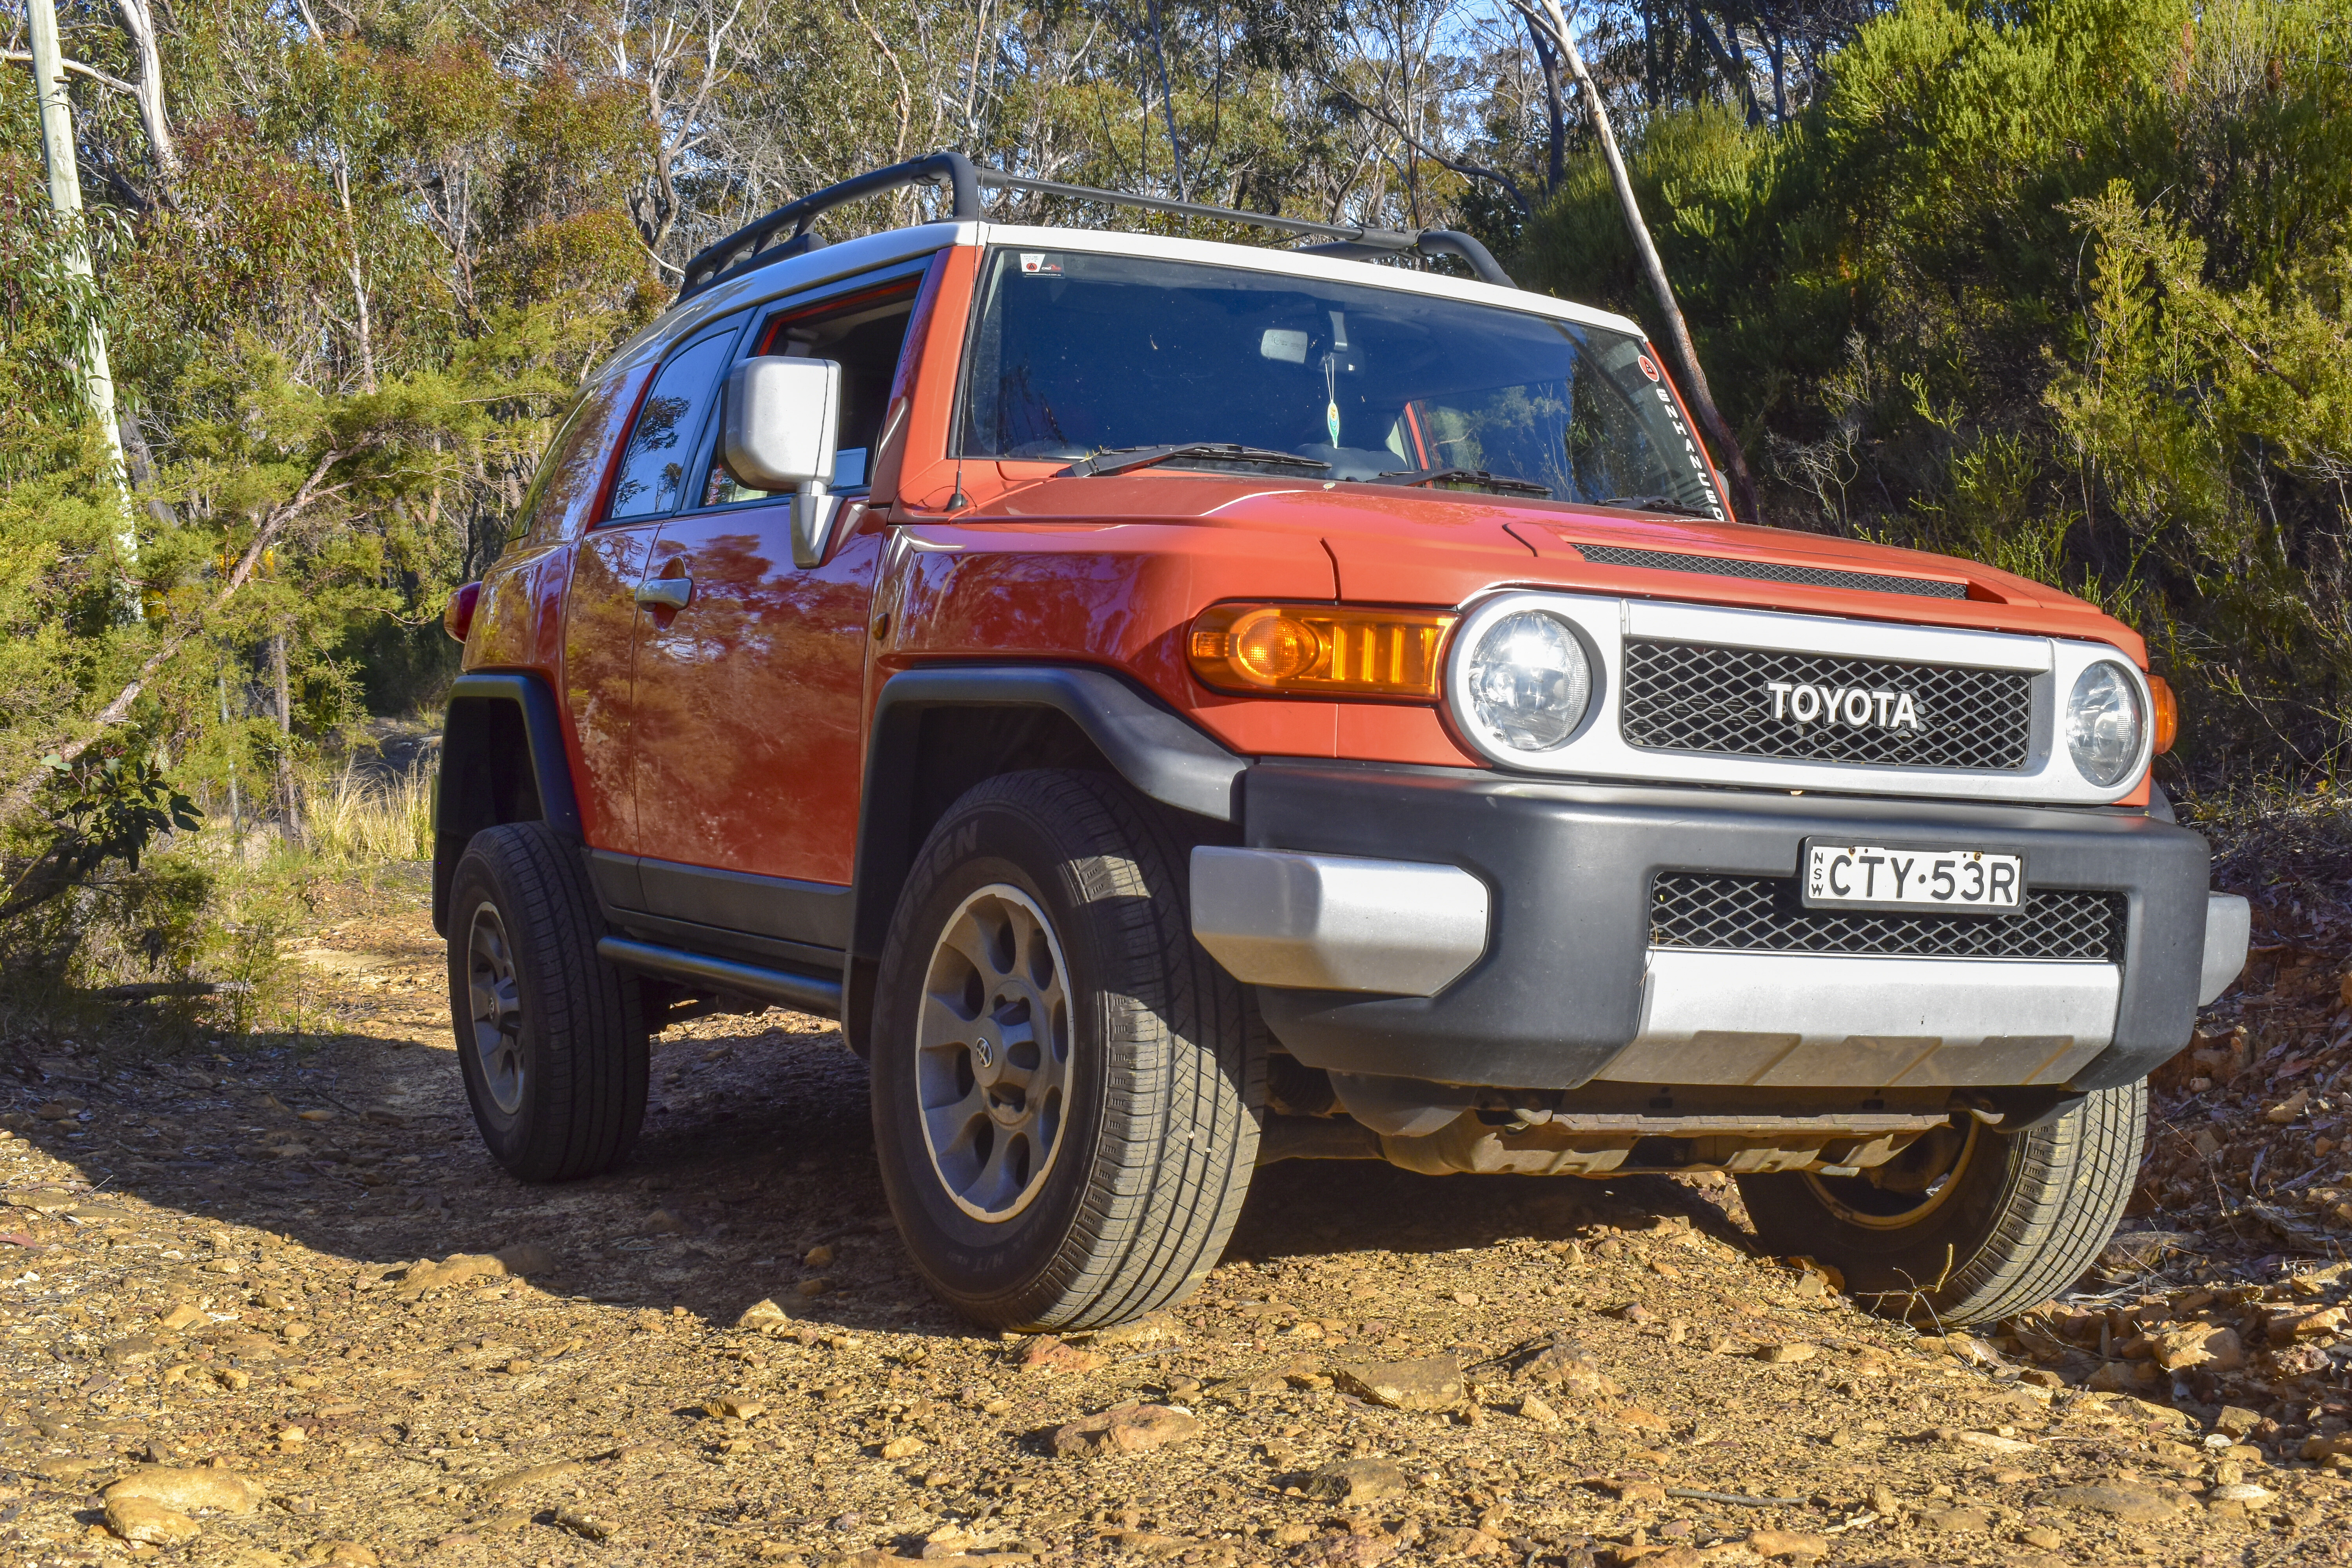
I wanted to buy a 4×4 wagon because I’m struggling to fit myself, my wife Jess and our dog Chiquita in my much-loved single-cab Hilux camper. I remember writing just over a year ago that I’d never sell my Hilux and that it was perfect for me. And it was. I haven’t managed to gather the courage to put the Hilux up for sale yet, but it’s time for a new owner as I’ve just driven home with something we can all enjoy as a family. Talk about an expensive dog …I wanted to build up a modern and reliable 4×4 I could take on hard tracks close to home, then drive ten hours on the highway in comfort; let’s call it a tough tourer. So why an FJ Cruiser, or, as my mate’s love calling it, the less practical Prado? Honestly, I’d never really considered buying one. Ever. I’ve reviewed them in the past and thought they were capable yet cramped inside with terrible visibility. Those points still stand.
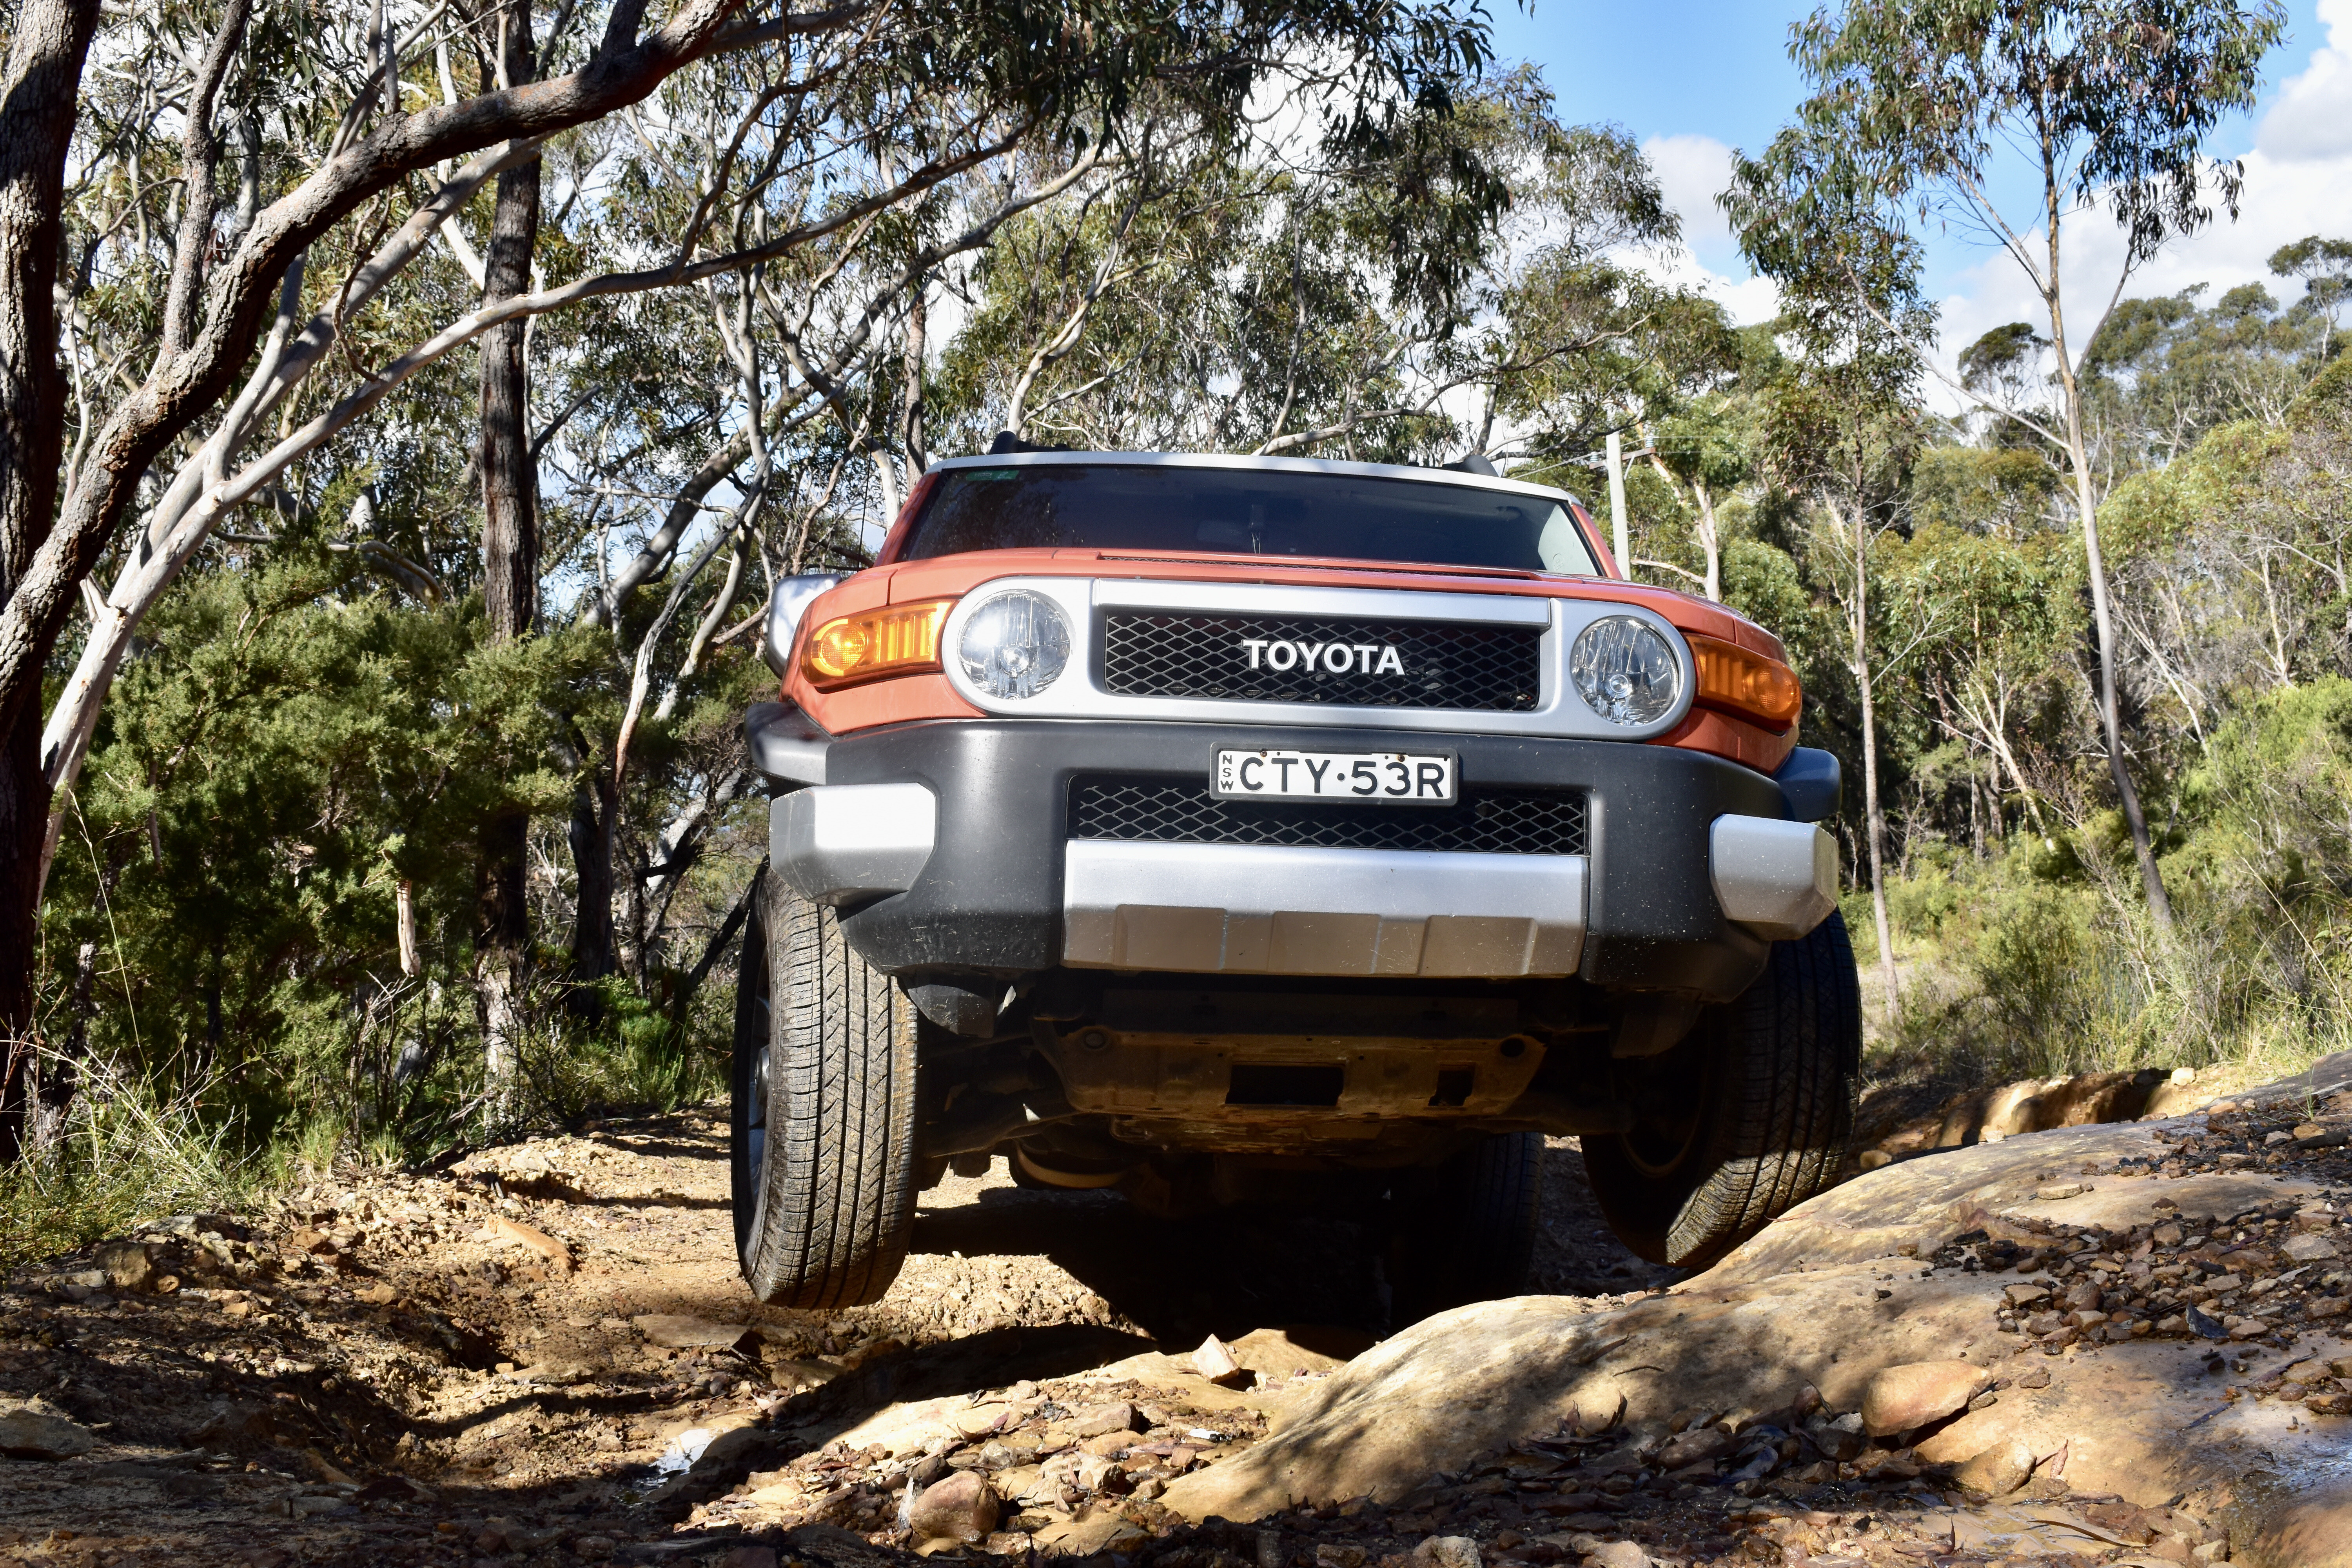
I’ve spent the last six months agonising over what to buy, a process that was consuming me mentally and emotionally. From dual-cab utes, to an 80 Series LandCruiser, a new Suzuki Jimny or the four-door Jeep Wrangler. One fine day, however, this bright orange FJ Cruiser popped up on FB Marketplace and something clicked. I personally know three people who own FJ Cruisers and they’ve raved about them. Editor Matt also enthusiastically suggested they are a good thing, so down the rabbit hole I went.It was a two-hour trip down Wollongong way to look at the FJ, which I’ve since nicknamed Pinchy (Simpsons fans will get it) in stock standard condition, with full service history and a genuine reason for sale. I slapped down a deposit on the spot after a long test drive and friendly negotiation down to $34,000. Not a small amount of money for a used vehicle, but considering how crazy the market is, and the insane resale value FJ Cruisers are holding globally, I feel I’ve scored a bargain. Anyone want to buy my Hilux?
For the same money as a new Suzuki Jimny, this 2013 FJ Cruiser has a rear diff lock, 159-litre fuel tank, CRAWL Control, ATRAC (active traction control – it’s awesome too) and a bulletproof 4.0-litre petrol motor with less than 160,000km on the clock. That’s a fair bit of kit from the showroom, saving me money in the process, while still allowing us to get out and use the thing in stock trim off-road. I’m not yet used to the enthusiastic FJ owner’s wave though, talk about an unexpected surprise …So, what’s next? Well, I’ve really been enjoying driving it around in stock form, finding its flaws (like the stupid factory roof rack) and developing ways to fix them. Make no mistake, this FJ will be modified, with the brief of keeping it light with products from as many Australian companies as possible.
I’ll be taking you along for the ride as we modify Pinchy in to a capable and comfortable tourer. First up, I want to get it on a hoist and make sure everything is working as it should be, and then it’s game on.Do I regret buying a used FJ Cruiser? Not in the slightest. Life is too short for boring cars, and let me tell you there’s nothing boring about driving an orange FJ Cruiser called Pinchy with a happy partner and dog by your side. RIP Hilux …
TOTAL KILOMETRES: 159,281km KM THIS MONTH: 835km AVERAGE FUEL USE: 12.0L/100km
Part 2: Something borrowed, something new
You have to hand it to Toyota; it has a knack of developing one part and using it across as many different vehicles as possible. It makes perfect sense from an engineering and cost-saving point of view, and it also makes it easier for us four-wheel drivers to swap parts.
You see, before I build the courage to list my old Hilux for sale (selling stuff is the worst) I looked at what I could take from it to save me some money but not decrease its resale value. There were two items I deemed worthy of hanging on to, the throttle controller and UHF radio.
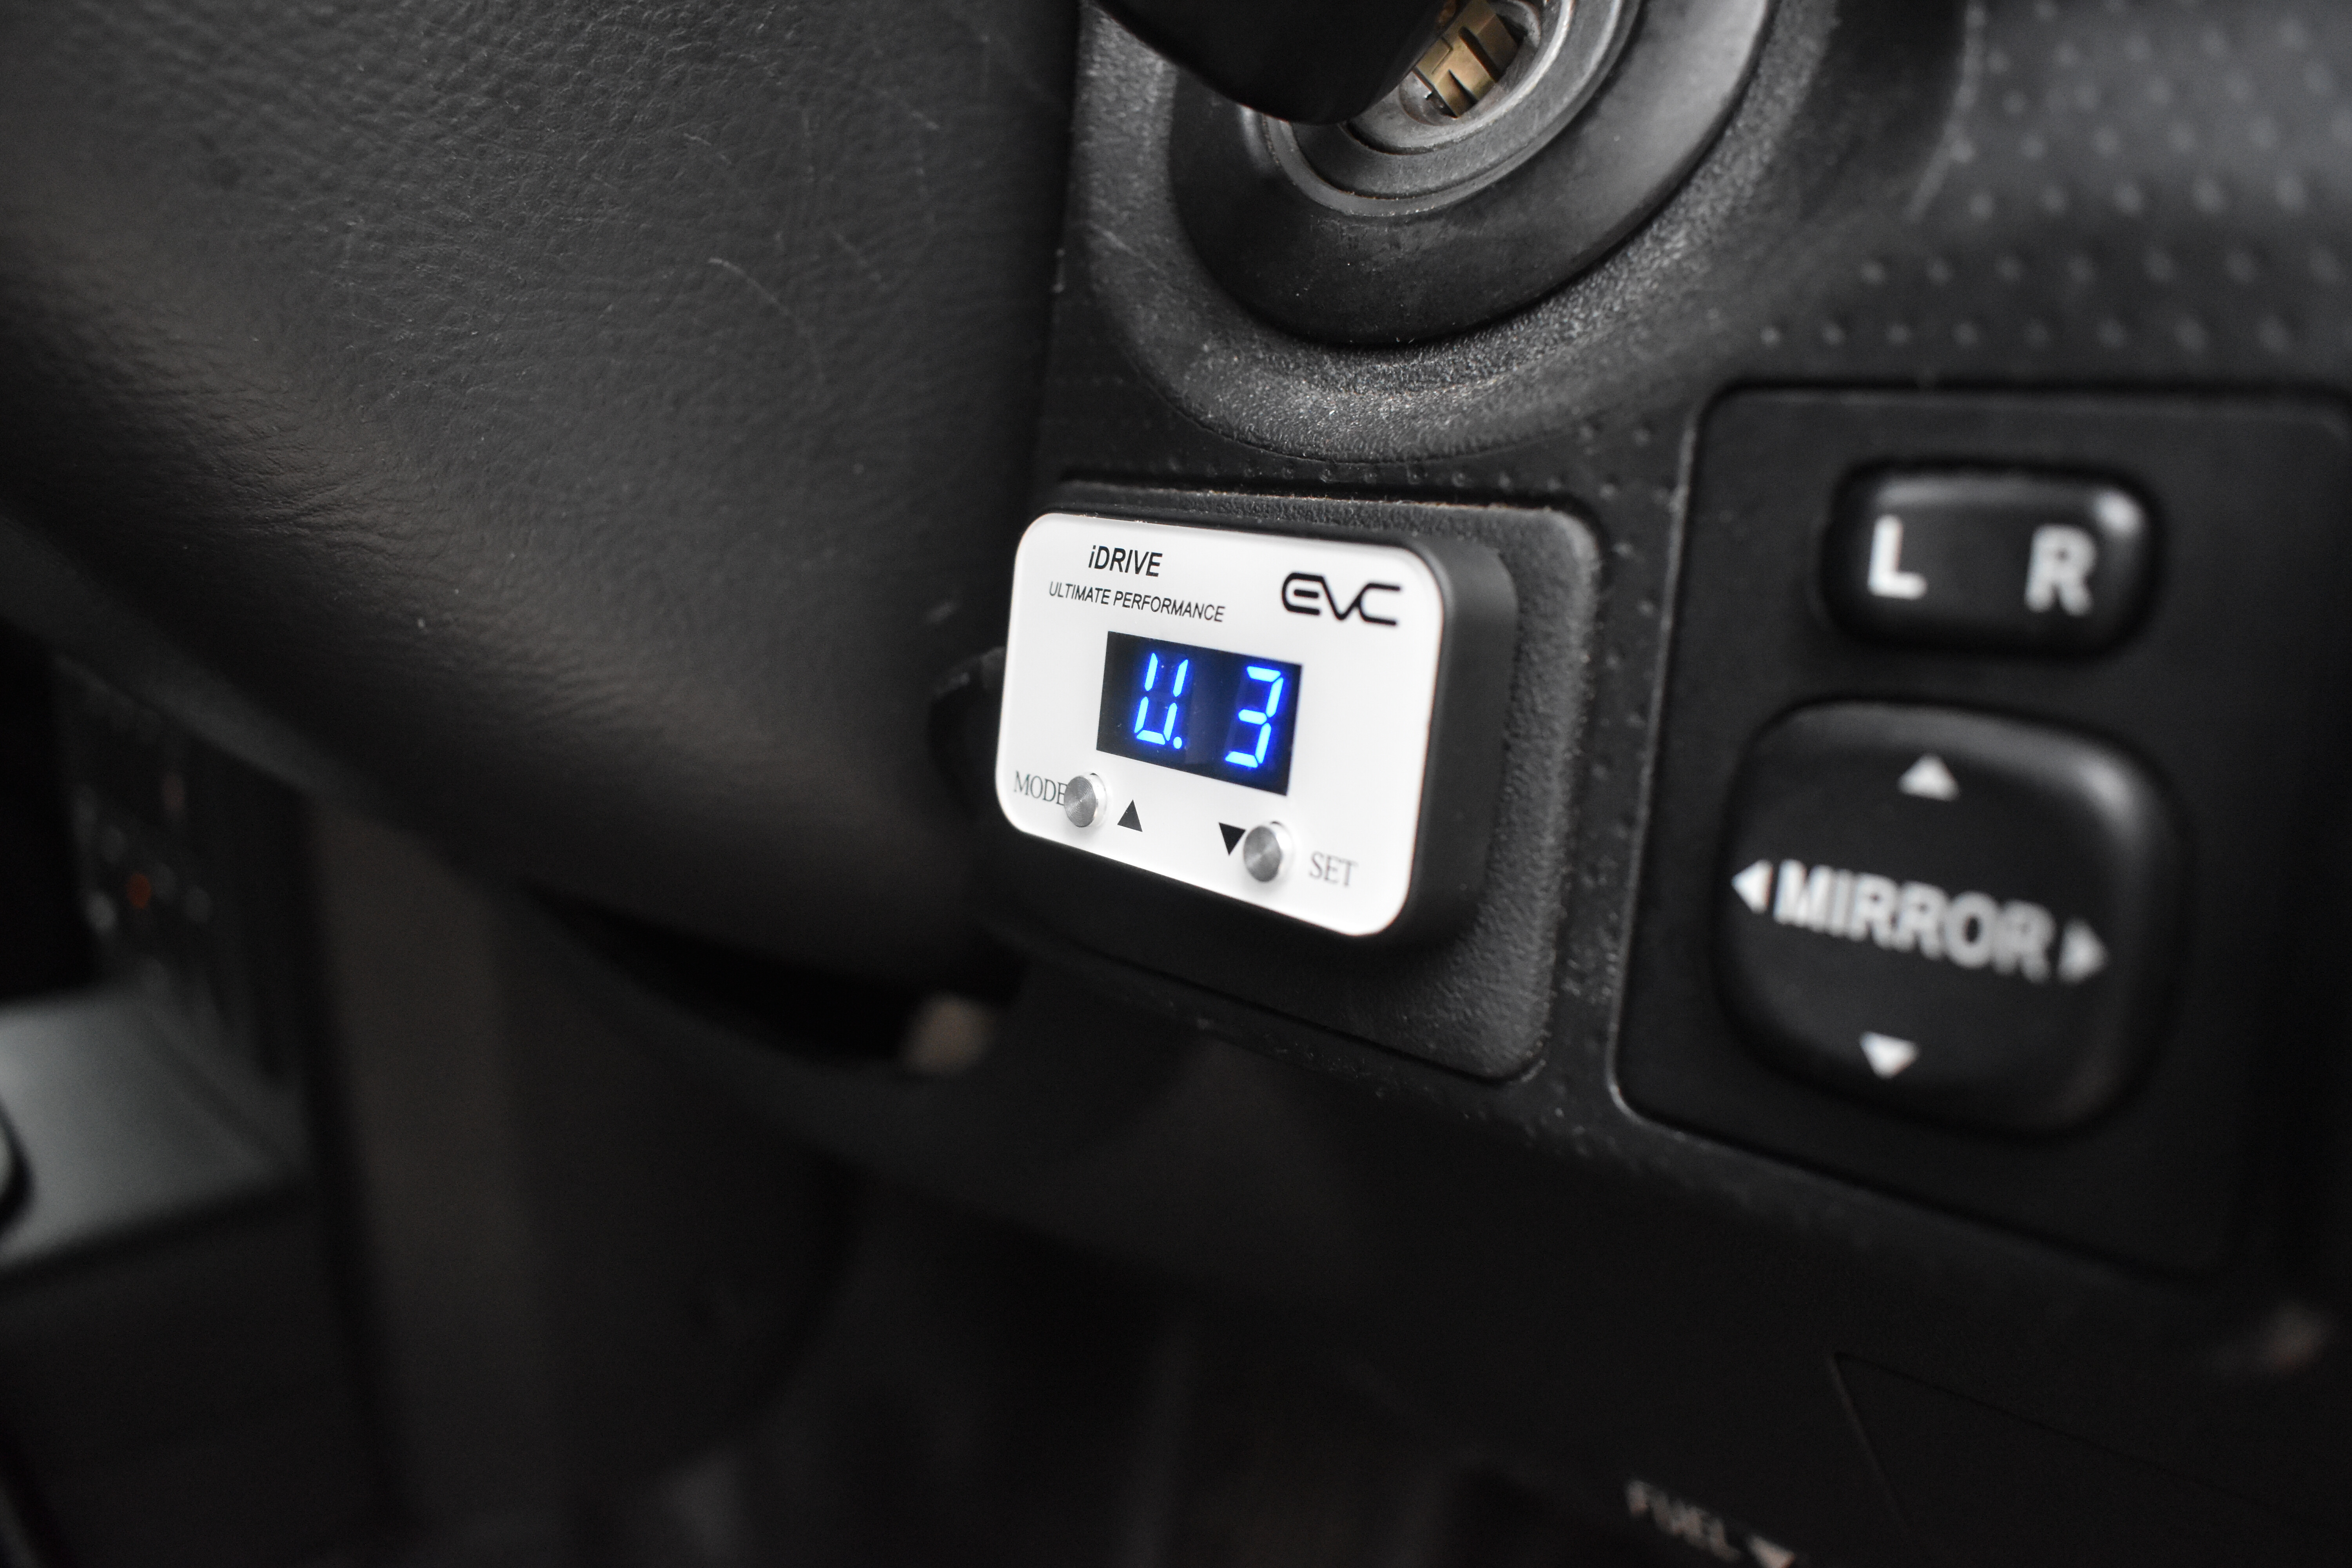
I have had an iDrive (Ultimate 9, as they are now known) in the Hilux for years, and loved how simple and effective it was. Guess what? It’s the same part number as the one used in the FJ Cruiser, so that’s a no-brainer to keep and fit. And talk about an easy installation, it took me about two minutes to disconnect the unit and have it installed in the FJ, connected to the throttle, with the unit mounted low on the driver’s side of the dash.
So far, I’ve found the Ultimate 3 setting to be the best for daily driving, and it has really woken up the FJ’s throttle response. Plus, as my wife is learning how to drive, I can put it in to Economy mode to dull the throttle response down for, let’s say … less spirited acceleration.
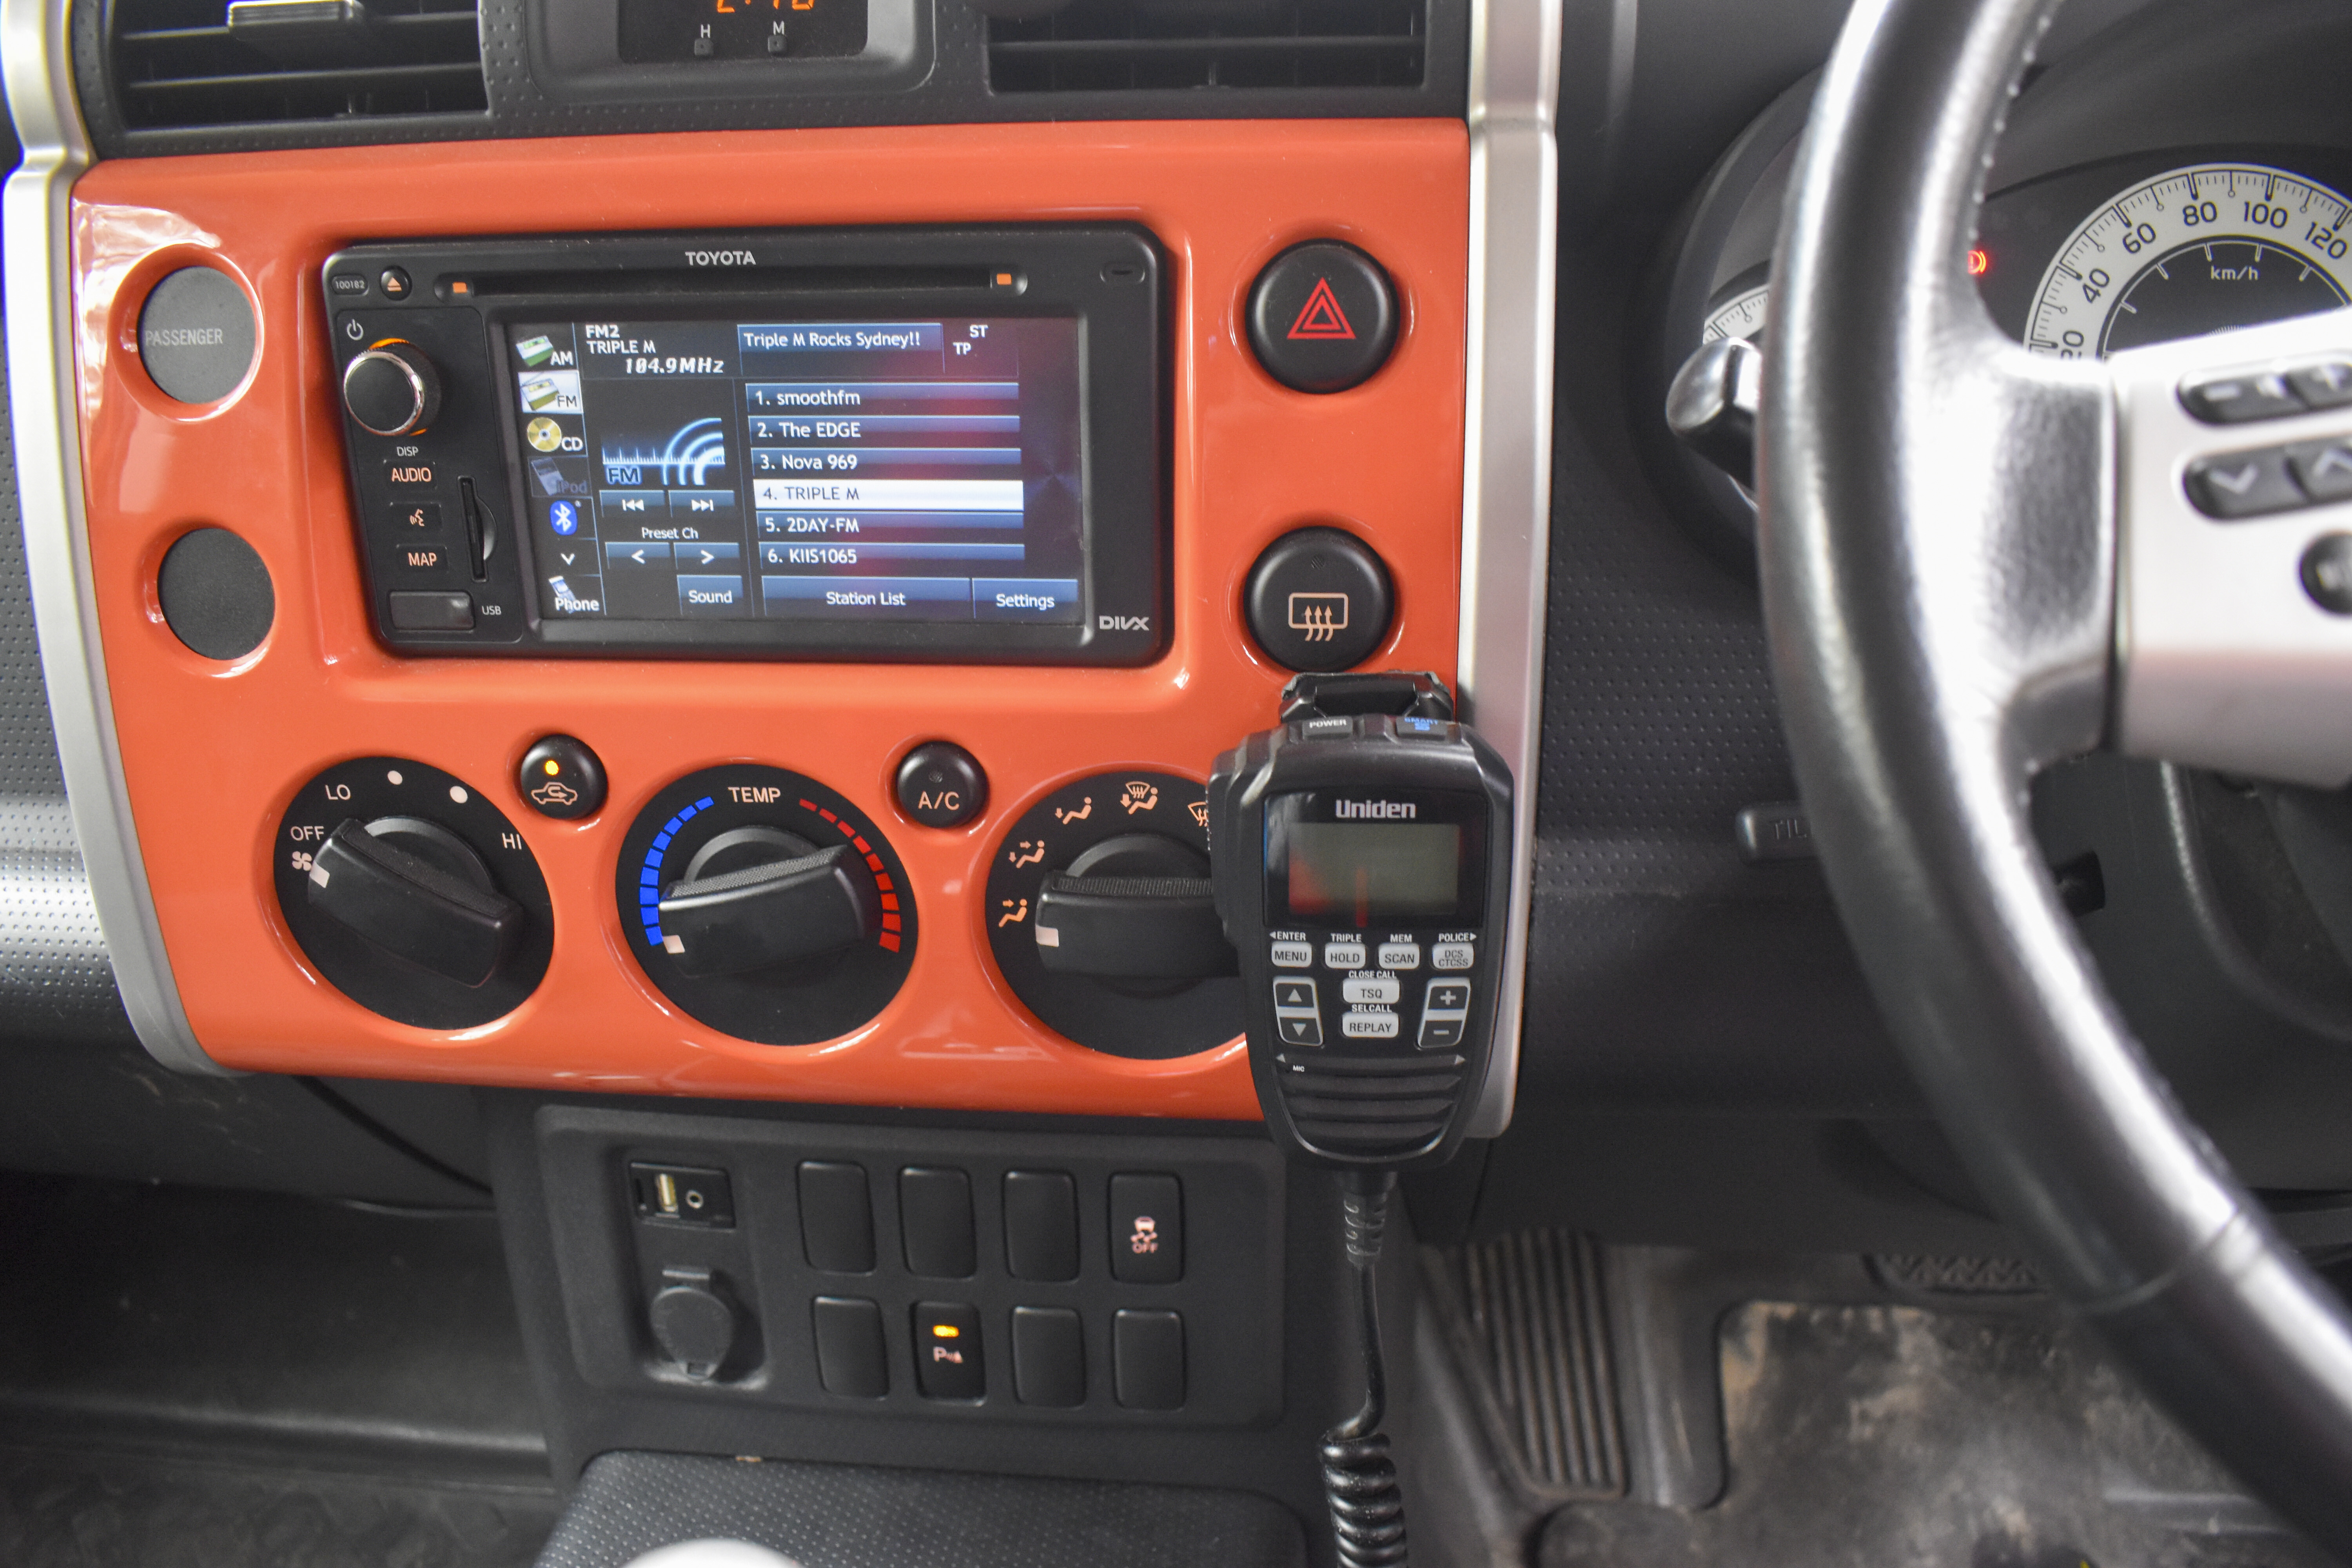
My next job was to pull the old Uniden UHF out of the Hilux, which was a simple affair. I’ve had it for four years or so, and it still works fine, so I saw no need to sell it with the Hilux. I also have the twin-antenna pack, so I swapped out the whip for a shorter one, and decided I wanted to mount that on the back of the FJ for something a little different.
I did some Googling and found a few options for mounting a UHF antenna on the back door, one called a Bandy Mount and the other from Kaon, which is an Australian company that designs and manufactures in Australia. Safe to say I went with the Aussie-made Kaon mount. I also spent an extra few bucks and optioned it to have a bottle opener incorporated in to the UHF aerial mount. I’m not sure if I’ll ever use it, but the one day that it comes in handy it will have paid for itself.
For a pretty small item, the Kaon mount wasn’t what I’d call cheap, but at the same time it’s a really well thought-out and well-made mount, and for the $115 delivered, it was money well-spent.
Installing the Kaon mount was honestly too easy; you simply remove the plastic trim surround on the rear door hinge, slide the mount in to place, and secure it with one supplied bolt and a nyloc nut. Running the cabling for the antenna was a little bit more involved, but not too hard thanks to the Lego-like design of the FJ’s interior.
A small hole was cut in to the rubber boot on the back door (and sealed up with automotive silicon), trim panels in the way were pulled back, and then I ran the cable down the vehicle, hidden all the way to the centre console.
I hid the actual UHF unit beneath the centre console and cable-tied it up and out of the way, and then ran the remote handpiece up to the dash, where it is held in place on the old mount borrowed from the Hilux with double-sided tape … for now. We’ll see how long that lasts.

To power the UHF, I tapped in to the factory fuse panel using a device called a fuse tap, with a 10amp fuse, which makes for a really neat factory finish. No twist and tape here, it’s like I’ve learnt a thing or two over the years of doing dodgy modifications on my own four-wheel drives. Not this time around, the FJ will get the love it deserves.
With those bits of left-over gear installed, it’s now time to tackle the rest of the build, with the brief of incorporating and showcasing as many Aussie-made products as possible. It’s going to be one hell of a ride.
TOTAL KILOMETRES: 160,691km KM THIS MONTH: 1410km AVERAGE FUEL USE: 12.0L/100km
Part 3: First big trip
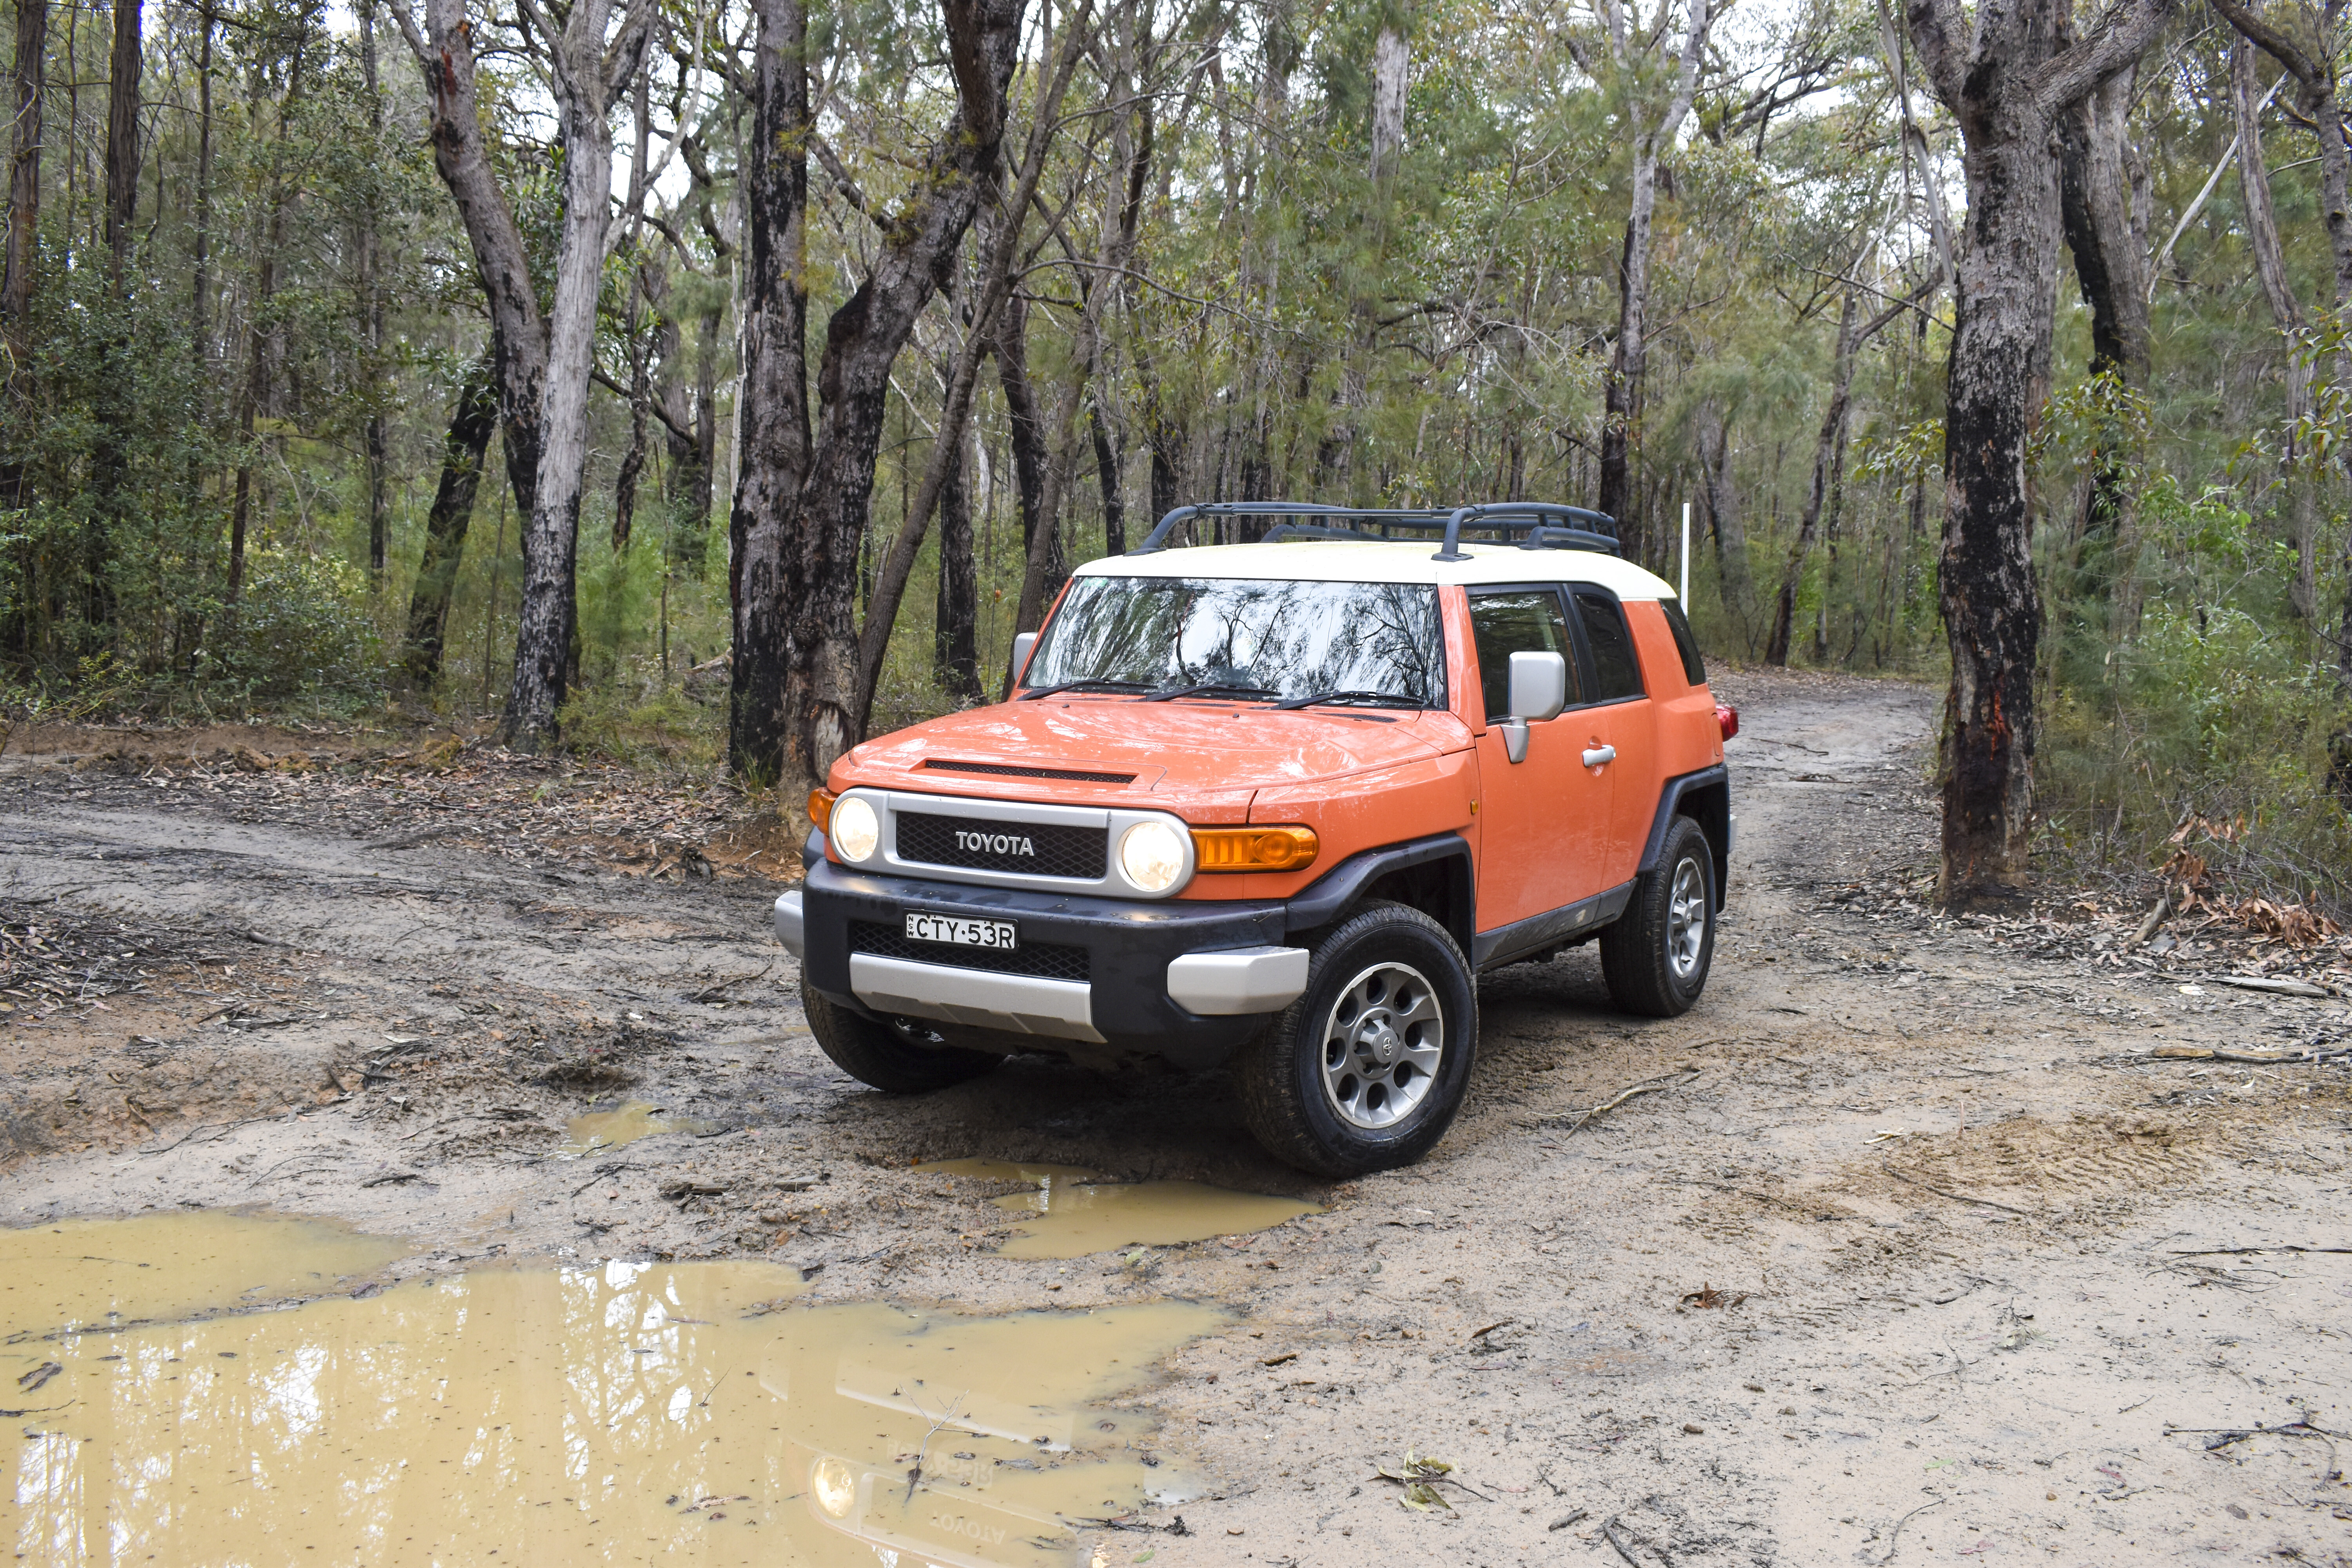
I sadly had to do a bit of a quick run from my home in the Blue Mountains, up to Maryborough, Qld, to attend my grandmother’s funeral recently. Last-minute plane tickets were insanely expensive, so I made the decision to drive solo, just me and my FJ Cruiser (and a wicked Spotify playlist) the 2500km there-and-back over three days. With fuel prices being what they are, and a V6 petrol engine to feed, I fearfully did some quick maths and calculated a budget.
Spoiler alert, this FJ is a bloody winner, using an average of only 11L/100km loaded up with my camping gear. With 159l of fuel on board, I made it to Maryborough and back to Gympie before needing to fill up, and that refill got me all the way back home with a quarter tank left in reserve. It’s safe to say I’m totally chuffed with this vehicle so far, but there’s something that I’m absolutely hating about it too, and it’s all my fault.
So, if we backtrack a bit, I made it to Brisbane the first night, and set up camp at a swanky caravan park, in a very unswanky bat-infested unpowered site right near the highway. Curse my self-imposed frugal budget. I rolled out my swag in the last remaining light and cracked a beer from my Esky … which after 10 hours on the road was leaking water faster than it could chill my beverages.
I really hate not having a fridge in the FJ. At that moment, I decided I’ll never travel this way again, and started looking online for a suitable fridge that would fit the FJ Cruiser’s petite cargo area (I’ve since bought it, but you’ll have to wait for the next issue to see what it is).
I was also really hating how messy the vehicle had become in such a short period of time, even though I’d chucked in a storage tub there was crap everywhere that I needed to bring but didn’t yet have a proper home. I’m not sure if I want the added weight and expense of storage drawers, but something has to be done to improve the FJ’s storage, and it’s on me to come up with the best call.
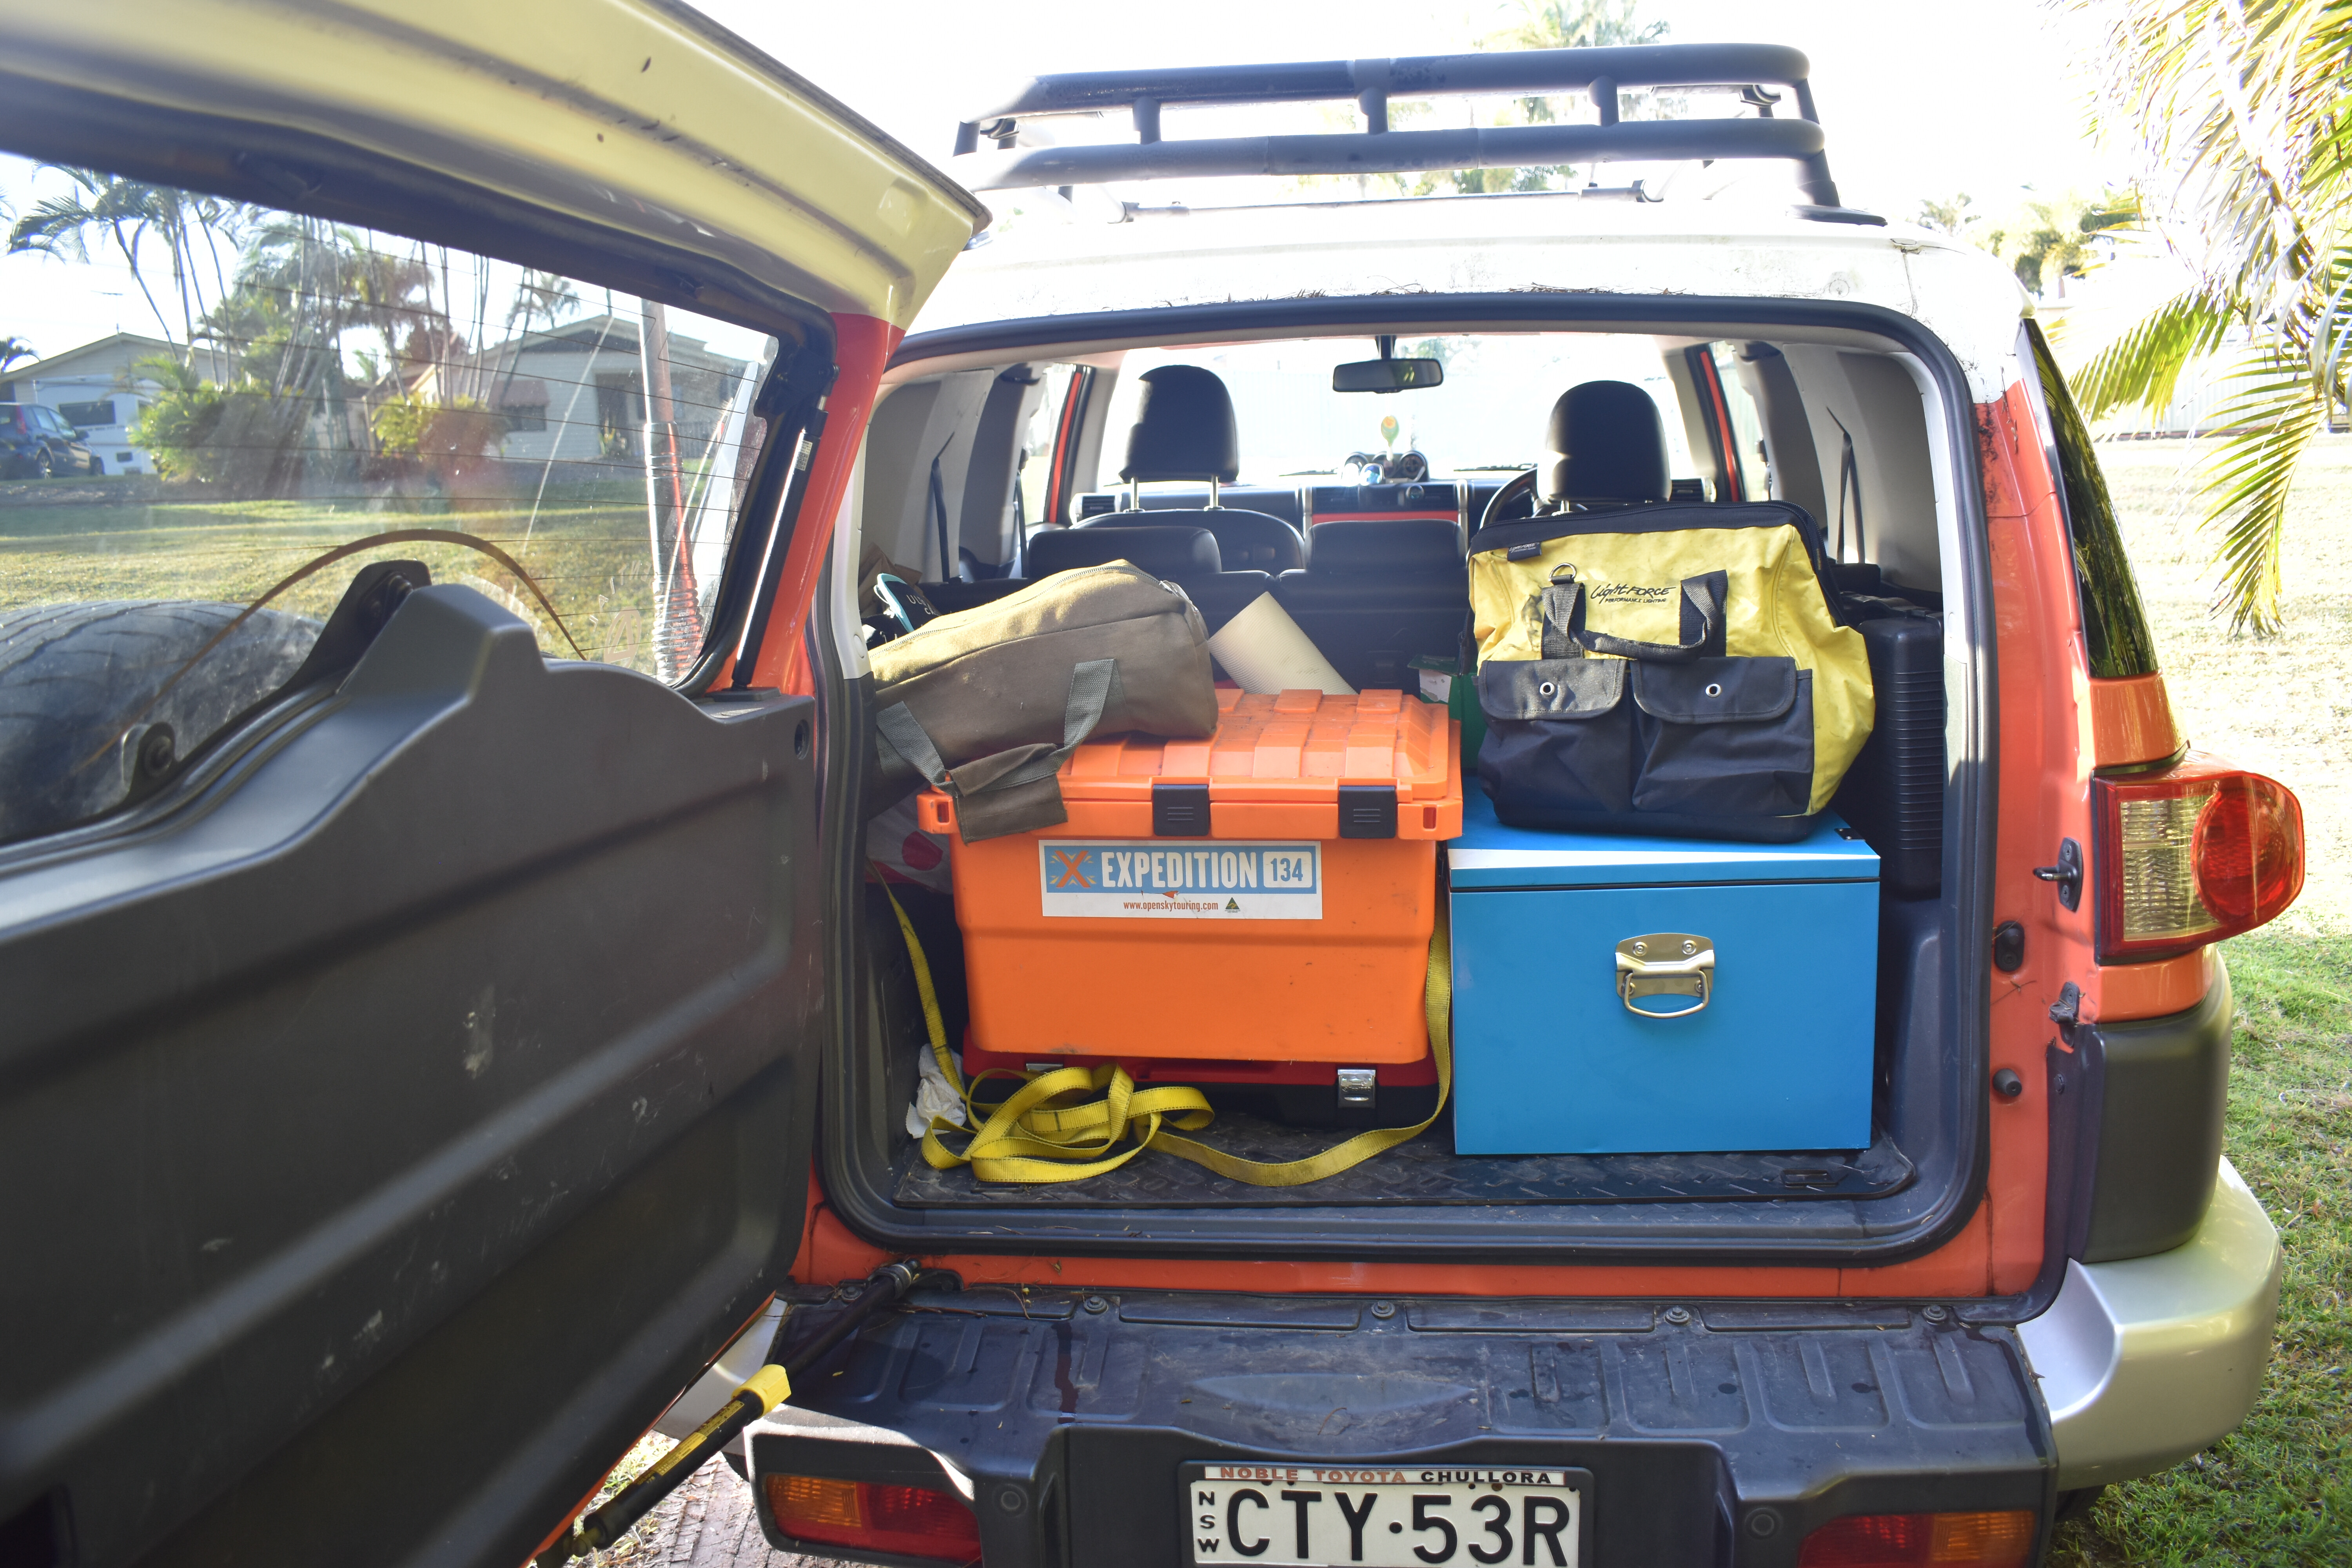
I’m thinking more storage tubs, and some smaller storage bags, so everything has a home, but there are some brilliant Australian-made storage drawers on the market too, which would make for a really neat set-up. Hmm, decisions, decisions.
As I’d not had much time to prepare for the trip, the FJ was well due for a service by the time I’d made it back home. My good mates at Advanced Installation Service made time for me after hours (thanks again), and we went through the FJ, changing the oils, as well as the cabin and air filter.
I’d been so impressed with the Bendix Ultimate brake upgrade we’d recently installed in the front, which was tested regularly in the horrible Brisbane afternoon traffic, so decided to give the rear brakes the same treatment while the car was on the hoist with upgraded pads and rotors. We’d already upgraded the rear brake lines to Bendix braided ones, so it was an easy job for mechanic Shannon.
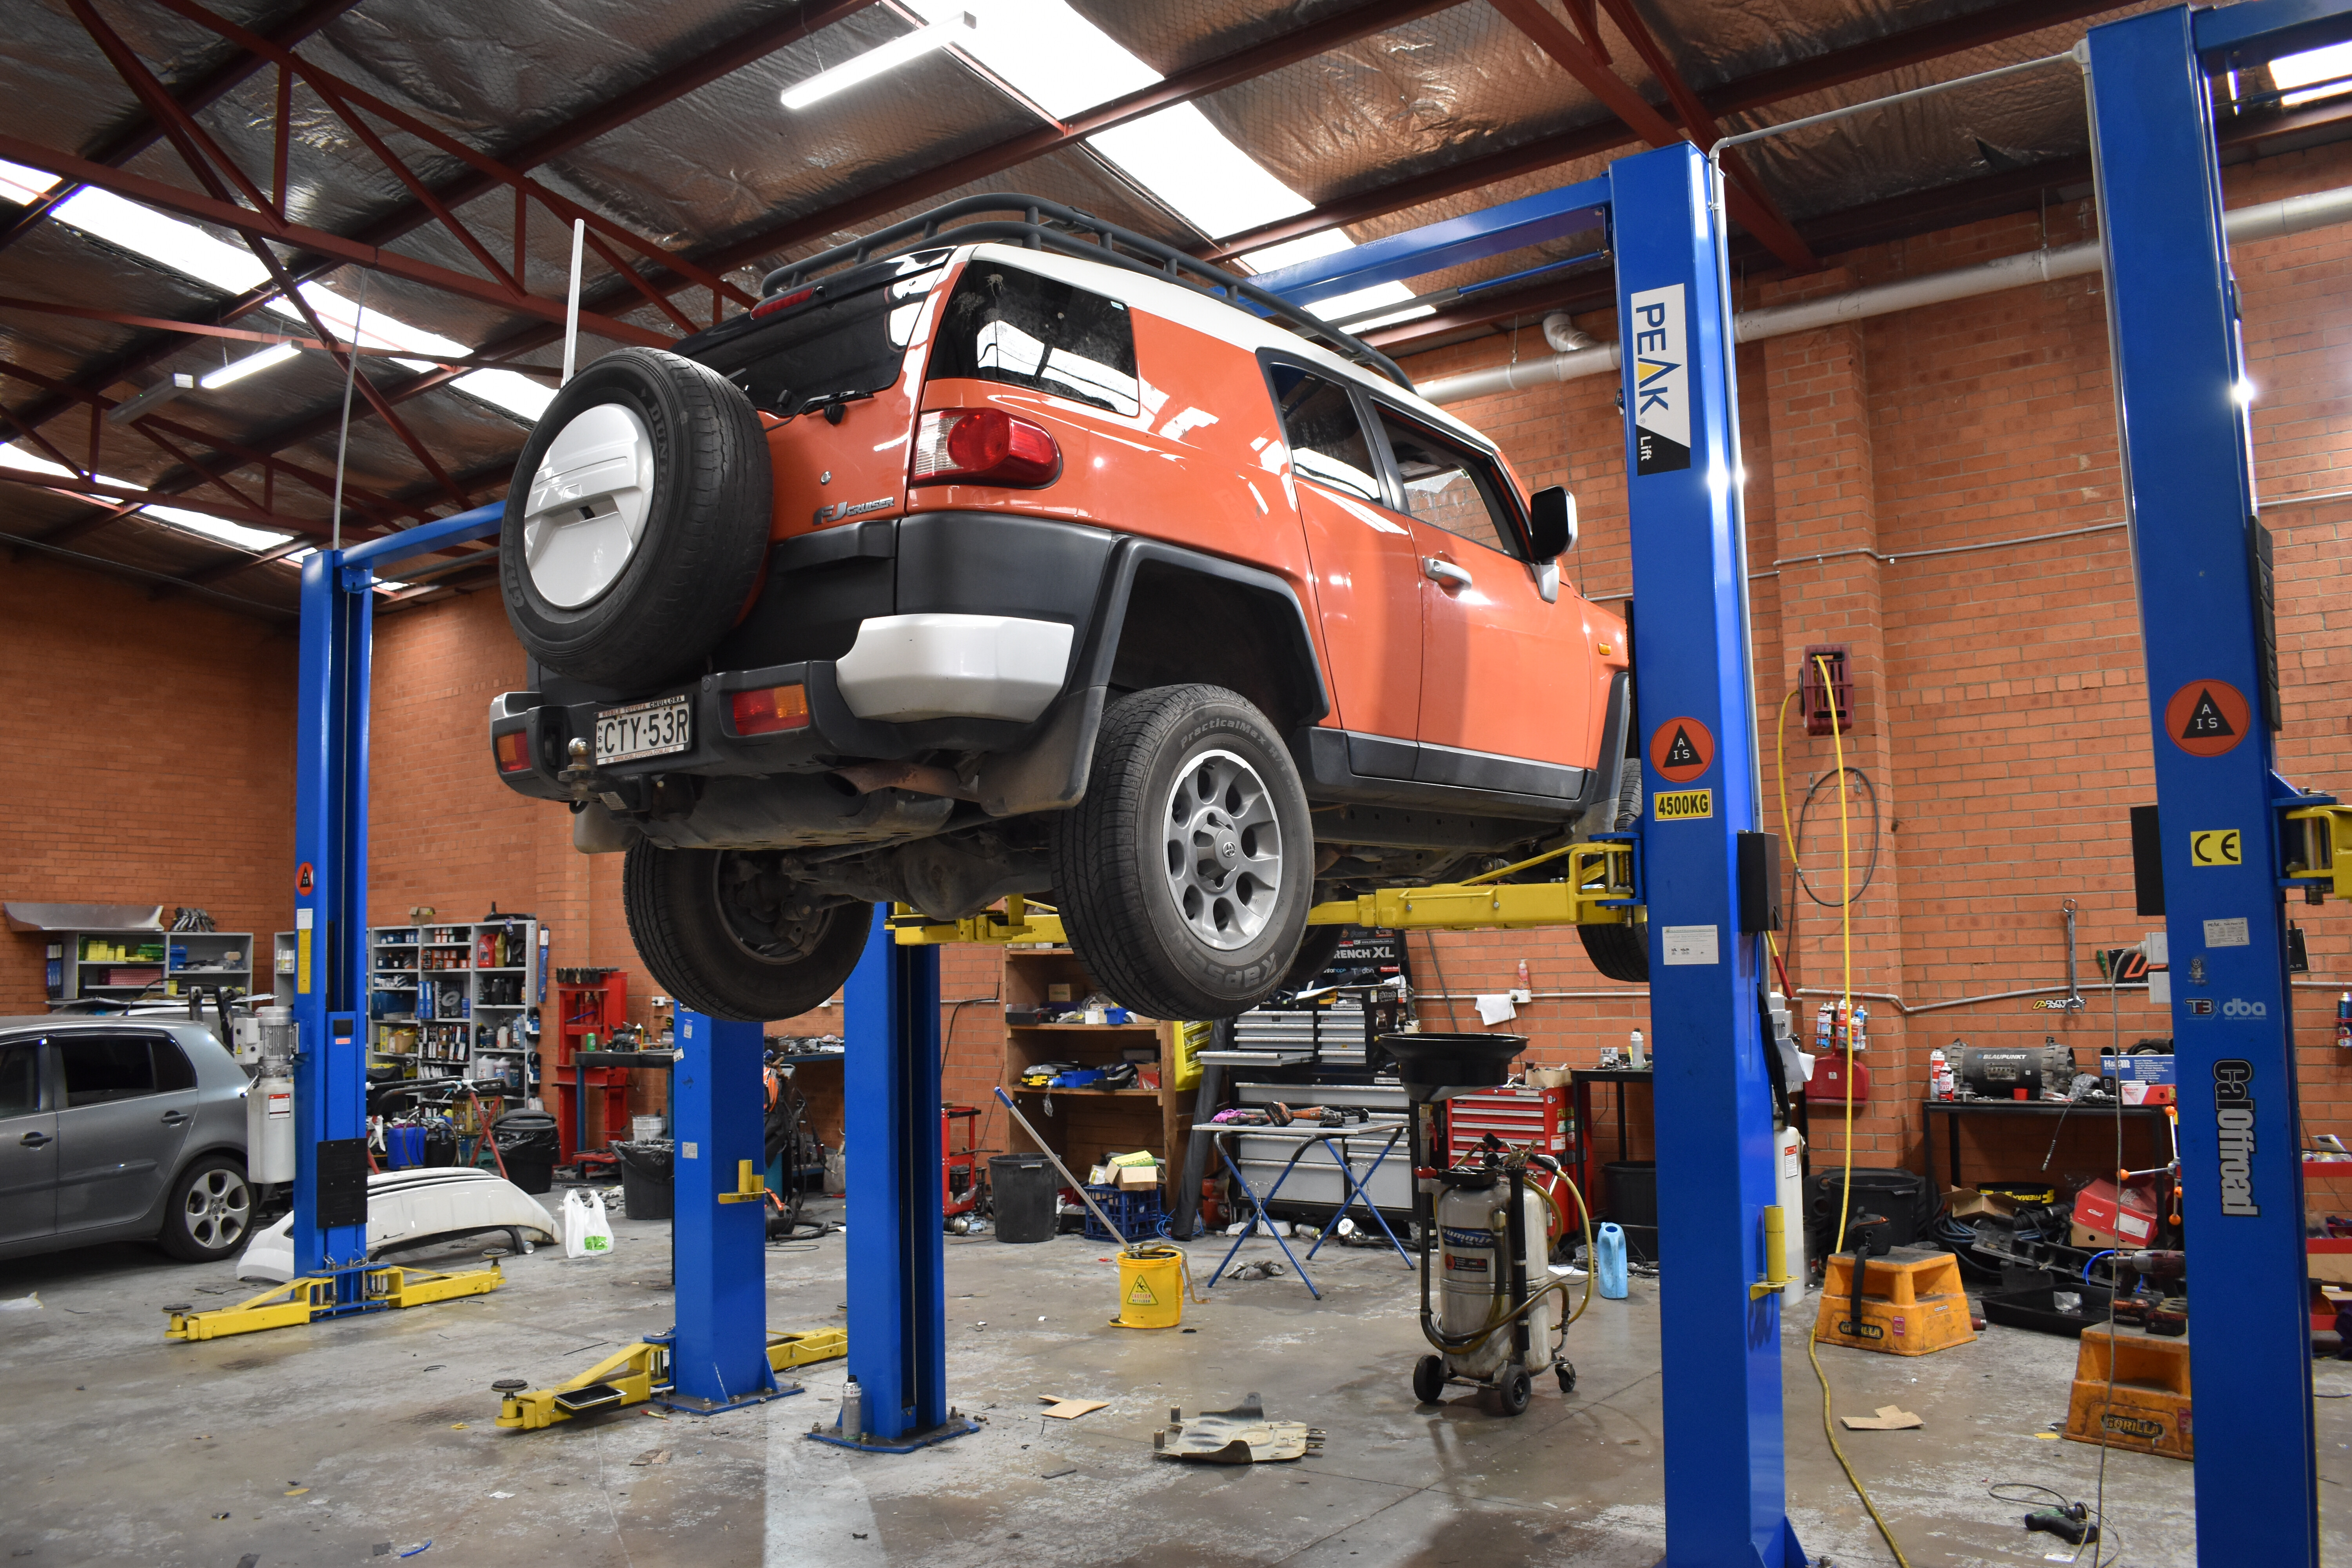
The FJ is now running spot on, and the brakes are amazing. I’m confident that when I add more weight and larger tyres, the Bendix gear will be more than up to the task.
The vehicle is exceeding my expectations, but I’m letting it down with my sub-par camping set-up. Never again will I travel this way. It’s time to get organised, and I’m actually looking forward to doing the research in a weird sort of way.
So, anyone want an Esky? Only used once and in near-new condition, free to a good home.
TOTAL KILOMETRES: 165,100km KM THIS MONTH: 3000km AVERAGE FUEL USE: 11.0L/100km
Part 4: Bargain hunter
Something I love about owning an FJ Cruiser is there aren’t that many of them getting around. That means if you are selling something used online, there’s fewer potential buyers. Which is why I’m a bit of a shark when it comes to shopping for used parts online. You can basically name your buy price, something I did a little too much of this past weekend.
First of all, I spotted an Aussie-made Kaon cargo barrier and shelf I’ve wanted for ages to help neaten up the cargo area, but I was put off by the $600 retail price (it’s worth the money). Marketplace to the rescue, and I managed to nab a basically brand-new unit from a couple who lived close by, for the bargain price of $350.
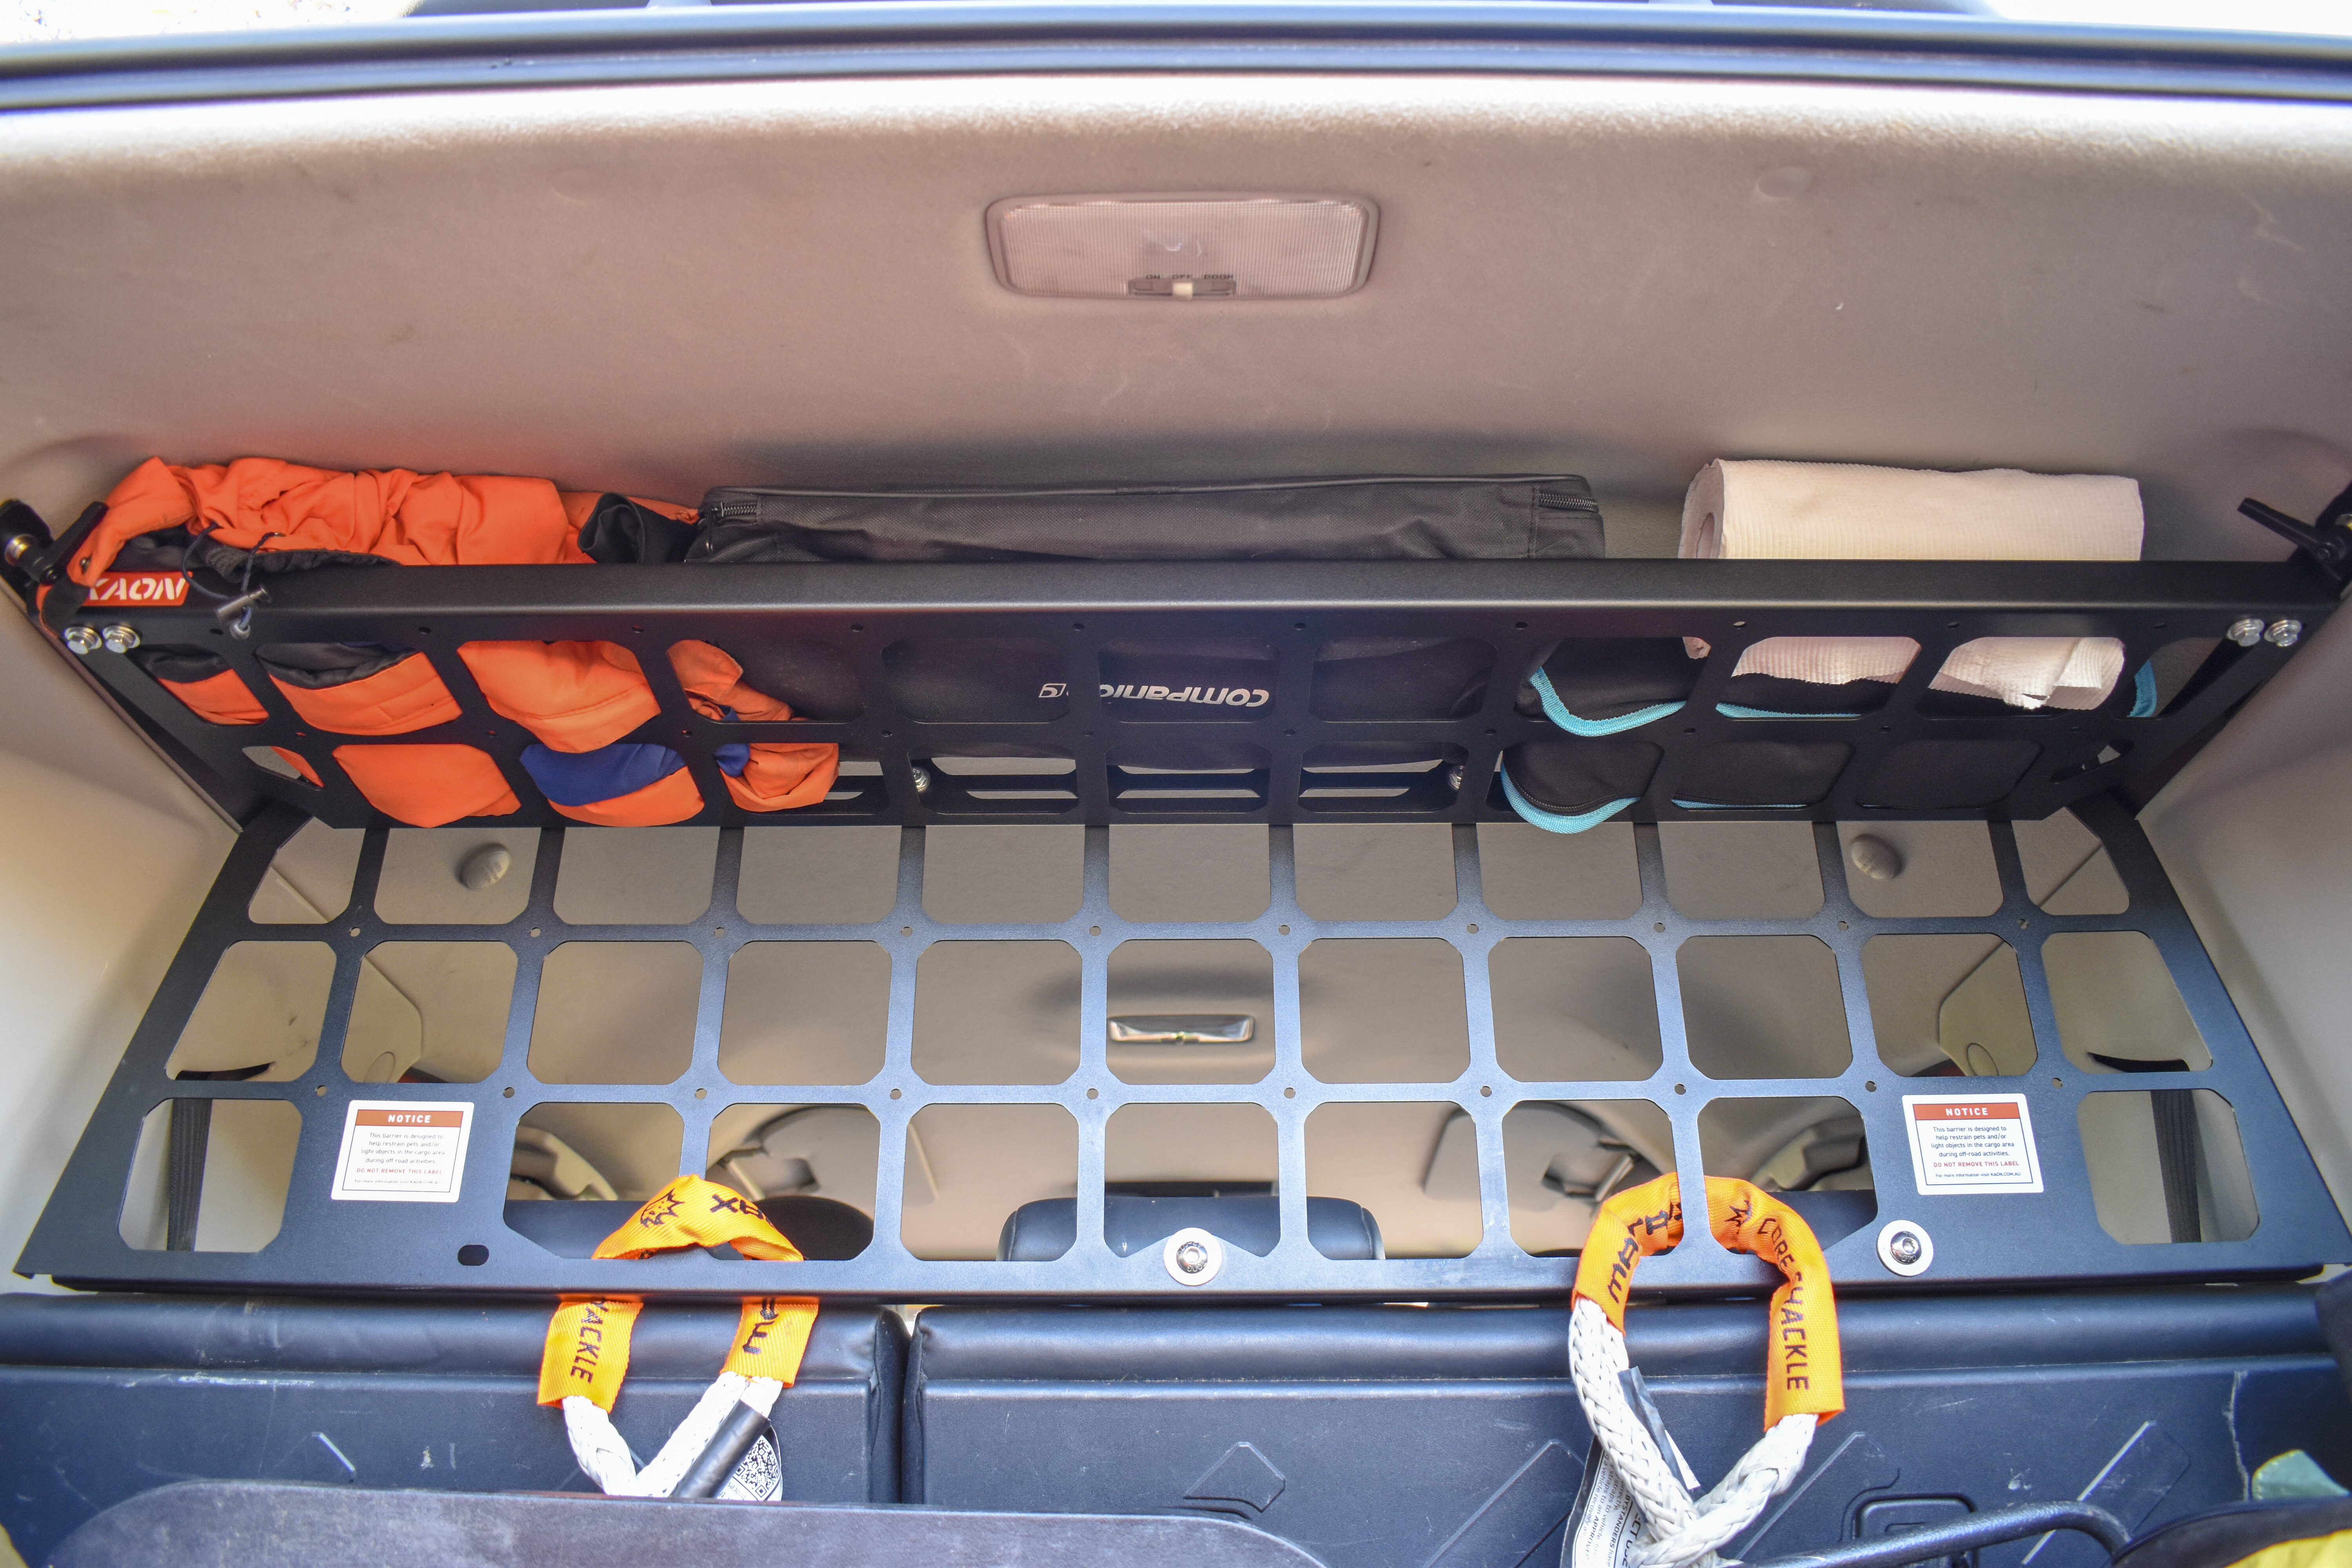
It’s a ripper too, and was super easy to install. I can put my gas cooker and small camp chairs up on the shelf, and you can even fold down the passenger-side rear seat for moving around longer items under the cargo barrier. Something I had to do a few days later, as it turns out.
You see, I have a problem. I’m borderline addicted to Facebook Marketplace and Gumtree (thanks for listening). I can’t help myself, and when a set of factory Toyota rock sliders and heavy-duty Bushskins-branded bash plates popped up two hours from home, I felt that familiar tingle in my bank account.
I tried to ignore it, left it a day or two, then made the mistake of sending a link to an FJ Cruiser-owning mate, who naturally played the role of enabler and declared the purchase a bargain.

Old mate wanted $500 for the pair, which is reasonable … naturally I offered $300. With some back and forth, I was able to use my favourite line when negotiating, “can you meet me in the middle?” Some $400 later, I now had some solid protection for my FJ for way less than half the price these parts would cost new. And everything is in great condition, with all nuts and bolts included.
Buying used is a risk, and I’d avoid buying anything that didn’t come supplied with a fitting kit; make sure you go through everything to avoid a headache down the track. History dictates incomplete bargains, usually cost you more in the long run – I was lucky this time around.
I wasted no time fitting up the rock sliders, and what an absolute shocker of a job that turned out to be. I read up online about the best method of bolting them to the chassis (6 bolts a side), which seemed easy enough, but tightening the three top bolts per side was an awful experience thanks to a lack of access space. I tried using extensions with universal joint fitting, I tried an impact gun, and I certainly tried swearing which didn’t help.
The solution was to put a spanner (for leverage) on to a ratchet spanner, and take my time – not that I had a choice in the matter. This was certainly not ideal for my poor ratchet spanner, but I got there in the end with nothing more than a few grazed knuckles and sore muscles I never knew existed.
I’ll wait to borrow a hoist to fit the bash plates up; with stock tyres and suspension still on the FJ Cruiser, it’s a tad too tight to do the job on the ground. Doable, but why make things harder than they need to be.
All in all, I’m stoked with my new additions and direction the FJ is heading in. I’m not sure what the next update will be, but future plans include ditching the factory roof rack for a new roof platform, and to look at a bullbar before upgrading suspension and tyres.
For now, it’s time to avoid Marketplace and Gumtree. It’s too tempting and, clearly, I’m weak.
TOTAL KILOMETRES: 166,200km KM THIS MONTH: 1200km AVERAGE FUEL USE: 11.0L/100km
Key Points
- Supercharged Hellcat V8 pumps out 850hp
- Apocalypse converts Ram TRX into 6×6 monster
- Australiau2019s Autogroup International in discussions for RHD conversions
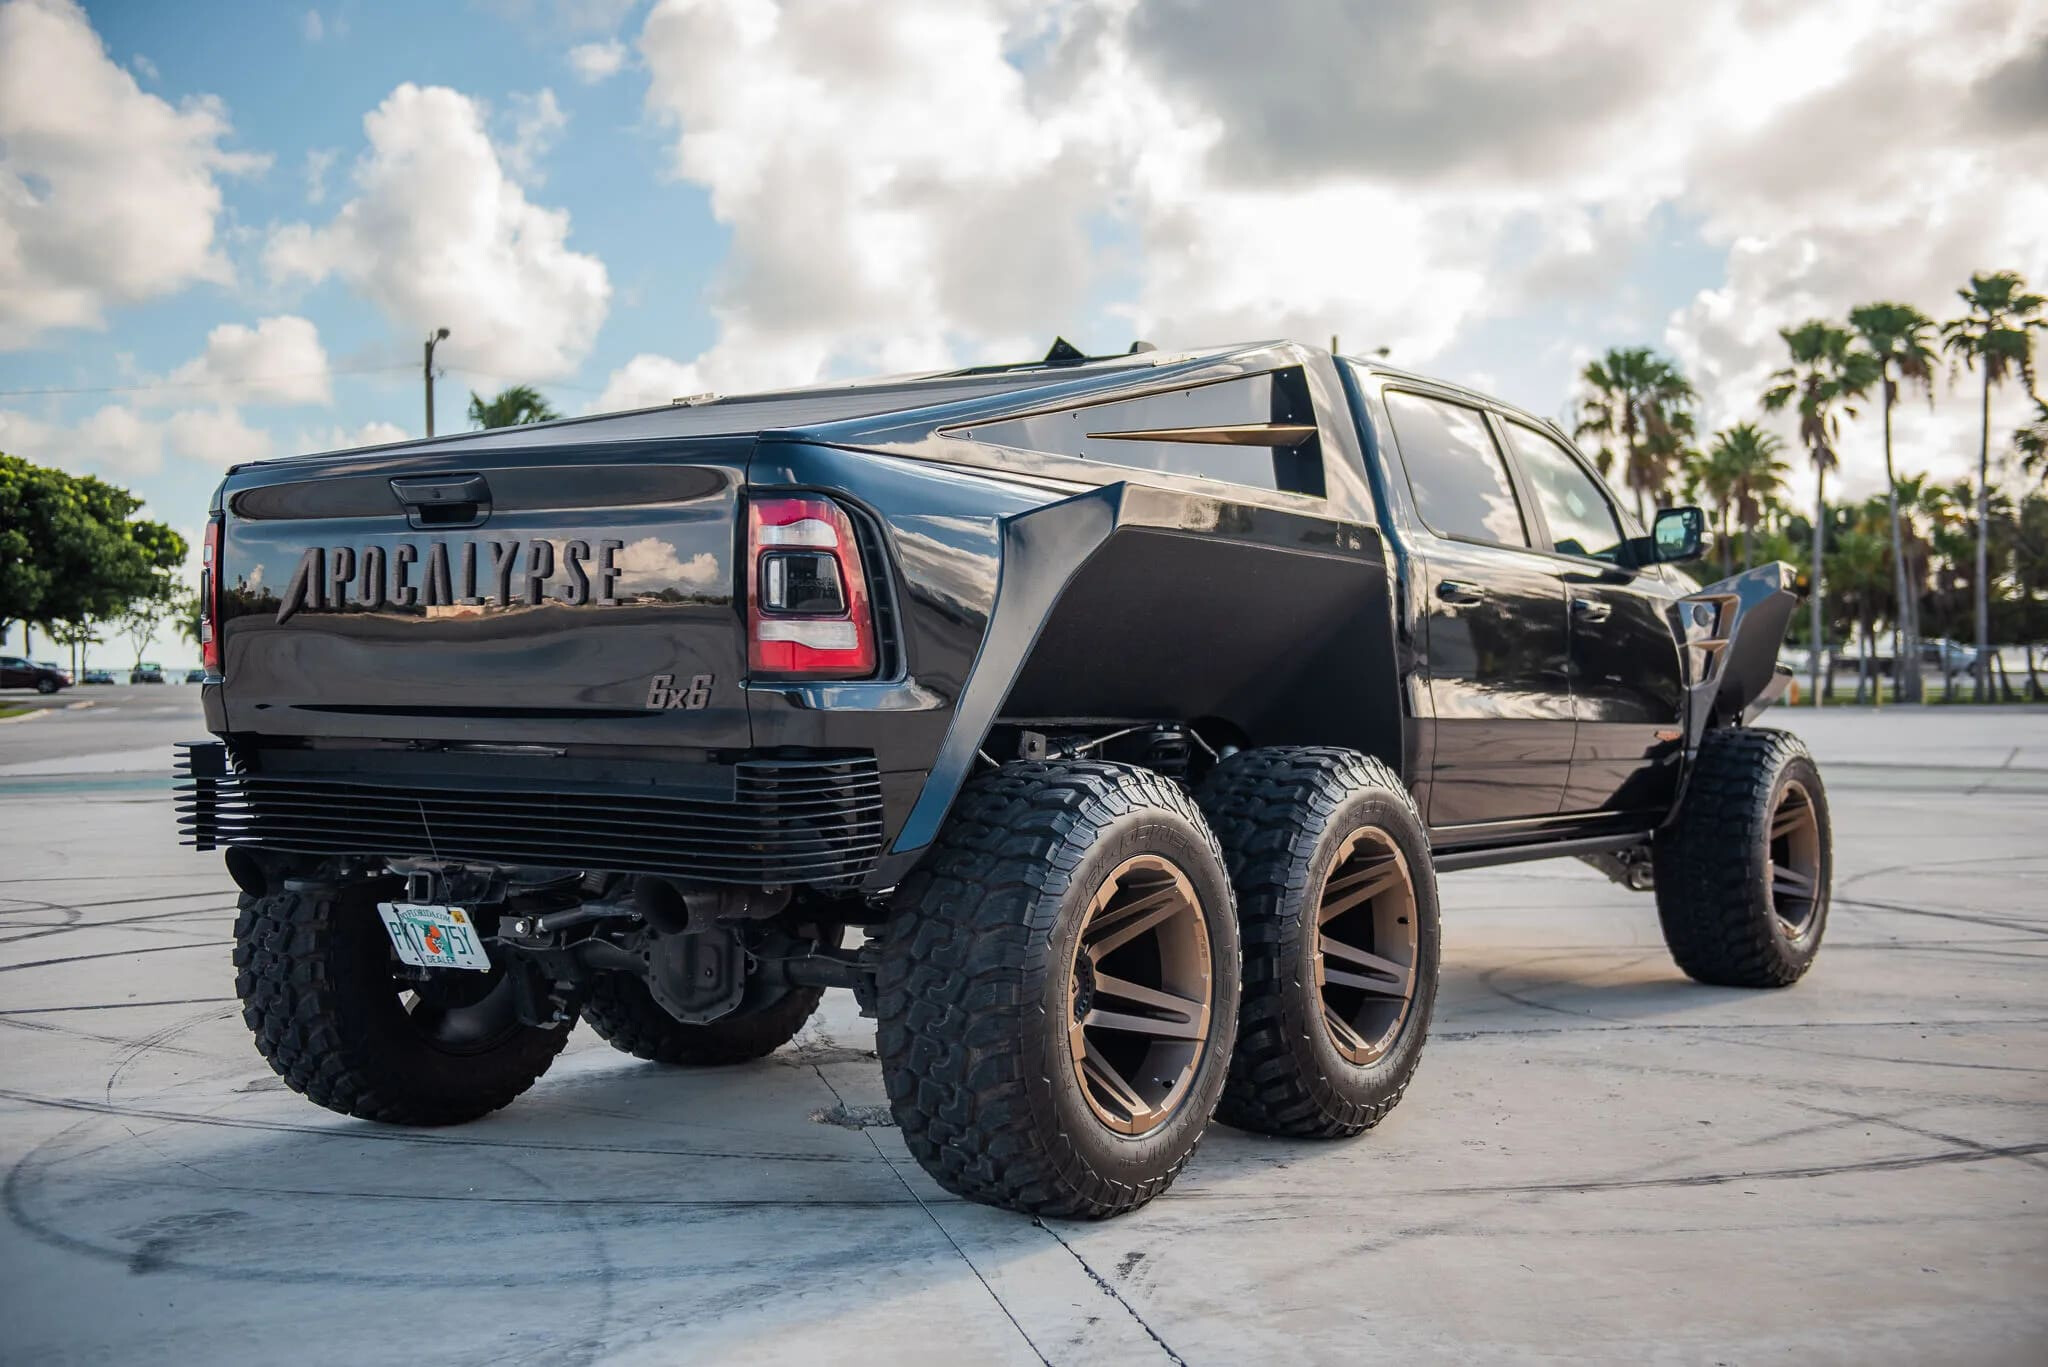
When the supercharged 707 horsepower Ram TRX is just too common for you and doesn’t deliver the punch-in-the-face looks you want when driving around town, then Florida’s Apocalypse 6×6 has the rig for you.
Apocalypse convert the TRX into a monster 6×6 that they call The Warlord with an extended chassis and the Hellcat engine tuned to 800hp.
But for those wallflowers that feel they’re still not putting the fear of god in their fellow city commuters, Apocalypse has created what it calls The Juggernaut.
And it could be coming to Australia!
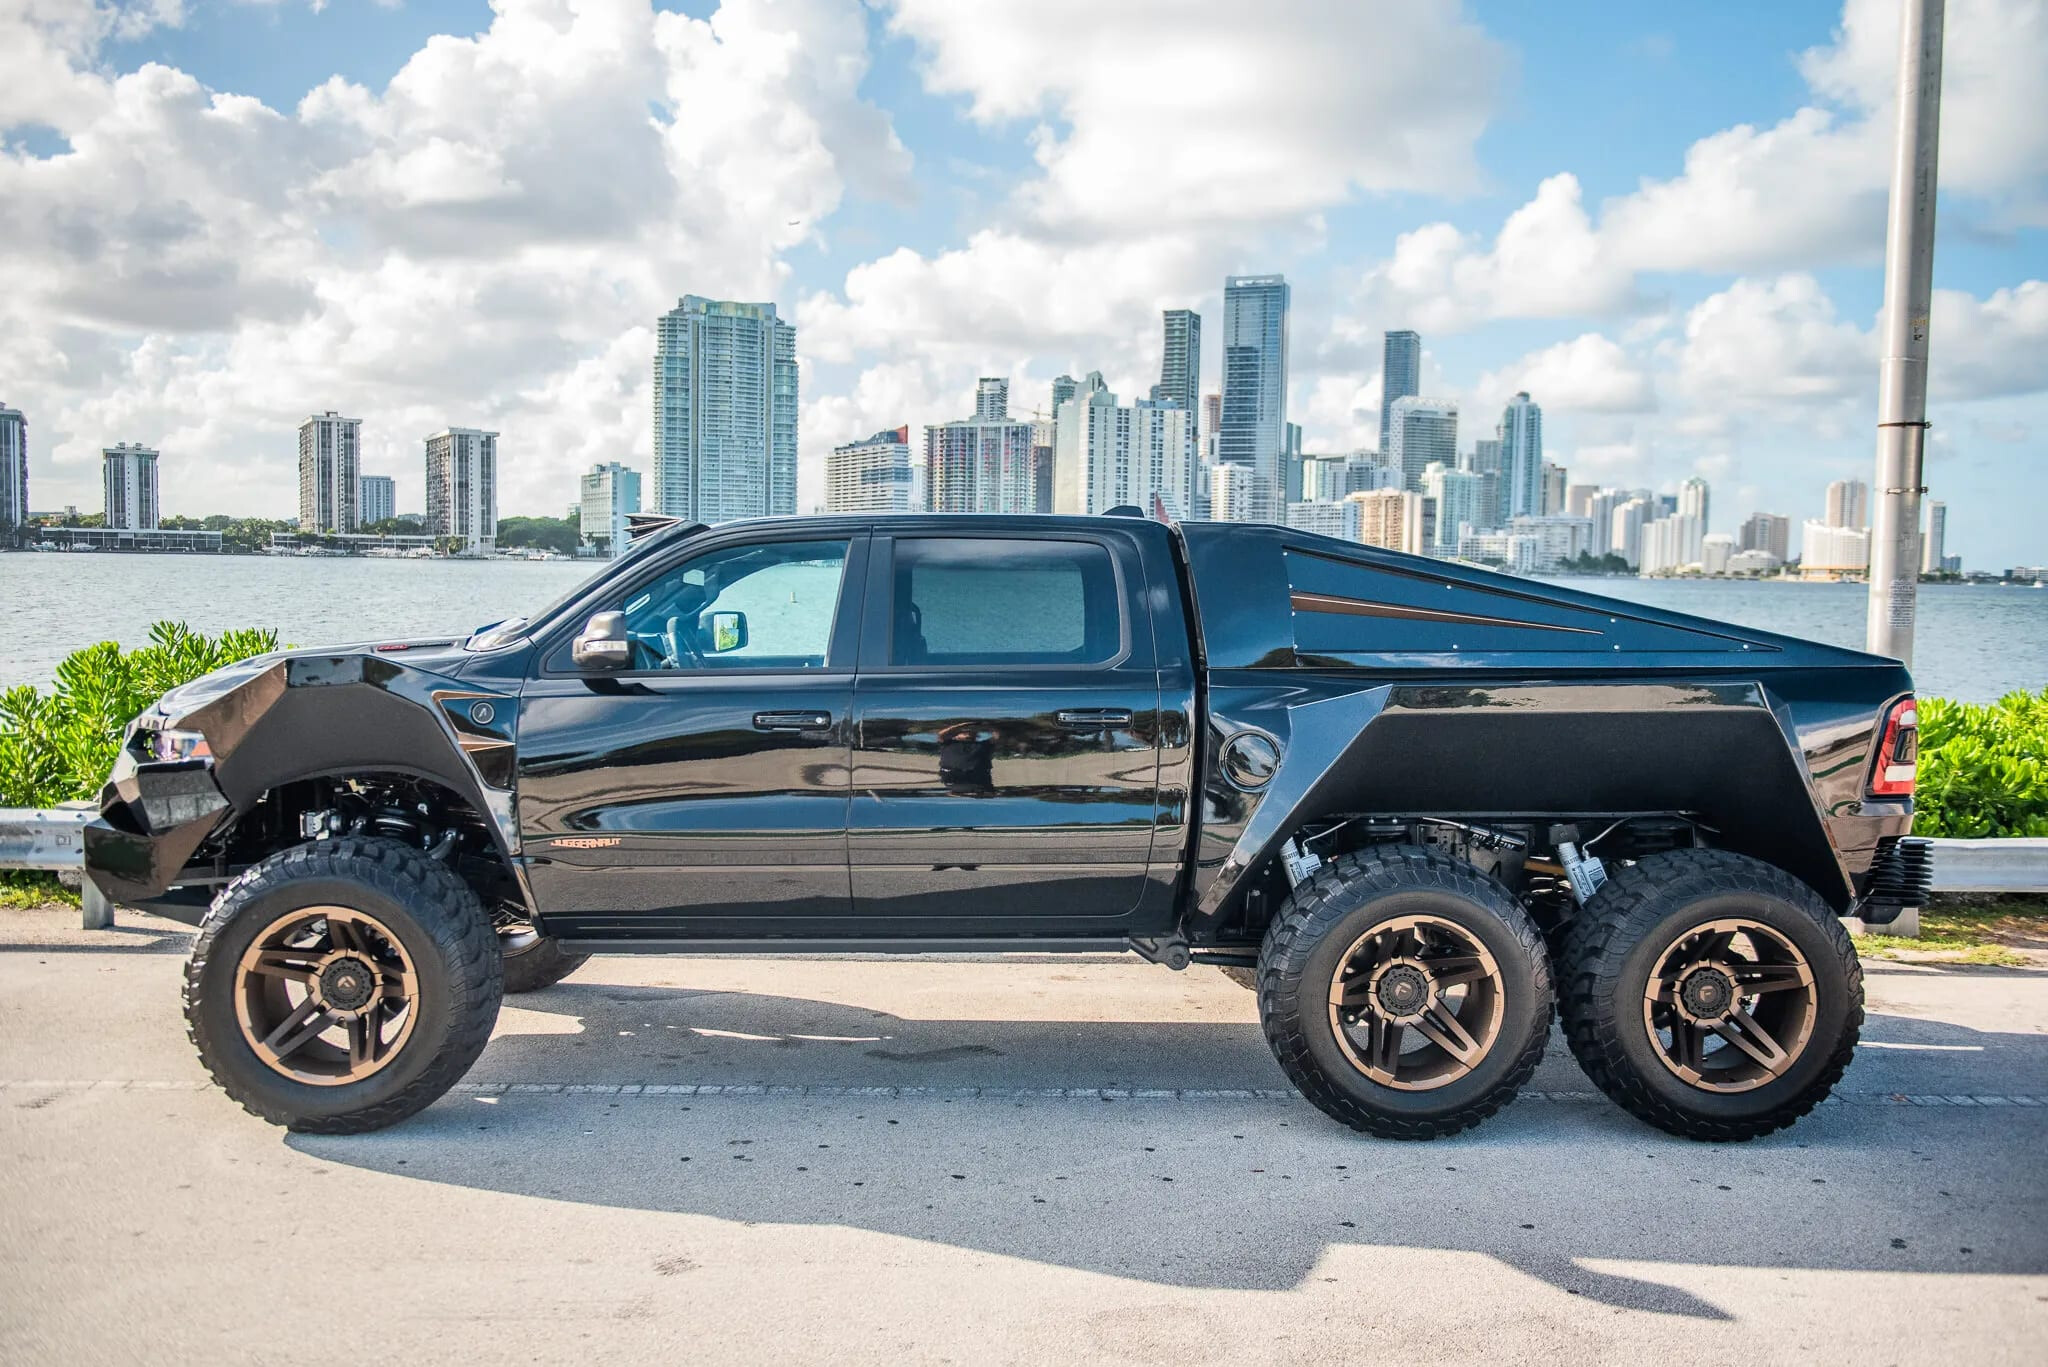
The Juggernaut ditches the stock TRX’s body work but keeps the four-door cab. The front and rear panels are replaced with the custom bodywork that you see here and could only be described as intimidating. This is a truck that looks like it’s ready for the end of time, or your next cars and coffee get together.
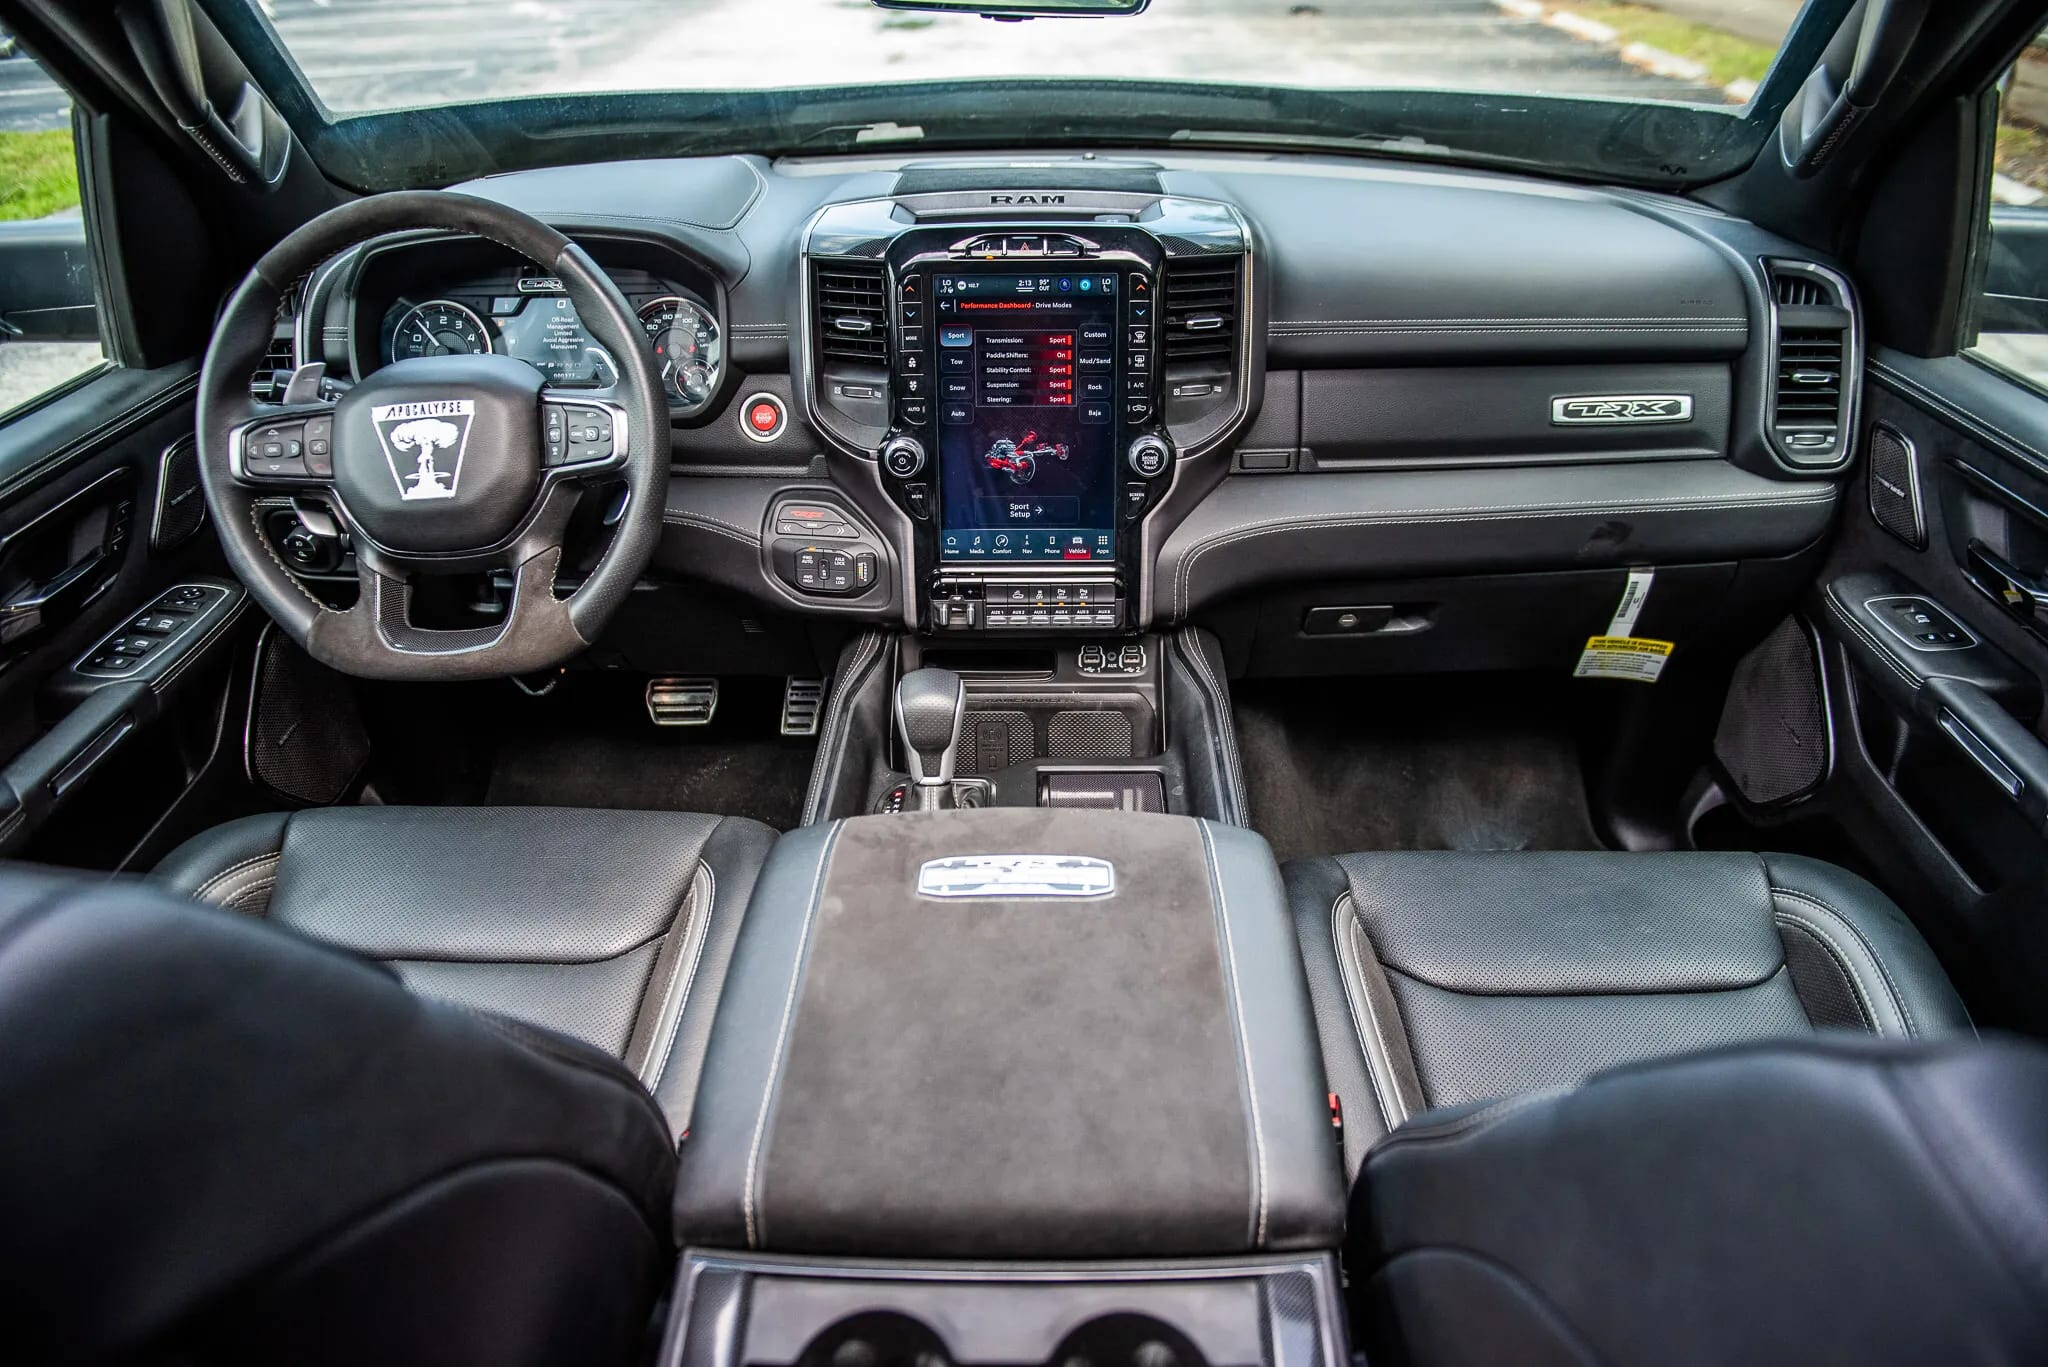
But the Juggernaut is not all about scaring the neighbours with its looks. The Hellcat V8 is pumped up to put out 850hp and the whine of the supercharger is enhanced to ensure everyone knows the Juggernaut is on its way. The powertrain features five drive modes including Sport, Drag Race, Baja, Rocks and Mud to be ready for whatever you point it at.
The Dana 60 axles are fitted with locking differentials, and custom suspension is used throughout including that trick IFS set-up. There is a range of wheel and tyre packages available, but 40-inch rubber is used for best effect.
The TRX’s cab is already pretty plush but is decked out inside with heated and cooled leather seats, a Harmon Kardon sound system, a 12-inch head display and a massive sunroof. Power side-steps are needed to get into the massive rig and they drop down to make access easier.
Apocalypse also builds wild 6×6 Jeep Wrangler and new Ford Bronco vehicles and says it has more than 140 cars on the roads now, and some of them in RHD for international customers.
Discussions with Australia’s Autogroup International (AGI) will see them taking on the RHD conversions so that Apocalypse can concentrate on building the cars themselves.
AGI’s Rob Hill tells us that they are taking on the conversions for RHD markets and will look at bringing them to Australia if there is a demand.
The Juggernaut starts at $300,000 so don’t expect any change from AUD$500,000 to get one here. Owning a vehicle that will help you survive the Apocalypse doesn’t come cheap, but if you’re the only person to survive, who are you going to show off your special rig to?
With so many remote corners of Australia to explore, and vast stretches of wilderness in between, there’s endless opportunities to explore. But if you don’t have a long range fuel tank and you need a fuel reserve – these lightweight fuel bladders are an excellent option, whether you are adventuring on two wheels or four.
When comparing lightweight fuel bladders to rigid containers like jerry cans, it seems like a no brainer. Fuel bladders are lighter and you can roll them up to store them away when not in use. But are they functional, safe and worth the expense?
We’ve reviewed the best lightweight fuel bladders and bags in Australia from Armadillo Bag, Desert Fox, Adventure Moto, Liquid Containment, Fleximate and Naz Bags to find out. We’ve also included a Buyers Guide to help you choose the best lightweight fuel bladder for your needs.
| Capacity (litres) | Weight (grams) | Size (empty) | |
|---|---|---|---|
| Armadillo Bag Fuel Bladders | 3.8 / 7.6 / 11.4 / 18.9 | 368 / 454 / 567 / 680 | 25.4 x 41.91 x 7.62cm
30.48 x 52.07 x 10.16cm 33.6 x 62.2 x 12.7cm 38.1 x 75.6 x 15.24cm |
| Desert Fox | 3 / 6 / 20 | 300 / 400 / not specified | 24 x 40cm
35 x 40cm 30 x 30 x 30cm |
| Adventure Moto | 5 / 8 | Approx 500 / Approx 500 | 55 x 25cm
59 x 30cm |
| Liquid Containment | 2 / 5.5 / 10 / 12 | not specified | 22.5 x 35cm
33 x 41cm 39 x 45cm 43cm x 45cm |
| Fleximake | 4 | 500 | 38 x 32 x 9cm |
| Naz Bags | 4 / 5.5 / 10 / 12 | 400 / 500 / 700 / 900 (Approx – depending on customisation) | 45 x 33cm
48 x 36cm 52 x 42cm 58 x 46cm |
Armadillo Bag Fuel Bladders

Specifications
- Capacity (litres): 3.8 / 7.6 / 11.4 / 18.9
- Weight (grams): 368 / 454 / 567 / 680
- Size (filled): 25.4 x 41.91 x 7.62cm / 30.48 x 52.07 x 10.16cm / 33.6 x 62.2 x 12.7cm / 38.1 x 75.6 x 15.24cm
Things we like
| Not so much
|
- Capacity (litres): 3.8 / 7.6 / 11.4 / 18.9
- Weight (grams): 368 / 454 / 567 / 680
- Size (filled): 25.4 x 41.91 x 7.62cm / 30.48 x 52.07 x 10.16cm / 33.6 x 62.2 x 12.7cm / 38.1 x 75.6 x 15.24cm
The Armadillo Bags consist of an abrasion-resistant Cordura outer bag and a RF-welded inner bladder. Rubber handles make it easy to fill and pour from the bladder, while daisy-chain strapping gives you more secure tie-down options and will prevent the bag from slipping. Upgrades from the previous model of fuel bladders by Armadillo Bag include reinforcement around the spout and an outer pouch for the spout to be stored in when not in use. You can tell attention to detail has gone into the construction of these bags, with features like dust flaps on the spout pocket.
These fuel bladders undergo rigorous testing to ensure they are leak-proof and durable – every inner reservoir is individually pressurised and tested at the factory. The Armadillo Bags can be used to store hydrocarbon fuels such as gasoline, diesel, kerosene and jet, as well as coolant, hydrocarbon based lubricants and other automotive and industrial fluids. Best of all they can be rolled down small to be stored away when not in use. *Note: these fuel bladders are designed in the US and have capacity of 1, 2, 3 and 5 gallons – we have converted them to litres for this review.
Desert Fox – Trail / Overland / Extreme Fuel Bladders
Specifications
- Capacity (litres): 3 / 6 / 20
- Weight (grams): 300 / 400 / not specified
- Size (empty): 24 x 40cm / 35 x 40cm / 30 x 30 x 30cm
Things we like
| Not so much
|
- Capacity (litres): 3 / 6 / 20
- Weight (grams): 300 / 400 / not specified
- Size (empty): 24 x 40cm / 35 x 40cm / 30 x 30 x 30cm
These fuel bladders have large D-rings and daisy chain strapping so there’s no need for any hardware to mount them. They also have carry straps for easier handling and filling. The 6L also has tie-down cinch straps for securing on top of panniers. You can roll these bags down after refuelling and store them away until you need to use them again.
The outer bag is made from durable canvas and the inner bladder is a heavy duty plastic. The fuel spout is included and can be stored inside a dust-proof integrated pouch when not in use. These bags are extremely durable and strong, making them a great long-term purchase that you will have no problems taking off-road.
Adventure Moto – ADVWorx Fuel Bags
Specifications
- Capacity (litres): 5 / 8
- Weight (grams): Approx 500 / Approx 500
- Size (empty): 55 x 25cm / 59 x 30cm
Things we like
| Not so much
|
- Capacity (litres): 5 / 8
- Weight (grams): Approx 500 / Approx 500
- Size (empty): 55 x 25cm / 59 x 30cm
ADVWorx have upgraded their original fuel bags with this second version – which earns its place amongst the best fuel bladders in Australia. The upgrades include a rubber grip handle at each end and reflective fabric on the daisy chain strapping in case you are searching for it in the dark. The cap has been redesigned to screw on and off easily and an Ezi Pour spout is included with the fuel bladder. There’s also an outer pouch on the bag for storing the spout.
The ADVWorx fuel bags come in 5L and 8L sizes. Each has a welded film bladder sewn into a ballistic nylon outer bag – making it durable and leak-proof. Rolling down these bags when they are not in use, makes them an excellent portable solution for fuel storage. The daisy chain strapping allows you to tie it down securely and the handles are perfect for holding or hanging the bag while refilling and pouring. These fuel bladders are compatible with most petroleum fuels including gasoline, diesel, kerosene, and jet.
Liquid Containment – Jerry Flex Touring Fuel Bladders
Specifications
- Capacity (litres): 2 / 5.5 / 10 / 12
- Weight (grams): not specified
- Size (empty): 22.5 x 35cm / 33 x 41cm / 39 x 45cm / 43cm x 45cm
Things we like
| Not so much
|
- Capacity (litres): 2 / 5.5 / 10 / 12
- Weight (grams): not specified
- Size (empty): 22.5 x 35cm / 33 x 41cm / 39 x 45cm / 43cm x 45cm
Their range of fuel bladders features four sizes – each with the same design and functionality. They are made from reinforced military spec TPU giving them superior strength and adhesion, plus they have an odour proof layer. They each have an ultra light filler with a pressure relief cap design and they are suitable for short-term storage of a range of powersport fuels.
The outer design has either four or six tie-down eyelets and four belly-strap loops to keep the fuel bladder secure. Each size in the range has a spout included which can be stored on the outside of the bag. These fuel bladders cannot be rolled but they can be folded or stored flat. Better yet, they can be tailor-made to suit your needs, so if you haven’t found a good solution for your fuel storage needs in these reviews – consider a custom option from Liquid Containment.
Fleximake – Motorcycle Fuel Bladder
Specifications
- Capacity (litres): 4
- Weight (grams): 500
- Size (filled): 38 x 32 x 9cm
\n
Things we like
| Not so much
|
Fleximake is an Australian manufacturer of a range of flexible products, including a 4L motorcycle fuel bladder that is perfect for two wheeled adventures. If you are planning to ride further than one tank of fuel will take you, this fuel bladder by Fleximate is a simple, durable fuel-carrying solution.
The Fleximake 4L Motorcycle fuel bladder is built tough so you can take it anywhere. The bladder is made from reinforced TPU with a 2 year manufacturer’s warranty. It has four tie-down points and a filler with screw on cap. There is a small handle alongside the cap to assist with filling and pouring.
If you want a portable fuel option without all the bells and whistles – but with more than enough durability to face tough, off-road conditions – this fuel bladder by Fleximake is a great choice.
Naz Bags – Motorcycle Fuel Bladder Bags
Specifications
- Capacity (litres): 4 / 5.5 / 10 / 12
- Weight (grams): 400 / 500 / 700 / 900 (Approx – depending on customisation)
- Size (internal): 45 x 33cm / 48 x 36cm / 52 x 42cm / 58 x 46cm
\n
Things we like
| Not so much
|
Naz Bags have designed these tough motorcycle bags to store your fuel bladders while out on (or off) the road. If you own, or plan to buy, a fuel bladder and want a little more protection for it – these customised bags are compatible with the Liquid Containment and Fleximate fuel bladders.
Naz Bags have a range of Australian made motorcycle luggage products. Their fuel bladder bags are designed to give more durability and better tie-down options for some of the fuel bladders on the market. The bags come in four sizes and each is made from ripstop canvas. They can be used individually or joined to create tank panniers.
If you are really looking to customise your gear on your bike, this is a great option. All of the bags are customisable, so you can choose not only the size, but also the number of webbing tabs or steel buckles and D-rings. This gives you a great opportunity to create a storage system that works for you. You can also tailor it further by picking out the colour of the fabric or adjusting the strap length or pocket size at no additional cost.
HOW WE REVIEW PRODUCTS
4X4 Australia has been reviewing four-wheel drive vehicles, aftermarket products and camping gear for over 40 years. When looking for the best lightweight fuel bladders in Australia there are some things that are essential to ensure you can safely store and transport fuel for your bike or vehicle.
When we compared each of the fuel bladders in the list we looked at the durability, versatility, design and size, as well as extra features which make them stand out from the rest.
We looked at user reviews and drew on our own experience using lightweight fuel bladders and bags to make sure our recommendations are for the best on the market.
Disclosure: When you buy through our links, we may earn a commission. We also include products that we do not earn a commission from.
BUYERS’ GUIDE TO LIGHTWEIGHT EXPEDITION FUEL BLADDERS
How to choose a lightweight fuel bladder
Fuel bladders are not a new invention, they have been used by the marine industry and the military for many years, but now they’ve been adapted to be available to individual users for powersports, 4WDing and boating. Meaning you can now get your hands on one – and you might not ever want to let it go.
Fuel bladders are designed to be flexible and versatile, yet durable and safe for transporting fuels in even the roughest conditions. With the right fuel bladder you should have no hesitation filling it up, strapping it down and heading out for an epic adventure.
To give you an idea of what features to look for in a lightweight fuel bladder, we’ve put together this Buyers Guide – breaking down the main things to consider when purchasing one.
Short-term fuel storage
These fuel bladders are designed for short-term fuel storage and transporting only. They should be filled up and then emptied (used) at the earliest possible time. If you need to store fuel for a long time, or don’t have a time frame for using it, it is better to get a rigid fuel storage container that complies with the Australian regulations for fuel storage.
Versatility
The beauty of fuel bladders is that they can be filled and taken out on the road, then rolled or folded down and stored away once you’ve used them. When not in use, fuel bladders take up just a fraction of the space that they do when full – which can not be said for rigid fuel containers.
If you are planning a long expedition and may only need a fuel reserve for some sections of the trip, you can keep the fuel bladder packed away until you need it. No need to lug a rigid fuel container around for the entire trip if you may only need to use it for one stretch.
You can also use fuel bladders for a range of different applications – without needing to add extra hardware each time. Grab one good quality fuel bladder and you should have no hesitation strapping it to your motorbike, the back of your ute, or the deck of your boat.
In some products you can keep the same outer bag but swap out the inner fuel bladder for a different size, giving you versatility in how much fuel you can carry. In addition, some fuel bladders can also be used for the storage and transport of water – provided they haven’t previously been used for storing fuel.
Durability
Many fuel bladders come with a tough outer bag and inner bladder which holds the fuel.Before buying a fuel bladder you should check the materials used on both the inner fuel bladder and the outer shell, and also check what fuel types it can be used for.
The outer shell needs to protect from dirt and dust, and be tough enough to stand up to off-road conditions – not just the bumps, but the possibility of being dropped as well.
The inner bladder needs to be fuel resistant and leak proof. The fuel bladders we have reviewed are made of fuel-safe materials which are welded at the edges to prevent leaks. They can be used for short-term storage and transport of fuel when you need to do so safely, quickly and easily.
If you are buying just a fuel bladder, there are fuel bags on the market which will give you extra protection, plus an easy solution for transporting the bladder.
Easy to Use
Checking out the different features on lightweight fuel bladders will give you a good indication of how easy they are to use. Some things to look for include tough handles, the inclusion of a spout and enough tie-down points for you to secure it safely to your bike or vehicle.
Having handles on your fuel bladder will make it easier to hold when emptying the fuel into your tank. They are also useful for hanging the bladder on your handle to fill it.
Check that the bladder comes with a spout, or an option to buy one separately. If the spout is a standard size, you’ll have no issues replacing it out on the road in case you lose yours. Also check if there is storage for the spout so you don’t have to keep it stored separately.
The fuel bladder should have tie-down points, to allow you to secure it to your bike. If it doesn’t you might want to purchase a custom bag to put it in. If you are securing it to a motorbike any kind of cinch strap will work well, or Pronghorn straps by Giant Loop and Rok Straps are quick and easy options to use.
Weight
Fuel bladders are designed to be lightweight, especially compared to rigid fuel containers. The weight and ability to roll or fold them down small are some of the key features. However, it is important to keep in mind the weight of your fuel bladder once it is full. Depending on how many litres you plan to carry, fuel can be very heavy and you don’t want to overload your bike, vehicle or boat.
Keep this in mind when looking at the size of the fuel bladder you are looking to purchase – alongside the weight of any other luggage or gear you will be carrying.
Capacity
The range of bladders we reviewed carry between 2 to 20 litres of fuel. To figure out what capacity fuel bladder you will need, it’s best to know how much fuel your vehicle or motorbike uses in different driving or riding conditions – including when loaded for travel.
This way you’ll know how far you can get with your tank full of fuel and you can plan for how much extra fuel you will need to be carrying. Keep in mind you do not need to completely fill the bladder with each use. You can buy a larger fuel bladder and only fill it to the capacity you need for each adventure.
Price
The price range of the fuel bladders we have reviewed is between $95 and $250 – making them a relatively inexpensive safety investment. If you consider that these bladders will keep you out on your adventure longer, with no stress of having to reach the next fuel station in time – they are an item well worth paying for.
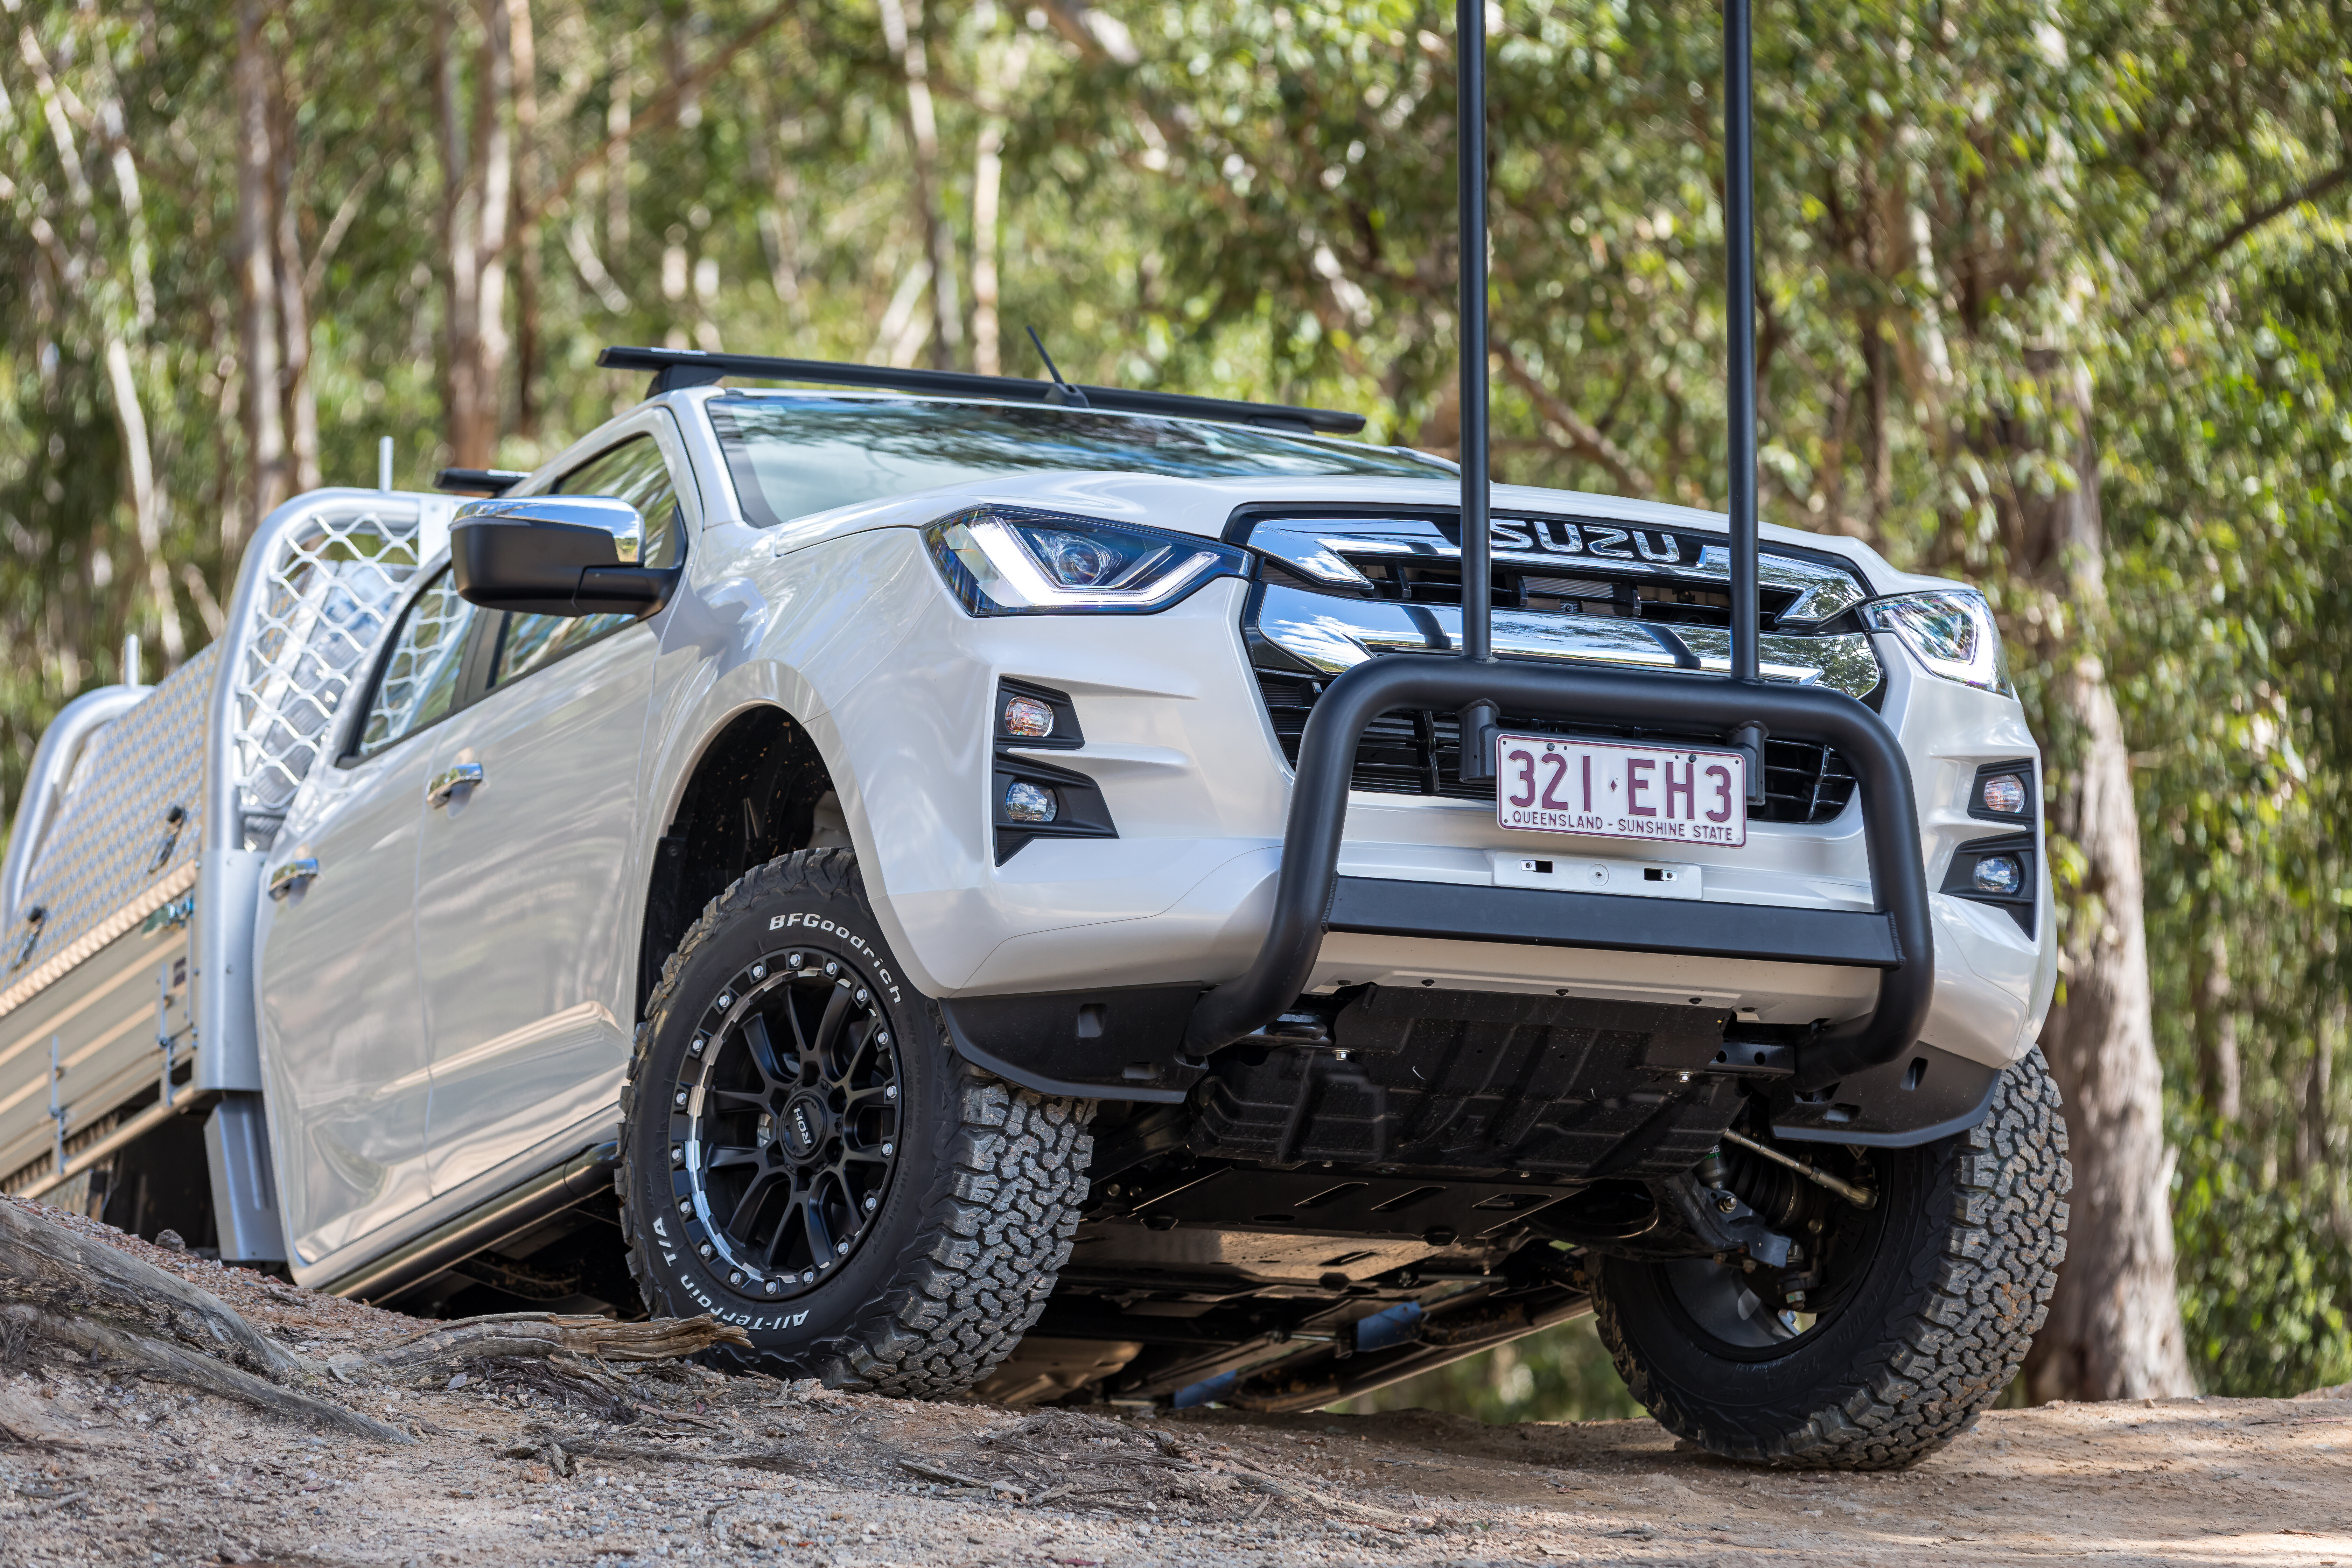
German tuning house, Delta4x4, has transformed the upcoming 2023 Volkswagen Amarok into an off-road monster, in a series of digital renderings released this week.
Dubbed ‘The Beast 2.0’, the wild ‘Rok towers over the stock vehicle courtesy of a 150mm lift (body lift kit and chassis).To assist with increased clearance, the vehicle is equipped with 35-inch BF Goodrich all-terrain tyres (35×12.5R18) wrapped around 18 x 9-inch Hanma wheels.
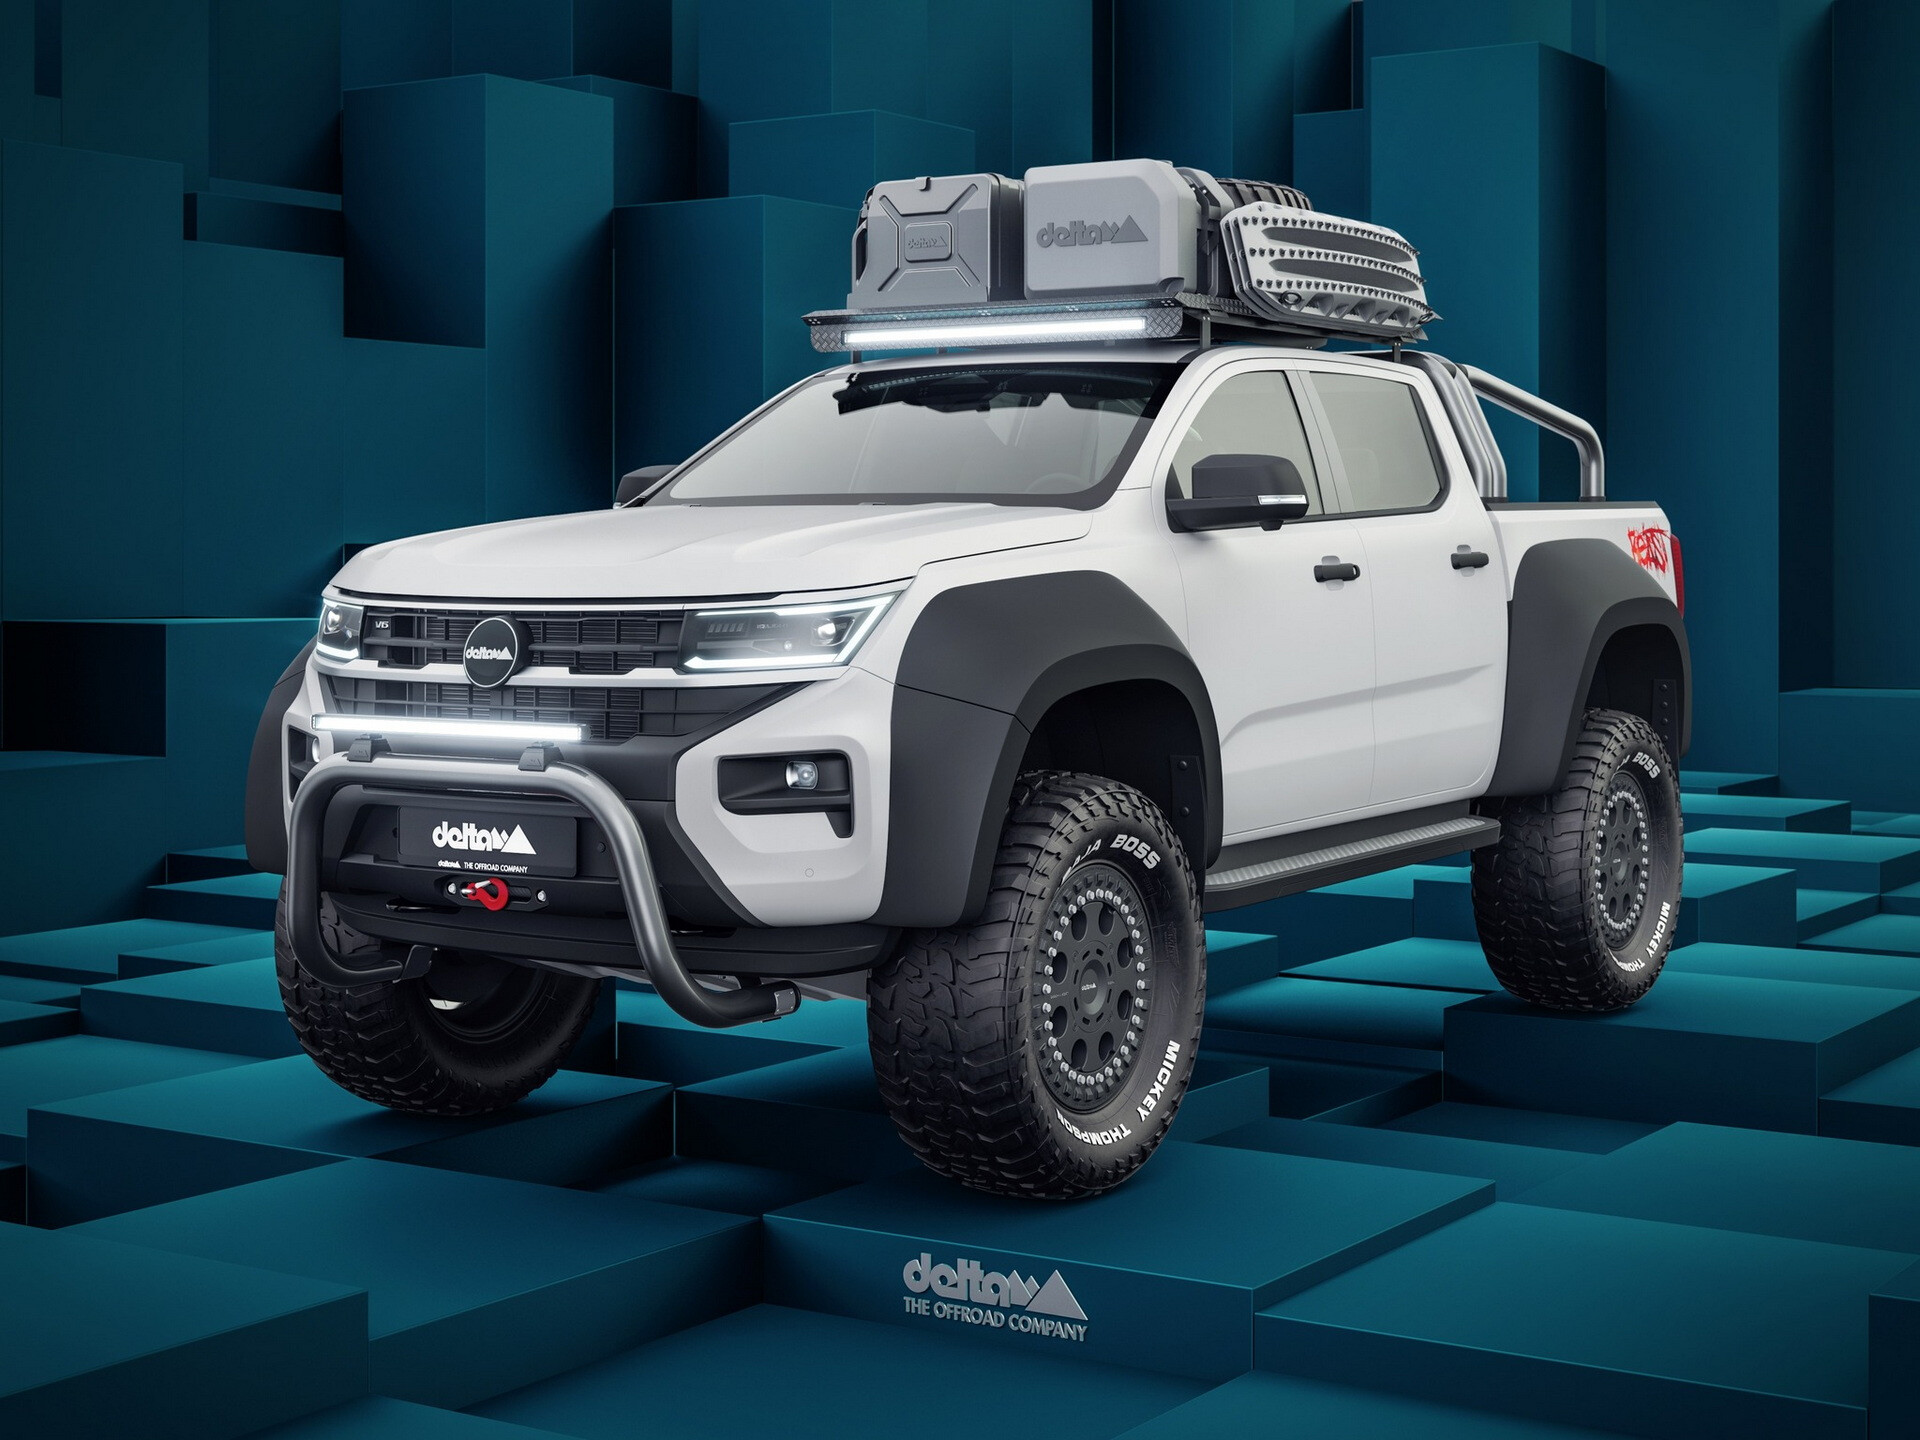
Keeping the rubber in check are enormous – rather comical-looking – fender flares. Plus, the images also reveal a bullbar and underbody protection.
Up top, the vehicle can be seen carrying recovery boards, a shovel, a full-size spare and auxiliary jerry cans atop a roof rack. An LED light bar from PIAA is fitted to the front of the roof rack.
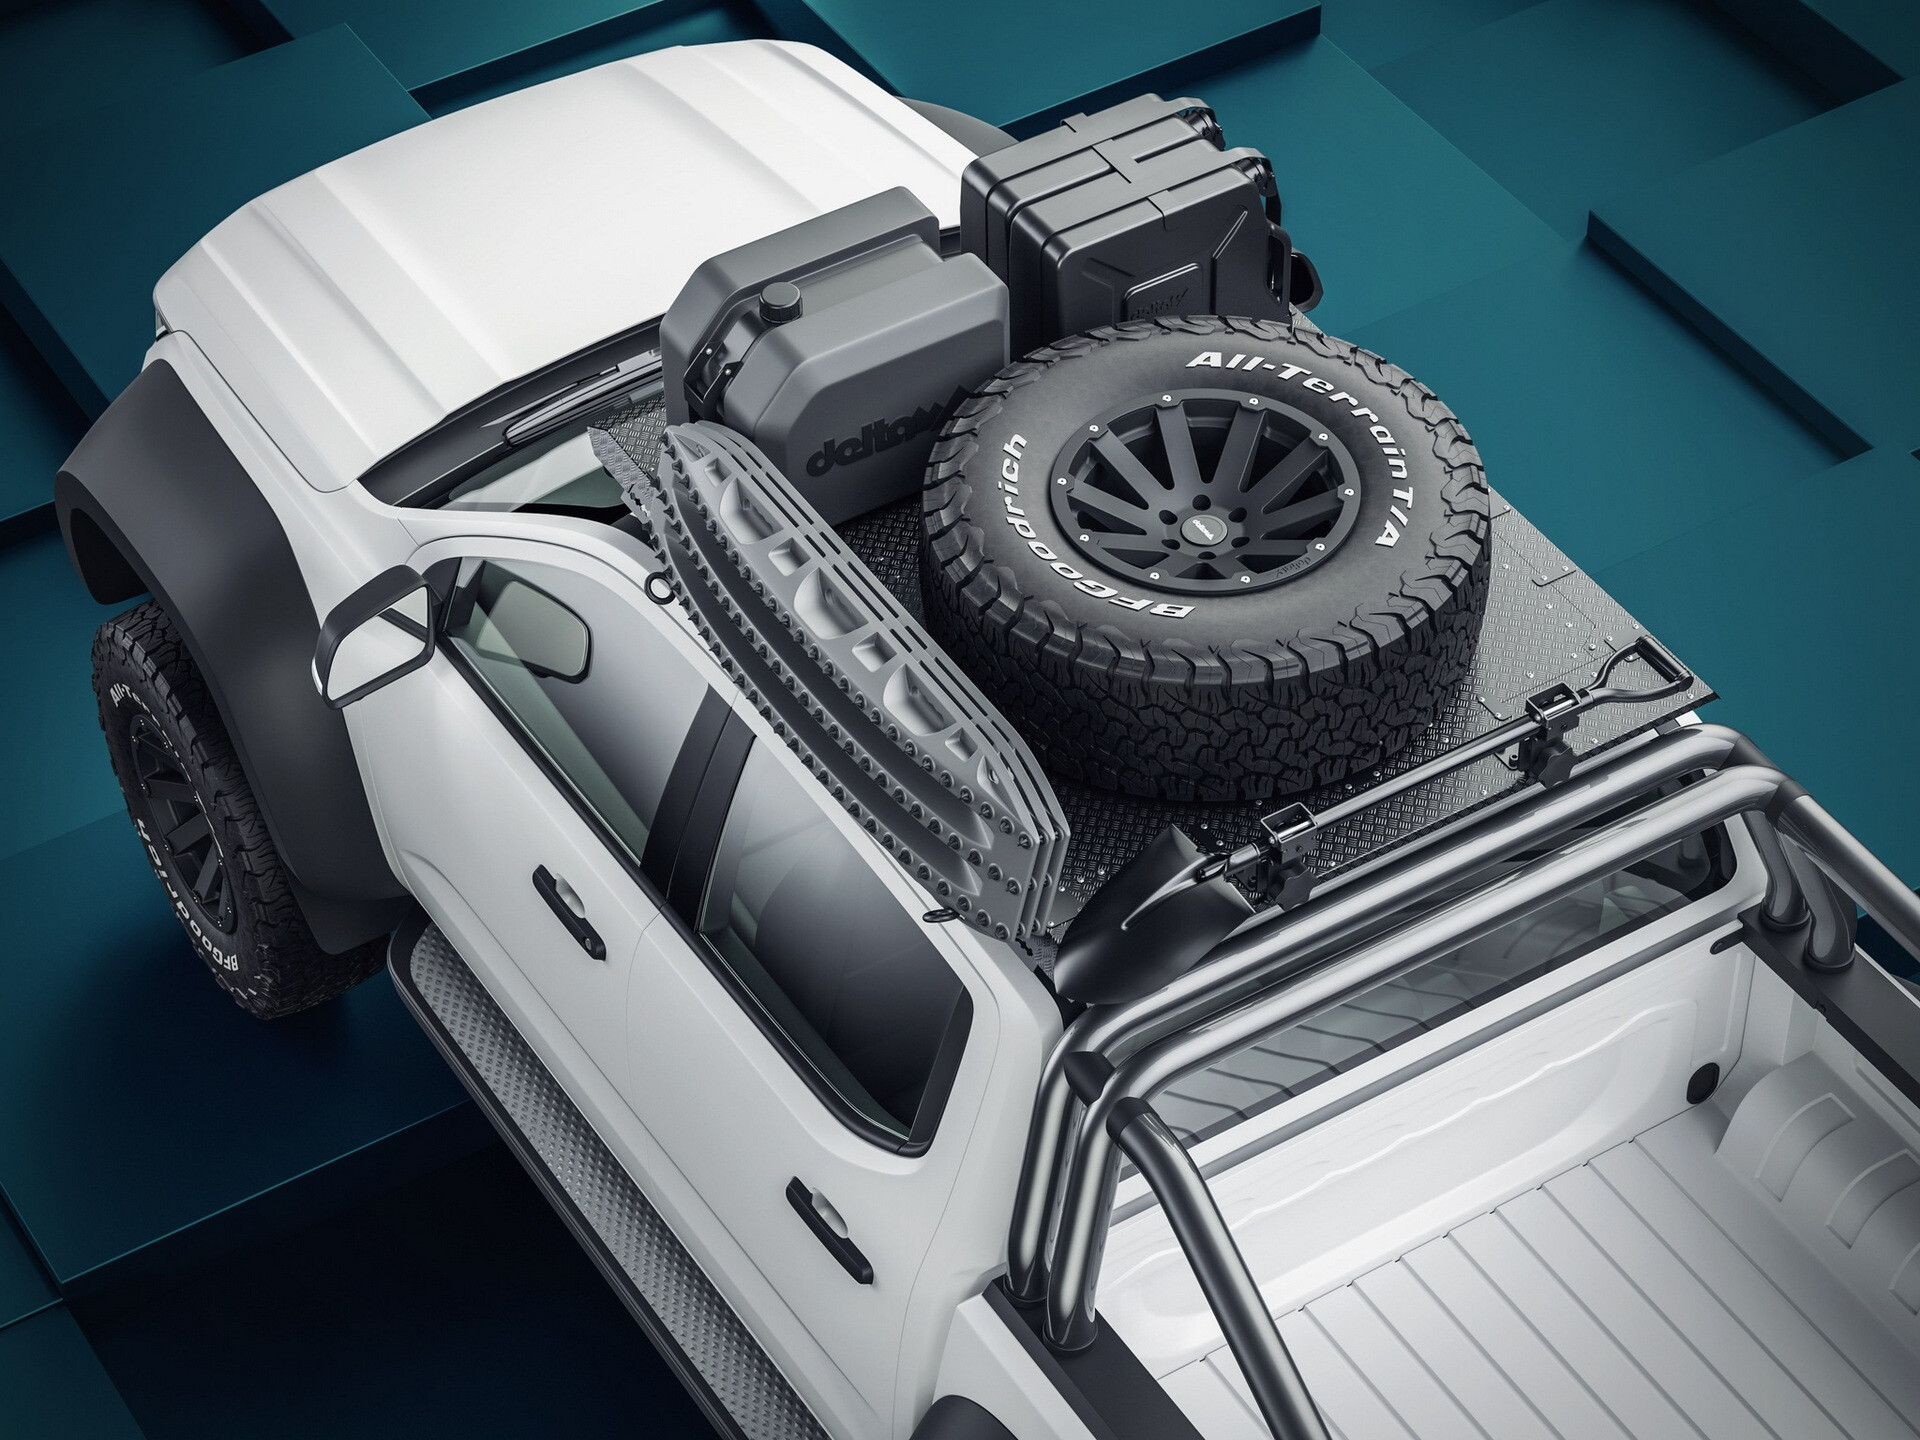
Other than this list of equipment, no further information was revealed – so whether it will receive a tickle to the V6 powertrain is unknown.
Shared to the company’s Instagram and Facebook pages, the rendered images are just that, renderings – but expect to hear about Delta4x4’s future plans once the 2023 VW Amarok launches early next year.
The 4×4 world is deep in a retro revival. You don’t have to look far to see major manufacturers building throwback models like the Bronco and upcoming Scout.
The aftermarket is in on it too. Fibreglass mock-up kits are available for a range of Jeeps to give them classic styling. That’s without even looking at the endless ’70s inspired vinyl wraps adorning Troopies all over the country.
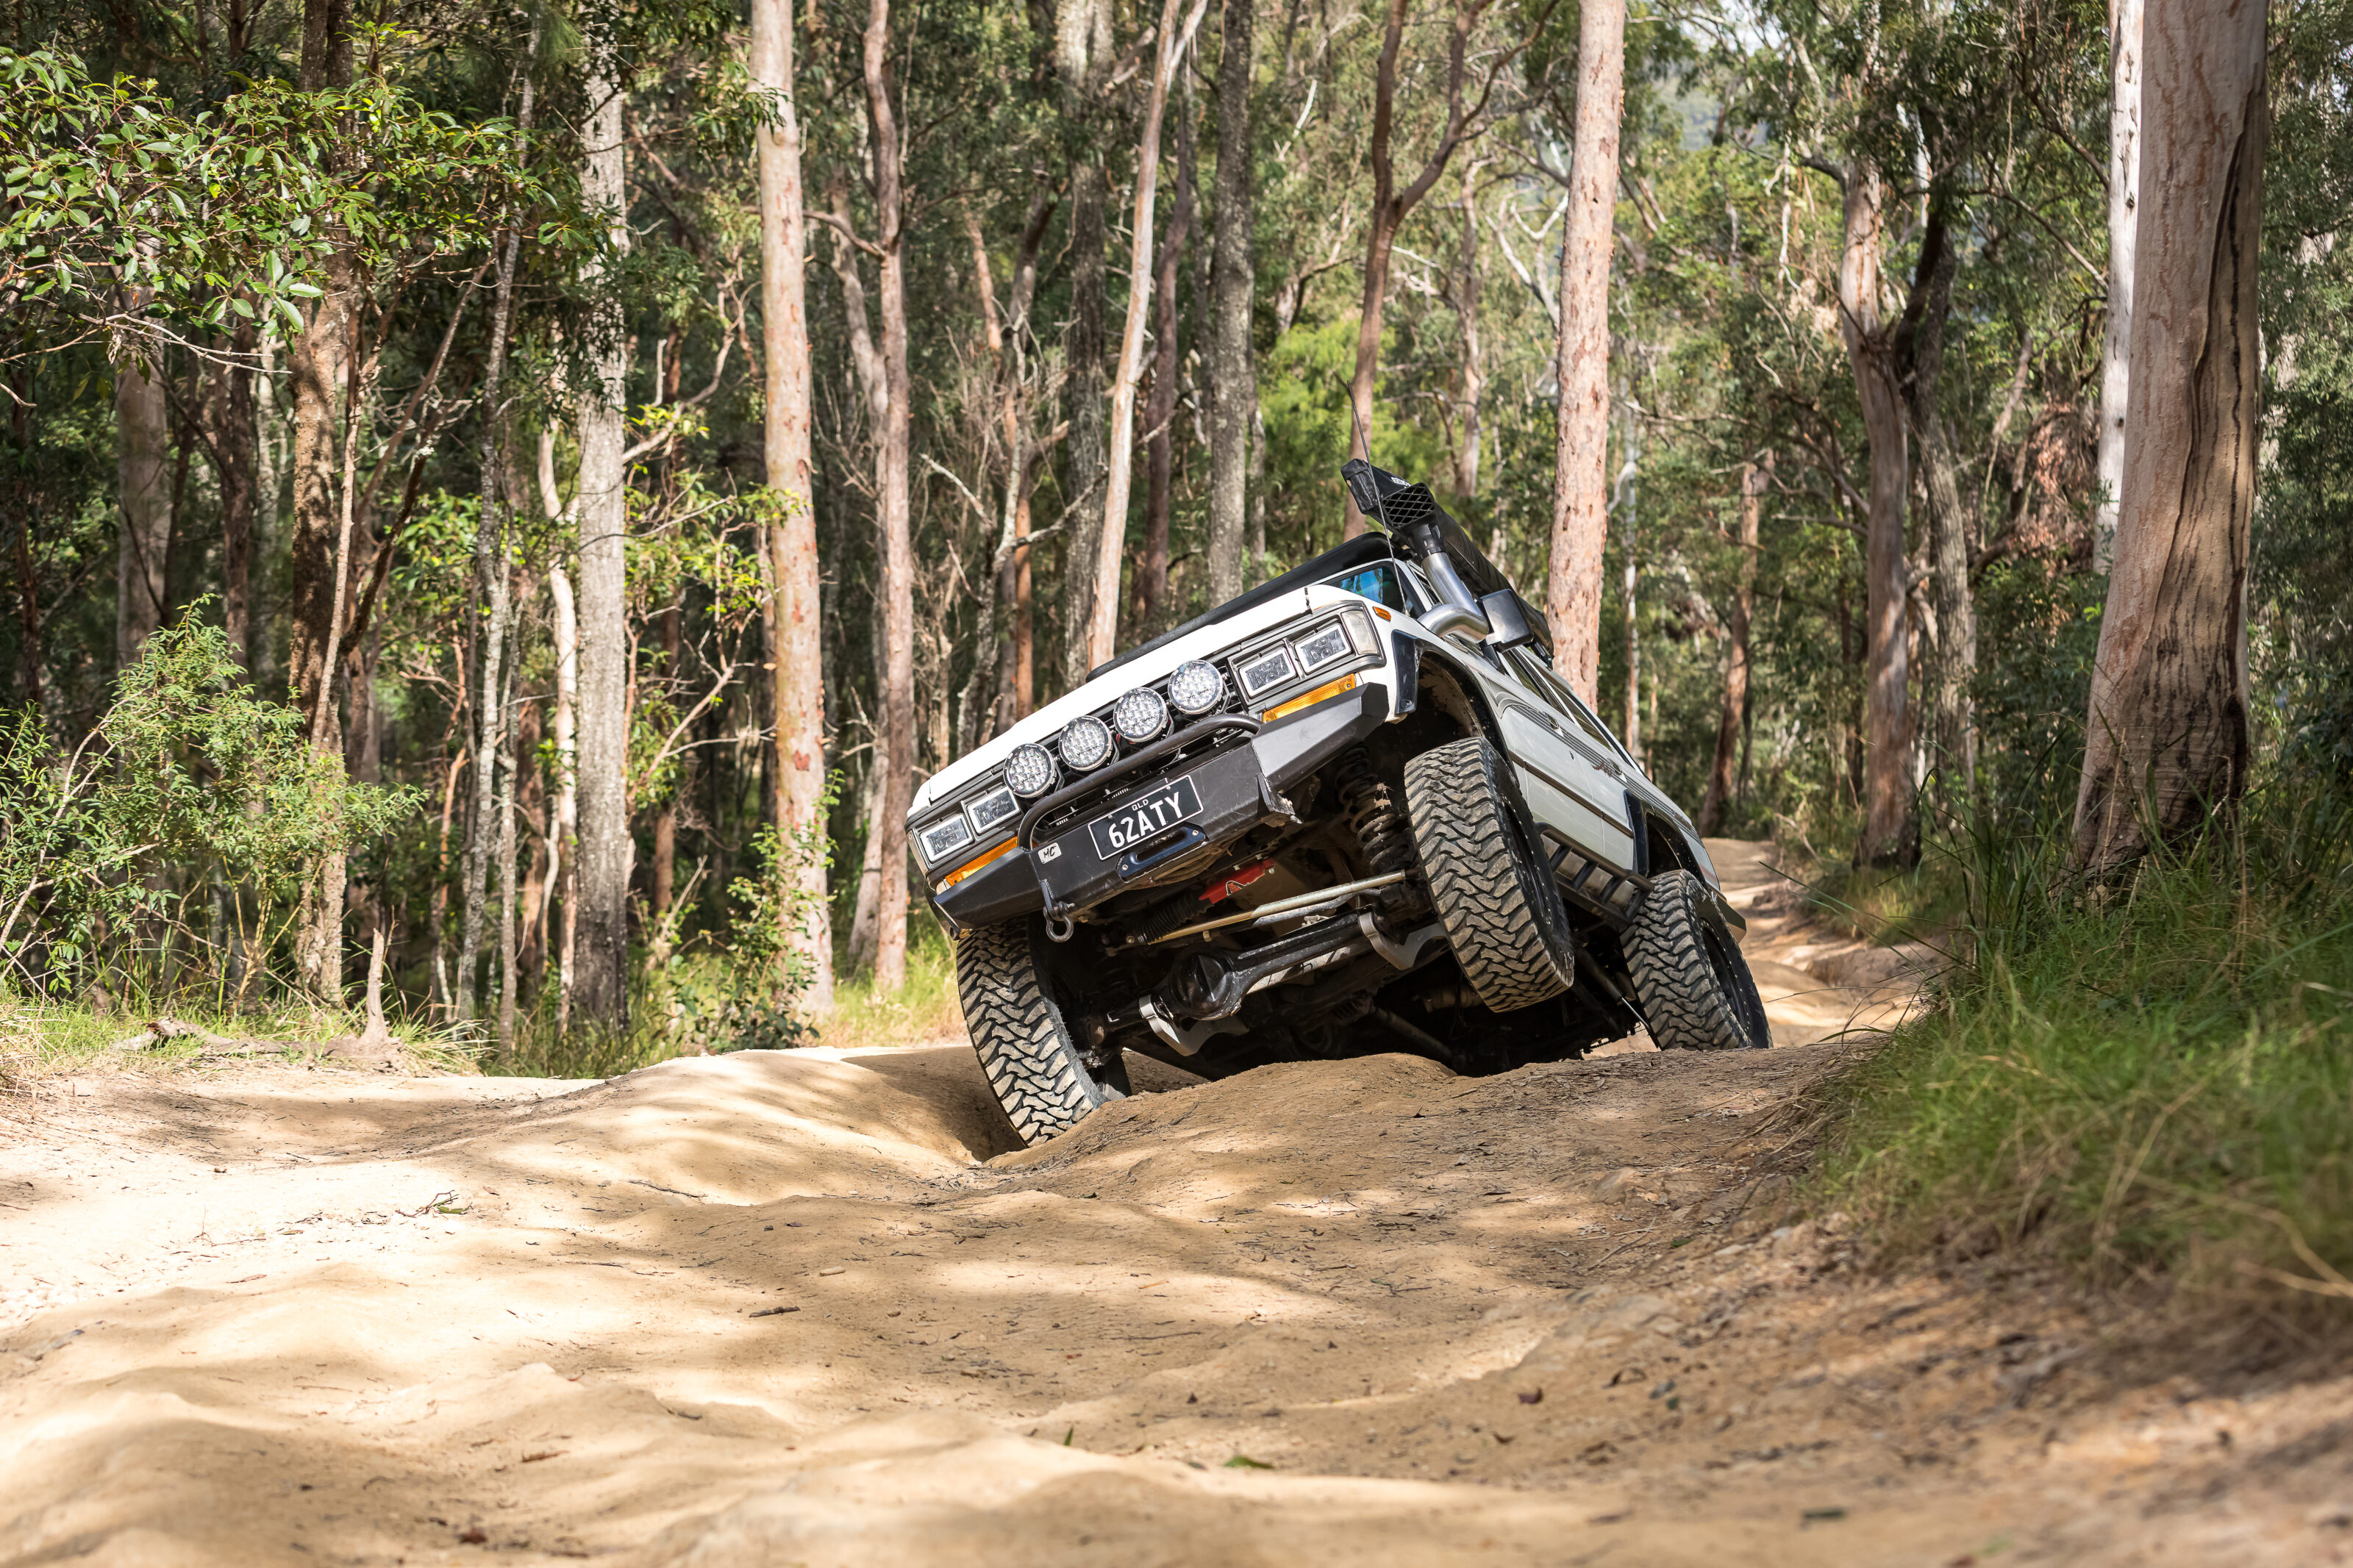
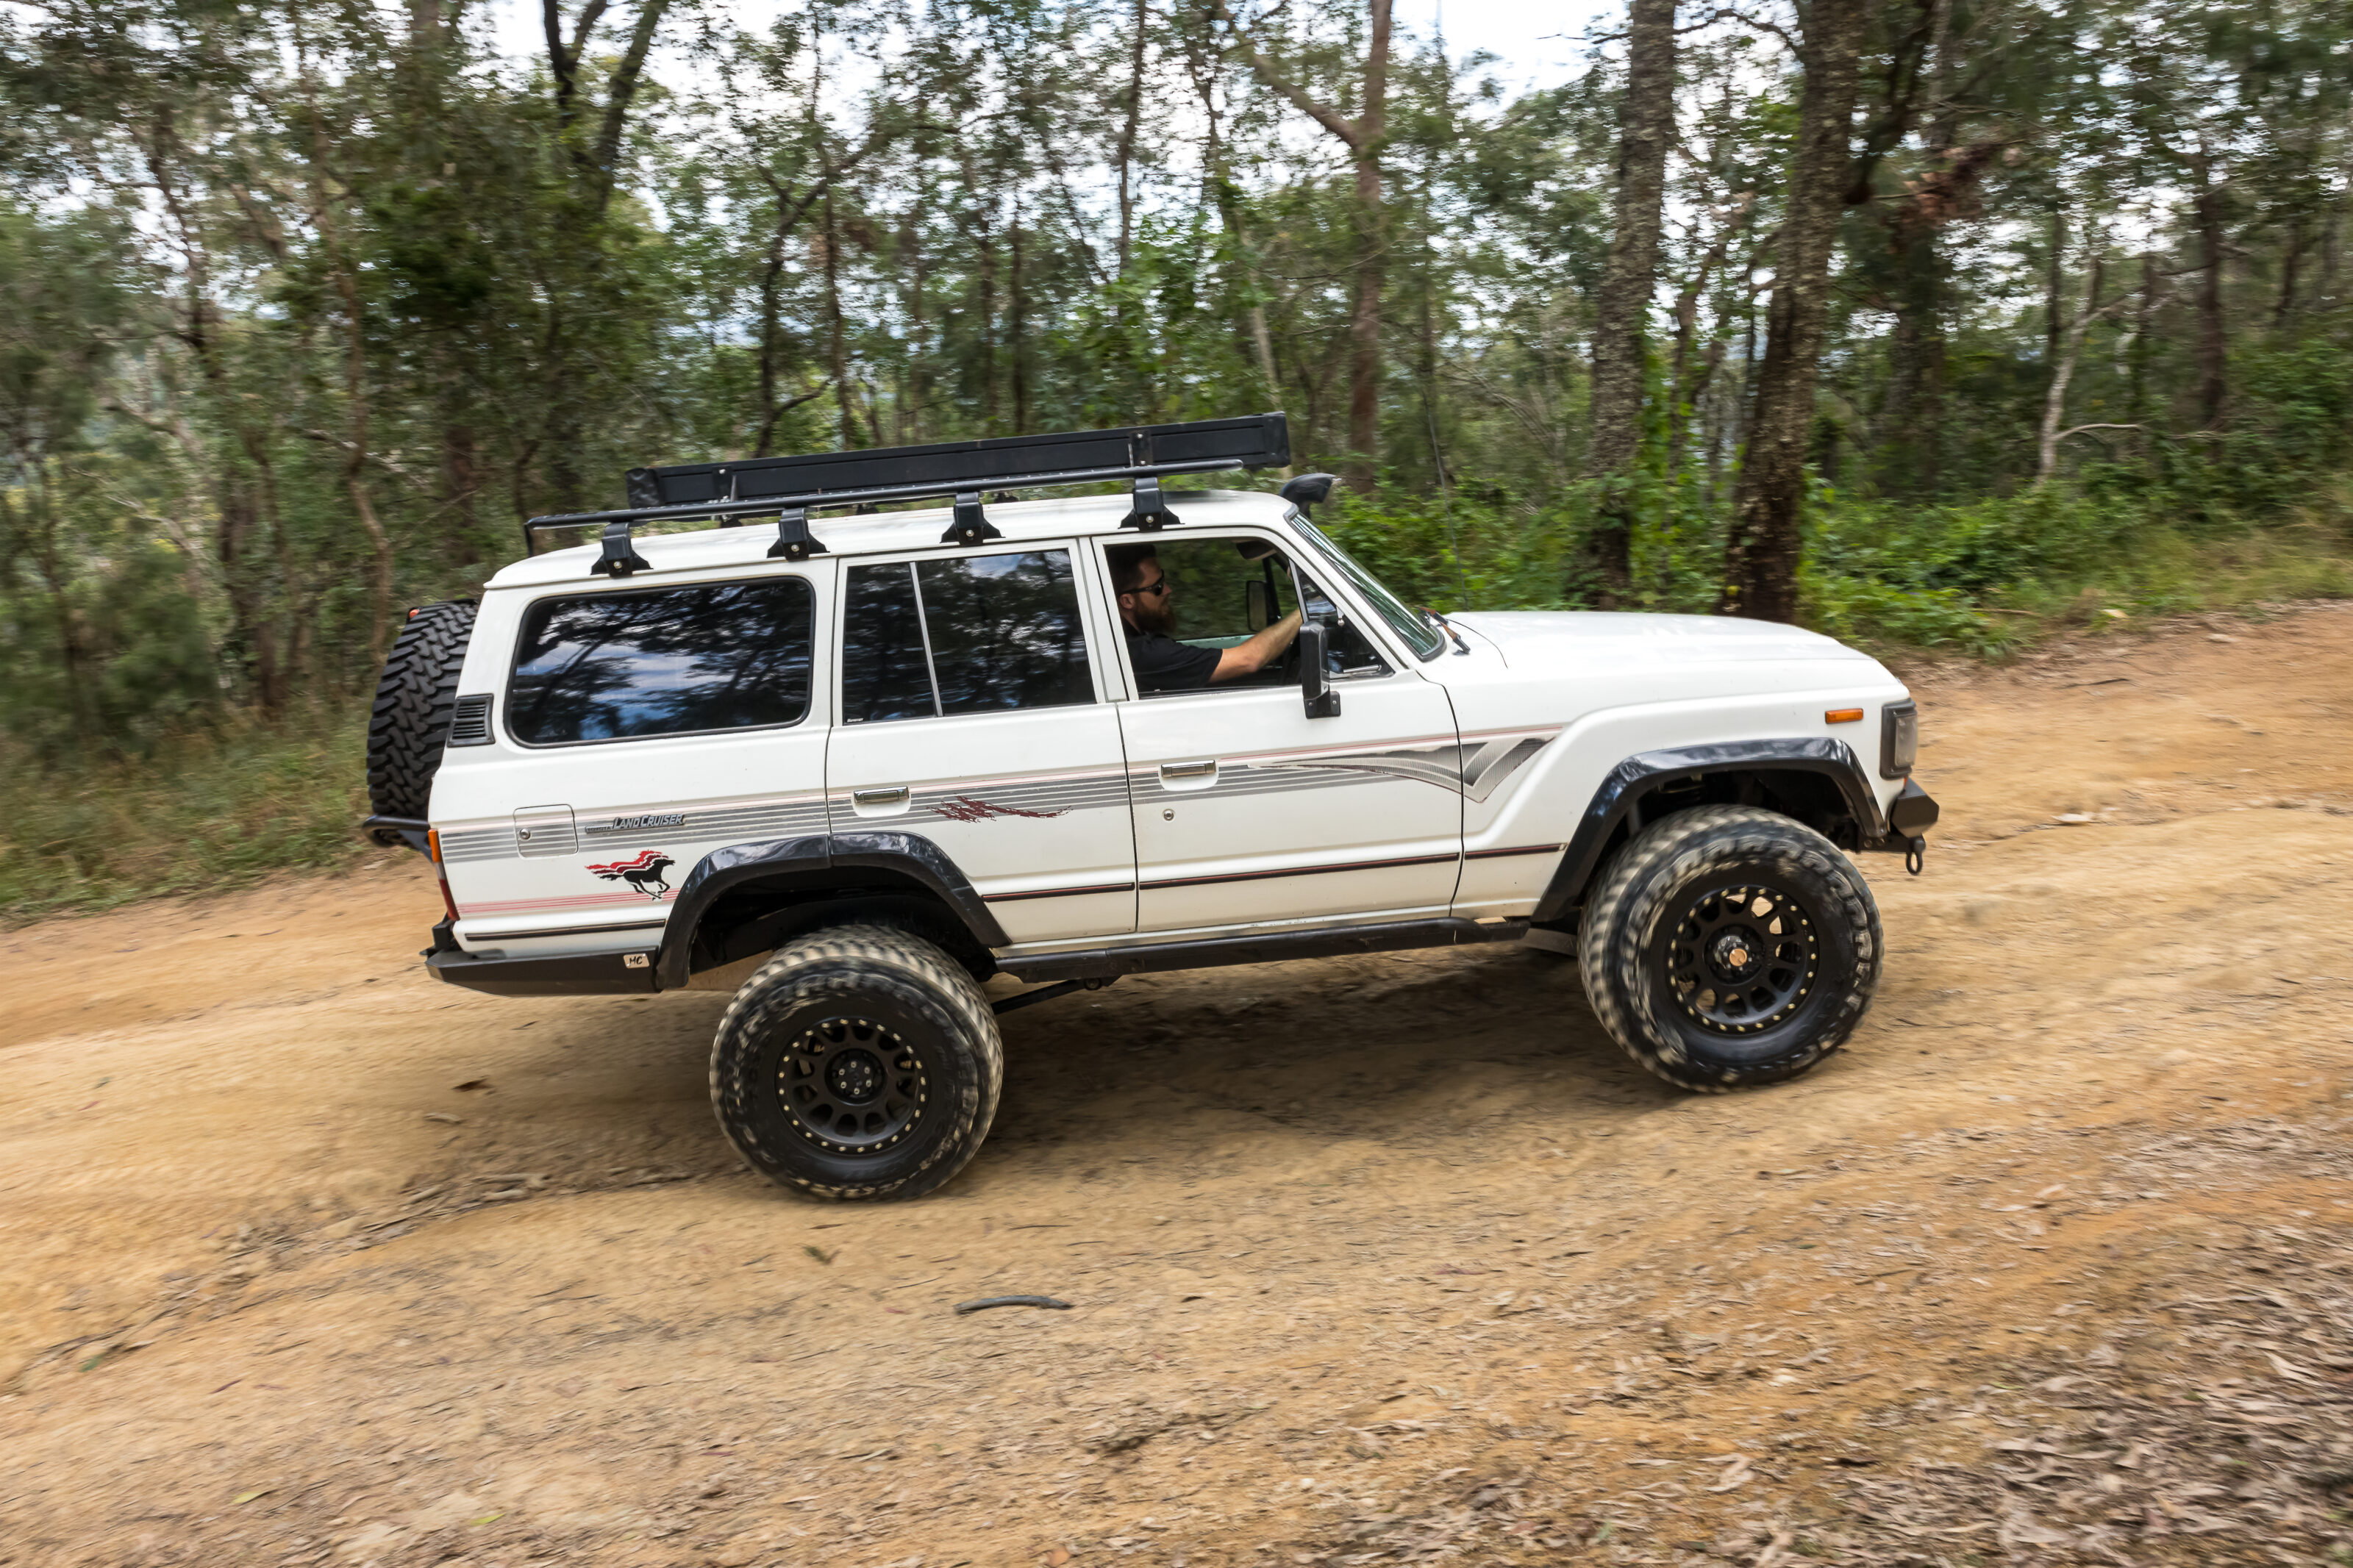
But the 60 Series LandCruiser you’re looking at isn’t a cheap gimmick. It’s the real deal. The type of 4×4 the newer vehicles can only hope to emulate. And it’s something that can only be bought with a blank check for hard graft.
McKinnon’s Cruisers in South East Queensland is responsible for the build you’re looking at. They kicked it off with a clapped out 1988 HJ60 LandCruiser. With 671,889km on the clock it had a proven cool factor, but was seriously long in the tooth. The decision was made it’d get their near-iconic 60/80 upgrade.
Chassis upgrade
First things first. The original HJ60 frame was unbolted and thrown to the side. After well over half-a-million kays on the tracks, it simply wasn’t going to cut it.
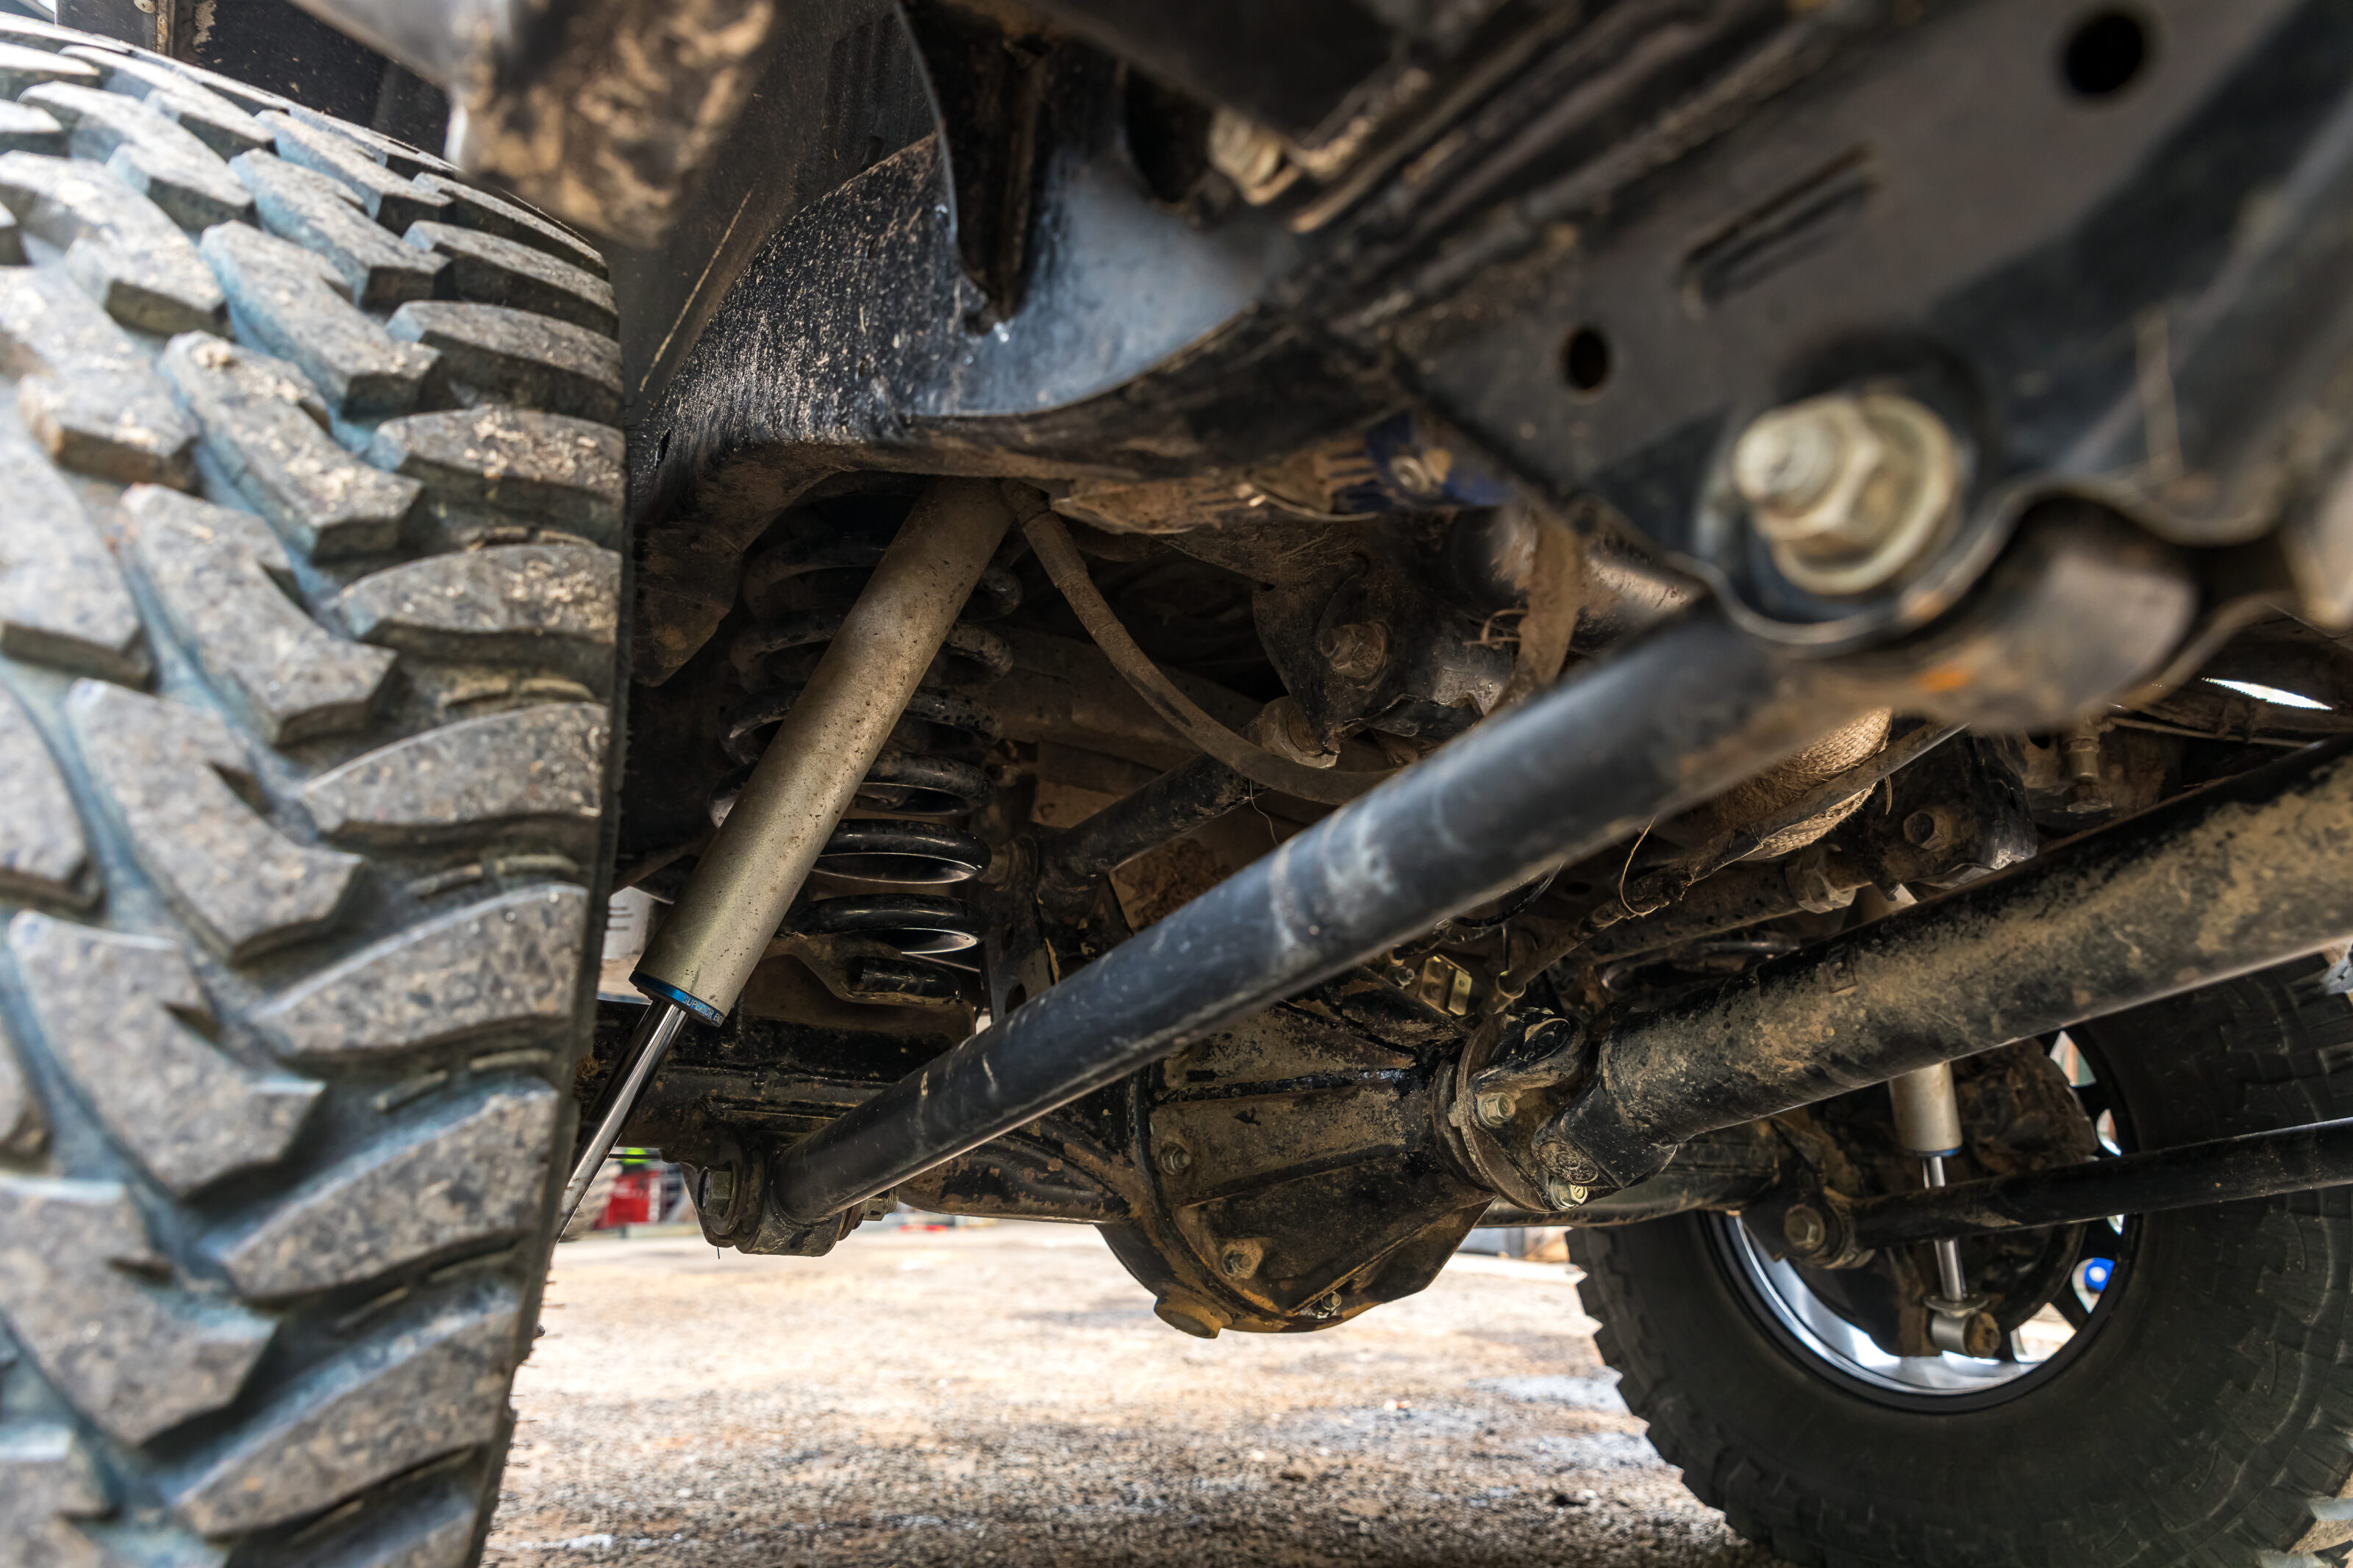
Riveted on body mounts and leaf springs all-round might be authentic, but by swapping in a chassis from a 1992 HDJ80 the classic Cruiser now sports a significantly better chassis, with coil springs and disc brakes on each corner. It wasn’t a bolt-on job though, 125mm needed to be sliced out of the wheelbase to suit the 60’s smaller proportions.
The newer 80 Series chassis underneath provided plenty of upgraded opportunities to really make the Cruiser an animal off road. Up front, the factory 80 Series radius arms have been binned. In their place Superior Engineering castor correction arms have been fitted up. They’re paired with a heavy-duty and adjustable tie rod, drag link and Panhard rod to keep the front axle where it needs to be, and pointing where it needs to point.
Inside the front diff got a working over as well. In the diff centre, a selectable ARB Air Locker allows maximum traction with the flick of a switch. The CV joints in either side have been replaced by heavy-duty chromoly versions from USA-based Longfield. The free-wheeling hubs also copped a Longfield gear upgrade, and the hub studs have been drilled out and upgraded with beefier 10mm studs.
There’s a similar spec sheet up the back too. There’s Superior Engineering HD lower control arms, adjustable uppers and an adjustable Panhard rod. A second ARB Air Locker sends drive to both wheels, with more 10mm stud upgrades ensuring the 60’s axles do as they’re told, even when driven in anger.
Modern wheels got the nod. A set of 305 NV Method Race Wheels punch in at 17×8.5. They’re wrapped inside 35×12.5R17 Toyo Open Country M/Ts. The 50mm lifted coils on each corner and Superior Engineering remote reservoir shocks free up some room for the larger rubber and ensure the 60 flexes up on the tracks better than most modern rigs.
V8 transplant
Of course, all that trick suspension isn’t much good without an engine driving it. When the Cruiser rolled off the production line back in the ’80s, the 2H diesel it was sporting had a 4L capacity, six cylinders and not a single turbo in sight. The result was an anaemic 80kW, and just 240Nm.
The call was made to bin the old donk and slot in something with a little more anger in its place. Resting between the chassis rails now is an L77 6.0L V8 pried from a late-model VF Commodore. Power has climbed a huge 225 per cent to 260kW. Torque has more than doubled too, up to 517Nm. Breathing in through a custom stainless-steel snorkel, and out through a custom exhaust. It’s a combo that could put a horn on a jellyfish.
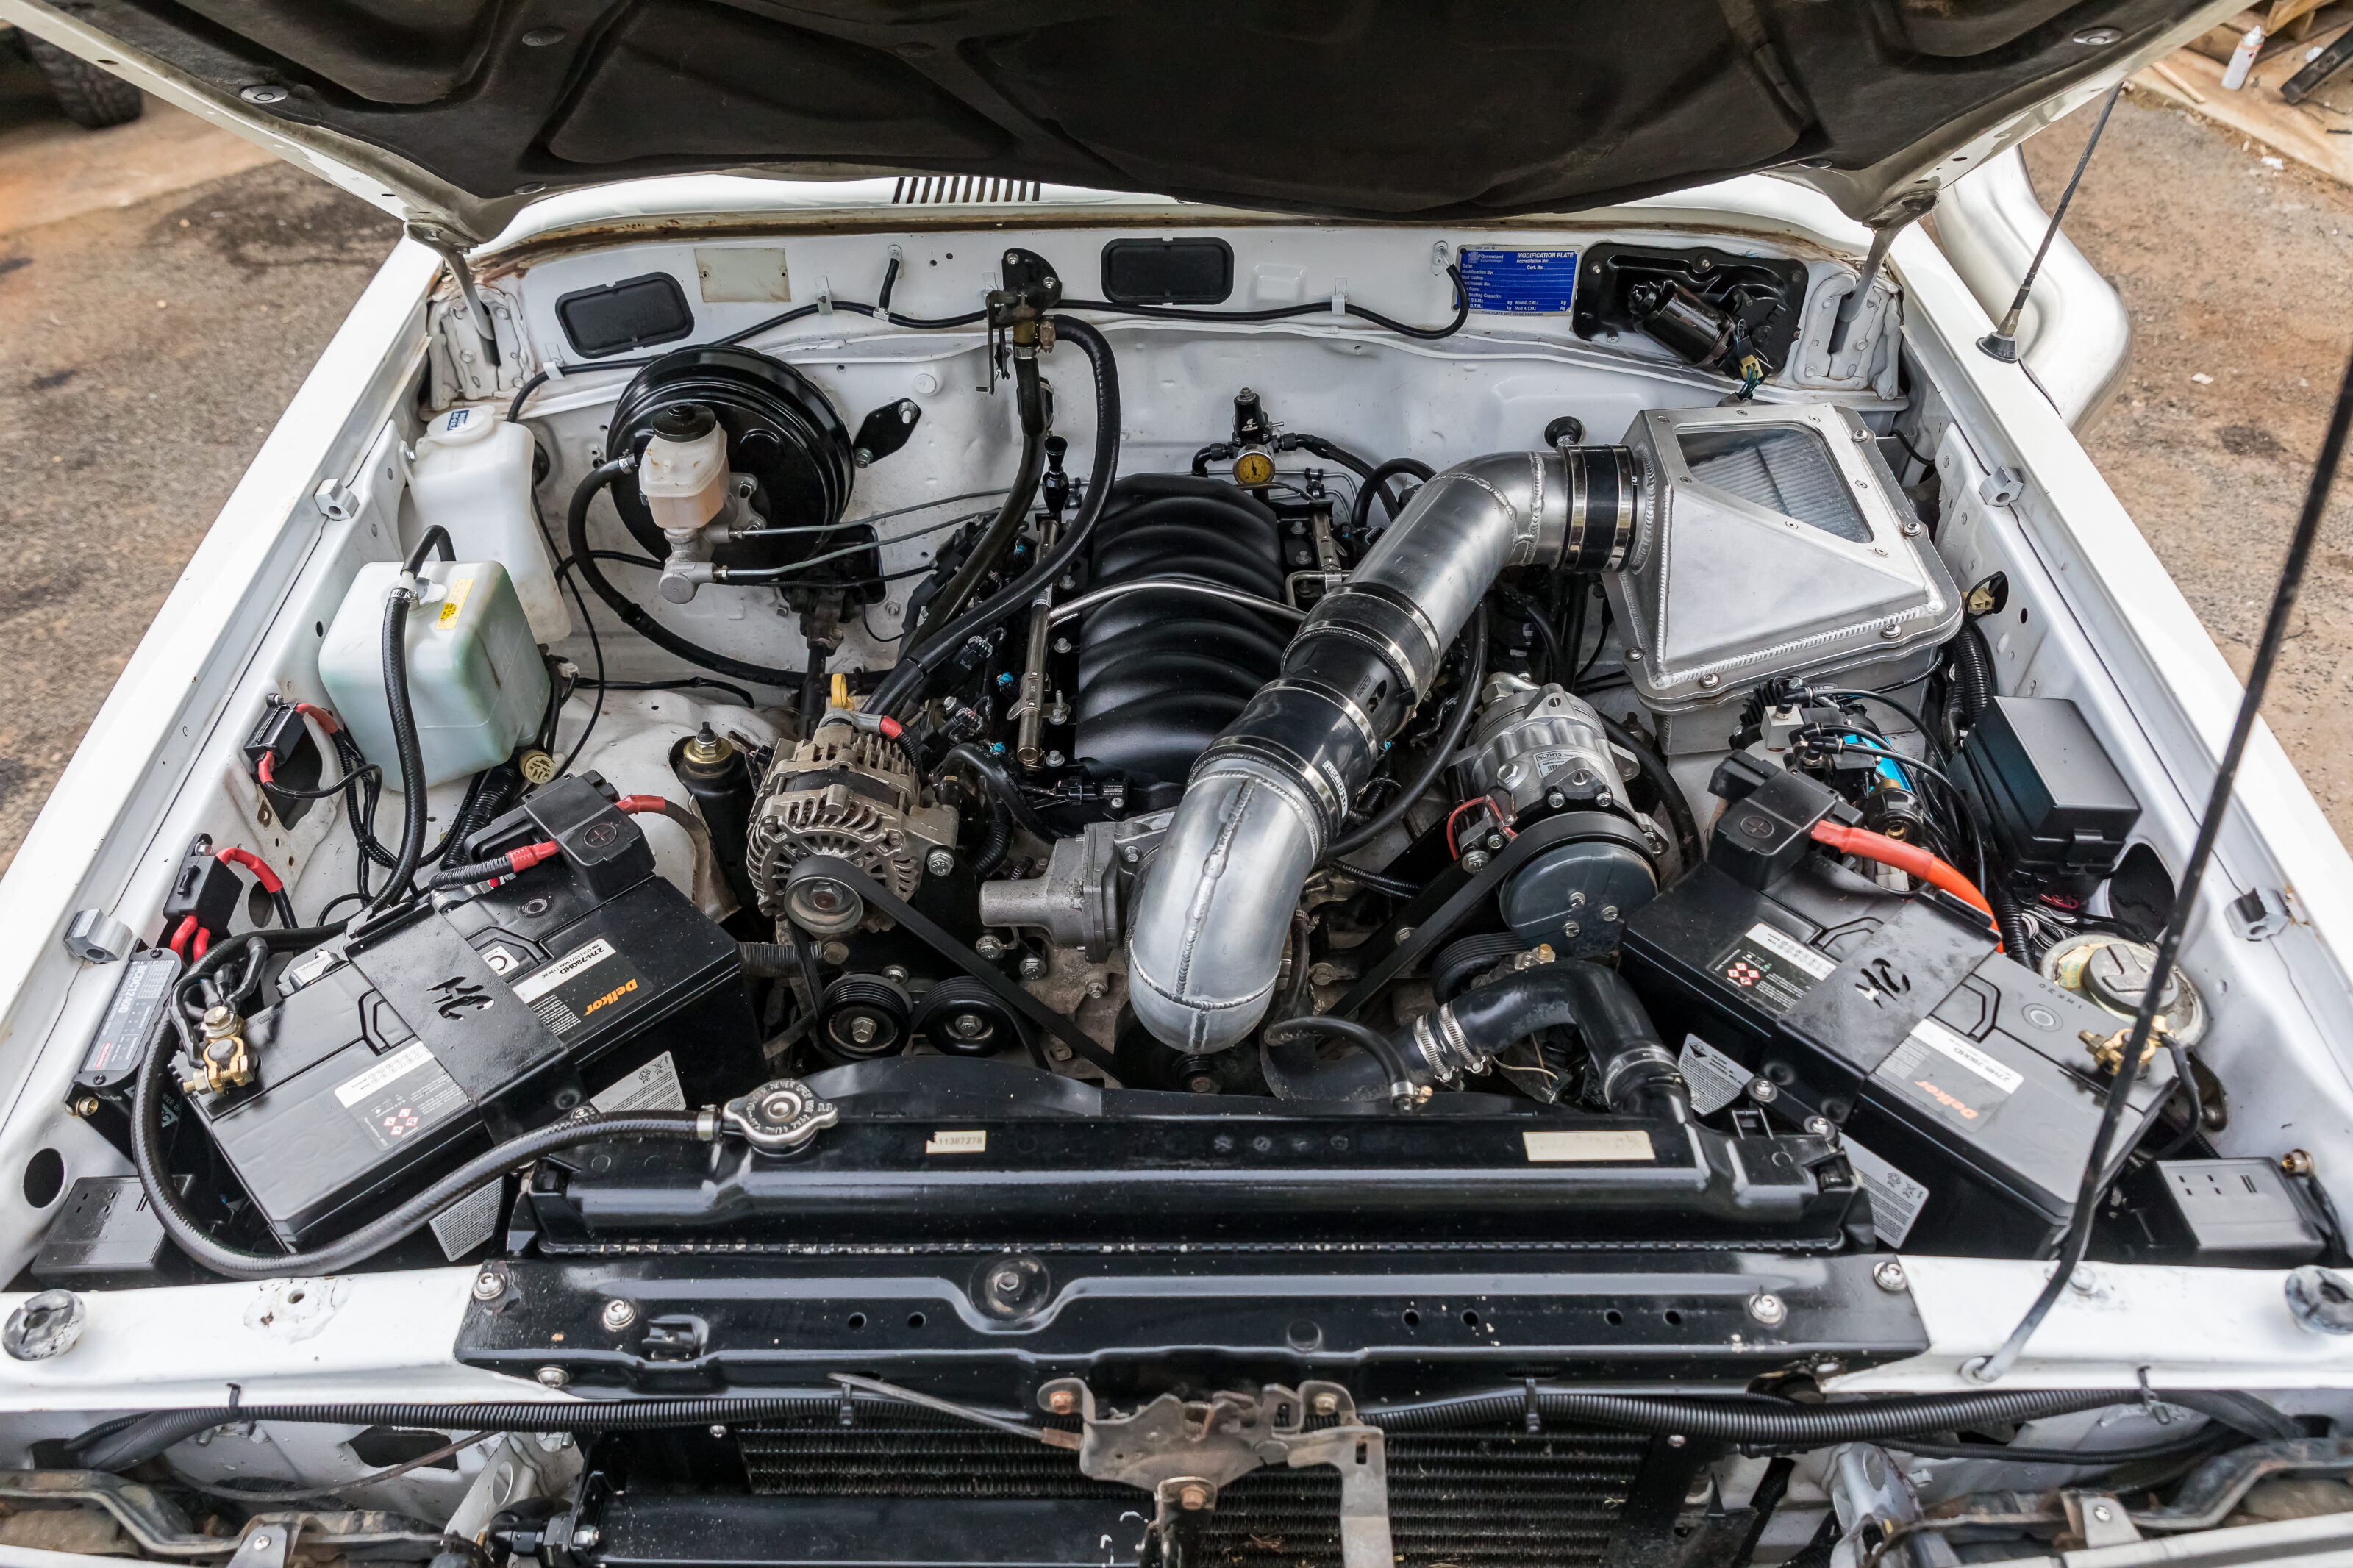
Ensuring all that power gets to the ground, a 6L80E transmission has been given the nod. Featuring six gears, and heavier duty internals over the more common 4L60, it’s a winning combination shoehorned between the V8 and 80 Series transfer case.
There’s a Lokar Tiptronic shifter mated up for precise control when required, or for banging gears when demanded. V8s aren’t exactly known for conservative fuel consumption when you mash the loud pedal, so a custom 150L fuel tank has been fitted up behind the rear axle too.
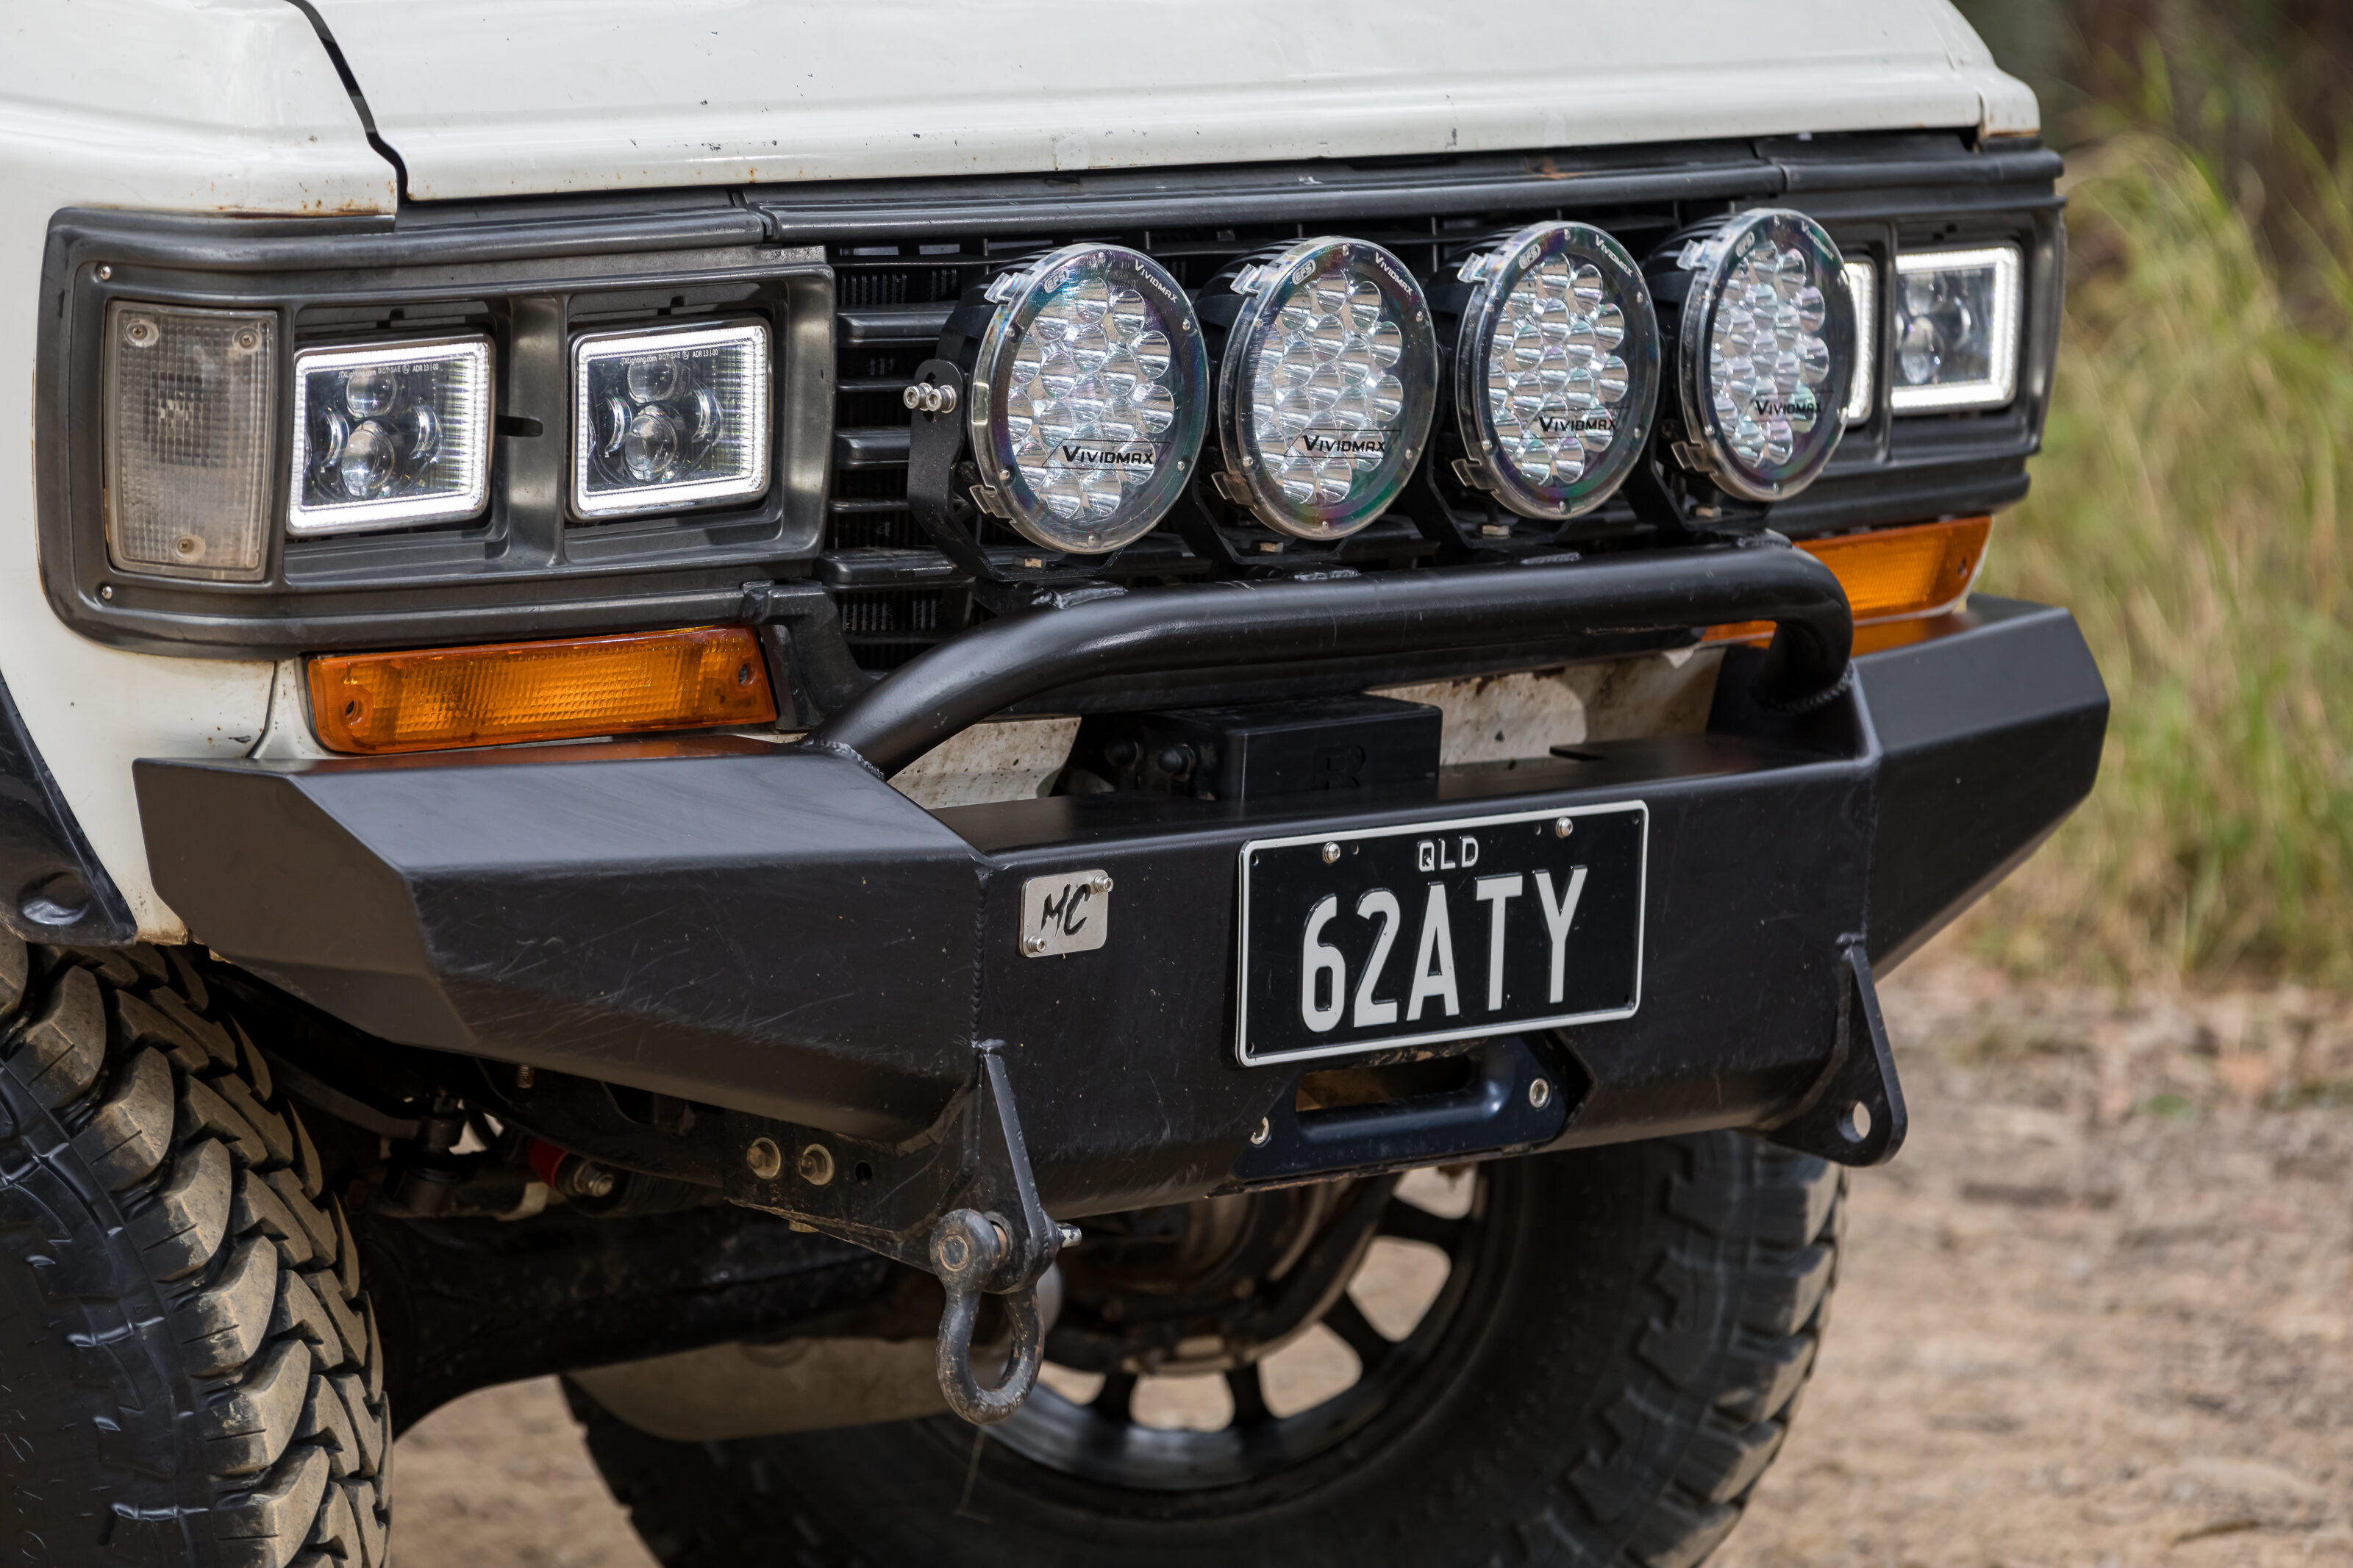
With the 60’s driveline and suspension sorted, it was time to turn attention to the armour package. Up front, McKinnon’s Cruisers pieced together one of its plate steel low-mount winch bars in place of the factory bumper. It plays host to a squad of four Vivid Max LED spotlights from EFS, while JTX LED headlights fill the factory holes.
Moving along the flanks, and FRP flares cover the wheel arches for the increase in wheel track and McKinnon’s Cruisers upswept sliders protect the soft sheet metal rocker panels. A touring styled flat rack up top provides bulk storage solutions and gives the Rhino-Rack 270-degree awning a permanent home.
The rear bar is the real work of art though. Another McKinnon’s Cruisers item, it provides huge protection for the rear end and vulnerable quarter panels. It ties in with a trick tube spare-tyre mount, UHF aerial holder and rear facing LED light bar.
80s vinyl
Swing that driver’s door open with a creak and on the inside you’ll find a simple 80’s interior. The original vinyl seats show every drive of that 670,000km and are all the more cool for it. A sea of brown vinyl covers the floors and doors, and a cheeky Alpine Type R stereo modernising things somewhat.
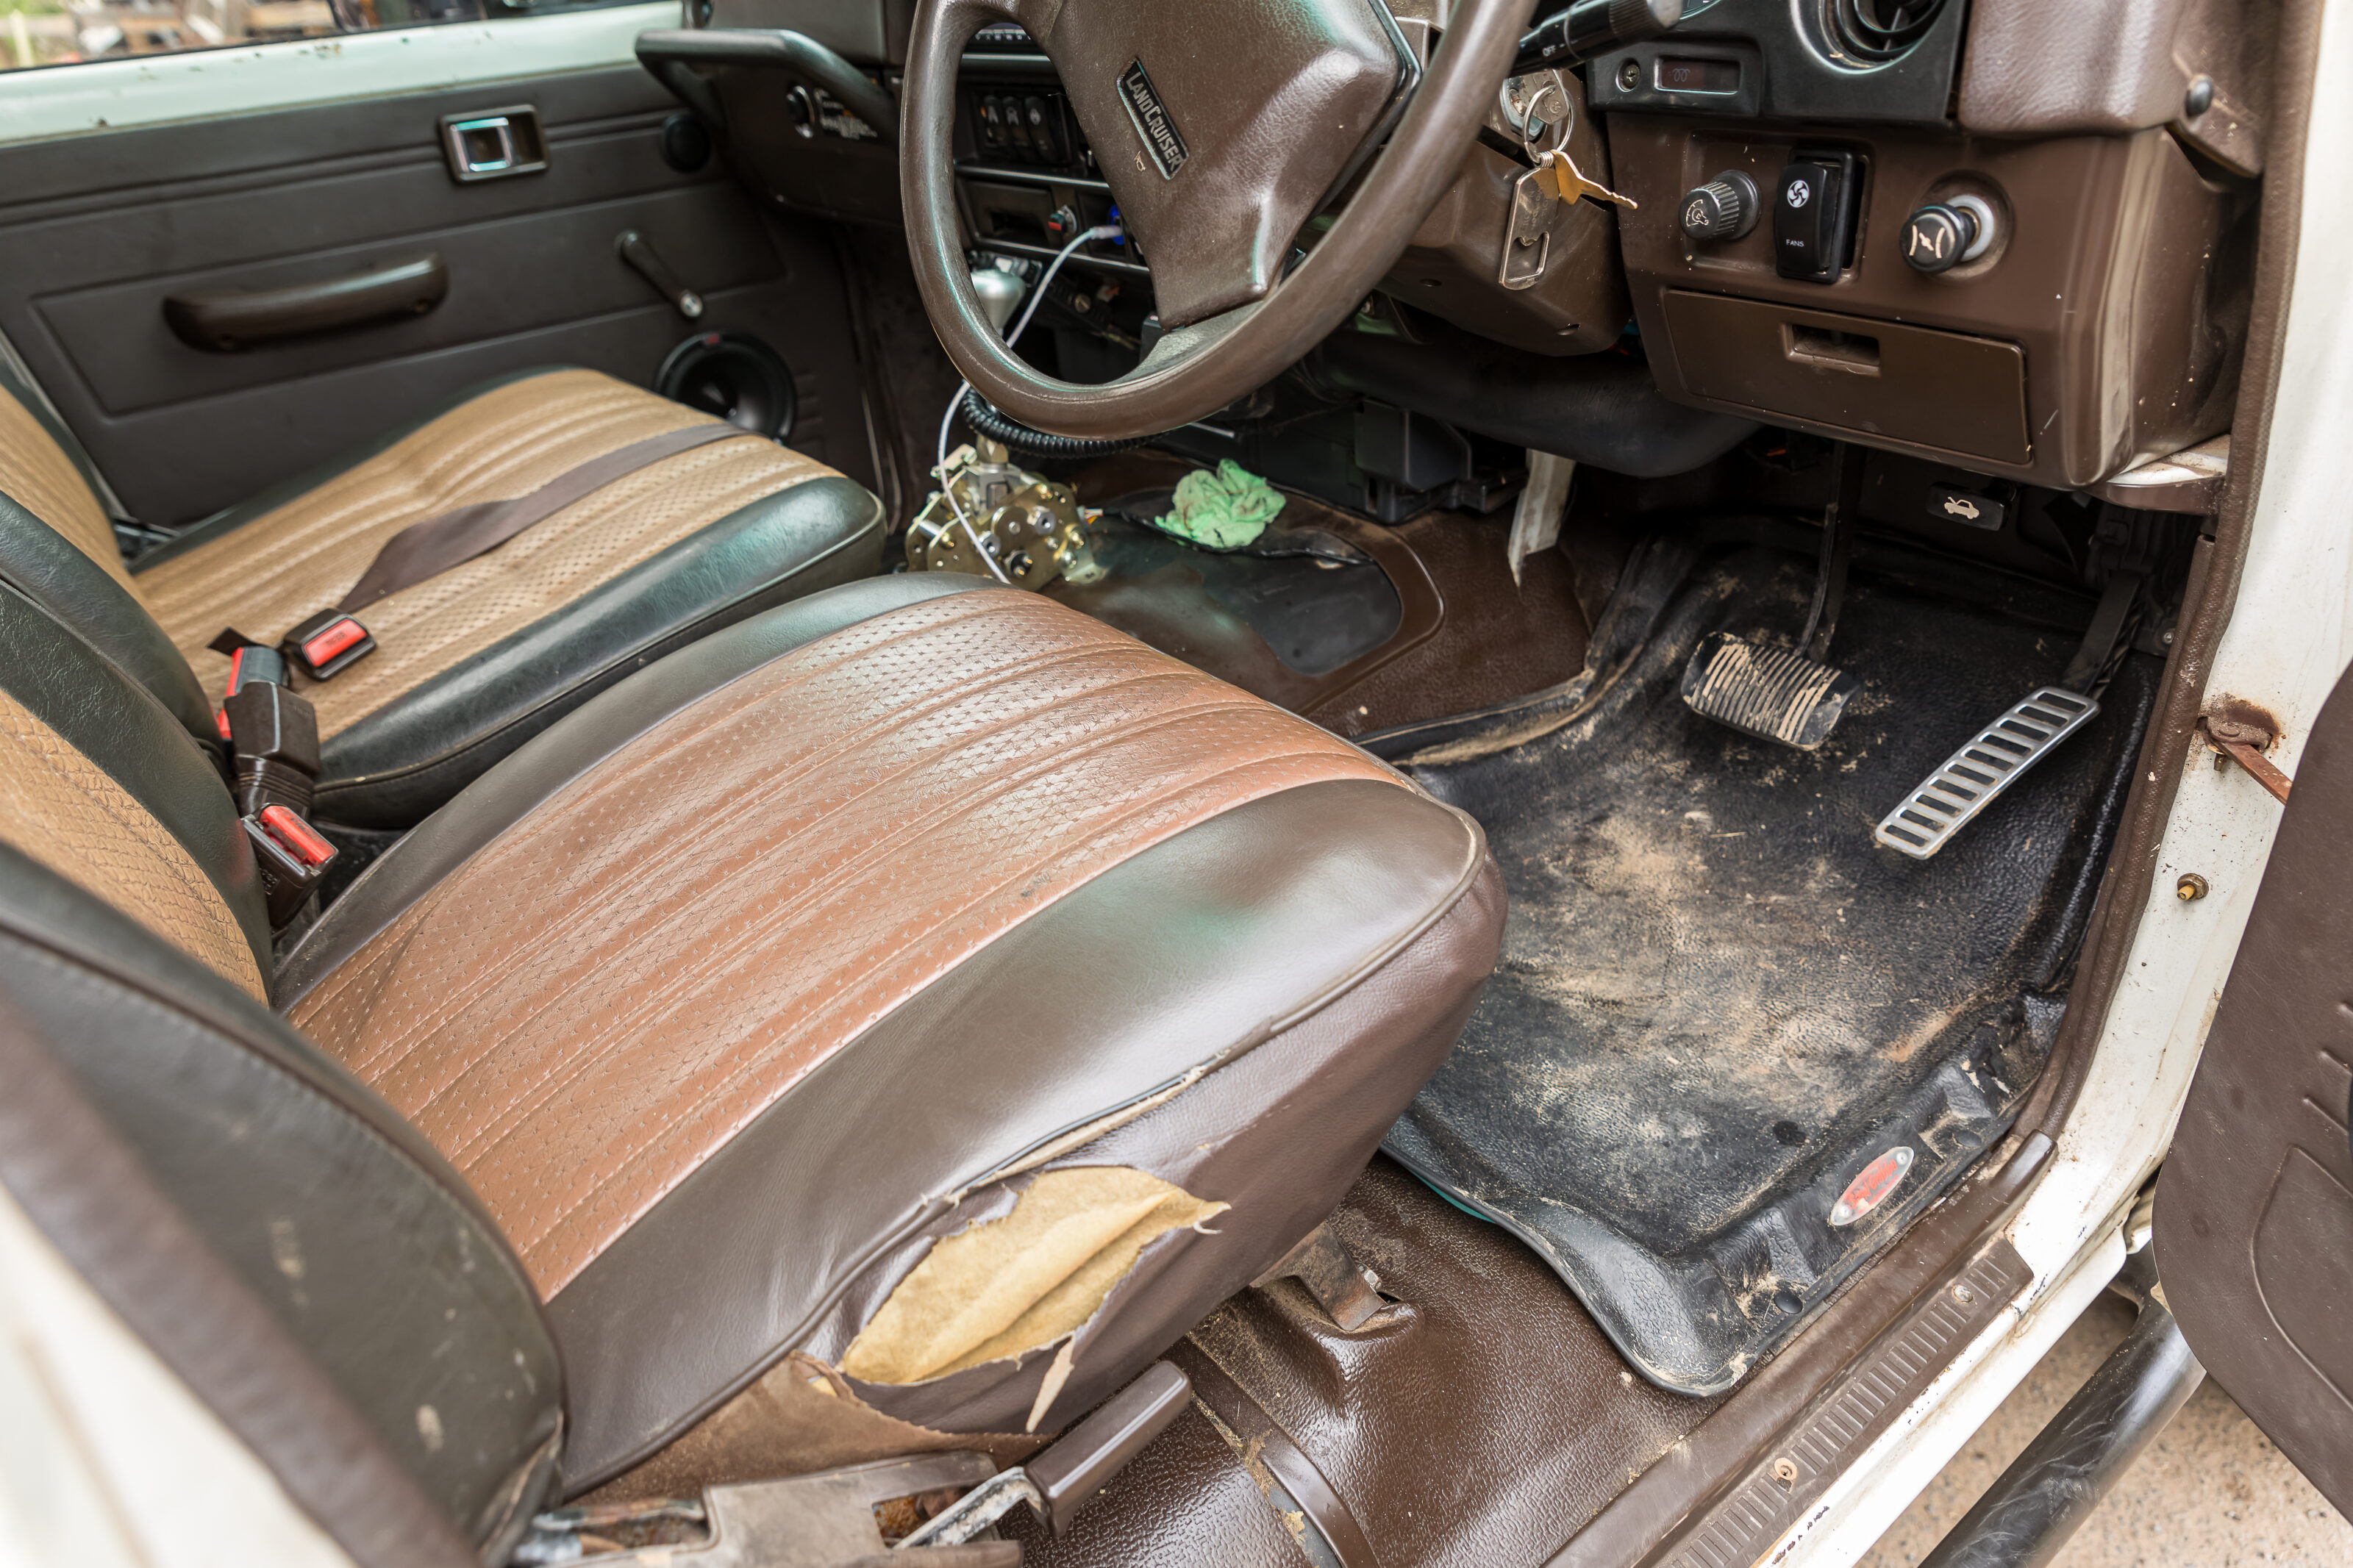
There’s a simple GME UHF and external speaker fitted for reliable comms in convoy, but don’t expect too much technological wizardry there. Even up the back it’s nothing but a simple storage drawer set-up. A metal 60L Engel fridge sitting next to a jerry can of water counting for touring mods.
Verdict
The 60/80 hybrid you’re looking at won’t come cheap. There’s plenty of hard cash in parts, and hard work in custom fab, and that’s what makes it a true standout. It’s not another disposable accessory designed to be replaced. This LandCruiser has spent more than 30 years on the tracks, and with a little hard work it’ll spend another 30 more.
What is castor?
You ever had a shopping trolley with a bung wheel? No matter how hard you fight, it’s near impossible to keep it pointing where you want it. And the reason is something that affects our 4x4s too, especially when you lift them.
You’re probably familiar with the term camber, it’s when the top of a wheel pokes in a different amount to the bottom. When the top is in more, that’s negative camber. When the bottom is in more, that’s positive camber.
Castor works the same way, except it’s the relationship between the top and bottom ball joints in an independent 4×4, or the top and bottom bearings in the swivel hub on a solid axle 44x. Effectively, it’s the imaginary line the wheel pivots on when turning.
When the top bearing or ball joint leans back behind the bottom bearing or ball joint, that’s positive castor. When it’s the opposite, it’s negative castor. By changing this angle you can make your 4×4 lazier, or more fidgety to steer. Much like a bung shopping wheel trolley, when you lift your 4×4 the angles are all thrown out and result in horrible steering.
Castor correction arms correct the angle between those two pivot points to ensure your 4×4 drives how you want it to.
Key Points
- Three different types of suspension kits available
- GVM upgrades will also be offered
- XGS upper control arms also freshly released
It’s been three years in the making, but we can now announce that TJM is about to unleash its new ranges of XGS suspension kits, as well as GVM upgrades to suit a wide range of modern (and some old-school sweethearts) four-wheel drives.
These kits are about to hit the shelves, with the announcement they will available this month (November 2022) in TJM showrooms across the country.
XGS category manager, Justin Hettrick had this to say regarding the new range of XGS Suspensions by TJM Australia. “Since the start of 2019, our top priority as a business has been the expansion and reinvention of XGS. Not once did we move the goalposts or stray from our target of launching this revolutionary suspension range in 2022.”
“Our engineers and designers have worked tirelessly to create this new range of XGS suspension and accessories. With over 40 years in the suspension game, TJM have used this extensive knowledge and testing to deliver a massively improved, cutting-edge range that is packed with groundbreaking technology, market-firsts and premium resources,” he adds.
“And now, with the imminent launch just around the corner, this updated and improved range is about to redefine the entire aftermarket suspension industry.”
Speaking of the range, there are four categories of suspension offered in the XGS line-up. Let’s take a closer look at what makes them tick, and to see which kit would best suit your needs.
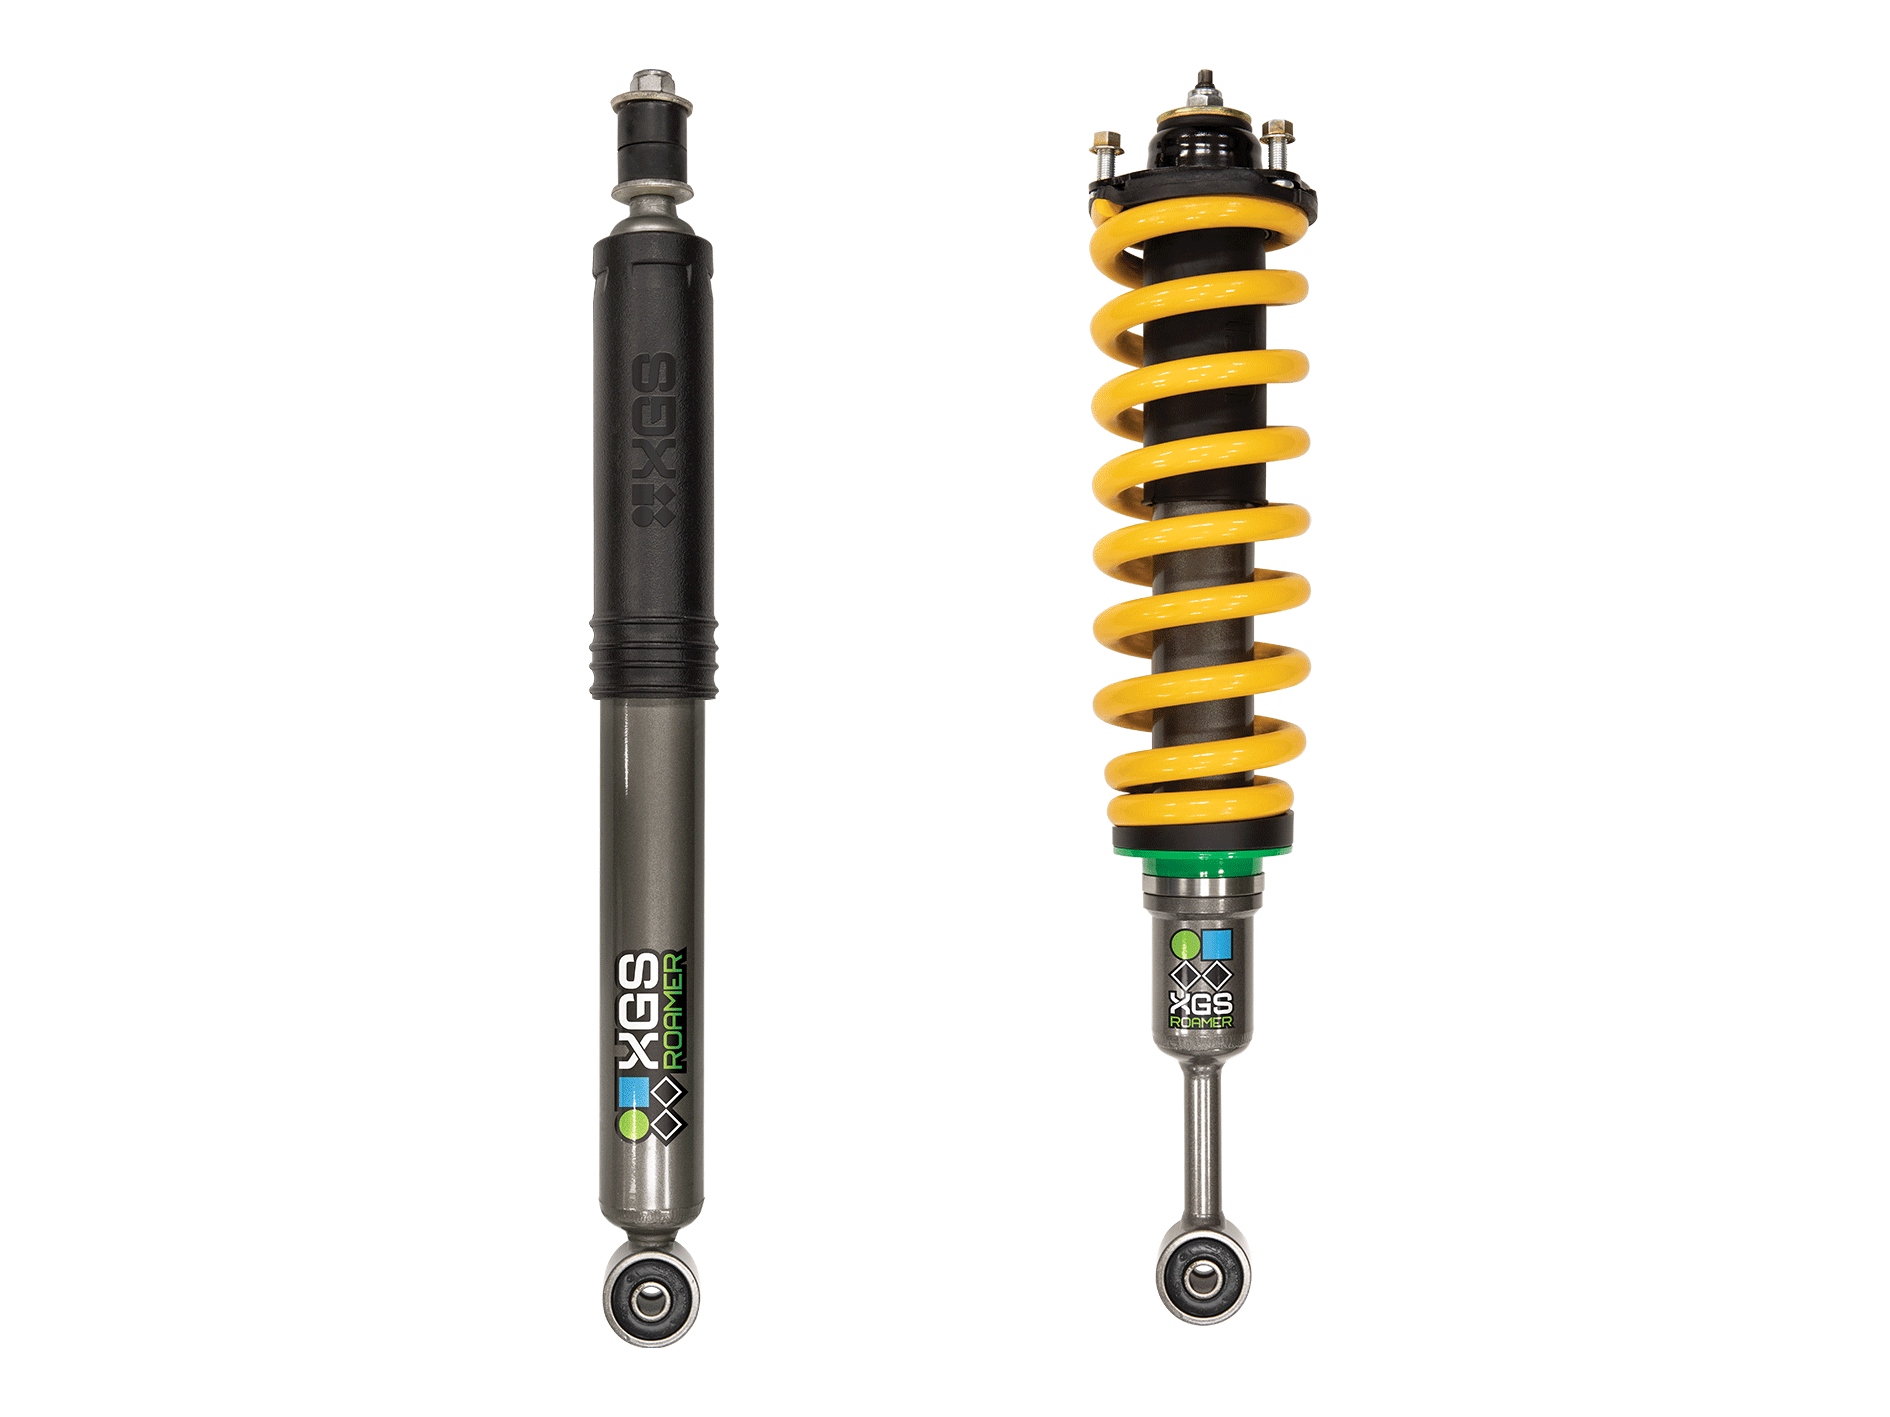
XGS Roamer
The XGS Roamer suspension kits have been designed with ‘the all-rounder’ in mind, think the weekend warrior that uses their 4WD during the week for the daily commute, but wants a strong suspension package for off-roading on the weekends and long-distance touring on holidays.
Comprised of nitrogen twin-tube shock absorbers, with an 18mm hard-chromed piston rod and 40mm piston bore, as well as multi-stage velocity-controlled valving designed to allow these shock absorbers to dynamically adapt to changes in terrain while in use.
| Vehicle | Suspension kit | Priced from |
|---|---|---|
| Ford Everest | Roameru00a0u00a0 | $1554 to $1624 |
| Great Wall V200 | Roamer | $1961 to $2520 |
| Holden Colorado RC | Roamer | $1961 to $2520 |
| Holden Rodeo RA | Roamer | $1961 to $2520 |
| Isuzu D-MAX RC | Roameru00a0 | $1961 to $2520 |
| Nissan Navarau00a0 | Roameru00a0 | $2188 to $3188 |
| Nissan Pathfinder R51 | Roamer | $1710 to $1780 |
| Nissan Pathfinder R52 | Roamer | $1710 to $1780 |
| Toyota LC300u00a0 | Roamer | $1822 |
| Toyota LC60 | Roamer | $3343 |
| Volkswagen Amaroku00a0 | Roamer | $2532 to $2692 |
*Please Note: Pricing is Supply only. Fitting and wheel alignment extra, please consult your closest XGS distributor for pricing
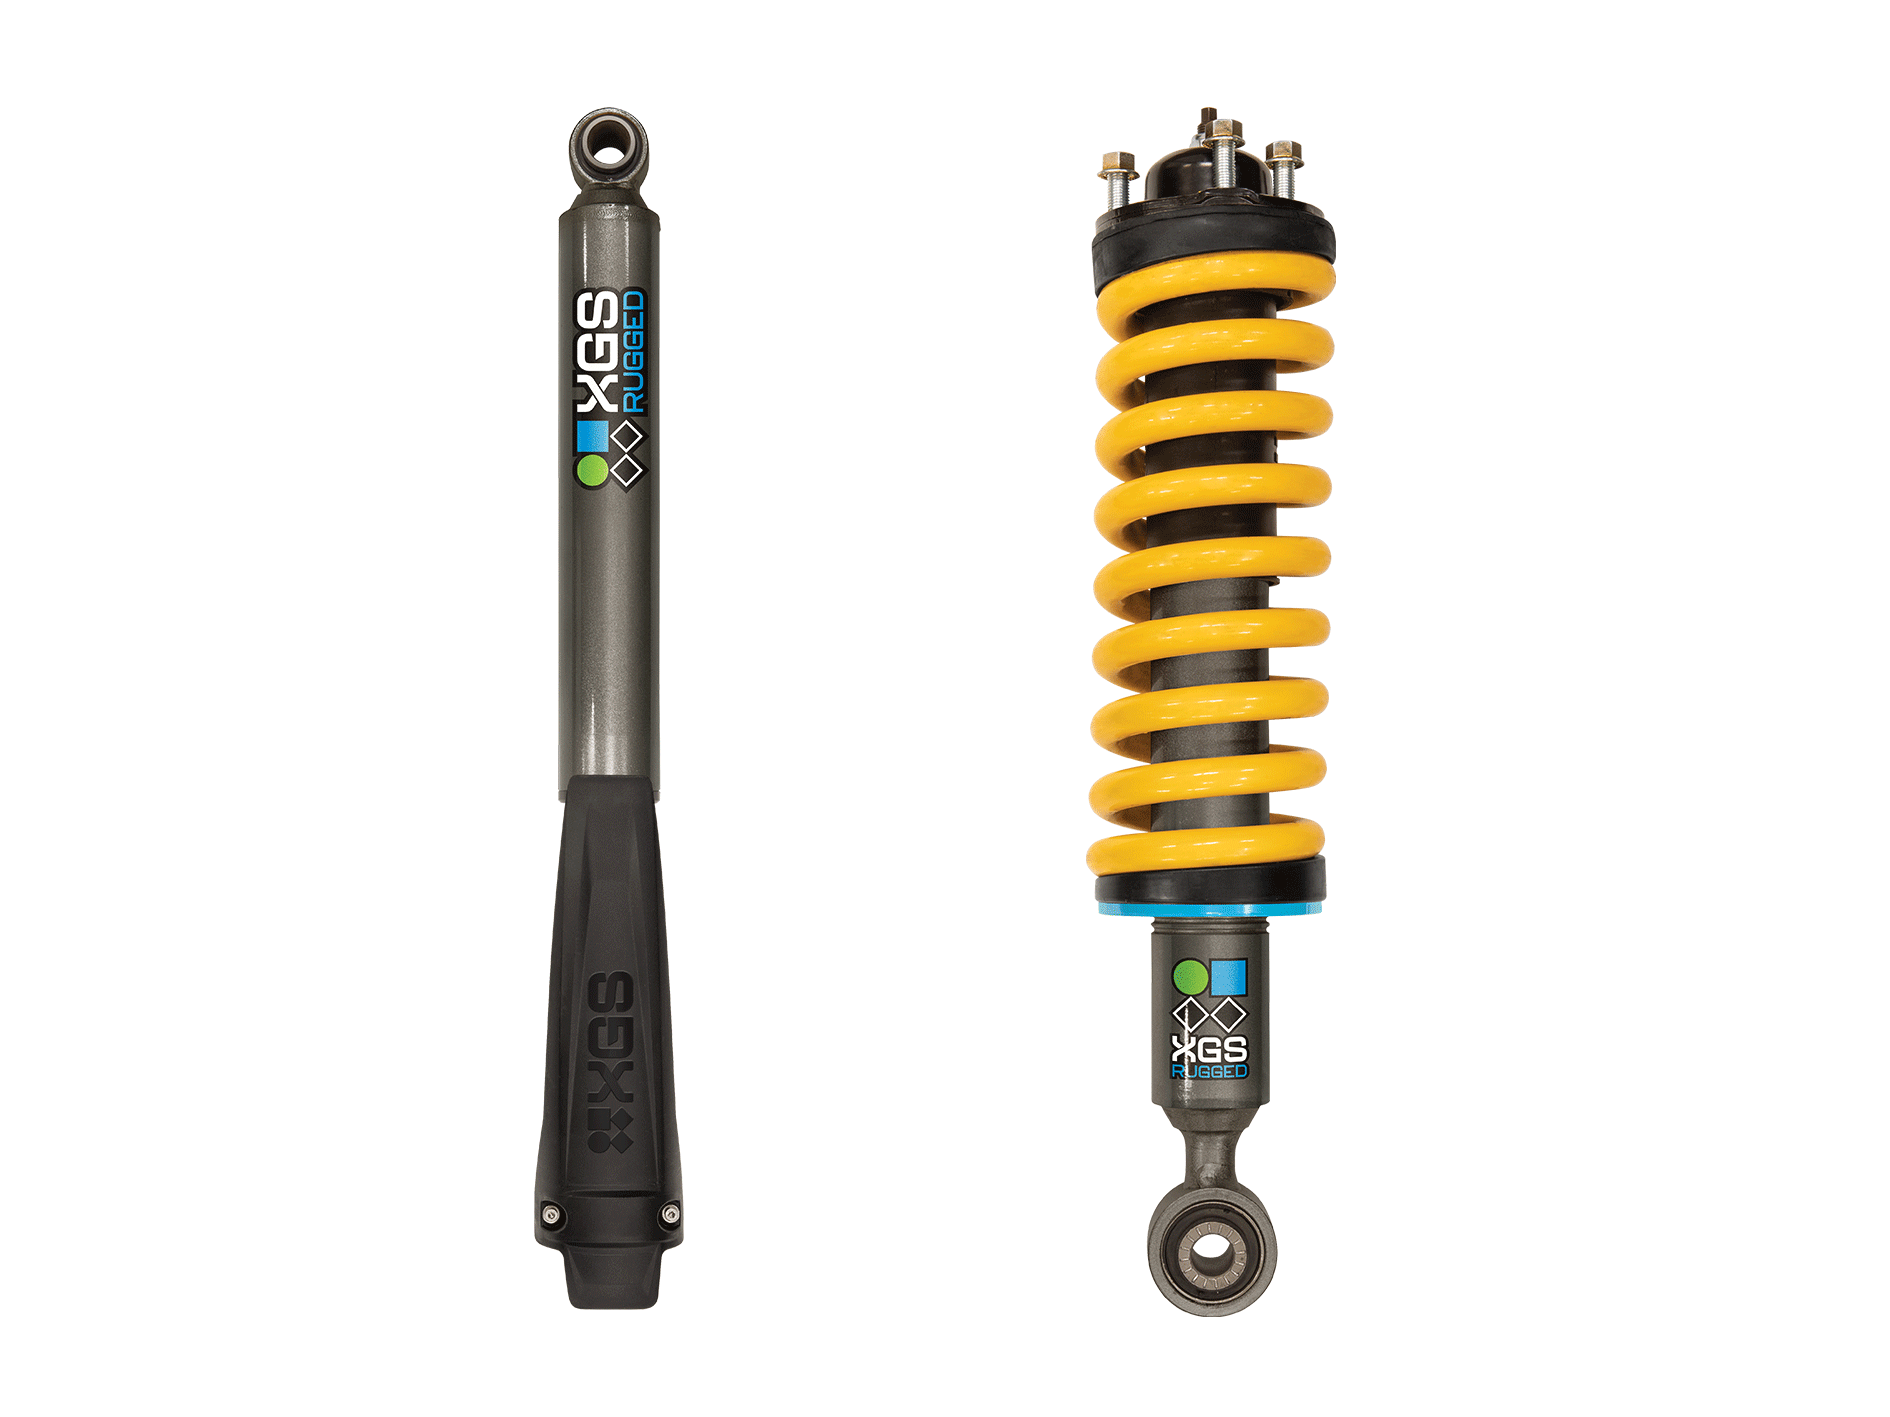
XGS Rugged
Taking things up a level, is the XGS Rugged with the heart of this kit being a mono-tube construction shock absorber which TJM tells us delivers a superior high-end ride quality as well as virtually eliminating shock fade over harsh corrugations. This shock absorber features a massive 52mm piston bore, adjustable front struts as well as multi-stage velocity-controlled valving which helps when hauling heavy loads on-and-off road.
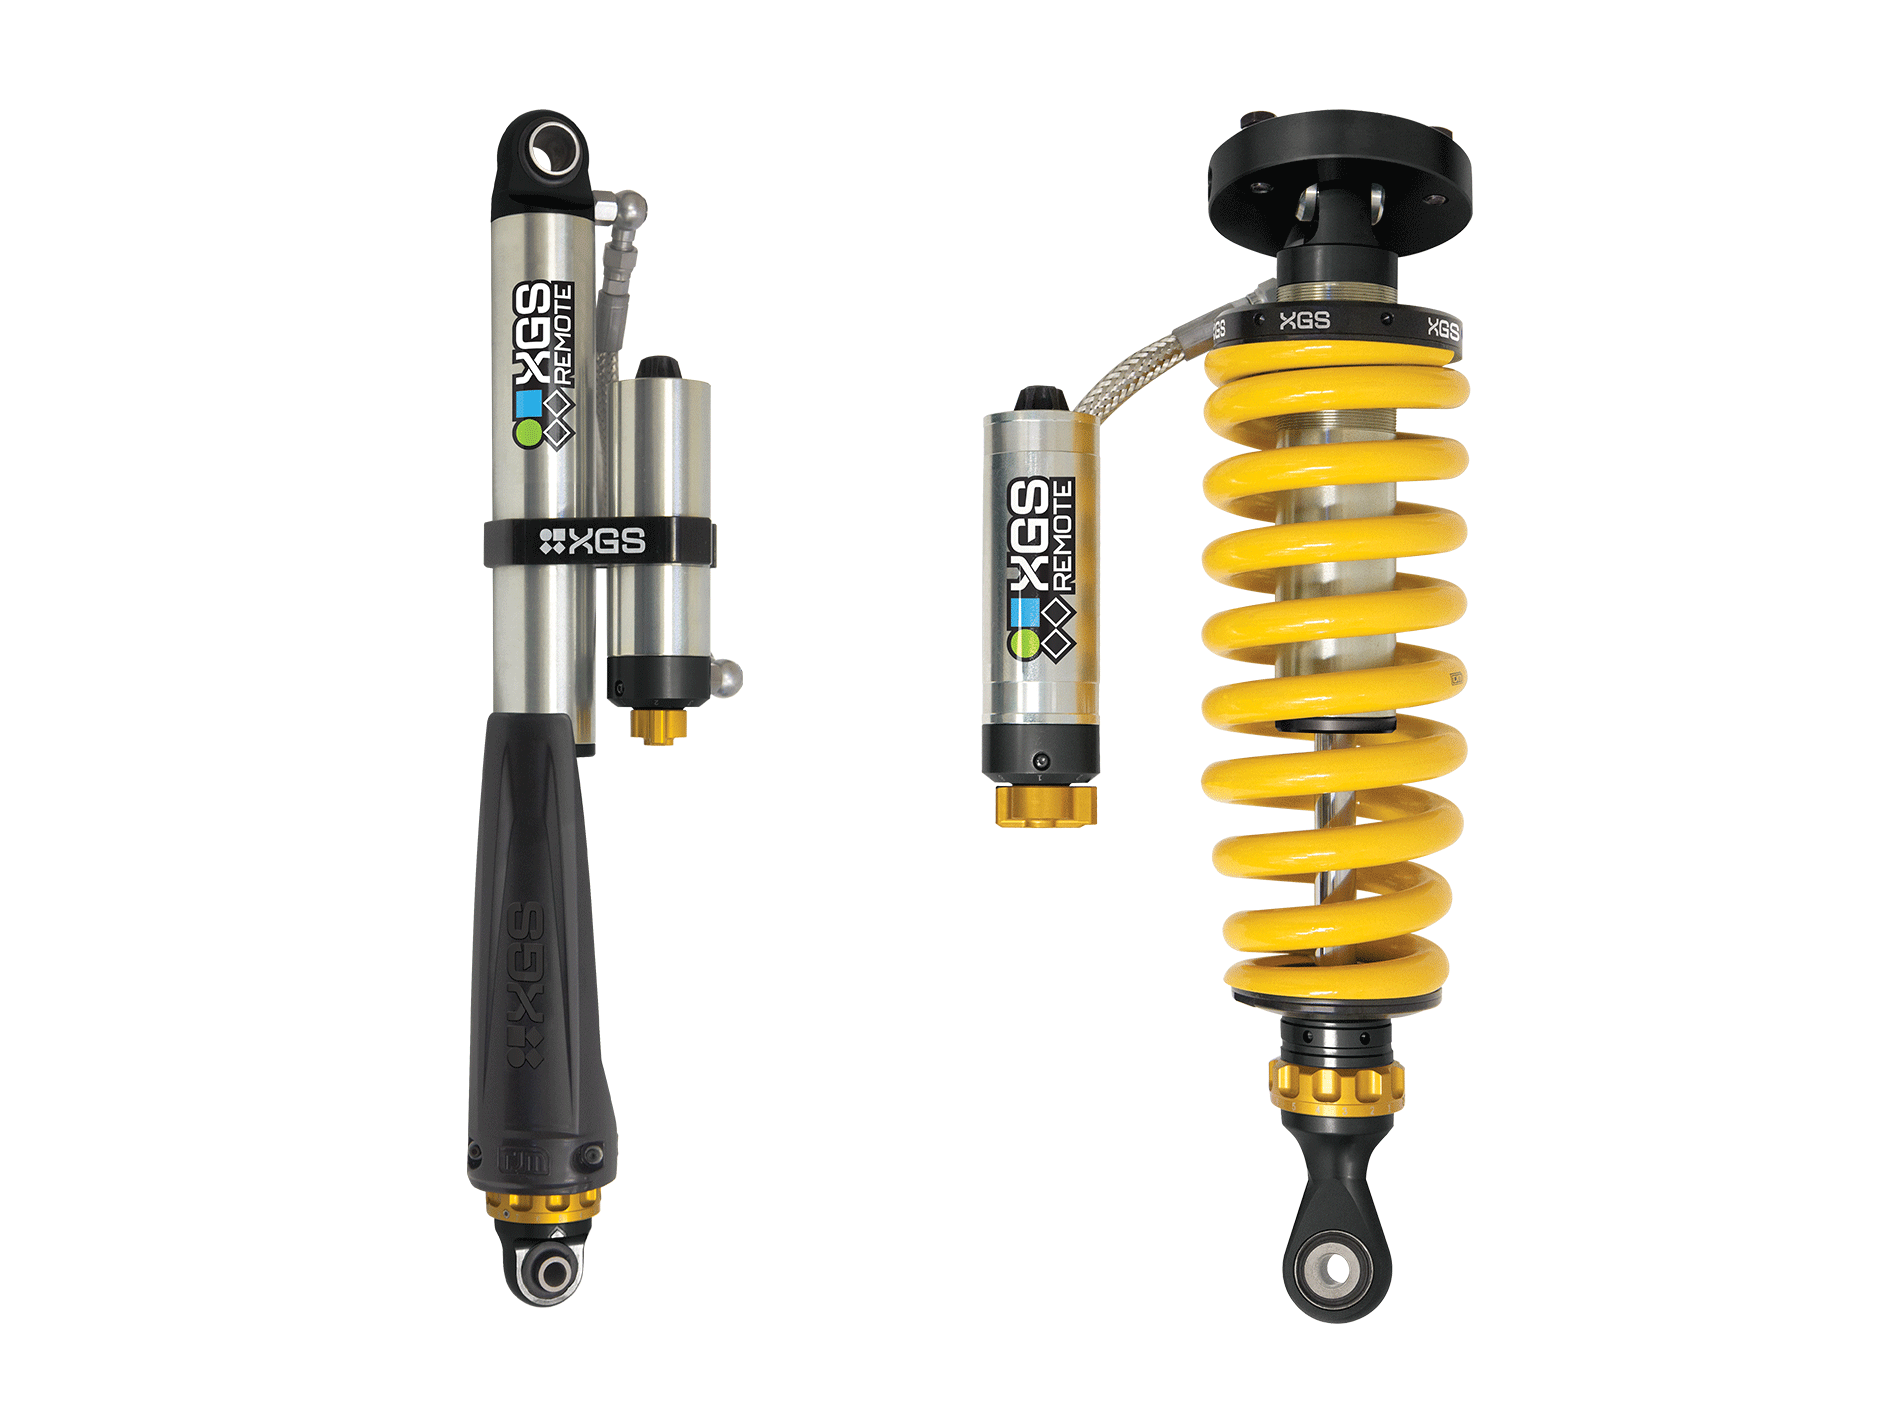
XGS Remote
The top-of-the-line new release from the new XGS range, is the XGS Remote which TJM tells us is packed full of ground-breaking technology and premium materials. It features the same 52mm piston as found in the XGS Rugged range, but takes things to the next level with the introduction of a remote reservoir doubling the oil-carrying capacity of the shock absorber. More oil in a shock absorber means better shock damping potential as well as shock absorber durability.
Every XGS Remote shock absorber also features a patented inbuilt hydraulic bump-stop, providing a progressive feel when compressing the shock absorber at high speeds, resulting in a much better ride when fully loaded and driving over corrugations or bumps at speed.
The final piece of the puzzle for the XGS Remote range, is the fact this shock absorber is fully adjustable and features 8-stage compression and rebound damping dials to customise the ride quality you need to suit your vehicle and the terrain you drive. This allows you to set not only how fast your suspension compresses but also the extension rate of the shock absorber after compression. Adjustment is as easy as turning a dial, so you can really play with this system to find a setting that best works for your need and the loads you are carrying.
| Vehicle | Suspension kit | Priced from |
|---|---|---|
| Isuzu D-MAX RG | Remote | $5057 to $5217 |
| Mazda BT-50 TF | Remote | $5057 to $5217 |
| Toyota LC300u00a0 | Remoteu00a0 | $4153u00a0 |
| Toyota LC76u00a0 | Remote | $4923 to $5123 |
| Toyota LC78 Troopy | Remoteu00a0 | $4714 to $4873u00a0 |
| Toyota LC79 Cab Chassisu00a0 | Remote | $4753 to $4873u00a0 |
*Please Note: Pricing is Supply only. Fitting and wheel alignment extra, please consult your closest XGS distributor for pricing
XGS GVM Plus
As well as offering three different ranges of suspension lift kits, XGS is also offering GVM upgrades under the XGS GVM Plus banner. XGS GVM Plus kits have been engineered to increase the legal load-carrying capacity of your 4WD, while still offering enhanced ride quality on-and off road. XGS GVM Plus kits will come complete with all required components, such as leaf springs, XGS coil springs made from X5K spring steel, and all bushings and accessories required for a complete installation.
XGS Upper Control Arms
In the interest of offering a complete suspension package, XGS has also announced the release of its own upper control arms. These arms have been designed to solve wheel alignment issues after raising a vehicle by providing up to three-degrees of additional castor and camber, so you can really dial in correct suspension geometry when having the vehicle wheel aligned after the lift kit is installed.
The XGS upper control arms have been built using the latest in 3D CAD (computer aided design) techniques, with the aim of occupying the same or as similar as possible footprint as the standard OE upper control arm originally found in your vehicle, with the added benefit of correct geometry and ball joint location to work best with the XGS lift kits. TJM tells us its XGS upper control arm design prevents against the rim fitted to the vehicle rubbing on the arm, as they have been designed to offer as much clearance as possible and tested with a wide range of aftermarket wheels to prove this point.

Kits and Pricing
Pricing is to be used as a guide only, however, all prices supplied were correct at the time of publication. Pricing is supply only, installation of these suspension parts does not include fitting or a wheel alignment.
More Information
If you would like to take a closer look at the new range of XGS Suspension from TJM, be sure to check out its new website dedicated to the range.
Website: https://xgs.com.au
Our December 2022 magazine is out now!
Stealing the show is Melbourne-based On Track 4×4’s stunning 6×6 Patrol build. Fettled together to showcase On Track’s impressive skill set, the 6×6 Patrol is an off-road powerhouse packed with quality mods including a massaged V8 that sends 350kW to the wheels.
McKinnon’s Cruisers in South-East Queensland has modified a vehicle that’s just as drool-worthy. This 1988 HJ60 LandCruiser has received an LC80 upgrade and a V8 transplant, making it a show-stopping veteran on the tracks!
On the new 4×4 front, Matt road-tested a Land Rover Defender 90 D250 S, to find out whether the Defender is just style over substance. Kitted up, our three-door test car was priced at more than $100K, but is it any good when tarmac turns to dirt?
We also toured the largest sand island in Australia, K’gari (Fraser Island), in a Mazda BT-50 Thunder. The beauty of the island is that it’s easy to reach and it can be explored in a bone-stock 4×4, which is exactly what we did.
The rear vision of our MU-X build has been substantially improved, with a set of MSA 4×4 towing mirrors installed. These cleverly designed mirrors are a quality piece of kit, and they not only improve vision because of their bigger size, but the quality of the reflection is exceptional.
We then attached OZTrail’s all-new Birdsville 1400 hybrid rooftop tent atop the MU-X. The tent is relatively easy to set-up and pack-down, it’s made using high-quality and durable materials, and it’s a cosy abode for a good night’s sleep. Full review in this issue.
In this month’s ‘How to 4×4’ instalment, Deano explains how to safely negotiate water crossings, so that you make it to the other side in one piece.
What else is there?
- GVM upgrades, and whether you need one
- The dangers of spinifex
- Touring the Buntine Highway
- 2022 4×4 Christmas Gift Guide
- New products, opinions, and long-term reviews
We’ve assembled six custom 4x4s sent in by our loyal readers. If you want to see your four-wheel drive in the next issue of 4X4 Australia magazine, send us a photo via our Facebook page or email us at: [email protected]
1993 Ford Maverick
I just wanted to show you my 4WD and everything which has been done to it. I hope it encourages other women to get into 4x4s. Everything on this car has been done by myself, with the help of my dad!
Modifications include a rebuilt TD42 with UFI 16g turbo; 11mm boost comp injector pump; rear quarter chop; Patroldocta bullbar; custom rear bar; lithium battery and DCDC set-up; fridge slide with 75-litre ARB fridge and fridge cage; barn door table; on-board air compressor; two-inch Superior lift kit; long-range fuel tank; lights on roof rack; Bushwakka awning; custom dash fascia; and black-painted interior. My Instagram is @hugh_thefakegq – Delenn Sheppard
Nissan GU Patrol
It’s fitted with all of the usual stuff: twin lockers, GU diffs, gears, HD everything, and a Holden 355 stroker in front of a built RE4. It’s wrapped in custom bar work, body work and paint. The rear has been set up for camping. I have done heaps of travel around Victoria and interstate over the years. – Darryl Kimmoe
1989 Suzuki Sierra
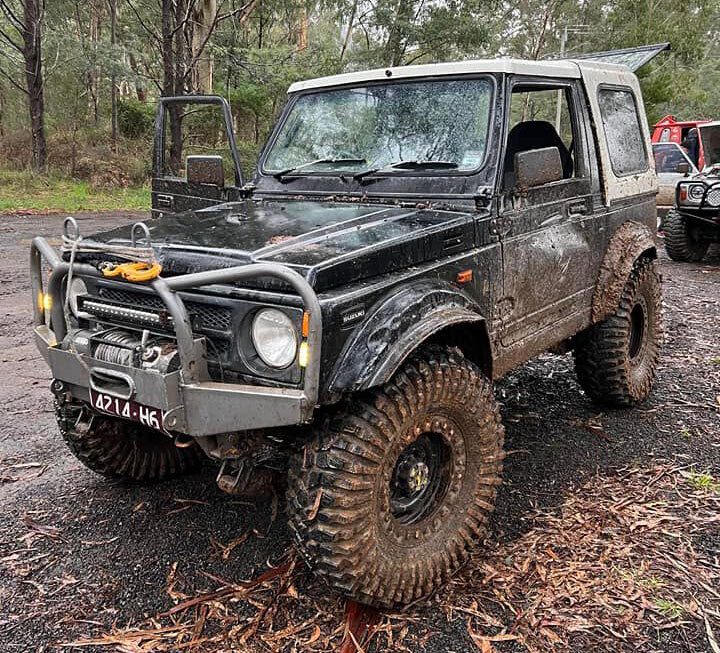
It’s a 1989 short wheelbase SJ70 with a 1.6 EFI from a Suzuki Baleno. It has reduction gears, twin lockers, 32-inch Maxxis Roxzillas, 24-volt Runva winch, roll cage, and home-made front and rear bars. I love Ellis Track in Gladysdale. Any creek driving around Gippsland in Victoria is great too. – Tyler Hunt
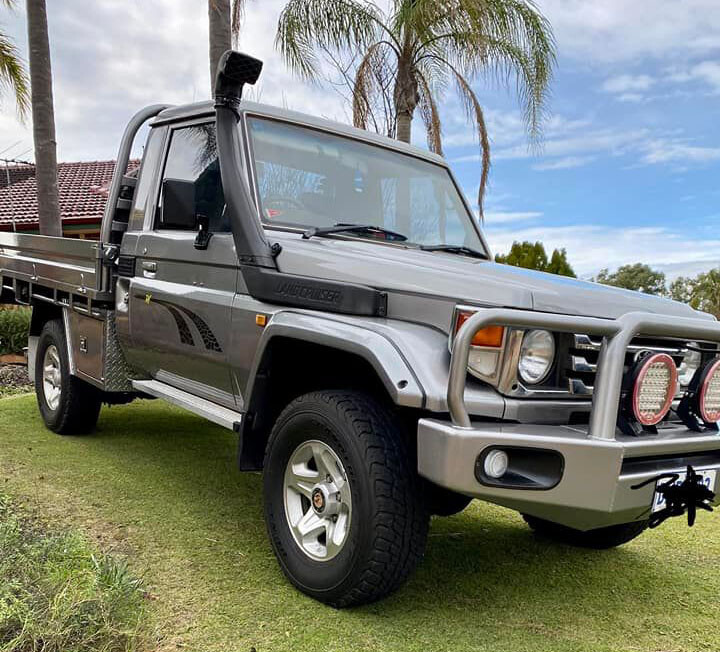
2002 Toyota LandCruiser HDJ79R
My beloved Cruiser started life in the Pilbara on a station, and after a few years she moved to the coast in the north-west of WA. I took her over about three years ago when she moved to Perth. After many years in the harsh Pilbara sun, I gave her a fresh coat of paint, new bullbar, a three-inch stainless-steel exhaust, and a three-inch lift. She now lives under cover, with the occasional caravan and beach trip. It has done 313,000km and the FTE engine hasn’t been touched. – Mark Pelling
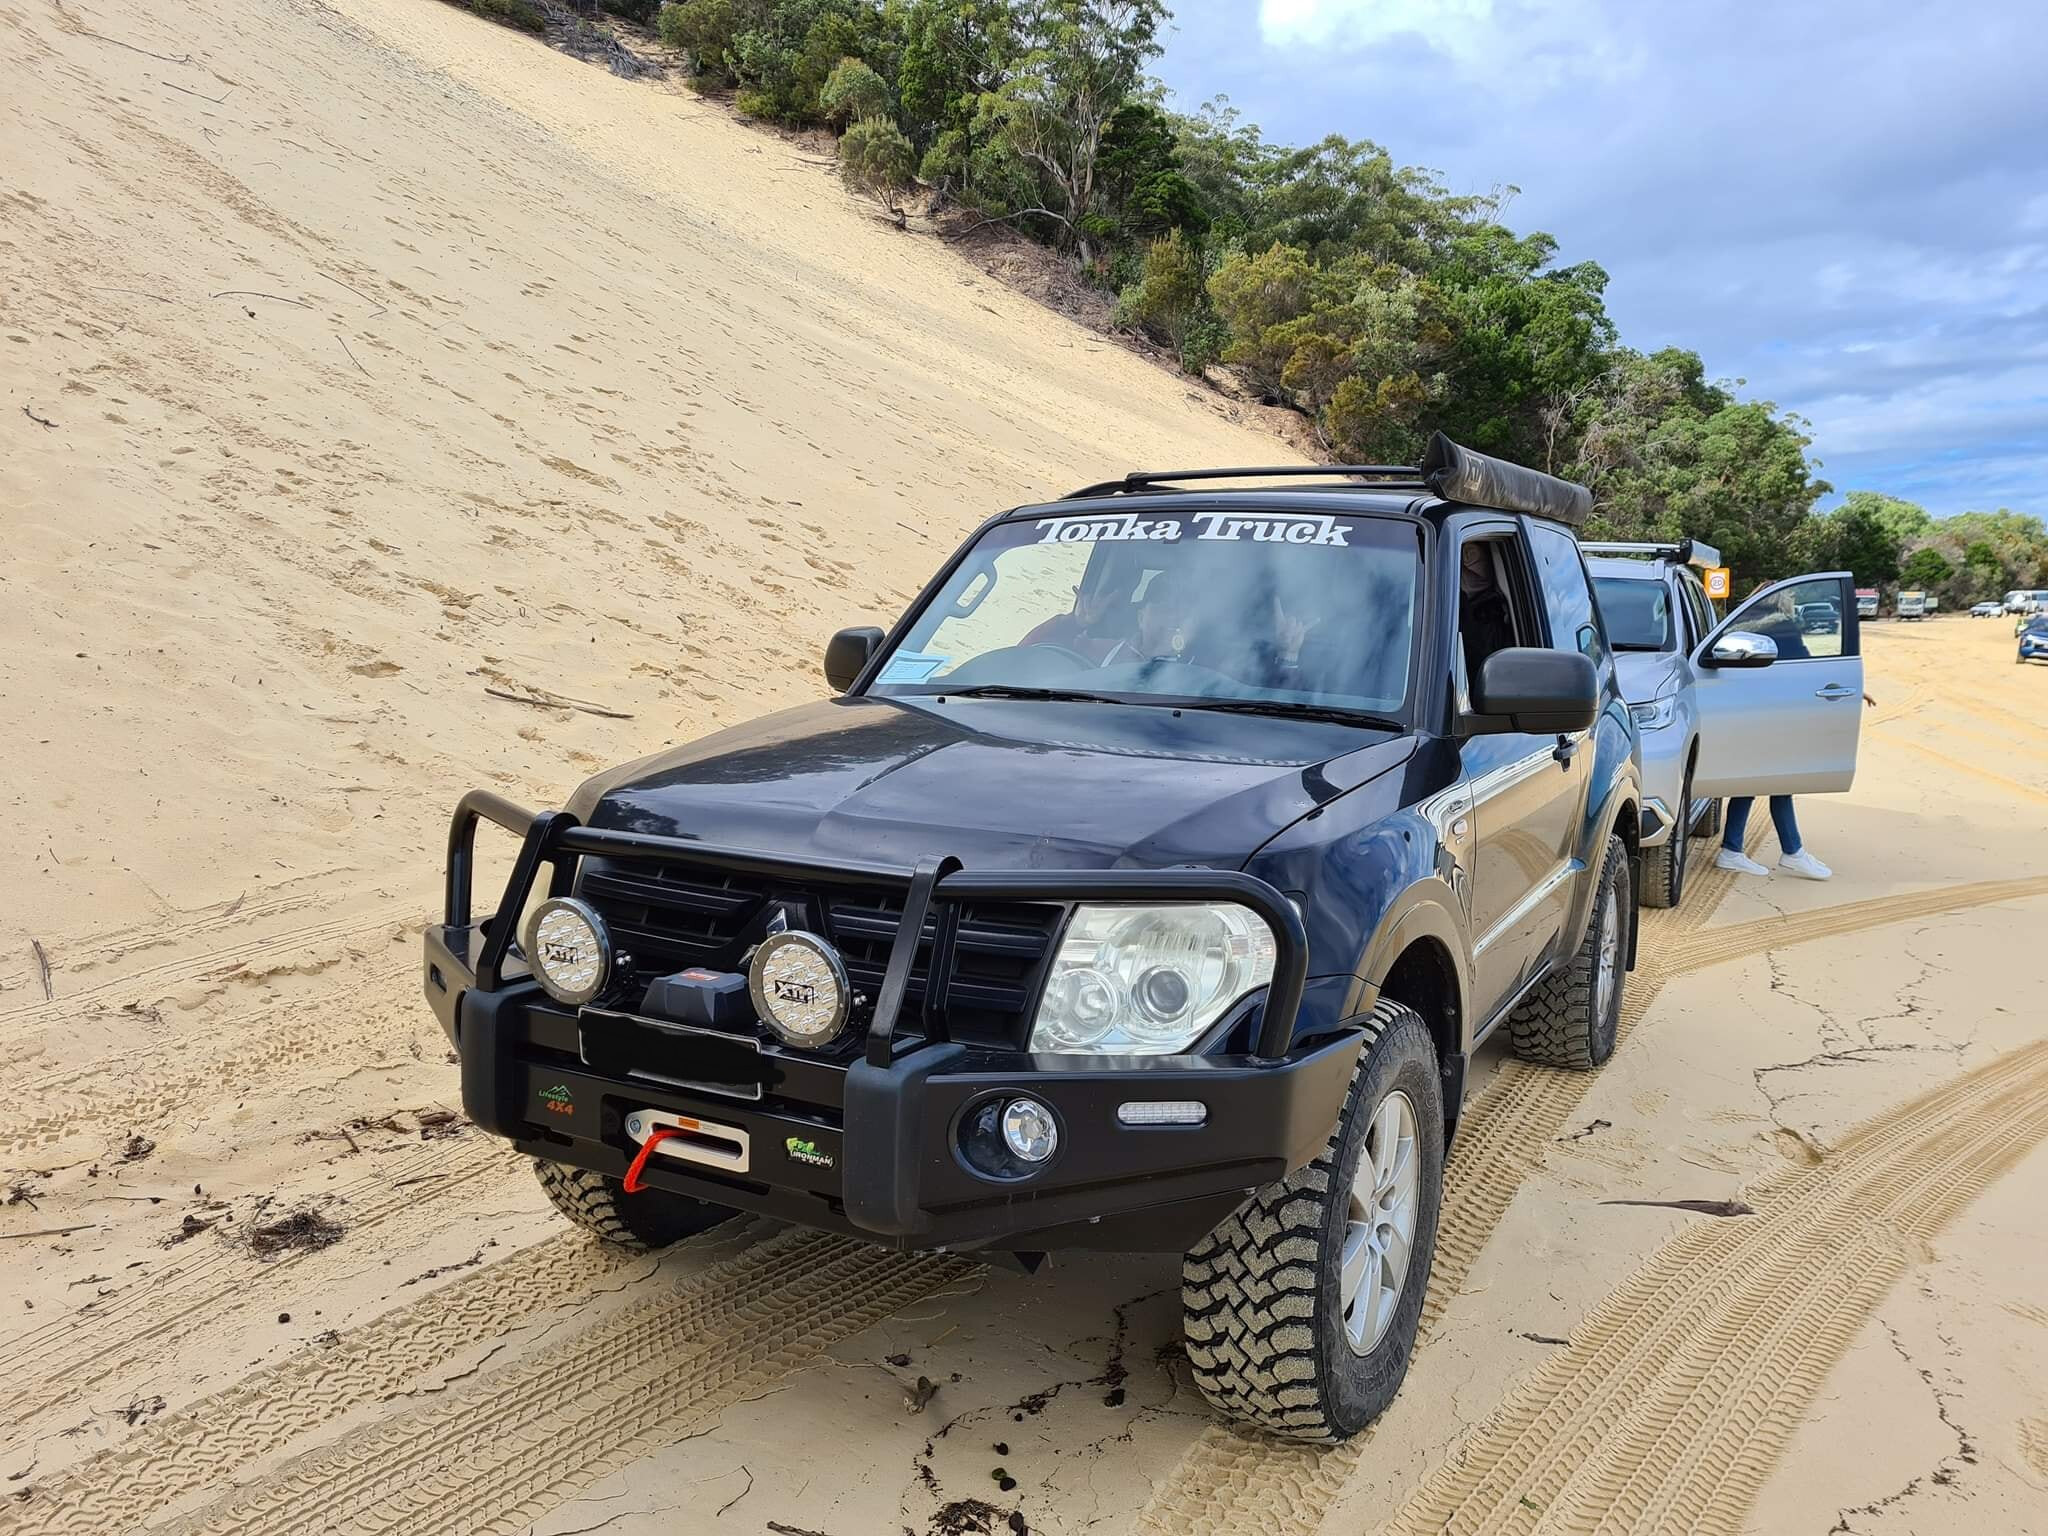
2008 Mitsubishi Pajero
The Paj is running Hankook mud-terrains; Ironman suspension lift; Ironman Deluxe bullbar; Ironman underbody protection; XTM seven-inch driving lights; XTM winch; XTM recovery hitch; XTM 2.5m awning; and Rola aero roof bars. – Shaun Young
2007 Jeep JK Wrangler
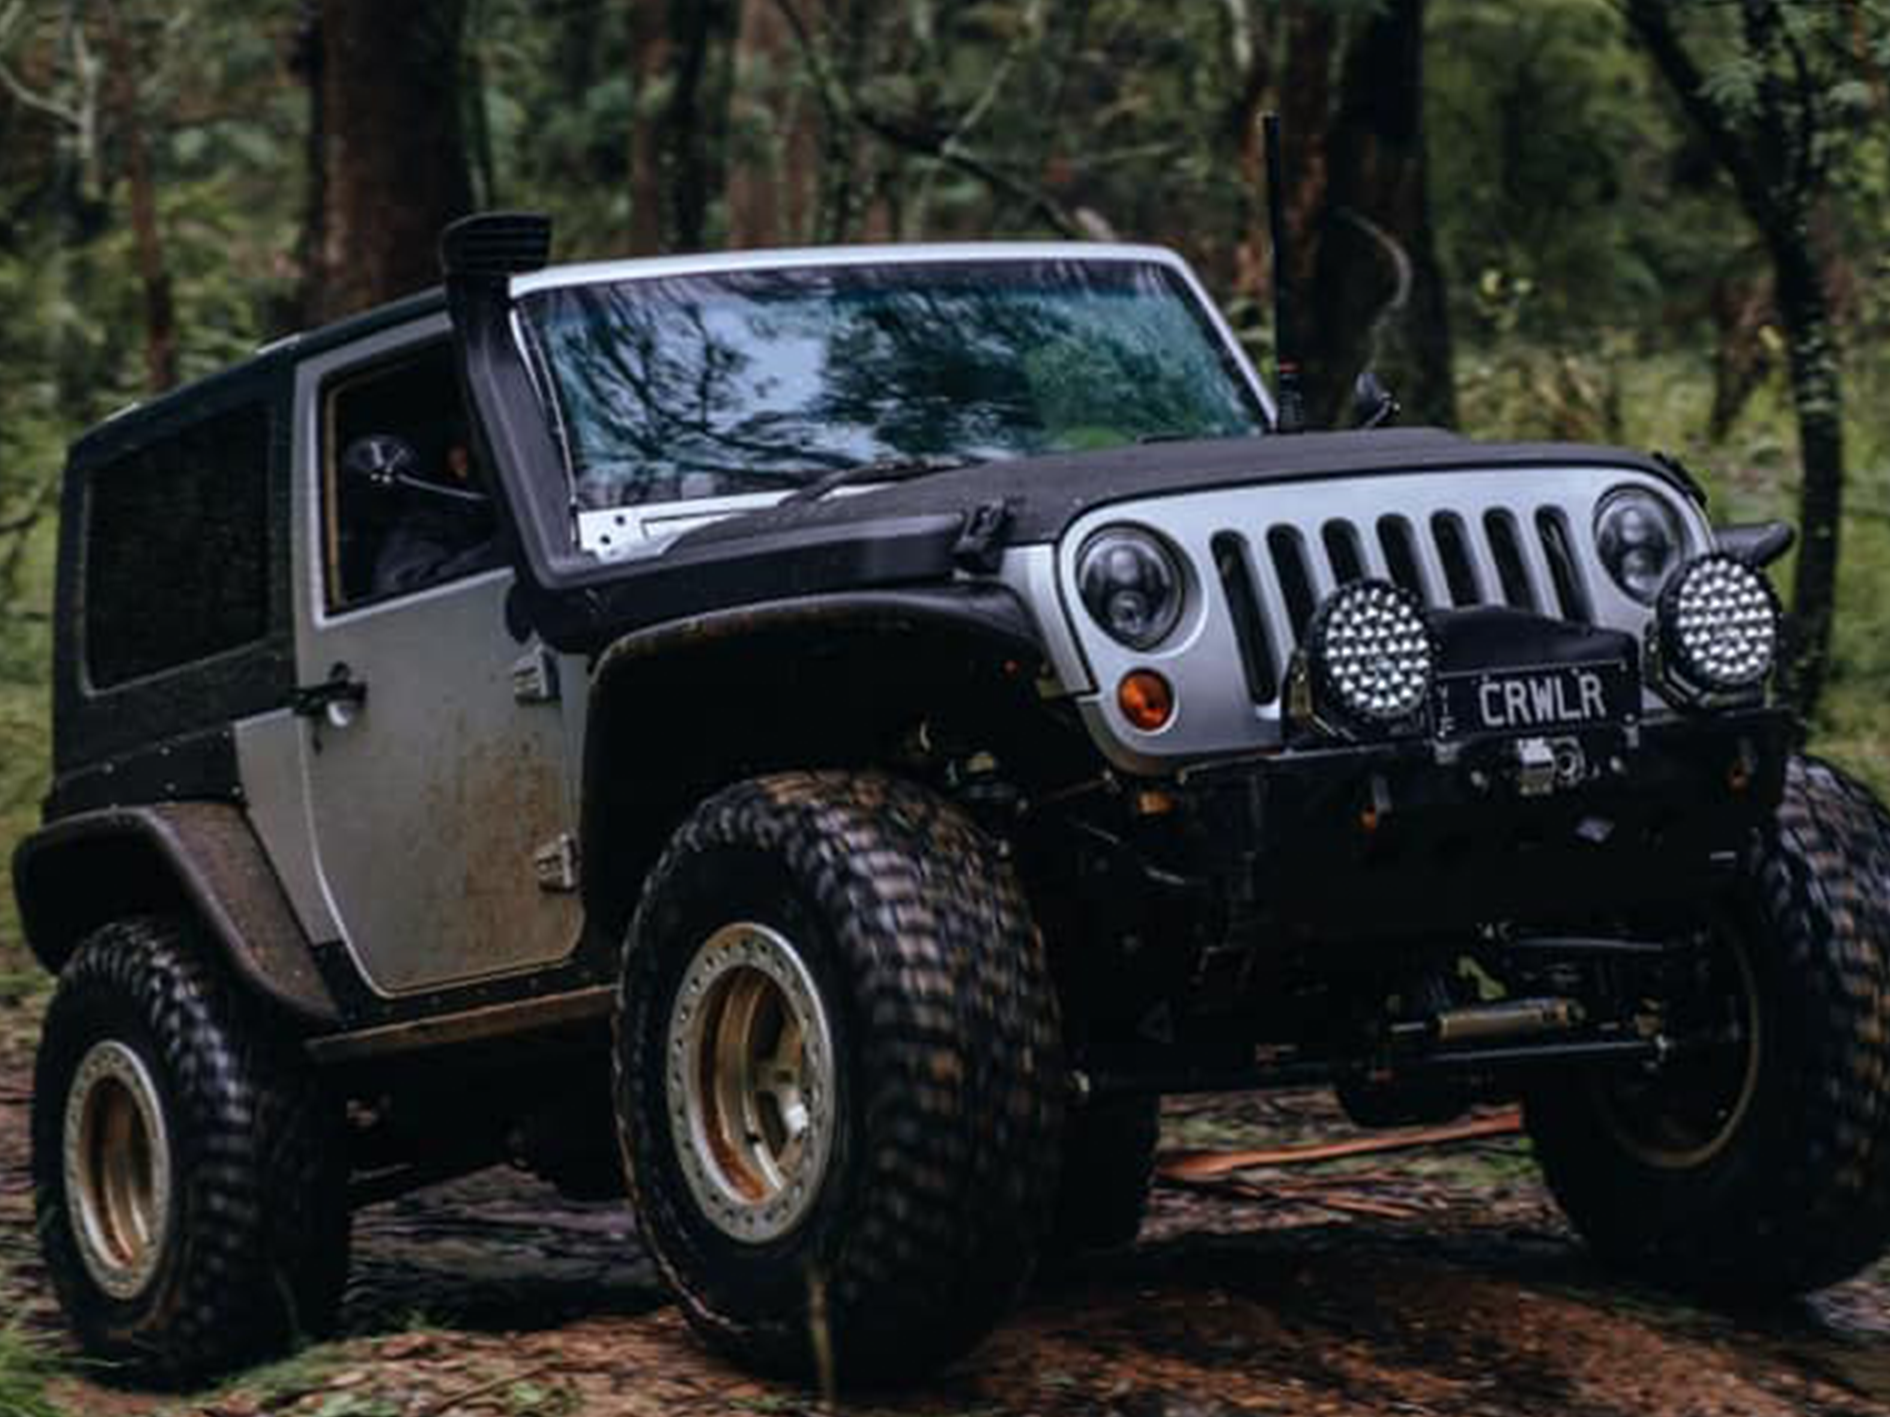
It’s the two-door 3.8L manual, with plenty of aftermarket kit including a Smittybilt XRC Modular front bar; Stedi Type-X PRO LED driving lights; Carbon 12,000lb winch; Smittybilt SRC Stingray vented hood; JW Speaker head- and tail-lights; Poison Spyder front and rear Crusher flares, inner fender kit and brawler rockers; JCR Offroad’s Crusader rear mid-width bumper; TeraFlex Alpha spare tyre carrier and mounting kit; and TeraFlex Prerunner three-inch Long Flexarm suspension system with Teraflex/Falcon 3.4 remote air-adjust piggyback shocks.
It also has TeraFlex Rzeppa CV kit; G2 Core 44 front and rear diff with ARB air locker 4.88 gears; G2 Mini Air Compressor for lockers and suspension; ARB breather extension kit; ATX Chamber Pro II beadlocks; BFG KM3 37/12.5×17 tyres; ARB high-performance twin on-board compressor; Subaru BRZ seats; Rugged Ridge A pillar switch pod; Smittybilt C-RES2 cargo restraint system; GraBars grab handles; and a custom rear drawer system. – Matt Ackley