The definition of a shortcut typically means a shorter route than what is usually taken, and that’s what I thought when we veered off our intended route on a recent off-road trip – little did I know what we were going to find along the way.
The original plan was to head across to the Flinders Ranges, from Broken Hill into South Australia and up to Wilpena Pound, to hike and revisit the area after recent rainfall. However, with an overnight stay at Yunta in South Australia, we found we could cut across the desolate plains towards the Flinders and maybe save some time – or so we thought.
Yunta, on the Barrier Highway between Broken Hill and Adelaide, has a population of less than 100 people and is now used as a stopover for fuel, but it was once a bustling railway town.
Established in 1887, Yunta was an extremely busy place where more than 5000 miners passed through on their way towards new goldfields at Teetulpa and Waukaringa to the north, as well as being a busy railway town on the growing Adelaide to Broken Hill line. Around Yunta, there are still a few rail relics standing from this bygone era.
Yunta is also known as being a base for the well-known Harry Ding, who took on Arthur Kruse’s business in 1934 which included a general store and a post office. It was from here that the legendary Tom Kruse, at the ripe old age of 22, first started his iconic runs to Birdsville on January 1, 1936.
For nearly 20 years, Tom and his aboriginal offsider, Henry Butler, worked tirelessly to get the mail truck to Birdsville and back, enduring a range of conditions and hardships. It wasn’t until 1957 that a road was graded for an Ampol car trial to Birdsville, which made life easier for Tom and the crew.
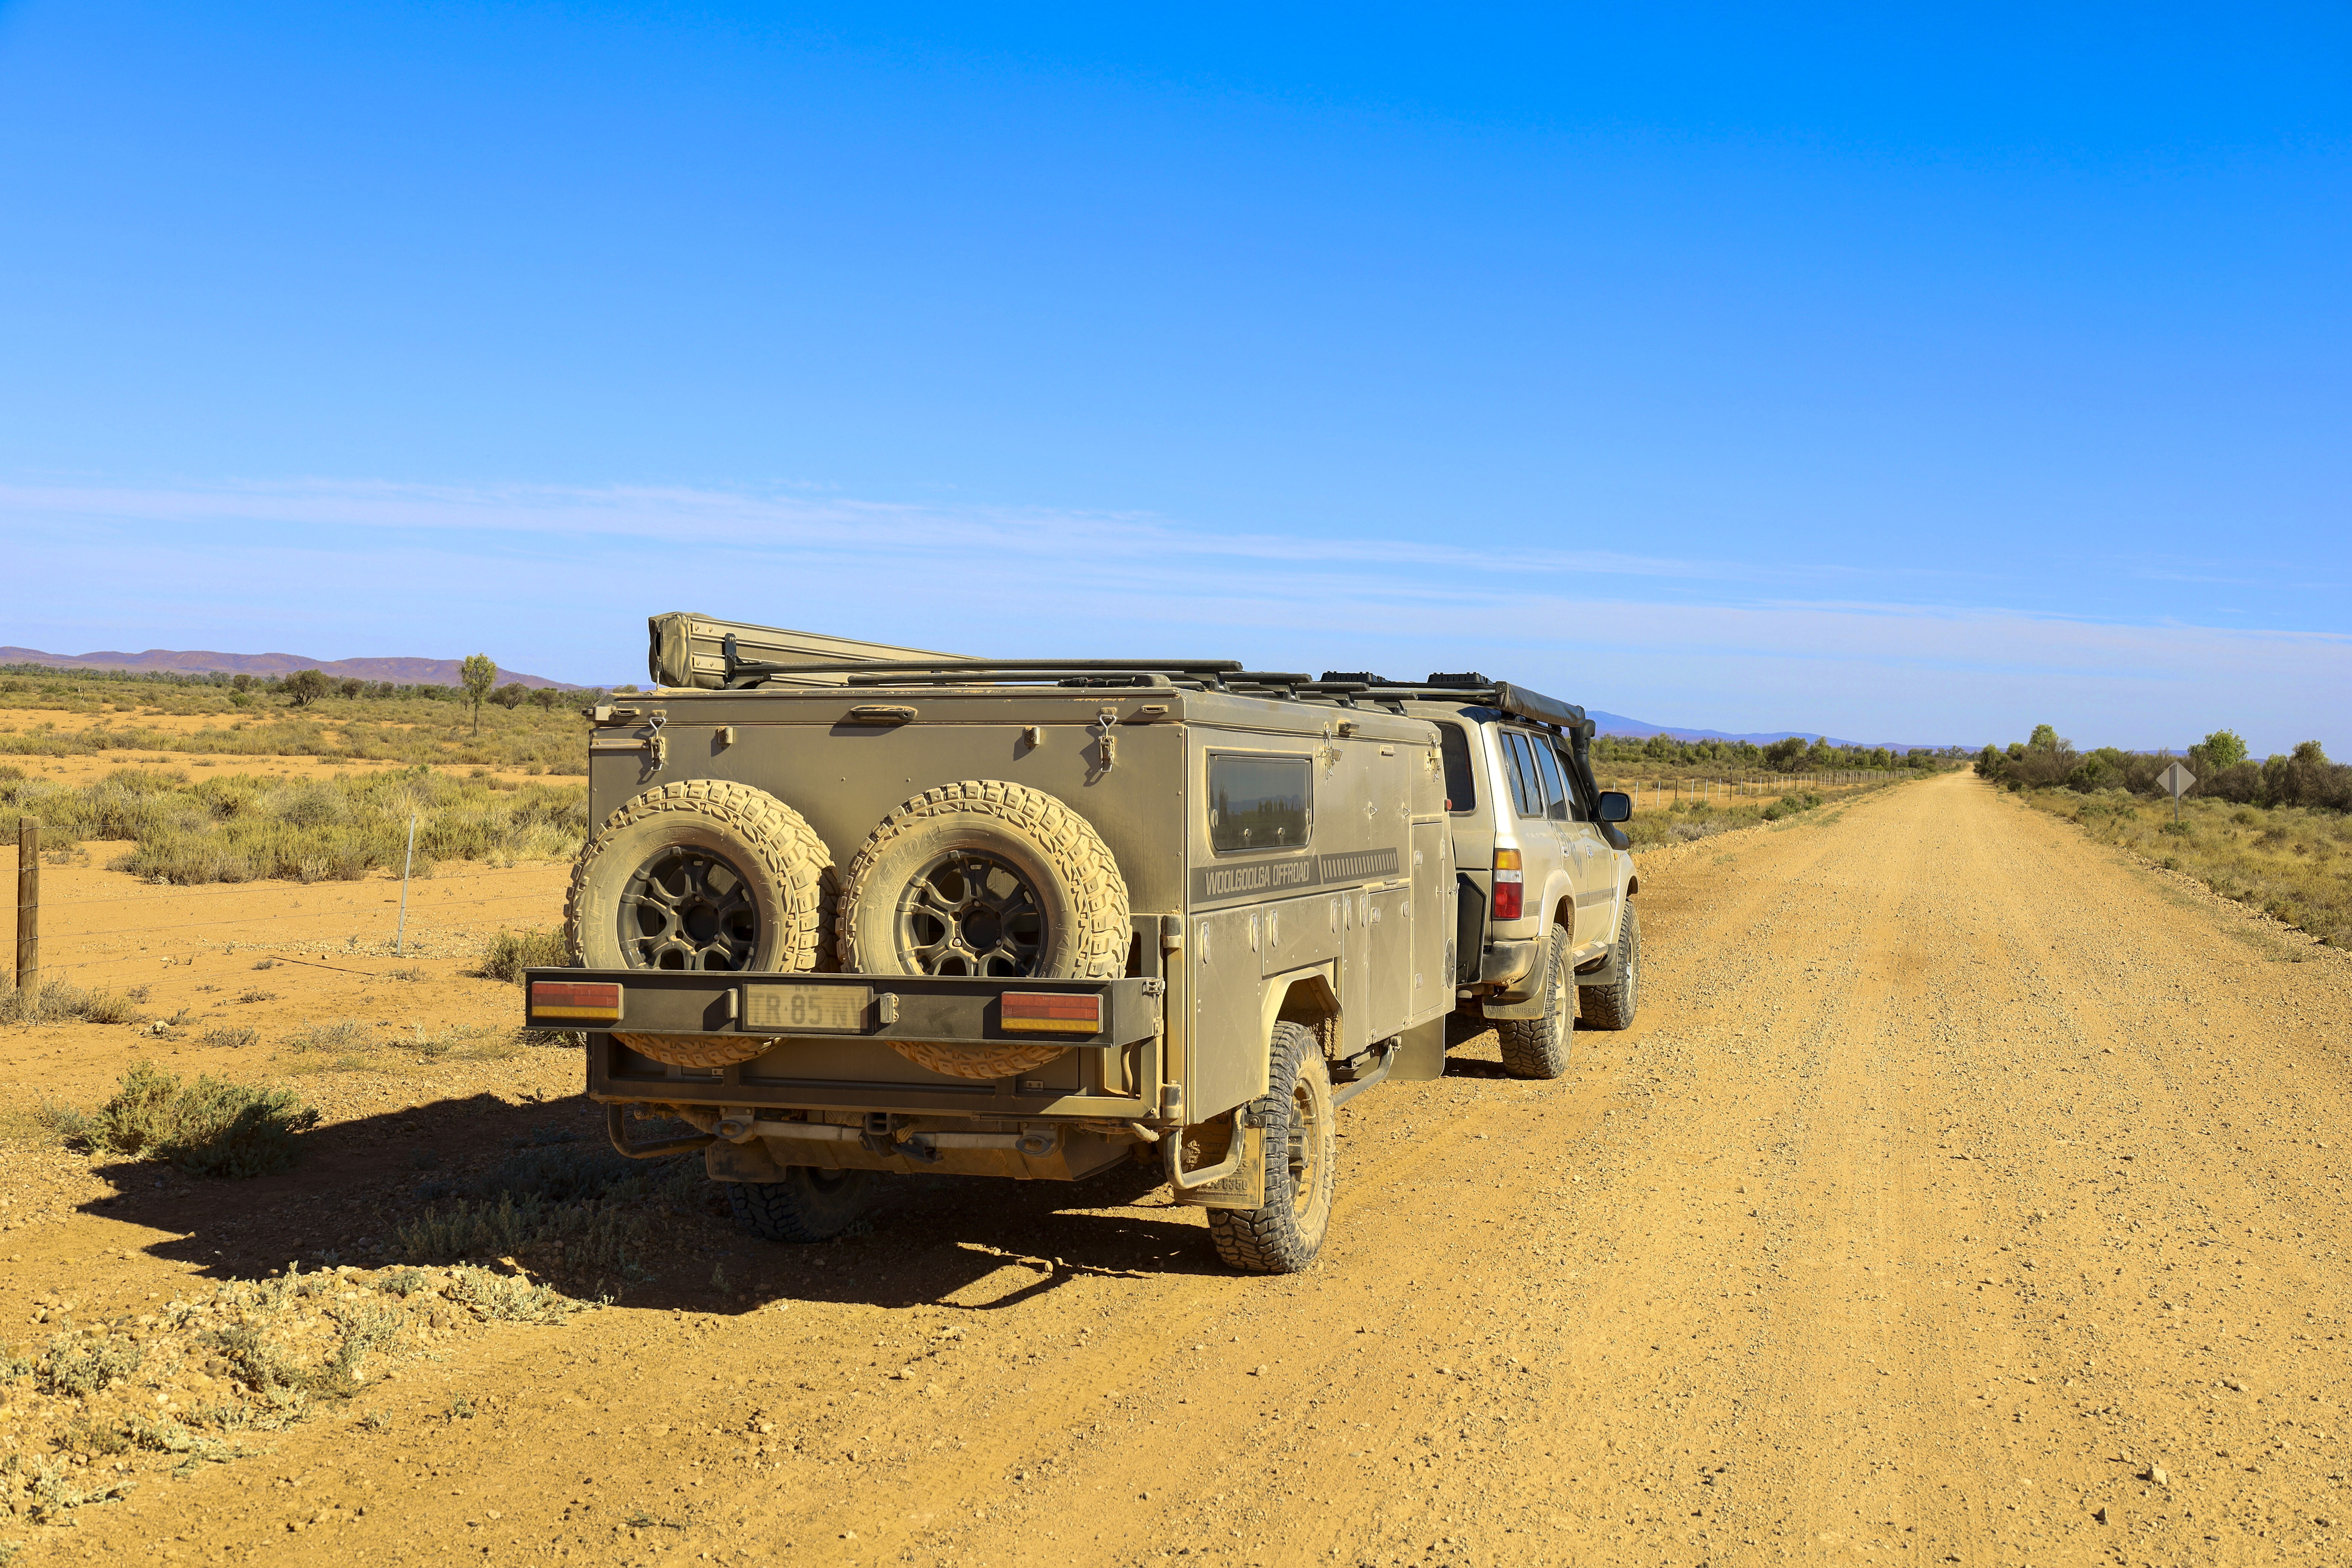
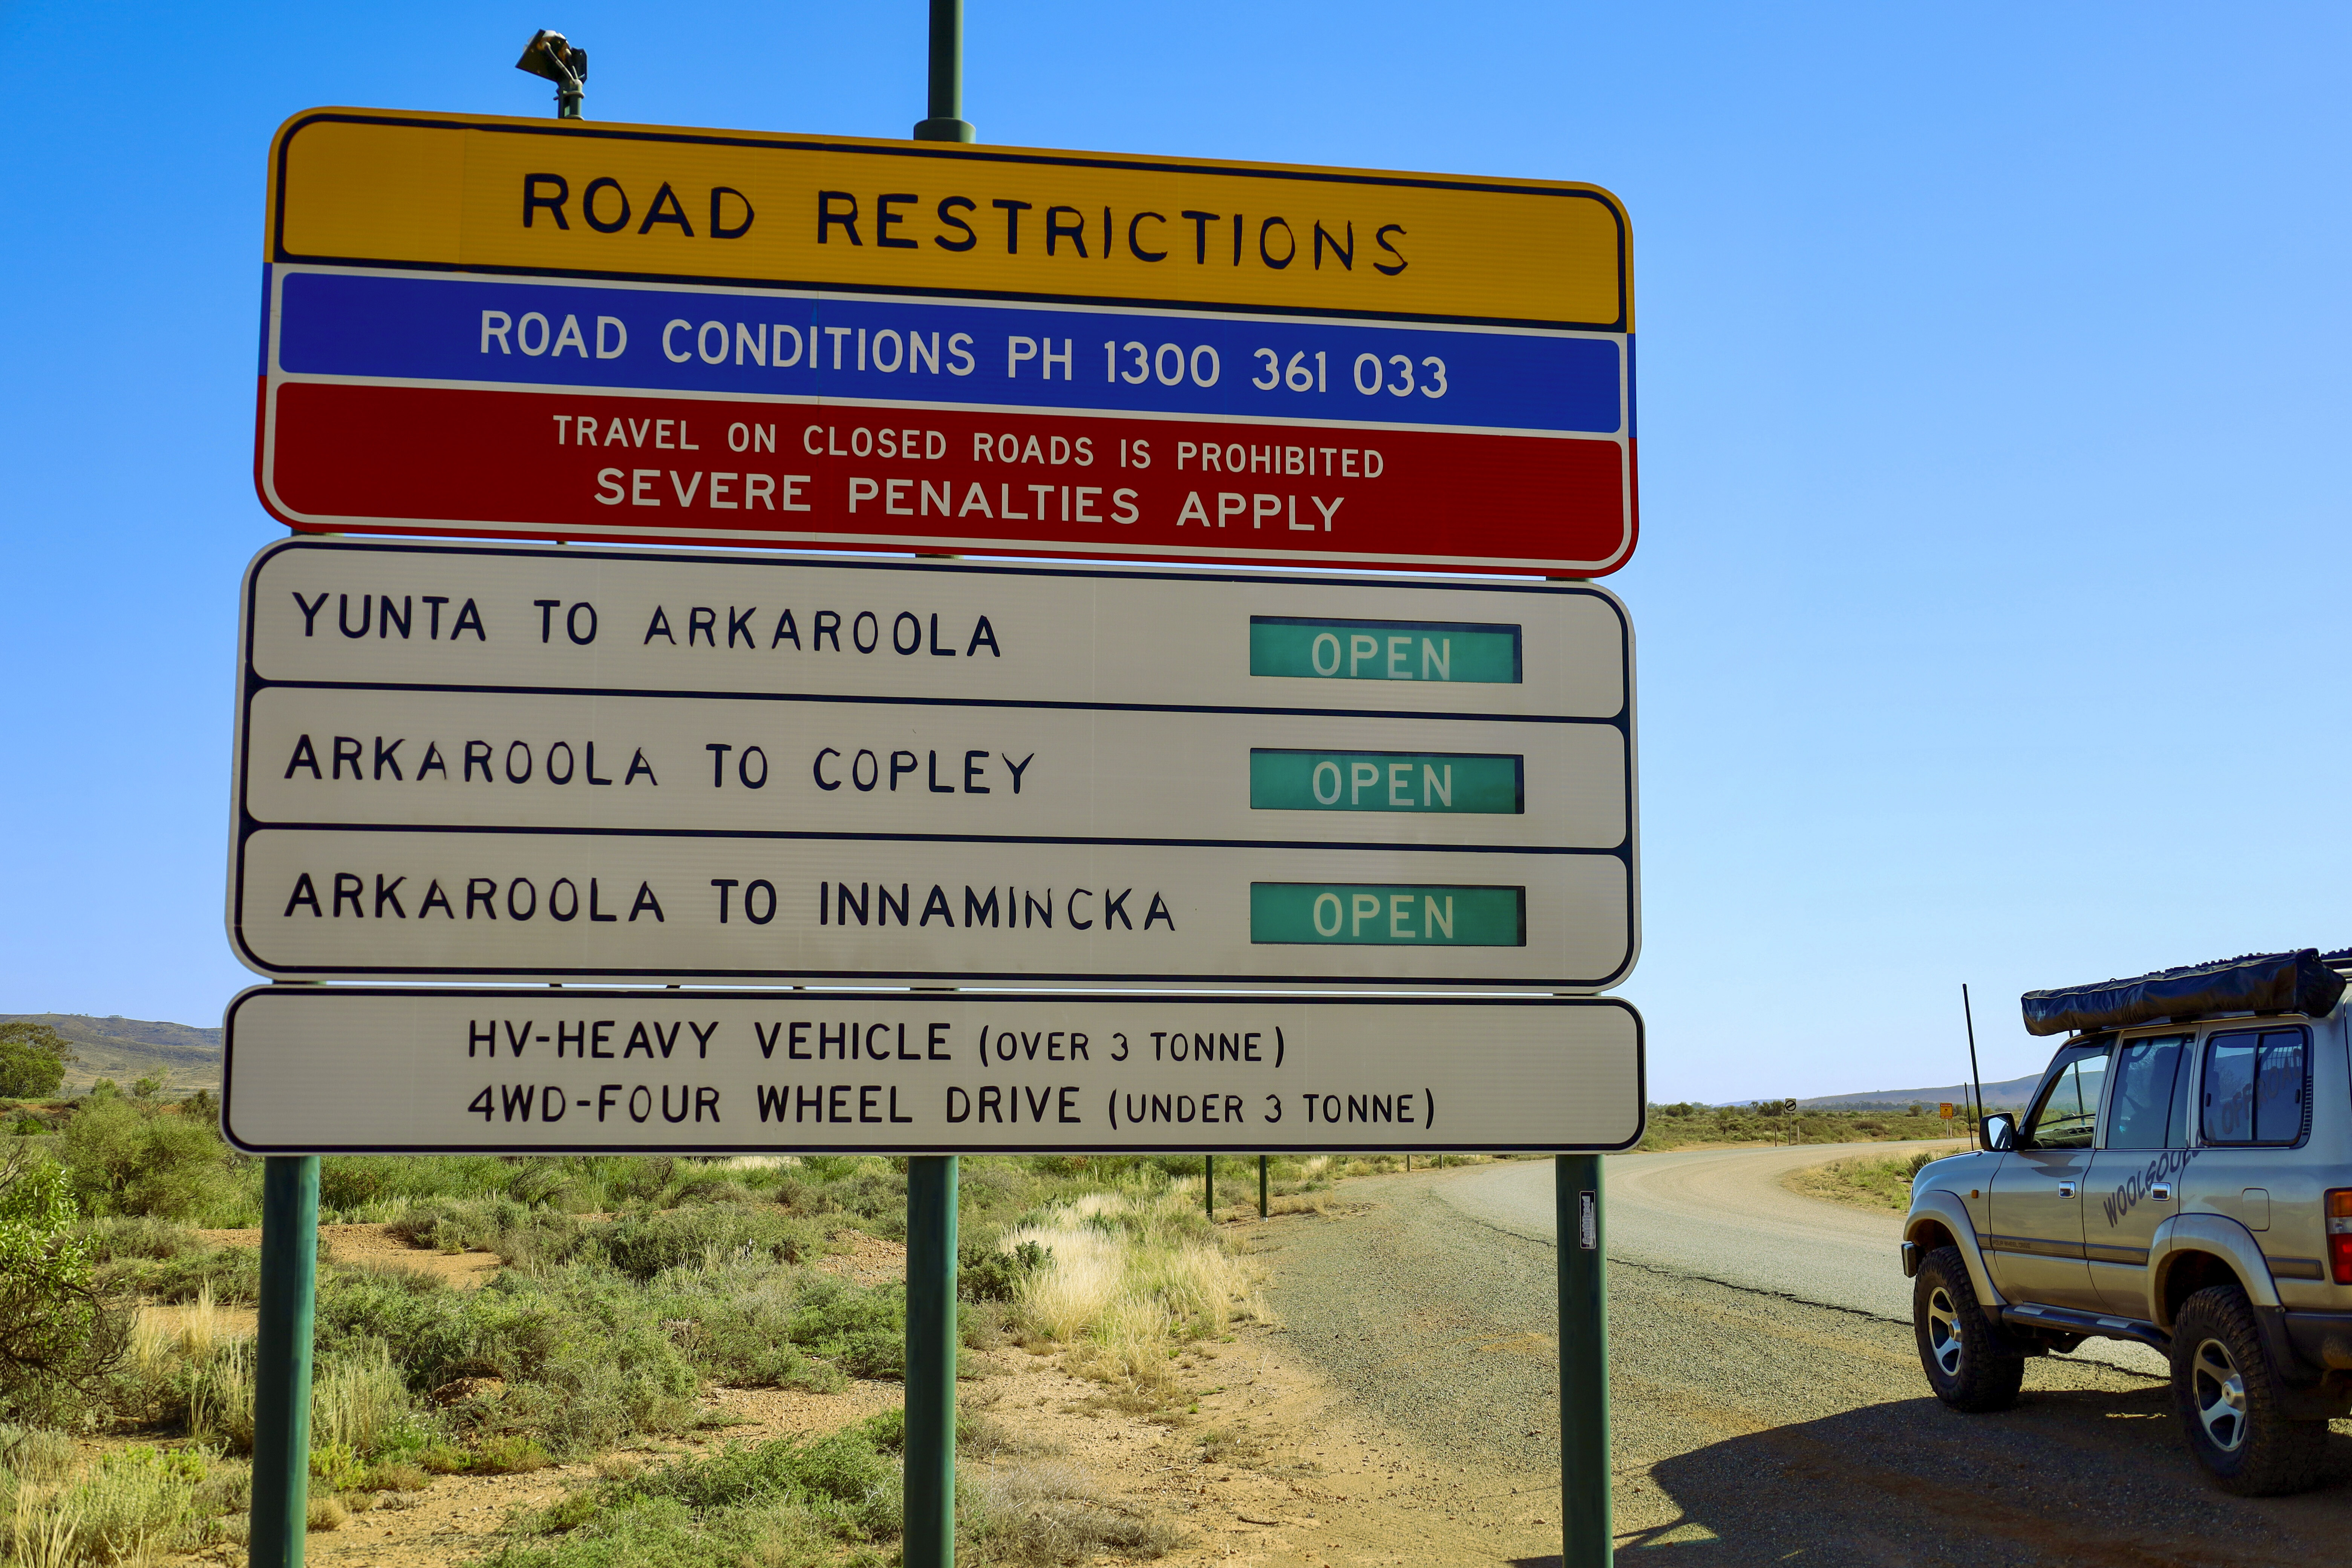
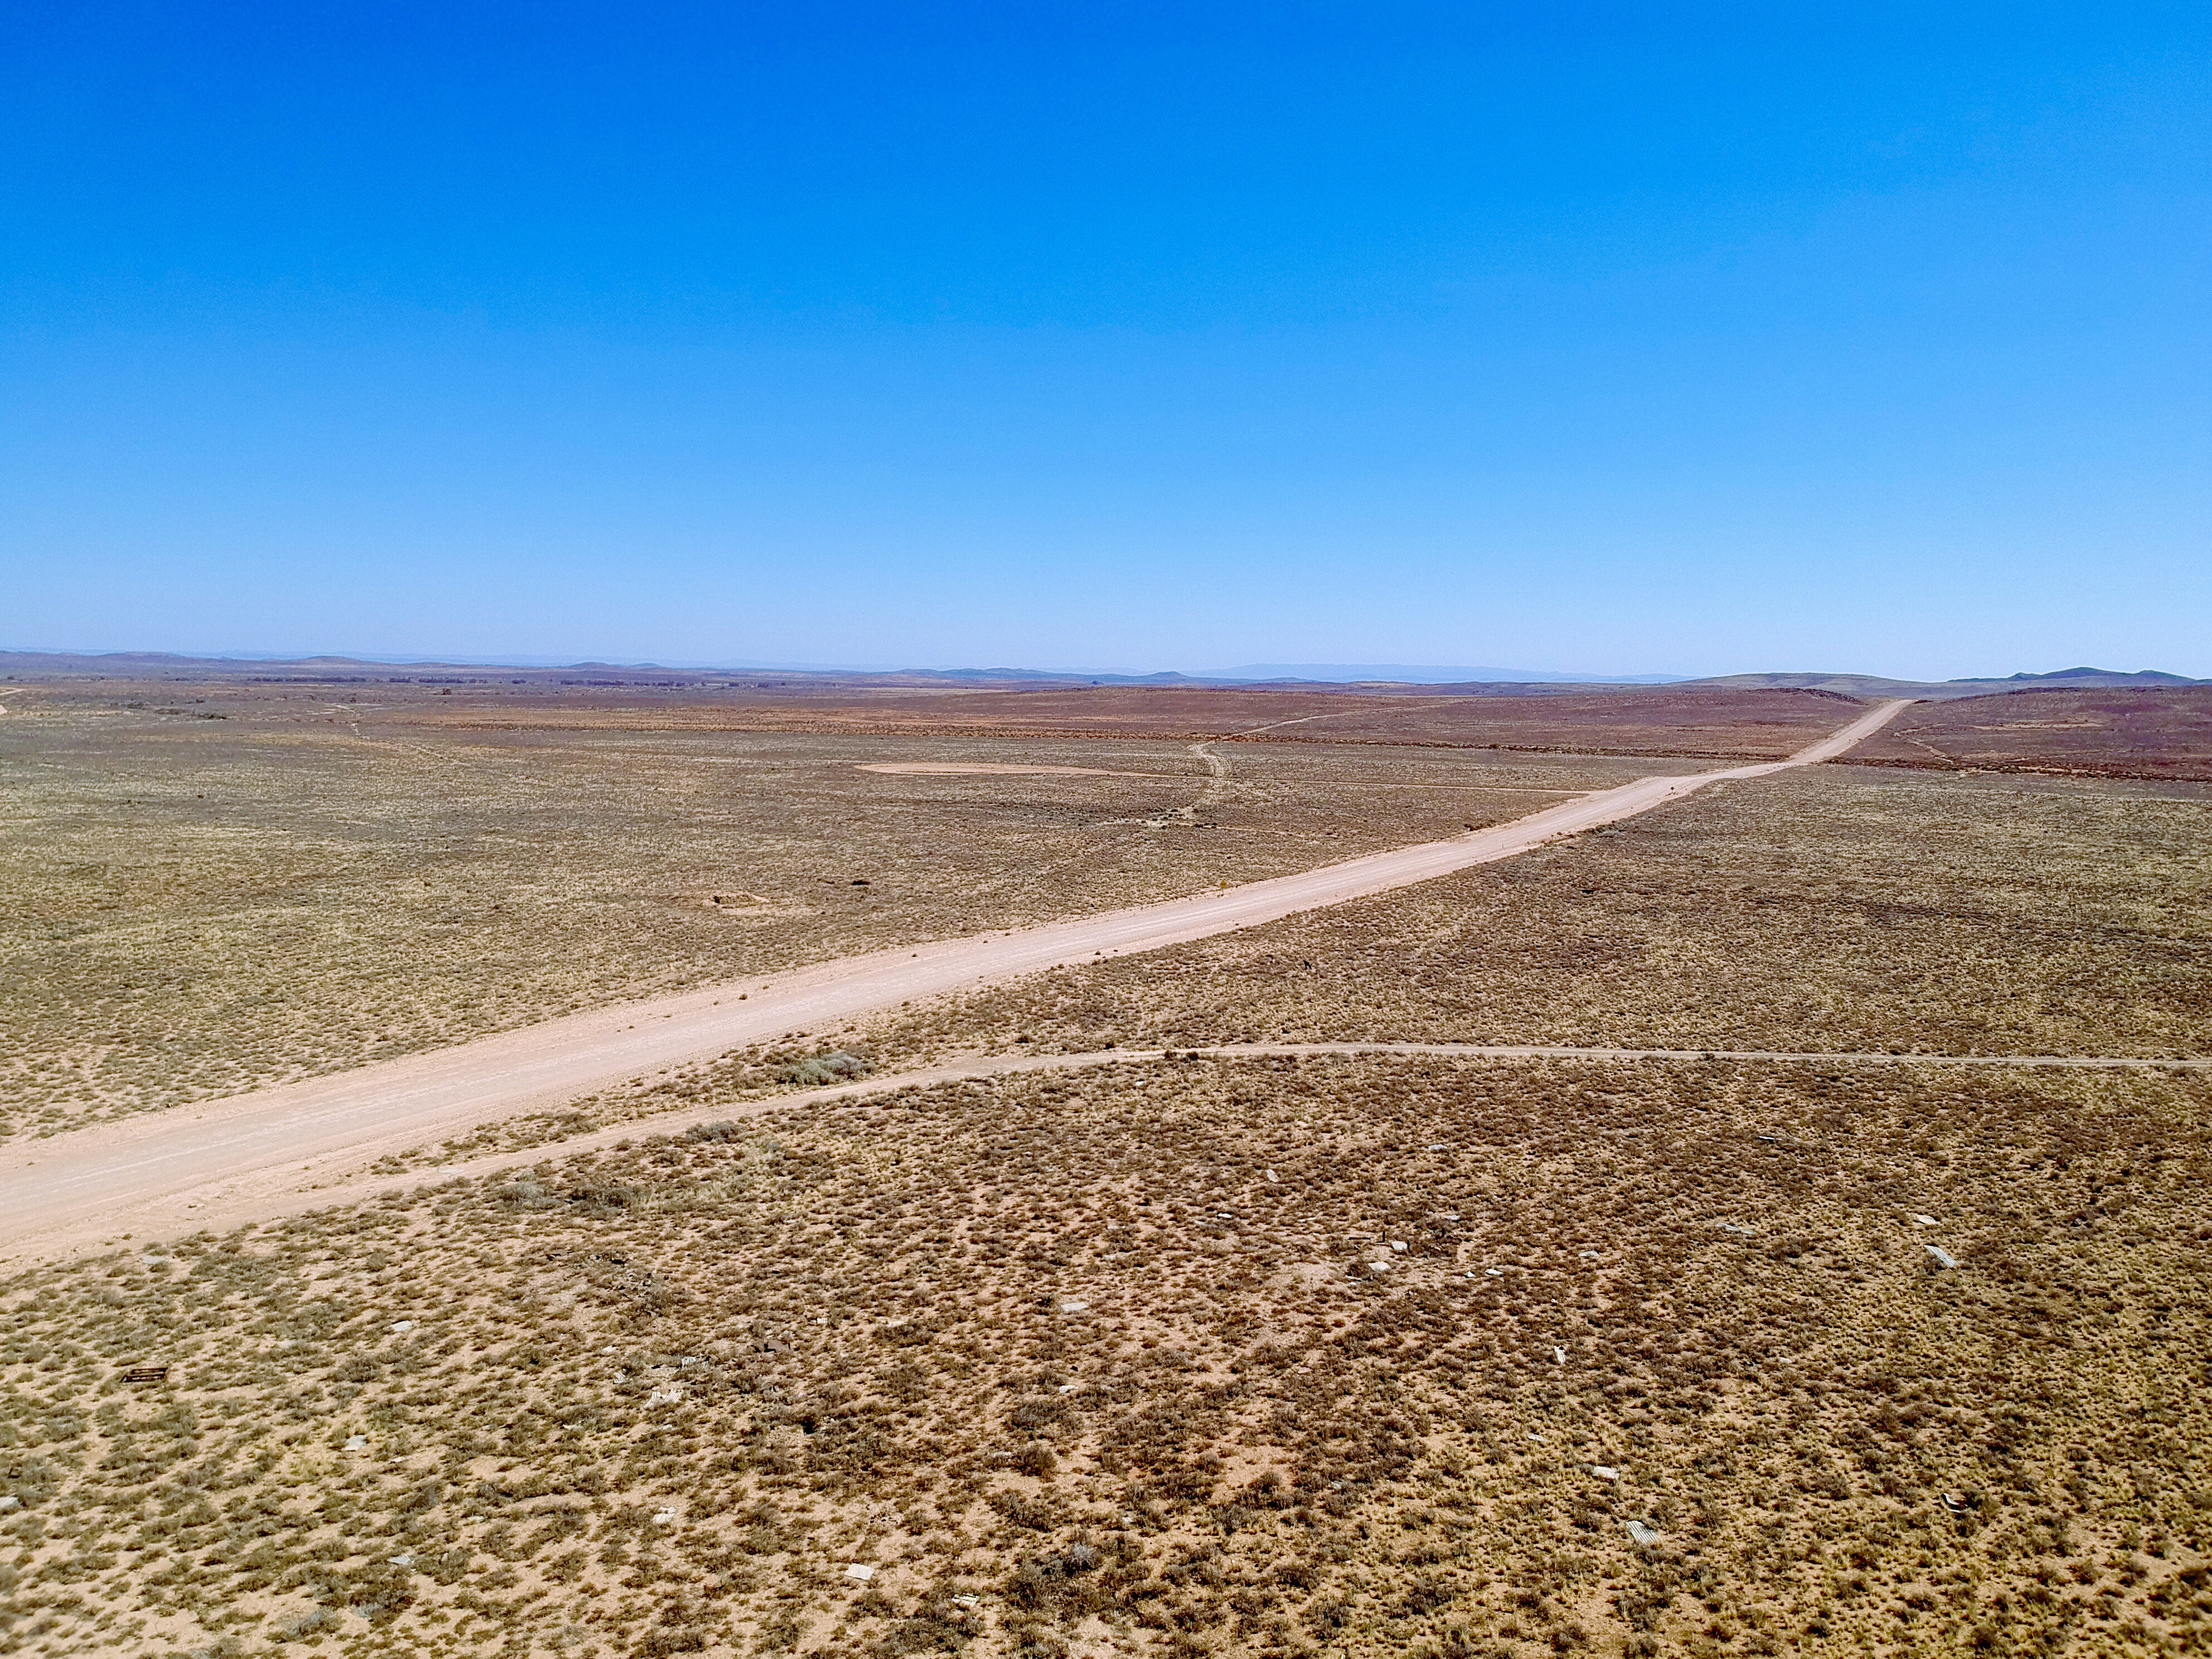
Heading out of Yunta, I spotted an alternative route towards Arkaroola and Innamincka, and was hoping we could track across to Wilpena. Tea Tree Road heads north, which was at least in the right direction, and warning signs indicated the entire road was open, going straight to dirt just out of the town’s limits. The land is barren out here, with mountain ranges in the distance, and it was surprising to see pastoral stations – it made us wonder what the stock would feed on.
Waukaringa Gold
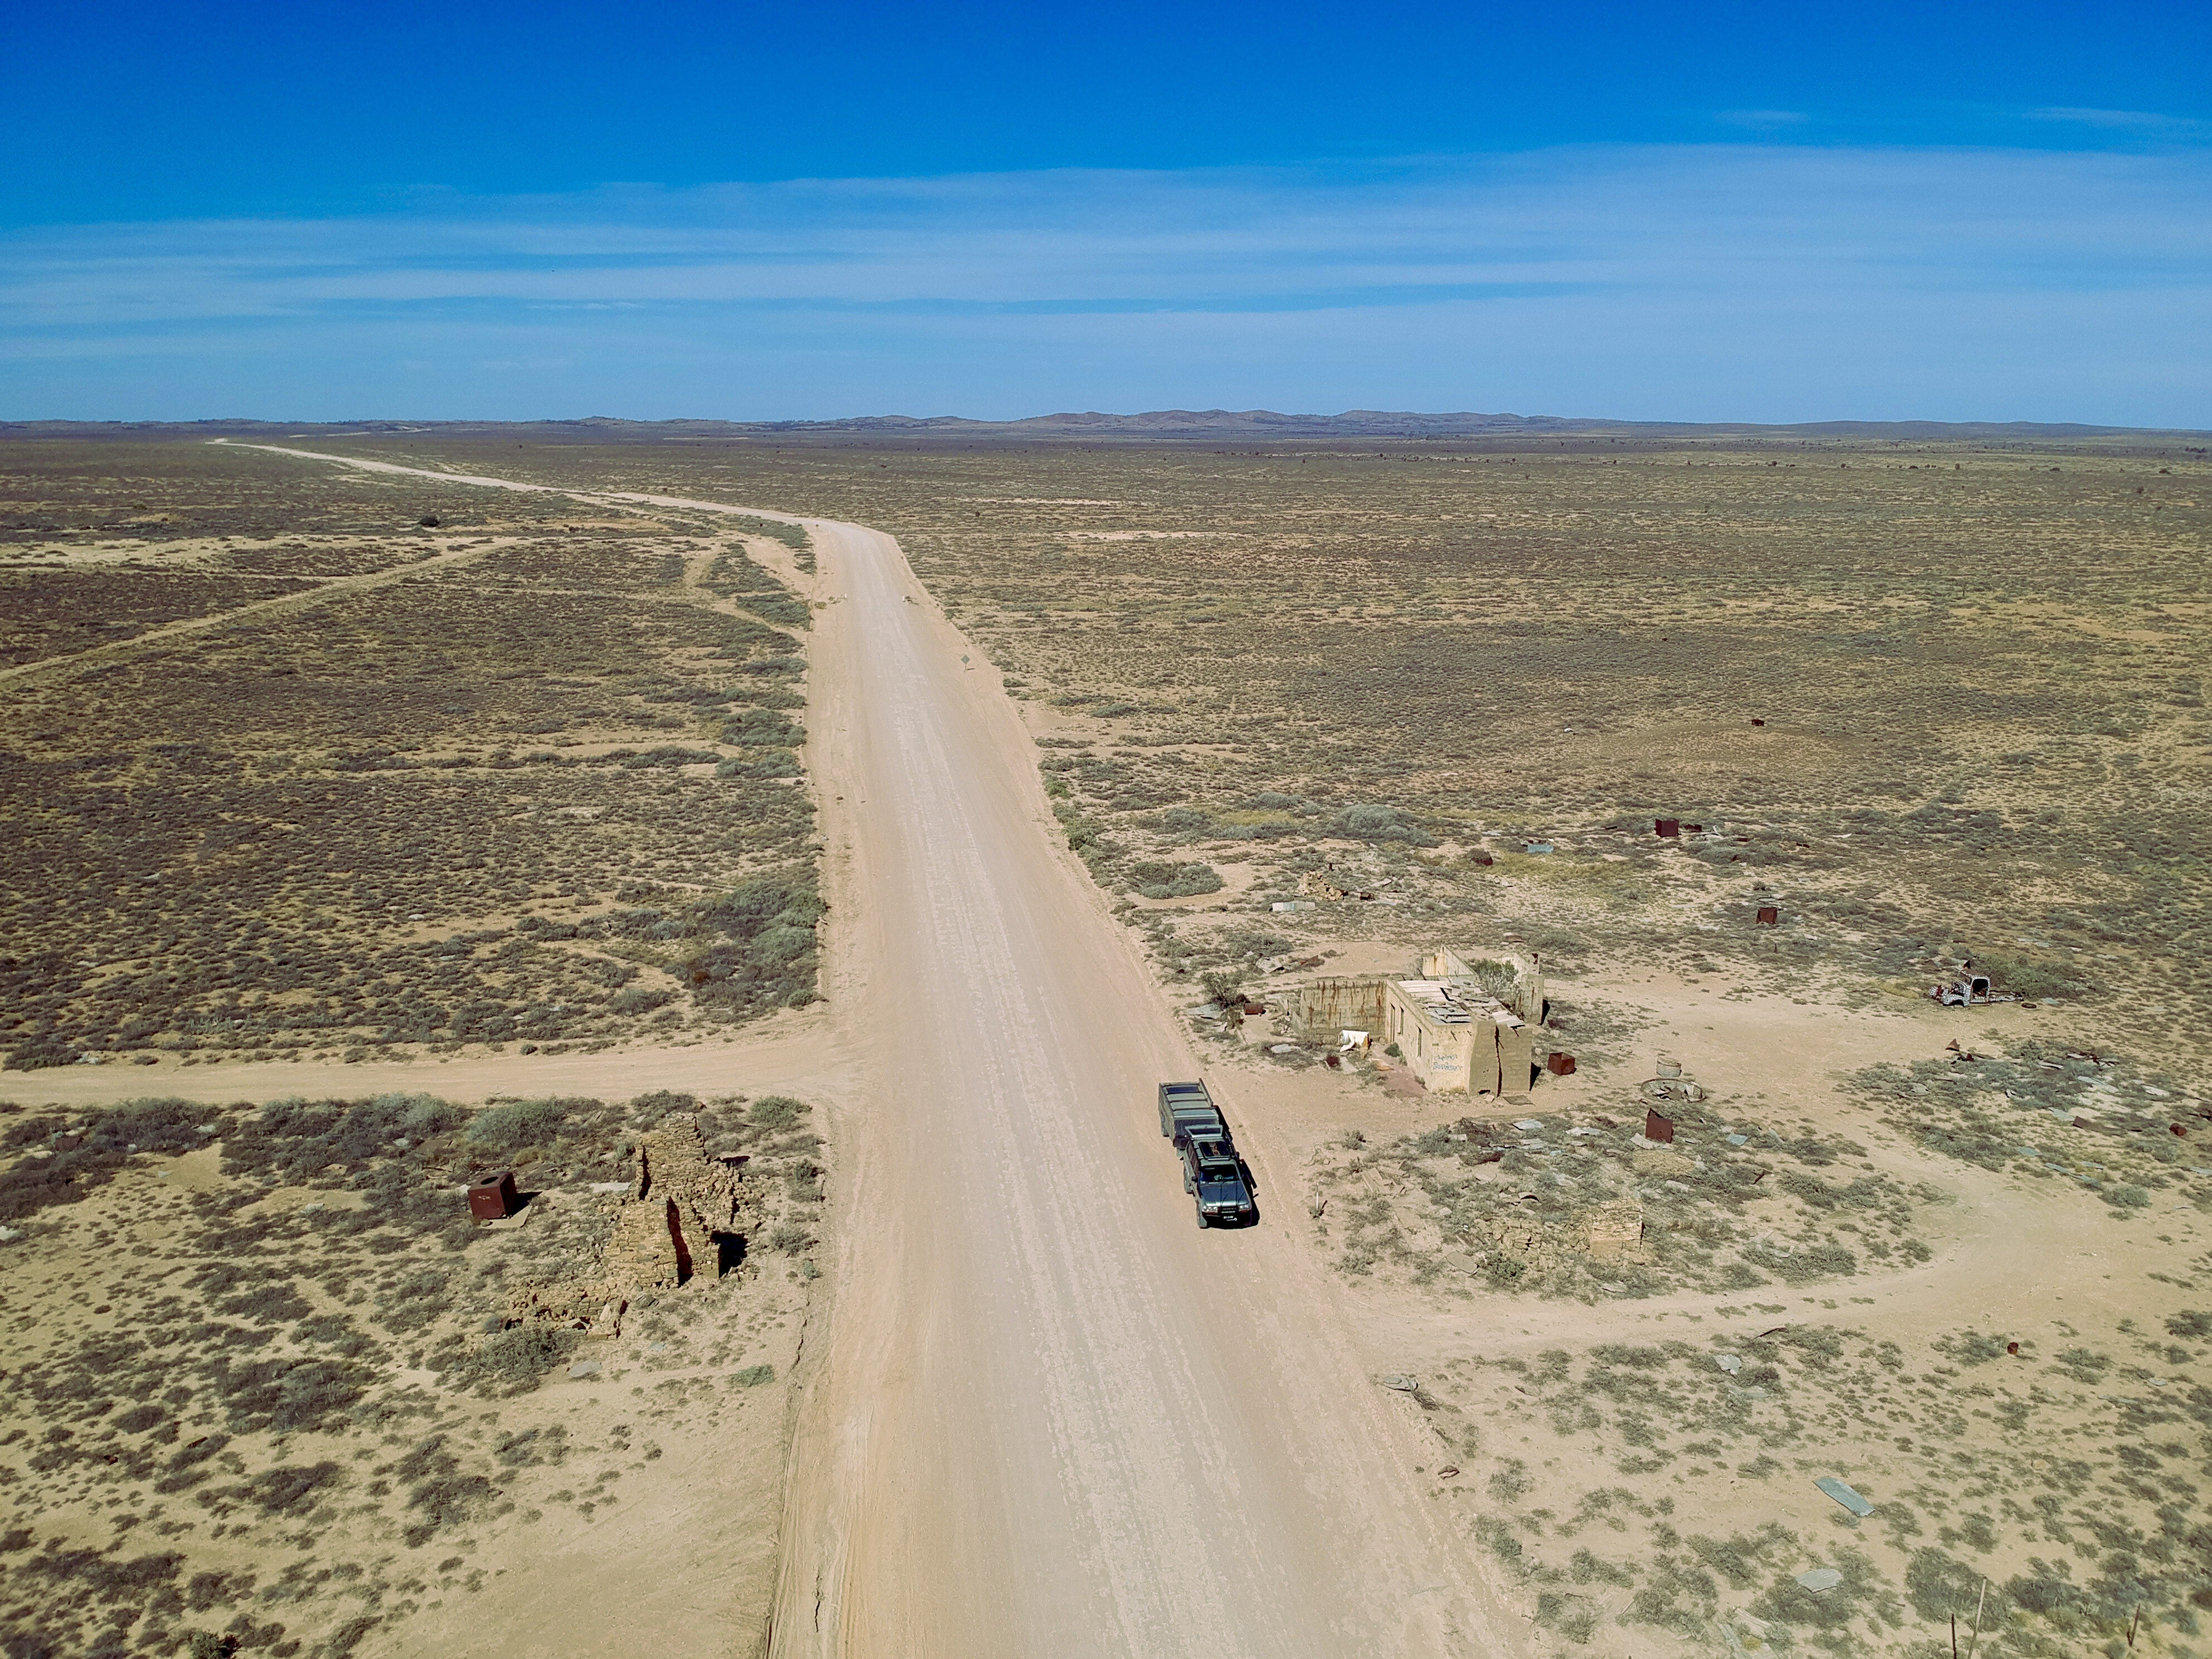
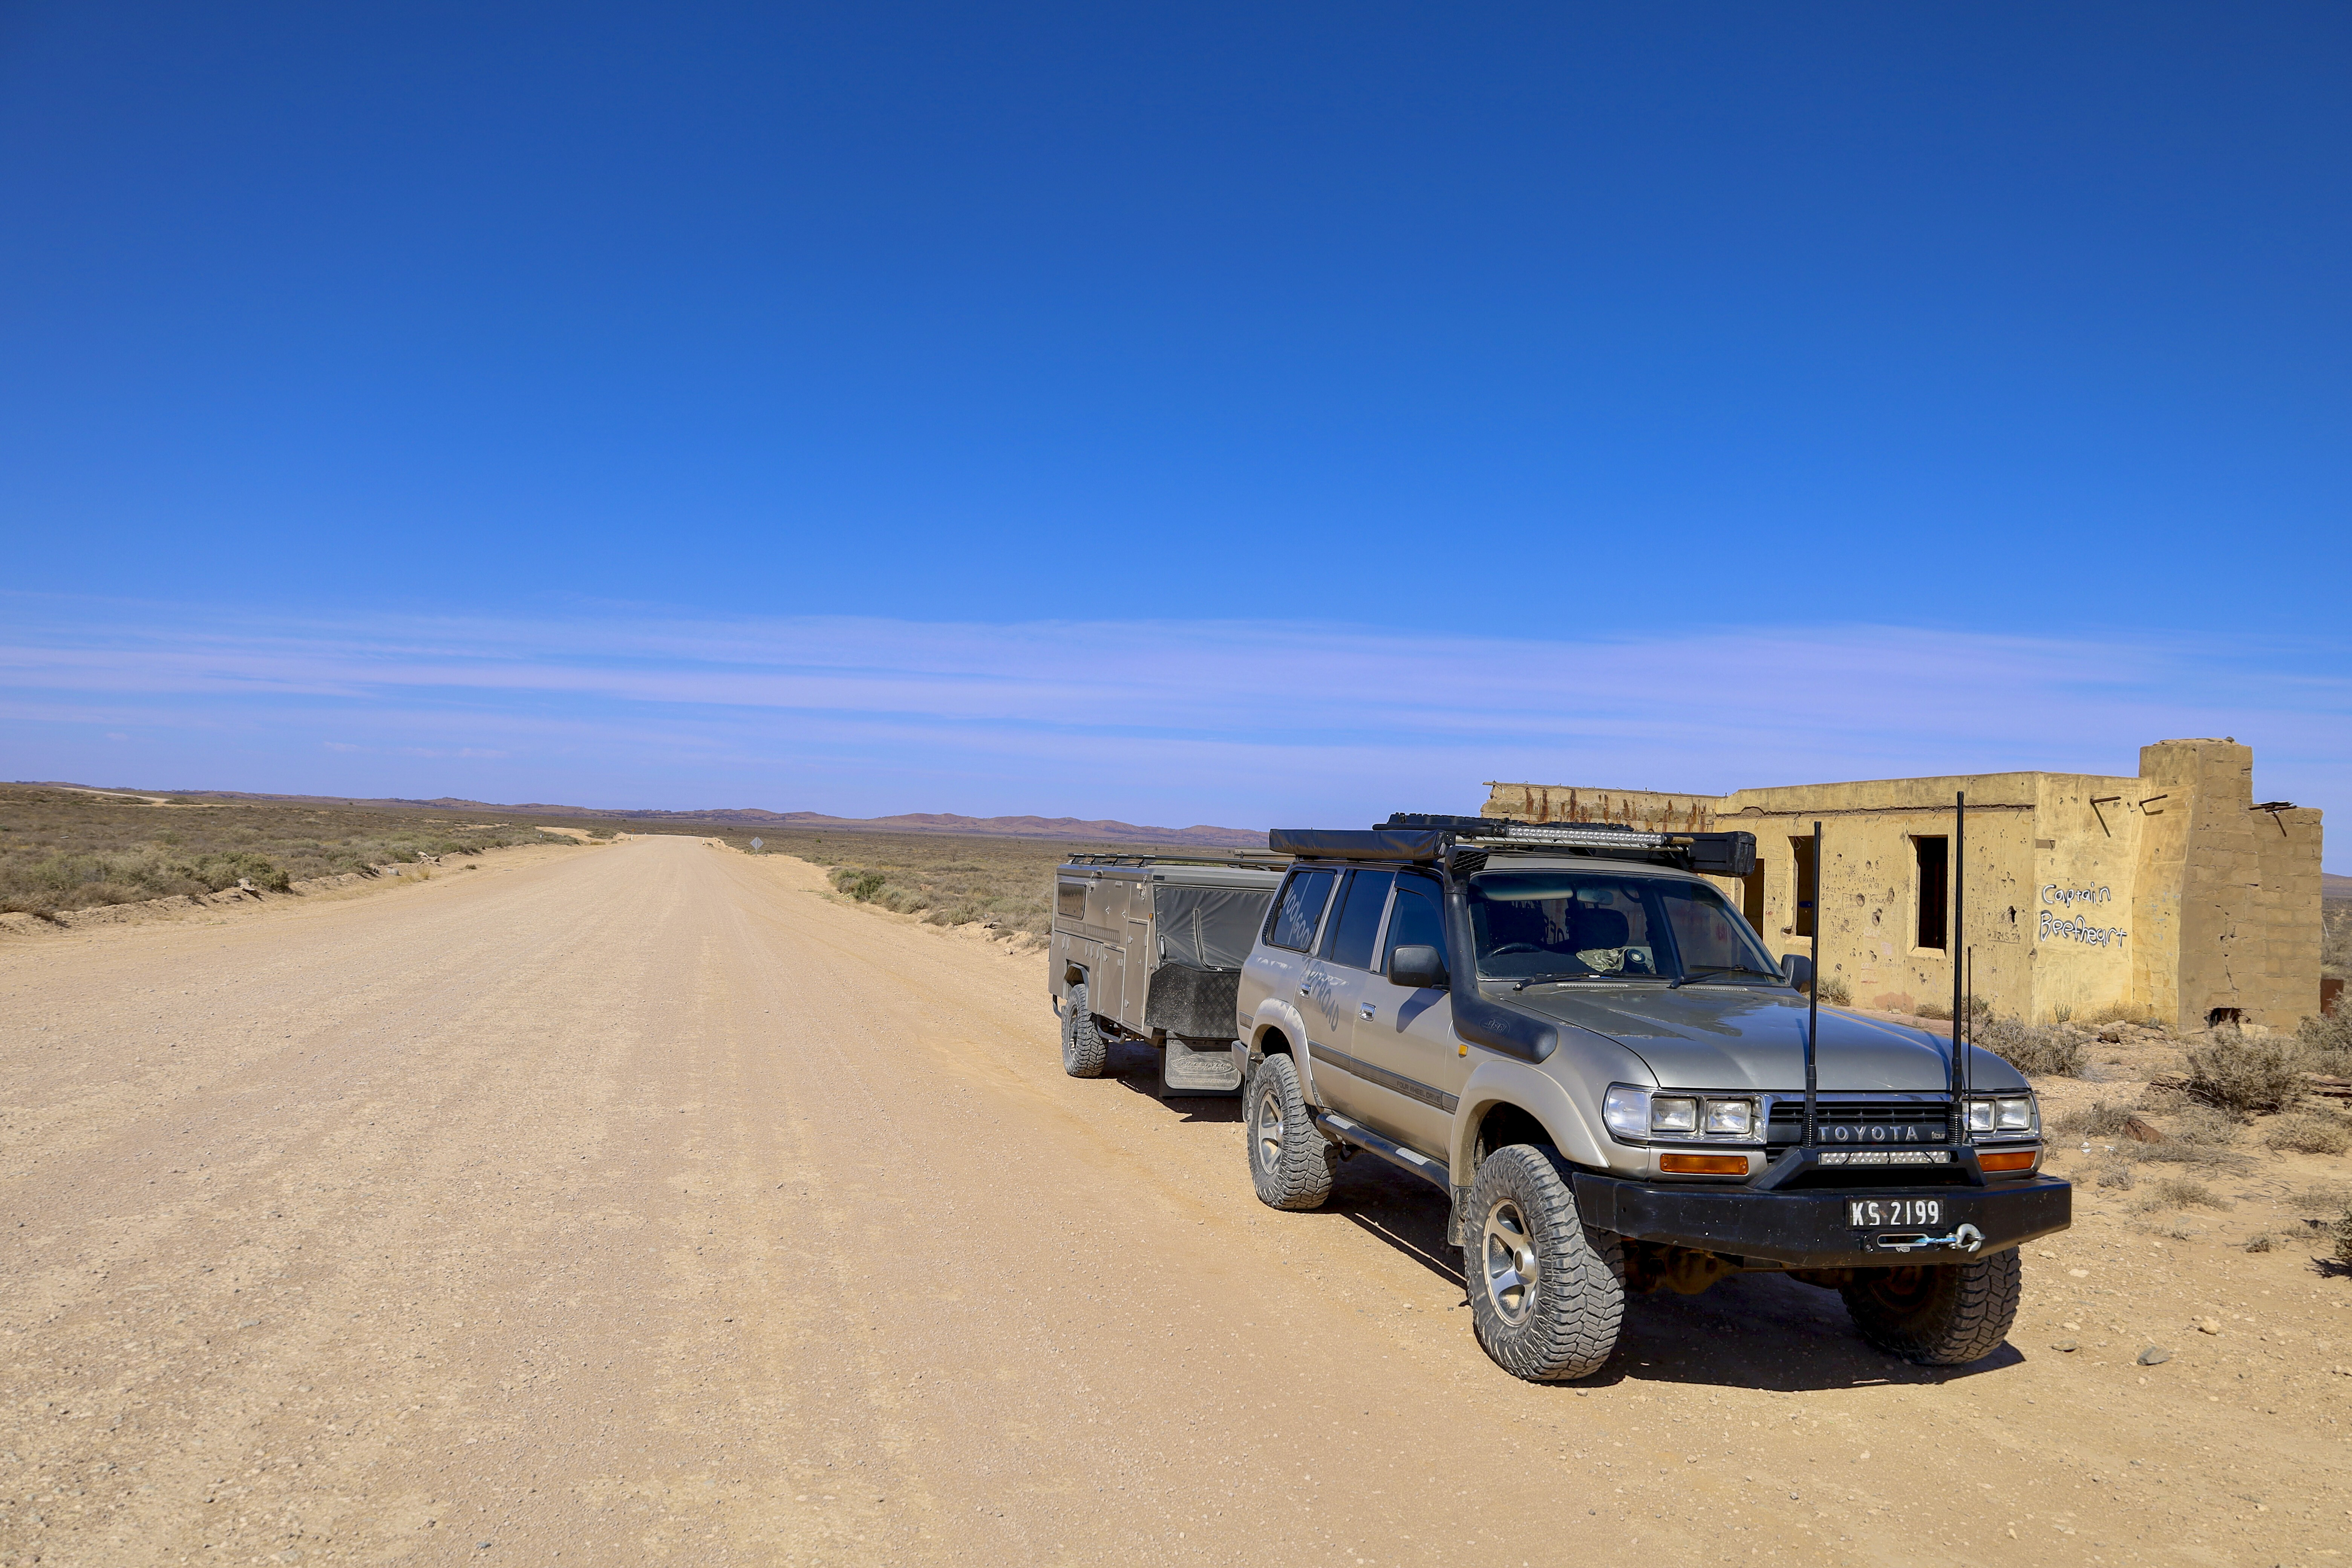
With just 35km under our belt we came across roadside ruins and, always one to check them out, it turned out to be more than we bargained for – the roadside info signs told us this was the Waukaringa Goldfields area.
The sandstone-block building beside the road was the post office that was manned from 1875 through to 1984; it also ran as a general store and the local bank. It moved to its present location in 1903 after a fire burned down the original building. Reading the postmaster’s sign, it seemed the job was handed down through many family members over the years.
Across the paddock, the large and significant ruins of the Waukaringa Hotel – which was built in 1889 and served its last drink in 1964 – still stand. The township was proclaimed in 1888, where a population of nearly 500 was driven by the local goldfields.
The massive, crumbling ruins have multiple rooms on the ground level and underground cellars can be seen; plus, the building has three huge chimneys which would have been used for heating and cooking. Other ruins in the surrounding area include smaller walls, huge brick pits used for underground storage, and a massive amount of metallic materials like vehicle wrecks, large square water drums and thick metal plates.
The town of Waukaringa was built due to gold-bearing reefs found nearby in 1873 by James Watson, who was a shepherd on a local pastoral run. Originally, there was chatter it would be perfectly useless to search for gold in that direction to the north. At the time, gold was being freely found more to the west at Kooringa where it could be seen in the quartz and ironstone, so Waukaringa developed slowly over a number of years and was to become one of the longest lasting goldfields in SA.
Starting as alluvial goldfields where independent miners claimed small fortunes, larger companies soon moved in and commercial operations began. The nearby fields and ranges soon became full of deep gold mines and shafts, and lead was also found in abundance.
Good gold was being found and there was an intention to run two shifts a day to make it more profitable, but, in most cases when large companies come in, there was conflict as the miners refused to work after 1pm on Saturdays. Consequently, all the miners were sacked on the spot and others were transported from Victoria. It’s reported that 1427kg of gold was pulled from the ground here.
Scanning the horizon, two huge chimneys caught my eye on a ridge nearby, as well as a massive sunken roof in a gully. Exploring the area, the stacks (one huge stone stack and a smaller metal one) were part of the mining set-up. Close by, it was easy to find where the boilers, stampers and crushers were going by the massive threaded steel bolts protruding from the ground.
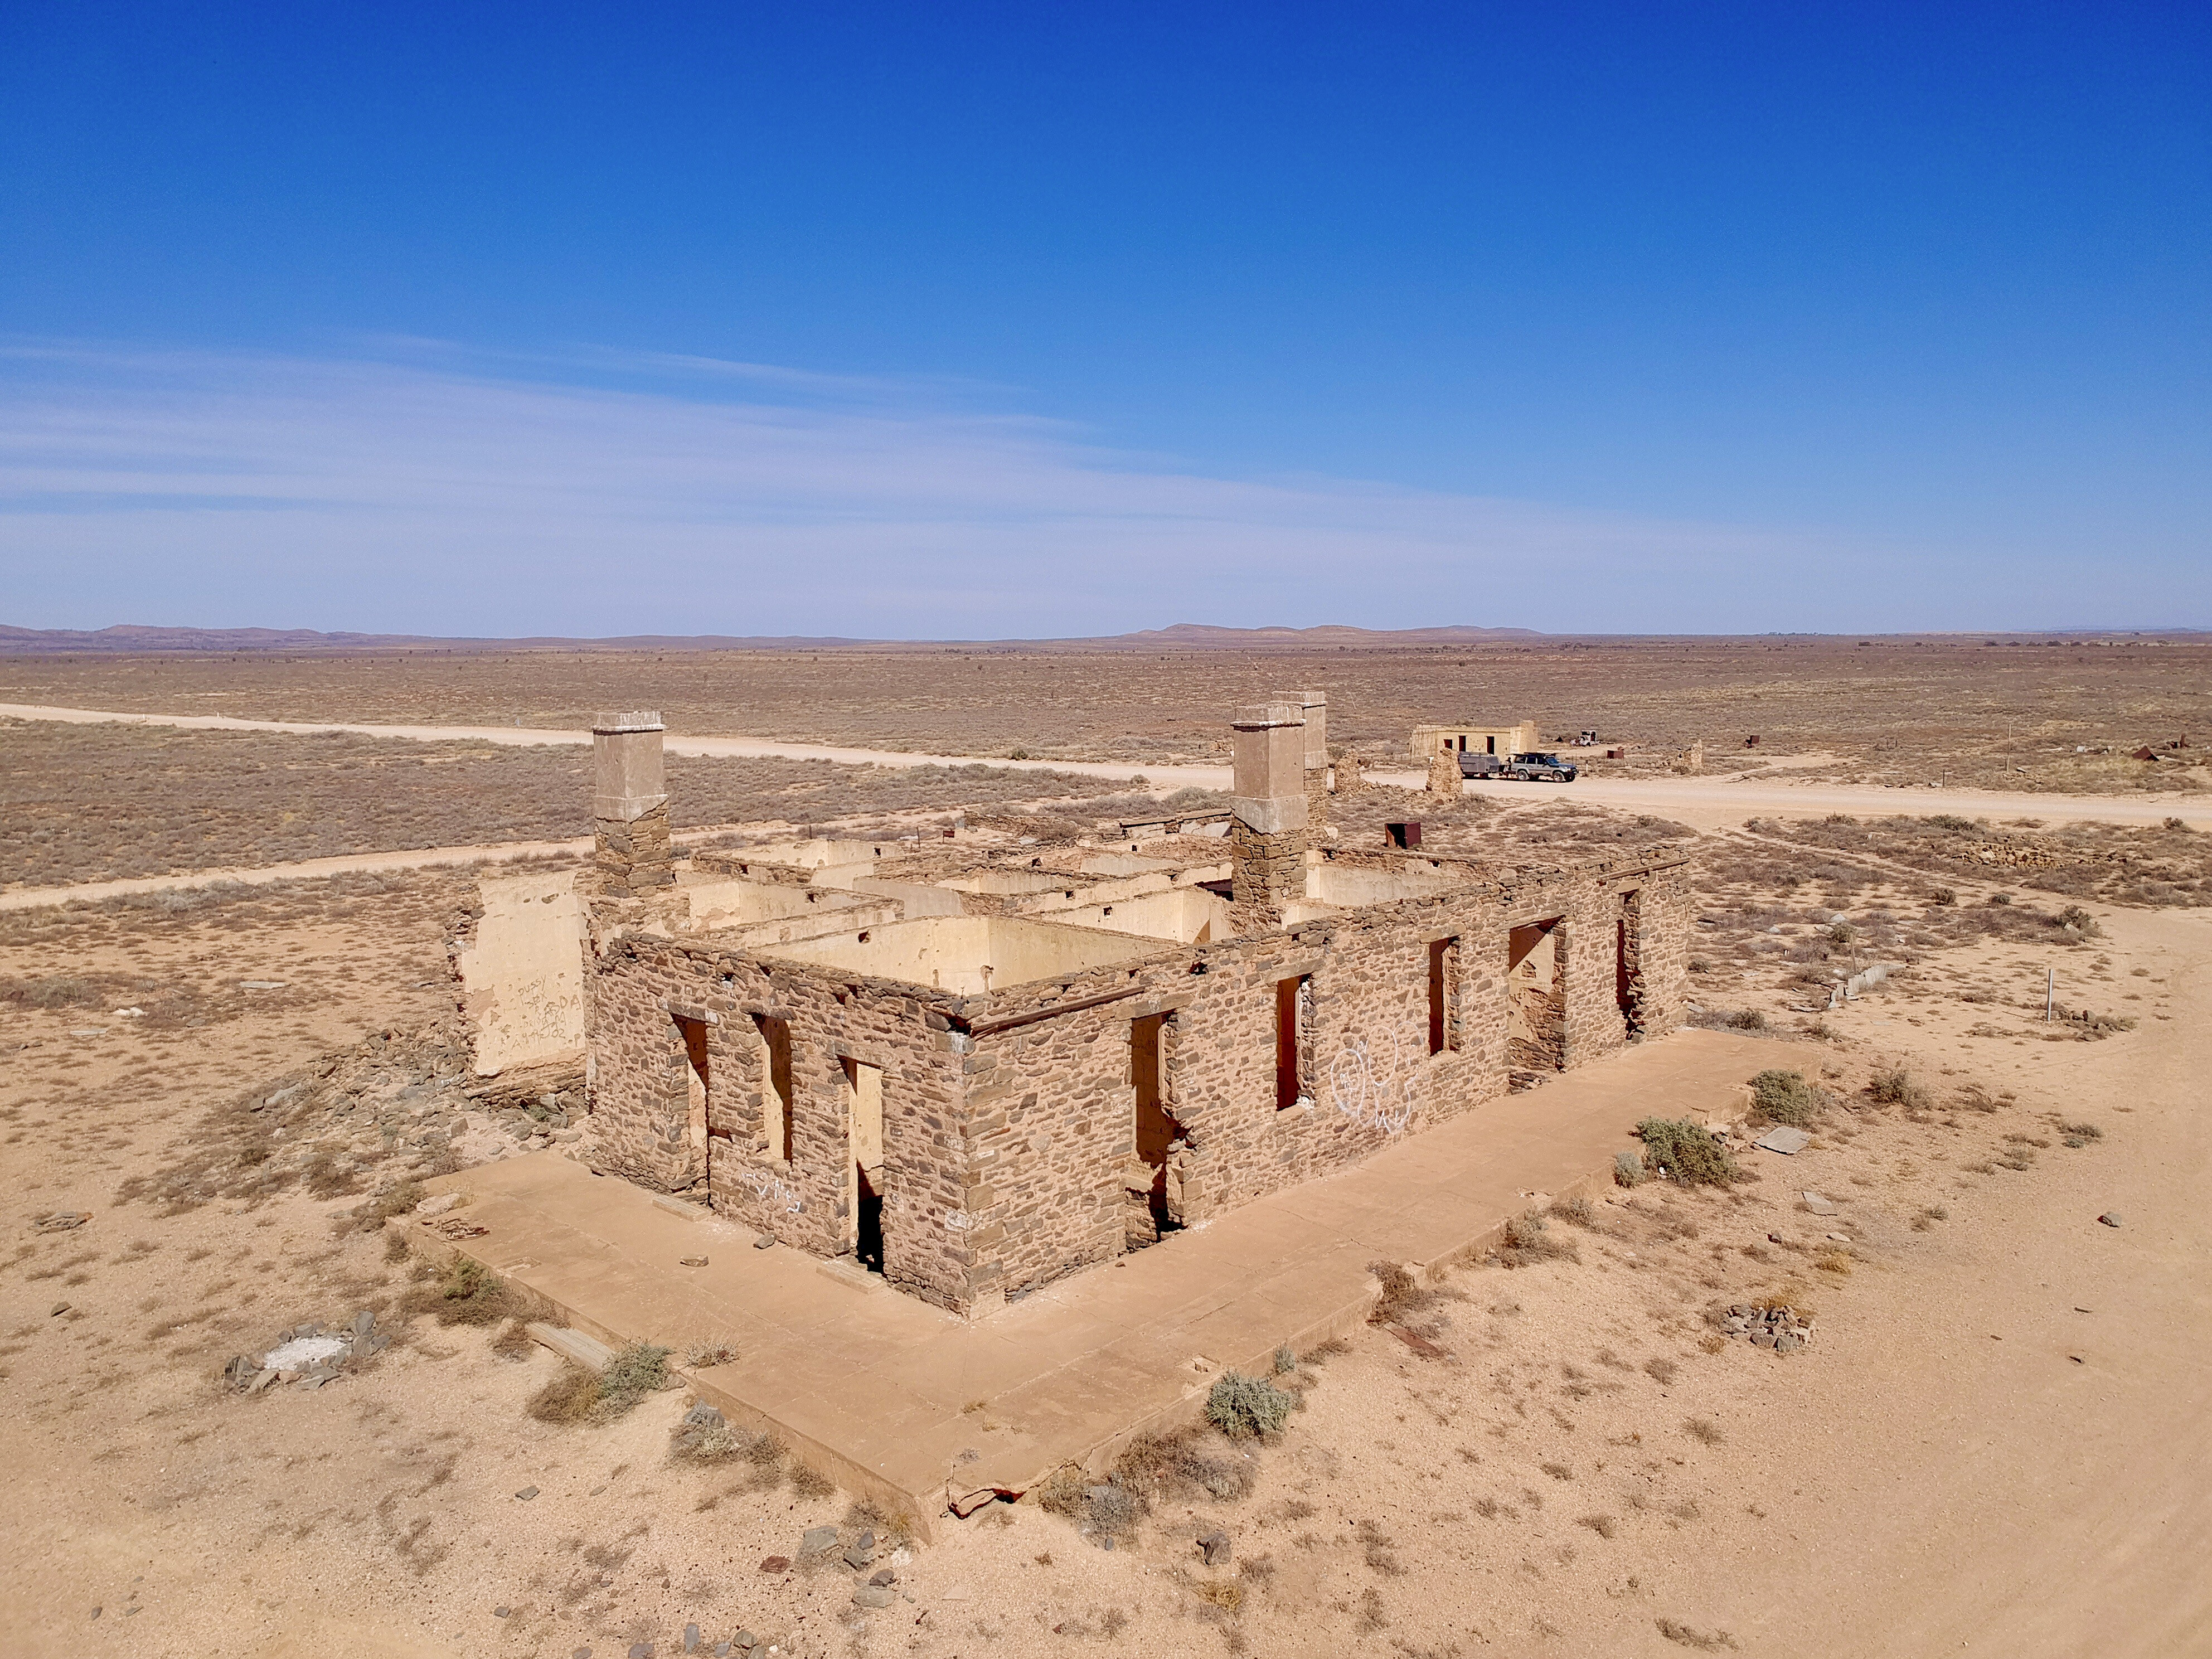
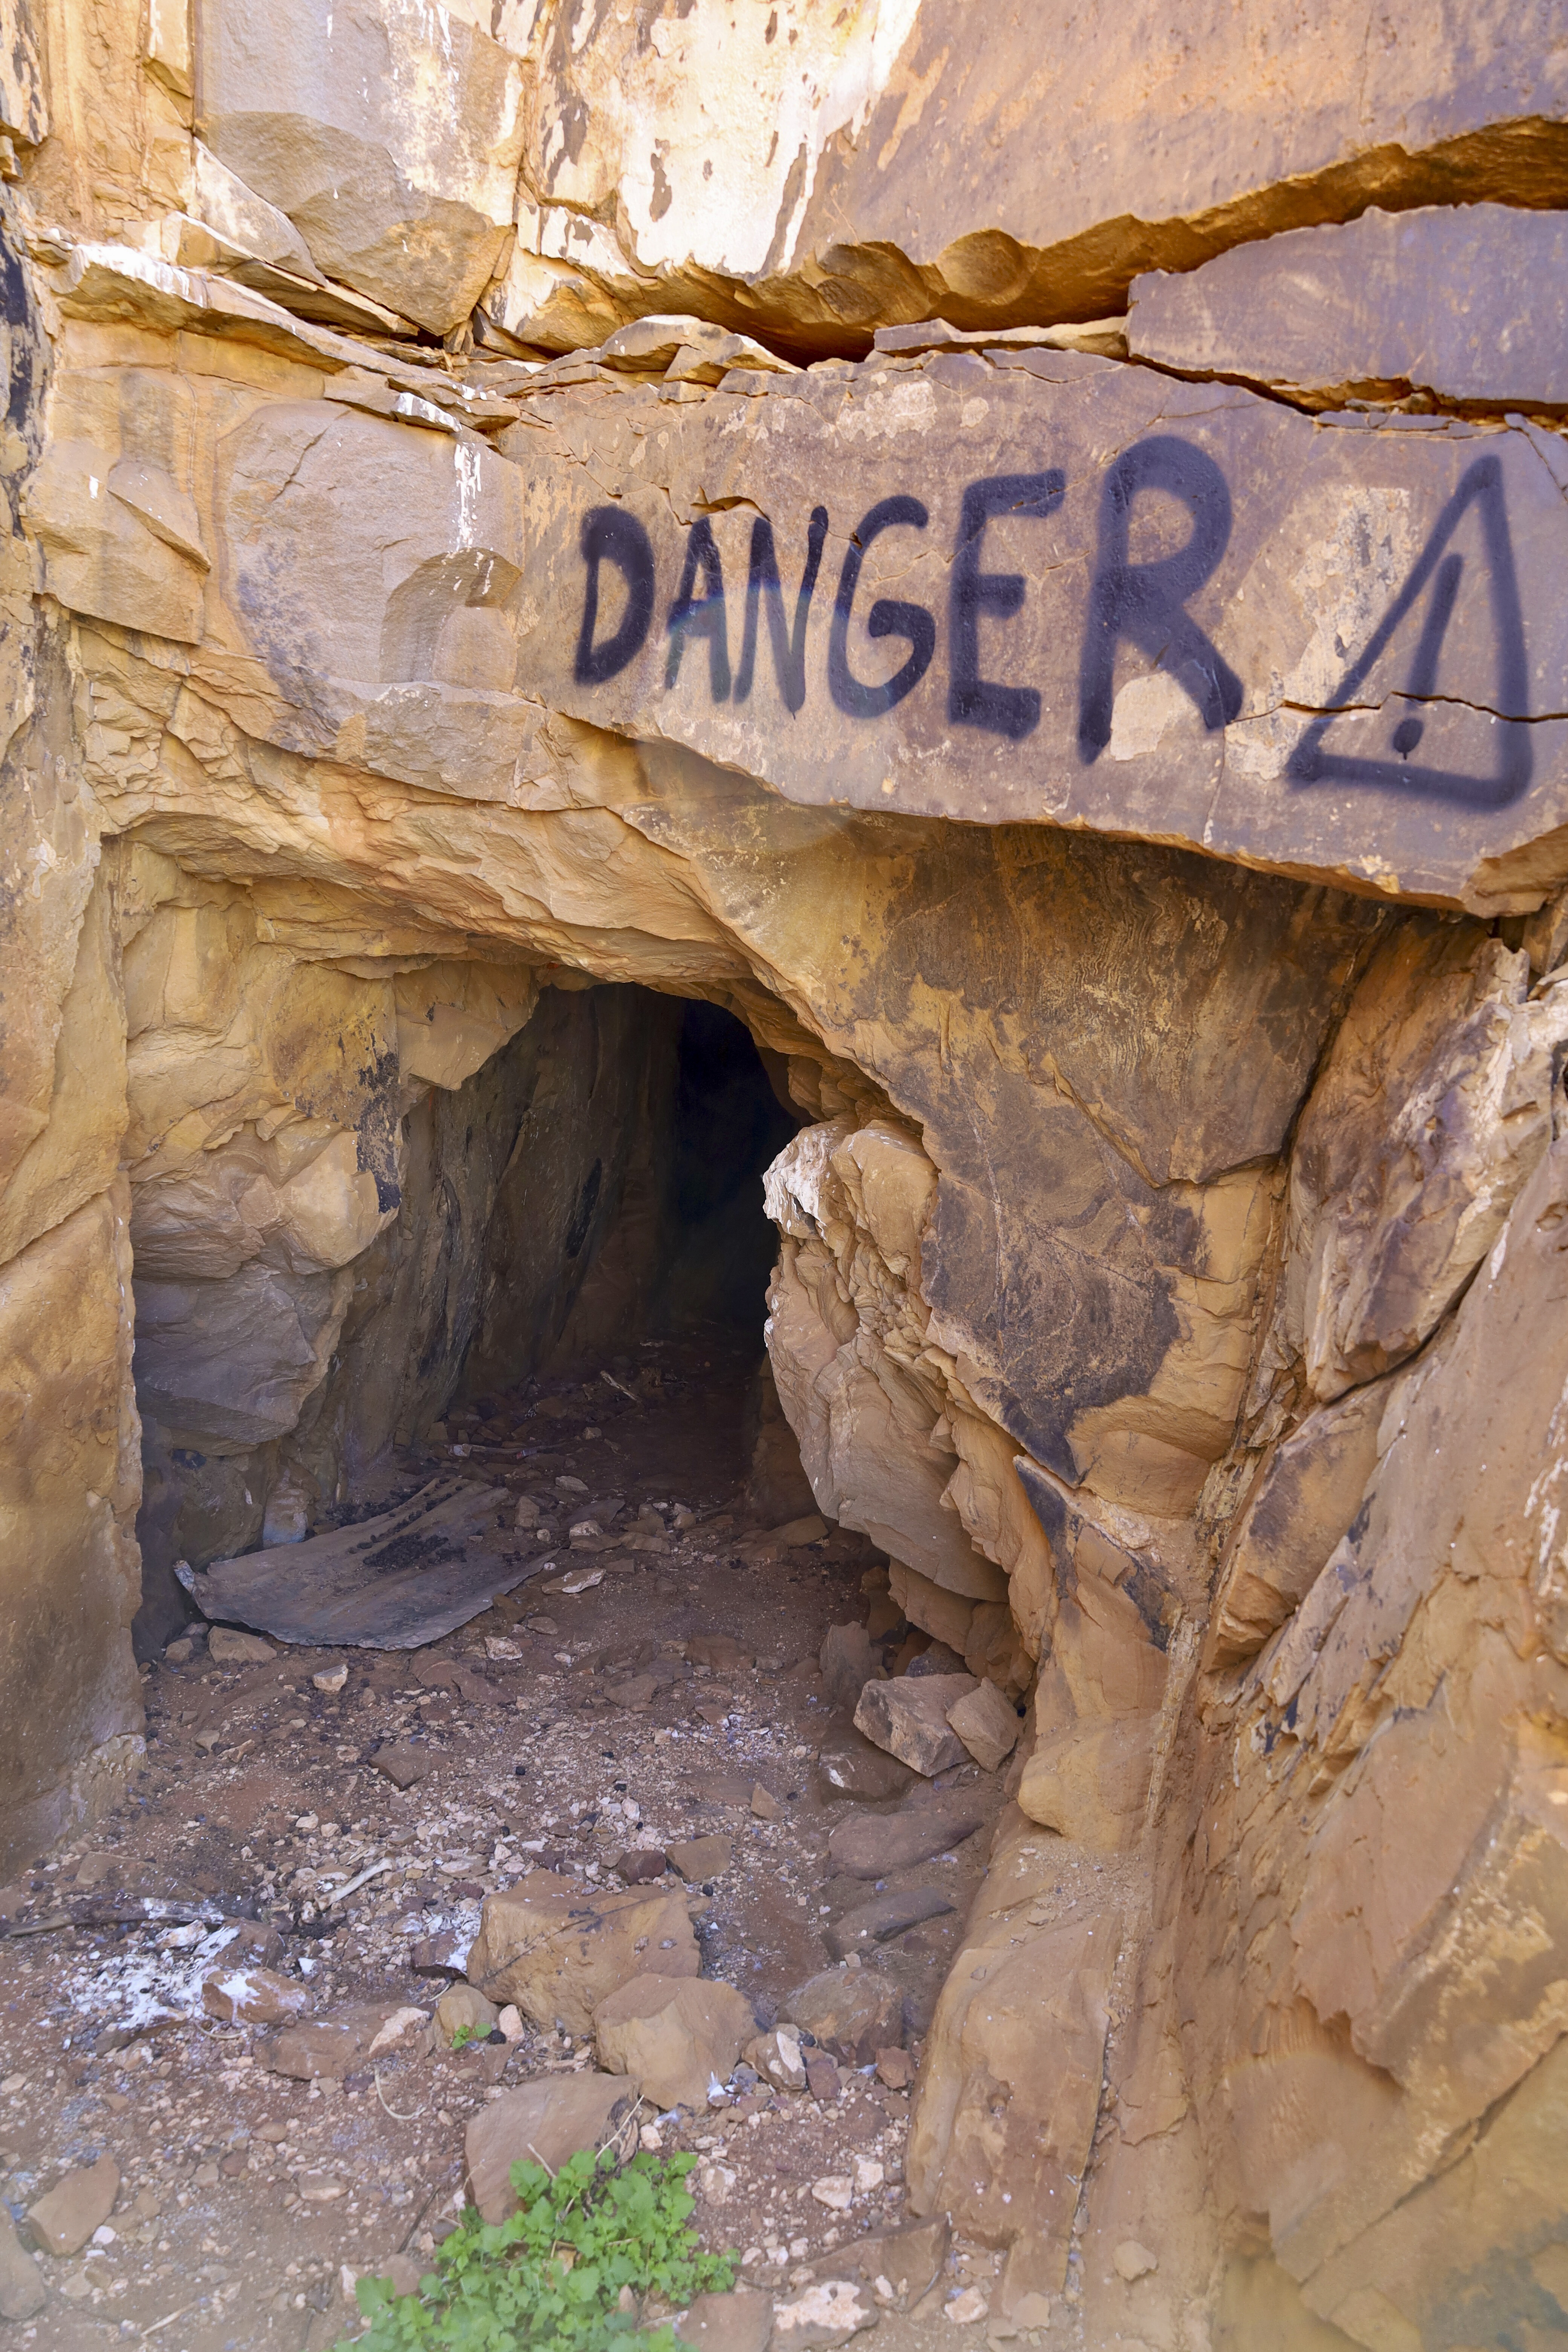
There’s plenty of stonework still around the area including basic shelters, chimney flues, walls and relics scattered about. The main mine, the Alma, can still be found, where documents say it’s more than 500m deep, has 14 different levels and more than 1600m of tunnels – truly impressive. Other mine tunnels can be found, but with warning signs declaring bad air inside – it’s unwise to go in, even though it was tempting.
Down in the gully, the massive low roof that seems to be sitting on the ground actually covers the old water supply, where water run-off was channelled to the undercover tanks from a couple of different areas. Still holding water today, the water supply attracts an abundance of birds and insects.
Like most towns that have steady population growth, two cemeteries were built: a Catholic cemetery near town and a general cemetery away from town in the town common. The entire area was finally abandoned in 1982.
When we finished exploring the area, we tracked north on Tea Tree Road for another hour, hopefully to find a crossroad towards Wilpena and the Flinders. Road conditions were pretty good, with long stretches of desert-like sections, plenty of dry creek beds (these were rough) and small rocky ranges.
We often chatted about being an early explorer in these areas and how tough it would have been climbing up to a range to see more of the same in the distance. Definitely soul-destroying.
Eventually we found a turn-off just past Curnamona Station and swung left on to Martins Well Road, with the Flinders in the far distance. The closer we got to the Flinders, we noticed there were more creek beds, the gums were bigger, and the mountain ranges were more solid. Out here these are known as ‘calcareous plains’, where there are small rises and low hills covered in bladder saltbush, sandhill wattle, desert cassia and a mixture of undergrowth grasses.
Pugilist Hill
Passing the huge Martin Wells Station, we were on the last leg of the ‘shortcut’, with the Chace Range towering beside us to the south.
Our last stop was up to the very impressive Pugilist Hill Lookout. The short, steep track to the top led us to the most amazing 360-degree view towards stunning prehistoric ranges that are claimed to be the oldest rocks in the world, holding many secrets from the past.
Across the landscape below, it was easy to trace where old creek beds were with trails of green gums that have been soaking up the water for many years, and it was easy to see other travellers pass by with their trails lingering without a breeze to disperse the dust.
Our journey was nearly over, as it was only a few kilometres to Flinders Ranges Road and to camp. While the shortcut got thrown out the window because we spent a day at the ruins, it definitely was great exploring the goldfields and getting off the beaten track.
Top 5 things to see and do
01: Yunta
The last town on the SA side of the Barrier Highway before hitting the NSW border and Broken Hill. Yunta lies on the T-intersection with Tea Tree Road, and following that track was a new shortcut to our Flinders Ranges-Wilpena Pound destination. The town has a hotel, two roadhouses (one with caravan sites), a post office, an airstrip, and a rest area with public toilets located opposite the hotel.
02: Waukaringa
Very much a ghost town, the former gold-mining town of Waukaringa was abandoned in the 1950s and officially ceased to exist in 1982, 96 years after it was established. The former Waukaringa Hotel is one of several remaining ruins, with more visible in the nearby goldfields. Waukaringa is on Tea Tree Road, 35km from Yunta.
03: Ikara-Flinders Ranges NP
The Flinders Ranges is the biggest mountain range in South Australia, and a bucket-list item to visit. The area is noted for its stunning scenery, wildlife and classic outback vistas, with the national park offering several camping sites (all with toilets, bar one) where park entry and camping fees apply.
04: Wilpena Pound
The natural amphitheatre that is Wilpena Pound is among Australia’s most famous geological wonders, and is located in the heart of the Ikara-Flinders Ranges National Park. It is accessible via a sealed road and is the highest section of the Flinders Ranges, dominated by St Mary Peak at 1171m. The popular 7.8km Wangara Track has panoramic views across Wilpena Pound’s interior.
05: Pugilist Hill
Not far from the Flinders Ranges NP and Wilpena Pound, turn right off Flinders Ranges Way on to Martins Well Road and to the Pugilist Hill Lookout. From here are fantastic views of the Chace Range to the south and the ramparts of Wilpena Pound to the north. The drive to the lookout follows a short and steep track to the top, with fantastic 360-degree views.
Once again, the good old USA shows us not only how it is done but how hard it can be to modify four-wheel drives in Australia in order to keep on the right side of the law.
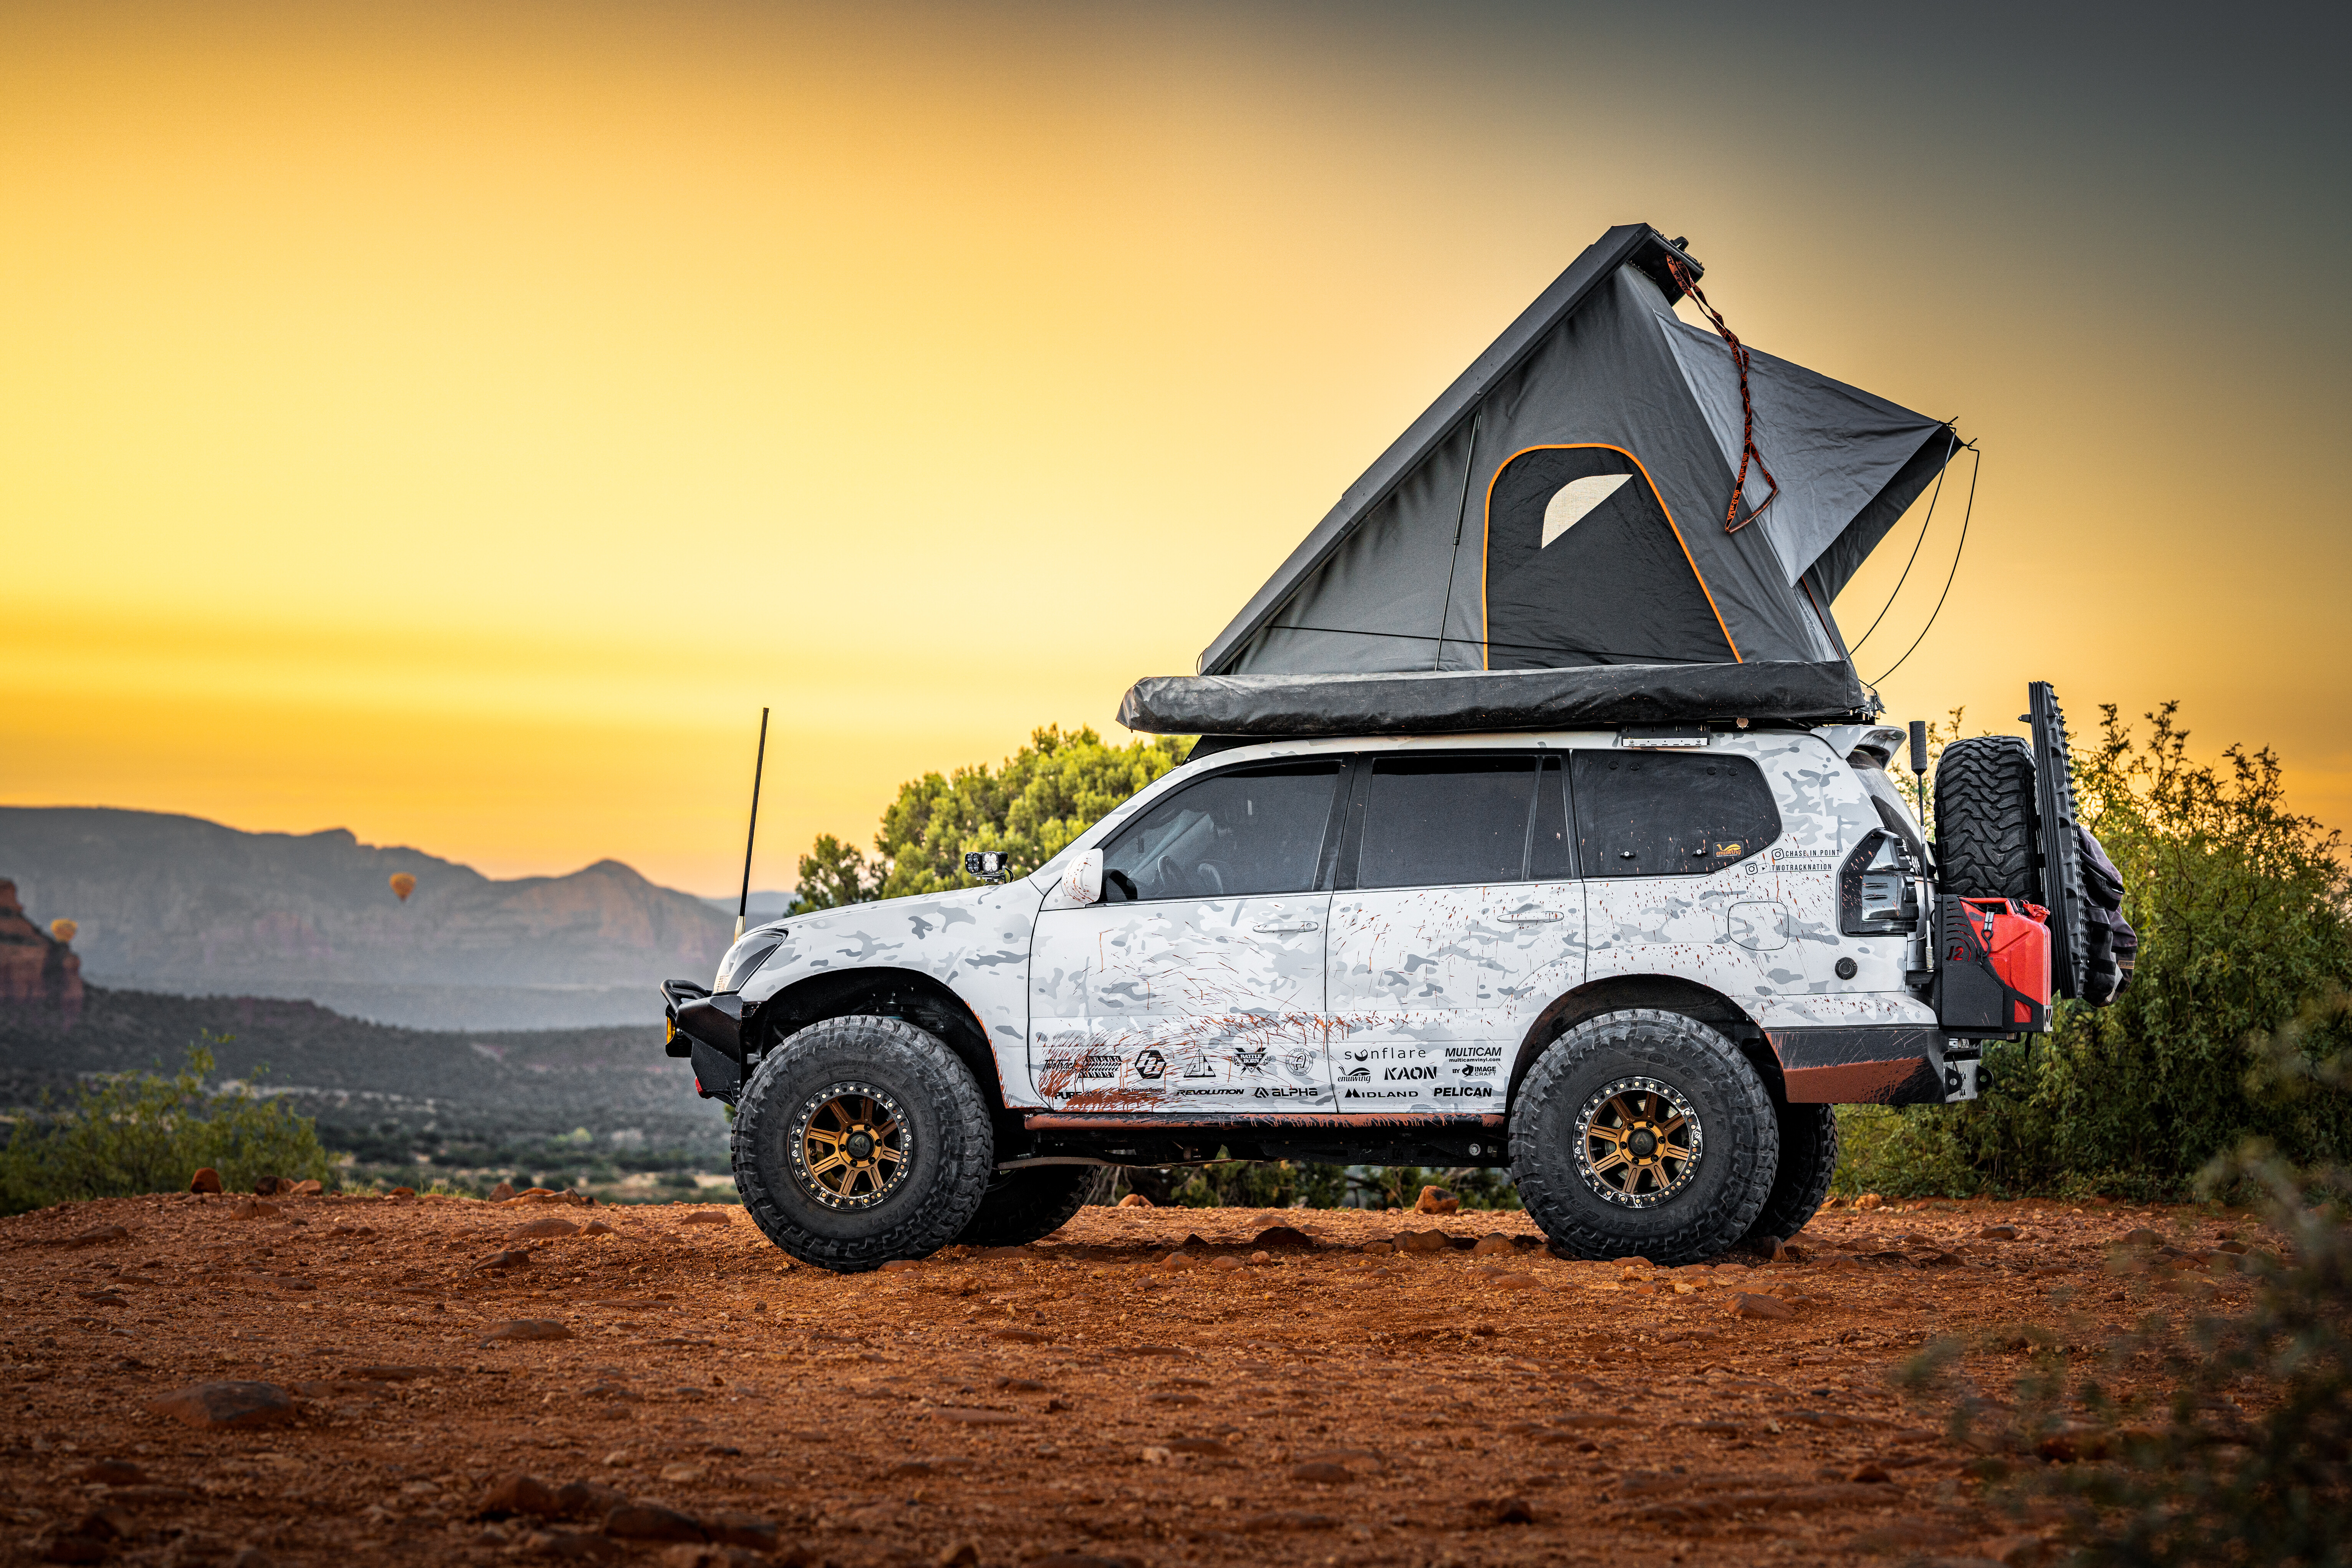
When was the last time you saw a J150 Prado fitted with 37-inch tyres driving the streets of Sydney? I’ll answer that for you, probably never. In America, where vehicle modification laws appear far more relaxed, this Lexus is the result of building what you want.
This Prado, sorry, Lexus GX470, is Chase’s first 4WD, and I don’t know many people who can say their first fourby was a V8-powered wagon on 37s. He decided to get into the game after messing around with a 2WD Toyota 4Runner, spending 15 years before that drifting his Nissan S13 which is still buried up the back of his garage.
When asked about why he decided to build up a Lexus GX470, Chase said: “I wanted a reliable mid-size SUV for tight trails in Arizona, where I live, that was capable of getting me to some of the harder-to-reach spots in the south-west.
“All Lexus GX470s come with the extremely reliable 2UZ-FE V8 and are full-time 4WD with Torsen centre locking differential. Finding a fourth-gen 4Runner with the same powertrain and low miles was extremely hard to do at the time as most of them came with a V6. Also, Lexus tends to be cared for better and not abused as much,” Chase tells us.
“I wanted a reliable mid-size SUV for tight trails in Arizona, where I live, that was capable of getting me to some of the harder-to-reach spots in the south-west”
“I bought this one in absolute mint condition, with only 99,000 miles on the clock. I managed to buy the nicest one I could find.”
So, while it probably can’t be done legally in Australia, this is a damn good indicator that it can be done, and done well. Besides, it just looks cool. Let’s take a closer look at one of the most insane Lexus GX470s we’ve ever seen.
Suspension mods
A wild Lexus such as Chase’s is going to need some significant suspension modifications to fit the 37s, as well as make them work off-road. Chase has done the work himself too, which is quite an achievement. The vehicle has been lifted approximately three inches using a range of suspension components including Dobinson MRR/MRA long-travel shock absorbers from a Prado 150.
On the front end, Chase has selected Alpha Foxtrot Designs upper and lower control arms in long-travel configuration. These were chosen to offer a reasonable width off-road, whilst still allowing 11 to 12 inches of travel. The hub was also moved forward 1.5 inches in an attempt to get the tyre moved away from the factory body mount.
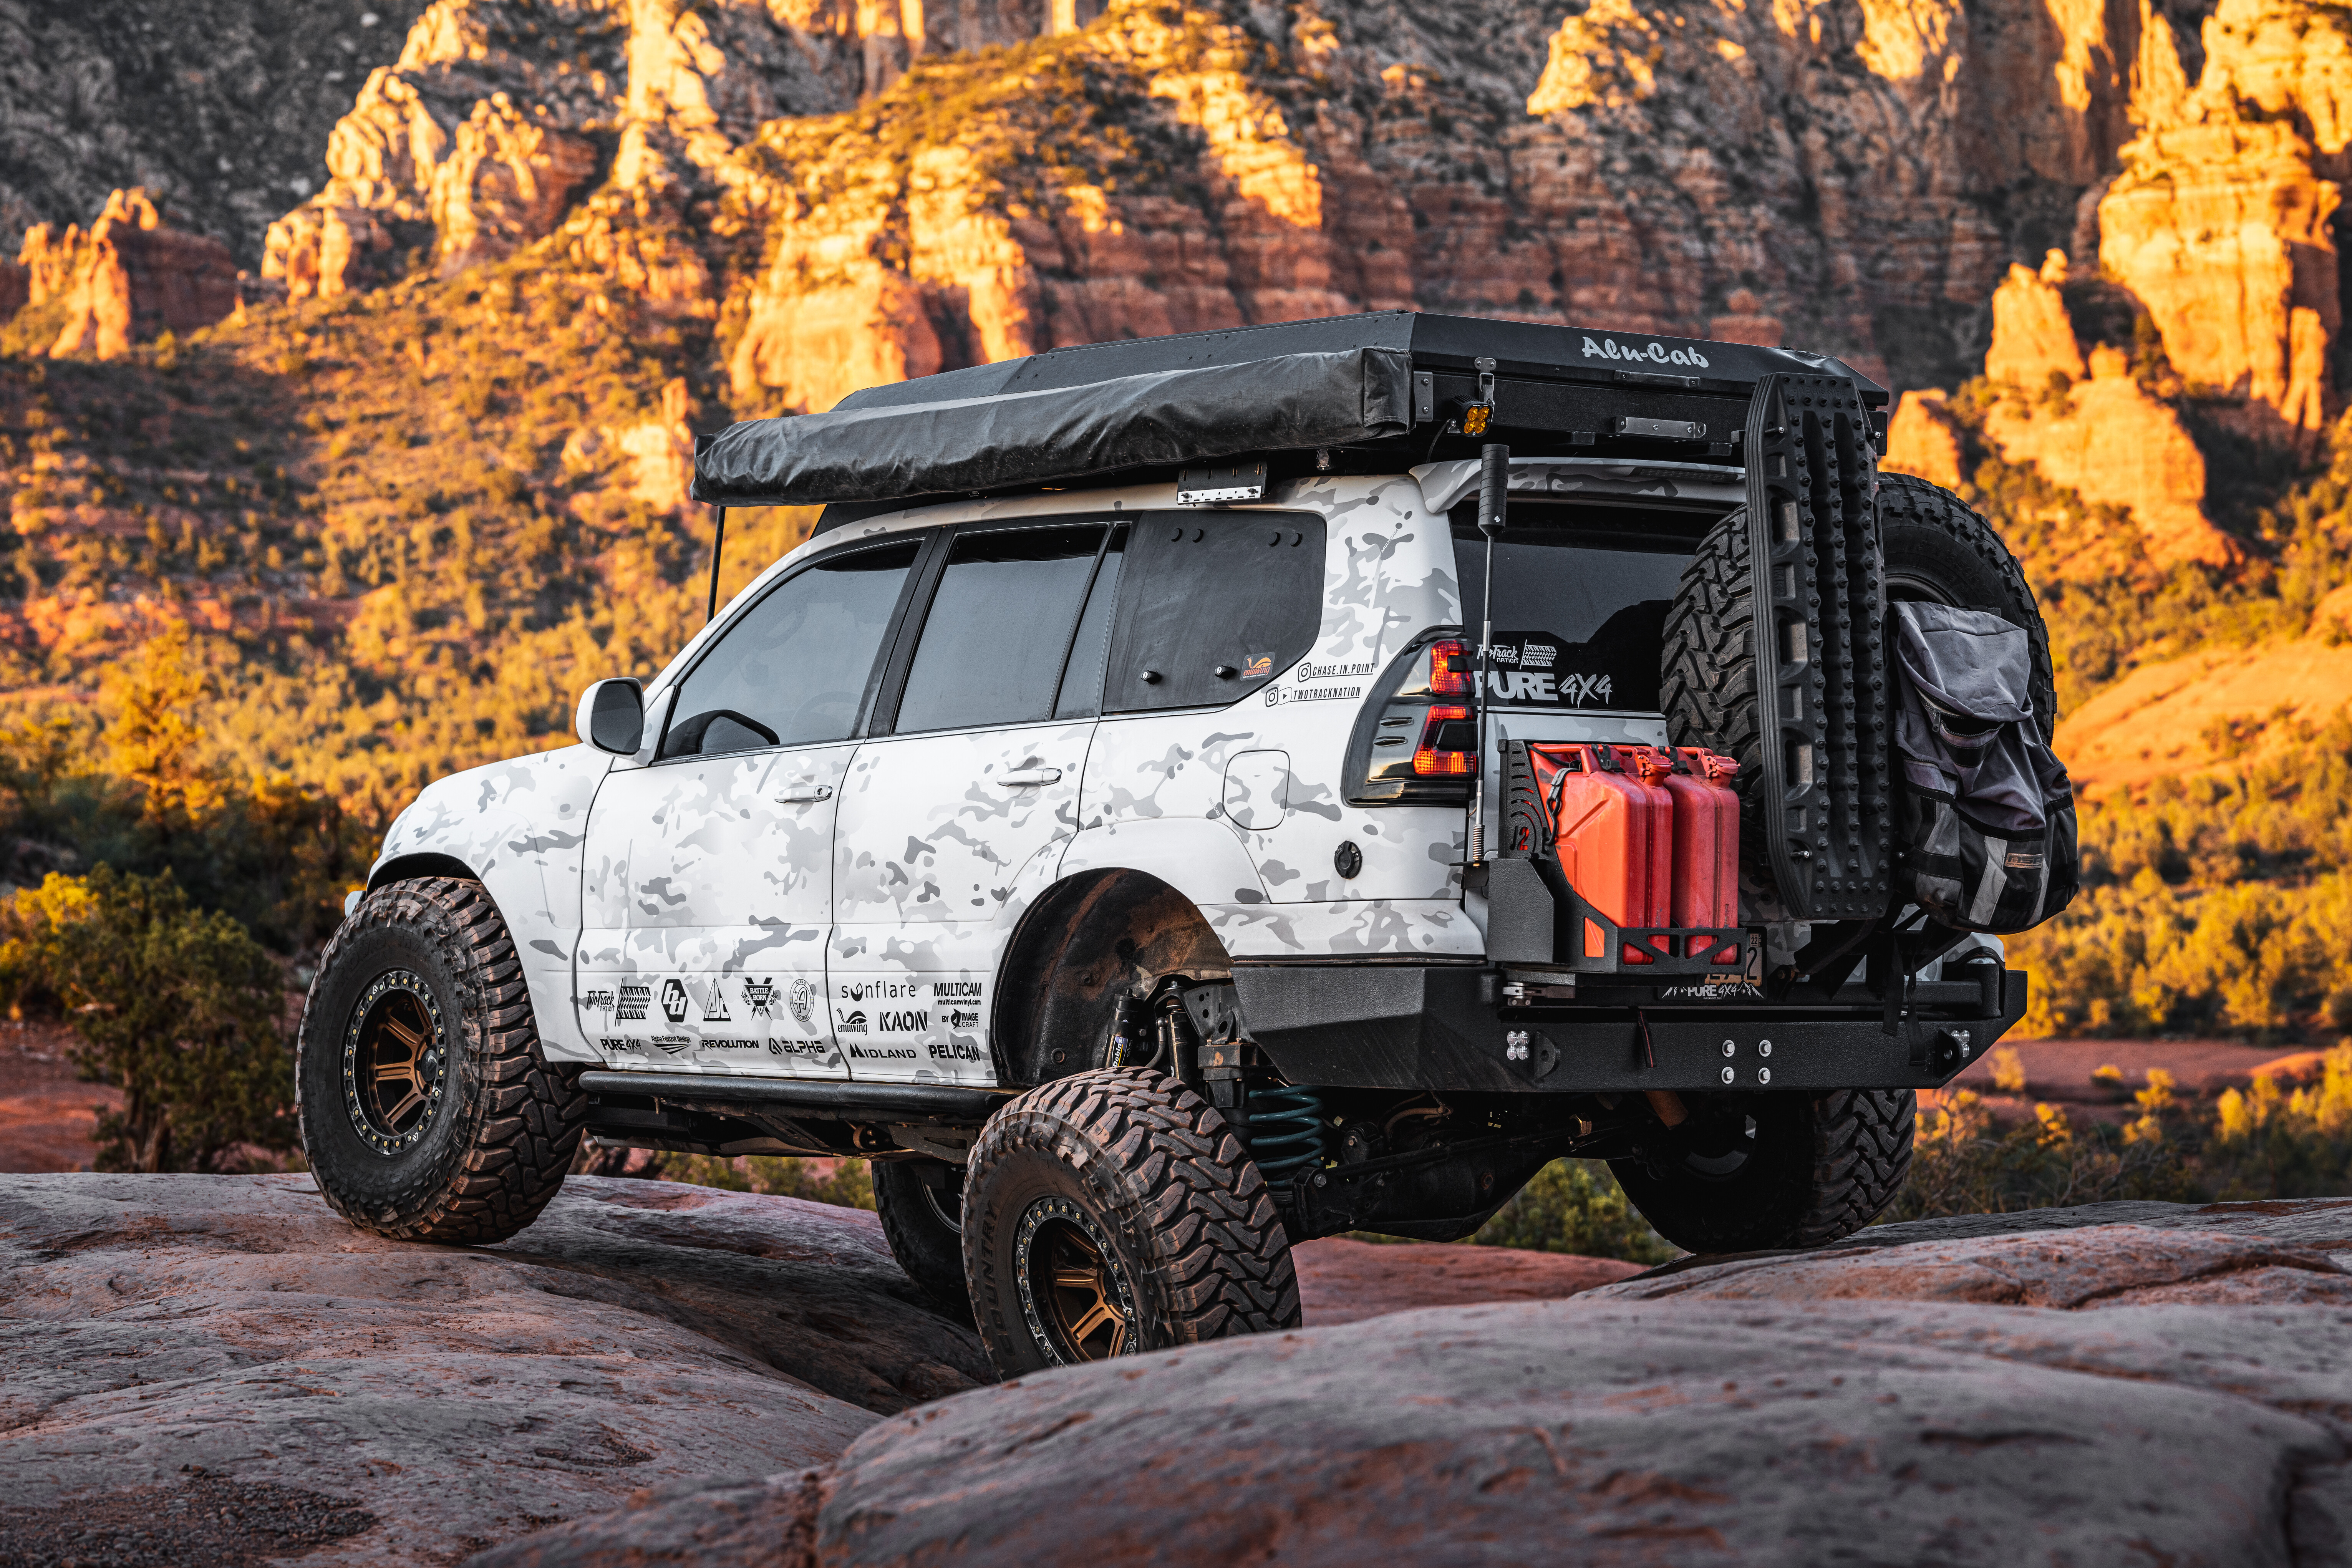
Custom knuckles have been fitted, utilising one-inch Uniballs for the upper and lower ball joint. YotaMafia 12-inch limiting straps and DuroBumps bump stops round out the front-end suspension, other than the use of two-inch wider axles to reach the additional width provided by the long-travel kit installation.
At the rear, Chase installed a larger 8.2-inch axle from an FJ Cruiser with factory E-Locker (regeared to 4.88 with an ARB air locker in the front). It also runs Dobinson MRR/MRA shocks as well as a Dobinson adjustable Panhard bar.
As the Lexus originally rolled off the production line with airbag suspension, Chase ditched that to run coil springs using Dobinson long-travel progressive springs and a Southern Style OffRoad spring conversion kit, before adding DuroBumps bump stops to complete the package.
Fitting 37s
It may come as a surprise, but fitting 37s to a Lexus GX470 is a bit of a mission. However, there’s nothing that can’t be achieved with an angle grinder, a few talented mates and a positive attitude.
When asked about those monster 37×13.5R17 Toyo Open Country Mud Terrain tyres mounted on ALPHAequipt 17×10 bead-locked wheels, there’s no surprise this took a bit of work.
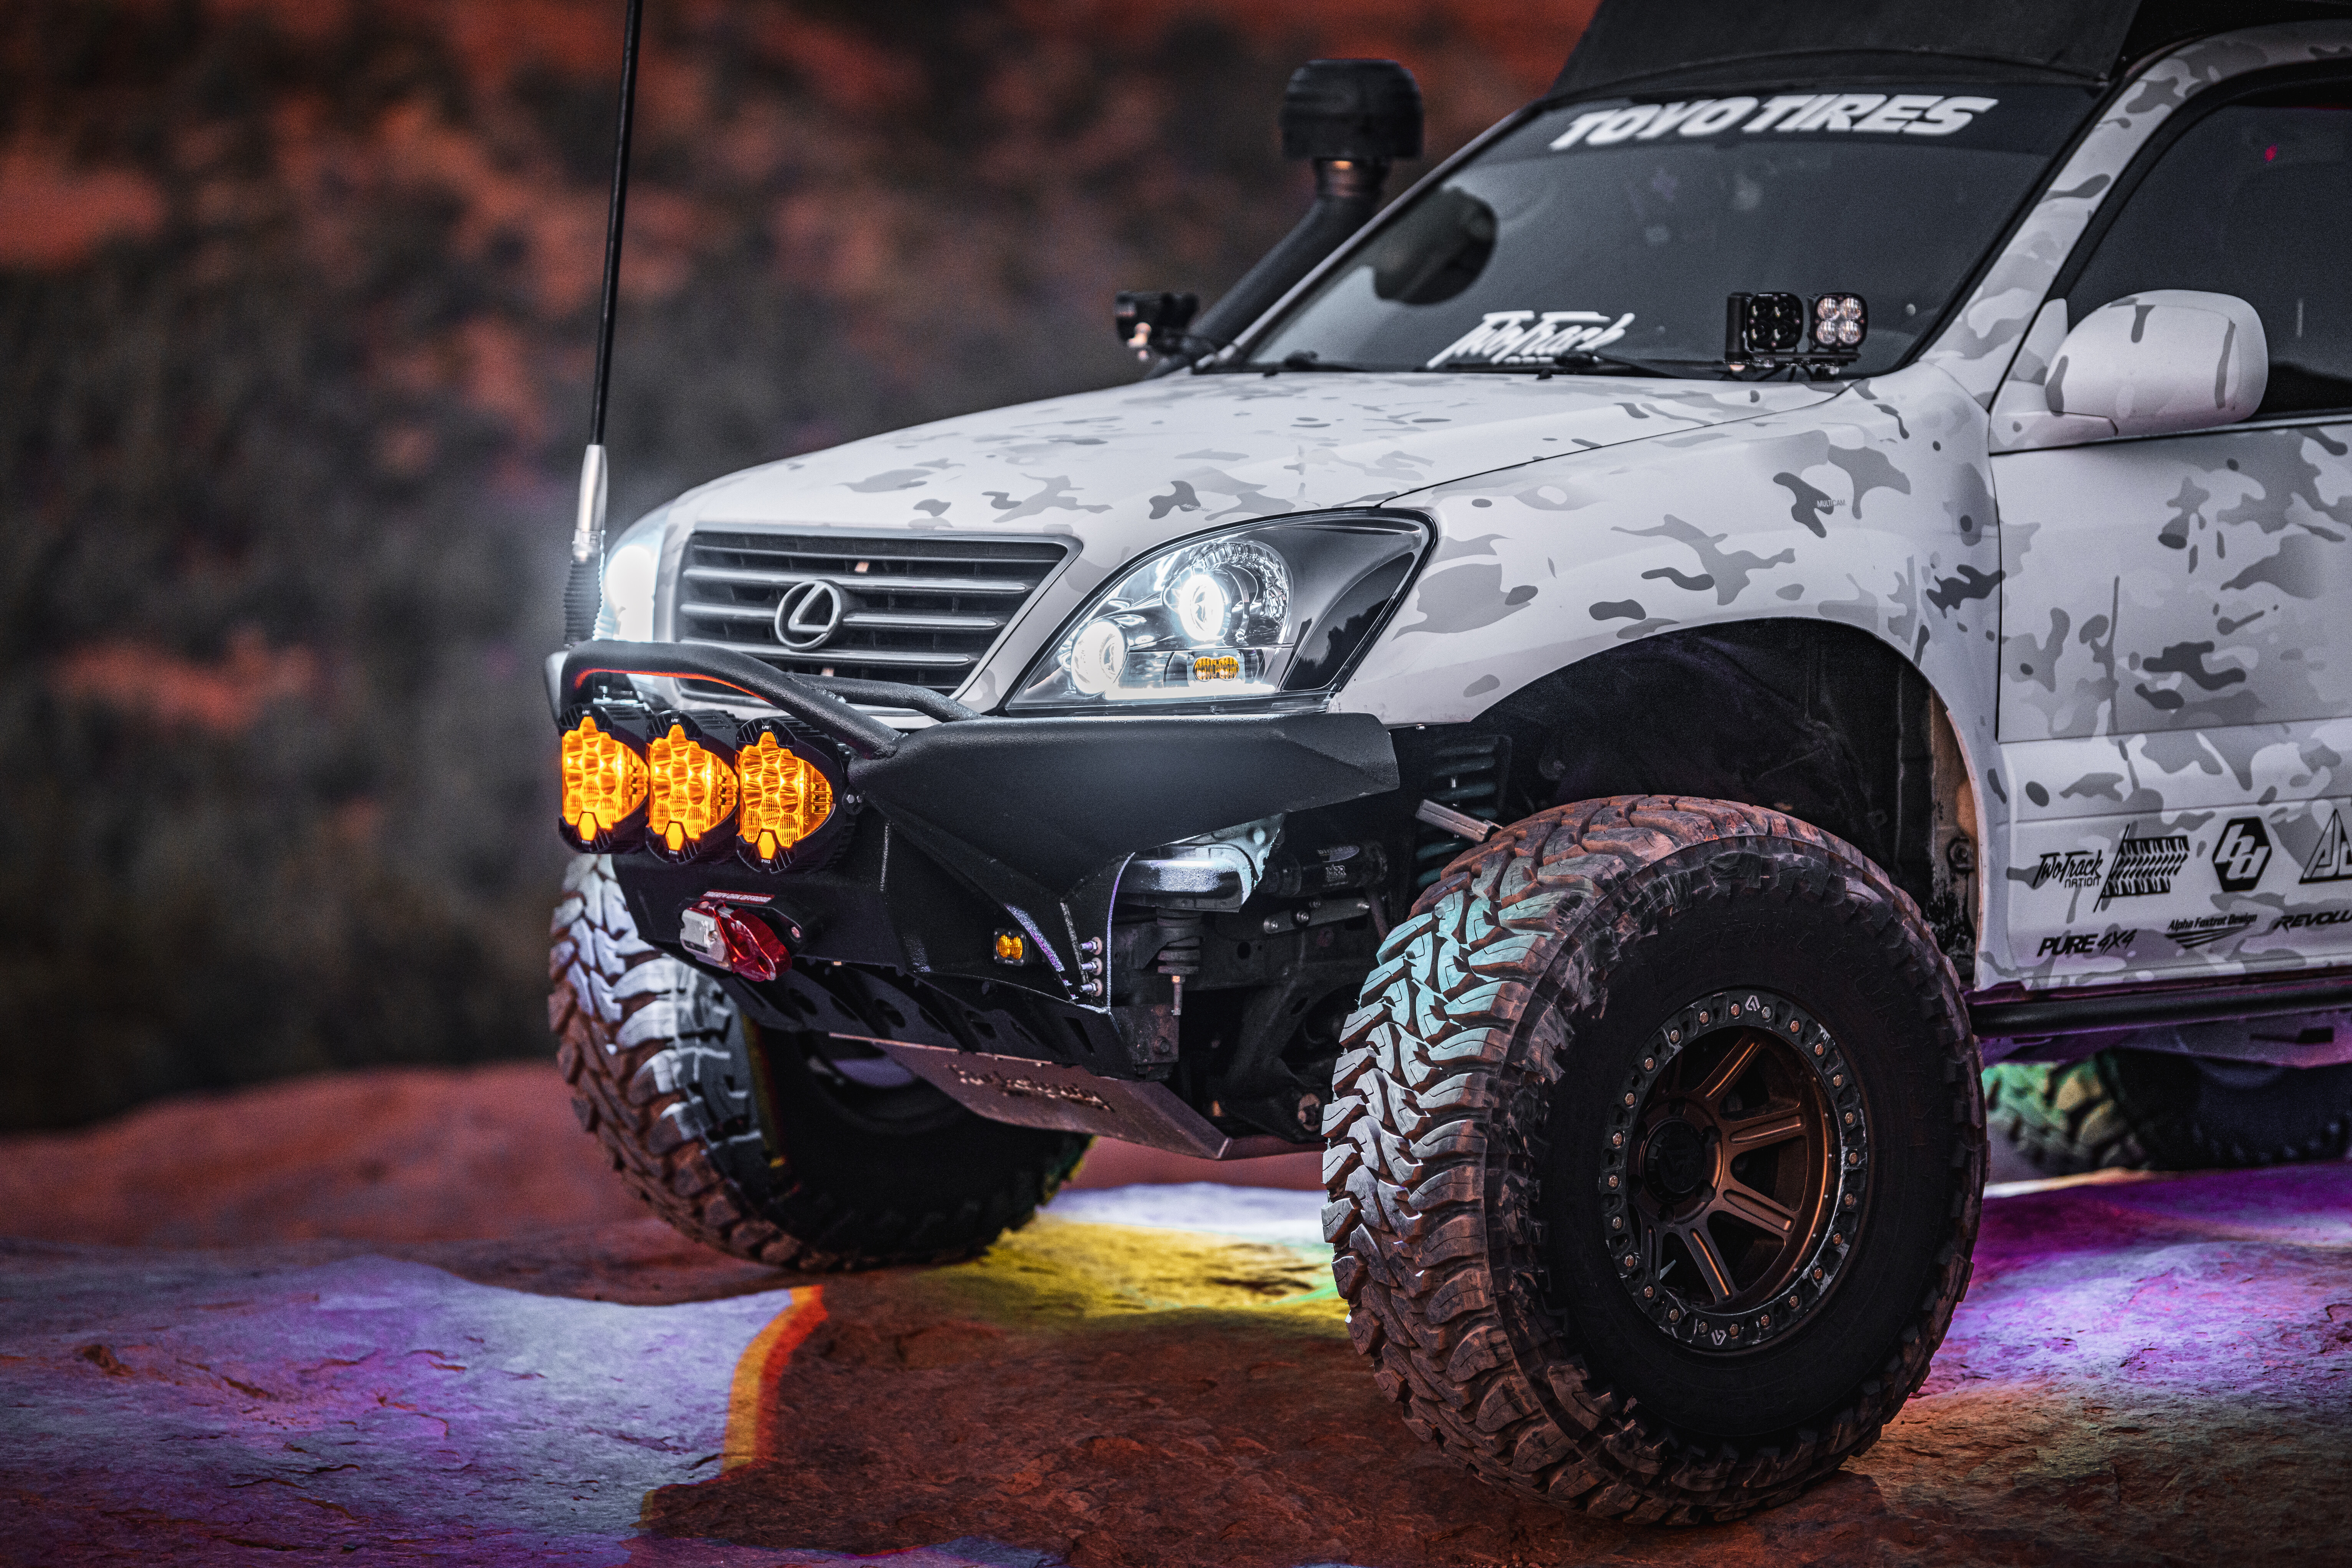
“Fitting the 37-inch tyres was a bit of a challenge,” Chase admitted. “I clearanced a lot of the body pretty well in the driveway, but out on the trail I ended up having some issues with the rear plastic guards and front bumper that required some trail trimming.
“To fit 37s, both the front and rear wheel arches have been tubbed/modified to clear at full flex with no body lift. The bottom door trim was removed to clear sliders, and the front fenders are also fibreglass wide fenders from McQueen Fiberglass that integrate the Dobinson snorkel seamlessly into the fender and provide additional clearance for larger tyres.”
Bar work and protection
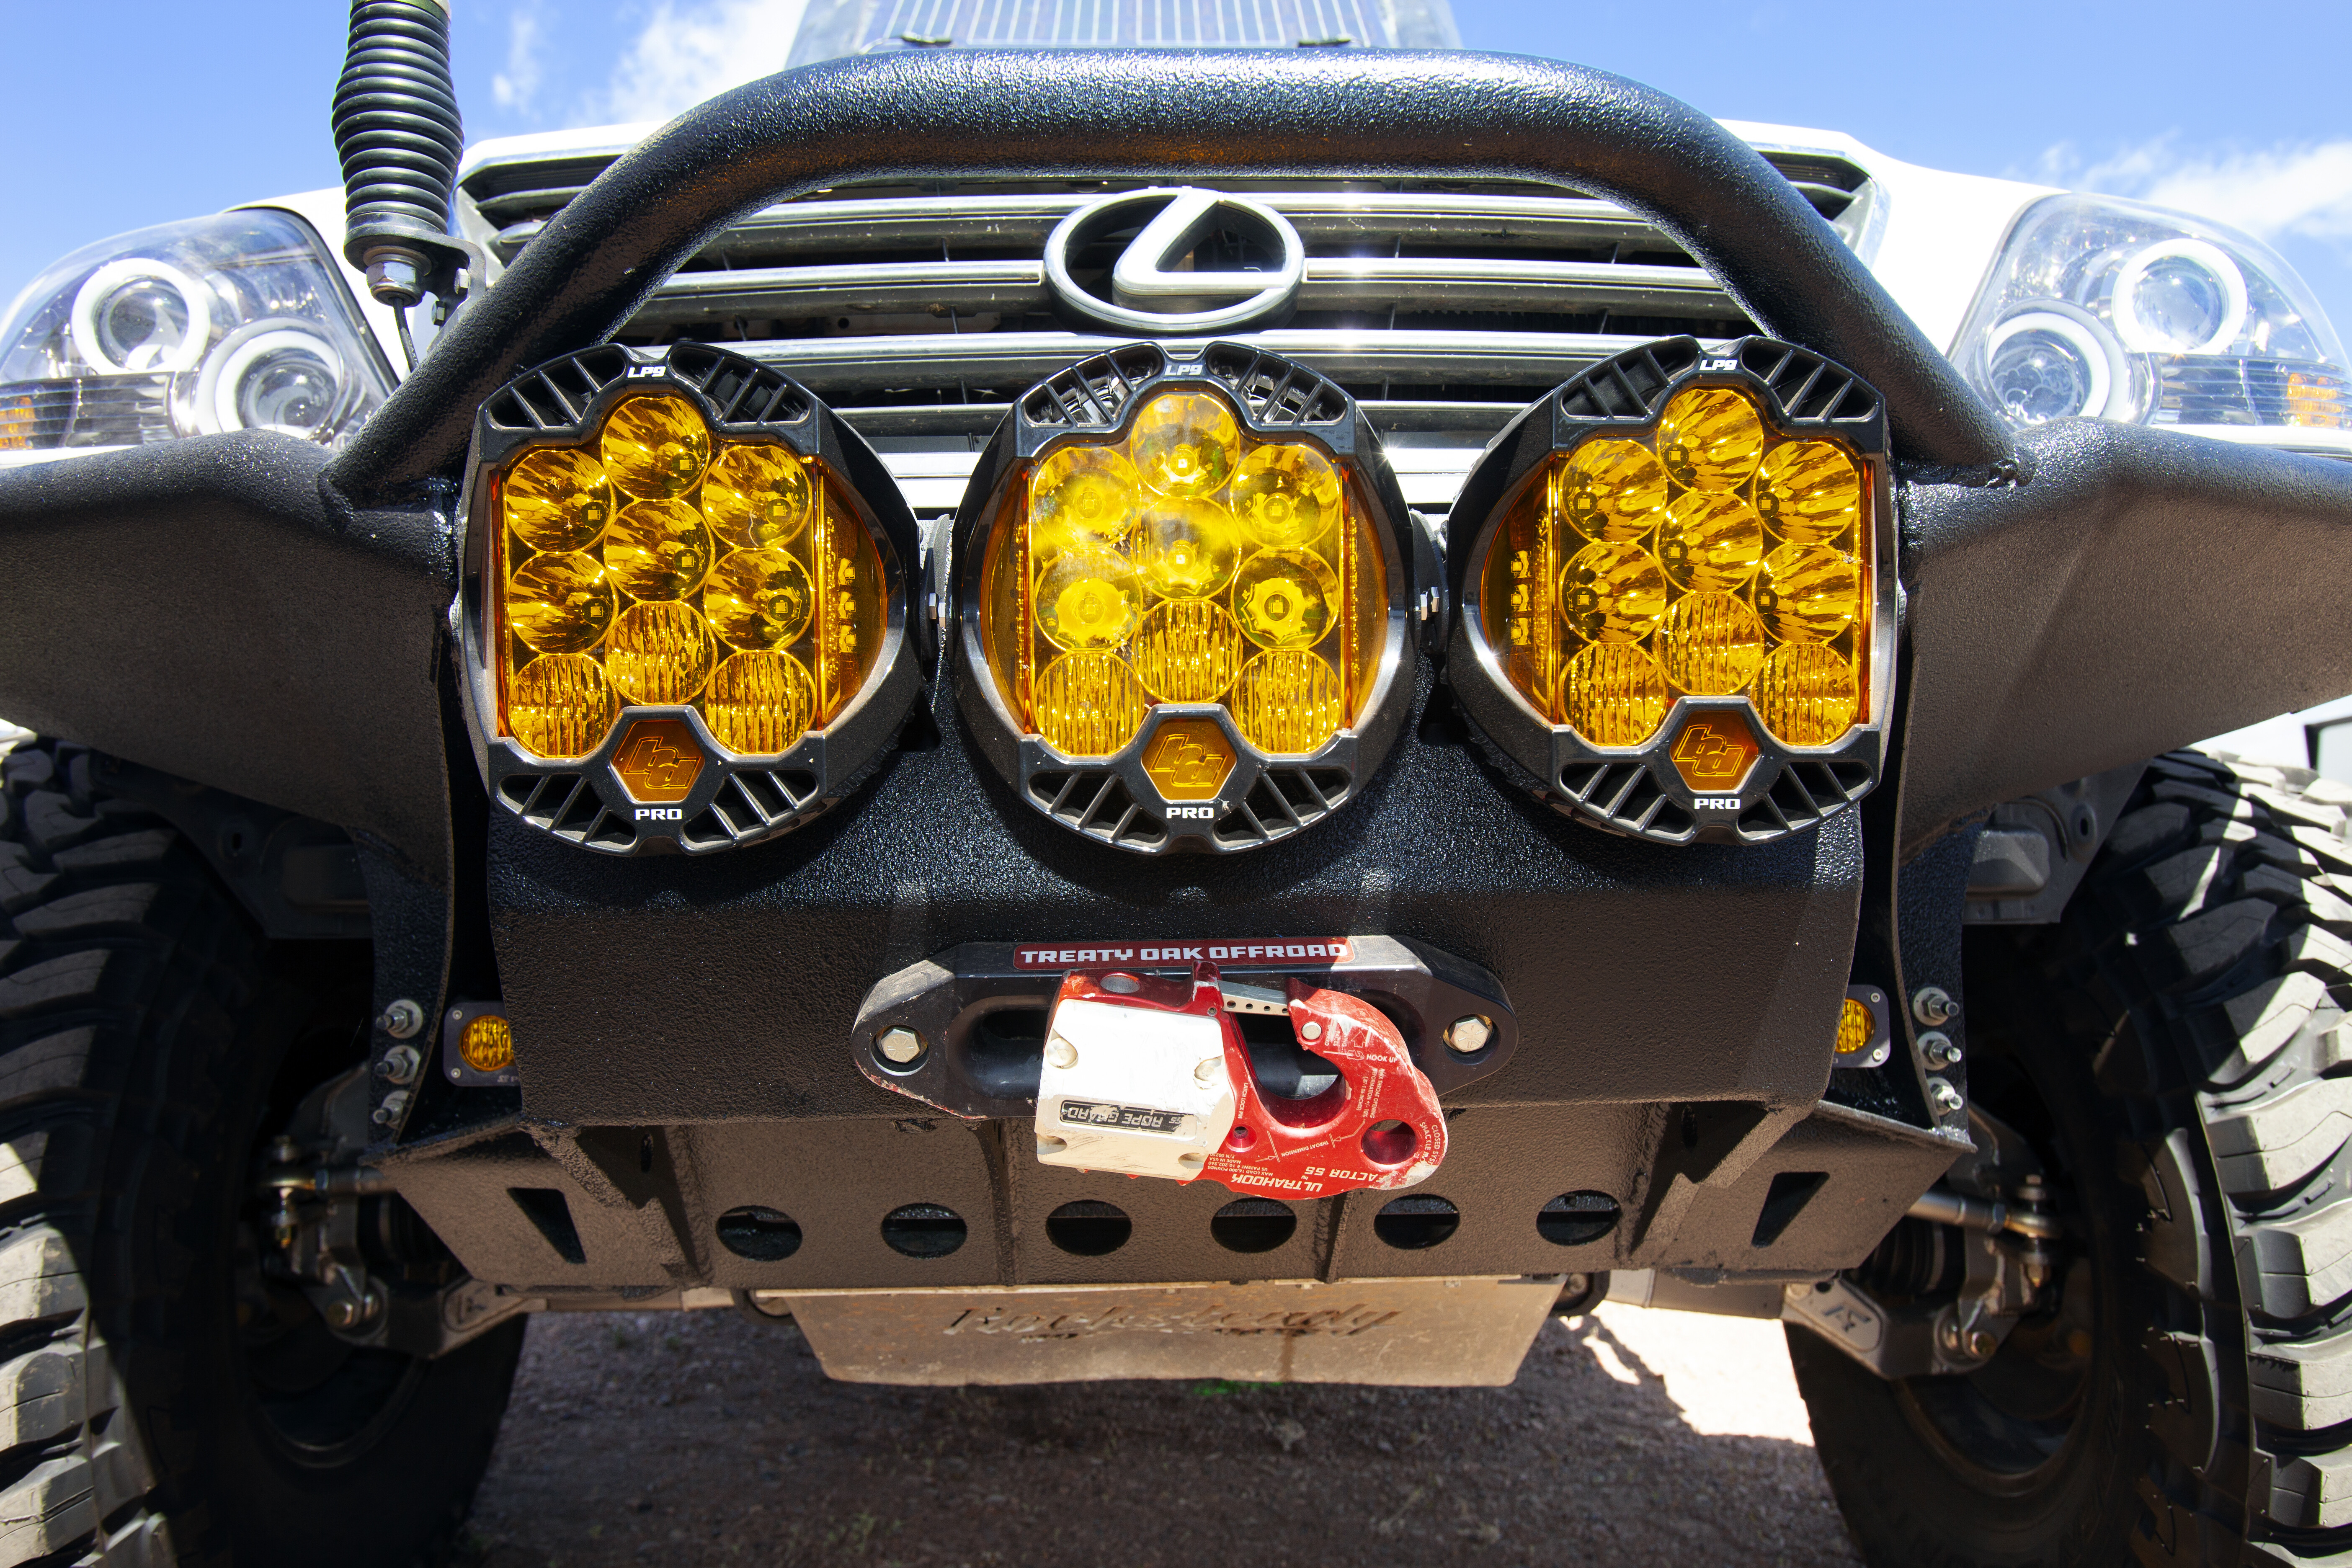
Providing protection to the front of Chase’s Lexus GX470 is a 4X4LABS bumper kit, which Chase assembled, welded and Raptor-Lined together himself at home. Once the Raptor had dried, he also bolted up a WARN Zeon 12-S winch for added peace of mind.
Rock sliders were then fitted, which were supplied by RRW and are welded to the frame of the Lexus. At the rear of Chase’s vehicle, he decided to install a Coastal Off Road weld-together bumper, with a single swing-away arm Chase designed with 4X4LABS that not only swings out but also down.
Underneath Chase’s Lexus, you’ll spot ¼-inch-thick alloy skid plates from Rocksteady Motorsports, which Chase mentions are well-worn these days. There’s also a fuel-tank skid plate and rear differential protection from C4 Fabrication, which Chase mentions have been fabricated from 3/16-inch steel for extra beef.
12-volt set-up
To get this 12V party started, Chase has a total of five batteries in his Lexus – yes, you read that right. There are four 100Ah Battle Born heated lithium batteries in the back providing 400Ah of lithium grunt, as well as one 100Ah AGM battery for starting duties.
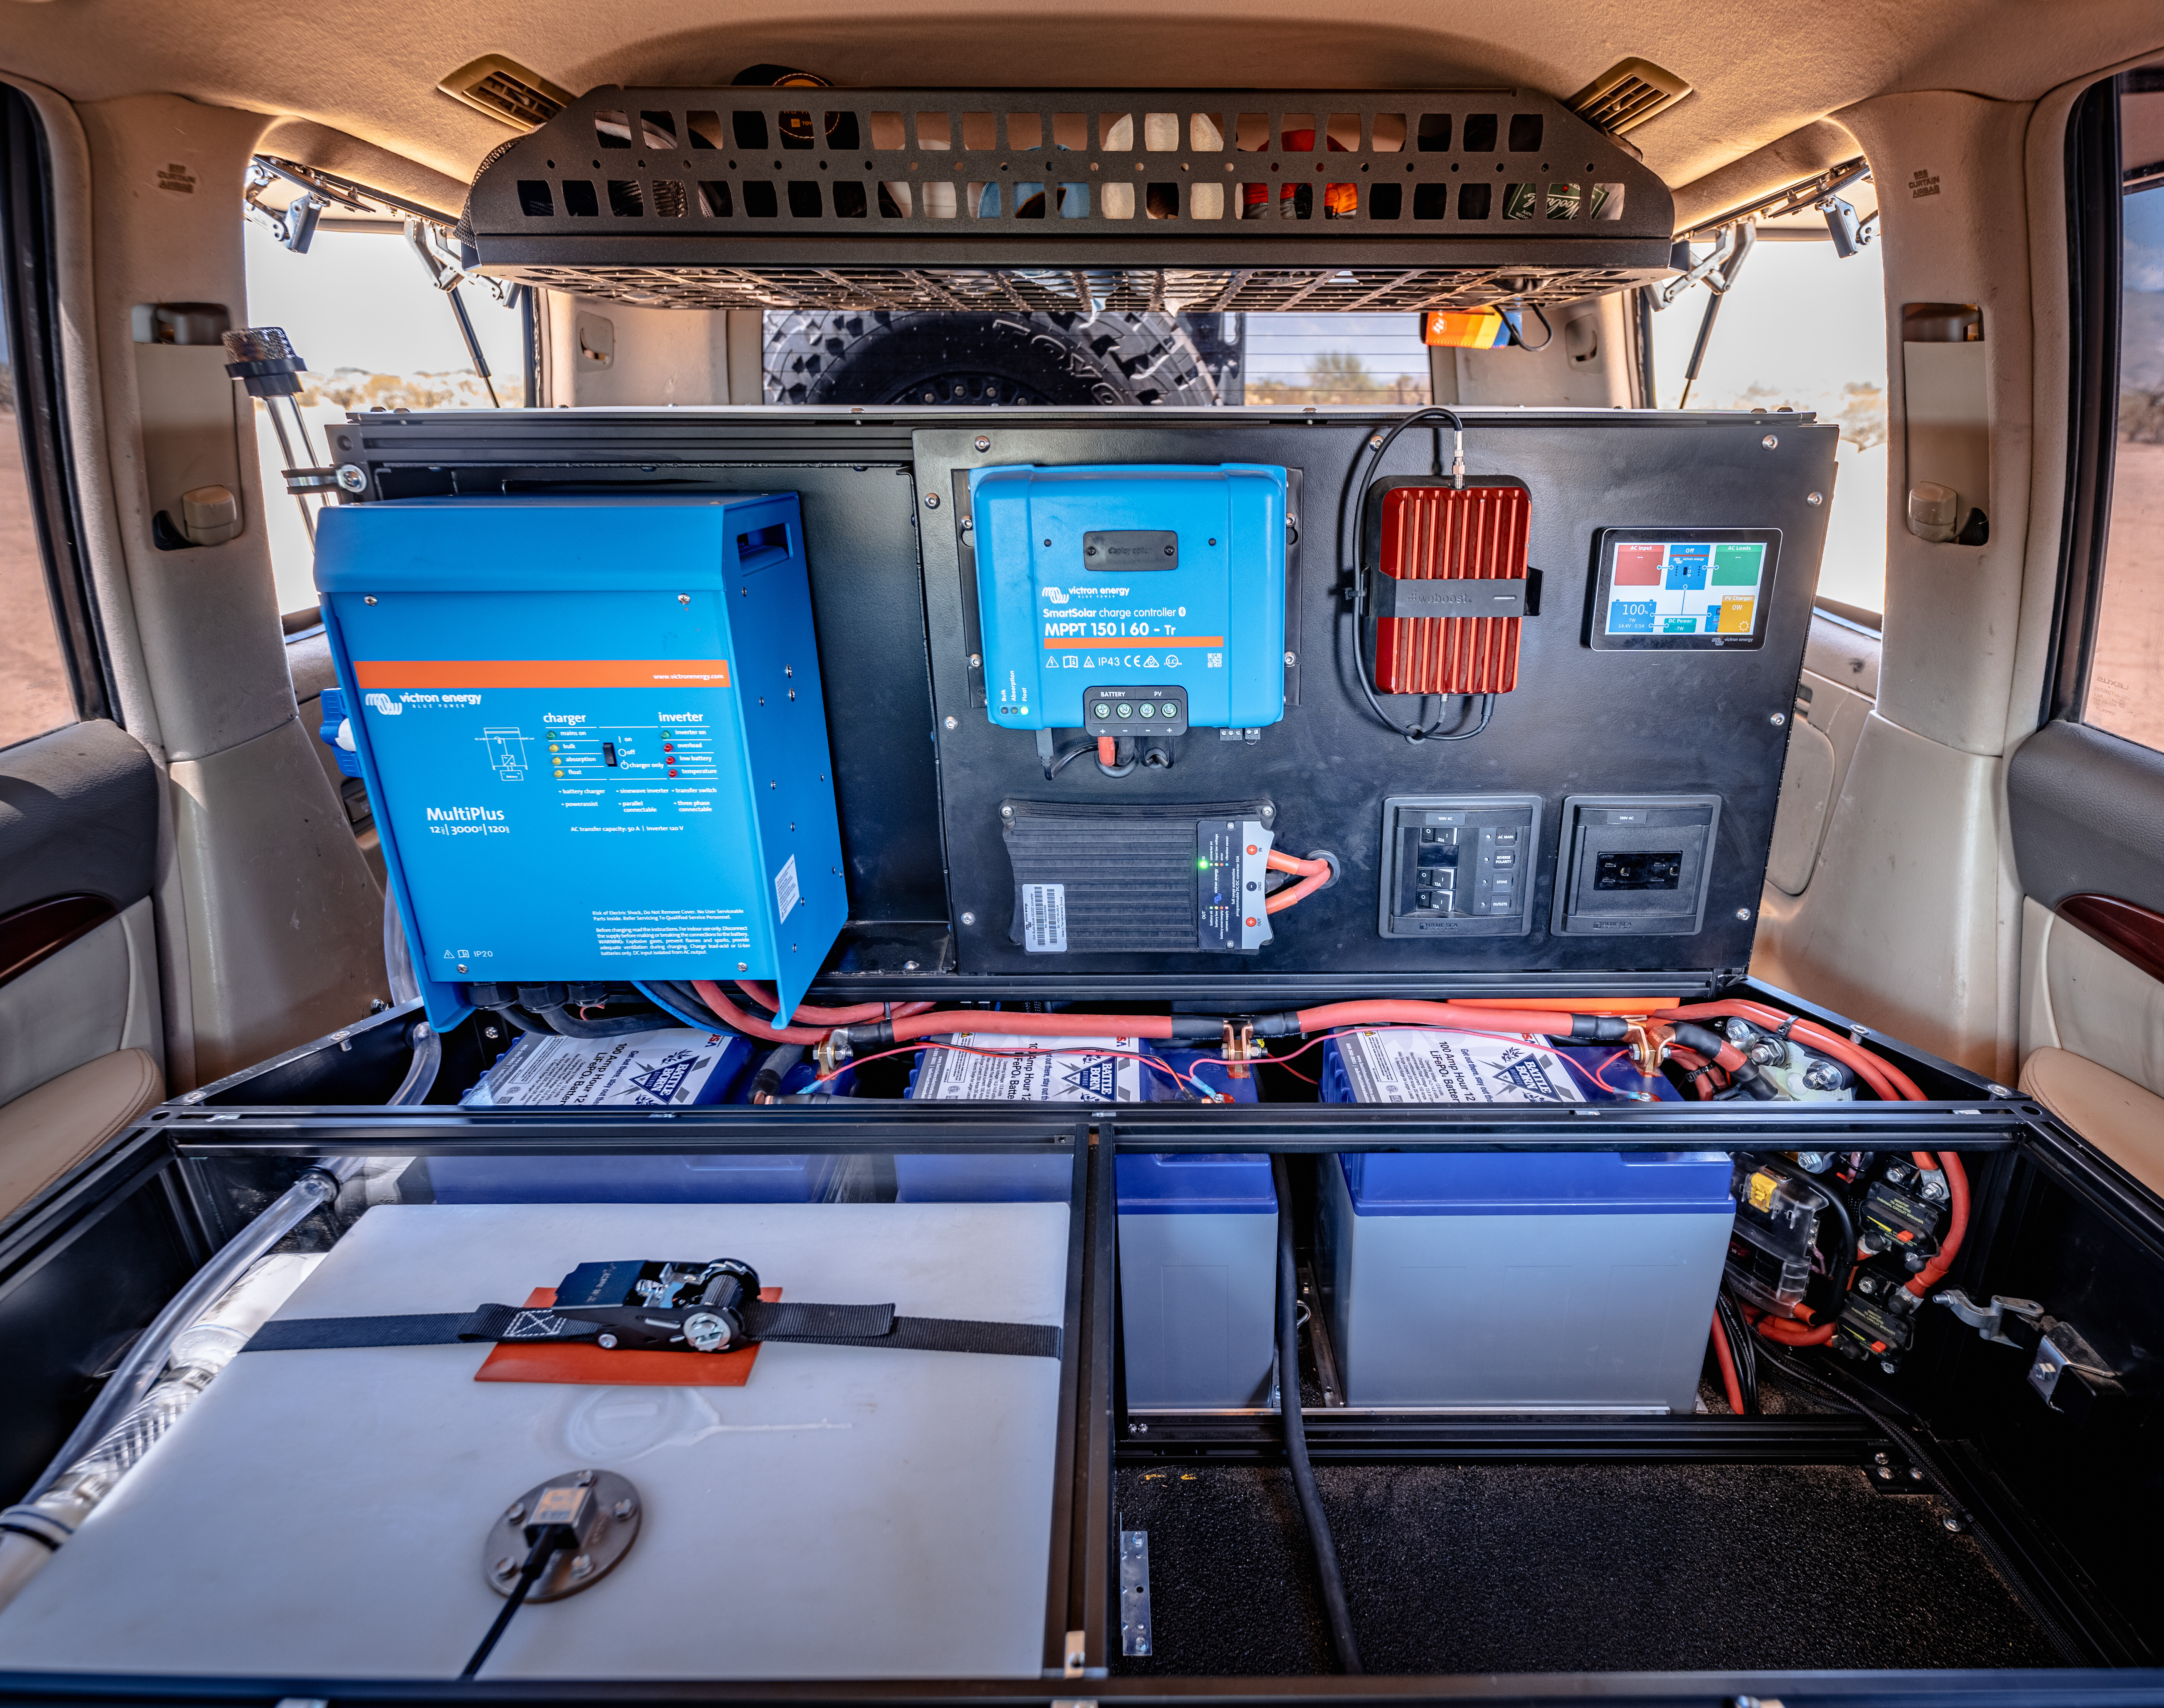
Managing this massive amount of lithium power is a Victron 50A Bush Boost DC-DC charger, two smart shunts and a Victron 3000W inverter to power his induction cooktop. Topping up charge to this huge battery bank is a Sunflare 180W solar panel mounted on the AluCab roof tent, which is regulated via a Victron 150/70 Solar Charger.
If you thought having 400Ah of lithium batteries was serious, wait until you see the lighting system Chase has assembled. All forward-facing lights are from Baja Designs, as well as four rear-facing lights also from Baja Designs. If that’s not enough, Chase upgraded his headlights to custom retrofits from BXBuilt with upgraded projectors, RGB halos, RGB Demon Eyes and custom etching on all four projectors, which Chase says are his favourite Easter Egg on the Lexus.
Touring interior
One of the most dramatic changes, according to Chase, was the complete redesign of his interior touring set-up. The whole second-row seating and old third-row storage system were stripped from the Lexus, and the entire interior was gutted before sound deadening was painstakingly applied prior to the installation of the new storage system built by Aiden James Customs.
“We worked hand-in-hand with JETG Designs to develop a one-of-a-kind system that, as viewed from the back, has a main 40-inch deep drawer on the bottom right for tools and two 36-inch drawers right above it for cooking utensils and dry food,” Chase explained.
“The left side has a hidden 75L fridge behind a drop-down 1800W dual-element induction cooktop. I believe this might be the first built-in SUV induction system in the USA. A lot of the house electronic wiring is also hidden back here, and just above is an extremely wide and 40-inch-deep drawer for other camping gear like chairs, a table, and other large flat items.
“The second-row seat was deleted to house the four 100Ah LiFePO4 batteries from BattleBorn Batteries, and all the Victron electronics mounted on a main electrical panel just above. There is also a 10-gallon water tank (roughly 38 litres for us Aussies), and room for clothes storage inside the second-row seat delete. All doors and drawers in the system also have automatic lighting, so you can easily access what you’re looking for at night.”
Talk about an incredibly functional and well-thought-out interior set-up.
Issues along the way
When building something as unique to this level, there are going to be challenges that present themselves along the build path.
“This has been a long-term process of progression over four years or so, and many broken parts and upgrades,” Chase tells us.
“I’d say the biggest learning for me was how I wanted the interior set up. I had a relatively simple interior with a home-made platform in the third-row seating area that did me well for years. I learned what worked, what didn’t work, and what my ultimate set-up would be for the interior for me.
“I was fortunate enough to partner with Aiden James Customs and BattleBorn Batteries to make that all a reality in terms of a storage system designed to work well with the rear tailgate, and a power system large enough to support induction cooking and camera/device charging while out on longer trips.”
Special thanks
Chase tells us he could not have achieved this build without the help of all of his sponsors and supporters. Special thanks go to his good friend and business partner Hunter Constantine for spending long hours with Chase in the mad-dash to finish the rig’s latest updates before Overland Expo West.
Chase would also like to thank Aiden James Customs, BattleBorn Batteries, Toyo Tires, Baja Designs, Image Craft & MultiCam Vinyl, Long Range America, Kaon USA, Emuwing, Alpha Foxtrot Designs, ALPHAequipt, Midland USA, Barebones Living, Adventure Imports, Sunflare Xplor, Adam’s Polishes, WARN Winches, McQueen Fiberglass, DuroBumps, Ohana Rig Supply, Dobinsons USA, Factor 55, and Desert Does It.
I have always been adamant that a good 12V system with dual batteries is one of the best additions you can make to a touring four-wheel drive.
I feel lost without a reliable way to keep my fridge cool, lights powered and electronic gear charged. My Hilux is well set-up in this regard, but my FJ Cruiser and myriad press cars I’m lucky enough to find myself driving aren’t – so it was time to think of a way to have the best of both worlds.
Enter the Rover 40 Lithium Power Station from Companion, mated to a Companion 200W folding solar blanket. A portable lithium and solar set-up I can charge at home, and then take from car to car and campsite to campsite.
The Companion Rover 40 Power Station is small in size but packs a decent punch, offering 40amp of lithium power in a package that weighs just 6.5kg, which is enough to keep my 47L myCOOLMAN fridge running for just under two full days without a charge.
I can charge the power station back up via 240V mains, 12V or solar. What I usually do is ensure the power station is fully charged before leaving on a trip, run my fridge off a 12V outlet in the vehicle when moving, and then plug the fridge into the Companion Rover 40 when at camp.
It will accept a maximum of 5amp charge from the 200W Companion solar blanket (or any solar panel) which is somewhat limiting, but it hasn’t caused an issue as I’m putting in more than I’m taking out.
This set-up has come in handy around home, too. We seem to experience a fair few power outages here, so having a backup power source has proven invaluable. Features include a USB-C output that will charge my laptop, two USB points, an Anderson plug output (perfect for my fridge), two CIG outputs (one is a two-pin socket that also works with my fridge), and two DC DC5523 points that can be used for lighting. There’s even a torch built into the Rover 40.
Connecting the Companion 200W solar blanket (they call it a Solar Charger) is as simple as plugging it to the solar input of the Rover 40 with the supplied cables. You get plenty of cable options included in the Rover 40, which is great to see. There’s no need to run a separate solar regulator either, as the Rover 40 has an inbuilt MPPT solar controller.
When connecting the Companion 200W Solar Charger to my vehicle’s battery, it could produce at best 10amp of output, which is fine by me. Companion claims a maximum output figure of 11.1amp per hour, so it’s not far off the money. Overall, the quality of the panel feels really good, and I see no reason at this stage to add more solar to my kit as this seems to be a sweet spot for my needs.
I’m in the process of installing a 100amp lithium dual-battery set-up in my FJ Cruiser, but I’ll continue to use both the Rover 40 and 200W Solar Charger.
So far, they have outperformed my expectations, and having portable power when on the go is priceless as far as I’m concerned.
More information: https://www.companionoutdoor.com/
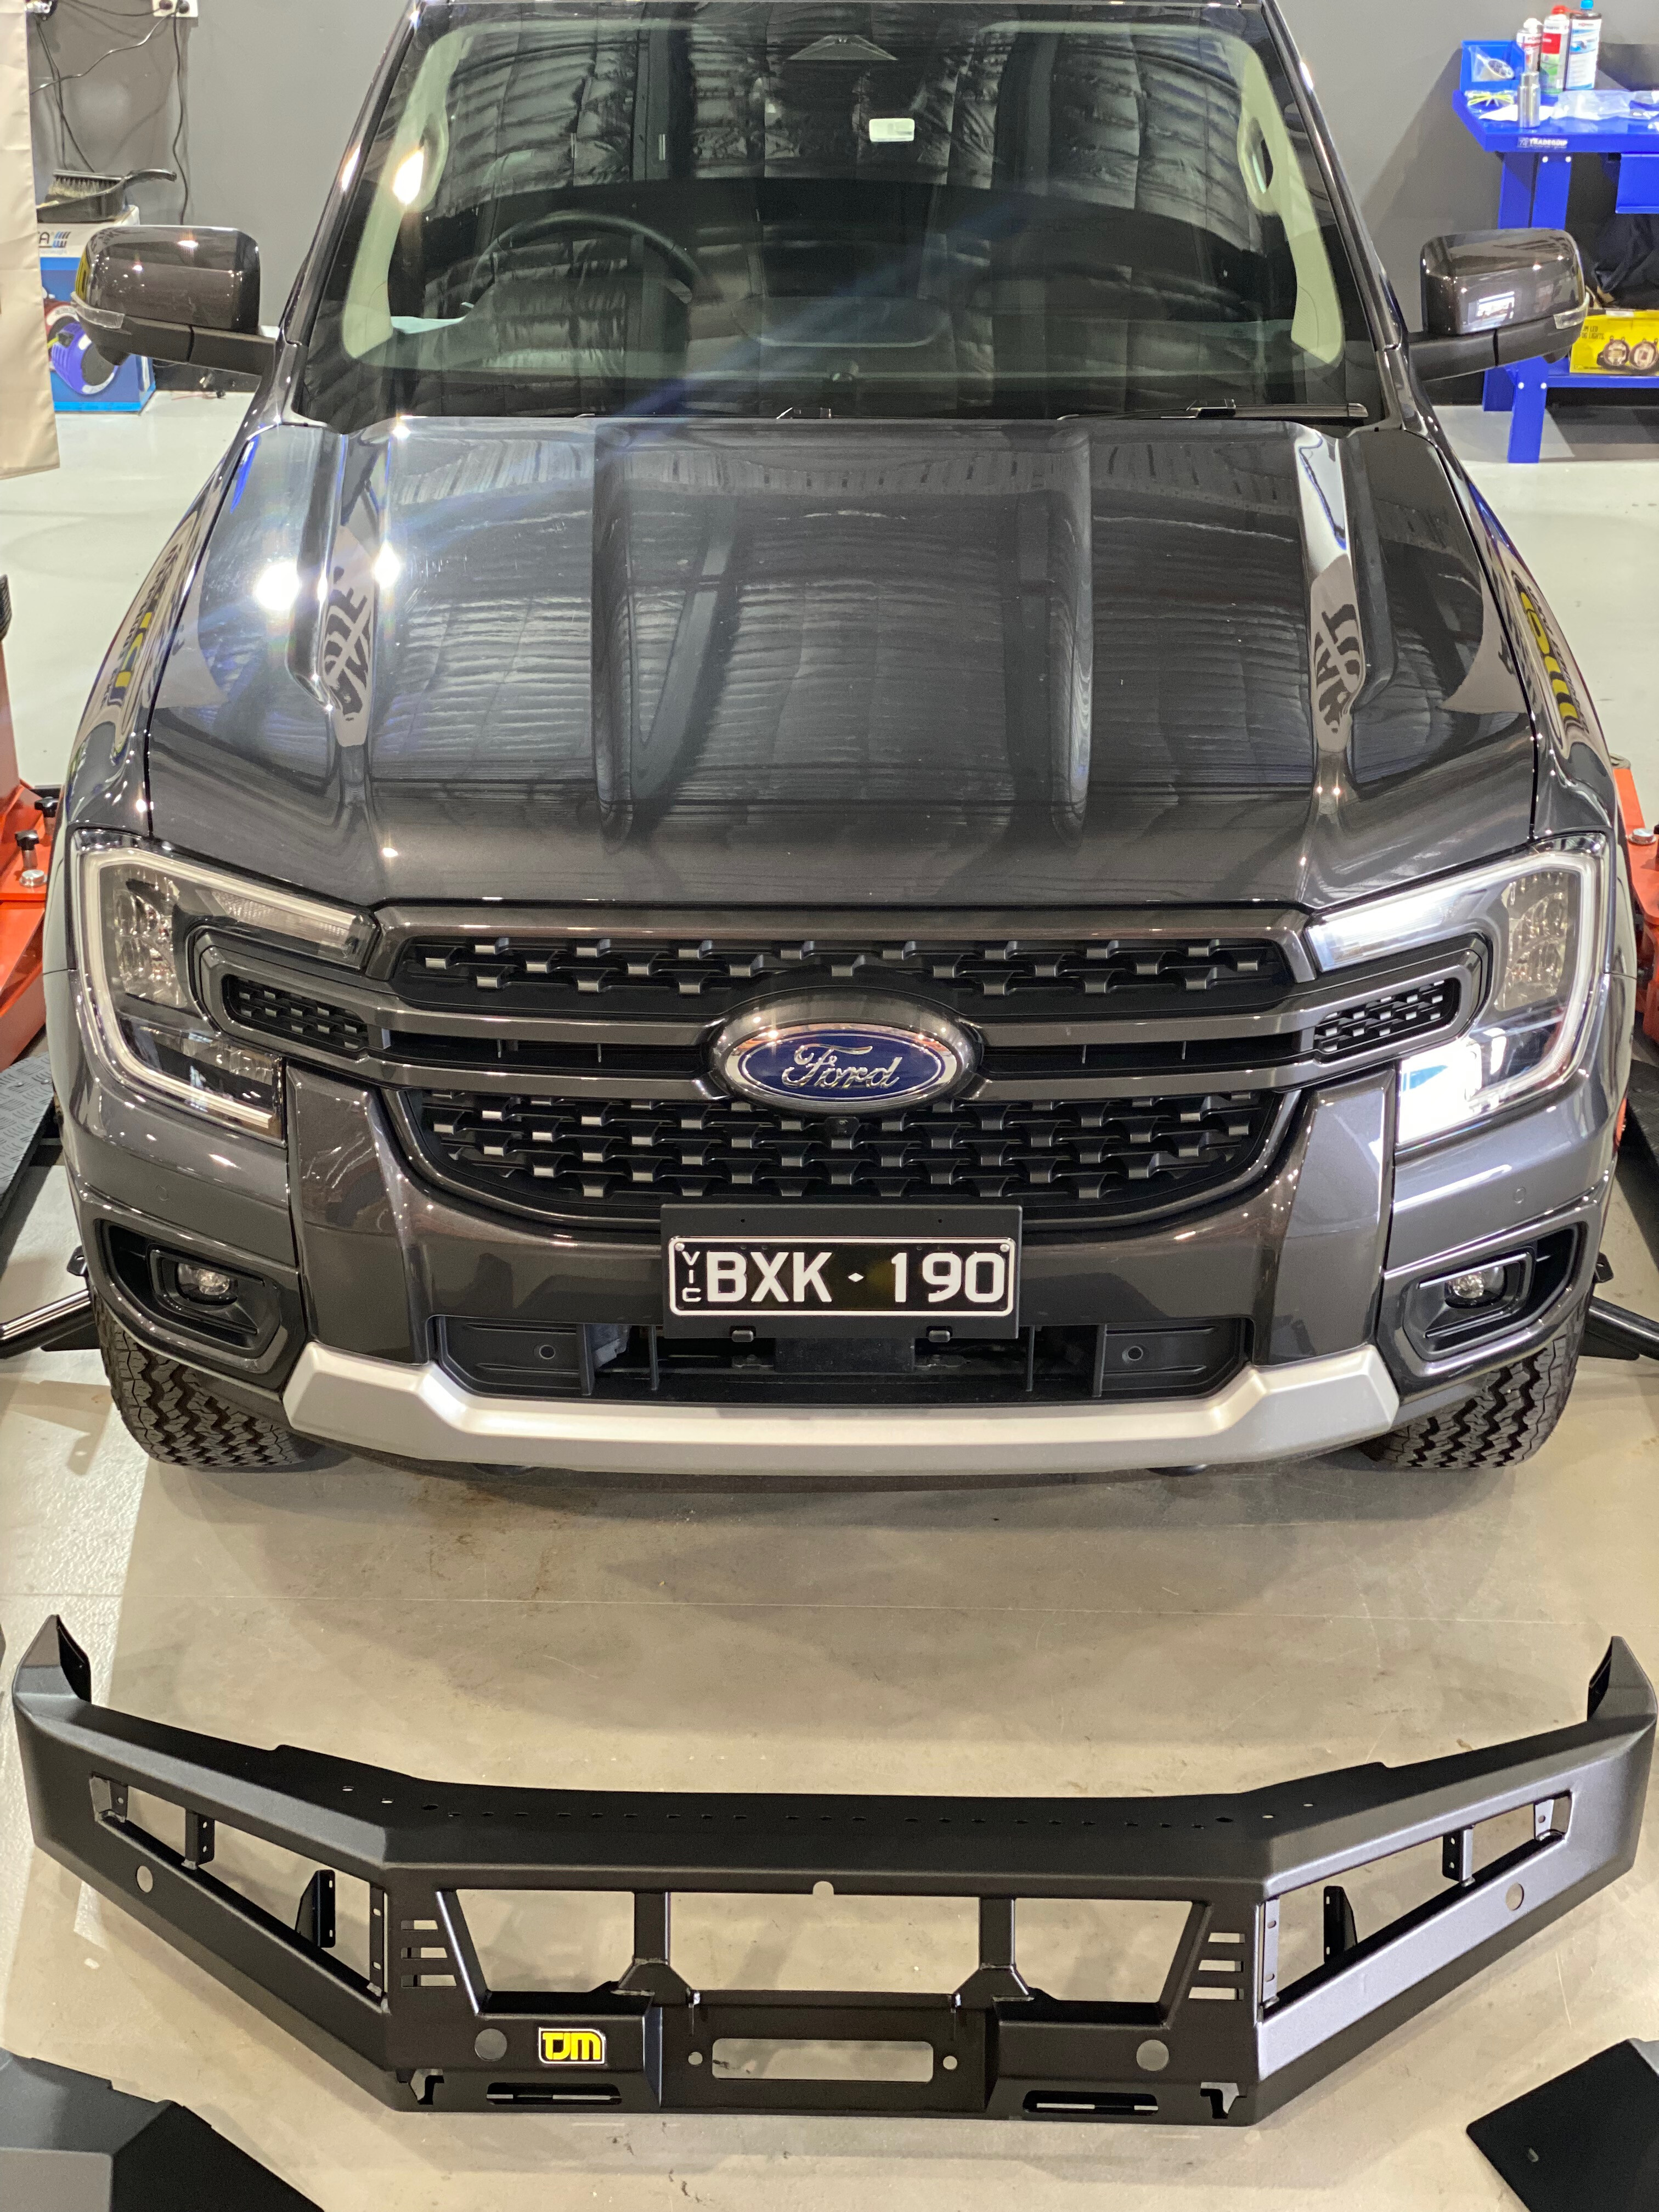
From the outset of our Ranger build, replacing the cargo tub with a full service body canopy was always in the plans. We did the same with our PX Ranger build a few years ago and found the addition of the canopy makes the vehicle much more usable and versatile for the sort of overlanding we do.
One of the very first full replacement canopies we saw for the new-model Ranger came from Victorian business, Trig Point. This was at the Melbourne 4×4 show, just weeks after the launch of the then-new Ford. Adorned in stunning Sedona Orange, the Trig Point canopy looked impressive and went straight on our project wish list.
We’d also seen Trig Point canopies on other vehicles, none more so than the Offroad Images 79 Series LandCruiser when photographer Michael Ellem was out on our photo shoots. Mick couldn’t be happier with his Trig Point and, experiencing it first-hand, the functionality and quality of the canopy further enforced our belief that this was the product for our Ranger.
We also checked out the canopy on the neat extra-cab Patrol owned by Trig Point’s managing director, Murray Brookes, when we featured it in the magazine recently.
Fast growing
Trig Point is a relatively new player in the aluminium vehicle-canopy sector, but the booming popularity of 4×4 utes and a spike in interest of touring vehicles has seen the business grow rapidly.
Started by Murray Brookes in 2015 after working on the design of the canopies while working at ARB, Trig Point now employs 19 staff across two factories in Rowville, in Melbourne’s south-eastern suburbs.
When that first canopy was built Murray was renting the corner of the workshop at Uneek 4×4, before he moved to his own factory in 2017 and then to the Rowville site in 2019. Even then there were only eight staff members, so numbers have doubled in just three years.
The second factory is across the road from Trig Point HQ and only came online in 2022 as the business brought all its sheet metal work in-house. Doing this was a huge investment, not only in the premises but also commissioning all new laser cutting, folding and bending machines, welding bays, storage racking and office space.
Murray told us that bringing the sheet metal fabrication in-house and buying the latest LVD machines has allowed the team to improve the quality of the products, reduce downtime from having to adjust parts that didn’t fit quite right, and allowed the designers and engineers to work with better designs.
The improved production process now sees Trig Point turning out four canopies a week. Murray says that, ideally, they will be looking to move to a bigger premises to bring all of the production under one roof.
Under cover
Trig Point canopies are a full replacement body – that is, they are mounted directly to the chassis, replacing the tub and not sitting on a tray. This allows for lighter overall weight, optimised interior space and a lower canopy floor, as well as making it easier to tailor the design to the owner’s needs.
The canopy bodies are made from aluminium sheet, again for light weight, with the base being a steel frame. Trig Point keeps the design simple with the basic doors on each side and a fixed back where the owner can opt for wheel or jerry can mounts and/or a ladder to access the integrated roof rails.
The sizes of the canopies are also kept simple to cover the popular vehicle models like the Ranger, Hilux and LandCruiser 79, and Trig Point doesn’t do full custom designs or builds.
This allows the business to keep the list of parts numbers to a minimum and ensure it has what it needs in stock for builds and also repairs when the inevitable damage comes around. Even the canopy on Murray’s custom Patrol is basically a standard Hilux/Ranger double-cab unit.
The canopy comes standard with LED tail-lights recessed in the body for protection, further protection from a rear steel bar, underslung rear toolboxes, roof rails, rear power distribution box with 12V outlet, internal touch-operated LED lights, full door seals, slam-shut door catches that are integrated in the car’s central locking system, rear wheel arches, and filtered vents that allow airflow into the canopy without letting dust in.
The canopies meet all ADR requirements, and your vehicle’s parking sensors and other electronics are all reintegrated back in the new canopy. They come standard in white, grey or black powder-coat, but Trig Point has its own paint booths where they can colour-match the canopy, or just the canopy doors, to your vehicle.
Then there are myriad options available like water tanks, trundle drawer, internal dividers, upright fridge or fridge slides, water pumps, 12V systems, lights, front toolboxes (LC79 only), shower and awning mounts, vented side doors to allow pets to be carried inside, compressor mounts and drawer systems. Trig Point can work with the customer to design and build a canopy to their needs.
The basic 1700mm-long canopy for a double-cab Ranger with all the standard features starts at $18,490 and rises from there depending on the options you choose. The fully Australian-made Trig Point canopies are delivered with a three-year/100,000km warranty against defects in materials and workmanship.
Our canopy
When it came to designing the canopy for our Ranger, we poured over the standard and optional features before selecting to go with the side and toolbox doors colour-matched to the Ranger’s Meteor Grey, a water tank with electric pump, a rear trundle drawer, black-chrome LED tail-lights, spare wheel mount and rear ladder.
It has been fitted to the car in this empty stage but there are still a few extras to go inside, some of which were still in development at the time we needed the canopy fitted. These include a full Projecta Intelli-Grid lithium power system, MSA power drop slide and Dometic CFX3 45L fridge, MSA drawer, and something new from Trig Point that you’ll just have to wait and see.
Having the Trig Point canopy fitted to our Ranger marks a huge step in the project and one that will become a major feature of the car.
More information: https://trigpoint.com.au
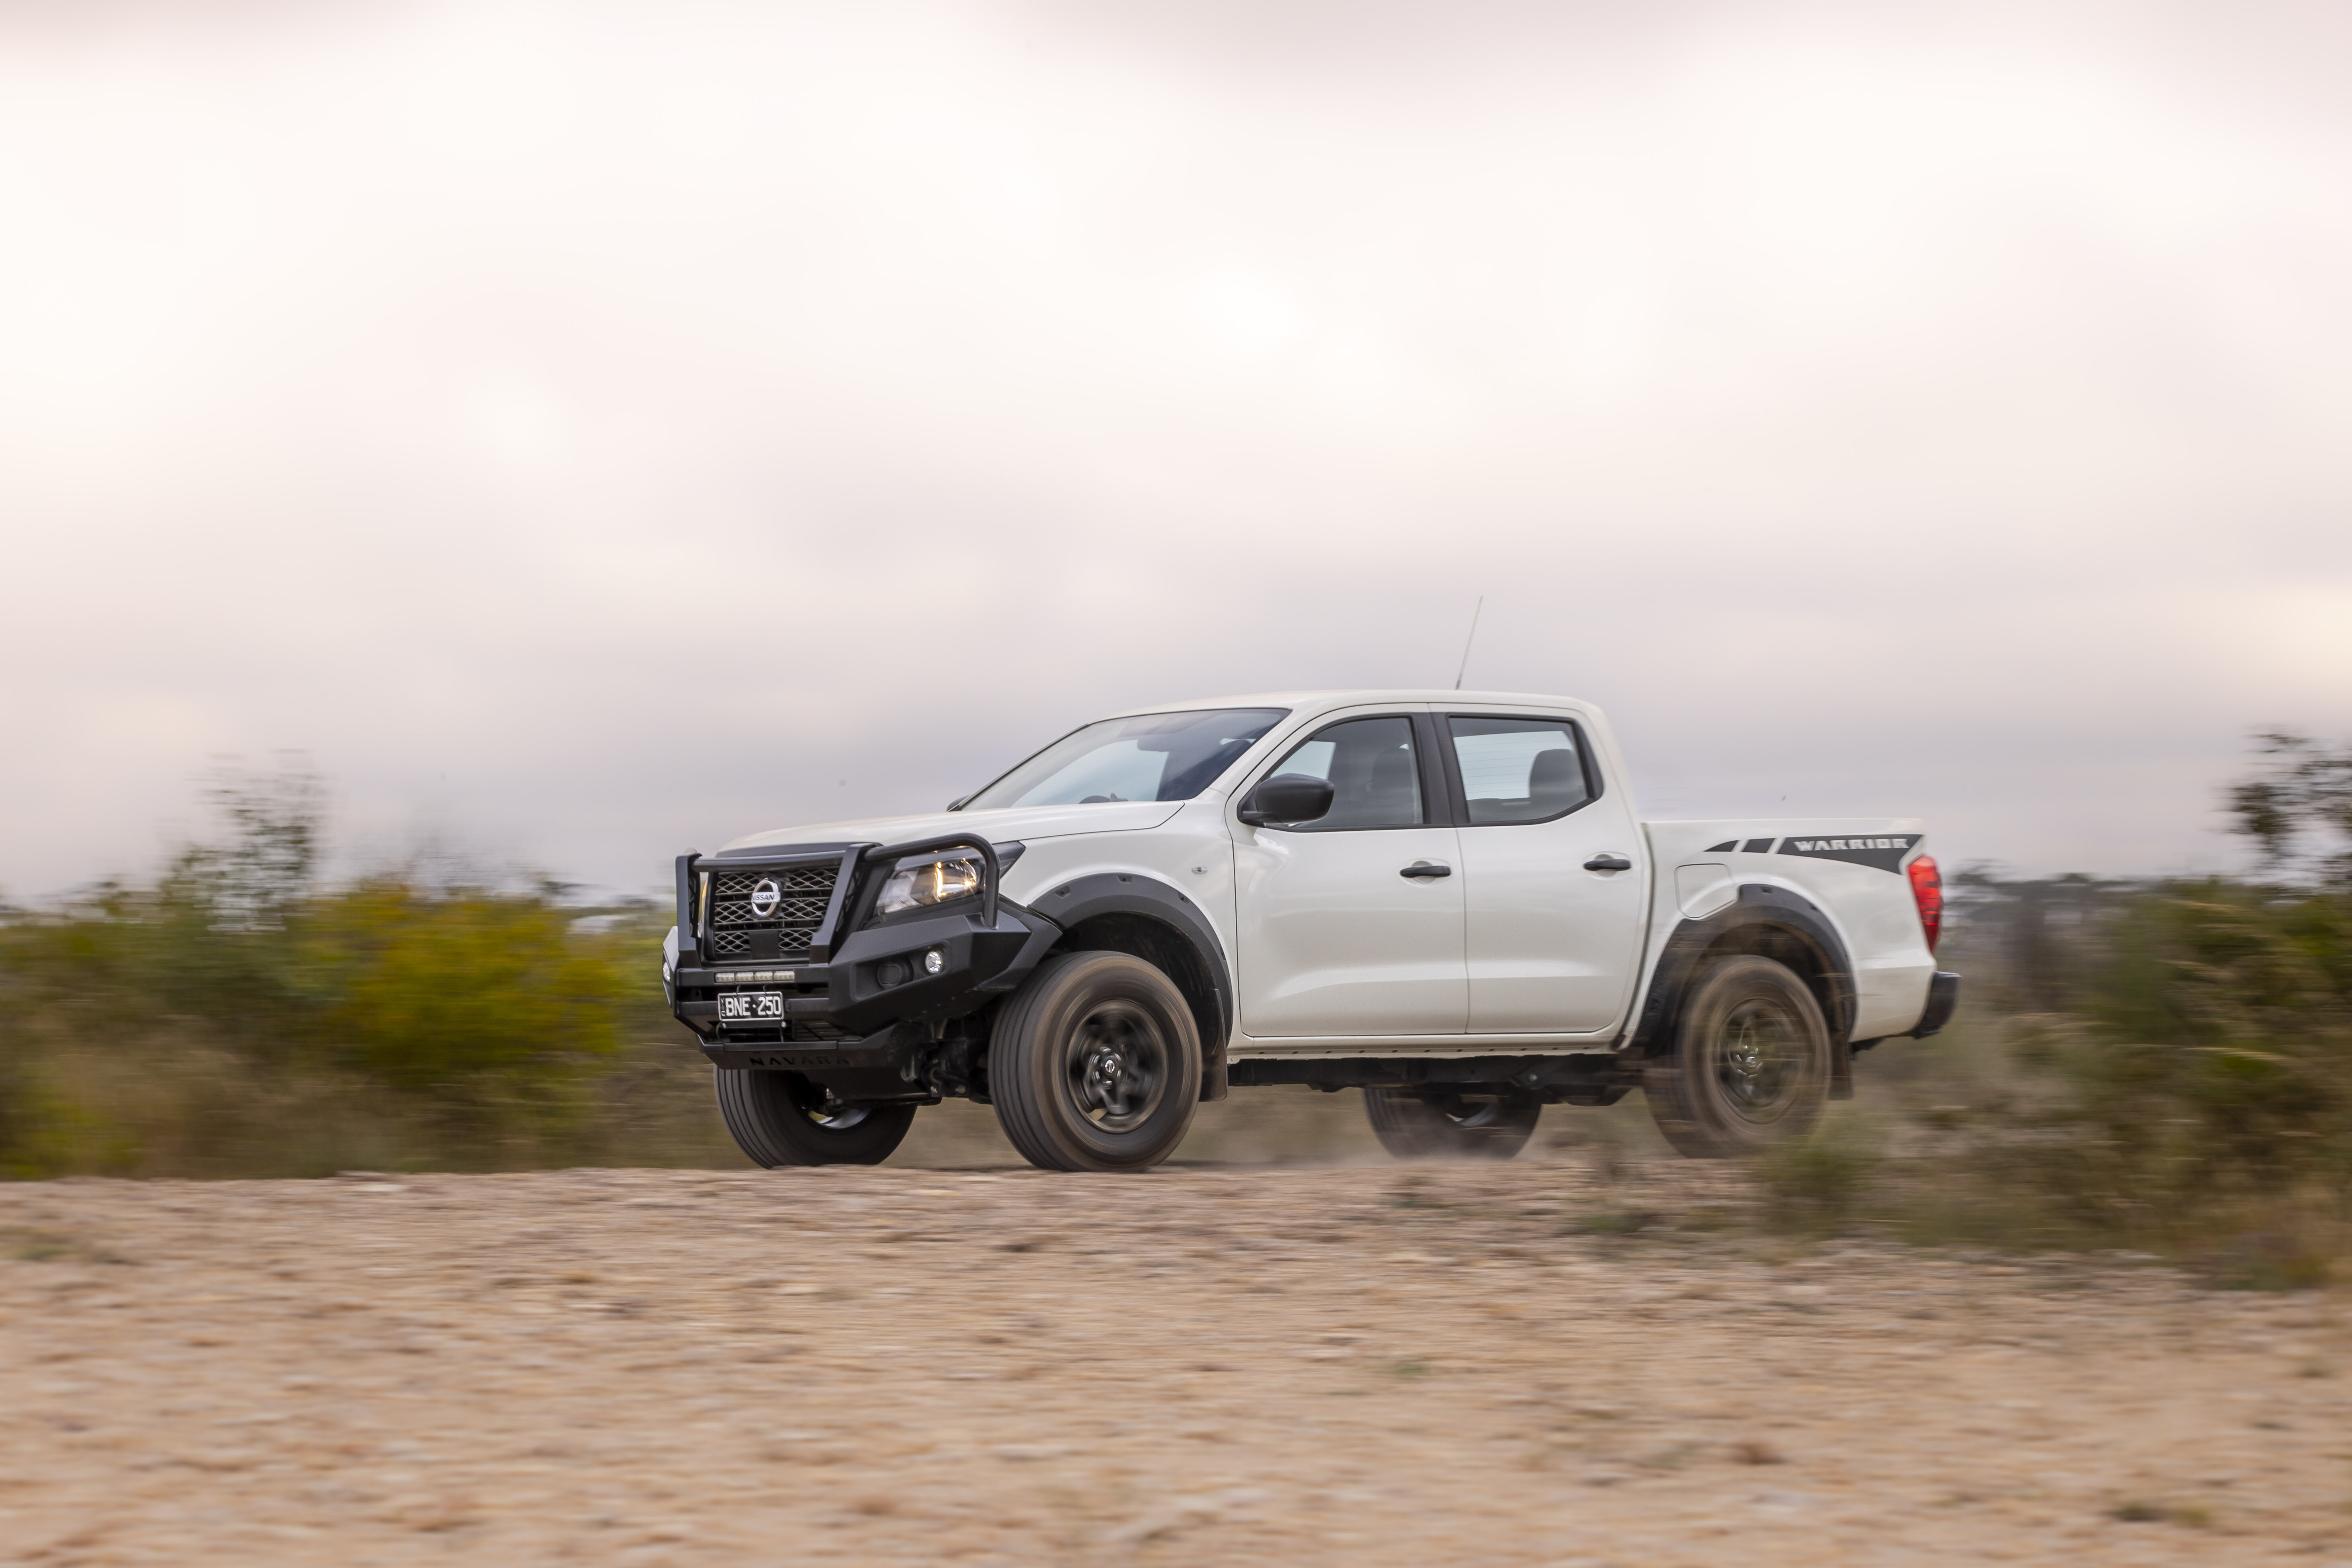
A base-model 4WD loaded with off-road goodies from the factory – could the SL Warrior be the perfect dual-cab ute for serious four-wheelers?
JUMP AHEAD
- What you get
- Powertrain and performance
- On-road ride and handling
- Off-road
- Cabin and accommodation
- Practicalities
- VERDICT
- Specifications
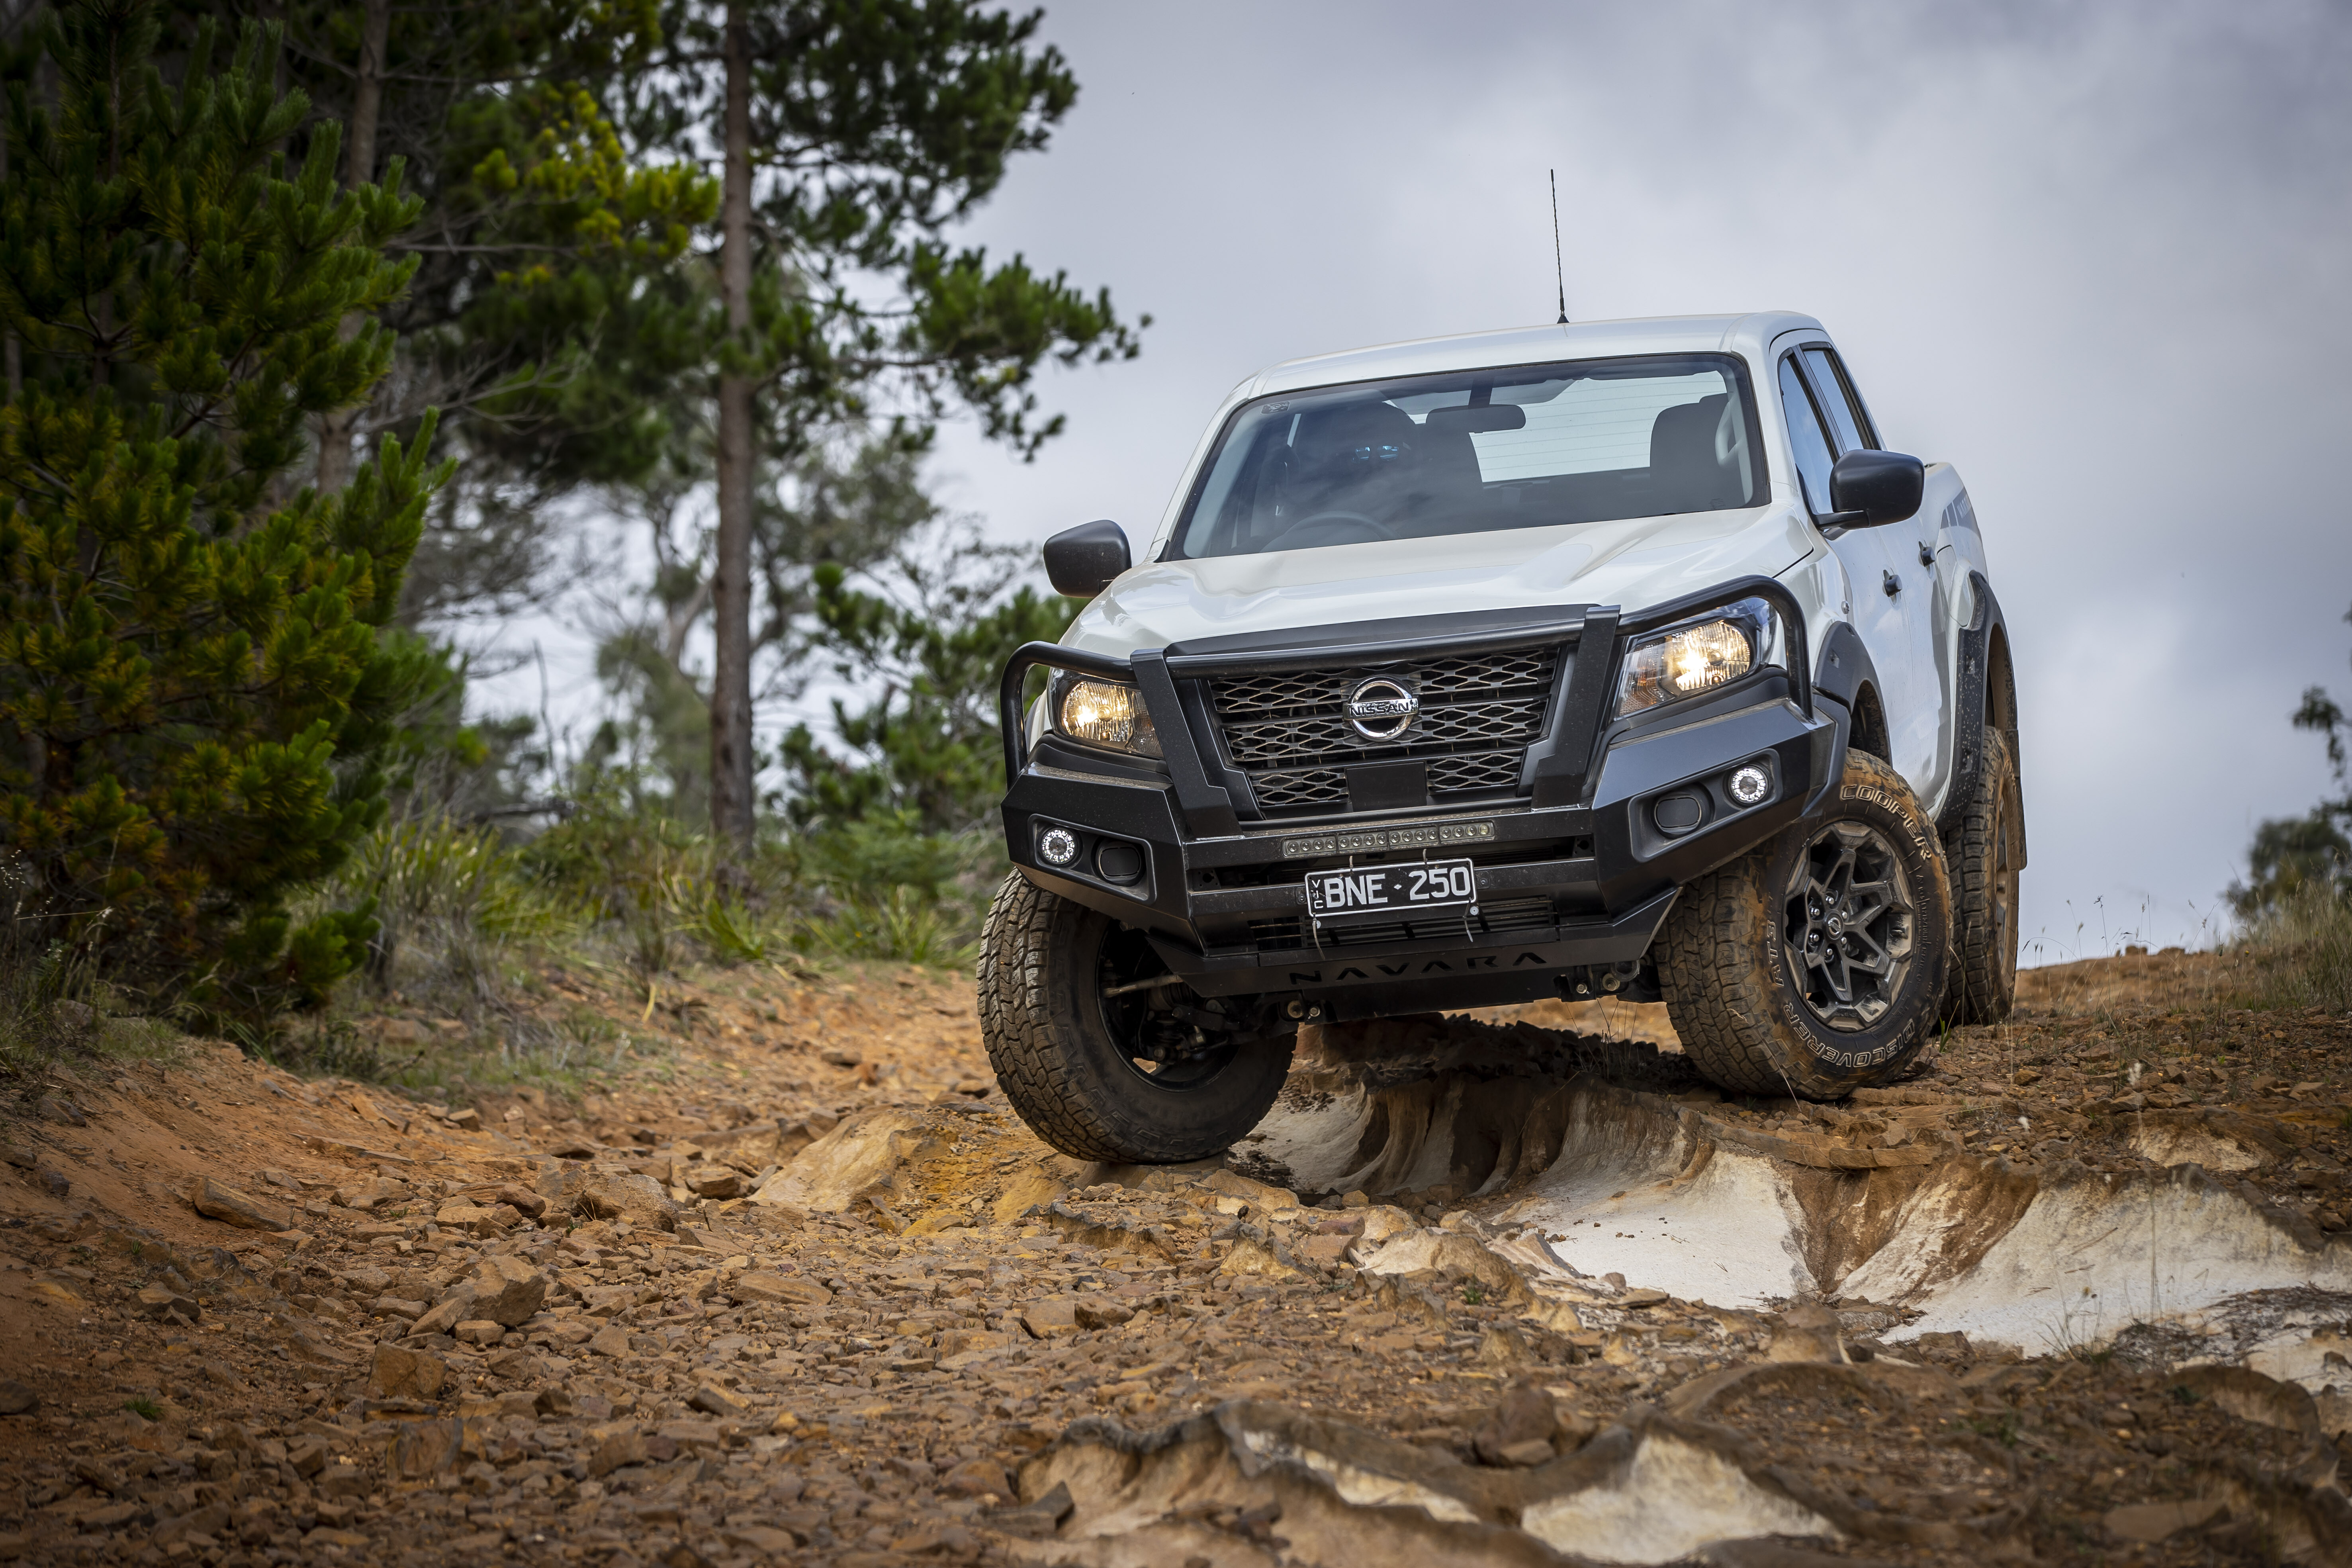
What you get
Premcar, the team behind building the off-road-focused, top-of-the-line Navara PRO-4X Warrior for Nissan, has been tasked with creating a lower spec, more affordable Warrior based on the Nissan Navara SL.
While many manufacturers are offering high-spec models with off-road-ready accessories, Nissan has done a smart thing by also providing a lower-spec four-wheel drive with upgraded components ready to hit the dirt from the factory.
I love ‘pov pack’ 4WDs, because they are designed for work first and foremost – simple interiors, vinyl flooring and less gadgets and gizmos to distract you or potentially go wrong down the line. This is what makes the SL Warrior such a great thing, in theory, for Australian four-wheel drivers who are going to use their vehicles for work and play.
From day dot, the SL Warrior comes with a 40mm suspension lift tuned for Australian conditions; a modern-looking, winch-compatible bullbar with recessed LED light bar; a small steel bash plate protecting the radiator and front-mounted intercooler; and it rides on larger Cooper AT3 all-terrain tyres.
It’s an impressive-looking vehicle too, with a wider wheel track covered by bulging fender flares and a longer wheelbase compared to the stock SL Navara.
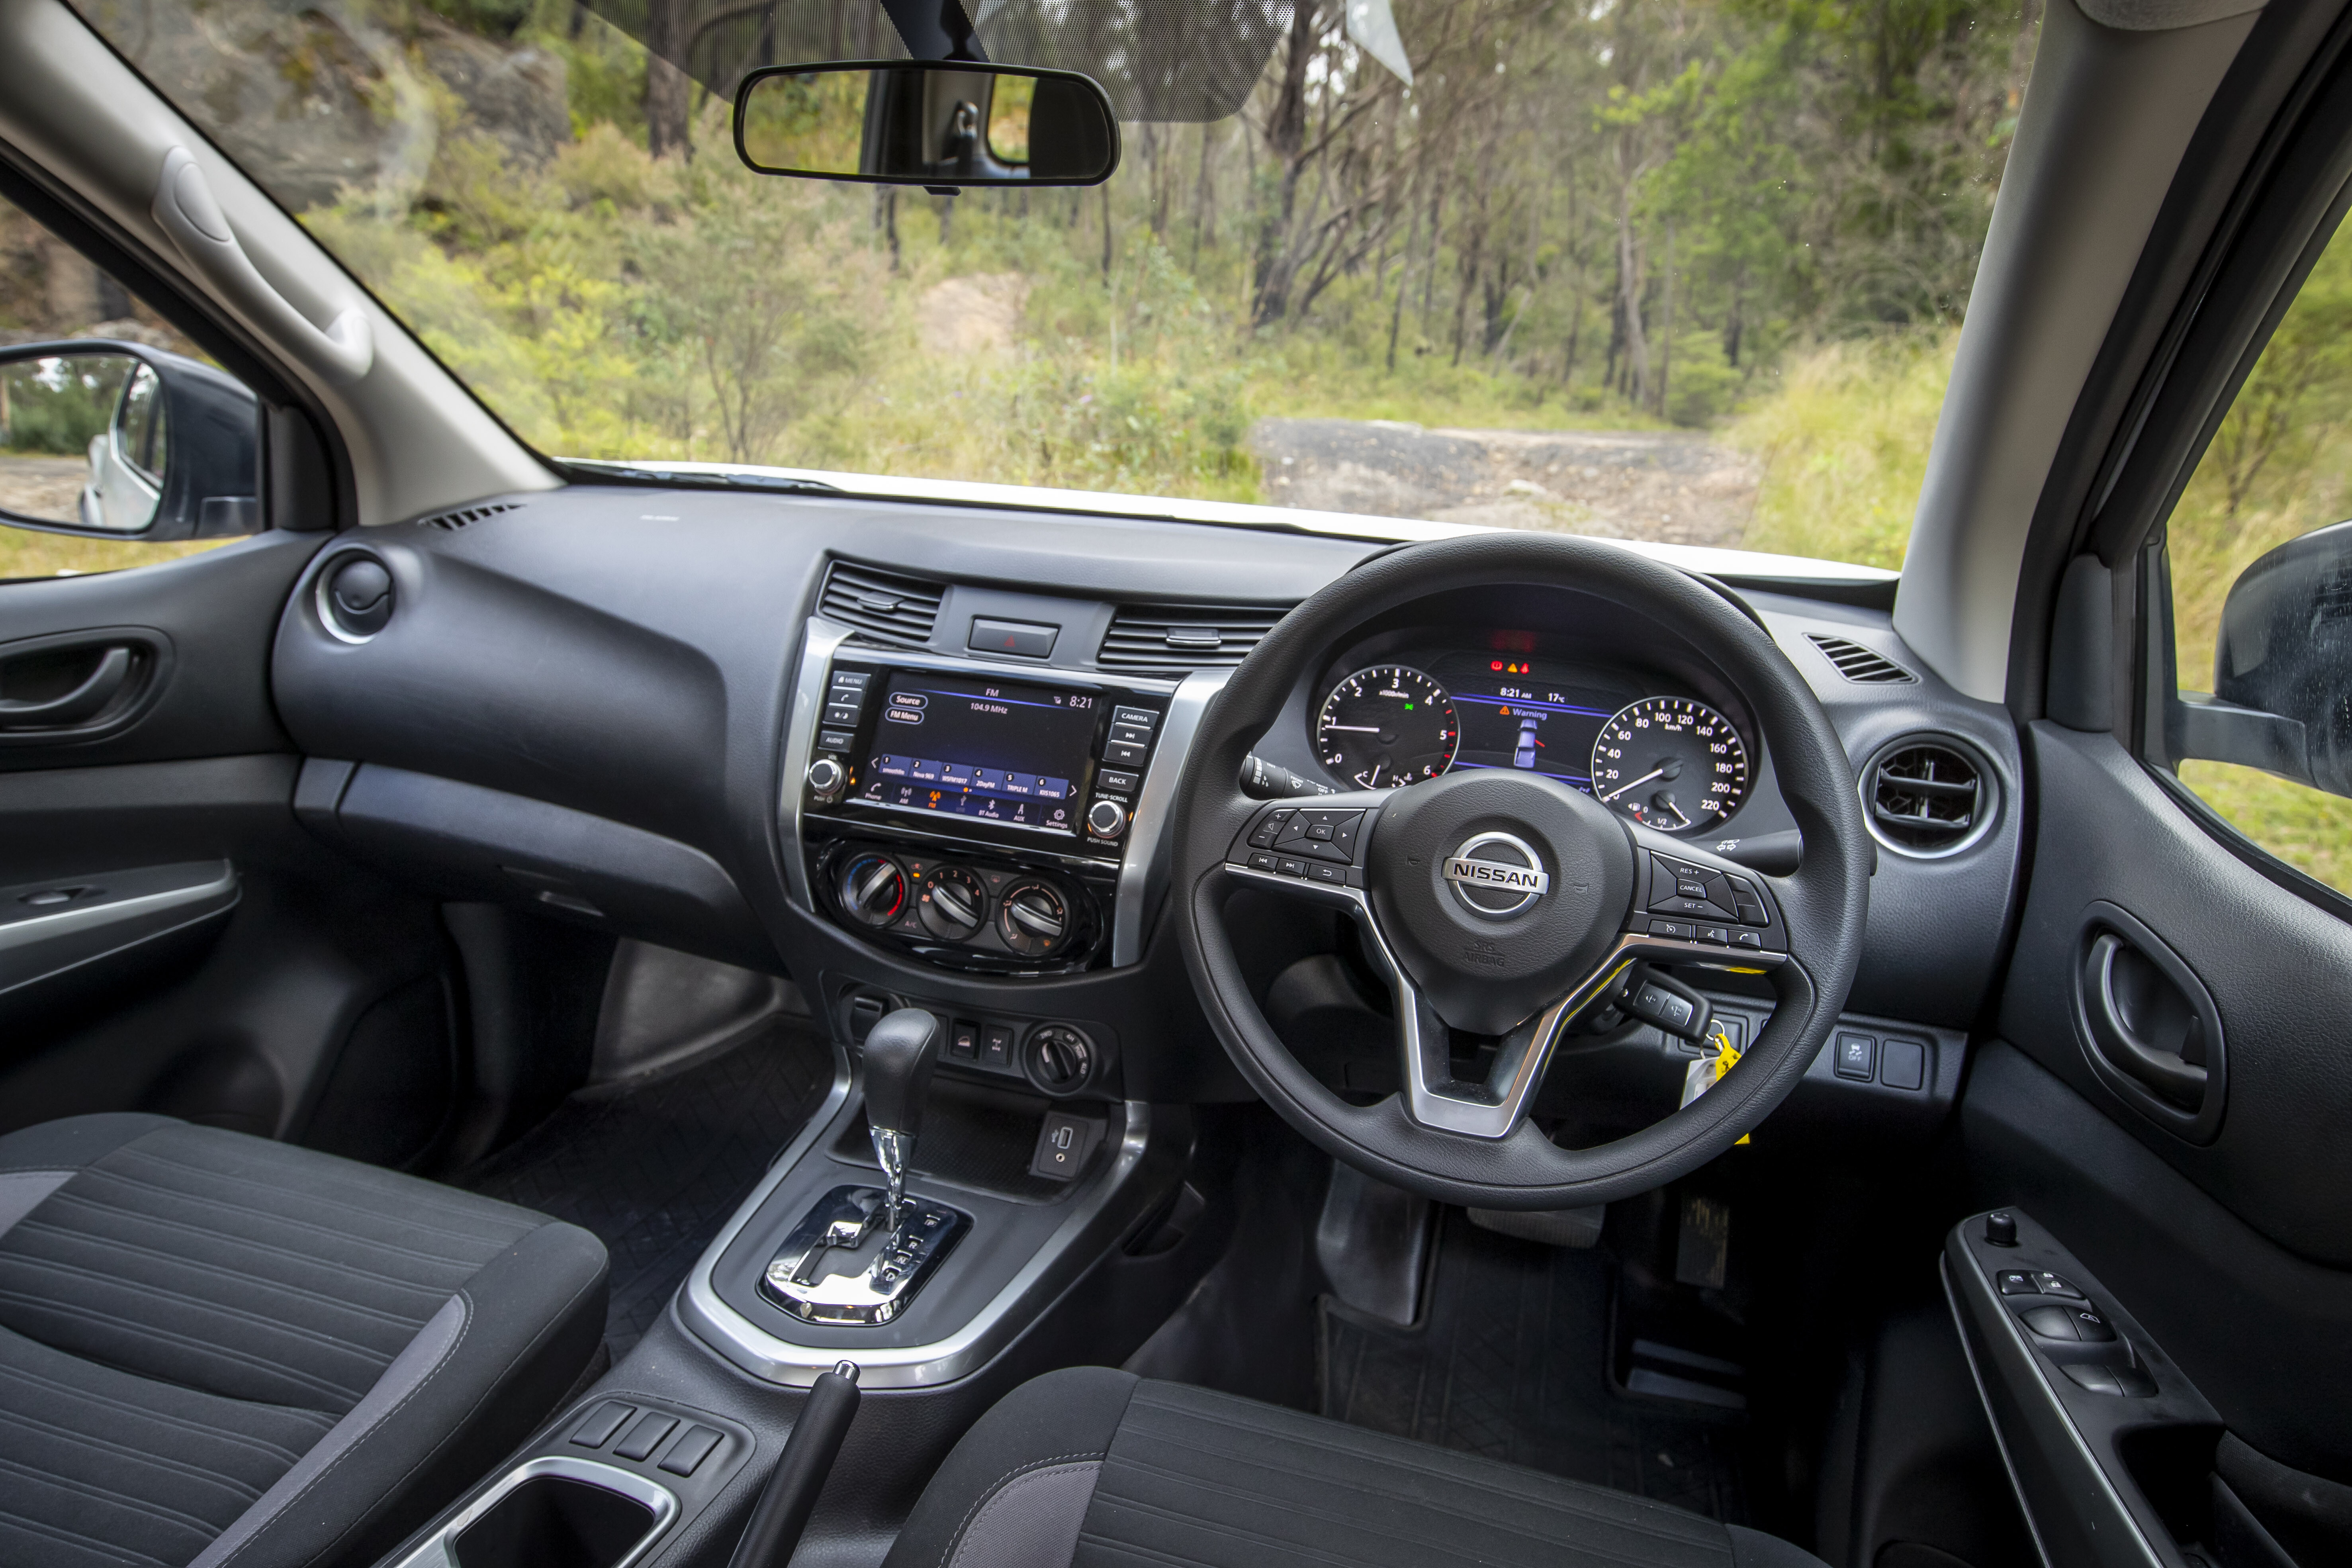
The interior is quite basic and loaded with hard plastic surfaces, which might not sound appealing but in the real world this means a hard-wearing and easy to clean space, again perfect for work or play.
But is it too basic? Would it make more sense to spend more on the higher-spec Warrior? That’s what we’re here to find out.
Powertrain and performance
The seven-speed automatic gearbox in the Navara is a winner, both in terms of gearing ratios and performance. It’s a strong unit and is the same one used in the Y62 Nissan Patrol, so you know it will be able to handle the power figures produced by the 2.3-litre twin-turbo diesel motor.
Speaking of power, it’s the one thing this SL Warrior could use more of. With 450Nm produced between 1500 to 2500rpm and 140kW at 3750rpm, the Navara is showing its age compared to the competition.
It’s a bit laggy off the line, but quite good in mid-range and in low-range 4WD. If Nissan was to bump this figure up to, say, 500Nm, this would offer a far more rewarding driving experience – you could always swap in the 5.6-litre V8 from the Nissan Patrol, which some clever cookies are doing in Australia.
Fuel economy was good on test, resulting in an average of 9.9L/100km. With the decent-size fuel tank listed at 80 litres, this should see almost 800km of driving before needing to refuel. If that’s not enough, there are plenty of aftermarket long-range fuel tanks available to suit the Navara platform.
In fact, there isn’t much you can’t get for the Navara, as it’s such a popular four-wheel drive to modify, even though Nissan and Premcar have done most of the hard work for you with the SL Warrior.
On-road ride and handling
The steering feel of the Navara is heavy and somewhat dull, but it’s not a deal breaker as you’ll get used to it. That’s about it when it comes to negatives surrounding the on-road ride and handling of the SL Warrior. It’s an easy vehicle to pilot daily around town, on the highway and on dirt roads.
Brake feel and performance is excellent, especially the ABS calibration on dirt roads which effectively pulls the vehicle up without drama. On-road ride quality, while a touch firm when unladen, is impressive thanks to the upgraded suspension included on the SL Warrior. It would also handle a load incredibly well, which is ideal considering the massive payload capacity offered by Nissan on the SL Warrior.
I did notice a slight steering wheel shimmy when driving at 100km/h, which felt like the tyres weren’t balanced correctly. As this press vehicle had more than 8000km on it, of which I dare say were hard kilometres, a wheel weight could have fallen off, resulting in the slight shake. I’ve not experienced this in any other Navara and it certainly wasn’t extreme.
Off-road
This is really what we wanted to get to, testing the mettle of the SL Warrior on the tracks around Lithgow in NSW.
The Navara has always been a solid contender off-road thanks to coil springs on all four corners, superb low-range reduction, and an effective traction-control system that remains active on the front end when the factory rear diff locker is engaged.
With raised suspension, taller and more aggressive 275/70R17 Cooper all-terrain light-truck constructed tyres, and solid frontal protection (including a neat recessed LED light bar), the SL Warrior went everywhere we wanted it to go, and without fuss.
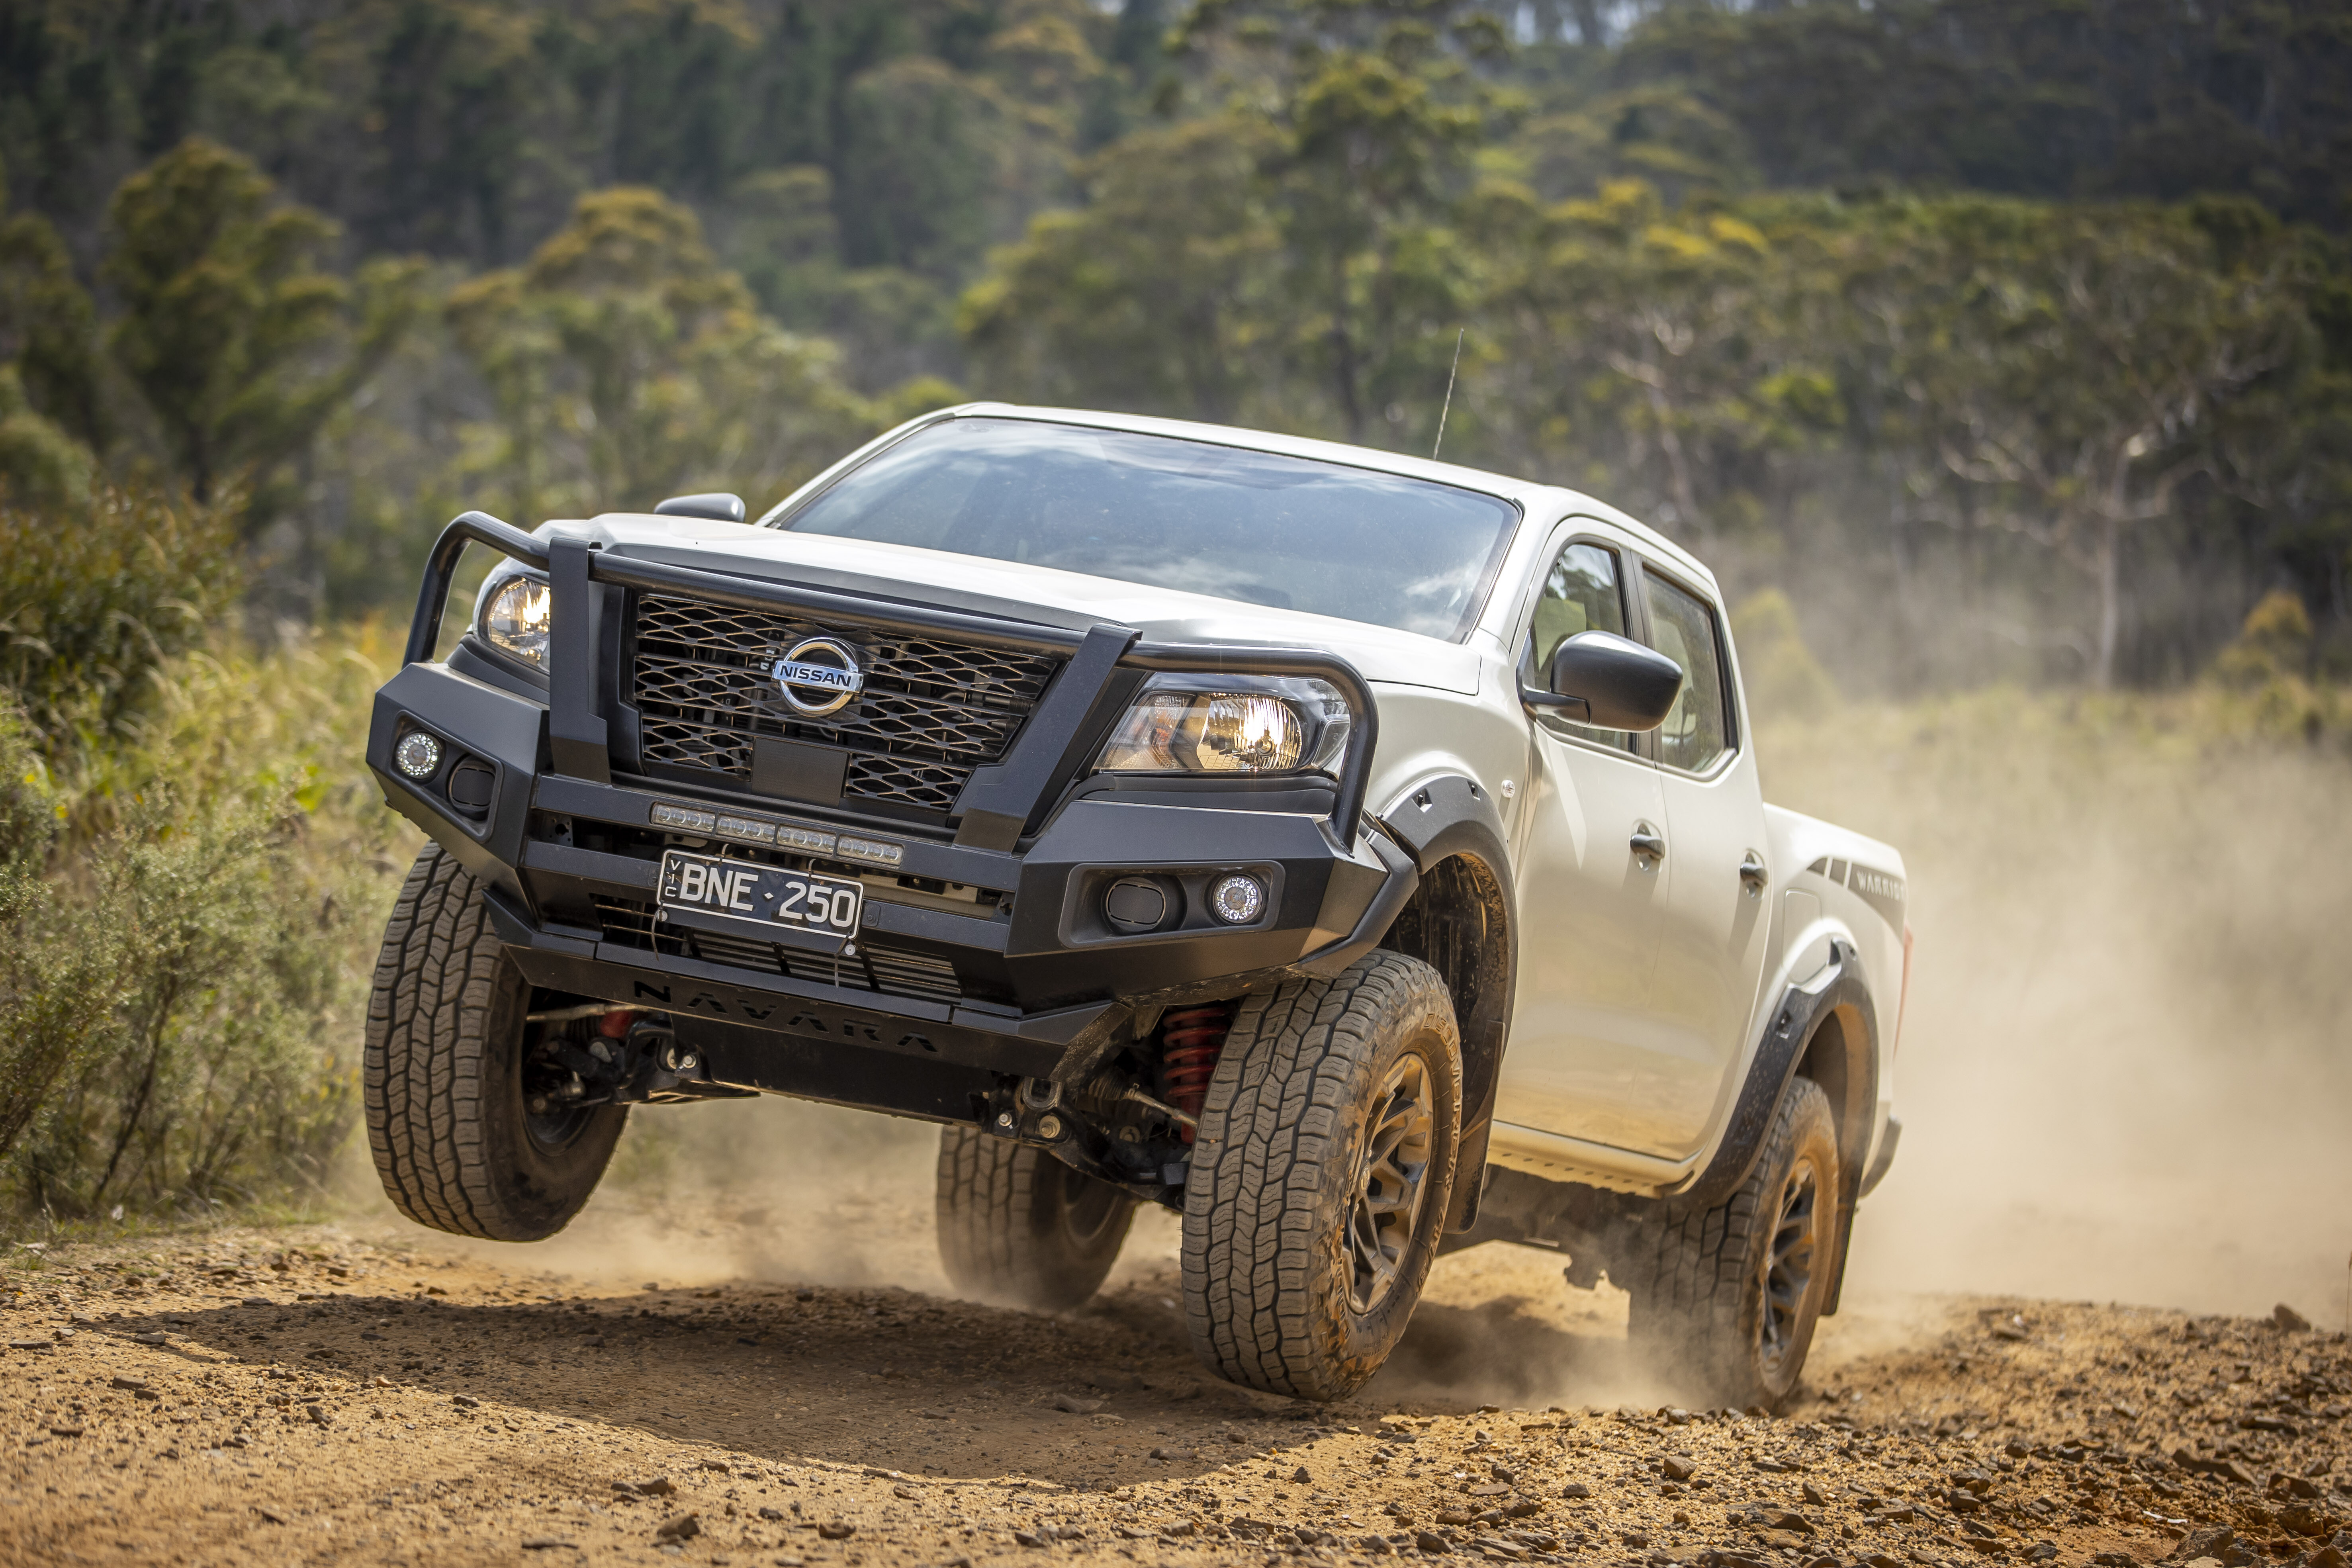
Suspension travel was impressive thanks to the progressive rear coil springs and Premcar-tuned dampers, with ride quality on corrugated roads being exceptional for a ute. Not Ranger Raptor good, but the SL Warrior isn’t pretending to be a Raptor.
With a 30mm wider wheel track and 30mm longer wheelbase compared to a stock SL Navara, stability on off-cambered 4WD tracks and when climbing steep obstacles was brilliant. These subtle changes make for some impressive results in the real world and, best of all, these off-road focused enhancements found on the SL Warrior don’t come at the detriment of on-road performance or the overall practicality of the Navara.
Cabin and accommodation
The interior of the Navara SL Warrior is pretty basic, but some folk, like myself, tend to like that in a vehicle.
It’s perfectly comfortable thanks to the decent cloth seats, of which only the driver’s seat is electronically adjustable; although, the sea of hard plastics quickly reminds you that this is a workhorse. At no stage did I feel uncomfortable driving the SL Warrior and I would be perfectly happy to do big days behind the wheel.
I struggled for headroom and my legs were cramped in the back seat, so this could be a concern if you regularly transport lanky folk such as my nearly two-metre-tall self. For a younger family, you’ll have no problems.
Also, the SL Warrior doesn’t feature the sliding rear window that the higher-spec Navara has, but there is a blank spot on the dash for where the switch would normally sit. Missed opportunity there, but that’s the life of a base-model vehicle.
There is a fairly basic eight-inch infotainment screen on the dash, which does the job but certainly isn’t cutting edge. It’s compatible with Apple CarPlay and Android Auto, but it’s not wireless, so you’ll need to plug your phone in with a cable. You also miss out on some active safety technology such as lane-keep assist and blind-spot monitoring.
Practicalities
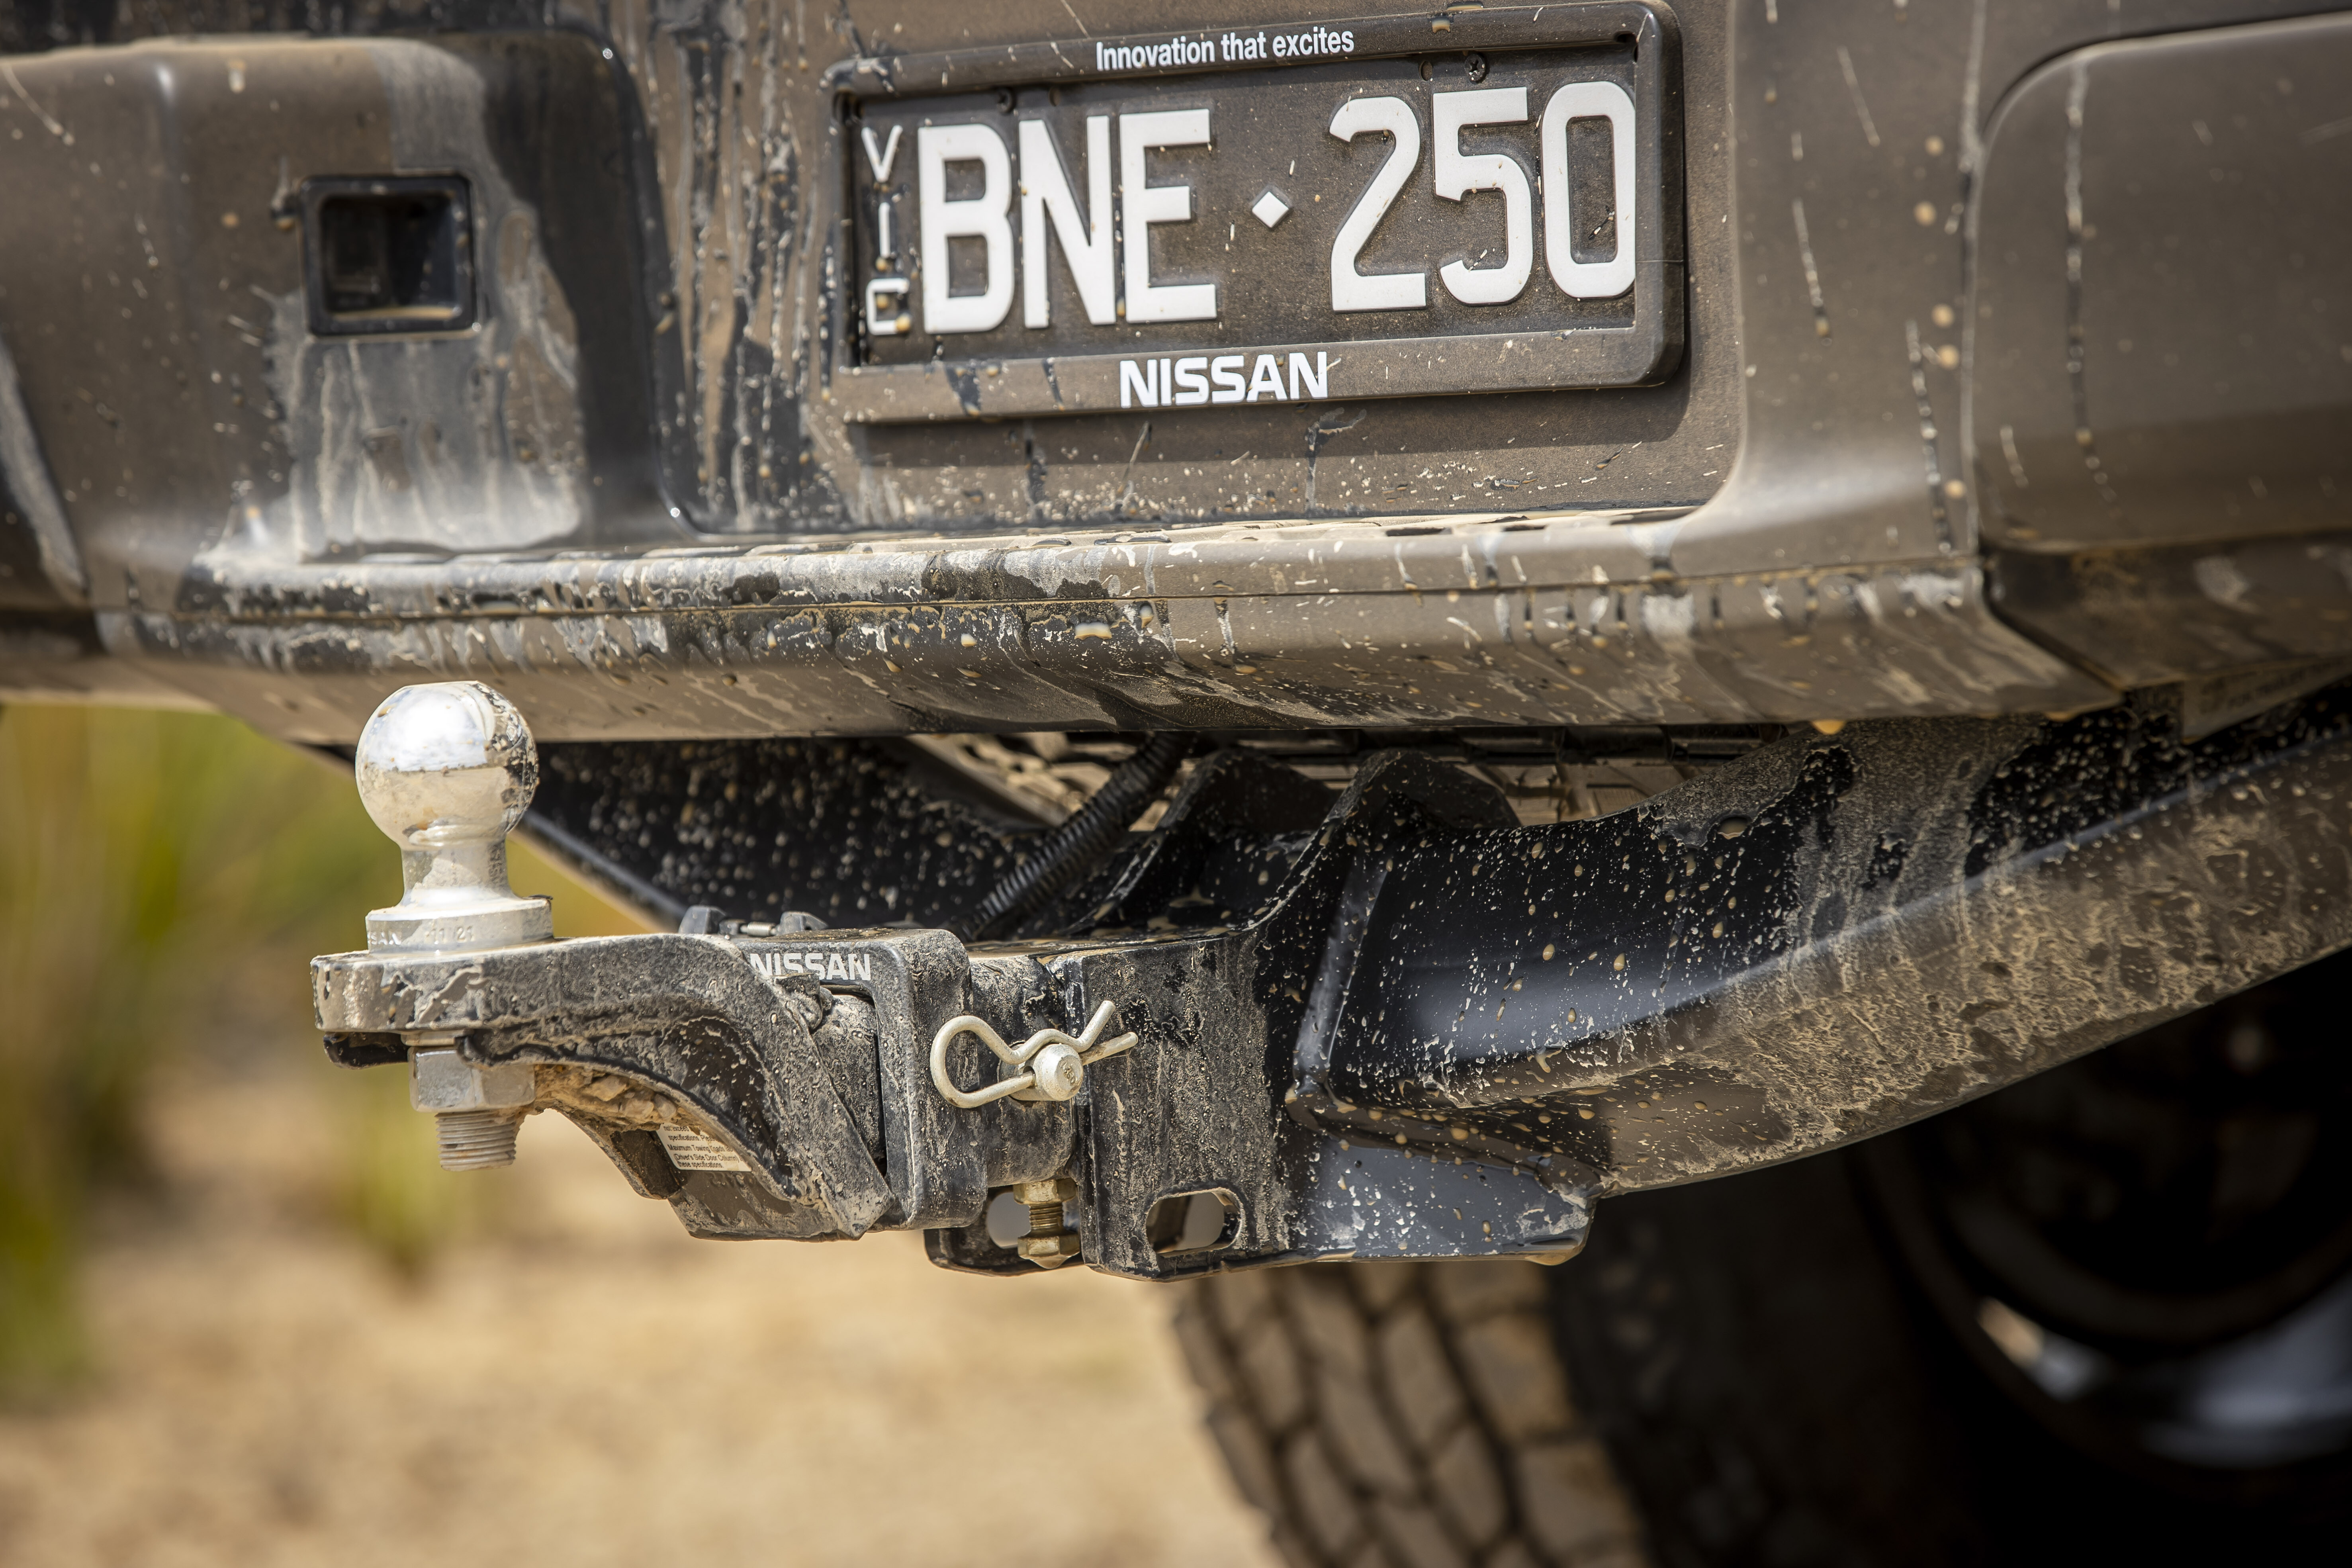
Did you really think a 4WD ute with vinyl floors wasn’t going to be anything but practical? Practical is the SL Warriors’s middle name. A great inclusion is the factory fitted towbar as standard, which is rated to 3500kg.
Plus, the payload capacity of the SL Warrior is an impressive 1081kg thanks to an 100kg GVM upgrade over the stock SL Navara.
One look at the rear-axle housing and shaved differential shows that this is a seriously stout ute, as they are utterly chunky. I have no doubt the SL Warrior will be able to handle such high loads without any problem.
In the tray area, there’s a simple drop-in tub liner and four looped tie-down points. It’s a very usable tray with 1134mm of space between the wheel arches, and there is a torsion-bar-style tailgate assist that makes opening or closing the tailgate a one-handed affair.
Something I wasn’t stoked to see were the halogen headlights instead of LED lights. This is old tech these days, and as such the performance offered by the headlights was pretty poor on dark rural roads. Thankfully, you have that recessed LED light bar in the front end to boost lighting output.
You’ll also struggle to fit a set of round LED driving lights to the SL Warrior’s bullbar, as there doesn’t seem to be the space to physically mount them due to the minimal overhang of the bar.
Verdict
Is the SL Warrior the perfect ute? No. Is it a damn good ute that I’m happy Nissan and Premcar have created? Absolutely! For someone who wants off-road capability, less frills and a swag of off-road-focused accessories from the factory, it’s a winner.
For someone who wants off-road capability, less frills and a swag of off-road-focused accessories from the factory, it’s a winner
Nissan has given the serious four-wheel driver a solid foundation to get out and explore the country from the dealership forecourt, and for those who want to further accessorise their vehicle for off-road adventures, you have a head start. All of the included upgrades look and feel to be of high quality.
With its wider track, taller suspension and larger tyres, the SL Warrior really looks the part, and best of all it’s not just a pretty face but a genuinely capable vehicle.
I’d love to see more power, though, and the new-gen Navara which we should be receiving in the coming years will hopefully address that. For now, the SL Warrior is the Navara to buy – if I was in the market for a dual-cab ute, it would be towards the top of my list as it perfectly suits my needs.
What can I say … I’m a sucker for vinyl floors and modified base-spec 4WDs with genuine off-road capability.
Specifications
| Engine | 2.3L twin-turbo diesel 4-cylinder |
|---|---|
| Max power | 140kW @ 3750rpm |
| Max torque | 450Nm @1500-2500rpm |
| Transmission | 7-speed automatic |
| Transfer case | Dual range with electronic selectionu00a0 |
| Front suspension | Independent double-wishbone/coil springs |
| Rear suspension | 5-link coil sprung/solid axleu00a0 |
| Kerb weight | 2169kg |
| GVM | 3250kg |
| Payload | 1081kg |
| Towing capacity | 3500kg brakedu00a0 |
| Fuel tank capacity | 80Lu00a0 |
| Fuel use | 9.9L/100km (as tested) |
| Departure angle | 19.0 degrees |
| Rampover angleu00a0 | 26.2 degrees |
| Approach angleu00a0 | 36.0 degrees |
| Wading depthu00a0 | 600mmu00a0 |
| Ground clearanceu00a0 | 260mmu00a0 |
| Price | $60,500 + On-Road |
Part 1: Installation
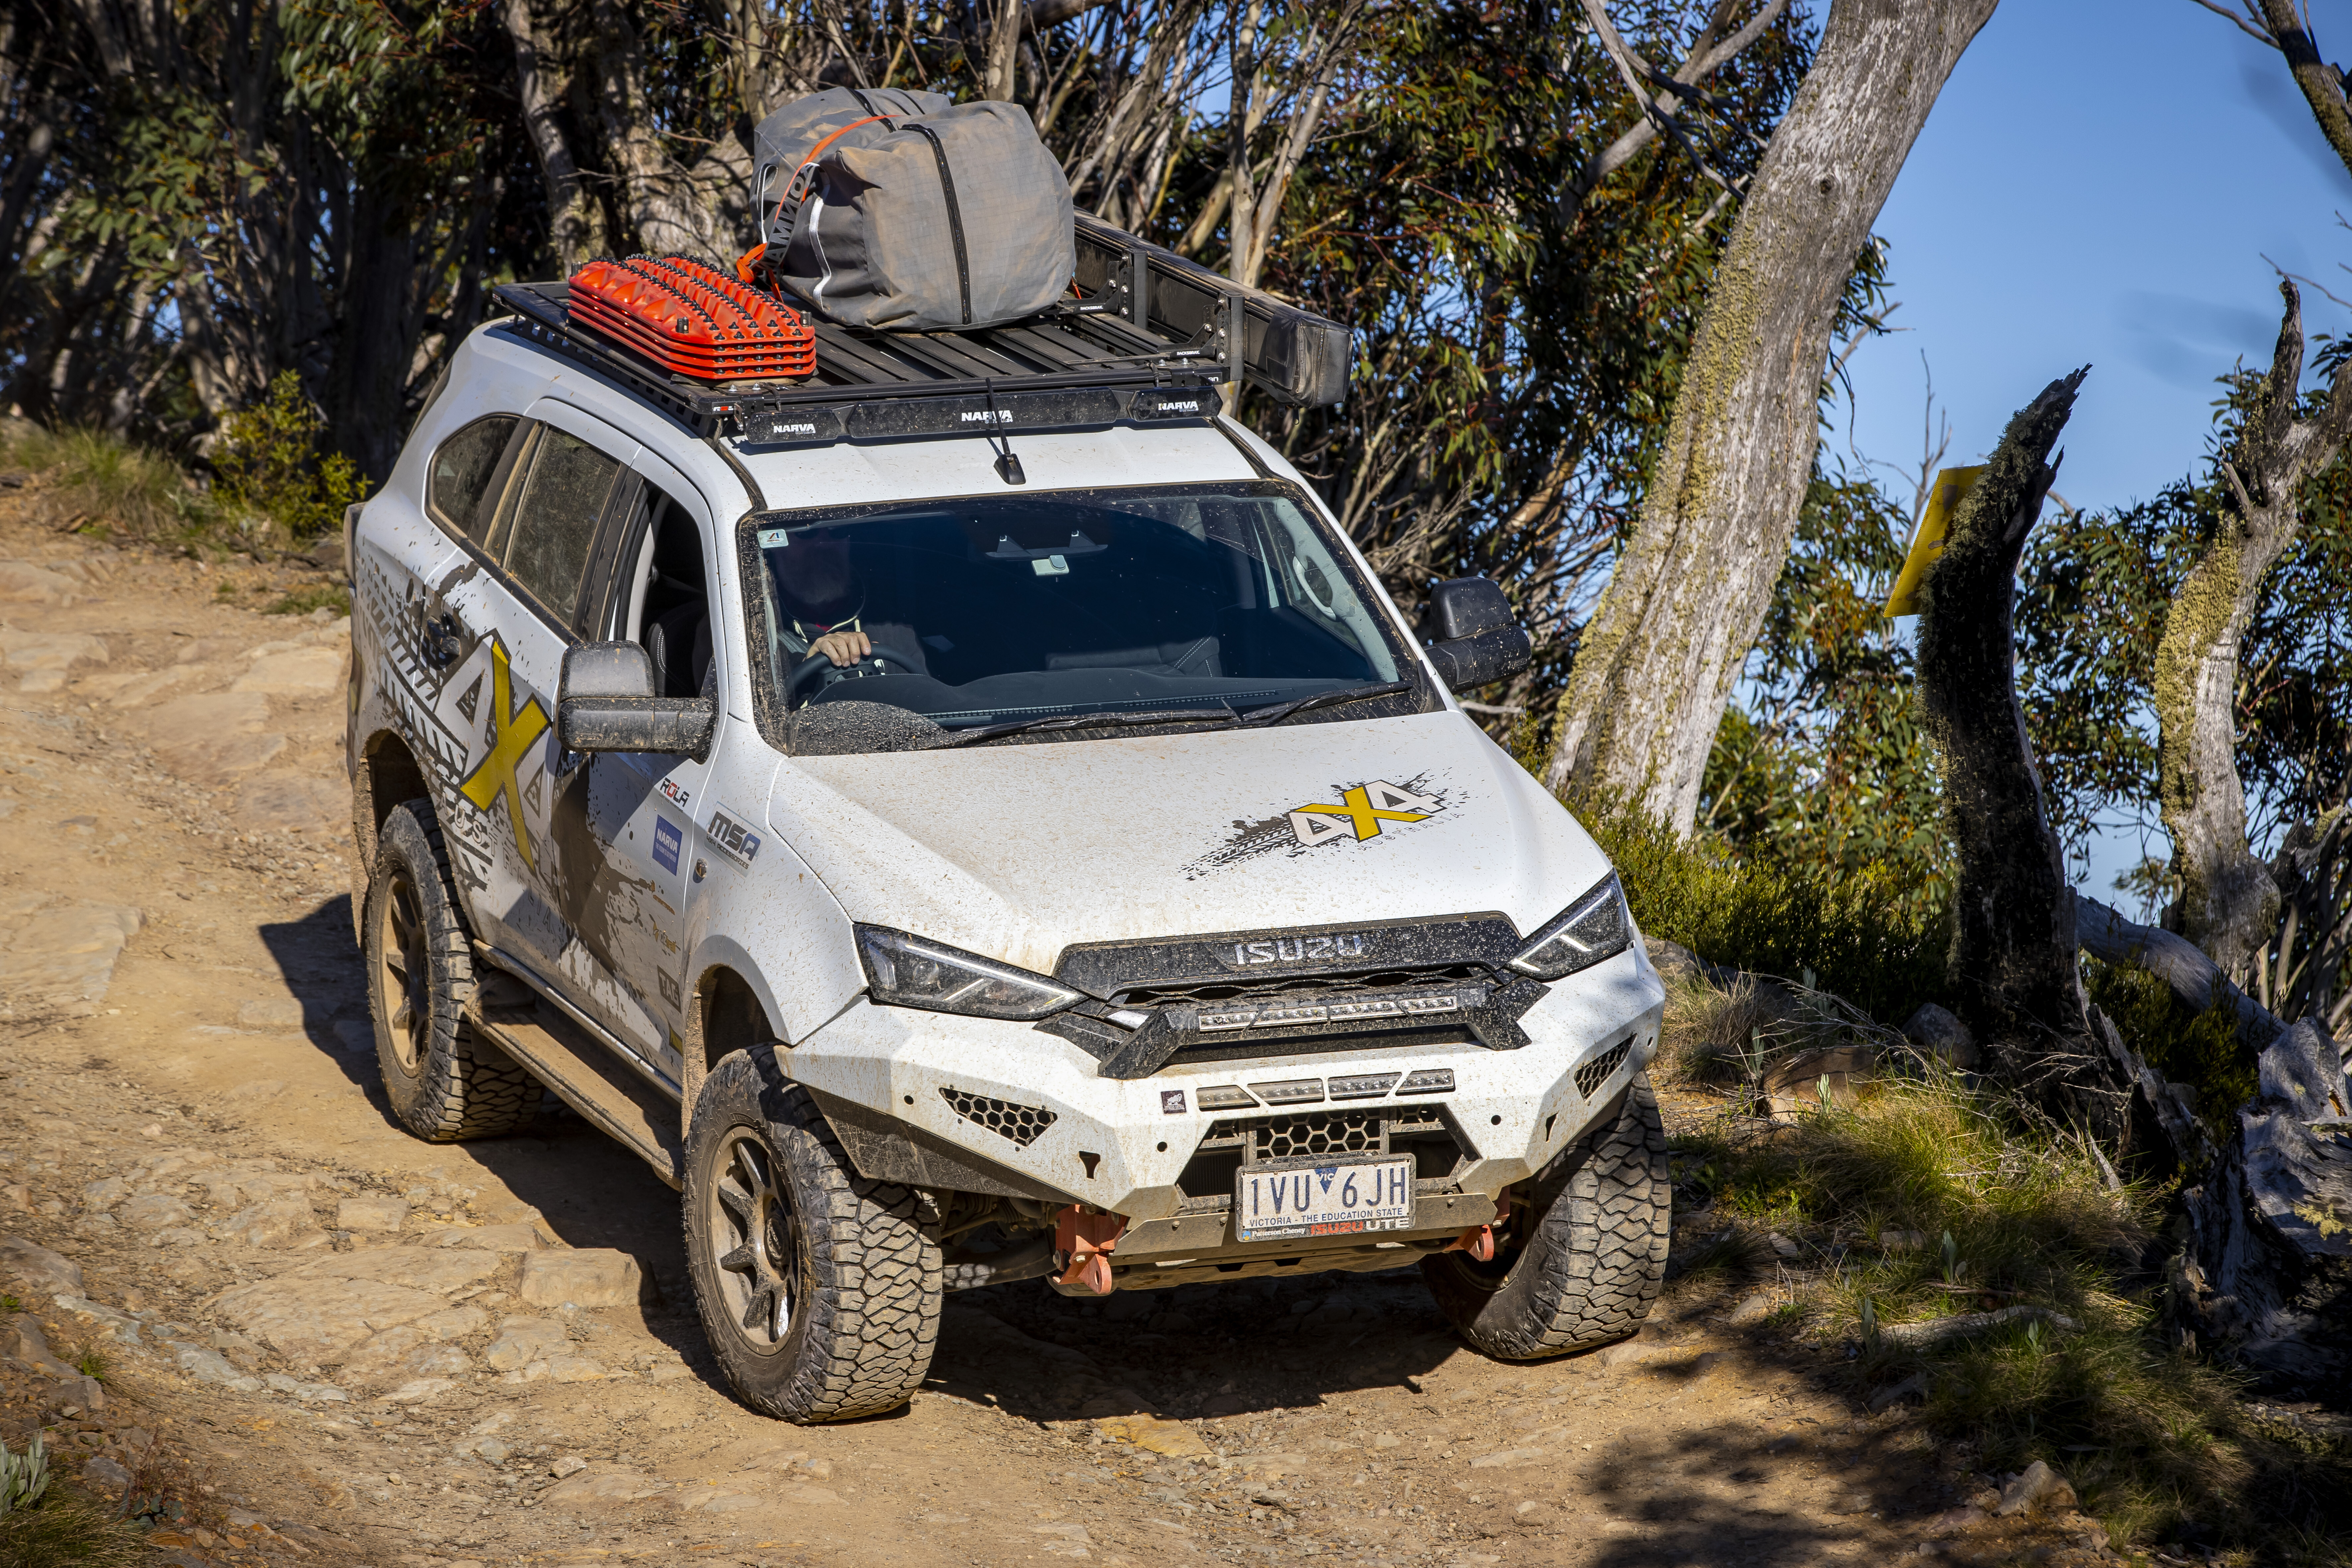
With the limited cargo capacity of the mid-size MU-X wagon, a roof rack was definitely called for to carry any bigger bits of gear. Thankfully, Isuzu bestows the MU-X with a generous 100kg rating for the roof, so there’s quite a bit you can haul up there if you need to.
With some of the newer hard-shell roof tents weighing in at 80kg and more, you’ll use every bit of that rating once you account for the weight of the rack itself and any mounts.
After sampling and being impressed with the Ridge Mount rack on its 300 Series LandCruiser earlier this year, we went straight to Rola Racks to see if it had a Ridge Mount for the MU-X. It turns out it didn’t but were keen to develop one ASAP, so our MU-X would be the guinea pig.
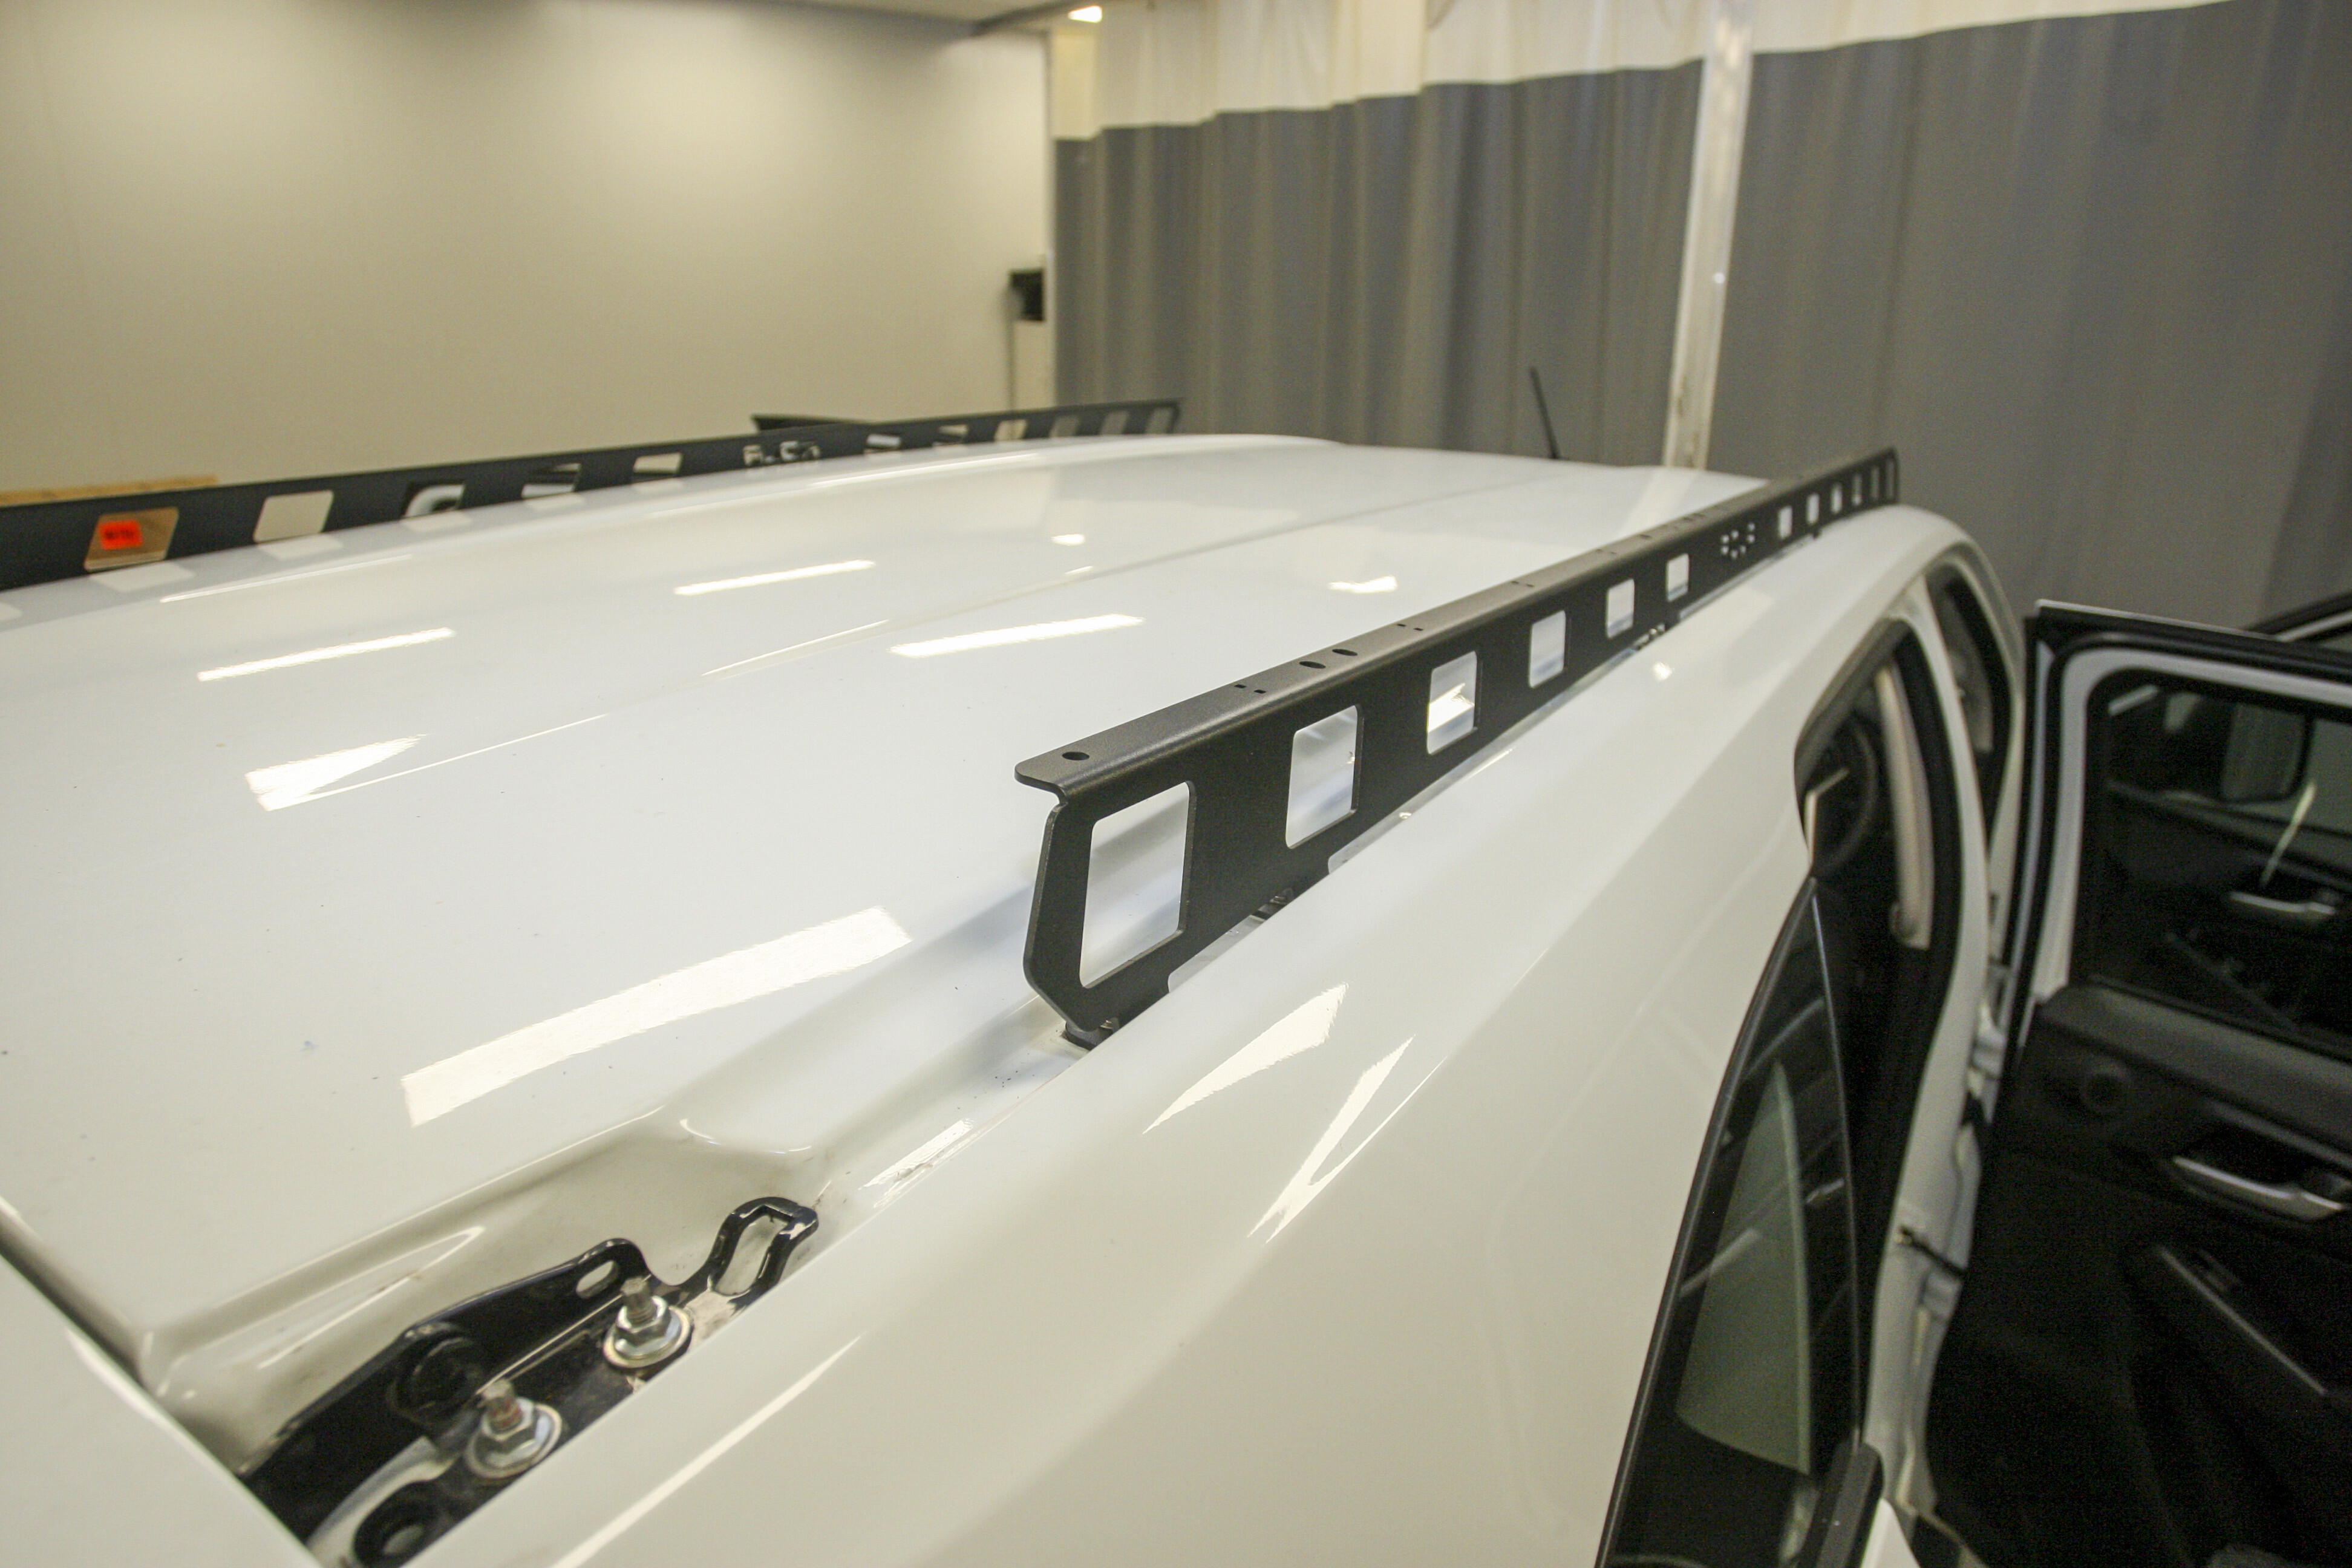
The Ridge Mount system is a good-looking alternative to conventional mounts for Rola Titan Tray flat racks. They form a stylish spine that runs down the length of the roof that gives a more stable mount for the Titan Tray. The Ridge Mounts attach to the vehicle in the factory channels and mounting points, so there is no drilling or modification needed to the vehicle itself.
The team at Rola’s Melbourne headquarters were able to fabricate the Ridge Mount for the MU-X before we got there, so, all things going well, it should be a relatively easy installation and something anyone with basic skills and tools could do at home.
In fact, the most difficult part of the job was removing the factory sealant that is in the roof where the mounts bolt to. Don’t forget to put sealant around the bolt holes when you are bolting the Ridge Mounts on to the car.
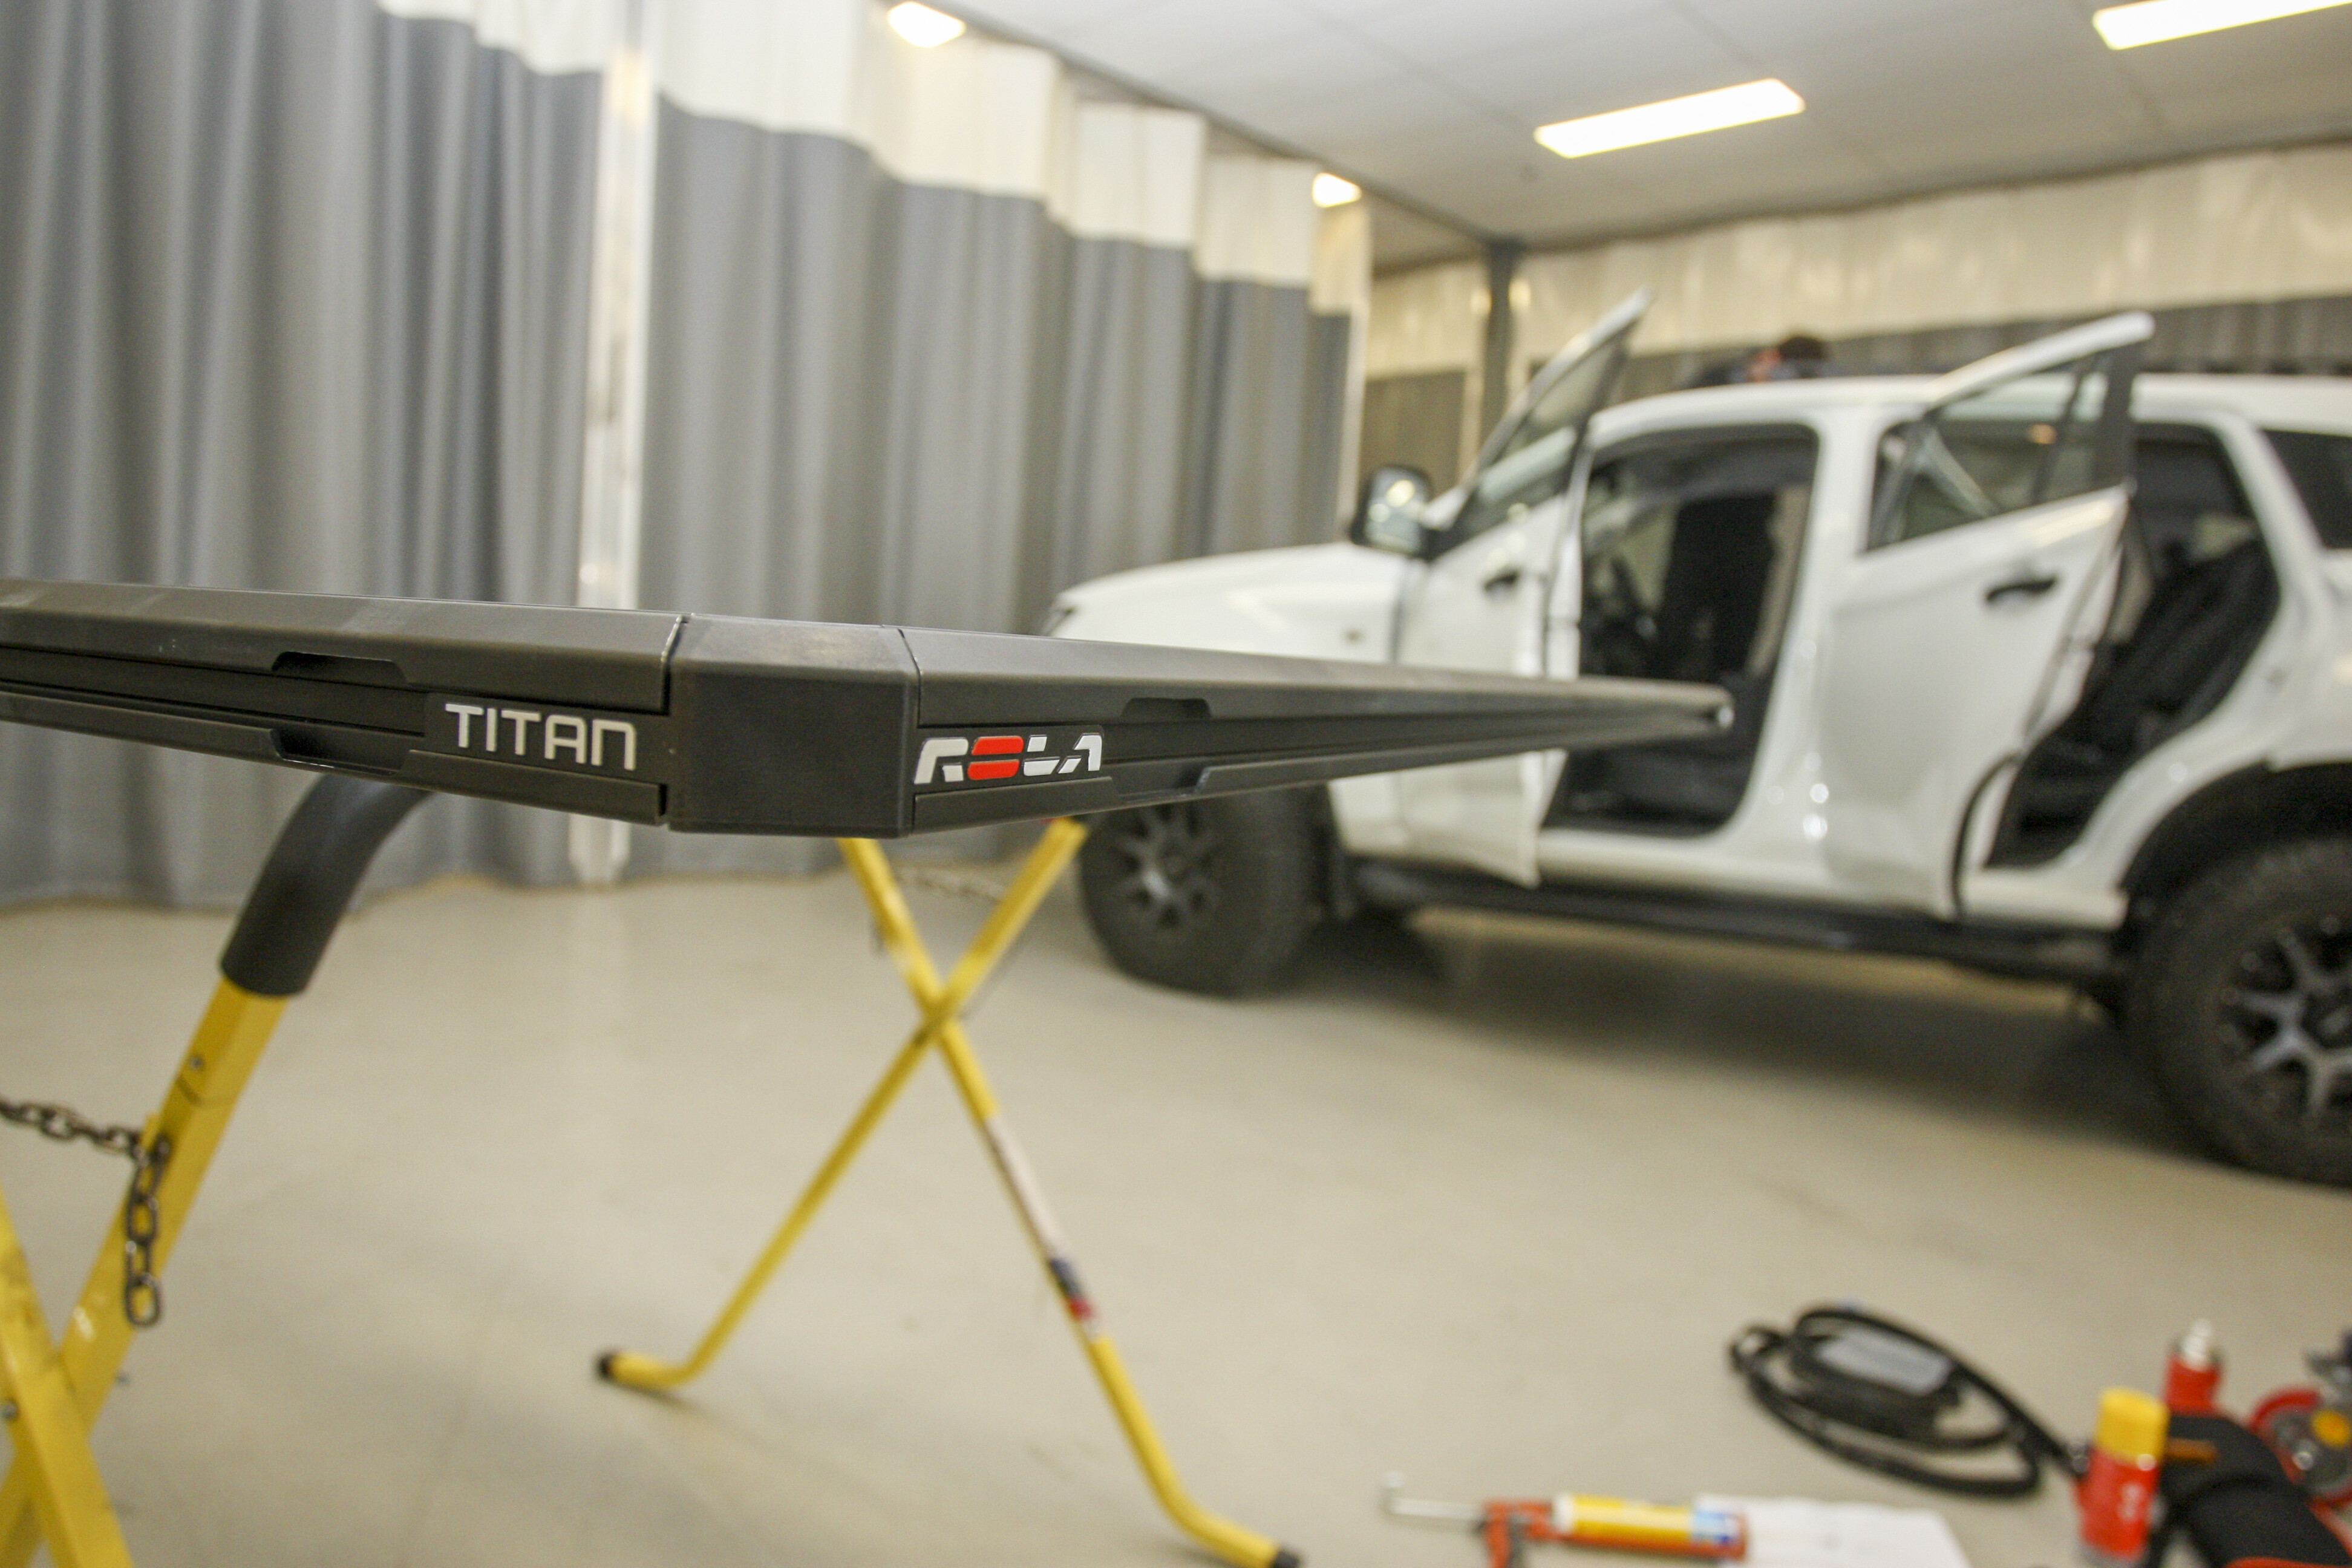
With the two Ridge Mounts lined up and bolted down in the Isuzu’s roof racks, it was time to fit the Titan Tray. We chose an 1800mm x 1200mm Titan tray to suit the MU-X, but they are available in bigger sizes for bigger wagons and smaller trays for utes and cargo hard covers.
The Titan Trays have their slats running front to back rather than side to side on the roof of your car, which offers plenty of adjustment for whatever you need to carry on your roof.
There is also a huge range of Rola accessory mounts for specialist items like jerry cans, gas bottles, traction boards, light bars, shovel/axe holders and awnings. The accessories attach via T-bolts in the slots, so again there’s plenty of adjustment for where you need to carry the load. Raised side rails for containing your cargo are also an option.
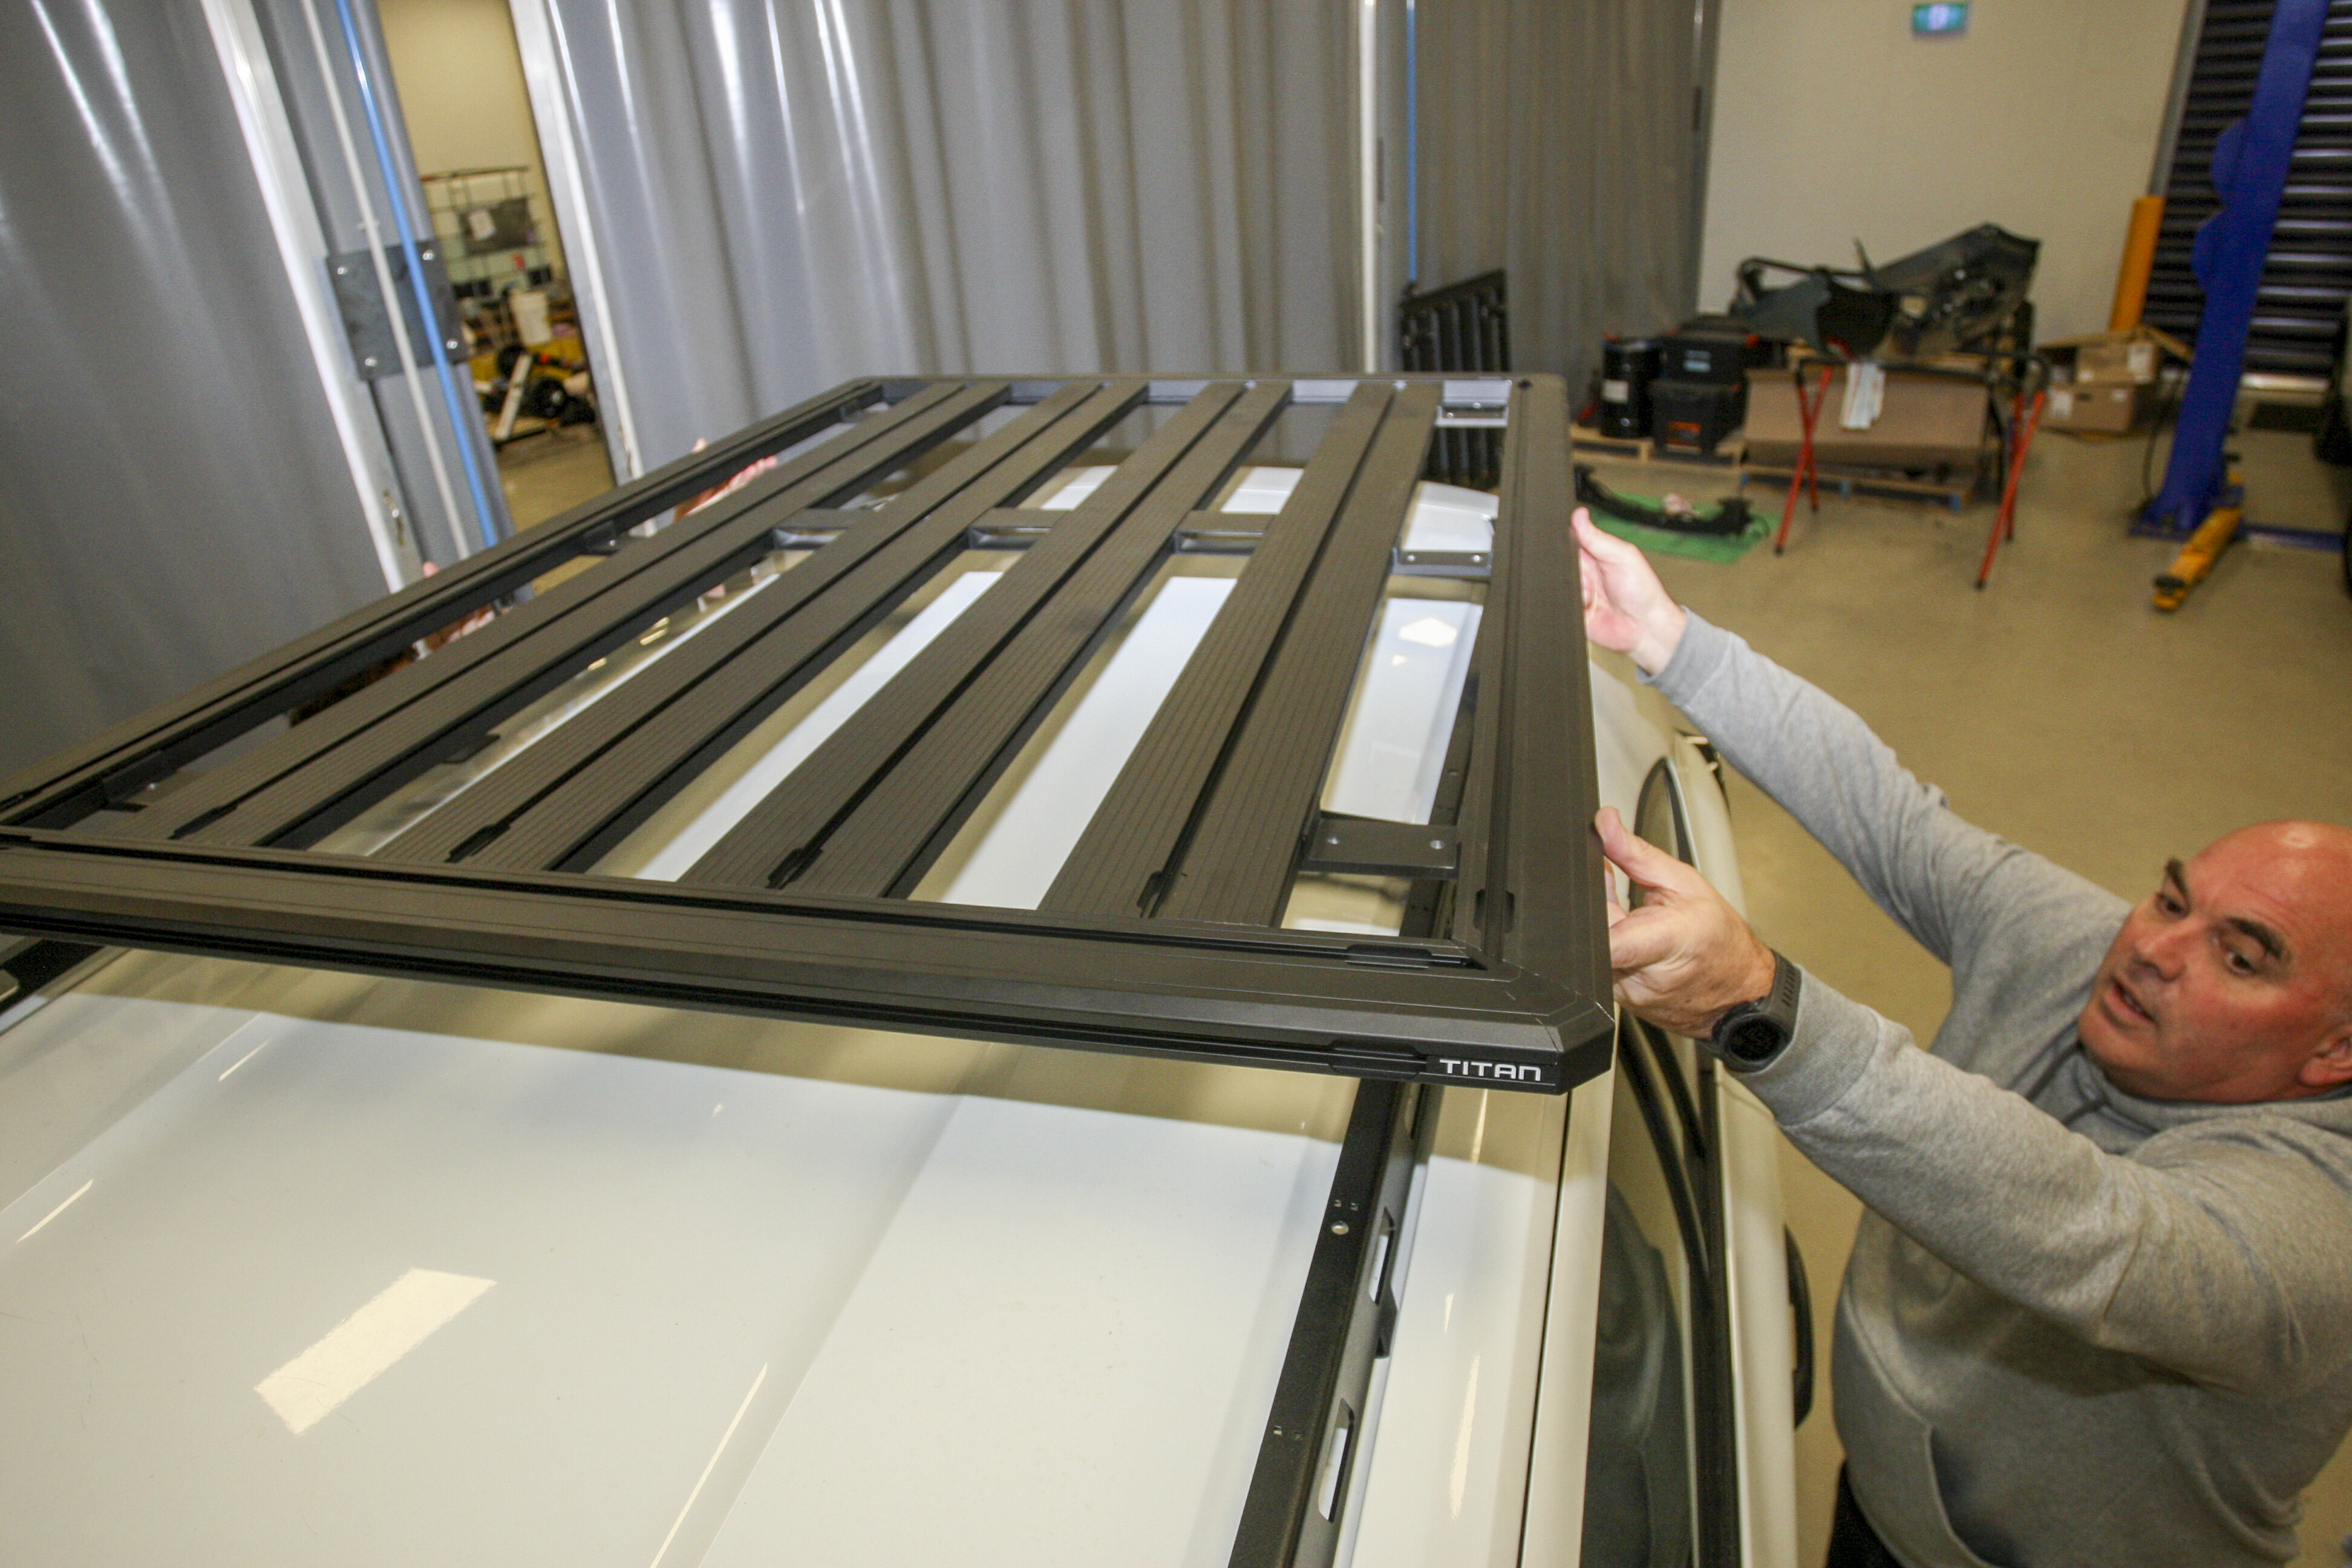
Fitting the lightweight tray is relatively simple but best done with two people because of the size and to have someone on each side of the car. Once it’s up there and lined up to where you want it to sit, it’s just a matter of bolting it down and it’s ready to go.
The Titan Trays and Ridge Mounts are rated to hold 300kg, which exceeds that of the 100kg rating on the MU-X and most other vehicles.
So far we only have our Narva LED light bars fitted to the front of the Titan Tray using the Rola accessories brackets, but in the coming months we’ll be loading a roof tent, awning, recovery gear and other accessories (not all at once) on to the rack, to put it through its paces.
Part 2: Put to work
A quality roof rack is essentially a must-have for any 4×4 being used for outback touring.
Be it a place to mount large items like a rooftop tent; to carry bikes, kayaks, a tinny or any other large sporting equipment; to mount an awning; or simply to haul cargo that doesn’t fit inside the car. The roof rack can fill all those roles. The rack on our Isuzu MU-X has been called on to carry, haul and mount many of the items mentioned above and has proved a priceless addition to the vehicle.
The rack we chose is a Titan Tray flat rack from Rola, measuring 1800 x 1200mm. Flat racks have become the go-to product for 4x4s as they offer a lower overall height when there is nothing on them and a ton of versatility when combined with the many accessories available for carrying all sorts of gear, luggage and equipment.
Some of those accessories that are of particular interest to four-wheel drivers include shovel/axe mounts, high-lift jack mounts, jerry can brackets, gas bottle holders, awnings and light mounts.
Rola’s Titan Tray range of flat racks comes in many sizes to suit a range of different vehicles, from large wagons to the relatively small roofs on utes. They are made from black anodised aluminium to be both lightweight and durable, with the slats running lengthwise down the rack. The slats and perimeter rail have channels in them to secure eye bolts for lashing cargo down or any of the many different accessories.
The hooks in the ratchet straps and tie-downs easily slip into these slots or the edges of the slats. Titan Trays are rated to carry up to 300kg, but this is limited by the rated capacity of your vehicle’s roof itself. In the case of the MU-X, the capacity is 100kg when driving.
While the Titan Trays have been around for many years, a new product for Rola when we were fitting out the MU-X was the brand’s Ridge Mount system to hold the tray to the vehicle. The Ridge Mount is a long mount that bolts into the vehicle’s factory roof channels and supports the full length of the rack for more stability and to even load bearing. They also look great and help keep the overall height lower.
Since fitting the Ridge Mounts and Titan Tray to the MU-X, it has been in use the whole time. First up was installing the Narva Ultima light bars to the front edge of the tray, which were fitted using Rola mounts made especially for LED light bars.
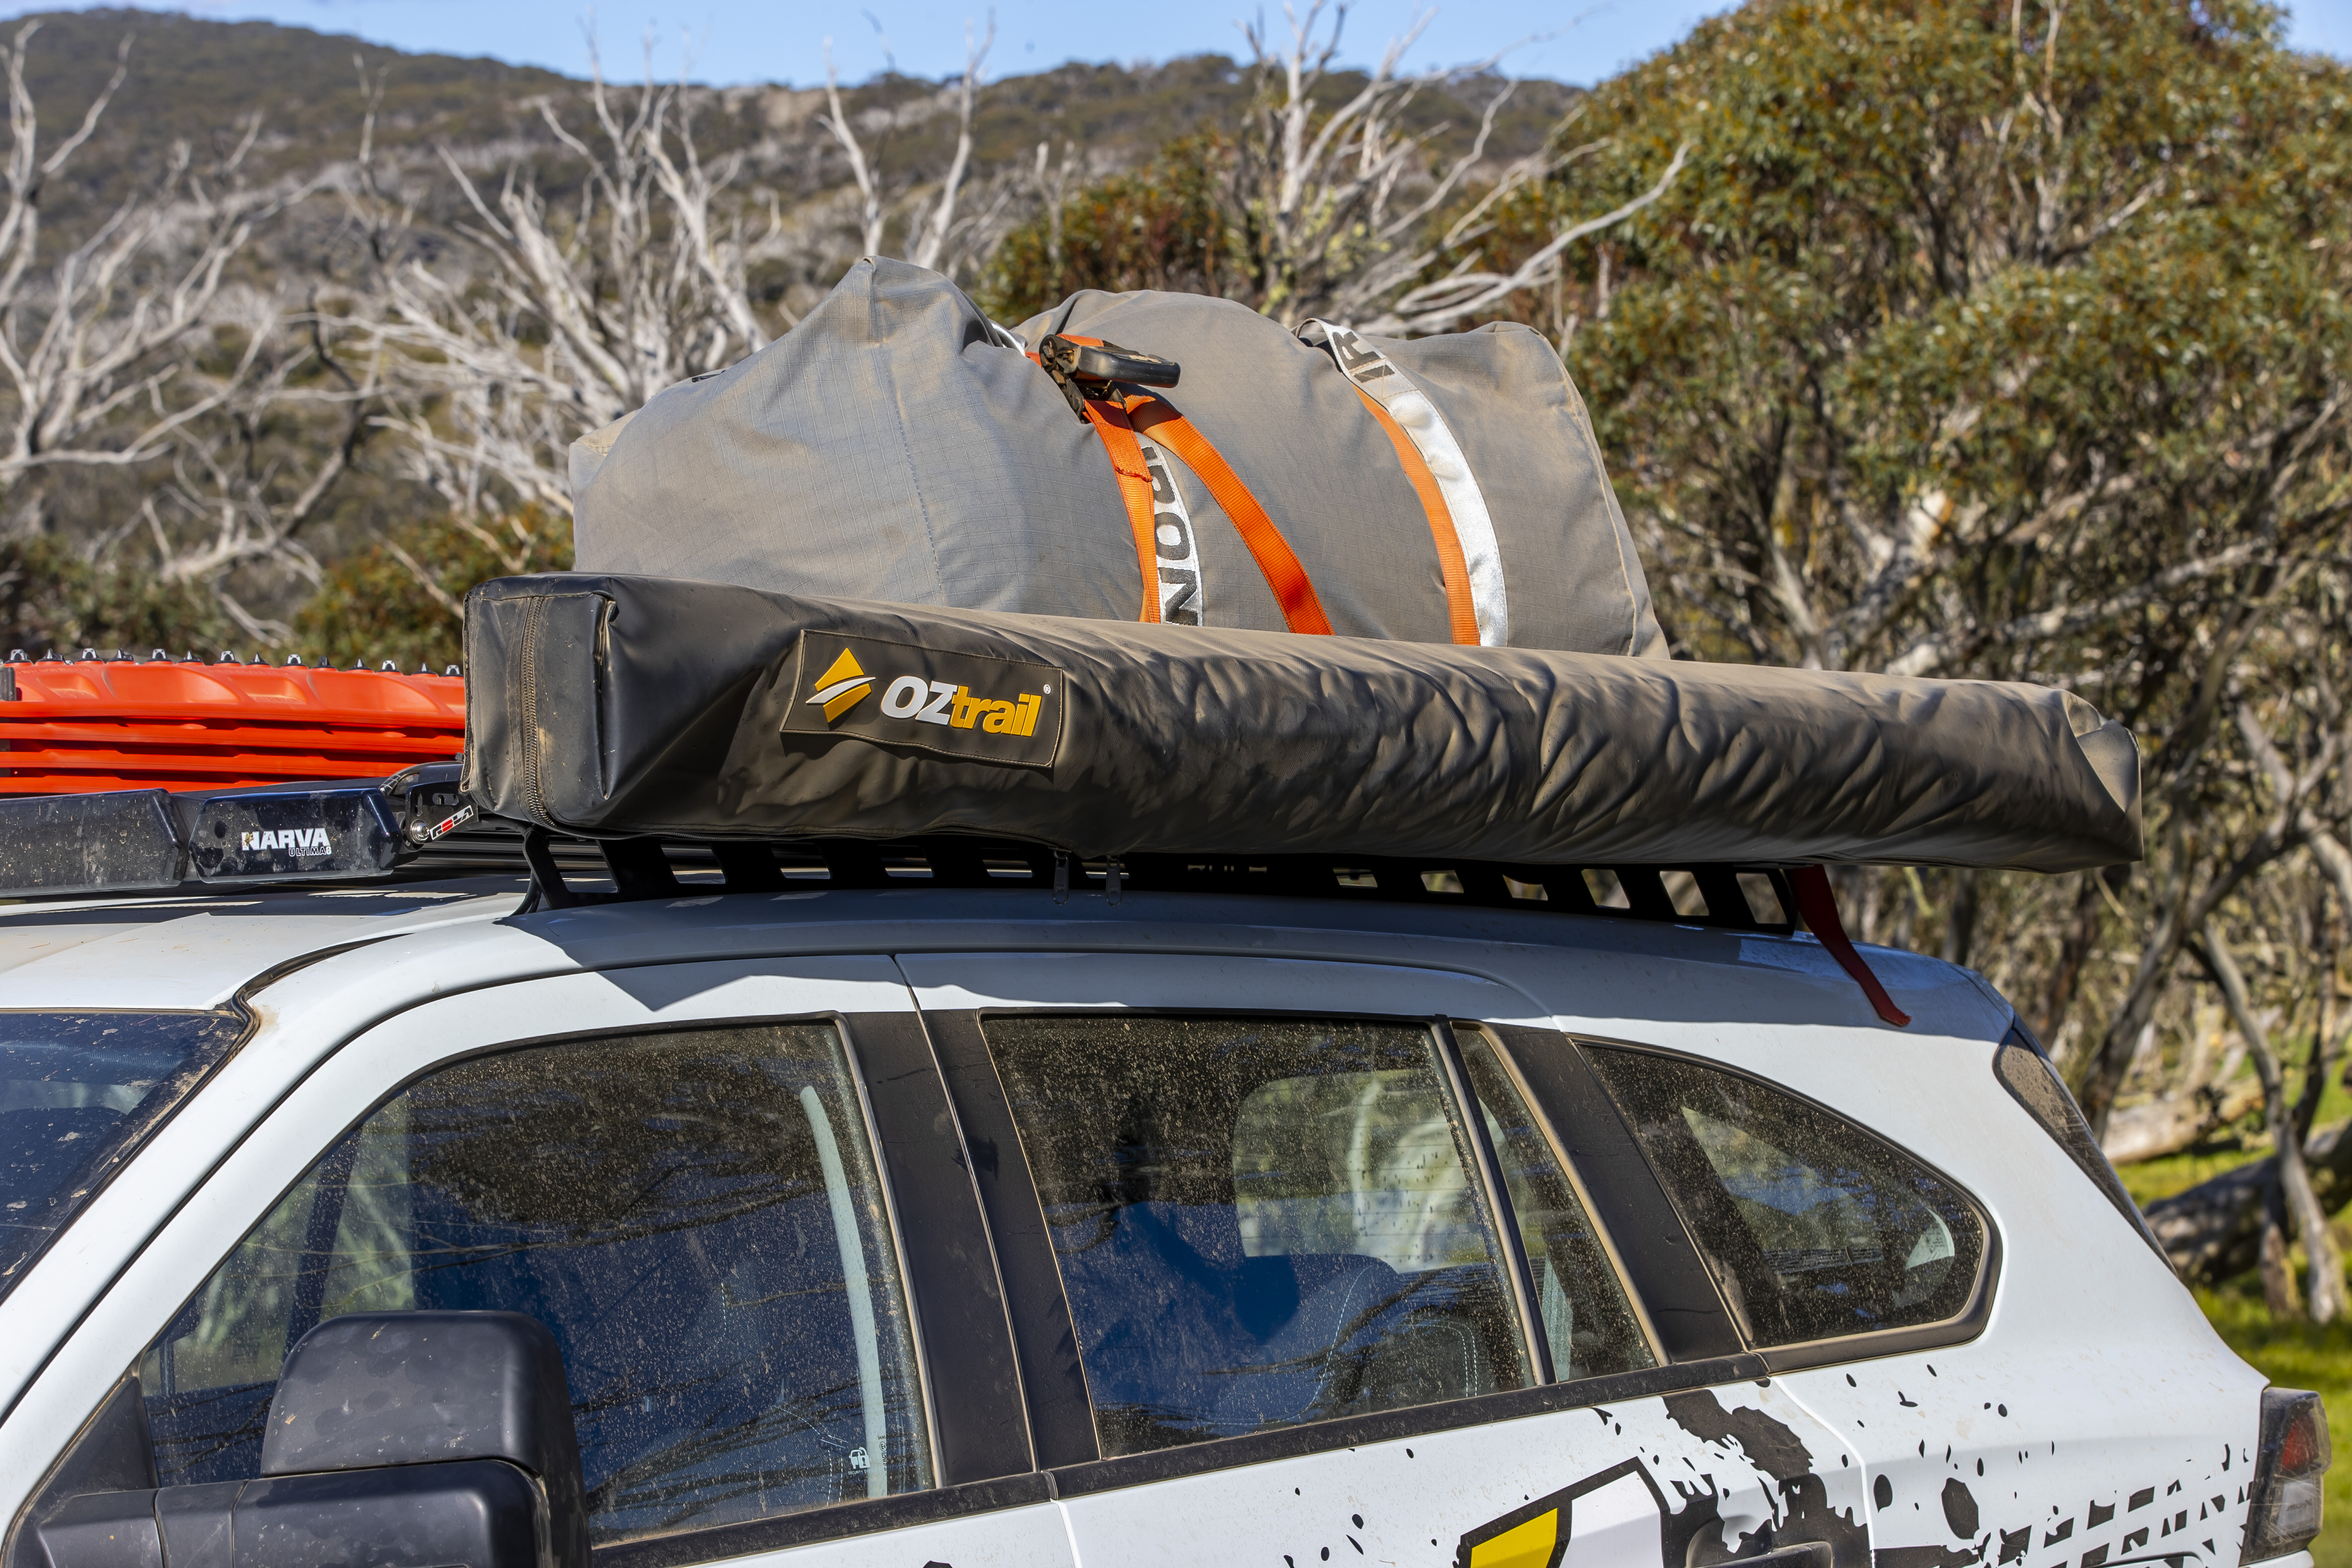
Next up was a rooftop tent from OZtrail which went on easily and was fully functional. As good as the RTT was, it didn’t really fit with our use of the car and limited anything else we could carry up there due to both its size and weight.
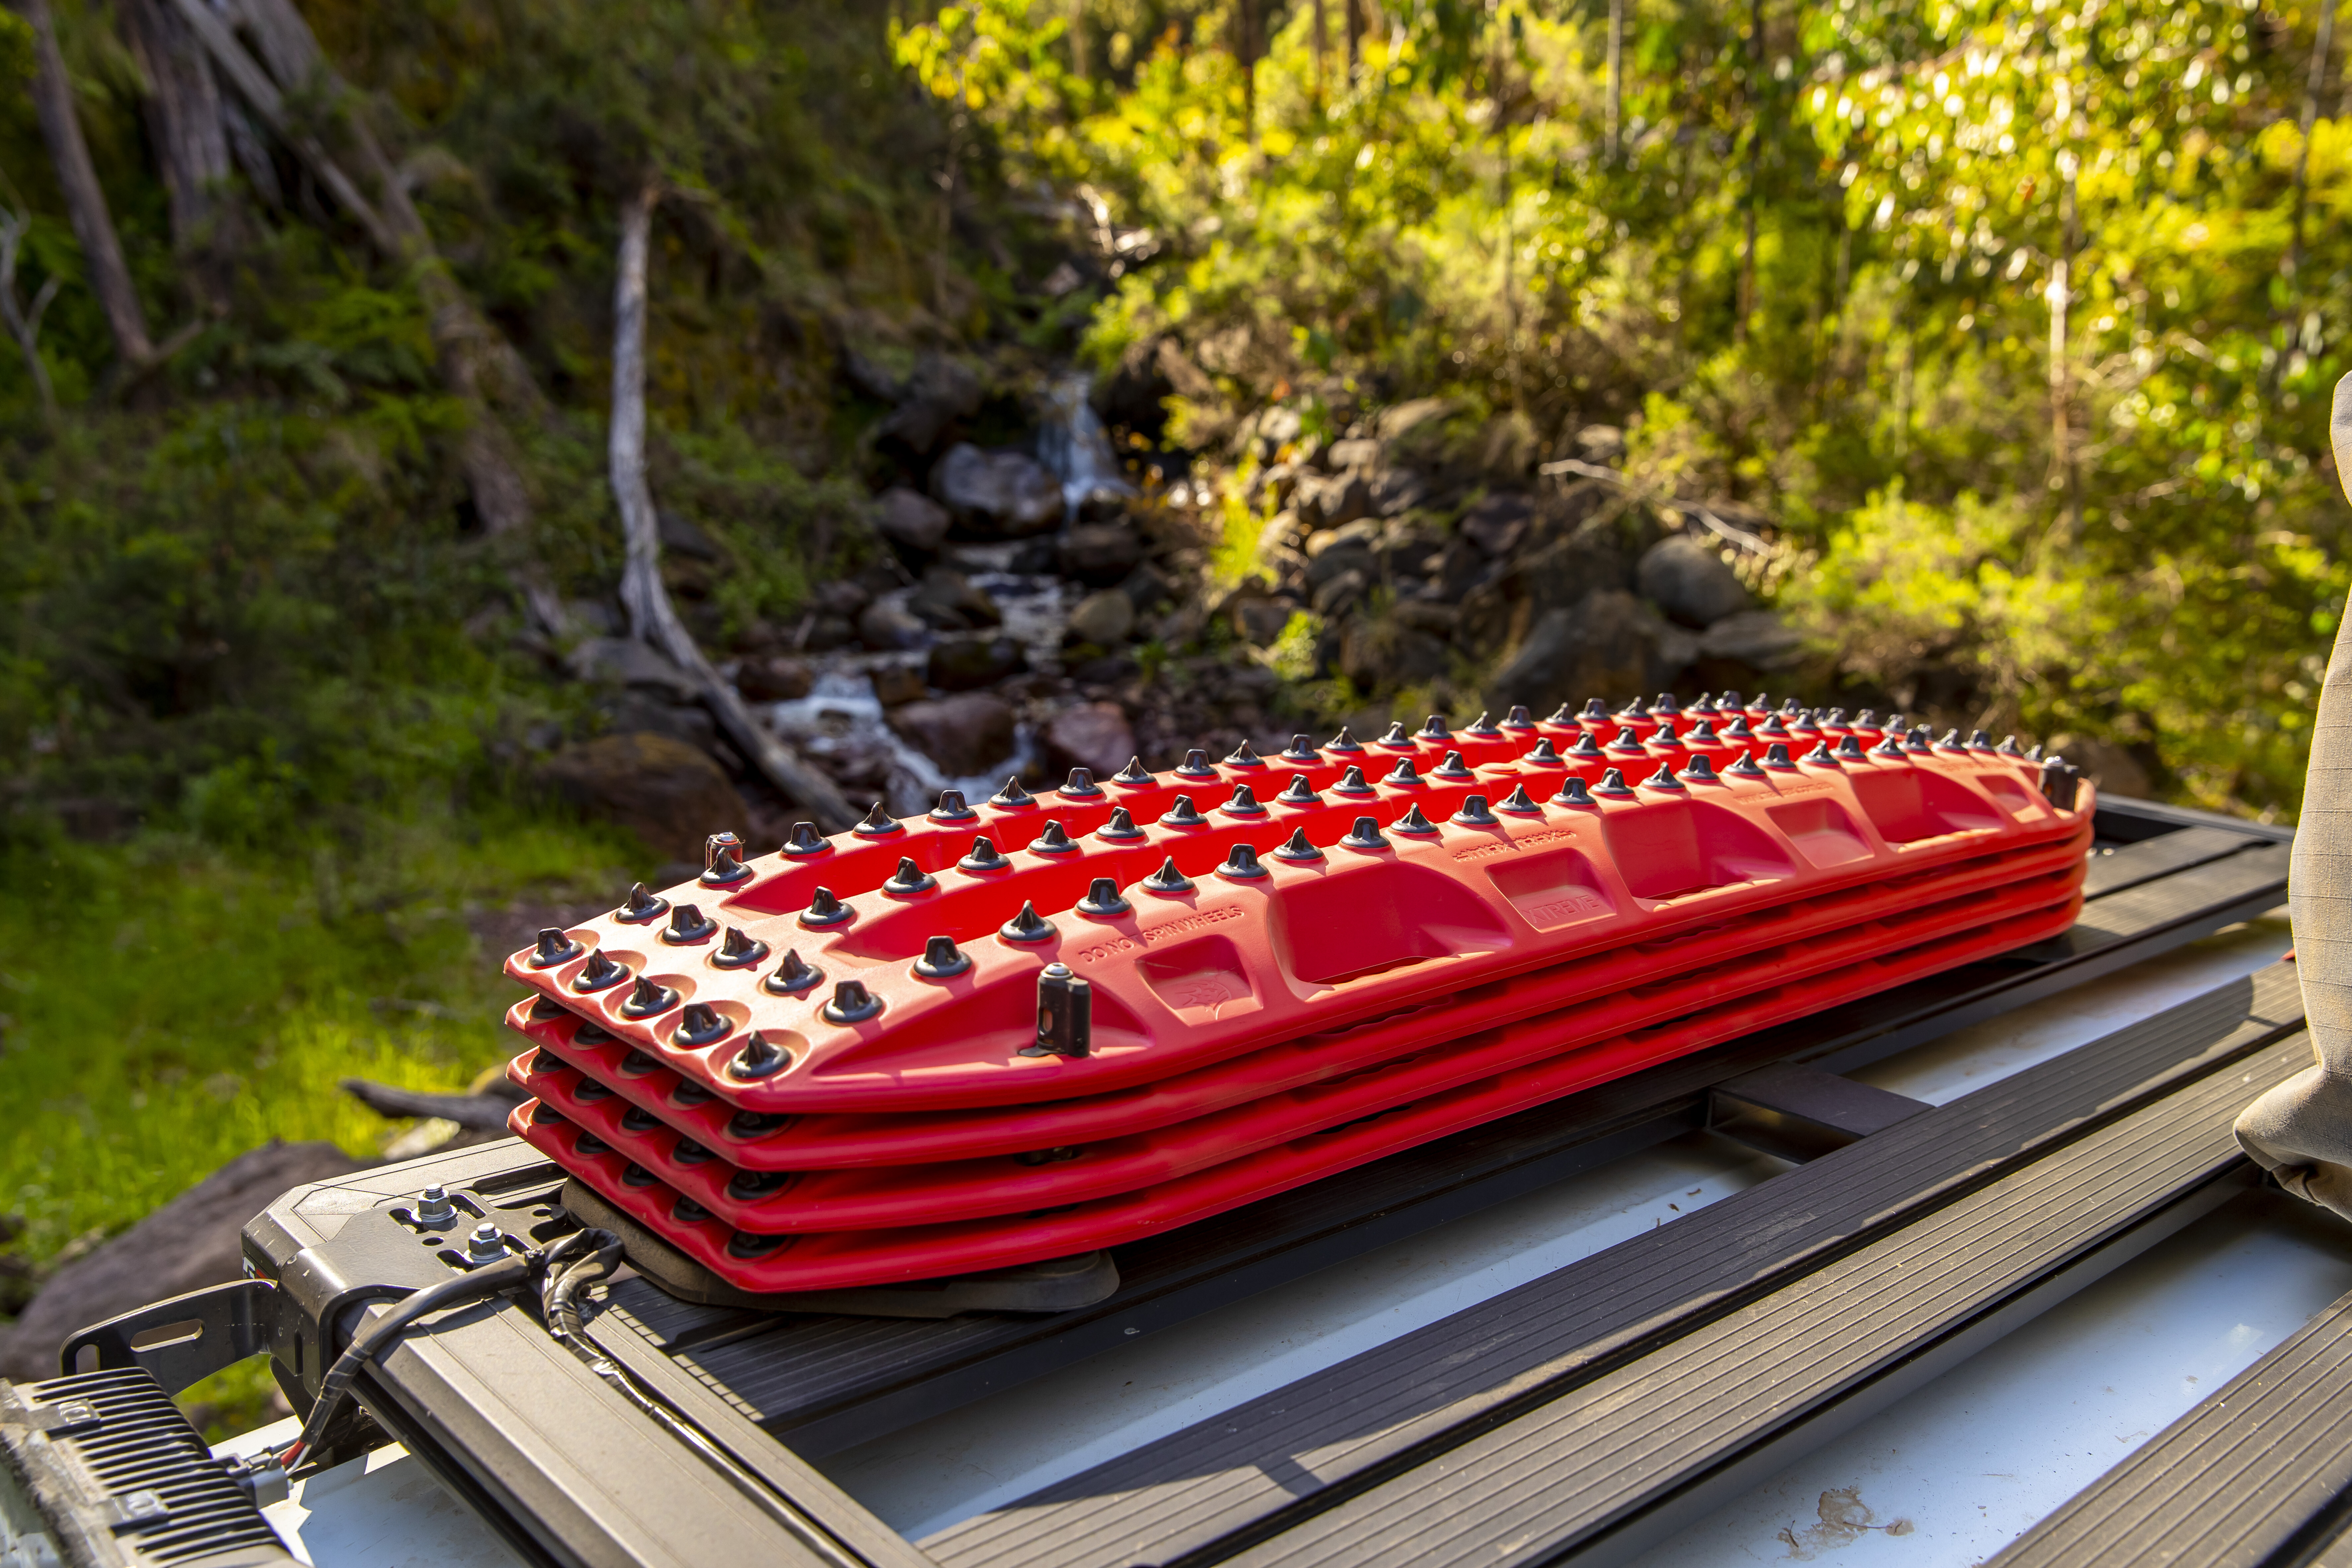
We replaced the tent with a 270° awning, also from OZtrail, which we get much more use from and has been an invaluable addition for bush touring. Again it mounted easily and securely using the channels in the tray and appropriate hardware. This also freed up space for us to carry our MaxTrax on the rack, as well as swags and storage cases when required. We’ve even strapped firewood up on the Titan Tray when needed.
Our OZtrail 270° awning has been an invaluable addition for bush touring
As the MU-X is a relatively small vehicle when compared to popular wagons like LandCruisers and Patrols, and with the fridge and storage system in the back of our car, the internal cargo space is further restricted. Because of this limitation, having the extra carrying capacity of the Titan Tray up top has been invaluable when hitting the tracks.
Rola is preparing to release its third-generation Titan Tray in Australia, promising to be more versatile, functional and stylish. Keep an eye out for them online and in retailers and, dare I say it, on our new Ranger build.
Pricing
- Rola Ridge Mounts for MU-X: $551.55 (plus fitting)
- Rola Titan Tray (1800 x 1200mm): $839 (online)
Australian manufacturer of 4×4 products, Clearview Accessories, has completed its range of towing mirrors for 2022+ Ford Ranger and Everest models.
Clearview kicked off its range of mirrors for Ford’s newest 4x4s late in 2022 when it introduced its products to suit models without the 360° camera fitted as part of the standard features. Clearview now covers the full range of next-gen Ranger and Everest models, right up to the Platinum and Raptor variants.
The 360° camera is standard on Ranger Wildtrak, Platinum and Raptor models, as well as the Everest Platinum. It is available as part of an option pack on Ranger XLT 4×4 and Sport, and Everest Trend and Sport.
The cameras that provide the image down both sides of the vehicles are mounted under the external rear-view mirrors and offer drivers views around the car including a bird’s eye top-down view, 180° front and rear split view, front off-road view, and rear trailer hitch view from the large centre display. The front and rear views come from separate cameras mounted in the grille and tailgate.
“Our customers don’t want to compromise on their vehicle’s features when they install towing mirrors, and it’s for this reason that we’ve remained at the forefront of emerging mirror technologies,” said Mike Cowan, Co-Founder of Clearview Accessories.
The Clearview mirrors were designed in conjunction with Ford and are factory-approved replacements. They retain all the functions of the OE mirrors including 360° camera view, power folding and adjustment, puddle lamps, heated glass, BLIS, and LED indicators. These features are only applicable when they were fitted to the model originally and may not operate if your car didn’t have them from the factory.
The LED indicators in the Clearview mirrors are made to meet the appropriate standards if your vehicle has a GVM upgrade that requires such indicators, so you don’t have to fit an extra set of side blinkers. CAT6 indicators are available on CAT6 indicator models, but CAT5 indicators are standard.
The Clearview towing mirrors for the new Ranger and Everest are available in Compact and Next-Gen styles, and they offer a bigger glass area than the OE mirror and the ability to extend out to the sides of your vehicle to provide a better rear view for towing.
The Next-Gen and Original mirrors also have two glass elements, with the smaller one offering a convex glass to give the driver a wider view of what’s behind the car and trailer. They are able to do this while still providing a mirror with a factory-like appearance that’s permanently fitted to the car. No more silly strapped or stuck-on towing mirrors.
Clearview mirrors are easy to install and are made for each different model of car, so they use the factory mounts, plugs and connections. If you don’t want to fit them yourself, most of the thousands of Clearview dealers around the country can fit them for you.
For all the details on the products and where to find your closest dealer, head to: www.clearviewaccessories.com.au
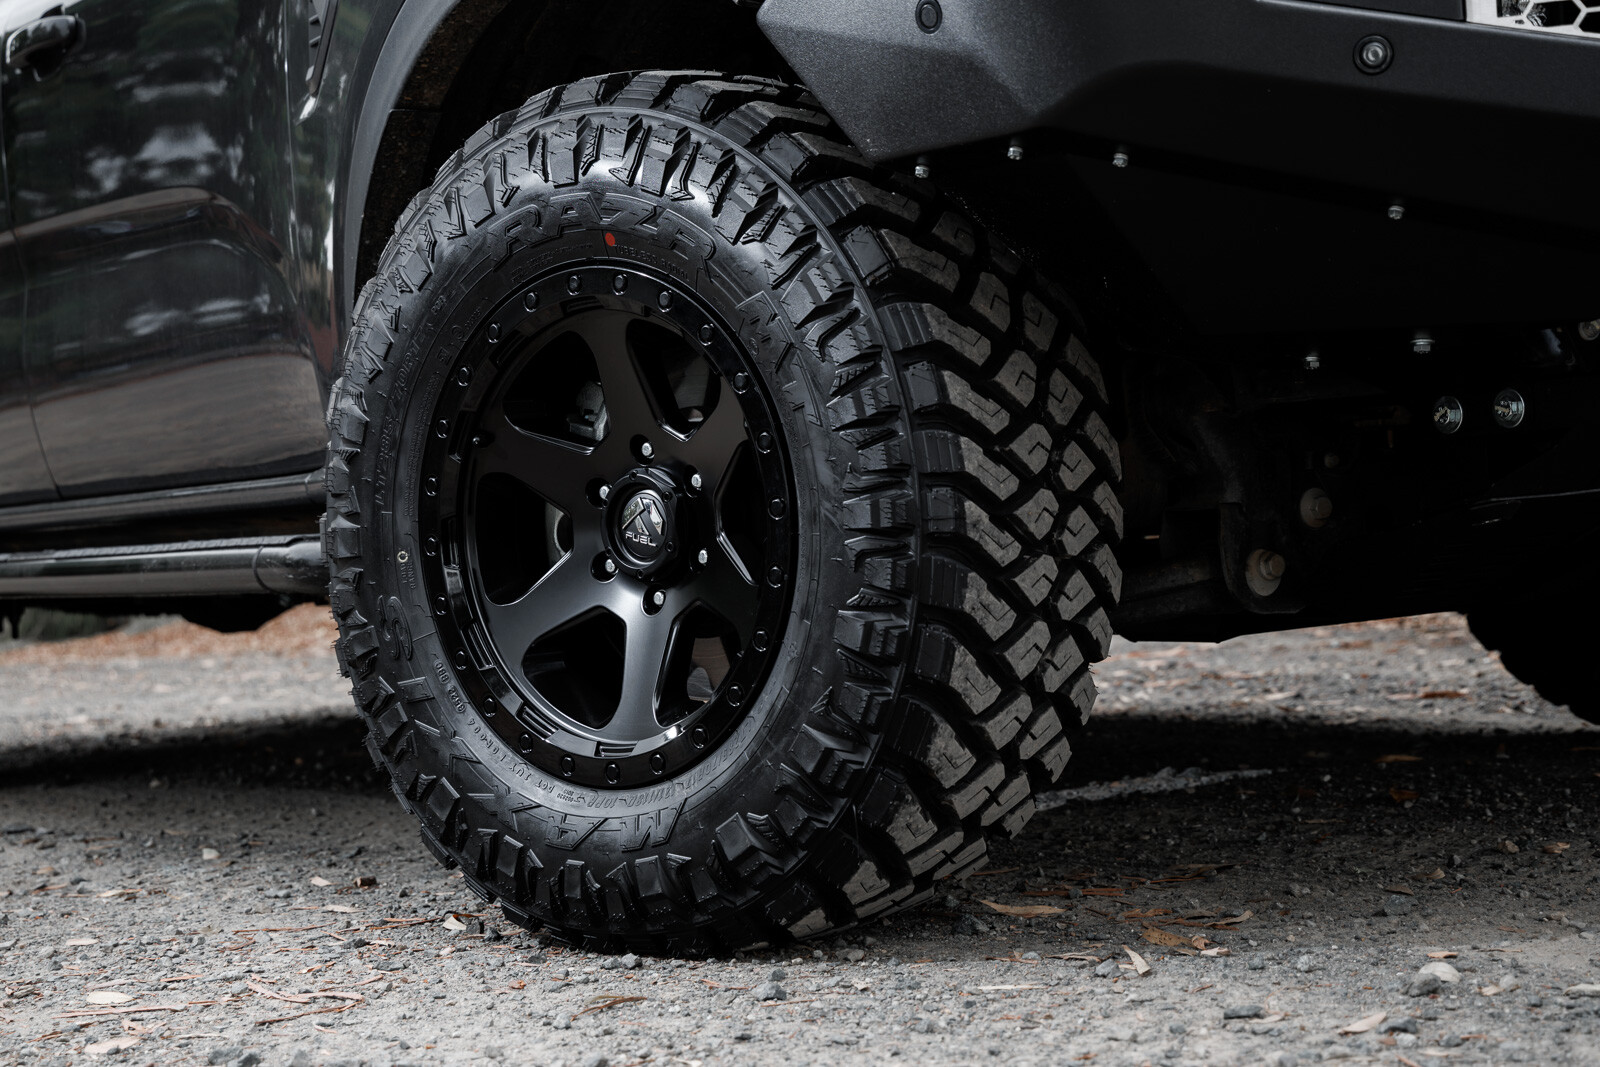
Nothing sets off a car build like a new set of wheels and tyres. Not only is it an easy way to personalise your car by replacing the factory-fitted wheels with something more to your liking, but also the perfect time to equip the car with tyres better suited to your intended driving.
Our 2022 Ranger Sport came with 18-inch alloy wheels wearing tame 255/65 Goodyear AT/S tyres; fine for around town but less than ideal for any outback overlanding. We wanted some more durable light truck (LT) construction tyres with a taller sidewall for both a bigger footprint at low pressures and a bit of added ride height. An aggressive mud-terrain tread pattern would also be handy for those muddy High Country weekends.
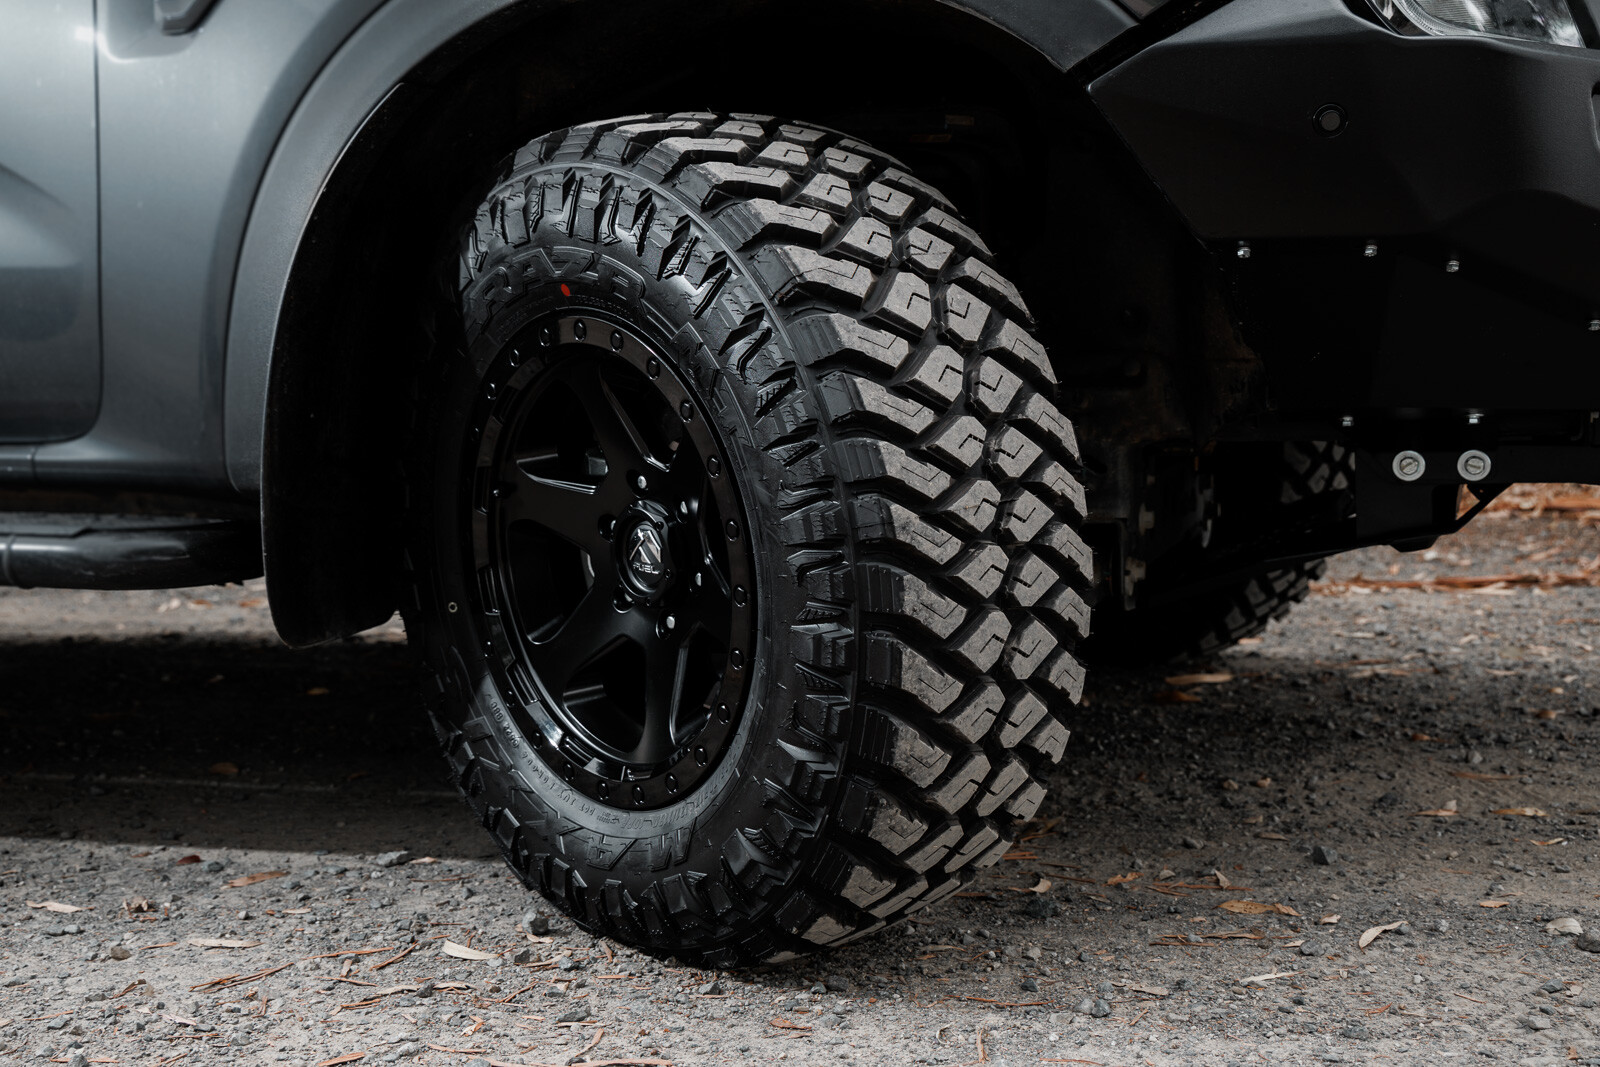
We’ve had a great run using Maxxis Tyres’ RAZR range of LT tyres and, for the Ranger, we’ve gone with the more aggressive MT772 pattern. We had these on our PX Ranger and were more than happy with their performance and durability.
For the RA Ranger we’ve gone with an LT285/70R17 tyre that gives us the additional height and taller sidewalls. They are an LT tyre with a 10-ply construction and deep 14.3mm of aggressive tread design.
An aggressive mud-terrain tread pattern would be handy for those muddy High Country weekends
The MT RAZR 285/70R17 is 837mm tall, so it’s pretty much smack on 33 inches in the old money, and it has a broad 305mm section width which sits in our Ranger’s wheel wells without fouling at all on full steering lock and standard suspension.
The MT772 is available in 36 sizes all the way up to 40-inch monsters.
Fuel Ripper rims
When you’re looking at wheel choices for your 4×4, no one has a more extensive range of choices than Wheel Pros Australia. Wheel Pros handles all the big brands of 4×4 alloy and steel rims, in every size you could ever want and in more styles you would think possible.
Choosing your new wheels on the Wheel Pros website is like being the kid in a candy store who is spoiled for choices and wants one of everything. So many choices make it hard but allow you to personalise the look you want to achieve.
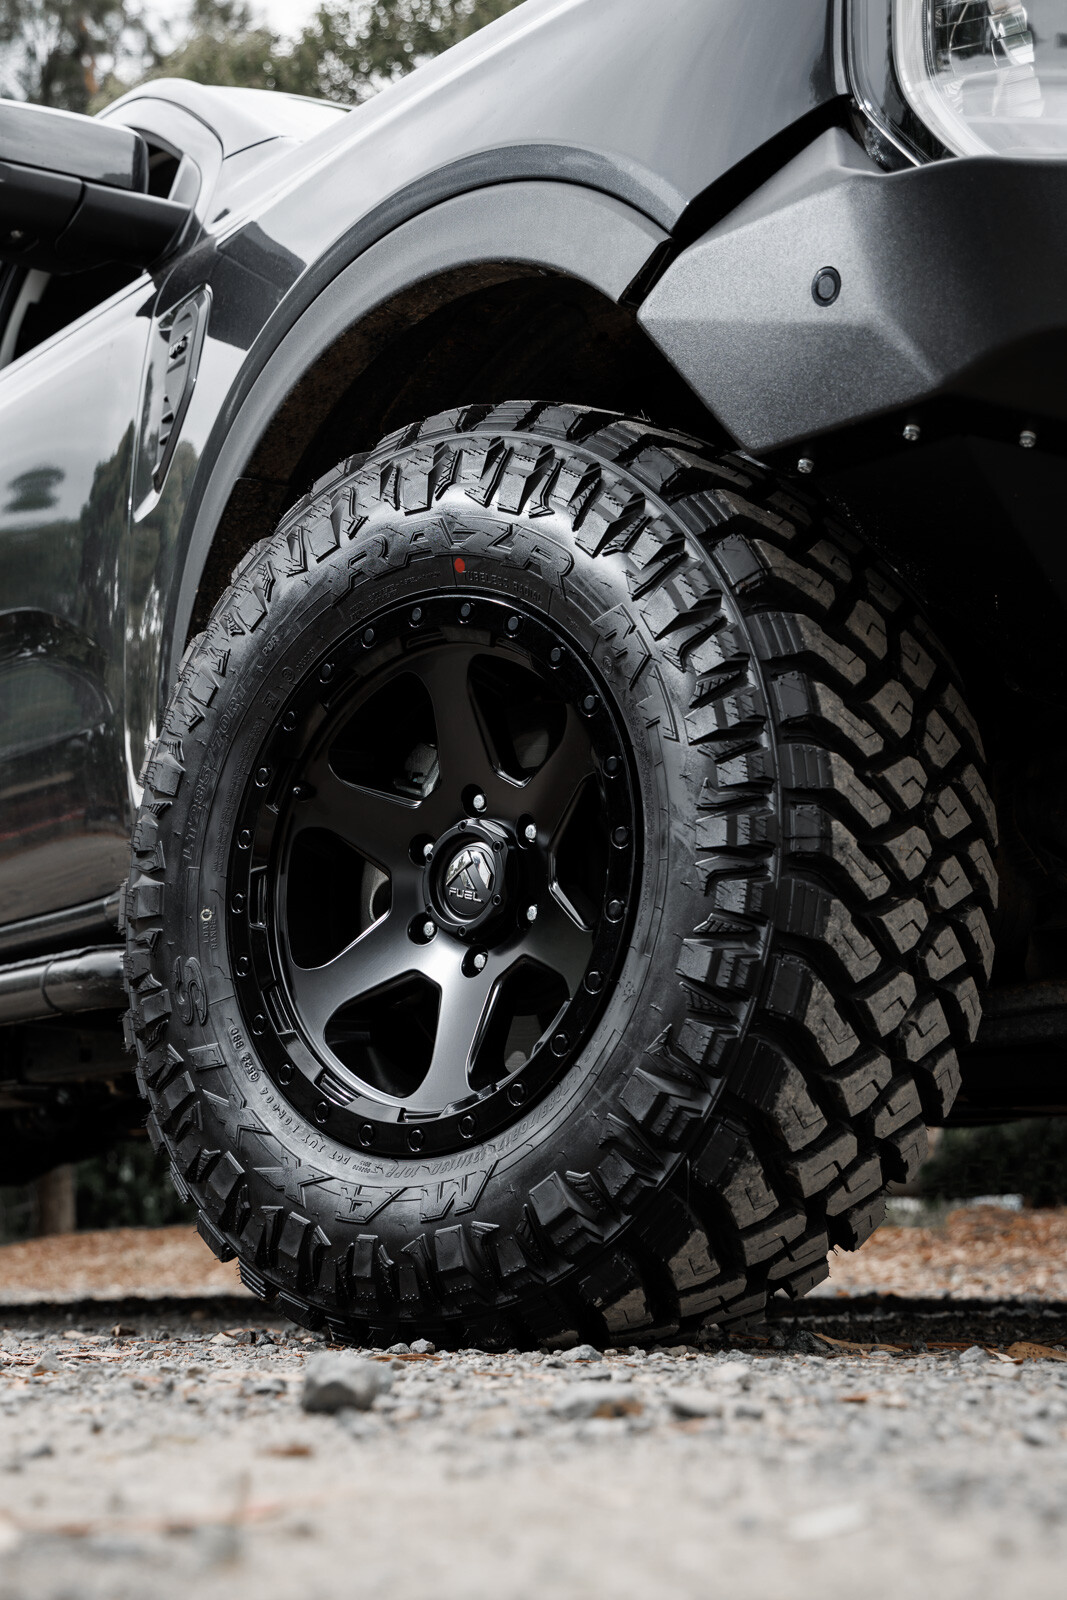
We had a couple of prerequisites for our new wheels in that we wanted to step down to a 17-inch rim from the 18s to again allow us a taller tyre sidewall; we wanted an open design without too much detail or too many spokes to keep them easy to clean; and we wanted them black.
The wheel that ticked all those boxes for us was the Fuel ‘Ripper’ design in a 17×9 size with a positive 20mm offset. This gives a deeper dish than the factory offset wheel, but does mean the 285 tyres poke outside the guard lip a tad – we’ll cover them up with a set of EGR flares. More importantly, they are close enough to factory offset that the bigger tyres fit without any rubbing or requiring modification to the inner guards.
The Ripper is an older design from Fuel and I remember eyeing them off when we built the PX Ranger, but we wanted a different look for that car. We’re glad Fuel still offers them and we could get them for the new Ford.
The Fuel Ripper is available in a range of sizes and offsets, while our ones have a suggested RRP of $338 each from Wheel Pros.
As always, we had our new rims and rubber fitted by the great team at Competition Tyres & More at Murrumbeena. They always do a great job for us, and a bit of extra work on the Ranger involved stripping the factory tyres off the rims and removing the tyre pressure sensors to fit them to the new wheels, then refitting those tyres again. This way, we retain the Ranger’s standard tyre pressure monitors.
More information
Maxxis Tyres: www.maxxistyres.com.au Wheel Pros: www.wheelpros.com Competition Tyres & More: www.tyresandmore.com.au/stores/murrumbeena
When it comes to carrying and towing, there are a few things you need to know in order to be both legal and safe.
Gross Vehicle Mass, or GVM, is how much the vehicle can weigh when fully loaded. That includes the weight of the vehicle itself, known as ‘kerb weight’.
The difference between the GVM and the kerb weight is the payload.
Before you put anything into the tub, however, you must understand that your payload includes you and all passengers plus any accessories fitted to the vehicle – even the towbar.
Some manufacturers don’t quote a kerb weight, which includes a full tank of fuel; instead they use tare weight, which includes only 10 litres of fuel. In this case, any fuel over 10 litres also eats into the payload.
Payload figures for cab-chassis models don’t even include the tray weight. When towing, the weight on the towball also becomes part of the payload and not necessarily at a one-to-one ratio, so you need to check the manufacturer’s towing information.
Gross Combination Mass, or GCM, is the towed weight added to the weight of the vehicle, plus any payload.
None of these utes can be loaded to their GVM and tow their rated maximum at the same time; in each case, although in varying degrees, this exceeds the GCM.
When you are towing at or near the maximum tow rating, the GCM is the critical factor in determining how much you can carry at the same time – generally not much once you have a driver and a few passengers on board.
FAQs
As one of the most talked about and biggest new 4×4 vehicle launches of 2022, the new Ranger holds heaps of appeal to both us and the aftermarket suppliers, so it was an easy choice of vehicle for our build. Much easier than actually buying one at the moment.
It’s around six months since the RA Ranger hit the market and there’s plenty of great aftermarket gear available for it, so we were able to jump right into the build. First stop was to the workshop of TJM Epping in Victoria. The Epping store is relatively new and is a corporate showcase store, so it’s all shiny and clean and loaded with all the best TJM gear as well as plenty from other leading 4×4 accessory brands.
TJM supplied the protection equipment and a winch for the Ranger and, while we were keen to fit a full bullbar – like TJM’s Outback Bar – and side rails to this build, the company was keen to show off its new Venturer bar. Now that the Venturer bar is on the car, we’re glad they insisted on it.
Why fit a replacement bumper that doesn’t offer the full protection of a bullbar with hoops? Hoopless bars like the TJM Venturer still offer increased protection over the factory plastic bumper because they are made from steel.
The design of the Venturer bar not only looks good and offers a level of protection over that of the factory plastic bar, it also improves your car’s off-road ability by increasing the approach angle and the tapered ‘wings’ of the bar, giving more clearance for your front tyres.
The Venturer bar also comes with integrated 8000kg rated recovery points, high-lift jacking points, provisions for a winch mount, and multiple options for mounting driving lights and aerials.
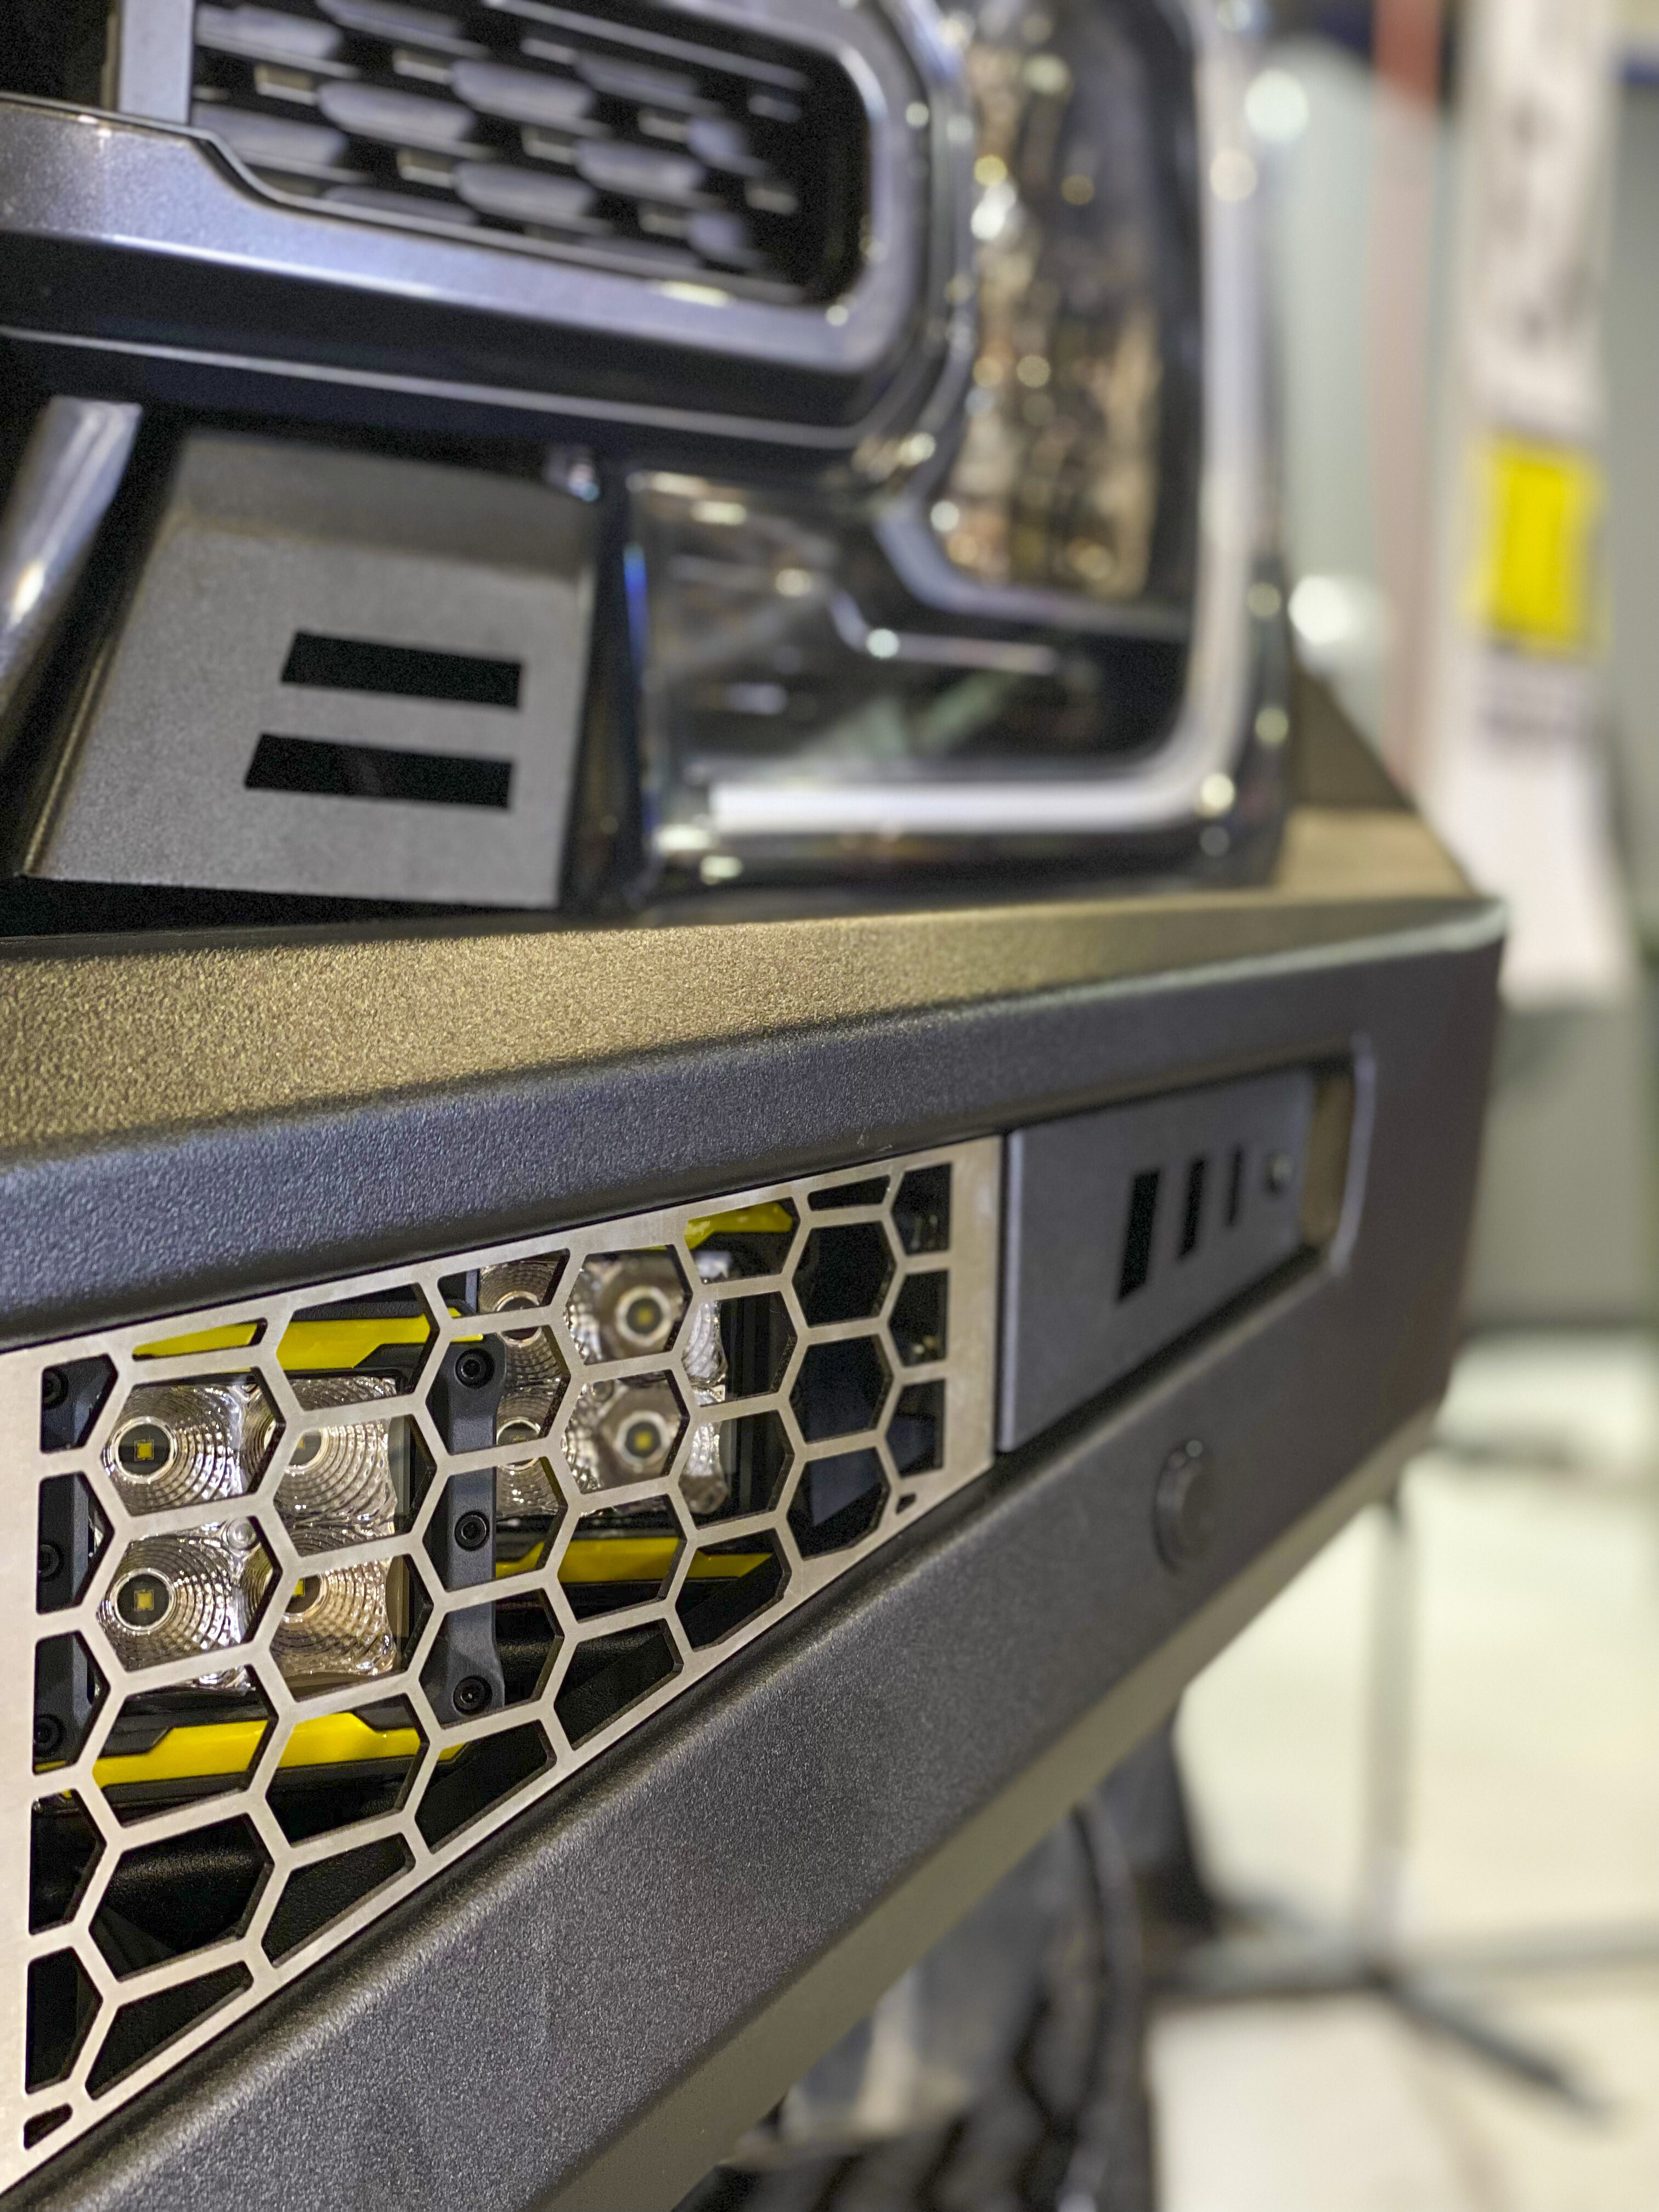
The bar is designed and tested to meet all ADR regulations and maintain the operation of the airbags and radar controlled safety features. The factory forward-facing camera for the 360° viewing on-screen has been relocated to the new bumper, and the bar itself is covered by TJM’s three-year national warranty.
The Venturer bar is also available with a top hoop with integrated LED light bar, but we opted against it as it won’t suit our planned forward lighting package. The team at TJM Epping did replace the Ranger’s standard fog lamps with TJM Pod lights behind the bar.
We reckon the Venturer bar really suits the front of the Ranger, with its squared-off style and flat-top surface that mimics the Ford’s flat bonnet edge. The bar also has large openings to give the user easy access to the winch to operate the free-spool clutch and plug in the controller.
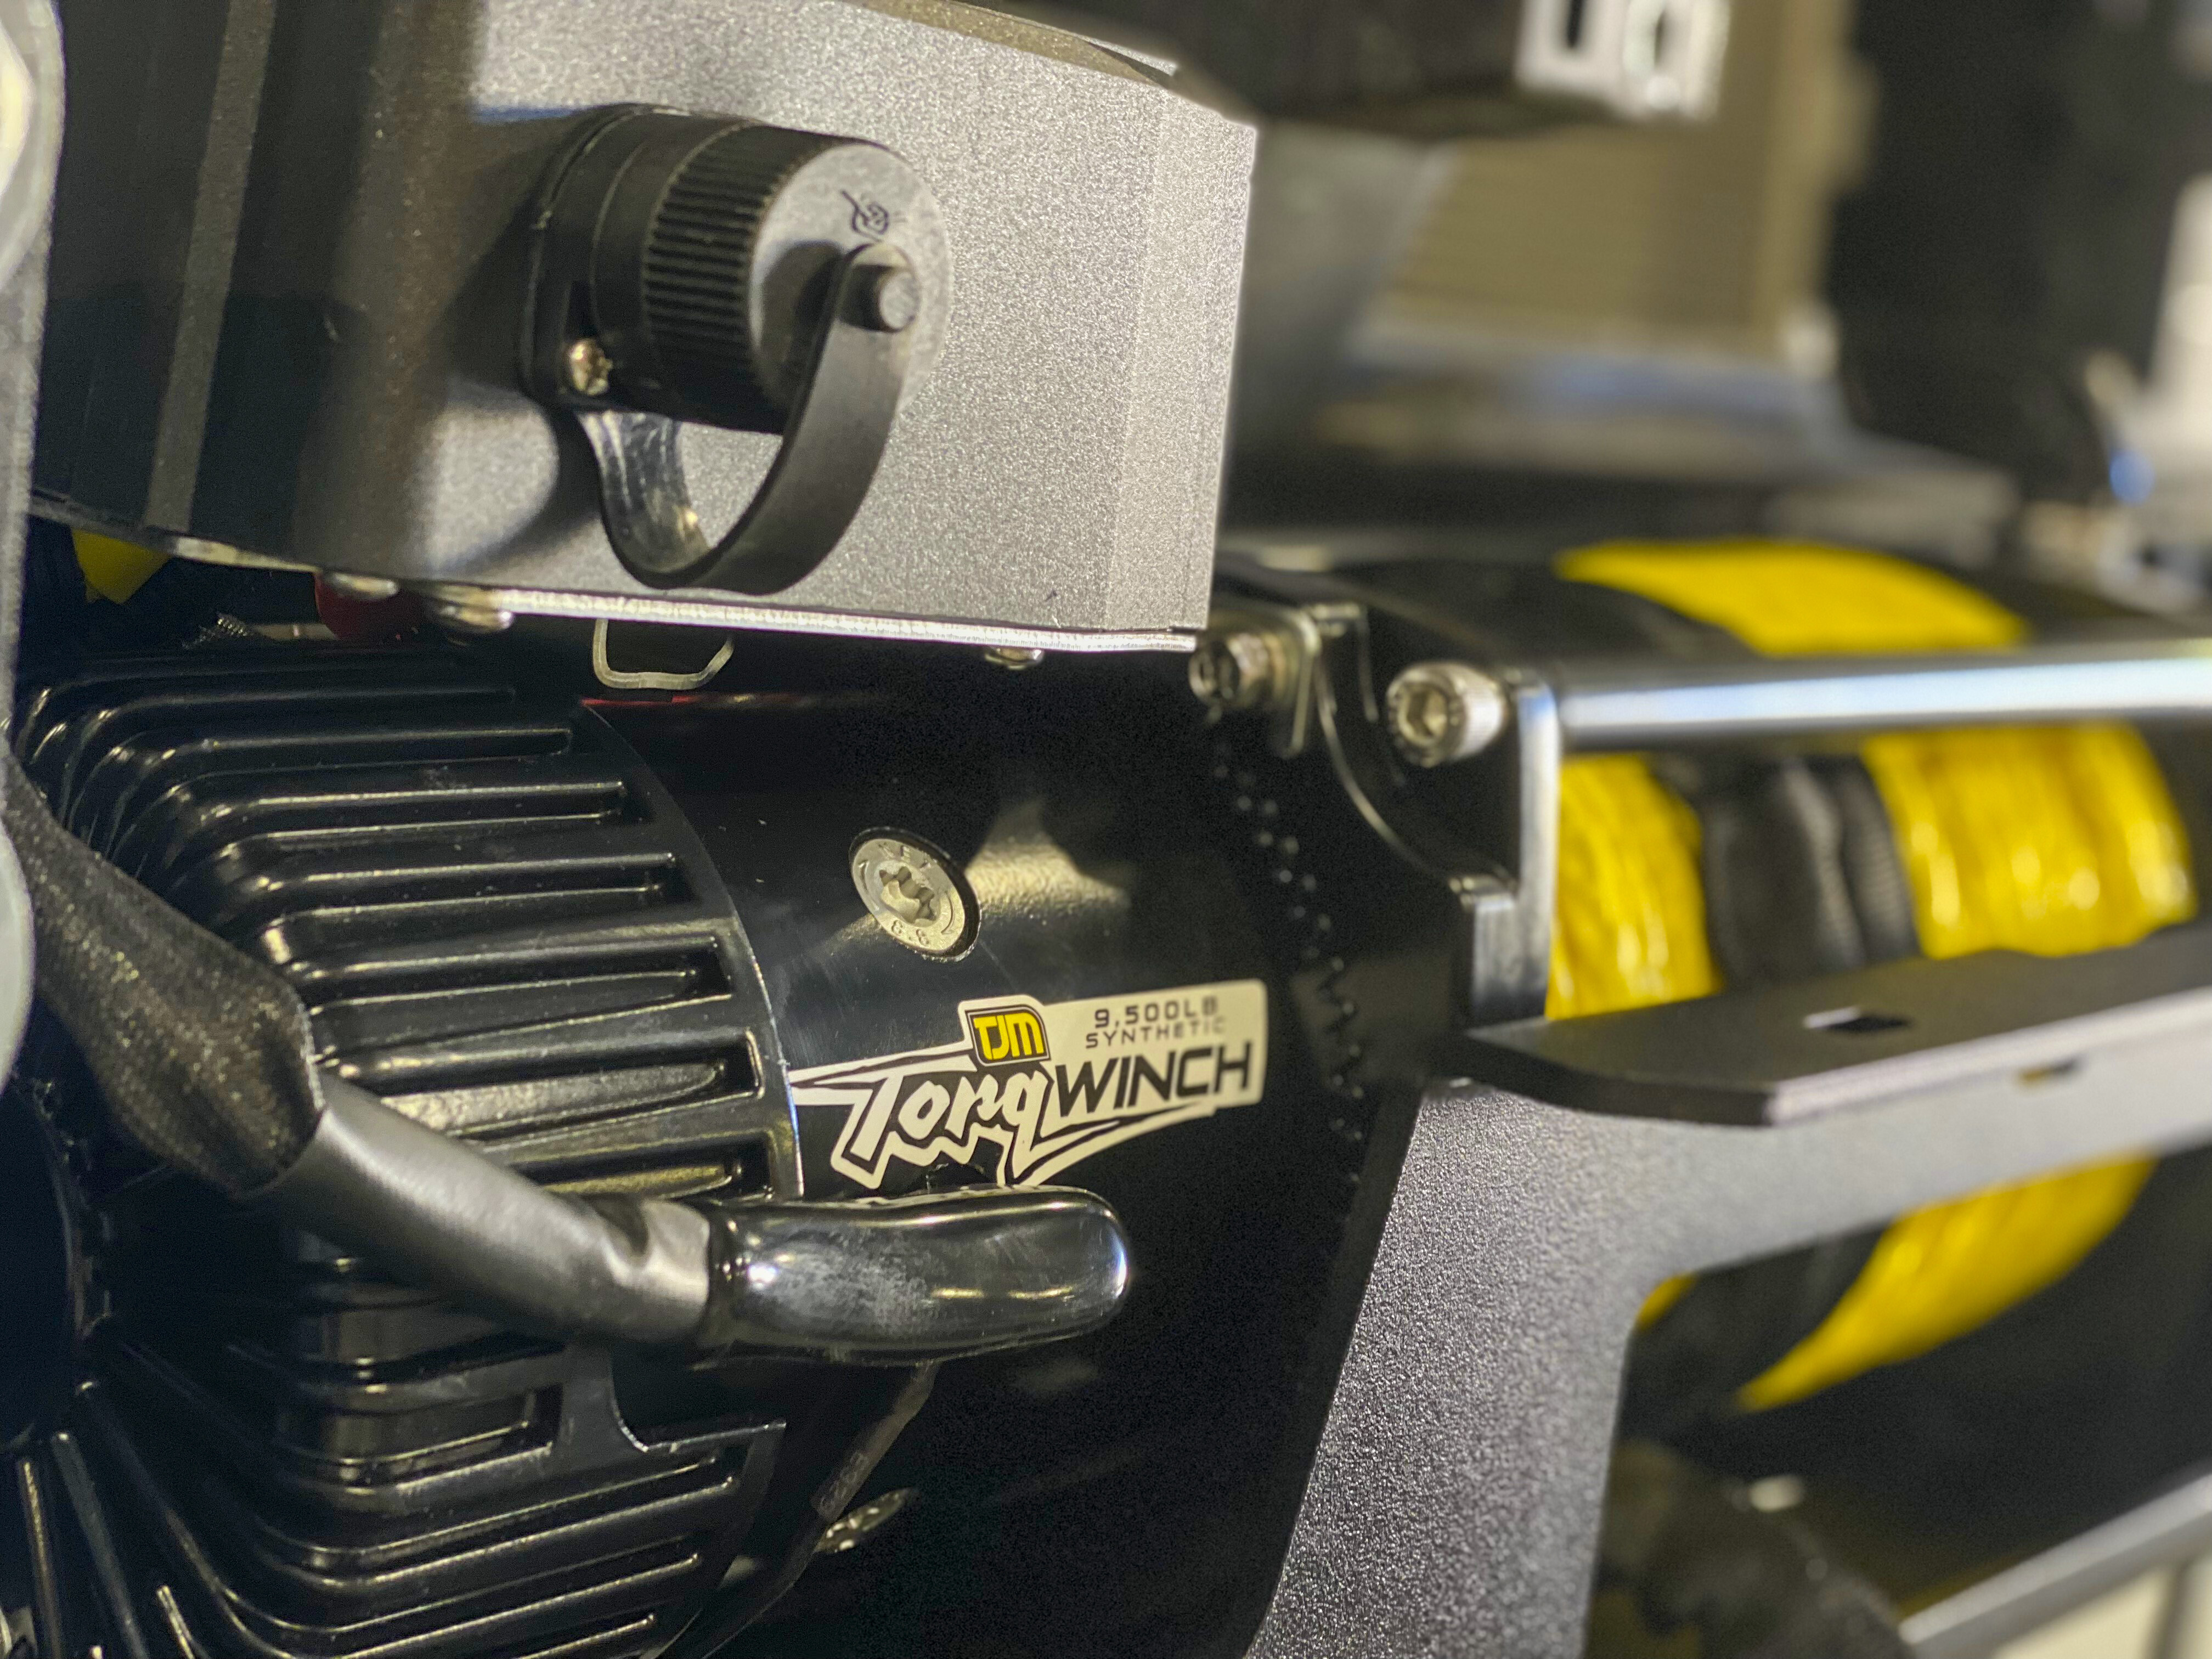
Recovery ready
Speaking of winches, that’s a TJM Torq 9500lb winch wearing the signature yellow synthetic rope. The Torq winch has been engineered to suit tough Aussie conditions and is IP76 rated for dust and water ingress, has low current draw and comes with both plug-in and wireless controllers. The free-spool lever is nice and big, so it’s easy to operate, unlike some winches that have smaller levers.
Underside armour
Behind the Venturer bar and Torq winch we have TJM underbody protection extending from the bar back under the engine sump. Made from 3mm high-strength steel that is powder-coated for its own protection, these metal plates will do a better job of protecting the Ranger’s underbelly once we get it out on the tracks.
Further protection along the Ranger’s sills is a pair of TJM tubular steel side-steps. More durable than the factory plastic steps, the steel steps are mounted to the chassis and not the body as the factory ones are. This will offer real protection against rocks and branches bashing the sills.
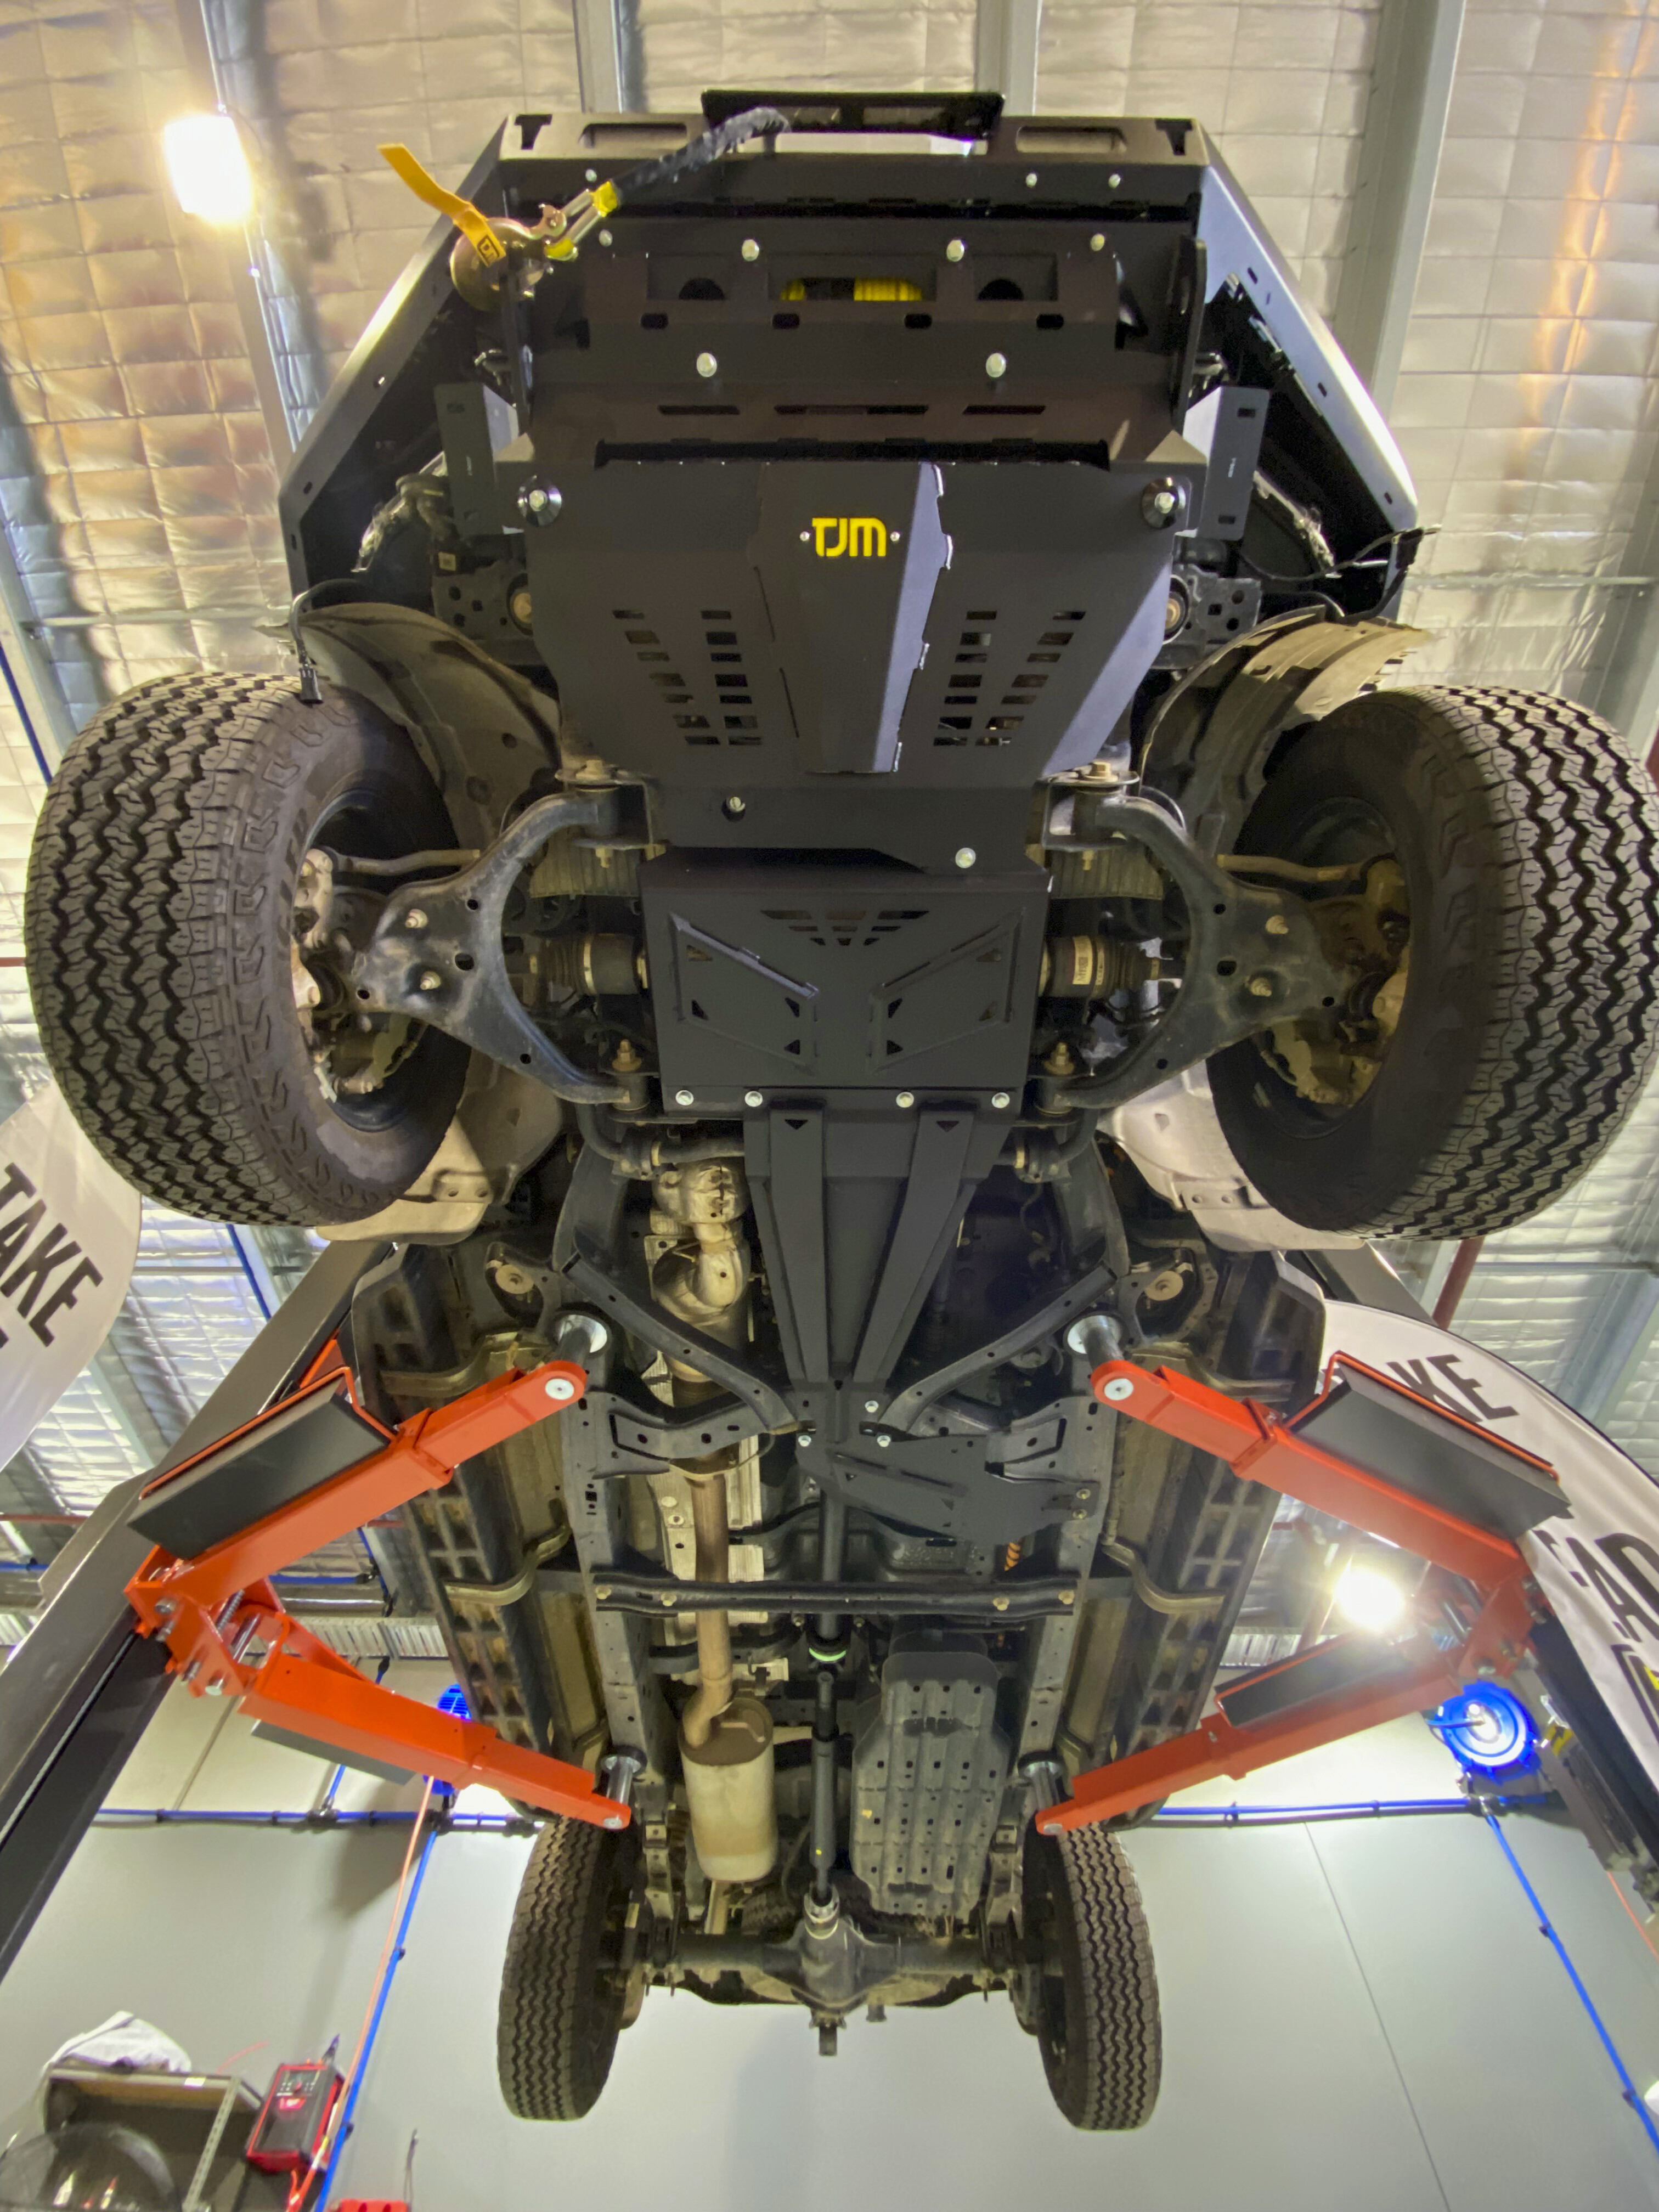
Made using 63mm powder-coated steel with black alloy checkerplate tread panels, they not only serve to protect, but look the part as well.
TJM has supplied us with a comprehensive protection set-up for our Ranger that looks great, and the addition of the winch will give us the surety of having self-recovery ability if and when needed.
Rob, Liz and the team at TJM’s Epping store were great to work with from the moment we dropped the car off, explaining everything they were doing and when the car would be ready. They even helped us out with taking photographs of the installation process and we can’t thank them enough.
Pricing
- Torq 9500lb synthetic rope winch: $1299
- Venturer Bar: $3350
- Pod lamps: $75 (each)
- Underbody protection: $610 (under engine), $520 (under transmission and transfer case)
- Side steps: $1420