
THE TRACK dipped and climbed along the ridgeline, rising steeply to a trig point before descending in a rush to a saddle, where you could grab a breath before another long climb began.
For most of the time the Cruiser coped easily in third low. The track was in pretty good condition, with a firm and even surface, though it was bloody steep and narrow in places. Perhaps not as exposed or dramatic as Billy Goat Bluff or the Blue Rag Range tracks, but still challenging, with impressive views all around.
Only on the short scramble to the crest of Mt Selwyn did I slap the gearbox into second and floor the accelerator. The V8 responded, the Cooper STT Pros scrabbled for grip on the pot-holed, shaly rock, and the suspension bucked and jostled the wagon to the top.
The view from the crest of Mt Selwyn was dazzling. To the north the indented skyline of The Horn on the plateau of Mt Buffalo could be seen, while to the west were the jagged outlines of Mt Cobbler and Mt Speculation. To the south Mt Howitt stood proud, while to the east were the high snow plains of Hotham Heights and Falls Creek. In between and all around the ridges, peaks and valleys of the Australian Alps and the Victorian High Country filled the scene from horizon to horizon. It was a grand view.
We had been coming to this area of north-east Victoria for more years than I care to recount, but we had never taken the Yarrabuck Track that joins the Buffalo Range Track along the high ridge that borders the Buckland Valley to the west. That was a crazy oversight.
On this trip we were mapping the next edition of Hema Maps’ The High Country Atlas & Guide, so we were looking for new 4WD routes that hadn’t been ‘discovered’ and would inspire travellers to leave home, get away from the norm and breathe some clear mountain air. On this route we found all that in spades.
From Mt Selwyn, our route dropped down the narrow Great Divide Track through a forest of dead giants that tower overhead until Selwyn Creek Road meets the Twins Jeep Track. From here you can follow the high ridges and cut across to Mt Murray and Mt St Bernard on the Great Alpine Road, just below the glitz and glamour of Mt Hotham Resort.
We opted for less fancy fare and headed north, winding downhill and meeting with the east branch of the Buckland River before arriving at the large clearing of Beveridges Station.
The station is named after the first pioneers here, the Beveridge brothers. In the mid-1800s the brothers had some large parcels of land in the High Country, including this long delightful clearing beside the river. Today, a section of the cleared land is in the Alpine National Park, while downstream the area is still private grazing land and is marked by the ruins of an old shack that’s slowly succumbing to the elements.
The Buckland Valley is more famous for being one of the richest alluvial goldfields in Victoria. The fields were discovered in the winter of 1853 when a small party of men led by Henry Pardoe obtained 360oz of gold in just a couple of days. By spring of that year, 3000 diggers were in the valley, with another 3000 arriving by January 1854.
However, disaster soon struck as typhoid disease swept through the rough camps and the Buckland gained the reputation of having the highest mortality rate of any Victorian goldfield. It was said by those who were there that the valley was so thickly dotted with graves the river seemed to wind through a churchyard.
In July 1857 the infamous Buckland riots occurred. European diggers violently attacked and expelled the Chinese gold-seekers who had arrived there in the thousands. Many were killed before the police, led by Superintendent Robert O’Hara Burke, arrived from Beechworth. Burke was to later find lasting fame by dying on the banks of a distant Cooper Creek, leading what became known as the Burke and Wills expedition.
By the early 1900s hydraulic sluicing and bucket dredges had turned the worn and torn river flats along the valley into seemingly one big gravel pit. The dredges worked the complete length of the river, including both branches of the Buckland upstream from Buckland Junction. Meanwhile on the steep ridges, hard rock miners sorted the gold-bearing quartz reefs, with dozens of mines, including the Band of Hope, Comet, and the Rip and Tear, extracting the wealth that lay beneath the rocky soil.
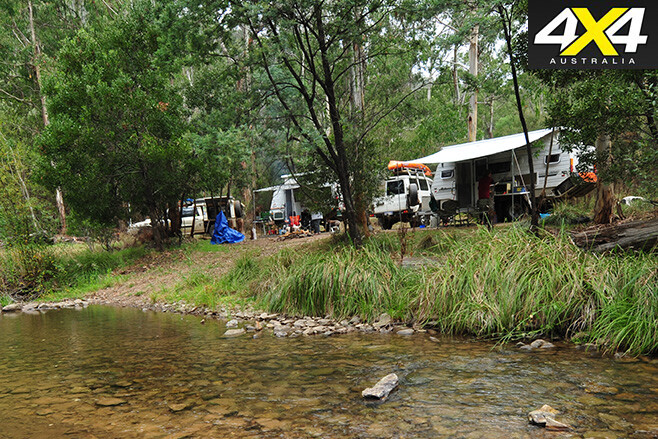
Today the valley is quiet, peaceful and surprisingly green, with grassy flats between the dense stands of native forest. All the effort and toil of the past can still be seen, though. There are piles of rocks along the river, there are the low cliffs formed by the hydraulic sluices, and there are channels and races that cut across the landscape.
At the old cemetery beside the main road, poignant headstones testify to the tough past. While nearby is a monument to the Chinese who died during and after the riots. Little remains of the machinery that helped work these mines, apart from some scattered and torn metal fragments of boilers and furnaces. Flecks of gold can still be recovered from the river, and occasionally a rich pocket of alluvium missed by those early miners can be discovered by the lucky fossicker.
Most people come to the Buckland these days for the tranquillity of the valley, as well as the chance of catching trout, finding a fleck of gold, hunting a deer, or enjoying a 4WD track. We enjoyed our survey trip so much we went back again a few weeks later with friends, to camp on the Buckland and to drive Buffalo Range once more. It was even better the second time around!
TRAVEL PLANNER
- WHERE: Buckland Valley – 380km north of Melbourne.
- WHEN TO GO: Spring to autumn.
- DRIVING CONDITIONS: Most tracks are easy to moderate.
- CAMPING: Numerous sites; most have fireplaces, but just one has a toilet.
- PERMITS/RESTRICTIONS: No permits required. Some tracks (not the main access to valley) are subject to seasonal closure.
- FACILITIES: Normal travel facilities, campsites and accommodation at nearby Porepunkah, Myrtleford and Bright.
- MORE INFO: Visit Bright website
IT HAS been a long journey, but the final pieces of the Loaded Lux puzzle are coming together as we get ready to give away this exciting get-away package to one of our lucky readers. For this last fit-up we headed to Opposite Lock’s store in Dandenong to get some gear from Front Runner fitted and, while we were there, we also fitted one of the all-new Opposite Lock fridges on an MSA 4×4 fridge slide.
Click here for your chance to win 4×4 Australia’s Custom Toyota Hilux.
Front Runner is a South African brand of quality storage and protection products, and as the Saffas share our love of bush travel and have harsh terrain similar to our own, their stuff is generally top notch and built tough. The Front Runner gear is no exception – we’ve been running a Slimline roof rack on an LC200 for a few years now and have no complaints about it.
RACK ’EM UP
WITH this in mind we again chose the Front Runner Slimline II rack to sit over the cab of the HiLux, as its low profile keeps it in line with the tent on the back and its versatility is unrivalled. Front Runner offers a specific fitting kit and size to suit the popular double-cab HiLux.
The versatility of the rack comes from its slots in each of the aluminium crossbars, which accommodate sliding eye bolts that can tie down specific accessories. This include clamps and brackets for mountain bikes and kayaks, as well as popular 4×4 accessories like spare wheels, high-lift jacks, jerry-cans, shovels, awnings, roof-top tents and more. There’s even a swing-out arm that you can hang your shower bag from.
This will allow the lucky winner of the HiLux to tailor the rack to his or her own needs. However, one accessory we have included is a clever camp table that slides in under the rack to take up space that’s normally wasted.
The Slimline II racks are made from powder-coated aluminium, so they are lightweight and durable. The design of the slats and surround make it rigid, while the slats can be moved to best accommodate your loads. Extra slats can also be added to create a solid load bed. The HiLux rack measures 1165mm x 1358mm and includes a wind deflector at the front to limit wind noise.
BUMP & GRIND
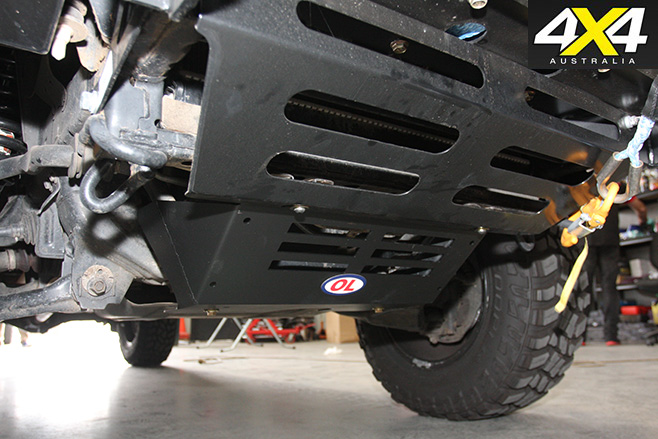
OPPOSITE Lock also fitted a Front Runner sump guard to the HiLux. This is a 3mm steel plate that replaces the factory tin plate to better protect your engine sump from the potential damage caused by scraping against rocks and ruts when driving off-road. It’s powder-coated for longevity and, being steel, it’s tough and offers superior protection to the underside of the vehicle.
CHILL FACTOR
OUR arrival at Opposite Lock couldn’t have been better timed, as it coincided with the launch of the new OL stainless-steel fridge/freezer range. These are another South African-made product, and Opposite Lock has chosen 40- and 72-litre sizes.
Inside the stainless-steel case these fridges have a think 60mm of polyurethane insulation, so once that 66-Watt SnoMaster compressor gets the contents down to temp, it keeps them there longer without having to switch on as often. Speaking of temp, the fridge will chill down to -22 degrees and up to 10 degrees. The compressor draws 5A on full power or 2.5A on low current draw, and the unit operates on 12, 24 or 240V, with a variable low voltage cut-out option.
The 40-litre unit, as fitted to the back of the HiLux, features three internal baskets, an LED interior light and a door open warning chime. It also comes with a remote temperature controller and a transit bag. External cabinet measurements are 600 x 420 x 520mm (WxDxH). The lid side-opens on stainless hinges and there are stainless handles at each end, so it can be easily lifted and tied down.
The new Opposite Lock stainless-steel fridges retail for $1249 for the 40-litre, single-door model and $1549 for the bigger dual-zone, double-door, 72-litre version. They both come with a five-year manufacturer’s warranty on the compressor and two-year parts warranty.
The OL crew mounted the fridge on a top-notch slide from MSA 4×4, so it’s now a simple task of dropping the tailgate, sliding out the fridge and dipping inside to retrieve a coldie at the end of a long day driving. The Australian-engineered MSA slide is anodised and powder-coated, so, like the stainless-steel OL fridge, it will stand up to the elements when it’s exposed in the HiLux tub.
CONTACT OPPOSITE LOCK Stores: Nationwide Website: www.oppositelock.com.au
OPPOSITE LOCK DANDENONG Where: U4/97 Monash Drive, Dandenong, Victoria, 3175. Contact: (03) 8788 8277
Want to know more about the Project Toyota HiLux build? Follow the link to find out.
SINCE its inception, the Easter Jeep Safari has captured the attention of the off-road world.
What started in the 1960s as a local trail ride with a few Jeeps, Scouts, Broncos and Land Cruisers has morphed into a massive American spring gathering and draws more than 20,000 four-wheel drive aficionados from around the globe.
Each year, Jeep, along with its underground team of mad engineers, rolls into town with its latest batch of concept vehicles. The word ‘concept’ is a little deceptive, as one might be misled into believing these creations are in the works for the general market. While some – or variants thereof – do eventually see the light of day on showroom floors, most remain eye candy for all to drool over and dream of.
As the hired gun responsible for photographing these works of art, I’m often able to talk the top dogs at Jeep into letting me take one or two out for a private day on the trail. All of this year’s concepts are worthy of a good romp in the bush, but it was the Crew Chief that caught my eye. It’s based on a late-model Wrangler Rubicon chassis, although it radiates DNA from another era – one of olive drab green and the Kaiser M715.
With keys in hand I headed for the Sand Flats Recreation Area in the lee of the snow-capped La Sal Mountains for a relaxing day on Moab’s expansive slick rock.
Jeep’s underground team began by slicing the frame in half and adding 585mm in front of the rear axle. The cab was chopped off behind the rear doors and replaced with a 1525mm steel bed fitted with a hardwood floor, mesh side panels and a pair of jerry cans. The front clip was removed and sent to the body shop, where the grille, hood and fenders were reworked with the design lines of the M715. When complete, a custom ragtop was stretched over the top, windows were removed for an authentic open-air feel, and door panels were sealed up.
The final package was trimmed with Jeep Performance Parts 10th Anniversary Rubicon bumpers fitted with Warn winches fore and aft, JPP Rubicon rock rails, and bed-mounted lashing points.
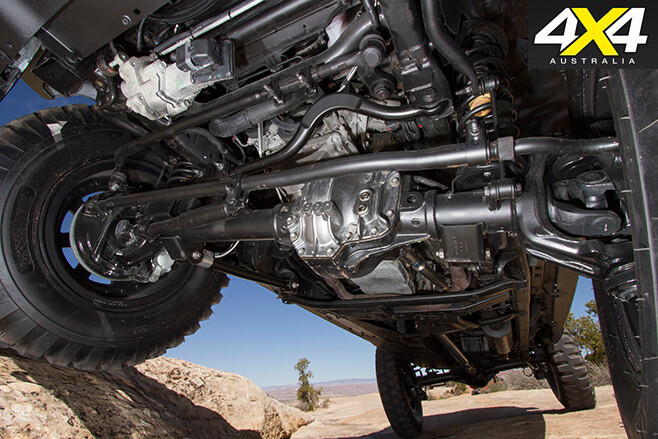
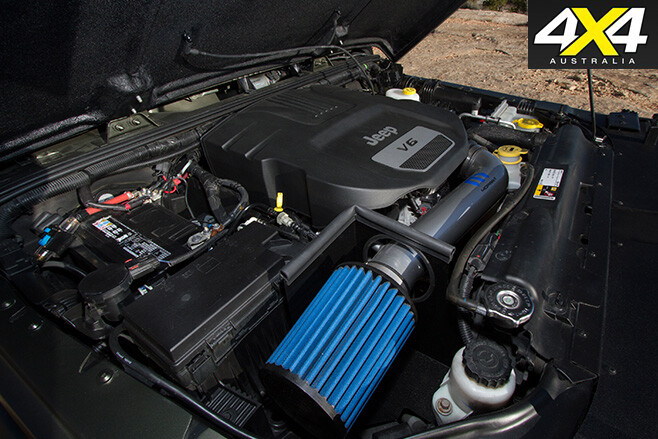
The Crew Chief rolls on 40-inch NDT military tyres wrapped around 20-inch beadlock wheels. Supporting the additional weight are a pair of JPP Dana 60 axles fitted with Eaton ELockers, 5.38:1 gears and Warn hubs. Prop shafts from Tom Woods tie the axles to the reliable 3.6-litre Pentastar V6 engine and five-speed automatic transmission. To keep the tyres in contact with the surface, the underground boys installed a four-inch suspension from JPP, and FOX remote reservoir shocks.
Rolling down Main Street gained me no less than celebrity status. The thumbs-up was the ubiquitous gesture from passersby, intersections became autograph sessions, and I nearly had to peel lookyloos out of the cab when I stopped for fuel.
Across the dash sits the control centre with its full-size nautical compass and toggles for the ELockers, ARB air compressor, and a mysterious button labelled ‘auxiliary.’ Hmm, maybe a rocket-propelled grenade launcher?
A cool Utah breeze rolled through windowless doors as a friend and I scaled the Fins & Things Trail. The Katzkin leather seats felt good and the lockers kept the square-cut military treads turning evenly. The Crew Chief’s wheelbase, which is about a gazillion inches long, actually helped when surmounting some of the larger ledges. However, the turning radius was akin to the Titanic.
By the end of the day I wasn’t ready to hand the keys back to the Jeep boys; rather, I was thinking about filling the tank to take a leisurely 1600km dirt trek back to California.
[specs] JEEP CREW CHIEF 715 CONCEPT Engine: 3.6L Pentastar V6 w/JPP cold-air intake Transmission: five-speed automatic Colour: Tactical Green Axles (f/r): JPP Dana 60, 5.38:1 gears, Warn hubs Lockers: Eaton ELocker Suspension: JPP 4in with FOX remote reservoir shocks Tyres/wheels: 40in NDT military, 20in beadlocks Bumpers: JPP Wrangler 10th Anniversary Winch (f/r): JPP/Warn Rubicon Onboard air: ARB compressor Bed: custom 1.5m steel Canvas top: custom
VOLKSWAGEN has let slip that a Toyota Fortuner-rivalling, seven-seat SUV based on the Amarok is definitely on the carmaker’s development table.
Under intense scrutiny over why Volkswagen Commercial, the commercial vehicle arm of Volkswagen Group, chose not to add head-protecting side curtain airbags as part of a major makeover for the Amarok ute due in Australia late this year, a spokesman told 4X4 Australia that they would need to be engineered in for the next generation “for the seven-seat”.
“It [rear-curtain airbags] is under consideration for this generation,” the spokesman said. Asked if the head-protecting rear airbags would definitely be part of the second-generation Amarok due around 2019, he said: “We will have to have it for this [Amarok] and for the seven-seat.”
It’s the closest we have come to confirmation that Volkswagen is considering the niche seven-seat off-roader as part of its future product development. It won’t need to be a big-volume seller for the commercial division of VW, either, with Amarok designer Albert-Johann Kirzinger indicating that an Amarok-based SUV would only need to attract a small number of sales – about 1000 a year – to make it viable.
“When we look at a niche in the commercial vehicles, we’re looking at numbers that are lower than one per cent [of total sales],” he said.
Adding weight to the seven-seat Amarok’s development is a shift to a 3.0-litre V6 turbo-diesel engine for the ute, which will help to move the heavier kerb mass of a wagon-based Amarok via a more versatile spread of torque than the current twin-turbo 2.0-litre engine.
Australia is the second largest market for the Amarok outside South America, with VW keen to maintain a foothold here even as mining companies step up their safety standards to mandate side curtain airbags on all vehicles used on worksites. The Amarok currently wears a top five-star crash rating in Australia – it was the first vehicle sold here to gain the top score without side curtain airbags. Instead, it relies on a specially engineered safety cell to protect rear-seat passengers in the event of a side-on collision.
However, the seven-seat Amarok’s niche future may be over even before it starts, with the carmaker – struggling in the wake of the ‘Dieselgate’ emissions scandal – reportedly looking to cull up to 40 models from its product line-up as part of cost-saving measures.
IN RECENT years, road testing at 4X4 Australia has involved a near constant stream of turbo-diesels, with the odd petrol engine in the mix.
But this status quo was recently undone, with no fewer than three petrol vehicles – in a row – to road test, which has got to be some sort of record.
You may think: “Well, so what?” But there’s more to this tale than that. Two of those three petrol engines were small-capacity turbocharged fours rather than larger-capacity naturally aspirated fours, sixes or eights, all of which says much about where automotive engine development is heading right now.
First up was the Haval H9, a Chinese take on a Toyota Prado, save for its 2.0-litre turbocharged four-cylinder petrol engine. Otherwise, the H9 mimics the Prado in every way: six-speed auto; same body dimensions; seven seats with 150-Series folding, side-hinged single rear door; separate chassis; independent/coil front suspension; live-axle/coil rear suspension; and dual-range, full-time 4×4.
All that means the Haval H9 shares its weight with the Prado and in the case of the test vehicle, 2236kg would seem a lot for a 2.0-litre petrol donk – even one with a turbo – to haul around. After all, the Prado comes with a 4.0-litre petrol V6 or a latest-design 2.8-litre turbo-diesel.
Truth is, the Haval’s 2.0-litre four does very nicely. With its maximum torque on tap at an almost diesel-like 2000rpm, and then remaining undiminished for the next 2000rpm, it makes very useable and perfectly progressive power in that much-used rpm range.
The Haval’s engine bears an uncanny technical resemblance to Volkswagen’s current 2.0-litre TSI engine, a turbocharged petrol four that serves in a range of VW models however Haval says the design is “in-house”.
The engine has all the latest technical features you’d expect from a premium European brand, not from a Chinese – or even a Japanese – manufacturer. Those features include high-pressure direct fuel injection, a low-inertia dual-scroll turbocharger and an undersquare bore/stroke relationship designed to optimise the combustion chamber shape.
If the Haval’s small 2.0-litre engine did an excellent job of hauling more than two tonnes of heavy-duty Prado-like 4×4, then I was even more impressed by the second, and even smaller, turbo four, which boasts just 1.4 litres.
This engine was sampled back-to-back with a 2.4-litre naturally aspirated petrol four, both of which are available in Jeep’s new baby wagon, the Renegade.
The Fiat-designed 1.4-litre turbo is the default engine in the Renegade range, with the off-road-pitched Trailhawk being the only model using the Chrysler-designed 2.4-litre.
Interestingly, the 1.4-litre turbo claims a maximum of 230Nm, the same as the 2.4 but where the 1.4-litre’s peak torque is available from just 2500rpm, the 2.4 needs 4400rpm to achieve the same peak. Ultimately the 2.4-litre makes more power than the 1.4-litre (129kW versus 103kW), but it needs an additional 1000rpm to do so.
With its stronger torque at much lower engine speeds, the 1.4 is more eager and responsive than the atmo 2.4, and it does that with just six speeds inits dual-clutch sequential gearbox – the 2.4-litre has nine speeds to call on via its ZF auto transmission.
Being a much smaller-capacity engine, the 1.4-litre is noticeably smoother than the sometimes buzzy 2.4, due to the less than ideal dynamic balance of an in-line four, especially in bigger capacities and at higher revs.
The lesson here is if turbo-diesels fall over due to emission regulations, then the small-capacity turbo-petrol engine is ready for more widespread duty.
History Lesson
THE IDEA of increasing an engine’s power output by forcing air into its combustion chambers, rather than having the engine draw in the air itself, is as old as the internal combustion engine. Indeed, Gottlieb Daimler, the automobile’s ‘father’, patented a gear-driven air compressor (or supercharger as we know it today) as early as 1885.
The first turbocharger, or exhaust-gas-driven air compressor, was patented in 1905, but the idea wasn’t put into practice until World War I, where turbos started to appear on military aircraft engines.
Turbos first appeared in passenger cars in 1962, when General Motors produced both the Oldsmobile Cutlass Jetfire and the far more controversial rear-engined Chevrolet Corvair Monza Spyder for the USA market.
For various reasons neither car was a success, but the future of turbocharged road cars became assured when BMW launched its 2002 Turbo in 1973 and Porsche its 911 Turbo the following year.
BACK IN late 2015, Nissan repositioned its Patrol range – dropping from three variants to two and slicing close to $20,000 off the price of some models.
The big Patrol has always been a good thing, but when entry-level meant forking out around $85K, most struggled to see the value in it. Now, starting at $69,990 with more standard equipment, the Patrol makes a lot more sense and has seen a bump in sales.
It has been a few years since we last drove a Y62, and today we’re looking at the entry-level 2016 Patrol Ti (the up-spec Ti-L is $86,990).
POWER PLUS
THE drivetrain in the 2016 Patrol range remains the same as when the model lobbed here early in 2013. That’s the stonking VK56 5.6-litre V8 engine backed by a seven-speed auto-only transmission. The 5552cc V8 engine bellows out 298kW and 560Nm and is silky smooth in its delivery. The high-tech engine’s variable valve lift and duration system gives it a very linear power delivery and sporty characteristics, even if it is fitted in a massive off-road wagon. Fit a big free-flowing exhaust to this baby and listen to it sing! Around town and on off-road tracks, the engine burbles along without a care, but squeeze the throttle for a steep mountain climb or a quick on-road squirt and it blasts out its exuberance.
However, no amount of tech can make this 2750kg off-road wagon fuel efficient. The Ti has a 14.5L/100km official ADR rating, but it used 15.7 litres of premium unleaded fuel for every 100km we drove with it. Yes, the Nissan asks for premium fuel, and keeping its 140-litre tank full can be costly.
The Patrol uses an on-demand 4×4 system which, when in Auto mode, is rear-axle biased and only sends drive to the front when needed. Turn the All Mode 4×4 dial to ‘4H’ and the front-to-rear drive is locked 50:50 for loose road surface use. Turn it another click clockwise and the system enters low-range four-wheel drive for real off-road use. The drive system benefits from a multi-terrain system with Off-Road, Sand, Snow and Rock settings, and there’s a selectable rear differential lock.
The system works well in most conditions, but it can be a bit slow to react if left to its own devices in Auto mode. For example, we were climbing a wet and snotty hill in Auto and the system struggled and sent limited power to the wheels. Simply flicking from Auto to 4H gave an instant boost in traction, as the Patrol surged onwards and upwards.
The original model range was mechanically differentiated by the inclusion of Hydraulic Body Motion Control (HBMC) on the two upper-spec models, while the entry-level model made do with conventional coils on its full-independent suspension. Both models now get the clever HBMC system, making the two grades mechanically identical. A HBMC-equipped Ti Patrol used to be a $93,390 option, but it’s now much more attractive at $70K.
The real benefits of the HBMC system are experienced on a closed track, and we had that opportunity when the Patrol was first launched. Driving straight from a tight and tricky off-road track – where the stock Y62 crawled through easier than a stock GU Patrol – we went onto a closed road course, where the 62 astonished with is flat cornering and dynamics (considering its size and heft). Sure, it’s no sports car, and you can’t hide that mass, but it’s amazing how this thing handles. We had similar experiences on this test, where we went from wet and tricky tracks to twisting mountain roads with ease and confidence.
CABIN FEVER
IF YOU like a big car, you’ll love the Patrol. It’s big all ’round and even makes a Land Cruiser 200 feel compact in comparison. Space in the front- and second-row seats is ample and comfortably accommodates five adults, but the third-row pew is more suited to kids, which is surprising when you consider smaller wagons like the Isuzu MU-X do a better job of the third row.
However, the Patrol wins again when you go further back – you could just about fit a 40-litre fridge behind the third-row seat. The Patrol Ti has seating for eight (with three shorties in the back seat), while the TI-L is limited to seven.
PRACTICALITIES
THE Patrol rolls on large 18-inch alloy wheels, but they wear sensible 70 aspect tyres for a good-sized sidewall. The 265/70R18s are massive and equate to a 33-inch tyre, so you should have no trouble fitting off-road 33s, or 35s with a two-inch suspension lift.
There’s plenty of aftermarket gear available for the Y62, but more specialised things like snorkels, drawers and rear bars can be harder to come by. The active crew in the Y62 owners group have done some sourcing of their own to get the products they want made, and the intake snorkel is one example.
Under the bonnet, the big airbox draws air through the near-side ’guard, while the air cleaner is accessible without needing tools. There is space behind the standard battery for a second battery, but you need to relocate a computer and some other bits to make it fit. There are kits available for this. There are tow hooks front and rear, but they aren’t the solid-rated type you really want to use for a vehicle recovery.
The standard fuel tank’s 140-litre capacity sounds good, but the best you’ll get out of the V8 engine on the highway will be high 12s per 100km, so range will be limited to around 700km. It’s the price you pay for having such a sweet V8 in a big bus.
WHAT YOU GET
IN SO many ways, the Y62 is like no other Patrol before it; none more so than the level of equipment in it compared to anything in the past. Among its many features, the Ti comes with HBMC; keyless entry and push button start; leather seats with power adjustment on the front ones; three-zone climate control; sat-nav; an around-view monitor; tyre pressure monitor; and a power sunroof.
Fork out more for the Ti-L and you add forward collision warning; blind spot monitoring; lane departure warning; radar cruise control; xenon headlights; a Bose sound system; and power folding door mirrors with puddle lamps. The entry-level Ti has everything you need, but the Ti-L takes it up a notch.
If you want to go further, you could look at the Infiniti QX80. At $111,000, the QX80 is based on the same vehicle, but dials everything up to 11 – it comes in a bespoke body that only a mother beluga whale could love. Both Patrols and the Infiniti all share the same 5.6L V8 engine mated to a seven-speed auto and all-mode 4×4 system; it’s just the level of features that dictates the price. However, no matter what you choose, all the good stuff is there at the base level.
BIG BRUTE
THE Y62 Patrol mightn’t be the old GU we knew and loved, but it’s a new-age 4×4 that relies on technology and brawn to deliver a high-performing, super-spacious wagon. Sure, it’s thirsty compared to a diesel-fuelled vehicle, and there’s no question Nissan would sell a lot more of them if they could offer a diesel engine, but for what it is, there’s nothing like the big Patrol at this price. To get similar levels of equipment and performance, you need to be looking at European wagons that cost a lot more and don’t have the same off-road ability.
Even for a Land Cruiser 200 Series at similar spec, you’re looking at $92,500 (for the VX petrol LC200) or $97,500 (for a VX diesel). With that $20K saving, you could buy a lot of PULP to keep that VK56 V8 singing.
ON A ROLL
ELSEWHERE in the June issue (page 86), Fraser Stronach explains the working of Toyota’s KDSS sway bar system. Nissan’s Hydraulic Body Motion Control (HBMC) is similar, but it takes it a step further and its benefits are greater.
For decades, off-road drivers have removed or disconnected their vehicles’ anti-sway bars to improve the wheel travel of their suspension and off-road ability. That’s all good, but the problem lies when you hit the road to go home and the vehicle rolls around like a tall cork in a rough sea. Anti-sway or stabiliser bars control body roll, but limit wheel travel.
Nissan’s full-independent, coil-spring suspension with HBMC does away with sway bars. Instead, the shock absorbers are linked by hydraulic lines and are able to pressurise each side of the vehicle to steady the ship. This action is speed-dependent so the shocks pressurise at road speeds to maintain a flat stance, but can soften up at low, off-road speeds to allow the suspension to droop to maximum effect.
And before you write HBMC off as a system that will prevent you from raising the ride height or fitting bigger tyres, specialist 4×4 shops such as Melbourne’s On Track 4×4 have developed a kit to give the system a 50mm lift. You can’t build a hurdle that the Australian 4×4 aftermarket can’t conquer!
[specs] NISSAN PATROL Ti Engine: DOHC 32-valve DI petrol V8 Capacity: 5.6-litre (5552cc) Power: 298kW @ 5800rpm Torque: 560Nm @ 4000rpm Gearbox: seven-speed auto 4X4 System: on-demand auto with locked high and low ranges Crawl Ratio: 43.95:1 Construction: five-door wagon on a separate chassis Front suspension: independent/coil springs Rear suspension: independent/coil springs Tyre size: 265/70R18 Tare Mass: 2706kg GVM: 3500kg Payload: 794kg Towing capacity: 3500kg Seating capacity: eight Fuel tank capacity: 140 litres ADR fuel claim: 14.5L/100km Test consumption: 15.7L/100km
Winter isn’t coming, it’s here. that means it’s the perfect time for soup! Here’s a hearty feed that’ll chase away those winter blues.
INGREDIENTS Makes a very large pot of soup Olive oil 4 to 6 slices of thick smoked bacon, chopped (the more bacon you use, the more intense the bacon flavour) 1 onion, finely chopped 1 leek, washed and thinly sliced (use the white and light-green part only. If you don’t have a leek, add an extra onion) 4 to 6 garlic cloves, crushed (or 4 to 6 tsps of minced garlic from the jar) 1 to 2 tsps of dried red chilli flakes (optional) 2 stalks of celery, chopped 2 medium carrots, chopped 2 to 4 potatoes, diced 1 zucchini, diced 8 cups of chicken stock (salt reduced) 810g can of crushed tomatoes 1 tbsp of tomato paste (optional for flavour) ¼ to ½ Savoy cabbage, shredded (to your personal preference) 1 to 2 tsps of dried thyme (or to taste – it can take over) 2 x 400g tins of cannellini beans, drained and rinsed (white kidney beans or fasolia beans) Salt and pepper 6 to 8 slices of day-old, stale white bread, crusts removed and torn into chunks (sourdough, Pane di Casa or crusty breads are really good)
OPTIONAL HOP-UPS Shaved or grated Parmesan cheese can be used.
Pour a little olive oil over the top of the soup before serving, if you want a traditional finish.
Add or omit whatever vegetables you want. Traditionally, kale and/or char are added. The addition of green beans is also good.
COOKING IT
- Heat a heavy-based, large pot or your camp oven over medium/high heat and add a little olive oil and the slices of bacon.
- Sauté the bacon until lightly browned. Remove and drain on some paper towel.
- Add more oil to the pan if needed and add the leek, onion, garlic, red chilli flakes, celery, carrot, potatoes and zucchini, and sauté over a med/high heat for about five mins, or until the onions are translucent.
- Add the chicken stock, tinned tomatoes, tomato paste, Savoy cabbage and thyme. Bring them to a simmer. Season to taste.
- Puree one can of the cannellini beans (you can use a fork or potato masher). Combine them with one cup of the soup liquid, mix well, and then add to the soup and stir .
- Add the remaining whole beans and the browned bacon. Mix through the soup.
- Bring to the boil, reduce to a simmer, cover and simmer very gently for another 45 mins to an hour, stirring occasionally (the bigger the vegetables pieces are, the longer the soup takes to cook).
- When ready, remove the pot from the heat and add the bread, gently stirring through.
- Check seasoning.
- Leave the soup to rest for at least one day. The longer it sits, the better it gets.
- The next day, it’s ready to reheat and serve.
- The final consistency of the soup has a lot to do with the type of bread you use, and the amount.
It’s a great way of using leftover stale bread, and a good way to use up lots of vegetables.
This recipe is based on a classic, hearty Tuscan and it’s full of body and flavour. It might not be completely traditional, but it tastes great. It needs to be cooked and then left for at least day or so – Ribollita means re-boil. Like most soups, it tastes better after two or three days.
IT’S FUNNY, isn’t it? Last month we had a yarn about metal fatigue, and I showed you some of the damage on Milo’s front panel. But then when I went to make another one, the first thing I had to deal with was another form of fatigue.
No, not the sort that sees the average mudflatter with his head on the bar late at night after a rather long counter lunch. Nope, this time it was rubber fatigue in the MIG welder.
If I sound surprised, it’s because I was. See, I bought that MIG more than 15 years ago after putting in buckets of research to make sure I got the right one. It’s the first MIG I’ve ever owned and will probably outlast me. So I guess this column is a bit of a yarn on what to look for when you’re spending money on tools. And it’s written by someone who’s wasted so much money on tools over the years, he should know.
I started collecting tools as a lad. My 14th birthday present was a set of Sidchrome sockets – Whitworth-sized, because I had an old BSA. I’ve still got them, and still use them. They’re a bit rusty maybe, but good tools can last a lifetime. At 16, with a toolbox full from farm sales and things bought when needed, I made the biggest investment of my life: a stick (or arc) welder, because I wanted to weld some mounts to my FJ to take a red motor.
These days you can buy stick welders anywhere, from Big W to the web, but back then, especially in the country, there wasn’t a lot of range. In fact, in my town I had a choice of two, and one was an industrial model so expensive I could have bought another dozen or so FJs for the same money. That’s not saying much: the average price of an FJ in 1973 was about $50.
This was still slightly more than I earned in a week, and the smaller welder still cost me three weeks’ work. It was a Liquid Arc, made in Australia, and although it looks like total crap, it still works.
I got lucky, because in those days in a small town no business could survive selling stuff that didn’t last. Strangely enough, last time I passed through there, there was a dollar shop selling rubbish where the old hardware store used to be. Times change, eh?
That little Liquid Arc taught me to stick weld, which meant I could always make a buck in the bush; in the ranks of bush mechanics, you’re judged by how good your own welding looks. Starting young is an advantage!
Along the way I learnt gas welding, too, although the gas usually got used more for cutting, brazing and bending. Still, armed with both, I could pretty much do anything. So, even though the world had shifted to MIG welding, I just stuck to the old stick.
Then, faced with a whole stack of panel welding back in the days when I first built Milo, I figured it was time to invest in an MIG and learn how to use one. I looked at various models, asked people who used them daily – like my mate Cooky who builds custom exhausts – and did a bit of homework on the principles behind gas shielding. I wound up yarning with a bloke called Greg from State of the Arc.
Here’s the first trick: If you’re going to make a real investment in tools, go to a specialist (forget about the combination 52-piece toolkit you get for $12 at Aldi). In my case, that meant travelling a couple of suburbs away to Capalaba. Greg was a boilermaker in a past life and exactly the sort of bloke who knew about welding. He recommended buying the largest single-phase MIG in the shop, which was a lovely bright red Lincoln.
I baulked at the price – even if it was only half that of a rusty FJ – but he told me the same factory that made Lincolns under licence here in Australia also made its own brand – much the same thing but at a better price. That brand was Liquid Arc. With happy memories of the back seat of the old FJ, I gladly put in an order.
The ‘new’ MIG worked brilliantly every time I needed it, until I plugged it in to do the job pictured here. Then it spattered and sparked and generally behaved like one of us had lost the plot. It gave plenty of gas, so the wire feed was right, but the test welds looked like bird shit.
So I rang State of the Arc and asked to speak to Greg. I figured after 15 years he’d probably moved on, but he was still there. Good shops are like that. I was only halfway through describing my problem when he said: “How old is it again?” He told me that the rubber gas line was probably past its use-by date, so none of the shielding gas was getting to the handpiece. Then he told me how to fix it.
After a bit of mucking around and sourcing some old fuel line, I was back in business. I was so chuffed I figured I’d drop over to State of the Arc with a slab of XXXX. I would have, too, except the old bike wouldn’t start until I’d swapped out the battery – and the 10mm spanner and Phillips driver from the Aldi toolkit had turned to cheese.
So if you’re planning on mucking around with machines for a lifetime or two, good tools are worth every penny. Next month I’ll tell you how things went with the new front panel!
USING beer for any other reason other than drinking it better be bloody worth it. And, in this case, it is. Who doesn’t like beer-battered fish and crispy chips?
However, before you throw the snapper in the pot of boiling water, the first task is to knock up some French-style chips.
To get the chips a lovely, crispy golden brown, cut the spuds thin and cook the chips twice in the oil. Don’t bother peeling the spuds either, as that’s a waste of time according to Roothy. A thorough wash will do just fine.
Once the chips are put to the side, it’s time to concoct the beer batter. Roothy’s method is to keep it really simple – the outback way.
All you’ll need is egg yolk, plain flour, salt, sugar, cream, and the miracle ingredient: beer (remember, it’s important to taste the beer before you apply it).
Smother the snapper (or whatever cut of fish you’d like) in the batter and throw it in the oil for a few minutes, or until golden brown. Voila!
When you’re in outback Australia, you’re a long way from the ocean, but that shouldn’t stop you from indulging in a great feed of fish and chips. Plus there aren’t any seagulls bugging you for a chip – well, apart from the campsite neighbours.
THE BATTLE between wagons and utes has been raging since the first ute rolled off the production line.
One camp loves the versatility of a wagon; the other loves the versatility of a ute. Wagon owners will rant and rave about their storage options, while those with utes will do the same. It’s a rivalry of epic proportions, where even manufacturers hedge their bets by producing what are essentially the same vehicles in both configurations.
The harsh reality is: If you’re serious about remote-area touring a ute is the hands-down winner, and that comes from someone who owns a wagon. You only need to look at the popular trends in wagons lately to see what I mean. We’re hell-bent on caging off the back to give us two separate compartments. The real adventurous even cut the quarter panels to replace vulnerable sheetmetal with tougher plate and tube steel.
View our guide to building a 4×4 on a $10K budget
If you didn’t know better you’d be forgiven for thinking we were trying to replicate all the positives of a ute, while still maintaining the comfort levels of a wagon. However, with the refinement and power levels of modern-day utes being toe-to-toe with their wagon counterparts, things start slanting pretty heavily in favour of utes.
It’s no surprise utes are continually growing in the Australian market and are quickly replacing the wagon as the family bus, and the overwhelming reason is the sheer versatility and storage space the platform offers.
Over the years we’ve gone from the simple tonneau cover (or rudimentary canopies) through to today’s high-gloss and weatherproof offerings. But it’s the current trend of bolt-on, custom-built canopies and campers that has grabbed our attention. They’ve taken the market by storm, offering all the strength of a Sherman tank while making your 4×4 more comfortable off-road. You only need to scan through these pages to see any number of touring set-ups – with varying levels of refinement – ready to take on this vast continent.
We have wrangled some of the biggest names in the industry to give us their unbiased advice on what your options include. From simple canopies with steel construction right through to pop-top campers and TIG-welded aluminium, this guide will help you turn your four-wheel drive into a red-dirt-eating tourer.
UNDERSTANDING YOUR NEEDS Choosing a canopy or camper for your four-wheel drive can be complicated as there are thousands of options to choose from, and for the price of some of the higher-end models you could pick up a near-new 70 Series Land Cruiser. So there’s plenty of incentive to buy the right set-up for your needs.
It’s easy to find something that looks great on another person’s rig and want the same, but what works in one situation won’t necessarily work in yours.
“When we have a new customer come through the door for a canopy the first questions we will ask are: What are you mostly going to use it for, how often and where?” Kelvyn Kruger from Metalink said. “Only then can we start to design a unit to suit their specific needs.”
The first step before worrying about integrated headboards and slide-out kitchens is to come up with a list of what you want to do with the tray. Does the tray need to come off? If so, how often? Do you want to camp in the tray, out of it, or just use it for storage? Will it stay loaded with camping gear, or will it need to do double-duty for work? What sort of terrain will you be spending the majority of your time in? This affects the required dustproofing or water resistance, as well as the corrosion requirements of the set-up.
However, the elephant in the room is weight. You’re effectively redesigning half of your vehicle, which can have drastic effects on GVM, towing ability, handling, off-road ability and steering feel. In vehicles that are already close to their GVM, or do a lot of towing, the extra weight can make the vehicle essentially unusable. On the other hand, nose-heavy vehicles which are rarely loaded can perform better with some extra weight over the rear axle.
When you know which general direction you want to head, it’s important to then find the right person for the job.
“No matter what, always ask for previous experience and photos to give you a clear idea of what is available and what the fabricator can deliver,” Isaac Edmiston from Norweld Engineering told us. “Regardless of the scope of work involved, it’s important to know that they can deliver on what was quoted or what work you require. If the price is too good to be true, there is usually a reason.”
GET THE RIGHT MATERIALS Every single shop will tell you whatever construction method and materials they use are the best. There are pros and cons for just about every style available, so you need an informed idea of what you’re after before picking up the phone.
Without doubt the cheapest and lightest option is canvas over a steel frame. This offers excellent value for the budget-conscious and, with varying levels of strength from the internal frames, can hold up to some abuse. These can be picked up from as little as $3000 for a basic set-up through to around $8000 if you’re chasing roof-carrying capacity and secure sides. Their biggest downfalls include a lack of protection from the elements and low refinement levels.
Next up the price ladder, at around $3000-$8000 for a basic set-up, are mild steel enclosed canopies. The lower price is reflective of the increased weight, and they are susceptible to corrosion depending on their levels of protection. A standard paintjob will quickly age with use, while light scrapes can rust. Hot-dipped galvanised trays rectify some of these issues with much higher resistance to wear and tear, although future modifications will damage the galvanised surface, opening the potential for rust.
The current market is largely dominated by custom-built aluminium set-ups, so expect to pay in the vicinity of $5000-$12,000 depending on quality and options. Despite the higher pricetag, the pros often outweigh the cons.
“Aluminium trays are great for weight saving and corrosion resistance,” Isaac said, “but require careful thought put into the design and welding process to ensure a long-lasting and great-looking tray.” The generally thicker construction means you don’t give anything away to steel canopies in terms of strength.
Some of the more elaborate set-ups on the market are often built from fibreglass or a composite of materials. While heavier than comparable aluminium trays, fibreglass set-ups are often more involved, making it hard to compare apples to apples. Much like aluminium, repairs aren’t complicated but require knowledgeable repairers.
“We use a composite lay-up and this keeps weight down but produces a high-grade strength,” Darren Hoger from Travelander added. Depending on the camper, these can come in anywhere between the low $20,000 mark to more than $50,000. However, as they’re essentially a ute-mounted caravan they shouldn’t be compared on price alone.
WHAT STYLE WORKS FOR YOU Next in the selection process is deciding which basic design and construction methods to use. There are two popular styles of tray you’re likely to come across, with multiple variations within both. The market is 50/50 split between tray- and chassis-mounted canopies, with both having positive traits.
A canopy bolted directly to the chassis has a few main benefits. “You need to ask: ‘Do I really need to take the tray off?’” Kelvyn Kruger stated. “If the answer is no, you’re better to go for a canopy bolted straight to the chassis as it is a lighter option with a lower floor height.”
The additional benefit of a chassis-mounted canopy is significant cost savings, without the need for a separate tray. “Chassis-mounted canopies negate the need to purchase both a tray and a canopy,” Caitlin Bresette from Uteboss Utility Canopies added. “We simply remove the tub, fit the canopy, wire the lights and away you go. If you don’t plan on changing vehicles frequently or taking off the canopy, a chassis-mounted model is a great option.”
While a tray-mounted canopy falls behind in terms of price and weight, they leap ahead with regards to versatility. All tray-mounted canopies are able to be removed and re-fitted to another vehicle if you upgrade or need to clear the tray for work duties. “Our canopies are able to be lifted off in six minutes,” Darren Hodges commented. “You’re not stuck in one spot, the vehicle is freed up to go out and see the surroundings.”
Before signing on the dotted line there are a few key design elements left to double-check. If you’re planning on fitting roof-top tents, boat loaders or roof racks on top of the canopy you’ll need to ensure the roof is sufficiently reinforced.
For steel and alloy trays this can be as simple as implementing a fabricated structure inside; fibreglass canopies can achieve similar results with an internal frame or ribbing on the roof itself. Check for quality welding on previous examples, as well as strengthened inside doors and (large) panels.
Corrosion resistance can be enhanced by the use of stainless-steel fixings, as well as chemically bonded panels and welded framework. Some canopies and trays are bolted together to allow twisting and reduce fatigue; although, if you come across panels warped from welding or held down with screws or mild steel bolts, turn tail and run!
SMOOTH AROUND THE EDGES What can you get fitted inside your shiny new camper set-up? Do you want the canopy to include sleeping options, or is it simply for storage? A single person can get by with a swag rolled out inside, but if you’re chasing a nicer set-up you’ll want to be looking at either a pop-top set-up with a queen bed or a hard-floor camper for more floor space.
If you’re planning on using the canopy as a camper set-up you’ll also want a standalone electrical system, preferably with lightweight lithium batteries. Water storage and camp kitchens are more-or-less standard now, so look for integrated plumbing for both water and gas.
A comprehensive storage system can also mean you’re ready to go at a moment’s notice. “For short trips, time is precious,” Caitlin Besette added. “You don’t want to spend half the weekend packing the ute with everything you need. We can make a designated spot for all the essentials to stay in the canopy for when you need them.”
You’ll need to keep the contents secure from the elements and prying hands, so ensure external access is key-lockable and capable of preventing dust ingress. Some companies offer auto locks synced to the car’s locking.
By now your list of wants (and don’t wants) is undoubtedly getting longer, but these last few requirements are the most important.
Firstly, is the design smart? Weight positioning can drastically affect the performance of a 4×4, so check that most weight is as forward as possible – water storage, electrical systems and kitchens should ideally be in front of the rear axle, with camping gear up the back. Also pay extra attention to the little details often overlooked. If the set-up needs to be modified later on, is it possible? Are there sufficient tie-down points internally? Is the fuel filler accounted for in the design, or will it be cable-tied underneath?
TOP TIPS
If it all seems like we’re speaking Chinese, here are a few simple tips to keep in mind when on the hunt for the perfect touring set-up.
1. WEIGHT Weight is your enemy when off-road. Do you really need an extra 200 litres of water and a triple battery set-up for the weekend getaway? Probably not.
2. PRICE It’s easy to baulk at the high-end canopy set-ups, but a lot of them are comparable to more expensive camper trailers and caravans yet lighter and better off-road.
3. QUALITY If you can’t afford to buy a better-built camper to start with, can you afford to have a cheaper one repaired or modified if it breaks later on? Buy once, cry once!
THANKS
METALINK Web: www.metalink.net.au Ph: (07) 5445 0893.
NORWELD Web: www.norweld.com.au Ph: 1300 302 899.
UTEBOSS UTILITY CANOPIES Web: www.utebosscanopies.com.au Ph: 0431 135 354.
TRAVELANDER Web: www.travelander.com.au Ph: 1300 287 283.