ONE of the wildest off-road vehicles ever conceived will soon be available to buyers in Australia, but you’ll need deep pockets to secure one.
The Hennessey VelociRaptor takes the already nuts Ford Raptor, stretches it, adds six-wheel drive and tweens the turbocharged EcoBoost engine for up to 800hp!
The 600hp+ package includes upgraded turbochargers, high flow induction, a performance intercooler, stainless-steel exhaust system, forged conrods and pistons, upgraded transmission and ECU, and much more.
Huge Brembo brakes are fitted to all six of the 20-inch wheels, as are Fox Racing shock absorbers. All performance-upgraded VelociRaptors are serial-numbered with their unique identity.
Melbourne’s American Vehicle Sales has secured the rights and approvals to import, convert and sell the Hennessey here in Australia, with prices starting from $505,000 and heading upwards depending on how game you’re prepared to venture with the engine upgrades.
AVS’s James Hill described the VelociRaptor as the supercar of the off-road world, but added: “Can you take your Lamborghini on the beach? Will your Bugatti carry your dirt bikes to Cape York? Will your Ferrari take you across the Simpson?”
The VelociRaptor can do all of the above and will turn more heads than any of the Italian sports cars, wherever you take it.
When the lotto balls drop your way, visit www.american.com.au to secure your Hennessey VelociRaptor.
AVS imports, converts and sells a range of American vehicles including pick-ups, muscle cars, regular Ford Raptors, and now the VelociRaptor.
MY portable fridge spends much of its time sitting in the back of my 4×4, but I occasionally drag it out and throw it in the back of a test vehicle, which means I have to power it from said vehicle’s starting battery.
Of course, the issue here is that I run the risk of draining the starting battery, especially if I leave the fridge on overnight. I recently bought a 44Ah Primus Portable Power Pack to overcome this dilemma. I now run the fridge off the starting battery during the day (when the vehicle is running) and swap over to the power pack at night.
Inside the Primus Portable Power Pack’s tough ABS housing are two 22Ah AGM batteries. There are several power outlet options including a 12V/15A cigarette lighter socket, a 12V/15A heavy-duty merit socket and a 5V/2A USB port.
The power pack comes with 240V AC and 12V DC charging cables, and it has an Anderson socket connection for charging via a solar panel (not supplied).
It should be noted that the 12V DC input is only enough to trickle-charge the power pack, so you’ll need to find a 240V AC power source or use the Anderson socket connection to give it a proper top-up during the day.
Features include a digital voltage/amperage display, a low battery warning (light and alarm), overload protection with resettable circuit breaker, and supplied 240V AC and 12V DC charging cables. Weighing in at 16kg, you’d hardly describe the Primus pack as light, but it’s relatively compact (330x310x290mm) and easy to manoeuvre thanks to a sturdy fold-away carry handle.
If you don’t have a dual-battery set-up in your vehicle, the Primus Portable Power Pack could be the ideal power solution. However, the fact it doesn’t fully charge via its supplied 12V DC cable is a bit of an inconvenience and something to keep in mind.
The Power Pack should be charged every three months when not in use to maintain peak performance, and it’s covered by a 12-month warranty.
AVAILABLE FROM: outdoor.companionbrands.com.au RRP: $429 WE SAY: Reliable power back-up
I HAVE been a big proponent of apprenticeships ever since I failed my own spectacularly.
While their primary purpose is to teach the ins and outs of a specific trade, they more often than not equip you with a set of skills you’ll use almost every day of your life. From knowing when to shut your mouth and when to point out those more qualified are doing it wrong, to hands-on skills and the ability to make a few hundred bucks for a Saturday’s work.
But, without a doubt, the one skill that’s universal across every apprenticeship is learning how to achieve your goals with barely two cents to rub together. While the Hilux you’re looking at now might have had a few key upgrades when apprentice electrician Taylor Shaw got his hands on it, it’s that can-do attitude which turned it into the off-road beast it is today.
When Taylor first took the keys two years ago, the live-axle conversion had already been undertaken by a local fab shop – with a few loose ends left to tie up. The custom 4×4 shop had sliced and diced the OEM independent front end away from the chassis and grafted into place a custom live-axle housing based off an 80 Series Cruiser.
It runs an 80 Series diff centre, axles and steering knuckles, but the whole lot has been shoehorned into a one-off sheetmetal housing with the pumpkin flipped to the passenger side to suit the Hilux’s transfer case drop.
The arrangement is held in place with a set of off-the-shelf 80 Series radius arms and a Panhard rod, all going to custom-fabricated mounts on the ’Lux’s frame. While the hot-glue gun was out, an 80 Series steering box was added to the arrangement, with extensive plating to reinforce the chassis.
Links are great, but all the links in the world won’t keep your 4×4 off the bump stops. To that end, the ’Lux is running a set of 10-inch travel Fox coilovers with a 2.5-inch diameter body giving huge dampening ability. Sounds great, and it was, but it wasn’t finished.
When Taylor took the keys there were plenty of good bits added, but it was barely a roller and looked more like a farm truck than the rock-crushing weapon it is now. To finish off the front end, he knocked the ride height down from six inches over stock to four inches, helping lower the centre of gravity and freeing up some valuable down-travel in the process.
A one-off front driveshaft was fabbed up, with the final piece of the puzzle swapping out the stock rear ring and pinion gear to suit the 4.1:1 ratio. With the front-end sorted, Taylor turned his attention to the rear suspension.
It’s still sporting leaf springs, but they work leaps and bounds better than a stock set-up thanks to a little bit of know-how on Taylor’s behalf. After running a tape measure over the stock leaf pack, Taylor worked out that a set of leafs from an RG Colorado would bolt into the front hanger, keep the diff in the same position, then add a heap of length behind the rear axle.
When teamed with extended shackles, the arrangement gives the ’Lux a far more compliant ride that easily flexes its way through tough tracks right behind the slinky front-end. There are plans to fit a set of Fox rear shocks eventually, but for now a set of Tough Dog adjustables keep the rear axle under control.
After the rear suspension was dialled in, Taylor ditched the Farmer’s steel tray and installed a factory rear tub. With a set of OEM flares installed, he’s been able to shoehorn in a set of 35-inch Federal Couragia mud-terrains wrapped around 15-inch Dynamic D-Hole steel wheels.
Taylor’s not scared to punt the big ’Lux into silly situations, but he’s also cautious to not beat it into a pulp for the fun of it. To keep it in one piece after a weekend on the tracks, he’s gone from headlight to tail-light with a comprehensive barwork package.
The tip of the spear, and the piece that cops the most rocks straight to the face, is an Xrox tube bar that houses a set of LED spotlights and a 12,000lb winch.
Eagle-eyed readers may notice something a little different with the front bar – Taylor’s fired up the welder and bender and added in headlight protection with a set of hoops that show the Jeep boys there are better ways than plastic angry eyes.
The new hoops are tied into Taylor-made scrub bars that then tie into the sidestep-cum-rock sliders; although, after beating them like they owe him money, they’ll probably be getting a rework soon, too. You can’t crunch sheetmetal if there’s no sheetmetal to crunch, so the grinder was called for again in the rear.
Both quarter panels have been removed from the tub and replaced with a tube rear bar that incorporates the tow bar as well as protects what remains of the tub and tail-lights.
While the suspension and barwork package read like a how-to for a rock crawler, the set-up functions perfectly for two-up camping, with just the right amount of touring mods. Rather than running an expensive and vulnerable fibreglass rear canopy, Taylor knocked-up a simple frame then wrapped it in DIY canvas to keep the tub dry for any weather this side of Hurricane Harvey.
The back’s been kitted out with a set of simple sheetmetal storage drawers for all the vital tools and camping equipment, with enough room to shove a swag or two on top. A UHF also got the nod as a piece of must-have equipment and, with a 3-inch exhaust bolted straight to the back of the turbo, a few extra killer wasps have been freed up to help move the big tyres.
While the build might look and perform like a million bucks, it’s just more proof that thinking things through and rolling up your sleeves almost always results in a better build than opening the chequebook and smoking cigars. With a little less than two years of seat time into his ’Lux, we’re sure this isn’t the last we’ll be seeing of Taylor or his Toyota.
MR POPULAR
EVERYWHERE you look, custom 4x4s are popping up with coil-over front suspension arrangements – in extreme builds they’re in the rear, too. But what do they offer over a traditional spring-and-shock arrangement? Believe it or not, the biggest selling point for a coil-over in a custom application is normally packaging.
With a traditional spring and shock you need to make shock mounts at each end, as well as a complicated spring seat on the diff and chassis – it’s not fun when you’re pushed for space as it is. A coil-over significantly reduces the component footprint and allows for a few simple tabs top and bottom for mounting.
Of course, there’s a whole host of benefits on the performance front, too; although, they mainly come down to tuneability rather than any special voodoo magic. Spring rates are easily adjustable without affecting ride height, and with dual-rate coils you can fine-tune the rate to work perfectly for the application, even changing the rate part way through the stroke.
Likewise, if the shock valving is too stiff or soft you don’t need to bin the whole shock; just take it to a shock tuner and have them swap out the internal shims to suit your needs.
THIS is a practical example of changing oil.
This was first published in 4×4 Australia’s May 2013 issue.
You’ll need to find the oil change quantity, recommended oil grade and a workshop manual to cover the specifics for your type of vehicle. You’ll also need an oil filter and, depending on the type of sump plug you have, a new washer or replacement sump plug itself.
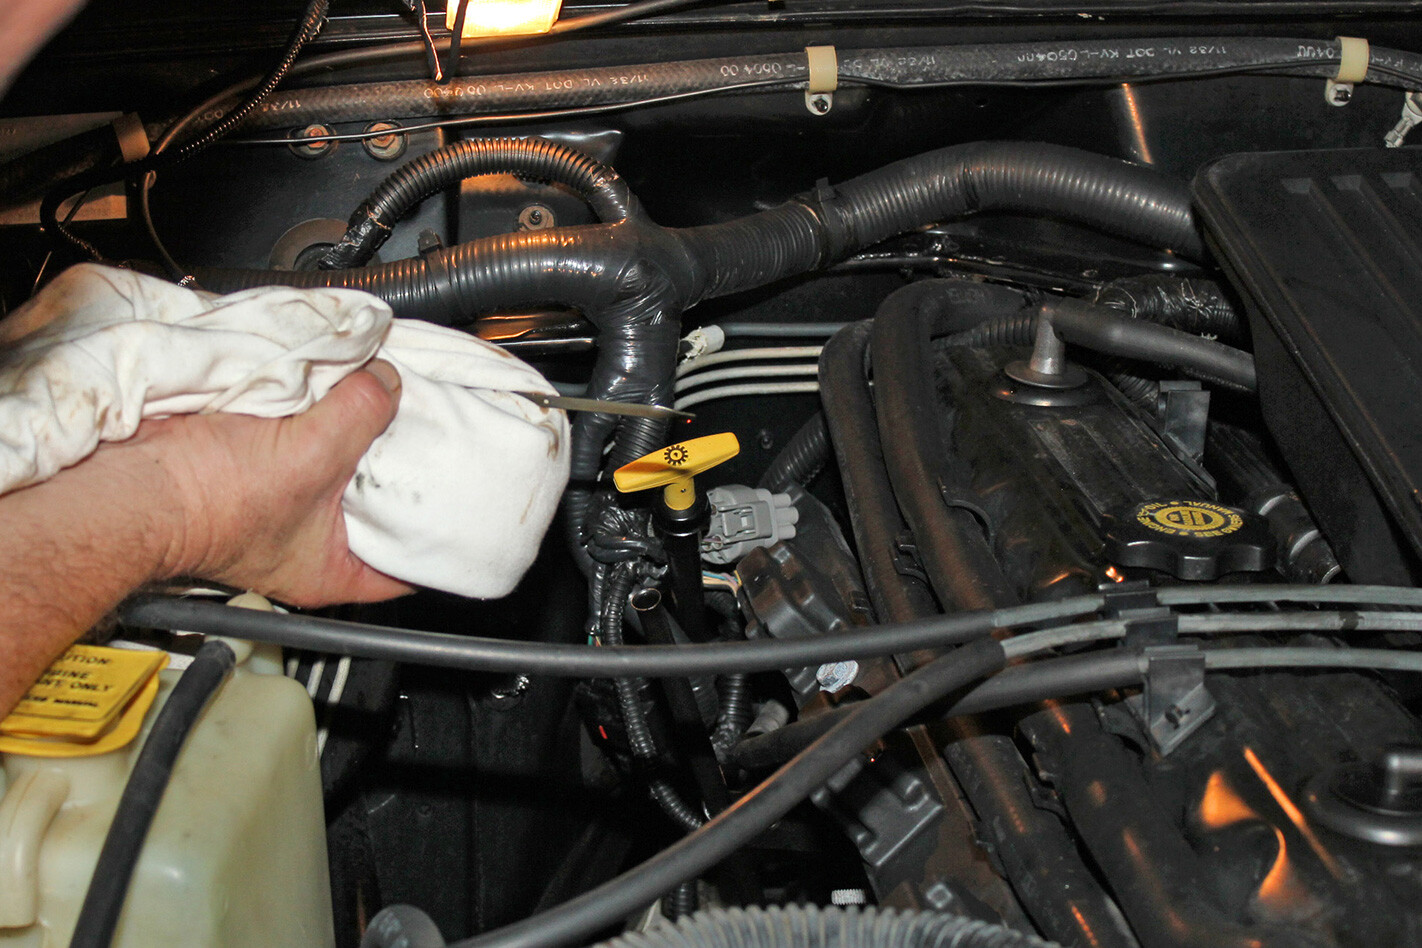
Tools you need include wheel chocks, oil drain pan, socket set and an oil filter removal tool. Run the engine until it reaches operating temperature because hot oil will more likely bring any impurities and sludge out with it. Wear gloves to avoid the risk of burns when the engine is hot.
Remove the oil filler cap and put aside. Then get underneath the vehicle and loosen the sump plug with a socket wrench. Get the drain tray ready and undo the sump plug by hand until you can feel it’s at the end of the thread. Pull the plug away and let the oil drain out.
Then wipe the plug and the sump clean and replace the sump plug and tighten to specifications. Position the oil drain tray underneath the oil filter, and then loosen the oil filter with the oil filter tool. Unscrew the filter the rest of the way by hand and remove. At this point oil will probably spill out of the filter so make sure to aim it into the drain tray.
Lift the filter out and place it on the tray to drain. Put a dab of fresh oil on a clean cloth and wipe it onto the new oil filter seal. Then screw on the filter by hand. Once the seal has come up against the mating surface, tighten according to specification. Pour fresh oil into the oil filler using a funnel to avoid spills.
Fill to just under the required amount, and then replace the oil filler cap. Start the engine, allow up to 10 seconds for oil pressure to be restored. After running the engine for three to five minutes, turn it off, allow five minutes for the oil to settle and then check the oil level at the dipstick. Top up oil as necessary.
1. The engine oil must be hot, so either drive or idle your vehicle until it’s at operating temperature.
2. With the engine off and the handbrake on, unscrew the engine oil filler cap and set aside.
3. Carefully loosen the sump plug. Try not to drop it in the oil drain tray you must have ready to catch the oil.
4. Let the old oil drain until all that’s left emerging from the sump hole is a slow drip.
5. Replace the sump plug and tighten with a socket wrench to the appropriate torque.
6. With an oil drain tray underneath, use an oil filter wrench to loosen the old oil filter.
7. Wipe the oil filter housing at the mating surface with a clean cloth.
8. Using a clean cloth, smear a thin coating of fresh oil on the new filter seal.
9. Hand tighten the new filter on the housing to the manufacturer’s instructions.
10. Pour fresh oil into the oil filler, filling just shy of the manufacturer’s maximum permitted quantity.
11. Start the engine and allow to idle as oil pressure is restored.
12. Turn engine off and recheck oil level. Top up as necessary. Dispose of your old oil at a council oil recycling facility.
ANY trip down the Birdsville Track isn’t complete without a stopover at the famous Mungerannie Hotel.
Publican Phil Gregurke welcomes visitors with open arms and loves nothing more than to have a drink with his guests late into the night. Like many outback pubs, the ceiling of the bar area strains under the weight of visitors’ hats; in this case, many once belonging to those who’ve worked on the Birdsville Track.
Look closer and you’ll also see snippets of human hair hanging from the ceiling, once belonging to those who’ve drunk at this quirky establishment. Flags, stickers, stubby coolers, $5 notes, old signage and plenty of other strange paraphernalia also adorn the walls.
If you fancy a feed to go with your icy cold beer, the pub serves everything from bacon and egg rolls, pies, pasties and burgers, through to schnitzels and T-bone steaks. If you can drag yourself away from the bar, a soak in the hot spring bath is a great way to relax.
The pub offers accommodation ranging from unpowered campsites through to dongas with en suites. Mungerannie Hotel also has fuel and tyre repairs/sales. If you want to stay more than a couple of nights, you’re in luck – the Mungerannie Hotel is currently on the market.
ESSENTIALS
Hours: 8am-12pm (7 days) Beers: Light $5; Mid $6; Heavy $6 Meals:Lunch $15 (approx.); Dinner $10-28 Accomodation: $120 w/ en suite; $95 for double or twin; $70 for single
CONTACT
Phone: (08) 8675 8317 Email: [email protected] Website: mungeranniehotel.com.au
Every four-wheel driver who doesn’t use the car solely to pick up the kids after school understands the importance of going into remote areas well prepared for whatever might come along.
This article was first published in 4×4 Australia’s May 2013 magazine.
On those long trips up the gibber trails, across dry mud pans and down the face of yellow dunes the storage tubs and rear drawers are bursting with every conceivable spare and tool that you can carry for the engine, transmission and suspension. But how many people ponder an electronics tool kit?
The what? What spares would you carry? That stuff either works or it doesn’t. If it doesn’t then someone else might know enough to bodgey a repair and get it into the nearest workshop. Well, if that’s your attitude you’re likely to spend quite a while looking at your dead car out in the mulga at some time.
Stuart Peddle is the 4WD specialist for Redarc, one of Australia’s leading automotive electrical product developers, and he recommends a thorough kit that will get you out of the worst emergencies. “It’s always good to be prepared,” he told 4X4, “I carry equipment for all sorts of situations because it might not just be your own vehicle which has a problem, and if you travel in convoy with other vehicles you tend to share resources.
“What I find is – and we get a lot of calls at Redarc on things like the pay phone at Innamincka or somewhere like that – that people can have the best system in the world but when they get out there they can find out that connections and fittings can start to break down on corrugations and under attack from moisture and dust.
“What I recommend is that people take just the basics that they can get away with, along with a fundamental understanding of what their system comprises and how it works. Batteries and 12-volt electronics are a must for us to be out there.”
Here’s Stuart’s kit:
WD40 A can of WD40 or some similar agent (they’re all essentially fish oil with a minor range of additives and will do the same basic job) is probably a man’s best friend when it comes to electrical connections. You can use it to wash out dust, to ensure moisture doesn’t get into things you want to stay dry, to stop corrosion being caused from there on.
That can be on fuse connections, trailer plugs and all that sorts of things. It’s also useful for a huge range of other jobs when in the bush; don’t leave home without some.
Trailer Plugs It’s always good to have a quality metal male-side trailer plug. The plastic plugs can be stood on or bent in camp and break up quite easily. The cast aluminium versions are much more robust and if it unplugs itself you have a much better chance of it simply dragging along the ground than if it’s a plastic plug which will certainly break up. Stuart Peddle says he always carries a spare plug just in case.
Anderson plugs, for transmitting power from the alternator to a trailer-based battery, only come in plastic and so will be subject to damage if they fall out of the vehicle plug while driving or to other physical damage around camp. Carry a spare is the simple advice (buy genuine Anderson brand, not a cheap clone, as these are prone to corrosion on the connectors which will inhibit electrical efficiency).
Small Set of Basic Tools A small tool set is important for electrical work. Both a Phillips head and a flat blade screwdriver are always important, especially if that trailer plug needs attention. Wire crimps, a pair of pointy nosed pliers and a pair of sidecutters are also always vital; the latter also coming in handy for trimming cable ties, baring wires or crimping a terminal. And don’t forget a small knife and a torch for those dark, out of the way places.
Cable Ties A pack of cable ties (aka zip ties) can be amongst your best friends in the bush, and can come in handy electronically for holding wires clear of moving parts, bunching wires together and supporting longer runs of wire. And don’t forget to regularly check zip ties beneath the vehicle to ensure that stones have not broken any off (quite common on gibber tracks) or that heat from the exhaust has not weakened the ties and allowed them to sag and expose the wires to damage.
Fuses Carry a bunch of fuses to suit the various amperages and types required for your vehicle, whether it’s the standard fuses fitted to the car or the aftermarket accessories which you have fitted. Fuses are cheap and can be bought in packs of all the common amperages at most auto parts outlets. Carrying a spare fuse holder can also be a good idea in case you have to wire in a fresh circuit.
Insulating Tape If you have to make a join again or have to bare the wire core for any reason you’ll need electrical insulating tape. It’s cheap and light and should be a part of any electrical repair kit, as well as having additional uses beyond repairing connections in wire.
Soldering Iron There are two forms you could consider for a mobile repair kit, a 12-volt unit or a gas unit. Forget the former. They take ages to heat up and the first puff of breeze will blow the heat out of them and they struggle to sufficiently pre-heat a heavier gauge cable ready for soldering. Small gas units are now quite cheap and they can provide instant heat sufficient to solder anything, from heavy duty cable to the finest connections. Don’t forget to carry a can of butane gas to keep it operational.
Carry a small roll of solder (thinner gauge material is easier to work with given the variety of wire and component sizes you might need to connect). Practice with it at home to get used to the fairly basic processes of soldering together two lengths of wire or terminal fittings onto a wire. Solder can be added to a crimped fitting (where there’s no insulation) to make it much stronger and more likely to live through the extremes of vibration that it’s going to experience in the outback.
Cable Terminals Buy a selection of terminals in a variety of types for the most common cable sizes. Make sure you carry ring, spade (or fork), quick disconnect and bullet or butt terminals, and it’s best if they’re pre-insulated as for roadside repairs crimping is usually sufficient.
A selection in yellow, red and blue insulation will cover the most common cable sizes. Throw in a couple of cable lugs for larger diameter cabling (battery cables, 6B&S for trailer charging cables, etc) and you should be covered.
Digital Multimeter A simple digital multimeter can be worth its weight in gold for diagnosing problems. These can be purchased for as little as $10 and even at that price they will give you a fairly accurate reading. Even just to make you aware of the efficiency of your battery(s), or how your alternator is working, they can vital.
Literature If you’re not completely sure of how this all might work we’d recommend one of Collyn Rivers’ excellent books on 12-volt electronics. These will guide you through the basics of all manner of issues in this often complex area in very down-to-earth language. These are available from a variety of outlets or off the internet.
Always carry a workshop manual for your vehicle as these will often guide you to solving problems (mechanically as well as electrically) and should include wiring diagrams that can be a great help in resolving some issues.
Emergency Fuses In the absence of a fuse of the right rating, you can fashion one using lengths of single strands of copper wire from your standard 240-volt three-core electrical cable. Each strand from the power or neutral wires (blue and brown), known as 24/0.2 (7.5 amp) or 32/0.2 (10 amp) cable, will function at approximately 8 amps, so two twisted together will equal about 16 amps, three will be approximately 24 amps, and so on.
They will not function exactly as manufactured fuses (they will have some internal resistance so may cause things such as lights to run dim) and may take slightly longer to fuse than the manufactured item, but any fuse is better than no fuse at all and it may be enough to get you out of trouble and it has to be better than the nail piece of aluminium foil which some bush electricians are tempted to use. And don’t be tempted to put in lots of strands beyond the original fuse rating if you keep blowing fuses or you may end up with a serious fire.
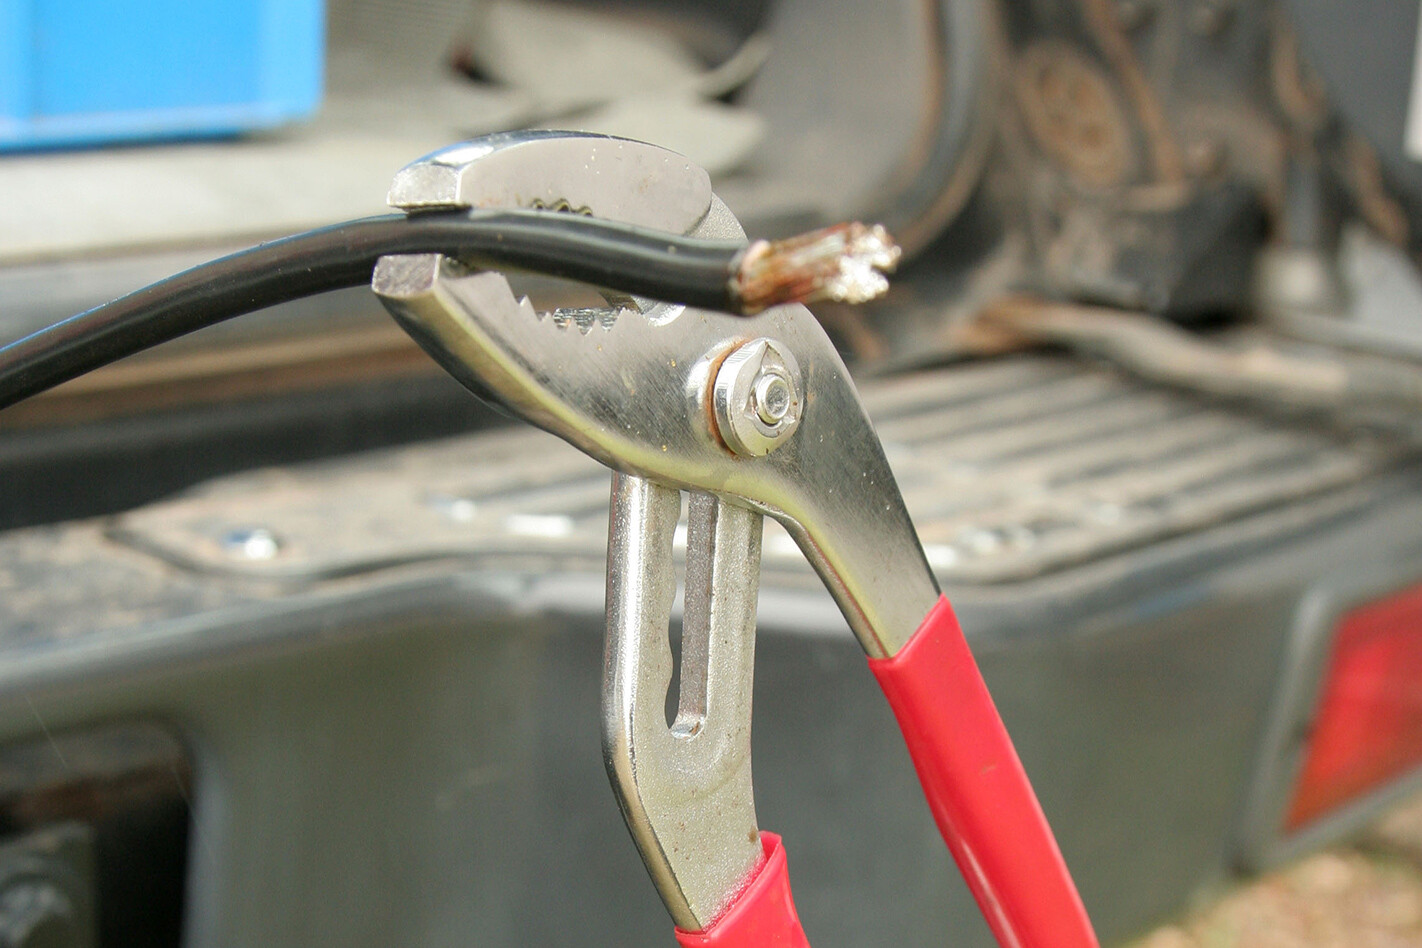
Emergency Vice Sometimes you just need an extra hand, especially when trying to solder wires together. A simple vice can be pulled together from a pair of multigrips or pliers and a rubber band. Simply place the wire in the jaws of the multigrips, wrap the handles with the rubber band and stand it in any horizontal hole, such as the Treg hitch seen here, or in any other position where the set-up is held firmly in place.
SO LAST month I diddled around fitting the clutch and getting the gearbox built, and this month we’re talking about Milo2’s maiden run – that’d be a worry if it wasn’t pretty much how it unrolled in real time.
Why? I’m the sort of bloke whose life has been dictated by deadlines. I got through college – it was free in the 1970s and they’d take anybody – by waking up a day or two before the exams.
Then life was ruled by the seasons during my bush days, where we had to get machinery ready for the summer’s gold prospecting and then change everything for winter’s opal hunt. Then there were the 30 years or so making a living out of magazines, where to miss a deadline just wasn’t on.
I can hear Editor Matt chuckling about now, seeing as he still hits me with a stick to get his words most months. Milo2 got to a critical stage. I had most of the bits back home, the chassis rolling thanks to the two Nicks up at OL Sunshine Coast, and Terrain Tamer had rebuilt the engine, gearbox and transfer.
Building a 40 Series is hard in one sense because they’ve all been flogged mercilessly, but it’s also easy because you can get most parts brand new – and improved, thanks to Alan Gray and Terrain Tamer. After 50 years in the parts business, they know what breaks.
Getting everything together wouldn’t have been possible without Mr Land Cruiser Paul Reid, either, because a project like this needs a mate with a heap of wrecks. Paul and I are also both members of the Classic Land Cruiser Club of Queensland.
It doesn’t matter what you’re trying to do, someone’s usually done it before. Like fitting that 12HT, which was made a whole lot easier thanks to constant messaging with fellow CLC member Chris McConnel, a diesel-fitter on mines machinery when he’s working, and a builder of tough 40s when he’s not.
It was Chris who said a 12HT and five-speed would fit using the right combination of standard parts – no welding, no fabricating and a lifetime of easy ‘stock’ replacement parts. That’s a huge win. All I had to do was put it together, but after a couple of years mucking around I knew that meant a deadline.
With a month or so to go before the Melbourne National 4×4 Expo, my mates figured that’d be the whip I needed. Simon (my 60 Series driving mate), and mutual friend ‘Smart’ Richard, were going to lend a huge hand, and Jason, another old Tojo nut and FIFO (fly-in fly-out worker), lent his spare days, too.
The driveline was finished and, after mucking around with a few cabs, we finally bolted down an ’82 ute body. Then the whole plot went on a trailer – aptly towed behind my mustard 45 Series – up to the Bush Company on the Sunshine Coast, where owner Dean fitted one of the 79 Series tubs he imports from South Africa.
The plan was to complete that with a Rhino canopy – the all-aluminium tops The Bush Company manufactures in Australia. They’re so strong I figured I could do without the rollcage – those bars suck up the space in a 40 Series cab.
Dean got Hylton from Flying Paint to paint the tray back Milo Green, but when Hylton saw the ‘standard’ of my previous paintwork he wouldn’t let that blue cab go without working his magic. Meanwhile, Jase fitted soundproofing and mats from Aussie company Tru Fit, and Smart Richard didn’t let me get away with my usual shoddy bush mechanic-style work. Bugger.
We wound up bleeding brakes and bolting in seats at 3am on the Monday morning, just a week before the show. By breakfast Milo2 was registered and I was on the road to Victoria. A day and a half and a couple of thousand kilometres later, my old mate Alan Gray checked her out at Terrain Tamer HQ in Sunshine. We did a full service, and then took her on a few laps of the test track just for fun.
I think I could have slept for a week about then. We’d made it in an unproven rig, with a whole lot more to do to finish her off. But Milo2’s on the road, a deadline was met, and the world’s a better place for having another old truck restored and ready for another round.
NISSAN’S NP300 (D23) Navara arrived in 2015, but it was revamped just over a year later as the Series II.
Along with a new model in the dual-cab 4×4 range and some spec changes, the rear suspension was revised for what Nissan says is “more refined ride and handling with improved lateral stability, especially when carrying a load in the cargo area or towing”.
In what was unfortunate timing, the changes were announced just after we had conducted and published a seven-ute tow and load test (see ‘On the Job’), which saw the Navara disappoint. Nissan said it had made the changes off the back of customer feedback, among other things.
Given the changes we thought it only fair to retest the Navara, at least its ability to cope with the same payload we used in the original test – namely 800kg in the tray plus driver, passenger and other payload additions such as the towbar (so effectively a maximum payload).
ON THE ROAD
IN ITS pre-Series II iteration the Navara didn’t feel all that good suspension-wise, even when unladen. The then-called NP300 didn’t ride any better at the rear than competitor leaf-sprung utes, nor was the front-to-rear suspension match particularly well sorted.
Among other things the front-end felt noticeably underdamped and, on some undulating country roads, would pitch uncomfortably up and down as if the whole car was hinged around the rear axle. Owners of the D22 Navara that predated the D40 will know the feeling well.
The good news is that the changes to the Series II have addressed the unladen ride and handling. The front-to-rear suspension match is far better and the Navara is noticeably more composed and tidy than it was before. Being smaller and lighter than many competitors, notably the Ranger, Colorado, BT-50 and D-Max, it feels quite sporty as far as dual-cab four-wheel drives go.
Loading 800kg into the tray shines a different light on the changes. When loaded, the rear end drops a noticeable 105mm, just as it did before the Series II changes.
When originally tested (pre-Series II) the rear end dropped 100mm, with the slight difference perhaps due to the fact we couldn’t move the load as far forward as we wanted due to interference with the sports bar – or the difference could be due to the respective age and previous use of the two test vehicles in question.
Either way, this 105mm drop is in sharp contrast to the typical 60mm droop of most of the competitor utes (Ranger, Hilux, Colorado, BT-50 and D-Max) in the original multi-ute test. It also indicates that if the rear springs are new, there’s no significant change to the spring rate.
On the road with the 800kg in the tray, the Navara still feels decidedly nose-up, which does nothing for steering feel or confidence. On larger bumps it also feels to bottom out, as it did before.
However, the rear end doesn’t feel to squirm around as much as it did prior to the changes, but this is hard to verify without a side-by-side test. Either way, the Navara still feels well short of the stability and neutral attitude of most competitor utes when carrying 800kg in the tray.
ON THE JOB
TWELVE months ago we put the seven most popular dual-cab 4x4s – with automatic transmissions – to a maxxed-out tow and load test. Those utes so specified were asked to tow their claimed 3500kg rating, while those with slightly lower tow ratings (Hilux and Triton) were tested with a 2800kg trailer.
Following the tow tests, all the utes were then tested with 800kg in their trays. That weight in the tray, plus driver, observer, towbar, etc. meant a combined payload not far short of 1000kg, so at or near a maximum payload for these utes. For both the tow and the load test, the utes were driven over the same hilly, winding and bumpy road course.
The payload and tow tests were conducted separately, but there was a very strong correlation in the way each ute performed in the separate tests. If a particular ute did well carrying the 800kg in its tub, it also generally did well in the tow test.
Taking into account how the powertrain and the chassis of each ute performed in the tow and load tests, and the theoretical max of what each can carry and tow, we rated the seven utes this way: 1ST – FORD RANGER With the big five-cylinder engine, long wheelbase, extra weight and class-leading GVM and GCM, the Ranger looks the goods on paper and delivered on its promise. EQUAL 2ND – MAZDA BT-50 It has the same core strengths as its ‘twin’ Ranger, but it lacks the detail improvements that made the MY16+ Ranger a better vehicle. EQUAL 2ND – HOLDEN COLORADO Plenty of punch from the 2.8-litre diesel, even if it needs more revs than the Ranger or Mazda. A very smart gearbox, and the chassis works well. 4TH – TOYOTA HILUX Primarily held back by the conservative tow rating of the automatic, and it had the lowest payload at test. The chassis is well up to the job, but it needed more grunt from its 2.8-litre diesel to match the best here. EQUAL 5TH – ISUZU D-MAX Has a worthy chassis, but the engine struggled with either 3500kg or at maximum payload. Since that time, the D-Max’s engine has been upgraded and now offers considerably more torque over a wider spread, so it should tow with more authority. EQUAL 5TH – MITSUBISHI TRITON Its engine is willing and able, but the chassis is compromised due to its shorter wheelbase and long rear overhang. 7TH – NISSAN NAVARA The engine may have plenty of punch, but the chassis fell well short of towing 3500kg or carrying maximum payload. Since that test the Navara Series II brings revised suspension … hence this retest.
WEIGHTY ISSUE
IF YOU want a ute to carry anything near maximum payload, you can do better than the Navara. While we didn’t test the Series II with a 3500kg trailer-load, we don’t expect it to perform notably better than before, given the strong correlation between the way all of the utes performed at either maximum payload or maximum tow capacity.
Away from hauling or towing heavy loads the Navara offers spritely performance thanks to its punchy 2.3-litre bi-turbo, as well as being slightly smaller and lighter than most competitors.
Its seven-speed auto helps, too, given six speeds is the default in this class, as does the short final-drive gearing. The only powertrain negative is that the Renault-sourced engine is on the noisy side when worked hard.
The Navara’s unladen ride and handling is well-sorted and would no doubt cope with moderate loads and tow weights without much fuss. Sharp pricing is also a Navara positive.
WHAT’S NEW?
MEDIA information issued by Nissan in March this year stated the Series II rear suspension changes centred on new front and rear dampers; although, the initial ‘teaser’ about the Series II issued late in October mentioned the rear coils had been changed as well.
We asked Nissan for clarification, but didn’t receive a reply on that, nor on whether there were any other changes such as upgraded bushes for the five-link system.
SPRUNG!
THE Navara’s rear suspension employs a live axle, as per the ute norm, but has coil rather than leaf springs, a feature that distinguishes it from its immediate competition. Without leafs to locate the axle (i.e. stop it moving fore-and-aft or side-to-side), the Navara uses four trailing arms for longitudinal location and a Panhard rod for lateral location.
The two trailing arms on either side of the axle sit above one another in a parallel arrangement rather than the top pair being angled in to assist the Panhard rod in laterally locating the axle. The lower longitudinal arms are made from pressed and welded steel, while the upper arms are 25mm-diameter steel rods.
What appears to be single-rate coils are located inboard of the bump rubbers, while a beefy-looking swaybar is mounted behind the axle.
2017 NISSAN NAVARA II ST SPECS (DUAL CAB 4X4 AUTO) Engine: 2.3-litre 4-cyl bi-turbodiesel Max power: 140kW at 3750rpm Max torque: 450Nm at 1500 to 2500rpm Gearbox: Seven-speed automatic 4×4 system: Dual-range part-time Crawl ratio: 44.6:1 Construction: Separate chassis Front suspension: Independent/coil springs Rear suspension: Live axle/coil springs Kerb weight: 1925kg GVM: 2910kg Payload: 985kg Towing capacity: 3500kg Towball download: 300kg GCM: 5910kg Fuel tank capacity: 80 litres ADR fuel claim: 7.0L/100km
NISSAN NAVARA II PRICES* SL: $43,990 ST: $46,990 ST-X: $51,990 *4×4 dual-cab pick-up coil-sprung manual transmission.
A GOOD risotto takes patience, concentration and time for the end result to be smooth, creamy and delicious.
This was first published in 4×4 Australia’s July 2013 issue.
Here is a great way to make a risotto without standing over the stove top for 25 minutes or more, constantly stirring and ladling in hot stock: bake it in the camp oven (or oven at home). It works really well, is easy, and the end texture is still quite creamy.
Check out more bush cooking recipes
INGREDIENTS
1 tblspn olive oil
1 onion – finely chopped
1 clove garlic – crushed (or use one tspn minced garlic)
3 or 4 rashers of thin bacon – chopped
(or you could use pancetta or similar)
2½ cups sliced mixed mushrooms (i.e. Swiss brown, button mushrooms, rehydrated Porcini mushrooms)
2 cups Arborio rice
5 tblspn white wine
1.2 litres (just under five cups) chicken stock – boiling hot
½ cup grated Parmesan cheese
2 tblspn butter – optional
Salt, pepper
INSTRUCTIONS
- Preheat oven or camp oven to 170°C.
- Heat oil in a flameproof/ovenproof casserole dish that can be used on the stovetop, and one that will fit inside your camp oven (on a trivet).
- Add the onion and garlic and sauté over a medium heat for a few minutes until softened.
- Add the bacon and mushrooms and cook for a few minutes until the mushrooms have softened.
- Stir through rice until well coated with any oil left in the pan; stir for about three minutes so the rice grains are translucent around the edges.
- Add the white wine, stir and boil for about three minutes until it has been absorbed into the rice.
- Pour in the stock and stir.
- Cover with the lid and place into the oven for approximately 25 to 30 minutes, or until all liquid has been absorbed.
- Alternatively, place the dish on a trivet inside your preheated camp oven. Put on camp oven lid and bake as per your oven’s instructions.
- To serve, stir in the Parmesan, followed by the butter, and mix through. Season to taste and serve immediately.
Use dried mushrooms, reconstituted as per packet directions, and liquid from the mushroom-soaking. They are easy to carry and have a great flavour.
WEBSITE OF THE MONTH
The Donna Hay website is a beauty and it’s full of many great recipes, including some fabulous baked risotto recipes. www.donnahay.com.au
AUSSIES are a pragmatic bunch, especially when it comes to their 4x4s.
There’s no doubt the big T still rules the hearts and heads of a lot of people who live out where having a 4×4 is a necessity, not a fashion statement – but other brands are starting to make their presence felt. One of those interloper brands is Volkswagen.
The German stalwart has big plans for its lone dirt-trooping Amarok, but Australians still need convincing. Euro utes … seriously?
We joined the Volkswagen Australia team for a 1200km cross-country odyssey that took in three states and more than 1200km of dirt roads, aboard a pair of lightly modified Amaroks, including a V6 Ultimate.
The Ultimate’s 3.0-litre V6, plucked from under the bonnet of Porsche’s Cayenne, is creating a big stir for its category-topping 165kW and 550Nm output, and VW is determined to make the most of the momentum by getting out amongst the people that actually use 4x4s properly.
Mods to our factory-fresh cars are minimal; along with the standard sports bar in the rear of the V6 Ultimate’s ute tray, a black lockable roller shutter has been added, along with a VW genuine accessories-sourced roof rack and platform combo, an ARB awning and sand-shovel holder.
The usual 19-inch rims have been replaced with 17-inch versions from the Amarok Canyon special edition and finished in black, and they’ve been fitted with 265/60 R17 General Grabber G2s all-terrain tyres. There’s a set of rock sliders along the side of the car, but no bullbar or snorkel as VW Australia is yet to finalise approval for factory-fitted items.
A light bar with an aerial mount cleverly attaches to bracing fitted across the front of the radiator, and custom black graphics finish it off. The four-cylinder Amarok gets a canopy from ARB, roof rails and a rooftop tent.
We flew into Broken Hill to meet the cars, with plans to drive the 1200km to the second annual Big Red Bash music festival, held in the shadow of Big Red, 35km west of Birdsville. Music festivals have come a long way in the last decade, with VIP camping and backstage access obtainable for a price. Not this one.
The organisers’ list of what’s not on site is kind of eye-opening to this softy city slicker; there’s no power, no showers, no internet access, no hotels within 35km of the site (which in truth is just down the road in the outback) … in many ways it’s a throwback to the days when getting out amongst it was the best entertainment available.
It’s a journey not undertaken lightly, either. The unsealed roads that intersect the borders of NSW, Queensland and South Australia are graded periodically, but recent wet weather will make access a lottery.
Thankfully, the roads were looking good; even before we left Broken Hill, the bush telegraph was in full effect in the local coffee shop, with other festival goers helpfully passing on road-condition info before we set off.
The Big Bash is billed as a family event, and we joined a group of Amarok owners who have been on the road for a week already just to get to Broken Hill. They’d come from Sydney and Melbourne and all points in between to live an adventure many of us may only ever daydream about, and they did it in something that – out here, at least – is pretty far from the norm.
Twelve Amaroks of various ages congregated in the small town of Tibooburra, most towing camper trailers and outfitted with gear to get right off the beaten track. After a quick briefing from tour leader, Sam Petzy, and a refuel, we headed for our first stop, Cameron’s Corner.
I’d only ever driven the Amarok in more rural settings and some short coastal fire road traverses, so settling in with the torquey V6 over the loose, dusty gravel was a revelation.
The weather and grader gods had been kind, and the Silver City Highway was all gravelly goodness right past the Salt Lake and through to Cameron’s Corner, where we made camp for the night and lost several five-dollar notes trying to stick them to the roof of the Cameron’s Corner pub. City slickers …
Our luck varied the next day for the run from the intersection of NSW, Queensland and South Australia, as we’re obliged to take Omicron Road to Innamincka rather than the Strzelecki Track, but a second big day puts us within cooee of Birdsville, and a great night spent beside the Catchiekambo Waterhole.
The run along Cordillo Road towards Birdsville Developmental Road is an absolute corker. The roads were freshly graded and conditions perfect for a high-speed blast through its surprisingly frequent twists and turns – but the final run into Birdsville was a bit of a slog, with thick traffic on the way to the festival throwing up billowing dust clouds that made passing almost impossible.
Still, the Amarok fleet managed the journey with barely a hair out of place. One participant lost a side window to a stray rock, but clever use of a piece of real estate-sign Corflute from the back of a camper trailer soon saw the convoy back in action.
The V6 was an absolute boon in these conditions. There’s plenty in reserve when compared to the four-potter, which has to be worked a bit harder with a load on board. Pushing the off-road-mode button added noticeable additional torque to the front axle in the Ultimate, and it contributes to our appetite for fuel.
With full-time 4×4 always on hand, the relatively smooth dirt allowed us to limit the off-road mode for when we really needed it.
The rear-biased drive system gives the Amarok a bit of character, while its compliant suspension tune offers support in the middle of the stroke, despite the estimated 300kg of payload on board. Steering is excellent for a 4×4 ute, and the braking performance is top notch, too.
This is a trip designed to put the Amarok firmly in the sights of a cross section of people who use their vehicles just as their makers intended. While a lot of the roads on this trip could be tackled in a pretty standard SUV if the conditions were favourable, there wouldn’t be a lot left of it when you got home.
Out here, what was once almost exclusively Toyota Land Cruiser country is slowly but surely changing its stripes. There are still plenty of Cruisers and Prados, of course, but the Japanese brand’s once iron-clad grip on dusty outback roads is not what it once was.
The Big Red Bash provides a great snapshot of this brand drift. More than 6000 people descended on the tiny outback town, setting up a mini city 35km from Birdsville for the better part of a week – and they drove here, for the most part, in 4×4 utes.
Row upon row of 4x4s, the majority towing camper trailers or off-road vans, are lined up in an orderly semi-circle that’s almost two kilometres long on its outermost edge, all facing into a sound stage that’s nestled in the shade of Big Red. It’s an eclectic mix, too, but it follows current sales trends pretty closely.
Hiluxes rub fenders with new arch rival, Ford’s Ranger, while Isuzu D-Maxes nestle next to Nissan Navaras, with a smattering of oddities – a Mazda CX-7, a Commodore wagon and a couple of Land Rover Defenders – in amongst the sea of bullbars, awnings and cans of XXXX.
So, why has our band of Amarok owners looked to Germany for a 4×4 ute? Surprisingly, a lot of people picked it for its size. “I had my heart set on a new Hilux,” says Brendan McKee, who brought the entire clan along in their 2011 ’Rok. “But when I sat in the Amarok, it was just so much more comfortable. We’ve done a lot of work in ours, and it hasn’t missed a beat.”
Eric Yu uses his 2013 Ultimate for his day job as a sign writer in Melbourne, but he’s outfitted the rear to fit a large fridge, a custom-made single-drawer cabinet, electronics, a 12,000lb winch and more. A set of 33-inch BFG mud tyres, a bullbar, and custom drawers and canopy turn his workhorse into a play toy.
“We finished work on Friday afternoon, ditched the tools and were on our way to Broken Hill that same day,” he says. “This is my first 4×4, and it felt most like a car. I did try a Hilux, but it just felt old tech to me. I wanted something that felt a bit newer.”
Eric is typical of the group on this trek. They aren’t buying Amaroks because it’s trendy, or – as I initially suspected – because they enjoy challenging the status quo. The words ‘comfortable’ and ‘reliable’ come up again and again in conversations with these seriously car-minded people, and their rigs cover serious distances.
Property assessor Ian Gumley covers 60,000km a year in his Highline and reckons it’s the best tool for the job. “I’m a big guy, and everything else I tried just doesn’t have the same comfort,” he says. “And it’s easy on the pocket, too. I just changed the front rotors at 210,000km. Did the pads, too, but they could have gone longer.”
The crew enjoyed a couple of days at the mid-week festival, with three nights of shows from artists as diverse as Missy Higgins, Ian Moss and Kate Ceberano to country music heavyweights Lee Kernaghan, Christie Lamb and Troy Cassar-Daley. The weather was fair and the company great.
We expected to go to Birdsville in an Amarok and be laughed out of a town rammed full of Toyotas, but my theory was debunked almost immediately. Aussie buyers aren’t abandoning the brand that helped open up the outback by any means, but plenty of other rigs are starting to show up, dusty and dirty, in outback towns.
The Amarok’s penetration will always be limited in the bush by the lack of a dealership network, but in terms of being a valid, relevant product for a tough environment, it deserves a place at the outback pie-shop table.
There will still be snide asides from the diehards for a few years yet, but don’t be surprised to see more and more Amaroks carrying the marks of a week in the bush turn up in the office carpark on a Monday morning.
THE RIGHT TUNE
JOSH Cinzio is a man on the move – or, at least, his cars are. He runs an engine-tuning business out of South Australia called J-Tech Automotive Enhancements, specialising in remapping ECUs for all manner of 4x4s, but VWs in particular. He’s recently completed the work on a tune for the V6, netting owners up to 35kW and 84Nm extra grunt for a final result of 168kW and 505Nm.
More importantly, Josh backs himself and his work, insisting that every customer car gets its own tune. He even travels the country to install tunes, exhausts and other parts for customers.
He took his 2015 four-cylinder Amarok Highline to the Bash, fitted with Outback Armour suspension, an AFN bullbar and TJM rear bar, Delta Klassik Beadlock 18×9-inchers fitted with BF Goodrich K02 275/70 17s, as well as custom rock sliders from SC FabWorx in Brisbane.
It’s also running a stage one tune which gives the 2.0-litre four-potter 155kW and 520Nm. “It’s my second year, and it’s a fantastic event,” he said. “Great driving roads and it’s a great place to meet other VW enthusiasts. I’ll be back in 2018.”
BEST ’ROK IN TOWN
YOU’VE bought a new Amarok and you can’t find accessories for it. Do you wait until someone builds them; go buy another truck; or get sick of waiting, quit your high-paying IT job and start your own company importing and producing accessories for Amaroks? If you guessed the latter, then meet Ashley Gibbons, who runs Wolf 4×4 from Queensland.
South African born, he was exposed to Amaroks while visiting family and friends, before seeing them on the roads when he emigrated here.
His business literally kicked off from his bedroom floor in 2011, and it now runs from a facility in North Lakes, dispatching bits like Darche rooftop tents, Bilstein shock-based suspension kits of his own design and loads more.
A self-professed petrol-head, Ashley ditched fast cars for a Nissan X-Trail (“Yeah … that wasn’t the smartest car to start with,” he grinned) before scratching the Amarok itch with this car, a 2015 Dark Label limited edition.
As the importer of AFN bullbars and parts, Ashley’s car wears kit from the Portuguese company, as well as a raft of other kit, including a cleverly hidden Runva winch controller behind the VW badge, 6mm AFN underbody protection, 17-inch Fuel Vector rims on 285mm BF Goodrich K02s, Outback Armour suspension, EzyDown tailgate struts and Rhino Cab canopy, an awesome MSA drop slide and more.
“From a personal perspective, it was great to catch-up with fellow Amarok owners, some new faces and some old faces,” said Ashley. “For business, it was great to have possibly the most modified Amarok out there, which got plenty of attention from prospective customers … as well as the boys from Volkswagen Australia!”