YOU don’t see too many crazy modified VW Amaroks. Sure, there are plenty making big power thanks to that mighty V6 engine, and there are loads set up as comfy tradie vehicles.
There’s plenty of tourers as well, built to travel the countryside in style. But answer me this, when is the last time you saw a VW Amarok on 34-inch tyres?
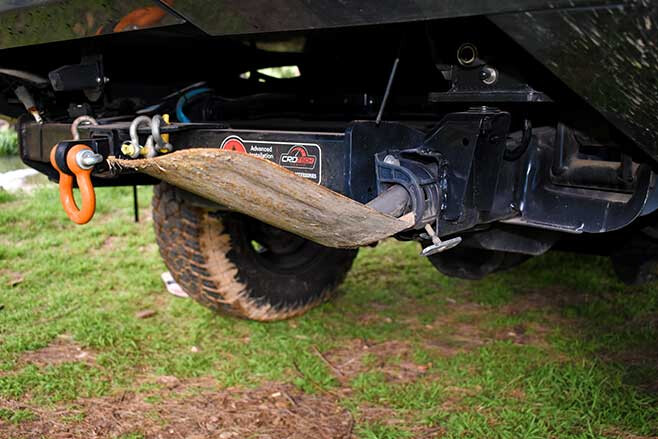
Jeremy Cooke, the owner of this rolling work of art, also owns a 4WD accessory and dyno tuning shop in Sydney called Advanced Installation Service. Now, AIS also happens to specialise in servicing, tuning and modifying VW Amaroks.
“I kind of fell into it by accident,” says Jeremy. “I’ve owned a bunch of Land Rovers, including a yellow Defender 130 called Big Bird, but when the engine died early on thanks to a dud EGR cooler, I decided to give the Amarok a go. We’ve created a real niche in the market, and are now the go-to shop in NSW for anything VW Amarok.”
When your bread-and-butter is building and servicing Amaroks, you know the shop truck is going to be pretty damn serious. Introducing Dr Rok, what I’m calling the most modified VW Amarok in Australia.
Jeremy wanted the Rok to be as practical as possible, but also as light as possible. This is the reasoning behind using the Rival front bar from Drivetech 4×4 as it’s made from alloy. He also fitted up a dual-speed Drivetech 4×4 winch and Rival underbody bash plates.
The nine-inch Perception Lighting LED driving lights help turn night into day, with just enough space left for Jeremy to fit a GME UHF antenna to the front bar on a flip mount. A set of Fatboy rock sliders from Southern Cross Fabworks were also bolted on, but coated with Raptor Liner in Jeremey’s signature orange colour.
To protect the engine from water and dust ingress, a Safari Armax snorkel has been given the nod and the induction noise through it is simply intoxicating. Air On Board diff breathers have also been installed, for peace of mind when exploring his local Blue Mountains tracks. We put them to the test on this photoshoot, that’s for sure.
To further safeguard the engine, Jeremy installed a Process West catch can and a secondary Fuel Manager diesel pre-filter.
CUSTOM: Amarok Dark Label
“I consider these modifications as essential for the Amarok,” says Jeremy. “They aren’t terribly expensive when you consider how much a new motor will set you back if things go wrong.”
The key feature of Jeremy’s Amarok is certainly the custom canopy built by MITS Alloy in Newcastle. “Don’t ask for one, as they told me they wouldn’t be interested in making another one like it,” Jeremy says with a grin.
Not only is it a thing of beauty to look at, matching the lines of the Amarok as neatly as possible, but it’s insanely practical as well. Jeremy wanted everything to have its own place but still leave enough room for swags, firewood and other bulky items that get added last minute. It’s not just a tourer, it’s a work vehicle as well at the end of the day.
Storage is handled by a set of RV Storage Solutions drawers, which Jeremy feels are the best in the business. With the height of the canopy, an upright Bushmans fridge sits perfectly on the passenger side, and he has enough space for a second smaller Bushmans fridge on the driver’s side if heading away for an extended fishing trip.
As Jeremy is an agent for CRD Tech custom dyno tuning, his V6 Amarok was always going to have a power increase. Well, after swapping out the turbo multiple times purely to experiment with high-flow options, and spending hours on the dyno getting the tune right, Jeremy is now over the moon with the performance of the Amarok.
There’s also a PWR intercooler and a three-inch Manta exhaust fitted for further gains, as well as a gearbox tune which changes the shift patterns and helps when trying to reverse in soft sand or when backing up a trailer. And the end result? This Amarok now makes 220kW and 600Nm at all four wheels.
On 34-inch tyres. Now that is impressive! A Wholesale Automatics transmission cooler kit was installed to help keep gearbox temps down around the same time, and Jeremy has seen a massive drop in temps since fitting it, as well as a ScanGauge to monitor vital temperatures.
Being a European vehicle, there was only one option for Jeremy when it came to suspension. He’s installed a suite of Bilstein products sourced from Heasmans Steering in Sydney. B6 Bilstein struts with H&R coils and Hardrace upper control arms get the party started in the front end, with a diff-drop kit from Southern Cross Fabworks installed to keep CV angles within spec.
In the rear end, Jeremy installed a set of Outback Armour constant-load leaf springs, Polyair air bags and the massive (and expensive) Bilstein B60 rear shocks. The reasoning for going with the big shocks in the rear is because this is where most of the weight sits. So far Jeremy says he is wrapped with the performance, and has no plans to change it.
As well as the suspension, Jeremy’s Rok is riding higher on a 43mm body lift kit from Southern Cross Fabworks. Interestingly, the Rival front bar is adjustable to suit the body lift so no additional fabrication was required post body lift, as the rock sliders were made to suit. Good info for anyone at home wanting a high-riding Amarok.
It seems that if you own an Amarok, you have Fuel Vector wheels fitted. And there’s nothing wrong with that. Jeremy wanted to stand out from the crowd though, and decided on a classic-looking set of Rotiform alloy wheels in 17×9 flavour. One of Jeremy’s favourite accessories on Dr Rok are the tyres. He’s running the new Yokohama X-AT all terrain tyres in 295x70R17 or 34-inch diameter in the old money. “They get the power to the ground, don’t feel sketchy in the wet and work well off road,” Jeremy mentions.
By trade, Jeremy is an auto electrician, so naturally the 12V setup in his Amarok was going to be pretty wild. The whole box-and-dice is controlled by a Redarc RedVision system, which allows all 12V accessories to be accessed from one touchscreen or by using the app on his phone. No custom 4×4 is complete these days unless it has the all the niceties of home. So, you guessed it, there’s a pie oven and coffee machine, as well as an electric hot-water system with shower hose (Jeremy isn’t a fan of carrying gas).
It seems you can have your cake and eat it too, if you put in the ground work. Jeremy has created a 4×4 that is comfortable, powerful and capable. And yes, it’s been reliable too. But if you reckon you have a more modified VW Amarok, we’d certainly love to see it.
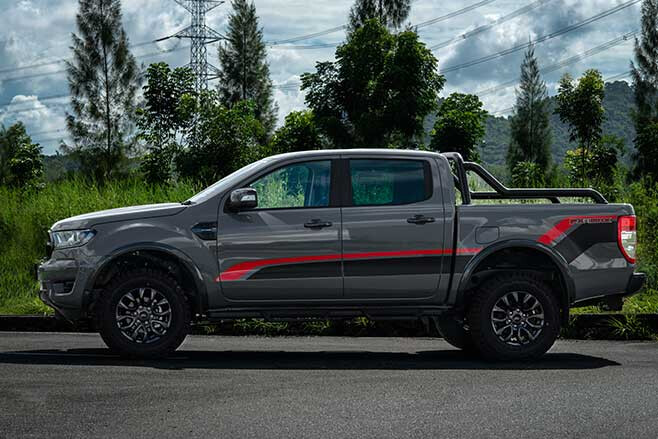
POUNDING in to the first craggy gully along an undulating dirt road is enough to establish that Ford’s latest addition to its vast Ranger family has solid nous when the going gets tough.
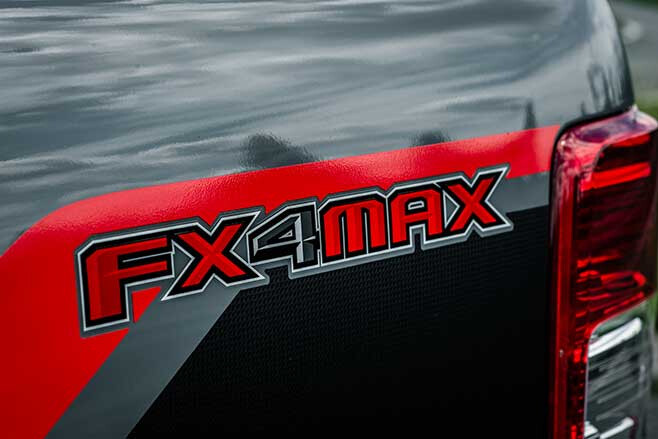
Yep, I did say “latest addition.” Just when you thought there were enough Ford Rangers to wade through, along comes another – the FX4 Max.
Borrowing most of its mechanical kit and spec from the Ranger XLT, the new FX4 Max has wisps of Raptor DNA designed to step up the off-road cred and add some all-important visual muscle.
First things first: The looks.
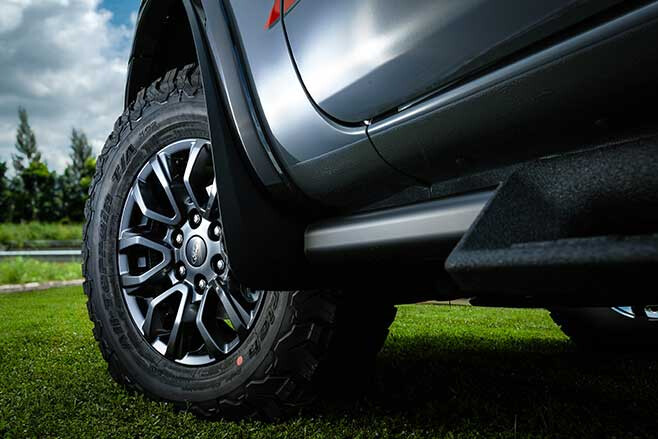
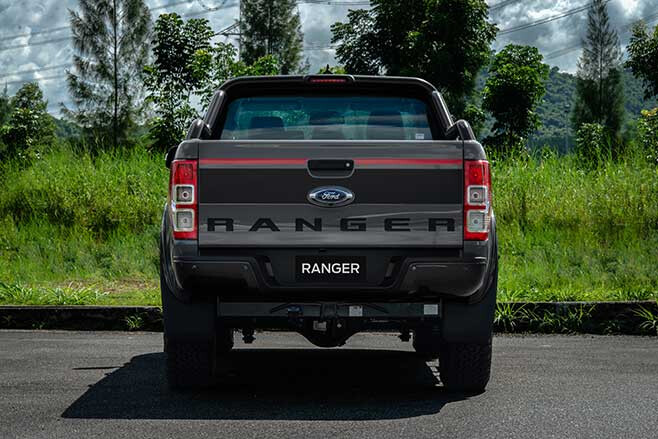
There are Raptor-esque touches. Black 17-inch wheels (they’re unique to FX4) and the F-O-R-D grille replacing the more formal blue oval one are two highlights. An extended black sports bar adds to that look, while unique side-steps with protruding hoops aim to make the rise into the cabin that tad easier. Wheel-arch flares are smaller than those on Raptor, as are the arches themselves; the Max’s body is shared with regular Rangers, so doesn’t have that full-blown, pumped-up stance.
Optional stickers ($750) add to the grunty bling, although we’re not sure they’d be high on our shopping list. At least you can add adaptive cruise control for $800, something that can’t be achieved at any price in a Raptor.
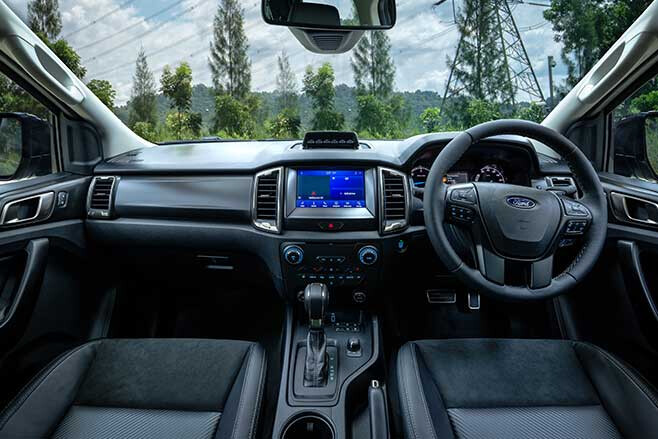
Inside, the seats have FX4 Max embroidered along with something supposed to look like carbon fibre and slivers of leather.
Yet in an indication that cost containment was part of the goal – the FX4 Max is $65,940 plus on-roads – you’ll still be adjusting your seat manually.
But it’s underneath where things get interesting.
The Max brochure is quick to spruik the “advanced Fox shocks”, which creates that marketing link with the Raptor. However, whereas the Raptor gets 2.5-inch shocks, the Fox in the FX4 Max are 2.0 inches in diameter. And there’s none of the motorsport-inspired geometry that separates a Raptor from a mere Ranger. That said, there’s also plenty to get excited about: new bump stops, a 29mm front stabiliser bar and remote reservoirs on the rear which retains its leaf springs.
Springs have also been revised to match the new Fox components and account for the higher ride height. All up, there’s another 30mm to play with compared with a regular Ranger, about 20mm through the suspension and 10mm in the tyres. Which brings us to those bulging BF Goodrichs, each 20mm narrower than those on a Raptor. The 32-inch all-terrains ride on 17-inch rims and stick out further, widening the track by 26mm.
So, the $65,940 question … does it all compute? And is the FX4 Max a Raptor killer?
Our first contact with choppy gravel showed there are noticeable improvements over a garden variety Ranger, a mix of suspension and tyres better disposing of washouts and rocks poking their head above the shifting surface. No doubt the additional sidewall in the tyres is doing a lot of the early work.
Driven briskly over fire trails, there’s still the firmness of an unladen Ranger but it recovers from a bump more assertively. There’s more consistent control and with external canisters for the rear shocks we’d like to think the prospect of rolling over corrugations would be less punishing on the gear, especially if you’re approaching GVM.
The Max benefits are more obvious over, say, 50km/h. In that sense it’s like the Raptor, although the Max is skewed towards the XLT side of the ledger. Like the Raptor, the FX4 Max’s suspension tweaks are most pronounced over bumpier roads and with some pace on board. That said, the leaf-sprung rear-end isn’t completely quelled, occasionally skipping, especially after a big hit. Whereas the Raptor will hungrily attack almost any bump at any speed and somehow skillfully cushion 2.3 tonnes of flying Ford, the FX4 Max still calls for restraint.
Granted our drive was with the car unladen and we suspect the difference between suburban-spec Ranger and FX4 Max may be more pronounced with half-a-tonne on board.
It’s the additional kilos where the FX4 Max makes up plenty of 4×4 points. Its 981kg payload (233kg up on Raptor) is ready for gadgets and gear – and you get the impression the suspension will happily welcome it. The 3.5-tonne tow capacity matches that of other Rangers.
There are also other teasers that make the Max a more proficient adventurer. Accessory switches on top of the dash have been plucked from the F-150 parts bin and make it cleaner to connect everything from additional lights to a winch. The 250amp alternator ensures the electrical system copes with extra accessories, although many will still splash out on a second battery for fridges and other things you want powered overnight.
On road the BF Goodrich K02s ram home the compromises. The taller sidewall takes the edge off steering accuracy, so additional input is required for the same result. There’s a little more hum from the tyres at 110km/h, particularly from the rear. And water on bitumen is not a good mix, the BFGs slide unnervingly. We’d be prepared to bet they’re better on gravel than wet bitumen, the chunky tread blocks beautifully clawing every grain of dirt for impressive control. There’s also a matching spare underneath, although the chances of getting a puncture are a lot less than they are with the highway rubber typically fitted to a Ranger. That’s the start of a solid off-road package with the FX4 Max.
The extra 30mm of clearance – 19mm at the rear diff – improves the approach and departure angles to 31 and 23 degrees, each 2 degrees up on a Ranger but still shy of a Raptor. And the BFGs do a better job of clutching at rocks and mud.
Ford claims the side-steps don’t impact overall ground clearance, but it doesn’t take a particularly challenging rock or log to realise they’ll limit how far you can go. At least they’re tough and should deal with the occasional scrape, although the steps that hang down can easily catch on things, so it pays to have a spotter ensuring some of that bling stays put.
Better still, remove the side-steps and bolt on proper rock rails. They’ll also be less likely to dig into your shins or calves on entry and exit.
Like the Raptor, the FX4 Max comes exclusively with the 2.0-litre bi-turbo four-cylinder diesel that is a $1500 option on an XLT. Smoother and quieter than the venerable 3.2 five-pot, the 2.0 doesn’t have the initial throttle response but makes up for it with more pep across the rev range. Overtaking is easier, the additional Newton-metres better dealing with a weighted Ranger.
The 10-speed auto is ever eager to slot into a taller ratio, something more obvious when winding up a mountain pass or tackling winding trails. Without paddle shifters the only way to take control is with the fiddly toggle switch on the side of the gear selector.
HEAD TO HEAD: FX4 MAX vs D-MAX X-Terrain
So, yes, there are genuine changes and improvements over an XLT, although the Raptor is still leaps and bounds ahead (literally) for those wanting a seriously special truck. There’s still a place in the bush for something with wild Baja genes.
Instead, the FX4 Max compromises some of that never-slow-down Raptor mentality and deftly turns it towards the adventurous side of 4×4 touring. Having a proper payload and tow capacity is key to its appeal.
The FX4 Max is an acquired taste that prioritises off-road hardware over showroom bling. And it’s a ute that’s undoubtedly more XLT than Raptor. But it absolutely has a place for those who use their trucks as they were originally designed.
FORD RANGER FX4 MAX SPECS
ENGINE: 2.0-litre four-cylinder twin-turbo diesel MAX POWER: 157kW at 3750rpm MAX TORQUE: 500Nm at 1750 to 2000rpm TRANSMISSION: 10-speed auto TRANSFER CASE: Part-time dual-range FRONT SUSPENSION: Independent/coil springs REAR SUSPENSION: Live axle/leaf springs TYRES: 265/70-R17 KERB WEIGHT: 2219kg GVM: 3200kg PAYLOAD: 981kg TOWING CAPACITY: 3500kg FUEL TANK CAPACITY: 80L ADR FUEL USE: 8.0L/100km PRICE: $65,940 DEPARTURE ANGLE: 23⁰ RAMPOVER ANGLE: 25⁰ APPROACH ANGLE: 31⁰ WADING DEPTH: 800mm GROUND CLEARANCE: 256mm
YET another news story recently hit the headlines about the number of people travelling the outback for the first time and getting into trouble in the process.
Police in Broken Hill, for example, are getting numerous calls from travellers doing the wrong thing and getting bogged and then needing help … and it’s happening all over Oz.
For many people, this year will be the first time they have towed a van or a camper or have even driven on a dirt road for any length of time. And while many people who buy a 4WD vehicle for that change of lifestyle and for the big trip around Australia do a 4WD course, many of those courses have little instruction on how to drive on dirt roads. So, it’s essential to pick one that does!
4X4 RECOVERY: The Basics
Generally, you are not going to die while driving on a sandy beach or crossing a river up on Cape York, but do the wrong thing at 80km/h on a dirt road and you’ll be lucky to walk away from it unscathed. Put a van or camper on the back and the chances of you coming to grief, if and when you do the wrong thing, are magnified 10 times over.
It’s best not to rely on your mates for any enlightenment, but to join a 4WD club. Do a dedicated driving course or join a tag-along tour so you can start your initiation into the enjoyable life of touring and camping and learning by experience. For a course, check out Great Divide Tours in NSW or Google ‘Driving courses for towing with a van’ or similar. The life you save may be your own, your partner’s or some stranger coming the other way.
4WD CLUB: Should I sign up?
Then, when you are on the road, there is some etiquette involved with passing and overtaking. If you are towing, consider those behind you. In the USA it’s a law in most states that you pull over if there are more than four or five vehicles behind you, but you really shouldn’t let it get to that stage. On a dirt road it’s more important again, and simply driving slowly on the dusty verge is not good enough – pull well over and let those following slip by.
When you come upon a truck, a semi or a road train, heading either towards you or in the same direction, you can bet that if it is a single-lane strip of blacktop he will be very reluctant to drop off on to the dirt. If you want to overtake, best to give him a call on the UHF radio (you’ll have one of them, won’t you?) and let him know you’re behind him and he’ll let you know when it’s safe to pass. On a dirt road if a truck with a billowing cloud of dust is approaching, it’s best to get well out of his way, stop and let the dust cloud dissipate before proceeding. Being in a hurry could easily cost someone’s life.
Then when you are in camp, bush etiquette demands that you begin playing by the largely unwritten rules even before you set up.
Take care with fire and dispose of your rubbish properly. As far as going to the toilet in the scrub – if you haven’t got a Porta Potti or similar, and there isn’t a long-drop dunny within cooee, then find a spot, dig a hole, do a poo, cover it up and burn the loo paper. It’s not that hard!
Most outback roads pass through pastoral properties and, while you may not have seen a house or a living soul for ages, the land is owned by someone who is generally trying to make a living out of it.
You are not entitled to wander around willy-nilly following any station track you come across. And if you pass through a gate, leave it as you found it – if it was open, leave it that way; if it was closed and you opened it, close the bloody thing!
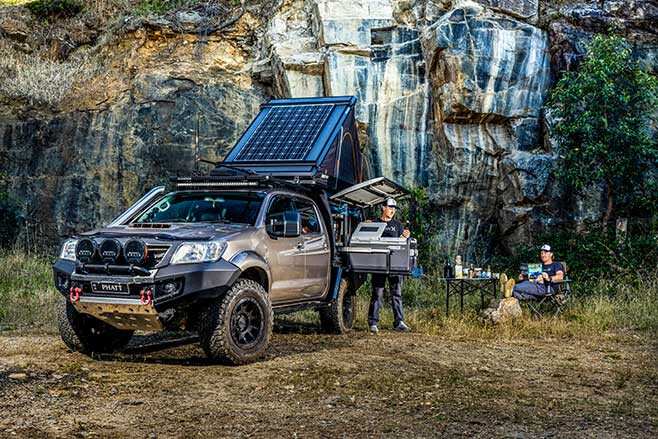
IT’S funny how life throws things your way, like a two-wheel drive 2007 N70 Hilux for the princely sum of $500.
As an ex-TV commercial hero car, it had starred as a tradie’s ute slamming into a roadside fruit stand, all in the name of safer driving. After a couple of weeks of daily-ing in the N70, the usual Maloo ride with the cam-lope, horrible drinking habit, and leg-day clutch pedal just didn’t seem as appealing. Selling off parts like the tradie rack and rear tub for a collective $500 brought the Hilux ledger back to nil. Hello, NoBuxLux.
Being an entry level WorkMate, standard amenities like power windows weren’t an option, but this is where the journey to the PHATT 4×4 you see before you began. Taking a look at the main loom found, Toyota had seen fit to include all the connections to simply plug in a power window unit. Mint.
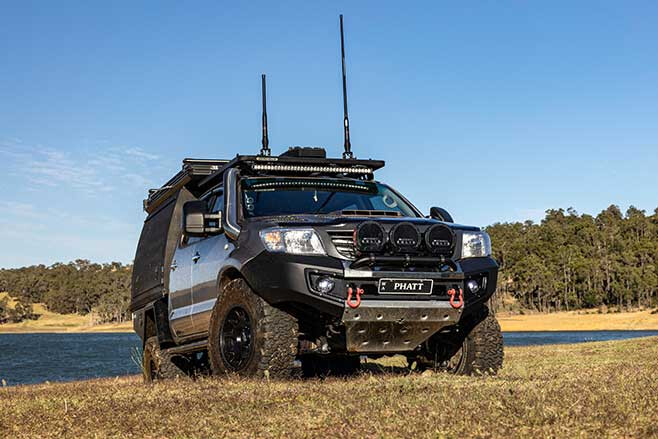
The Interweb turned up a young bloke wrecking his crashed 2006 Hilux, but this one was a 4×4. Making a dash out to salvage some parts before the local wreckers got hold of it discovered a pretty decent KUN26 SR Hilux that, in my opinion, was too good to waste and with a bit of work, could be put back on the road with a minimum of fuss.
According to the owner it had sat for about a year, so after making sure it would run the deal was done. Furthermore, it had an encyclopaedia-thick pile of paperwork showing an excellent service history for the life of the car. The idea formed to build a tough 4×4 capable of carrying all my commercial photographic gear to any location, for as cheaply as I could while leaving plenty of budget for some killer mods.
LIFTED: SR5 Hilux pumps out 200kW at the wheels
Replacing damaged suspension parts to get it rolling again, the Hilux was chained to a chassis table and checked over for cracks and alignment. Thankfully, all was good, but both Hiluxes had damaged front sheet metal, so some half-price Taiwanese guards and bonnet were bought. It was a perfect time to upgrade to the facelift look (2012-15) which turned out to be a relatively straightforward bolt-on. Some eBay headlights and grille made their way on, along with a new radiator, fan shroud and condenser.
It looked like a Hilux again, but I needed to thicken it up a bit. A set of Dirty Life ‘Scout’ alloys shod with fat 305/65-R17 BFG KO2s kept tyre diameter under 33 inches. The +5mm offset improved the stance outwards, but going any taller would need the differentials regeared. There was the small issue of the tyres redesigning the inner wheel arches and new Utemart flares, but, as it turned out, a pair of Superior Engineering’s billet UCAs found their way under the front end along with some SuperPro offset bush lower arms, allowing the front spindles to be pushed forward for better clearance and far better alignment for the lifted front end.
On Track Fabrication was then tasked to carry out a mod-plated body-mount chop for more clearance, before a Phat Bars diff-drop kit found levelled out the CV shafts nicely.
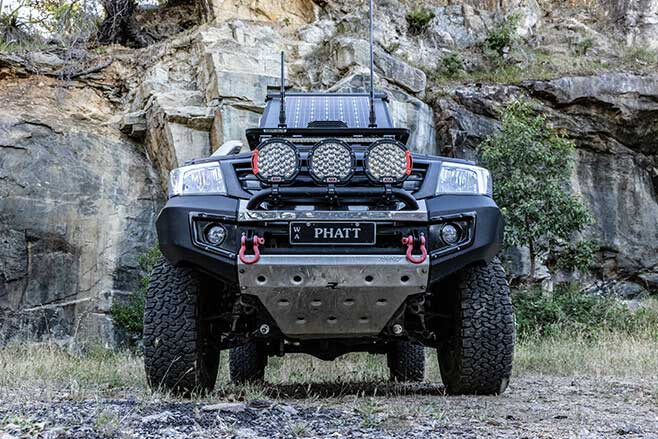
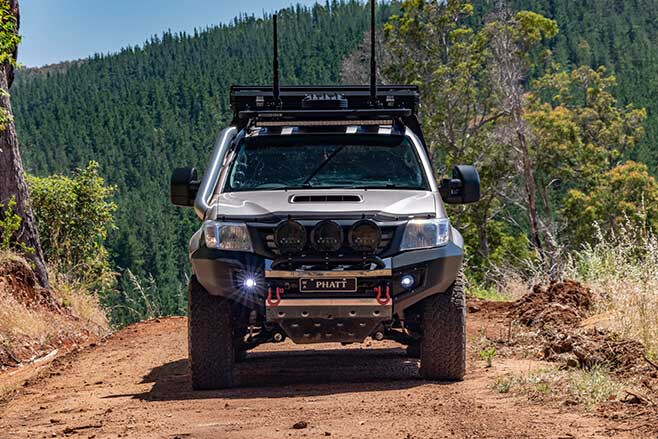
Improving the approach angle, a Rhino Evolution three-piece winch bar was ordered to suit the facelifted model. Chosen for its integrated design it came with built-in LED indicator/spotlights, stainless-steel bash plate and centre support. Blinding roadside fauna are two spot and one flood, dimmable ARB Intensity Solis lights standing shoulder-to-shoulder across the grille.
The Hilux came fitted with two-inch taller RAW struts with matching-height 300kg constant-load leaf springs in the rear, but the chunky six-leaf spring pack was causing issues with its lack of flex.
Swapping in a pair of Terrain Tamer parabolic springs improved off-road traction immensely, with far better articulation and on-road comfort. A pair of N80 Hilux Tough Dog foam-cell shocks allowed an extra 45mm extension over the N70 option, allowing further articulation again.
HISTORY LESSON: 50 years of Hilux
Combined with the new wheels, this combo gained a clearance increase of four inches over standard, however it wasn’t enough to save the OEM alloy running boards. Phat Bars got the nod again for rock sliders, protecting the sills and giving the Hi-Lift something to jack against. Rounding out the order, a stainless-steel four-inch snorkel kit now feeds dry air into the standard airbox.
With the stance now set, it was time to paint. A combination of backyard, front yard, and driveway locations saw fresh Angora Beige metallic sprayed on various plants and car parts, leaving only the outer skin to complete. After hiring a paint booth I waved the gun over the panels for two base and three clear coats before reassembling.
While still in the painting mood, the full interior was also pulled out, washed thoroughly and painted a dark charcoal to match the leather XR seats I’d scored for a song and bolted in using Huracan Fabrication adapter brackets. Other interior enhancements include the GME XRS-370C4P UHF, a 2017 N80 Hilux twirler, and next-gen Clearview towing mirrors that provide electronic adjustment after adding in a standard Hilux mirror switch to the previously unused plug behind the dash. Thanks Toyota!
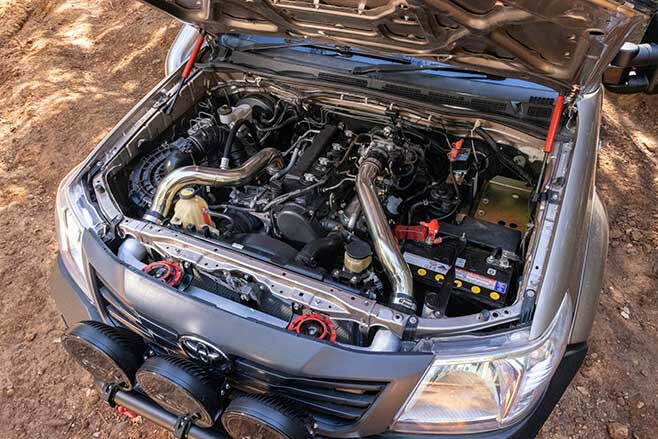
While the engine is stock for now, the supporting mods have been put in place to turn the wick up on the 1KD-FTV. A Performance Diesel Intercoolers bar and plate front-mount kit dominates the grille area, with sand-cast end tanks allowing precise fitment around radiator support brackets while maximising the finned cooling area.
A full turbo-to-tip LuxFab three- to four-inch stainless-steel exhaust system complete with cat and four-inch resonator allows for the easy spool-up of the turbo. To say it’s a shame something so well constructed is hidden under the Hilux is an understatement, as row-of-coins TIG welds, perfect mandrel bends and V-band joins are used throughout. There is the nicely muted note to remind you it’s there though, plus a sweet turbo spool-down as a closing credit.
To cope with the intended future super-torques, an NPC 275mm clutch and flywheel now joins motor and ’box. Using a machined LandCruiser 1HZ pressure plate and machined steel flywheel, this setup is rated up to 750Nm at the flywheel and 300hp at the wheels, while remaining easy on the clutch pedal. Used previously in another streetcar build, a trio of Defi Black Face gauges are mounted to the A pillar, with the main controller now filling the OEM clock location. These monitor engine vitals of boost, oil pressure and EGT, with the ability to record and replay readings too.
Seeing the astronomical prices being paid for service-canopies was enough to want to build my own setup, but I’d been driving past the local MW Toolbox store for months while keeping an eye on an alloy jack-off canopy that never seemed to move. Being narrower than most other canopies, my guess was it wasn’t popular, but the curved sides fitted in with the Hilux’s cab shape and width.
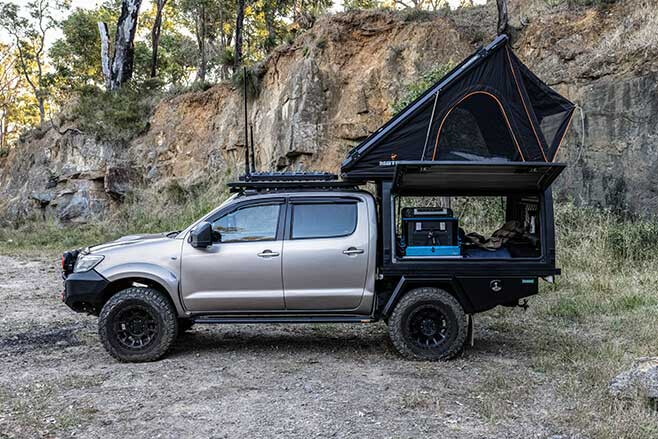
So I called in and made a successful offer. The aluminium tray’s side coaming was then unbolted and the support panels trimmed back matching the canopy width before reassembling. Raptor Liner was laid over the tray and canopy, and to finish off, six whale-tail compression locks were fitted complete with electronic solenoids, making locking a one-button operation.
A Motop 135 V3 rooftop tent was chosen for its low-profile design and attached perfectly to the canopy top rails. The optional Motop racks give a solid mounting point for a 250W solar panel to be mounted, and also allow the panel to be angled towards the sun at camp. With the extra weight of the solar panel plus any additional items loaded topside in the future, the gas struts were recharged from 400 to 500 Newtons, increasing their lifting strength.
LEXUS V8 POWER: 1999 custom Lux
Inside the canopy are two 120amp/h Schneider AGM batteries, topped up via a Victron MPPT Smart Solar 20amp charger. The beauty of the Victron is its smartphone app showing all the real-time charge readings you could want plus a 30-day history of battery state. Further charging from the alternator is through an Intervolt Electronic Battery Isolator under the bonnet, sending current through to the rear once the start battery has reached a user-set voltage. While canopy setup is a work in progress it runs the CFX75 Dometic dual-zone and maintains charge on the photographic gear.
More eBay browsing turned up the perfect-length 900mm tapered undertray toolboxes and matching wheel arches from T.C Boxes, allowing low-slung storage of recovery gear, ratchet straps and an XTM air compressor. Considering the extra weight added by the new canopy/RTT setup, the rear differential housing was also upgraded to a 2012 model for the extra-width axle bearings.
Catering for more storage and doubling as a raised shooting platform a Rhino-Rack Pioneer Platform, along with the newly released N70 Backbone mounting system, was riveted to the roofline. Both the 2.1dBi and 6.6dBi Radome GME antennas are mounted as high as possible, with Rhino-Rack swivel mounts laying them flat when not in use. A quartet of black MaxTrax recovery boards are centrally mounted for easy access from both sides, with a Big Red light bar filling the front underside void.
With plenty of seat time the Hilux has excelled as a daily go-anywhere rig, and in its first year of COVID-isolated ownership getting stuck in to it myself was definitely the way to go. The cost? After selling the 2WD and spare parts and counting up the receipts, the total spendings are less than a bog-standard, average kilometre/condition late-model N70 Hilux. A lot less actually.
WITH THANKS
All this would not have been at all possible without the help and advice from a lot of people, so many thanks go to: – Maro at Premier Automotive Paints, Malaga, WA – Shannon at ARB Australia – Lachlan at LuxFab – Adam at Auto One, Morley, WA – James at NPC Performance Clutches – Vince at Pro Spray Automotive Refinishing, WA – Omar and Nick at Ulti-Mech, Gosnells, WA – Matt at T.C Boxes – Derek and Leon at MW Toolbox – Ken at Don Kyatt Spare Parts – Ben at Rhino 4×4 – WA Solar Supplies – Knox Tyrepower – Adam at Clearview Accessories – Perth Hilux Club
YOU may not have noticed but the Federal Government, yes, that’s ScoMo’s lot in Canberra, has recently released its Future Fuels Strategy discussion paper, which sets out the government’s thinking on electric vehicles and invites submissions on the same.
In the fashion that politicians so love, and crafted by bureaucrats in a way that only they know how, it uses many words to say little.
However, there are some take-home messages, perhaps the key being that private buyers won’t receive a subsidy to make electric vehicles cheaper to buy. Predictably, this has been labelled a ‘do-nothing policy’ by those pushing for a faster uptake of EVs.
OPEN-AIR: Hummer EV!
The discussion paper, though, does suggest incentives for the uptake of EVs for business and industry, which is again predictable given the government’s political leaning. The thinking here is that EVs bought by commercial fleet buyers will soon find their way into the hands of private buyers, given fleet buyers turn over new vehicles every couple of years. We will see.
Regardless of government policy, or lack of it, EV take-up is going to be very slow and you can be certain that diesel and petrol vehicles will be around for a good while yet. And while governments in some overseas countries have said they will ban the sales of petrol and electric vehicles by a certain date (in some cases as soon as 2030), for mine this is political posturing rather than hard policy.
Part of the problem in Australia will be that state governments will no doubt head in different directions from each other, and from the Federal Government when encouraging (or discouraging, as they have already done) EV take-up. The pandemic has already proved that Australia is a very fractured federation, as did the bushfires before that for those who were paying attention. Local government will also play a part in this – and hopefully a smarter one than allowing Tesla to install EV charging stations where you can only charge a Tesla! Ridiculous!
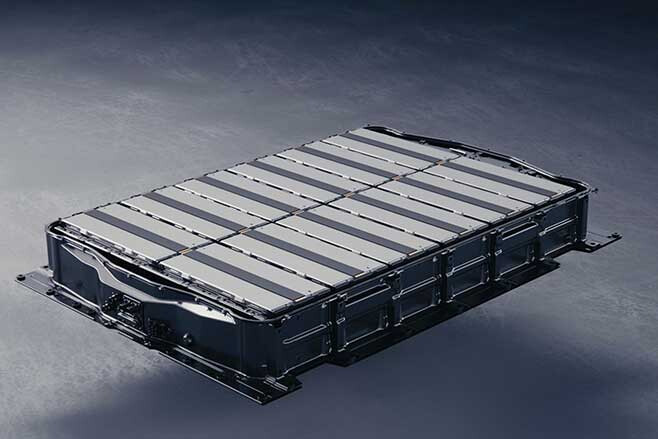
Here’s what happens to old EV batteries
The relative merit of battery EVs versus hydrogen fuel-cell EVs isn’t discussed in the paper; although, both are mentioned as part of the future EV mix developing in parallel, market forces no doubt playing the major hand with the relative success of the two.
Hydrogen fuel-cell EVs have the advantage of quick refuelling times, but hydrogen-supply infrastructure will be expensive to roll out, even if existing service stations can be used. And hydrogen is problematic to transport by road in the way petrol and diesel are supplied to service stations far and wide.
Battery EVs are also very infrastructure-dependent; although, you can charge them at home if off-street parking (with a power point) is available. The key problem with battery EVs is very slow charging times, which will only be overcome with a significant technology breakthrough with batteries.
Installing battery-EV charging points in carparks of all descriptions, where cars are going to be parked anyway while you’re at work, or shopping, or doing whatever else, is of course the answer. That way, the slow charging time becomes largely irrelevant.
Battery EVs will also put significant demand on our national electricity grid that’s already stretched, with studies suggesting a doubling of electricity demand if there’s a 100 per cent swap from petrol/diesel vehicles to battery EVs.
The merit of charging battery EVs off a national grid that’s largely dependent on coal-generated power is also questionable and makes nonsense of the immediate call for EV subsidies. We need a grid powered by renewables to close the environmental loop with EVs.
The fastest-charging electric vehicles
The government paper also includes conventional hybrids (as against plug-in hybrids) as part of the discussion as if to suggest we are already someway down the road to ‘future fuels’. Given a conventional hybrid relies 100 per cent on ‘current fuel’, namely either petrol or diesel, for its energy source, this is nonsense too.
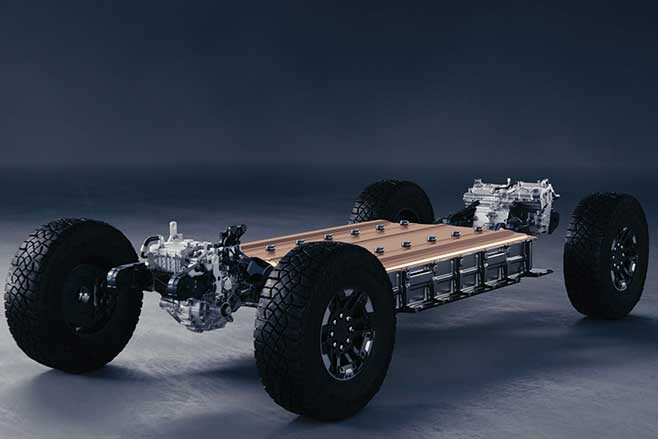
Make no mistake, EVs have much going for them, not the least being brilliant simplicity and greatly reduced maintenance. They are quiet and smooth running, too, while the nature of EV power delivery is well-suited to stop-start city driving. Making a proper go-anywhere 4×4 EV won’t be so simple.
WHENEVER I see on a map the words, Developmental Road, it always grabs my attention for being a less-used route.
Apparently the name Developmental comes from the roads being under constant development, and a lot are damaged or washed away from the severe wet seasons in the north of Australia. The facts are that they are always gravel, are variable in their conditions, and were originally built to facilitate the transport of stock in the far reaches of Queensland.
Spending time at Karumba on the southeast coast of the Gulf of Carpentaria and looking for an alternative route across to the east coast of Queensland, I spied the Burke Developmental Road (BDR). Karumba’s a bit of a strange town as, if you’re not a fisherman, there’s honestly not a lot to do.
Located right on the banks of the Normanton River, the waters are apparently rich with barramundi and Gulf banana prawns which are the town’s main industries. After visiting the Barramundi Discovery Centre where you can learn the history and behaviour of the barra and other aspects of the town, you can dine at the sunset bar which is one of the few places in Queensland where you can watch a sunset over the ocean – but that’s about it for Karumba.

A working town, Karumba is an industrial port for the specialised barra and prawn fishing boats, for where livestock gets loaded, and where MMG Century mines has a loading facility for its 300km underground pipeline to exit from where it conveys zinc slurry from its mine to the west. Just offshore, Sweers Island is a paradise for anglers, surrounded by reefs and holding a ton of sportsfish – it was named back in 1802 by Matthew Flinders.
One interesting fact about this area is that it has only two tides (not four, like others) in most 24-hour periods, This is due to the narrow waterway at the top of the Gulf, where water surges push against each other and stop the flow.
The BDR caught my eye for several reasons: it was a long way between fuel stops, which meant it was less-travelled by others; and it runs along several rivers for a few miles, so is hopefully good for remote camping. Leaving Karumba, it’s a sealed road to the start of the BDR (or, on some maps, the Normanton-Dimbulah Road) just 41km away, and right from the start there are warning signs regarding no fuel for 600km and rough roads.
The BDR heads in a northeast direction for nearly 260km, passing through open savannah plains and woodlands. At the time we travelled on it there were also about four million corrugations, which definitely found new rattles in the old Cruiser.
VAN ROOK STATION
ABOUT 100km into the trip there’s signage for Van Rook Station. Now, while it’s not possible to enter the gates, this empire consists of more than 1,000,000 hectares of prime grazing land broken into four different stations dating back to 1883. The Dutch-bearing name Van Rook refers to early coastal explorers who sailed past the top of Australia in the 1600s.
The station runs approximately 100,000 head of Brahman cattle, and one outstation is surrounded by water on three sides. Plus, some outstations have fresh waterholes nearly 20km long, while another is bordered by remote shell-covered beaches. Van Rook is regarded as the largest station in Queensland.
This section of the BDR runs diagonally with the gulf coastline for 260km, with several massive bridges across rivers flowing into the gulf. Being only 100km to the coastline, there’s always a good chance to see a few crocs along the way if there’s any water in these rivers. They may only be freshies, but be croc-wise.
DROP THE PRESSURE: Here’s why you need to drop PSI
It’s not long before the BDR takes a sharp turn to the right and starts heading directly east along the Mitchell River at Dunbar Station. The landscape seems to change where there’s more moisture in the ground; the trees are greener and the low scrub thicker. Our camp for the night was at the Drumduff Crossing on the banks of the Mitchell River.
The crossing over the water is a long, low concrete causeway which acts like a weir holding back water on one side, yet the water can cascade over when there’s flow. What blew me away was that the causeway is just 200m across, but during the wet season the river is nearly 2km wide – this was apparent by the amount of sand the road traversed out the other side towards Drumduff Station.
This is one of those camps where you plan for one night and stay a few more. Just a stunning place where the serenity pulls you in, the water is cool on a warm day and the birdlife is amazing. Recent reports said that barra were caught upstream of the causeway, but unfortunately none were spotted or hooked during our stay. We did, however, see several small freshwater crocs away from the camp and at night it was possible to see their beady, red eyes glow from the torch beams. Swimming during the day was pretty safe in the shallow rockpools near the river’s edge.
CROC CULLLING: Is it necessary?
East of Drumduff the BDR starts to change, with mountains in the distance giving life to the barren landscape left behind. Waterholes filled with lily pads and alive with birdlife are an indication there is life out here still. Brolgas, wrens, jabirus and even ibis congregate around the water’s edge, looking for a feed.
Crossing the Lynd and the Walsh Rivers are other stopovers to look for crocs if there is any water flow, but nothing can be guaranteed at the end of the dry season. The road soon swings south and heads towards the Sentinel Range, where towering peaks seem to pop-up out of nowhere, but this volcanic area has been weathering away for more than 400 million years.
CAVING
THE Chillagoe-Mungana Caves National Park is known worldwide for its ancient aboriginal artwork, nearby heritage, and an estimated 600 to 1000 stunning limestone caves within the park. Luckily there are a handful that are easy to access, and you’ll be blown away with what nature has created. One of the better ones is 30km before Chillagoe in the Mungana Reserve, named The Archways.
A labyrinth of caves and walkways are spellbinding, with tall trees shooting skyward and stretching out above for any moisture in the air. It’s an amazing walk through the different rooms exploring the rock formations and cosy caves. Outside there’s the Mungana Rock Art site, where a host of ancient Aboriginal paintings depict a story from years ago in a peaceful area.
In conjunction with volcanic rock, minerals are normally found nearby, and within a few kilometres towards Chillagoe is the turnoff to the Mungana historical mine that soon caught our attention. An easy road in, it stops at the once rich and rough town site of Mungana, where way back in 1896 copper was found.
With a smelter and railway line back to Chillagoe, the town was set up here but it was a harsh area with a lack of water, facilities and food plaguing the workers for many years. Walking around where the town once was beside the railhead, there’s evidence of buildings and a few relics; the railway line is still there with uneven sleepers, and the info boards depict a picture of prosperity and hope.
Sadly in the early 1940s the OK Mine closed and the people blended into other areas within the district. Originally horses and camels were used around the mine, but the horses started to bolt and were erratic when the camels and cameleers came too close. Soon only camels were used to transport the copper from the mines, but during this time the animals were getting sick from eating the leaves off the ironwood tree.B
CAPE YORK: Best 4WD tracks in the Cape
However, a bit of smart thinking in 1907 by head cameleer Abdul Wade bought several steam-driven tractors in to move the heavy loads from the mines. At the peak of production there were 13 tractor engines operating and, when the mines closed, Japanese interests bought all but one of them. The last one was sent to Atherton where it was used to haul timber.
The last stretch of road to Chillagoe is sealed, and something not to be missed in town is the heritage-listed Chillagoe Smelter site. Huge amounts of copper were found here in the early 1880s and this subsequently opened up Far North Queensland for more mining exploration. At the peak of production, more than 1000 people were employed within the mines. However, in 1914 the mine shut for the duration of WWI and failed to reopen due to financial problems and overcapitalisation of the mine.
Over the next few years the Queensland government took ownership and recommenced operations, trying to help it through the depression years. However, it failed and the smelters closed once and for all. Today the site has been cleaned up and there are public viewing areas that overlook the chimneys, the main smelter area, tunnels and more.
Walking tracks lead you to where the manager’s grand house once stood overlooking the stunning Featherbed Ranges to the east. Another walking trail takes you to a view of the largest remaining slag heap left in Queensland. After processing the ore, the leftover material (a thick liquid called slag) was transported by a trolley on rails with large bell pots on the side to the dump. It’s estimated that nearly a million tonnes of waste was dumped to make this slag pile.
There was a vision by John Moffat to create a network of railway lines, from the smaller mines back to the massive Chillagoe Smelter works, but reports of corruption, mismanagement and scandals soon brought everything to a halt. They say that the Chillagoe Smelter never made a profit in any year, only supported the town through a flow-on effect where there once were 10 hotels, a bustling town centre and relevant services. Today Chillagoe is a quaint drive through an outback town, where history blends in with the new.
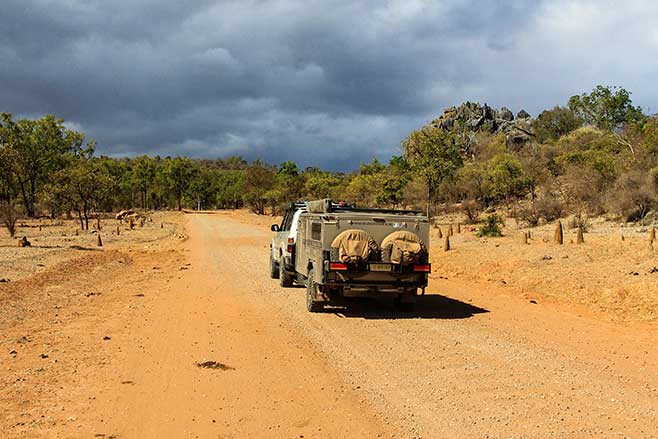
The BDR continues on towards Dimbulah and is a mixture of dirt and sealed road. While the entire road can be done cautiously in a modern car, a 4WD is highly recommended due to the lack of road maintenance, wet-weather events smashing the area, or just finding those little out-of-the-way campsites. Listed as one of Australia’s most dangerous roads and at more than 1000km long, the Burke Developmental Road is anything but boring if you’re keen to heighten your sense of adventure.
GWM stands for Great Wall Motors and is effectively a renaming of what was previously Great Wall, a brand that’s now reasonably familiar in Australia having been here since 2009. GWM is China’s largest ute, 4×4 and SUV maker, examples of the latter two being sold here under the Havel brand.
The new GWM Ute is presented as the Cannon, Cannon-L (as tested here) and the Cannon-X, with prices starting at a low $33,990, which includes government and dealer charges.
The Ute is effectively new from the ground up, although it does use a revised version of the 2.0-litre diesel engine from the previous Great Wall Steed, although now backed exclusively by an eight-speed automatic gearbox rather than a six-speed manual, the only gearbox offered with the Steed.
Most notably the GWM Ute is much bigger than the Steed and gives nothing away in size to the biggest utes in the class such as the Ford Ranger, whereas the Steed was a small ute by current standards. And where the Steed was behind the game in terms of technology and sophistication, the new GWM Ute comes stacked with the latest safety and convenience kit.
POWERTRAIN AND PERFORMANCE
THANKS to a new turbo and a more sophisticated (read higher pressure) diesel injection system – the usual ‘tune-up’ items with modern turbo diesels – what was 110kW and 310Nm in the Steed has become 120kW and 400Nm in the GWM Ute.
Complete with the now obligatory diesel particulate filter (DPF) the engine meets the now mandatory in Australia Euro 5 emissions standards. A manual DPF regeneration switch is provided, which is a very practical touch. Sold elsewhere (with the addition of urea injection or AdBlue) it’s a Euro 6 engine, which is testament to its modernity of its top-end remake.
On the road 120kW and 400Nm still doesn’t set the world on fire, as you would expect, but the engine still gets along effortlessly enough in general give-and-take driving, doesn’t make a fuss on hills and all the while, is relatively smooth, refined and quiet. However a colleague drove a different example and complained of excessive vibration at urban speeds, something not evident with the example tested here.
Helping getting the most out of this engine revision is a slick eight-speed automatic, made under licence from German transmission specialist ZF. As ever with the now ubiquitous ZF eight-speed the shifts are near seamless, especially with moderate throttle loads.
The shifts are also well-timed which, along with the relatively gear close ratios, helps keep things percolating along nicely. Paddle shifts are also provided for the ‘manual’ control if you so wish, and most useful off road.
Not so good is the throttle progression, which is soft in initial response but then ramps up quickly. You get used to it, but it could and should be better. The overall throttle travel is too short too, especially for off-road driving.
ON-ROAD RIDE AND HANDLING
THE Ute’s chassis is a world apart from the Steed. Gone is the latter’s torsion bar front suspension and hydraulically assisted recirculating-ball steering. In its place the Ute has far more sophisticated double-wishbone coil-spring front suspension and electric power steering. A live axle and leaf springs are of course retained at the rear, as are disc brakes, an unusual feature in this class.Unladen, the Ute’s ride is firm as you would expect, but the general handling is tidy enough even on bumpier roads. The damping seems well-sorted, and likewise the suspension’s front-to-rear match is good.The electric power steering means that little steering effort is needed at parking speeds, but at highway speeds the steering is too heavy and notably devoid of feel. Like the throttle, you get used to it, but it’s not something you learn to love.

More positive is the on-demand 4×4 system, which means drive to all four wheels is engaged if any when needed. Presumably it’s the same or similar made-under-licence Borg Warner system used in the Steed and likewise similar to that used in the Ford Everest.
It does its best work on wet bitumen or on roads that alternate between sealed and unsealed and is a significant step up from the relatively primitive part-time 4×4 systems used in most of the mainstream popular utes. It provides ‘Normal’, ‘Sport’ and ‘Eco’ driving modes via a rotary dial on the centre console.
In what is becoming a now recurring theme in new cars thus equipped, some of the high-tech safety aids are more annoying than helpful. In particular the active lane-keeping assistance can at times try to counter your steering input without good reason. Winding country roads are a particular problem.
You can go into a readily accessible menu to switch off the lane keeping, but it defaults to the on position every time you switch the ignition off and then on again.
OFF-ROAD
THE same dial is used to engage low range, which offers a good reduction especially given the eight-speed auto has an especially low first gear anyway.
The Ute also offers respectable ground clearance and notably good rear wheel travel to provide class-competitive off-road ability. A driver-switched rear locker is also standard and when engaged, it doesn’t appear to kill the ETC across the front axle, which is a major positive.
A reasonably solid looking front skid plate, and front and rear recovery hooks are other positives. Likewise the engine draws its air through the inner guard, which should help with water crossings.
The standard road-pattern tyres don’t help off road but are in the common 265/60R18 size, which is both taller and wider than the tyres used on the Steed and means plenty of options for replacement rubber.
CABIN AND ACCOMMODATION
THE GWM cabin presents as modern but glitzy, but is also roomy and decently finished. Keyless entry and push-button start continues the modern theme but the tilt-only steering wheel reach adjustment in this mid-spec model (as well as the base model) seems like penny-pinching given the top-spec model gets both tilt and reach adjustment.
No entry-assist handle for the driver (passenger only) is another omission. Otherwise the driving position works well in terms of vision and general comfort, and shorter drivers will appreciate the good amount of height adjustment with the seat. Rear seat room is also good and up with the bigger utes in the class.
PRACTICALITIES
THE Ute is rated to tow 3000kg, so a little below the class norm but with only 120kW on offer, 3000kg might even be a bit of a stretch under more demanding conditions.
An assisted tailgate is easy to open and close and while four tie-downs are provided, unfortunately the front two are mounted too high, as is the norm on most utes. There’s also not sufficient room between the wheel arches for a full-size pallet, again an unfortunate norm for most utes, VW’s Amarok being the notable exception.
To sweeten what is already an attractive deal price-wise, GWM offers fixed price servicing for the Ute for the annual and/or 10,000km services pegged at $360 for the first five dealer visits.
SUMMING UP
THE GWM Ute is a huge step forward from the Steed and presents a compelling argument for the price. It will be best as an everyday family ute with some weekend 4×4 recreation thrown in, but can do work duties as well as long as that doesn’t involve heavy-duty towing.
As a day-to-day ute it certainly ticks all the main boxes, even if it needs a little more finesse at the driver interface to keep keen drivers happy.
WHAT YOU GET
THE GWM Ute comes in three specification levels and is stacked with kit from the bottom up. Standard across the full range, which starts at $33,990 (driveaway) for the Cannon, is a full suite of safety features led by automatic emergency braking, lane-keeping assistance, radar cruise control, rear cross-traffic alert, tyre-pressure monitoring, over-speed warning, rear and kerbside cameras, and seven cabin airbags.
Keyless entry, push-button start, auto on/off LED headlights, a 9-inch touchscreen and the usual smartphone connectivity apps are also standard across the range. Mechanically all models also get the same engine, the same eight-speed automatic, the same on-demand 4×4 system, a rear differential lock and 18-inch wheels. All models also get side-steps.
The $37,990 (driveaway) Cannon-L (as tested here) then adds heated front seats, electric seat adjustment for the driver, automatic climate control, a 360⁰-view camera, a 220V power outlet, sports bar, tub liner, easy up/down tailgate, lots of chrome and other minor items.
The top-spec $40,990 (driveaway) Cannon-X then adds leather, reach (as well as tilt) steering-wheel adjustment, electric adjust for the passenger seat, wireless phone charging and different ‘modes’ for the electric power steering as its main attractions.
GWM UTE CANNON-L SPECS
ENGINE: 2.0-litre 4-cyl turbo diesel MAX POWER: 120kW at 3600rpm MAX TORQUE: 400Nm at 1500 to 2500rpm GEARBOX: Eight-speed automatic 4X4 SYSTEM: Dual-range on-demand CRAWL RATIO: N/A CONSTRUCTION: Separate chassis FRONT SUSPENSION: Independent/coil springs REAR SUSPENSION: Live axle/leaf springs WHEEL/TYRE: 265/60R18 110H FUEL TANK CAPACITY: 78L ADR FUEL USE: 9.4L/100km TEST FUEL USE: 10.8L/100km DEPARTURE ANGLE: 25⁰ RAMPOVER ANGLE: 21.1⁰ APPROACH ANGLE: 27⁰ GROUND CLEARANCE: 194mm (laden)
YOU really are spoilt for choice if you’re in the market for a 12V fridge in 2021.
There’s a huge array of options to suit a broad spectrum of budgets, and that’s great news; but for the most part, it’s a struggle to come across an offering with a significant point of difference.
BUYER’S GUIDE: 12-volt fridges
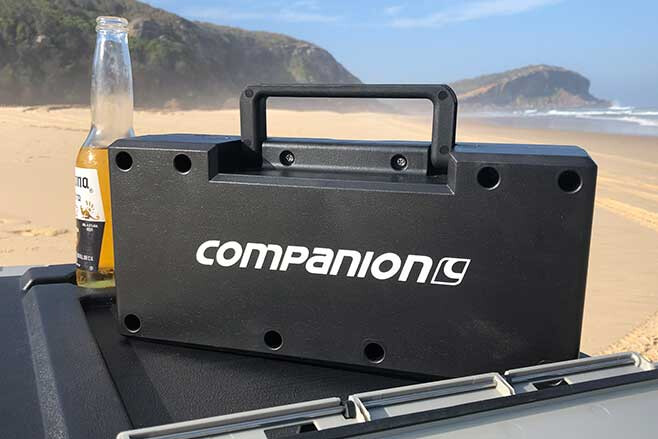
Companion’s rechargeable, lithium-equipped fridges are relatively new-to-market, and they’re particularly unique due to the fact that they’re packing an integrated 42AH battery. There’s a 60L single-zone and a larger 75L dual-zone model available, and I’ve been getting acquainted with the 60L jobbie for the past few months.
When I first got hold of the fridge I hadn’t yet sorted my vehicle’s dual battery system, so I charged up the fridge’s internal battery from mains power, threw it in the back of the ute and let it run under its own steam as I made my way out of the city and up the coast for the weekend.
Companion’s claimed 16-hour battery life seems on the mark, and I reckon that running the fridge off a vehicle’s factory 12V outlet during transit, then charging it with a portable solar panel or blanket during the day would probably see you through a weekend away in favourable conditions, without needing to rely on a second battery. You’d just need to ensure your solar regulator had a setting suitable for a lithium battery.
For longer off-grid trips you’d certainly need a more reliable external power source. I’ve now installed a dual battery system in my ute, but the fridge effectively serves to extend my battery life by 42AH of lithium power, which is no small thing. I still have the option of removing the fridge from the ute and running it off the internal battery if I ever need to camp away from my vehicle, or even just spend a day at the beach.
TEST: Dual battery systems
The fridge’s integrated USB outlets allow you to charge phones, tablets and torches, and run additional campsite equipment like LED light bars, or even another fridge via the unit’s second Anderson socket.
Internal battery aside, as a fridge, it’s a good thing. The control panel is user-friendly, the door opens in both directions and is removable for ease of cleaning and airing out, and the dual bottle openers are a neat feature. It cools down quickly and I’ve found the temperature remains stable in hot conditions despite regular access for fresh cans.
Speaking of which, the internal proportions are perfect for beer drinkers; you can slot a 30-pack of cans in sideways, leaving roughly half the capacity for tucker – or another 30-pack, depending on your priorities.
However, the external dimensions are one of the few drawbacks I’ve encountered so far. Due to the battery, it has a large footprint relative to some other 60L fridges, and that means it eats up a bit of space in your vehicle and limits your options in terms of compatible fridge slides.
The power ports (whilst conveniently located in both the front and the rear of the fridge) are positioned fairly low, which meant I had to clear space to access them. And while it’s not an issue with the fridge itself, I found the pockets on the optional fridge cover are positioned similarly low, so they jam up in the runner of the fridge slide when you retract it.
The fact the 42AH lithium battery pack is removable is awesome; it has its own USB outlets and so it can be used to separately charge and power other devices around camp if the fridge is being powered by an external source.
However, the battery pack can’t be recharged separately from the fridge, which would be handy for those who don’t have a 240V power source handy to where they store the fridge.
All in all, the Companion Lithium 60L Single Zone Rechargeable Fridge/Freezer is a great quality fridge that stands out for the versatility it offers thanks to its innovative internal lithium battery.
ESSENTIAL INFO
AVAILABLE FROM: www.companionoutdoor.com RRP: $1499.99 WE SAY: Integrated 42AH power pack is a total game-changer. It adds weight, bulk and expense over some comparable fridges, but the pros far outweigh the cons.
BACK when electric typewriters and telex machines were cutting edge, I was very fortunate to meet the late Phil Irving MBE, the great Australian automotive engineer and author best known for his design work with the world championship-winning Repco-Brabham Formula One engine and the speed-record breaking Vincent V-twin motorcycle engines.
At the time Phil was consulting on, and I was reporting on, the development of a rotary-valve cylinder head for four-stroke engines by Australian inventors Peter Gabelish and Albany Vial.
On our first meeting Phil asked with hardly an introduction, “Son, what does bhp stand for?” As Phil was near 50 years my senior I wasn’t offended by him calling me “son” but I did think that a silly question given the apparently obvious answer.
EXPLAINED: What is power and torque
“Brake horsepower,” I replied confidently, only to be told, “No son, it’s brochure horsepower.”
Phil didn’t explain what he meant by this at the time but later stressed the point that manufacturers’ quoted power and torque figures are maximums only and, unless you know the shape of the power and torque curves in question, are largely meaningless.
In other words two engines that claim 150kW and 450Nm, for example, aren’t necessarily equal in effective output, and what’s on the sales brochure is just that, a ‘brochure figure’ that doesn’t necessarily tell the whole story.
The problem with sales brochures, be they printed or digital, or manufacturer’s vehicle specifications in general, doesn’t end there however, and many things that may appear to be equal when comparing one set of specifications to another aren’t necessarily so.
Take for example driver-switched rear differential locks, commonly fitted to new 4x4s these days. On paper these would all appear to offer the same benefit, but that’s not the case. In reality they come in what we will call ‘A-Grade’ lockers and ‘B-Grade’ lockers.
A-Grade rear lockers, when activated, obviously nullify the electronic traction control (ETC) across the rear axle but still keep the ETC on across the rear axle active. B-Grade lockers cancel the ETC front and rear, leaving the front differential effectively open.The difference is substantial and while A-Grade lockers always provide a traction advantage when switched on, B-Grade lockers don’t, which means 4x4s fitted with B-Grade lockers may perform better off road with the locker switched off, depending on the exact nature of the terrain in question.
Unfortunately, on a manufacturer’s brochure or specification sheet, while it may list ‘Rear Differential Lock’ it will never list ‘B-Grade Rear Differential Lock’.
ETC: The gift that keeps on giving
And, while on the subject of traction, not all ETC systems are created equal and some are far more effective off road than others.
All new 4x4s now come with ETC as ETC is a sub-set technology of Electronic Stability Control (ESC), which is mandatory on all new vehicles, 4x4s now included.
ETC wasn’t initially developed as an off-road traction aid but as a safety feature to limit or prevent wheel spin under acceleration on slippery roads. It was actually developed before ESC and was one of the stepping-stones in ESC development.
ETC designed to prevent on-road wheel spin still helps off-road but nowhere near as much as second and third generation off-road specific ETC pioneered by the likes of Land Rover and Jeep and taken up by others.
Again it’s a case of A-Grade ETC and B-Grade ETC although with the ongoing development here there’s more like A, B and C-Grade ETC now. The difference is in the tuning of the electronic software that controls the strength, timing and duration of the application of individual wheel brakes, the engine power modulation, and the shift protocols used by automatic gearboxes now almost universally fitted to modern 4x4s.
The irony of all this is the most important off-road traction attribute of a 4×4 is wheel travel and that is one specification you very rarely – if ever – see on a sales brochure. If you have long and supple wheel travel then the need for, and importance of, diff locks and ETC is greatly diminished.
IN PAST months, in between lockdowns, we here at 4X4 Australia have managed to use and abuse a shed full of modular alloy roof platforms and accessories. We’ve thrown kayaks, mountain bikes, high-lift jacks and rooftop tents at these sleek alloy trays to find where they excel and their shortcomings. The honest truth is the key players are all delivering decent quality products, albeit with their own positive and negative nuances.
So when ARB decided to enter the fray of low-profile modular alloy roof platform systems in 2020, we wondered how different the ARB BASE Rack might be from all the rest.
Well, the answer is ‘vastly different’.
ARB has taken the bullbar by the horns (excuse the dad joke) by doing away with T-slots to develop a progressive dovetail attachment for its fully welded platform, and thrown in an entire range of accessories to boot.
The roof-rack market is a playing field for a plethora of high-end manufacturers with proven non-welded trays and a mass of existing T-slot accessories. So, the obvious questions arise; is a fully welded rack any better than other assemblies, and is moving away from the industry standard T-slot a smart move?
I was sceptical whether the risk would be worth the reward, however, months of mixed multi-day sojourns including 4×4 trips, rooftop camping trips, and regular mountain bike, surf and kayak excursions all in the name of serious evaluation purposes, proved my scepticism unfounded. In fact, this fandangle dovetail cut-out might just be my favourite discovery of the year.
Read on and you might agree.
ARB BASE RACK
ARB is synonymous with off-roading and touring in Australia. Such prevalence within the industry is well-deserved, for ARB has been manufacturing 4×4 accessories for nearly 50 years.
But what you might not know is a small suburban garage in Melbourne was where ARB was born, and more accurately, where Anthony Ronald Brown designed his first home-made roof rack. Yep, you heard right, the birth of ARB was not via bullbars, air lockers or canopies but rather roof racks.
Fast forward 50 years and ARB is now a multinational 4×4 accessory giant, but in today’s world of sleek, techy and stylish off-roaders the bombproof ARB roof racks of the past just haven’t cut the right image against some of the sleeker low-profile alloy roof platforms.
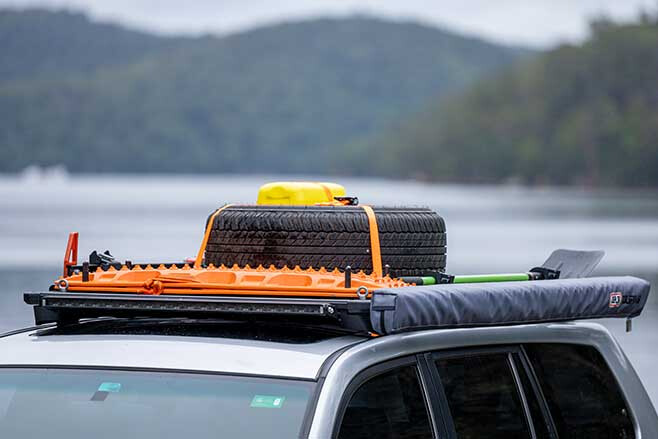
In 2020 ARB changed the game and introduced its own low-profile modular roof platform, redesigning the platform accessory system from the ground up. The result is the ARB BASE Rack.
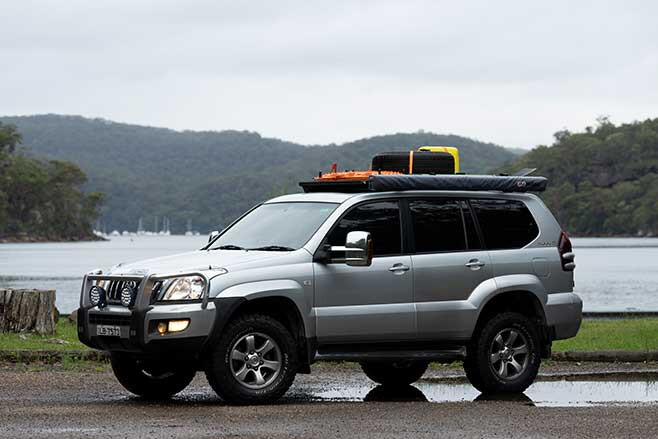
On delivery of a 1835mm x 1155mm platform ARB BASE Rack for our trusty ol’ Prado 120, it was immediately evident the new rack is light … I mean really light. In fact, our seven-bar platform weighed in at a ridiculously impressive 18.5kg, a near 10kg weight saving to some other low-profile alloy trays we’ve evaluated.
With such a light tray it’s easy to assume strength and structural integrity might well suffer, however a cross section of the powdercoated extruded aluminium cross-beams displays a box-beam construction with internal bracing. When combined with short lateral beams and a fully welded construction, the system delivers a max 170kg carrying capacity, well beyond the 100kg maximum load capacity of our vehicle.
ARB: Complete Slide Kitchen
Fitting the platform is a hell of a lot simpler than an IKEA bookshelf and took myself, with the occasional help of a neighbour, less than an hour to complete … but remember, don’t skimp on the Permatex to seal up mount points or the next monsoonal downpour might just trickle its way into the cab.
When sealed and secured, the requirement for such a strong and rigid platform becomes obvious. The sleek one-piece longitudinal blade mounts have a mere 45mm clearance at the midpoint mount, meaning the BASE Rack sits an impressive 90mm above the roofline at the Prado’s midpoint channel mount. With dovetail accessories sitting near flush to the cross-beams, the ARB BASE Rack delivers our lowest profile platform system yet.
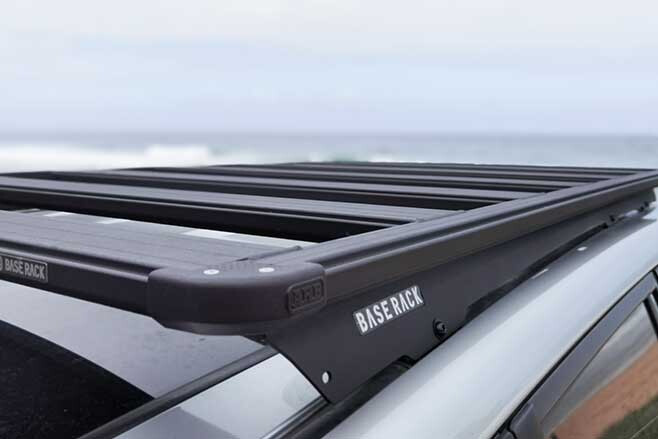
Unsurprisingly the lateral crossbars of the ARB rack produced more wind noise than some other tested platforms, but, on installation of the supplied deflector, wind noise was dramatically reduced. The real talking point of the BASE Rack is the dovetail mounts.
ARB brand marketing manager, Mark Barger explains: “The side profile of every BASE Rack beam features a dovetail extrusion that allows for attachment and removing of accessories, anywhere along the rack’s beams and/or perimeter without having to slide them into place from one edge, or having to remove one accessory to get to another.”
It is in the ease of the attachment and removal of accessories where the BASE system excels over T-slot systems. Our experience has proved heavy use of BASE mounts in all types of terrain saw no less reliability than a T-slot.
Once installed on our Prado, there’s no doubt the BASE Rack rivals the best for looks and style, but what about accessories? Read on.
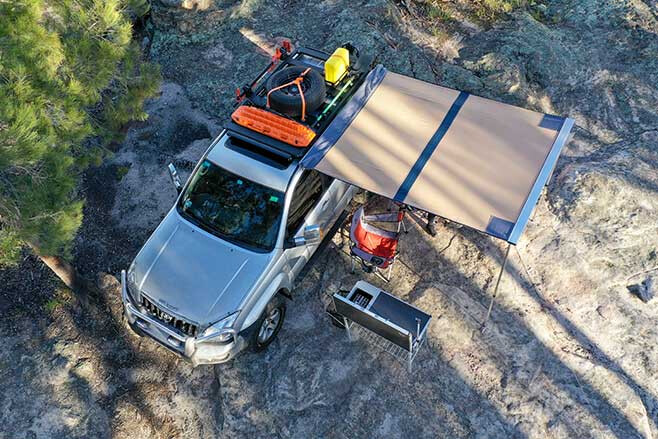
AWNING & LIGHT KIT
TO ensure we’re ‘up with the Joneses’ we fitted ARB’s 2 x 2.5m Awning & Light Kit to our left siderail. The awning is quick and easy to set up, and the 300gsm poly/cotton ripstop canvas and 1200-lumen colour-adjustable LED light strip are a one-stop solution for sun, rain and camp lighting.
HOLDERS
The siderail accommodated an ARB premium high-lift jack holder. We opted for the premium mount over the classic to allow for simpler placement and removal of our jack via dual padlock-able hinged cradles. Aside from looking tough, we managed to use the jack in anger on our first foray with our BASE Rack, and the ease of the jack cradles is a rather nice bonus when things go to shit.
In fact, on one outing, we required a full set of recovery tracks that were mounted on our dovetail-mounted recovery track holders. The holders sit the tracks flush onto the BASE Rack and once again are padlock-able. Not much to add but they do what they are supposed to do, and the ease of installation means you’ll always have these accessories rather than not.
The horizontal jerrycan holder is just as simple and easy to install via the dovetail mounts, as was the gas bottle holder, and the full-width low-profile roller was barely noticeable at the rear of the rack while easing the loading and unloading of heavy gear.
It’s possible you’re seeing a pattern emerge. We’re big fans of the practicality and simplicity of the dovetail system. In fact, it was the simplicity of the spare-wheel Y-strap that excited us; until we tried to use it. The dovetail clips occasionally slipped when they should have offered grippy positive connection to the crossbars, and the 150kg rated polyester webbing was too smooth for the central Y-buckle and slipped when tightened.
WHAT TO PACK? For a 4×4 trip
In a severe case, this could lead to the dovetail clips loosening and causing the entire system to disengage. Fortunately, some grip-tape should alleviate the slipping dovetail clips (tyre tread can be used to direct the Y-straps) and rethreading the webbing with extra loops in the Y-buckle will cause more friction. Easy fixes but something we would like to see addressed.
While we are on a whinge, we might point out ARB is yet to offer a dedicated dovetail shovel holder. All other key recovery components are covered so we were surprised not to find a shovel mount in the BASE accessory catalogue.
LIGHT BAR
WE installed ARB’s new BASE-specific 130W low-profile light bar in our initial fit-out. The light bar provides mid- to long-range spread of 8552 effective lumens and sits sleekly with the rack’s low-profile design. We mounted the light bar to sit aft of the front perimeter beam and wind deflector. The narrow profile of the light bar meant it sat flush with the top surface of the BASE Rack, thus offering unimpeded placement of gear. For peace of mind we snapped on the polycarbonate covers to protect the lens when not in use.
HOME DUTIES
WHEN we’re not heading to the hills, is the BASE Rack usable around home? We tested that too. Our toys of choice were bikes and boats.
As a dedicated off-road accessory provider ARB hasn’t yet delved into the world of ‘toy attachment’ like Thule, Rhino-Rack and Yakima, who all use a T-slot attachment. However, ARB are no fools. With a mass of trade and sport equipment T-slot accessories already in existence, ARB offers a T-slot adaptor. The adaptor clamps to the dovetail and delivers a bracket for T-slot accessories.
For the bike we fitted a Whispbar Frame Mount Bicycle Carrier to the T-slot adaptor, and it held our carbon Santa Cruz MTB firmly and securely. The only downside was a need to fit four T-slot adaptors for the width of a narrow bike carrier, and so we’d like to see some wider T-slot adaptors in the future.
We were also able to slide a kayak on the BASE Rack, using the roller kit and dovetail eye-bolt brackets to lash the boat down. For our 5.13m 30kg Exodus Sea Kayak we fitted Rhino-Rack’s Nautic 581 Rear Loading Kayak Carrier (via T-slot adaptors). A couple of Yakima AceO’Spades clamps held the paddle, but we had to swap the T-slot screw and bolt to suit the ARB adaptor. I suspect this might become an issue for many accessories and so a deeper T-channel might be better suited to fit various equipment.
After months of tests and tweaks we found a solution to all our needs in the ARB BASE Rack. As such, it’s hard to hold a grudge for minor annoyances.
THE GOOD STUFF
• Strong, sturdy and durable. • Easy fitment. • Super low profile. • Dovetail accessories are quick and easy to fit and remove without a need to ‘juggle’ other accessories. • Trusted brand with a lengthy warranty.
THE NOT SO GOOD
• Platform is noisier than some other key industry players (wind deflector a must). • Spare wheel Y-strap needs a rethink. • No T-slots limit third-party accessories (T-slot adaptors don’t suit all accessories).
VERDICT
THE ARB BASE Rack delivers a cutting-edge design and the quality we have come to expect from ARB. One of the lightest and lowest profile roof platforms on the market, the BASE Rack delivers exceptional strength-to-weight ratio in addition to a quality finish.
The dovetail design provides one of the most considered modular accessory systems we have used to date, and the simplicity and ease of accessory placement, installation and removal is key to the BASE Rack’s appeal.
A dedicated list of quality low-profile BASE-specific accessories accompanied by a growing list of dovetail attachments, delivers an exceptionally usable platform for off-road use.
The ARB BASE Rack loses a few points for wind noise (without the deflector), simple design faults in the spare wheel strap and a limited accessory range. We would love to see ARB applying its manufacturing expertise toward dovetail BASE mounts for trade, sport and recreation. It is difficult to fault the ARB BASE Rack and what ARB lacks in cross-platform usability, it delivers in the world of off-road touring. The BASE Rack should be a consideration for anyone fitting a low-profile roof platform to their vehicle.
STAR RATING
Build: 5/5 Lightweight yet solid powder-coated welded platform which partners well with the aerodynamic one-piece blade mounts.
Style: 5/5 Sleek, super low-profile design with strength in simplicity. Pleasing matte black powder-coated finish suits most vehicles. The development of a dedicated low-profile BASE light bar adds to the aesthetics rather than detracting from it. Lowest profile platform and accessory offering yet.
Install: 5/5 Easy to assemble and well-considered installation with minimal tools. Vehicle-specific mounts allow for easy first stage fitting and the platform simply lifts on and bolts in place.
Drive: 4.5/5 Excellent solid fit with no movement or loosening of parts throughout evaluation period. Initially noisier than expected until wind deflector installed. Wind deflector reduced most excessive wind noise but not all. Dovetail accessories fitted on securely and didn’t budge.
Accessories: 4/5 The majority of key off-road accessory mounts are available but the system loses points for lacking just a few key accessories (like shovel holder, axe, chainsaw, side mount recovery track) and the (at present) limited range of vehicle-specific mounts. A few accessories (especially the C-clamp type) have limitations with placement. We would ideally like to see development of dovetail trade and sport accessories to offer an expanded BASE accessory range (but this is a personal wish).
Usability: 5/5 Dovetail system is extremely user-friendly and offers a well-considered and simple accessory attachment system. The attachment and removal of accessories is fast and simple and offers endless layout options.
OVERALL: 28.5/30
ESSENTIAL INFO
AVAILABLE FROM: arb.com.au RRP: $1395 (1835×1155 ARB BASE Rack, Mount Kit, Deflector) WE SAY: Strong and durable. The low-profile ARB BASE Rack is easy to fit and use