Cooloola Recreation Area (RA) is often viewed as a ‘smaller sibling’ to its more famous counterpart (K’gari) in Great Sandy NP. However, it is a brilliant touring and camping destination in its own right, located just three hours’ drive north of Brisbane.
Accessed from the south via a vehicular ferry near Tewantin that takes you across the Noosa River (the RA is just north of the Sunshine Coast tourist mecca of the same name), Cooloola RA offers a brilliant weekend (or longer) escape from the city, with its mix of beach driving, loads of bushwalking tracks, inland lakes that host numerous native birdlife (for the birdwatchers among us; there has been up to 350 species recorded here), beach and river fishing, paddling (canoe or kayak) and a spread of sublime campsites that range from right on the beach to nestled beside Noosa River’s banks.
For a weekend adventure we recommend starting at the southern end of the RA, with access via the aforementioned ferry. Don’t forget to buy your vehicle access permit and camping permits from the Great Sandy Information Centre, near the Noosa River ferry, before you get on the ferry.
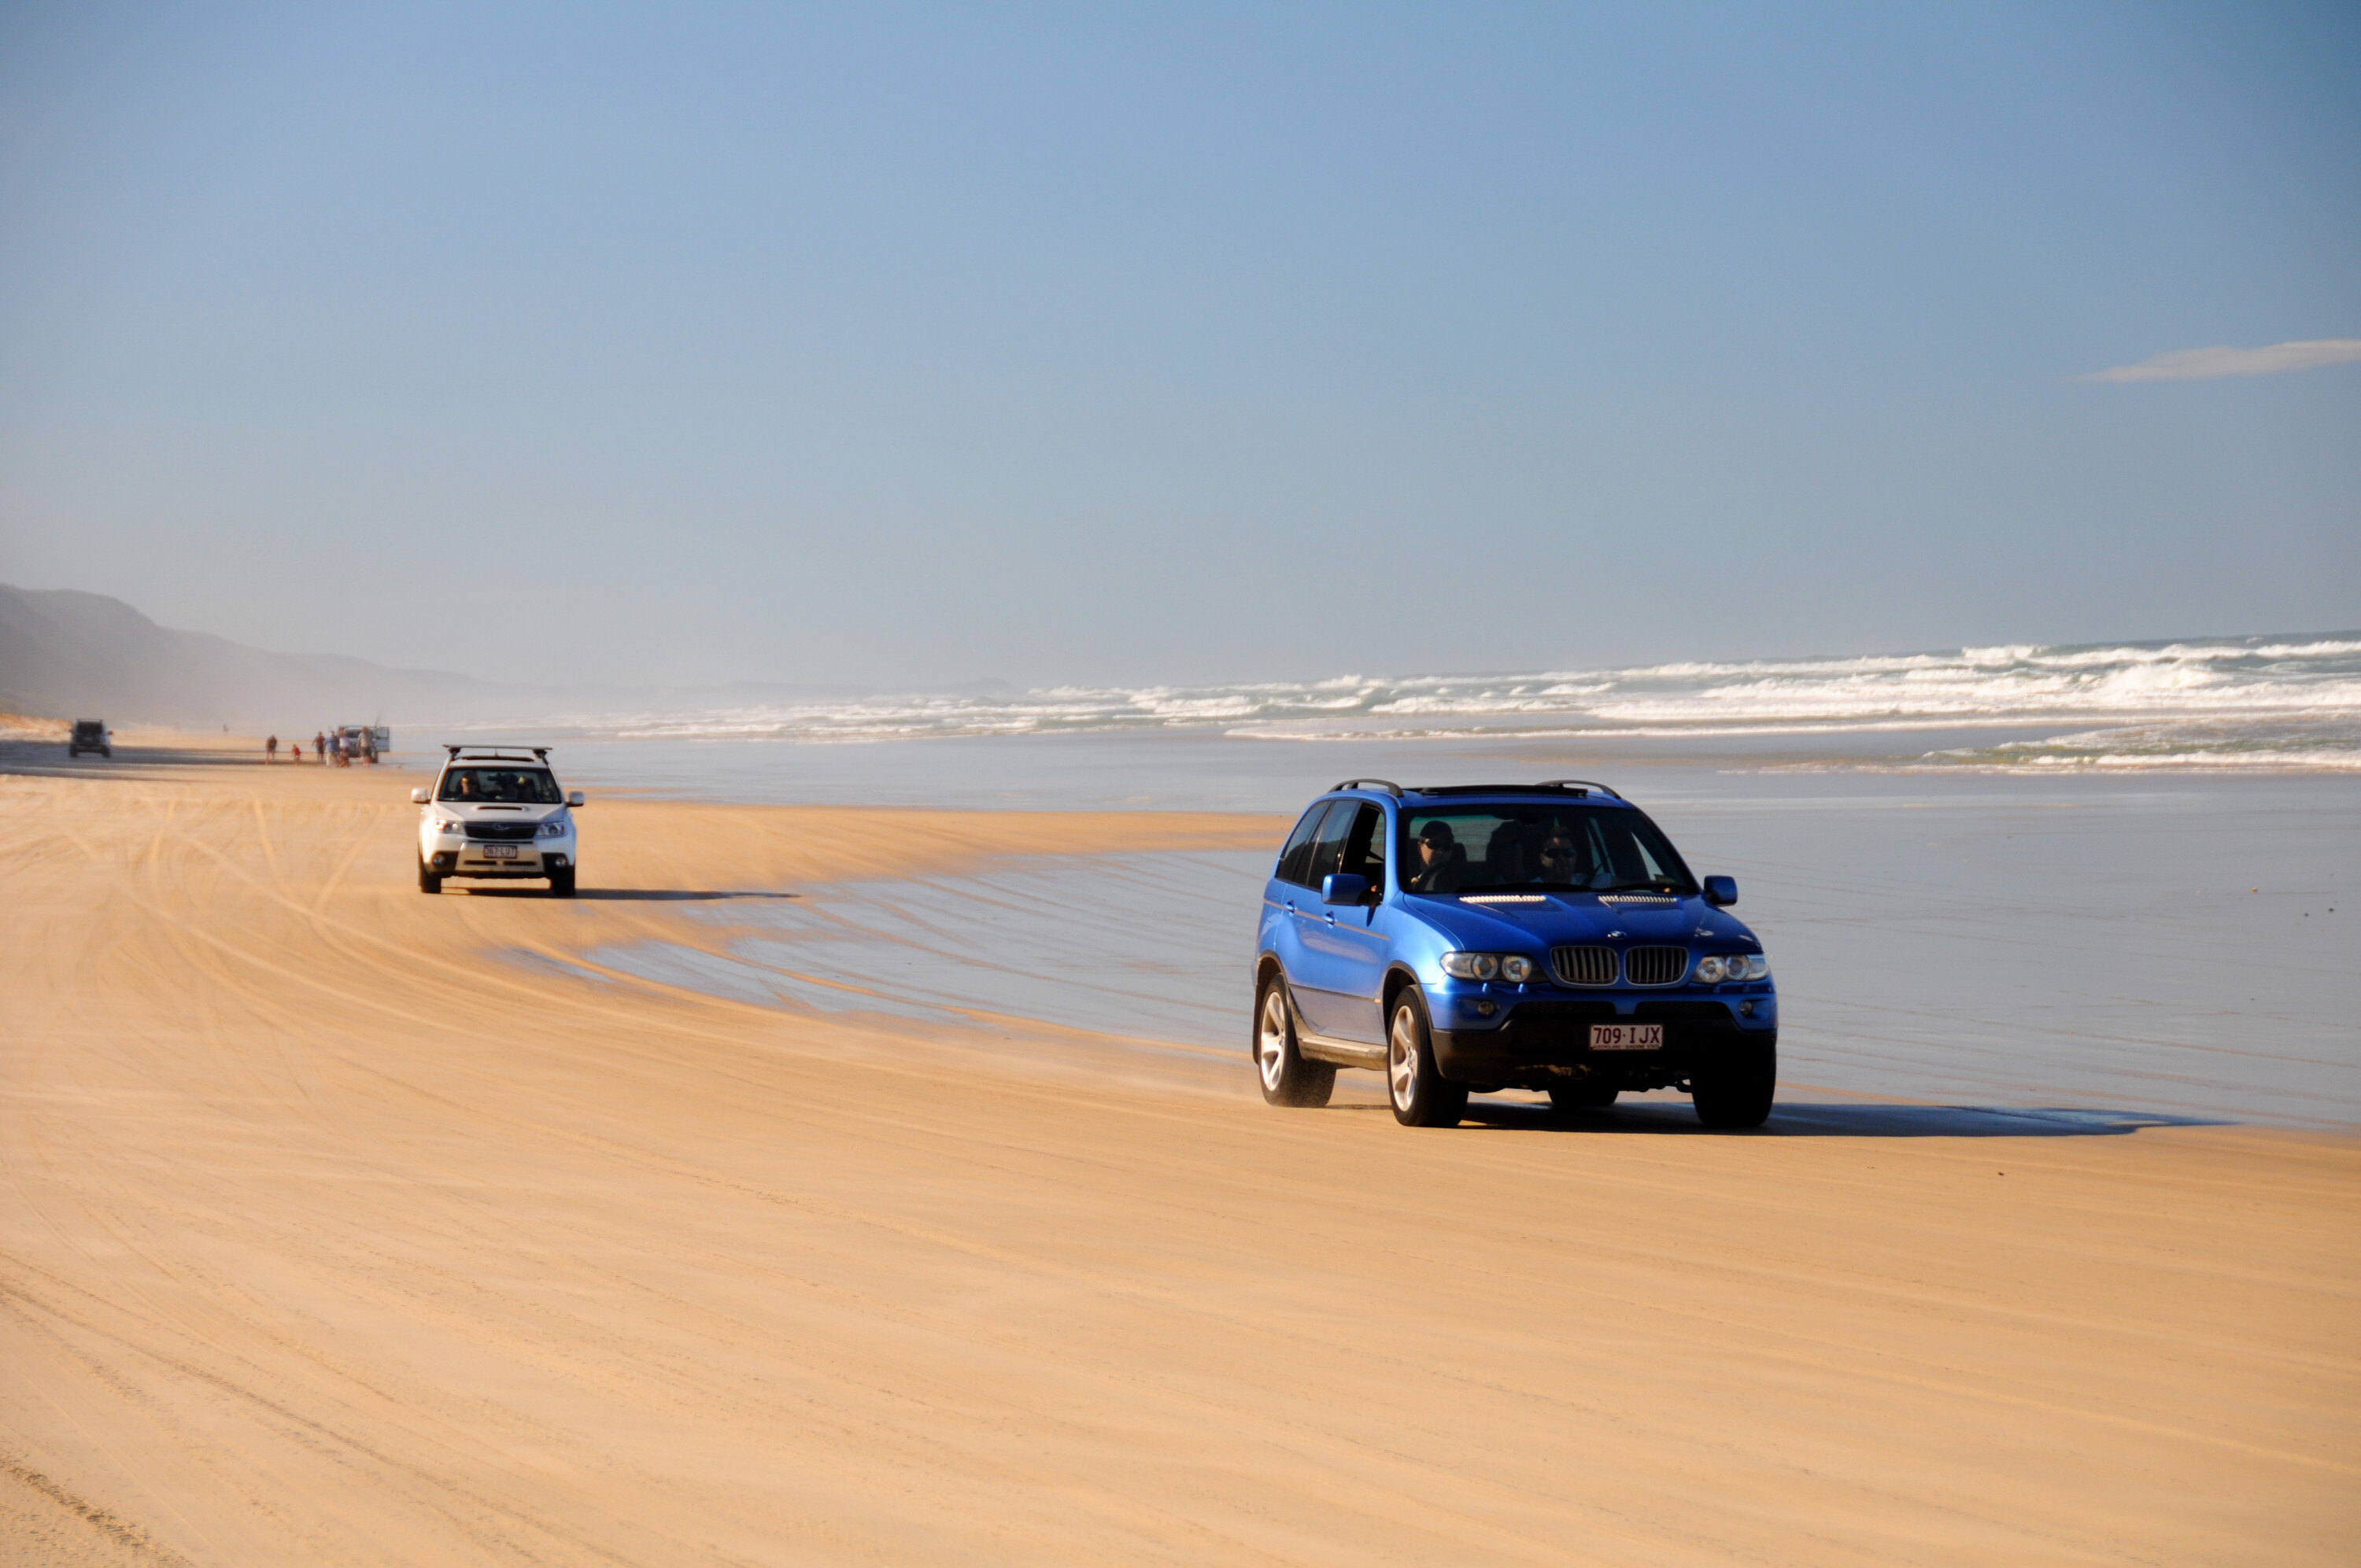
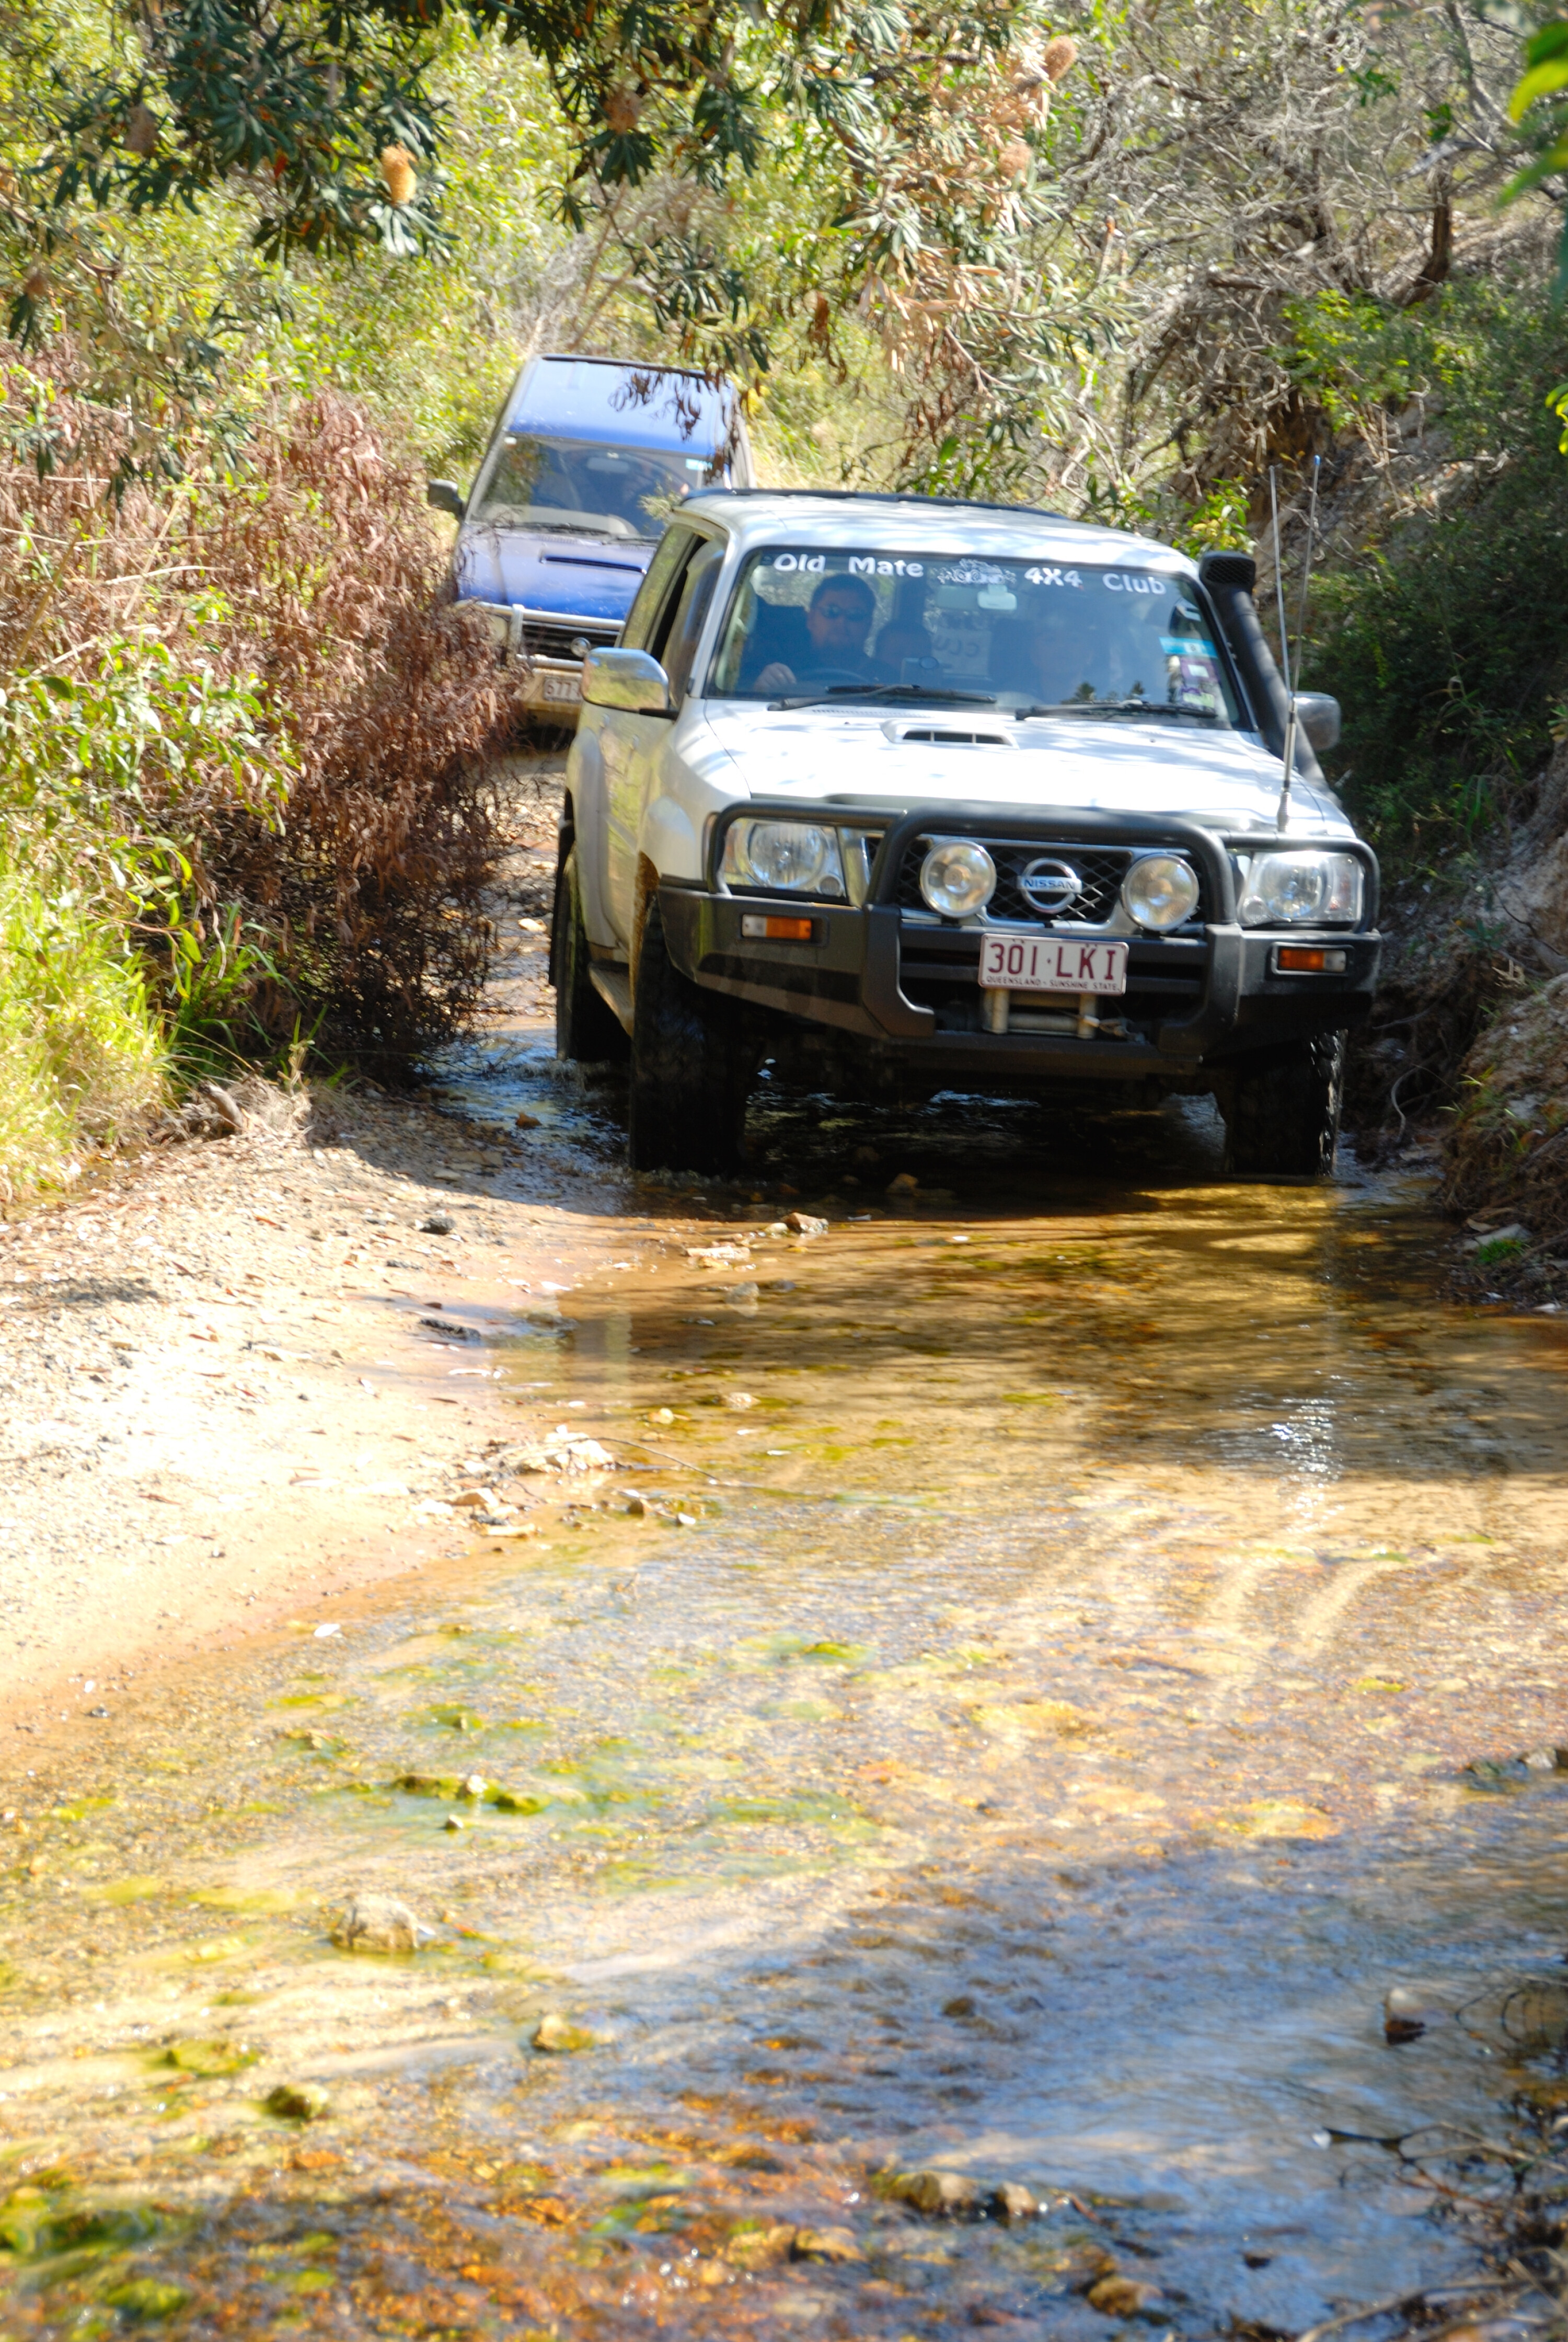
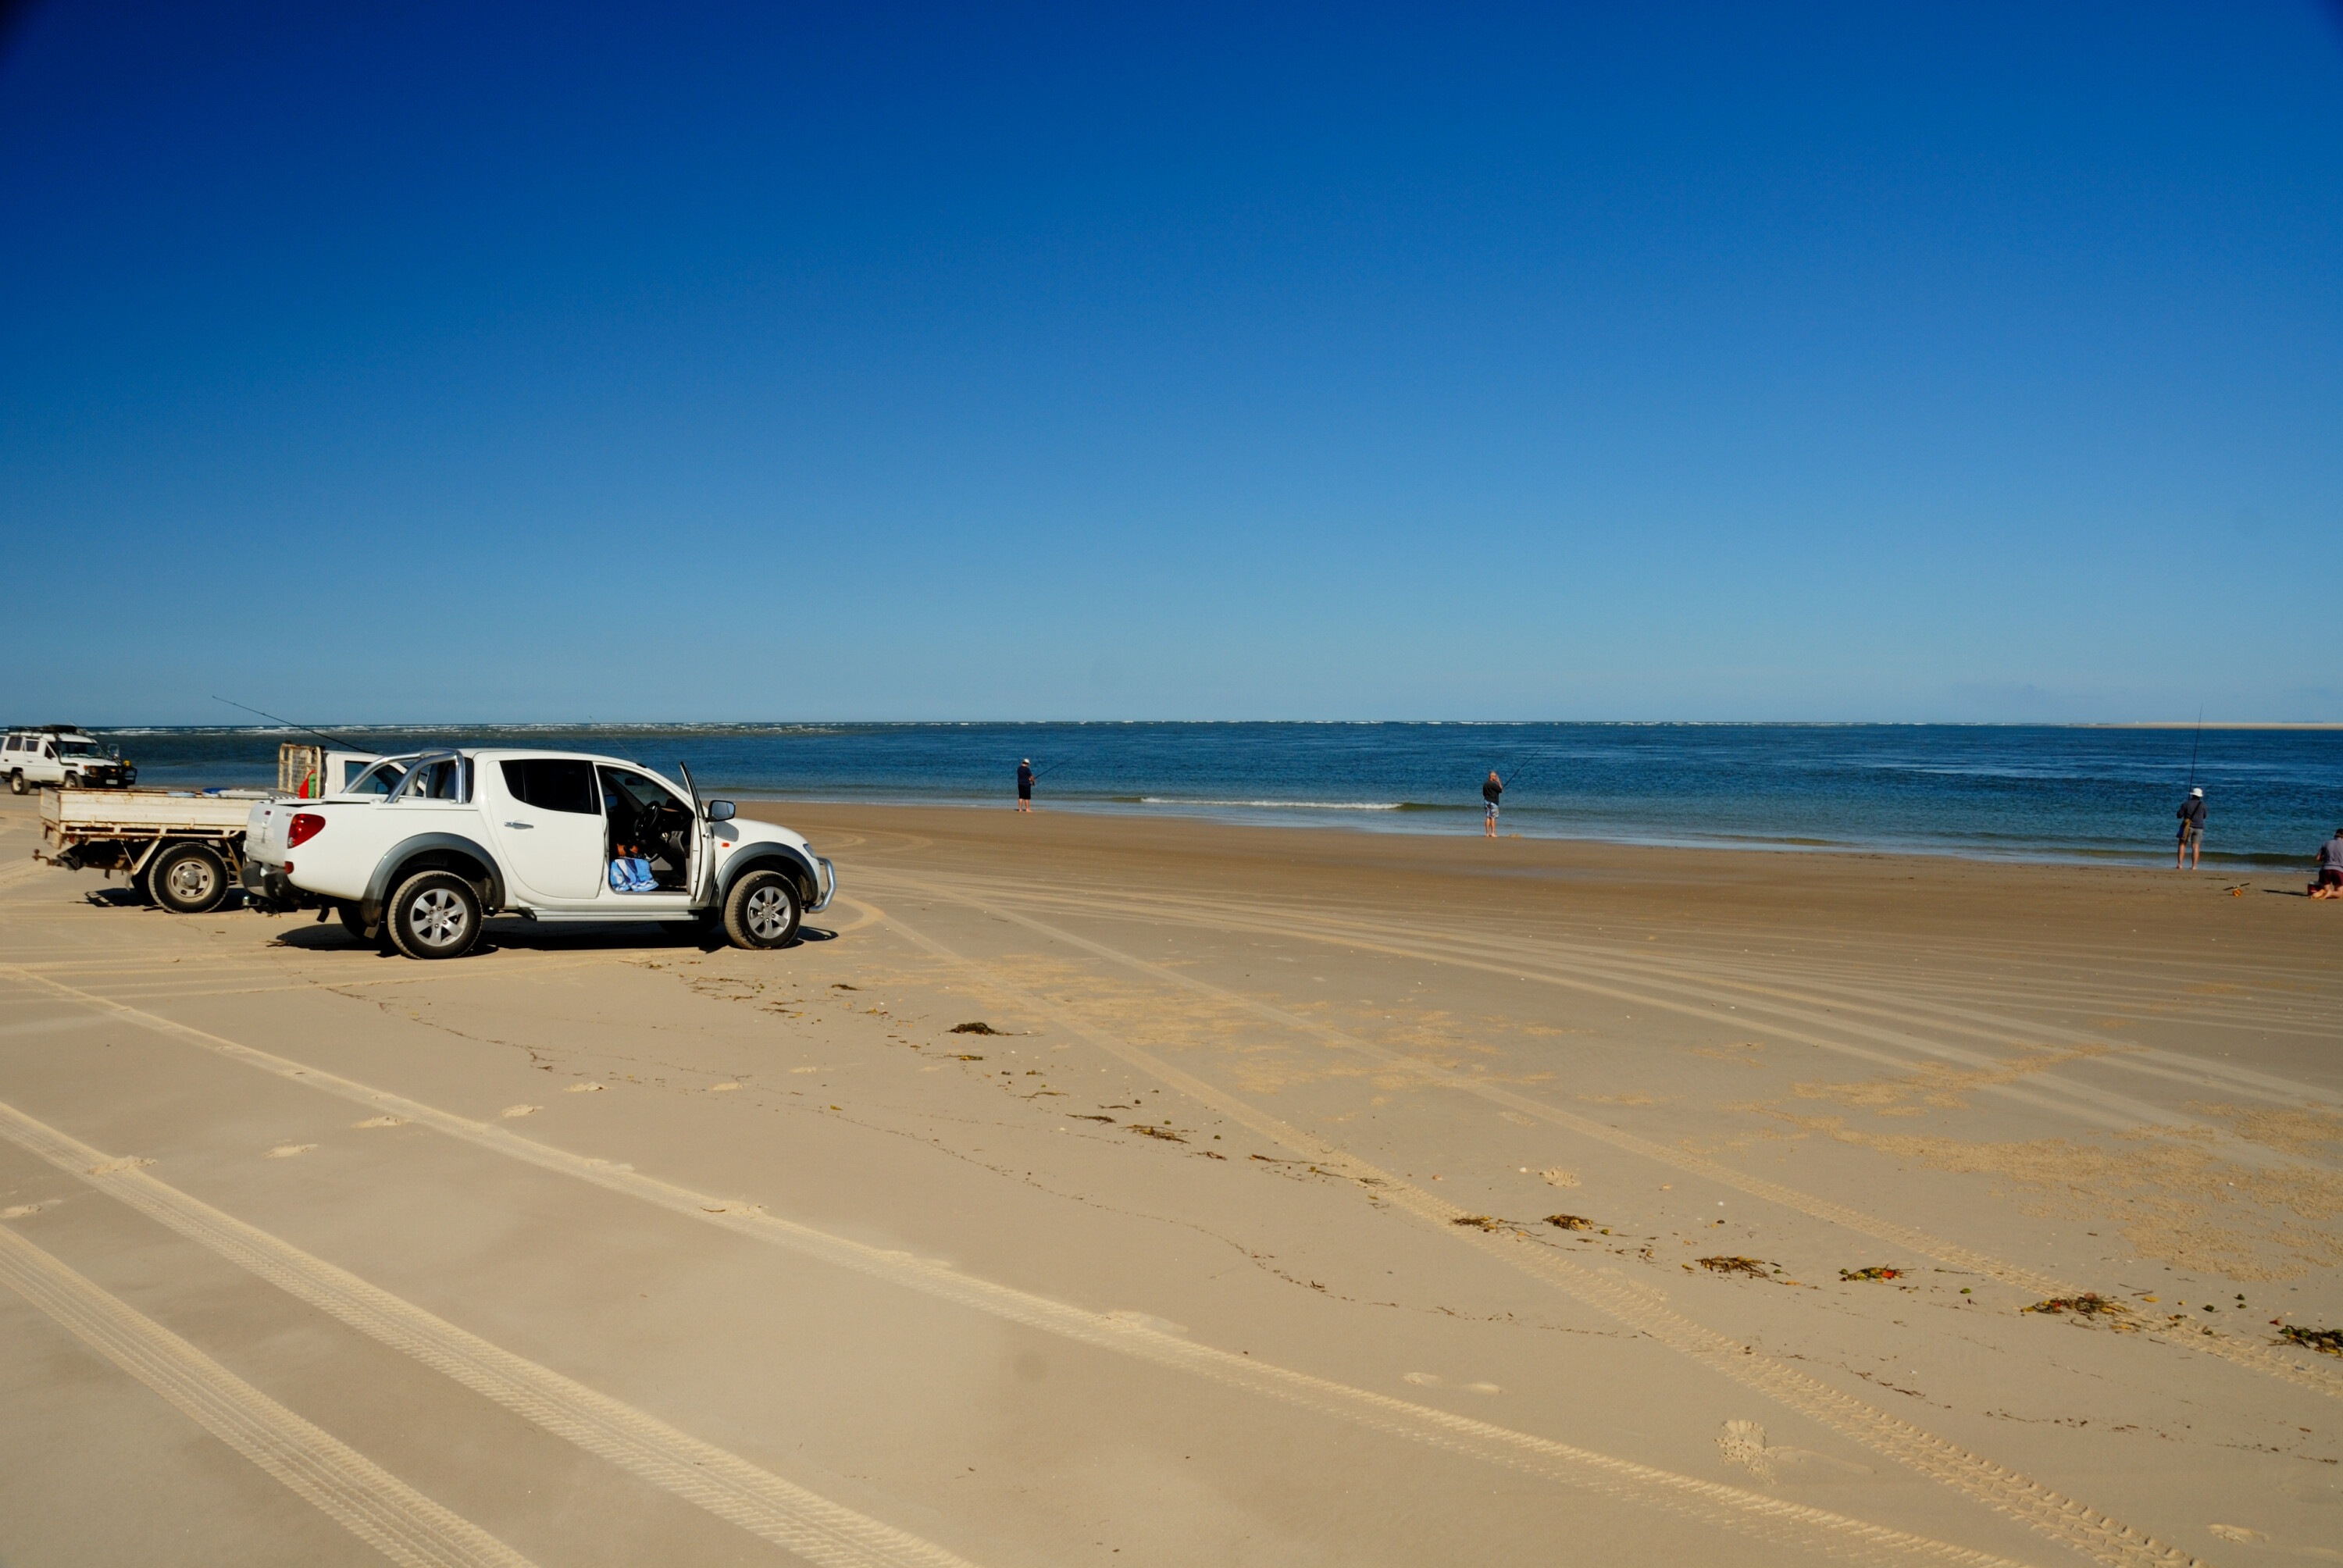
Once you’re in the RA you will soon be at the first access track that leads to Teewah Beach. This beach runs the full length of the RA’s eastern border and is a great drive, with one caveat: be sure to check tide times and air-down your tyres before venturing onto the sand.
Surprisingly (or maybe not), Teewah Beach still claims a few vehicles each year, simply due to drivers not being aware of tide times – or becoming bogged at the turn of the tide. Either way, it’s easy to avoid an act of stupidity by simply checking tide times as part of your trip prep. Lecture over, it’s time to continue north – albeit with some caution.
The fact that fishing is so popular here means you’re going to encounter any number of anglers (young and old) on the beach, so it pays to drive carefully and keep an eye out just in case.
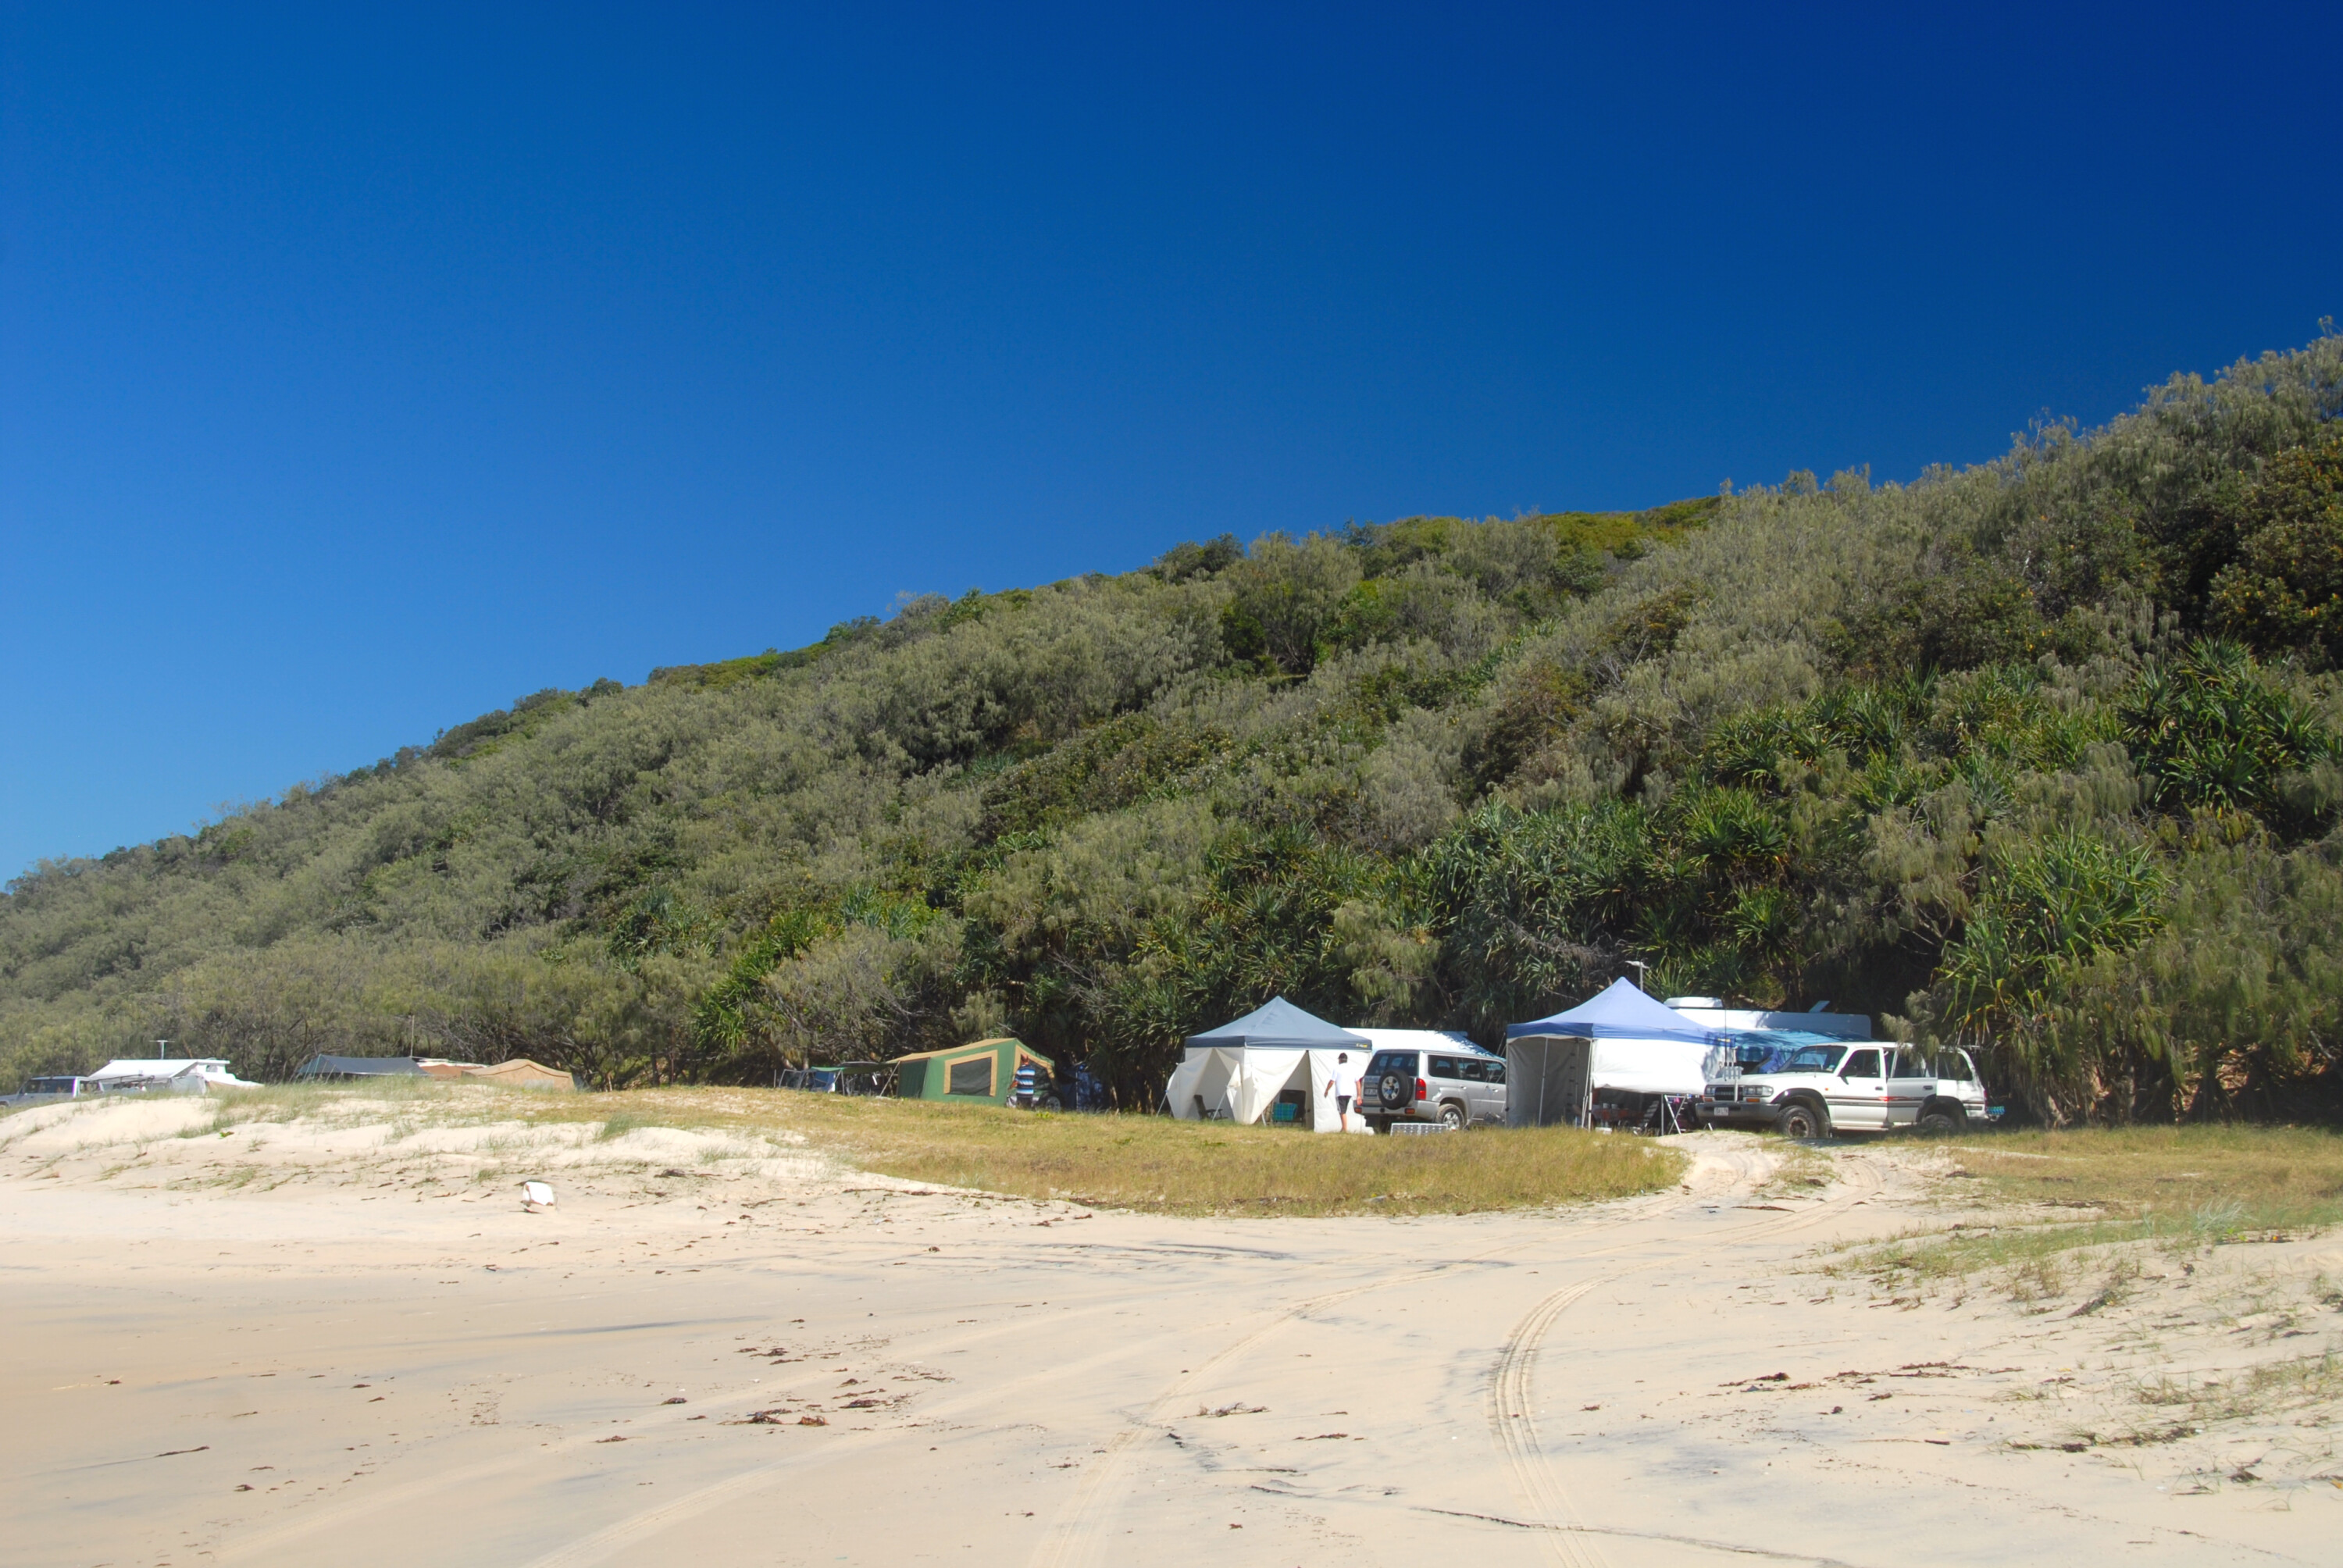
Another reason Teewah Beach is so popular is the fact you can camp right on the beach; once you pass the 20km No Camping zone, the next 15km or so allows near-free reign when it comes to setting up camp.
Use common sense and camp back from the beach a bit and you’ll be rewarded with the chance to have a campfire (fire warnings permitted; and you need to bring firewood) and also wake up to one of this country’s best sunrises each morning – not a bad start to the day while you cook brekky. Not bad at all.
If you want a little bit more in regards to amenities, the Freshwater campground is the better option. With 59 sites and a toilet/shower block that even has hot water (you need to use $1 coins to get hot water, but it’s a cheap luxury!), this campground is excellent and is only 500m from the beach.
The Freshwater 4WD Track nearby runs for 15km and is a nice touring option for an hour or so, taking you past Freshwater Lake (one of the many freshwater lakes found in the RA) and linking onto Rainbow Beach Road, if you want to head to that northern village for supplies.
For off-roaders looking for challenging driving, you can opt to turn off Teewah Beach at Kings Bore Track. This 40km circuit is actually part of the RA’s fire management track network, but makes for a great four- to five-hour adventure as you negotiate the sandy track surface past huge eucalypts and the historical Camp Milo (this was part of the timber industry’s tramway built here in the late 1800s to assist in hauling timber out).
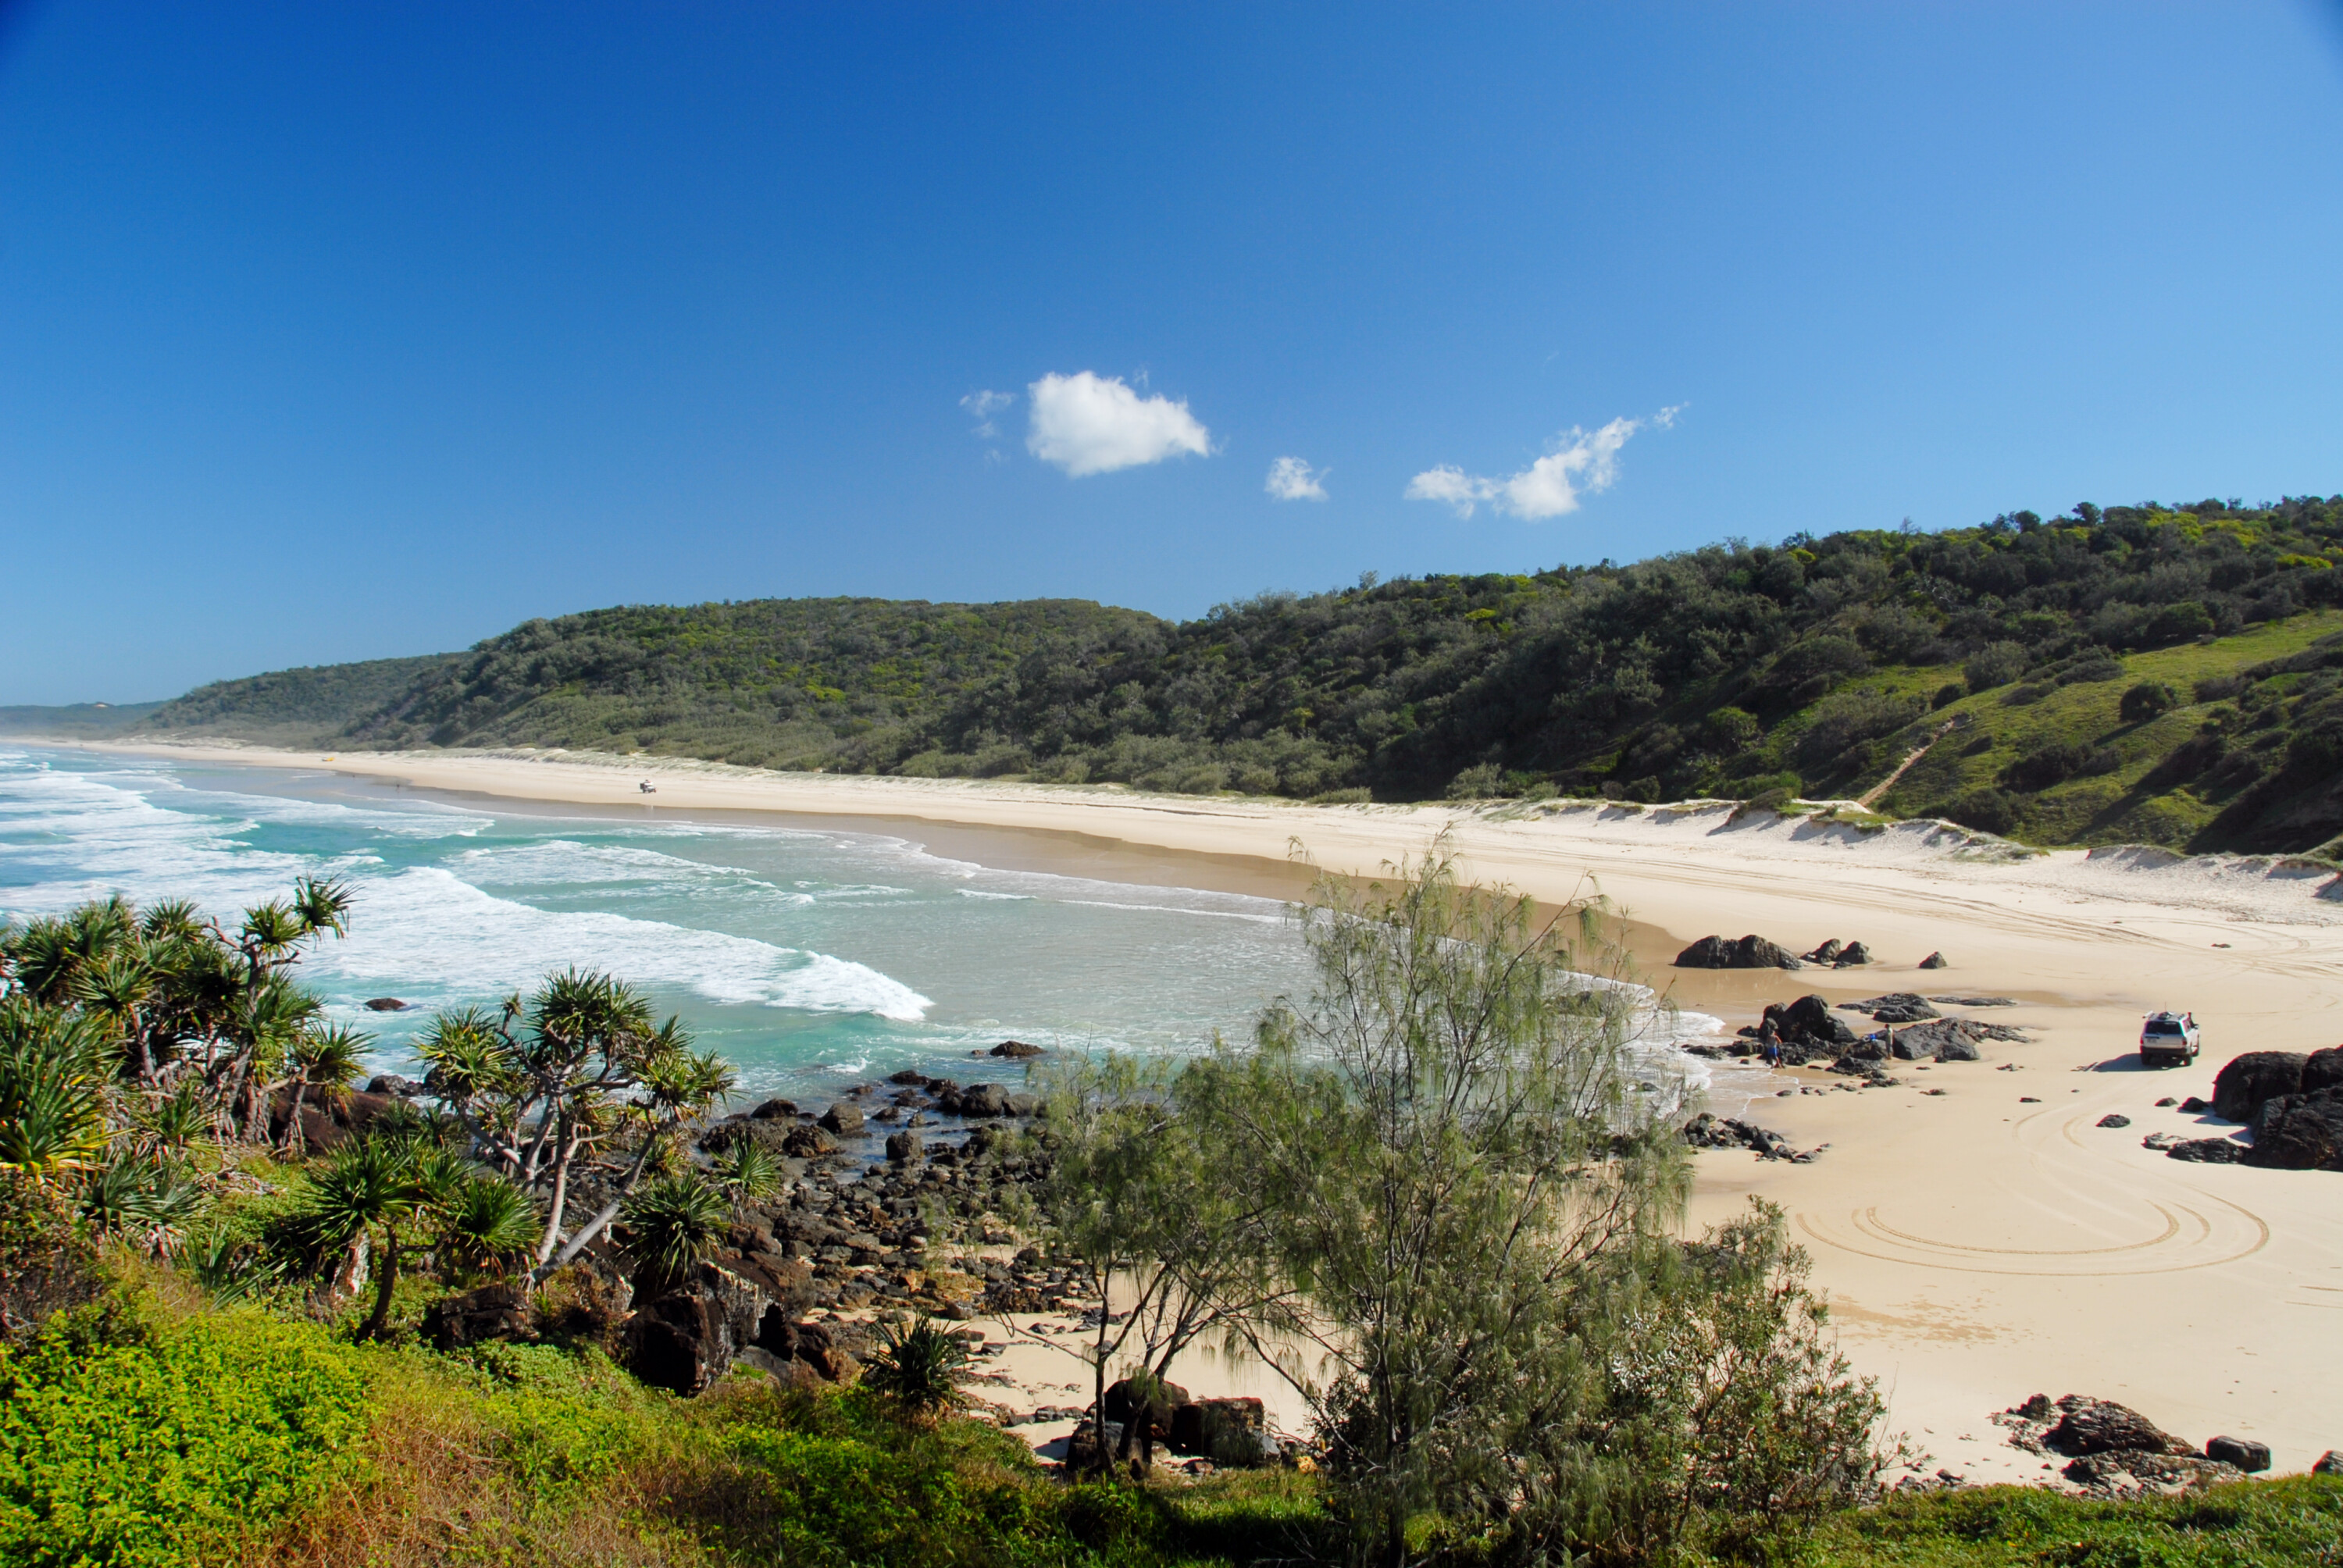
Another of the many drives here is the Cooloola Beach Drive, tracking along the northern coastline of the RA from the village of Rainbow Beach in the north and allowing tourers to access the walk to the historic Double Island Point Lighthouse – a must-do on your visit here. Be sure to do this drive at low tide and be careful negotiating Mudio Rocks near the village at the beginning of the drive. And don’t forget to check out the multi-coloured sands you find here.
Another shorter off-road sojourn is the Harry’s Hut Road 4WD track, back down in the RA’s southern section. Harry’s Hut is an old timber workers’ shelter but is actually named after a Cooroy pharmacist, Harry Springs, who used to fish and camp here and bought the hut in the 1960s.
As you can see, for a relatively ‘small’ Recreation Area, Cooloola packs a mighty big punch, with plenty more to occupy those who opt to stay longer, including longer bushwalks, such as the Cooloola Great Walk (a 102km four-day journey, staying at walker-only camps), canoe/kayak trips along the Noosa River, and, of course, even more fishing. Yeah, we reckon it’d be hard to leave, too.


Want a 4×4 getaway as close as possible to Brissy? Well, at 40km from the centre of Brisbane, Moreton Island fits that bill.
The location isn’t its only appeal, as Moreton Island’s 18,000 hectares contain plenty for a weekend escape, whether you’re a swimmer (the island’s lakes make great swimming spots; confine your surf/beach swimming to the area at Main Beach that has surf lifesaving patrols), diver, angler, camper, bushwalker or a combo of all of these (plus, there’s activities such as sand tobogganing on the huge dunes).
Add in the fact that all the ‘roads’ on the island are sand (there are no sealed-surface routes here; the sand here is often very soft) and you’ve got a brilliant overnight or weekend off-road touring destination that is, quite literally, right on the city’s doorstep.
The island is reached via the Micat (Moreton Island Adventures) ferry that runs daily from Brisbane (the Port of Brisbane, to be exact) to the island’s central western coastline (The Wrecks). From here it’s onto the beach.
As expected, the island’s beach-driving conditions are governed heavily by both the tides and the weather in general; big storms can wash away large sections of beach, so it pays to check online at the Queensland Department of National Parks for the latest track/beach conditions, and also to book your vehicle access and camping permits.
Our tip for a worry-free beach-driving experience is to make sure your planned beach driving happens around two hours either side of low tide only – there’d be nothing worse than joining the reasonably long list of vehicles Moreton’s beaches have claimed.
The island has five campgrounds, all of which have toilets, showers and bore water (make sure you treat or boil this water before consumption or use with cooking). There are a further five camping ‘zones’ (beach-based, mainly). Campfires are not permitted on the beaches here (you can have fires in designated fire pits at campgrounds, but you will need to bring your own wood in).
For anglers, you need to be aware that parts of Moreton Island’s coastline are encompassed inside the Moreton Bay Marine National Park, so fishing is not allowed in those areas.
In terms of an overnight or weekend drive/camping adventure, we’d head north once the ferry has deposited you and your rig at The Wrecks. You have the option here (if the tide dictates) to take the high tide tracks at Cowan Cowan and Cravens Creek and then return to the beach for the rest of the trip north to Bulwer and the pretty Comboyuro Point campground.

The Bulwer North Point Road (sand) takes you across the island’s northern section, passing some beach access tracks along the way (as well as the must-visit Five Hills Lookout, a viewpoint atop a huge sand dune that provides a vista that takes in Heath Island) before you reach two potential overnight stays: Yellow Patch and, just a bit farther along, North Point campgrounds and the island’s famous historic Cape Moreton Lighthouse.
For those towing camper trailers, the best option is to take the Bulwer Blue Lagoon Road to the Blue Lagoon campground and to access the east coast. Time your visit for whale-watching season (June to late October) and you’ll easily spot those big boppers from here.
The next day’s drive down the eastern coastline of Moreton is awesome; there are more camping opportunities once you’re south of Spitfire Creek, but we’d continue on to beautiful Blue Lagoon, with its nice campground and fantastic swimming. This lake is the island’s biggest (and often most popular), but it’s well worth a stopover.

Also worth a pause as you continue south along this eastern coastline is the Rous Battery site. This World War II defence site is now in ruins, but it offers a great chance to get the young’uns out of the vehicle for a bit of exploration as they search for the remnants of the structure.
For even more family entertainment – whether young or old – the Little Sandhills and, a couple of kays south of these, the Big Sandhills offer both great views from their lofty heights (80m-plus) and the chance to try an activity synonymous with Moreton: sand tobogganing.
The island’s southernmost point includes Mirapool Lagoon (a top spot for birdwatchers) and then, on the southwestern side, Kooringal, which is the landing point for the ferry to North Stradbroke Island.
It is here you need to make a decision: the beach north of Kooringal is far more challenging (and often impassable) so you can opt to backtrack and take the eastern beach-side drive again up to the Middle Track turn-off, which takes you back overland to The Wrecks and the ferry back to Brissy. Or, you can jump on the ferry back at Kooringal to another escape.
Straddie, as it’s colloquially known, is similar to neighbouring Moreton Island when it comes to what’s on offer for a weekend away from Brisbane.
The island is accessed via a ferry from Cleveland on the mainland, or by the northern tip from Moreton by ferry, as mentioned previously. The island allows for numerous activities including swimming, surfing, fishing (outside the marine park boundaries), beach driving, kayaking, camping and even golf (yep, the island has a golf course).
As with Moreton, you will need to buy a beach access permit for Straddie (this is valid for 12 months and available from Minjerribah camping) and be aware there is no four-wheel drive access to the island’s beaches an hour either side of high tide (you will be fined if caught doing this). Naree Budjong Djara National Park also covers parts of the island, and there are restrictions on vehicular access to some sites, such as Blue Lake, which requires a 5km return walk to check out.
The roads on the island are a mix of sealed bitumen and unsealed (sandy) 4×4-only tracks. The ferry from Cleveland lands at the ‘capital’ of Dunwich, which provides the opportunity to grab last-minute supplies – and an island map – before setting off.
Our preferred route begins by heading north along Dickson Way; although, a nice and short side-trip option is to drive east along Tazi Road for a brief circuit of Brown Lake. Just be aware this lake circuit is suited to high-clearance off-roaders and can be quite muddy/boggy after rain.
For those heading north, looking for a nice, easy family trip, stick to East Coast Road from Dunwich, passing through the northern section of Naree Budjong Djara NP before veering left (north) toward the caravan park at Amity Point (where the Moreton Island ferry lands).
Or, preferably, turn right and settle in at one of the excellent campsites dotted along Flinders Beach that runs along the island’s northern coastline. The beach driving along Flinders is fantastic, but be aware this is a popular area and there will be a fair number of pedestrians on the beach (and anglers testing the waters), so take it easy.
This beach drive leads to an exit near Adder Rock before the tiny settlement of Point Lookout (fuel and food/supplies here). Then, it’s on to the big one – the 24km journey south along Main Beach to the end-point (literally) at Jumpinpin Channel (aka The Pin), which is the channel separating the north island from South Straddie.
You can opt to camp along Main Beach at any number of campsites, or you can retrace your tracks north and turn west onto the sealed Tazi Road (this will take you past the Blue Lake walk carpark) and return to Dunwich, taking in Brown Lake if you didn’t visit it at the start.
A far more challenging route on the island is to initially head north from Dunwich along the East Coast Road/Dickson Way and turn right just past the Beehive Road turnoff, onto Tripod Track. This is a cracker of a drive and leads you through the island’s densely vegetated interior (also stop off at Tripod Lookout for great views over the island); before you descend a very narrow track, briefly rejoin bitumen on Tazi Road, and then turn onto Fishermans Road.
Drive north on this until you see the turnoff to Keyhole Lakes Track on the left. This tough side trip (thanks to the many water crossings; it’s highly recommended to only attempt this with a vehicle fitted with a snorkel and to check depth beforehand) is rewarding if you have the necessary skills and equipment (a water-crossing tarp isn’t a bad idea, either).
These remote bodies of water offer great paddling (canoe/kayak) and fishing, and there are picnic tables near a couple of the lakes. Here, thanks to the tough access, you’ll gain that sense of isolation that is harder to find on the rest of the island.
The Australian on-sale date for the BYD Shark 6 has been confirmed, with the plug-in hybrid ute available to order from October 29, 2024.
To be released in Australia in partnership with BYD’s exclusive Australian distributor, EVDirect, the Shark has been extensively tested on local soil for the past six months. This fine-tuning has ensured it should be able to match it with Australia’s range of relentless terrain.
“The Shark 6 marks a really exciting moment for the brand as Australia’s first plug-in hybrid ute that’s been specifically made and tested on our roads, for our roads. It’s built for Australian demands with its spacious interior and sporty drive, showcasing versatility to suit adventurers, tradies and of course families,” said David Smitherman, EVDirect CEO.
“We believe it’s a true category creator with its luxury design and full suite of custom accessories. Importantly, it has incredibly low ongoing running costs as it toggles between pure EV and Hybrid formats, which in today’s economic climate is a genuine consideration for customers,” he added.
The BYD Shark is equipped with BYD’s DM-O (dual-mode off-road) technology, which pairs a 170kW 1.5-litre four-cylinder turbocharged petrol engine with dual electric motors – 170kW/310Nm on the front axle, and 150kW/340Nm on the rear axle – for a combined power output of 320kW.
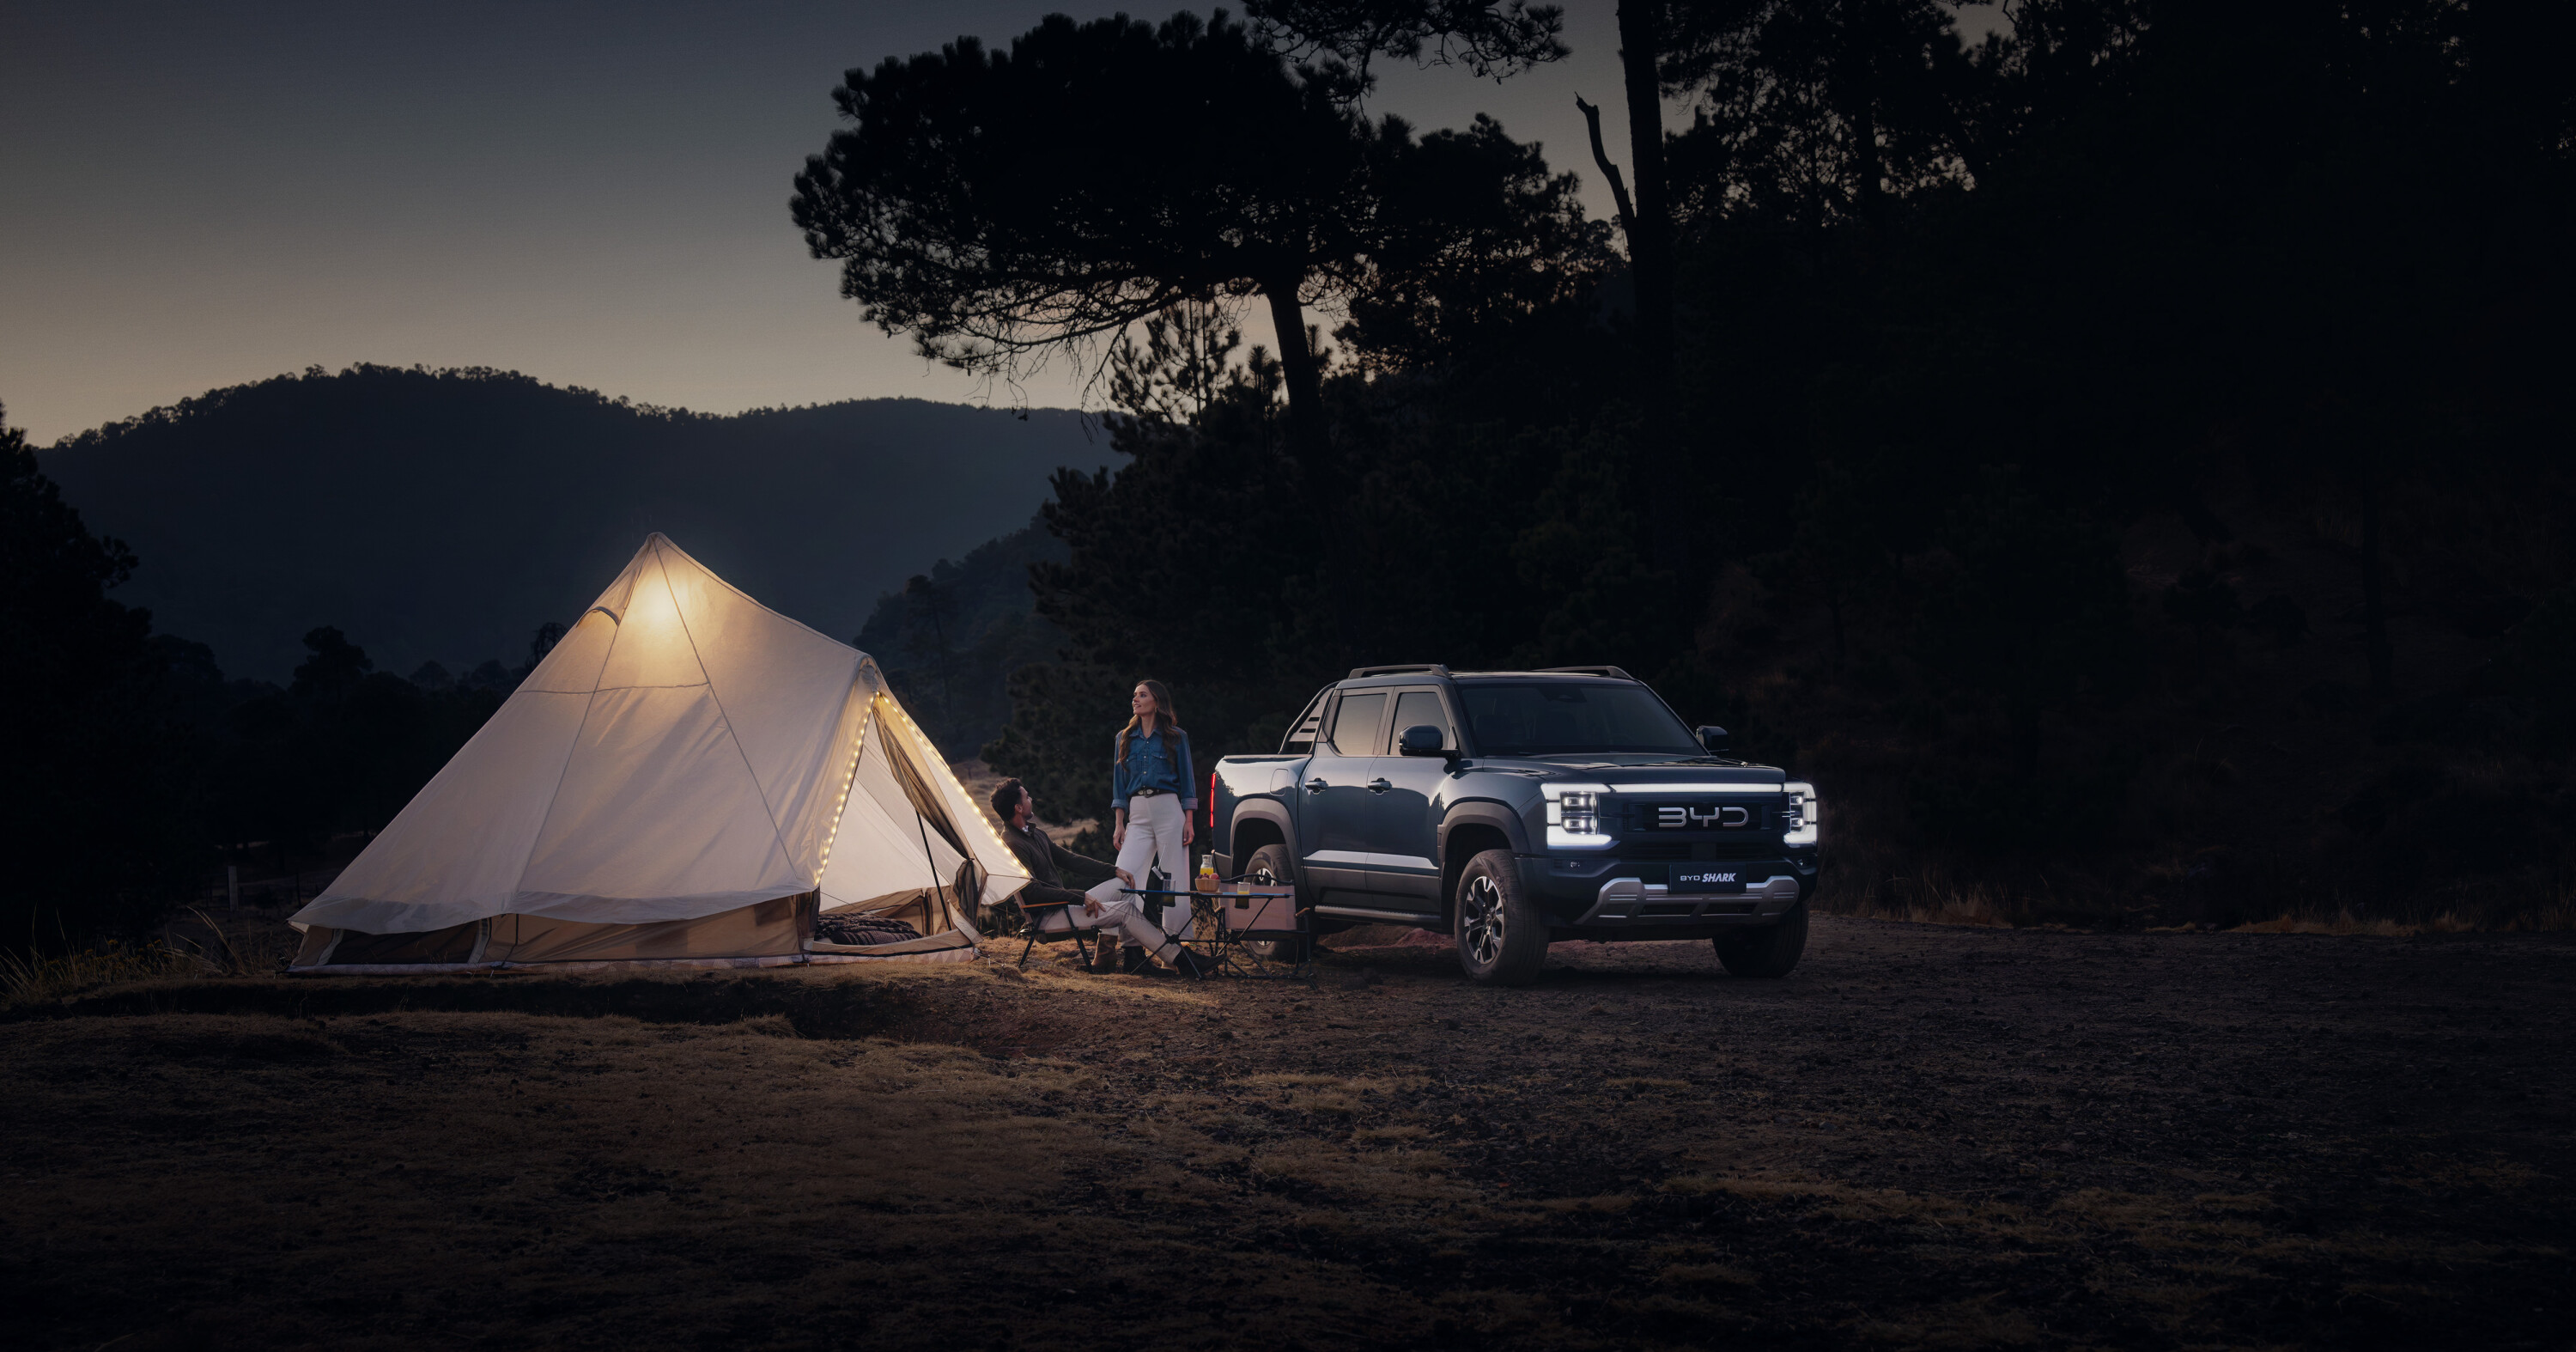
The Shark runs on independent coil-spring rear suspension and features three terrain modes – Sand, Mud and Snow – as well as instant torque distribution between the front and rear wheels. BYD claims the Shark 6 will have a combined range of approximately 800km.
Notable interior kit includes a 12.8-inch infotainment system, Apple CarPlay and Android Auto, a 10.25-inch digital instrument cluster, a 360-degree camera system, a wireless phone charger, a head-up display, and the use of an NFC key card.
Full specs and pricing is yet to be determined and will be revealed over the coming weeks, but here’s everything we know so far!
A reliable power source is essential for 4×4 enthusiasts, and a dual-battery system is an excellent way to ensure your Ranger has enough power for every adventure.
Dual-battery systems help to extend the lifespan of your battery and electronics, making it a worthwhile investment for any serious off-roader. The following products are intended as a starting point, to give you an idea of what’s available. We’ve included information on Ford Australia’s genuine accessories, in case you’d prefer to stick to OEM.
What it is: A second battery system and associated hardware, to run accessories such as fridges the battery and charging systems.
Why you need it: Fridges, radios, laptops and other accessories can significantly drain a battery, leaving insufficient power to start the car. A car battery isn’t designed for powering appliances long-term; it’s designed to deliver a lot of power for just a moment to start the car. So the best thing to do is to create a second electrical system for accessories.
Buying tips: The Ranger is not unique or special compared to other modern vehicles, so any auto electrician should be able to create a dual-battery system. We have listed below some of the Ranger NG specific kits, especially trays to hold the batteries, as that’s the part which tends to be unique to a given vehicle.
Lithium: For the battery itself you may also consider a lithium battery as the second battery; compared to the older AGM design, lithiums are much lighter, smaller and can be discharged lower than the AGMs. However, they are much more expensive.
Custom Lithium battery kit
These custom lithium batteries are designed for the Ford Ranger (2015-2024) including PX2, PX3, and next-gen RA models. They’re compatible with models featuring Premium Audio. Available in 100Ah, 150Ah, or 200Ah capacities, the system offers a no-drill solution that fits your vehicle without needing an additional battery tray.
If a Victron battery monitor is selected, it will be pre-mounted and configured for easy use. You can also customise your setup with additional components to charge the battery and power your adventure.
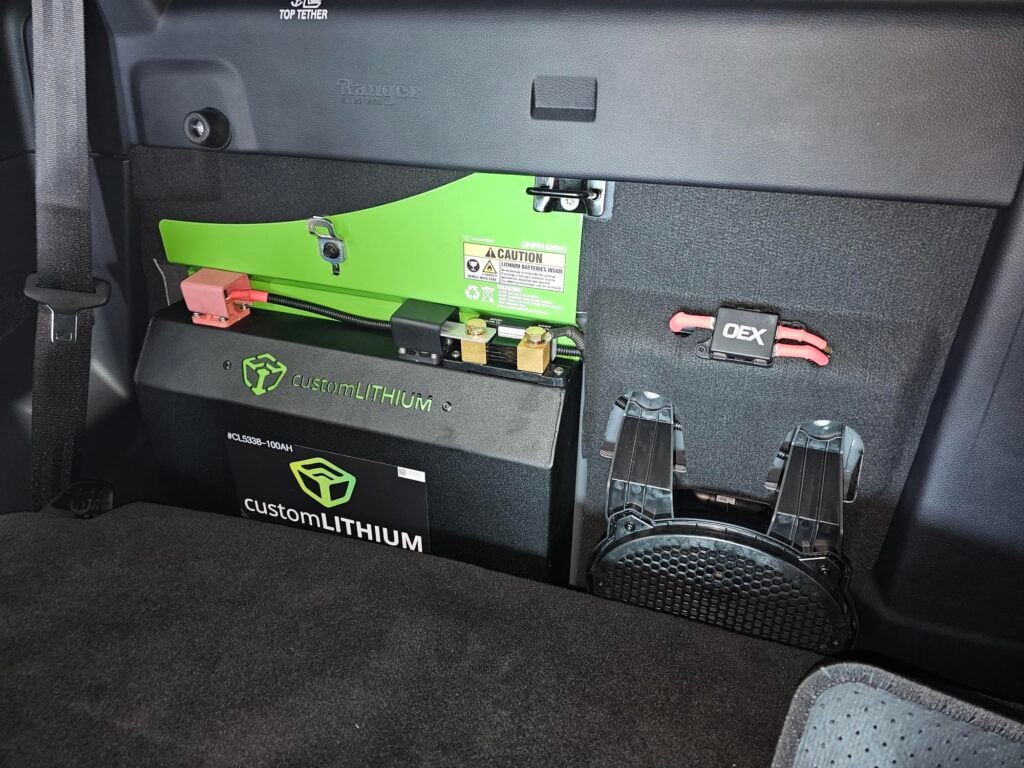
Specifications:
- Battery tray: Yes
- Charger: Option
- Battery: 100Ah – 150Ah – 200Ah
- Location: Behind rear seat
Things we like
- Tucked away out of sight
- Large capacity battery
- Build kit to suit your needs
Not so much…
- N/A
Pirate Camp Co. under-bonnet auxiliary battery mount
Pirate Camp Co. has an under-bonnet auxiliary battery mount specifically designed for 2022+ Ford Ranger and Everest models.
The mount accommodates a range of battery types and is compatible with Redarc BCDC battery chargers. It has a maximum weight rating of 25kg and is made of high-quality 304-grade stainless steel with a durable powder-coated texture in black. The tray is suitable for other batteries, including lithium options, with a maximum height of 190mm. It is 100 per cent Australian made and owned.
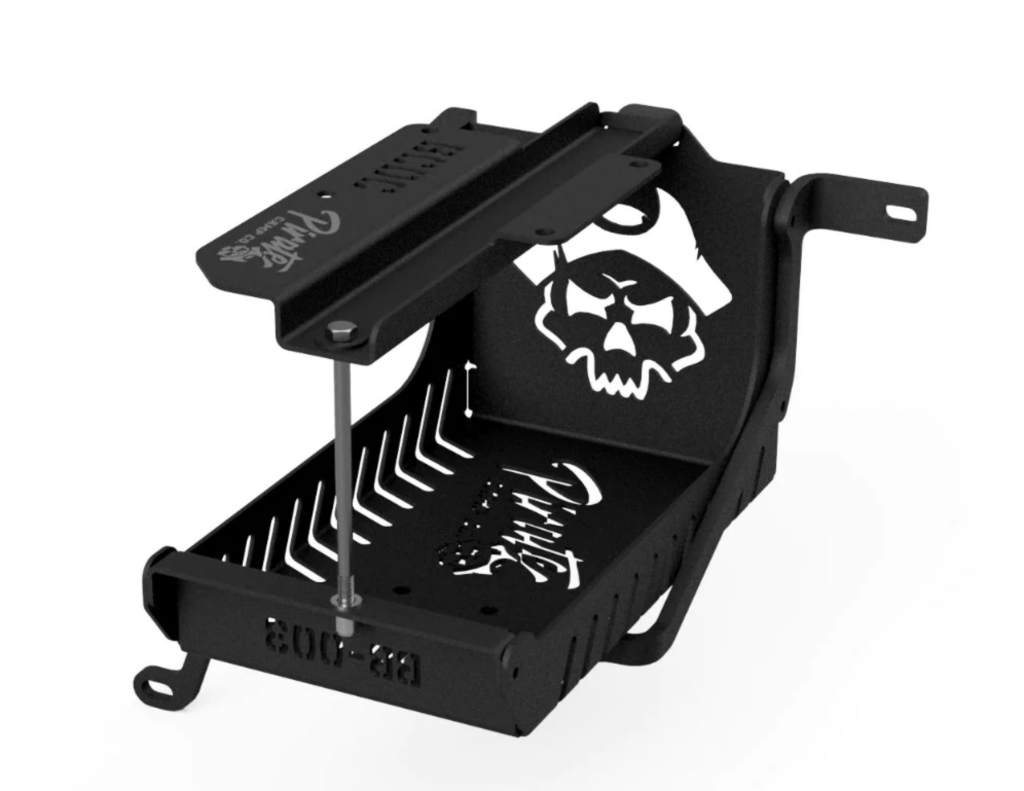
Specifications:
- Battery tray: Yes
- Charger: Mounts a Redarc BCDC1225D
- Cabling: Option
- Battery: Not included
- Location: Under bonnet
Things we like
- Mounts Redarc BCDC charger
- Maximum battery height of 190mm
- Easy DIY installation
Not so much…
- Battery not included
- Under bonnet location
ARB auxiliary battery kit
This is a kit that allows for an auxiliary battery to be added to the engine bay of the Ford Ranger, in order to power additional items without draining the main battery. It includes a battery tray, mounting bracket, charger, wiring, and hardware, but does not include the battery or outlet wiring. It is not compatible with the Ranger Raptor model. It is a licensed accessory by ARB that is backed by a Ford warranty.
Ford Australia has a licensing agreement with ARB. Order ARB accessories when you order your next-gen Ranger, and they’ll be covered by Ford’s five-year warranty. So if you have a warranty issue, there are no grey areas about which company’s responsible.
If you order ARB accessories after purchase (through a Ford dealer), they’ll be covered by the remainder of the warranty period. If you’d like to know more about the Ford/ARB partnership, then go here.
Specifications:
- Battery tray: Yes
- Charger: Redarc BCDC1225D
- Cabling: Up to BCDC input only
- Battery: Not included
- Location: Under bonnet
Things we like
- High-quality Redarc BCDC charger
- All wiring supplied up to BCDC input
Not so much…
- Battery not included
- Under-bonnet location
4×4 Outdoor battery kit
This next-gen Ranger and Everest dual battery under-bonnet tray accommodates batteries up to 120Ah or those with dimensions of 185mm(W) x 345mm(L) x 220mm(H) or smaller. It is compatible with V6 and bi-turbo models. The kit includes a tray and under-support brace. The kit is easy to install and suitable for DIY installation, with an available installation video for reference.
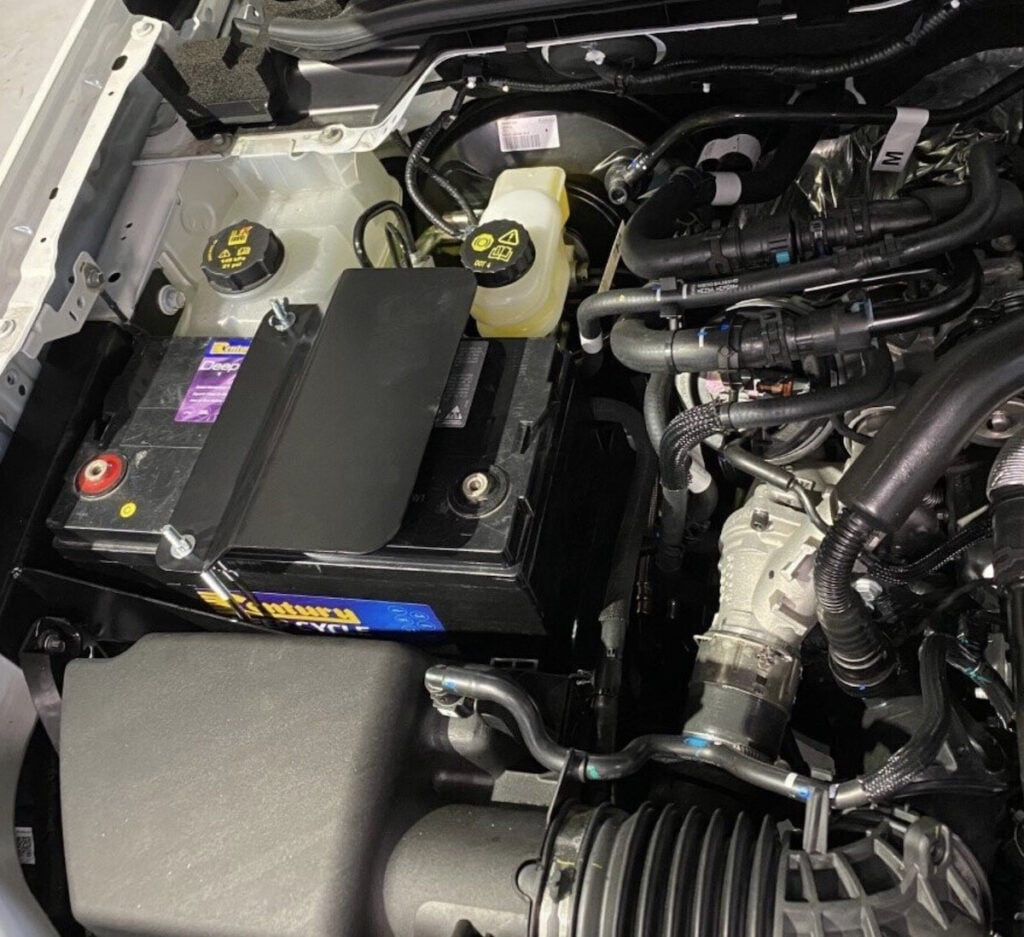
Specifications:
- Battery tray: Yes
- Charger: Option
- Cabling: Option
- Battery: Option up to 120Ah
- Location: Under bonnet
Things we like
- Build kit to suit your needs
- DIY or workshop installation options
- Installation video available
Not so much…
- Under bonnet location
Off Road Downunder battery kit
The battery tray is designed for the 2022+ Ford Ranger RA and is a precision laser-cut battery tray that fits the Invicta Lithium 40Ah battery under the rear seat.
The tray is made of 2mm-thick Australian mild steel and features a durable powder-coated finish. The kit includes the battery tray base, side mounting bracket, heavy-duty cam-buckle strap, installation bolt kit, and step-by-step instructions.
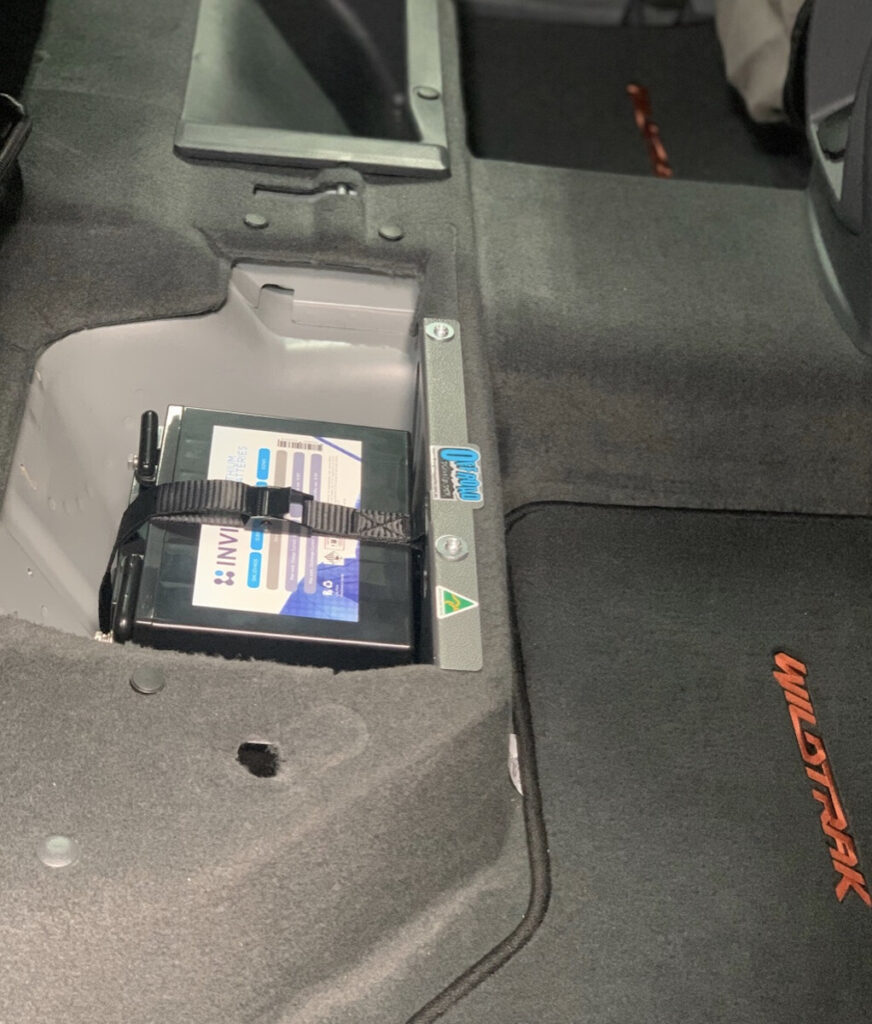
Specifications:
- Battery tray: Yes
- Charger: Option
- Cabling: Option
- Battery: Option up to 40Ah lithium
- Location: Under rear seat
Things we like
- Away from engine-bay heat u00b7
- Uses otherwise empty space
Not so much…
- Limited battery capacity
- Need to drill holes for installation
Buyers’ guide: Dual-battery kits
What is it?
A dual battery system is a battery with its own charging system, installed in a vehicle or boat. They’re pretty much essential for anyone who spends weekends camping or for longer touring trips. Dual battery systems enable you to charge all those devices we carry nowadays, keep the fridge cold, and power the lights around the campsite.
The battery provides 12 volt power for accessories… fridges, phones, camp lighting, and so on. By adding an inverter, you can have 240VAC on hand as well. The charging system keeps the battery charged. It uses power from devices like solar panels.
Why do you need it?
Your devices need charging while you’re camping or travelling… phones, tablets, laptops, and so on. And you’ll probably have at least one fridge, plus an inverter to run 240VAC devices. You can’t possibly run all this gear off the starting battery. It’d be flat in no time, and it’s not designed for repeated gradual discharging.
So sooner or later, your start battery will throw the towel in. Usually this happens when you’re camping alone in a remote place with no phone reception. I can tell you from first-hand experience, there’s no worse sound in the bush than the horrible dead “ticking” noise when you turn the key.
How do you avoid killing the start battery, yet still have the convenience of charging all your devices? By installing a dual battery system. This way, you can run all kinds of devices from the second battery. The worst that can happen is you’ll run out of power and the fridge will get warm. That’s a whole lot better than being stranded in the middle of nowhere with a flat or dead starting battery.
Buying Tips
We said earlier, a dual battery system’s a battery with its own charging system. Let’s look at it more closely. The battery must be able to handle gradual loss of charge and recharge, repeated thousands of times. In contrast, a starting battery provides a quick blast of power.
So the batteries are different. They’re called deep cycle batteries, meaning they’re happy to repeatedly cycle through deep discharges before being re-charged. A deep cycle battery is most commonly AGM (absorbed glass mat) or Lithium. If the word Lithium makes you think of fires, don’t worry.
Deep cycle Lithium batteries are the safe LiFePo4 type, not the more volatile Lithium-ion which are notorious for catching fire.
The charging system keeps the dual battery charged. It uses one or more sources of power:
- Power from the vehicle’s original electrical system
- Solar panels
- An external 240 volt supply
What charging system you use depends on your needs and budget. It can be as simple as a switch to turn on power from the vehicleu2019s starting battery, all the way up to a complex battery charging/monitoring/conditioning unit.
Dual battery systems come in many shapes and sizes. They broadly fit into two categories – permanent installations and portable units.
Installation options
You can install a second battery permanently in your vehicle or it can be portable. Both have pros and cons.
Permanent installation
Once the system’s installed, it becomes part of the vehicle. You can fit USB charging outlets, power devices like UHF radios or dashcams, and have the convenience of a 240VAC inverter. This way, they’re always connected.
For example, if you’re a tradie you can use the inverter to charge batteries for power tools on site during the week. Then on the weekend it can run the pie oven in your canopy. The downside is you need space to fit both the battery and the charging system. And it adds extra weight, especially if you use an AGM battery.
Portable dual-battery system
Portable units are the ideal solution for when you don’t have room for something more permanent… or if you want to share one dual battery system between two or more vehicles.
The features and battery capacity vary between units. At the lower end of the scale, you’ll get a small battery with one lighter socket for both charging and DC output. At the upper end are units that have:
- 100Ah lithium battery
- 240V AC mains charger
- Solar input
- Solar regulator
- Battery management system
- Battery monitor
- Anderson plug, USB ports, and cigarette lighter 12V outlets
Battery Type
AGM and Lithium deep cycle batteries are the best solutions for dual battery systems. AGM is older technology and should only be discharged to 50% of capacity. So, a 100Ah AGM battery effectively only has 50Ah of useful capacity.
Lithium batteries can discharge down to 20%, giving you 80Ah of useful capacity. And there’s a twist to this tale. Look carefully at the specs. Revolution Power for example specific their Lithium batteries as having 100Ah “nominal” capacity. This means the battery is actually larger than 100Ah… around 125Ah.
So, a quality battery with 100Ah nominal capacity has 100Ah of usable capacity. That’s double the capacity of an equivalent AGM.
The initial purchase price of Lithium batteries is many far higher than AGM batteries. However, a quality Lithium battery will last around 5,000 cycles (a cycle is one discharge and one recharge). In contrast, an AGM only lasts around 600 cycles for the same application. When you compare whole of life costs, a Lithium battery wins hands down.
There are other benefits to choosing Lithium over AGM. The most obvious is usable capacity. Quite simply, your Lithium battery will run your fridge for double the time, when compared to an AGM. This can mean the difference between a campsite with power on a cloudy day… or a hot fridge and no lighting.
Another benefit is weight. A Lithium battery is about half the weight of an AGM. For example, a 100Ah AGM weighs about 30kg while a 100Ah Lithium is around 14kg. Combine the weight savings with the doubled capacity of equivalent battery types, and the benefits of Lithium keep stacking up. You halve the space and reduce weight by three quarters (14kg instead of 60kg).
In short, if you’re on a tight budget then AGM batteries are the only choice. But if you can afford a bit more, you’ll save a stack of weight, space, and money in the long run.
Charging the battery
The charging system can be as simple as a solar panel with a voltage regulator and alligator clamps for connection to the battery.
However, it’s great to be able to charge the battery from a few sources… solar, the vehicle, and an external 240VAC supply. In this case you’ll need a controller, also known as a battery management system or a DC-DC charger.
A controller has two jobs:
- Choose the best available power source (solar, vehicle, and so on).
- Continually monitor the battery’s condition then charge it accordingly.
Any decent controller will operate as a battery charger, known as a DC-DC charger. It will monitor the battery and charge it using several charging stages. There are thousands of different controllers available. Choose one to suit your needs and your budget. One handy feature is a digital readout of the batteryu2019s charge level, so you can check it at a glance.
Finally, if you go with a Lithium battery then make sure the controller is compatible with charging of Lithium LiFePo4 batteries.
Where to install the system
Until now, the typical dual battery installation in a 4WD has been under the bonnet. With engines becoming more complex, under-bonnet real estate is getting harder to find.
But even if you do have space under the bonnet, try to find a better location. Heat kills batteries, especially Lithium batteries. In fact, don’t even think about sticking a Lithium battery under the bonnet. Find a spot in the tray or under a seat instead.
What to look for
When it comes to deep-cycle batteries, you get what you pay for. A cheap battery is cheap for a reason. This is especially true for Lithium batteries. They have an internal battery management system, cabling, and a bunch of Lithium cells.
Manufacturers of cheap Lithium batteries have to cut costs somewhere. They might use inferior quality components, cut corners during assembly, or even supply cells which don’t store the claimed battery capacity. This last point is important.
We said earlier how quality Lithium batteries usually specify nominal capacity. So a Lithium battery advertised as 100Ah will deliver 100Ah of usable capacity. However, the cheaper batteries use the smallest capacity they can get away with… remember how we said they need to cut costs?
The outcome? You buy a cheap Lithium battery rated at 100Ah and you only get 80Ah usable capacity. In short, you’re getting ripped off. Worse still, yes there are stories of Lithium LiFePo4 batteries catching fire. But the Lithium cells aren’t combustible, so how do they catch fire? It comes down to poor assembly. Wires short out and the electronic components catch fire. That alone is a good reason not to buy cheap Lithium batteries.
As for the controller, look for one which suits your needs. If you have solar panels, make sure the controller has a solar input. If you only camp at caravan parks, make sure it has a 240VAC input. You get the idea.
A dual battery system will make your camping life so much easier. Once you get one, you’ll wonder how you managed without it.
Back to top ⬆️
How we review products
4X4 Australia has been reviewing four-wheel drive vehicles and aftermarket products for more than 40 years.
When looking for the best accessories for your make and model of 4WD, there are some things essential to making sure you have the best off-roading experience. When we compare products, here are some of the things we consider:
- Warranty
- Build quality
- Value for money
- Time and ease to set-up/install
- Weight
- Fit and finish
- How well it gets the job done
- What materials they’re made from
- Corrosion/UV resistance
- Coatings
- Compatibility with other accessories
- Compliance with ADRs and vehicle safety systems
- Country of manufacture
- Load ratings,
to determine what’s the best product across each price point.
We also consider user reviews and our own experience with these products to make sure our recommendations are for the best on the market. Disclosure: When you buy through our links, we may earn a commission. We also include products that we do not earn a commission from.
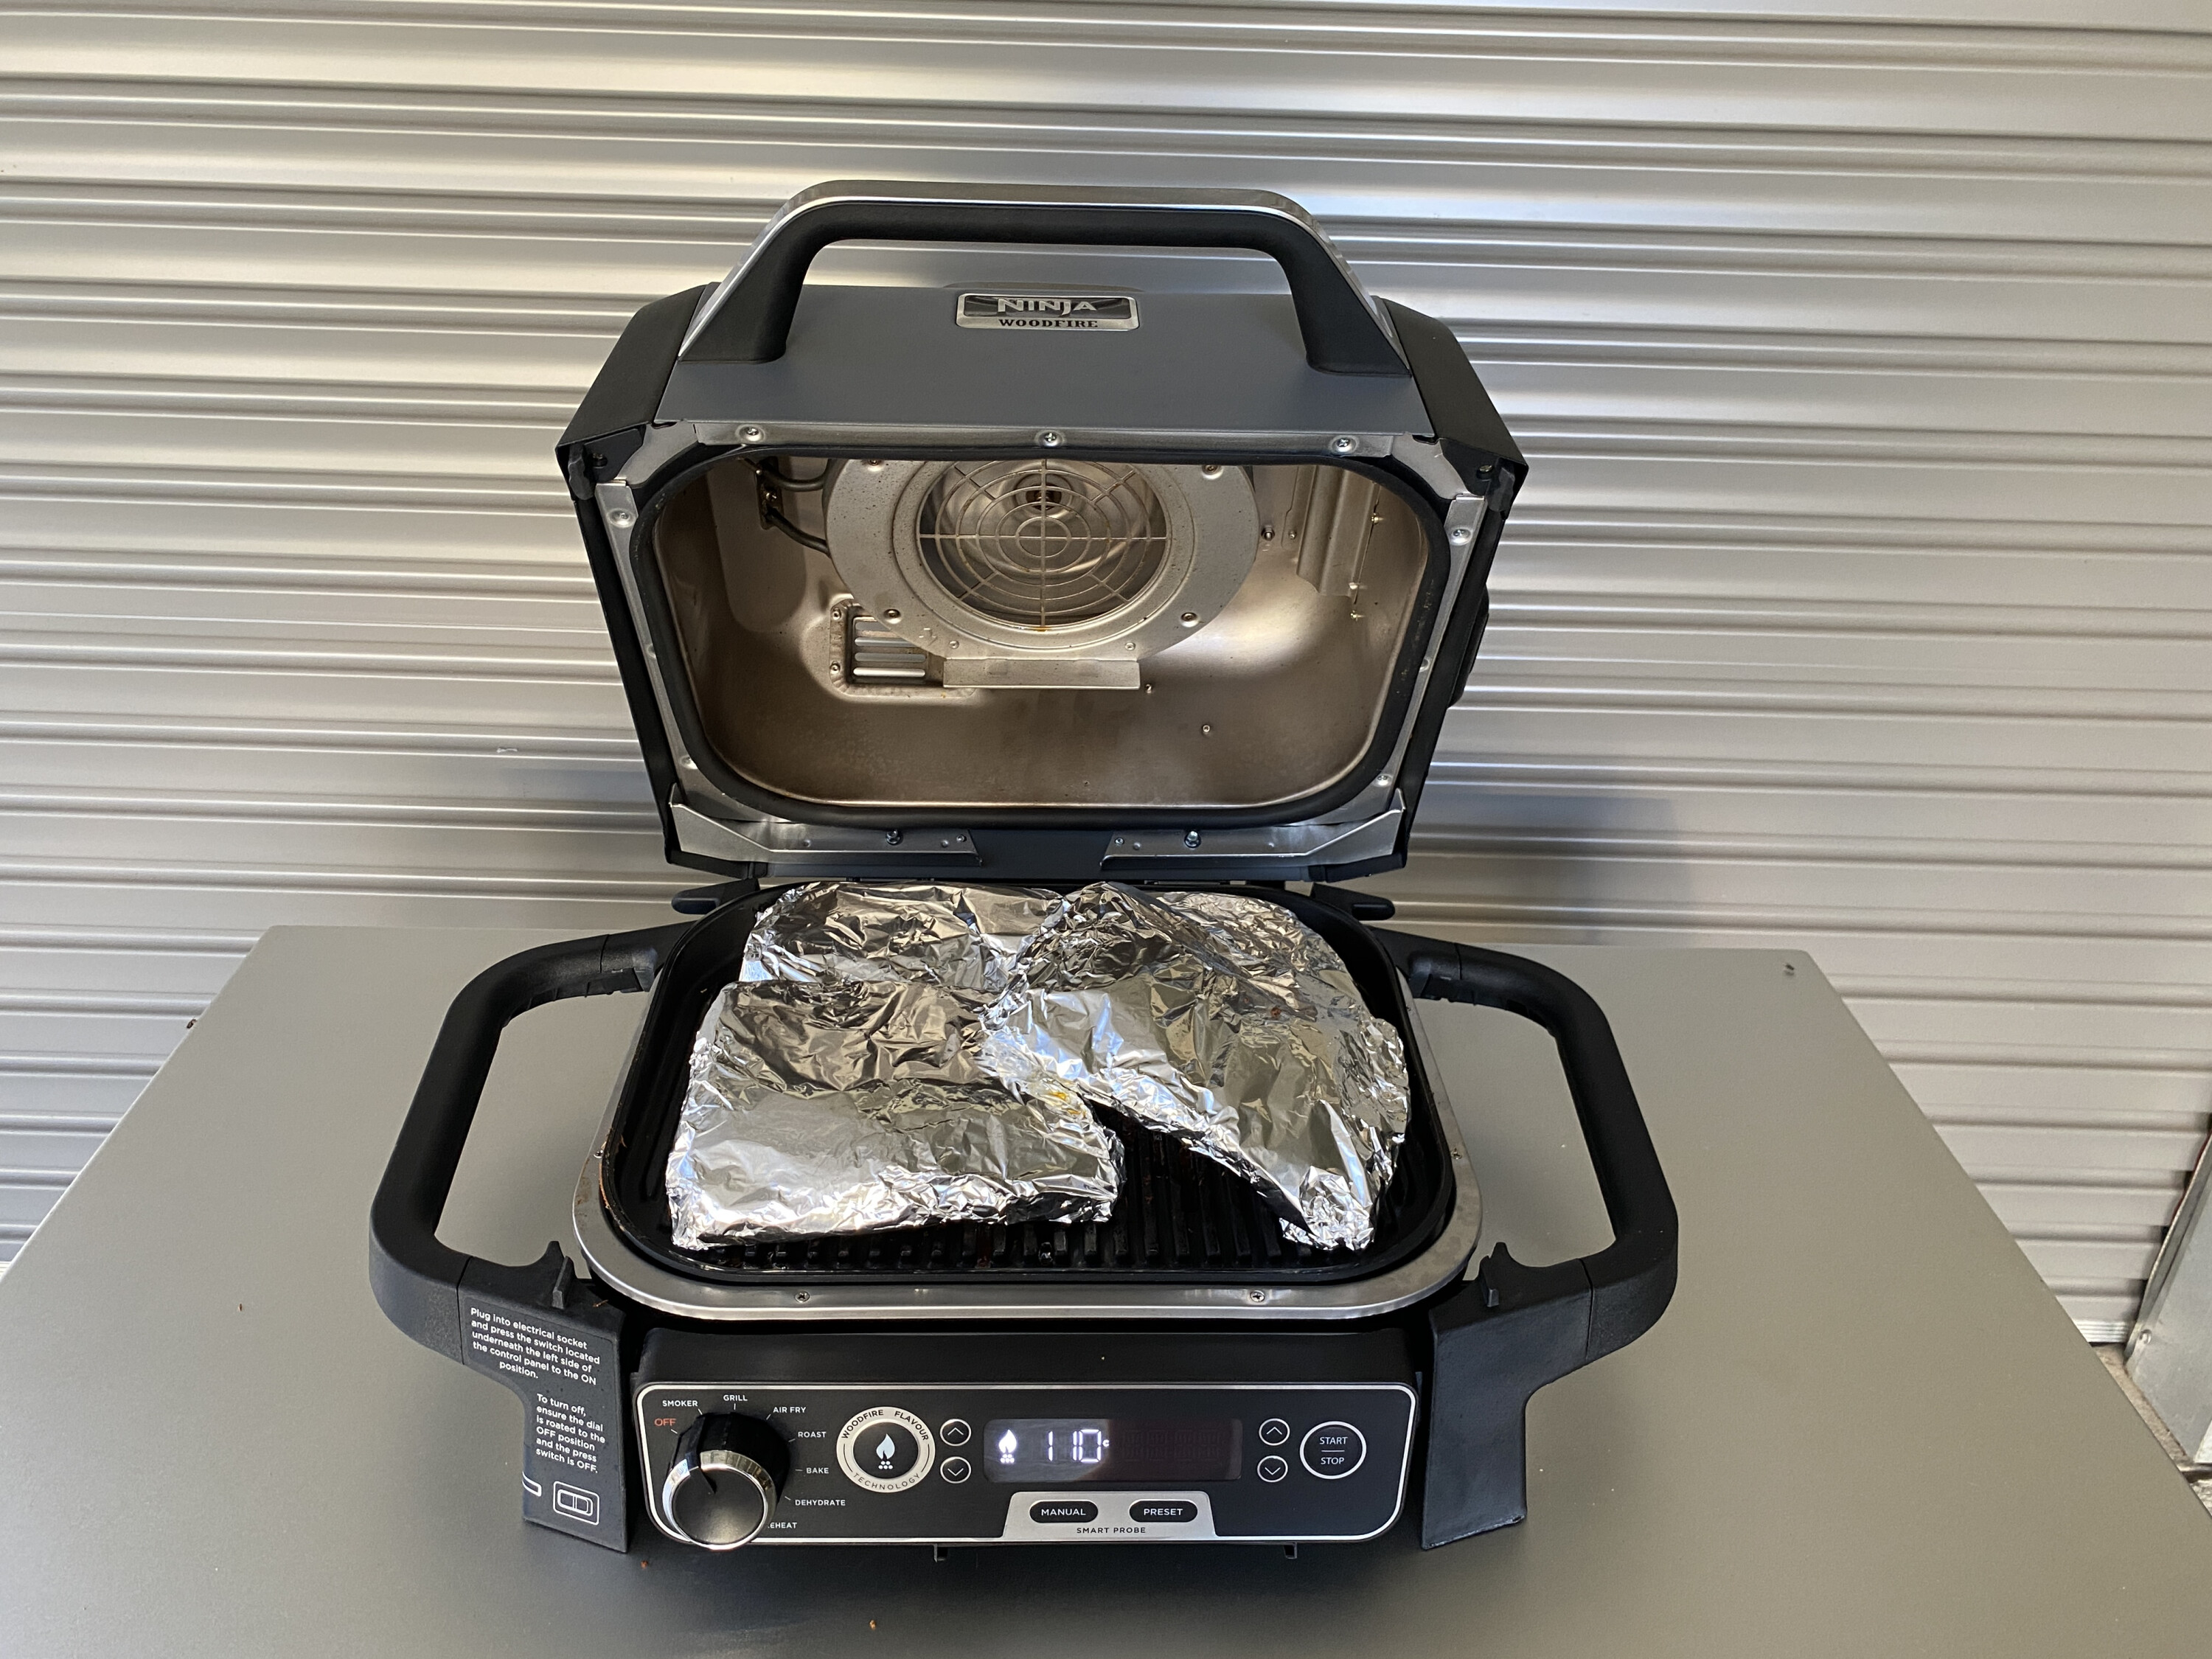
While the Ninja Woodfire Electric BBQ Grill & Smoker has garnered considerable attention from those with a passion for outdoor cooking at home, I initially wondered if there was a place for it in a camping environment.
Sure, it’s packed with innovative features and has the ability to infuse authentic smoke flavours into food, but it is quite heavy and can have a high power draw in some cooking modes. Despite the weight, the Ninja Woodfire has a sleek and compact design, which will please those with limited space for storage and who enjoy grilling on the road.
One of the standout features is the Woodfire’s portability. It has been designed to be easily transportable, whether you’re heading to the beach, a picnic or are off on a camping trip. Importantly, this compact design does not compromise the cooking surface, which is spacious enough to accommodate various types of food, from steaks and burgers to vegetables and seafood. Additionally, it features sturdy legs that provide stability on different surfaces, ensuring a safe cooking experience.
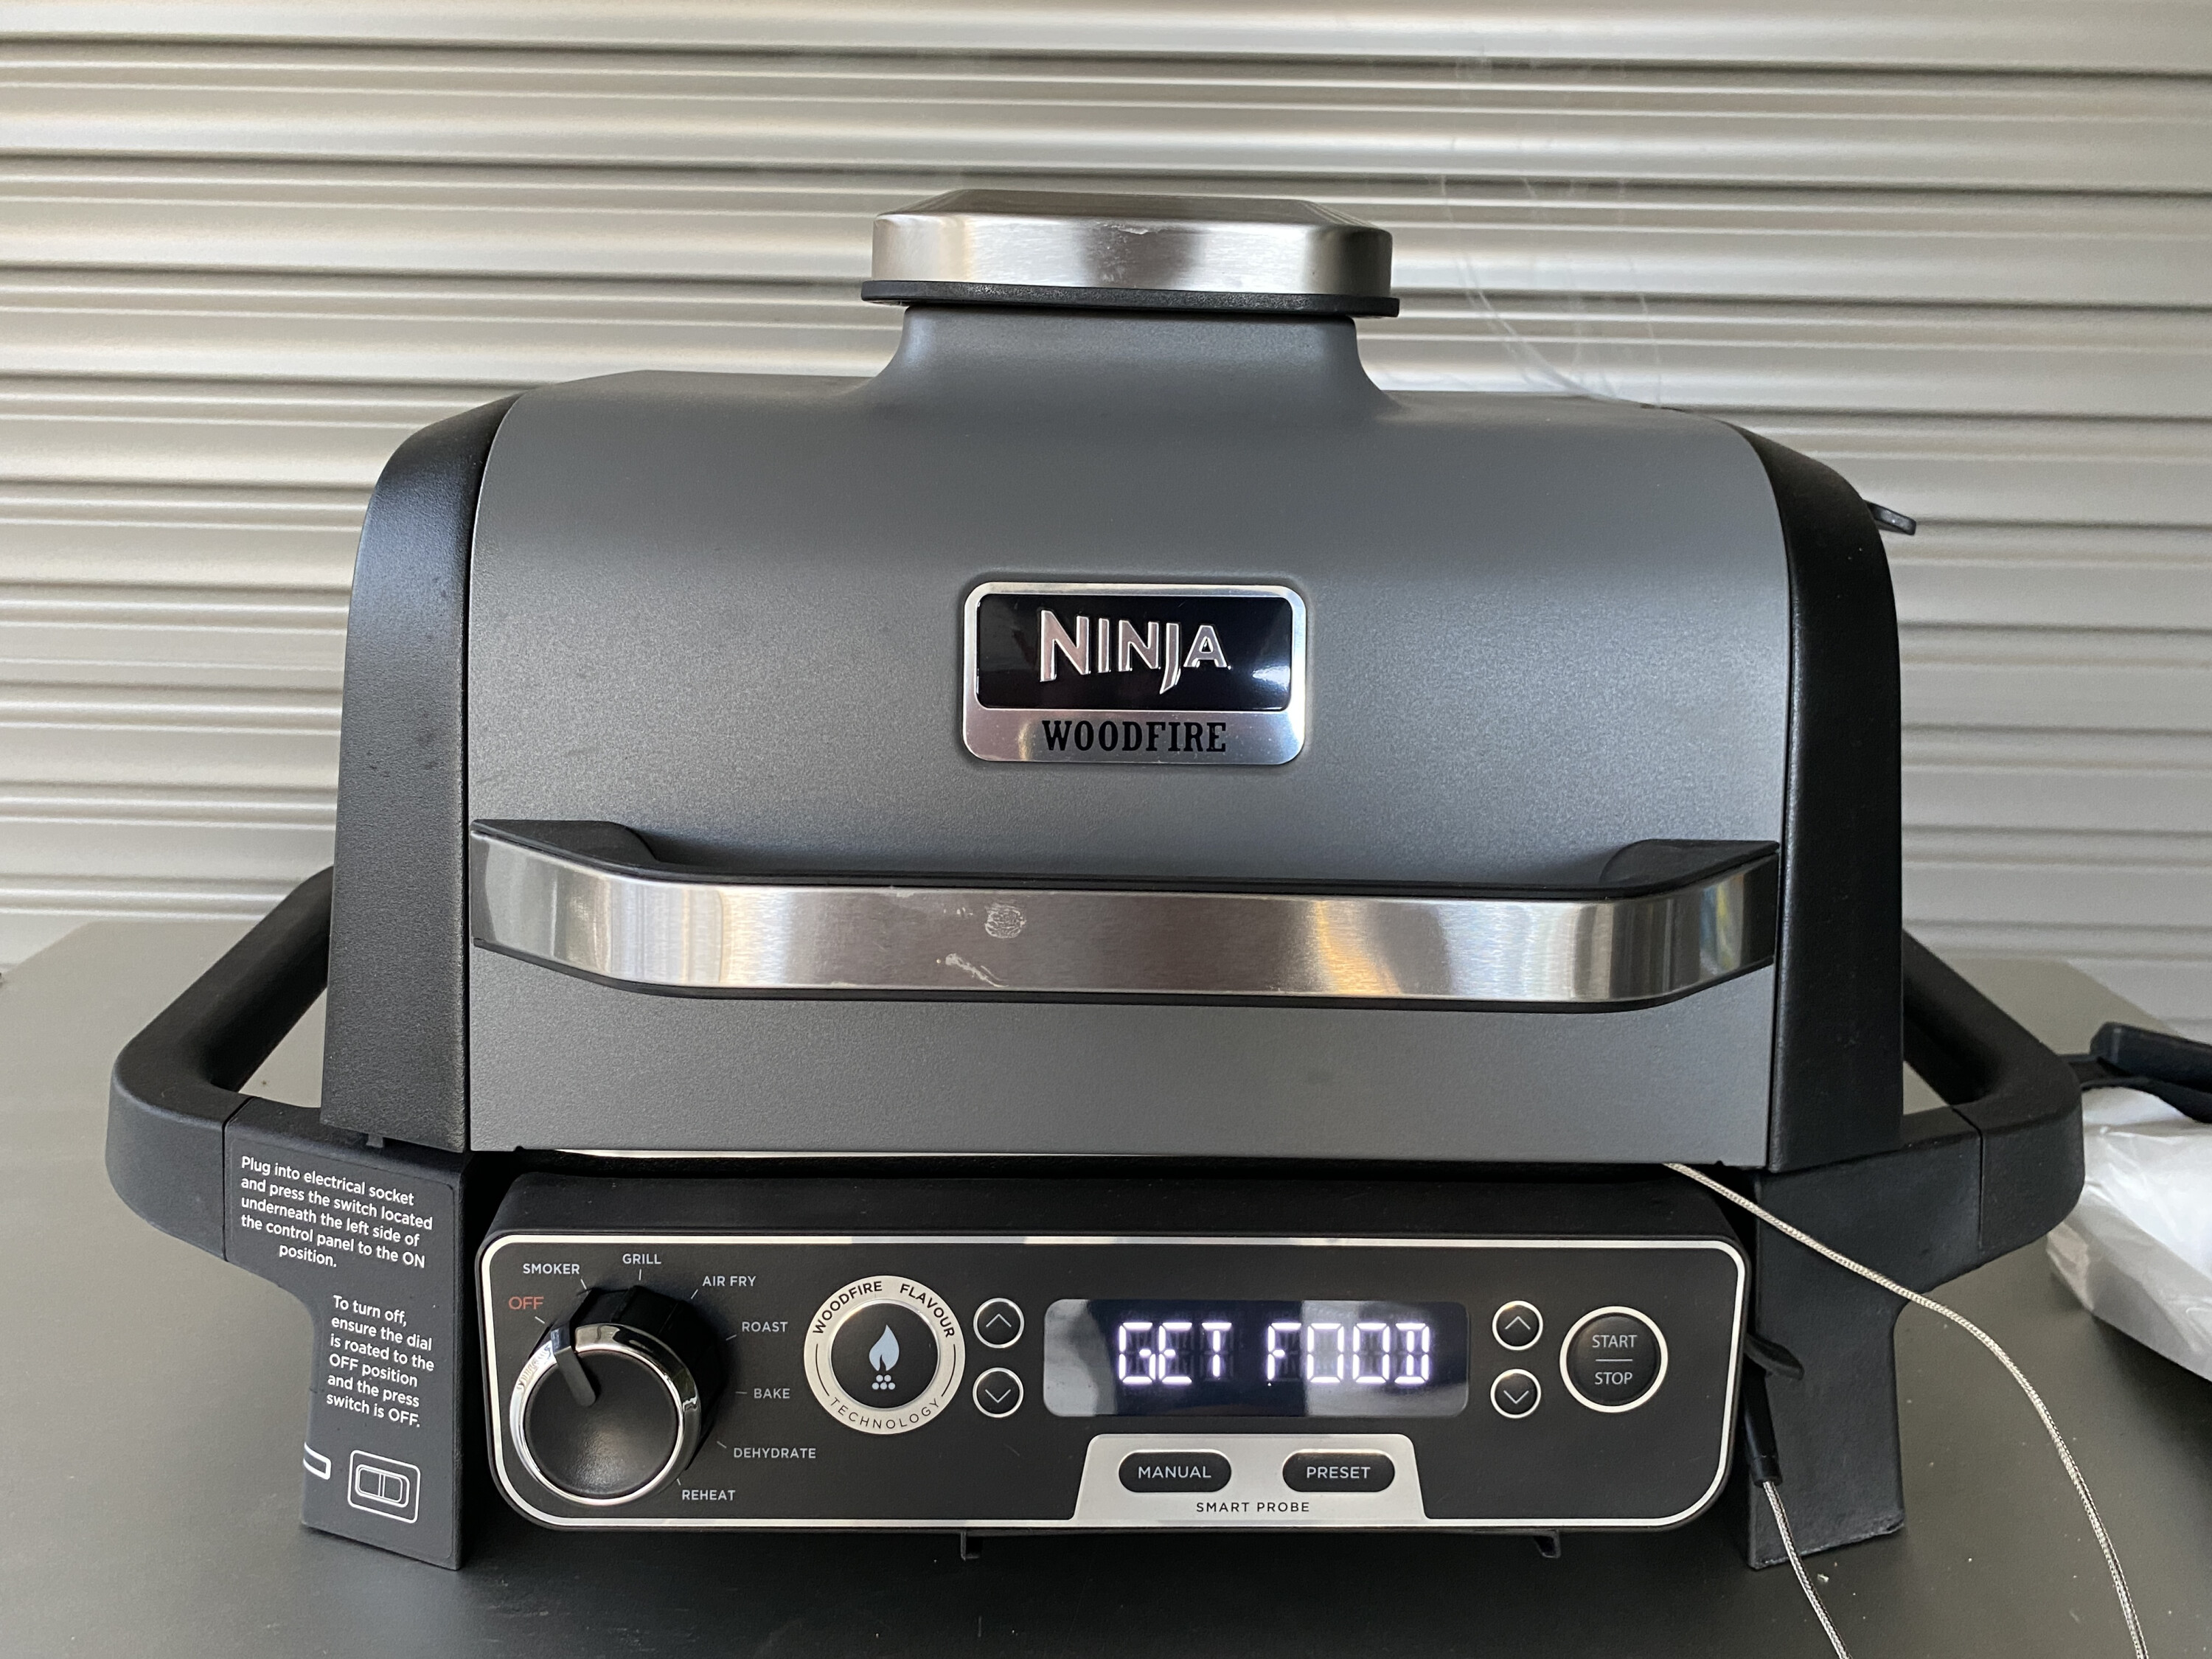
The most unique feature of the Ninja Woodfire is that it uses real wood pellets to impart a rich, smoky flavour to food, a characteristic that sets it apart from traditional gas or charcoal grills. This woodfire flavour is one of the grill’s main selling points, providing a distinctive taste that is as close as you can get to a full-sized pellet smoker.
The Ninja Woodfire has multiple cooking modes that include grilling, smoking, air frying, roasting, baking and dehydrating. It also has a reheat mode. This versatility allows you to experiment with different cooking techniques and recipes, making it an all-in-one outdoor cooking solution. The digital control panel is intuitive and user-friendly, enabling precise temperature control and monitoring, which reduces guesswork and ensures consistent results. It even tells you when to ADD FOOD, when to GET FOOD and what the REST TIME is.
Another great feature is the integrated thermometer, which provides accurate monitoring of internal food temperatures. This is crucial for cooking meats to perfection while ensuring they remain juicy and flavourful. I reckon the Ninja Woodfire is crying out for Bluetooth or Wi-Fi connectivity, which would make monitoring even simpler.

I was surprised by the performance of the Ninja Woodfire which consistently delivered exceptional results. The wood pellets generate a consistent heat source, and the grill heats up quickly. The grill preheat times depend on the level selected; HI takes 15-20 minutes, MED 13-18 minutes and LOW 12-16 minutes. If the WOODFIRE FLAVOUR option is not selected these times are reduced by 5-7 minutes respectively, as this is the time it takes for the pellets to go through the ignition cycle.
When it comes to grilling, the Ninja Woodfire performs well, although I couldn’t get a steak to cook and look how I like it. They always seemed overcooked in order to achieve sear marks, or sear marks were reduced in order to get a nice medium-rare cook. However, the sear marks it produced on other proteins such as chicken, burgers and fish were impressive.
The woodfire flavour is pronounced but not overwhelming and adds a depth of taste that enhances the overall eating experience. Vegetables and seafood also benefited from how well the grill performed, coming out perfectly cooked and infused with a subtle smokiness.

When smoking on the Ninja Woodfire the results are impressive. The ability to control the temperature precisely ensures that meats are cooked low and slow, resulting in tender, flavoursome proteins. The ease with which I could cook pulled pork and a leg of lamb was satisfying, especially compared to my larger pellet smoker. The smoke ring and flavour infusion achieved on smoked meats are a testament to the grill’s capability to function as a dedicated smoker. Ease of use is an area where the Ninja Woodfire kicks goals.
Setting up the grill is straightforward, and the clear instructions make it easy for anyone to get started. The intuitive digital control panel simplifies the process of selecting cooking modes and adjusting temperatures, making it accessible even to those who may not be experienced grillers.
Maintenance and cleaning are also hassle-free. The grill’s ash management system efficiently collects ash from the wood pellets, and the non-stick grill grates are easy to clean with some hot soapy water and a gentle scourer, as are the internals of the Ninja Woodfire, with a quick wipe once it has cooled down. The grease trap doesn’t perform well when lined with foil, but it is easy to scrape out and dispose of the cold drippings before washing it in hot soapy water.


The maximum draw of the Ninja Woodfire is 1760W, with the highest numbers seen on test during the preheat function for the air fryer mode at around 1733W. Once the preheat finishes, power draw reduces significantly to an average of 815W when roasting, 40W when smoking, 230W when grilling and 1650W when air frying. This means you could easily operate the Ninja Woodfire on a 2000W inverter, although you would be near the limit with air frying.
In terms of value for money, the Ninja Woodfire is cheaper than a Weber Pulse 2000 yet offers better functionality. The two compare well for portability, but the Ninja Woodfire has greater versatility and advanced features that make it a better choice.
The grill’s durability and high-quality construction mean it is likely to last for many years, providing long-term value. Moreover, the unique woodfire flavour it imparts to food is a feature that many will find worth the investment, as it enhances the overall cooking and dining experience.
I should point out that having used the Ninja Woodfire extensively over the past six months I have noticed that the spring-loaded lid on the ash management system stretches so that the lid doesn’t close all the way; not a biggie, but something to take note of.
I guess the question is, would I buy a Ninja Woodfire Electric BBQ Grill & Smoker? The answer is a definite yes. I’ve even convinced our daughter to buy one for home. The unique blend of portability, functionality and performance, and the ability to infuse food with authentic wood-fire flavour, sets the Ninja Woodfire apart from other grills on the market. The versatile cooking modes, user-friendly design and consistent performance make it suitable for both seasoned grill masters and beginners alike.
The Ninja Woodfire also provides a reliable and enjoyable grilling experience with advanced features that make it a versatile tool for a variety of cooking methods.
The Ninja Woodfire represents a great investment for anyone looking to elevate their outdoor cooking game.
RRP: $699.99
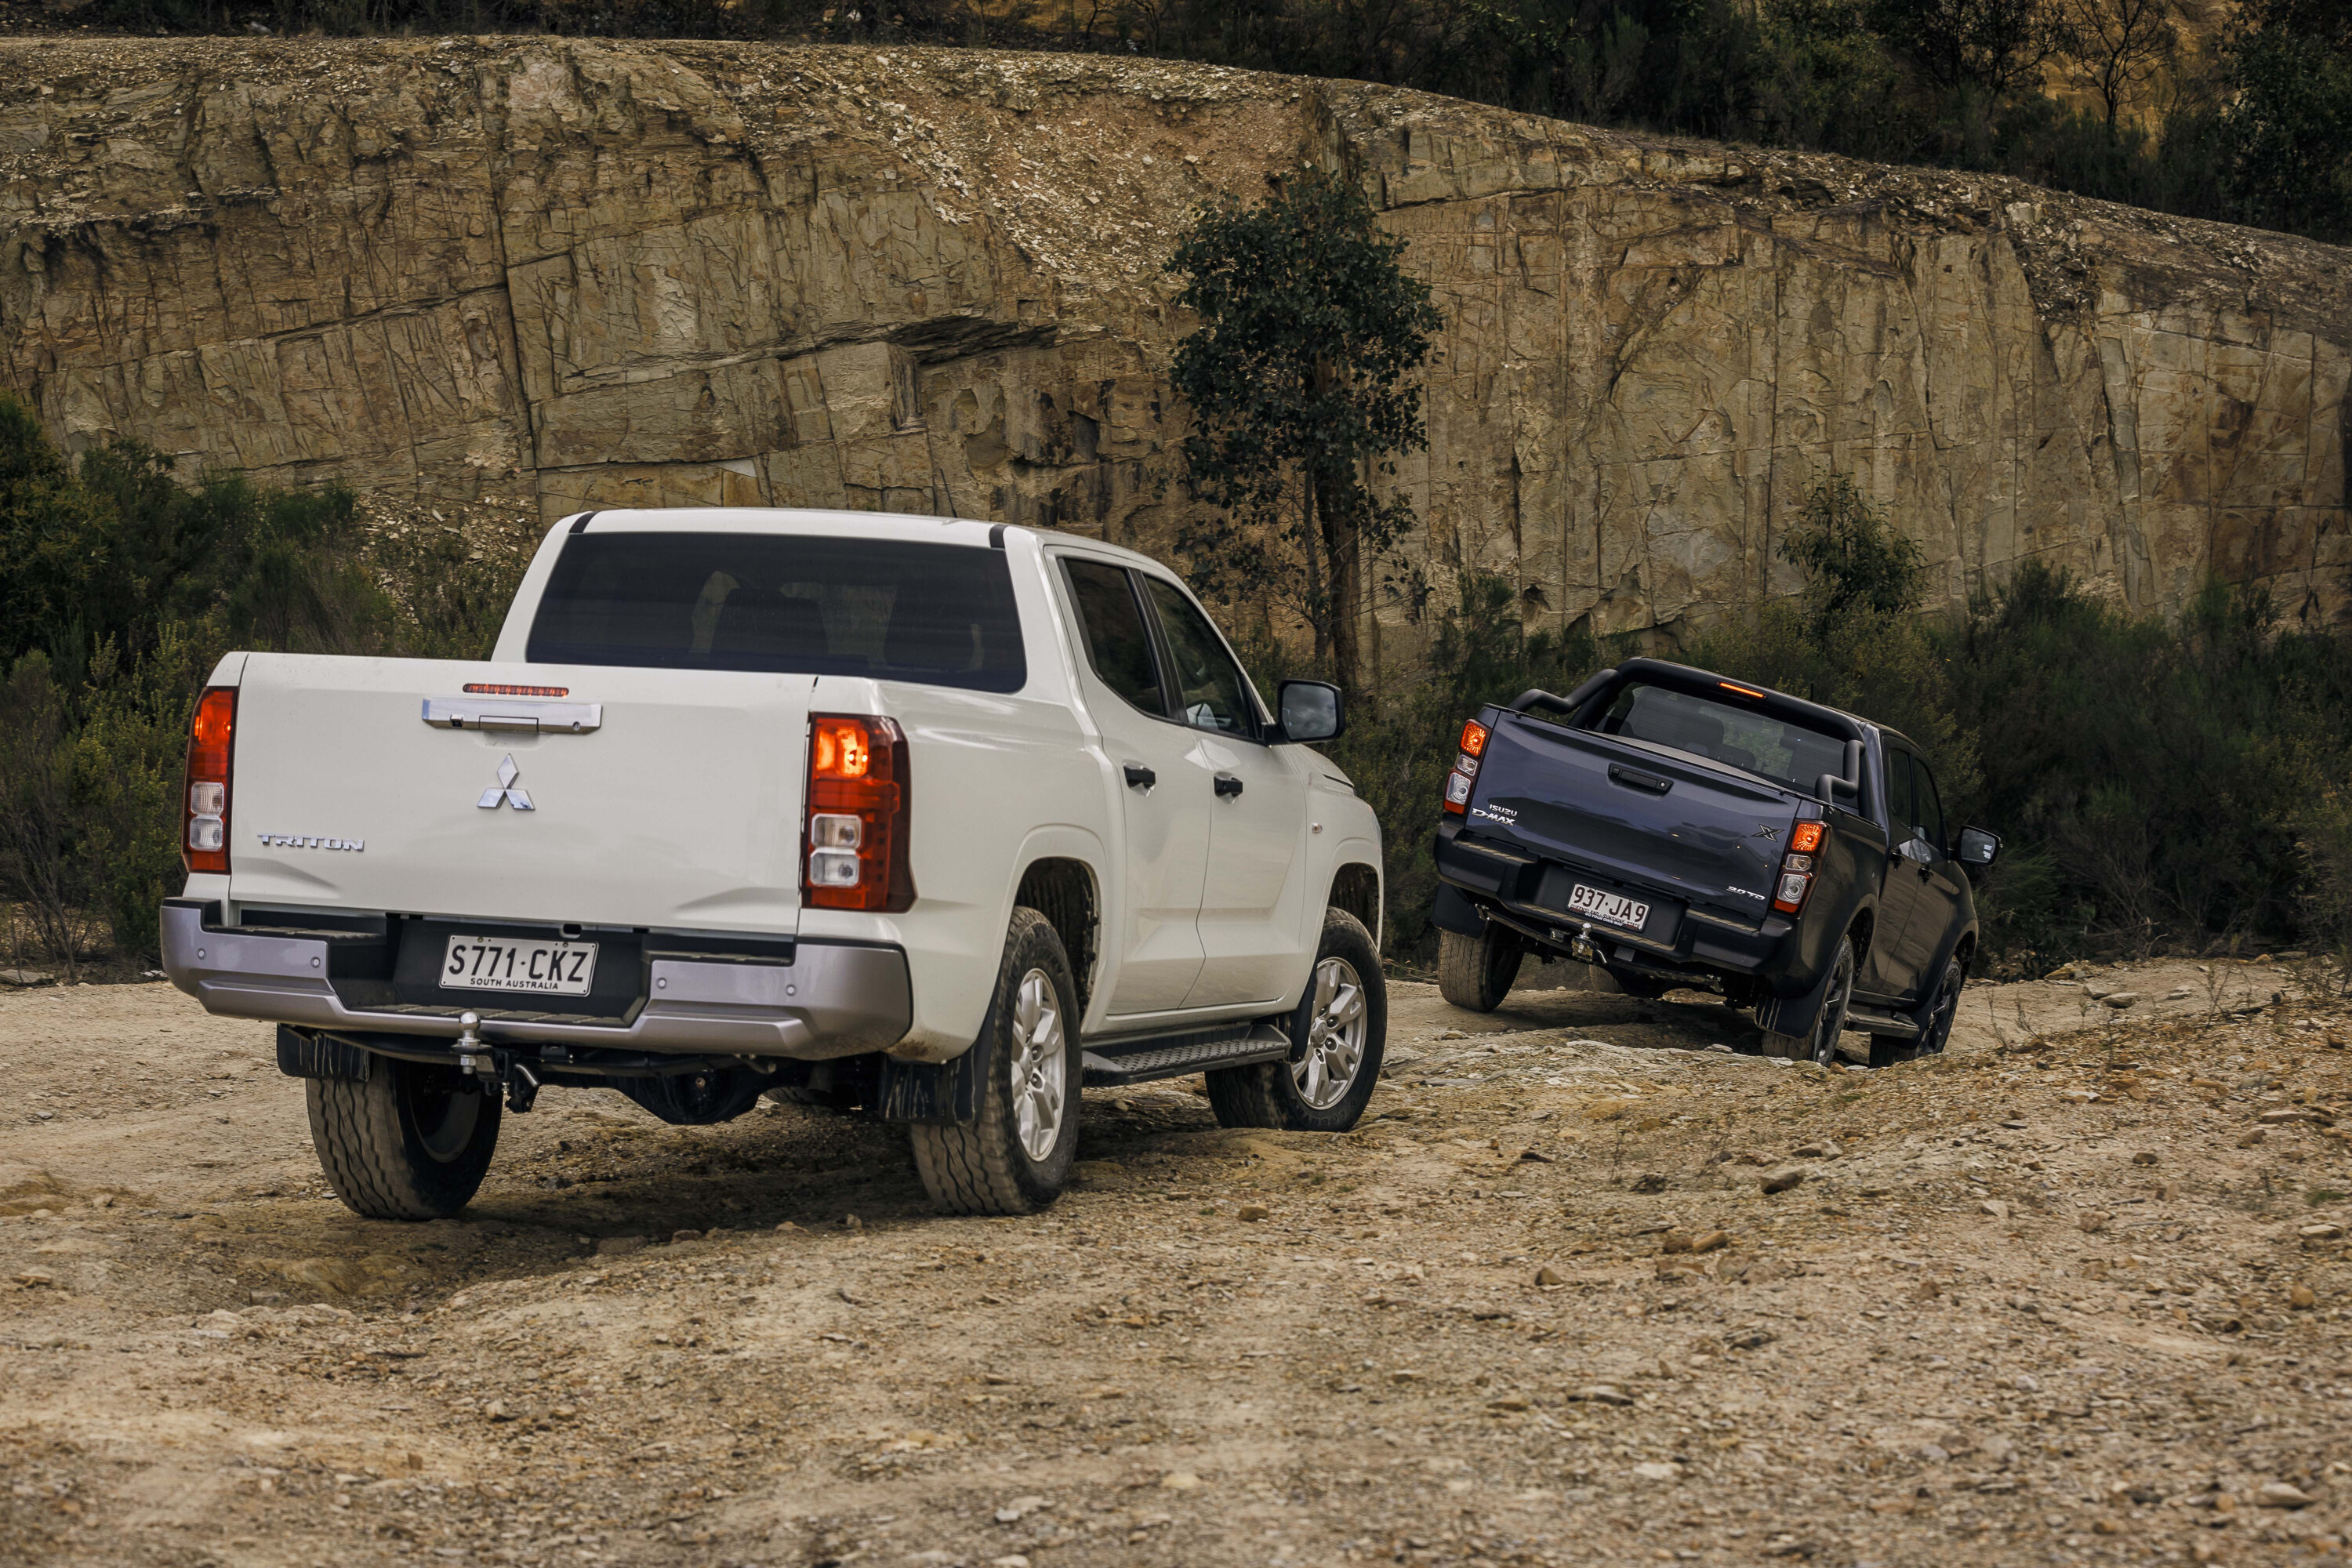
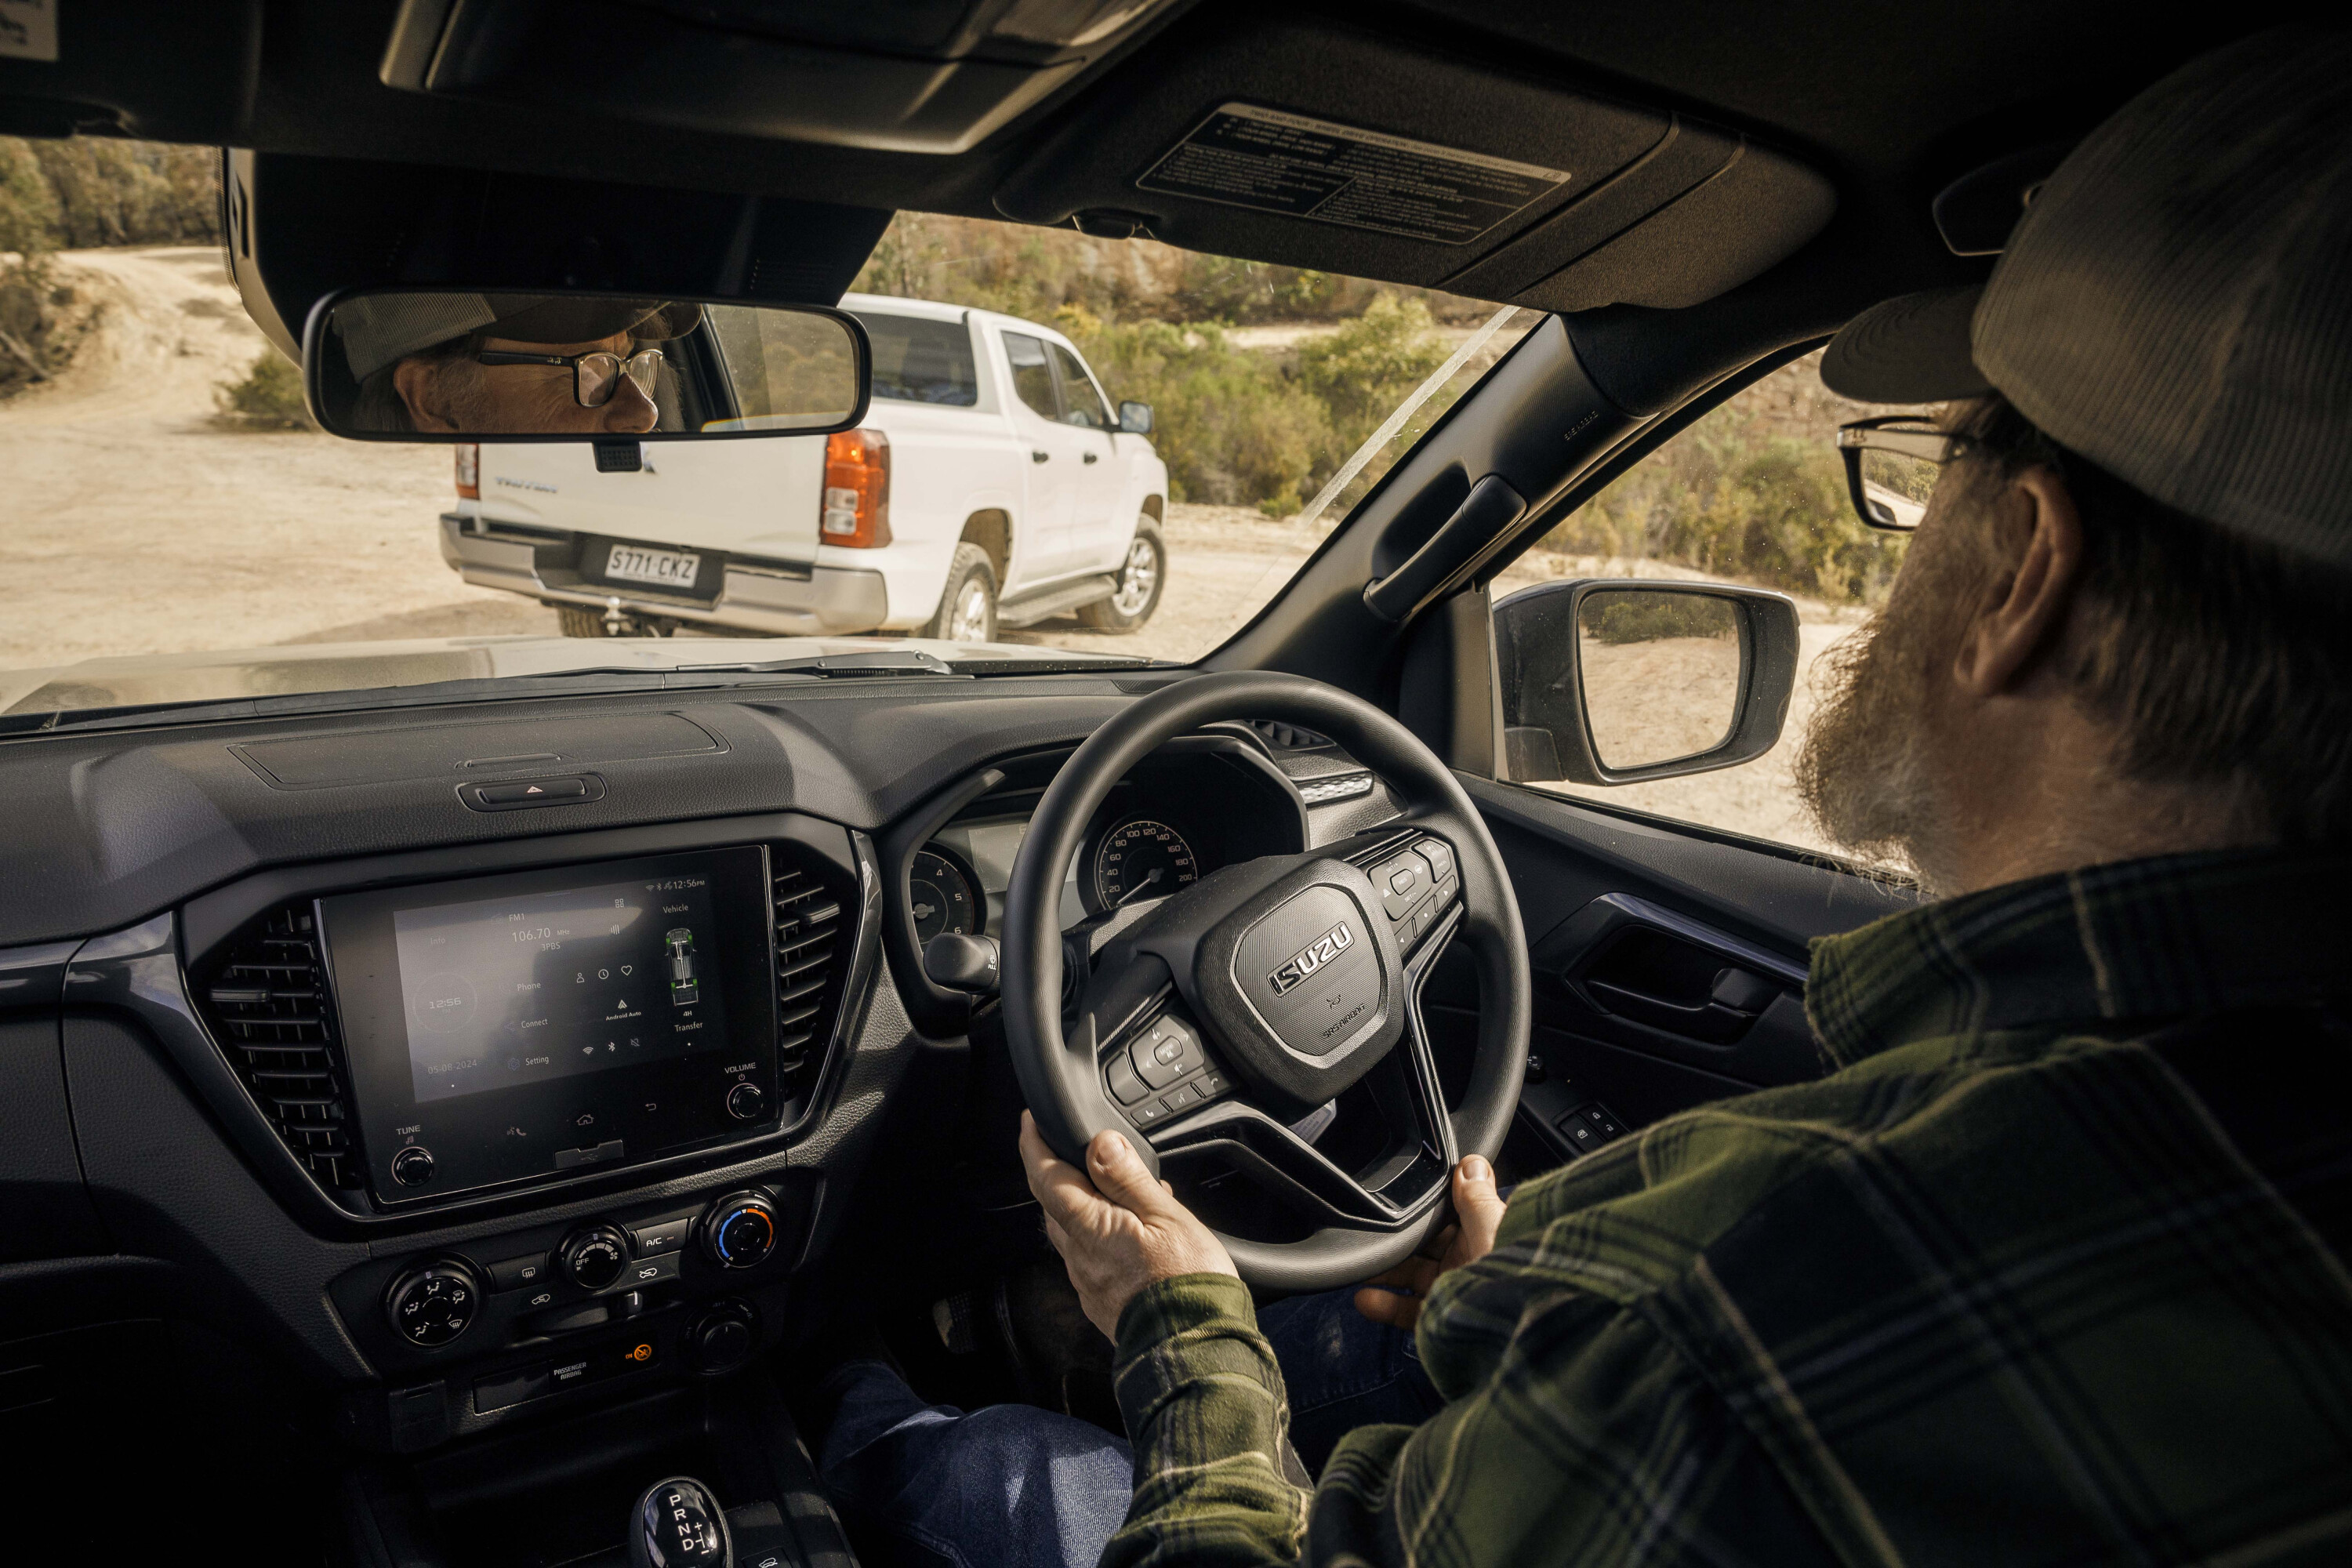
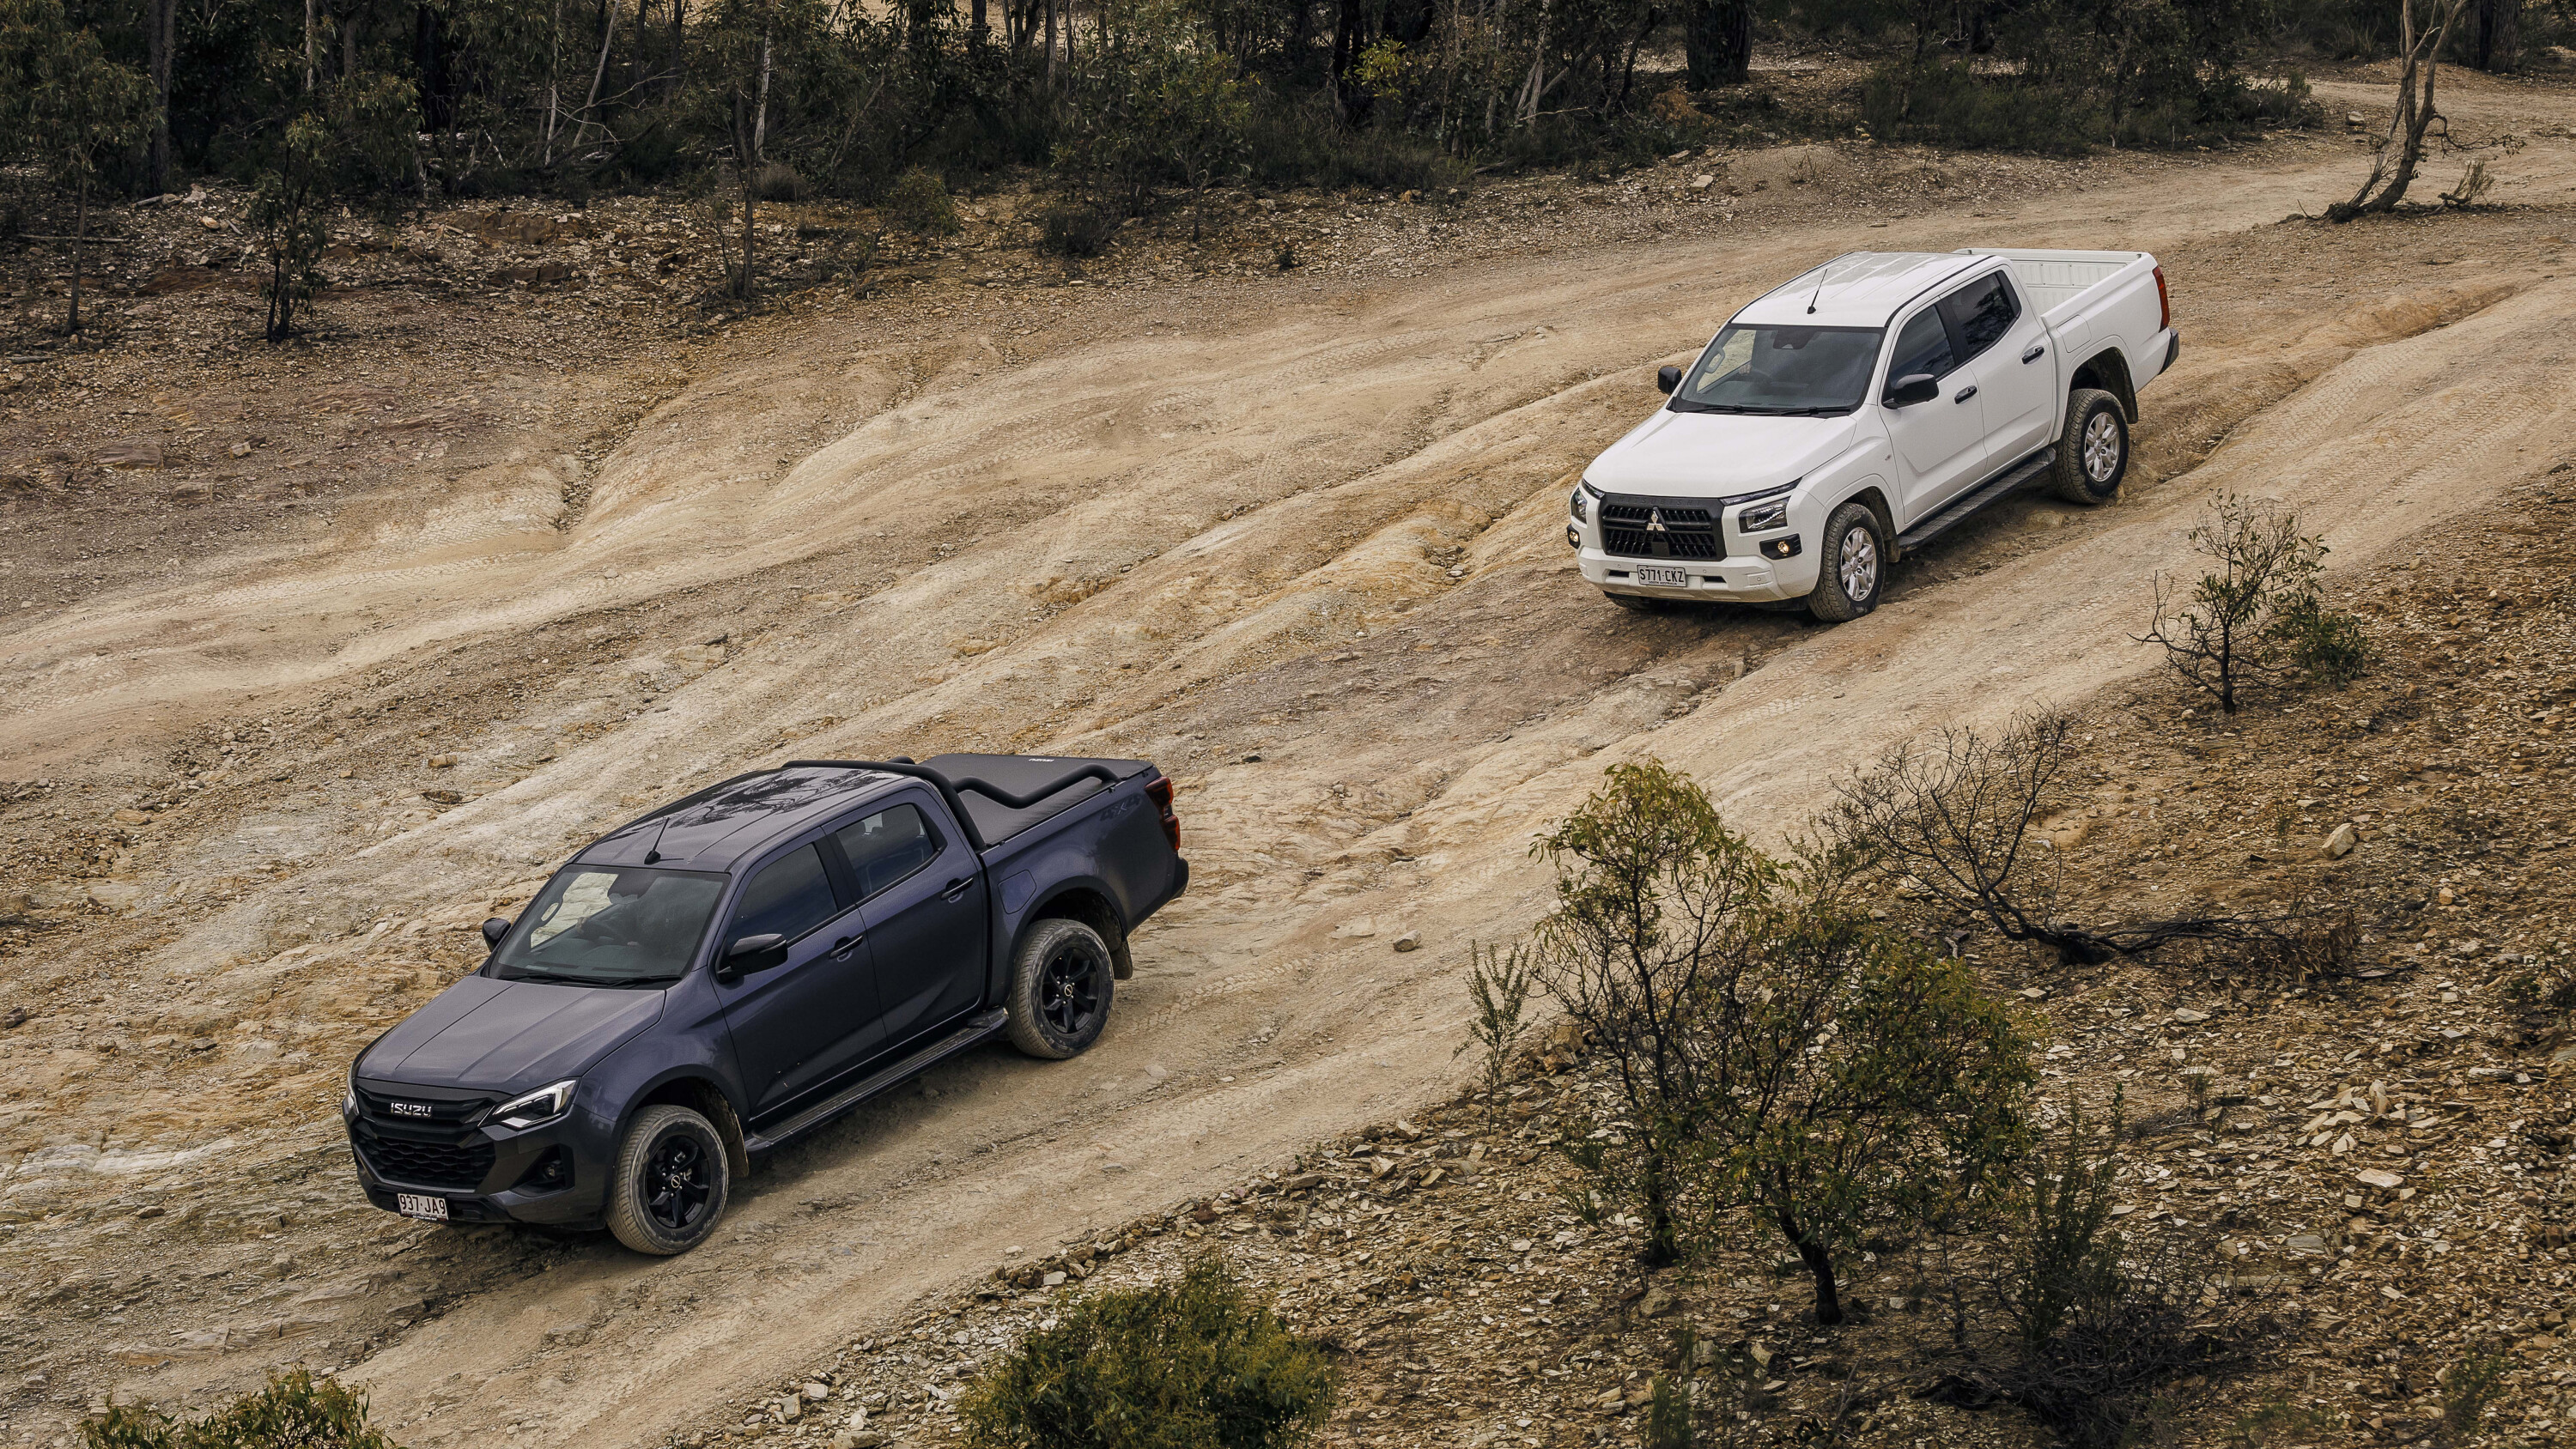
It’s a two-horse race in the mid-size 4×4 ute popularity contest with the Ford Ranger and Toyota Hilux duking it out for top honours over recent years, with the Blue Oval’s Ranger forging ahead these days.
Behind Ranger and Hilux we’ve always had the other class stalwarts comprising of the Mitsubishi Triton, Nissan Navara, Isuzu D-MAX and even the sorely missed Holden Colorado. Mitsubishi had a firm grip on the bronze medal position on the dais, selling its Triton ute in big numbers on the back of value-for-money pricing and longer-than-most warranty periods, but as the Triton aged and an all-new D-MAX came to market, the Isuzu soon overtook the Mitsubishi ute.
Now the tables have turned and the Triton is the latest model in the segment while the D-MAX is one of the oldest. But the D-MAX remains a solid performer with plenty of fans, and clawing that third place position back will be a difficult task for Mitsubishi.
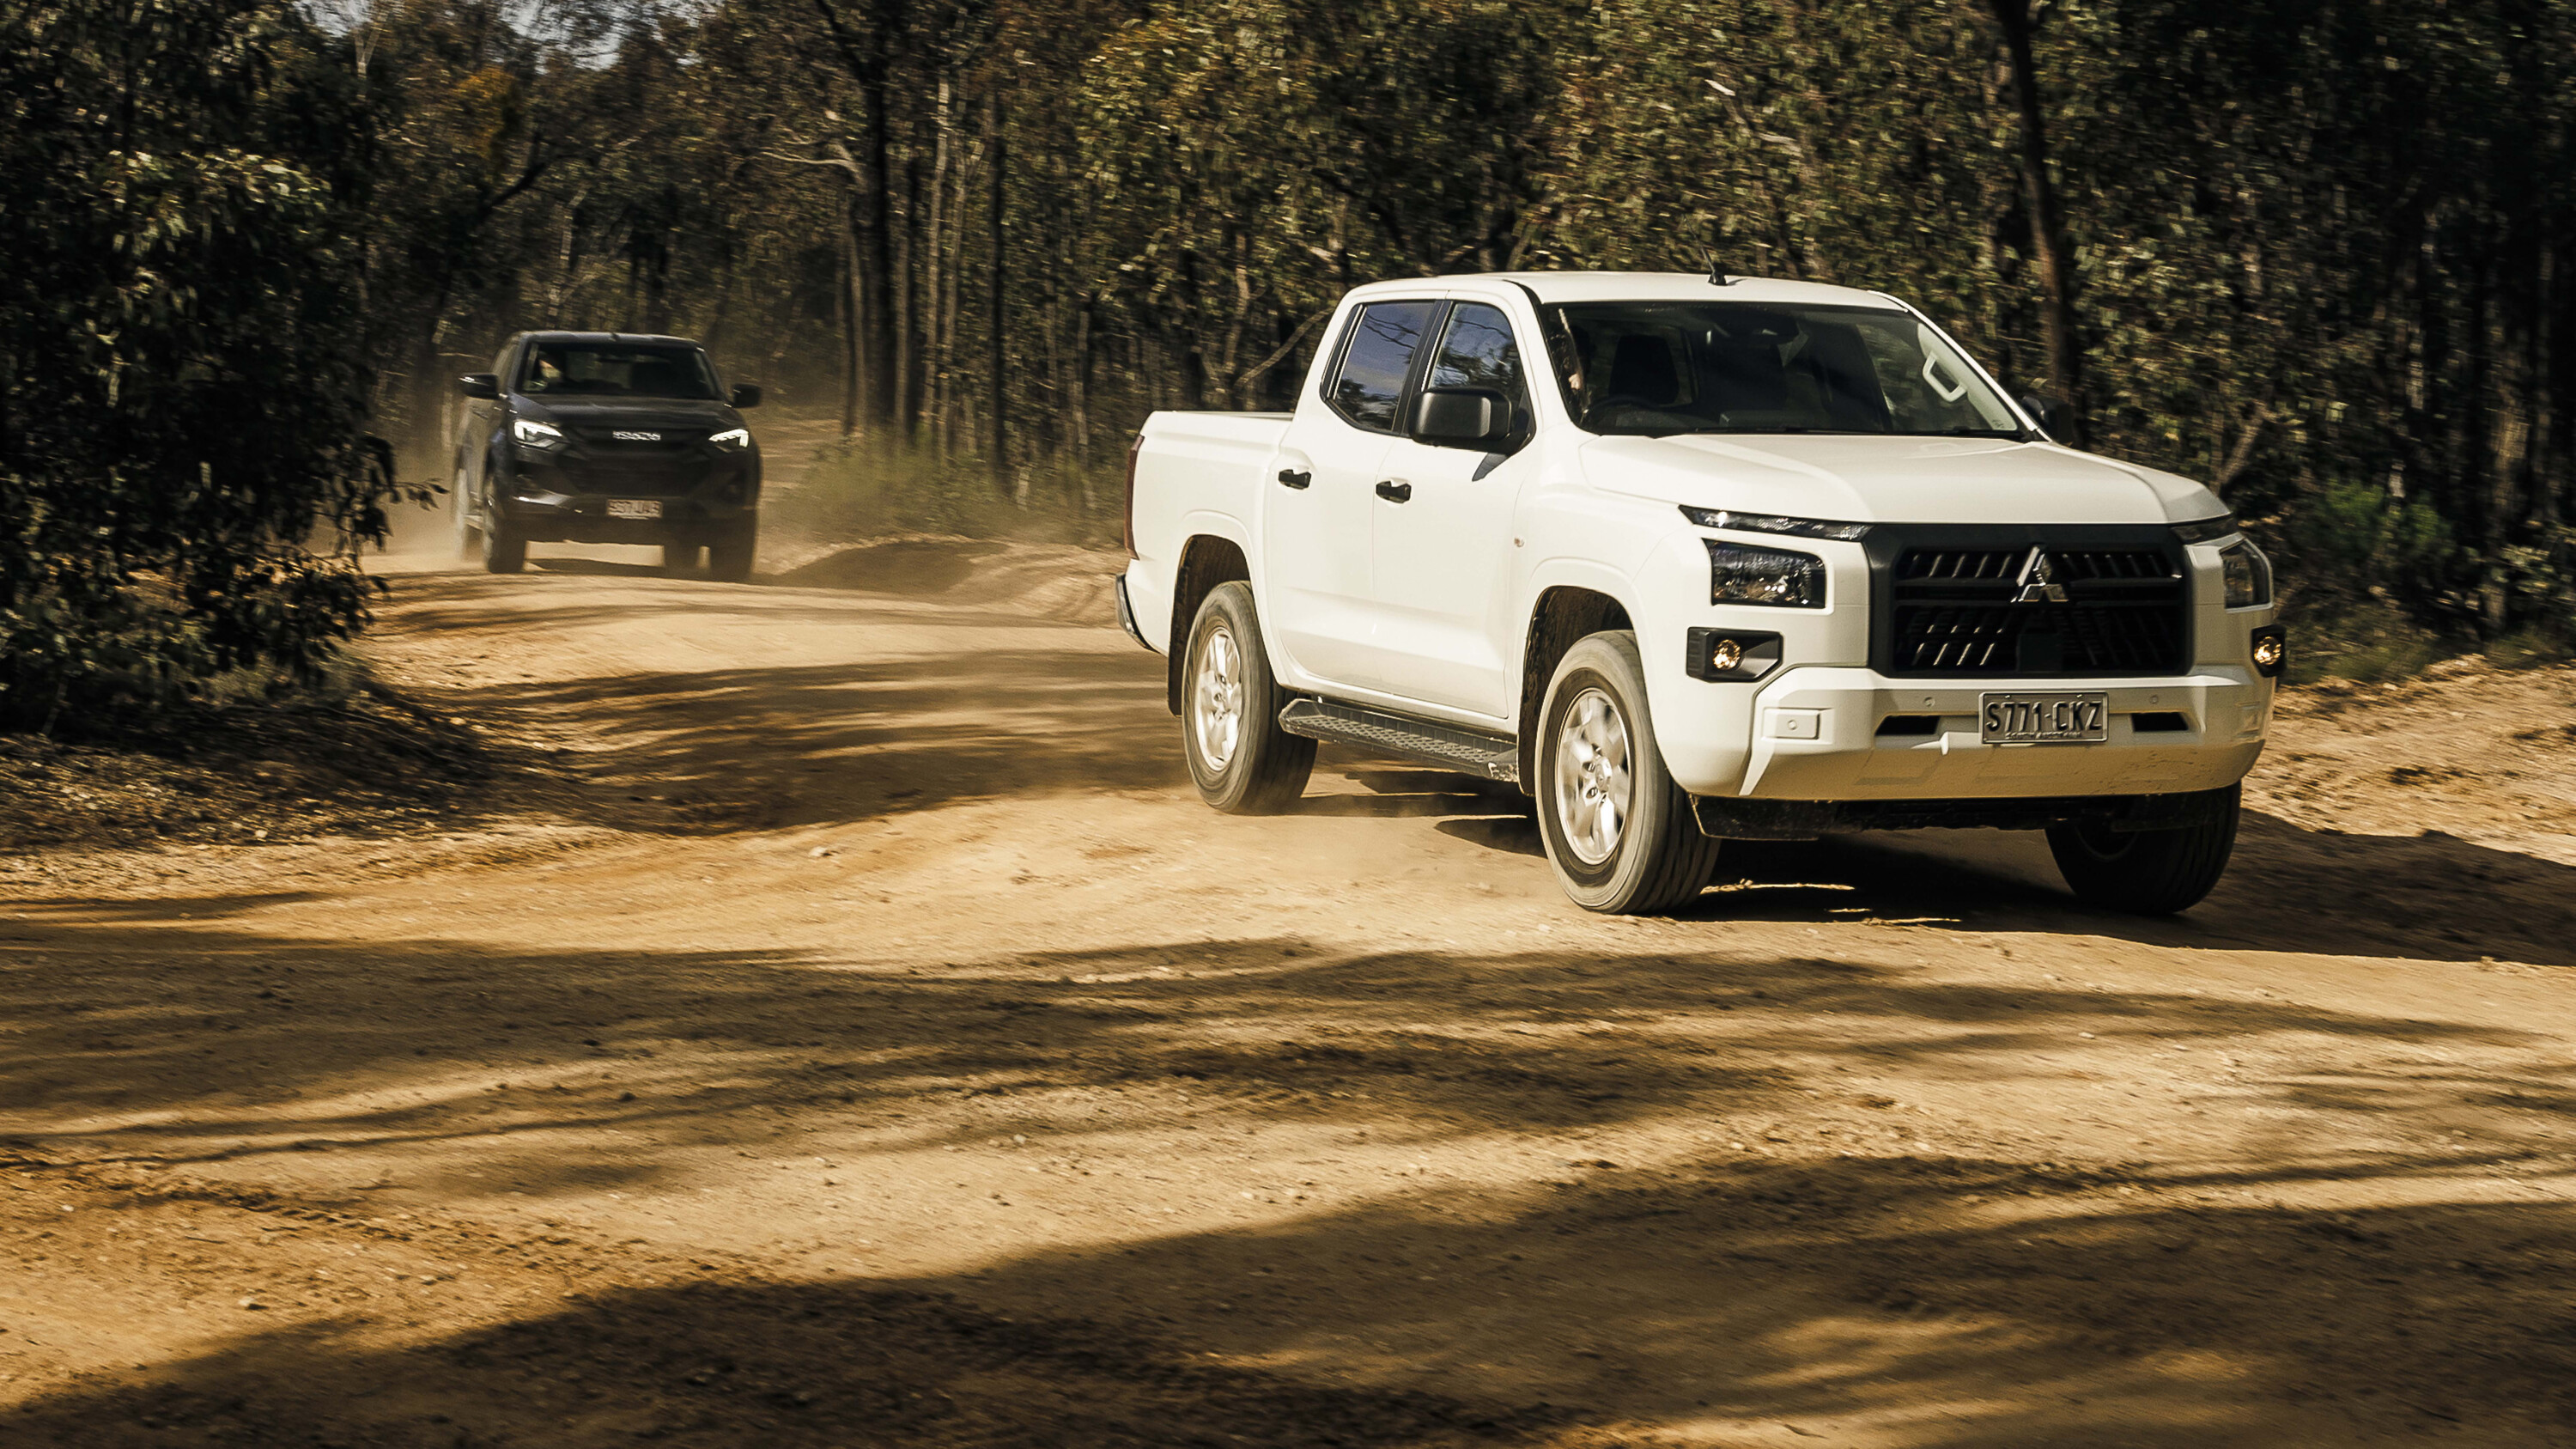
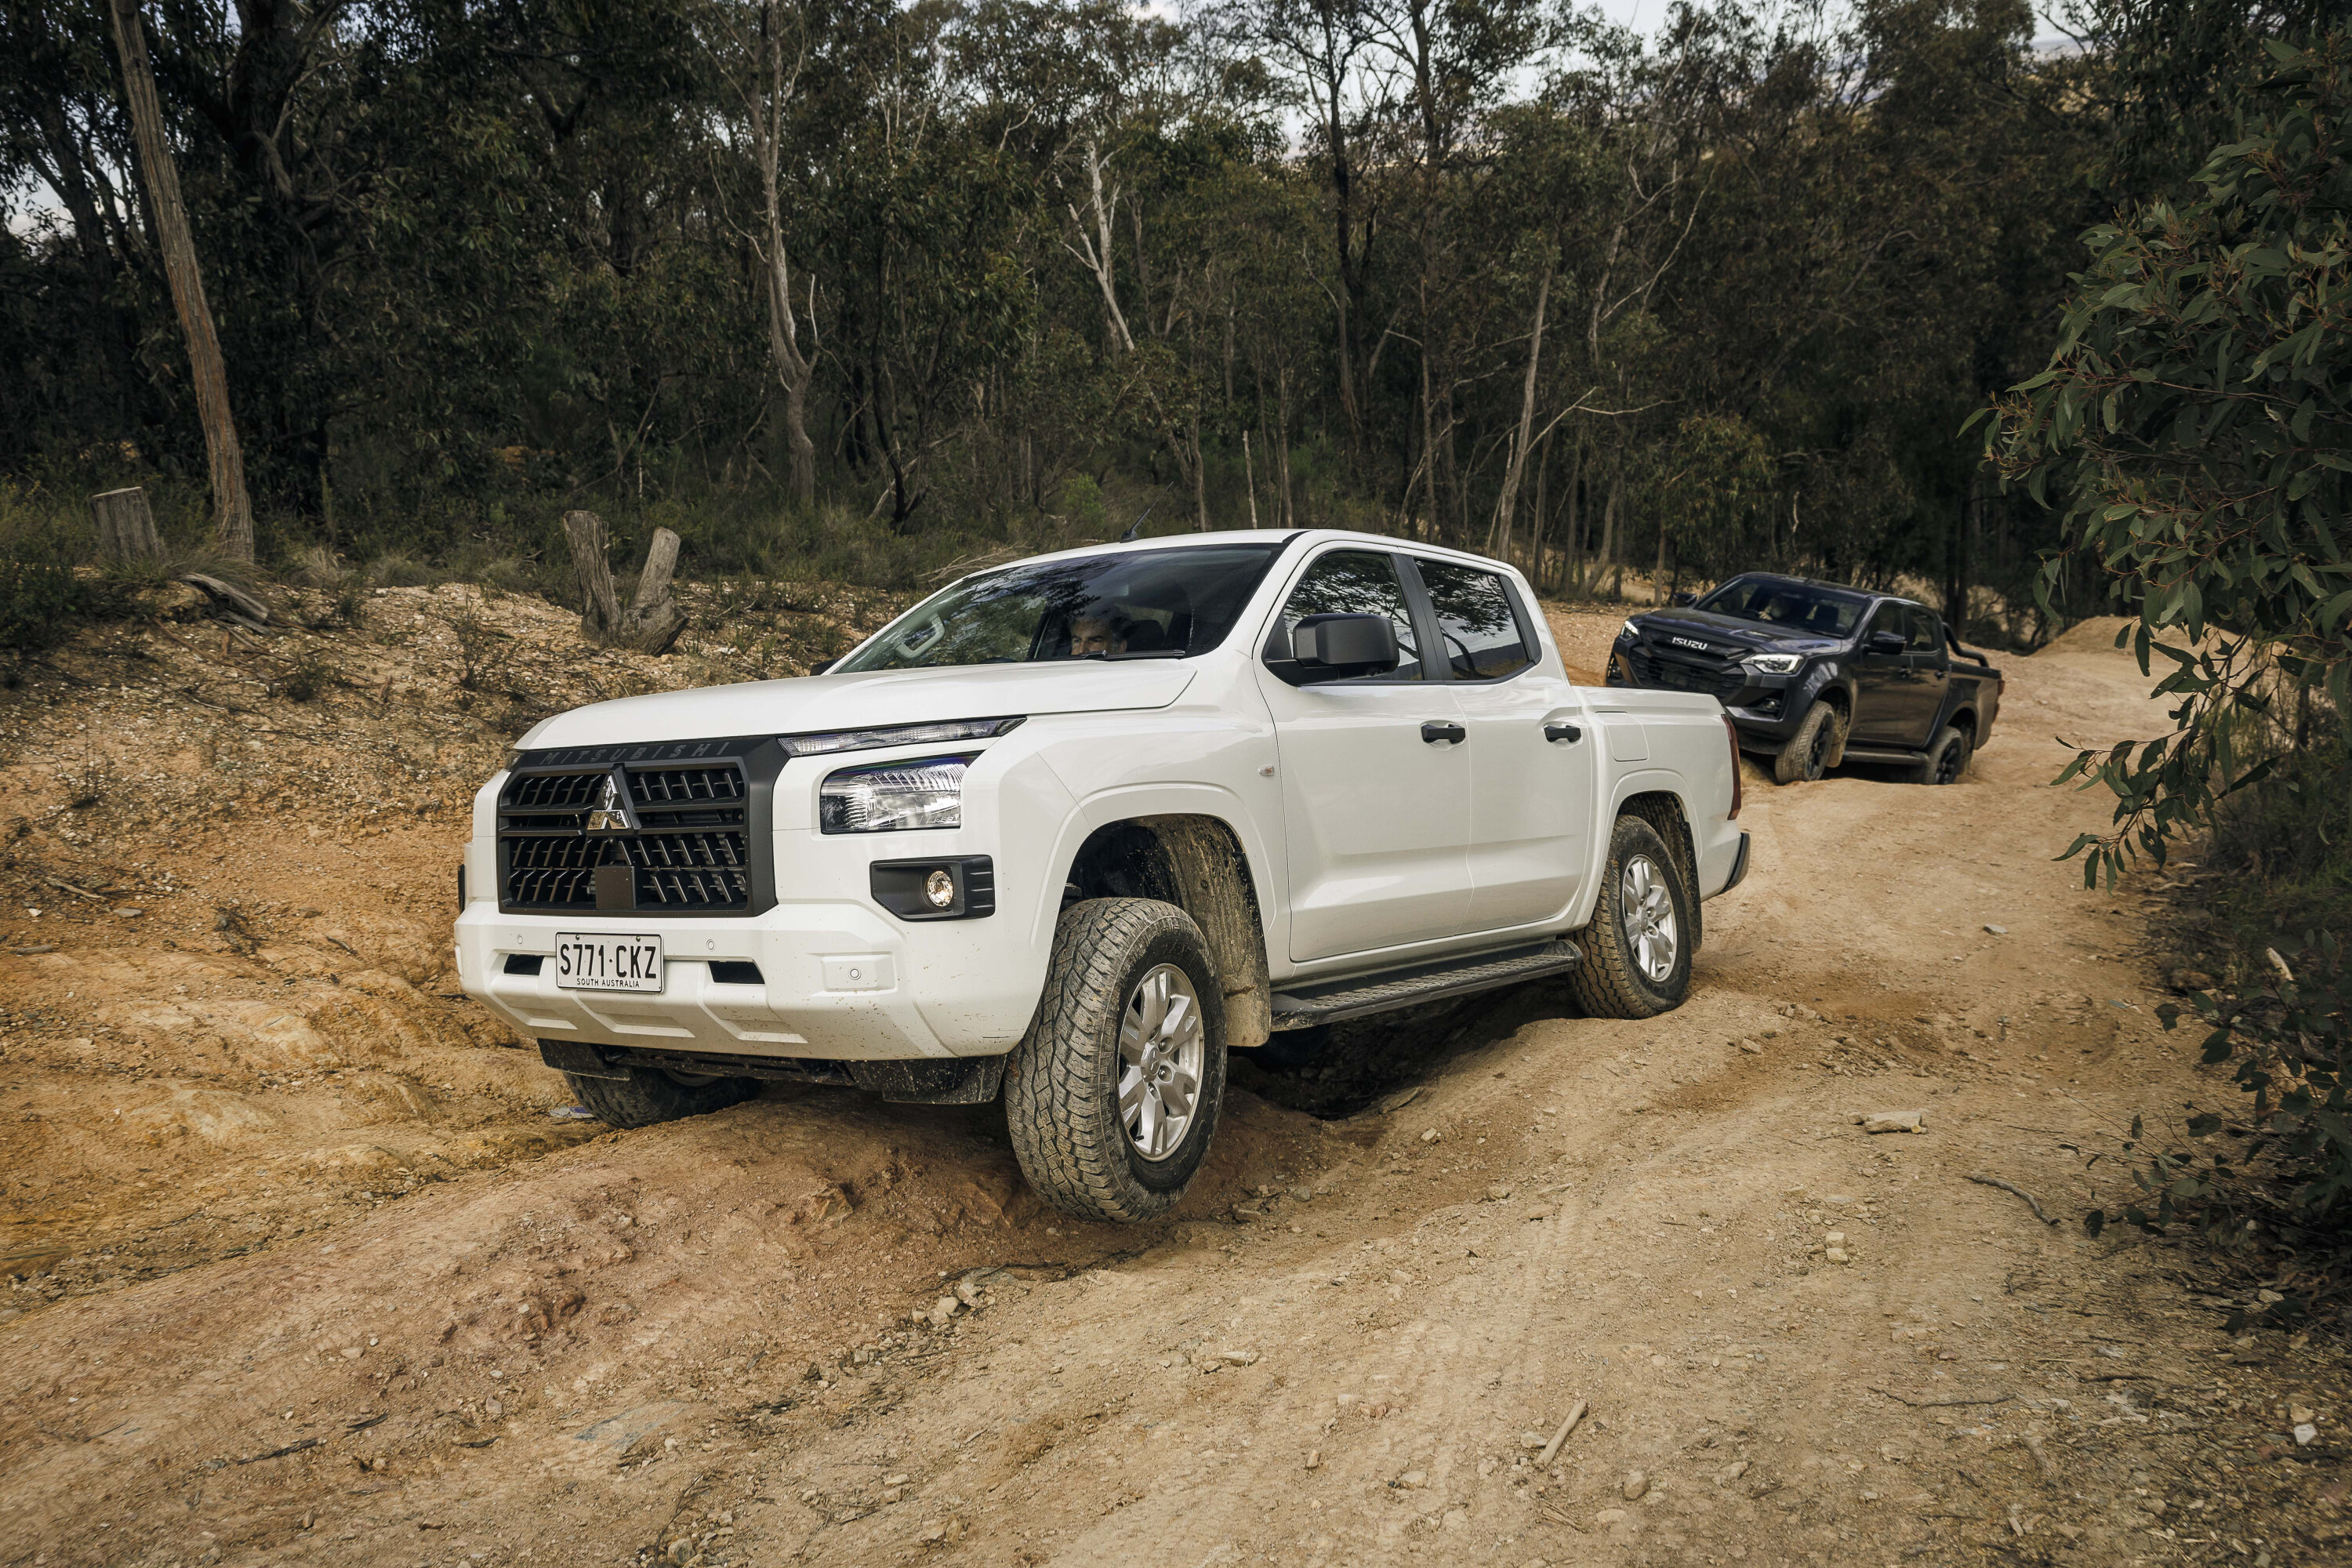
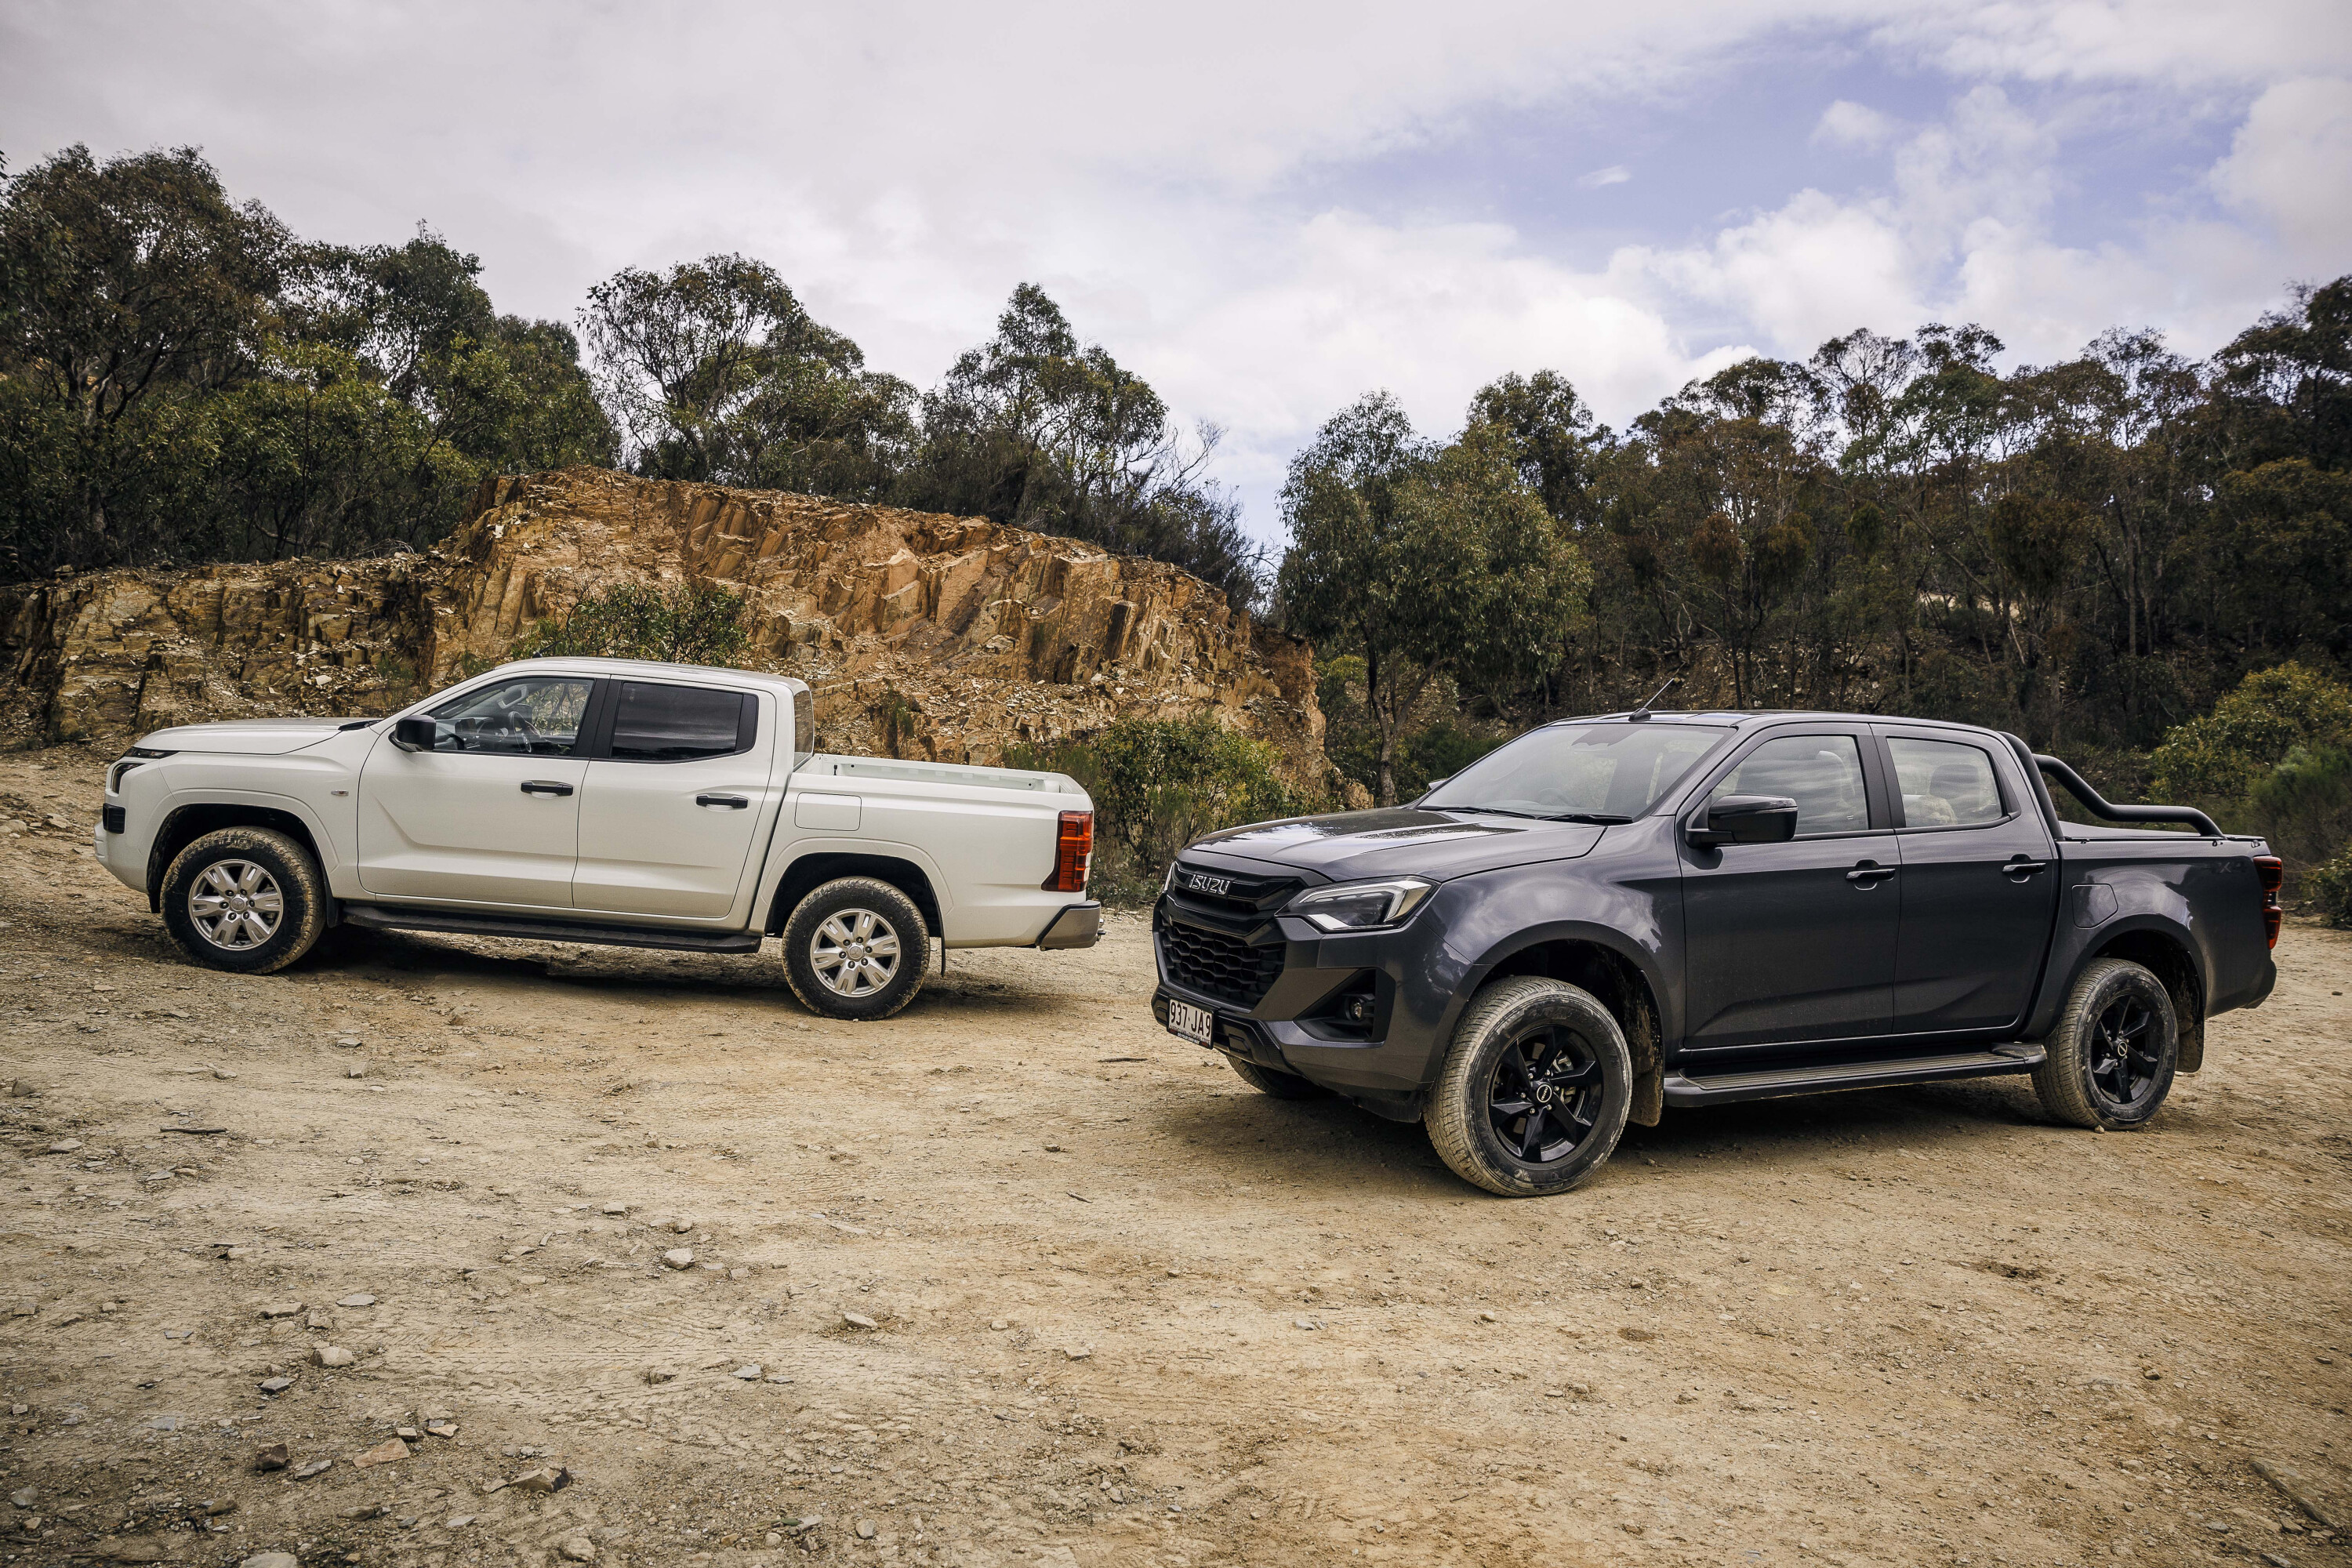
To get a better handle on the new Triton’s chances of regaining its past position, we’ve lined up a pair of mid-spec models to see how they compare ?
JUMP AHEAD
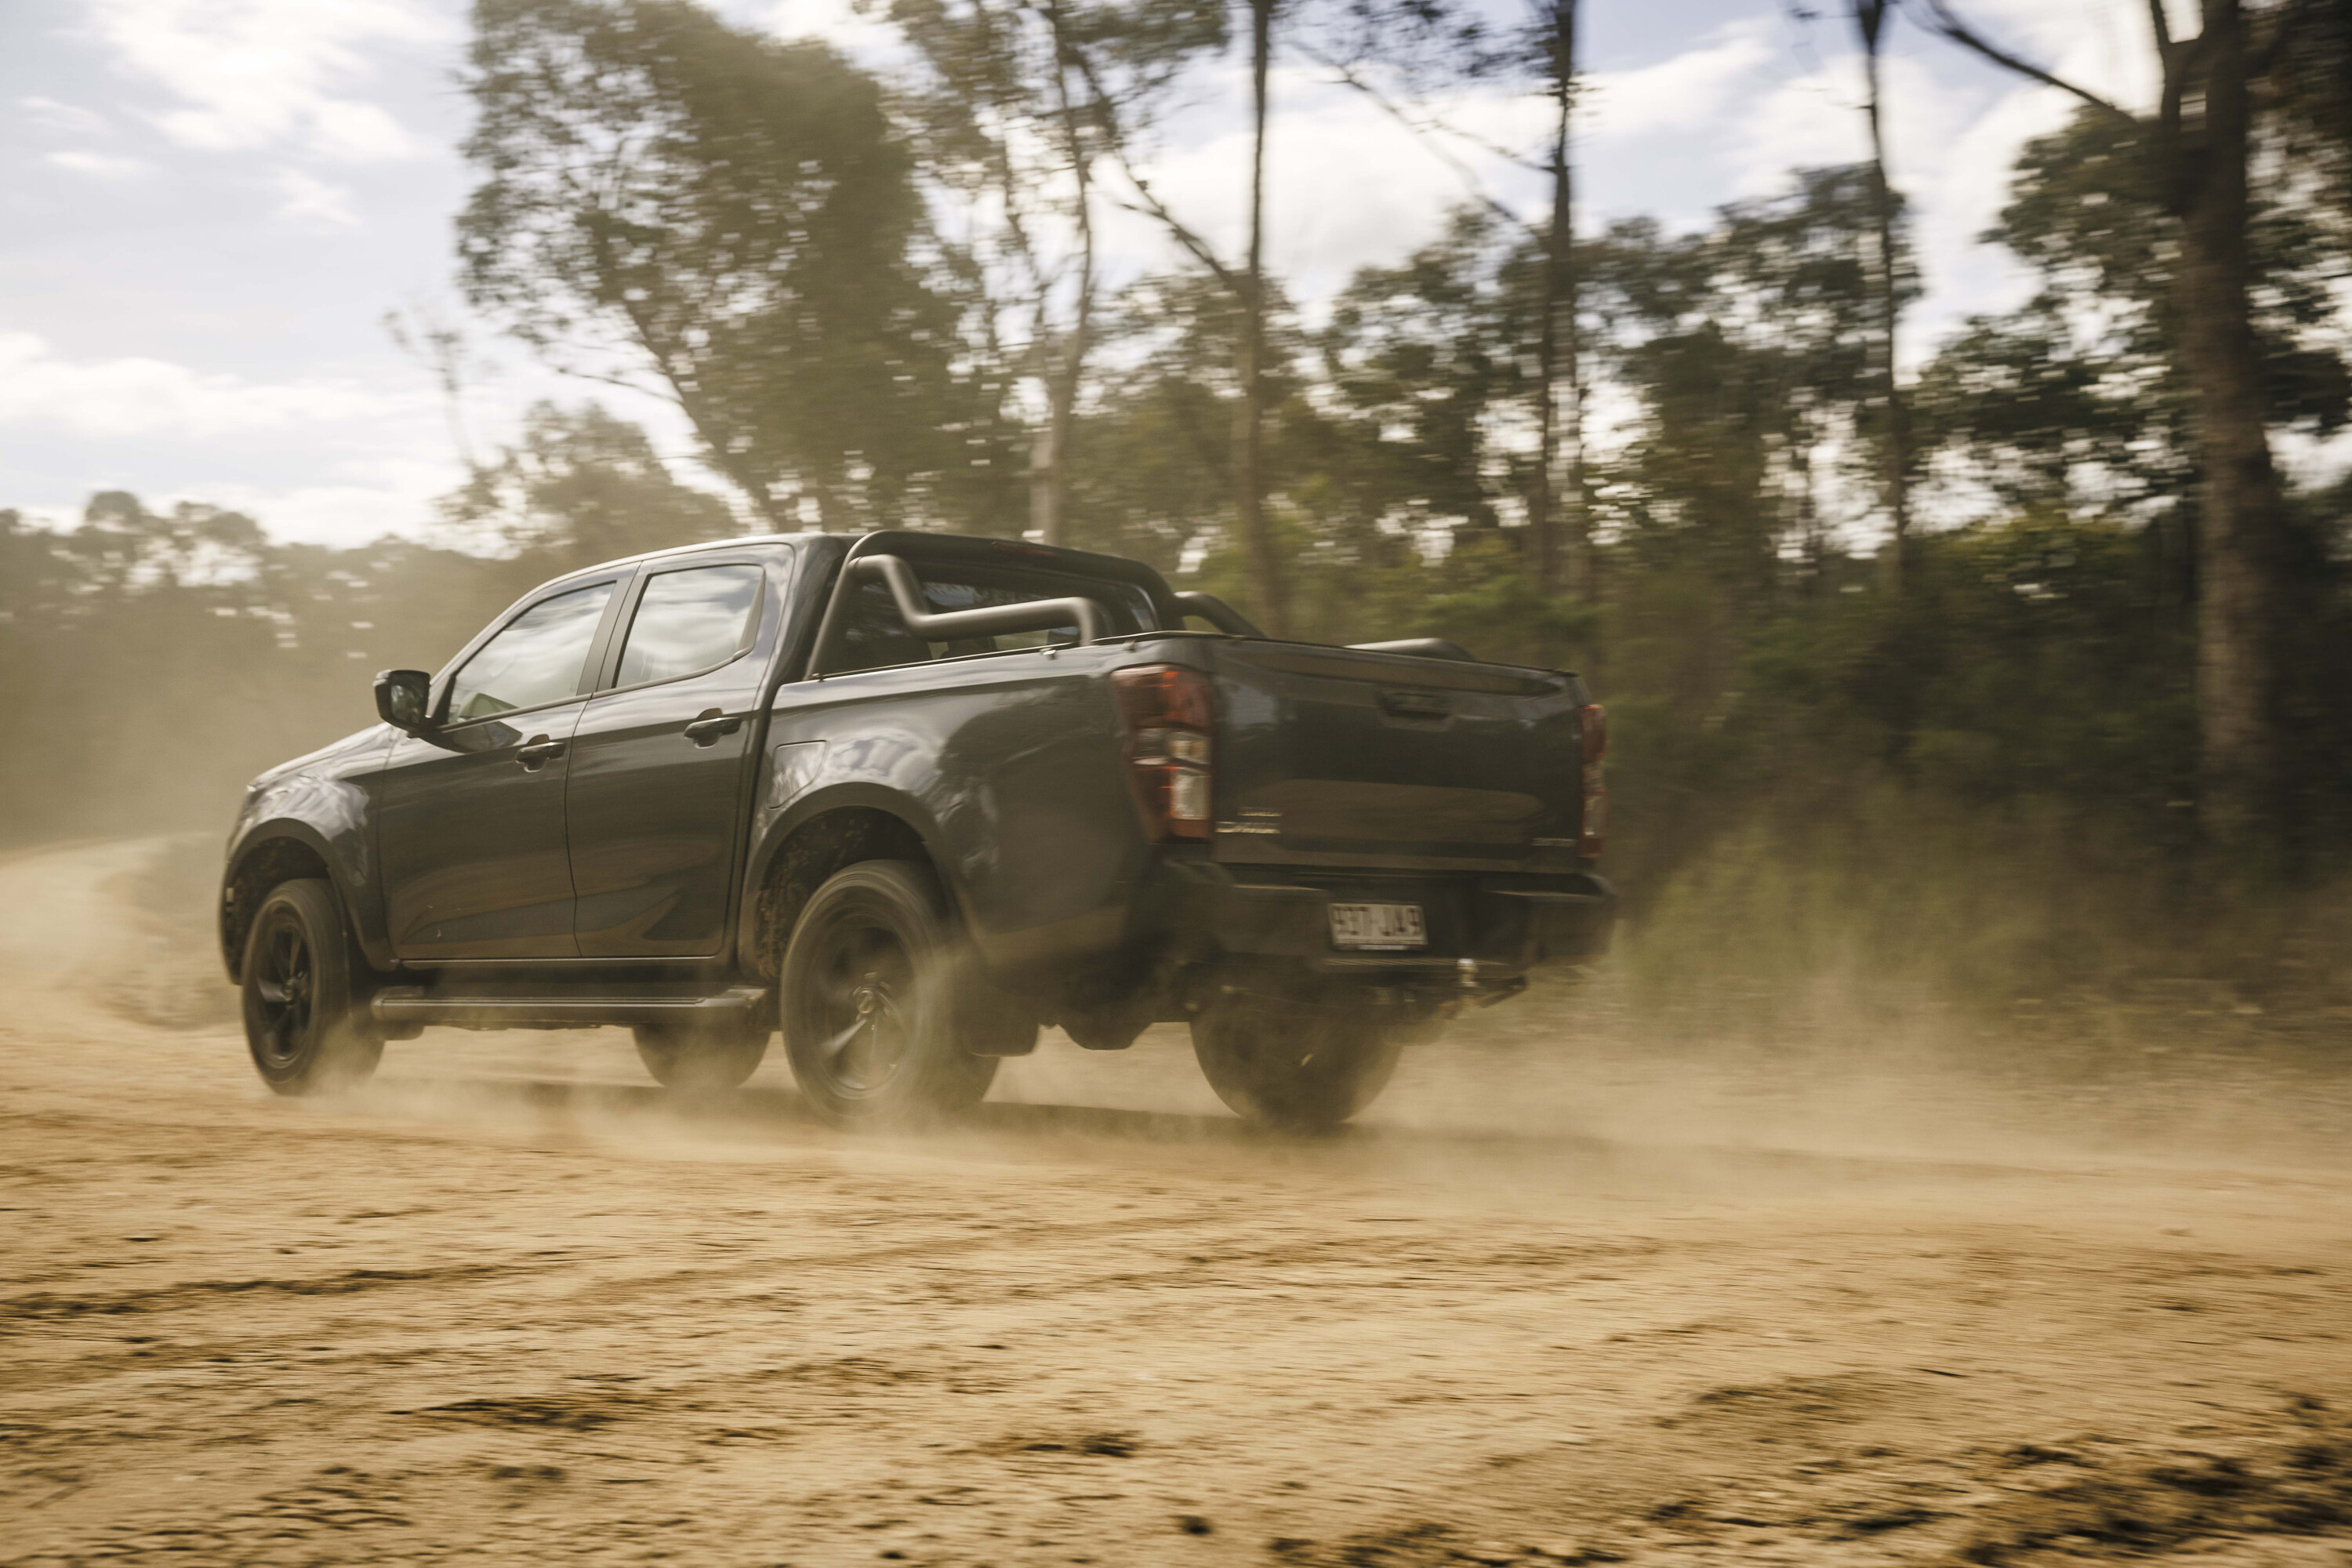
Isuzu D-MAX X-Rider
Adding some freshness to the recently facelifted D-MAX line up is the new X-Rider model at $59,500.
We’ve lined the X-Rider up with the new Triton in GLX+ specification which tips the till at $53,290. Sure a Triton GLS at $59,090 would have been a better match on price, but it gets even more kit over the X-Rider and the GLX+ was all that was available at our time of testing.
Isuzu’s new D-MAX X-Rider gets the exterior blackout treatment normally reserved for higher spec models like the top-of-the-range X-Terrain, but is based on the mid-spec LS-M model so it has vinyl-covered floors, cloth seats and a new-eight-inch infotainment screen.
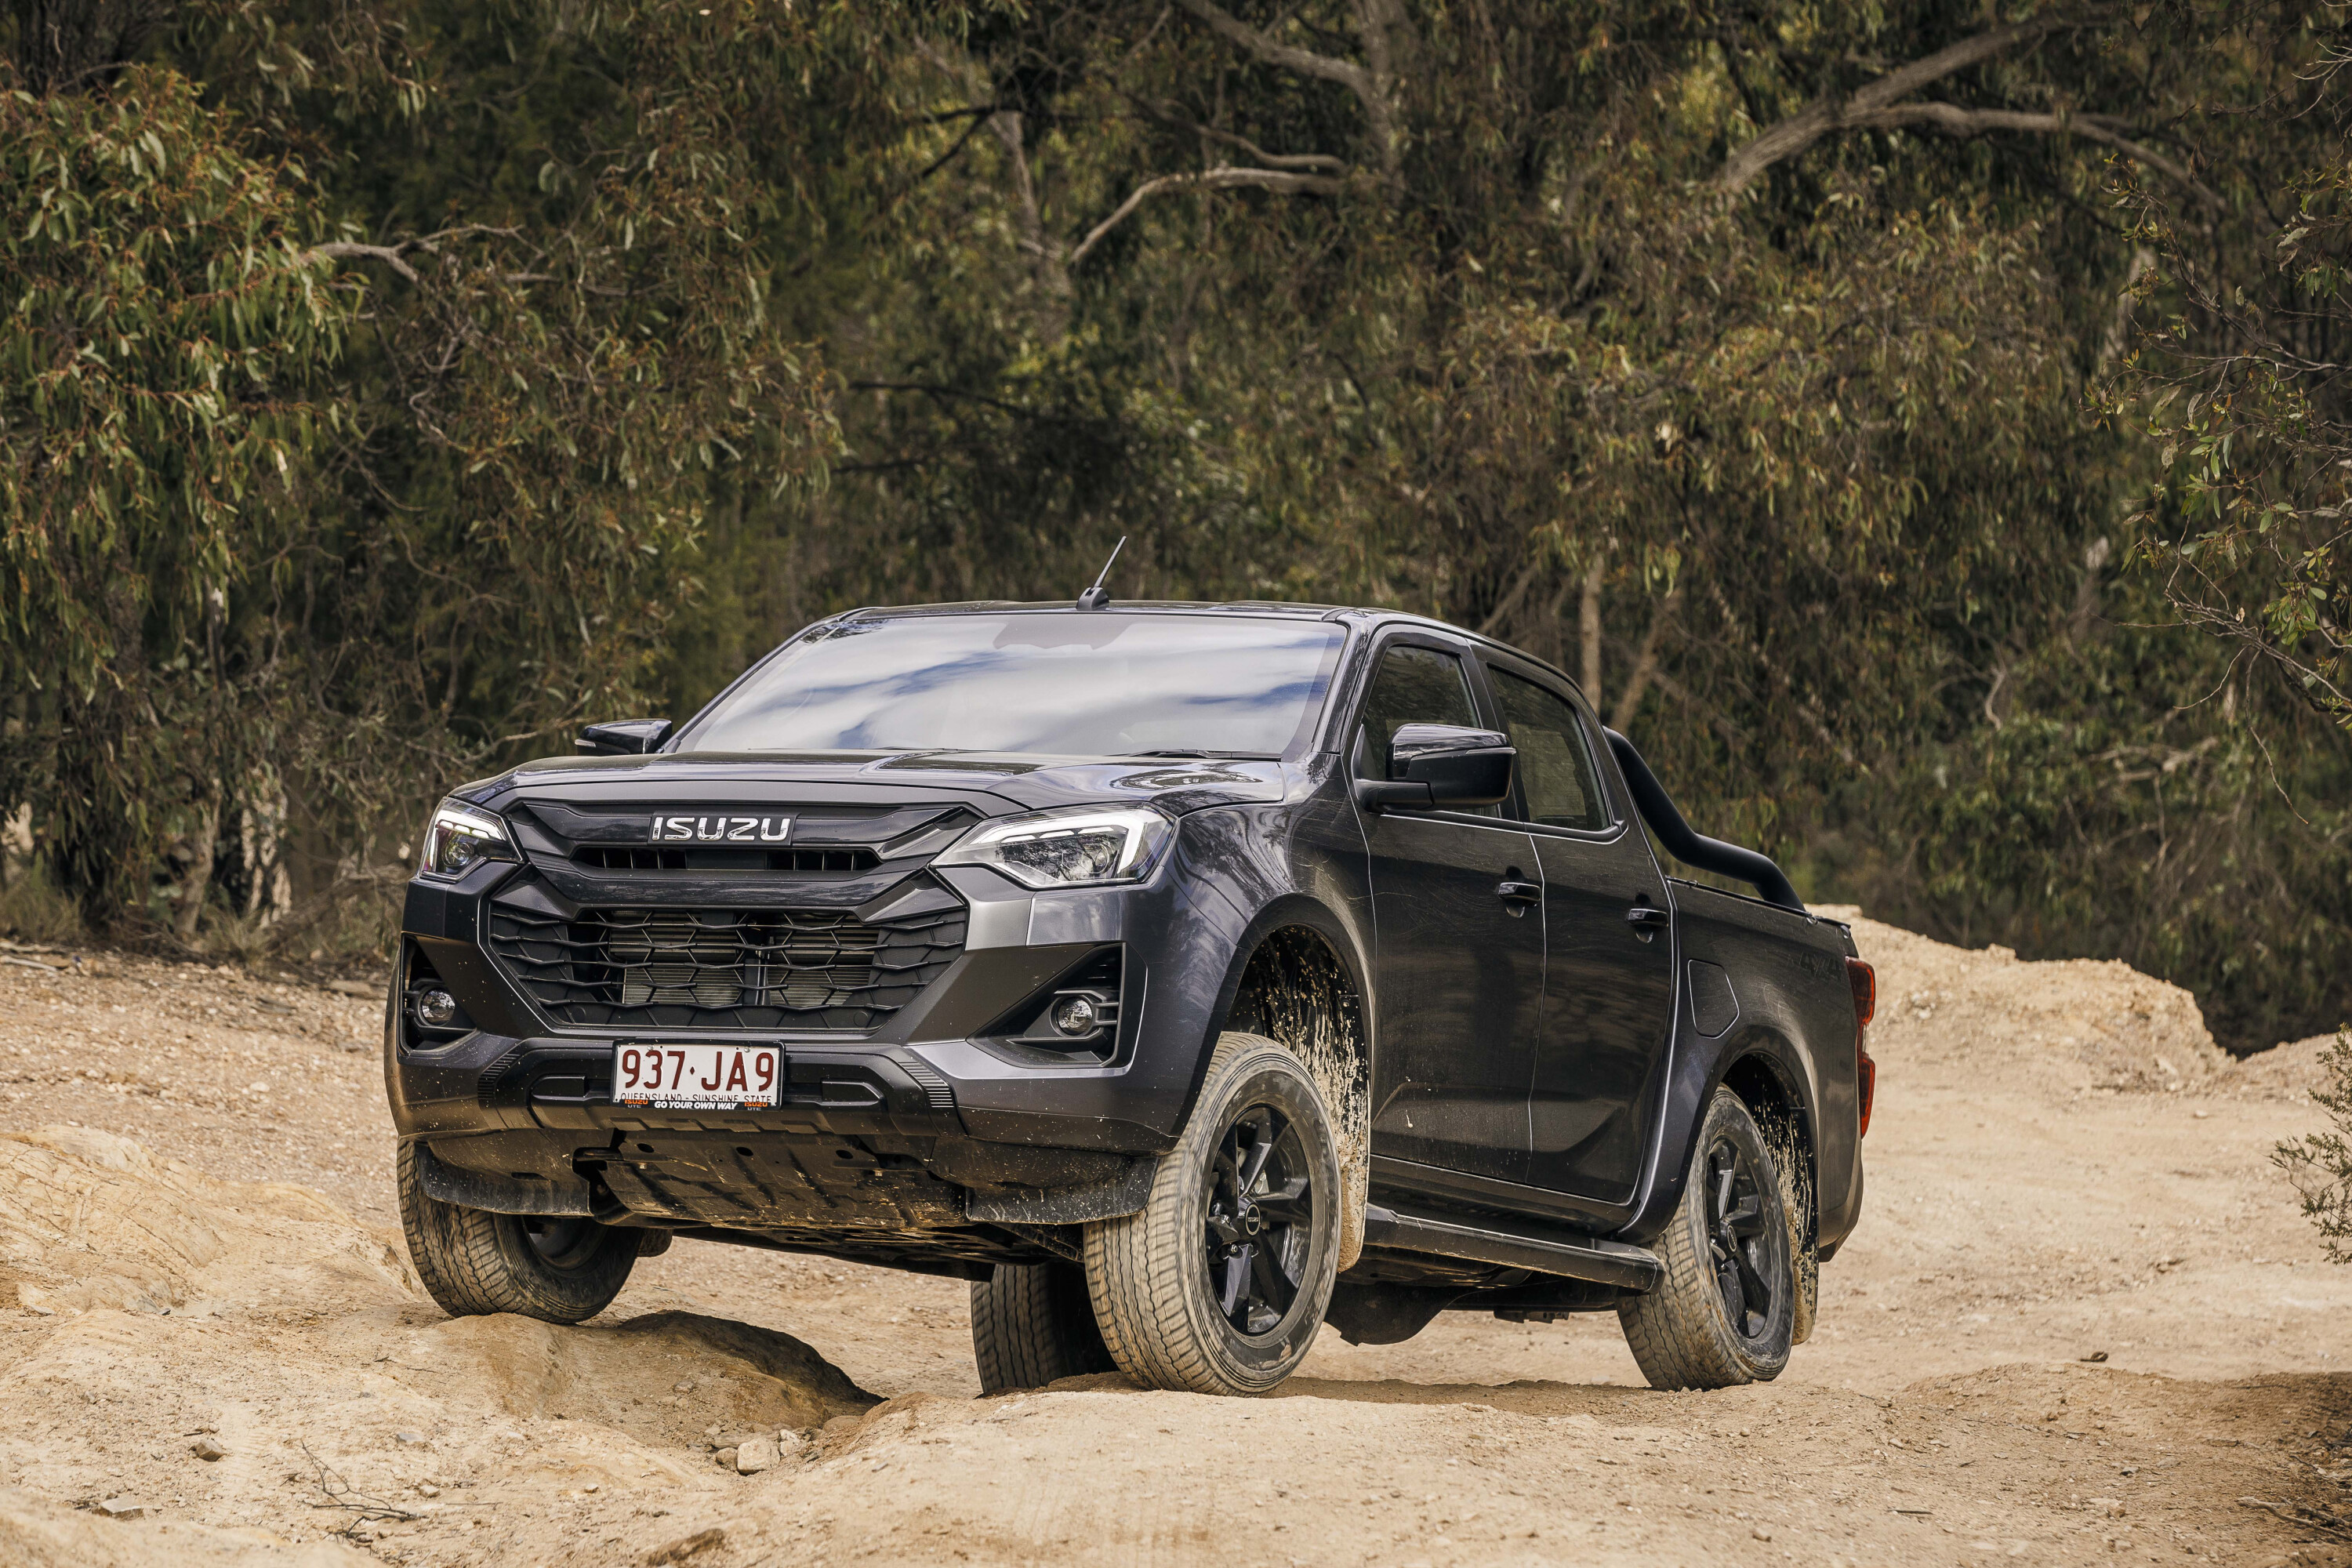
Black trims extend to the doorhandles, wheels and badges, while a soft tonneau cover adds some protection in the tray and a black sports bar adds … well nothing really. Bi-LED headlights are a nice addition at this spec level.
The X-Rider adds $1500 to the price of the LS-M model it is based on. The LS-M is the second model up in the 3.0-litre-powered double-cab D-MAX range, just as the GLX+ is the second up in the Triton line-up.
The D-MAX’s suite of safety kit includes eight airbags – dual front, dual seat side, dual full-length curtain, front knee and centre airbags; AEB with Turn Assist; Forward Collision Warning; Adaptive Cruise Control; a Speed Limiter; Mis-acceleration Mitigation; Driver Attention Assist; Traffic Sign Recognition; Lane Departure Warning; Lane Departure Prevention; Lane Keeping Assist; Emergency Lane Keeping; Blind Spot Monitoring; Rear Cross Traffic Alert; Trailer Sway Control; Adaptive Cruise Control; Rear Cross Traffic Brake; and a digital reversing camera.
Isuzu has softened the sensitivity of its electronic driver intervention systems, making them less intrusive and annoying than they were in the earlier iterations of the current generation of vehicles, and it’s an appreciated change.
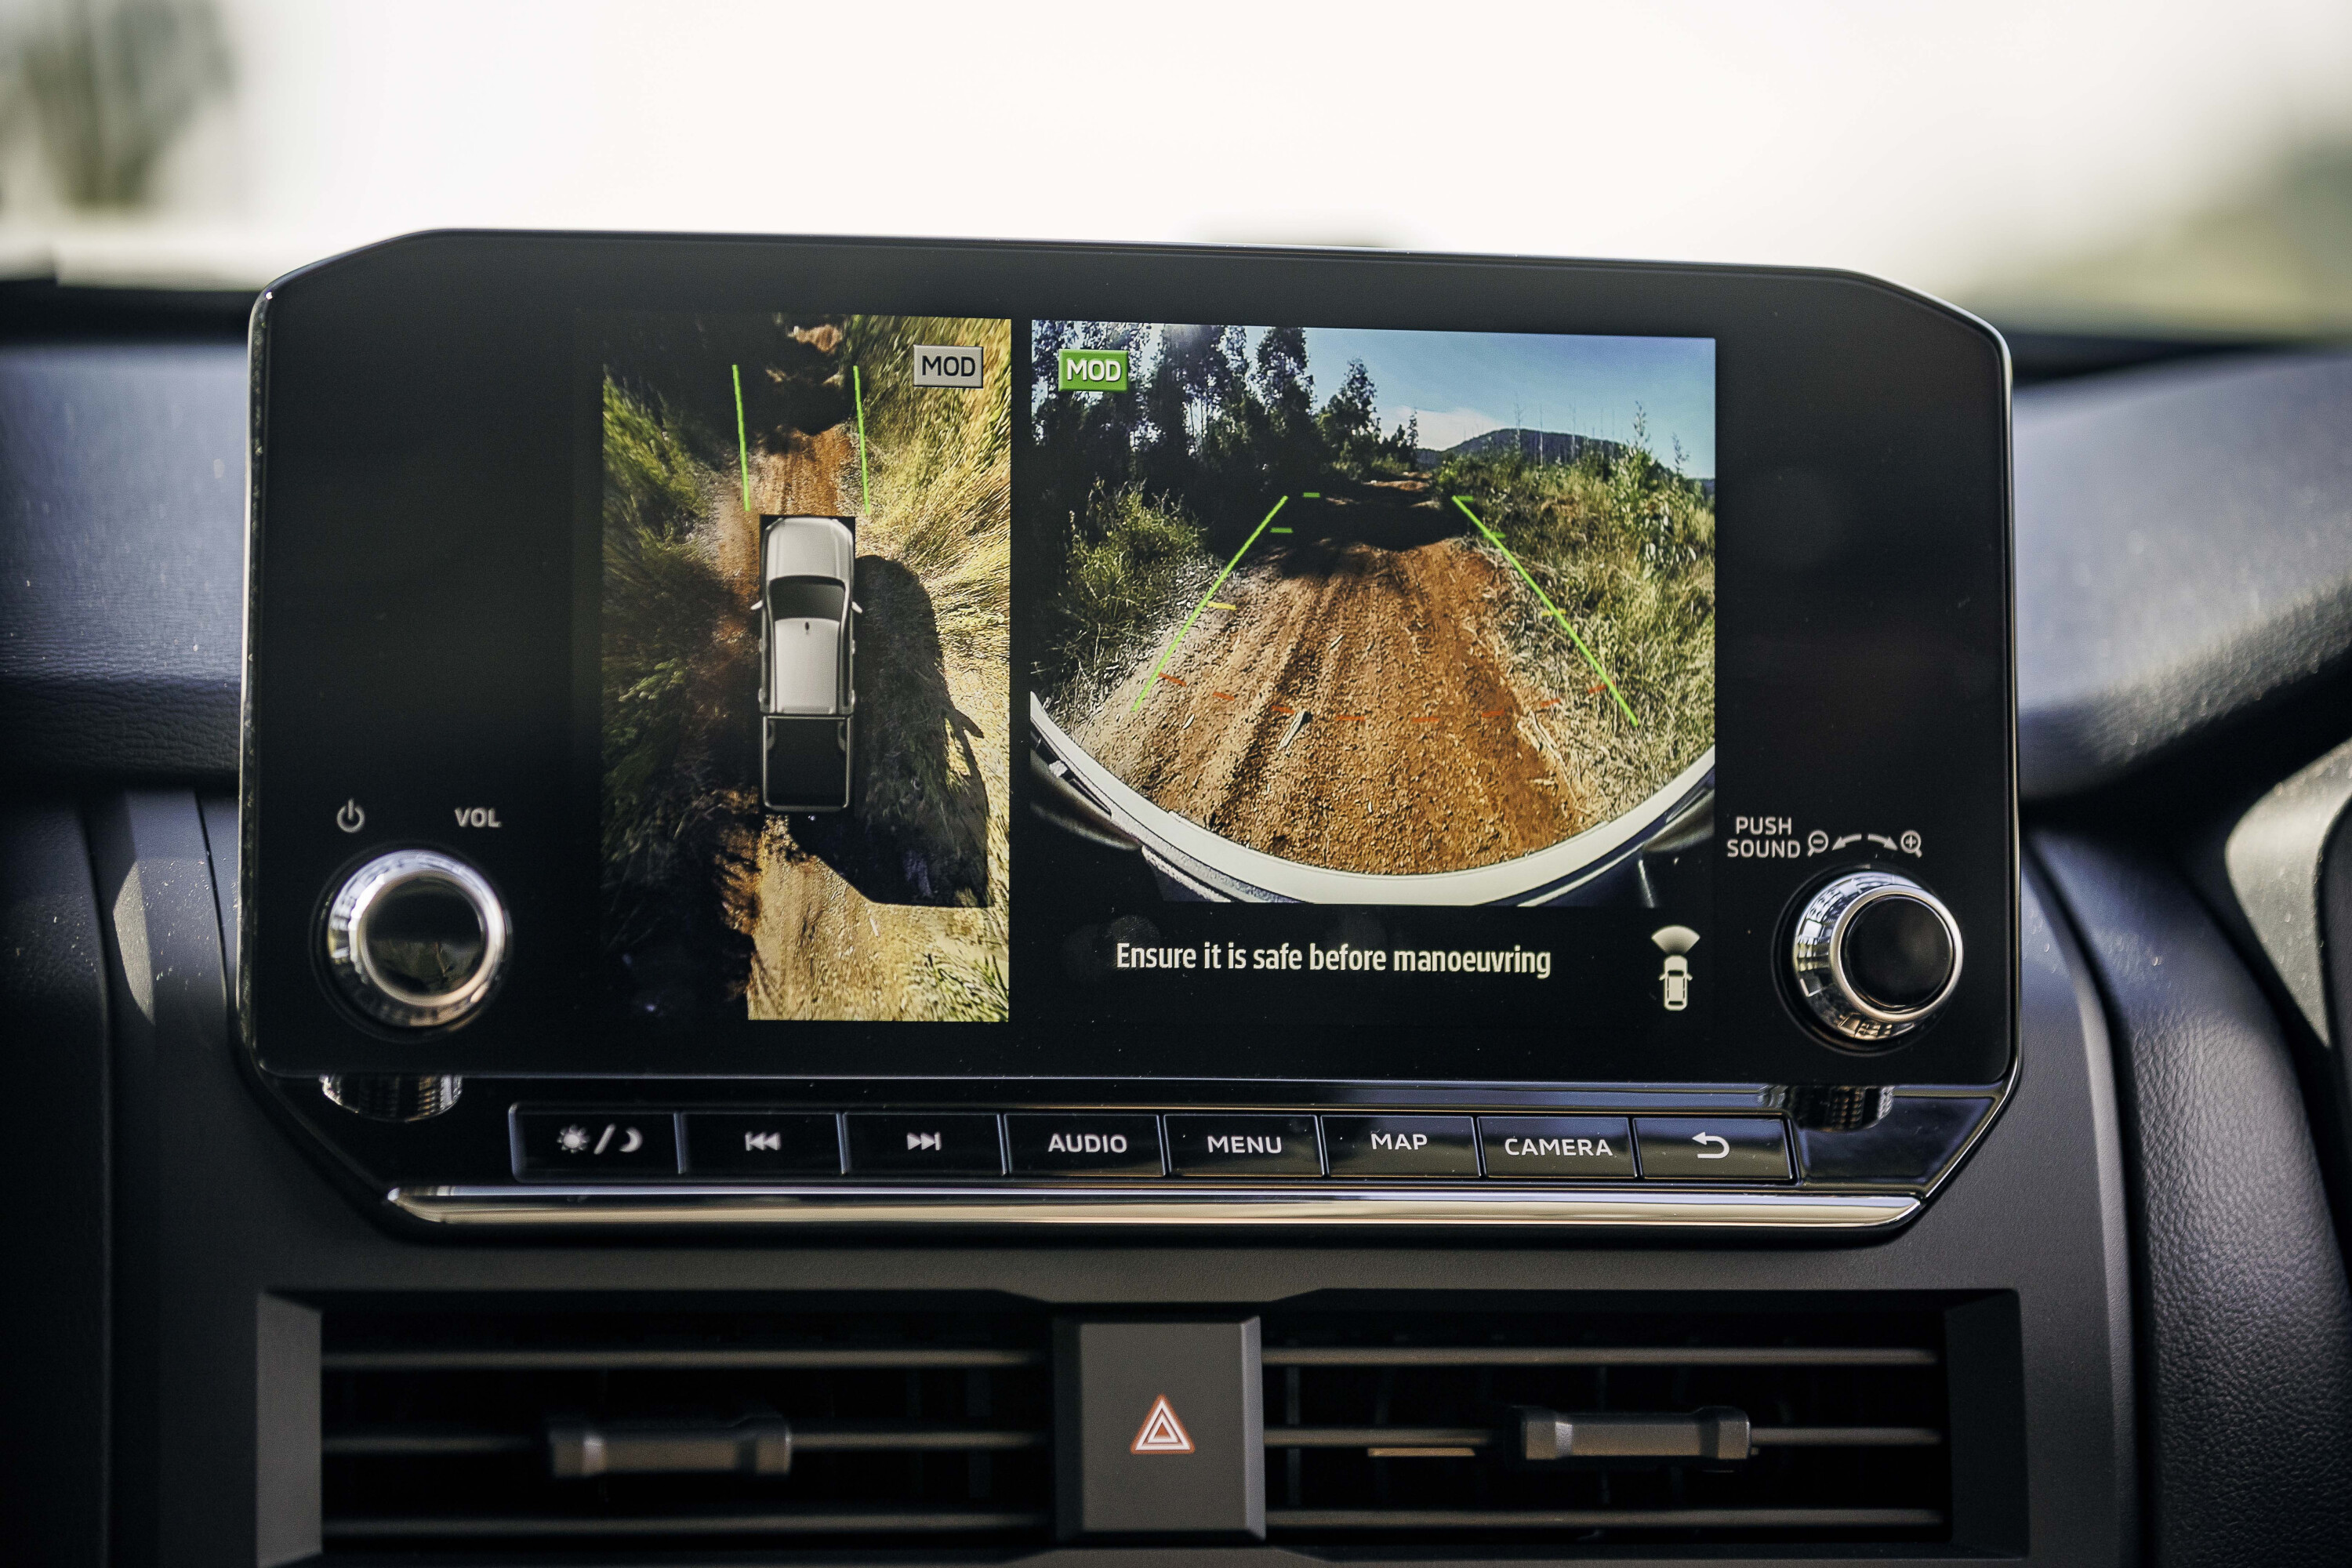
Unfortunately the LS-M and hence the X-Rider miss out of Isuzu’s clever new TPMS, which is only available in the higher grades with the bigger dash screens and 18-inch wheels. The X-Rider has a digital dash that is very busy in a video-game sort of way, but the new eight-inch infotainment screen is a step up from the old seven-inch unit.
The infotainment has Apple and Android phone mirroring, both available wirelessly, which is just as well as the new Isuzu no longer has a USB outlet in a convenient place; just one on the rear view mirror to work with dash cams, and smaller USB-C outlets on the audio system and at the back of the console.
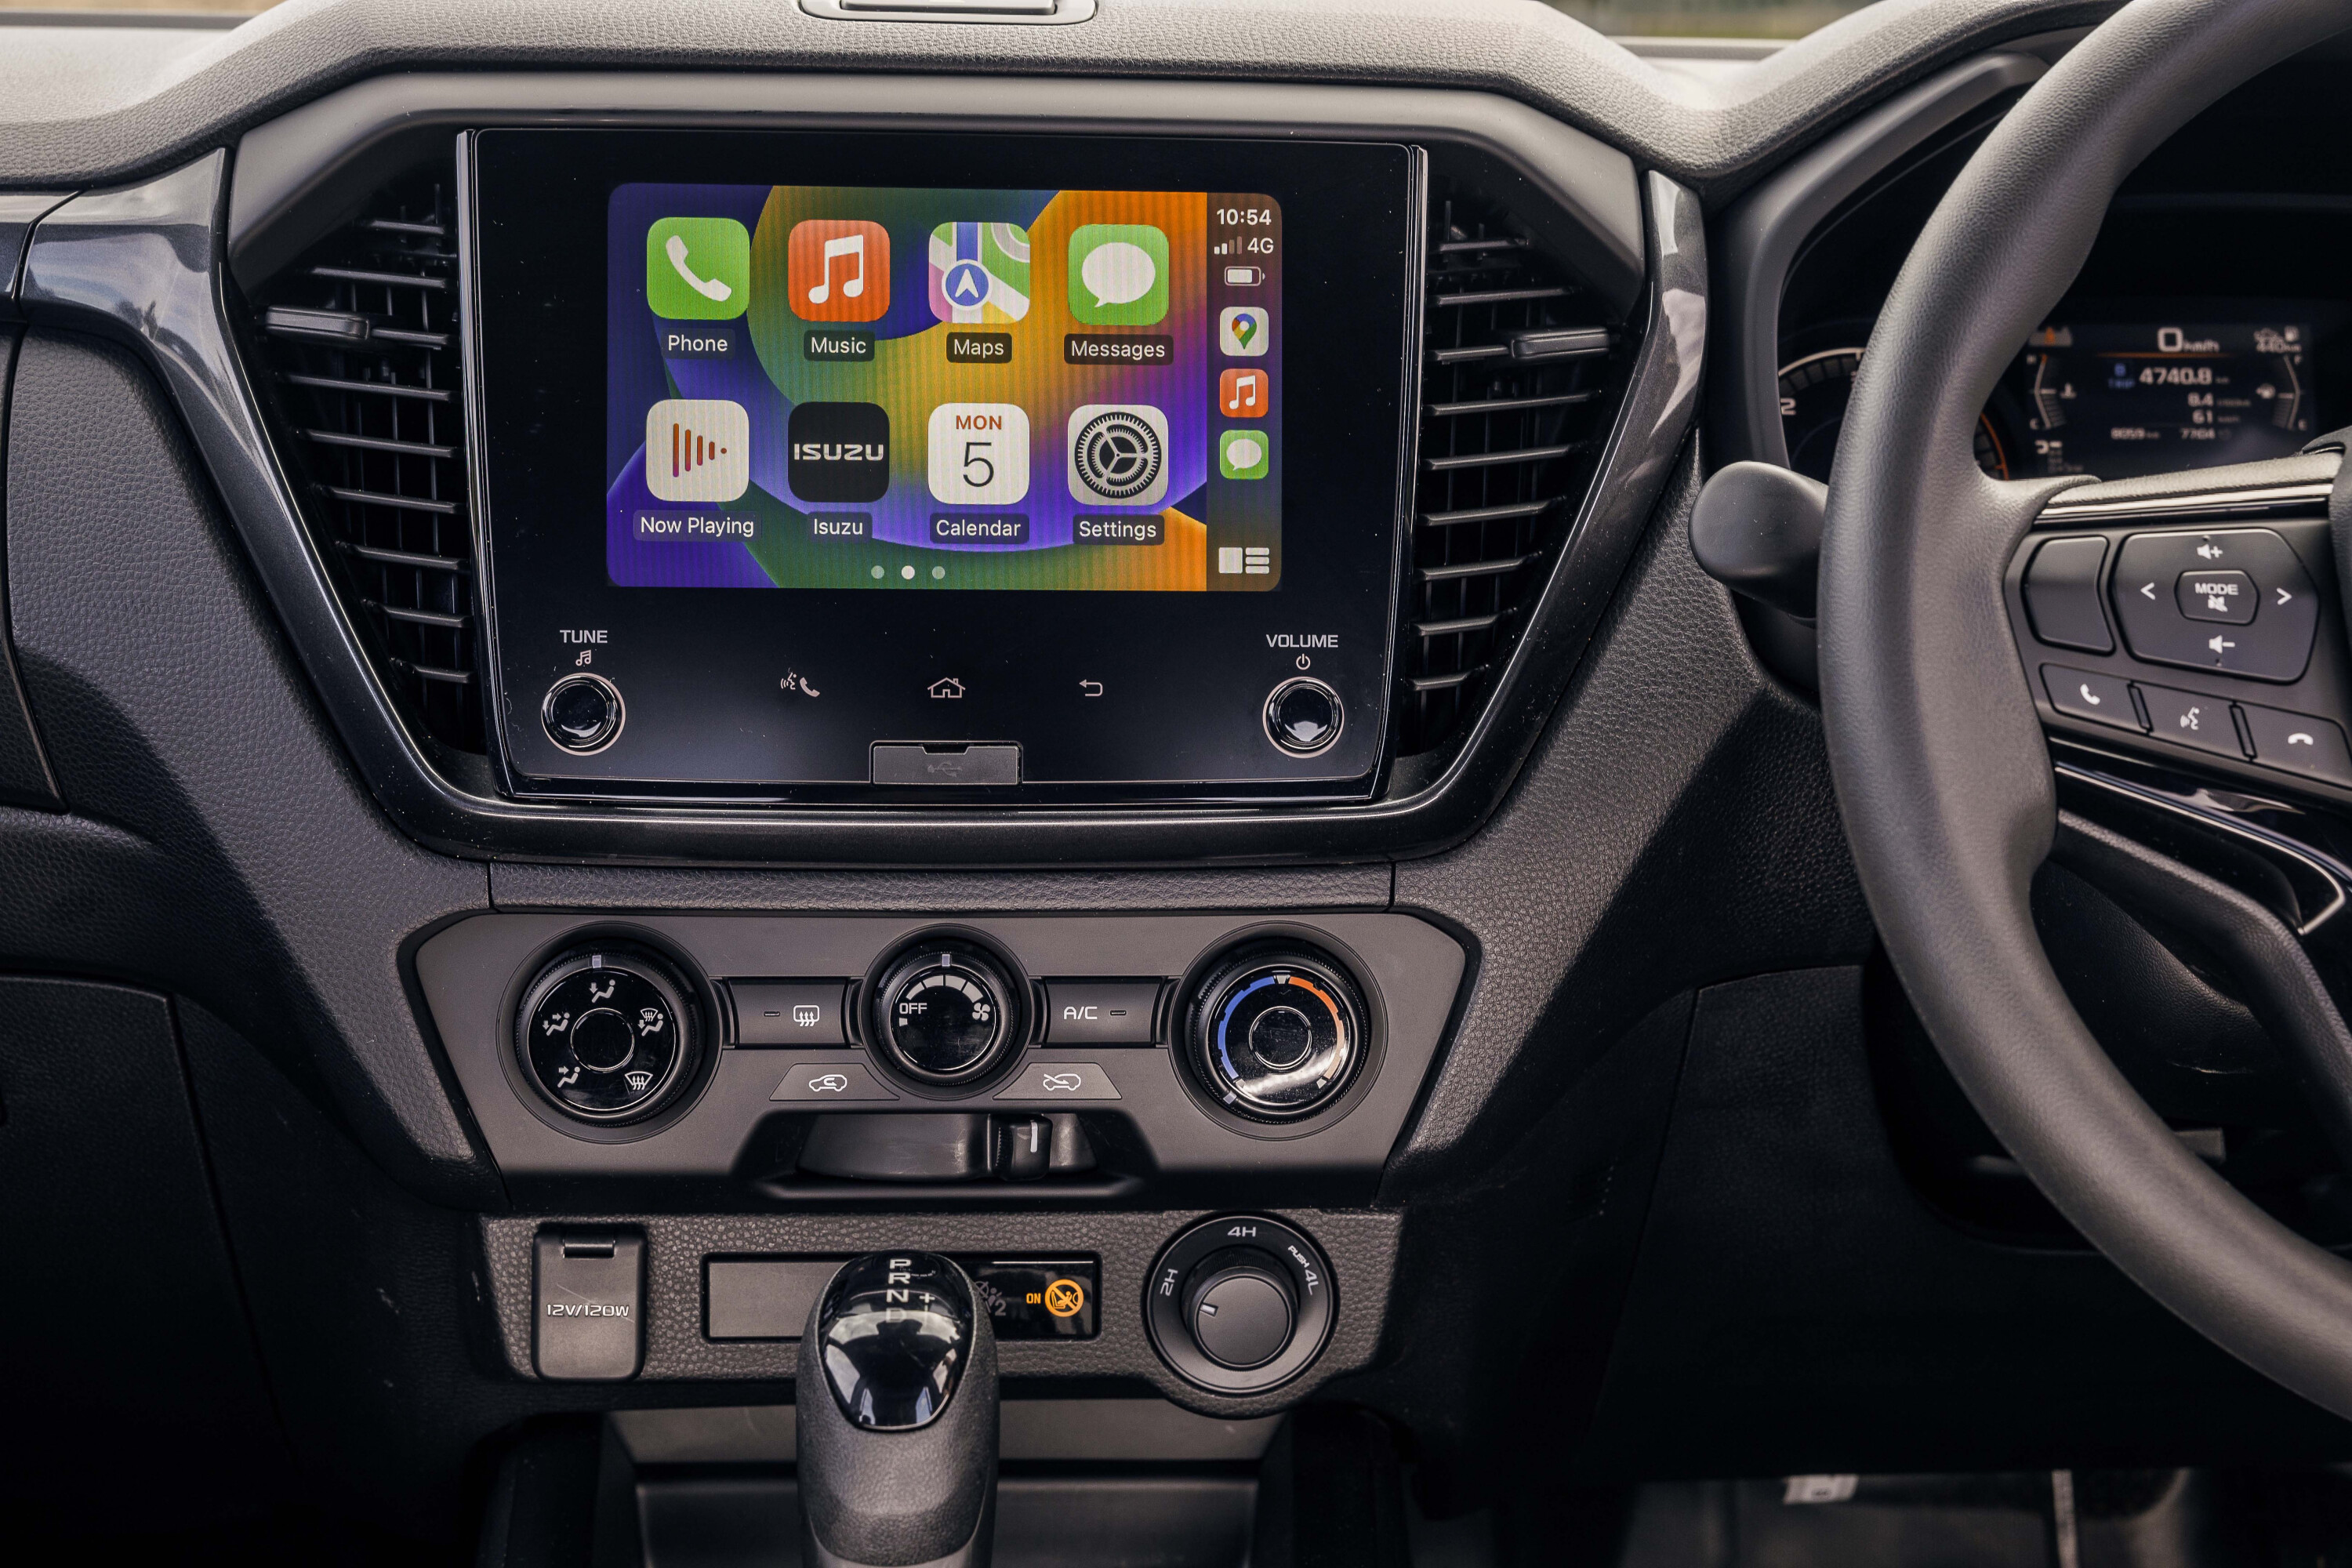
The X-Rider is powered by the popular 4JJ 3.0-litre, single turbo-diesel engine that is an honest workhorse and puts out a modest 450Nm and 140kW. It’s only offered with an automatic transmission, which is the excellent Aisin six-speed unit.
It’s a drivetrain that isn’t all about the power but gets on with the job now matter if you are on road or off, towing or not. And I still rate that Aisin box as the best in the segment. It sounds like Isuzu has taken measures to better insulate the cabin from driveline noise, but there’s no hiding the diesel rattle when you put your foot down and load it up. At light throttle and around town, it’s reasonably quiet.
Four-wheel drive comes via a part-time, dual-range transfer case that is electrically switched. It’s backed up by a locking rear differential and electronic traction control, which now benefits from Rough Terrain mode.
Rough Terrain has come across from the MU-X wagon for the 2024 facelifted D-MAX and, when deployed, it sharpens up the traction control, bringing it in at lighter throttle response and engine revs to be super effective.
It works really well, but I still can’t see why the electronics wouldn’t automatically switch to that mode when you select low range. It’s something to keep the marketing department busy, I guess, but it does improve the Isuzu’s off-road ability.
Being LS-M-based the tub in the X-Rider is a basic affair, but it does add the aforementioned vinyl tonneau cover. There’s no lighting, power outlet or tub liner; although, the test car did have a heavy duty rubber mat on the floor that is a genuine accessory and does a great job of protecting the paint and restricting cargo from sliding around. Four tie-down points are standard.
Back to top ⬆️
Mitsubishi Triton GLX+
While the X-Rider is a new variant in an upgraded-for-2024 D-MAX line-up, the 2024 Mitsubishi Triton is pretty much all new; and it’s a big step up from the model it supersedes.
Big in that it is physically a bigger car than the old Triton, offering more room for the driver, passengers and cargo. Switching between the Triton and the D-MAX, the driver’s seat in the Mitsi offers more space and comfort for the driver who is fronted by a simple analogue gauge cluster with an information screen between the speedometer and the tach.
It’s a much easier dash to view than the busy one in the D-MAX, but it still has all the features you need. The GLX+ also has automatic climate control where the X-Rider makes do with manual HVAC.
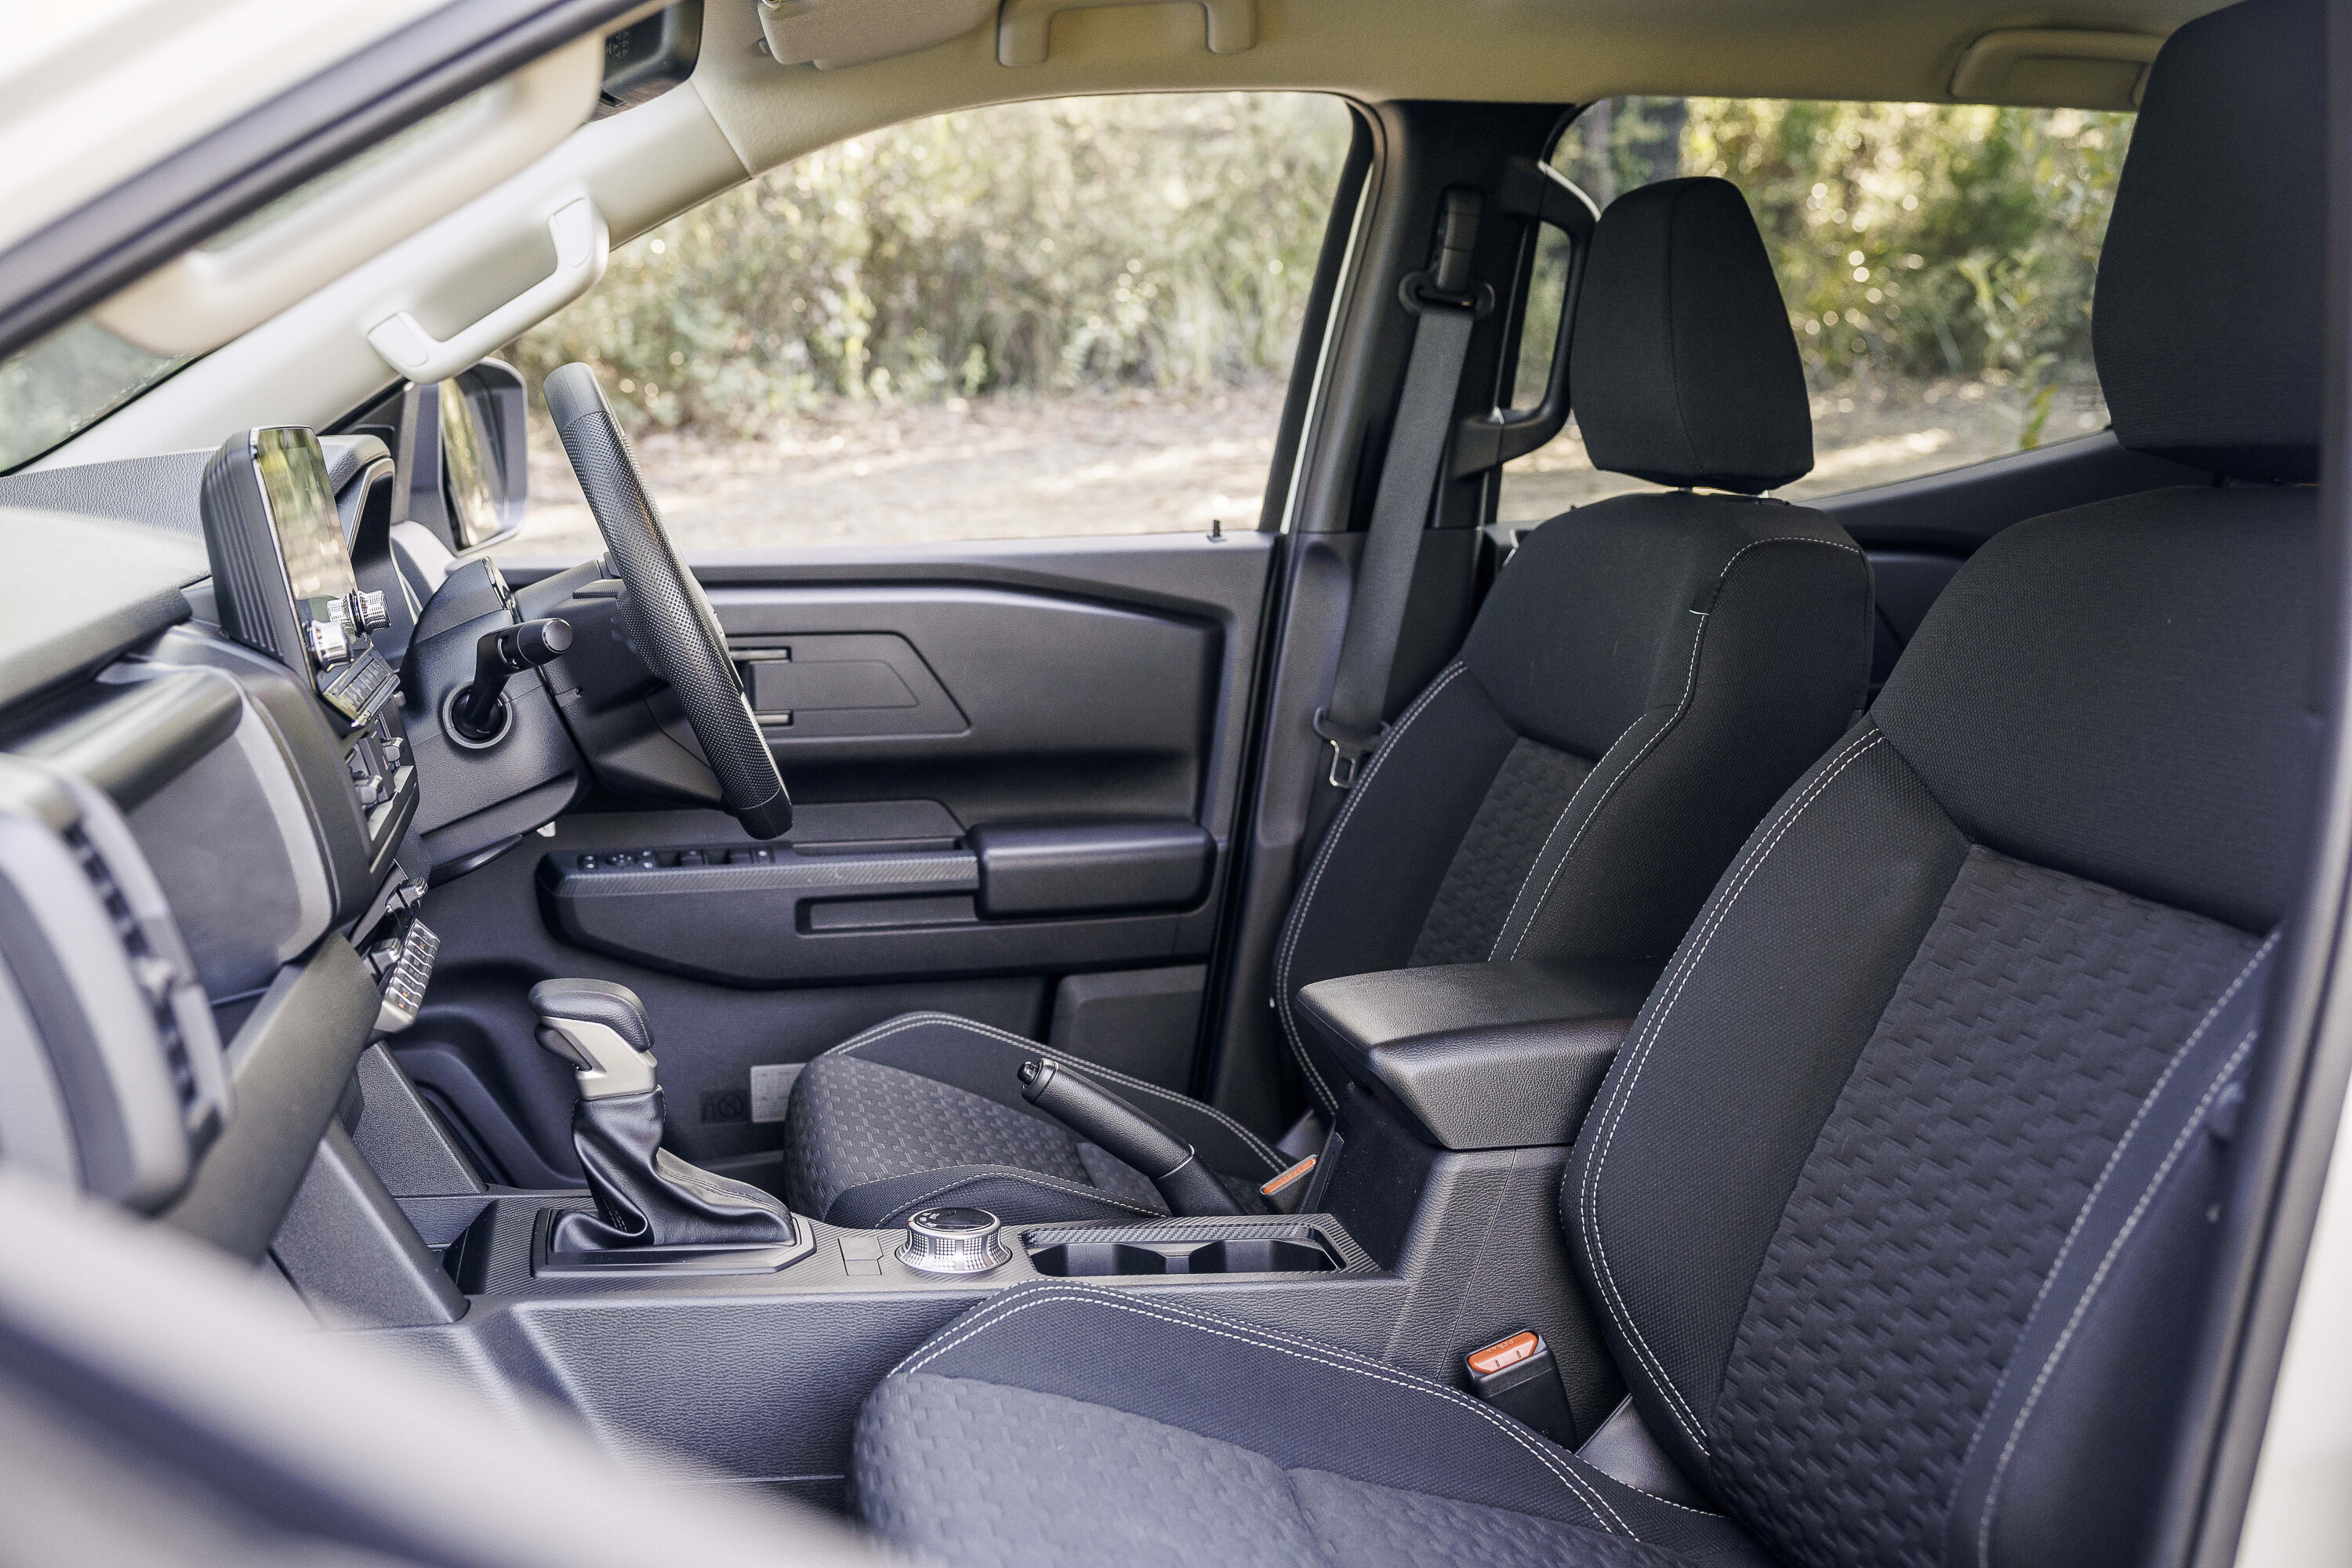
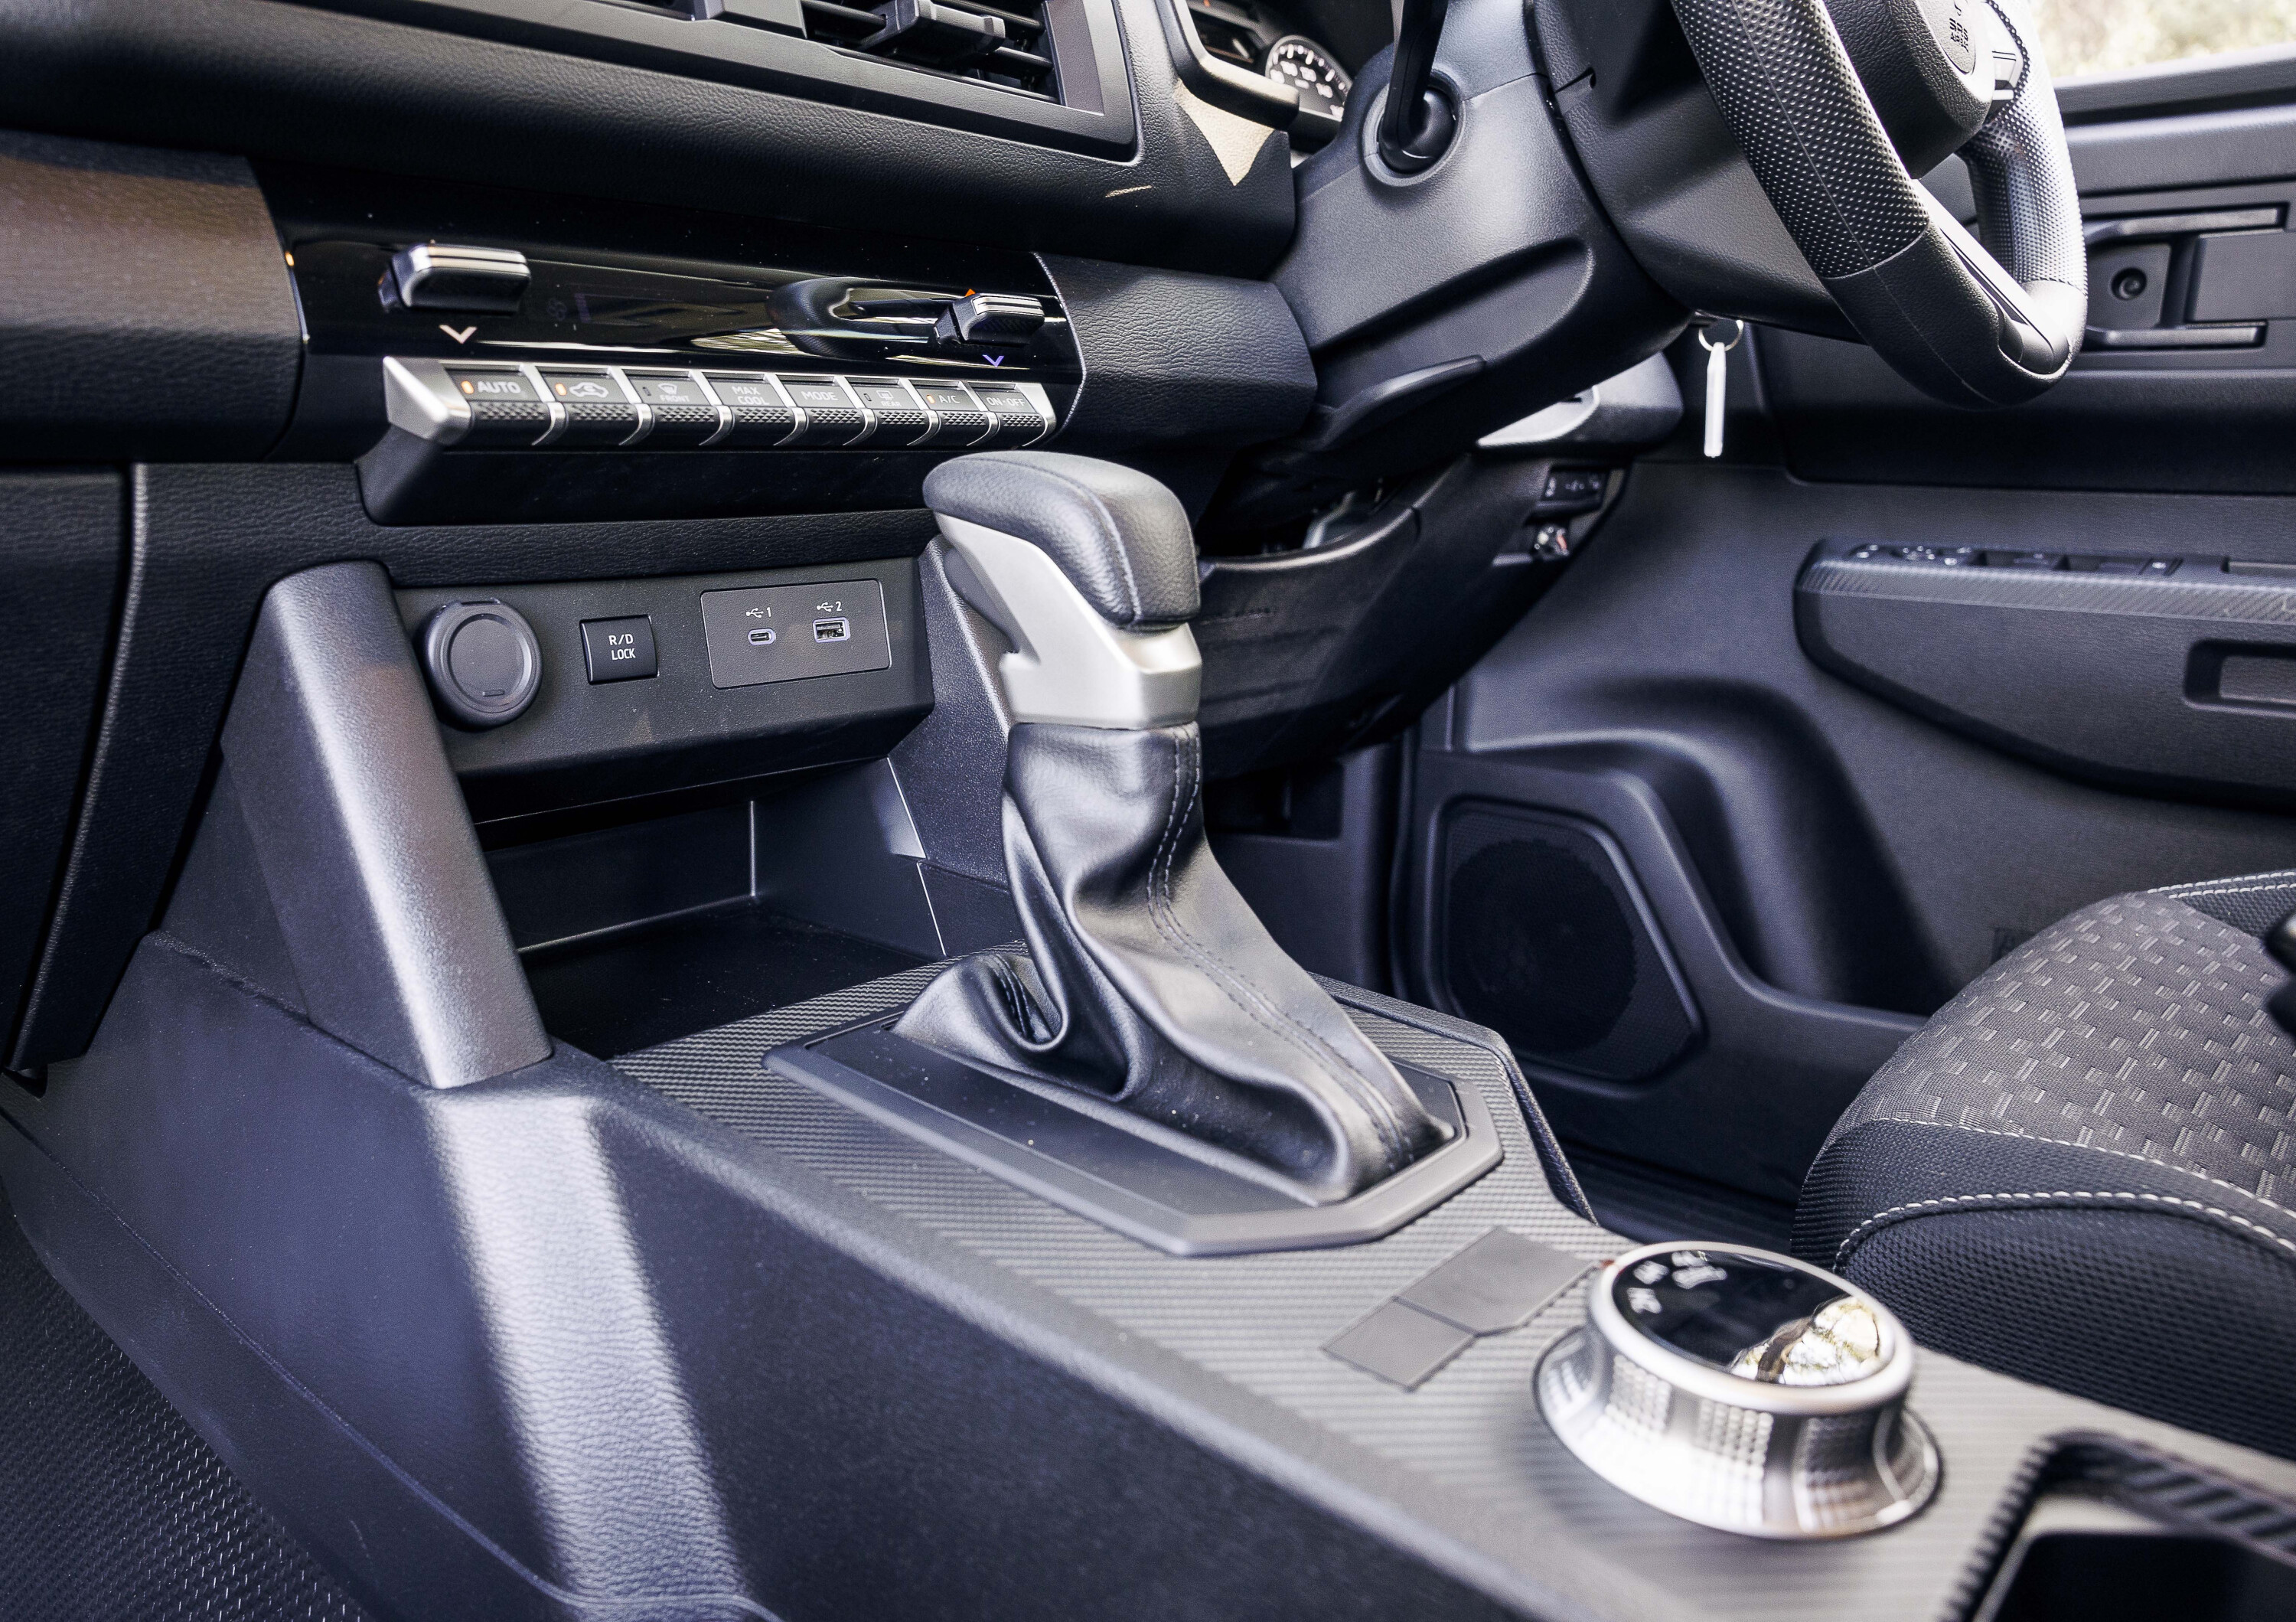
Likewise, the Triton’s nine-inch multimedia screen is big, easy to see and use, and well-positioned high on the dash.
It has large tactile dials for volume and track selection, plus phone mirroring with wireless Apple CarPlay, Android Auto, inbuilt sat-navigation and two USB inputs, with another two USB outlets is at the back of the console for rear seat occupants. The cabin and the driving experience it offers is by far the biggest step forward for this new Triton.
The Triton’s cabin is not as quiet as that of the D-MAX, and the 2.4-litre twin-turbo diesel engine makes itself known a lot more than that in the Isuzu. More annoying is the stop/start engine function which is quite abrupt and needs to be switched off every time you restart the car.
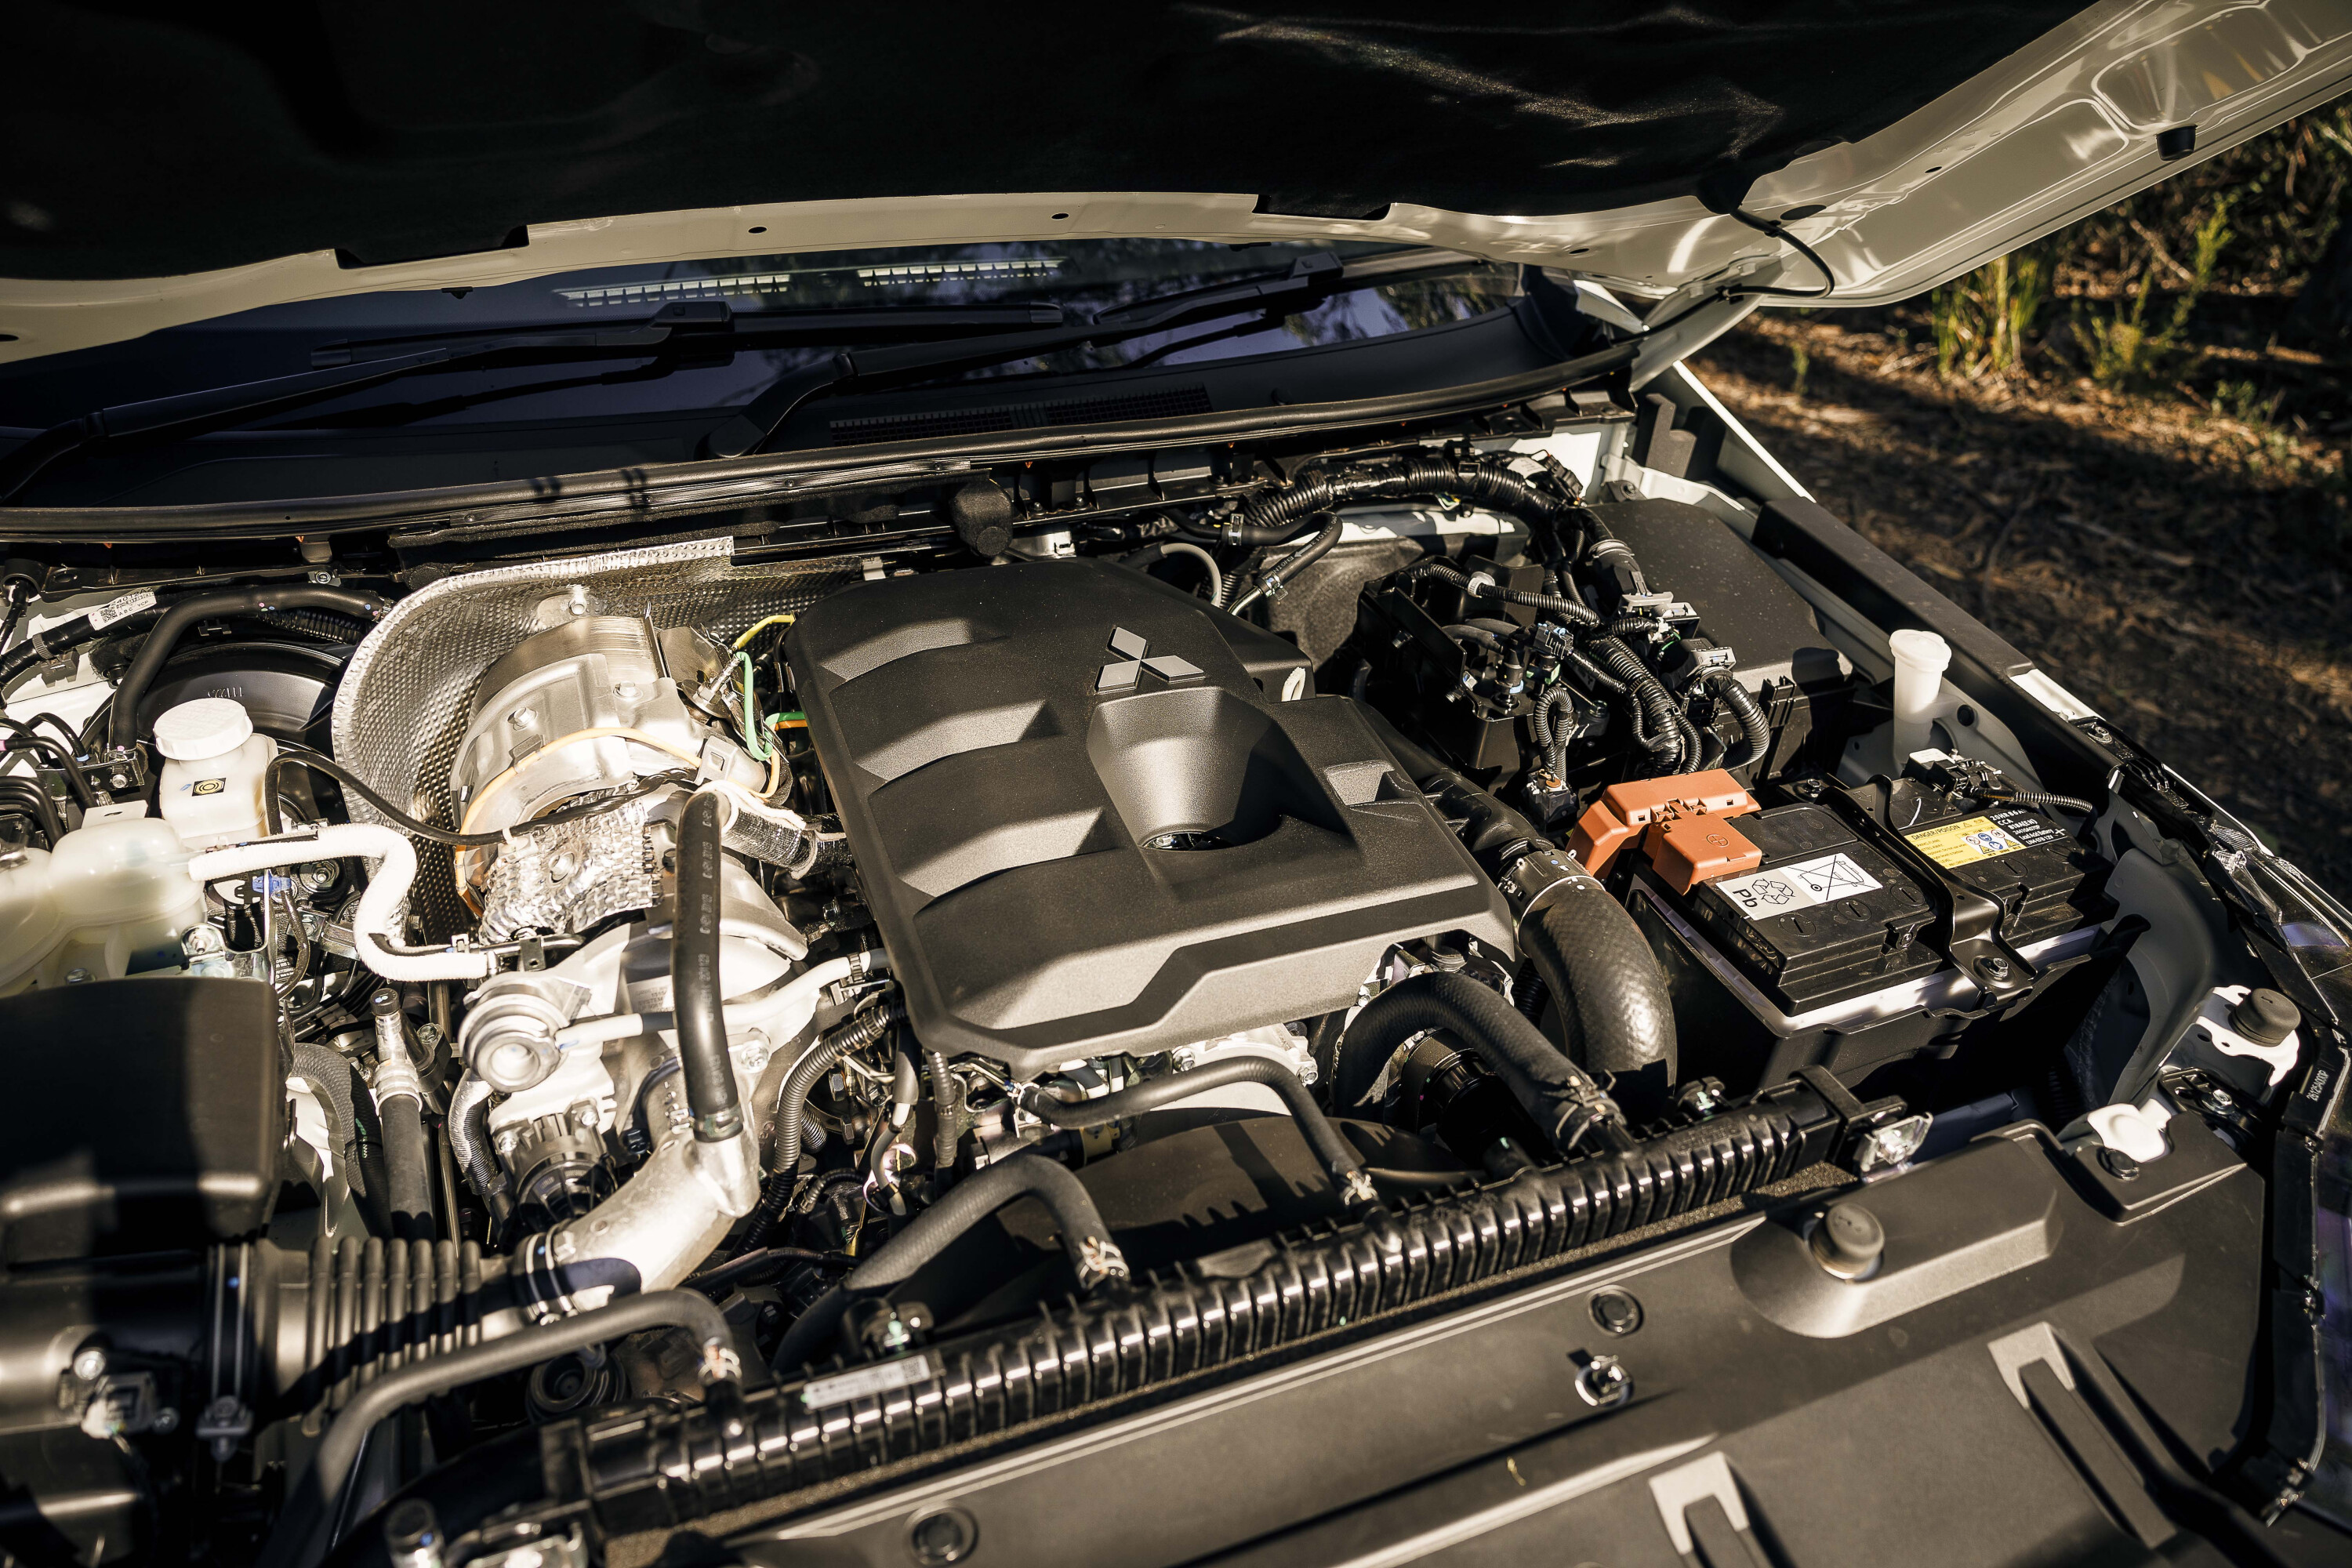
Mitsubishi’s 2.4-litre diesel engine has been upgraded with a pair of turbochargers, and new and improved injection and calibration to up its outputs to 150kW and 470Nm. This gives the unladen Triton sprightly acceleration and performance; although you do hear it when you put your foot down.
The Triton also uses the Aisin six-speed automatic transmission, but it is calibrated differently to the one used in the D-MAX. It has a more aggressive tune to its shifting, making it keen to downshift on deceleration like it’s in a sport mode when you really don’t want it to be. It does the job well but feels a bit too aggressive at times when you are cruising around the suburbs.
Following on from feedback after the launch of the new Triton, Mitsubishi has recalibrated the driver monitoring camera to be less invasive, and they have certainly succeeded there.
Yes, it will still beep at you if you spend too long looking at the multimedia screen or out the window, or if you drive with your hand on top of the steering wheel and block the camera’s view of your face, but it’s less intrusive than it was in the past.
We drove this exact same car a few months back and you can notice the difference, but it doesn’t bother me as much as the stop/start function. The driver monitoring system is part of the extensive safety kit required to attain the latest five-star ratings, and the new Triton has gained that.
Also in the safety package are all the regular technologies such as AEB; ABS; ESC; ETC; lane departure warning and intervention; rear cross traffic alert; TPMS; and nine airbags. The GLX+ misses out on the front cross traffic alert system that comes on the Triton GLS and GSR variants above it.
Four-wheel drive is again via a part-time, dual-range transfer case backed by a RDL and ETC. Only the Triton models higher up the range get the Super Select 4×4 system that includes full-time 4×4. It’s a nice function to have and gives the Triton a point of difference to most of the mid-size 4×4 utes, but not having it is no dealbreaker as you can easily slip between 2WD and 4×4 high range on the fly, as you can in the D-MAX.
Back to top ⬆️
Suspension set-ups
While both of these workhorses utilise a traditional ute live axle on leaf springs under the back end, each brand calibrates theirs differently. Isuzu uses a softer version of the three-leaf set-up under the ute and only offers the heavy duty set-up under cab-chassis models.
Mitsubishi sees the GLX+ as more of a working-class truck and fits a heavier duty leaf pack in its rear suspension with lighter leaves in higher spec variants. The GLX+ also has heavy duty Toyo all terrain tyres. You can feel this in the way each of them drives when unladen, with the Triton being much firmer and verging on bouncy over rough terrain, while the D-MAX soaks those bumps up to provide a softer ride.
Both utes have payloads north of one tonne and 3500kg towing capacities, but the Triton is more attractive with higher GVM and GCM capacities for when you load them up.
Back to top ⬆️
Warranty and servicing
Many owners buy Isuzu vehicles due to their reputation for durability. New D-MAX owners will enjoy five-year flat price servicing program at $449 per year/15,000km intervals, a six-year/150,000km warranty, and up to seven-year roadside assistance.
Meanwhile across at Mitsubishi you have the longest new car warranty offered in the business with its 10-year warranty and 10-year capped price servicing program over 12-month/15,000km service intervals. The first five services (to 70,000km) are $485 a pop.
Roadside assist is also included for 12 months and renewed for another 12 months when the vehicle is serviced in accordance to the capped price servicing program for a maximum of four years.
Back to top ⬆️
Verdict
They might not be the top-selling utes in the country, but the D-MAX and the Triton remain two of the more popular options. At this price-point they are ideal choices as a work-and-play vehicle or something on which to build your perfect touring rig.
While the D-MAX has a few years on the new Triton, it doesn’t show its age except that it lacks some of the latest safety tech such as the driver monitor, but most buyers would be happy to drive without that.
The X-Rider D-MAX is a little bit more refined than the Triton thanks to its softer suspension, smoother transmission calibration and quieter engine, but the GLX+ wins back brownie points with its more spacious cabin, automatic climate control and heavier GVM and GCM capacities.
Between these two models the Mitsubishi represents considerable savings, and if you’re not excited by the X-Rider’s black-out treatment it would be the obvious choice.
A standard D-MAX LS-M, which is the same truck without the black-outs, starts at $55,800. If you were to step up to the Triton GLS at $59,090 you’d be getting a better-equipped ute with the Super-Select 4×4 system.
It’s a close race on spec and features and one that will come down to what your requirements of a car include. But with all things considered, the Triton GLX+ would be the ute to find its way in our shed from this pair.
Back to top ⬆️
Specs
| 2024 Mitsubishi Triton GLX+ | 2024 Isuzu D-Max X-Rider | |
|---|---|---|
| Price | $53,290 +ORC | $59,500 (+ORC) |
| Engine | Inline 4 u2013cyl diesel, twin turbocharger | Inline 4 u2013cyl diesel, single turbocharger |
| Capacity | 2442cc | 2999cc |
| Max power | 150kW@3500rpm | 140kW @ 3600rpm |
| Max torque | 470Nm @1500-2750rpm | 450NM @1600 u2013 2600rpm |
| Transmission | 6-speed auto | 6-speed auto |
| 4×4 system | Part-time, dual range 4×4 | Part-time, dual range 4×4 |
| Crawl ratio | 39.46:1 | 33.3:1 |
| Construction | 4-door double cab ute | 4-door double cab ute |
| Front suspension | IFS with wishbones and coils | IFS with wishbones and coils |
| Rear suspension | Live axle on leaf springs | Live axle on leaf springs |
| Tyres | 265/65-17 alloy wheels | 255 / 65 -17 on alloys |
| Weight | 2105kg (kerb) | 2030kg (kerb) |
| GVM | 3200kg | 3100kg |
| GCM | 6250kg | 5950kg |
| Towing capacity | 3500kg | 3500kg |
| Payload | 1095kg | 1070kg |
| Seats | 5 | 5 |
| Fuel tank | 75L (17L adblue) | 76L |
| ADR fuel consumption | 7.5L/100km | 8.oL/100km |
| On test fuel consumption | 9.6L/100km | |
| Approach angle | 30.4u00b0 | 30.5u00b0 |
| Ramp over angle | 23.4u00b0 | 19u00b0 |
| Departure angle | 22.8u00b0 | 23.8u00b0 |
| Ground clearance | 228mm | |
| Wading depth | N/A |
Back to top ⬆️
Key points
- Tundra Limited to arrive in November
- High-spec Premium model coming in 2025
- Prices still to be confirmed
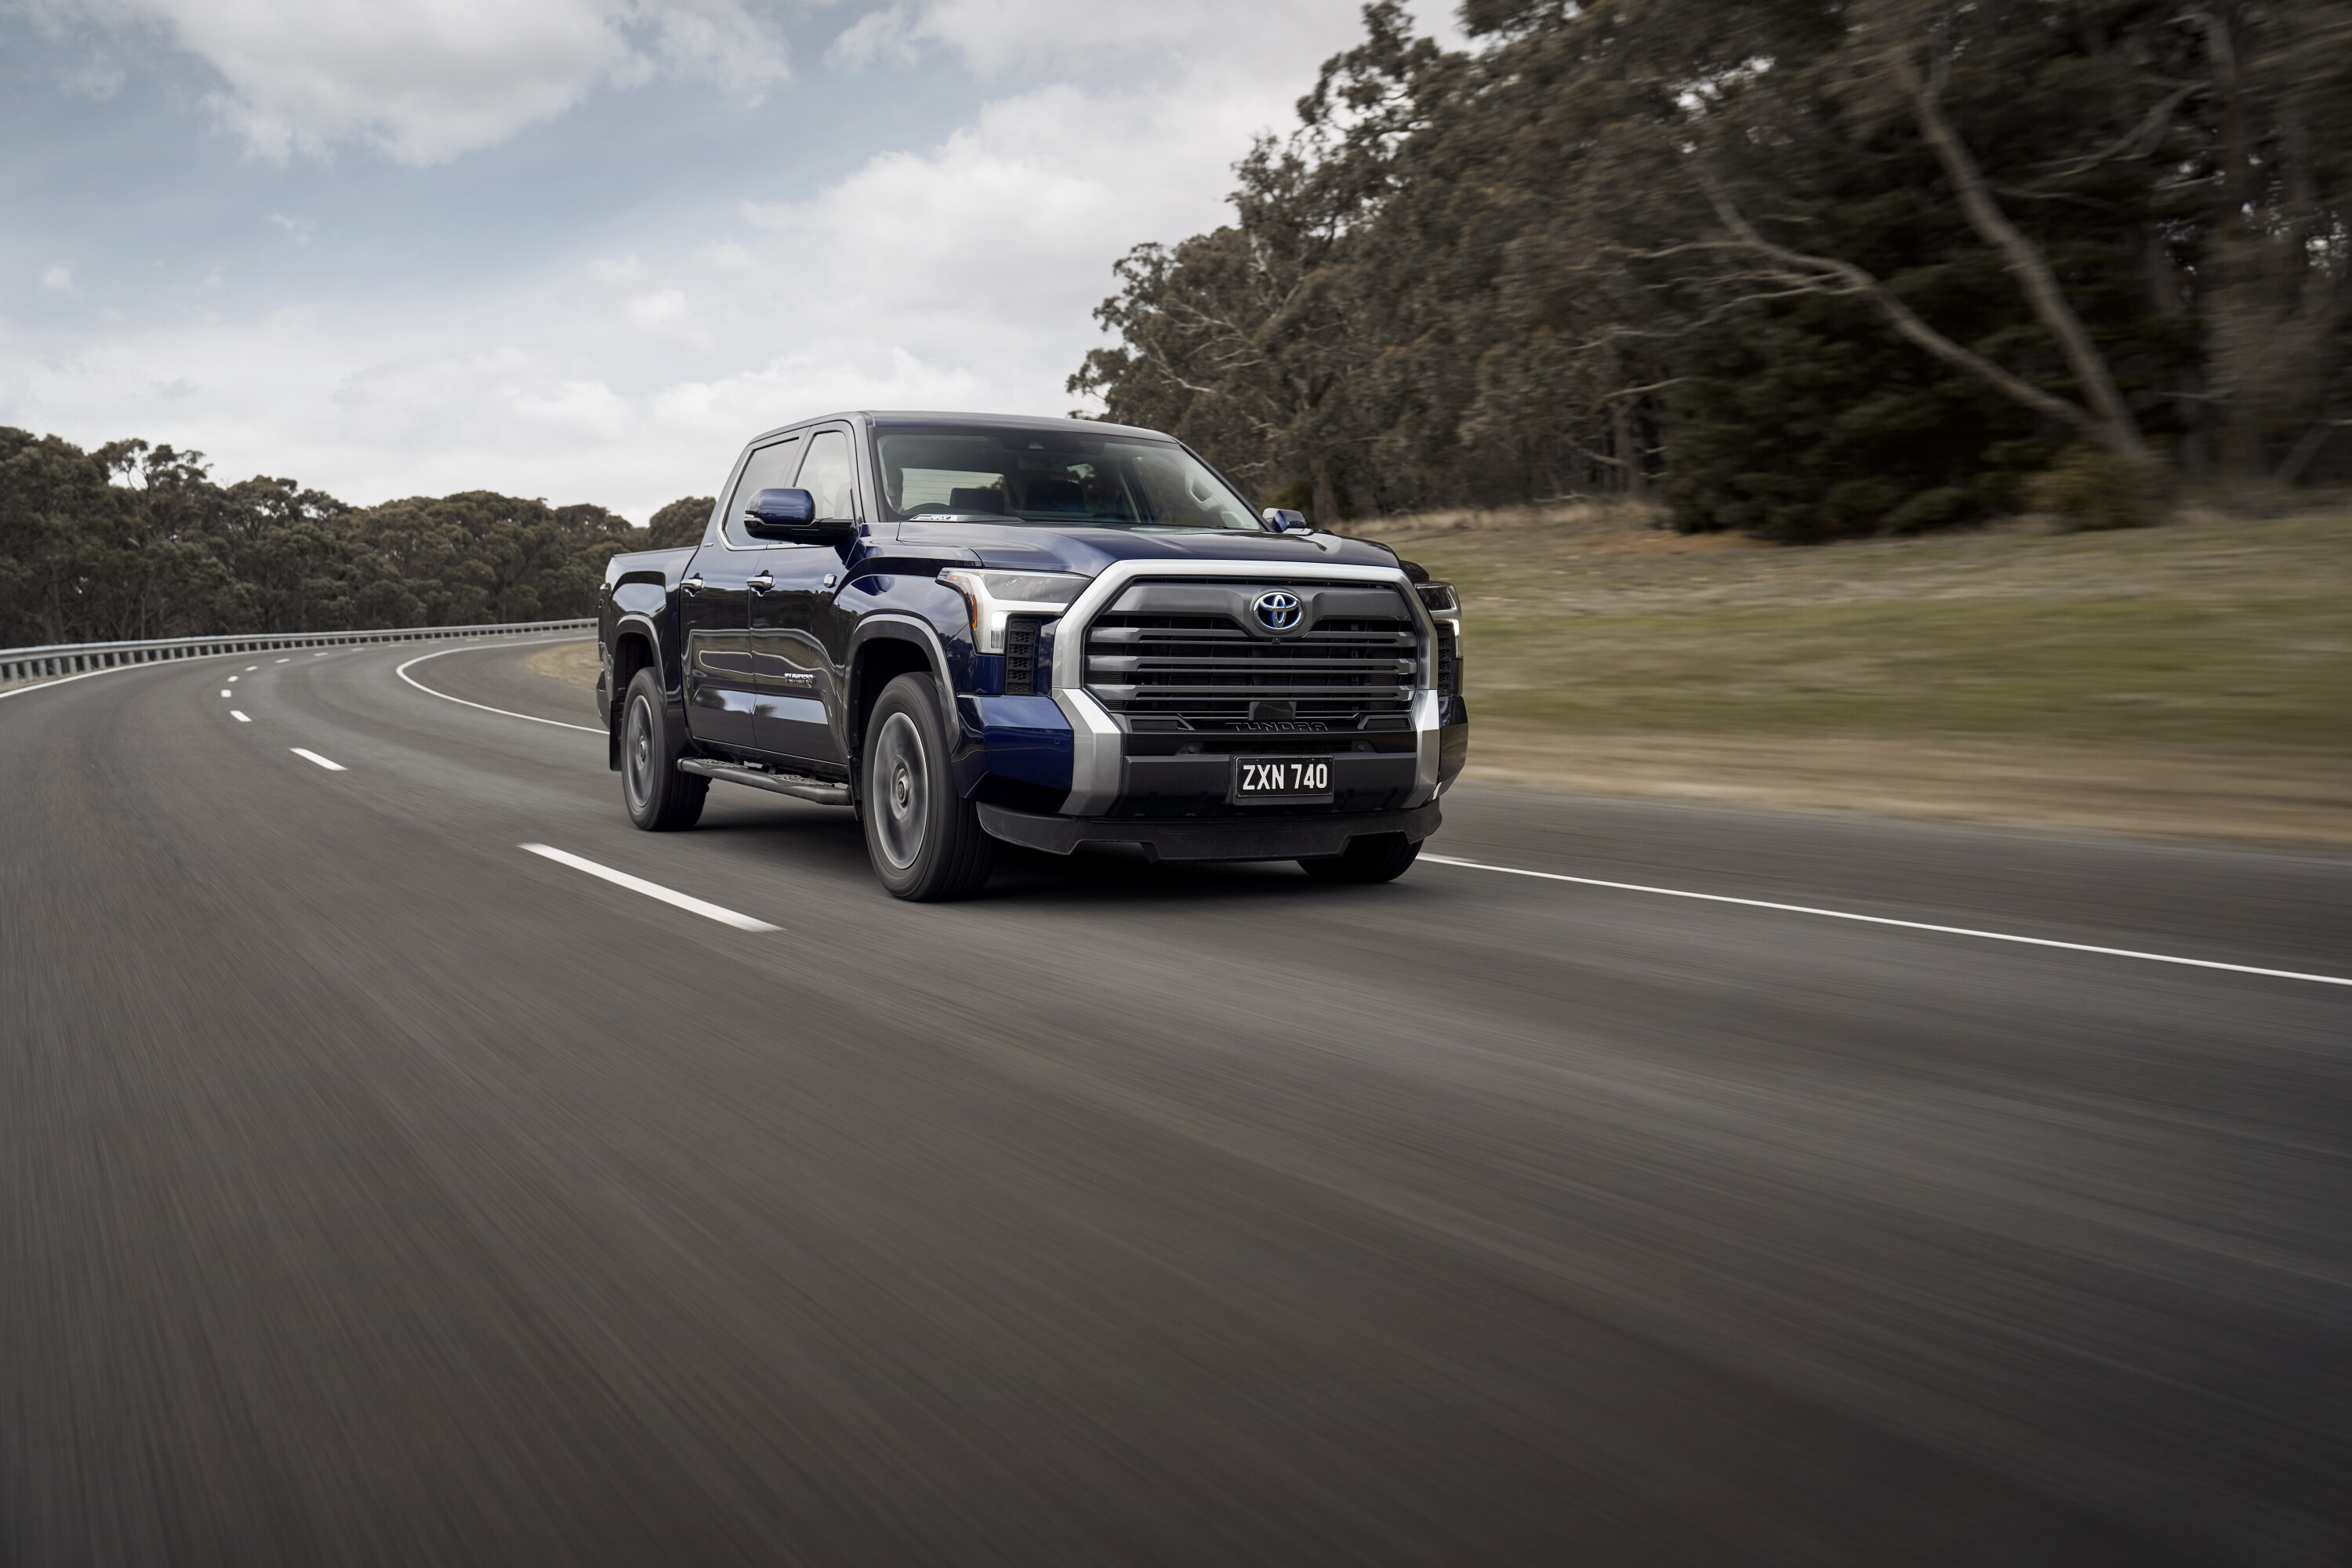
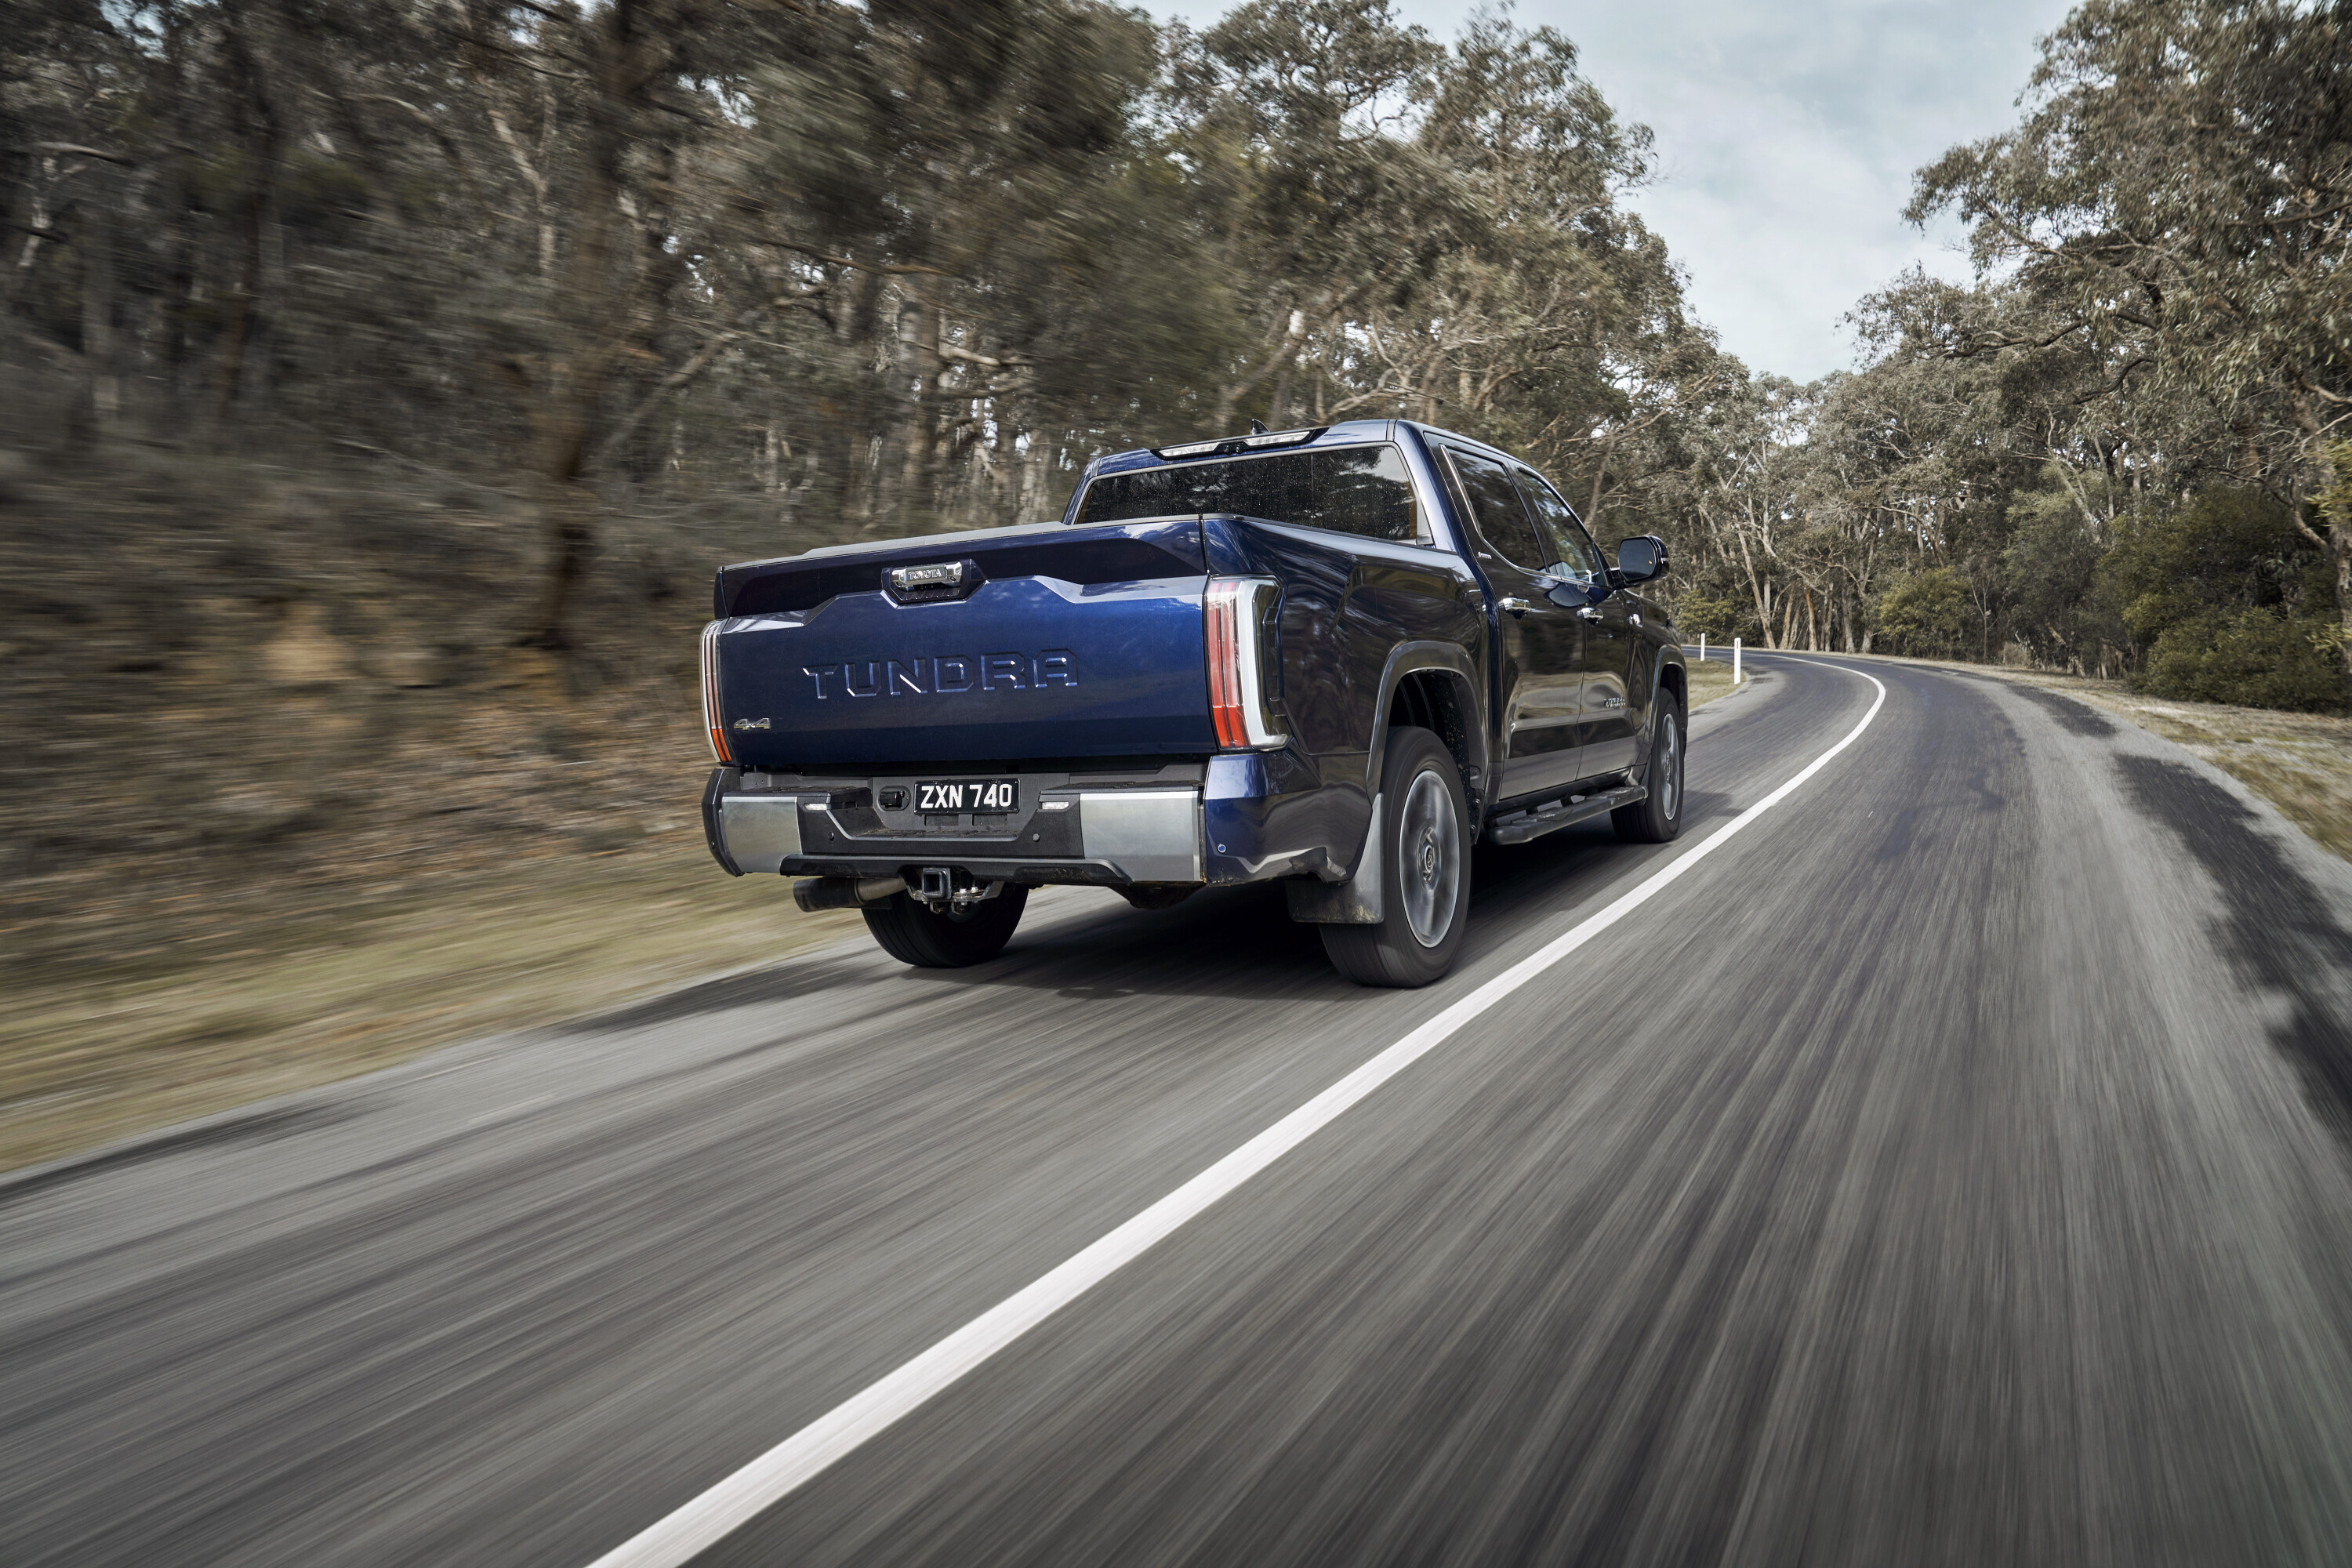
Toyota Australia has confirmed the 2025 Tundra full-size pick-up will join its local fleet in November this year.
Following a nine-month evaluation process where 300 vehicles were leased out to potential owners to use as they see fit and test the vehicles, TMCA now says the Tundra will be in Toyota dealers from mid-November.
Manufactured at a Toyota plant in the USA in left-hand-drive configuration only, the Tundra will be imported to Australia and re-manufactured to right-hand-drive by the Walkinshaw Group at its Melbourne facility.
Walkinshaw has the runs on the board in this re-engineering business, as it does similar work with RAM vehicles for Ateco Automotive and the Chevrolet Silverado for GMSV, but Ryan Walkinshaw says the work with Toyota is different as it is a full factory operation with the Toyota Corporation.
Toyota Australia’s Vice President of Sales, Marketing and Franchise Operations, Sean Hanley, said of the collaboration, “The Tundra has been completely re-engineered by Toyota engineers working in close collaboration with Walkinshaw and uses many parts and components from other Toyota vehicles such as LandCruiser 300 Series, to ensure the very highest quality standards.”
This project marks the first time such a program has been approved and undertaken by Toyota anywhere in the world, where a left-hand drive vehicle is exported to another country, re-engineered by a third-party partner and sold by TMC.
“It really was a massive effort on behalf of everyone involved and I’m proud that we have been able to gain final approval from our parent company for what is a global Toyota first,” Mr Hanley concluded.
The Tundra rides on Toyota’s TNGA-F platform that underpins the LandCruiser 300 Series and incoming 250 Series Prado. As such, Walkinshaw was able to use some LC300 components in the left- to right-hand drive process.
Powered exclusively by a 3.5-litre twin-turbo V6 petrol engine that makes 326kW and 790Nm and drives through a 10-speed automatic transmission and part-time dual-range transfer case, the Tundra also has a 4500kg towing capacity. Its payload is a relatively low 758kg, which is comparable with other 1500-class full-size American pick-ups. The engine is paired with a 36kW/250Nm electric motor generator and 6.5Ah nickel metal hydride battery (Ni-MH) that delivers total system maximum outputs of 326kW and 790Nm.
From November the Tundra will only be available in the existing Limited model, with a new, higher specification variant set to join the line-up in 2025.
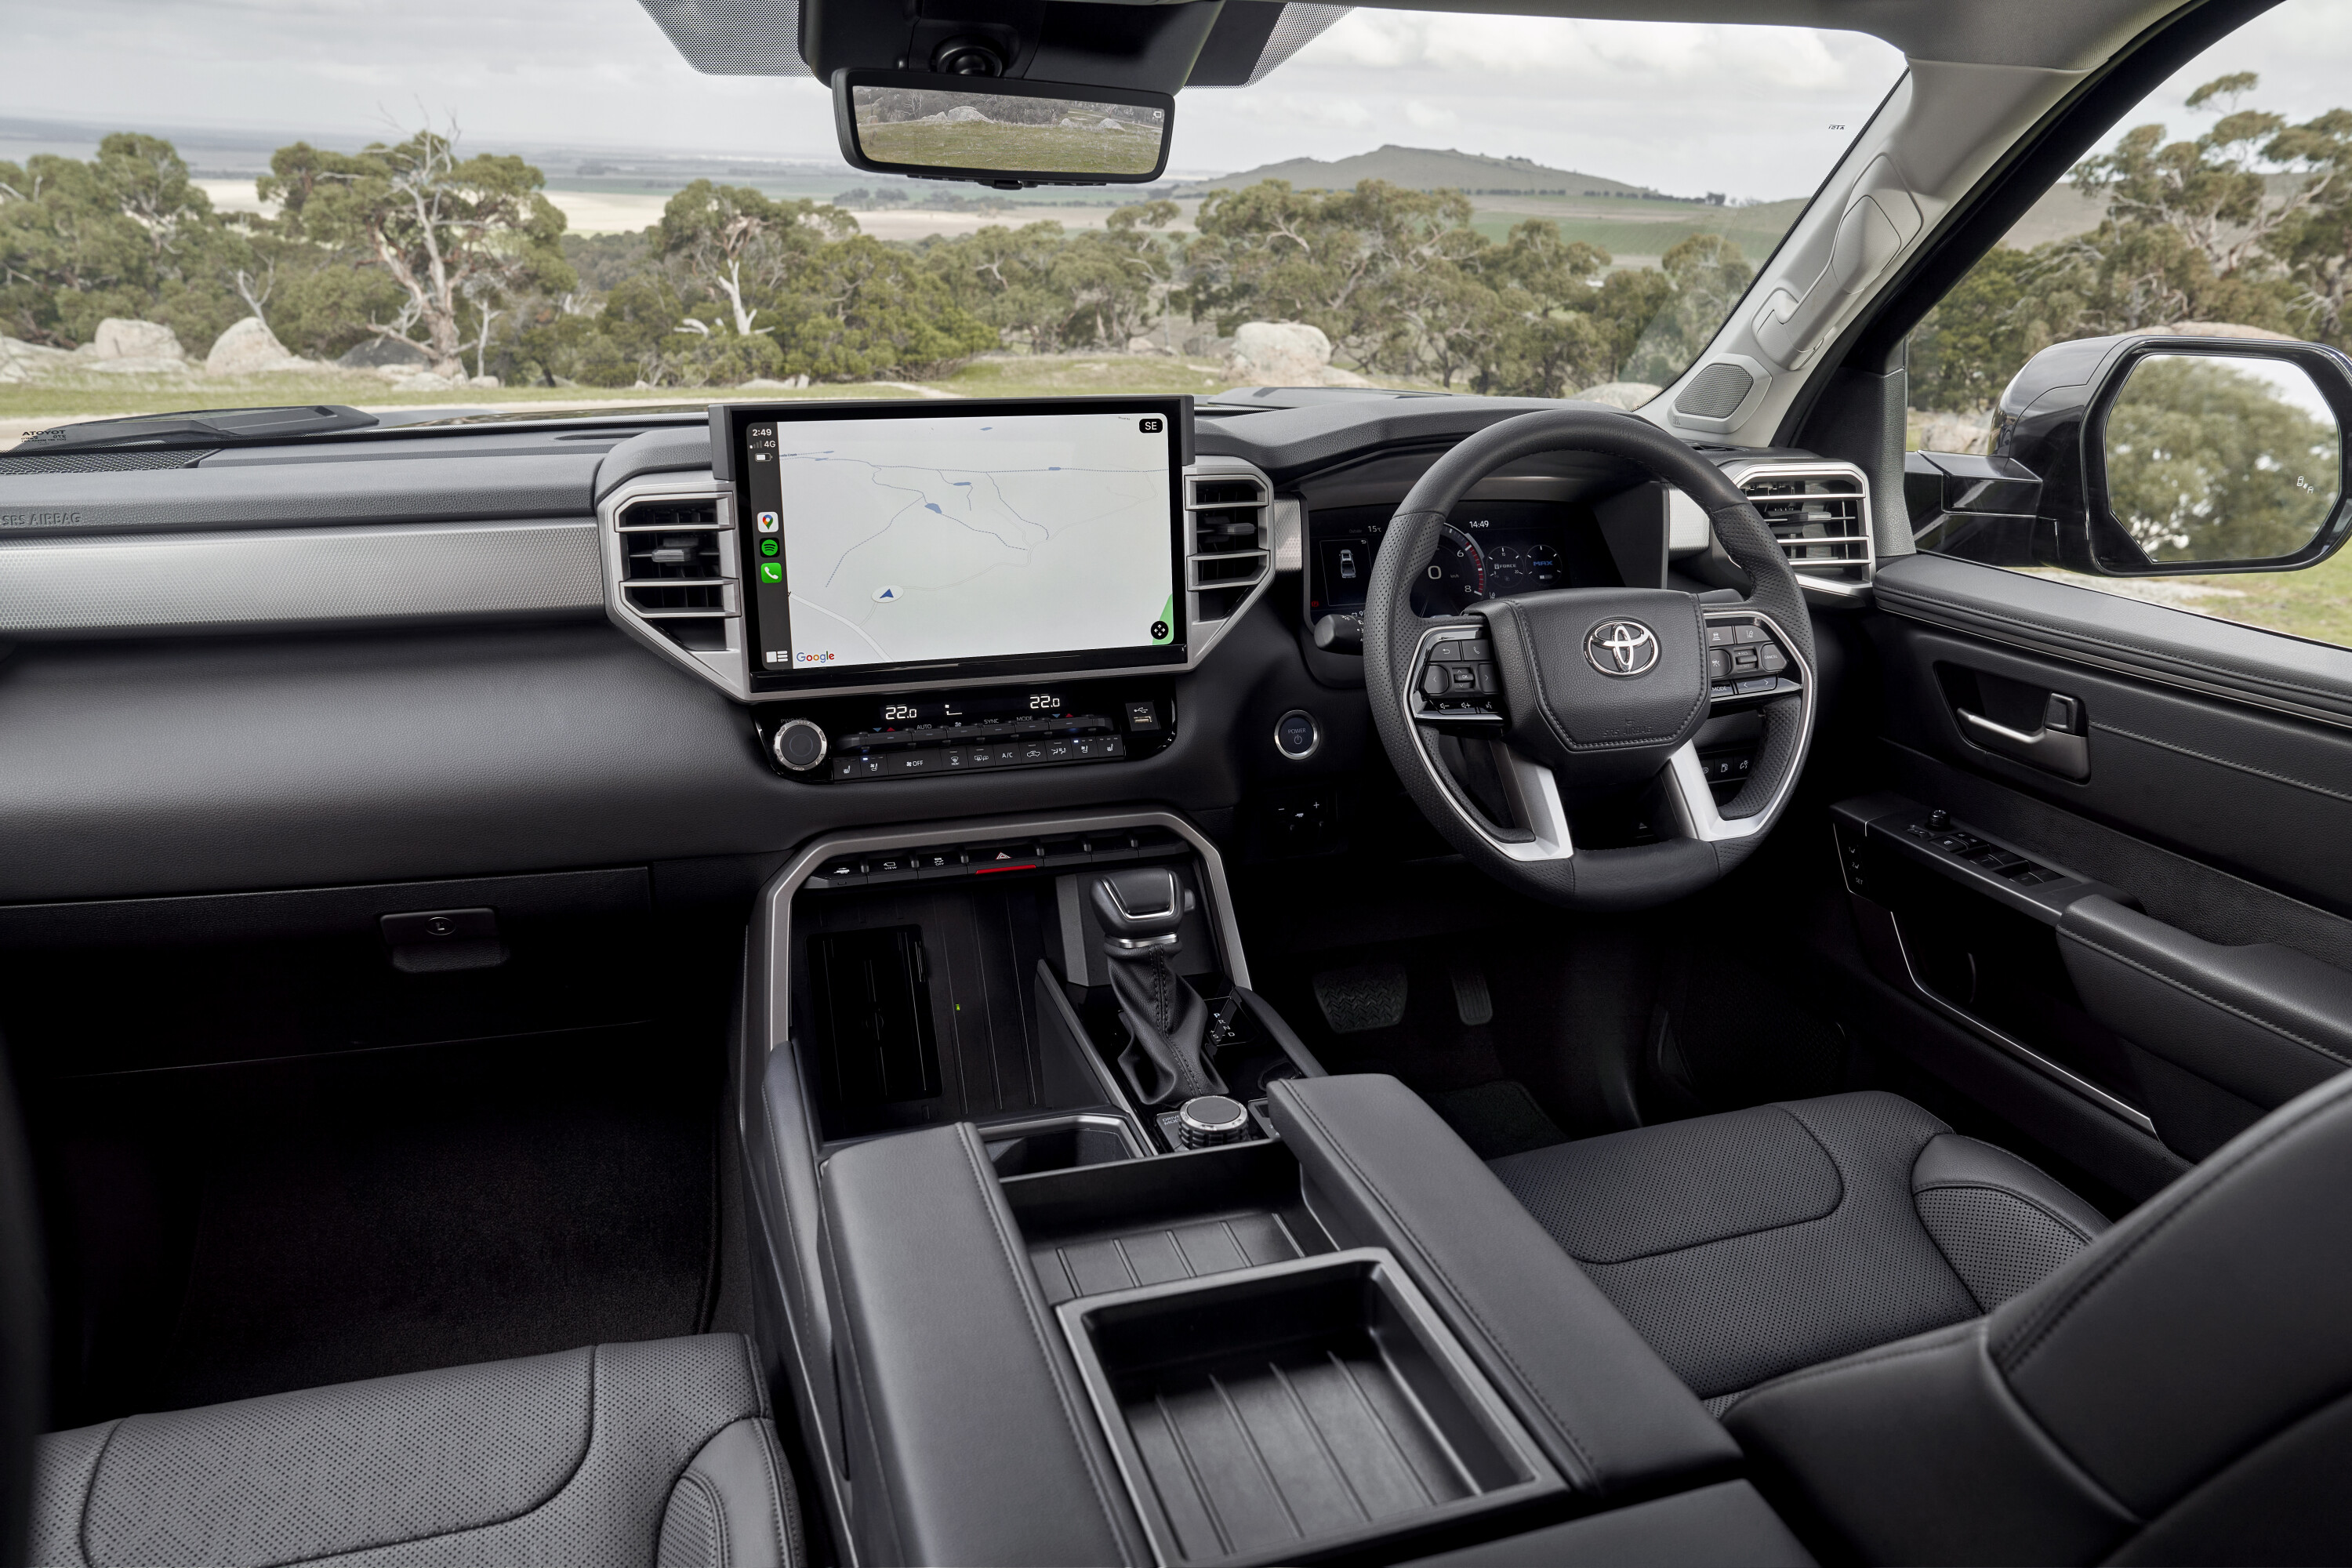
The Tundra Limited is well-equipped with 20-inch alloy wheels; LED lights; leather-accented seats with power adjustment, heating and ventilation for the driver and front passenger; 14-inch multimedia touchscreen with a 12-speaker JB audio system and wireless Apple CarPlay and wired Android Auto compatibility; 12.3-inch digital instrument cluster; dual-zone climate control; and an in-built trailer brake controller. The upper spec model is set to take the luxury further with new levels of equipment and styling.
Toyota Australia is clearly adding the Tundra as a premium ute with high towing capacity, rather than an off-road vehicle. Yes, it has 4×4 with low range, but the models being offered here lack features like Crawl Control, downhill assist and a locking rear diff, all of which are available in LC300 and US-spec Tundra variants.
Pricing for the 2025 Tundra Limited is yet to be disclosed, but we are tipping you won’t get much change from $150,000 if you want one.
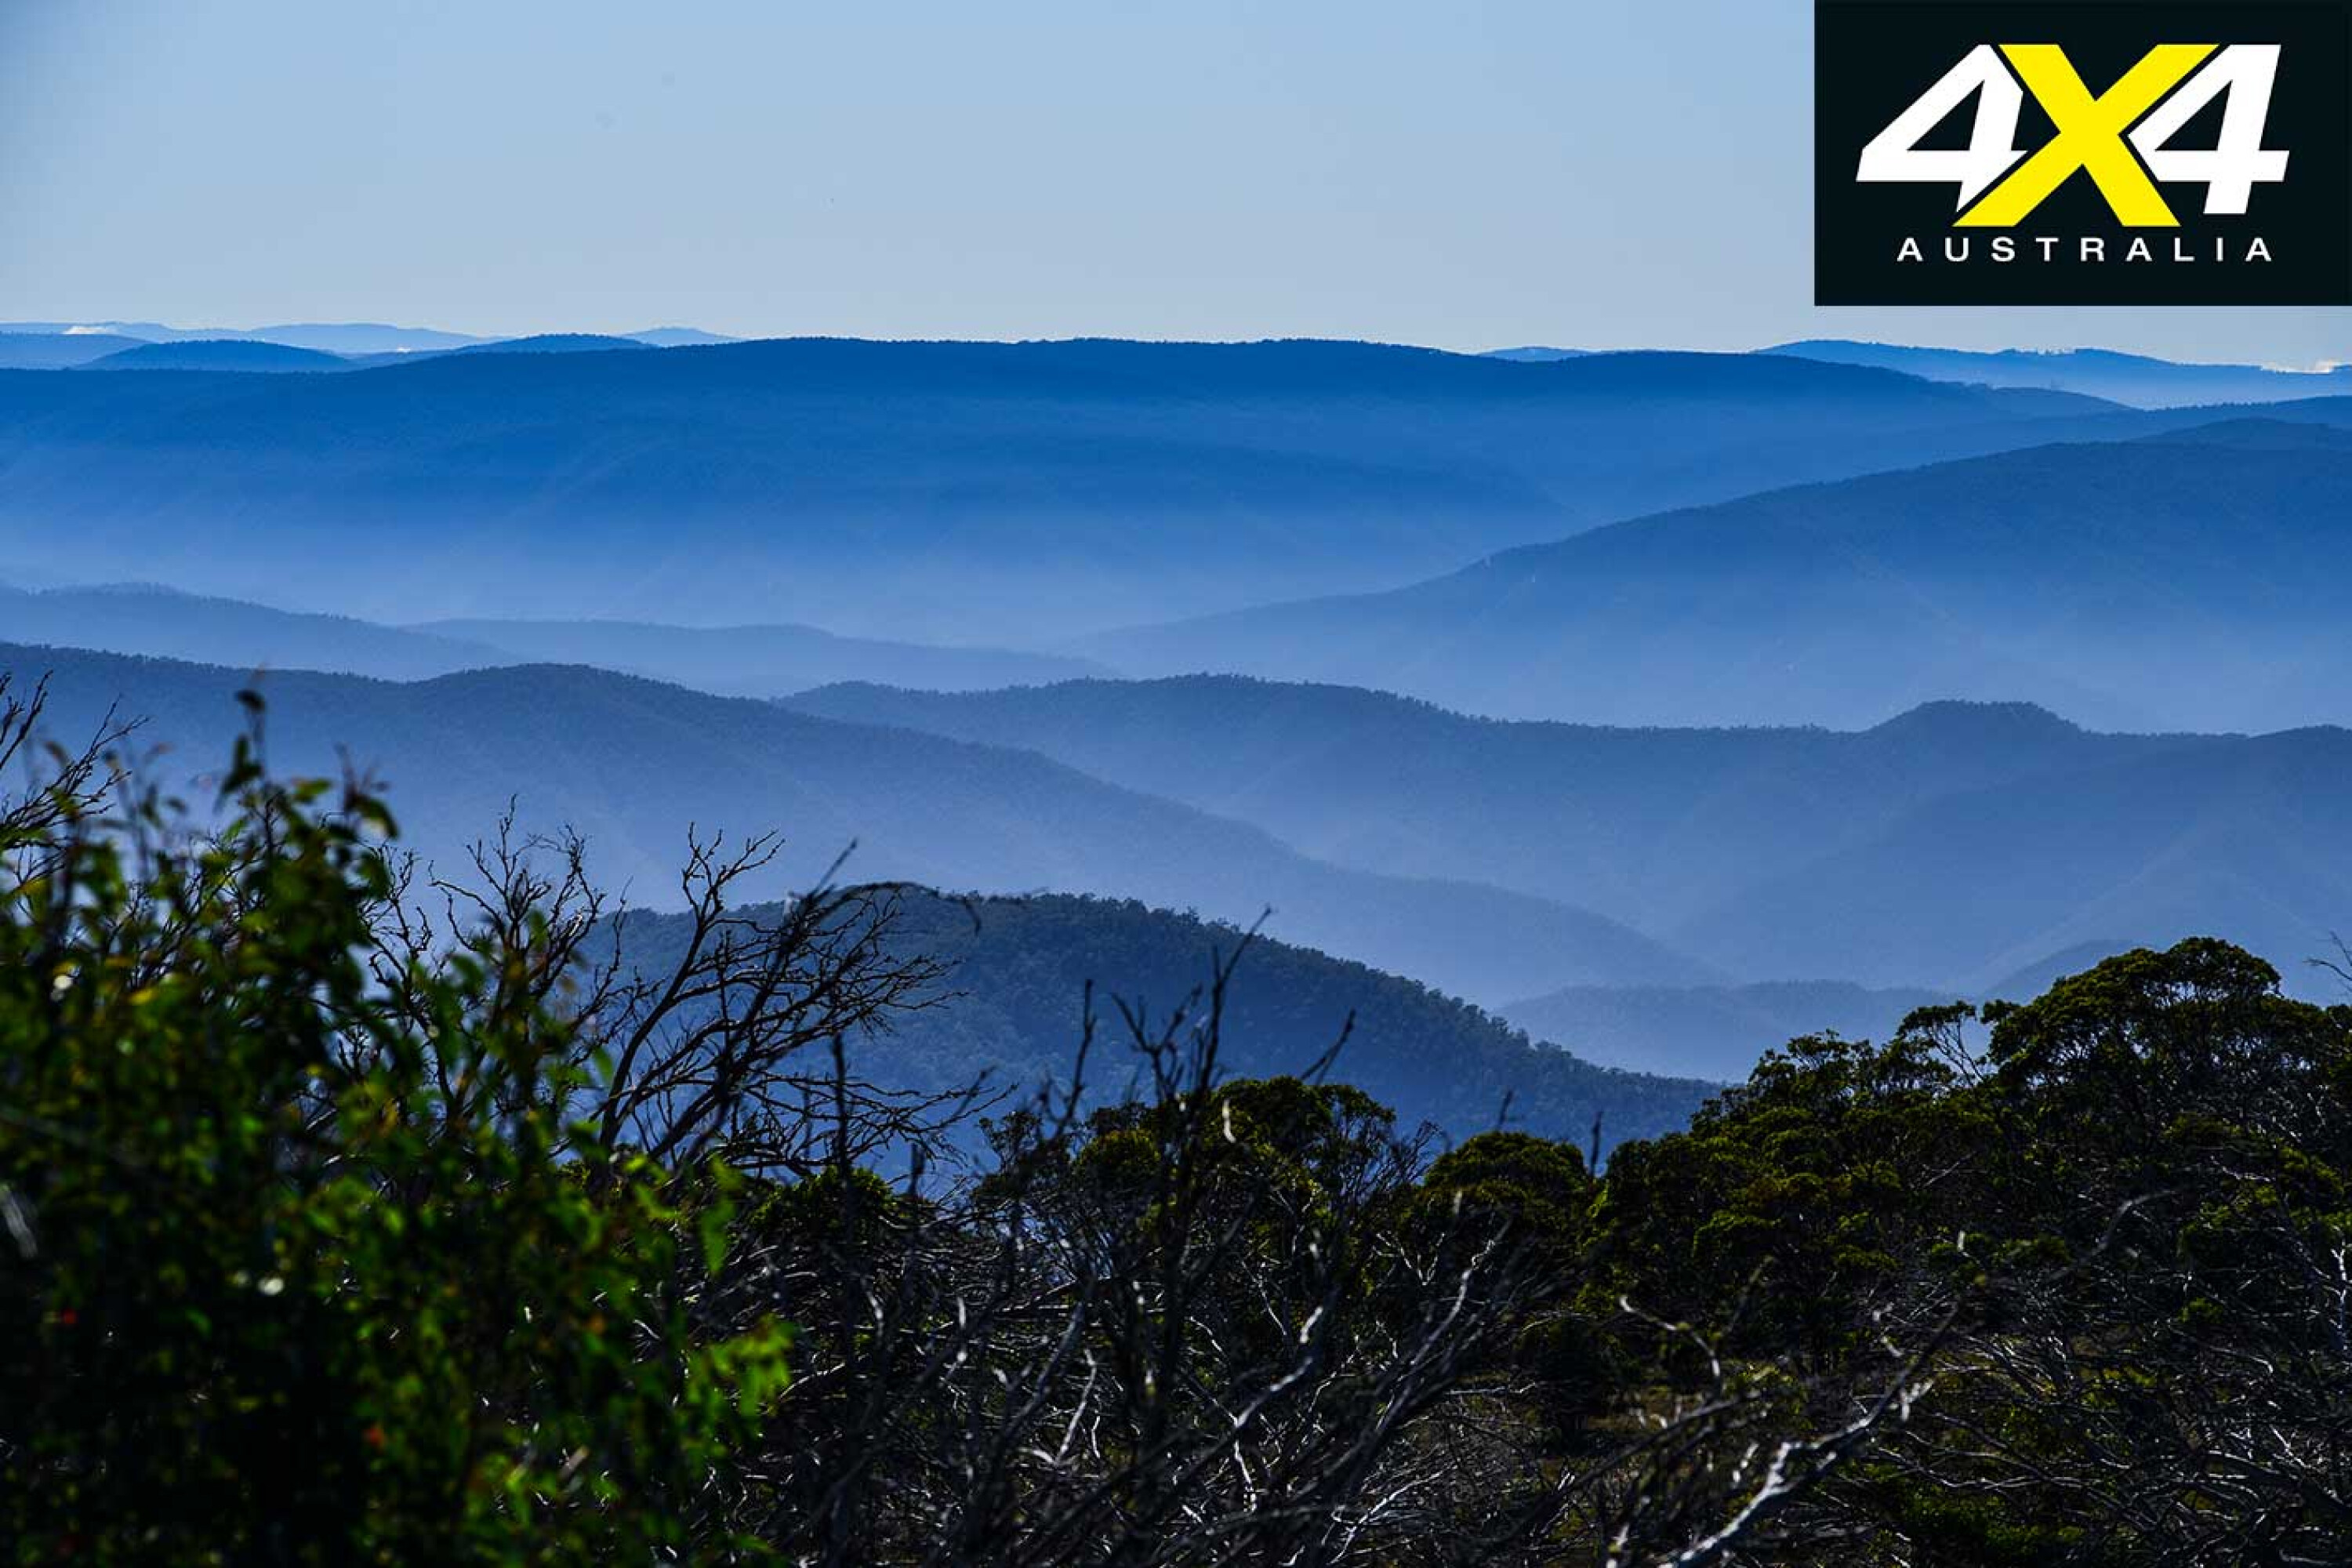
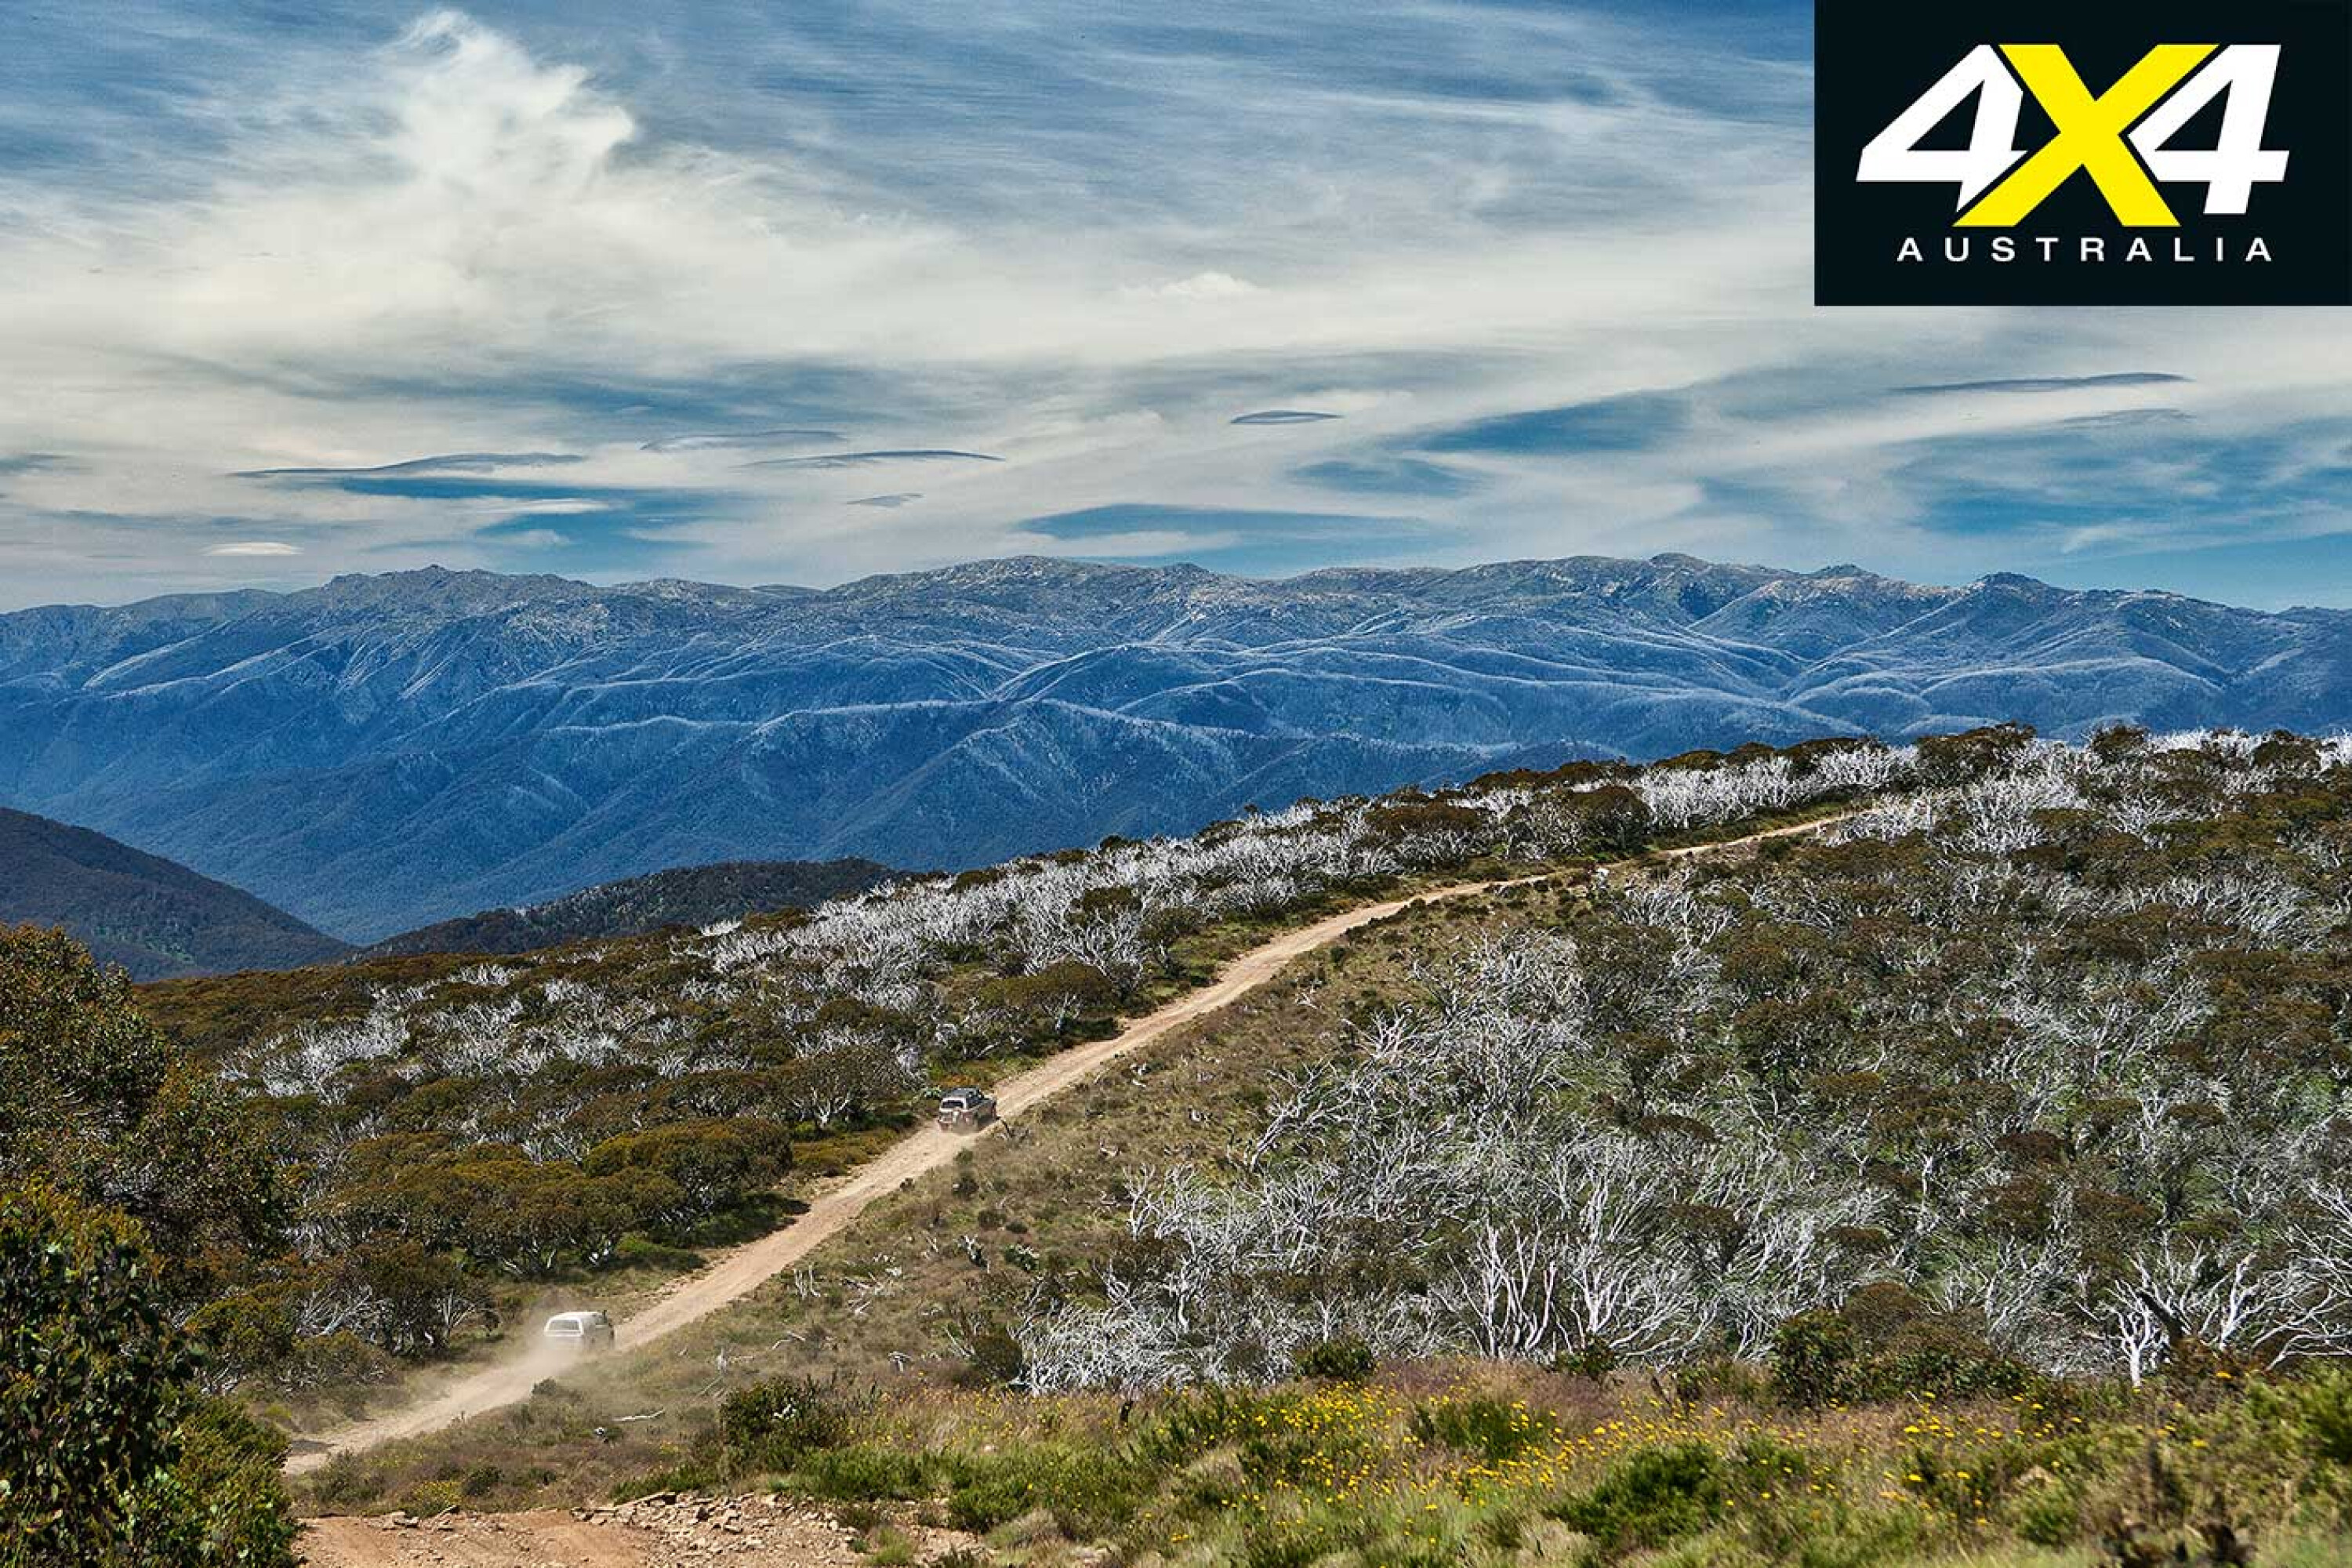
The Victorian High Country is a must-visit 4WD destination in Australia, and it’s often mentioned when discussing the best tracks in the country.
Only a few hours’ drive from Melbourne, the High Country is known for its stunning views, rich history, extensive outdoor activities, dense and lush forests, and of course challenging 4WD tracks. Not just a mecca for off-roading, the region is also well-known for its skiing, hiking and fishing, and beautiful towns like Mansfield and Bright.
The best time to visit the High Country is between spring and summer, and a majority of tracks in the area are closed during the winter months. And remember to always carry essential safety equipment and off-road gear for such an adventure.
JUMP AHEAD
Billy Goat Bluff
Billy Goat Bluff isn’t for the faint of heart, but overcoming its incredibly steep ascents and descents – it’s one of the steepest tracks in Victoria – will lead to breath-taking scenery. A modified 4WD with high clearance is essential for anyone wishing to embark on this challenge, as the track is graded as difficult.
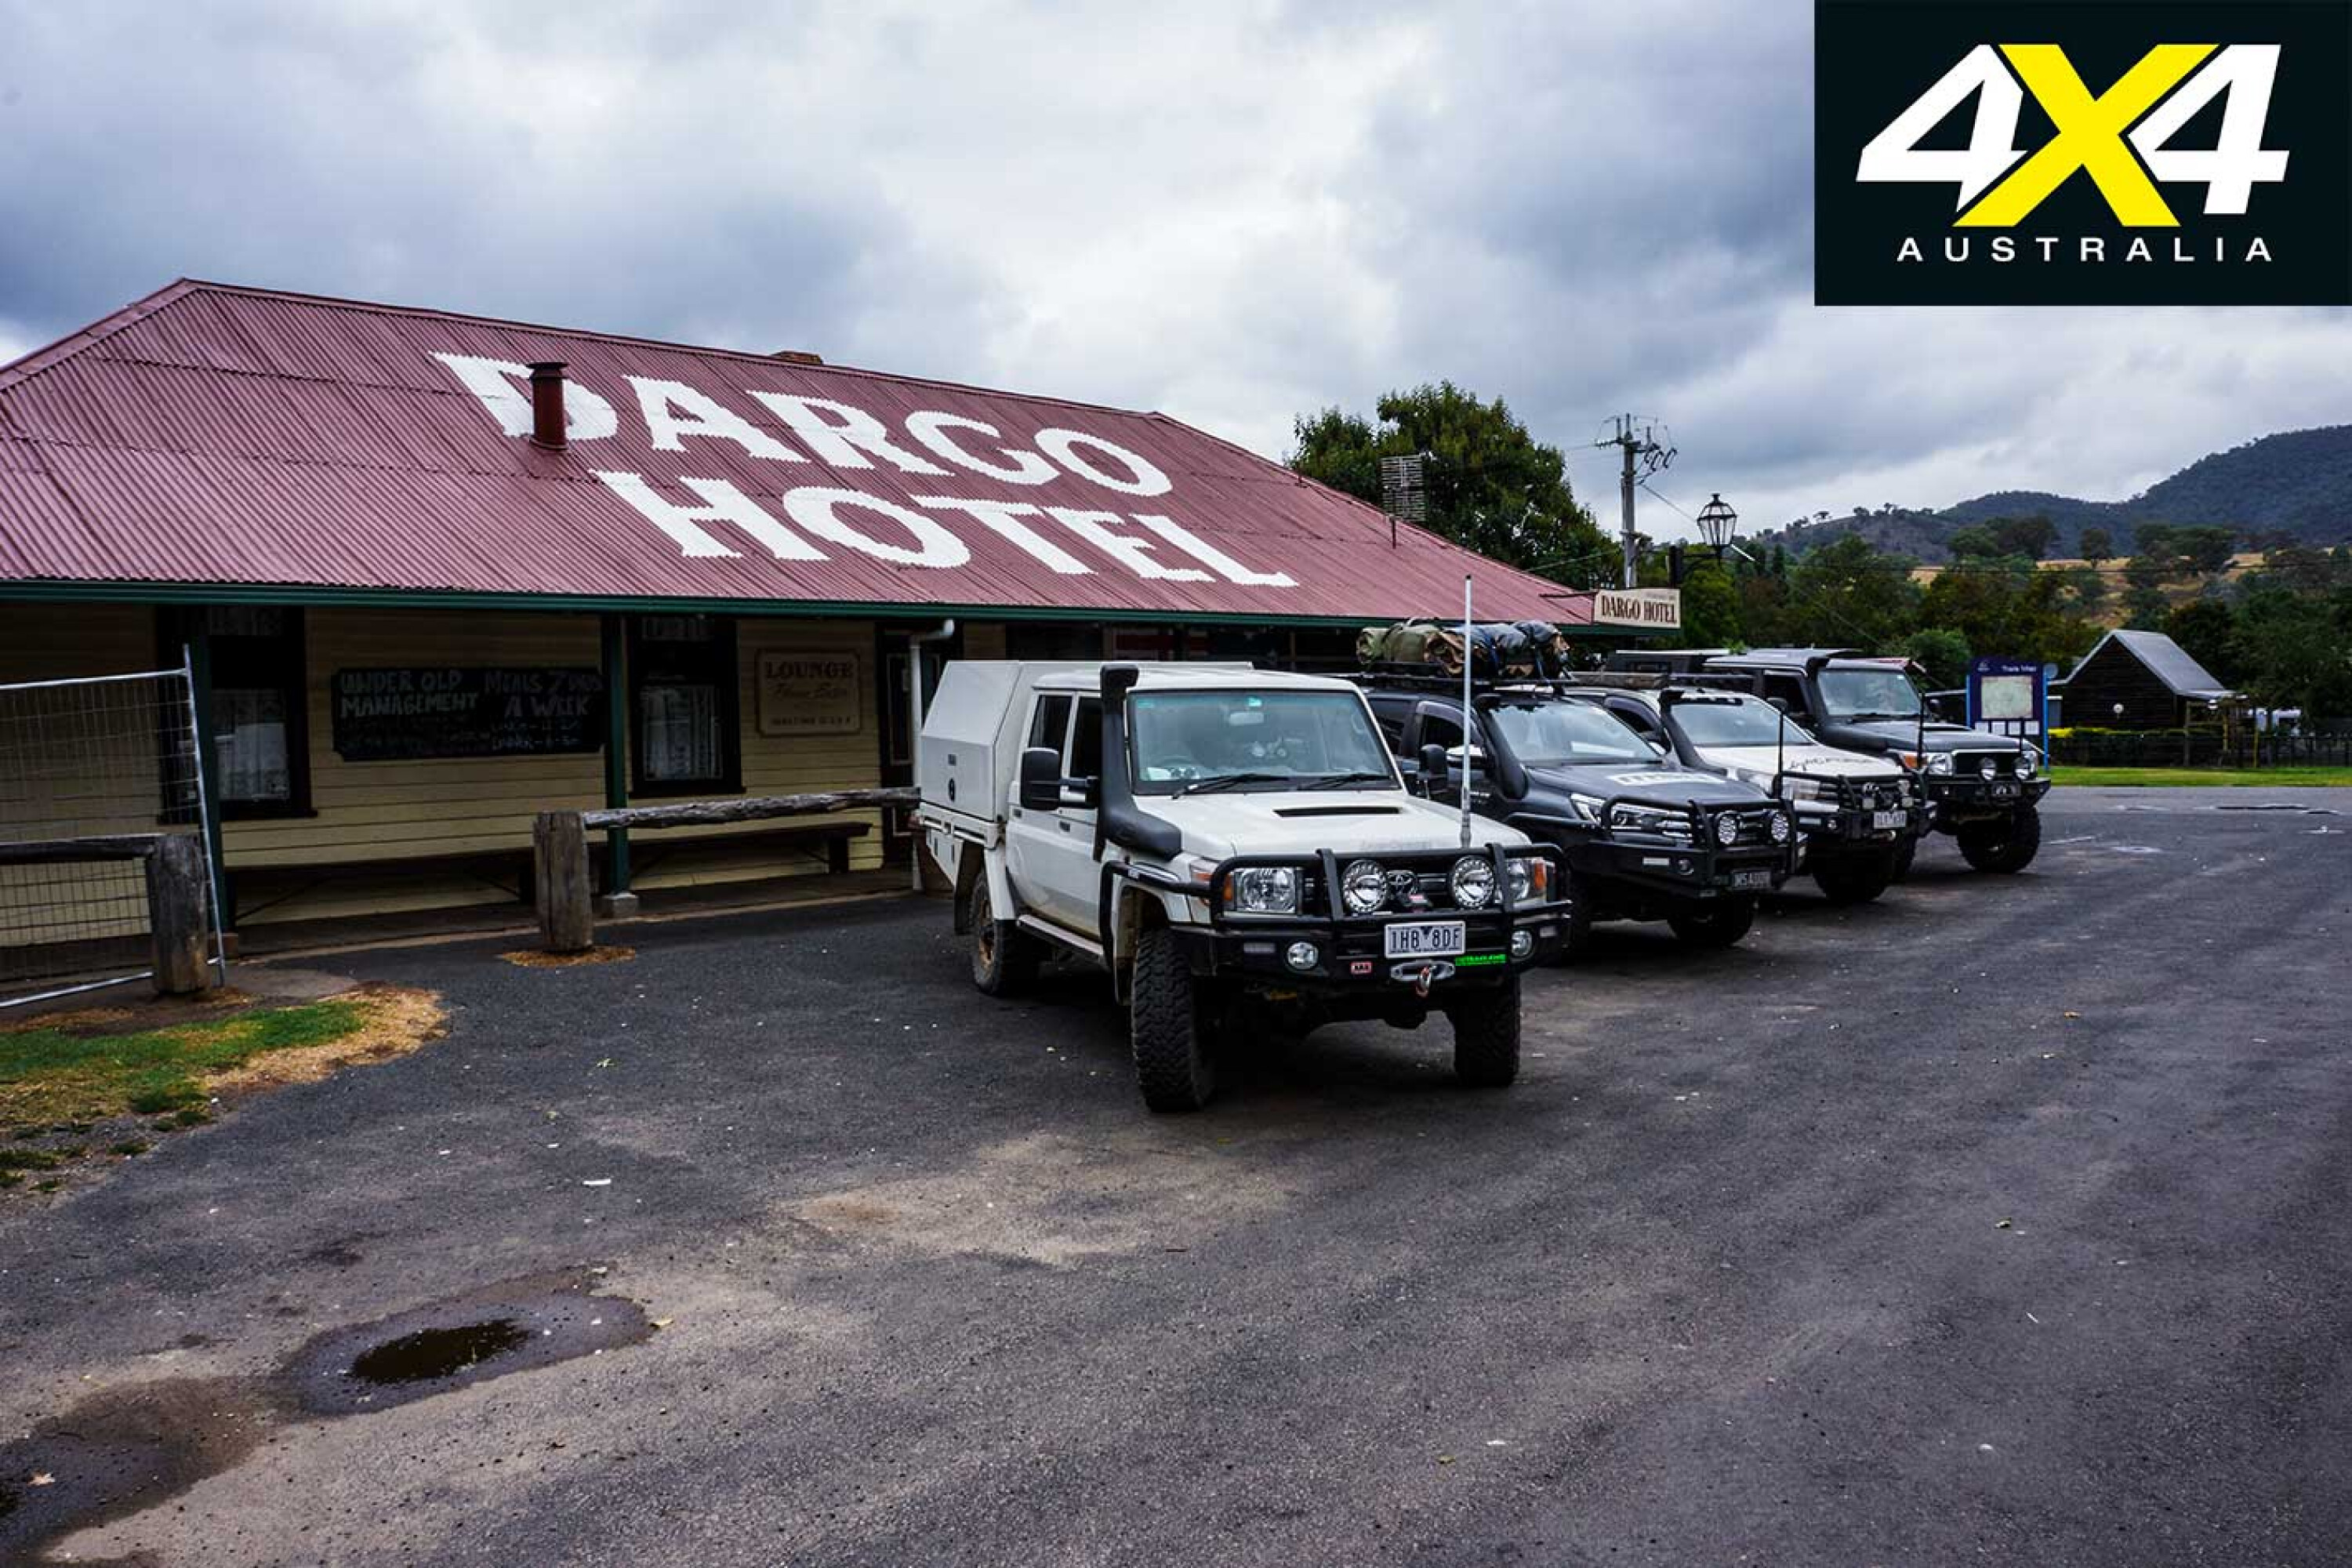
The track is located within Alpine National Park near the Wonnangatta River, and it’s common for 4WDers to start at Dargo (27km to the track via Crooked River Road) and end at Licola. There are a few camping spots along the way, including at Horseyard Flat and Black Snake Creek. The area is also popular for bushwalking, horse riding, rock climbing and fishing.

Howitt Plains Track
Easier and more inviting than Billy Goat Bluff for casual 4WDers, Howitt Plains Track is a scenic route that carves through beautiful alpine forestry and provides access to many walking trails and well-known camping spots.
The track is accessible from the small town of Howitt, approximately four hours’ drive from Melbourne, and 4WDers often start at the southern end near the Howitt Plains. Some sections can be challenging, so a high-clearance 4WD is recommended. While there, be sure to have a picnic at Howitt Plains; detour to Mount Howitt to get truly impressive vistas of the area; or bushwalk the many trails including The Viking, a multi-day hike.
Mount Pinnibar Track
Most tourers depart from the nearby towns of Omeo and Benambra to access this challenging 4WD track from the northern end, near the southern base of Mount Pinnibar. As with the other tracks on this list, a high-clearance 4WD is essential, as the track is steep in sections, with mud known to hinder vehicles after rain.
Inexperienced drivers need not apply, as the track has plenty of technical sections and steep climbs, but the alpine views at several vantage points along the way make it an extremely rewarding journey.
Dargo High Plains Track
This adventure typically starts at the towns of Dargo or Licolo, roughly four hours’ drive from Melbourne. The well-known track weaves through the Alpine National Park and mixes picturesque views with challenging terrain. A combination of river crossings of the Dargo River, steep climbs and technical sections means a high-clearance 4WD is essential. The Dargo High Plains Road leads to the start of the Blue Rag track, which ends at a high peak with unbeatable views of the area.
As with all tracks on this list, it’s paramount to be well-prepared if things turn sour – that means packing the correct safety and off-road gear (and knowing how to use it). Canoeing, fishing and rafting are popular in the region, as is hiking and horseback riding.
Zeka Spur Track
The historic Zeka Spur Track is another track recommended for experienced tourers only, due to its demanding and technical off-road sections. The 10-30 km track that leads to the Wonnangatta Valley is littered with sharp rocks, steep ascents and descents, and multiple river crossings, so an appropriate high-clearance 4WD fitted is non-negotiable.
It is most commonly accessed from the southern end off Howitt Plains Road from Licola, but it can also be reached from the northern end near Dargo. It’s also highly popular for trout fishing and hiking.

Darwin is the gateway to the Kakadu National Park, and it has plenty of ideal 4WD destinations within a few hundred kilometres of its city centre.
From the famous Litchfield NP to the massive and iconic Kakadu NP, the challenges are immense but the rewards are intensely satisfying. Put a 4WD adventure in the NT on the bucket list.
Here are a few destinations within a few hours’ drive of Darwin. If you have any recommendations, please let us know in the comments section below.