Those new to the four-wheel drive scene may be surprised to learn four-wheel driving wasn’t always like it is now. The standard today is over-bearing modification laws and bureaucracy, but things used to be a little more, well… wild.
In no uncertain terms they were the glory days of 4x4ing, where vehicles were built for purpose and the tracks were wild and open. Every few months, if you knew where to look, the hills of rural Victoria would ring loud with the roar of V8s, the clack-clack of competition winches and the cheers of crowds as driver and navigator battled the clock and the terrain. It was wild, it was glorious, and it’s back.
After countless meetings with Baw Baw Shire Council, James Hill and Barry Smethurst were able to cut through the red tape and put together what is set to be the premiere winch challenge in Victoria: the Wild Dog Winch Challenge.
If you’re unfamiliar with winch racing you’re seriously missing out. The stages are a mixture of high-speed cornering through tight tracks, precise driving through technical terrain, and more than a few climbs that are so steep nothing short of a competition winch and a heavy hand of wheelspin will get you to the top.
The 2016 Wild Dog Winch Challenge drew massive numbers of both spectators and competitors. Sold-out crowds turned up all weekend to watch 42 individual teams and their large “support crews” fight tooth and nail for a spot on the podium. For some, the weekend brought glory; for others, broken dreams and busted 4x4s. However, everyone left with a smile.
“It was an absolutely gargantuan task to get everything together,” James Hill told us after the event. “We spent literally hundreds of hours preparing fencing, stages and spectator tracks so it would all run smoothly. We’d have to print a full page of names just to cover the amount of people who helped out, from the volunteers of the Snatch’em 4X4 club through to Alan and Karen McMullen, the property owners.”
The event was such a huge success the Wild Dog Winch Challenge will be back in 2017, bigger than ever. Spectator tickets will again be limited, so make sure you line up early or risk missing the wildest 4×4 event in Victoria.
Want more? Check out our 4×4 recovery guide to winching.
WHEN we first went to the Kimberley in 1976 there were few travellers and the Gibb River Road (GRR) was little more than a rarely graded track which had no fuel or supplies between Derby and Kununurra.
Even such well-known attractions as Windjana Gorge and Tunnel Creek had no one around for most of the time and we were nearly always on our own. Only once did we come across another traveller, even though we spent time mustering cattle on Mt Barnett Station (the fuel outlet and store were still a year away) and wandering the back tracks with an eccentric diamond prospector – which is a story in itself.
How things have changed. Now the GRR is a major thoroughfare in remarkably good condition for most of the time, with traffic streaming along it in the hundreds per day during the peak of the tourist season.
The Kimberley is an expensive place to visit, and we often have people complaining to us about the cost of camping, the lack of free bush camping places, and the virtual absence of free overnight camps. It’s an issue that’s been around for a long time, but nobody seems keen to address it. With a bit of effort you can find a free overnight campsite, though finding a spot that’s worth staying for a few nights is another question entirely.
On our latest trip collecting info for the next edition of Hema Maps’ Kimberley guide, we poked down little-used tracks trying to find hidden gems known only to a few locals and long-time Kimberley travellers. Here are some we’ve found in recent times.
1. THE MAY RIVER
THE May River, north-east of Derby, has a couple of spots worth investigating, especially if you’re into fishing for barramundi or cherabin. To reach the best of the camping spots, take the dirt road from the GRR (approx. 40km from Derby) and head north to Meda Station.
Travel six kilometres along this dirt road, veering right where the road forks to reach the wide crossing of the river.
This isn’t normally a problem in the dry season, though after heavy rain this black-soil route can be boggy. The best spot to camp is near the crossing (GPS 17°22’14.6”S 124°01’37.3”E), but with a bit of exploring you’ll find other spots worthy of throwing down the swag.
A rough track on the right – just before the crossing – leads upstream, but access to the long stretches of waterhole is difficult because the track is often washed away. Nearby is a monument to the Emanuel brothers, who first established this pastoral property, one of the first in the region, in 1882.
The Blue Holes can be found closer to the mouth of the May River (GPS 17°06’23.5”S 123°40’30.8”E). It’s a popular spot for locals to launch a boat and fish for barramundi and a host of other estuarine species.
The access road can be found along the GRR, about 10km from Derby at the junction of the track to the Bungarun Aboriginal Community.
It’s approximately a 120km round trip from Derby to Blue Holes and Black Rock Light. There are some reasonable camping spots close to the track – west of the Blue Holes and around to and beyond the Black Rock Light.
There are no facilities and fresh water is non-existent, but there can be plenty of sandflies and mozzies. High tides can flood the tracks around Blue Holes and Black Rock Light, so take care as you don’t want to get bogged out here. Also be aware of saltwater crocodiles which inhabit this area and all the waterways in the region.
2. MYROODAH CROSSING
THE Myroodah Crossing on the Fitzroy River has long been a favourite of ours. It can be easily reached via a good dirt road that leaves the Great Northern Highway, about 42km east of the Derby Junction.
You’ll cross the grassed flat plains of the Fitzroy River and then arrive at the crossing of the Fitzroy itself. There’s a small camp on the east side, but a better one can be found by crossing the causeway and taking the faint track to the east, about 400 metres from the crossing.
This leads to a flat camping spot above the wide sandy banks of the river. The river is pretty shallow in these spots, with deeper pools up and downstream where you can catch barramundi, bream and cherabin.
Don’t be lulled into a false sense of security around water here though, as there are saltwater crocs aplenty.
3. MANARI CREEK & BEYOND
THE Dampier Peninsula is high on most people’s itinerary when visiting the Kimberley, and for good reason. There’s some great fishing, the coastline is spectacular, the birdlife is fantastic, whales can be seen for much of the winter months, and there is a rich aboriginal culture for everyone to experience, explore and enjoy.
However, there is very little bush camping. In fact, no camping is allowed at all along the Cape Leveque Road, while bush camping at Quondong Point is popular and often crowded with long-termers.
Still, with a bit of exploring you can find some good bush camps around Willie Creek and Barred Creek, south of Quondong. If these are still too busy for your liking, head north along the Manari Road past James Price Point (another good but popular bush camp) to Coulomb Point.
Here you can wind along the edge of a shallow creek to the beach for a long beach drive north (take care, as it starts to get remote) or a shorter one south where there are a couple of good camps right on the beach near an un-named rocky headland.
The track degenerates north of Coulomb Point and, once at the Manari Creek Crossing just a couple of kilometres later, it can be very challenging. You’ll find a campsite near the mouth of Manari Creek and another beach access point.
Rest assured that you’ll have the camp to yourself – apart from the occasional local who’ll be even more cheesed off than you!
4. THOMPSON SPRINGS & LAKE ARGYLE
WHEN we “discovered” this spot on our last trip, we wondered why we had never found it before. It was a Sunday and two locals were skinny-dipping when we came across them – they were more surprised at our sudden arrival than embarrassed, but quickly moved on anyway.
The spring lies tucked up close to a rocky range; the access track leaves the main highway about four kilometres from the Lake Argyle dam access road at Golden Gate Creek. A track on the right veers west and leads just over two kilometres to Thompson Spring itself. This delightful swimming hole is surrounded by Pandanus palms and verdant vegetation, while there is a very small camping area nearby.
Back on the main dirt road the route south crosses numerous small creeks and washaways, and the going is slow but not too difficult. About 15km from the Thompson Spring track junction you come to a flat, grassy plain bordering the shallow backwaters of Lake Argyle. This is a vastly different scene to the one at the dam wall.
There are a number of pleasant camp sites under the trees before the edge of the water, and the birdlife can also be rich around here.
5. SANDY BEACH
KNOWN as ‘Winyba’ to the local Aboriginal people, this spot on the Ord River is not well-known or often visited. While there are a couple of reasonable bush camps along the Ord below Kununurra, the track to Sandy Beach is found about 10km downstream from Buttons Crossing along Parry Creek Road. Buttons Crossing, just off the main road, is a good place to wild-camp on the edge of the river.
Once at the junction to Sandy Beach the track winds across relatively flat grassy plains to come to the wide gravelly bed of the river. There’s a gravel bar here and the river is shallow, but deeper pools exist both upstream and downstream.
There is reasonable camping back from the water’s edge among the trees and scrub. You can launch a small tinnie here and there’s some good fishing, but be aware of the big crocs that inhabit the area.
6. BRADLEY LAKE
BRADLEY Lake was established when the Mt Bradley gold mine was in operation during the 1990s. Access was restricted during the mine’s operational days, but since the mine’s closed, a few prospectors have found their way to the water’s edge, which is now a haven for birds. There are a couple of great camps, and with a bit of exploring on the tracks that criss-cross the surrounding hills, you’d surely find more.
The easiest way to get to this enjoyable hidden spot is to head down the Duncan Road from Halls Creek. About 32km south of town, look out for a termite mound and a wheel rim on the west side of the road where a track strikes west; six kilometres later you’ll be on the backwaters of the dam. Where you actually end up depends on which track you take – poke around and you’ll find a good spot to camp.
Nearby and a bit closer to town, the Duncan Road tracks lead to the old Golden Crown Mine and the Black Elvire River, where further exploration will unearth some pleasant camps close to waterholes. While most people rush through Halls Creek, I like wandering the rocky hills and finding top little spots to stop – and I don’t even prospect for gold!
Off-road light trucks offer a world of potential for work and play. They’re relatively cheap and uncomplicated, and the cab-on-chassis construction makes them pretty damn versatile for building an expedition truck or the basis for a drop-on camper.
The Fuso Canter 4×4 is available as 4.5-tonne-GVM, car-licence-friendly truck, or as a 6.5-tonne light truck. It’s also available in single cab or seven-seat crew cab form. A 3.0-litre Euro-5-spec turbo-diesel creates 110kW and 370Nm, and behind that is a five-speed manual gearbox and two-speed transfer case.
Being a Euro 5-spec truck means it uses exhaust gas recirculation (EGR) to burn off diesel emission nasties. And as it’s an EGR engine it requires a DPF regen burn-off on occasion – depending on workload this can happen while on the move, but it will sometimes require a parked regen which will need the truck to be parked for around 30 to 40 minutes.
To keep the rear duals firmly on the ground and my kidneys intact for this jaunt in the Victorian High Country, we had 1200kg of payload sitting in the steel tray.
Winter had arrived with a vengeance and most High Country tracks were closed, so we headed to the Buckland Valley in the shadow of Mount Buffalo and tackled Goldie Spur track. Goldie Spur provides the perfect terrain for a truck like the Canter: slippery forest roads, fire trails and snow are all part of the natural habitat for the Fuso.
Our trip to the mountains meant three hours of highway travel, which was a good way to assess the Canter’s open-road manners. The Fuso felt at home on the blacktop and cruised at the legal highway limit with ease.
The 215/75R17.5 rubber that it wore on all four (well, six) of its wheels was relatively quiet during on-road use.
This truck was a fire service-spec truck, which meant it arrived sans airbags and electric windows. The idea being that, in the event of a burn-over during a bush fire, heat won’t detonate the airbags and the window wiring won’t melt and disable the windows.
The Canter’s interior is unapologetically spartan and functional, yet it’s comfortable enough. Basic switchgear is, for the most part, well placed and the gauges are easy to read. The dual cab seats seven, but unfortunately I couldn’t find seven people to cram into the cab to see how accommodating it is – every passer-by I asked to hop in the truck ran away for some reason.
Given that the pricing isn’t that much more than a premium 4×4 dual cab ute, it’s fair to say the Canter makes a strong value statement as a platform for an expedition truck. Just without the leather interior, the climate control and all the other cosy stuff.
The multi-media system is pretty much the same as you’d find on equivalent trucks in this class, and it displays truck-specific navigation if needed. The nav surprised me – even up in the High Country the bush tracks and fire trails were all marked and often named on the display screen.
Selecting four-wheel drive is a matter of pressing a button on the dash, jumping out to lock the front hubs, and then selecting either high or low range. From there it’s a case of pointing the jigger at a gnarly obstacle to see how it goes.
The Fuso was surprisingly capable off-road. Initial impressions were that the DPF and exhaust were hanging a little low and would affect ramp-over angles, yet we didn’t drag the exhaust at all. The Fuso’s forward control layout also acts as a great passive safety feature – you only hit an obstacle going too fast once; after you’ve bounced off the roof a couple of times you’ll slow the hell down and never do it again.
The factory suspension seat in conjunction with the retractable fixed-position seatbelt will also let you know if you’re being a goose on the rough stuff, as the combination will soon have you pinned in the seat like a chimp in the coils of a python. So in the name of comfort it’s best to take a slow and steady approach when off-road.
Slippery fire trails were handled relatively easily, as were some tougher off-road climbs and descents. We used the cleared area under the power lines below Goldie Spur to see how the Canter handled some more gnarly obstacles – angle of approach was good; angle of departure wasn’t too bad. We certainly didn’t drag its bum too badly.
Steep descents were made a lot easier by using the Fuso’s exhaust brake. I’m usually fairly scathing of the effectiveness of most Japanese exhaust brakes; it’s often just a fart sound without much actual effect. However, if you keep the revs up around 3000rpm on an off-road descent it works rather well.
An out-of-control descent is bad news in any off-road vehicle, but in a truck the extra weight makes the potential for carnage even worse – gravity and momentum can have a wayward truck sliding a long way. However, with the Canter I was able to wander down to some tight tracks brimming with snow, slush and mud without any unscripted sideways action. The exhaust brake kept my foot off the brake pedal and gently grabbed all four wheels on the way down the hill.
Getting the Canter to the top of a slippery slope was a more demanding task. The lack of a front diff lock hampers climbing quite a bit if you lose momentum, but the rear limited-slip diff manages to keep things moving in the right direction in most cases.
One of the Fuso’s biggest downsides is a lack of wading depth. In factory form the Canter 4×4 is rated at a mere 330mm. In other words, don’t submerge the diff, transfer case or gearbox. If you do happen to get it wet, it’s recommended you revise the service schedule to ensure no water has leaked into the important bits.
As you can see from the pics, I wasn’t aware of this at the time and … err … well, we didn’t have any issues with the truck after fording the Buckland River.
As a road-friendly off-road truck the Canter 4×4 makes a capable platform with plenty of chassis real estate. Just don’t get its feet too wet.
For those who had $5K in the piggy bank there should now be $2500 or so left over after fitting tyres, suspension and a snorkel in part 1 of our potential maximisation guide. It’s now time to start equipping your vehicle with some protection equipment, and the obvious place to start is with a bullbar.
Follow our budget building guides to make your 4×4 the ultimate tourer
Whether you’re going to use your vehicle for outback touring, weekend rock-crawling or towing a trailer, a quality bullbar is an essential piece of equipment for anyone travelling outside city limits.
The three basic choices when it comes to bullbars are plastic (polyethylene), alloy and steel. Each have their merits and there are many designs and styles. Plastic bars suit vehicles driven regularly in urban areas and it’s claimed that they can reduce the risk of injury to pedestrians. They’re also engineered to regain their original shape after impact, but they simply won’t offer the protection afforded to the vehicle by an alloy or steel bar.
Alloy bars are much lighter than steel but are not as strong. A well-designed and engineered steel bar will offer the ultimate in protection, but it will be the heaviest of the three options. Assuming you’ve chosen your suspension wisely, this weight penalty won’t present a problem.
Regardless of the material chosen, you should ensure the bullbar attaches directly to the vehicle chassis and is airbag compatible. There are a variety of designs available including tubular rock-crawler styles that offer plenty of approach angle (but less protection), bars with no hoop sections, bars with a single hoop, and traditional bullbars that afford maximum vehicle protection.
Prices vary wildly, but factor in at least $1200 for a decent bullbar and then add up to $900 for brush bars and side rails or rock sliders. of b If touring is your thing then the aforementioned bullbar, brush bars and side rails will cost a couple of grand, leaving you with just $500 or so for a set of driving lights. In this price bracket you can pick up a pair of quality HID driving lights or some budget LEDs. Alternatively, you could opt for an LED light bar and have enough cash leftover to buy yourself a decent 80-channel UHF radio for vehicleto- vehicle communications.
Brush bars and side rails will not be as much of a priority for rock-crawling enthusiasts as an electric winch. These days there are plenty of cheap winches on the market, but assuming you’ve spent $1200 on a bullbar then you’ll have $1300 leftover for a winch. It’s worth spending the rest of your budget on a quality winch because this is one piece of equipment you don’t want failing when you really need it.
If you use your four-wheel drive predominantly for towing, then a decent rear-step tow bar will be more of a priority than brush bars/side rails and a winch.
Factor in at least $500 for a basic steel rear bar with a tow hitch, and up to $1500 for something more stylish. Much more than a tow hitch, an aftermarket rear step tow bar will improve ground clearance and protect the rear of your vehicle when exiting offroad gullies or dropping off rock shelves.
Some models also accommodate parking sensors and reversing cameras.
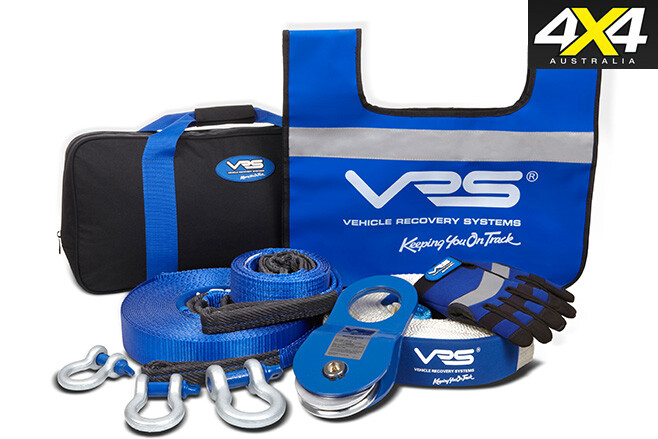
If an electric winch didn’t make it on to the shopping list and you’re likely to be driving off-road by yourself, then a pair of recovery tracks ($200+) will prove an invaluable addition to your basic recovery kit. A decent hand winch is also useful, but at $500-ish they are almost as expensive as some of the cheaper electric winches on the market.
SHOPPING LIST
PRICE GUIDE* Brush bars/side rails: $900+ Rear step tow bar: $500-$1500 HID/LED driving lights: $500+ LED light bars: $100-$400 Recovery tracks (pair): $200-$500 Hand winch: $500*Prices vary depending on quality, manufacturer and model. This list is a general guide only.
Don’t be put off by the words “couscous” and “salad” – this is a delicious, no-fuss meal.
INGREDIENTS Serves 8 2 cups of pearl couscous ½ packet of dried cranberries – roughly chopped ½ to 1 cup of semi-dried tomatoes – roughly chopped (to taste) ½ cup of slivered or flaked toasted almonds (to taste) The seeds from ½ to 1 whole pomegranate (optional) Salt and pepper to season
Dressing Option 1 – lemon vinaigrette ¼ to 1/3 cup of lemon-flavoured vinaigrette dressing (or use something like a basic French dressing) 1 to 2 tsps of curry powder (to taste) 1 tsp of honey or sugar (to taste)
Option 2 – cranberry-pomegranate vinaigrette 125ml of oil 90ml of cranberry pomegranate juice 1 tbs of balsamic vinegar 1 heaped tsp of wholegrain mustard 1 heaped tsp of brown sugar Salt and pepper (to taste)
INSTRUCTIONS
- Make up two cups of pearl couscous, following the packet instructions.
- While the couscous is cooking, get the remaining ingredients together.
- Combine all the dressing ingredients in a bowl (or screw top jar) and mix well to combine. Adjust flavour with more dressing if need be.
- Pour some of the dressing into the salad and gently fold through until well mixed. Add more dressing to the salad as you need or just before serving.
Pearl couscous can be used in recipes that you would use orzo (risoni) or other pasta and rice. Add a handful to thicken a soup. Use it as a base, topped with some roasted vegetables. Use it in a pilaf, instead of rice.
The pearl couscous grains will fluff up just slightly when cooked and have an al-dente texture.
A FEW MORE HINTS For a bit more flavour, toast the dried pearls for a minute or two in butter or olive oil before cooking, just like you would do for making a risotto.
Because Israeli couscous is made from wheat flour, it is not a gluten-free food; although, it is vegetarian. It also has a low glycaemic index, making it a healthy and high-fibre food.
Please don’t be put off by the use of the pearl couscous; it is nothing like the finer African couscous, which is a type of North African semolina in granules made from crushed durum wheat and which is cooked by steaming (or absorption). Most people buy the instant couscous in supermarkets which has been pre-steamed and dried and which Ron says tastes like “cardboard” (he isn’t a big lover of instant couscous).
The pearl couscous is really good and easy. Give it a try, and with this salad mixture you’ll find it a popular dish.
FOR car-nuts of every stripe, a genuine barn-find is the Holy Grail: the perfect classic, sitting, long-forgotten, patiently waiting to be saved – normally under an inch of red dirt in a country barn.
Vote for Billy’s FJ45 Troopy hybrid to decide this year’s Custom 4×4 of the Year.
It’s a story we’ve all heard before, normally three times removed from a bloke who met a bloke. For Billy McKinnon, it’s just part of the story of his FJ45 Troop Carrier.
When he first stumbled across the rust-free 45 near Kingaroy, Queensland, it was doing duties as a make-shift dog kennel. After hosing it out and dragging it home it didn’t take long before it was re-born into what is unarguably the best FJ45 Troopy in the world, and that’s no exaggeration.
Billy’s no stranger to 40-series Cruisers. Over the years he and his old man have pieced together around a dozen in all sorts of configurations, from short-wheelbase 40s, through to utes, Troopys and even a coil-sprung 47 he used to race off-road. So he had a fair idea of where he wanted this build to head.
“I had originally planned on rebuilding the 47 ute for the road, but it was just too far gone,” Billy told us. “It needed too much work and was way too modified to ever legally see the road. I rang up a mate who had a busted old 80-series. I bought it for dirt cheap and got to work.”
Over the course of a weekend the chassis was pulled from the 80-series and the 45 body placed on top ready to mock up the body mounts and bar work. The body has been set back on the frame to push the front axle forward for a better approach angle. Surprisingly this meant the wheelbase between the 45 and 80 were almost bang-on identical, with only a slight re-work of the rear wheel arches all that was needed to dial it in.
With the wider 80-series axles pushing the wheels and tyres out a further 100mm each side, Billy constructed a series of reinforced tube wheel-arch flares that also tie the front and rear bars into the sliders. The whole lot not only gives Billy the confidence to slip and slide the 45 through rocky terrain, but it substantially reinforces the chassis against twisting.
While the body was off for final welding of the bar work and body mounts, a new crossmember and engine mounts were burned into place for the updated drivetrain. Where the carburetted six used to sit there’s now a 5.7-litre LS1 V8 backed by a TH400 auto transmission sending power to both axles through a Chevy-sourced NP205 transfer case.
Just for good measure Billy shoe-horned a GTX42 turbocharger into the already cramped engine compartment, with a front mounted intercooler slotted in between the radiator and support panel. Despite being a low boost set-up with only 8psi pushed through the intakes, upgraded injectors were required for the increased fuel demands.
Hanging off the back of the turbo is a full 3.5in custom exhaust with a Hooker muffler. On its first run on the dyno with a mild tune she pushed out 340hp at the wheels, which works out to be in the mid-400s at the flywheel – although with a more aggressive tune in the works this number should jump to 400 and 500 respectively. Serious ponies for an old Troopy.
However, it wasn’t all sunshine and rainbows getting the new drivetrain working. With the transfer case’s rear output centred in the chassis and the 80-series diff centre being offset to the drivers’ side, a GQ Patrol rear axle was needed to get things back in line. The centre was also swapped for a high-pinion front from a GU Patrol with LSD internals installed. Up front there’s also a GU Patrol steering box on custom mounts, with a chromoly draglink tying the Patrol steering box to the Cruiser front axle.
Despite running mostly stock suspension components, there’s now an extra two inches of clearance thanks to a 50mm suspension lift from EFS. Each corner was weighed individually to get the exact spring rate dialed in for a plush ride. The coils have been teamed up with four-inch longer RAW 4×4 shocks for a little extra droop, providing more stability in the rough stuff. The change in ride height freed up just enough room for a set of 37-inch General Grabber SRLs wrapped around 17-inch Dynamic steel wheels.
With the body bolted back on, things don’t get any less impressive. It’s been painstakingly straightened, with all remnants of farm life removed. LED tail-lights and indicators have been recessed into the rear quarters, and a smooth coat of Toyota’s Dune Beige 416 has been liberally applied – one of the very few jobs Billy farmed out.
Those with eagle eyes may have noticed a lack of front indicators. To keep things looking clean the old boxy units have been binned and replaced by a trick halo-style headlight designed for early Mustangs, with the indicator built into the light.
Up the back Billy’s made a trick wrap-around tyre carrier, with the pivot point near the passenger-side rear wheel. This has allowed him to keep a seriously impressive departure angle, despite having a rear-mounted Runva 11XP winch sandwiched between the body and tow bar. Up front the winching duties are handled by a significantly larger Warn 8274, otherwise known as a high-mount. It’s had the housing braced, and the brake shaft drilled, tapped and capped with a Warn 6hp motor upgrade.
On the inside Billy has kept the theme of old-school-cool, with a modern twist. The cargo area could almost pass as stock, with a sound-deadened floor and stock bench seats. Up front the driver and passenger are both strapped down in a pair of fixed-back Corbeau race seats Billy picked up second-hand for a bargain.
The clunky factory gauges have all been replaced by a sleek digital unit from Australian company 1Gauge, which covers all engine vitals including most temperature levels, pressures, fluid levels, boost, and even air/fuel ratios. The speedo has been replaced by a GPS unit from Navman, with the whole lot wired up with the help of a few mates and more than a few beers.
Billy’s one-of-a-kind FJ45 may have some purists baying for blood, but it’s a good indication of the way 4×4 touring is heading in Australia: a combination of reliability and capability, with a huge slice of cool thrown in.
High-pinion?
WHEN talking diff centres the terms high- and low-pinion can come up in conversation. If you’re not familiar with the terms don’t be too embarrassed, as they’re irrelevant in 99 per cent of situations. The purpose of a diff centre is to redirect drive running down the vehicle, and to send it out to the wheels. It does this by running a pinion gear along the side of a crown wheel (or ring gear). High-or low-pinion simply indicates whether the pinion gear connects on the top or bottom half of the crown wheel.
Vote for Billy’s FJ45 Troopy hybrid to decide this year’s Custom 4×4 of the Year.
Let’s assume you’ve just bought a standard four-wheel drive, and on your first foray into the scrub it didn’t perform nearly as well as you’d been led to believe by the manufacturer’s impressive marketing. The trouble is you’ve just about spent your entire budget on the vehicle and you only have a couple of grand left to make improvements. Where do you start?
Follow our budget building guides to make your 4×4 the ultimate tourer
Nothing will improve the off-road performance of a standard four-wheel drive as much as a decent set of tyres.
Whether you’re going to spend most of your time driving on the blacktop, touring Australia’s vast outback, or climbing nighimpossible tracks on the weekends with your mates, there’s going to be a tyre that’s just right for you, and it will have an LT (Light Truck) casing.
Regardless of the tread pattern, an LT tyre will perform better than a passenger tyre in every scenario, except perhaps on-road comfort. An LT tyre’s heavier bead and sidewall construction means it can handle higher inflation pressures for carrying heavier loads, as well as lower pressures for driving off-road without fear of staking the sidewall.
Choosing the right tread pattern will depend on what type of four-wheel driving you’ll do: a highway terrain tyre for mainly on-road driving, an all-terrain tyre for gravel and dirt road touring, or a mud-terrain tyre for extreme off-road conditions where maximum grip is required.
The price of a decent set of all-terrain or mud-terrain tyres will depend on what size your 4×4 requires, but for most popular vehicles you’ll be looking at around $280- $380 a pop. So budget for around $1200 a set plus fitting and balancing (and add $300 for a matching spare), meaning half of your $2500 budget will be spent on rubber. Don’t be tempted to skimp on quality rubber – go for a reputable brand and you’ll always get good value for money.
You might be tempted to spend the other half of your budget on a shiny new bullbar and set of driving lights, but the next best way to improve your vehicle’s off-road performance will be to give it a lift with a new suspension system.
A sensible 50mm (two-inch) suspension lift consisting of new springs and shock absorbers can cost as little as $500-$600 on a vehicle such as a GQ/GU Patrol, 80 Series LandCruiser or a Suzuki Jimny – though you can spend more than $1500 on a modern 4×4 ute. No matter what suspension system you opt for, make sure the spring rates have been designed to suit the equipment fitted to your vehicle and the load it will most regularly be required to carry.
In other words, a vehicle fitted with a bullbar, winch and dual-battery system at the pointy end, and carrying a canopy, drawer system, fridge and recovery gear down the blunt end, will need heavier spring rates than a standard vehicle with no load on board. The shock absorbers should be engineered to work with the chosen springs, so it’s always best to purchase a matched suspension system rather than separate components.
If you have any money leftover after tyres and suspension, tyres and suspension, the next item on your shopping list should be a snorkel. Not only will it reduce the risk of your engine ingesting water (and therefore the potential for very expensive mechanical damage) but it will also keep a lot of the dust out, especially if fitted with a pre-filter. A decent snorkel will set you back $300-$500 plus fitting. While there are plenty of el cheapo snorkels on the market, this is one area in which you really don’t want to be stingy; a properly engineered snorkel will also be designed to ensure efficient airflow to your engine so it won’t suffer any performance or economy losses.
If water crossings are on the agenda make sure your vehicle’s diffs and transmission are fitted with breather extensions that are secured high in the engine bay. This is a relatively cheap modification but will prolong the mechanical life of your vehicle if you regularly tackle water crossings.
If you have any cash leftover you should invest in a basic recovery kit invest in a basic recovery kit before you head off the road, with a couple of rated shackles, a snatch strap and a shovel at the bare minimum. And make sure your vehicle is equipped with proper recovery points, front and rear. If you’ve still got change, buy a portable air compressor and a tyre repair kit – or at least drop broad hints in the run-up to Christmas and birthdays.
Hint: Knowing in advance what the vehicle will eventually be carrying will make spring and damper selection easier.
SHOPPING LIST
PRICE GUIDE* Tyres (set of 4): $1000-$1600 Suspension (50mm lift): $500-$1500 Diff breather kit: $80 Snorkel: $300-$500 Basic recovery kit: $150-$300 Bullbar: $1200+*Prices vary depending on quality, manufacturer and model. This list is a general guide only.
THE Nissan Patrol that Australia has embraced over the past 50 years, even back to when it was called a Datsun Patrol, is a goner.
From November 1, 2016, Nissan won’t be able to legally sell you an old-school Patrol, as it’s powered by what is an unacceptably ‘dirty’ diesel engine – according to the latest exhaust emission standards, known as Euro 5 (see ‘Euro 5 Explained’ sidebar).
Back in 2007 the Patrol was also dealt a blow when the much-loved 4.2-litre six-cylinder diesel was the victim of Euro 4 exhaust emissions standards.
You can still buy a Patrol after November 1, but that Patrol, known as the Y62, is several worlds apart from the old Y61 Patrol. Among other things, the new Patrol has a 5.6-litre petrol V8 that produces up to 27 per cent more carbon dioxide (greenhouse gas) than the soon-to-be outlawed diesel.
You could argue that there’s a bias against diesel engines in these regulations, and in a way that’s true, but diesel emissions are more immediately dangerous to human health – especially in crowded cites – than petrol emissions, and Europe has plenty of big cities and generally high population densities. So where a petrol engine’s larger greenhouse-gas output might be killing the planet, diesel emissions, if not cleaned up, will kill you more quickly. What’s more, carbon dioxide output (like fuel consumption) isn’t regulated under Euro regulations.
The implementation of Euro 5 has caused a flurry of other activity across the market, and it’s not just restricted to the Patrol. The new 2.8-litre diesel engine in Toyota’s Prado comes courtesy of Euro 5, and likewise the timing of the release of new Hilux which shares the Prado’s new diesel engine. The 70 Series LandCruiser’s V8 diesel is also being updated with new technology to make it Euro 5 compliant.
Compared to Euro 4, Euro 5 (as applied to diesels) brings no change in carbon monoxide limits and little change in the legal levels of NOx. But emissions of particulate matter, or so-called soot, have been slashed tenfold to match that of petrol engines. So it’s no surprise that the introduction of Diesel Particulate Filters (DPFs) is the key technological change behind compliance with Euro 5. In fact, it’s as simple as this: no DPF means no hope of meeting Euro 5.
Diesel Particulate Filters are high-tech devices that clean themselves. They generally do this via a special engine program that detects when the filter is full, heats up the exhaust stream and then adds extra fuel, which triggers a catalytic reaction in the filter that burns off the collected soot in a relatively harmless manner.
The trouble is, all this needs high-tech electronic control of all the engine’s key systems, which isn’t cost effective to fit to an existing diesel engine given that an older diesel engine’s basic design (bore/stroke relationship, cylinder-head shape, etc.) would also be out of date.
Will DPFs be a problem? Well yes, they’ve already proven to be far from infallible, as any bit of technology always is. It’s just something else to go wrong. However, the problems with DPFs generally come from vehicles that are used for nothing but very short city commutes, where the exhaust gas can’t get hot enough to trigger the DPF self-cleaning.
Euro 6 is slated (but still under some discussion) to arrive locally in July 2017 for new-design vehicles and by July 2018 across the board. It targets NOx emissions, which was largely left alone with Euro 5. And just as Euro 5 means DPFs, Euro 6 means Selective Catalytic Reduction (SCR) technology using Diesel Exhaust Fluid, commonly known as AdBlue, often based on urea and giving a distinctive ammonia smell.
Some vehicles, like the Ford Everest, already have SCR and are therefore ready for Euro 6. Like DPFs, SCR adds another level of complexity to the engine and also brings the need to replenish the AdBlue fluid – usually, but not exclusively, as a standard service procedure.
NISSAN has taken the covers off its Navara EnGuard Concept, a rig designed to save lives and survive in the world’s most extreme environments.
Revealed at the 2016 Hannover Motor Show, the durable all-terrain pick-up is based on the double-cab Navara and is packed with equipment necessary for emergency and disaster recovery work.
To help carry the extra gear over any terrain the Navvie has received a fully adjustable suspension system with uprated nylon bushes, resulting in a 50mm lift.
The front and rear wheel tracks have been widened by 80mm and 94mm respectively, with 285/75R16 off-road tyres on each corner. More sensible 16-inch rims replace the stock 18-inch alloys.
A snorkel has been fitted, as well as bespoke fender flares over the wheel arches. Moulded side steps run along the flanks.
Down back is a load bed packed with rescue equipment stored in two pull-out trays. Each twin-skin fibreglass tray extends by 800mm.
Part of the rescue kit includes a prototype portable battery pack from Nissan. Utilising the brand’s EV battery tech, the packs are “constantly in charge mode, using power generated by the vehicle’s 2.3-litre diesel engine”. This enables the packs to always be ready for emergency use. Integrated into each pack are two charge and five discharge sockets.
Forgetting the rescue uses, such a power pack would be ideal for powering all your campsite toys and gadgets.
Speaking of toys, the concept event has its own DJI Phantom 4 drone, to help with search and rescue missions in rugged and hard to access terrain.
While not for everyone, the EnGuard Concept does show a few ideas that could be handy for the recreational four-wheel driver.
JEEP’S upcoming JL Wrangler, due to appear at the end of 2017, is set to gain a host of fuel-saving features to improve the model’s otherwise average consumption.
The new Jeep will come with the option of a turbocharged four-cylinder petrol engine or a V6 diesel engine, as well as an eight-speed automatic transmission. It will also benefit from weight-saving aluminium panels.
Reports out of the USA are quoting a Jeep supplier as saying that the JL Wrangler will have an aluminium bonnet and doors to help cut overall weight and, in turn, fuel consumptions.
Prototypes caught in testing also appear to have a windscreen that is more laid back than the upright screen that has been a feature of Jeeps for the past 75 years.
The JL Wrangler will also see the debut of a factory-made double-cab pick-up variant, something Jeep enthusiasts have been calling on for many years. As Australia is one of the biggest markets outside North America for the iconic Wrangler, we expect to see the JL on sale here sometime in the first part of 2018, shortly after its US debut.
The Jeep Wrangler remains one of the very few true 4x4s available to enthusiasts, and with the JL set to retain a separate chassis construction with live axles front and rear, that ability should continue with the JL.