If there’s one essential item on anyone’s camping list, it is a decent camp chair.
Surprisingly, it can be hard to find good quality ones that will take a beating whenever they’re squeezed into tight spaces – let alone ones that will survive having heavier gear thrown on top of them.
The camp chair market usually falls into two distinct segments: the lightweight and compact jobs that ‘roll up’, and the spacious, flat-folding and heavy units that take up copious amounts of precious storage space in your vehicle’s cargo area.
ARB is renowned for its top-end engineering and ingenuity of design in regards to its mechanical products. This ethos has carried through to its camping gear – with these two camp chairs, dubbed the Sport and Air Locker (after the company’s famous air-operated differential lock), proving that even though camp chairs have been around for many years, there are still a few tweaks that can improve the basic design.
The company has managed to combine a relatively compact (packed) size with the robustness that’s needed for a camp chair to survive years of use. When packed, the two chairs are of very similar size (the Air Locker may be slightly smaller in its bag), and they both share the same unique set-up process.
Once out of the carry bag it’s a simple matter of unclipping a small locking mechanism on the rear of each chair arm, before extending the arm to full length. Once the chair is fully open, the clip-lock at the arm’s rear then clips into the rear vertical metal tubing on the chair’s back. It’s quick, easy and results in a chair that feels solid and stable when set up.
To pack the chair up you just reverse that procedure, sliding the arm back and down until the chair is collapsed and the clip locks marry up with a corresponding lock on the chair leg. This is not only easy but, because the chair legs are locked in place even when packed up, it reduces the chances of them splaying out when you’re trying to feed the chair back into its carry bag.
For the space-conscious among us, you’ll be pleased to know the packed size of the chair is comparatively small. Anything but the smallest hatchback should have no trouble fitting a few of these in, meaning that these little beauties will hardly impact on your ability to carry everything you need for a weekend away.
The chairs are constructed of rugged Oxford-weave nylon material and feature comfortable padded seats, as well as side-pocket sections that house a Velcro-enclosed pouch for your keys and wallet, and a drink holder.
On the back there’s also a cool mesh pocket that can hold a magazine or iPad. Both chairs are rated to a hefty 120kg, so durability shouldn’t be an issue.
Now you can focus a bit more of your hard-earned camping time on the more important tasks – sitting in the chair, grabbing a beer from its holder and kicking back in comfort!
RATED
Available from: www.arb.com.au RRP: $65 we say: Sturdy, convenient, comfy.
DID you get out and about over the holiday period? Perhaps you’re still out discovering Australia’s hidden gems. If not, here’s the next collection of Readers’ Rigs taken from all over the country to give you inspiration.
Check out more Readers’ Rigs here.
The next time you’re exploring some of Australia’s rarely ventured tracks, take a picture of your 4×4 and post it on 4X4 Australia’s Facebook page. It may get published in the mag one day and, if we really like it, perhaps you’ll even see it on the cover of 4X4 Australia!
2015 ISUZU D-MAX LS-T: RACHEL GALNA
WHAT IT’S GOT: Ironman winch, bullbar, brush bars and sidesteps painted hammer tone, two-inch-lifted 265/75/17 Coopers; long-range tank, 42-inch light bar, dual battery system and a DC/DC charger. Just did a tray conversion and it’s now ready for a Jackoff Camper.
2011 JEEP LIBERTY KK – FRED REITZ
WHAT IT’S GOT: OME suspension 4.56 gears, LOKKA lockers, JBA UCAs, Trick Pro Motorsports custom snorkel, ATH winch, bumper and rock sliders, TeraFlex bump stops and one hell of a custom-made RTT trailer with all the amenities. Born in the USA, inspired by Australian overland rigs.
2016 JEEP RUBICON – PETER COLTHUP
WHAT IT’S GOT: Most of the goodies come standard, like lockers front and rear, swaybar disconnect, crawler transfer case, bigger diffs, 4.1 gears, added two-inch lift, 34-inch tyres, winch, front bar, high-lift-jack mount, heat-reduction bonnet and a few other goodies. Easily the most capable 4WD I’ve ever driven.
2012 VW AMAROK TRENDLINE – DALLAS POINTON
WHAT IT’S GOT: Six-speed manual, 2.0-litre twin-turbo diesel, GME XRS Connect UHF with GME aerial, 40mm Bilstein lift in front and 25mm lift blocks in rear with H&R coils, Opposite Lock 9in Nitro LED spotlights, 265/65/17 BFG KO2s on 17x8in Dynamic steelies, AFN bullbar with winch mount and a 130L long-range fuel tank.
105 SERIES TOYOTA LAND CRUISER – WAYNE CHAPMAN
WHAT IT’S GOT: Air lockers front and rear, ARB bar and rear-wheel carrier, 180L long-range tank (as well as 90L regular tank), OME 2in lift, Outback drawers, ARB spotties, cargo barrier, MSA drop slide, ARB 60L fridge, and Cooper STT 33in tyres. 80 Series trailer has a Bundutec three-sided poleless awning, and an IKEA memory-foam mattress for sleeping and camping bliss.
TOYOTA PRADO KAKADU – MICHAEL GONZALEZ
WHAT IT’S GOT: I walked into ARB and said “I’ll have one of almost everything please”. Foxwing awning, roof lights and LED running lights all around and a DP chip and exhaust upgrade. I only replaced the TJM front coils, as I can’t give up the Kakadu air-ride suspension.
2014 TOYOTA PRADO 150 – MITCH PERKS
WHAT IT’S GOT: Three-inch lift, front and rear air lockers, ARB deluxe front bar, Kaymar dual wheel carrier, 17x9in Fuel Off-Road wheels, MT 285/70 ATZ P3s, Warn Zeon 10-S, ARB Intensity lights, 42-inch light bar, Redback three-inch exhaust, Outback drawers, custom rear battery system, Redarc BCDC1240, Redarc 120W solar panel, Rhino Rack Pioneer tray, Black Duck black denim seat covers, ARB twin air compressor… the list goes on.
2015 TOYOTA PRADO 150 2.8L – DUCK ROGERS
WHAT IT’S GOT: ARB steel winch bar, ARB sidesteps, OME BP-51, SmittyBilt X20 Gen 2 winch, IPF HID spots, Redarc dual battery, 240W solar panels, ARB recovery points, ARB steel roof rack, ARB twin compressor, dual Lightforce rear work lights, Icom 450 UHF, RFI antenna, and an Open Sky awning.
MANY of our readers are most likely competent at backing up a trailer into a tight spot, but for those new to the game, here’s a step-by-step guide on how to reverse with a trailer.
1: BEFORE you attempt your first ‘official’ trailer back-up, head to an empty car park and familiarise yourself with the hitched trailer’s extra size and weight. Throw it in reverse and learn the intricacies of which way to turn the steering wheel. You should get the hang of it in no time. Hint: longer trailers are easier for beginners.
2: ONCE comfortable, venture out into the ‘real’ world, preferably with a buddy who can spot you. When it comes time to park, assess the area and plan a path that’ll comfortably cater for both the 4×4 and the trailer. Get this wrong and you can get stuck, with no way forward and no way back. Take into account surrounding trees, cars and other obstructions.
3: ADJUST your 4×4’s mirrors so that you can see the rear of the trailer. If you’re with a mate, get them to jump out to provide an extra set of eyes. Be sure all directions are clear, and that includes trees above your line of vision.
4: IF POSSIBLE, line up the vehicle parallel to the driver’s side, so that the driver can see the length of the 4×4 and trailer as well as the final destination. Head checks are also required throughout the process. So make sure you have a good vantage point.
5: SLOWLY does it. Turning the wheel left will make the trailer move to the right. A handy trick is that the trailer will follow the direction of the bottom of the steering wheel. Turning the wheel quickly in any direction will just mess the direction up.
6: NOT going to plan? Don’t be afraid to get out and check progress, and if things aren’t going to plan, drive out and start again.
Before you know it, backing up a trailer will become a natural part of four-wheel driving.
Looking to get away but not sure where to go? You’ll be spoiled for choice with this list.
27th Annual Speed Week, Lake Gairdner (SA) The Dry Lake Racers Australia (DLRA) conducts its annual Speed Week at Lake Gairdner in South Australia. It’s a straight-line speed event on ‘the big white dyno’, and it’s as fast as you can go in the remote Australian outback. There is no setting like it anywhere in the world; it is a truly unique event in a spectacular location. There is an amazing range of cars, motorcycles and trucks dating from the turn of the century to the modern day. Spectators are welcome, but you need to be pretty much self-sufficient. This year the event runs from February 27 to March 3. For more information, visit Dry Lake Racers Australia.
Texas Longhorns, Leahton Park (QLD) This station stay offers something different. Leahton Park, just out of Charters Towers in North Queensland, offers accommodation and wagon tours of their unique property. This not only features water buffalo, American bison and African Watusi cattle, but also the biggest herd of Texas longhorn cattle in Australia. One of the steers, JR, has been certified with the longest horns in the world. For more information, visit Leahton Park.
Bush racing, Hinnomunjie Cup (VIC) On Saturday, March 11, soak up the sun on the lush lawns or throw a rug under the shade of an old gum tree to enjoy some great bush racing at Hinnomunjie, north of the Vic High Country town of Omeo. Bring your own picnic or pre-purchase one from the local race club. Kids will be kept amused with plenty of free on-course entertainment, while live music, DJs, marquees and fashions on the field will be in full swing. For more information, visit Hinnomunjie Picnic Races.
Wooden Boat Festival, Hobart (TAS) If you are down in Tassie, don’t miss one of the best festivals on the calendar. The Wooden Boat Festival will be held in Hobart from February 10-13. There will be lots of fun and entertainment to keep everyone amused, while the boats, from canoes to clipper ships, are the main attraction. For more information, visit the Australian Wooden Boat Festival.
Night Rodeo, Hay (NSW) It might be a bit warm out west in summer, but there’ll still be lots of fun and action at the Hay Night Rodeo on Saturday, February 18, from 6.00pm. Highlights include the open bull ride, saddle bronc rides, the ladies barrel race and clowns. There’s $10K up for grabs for the competitors, while a bar is on site for the spectators. Camping is available nearby. For more information, visit the Hay Shire Council website.
Marree Man, Finnis Springs Plateau (SA) The original giant etching, or geoglyph, of an Aboriginal man with a throwing stick was discovered in 1998, but its origins remain shrouded in mystery. The original figure, some 4.2km long, was probably created by a grader or dozer cutting the 28km outline on a flat section of plateau country near Lake Eyre. After years of negotiation with the traditional owners, Marree Hotel owners, Phil and Maz Turner, and Trevor Wright of Wright Air, based in William Creek, are proud to say the rejuvenated ‘Marree Man’ can now be seen once again from the air. For more information, visit The Maree Hotel website.
Evandale village fair (TAS) The Evandale Village Fair is being held on February 18. There will be plenty of attractions and entertainment including working steam tractors, farm machinery, old-time horse-drawn vehicles, fabulously restored vintage cars and the famous, ever-popular and entertaining Penny Farthing bike races, with competitors coming from all over Australia to test their skill. For information, visit Evandale Village Fair.
Not so long ago, when looking for driving lights, the only choice you had were halogen lights. Sure, you got to wrack your brain deciding on a pencil or spread beam and whether to ‘up’ the bulbs from 100 to 130 watt in some brands. Life was easy.
This article was originally published in the August 2014 issue of 4×4 Australia.
Nowadays, there’s endless choice on offer in the lighting scene. You still get to choose pencil or spread beams, but how much of each do you need or want; 10 degrees, 20 degrees or up to (almost) 180 degrees of light throw. If you ticked the pencil beam box, how far do you really want to see ahead; 500 metres, 800 metres or is it really necessary to see 2000 metres down the track? Mind-boggling stuff and pretty much anything is available, depending on how deep your pockets are.
To increase the brain strain, add the need to choose between old school halogen (quartz halogen is simply a quartz glass bulb with halogen gas inside) beams, high intensity discharge (HID, or known as Xenon by some; it’s still a quartz glob but filled with Xenon gas), or the latest type – light emitting diode (LED).
If you are new to all this, you may well scoff at utilising LEDs to light the road ahead, rather believing that those tiny LEDs are only used in handheld appliances or as tell-tale lights. Nothing could be further from the truth, as the clever clogs in the lighting industry have managed to pack enough punch into an LED driving light to well and truly light your path into the great unknowns of any road or track.
Did we mention you also have a choice between 35 watt and 50 watt in the HID option as well as sometimes a light colour choice from 4200 to 6000 Kelvin, or 3900, 5900, 9800 or 17600 Lumens if ticking the LED box. How’s that for information overload?
For the sake of this article, and to ensure we don’t overwork your brains, we’ll keep things as simple as possible and demonstrate via real life testing with a few techo measurements thrown in to be doubly sure we’re not leading anyone astray.
PROS AND CONS In surmising the for and against, you, the driver, will have to make the final decision on which light works best for you based on performance in length or width, longevity of bulb or even purely based on price. Here’s a rundown on our experiences over the years, plus the results of this testing.
Halogen: Being the oldest form of forward driving lights (readily available), you don’t need to look any further if you’re looking at doing the least damage to your bank balance. While they are the lowest price, don’t discount their superiority over OEM headlights.
Many travellers have lapped Australia and had to endure the occasional blown bulb (which is easily and cheaply replaced), put up with the yellowish light output and make sure they don’t exceed the alternator output. I spent close to 20 years ‘putting up with’ halogens and that included a stint around Australia for 24 months in which I replaced the bulbs (with the cheapest ones I could find at the time) only a hand full of times.
Given their shortcomings, halogen lights can still cast a decent length and width of beam. It’s also easy to up the wattage to 130 or even 150 (provided your casing, lens, reflector, alternator and wiring are all up to the task), or try playing with different coloured bulbs or covers for a bluish appearance if you must.
HID: The step up in cost and outright light brilliance are the major factors with HID lights. While prices have plummeted since their introduction (from thousands per light to hundreds per pair of lights) they are still significantly dearer than halogen lights.
The next big improvement is the bulb life expectancy of over 7000 hours; however, it’s not unheard of for them to blow with much less use than that. The HIDs lower current draw is also significant, given they are driven by 35 or 50 watt systems. One of the drawbacks that detractors always cling to is the ‘warm up’ time: there can be (depending on type of ballast) five to 10 seconds until the bulbs reach their maximum intensity. That being said, the latest ballasts have less initial warm up time, followed by (practically) none once your lights have been dipped for oncoming traffic, then switched on again.
Possibly of most concern is the blinding glare from the lights for both oncoming traffic and the driver. Having driven with HIDs for around seven years, the reflection of road side signs is so great that I frequently dip the lights while passing them.
LED: Given the relative ‘newness’ of using LED lights on front facing driving, there are many detractors. Indeed the earliest LED driving lights were pretty crap compared to those available on the market today, and most of them didn’t cast much light along the road.
Rather, they have mostly been regarded as a wide-beam-only lighting system. Compared to the long-casting HID systems, that was pretty much the summery of LEDs – wide not far. But believe me, you’d be surprisingly happy travelling about rural roads with some of the later types of medium length LED bars.
As mentioned, I’ve been lucky enough to have driven thousands of kilometres with HIDs, but have also been graced with two medium LED light bars for the last two years. Not as a replacement to the HID, but as an addition. It’s given me a much wider and more evenly lit field of view when all four lights are on. I’ve also tried driving with just the LEDs (HIDs turned off) and other than that outright reach of light, I was perfectly happy around town and the back blocks, although a larger bar (higher lumen output) would be preferable.
LEDs excel in lower currant draw, have no warm up time, have a massive (many say more than 50,000 hours) life expectancy and therefore no need to replace globes. Given their natural tendency to ‘spread’ or ‘scatter’ light rather than ‘direct’ it has more recently seen a concerted effort to manufacture a true spot beam as compared to the LEDs excellent spread beam pattern. Total waterproofness and vibration resistance see the LED jumping leaps and bounds ahead of all others in longevity, now we just need to see that usual trend of price decreasing with time on the market.
Another noteworthy attribute regarding the ‘light scattering’ effect of LEDs is the ability to spread in both the vertical and the horizontal plain. While most bang on about ‘width of beam’, many forget about the benefits of having a greater ‘height of beam’ – we want to see the undulating, pot-holed track ahead at all times, even when the front of your 4×4 dips and mounts everything in its path.
Given prior use and current testing of these NARVA units, it’s clear they can be used as a spot driving light instead of just a spread. Sure they can’t match outright distance of the HID spot, but crikey, there’s not much you’d miss on the tracks with them.
Given my time again, I’d still say the all round pick of a combination of HIDs for maximum distance down the road, with either one long LED bar or two medium length units to spread the light as wide as possible in the near to midrange distance would be my combination of choice.
Then again, there are some exciting new LED lights that have been released, plus a few that are about to enter the market, so keep watching this space as we round up all the best LED lighting options for a future article. This could be enough to change my mind about lighting altogether and ditch all other systems completely.
FAIR PLAY THANKS To be sure we are comparing apples with apples, as much as possible; we’ve given the nod to NARVA to supply all the required lights this time around. This ensures we are getting equal quality across the board, equal dimensions within the chosen light types – as in the same diameter halogen and HID is available in their range – and we managed to convince them to supply wiring looms to suit all lights to enable quick and easy light changing. If you’d like to see the complete range of NARVA lighting, check out the Narva website.
CHOICES GALORE While sieving through the NARVA range of lights, we quickly became aware of the extent of our choices – it actually managed to make our testing regime larger and better for it. So rather than choosing one set of each type of lighting; we went for two of everything – a double burger, or upsized, test you might say.
In the halogen range we went for the large 225 Ultima 100W combo kit, as well as the smaller diameter Ultima 175 combo kit. That would not just show if size really does matter, but also the differences between older style lens-optic lights (Ultima 175) compared to free form reflectors (Ultima 225).
Then, when we looked at their HID catalogue, we found we had the choice of 35 watt and 50 watt spots and spread – we went with one of each to see if we could pick the difference in light outputs from the different wattage lights.
The LED range was even larger, so we went for the smallest NARVA light bar at 3900 Lumens with eight LED lights and the Big Bertha of the range, a 17600 Lumen bar with a whopping 36 LEDs. Surely we’d notice a difference there.
All up, that gave us ten different lights, of which six of them look identical – enough to give you an insight into the best option for each driving situation.
Halogen: Ultima 175 combination pack (spot and spread) $199 Halogen: Ultima 225 combination pack (spot and spread) $449 HID: Ultima 225 35 watt combination pack (spot and spread) $649 HID: Ultima 225 50 watt combination pack (spot and spread) $789 LED: (3900 lumens, 256mm long) $379 LED: (17600 lumens, 967mm long) $1199
LAYMAN’S LIGHTING Here’s a little bit on the technical side of lights to help you understand our testing procedure. Lux is the International System unit of luminance (brightness); defined as the amount of light on a one square meter surface, all points of which are one meter from a uniform source of one candela of light.
The higher the lux, the brighter the light is when shining on the subject; whereas lumen (which is more often quoted by the manufacture) is the total amount of light that can be generated by that light source. So, a 10,000 lumen light may throw a light which is measured at 500 lux 20 meters away, but that same light may fall to 10 lux at 600m away.
Kelvin is a temperature scale used to measure the colour of light. The lower the temperature the more yellow the light appears, the higher the temperature the light will appear with a blueish hue.
A standard halogen bulb is around 3200 to 3500K (soft yellow bias) compared to HID bulbs, which are very white and range from 4000K upwards. LEDs are generally up around the 5000 to 6000K, which is as close to natural daylight as man can make it. Keep in mind that the colour has no correlation to brightness.
Is that all too much to get your head around?
Look at it this way – zero lux is when you’ll be blindly feeling your way in a cave, 0.1 lux is the light of a full moon, one lux is the equivalent amount of light needed to be able to just read your favourite 4X4 Australia magazine, 50 lux is an average fluorescent lit room, while anywhere from 10,000 lux upwards is a bright sunny day.
Compare these with each lights lux readings to give you some idea on how far the light throw is usable. Remember to look at both that length and the width of each beam combined with the actual pattern of light to give a feel of how it’ll help your driving.
GONIOPHOTOMETER, BEHIND THE SHED OR IN THE PADDOCK A Goniophotometer is the scientific machine used in conjunction with a photocell to help measure and extrapolate the light patterns of driving lights to real world conditions.
While I’ve been involved in that type of testing in the past, and believe me it’s very accurate and time consuming, we’ll lean more towards lighting up the side of a shed and a 400 metre long paddock and trees, with a stack of accurate markings in place. The shed wall and paddock approach is just as time consuming, but combined with our set markers and lux readings, it provides a similar result to that of the laboratory, but in a more layman’s way by showing exactly what each type of light can achieve in real life.
With the shed wall part of our test, we’ve measured out our 25 metre test bed (exactly the same as in the lab), marked the wall at the centre line at the height of our Land Cruiser’s light mounting points and half meter intervals to one side and above. With each photo, you’ll see the light pattern and size, and be able to compare them with each test.
This in no way, depicts the amount of light further out on a real road – it’ll just display the exact light pattern exactly the same as in lab testing. Indecently, when comparing our test results with my lab test from the past, we’ve got (almost) exactly the same outcomes with the 35 watt HID, which was on the previous lab test.
With the paddock test section, we’ve marked out 50 metre intervals along the centre line of the light mount with reflectors, as well as offset markers at five metre intervals to the side, to 25 metres.
While we realise the reflectors will ‘throw’ light back to us that may not actually be useable light in real practise, they do provide us with excellent feedback as to how far and how wide each driving light is piercing into the darkness when looking at the light patterns surrounding each reflector. The row of trees at the end will also give an excellent indication of light pattern over a much longer distance.
We’ve utilised a lux meter to record light ‘brightness’ at all the above mentioned points – both distances and widths to deliver a scientific measure of how well each light is performing. Putting this information into some form of graph actually replicates the birds-eye view IsoLux (heat dispersant) images we created in the lab from the previous test regime.
Again, not totally scientific, but a dazzling way to combine science with real life to show you how each light performs.
Of course, all photos taken have identical camera settings. More so the human eye can actually see more light than depicted in the photos, especially with the larger LED light bar. Photos don’t lie; they just don’t do reality justice. We’ve utilised equal camera settings to best show the difference between each light.
AMPERAGE Currant draw for each light gives you an indication of how much power each driving light is sucking from your vehicles electrical system. Check out the low currant draw of the smaller LED (8 LEDs) at 1.38 amps – you could easily use two of these to light your way and use stuff all power.
Even the brightest 225 50 watt HID only sucks 3.88 amps – well within your alternator’s capabilities with two or even four of them blasting away at night. We kept the Cruiser idling at 1400RPM for the complete test time to ensure fair and equal battery power source was achieved, all at the expense of terrible fuel consumption.
| u00a0Light | u00a0Current draw (Amps) measured | Nominal bulb wattageu00a0 |
| NARVA Ultima 175 (hal) spot | 8.20 | 100 |
| NARVA Ultima 175 (hal) spread | 8.34u00a0 | 100u00a0 |
| NARVA Ultima 225 (hal) spot | 7.45u00a0 | 100u00a0 |
| NARVA Ultima 225 (hal) spread | 7.39u00a0 | 100u00a0 |
| NARVA Ultima 225 (35W HID) Spot | 3.10u00a0 | 35u00a0 |
| NARVA Ultima 225(35W HID) Spread | 3.17u00a0 | 35u00a0 |
| NARVA Ultima 225 (50W HID) Spot | 3.80u00a0 | 50u00a0 |
| NARVA Ultima 225(50W HID) Spread | 3.88u00a0 | 50u00a0 |
| NARVA 3900 (8 x LED) bar | 1.38u00a0 | 8 x 5W bulbsu00a0 |
| NARVA 17600 (36 x LED) bar | 7.8u00a0 | 36 x 5W bulbsu00a0 |
SUM UP Through the lux recordings, it’s obvious that HID is king of the light outputs; especially the 50 watt HID set – the spot blasts everything else into oblivion. This HID spread also provides an impressive light coverage and just these two lights would cover pretty much everything any driver would require. While the light difference between 35 watt and 50 watt wasn’t really apparent, the lux readings showed otherwise – wattage really does matter.
Looking at the LEDs, it’s apparent size also matters – the smaller 3900 lumen light bar is okay, but only just. The massive 17600 lumen LED on the other hand is downright awesome. While it doesn’t punch the same high lux figures as the HIDs, the sheer amount of even light spread across our 400 metre test paddock show’s their superiority as a ‘one-light-does-all’ concept.
The high vertical spread, combined with width of light will show pretty much every nook and cranny during most driving terrain, especially off road.
The halogens again shows size matters with the 225 blasting the 175s out of the park. When we paired two HID spots and the long 17600 lumen LED bar up, this provides one hell of a driving light set up that would be hard to fault – it shines very far and wide.
Right, I know I was going to show you more on the Milo 2 build this issue, but I got sidetracked by some product testing for Opposite Lock.
Determined as they are to have nothing but quality products, they’ve had me delving into all sorts of things and it’s stuff I really enjoy. But this time it really came from left field.
As in ‘left of Perth’ because I was sent to South Africa to check out the entire range of Front Runner racks and camping accessories that Opposite Lock has been importing for a while now. Trouble is, they’re not well known on the Aussie market and as a consequence they haven’t achieved the penetration they deserve. In fact, the first Front Runner product I ever fitted was a rack to my 76 Series test vehicle last year. It was so good I’ve fitted one to Milo now, too.
Why? Because they’re super strong, lightweight (all-aluminium in the racks) and come in a modular package which means you can add almost any accessory securely. The level of common sense in the design is terrific, too, even down to simple things like allowing you to walk all over the rack in bare feet because the slats are horizontal.
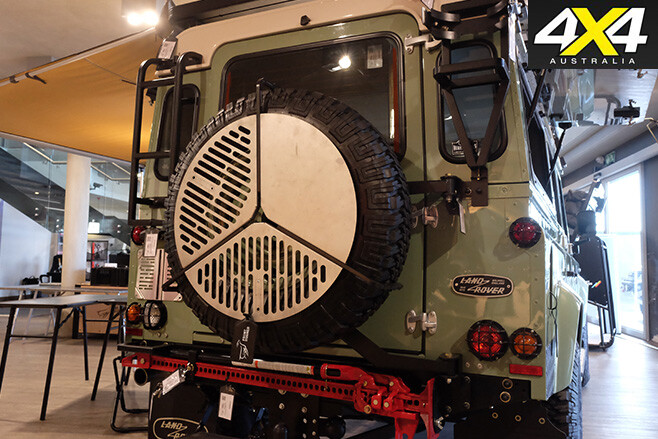
But are they tough enough for Australian conditions? That’s what we went to find out. First thing, though, was to have a look around the showroom and factory in Johannesburg.
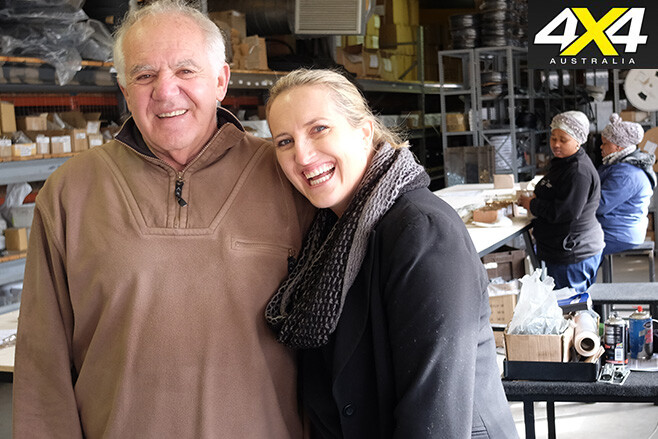
Travelling with Land Rover nutcase Gordon Shaw, who’s also the biggest retailer of Front Runner products in Australia through his Opposite Lock store in South Sydney, we barely got past the Defender Heritage model decked out in full Front Runner gear. Stan Illman bought this one with no plans to drive it, he just couldn’t resist owning one and so he got the team to dress it up as a display. With it’s skinny steel rims and light green paint it’s just pure eye candy for any off-road enthusiast.
Stan’s the powerhouse behind Front Runner’s superb manufacturing facility. He’s always been involved in manufacturing, but his passions include overlanding, motorcycling and off-road racing – all things you see reflected in the Front Runner products. He’s won the ‘Roof of the World’ rally a couple of times, too. Looking through his photo albums was like looking through a world adventure book.
Originally he bought into Front Runner because, as an ‘overlander’ himself, he could see plenty of room for accessory development in a country that loves going bush. Pretty soon Stan was applying his manufacturing expertise to the factory while refining and expanding the range of products. The theme might have been race-inspired right from the start: lightweight, innovative, practical and strong. Yes, I came away impressed!
The product line-up includes a corrugation-proof rack mount for MaxTrax. It was great to see our Aussie-made MaxTrax are appreciated in South Africa. As one of our African guides said, ‘you don’t go anywhere without Maxies over here, not when walking out can mean getting eaten.’
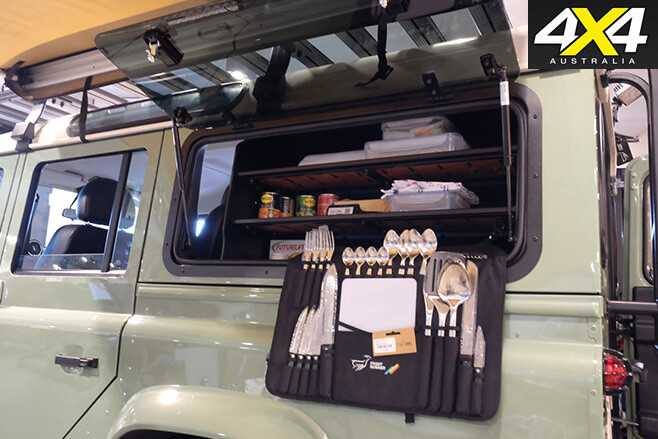
I thought I’d seen plenty of products on the Heritage – and all over the surrounding walls – but there turned out to be another floor of products just above. This time it was a blend of quality stuff from other companies (and more Front Runner camping goodies). Everything had that look of real-world development and experience. The storage boxes were stackable and the kettles made from stainless steel with big handles and easy-pour spouts. I realised that if Stan wasn’t happy with something, it got put straight in the box and sent back.
The factory itself, a massive building around the corner from the showroom, was modern and organised with machinery even I recognised as state-of-the-art. Profile cutting, forming, powdercoating and final packing is all done in-house so quality control can be maintained.

That’s essential when a roof rack is supplied flat-packed in a box with all fixtures and fittings included. Having assembled a couple of racks and quite a few Front Runner accessories, I’ve been impressed with both the instructions and the organisation that goes into every product. They even include little notes from each person involved in the packing process for a personal touch.
Having experienced the range, I was keen to get out and do some testing. Outside was assembled a group of dead-stock vehicles – a Jimny, a shorty Pajero and a Kia Sorrento of all things – proudly showing off Front Runner gear. The one vehicle that had any pretensions as a serious off-roader was a TJ Jeep Wrangler with suspension, tyres and a winch.
The testing was about Front Runner’s range after all, so the decision had been made to transform ‘lightweight’ vehicles to underline the benefits of lightweight products. Looking at the two-ply stock tyres on the Kia I figured we might have bitten off more than we could chew.
A half dozen or so journalists and engineers were looking for places to stash their bags in cars already packed to the brim with food, drinks, camping gear and tools for a fortnight’s worth of trekking through the Kalahari Desert. You could smell adventure in the air.
I reckon Stan must have caught a whiff of that because minutes later he’d cancelled a heap of business meetings, chucked a bag into his decked-out Mercedes Gelandewagen and led the way out of town.
How did we go? Stay tuned, you’ll find out exactly how far a fully loaded Kia Sorrento on stock tyres with no clearance can go when you’re being chased by a lion.
THE HERD was agitated: ears were flapping, raised heads were swinging one way and then the other, and dust was swirling around stomping feet.
We had seen what an angry elephant can do to a Hilux a few years back in Kruger National Park, so we pulled to a halt on the narrow track. You need to treat elephants with a huge degree of respect, and keeping one’s distance is a good start. Rob, our mate who was driving, slipped the Hilux into reverse, preparing for a hasty retreat.
Slowly the herd began to move away from the water, their thirst satiated, but they were in no hurry to clear the track. The matriarch still watched us intently, ears wide, trunk uplifted, all the while making sure her brood was safe and happy and working their way into the sanctuary of the thick mopane scrub. As we edged along the track most of the herd had vanished into the thick bush. Heart rates slowly came back to normal as we continued on the sandy road.
We were on a side track around a flooded section of dirt road near the town of Maun, south of the Mababe Gate of the Chobe National Park, heading to the tourist outpost and gateway to the famed Okavango Delta. The annual flood of the Delta was occurring and tendrils of water were pushing through the parched land and across the main track, hence our detour. With the water came mobs of wild animals looking for fresh food or easy prey. This was life and death in the African bush, as it has always been.
Our trip – a family sabbatical organised by our son – began two weeks earlier at the luxury Swala Camp in a remote section of the elephant-loaded Tarangire National Park in northern Tanzania. We did the tourist thing for the next week, taking in the incredibly varied extravaganza of wildlife in the Ngorongoro Crater and the delights of Giraffe Manor in Nairobi, before flying south to Victoria Falls and the Sussi & Chuma camp on the banks of the Zambezi.
Here our hire vehicles – a V6-petrol-powered Hilux and a 76 Series Cruiser with the 1HZ engine – were waiting for the rest of our adventure. We crossed into Botswana at the hectic border post at Kazungula and took the short ferry ride across the Zambezi. A few fantastic days at Sanctuary’s Chobe Chilwero Camp followed before we set off through desert country on our drive south – and that encounter with the elephants.
We stopped in this remote area for a couple of days, savouring a place where few travellers pull up for more than a brief rest or, at most, an overnight stop. There were encounters with elephants, hippos and more. With no other tourists to crowd us, the girls spent an hour with a young leopard that lingered just metres from their car.
We had earlier split into ‘boys’ and ‘girls’ vehicles for the day and told them not to follow us; they were elated and told us endlessly about the magnificent, usually elusive beast which we had missed completely. Such are the vagaries of wildlife watching.
Access into the Okavango when the flood is pushing deep into the desert is by plane and boat, with road and track access extremely limited. However, once you’re on an island in the Delta, as we were after a 20-minute flight, movement was possible only in modified Cruisers running 9×16-inch tyres on split rims.
At times we ploughed through water for kilometres, and it’s no wonder the service schedule on these hard-working rigs – more like boats than trucks – is extreme, with oil changes and greasing of wheel bearings needed every couple of weeks. Every year after the tourist season, the running gear is totally rebuilt.
We stayed at the luxurious Baines’ Camp (named after Thomas Baines, the artist who also painted in Australia when he was a member of the 1855 A.C Gregory Expedition across the top of the continent) and the little less extravagant Stanley’s Camp, savouring the incredible experience of this watery wonderland, which is often described as ‘Africa’s last Eden’.
While wildlife is plentiful, we’ve found after four trips to the Delta (not all as luxurious as this one) that the wildlife isn’t as easy to find or see as, say, in Chobe.
Back at Maun after our Delta adventure we said goodbye to half our group. They were heading for Johannesburg and flights home while four of us slipped into the Hilux for a three-week journey through Namibia. This was to be a low-key affair, with a mix of accommodation and camping in places as diverse as national parks, local hotels, game farms, private reserves and guesthouses.
Why such eclectic accommodation? On tag-along trips we ran in Africa a few years ago, travellers loved both the variety and the chance to meet other travellers, as well as local farmers and workers, all of whom provided different insights into life in Africa.
We spent a couple of days in Etosha National Park, one of the great parks of Africa, in the desert of the country’s north. A vast pan – similar to Lake Eyre, although a bit smaller – forms the heart of the reserve, but around it ebbs and flows an incredible amount of wildlife wandering from one waterhole to another. Small herds of elephant, many groups of giraffe, sprightly antelopes and gazelles, zebra, warthogs and, if you’re lucky, black and white rhino.
Of course, predators are there too, from jackals that show no fear of lions, to delightful bat-eared foxes, snappy mongooses, timid cheetahs and, surprisingly, a large number of leopards.
From Etosha our route took us through the dry desert country of the Himba people, traditional cattle herders who were having a hard time because of the drought that gripped the country.
The towns are magnets for a mix of cultures and people, the most striking being the semi-naked Himba and the immaculately groomed Herero women who stand out in the finery of their full-length dresses and wide, cow-horn-style headgear.
We slipped through the Namibian tourist enclave of Swakopmund, a coastal town rich in colonial German heritage. The town, cooled by the South Atlantic Benguela Current, offers fine restaurants, beachside delights and a reprieve from the heat that dominates much of Namibia.
From here we headed south through desert country that grew drier with every passing mile, and we crossed the Tropic of Capricorn. Then the country began to change with short, wiry grass covering the rolling plains, and we started seeing gemsbok, springbok and zebra, even though we were far from any reserves or protected area.
We stopped at the small village of Solitaire, just a scattering of buildings around the roadhouse and bakery. It didn’t offer customers much in the way of choice, but the coffee wasn’t half bad.
Next morning we entered the vast Namib-Naukluft National Park, which covers more than 50,000km² and is known for the Sossusvlei Dunes, some of which are among the world’s tallest, towering more than 300 metres above the sand plain that surrounds them. It was early morning, the sun had just come up behind us and white clouds hung amongst those red-sand giants.
A spectacular and somewhat eerie sight, it was one we had never seen before. Feeling over-energetic, we climbed up Dune 45, a baby of just 85 metres. The ascent left us hot and panting in the cool, mist-laden air, but the effort was worth it, the view from the dune’s sharp-edged crest magnificent.
The road continues deeper into the dune field, ending at a car park. From there most people take a short walk to Sossusvlei (a small ‘pan’ or dry salt lake surrounded by big dunes), or do the strenuous climb to the top of ‘Big Daddy’; at 325 metres it’s one of the biggest dunes in the area… but not the biggest. That accolade goes to Dune 7, which at 388 metres above the plain makes our Big Red on the edge of the Simpson look pretty small.
Over the next two days we headed west, stopping at some great pubs in small towns before crossing the border into South Africa and taking in the Kgalagadi Transfrontier Park which straddles the border of Botswana and South Africa. This park is well-known for its cheetahs, but luck was not with us – we saw plenty of desert animals and lions, but the fast, spotted cats eluded us.
After more than a dozen trips to Africa, including a 10-month trek from the southernmost tip to the northern extremity of this great continent, we knew we’d be back – we simply can’t stay away. Whatever you do, go to Africa at least once. You’ll probably feel the same!
TRAVEL PLANNER
SELF-DRIVE Explore South Africa, Botswana, Namibia, Zambia, and the Kingdoms of Lesotho and Swaziland.
If you’re going for less than three months it’s more economical to hire a fully set-up 4WD. We use Afritrax 4×4 Offroad rentals (www.afritrax.co.za). They also supply a full complement of camping gear, plus they suggest itineraries and can provide a driver.
For longer trips (further afield to East Africa) think about taking your own vehicle (www.guidebooks.com.au).
Start your trip in Jo’burg by staying at the Farm Inn on the outskirts of Pretoria. It’s close to Afritrax headquarters.
For exclusive luxury stays, check out Sanctuary Retreats.
For camping info on Kruger National Park and all the other parks in South Africa, visit South African National Parks.
For info on Namibia, visit Travel Namibia.
To start your Botswana adventure, check out Botswana Tourism.
IT’S AN odd line of work this. It often feels like we’ve come across the absolute pinnacle, something that simply can’t be topped.
Vote for the Duramax Nissan GU Patrol to win the 2017 Custom 4×4 of the Year
Sometimes it’s a new model 4×4 that completely outshines the previous generation. On the other hand it could be an inspiring travel yarn by people out there doing things most could never dream of. And then there are the phone calls with Andrew from On Track 4×4.
If that name rings a bell it’s because he’s the owner of the earth-shatteringly-fast Nissan Y62 Patrol featured in our December 2016 issue (with its insane 350kW of daily-driven V8 grunt). So when he said he had a GU Nissan Patrol unlike anything we’d ever seen before he had our attention straight away.
Travis Rampling’s one-of-a-kind GU Patrol has nearly double the torque of a 200 Series V8 Cruiser, fuel consumption that’d rival most dual-cab utes, and enough off-road ability to take on basically any track you point it at.
Let’s not beat around the bush. How do you get a ZD30 Patrol to punch out nearly 1200Nm and 380kW on 37in tyres? If you’re Travis, you yank out the old ZD and shoehorn into its place a 6.6L Duramax V8 turbo-diesel more commonly found in full-size Chevy Silverado pick-ups.
“Travis came to us and was chasing more power than the ZD30 could put out, and eventually we decided a Duramax would be the best option,” Andrew told us.
“I’ve owned it since new in 2002 and the ZD had never really let me down, but I just wanted more,” added Travis.
RELATED: 5 of the best Custom Nissan Patrols
To make the install as neat and thorough as possible, On Track 4×4 kicked things off by stripping the GU down to its chassis and strengthening key areas before mounting the engine and transmission combo. To keep up with the grunt of the Duramax the Patrol gearbox was also swapped out for the matching Allison six-speed auto. There’s a four-inch stainless snorkel plumbed up to the turbo and Garrett intercooler, with a matching four-inch exhaust dumping spent gasses out the rear.
To achieve the mind-numbing power figures Travis had the ECU custom-programmed with five separate tunes to give versatility in any situation. “There’s a few tunes in there that go from out-and-out performance through to fuel savings or general driveability, all available at the push of a button,” Andrew said. “At its most aggressive it makes around 380kW at the wheels, and in fuel-saving mode it can do sub 13.0L/100km fully loaded and towing a camper trailer.”
You can’t go pushing that much power through a standard diff and not expect a few issues along the way. Up front the front axle housing has been fully laminated to prevent bending or twisting, and a TJM Pro Locker has been slotted inside the centre. After turning three standard rear diffs into paste, they’ve swapped it out for the larger H233 unit found in some models with an ARB Air Locker tucked inside.
Despite the larger tyres, the torque profile of the Duramax, as well as the Allison’s ratios, has the standard 4.3:1 diff ratios right on the money. To pass engineering the brakes needed to be upgraded as well, so the GU is now running a hydro-boost brake system with crossdrilled and slotted rotors on each corner.
There’s an array of heavy duty adjustable arms holding both diffs in place, while custom-valved Performance Series King 2.5in stroke shock absorbers help reign in the four-inch-lifted King springs. The rubber bump stops were also ditched in favour of King hydraulic offerings to ensure no bottoming out, no matter how deep the washouts.
The GU reads off like a who’s who of high-end parts underneath, but the exterior is the automotive version of a British gangster – presentable enough to not draw attention, but mean enough to knock out a few teeth along the way.
Up front the ARB Sahara bar was dissected by On Track 4×4 to accept a Viper unit from Red Winch, a trick high-mount replacement out of the UK with standard features like an air-free spool. Rather than block the radiator with huge HID lights, Travis opted for a set of slimline LED bars from Baja Designs, with a 20in slung inside the front bar and a matching 50in up on the Rhino Pioneer roof platform.
Like most of the fab work on the GU the rock sliders are a custom offering from On Track 4×4 and sit tight to the body for maximum ground clearance.
The rear bar is an ARB unit with a spare beadlocked ProComp Extreme hanging off the driver’s side. A jerry can resides on the other side.
Open the rear barn doors and things don’t get any simpler. A drop-down table on the right-hand door makes for an easy-to-use cooking station with LED lighting throughout, and a 60-litre ARB fridge lifts into place thanks to an MSA 4×4 drop-down fridge slide. Plus there’s a twin-drawer design from Outback Drawers that has a few tricks up its sleeve.
Due to the lack of room under the bonnet, a second battery now lives inside the drawers, with a Redarc BCDC 1240 unit keeping it charged. A twin-piston ARB compressor, solely for pumping up tyres, also resides in the drawers. While a second single compressor under the front seat runs the lockers and winch-free spool.
Up front the stock pews have been ditched in favour of a set of Recaro units, while an Icom IC440 UHF handles communications.
It might sound like another over-the-top build that never gets driven, but that couldn’t be further from the truth. With the help of some of the most knowledgeable blokes in the industry, Travis has, over time, pieced together one of the ultimate touring 4x4s you can imagine.
It’ll comfortably do daily duties, rock crawl with the best of them and take the family and the camper to Fraser Island, and it will do it all while blowing the pants off SS Commodores. Just don’t ask him how much he has spent.
Duramax… you mean the Colorado engine?
YOU’VE probably heard the term Duramax thrown around recently with the updated Holden Colorado wearing the name tag. While the Duramax in Travis’s GU Patrol rolled off the production line in the USA (a 6.6L twin-turbo V8 packing 270kW and 881Nm), the Colorado’s donk is an Italian-made 2.8L four-cylinder turbo-diesel with a slightly less impressive 147kW and 500Nm. So what do the two have in common? Absolutely nothing. The term is a catch-all General Motors uses for its diesel engines sold in the States. There’s no coincidence the nameplate popped up on the Colorado’s flanks right around the same time it went on sale stateside.
The right set of aftermarket wheels can visually set your 4×4 apart from the pack and provide it with the strength to survive and thrive on rugged terrain.
This is advertiser content.
However, things can go very wrong if you fit wheels that aren’t suited to your vehicle. FUEL AUTOTEK is the exclusive Australian distributor of premium brands such as Black Rhino Hard Alloys and TSW Alloy Wheels. The company’s General Manager, Mitch Crosher, provides some tips.
Understand your vehicle’s fitment specifications First and foremost you must be aware of your vehicle’s stud pattern, or pitch circle diameter (PCD), as this will dictate which wheels will fit and which will not. In order to find a set of wheels that fit your vehicle, the PCD of the wheel must match that of the vehicle.
It is also critical that you understand the applicable offset range for your vehicle. A wheel’s offset refers to the distance between the mounting surface and the centre line of the wheel. The offset is measured in millimetres and results in a positive, negative or zero offset.
Finally, different vehicle makes have different centre bore specifications, and this will have an impact on the variety of alloy wheels available to suit your vehicle. If you wish to replace your OE wheel and tyre set-up with smaller wheels and larger all-terrain or mud-terrain tyres, it is critical that the overall rolling diameter remains consistent.
Ensure that your chosen replacement wheels are load rated for your vehicle It is of the utmost importance that aftermarket alloy wheels meet or exceed applicable Australian or international safety standards. Aftermarket alloy wheels sold in Australia must comply with Australian AS1638 standards or equivalent international regulatory standards such as DOT (USA) or German TUV. These specifications can often be found as markings on the rear of the wheel to certify compliance. It is also crucial that the load rating of the respective aftermarket wheels satisfy or exceed the requirements of the vehicle, not just for 4x4s but any vehicle. It is also very important to do your research and check that the wheel has been designed and manufactured for 4×4 use. Finally, the wheels must be fitted with the correct fitting hardware including lug nuts and hub-locating rings to ensure there is no vibration. If the lug nuts are a different size to the OE nuts, ensure you have an applicable wheel brace handy.
Select a design and finish Finally, you must find a design and finish that you feel will best suit your vehicle. There are countless wheel designs currently available to Australian consumers. Depending on your vehicle’s fitment specifications you may be able to select a wheel with a deep lip or concave, which will give your vehicle an aggressive appearance. Popular alloy wheel finishes include Polished Silver, Matte Black and Gunmetal. To help determine the best-looking wheel for your vehicle why not use FUEL AUTOTEK’s Interactive Wheel Selector and Fitment Guide.
THERE’S no question that 2015 was a bumper year for new four-wheel drive releases. It was one of the best in memory and brought us a new Toyota Hilux, Toyota Fortuna, Ford Everest, Mitsubishi Pajero Sport and Triton, and a swag of upgraded models.
While those new vehicles excite those folks looking to update their 4x4s, for those in the aftermarket accessories industry it means a whole lot of work researching and developing products to suit all the new vehicles and variants.
For a company like Ironman 4×4, an influx of new models means massive investment. Those bullbars and suspension packages don’t get delivered by Santa Claus but require vehicles to be bought and thousands of hours of development before the first prototypes are even fitted to a car.
Toward the end of 2005, when we were visiting Ironman 4×4’s Melbourne head office, Adam Craze invited us out to the back shed as he had something to show us. Behind the big roller door were no less than 12 new vehicles, most shining in the company’s signature black, but there were a few graphite grey Toyotas in there too.
These vehicles represented a massive investment for Ironman 4×4 and the workload Adam and his team had ahead of them. There was around $600,000 in purchases alone, but when you add the research and development that goes into them you can double that figure. Buying the 4x4s is just the beginning.
Vehicles like the new Everest and Fortuna required all-new product, created from scratch to suit the new body styles. But even the updated vehicles, such as the facelifted Land Cruiser 200 Series, needed new or updated products. New technology including the forward collision system and radar cruise control that came with updates (like the PXII Ranger) needed heavily revised bars to accommodate the electronics; while unseen items such as relocated parts in the engine bay of the 200 Series needed revisions to things like auxiliary battery systems.
It all meant a lot of work for Ironman 4×4 (and other 4×4 accessory companies) in order to stay at the top of the game and be able to supply equipment as soon as possible once the vehicles are on sale.
The work doesn’t finish once the product has been designed, engineered and manufactured. There’s still product information to be produced for the retail stores, and packaging, promotions and marketing to let the customers know that the latest gear is available for their new 4×4 purchase.
We’ve all seen Ironman 4×4’s impressive photos of fully loaded vehicles in stunning locations and wondered just how to get a job with those guys. So when Adam invited us to join an Ironman 4×4 convoy to the Flinders Ranges to shoot the latest vehicles, he didn’t have to ask twice.
Touring some of the Flinders’ best-known locations during spring with a team of fully equipped 4x4s was an opportunity too good to pass up, even if it meant a pre-dawn start out of Melbourne in order to reach the Flinders on Day One.
The convoy included an Everest Trend, Ranger XLT, Hilux SR, Fortuna, Triton, LC200, Navara D23 and a pair of LC79 utes. While most of what you can see on the cars was production-ready product that is available to the consumer, some were fitted with prototype parts undergoing development for future additions to the Ironman catalogue.
GET OUT OF TOWN THE long day on sealed roads to get out of town meant we would have the five days to explore the Flinders. And at the end that tiring first day we were rewarded with a stay at the historic Cradock Hotel. Cradock is at the southern end of the Flinders, and the pub there is more than 120 years old.
Thankfully it has been renovated a few times since the 1880s but it still offers an historic feeling, with welcoming publicans, good accommodation, great meals and cold beer. It’s definitely worth the time if you’re looking for a place to stop on your Flinders adventure.
The following days were spent enjoying the best of the Flinders. After fuelling up in Hawker we toured the scenic drive through the Arkaba Conservation Sanctuary which was once a grazing property but is slowly being returned to its native state through the efforts of Wild Bush Luxury, the property owners. It’s interesting to see how the land on this property differs from the surrounding grazing properties since it was taken over back in 2009.
The drive through the property is not off-road, but it takes you through rolling hills and craggy gorges typical of the area. It wasn’t real off-road, but it was good to get the Ironman convoy off the bitumen and into the dust.
Another gorge run further north took us through the spectacular Parachilna Gorge so that we could loop around and get back to our camp at Wilpena Pound for the next few nights. Along the way we stopped at various points to snap the vehicles in this spectacular part of the country.
More gorging the next day, this time through Bunyeroo and Brachina Gorges that each supplied stunning backdrops for photos and video. It was while returning from Brachina that the clouds formed and promised rain, and light showers overnight put a dampener on our Wilpena campsite.
With the same weather front that was playing havoc with the Icons trip (see page 120) now hovering over us, we decided to head east where the maps said there was less rain. Back roads took us to more open country where we were able to vary the style of shots and videos we were getting of the vehicles. The rain was scattered but the roads remained solid.
Arriving at Lake Frome right on sunset was well worth the drive, as the colours and textures of the surrounding dunes and hills came alive. It was the ideal time to put up the drone to capture the true remoteness of the area.
Backtracking in the dark gave us all a chance to check out the performance of Ironman’s new range of LED lights. The vehicles were equipped with both round and light bar LEDs, and they were invaluable for spotting wildlife and variations in road conditions.
We got back to Blinman with some of the vehicles running on fumes, only to find we were too late for both the pub and the fuel pumps. So, after putting one of the cars on the back of a strap, it was a slow run back down to Wilpena.
Daybreak saw the sun out and the group rolling up wet swags. We were moving across the road to Willow Springs and its impressive Skytrek scenic drive. We found a campsite that could accommodate our group and unloaded some gear before we set off on the 80km loop around the property. We just made the 10.30am cut-off, so we were the last group on the track. This gave us time to stop and shoot as needed.
When you sign up to do Skytrek you get a leaflet that contains notes on where you are going and what you can expect to see along the way. There are 50 points of interest marked along the route and, provided you reset your trip meter at the start gate, you can follow the points in the trip notes. Willow Springs recommends allowing around six hours for the trek, which is why they have a cut-off start time.
We were lucky to get a break in the weather, as the drive around Skytrek is truly spectacular. One minute you’re driving through valleys with towering mountains either side of the track; the next you’re passing through dry creek beds that form tight gorges leading to open plains. It’s not until you reach the last quarter of the trek that you find out why Skytrek gets its name.
The track climbs steeply and requires low range, as some of the surface is loose and scrabbly. Reaching it late in the afternoon, as we did, you look straight up in to the setting sun; but once you reach the summit, you feel as if you’ve reached the sky. Time it right, and with some co-operative clouds, and you’ll be treated to a spectacular Flinders sunset over the peaks of Wilpena Pound to the west.
It was a fitting way to end our Flinders trek and we celebrated around the campfire that night. For some in the group it had been their first 4×4 experience, and these are the moments to remember! But the fun driving wasn’t over yet.
No one was looking forward to the long highway drive back to Melbourne, so Adam and Smithy from Ironman 4×4 found a more interesting route. We followed the dirt roads east of Hawker, out through Waukaringa and its abandoned goldfields, before meeting the Barrier Highway at Yunta. From here the Queenslanders in the group split north toward Broken Hill while the rest of the convoy crossed the highway and continued south on the dirt through the Danggali Conservation Reserve.
While this was a more interesting drive than the highway, storm clouds gathered as the sun set and another weather front caught up with us. Heavy rain turned the road to soapy mud and there were many sections that had to be bypassed; others sections required you to stab the throttle and attempt to keep the wheels pointed where you needed to go. It made for a long but exciting drive, and it’s a short cut we’d like to cover during the light of day.
It was after midnight when the eight very muddy Ironman 4x4s rolled in to a motel carpark in Wentworth, New South Wales, but we found the stamina to enjoy some carpark ales to mark the end of the adventure. That last drive had been gruelling for some and those beers went down very nicely. The warm, dry bed was much appreciated as well.
It had been a hectic schedule, but we covered challenging terrain, saw spectacular scenery and really put the vehicles, drivers and Ironman 4×4 gear to the test. The only equipment failure was a single flat tyre on one of the two cars in the convoy not wearing Mickey Thompson rubber. The rocky tracks had been harsh on tyres, but the Mickeys showed no signs of the torture they were subjected to.
The next time you’re looking through the Ironman 4×4 catalogues or website and you’re taken aback by some of the stunning images, check to see if it was one of these cars and if the images look familiar.
You’ll know where they were taken and you’ll have an appreciation of the work required to capture them. It might also make you think about what goes in to making Ironman 4×4’s quality products for your 4×4 vehicle.
Watch the video of Ironman 4X4’s Flinders Adventure.