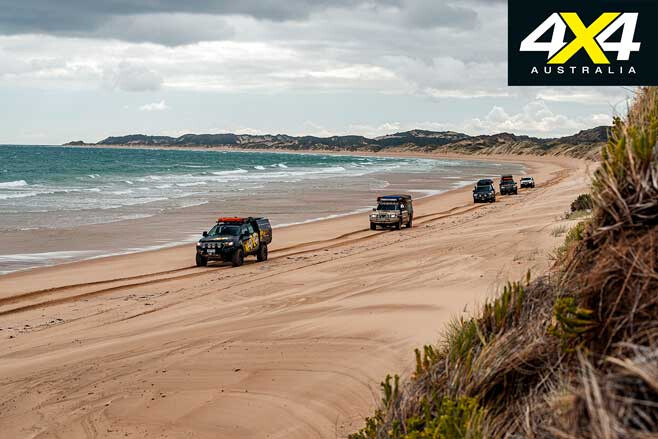
At 4X4 Australia we want our roof racks to do everything and then some more, so we’ve been keeping an eye on low-profile roof platforms as they’ve progressed from welded steel to alloy to composite with present-day systems offering an accessory list longer than your mate’s rusting winch cable.
The idea behind these nifty rooftop trays is they should be just as at home halfway across the Tanami as they are dodging the sprinkler system of your local undercover carpark. They should brace a mountain bike for Friday arvo rides with mates or a kayak for a spot of estuary fishing, but also tote a spare wheel and high-lift jack for those off-road exploratory camping sojourns. It needs to offer simple attachment and removal of accessories, even a roof box … and of course be relatively easy to fit, quiet, aerodynamic and look sleek but tough.
A tall ask, but if you’re forking out more than $1.5K for some powder-coated aluminium to bolt to our roof, it’s gotta be better than some rusting tradie-bars and a couple of frayed bungees.
In Rhino’s favour is the fact it has been manufacturing roof racks since Richard Cropley developed the first prototype in 1992. The Pioneer system emerged in 2010 and has been refined over the last decade with the present-day iteration made from non-corrosive reinforced nylon and aluminium, delivering an extremely lightweight but durable product.
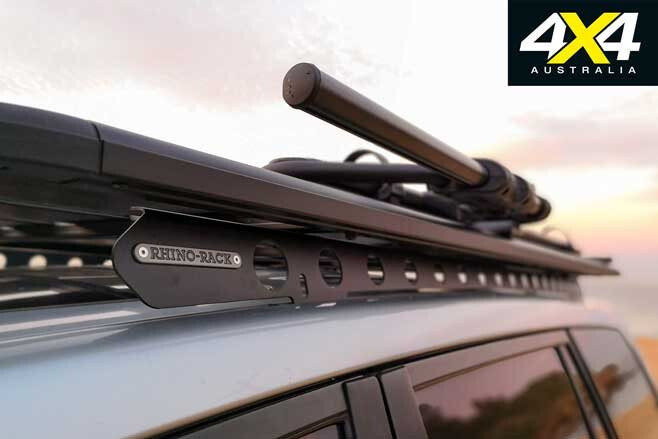
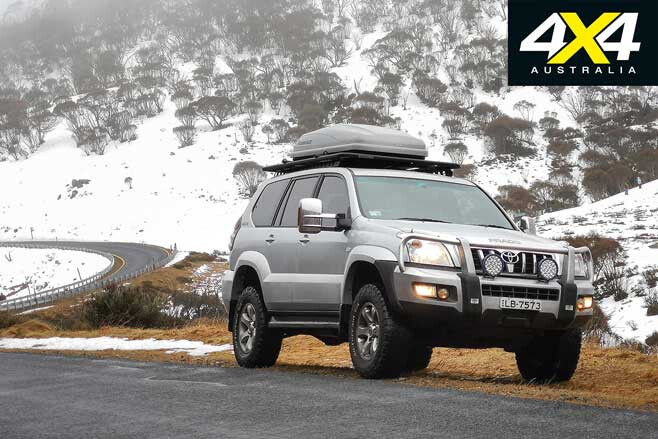
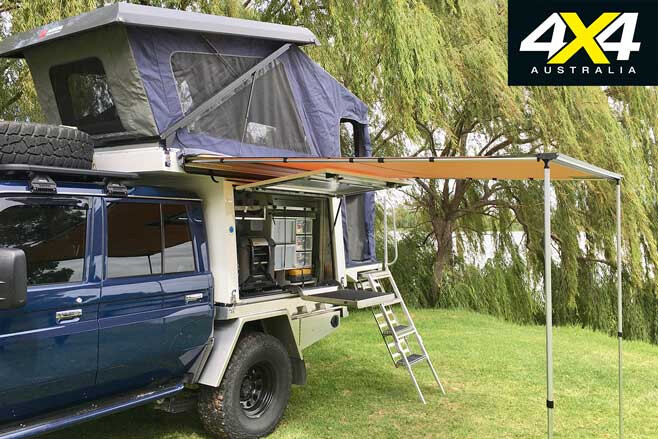
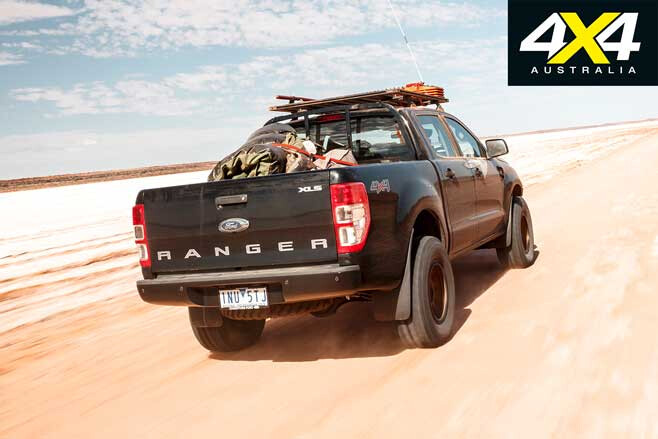
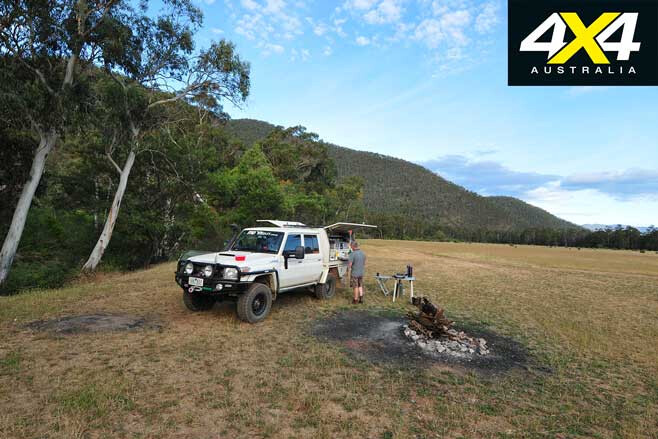
For our review we opted for Rhino’s 2128mm x 1236mm Pioneer Platform coupled with a Rhino-Rack Backbone to replace the Prado 120 Grande’s existing factory roof rails. This combination provides us with the lowest possible profile and max load capacity for our vehicle. In fact, when fitted via the Prado’s existing ditch mounts, the backbone sits at the exact same 50mm midpoint-ditch-mount roof clearance as the Toyota factory rail.
With our Pioneer Platform installed atop the backbone, the overall vehicle height is increased by 90mm at the midpoint, a mere 40mm over the original roof rails (without accessories), delivering one of the market’s lowest profile offerings.
For the Prado fit-out, the backbone and Pioneer Platform deliver a maximum on-road vehicle allowance of 120kg, while offering a staggering static roof allowance of 360kg and off-road allowance of 96kg. This adds an extra 20kg allowance from the factory rail’s on-road allowance of 100kg.
Additionally, the Rhino-Rack Backbone has been tested to International Standards ISO PAS 11154-2006 Road Roof Load Carriers and Australian Standards AS1235-2000 Road Vehicle Roof Bar Testing, which is important for both insurance and safety purposes.
For those who want a simpler installation and aren’t as concerned with vehicle clearance and load capacity, Rhino-Rack’s Heavy Duty Removable Rail Mount CXB or SX legs fit directly to factory rails. When combined with the platform itself, however, this combination on the Prado sits nearly 40mm higher than the backbone mount (without accessories) while also limiting the platform’s on-road cargo capacity to under 75kg.
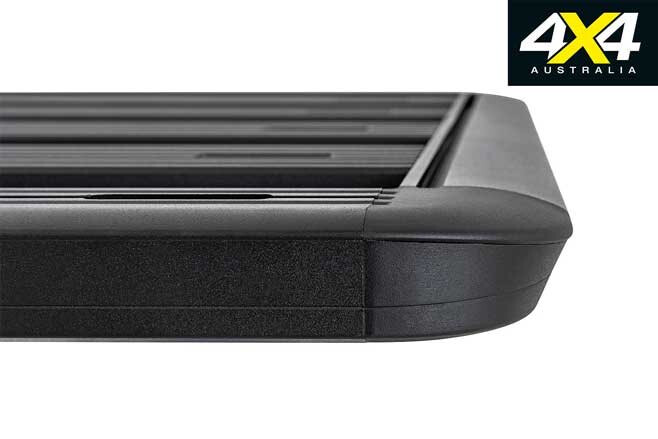
Installation is reasonably straightforward and Rhino-Rack offers clear and concise instructions with detailed diagrams for every product so fitting can be carried out at home with a mate and a good set of tools, but you’ll need to be patient and precise when fixing the backbone channel-nuts to the platform. The 2020 platform (now available) with an integrated measuring strip makes things easier on this front.
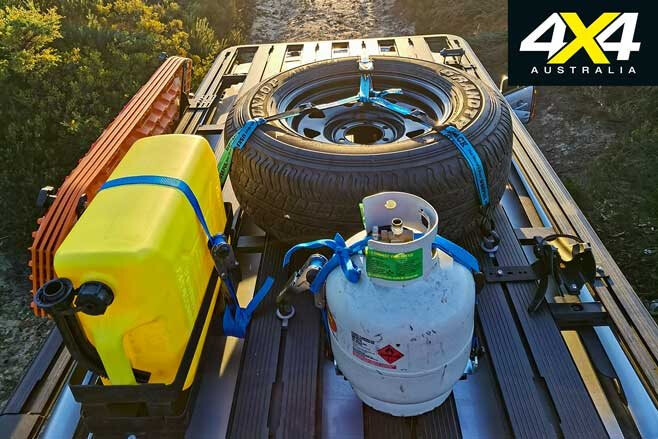
With a backbone and platform installed, the roof becomes a base for your next adventure, and for our 4×4 setup we chose a Spare Wheel Holder, Gas Bottle Holder (4kg), Horizontal Jerry Can Holder and Recovery Track Holder to fix our tools. For fixing toys, we installed a bike mount, kayak mount and roof box option as well as a Pioneer Roller and a load of eyebolts.
Bicycle
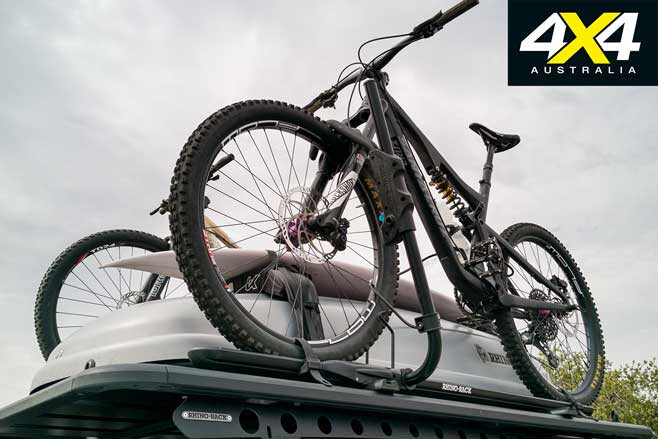
For the bike we trialed both the new Thru Axle Bike Carrier and the existing Hybrid Bike Carrier. The Thru Axle offers a simple low-profile design that keeps your bike sturdily in place. The cons however are the need to remove and find a place for the front wheel and the need to purchase the appropriate Thru Axle insert for varying axle diameters. Once setup though, it is a breeze to use.
The Hybrid Bike Carrier on the other hand is a beast of a bracket and requires quite a bit of finicky installation to fit to the Pioneer platform (which was accentuated when our Whispbar bike carrier secured tool-free in seconds). After initial installation however the Hybrid Bike Carrier is easy to use, sturdy and secure and has ability to accept a host of different bikes, all lockable in place with the integrated locks and without removing any wheels.
Snow Gear
For the snow we opted to use our existing Rhino Masterfit 440 Roof Box. We’ve had this for a number of years and it has been on multiple outings without missing a beat. The ABS/ASA thermoplastic roof box is lightweight and easy to install with tool-free brackets clamping firmly to most roof racks, or in this case the Accessory Bars. Our small complaint with the roof box is any equipment packed against the side of the box can obstruct the internally exposed locking mechanism forcing some last-minute gear manipulation to get it to.
Kayaks
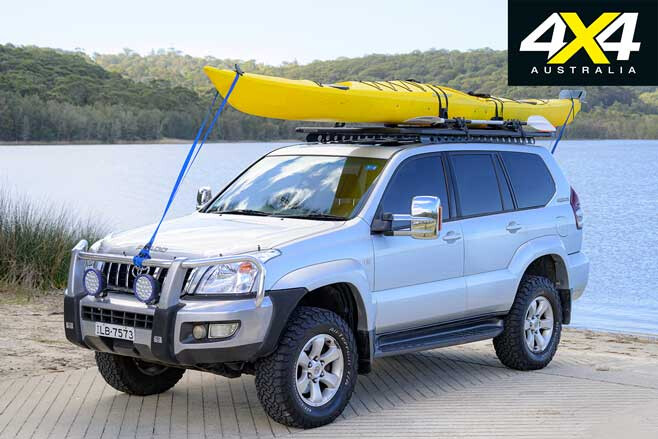
For our kayak we chose to go with the tried and trusted Nautic 581 Rear Loading Kayak Carrier. This allowed us to fix our 5m, 30kg Dagger 6.10 Exodus Sea Kayak to the roof of the Prado. It’s a hefty kayak to haul atop a 4×4 and after a few outings we opted to install the Pioneer Roller.
Fixed in mere minutes to the rear of the Pioneer tray, the roller allows our kayak to roll onto the Nautic brackets where it can then be settled to sit flush and fixed securely. The Nautic system is tool-free with the only downside being it can be difficult to tighten the turn-wheel brackets enough to accommodate a heavy sea kayak and can be hard to undo. All-in-all the system works as it should.
Verdict
The Rhino-Rack Backbone and Pioneer Platform combination comfortably delivers on what it has been designed for. It is low-profile, rugged and hard wearing, with a high build quality. The platform is quiet on road, looks stylish and most importantly offers a plethora of options for everything from trade to 4×4 to adventure accessories.
The Pioneer Platform loses some points for small frustrations such as limited tool-free options, the need for a multitude of tools to fit accessories, and design issues surrounding the use of accessory bars. Fortunately, and perhaps unsurprisingly, the practicalities of the platform far outweigh its minor annoyances and when, on occasion, we found ourselves scratching our heads in frustration, we were relieved to discover the Pioneer Platform is as much about practicality as it is about prettiness.
All-in-all, the Rhino-Rack Pioneer Platform does exactly what is asked of it, performs admirably and delivers an extremely capable roof-carrying system for those who demand a solid tray to excel in the harshest of Australian conditions.
LDV has broadened its seven-seat D90 line-up, slotting in a bi-turbo diesel-powered variant to compete with the likes of the Isuzu MU-X, Toyota Fortuner and Ford Everest.
The 2.0-litre four-cylinder engine – designated D20 and designed in-house by Chinese-owned company SAIC – sends 160kW and 480Nm through an all-new eight-speed ZF gearbox.
Compared to its diesel contempories – MU-X (130kW/430Nm), Fortuner (130kW/450Nm) and Everest (143kW/470Nm and 157kW/500Nm) – the D90 diesel donk’s 160kW and 480Nm makes it one of the most powerful in its class – not bad for a sub-$50K price tag.
“We’re delighted to broaden our offering in the large SUV segment with the arrival of a diesel alternative,” says Dinesh Chinnappa, General Manager LDV Automotive.
“At over 120,000 units per annum, the Large SUV segment is significant and dominated by diesels. Now, with a powerful new bi-turbo diesel offering, our seven-seat D90 family SUV offers even greater versatility for our target market.”
The D90 diesel option is only availble with the Executive nomenclature – The D90’s flagship offering – and it runs standard kit including BorgWarner transfer case and LDV’s Terrain Selection system.
The LDV D90 has a selection of active safety features to compliment its five-star ANCAP rating, as well as a 3000kg towing capacity and plenty of storage space (1800 litres with the rear seats folded down).
“Our target market is hard-working Australian families. Now, more than ever, they need value for money, but they also still demand safety, quality, features and performance,” said Chinnappa.
“With childcare costs, rising energy bills, inflation, static wage increases and worries about the future, the family purse is being squeezed. Hardworking Australian families can’t afford to be flippant or wasteful with money. The new LDV D90 bi-turbo diesel fits the bill perfectly.”
LDV D90 Driveaway Pricing (4×4) – LDV D90 Executive 4WD Automatic Petrol $43,990 – LDV D90 Executive 4WD Automatic Diesel $47,990 *Option Premium Paint $500
I’VE OWNED a Carry Me Camper for the last 14 years, and back when the campers were produced by Candy Campers of Tintinara, South Australia, with the steel canopy built by Jacksons. A few years back when Phil and Sandy Candy wanted to retire, Jacksons bought the Carry Me Camper product and shifted the whole operation to its huge Murray Bridge HQ.
For the last 30 odd years or so, Jacksons has been building silos, storage bins, animal shelters, pig troughs and a host of other sheet metal products, including ute canopies and trays, so it has a huge amount of knowledge and design experience on such products. A camper was a natural progression, especially now it has a well set-up 4WD store in Murray Bridge as well. Jacksons 4×4 Accessories is an ARB retailer, while also supplying a range of other brands such as Redarc, Jmacx and others.
But back to the campers.
All Jacksons’ vehicle-based product, such as canopies, trays and slide-on campers are made from aluminium, significantly cutting down on weight. Back that up by the best cad-cam design, computer controlled machinery and fine welding, and you have the impressive basis for a great camper.
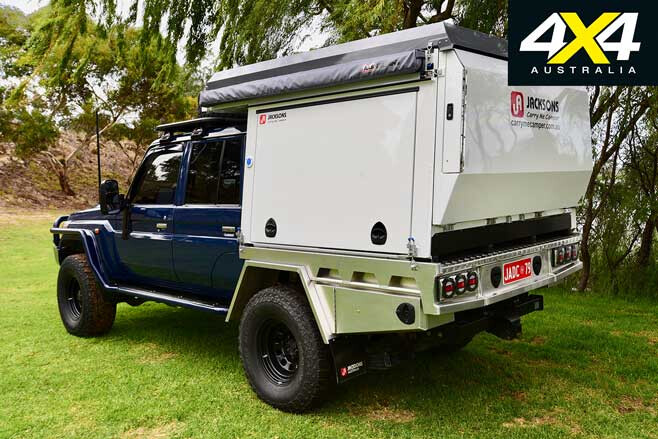
The company’s latest design of slide-on is a two-stage, hardtop camper, unlike anything else on the market, giving unparalleled space and ventilation in the sleeping area. Since its inception, not even 18 months ago, the hardtop two-stage camper has become the unit everyone wants and now Jacksons has released a model suitable for extra-cab and dual-cab utes and pick-ups.
This is a very impressive camper, the build quality being absolutely first class with some great design innovation that you just don’t see on other cheaper campers. The unit sits on an 1850mm x 1640mm tray and weighs-in, as a complete package for this top-of-the-line unit, at the 500kg mark. Expect to see a reduction in that of 50kg or so as the engineers at Jacksons look at ways to get rid of some excess weight. Even so, you’ll probably need to look at the suspension of your vehicle, perhaps a GVM upgrade for the best handling and ride comfort under all conditions, but something that Jacksons 4×4 can help you out with too.
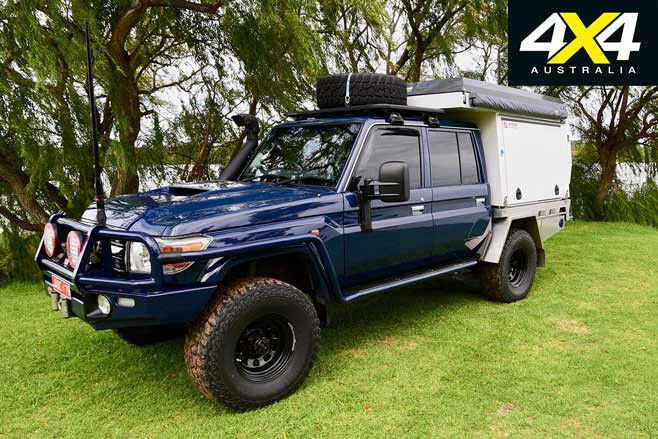
The canopy roofline is low, the top around 300mm above the roofline of the Cruiser the unit was sitting on. And I just loved the way the 250W CIGS solar panel (standard on this model) is integrated into the roof and lies flat within it – another well-thought-out design criteria of this camper.
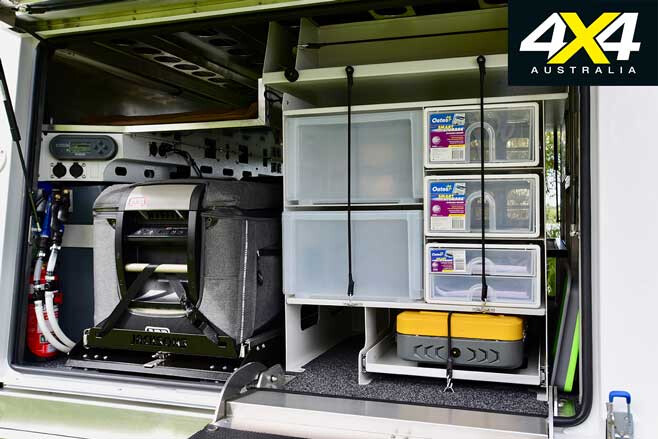
The kitchen area is accessible at all times by opening the large easy-lift side door which exposes the fridge on a drop-down fridge slide, and in this top-of-the-line version there’s a large stainless steel kitchen work bench, plus a two-burner stove, again on a slide-out self-supporting tray.
The stove is not plumbed into the camper and could be moved away if and when required. The gas bottle can be stored on the far side of the camper or, if small enough, in the under-boxes of the tray. The storage pantry includes four heavy-duty boxes, three drawers and a pop-up wash bowl; everything you need for a quick lunch stop or an even quicker morning brew stop.

In the very front of the camper are two 54-litre water tanks with a hose and tap for each tank, located beside the fridge. A single, gutsy 100amp/h lithium battery is located on the opposite side, again at the front of the camper, while a Redarc battery management system is integrated into the whole 12-volt system. There are white and yellow LED dimmable lights on both lift-up doors which is great for illumination, while the yellow light helps keep bugs from being attracted to the area.
On the other side of the camper, lifting the door reveals a vast storage space that you can really set up any way you want. In our case we had mesh shelving along with some under-shelf storage boxes; many people opt for a second fridge slide. Above the aforementioned lithium battery is a 12-volt power distribution box with fuses and a circuit breaker. Scattered around the canopy, in handy spots, are a number of 12-volt and USB sockets for powering and charging all those power-hungry items we seem to have these days.

To open the camper for an overnight stop is easy and quick; just drop down the rear tailgate and slide out the self-levelling steps from their hideaway box in said tailgate – another unique Jacksons design. Then climb up onto the now horizontal tailgate which has also exposed the canvas area of the camper. Undo a couple of latches allowing the roof to raise to its normal position, sneak under the exposed rear canvas and unfold the canvas roof support, add a couple of legs and you’re done, the whole operation taking less than a couple of minutes. (Check out the speed of the set-up here).
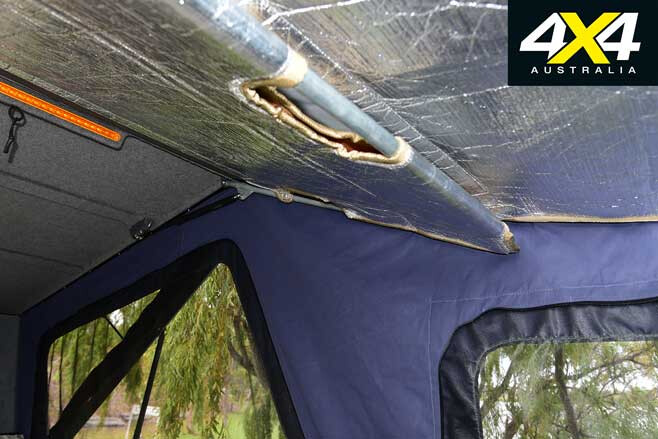
The previously mentioned canvas roof support is another unique Jacksons development and also adds a layer of insulation to the tent area of the camper in addition to the roof insulation in the hardtop section. Here in this tailgate area of the camper you’ll also find LED lighting and an access hatch for an optional portable loo.
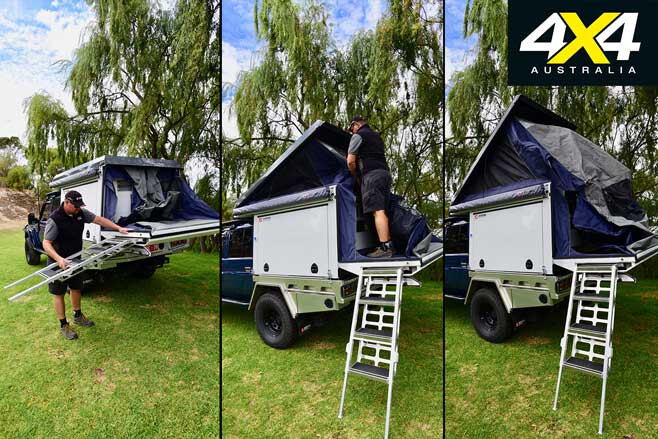
A fold-down step from the tailgate dressing area gives easy access to step up the short distance to the large north-south bed, complete with a 140mm thick innerspring mattress. At the head of the bed you’ll find lighting and 12-volt and USB power outlets, but what really impresses is the amount of ventilation and headroom this unit has; it is superb.
Oh, and a couple of more quality issues. The canvas is high-grade Aussie made, the zips top-quality YKK, the sewing first class, while the mesh is midgee proof to keep those blood suckers away from any sleeping souls.
This model of hardtop camper also comes with an exterior awning adding shade and protection over the kitchen area, although the lift-up doors seem to provide enough for all but the hottest or wettest of conditions.
Slide-on campers are fabulous for long-distance touring. We have, as previously mentioned, an early-model Carry Me Camper on our Patrol and a Four Wheel Camper on our Ram in the USA. With a slide-on camper the capability of the vehicle is not compromised and if you want you can tow a trailer with your toys such as bikes or a boat. That opens up even more country and adventures for the daring souls amongst us.
The camper comes with four legs so you can unload it and have it freestanding for those forays into town, if you so wish. Some people may use them but in all my time with slide-on units I’ve never bothered; in fact, both my units are bolted to the tray of the vehicle and have rarely been lifted off!
Pricing for this Carry Me Camper starts at $38,830. The top-line unit we were testing comes in at $42,780 and includes everything we’ve yarned about as well as dual fridge slides. Optional extras included diesel cabin heating and hot-water systems, an LPG hot-water heater if you prefer, storage/rubbish bags and a bike carrier and the like.
Currently the spare wheel needs to be carried on a roof rack, as shown in the pics, which I’d hate to put up there on my own in the scrub. However, Jacksons is working on a drop-down tailgate version of a tyre carrier and it would be one I’d be opting for.
You are probably thinking that 40 odd grand for a rooftop camper is a lot of money … and it is. But, I’ve gotta tell ya, in my 35 years or more of being in the 4WD touring industry, I haven’t seen a better designed or manufactured slide-on camper anywhere, at any time. Some of the innovation is fantastic to see … and will, no doubt, be copied by others. This unit looks the goods, works extremely well with a minimum of effort and will give you many years of useful and faithful service.
Now, if I could just convince Viv it would be great to upgrade…
Product Enquiries
– Jacksons Carry Me Camper Phone: (08) 8531 2700 Website: carrymecamper.com.au
– Jackson 4×4 Accessories Website: jacksons4x4.com.au
PICTURE this, you’re trundling down a well beaten track way out past nowhere when you clock the rising plume of dust ahead signalling a fellow traveller approaching at speed.
2020 CUSTOM 4X4OTY: Vote now for a chance to win!
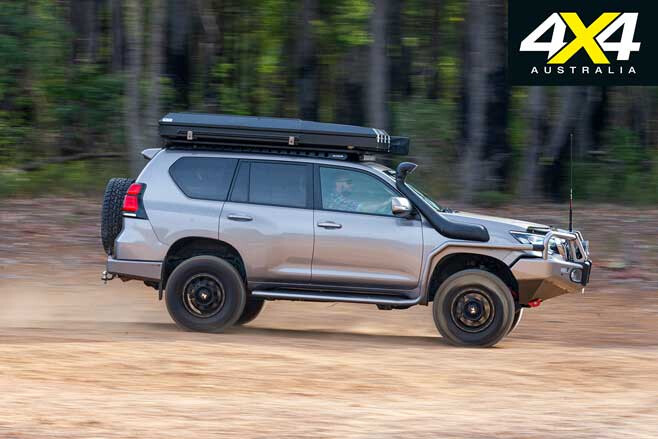
The track’s been pretty hard going on the fourby so your mind starts to speculate as to what kind of rig is also up to the task. With the mindset of most four-wheel drivers following the same tried and tested models it would be safe to say seeing a Toyota LandCruiser Prado 150 at this point would be a big surprise, and without a soccer field or schoolyard anywhere in sight!
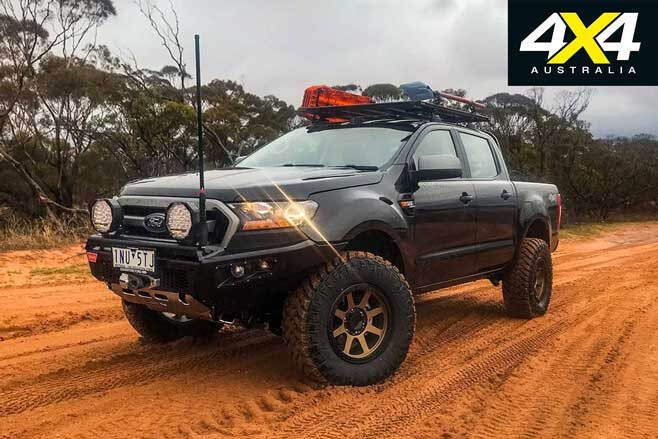
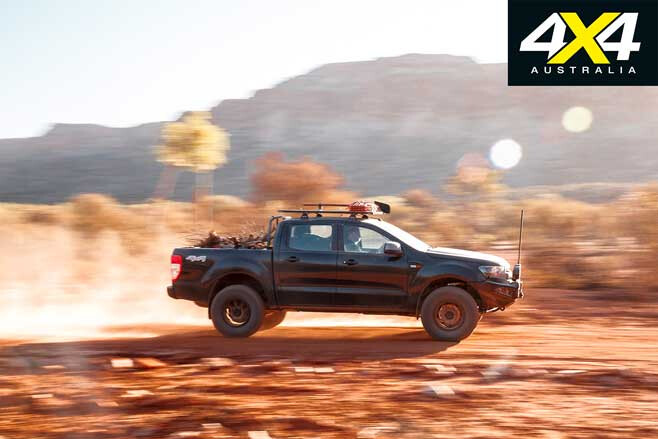
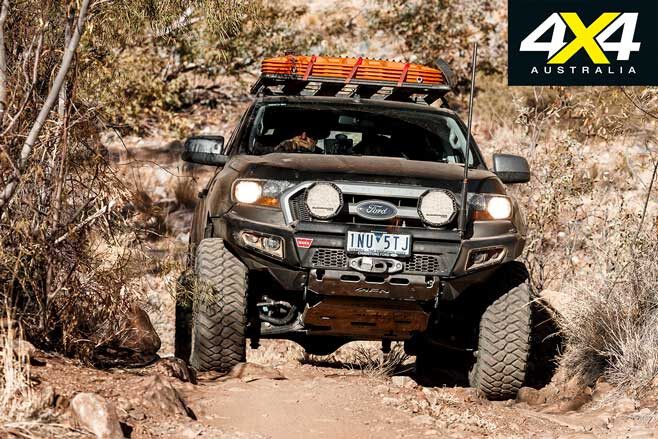
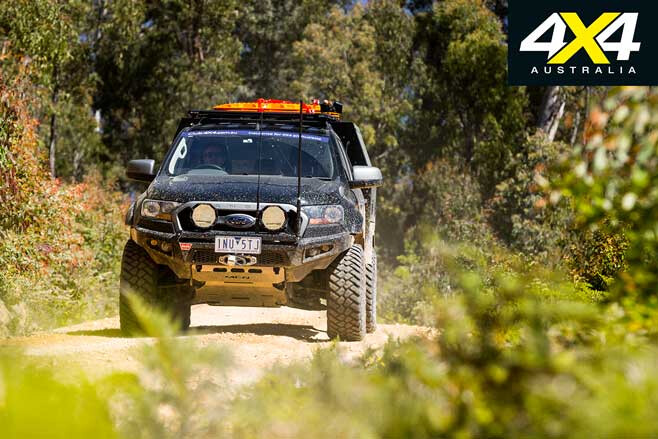
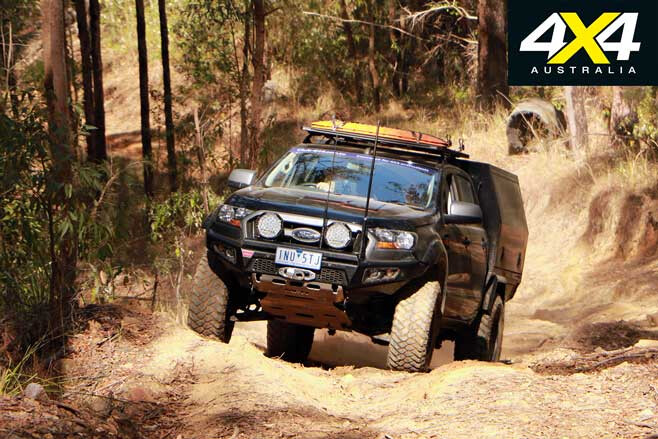
Tom Ledger was tired of seeing the same vehicles being used on tourer builds, and saw the trusty Prado as an alternative. “Going against everyone’s opinions was a big risk but in the end I thought why not? I’ll just do it,” he says.
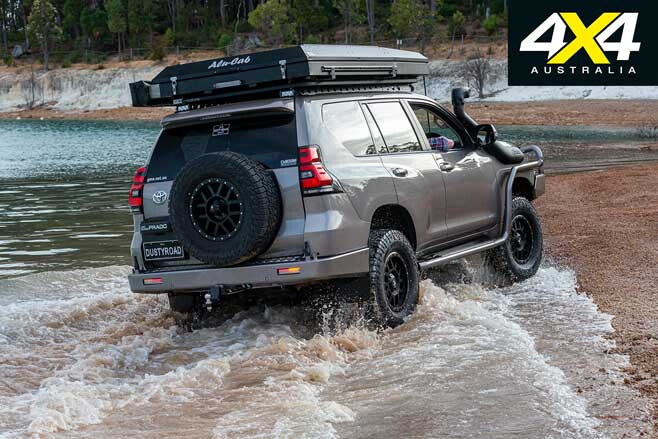
Tom shook hands on a brand-new 2019 Prado, before then enduring a two-month wait to collect his new Dusty Bronze ride, as his chosen colour had to be specially ordered. “I liked that it had dusty in its name so I took a gamble,” he said. “The dealership wasn’t helpful, the website was terrible, but I liked the name. I wasn’t too sure on the colour when I first saw it, and thought I’d made a huge mistake. But once I started fitting the black accessories to it, it really grew on me.”
Of course, the Prado was nicknamed ‘Dusty’, and Tom was soon on a mission to improve it and within a month of picking it up a plethora of gear had been fitted.
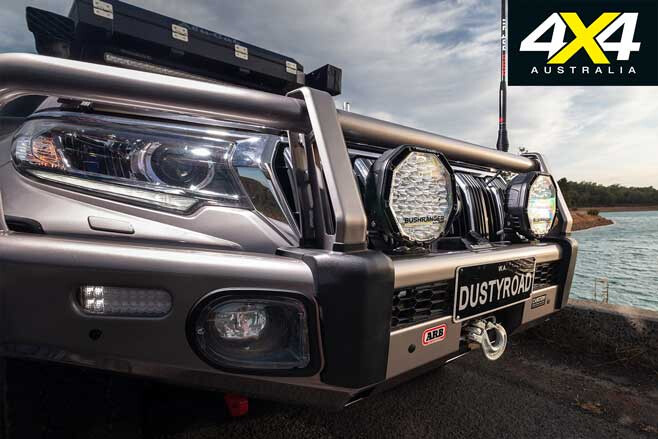
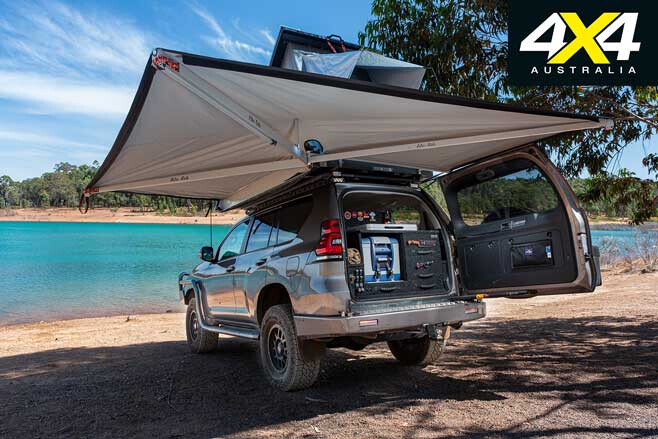
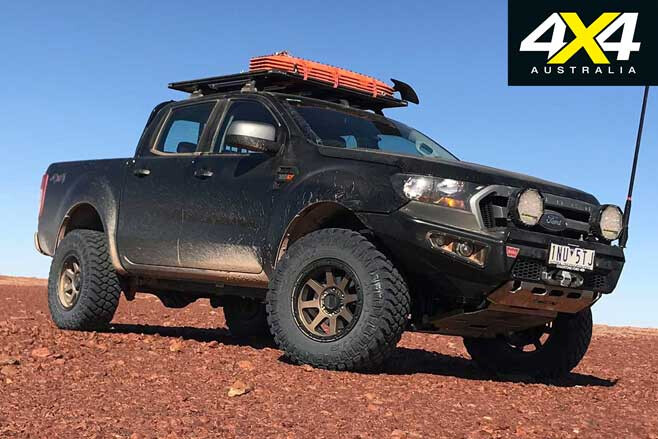
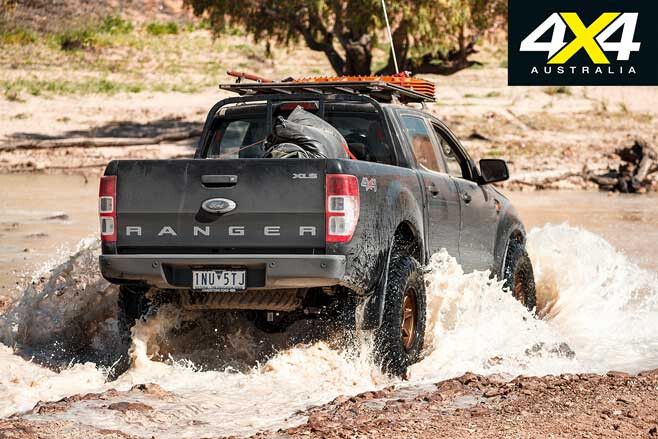
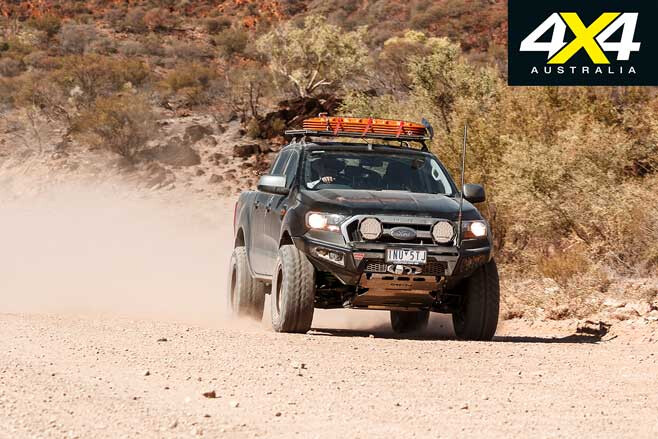
Starting with the colour-coded ARB Summit bar, and ARB 8-tonne recovery points; Bushranger 10,000lb winch, Nighthawk VLI LED spotlights, 43-inch light bar and 5.5-inch camp lights; Rhino-Rack Pioneer Platform and Backbone roof Rack system soon changed the look of the wagon. When it’s time to head out for extended trips away an Alu-Cab Gen 3 rooftop tent bolts on complete with a matching 270-degree Batwing awning.
“I love it,” Tom told us. “It takes me less than 15 seconds to set (the tent) up, and another 15 seconds to pack it down. It’s got LED interior lights and USB charging points too. I can leave all my bedding in there when it’s closed. I don’t have to worry if I hit the tins too early either. The amount of times I’ve fallen asleep on a swag that’s not properly set up because I was too drunk to do it, I don’t know. It does still require some accuracy getting up the ladder though.”
With many modified vehicles you’ll hear the build “got out of hand”, but not in this case. After previously modifying several other 4x4s, Tom had a plan that would allow for some serious touring once the rattle guns and drills were put away. The end result had to accommodate everything needed for up to a month at a time.
“I don’t like being around people. I really enjoy being in the outdoors and heading bush. Growing up in the bush I’ve always favoured the isolation over the population,” says Tom.
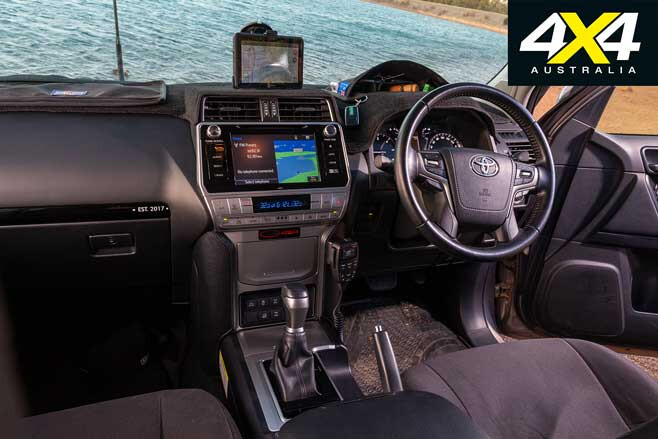
Having previously owned a 79 Series single-cab, one of Tom’s biggest problems was trying to pack all the gear he’d grown accustomed to carrying inside the smaller 150 Series. “The Prado’s cabin space is basically one-metre deep by one-metre wide, so the ability to utilise every bit of space in the back of that car in an organised fashion is sensational.”
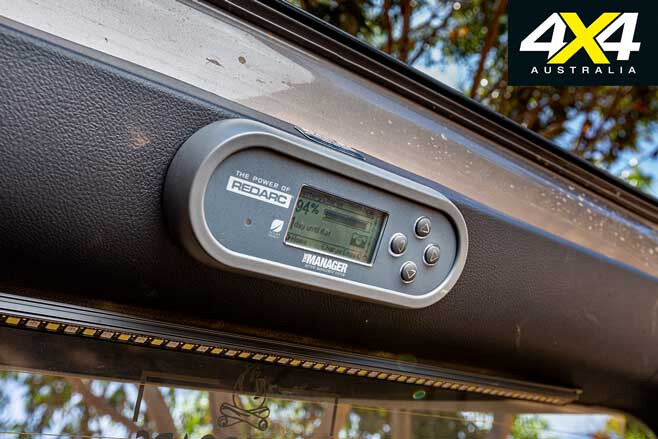
By removing the centre seat row and panelling out the space Tom was able to increase his useable cargo space considerably, allowing the fitment of a 60-litre water tank that operates through a pump to the Nitto food grade outlet just inside the tailgate. Above this sit the Redarc S2 Manager30 and a 1500W pure sinewave inverter, ARB twin-cylinder compressor, and fire extinguisher. “The inverter allows me to run all the camping accessories, and also charge my 56V chainsaw, the drone batteries, charge a laptop, and my missus likes to run her hair dryer off it.”
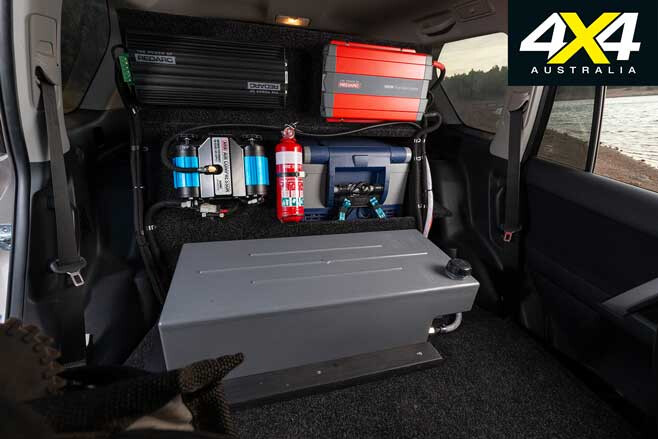
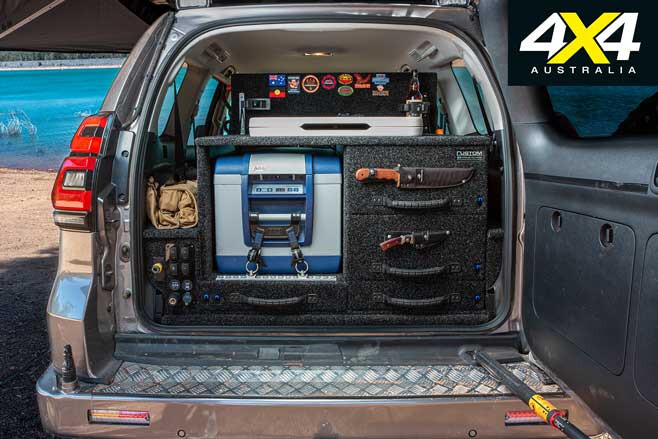
Chris Teirling from Custom Installations was called on to screw together the tailgate fitout, complete with custom drawers and enclosed fridge specific to Tom’s specifications. A dedicated panel houses switches for the water pump, compressor, auxiliary lights, USB/12V charging points, and ARB compressor outlet, keeping clutter to a minimum.
An Atlas 46 Yorktown tool roll fits perfectly into the space above the panel allowing Tom easy access should things go awry out on the track. One of ARB’s 60L fridge/freezers keeps the steaks cold with access gained by a custom lockable slide complete with a further slide-out workbench beneath it. Three different-size drawers house all of Tom’s camping and recovery equipment, while doubling as easily accessible knife mounts, with twin rum-bottle holders standing atop the whole arrangement.
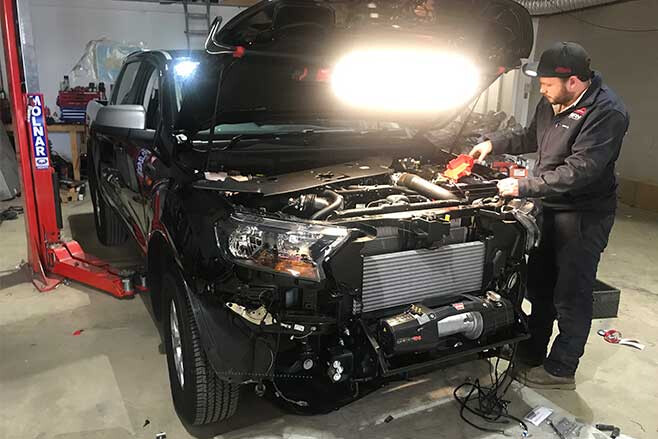
Without a doubt loading a new car up with a swag of electrical accessories is going to place a hefty load on any existing automotive electrical system. Risking any interference to the shedload of new car electronics can result in a stranded traveller, so with the previous builds experience under his belt, Tom elected to keep the new accessories completely isolated from the vehicle’s existing electrical system − smart thinking.
In fact the only non-factory item you’ll find under the bonnet is the secondary deep-cycle Optima blue-top battery locked down in an Outback 4X4 Accessories auxiliary battery tray. This is fed by the Redarc Manager30 and powers all added accessories while keeping both starting and auxiliary batteries charged and in a workable condition.
A remote monitor is mounted high on the rear door’s inside trim, this area being Tom’s ‘hub’ once camp is set up. “I’m always at the back of the car when I’m camping. Whatever I need, whether it be food, water, air, cooking equipment, rum, it’s all within arm’s reach,” he said. “I don’t have to wander around and open doors or muck around with lights.”
Keeping the dash free of a bunch of obvious aftermarket switches and gauges was paramount to the clean look Tom was shooting for, so with this in mind he fitted QVEE Toyota-style switches to the existing Prado switch panel below the start button. These control the spotties, light bar and camp lights, while the wireless winch controller hides away in the glove box. “I hate dash clutter,” Tom admits. “It’s the absolute worst, especially on a newer type vehicle. It’s all good on a GQ or an 80 series to fit a tin box full of switches, but on a new car it looks absolutely terrible.”
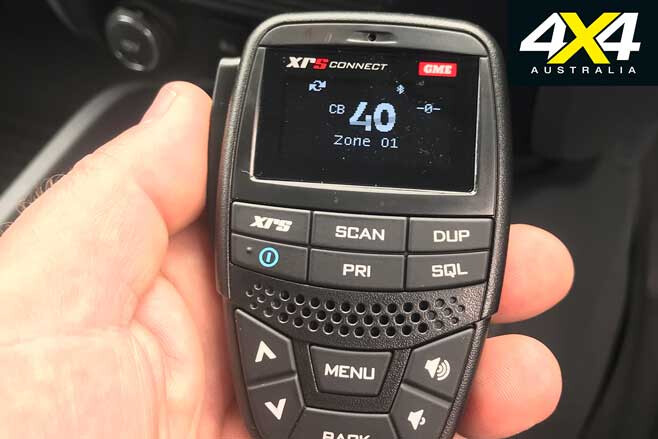
Toyota sadly never made allowances for the easy fitment of a UHF radio however, but now that GME has released its XRS330C with all its display and controls contained on the hand piece, Tom was able to simply mount it where it was easily accessible. A GME 6.6db antenna complements the installation.
Rounding out the interior are a pair of custom made SupaFit padded denim seat covers.
“Between myself and Ken, the WA state manager at SupaFit, we wanted to come up with something that pays respect to ANZACs,” Tom said. “He went through six or seven attempts at getting the stitching on the Rising Sun right, but once he got it, it was like ‘take my money!’”
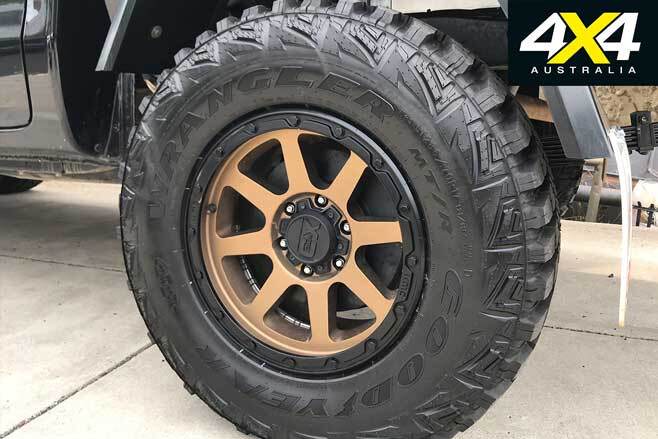
Knowing the Prado had serious touring kilometres ahead, and not having a lot of info available on what best works, proved a real challenge in getting the suspension right. Starting with each corner a set of Falken Wildpeak 285/70R17 AT3W All Terrain tyres were stretched over satin black 17×8 King wheels chosen for their ease of cleaning, but also as their +20 offset sat wider than standard inside the guards without the need for flares.
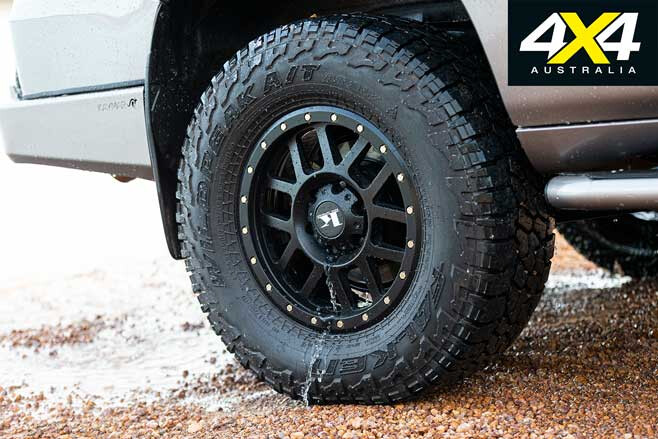
With a little more than 20,000km under their collective belts, Tom says: “They’ve been absolutely faultless. I needed a tyre that could handle corrugations, bull dust, limestone and sand exceptionally, and these Wildpeaks have been bloody brilliant!”
Nothing is ever a simple ‘bolt-up’ though, so to help the wheels maintain proper alignment and clear those fat tyres a pair of Blackhawk upper control arms were bolted on. The final item on the list being the remote reservior Old Man Emu BP-51 adjustable bypass shocks. These are a coil-over unit for the front combined with Old Man Emu H/D coils which raised the nose 65mm.
The extra load of the camping accessories necessitated a pair of Ironman 4X4 500kg springs for the rear, raising it 50mm. Having an internal bypass system located inside the OME BP-51 shock body allows the circulation of the shock’s oil within itself, paired with the adjustable bump and rebound allowing for maximum control when pushed to extreme temperature levels. This was tested to the limit when tackling the Anne Beadell Highway recently.
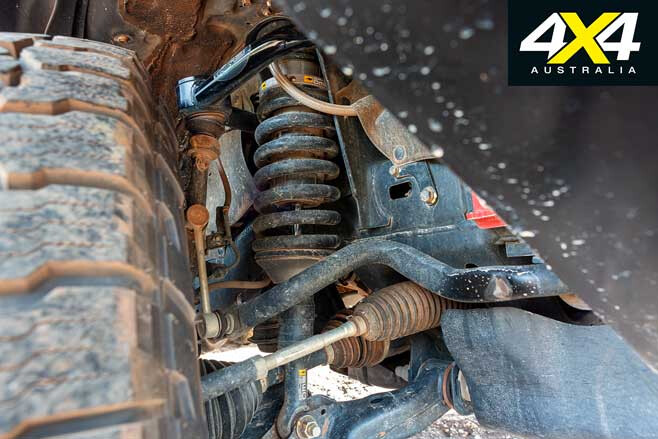
“Winding the compression right down and the rebound right up allowed the car to handle the corrugations effortlessly with no bottoming out of the vehicle. They’re bloody expensive to buy, but worth it,” says Tom. To further cope with extra loads or towing, a pair of Airbag Man helper airbags were also fitted inside the rear springs, their feed valves being mounted to the Kaymar rear bumper valance.
With all those mods onboard it’d be easy to assume Tom has tickled the driveline too, however this is not the case. The Prado remains standard Toyota from radiator to rear e-locker. This was done to prove a point that the OEM fare is more than enough to handle the punishment outback touring has to throw at it, and let’s face it, way back when folks were forging the 4×4 tracks we all know and love today, they were doing it in close to stock-standard rigs.
In the 26,000+ clicks so far, Dusty has given faultless service navigating tracks like the Cook, Nullabor and Great Australian Bite, with the aforementioned Anne Beadell Highway the toughest to date. The Canning Stock Route, Tanami and Finke are up in the near future.
What Tom has really done here is show how the norm is something to be challenged at all times. The reward being the satisfaction of proving the doubters wrong cannot be underestimated. Even moreso, the contentment from having the confidence to follow through with your vision, while taking you to all the places you’d rather be.
Thanks • Offroad Equipment Myaree (4X4 accessories). • Dave Cobban (Auto electrician). • Tammy at Busselton Toyota. • Ken at SupaFit Seat Covers. • Scott Montgomery at Redarc Electronics. • Chris Teirling at Custom Installations. • The doubters, for giving Tom the push to build Dusty his own way.
- Introduction: Meet the Project Ranger
- Update 1: Weapon of choice
- Update 2: Hitting the tracks
- Update 3: Geared up
- Update 4: Ronny’s Ranger
- Update 5: Box and Dice
- Update 6: Tow Ready
- Update 7: Head for the Hills
- Update 8: Rear Renewed
- Update 9: Branded!
- Update 10: Tassie Tiger
Introduction: Meet the Project Ranger
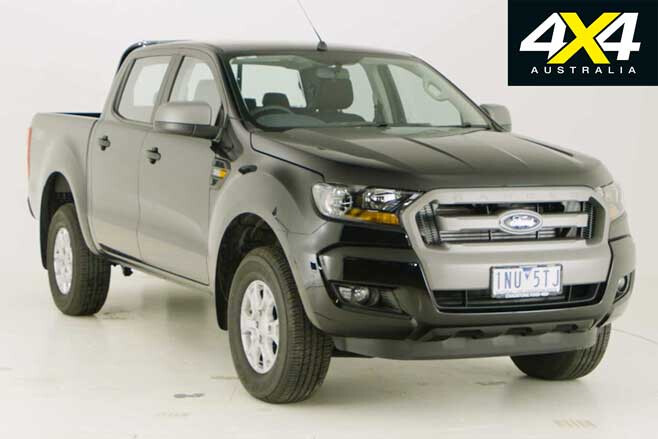
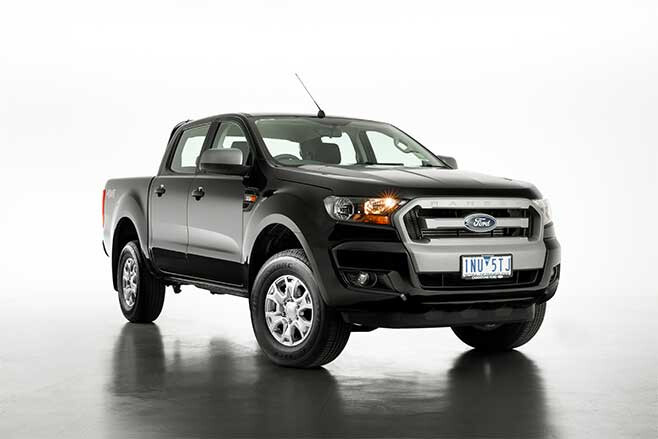
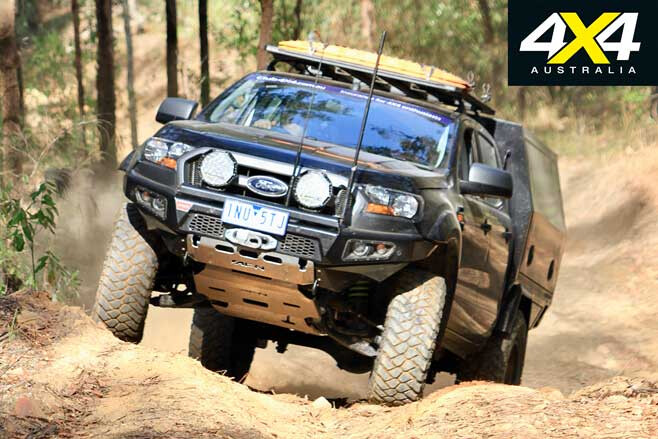
WE’RE PRETTY excited here at 4X4HQ after taking delivery of this new Ford Ranger. We say new, but it’s a 2018 model we scored as a demo with only 250km on the clock … so, as good as new.
We’ve got big plans for the Ranger which are swinging into action as we speak, with some of the biggest names in the 4×4 business helping us out.
The Ranger will primarily be the support vehicle for our 4×4 Adventure Series trips, so we need to kit it up to be expedition ready. We put a wishlist of accessories together and, before we head out to the Red Centre in July, we’ll be fitting the Ranger with Ironman 4×4 suspension and a long-range fuel tank, Maxxis RZR tyres on KMC wheels from Wheel Pros, an AFN bumper housing a Warn winch and Bushranger Nighthawk lights, a Cel-Fi phone signal booster, and a Water Watch fuel monitor. The whole lot will be covered thanks to Club 4×4 Insurance.
There’s more to come when we get back to town including the exciting aluminium body from AMVE and Redarc power system, so keep an eye for updates on WhichCar along the way. And keep an eye out for us on the tracks and say G’day if you see us.
Update 1: Weapon of choice
We welcome our new Ford Ranger project car and waste no time loading it with accessories.
WHILE MOST of the cars we feature in our ‘Garage’ are our personal old bangers and long-term road-test vehicles owned by the car companies, this ‘newish’ Ford Ranger is actually ours to keep. Yep, the magazine owns it, and we’ll be kitting it out with some awesome gear over the coming months and using it on our adventures.
I say ‘newish’ as it is a 2018 PXII Ranger, but it was a demo model and arrived to us with only 250km on the clock. Basically, it has sat in a Ford dealership just around the corner from our HQ for the past eight months and barely been driven.
So we got a good deal, but it also ticked all of the boxes for us: a 4×4 Ranger with the 3.2-litre engine and manual gearbox were our only prerequisites.
Why a 3.2-litre with a manual transmission? Because that’s my preferred choice of Ranger engine, and I like manual gearboxes. We chose a Ranger because it’s currently the best-selling new 4×4 to private buyers and there’s a shed-load of great accessories available for it.
Before we even drove it off the lot we called Club 4X4 to cover the insurance, and we’ll be updating that policy regularly as more kit goes on the ute. Then it was straight down to our mate Phil at Ontrack Automotive in Ferntree Gully to have a Water Watch pre-filter fitted to catch out any contaminants in the diesel fuel.
With a deadline fast approaching on a Red Centre 4×4 adventure we took the car to the crew at No Limit 4×4 & Outdoor in Dandenong, where they installed an AFN loopless front bumper with full underbody protection plates, as well as a Warn Zeon 10-S winch and a pair of Bushranger Night Hawk LED driving lights.
Just around the corner from No Limit 4×4 is Freeway Car Audio Visual, and the Ranger went there to get a Cel-Fi phone signal booster from Powertec fitted.
Ironman 4×4 fitted a full suspension kit, including its Foam Cell Pro shocks and new forged alloy UCAs, plus a long-range fuel tank for added touring capacity. While it was up on a hoist we bolted on the bronze Wheel Pros KMC Addict 2 alloy wheels wrapped in Maxxis RAZR muddies, which should be tough enough to take on any terrain. They certainly look the part.
With a Rola Titan Tray roof rack up top and a MaxTrax full recovery kit on board, we hit the highway for Alice Springs. We’ll be reviewing these products and more on the Ranger over the next year or so, and it promises to be a lot of fun. We look forward to racking up the miles and bringing you these real-world reviews, so stay tuned.
Update 2: Hitting the tracks
We escape town to put our Ranger and its new accessories to the test in the Red Centre.
AS SOON as the last bolts securing the Rola Titan roof racks were tightened, and the winch rope and Factor 55 FlatLink were fitted, we were loading our Project Ford Ranger up with gear for a three-week trip to Central Australia and the Simpson Desert.
The tray area in the XLS-spec Ranger doesn’t have a 12-volt outlet, but the rear seats fold up neatly to provide a flat space that snuggly fits our 40-litre ARB fridge/freezer on one side and leaves enough space behind the passenger seat (and in the tray) for more cargo, including swags, camp chairs, stretchers and so on. Even though I was travelling solo, I was meeting a crew in Alice Springs and had all of their camp gear onboard.
It was a highway run to Alice, with the Ranger easily eating up the miles; the Maxxis RAZR muddies humming along on the black-top, and tunes flowing from the Ford sound system. The Ranger XLS only has a basic stereo with two front speakers and no sat-nav in the dash, but it sufficed on long days on the tracks.
I’m normally a big fan of automatic climate-control systems, but the XLS misses out on this feature. Still, I was pleased with the ease of use of the old-school HVAC system and its big dials for temperature and fan control, as opposed to the tiny buttons used on the higher-spec XLT and Raptor models. The cabin of our low-spec Ranger proved to be a nice place to spend long hours on the road.
With the oversized tyres throwing the speedometer and odometer out by around five per cent, and the Ironman 4×4 long-range fuel tank leaving the fuel gauge imprecise, we couldn’t get accurate fuel-use figures, but we estimate it was returning around 13 to 13.5L/100km on the highway. The 140-litre tank provided around 900km of safe fuel range.
Once in Alice Springs we dropped into Ironman 4×4 fitters, Stuart Highway Auto, for a spanner check of the new suspension. This is always recommended at around 1000km after installation, and we’d logged up more than 2300km heading to Alice. It all checked out okay, and it was then only a matter of picking up the crew and heading on our way.
You’ll read more about our Red Centre adventures, as well as reviews of the gear fitted to the Ranger, in upcoming issues of the magazine. We’ll also tell you how well the Ranger took on the deserts. With it now back in Melbourne, it’s overdue for its 3000km service; plus, we have more gear to be fitted before we leave the black-top behind for another trip.

4×4 Shed Log 1: 2018 Ford Ranger XLS Current mileage: 6112km Date acquired: June 2019 Price: N/A Mileage this month: 5737km Average fuel consumption: N/A
Update 3: Geared up
The Ranger gets its first service and more accessories.
With the Ford Ranger back in town after the Central Australia trip, it was way overdue for its 3000km service. This is a complementary service from Ford and is basically a check-over to make sure everything is running right. We had a couple of small things that needed attention while it was in the shop.
We ordered a set of factory colour-coded flares to cover the bigger Maxxis tyres we’d fitted, but they didn’t arrive before the trip so the Ranger was running with a bit of tyre poke on that run. These arrived at the dealer and were fitted while it was in for the service. The flares cover the tyres now and it shouldn’t spray so much mud up the sides when driving off-road, as it did in the desert.
While we were away we had a sway bar link rattle loose from the front left upright, and this allowed the bar to drop onto the CV joint and tear the rubber boot. Most of the outback trip was done with the sway bar removed which wasn’t a problem, but the torn boot let dust into the CV joint so we asked Ford to replace that. This is a $690 part and replacing it along with refitting the sway bar meant that the service set us back $980.
The Ford dealer also replaced the inverter under warranty, as it started showing a fault and stopped working while we were on our trip.
More accessories arrived at the office while we were away, so after the dealer visit we sent the Ranger back to Ontrack Automotive in Ferntree Gully to have the GME XRS 330CTP UHF kit ($629) and King Brown three-inch cat-back exhaust system (from $760) fitted. With a lack of space for additional switches in the Ranger’s cabin, we also fitted switch-panel fascia from Lightforce ($135) that gives us that facility while retaining a factory-fit look.
Lastly, a set of tough 3D floor mats from Tru-Fit carpets were installed to protect the factory carpets from dust and mud. We should have fitted these before the dusty Red Centre trip, but we’re heading to South Australia next month so they’ll be put to good use. These hard-wearing, waterproof ‘Maxtrac’ 3D mats fit like they were moulded directly to the floor pan, and the clever hook system on the back of them grips the carpet so they don’t move around in the footwell like many other mats do. The full set of mats for front and rear sells for $279.
With this new gear onboard we’re again loading the Ranger up for another adventure. This time we’re off for two weeks in the Flinders Ranges.
4×4 Shed Log 2: 2018 Ford Ranger XLS Current mileage: 6434km Mileage this month: 322km Average fuel consumption: N/A
Update 4: Ronny’s Ranger
Ron drives Our Ford Ranger on an outback jaunt. By: Ron Moon
When I picked up the Ford Ranger from the 4X4 Australia office, it had been with the mag for a few months and had already seen a bit of outback action, but this was the first chance I’d had to drive it for more than an hour or two.
It’s a smart-looking beast, accentuated with a good-looking AFN front bumper that hides a Warn Zeon 10-S winch, while also wearing a pair of Bushranger Night Hawk LED driving lights. With a set of Wheel Pros KMC Addict 2 alloy wheels fitted with Maxxis RAZR muddies, and all propped up by an Ironman PXIII suspension kit with foam cell shocks and Pro Forge upper control arms, it certainly looks the business.
A Rola Titan Tray up top can hold a load of gear; although, we only seem to carry a set of MaxTrax, a shovel and the occasional swag up there.
In the cab of the XLS-level Ranger you don’t get too much fancy stuff, but I kinda like it that way. It has air-conditioning and a stereo with a couple of speakers, which is more than sufficient to make long-distance cruising a doddle; and we’ve done a fair amount of that!
For inter-vehicle comms we have fitted a GME XRS 330CTP UHF radio, tucked away out of sight, with all the controls, mic and speaker on the handpiece. I don’t normally like such handset speaker mics, but I was surprised at the clarity, tonal and volume response from this unit; it is without doubt the best I have ever used.
So what were my impressions after two weeks of driving over 4000km or so under a variety of conditions and road surfaces? First up, while humming along over a variety of bitumen road surfaces, there was just the slightest feel of coarseness in the ride quality over what you get from a standard Ranger.
I put this down entirely to the difference in the tyre package over the standard, more road-orientated rubber fitment. I had also been driving a few vehicles in the previous few weeks all fitted with far less aggressive tyres than the Maxxis units, so it wasn’t any real surprise.
Still, it didn’t take much time before I was oblivious to the slight change in ride quality and the extra noise, and by the time we had clocked up a few hundred kilometres on a variety of dirt roads and tracks, where the tyres were in their element, any differences were really a non-issue.
What really impressed me with the Ironman 4×4 suspension package was the new upper control arms, which allow more clearance for the larger tyres we have fitted, and have resulted in improved ride and capability when in the rough stuff.

We found plenty of tracks in the Flinders that were rocky, with some good-size steps and some scrabbly sections of loose rock and deep bulldust. The tyres, combined with the improved lift and articulation of the suspension, made this the best, most capable Ranger I have driven off-road.
On high-speed dirt, or through long sections of fast corrugations, the suspension package exhibited good control and as good a ride as you can get in such circumstances, with no sign of fade from the hard-working foam-cell shock absorbers.
In all, it was a delight to drive … and I didn’t want to hand this smart-looker back. But the editor insisted!
4×4 Shed Log 3: 2018 Ford Ranger XLS Current mileage: 10,434km Mileage this month: 4000km Average fuel consumption: N/A
Update 5: Box and Dice
Our Ranger gets its canopy fitted and then heads for the hills on the NSW North Coast.
We had to pry the keys to the Ranger out of Ronny’s hand after the Flinders Rangers trip, where he sounded suitably impressed with its performance in the rocky terrain. It had a date with a new body back in Melbourne, as one of the major components of the build was ready.
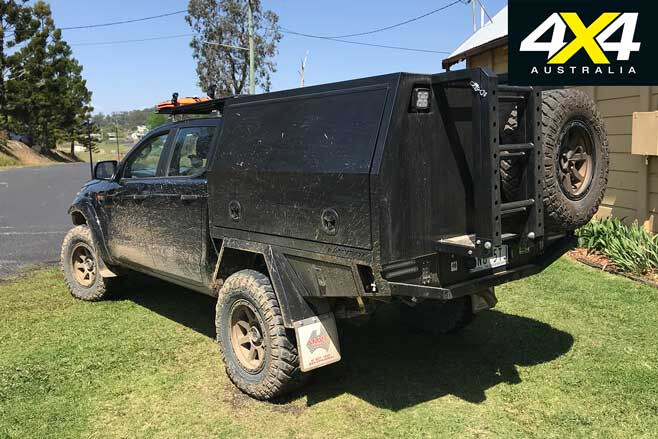
From the outset we wanted to fit a full aluminium box body to the back of the Ranger, and Jamie and his team at Allsafe Mine Vehicle Equipment in Brisbane (AMVE) designed a unit specifically for us. AMVE has done a few canopies for Rangers and BT-50s in the past, and they are all built to order to perfectly suit the customer’s needs.
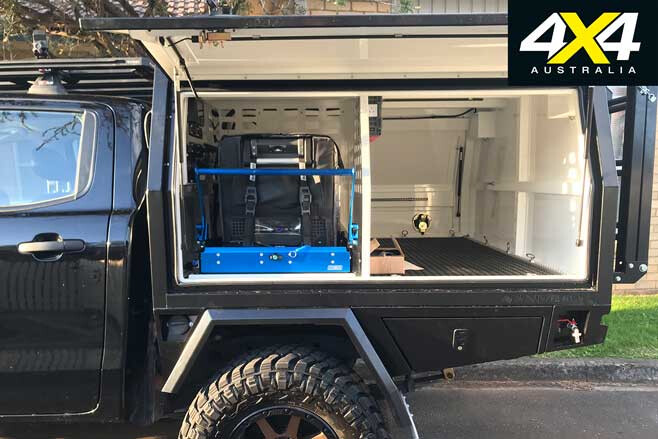
We were conscious of weight in our build, and a full aluminium replacement body – not one that sits on a tray – is the best way to maximise space while limiting additional weight. In fact, by the time you remove the Ranger’s original steel ute tub and replace it with the AMVE aluminium body, there’s not a whole lot more mass to it.
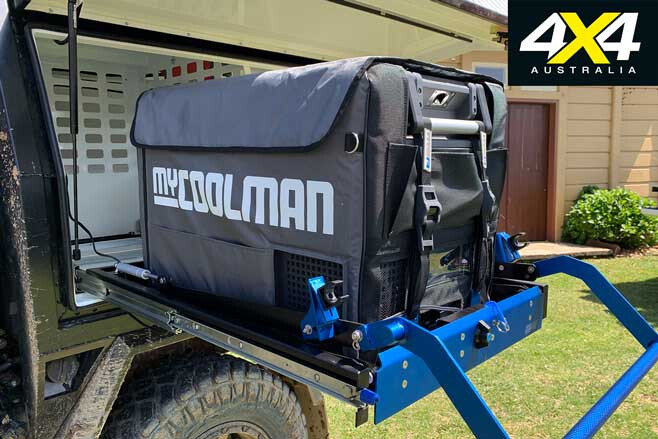
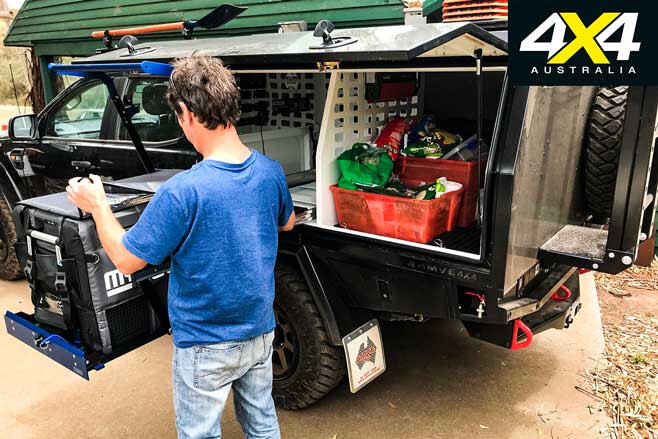
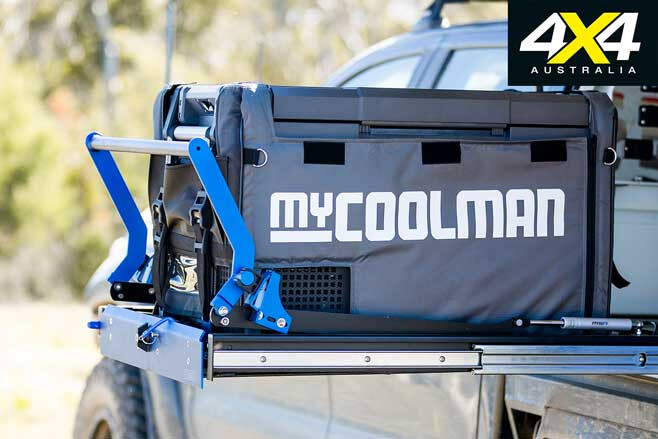
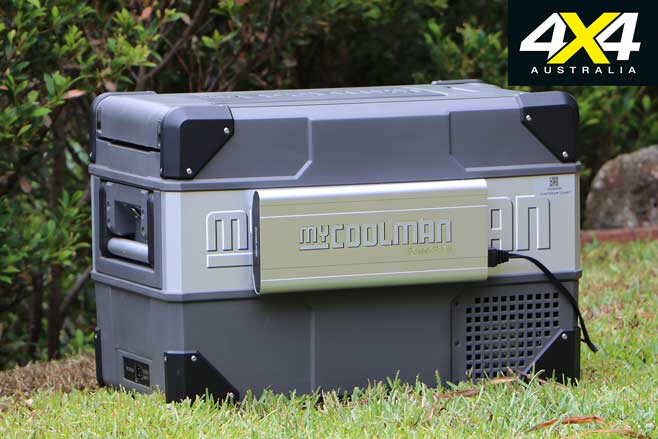
We kept the internal features to a minimum with just an MSA Drop Slide to mount the myCoolman fridge, a full Redarc power system including a BCDC charger, 2000W inverter and RedVision control centre, and a bank of lithium-ion batteries. That left us with plenty of space for swags, Pelican cases and such. We’ll have a full review of the AMVE canopy in the mag soon, but suffice to say, we love it so far.
No sooner had Jamie fitted the canopy with some help from the team at the TJM Dandenong store, including use of their workshop, the Ranger was back on the highway headed for another adventure.
Each year we invite a handful of our supporters away on a trip for a few days of off-roading and just hanging out. No business talk, no video BS, just good vibes for days. This year we headed for the hills west of Coffs Harbour, where the forests hide all manner of terrain.
Plenty of steep climbs, ruts and washouts, with a bit of local history thrown in thanks to our guide Kevin Smith. This is just the sort of driving the Ranger has been built for and it does it easily. The only thing to complain about is its crappy, old phone Sync system that constantly cuts out, requiring you to unplug and re-plug the USB, interrupting the good vibes when highway touring.
4×4 Shed Log 4: 2018 Ford Ranger XLS Current mileage: 13,666km Mileage this month: 4250km Average fuel consumption: N/A
Update 6: Tow Ready
More pieces to the puzzle for our Ford Ranger
The RANGER hasn’t seen much action this month since we got back from the advertisers’ trip in Coffs Harbour (Summer 2020 issue). However, we’ve managed to get some more pieces of the puzzle in place before we head out again.
With the AMVE canopy now in place we could head back to Hayman Reese/Rola to get the X-Bar rear bumper fitted. Up until now these have only been available to suit cab-chassis utes – and not those with a tub on them – which is why we had to wait, but there is a new ute tub version of the X-Bar now hitting the market.
Even so, the fitment to the back of our car wasn’t straightforward. We set up our canopy to sit low on the chassis and it hangs back a fair way behind the end of the chassis rails, which posed a problem.
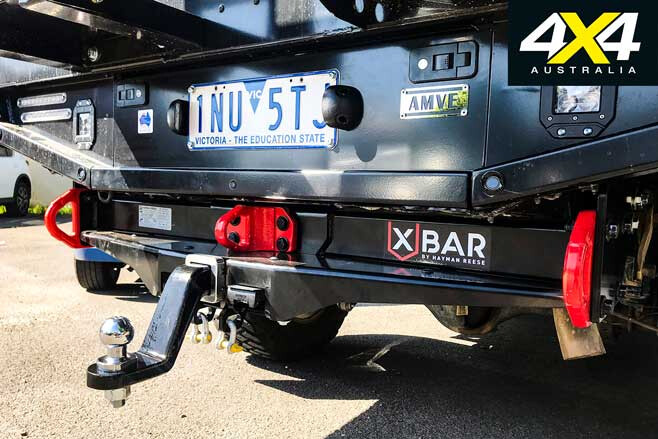
However, the guys at Hayman Reese sorted that out with some custom-made brackets that move the bar back and down a little. The great thing about the brackets is that they still leave the X-Bar high enough that it won’t infringe on the departure angle when we are driving without the towing hitch in place.
Our Ranger now has three solid, rated recovery points on the back for helping to drag other vehicles out of trouble. The centre recovery point on the X-Bar is rated to 8000kg, while the points at either end are 4000kg a piece.
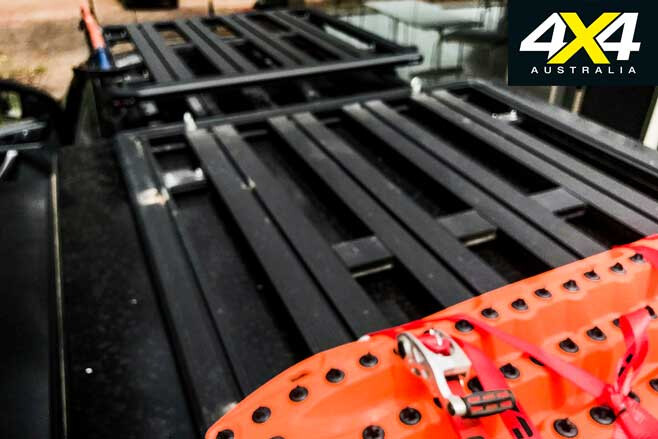
While it was in the shop we had the guys take the 1500mm-long Rola Titan tray off the Ranger’s cab and move it atop the canopy. This too required some custom mounts, as we wanted to keep the tray as low as possible, but the guys just modified the standard mounts to suit. They also fitted a shorter 1200mm tray above the cab, so now the Ranger has plenty of storage space, inside and out.
The next trip for the Ranger will be as a support vehicle on the 4×4 of the Year road test and, with almost 15,000km on the clock, it was time for a service. We again entrusted Chris and Phil at Ontrack Automotive in Ferntree Gully for this work and asked them to give the car a thorough spanner check. Chris noted the air cleaner was pretty blocked up and replaced both its element and the fuel filter as part of the service. This is why we prefer to have our car serviced by a specialised 4×4 workshop and not a dealer who doesn’t understand what we do with our vehicles.
Chris also fitted a ProVent oil catch can, to protect the intake from clagging up. This is essential equipment for any modern diesel four-wheel drive that uses an EGR emissions system, as they are prone to gunking up. We got our catch can in a complete kit from the team at Direction Plus.
4×4 Shed Log 5: 2018 Ford Ranger XLS Current mileage: 15,098km Mileage this month: 1432km Average fuel consumption: N/A
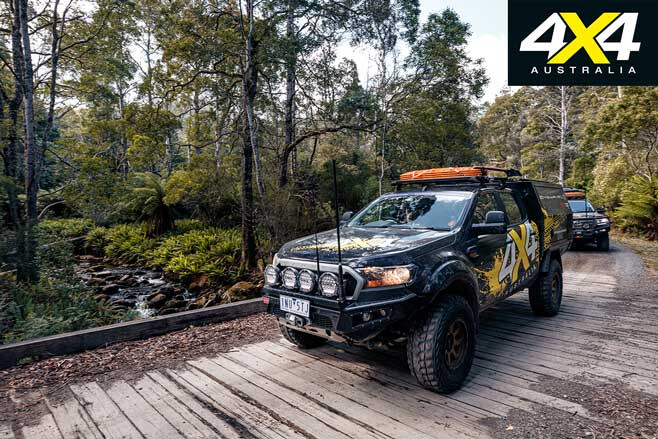
Update 7: Head for the Hills
The Ranger gets loaded up to serve as support vehicle for a trip to the Victorian High Country.
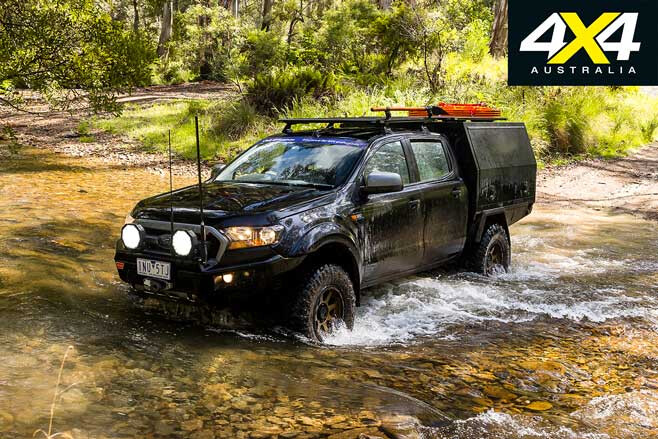
With its new Rola Titan roof racks, X-Bar and Provent catch can recently fitted, it was time to load up the Ranger and head bush again. Just a local trip this time, up into the Victorian High Country as the support vehicle for our 4X4OTY testing, but it was the first time out with the AMVE body loaded up.
GT was using the Ranger for camp catering, so it was carrying all the food, drinks, water and cooking kit to keep 11 blokes fed and watered for a week. This included 30-odd litres of water in the AMVE water tanks and a myCOOLMAN fridge full of beers. It also had all the recovery gear onboard in case any of the new cars got stuck in the hills.
When we originally fitted the Ironman 4×4 suspension to the Ranger, the guys used relatively soft rear springs commensurate with the types of load we’d be carrying. We knew then that the AMVE body would be a few months off and didn’t want the Ranger to ride too hard, and we planned to fit stiffer springs once the body was fitted.
When the body went on and we drove the car to Coffs Harbour we liked the supple ride. The weight of the canopy didn’t seem to affect the suspension adversely, either, but now with the canopy loaded, the rear leafs were almost flat and it wallowed a bit when up in the mountains … time for those stiffer rear leafs in the New Year.
The Ranger chugged along at the back of the new-car convoy for a week without any dramas. We did bust off the power plug for the fridge when sliding it out on the MSA Drop Slide and this shorted out the Redarc unit, but nothing that can’t be fixed. We want to wire the fridge power directly into the RedVision unit anyway, along with a few other new accessories to be fitted before the next jaunt.
4×4 Shed Log 6: 2018 Ford Ranger XLS Current mileage: 15,585km Mileage this month: 487km Average fuel consumption: N/A
Update 8: Rear Renewed
The Ranger gets new leaf springs and shocks for the back end.
No action for our Ranger over the New Year period as it was parked up for the holidays, but no sooner than we were back in town and it was in the shop getting new parts fitted.
First stop was back to Ironman 4×4 HQ in Dandenong to get the rear leaf springs replaced. When we first had the Ironman suspension fitted it was set up with the standard tub on the back, not the AMVE aluminium canopy. With the canopy on and loaded the medium rate (200kg to 400kg) leafs were at their limit so they’ve been replaced with Ironman’s Constant Load springs rated to 400kg+.
The team at Ironman 4×4 also upgraded the rear shocks to match the higher-rated springs, again using the company’s Foam Cell Pro shocks, but with the new Professional Valving which offers improved performance under heavier loads.

Released late in 2019, the Professional Valving shocks are designed for those who use their vehicle as a fully loaded workshop on wheels or regular tourers who load up for extended off-road adventures. The Professional Valving Series dampers are available across Ironman’s Nitro Gas, Foam Cell and Foam Cell Pro ranges.
Our tenure with the Maxxis RAZR muddies is up and after a little more than 15,000km on them I’ve got to say we have been very impressed. They’re relatively quiet on road, never struggled off road, and suffered no punctures or signs of damage after some torturous rocky tracks in the Flinders; they’re right up there with my favourite mud-terrain tyres, and at a price that comes in a fair bit cheaper than the competition.
We have replaced the RAZRs with Goodyear’s MT/Rs, again in the 285/70R17 size. I’ve had great service out of the old-style MT/Rs going back a few years so I’ll be keen to see how these newer ones perform on and off the road.
Initial impressions of the new rear suspension and Goodyear tyres has only been from ferrying it around town, but so far so good. We’ll have to wait until we load it up for a few more off-road kays before we can give a full report.
Before we head off again we’ll fit a set of MSA 4×4 adjustable towing mirrors and we’ll swap out the driving lights with a new setup.
4×4 Shed Log 7: 2018 Ford Ranger XLS Current mileage: 15,859km Mileage this month: 274km Average fuel consumption: N/A
Update 9: Branded!
The Ranger gets new gear from Narva and MSA 4×4, before being branded and sent to Tasmania.
Before we sent the Ranger off on its first adventure for 2020 we had a few bits to fit to it. After installing the new Ironman 4×4 rear springs and shocks and Goodyear MT/R rubber, it went back to Phil at Ontrack Automotive to replace the driving lights with a new combo from Narva, update the Redarc Redvision system and install a long-awaited set of MSA 4X4 towing mirrors.
We’ve been lucky enough to follow the development of the MSA 4X4 mirrors since their early prototypes and knew back then that these would be an exciting addition to the market. They offer buyers a larger mirror that is extendable for use when towing yet they aren’t as big and ungainly as some of the US pick-up truck style towing mirrors. In fact, with them folded in they look just like OE offerings.
We’ve seen the prototypes go through months of testing and development and were keen to see them come to market. Once we had the AMVE aluminium body fitted to the Ranger we knew we needed a set as the aluminium canopy is wider than the old tub, restricting rearward vision.
The MSA 4X4 mirrors finally arrived to market over the New Year break and we had them fitted ASAP. Even on the drive back from Phil’s workshop the better visibility via the MSA 4X4 mirrors was evident. We’ll have a full review on these once we’ve put some more miles on them.
From the outset of the Ranger build, I wanted the AFN 4×4 loopless steel bar with a quartet of smaller LED lights across the front. Bushranger wanted us to try out its Nighhawk driving lights first and we were very impressed with them and their variable power output, but I still wanted the smaller lights. I have a pair of Narva Ultima LED 180s fitted to my Land Cruiser and thought they would be the perfect size for our Ford. Ontrack fitted the four of them for us and we’re keen to give them a blast at night.
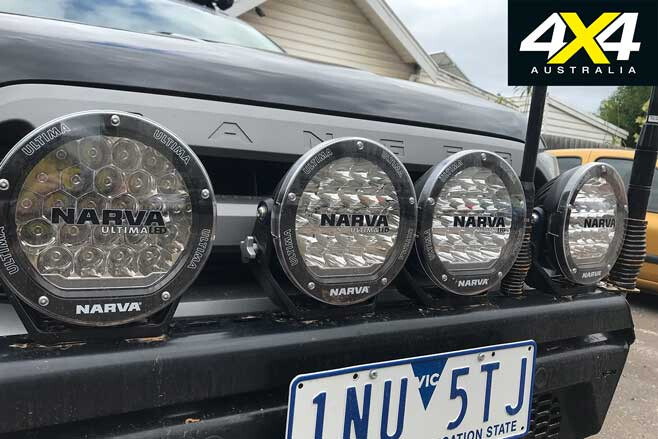
Ontrack also fitted four slimline Narva LED work lamps to the Rola Titan roof tray to use when we are in camp, and these have been wired in through the Redarc Redvision system. This allows them to be switched individually for the driver or passenger side of the car via the Redvision control panel which is mounted in the canopy, or via the Redvision App on a mobile phone.
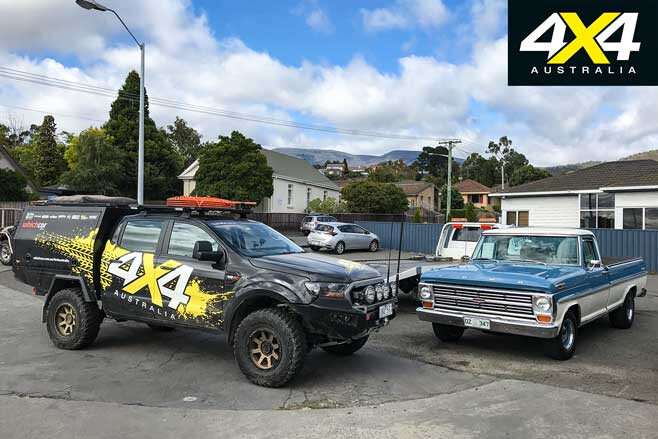
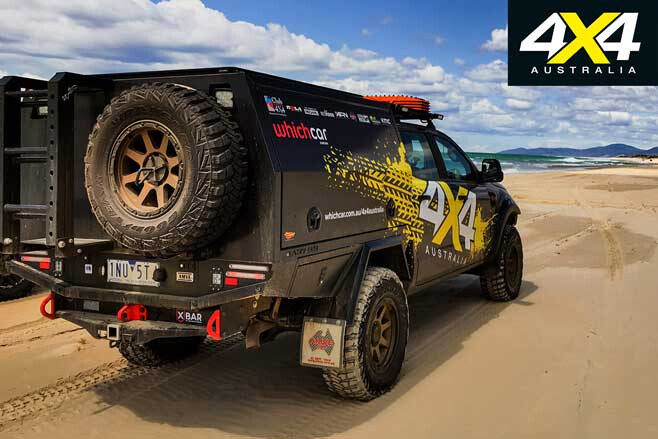
Lastly, we sent the Ranger down to the team at Fleeting Image for the vehicle wrap and branding that will ensure the Ranger doesn’t go unnoticed wherever it is driven, before Deano loaded it up and joined Ron Moon and the crew for a trip to Tasmania. We’ll see how the Ranger performed in Tassie when the crew get back from their adventure.
4×4 Shed Log 8: 2018 Ford Ranger XLS Current mileage: 15,894km Mileage this month: 35km Average fuel consumption: N/A
Update 10: Tassie Tiger
The Ranger completes its lap of Tasmania.
The Ranger scored several upgrades prior to its Tassie trip, and when I picked it up in Melbourne from Editor Matt Raudonikis it looked resplendent in its new 4X4 Australia wrap, applied just in time by the team at Fleeting Image.
As well as the gear already fitted to the Ranger, new stuff for the Tassie trip included a set of Goodyear MT/R tyres, four new Narva Ultima 180s, MSA 4X4 towing mirrors and upgraded 500kg constant-load Ironman 4×4 springs in the rear. These upgrades added to the Ranger’s existing arsenal of 4×4 touring gear which includes an aluminium AMVE canopy with a built-in water tank, Revolution Power lithium batteries, Redarc battery management system including a RedVision controller and 2000W inverter, a myCoolman 60L fridge, an MSA 4X4 drop slide and Rola roof racks with Narva work lights.
Having not driven the 4X4 Australia Ranger before, I knew that all this kit would take some getting used to, but the first thing I learnt about was an OE Ford feature: the vehicle’s perimeter alarm with motion sensor. The Spirit of Tasmania I had barely got underway when I heard a car alarm sounding from the bowels of the boat, and then the call came over the loudspeaker system: “Would the driver of Ford Ranger registration number 1NU-5TJ please head down to Deck 5 to turn off their alarm?”
I went below decks and one of the ship’s staff guided me through the Ranger’s menu system so I could quickly turn off the motion sensor. Over the next 30 minutes or so another half-dozen Ranger/BT-50 owners were called downstairs to perform the same task.
Once off the ship we had a highway run to Lonsdale before setting up camp in drizzling rain. As well as my swag, clothes bag and camp chair, the canopy was jam-packed with photographer Ellen Dewar’s gear, along with some other stuff Matt had thrown in there for the trip including recovery equipment, a shovel, four MaxTrax, an (ancient) air-compressor, a power lead, a hose, a couple of other camp chairs and a few other bits and pieces. Sorting everything out would have to wait until morning.
The next day we had a bit of time up our sleeves so I pulled everything out of the Ranger and repacked it to easily find stuff when needed. I also tried to familiarise myself with the operation of the Redarc RedVision system and I downloaded the RedVision app so I could operate it via my phone. I also mated my phone’s myCoolman app to the 60L fridge so I could monitor and adjust cabinet temperature remotely as required. Sure, a lot of these things sound gimmicky, but once you’ve used them, you’d be amazed at how easy they can make life.
Once fed and packed, we soon found ourselves on winding country roads to Jacob’s Ladder. It continued to rain for much of the morning and the Goodyear MT/Rs offered surprisingly good grip on wet bitumen, no doubt partially attributed to their asymmetric design with plenty of sipes on the outer tread area. I was also impressed by the Ranger’s laden ride quality, which felt firm enough to offer good control yet compliant and comfortable over bumps.
The Ranger’s five-cylinder engine has loads of bottom-end torque, and it works well with the slick-shifting six-speed manual gearbox. The clutch is light and progressive and there’s a gear for all occasions.
On the highway I found myself using fifth gear more than sixth, as the latter is quite tall and doesn’t really lend itself to speeds below 100km/h, and fifth is tall enough for most highway touring scenarios anyway. I probably shifted up and down through the ratios more than necessary in the first couple days due to the novelty of driving a manual Ranger – most of the Rangers I’ve driven in the past have been autos.
Despite the amount of gear onboard, the Ranger felt light and nimble thanks to its firm suspension, good steering feel and more than adequate performance. I ran 35psi in the tyres on the bitumen and dropped down to 28psi once we hit the dirt, which offered a more compliant ride. The MSA 4X4 towing mirrors proved their worth when driving in convoy, as extending them afforded an excellent view to the rear which was handy when marking turnoffs and the like, and then retracting the mirrors in tight off-road spots to prevent them whacking on tree branches.
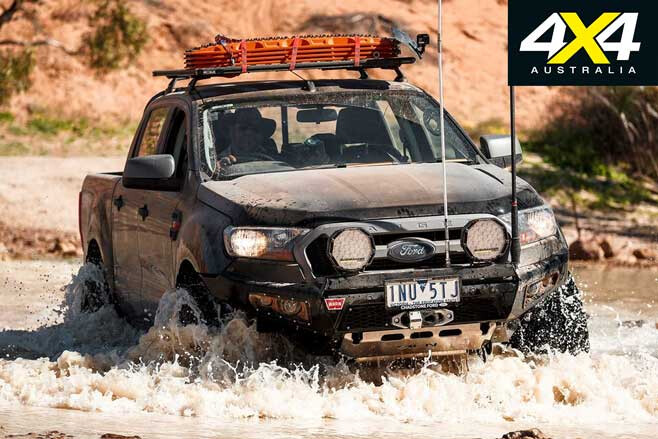
Once into gnarly off-road tracks, the Ranger really started to shine. The combination of strong bottom-end torque, excellent low-range reduction, ample ground clearance, good wheel travel and the grippy MT/Rs made light work of just about every type of terrain we threw it at.
On muddy tracks I ran the MT/Rs at around 22psi and then when we hit the beach I dropped them down to 16psi. The only time I had to go lower was on the run out to Sandy Cape Lighthouse in the Arthur Pieman Conservation area – the sand is super soft here in spots and after snatching our tucker truck out of a stuck predicament, I dropped the MT/Rs down to 13psi to avoid any potential for embarrassment.
Living out of the Ranger became easier as the trip wore on; we started to figure out the best places to stow gear and photographer Ellen and videographer Mark became accustomed to powering and charging equipment using the RedVision system and the 2000W inverter.
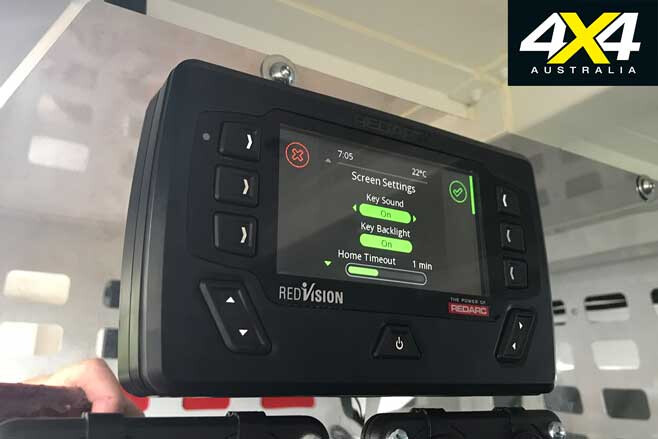
Having the Redarc RedVision on the wall behind the fridge isn’t ideal, as it can be a little hard to access, but this can be overcome when connected via the Bluetooth app. And being able to switch the work lights on and off from a smartphone is fantastic when you don’t want to get out of your swag. The multicoloured LED strip lights fitted to the canopy awnings were also great, as the yellow mode provided light without attracting insects.
There’s no doubt that dual-cab utes make for great 4×4 tourers, especially when set up right, and while there are a couple of minor things I’d change on the 4X4 Australia Ranger, I reckon it’s almost spot-on.
4×4 Shed Log 9: 2018 Ford Ranger XLS Current mileage: 18,359km Mileage this month: 2500km Average fuel consumption: N/A
THANKS TO
www.redarc.com.au www.club4x4.com.au www.amve.com.au www.atecoequipment.com.au www.maxxistyres.com.au www.wheelprosaustralia.com.au www.ironman4x4.com www.pxwholesales.com.au www.afn4x4.com.au www.bushranger.com.au www.ontrack4x4.com.au www.titantray.com www.maxtrax.com.au www.powertec.com.au www.gme.net.au www.lightforce.com www.pacemaker.com.au www.3dmats.com.au www.x-bar.com.au www.mycoolman.com.au
Expedition 4×4 specialists, Arctic Trucks, have made a name converting Japanese utes and 4×4 wagons into polar-region-bashing expedition vehicles, and this time the Iceland-based company has turned its attention towards outfitting a Ford F-150.
The donor F-150 Lariat copped what Arctic Trucks designates as the ‘AT44’ treatment or ‘Arctic Truck 44 inch’, pertaining to the fitment of massive 44-inch Nokian winter tyres.
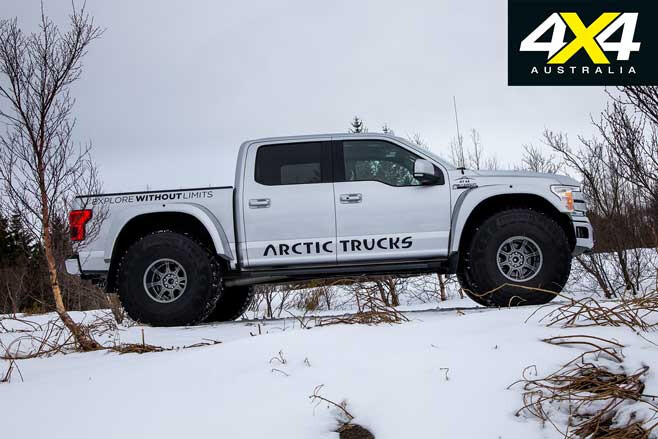
To accommodate those tyres, Arctic Trucks technicians cut and removed the F-150’s wheel arches to give it enough clearance for the wheels and replace it with the fenders used for its Hilux AT44 builds.
Aside from the bigger wheels and wheel arches, the F-150 AT44 retains the same 280kW/637Nm 3.5-litre turbocharged EcoBoost V6 petrol and would only need a suspension upgrade to prepare it for any serious 4×4 expeditions.
According to Emil Grimsson, Arctic Trucks’ chairman, the F-150 was not considered as an ideal base for one of its expedition vehicles until Ford started making it lighter with the use of aluminium in its construction.
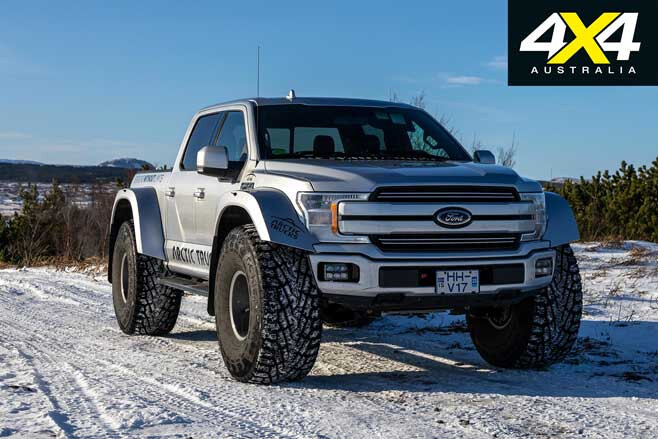
For the conversion, Grimsson chose the Lariat spec, rather than the high-performance F-150 Raptor, as it was able to retain its street-legal status in Iceland, even with the fitment of the massive 44-inch tyres.
With a track width of 1877mm, the F-150 Raptor is a whole 160mm wider than the Lariat-spec F-150.
For now, Grimsson plans to continue testing the F-150 AT44 and prepare it for future expeditions in Antarctica before the end of 2020 or mid-2021.
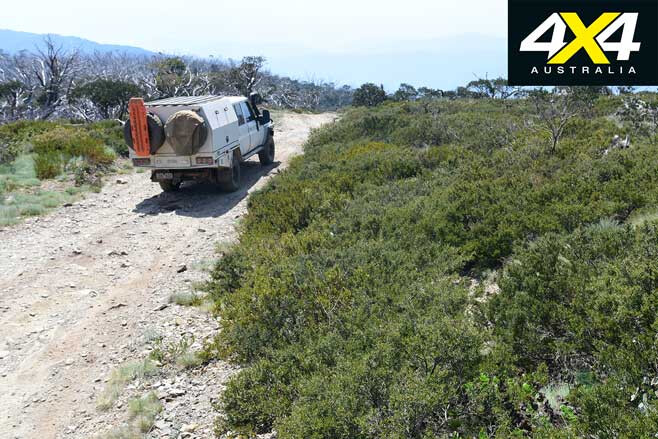
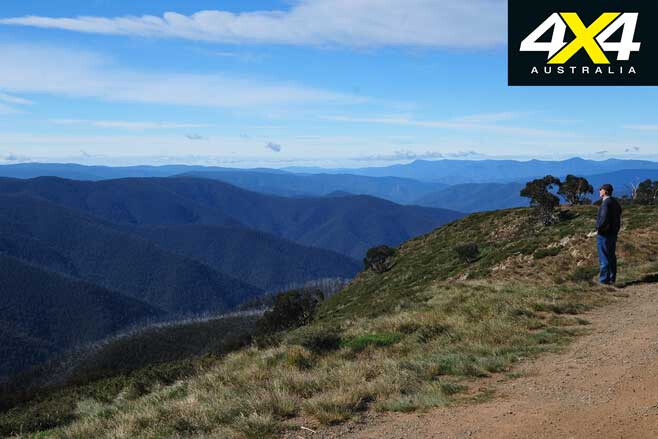
We were wandering through the High Country of Victoria about 12 months back and somehow the conversation around the campfire got around to the famous ‘5 Peak Challenge’ in the UK, which has been copied by runners and bike riders the world over. That thought lay dormant in my little brain for a month or so and then, not being enthused by either running or riding up hills, I got around to thinking about a ‘5 peak challenge’ in Victoria for four-wheel drivers.
That took me to the maps of the High Country, helped of course by Google, as I looked for the highest peaks you could drive to in the Victorian mountains. I quickly discounted all the roads you can travel on the blacktop, which included the highest road in all of Australia where the Great Alpine Road crosses over Mt Hotham at 1840m, or 6040ft in the old money.
Then I had to make a couple of other arbitrary decisions. Most peaks demanded you walk a few metres to get to the crest. I discounted those such as Mt Cope (at 1820m a contender early on) that needs a 2km walk to reach the highest point and any similar such mountain. I set a limit for the walk of a couple of hundred metres.
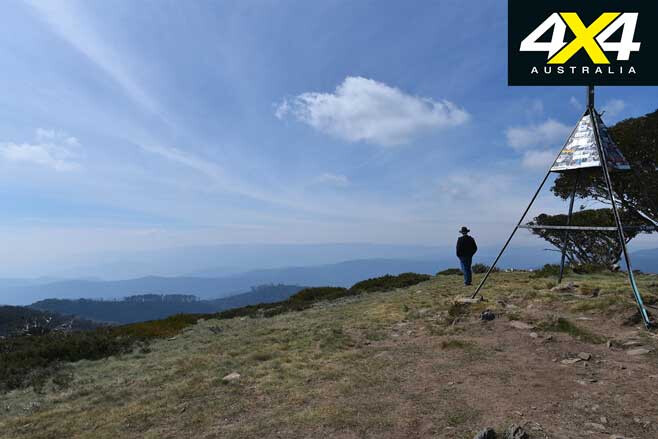
So, with that criteria, I established my list of the ‘Big Five’. They are: 1. Mt Pinnibar at 1772m 2. Mt Gibbo at 1757m 3. Blue Rag at 1726m 4. Mt Stirling at 1720m 5. King Billy No1 at 1716m
Most High Country lovers would be familiar with these peaks and some will point out that maybe Mt McKay at 1842m should be on the list; that little conundrum and how I convinced myself of its eligibility, you can read in the accompanying sidebar.
Then I figured out a route that took me to each peak and which by sheer chance leads one through most of the Victorian High Country from Corryong in the east and close to the NSW border to Mansfield at the western end of the mountain chain.
How you actually get from one peak to the other is really up to you, but I added another criterion for my trip of visiting Corryong, Omeo, Dargo, Merrijig and Mansfield along the way; you’ll probably need to anyway for fuel, beer or other supplies. And today, after the horrendous bushfires, such mountain towns need all the help they can get from passing travellers.
Finally, we were on our way, the Cruiser enjoying the run along the edge of the mountains to Corryong where we turned south and found our way to Mt Pinnibar Hut tucked in beside a trickling tributary of Shady Creek. I first camped here in the mid-1970s and have always known this timber abode as Gibson’s Hut, after the mountain cattlemen family who built it and ran cattle in the surrounding forest for generations.
There’s also a lot of track work going on around here with even new culverts and bridges being erected over what was, until recently, some challenging creek crossings. Talking to one of the road workers it’s all due to improved fire-fighting access, which I guess is fair enough. Still the drive to the top of Mt Pinnibar, the first peak in our quest to drive to all five of the highest peaks in Victoria, isn’t a doddle, the last few hundred metres sending the Cruiser scrambling for a foothold on the steep, shaly slope.
The view once we were at the top was expansive, but misty cloud (or was it smoke from those fires far to the north) obscured the grand vista of the Main Range of the Snowy Mountains, across the border in NSW, where Mt Townsend and Mt Kosciuszko are the highest peaks.
We dropped off the peak and then skirted along the ridge to Mt Anderson before making the difficult climb to Mt Gibbo, at one stage needing to slip in the Cruiser’s rear locker to climb a particularly challenging rocky step. The view from the crest again was superlative and with the sun higher in the sky the intervening mist and cloud had burnt off a little, making the view even grander.
From these two closely related peaks, separated as they are by less than 13km of mountain trails, we dropped off the ridgeline onto better forestry roads and headed to Omeo where we grabbed a few supplies and fuel.
Our next peak – No 3 in our quest – was the famous Blue Rag. There are a number of ways to get there from Omeo but we opted for an easy run across the lush, rolling plains of Cobungra Station. The 6486ha (plus 24,000ha of forest lease country) property, is one of the most prestigious cattle-breeding properties in Victoria, and one of the largest, which sold for a mere $35 million earlier last year.
Anyway, I always enjoy the drive through here, the delightful green, grassy hills dotted with cattle reminding me, more than any other place in Australia, of the verdant hills of Montana or Wyoming, which we’ve been lucky enough to visit on more than one occasion.
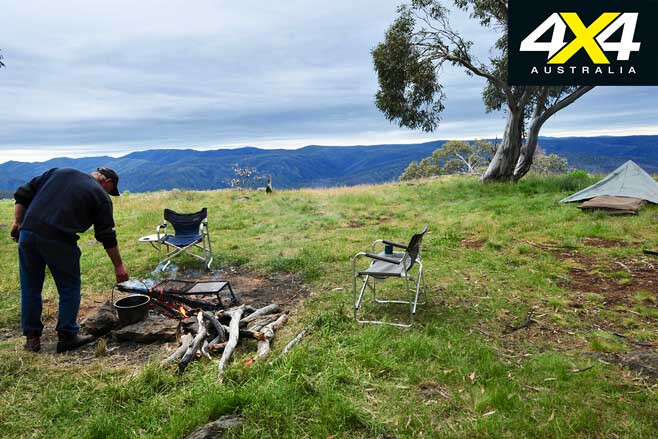
That evening we set up our swags amongst snow gums, just back from the edge of the cliff-lined Devils Hollow. At 1500m above sea level we were hoping for a calm and mild night, which luckily for us we got, although a small fire helped keep the chill of the night air away.
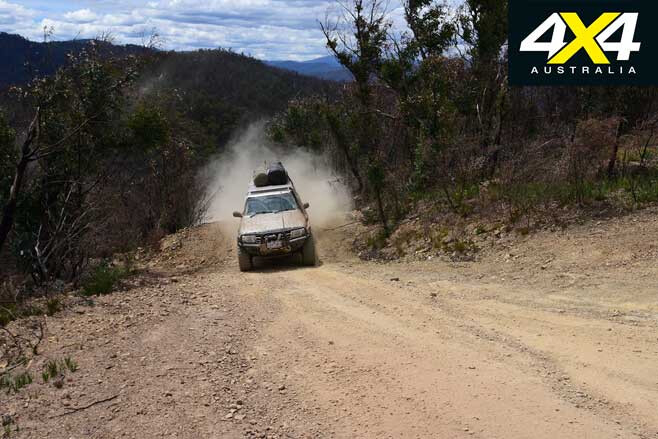
The next morning we were up with the sparrows and heading north along the Dargo High Plains Road before taking the track to Blue Rag. The route climbs quickly from the road junction, although a relatively new culvert makes access a lot easier at the very start. The 7km out to the trig on top of Blue Rag is challenging in parts, steep in others, but nearly always sticks to the top of the ridgeline and offers some fine views along the way.
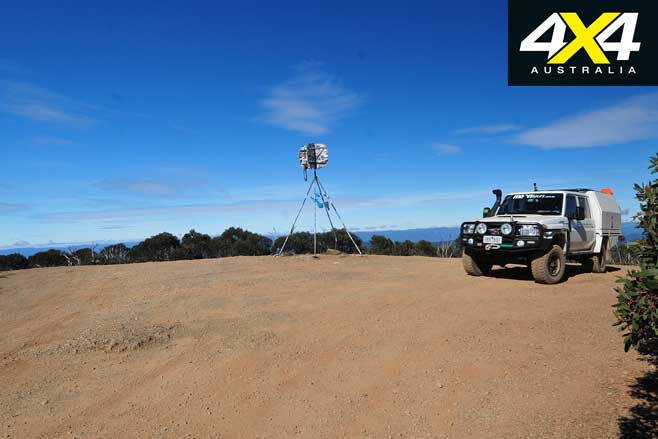
Once at the top we were joined by a few other adventurers. Such is the popularity of this high peak that you can now rarely visit it without being joined by other like-minded souls. We shot a bit of video, took a few pics and enjoyed the view while having a brew. Then as we headed off we passed a couple of bike riders and a few more four-wheel drive vehicles, all heading to the top.
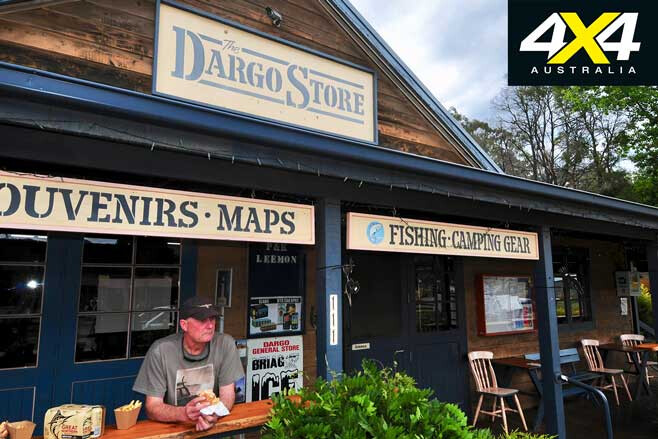
Having lunch in Dargo we enjoyed an egg and bacon roll from the general store, which is now adorned by a large, impressive mural. We took on some fuel, more as a thank you to the store for being open and there, than for any real need to keep the engine running. You’ve got to support these places because if you don’t they could well close their doors and we’d all be the losers if that happened.
We took the Wonnangatta River Road to Eaglevale, our wheels throwing up a cloud of dust, and then climbed Mt Cynthia before descending into the ‘Hidden valley of the Australian Alps’, the famous Wonnangatta Valley, via Herne Spur.
This steep track I tend to stay away from when it is wet … damp, even! Still, it was dry as chips and it was a bit of a doddle, even though it still had its legendary steepness. At its base we splashed through a couple of shallow river crossings as we headed along the verdant valley.
Being a Saturday afternoon and a pretty late one at that, a couple of my favoured campsites north of the old Wonnangatta homestead site were already taken, so we just pulled up above the river on a wide, open grassy flat and called it a night. Still, it was as magical as ever, and like most people, it’s a place I never get sick of.
The climb out of the valley the next morning was a long one up Zeka Spur Track, but again the track has been worked on for much of the way since I was last here 12 months or so ago, and it only took us an hour and forty minutes to get to the junction with the Howitt High Plains Road.
Heading north the road quickly gives way to the King Billy Track which drops down through ancient volcanic rock scree slopes to the headwaters of the delightful, but timber choked, Macalister River. A long climb follows which brings you to the top of the range, a major track junction and King Billy No 2, at 1690m just a tad short of our Big 5.
Taking the Bluff Track we passed just below the peak of King Billy No 1, before stopping at the short walking trail to the crest. This was the fourth peak in our quest for the top five peaks and we again unlimbered the cameras to record the event.
This route also takes you past the heritage-listed King Billy Tree, a gnarled snow gum reputed to be 500 to 600 years old, before getting to Picture Point, a bluff and impressive lookout made famous by the first The Man from Snowy River film.
Shortly afterwards the track brings you to Lovick’s Hut, built and named by one of the most renowned mountain cattlemen families. From here the track improves slightly taking you to the famous Bluff Hut, built by another celebrated mountain cattlemen family, the Stoneys.
The hut and surrounds were crowded with a group of horse riders having lunch and as we didn’t receive an invite we headed off down Link Road to cross the Howqua River just upstream from one of my mountain favourites, Bindaree Hut.
From the Howqua crossing we climbed to Circuit Road, crossing it onto Monument Track. This track was once a pretty difficult one, but recent roadworks have made the route much easier to traverse and we quickly and uneventfully slipped onto the Clear Hills Track for the final climb to our last summit, Mt Stirling.
The skies were clear when we got to the carpark and walked the 70m or so to the trig point on top of the peak. And while it was sunny, the wind was strong and cool. We didn’t stay long, just long enough to admire the expansive view and rugged mountains, and to gloat on the success of our trip and crank up the cameras before we headed back to the shelter of the Tojo.
The next stop was the Merrijig pub for a celebratory drink for having driven to the ‘Big 5’, the five highest peaks you can drive to in Victoria. The route, whichever way you choose to connect the peaks, takes you through some of the finest mountain country in Australia and some of the most scenic with some of the best campsites in the whole continent. And it’s just another excuse to experience the Victorian High Country!
That bloody Mt McKay
The highest peak you can drive to in all of Australia, I was to find out halfway through my quest, is Mt McKay.
We had just come down onto the Dargo High Plains Road from summiting Blue Rag when we met up with a video crew filming the latest Nissan Navara ad. One of the crew, a keen four-wheeler, let me know about Mt McKay.
‘Shiiiit’, I thought, ‘Is there some way I can discount this peak, or will I have to include it?’
Back home after my drive through the mountains I checked the info available on Mt McKay. I had assumed that any peak within cooee of Falls Creek was out of bounds for vehicles; I was wrong.
You can certainly drive to Mt McKay … and it’s via a dirt road – albeit a good dirt road hailed as a tourist drive – from the Falls Creek village.
So, for this story I discounted it. And later when I wanted to go there I couldn’t because of all the fires tearing through the mountains. Bugger!
So, you can include this 1842m peak if you wish – you’re sure to enjoy the drive across the Bogong High Plains and around Rocky Valley, but most of it is on bitumen with only the last few kilometres being a dirt road.
Travel Planner
From Corryong to Mansfield via the 5 Peaks is about 700km, depending on your actual route and whether you go to Mt McKay.
Driving time for this challenge will depend on how committed you are and how much you want to enjoy the experience. You could do it in three days (or even shorter) but why hurry?
Supplies and fuel are available at Corryong, Benambra, Omeo, Dargo and Mansfield, so you shouldn’t have any issues in that regard.
You’ll need Hema’s map of the High Country as well as a Hema navigator loaded with the Vic High Country map.
Be well prepared as many of these tracks are rated as ‘double black diamond’ which demands experience and a very well set-up vehicle.
Snow and cold weather can hit at any time in these mountains so have the appropriate clothing and sleeping gear.
You’ll be in the Victorian Alpine National Park for most of the time so check the Parks Victoria website for the latest track closures, fire warnings etc.
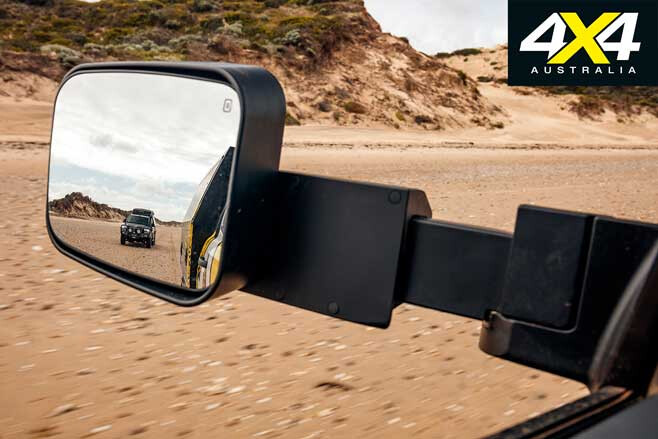
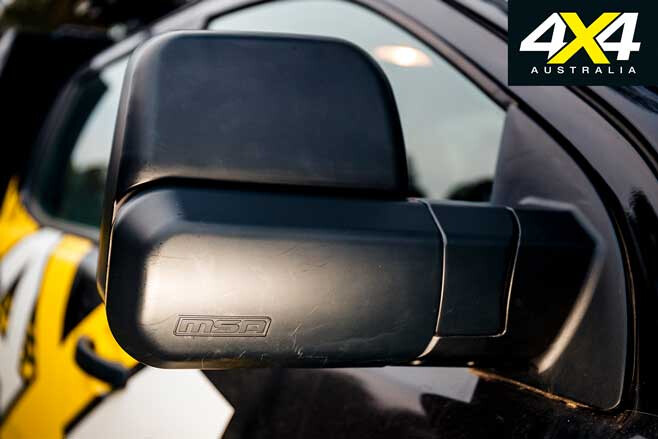
After fitting an AMVE aluminium canopy to our long-term test Ford Ranger, we knew the standard mirrors were no longer going to cut it. Sure, the canopy isn’t super wide, but it’s wide enough that the view to the rear was partially blocked when using the OE mirrors.
While there are plenty of towing mirrors on the market, we didn’t really want a set that stuck out like Dumbo’s ears, so we considered ourselves quite fortunate that MSA 4X4 had just developed its new ADR-compliant Towing Mirror range, and was keen for us try them on the Ranger.
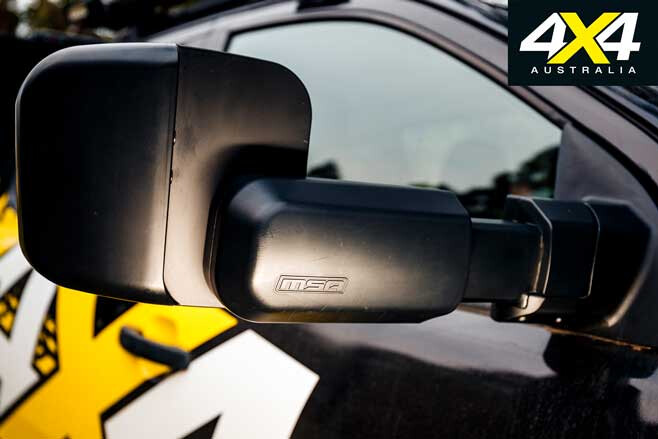
The beauty of the MSA 4X4 Towing Mirrors is, when retracted, they look pretty much like OE mirrors, and even in their retracted state they offer a wide viewing angle. For the ideal view around wide trays, canopies and trailers, the mirrors have four positions: retracted with the mirrors in a vertical position; retracted with the mirrors in a horizontal position; extended with the mirrors in a vertical position; and extended with the mirrors in a horizontal position.
When driving on the road, we found setting the mirrors in their extended vertical position was ideal for seeing around the canopy. If towing a van or other large trailer, you would then flick the mirrors down into their extended horizontal position.
For tight off-road tracks or for when parking in tight spots, it’s little effort to simply push the mirrors back into their retracted vertical position.
On our trip to Tassie, the MSA 4X4 Towing Mirrors copped a beating, particularly on tight tracks such as the run to Montezuma Falls, as well as through some scrubby country in the Wellington Range.
Despite the knocks, the mirrors stayed in their set position and suffered no more damage than you’d expect of OE mirrors – just some minor bush pinstripes.
The mirrors feature a heavy-duty extension slide that’s been thoroughly tested for strength and durability, and the vehicle’s remote mirror adjustment is retained. In fact, on vehicles fitted with heated mirrors and positioning/indicator lights, these features are also retained on the MSA 4X4 Towing Mirrors.
The MSA 4X4 Towing Mirror range is expanding all the time and currently covers vehicles including Ford Ranger and Everest, Holden Colorado, Nissan Patrol (Y62), and Toyota Prado, Hilux and Land Cruiser (70 and 200), and they are available in black or chrome finishes. We obviously opted for black on our black-on-black Ranger.
The benefit of towing mirrors when your vehicle sports a wide tray or canopy – or when towing – is obvious, but the fact you can now have towing mirrors that don’t look like towing mirrors is priceless.
RATED Available from: msa4x4.com.au RRP: $845 We Say: Tough, versatile towing mirrors that don’t look like towing mirrors.
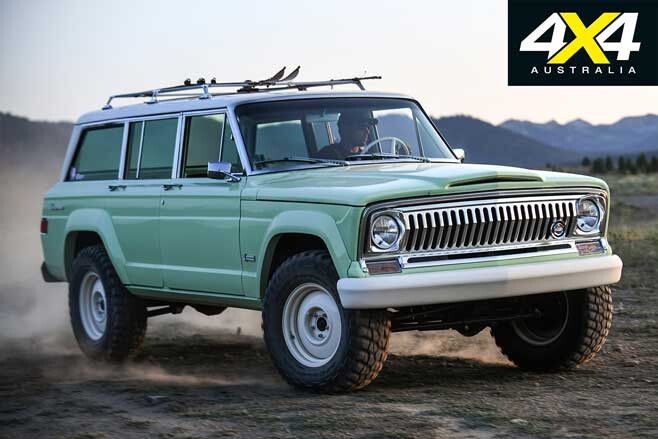
WITH the Easter Jeep Safari canned for 2020, we thought we’d take a stroll down memory lane and take another look at some of the best EJS creations from years past.
Jeep Wayout concept
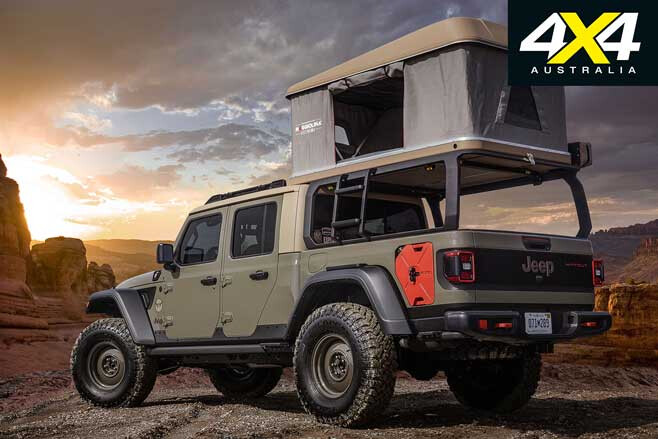
The Wayout had tongues wagging at the 2019 Easter Jeep Safari, with its roof-top tent, large canopy, 270-degree awning, a Mopar/Decked bed-drawer system, two custom-fit auxiliary fuel tanks, an ARB on-board air system, two-inch lift kit, 37-inch muddies and a 12,000lb Warn winch.
Jeep Flatbill concept
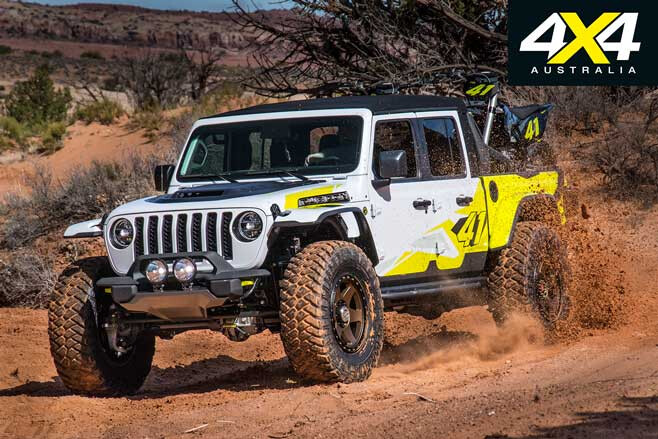
Also unveiled at the 2019 EJS, the Flatbill was the ultimate hauler of fast toys. The concept had its tray removed and wheel ramps added, and it also featured a shortened front bumper, a skid plate to improve the approach angle, Dynatrac Pro-Rock 60 front and rear axles, an Off-Road Evolution custom four-inch lift, large rear bypass shocks, and 40-inch rubber.
Jeep Gladiator Gravity concept
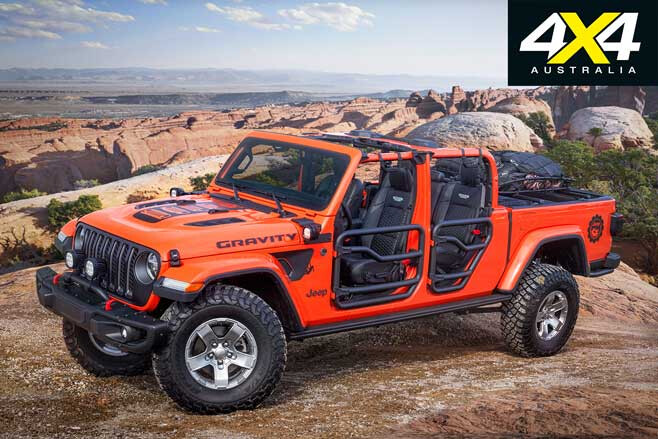
Jeep threw the full Jeep Performance Parts (JPP) catalogue at the Gravity concept, to show off the gear that’d be available when the stock Gladiator landed in showrooms. This included the Mopar cross rails in the tray, Mopar/Decked truck bed storage system, a JPP two-inch lift kit, plenty of LEDS, heavy-gauge steel JPP rock rails, cold-air intake, and a cat-back exhaust system for extra zip.
Jeep 4SPEED Wrangler concept
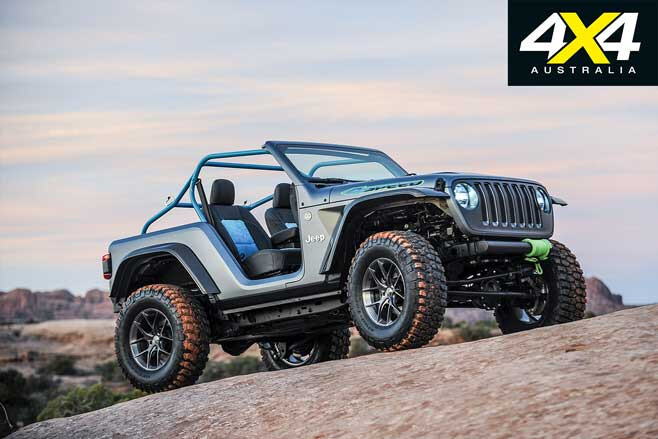
The 4SPEED concept was dressed in custom carbon-fibre – the bonnet, fender flares and rear tub – to make it 408kg lighter than stock. The neat, little 4SPEED had its seats refitted with snowboard jacket material, and it rides on BFGoodrich KM2s wrapped around Forgeline wheels. The wheelbase was shortened 22 inches.
Jeep Wagoneer Roadtrip concept
The Wagoneer Roadtrip concept was one for the traditionalists, and it was the darling of the 2018 EJS line-up. Based on an original 1965 Wagoneer, the 5.7-litre HEMI-powered Roadtrip may look original but it features a wheelbase (and body) that has been lengthened by 125mm, and a track has been widened and now sports Dana 44 front and rear axles with diff locks.
Jeep Grand One concept
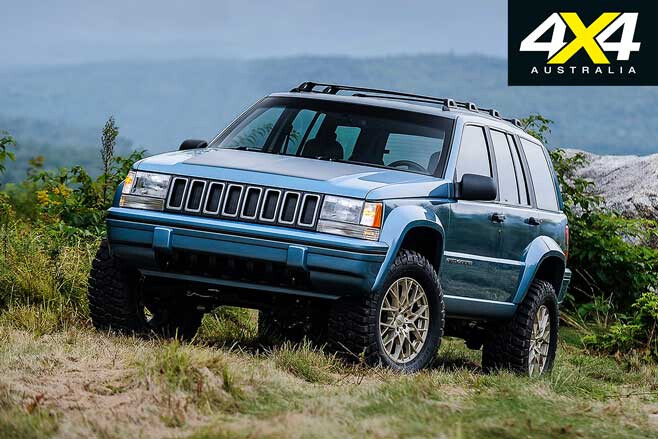
The Grand One harks back to the glory days. 2017 marked the 25th anniversary of Grand Cherokee production, and Jeep celebrated by unveiling the Grand One. To celebrate, open the rear deck, slide out the lamp assemblies and you’ll find a bottle of Jack Daniels and shot glasses hidden in the tail-lights. The Grand One features a 5.2-litre V8, four-speed auto, front and rear lockers added to a pair of Dana 44 axles, a two-inch lift and 33-inch BFGoodrich Mud Terrain KM2s. Jeep also stretched the wheelbase three inches.
Jeep CJ66 concept
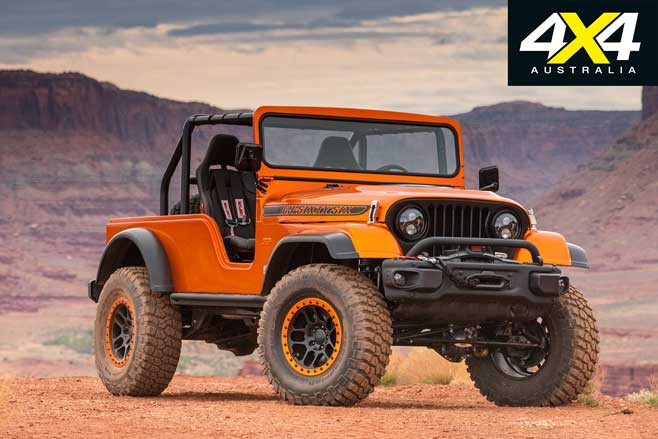
The build the retro-modern CJ66, the Jeep crew melded a 1966 CJ-6 Tuxedo Park body with a TJ chassis. They then slotted in a crate 5.7-litre Hemi, backed by a late-model six-speed manual transmission. Other features a pair of Mopar Dana 44 axles from Jeep Performance Parts (JPP), 17-inch JPP beadlocks, 35-inch BFGoodrich KM2 muddies, two-inch JPP suspension with Fox shock, a Warn 9.5ti winch, Simpson harnesses,a quick-access spare tyre, air compressor, and custom rock rails.
ANYONE who has driven a new vehicle from SsangYong’s current line-up should have been pleasantly surprised by the vehicle’s quality, equipment and the way it drives. Certainly if you had any experience with the marque’s vehicles from 20 years ago.
The South Korean manufacturer of SUVs and utes is no longer just a budget vehicle brand; although, its products remain to be great value. Like other Korean auto brands, its products have stepped up greatly, with some of them challenging the more recognised brands.
Much of this across-the-board improvement stems from a bailout in 2010 by Indian manufacturing leviathan Mahindra & Mahindra, when it bought 70 per cent of SsangYong to pull it out of near-insolvency.
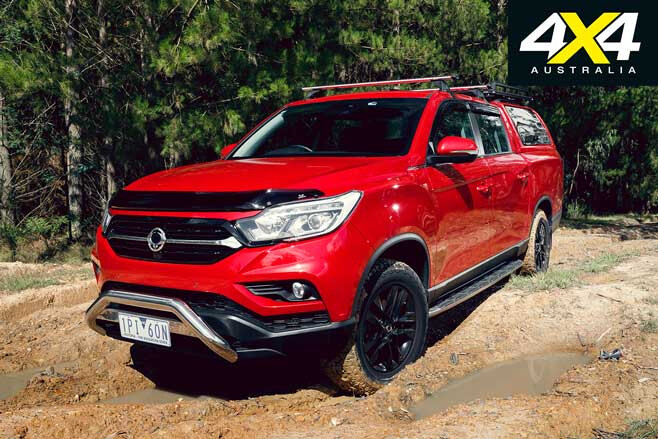
Things might change again after Mahindra this week pulled back on its support of SsangYong, cutting back on planned further investment. As recently as February, Mahindra announced a US$423million package to turn SsangYong around to be profitable by 2022. But, this week, under the shadow of the coronavirus and a government imposed 21-day lockdown in India, M&M has rethought its input.
“After lengthy deliberation given the current and projected cash flows, the M&M board decided that M&M will not be able to inject any fresh equity into SYMC (SsangYong Motor Company) and has urged SYMC to find alternate sources of funding.,” said a company statement issued by Mahindra.
Mahindra has offered a one-off cash injection of close to US$33million over three months to help SsangYong stay in operation while it looks for any alternate sources of funding.
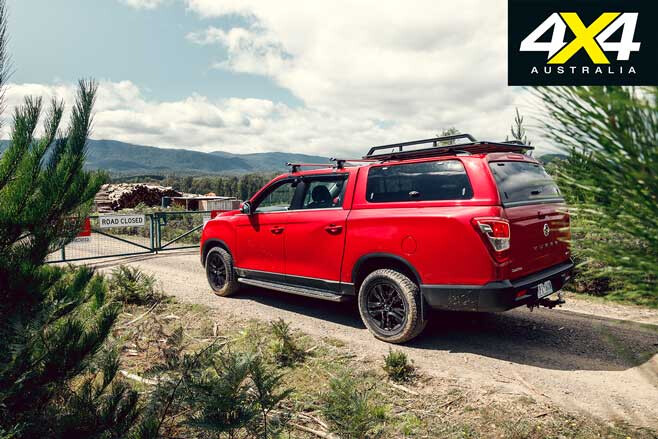
SsangYong only returned to Australia in 2018 with an impressive model line-up and 40 dealers around the country. In a statement to those dealers, SsangYong Australia’s recently appointed Chief Operating Officer, Chris Mandile, said this week, “Mahindra remain committed in maintaining its current position with the SsangYong business. SsangYong have a three-year business plan and structures to support its operations both here and abroad.”
As well as looking for alternative investment, SsangYong Korea has already embarked on strengthening the business against the effects of the virus-related downturn, with a range of innovations across a number of areas, as well as improvements to its financial structures .
The current SsangYong Australia line-up includes the Musso and Musso XLV pick-ups, and the Tivoli, Tivoli XLV, Rexton and Korando SUVs. All SsangYong vehicles are covered by a comprehensive seven-year unlimited kilometre warranty that includes roadside assistance and capped price servicing for the full seven-year period.