YOU’VE got to admire the optimism of some 4×4 owners. Pushing through the air what could only be described as a folded apartment, bolted to some equally optimistic roof racks, while valiantly striving for country speed limits.
Possibly the greatest idea since poles and canvas were invented, the rooftop tent (RTT) has given the masses a simple above-ground bedding alternative with quick set-up and pack-down times. They have, however, suffered a bit of a middle-age spread with bigger and more complex examples increasing their size, while increasing the fuel bill for good measure.
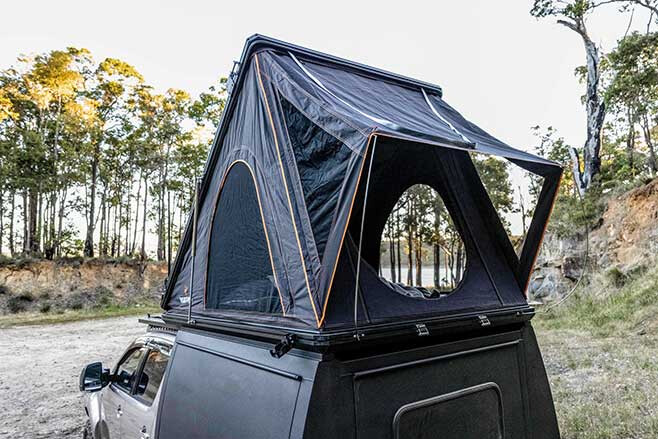
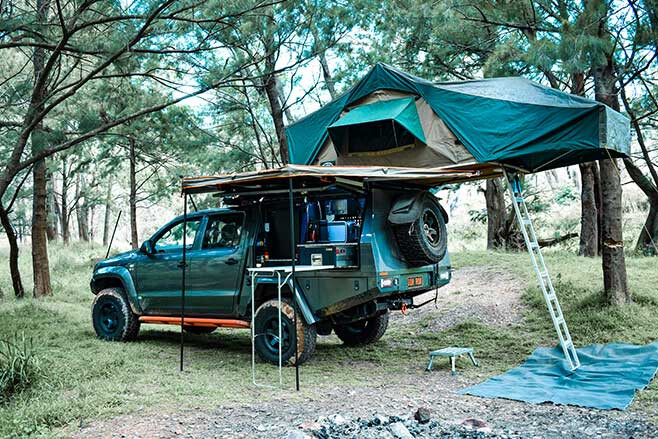
Motop decided a simpler approach was needed, and took a razor to the norm, shaving their overall packed height to a slimline 160mm.
Two widths are available with the narrower MT-120 spanning 1200 x 2170mm internally, and the MT-135 giving you and yours a bit more wriggle-room at 1350 x 2170mm. The raised internal height is a generous 1450mm across the range. External measurements add an extra 80mm to the width and length.
The first version of the Motop was launched to the Australian market just over a year ago, but Motop has listened to customer feedback leading to several tweaks and improvements. Currently in its third incarnation, these improvements have included storage netting, a carpeted ceiling, easier to close compression locks, anti-condensation mat, thickening the breathable canvas from 265gsm to 285gsm, and increasing overall length an extra 100mm.
Consisting of two 20mm-thick powder-coated panels, the internal honeycomb structure remains light but adds strength. Joined by three stainless-steel hinges, an extruded edging runs along all four edges of each panel, with a central channel holding captive nut plates which allow mounting of the gas lift struts, compression locks, ladder mounts, handles, or just about anything you’d like to bolt to the sides.
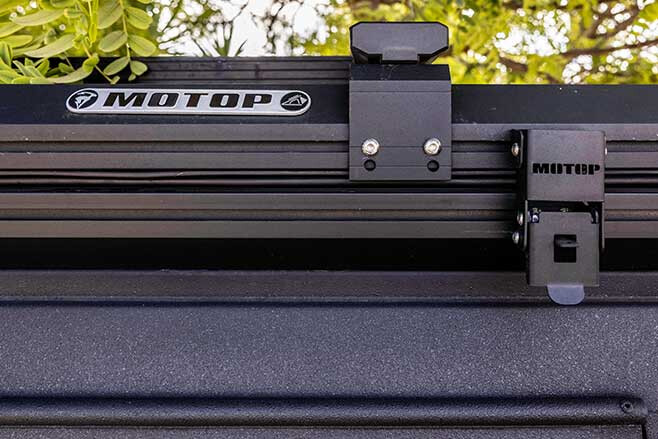
Two mounting rails run the full length of the lower shell, with clamps included to mount to an existing roof rack. Keep in mind your roof-rack’s loaded capacity on and off road, however. While Motop tents are relatively lightweight at 69kg and 73kg respectively, once off road most racks have a reduced load-carrying capacity due to the extra stresses.
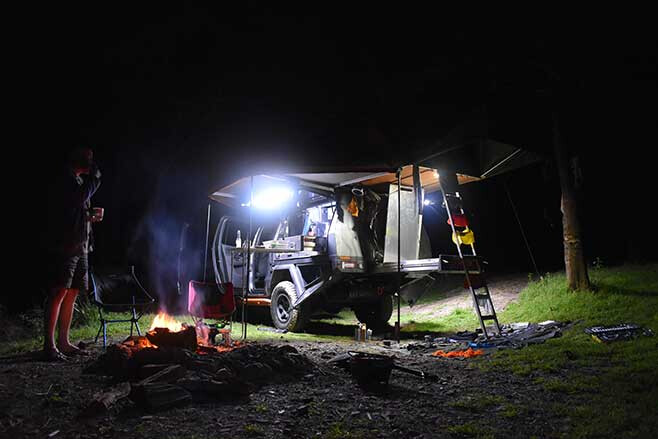
Once at camp it’s a simple matter of attaching the 2.3m collapsible ladder, unlocking the latches, and gently pushing up. The gas struts do the lifting until the top panel pulls the canvas tight. A pair of stainless-steel flex poles are inserted into holders to stretch out the rear awning and you’re good to go. After using the tent for several trips I’ve found it seals well in wet weather, whilst keeping the amount of movement in the canvas to a minimum when it’s blowing a gale outside.
Entry windows are available on three sides via the lightweight collapsible ladder, with zipped midge netting keeping insects at bay. The main canvas gives an almost total block-out of light should the need to sleep-in be greater than catching the sunrise, and inside is a large storage net on the ceiling good for magazines or clothes once you’re ready for bed. There’s also small storage pockets on each side, handy for easily misplaced items like keys or phones, and a shoe bag to hang off the ladder.
With such a low profile, the high-density foam mattress comes in at 70mm. The firmness isn’t to everyone’s taste, but I personally found it okay, being identical in thickness to my longtime swag. Motop has again listened to feedback and provided a solution to this (see breakout). If storage is more important than a slimline height, then the MT Plus+ range may interest you. Just announced with an extra 40mm worth of closed space on both models, this can accommodate most bedding and the ladder internally.
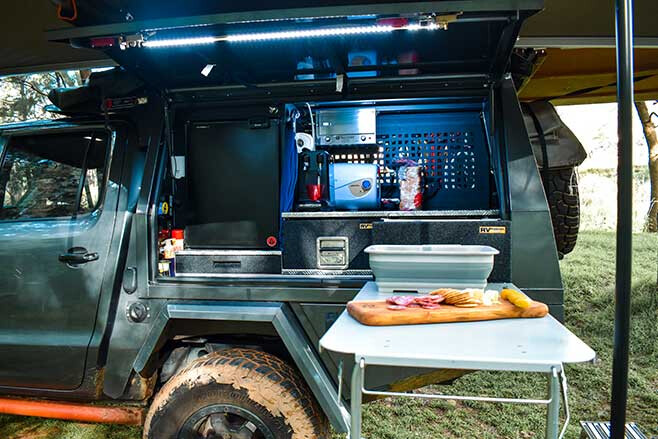
Our own standard example had the optional Motop roof racks installed, with an aftermarket solar panel attached between. Motop has since released its own 219W 1050 x 1170mm PV with brackets designed to match the sides and width of the Motop, allowing fitment of up to two PV panels. The beauty of the tent design means I was able to accurately angle the PV towards the sunrise, efficiently recharging the auxiliary batteries from first light.
Since release, the Motop has proved popular amongst campers of all kinds, and importer MW Toolbox Canopy & Trailer has distributors in every state with supplies frequently sold out before shipment arrivals. The strong slimline design combined with the client-driven improvements and comparatively low price compared to other hard-shell designs, sits it well in the marketplace as a great option that works.
AVAILABLE FROM
WEBSITE: www.mwtoolboxqld.com.au
RRP
MT-120 $3099; MT-135 $3299; 219W solar panel w/ brackets $350. Roof racks: MT-120 $199 pair; MT-135 $219 pair.
VERSION 4
VERSION 4 due for release at the beginning of autumn, comes with a ra:ft of upgrades and optional accessories after taking onboard suggestions from its worldwide customer base:
* 60mm self-inflating mattress allowing some storage of bedding when packed down * Internal LED light strip * Rivets deleted along the roof top for better weather sealing * Six canvas storage pockets to replace the ceiling net * Custom designed solar panel with brackets (optional) * Shower tent (optional) * Awning brackets (optional)
The good news for early adopters is that all upgrades (except the rivets) can be retrofitted to previous iterations of the Motop.
EVERY now and then you come across a manufacturer located within our girt vastness, that makes you ask: “Why aren’t more people doing it like this?”
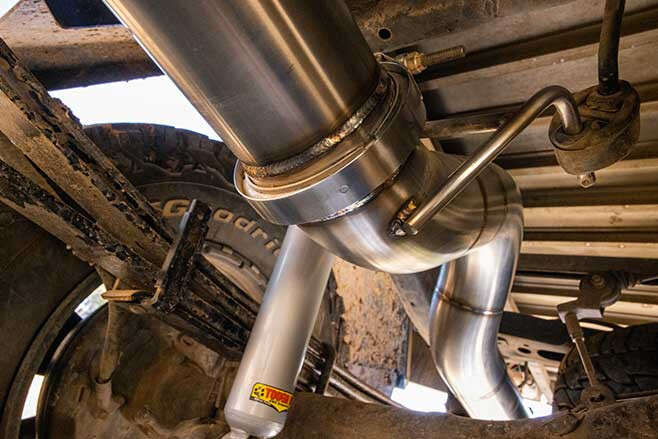
Located in the Darling Downs region of Queensland, Lachlan ‘Lux’ Shields at Lux Fab has been producing bespoke stainless-steel exhaust systems for the Australian 4×4 and streetcar community since 2019. Combining his ideas on how to construct a better system with a well-developed sense of quality and customer service, Lachlan’s systems are meticulously pieced together using art-like TIG welding, stainless-steel V-band joins, and perfect fitment for their intended vehicle.
Starting with 304 grade stainless steel chosen for its ability to handle heat cycles better than 316 grade, an on-car system is first constructed while ensuring the best clearances around the body/chassis and from the ground. The completed system is then removed to construct a detailed jig, allowing Lachlan to build multiple systems to whatever a customer’s requirements may be.
The inaugural Lux Fab offering being the KUN26R N70 Hilux, chosen for the common chassis between single- and dual-cab models and a long 10-year (2005-15) production run.
Kicking off a business producing a quality aftermarket exhaust for one of the highest selling 4x4s in Australia was a wise move, setting the foundations for Lux Fab to expand into the 79 Series LandCruiser as well. Future models in planning are the 200 Series, Ram and Isuzu D-MAX currently scheduled for production.
The shoot-rig Hilux required a new exhaust so a call was made to Lux Fab to discuss what would suit its requirements best. Paramount being that it flowed a lot better than the OEM system, allowing the turbo to spool up as quick as it could while not droning or being obnoxiously loud on the highway. Plus it had to do all that while looking the goods and resisting rust.
A short time later, a big box arrived with a brushed stainless-steel system divided into four components inside. An added bonus being Lux Fab chooses to wrap its new systems in a full-length packing blanket instead of bubble wrap, and this doubles as an excellent ground sheet when laid under the 4×4 while fitting the new pipes in your driveway.
From the turbo flange a three-inch mandrel-bent pipe connects to a 200-cell catalytic converter, with a braided flexi-join about halfway between to absorb any engine movement. Provision is also made for an Exhaust Gas Temperature probe to be screwed in just after the turbo, but it comes with a brass bung should you not require it. From the converter the pipework flares out to a whopping four inches, continuing all the way to the downturned tip, while incorporating a six-inch straight-through resonator just before the diff arch.
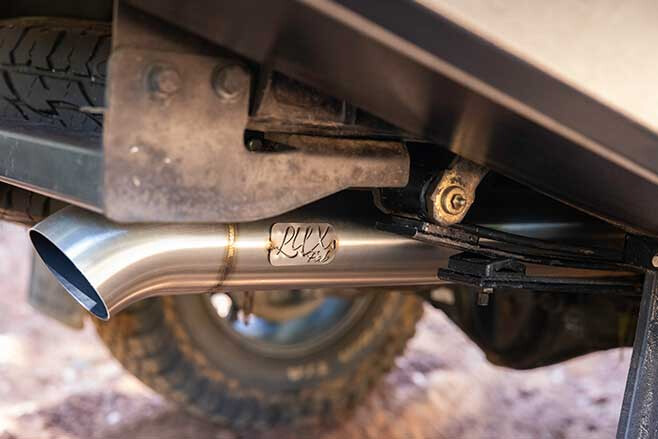
Joining the four sections are not the normal nut-and-bolt secured flanges, however, but machined V-band joins. Among their many benefits these are more slimline than the more agricultural flange joins, do not require gaskets, flow perfectly and do not leak, plus allow for rotation should you need to tweak the alignment of your exhaust from its standard path. After watching USA-based builds using these for a decade it’s a wonder why more manufacturers Down Under haven’t incorporated them in their offerings.
Fitment was as straightforward as they come and took less time than removing the old exhaust. Once all pipework is hung in place, it’s as simple as flicking open the V-band clamp and placing it over the machined male/female V-band pipe ends, before re-securing the clamp, nipping it down just enough to maintain its position but still allow some rotation of the joints. Get all the pipework in the desired orientation before final tightening of the V-bands, and Bob’s your mum’s brother.
THE END RESULT
AFTER driving beach dunes, mud holes and across heavily rutted tracks for around 2000km so far, the Lux Fab exhaust has performed flawlessly, doing everything asked of it when first ordered while delivering a nicely rugged note only slightly louder than standard. It really is a shame something so well put together is hidden under the 4×4.
AVAILABLE FROM
Website: Lux Fab on Facebook Phone: 0431 652 837 Email: [email protected]
RRP
Full exhausts for the N70 Hilux start at $1285 through to $1650 for the full-spec system.
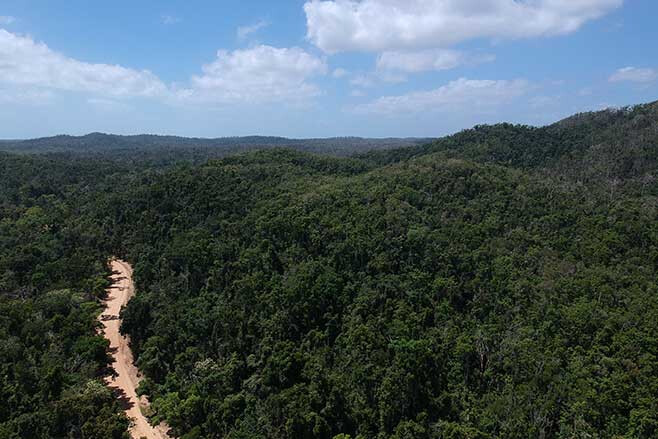
IT’S not often I get excited by ‘just’ a road, but after spending a week checking out so much history in a stunning location, I’m sold on the area. While in Cape York we thought we would just shoot over to the much talked about Chilli Beach to see what all the commotion is about.
The Portland Road turnoff is 30km north of Laura Roadhouse and 100km south of Coen, along the Peninsula Developmental Road (PDR to the locals). Like nearly all other roads around here, it’s dirt pretty much all the way across to the coast, and well signposted to Lockhart River and Portland Roads.
The majority of the Cape has Traditional Owners protecting the land, and at the start of Portland are a couple of very informative boards explaining their history, ownership and other valuable insights. There are pretty strict rules in the area, so by studying and obeying the boards here you’ll keep on the right track.
The bone-jarring corrugations start straight away, and bulldust holes are everywhere along the first part of Portland Road. Some of the holes are that deep and wide there are bypass tracks around the original bypass tracks. However, saying that, we did this trip at the end of the dry season, so hopefully graders will fix up the start of the road seeing as there are a few communities along the way.
The first 20km passes through dry scrub bushland not unlike most of the Cape. Tall anthills and patches of grass trees break up the scenery between the gums, and all are covered in dust – either red, white or grey – from the long dry season they’ve had.
VIDEO: FJ40 in Cape York, 1975
At the Cape during the wet season (generally late spring through summer) everything is bigger, especially the storms, the wind and the water flow. The first mind-blowing indication of this is when you approach the infamous Wenlock River crossing.
It’s not until you reach the top of either side of the crossing that you realise how steep it actually is, to allow the massive amounts of water to flow through during the wet. These days the actual water crossing has a concrete base for better traction.
CAPE GOLD
ANYONE doing research for a trip to the Cape will learn there is plenty of history in the north, including from the war, the goldfields and right down to pastoral. One very significant area that I wanted to explore was the Batavia or Wenlock Goldfields. The shiny stuff was found in the Cape as early as 1876, but the Batavia area was proclaimed later on in 1892. There was that much gold found here that it was declared the most productive goldfield in the Cape during the depression, around 1930.
After crossing the Wenlock heading towards the coast, there are two miners’ tracks to the left, and either one leads to the fields and can loop out on the other. The first road in follows the Wenlock, and we soon found one of the camps with a series of mango trees – the ground had also been levelled, where veggies were grown in long rows beside the river to feed up to 130 men and families working in the field.
There are several small concrete slabs around and a bottle dump. An interesting find was the lone grave of Thomas Power, who apparently died in a gunfight back in 1930. The road in doesn’t see much traffic these days, so we found there were plenty of trees and washaways to avoid; but that’s all part of the adventure. Farther around on the loop road (about 3km) the main mining work area can’t be missed … literally.
TOP TRACKS: Cape York’s best 4×4 tracks
There’s a staggering amount of relics trackside and the more we looked, the more we found. Away from constant rainfall and the salt air, most of the equipment still looks pretty good, including steam boilers, water tanks with handmade pop rivets, old trucks, trolley lines, and even a rare Huntington roller stamper.
Normal stampers have tall rods and a heavy head where they’ll crush the rock in the bottom; this one has a series of weights that go around a huge round tank, crushing the rock and then feeding it out. I’ve seen many stampers in my time, but never one as impressive as this. One of the early stampers here was a three-head stamper that ran 24 hours a day – imagine trying to sleep with the constant thud all night.
It’s mind-boggling how they managed to transport the gear here, especially when a lot of this gear was made and shipped from London before 1900.
Originally there was only one field, but in 1915 an Aboriginal women, Kitty Pluto, was pushing a barrow and found a large nugget in the wash. It was then that the lower fields were discovered and named Pluto. Kitty also found gold in several other areas, becoming one of the most successful Aboriginal prospectors in Cape York and the only woman recorded as discovering a goldfield in Queensland.
Strangely, in 1942 the Australian Army dismantled some of the mining gear and mines, thinking that if there was an invasion from the north, the Japanese could not utilise this area. Some five years later the mines kicked off again and the Portland Road was properly constructed all the way to the coast and the new settlement of Portland Roads.
Right up until the late 1940s the mining was producing some pretty impressive gold figures, but in the massive storms of 1950 the whole area flooded and mines filled up with water. This was the demise of the Batavia goldfields, and work soon started to wind down.
The road out is 4WD only (depending on which way you come from), with several dry creek crossings where the going can be a bit tough. Portland Road continues towards the coast, crossing creeks and winding its way up, over and around several small ranges; sometimes getting down to single-lane tracks but other sections as wide as a freeway. Keep an eye out when crossing Garraway Creek for the massive central pier, used for the bridge construction in 1946 when a proper road was built to the coast.
TO THE NORTH: Northern Cape York
Continuing on and a huge mountain range looms, feeling like it was peering down around every corner. Midway along there’s a pull-off area with a short, signposted walk highlighting flora, fauna and local aboriginal history. It leads to a viewing deck looking towards the Tozer Range. Age-old granite volcanoes spewed out red-hot pumice millions of years ago, leaving layers of ash across the landscape; over time it fused together to form welded tuffs, just like a hard volcanic rock.
The most prominent landmark is Mount Tozer, standing 545m high. Other bands of rock can be seen in the ranges where the heath grass won’t grow in the poor soil; it’s part of the Kutini-Payamu National Park, or the Iron Range NP.
For another 15km Portland Rd is sealed, with views in both directions toward the range and to the wind-shaped trees and low heath. There are only a couple of designated camping areas in this part of the world, and if you haven’t booked online you’ll need to detour towards Lockhart and stop at the QNPWS office. There’s no reception along the way, so we had to call in to book – with a self-registration computer system, the process works … very slowly.
Our camp for the night was back along Portland Road at the Rainforest Number 1 area. Surrounded by thick, almost impenetrable forest it’s a stunning area with plenty of shade and a small walk to the toilets. At night we were greeted by the elusive cuscus, which looked like a large, yellow possum scurrying around and eating the mangoes. From camp there’s a stunning 5km walk through the rainforest to discover more of the area and its unique animals and plant life found only in this part of Cape York.
CHILLI BEACH
THIRTY minutes along Portland Road is the amazing Chilli Beach, known for its windswept and bent coconut trees, 7km of stunning white and desolated beaches, and views across to Restoration Island where Cook explored back in 1789. Before we headed here people told us the east coast trade winds were making things uncomfortable and there weren’t too many campsites out of the wind. Don’t get me wrong, it’s a ripper of a spot jammed in between the reef and rainforest, but it frequents a lot of rubbish from the ocean currents.
To the north of Chilli Beach and some 10km away is the community of Portland Roads. On a good day there are about 10 people living here around the bay and you can walk the streets in about 10 minutes, but it’s the underlying history that makes this place pretty special.
Prior to WWII a jetty extended from the shore and was a base for local fishing boats trading along the coast, but during the war effort there was a need for a berthing point for large navy ships serving the nearby Iron Range Air Force Base. Today only timber stumps protrude at low tide from the ocean sands, and steel beams lay rusting on the nearby shores. To protect this valuable jetty, naval fort structures were built in the headland overlooking the north, but, thankfully, this area was never targeted.
Portland Roads played a key role in keeping supplies to the bomber groups that operated nearby delivering strikes on Japanese installations. This was a turning point in WWII and pushed the front north. Overgrown and lost in the thick scrub, the only remnants left are concrete bases, an observation post and where the gun placements were.
TO THE SOUTH: Southern Cape York
Heading back towards camp, some 30km, a turnoff to the Lockhart River township caught my eye, but not before noticing huge cleared areas in the middle of the rainforest. It’s here, back in 1963, that Australia’s only ‘nuclear’ blast was set off. Named Operation Blowdown, the government at the time wondered what such a blast would have on a tropical rainforest during the Cold War.
Some 17,000 trees surrounding the central blast area were tagged and recorded to see what effect the blast would have. Huge steel platforms were erected and finally a 50-tonne bomb was placed 140 feet in the tower. Thankfully only TNT was used, but it destroyed the area and, even today, only grasses grow where the jungle once stood.
Closer towards Lockhart, the historical Iron Range Airport is a must-see. Relics, memorials and a plethora of information are on hand to inform how significant this area was in the protection of our country during war times.
Lockhart itself has a checkered history which dates back to 1789, when William Bligh made contact nearby, and later when explorer Edmund Kennedy passed by in 1848 on his ill-fated attempt to reach the Gulf. From early pearl divers through to sandalwood trading and war expositions, it all happened nearby. Aboriginal culture is strong and alive at Lockhart, where the entire community has a strong identity as one.
What started off as a ‘quick’ detour, turned out to be a huge adventure exploring masses of history, finding relics and whetting my appetite for another exploration along Portland Road in Cape York.
The Jeep Easter Safari is a nine-day event located in the scenic Moab area of Utah. Hosted by Moab’s Red Rock 4 Wheelers four-wheel drive club, it’s made up of trail rides through this iconic and demanding area.
It’s also the perfect setting for Jeep to unveil their wild concept vehicles for the year.
“Moab Easter Jeep Safari has long been our testing ground for both our newest Jeep 4x4s and for showcasing new Jeep brand concepts, Jeep Performance Parts and Ideas that truly resonate with our most Passionate customers – the die-hard off-road enthusiasts who attend this event every year,” said Jim Morrison, Vice President of Jeep Brand North America.
“This year’s Safari shines a spotlight on what makes Jeep vehicles unmistakably distinctive and undeniably capable – a variety of powertrains that deliver superior power, performance, torque and, above all, fun. Moab’s demanding trails are a worthy opponent for our Jeep Wrangler and Jeep Gladiator concept vehicles.”
This year, Jeep certainly isn’t mucking around, with such a wide range of concept vehicles on offer. Let’s take a closer look at what they have been working on for the event.
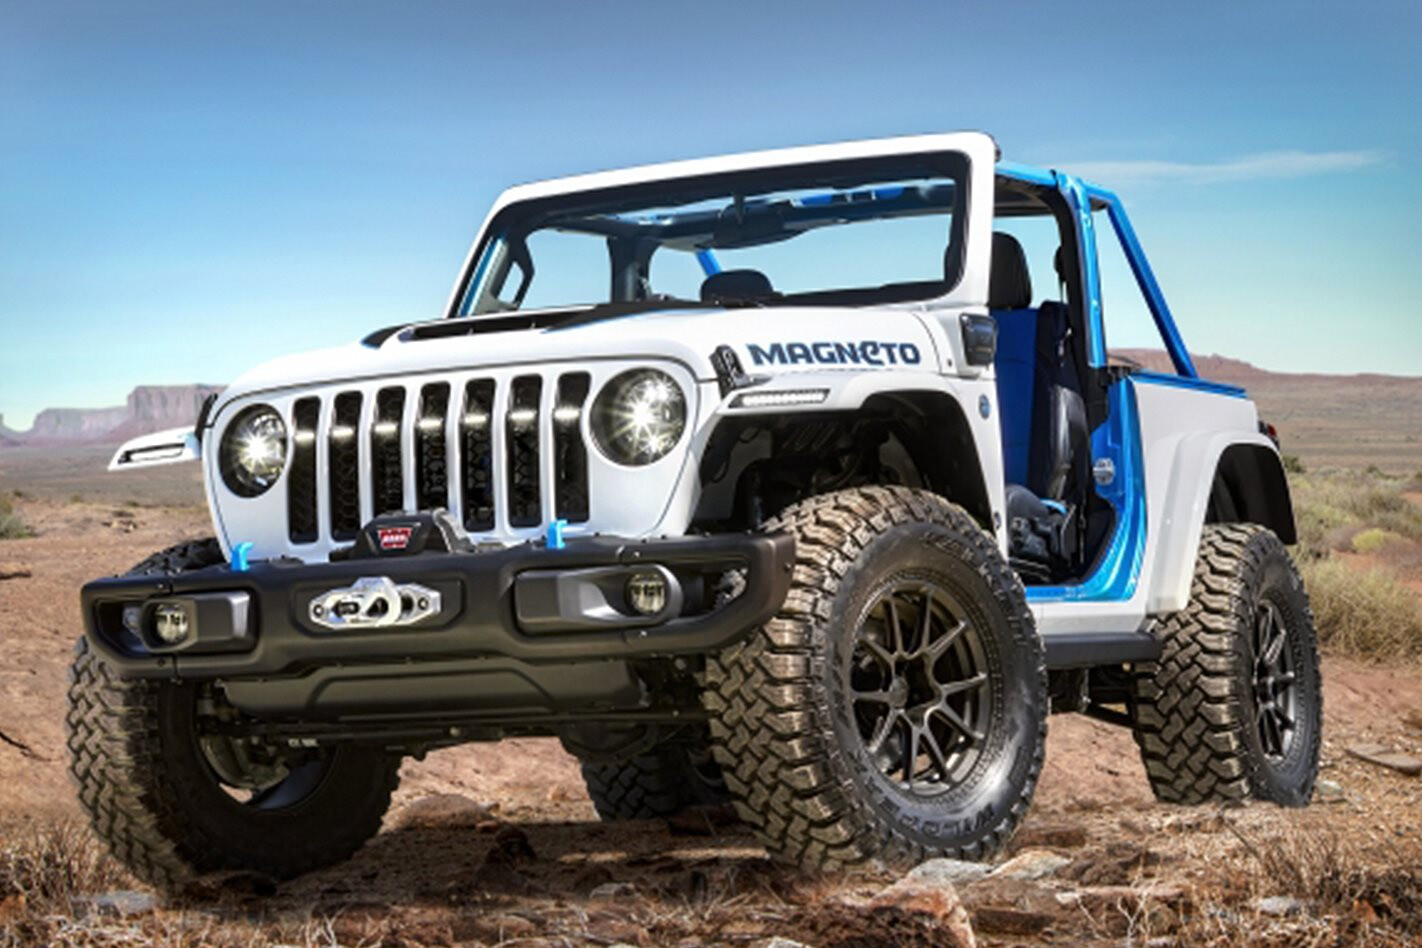
The Jeep Magneto is an all-electric concept based on a 2020 two-door Wrangler Rubicon that Jeep tells us is quiet, quick and an unmistakable rock-climbing force. A zero-emissions vehicle with the same 4×4 capability you’d expect from any Wrangler.
A custom-built axial flux electric motor can operate up to 6,000rpm, capable of moving the Jeep from 0-60mph in 6.8 seconds. The Magneto is powered by four lithium-ion battery packs. It is also equipped with a JPP 2.0-inch lift, 17-inch wheels, 35-inch tyres and a wide range of off-road armour.
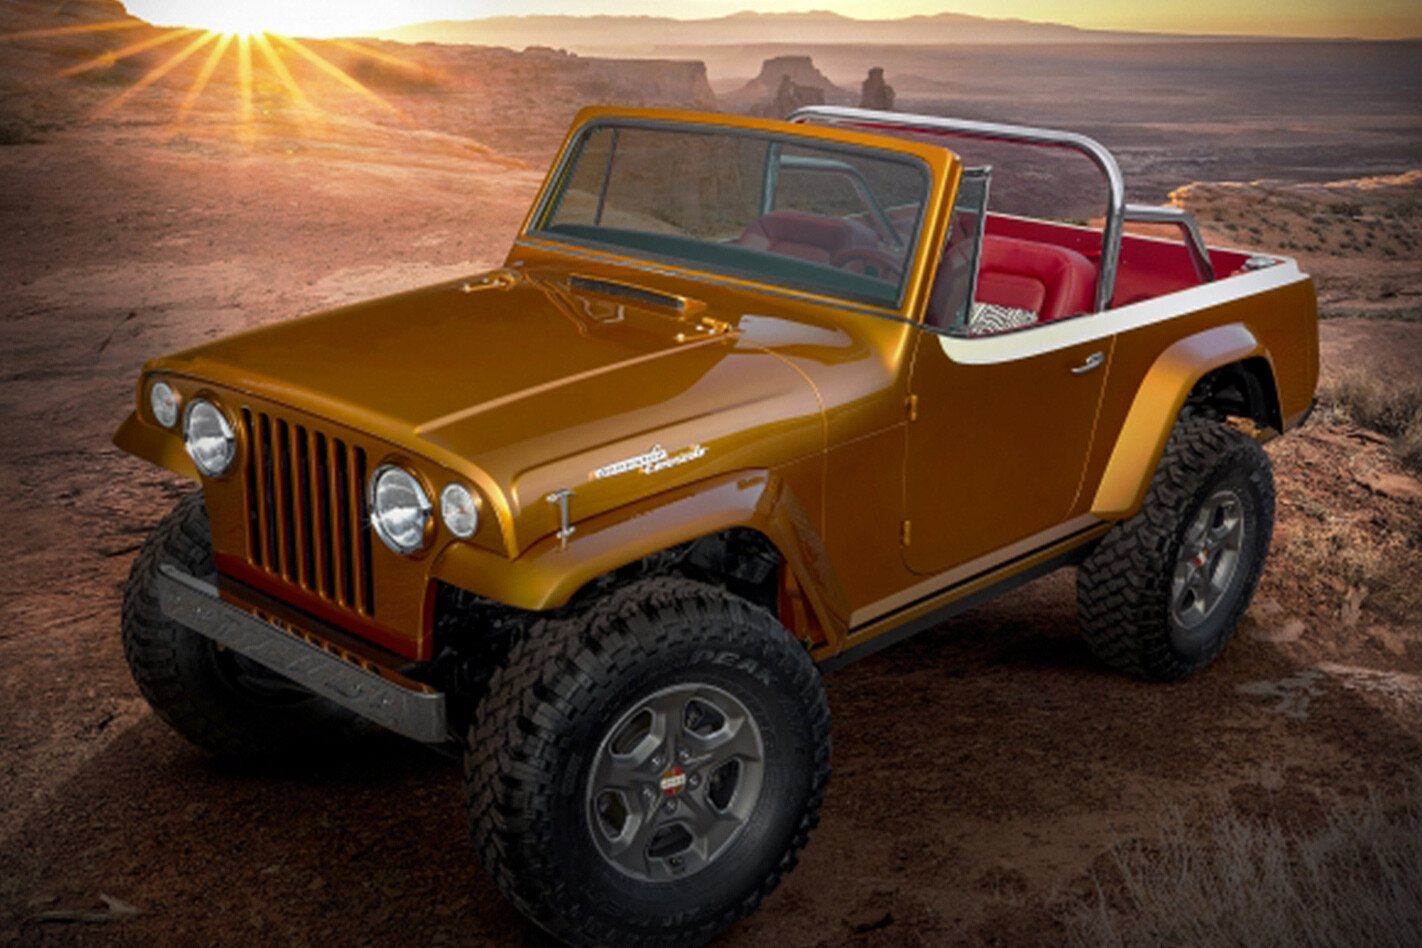
Jeepster Beach is a nod at the ever-popular resto-mod scene, and is a throwback to the second generation Jeepster. It started out as a 1968 Jeepster Commando (C-101) and has been blended with a 2020 Wrangler Rubicon to bring it up to speed.
Speaking of modern, it’s powered by a 2.0L turbocharged four-cylinder motor which has been tweaked to increase output by 25 per cent to 340 horsepower (253kW). 4.1 ratio transfer gearing helps turn the 35-inch tyres, and a custom red interior (with chrome roll cage) really sends the resto-mod image home.
Next up is the Jeep Red Bare, designed to be a combination of hard-working ute and capable off-roader. It’s powered by a 3.0-litre EcoDiesel V6 engine, with 8-speed automatic transmission.
The concept features front-and-rear Dana 44 axles, which have been upgraded with 4.88 ratios for greater performance.
It also has a very impressive 91:1 crawl ratio, making this a serious workhorse, yet with all the fun features of a Wrangler including half doors and a black soft top for that familiar open-air experience.
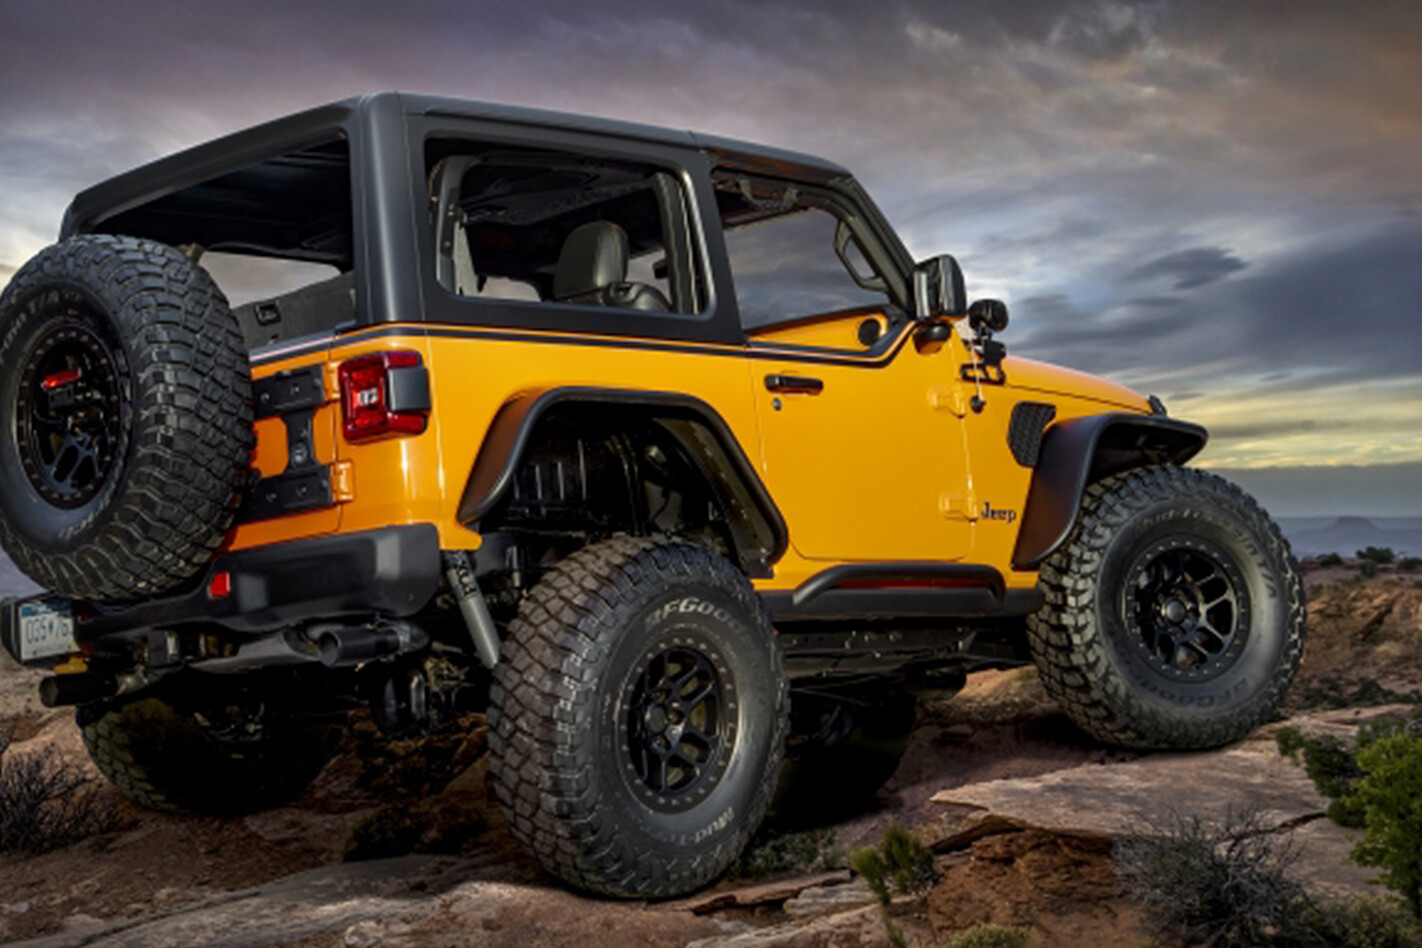
Jeep Orange Peelz is all about fun. Riding high on 37-inch tyres, it’s the one you’d pick for a play in the rocks. Powered by the 3.6L Pentastar V6, performance has been tweaked with the addition of a JPP cold-air intake and cat-back exhaust system.
A JPP swing Gate Hinge Reinforcement allows the larger spare tyre to fit, as well as body coloured tow hooks to pull out lesser vehicles on the tracks. Side and rear windows have been removed, with prototype JPP half doors and a custom removable one-piece Freedom Top glass sunroof completing the package.
Jeep Farout is the overlander of the group, based on the Gladiator platform powered by a 3.0L EcoDiesel V6. The standout feature here, is a customised AT Overland Equipment Habitat Truck Topper, a 16-foot-long and 7.5-foot-tall camper that sets up in just seconds, and sleeps four people. It also rides on 37-inch tyres, with Fox performance shocks for amazing ride quality and an integrated roof-rack system for additional storage.
Jeep Wrangler Rubicon 392 needs no introduction, as this is the V8-powered Rubicon we all want to drive. Powered by a 6.4L V8 engine, which makes a screaming 485 horsepower (361kW) with most power available just above idle where you want it.
A dual-mode performance exhaust furth adds to the ridiculousness, switching between wild and outrageous.
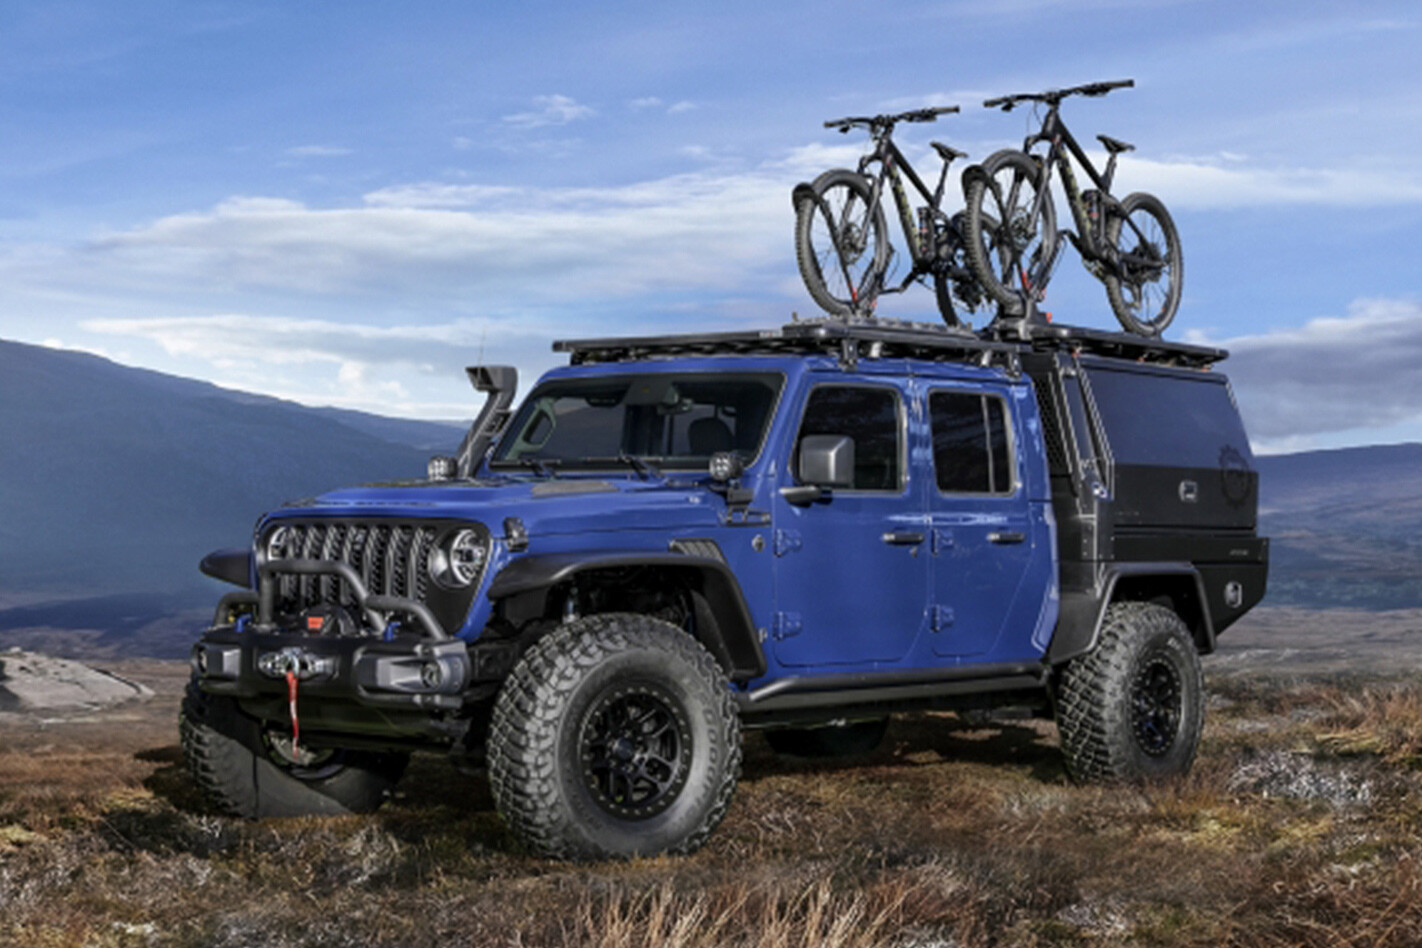
Jeep Top Dog has been designed primarily with mountain bikers in mind, and has been decked out extensively with additional cargo capacity with the use of a custom (and Aussie-made) PCOR flatbed storage system.
There’s pull-out drawers, a battery-powered refrigerator and even an electric hot dog roller grill stand for when you get hungry out on the tracks.
Above the cab, two Rhino Rack structures offer additional storage for tools or perhaps additional hot dog supplies.
We are certainly excited by this range of Jeeps, and are looking forward to seeing which concepts become a reality in Australia in the coming years.
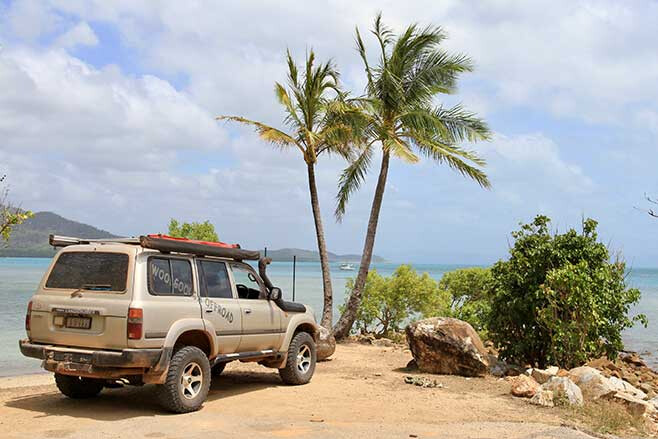
PICTURE this: crystal-clear water, stunning beaches rich in piscatorial delights, secluded coves, rocky headlands with cliff-top single tracks, and some of the best sand-dune driving you could possibly hope for … oh I forgot one thing, no crowds!
Sounds ideal, doesn’t it? Well, it is as close as you can get to four-wheel driving Mecca and it should definitely be on your destination list.
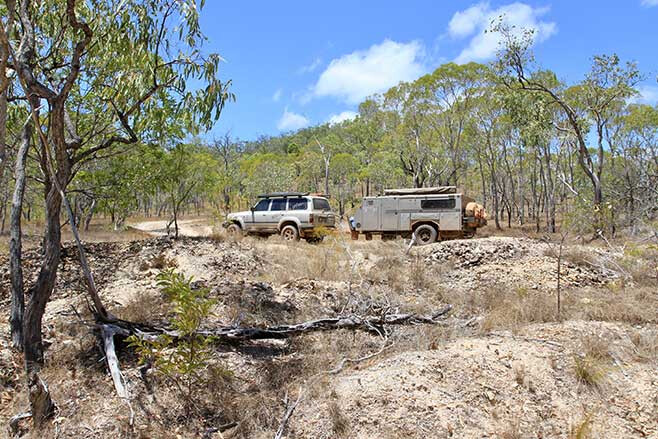
We had just come off the fantastic Googs Track and restocked in the coastal town of Ceduna, and with a few weeks of leave still left it made perfect sense to push on for some more of South Australia’s treats.
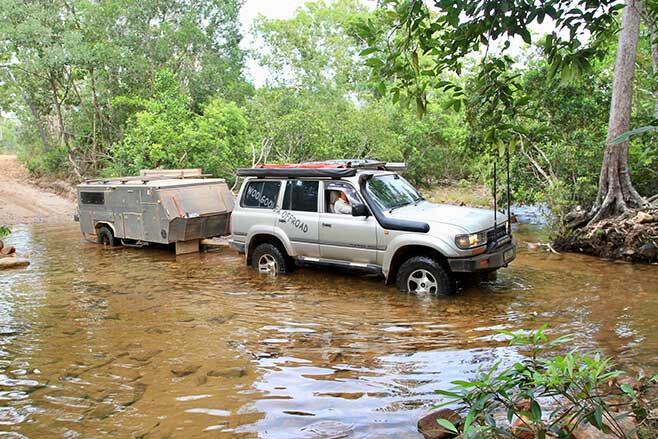
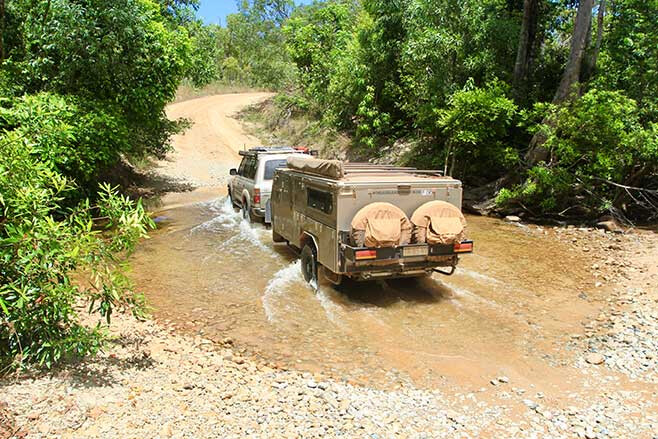
After a short Eyre Highway leg, we turned off for the tiny township of Fowlers Bay. There is not much here, other than a small basic van park and a little store and café, so after a quick exploration of the long jetty (from which one of the best southern right whale watching tours departs during the season) we headed for the entry in to the dunes which form the backdrop of the town. Airing down to 16psi and selecting low range, we climbed up into the dune system for our first taste of the incredible 4WDing to follow.
When you are only two minutes into the driving and already stopping to grab the camera, you know you are on to a winner, and that’s exactly what we were doing. Perched atop the dunes above the town with panoramic views over the ocean and surrounds, we all got some incredible images and the smiles were abundant and genuine – this is what owning a 4×4 is all about.
Staying in the dune system we tracked onward and within a few kays were greeted with the first of many stunning beaches on this trip. We needed to travel the length of this beach to the distant headland to reach our first camp, and it is here that I will give you a handy warning.
A TRACTOR AWAITS
THROUGHOUT the year in certain conditions, ribbon seaweed gets washed up on the shore, creating a deep blanket that covers the sand. Over time the weed that does not get washed back out to sea becomes covered in sand.
The danger here is that it may seem like you are driving on hard-packed, smooth sand below the high-tide mark, which is common practice on many beaches across Australia (particularly the east), but in fact you may only be driving on a thin, sandy crust suspended on a vehicle-swallowing bed of rotting weed. Believe me, the old tractor you see parked up in Fowlers Bay makes a solid living, not from farming, but from 4×4 beach recoveries!
There is a well-worn beach track above the high-tide mark that is your safest bet for avoiding strife, but remember, this is generally not advisable or even allowed on many beaches as it is home to nesting shorebirds and is hard, thirsty going for a 4×4.
TOP 5: Tips for driving on sand
I decided to once again test this out to demonstrate to my travelling companions who had not seen this before, and gingerly started to dip the BFGoodrich paws lower toward the water as I was driving along, and pretty quickly the rig began to sink requiring some full-throttle and corrective steering to get back onto the harder stuff. It’s a strange phenomenon and completely opposite to what you would experience on Fraser Island’s beaches for example.
With that fun out of the way, it was time to really appreciate what we had here, a nice sunny day, with a mildly stiff onshore breeze on this beautiful golden beach and water clarity to rival the best in the country. Stunning – and we had not seen another soul.
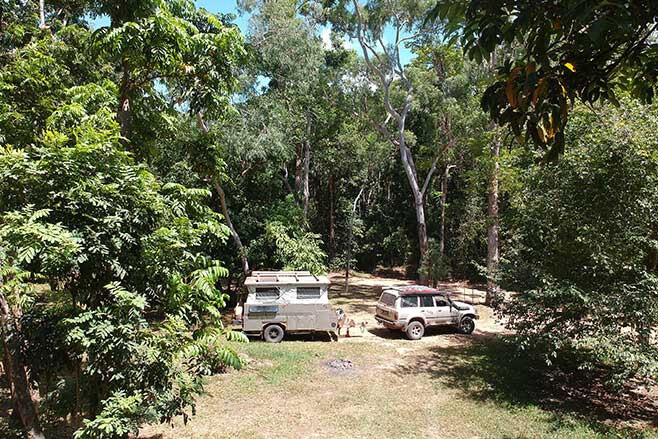
Tucked in behind the dunes of the next beach along are several bollard-ed campsites, one with a long-drop toilet. Typical of the Great Australian Bight, tall trees are not to be found close to the shoreline due to the frequent high winds, but there is a solid smattering of saltbush, grasses and shrubs that offer mild protection but no shade. So, if travelling in the hotter months anywhere along this coastline, make sure you take your own robust shelter that can handle high winds.
The plan for the rest of the trip was to head west, following and exploring as many of the coastal tracks as possible. The following morning, our minds were blown away as we neared the shore to discover we were atop a cliff with a rocky, single track only metres from the steep drop-off to the ocean below. Wow, this is as good as off-roading gets.
Once again, the cameras were out to capture these stunning views and, honestly, we just spent the rest of the next few days eating up the endless cliff-top, beach and dune driving at a leisurely pace. I have travelled most of Australia in a 4×4 and I would rate this as one of the top three touring experiences in this land. Let me put it this way, at times it felt so good it felt illegal, but rest assured it is not. Perhaps the notable absence of other travellers added to the charmed feeling.

At times we came across beautiful secluded and sheltered little beaches, surrounded by steep headlands, some we stopped in to wet a line or, in one case, simply drift asleep on the sand bathed in sunlight and the sounds of breaking waves. Bliss. At the end of each day we managed to easily find an idyllic bush camp, most of these happened to be along the inland tracks in amongst thicker and taller vegetation, as we wanted to escape the wind, but we were never far away from the coastline.
DOG FENCE
SOMEWHERE along the way we realised that as much as we wanted this to last forever, it could not. We needed to put a punctuation mark on it, so looking at the maps we decided we would start our trip home after reaching the very end (or start) of the Dog Fence. Its origin traces back to the early pastoralists in the late 19th century (who constructed the original dingo-proof cells) and a Royal Commission in 1894 on the impact of dingoes and other vermin upon grazing lands – which subsequently led to a more concerted effort in fencing.

So, with that locked in and with growing heavy hearts, we made our way past one last notable landscape, the Wonginya Sandhills. Well, apparently not many people venture out here, as the track was so overgrown, littered with fallen timber and reclaimed by the movement of the dunes that we were frequently stopping to clear the way ahead and scout out a driveable line in the dense timber and encroaching sand at the back of this extensive system.
While challenging at times and most certainly harsh on the paintwork (don’t even think about it if you are precious about your Duco) it was seriously fun and engaging driving, with one last stunning bush camp to boot before finally reaching that famous fence.
I said it years ago and now I find myself saying it again, “Fowlers Bay, I will be back again.” It is incredible!
YOU don’t see too many crazy modified VW Amaroks. Sure, there are plenty making big power thanks to that mighty V6 engine, and there are loads set up as comfy tradie vehicles.
There’s plenty of tourers as well, built to travel the countryside in style. But answer me this, when is the last time you saw a VW Amarok on 34-inch tyres?
Jeremy Cooke, the owner of this rolling work of art, also owns a 4WD accessory and dyno tuning shop in Sydney called Advanced Installation Service. Now, AIS also happens to specialise in servicing, tuning and modifying VW Amaroks.
“I kind of fell into it by accident,” says Jeremy. “I’ve owned a bunch of Land Rovers, including a yellow Defender 130 called Big Bird, but when the engine died early on thanks to a dud EGR cooler, I decided to give the Amarok a go. We’ve created a real niche in the market, and are now the go-to shop in NSW for anything VW Amarok.”
When your bread-and-butter is building and servicing Amaroks, you know the shop truck is going to be pretty damn serious. Introducing Dr Rok, what I’m calling the most modified VW Amarok in Australia.
Jeremy wanted the Rok to be as practical as possible, but also as light as possible. This is the reasoning behind using the Rival front bar from Drivetech 4×4 as it’s made from alloy. He also fitted up a dual-speed Drivetech 4×4 winch and Rival underbody bash plates.
The nine-inch Perception Lighting LED driving lights help turn night into day, with just enough space left for Jeremy to fit a GME UHF antenna to the front bar on a flip mount. A set of Fatboy rock sliders from Southern Cross Fabworks were also bolted on, but coated with Raptor Liner in Jeremey’s signature orange colour.
To protect the engine from water and dust ingress, a Safari Armax snorkel has been given the nod and the induction noise through it is simply intoxicating. Air On Board diff breathers have also been installed, for peace of mind when exploring his local Blue Mountains tracks. We put them to the test on this photoshoot, that’s for sure.
To further safeguard the engine, Jeremy installed a Process West catch can and a secondary Fuel Manager diesel pre-filter.
CUSTOM: Amarok Dark Label
“I consider these modifications as essential for the Amarok,” says Jeremy. “They aren’t terribly expensive when you consider how much a new motor will set you back if things go wrong.”
The key feature of Jeremy’s Amarok is certainly the custom canopy built by MITS Alloy in Newcastle. “Don’t ask for one, as they told me they wouldn’t be interested in making another one like it,” Jeremy says with a grin.
Not only is it a thing of beauty to look at, matching the lines of the Amarok as neatly as possible, but it’s insanely practical as well. Jeremy wanted everything to have its own place but still leave enough room for swags, firewood and other bulky items that get added last minute. It’s not just a tourer, it’s a work vehicle as well at the end of the day.
Storage is handled by a set of RV Storage Solutions drawers, which Jeremy feels are the best in the business. With the height of the canopy, an upright Bushmans fridge sits perfectly on the passenger side, and he has enough space for a second smaller Bushmans fridge on the driver’s side if heading away for an extended fishing trip.
As Jeremy is an agent for CRD Tech custom dyno tuning, his V6 Amarok was always going to have a power increase. Well, after swapping out the turbo multiple times purely to experiment with high-flow options, and spending hours on the dyno getting the tune right, Jeremy is now over the moon with the performance of the Amarok.
There’s also a PWR intercooler and a three-inch Manta exhaust fitted for further gains, as well as a gearbox tune which changes the shift patterns and helps when trying to reverse in soft sand or when backing up a trailer. And the end result? This Amarok now makes 220kW and 600Nm at all four wheels.
On 34-inch tyres. Now that is impressive! A Wholesale Automatics transmission cooler kit was installed to help keep gearbox temps down around the same time, and Jeremy has seen a massive drop in temps since fitting it, as well as a ScanGauge to monitor vital temperatures.
Being a European vehicle, there was only one option for Jeremy when it came to suspension. He’s installed a suite of Bilstein products sourced from Heasmans Steering in Sydney. B6 Bilstein struts with H&R coils and Hardrace upper control arms get the party started in the front end, with a diff-drop kit from Southern Cross Fabworks installed to keep CV angles within spec.
In the rear end, Jeremy installed a set of Outback Armour constant-load leaf springs, Polyair air bags and the massive (and expensive) Bilstein B60 rear shocks. The reasoning for going with the big shocks in the rear is because this is where most of the weight sits. So far Jeremy says he is wrapped with the performance, and has no plans to change it.
As well as the suspension, Jeremy’s Rok is riding higher on a 43mm body lift kit from Southern Cross Fabworks. Interestingly, the Rival front bar is adjustable to suit the body lift so no additional fabrication was required post body lift, as the rock sliders were made to suit. Good info for anyone at home wanting a high-riding Amarok.
It seems that if you own an Amarok, you have Fuel Vector wheels fitted. And there’s nothing wrong with that. Jeremy wanted to stand out from the crowd though, and decided on a classic-looking set of Rotiform alloy wheels in 17×9 flavour. One of Jeremy’s favourite accessories on Dr Rok are the tyres. He’s running the new Yokohama X-AT all terrain tyres in 295x70R17 or 34-inch diameter in the old money. “They get the power to the ground, don’t feel sketchy in the wet and work well off road,” Jeremy mentions.
By trade, Jeremy is an auto electrician, so naturally the 12V setup in his Amarok was going to be pretty wild. The whole box-and-dice is controlled by a Redarc RedVision system, which allows all 12V accessories to be accessed from one touchscreen or by using the app on his phone. No custom 4×4 is complete these days unless it has the all the niceties of home. So, you guessed it, there’s a pie oven and coffee machine, as well as an electric hot-water system with shower hose (Jeremy isn’t a fan of carrying gas).
It seems you can have your cake and eat it too, if you put in the ground work. Jeremy has created a 4×4 that is comfortable, powerful and capable. And yes, it’s been reliable too. But if you reckon you have a more modified VW Amarok, we’d certainly love to see it.
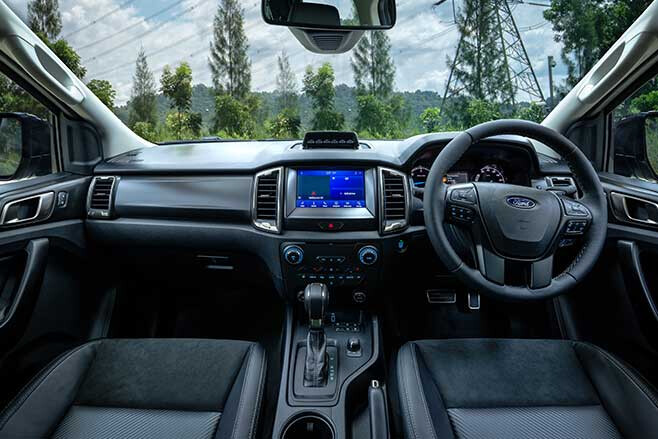
POUNDING in to the first craggy gully along an undulating dirt road is enough to establish that Ford’s latest addition to its vast Ranger family has solid nous when the going gets tough.
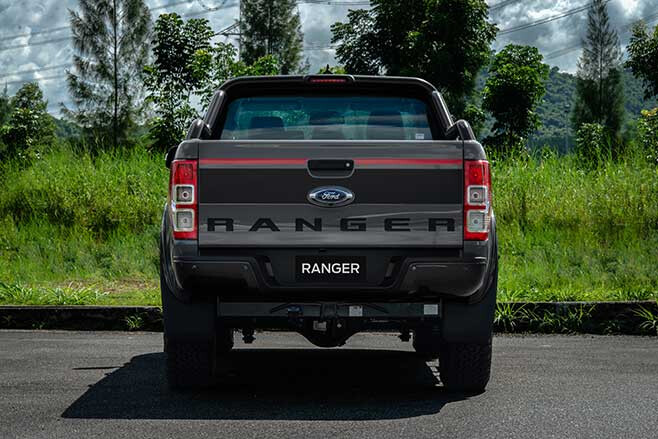
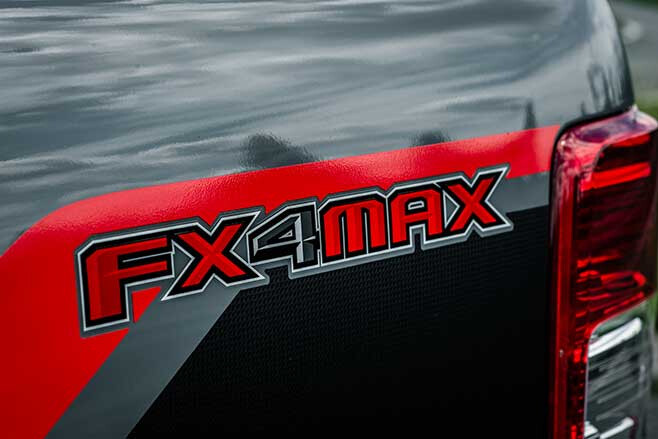
Yep, I did say “latest addition.” Just when you thought there were enough Ford Rangers to wade through, along comes another – the FX4 Max.
Borrowing most of its mechanical kit and spec from the Ranger XLT, the new FX4 Max has wisps of Raptor DNA designed to step up the off-road cred and add some all-important visual muscle.
First things first: The looks.
There are Raptor-esque touches. Black 17-inch wheels (they’re unique to FX4) and the F-O-R-D grille replacing the more formal blue oval one are two highlights. An extended black sports bar adds to that look, while unique side-steps with protruding hoops aim to make the rise into the cabin that tad easier. Wheel-arch flares are smaller than those on Raptor, as are the arches themselves; the Max’s body is shared with regular Rangers, so doesn’t have that full-blown, pumped-up stance.
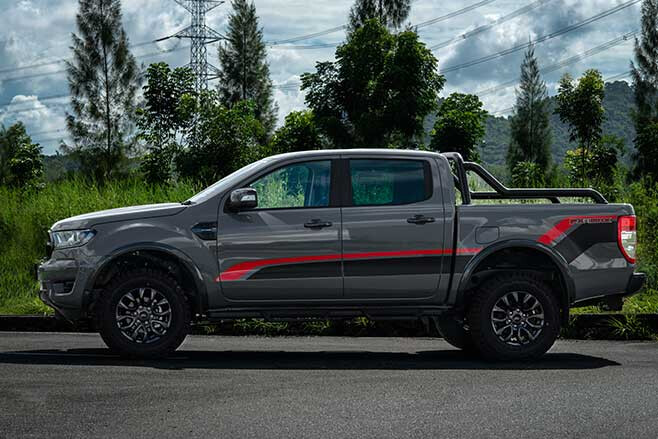
Optional stickers ($750) add to the grunty bling, although we’re not sure they’d be high on our shopping list. At least you can add adaptive cruise control for $800, something that can’t be achieved at any price in a Raptor.
Inside, the seats have FX4 Max embroidered along with something supposed to look like carbon fibre and slivers of leather.
Yet in an indication that cost containment was part of the goal – the FX4 Max is $65,940 plus on-roads – you’ll still be adjusting your seat manually.
But it’s underneath where things get interesting.
The Max brochure is quick to spruik the “advanced Fox shocks”, which creates that marketing link with the Raptor. However, whereas the Raptor gets 2.5-inch shocks, the Fox in the FX4 Max are 2.0 inches in diameter. And there’s none of the motorsport-inspired geometry that separates a Raptor from a mere Ranger. That said, there’s also plenty to get excited about: new bump stops, a 29mm front stabiliser bar and remote reservoirs on the rear which retains its leaf springs.
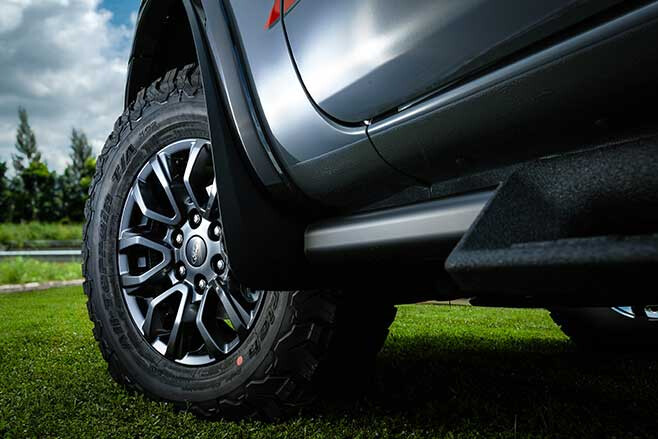
Springs have also been revised to match the new Fox components and account for the higher ride height. All up, there’s another 30mm to play with compared with a regular Ranger, about 20mm through the suspension and 10mm in the tyres. Which brings us to those bulging BF Goodrichs, each 20mm narrower than those on a Raptor. The 32-inch all-terrains ride on 17-inch rims and stick out further, widening the track by 26mm.
So, the $65,940 question … does it all compute? And is the FX4 Max a Raptor killer?
Our first contact with choppy gravel showed there are noticeable improvements over a garden variety Ranger, a mix of suspension and tyres better disposing of washouts and rocks poking their head above the shifting surface. No doubt the additional sidewall in the tyres is doing a lot of the early work.
Driven briskly over fire trails, there’s still the firmness of an unladen Ranger but it recovers from a bump more assertively. There’s more consistent control and with external canisters for the rear shocks we’d like to think the prospect of rolling over corrugations would be less punishing on the gear, especially if you’re approaching GVM.
The Max benefits are more obvious over, say, 50km/h. In that sense it’s like the Raptor, although the Max is skewed towards the XLT side of the ledger. Like the Raptor, the FX4 Max’s suspension tweaks are most pronounced over bumpier roads and with some pace on board. That said, the leaf-sprung rear-end isn’t completely quelled, occasionally skipping, especially after a big hit. Whereas the Raptor will hungrily attack almost any bump at any speed and somehow skillfully cushion 2.3 tonnes of flying Ford, the FX4 Max still calls for restraint.
Granted our drive was with the car unladen and we suspect the difference between suburban-spec Ranger and FX4 Max may be more pronounced with half-a-tonne on board.
It’s the additional kilos where the FX4 Max makes up plenty of 4×4 points. Its 981kg payload (233kg up on Raptor) is ready for gadgets and gear – and you get the impression the suspension will happily welcome it. The 3.5-tonne tow capacity matches that of other Rangers.
There are also other teasers that make the Max a more proficient adventurer. Accessory switches on top of the dash have been plucked from the F-150 parts bin and make it cleaner to connect everything from additional lights to a winch. The 250amp alternator ensures the electrical system copes with extra accessories, although many will still splash out on a second battery for fridges and other things you want powered overnight.
On road the BF Goodrich K02s ram home the compromises. The taller sidewall takes the edge off steering accuracy, so additional input is required for the same result. There’s a little more hum from the tyres at 110km/h, particularly from the rear. And water on bitumen is not a good mix, the BFGs slide unnervingly. We’d be prepared to bet they’re better on gravel than wet bitumen, the chunky tread blocks beautifully clawing every grain of dirt for impressive control. There’s also a matching spare underneath, although the chances of getting a puncture are a lot less than they are with the highway rubber typically fitted to a Ranger. That’s the start of a solid off-road package with the FX4 Max.
The extra 30mm of clearance – 19mm at the rear diff – improves the approach and departure angles to 31 and 23 degrees, each 2 degrees up on a Ranger but still shy of a Raptor. And the BFGs do a better job of clutching at rocks and mud.
Ford claims the side-steps don’t impact overall ground clearance, but it doesn’t take a particularly challenging rock or log to realise they’ll limit how far you can go. At least they’re tough and should deal with the occasional scrape, although the steps that hang down can easily catch on things, so it pays to have a spotter ensuring some of that bling stays put.
Better still, remove the side-steps and bolt on proper rock rails. They’ll also be less likely to dig into your shins or calves on entry and exit.
Like the Raptor, the FX4 Max comes exclusively with the 2.0-litre bi-turbo four-cylinder diesel that is a $1500 option on an XLT. Smoother and quieter than the venerable 3.2 five-pot, the 2.0 doesn’t have the initial throttle response but makes up for it with more pep across the rev range. Overtaking is easier, the additional Newton-metres better dealing with a weighted Ranger.
The 10-speed auto is ever eager to slot into a taller ratio, something more obvious when winding up a mountain pass or tackling winding trails. Without paddle shifters the only way to take control is with the fiddly toggle switch on the side of the gear selector.
HEAD TO HEAD: FX4 MAX vs D-MAX X-Terrain
So, yes, there are genuine changes and improvements over an XLT, although the Raptor is still leaps and bounds ahead (literally) for those wanting a seriously special truck. There’s still a place in the bush for something with wild Baja genes.
Instead, the FX4 Max compromises some of that never-slow-down Raptor mentality and deftly turns it towards the adventurous side of 4×4 touring. Having a proper payload and tow capacity is key to its appeal.
The FX4 Max is an acquired taste that prioritises off-road hardware over showroom bling. And it’s a ute that’s undoubtedly more XLT than Raptor. But it absolutely has a place for those who use their trucks as they were originally designed.
FORD RANGER FX4 MAX SPECS
ENGINE: 2.0-litre four-cylinder twin-turbo diesel MAX POWER: 157kW at 3750rpm MAX TORQUE: 500Nm at 1750 to 2000rpm TRANSMISSION: 10-speed auto TRANSFER CASE: Part-time dual-range FRONT SUSPENSION: Independent/coil springs REAR SUSPENSION: Live axle/leaf springs TYRES: 265/70-R17 KERB WEIGHT: 2219kg GVM: 3200kg PAYLOAD: 981kg TOWING CAPACITY: 3500kg FUEL TANK CAPACITY: 80L ADR FUEL USE: 8.0L/100km PRICE: $65,940 DEPARTURE ANGLE: 23⁰ RAMPOVER ANGLE: 25⁰ APPROACH ANGLE: 31⁰ WADING DEPTH: 800mm GROUND CLEARANCE: 256mm
YET another news story recently hit the headlines about the number of people travelling the outback for the first time and getting into trouble in the process.
Police in Broken Hill, for example, are getting numerous calls from travellers doing the wrong thing and getting bogged and then needing help … and it’s happening all over Oz.
For many people, this year will be the first time they have towed a van or a camper or have even driven on a dirt road for any length of time. And while many people who buy a 4WD vehicle for that change of lifestyle and for the big trip around Australia do a 4WD course, many of those courses have little instruction on how to drive on dirt roads. So, it’s essential to pick one that does!
4X4 RECOVERY: The Basics
Generally, you are not going to die while driving on a sandy beach or crossing a river up on Cape York, but do the wrong thing at 80km/h on a dirt road and you’ll be lucky to walk away from it unscathed. Put a van or camper on the back and the chances of you coming to grief, if and when you do the wrong thing, are magnified 10 times over.
It’s best not to rely on your mates for any enlightenment, but to join a 4WD club. Do a dedicated driving course or join a tag-along tour so you can start your initiation into the enjoyable life of touring and camping and learning by experience. For a course, check out Great Divide Tours in NSW or Google ‘Driving courses for towing with a van’ or similar. The life you save may be your own, your partner’s or some stranger coming the other way.
4WD CLUB: Should I sign up?
Then, when you are on the road, there is some etiquette involved with passing and overtaking. If you are towing, consider those behind you. In the USA it’s a law in most states that you pull over if there are more than four or five vehicles behind you, but you really shouldn’t let it get to that stage. On a dirt road it’s more important again, and simply driving slowly on the dusty verge is not good enough – pull well over and let those following slip by.
When you come upon a truck, a semi or a road train, heading either towards you or in the same direction, you can bet that if it is a single-lane strip of blacktop he will be very reluctant to drop off on to the dirt. If you want to overtake, best to give him a call on the UHF radio (you’ll have one of them, won’t you?) and let him know you’re behind him and he’ll let you know when it’s safe to pass. On a dirt road if a truck with a billowing cloud of dust is approaching, it’s best to get well out of his way, stop and let the dust cloud dissipate before proceeding. Being in a hurry could easily cost someone’s life.
Then when you are in camp, bush etiquette demands that you begin playing by the largely unwritten rules even before you set up.
Take care with fire and dispose of your rubbish properly. As far as going to the toilet in the scrub – if you haven’t got a Porta Potti or similar, and there isn’t a long-drop dunny within cooee, then find a spot, dig a hole, do a poo, cover it up and burn the loo paper. It’s not that hard!
Most outback roads pass through pastoral properties and, while you may not have seen a house or a living soul for ages, the land is owned by someone who is generally trying to make a living out of it.
You are not entitled to wander around willy-nilly following any station track you come across. And if you pass through a gate, leave it as you found it – if it was open, leave it that way; if it was closed and you opened it, close the bloody thing!
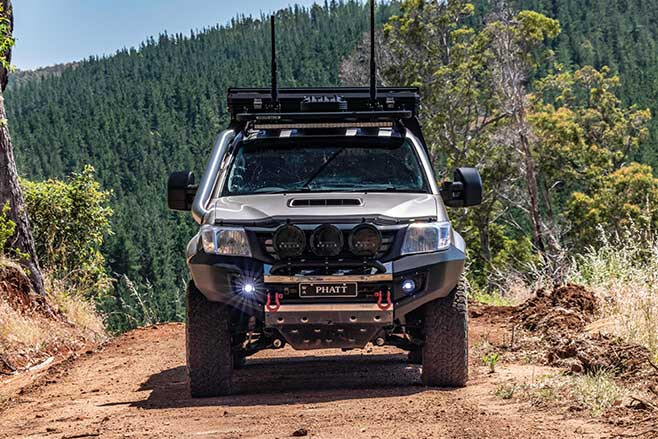
IT’S funny how life throws things your way, like a two-wheel drive 2007 N70 Hilux for the princely sum of $500.
As an ex-TV commercial hero car, it had starred as a tradie’s ute slamming into a roadside fruit stand, all in the name of safer driving. After a couple of weeks of daily-ing in the N70, the usual Maloo ride with the cam-lope, horrible drinking habit, and leg-day clutch pedal just didn’t seem as appealing. Selling off parts like the tradie rack and rear tub for a collective $500 brought the Hilux ledger back to nil. Hello, NoBuxLux.
Being an entry level WorkMate, standard amenities like power windows weren’t an option, but this is where the journey to the PHATT 4×4 you see before you began. Taking a look at the main loom found, Toyota had seen fit to include all the connections to simply plug in a power window unit. Mint.
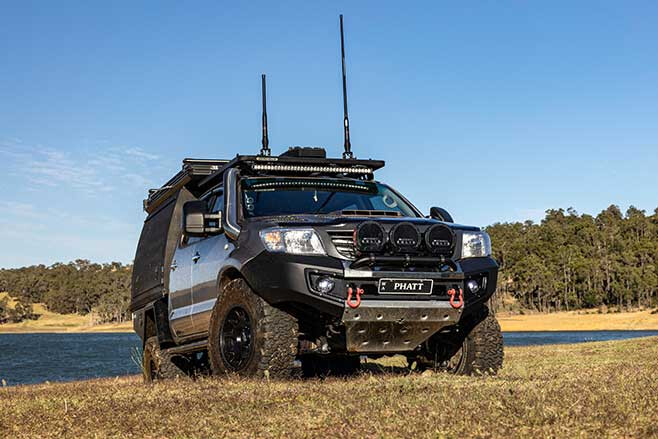
The Interweb turned up a young bloke wrecking his crashed 2006 Hilux, but this one was a 4×4. Making a dash out to salvage some parts before the local wreckers got hold of it discovered a pretty decent KUN26 SR Hilux that, in my opinion, was too good to waste and with a bit of work, could be put back on the road with a minimum of fuss.
According to the owner it had sat for about a year, so after making sure it would run the deal was done. Furthermore, it had an encyclopaedia-thick pile of paperwork showing an excellent service history for the life of the car. The idea formed to build a tough 4×4 capable of carrying all my commercial photographic gear to any location, for as cheaply as I could while leaving plenty of budget for some killer mods.
LIFTED: SR5 Hilux pumps out 200kW at the wheels
Replacing damaged suspension parts to get it rolling again, the Hilux was chained to a chassis table and checked over for cracks and alignment. Thankfully, all was good, but both Hiluxes had damaged front sheet metal, so some half-price Taiwanese guards and bonnet were bought. It was a perfect time to upgrade to the facelift look (2012-15) which turned out to be a relatively straightforward bolt-on. Some eBay headlights and grille made their way on, along with a new radiator, fan shroud and condenser.
It looked like a Hilux again, but I needed to thicken it up a bit. A set of Dirty Life ‘Scout’ alloys shod with fat 305/65-R17 BFG KO2s kept tyre diameter under 33 inches. The +5mm offset improved the stance outwards, but going any taller would need the differentials regeared. There was the small issue of the tyres redesigning the inner wheel arches and new Utemart flares, but, as it turned out, a pair of Superior Engineering’s billet UCAs found their way under the front end along with some SuperPro offset bush lower arms, allowing the front spindles to be pushed forward for better clearance and far better alignment for the lifted front end.
On Track Fabrication was then tasked to carry out a mod-plated body-mount chop for more clearance, before a Phat Bars diff-drop kit found levelled out the CV shafts nicely.
Improving the approach angle, a Rhino Evolution three-piece winch bar was ordered to suit the facelifted model. Chosen for its integrated design it came with built-in LED indicator/spotlights, stainless-steel bash plate and centre support. Blinding roadside fauna are two spot and one flood, dimmable ARB Intensity Solis lights standing shoulder-to-shoulder across the grille.
The Hilux came fitted with two-inch taller RAW struts with matching-height 300kg constant-load leaf springs in the rear, but the chunky six-leaf spring pack was causing issues with its lack of flex.
Swapping in a pair of Terrain Tamer parabolic springs improved off-road traction immensely, with far better articulation and on-road comfort. A pair of N80 Hilux Tough Dog foam-cell shocks allowed an extra 45mm extension over the N70 option, allowing further articulation again.
HISTORY LESSON: 50 years of Hilux
Combined with the new wheels, this combo gained a clearance increase of four inches over standard, however it wasn’t enough to save the OEM alloy running boards. Phat Bars got the nod again for rock sliders, protecting the sills and giving the Hi-Lift something to jack against. Rounding out the order, a stainless-steel four-inch snorkel kit now feeds dry air into the standard airbox.
With the stance now set, it was time to paint. A combination of backyard, front yard, and driveway locations saw fresh Angora Beige metallic sprayed on various plants and car parts, leaving only the outer skin to complete. After hiring a paint booth I waved the gun over the panels for two base and three clear coats before reassembling.
While still in the painting mood, the full interior was also pulled out, washed thoroughly and painted a dark charcoal to match the leather XR seats I’d scored for a song and bolted in using Huracan Fabrication adapter brackets. Other interior enhancements include the GME XRS-370C4P UHF, a 2017 N80 Hilux twirler, and next-gen Clearview towing mirrors that provide electronic adjustment after adding in a standard Hilux mirror switch to the previously unused plug behind the dash. Thanks Toyota!
While the engine is stock for now, the supporting mods have been put in place to turn the wick up on the 1KD-FTV. A Performance Diesel Intercoolers bar and plate front-mount kit dominates the grille area, with sand-cast end tanks allowing precise fitment around radiator support brackets while maximising the finned cooling area.
A full turbo-to-tip LuxFab three- to four-inch stainless-steel exhaust system complete with cat and four-inch resonator allows for the easy spool-up of the turbo. To say it’s a shame something so well constructed is hidden under the Hilux is an understatement, as row-of-coins TIG welds, perfect mandrel bends and V-band joins are used throughout. There is the nicely muted note to remind you it’s there though, plus a sweet turbo spool-down as a closing credit.
To cope with the intended future super-torques, an NPC 275mm clutch and flywheel now joins motor and ’box. Using a machined LandCruiser 1HZ pressure plate and machined steel flywheel, this setup is rated up to 750Nm at the flywheel and 300hp at the wheels, while remaining easy on the clutch pedal. Used previously in another streetcar build, a trio of Defi Black Face gauges are mounted to the A pillar, with the main controller now filling the OEM clock location. These monitor engine vitals of boost, oil pressure and EGT, with the ability to record and replay readings too.
Seeing the astronomical prices being paid for service-canopies was enough to want to build my own setup, but I’d been driving past the local MW Toolbox store for months while keeping an eye on an alloy jack-off canopy that never seemed to move. Being narrower than most other canopies, my guess was it wasn’t popular, but the curved sides fitted in with the Hilux’s cab shape and width.
So I called in and made a successful offer. The aluminium tray’s side coaming was then unbolted and the support panels trimmed back matching the canopy width before reassembling. Raptor Liner was laid over the tray and canopy, and to finish off, six whale-tail compression locks were fitted complete with electronic solenoids, making locking a one-button operation.
A Motop 135 V3 rooftop tent was chosen for its low-profile design and attached perfectly to the canopy top rails. The optional Motop racks give a solid mounting point for a 250W solar panel to be mounted, and also allow the panel to be angled towards the sun at camp. With the extra weight of the solar panel plus any additional items loaded topside in the future, the gas struts were recharged from 400 to 500 Newtons, increasing their lifting strength.
LEXUS V8 POWER: 1999 custom Lux
Inside the canopy are two 120amp/h Schneider AGM batteries, topped up via a Victron MPPT Smart Solar 20amp charger. The beauty of the Victron is its smartphone app showing all the real-time charge readings you could want plus a 30-day history of battery state. Further charging from the alternator is through an Intervolt Electronic Battery Isolator under the bonnet, sending current through to the rear once the start battery has reached a user-set voltage. While canopy setup is a work in progress it runs the CFX75 Dometic dual-zone and maintains charge on the photographic gear.
More eBay browsing turned up the perfect-length 900mm tapered undertray toolboxes and matching wheel arches from T.C Boxes, allowing low-slung storage of recovery gear, ratchet straps and an XTM air compressor. Considering the extra weight added by the new canopy/RTT setup, the rear differential housing was also upgraded to a 2012 model for the extra-width axle bearings.
Catering for more storage and doubling as a raised shooting platform a Rhino-Rack Pioneer Platform, along with the newly released N70 Backbone mounting system, was riveted to the roofline. Both the 2.1dBi and 6.6dBi Radome GME antennas are mounted as high as possible, with Rhino-Rack swivel mounts laying them flat when not in use. A quartet of black MaxTrax recovery boards are centrally mounted for easy access from both sides, with a Big Red light bar filling the front underside void.
With plenty of seat time the Hilux has excelled as a daily go-anywhere rig, and in its first year of COVID-isolated ownership getting stuck in to it myself was definitely the way to go. The cost? After selling the 2WD and spare parts and counting up the receipts, the total spendings are less than a bog-standard, average kilometre/condition late-model N70 Hilux. A lot less actually.
WITH THANKS
All this would not have been at all possible without the help and advice from a lot of people, so many thanks go to: – Maro at Premier Automotive Paints, Malaga, WA – Shannon at ARB Australia – Lachlan at LuxFab – Adam at Auto One, Morley, WA – James at NPC Performance Clutches – Vince at Pro Spray Automotive Refinishing, WA – Omar and Nick at Ulti-Mech, Gosnells, WA – Matt at T.C Boxes – Derek and Leon at MW Toolbox – Ken at Don Kyatt Spare Parts – Ben at Rhino 4×4 – WA Solar Supplies – Knox Tyrepower – Adam at Clearview Accessories – Perth Hilux Club
YOU may not have noticed but the Federal Government, yes, that’s ScoMo’s lot in Canberra, has recently released its Future Fuels Strategy discussion paper, which sets out the government’s thinking on electric vehicles and invites submissions on the same.
In the fashion that politicians so love, and crafted by bureaucrats in a way that only they know how, it uses many words to say little.
However, there are some take-home messages, perhaps the key being that private buyers won’t receive a subsidy to make electric vehicles cheaper to buy. Predictably, this has been labelled a ‘do-nothing policy’ by those pushing for a faster uptake of EVs.
OPEN-AIR: Hummer EV!
The discussion paper, though, does suggest incentives for the uptake of EVs for business and industry, which is again predictable given the government’s political leaning. The thinking here is that EVs bought by commercial fleet buyers will soon find their way into the hands of private buyers, given fleet buyers turn over new vehicles every couple of years. We will see.
Regardless of government policy, or lack of it, EV take-up is going to be very slow and you can be certain that diesel and petrol vehicles will be around for a good while yet. And while governments in some overseas countries have said they will ban the sales of petrol and electric vehicles by a certain date (in some cases as soon as 2030), for mine this is political posturing rather than hard policy.
Part of the problem in Australia will be that state governments will no doubt head in different directions from each other, and from the Federal Government when encouraging (or discouraging, as they have already done) EV take-up. The pandemic has already proved that Australia is a very fractured federation, as did the bushfires before that for those who were paying attention. Local government will also play a part in this – and hopefully a smarter one than allowing Tesla to install EV charging stations where you can only charge a Tesla! Ridiculous!
Here’s what happens to old EV batteries
The relative merit of battery EVs versus hydrogen fuel-cell EVs isn’t discussed in the paper; although, both are mentioned as part of the future EV mix developing in parallel, market forces no doubt playing the major hand with the relative success of the two.
Hydrogen fuel-cell EVs have the advantage of quick refuelling times, but hydrogen-supply infrastructure will be expensive to roll out, even if existing service stations can be used. And hydrogen is problematic to transport by road in the way petrol and diesel are supplied to service stations far and wide.
Battery EVs are also very infrastructure-dependent; although, you can charge them at home if off-street parking (with a power point) is available. The key problem with battery EVs is very slow charging times, which will only be overcome with a significant technology breakthrough with batteries.
Installing battery-EV charging points in carparks of all descriptions, where cars are going to be parked anyway while you’re at work, or shopping, or doing whatever else, is of course the answer. That way, the slow charging time becomes largely irrelevant.
Battery EVs will also put significant demand on our national electricity grid that’s already stretched, with studies suggesting a doubling of electricity demand if there’s a 100 per cent swap from petrol/diesel vehicles to battery EVs.
The merit of charging battery EVs off a national grid that’s largely dependent on coal-generated power is also questionable and makes nonsense of the immediate call for EV subsidies. We need a grid powered by renewables to close the environmental loop with EVs.
The fastest-charging electric vehicles
The government paper also includes conventional hybrids (as against plug-in hybrids) as part of the discussion as if to suggest we are already someway down the road to ‘future fuels’. Given a conventional hybrid relies 100 per cent on ‘current fuel’, namely either petrol or diesel, for its energy source, this is nonsense too.
Make no mistake, EVs have much going for them, not the least being brilliant simplicity and greatly reduced maintenance. They are quiet and smooth running, too, while the nature of EV power delivery is well-suited to stop-start city driving. Making a proper go-anywhere 4×4 EV won’t be so simple.