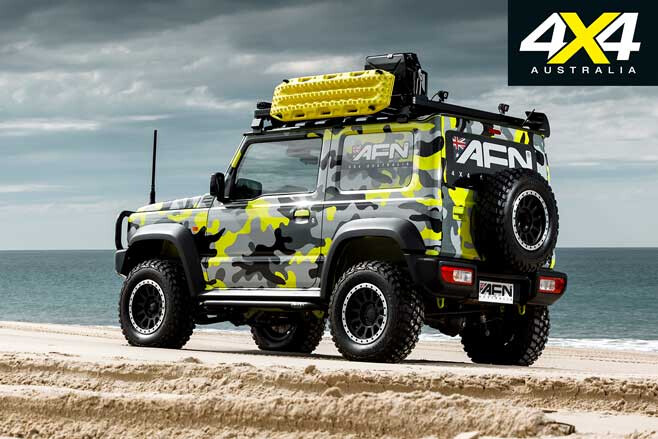
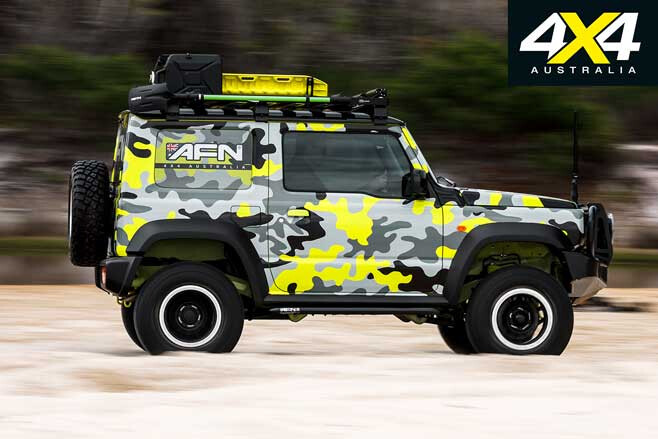
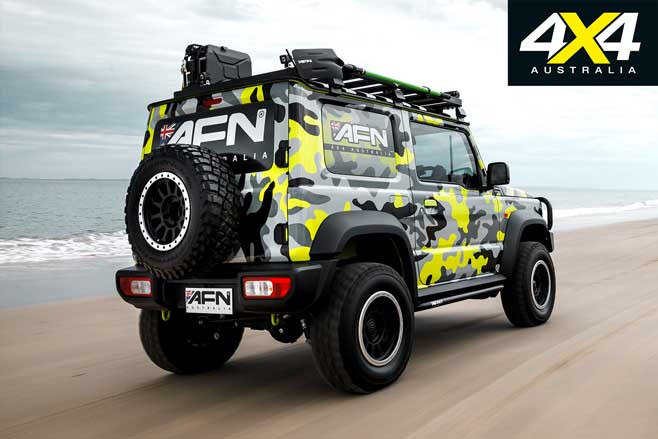
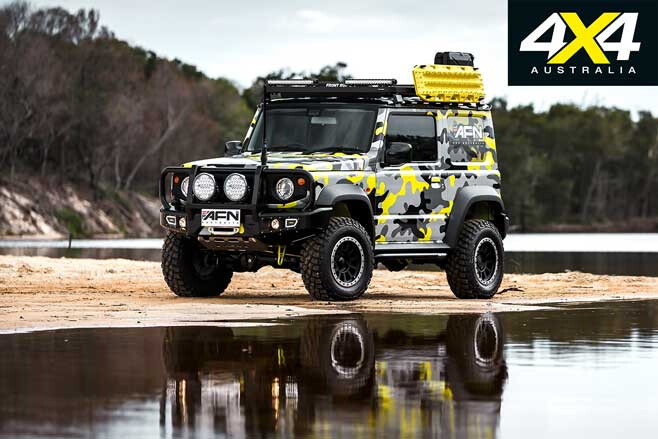
IT MIGHT be small, but this Suzuki makes a huge visual impact. And it’s not just the wild wrap – the Suzuki Jimny has been lifted, widened and protected, and over the past few months it’s grown on its owner so much that it’s morphed from mere a promotional tool to an almost-daily driver.
The Jimny’s owner is Gavin Duffield, the man behind AFN 4×4 Australia. Chances are you’ve heard of AFN 4×4, despite the fact the accessory manufacturer has only been active in the Aussie market for the past four years or so. That’s because Gavin has thrown plenty of resources and marketing nous behind AFN 4×4 to offer four-wheel drivers an alternative to the traditional manufacturers of bullbars and other vehicle protection equipment.
“It’s been a really tough market for AFN 4×4,” says Gavin. “Trying to grow the brand name and get publicity … we don’t have a budget like the big boys, we’re small fry, but we do believe that our approach and what we’ve been doing is pretty good.” And the Jimny gracing these pages is just a small part of getting the word out on the street.
Gavin picked up the Jimny at the start of 2019, not long after the model had been launched on the Aussie market. Due to strong initial demand for the little Zook, Gavin was unable to source a brand-new vehicle, but he managed to find this second-hand Kinetic Yellow example with just 1000km showing on the odo.
“We bought it as a promotional vehicle, just to promote our business and our product, but now that we’ve had it for a while it’s quite a lot of fun; it’s a great little car to drive around in the city and to take off-road,” says Gavin.
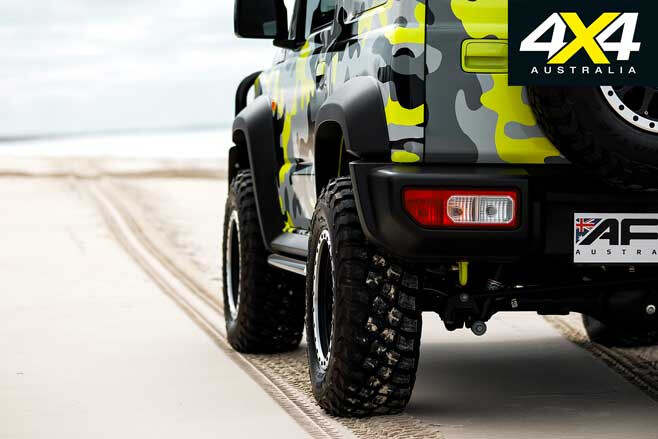
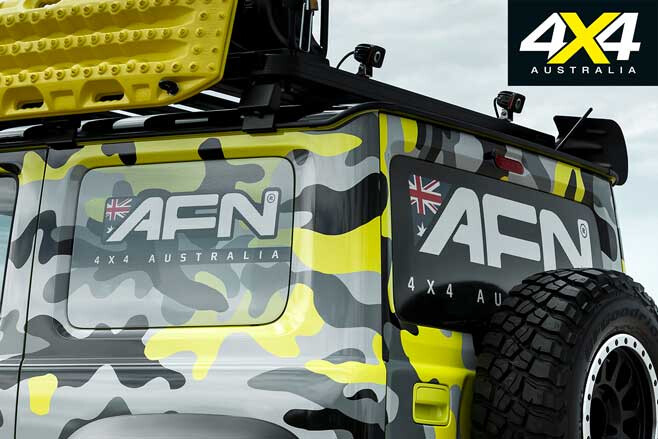
Nevertheless, the Jimny has been built to sell AFN 4×4 gear and that’s why it wears the company’s bullbar up front and side bars beneath the sills, with a lot of thought put into the design and construction of these components.
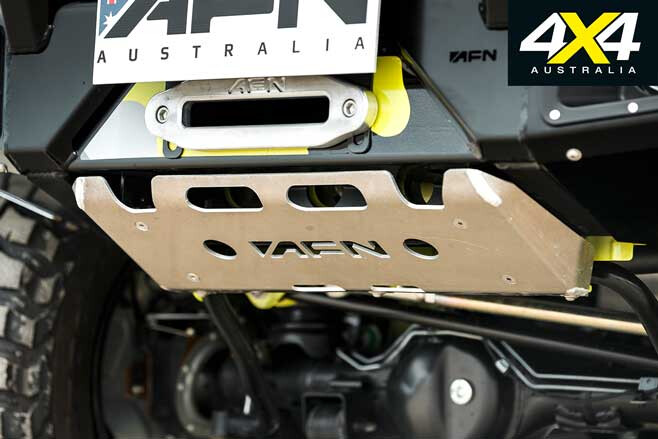
“The Jimny doesn’t have a lot of (design) lines to follow, and we knew that whoever made a bullbar for it, they would all look pretty much the same,” says Gavin. “So we thought about what we could do differently; like our other bullbars it doesn’t have a perfectly flat top surface, and we’ve included a standard aluminium bash plate on the bottom, which is a replaceable piece, so if you get it smashed up or dinged you can replace the aluminium.”
Other features include integrated driving-light mounts, two antenna mounts (which Gavin says are unique to the AFN bar), retention of the OE fog lights and headlight washers, combination DRL and sequential indicator lights (the latter illuminate in a circular fashion), and sculpted wings that tie in neatly with the Jimny’s inner guards.
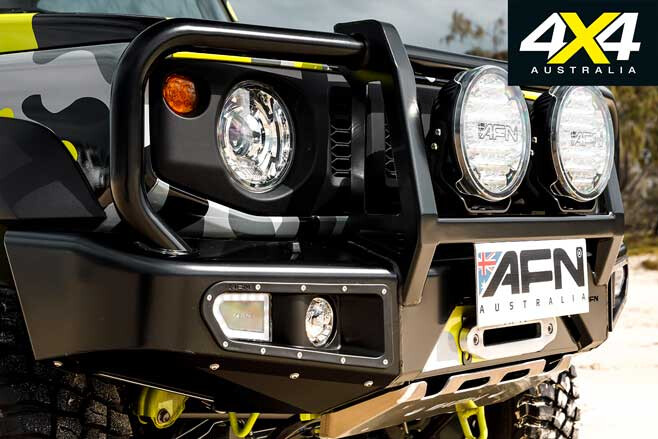
Gavin is keen to emphasise all of these features are standard: “We only have one price,” he says. “Say you bought the hoop bar, you don’t have to pay extra for the lights or for the bash plate or the wings or for anything … it’s one price, everything is there.”
On a vehicle such as the Jimny, minimising weight is a priority when developing accessories, and Gavin says the AFN Full bullbar only adds 33kg to net weight once all of the OE Suzuki bits have been removed, while the Jimny Loopless bullbar only adds 29kg.
Eagle-eyed readers will probably notice there’s plenty of space for a full-size winch in the Jimny’s AFN bullbar, but none is fitted at the moment as the company works on finalising an agreement with a supplier for an AFN-branded product, so stay tuned.
Manufactured from 40mm steel tubing and attached to the chassis at three separate points, the Jimny’s side rails are best described as genuine rock sliders.
“They are a proper slider,” says Gavin. “They are mounted in three secure spots: at the front chassis mount, two centre bolts and then a rear mounting bracket. Some people have asked ‘why can’t we make one you can stand on?’, but if you push it further out you can’t protect the sill, and the Jimny is so small you don’t need a step.”
If you check out the AFN 4×4 website you’ll see a great-looking replacement rear bumper with a wheel carrier, which also incorporates a jerry can holder, winch recovery points and Hi-Lift jack points. A prototype has been completed, but Gavin says there’s still a bit of weight-saving work to do before this product is ready for market, as the company is looking to get it down to around 30kg.
“A lot of the weight is in the pins in the sides that the swing-out arms mount to – they have tapered roller bearings in them and a whole lot of metal parts – so we’re looking at that and at different composites and materials and bushings to try to and get the weight down,” he says.
Despite not being AFN 4×4 products, the trick 15 x 8-inch rims are a standout feature of this Jimny; they not only look great in their own right but they also change the stance of the vehicle thanks to their width and -11 offset, which adds about 100mm to the overall track of the vehicle. Unable to find rims locally when the Jimny build commenced, the wheels were sourced from the USA.
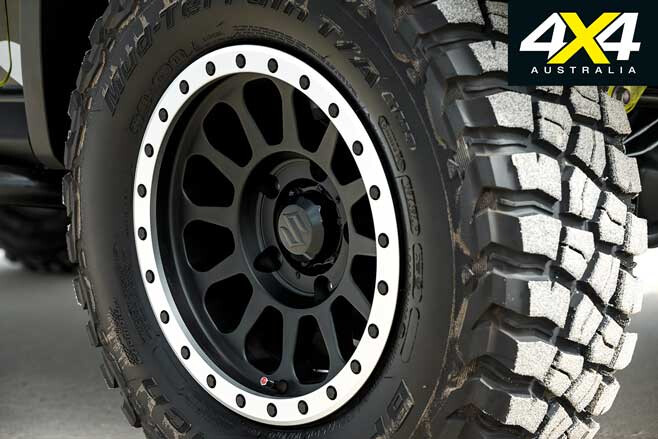
“We found an American company that had a 15 x 8 wheel with the right bolt pattern, but the centre bore was incorrect; but we thought we could probably machine that if we just got the rim,” explains Gavin. “The offset is a -11, which is quite a big offset, and we thought this is really going to poke out the side, but we went ahead thinking we’d just have to live with the consequences; they’re actually off a Ford F150!
“We thought the eight-inch width might be too much, but it would suit the LT235/75R15 tyres. I thought they were going to stick out way too far but then we stuck them on the tread pattern was still within the fender – they’re almost a perfect fit,” says Gavin.
The tyres are BFGoodrich Mud-Terrain KM3s and Gavin reckons they’re extremely effective off-road when fitted to the lightweight Jimny, albeit when pressures are dropped significantly.
“I let the tyre pressures down to about 8-9psi on shaly rocks and it’s just got so much traction,” he says. “I let it down that low because with the strength in the sidewall of the KM3s, you need to let it down to get it to flex. Hopefully I don’t roll it off the rim one day.”
Like the wheels, Gavin says there were no suspension options available for the new Jimny when the build began. However, when he spoke with the lads at EFS 4×4 Accessories, they assured him their suspension to suit the previous model Jimny would work on this one.
The EFS kit is designed to lift the old Jimny by around 50mm, but when Gavin fitted it to the new one the height increase was closer to 70mm, which inadvertently led to the development of a new AFN 4×4 product: a replacement chassis brace.

“When we lifted the suspension up, the front driveshaft started to rub on the original chassis brace,” explains Gavin. “We did some research to see if we could remove the brace but were advised that it’s an additional support that strengthens the chassis around the engine bay, so we proceeded to manufacture our own chassis brace.
“We did an FEA (Finite Element Analysis) to make sure we’d get the right strength out of it, and it ended up being extremely strong.
“It’s basically two 10mm plates of high-tensile aluminium with some spacer bushes … and we’ve been selling quite a few of them.
“Even if you raised the suspension by 40mm, that drive shaft would touch the original chassis brace, but ours increases the clearance by 50mm.”
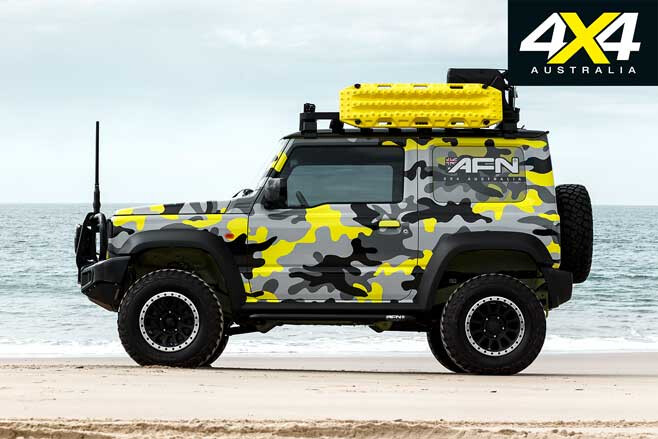
The suspension lift necessitated some tweaking to the castor angle, and the front diff has been rolled over to improve steering feel and handling, which Gavin says is also aided by the Jimny’s wider track thanks to a noticeable reduction in body roll when cornering compared to standard.
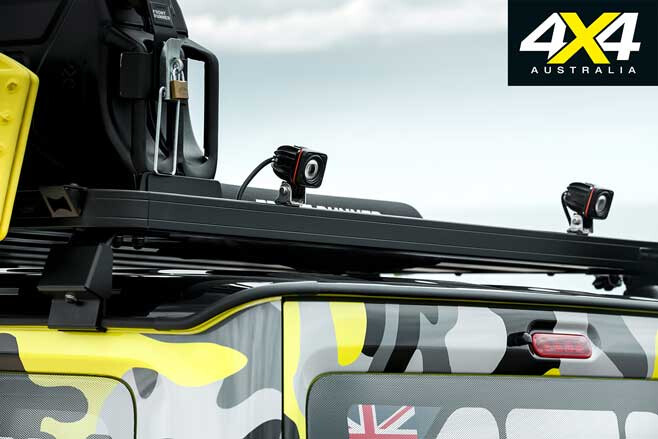
Up top, the Jimny wears a Front Runner roof rack with recovery board, jerry can and shovel holders, and it also serves as the mounting platform for a pair of AFN LED light bars and AFN LED reversing lights. The 230mm 100W driving lights are claimed to project 1.1km at 1 Lux and they incorporate a DRL function. They have a cast aluminium housing, polycarbonate lens, an IP69K rating and are covered by a five-year warranty.
Gavin is rightly proud of the LED light bars. “They are impressive; each is about 380m at 1 Lux but they’re only a 40W light,” he says. “The two little lights at the back, they’re 60° wide angle reversing lights and they’re 15W – we had a special lens designed to give us that spread because a lot of those little lights are a spot, but we wanted a very wide spread.”
What about that striking body wrap?! Well, it wasn’t always planned to look this way.
“Originally that green colour was going to be a bright pink, because I wanted it to appeal to a feminine market,” says Gavin. “But when we got the car, it was that Kinetic Yellow colour, and a lot of that is left showing on the inside of the car, so I said that’s never going to work. So I went to the guy who did the graphics and asked if he could match the ‘green’ colour on the print and he said, ‘I’ll give it a crack’. Well, they did a good job; it’s not perfect but it’s close; they did a fantastic job.”
One of the advantages of using the Jimny as a daily driver is that it’s always out and about and people get to see it.
“Every opportunity we get we try to take it to a beach or expose it around the place,” says Gavin. “We’re fortunate up in Queensland because there are lots of beaches. Whenever I can I’ll just park it at the beach and spend a day with the dogs or something, and that was never the intention, but the more I drive it the more I think this is a great little car.”
What is AFN 4×4?
AFN 4×4 is a Portuguese company that has been manufacturing protection equipment for military applications since 1995, and while AFN consumer products have been available in Australia for a few years, it wasn’t until Gavin Duffield took over distribution just over four years ago that the brand started to gain a foothold locally.
“Originally I was just an investor for the product, but I realised there was a lot more potential,” says Gavin. “I approached AFN (in Portugal) and said if you want somebody to put a lot of investment in this business, to grow this – AFN had outlets in Australia and they were just dabbling in the Australian market – I said we need to do this properly and not mess around … and they said ‘yes, let’s do this’.
“AFN is named after the founder Antonio Hernandez Nogueira, and he basically said we’ve taken him and put him on the world stage, because nobody knew of AFN, but we came up with a design philosophy and we pushed and pushed their envelope so much to change, and they say all the time it’s all been for the better; their business has grown, the company has grown…
“AFN had been making bars for the military for 25 years, and I came along and said, ‘no, all of that is rubbish … I said, ‘If you sell a bullbar to the military, the guy that gets in that car in the morning, he doesn’t own that car, but the guy in Australia who puts it on his car, he owns it, and that’s a huge difference’.
That made them change their way of thinking. We’ve worked hard promoting this, and now when you mention AFN people say, ‘Yeah, I’ve heard of them’.”
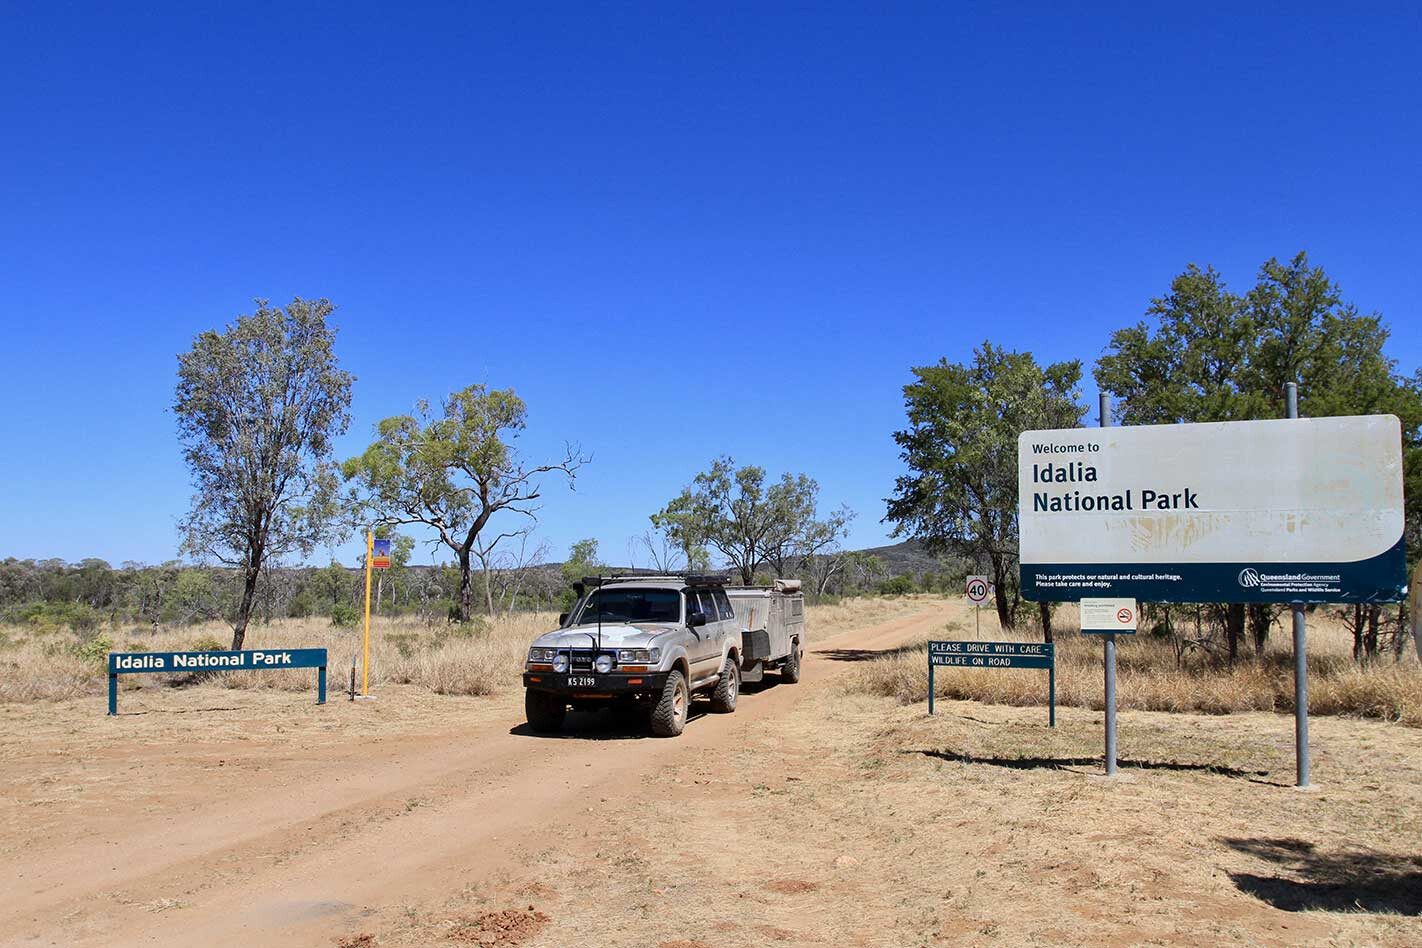
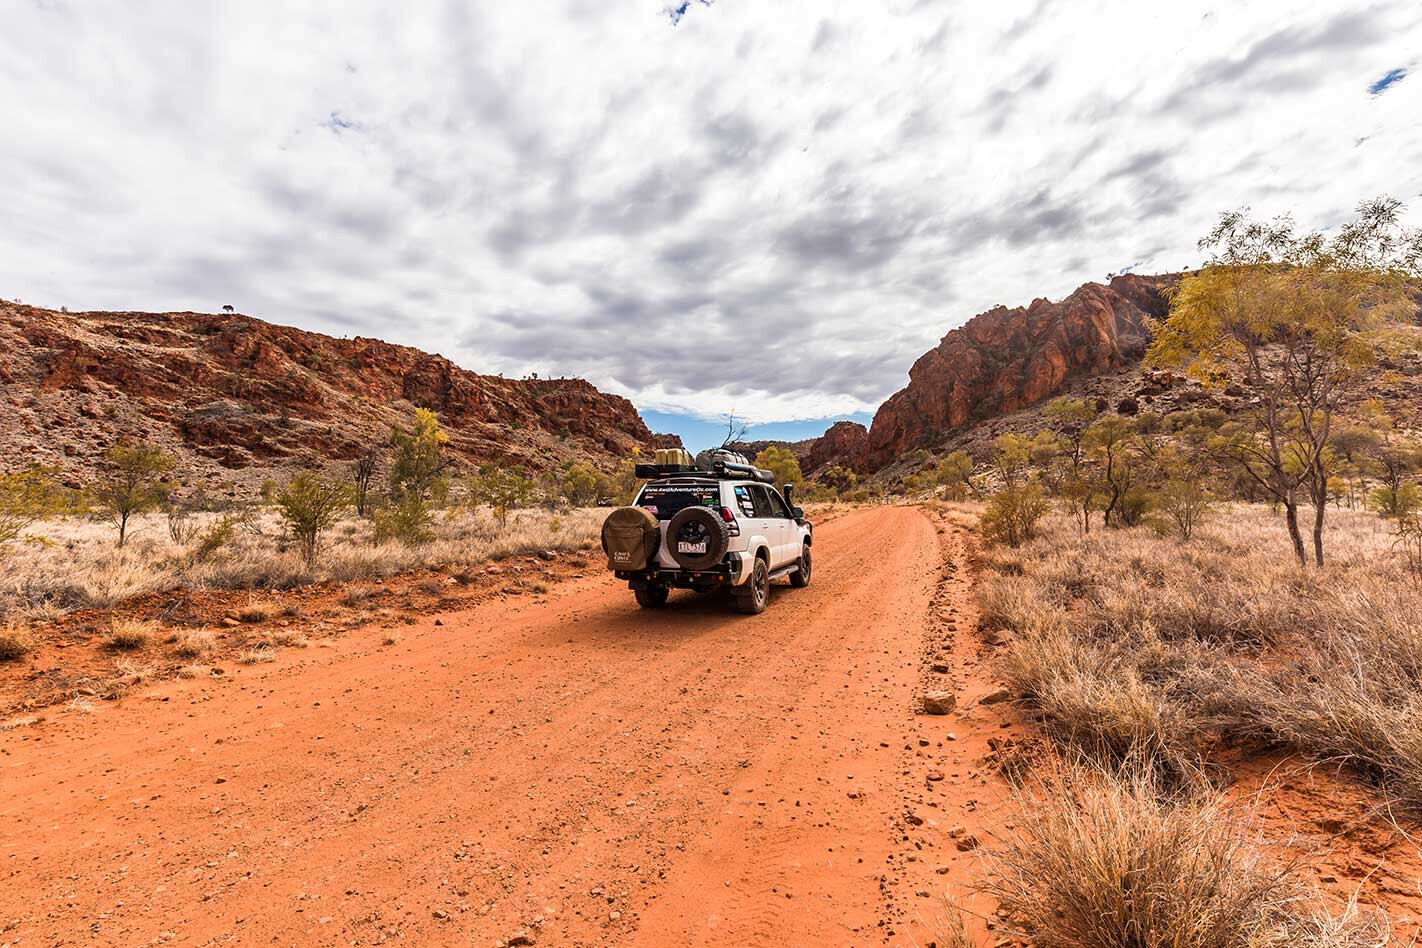
There’s only one way in and out of Idalia, so locating it is an easy affair; it’s a 115km drive southwest of Blackall in central Queensland.
Now, before you attempt to visit the park you need to be confident in remote-area travel and camping, and be self-sufficient in every regard as there is no mobile service out here and seeing another camper just may not happen at all. The dirt drive towards the park sees you skirt around the eastern side through large pastoral stations including Collabara Station, which is now Southern Idalia, until you enter the park.
Jump back to 1919, when Herbert Golding decided it was a good move to purchase 45,000ha here and move his wife and three children to this harsh environment to create a lifestyle. The early years saw them survive in a tin hut as they struggled through droughts, wild dogs, termites eating the fences and then the infestation of the prickly pear.
In 1924 Herbert moved away during the severe slump in cattle prices, but returned early in 1930 after he managed to secure loans for a ‘proper’ home, more stock, a vehicle and miles of netting to keep the wild dogs away from his stock. Unfortunately in 1933 a rogue bull knocked him off his horse during mustering and he died from his injuries; his son George took over until 1940 when Collabara was sold.
In recent times (1990) Idalia NP was formed by combining two pastoral leases – Collabara and Old Idalia – as they were originally part of the huge Terrick Terrick property of the Blackall region.
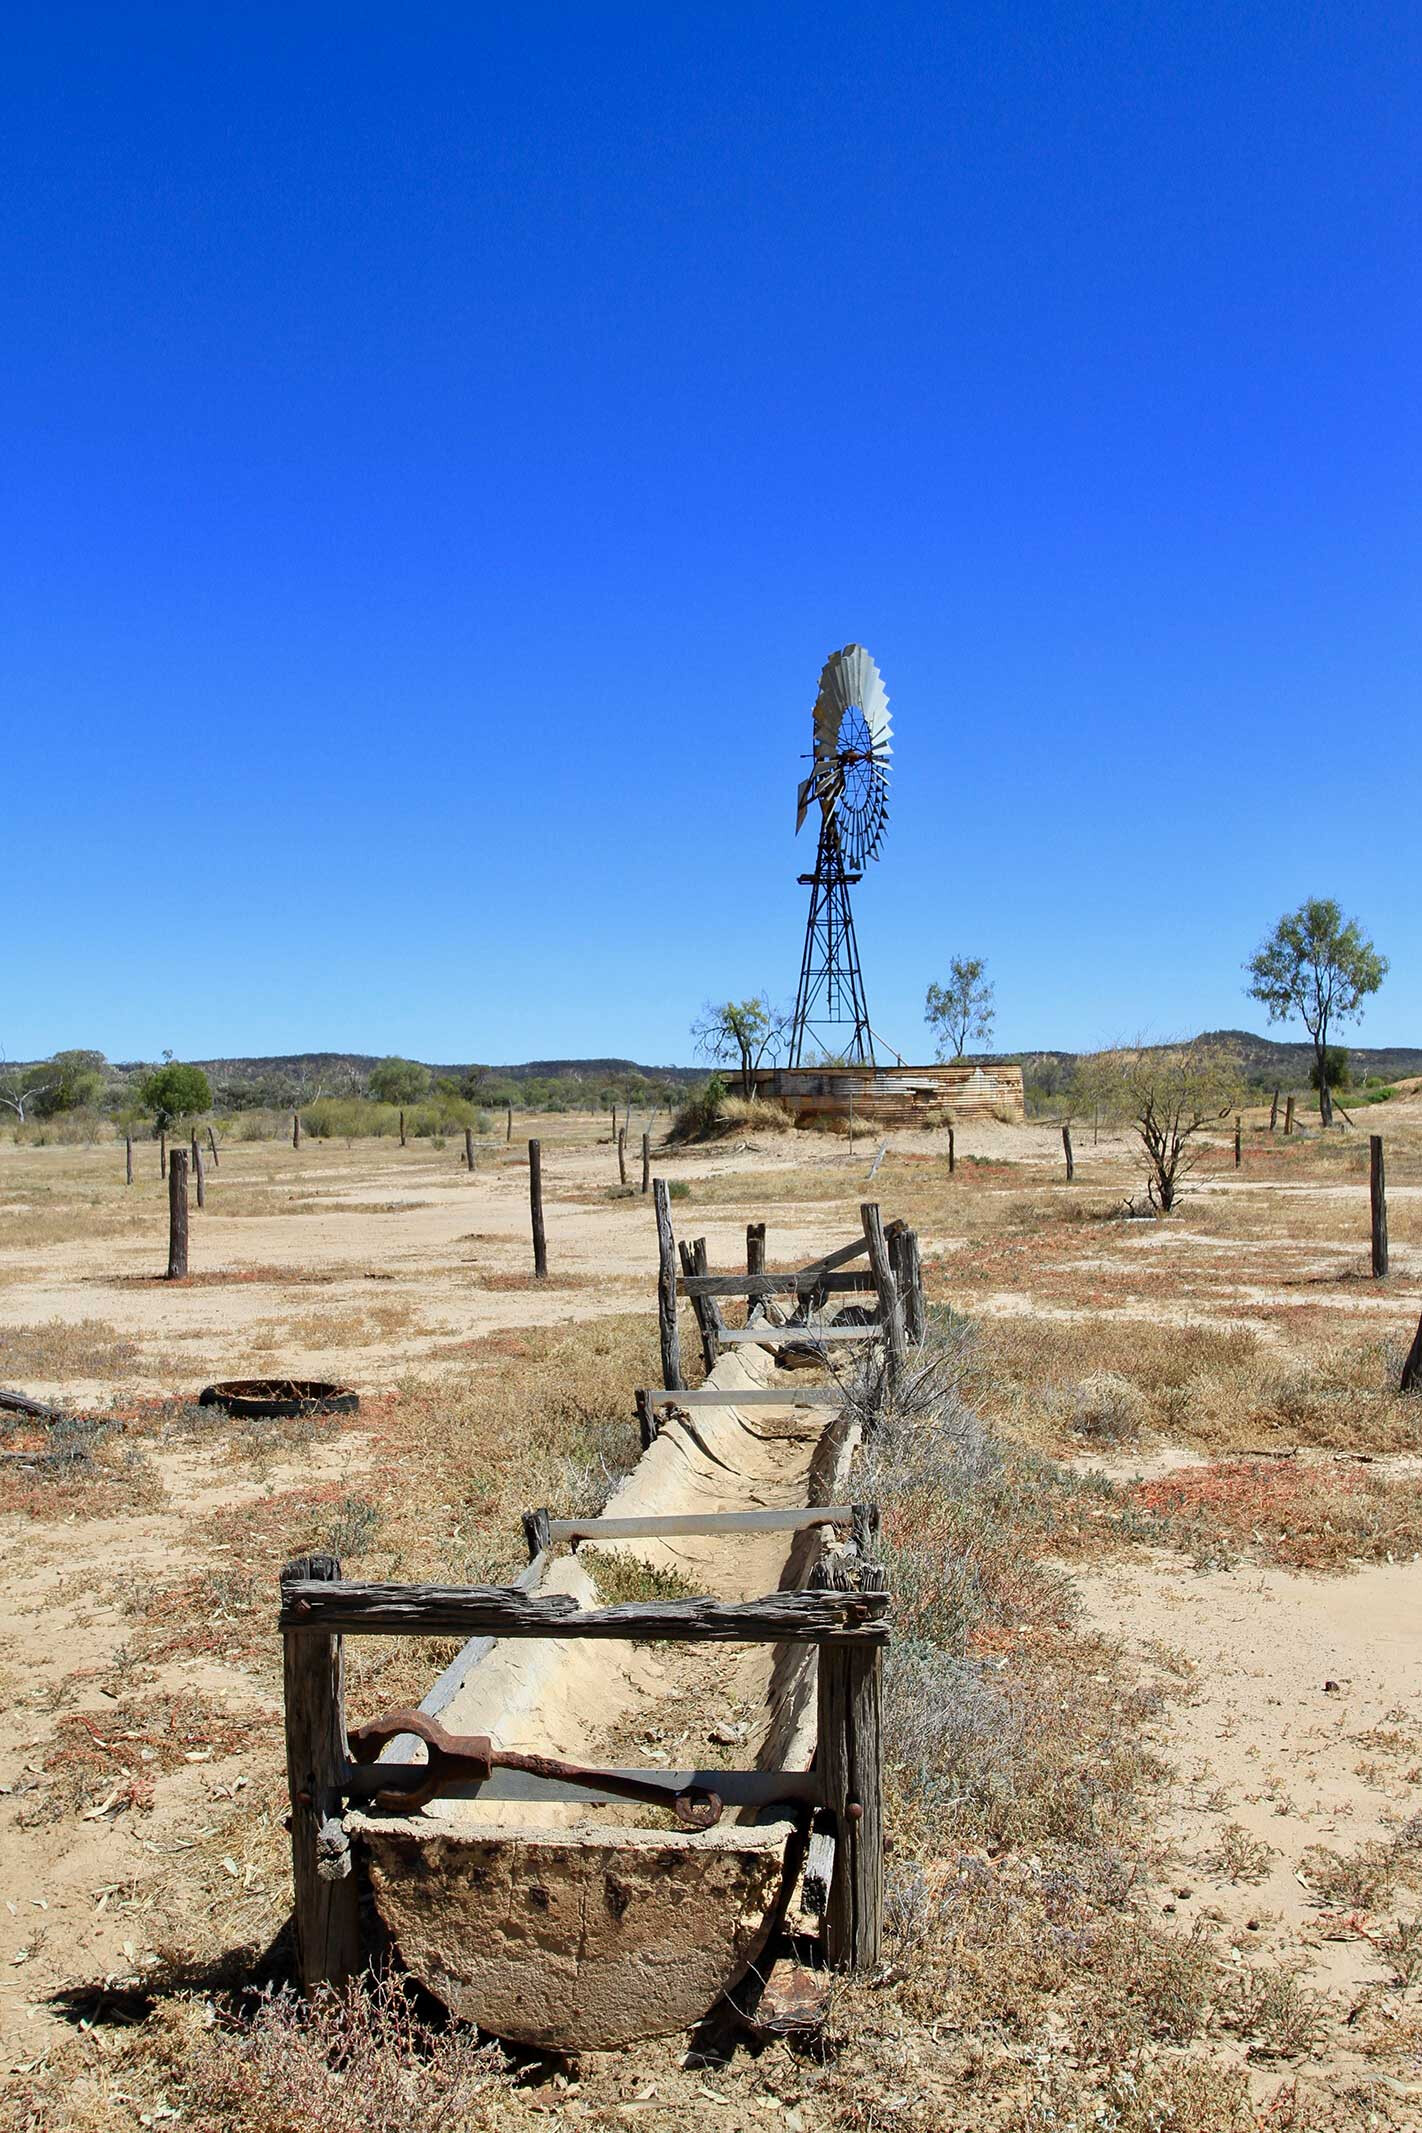
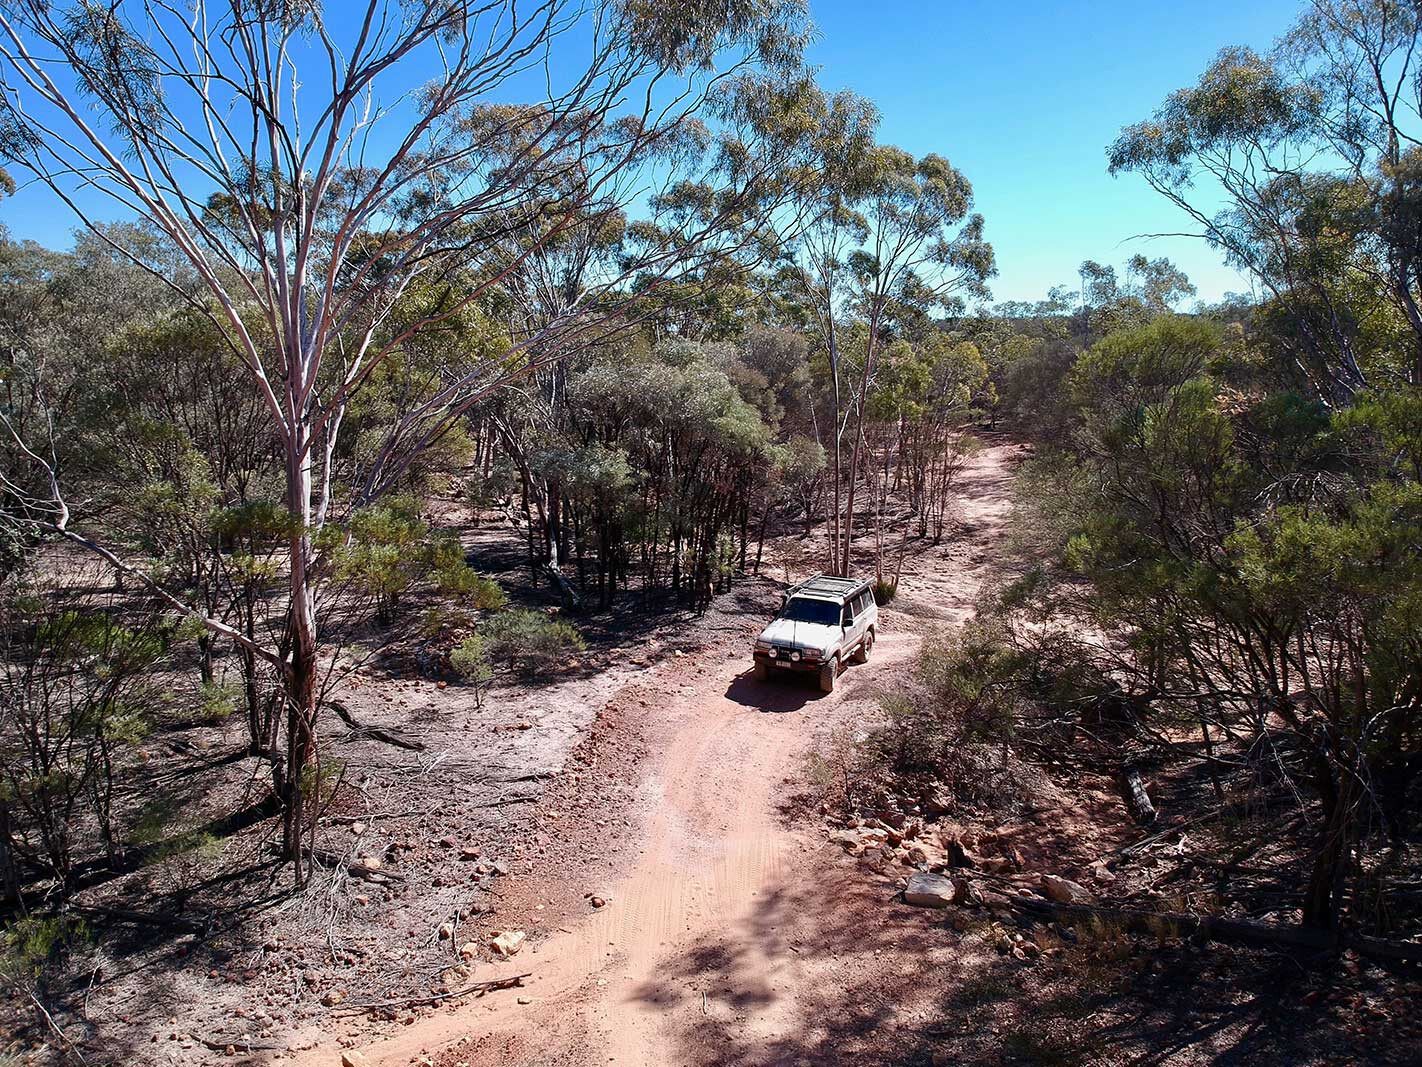
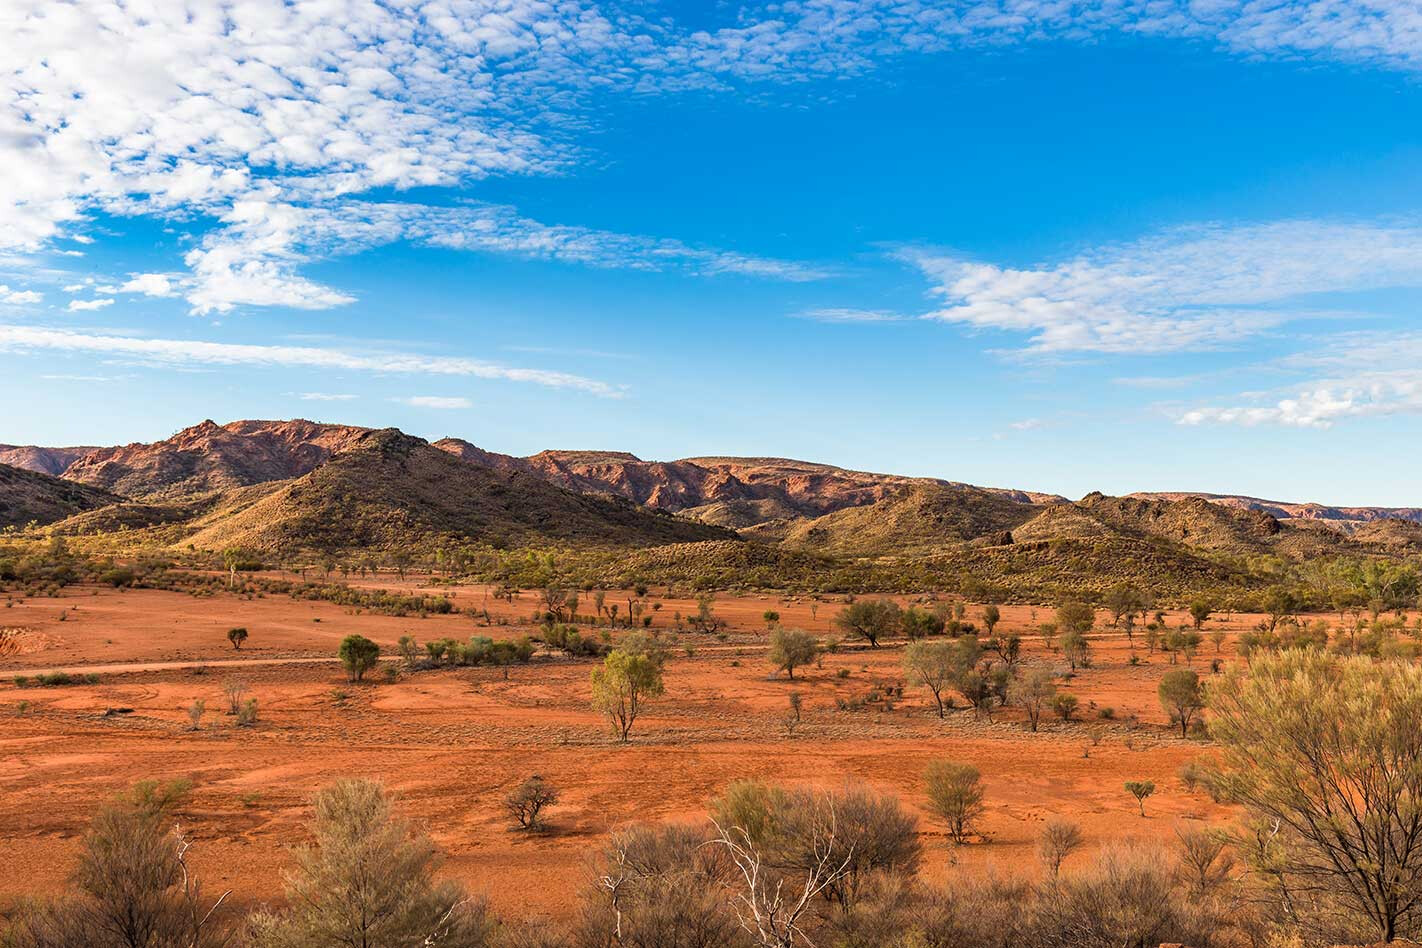
Today there are many relics around the park where it embraces part of the Gowan Ranges and neighbouring plateaus. From the park’s entrance it’s not far to the first set of ruins that include the windmill and tanks, old bores and heritage-listed stake fences. Monks Tank is the only designated camping area in the park and is a 23km drive across open Mitchell grass plains and through mulga woodlands on sandy tracks, best with a high-clearance 4×4.
Along the way, if you’ve got the time, take the turns and explore Old Idalia, where a slab hut once stood which was used as a remote mustering hut. Current reports told us it was still standing, but unfortunately there’s now only a pile of timber, corrugated iron and a few bits of rusty relics scattered on the site.

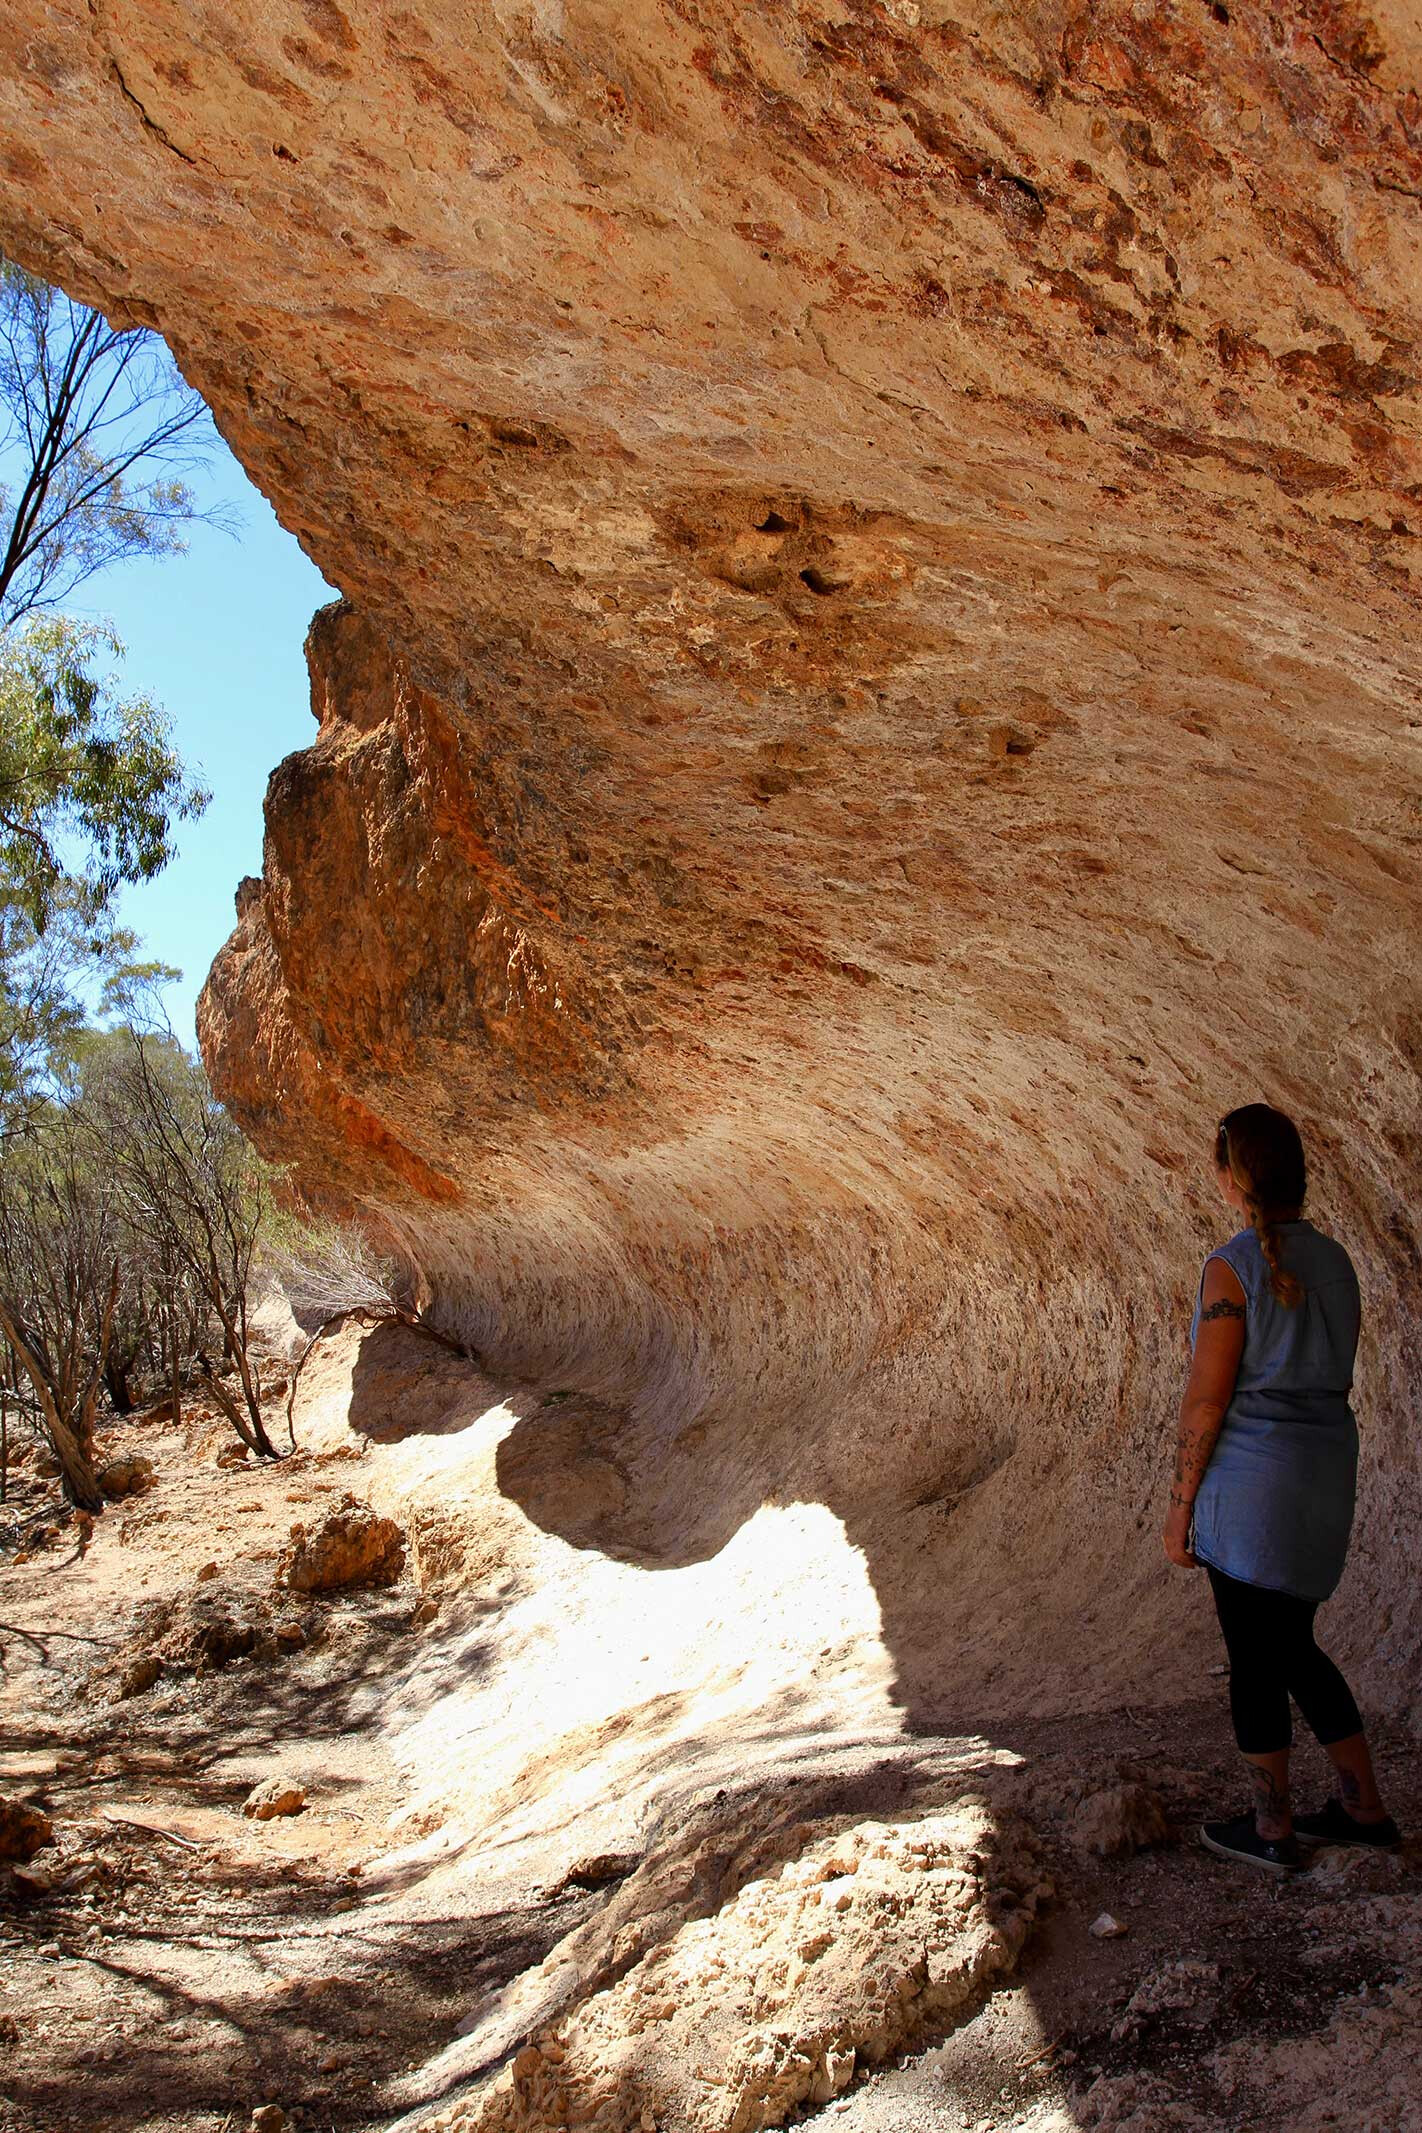
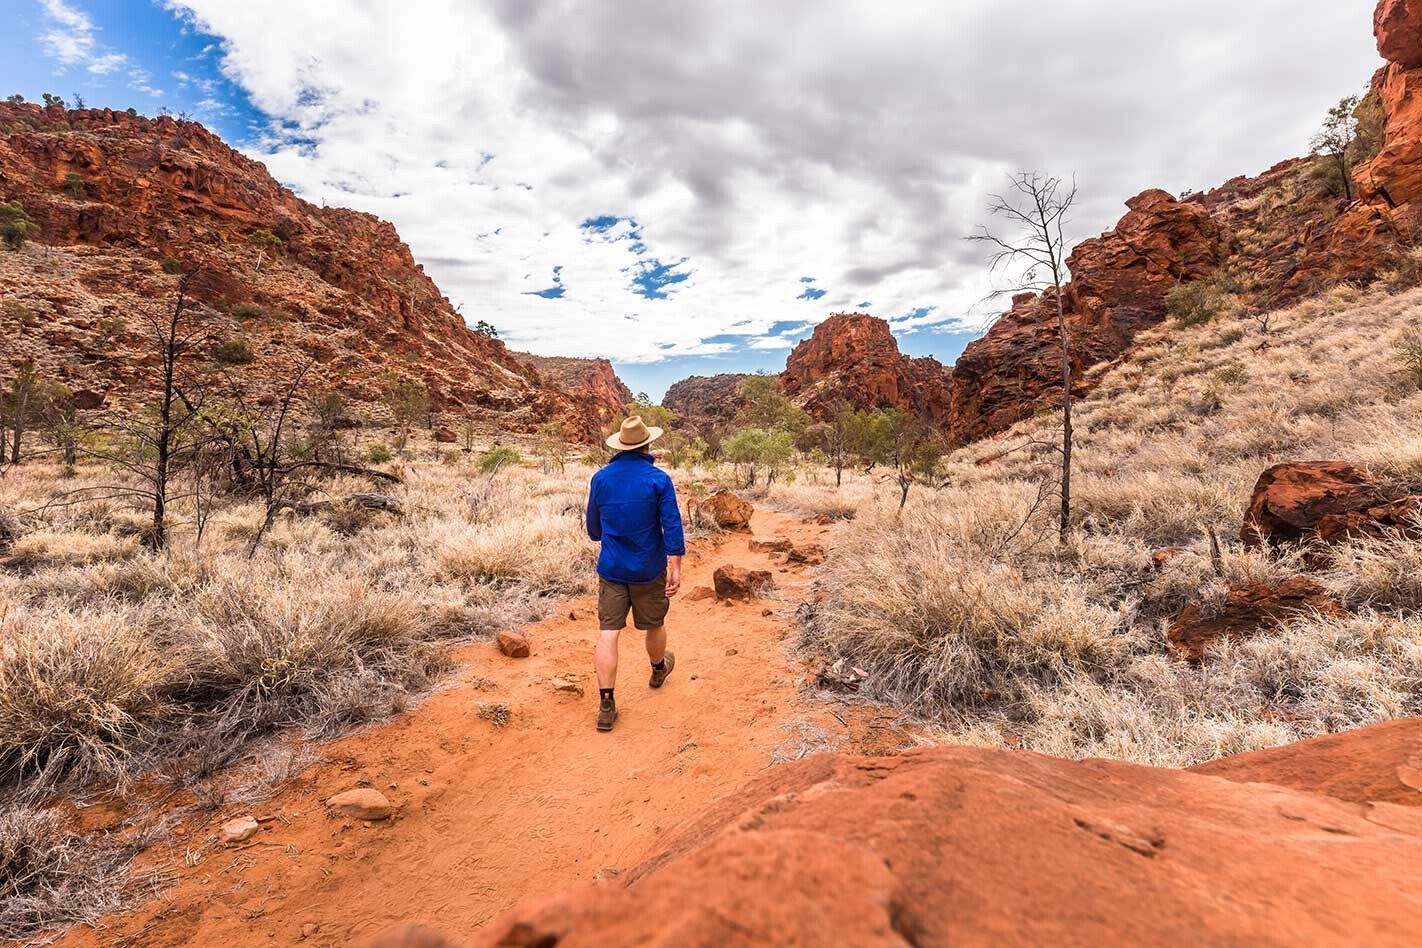
A walking trail behind the rubble leads to Wave Rock, where hundreds of years of weathering has worn away the soft sandstone rock to leave a 100m-long wave-shaped rock, which, for most part, looks like a surfing barrel about to break. For the surefooted, a wander up the trails to the top gives stunning views across the surrounding areas of the silver-leafed acacia trees.
Wildlife in the park includes birds and several species of wallabies; if you’re around during dusk you might see the endangered nail-tail wallaby that once over-populated this area until hunters nearly wiped them out prior to 1930. A nearby reserve has been set up to raise and monitor these animals.
Reading the information boards, Queensland National Parks reports there are six different types of wallabies (or macropods) within Idalia, and they have adapted well to this area by not needing much water to survive. During drought they are not fussy when eating as they are happy to mix their diet between leaves, grass, bark and other animal droppings.
Monks Tank waterhole is very basic with no allocated camping areas, but it does have a decent long-drop dunny all within a thick mulga-wood forest, and it’s a great base to set-up for a few days to explore the other reaches of this remote park.
A short walk from camp are two waterholes that are a haven for what seems like dozens of varieties of birds, especially at sunrise and sunset. Bird lovers have reported an array of different parrots, finches, robins and bellbirds in the park. While not expert bird spotters, we did see about a dozen different types, as well as tiny marsupial footprints in the red sand around the camp each morning.
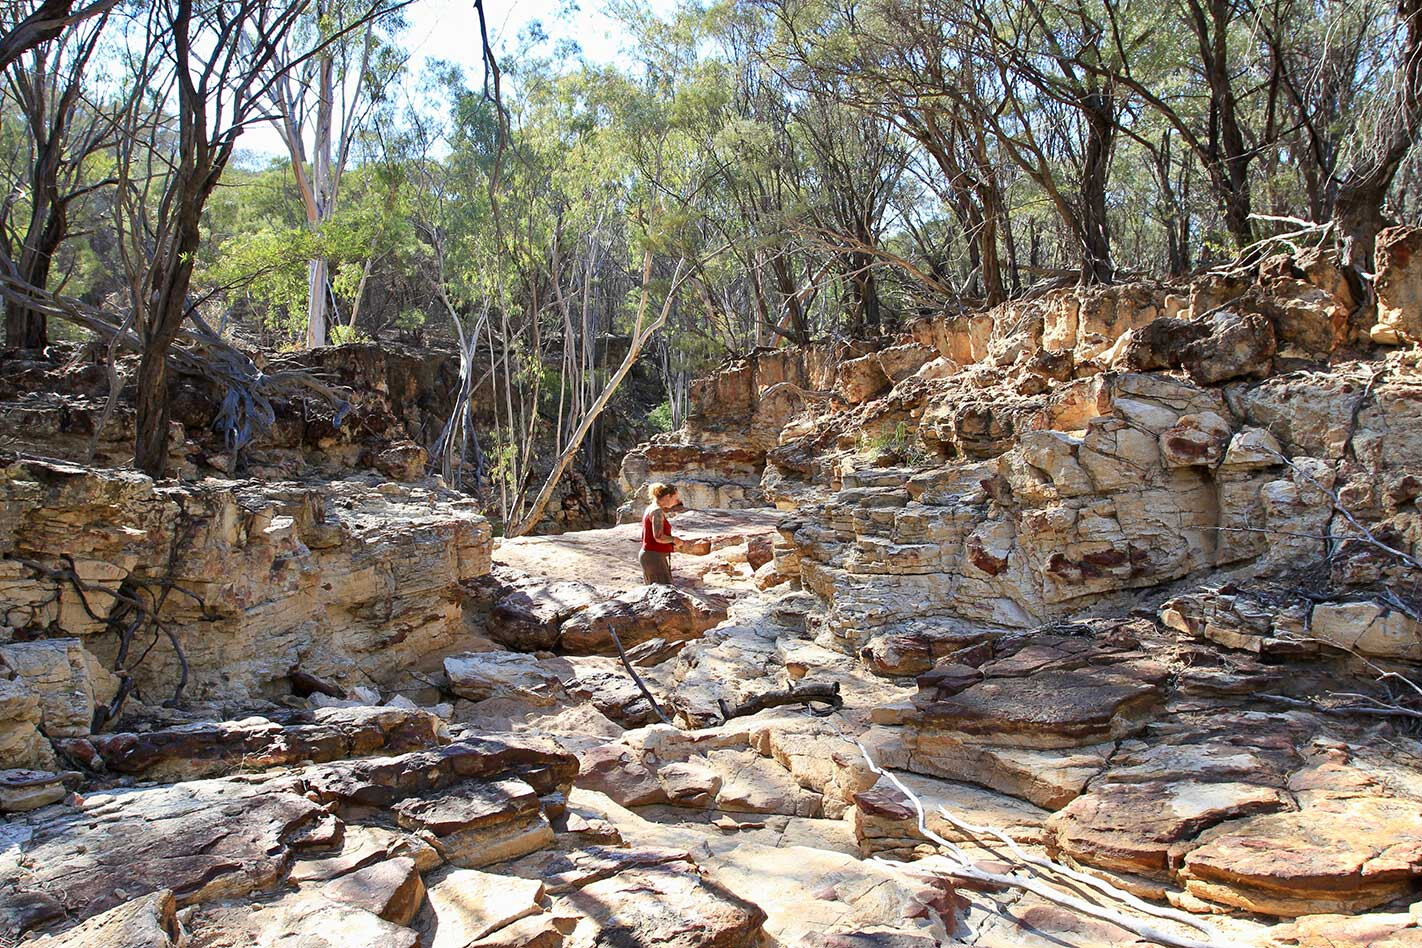
Heading out from Monks there are several areas to explore in the more remote regions of the park, and with only one road to follow, navigation is a no-brainer. About 10km away from Monks is Rainbow Gorge, where you can walk along an old creek that, thanks to erosion, displays a mass of different-coloured sandstone rock.
Water through here flows fast and furious, tumbling over huge drop-offs and gouging out more soft substance to expose hard rock. Even in dry times, the colours shine in different lights and it’s a nice surprise in this otherwise harsh environment.
The next stopover is Murphy’s Waterhole, where a narrow gorge surrounded by huge gums has been weathered away over time. We read that this spot is one of the farthermost inland places koalas can be spotted, but unfortunately we saw none during our gorge walk. Gnarly red gums give shade to the deep gorge, and in wet times it would certainly be a spectacular sight to watch the water flow gracefully through here.
The roads change between long, sandy straights and rough little pockets of rocky undulating creek crossings, and considering where the park is located these variations are unexpected. About 12km away is Emmet Pocket, which is a favourite for photographers and hikers as the views across the mulga plains are to die for. The walk from the carpark to the cliff line is a difficult and rough three-hour hike, but is a must if you’ve already made the effort to explore the outer regions of the park.
Last but not least is Bullock Gorge, which is a 30-minute drive to the east from Emmet Pocket. Again this walk is only suitable for the experienced due to the steepness of the track along craggy escarpments, where different layers of the mulga trees and acacia woodlands look like a huge map in the distance. Some 100 million years ago this was the seabed of an ancient ocean.
The remoteness of Idalia NP might not appeal to everyone, but for nature lovers it should be on their to-visit list. Despite its harshness, there are touches of delicate beauty where native fuchsia shrubs give a blush of crimson when in bloom and petite paper daisies flower at any sign of moisture in the air.
Queensland Parks allows mountain bike riding on designated trails within the area, but you should only cycle in the cooler months and carry plenty of water. We spent a few days here and saw no other souls, so you can’t depend on anyone else for help – Idalia is a seriously remote park. There are no bins and no drinking water; be on the lookout for any park warnings and don’t forget to carry plenty of fuel as the nearest servo is 115km away at Blackall.
Exploring here in the cooler months between April and September will give you cool nights (and hopefully no fire ban) plus warm days to enjoy the area. Even though you probably won’t see another camper in Idalia for days, bookings must be made online before you head to the area, as mobile service is non-existent for many kilometres.
Idalia is the perfect place to capture the essence of harsh remoteness in central Queensland, but it’s still a fragile environment where we need to look after the history as well as its flora and fauna. It’s a place to get back to nature, whether that’s hiking, taking photos or just relaxing, and it really is a spot where you can savour the freedom of the outback.
Essential Travel Tips
Campsite bookings: https://parks.des.qld.gov.au/ Fuel: Blackall (115km away) has three service stations. Maps: Hema ‘Outback Queensland’
The age-old saying ‘you only get out what you put in’ couldn’t be truer than it is with four-wheel drives. Want more capability? Put the parts in. Want more talent? Put the work in. Want to find yourself standing at the start of endless dirt roads and a thousand possible adventures? Flip your boss off, slap the credit card to the dash and head off into the sunset.
On occasion, however, the saying ‘you only get out what you put in’ can be a little too literal, and it’s nowhere near as fun when that happens.
You see, like us specimens of male health here at 4X4 Australia, your 4×4 is a finely tuned machine. And just like we require a very specific diet of Friday beers and burnt campfire snags, your 4×4 needs an exact diet to stay fighting fit so it’s able to take you on those previously mentioned adventures.
In most cases the complicated engine control unit will keep everything metered spot on. The right amount of air, the right amount of fuel, the right amount of combustion – it’s the perfect recipe to get you on the tracks. However, much like a peace-keeping mission in the Middle East, things don’t always go to plan.
Over the next few pages we’ll be taking a look at the three vital ingredients required to make your diesel or petrol 4×4 live a healthy life, and what kind of preventative measures you can take to ensure it stays firing on all cylinders.
Maintaining a fuel filtration system
When it comes to foreign bodies killing your 4×4, dirty fuel is right up there, especially when travelling to the more remote corners of Australia.
While all internal combustion engines are susceptible to damage, none of them are quite so much as the common-rail diesel engine. Older mechanical injection systems like Nissan’s trusty TD42 typically ran around 1500psi of pressure in their injectors. Current generation common-rail diesels bump that figure up 2300 per cent to a whopping 36,000psi, which is enough to cut through a grown man’s hands.
The result is that every component in the fuel system is running that fine a tolerance, and that fast, that even the most minute spec of dirt can slice the fuel pump and injectors to shreds. The resulting poor spray patterns can cause your engine to burn excess fuel, billow soot and, if the injector dribbles fuel, create hotspots on the piston leading to a hole and the need for an engine rebuild.
While particles in your fuel are a serious issue, the main factor most people will come across is water contamination. There are three different ways this typically occurs, and they’ll need three very different methods to combat them.
The first and biggest one to keep an eye out for in a 4×4 are river crossings. Sinking your 4×4 to the belly pan in deep water is an expensive way to test your fuel system’s weather sealing. Split low-pressure lines, breathers or improperly sealing fuel caps will all allow water to enter the fuel system. A new cap and a few metres of hose in an older rig are enough to prevent these issues.
Because of science, diesel fuel tanks are far more likely than their petrol counterparts to suffer from excessive condensation build-up, especially in colder areas. Over time this condensation can build up, leaving a layer of water in the bottom of the tank waiting patiently to be sucked into your fuel pick-up. Luckily it’s a relatively small volume of water, and keeping your tanks as full as possible will reduce the air volume and potential condensation build-up.
Finally, the horror stories we all hear: dirty fuel from outback service stations. Just like your 4×4’s fuel tank, low turnover (and low tank quality) can lead to water contamination sitting in the bottom of fuel tanks. It’s also present in urban servos, though less likely. It’s typically a major issue after a fresh batch of fuel has been poured in and the water is stirred up with the fuel.
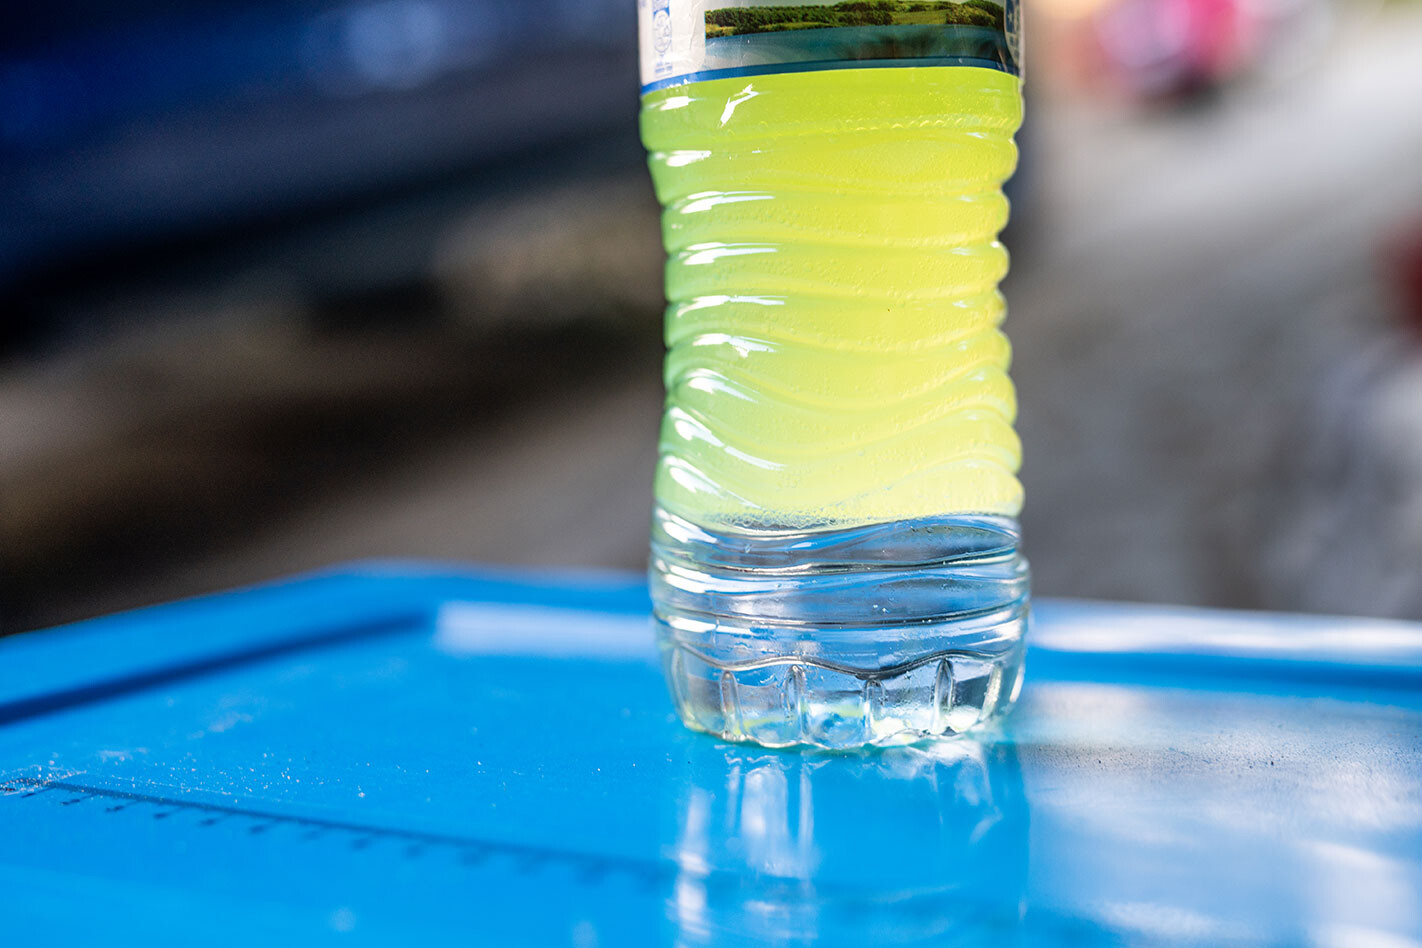
If you’re suspect of the fuel you’re getting, squirt a little in a dry water bottle before filling your tanks. A quick swirl will push the heavier water to the bottom clearly showing any contamination.
The last line of defence, and it really should be considered the last line, is a pre-filter and water-separator kit. There are pros and cons for pre- and post-filter setups, which we’ll go into on another day, but a water-separator kit is a no-brainer. They typically work as a centrifuge, spinning the fuel and forcing the heavier water to the bottom.
Kits will either run a glass bowl requiring inspection or an internal sensor that’ll sound a buzzer, alerting you to the presence of water in your fuel, hopefully in time to shut the engine down and drain the fuel system.
Maintaining an air filtration system
If fuel contamination has turned your brain to goo, don’t stress, air contamination is a much simpler problem and one pretty easily solved.
Like your fuel system, your engine’s internals are machined to fine tolerances for a variety of reasons. The first is to maintain compression. Without that, the pistons cycling won’t be able to properly form compression, so the air and fuel mixture will simply slip past the gaps rather than push the piston down giving you drive.
The second is to keep your engine properly lubricated by cutting a cross-hatched pattern into the cylinder walls, giving the engine oil something to stick to.

Introducing airborne contaminants into this mix acts like a sandblaster, eating up and smoothing down anything in its path, smoothing out the cross hatching and removing your engine’s ability to properly lubricate itself, resulting in catastrophic internal failure. Issues can also rear their ugly heads in the form of worn valve stem seals and piston rings causing excessive oil consumption, low power output and hard starts.
Engine ancillaries are in the line of fire, too; dust contamination before the turbo can eat it to pieces, while air-intake sensors can also get confused and cause problems such as the widely reported Mass Air Flow meter problem with some Toyota 1GD-FTV Hiluxes, causing engines to go into limp mode.
Unlike fuel, you’re not likely to pick up bad air at a service station, so solving these issues is more a case of minimising the amount of dirty air going into your air-intake and making sure none makes its way into your engine.
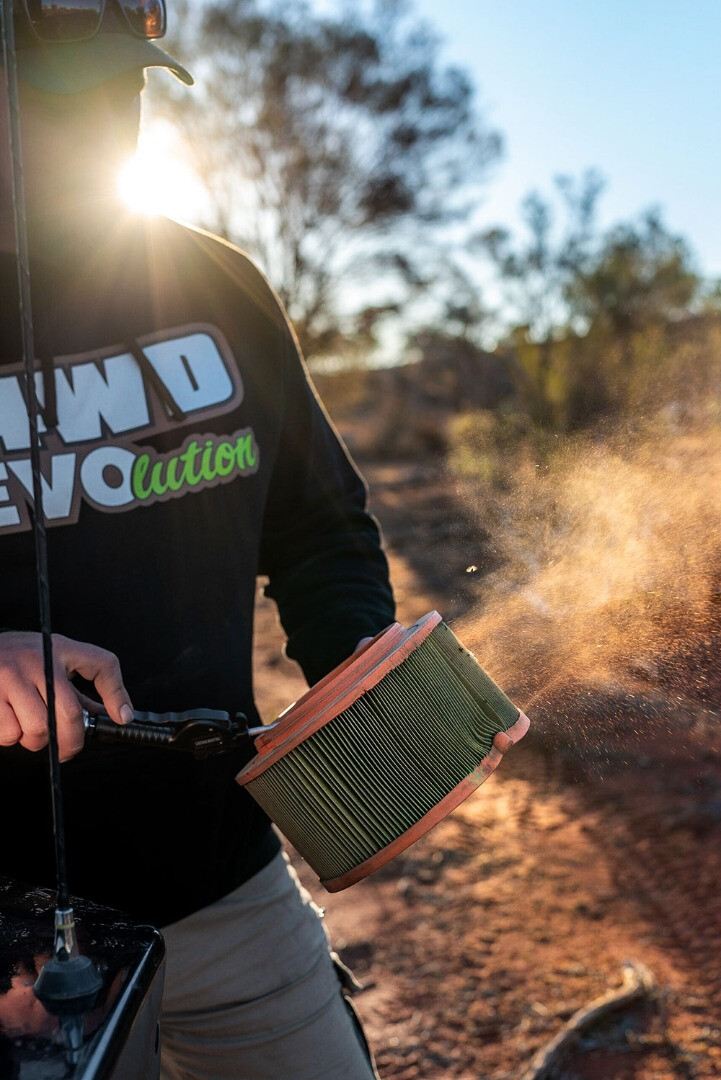
First things first: run a snorkel. Dust is heavy and likes to stick as low to the ground as possible. By raising the air-intake up a metre or so above the spinning wheels you’re already doing your engine a favour. Likewise, running a rearward-facing snorkel, or spinning your snorkel head backwards, can reduce the amount of dust ingress. Snorkel pre-filters can be used to further cut down dust ingress.
From here you’ll need to address the air filter. In most cases the OEM air filter element is fine enough to remove any particles in the air. A cleaner air filter isn’t always better, though, as a build-up of contaminants on the atmosphere side can help improve filtration levels. You’ll want to pay close attention to the sealing of the air filter, though; any dust on the engine side of the air filter is a sign there’s a problem with the filter itself, or the filter isn’t sealing properly. A light smear of grease on the edges can fix this.
Finally, and one people often forget, is that after the air filter there’s still a long system of potentially vulnerable pipework to the engine.
Modern sensor-laden engines are less susceptible to undiagnosed intake leaks, but it’s still worth checking the intake plumbing. Petrol engines can be checked by starting the engine and then spraying Start Ya Bastard along the length of pipework between the filter housing and engine intake, and listening for any rise in idle speed. Diesel engines will typically need to be checked over by a mechanic to detect any leaks in the intake system.
Maintaining an oil filtration system
If you thought contaminant issues were only caused by things you accidentally allow into your 4×4, you’re unfortunately mistaken, and possibly in an expensive way. Just like your engine needs its air and fuel to be in tip-top shape, the oil keeping the whole shebang together is just as susceptible to contaminants.
In perfect working order your oil should be thick enough to properly lubricate all the moving parts inside your drivetrain, yet thin enough to make its way through the engine from top to bottom, even in the dead of winter. And soapy enough to prevent carbon build-up in the oil galleys, carrying contaminants to the oil filter ready to be physically removed when you next have your vehicle serviced.
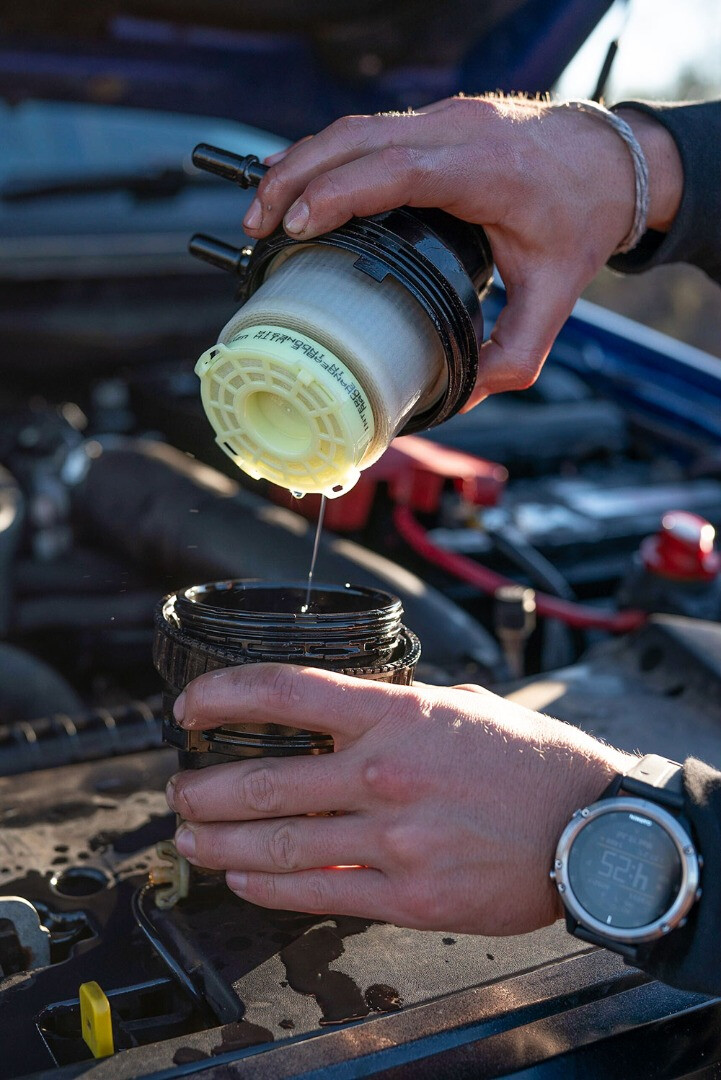
Over time diesel soot from engine blowby and metal particles from bearing and ring wear cannot only affect your oil viscosity, reducing cold-start lubrication, but can also increase wear on internal components, drastically reducing your engine’s working life. Luckily, regular oil and filter changes are enough to prevent these issues.
When you next drain the oil from your engine, set some aside for an oil analysis. This is one of the most powerful diagnostic tools at your disposal and will help identify any underlying issues such as slow coolant leaks through seal degradation.
Why you should pick the more expensive option
As soon as you talk popping-the-bonnet, many 4×4 owners fall back into the typical argument of “the manufacturer designed it that way”… and that is true. After all, vehicle manufacturers spend millions on research and development to put these vehicles on the road. The problem is, and it’s a doozy, this argument tends to forget about capitalism.
These manufacturers aren’t doing the world any greater good by producing the very best 4×4 they can; they’re doing it to make money. It’s the reason new 4x4s don’t roll off the factory floor with lightweight alloy wheels, high-end bypass shock absorbers and 1000Nm V8 diesel engines.
Let’s do the maths. Over a 12-month period Ford Australia sells around 40,000 4×4 Rangers. At a typical retail cost of $50,000, that equates to a $2 billion turnover a year in Rangers alone, just in Australia. By not installing a $100 filter that most city-dwellers won’t even need, Ford can save roughly $40 million over the typical 10-year sales life of the model. Kinda makes sense now why they might save money on gear most customers won’t really need.
Drive 4 Life is a non-profit organisation set up by a group of long-term four-wheel drivers, with the objective to raise funds for charitable organisations that don’t have a high profile and therefore have difficulty raising enough funds to achieve their annual objectives.
The main beneficiary over the past few years has been Northcott Disability Services, which was established as ‘The New South Wales Society for Crippled Children’ in 1929 by the Rotary Club of Sydney in response to the growing number of children left with the effects of illnesses such as polio and tuberculosis. Prior to this year’s second event, funds raised to date totalled $813,500. Each participating vehicle pays $1000 to join the trip, with all funds going directly to Northcott.
No event like this could run without the support of sponsors and, since its inception, Drive 4 Life has been supported by 4X4 Australia magazine, ARB and IGA.
Corner Country
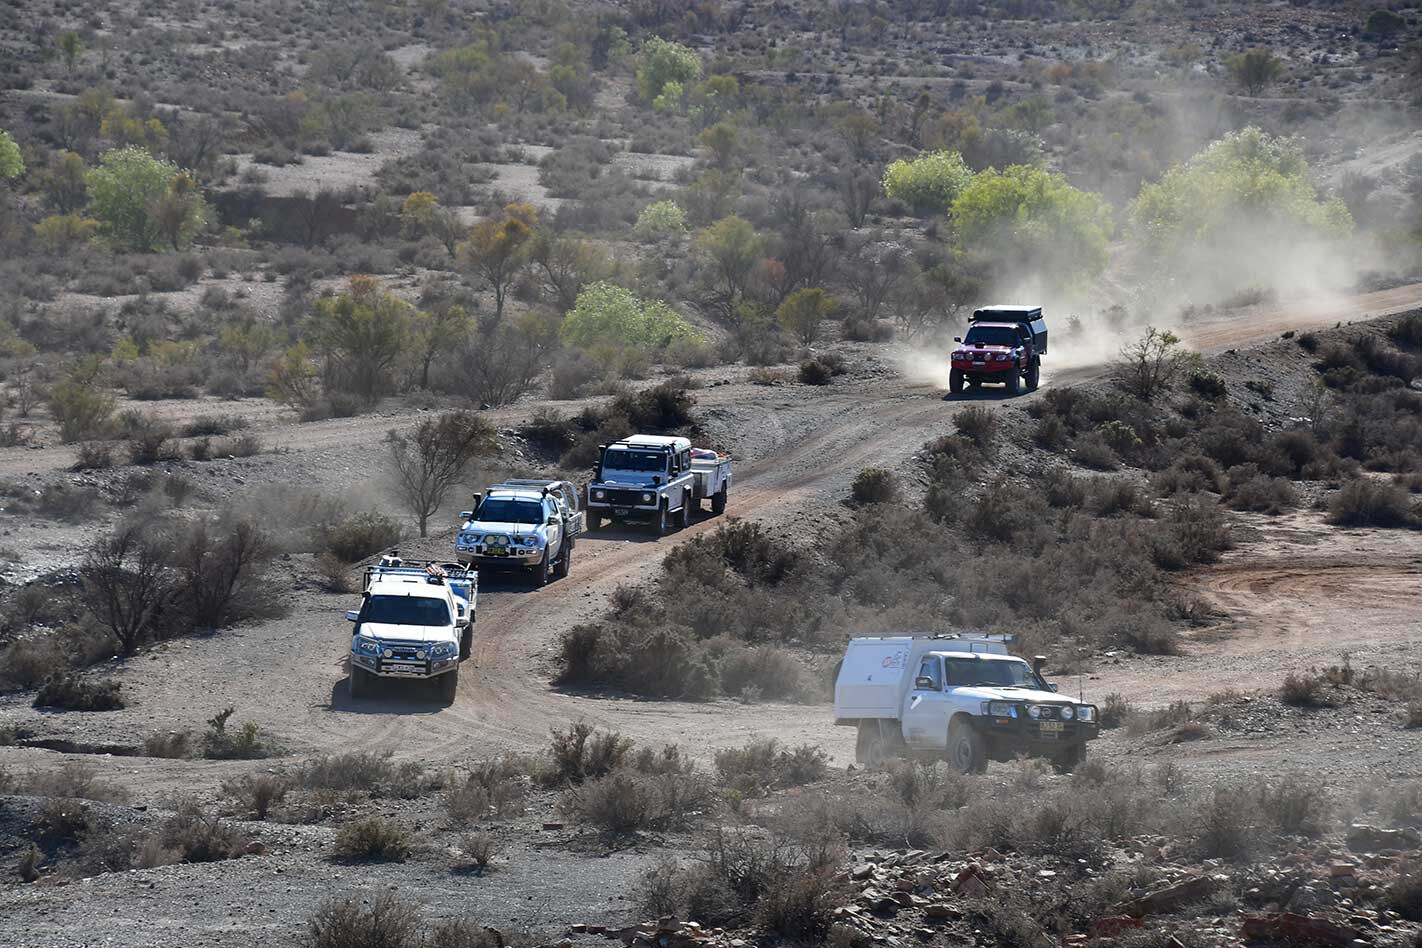
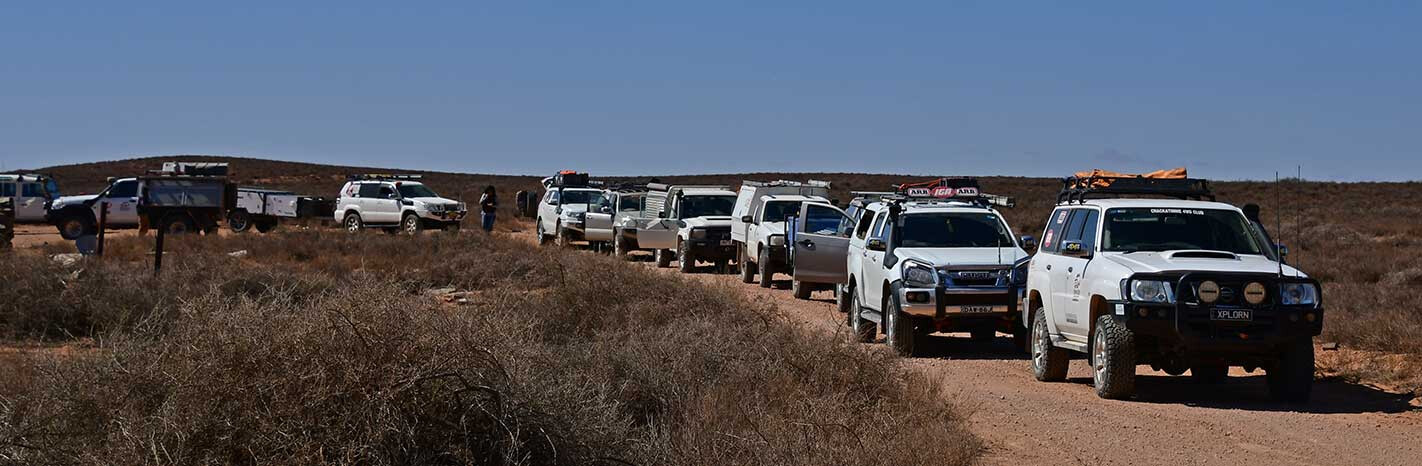
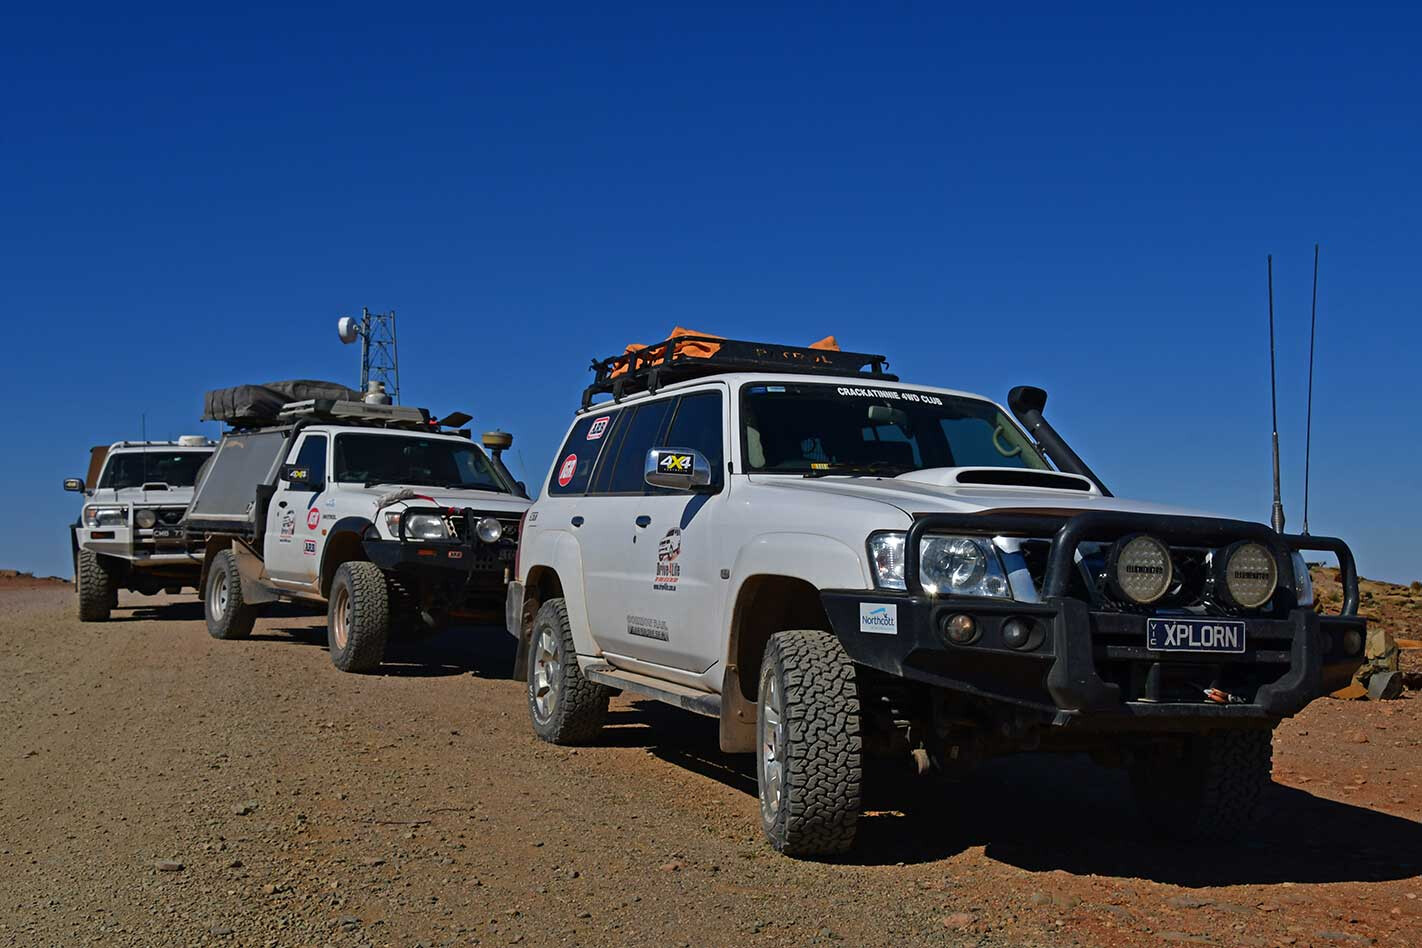
On the first day of spring, excited participants from 24 vehicles gathered at Broken Hill’s racetrack for a meet and greet with organisers and group leaders. Vehicle checks were conducted and sponsor stickers were applied to each vehicle. Leading the first group was Borgs and Wendy, along with Richo and Gay, while the second group was led by Mick and Brute, assisted by Noel. About half of the trip participants were towing camper trailers.
On Monday morning we again met at the racetrack and, after speeches from organisers Mick Whitehead and Chris Bates – and the obligatory group photo shoot – we were on our way. The two groups went in different directions, but both would basically visit the same areas.
While group one headed towards Peterborough, group two made tracks for Silverton to drive through the town and take a trip out to the original mine site, where there is still plenty of evidence of days long since passed, including the poppet head. We soon hit dirt for the first time and were reminded of the harshness of the land that is currently experiencing a soul-destroying drought.
The first night was spent by the creek below the Albert Hotel at Milparinka, which was first licenced way back in 1882, two years after gold was discovered at nearby Mount Poole. It is hard to imagine, but this area once had a population of 2000 people. We had a great night around the fire getting to know a little about each other.
The next day we were greeted with stunning weather, and before long we were out on the tracks heading for the historical town of Tibooburra. While in town we popped into the Family Hotel, well-known for the murals that adorn its walls – the most famous is the large mural painted by Clifton Pugh, which takes up an entire wall beside the bar.
It was then on to Cameron Corner, where the borders of South Australia, New South Wales and Queensland intersect. For those who hadn’t ventured here before, this provided the opportunity to stand in three different states at the same time. The store here is renowned for its hamburgers, and most of our group lined up to sample one.
It was time to head west along the Strzelecki Track and eventually make our way down to Montecollina Bore, our base for the night. It was here in 1903 that a bore was sunk to provide a reliable water source for travellers and stock.
The group was lucky as three members of the original Drive 4 Life committee were among us, including Norm and Dave who had spent numerous trips traversing the area. They’d came up with some interesting routes that would see us pass through some magnificent vistas.
On Wednesday morning we headed east and passed through old homesteads such as Wooltana, a pastoral lease that operates as a sheep station. Dating back to 1856, the homestead was established by John McTaggart who had arrived from Scotland just a few short years earlier.
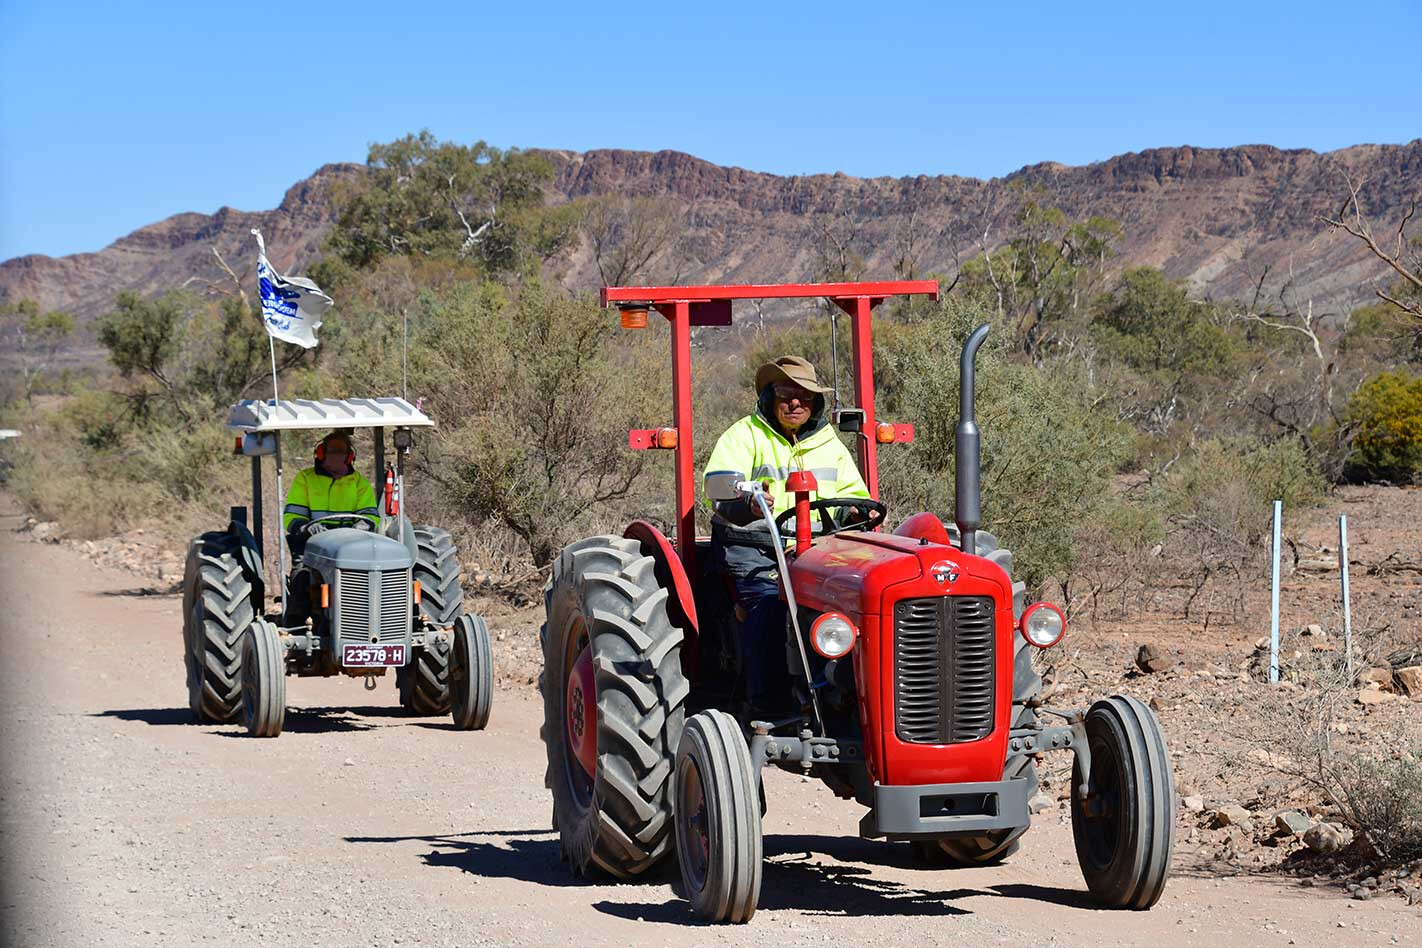
While it is common to encounter convoys travelling in the opposite direction, an amazing spectacle we witnessed was the 19 Massey Ferguson tractors following each other. They all gave us friendly waves, with one of the drivers yelling out: “Yeah, we’re all bloody mad!”
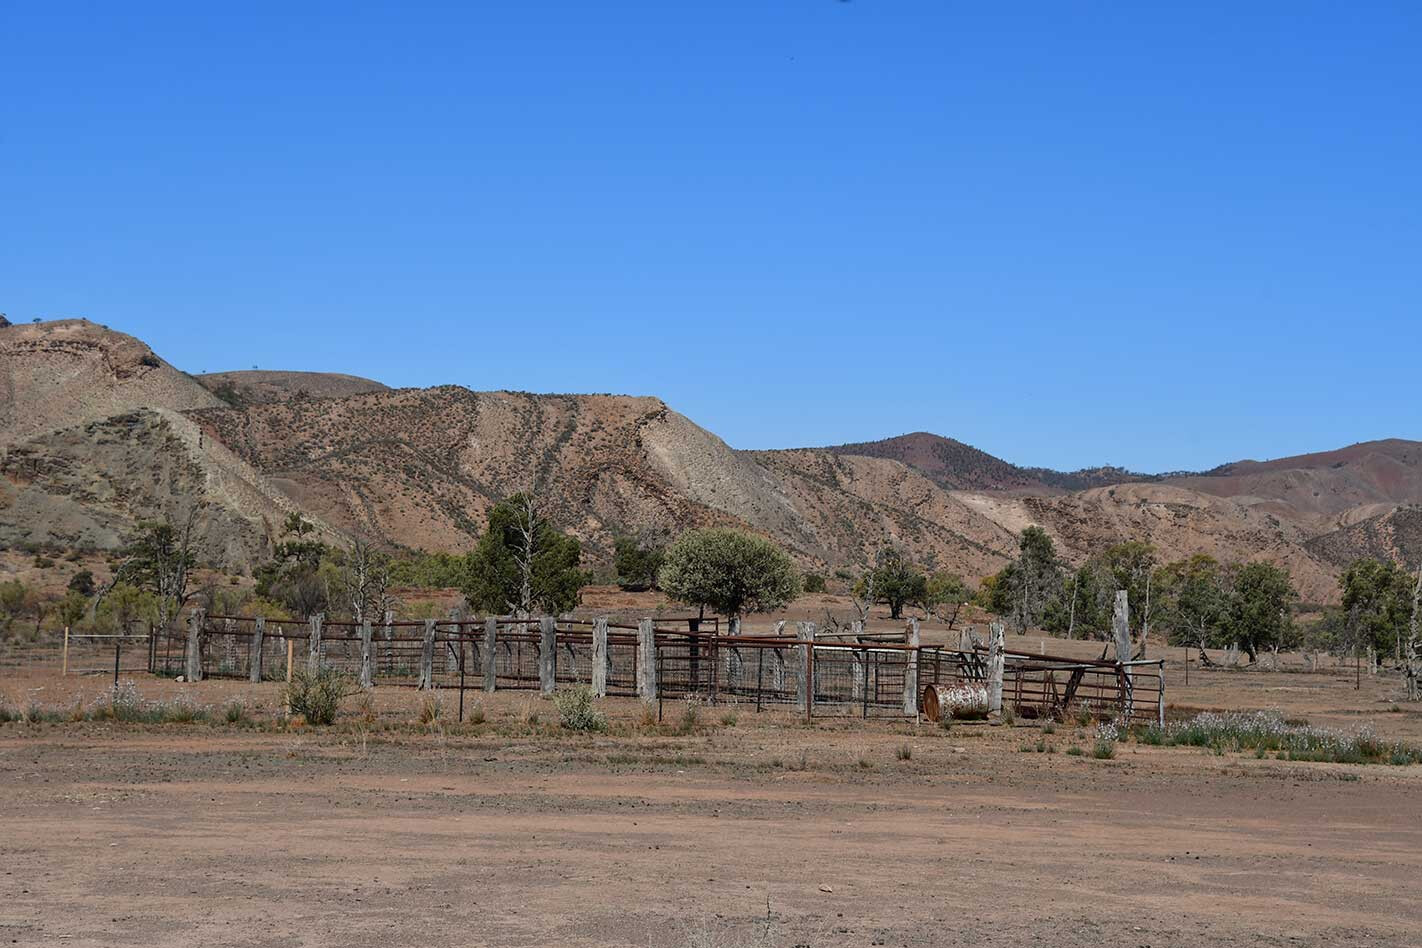
By now we could see the spectacular Gammon Ranges − a postcard photo just about everywhere one looked. Our first stop was at Balcanoona, which was also once a sheep station and is now part of the Vulkathunha-Gammon Ranges National Park. From here we drove out to Arkaroola, before heading for camp.
Into the Flinders
The night was spent at the Farina camping area, where a war memorial dedicated to the men from the area who served in the two World Wars is situated above the campground. There is also a plaque for each of the nine poor souls who paid the ultimate price while defending their country. Most of the group watched the sun disappear from up here, with a quiet drink or two.
On Thursday some of the group had booked to fly over Lake Eyre out of Maree and they left early to meet the pilot, while the rest of us had a wander around the ruins of the old town. Farina is on the Old Ghan Railway line and was once a bustling town, which had a peak population of approximately 600 in the late-1800s.
In its heyday, the town had two hotels (the Transcontinental and the Exchange) and an underground bakery, a bank, two breweries, a general store, an Anglican church, five blacksmiths, a school, and a house of ill repute. A group called Friends of Farina is dedicated to restoring parts of the old town.
Dave and Norm, who were leading the group for the day, guided us down to the Lyndhurst Ochre pits. These colourful pits are of great heritage significance to the local indigenous people, and the ochre was used in ceremonies, medicine and art, as well as a product of trade. We then headed to the old town of Beltana, where the railway arrived in 1881, transforming the place with an influx of construction workers, sleeper cutters and teamsters.
The rest of the day was spent travelling through the picturesque Parachilna and Glass Gorges, before arriving in Blinman by mid-afternoon where we were to meet up with Mick and those who had flown over Lake Eyre.
News arrived that Chris Bates, who had been travelling with group one, had sustained an eye injury and was being flown from Leigh Creek to Adelaide that evening. This meant Mick had to bring Chris’s truck back so Norm could eventually drive it back to Sydney.
By now it was too late to look for a camp and the decision was made to prop next to the Blinman North Hotel. Most of us took advantage of not having to cook and dined in the pub. During the night the winds blew up something fierce, and for the first time we awoke to bitterly cold weather – about half of the group braved the morning chill to tour the local copper mine.
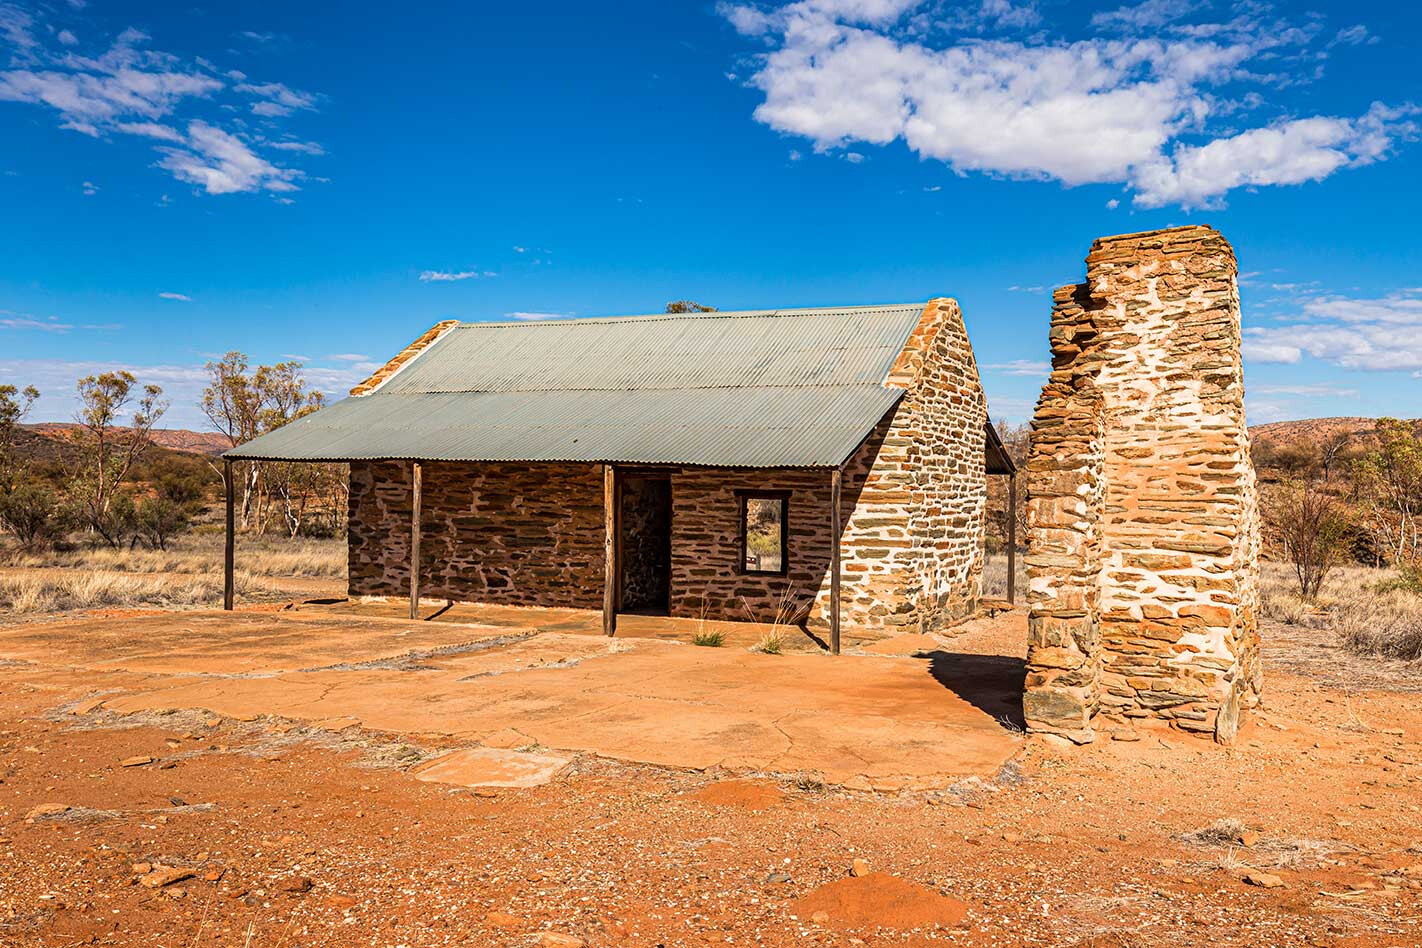
Back on the road we made our way out to the Aroona Homestead ruins where John Hayward, the first pastoralist to arrive in the region, took up the Aroona run in 1851 and stocked it with 3300 sheep. There are only crumbling ruins to be seen today, but there are several camping areas nearby – some with long-drop loos.
The next couple of hours were spent travelling through Brachina and Bunyeroo Gorges, where we able get an understanding of the geological significance of the area courtesy of signs detailing the formation of the ranges over hundreds of millions of years. Following on from what we had seen the last couple of days, most of the landscapes were gob-smacking, causing all the picture-taking machines to cop plenty of work.
With the day getting on, we made our way to Wilpena Pound, where the receptionist, after learning we were part of the Drive 4 Life charity group, went out of her way to work out the best deal for us.
Better weather greeted us on Friday and a bus delivered us out to Wilpena Pound. We had a leisurely walk out to the Old Hills Homestead, where there was plenty of information detailing the hardships the Hills family endured during the turn of the last century. From here, most of the group continued the challenging hike up to Wangara Hill lookout, which offers panoramic views over Wilpena Pound.
After being dropped back to the reception area it was time to hit the road, with our first stop at arguably the most photographed tree in the Flinders Ranges, the Cazneaux Tree, made famous by the photographer Harold Cazneaux.
Back on Blacktop
For lunch we headed out to the Sacred Canyon, where we followed the creek bed to see some stunning Aboriginal rock engravings. Once the worms were fed, we returned to the bitumen, stopping at Hucks and Stokes Hills lookouts where the views need to be seen to be believed.
Our final camp for the trip was at Chambers Gorge, and most of the group thought it was the most spectacular of all the gorges we had seen. At the end of the gorge is another Aboriginal engraving site, and one could only marvel at their skills, especially when you consider the tools they would have used. Like all of the previous evenings, we spent the night sitting around a fire sharing many a laugh.
For our final day we had quite a distance to travel, but all on good roads, stopping at the Waukaringa Ruins historical site. This area was first settled following the discovery of gold in 1873, and at its peak there was a population of around 750. Other than the former Waukaringa Hotel and a scattering of relics, there is little to be seen today. We continued on to Yunta, where we reinflated tyres and topped up with fuel before making our way back to Broken Hill.
All participants gathered in the Southern Cross Hotel later that evening for the traditional last-night dinner. There were speeches from the group leaders, and Mick Whitehead announced that $24,350 was added to the Northcott coffers. Included in this total were donations made by fellow travellers, who thought we were doing an awesome job raising funds for a very worthy cause.
Many a story was shared between both groups and there was no shortage of funny moments to be told.
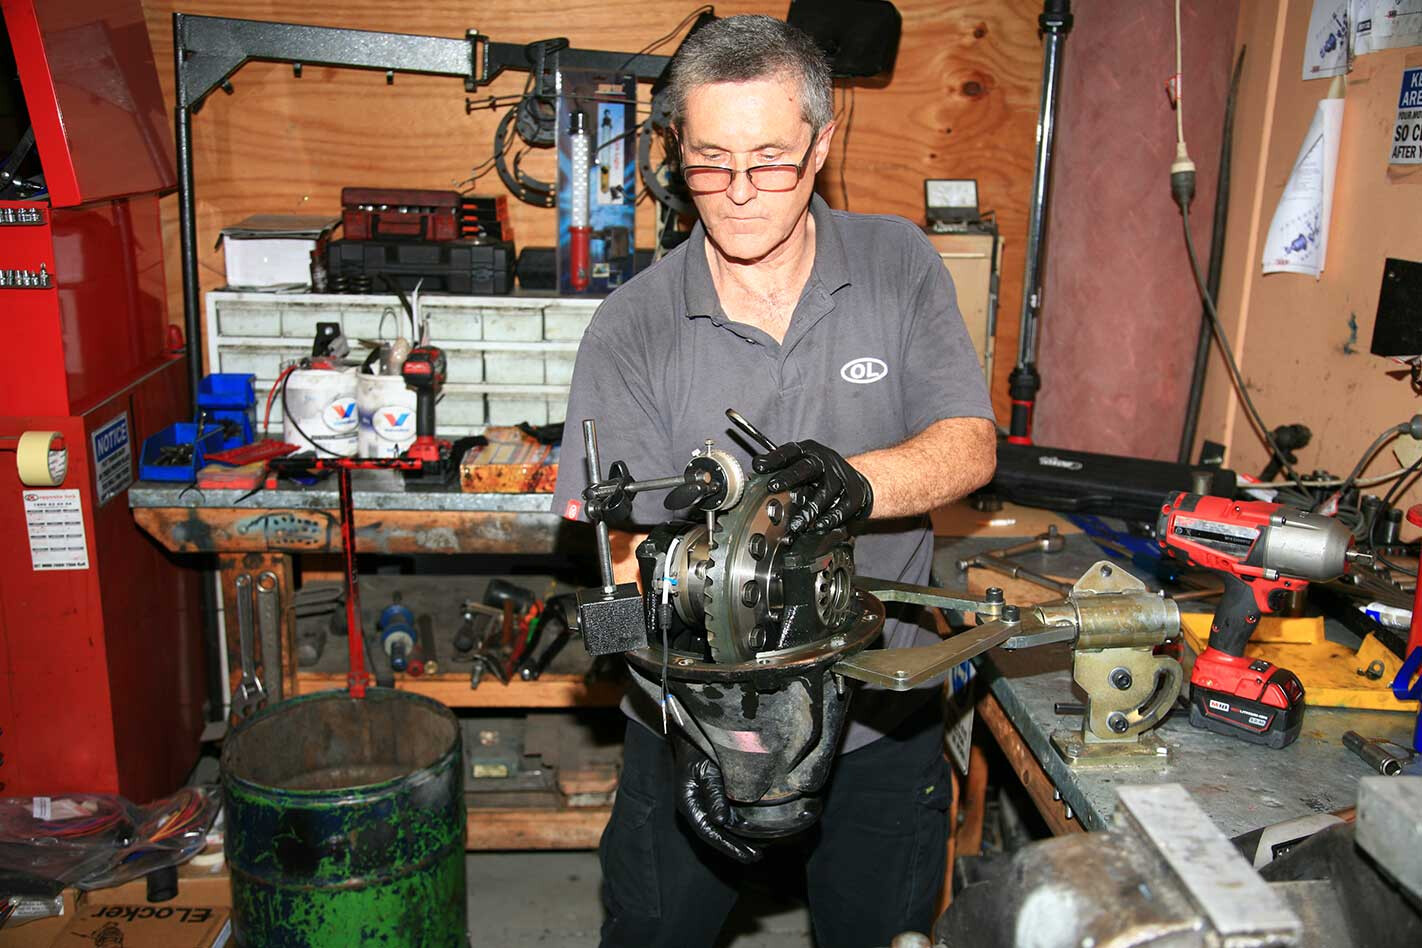
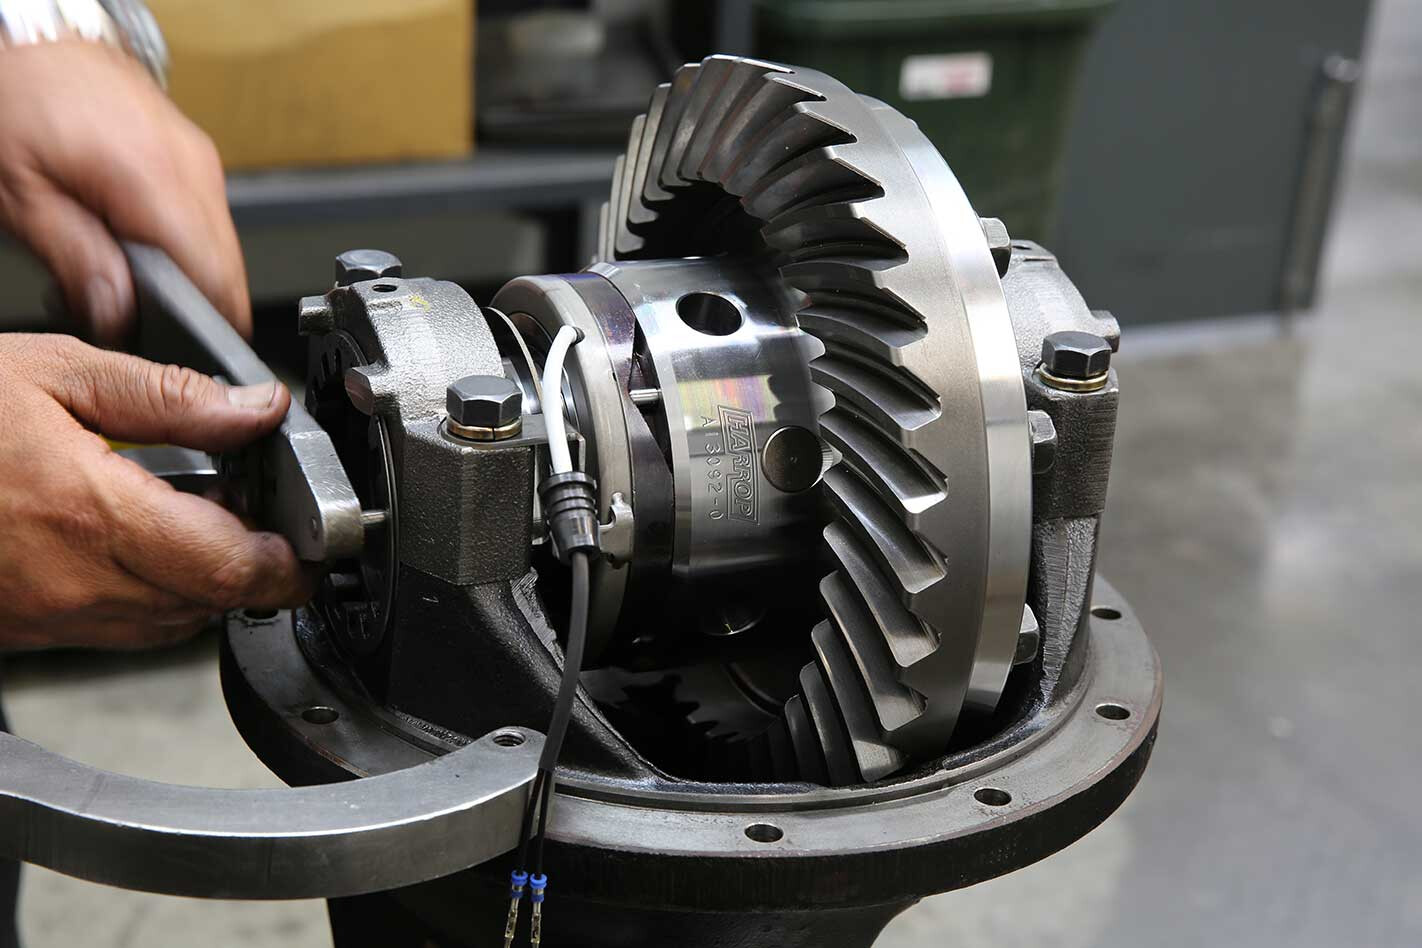
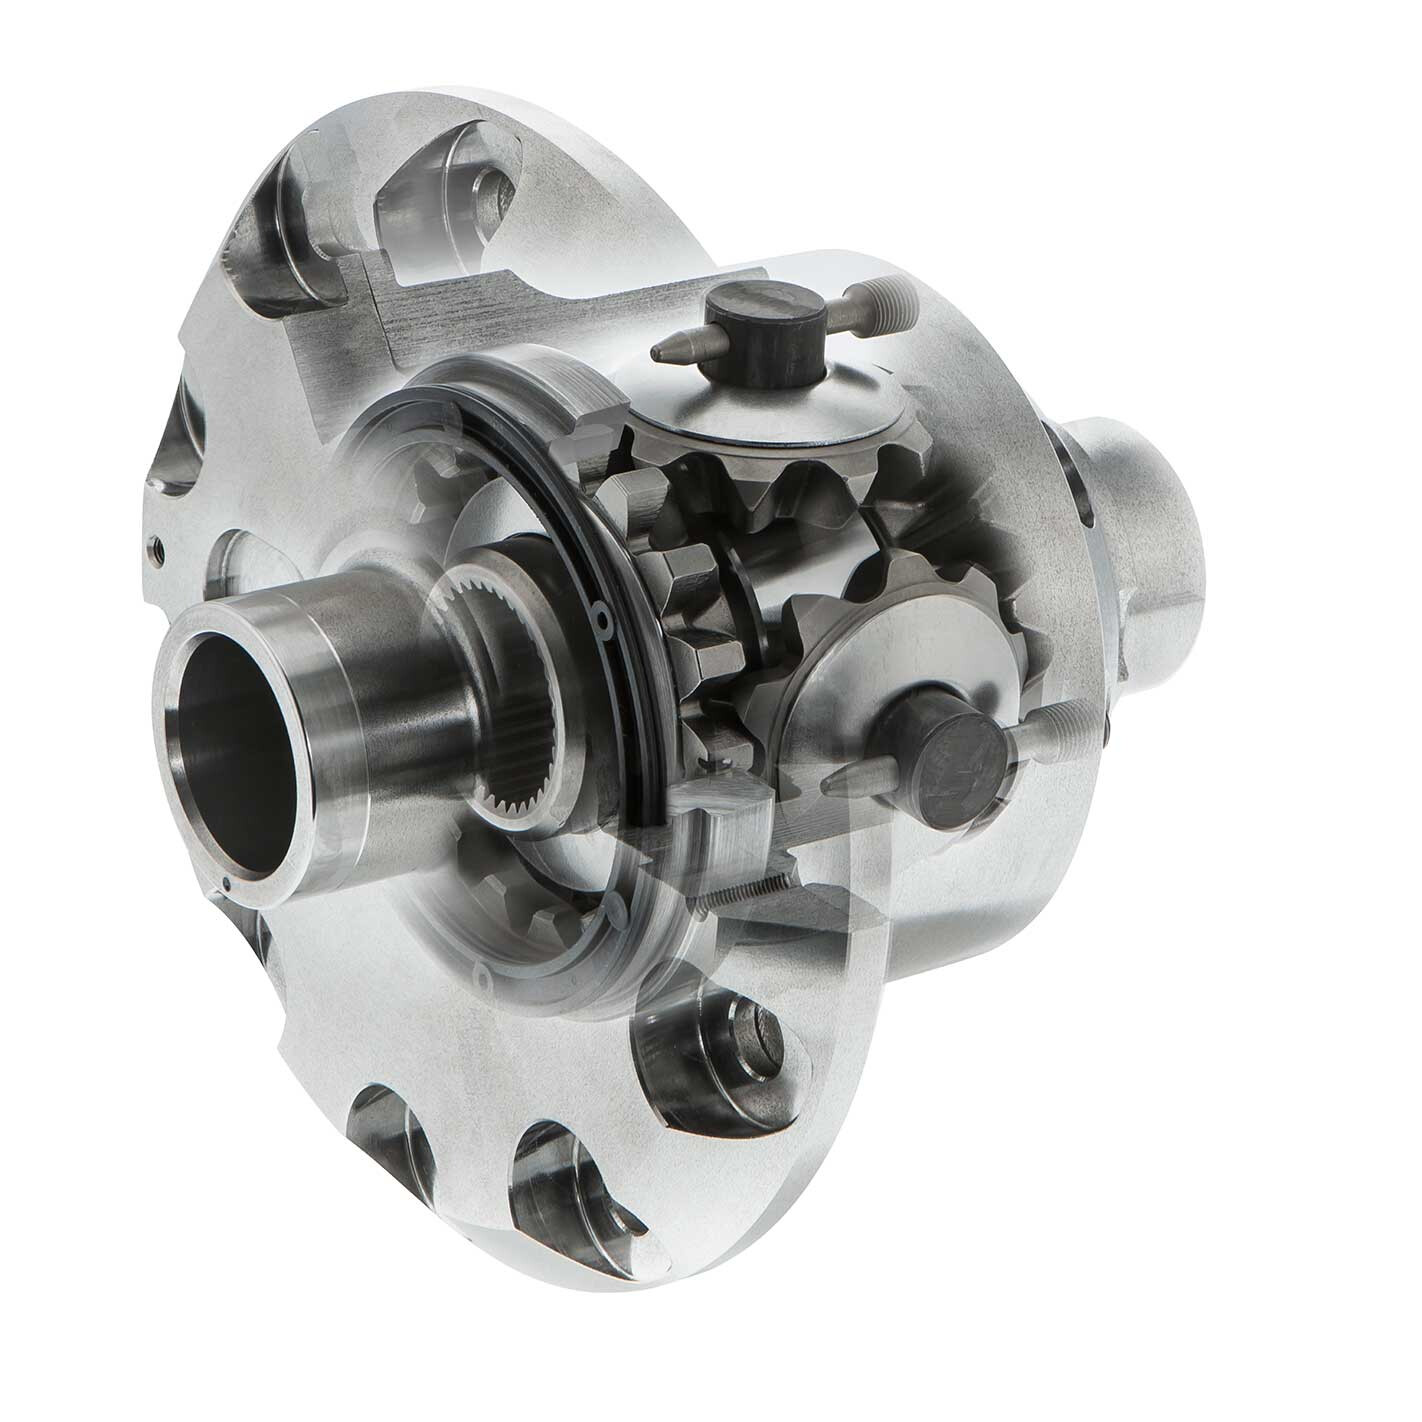
IF YOU have a penchant for perilous tracks that most of the population steers well clear of, then you’ll need to guarantee drive is delivered effectively to all four wheels. The only way to ensure this is with a pair of front and rear locking differentials.
When driving off-road, a differential will always send power to the wheel with least resistance; so if a 4×4 loses traction (in the air, stuck in mud, etc.) the wheel with the least traction will spin ineffectively.
Locking the diffs prevents this by sending equal drive to both wheels on an axis, regardless of terrain or traction, so with front and rear diff lockers (either selectable or automatic) you’ll be able to crawl through most obstacles with little or no wheelspin.
“Lockers are a great investment, as they dramatically improve the vehicle’s capabilities by giving the owner the ability to lock or unlock the differentials as necessary and capture 100 per cent of the available torque and distribute it equally to both ends of the axle,” Harrop’s design engineer, Sebastian Civitarese, told us. “This enables the driver to keep momentum when off-road and safely navigate harsh terrain without losing traction. It’s equally beneficial for the average tourer or when towing on slippery surfaces like boat ramps.
“Ultimately, lockers mitigate the loss of traction,” he said.
Locked up
A COMMON misconception by many 4WD pundits is that by shifting a vehicle into ‘4WD’, power will be sent to all four wheels at all times. However, in certain scenarios a standard vehicle with open differentials will only deliver drive to the easiest wheel to spin on any given axle, which will be the one in a mud hole or up in the air.
“A locker allows you to have full power to both wheels, even when one is off the ground,” said Terrain Tamer parts interpreter, Charlie Dunbar. “So when that wheel lands, you have movement already, allowing you to gain traction and get out of a bad spot.”
ARB’s brand marketing manager, Mark Berger, added: “With a differential locker, you can lock the differential to stop it from spinning the left and right wheel of an axle independently of each other, forcing both wheels to spin at the same rate irrespective of which wheel has traction and which one doesn’t.”
Installing a set of diff lockers and being able to lock and unlock the diffs when required increases a vehicle’s off-road abilities exponentially, with 100 per cent of the available torque able to be equally distributed to both ends of an axle.
As Justin Hettrick, TJM’s suspension and drivetrain product manager, explained, a diff locker provides instant traction: “The off-road ability of almost any 4×4 vehicle is doubled. A locker can be the device that makes you traverse terrain you never thought you would be able to.”
Centre Diff
A CENTRE differential, as the name implies, is positioned – in all-wheel drive and constant 4WD models, like the popular LandCruiser 200 Series wagon – between the front and rear differential. Unlike front and rear differentials, though, a centre diff will split power 50/50 front to rear instead of side to side of each axle.
A centre diff lock is essential to ensure drive to both the front and rear axles; although, diff locks front and rear are still required to spread drive evenly from side to side.
“Vehicles with a centre diff (and no lockers) can deliver drive to any of the four wheels of the vehicle, but the power will still only be delivered to one wheel and it will still be the wheel with the least traction,” explained Berger.
Front & Rear?
OPTING for either a front or rear locker ultimately depends on the type of vehicle and the equipment already installed. For example, some vehicles have a limited-slip differential (LSD) from factory, and therefore it may be a wise decision to opt for a locker in the front and leave the rear unchanged. For vehicles with open differentials, a rear locker is by far the more popular choice, as it’s more suitable to a diverse range of off-roading situations.
“If the vehicle only has open differentials we typically recommend a rear, which will be more effective when off-road hill climbing,” said Sebastian Civitarese. “If the vehicle has a factory LSD in the rear, it is a much better solution to install an ELocker in the front and retain the LSD in the rear.”
According to Mark Berger, rear lockers will give you best bang for buck, as the rear suspension will flex more and keep in contact with the ground, keeping that all-important momentum going. However, front lockers aren’t without their benefits, as Berger explained: “A front locker is perfect for climbing hills or pulling you through the last bit of a bog-hole or over a rock ledge. But front lockers can also restrict your steering ability when weight is over the front axle (i.e. flat ground and downhill), so you have to be careful when you use them.”
A third – and more effective – option is to install lockers on both the front and rear differentials.
“Why can’t we just have both?” asked Berger. “A locker on one axle will improve your four-wheel drive from 50 per cent drive to 75 per cent drive, while installing lockers on both differentials will provide you with 100 per cent drive.”
Why use quality lockers?
CONSIDERING a locker is an essential tool for those chasing remote, hard-to-reach campsites, it’s essential not to ‘cheap out’ and get a sub-standard unit that’ll leave you wishing you forked out more coin to a reputable brand. Surf the web and you’ll quickly find an abundance of products from dubious websites, but do your research and you’ll find that buying from a well-known, respected company makes a helluva lot more sense.
“A locker isn’t a component you want to skimp out on and settle for an inferior brand or quality,” said Sebastian Civitarese. “If something goes wrong out on the track, you have the potential to be left stranded.
“The cost of pulling a diff and repairing problems will quickly exceed the initial investment of purchasing a high-quality locker.”
ARB’s Mark Berger couldn’t agree more: “At the end of the day, a locker is an important mechanical component of your vehicle’s driveline, and as such it would serve 4WD owners well to ensure they respect the vehicle which they rely on to safely and reliably get them where they are going and back.
“As a technical and mechanical component, removal and installation can be both costly and time consuming, so it is worth purchasing a product that is both more likely to last and be supported by the manufacturer and installer.
“Quality, proven manufacturers are held to high industry standards with thousands of customer’s expectations worldwide to look after, trust in them that they will support their product and their customers.” As always, the trusted brands will offer multi-year warranties: TJM and ARB, for example, both offer five-year warranties for their respective Pro Locker and Air Locker, and Harrop and Terrain Tamer offer three years for the ELocker.

“Substandard lockers just aren’t made with the same high-quality materials, they haven’t undergone the same research, development and engineering, and haven’t had the same testing done to create a quality end product,” explained Charlie Dunbar. “Breakage is so common in substandard lockers, and, of course, they can cause breakage to other parts.”
Selectable v Automatic locker
Control is the main difference between a selectable and an automatic locker; you have control with a selectable locker and you don’t have control with an automatic locker. Choosing when to lock and unlock the diffs is important, as it can alleviate the stress on a vehicle’s drivetrain components.
“With an automatic locker, the diffs are always locked until enough cornering force is applied to release the locking mechanism from the diff,” said ARB’s Mark Berger. “The design of many automatic lockers can become the culprit of interesting on-road behaviour, as they lock and unlock and can lead to unnecessary wear on the vehicle’s driveline and tyres.”
Limitations of LSD
It’s common for showroom-stock vehicles to have an open diff up front and a limited-slip diff at the rear. The job of a limited-slip differential is to direct power (or drive) away from the wheel with less traction and send it toward the opposite wheel on the same axle.
“LSDs have long been considered a great option in the rear of many 4WDs, but they do have their limitations,” said Berger. “LSDs operate not too dissimilar to an automatic locker, where an amount of cornering force is required to release the resistance for the diff to spin freely and deliver drive to the wheel with the least traction.”
An LSD can never be 100 per cent locked and comes with limitations.
“LSDs by design are built from components such as clutch plates, which are prone to wear, and given they are being operated every time you drive the vehicle, the diff will progressively deteriorate in its functionality, becoming less and less effective,” added Berger.
Charlie Dunbar from Terrain Tamer added: “An LSD can’t supply full power to the wheel that needs it, and will always give part of it to the wheel with no traction.”
Pros & Cons: Selectable Lockers
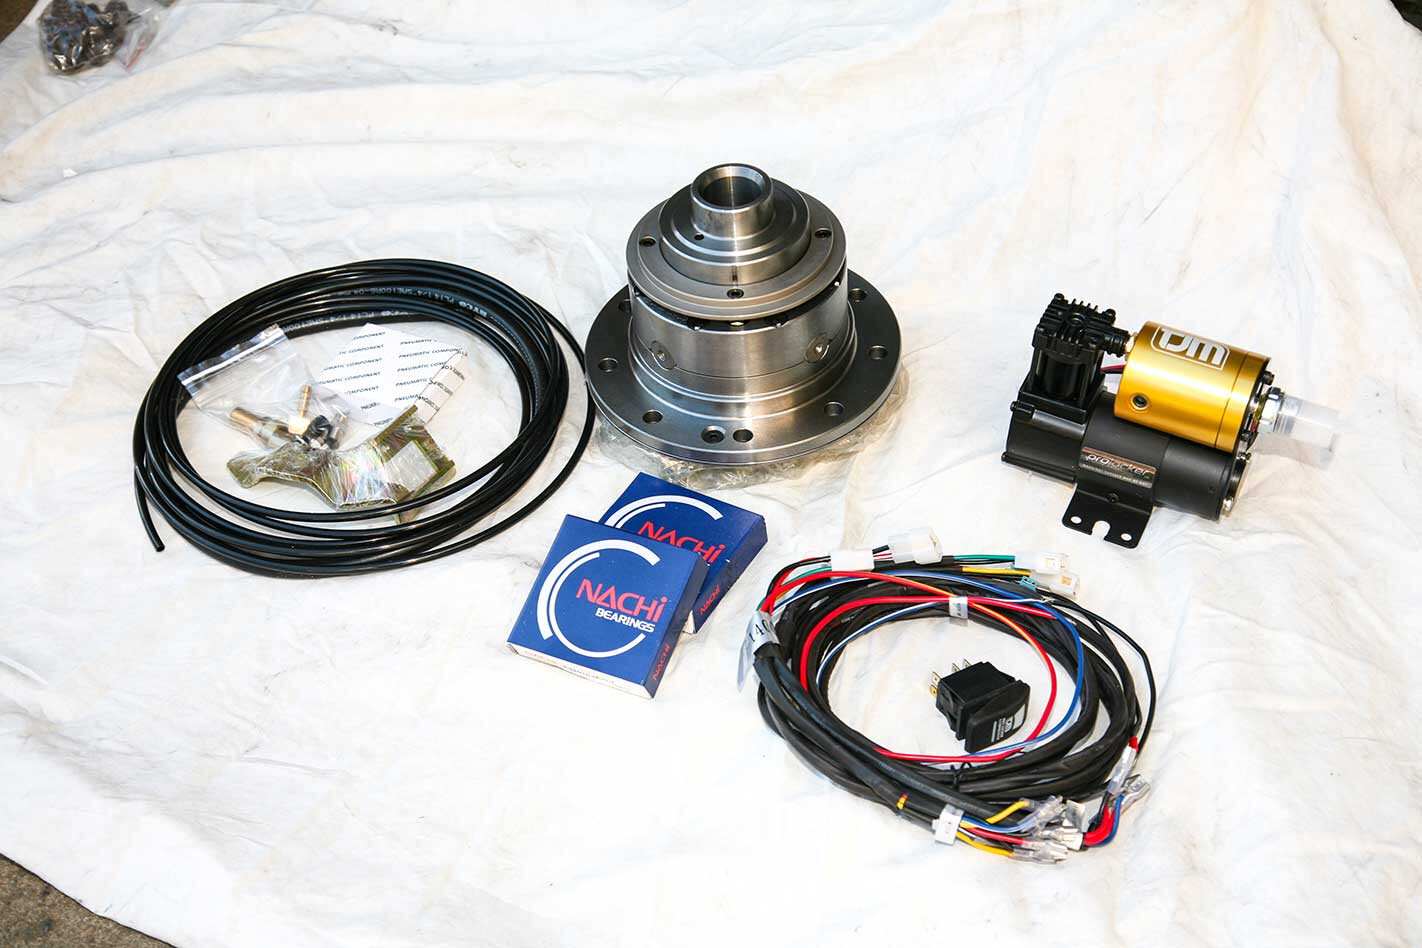
PROS • Reduces wear on vehicle components • Quieter operation • Instant traction • Can be turned on and off • Compressed air on-board (with air lockers) • Can lock one axle or both axles independently (when running front and rear lockers)
CONS • More expensive • Ongoing maintenance (air lines/wiring)
Pros & Cons: Automatic Lockers
PROS • Driver doesn’t need to lock/unlock diff • Cheaper alternative • Purely mechanical (no air lines or wires)
CONS • Driver has no control on lock options • Noisier than selectable lockers • Can affect vehicle’s drive characteristics • Can increase wear on driveline components and tyres • Harder to steer until point of disengagement
Types of Lockers
ELockers
THE ELOCKER is a selectable locker, but it differs from air-activated lockers (TJM’s Pro Locker and ARB’s Air Locker) as it uses an electrical magnet instead; which rotates the ramp plate to engage the lock pins and the locking plate which locks the side gear into the housing. When disengaging, the magnet is released and the locking plate returns to its unlocked position by the means of a return spring.
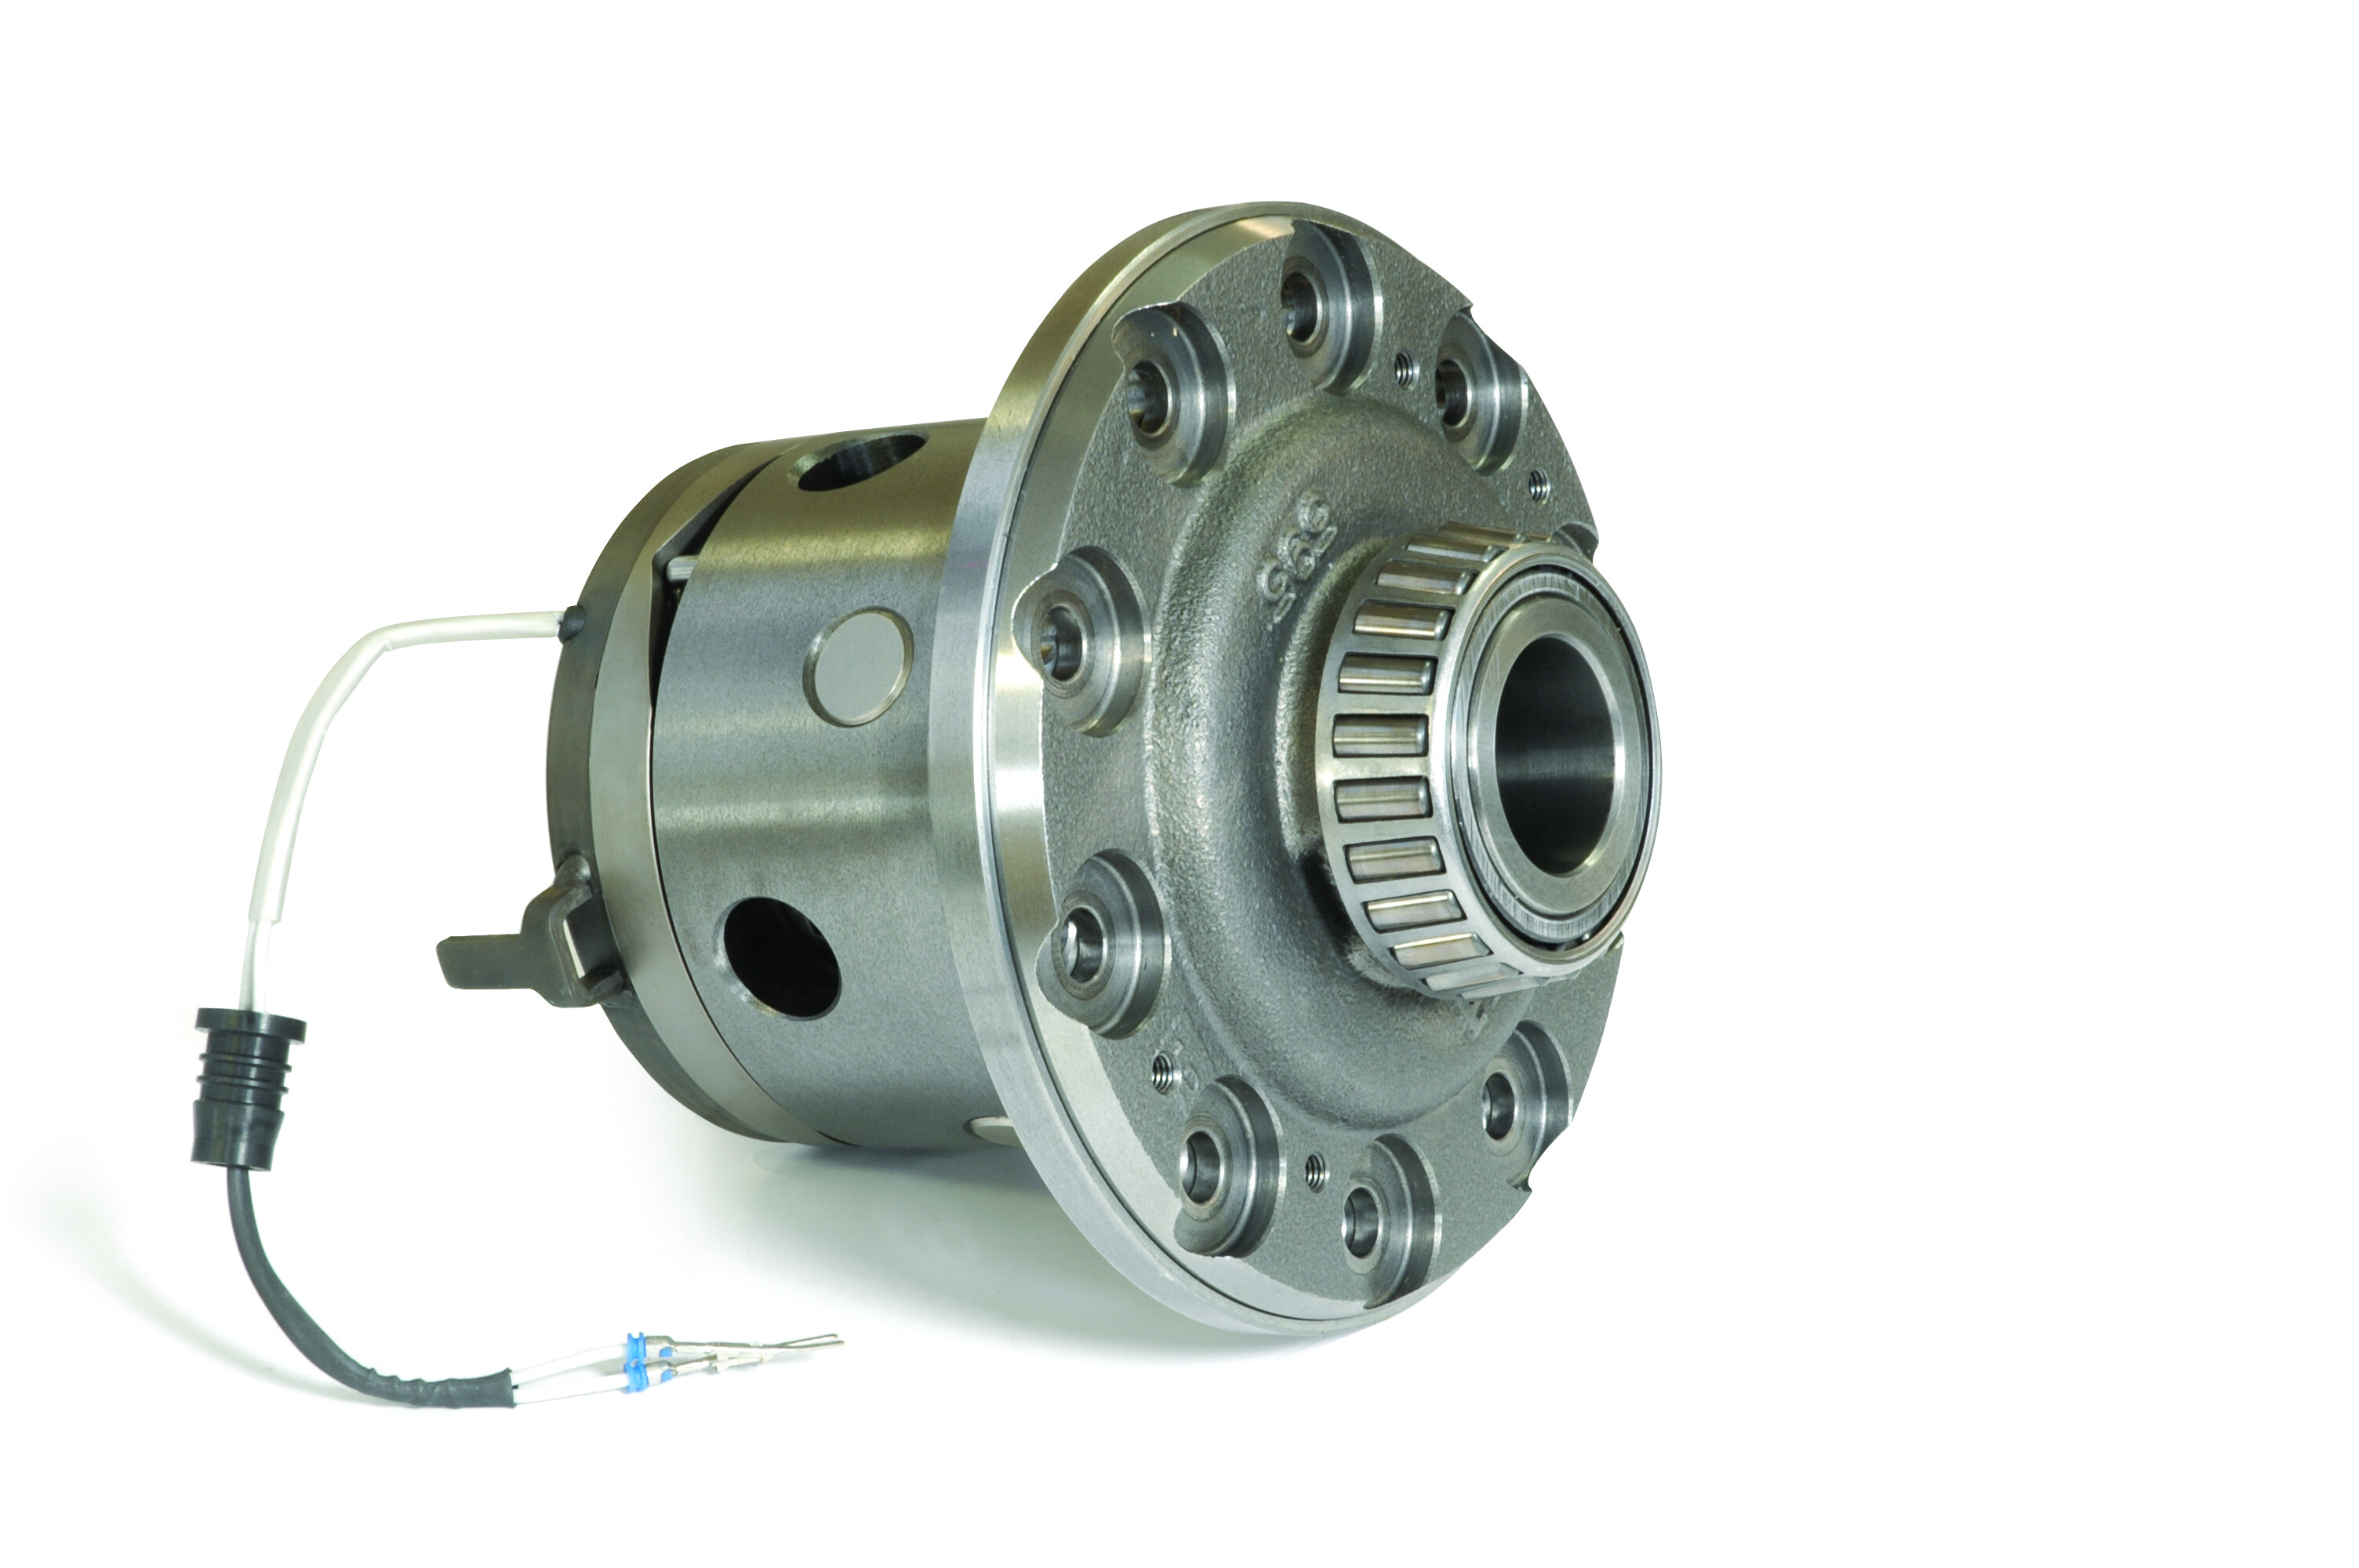
“ELockers are a fairly simple design in terms of installation,” said Dunbar. “There’s also the benefit of no air lines to run, or compressor to install or purchase.”
The ELocker is designed and manufactured in Australia, with the unit CNC-precision machined and featuring precision-forged and heat-treated gears. The internal gears from Eaton are specifically intended for heavy-duty application and provide improved strength and durability over standard-cut gears.
“The patented four-pinion electronic locker systems are then made in Australia and operate manually using an electromagnet powered by the vehicle’s battery,” added Dunbar.
Another benefit of the ELocker is that it requires no external module, compressor or hoses; it’s simply click and forget. This locking mechanism is trusted by OEMs globally – take the Chevy Colorado ZR2, for example, which features the technology in both the front and rear differential, further validating the design’s credentials and durability.
TJM Pro Locker
The TJM Pro Locker is manufactured from high-strength SG Iron, and the pinion gears are thicker than the OE (Original Equipment) gears. The flange cap assembly is extra thick to utilise longer crown wheel bolts, again, to increase strength.
Utilising compressed air, when the locker is activated the internal selector ring will engage the lock ring. Once the Pro Locker is engaged it forms a solid link between the carrier and side gears. The differential is now locked and will deliver 50/50 drive to both wheels across an axle.
A uniquely designed actuator works like a motor piston. The fork sits on top of the selector ring guiding it across when engaging or disengaging. This hardened selector ring connects to the lock ring via four metal posts. The hardened lock ring shares the forces internally and externally, increasing its locking strength.
ARB Air Locker
ARB’s selectable Air Locker is installed within the vehicle’s current differential housing and replaces everything except the crown wheel and pinion with new upgraded components for extra durability.
“The basis of the design is that compressed air is supplied from the onboard compressor, forcing an internal locking ring against the spider gears,” explained Mark Berger.
The Air Locker has four spider gears, which are the components that allow the differential to direct the drive to either the left or right wheel.
“The locking rings lock the spider gears against the housing, which prevents differential action and therefore delivers drive equally to the left and right wheels on the axle,” he said. “When the Air Locker is switched off, the air pressure is released and the internal gears are able to spin freely again allowing the differential to do its job.”
A significant benefit of an ARB Air Locker is that it can be engaged at any speed – unlike an ELocker – so drivers can flick them on the moment they need them, without stopping.
With more than 35 years of experience, ARB says it utilises in-house, highly automated CNC machines that excel at repeatedly producing tight tolerances and precision form that is scrutinised constantly through the aid of programmable robotic measurement.
Automatic Lockers
Brands like Lokka manufacture lockers that don’t require manual operation.
“Think of Lokka as an alternative set of planetary gears,” the company explains. “When factory gears operate or move, so will the Lokka gears. The difference is, the Lokka gears start from a locked position, whereas normal gears are free-spinning.
“The Lokka mechanism allows a wheel to turn faster than the speed the differential is driving it (differential action), but never allows a wheel to turn slower than the rotational speed the differential and engine is turning it (traction). Thus a wheel cannot ever stop turning if the engine is driving it, but in a corner it can be forced to actually turn faster. Unlike a normal differential the engine can never drive one wheel faster than the other.”
How good it is when an outback track starts at one of the most remote pubs in the country? Even getting to Mount Dare can be a challenge for many, so enjoy the hospitality offered, top up your fuel tanks and then begin a journey that’ll blow your mind.
Bulldust! Superfine, super deep and in stretches that can’t compare. It’s nasty stuff and there is no way of keeping it out of your vehicle, especially when you hit a patch so deep the dust sweeps up over your bonnet and straight into the cabin air intake.
From Mount Dare, Binns Track leads you across the border into the Northern Territory, towards Old Andando Station and for the first 45km, 80 per cent of the drive is bulldust, but once past Mayfield Bore, it settles a little and the corrugations take over.
Tyre pressures play an important role in making this type of terrain easier to tolerate. (N.B. This section of Binns Track is now closed indefinitely and a detour via New Crown Station is in place.)
Old Andando was home to Molly and Mac Clarke from early in the 1950s and the homestead has been left as it was when Molly reluctantly had to leave. She watches over her beloved property from her nearby grave.
The rustic campground at Old Andando is a great spot to roll out the swag, with flushing toilets and donkey showers included in the $10 camping fee (per person). Wind protected fire pits are spread around the site, but you’ll need to supply your own wood. If the caretaker Cobby Bob is around, invite him down to share your fire and be entertained with bush poetry and yarns that’ll make your night.
A little way up the track, a signposted detour leads you to the Mac Clarke Reserve where you’ll find one of only three remaining Acacia peuce collectives. This is an important conservation reserve, so leave only footprints and take only photos; camping and fires are not allowed.
Binns Track continues north towards the Santa Teresa community. This is cattle country and it’s incredible how they survive in this barren landscape devoid of grass, but healthy they look, feasting upon patches of wild things. You’ll pass through areas covered in gibber and burnt orange sand dunes with massive expanses of nothingness, but how beautiful it is.
Then sand country with spinifex, mulga and corrugations. Passing through the gap between the colourful Arookara and Rodinga Ranges, the sandstone looks like bauxite in the afternoon sun, and the waterways are lined by eucalypts.
From Santa Teresa, the road alternates between bitumen and gravel until you reach the airport on the outskirts of Alice Springs. For us, it was a chance to stop and prop for a couple of days to restock and refresh before the next push up Binns Track.
It was also a chance to get some repairs done on a pair of eyeglasses that’d been dropped and stepped on, on day one of the adventure. They would be needed as the East MacDonnell Ranges are best viewed with 20-20 vision to soak in their beauty.
From Alice Springs, take the Ross Highway and the first gorge in the stunning range is Anthwerrke (Emily Gap). Emily Creek has flowed through here for thousands of years, carving out the rock to form the Gap that’s very significant to the Arrernte people.
It plays an important part in the Dreamtime story about Three Caterpillars – Yeperenye, Ntyarlke and Utnerrengatye – whom the Arrernte consider themselves direct descendants. It is an easy Grade 2 walk into the Gap, and you’re asked not to photograph the artwork found within.
Continue another 7km down the Ross Highway to the second gorge, Jessie Gap, which is also associated with the Three Caterpillars Dreamtime story. This site is also important in an Emu storyline, with the white sand against the gorge face representing emu fat.
Back on the road you will soon reach the turnoff, following the ‘Binns Track’ sign east. Here is a good opportunity to drop some air out of your tyres as you will encounter bulldust, deep river sand, corrugations and gravel roads for the next 70km or so.
The first section of road is maintained so you will be able to keep a reasonable speed. Watch for horses around dawn and dusk as they can appear from nowhere between the desert oaks, mulga and gum trees that enjoy the underground moisture on the Todd River flood plain.
The willy-willies show where the bulldust holes are with the fine dust easily picked up in the twisters. Having travelled 42km and crossed the Ross River, turn left and follow the signs towards N’Dhala Gorge.
Take it easy around Shannon Bore as the cattle like to hang around the waterpoint and yards. The escarpments of the Fergusson Range are stunning, matched against the ghost gums that line the Ross River. Crossing the dry riverbeds can be a challenge at times as the deep sand can catch you out if you’re not careful.
Before long you’ll reach the turn off to N’Dhala Gorge (Irlwentye) carpark and camping area, and you’ll be reaching for the camera as you enter. This is one of the most visually stunning Red Centre gorges. It’s also home to several ancient petroglyphs that are important to the Eastern Arrernte people.
The 1.5km return walk into the gorge is graded as easy and interpretive signs are placed along the trail to explain some of the rock carvings and plant life. If camping, there is a box to self-register and pay the camp fee. You’ll need to be self-reliant as the only facilities are pit toilets, fire pits and tables. Firewood must be collected outside of the park and please, take any rubbish with you.
Another option if you want to camp for a couple of days while exploring the Eastern Macs a bit more is at Ross River Resort. There a several options from powered or unpowered sites, cabins or maybe even the rustic Starlight Camp. The swimming pool is a perfect way to cool down and the bar offers meals and cold beverages as well. Make sure you explore the old homestead, especially the massive fireplace.
It’s only 12km to the Trephina Gorge turnoff via a bitumen road from the resort, and the 8km drive into the gorge is via a gravel road. Another striking gorge, Trephina offers a couple of great walking options that offer stunning scenic views of the landscape and tree-lined sandy riverbed.
There are also numerous camping sites at the Panorama campground or the Trephina Bluff campground. Access to the remote John Hayes Rockhole is via a challenging 4WD track however it was dry during our visit.
The next section of Binns Track leads to the historic mining town of Arltunga. As you twist and wind your way through the range, crossing many floodways, the views are to die for. Better than the Flinders Ranges with the spinifex, desert oaks, ghost gums and gidgee. It is easy going in a 4WD, but it must have been harsh for those carrying their lives on their backs as they headed to Arltunga in search of a fortune.
The landscape eventually opens to treeless plains before entering the Cavanagh Range and soon the Arltunga Historical Reserve. Now a deserted gold town, this was the first town in Central Australia thanks to the 1887 gold rush, and it once had a population around 3000 people.
There is an unmanned visitor centre that provides plenty of information on the history of the area and the old police station has been rebuilt. There are more ruins spread about the precinct and a handful of self-guided walks help to show you what life was all about back then.
Just over the range is Hale River Homestead at Old Ambalindum that offers a fantastic farm stay with great camping and several accommodation options, meals and beverages, and one of the best pool decks you’ll ever find that’s perfectly placed to watch the sunset behind the windmill. From here it’s only a short drive to Arltunga, or there are plenty of bushwalking/mountain bike riding trails throughout the property. Fredrick’s Lookout is a challenging drive and is another top spot for sunrise or sunset views.
From the homestead, Binns Track follows the Arltunga Tourist Drive for approximately 60km before taking the Pinnacles Track. This is another spectacular drive with magnificent views of the Georgina Range on your left and Mount Johnstone on your right. The Pinnacle Track is slow going at the start and leads you through a gate that takes in Aboriginal Land, so you must stick to the track.
The northern section opens onto grassed plains before reaching the old bore at the junction with the Plenty Highway. Turning left and travelling a short 8km will bring you to Gemtree, which is a great place to settle and enjoy some outback hospitality.
If gems take your fancy, especially fossicking for your own, Gemtree is a great place to base yourself and join a tour or you can just pay for a bucket of garnet-bearing gravel if time is limited. You can’t go past a delicious camp oven roast dinner from Kate’s Kitchen, and the Billabong Bar will quench your thirst. The caravan park offers powered or unpowered sites, or choice of cabins or rooms if you want to enjoy some extra comforts.
So how did Binns Track get its name? Named after Bill Binns, who was a ranger with Northern Territory Parks and Wildlife before rising to the position as Executive Director of Parks NT. It was his dream to create a track that enabled travellers to enjoy some of the spectacular national parks that the Territory has on offer. This epic journey covers more than 2000km through some of the most remote, colourful and diverse country and is a 4WD adventure you will never forget.
Travel Planner
WHERE: Binns Track from Mount Dare to Gem Tree via Alice Springs is around 700km so allow two or three days to really soak in the landscape.
PERMITS: A Simpson Desert Parks Pass is required to access Mount Dare and can be purchased onsite.
FUEL: Mount Dare, Santa Teresa, Alice Springs, Ross River and Gemtree all provide unleaded and diesel fuel. Gemtree was limiting diesel fuel to 25 litres as the fuel truck was delayed, and this can happen anywhere that is remote, so take this into consideration when planning. Expect to pay top dollar for fuel at the remote places too, with $2/litre and above for diesel common.
BEST TIME TO VISIT: From June to September as the weather is generally cooler and the wet season waters should have receded.
MORE INFO: – The Hema Maps range of paper maps provide excellent coverage. A device such as a Hema HX-1 Navigator will also come in very handy. www.hemamaps.com – Mount Dare can sort you out with a desert pass and the latest track conditions. www.mtdare.com.au
If there were ever three things that were meant to be, it’s a dual-cab 4×4 ute, a pile of mountain bikes in the tub, and four or five riders and all their gear, somehow jammed in.
Well, that’s how a lot of 4×4 ute manufacturers present their vehicles to the ‘lifestyle’ market. Not seen are those expensive bikes getting banged against each other – and against the ute – and them actually taking up a fair chunk of storage space as you try various ways to secure them in the tray.
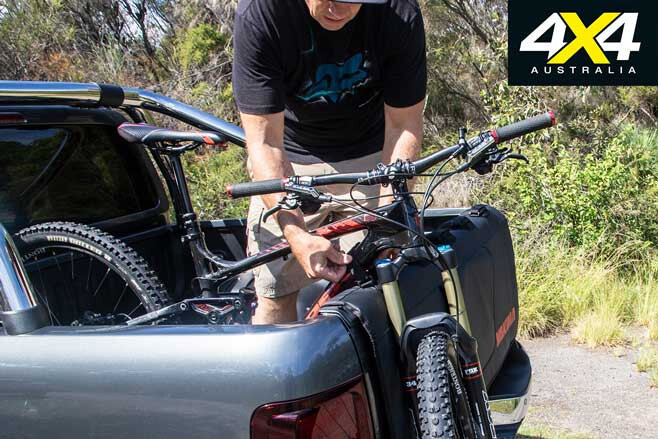
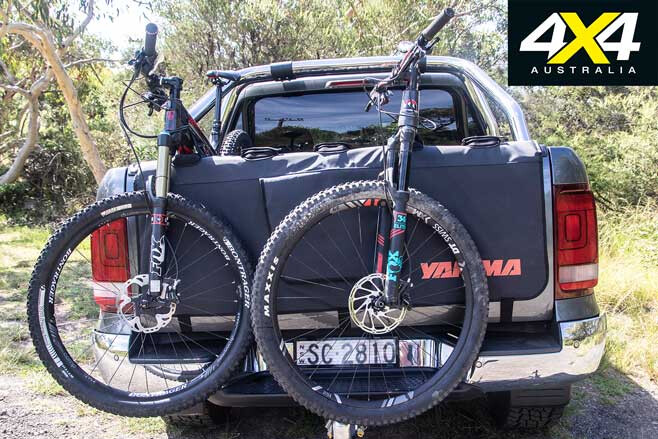
Yakima’s GateKeeper is a ute tailgate-based bike storage system that goes a long way to solving those problems. This tailgate pad offers secure storage for five MTBs in the tray of your ute, allowing you to still shove a big hardcase and a fridge/freezer up the back for you and your mates’ gear.
The appeal of these tailgate pads is that they keep the bikes down low (not on the roof rack) and also allow you to fit five comfortably – with the actual loading process super-simple. Even better, you don’t have to take a wheel off your bikes to do so, which is always welcome.
The GateKeeper’s exterior utilises a tough nylon material, with plenty of padding inside, and it weighs only 3.2kg and measures 1346mm long, 432mm tall and 127mm thick. The process of fitting the GateKeeper is simple and takes about five minutes; you just drape the pad over the tailgate (with the long side on the outer) and then feed the three straps through the gap between the open tailgate and the tray.
Then cinch the strap tight through the oversized buckles and it ain’t moving. As well as the tough nylon outer, the underside of the pad that comes in direct contact with the ute includes felt backing (there’s a stowable flap at the rear which gives easy access to your ute tray handle, or it can be dropped down to cover it).
The trickiest part of the install is ensuring the bike cradles are aligned with the angle of your bike’s downtube so that part of the bike is protected, which isn’t always easy as the tube angles on bikes can differ.
It is the downtube (and the tailgate underneath) that can cop the most punishment when bikes are loaded without using a pad, owing to tub/bike fore/aft and side-to-side movement. If there’s any grit/dust or other materials between the downtube’s underside and the tailgate lip, both cop a good scratching/sanding and there’s high potential for paint removal.
One thing we’d recommend adding is some form of locking system; as much as the bikes are easy to fit to the GateKeeper, they’re just as easy to remove. A simple cable lock threaded through the bikes will take care of this.
Loading a bike can be done by one person by simply lifting the bike over the tailgate and resting the downtube on the bike cradle, with the front wheel/forks hanging over the side. Then close over the Sit-Tight cushion cradles by looping the padded strap (it’s padded on both sides) through the clip and back over, before closing the Velcro closure. As with the tailgate pad itself, once the closure is cinched tight, your bike isn’t moving.
We tested the GateKeeper with two and three bikes aboard and they fit comfortably. The unit’s five-bike maximum capacity is definitely do-able, but it’s a far closer fit between bikes, with all those forks and wheels across the rear. It would be worth checking each contact point after the bikes are secured and adding in some additional padding, if you think it’s needed.
RATED Available from: www.yakima.com.au RRP: $199 We Say: Robust, easy to fit, needs some type of lock, built to last.
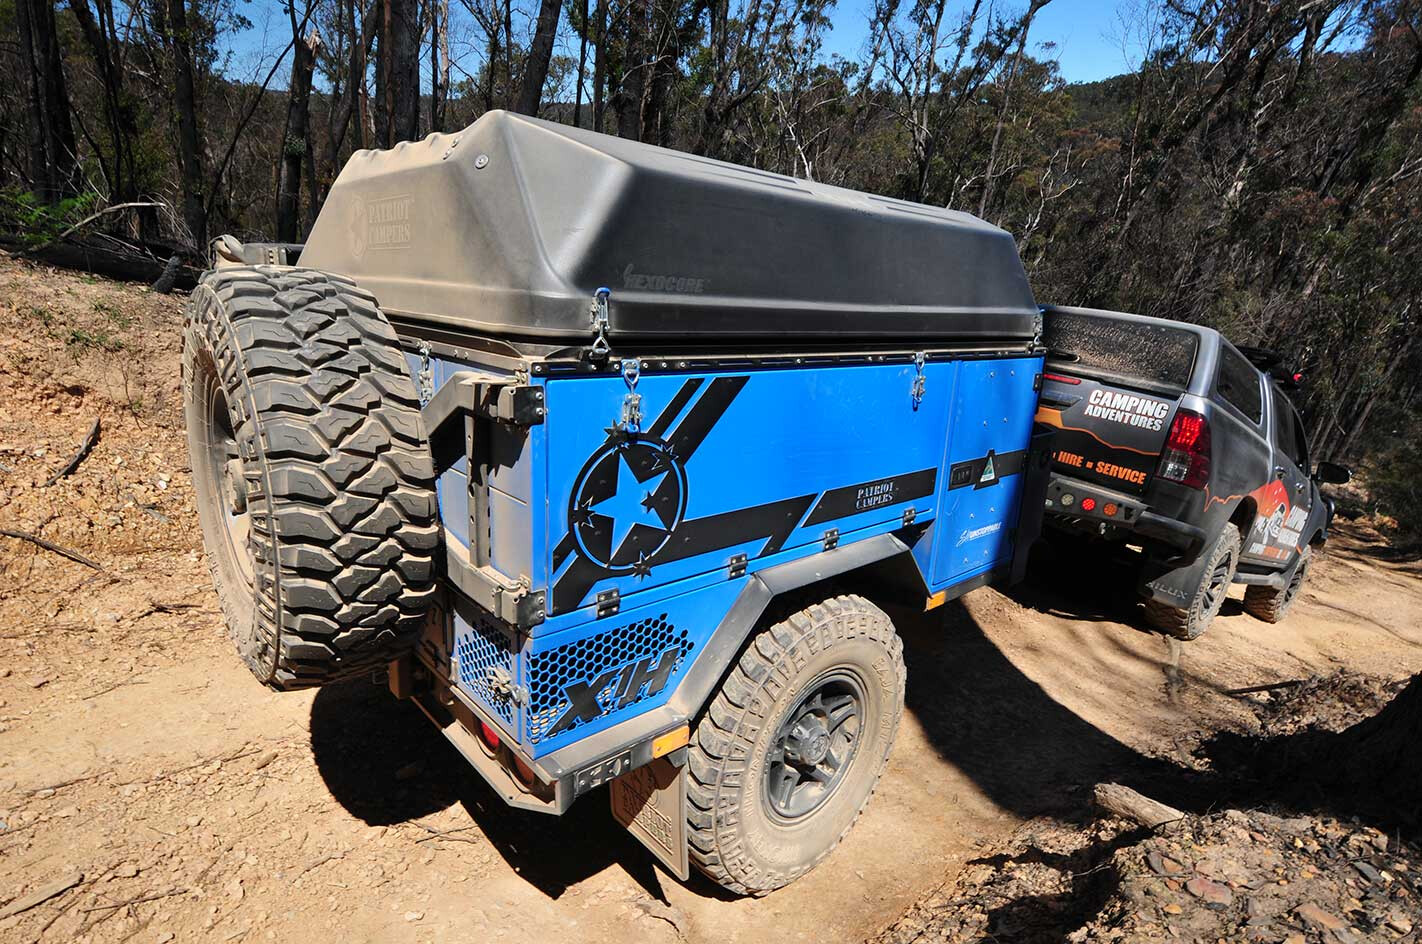
Since the first Patriot Camper was introduced to the public in July 2013, the Queensland-based trailer manufacturer has built an enviable reputation for groundbreaking design, quality and near unbelievable off-road capability.
There are essentially three models in the line-up: the entry-level X1-N starting off at $39,990; the X1 which adds six grand to the bottom line; and the X1-H which is the top-of-the-line model. We’ve also heard whispers that something else is brewing at Patriot’s manufacturing plant. Maybe it will be an ever grander version of the X1 … or maybe something entirely different.
This isn’t my first exposure to the Patriot brand – I first saw the range in 2015, again in 2016 at the Overland Expo in the USA, and then had the opportunity to travel with the then brand-new X1-H for a week or so in 2018.
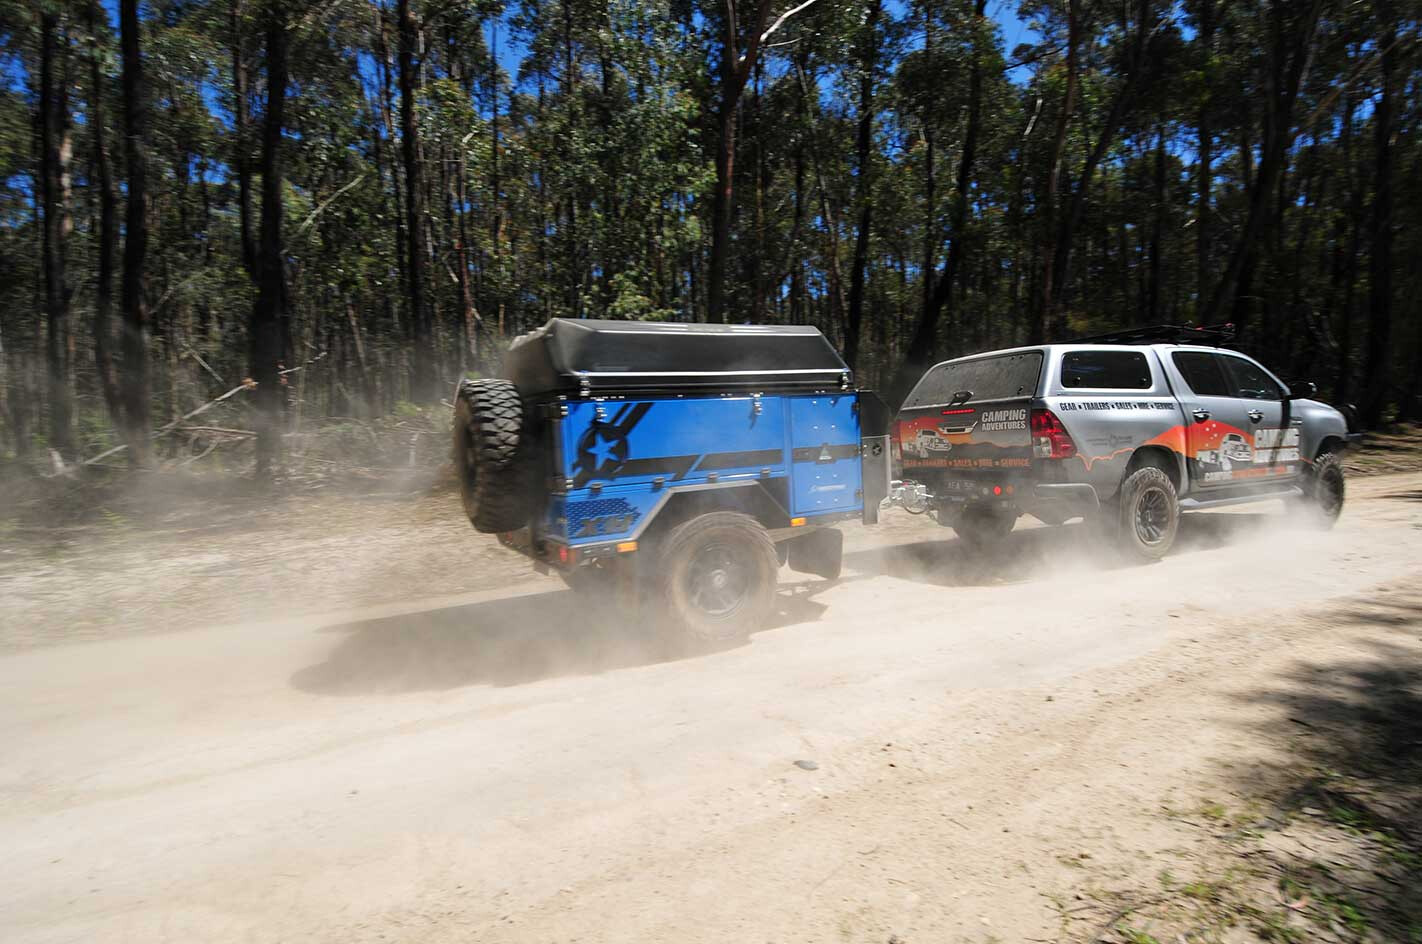
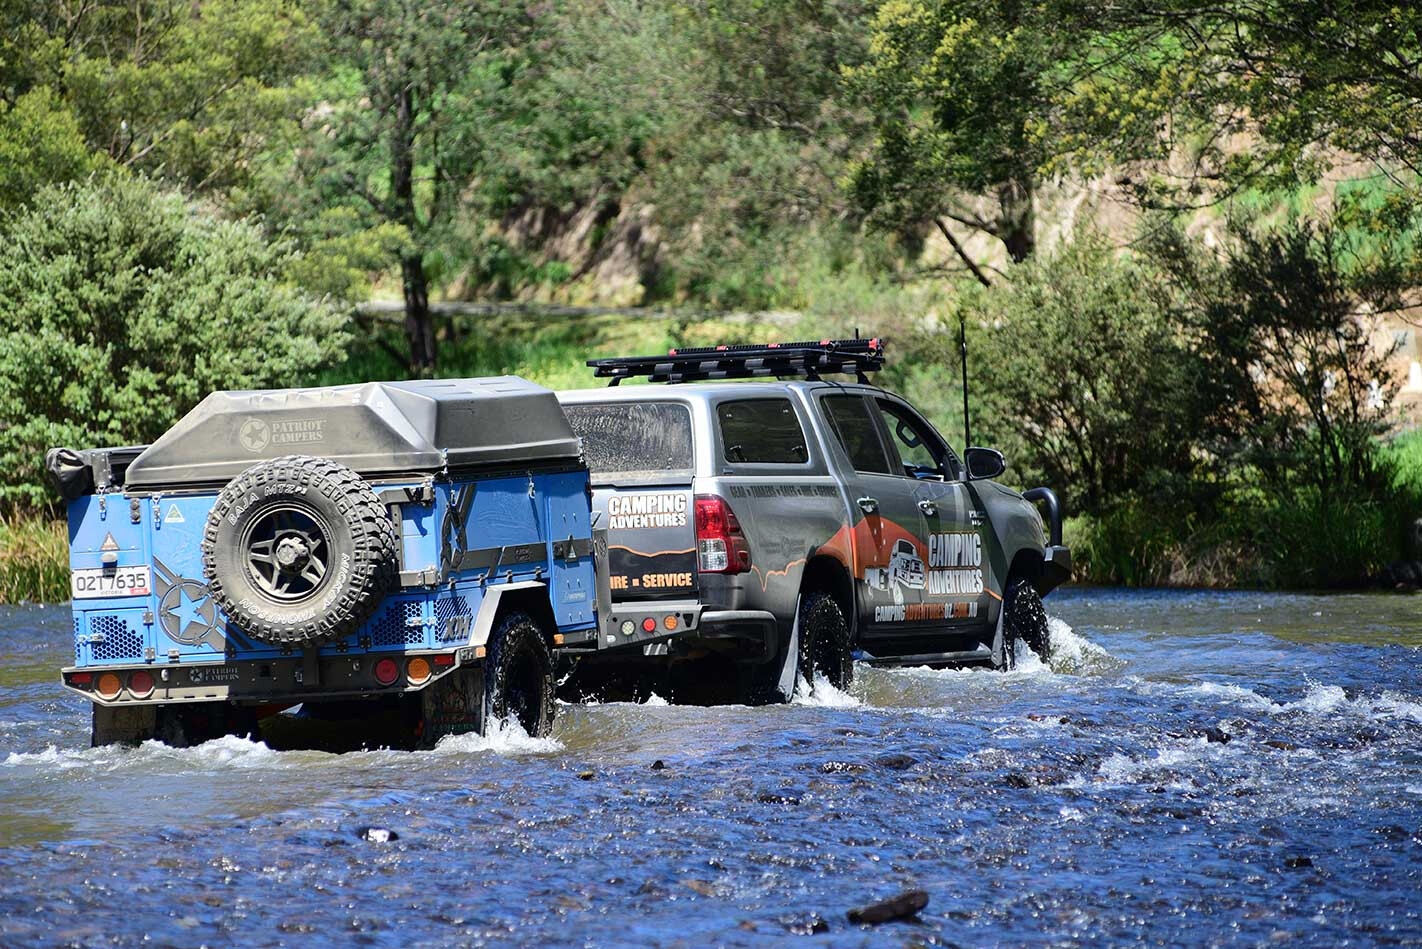
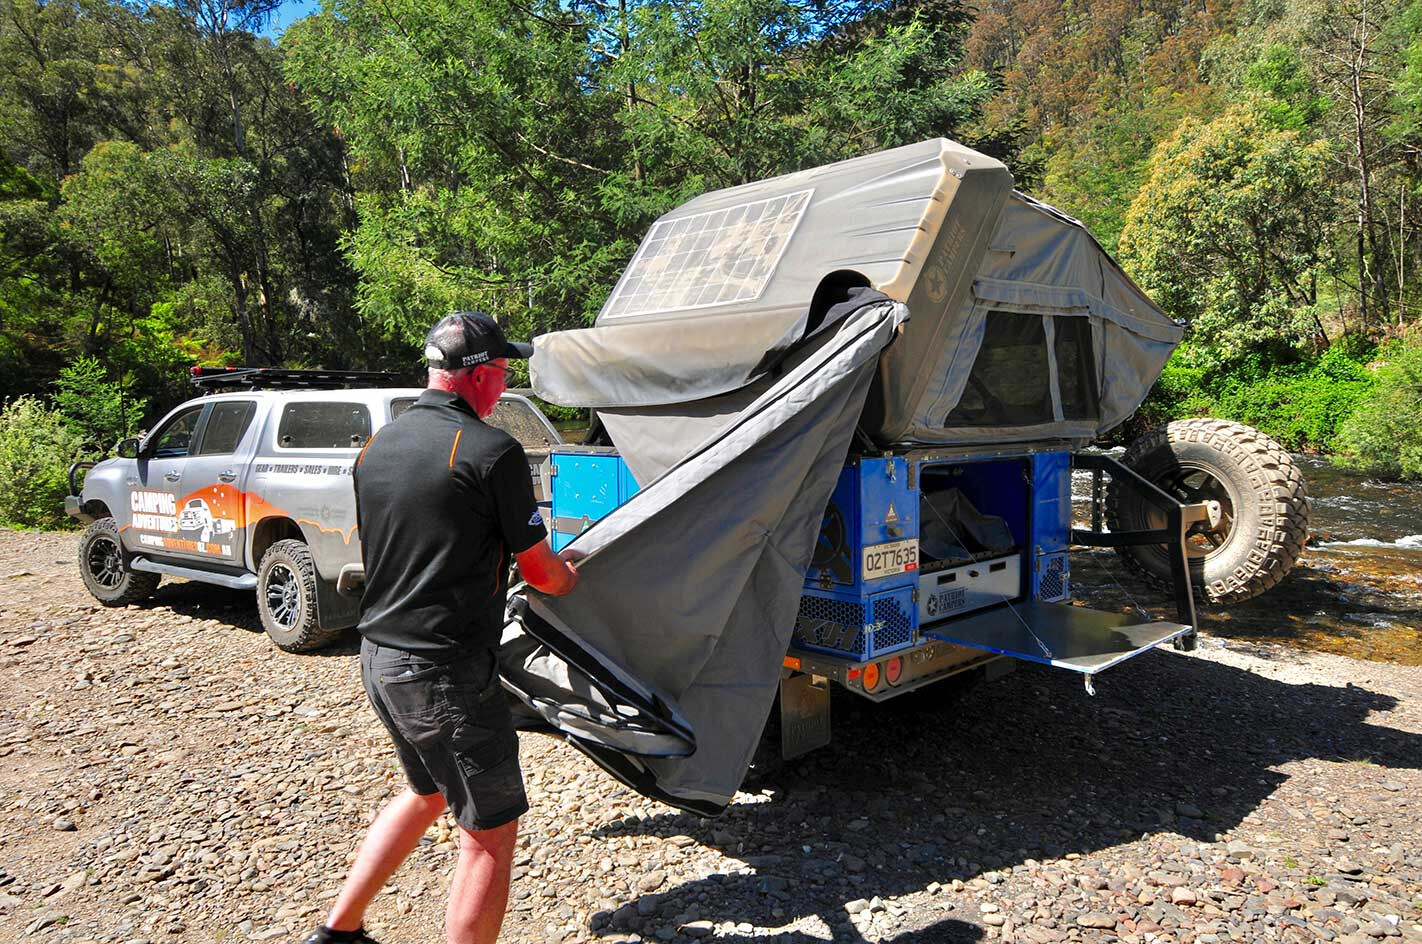
Picking up this unit from Camping Adventures in Carrum Downs, I was delighted to see that it was in a sparkling blue colour instead of the more traditional black or white they normally come in. With the camper behind a Hilux we headed bush in the mountains around Walhalla.
The X1-H is compact and light – overall length is 3.3m and it weighs 1000kg less dry. With a payload of more than 600kg you can cram a lot of gear into the 2000 litres of available storage space, but our test unit was lightly loaded for this run into the hills. With a rated ATM of 1600kg you can tow this camper behind just about any 4WD, and hitched up to an off-road capable vehicle like a Land Cruiser or a Wrangler, you’d have an almost unstoppable remote-area touring combination.
The X1-H’s galvanised interlocking Rigilite Hybrid chassis is unique in that it uses aluminium in non-supporting and stress-free places to help keep the overall weight of the camper down. The body of the camper is made from aluminium for the same reason.
With just 2.5m separating the tow coupling from the centre-line of the axles, it’s a track-following, sharp-turning trailer that sticks pretty darn close to the path of the tow vehicle, which you soon notice on tight, twisty tracks. The clean tow bar (not an A-frame) with its DO35 coupling allows you to pull some very tight turns without the towbar interfering with the tow vehicle’s bumper or body work, which is handy if you’re forced to back up and turn around.
The Cruisemaster X-Cruise Independent Suspension was equipped with optional airbags on our test unit, although coils are standard fare. The setup features twin shocks and is an absolute beauty.
Combined with the 16-inch rims and 33-inch Mickey Thompson tyres, there’s heaps of ground clearance and articulation, along with a 40° departure angle for when you’re in the rough, challenging stuff.
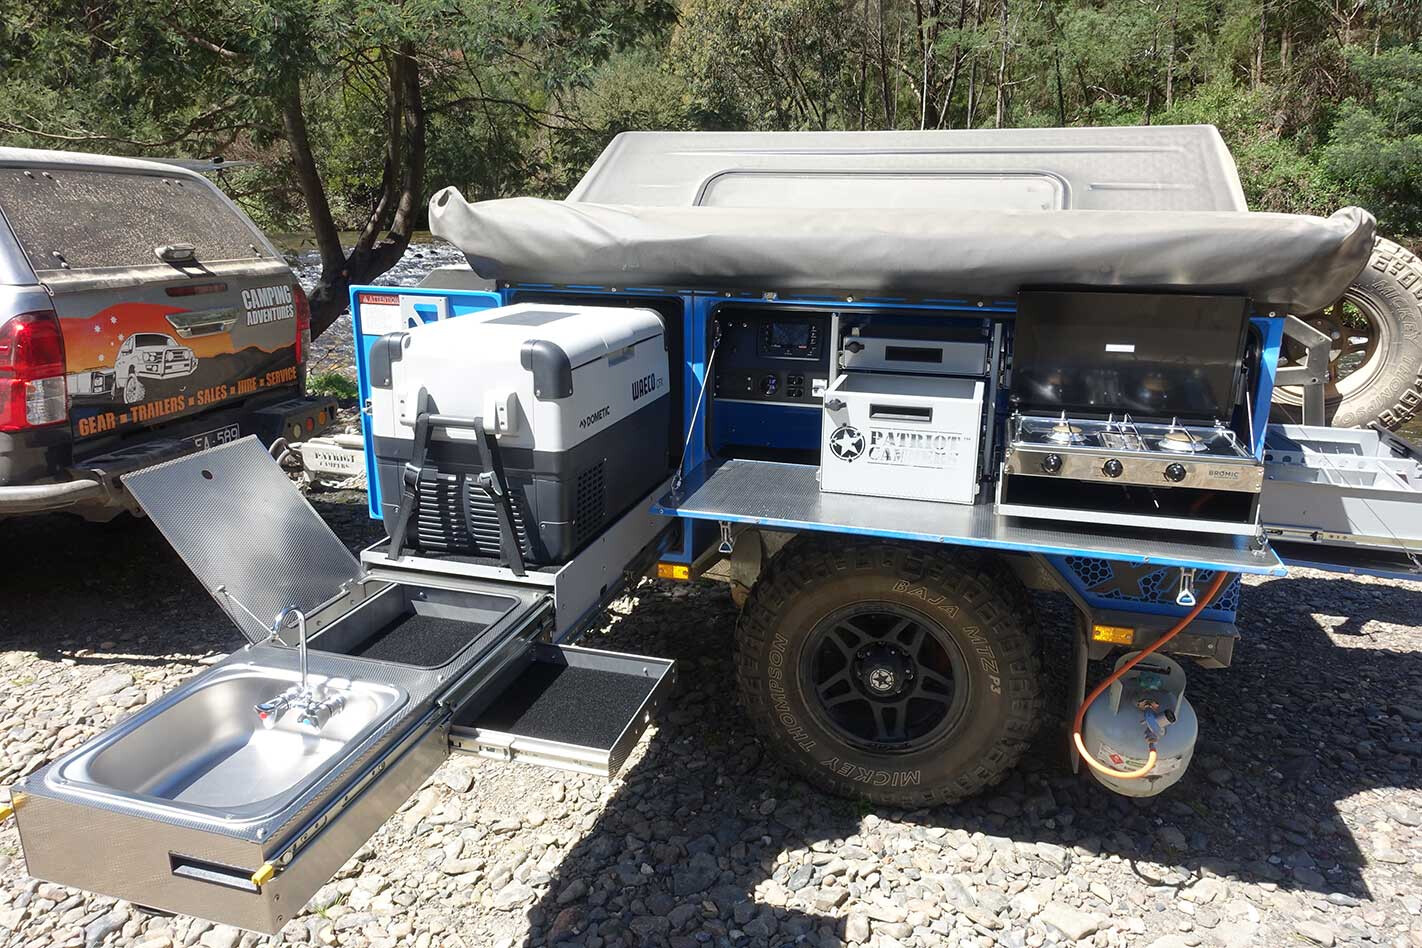
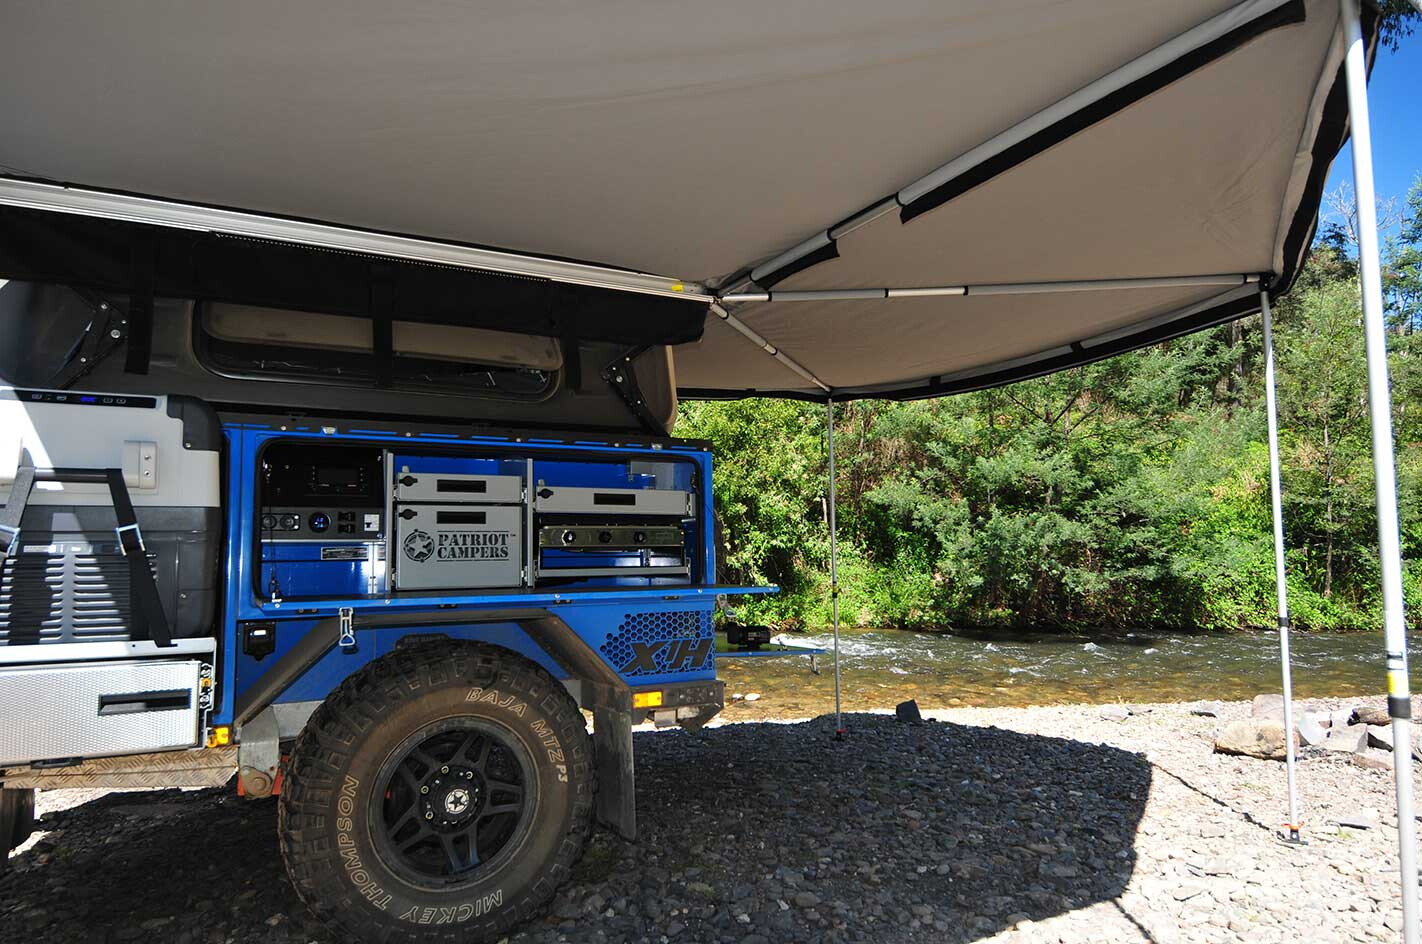
The kitchen is positioned on the nearside (passenger side) of the camper and pulling up for a brew is easy thanks to the drop-down door that exposes a two-burner stove and a couple of large drawers, which can be used for cutlery and everyday food items.
The control panel for the Redarc RedVision system, which includes the compressor control to level the air suspension, is also located in this compartment. Right next door is a pull-out fridge slide and sink setup, so everything is handy and close by whether you’re pulling up for a quick snack or a bigger meal.
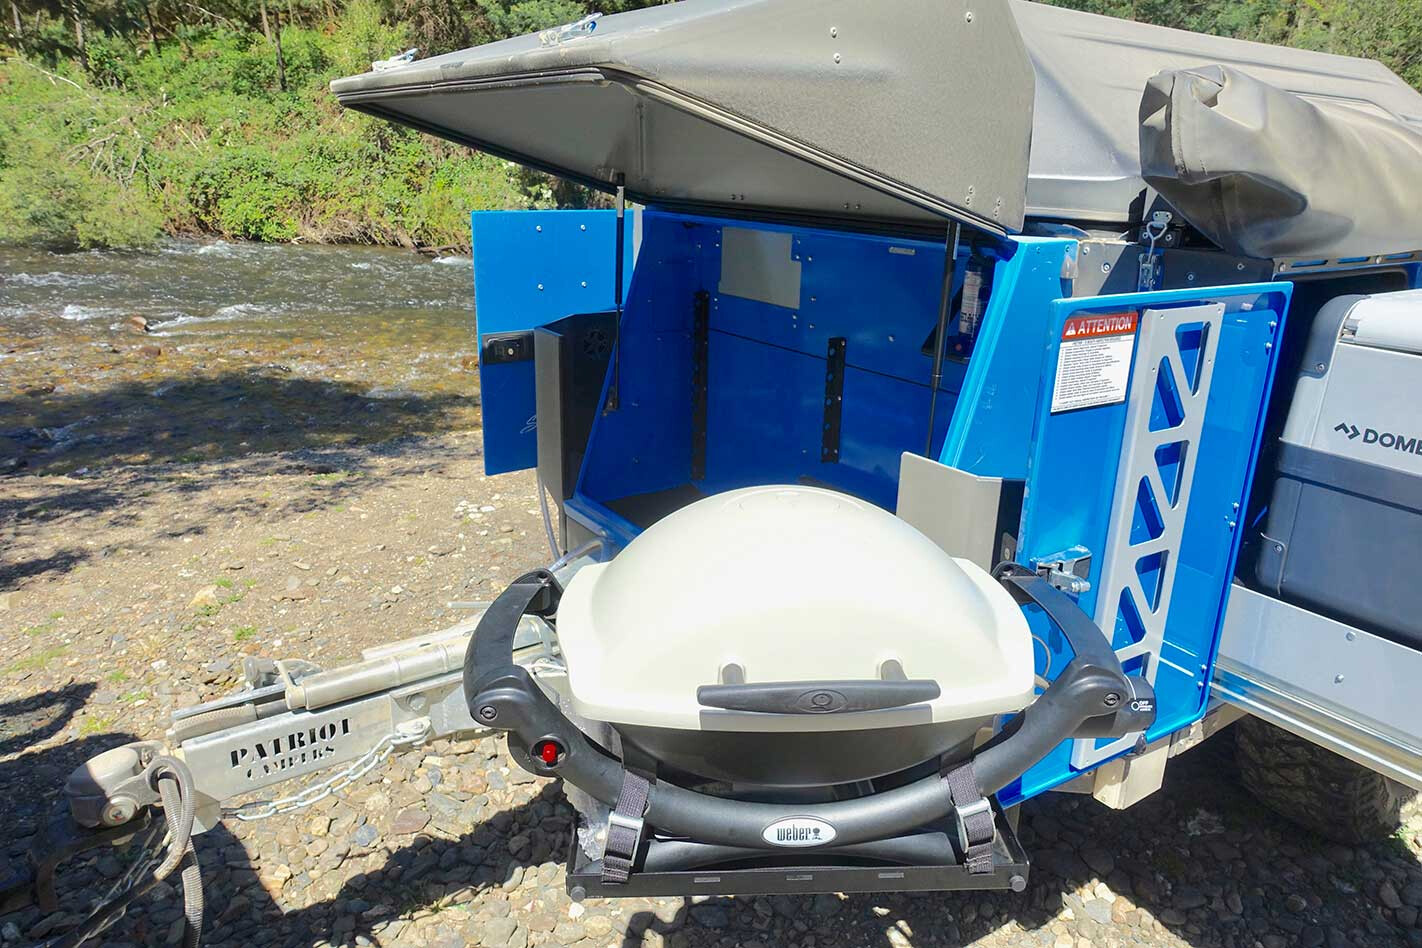
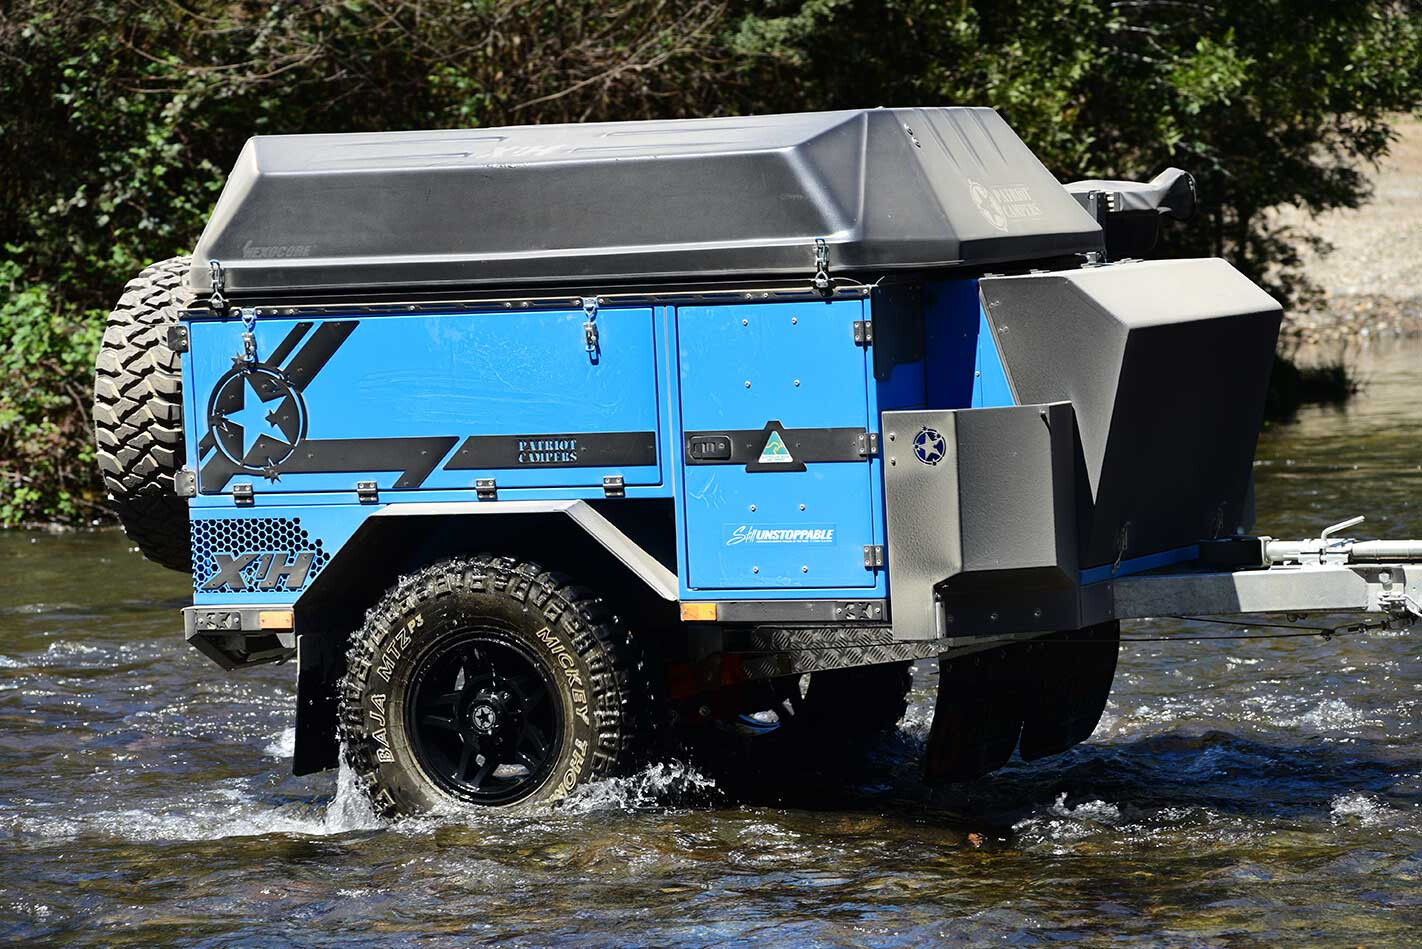
The stove, while a good quality stainless steel unit, is pretty basic, with no wind protection, which is a bit of an oversight in a camper that covers all the other bases so well. Still, giving this Patriot a bit more cooking credibility is a Weber Baby Q barbecue mounted to a swing-out stand in the front boot of the camper. There are a couple of gas-bottle holders on each side of this front boot that are tucked in behind protective covers and these are designed to accommodate 4.5kg gas bottles.
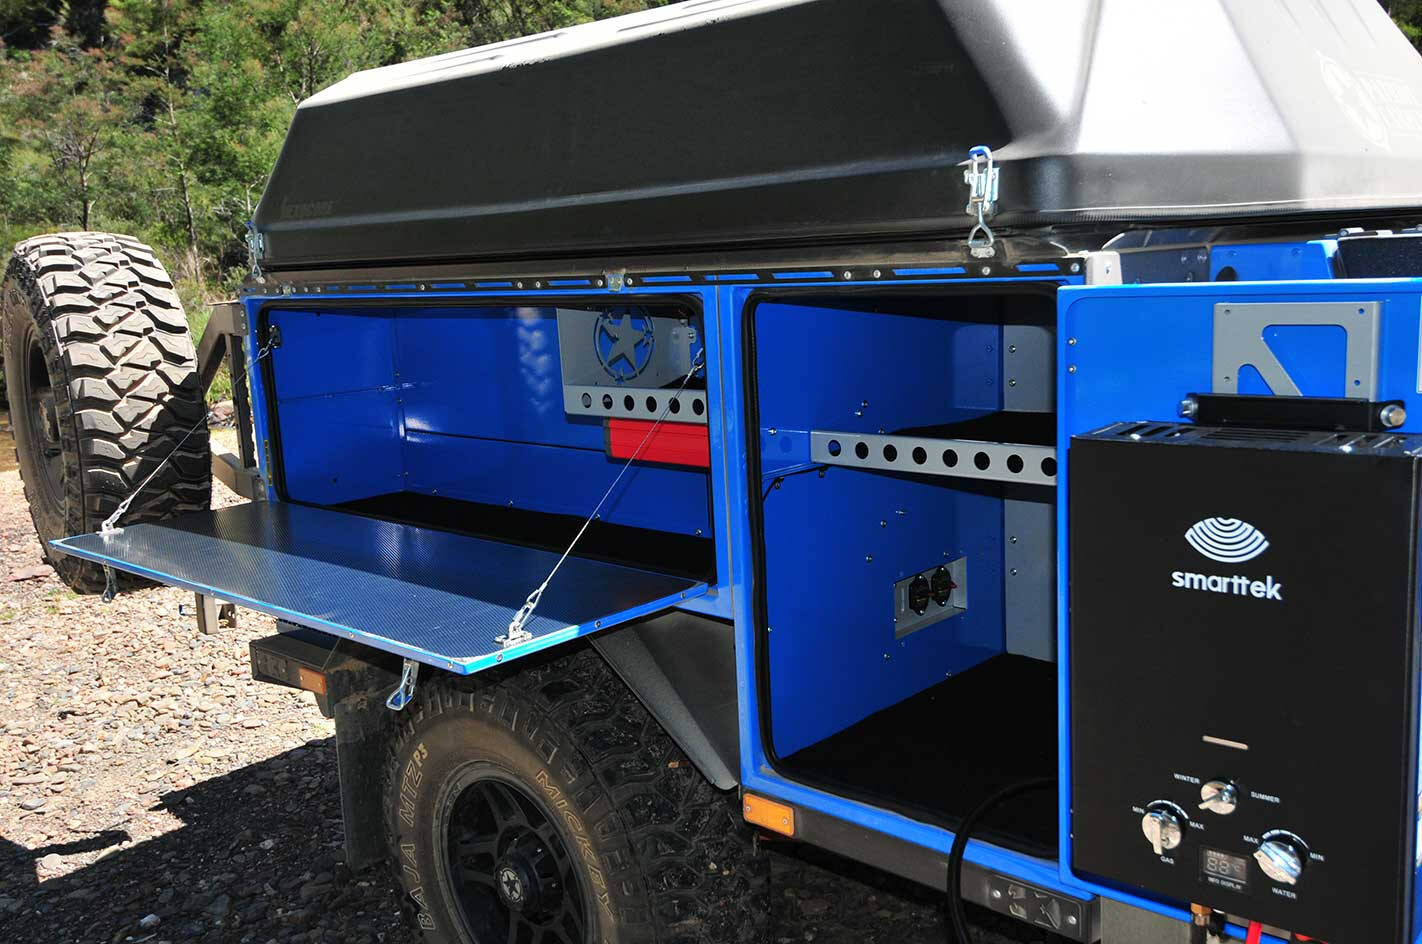
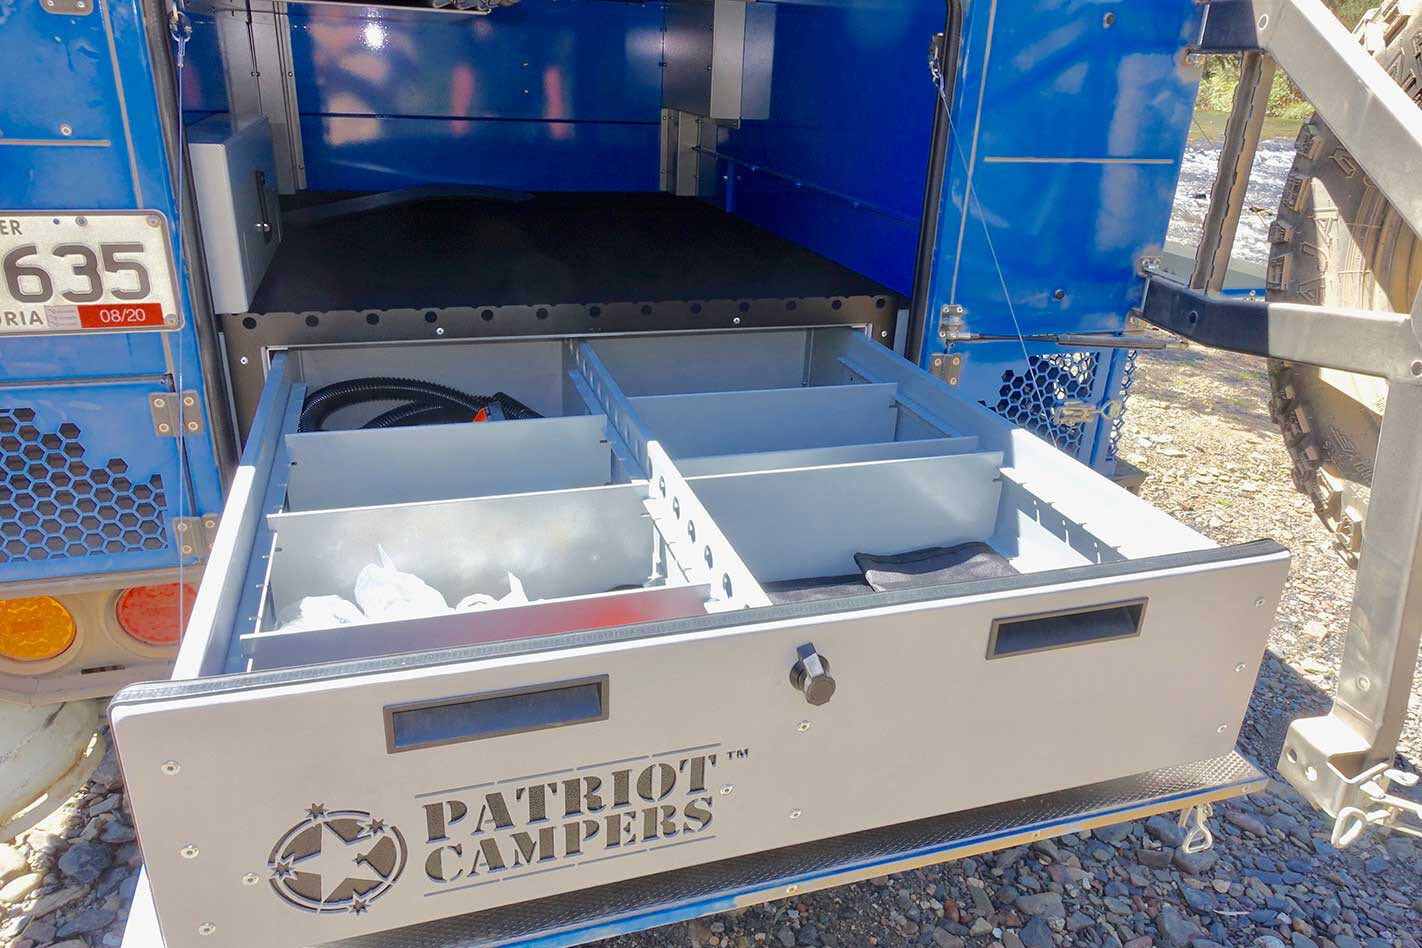
Behind the swing-away tyre carrier at the back of the trailer is a very large storage area complete with a roll-out drawer to aid access to the multitude of gear you can carry there. A couple of small doors on each side, essentially located behind the wheel arch, are good for carrying wet gear or muddy stuff such as recovery straps and the like.
Notably, the rear bumper comes with a couple of strong recovery points if you ever need to pull the trailer out of a bog or soft sand hole. The rear bumper also has a hitch receiver designed to carry a bike rack or the like.
On the driver’s side of the trailer are a couple of compartments offering more storage, as well as the spot for the inverter we had fitted (an optional extra), while the front compartment carries the gas hot-water heater, and this is easily connected to a hose that can feed the kitchen or a shower.
The air vent here (used to pressurise the interior and keep dust out) has a paper filter on it, but Patriot has gone one step further than most manufacturers by also adding a drain tube to whisk away any water that tries to invade the interior of the camper.
Power-wise, there are a couple of 12V 135amp/h Gel batteries controlled by a Redarc Manager30 charger. A solar panel on the roof will keep the batteries charged when off the grid, while a 240V input will do the same when you are in a caravan park.
There’s a couple of USB and 12V outlets to charge devices and, as well as the RedVision system, our test camper was also fitted with a 1000W full sine-wave inverter. In all it was a bloody good electrical setup.
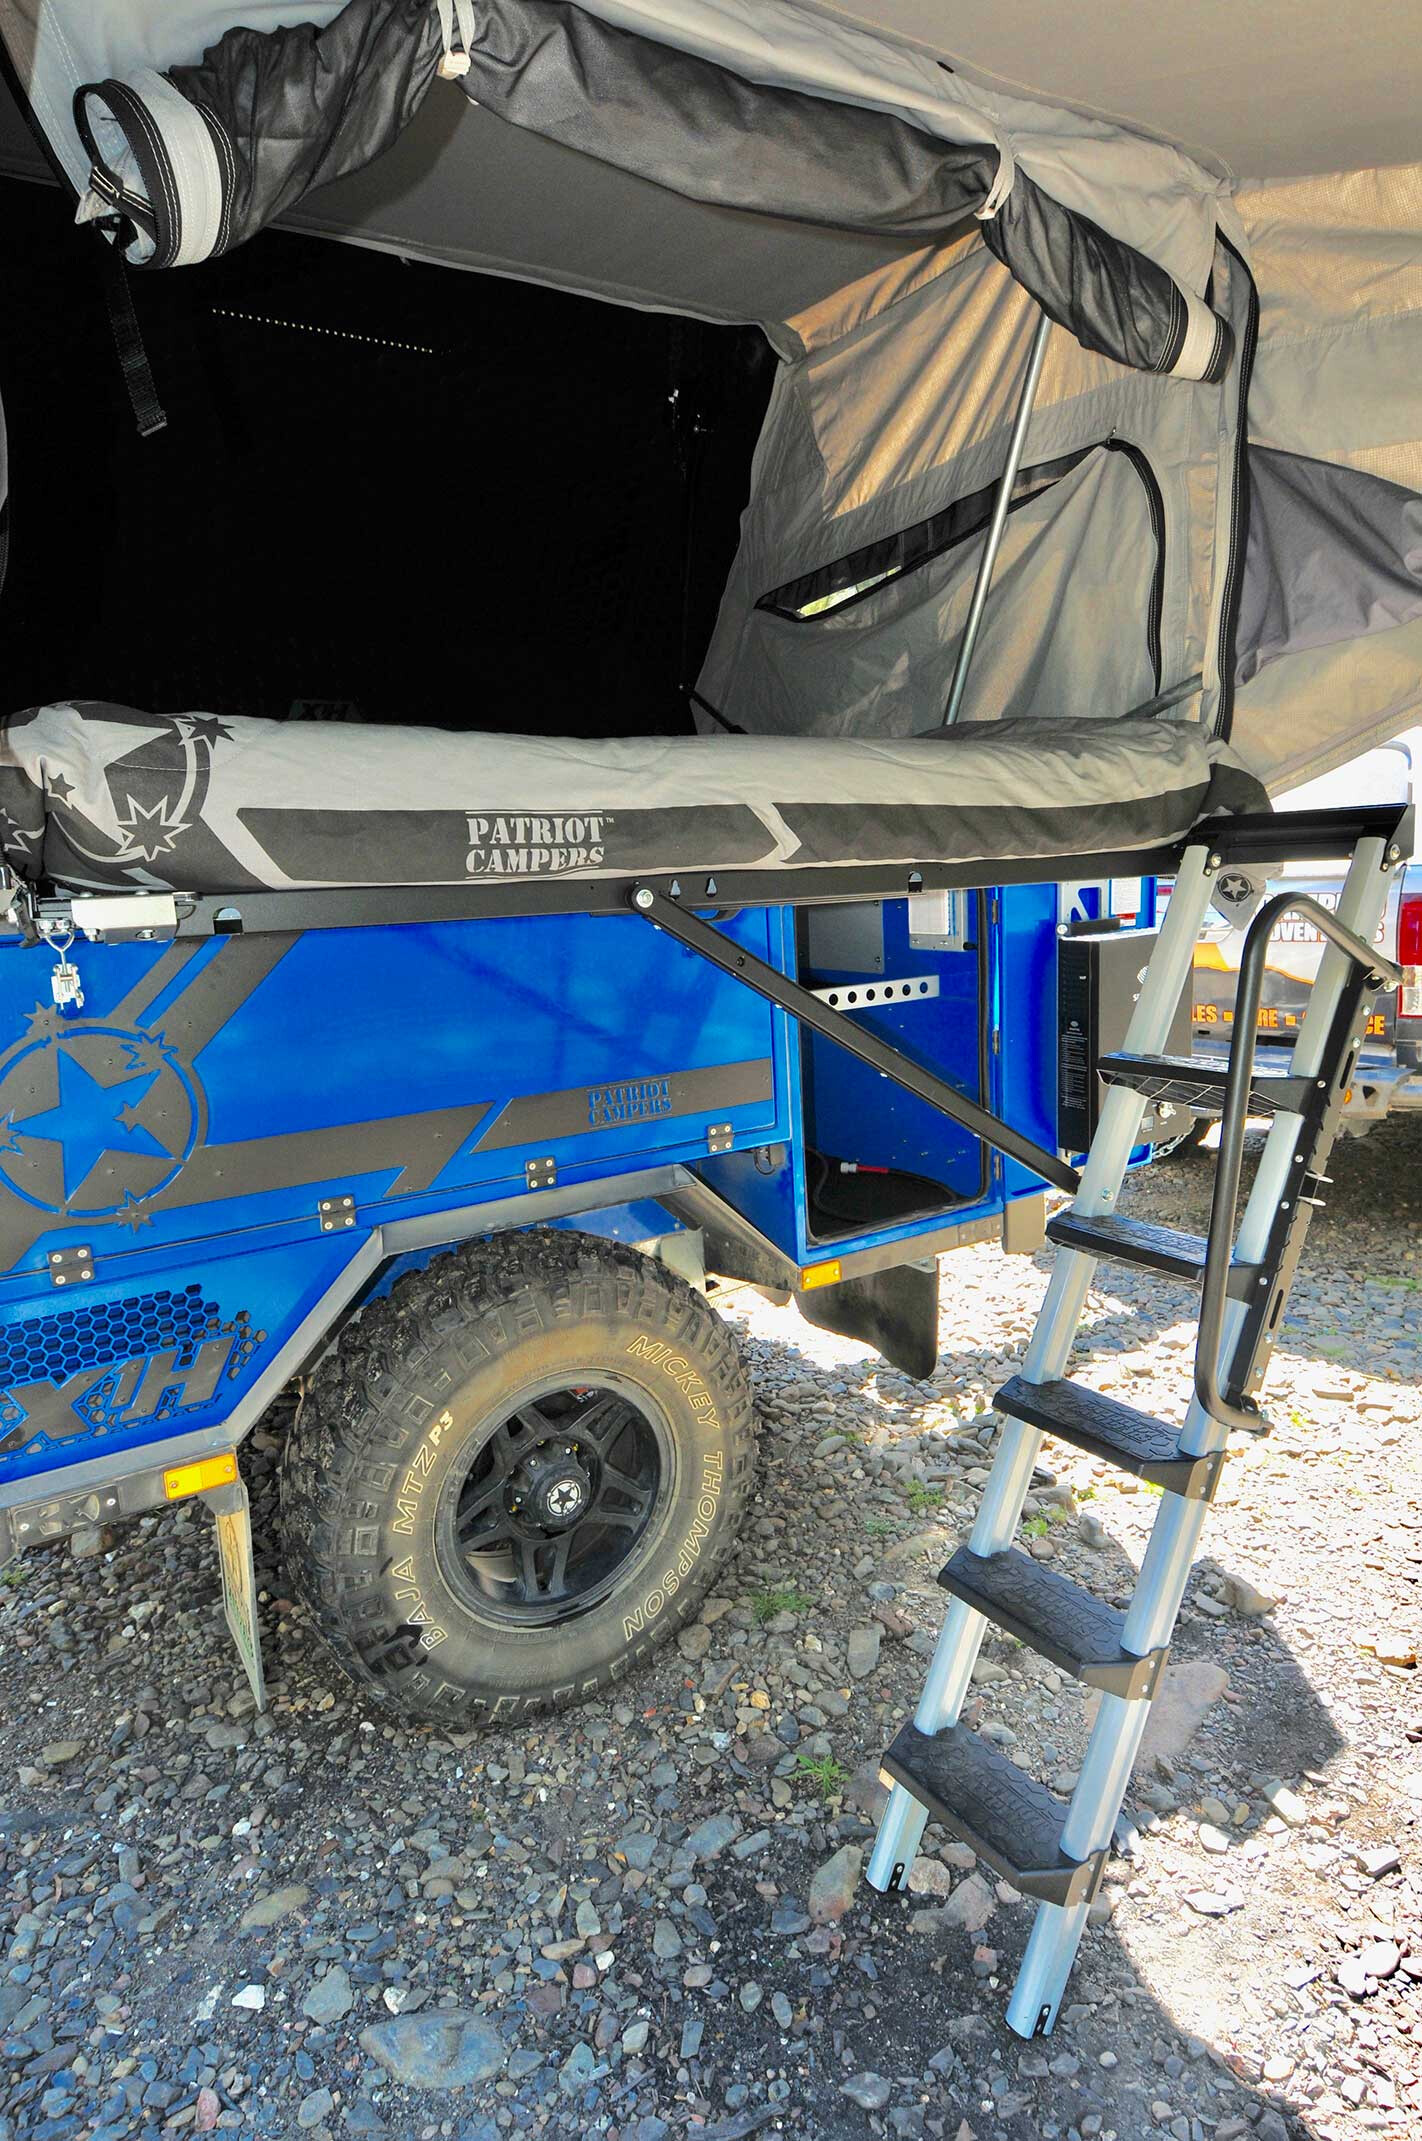
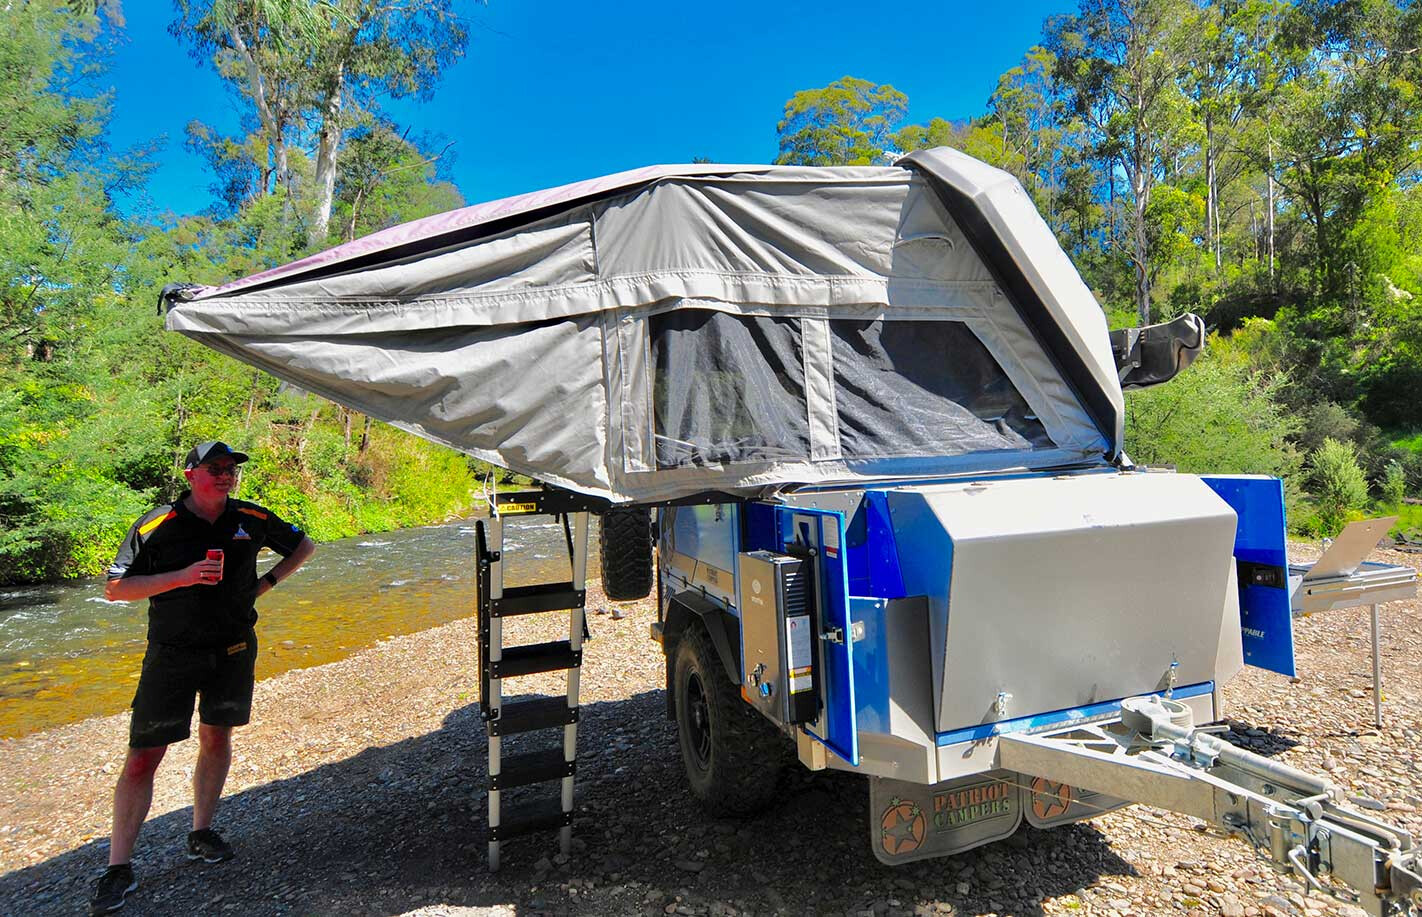
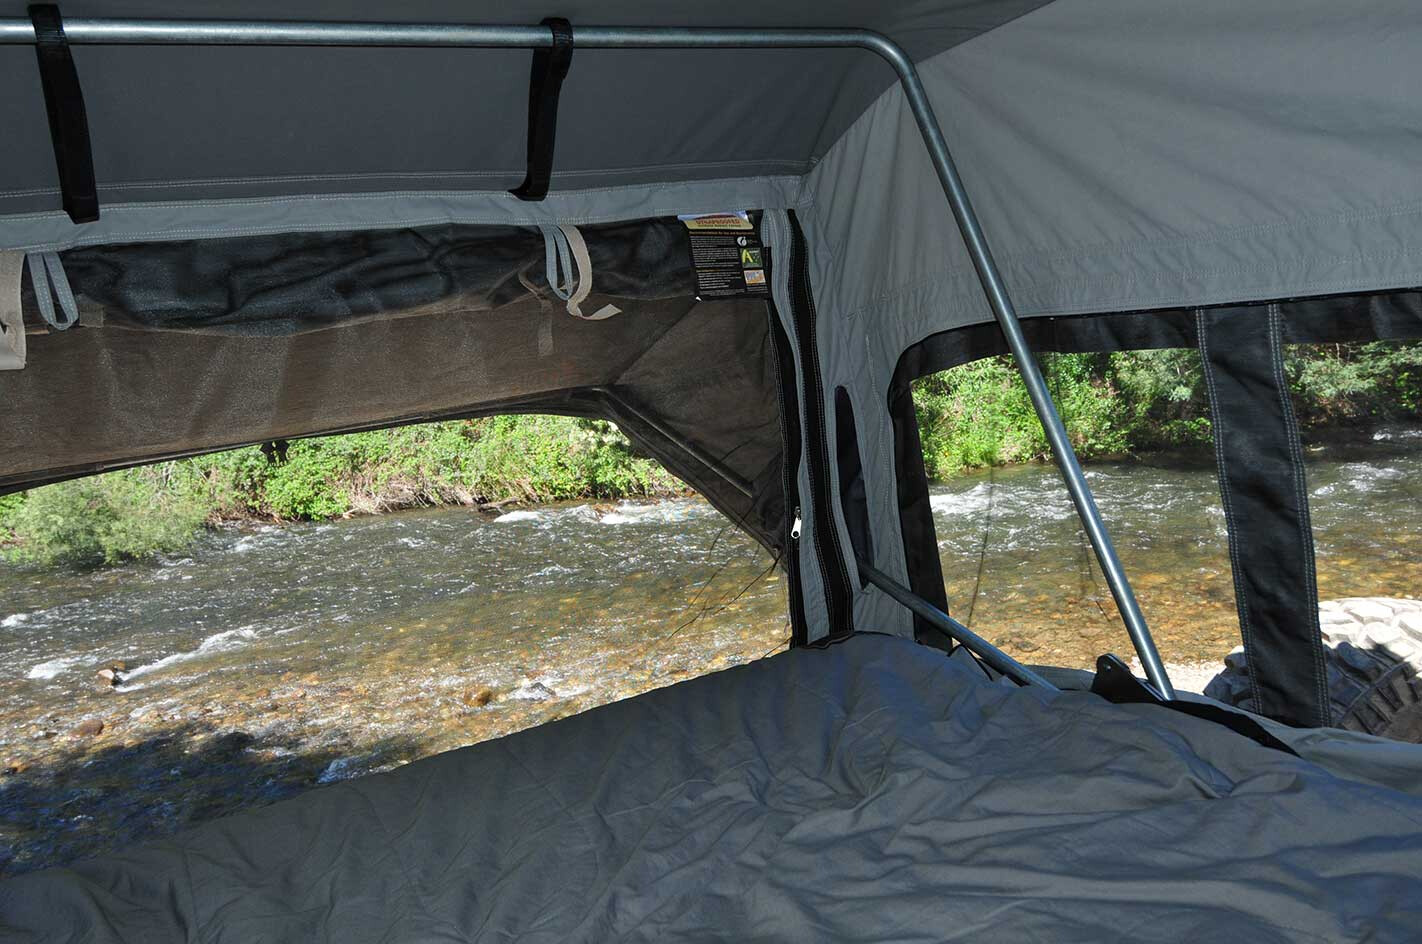
The real attraction of the X1-H that sets it apart from others in the Patriot stable – and from all other camper trailers – is the unique hard-roof tent setup. Undo a couple of latches, stand back and press the remote key and the roof lifts up. It takes less than a minute for the roof to reach its final position and then you simply grasp and pull the tent frame out which extends the walls and verandah of the tent.
The floor and its access ladder (a work of fine engineering design and manufacture) is then folded out, the ladder set up and then the exceptional gel-top pocket spring mattress is folded out from its travel position.
In all it takes two to three minutes to set up and you really don’t need to do anything more for overnight stops; although, you might want to peg the tent down for some added security in windy conditions. You can quickly add side walls (standard fare) for a spacious change room and extend it even further with an optional kids’ room, taking set-up time to around 10 minutes.
Befitting such a camper, and one that proudly wears its ‘Made in Australia’ badge, the tent material and fly wire used throughout is the best Aussie-made material you can get. There’s no cheap crap here. One thing you’ll immediately notice when you climb up onto the comfy bed is how roomy the tent area is – it beats most other rooftop tents hands down – and there is much more headroom as well.
The hex-pattern roof lining of the hardtop helps insulate the tent from sound and the elements, while an LED strip light illuminates the area at night. A large louvred window at the head of the bed opens to improve airflow in what is, when all the windows are zipped open, a very airy tent anyway.
If you are camping in cold conditions (Tassie readers take note) you can add an optional diesel hot-water and tent-heating system that pipes warm air into the tent area to keep you snug as a bug when its snowing outside.
Around the other side of the camper, a 270° awning is quickly and easily swung into place, providing ample protection from the sun and/or rain when you’re in the cooking area.
This camper is designed for the adventurous four-wheeler and is capable of going anywhere you care to tow it. Sure, any trailer can tend to act like an anchor at times, but this one will do it less than most and will follow you faithfully wherever you want to go.
With the camper’s 155 litres of water (in two tanks), two batteries and a good-size solar panel, along with a reasonably sized fridge and a heap of storage space, the X1-H provides all the essentials to live comfortably off the grid so you can stay at remote camps for a week or longer.
While it doesn’t come cheap, with a starting price of $52,990 and topping out at around $65K depending on options, the X1-H is one of the best Aussie-designed and -manufactured campers on the market. You’ll be the envy of many of your friends and with a five-year structural warranty you’ll be able to lead the pack, anywhere, for many years to come.
Patriot X1-H specifications
HEIGHT (AT TRAVEL): 1750mm WIDTH (EXTERNAL): 1850mm LENGTH (OVERALL): 3300mm TARE: 940kg ATM: 1600kg BALL WEIGHT: 120kg (unloaded) DEPARTURE ANGLE: 40° STORAGE SPACE: 2000L BODY: Self-supporting aluminium shell CHASSIS: Rigilite Hybrid Chassis ROOF: Hexocore composite powered tent lid (remote controlled) TENT: CS3 Integrated tent + change room SUSPENSION: Independent Cruisemaster X-Cruise airbag suspension BRAKES: 10-inch electric drum brakes WHEEL/TYRE: 16-inch alloy/33-inch Mickey Thompson MTX-P3 FRESH WATER: 155L (1x85L; 1x70L) BATTERY: 2 x 135amp/h gel ELECTRIC: Redarc Manager30; Redarc RedVision TVMS SOLAR: 1 x 140W roof-mounted panel HOT WATER: Smarttek gas heater GAS CYLINDERS: 2×4.5kg COOKTOP: Bromic S/S 2-burner and grill; Weber Baby Q barbecue (opt.) FRIDGE: 50L Waeco CX50W (opt) LIGHTING: LED throughout PRICE: $52,990 ($60,544 as tested)
Contact
Patriot Campers HQ: (07) 5597 0638; www.patriotcampers.com.au
Camping Adventures (Vic): (03) 9708 2946; campingadventuresoz.com.au
Many 4WD clubs have an unwritten rule along the lines of ‘whoever is the first to hold the group up self-nominates to write the trip report’. Well, here I am … that bead-popping incident happened about 500 metres into the first track. First, let’s back up a bit for some background.
Brand Sales Manager for 4X4 Australia, Scott Crowley, has organised a few of these Advertisers’ Trip events over the years. This year it was based at Glenreagh, about halfway between Coffs Harbour and Grafton, NSW.

Scott brought his own VW Amarok V6, but it’s not set-up for 4WD use – more of a dirtbike hauler – so he wisely rotated through the other vehicles as a passenger. Editor Matt Raudonikis was in the magazine’s own black Ford Ranger; Deputy Editor Dean Mellor was in his Defender 300Tdi; Queensland 4X4 Australia representative James Secher and his mate Shannon were in a 3.0-litre Hilux; as was Dave in HEMA’s long-suffering version; Rob from ARB was in a go-faster red Colorado; James and Chris from EFS 4WD were also in a Colorado; Brad of MaxTrax fame was in a current 200 Series; Rob from Narva was in another Ranger; and I, Michael of Piranha Offroad, was in yet another Ranger.
Guiding us was Kev Smith, who hardly needs introduction, being a regular 4X4 Australia contributor and also having 35 years of four-wheel driving experience around the Coffs Harbour area, most lately in his trusty 80 Series Land Cruiser.
Everyone made it to Camp Eagle Eye at Glenreagh on Tuesday night, so after a sleep and breakfast of bacon and egg rolls, we were ready to go for what ended up being a 50km loop of scenic and, in parts, challenging tracks. All of us aired down to be within the 18 to 22psi pressure range, and soon after we were off to the first track for the day.
The conditions in general over the two days were dry, dusty and decently grippy, with the soil being a sandy, gritty light clay, giving way to sandstone rock steps where eroded. Once my vehicle was secured on the first hill of the day, there were two options: try to reseat the bead(s), or change the wheel. My compressor was able to reseat both beads, but the valve stem was damaged and leaking. I pumped enough air into it to get back off the jack and back down the hill onto some more level ground, where the second option was enacted.
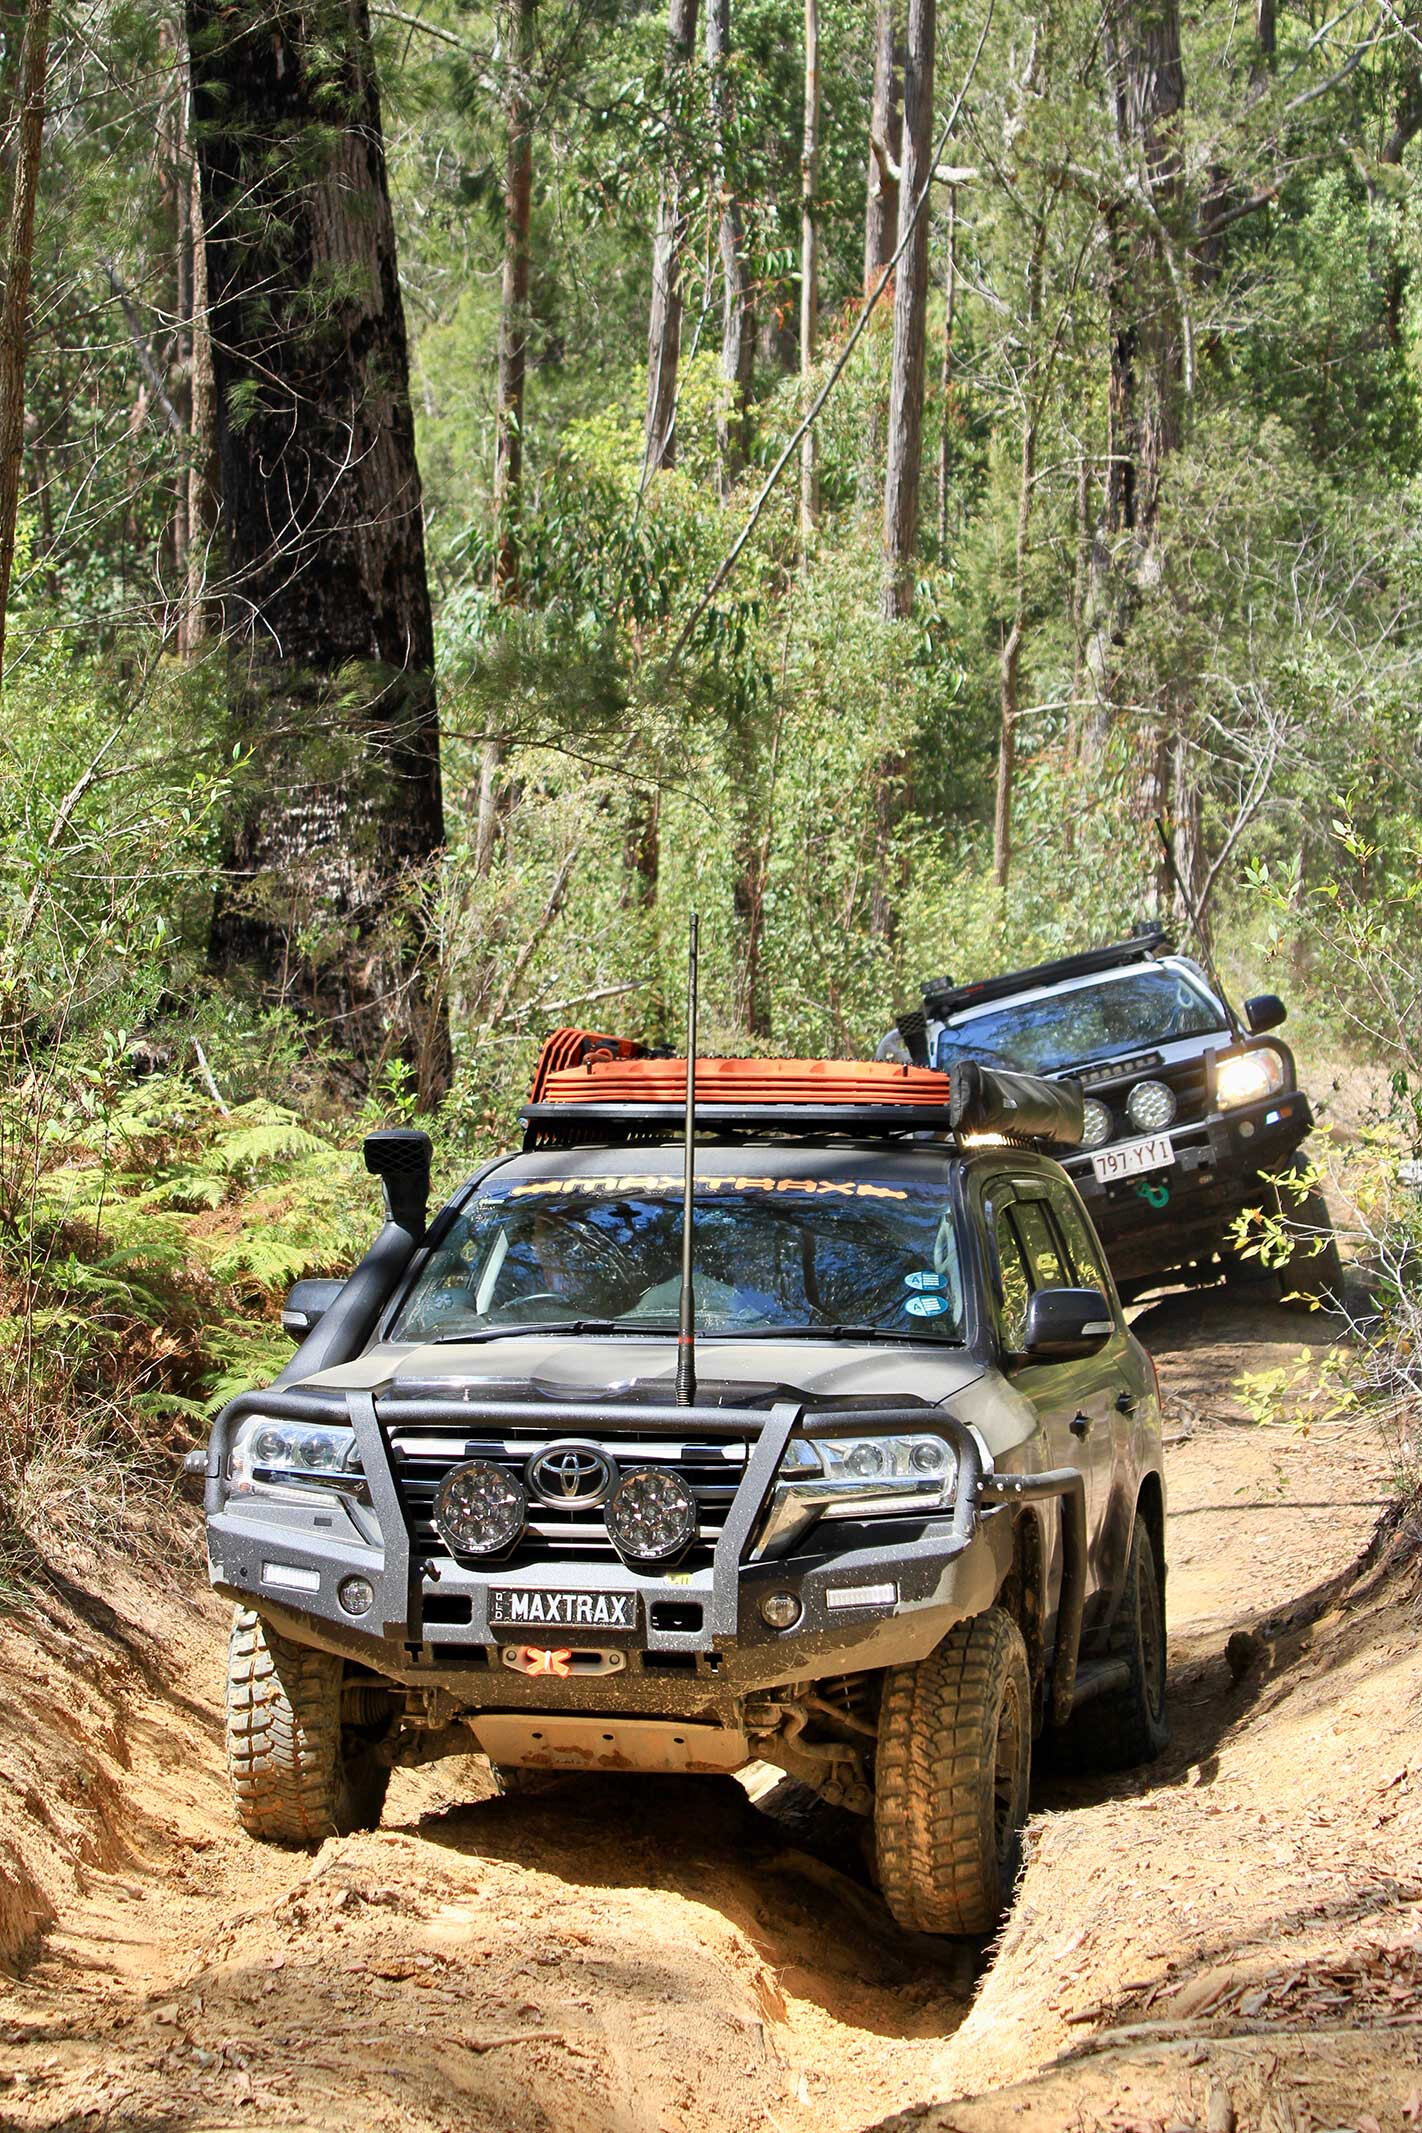
Considering that amongst a group of 10 vehicles like this, there is always a mix of experience levels and familiarity with what the vehicles can do, everyone was doing a great job of dealing with the terrain. In the end, the bead-popping event was the only hold-up due to mechanical issues, and there was no recovery gear used during the two days.
After navigating a few tracks, we soon arrived at the next obstacle, which wasn’t very wide but wide enough that two or more driving lines were presented. In some places, it even made sense to cross from one side of the track to the other to drive a better line. Some slight damage was suffered here when a couple of vehicles wedged their driver-side rear wheels against the same rock; the EFS Colorado munched up the centre cap and the 200 Series copped some battle scars on its alloy rim.
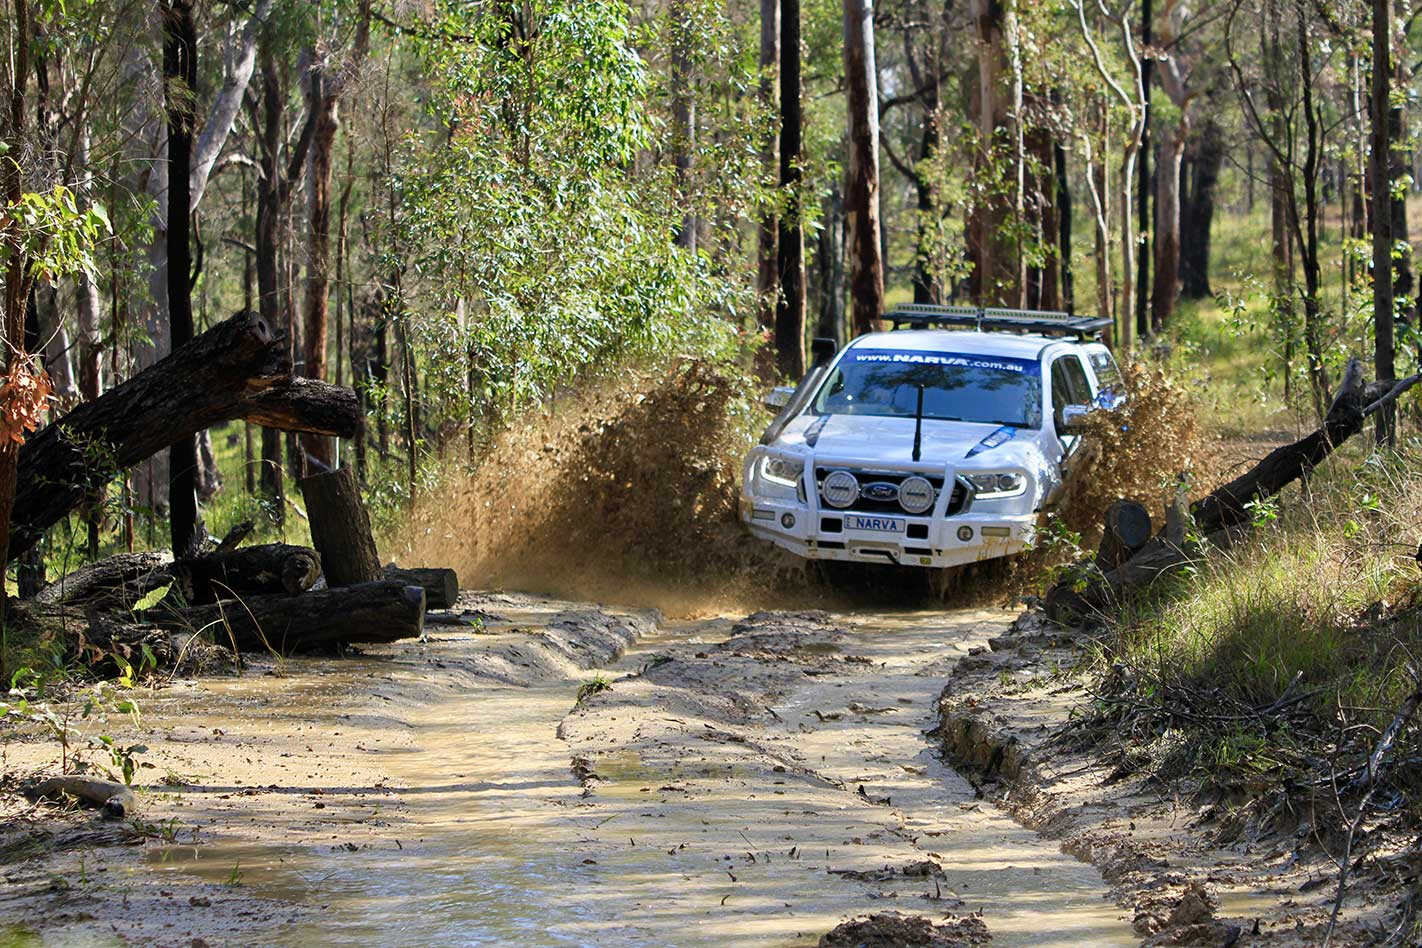
The last tricky bit for the day was much like the other two – rocky, rutted and steepish – and this spot also resulted in some vehicle damage. The ARB Colorado, lacking a rear diff lock and not yet having an Air Locker or two installed, had to be pushed a bit harder and consequently landed on its Summit rear step bar, denting the replaceable side wing.
With the temperature reaching 35°C, a cold beer or two was much appreciated after an early end to the day’s travels. A storm was brewing during dinner, with plenty of lightning and thunder. It poured during the night and sounded like much more rain had fallen than the 14mm the camp caretaker said he measured the following morning.
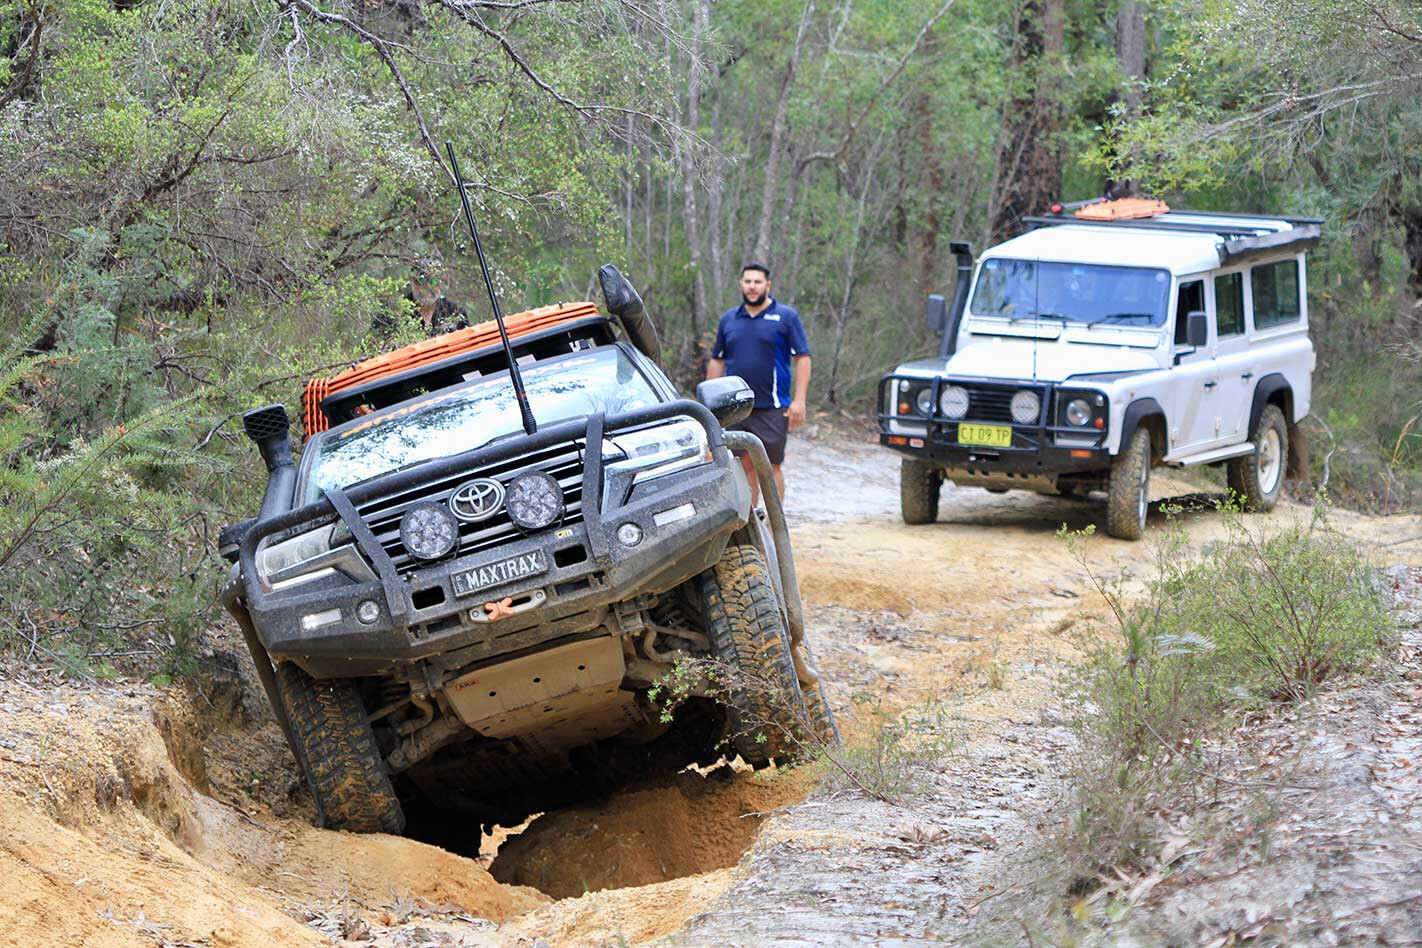
A smaller group remained for day two, with the EFS boys, HEMA’s Dave and 4×4 Australia’s Queensland rep James and mate Shannon hitting the road early. The overnight rain had cooled things off (only mid-20s today), settled the dust and left a bit of water lying around on the tracks.
This was more of a scenic and historical day, and we had a look at the Glenreagh Mountain Railway, which closed in 1972 after extensive washaway damage. We then drove hidden, almost secret tracks that Kev and a mate had attacked over two days with hedge trimmers, clearing the noxious lantana which will likely be only a temporary measure, as it will, no doubt, soon be back to be impassably overgrown in a year or two.
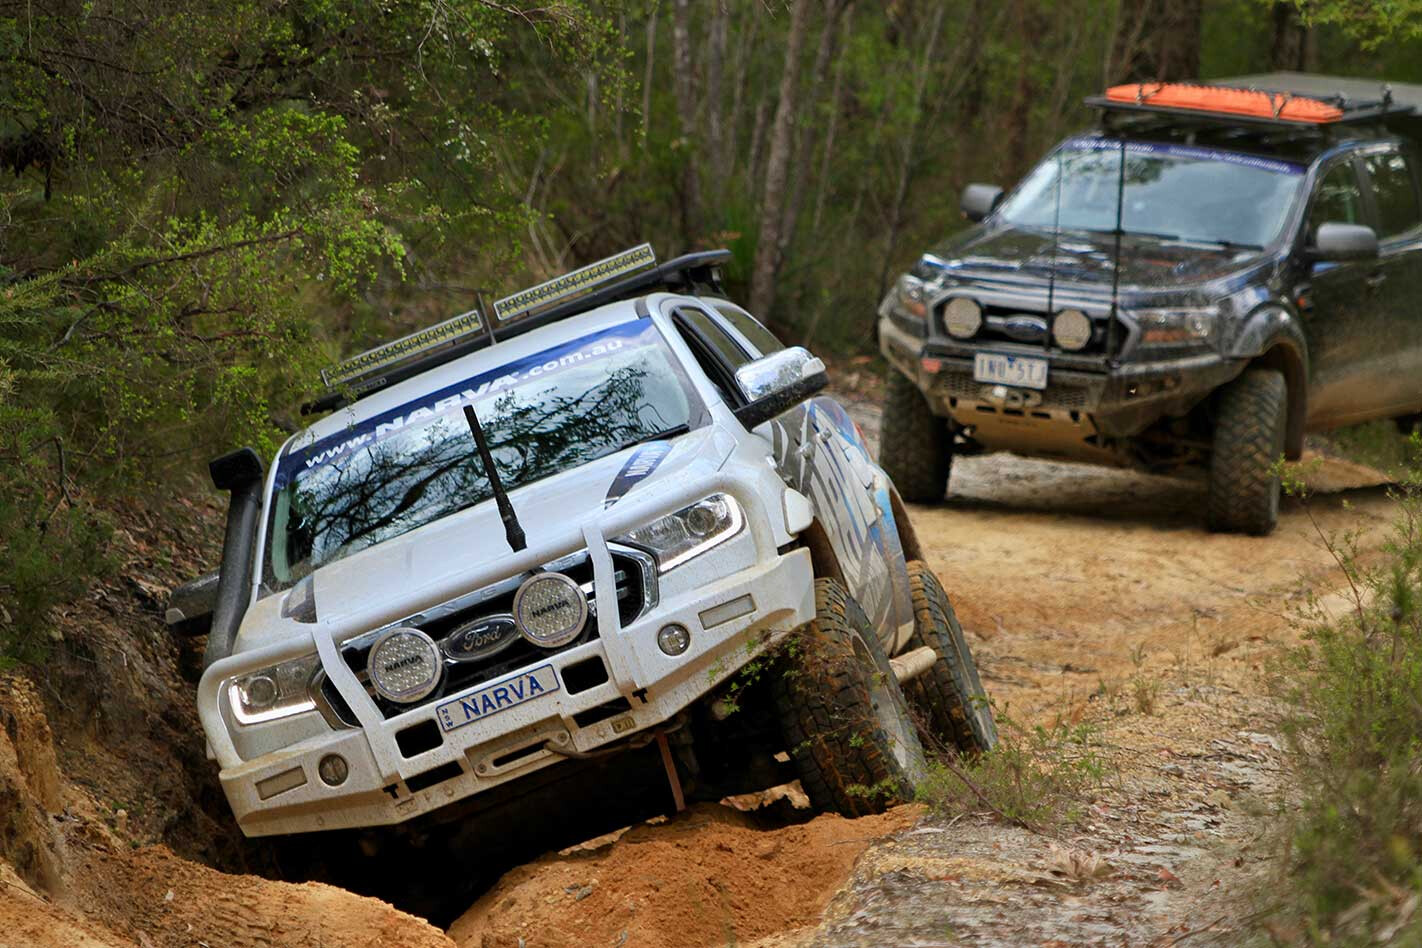
Dep Ed Dean was having trouble activating his Defender’s ARB air compressor and, consequently, the front and rear Air Lockers. This was only a slight inconvenience for our last bit of tricky track, as good wheel travel and the application of some left-foot braking got the Landy through in the end.
The tricky section was only about 100 metres of undulating sandy, gravelly soil, but it offered a deep trench with plenty of opportunities for crossed-up axles. There was precious little in the way of line choice; you just entered the trench and off you went. ARB’s Rob gave it a really good go in the Colorado, but in the end admitted defeat and took the optional side-slope-inducing bypass.
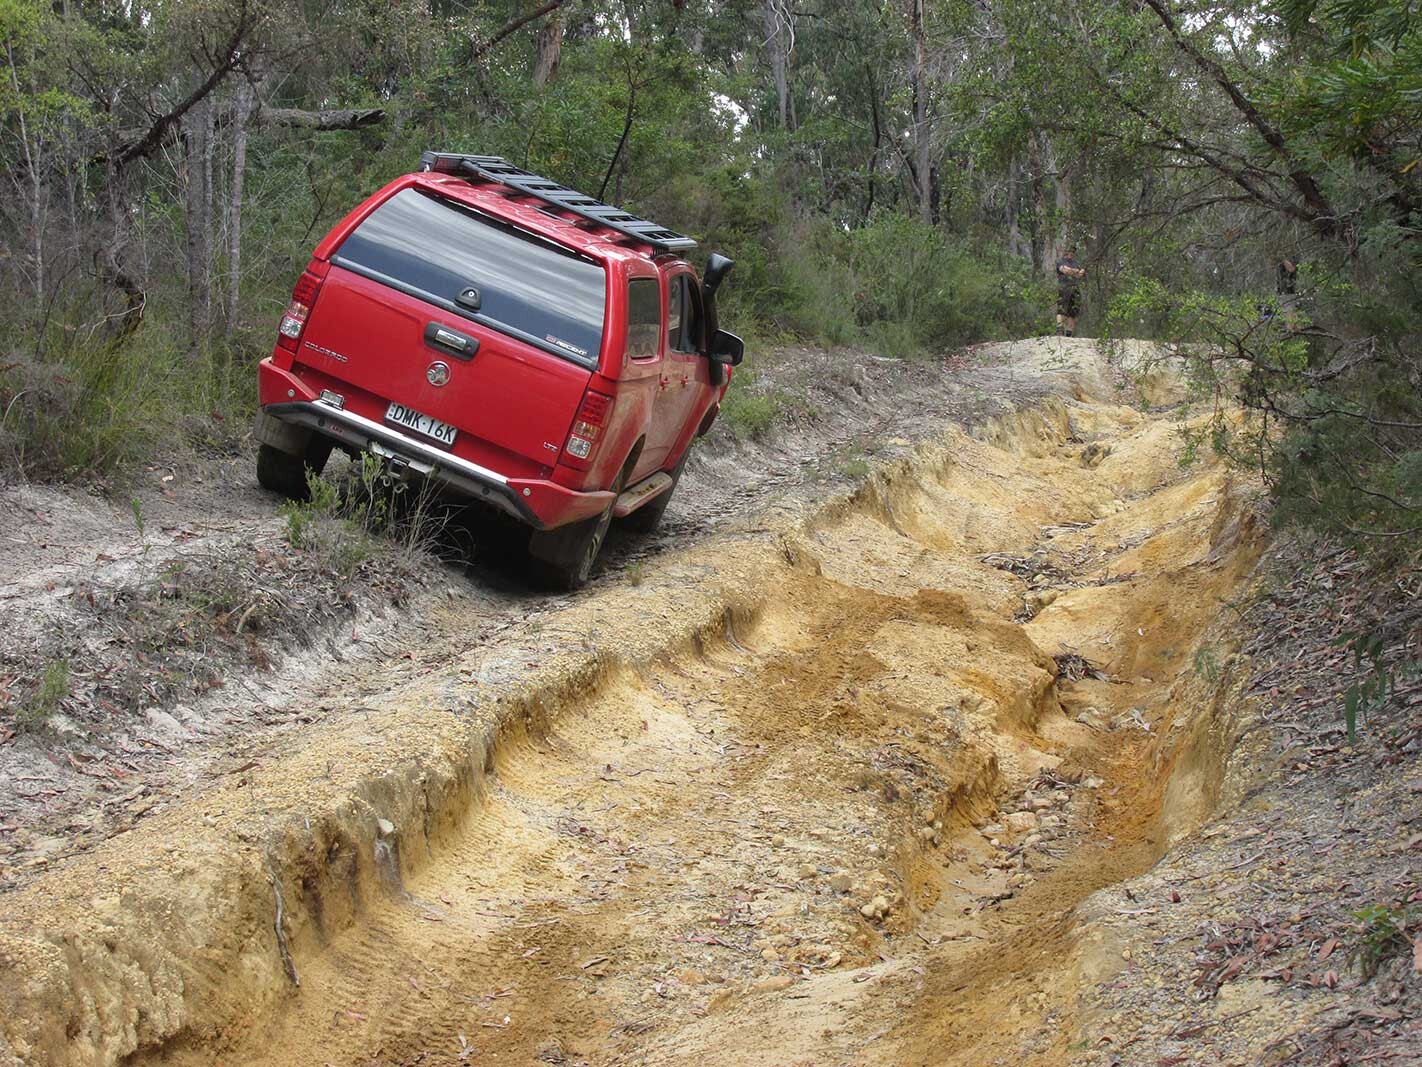
After admiring the view from an impressive lookout we were done for the day, so headed back to camp where most of us started to pump up tyres, except Dean, who started looking into why his compressor wouldn’t switch on. What he discovered was the (self-installed) wiring loom for his Lightforce driving lights had wound up in the steering shaft and stripped bare. The DRL function of the lights is powered from the ignition-switched cigarette lighter socket, and the fuse was blown. The air compressor relay also uses this circuit, so the compressor doesn’t run unless the engine is also running.
We taped up the bare wires, replaced the fuse and the compressor worked once again. I believe Dean had an auto electrician sort the headlight and driving light wiring when he got home. He swore the loom was all cable-tied up and away from the steering shaft, but I reckon he’d better not quit his day job.
Much has been said and written about the coil-spring Navara dual-cab ‘NP300’ (or D23) that arrived here in mid-2015, not all of it complimentary, especially with regards to its heavy load and tow abilities, and much of it about the subsequent suspension revisions for the 2017 and 2018 models.
Meanwhile, flying under the radar, and among a host of coil-spring Navara models, has been a solitary leaf-spring dual-cab: the RX cab-chassis. This is the base-spec model in the Navara 4×4 dual-cab range, something that’s pretty obvious given its steel wheels, lack of side-steps and its work tray.

Not that the steel wheels or lack of steps should put you off, and if you did want a smarter-looking and more aerodynamically efficient ute it wouldn’t be hard to pick up a factory tub, given so many are discarded from higher-spec models to fit work trays.
You can buy an RX with a factory tub, but like the more expensive SL, ST and ST-X Navaras, it too comes with coil springs at the rear.
The RX cab-chassis comes standard with a six-speed manual, but our test vehicle has the optional seven-speed automatic, which means a $41,350 sticker price, or around $46K on road, tray included.
Powertrain and Performance

As well as only being available as a cab-chassis, the leaf-spring Navara’s other single-model limitation is that it only comes with the less powerful of the two 2.3-litre four-cylinder diesels on offer in the wider Navara range.
The RX’s engine claims 120kW and 403Nm, while the more expensive Navaras get the 140kW/450Nm engine, the difference being in the turbo arrangements. Where the RX has just one turbo, the higher-spec models get a more sophisticated and complex bi-turbo arrangement. Both engines are sourced from Nissan’s alliance partner Renault and were originally designed for commercial (delivery van) use rather than passenger-car use, so that should bode well for durability.
On the road the RX’s engine offers generally effortless and relaxed performance that’s helped by the attentive and slick seven-speed automatic and not overly tall final-drive gearing. The engine’s low-speed flexibility is surprisingly good and feels to give nothing away to the bi-turbo variant except when pushed hard, such as overtaking and on long, steep hills.
This engine isn’t the last word in refinement, but it’s smooth enough and not notably noisy. Perhaps even quieter than the bi-turbo variant on wider throttle openings.
On-Road Ride and Handling
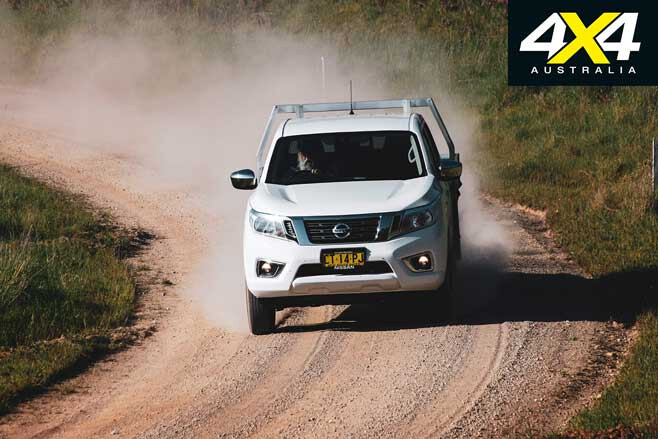
If you were thinking the RX’s leaf springs would translate to a firm – even hard – unladen ride, you’ll be pleasantly surprised. In fact, the unladen ride is surprisingly comfortable, the suspension well matched front-to-rear and the steering weight and feel better than you’d expect from a ‘work ute’.
The rear springs are a four-leaf design (including one helper leaf) and have vibration damper blocks fitted fore and aft on each spring pack.
The relatively narrow and tall (205 R16) light-truck tyres aren’t the last word in on-road grip but they no doubt contribute to the surprisingly pleasant ride quality, offer less bump disturbance on rough roads and provide good cut-through on loose gravel.
Off-Road
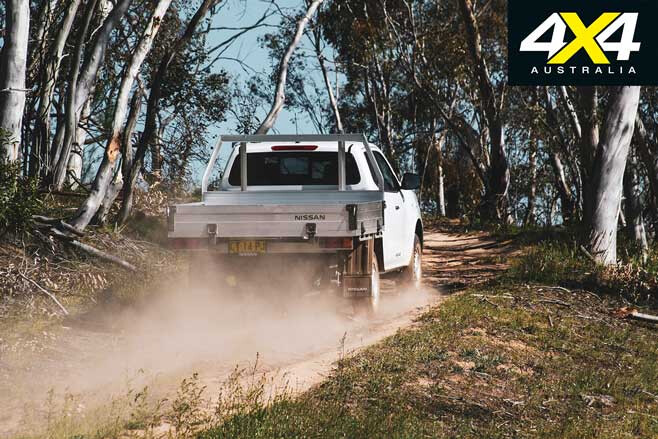
The light-truck tyres have plenty going for them off-road in terms of damage resistance, but the highway tread pattern is the weak link in their off-road performance, especially in mud. Fitting slightly wider tyres would also provide better floatation on soft surfaces.
Unlike more expensive Navaras, the RX doesn’t get a rear diff lock, but it does have electronic traction control and there’s also a surprising amount of articulation at the rear axle. In fact, the leaf springs look and feel to provide more articulation than the coil models; although, that wouldn’t be hard as the coil-spring setup doesn’t provide a notable amount of travel.
Otherwise, what you see is what you get. The RX has reasonable but not class-leading ground clearance and a conventional part-time dual-range 4×4 system. The seven-speed automatic offers tip-shift ‘manual’ control and a low first gear, which helps off-road driveability even in high range. Courtesy of this low first gear and the deep low-range reduction, the crawl ratio is a handy 44.6:1.
Practicalities
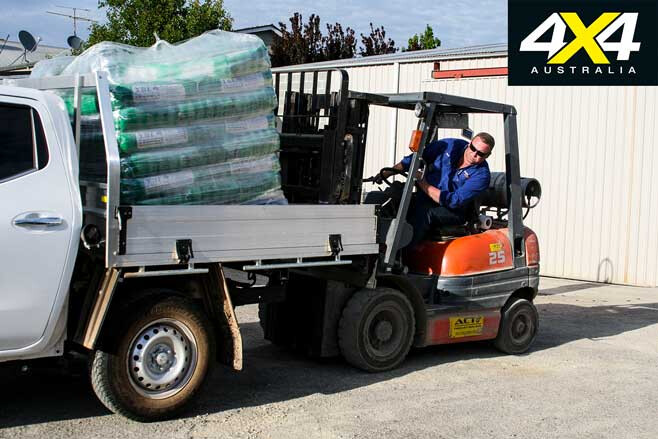
Somewhat surprisingly the leaf-spring RX has the same gross vehicle mass (2910kg), gross combined mass (5910kg), maximum tow rating (3500kg) and maximum towball download (300kg) as the coil-spring Navaras.
Without a towbar fitted to our test vehicle we couldn’t conduct a tow test, but we did test it for load carrying by loading 800kg in the tray. This 800kg payload is a standard load we use for maximum payload tests for all dual-cabs, remembering once you add a driver, passenger and towbar you’re around 980kg payload, effectively a maximum working payload for most dual-cabs – even a little over maximum for some.
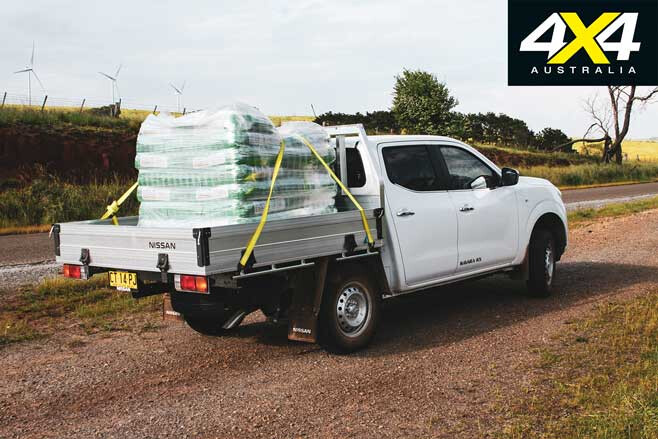
With the 800kg in the tray the RX dropped 80mm at the rear axle line and came up 25mm at the front axle line, which is a slightly better result than a coil-spring Navara with the same load onboard, but still a more severe attitude change than the best load-carrying utes.
On the road the RX carried the load reasonably well but still felt a little light in the steering and did bottom-out to the bump stops at the rear over bigger road irregularities. It’s still much better with 800kg onboard than the coil-spring Navara was in its first iteration, and it generally feels more solid than the latest iteration coil-spring Navaras without being up with the best load and tow utes.
Power-wise, too, the RX felt the extra 800kg as you’d expect but still got the job done. If you were to tow a full 3500kg, that’s when the more powerful 140kW engine would help.
Cabin and Equipment
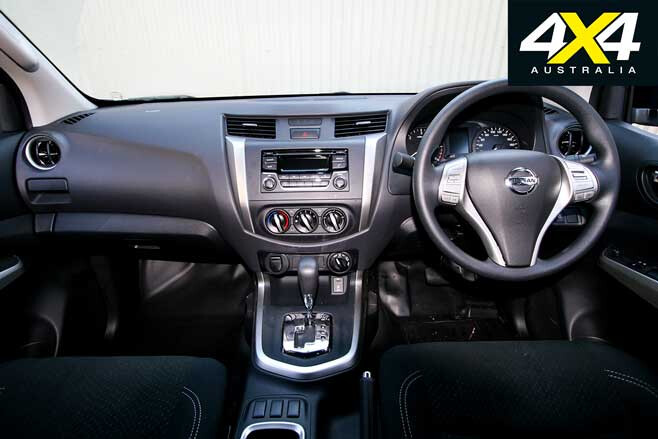
The RX’s vinyl floors and the basic dashboard (no big touchscreen) confirm that this model grade is more work ute than recreational/family ute, but, still, the vinyl floors have benefits over carpets and the RX’s equipment (see ‘What You Get’ on page 34) covers all the basics.
Like other Navaras, the RX’s cabin is among the smaller of the dual-cabs (along with Triton and Hilux) but is still roomy and comfortable enough even if the back seat is a squeeze for three. There’s no reach adjustment for the steering wheel either (tilt only) but the RX still provides a comfortable and roomy driving position. Height adjustment for the driver’s seat is a nice touch.
What You Get
The RX comes with seven airbags (front, side, curtain and driver’s knee) and the usual suite of electronic safety kit including stability control, traction control and ABS brakes. Convenience features run to steering wheel cruise-control and Bluetooth phone connectivity, while a six-speaker audio system with AM/FM radio, CD and USB, iPod and AUX jacks takes care of entertainment. Cabin features also include an opening glass panel in the back window, and rear privacy glass.
Sum up
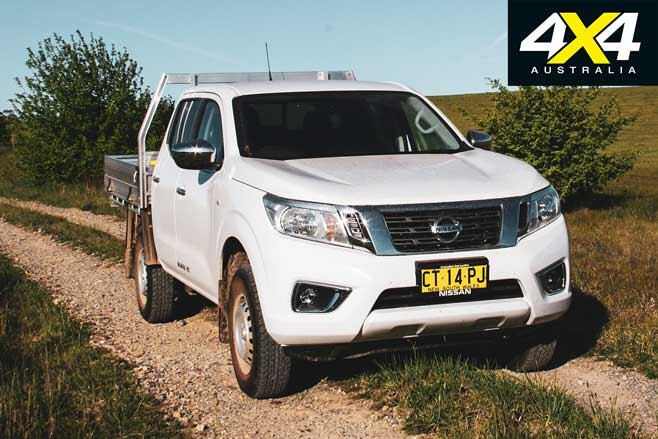
The RX is decent to drive and does most things asked of it well enough, and all at a good price. You could argue it’s the best value Navara. However, it still doesn’t do the job of a heavy-duty load and tow ute all that well. Given Nissan has gone out of its way to build a leaf-spring Navara variant in the first place, why not make it a serious heavy-duty load hauler? Perhaps throw in the 140kW engine as well, which would make it even better for towing or carrying heavy loads.
2019 NISSAN NAVARA RX DUAL-CAB/CHASSIS SPECS: Engine: 2.3-litre 4-cyl turbo diesel Max Power: 120kW at 3750rpm Max Torque: 403Nm at 1500 to 2500rpm Gearbox: Seven-speed automatic Crawl Ratio: 44.6:1 4×4 System: Dual-range part-time Construction: Separate chassis Front Suspension: Independent/coil springs Rear Suspension: Live axle/leaf springs Brakes: Discs front/drums rear Wheel & Tyre: LT205/R16 110/108 R Kerb Weight: 1783kg (no tray) GVM: 2910kg Payload: 1027kg (with 100kg tray) Towing Capacity: 3500kg GCM: 5910kg Departure angle: 26.3° Rampover angle: 22.8° Approach angle: 32.5° Wading depth: 450mm Ground clearance: 219mm Fuel Tank Capacity: 80 litres ADR Fuel Claim: 7.1L/100km On-test Fuel Consumption: 9.5L/100km Price: $41,350 (plus ORC)