IT’S 8.20am and despite the sun it’s about 6°C. Two blokes are propped in camp chairs on a small dune of Aussie red sand.
One of the blokes wipes his face with the sleeve of his footy jersey, shakes his head as if to snap himself out of a daze, then lifts the lid of a blue icebox. He pulls out two beers, pops the tops and with comically exaggerated politeness offers one to his mate who smiles brightly and offers a jaunty “Cheers!” in return.
With the formalities out of the way, both lads guzzle half their breakfast beers in one swig and then lean back on their 10-buck thrones, gazing over the trackside bunting to the lumpy sand that’s soon to be pounded by 160km/h, 600hp off-road racers. These blokes are two kings waiting for the day’s entertainment to begin.
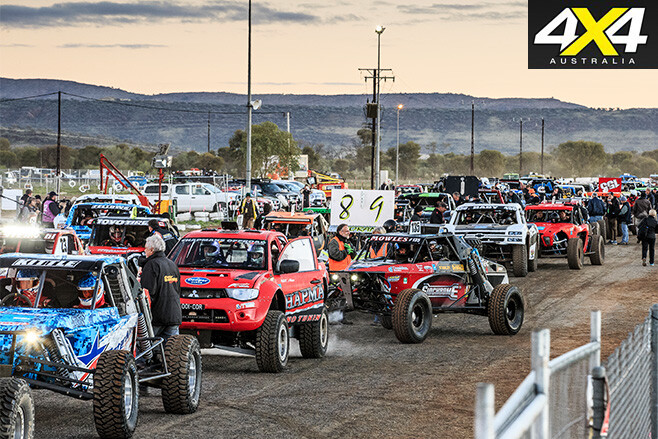
Welcome to the Finke! It’s one of the most down-to-earth yet incredibly intense motorsport events in Australia. It’s a flat-out sprint across the desert from Alice Springs to the dot-on-the-map community of Finke (Aputula) and back to Alice the next day.
Each day is 225km of gut-shaking, suspension destroying sand-blasting that takes human and mechanical endurance almost to the limit. Being held on the June long weekend means the Finke is a great reason to get out of town for a week in winter. So that’s exactly what we did.
There’s upwards of 10,000 campers scattered along the dusty race route. Just like at the annual touring car races at Bathurst, many of the spectators have been coming back for years – decades even – to the same sites. Hand-painted signs mark sites for family and friends: Wog’s Camp, Runamuk M8, Camp Redneck and Camp Madness, to name a few.
Take for example Lynlee Sleep and Chuck Ritenour. The Alice Springs couple have been trackside at the Finke with a bunch of mates for 23 years. Each year, the mob dresses in matching outfits – this year it was police uniforms, but in the past they’ve dressed as leprechauns, prisoners and even Santas.
We also had a quick chat to a crew from Captains Flat, in southern NSW, who had made Finke the turn-around point for their annual outback touring holiday. Like plenty of other campers, they were set-up in a prime position to see these off-road racing maniacs blast past.
Including the prologue – a short, frantic sprint to determine pole position and the event’s running order – the Finke is a three-day event (Saturday to Monday). However, the fun begins on Friday evening when spectators can get up close to the competition vehicles during the scrutineering session. Lined up side by side is the most incredible display of off-road vehicle tech, from buggies budget-built by blokes in backyard sheds to the half-million-buck trophy contenders.
There’s also the chance to become a Finke Ironman by running the event in a four-wheeler then catching a helicopter back to Alice Springs and starting again on a bike – as Toby Price did this year. The 2016 Dakar winner (on two wheels) finished Finke in second place on four then won the motorcycle division later that afternoon. He in only the second person to achieve Ironman status and he placed higher in both classes that the other Ironman, Billy Geddes.
The 41st running of the Finke drew a full field of 600 bikes and 140 four-wheelers. In fact, the initial allocation of 110 four-wheeler spots filled within a day of event entries opening, so CAMS approved an additional 30 places. With the event’s growing international reputation, it’s sure to get bigger.
These days the trophy trucks – purpose-built off-road monsters with screaming 6.0-litre V8s and around a metre of suspension travel at both ends – reach Finke in the shortest time. The fastest of these maniacs do it at an average speed exceeding 100km/h.
The way these competition vehicles cope with the terrain is nothing short of astonishing – it’s a lesson in technology for anyone who has an interest in the durability of off-road vehicles.
The sound of the first approaching competitor on the Sunday morning was unforgettable. It was Toby Price’s trophy truck singing toward us with the bellow of a V8 Supercar, but unlike a V8 Supercar there didn’t seem to be any backing off for corners. These things lean on their cogs at all times.
With recent outback rain, dust wasn’t as much of an issue for competitors or spectators as it would have been in drier years. However, with just about everything in the event loaded with big gobs of power, there was still plenty of rooster-tailing.
The amazing suspension systems allow the bodies of these rigs to stay level, while the wheels seem to do double-distance following the terrain. It’s all about suspension travel, strength and control. The corrugations are two car lengths long and half a metre deep so there are no cheap, red-painted strut spacers or eBay suspension packages making the running here.
If you’re looking for a destination for your next touring holiday, put the Tatts Finke event on your got-to-go list. As the fella from near Cooma commented: “Jeez, now I’ll never see any other part of Australia. I’ll use all my holidays every year to come back and watch this!”
RAIN can make a night in the bush miserable, but so can a lack of light when you’re trying to set up camp or cook under a tarp or tree in the bush.
Lightforce – known to four-wheel drivers for its Australian-made high performance HID and LED vehicle driving lights – has introduced a flexible LED camp light that can be quickly strung up anywhere for instant camp lighting.
The 1.2m-long Lightforce flexible LED strip light has 72 LEDs that can be toggled on and off (and brightness controlled) by a touch-sensitive switch. The strip features hooks at each end and four Velcro straps along its length. The power cable is 5.5m long, so there’s plenty of reach from a power source to your kitchen or tent area.
We grabbed one for our recent Oodnadatta/Finke trek and it quickly proved its worth. It can easily be hung or strung from a tree branch or tent pole or – in our case, where we didn’t have any gazebo-type structures to hang lights from – a vehicle door mirror, to shine light on our camp stove and kitchen equipment.
Drawing around 15W, the flexible light is kind to your power supply (as LED lighting generally is) and doesn’t seem to attract too many insects. The kit includes a croc-clip accessory socket for use on a 12V battery.
As well as quickly and easily lighting your campsite at night, the Lightforce strip light is just as handy for under-vehicle inspections, and rolls up for storage in a glovebox or under a seat. And with IP65 waterproof rating, it’s at home on the water.
Two thumbs up!
RATED Available from: www.lightforce.net.au RRP: $99. We say: flexible, convenient, handy.
OVER the past few years there’s been a surge in the number and size of 4WD/overland shows around the world, with the Sydney, Adelaide and Perth shows reporting an increasing number of attendees and exhibitors every year.
This pattern is not just occurring in the Southern Hemisphere either, with the well-established Overland Expo West, held in Arizona, USA, also getting bigger every year – according to its website it claims to be the biggest show of its kind in the world. However, having recently visited the Abenteuer & Allrad 4WD and Overland Expo in Germany, that claim is debatable.
The Abenteuer & Allrad Expo is an annual event now in its 18th year. The 2016 show took place in May and was a huge success, with more than 55,000 visitors from all over the world descending on the small town of Bad Kissingen.
THE CAMPSITE SIMILAR to the American expos – and unlike the Australian shows – the German event provides camping facilities.
However, finding a space to park the Land Rover at the campsite was a bit of a challenge, as it was full of every type of 4WD and overland vehicle imaginable – large trucks, smaller touring Unimogs, Jeeps, Land Rovers, Volkswagens, Toyotas, Suzukis, Fords and some weird-looking rigs that may well have been brewed up in Frankenstein’s laboratory.
With more than 2000 vehicles parked up, the campsite was pretty much a show by itself. We could have happily spent a couple of days checking out the huge variety of touring vehicles and camping set-ups.
After finding a space and setting up camp, it was time for a cold beer before taking a look around. The campsite had a great atmosphere as the crowds settled in for three days of Overland and 4WD mania.
The sun was shining and everyone was smiling (nothing to do with the cheap German beer, of course). With the barbecues burning, the beers flowing and the hum of banter amongst enthusiasts from all walks of life, we knew it was going to be a great couple of days.
SHOWTIME THE show is held in the small town of Bad Kissingen, about 140km east of Frankfurt.
With Italian, Swiss, British, French, Swedish, German, Norwegian, Irish and a few Australian, South African, American, Brazilian and Mexican flags flying, this was a multinational 4WD gathering.
Late arrivals set up camp in shopping car parks, on the sides of roads and even in the middle of roundabouts.
The show focuses on all things 4WD, with cross-country vehicles of all shapes and sizes on display in the generous 110,000m² exhibition space. With more than 250 exhibitors showcasing and selling 4WD accessories and camping products, you need a couple of days to see everything on display.
Similar to the Australian shows, this one incorporates custom-made off-road tracks, where visitors can drive a number of vehicles including trucks, quads and the latest 4WDs.
The expo also features organised travel talks from Europe’s well-known globetrotters, while off-road travel companies show off their most popular off-road expeditions.
AUSSIE, AUSSIE, AUSSIE AUSTRALIAN products and brands were well-represented at the expo, and among the Australian exhibitors present at this year’s event were TJM, Ironman, Terrain Tamer, 3DOG Camping and Oztent.
We spoke with some of the key personalities who were introducing Australian-made 4WD accessories and camp products to Europe. One of these guys was Andreas Bauhofer, operations manager for Style-X, a leading European automobile product provider who recently became the European distributors for Ironman 4×4 products.
Andreas highlighted that Australian aftermarket accessories are well-respected in Europe for their quality and reliability, and that’s why Style-X decided to become the European distributors. He was also quick to remind me that the founding member of Ironman 4×4 came originally from Germany – he moved to Australia, where the Jacob family started to make springs for horse carriages back in the 1930s.
Andreas explained that since becoming the European distributor, Style-X has been busy working on securing European certification for some of the Ironman 4×4 products as the requirements are different in Europe. He also highlighted that since embracing the Australian brand just over a year ago they have had a lot of interest in Ironman’s suspension, winches and camping products.
He told us that recovery gear isn’t as popular in Europe as it is in Australia, as the sheer volume of accessible off-road tracks in Europe is relatively limited in comparison to what’s available in Australia. The main recovery gear market, he says, would come from the established 4WD clubs and, of course, overlanders.
Andreas also highlighted that Style-X produces conversion kits for various vehicles, including Fords. This includes a complete body kit, leather interior, steering wheel, suspension, wheels and colour dials.
Style-X launched the Ford Ranger M Sport conversion at the expo, right out the front of the Ironman 4×4 stand.
Andreas says he will be launching the Ford Ranger kit in South Africa this summer before it will come to Australia, and they make it available worldwide.
Next, we stopped by the TJM stall to chat to Gernot Tonauer (general manager), Marko Lindheimer (senior executive manager) and Rosmarie Reiss (project manager for off-road components).
Gernot said they were very happy to be the European distributors for TJM and have been developing the business since 2012, and are continuing to build it by seeking retailers for TJM products throughout Europe.
Similar to Ironman 4×4, they are also busy securing approval to sell the full range of TJM products; so far only a handful of products have not met the specific requirements.
European regulations are very different to those in Australia when it comes to bullbars – well, you don’t have kangaroos hopping around the roundabout at the Champs-Elysees.
Gernout highlighted that TJM awnings and roof-top tents are becoming extremely popular across Europe. Other products doing well include space cases, compressors and recovery gear.
Terrain Tamer was represented and had a great selection of Toyotas at their stand, including an FJ45, the BJ40 Series, and the more recent Land Cruisers. The life-sized cardboard cut-outs of Allan Gray scattered around the place were also hard to miss.
Terrain Tamer is well established in Europe, having been in Germany since 2008. Retailing under the famous Tom’s Fahrzeugtechnik brand, Terrain Tamer products are also distributed to the Balkan countries and its best-selling products are the gearbox/rebuild kits.
The Australian-designed 3DOG camper trailer and roof-top tents stand also attracted droves of visitors. 3DOG’s marketing manager, Eric, told me 3DOG campers are now also being produced in Hamburg, using the same high-quality materials as those of its sister company in Australia.
Other products on display included the Oztent range of camping gear stocked by European distributors.
GIVE IT A GO! THE general feeling among the distributors was that the Australian products entering the European market are well-received, as they have been tested in some of the harshest conditions in the world.
Show organiser Thomas Schmidt reckons that three to four per cent of the total 55,000 visitors were Australian, and that there have been increases both in the number of Australian-made products exhibiting at the show and Aussie visitors attending.
The 2017 Abenteuer & Allrad 4WD Expo will take place June 15-18. We reckon all keen tourers, four-wheel drivers and campers should make the pilgrimage to this huge festival at least once in their lifetime. If you do plan to attend, make sure you get in early and stay in the designated campsite!
With production of the Toyota FJ Cruiser rolling to an end, this retro inspired Cruiser has been on our minds of late. One particular rig which springs to mind was this modified FJ which first appeared in 4X4 Australia back in 2013.
This story first appeared in the March 2013 issue of 4X4 Australia.
Since the release of the FJ Cruiser back in 2011, this rig has been quite popular, motivating enthusiasts to modify their 4×4 vehicles. Similar to Jeep’s Wrangler, many aftermarket specialists, clubs and enthusiasts have appeared, willing to help customise FJs to their owners’ wishes.
Many dismiss the FJ as a tourer because it lacks a diesel engine, yet the stock 4.0-litre petrol V6 has proven to not only be economical, but capable of delivering plenty of grunt. Some enthusiasts can never have enough power, though, and TRD (Toyota Racing Development) supercharger kits – available for earlier versions of the 1GR-FE engine – have allowed owners to generate even more power.
Australian-delivered FJs have the 1GR-FE V6. It’s equipped with variable valve timing on both the inlet and exhaust valves (dual VVT-i), as well as different cylinder heads to the early models that were only sold in the USA. The TRD supercharger kits don’t fit those engines, but that didn’t stop Australia’s innovative aftermarket industry. Queensland’s Bullet Cars developed its own supercharger package for Aussie FJs, and this fully-loaded example takes it to the extreme.
Bullet’s bolt-on kit for the FJ makes around 204kW at the tyres, with the blower running 6psi of boost. But that wasn’t enough for the owner of this FJ. He wanted all he could get from the improved set-up, so Bullet developed a one-off kit for him.
To produce more power more boost was sought, and this required a lower compression ratio. This was achieved by replacing the pistons and conrods, but, again, the established product to do the job doesn’t fit the newer engine. A new set of forged pistons had to be custom-made for this engine, and they drop the comp ratio from the standard 10.5:1 to a more usable 9.2:1.
The lower comp allows more boost, and the Rotrex C38 supercharger is now pumping 10psi into this engine at 5400rpm. That’s enough to produce 232kW at the tyres, up from 148kW at the tyres as standard.
There was good reason for needing more power in this FJ. The plans for it included much bigger tyres that required more grunt to turn them, as well as a load of accessories that would add weight. Like the custom build of the engine, most of the gear fitted to the FJ is either modified or a one-off fabrication.
John Rea managed the project for an owner who wishes to remain anonymous. John is a military 4×4 enthusiast, and this shows in many aspects of the FJ such as the Hummer tow/tie down hooks, the WWII vintage aerial mount on the spare wheel, and the pintle hook tow hitch. He applied his many years of experience from playing with everything from WWII Jeeps to Humvees, to the modern Toyota 4×4.
John wasn’t keen on the massive 325/65 R18 Mickey Thompson MTZ tyres, preferring more practical, smaller tyres for off-road use, but said the owner insisted on them from the outset. That’s 35 inches of rubber in the old money and there are six of ’em when you count the two spares. They mount to ‘Fuel Boost’ alloy wheels that have had the black coating machined off the rim dish for a unique look. The wheels cover drilled and slotted brake discs; the front ones clamped by monster JBT six-piston calipers.
Even with the extra power the supercharger affords, the oversize rubber saps performance requiring lower 4.88:1 crown wheel and pinion gears in the diffs to bring out the best in the blown engine. The FJ Cruiser has an electronically-actuated diff lock in the rear end as standard, and this has been supported by an ARB Air Locker in the front diff.
An ARB compressor provides the air for the front locker, as well as to air fittings at the front of the vehicle. ARB also made the diff cover for the rear housing that strengthens and protects the differential. Piranha extended diff breathers are utilised to keep water out.
The suspension has been upgraded by hardcore off-road specialists Superior Engineering – staff there fitted three-inch lifted coils, ProFender remote-reservoir shock absorbers, extended brake lines, and swaybar links. To keep the wheel alignment in spec with the big rubber, the upper control arms were replaced with adjustable units also made by Superior Engineering.
For a different look for the frontal protection, the ARB bullbar has had its upper side bars removed and smoothed off. What isn’t as obvious is the 35mm sectioned out of both ends of the bar to have it fit tighter within the lines of the vehicle. A 9000lb Warn winch resides inside the bar, with a Narva LED lightbar on top of it. The underside bash guard is a heavy-duty piece that was custom-made by John Rea.
Bullet did the mods to the front bar and also fabricated the rock-rails in steel tube. They have been designed to fit up close to the sills and protect the stainless-steel exhaust that runs inboard of them and exits just ahead of the back wheels. The exhaust is a dual 2.5-inch system behind ceramic-coated extractors that gives this FJ a loud growly note – it barks when the go pedal is mashed.
The rear bar was imported from Fab Fours in the USA and it incorporates the spare-wheel carrier, tow-hitch receiver and rear quarter panel protection. It’s a beautiful (and expensive) piece of kit, but required the chrome bolts to be replaced with stainless-steel ones to stop them rusting in the Aussie climate.
Like every aspect of this FJ build, there are a few custom touches to the body, too. Things like the Bushwhacker wheelarch flares and the functional bonnet scoop – which was made by Bullet – stand out, but others, such as the removal of the side indicators, the black painted badges and grille, and the colour-coded roof are more subtle.
Up top, an ARB roof-rack is fully loaded with the second spare wheel and tyre, a couple of jerry cans, a few Space Cases, shovels, MaxTrax, and a high-lift jack. The forward-facing light bar is from Rigid Industries with Narva LEDs providing light to the sides and another Narva light bar at the rear of the rack. The crew at ARB’s Caboolture store fitted all the ARB gear and wired in the lights. They also installed a Redarc BCDC 1225 dual-battery isolator and charger, as well as a Long Ranger 120-litre replacement fuel tank.
The roof rack is needed, as the FJ doesn’t have a lot of space inside for gear; especially this one, as there’s a 70L Engel fridge on a slide and massive subwoofer box taking up interior real estate. The sub box is part of a comprehensive Alpine audio/visual system that includes sat-nav and a drop-down screen for showing DVD movies to anyone in the back seat. Other interior extras include a GME UHF radio, ARB-style switches to control lights and ARB accessories, and a fire extinguisher.
This FJ Cruiser has been built for style and performance, but it’s also been built with a purpose. The owner plans to take it to Cape York with a group of mates to test just how well all the modifications come together to improve what is already a good package in the stock FJ Cruiser. Speaking of the modifications, there’s a Queensland Transport ‘Blue plate’ fitted to it, certifying that all the mods are legal and roadworthy in the Sunshine State.
BLOW FOR GO
Bullet’s regular supercharger kit for the 1GR-FE 4.0-litre V6 engine is designed as a bolt-on kit, meaning that it can be fitted without internal modifications to the engine, thus saving the cost of a rebuild.
The kit includes a C38 Rotrex supercharger with internal oil pump, oil reservoir, oil filter, oil lines and clamps, oil, external oil cooler, mounting brackets, drive belt, all hoses, fasteners, plumbing with silicon hoses and clamps, air-to-water intercooler, air cleaner, auxiliary boost injector and step-by-step installation instructions. You’ll also need a custom ECU, and Bullet can help you out there, too, as well as with full drive-in, drive-out installation.
In this configuration the supercharged engine produces approximately a 40 per cent gain in performance, taking the power to around 204kW at the tyres, with the blower pumping in 6psi of boost.
FOLLOWING on from Volkswagen’s so-called diesel scandal, where deliberately installed engine software was found to ‘cheat’ the very stringent US tests for NOx exhaust emissions, some other carmakers, including Mitsubishi and Suzuki, have been found to be fudging fuel-consumption figures.
Here at 4X4 Australia we don’t test new 4x4s for emissions, but we do test very carefully for fuel use. What we have noticed over the past decade or more is that while mandatory government-test fuel figures (stated on the yellow windscreen labels) have come down progressively and quite markedly, real-world fuel consumption figures, while marginally better, haven’t improved to nearly the same extent.
The other trend we’ve noticed here is that the more sophisticated the powertrain in terms of electronic controls, fuel-delivery systems and gearbox type, the greater the discrepancy tends to be between the official test figure and the real-world figure.
Powertrain engineers will readily admit that when you have very sophisticated fuel mapping, finely optimised high-pressure injection (either petrol or diesel) and automatic gearboxes with up to nine speeds, it’s not all that hard to tweak the powertrain response to the loads placed on it in the official test. After all, the official test has a fixed set of ‘driving events’, whose protocols are well known.
You could argue that optimising the powertrain’s response to the official test is not cheating, but that’s another story. Either way, our official ADR test, based on a European regulation, isn’t particularly indicative of real-world Australian conditions, with very low average speeds (see breakout), so it’s no surprise that the official figures are well under real-world usage even with older manual powertrains with minimal electronic control.
Owners often complain that their new 4×4 uses a lot more fuel than what the windscreen label states, but probably fail to realise that the label figure is what the car used in the official – and effectively theoretical – test. The manufacturer is not saying this is how much fuel the vehicle will use when you drive it in the real world.
So the problem lies not with the vehicle manufacturer as such but with a test procedure that fails to replicate real-world conditions. If you are going to blame anyone for the discrepancy between the official and real-world figures, blame the federal government’s bureaucrats for adopting this particular test procedure, which was devised by other bureaucrats in Europe.
Interestingly, the USA’s Environmental Protection Agency uses a combination of laboratory tests and real-world data to inform would-be car buyers what sort of fuel consumption they can expect. This gives a more accurate figure, but it does come at considerable public cost.
While the fuel consumption numbers quoted on the windscreen label are normally well below what you will achieve in the real world, there’s still some relativity between them, so they do have some validity as a buying tool.
TESTING TIMES
ALL new vehicles sold in Australia are subject to Australian Design Rule (ADR) 81/02. This is a fuel-consumption test based on the Economic Commission for Europe Regulation 101. The test is carried out on a ‘rolling road’ dynamometer in a laboratory, not on actual real-world roads.
The test covers a mere (and theoretical) 11km, and is done in two parts. The first, called the Urban Cycle, is from a cold start and consists of a series of accelerations, steady speeds, decelerations and idling. The maximum speed is 50km/h, the average speed is 19km/h and the distance ‘covered’ is just 4km.
The second test, called the Extra Urban Cycle, is conducted straight after the Urban Cycle (hot start) and consists of approximately half steady-speed driving with the remainder being acceleration, deceleration and some idling. The average speed is 63km/h, with one spike that reaches 120km/h. The total second test ‘distance’ is 7km.
WELCOME to another instalment of Readers’ Rigs.
Part 7 features not one (or even two or three) but four uber-capable Wranglers, a water-dwelling Navara, and an expedition-ready Ranger – among a heap more. For more Readers’ Rigs check out: Part 1, Part 2, Part 3, Part 4, Part 5 and Part 6.
To get involved simply take a snap of your rig when it’s out on the tracks and shoot it through to our Facebook page. Your pride and joy might even get published in the mag one day and, if we really like it, perhaps you’ll even see it on the cover of 4X4 Australia!
01: 2013 JEEP WRANGLER UNLIMITED RUBICON – ADRIAN HUGHES
WHAT IT’S GOT: I’ve owned it for almost two years. It has an ARB front bar; custom-built rear bar; Poison Spyder brawler sliders; 35×12.5in XR17 Nitto Trail Grapplers on Method Race rims; Aurora spotties and light bar; Runva winch; AEV snorkel; 4in coil lift with adjustable arms and 28in Fox shocks; sleeved and gusseted front axle; Nitro chromoly rear shafts; and front and rear Tom Wood’s driveshafts.
I’ve been to Fraser Island, Coffs Harbour and all the local 4WD parks. It’s mainly a weekend crawler, rather than a tourer.
02: 2005 D22 NISSAN NAVARA – BRYCE PONGRATZ
WHAT’S IT GOT: SHE’S got a 3in stainless-steel straight-through exhaust and a DP power chip running 110kW/380Nm; Tough Dog 2in suspension lift front and rear; Safari snorkel; dual-battery system; Xrox bullbar with a T-Rex 12,000lb winch and steel cable; Rhino-Rack roof rack, where I mount my 40in LED light bar when off-road (I’ve set it up so I can switch it on and off in less than five minutes); 32in Primewell Valera A/Ts, which are a cheap tyre but are amazing off-road (especially in mud); and a GME UHF system.
I’ve had her coming up to a year in September. She’s my first 4×4 and I love her to bits. I live in WA, so my favourite places would have to be Julimar and the Mundaring Power Line Track, when I want to lift wheels and get some serious air. I recently took a trip down to Busselton to a track called Adelaide Rd and it had been raining all week, so most of the track was flooded. My mates and I had a lot of fun smashing fresh water bog holes with my camper on the back. Needless to say my car was amazingly clean after that trip.
03: 2011 JK JEEP WRANGLER UNLIMITED SPORT – MATHEW DAVIDSON
WHAT IT’S GOT: 35in Dick Cepek Mud Country tyres; Teraflex 44 replacement front axle housing; RCV 35-spline axle; ARB air locker with 4.88 reduction gear; Tom Wood’s front driveline; a JE Reel driveline with 4.88 gears and an Eaton e-locker with G2 axle; 3.5in lift; and Bilstein shocks. All control arms are high-clearance adjustable from Synergy. It also has a front bar, side steps, rear bar, ARB bash plates and Bestop half doors.
All of the installation work was done by my old man and I. Favourite place to go is Yalwal, NSW. I’ve had it about three years.
04: 2014 FORD RANGER – ROB FISHER
WHAT’S IT GOT: Ironman bullbar, TJM rear bar, BushSkinz bash plates and a Redarc DC/DC unit for charging second battery and camper batteries. It recently had a 2in lift with Ironman Pro foam shocks (after last year’s 13,000km trip). The vehicle has done two trips in the last 12 months. The first trip took in the Birdsville Track, the Simpson and the Kimberley, including Gibb Track and Munja Track. The second trip this year was to the Kimberley again. The vehicle has done more than 30,000km of off-road driving and hasn’t given me one ounce of trouble. Love the “Mule”.
05: 2005 TOYOTA PRADO GXL TD AUTO – MARK JACKSON
WHAT IT’S GOT: I’ve set it up for touring. It’s got a 2in lift; dual batteries; ARB bullbar; 12,000lb Ironman winch; Safari snorkel; Outback drawers; custom scrub rails and steps; and 265/70/17 Cooper STTs. It’s done 400,000 km and I’ve owned it since new. My camper trailer has matching Dynamic rims and matching Cooper STT tyres.
06: 2013 JK JEEP WRANGLER – SHANNON CALVERT
WHAT IT’S GOT: Uneek 4×4 front/rear bars and rock sliders; 4.88 air lockers; Dynatrac 44 front diff and factory 44 rear; King EVO MFG coil-overs; 37in Pro Comp XMTs; front and rear Runva winches; AEV bonnet and snorkel; Currie Antirock sway bars; and an OUT4X4 roof rack with Howling Moon roof-top tent. There are plenty more mods – that’s just the tip!
07: MITSUBISHI MQ TRITON – DEAN CROUCH
WHAT IT’S GOT: TJM bars with Yakima racks and roof gear.
08: RANGE ROVER HSE 4.6L V8 – ANDREW KIMMER
WHAT IT’S GOT: Most of the modifications have been passed on from the previous owner. Modifications include an MCC bullbar with a Tigerz11 winch; 2in lift blocks below the air springs; aftermarket swing-out spare wheel bar; Navara snorkel; twin exhaust with Fast Flow catalytics; triple battery set-up (one front, two rear); and a built-in twin compressor (can also use the air spring compressor for tyre inflation). A Harrop rear locker is to be installed this summer. I purchased it in May, 2016.
09: 2012 FORD RANGER – MARK WOOLCOCK
WHAT IT’S GOT: 17in Bandit alloys with Maxxis Bighorn muddies; Ironman bullbar and snorkel; roof basket; 60in high-lift jack; Ironman canopy; ARB rear protection rail and tow bar; Ironman underbody protection; Alpine navigation with mud maps, powered by four-channel amp with 10in subbie; and an Ironman awning with three-man tent attachment. I’ve had it since it was six months old. Best places I’ve taken it would be Emu Bay, on Kangaroo Island, and Cameron Corner. It’s a money pit, but bloody great fun!
10: JEEP JK WRANGLER UNLIMITED – JEREMY BEAR GEORGIOU
WHAT’S IT GOT: 3in suspension lift; TeraFlex shocks; Synergy springs, disconnects on the front for that famous Jeep flex; Smittybilt winch; DBOR front bullbar; and Pro Comp wheels and tyres. I’ve just fitted DBOR flares for extra clearance.
This pic was taken on the Mount Margaret track near Licola. The best tracks I’ve been on are at Cobaw in Victoria, because there are a variety of conditions.
I AM a bit finicky when it comes to inverters that convert 12-volt DC power to 240-volt AC power.
The cheaper units for a particular power rating invariably produce what is known as a modified sine wave. The more expensive units produce a true or pure sine wave, the same as you find in your household AC power supply.
Suffice to say here that a pure sine wave inverter is much better for charging expensive computer, camera and phone batteries, while allowing drills and grinders with electronic speed control to operate correctly and efficiently. If there’s a downside to a pure sine wave inverter it’s that they tend to suck more power from your battery than a modified sine wave inverter would.
I needed something small to charge my plethora of camera and computer batteries; something around 150-watt output would be required. In fact, my computer charger demanded it – before you buy, make sure the inverter you’re looking at has a rated output large enough for the devices you want to run or charge. Enter the Projecta Pro-Wave 12-volt 150-watt pure sine wave inverter.
This unit is a drink can-sized inverter designed to easily sit in a vehicle’s drink holder. It has a rated output of 150 watts continuous, with a 300-watt peak. However, to reach the 300-watt peak without the warning buzzer beeping it needs a fully charged battery or the engine running. That’s no drama, as I tend to charge batteries while mobile. I’ve learned over a long period of time that inverters aren’t something you leave connected and running overnight with your engine off.
A 2.1-amp USB outlet is also provided, allowing charging of tablets, Kindles, mobile phones and such. One thing I particularly liked was the heavy-duty input cable and fuse-protected heat-resistant plug, because while producing just 150 watts of power (basically 0.6amps at 240 volts) the current draw from the battery (say 14 volts) is a little more than 10 amps. That’s quite a bit.
I’m very pleased with this unit. It does everything I want from it and it produces clean power, ensuring I get the best life out of the batteries I’m charging. Plus it runs my portable devices effortlessly and faultlessly.
RATED Available from: www.projecta.com.au RRP: $199 We say: Handy idea ideal for battery charging.
Tuck into these delicious foil-wrapped chicken treats.
Ingredients
Serves 1 (but make many as you like)
- 1 boneless chicken thigh/skinless chicken breast (or
- pre-marinated chicken)
- Garlic/herb seasoning (not needed if using pre-marinated chicken)
- 2 tbs ranch dressing
- 1-2 tbs water
- Onion or leek, thinly sliced
- 1 potato, thickly sliced
- ½ carrot, cut into thick sticks
- Handful of green beans
- Bacon or ham (optional)
- Black pepper
- Grated parmesan cheese
Cooking It
Preparation time: 10-15min Cooking time: 20-30min, depending on cut of chicken
Step 1: You can cook these parcels over a fire, on a barbecue plate on top of your gas stove, or in the oven.
Step 2: For each parcel you need one piece of heavy-duty foil (46 x 30cm) covered with cooking oil (if you don’t have heavy-duty foil, use two sheets of foil stacked on top of each other).
Step 3: Place the chicken in the middle of the foil and sprinkle on some garlic/herb seasoning.
Step 4: In a bowl, mix the ranch dressing with the water and add the vegetables. Stir to combine.
Step 5: Spoon the vegetables over the chicken and pour the dressing mix on top.
Step 6: Sprinkle with parmesan cheese (as little or as much as you want).
Step 7: Seal the foil edges and cook over the fire/grill/barbecue plate.
Step 8: Rotate the packets every five minutes to prevent the bottom from burning. Cook for approximately 20 minutes (the length of time will depend on the thickness of the chicken).
Step 9: Don’t have the fire too hot or you’ll burn the bottom of the chicken/veggies. It’s best to cook it longer and slower.
Step 10: Fold back the foil to allow steam to escape. Then test the chicken and veggies to see if they are done. Reseal if they need a little more time.
Step 11: Don’t flip over as you’ll lose all the lovely juices.
Step 12: To serve, simply open the foil packet and eat.
Viv’s hints
Don’t cut the vegetables too thick or they’ll take longer to cook than the chicken. However, if you cut the veggies too small they’ll turn to mush. The quantity (and type) of vegetables you put into each parcel is up to you.
If using a barbecue that has a lid, close it, as it will keep in all the heat and cook the packets more evenly.
To make a foil packet, lay a large sheet of heavy-duty foil (or a double layer of regular foil) on a flat surface, then spray the surface with oil. Next, put the ingredients in the centre of the foil and bring the short ends of the foil together, leaving some room in the packets for the steam. Fold twice and pinch the seams tightly to keep the steam from escaping.
AT the mere mention of national parks most people start yelling about locked gates, no access, no firewood, no four-wheel driving and no fun – it’s even worse when the parks are World Heritage listed. However, these people have probably never been to the Border Ranges that separate NSW and QLD.
Border Ranges NP was World Heritage listed in 1986, and the parks service has gone to great lengths to offer a wide range of activities for 4WDers and campers. The park features approximately 50 rainforest reserves and its most significant feature is Mount Warning, a largely eroded volcano now around half its original size.
The track through the park is only about 100km long, but it’s a great escape from the hustle and bustle of everyday life.
Lying 170km south of Brisbane is Kyogle in New South Wales, the starting point for this trip. Kyogle, a small logging town from way back, is a well-equipped country town where pies are still handmade and where you can get old-fashioned service at a proper garage.
The drive gets rolling by heading north from Kyogle along Summerland Way for 12km until you hit the little hamlet of Wiangaree, the last-minute stop for fresh bread, ice and milk. Here you’ll see a road and campsite condition board – critical for this area, as weather conditions can change dramatically. Over the next several kilometres you’ll pass dairy farms and old timber bridges until you arrive at the turn-off for Lynches Creek Road, a well-signposted road that heads towards the Border Ranges.
This is where the road starts winding its way into the thick lantana-infested forest. If there’s any moisture about it’s advisable to select 4WD, as the road climbs sharply for several kilometres and there isn’t much room either side. When the road eventually levels out, a sign indicates that Brisbane is only 132km away.
Turn right here to head deeper into the forest and pass several stone fruit and cattle farm properties. While not a hard drive, it’s advisable to keep your lights on and your speed limited to 40km/h due to the jump-ups, sharp turns and narrow roads. After 31km you’ll approach the turn-off to the first campground: Sheep Station Creek. If you haven’t already purchased a camping and vehicle pass you’ll need to use the honesty box.
The Sheep Station Creek campground has some 40 sites catering for tents and campers, as well as walk-in sites positioned well away from vehicles. The campsite also features tables and chairs, barbecues with fire pits (you must bring your own wood), long-drop toilets, a communal shelter with a large fire box, and information boards regarding walks and local vegetation – we’ve definitely got no complaints about paying fees to use this area.
There are several walking tracks to Sheep Station Creek, from where there are formed walking tracks and boardwalks allowing exploration of the cool running creek that cuts its way through boulders and palm trees.
Back at the turn of the century the red cedar cutters used this area to transfer logs downstream to awaiting ships. However, the steep contours of the land created a problem, and it’s possible to see where the workers unloaded the massive logs, moved the bullocks around the turn, then reloaded the logs for the next section of the journey. The cutters even blazed their names onto a large rock in the area, which dates back to the 1880s. Weather can change quickly in rainforest climates, so keep an eye out for pesky leeches and mosquitos if it’s a bit moist.
You’re required to park the caravans and trailers at Sheep Station Creek campground before following the narrow and steep roads that lie ahead. A left-hand turn at the top of the camp leads deeper into the park, and as the road plateaus you’ll come across another camping area: Forest Tops. This campground is blocked off with bollards lining the road, so you need to carry all your gear in – it’s not too far, but far enough to be annoying. With the usual national park facilities, this spot’s ideal if you’ve packed light.
Continuing on from the campsite will lead to a left-hand turn down a tight one-way track – although you can choose to head straight on the main road. Most people choose to turn left and take the tight track that cuts deeper in the heart of the park. It’s advised to use a lower gear here to save your brakes – plus there’s a good chance a lyrebird might dart across the road. At the very bottom of this section are several walks that lead to large red cedar trees and picnic facilities.
The road that climbs out the other side is somewhat narrow, with tree ferns and vines dangling across. It’s also very steep, with our GPS indicating we were 1000 metres above sea level. There are several informal lookouts and picnic areas on the rim of this road, but pick your time wisely – when it’s cloudy you’ll see nothing.
Further along you rejoin the well-signposted main road, so you can wander back to your camper, camp at the next stop or keep exploring. Turning left onto Tweed Range Road there may be traffic, so keep to the 40km/h limit and make it enjoyable for everyone.
Continuing along the rim will lead to the Bar Mountain Picnic Area, which has plenty of grass for the kids to play on, a barbecue table, barbecue pits (bring your own wood), undercover shelter and toilets. Be wary if cooking meat as there are resident quolls that will smell your food from a mile away. This is a great spot to unwind, with several walks leading towards 2000-year-old beech trees.
The main road quickly descends here, so select high 4WD and take your time, as one of the risks driving in old forests is the chance a rotten tree may fall in front of you. After a short drive the forest starts to shift into a landscape of scrubby timber, lantana and vines. As you approach the 90km mark you’ll come to the other end of the park, which is well signposted.
As soon as you pass these signs there are farms, hippie shacks and horticultural igloos in the area, all taking advantage of the rich soil and high rainfall. It seems this area must be lush all year, as the cows are fat and the trees lining the road are covered with stag horns and old man moss.
Follow your nose to the T intersection, turn right and follow Williams Road past flowing creeks and hidden bed and breakfast retreats. Unfortunately the tar soon turns up and you’re forced to turn right to Kyogle or left towards the coast through Murwillumbah. There is one other choice: turn around and do it all again!
TRAVEL PLANNER
- WHERE: The Border Ranges National Park is situated on the Queensland/NSW border, just 150km south of Brisbane. Access is from Kyogle in the west or near Murwillumbah in the east. The Kyogle loop is approximately 90km long.
- CAMPING: All the campsites have good basic facilities including pit toilets, barbecues (bring your own wood), water for washing and cleaning, and information boards. Caravans and trailers are not permitted from the eastern end or past Sheep Station Creek camping area. Forest Tops camping area is walk-in only.
- SUPPLIES AND FACILITIES: The nearest major town is Kyogle, which is a friendly country town with several fuel stops, mechanical services, plenty of shops, a local caravan park and an information centre. Phone service is limited in this park, so it pays to be self-sufficient. Ice, bread and milk can be bought at the one-shop town of Wiangaree.
- TRIP STANDARD: 4WD is essential, as the road rises and falls 1000 metres over several steep kilometres. All-Terrain tyres are highly recommended, as the weather can change dramatically and quickly make the road conditions unpredictable. In severe weather all gates are locked to prevent environmental damage, and as a safety measure.
- MAPS AND GUIDES: The Hema Maps North East Region map is easy to follow. The Grevillea, Brays Creek, Tyalgum and Nimbin local topo maps are also helpful. However, these maps aren’t a necessity as the drive is well signposted. All the roads travelled on this trip can also be located on most GPS systems.
- CONTACTS AND INFORMATION: KYOGLE TOURIST INFO OFFICE Ph: (02) 6632 2700 Website: www.visitkyogle.com.au
You will need to pay the standard national parks camping fee and have a visitor pass. Expect to pay $7 per vehicle per day. At each camping site you will need to pay $6 per adult and $3.50 per child per night. Passes can be bought online, or there are facilities at each entrance and at the camping areas. Additional information can be found at the Office of Environment and Heritage NSW website.
Whether heading bush on a major trip, or taking a quick weekend foray into the hinterland, we should always ensure there is plenty of water to drink and equipment to purify it when it’s not clean.
On long trips we’ll often have in-vehicle bladders, water tanks or water drums, though having good water receptacles doesn’t guarantee good water. The quality of our water will only be as good as the source from which we obtain it. So if we top-up from contaminated sources, or don’t keep our jerries clean, we risk becoming sick. Just remember, while the locals may drink water from the town’s water tower, the microflora in your gut may not be able to handle it.
On shorter trips, many of us might not bother to load up with water from home. After all, we’ll be home by Sunday lunch – won’t we? What happens if you get bogged somewhere remote, or something breaks? How would you stay hydrated until you’re recovered?
The LifeStraw range provides a water purification solution for all sorts of scenarios. Originally designed for use in developing nations and in humanitarian crises, the products now also have a range of applications for the outdoor professional and recreationist.
The LifeStraw range is lightweight and ideal for hiking, camping, travel, emergencies and survival. It makes contaminated or suspect water safe to drink by removing 99.9 per cent of waterborne bacteria and protozoan parasites, including E. coli and salmonella. It will even reduce the amount of suspended particulate (dirt) by filtering out anything larger than 0.02 microns in size. The range is also BPA-free and recyclable.
LifeStraw has been winning awards since its first release in 2005. It was named the best invention of 2005 by TIME Magazine. In 2008, it won the Saatchi & Saatchi award for World Changing Ideas, and in 2014 LifeStraw Go won the prestigious ISPO award in the outdoor trekking and equipment category.
The Range LifeStraw Personal is a straw that can be worn around the neck with a lanyard. At 216x32mm and weighing 56g, this unit can filter 1000 litres of water. If you’re on foot it can be used to suck water straight out of potholes, creeks and even hard to reach pockets, like hollows in trees. While it takes a bit of sucking to get the water through the straw (like sucking a thick shake through a straw), it is still a great piece of equipment. Keep one for emergencies, or to conveniently reduce the amount of water you need to carry when bushwalking.
LifeStraw Go incorporates the LifeStraw technology into a durable and lightweight BPA-free water bottle with a flip-top bite valve. To use it, simply scoop water from a source, screw on the lid, and sip clean water through the mouthpiece. A drawback is that the straw sold in the Go is not the same as that in the LifeStraw Personal. So you can’t interchange the two.
That’s a relatively minor design defect, though. With a 700ml capacity and the ability to fit in most cup holders, it is good to ‘Go’ at home, in the office, on the road, on a track, or on your bike. It makes us wonder why you’d want to head outdoors with a water bottle that wasn’t a Lifestraw Go.
LifeStraw Family 2.0 is the next generation of the high-volume unit. While you can still find the original Family 1.0 on shelves (and it’s still fit for purpose), the Family 2.0 is more effective and user-friendly. Filtering up to 30,000 litres of water, it’s designed to supply a family of five with clean drinking water for up to five years. It has a five-litre dirty-water compartment, and a built-in safe storage container with a tap and built-in backwash cleaning system. It has replacement filters for when the 30,000 litres are used and the filter eventually blocks (unfortunately the filters aren’t interchangeable with those in other Lifestraw products). With dimensions of 220x250x385mm, and weighing 2.4kg, this unit is built for bush shacks, fishing trips, touring rigs and campervans.
LifeStraw Home is a tabletop system (about the size of an office water dispenser) that’s built for home use, with the added benefit of removing viruses and chlorine by use of an activated charcoal filter. Suitable for homes connected to a dam or water tank, such as those you would find on rural properties, at club houses, or at pit stops along walking tracks.
Depending on where you live, you may also want to consider a LifeStraw Home for your house or unit – did you know that some councils are still serviced by wooden pipes in the water system? Who knows if the trees in your backyard have tapped into the water mains? Surprisingly, for its size, this unit can only filter up to 4500 litres of water before needing replacement filters.
How does it work? LifeStraw products are designed with a matrix of hollow fibres acting as individual ‘straws’. Water exits these fibres through microscopic holes in the side walls. These holes are small enough to trap bacteria, protozoa, and other harmful contaminants.
The products have no moving parts or batteries and they don’t use chemicals like chlorine or iodine. This is a bonus because water purification tablets that use these chemicals are not recommended to be used for extended periods (using them longer than three days can damage your kidneys).
What won’t it do? LifeStraw products can’t filter dissolved material such as salt, heavy metals, fuel and poisons. So they’re of limited use in a boat and marine environment where you should use a reverse osmosis pump instead.
Can you clean it? Sure can – by backwashing. This simply involves blowing out any debris directly after you’ve used it. For product longevity, we’d also recommend a regular wash in a glass of warm water for the LifeStraw Personal and the LifeStraw Go units. This will prolong the unit’s life and ensure that the straws don’t get clogged and become difficult to suck through. So soak the business end in warm water and suck and blow to clean the filter.
Don’t suck too hard if the unit is blocked, as you may suck clay deposits further inside. Other LifeStraw units have a backwash handle to manually pump clean the unit.
RATED Available from: TJM and other stockists RRP: From $30 to $380 We say: Innovative, ingenious, and lifesaving