CRIME Stoppers Victoria is urging the public to report any reckless or dangerous fire behaviour this summer.
This is advertiser content
The Reckless Fires Cost Lives campaign is targeted at Victorians to remind them of the dangers and consequences of deliberate or reckless bush and grass fires.
“Whether recklessly or deliberately lit, bush and grass fires have disastrous consequences,” Crime Stoppers said. “It is a criminal offence under Victorian law to cause a bushfire recklessly, or to be reckless as to the spread of a fire to vegetation or property belonging to another.”
Reckless behaviour includes disobeying restrictions relating to total fire-ban or fire danger periods, burning off without a permit, or using hot tools or machinery that emits flames or sparks on total fire-ban days. And, if you’re heading off-road this festive season, ensure you don’t leave campfires unattended.
“Reckless fires cost lives,” Crime Stoppers Victoria CEO Erika Owens said. “We need your help to keep the community safe from bushfires this summer by being aware of your own fire behaviour and that of others.”
“It’s up to everyone to know the fire rules for their local area, or the areas they’re travelling to and to be mindful of their own actions and the behaviour of the people around them.”
Forecast indicate an above-average fire season, so if you spot any reckless or deliberate behaviour that could lead to a bushfire, contact Crime Stoppers Victoria on 1800 333 000 or at www.crimestoppersvic.com.au. In an emergency, contact 000. All reports remain confidential.
For all its beauty and variety, the Australian countryside is also known for its vastness, which can spell serious trouble for any adventurer who find themselves stranded with a broken or damaged 4×4.
With harsh terrain that can bash and break the toughest of components, any overland adventurer who plan to venture deep into the wilderness needs to be prepared to carry out on-site repairs.
In the third and last instalment of our Vehicle Suitcase Guide, Chris Collard, delves into the subject of specialty tools, tyre repair kits, and welding equipment that are essential to carry out emergency repairs where ever you may be. For more advice on the basic essentials for a 4×4 trip, check out Part 1 of this series, while the subject of what tools and spares to pack are covered in this series’ Part 2.
Specialty Tools Suitcase
If you work on your own vehicle you’ll have an advantage in this department. While you are researching forums or tech sites for potential weak links, take note of any specialty tools needed to make the repair. If you learn that you must pull the motor to replace the starter, buy a different vehicle (you never want to be put in that position).
Having said this, there are a host of tools that, if you can dedicate the space to carry them, will eventually be put into service. Many are universal – cordless drill, gear puller, cutoff wheel, grinder, and C-clamps – while others are brand-specific.
Certain brand-specific tools come at a substantial cost if purchased from the dealer, but you can often fabricate your own at a fraction of the price. For example, I mentioned that I carry wheel bearings in my Hilux. They too need a press, but I made a slide hammer that can manage the job. I also created a tool for adjusting ring gear backlash and another for holding the crank in place in order to remove the pulley and main seal.
Takeaway: web forums can be a great source of information on your vehicle.
Specialty Tools Must-Haves:
Specialty tools are applicable for all vehicles. Shown here are large C-clamps, Vise-Grips (C-clamp style), a gear puller, hacksaw, drill bits and EZ-Out set, pneumatic cutoff tool, cordless and pneumatic drills, 50-foot air hose, siphon hose, and O-ring, fuse, and electrical kits.
Chris’ Specialty Tools Tips:
1 – Carry specific tools required for your vehicle.
2 – Save money by fabricating specialty tools yourself.
3 – Pneumatic and electric tools will save time and elbow grease.
Chris’ Specialty Tools Pack List: – Drill and bits – Bolt extractor set and reverse-rotation drill bits – Die grinder (various disks, wire wheel) – Pneumatic or electric cut-off tool – C-clamps (large) – Gear puller – Vise-Grips (C-clamp style) – 5-pound sledgehammer – Safety goggles – 50-foot air hose – Vehicle-specific tools
Tyre Repair Suitcase
One of the most common trail repairs is fixing a punctured or slashed tyre. The task can be as simple as removing the interloping nail, screw or pushrod (yes, this has happened), inserting a plug, and re-inflating the tyre. A basics kit should be a premium unit such as those from ARB, Extreme Outback Products or Safety Seal. Avoid the $10 discounts, as the low price reflects the quality – they’re cheap for a reason. Severely slicing a sidewall is not a frequent issue, but having the tools to address this scenario will be more reassuring than going on without a spare.
While reviewing tyre repair kits last year I found that Extreme Outback and Power Tank options included the surgical implements needed to fix a lacerated tyre (albeit temporarily): patches and cement, scrapers, and stitching material. Use a cordless drill to bore stitch holes; it makes the job easier, safer, and cleaner than using an awl or other pointy object.
A few other must-haves are room temperature vulcanising (RTV) black silicone and Tyrepliers. I’ve removed tyres by various methods (tyre spoons, Hi-Lift jack, the weight of another vehicle), but a set of Tyrepliers can’t be beat. This little dandy makes quick work of preparing a tyre for patching, stitching, or replacing a torn valve stem. It may collect dust for years, but when the time comes you will be glad you have it.
Takeaway: Tyrepliers can save your bacon.
Tyre Repair Kit Tools:
I have two overland vehicles and transfer my ARB CKMTA12 compressor to the one I’m using at the time. The tyre repair kits, one for each rig, are from Safety Seal and Extreme Outback Products.
Chris’ Tyre Repair Advice:
1 – Buy a high-quality tyre repair kit.
2 – Add stitching accessories and RTV black silicone.
3 – A stitched tyre is for emergency use only.
Chris’ Tyre Repair Kit List: – Self-vulcanising yarns – Reaming tool – Yarn insertion tool – Lubricant – Razor blades – Needle-nose pliers – Valve stems and cores – Valve core remover – Patches (various sizes) – Rubber cement – Buffer/scraper – Cordless drill and bits – Micro paracord/baling – Stainless-steel wire – Large surgical needle – RTV silicone – Air gauge – Air compressor
Welding Kit Suitcase
As you read through this section you might think, what good will welding equipment do if I don’t know how to weld? Welding may not be in your skill set (substitute any subject here), but when the need arises there is a good chance that someone in your group – a passerby or local – will know how to run a bead.
I’m not a great welder, so I always ask the best welder available to perform this type of repair – egos are best left at home. I’ve listed several welding options: batteries, Ready Welder, and Premier Power Welder. The latter is vehicle-based and the crème de la crème of bush tools, while the former two are grab-and-go affairs; the only catch is that you must have at least two batteries available at the repair site.
I’ve used all three systems to repair everything from a cracked frame and separated spring perch, to broken steering components and shock mounts. To keep my welding rod dry I made a storage tube out of ABS pipe.
Takeaway: a basic welding kit can mend a broken frame when torn apart.
Welding Kit Options:
There are three basic systems for trail welding: the old-school method of two-batteries, jumpers and rod (left); the battery-powered wire-feed Ready Welder (right); and the engine-mounted Premier Power Welder. I carry the first two.
How to keep safe when stranded in the outback
Chris’ Welding Kit Tips:
1 – Use a capped ABS pipe container to keep the rods protected.
2 – The best welder should manage the repair.
3 – Multiple batteries are often required for a proper welding jobbie.
Chris’ Welding Pack List: – Ready Welder or Premier Power – Welder (optional) – Welding rod (6011, 6014, 7014) – Storage tube – Welding shield – Gloves, brush, hammer – Battery welding kit: two-gauge cables (two 24-inch) with terminal-mount ends – Jumper cables or welding leads, two or three 12-volt car batteries
Chris’ Words of Wisdom
From an experience standpoint, most of my skills have been learned out of necessity on the trail. As Trail Co-ordinator for Sierra Trek, my crews and I have been confronted with everything from broken frames to pretzeled drivelines. During the past 35 years I’ve amassed a few opinions regarding MacGyver trail fixes and what to bring. When it comes to your rig, I say go light on fluff. Instead, pack as many tools and supplies as you can reasonably fit. My wife, Suzanne, says, “Pack like a Collard, not a Kardashian.”
I’ve heard many people say, “I drive a new vehicle. Why should I carry that stuff?” While this may be true, I can’t tell you the number of times I have provided supplies and equipment to someone who showed up for the party empty-handed.
The funny thing is that I’ve been that guy. Over the years my kit has grown, sometimes to the point of absurdity. That is when I re-evaluate and cull the herd. I pack many items I hope to never need, but the reality is that I’ve used nearly all of it at one point. Each adventure is a learning experience, and I promise you that being as prepared as possible will make your experiences that much sweeter.
Takeaway: prepare like a Boy Scout and don’t pack like a Kardashian.
MAHINDRA Automotive Australia Pty Ltd (MAAPL) has launched the next generation of its venerable PikUp, with a raft of updates including a new six-speed transmission, more grunt from its 2.2-litre turbo-diesel donk, and revised interior and exterior styling.
This new model’s release marks 10 years of the first-gen PikUp, which lobbed Down Under in 2007 and has proven popular with buyers looking for a cheap, basic and tough workhorse. Globally, the PikUp and its Scorpio wagon sibling have sold more than 500,000 units.
According to Joydeep Moitra, head of international operations at Mahindra & Mahindra Ltd, the new PikUp has been subject to extensive testing in Australia, as well as feedback from the local distributors.
“For the new Mahindra PikUp, a six-month test schedule was carried out in Australia and concluded in August 2017, clocking up over 80,000 local kilometres,” Moitra said. “This input has helped create a Mahindra PikUp perfect for local conditions. This is a testimony of our commitment to developing products for the Australian market.”
The 2.2TD engine now features a variable-geometry turbocharger and produces 103kW and 330Nm, with peak torque available from 1600rpm to 2800rpm. The dual-range, part-time 4×4 system carries over from the previous model. Off-road capability should be improved over the previous-gen PikUp, owing to fitment of a standard Eaton rear diff lock. Adding to the bush-tourer prospects of the PikUp, Mahindra is also offering a range of accessories including winch-compatible steel bullbars, snorkels, a suspension upgrade, towbar, stainless-steel nudge bar, and the choice of aluminium, galvanised steel or colour-coded steel trays.
There will be two spec levels with the new PikUp: S6 and S10. The S6 is the base model, with steel wheels, MP3/radio CD unit, fabric seats and air-con as some of the standard features. The S10 ups the ante with climate-control air-con, 16-inch alloys, cruise control, remote central locking, auto wipers, intelligent headlamps, and a six-inch touchscreen that includes sat-nav, Bluetooth, MP3/radio/CD and a reverse camera. The front-row seats are still fabric but gain arm rests and driver’s side height adjustment, while the lighting package on the S10 includes daylight running lamps (DLR) and side projection beams.
The new PikUp includes a raft of driver-aids and safety features: Hill Descent Control (HDC), ESC, ABS, EBD, roll-over mitigation, airbags, collapsible steering column and crumple zones all feature in the new model. All seats now include headrests and three-point lap sash seatbelts, plus there are now two ISOFIX anchors for child seats in the rear – and Dual Cab models include three top tether points. There’s no word on the ANCAP rating for this new PikUp at this stage, but it should improve notably on the first-gen model.
Cosmetically, the Mahindra’s exterior now offers a ‘sleeker’ appearance (if that term can be applied to a boxy 4×4) that is also less cluttered, especially at the front end. The headlights also copped some of the styling wand and now look far less pronounced, while the fog lamps, bigger Mahindra badge and black mesh inserts here and there combine to produce a far more modern-looking ute – a nod to today’s 4×4 ute market and its obsession with loud paint and ‘tough’ appearances. The interior has also been seriously tweaked.
At launch there are four variants – all 4×4 models – with Mahindra stating that 4×2 models will arrive early 2018. Pricing for the four 4×4 models is competitive: the Single Cab 4×4 S6 Cab/Chassis is from $26,990; Dual Cab 4×4 is from $29,490; Dual Cab with factory well-side tub is from $29,990; and the top-end Dual Cab S10 4×4 (with well-side tub) will set you back from $31,990.
All vehicles in the PikUp range come with a five year/100,000km limited warranty and buyers can choose from four colours: Red Rage, Arctic White, De-Sat Silver and Napoli Black.
Mahindra is very confident this new PikUp will sell well and, looking at the more-than-reasonable spec levels and pricing, it’s hard to argue, especially when you consider there’s no shortage of buyers looking for a cheap, functional workhorse. As the company’s dealership expands further, the PikUp could sneak more than the odd sale from the bigger players in this ever-more competitive 4×4 ute market.
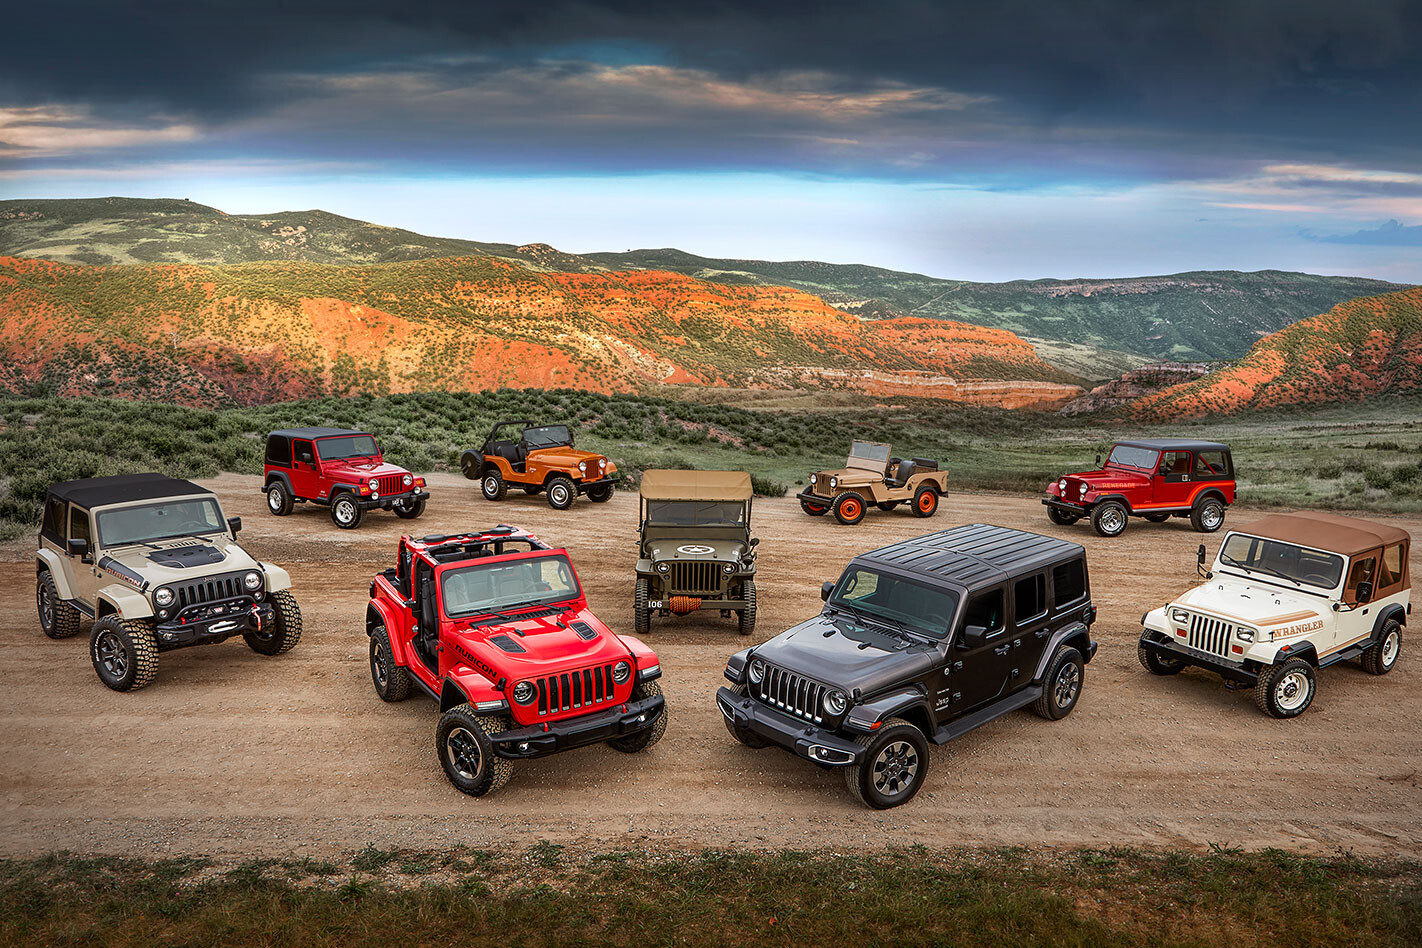
WHEN the Wrangler made its debut in 1987 as the YJ, Jeep purists poked fun at Jeep’s new prodigy, casting derogatory insults such as “Yuppie Jeep” and “Real Jeeps have round headlights.”
While I agree with them regarding round headlamps, the YJ retained the DNA of its venerable predecessors in the CJ line-up. It had solid axles, a reliable six-cylinder mill and traditional leaf springs. A decade later we met the coil-sprung TJ and, in 2007, the internationally acclaimed JK.
When Jeep announced a new generation of Wrangler would replace the JK, the public, as well as those in the media, feared the brand would succumb to soccer-mom factor: a wind-tunnel-designed land sled sans proper chassis and solid axles. I voiced my concerns with Jeep insiders during the last few years, that the Wrangler sets the bar for all four-wheel drive platforms and anything less would be the beginning of the end for the seven-slot legacy. They assured me, “We won’t screw up the Wrangler.”
After spending time in the JL, I can comfort you in saying all is well in the world of the Wrangler. Let me walk, no, drive you through what’s new, what I love, and what I could do without.
TRADITIONAL VALUES
Regardless of what bells and whistles have been added to a vehicle’s interior and aesthetics, I always look at its bones first, and I like what I’m seeing. The body-on-frame design, five-link coil-sprung suspension, and live axles fore and aft – everything we expect from Wrangler – live on.
The Sport and Sahara retain Dana 30 and 35 axles, a Command-Trac NV241 transfer case, and optional Trac-Lok limited-slip out back. The Rubicon’s Dana 44s are slightly wider but have been upgraded with larger-diameter axle tubes and a better forging process. Its NV241OR Rock-Trac 4:1 low range transfer case and Tru-Lok electronic locking differentials remain; paired with the new D478 six-speed manual transmission (now cable-operated), which features a stump-pulling 5.12:1 first gear and a class-leading final drive ratio of 84.13:1. The 850RE eight-speed automatic (4.7:1 first gear) kills the competition with a whopping 77.2:1 ratio. As a guy who learned his technical driving skills on the Rubicon Trail, this resonates in a big way.
UNDER THE HOOD
Back in the saddle will be the venerable 3.6-litre Pentastar aluminum-block V6 mill. I’ve heard people whine about having a “minivan” motor in their Jeep, but I can tell you that the minivans got the sweet end of the deal. The Pentastar puts out 285hp (213kW), 260lb-ft (353Nm), and has proven to be a reliable and efficient powerplant.
It will be joined by two new options: the first being a turbo-charged two-litre, four-cylinder that generates 270hp (201kW) and 295lb-ft (400Nm). On the road and trail, this new four-banger was no slug, its power band feeling appropriate for the JL’s size and mass. EPA fuel economy figures (not available yet) should best the V6’s 7.7L/100km (city) 9.8L/100km (highway), but I feel this offering is another effort by the company to adhere to increasingly strict CAFE requirements rather than a replacement for the Pentastar.
The Jeeping public (along with journalists, like me) have pined for a diesel Wrangler for years, and we’ll finally get it. The 3.0-litre EcoDiesel V6, which we’ve enjoyed in the Grand Cherokee and RAM 1500, will make its debut with 2019 models, but only mated to the automatic transmission.
From any angle and any distance, one glance at the JL and you know you’re looking at a Wrangler. There are subtle changes, though, some seen and some beneath the paint. In an ongoing attempt to reduce weight, engineers revisited the chassis design and materials. By implementing high-strength steel they have not only increased rigidity, but also shaved 100 pounds (45kg) off the scale.
From an aesthetics standpoint, the hood dives a little lower at the front, the grille has a defined lateral V shape, and the windshield rakes back a bit more. A functional vent now sits behind the front fenders, vacating airflow from the engine compartment. Side latches still secure the hood but have been improved to eliminate the buffeting experienced with the JK. Lighting has been updated with LEDs, and front fenders now carry wide corner lights. Not perceptible to the eye but significant to GVWR, a number of body components (doors, hood, fenders, windshield) are now aluminum, and the rear gate is magnesium, reducing mass by an additional 100 pounds (45kg).
Forged-steel, frame-mounted recovery points are back, along with an electronic sway bar disconnect, and Rubicon models offer an optional winch-ready modular front bumper and Warn winch. Providing grip to the tractive surface are Baja-proven BFGoodrich All-Terrain KO2s wrapped around 17-inch polished aluminum wheels.
We don’t see many Wranglers on the trail with their windshields down, but there is nothing like tooling through the backcountry on a summer day with a 360-degree view and the occasional bug in your mug. As is the tradition “going back to 1941,” you can still kick the glass forward. Compared with the JK’s two-hour removal process, the JL offers an unrestricted view with just a five-minute investment. This is accomplished via a new structural A-pillar, permanent header bar and reduction of hardware.
IS BIGGER BETTER?
While the width of all models is technically unchanged (2.54mm increase), overall length and wheelbase have been stretched: the four-door by 88.9mm and 60.96mm respectively (4785.36mm/3007.36mm) and the two-door a bit less at 63.5mm and 35.56mm (4236.72mm/2458.72mm). This data alone would lend one to think the JL would be lower, have a reduced breakover angle, be more susceptible to getting hung up on obstacles, and maneuver like the Titanic. Not so, my seven-slot aficionados.
After watching the auto industry run scared from so-called consumer advocates (you know the guy) and being sued for producing vehicles that spontaneously flop over in the middle of the road – apparently without any input from the driver –I’m impressed to see Jeep just say “no” to these whack jobs. Approach, departure, and breakover angles have actually been increased over that of the JK (44, 37, and 22.6 degrees respectively on the four-door) while maintaining 254mm of ground clearance under the chassis (274mm on the Rubicon).
Classic 4×4: Amphibious Jeep around the world
In short, the JL is no low-rider Wrangler. They also managed to decrease the turning circle, which was noticeable while backing into tight parking spaces and a big plus on the technical, Rubicon-style test track. As for payload and towing capacity (two door: 907kg/ four door: 1588kg w/ Pentastar), and GVWR, they are basically unchanged for all models.
THE COCKPIT
The Wrangler design team did a number on the JL’s interior, drawing from and including subtle accents from the CJ and Willys. Considering the plethora of dials, knobs, buttons and LCD screens they shoehorned on the dash, it is surprisingly uncluttered and ergonomically pleasing. The instrument cluster contains the normal array of information, but adding to it is a full-colour centre display that, via its numerous modes, monitors all vehicle functions and can be customised for personal taste.
The fourth-generation Uconnect features wheel-mounted controls, hands-free operation, and up to an 8.4-inch touchscreen. Apple CarPlay and Android Auto pair with nearly any smartphone, and navigating the various menus is quite intuitive. While the Uconnect WiFi hotspot has been available for years, the new system features 4G connectivity for up to eight devices. Keeping up with our electronic times, there are plenty of 12-volt and USB outlets as well as auxiliary inputs for the audio system; SiriusXM radio is optional.
Locker controls on the Rubicon are now more intuitive. Pressing the console-mounted toggle down engages the rear; press up and you have front and rear; and a simple “off” button disengages both. As with previous generations, one can still pull the carpet out for an easy wash-down of the interior. New grab handles on the A-pillar are well positioned and provide a safe place for hands in precarious situations.
ABS and electronic stability control (ESC) are lifesavers during high-speed emergency maneuvering, and hill-start assist can be handy with a manual transmission in steep terrain. However, I could do without many of the other beeping and buzzing nanny features such as the ParkView backup camera, rear park assist, blind-spot monitors… the list goes on. Fortunately, as with the engine start/stop (ESS), you can turn most of them off.
ROAD AND TRAIL
There is no argument that the Wrangler is one of the most capable 4WD platforms on the global market but, for the average consumer, its road manners have left a lot to be desired. After spending a day on and off the pavement, I can tell you that on-road handling is greatly improved. The longer wheelbase and wider track render a more stable feel, and it corners flatter, tracks better and is more predictable during emergency lane changes and braking. Much of this is due to the enhanced electronic stability control, which includes features such as roll mitigation, trailer-sway control and ready alert braking (RAB).
New for the JL is electro-hydraulic power steering. I found it to be very responsive and provide excellent feedback at the wheel. I’m not a fan of adding complexity, but this system works well. Bravo to Jeep’s engineering team on all accounts.
Our off-pavement test loop was hands down the most difficult any OE has put journalists on – obstacles were easily as challenging as sections of the Rubicon Trail. While I would normally engage a locker or two, I decided to only utilise the traction control system or brake lock differential (BLD), which is standard on all models. Using threshold throttle modulation, I can’t emphasis how impressed I was with the BLD’s ability to monitor tyre slip and apply power to the appropriate wheel. In the past, wheel speed needed to reach a certain rate to engage, an unnerving and clunky operation. The new BLD system is seamless and virtually transparent to the driver, and (I’ll get lambasted for this one) nearly eliminates the need for lockers.
WHAT’S NEXT?
I’m very impressed with the newest member of the Jeep family; it has the requisite DNA of its predecessors and more. On-road drivability, comfort and safety have been refined, and its off-pavement tenacity is everything we’d expect from the brand’s iconic top-down, wind-in-your-face, seven-slot icon. I’m glad to know all JLs will be built by the company’s dedicated craftsmen in the Toledo, Ohio, plant. Jeep feels that not only US consumers, but also overseas Wrangler buyers, place a high value on the Americana ethos and quality of construction associated with the “Made in USA” stamp of approval. I agree.
Eungella National Park is perched atop the Clarke Range of the Mackay Highlands, which comprises Australia’s longest stretch of sub-tropical rainforest.
This article was originally published in 4×4 Australia’s May 2012 issue.
Ideal for a family weekend escape, the national park and surrounding forests offer a network of short walking tracks and four-wheel drive tracks to get you out in the cool mountain air so you can fully appreciate the gorgeous landscape.
The park is serviced by the Mackay-Eungella Road, which weaves through the Pioneer Valley from Mackay, surrounded by farming communities. Make sure you stop in at the Pinnacle Pub on the way through to sample their revered Pinnacle pies.
Not far past Pinnacle is the township of Finch Hatton. Follow the signs to the gorge to indulge the senses with a number of short walks through the lush rainforest, featuring fast-flowing streams and waterfalls. Don’t forget your bathers as a rock pool rewards the climb at the end of each walk.
Back on the Mackay-Eungella Road, the road winds sharply and steeply up the Clark Range to reach the Eungella township.
If cabins or camping with hot showers, a camp kitchen and powered sites are part of your get-away-from-it-all requirements, turn right at North Street and follow the signs for a couple of hundred metres to Explorer’s Haven, a cosy campground offering around 20 sites (powered and unpowered) and five cabins, all sharing a tremendous view down the valley.
From Eungella, take the first left towards Broken River for park information, picnic facilities, short walks and viewing decks from which to spy a platypus or two. Pick up a visitors guide which lists a suggested itinerary – the sights along sealed roads, country back lanes or getting the wheels dirty along isolated forest trails.
If bush camping is more your style, the Diggings Campground on Broken River (21 10 26.20S, 148 28 46.32E) is easily the pick, with plenty of space, flat ground, mature shade and the river to cool off in. There is no toilet, so bring a porta-potty, thunderbox… or a shovel.
The camping area is easily accessed along Diggings Road which spears off the main tourist road to the right, just before Sky Window which, as the name suggests, offers an unsurpassed view down the valley.
Diggings Road is unsealed and narrow in parts and generally easy going until it reaches the river crossing and campground. From there it’s high-clearance 4X4 only, crossing the mountain range before joining up with the Eungella Dam Road.
Denham Range in the adjacent Crediton State Forest is the other off-road camping alternative in the vicinity, but there are few flat sites and it seems better suited to the walk-in fraternity, as opposed to vehicle-based camping.
The campground is located on the mountain ridgeline bordering the Homevale National and Conservation Parks.
A 4X4 track meanders along the border for around 10km to reach a locked gate and the beginning of the walkers-only Dray Track, which makes its way to Moonlight Dam. The track is part of the 56km Mackay Highlands Great Walk.
4×4 Australia destinations
Vehicle access to Eungella is back the way you came, with some steep sections, red clay and rainforest pockets. It is generally easy going with a high-clearance four-wheel drive and a compact off-road camper-trailer.
There are a number of other worthwhile areas to explore nearby, including the Crediton Loop and historic Crediton Hall and campground; the Eungella Dam; and the Mia Mia State Forest.
With everything on offer, you could easily occupy a weekend or more in Eungella National Park. And at such close proximity to the bustling township of Mackay, it makes an ideal family getaway – without taxing the mind or body.
TRAVEL PLANNER
WHERE Eungella National Park is in the Mackay Highlands, 80km west of Mackay, Qld.
PERMITS AND ACCESS Camping permits are required in Eungella NP and Crediton State Forest. Visit derm.qld.gov.au/parks or phone 13 74 68.
CAMPING Crediton Hall campground; water, toilets. Denham Range campground; water, long-drop toilet. The Diggings campground; no facilities. Eungella Dam campground; water (subject to blue-green algae), toilets, bins. Dogs allowed. Explorer’s Haven; 07 4958 4750
WHAT TO TAKE Insect repellent, drinking water, binoculars, swimming gear, walking shoes.
SUPPLIES Basic supplies are available at the Eungella Store. Otherwise Finch Hatton has two pubs, a post office and a general store with eftpos and a newsagency. There are no ATMs in the Pioneer Valley.
TRIP STANDARD Easy. Diggings Road is rocky and slow-going in parts. Note: forest trails may get tricky after rain.
MAPS AND GUIDES Mackay Highlands & Eungella NP Visitors Guide. Phone 13 74 68 or see derm.qld.gov.au/parks and mackayregion.com.
Drawing from 35 years of experience of 4×4 adventures, Chris Collard outlines his list of items that are necessary for any self-supported travel.
In the second instalment of this series we cover essential tools and items need to carry out basic repair and maintenance to keep your 4×4 running no matter where you are. Read Part 1 for Chris’ advice and tips on basic essentials for travelling in the countryside and recovering your 4×4.
Tools (basic) Suitcase
While pre-packaged toolkits are handy and the plastic cases have a place for every socket and screwdriver, they are far from adequate and occupy too much real estate for the limited assets they carry.
I carry two kits. The first is a heavy canvas bag stuffed with the basics: 1/2- and 3/8-inch sockets, metric and ASE spanners, Vise-Grips, Channellocks, needle-nose pliers, screwdrivers and such. I call this my I-don’t-want-to-retrieve-my-toolbox bag, and store it behind the driver’s seat. My main toolbox, which is buried behind loads of other gear, is a shop-grade, multi-drawer unit. It contains the seldom-needed items such as a multimeter, JB Weld, Teflon and electrical tape, pickle forks, files and punches, along with various small items.
A telescopic magnet and emery cloth are good examples of little implements that can have a big impact. If you need to polish a bearing surface or extract an air cleaner nut from the depths of a carburetor, they are the only tools for the job.
Takeaway: toss the plastic organiser in lieu of a handy canvas bag and proper toolbox.
Basic Tools Suitcase Arrangement
A spare part won’t do you any good if you don’t have the appropriate tools to install it. My tools are separated into two categories. Basic tools are stowed in a handy location (canvas bag on right), while seldom-used items stay in my main toolbox.
Chris’ Basic Tool Tips:
1 – Store a basic toolkit in a handy location
2 – Seldom-used items reside in your main toolbox
3 – Small items can be a big asset.
Chris’ Basic Tools Suitcase Item List: – Metric and SAE spanners – Metric and SAE sockets (¼, ½, ¾ inch) – Screwdriver set – Allen set – Channellocks (large, small) – Crescent wrenches (large, small) – Vise-Grips (large, small, needle-nose) – Files (combination, keyhole) – Hacksaw – Dead-blow mallet, hammer – Hub wrench – Pinion nut socket – Pickle fork (two sizes) – Pry bar – Snap-ring pliers – C-clamps (small) – Brake line bender – Multimeter – Telescopic magnet – Gasket material – Wire kit, wire, crimper – Fuses – Brass punch, metal chisel/punch – Tape (Teflon, electrical) – Cleaning brush – Spark plug thread bore – Emery cloth – Dental tools (picks, tweezers) – Alligator-clip jumpers – JB Weld, Loctite, fuel cell epoxy – Stop leak – Utility knife
Fluids Suitcase
Fluids are also items that cross all vehicle makes, and a full selection should be carried at all times.
In the mid-1980s, I was on the Rubicon Trail stuck behind a group with a broken vehicle (bad power steering pump). They would not allow us to get around on a bypass (one of them actually said, “you %#&@ Toyotas can go back to the &%#@ highway where you belong). After we waited patiently, the knucklehead walked back and asked if we had any power steering fluid they could have. I sarcastically said, “Of course, don’t all prepared four-wheelers carry the basics… yours is back at the highway.”
I handed over a quart to get them out of our way.
Takeaway: don’t be a knucklehead.
Fluids Suitcase Essentials List:
Every vehicle should carry basic fluids: brake cleaner, power steering and brake fluid, engine and differential oil, WD-40, starting fluid, bearing grease, shop towels, and hand cleaner. Store them in a leak-proof container, as they will eventually leak.
Chris’ Fluids Tips:
1 – Standard fluids will work on any vehicle (temporarily).
2 – If each vehicle carries an array of fluids, you will have enough for any job.
3 – Bring a drain pan and container to store used fluids.
Chris’ Fluids Suitcase Item List: – Motor oil (2 quarts) – Diff/transmission oil (2 quarts) – Oil pump – Power steering and brake fluid – Brake cleaner – Carb/mass air-sensor cleaner – Drain pan, kitty litter – Used oil container – Bearing grease (high temp) – Siphon hose (shaker type) – Starting fluid – WD-40 – Hand cleaner
Spare Parts Suitcase
What spare parts to bring has been the topic of many campfire debates. If you drive a late-model vehicle, the list may be limited to belts, hoses and filters. If your love is an old Willys MB or Toyota FJ-40, I suggest you become intimately familiar with its nuances. Read enthusiast forums and query other owners for info on common mechanical issues and what items to carry. The spares kit in my 1982 Hilux (a rock rig) includes axles, drivelines, steering components, a cap, rotor, and an igniter (the list goes on). However, my 2002 Tacoma’s inventory is limited to belts, hoses, water pump and a few small parts. I carry extra wheel bearings in the Hilux (a field fix), but changing a Tacoma bearing isn’t possible without a press and jig.
Design the spares kit around your vehicle, type of travel and distance from services. There is one caveat: if you carry a part, even if the repair cannot done in the field or you lack the mechanical skills to perform the job, it will expedite the process when you get to a shop.
One interesting scenario I’ve dealt with was when the clutch throw-out bearing on a friend’s vehicle flew the coop. Steve, the world’s greatest pack rat, had a used one in his parts box. We set up camp, dropped the transmission, swapped in the used (but functional) bearing and, voilà, were able to continue on in the morning. Takeaway: if you have room for a spare part, it is better to have it than partake in a forced march in the desert.
Spare Parts Suitcase kit List:
Spares should be specific to your vehicle. This kit includes a driveline, front axle shaft, rod end, U-bolts, fuel filter, wheel bearings/seals, water pump, hoses, belts, battery cable, and igniter. The ammo cans hold everything from clutch and brake hydraulic kits to lug nuts.
Chris’ Spare Parts Tips:
1 – Research your vehicle for potential weak links.
2 – Spares that cannot be swapped in the field are usually low priority.
3 – Include small “used” parts from previous upgrades.
Chris’ Spare Parts Suitcase List: – Battery cables – Belts – Axles and seals – Brake line – Clutch and brake slave cylinder kit – Fuel pump, line, clamps, filter – Drivelines – Distributor cap, rotor, coil, points – Leaf/coil spring – Radiator hoses and clamps – Steering (tie rod, links, ends) – U-bolts and nuts – U-joints – Water hose (various diameters, 3 feet) – Water pump – Wheel bearings and seals – Thermostat
THERE are more than 300,000 quads/ATVs on the Australian market, and it’s estimated that only 20 per cent of quad users wear helmets.
Yamaha Australia has been working closely with organisations such as the FCAI to apply safety-based programs, like the ATV 5 Star Safety handover, which occurs at the handover of a quad at dealer level. At the dealer handover, new owners are educated on personal safety, training, correct load carrying, manufacturer recommendations, and using ATVs in the right situations.
It is estimated that more than 30 per cent of ATV fatalities could have been avoided with the use of a helmet and, with this in mind, Yamaha worked closely with French helmet-maker Shark to release the Shark X16 ATV ROV helmet. The helmet is fully certified ATV- and SSV-specific, with features incorporated to reduce perceived hurdles: too hot, too heavy, can’t hear the animals and annoying D-link buckles. With features including quick-release buckles, lightweight feel, increased ventilation for air flow and increased hearing, Shark is hoping to increase ATV and SSV helmet use and decrease fatalities Australia-wide.
We got to use the new Shark ATV and SSV helmet during the Kodiak launch and can attest it is considerably lighter than an average helmet, tipping the scales at a minuscule 1.2kg. The quick-release buckle is easy to use, and sound travelled well through the dedicated hearing vents.
With a laundry list of attachments and features available, from fly nets, sun packs, eyewear compatibility and noise reduction, the only thing Shark could have done more to encourage wearing a helmet on an ATV is make one that looks like an Akubra.
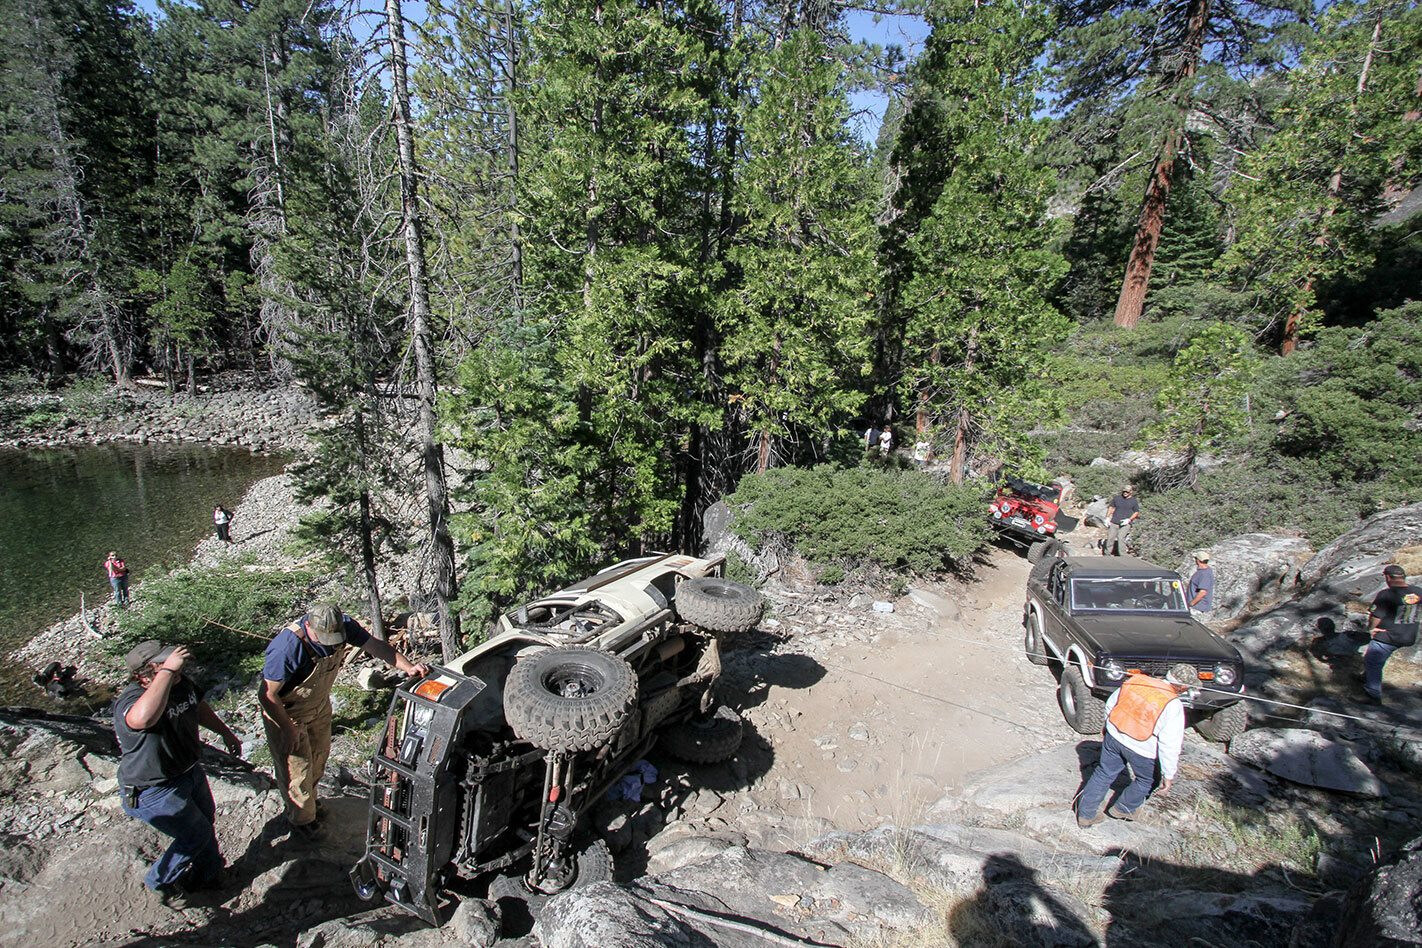
If we sat around a campfire spinning yarns about our early exploits into the backcountry, my guess is that the memories, regardless of the details, have been filtered into blissful adventures. They were most likely simple affairs with a full complement of necessities: a cooler of coldies, sleeping bags and camp chairs.
I recall the first trip in my ’82 Hilux. My buddy Rich Currie and I blazed out of town one afternoon, bent on exploring a place called South Fork. The route, a muddy three-mile trench, was a good distance from the pavement and we had the place to ourselves. All was good until I buried the truck to its frame and realised the cooler lid made a poor digging implement. We survived, but the takeaway was that I should pack a shovel next time.
During the next adventure, a friend became mired in axle-deep snow. I attempted to pull him out with an old rigging rope, which immediately broke. Another takeaway… I needed to buy a recovery strap. A year later, the radiator and fan of a friend’s Jeep did the tango. I watched as the “old guys” in my club resuscitated the radiator with needle-nose pliers and coarse-ground pepper. Yet more to add to my toolbox: pliers and pepper.
What do you carry in your 4×4 toolbox? Specifically, what tools, spare parts, recovery gear and specialty items do you carry that might help you (and your rig) get home alive.
Things to consider should be the age and condition of your vehicle, your mechanical skills and available storage space. At the end of the day, packing a vehicle’s suitcase is akin to sorting out personal items for a big trip. Lay out everything you think you’ll need, determine what will fit, prioritise, and cull the items at the bottom.
To simplify things, I’ve broken the process into several categories: recovery, tyre surgery, spares, standard and specialty tools, welding kit, fluids, and go-to backcountry gear. Don’t feel compelled to stuff everything on my list in your rig, simply use it as a guideline.
In Part 1 we will cover the basic essentials in the form of the Recovery Suitcase and Basic Backcountry Kit Suitcase.
Recovery Suitcase
When asked about the first modification someone should make to a vehicle, my answer is always to source a quality recovery kit. The basics should include a kinetic energy recovery rope (KERR) or snatch strap, two rated screw-pin bow shackles and gloves. If the vehicle is equipped with a winch, a winch line damper, pulley block, tree saver and additional bow shackles should be included. For advanced winching operations and remote travel, add a winch line extender (50-foot minimum), another pulley block, plus additional snatch and utility straps.
It is important that all components in a winching system have a working load rating (WLL) no less than twice that of the winch. I should clarify the difference between WLL and minimum breaking load (MBL). The stated WLL includes a safety factor that is usually 1/4 to 1/6 the MBL. For example, I have several Van Beest Green Pin shackles, which have a WLL of 4.75 tons and a safety factor of 6x (MBL of 28.5 tons). Think about this when reviewing the vehicle-to-vehicle recovery tip below.
Without getting into a long dissertation on safety, be certain that every component has the appropriate WLL and MBL for a given use and is in good condition. Personal experience has taught me that a system failure under load can be disastrous. Takeaway: a chain is only as strong as its weakest link.
Recovery Suitcase Must-Haves:
A comprehensive recovery kit should include a Hi-Lift jack and base, Pull-Pal, MaxTrax, recovery straps (2), tree protectors (2), 50-foot winch line extender, screw-pin bow shackles (5), pulley blocks (3), shovel, and gloves.
Chris’ Recovery Tips:
1 – Introducing a pulley block to a winching system can double WLL on some components.
2 – During a vehicle-to-vehicle snatch recovery, the kinetic energy developed by a 5000-pound vehicle moving at 15mph is 34,485 ft-lb.
3 – Evaluate WLL and MBL prior to purchasing recovery equipment.
Chris’ Recovery Suitcase Pack List: Statch straps (2) Tree protector Winch line extender Winch line damper/sail Pulley block (2) Bow shackles (4-6) Gloves (heavy-duty) Pull-Pal MaxTrax Shovel
Basic Backcountry Kit Suitcase
While most of the items listed here may seem obvious, I’m surprised at the number of people I meet on the tracks with only a cooler of drinks (me, 30 years ago).
I’ve heard people say Hi-Lift jacks are bulky and dangerous, rubber gloves are for wimps, and that they don’t need “all that other mumbo jumbo.” I agree that a Hi-Lift is heavy, can be dangerous if not used properly, and will pulverise anything in its path if stored improperly.
However, it is on my Top 10 list of must-have tools of the trade. It can be used to realign an axle housing or broken frame, as a press, wood splitter, to reposition the cab of a rolled vehicle, and yes, it can even lift a vehicle. Ratchet straps, bungee cords, and zip ties are three of the Seven Wonders of the trail. An axe, shovel, machete, and the rest are all commonsense basics.
Another handy addition is nitrile rubber gloves. They are a must when you need to drop greasy parts and want a clean hand to grab a sandwich. As for spare metal plating and hardware, they come in handy for patching up the aforementioned broken parts (these will save you from using expensive tools as filler material).
This list may be a bit intimidating, but I gathered much of it from hanging around old Jeepers driving Willys CJ-2As and CJ-5s (and they made it all fit). Takeaway: rubber gloves… so I’m a wimp!
Backcountry kit Essentials:
There are a host of items that should be carried in your vehicle. The list includes an axe, saw, sleeping bag, poncho, water filter or purifier, handheld UHF radio, medical kit, hot wood and lighter, trash bag, zip ties, bungee cords, ratchet straps, food rations, and a flask of your favourite spirits.
Chris’ Backcountry Kit Advice:
1 – Basic equipment should be in your vehicle at all times.
2 – Hi-Lift jacks, ratchet straps and bungee cords are amazing.
3 – Carry a selection of metal and hardware for major repairs.
Chris’ Backcountry Pack List: Hi-Lift jack and base Axe Shovel Saw Machete Bungee cords, ratchet straps, zip ties Rigging rope and paracord Collapsible bucket Jumper cables Fire extinguisher Tyre iron (4-way star type) Mac’s Tiedowns utility mat Safety glasses Nitrile rubber gloves Medical kit Flares Bug repellant Canteen, water filter or tablets Compass Extra food (three-day supply) Flask of spirits (your choice) Flashlight/headlamp (extra batteries) Sleeping bag for each occupant Fuel sticks (fat wood) Waterproof matches Knife and multi-tool Spare ignition key Sunscreen Toilet paper Biodegradable soap Baling wire Duct tape Ziploc bags Shop rags Hardware (various sizes) Metal flat bar, angle iron Tarp Poncho
Meandering down Pableup Drive on the western side of Fitzgerald River National Park, you can’t help but feel a buzz of excitement as your eyes follow the corrugated road into the distance, flanked by a sea of green in every direction.
This article was originally published in 4×4 Australia’s August 2011 issue.
While not exactly remote by normal standards, the area is sufficiently far away and rough enough to deter the grey nomads, backpacker vans and the general tourist trade, leaving you to appreciate the tranquillity of the surrounding landscape in relative isolation.
Fitzgerald River NP is roughly midway between Albany and Esperance on the south central coast of Western Australia. Beyond Western Australia’s trademark white sandy beaches and turquoise waters, the park is one of the largest and most botanically significant national parks in Australia.
Over 1800 plant species have been identified, 75 of which cannot be found elsewhere. More species of animals live in this park that any other reserve in south-western Australia. From June to November, southern right and humpback whales shelter close to shore with their newborn calves. September to November is the wildflower season, with hundreds of species coming to bloom. Add to that ocean beach access, good four-wheel drive tracks, and interesting bushwalks and it’s not a bad place to park the camper for a few days or more.
With its abundance of natural splendour, the park is recognised as a Biosphere Reserve, the only one in WA, where ongoing studies evaluate environmental change. Public interest groups such as the Friends of the Fitzgerald River National Park work with land-owners and government agencies to manage the area and minimise potential impacts.
The main points of entry into the park are from Hopetoun, Bremer Bay or off the South Coast Highway between Ravensthorpe and Jerramungup. The eastern side is more attractive offering a scenic drive, varied landscape and plentiful beaches.
It runs along Hamersley Drive, starting from the South Coast Highway, 41km west of Ravensthorpe, and winds its way to East Mt Barren where the eastern ranger is located. It affords excellent views into the heart of the park and access to a string of beaches including Four Mile, Barrens, East Mylies, Mylies and West Beach, which are also accessible from Hopetoun.
Back on the scenic drive, a four-wheel drive track junction at the 36km mark leads to Quoin Head and Hamersley Inlet camps. A few kilometres in, a track junction separates the two camps but they eventually rejoin as they parallel Whale Bone Beach. Another four-wheel drive track runs off Hamersley Drive heading north out of the park and into Ravensthorpe.
We ventured into the park from Jerramungup, on the western side, via the South Coast Highway and Quiss Road, which borders private property, before diving headlong into the park. An information hut with photos, brochures and general park information is located not far from the highway, providing a convenient location to reduce tyre pressures and scope out road conditions. Quiss Road leads onto Pableup Drive once inside the national park. It is well formed and reasonably wide, but littered with corrugations that deteriorate the further you move off the main thoroughfare. In addition, varying levels of fine surface gravel create an extra hazard to negotiate.
Large on-road vans and motorhomes are not permitted in the park due to the road conditions and the small campsites with limited space to manoeuvre. Any small off-road van with the footprint of a camper trailer would be okay. (As a guide, our 16ft Track Topaz was about the limit.)
It was a magical experience weaving along the dusty tracks without another vehicle in sight and being surrounded by vegetated plains extending to the distant mountains.
Trundling 24km into the park takes you to the four-wheel drive turn-off to the Twertup Mine Hut and Field Studies Centre. This area was damaged by the wildfires in January 2008 and vehicle access is not permitted. The Field Studies Centre is maintained by the Friends of the Fitzgerald River National Park, that assists in the upkeep and conservation of the park. The group has been working on the Twertup site, removing the old structure and readying the site for rebuilding. While some government funding has been received, significant funds are still required to restore the site. As such, the 4X4 track to Twertup remains closed, which is a pity, as the ravine country is the jewel of the western side of the park. The walks that kick off from Twertup can only be accessed by pedestrian traffic from the Pableup Drive track junction, adding 5km or so to the existing walks.
A further 20km takes you to the turn-off to Fitzgerald Inlet, near Point Charles. This track lives up to its 4X4-only status with plenty of lumps and bumps, rock steps and soft sand to provide an entertaining drive. The route carves across the bumpy coastal heathland tracks and through pretty woodlands, before tracing the perimeter of the inlet. The campsite is shrouded in tea tree that offers shelter from the wind and sun in the warmer months. The facilities are impressive for such a remote location; gas barbecues, picnic tables and a long-drop toilet. We found the clearances a little tight for the Patrol, with foliage screeching against the paintwork at a number of spots. The camp is best suited to tent-based accommodation or small camper trailers.
The track continues to the inlet through soft sand with a firm base. There are a few big roots over the track framing nasty holes which could make it a little tricky for low-clearance vehicles, but otherwise the track condition was okay. As you approach the inlet, the track is almost swallowed in a cocoon of tea tree. Our ARB rooftop tent copped a few touches on the way, as did the brush bars, pushing the leafy scrub aside as we gingerly edged through.
Like many of the inlets along the south coast of Western Australia, Fitzgerald is closed to the sea. Instead, a wide expanse of bare white sand stretches across where water once lapped. Our VMS navigation system warned of quicksand near the track’s exit so we didn’t explore too far from the edge. According to the ranger, it’s okay most of the time…
A few big dunes on the far side of the inlet mouth looked good for some dune surfing, but you would need surplus amounts of energy to walk there first, let alone climb the dunes countless times. The track weaves its way onto the beach, with fresh wheel tracks indicating an isolated fishing spot wasn’t too far away.
Retracing our steps, the return journey provided a number of vantage points to photograph the wide expanse of white sand in Fitzgerald Inlet or duck through the tree line and wander out for a closer inspection.
Back on Pableup Drive, another 4km south takes you to the track junction towards Point Ann and the St Mary Inlet campsite, 15km from the main road. The campground is a short distance from the inlet with tree cover providing protection from the sea breeze. Like Fitzgerald, St Mary Inlet is closed to the sea and is none too appealing; the skeleton-like rocks partly submerged in the diminishing water supply. Without the cleansing flush of the tidal surges, the water soon loses its vibrancy, increases the salinity of the water and leaves its inhabitants little option but to adapt or die.
The campsite features drop toilets, gas barbecues and a few picnic tables. Beach access is available from the camp with a boat launching facility at Point Ann for craft under 3m, but only for use outside the whale migration season. Point Ann has viewing platforms from which it’s easy to spot southern right and humpback whales or just enjoy the panoramic views. The Point Ann Heritage Trail (1.2km) provides an opportunity to discover a snippet of the area’s history, including remnants of the Rabbit Proof Fence, with information boards en route.
There are a number of other walks throughout the park that range from 1-4hrs and include; West Mt Barren (1-2hrs); Twertup Horrie Dorrie (1-2hrs); East Mt Barren (3hrs); West Beach Point (1hr). The Point Charles Beach Walk is for the fit, at 11km, but a number of shorter walks emanate from the Twertup site.
Beach access through soft sand from the campsite runs past St Mary Inlet and up to Point Charles. Beach fishing is popular with herring, salmon and sand whiting frequently succumbing to the temptation of tasty bait. Swimming is also popular, however as idyllic as the turquoise water appears, strong rips and undercurrents are often present, so take care.
There are a number of privately run accommodation options outside the southern perimeter of the park including Quaalup Homestead, the Gordon Inlet camping area and House Beach camping area. All are accessed by unsealed roads which can be closed after rain. These backroads lead into Bremer Bay, across the dry mouth of the inlet – yep, another one.
With so much on offer, a touring holiday along Western Australia’s south coast is hard to beat, particularly so the Fitzgerald River NP. With its natural beauty, remote wilderness location, rugged cliffs and diverse flora and fauna encounters it will long be remembered as one of our southern highlights of the West Australian coastline.
ADVISORY – DIEBACK
In addition to bushfires, dieback is a serious threat to the parks of Western Australia and the four-wheel tracks that carve through them. Dieback is a plant disease prevalent in the parks along the south coast. The climate favours the spread of the disease, thriving as it does in warm moist soil that can then be easily spread in minute debris that adheres to tyres or walkers’ footwear.
For that reason, it is imperative to clean footwear and vehicle tyres before entering these parks to prevent the spread of the disease. The Point Ann Heritage Trail includes a dieback footwear cleaning station for visitors to use before embarking on the route. Areas affected by dieback are often burnt as a cleansing exercise, which also closes any four-wheel drive tracks in the vicinity. With track closures on the rise, do your bit by obeying any cleaning instructions before entering the parks of the south coast or any areas affected by dieback.
TRAVEL PLANNER
WHERE Fitzgerald River National Park is located on the central south coast of Western Australia, between Bremer Bay and Hopetoun, 420km south-east of Perth.
CAMPING 4X4 access: Fitzgerald Inlet, Quoin Head. Conventional access: Four Mile Beach, Hamersley Inlet and St Mary Inlet. Long-drop toilets and gas barbecues at all sites. Some picnic tables. No fires or big vans. Generators permitted.
WHAT TO TAKE Insect repellent, drinking water, fishing gear, binoculars, standard recovery gear, compressor and tyre gauge.
SUPPLIES Bremer Bay, Ravensthorpe, Hopetoun and Jerramungup can supply fuel and other requirements.
TRIP STANDARD Easy to medium. The four-wheel drive tracks lead down to soft sandy beaches and require reduced tyre pressures.
MAPS & GUIDES Hema’s, Goldfields, Esperance & the Southern Coast of WA, 1:750,000.
CONTACT INFORMATION Department of Environment & Conservation (DEC) 08 9842 4500, website: dec.wa.gov.au. Rangers: East, 08 9838 3060; West, 08 9837 1022 – check for road and track closures. Friends of the Fitzgerald River National Park, website: fitzgeraldfriends.org.au/.
The 2018 Gear Guide has landed in stores, just in time for Christmas.
So it’s time to scratch the new pair of socks from the wish list and replace it with kit that’ll help you reach the Cape.
Not sure what to get? The 2018 Gear Guide has got you covered, with 30 of the best products that hit the shelves in 2018. We also answer whether it’s worth spending big bucks to customise your dual-cab, by lining a stock Ranger up against a highly modified unit.
Get your copy of 4X4 Australia’s Gear Guide from newsagents or via the Mag Shop.
We also take a closer look at bullbars by chatting to the industry experts, provide everything you need to know – the good, the bad and the downright dangerous – about off-road jacks, reveal the black art of ECU remapping, install a Redarc Tow Pro Elite in five easy steps, and lay five different solar panels under the sun to discover which one works best.
To help inspire your next (or debut) project, we’ve also included some of the best custom rigs of 2018 including a toy-hauling NP300 Navara, an LS3-powered Colorado, an insane 6×6 LC79 built by Patriot Campers, and a wild JKU Rubicon. Plus we kick up some dirt in Yamaha’s all-new Kodiak 450 quad.
A set of Australian made Lightforce Genesis and Narva Ultima 215 LEDs are put to the test, as is an ARB Frontier fuel tank! We also catch up with three big players on the Aussie aftermarket scene: Piranha Off Road, 4WD1 and Century Batteries.
Also in the 2018 Gear Guide we explain the importance of pre-trip preparation – and how to make it fun! We also debate what’s better: the new-age or the old-school fourbie, and what direction the industry is heading in.
Before you hit the tracks this summer, pick up a copy of the packed 2018 Gear Guide. It’ll make your Christmas shopping a lot easier… and way more fun!
Get your copy of 4X4 Australia’s Gear Guide from newsagents or via the Mag Shop.