
ARE these family-friendly dual-cab utes up to doing the work of a truck? Can they tow a 3500kg trailer or carry a 1000kg load in the tub?
We’ve corralled the Toyota Hilux, Holden Colorado, Ford Ranger, Mazda BT-50, Isuzu D-MAX and the Mitsubishi Triton to find out.
To do this we have lined up a trailer loaded with a site forklift and a pallet of bagged cement, weighing 3500kg in total. To cater for the lighter-rated Toyota Hilux (3200kg) and Mitsubishi Triton (3100kg) we have a second trailer carrying an excavator totalling 2800kg.
To test load-carrying we have a pallet of bagged cement weighing 800kg, which when added to the other payload elements (driver and passenger, etc.) brings the total payload close to 1000kg, effectively the maximum payload in the class, give and take a little.
In each case the 800kg pallet was loaded up against the front of the tub, not an easy task given the tailgates don’t drop right down on any of these mid- and up-spec utes. Before and after loading, the ride-height (at the axle line) was measured to see how far the rear of each ute dropped.
The tow and load tests were conducted separately. For the separate load and tow tests the vehicle was driven over a set course encompassing an uphill winding road followed by a downhill descent, again with lots of corners.
The course was covered at least twice for both load and the tow tests, so four or more runs for each vehicle.
See the video to learn how they went. Some did it better than others, while some results were eye-opening.
IMAGES reportedly leaked from a Jeep dealer meeting in the USA have revealed what the front and back styling of the upcoming 2018 JL Wrangler and 2019 Grand Wagoneer models will look like.
As expected, the new models retain the traditional seven-slot grille and other hallmark Jeep attributes.
The JL Wrangler is expected to be seen in full some time in 2017 as a 2018 model and, to keep its unrivalled off-road ability, it will retain all the attributes that matter including a dual-range transfer case, body-on-frame chassis and live-locking axles front and rear.
New for the Wrangler range will be a four-cylinder turbocharged petrol engine, as well as the traditional petrol V6 and a V6 diesel engine from VM Motori. An eight-speed automatic transmission is also slated for inclusion.
Body styles will include the familiar two- and four-door, soft/hard- top variants, as well as a new ute that is expected to be a double-cab model.
The Grand Wagoneer recalls a name plate from the past and applies it to what is expected to be a range-topping seven-seat wagon based on the Grand Cherokee platform. Jeep bossman Mike Manley has said in the past that the Grand Wagoneer will be a luxury SUV that will rival the likes of Ranger Rover and will have corresponding levels of luxury and equipment, as well as a matching price tag.
Expect that to be around $200,000 if the Grand Wagoneer is produced in right-hand-drive and makes it to Australia. Would Australians ever pay Range Rover money for a Jeep?
The current Grand Cherokee is built on a platform that it shares with the Mercedes-Benz GLE (formally ML-class). Benz’s GLS (GL-Class) is built on a stretched version of that platform. A Grand Wagoner would ride on a stretched Grand Cherokee in the same way the Mercedes-Benz siblings do. Whether that is on the current platform or an all new one is yet to be revealed.
THE proliferation of new 4×4 vehicles that were launched during 2015 has kept the four-wheel drive accessories manufacturers busy in the months since.
There were half a dozen all-new models launched to market last year, and then there were countless model updates and facelifts to keep the engineers, designers and factory workers flat-knacker getting the products out there to feed the buyers.
Ironman 4×4 didn’t hold back, and at one point late in 2015 we spotted 10 brand new, mainly black, new vehicles at its Melbourne headquarters. They were being 3D scanned, pulled apart and crawled over in preparation for new bullbars, side steps, brush bars, snorkels, storage systems and all the other gear we love to fit to our rigs.
This represented more than $500,000 in vehicles alone and, once you factor in the development and engineering to get the product made, you can more than double that figure again.
Fast forward to 2016 and Ironman has its fleet of kitted-up 4x4s on the road and the products are all available to enthusiasts, yet the work never stops. There are still new and refreshed models to have products developed for them, and the existing gear has to be marketed.
Part of developing and selling 4×4 accessories means marketing them, and when the team at Ironman invited us on the trip to the Flinders Ranges to sample some of the new gear while they photographed and filmed them for marketing use, we couldn’t resist the chance to escape the office.
With a first-class crew on board we drove some of the spectacular Flinders gorges, trekked out to the edge of Lake Frome, and spent a day touring around the stunning Skytrek at Willow Springs. Keep an eye on a future issue of 4X4 Australia magazine for the full story, but check out this video for a sample of the amazing adventure.
OUR drive of the Murchison Products Overland JK pick-up (see November issue) took place during a weekend drive event put on by Stuart Murchison and his team.
The event was held at Swan Gully 4×4 Park, west of the Gold Coast. With eight well-modified customer Jeeps tagging along, plus a few of the shop’s own special vehicles, it was a great weekend to showcase the work done at MP and spend time with the customers doing what they love doing: driving Jeeps off-road.
Also in attendance for the weekend was global sales manager of American Expedition Vehicles (AEV) Chris Wood, in Australia to catch up with our two AEV distributors – Murchison being one.
Australia is one of the biggest markets for the Jeep Wrangler outside of North America – and we love to modify our Jeeps – so this makes us an important market for AEV. Chris uses any chance he can to head down here to see what’s happening and where the market is heading. Of particular interest on this visit was the growing popularity of full-size US pick-up trucks, as well as the growth of the RAM brand.
Notable vehicles in attendance included the silver TJ ‘Stockman’, which was Murchison’s take on the Aussie farm truck and is now owned by a customer.
Stuart’s black TJ Brute really lives up to that name. It rolls on massive 40-inch Treps and is set-up for crawling or hardcore touring. With a permit to drive it on-road for this event the black Brute made a scene driving down the highway to Swan Gully, and it took no prisoners on the most challenging of the tracks there.
The only non-Jeep on the trip was the RAM 2500, which was supplied by SCD American Vehicles in Brisbane. It is SCD’s demo truck, but the crew at MP waved the AEV wand over it and fitted a front bar, three-inch dual-sport suspension and Katla alloy wheels. AEV does a full range of products to suit the RAM, all available through Murchison Products.
After an early rendezvous at Murchison’s shop, the drive that Stuart and the crew set had us heading southwest of Brisbane to Boonah, in the Scenic Rim region – we followed the Cambanoora Gorge track south along the Condamine River to the New South Wales border.
This track is marked as 4WD only as it has a steep climb up the range, and once down on the Condamine it has 14 river crossings that vary in depth depending on recent rainfall.
From the southernmost point we headed back north along the spectacular Falls Drive to Boonah, before traversing in to Swan Gully. The Cambanoora Gorge and Falls Drive circuit is a great little 4×4 day trip within easy reach of Brisbane and is suitable for soft roaders if the river levels are low.
Swan Gully Park on the other hand is steep, gnarly and best-suited to well-modified 4x4s with experienced drivers – just what we had lined up here. With our late afternoon arrival some chose to hit the tracks as soon as camp was set up, while we sneaked off with the pick-up to shoot the feature photos.
The only vehicle left in camp on Sunday was the RAM, as its sheer size would have restricted it on the tight tracks. But the AEV-equipped Jeeps tackled them with relative ease, often ‘spotted’ by Stu on some especially difficult sections. There was one in particular that was the cause of some butt-clenching, as the JK crabbed into a rut on a very steep descent.
Murchison Products runs customer trips like this a few times a year as a way to build closer relationships with its customers. The trips would have to be good for business too, as drivers come away wanting more equipment for their Jeeps. Anything broken or damaged on the tracks will also find its way into the MP workshop for repairs the following week. There are also plans in place for a RAM-only trip with SCD in the future, too.
There was no such damage to any Jeeps on this trip, and it was enjoyed by all – a win-win situation for everyone.
A solar still provides a means to distil water using the heat of the sun. It works by extracting and purifying any available moisture.
Erecting a solar still can be a valuable survival technique if you’re stranded in the bush.
To get the job done, you’ll need a container and a sheet of plastic large enough to cover the hole you’re about to dig.
1. Dig a hole about half a metre deep and one metre wide. If the ground’s rock hard, search for an existing hole or hollow that’s in full sunlight. Place container in the centre of the hole.
2. Pack green leaves around the edge of the bowl then pour any available fluids over it.
3. Cover the hole completely with plastic and pile soil and rocks right around the edge of the plastic to totally seal up the hole.
4. Position a small stone directly above the container, so that the plastic dips in the centre.
The leaves will sweat out any fluid in them as the temperature increases. The water will then turn to steam and evaporate towards the plastic, leaving anything that is not pure water on the bottom. Condensation reforms the steam back into water droplets which will then drip down the angled plastic near the rock and into the container.
TOP TIP: You can use this method to desalinate a few litres of seawater when stranded at the beach.
For more survival tips when out in the bush, read the Australian bush survival guide.
THE decision of whether to take your dog with you or leave him at home needn’t overshadow the excitement of your forthcoming trip. With more information available than ever before, making the right choice for you and your furry friend has never been easier.
This article was originally published in the January 2014 issue of 4×4 Australia.
PAWS FOR THOUGHT
Your more familiar with your dog than anyone else so you know how suited he is to long-distance travel. Can he handle extended periods on the road? Or, will leaving your best mate behind ruin your holiday? We are all different — some people see time away from their pet as no big deal, for others even the prospect alone might be too upsetting.
Consider the sacrifices you will make in order to have your pet with you while travelling. Do you mind not being able to stay in certain campsites or caravan parks due to pet regulations? Will missing out on certain beaches or national parks ruin your trip? But there are also great benefits to taking your furry companions along for the adventure.
According to seasoned interstate traveller Susan McDonald, holidaying with her dog, Rip, never held her back and in fact it added to the fun of the experience.
“People often stopped and admired him,” she said. “We’d talk about good and bad places to stay with a pet. People tell you the parks to avoid.
“After a while, the staff would realise my dog was well trained and would sometimes even let me leave him at the park unattended. It was a case-by-case scenario.”
With careful planning, travelling with your dog needn’t restrict your holiday. If you want to visit a national park which doesn’t permit pets, drop your dog off at a kennel en route for a few days – this way you can visit great Australian attractions without leaving your best mate behind for an extended period.
Some parks offer pet-minding, which can differ slightly in service; Queensland’s Bedrock Village Caravan Park provides this service for guests who want to visit local sights. “We do daily tours into the Undara Volcanic National Park where pets are prohibited, so we are happy to look after them while our customers are on tour,” co-owner Jo Lockyer said. “There is no cost involved in looking after pets; we just ask for a donation for our Royal Flying Doctor tin.”
Once you give the above factors careful consideration, you will be better prepared to make the right decision. However, the first essential step in every good trip is good planning.
TRIP PREPARATION FOR PETS
Being on the road for long periods of time can be a drag for everyone, including dogs. So how can you make it more enjoyable for all involved?
Take regular breaks to let your dog relieve himself and stretch his legs.
If your pet uses something regularly at home, they will use it on the road too, so have a checklist of all the things they will require while away, including bedding, bowls, food, toys, leash, water and poo bags.
If you have a cat, chances are you will have thought twice about taking it on the road, otherwise you run the risk of them going walkabout. Cat owners should be mindful of their skittish feline friends and always err on the side of caution. If you take your cat, perhaps buy Feliway pheromone spray, which is claimed to help alleviate stress in felines and may be useful in transit. The spray “is a synthetic copy of the feline facial pheromone, used by cats to mark their territory as safe and secure”, according to the company’s website.
A well-made harness secured with identification, ensuring doors and windows are always shut tight and parking your 4X4 away from dogs are simple ways to avoid upsetting scenarios.
Again, you know your pet best and should question how suited they are to this kind of upheaval.
CARAVAN PARKS AND CAMPSITES
Don’t be put off by the formalities required by some caravan parks or campsites. Many establishments ask pet owners to sign an agreement and in some cases provide a refundable deposit as a condition of stay, but in most cases this is nothing more than a safeguard.
Secondly, you will almost definitely see the words ‘Pets on Application’ but don’t be alarmed — it is a standard phrase which gives the management the right of refusal. Another thing you may be required to show are vaccination certificates, so it is a good idea to bring copies to avoid being refused on arrival.
Despite the rules and regulations, many Aussie tourist parks genuinely welcome your pet. Parks such as The Best Friend Holiday Retreat in south-east Gippsland, Vic, are specially designed with dogs in mind and offer pet-minding as well as purpose-built doggie facilities.
DON’T BE CAUGHT OFF LEASH
Choosing a beach to take the dog to in Australia is no mean feat. Research where you can officially go to avoid copping a fine. Most beaches and parks remain dog-friendly throughout the year, but it is not uncommon to come across timeshare beaches or places where pets are only permitted out of peak times.
Contact the council or check beach or park signage on arrival for up-to-date information. Some states are more strict than others, so don’t assume rules are the same in all places. The Doggo website offers current information on places to take your dog.
SIT, STAY
You’ve weighed the pros and cons of taking your best mate with you and have decided leaving him behind is best. So, now what? Leave him with a friend or relative, employ a pet sitter or use a boarding kennel?
Obviously, the most ideal situation would be for Bonzo to stay at home with a reliable family member. It’s free, your pet is comfortable at home and you have peace of mind.
If you’re not lucky enough to have friends or relatives who could look after your pet, other possibilities exist. You could employ a pet sitter, some of which offer services that are affordable or even free. Based in Sydney, Esther’s Pet Minding Team offers a unique service in return for accommodation. Generally, there are two types of pet sitters: those who do day visits and those who stay in your house. Remember, the double benefit of having a pet sitter stay at your place is they will water your plants and be there to fend off robbers.
KENNELS AND CATTERIES
If taking your pet with you isn’t for you, find a kennel or cattery with a good reputation. Ask your vet – they’re a safe place to start. To minimise your pet’s fretting, you should leave familiar toys and blankets with them.
With more resources than ever to assist you and more caravan parks welcoming pets, the days of being forced to leave your pet at home while you go on holiday are now thankfully a thing of the past. The most important things to remember are: be well prepared, have fun and always park in the shade.
PET-FRIENDLY TRAVEL CHECKLIST
- Treat against ticks and fleas
- Feed at least two hours before travelling — don’t leave with a full tummy!
- Go for a walk before you set off
- Pack tick wash
- Pack wet wipes and tissues for sickness mishaps
- Pack plenty of poo bags
- Pack fresh drinking water and a non-spill bowl
- Pack plenty of your pet’s favourite food
- Pack your pet’s bedding
- Pack an extra leash
- Pack a copy of vaccination certificates
- Take regular toilet breaks
- Keep your pets leashed when you stop in unfamiliar places
- Make sure your pet is microchipped or has an ID collar (ideally both)
- Pets should be restrained in vehicles — don’t drive with a pet on your lap!
- Don’t leave your pets in the car unattended (especially in hot weather)
- Invest in a good car harness or cat carrier
- For cats, invest in some Feliway spray
Useful Links
PARKS WITH PET-SITTING SERVICES
ARMIDALE TOURIST PARK (NSW)
There is an enclosed dog kennel where guests are able to leave their pets. Guests have to provide food and water and are able to lock the gate and keep the key. This is a free service.
TOORAWEENAH CARAVAN PARK (NSW)
Pet sitting is available for a small fee.
ARNO BAY CARAVAN PARK (SA)
Pet sitting is available for $10 a day.
WINDSOR GARDENS CARAVAN PARK (SA)
Has a vet clinic that offers doggy daycare nearby.
BEDROCK VILLAGE TOURIST PARK (QLD)
Pet-sitting available for customers on tours. There is no cost involved in looking after pets — just a donation for the Royal Flying Doctor tin.
FLAMETREE TOURIST PARK (QLD)
Will check on guests’ pets and take them for a walk when they do a tour booked through the park.
SEABREEZE CARAVAN PARK (QLD)
A couple of ladies will pop in for a short time to pet sit; they charge anything between $20 to $30. This is good for appointments but not suitable if you are going on a day trip. Otherwise guests can use Whitsunday Boarding Kennel for longer periods.
BROOME’S GATEWAY CARAVAN PARK (WA)
There are two fenced kennels that have individual runs. Will feed and water, and walk if guests are on overnight tours. Pet minding negotiable with the caretaker.
BEST FRIEND HOLIDAY RETREAT (VIC)
This resort has luxury day-use kennels where guests’ dogs have their own little room with TV, DVD, heater and armchair with access to their own grassed area. There is a fee of $25 for up to three hours or $50 per kennel per day.
SUNNYSIDE CARAVAN PARK (VIC)
Offers pet-minding during office hours. The first two hours are free, then $5 per hour after that.
Tuna patties are an old family favourite and are a great standby when camping. But here is a recipe for fish patties with a difference using canned salmon and couscous. My carnivore of a husband enjoyed these – even after he said I should pour the couscous out of the packet, throw away the grains and eat the cardboard!
Ingredients
(Serves four to six people)
- 415g canned salmon – drained with bones removed
- 1/2 cup couscous
- 2/3 cup orange juice
- 2 eggs – beaten
- 2 cloves garlic – crushed (or use ready-made minced garlic)
- 1 tsp Moroccan spice mix (or more, depending on how much flavor you want)
- 1 tsp chilli paste – optional (or you could use some fresh red chilli, finely chopped)
- 1 tbs fresh parsley and/or mint – finely chopped
- Salt, pepper to taste
- Breadcrumbs or plain flour
- Oil
METHOD
- Prepare the couscous by placing it in a large bowl and add the orange juice. Leave for about five minutes until the liquid is absorbed (if you don’t have any orange juice, you
- can just use water or stock, but orange juice gives the couscous a lovely flavour).
- When the couscous is ready, add the salmon along with the remaining ingredients and mix well to combine.
- Form the mixture into patties. Cover and refrigerate for about 30 minutes or until they are firm. If you do this, the patties will hold their shape while cooking and not fall apart.
- Before cooking, coat the patties in a thin layer of breadcrumbs or plain flour.
- Heat a little oil in a large frying pan or BBQ plate (preferably non-stick if you’ve got it) over a medium heat. Don’t have the heat too hot or you’ll burn the patties. Fry the patties
- for about three to four minutes each side, or until golden brown, turning once.
- Serve with some sweet chilli mayonnaise (just mix mayo with some sweet chilli sauce to taste). They are even great cold in a sandwich.
VIV’S HINT
You could change the flavour and add some Thai or Middle Eastern spices. You could even add some finely grated carrot or maybe a little finely grated lemon rind. If you can get flavoured couscous, even better. It all adds flavor to the patties.
Many of us feel reasonably confident and competent with pure mechanical stuff, but electricity seems more slippery.
When you can’t hit it with a hammer or even see what’s what, it can start to feel frustrating, but don’t panic. Here are some tips, tricks and techniques learnt from years out on the tracks that might get you out of strife.
As with mechanical repairs, there are two sides to the coin – finding the problem and fixing it. Follow along as we spill the beans on the basics of 12V fault-finding and a few bush fixes to get you back in the game. Sometimes, the best way to avoid electrical problems out on the track is to keep your 12V set-up and accessories simple.
KEEP IS SIMPLE SILLY
The Troopy is running a pretty basic battery set-up. There’s one 800CCA cranking battery to power up the mighty 12HT diesel donk, and one deep-cycle battery with a simple isolator solenoid to manage the charging side of things. There’s also an ArkPak as a back-up battery.
Now for the fun stuff – all the accessories such as my CD/radio, interior lights, plus all the aftermarket gear now runs directly from my auxiliary battery, that way I won’t flatten my starting battery accidently – again!
I’ve wired the spot lights to run on a completely different circuit than the headlights. That way, if one lighting circuit fails, I can simply flick the other switch and light the place up in an instant. I’ve also got two separate circuits for the 60L Evakool fridge – one circuit runs off the auxiliary battery and the other runs off the ArkPak, so if I have a fridge wiring problem the beer doesn’t get warm!
I learnt years ago that you can’t have enough 12V auxiliary sockets in your 4WD, so I installed a multi-outlet 12V power panel from Bainbridge Technologies to the roof console. Each circuit is individually switched and runs directly to the battery, so you can charge all your electrical accessories without having the ignition on. Plus, there’s a volt meter so you can keep an eye on the battery’s voltage level.
Oh, and years back my winch somehow activated itself during the middle of the night and twisted up my whole bullbar like a giant Curly Wurly. Would you believe I actually heard the winch going but figured I was just dreaming about 4WDing again? It’s safe to say I’ve got an isolator switch in there now.
DOWN TO EARTH
When it comes to off-road vehicles, the most common cause of circuit failure is a bad earth, and you’ll find the main reason for this is dirty or corroded connections, resulting in poor contact. A bad earth can amplify the resistance in the circuit which, as you might have guessed, increases the current draw and eventually leads to it exceeding the rated amperage of the wiring and components. This is why fuses are absolutely vital for any 12V project.
BASIC FAULT FINDING TECHNIQUES
Let’s say the fridge or your 12V lighting has stopped working:
1. The first step would be to check that the fuse isn’t blown by ensuring there’s power at both contacts while the circuit is activated.
2. If the fuse is okay, use a multimeter at the exposed positive wire closest to the accessory to make sure it’s receiving 12V. If the accessory is still not working, despite a 12V reading, you know there’s a problem with the accessory itself.
3. If there’s no power at all, check the wiring for damage between the accessory and the fuse.
4. If there’s a relay in the circuit, check it’s working correctly by ensuring it has got 12V power at pin 87 (output) with the accessory turned on.
5. If there’s no power, check the relay has constant power to pin 30, signal power to pin 85 and ground at pin 86. If all of this is present and there’s still no power to pin 87, the relay is busted.
COMMON PROBLEMS AND EASY FIXES
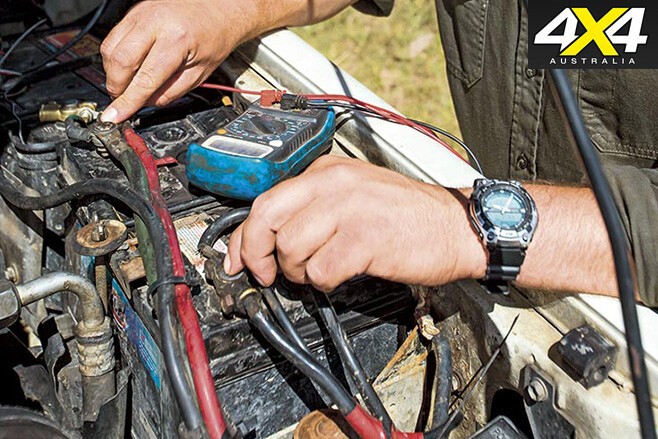
ALTERNATOR LIGHT ACTIVATED Grab a multimeter and check the voltage at the alternator’s battery positive terminal is between 13.5V-14.5V with the engine running. If it’s not charging, for us 4WDers, it’s usually due to mud getting in and clogging the internal brushes of the alternator, so give it a thorough wash with clean water and see if it kicks back into life.
The bush fix If your alternator is completely stuffed, it’s time to turn all of your accessories off so your battery keeps your engine running for longer. Remember, most camper trailers have batteries these days so you can swap it with your 4WD battery to get back on the road and, if you’ve got solar panels, it’s time to get them out.
If you’ve got a 12V drill, there’s even a possibility of attaching it to your alternator pulley with the belt off and winding it over that way. You never know, it might charge the battery just enough to kick the engine over.
Some late-model engine management systems will cut the power if the voltage is too low (less than 12V). There are all sorts of solutions – some we recommend and some not so much. In fact, people have even been known to strap the generator to the roof and charge the battery via their camper’s battery charger while they drive.
TRAILER LIGHTS AREN’T WORKING Before you start pulling things apart, sometimes spraying the auxiliary plug terminals with WD-40 is all you’ll need to do.
Check for damage to the wiring and the auxiliary plug, as it’s prone to bottoming out. If there’s no physical damage, you’ll have to check each circuit is working at the plug by activating each output individually and checking for power. Then ensure there’s power at the lamps, and pay particular attention to the condition of the earth strap/points.
The bush fix If the auxiliary plug is damaged beyond repair, you can bypass it by attaching the corresponding wires together using scotch locks, spade terminals or, worst case, by simply twisting the wires together and wrapping them with electrical tape.
BATTERY TERMINAL REPAIRS Loose or corroded battery terminals are the leading causes of electrical problems out in the scrub. They can be responsible for things like the engine not starting, warning lights flickering on and off, and they can even cause fires.
The bush fix You can clean off corrosion by pouring boiling water over it. For loose battery terminals, you’ll need to shim the gap between the battery terminal and the clamp to get you out of trouble. One great little trick is to cut up an old Coke can and wrap it around the terminal before fitting the clamp back on. You could even wedge a self-tapping screw between the two.
STARTER-MOTOR DRAMAS A stuffed starter motor is bad news out on the tracks. Sure, you can usually clutch start a manual vehicle, but what if it’s an automatic? The first step is to diagnose what the problem is. For example, if the starter clicks when you try to start it, it’s usually either the battery is low, or the solenoid is sticking. If there’s no noise at all, you could have a wiring problem to the starter motor itself (wiring harness).
The bush fix If the starter motor is clicking, the solenoid is likely to be stuck. Try tapping the solenoid with a metal rod (preferably with a soft end) while your mate tries starting the vehicle. Another common problem is that the starter motor has got too hot, so let it cool down and try again a bit later.
If you’ve got no power to the starter motor and you can’t find the problem, you can use a set of jumper leads to bypass the original wiring by running the cable from the battery’s positive to the large positive terminal on the starter motor solenoid. Then, with the vehicle in neutral, use a wire or screwdriver blade to jump power from the solenoid’s main positive terminal to the smaller ignition positive terminal to actuate the solenoid until the vehicle starts. This is a last resort and should be avoided when possible, especially on modern vehicles.
12V BUSH MECHANIC ESSENTIALS
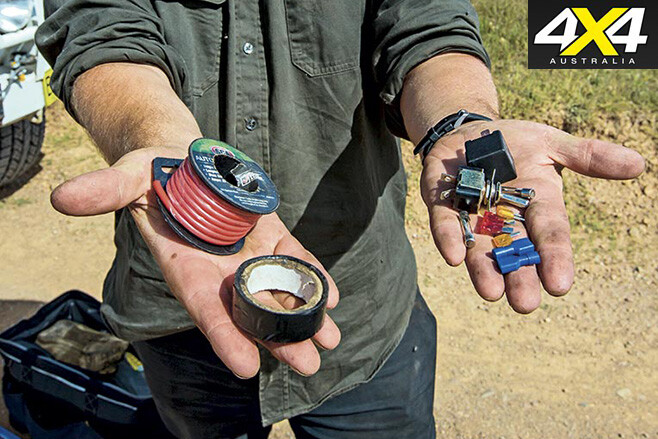
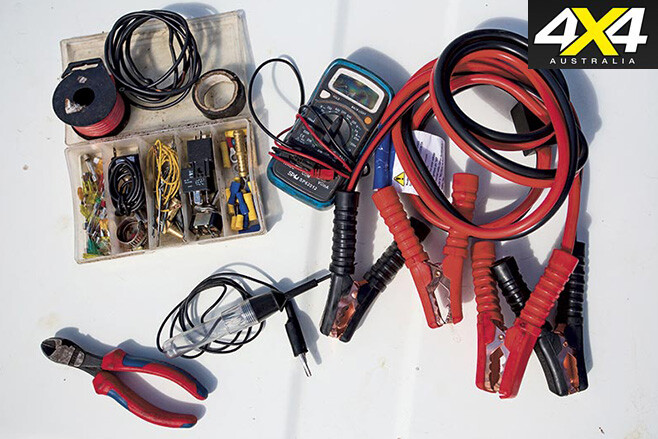
• Electrical cable • Jumper leads • Terminal kit • Spare fuses • Electrical tape (non-conductive, unlike other tapes) • Test light • Multimeter • Spare on/off switches • Spare relays • Crimper pliers • Test cables (length of cable with an alligator clip on each end) • Scan tool
WRAPPING IT UP
Well, there you go, electrical dramas on the tracks don’t always mean you’re going to be stranded. Believe it or not, with a bit of knowledge and creative ingenuity, there are few situations from which you can’t escape. In saying that, it pays to learn those little details about your set-up, carry enough practical spare parts and make friends with the towie in the closest town!
NEED A MAKESHIFT TEST LIGHT?
You can make a test light for trackside diagnosis with one 12V globe, two wires and some electrical tape. Simply tape one electrical wire to the terminal on the bottom of the globe housing, and tape the other to the side of the housing and Bob’s your uncle, you’ve got a test light. If it’s an electrical problem that’s stopping you and you need to diagnose it, everything else become secondary, so pop a globe from your vehicle’s rear lights if you need to, get the beast up and running and then worry about any recovery operations.
When heading out bush, their are some items you can not afford to leave at home. Here are five things I always remember to bring:
This article was originally published in the June 2014 issue of 4×4 Australia.
1. BLADES I don’t go anywhere without my Leatherman Wave or Swiss Army knife. The Wave is my favourite bush tool, but in the city I prefer the Swiss Army knife. I also carry a good fixed bladed knife when I’m heading scrub – a Schrade, Uncle Henry Golden Spike, to give it its full moniker, with super hard 5-inch 153UH steel blade. This has copped alot of abuse over the many years I’ve had it, and it still works like new.
2. STOVE We’ve been cooking with gas for more years than I can remember and we’ve been using Coleman stoves for much of that time. We currently have a 3-burner unit and, like all their gas stoves, it can run off a small bottle of Coleman LPG – or with a connector hose from a normal refillable LPG cylinder. Why these units? Their ability to heat in windy conditions and the amount of control over the flame make these Coleman stoves a winner.
3. FIRST AID KIT While hopefully it’ll never be used to keep Viv, our friends, or myself alive, I always carry a first aid kit just in case. Who knows when someone will be in need of first aid. Doing a lot of miles on outback roads we’ve come across the odd road accident or two and a few sterile bandages, clips and safety pins, along with antiseptic and other similar items, really comes in handy. It may never be used, but always pack one.
4. CAR FRIDGE Most of the time there is an Engel 40-litre unit in any vehicle we have out on the road, although Viv now prefers the National Luna 55-litre fridge with a 10-litre freezer box. Still, I reckon you can’t beat the Engel for reliability. But, the National Luna is very flexible in its use and the freezer box is very handy. Although the National Luna units are expensive to buy and are a little heavier on power because of the freezer box.
5. SWAG Of all the swags I’ve used, my Southern Cross single dome swag is the one I always take when travelling on my own or heading out on a road test with the crew at 4X4. I’ve done away with the normal mattress and set it up with a self inflating mattress, but more recently I’ve taken to carrying a stretcher to help ease the aching bones. It’s had a lot of use over the years and being Aussie made with Aussie canvas, you can’t beat it.
FAVOURITE 4X4 LOCATION
This is a hard question. I guess if you go by the number of visits to any particular area we have done, then you’d have to say Cape York, the wild west coast of South Australia, or the Flinders Ranges – I was bumming around the Flinders and the west coast way before I got a 4WD, chasing bunny rabbits and spearing fish. Since 1980, Cape York has been attracting us for the challenges it offers, the variety of country, the fishing and hunting and the fabulous camping spots. In a country with many exceptional places, Cape York has to be high on the list of places to visit!
Being stuck on the side of the road with a broken 4WD or camper trailer is the last thing any traveller wants in the middle of nowhere.
Plus, there’s always that real element of worry when you’re trying to figure out what you’re going to do next, not to mention knowing your pride and joy has just let you down. The truth is, mechanical failures are just as much a part of exploring the bush as golden sunsets and toasty warm campfires, so it makes sense to arm yourself with a bit of knowledge to help get you back on track. In most cases, if you can work out a way to limp your set-up to the closest town, you can arrange for more permanent repairs to be carried out.
The immediate problem is getting a busted camper trailer moving again with limited tools and even worse resources at hand.
To help improve the odds of getting your set-up back on the track, here’s a few proven trackside fixer-uppers, ideas and techniques that could save your camper from becoming a permanent ornament in the middle of no-man’s land.
THE BUSTED BEARING SLED
If the entire rotating assembly is immobilised (seized wheel bearing or massive brake assembly failure), your only option may be to build a sled.
The idea is to eliminate the need for the wheel to spin by building a sled and skull-dragging it without damaging the camper any further. V-shaped logs and old car panels make the perfect sled, and a drag chain attached to the front of the camper will stop the sled from sliding behind the wheel.
It’s vital you remember to tie the wheel itself to the sled, too, as this will stop the sled sliding out to the side.
BUSHY’S BEARINGS
If your wheel bearing has seized and you don’t have a spare, one dead-set last-resort way to keep the wheels turning (slowly) is the old oily rag trick. The main purpose of a wheel bearing is to allow the hub assembly to rotate around the stub axle freely without it actually touching, causing friction and damaging the components.
With that in mind, soaking a few rags in some old engine oil and jamming them between the hub and stub axle can create a bit of a buffered area for the components to stop them rubbing on one another, while allowing them to freely spin. You’ll be limited to crawling speeds and the wheel will still have a fair bit of a wobble, but if there’s no other choice you do what you’ve got to do.
MAKESHIFT BEARING CAP
It’s pretty common for bearing dust caps to fall off. The problem is, it then doesn’t take long for dust and water to destroy the bearings once they enter the hub assembly. A quick and easy technique to make a dust cap is to cut an old plastic drink bottle in half and secure it with a hose clamp. Cutting a small slit up the side allows you to adjust the size to suit the hub. The same can be done with aluminium cans and a few cable ties, if push comes to shove.
DAMAGED AUXILIARY PLUG
A smashed up auxiliary plug is a fairly common occurrence on a camper these days. If you’ve still got a few kays of on-road driving to go, you can simply bypass the plugs altogether.
Start by releasing the wires from the terminals from both the trailer’s plug and the vehicle’s plug. Strip the wires back and re-attach them to the corresponding coloured wires by either using crimp terminals, scotch locks or by simply twisting the wires together. Remember to tape each individual wire to avoid short circuits.
WORN SHOCK ABSORBER BUSHES
All of those corrugations and wash-outs can play absolute havoc on your shock absorbers’ bushes.
Admittedly, if you completely wear out a shock absorber bush on your leaf-sprung trailer, in most cases you could remove the shock completely to avoid further damage.
However, for coil-sprung suspension, especially on your 4WD, the spring relies on the shock absorber to control and limit its bounce (up or down travel). So if you removed the shock absorber, you would then have to install some type of limiting strap in its place.
The other option is to shim up the free-play between the shock and mount using some leftover rubber. Those tired, old rubber floor mats are perfect; simply cut them up and punch a hole through the middle. The aim is to take up the slack to minimise free-play.
BENT AXLE REPAIRS
If you’ve packed a bit too much weight into your trailer and then headed off on bumpy tracks, you could end up causing a slight bend in the axle. This tends to invert the wheels – often the first sign of trouble you’ll notice.
In more extreme cases the axle can crack and the entire weight of the camper basically buckles the wheels, rendering the camper un-towable.
CREATIVE PANEL BEATING
This is a serious breakage, but the fix is relatively simple. The key is to strengthen the axle by adding some support. An old sleeper or a fencing star picket or two are perfect for the job. Simply jack the axle up so it’s sitting as straight as possible, wire it up tight with some fencing wire and Bob’s your uncle.
SEALING UP HOLES
A leaking fuel or water tank is bad news in anybody’s book, but there are some simple and easy ways to patch up a hole. For larger punctures, it’s best to plug the hole first by cramming it with something flexible yet solid, so there’s less gap to fill and seal. One of the best materials to use is leather – an old dog collar or lead does the trick nicely as the leather will swell as it gets soaked, which helps to fill any gaps. If you’ve got a bit of silicon sealant, you can smear it over the plug to help seal up any remaining leaks.
PINHOLE PUNCTURES
For smaller pinhole type punctures, a self tapper screw could be the saviour. Ideally, the screw’s thread should be slightly larger than the puncture so it can cut its own thread and seal up fairly tightly. A little trick is to wrap a layer of plumbers tape around the thread to help seal it up a bit better. In fact, any tape should help seal the little gaps between the threads. If possible, fit a washer on as well – the larger the washer’s surface area, the larger the sealed area will be.