RRP: $830 (each)
WEBSITE: www.lazerlamps.com.au
WE SAY: A robust, well-made light with a pleasant, long reaching and wide beam. Quite possibly the best lights I’ve driven behind.
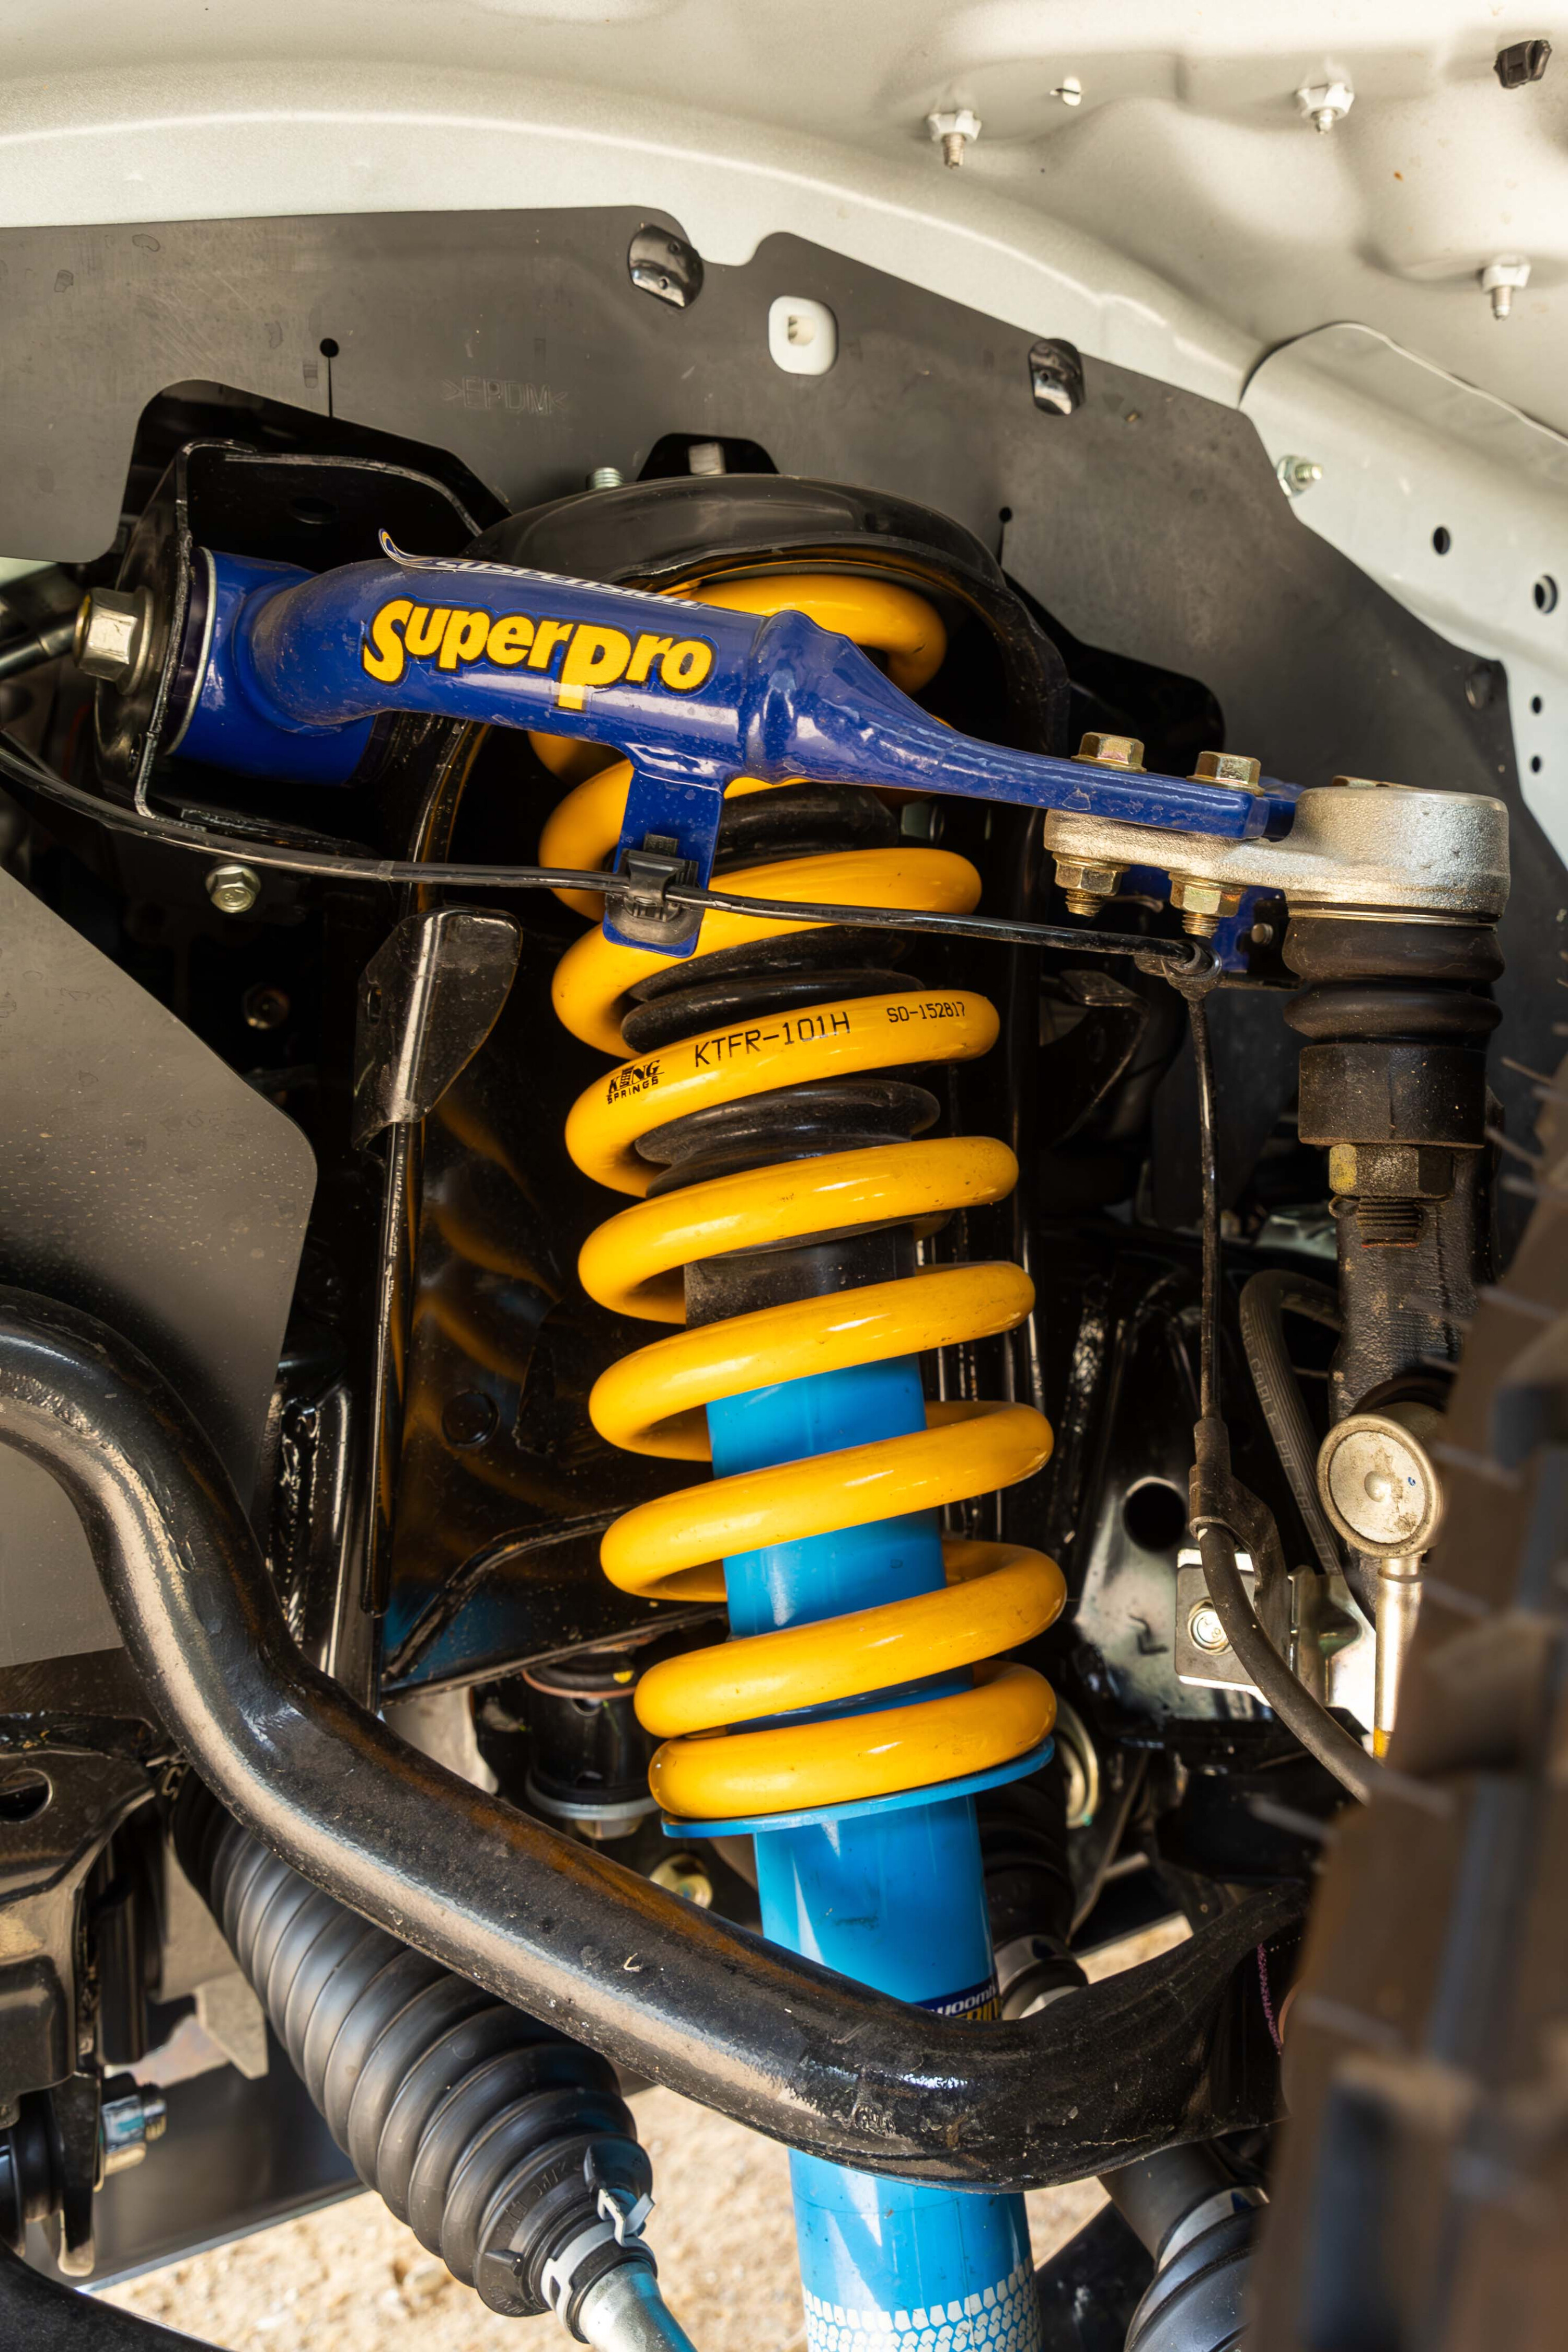
A key part of most GVM upgrades is uprated suspension components but between the suspension and the track are the wheels and tyres.
Wheels and tyres are rated and stamped with the loads they are made to carry and a lot of OE alloys that come standard on new 4x4s, as well as many aftermarket wheels, won’t meet the load rating of a vehicle with an increased GVM.
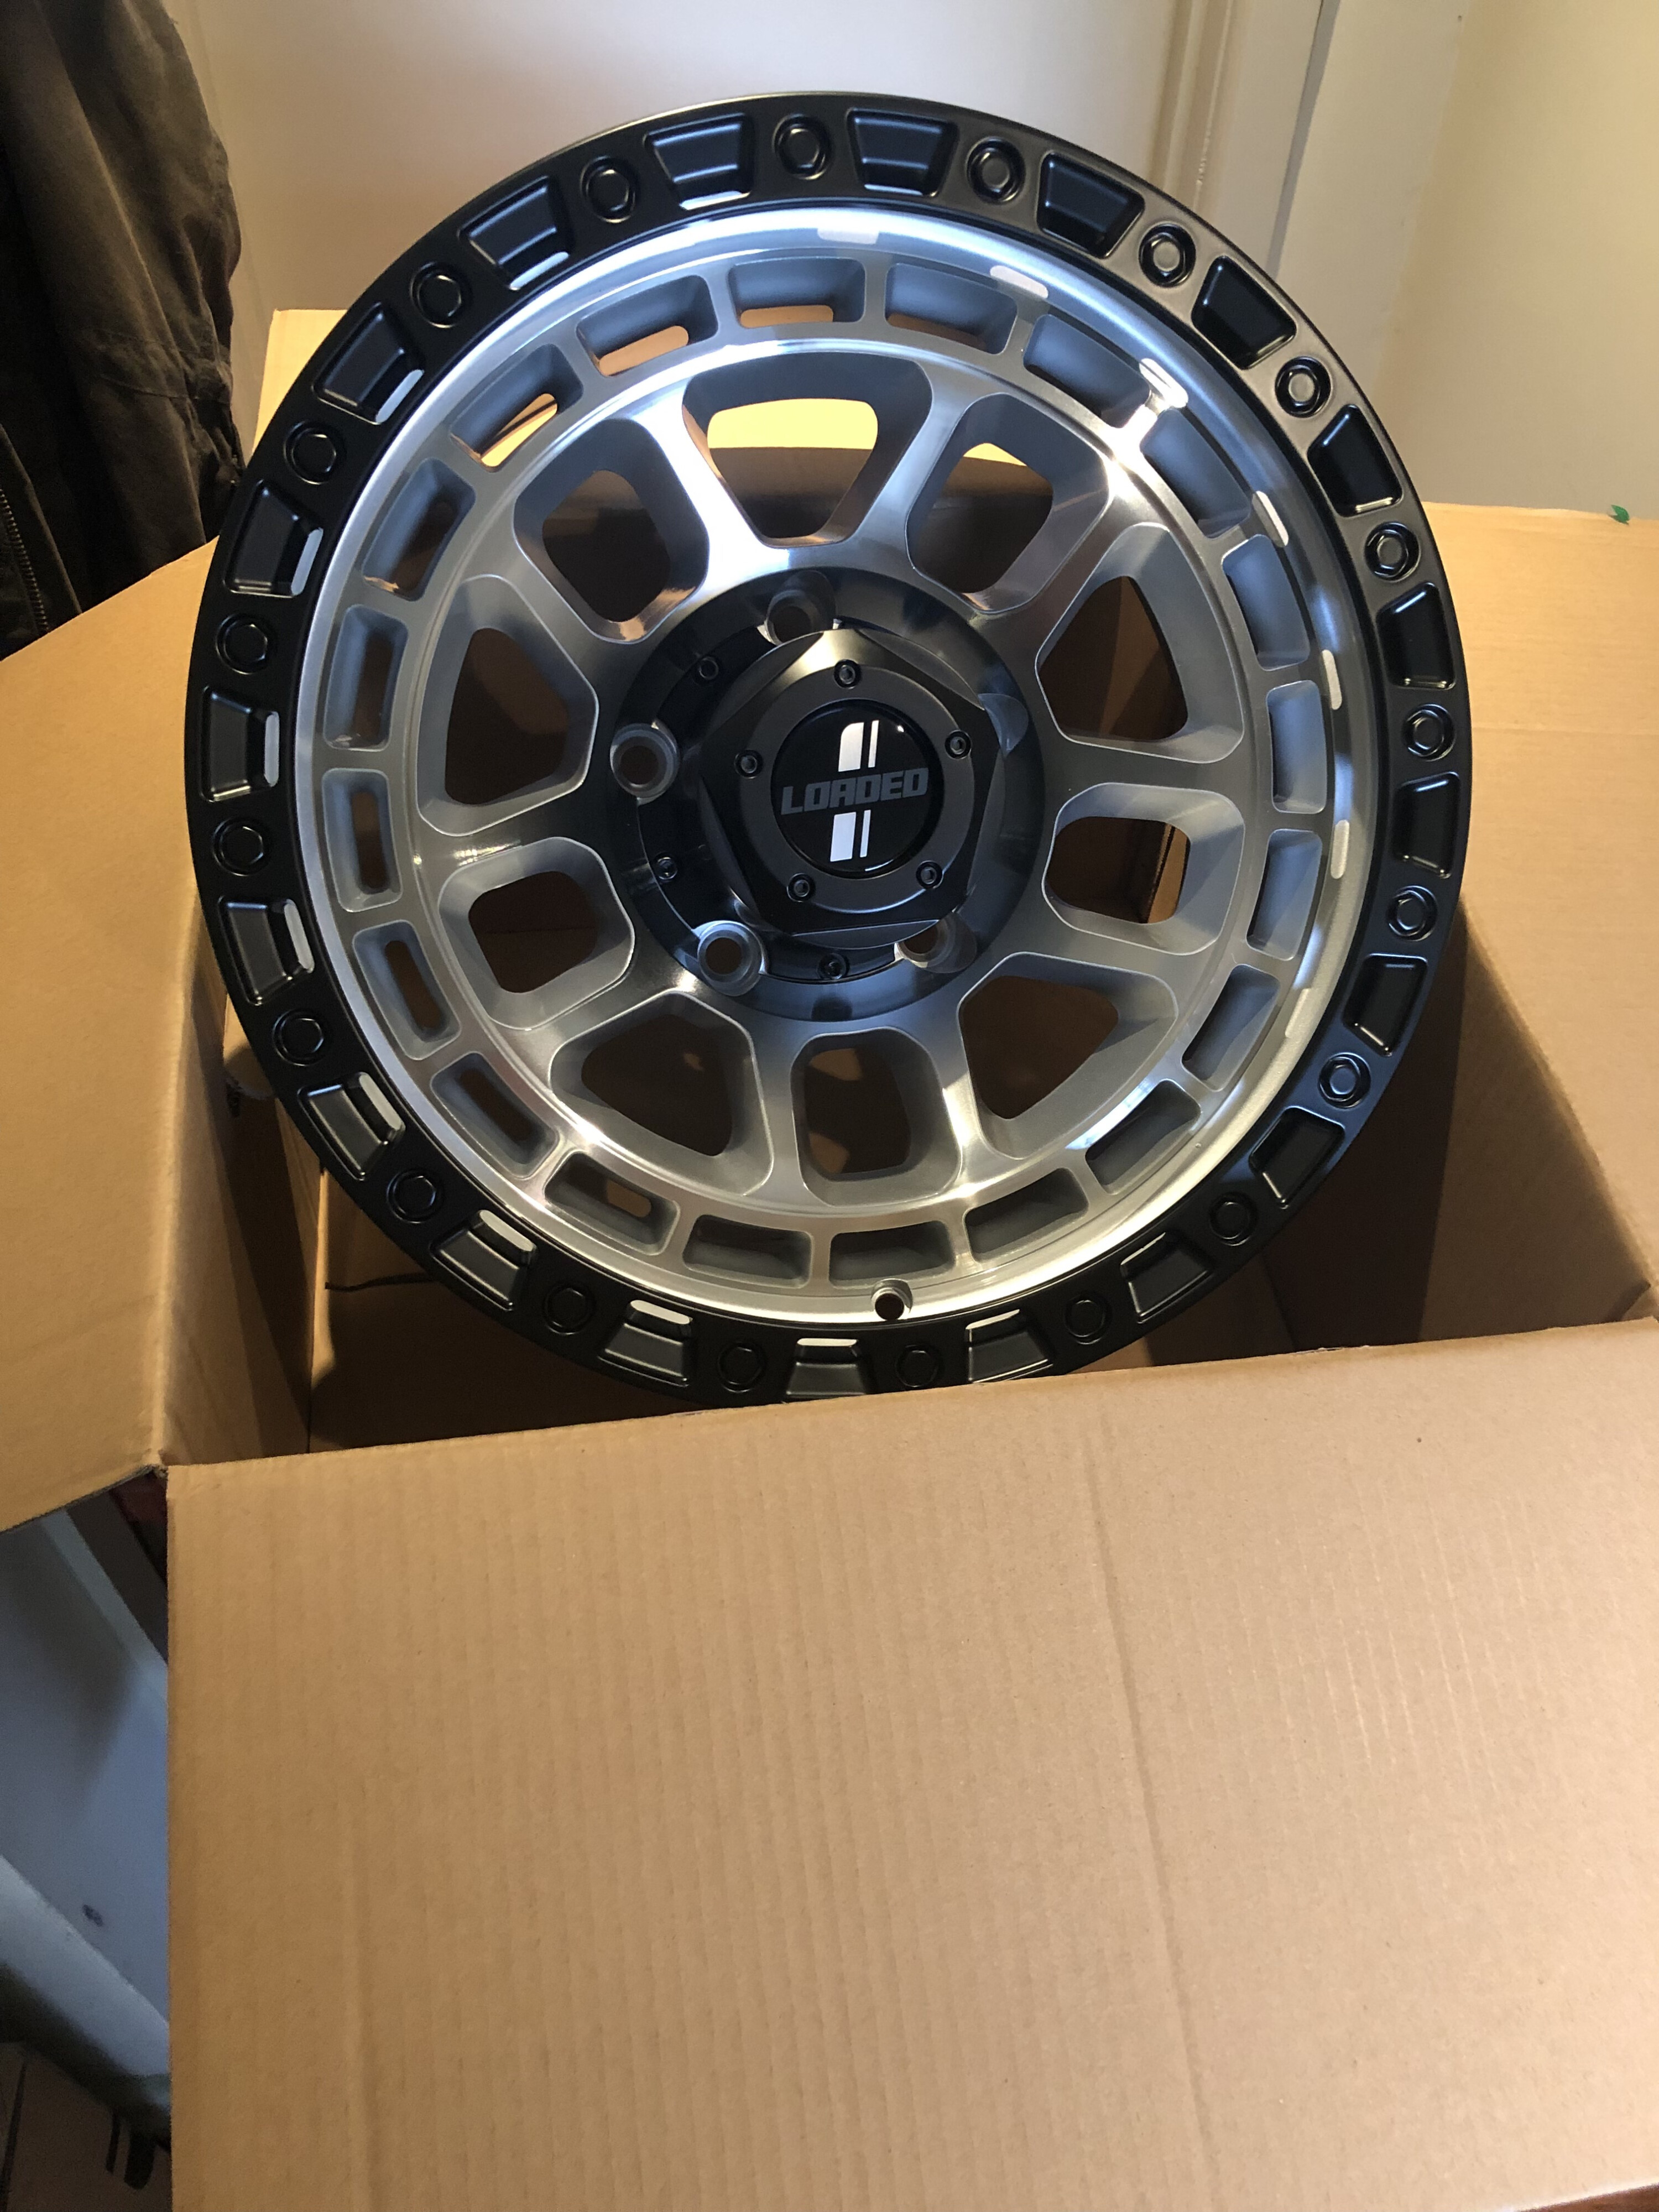
There are a few wheel companies promoting high-load rated wheels for such vehicles but one that caught our attention last year was Loaded Wheels. The reason? Loaded Wheels not only has some great looking wheel designs, but it’s a Queensland business staffed by blokes with a long history in the wheel and tyre business; blokes who know what 4×4 vehicles need in Australian conditions and who saw a gap in the market for quality high-load rated wheels.
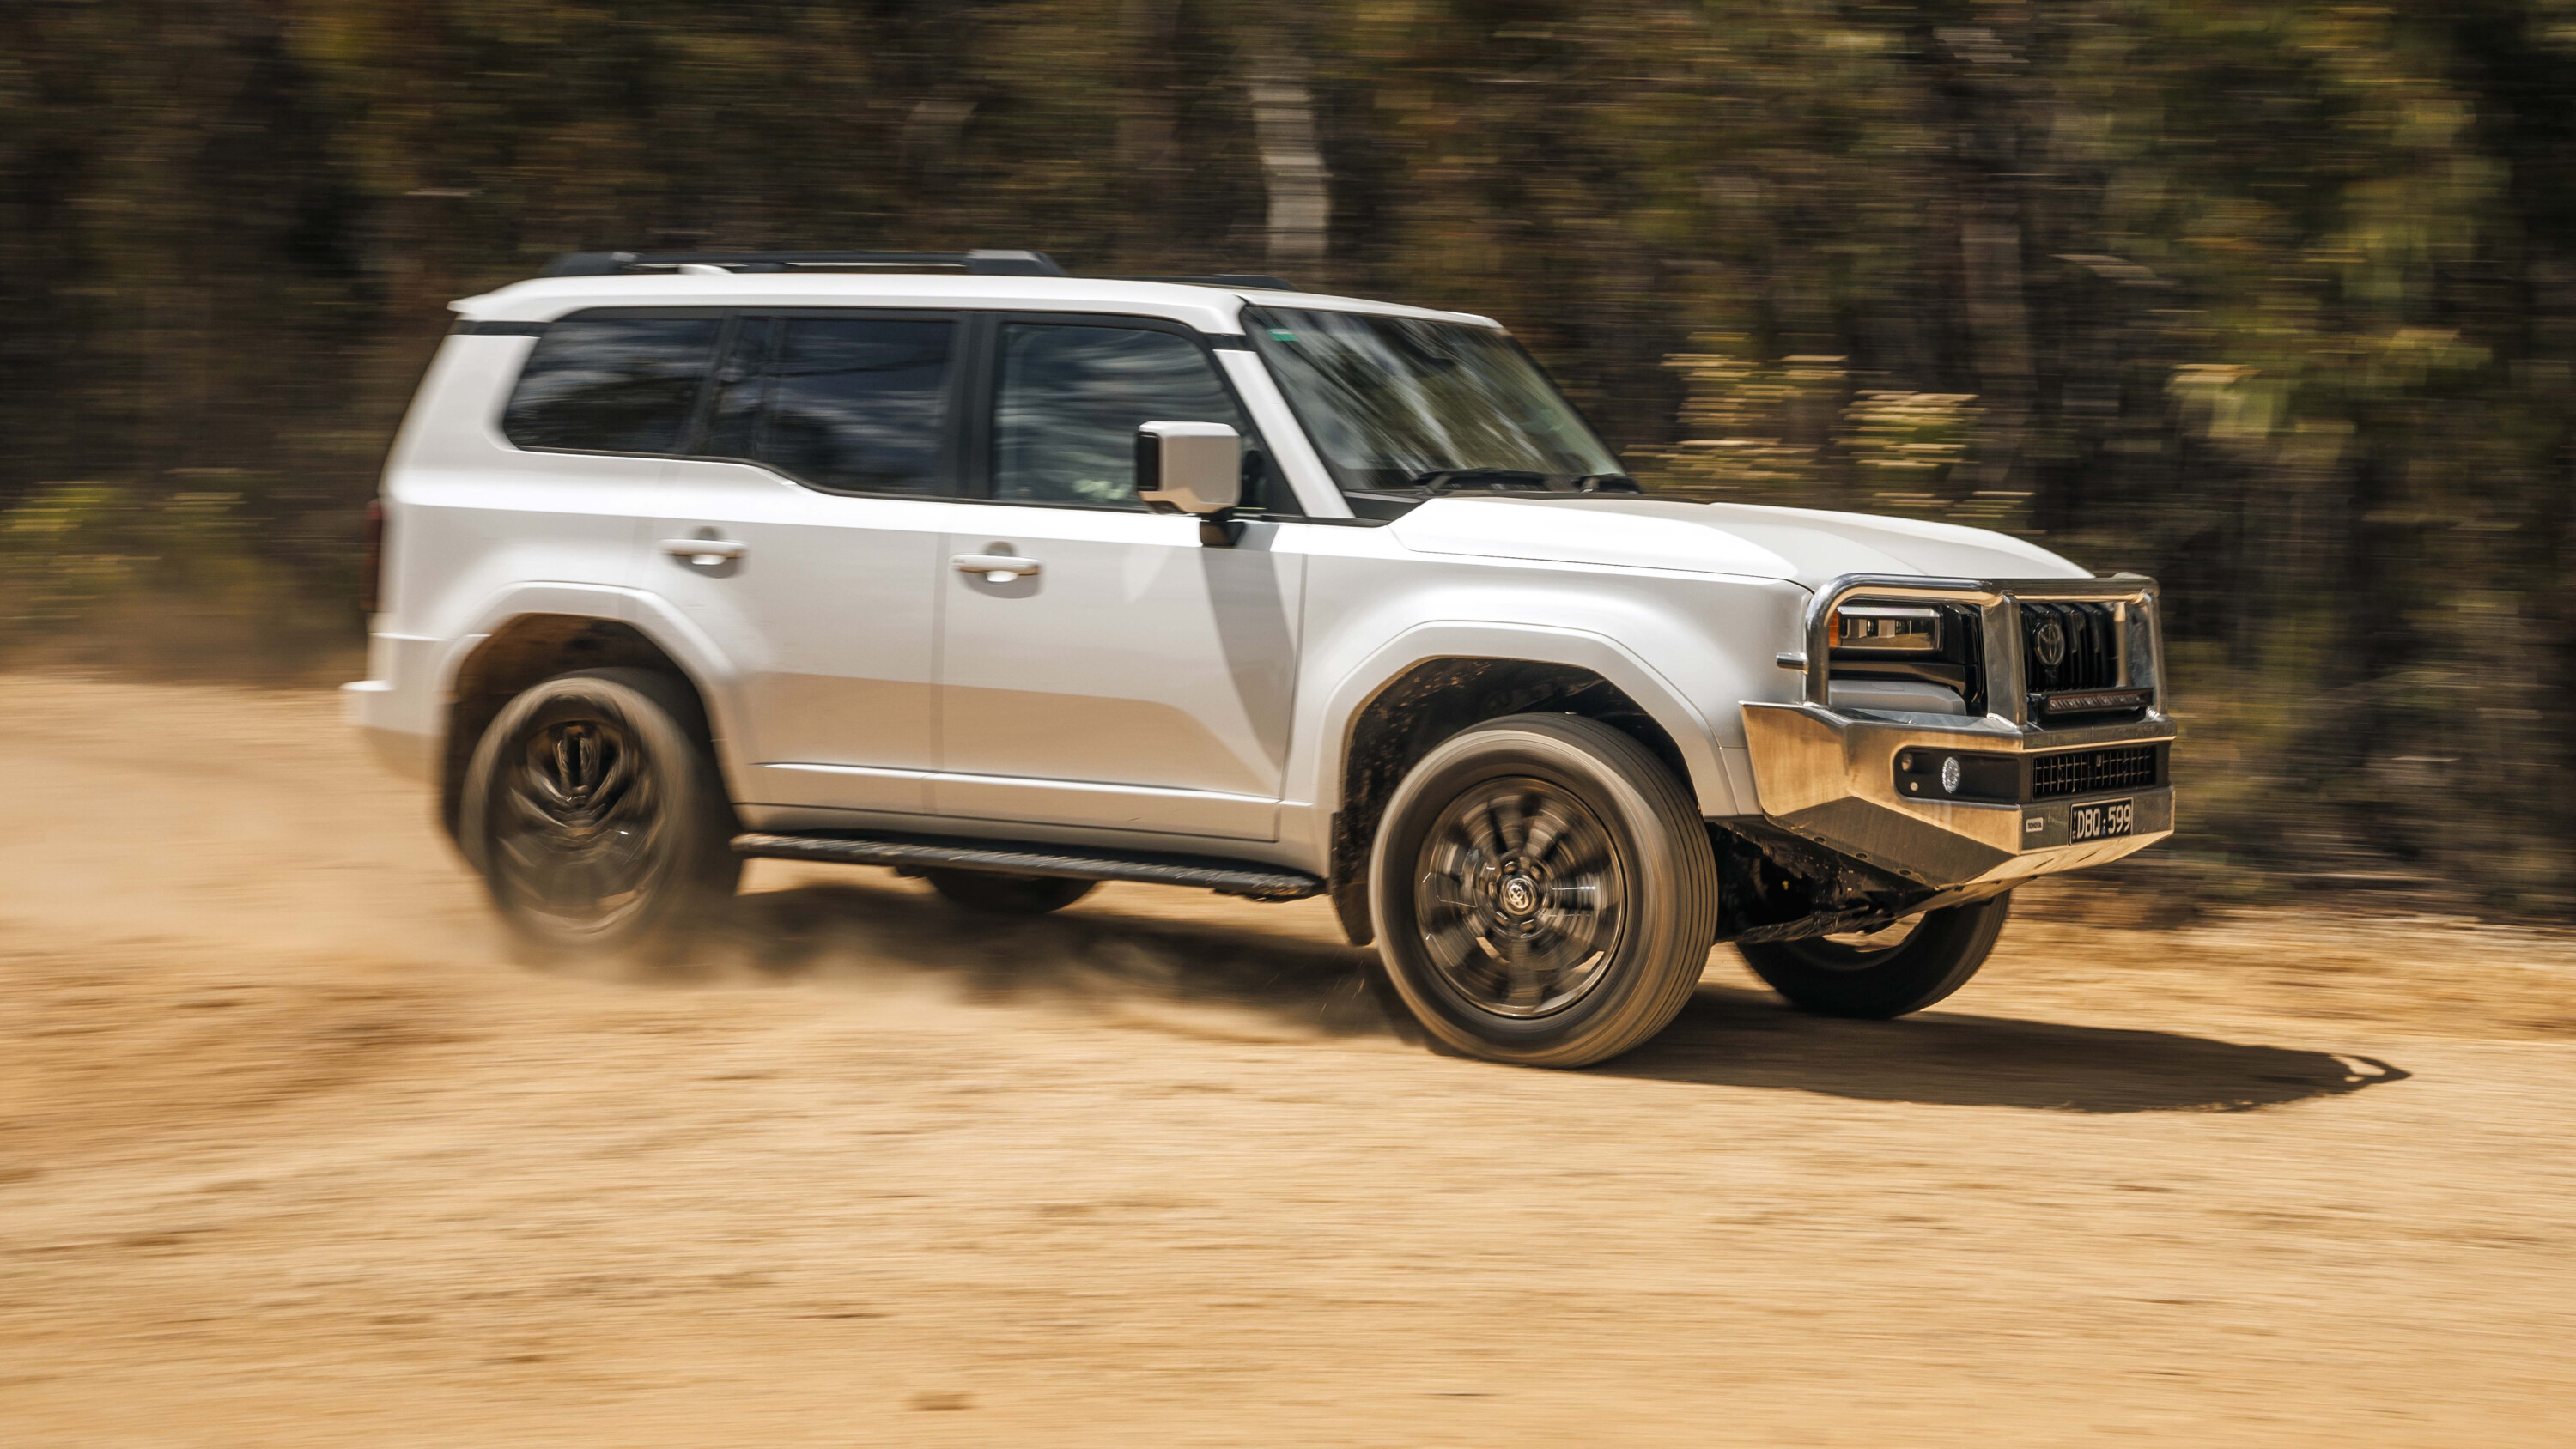
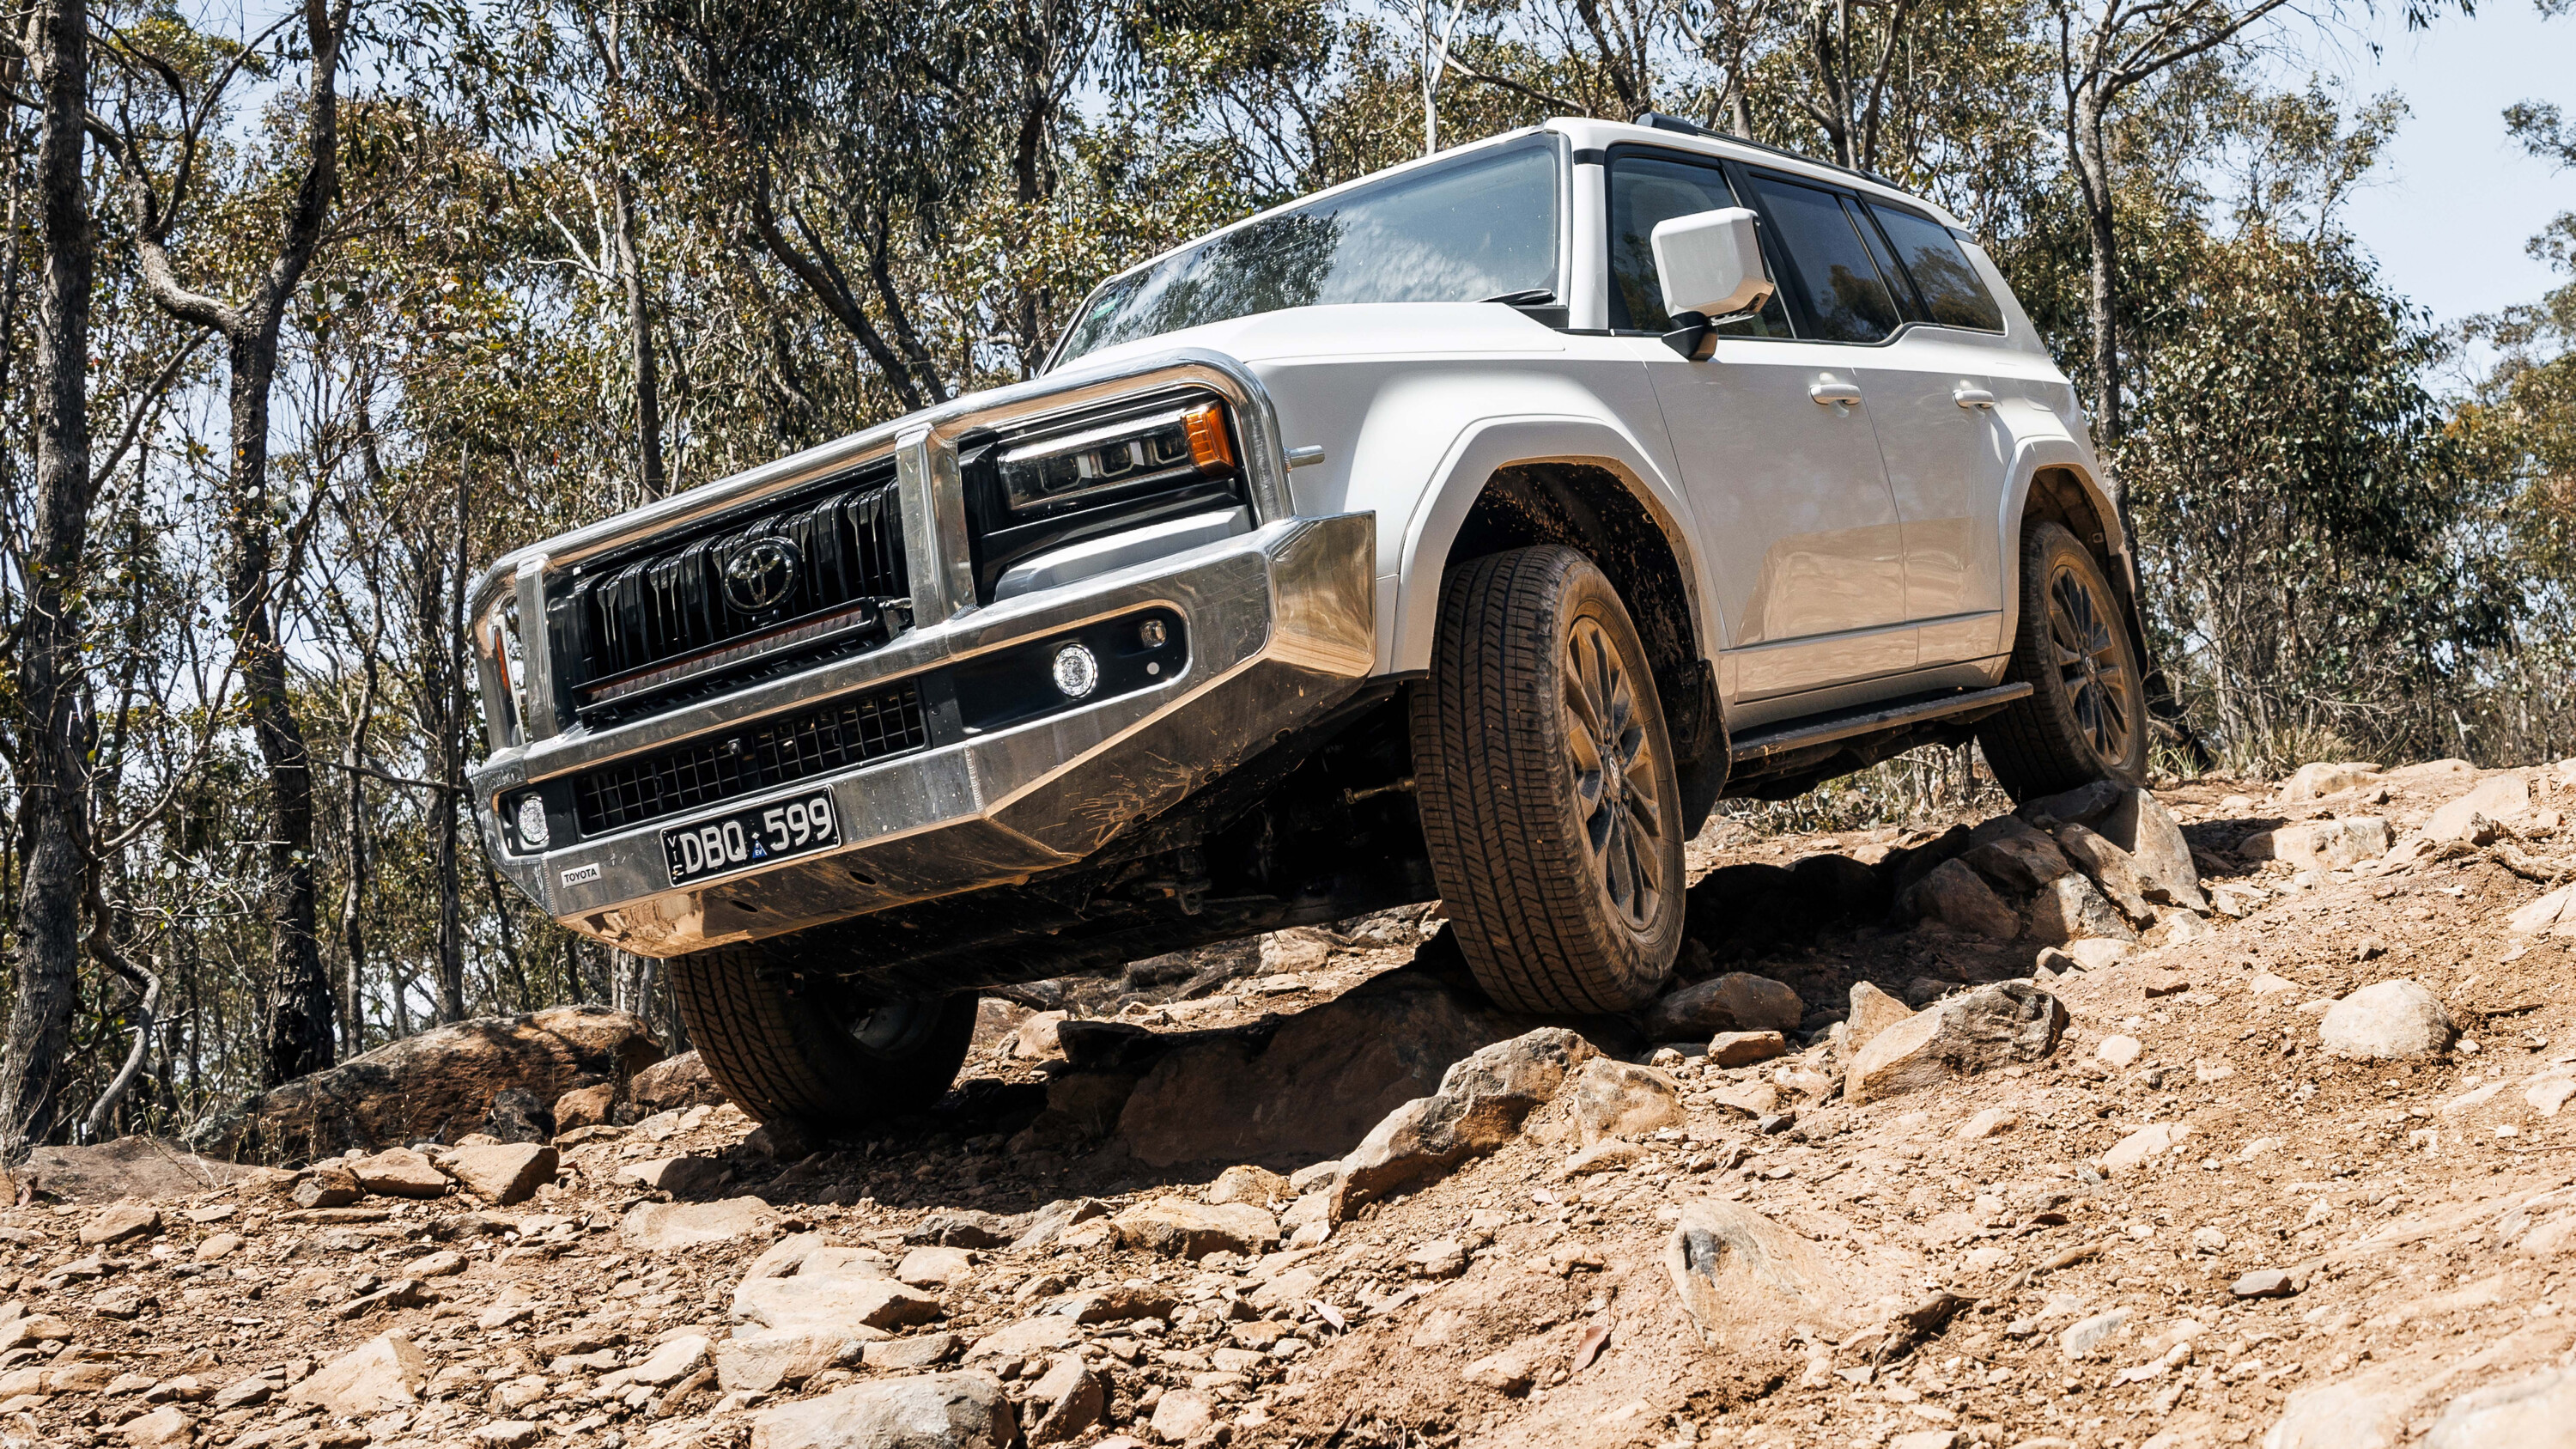
Loaded Wheels launched with just two designs, each named after iconic Australia destinations – the Stockton and the Gunbarrel – but it was the company’s new-for-2025 Gibb 1675 wheel that won us over when researching rims for our LC79 build.
Named after the usually rough and rugged Gibb River Road in the Kimberley region of Western Australia, the 1675 part of the name refers to the load rating which is 1675kg per wheel. All three wheel designs in the Loaded range share this 1675kg rating for heavier vehicles.
Using flow from manufacturing, Loaded Wheels are able to manufacture stronger wheels without adding mass to them, so the wheels themselves aren’t excessively heavy. This process and design also leaves more space within the wheels to accommodate large brake rotors as found on many modern 4x4s.
Currently the Stockton, Gunbarrel and Gibb wheels are available to suit most popular 4x4s on the market in a range of 17-inch and 18-inch diameters, and with a variety of finishes including machined, matt black, bronze and grey.
We went with the machined finish for the centres of the Gibb wheels with black outer rings, and we reckon they suit our white LandCruiser beautifully.
The new warranty program will not only apply to all new Nissan models sold in 2025 and beyond, but Nissan has confirmed the 10-year 300,000km warranty will be backdated to eligible Nissan vehicles purchased new since January 1, 2021. To be eligible, these vehicles “must have completed all scheduled services with Nissan at the correct interval/time to qualify for the warranty extension”.
The existing five-year unlimited kilometre warranty otherwise remains in place.
“The new service-activated warranty is Australia’s only 10-year 300,000km warranty and is industry leading. It’s designed to deliver peace of mind to our customers. Peace of mind that Nissan has your back. Peace of mind that Nissan is with you for the long term,” Michael Hill, Director of Aftersales, Nissan Oceania, said.
Nissan has also revealed a new five-year Flat Price Service (FPS) program, which will see service costs slashed on all new Nissan models. For example, servicing a Patrol at Nissan will cost a flat fee of $499 for each of the first five services. Previously, the first five services for a Patrol cost $452, $581, $560, $917 and $509 – resulting in a saving of $524 with the new fees.
“Nissan Genuine Service is the best solution for a customer’s car. When our customers service with a Nissan dealer, they can have the confidence of knowing that they are covered under our Nissan Customer Service Promise. Customers can be assured their vehicle will be serviced by factory-trained technicians using only Nissan genuine parts – giving the best care for their car in the long term.
“And this is not just about new cars. We’re sure this inclusive industry-leading ownership program will also ensure that your Nissan will be even more attractive when it comes time to buy your next car, as the warranty is fully transferable to the next owner aiding and supporting your future resale value,” Hill said.
We’ve taken readers to every corner of the country, driven countless 4×4 vehicles throughout the years, and tested thousands of aftermarket products – and this issue hits a massive milestone.
The February 2025 mag – out now and en-route to subscribers – is our 500th issue! To help us celebrate this special edition, we asked three of our editorial elders – Ron Moon, Dean Mellor and Michael Ellem – to share their most memorable off-road trips. And trust us when we say, these guys have travelled an eye-bulging amount of kilometres around the country.

On the travel front, we also ventured to two famous 4×4 destinations: Flinders Ranges in South Australia, and Finke Gorge National Park in the Northern Territory. These two trips should be on every tourer’s bucket list.

It’s poetic that in this special issue we have a comparison between two heavyweight SUVs of the modern era: the Ford Everest and Toyota Prado. There’s a significant price difference between the models tested here – the Prado Kakadu is about $30,000 dearer than the Everest Trend – but is it the better vehicle? The result may shock you.
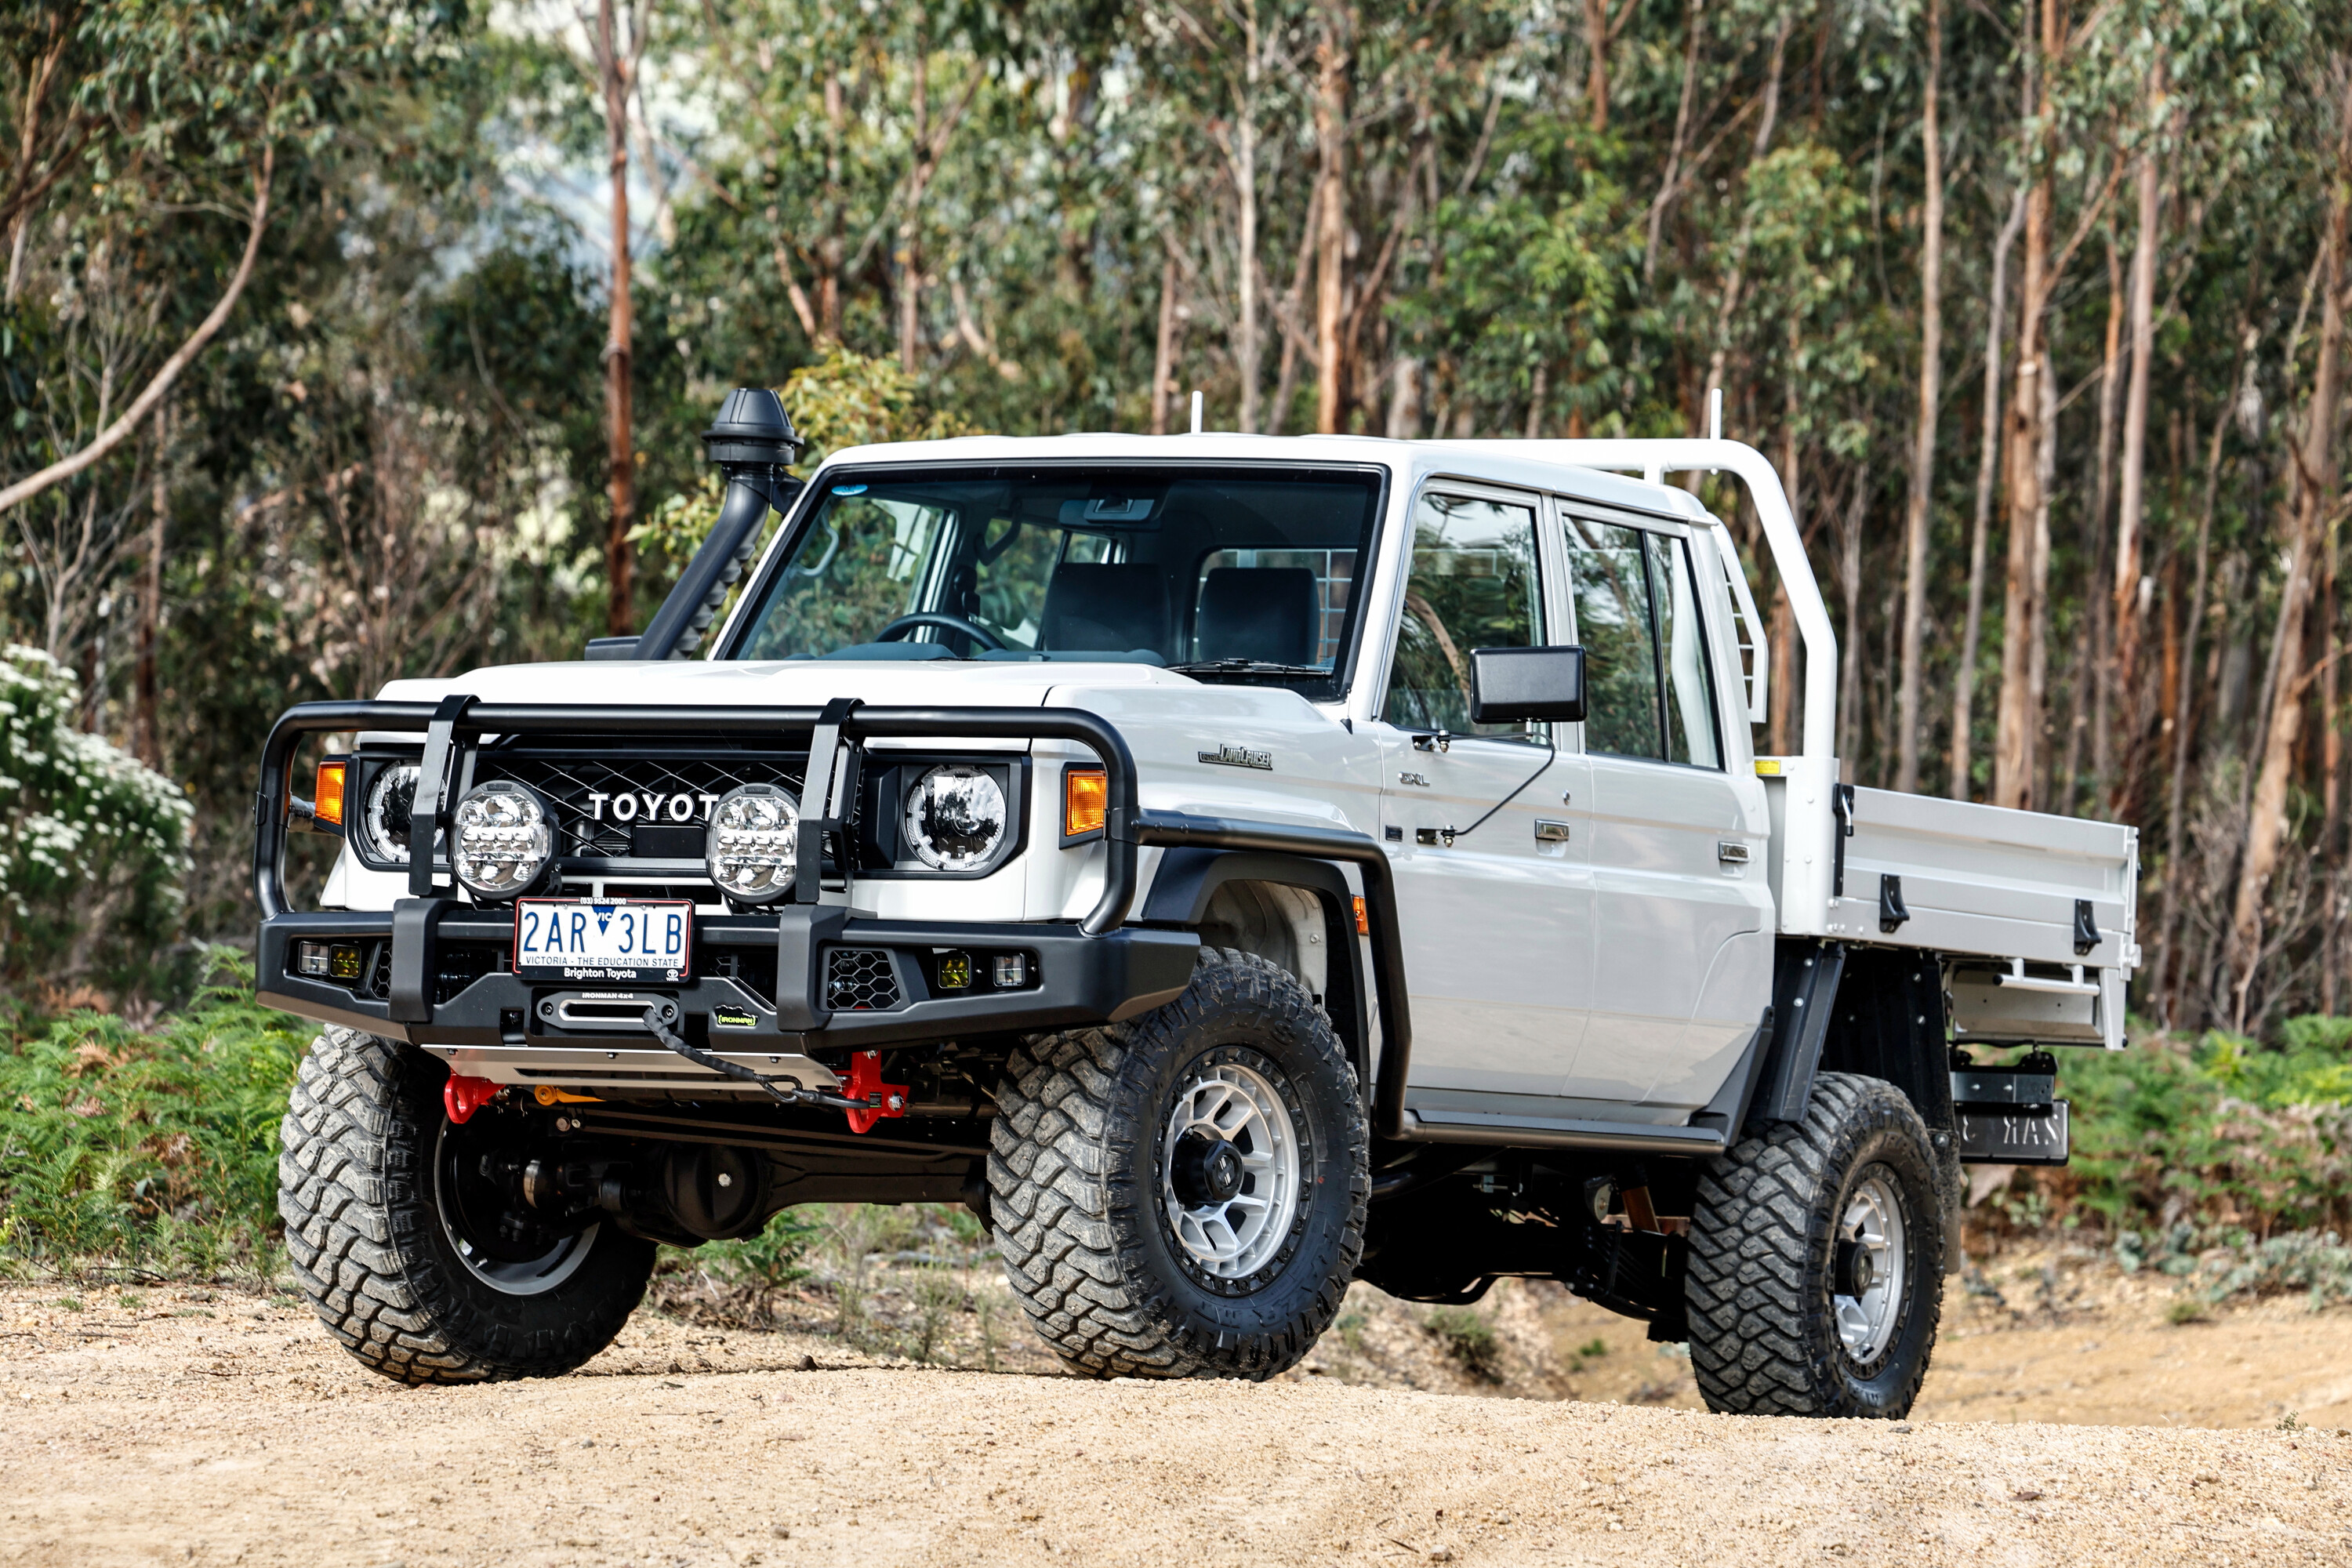
We also take an up-close look at a battle-hardened INEOS Grenadier fettled by Melbourne mob, GrenX; as well as a custom HJ61 LandCruiser that has been modified to be a better all-terrain tourer without losing its classic good looks. The retro-cool vehicle is not only stunning to look at, but it has been built to tackle all corners of the map.
Progress on our custom LandCruiser build is ramping up significantly. This month we equipped the 79 Series with a new set of Loaded Gibb 1675 alloy wheels and wrapped them in Maxxis RAZR mud-terrain rubber. Plus, we installed a Marks 4WD High Clearance tow bar to the rear end.
We also continue our long-term reviews of the Triton GLS and Ford F-150. This month the Triton ferried our resident photographer to a number of jobs; while the F-150 took a long-distance trip down the highway over the holiday period.
The LX Overtrail follows on from the GX550 Overtrail that launched in Australia in 2024 – and excelled both on- and off-road – at $122,250 (plus on roads). Pricing for the LX Overtrail is yet to be determined, with Lexus set to reveal pricing and major specifications for the revised 2025 LX range later this year.
In addition to the trio of locking diffs, the LX Overtrail is equipped with a suite of off-road traction aids including Multi-Terrain Select, Downhill Assist Control, Crawl Control, a Multi-Terrain Monitor and Active Height Control. Lexus has also given the Overtrail bigger wheels and tyres in the form of 18-inch Overtrail alloy wheels wrapped in 265/70R18 Toyo Open Country all-terrain tyres.
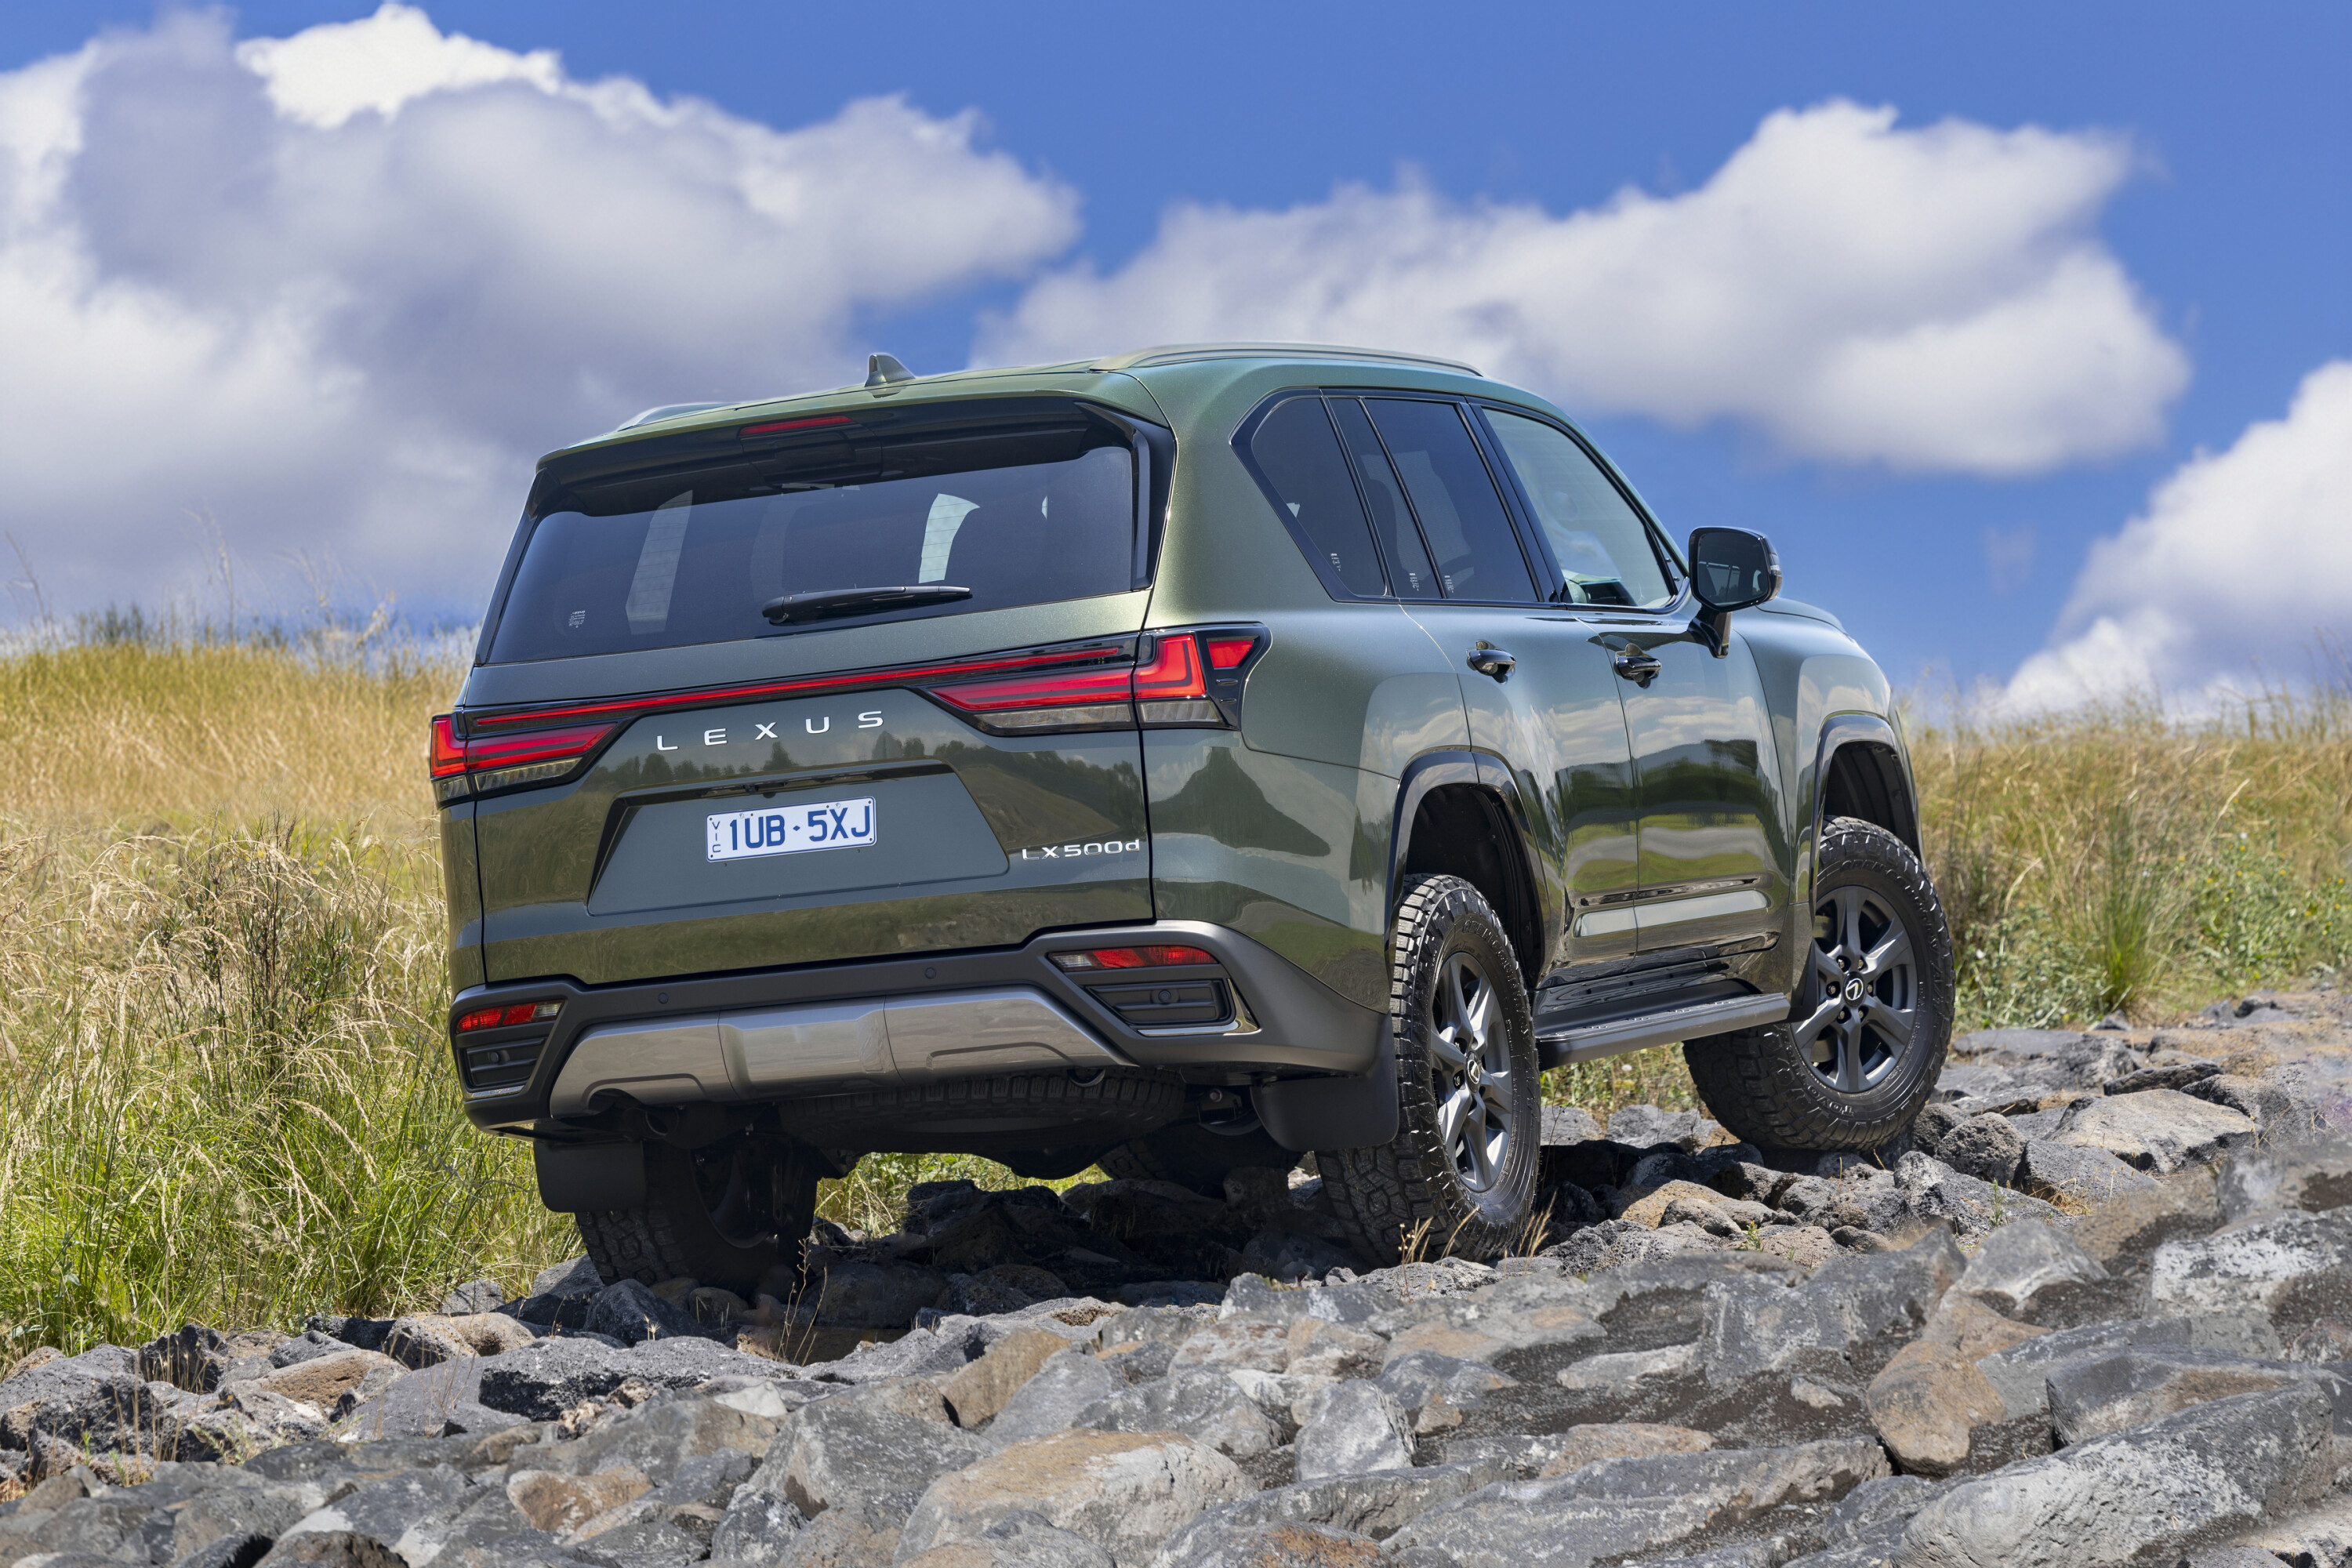
Two powertrains are available: a 227kW/700Nm 3.3-litre twin-turbo V6 diesel, and a 305kW/650Nm 3.5-litre twin-turbo V6 petrol. Lexus is also evaluating the viability of introducing a hybrid powertrain to Australia, but nothing has been confirmed yet.
“Since its introduction to the Lexus Australia range in 1998, the LX has enabled customers to navigate Australia’s tough terrains with unwavering reliability and unparalleled comfort,” said John Pappas, Lexus Australia Chief Executive.
“The LX combines luxurious appointments and thoughtful comfort features with the rugged performance of a full-size luxury SUV, delivering outstanding off-road, towing and hauling capability,” he added.
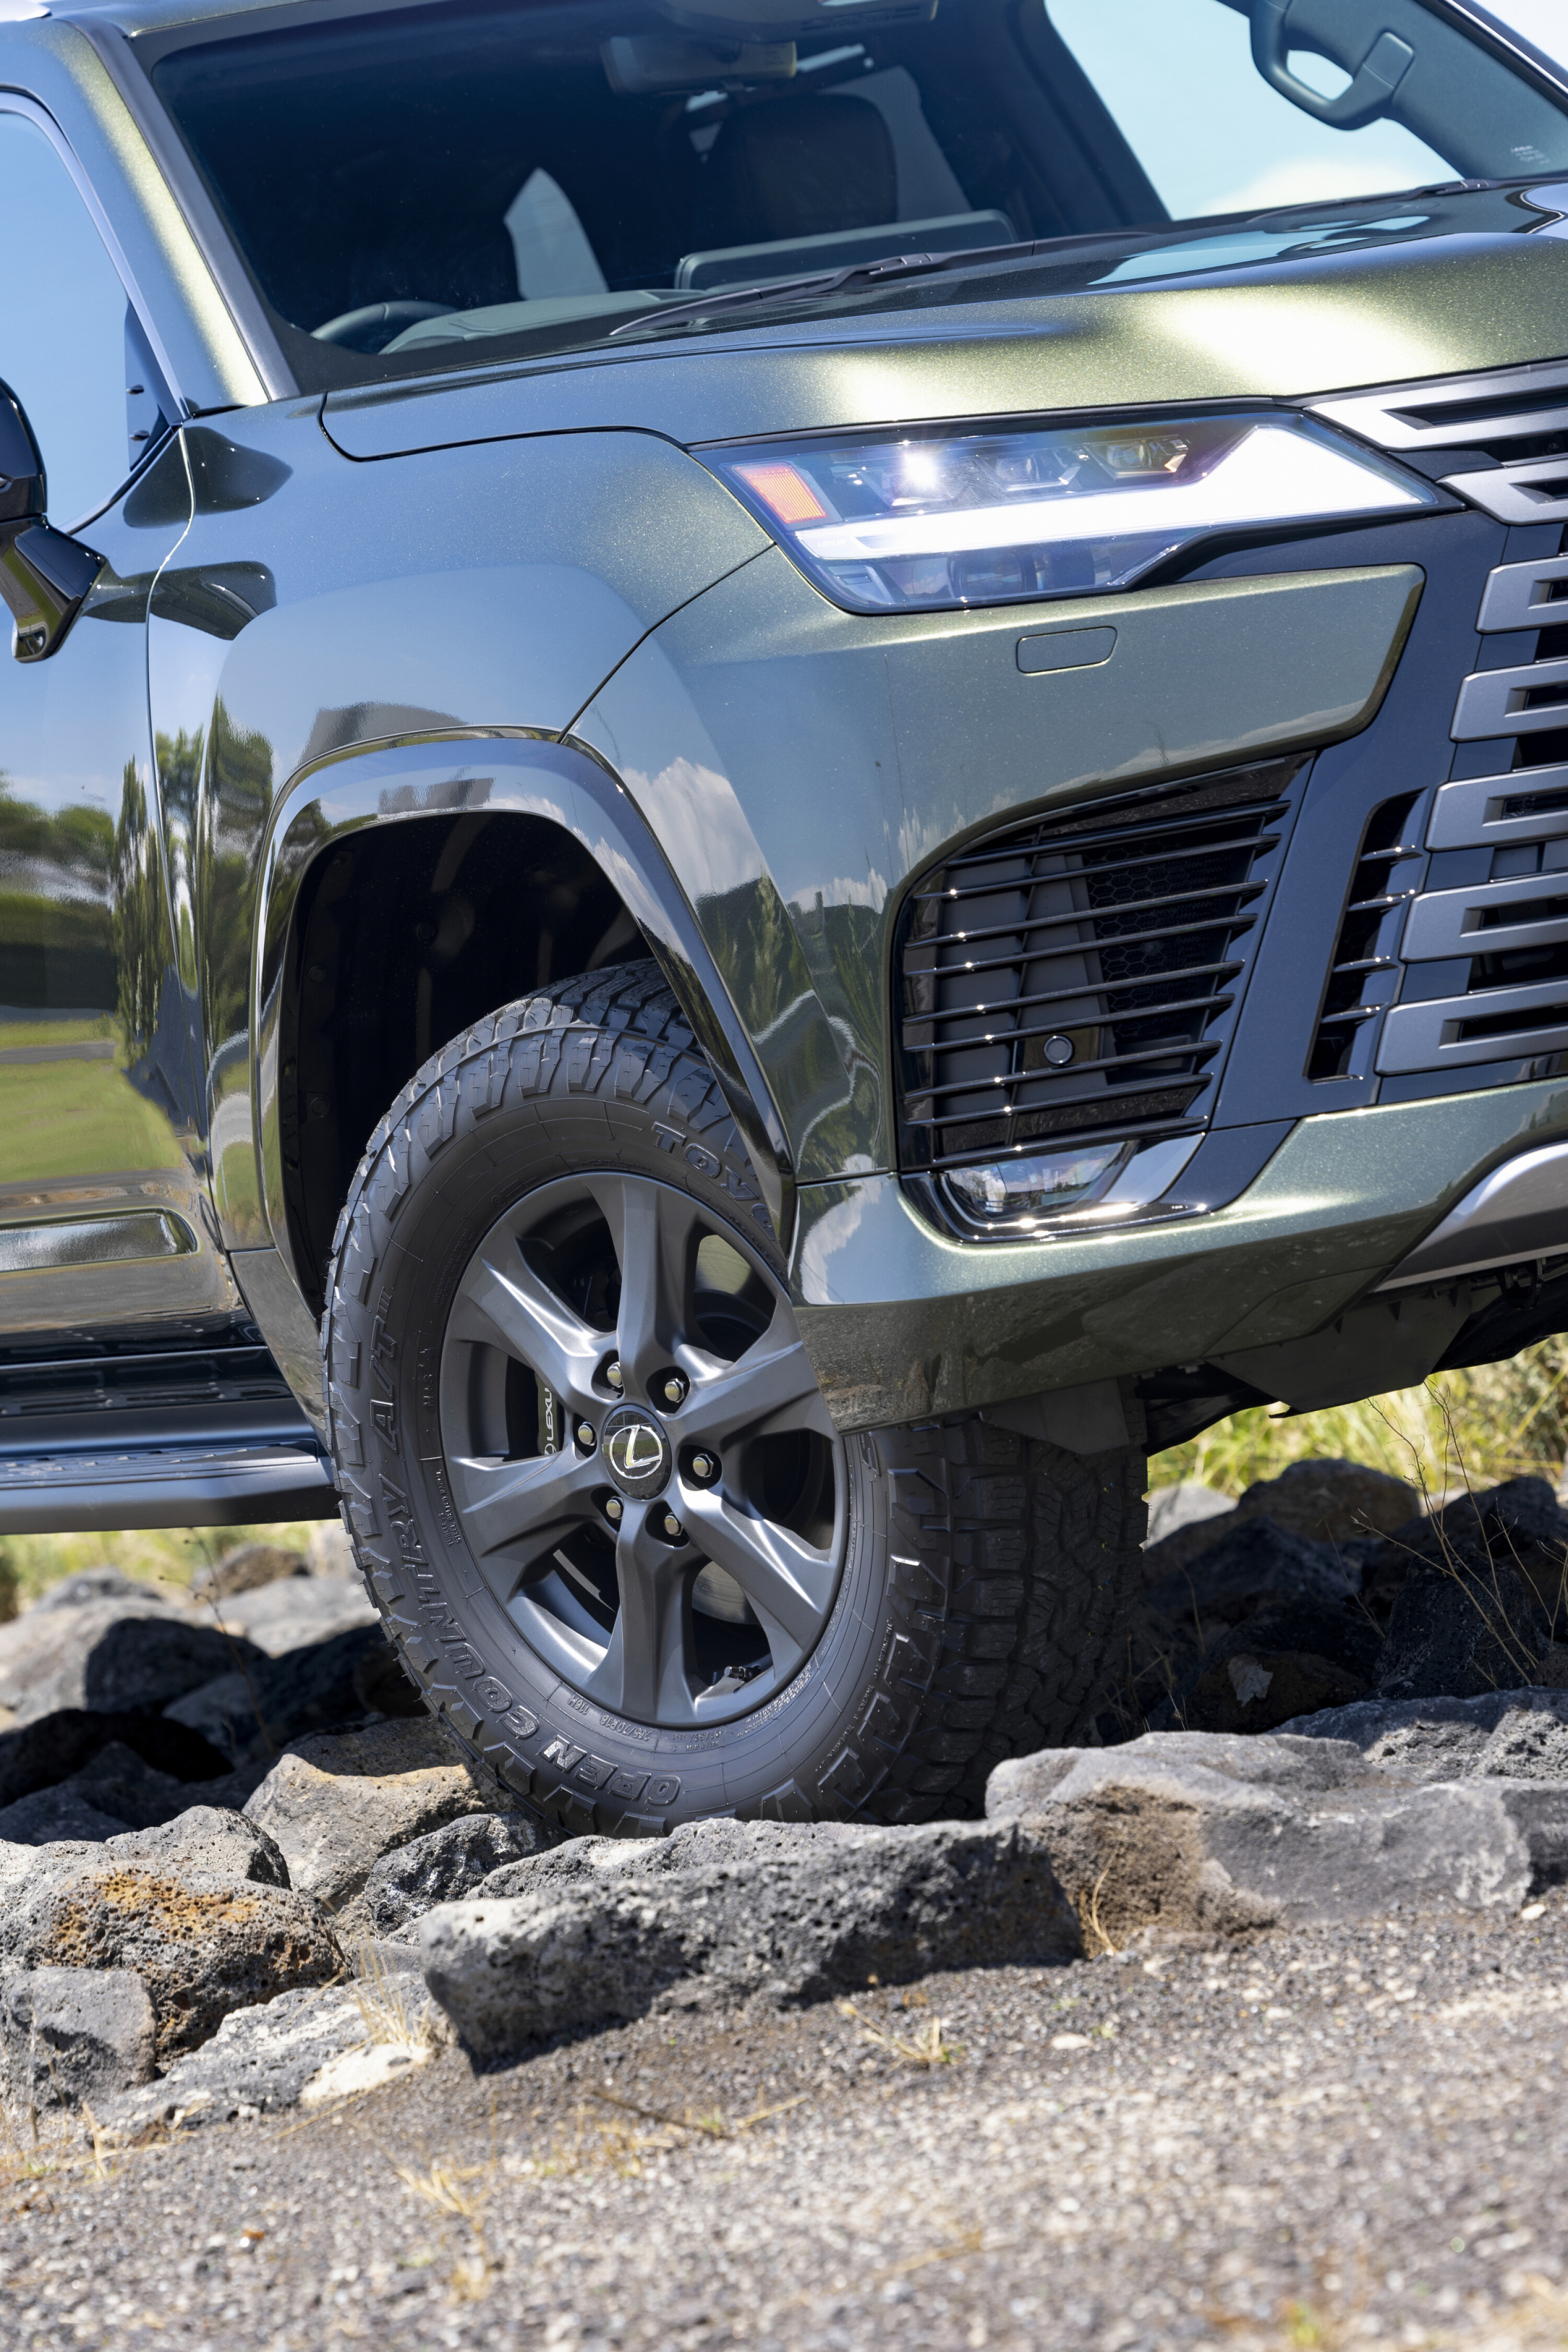
As a point of difference between other LX variants, the Overtrail’s exterior has received black highlights for the front spindle grille, front and rear bumpers, wheel arches, side mirrors, door handles, window mouldings and roof rails.
The single-cab XT is the cheapest entry point into the BT-50 4×4 line-up, priced at $47,250 MLP; the freestyle-cab XT is marginally more expensive at $51,000 (MLP); while the dual-cab XT cab-chassis is $54,620 (MLP). To get a 4×4 in a pick-up configuration, you now need $56,220 (MLP) for the XT.
Unsurprisingly, all prices are up across the board compared to its predecessor. A glance at just the dual-cab pick-up 4×4 variants indicates price increases of $990 (XT), $3470 (XTR), $3180 (GT) and $2810 (SP). Full pricing below ?
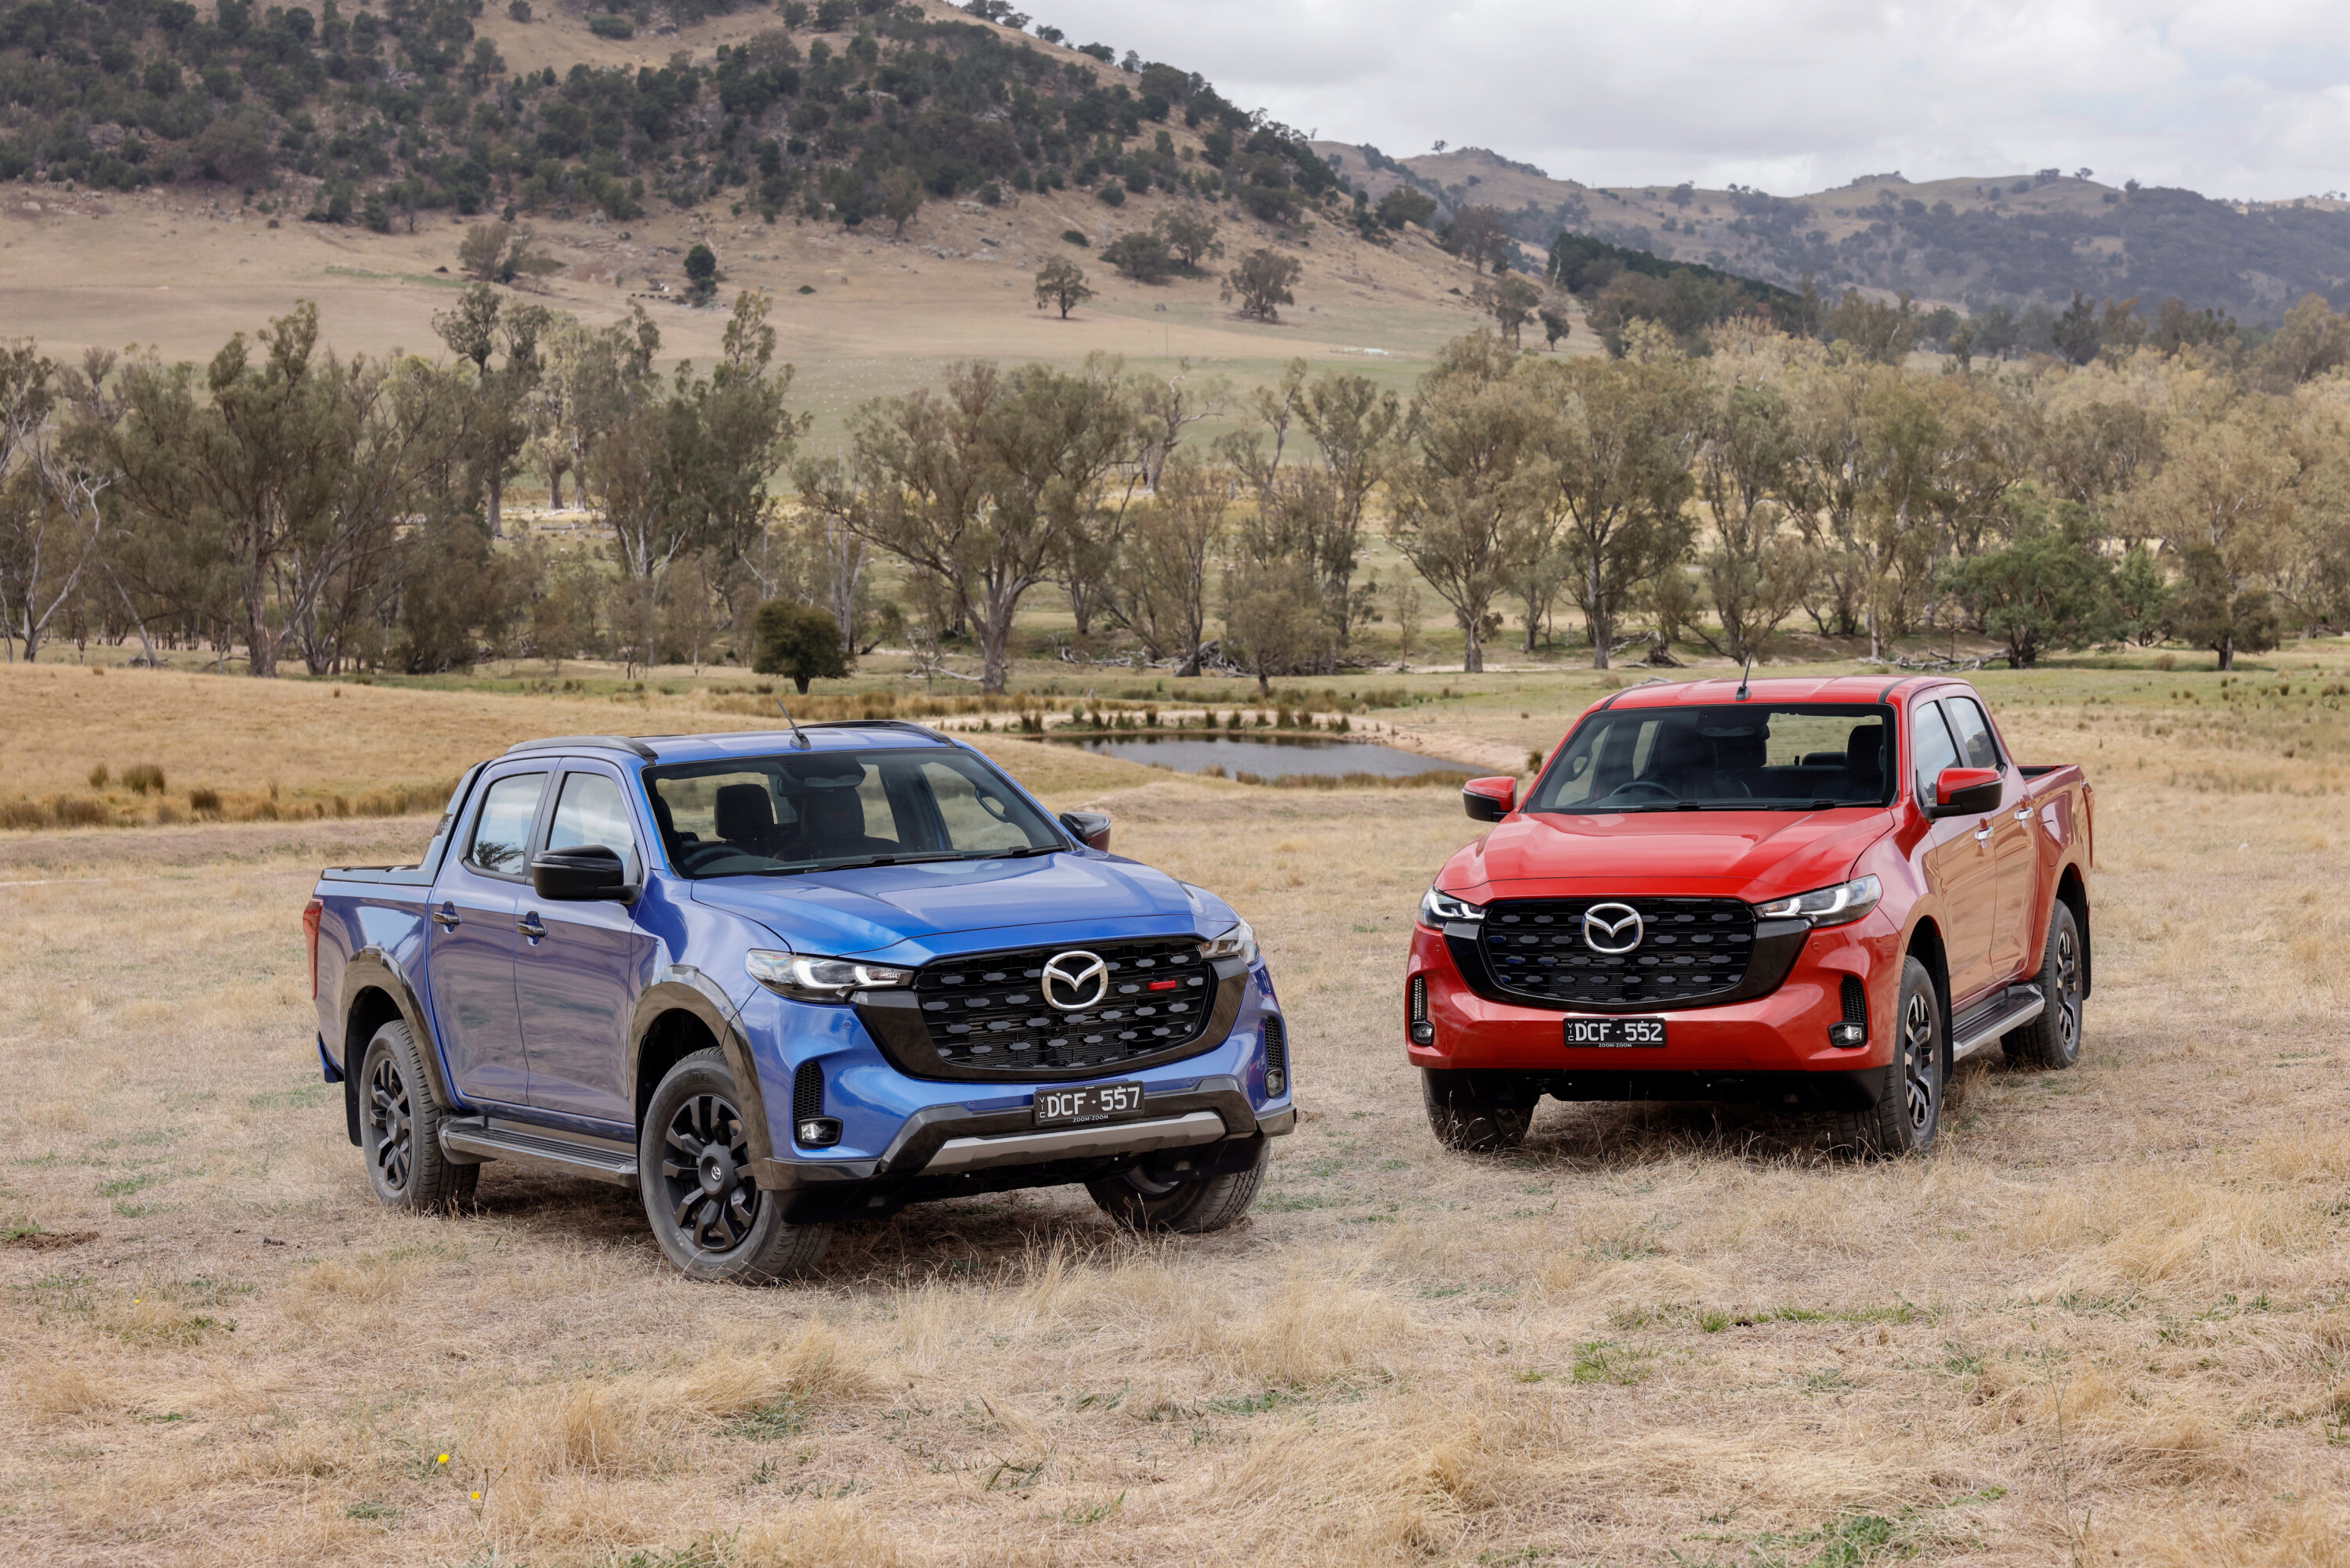
New for 2025 is a mild facelift encompassing a more aggressive front bumper, new radiator grille and LED headlights. The rear end was also mildly revised, now utilising an easy-down tailgate and integrated LED tail lamps. An enhanced infotainment system has also been added – spanning from eight inches (XS and XT) to nine inches (XTR and above).
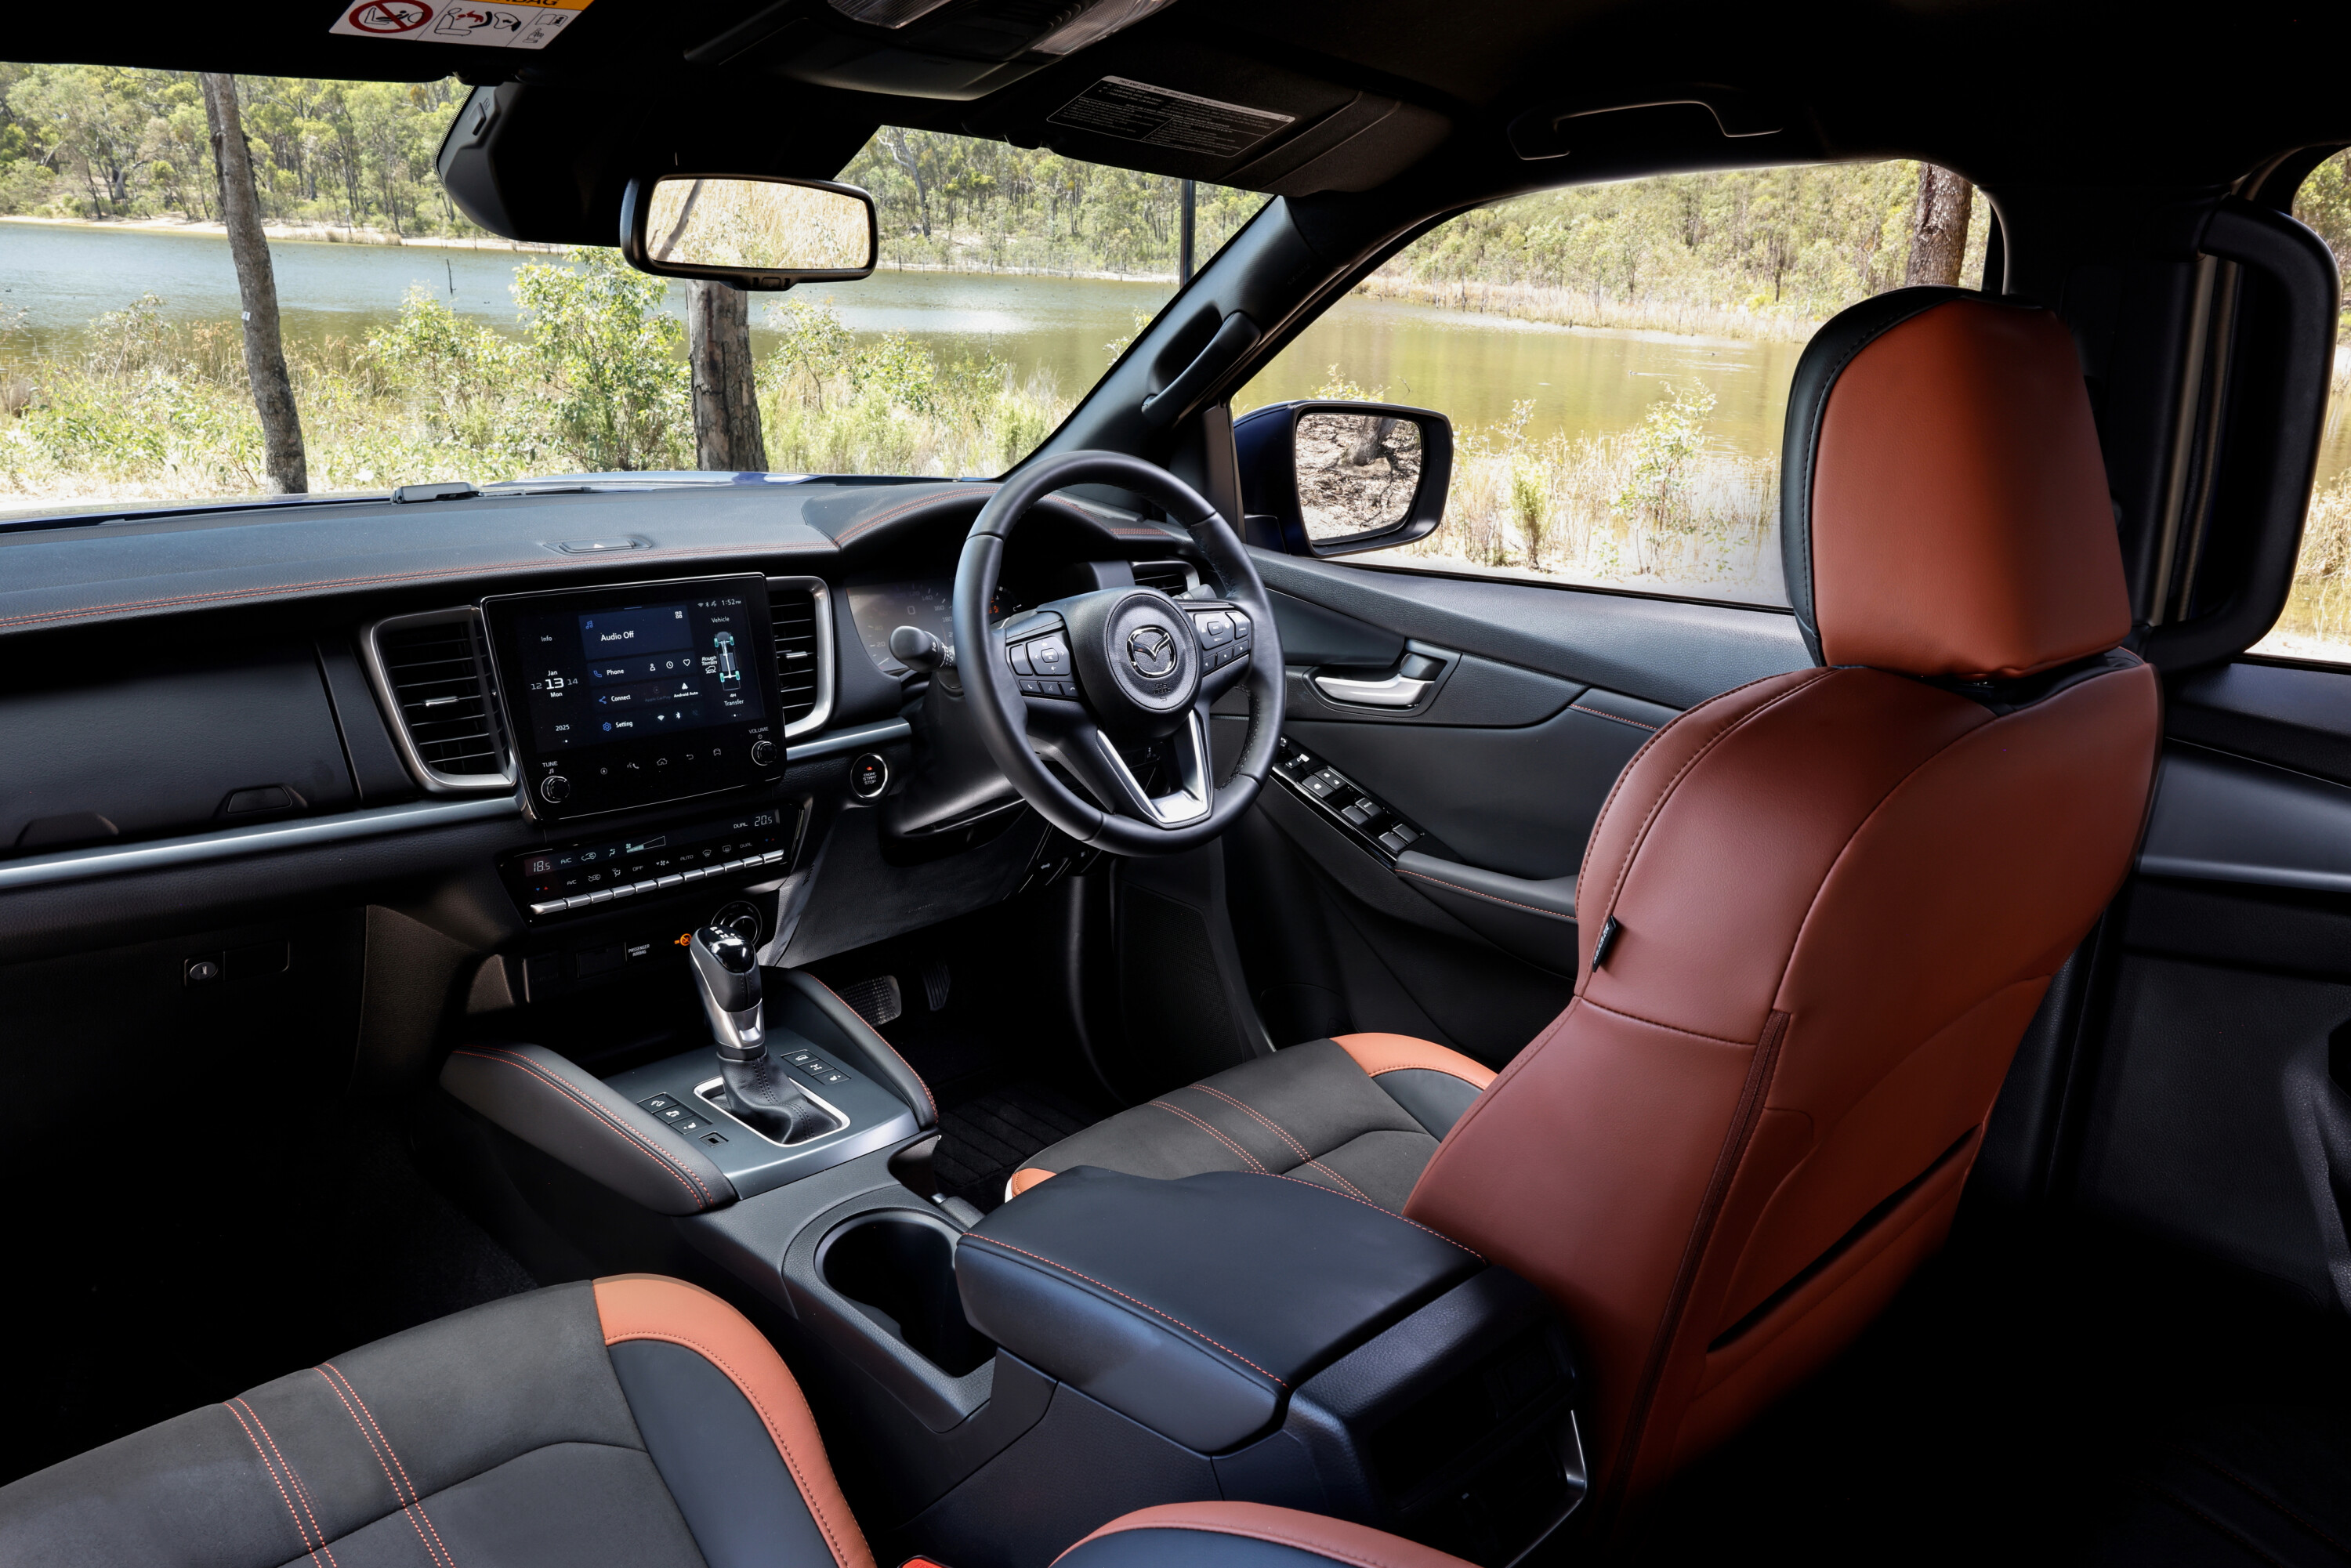
Wireless Android Auto now joins wireless Apple CarPlay, and the centre screen can now display information previously only found within the MID screen – things like real-time vehicle steering and tilt angles, TPMS status, drive mode/diff lock status, and Rough Terrain Mode status.
The full suite of advanced safety tech includes Lane Keep Assist System (LAS), Blind Spot Monitoring (BSM), Rear Cross Traffic Alert and Braking, Traffic Sign Recognition and Trailer Sway Control (TSC).
The powertrain for all 4×4 models remains unchanged, with Mazda carrying over the 140kW/450Nm 3.0-litre, four-cylinder turbocharged engine. It remains linked to a six-speed automatic transmission.
Mazda has also developed in collaboration with industry an extensive selection of Genuine Accessories for the new-look BT-50, with the gear locally tested and backed by the manufacturer warranty.
“We know that vehicle customisation plays a significant part in four-wheel driving culture,” said Jarrod Gieschen, Director of Sales and Marketing for Mazda Australia.
“We are therefore proud to have developed such an extensive list of accessories to complement the new Mazda BT-50, providing our customers with the ability to tailor their vehicle to best suit their needs – all while having the peace of mind of being backed by our leading five-year warranty.”
| BT-50 Singe Cab | Engine | Drivetrain | MLP |
|---|---|---|---|
| Single Chassis XT | 3.0-litre Turbocharged Diesel | 4X4 | $47,250 |
| BT-50 Freestyle cab | Engine | Drivetrain | MLP |
|---|---|---|---|
| Freestyle Chassis XT | 3.0-litre Turbocharged Diesel | 4×4 | $51,000 |
| BT-50 dual cab | Engine | Drivetrain | MLP |
|---|---|---|---|
| Dual Cab Chassis XT | 3.0-litre Turbocharged Diesel | 4×4 | $54,620 |
| Dual Cab Chassis XTR | 3.0-litre Turbocharged Diesel | 4×4 | $59,650 |
| Dual Cab Chassis GT | 3.0-litre Turbocharged Diesel | 4×4 | $63,070 |
| Dual Cab Pickup XT | 3.0-litre Turbocharged Diesel | 4×4 | $56,220 |
| Dual Cab Pickup XTR | 3.0-litre Turbocharged Diesel | 4×4 | $62,750 |
| Dual Cab Pickup GT | 3.0-litre Turbocharged Diesel | 4×4 | $66,170 |
| Dual Cab Pickup SP | 3.0-litre Turbocharged Diesel | 4×4 | $71,500 |
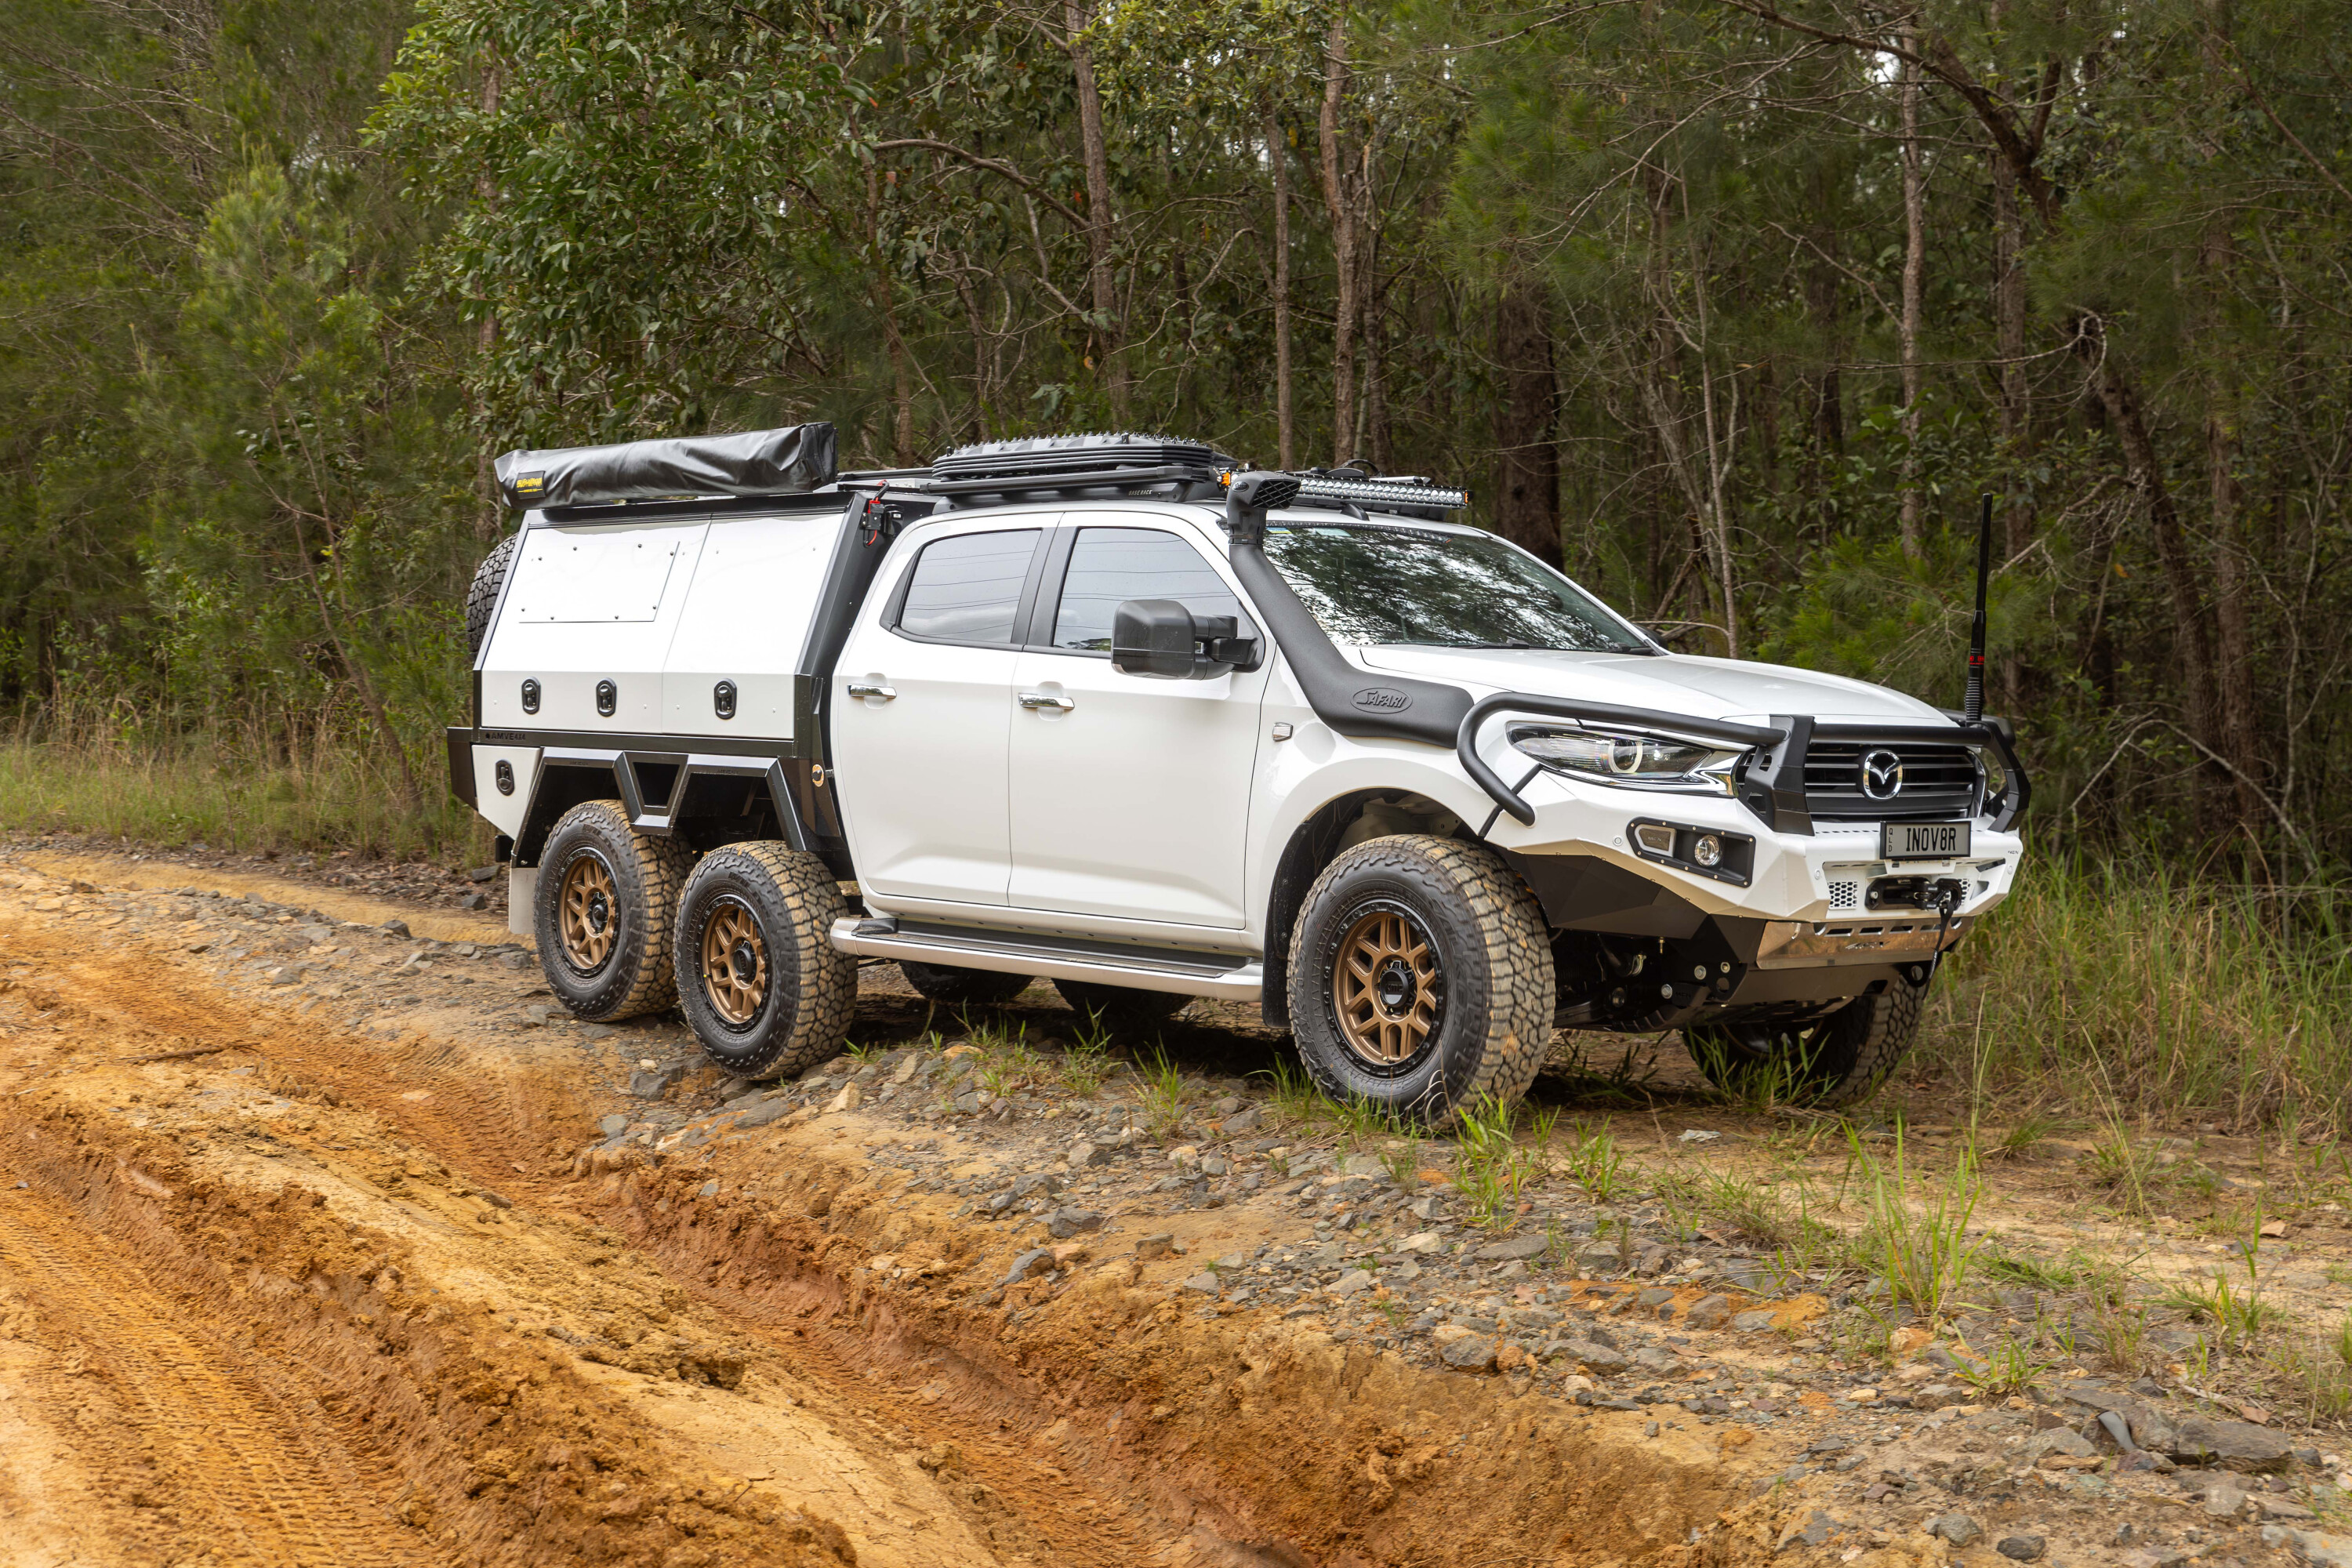
Let’s also say you wanted a ute with a canopy for practicality, and acres of storage, and just to make it even curlier, say you had to do it on a relatively sane budget.
That was the conundrum facing Jen and James back in 2023. Rather than opt for a full-size American diesel ute or light truck that can be tricky to manoeuvre down tight tracks, and cost a kidney to purchase, they instead went for a Mazda BT-50. As you do.
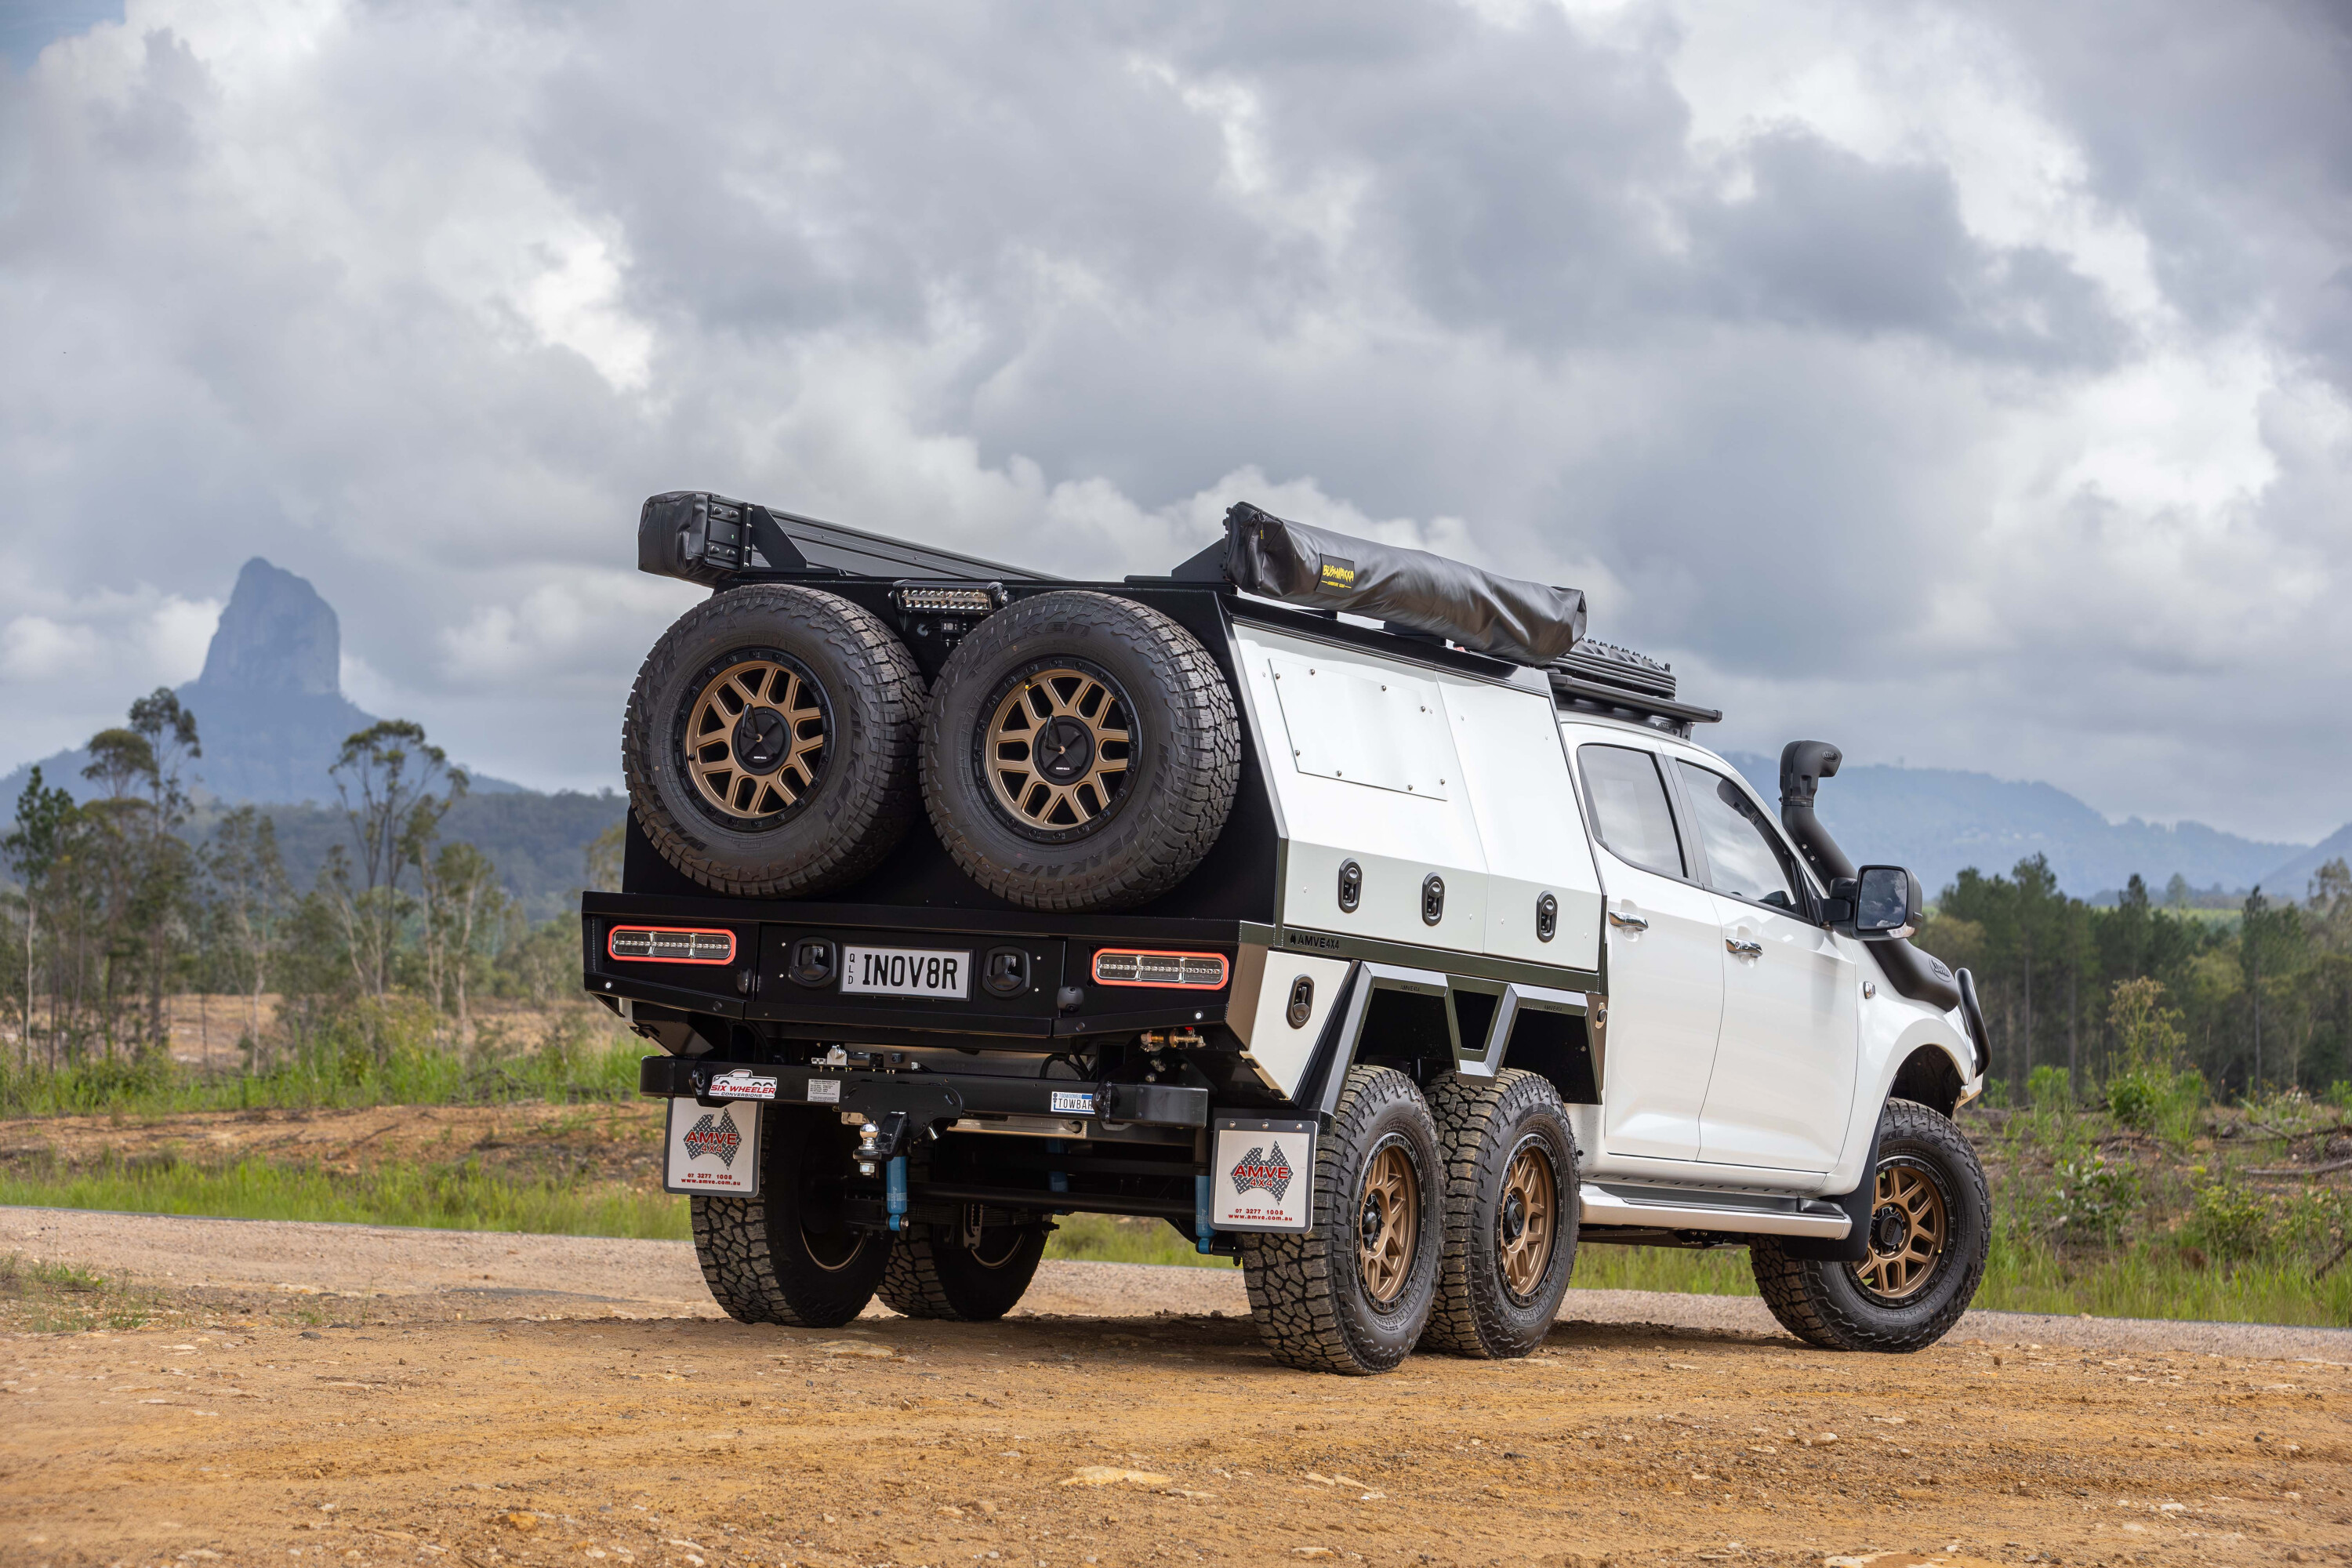
While the stock Mazda is no slouch, it’s not exactly the first thing you think of when you need a heavy-duty tow rig, but Jen and James had a plan. And despite our initial misgivings, it was one that actually made a lot of sense the more we thought about it.
“We love Mazdas and the Isuzu engine made it ideal for what we were building it for,” James told us. “On top of that, this was the most economical way for us to be able to build something that can legally tow 4.5t with a full canopy on the back.”
Hmmm… 4.5t legal towing capability when loaded up with all of the camping gear, fuel, water and their son’s quadbike? We needed to find out more about this weapon…
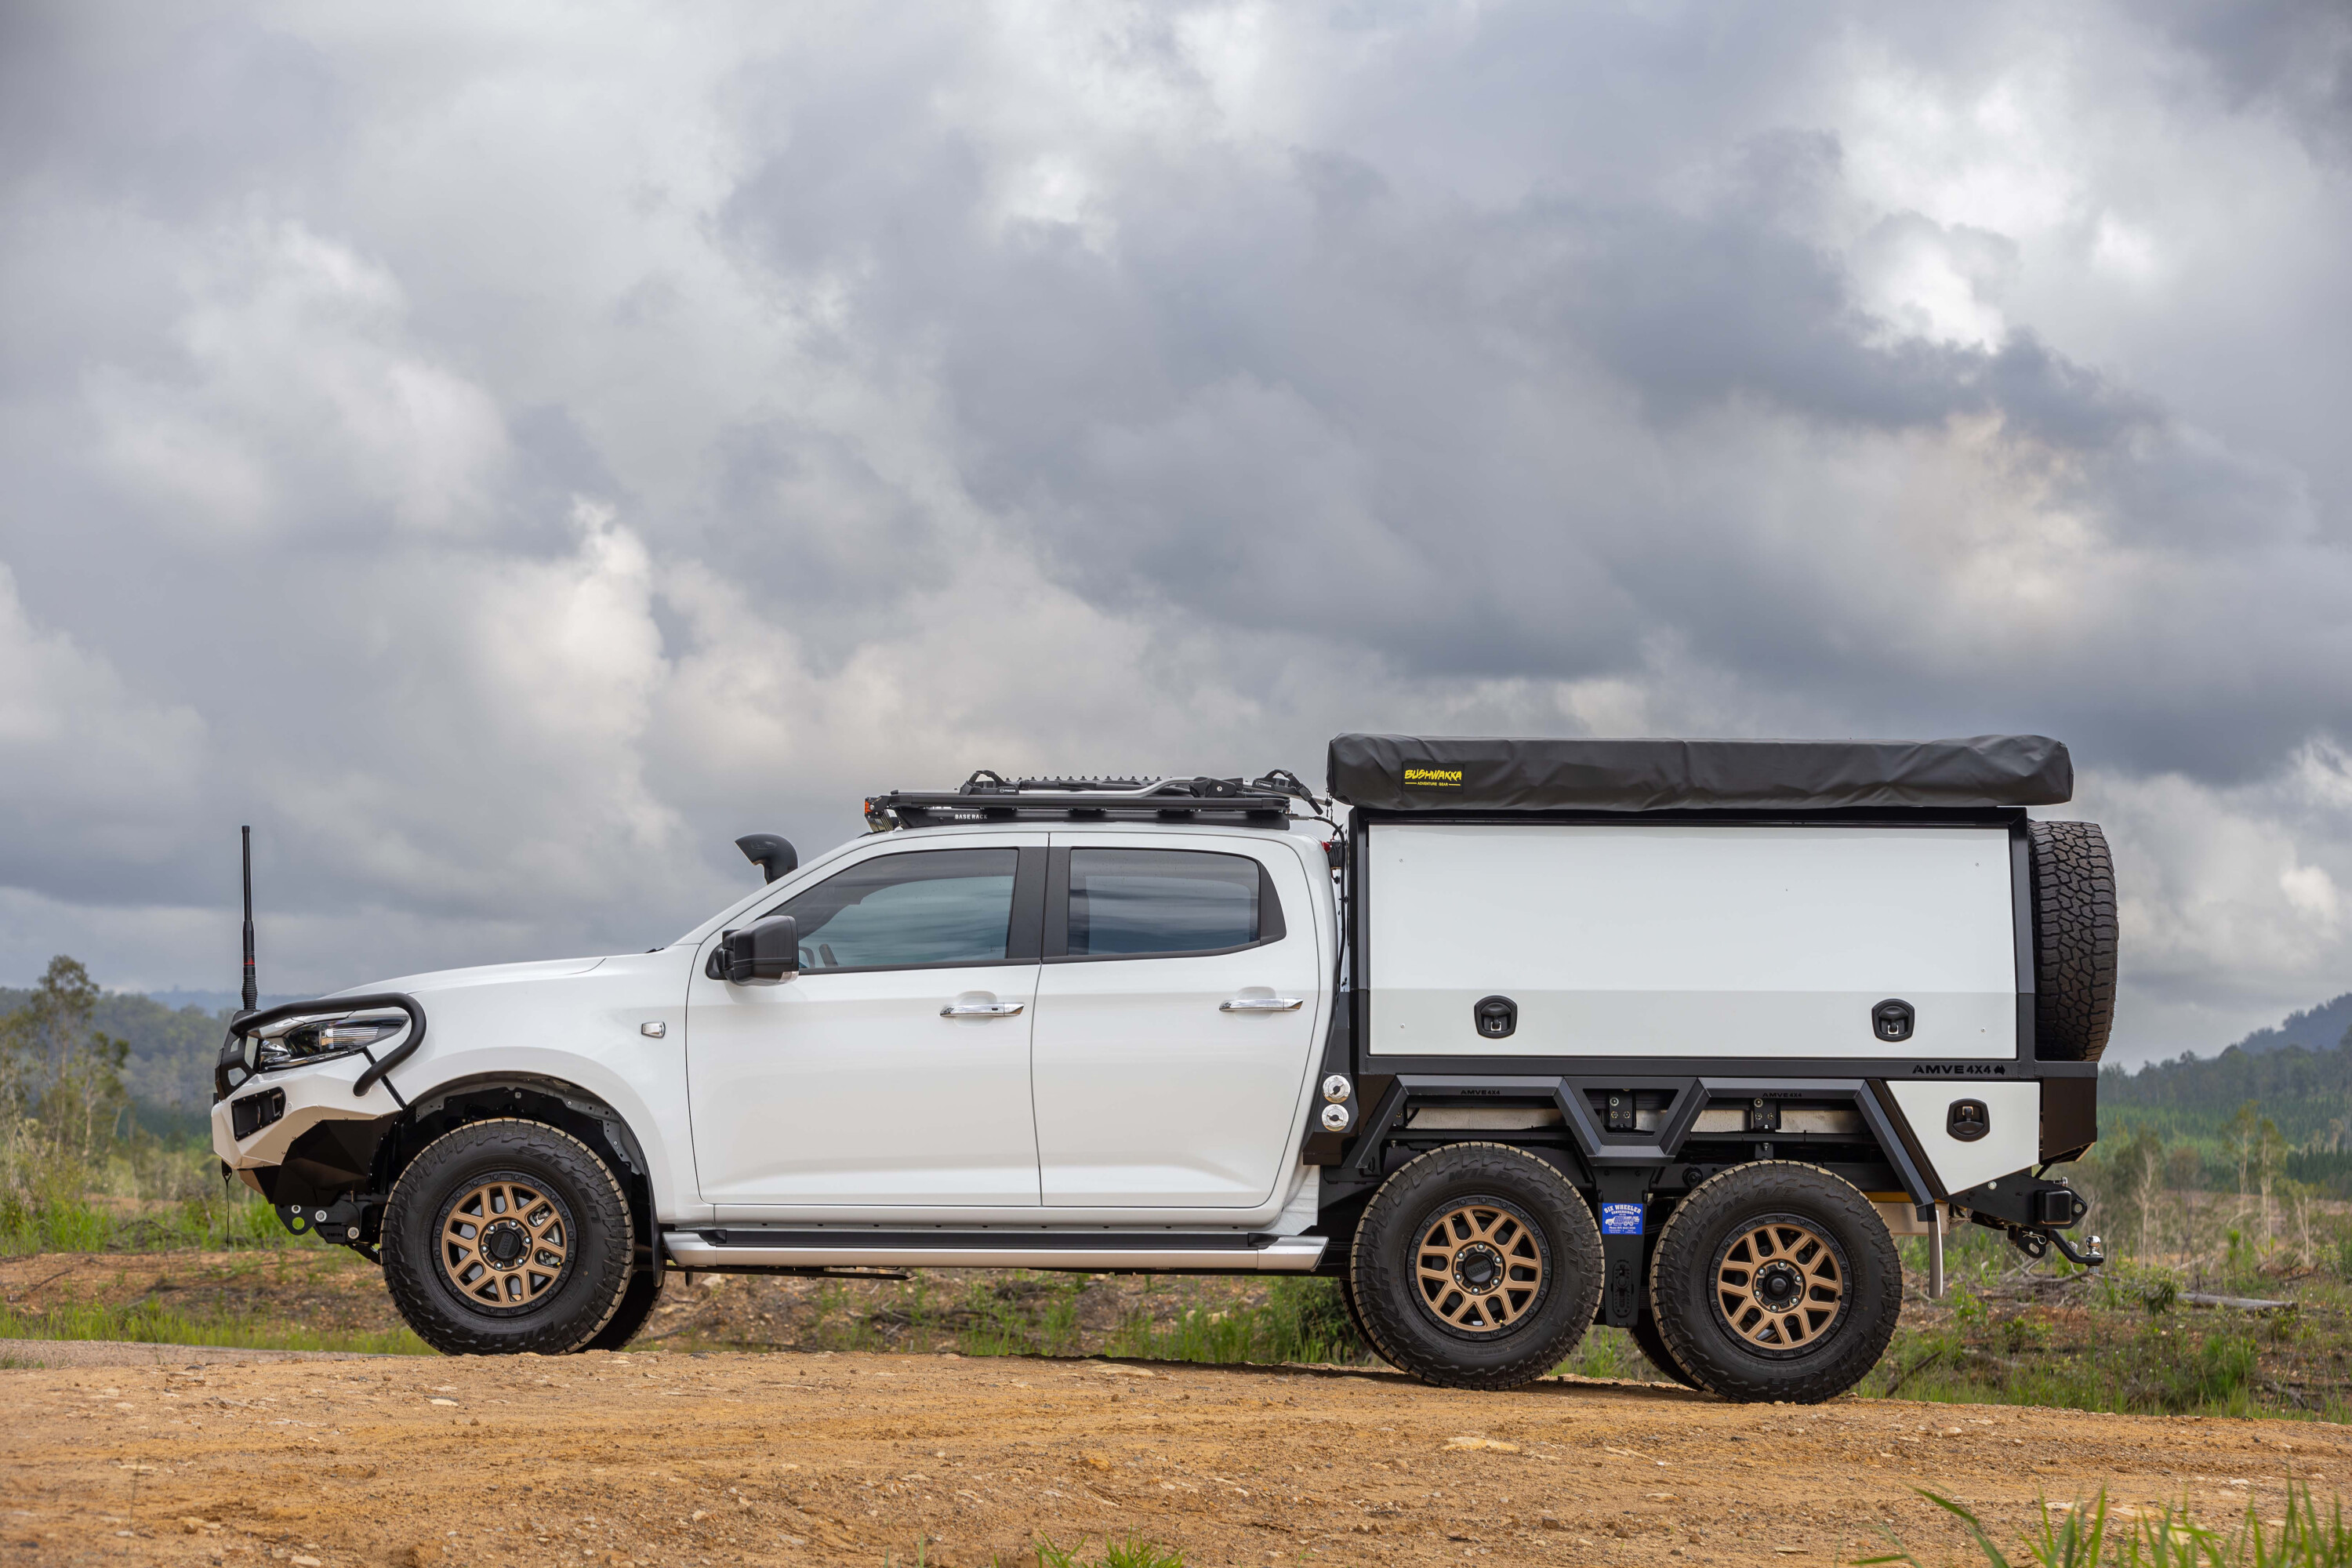
The conversion involves stretching and reinforcing the frame to accommodate the new lazy axle, as well as the installation of new leaf springs, with the whole show being designed to distribute the weight in a 60:40 split between the drive axle and the new lazy boy.
Interestingly, the off-road ability is not unduly hampered by the new addition. In fact, on sand the floatation is increased (especially when loaded up compared to a regular 4×4) and the articulation is still a respectable 300mm thanks to the leverage effect of the second axle tube.
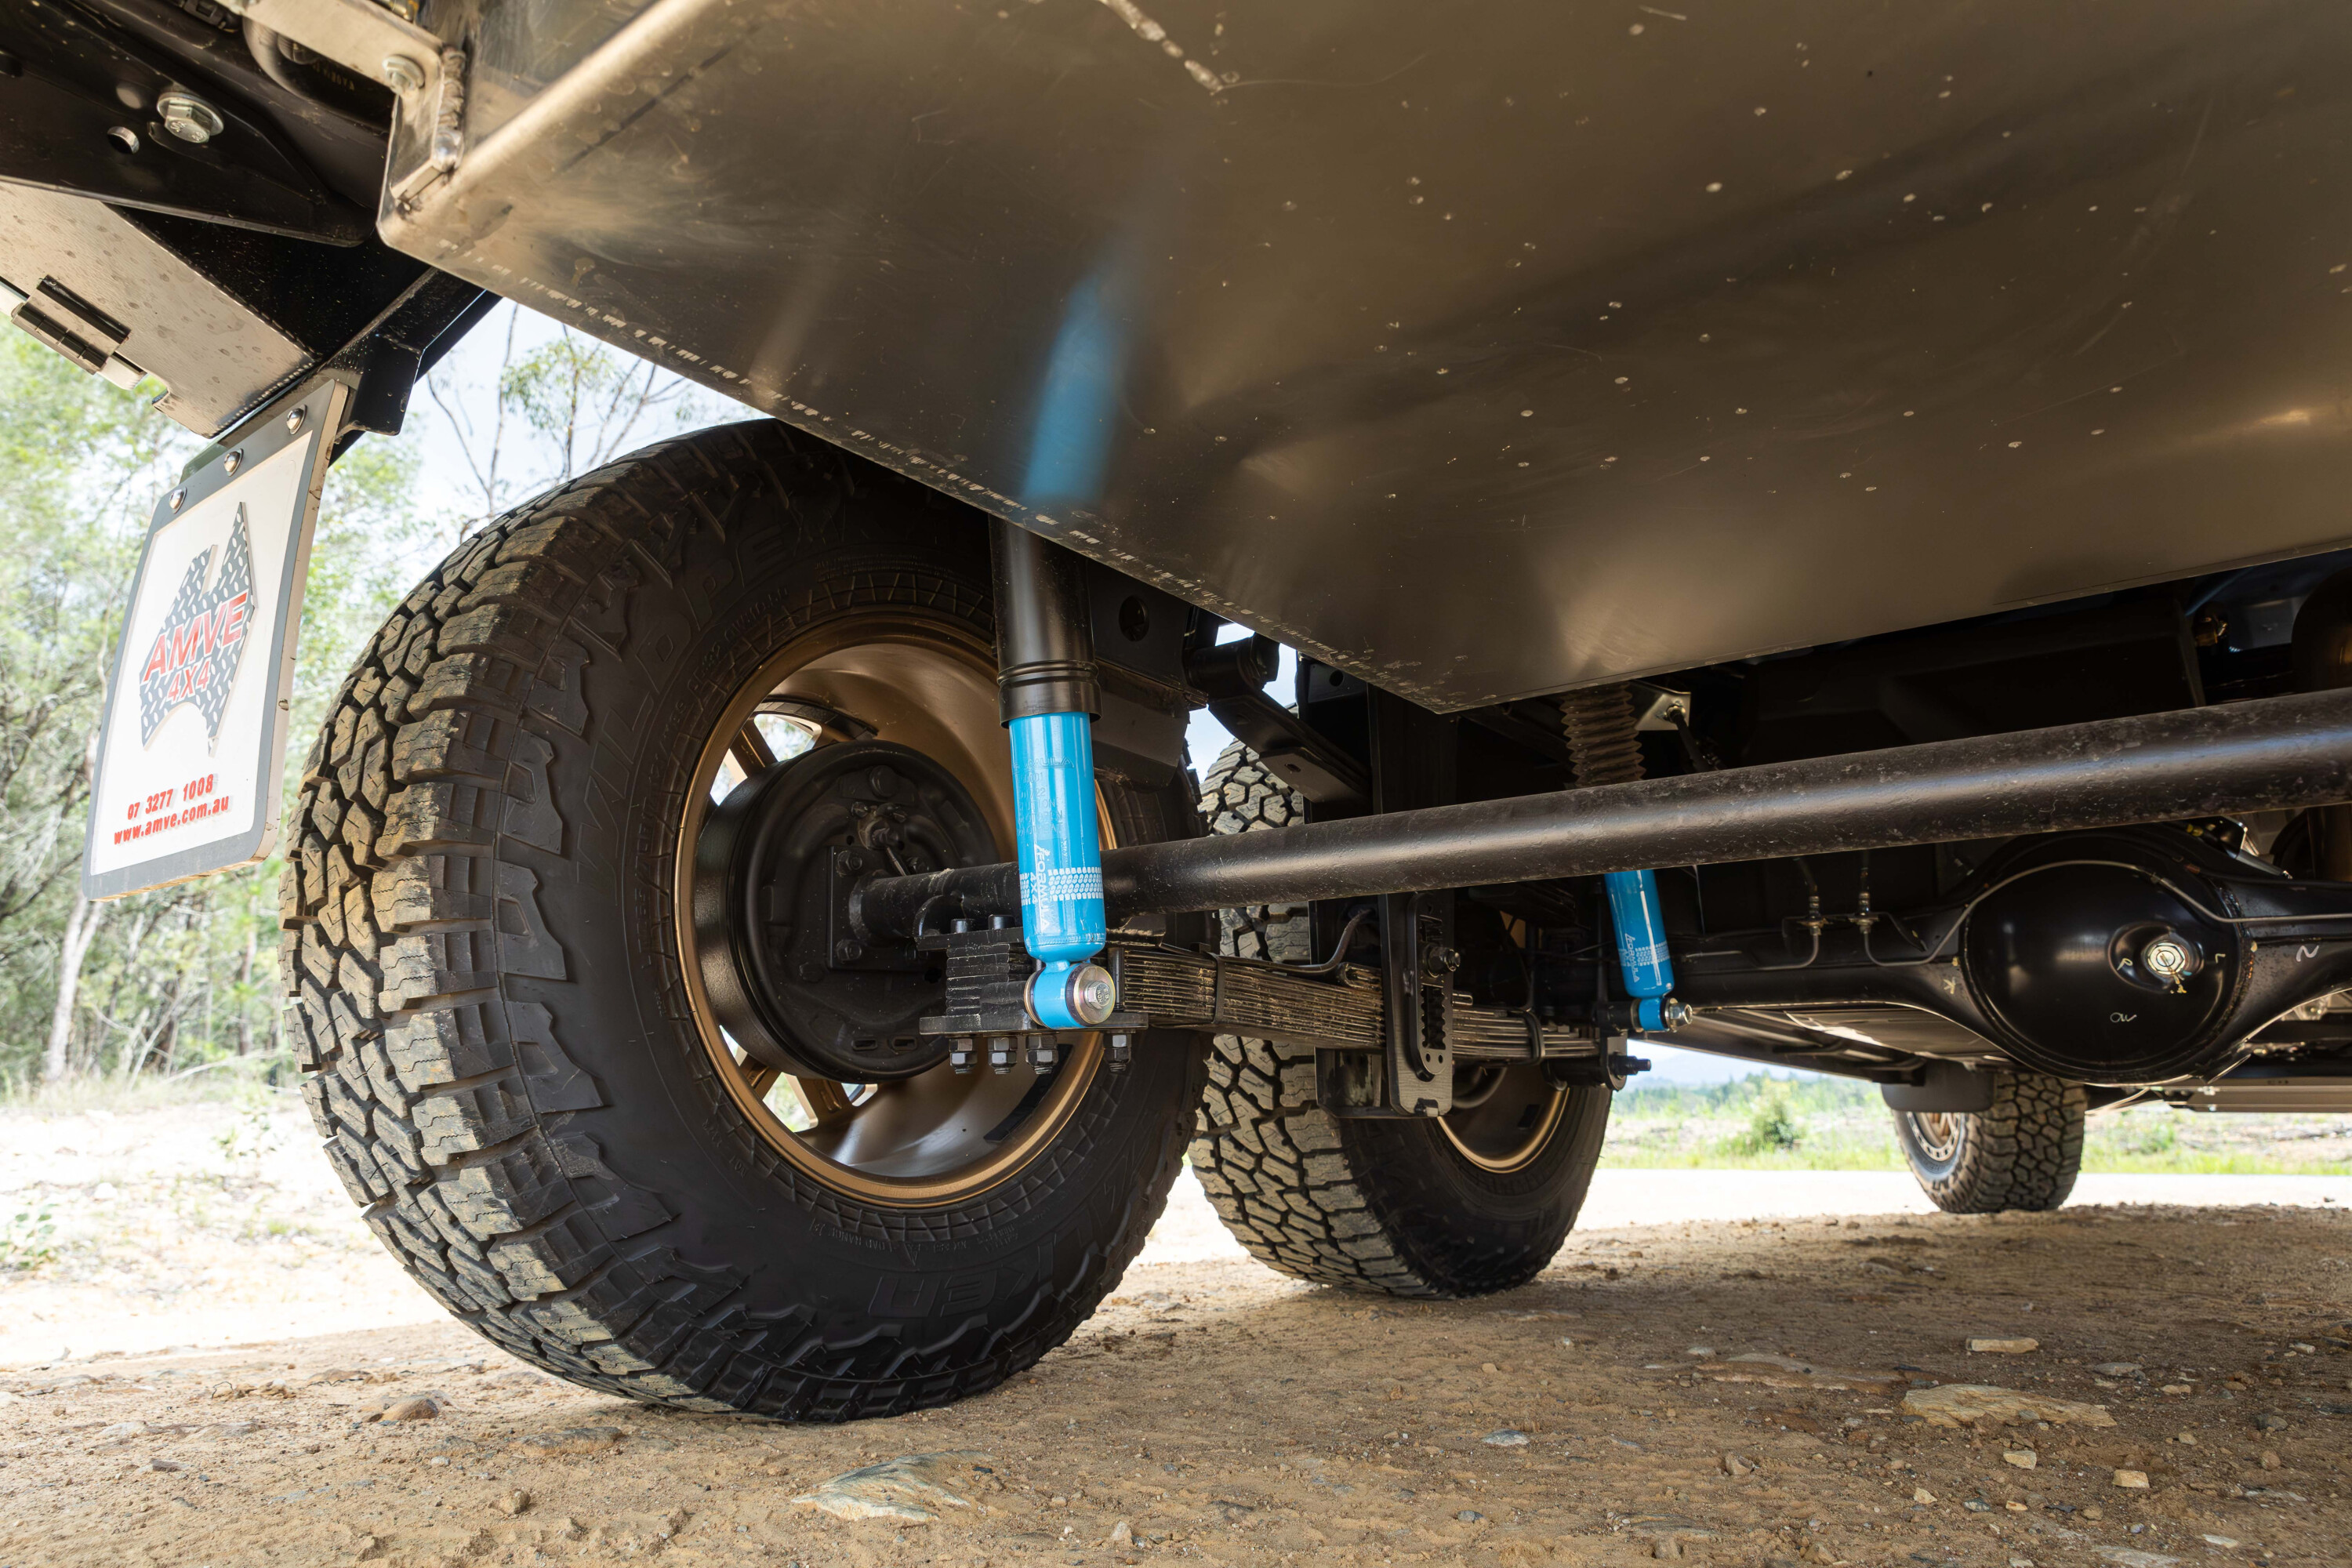
On-road driving and towing manners are also improved thanks to the extra wheelbase and optimum weight distribution between the six tyres’ contact patches.
As for the numbers, well, they’re pretty impressive. The new GVM is 4630kg (3100kg as stock) and the GCM is a hulk-like 8130kg (up from 6000kg). And in case you’re wondering, the front axle load is 1450kg while the rear axle group is rated at a massive 3183kg.
All of this necessitated registering the BT-75 as a truck, so a licence upgrade to LR is required to drive it, but the results and not having to worry about what is being carried or towed is priceless.
A full custom setup, James initially sketched out what he was after and gave it to Jamie and his team at AMVE who turned it into a scale drawing and fabricated it into reality.
In keeping with the theme of the build, the canopy is divided into six compartments – three primary ones for the essentials and three secondary storage areas for the rest of the gear. There are two of the primary housings on the driver’s side, the first of which holds a pair of 100Ah Revolution Power lithium batteries that are overseen by enough Victron gear to fill a catalogue, and topped up by a 140W solar panel up on the roof.
The second is the housing for the quadbike, which has to be the coolest thing ever, but if we spent too much time on every cool aspect of this rig we’d be here forever, so let’s move on.
The passenger’s side compartment spans the length of the canopy and houses a full custom kitchen that’d be right at home in a luxury apartment.
A fully functional bench is made possible thanks to the three slide-outs, two of which are double-slide, and a pair of pantries for huge amounts of storage.
There’s also a coffee machine, air-fryer, induction cooktop, griller, microwave (of course) and an 85L Bushman upright fridge centrally mounted for easy access. We’re guessing Jen and James don’t often resort to the home-brand loaf of white bread and cheap snags, or a tin of cold soup for their evening meals when out in the bush.
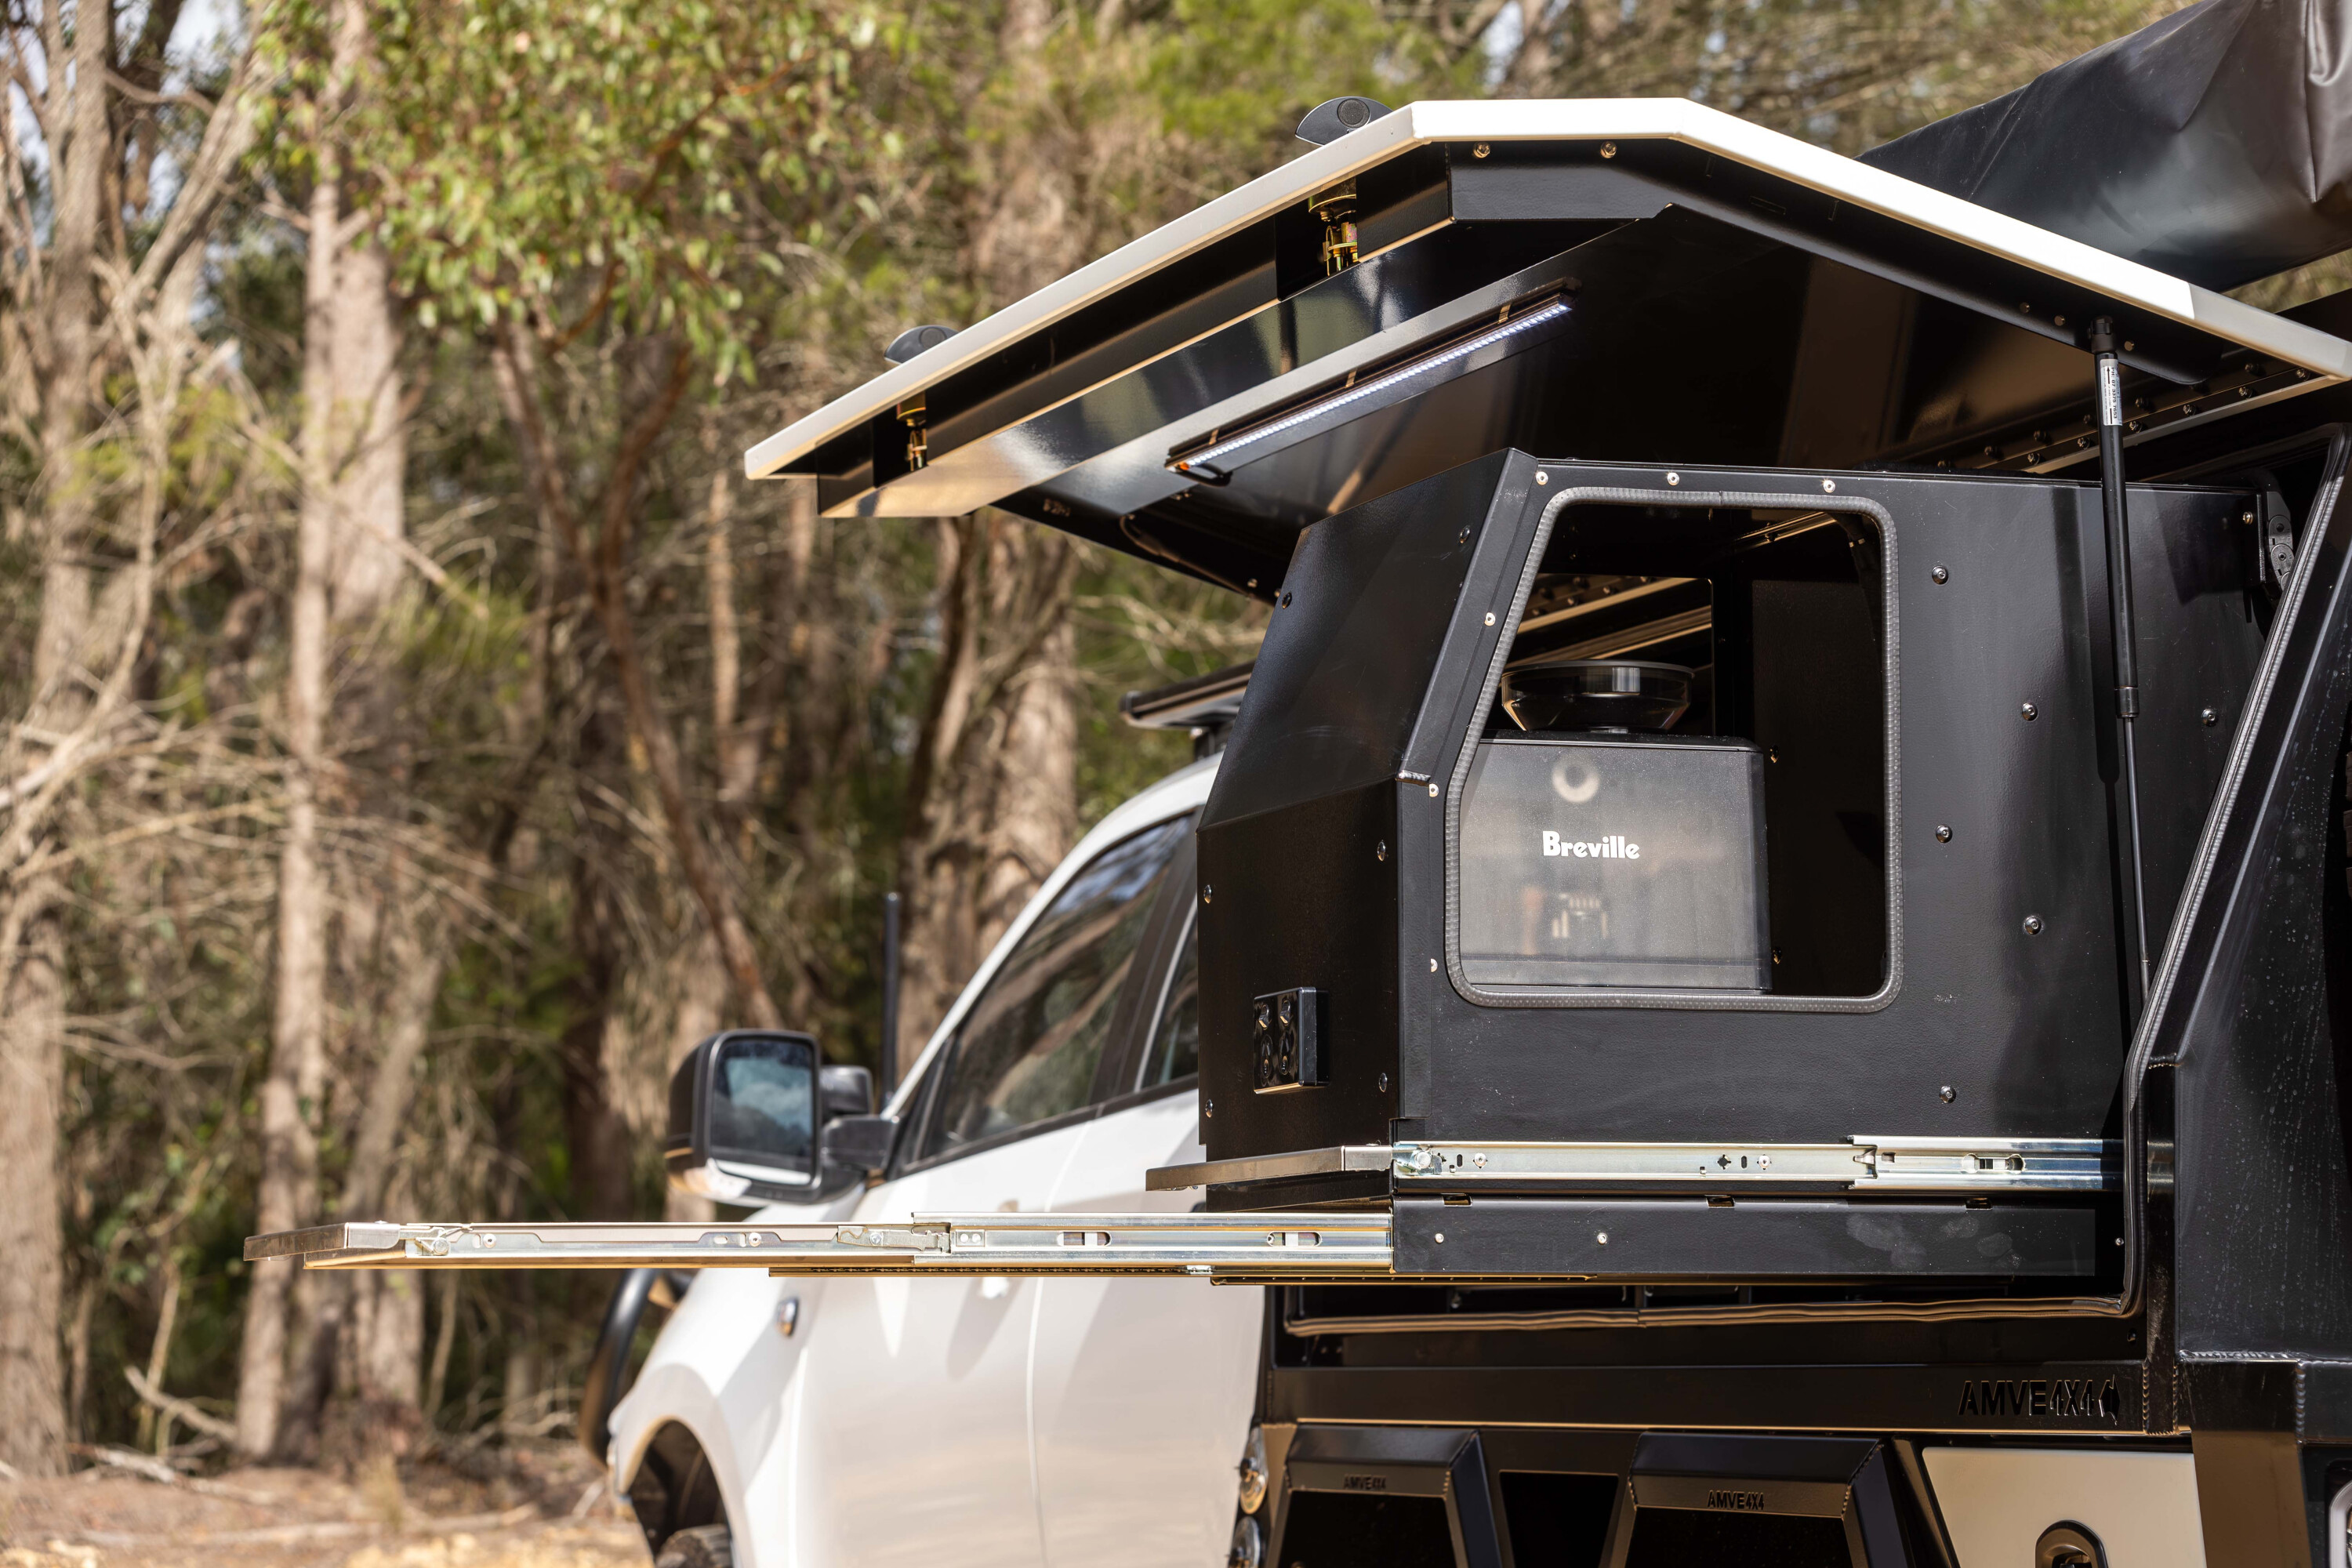
The secondary drop-down storage boxes house the ARB twin-pump compressor and accessories, the shower and water-based gear, and the tools and recovery gear should they be required at short notice.
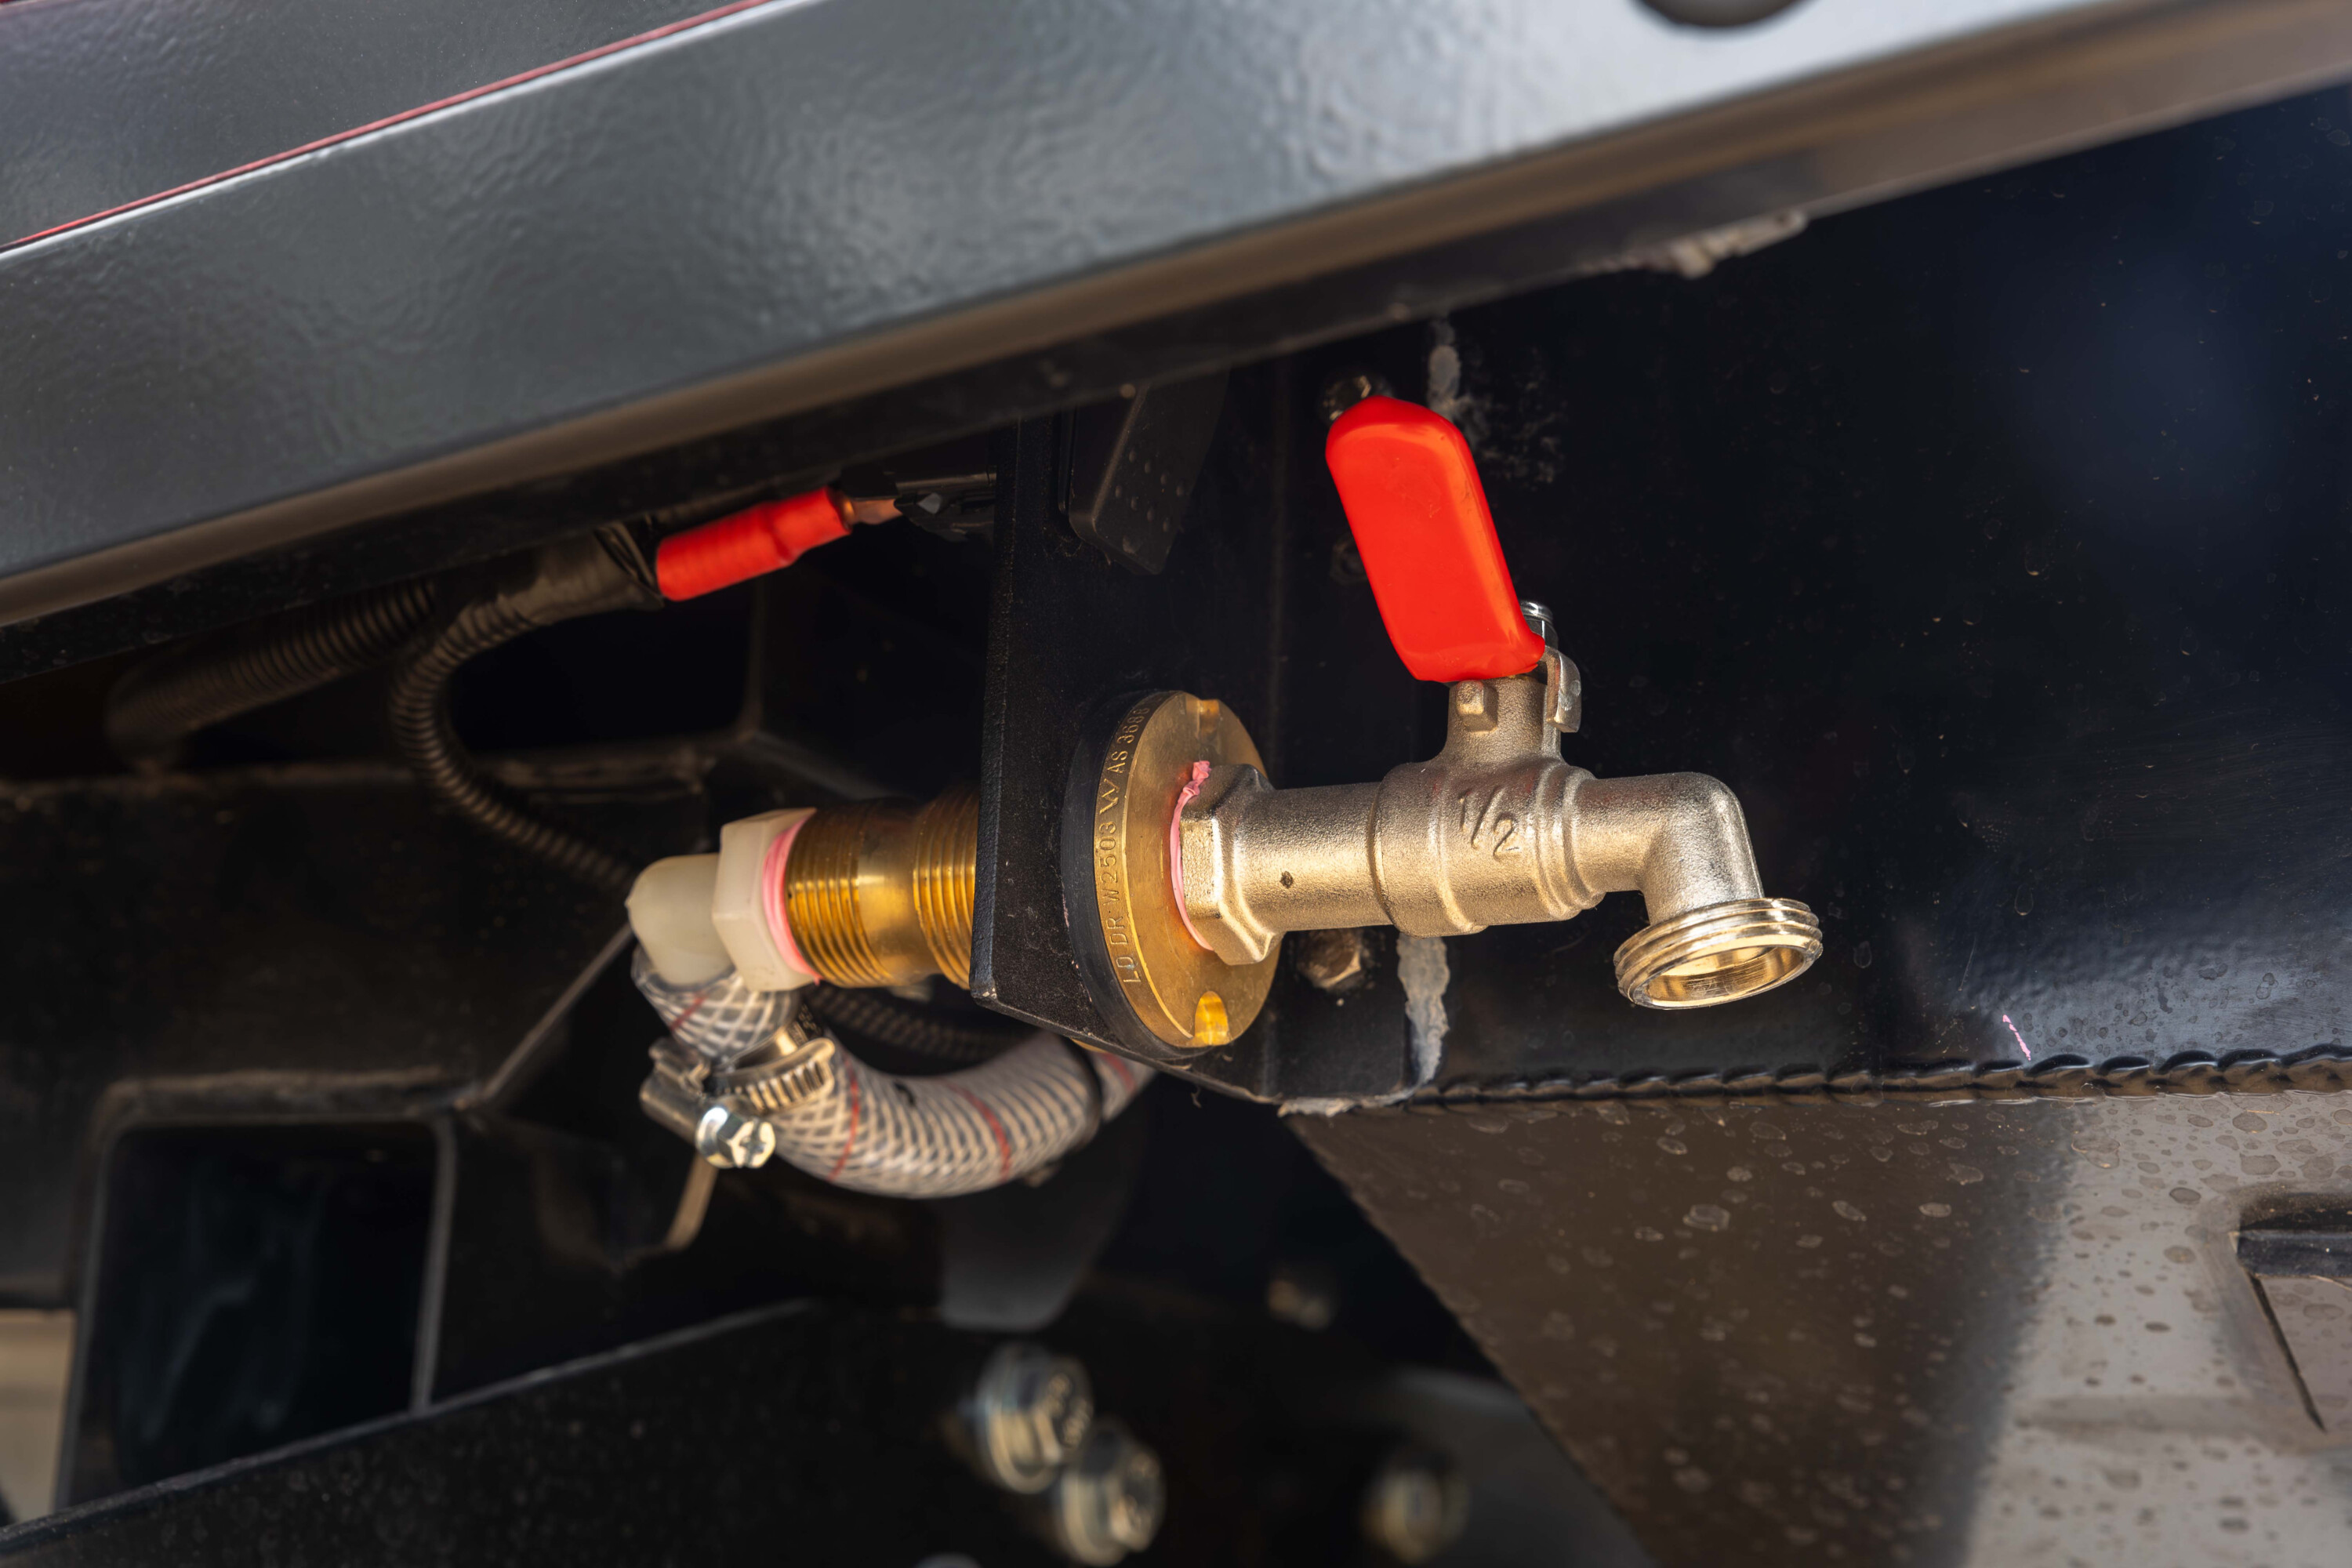
Under the tray there’s 191L of diesel available thanks to the ARB Frontier tank and BOAB 58L feeder tank, which gives this rig well north of 1200km of range, opening up trips like the Canning Stock Route or pretty much anywhere else for that matter. Water is stored in an AMVE custom made 80L stainless tank that feeds the 58L BOAB poly water tank. A high-pressure pump then sends it to the shower, sink or wash-down outlet after a run near the salt water.
The Bushwakka 270 awning and Bushwakka double ensuite rounds out what has to be one of the most comprehensive canopies we’ve ever seen.
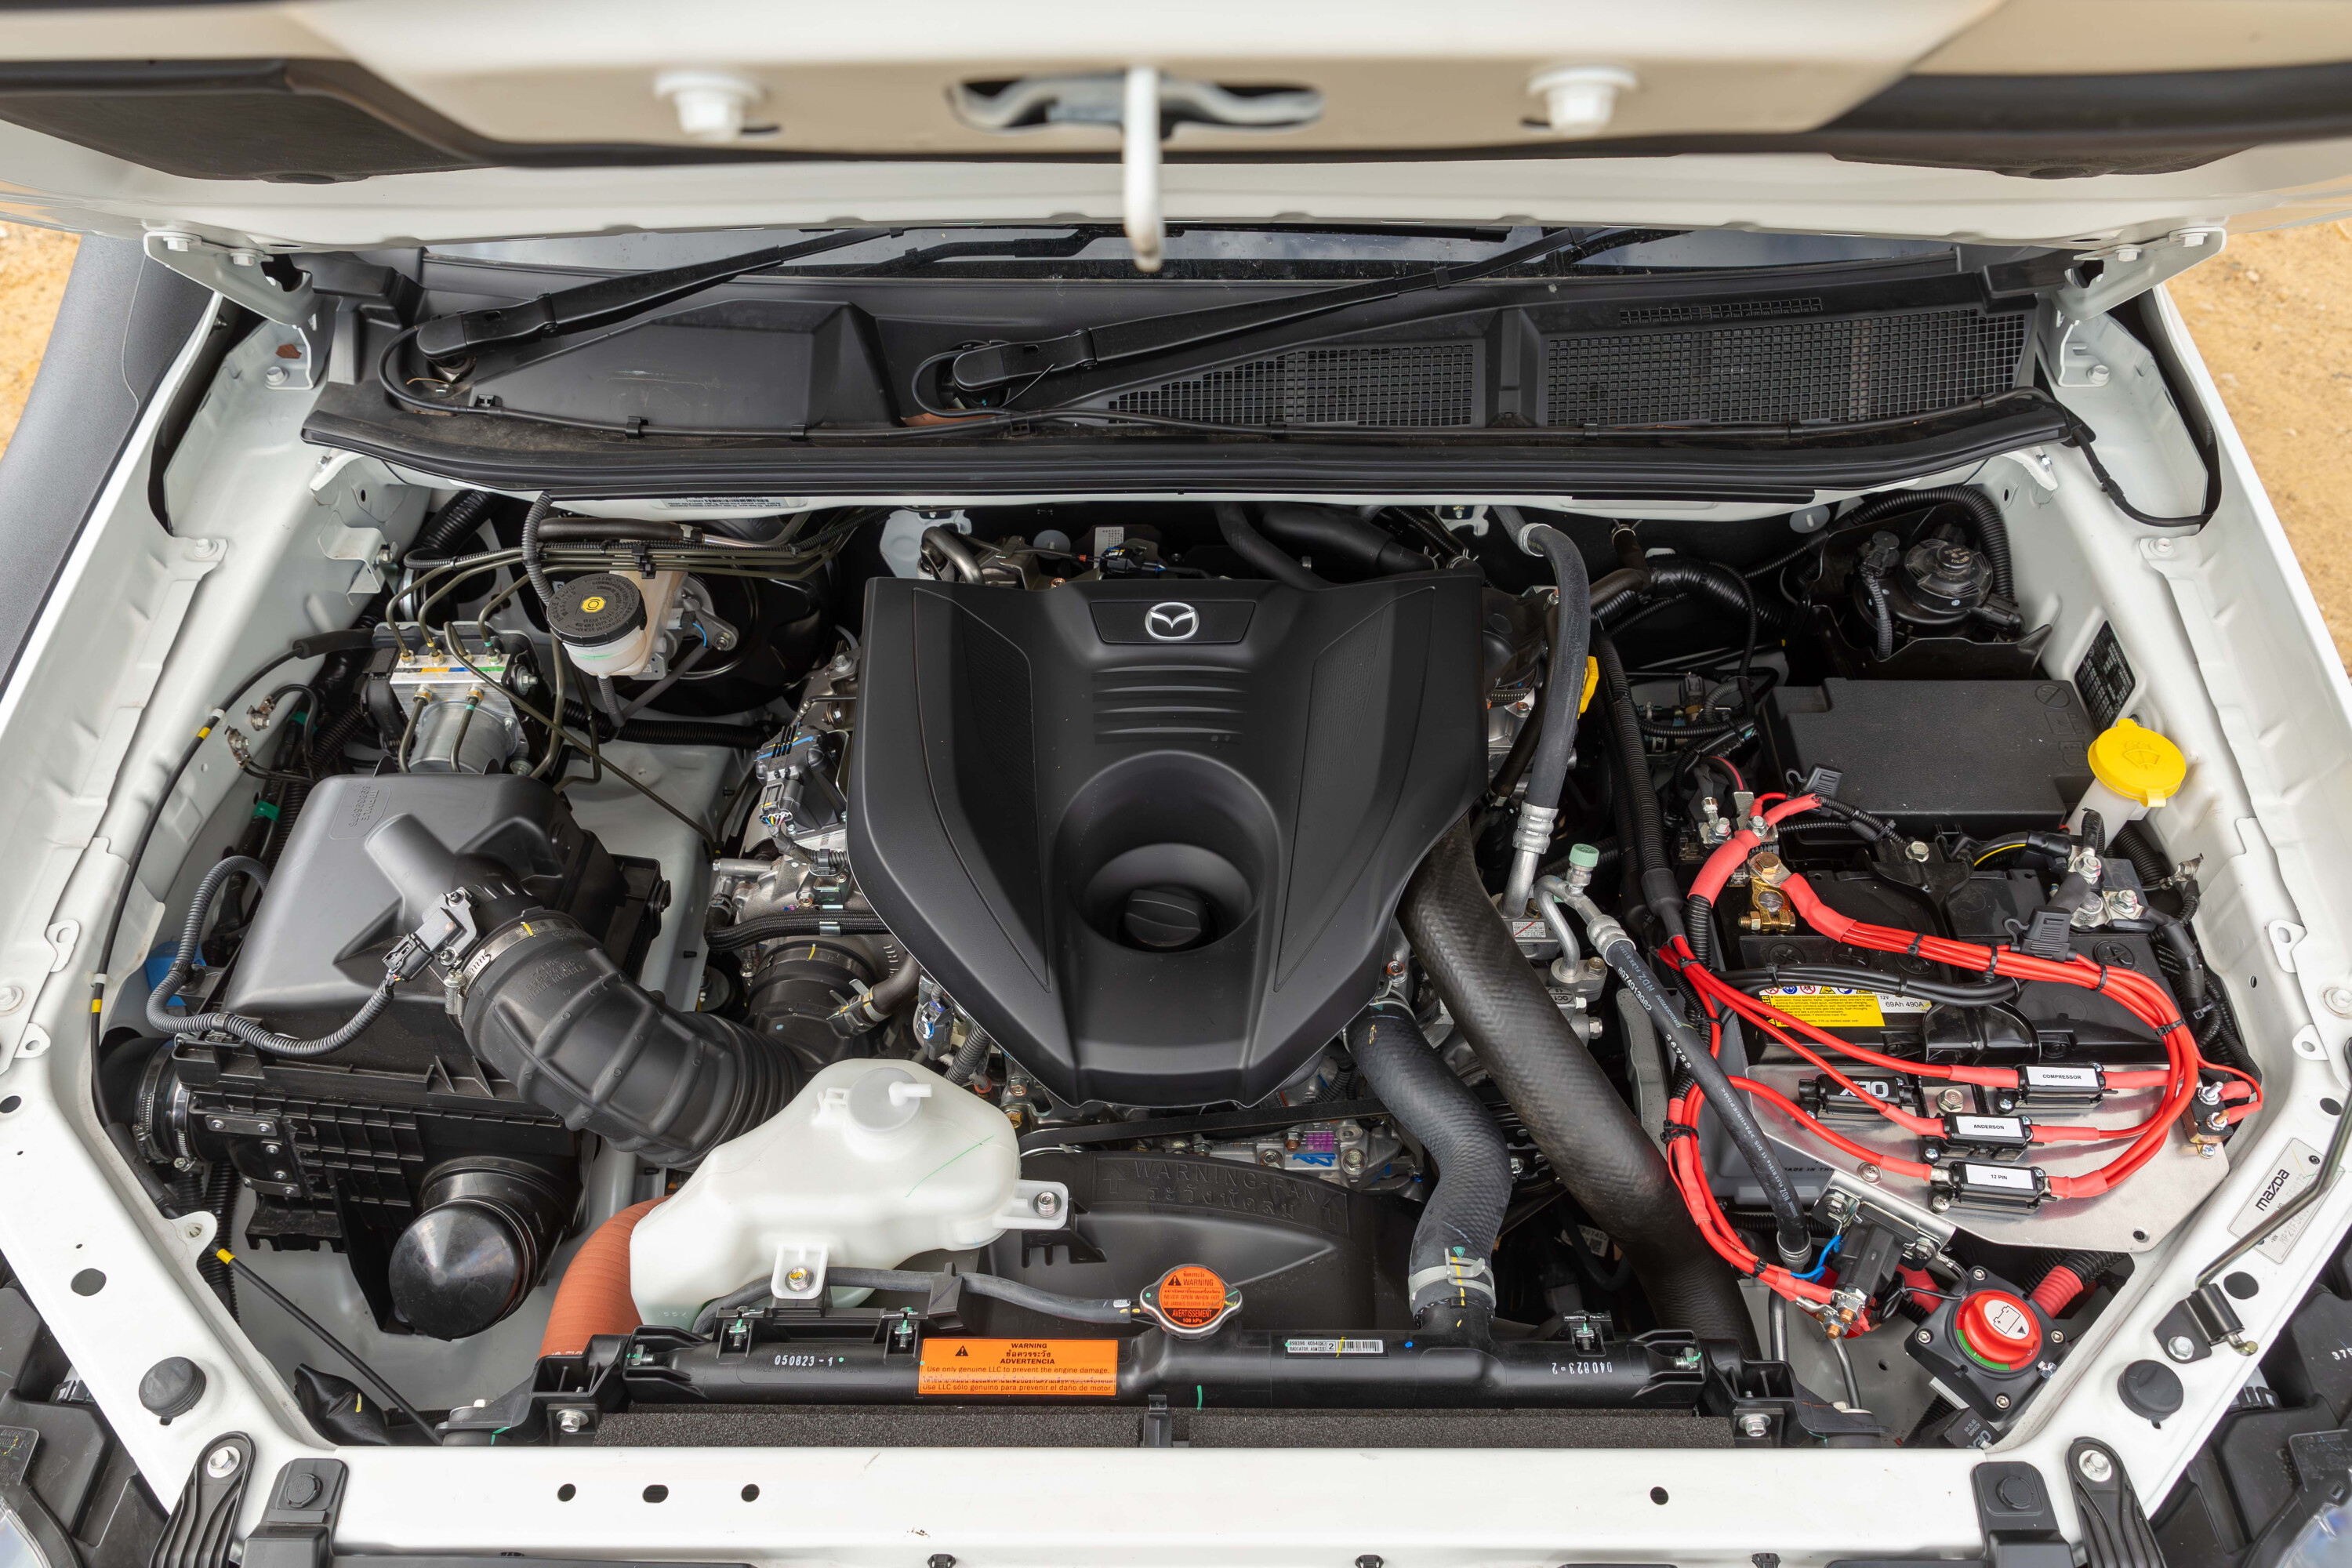
Under-stressed from stock and capable of big dyno numbers and bigger kays when treated right, it’s a solid engine for a tow rig like this. A Safari snorkel, PWR radiator, intercooler upgrade and trans cooler have been installed ready for the tune, which should be done by the time you read this.
As for the exhaust, a custom dump pipe from the turbo flows into the standard DPF for legal reasons, then into 2.75-inch pipe to keep things moving along nicely.
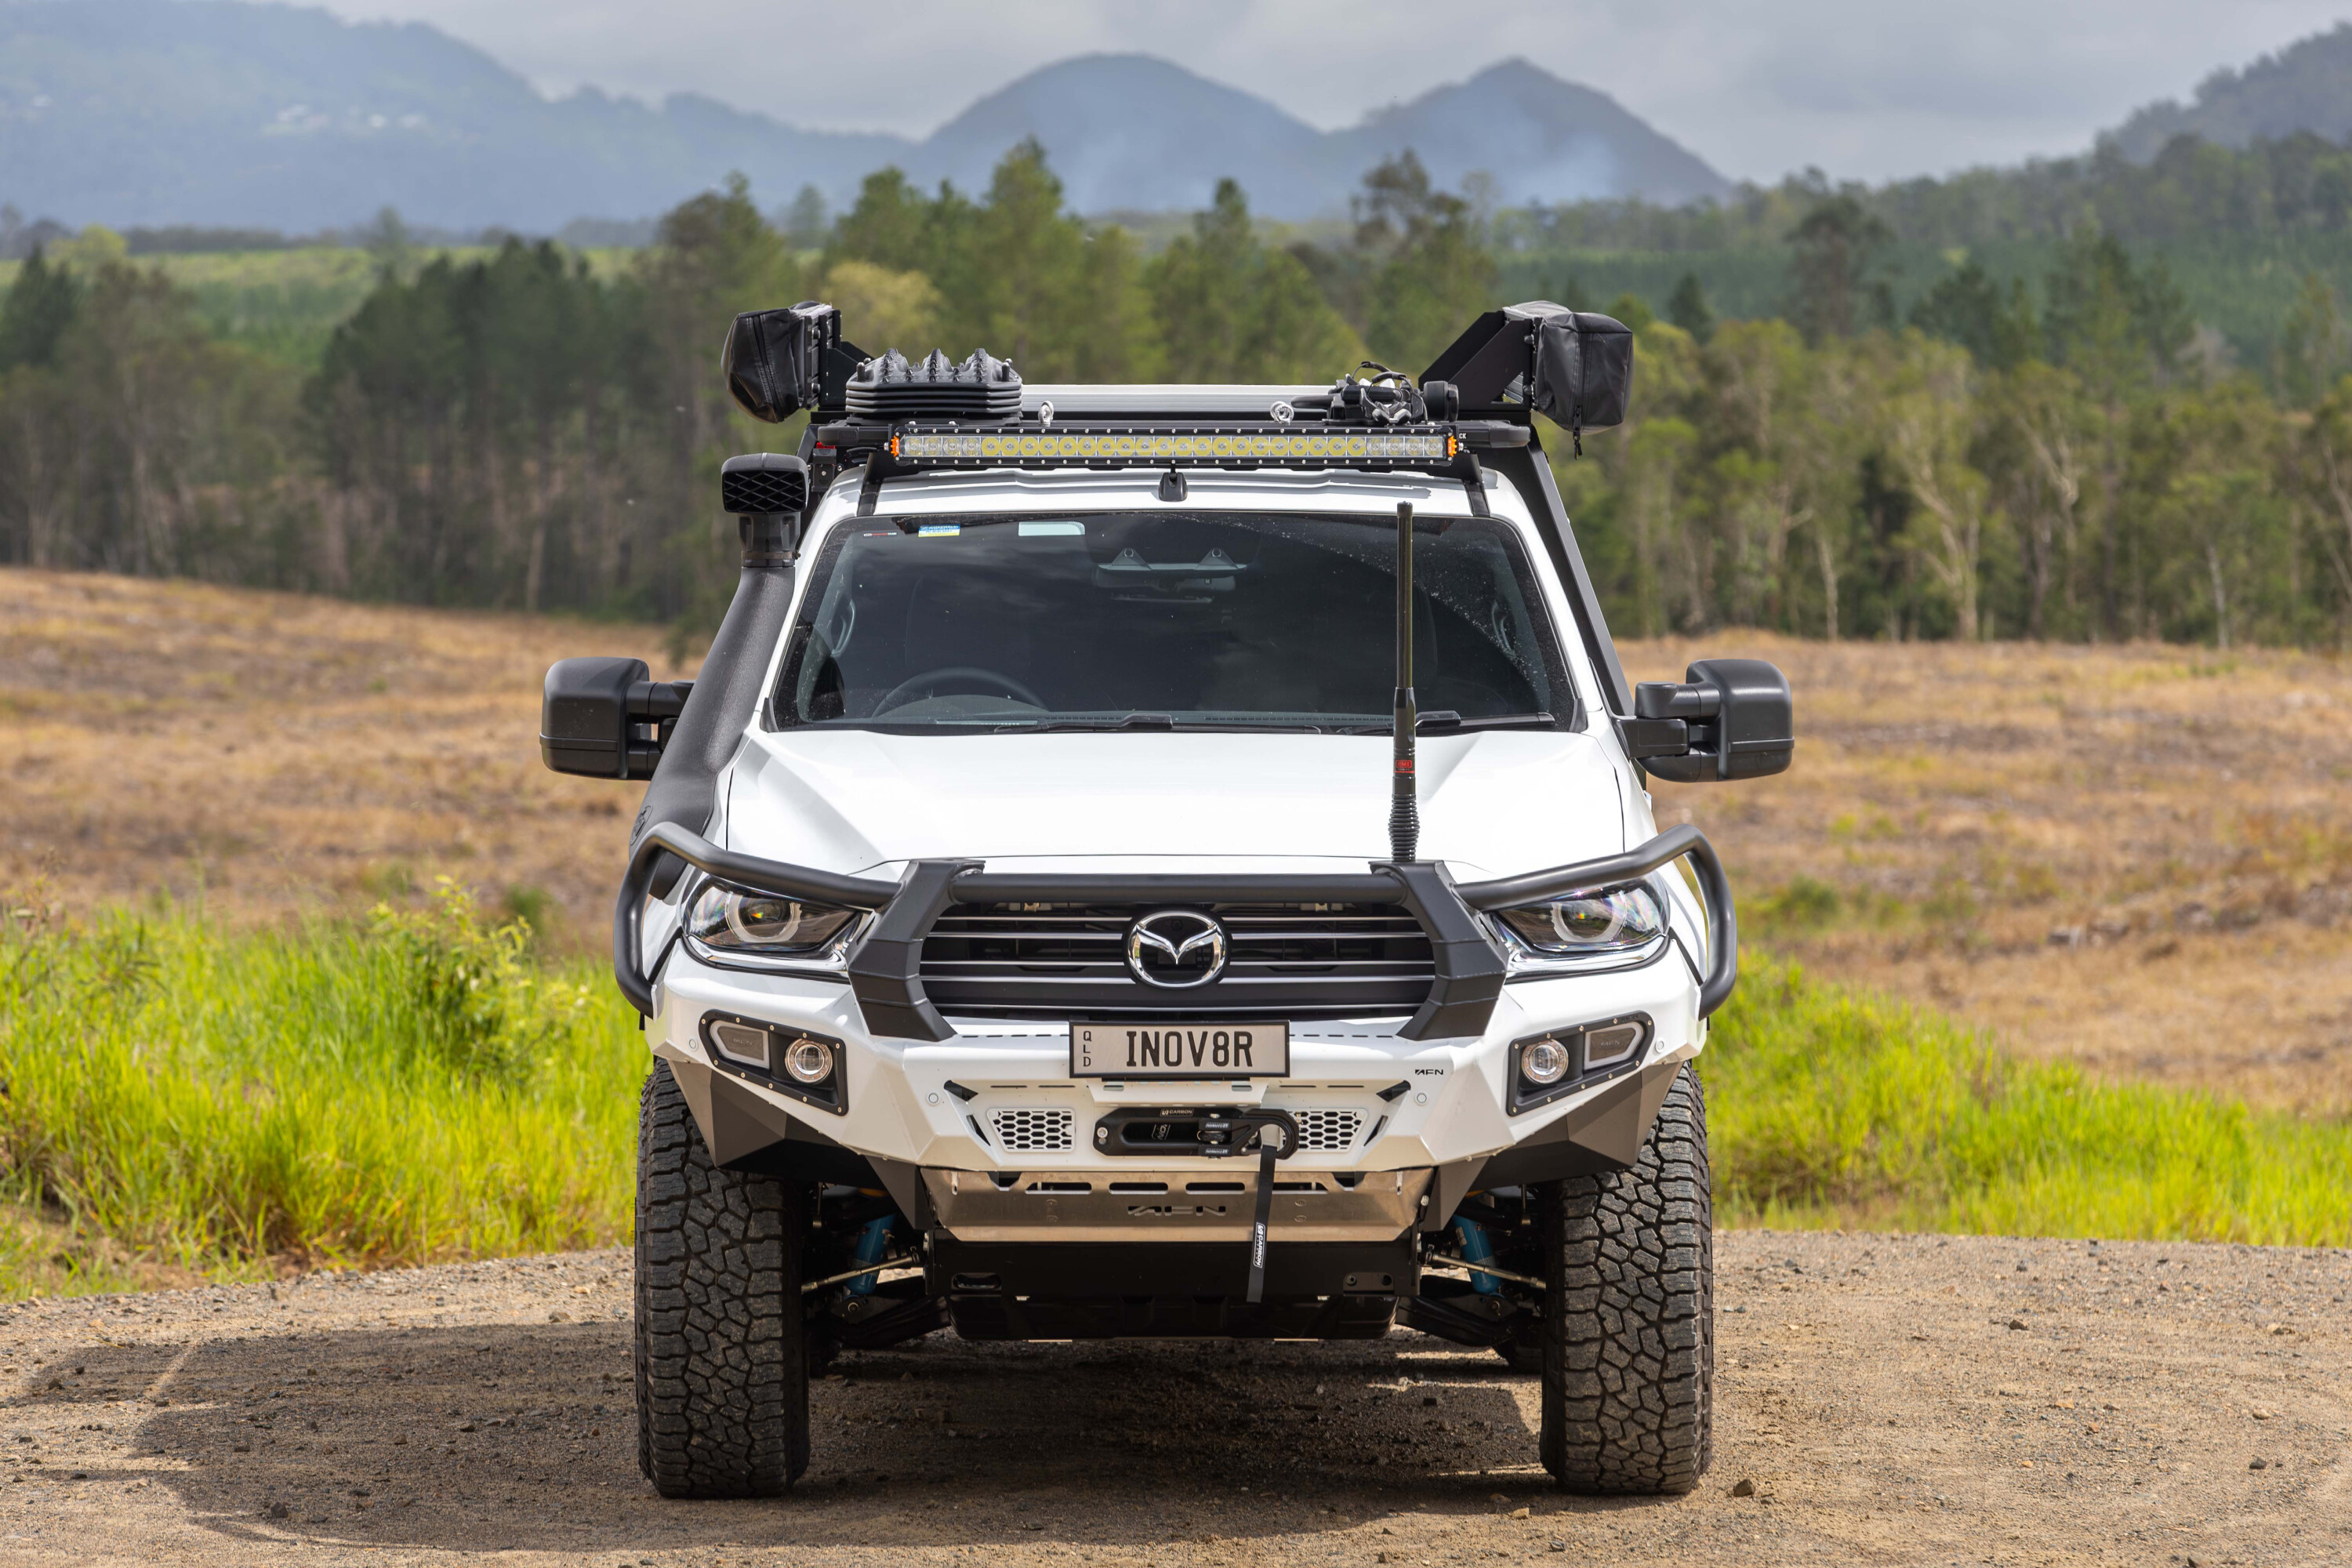
The suspension is roughly two-inches higher than stock which allowed fitment of the 265/75R17 Falken Wildpeak rubber.
To keep the front end protected an AFN colour-matched bar leads the way while a Custom Off Road stainless steel three-piece bashplate covers everything underneath back to the rear diff solednoid. A Carbon 12,000lb electric winch is also installed should the big rig encounter something it can’t power through on its own.
A Stedi lightbar keeps the ’roos visible after dark and there are LEDs pointing rearward and on all the canopy doors and underside of the awning so meal-prep or camp-chair-to-fridge journeys are well catered for.
With that said, there are still plans for a boat loader (if the scales permit) and a full vehicle wrap to make it really stand out like the dog’s jangly bits. They’re never 100 per cent done, right?
After that there are plans to head to the left coast to see Ningaloo and the thousands of other spots worth stopping at over in WA. Oh, and K’gari has also been calling and daring the big BT and 22ft van to come try its luck on the sand. If we were betting men, we’d be quietly putting a pineapple on the Mazda.
Either way, when it comes to living life on (and off) the road in comfort and style this is one set-up that’s tough to beat.
There is a huge range of different brand lights on the Aussie market, ranging in price from a couple of hundred bucks for a pair to well over $1500 for a set of high-performance lights, and we have tested many over the years. What we have learnt is that you get what you pay for, and we always go for top-end brands as they perform better for longer, while being stronger and much more reliable than cheaper lights.
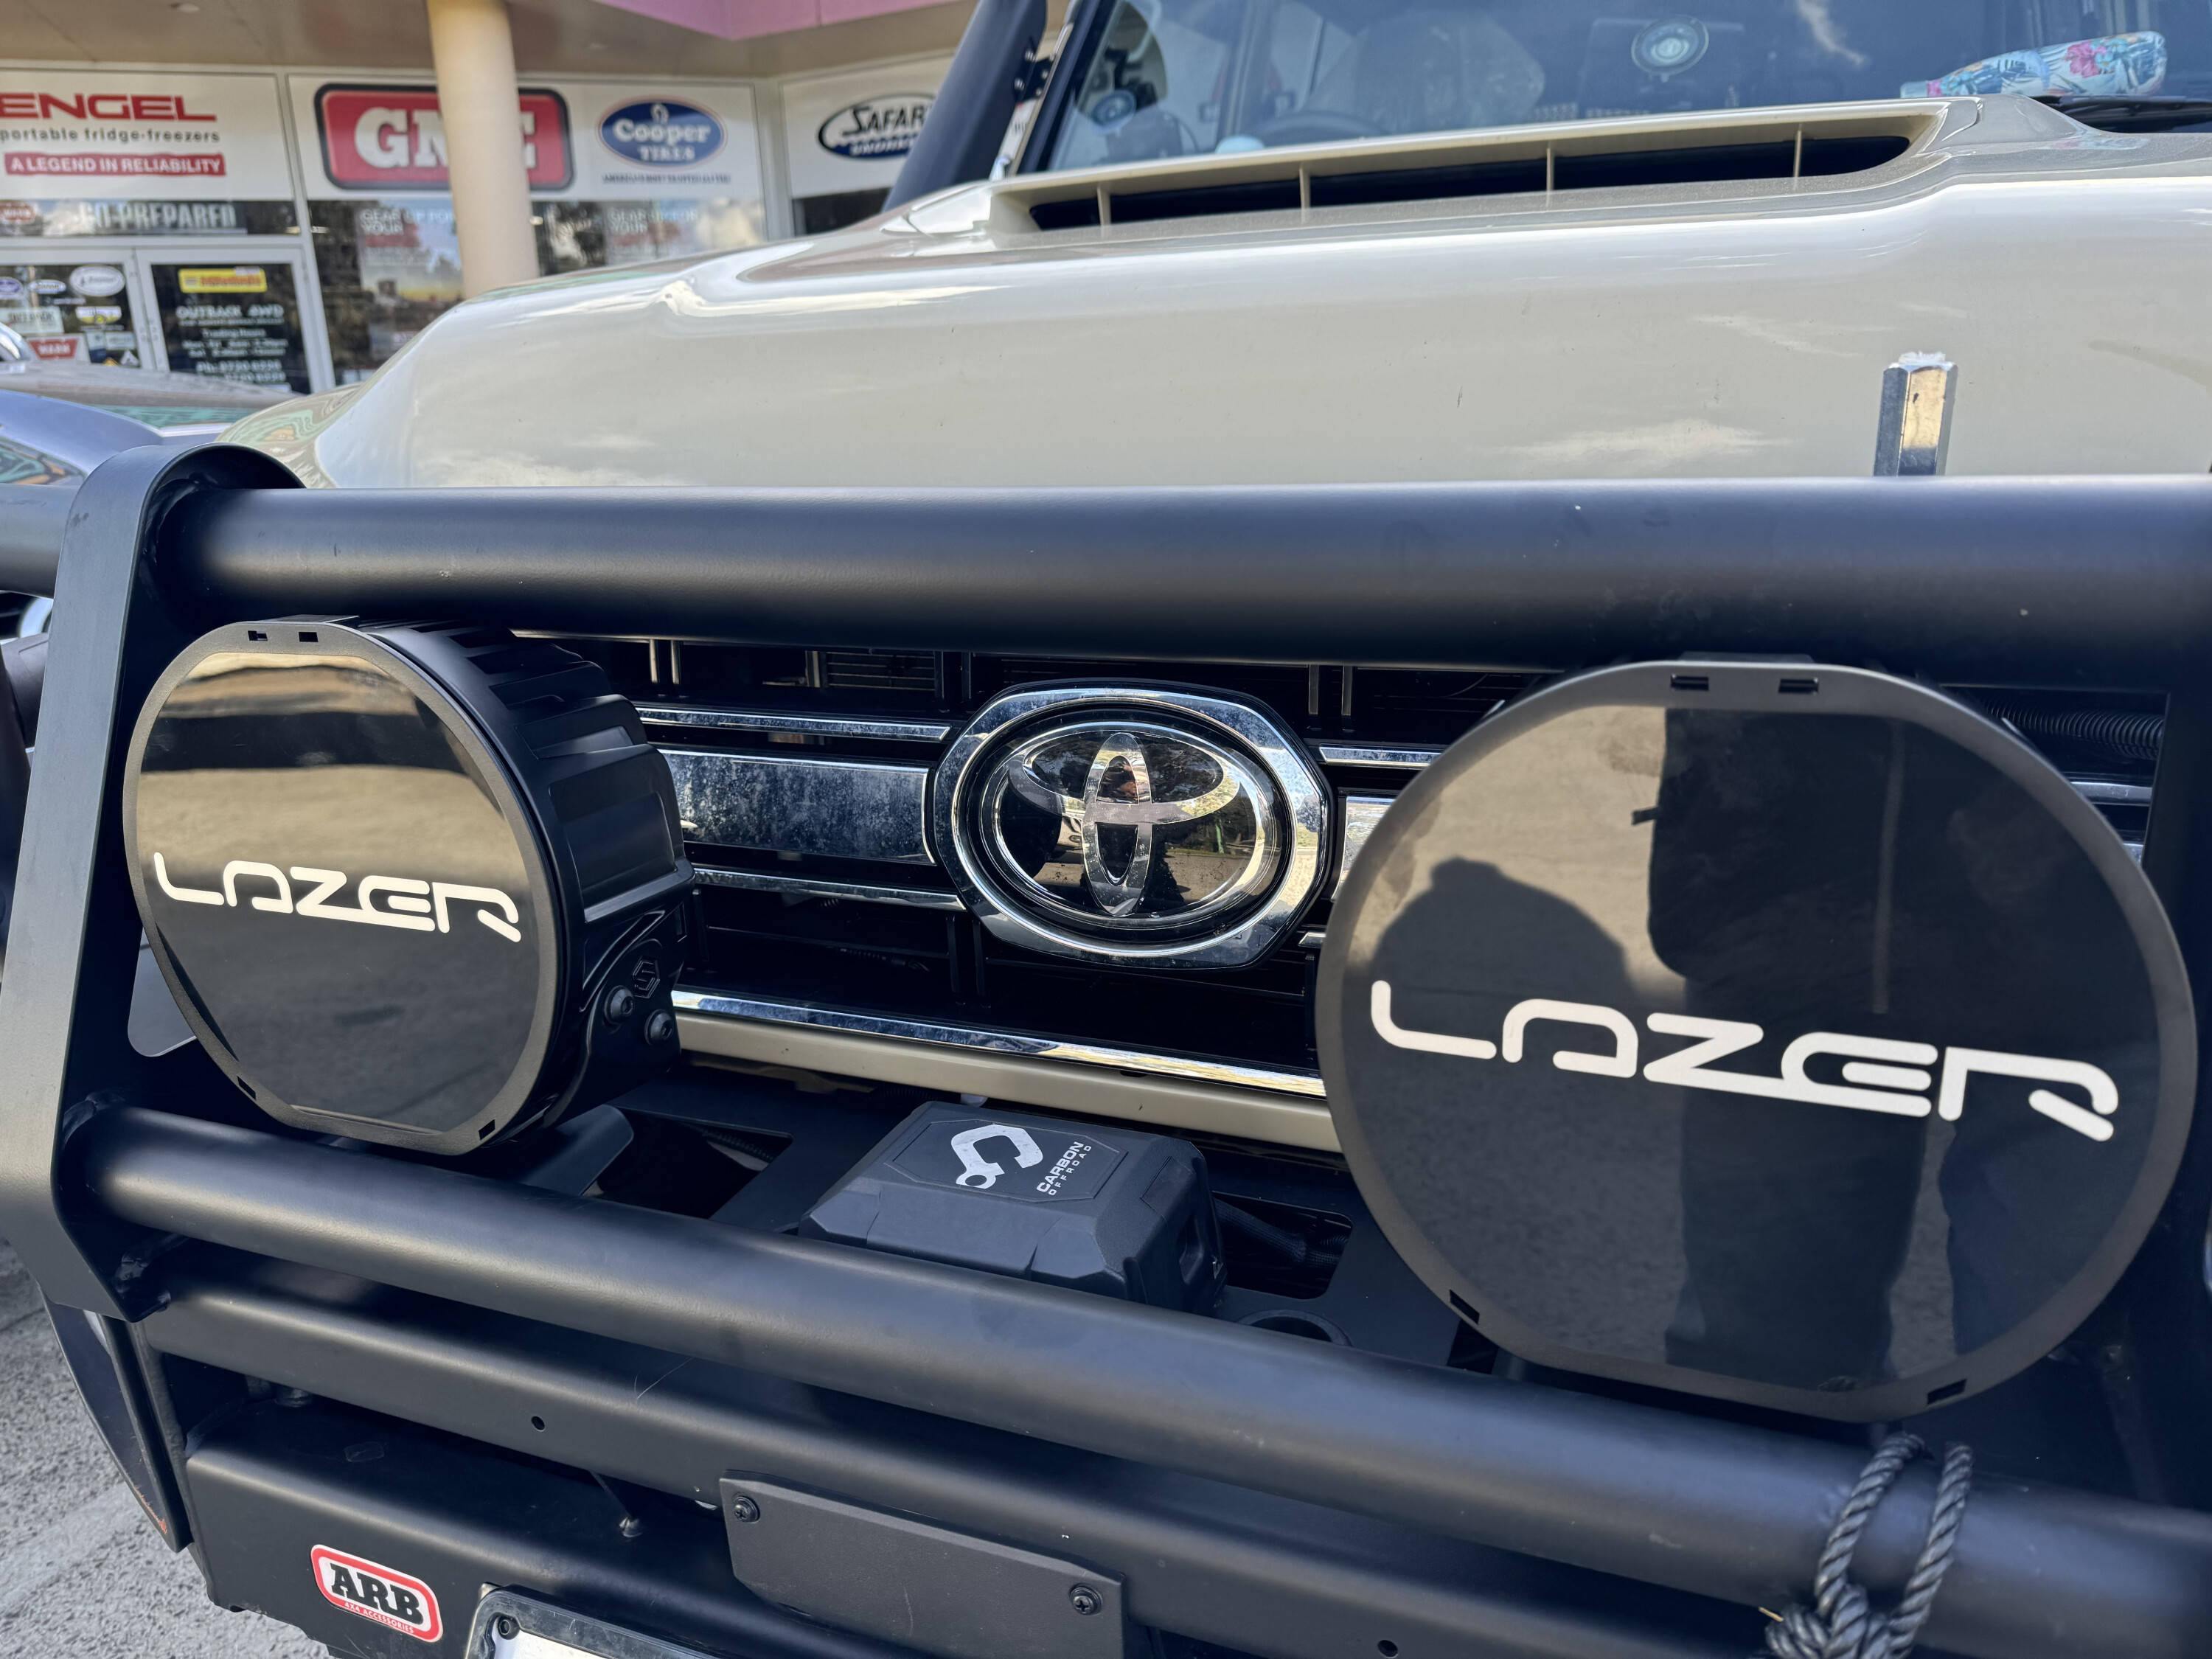
After hearing some positive reports, this time around we decided to fit a pair of Lazer Lamps Sentinel 9” Elite lights on the Troopy.
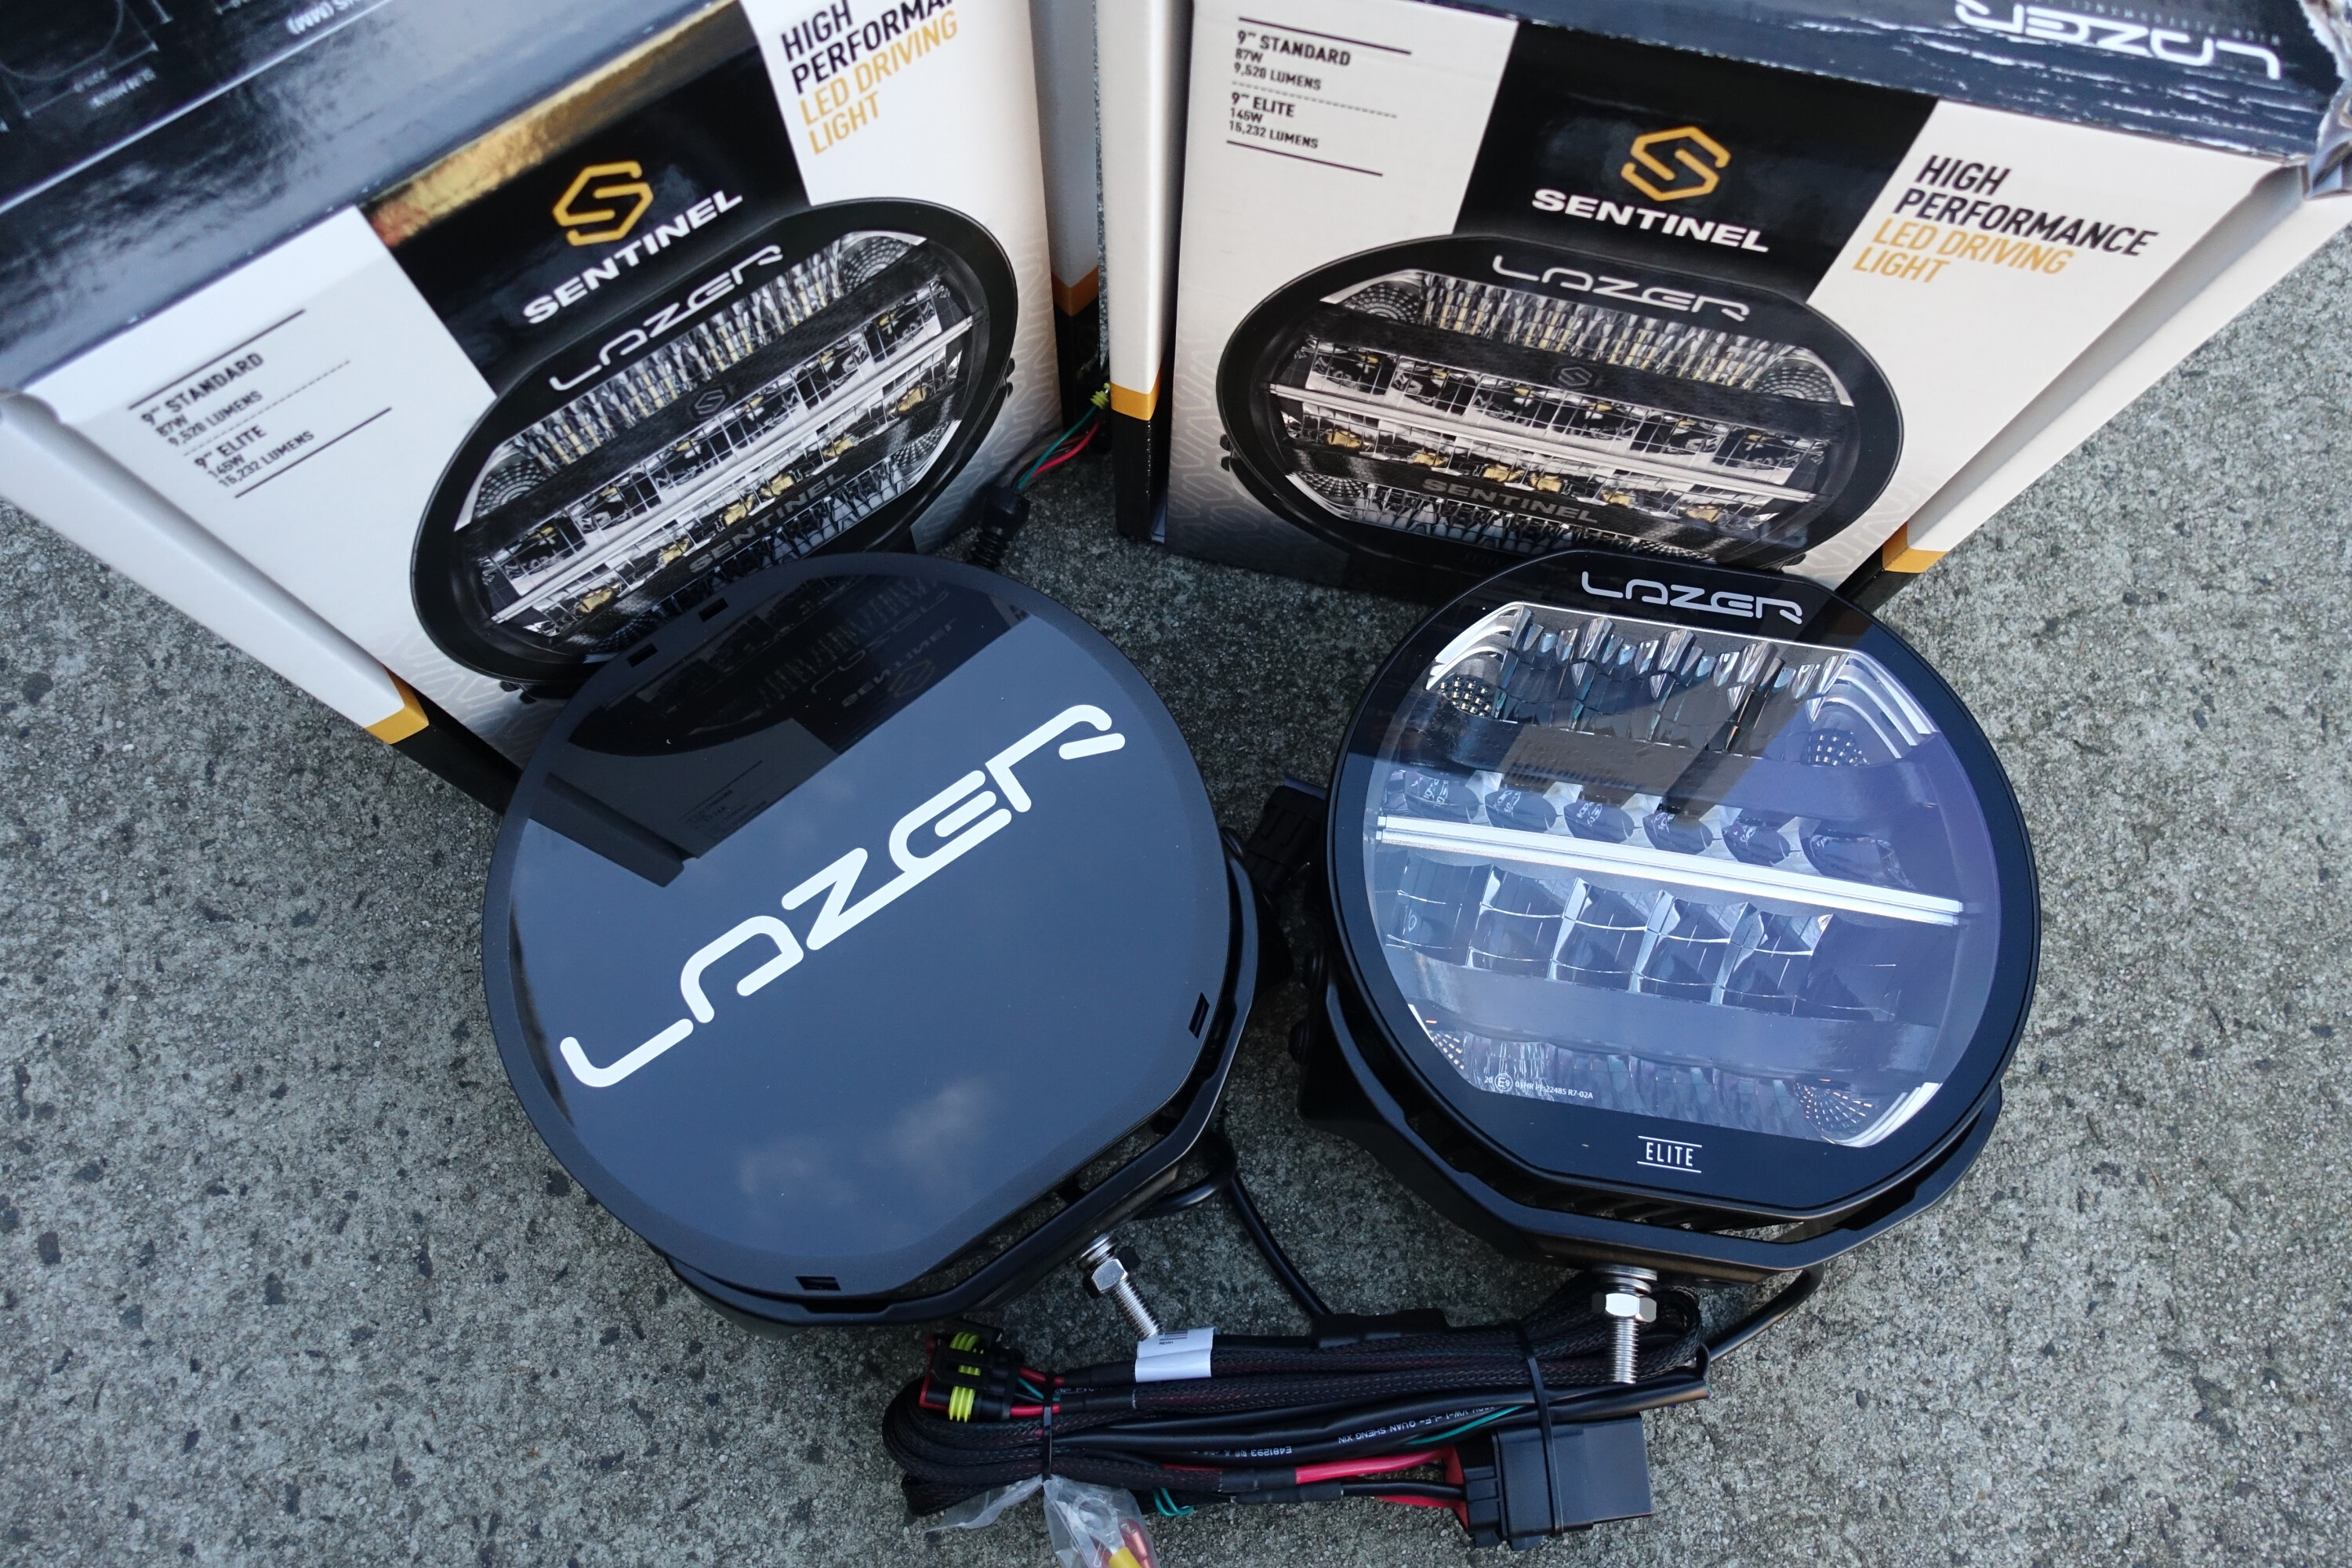
Lazer lights – be they driving lamps, work lamps or light bars – are designed, engineered and manufactured in the UK with no compromises in regards to component parts or build processes. They are impressive looking straight out of the box and exude quality. The Sentinel range is available in 7-inch or 9-inch models, in both Standard and Elite grades.
We opted for the 9-inch Elite grade with DRLs. Like all Elite models they come with an anodised and top-coated body and an ‘unbreakable’ polycarbonate lens. An optimised heatsink offers good thermal dynamics while an electronic thermal management system optimises light output to preserve the longevity of the 32 high output LEDs. The lifespan of the LEDs is claimed to be 50,000 hours.
Each lamp features over voltage protection as well as reverse polarity protection, and they have an IP68 waterproof rating, meaning they are good to be submerged to a depth of 1.5m for up to 30 minutes.
That means you’ll be safe crossing High Country rivers in Victoria, wading through Nolans Brook up on Cape York or crossing the Pentecost in the Kimberley.
Each lamp weighs in at 2.5kg and comes with a wide diecast aluminium mounting bracket that holds the lamp firmly and consistently in place. An alternative slim mounting bracket, along with a range of lens covers, stay bar kit and anti-theft fasteners, are available as optional accessories.
The colour temperature of the Lazer lamp is 5000K and total Lumens output, for those who know and care about such things, is said to be over 15,200, while sharpness and definition is rated as 80CRI. Each lamp consumes 145W and draws just a tad over 10 amps.

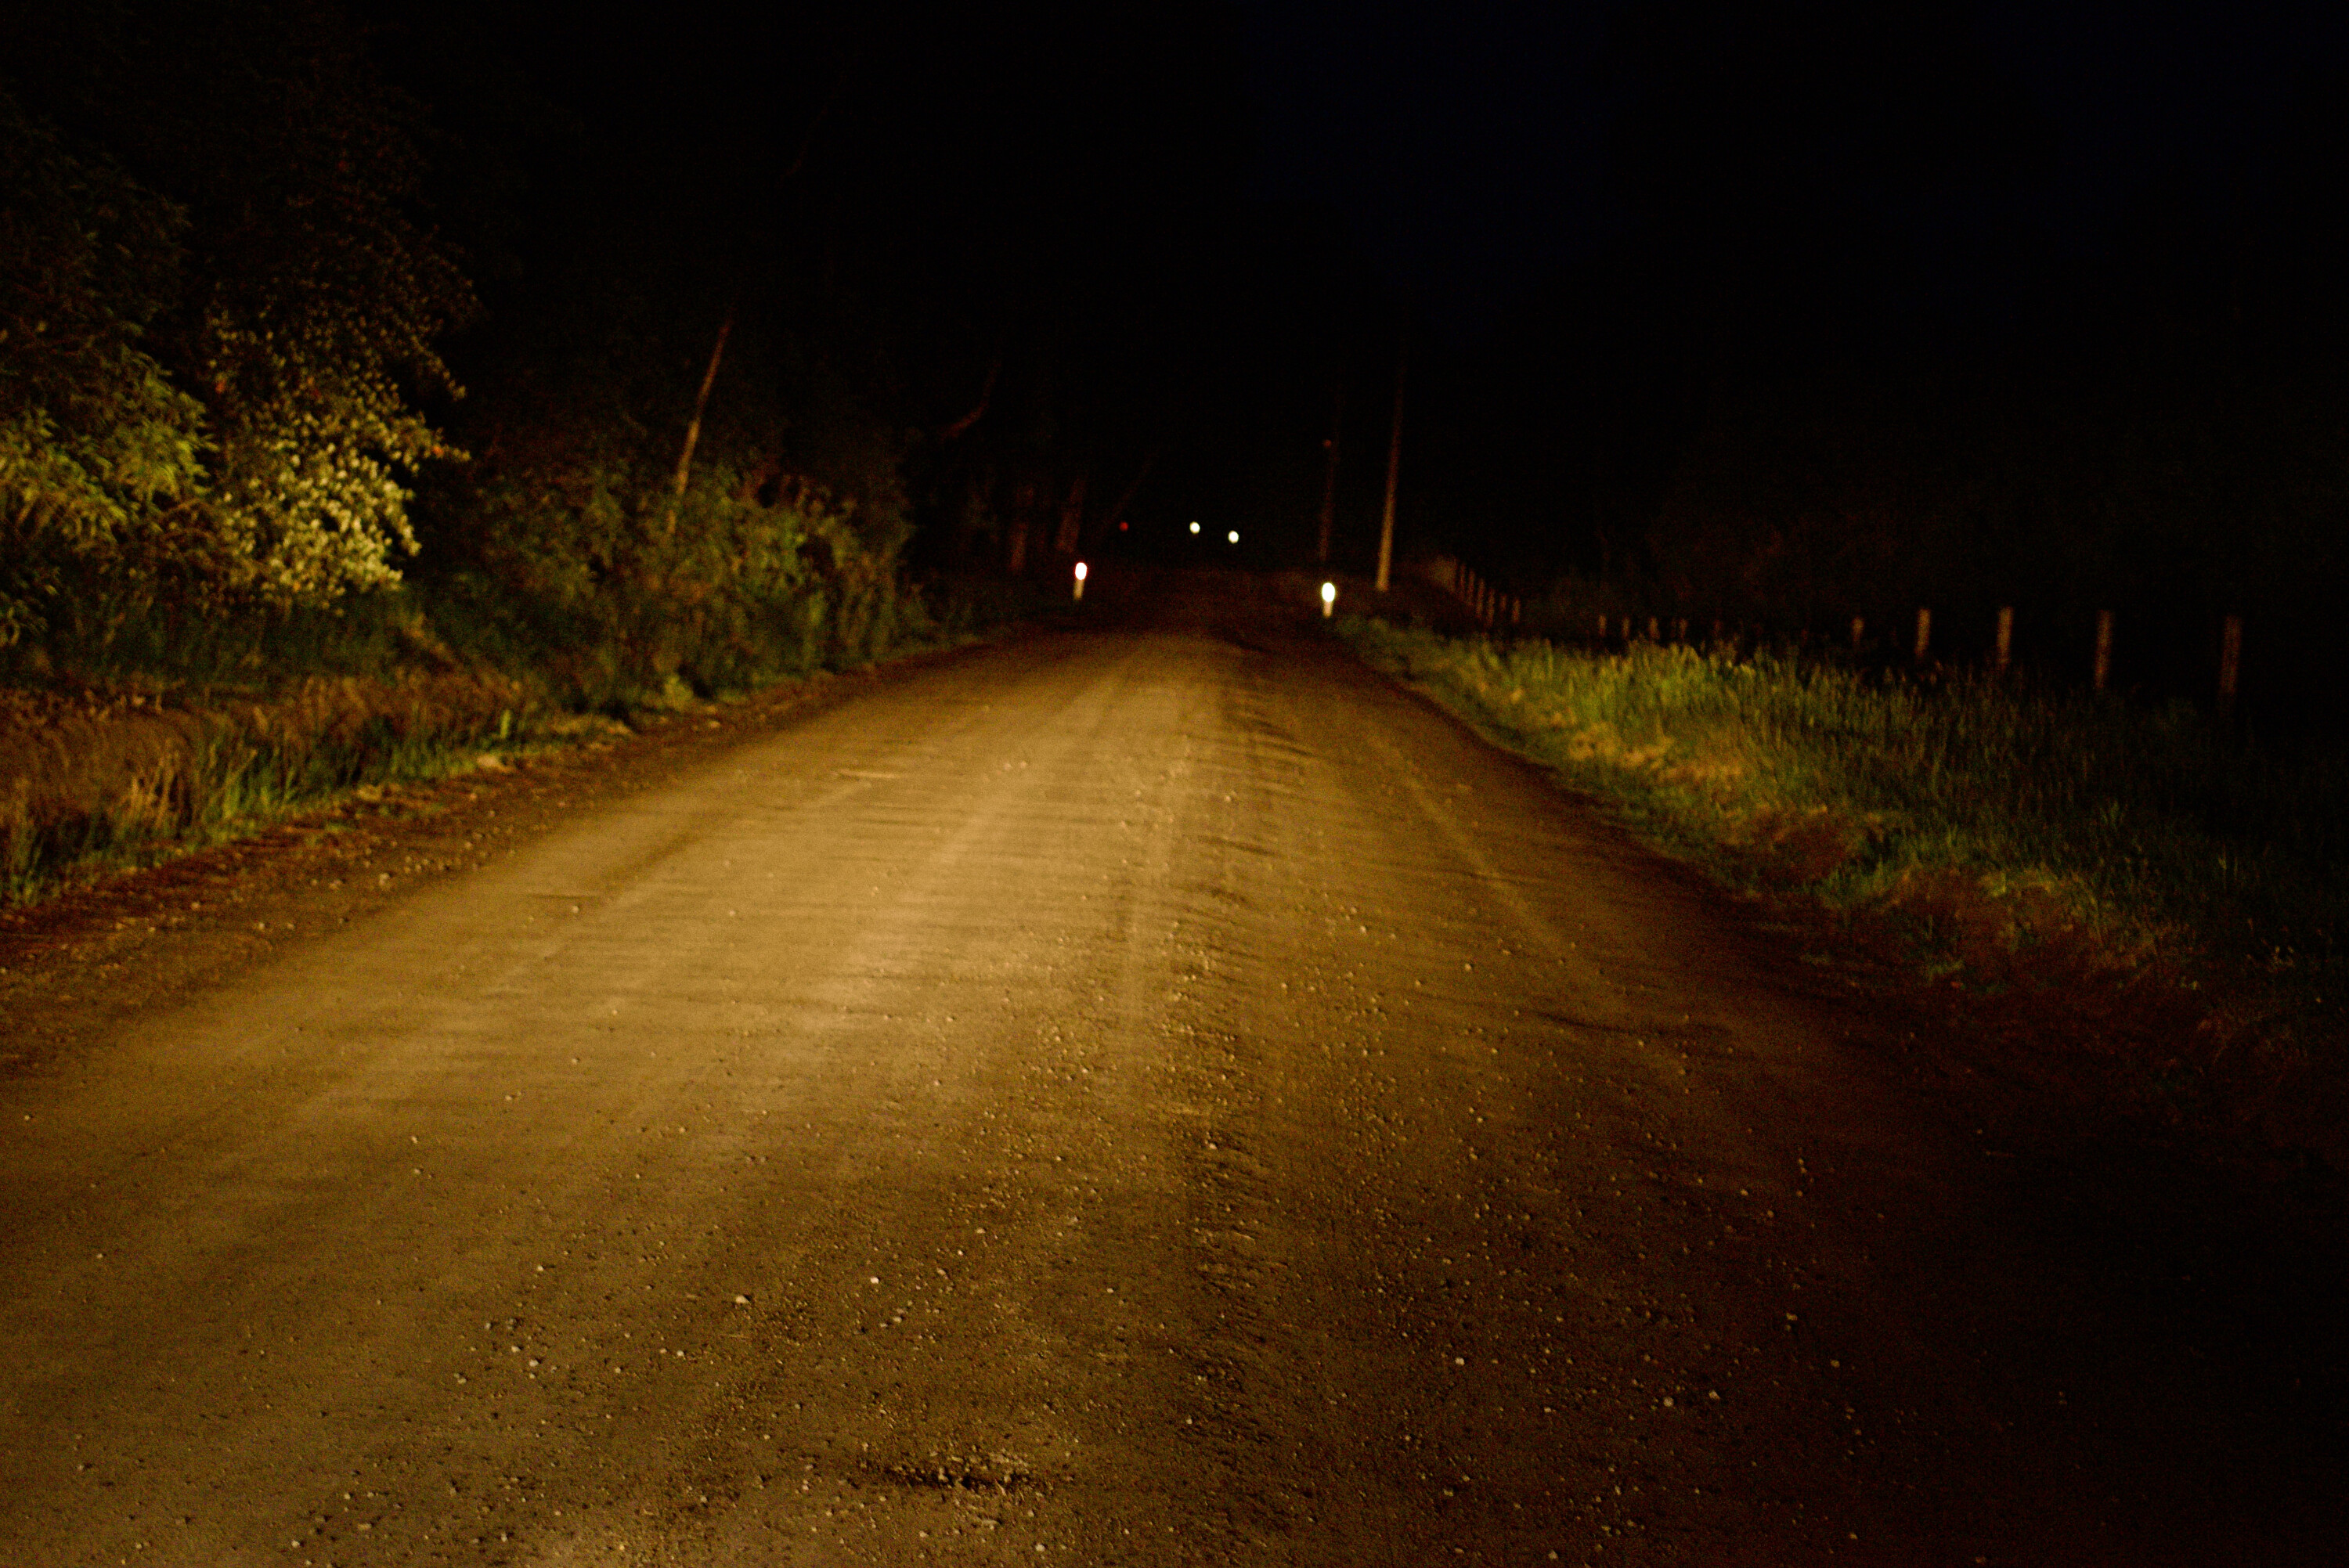
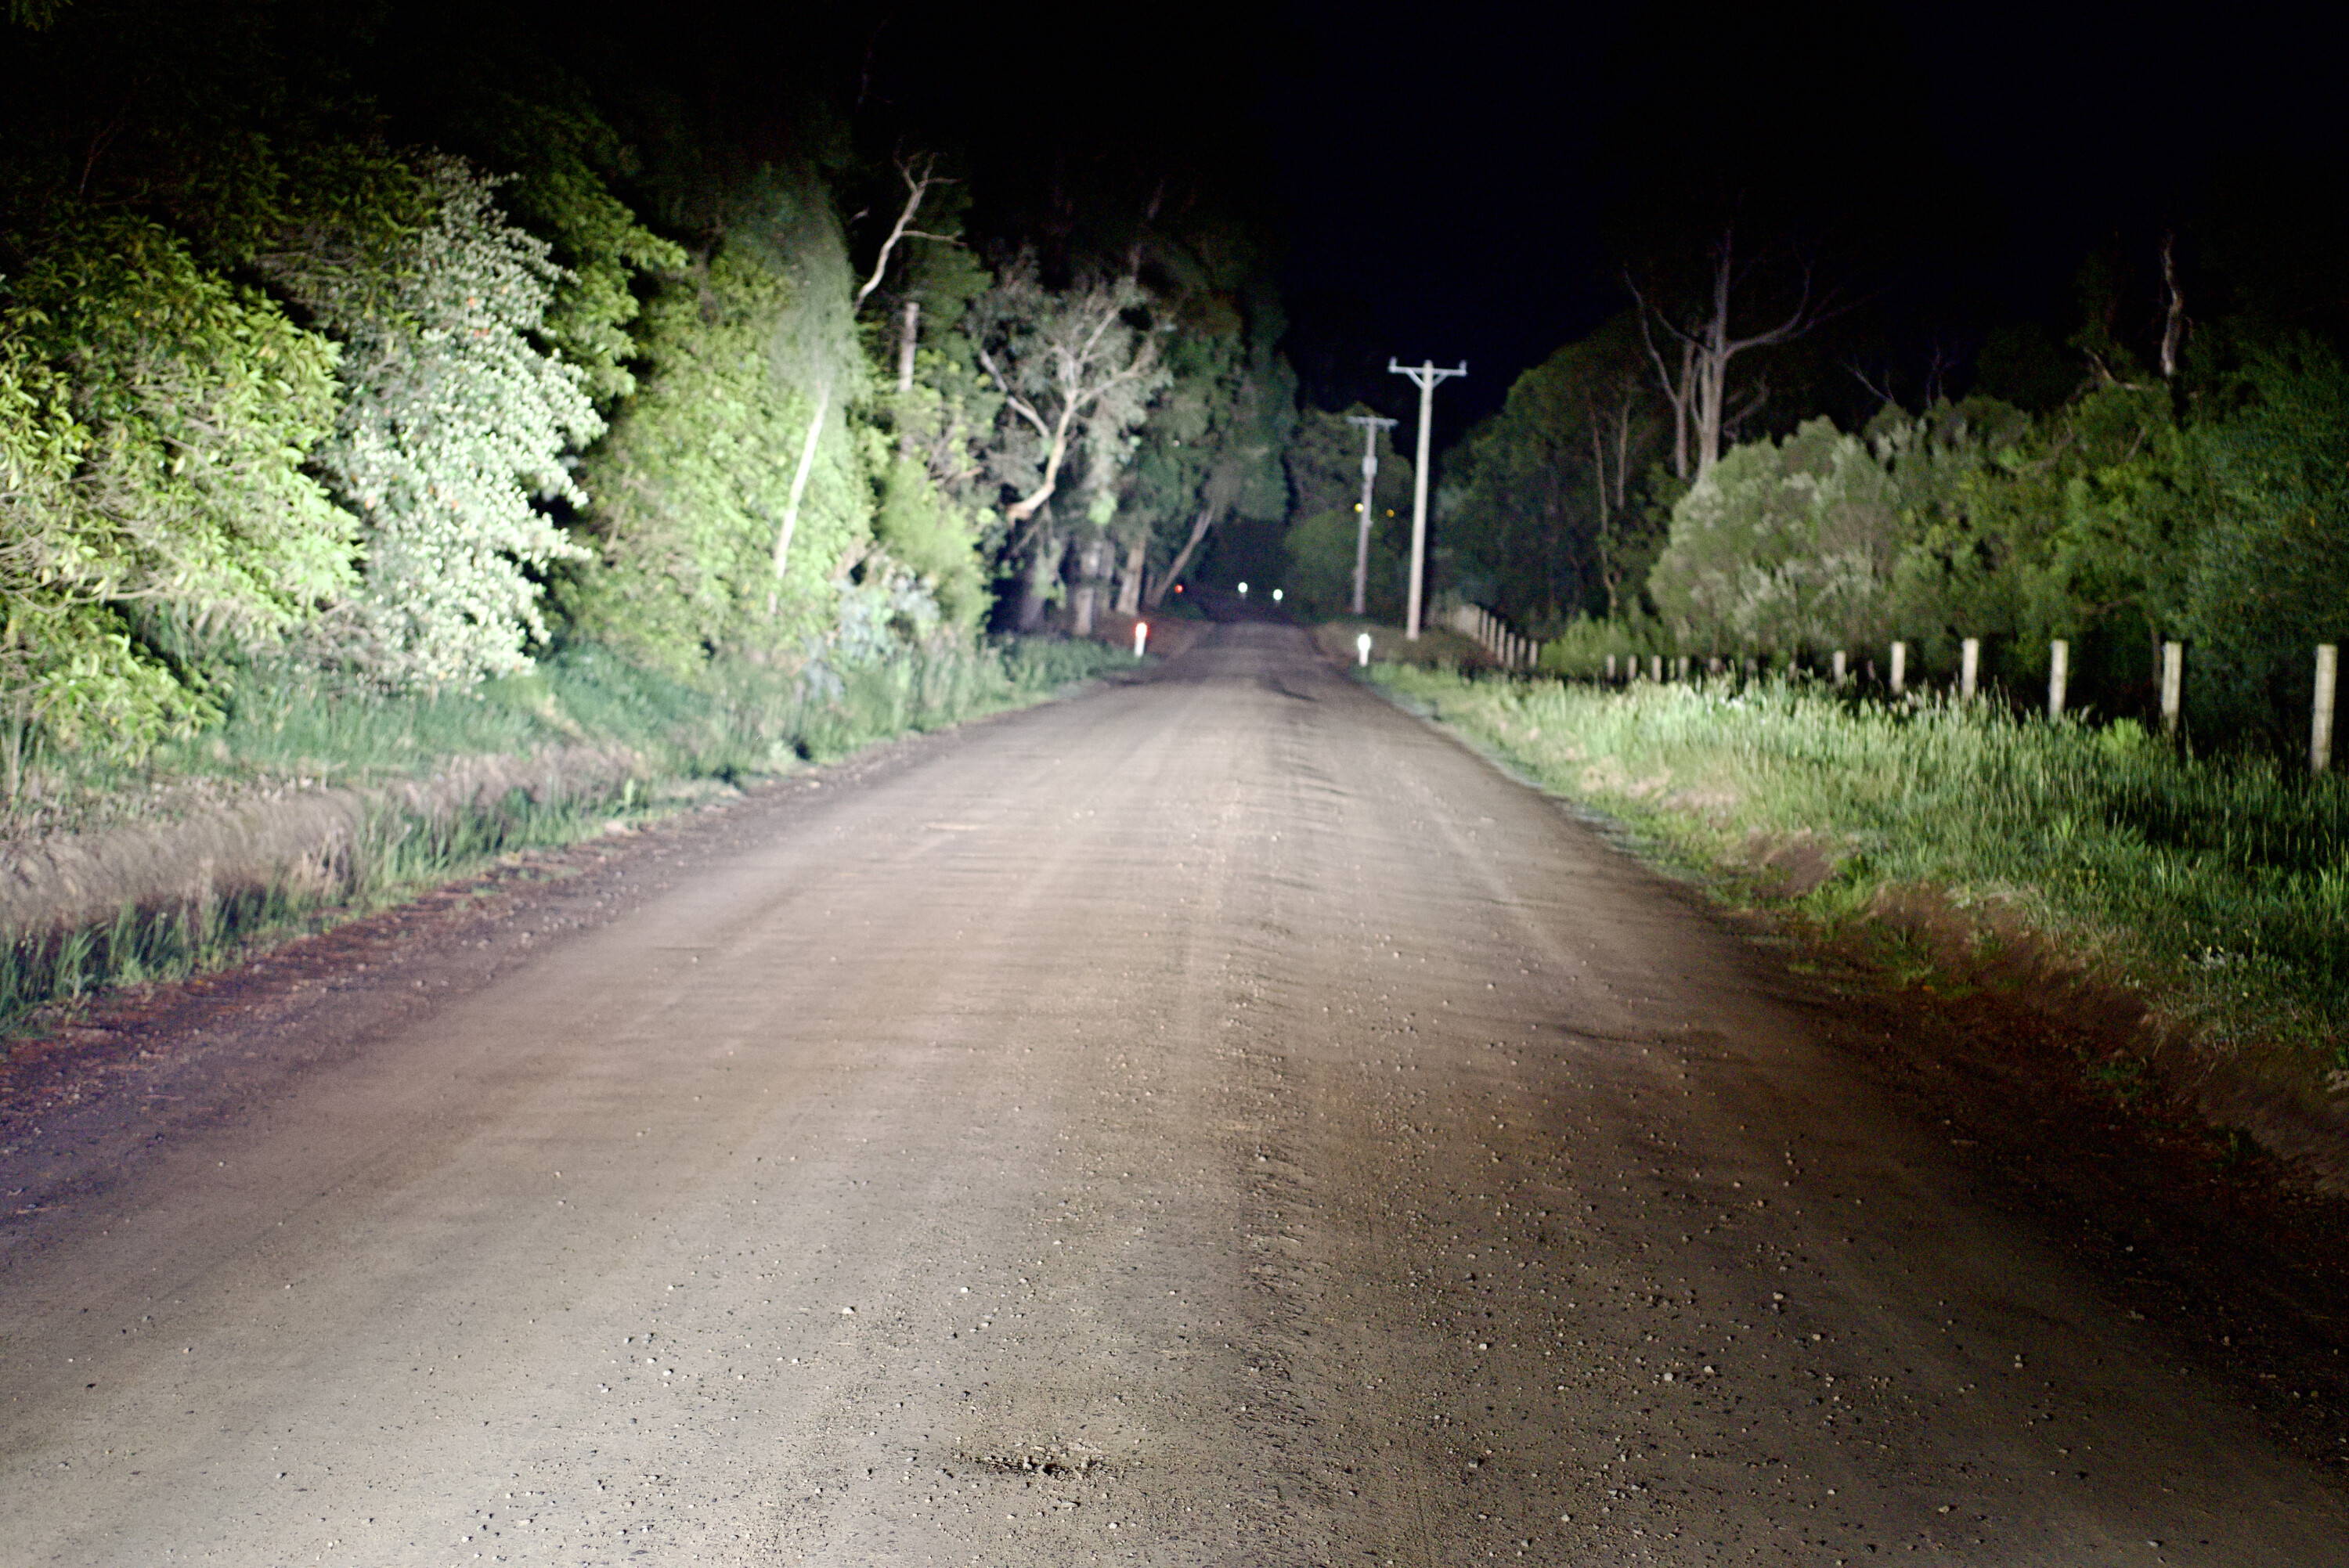
The light beam these lamps produce may not be the longest you have seen with 1 lux at 740m, but what makes them so practical and great to drive behind is the evenness of the light and the 52° beam spread, which means the side of roads and tracks are well lit up, making it easier to spot wayward animals lurking in the grass or scrub, waiting to leap out at you.
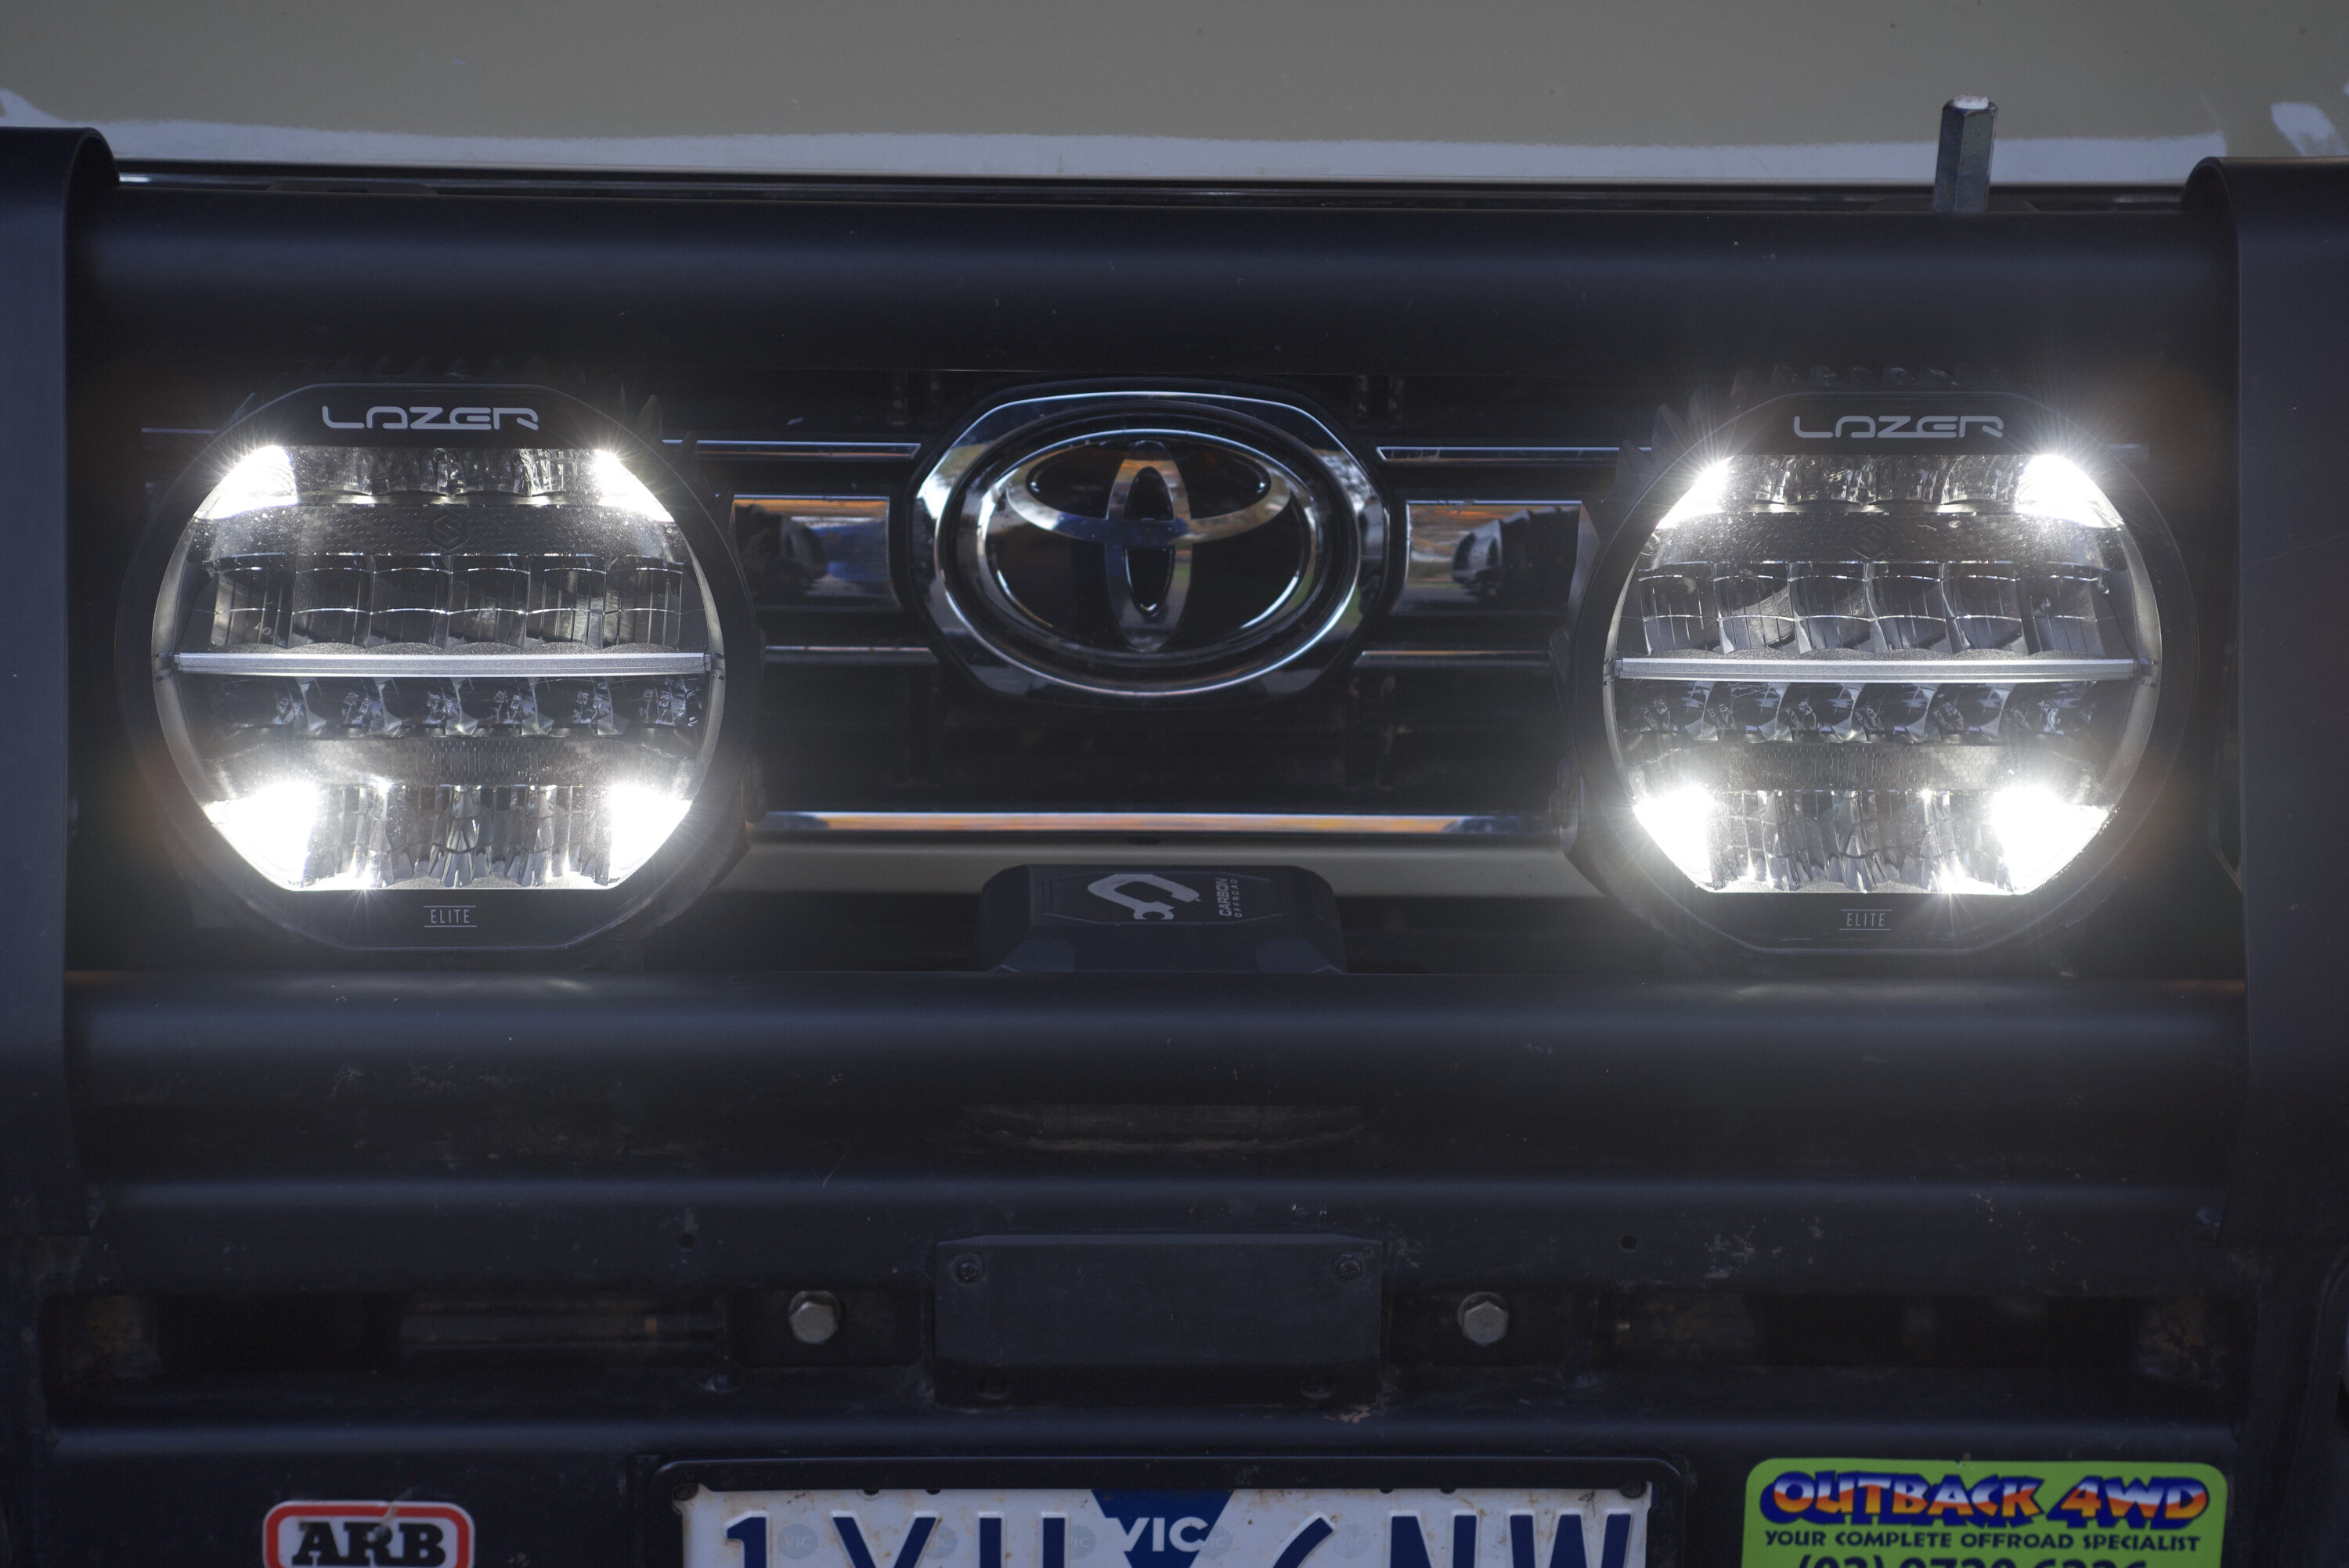
The crew at Outback 4WD (www.outback4wd.com.au) fitted the lights and wiring loom but not before I had broken a tab off the supplied light covers while removing said cover. I should have read the warning instructions about them being easily broken!
The supplied wiring loom with its Superseal connectors didn’t come with a switch, which is a bit odd, but apart from that the lights were easy to fit and wire up. We made sure to use the three mounting holes to secure each light securely to the bullbar.
We’ve now had these lights fitted for the last 20,000km, which has included a run down the Canning Stock Route and a trip across Queensland’s Gulf Country and up to the Cobourg Peninsula in the NT.
Needless to say they have been subjected to more than their fair share of corrugations and rough roads and have stood up to the pounding without any movement, the beam staying true the whole time.
The 9-inch Sentinels are quite large but they fit within an ARB Deluxe bar, although some drivers will find the 7-inch lamps preferable. Despite their size, the lights have not had a detrimental effect on engine cooling, but I’d hazard a guess that if fitted to my old TD42 Patrol there may have been an undesirable outcome.
I’ve only driven behind these lights at night on a few short forays, but I’ve found them to provide more than ample light, spread evenly with no obvious hotspots.
They offer far more illumination than standard headlights and are remarkably easy on the eyes, which makes long night drives easier and safer.
While they are not cheap, like all good driving lights they are well worth the money for those who spend a lot of time behind the wheel at night, or who want the best illumination possible on those dark winding mountain tracks. And they are covered by a five-year warranty.
RRP: $830 (each)
WEBSITE: www.lazerlamps.com.au
WE SAY: A robust, well-made light with a pleasant, long reaching and wide beam. Quite possibly the best lights I’ve driven behind.
After all, the Prado is one of Australia’s most popular and best-selling 4×4 wagons, so popular in fact that it has outlived the vehicle it mimicked, Mitsubishi’s legendary Pajero.
First seen in Australia in the mid-1990s (the earlier 70 Series Prado was never offered here), the 90 Series Prado took the recipe for the Pajero (right down to the model name) and gave it a Toyota flavour to great effect; starting a decades long battle for the popular family 4×4 wagons.
The 120 Series Prado lobbed in 2002 and rose to supremacy in the category over the next seven years, until the 150 Series launched as essentially an upgraded 120 and saw the end of the once ground-breaking Mitsubishi.
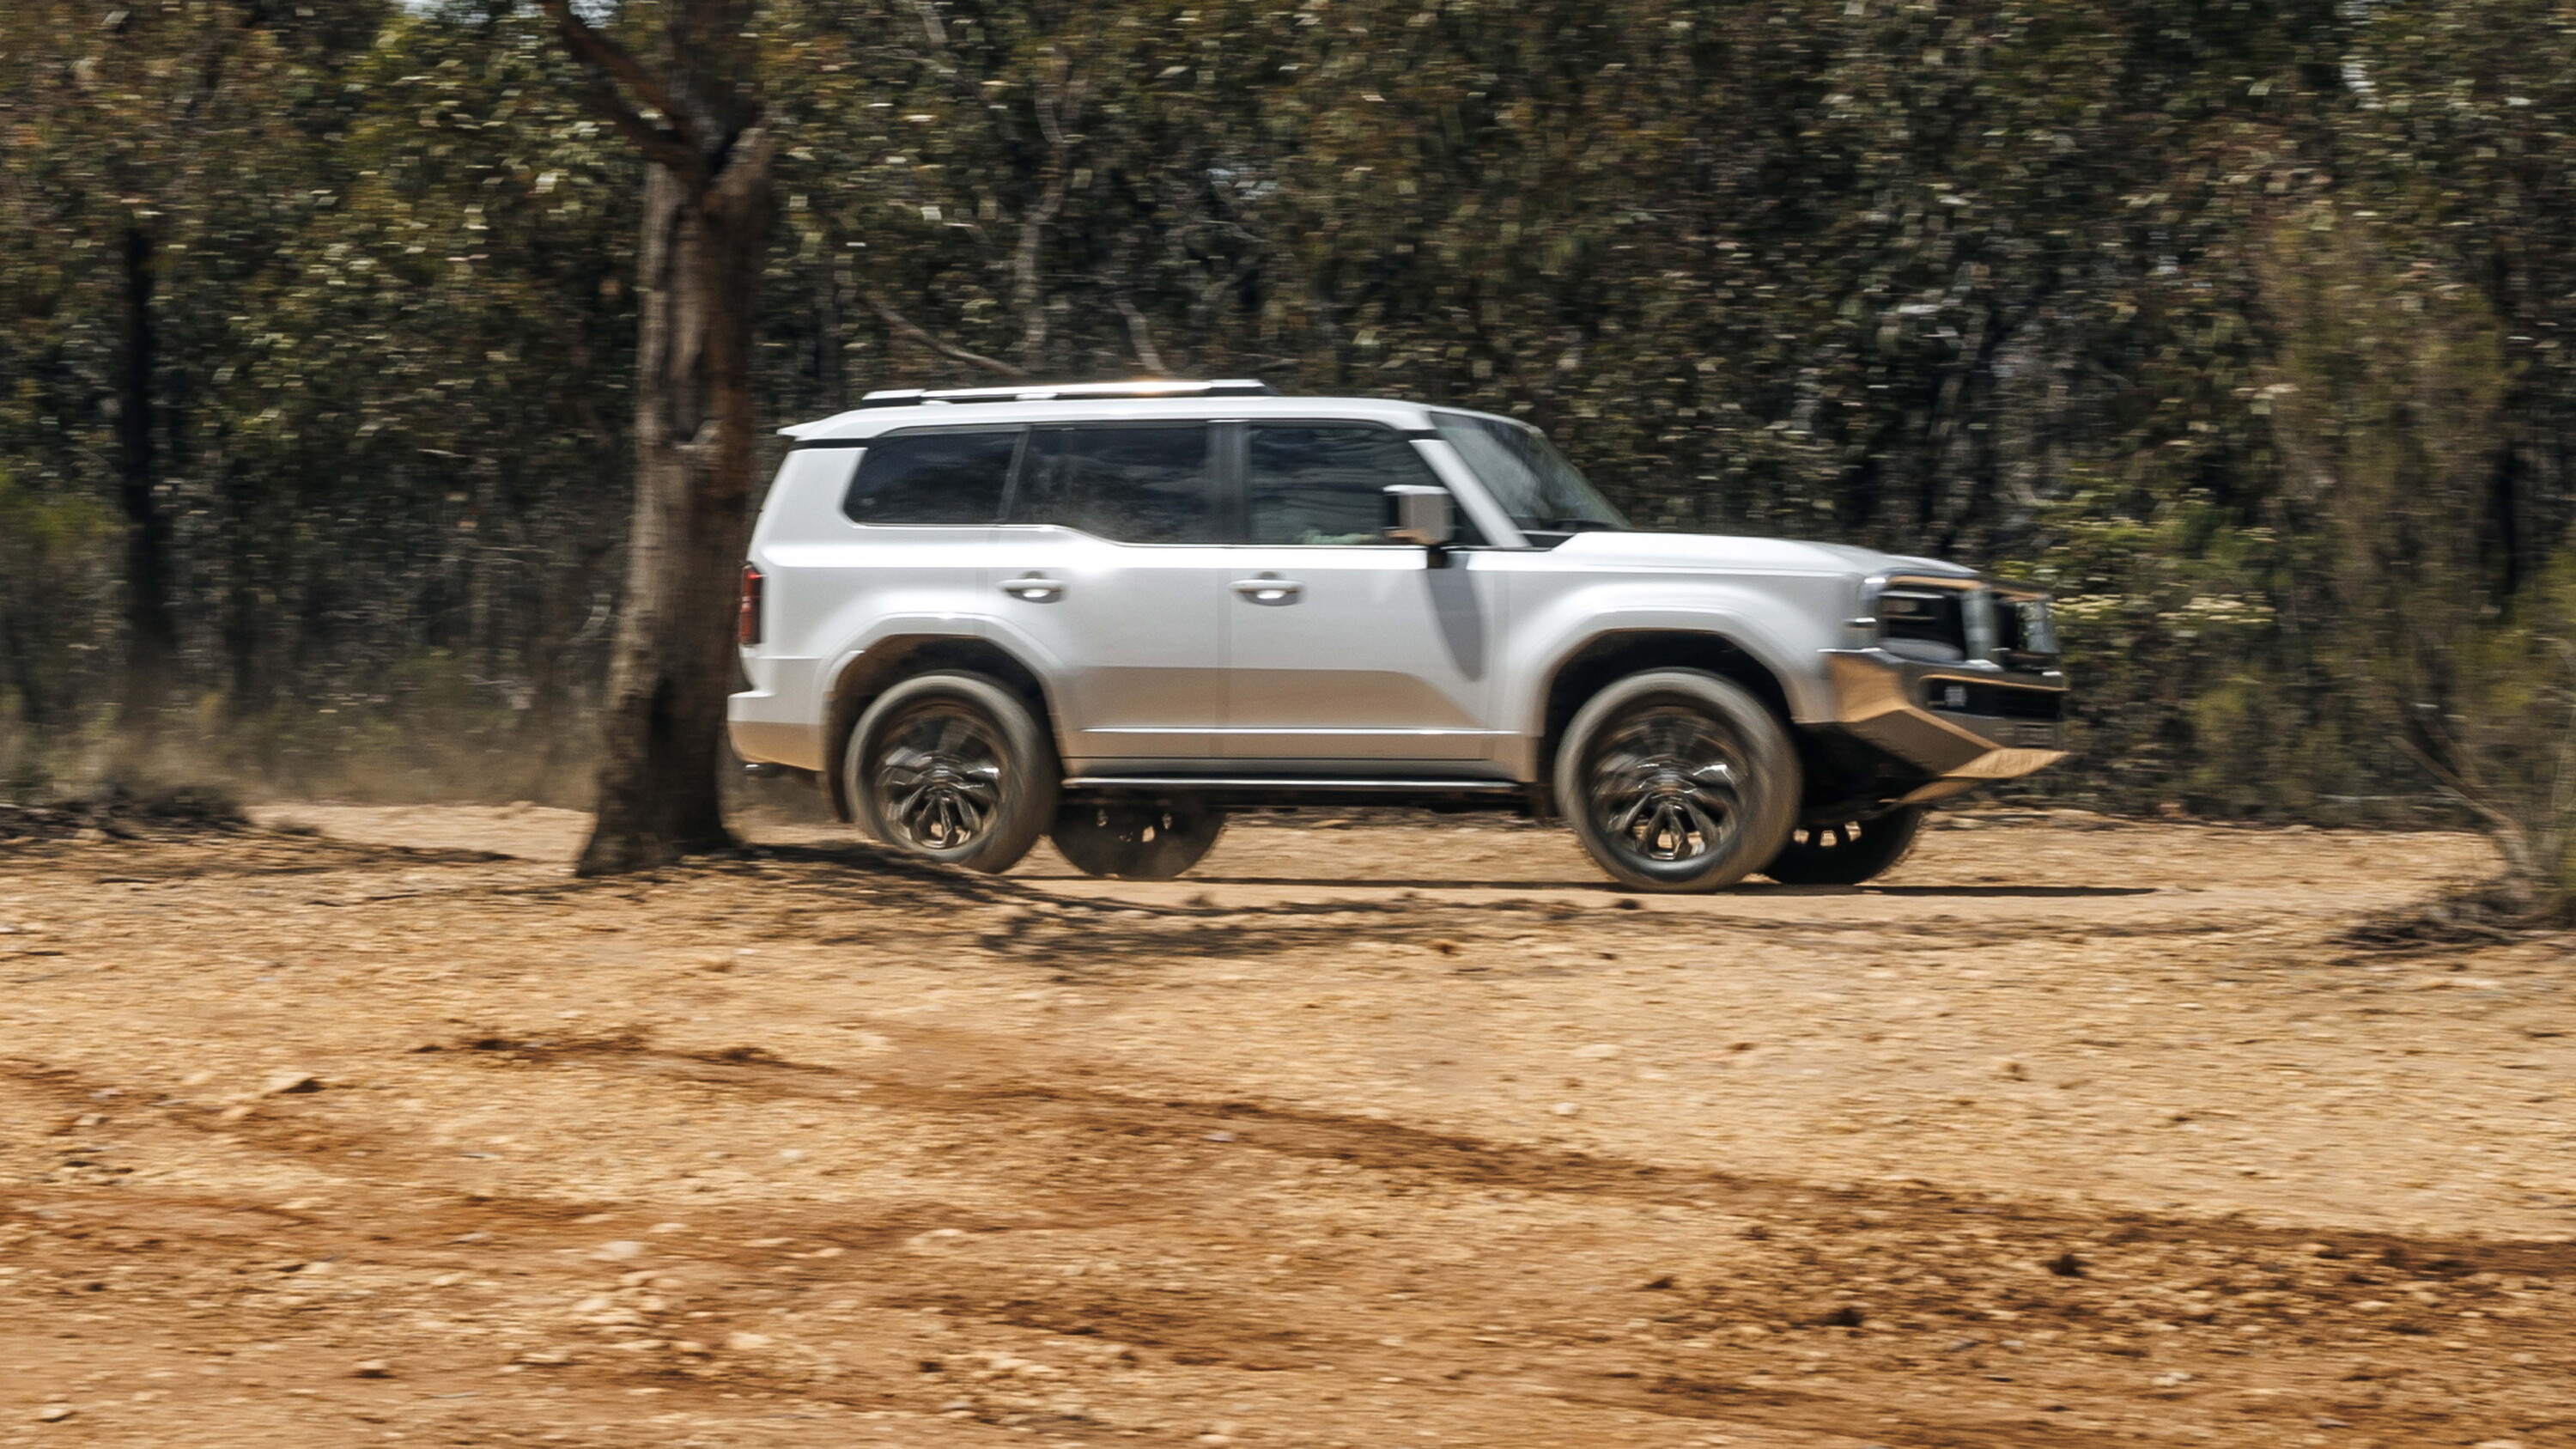
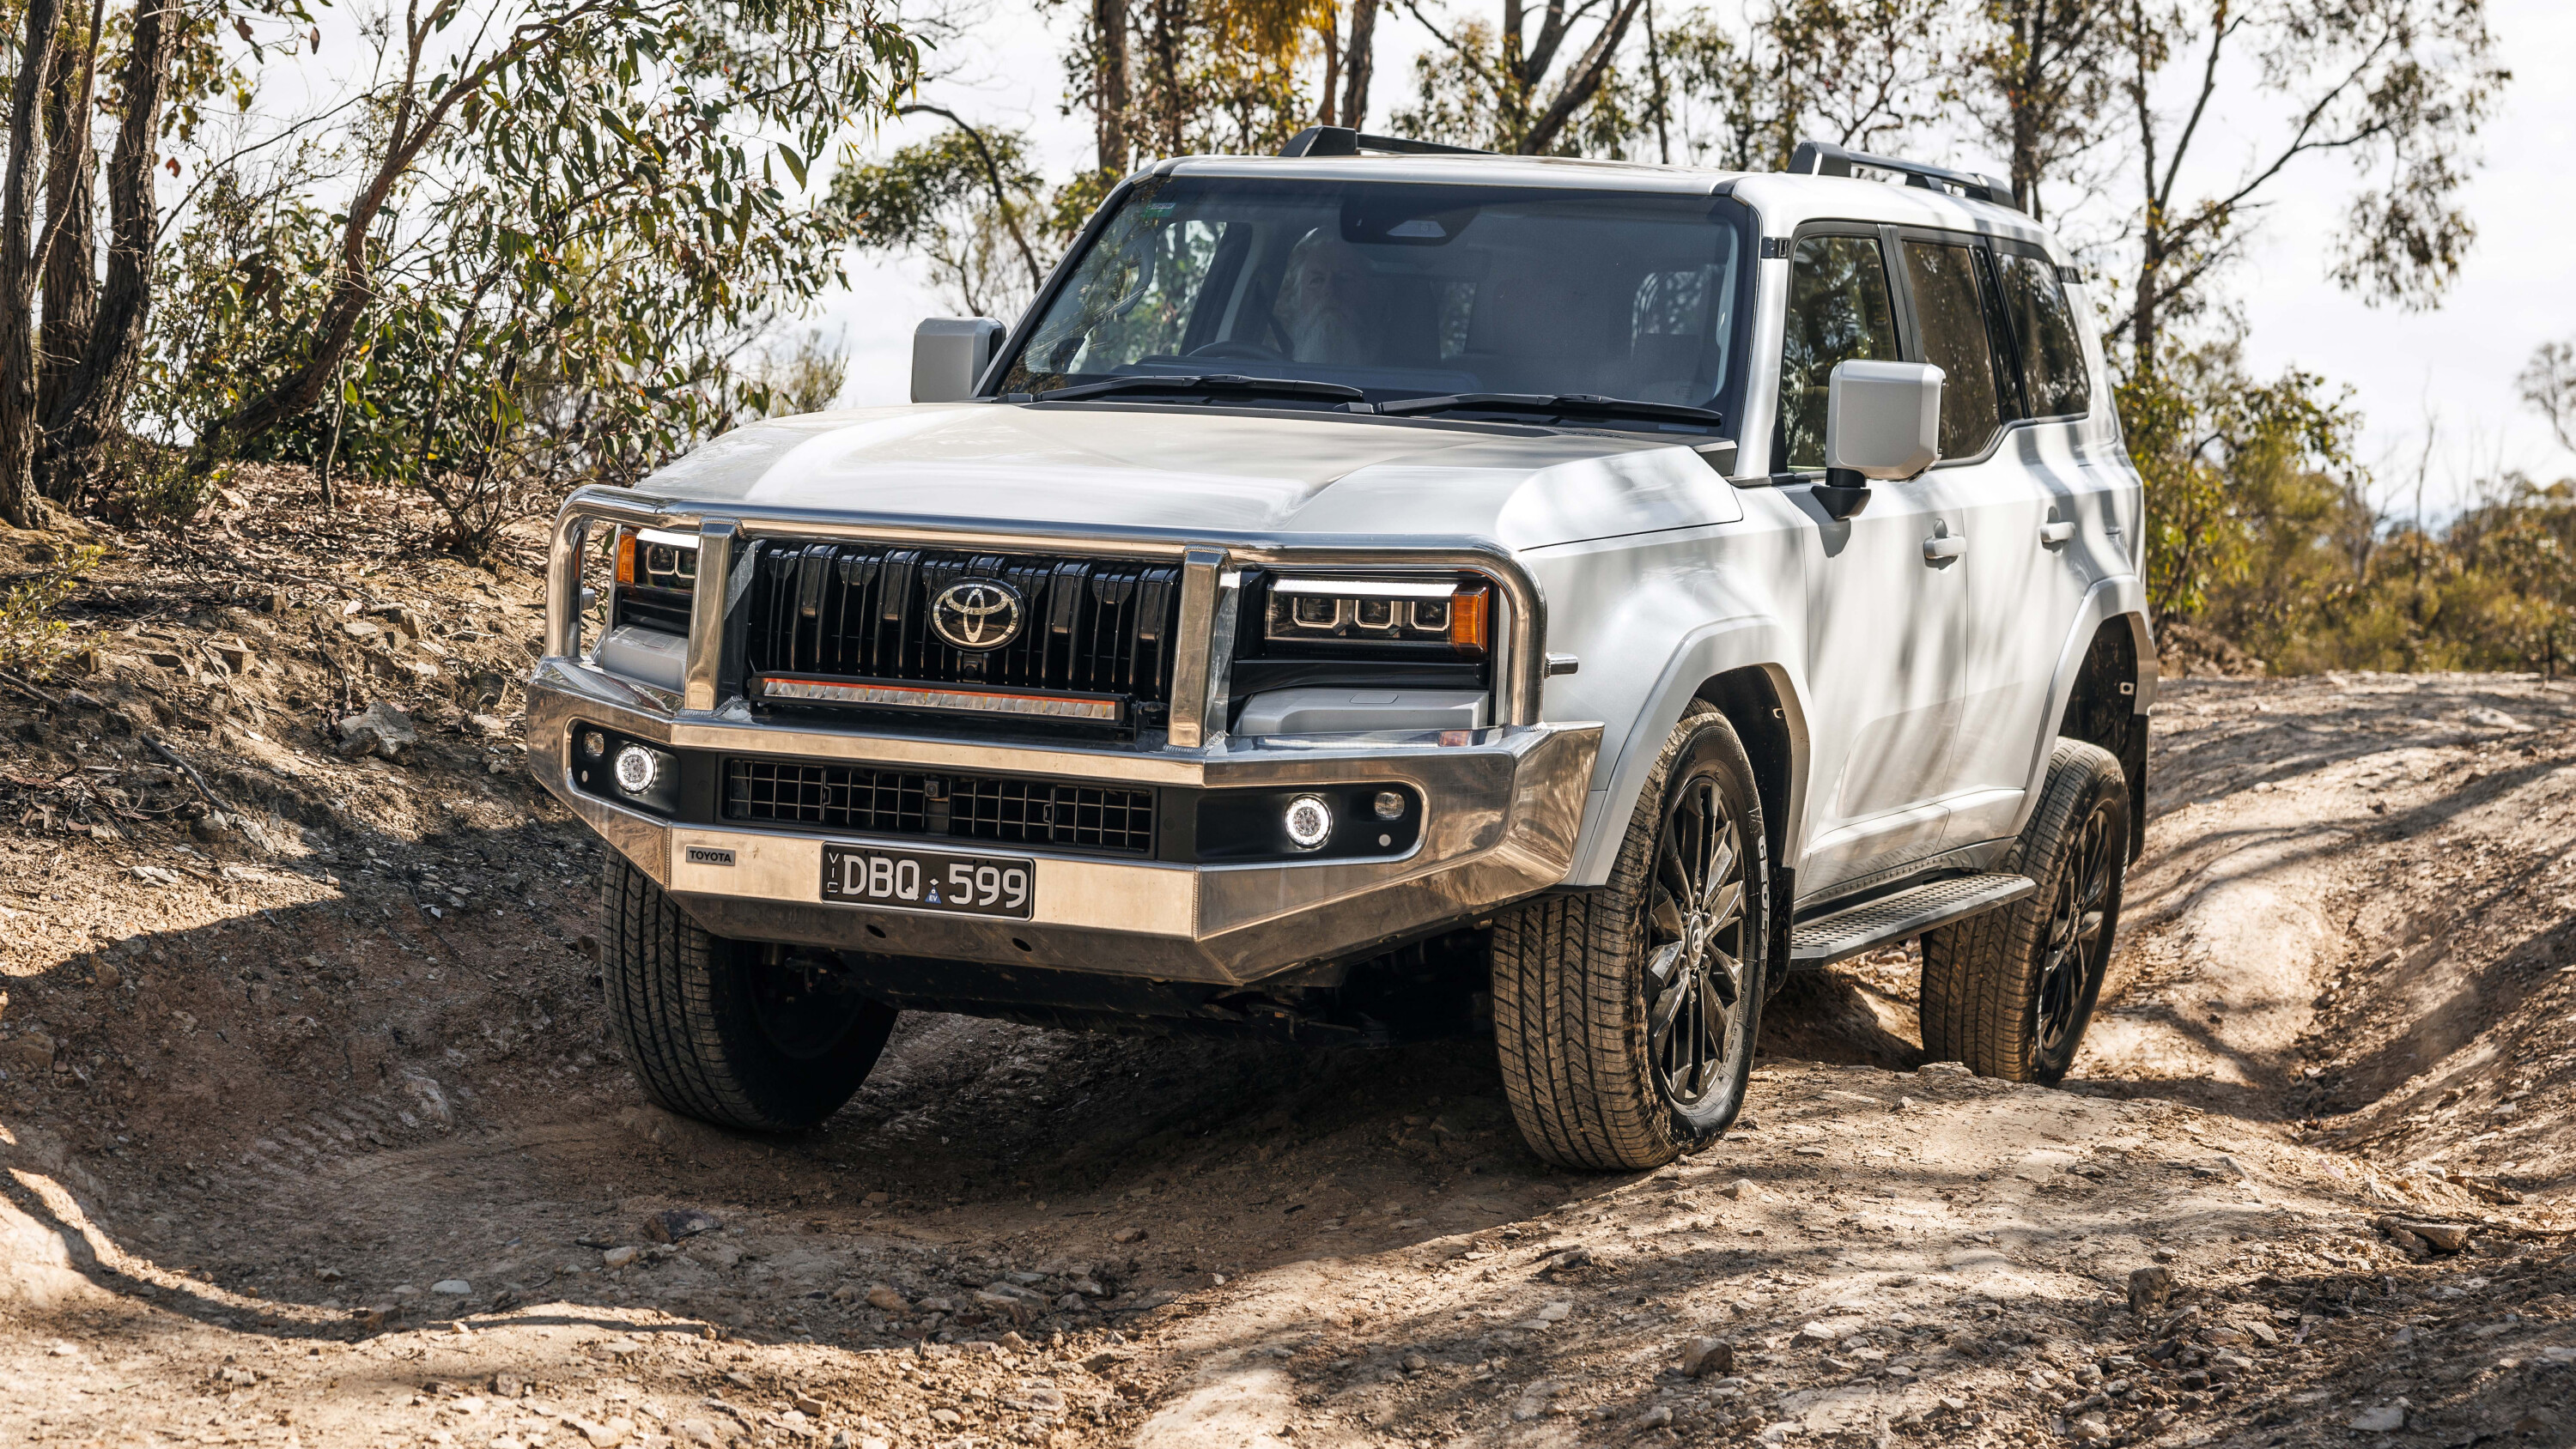
2025 brings us the (almost) all-new 250 Series Prado that is set to take the badge to new levels of market influence. The 250 Series arrives in five model grades, priced from $72,500 (+ORC) for the entry level GX to $99,990 (+ORC) for the Kakadu.
| Variant | Price |
|---|---|
| GX | $72,500 |
| GXL | $79,990 |
| VX | $87,400 |
| Altitude | $92,700 |
| Kakadu | $99,990 |
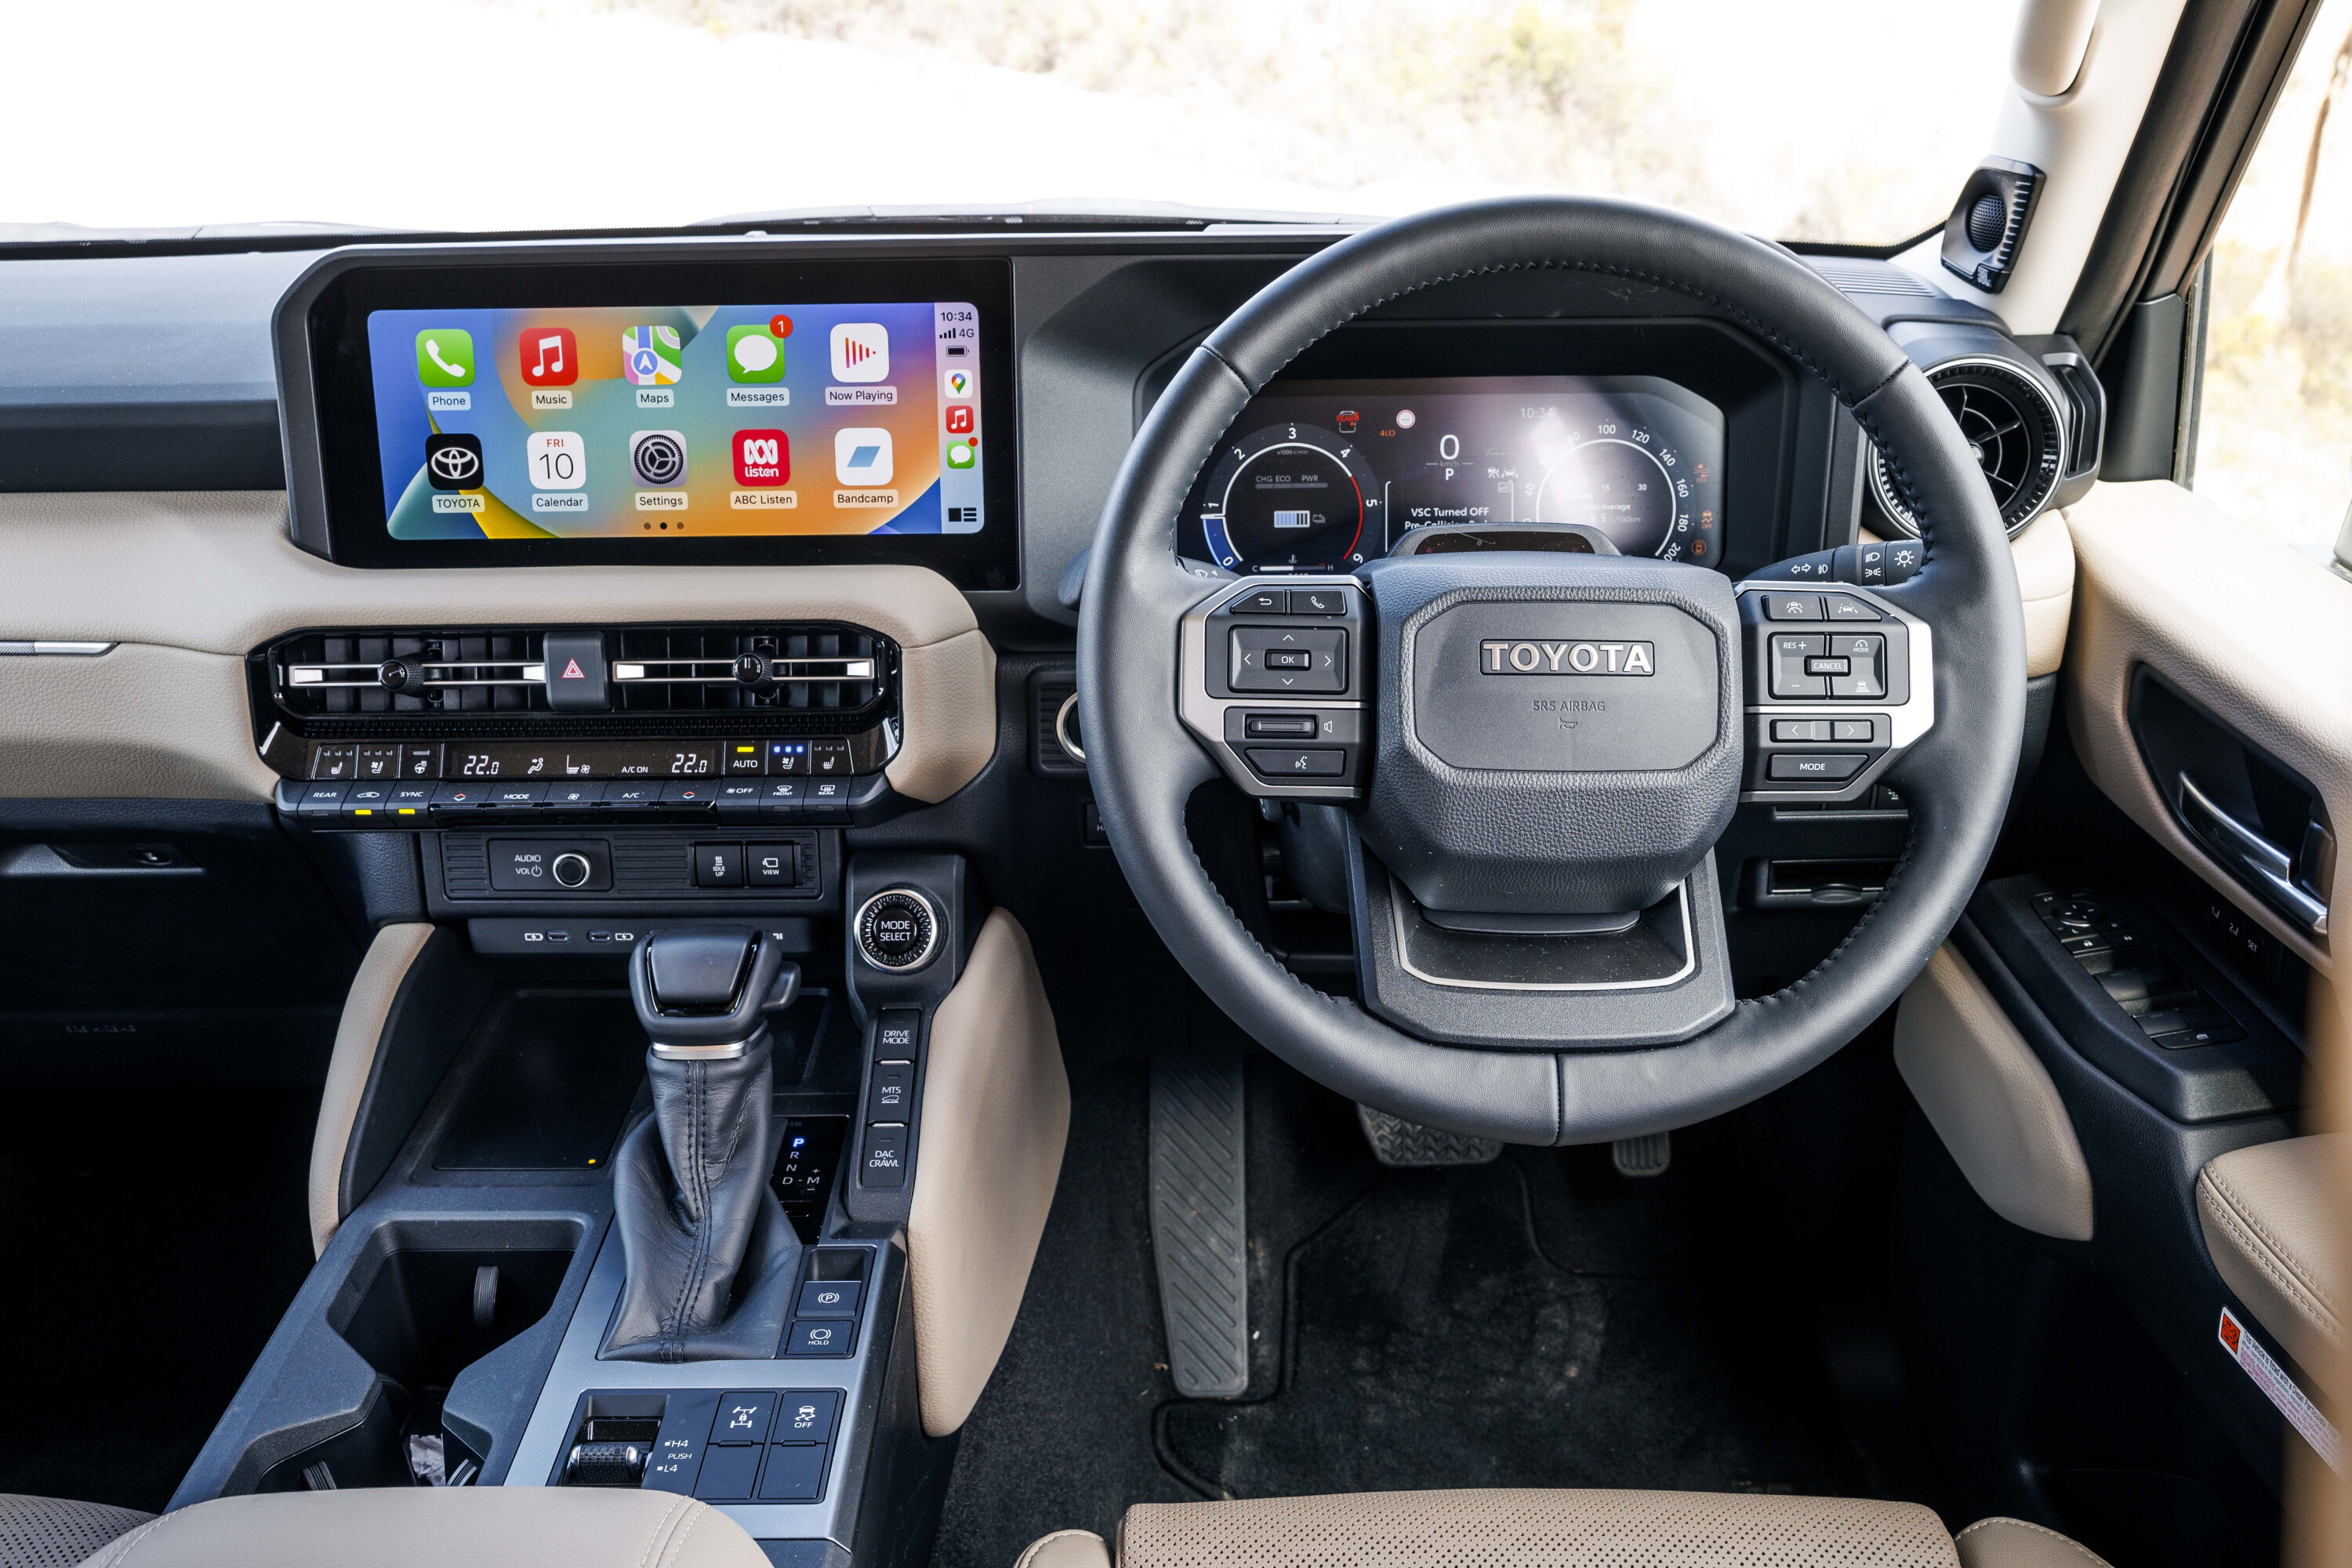
Like the rest of the 250 Series range, this starts with a premium 12.3-inch multimedia screen that is compatible with wireless Apple CarPlay and Android Auto, Bluetooth connectivity and cloud-based in-built sat-nav. It also gets a panoramic moon roof; leather-accented seat trim with eight-way power adjustment and power lumbar support and memory for the driver, and four-way power adjustment for the passenger seat; heated and ventilated front- and second-row seats; manually-adjustable driver seat cushion length; digital rear view mirror; heated steering wheel; and a heads-up display.
There’s a 12.3-inch digital instrument cluster, which is bigger than the models below the VX spec. A refrigerated console chiller is also a part of the package, as is a power-adjustable steering column and a JBL sound system that kicks out the jams through 14 speakers. It’s a full-on luxe interior worthy of the $100k price tag.
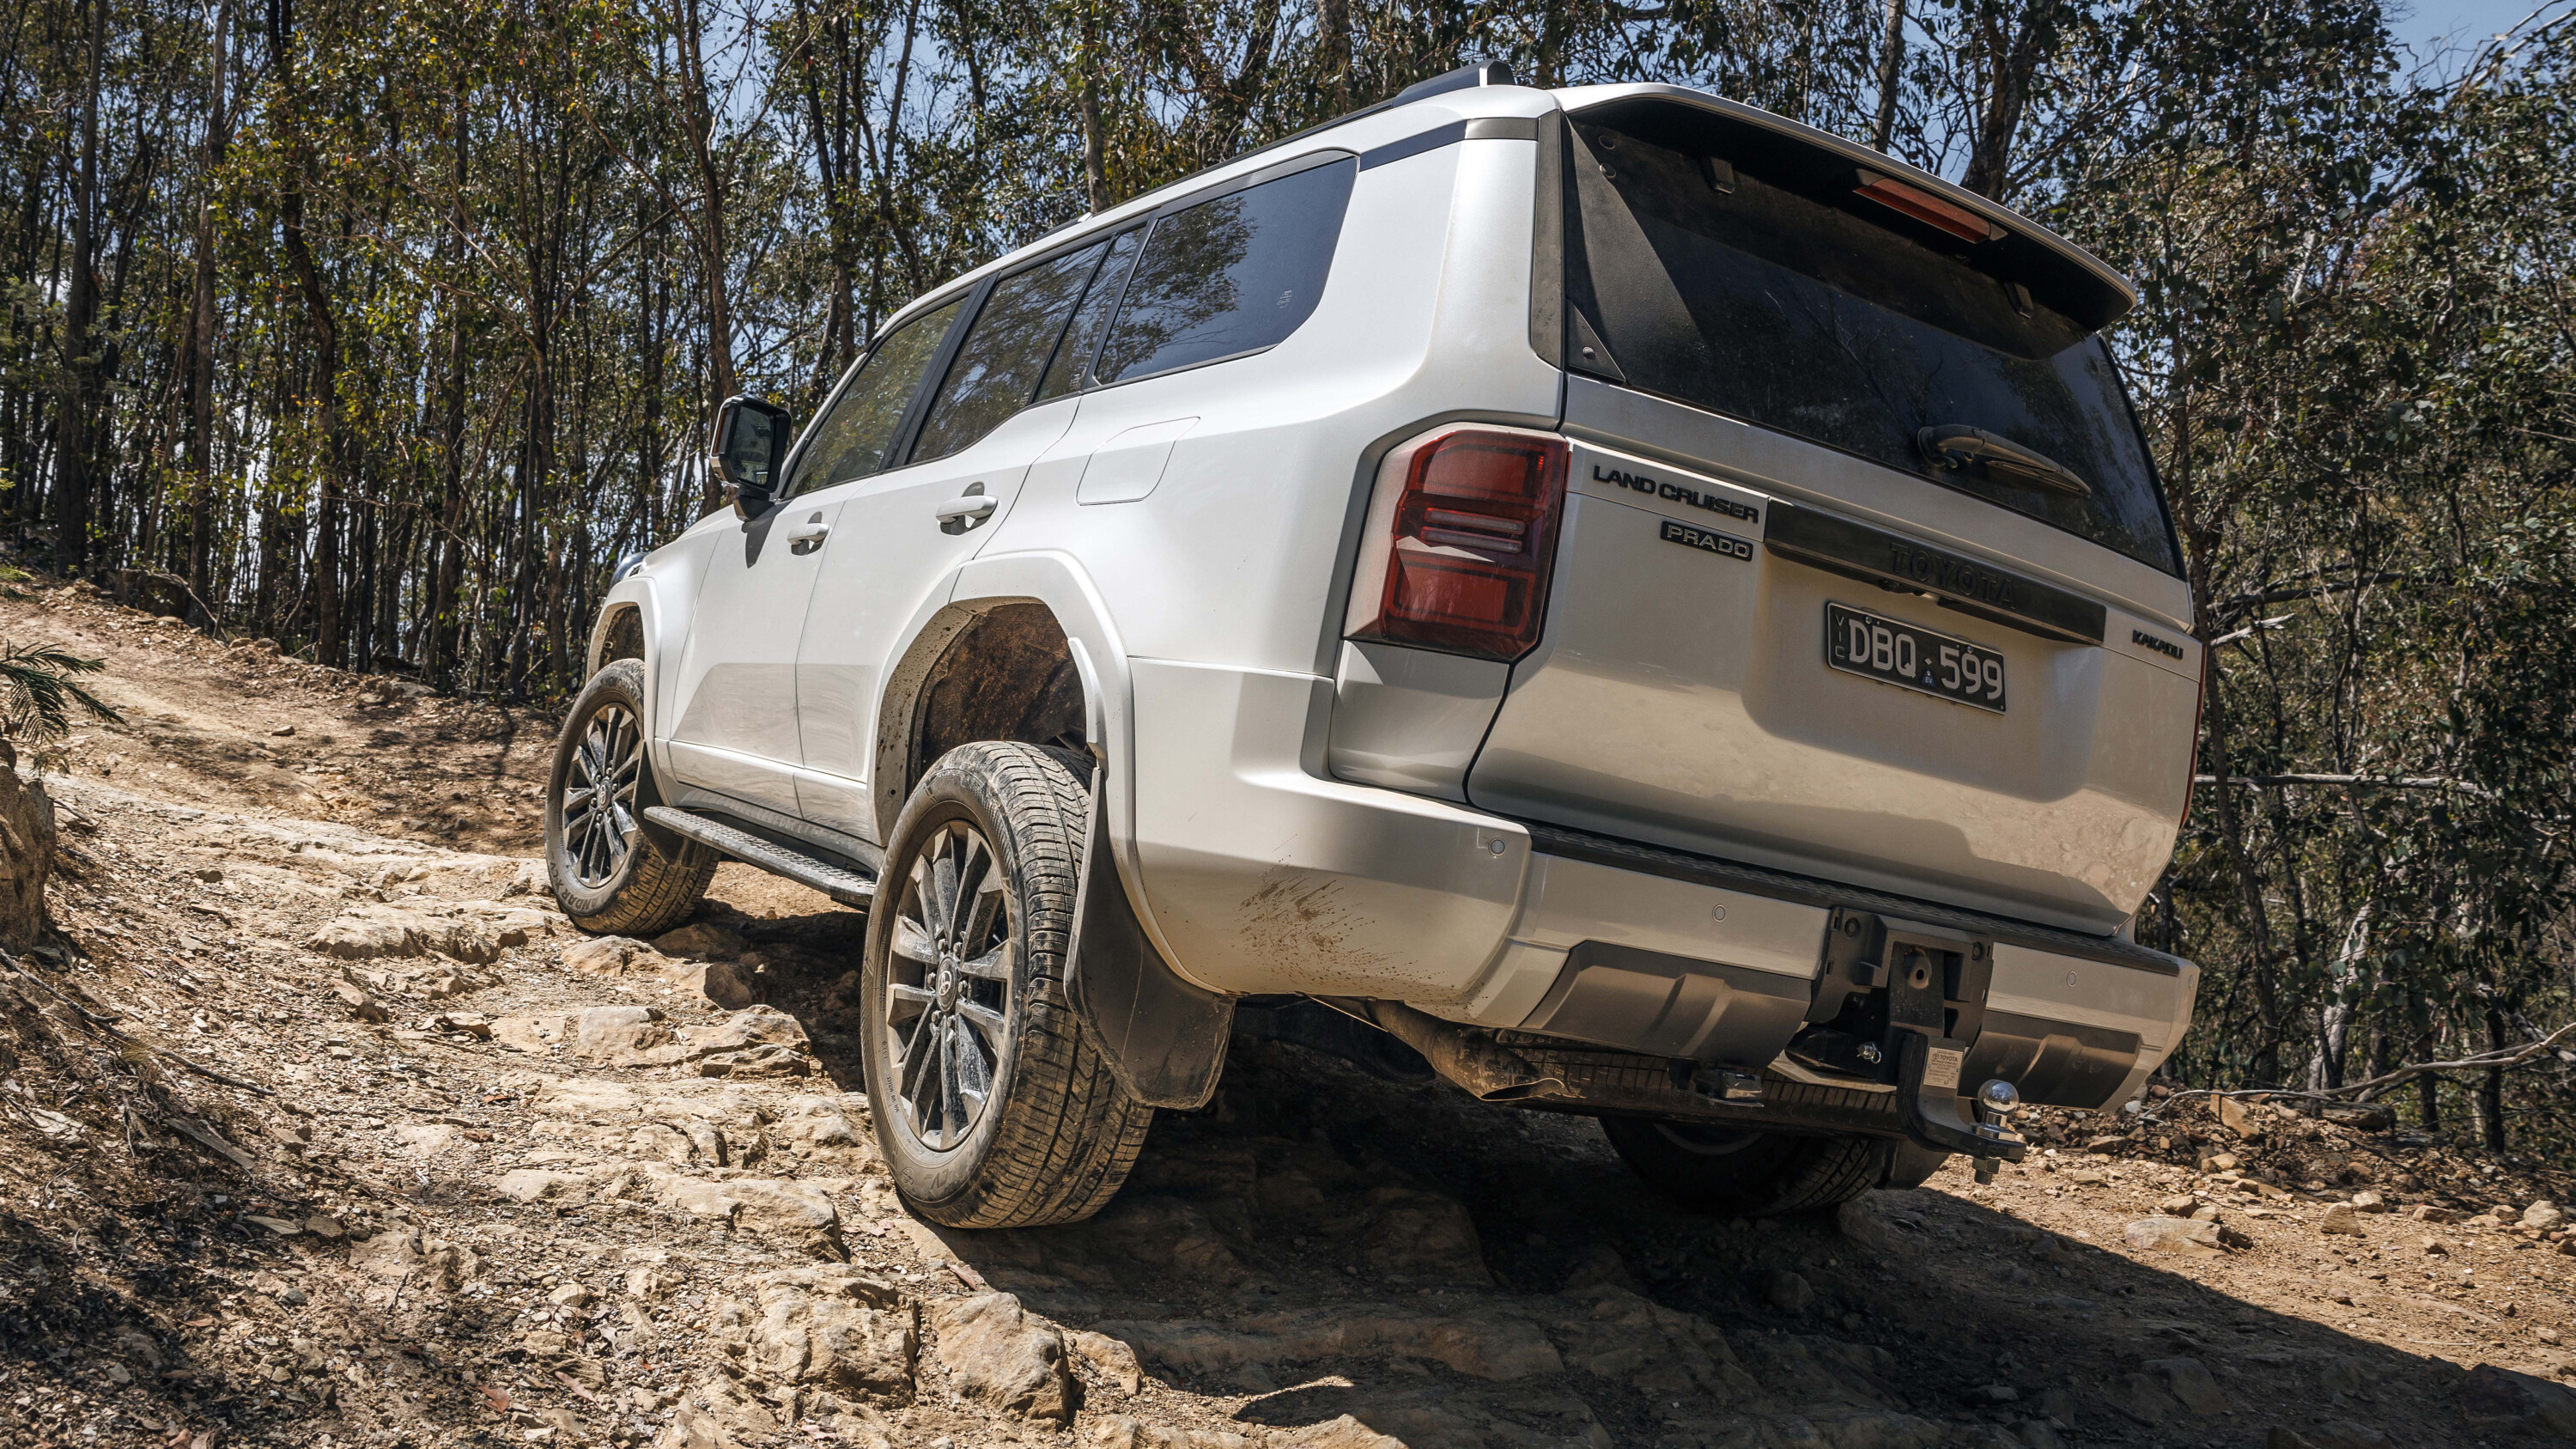
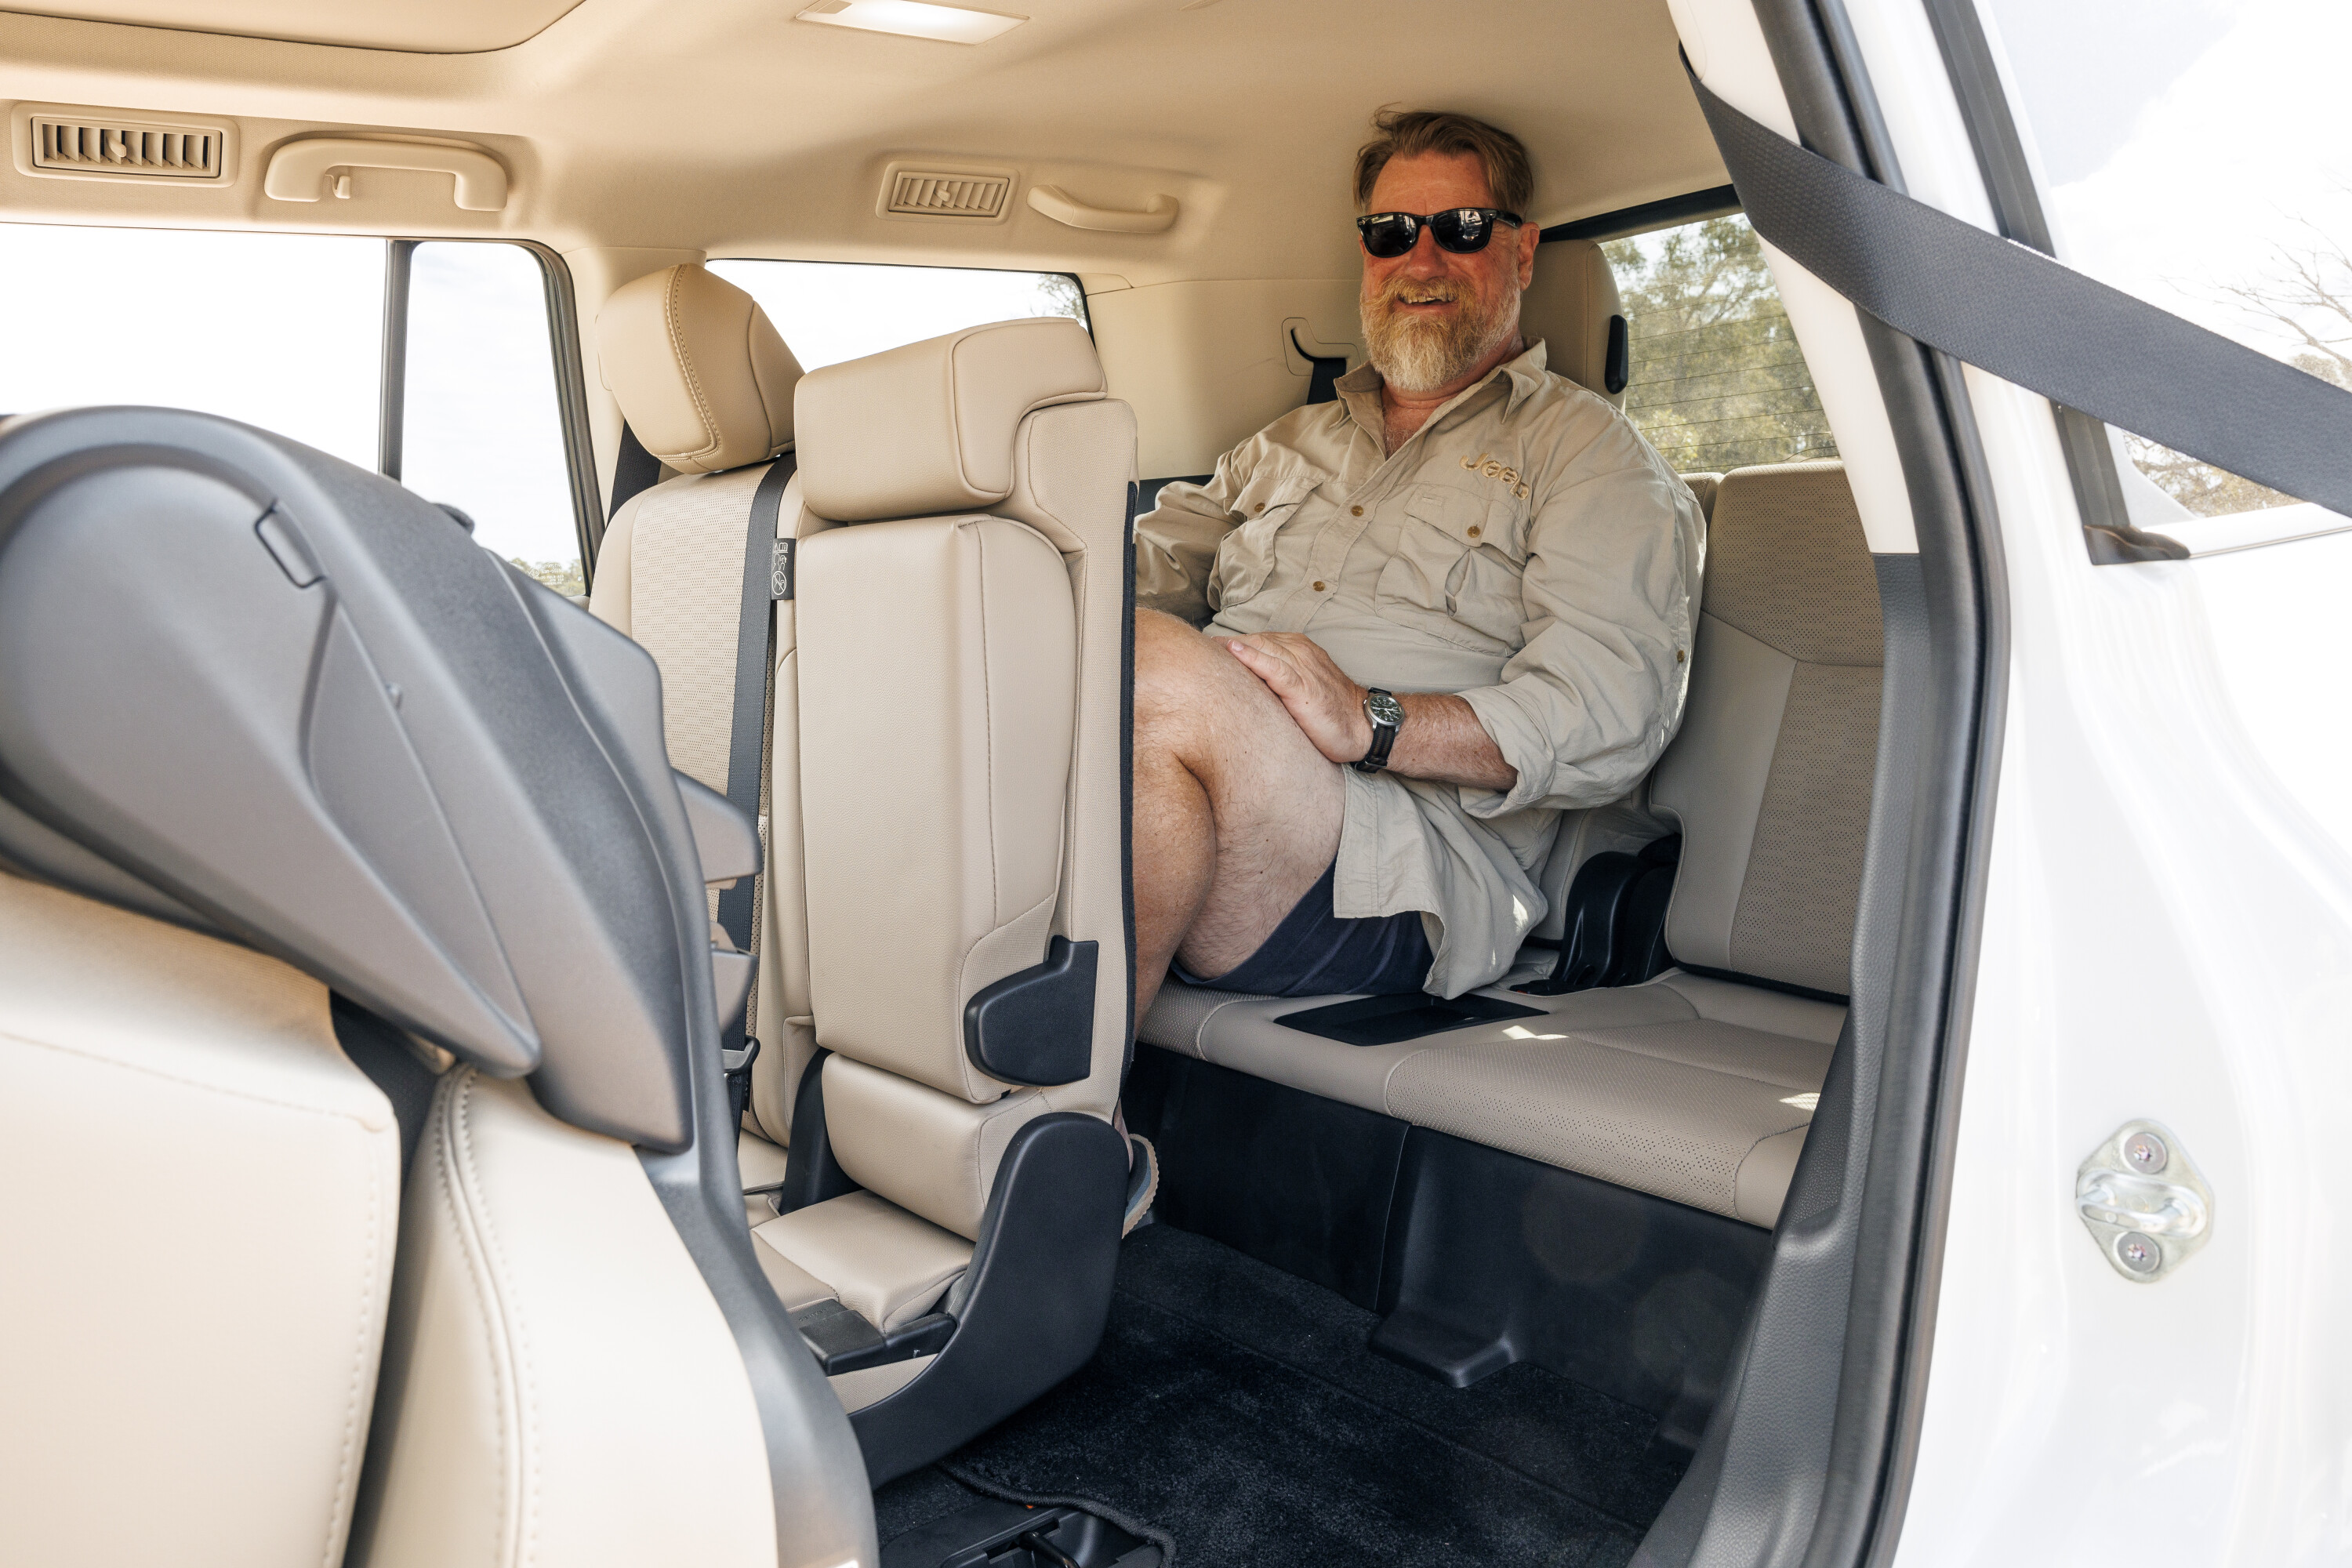
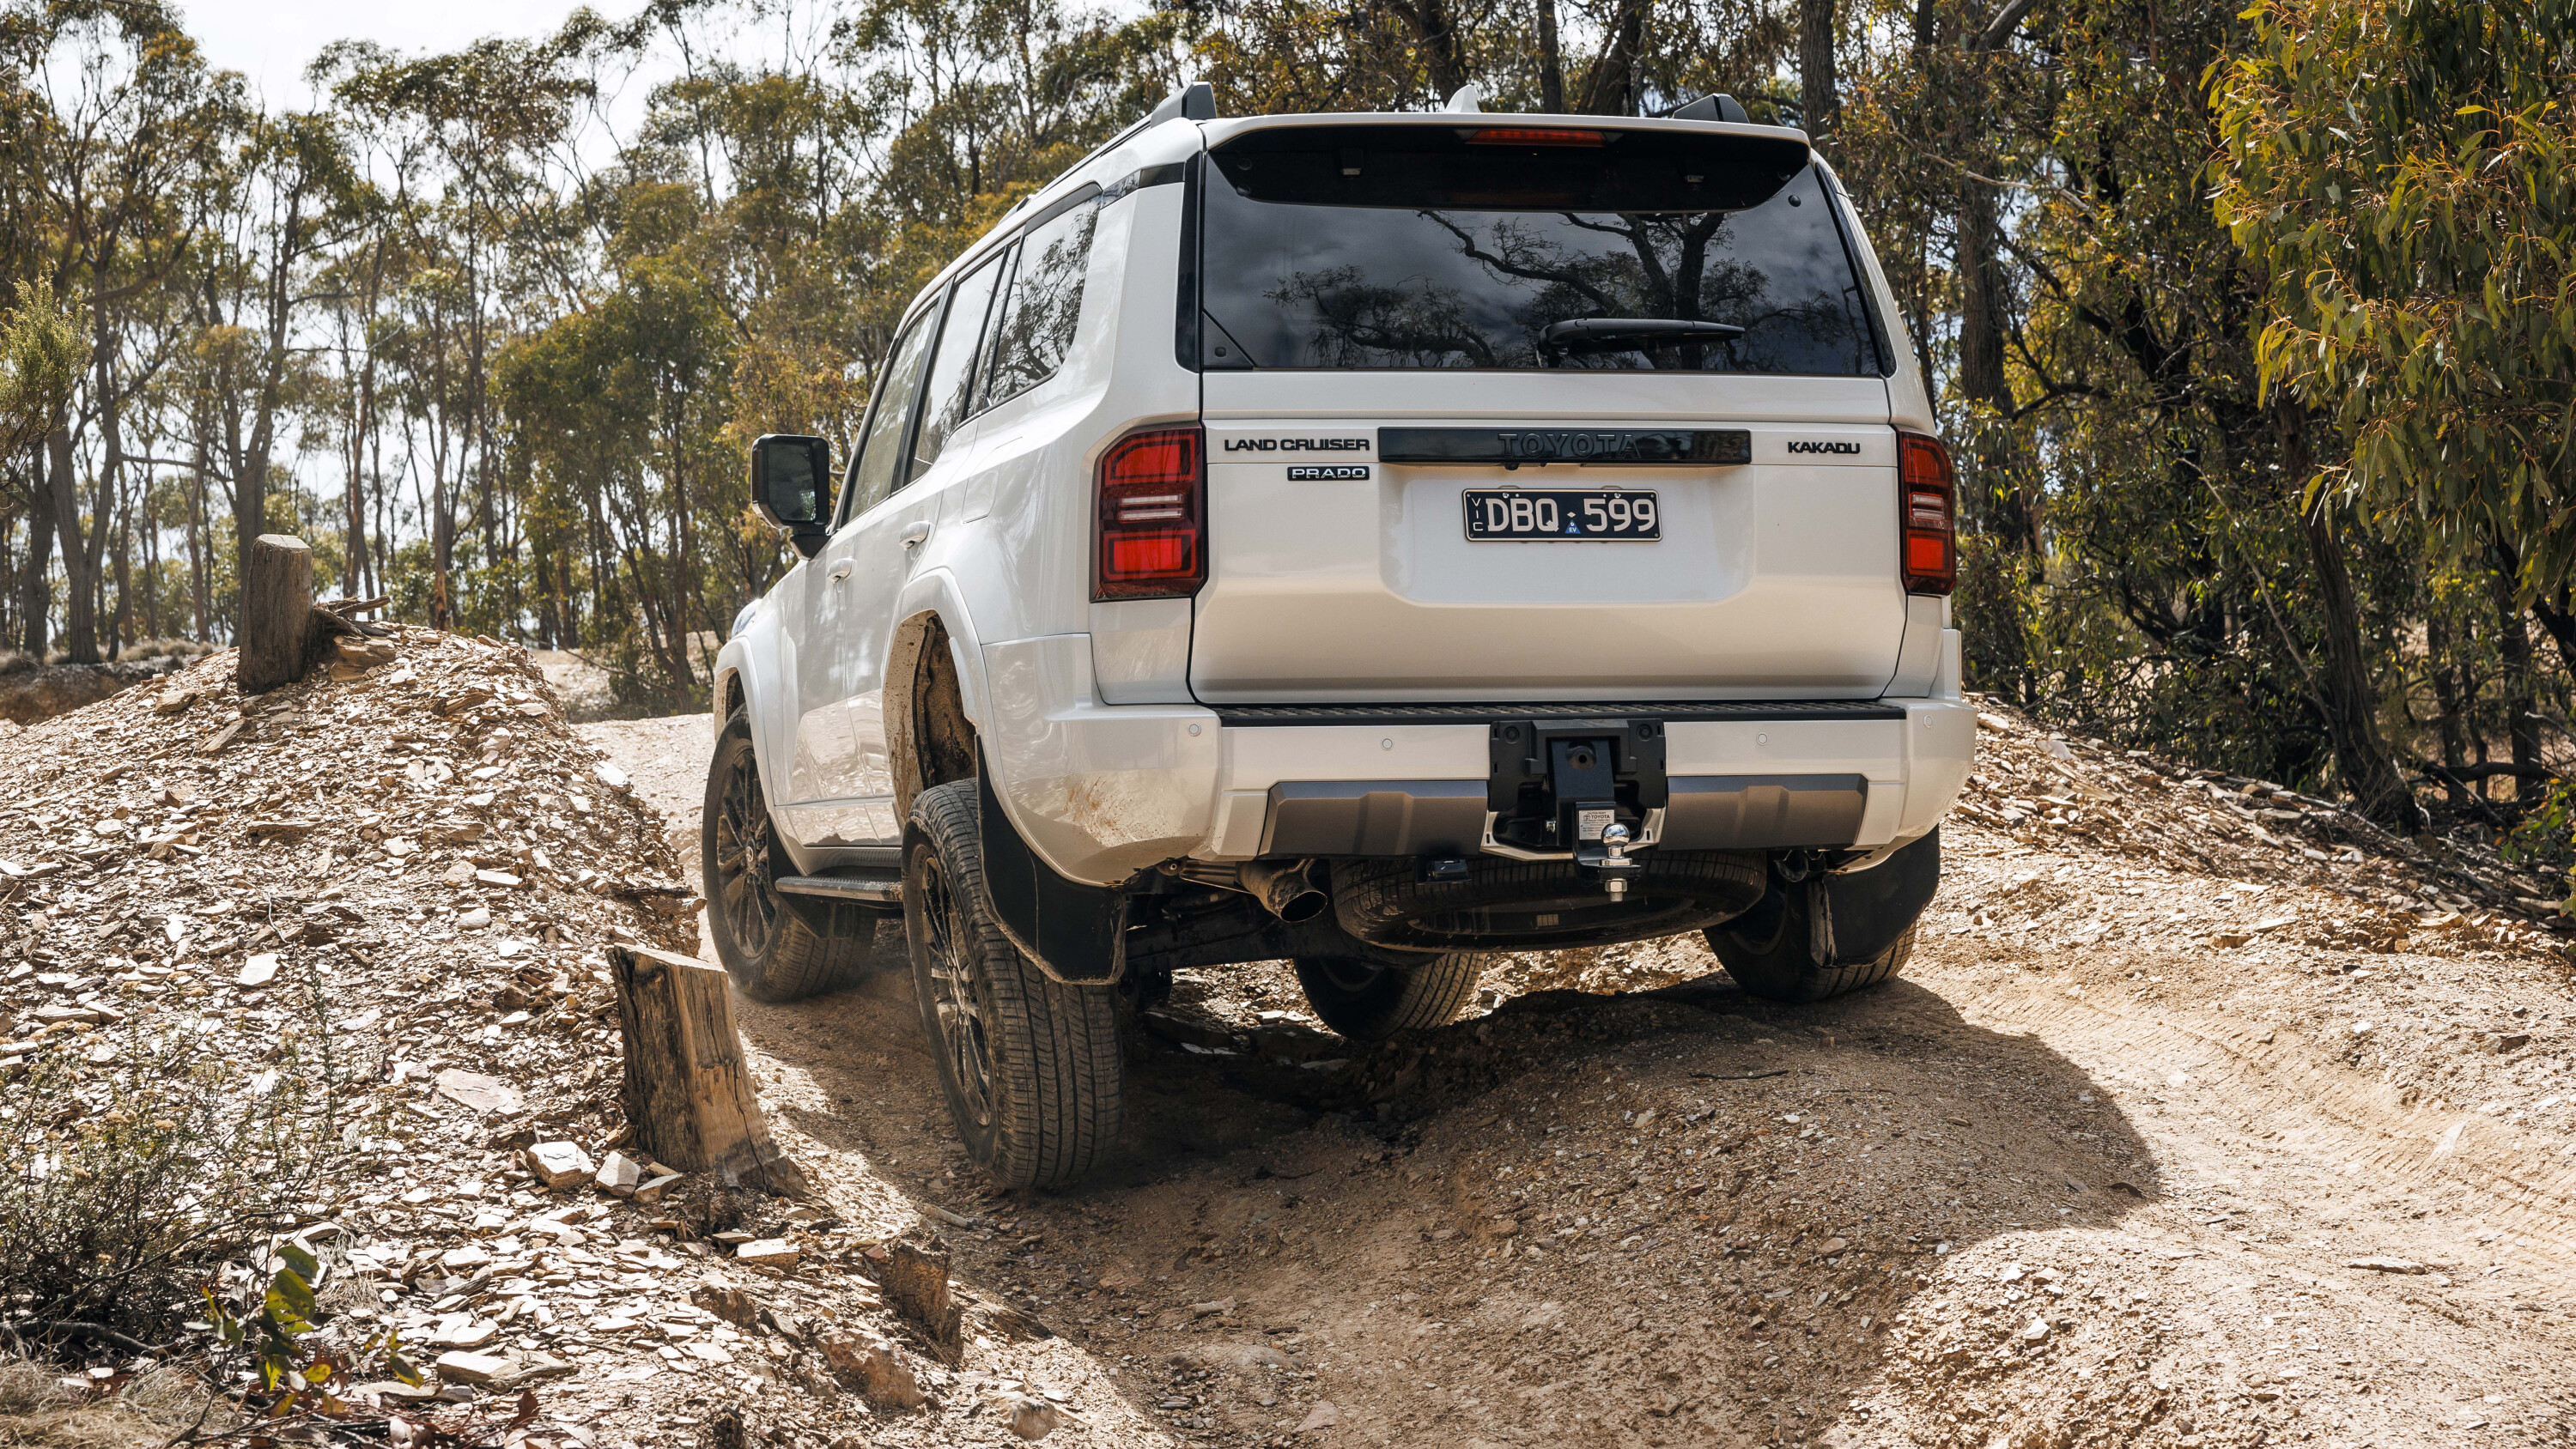
The Kakadu is only available as a seven-seat model, with five seats only offered on the entry-level GX and Altitude variants. Herein lies the biggest criticism of the 250 Series Prado, as the packaging of the third-row seat in the back of the car is horrendous.
Instead of folding into the floor as they did in the 150 Series, or up to the sides as they did in earlier models, the seats can only fold on top of the floor, totally ruining the rear cargo area for carrying cargo or anything else. Securely carrying a car fridge in the back of any seven-seat Prado becomes a challenge, which it shouldn’t be.
It has to be one of the worst designs we’ve seen in any new car in decades, and it has come about because of the engine’s 48-volt hybrid system which mounts its battery and inverter beneath the rear floor section.
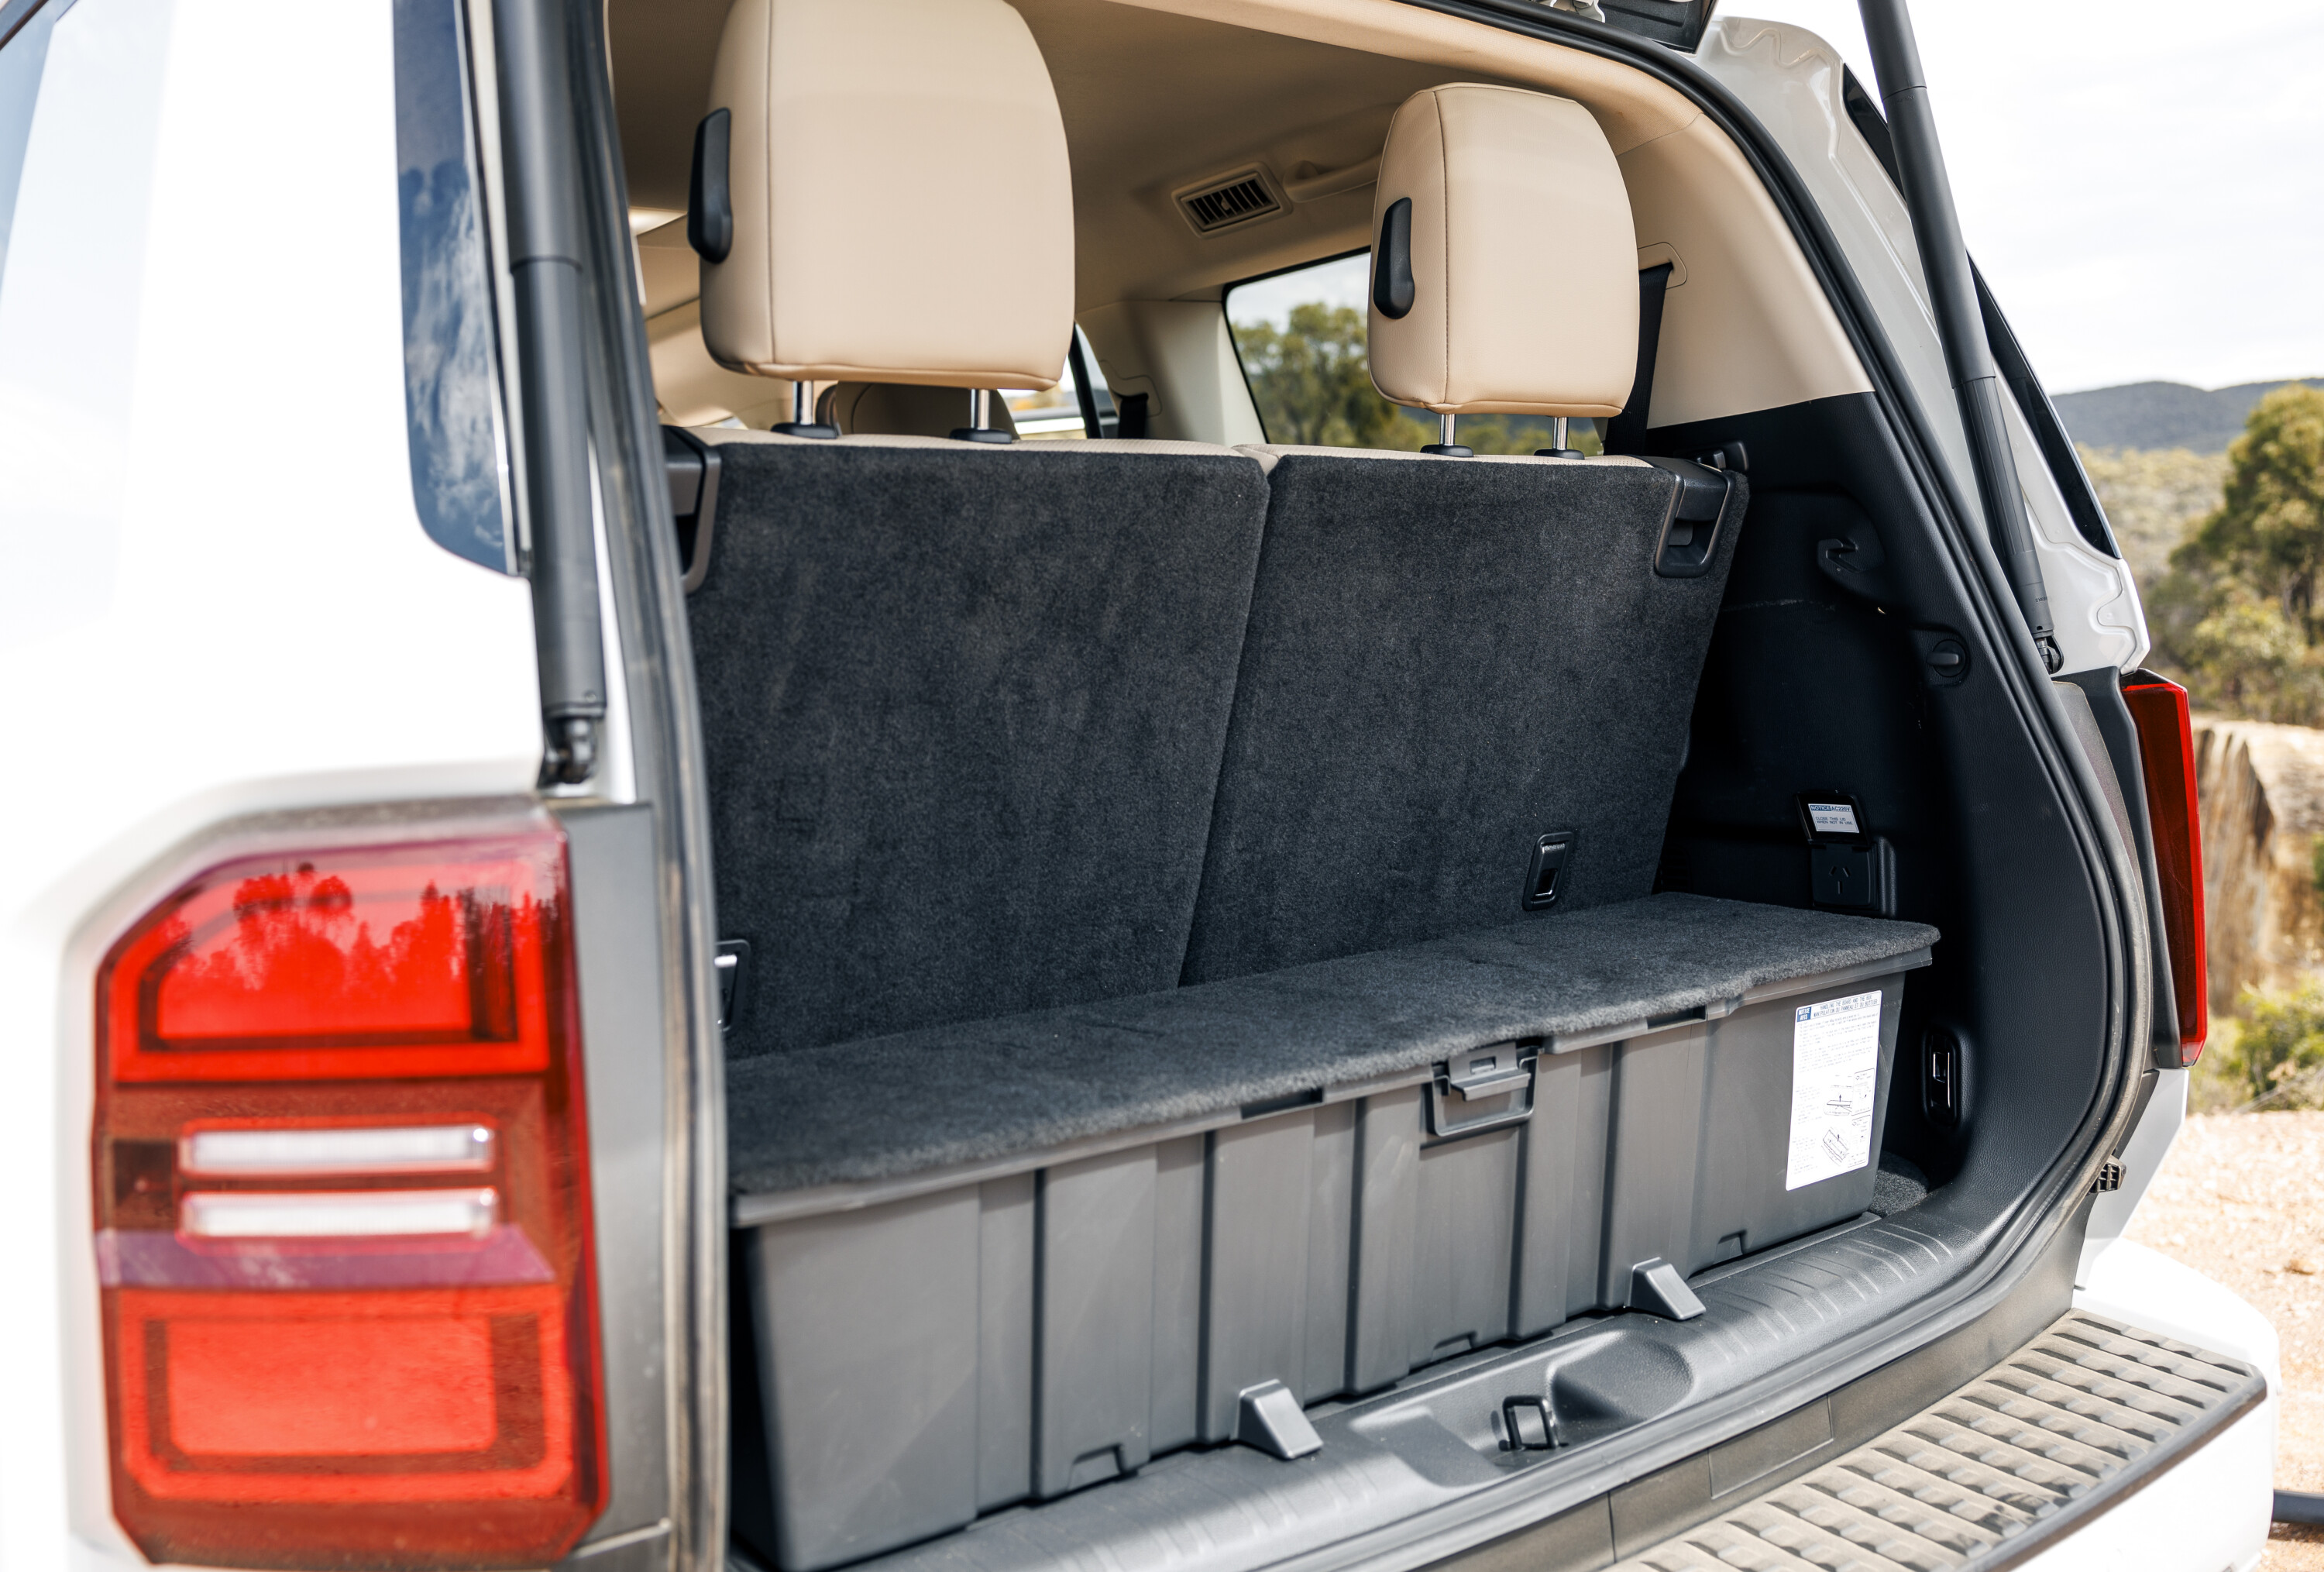
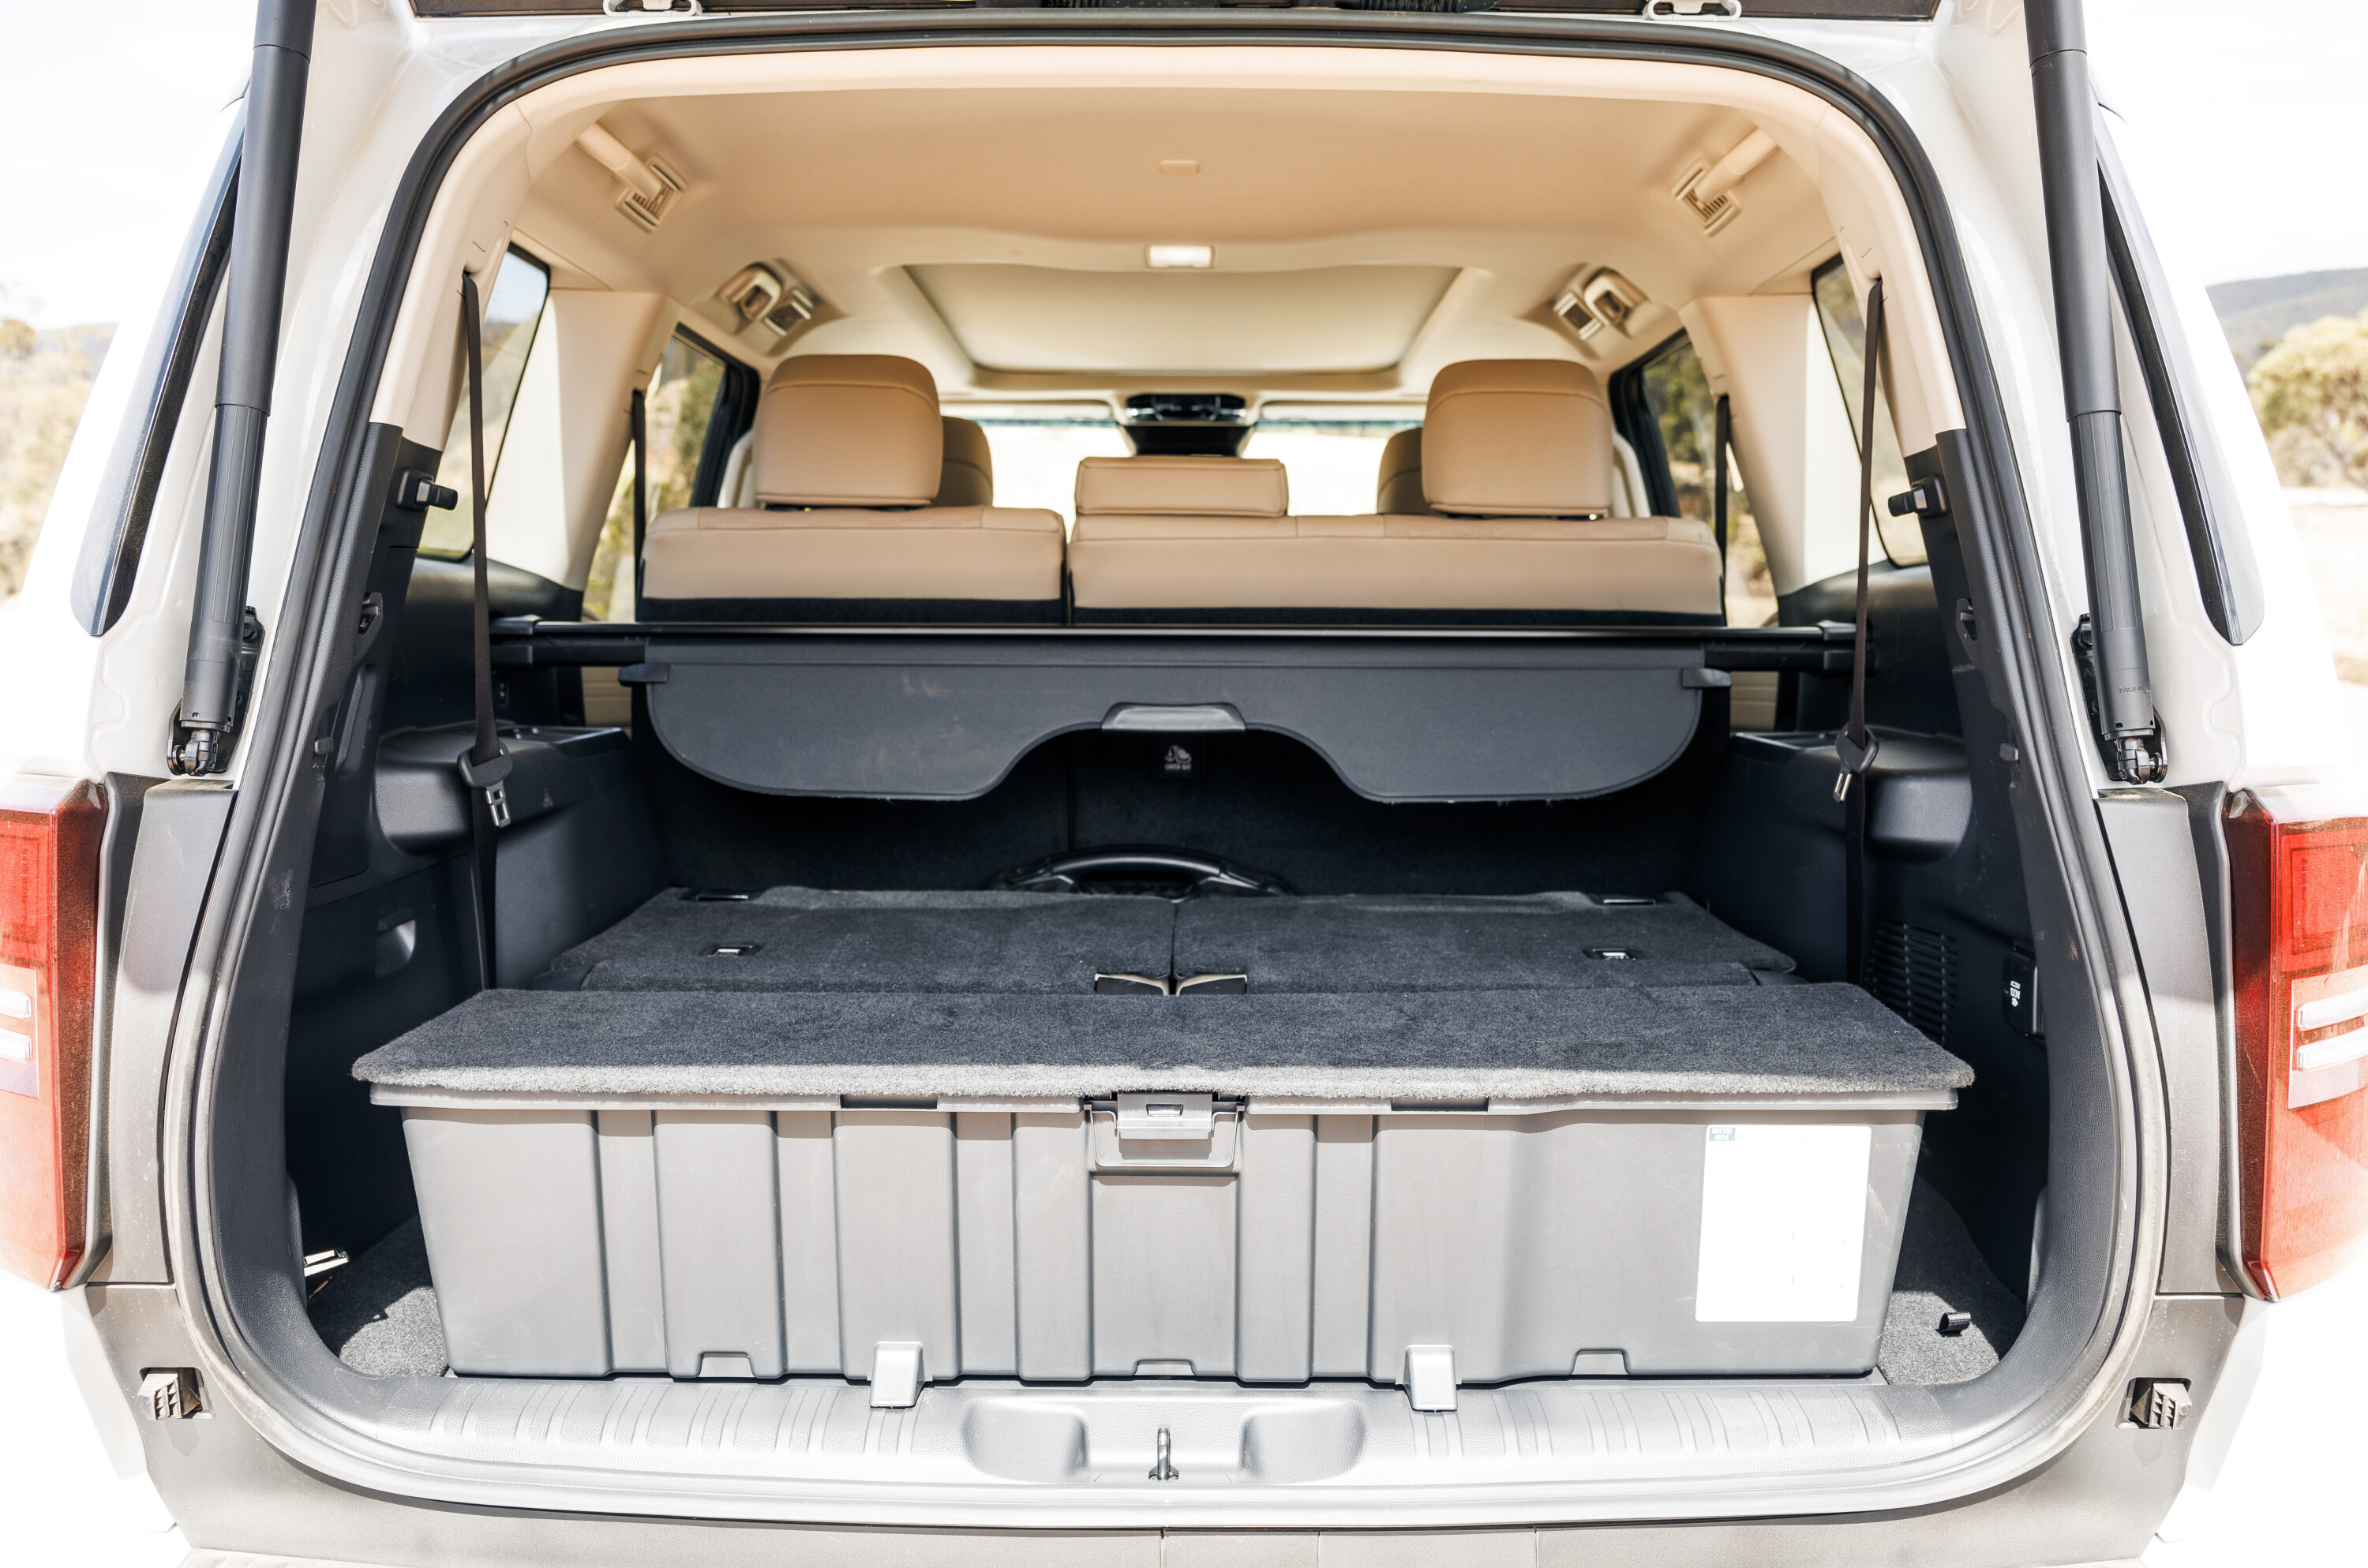
When you consider the very limited benefits of the mild hybrid 48-volt system, you need to weigh that up against the cost of losing a usable cargo area.
For a touring 4×4 wagon, you would think cargo-carrying capacity would always be a priority, and it’s a deal breaker for us. Even the five-seat GX and Altitude models are compromised here; although, not as badly as the seven-seat models.
For what it’s worth, Toyota quotes a cargo volume in the rear with the third-row seats stowed of 906 litres – its most logical competitor, the Ford Everest, has 898 litres. This is in part due to a high roof, but the clincher is using that space by stacking gear on top of the folded seats. A seven-seat LandCruiser 300 Series has 1004 litres of cargo space with the third row folded and measured on the same scale.
The new eight-speed automatic transmission is quick to kick down and respond to a floored throttle, and the engine pulls adequately with that familiar four-pot diesel rumble. Cruising at highway speeds is comfortable, with the engine ticking along at just 2300rpm at 110km/h.
Any previous thoughts that the 1GR-FTV engine wouldn’t deliver the performance and refinement expected for the new Prado are unfounded, even if it’s a long way from the performance of the turbocharged V6 in the Lexus GX550, which is the same car with a better powertrain and a more expensive Lexus price tag.
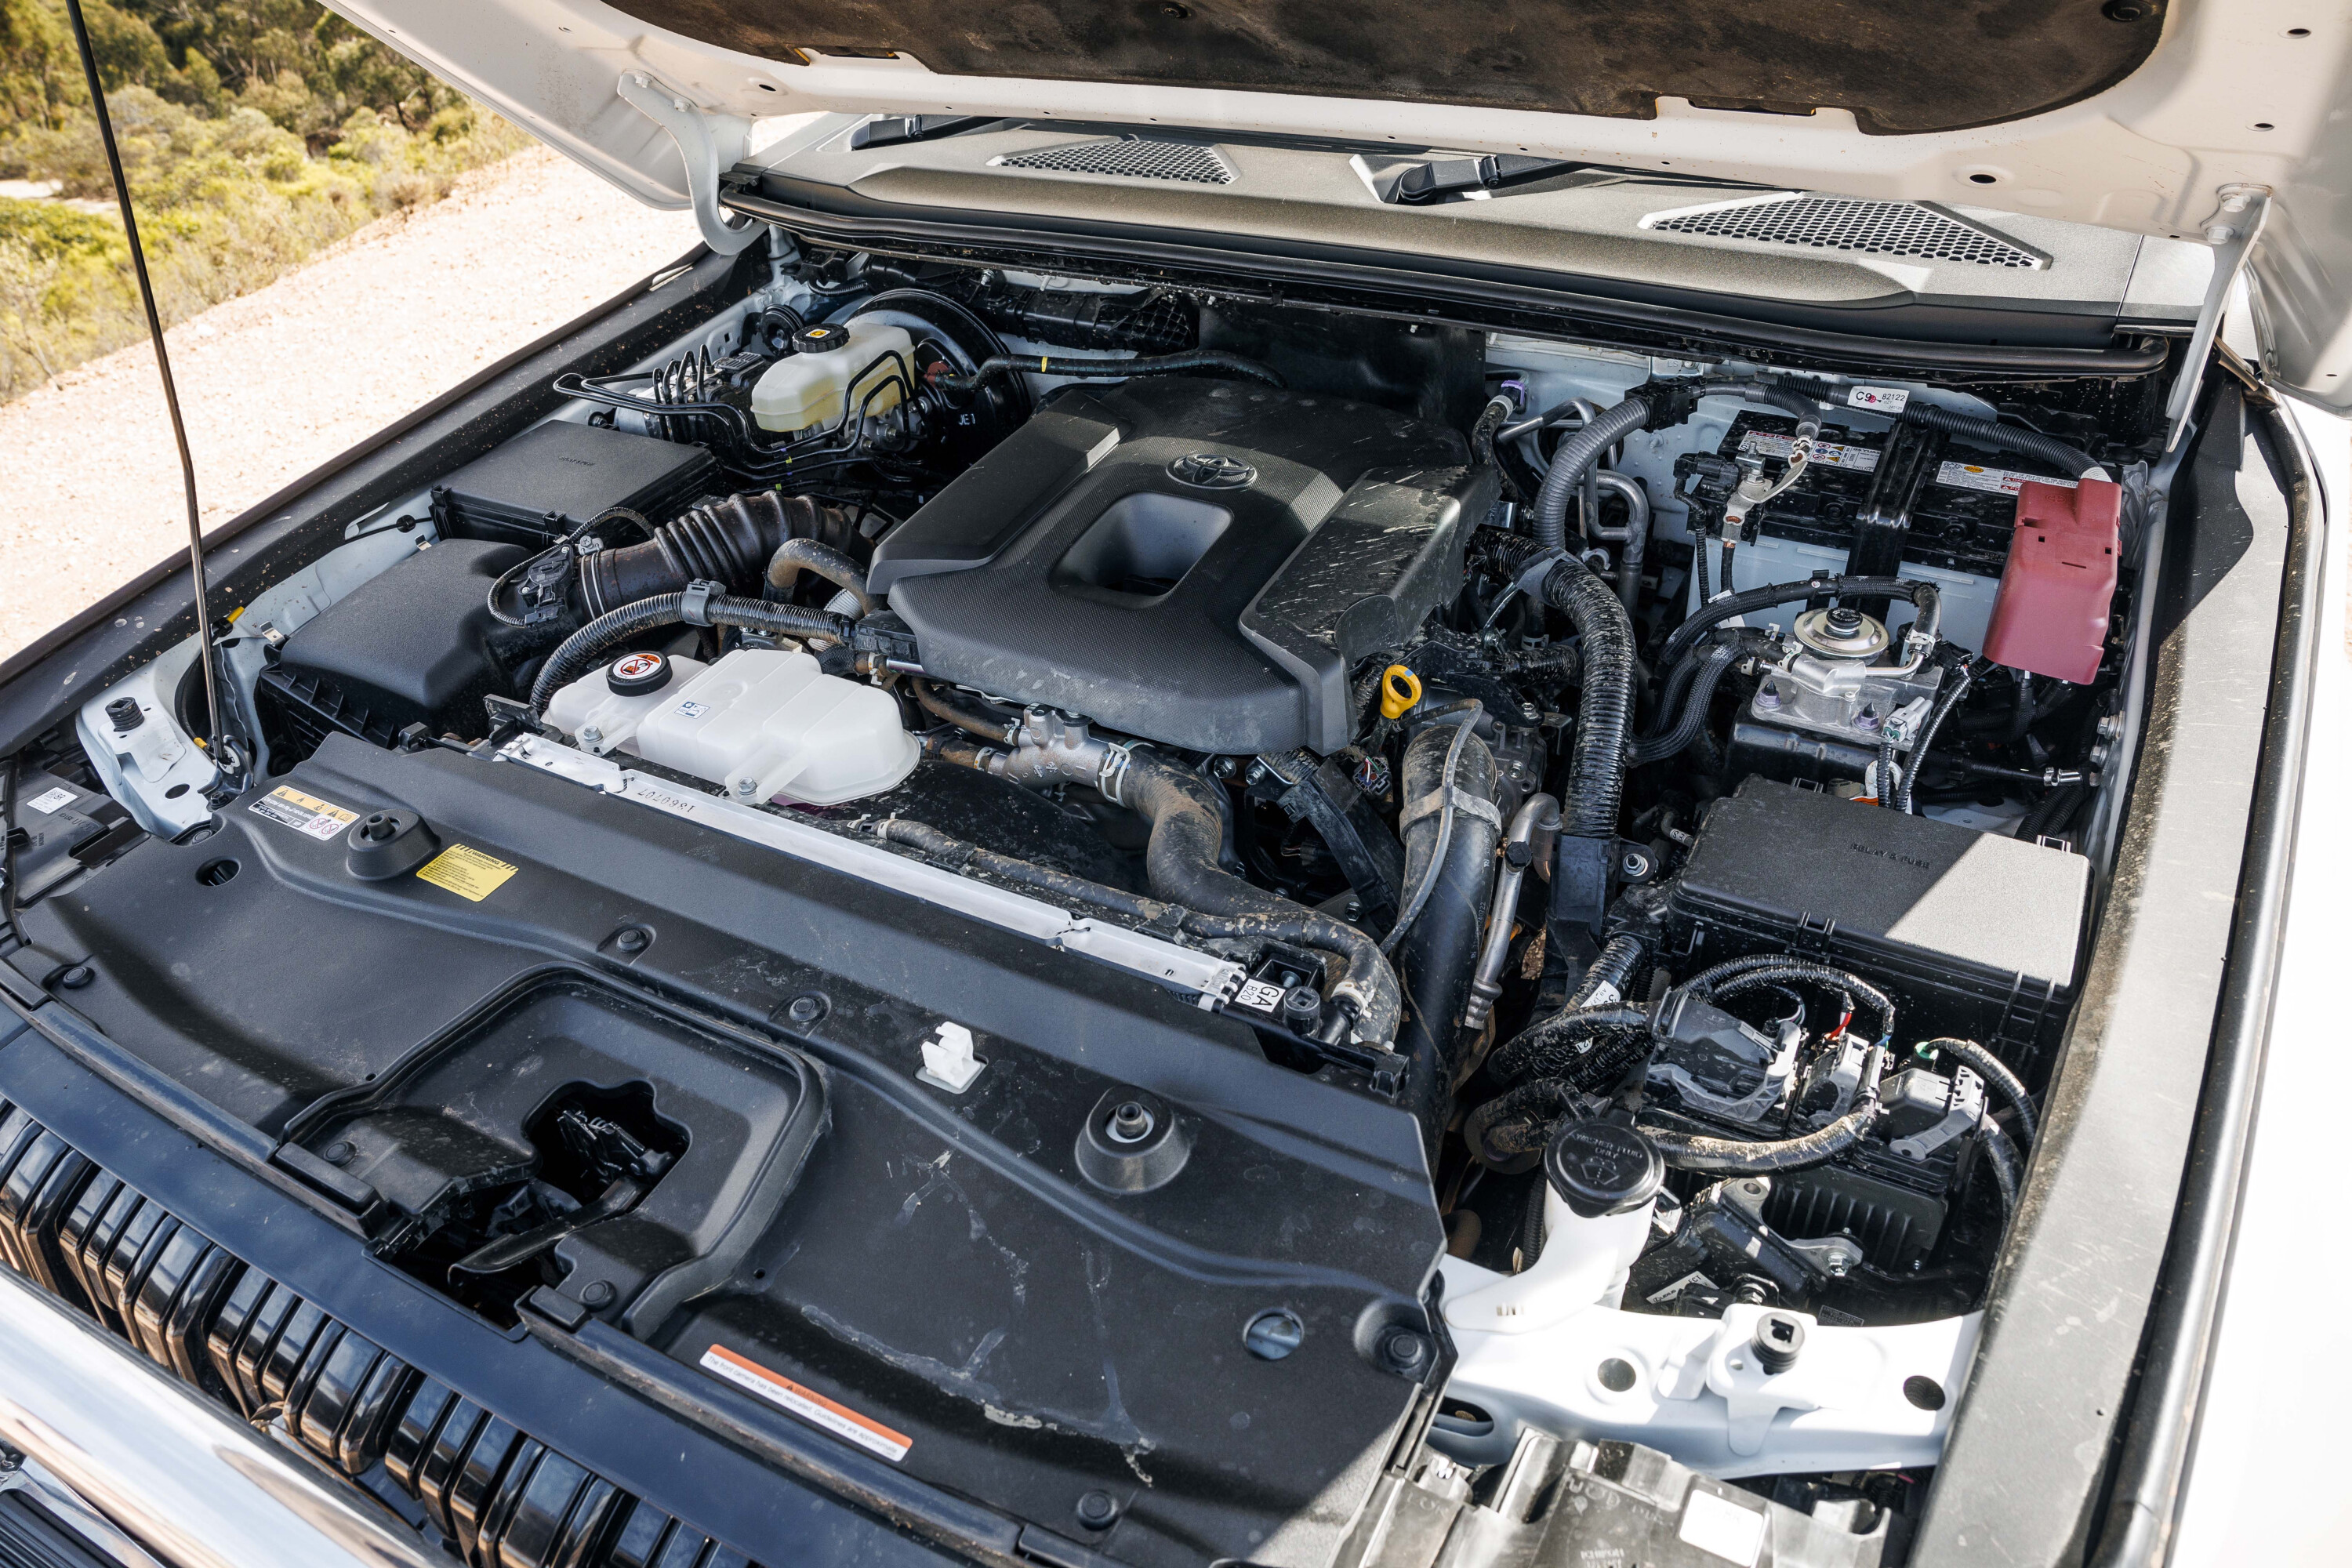
Like previous generations of Prado, the 250 uses a full-time 4×4 system with a lockable centre differential and dual range. It’s easy to use and our experience with it so far is that it is quick to engage when you hit the lock button and/or toggle into low range.
The Kakadu is the only model in the 250 Series range that uses a Torsen limited slip rear diff. When driving off-road and when wheel slip is detected at the back, you can feel the Torsen diff kick in and get you through the obstacle without much fuss.
Compared to the selectable locker that comes exclusively in the Prado Altitude, the Torsen diff eliminates the driver’s need to lock the diff manually as it does it automatically – but it does need to detect the slip before it does, and that little delay could be enough to get you stuck in some instances.
The Kakadu comes with a multi-terrain selector with modes for rock, sand, snow and others, as well as Crawl Control which we continue to say works amazingly to maintain steady progress over and up an obstacle or tricky track without any application of the throttle by the driver.
Crawl Control does this for you while distributing the drive to the wheels with the most traction, making easy work of rough tracks. It’s one technology that even old-school users will appreciate.
The Kakadu gets Toyota’s Adaptive Variable Suspension (AVS) which adjusts the dampeners to suit the driving conditions and the selected drive modes. The system can continuously adapt damping to smooth out road imperfections and minimise body roll, and will control damping force in accordance with vehicle speed and braking force to keep the vehicle level.
AVS also delivers benefits when off-roading, changing the suspension calibration when in low range to further improve ride comfort on rough roads. As always with Toyota 4x4s, the rear suspension delivers excellent axle travel to keep tyres on the ground in uneven terrain.
The Kakadu comes standard with 20-inch alloy wheels and low-profile tyres, which are less than ideal for off road driving; however, the 18-inch wheels off the lower grades will fit, as should 17s.
The 120/150 Series Prados were always very soft in their suspension calibration, which was good for low speed off-road use but could make them wallow and pitch on an open road with bumps and corners. The 250 Series, certainly the Kakadu with AVS, is far more composed in these conditions, making it more surefooted and precise.
The 250 Series uses electrically assisted power steering and it deserves credit for its tune that gives excellent feel and feedback on highway and secondary roads. It’s one of the best-feeling EPS systems we’ve driven in a 4×4 vehicle.
The Prado has always been a competent bush-touring vehicle, and to do that job in Australia it needs to have a sensible and practical cargo area – the seven-seat 250 Series fails terribly in this regard.
This doesn’t only relate to long distance touring. Anyone who uses their wagon for family sports or weekend getaways knows only too well the amount of gear you need to carry and the amount of space that takes up. That space is severely compromised in a seven-seat Prado without a cargo barrier.
Sure, you could load all the seats with kids and rely on a trailer or caravan to carry all of your gear, but not everyone wants to tow and towing will limit where you can take the car off-road. Towing a large caravan behind a fully loaded Prado will quickly put you in the red zone for the car’s GVM and GCM, which also needs to be considered.
If the functionality of the cargo area is not a concern for you then the new Prado has plenty to offer. It’s a bigger car than its predecessor, delivering more interior space for passengers.
It’s quieter and more refined than the 150 too, especially in Kakadu guise, leading to a more comfortable and pleasant experience for all passengers.
The chassis electronics for off-road use are beautifully calibrated and work well to get the Prado over obstacles, with the Torsen rear diff helping the Kakadu model.
Similarly, the electronics of the safety systems didn’t make themselves evident or annoying, with barely a beep from the driver monitor during our time behind the wheel – they just do their job in the background and don’t interfere with the driving experience, as many others do.
The new Prado is a big step up from the old model, and so it should be considering the price hike. If Toyota can secure enough stock for Australia to meet its existing orders for Prado, the nameplate will continue to be one of Australia’s favourite 4×4 wagons.
| 2025 Toyota Prado Kakadu specifications | |
|---|---|
| Price | $99,990 +ORC |
| Engine | 4-cyl turbo diesel |
| Capacity | 2755cc |
| Max power | 150kW@ 3000-3400rpm |
| Max torque | 500NM@ 1600-2800rpm |
| Transmission | 8-speed automatic |
| 4×4 system | Full-time, dual range |
| Construction | 5-door wagon on a ladder frame chassis |
| Front suspension | Wishbone and coil IFS |
| Rear suspension | Multilink coil live axle using Panhard rod |
| Tyres | 265/50-20 on alloy wheels |
| Weight | 2595kg (kerb) |
| GVM | 3200kg |
| GCM | 6600kg |
| Towing capacity | 3500kg |
| Payload | 605kg |
| Seats | 7 |
| Fuel tank | 110L u2013 17.4L Adblue |
| ADR fuel consumption | 7.6L/100km |
| On-test fuel consumption | 9.8L/100km |
| Approach angle | 32u00b0 |
| Ramp-over angle | 25u00b0 |
| Departure angle | 17u00b0 |
| Ground clearance | 221mm |
| Wading depth | 700mm |
GME packages its TX6165 a few different ways: it offers the core unit (TX6165X) for $279; a core unit plus additional accessories (TX6165) for $339; and a twin-pack with additional accessories (TX6165TP) for $639. Those additional accessories include an IP67 waterproof-speaker microphone, an earpiece-style microphone, and a 12V DC vehicle charger. In addition to those as-mentioned accessories, GME also offers the following optional accessories: a 12V DC charging cradle; a magnetic handheld mount; and a magnetic mount antenna.
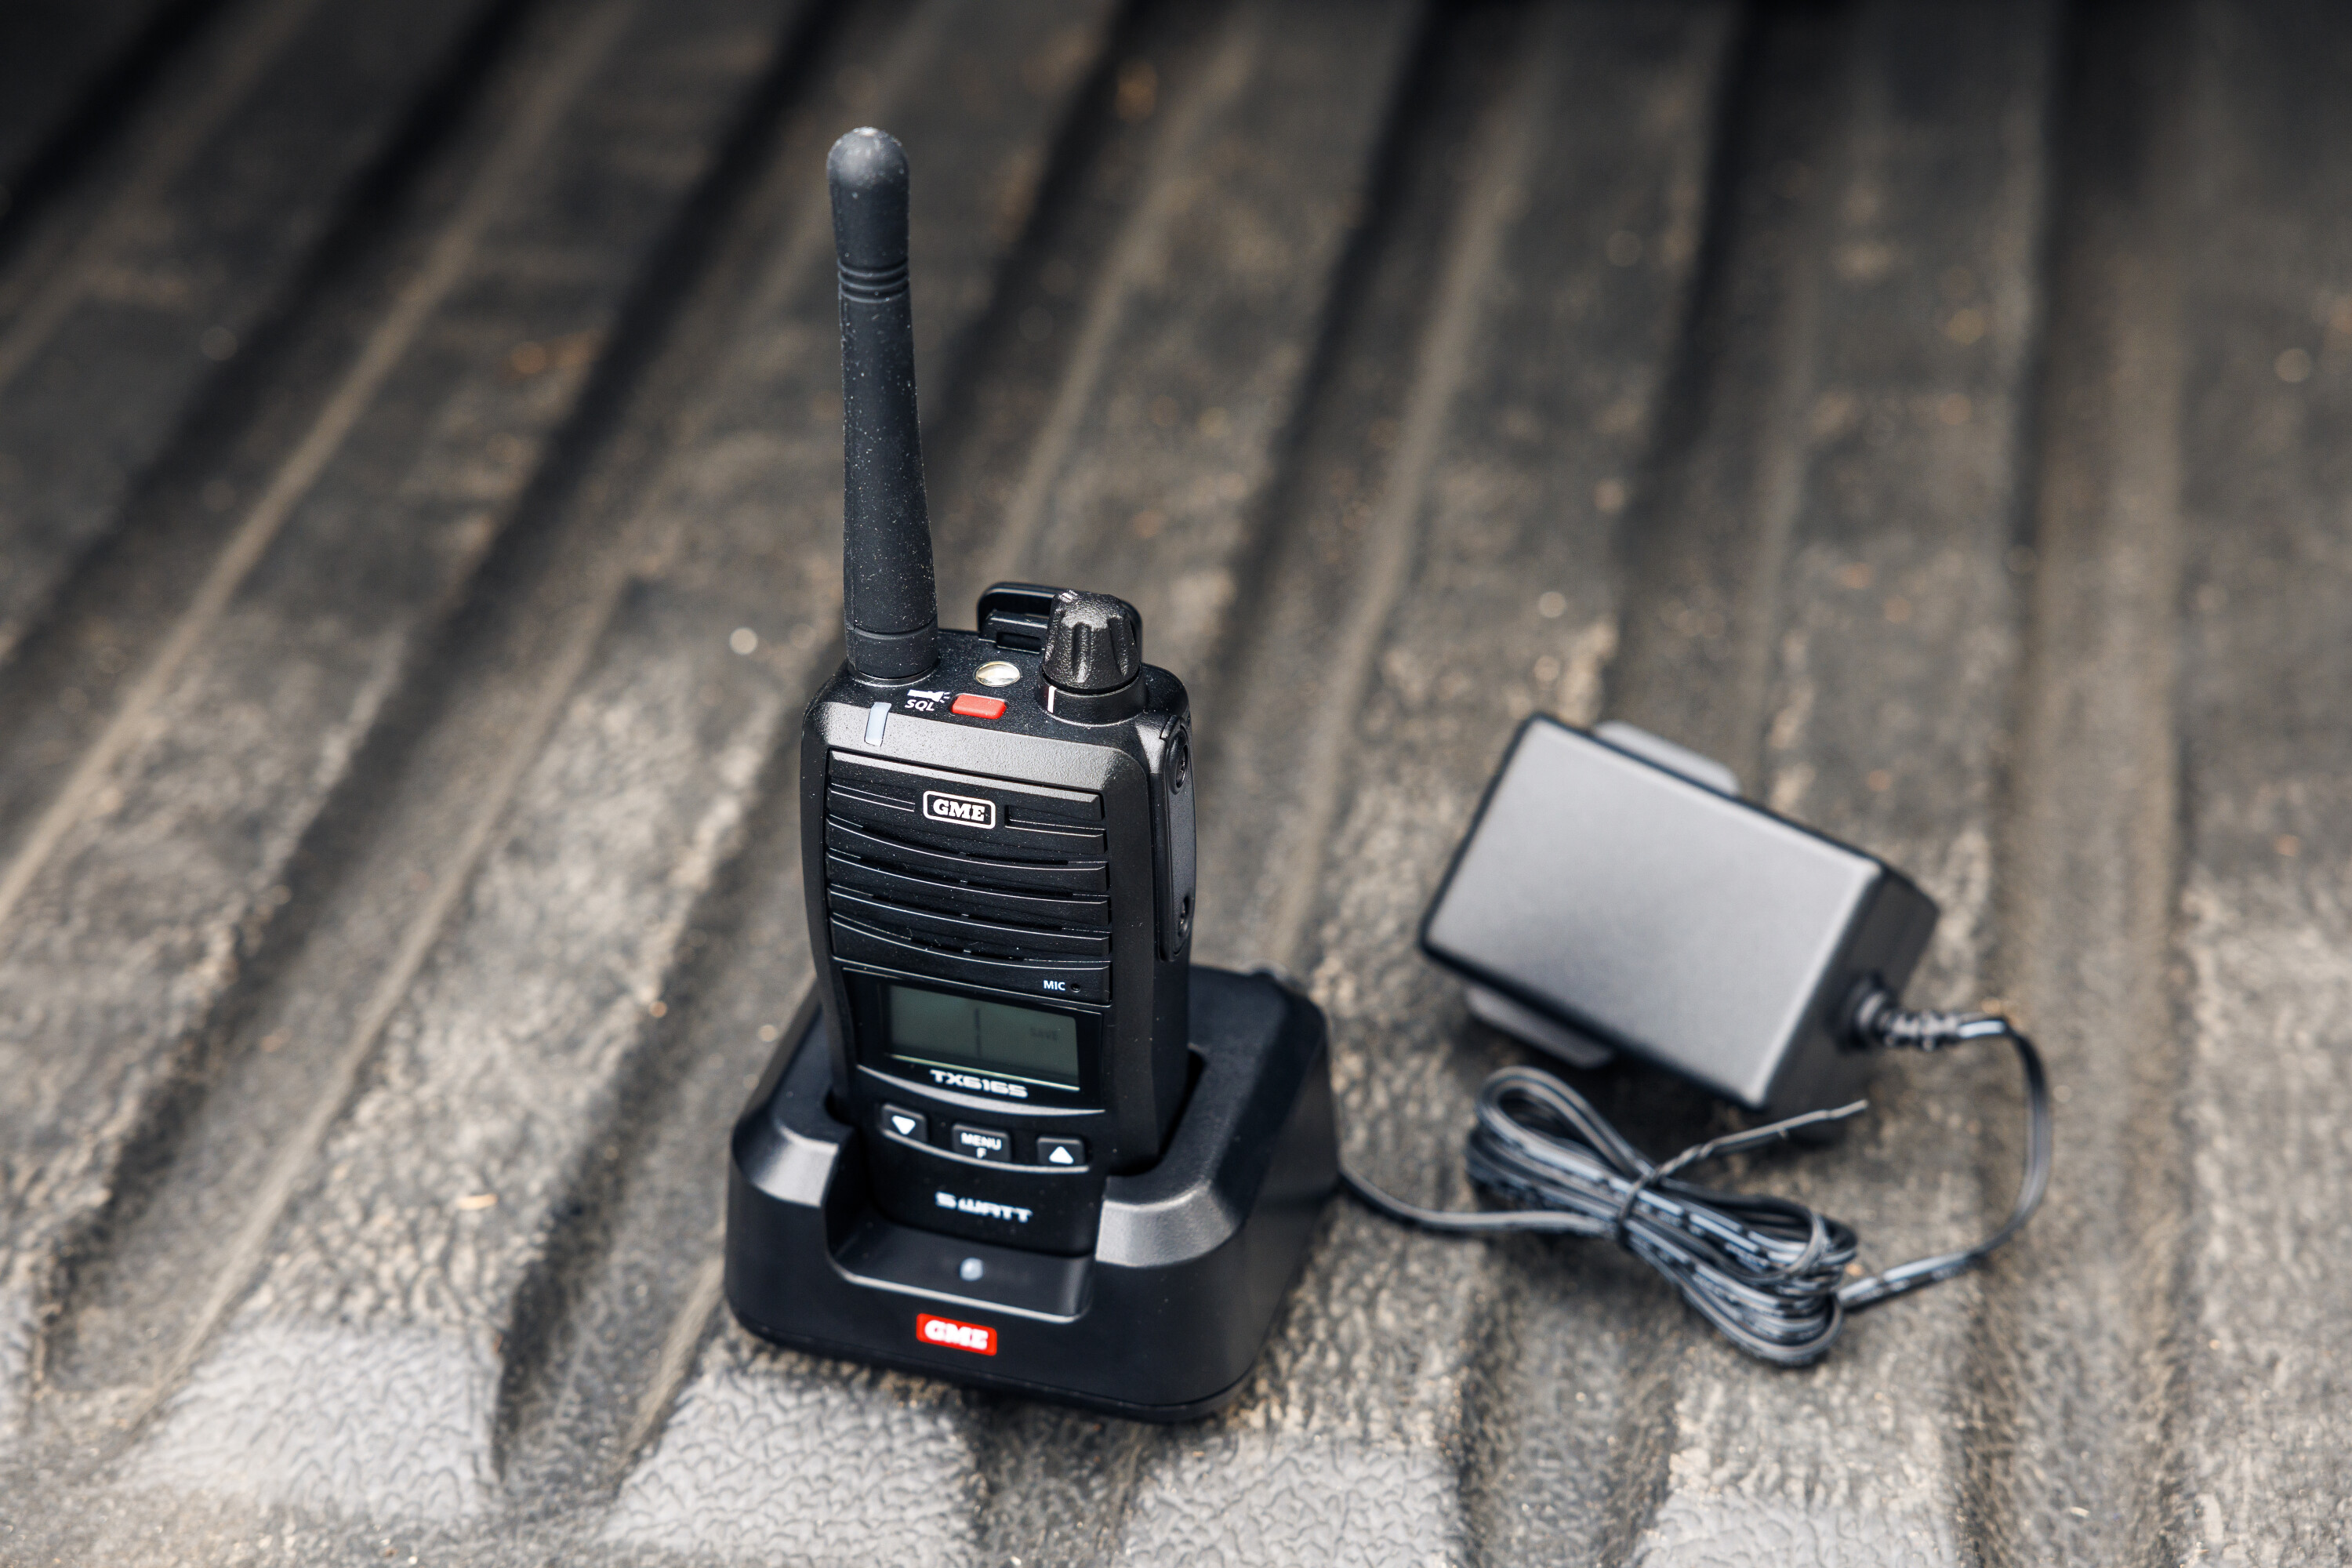
We received a core TX6165X unit. Included in the box – measuring 110mm (W) x 318mm (H) x 95mm (D) – is the 5-watt handheld UHF CB radio (TX6165X); a 2600mAh Li-ion battery pack; a rapid desktop charger; an AC adaptor; and a belt clip. Despite it lacking the additional accessories mentioned above, it’s still equipped with plenty of high-tech features including class-leading five-watt transmission power; an IP67 ingress-protection rating; up to 30 hours of battery life; and a VOX hands-free mode ?
| Key features | |
|---|---|
| 5/1-watt switchable transmission power | IP67 ingress protection |
| 2-watt speaker | User-programmable button |
| Priority channel | Dual watch and triple watch |
| Large, high-contrast LCD display | Up to 30 hours battery life |
| Built-in LED torch | Optional power-saving modes |
| Rotary power/ volume control knob for easy operation | |
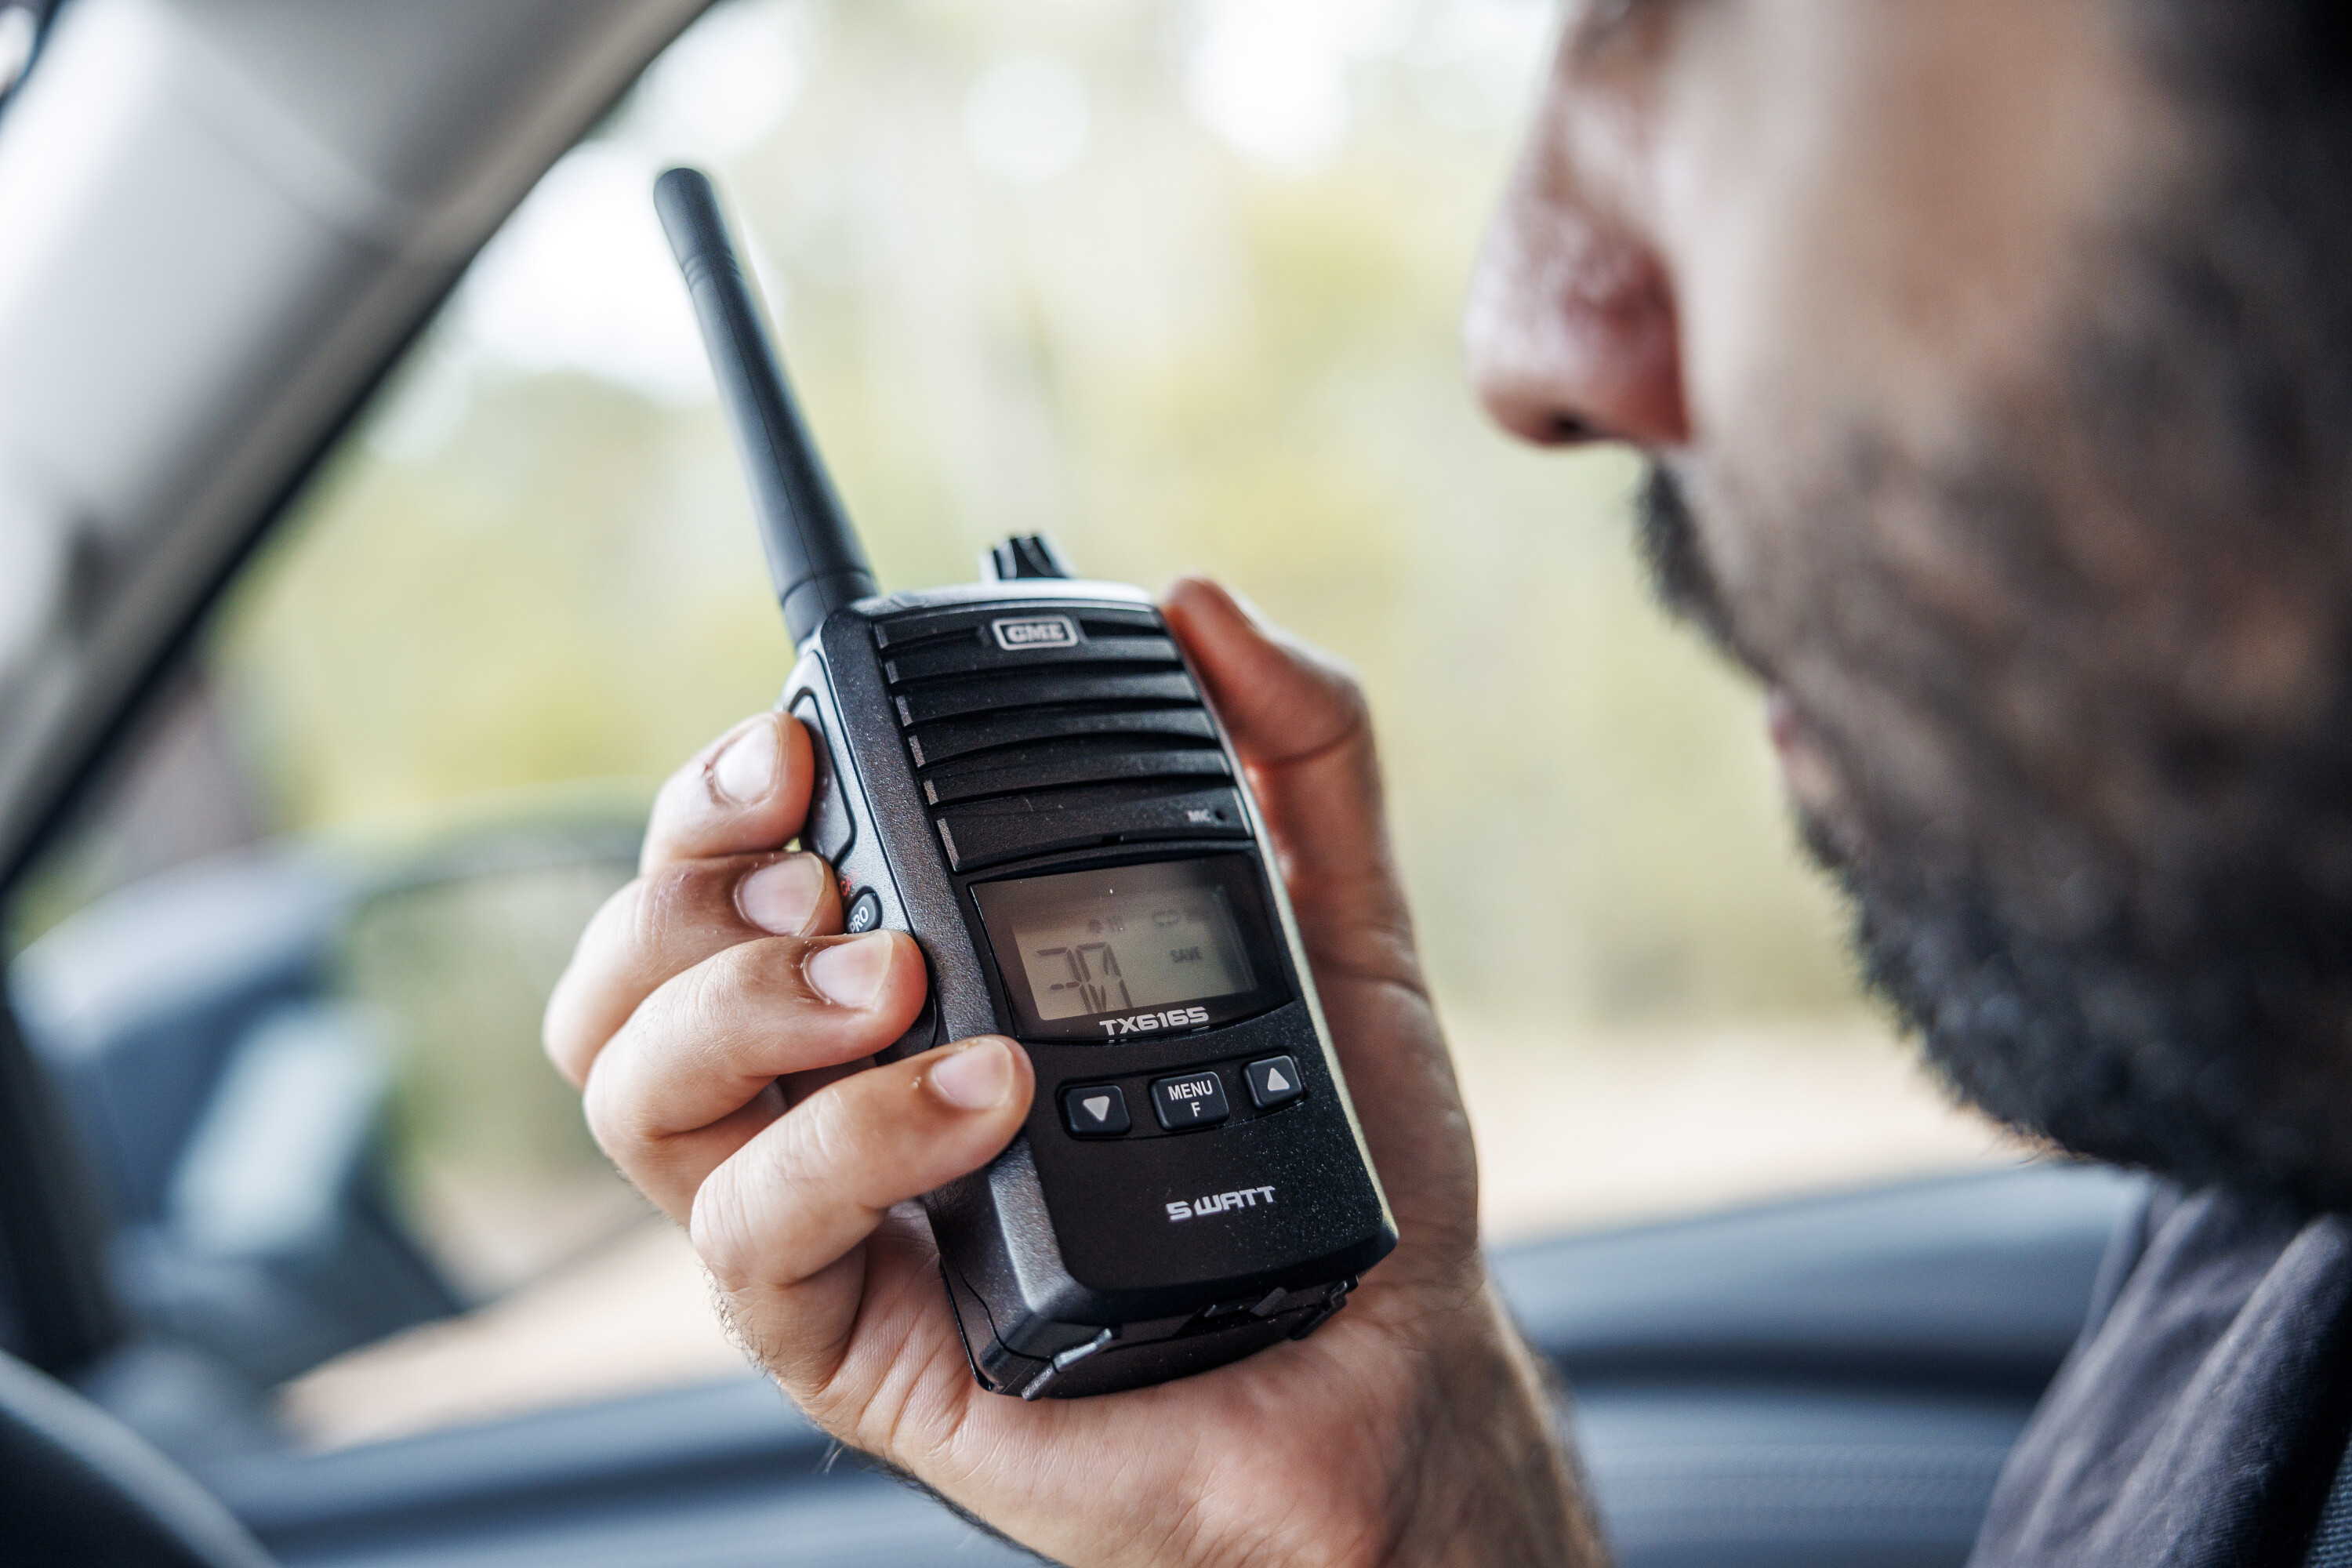
Despite its sturdy construction and ability to survive remote torture tests around the country, the unit itself is extremely lightweight. An ergonomical design allows it to cradle snugly in one’s hand, with all buttons easy to reach and positioned logically.
However, if it’s your first time using a GME radio – or any radio, for that matter – you’ll need a crash course on how to access all functions. Unfortunately, GME doesn’t provide a physical manual in the box; instead, users are prompted to head online and download a copy – which could be tricky if you’re stumped in the middle of the outback and you need some guidance. GME isn’t the only manufacturer to follow this trend, and it seems to be becoming more prevalent.
The sound quality is excellent, and one of the unit’s best features is its extremely generous battery life. GME claims an operating time of up to 30 hours when using low power output, or 12 hours when using high power output. Either way, the peace of mind knowing this unit will work when you need it is priceless.
The included belt clip locks in securely, feels sturdy and grips tightly. It’s also extremely easy to attach and detach, so users can quickly transfer the versatile radio from in-vehicle to a backpack (or a belt) when at camp or embarking on a bushwalk.
The radio securely locks into the provided quick-charging cradle, which is also solid in its construction. The desktop charger features an LED light to indicate the status of the charge, as well as four rubber grip points underneath to prevent it from sliding around. Plus, its design allows the radio to be charged with the belt clip still attached.
The GME TX6165X is a simple-to-use, durable handheld radio that’ll survive countless trips to the harshest corners of the country. A set-and-forget tool with up to 30 hours of battery life makes it the perfect companion for 4×4 tourers who also tend to escape down a trail on foot. At $279 for the TX6165X, we reckon that’s great value too.
| Key specs | |
|---|---|
| Number of channels | 80 CB |
| Channel spacing | 12.5 kHz |
| Supply voltage | 7.4V DC |
| Battery type | Li-Ion |
| Battery capacity | 2600mAh |
| Operating time (5W) | 18h |
| Operating time (1W) | 30h |
| Radio dimensions | 59mm (W) x 35mm (D) x 102mm (H) excluding antenna |
| Radio weight | 286g (with battery and antenna) |
| Operating temperature | -10 to +60 degrees celsius |
| Ingress protection | IP67 |
| Accessory connector | GME 3.5mm / 2.5mm stereo jack |
Competing against the GWM Ute, LDV T60 and Ssangyong Musso, the JAC T9 is offered in two variants: a base-spec Oasis and a top-of-the-range Haven.
The JAC T9 is equipped with a 125kW/410Nm 2.0-litre single-turbo four-cylinder diesel engine, paired with an eight-speed automatic transmission and a part-time four-wheel-drive system. Deliveries began rolling out to customers at the end of 2024.
The JAC T9 has earned the title of Australia’s safest ute in 2024, based on weighted results recently published by ANCAP.
An early Christmas present for some, as the first Australian deliveries of the budget-friendly JAC T9 dual-cab ute have begun.
JAC has announced an industry-leading program that will provide owners with a T9 loan vehicle whenever their own T9 is in the garage undergoing warranty repairs.
ANCAP has awarded the JAC T9 dual-cab ute full safety marks, with the five-star score applying to all 2.0-litre diesel variants sold in Australia.