WHEN you’re in the bush, things go wrong – it’s essentially the reason why we’re running this recovery series.
And one of the most dangerous things you’ll ever come across is the simple act of lifting your four-wheel drive off the ground. In theory it’s a simple exercise and, in a road-going vehicle, requires such little brain capacity it could be measured in teaspoons. But when you’re dealing with lifted 4x4s, things get a little more complicated.
4x4s by their very nature are higher than most other vehicles, and when you start adding suspension lifts and larger tyres they soon reach heights that no bottle jack could ever hope to reach.
When you do get them off the ground they’re so unstable a stray breeze could see them come crashing down – not good news for any unsuspecting legs that happen to be underneath. Enter the exhaust jack.
Exhaust jacks are designed as a simple and safe replacement for the trusty high-lift jack, a means to get your 4×4 off the ground without the risk of breaking your jaw with a wayward jack handle. Another plus is that an exhaust jack has a much larger, sturdier base.
The jacks can get you out of sand or mud in a recovery situation, or lift a flat tyre off the ground. Plus they’re touted as being one of the simplest bits of recovery gear money can buy.
STEP 1: Secure the vehicle IN ANY recovery situation it’s vital to plan out what’s going to happen through every stage of the process. 4x4s have a tendency to start moving once you’ve removed them from whatever is holding them back. Ensure the wheels staying on the ground are chocked, the handbrake’s on, and the vehicle is in gear. If the section of track you’re stuck on is steep enough, it’s a good idea to run a winch line to prevent the 4×4 from heading downhill at a rate of knots with no one behind the wheel.
STEP 2: A quick inspection
OVER time things are likely to get damaged through misuse, poor storage conditions, or wear and tear. Before attempting to lift your 4×4, give the jack and all hoses a thorough inspection. Keep an eye out for signs of abrasion, cuts, seams splitting, or bag deformation. While they may seem minor, even a small surface cut can become a point of failure once the weight of your 4×4 is sitting on it. If possible, inflate the bag off to the side for a thorough inspection before performing the lift.
STEP 3: Prepare the jac WHEN you’re confident the jack is safe to use, it’s time to set up all the components you’ll need. Additional to the bag itself, there should be at least one heavy-duty mat to protect the bag from punctures and cuts. Most common hose arrangements will consist of two pieces: one with an exhaust bung or funnel on one end and a one-way valve on the other, and another that connects the valve to the bag. Before installing the hoses, ensure all dirt and debris is clear of the connections.
STEP 4: Into position
WITH the hoses connected, the next step is to position the jack itself. You’ll want it flattened as much as possible to ensure an even lift. If lifting a rear wheel, you need to position the bag under the chassis or rock slider just in front of the wheel. Front wheels will be the same, but behind the wheel. In either case, ensure it’s in a location that can support the full weight of the vehicle without causing damage to fuel tanks, lines, or the jack itself.
STEP 5: Begin lifting When you’re happy with the bag position and confident the 4×4 won’t roll away when lifted, bump the gearstick into neutral and start the engine. The 4×4 should be void of passengers, with only the operator in the immediate area controlling the ignition through an open window. Keep the revs low to ensure a slow and controlled lift. Adjusting the idle up will often blow the exhaust bung out rather than speed up the process. Cut the ignition when the bag makes contact with the chassis and double-check that it’s lifting evenly.
STEP 6: Off the ground
ONCE you’ve ascertained that the lift is going as planned, reach back into the 4×4 and re-start the engine. The jack will begin taking the weight of the 4×4, so it will require careful monitoring. Most exhaust jacks can lift around two tonnes but shouldn’t be filled with more than 10psi, so if the bag stops lifting the 4×4 or appears fully inflated, cut the engine again. The one-way valve in the hose will keep the bag inflated even with the engine off.
STEP 7: Safety first IT SHOULD go without saying: Don’t ever trust a bag of hot air with your life. If you’re planning on working on the 4×4, position axle stands under the lifted corners to hold the weight. Alternatively, if you’re lifting a wheel to get it out of mud, snow or sand, now is the time to pack harder materials under the tyres.
STEP 8: Down she goes
WHAT goes up must come down. And just as lifting your 4×4 should be a slow and controlled process, the same goes when dropping it. In the hose you’ll have a one-way valve that allows gases to travel into the jack, but not back out. Grab the valve and slowly twist it open to deflate the jack. You’ll want to crack it just enough that if the vehicle begins lowering in an unsafe manner you can quickly stop the flow of gases and halt the descent.
STEP 9: Back on solid ground WITH the vehicle back on solid ground, give the jack another thorough visual inspection before packing it away. Keep an eye out for any new damage and clean off any mud or debris it may have collected. Over time, even a small patch of mud can dry out, rubbing the material and weakening the bag in the process. When back home, give the jack a thorough wash with warm water before leaving to dry out of direct sunlight.
TIPS FOR SAFER LIFTING
1. JACKS are designed for lifting, not holding. If you want to swing your legs under your 4×4, ensure it’s sitting on a stand, not a bag of hot air.
2. Unless your idea of a fun weekend is a lungful of exhaust gas, you’ll need to be careful both inflating and deflating the jack.
3. Things can go pear-shaped when performing any recovery. Keep everyone out of the 4×4 and the immediate areas, especially if working on a hill.
4. Despite their ability to lift massive weight, exhaust jacks will rarely handle more than 10psi.
5. 4x4s can and will fall off jacks, no matter what they’re made of. If you’re lifting a 4×4, it needs to be chocked.
THE winner of 4X4 Australia’s giveaway Project Hilux has finally been drawn.
The lucky winner of the Loaded Lux – valued at $55,000 – is Glenn Kelly from Perth, WA, who was drawn from a pool of more than 35,000 avid off-road fans.
Glenn flew in from Perth to pick the Hilux up from 4X4 Australia’s Melbourne office. He intends to drive the 4×4 back across the Nullarbor over the next week.
“I’m still waiting for someone to jump out and tell me it’s just a joke,” Glenn told us as we handed over the keys. “I still can’t believe it!”
To make the Lux the ultimate go-anywhere tourer, we’ve spent the past few months decking it out with all of the best aftermarket gear on the market.
We’ve turned the ex-Telstra stock SR Hilux into an off-road workhorse capable of mounting the harshest terrain the Aussie outback can throw at it.
We’ve documented the build over the past few months and our last trip with the Lux was to the snow only a few weeks ago.
A big thanks must go to Terrain Tamer, Flashlube, TJM 4×4, Mean Mother, Lightforce, TJM Airport West, Cooper Tires, EFS Suspension, Ironman 4×4, Ontrack Automotive, Marks 4WD, MSA 4×4 Accessories, HEMA Maps, DPChip, Piranha Offroad Products, Harrop Engineering, Opposite Lock and MaxTrax.
Thanks also to Red Plum Automotive for scouting the car for us.
Congratulations to Glenn and thanks to everyone who entered the draw.
Stay tuned for a video of the handover!
WHOA, by now you’re starting to wonder if old Milo will ever come back together, right?
Oh, you’re not, you’re too busy out exploring. Well I guess that’s half of Milo’s problem, too – she’s done so much exploring in out-of-the-way places, she’s in danger of falling to bits because of it.
Take that time in the Gulf when Glen, Kenno and I were cutting a new track through the scrub at Lorella Springs. We hit the beach, noted no movement in the tide and figured it was safe to go fishing. Then the tide whistled in about a metre in less than an hour and suddenly the once-safe beach turned into a nightmare of undermined sand. If we hadn’t been carrying a dozen MaxTrax between us and been able to build a road to harder sand, we’d have been stuck for good.
Nothing like a bit of adventure, eh? However, sand and salt takes its toll on an old truck, and everything I’ve looked at lately has taken me another level down in the repair stakes – what should have been a quick paint and lube has turned into a marathon of welding and patching. Good thing a bloke’s got a motorbike to ride to and from the wrecking yard.
But the truth is I’ve been missing my old girl so badly I had to hook in and get her finished. It is one thing to do the family holidays in the mustard truck, but quite another to get old Milo out there shifting dirt.
I say that because that’s how I think of this truck: more of an earth-moving machine than a vehicle. In many ways that’s the truth of it, too, because the 13BT motor is an industrial diesel sourced from a dump truck and the low-range GearMaster transfer case and ELockers mean you can puddle around at tracked vehicle speeds when things get tough. It’s also usually dirtier than the Bobcats I used to operate, and it’s certainly no more comfortable.
This might explain why I’m a tad ‘relaxed’ on how she looks. Nicko and I used to paint all of our mining gear with roof and metal paint because opal clay was corrosive, but there was something about having the compressor, hoist, generators and trucks all painted the same livery that made us look a bit more professional. At least that’s what we thought!
When your best truck is a 1950 Maple Leaf (Canadian Chev) running no brakes, timber-hungry board trays and a petrol tank that’s a five gallon jerry with a plastic pipe hanging off the running board, well, you need all the help you can get to look professional.
So it was never hard for me to squirt another coat of roof and metal paint on Milo every few years and, yes, there is a can in the glovebox for touch-ups.
Looks aren’t everything in the off-road world, which explains where I’m going with this latest modification, too. Because I haven’t a clue what it’s going to look like. As my wife is always keen to point out, I have no imagination whatsoever when it comes to visualising the end result of any project I attempt.
She says that from experience. Take the sheds I built that looked tiny on the plans but somehow grew another storey or two, or the picnic table and benches that would be perfect if you didn’t need to be about eight feet tall to climb on board. Being ‘vertically challenged’, she took that one particularly badly. Pity, but at least it saved me sanding it.
Right, so here we go with something completely different: Putting a ‘remote’ headlight panel out front of a 40 Series, which will extend the nose by about 60mm and may look a tad strange. But engineering-wise, it was the best possible alternative for a whole lot of reasons.
As detailed in past columns, this front panel knits the mudguards together while allowing the whole front end to flex where it’s hinged to the chassis, so it needs to be strong.
This is why I made the new one from angle iron, because I needed plenty of strength but still wanted to have a lot of room to mount the intercooler and run the pipes. Like everything else on Milo, this is something I’ve played with so many times on the tracks that I’ve had time to think about how I’d like it in a perfect world.
Since Roo Systems custom-built the intercooler I’ve come to love the extra power, but, on more than one occasion, one of the hoses has come loose as we’ve belted down a corrugated track. No problem. You know about it straight away because the power drops off and it sounds like someone’s put a vacuum cleaner under your seat. But squeezing around the cut frame to get the pipes seated properly cost me a lot in Band-Aids.
Not anymore – if all goes well. By making the headlight frame remote I can mount it on bolts, making it quick to remove. And if I get it right with some rubber tube either side of the frame, there’ll be a measure of shock absorption built in, too. This is important because these old girls have a habit of hammering out bulbs and lenses fairly frequently once they get a bit loose. In fact, I carry a few spare bulbs and lenses on every trip. At least it’s easy to get a seven-inch round insert in country towns – it’s possibly the most common light ever used!
However, they’re not easy to swap around once you’ve taken up all the available space behind the grille with turbo and intercooler pipes. So making the panel quickly detachable will make swapping out the lights much more ‘plug-and-play’.
The only issue is what will the finished job look like? Hmmm, hang in there. With a bit of luck I’ll get it finished next month and you can make up your own mind. What colour? Green, of course, with a sprinkle of orange. Yep, I’ve been carrying the MaxTrax on the roof rack for the past decade or so, but after that emergency up in the Gulf I’m shifting them to somewhere a whole lot easier to get to in a hurry – right above the driver’s door.
I just have to build something to hold them. Gee, wonder what that will look like?
Eggs are one of my go-to ingredients when I’m looking for a quick meal.
I have to say I make a very good omelette and it’s often our Sunday dinner, whether at home or camping. However I’ve discovered these wonderful little gems that make a great quick breakfast, lunch or dinner. They are even tasty cold, so make a bigger batch than you need for breakfast and have the remaining muffins for lunch the next day.
You can use as many ingredients as you want or have on hand. They are basically a very simple egg pie and your camp oven or stovetop oven is the ideal way to cook up a batch. Simple, delicious and so easy, you’ve got to give them a go.
Ingredients
(makes 6 large egg muffins) 6 eggs, beaten with 2 tbsp milk and seasoned to taste with salt and pepper
Fillings
- Spring onions, finely chopped
- Red or white onion, finely chopped
- Grated cheese – whatever you prefer
- Ricotta cheese or feta cheese
- Baby spinach, chopped
- Broccoli florets, cooked and chopped into small pieces
- Roasted red capsicum
- Tomato, chopped
- Bacon or ham, finely chopped
- Cooked sausages, chopped
- Salami, finely sliced or chopped
Instructions:
Step 1: Preheat your camp oven or oven to 200°C. Grease a large (six-cup) muffin pan. Add your choice of fillings into each muffin tin, making sure you only fill them 2/3 full or you won’t have enough room left for the egg.
Step 2: Pour the beaten egg mix into each muffin tin and if you like, give each a little stir with a fork to mix the ingredients around a little.
Step 3: Place the muffin pan on the centre rack of your oven and bake for approx. 20-25min or until the muffins are puffy, lightly browned and the eggs are set. If baking in your camp oven, make sure you place the muffin tin on a trivet/rack. I’ve got a six-pan large muffin tin that fits into my camp oven, but had to get Ron to turn up each corner a little so it would fit.
Step 5: When cooked, remove and set aside to cool for a few minutes in the pan. They will collapse as they cool, but they look pretty spectacular when first out of the oven.
Step 6: Loosen the sides gently with a knife if need be, then eat immediately, or allow to cool before storing in your fridge or freezer.
Note: If you’re at home, they can be reheated in the microwave.
Handy Hint
Peelings: Add a ½ tablespoon of baking soda to the water when boiling eggs and the shell will just peel straight off – Michelle
For more recipes or to follow Ron and Viv’s adventures, visit: www.guidebooks.com.au or www.facebook.com/MoonAdvPub
Want more recipe ides? Browse our Bush Cooking collection for inspiration.
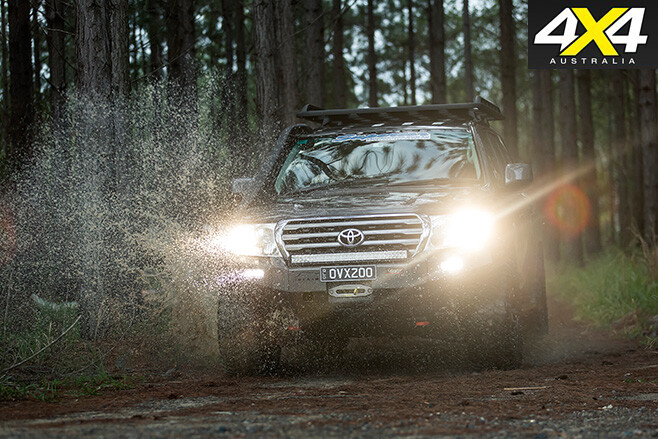
WHEN you first lay eyes on what is inarguably the neatest 200 Series Land Cruiser in Australia, the only word that can do it justice is perhaps one of the most overused: Perfect.
We’re not using that word lightly. In fact, we spent hours poring over Cale Walton’s immaculate LC200 trying to think of another angle, some other detail that makes it stand head and shoulders above the crowd. We couldn’t. Nothing sums it up better than that one word.
It’s not perfect in the way some other 4x4s have earned the title. It’s not the kind of bus that can rock-bounce with the best of them without turning vital components into a slurry of gear oil and metal shards. It’s not the fastest in the whoops, capable of leaping tall washouts in a single bound. It’s not even the most modified LC200 we’ve seen.
But every single modification, alteration and customisation has been so thoroughly researched and meticulously planned that the end result is far greater than the sum of its parts. It’s a mechanical work of art very few will ever fully appreciate.
If it sounds like we’re exaggerating, it’s because it’s hard to put into words just how rare it is for a build of this calibre to fall into place the first time around. It’s a testament to the careful planning of Cale, and the organisational skills of his wife Krystal, who makes things happen when Cale’s off working the gas lines.
We’ll kick things off at the logical starting point: the very front of the 4×4. There’s a growing trend among late-model 4×4 owners to work with the design of their vehicle rather than against it – form and function working together. With that mindset, Cale searched high and low for a bullbar that’d give him the protection needed for remote touring, without covering up the instantly recognisable styling of the 200.
He found it at the end of a lengthy import process, with an Ultima bar coming from Viper 4×4 in Venezuela. Shoehorned inside the bar is an Ox winch that’s best described as un-killable.
Cale laughingly assured us he’s never found himself on the business end of it, but it’s seen countless use recovering others or dragging fallen trees off the tracks. An LED light bar from Rigid Industries keeps it company on the Cruiser’s front.
Down each side is a pair of Viper 4×4 heavy-duty sidesteps that provide easier entry and exit without trekking mud inside. Cale says they’re more than strong enough to protect the sills, having taken the Cruiser’s full weight more than a few times in their life.
In an unconventional move, the spare tyre still lives in the stock location. To keep the rear panel and quarter panels in one piece, a colour-coded Kaymar rear bar resides down back.
The protection package is rounded out with a full set of TJM bash plates guarding the vital, and somewhat exposed, components underneath.
Cale has run Mickey Thompson MTZs for years, including on his rock-crawling-orientated GU IV Patrol that the 200 replaced. So it’s no surprise to see them shoehorned inside the LC200’s wheel arches. They measure in at a somewhat common 33 inches tall and 12.5 inches wide, but there’s an 18-inch hole inside to suit the black Monster XD alloy wheels.
To make room for the larger tyres, the 200 is sitting 50mm higher, thanks to a spring and shock package from Tough Dog. And, as with most things Cale does, it wasn’t a ‘throw it in and hope for the best’ sort of arrangement. Up front, the upper control arms have been replaced by Superior Engineering units that correct both camber and castor, with spherical bearings up top for increased articulation.
The rear has copped a similar treatment, with a Superior Engineering Panhard rod re-aligning the rear axle in the centre, while heavy-duty Superior Engineering lower control arms replaced the weak factory offerings.
The exterior package is finished off with two very simple additions. On the roof a Rhino Pioneer Platform rack provides a lightweight storage solution, but the Airtec snorkel from TJM is where things get really interesting.
Following the snorkel down the roof and through the front ’guard leads to a trick sheet-metal airbox and custom intake piping put there by the guys at Fingers Fabrication & Machining. The new airbox works hand-in-hand with the twin three-inch stainless exhaust that Cale had custom-built to help the 4.5-litre V8 turbo-diesel breathe easier.
The engine package has come a long way since it first rolled off the manufacturing line. Cale had the guys at Just Autos Mechanical Repairs in Nambour, Queensland, put together an engine package with their HKS F-CON iD diesel fuel computers.
In a world-first, the team replaced the stock LC200 computer with twin HKS units (one for each cylinder bank). The ECU package, along with larger injectors and tuning, has netted Cale’s Cruiser a monstrous 315rwhp (235kW) and 900Nm – a 20 per cent and 40 per cent gain respectively.
Cale added a 70-litre auxiliary diesel tank from Long Ranger to keep the 200 going longer between stops. Despite the huge power gains, the only negative effect Cale notices is the relays from the torque converter lock-up being too slow to engage, causing the HKS ECUs to flag a fault. The new computers are literally too fast for the TC lock-up to keep up with.
However, an upgrade to solid-state relays should rectify that soon. The rest of the drivetrain remains stock for now, although front and rear diff centres now house ELockers from Harrop, something Cale says “just work”.
With leather trim and NVH levels that’d rival most high-end luxo-barges, interior modifications have been kept simple and tasteful. Up front there’s nothing more than a simple stereo upgrade. The rear treatment has been a little more heavy-handed, though.
The cargo area is now home to a storage system from Black Widow, with a full-length drawer on one side and a pull-out fridge slide on the other holding the Engel. It’s kept running for extended periods of time by twin Fullriver batteries and a Redarc BCDC1225 charger from the team at JTS at Caloundra.
It’s hard to point to one single aspect as this build’s defining piece. There’s no crazy engine set-up, no wild camping set-up and no desert-race-inspired suspension. Instead, this is a well-thought-out and meticulously planned build. Each piece complements the rest perfectly, and the end result is a 4×4 that just flat-out works.
It’s a stylish tourer that can keep up with the best of them, with plenty of power and factory reliability. It proves that when you fit the right gear in the right way, a modified vehicle can be better than stock in every single way.
CASTOR WHAT?
EVER pushed a shopping trolley around with one bung wheel that constantly sends the trolley into orbit? It’s the result of castor, or the relationship between the top and bottom mounting points of a front wheel. In a live-axle 4×4 it’s the difference between the top and bottom kingpin bearings; on independent suspension it’s the upper and lower ball joints. When the suspension is lifted as little as 50mm, it can throw that angle right out of whack, causing twitchy steering, tracking, and all sorts of dangerous issues. Aftermarket control arms, castor plates, drop arms and offset bushes are all bolt-on ways of getting it back into spec.
THE Ford Ranger has maintained its positon on top of the 4×4 sales charts for the month of July.
According to the latest VFACTS report released today, Ford shifted 2357 units of the Ranger nationwide last month.
The Toyota Hilux has placed second two months in a row, with 2311 units finding new homes in July.
If the trend continues, this makes the race for overall year-to-date sales very interesting, with the Ranger poised to edge within striking distance of the enduring Hilux by year’s end.
The Hilux retains a small margin, with 17,795 sold nationwide this year compared to 17,623 Rangers. However, the gap between the two tough off-roaders has shrunk to just 172 units (it was 218 last month).
Holden’s Colorado, Nissan’s Navara and Toyota’s Prado round out the top five.
July proved passenger car sales are declining as a proportion of the overall market in Australia. In July 2015, passenger cars accounted for 44.9 per cent of the market; in July 2016, that figure has dwindled to 41.6 per cent.
This fall can largely be attributed to the booming SUV (37 per cent) and LCV (18.5 per cent of the market) segments.
FCAI’s chief executive Tony Weber said: “The ongoing strength of SUV sales, especially among business buyers, is bringing a healthy momentum to the market.”
The 4×4 ute segment saw a 9.7 per cent rise month-on-month, while 1320 more LCV vehicles were sold than the same month last year (an 8.5 per cent year-on-year rise).
Australia’s overall best-selling vehicles in July were: Toyota Corolla, Toyota Hilux, Ford Ranger, Hyundai i30 and Toyota Camry.
| u00a0 | 4×4 | July 16 | June 16 | YTD |
| 1 | FORD RANGER | 2357 | 3477 | 17,623 |
| 2 | TOYOTA HILUX | 2311 | 3385 | 17,795 |
| 3 | HOLDEN COLORADO | 1457 | 2302 | 9854 |
| 4 | NISSAN NAVARA | 1380 | 1319 | 8603 |
| 5 | TOYOTA PRADO | 1248 | 1357 | 8828 |
| 6 | TOYOTA LANDCRUISER WAGON | 1214 | 842 | 6542 |
| 7 | MITSUBISHI TRITON | 940 | 2533 | 11,044 |
| 8 | ISUZU D-MAX | 926 | 1097 | 6390 |
| 9 | MAZDA BT-50 | 697 | 1315 | 5875 |
| 10 | MITSUBISHI PAJERO SPORT | 648 | 689 | 3212 |
Vehicle manufacturers have a lot of people to please if they’re going to make a vehicle that really satisfies the market.
While the end result is often a great motor car, there will always be a few short comings in a vehicle when we start to focus on a specific application. With the abundance of accessories available today, when things start being fitted to your vehicle, the weaker points of the factory suspension start to show through. To show just how much the weight of a bull bar and winch can affect the vehicle, we documented a fitout from start to finish on our 2016 Toyota Hilux.
In the beginning… The 2016 Toyota Hilux SR5 that rolled off the production line and into our fleet was an SR5 dual cab spec, and the handling from factory was… in a word, jarring. Toyota had designed the vehicle to carry a load well (it is a commercial vehicle after all) and carry a load it did.
The trade-off was a jarring ride when the vehicle was empty. Our R&D department went to work, and we developed the 40mm Lift kit options that you can see at www.toughdog.com.au. The ride quality was vastly improved, and all was right in the world.
Bring on the accessories We then fitted out our Hilux with a Steel Bull bar and a 9000lbs winch sporting steel cable. The weight over the front was increased, and the front coil spring originally fitted, and designed for accessory levels up to a bull bar but not with a winch, was no longer able to handle the weight.
Apart from the drop in height as a result of the extra weight, the handling and ride comfort of the vehicle took a small backward step as well. The weight of the vehicle had been increased, and naturally that meant that the turn in characteristics were not as nimble as in factory trim. The vehicle, as expected, felt very nose heavy. The other side effect was that because the weight balance had been pushed forward, which pulled weight off the rear axle, and had the effect of stiffening the rear end of the vehicle.
The front and rear of any vehicle cannot be taken in isolation, the vehicle works as a whole platform, which is why things that happened over the front axle caused side effects through the whole suspension system. It was time to fit our heavier ‘bar and winch’ spring, to counter the effects that the increased weight had on the Toyota.
Rim to Guard measurements
Vehicle on Original 18” Wheels
Measurement Key | Original Vehicle | With 40mm Lift | Add Bar & Winch | Bar & Winch | |||||
P/S Front | D/S Front | 760 | 765 | 810 | 805 | 775 | 780 | 790 | 800 |
P/S Rear | D/S Rear | 820 | 820 | 860 | 865 | 850 | 860 | 850 | 855 |
Note: Factory vehicles can vary by up to 10mm in ride height.
Results The weight of just two of the most common accessories on the vehicle cause the vehicle height to change dramatically, losing 20mm as a result of the fitment. Changing the front spring shifted the weight back onto the rear axle, and corrected both ride height and handling characteristics. We’ve noticed though that some of the newer bars coming onto the market are heavier than previous bull bar styles.
It is for this very reason that the Tough Dog suspension offers spring choices specifically to suit the accessories fitted, to ensure ride height and quality are not compromised in your specific application.
BUILD & BUY ONLINE Tough Dog Suspension’s website has a new feature called Build & Buy Online, which allows you to select the right suspension for your vehicle, and have it delivered to your nearest dealer for collection. You can also arrange to have the dealer fit the suspension if you prefer. To see what complete options Tough Dog have for your vehicle, check it out at www.toughdog.com.au
FORD has announced a five-seat Everest will join its line-up in the second quarter of 2017.
The newest addition to the Everest range will be offered in the base-spec Ambiente equipment grade and will be available in four-wheel and rear-wheel drive systems.
The five-seat Everest will retain the 143kW/470Nm 3.2-litre turbo-diesel engine that’s mated to the six-speed automatic transmission.
This follows the announcement earlier this year of a rear-wheel drive version of 4X4 Australia’s 4×4 of the Year winner, the Everest Trend. The RWD Trend is set to hit showrooms by the end of 2016.
Over the past five years, SUV sales have increased by a whopping 71 per cent; over the same period, passenger car sales have declined by 12 per cent.
If the trend continues, and it’s very likely to, SUV sales will overtake passenger car sales within the next five years.
To cash in on this booming SUV segment, Ford has launched an EcoSport “Shadow” specialty model and a new Kuga (due to hit showrooms early next year) alongside the expanding Everest range.
In further news, an SUV based on the global Ford Edge has also been announced.
Ford Australia president and CEO Graeme Whickman said: ““Ford will continue to be ready for SUV growth to reach even higher record levels this decade, so we are investing even more to offer the freshest models with outstanding safety, fuel economy, technology and quality positioning.”
“Adding the Ford Edge and further expanding our SUV line-up comes as many of the 5.5 million millennials start having children and similar numbers of baby boomers continue to buy them after driving their early popularity.”
IF YOU keep your food and drinks in an ice box or light your campsite with a kerosene lantern, then this article is definitely not for you. However, if your 4×4 is fitted with all manner of mod cons (whether gimmicky or necessary), then setting up a complete 12-volt power system needs careful consideration.
A dual-battery system should be one of the first must-have items to fit to any touring 4×4. Sure, there’s the obvious powering of the fridge, but a second battery has many more uses. Plus there are new charging options to consider.
For my Troopy I initiated the project with a second battery tray from Piranha Off Road Products that accepts a standard N70Z-sized battery carcass. It would have been nice to go larger-capacity, but that’s all that would fit under the bonnet of the Cruiser – plus the larger they get the heavier they become. The tray arrived with all mounting hardware and instructions, and it easily fit on the passenger side directly behind the standard battery (just in front of the firewall).
I’ve had a good run from Fullriver AGM batteries before, so decided to stick with the brand. This time I opted for a DC Series and a 105-12B model rated at 105Ah. It weighs in at a hefty 30.2kg and incorporates M6-bolt-style terminals.
POWER IN THE strength of the tray and the quality and longevity of the battery are important factors, but the big decision was which charging system to implement. For this, I chose a recently released Projecta Intelli-Charge 25A DC/Solar Battery Charger, which incorporates a ‘solar in’ wire to allow efficient battery charging from a solar panel.
The charging unit is suitable for ‘smart’, ‘dumb’ and traditional alternators, it has a 25-amp, three-stage switch mode, a simultaneous automatic charge system for solar and alternator, and the ability to choose the correct charging profile to suit your chosen battery type (AGM, wet cell, calcium or gel).
I thought I wouldn’t take advantage of the auto selecting mode for alternator and/or solar charging, as I don’t have a solar panel fitted permanently on the roof, but it has come in handy as I’ve mounted an Anderson plug on the bullbar. So the under-bonnet system doesn’t need to be touched when I plug or unplug the solar panel, which is out in the sun while I’m parked in the shade – beauty! The charger unit incorporates tiny LED lights to indicate which charging source is being used, which puts my mind at ease knowing it’s working as it should.
Other than setting the battery type on the front panel, there’s nothing else to this smart charging system – set it and forget it.
While I opted for under-bonnet mounting (it can take the higher heat), the unit can be fixed pretty much anywhere within your 4×4, plus it’s IP67-rated as well as shock- and vibration-proof. For what it’s worth, I’ve fabricated a small bracket to fit the unit between the secondary battery and the inner mud guard. It’s a tight squeeze, but I can still preview the lights on the face if need be.
POWER OUT WITH the power source and power management taken care of, the next job was to work out how to expend all that energy via 12- and 240-volt outlets. Given the expansive use my Troopy has to take on – charging the kids’ electronic toys on the run, charging work cameras and computer gear, and running all manner of 12-volt gear for testing – I picked through the Narva catalogue for all I needed, under the pretence of ‘the more outlets the better’.
The left-hand of the dash features a rather useless-sized pocket that seems perfect for nothing more than a few dozen business cards, provided you don’t drive up a steep hill and allow them to slide onto the passenger’s lap! So, a flush-mount ciggie and dual USB outlet was screwed straight over the top of it. At a later date I’ll be making a custom centre console to house switches, gauges and power outlets, but for now I’ve mounted two ciggie plugs.
Behind the third row of bucket seats I’ve flush-mounted three ciggie outlets (for rear passenger and camping use) and a merit plug for direct power access for the 12-volt fridge. These are hardwired directly to the auxiliary battery for constant use. Also hardwired is a 300W Projecta pure sine wave inverter that’s easily accessible from the rear cargo area.
The rear bumper bar houses a 50-amp Anderson plug that plugs into my camper trailer to charge on-board batteries. I’ve connected the ‘solar in’ wire of the Projecta charging system with another Anderson plug and tucked it in behind one of the upright posts of the Opposite Lock bullbar, so it’s easily accessible and doesn’t require lifting off the bonnet to plug the solar panel in. Both Anderson plugs have a rubber cap to keep dust and water out when not in use.
The foldable Projecta solar panel came with alligator clips, so I cut them off, installed an Anderson plug and reinstalled the clips. This way the panel can be used via my on-board charge system with the Anderson input plug or via the alligator clips onto my camper trailer battery.
Given I kept the FYRLYT Nemesis 9000 driving lights from my last Cruiser, I had my local sparky wire up a custom heavy-gauge driving light loom complete with 12W to 24W converters to tackle these 24V halogen driving lights.
I have future plans to install camp lights, an on-board compressor and various other lighting, so I fitted a bank of five Narva toggle switches. These things are beaut, as you can utilise as few or as many switches as you like by making up a bank that then slots into your dash, console or any other panel. I have gone for five switches, but I’m not sure what I will run off them – just future-proofing the system.
To keep track of what each battery is charging and discharging, I’ve popped a Projecta dual-battery volt meter into the dash next to the steering wheel. The meter has a bar graph and digital readout to within 0.1 of a volt for each battery. It also incorporates a user-set audible alarm to warn of over- or under-charging.
Given the need to tow my own camper trailer, heavy loads including a Kubota tractor, a tandem box trailer, and various caravans, I figured the 3500kg tow-rated Troopy needed as much help as possible to help pull up without over-stressing the brakes. For this, a Redarc Tow-Pro electric brake controller was installed.
The main body of the Redarc unit fits neatly under the dash and out of the way of my knees. Hence it doesn’t take up any real estate on the fast-filling dashboard. The only tell-tale sign of this Redarc system is the small rotary dial fitted to the dashboard. Since fitting the unit, Redarc released an ‘Elite’ version, which eliminates the initial calibration process the standard version needs. To read the full specs of both units visit: www.redarc.com.au.
There are plenty of set-ups that are fancier, more technical and more comprehensive than what I’ve installed, but my set-up will do everything needed for personal and work-related use. Plus it’s reliable, simple to use, maintenance-free and will enable (almost) endless power usage. I’ve gone overboard with a few of the centre console switches, but that’s for ease of adding accessories at a later date, so all up the system is future-proof and will return many 12-volt benefits out on the tracks and campgrounds.
Thanks The installation would have taken me an age to complete by myself, so I delegated the huge job to my local sparky at Camden Haven Auto Electrical in NSW.
RATED Available from: www.piranhaoffroad.com.au, www.projecta.com.au, www.fullriver.com.au, www.narva.com.au We say: A must-have to power accessories.
ONCE your 4×4 is fitted with all the necessities, you can start rigging it up with some advanced tech.
With high-tech gadgets and electronics flooding the market, it can often be difficult to establish what you need compared to what you want.
And in the end, it all depends on what your intentions are for your 4×4.
Building a remote-area tourer? It’s probably a good idea to get some two-way radios. How about something to tow the boat? An electronic brake controller should be high on your to-buy list. Do you spend a lot of time in traffic? A Navig8r Crash Cam PRO X could help you evade an insurance nightmare!
Here are just a few of the brilliant aftermarket gadgets currently on the market.
SHOCK PROOF COOLDRIVE Distribution has released two new NOCO Jump Starters: the GB40 and GB70. These lithium-ion-powered jump starters incorporate patented spark-proof technology, making them almost impossible to use incorrectly. The GB40 can be used for up to 20 starts on a single charge and is suitable for petrol engines (up to 6.0L) and diesel engines (up to 3.0L). The more powerful GB70 offers 40 starts and is designed for larger petrol and diesel engines. They can recharge a battery in just over three hours, but can also be used to power a variety of 12V devices. Both are rechargeable via a USB port, or by using the provided 12V charger. Website: www.cooldrive.com.au
CONTROL FREAK IRONMAN 4×4’s new-gen Electric Brake Controller will keep whatever you’re towing in line. The controller utilises pulse microprocessor-based technology, and it features a remote dial control, so the main unit is hidden neatly under the dash. The compact system is easy to install and can be mounted on any angle, and it can handle both single- and dual-axle trailers. Also features a dashboard LED indicator, an easy-adjustment dashboard knob, and convenient override control. RRP: $180 Website: www.ironman4x4.com
FULLY CHARGED GETTING a flat battery fully charged and back to as-new condition is a pretty tough business, but Hyundai’s newly released range of Smart Car Battery Chargers claims to do just that. The new Hyundai Smart Charger range uses multistage charging to correctly build up a battery’s voltage. The final stage is effectively a trickle stage, which can be left on a car battery long term, to keep the battery charged and in top condition. There are Hyundai Smart Charge models to suit all size batteries. RRP: From $69.99 Website: www.hyundaipowerequipment.com.au
GOOD START BATTERY management expert CTEK has developed a battery charger that’s designed to support the power demands of start-stop vehicle technology and to minimise the risk of an unexpected flat battery. The CT5 Start Stop is fully automatic, easy to use, and its simple three-stage display tells you whether your battery is being checked and tested, is charging, or is in continuous 24/7 care mode. The CTEK CT5 Start Stop is suitable for all 12V lead acid batteries (wet, MF, CA/CA, AGM and GEL) with a capacity of 14-130Ah. It’s optimised for the AGM and EFB batteries used in start-stop technology. RRP: $177.87 Website: www.ctek.com
ROGER, ROGER A GREAT way to play it safe when exploring is to stay connected to your fellow travellers. And UHF two-way radios are the most reliable way to stay in touch when there’s no mobile phone coverage. Uniden’s new Titanium (one-watt UH810S and two-watt UH820S) series is designed to survive the harsh Aussie outback. The tech offers access to 80 UHF channels, and the radios have a range of more than 9km (UH810S) and 13km (UH820S). They’re rechargeable via USB, and talk time equates to approximately 15 or 21 hours. They come with a three-year warranty. A Tradie’s Pack is also offered. Call Uniden for more info: 1300 366 895. RRP: $89.95 (UH810S); $179.95 (UH810S-2); $229.95 (UH810S-2TP); $129.95 (UH820S); $249.95 (UH820S-2); $299.95 (UH820S-2TP) Website: www.uniden.com.au
WE’RE IN LOCKDOWN KEEP the valuables stored on your roof rack safe from thieving scum, with the Rhino-Rack Cable Core Lockdown. You can now leave the camping equipment unattended as you explore dusty tracks on foot, or hit the ski slopes in the colder months. The base mounts onto your roof racks or Rhino-Rack Pioneer system, and then an 8mm PVC-coated steel wire cable with zinc protection is looped around the items requiring extra security. The cable is available in three lengths: 0.6m, 1.2m and 1.8m. The system is also Masterkey compatible. RRP: $59.00 (1.8m); $49.00 (1.2m); $39.00 (0.6m) Website: www.rhinorack.com.au
LIGHT THE WAY THE FUTURE is brighter with an Ironman 4×4 LED light bar. These new beauties, developed using the latest tech, draw minimum power yet maintain an impressive light spread, achieved via state-of-the-art, high-intensity 5W CREE LEDs. Ironman 4×4 has also developed brand-new, bigger reflectors. Straight and curved light bars are available. Features include: 10/30V DC operating voltage; -20° to 50° operating temp; an integrated breather; IP67, IP69K water- and dustproof-rated; a dual mounting system; an integrated Deutsch connector; alloy diecast housing; and a shockproof polycarbonate lens. The light bar comes with a one-year warranty. RRP: From $150 Website: www.ironman4x4.com
WATER TROUBLES SUITABLE not just for remote-area touring, the Ironman 4×4 low-water alarm kit is a great addition to any city runabout. The kit’s technology has the ability to sense a negative current in the radiator water, and when the water drops below one of two probes, an alarm and warning light activate before there is even movement in the temperature gauge. The kit suits 12- and 24-volt systems and plastic or metal header tanks. Get one before it is too late! RRP: $199 Website: www.ironman4x4.com
INSURANCE JOB DODGE the hassle of proving to money-driven insurance companies that an accident wasn’t your fault. Pick yourself up Laser’s all-new Navig8r Crash Cam PRO X, a dash camera that takes in-vehicle incident recording to the next level with Super Full HD image quality. The cam includes an on-screen street map with alerts for school zones, speed cameras and red-light cameras. Tailored specifically for Oz roads, the Crash Cam also features journey review with Google Maps, automatic event recording, and park mode, which activates recording even when your car is unattended. For a full list of features, head to Laser’s website. RRP: $349.95 Website: www.laserco.com.au
EXPANSION PACK NARVA has added to its large range of heavy-duty recreational vehicle (HDRV) powering accessories, with the introduction of several new products to the line-up. Among the new additions include a thermoplastic right-angle merit plug; heavy-duty adaptors; and digital LED volt and amp meters, which are available in all housing styles. Two- and three-way module options, with a choice of six sockets and meters and six different housings, are also available. Website: www.narva.com.au