TOYOTA UK has released a series of ‘Hilux Little and Large’ web videos with a very simple premise – to show off its bite-sized (1:10 scale) Tamiya Hiluxes alongside its full-sized Toyota counterparts.
The radio-controlled, micro Hiluxes all feature a 4WD system mated to a three-speed automatic transmission, which is permanently locked in low range.
To help it go (almost) where its big brother can, the scaled-down ’Lux is fitted with chunky tyres and 50mm of ground clearance.
The full-sized Toyota Hilux, with its 2.4-litre turbo-diesel engine and six-speed manual transmission, features an AWD system and Active Traction Control. Plus the Invincible model in question has 293mm of ground clearance.
The first of the four short videos is titled Tow, and it sees both the ‘Little and Large’ Hiluxes towing a Toyota 86 through a series of chicanes – it’s topped off with some nice circle work.
The second vid, called Mud, is pretty much self-explanatory. It contains plenty of mud, and plenty of wheel-spinning from both combatants.
Pull is the third vid in the web series and it’s our favourite. It sees a team of 15 remote-controlled Hiluxes adorably strain to pull a full-size Toyota Hilux from a standing start.
The fourth and final video submerges the Tamiya Hilux beyond its ‘safe’ 30mm wading depth as its big bro utilises all of its 700mm of wading depth – with a tray of its tiny siblings on board.
Check out the videos for a bit of a laugh.
When it comes to multitasking, the once-humble dual cab ute now provides a high level of functionality, with manufacturers spending countless hours and huge budgets to ensure vehicles can perform acceptably in a large range of conditions.
But there’s always a point of compromise to appease the many different consumer needs – meaning your typical dual cab is an excellent base for a few aftermarket tweaks.
This article was originally published in the Utes 2016 issue of 4X4 Australia.
Unless you have a bottomless bank balance or major sponsor, make sure you carefully option-up based on what you’ll be doing with your vehicle, not what will impress the neighbours. A massive winch hanging off the front looks mean, but it’s not what you need if you’re sticking to well-formed tracks.
Running a set of light-truck all-terrain (A/T) tyres is one of the easiest ways to improve off-road capability. Showroom tyres are generally road-biased for quiet performance and passenger comfort. A light-truck all-terrain, however, is a more robust tyre than its highway counterpart.
Stronger sidewalls allow it to cope with higher loads, better withstand reduced pressures (where sidewalls flex), and allow it to mould to the terrain. A light-truck design also offers greater resistance to puncture, and the generally more aggressive tread pattern of an all-terrain tyre will aid traction for off-road conditions.
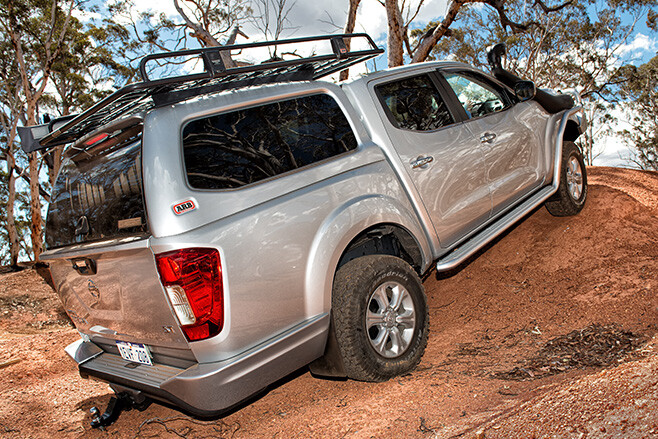
The BF Goodrich All-Terrain T/As fitted to this Navara NP300 have a square-edge profile that offer bite in muddy conditions and a good self-cleaning action, while the TriGuard three-ply sidewalls offer much needed extra strength.
You can complete your tyre set-up with a tyre gauge and a quality air compressor. Some people choose a vehicle-mounted unit with a switch in the console, so by the time they’re out of the cab and have hooked up the air line, it’s ready to go. For others, a toolbox-mounted compressor offers greater versatility.
If you don’t need to carry objects higher than the roof line, then a canopy gives your dual cab plenty of station wagon functionality – but with more load space. Also, a canopy protects your gear from weather and thieves.
Modern design and construction standards means a canopy should complement the vehicle’s lines with an OEM look and finish. Consider whether you want to carry a roof-top tent or prefer the functionality and practicality of a roof rack, and make sure the canopy can support the load. This Navara canopy has an integrated support frame to support a roof load of 100kg.
It cleverly negates the need for a separate frame, which can impede side window access or restrict the loading area. A roof-mounted vent creates positive pressure within the canopy to reduce dust. The canopy may also be synced into the vehicle’s central locking and operated by the standard key remote.
Murphy’s Law suggests that when you’re halfway to your destination you’ll probably need to access the tools for something. What are the odds they’ll be at the bottom of the pile?
If unloading everything road-side isn’t appealing then consider rear storage drawers, especially to house heavier items down low and to provide easy access. The side areas next to drawers are also perfect for mounting a water bladder or second battery, and you get a flat load floor.
A good drawer system is a compromise between weight and construction. The drawers have to be solid enough to cope with carrying heavy gear across bouncing corrugations without falling apart and they must slide easily when loaded and be able to lock in to place and support contents when extended.
Quality latches with easy to operate handles and recesses to avoid jamming your fingers are must-haves! A one-step lock-and-slide handle on the fridge slide is nifty, but shorter adventurers – or those travelling with kids – could benefit from a drop-down slide. Or, rather than the side-by-side drawer configuration, use a drawer stack and fit the fridge lower for easier access (or to allow for a taller fridge).
If your dual cab is primarily a tow tug for light off-roading, stop now. Your work is complete. You’ve improved the practicality of your rig and there’s no need to spend more.If you want to tackle more significant off-road obstacles, then your typical dual cab, like this Navara, can be limited by its showroom suspension, especially when loaded.
The first thing you usually learn about at the school of hard scrapes is the importance of ground clearance when negotiating off-road terrain – especially with a long wheelbase. Even for moderate undulations or obstacles, an inch or two (25 to 50mm) can make a world of difference.
Suspension tuning is not just a matter of bolting on stiffer shocks and springs, as – if incorrectly matched – they will have a detrimental effect on ride quality and handling. Plus, you need to decide on the primary use of your vehicle to ensure you choose the right suspension specification.
For the front of Nissan’s NP300 Navara, Old Man Emu (OME) has developed three specs: one for vehicles with no bar work; another for vehicles fitted with a bar; and the third for vehicles with bar and winch combos. With a moderate 30mm lift all-round on this vehicle, the factory geometry on the front suspension is well within the working range of the upper control arm.
The OME front damper units take advantage of a small amount of extra travel available in the Navara’s standard suspension, to provide an additional 10mm. The shocks are tuned to match spring rates to provide the best balance between ride comfort, handling and travel.
For the rear coils, there are several options tuned for expected loads of 200kg, 400kg and 600kg. The rear shocks offer an additional 30mm of travel and are available in two configurations: one for comfort and control off-road, the other for load-carrying control. There’s also a small mod for the sway bar to compensate for the extra travel.
On the black top, the Navara’s OME ride is comfortable and compliant, easily dealing with small irregularities and bumps. The added weight of accessories, bar work, winch, roof rack and drawers gives the Navara a slightly heavier feel, but push it into a corner and the OME suspension does its best to brighten the Navara’s lacklustre factory steering response that provides a feeling of rolling around corners rather than turning through them.
Turn on to the dirt where the steering issue is less relevant and the suspension proves a winner. The Navara flexes up easily; the extra travel and lift negotiates rocky outcrops, wash-outs, muddy creeks and steep gullies that would probably stop a standard Navara in its tracks.
If you unlock the potential of the Navara and start playing harder off road, you might want to consider a little protection. Fit something like the ARB colour-coded front bar, side rails and rear step bar to transform your ute from mundane to muscular, with integrated showroom style, fit and finish.
We like the front bar’s solid steel construction and upswept wing design; it improves approach angles, while the pivoting number plate frame hides the winch neatly. The replaceable side step covers are smart, too – no more permanently dull chequer plate. The flap on the rear step bar cleverly conceals mounting points for the trailer plug, Anderson plug or power-mounting point to run an air compressor.
The side rails and step offer protection for the front-quarter guards and side sills, in case you slip sideways and rest against a tree. The rear step offers protection for the corners of the vehicle body and provides easy access to the roof rack. The rear number plate also pivots for spare wheel access, and a 50mm hitch receiver is ready to hook up a camper trailer.
This Navara is also fitted with underbody protection covering vital components, from the front bar to the transfer case. There’s the option to install one or two recovery points designed for the Navara and matched to the front bar.
It makes sense to use an auxiliary battery to power accessories including the fridge and camp lights. To ensure proper charging of the second battery, electrical duties are capably met on this NP300 by a Redarc BCDC1225 25-amp in-vehicle battery charger. Redarc’s new multifunction LCD/LED gauge is neatly mounted in the side panel of the rear roller draws to monitor battery status.
IPF Xtreme LED Sport lights show the way at night. With one spot and one spread unit to give the best combination of distance and side coverage, they brighten the road side and extend a tunnel of light well into the distance. IPF says the LED Sport lights are lighter and produce less heat than conventional multi LED lights, thanks to the use of only three LEDs. According to IPF, this also results in them only drawing 25W, while maintaining a consistent colour of 6500 Kelvin – good for your eyes.
Given that dual cabs are a significant investment, whatever gear you select needs to do your vehicle justice. Choose quality products and do it all at once, or build things slowly – as your budget allows – to transform your ute into a capable off-road tourer.
When Ben Carlin would speak of his adventure around the world, he was often met with scepticism.
This article was originally published in the November 2014 issue of 4X4 Australia.
A trip across the Atlantic in a Ford-built, amphibious jeep (Seep), which he named Half-Safe, is almost too far-fetched to believe.
An example of this occurred near the end of his journey as Ben was crossing the USA when visiting the Ford plant. The then boss refused to see him and the public relations chief didn’t even acknowledge the Ford-built-jeep in the carpark. On top of this, Goodyear tyres were only “faintly interested” and so called experts referred to the Atlantic crossing with disdain: “If indeed the voyage really was accomplished, it rates as the most astonishing circus act ever staged on the high seas.”
Australian newspapers only briefly mentioned Ben’s exploits. Even when Ben arrived in Canberra in November 1955, the headline on page two read: “Crazy Carlins’ drive into Canberra in their Amphibious jeep.”
But nothing could deter Ben – not public scorn, ridicule, money or mechanical problems. Even bandits and hurricanes were no match for him.
The story began when Ben, a past student of Perth’s Guildford Grammar School, was demobbed from the Indian Army after the end of World War II. In March 1946, still in India, he saw his first amphibious jeep and casually said to his mate that with a bit of titivation the jeep could go around the world.
The amphibious jeep was a Ford GPA Seep (Seep is an acronym for seagoing jeep). It was hardly a successful design – it was heavy and slow on land with a low water line and a small cargo capacity.
Many Seeps reportedly sank in minor chop and, of the original order of around 10,000, only about 5,000 were built during World War II. Most were relegated to crossing the placid streams of Europe and Russia.
By late 1946, and now in the USA, Ben found and bought a Seep and started to modify it; adding a bow, a superstructure with an enclosed cabin and a belly tank for the estimated 500 gallons (2273 litres) of fuel required for crossing the Atlantic Ocean. He dubbed the Seep Half-Safe.
The first crossing attempt was in 1948, but grief struck just days out of New York – only 500km offshore. Ben, his wife Elinore, and a drifting Half-Safe, were picked up by an oil tanker. They tried again the following spring, this time from Halifax, Nova Scotia in Canada. This attempt was made without a belly tank, instead towing two tanks made from war surplus aircraft wing tanks. The tanks broke free and the couple had to chug back to Halifax.
After designing and building a new tow-tank, the intrepid duo set off once more from Halifax on July 19, 1950. This time they had 730 gallons of fuel, 30 gallons of water, eight gallons of oil and enough food to last six weeks. Setting watches through the day and night the two alternated driving the craft toward the distant Azorean Islands. The conditions were cramped and the cabin was swimming with exhaust and petrol fumes; no wonder Elinore was seasick for days on end.
Every three days, fuel had to be transferred from the tow-tank to the jeep’s bow tank, which was a tricky operation. Servicing and oil changes were also common necessities. On day 11 the engine broke down and Ben was forced to remove the head, regrind the valves and put it back together again – all as waves pounded Half-Safe.
Still, after a few more dramas, mechanical issues and stormy seas, they arrived after 32 days at Flores, the western-most island of the Azores. Here, the happy couple thought their biggest hurdle was over but little did they know, there was plenty more to come.
They spent two months on the island resting and repairing Half-Safe. After two false starts, they finally set off for Africa, estimated to be an easy 10 days away. When they hit the 10 day mark, with just a hand bilge pump working, they ran into a hurricane which pounded them and swept them off course. Somehow the little craft survived and on December 11 they arrived at Funchal, the capital of the Madeira Islands – and still more than 600km from Africa.
On the next leg they lost their tow-tank and had to divert to the Canary Islands for fuel. But as Ben reports in his book: “This 295-mile run was a catwalk.” So too was the remaining 75 miles to Africa, where they drove Half-Safe up the hard-packed sands of the small town of Cape Juby in, what was then, Spanish Morocco.
They left Cape Juby and headed north across a trackless section of the Sahara. Five days later they arrived at the Spanish fort of Tan-Tan where an earth road whisked them north, at an unprecedented 10mph, to the border and the French colony of Morocco.
On April 2, 1951 they crossed the Strait of Gibraltar to arrive in Europe and were met with a big dose of British bureaucracy. Over the next few years they worked, often apart, scraping together enough money to repair and modify Half-Safe for the next leg of the journey. In April 1955, they crossed the English Channel and headed across Europe. By the middle of May, they had crossed into Asia.
Traversing the Middle East, Persia, Pakistan and then India, the couple were plagued by heat, humidity, border guards and police harassment. But apart from vapour locks stopping the engine on a regular basis, the little jeep’s standard 4-cylinder 2.2-litre petrol engine kept chugging away – they even attained speeds of up to 55mph on flat bitumen roads.
In October 1955, they shipped the jeep from Calcutta to Perth and travelled across the Nullarbor to Melbourne, Canberra then Sydney and back again.
Elinore left Ben at this stage and while they were divorced some years later, they remained good friends for the rest of their lives. Ben went in search of a companion and Barry Hanley, a Perth local, took up the challenge.
In February 1956, Ben’s world voyage recommenced in Calcutta. He immediately set sail down the river and across the Bay of Bengal to Rangoon, where Hanley joined up. For the next nine months, the two sweated and strained to get Half-Safe through the most demanding country it had tackled yet. The crossing of the mountains, from Moulmein in Burma (now Myanmar) to Siam (now Thailand), was so tough that Ben stated he’d rather recross the Atlantic twice than tackle those mountains again.
Getting bogged in the swamps and jungles was common on their way north through Thailand, and the relatively new independent countries of Cambodia and Vietnam. Bandits were a problem on these lands, while on water they had pirates to contend with.
Across the South China Sea, the engine valves again needed regrinding which was achieved with a double dose of seasickness tablets to help overcome the nausea of working head down in a petrol and oil filled engine compartment. On top of this, the Seep bobbed around in a tropical sea and it was hot and humid.
On May 5 the two arrived in Hong Kong, then sailed to Taiwan and onto Okinawa where the jeep almost collided with jagged coral reef. On the evening of July 24, 1956 they arrived in the southern Japanese port of Kagoshima.
As they drove, and island hopped north, the little jeep again needed major maintenance. But in Japan, at that time, the sale of jeep parts to a civilian was banned. Ben managed to get around this problem by swapping parts.
In January 1957, Barry left Half-Case to live in Japan and Ben advertised for a companion for the last sea crossing. This time an American filled the void – Boye Lafayette De Mente, aka ‘Jingo’, who wanted to escape from two Japanese girlfriends.
On May 3 they left Tokyo for Wakkanai, the northern most port on the island of Hokkaido. By now the press was keenly interested and Ben was kept busy speaking at many different events. But the jeep was feeling the pressure of the odyssey; break-downs were becoming more common, it was burning more fuel and the bilge required pumping every 20 minutes.
Still, on June 12 they set sail from northern Japan, towing a large tank of fuel once more, and headed towards the Aleutian Islands – this archipelago is mainly Alaskan land and divides the Pacific Ocean from the Bering Sea.
Battling wind, huge seas and the intimidating cold of these northern latitudes, the jeep paddled onwards but again mechanical issues – a fuel pump repair, and yet another valve grind – stymied their progress with an average speed of just over one knot. At one stage Ben was forced overboard to cut a rope free from the prop and was dragged from the near freezing water almost unconscious. Still, they arrived at Dutch Harbour, a major outpost of civilisation on the island chain on August 8.
On September 2, 1957, Half-Case made its final landfall as it came ashore at Kenai, south of Anchorage in Alaska. It should have been the pinnacle of his adventure, but in Ben’s words he was flatter than “the bottom of the Grand Canyon. With no more oceans to cross, my life was ended.”
It was in Anchorage where he met another great Australian adventurer, Sir Hubert Wilkins. Ben was quickly dragged from his depression as he went from party to party.
Jingo flew home from Anchorage, seemingly not too impressed with Ben’s manner or temperament. Ben, in the meantime, managed to tear himself away from the parties and dinners, and on October 12 he headed out onto the Alcan Highway. This route south is considered by many travellers to be an adventure route, especially in those days when little of the 2000-odd kilometres was bitumen; but to Ben, it was easy.
On December 7, Half-Safe was driven into Los Angeles and Ben spent the next four months trying to ignite interest in his exploits and the film he had shot. On April 16 he gave up on this and headed east to Montreal, where the trip had begun 10 years previously. As he drove in to the original starting point, Ben recalled it was: “To the roars of my own applause.”
To this day, Ben managed to pull off an incredible adventure that has never been repeated.
IF YOU haven’t had a chance to travel along the Strzelecki Track that takes you through the heart of Strzelecki Desert, you should probably get it ticked off the to-do list fairly soon, as the South Australian government is considering sealing this dusty 498km track which runs from Lyndhurst to Innamincka.
The proposal to seal the existing track is mainly to improve the route for the road trains that service the Cooper Basin oil and gas fields at Gidgealpa and Moomba. However, for 4WD enthusiasts, this will change the landscape forever.
Some tourers who tackle this stretch of dusty track in a day will tell you it’s not the most scenic outback desert track in Australia, but this track and its surrounding environment has a lot more to offer should you take the time to camp along the route and explore the many interesting attractions and tracks that connect to this dusty desert highway.
If you are relatively new to remote-area driving, the Strzelecki Desert is the perfect place to take the family for a desert-crossing initiation. It’s also very accessible for those who are up for a mini adventure over a couple of days, particularly those who live close to the southern and eastern seaboard.
This is the perfect environment for the first timer who just wants to experience desert driving without the concern of a challenging and remote desert crossing, like the Simpson. This definitely doesn’t mean the Strzelecki deserves any less respect when exploring it, though.
The officially starts at Lyndhurst, but you can also access the track from Leigh Creek to the south. If you start from Leigh Creek you will pass through the Vulkathunha-Gammon National Park and parts of the Flinders Ranges. This option would be our route of choice, before eventually joining the Strzelecki Track near Mount Hopeless. We would give ourselves three days on this little adventure, exploring the Strzelecki Desert and the many interesting sights and tracks that dissect this iconic dusty route, before finally arriving at Innamincka.
Along the route from Leigh Creek you’ll pass by the Italowie Gorge before arriving at Balcanoona, which provides a good spot to camp and has a few interesting walks should you decide to work up a sweat. If you have time turn left towards Arkaroola Village, which is approximately 25km from Balcanoona and well-signposted. The area also has some challenging tracks to explore, including the Echo Camp Back Track and the guided Ridgetop Tour.
After a couple of hours of exploration, head back towards Balcanoona and set the compass for Moolawatana Station. From Balcanoona the first 20km is rough in parts with lots of washouts, so care should be taken. The 56km track from Moolawatana to Mount Hopeless is also challenging in parts, as the road becomes increasingly rockier as you approach Moolawatana Homestead. Keep an eye out for Mount Hopeless in the distance (due north) as you approach the Strzelecki Track.
On reaching the T junction you will meet the much wider and straighter Strzelecki Track that goes on for as far as the eye can see. Once on the Strzelecki Track you will be able to increase your speed because it’s well-maintained with long straight stretches, and as you accelerate along the track you’ll immediately be taken in by the surrounding desert, with the white sand and hardy vegetation spreading out towards the horizon.
In dry weather you’ll kick up a trail of white dust as you progress along this track, while in wet weather expect closures. So it pays to be well-informed before starting your adventure.
The desert’s topography is far from boring and it’s amazing to think you are driving over the Great Artesian Basin, which is one of the world’s largest underground water reservoirs. This ancient water source found under the desert floor also facilitates this arid desert environment to explode with wildlife in times of flood.
On this route you will also hit the outskirts of the Lake Eyre basin, which covers approximately one sixth of Australia. This basin contains one of the world’s last unregulated great river systems, with these rivers sometimes filling with water from monsoonal rains and then making their way across the country towards Lake Eyre. They say the best way to see this spectacle unfold in its enormity is from the air. Another day perhaps.
Another point of interest, approximately 30km from Mount Hopeless, is the Montecollina Bore, which was drilled to tap into the Great Artesian water supply beneath the desert in 1903. It’s also a popular spot for camping along the track.
From the Montecollina Bore you eventually cross the Strzelecki Crossing, and it’s interesting to note that the original Strzelecki Track used to follow this creek all the way into Innamincka before the existing and straighter route was created. This creek may look harmless in the dry weather, but when in full flood it can close this track for weeks.
We set up camp along the creek after finding a relatively sheltered spot among some trees away from the flies. We got the fire going, dusted ourselves down, cracked open a couple of cold beers and cooked a feast of kangaroo stew and damper. As the sun went down we braced ourselves for the spectacular view of the stars that came into their own as the light faded. It’s moments like these that make these little journeys so memorable, and what a great place to experience your first desert adventure.
After packing up early in the morning it was back in the dusty Land Rover to explore the remainder of the Strzelecki Track. The plan was to take a detour off the The Track to Cameron Corner and an awaiting cold beer at the famous outback stopover. The Merty Merty Track leads you all the way to The Corner and the Corner Store and its pub. You can get fuel and food at the store and there is a campground here, too.
A visit to the The Corner is a little bit of a detour off the Strz, but it’s well worth a look, particularly to see where the three states (South Australia, Queensland and New South Wales) meet. If you’re hoping to see the iconic yellow double decker bus en-route to The Corner you will be disappointed, as it’s no longer there.
The next area of interest once back on the Strzelecki Track is Moomba, and upon arrival you’ll be close to the off-limits processing plant. This area and what lies underground its sandy surface is the main reason why the Strzelecki Track may be sealed in the future by the South Australian government, as it incorporates the resource-rich Cooper Basin that boasts approximately 250 gas and oil fields.
The Moomba facility incorporates a massive underground storage facility for processed gas and ethane, where the natural resource is piped with crude oil all the way to Port Bonython near Whyalla. Ethane is sent to Qenos in Sydney via a dedicated pipeline, while sales gas is sent to Adelaide, Sydney and Brisbane via pipeline. If only Mad Max knew this place existed.
After exploring this part of the track you’ll be on the home stretch, as the Strzelecki Track eventually leads to the Innamincka reserve and the small town of Innamincka. There are plenty of things to see and do in Innamincka, including visiting the famous Burke and Wills Dig Tree, Coongie Lakes and King’s Marker, as well as checking out other historic sites associated with the ill-fated Burke and Wills expedition.
Driving the entire length of the Strzelecki Track in a day isn’t the most inspirational outback drive in Australia, but by giving yourself more time to explore the various attractions that run parallel to this 498km track you can easily turn an outback dusty drive into a mini outback adventure.
Spending more time camping along this route will give you a real feel for this desert, and by exploring some of the adjoining tracks and points of interest you will be treated to a variety of diverse attractions that will keep everyone happy.
With nine other deserts to get stuck into and explore, this arid adventure is only a small taste of what Australia has to offer 4WD enthusiasts.
TRAVEL PLANNER
CAMPING AND FEES ALL tracks in the vicinity including Strzelecki Desert, Sturt National Park, Lake Eyre, Innamincka Regional Reserve and many others including the Flinders Ranges all require special-access permits. Camping in the Innamincka Reserve requires a Desert Parks Pass, which you can purchase at the reserve office in Innamincka. The desert passes are valid for 12 months and provide detailed information including maps of the area. Passes can also be purchased at RAA offices. A Desert Parks Pass costs $160, but discounts are available for renewals.
ROAD CONDITIONS THE Strzelecki Track can often be impassable after heavy downpours. It’s also worth noting that winter nights can fall below freezing. Overall, the Strzelecki Track is maintained mainly for the large road trains that service the Gidgealpa and Moomba oil and natural gas fields.
DRIVING TIPS THE track from Arkaroola to the Strzelecki Track is mostly loose surface with some challenging driving, particularly through the dry creeks. Infrequent rain not only makes the roads slippery and treacherous, but can also cause flash floods which could leave you stranded for weeks at a time. It’s always advisable to check local conditions before venturing onto outback roads.
FUEL & SUPPLIES FUEL up at Lyndhurst, Leigh Creek or Innamincka. Fuel and basic supplies are available in Arkaroola and some supplies including fuel can be purchased at Cameron Corner. Take reasonable precautions when travelling in this region. Always have plenty of food, fuel, spare tyres and water on board with you. The weather is changeable out here and can go from extreme heat in the day to freezing at night, so make sure you have appropriate clothing to cope with conditions.
BEST TIME TO VISIT THE cooler months are definitely the best time to visit, although always check local conditions as this area can be impassable especially after heavy rains. Maximum summer temperatures can reach 50°C, so you won’t find many people living in this harsh environment – only three per cent of the country’s population call it home.
CONTACTS Phone: 08 8204 1910 Website: www.environment.sa.gov.au Arkaroola Wilderness Sanctuary – www.arkaroola.com.au The Corner Store – Ph: 08 8091 3872 The Innamincka Hotel – PH: 08 – 8675 9901
CRIME PAYS
IN 1845 the Strzelecki Track was discovered and named by after the famous Polish explorer, Edmund Strzelecki (pictured). The actual ‘track’ was originally blazed by the son of an Irishman, Harry Redford, a cattle thief who drove more than 1000 stolen cattle over untracked country from Central Queensland to Adelaide. Harry was eventually captured, but because of his brave efforts in establishing a new stock route through this harsh land, all criminal charges were dropped and he was let off the hook. Harry would go on to become one of the greatest cattle drovers in Australian history. Who says crime doesn’t pay?
DESERTED
IF you enjoy this desert experience, you’ll have plenty of choice to explore some of the other remote and more challenging deserts that Australia has to offer. Australia is home to many deserts including the Great Victorian, Sandy, Tanami, Simpson, Gibson, Little Sandy, Sturt, Stoney, Tirari, Pedirika, and Strzelecki. So it’s easy to see why 70 per cent of this big red rock is classified as semi-arid, arid or desert, with an annual rainfall of just 200mm or less. In comparison, the UK has an annual rainfall of close to 900mm.
What’s your next off-road destination? Find out and explore.
During holidays and hot summer days a trifle makes the perfect desert for a family, or friends, gathering.
This delicious trifle makes anyone feel like they are in the tropics and it tastes as good as it looks. If you are out camping it’s possible to make, you just need a bit of fridge space. It makes a great desert for a warm summer evening around camp (or at home).
INGREDIENTS
- 85g packet of lemon or passion fruit flavoured jelly crystals
- 300g packet of Madeira or lemon loaf cake – ready made
- 1 can mango slices (well drained)
- 500g tub thickened ready made custard
- 300ml thickened cream
- 1/4 cup (more or less to taste) icing sugar – optional if you want a bit more sweetness in the cream
- 1 large mango – peeled and thinly sliced or chopped
- 2 passion fruits or a small can of passion fruit pulp
- 1 punnet of fresh raspberries or berries – optional (or you could use a can of well-drained berries)
- Follow the instructions on the packet to make the jelly.
- Pour into a shallow dish to help it cool and begin the setting process; cover with some plastic wrap and refrigerate for about 30 to 45 mins, or until jelly is almost set (this may vary depending on how cold your fridge is).
- Cut the cake into slices (not too thick), and press lightly into the base of the bowl or suitable dish, with the cake slices just coming up the sides.
- Pour the jelly over the cake; put on a container lid, or cover with some plastic wrap and refrigerate for 30 mins, or until the jelly is set.
- Arrange the canned mango slices evenly over the top of the jelly, along with some raspberries or other fruit of your choice.
- Pour the custard evenly over the top.
- Beat the cream and icing sugar in a small bowl until soft peaks form. Spread evenly over the custard layer – it’s easier if you drop spoonfuls evenly over the top and then spread out.
- Cover and refrigerate overnight.
- Just before serving, top the cream with the fresh mango, raspberries and some passion fruit pulp.
- Make the trifle up in an oblong plastic container that will fit into your fridge.
- The raspberries are lovely, but can be expensive. You could use canned berries, but make sure they are well drained and patted dry on some paper towel.
- You could use whatever fruit you like – bananas, sliced peaches (fresh or canned), etc.
During a creek crossing, water in the wrong place can very quickly convert your vehicle’s engine to scrap metal.
This article was originally published in the October 2014 issue of 4X4 Australia.
That can be very expensive and inconvenient if you’re holding the steering wheel of a 4WD. That’s one reason why a snorkel is a terrific accessory for any touring 4×4. It lessens the chance of your engine sucking in water during a creek crossing by raising the air intake height.
Also, many vehicles draw their engine’s intake air from the front inner wheel-arch, so relocating the engine’s air intake away from the churning motion of the tyres can drastically reduce the amount of dust the air filter has to cope with.
For some older vehicles, breathing cooler air from outside the engine bay, therefore away from the radiator and other hot components, can help with drivability, economy and efficiency. The Australian-made TJM Airtec snorkel kit is manufactured from UV stable, high density polyethylene – which is pretty much indestructible.
Individually crafted for each vehicle type it retails from $430 to $620 plus fitment, depending on the car. TJM stockists can install it, however a competent enthusiast can DIY in a few hours.
A good quality snorkel is a must on any outback adventure.
1. TJM’s Airtec snorkel kit arrives ready for installation, though basic and specialist tools are required. The kit includes the down-pipe (mounted on the vehicle A-pillar), the duct that pipes air to the standard air cleaner housing, plus fittings/clamps and instructions.
2. The vehicle must generally be placed on chassis stands, with one wheel and wheel-arch splash guard removed, to allow access to the inner guard area. Splash guards may be held in place by screws, bolts, plastic plugs or by one-use-only metal rivets.
3. This 4.0-litre V6 petrol Hilux has its air intake in the inner guard piped to the air cleaner housing in the engine bay. This pipe is temporarily removed and its air intake bell-mouth cut off to accept the snorkel kit’s duct, that will be installed above the splash guard.
4. The back of the snorkel reveals the air delivery hole that enters the under-guard area and the threaded nutserts that are used to hold the snorkel to the outer surface of the vehicle’s front guard. Accurate location of these holes is critical.
5. The TJM Airtec kit includes this that accurately marks the position of the breathing and installation holes for the snorkel. Unfolding it, cutting it to shape and laying it on the mudguard shows precisely where these holes must be drilled.
6. A small drill bit is used for pilot holes before each hole is drilled to its correct size using larger drills and a hole saw. These holes will vary depending on the vehicle, but for this Hilux the hole-saw for the air duct around 100mm.
7. Another installation hole is required in the engine bay adjacent to the air duct hole. This 13mm hole is needed for the bolt to retain the duct that pipes air from the base of the snorkel through the inner guard to the now-modified air intake pipe and air-cleaner.
8. Now the fun begins! The duct must be fitted in the inner guard so its entry/snorkel end pokes out the guard’s surface and its delivery end into the engine bay adjacent to the air cleaner. The studs are screwed into the snorkel’s nutserts. Yes, I did stumble with the hole saw.
9. The TJM snorkel is supported on the A-pillar with a small bracket and two screws into the door jamb. The two screws’ location is found by test-assembling the snorkel, then marking and drilling pilot holes. Self-tapping screws, with a hit of rust preventive compound (eg Lanotec), are used during final installation.
10. After the test-fit, rust preventive is sprayed onto any bare metal (paint can also be used) and a fat bead of silicon sealer is laid in the mouth of the joining pipe. It’s essential that plenty of goop be used to properly seal the snorkel to its intake pipe for a water – and dustproof join.
11. After the sealer is applied, the snorkel is installed on the vehicle by inserting the outlet to the joiner pipe and aligning to the A-pillar. Then the five supplied Nyloc nuts and washers are installed on the studs high inside the inner guard, resulting in a permanent mating of the snorkel to its duct.
12. Cap its engine end and fill the snorkel with water to find and rectify any leaks. The final task is to install the intake ram. With a snorkel fitted, a vehicle faces less risk when crossing creeks and breathes cooler, cleaner air in hot and dusty outback conditions.
FILTER FIDDLERS You’ll sometimes see people in campsites removing their air cleaner element to clean it. “Not a good idea,” reckons GUD Automotive’s (manufacturer of Ryco filters) Engineering Manager, George Dearden. “Tapping an air-cleaner element on a hard surface can damage the element and compressed air can remove light resin-based filtering media and blow holes through pleats. The damage is tiny – but it’s there.
Also, dust can contaminate the inside surface of the element and unseen dust can drop – or be blown – into the engine’s intake during the time the element is removed. That doesn’t occur if the filter is simply left in place.” So, despite what you hear around the campfire, don’t chance it.
CROSS WITH CARE! Although it’s an asset when crossing a creek, a snorkel is not a magical device – it doesn’t alter the vehicle’s quoted water-crossing depth (or wading depth) specified by its manufacturer, allow a 4×4 to float or make it immune to water damage.
Mechanical components such as the axles, gearbox, starter motor and alternator are all likely to be damaged by water and sediment or mud during a creek crossing, especially if the vehicle becomes stuck. And if water enters the cabin, there’s potential for a lot more damage, especially to electrical items.
Want more DIY advice? Check out how to replace car brakes
IT’S NOT hard to catch the Landy bug. A glance in the wrong direction is all it takes, but be warned, once you’ve been infected by this all-consuming addiction it can be bloody hard to shake it off!
Vote for the Land Rover Defender 90 to win the 2017 Custom 4×4 of the Year
“I had no idea about Land Rovers,” recalls the owner of this spectacular Defender 90, Damian Lucev, thinking about his carefree pre-Landy days. “I knew the Defender was capable, but I really didn’t know that much about it. I liked G-Wagens, I liked the shape of them, and I just saw Land Rovers as an affordable version of that.
“But now I’ve become a part of this Land Rover world that I’ve fallen in to. I had no idea about it, but I’ve become a bit obsessed with them.”
A bit obsessed? What an understatement! “Basically all of my free thinking time involves thinking about what I am going to be doing to my Defender,” admits a seriously hooked Damian.
THE MIGHTY 90 Damian purchased this once-stock Defender 90 new in 2013, and in just a few years he has turned it into a vehicle perfect for performing the dual tasks of weekend escape machine and hardcore off-roader.
“I didn’t plan to do anything with it like it is now; it was just a driving-around-town car,” Damian says. “When I bought it brand new, it was stock standard. It’s a 2013 Limited Edition model and I basically wanted this Orkney Grey colour. There was one in Melbourne but it sold before I could get my hands on it, and I specifically wanted this colour. There was another one in Newcastle, so I just bought it over the phone without looking at it.”
“I wasn’t really a Landy person prior to this but now I have just become part of the cult,” admits Damian.
While relatively new to Land Rovers, Damian was certainly not new to four-wheel driving. “I’ve been in to 4WDing for quite a few years,” he explains. “My dad used to go hunting in the High Country when we were young, and he used to take us camping up there.”
While Damian says the Defender was originally slated as nothing more than a daily driver, he soon enlisted it to perform High Country duties. “A few years into owning it, my girlfriend and I planned a camping trip up to the High Country, so I bought a snorkel for that trip, and that was as far as I was going to go with it, and I sort of, yeah, ended up doing everything to it,” laughs Damian.
POWER UPGRADE This trick-looking Defender 90 Limited Edition is powered by the last-of-the-line Ford-sourced 2.2-litre four-cylinder turbo-diesel engines. Called the Puma 2.2 TDCi, claimed standard output is a modest 90kW at 3500rpm and 360Nm at 2000rpm. But Damian knew he’d need more grunt than that, especially when fitted with 35-inch rubber, so he started searching for power-upgrade options.
“There’s a place in the UK called Bell Auto Services – he does all the tuning and engine work to the Bowler Defender rally vehicles – and he has ECU kits that tune the engine to either 150hp (110kW) or 170hp (130kW); so I have got the 170hp ECU tune,” Damian says.
As well as a significant power increase, the Bell Auto Services (BAS) ECU upgrade also results in a healthy boost to peak the torque output to a claimed 440-450Nm. To keep air intake and exhaust gas temperatures in check, BAS advises that the ECU upgrade be accompanied by one of the company’s uprated performance intercoolers, which is precisely what Damian has fitted to his Defender.
On the intake side the Defender sources fresh air via a Safari snorkel, but on the exit side it’s an OE affair; on the advice of several Landy experts Damian has left the standard exhaust in place. “Apparently if you go any bigger it can fry the turbo,” says Damian. “I’ve been told the best thing is to leave the exhaust as it is out of the factory.”
BULLETPROOF DRIVELINE While the six-speed gearbox and the transfer case remain stock, the rest of the driveline has been modified for strength, durability and, of course, off-road performance.
“I’ve got front and rear Ashcroft diff lockers, with an ARB twin compressor in the cabin,” explains Damian. “I’ve upgraded the axles to Hi-Tough, and the CVs are Ashcroft units as well.”
The Ashcroft differentials have an air-operated selectable locking mechanism. Fitted in the standard diff housings, Ashcroft says one of the key design requirements for its locker was zero air loss, so it uses a static piston instead of a rotating seal as used in some air locker designs. Ashcroft says its locker also offers a full 6mm engagement, so it won’t slip out of lock when loaded.
The Hi-Tough Engineering axles Damian has fitted to the Defender are claimed to be around 50 per cent stronger than standard Land Rover axles – they’re manufactured from high quality aircraft material called HY-TUF nickel chro-moly steel. Combined with the Ashcroft CV joints, this Defender now has an almost bulletproof driveline, easily capable of handling the 35-inch rubber. As Ashcroft says of its CV joints, “These units have been subject to some very thorough testing in the UK and Europe and allow the driver to confidently use the front locker when on full steering lock, even with the vehicle on its nose.”
Those 35s fitted to the Defender 90 are proven BF Goodrich Mud Terrain KM2s, mounted to 16x8in Dynamic steel rims with a negative 25 offset. Ensuring that the larger rubber doesn’t extend beyond the guards, Damian has fitted Terra Firma flares to the Defender, and had them finished in a two-pack gloss black to maintain the factory look. These flares are two inches wider than the standard ones and are shaped perfectly for a neat fit.
The Defender is running a two-inch lift, although with the 35s, such a short wheelbase, and excellent approach and departure angles, it’s certainly not wanting for ground clearance. Damian says he’s about to upgrade the current suspension set-up after having broken a couple of rear shock absorbers. “I’m going to put Koni long-travel shocks in it,” says Damian. “All the main mechanical stuff has been done by Les Richmond Automotive in Thomastown, Victoria, and they do their own custom Koni kit that has matched coils and dampers.”
EXTERIOR MODS Wanting to ensure the unique front-end appearance of his Defender Limited Edition wasn’t obscured, Damian sourced a tubular bar from Rovacraft that didn’t interfere with the exaggerated headlight surrounds specific to this model. Cradled in the bar is a Runva 11,000lb 11XP winch, which is operated via an in-cabin controller and isolator. The bar is also home to a 17-inch Stedi Version 2 80W Cree LED Light Bar.
Additional lighting power comes courtesy of a big Stedi ST3300 48-inch 260W LED Light Bar mounted to the roof rack, as well as JW Speaker replacement LED headlights. There’s a pair of Stedi LEDs mounted at the rear of the Defender, too, to help light up the campsite when Damian’s on a trip.
The underside of the Defender is well protected with a Britpart front bash plate, Mulgo side rails and rear-corner bumperettes, and an APT Fabrication Fuel Tank Guard. The Mulgo side rails are manufactured from zinc-plated steel and, as well as offering significantly more protection than the factory aluminium steps, they also provide a neat factory look. The Mulgo bumperettes protect the rear corners and provide a good first step to complement the Front Runner ladder that leads up to a Tradesmen roof rack.
There’s a Darche awning mounted to the roof rack, which also carries a Front Runner twin jerry can holder, Hi-Lift jack, shovel and a pair of MaxTrax, as well as any other gear that won’t fit into the shorty Defender’s cabin. And the weight of that heavy 35-inch spare is no longer on the Defender’s rear door thanks to a Mantec swing-away spare wheel carrier; this trick set-up has a unique hinge that allows the rear door to be opened while still attached to the spare wheel carrier.
If Damian has to pull any Toyotas or Nissans out of the muck, the Defender’s front bar is equipped with two substantial recovery points, while the rear-end sports a recovery point that bolts to the Defender’s rear cross member and is manufactured by Nugget Stuff. This simple design is ideally suited to Defender owners who want a strong rear recovery point but who don’t want to fit a bulky tow bar.
INSIDE STORY The interior of Damian’s Defender 90 hasn’t been as heavily modified as the rest of the vehicle, but he has made upgrades to tailor the vehicle to better suit his requirements.
While happy with the Defender Limited Edition’s standard partial leather front seats, the rears have been flicked in favour of maximising cargo space. Damian has also installed a flat floor in the back so he can more easily access the fridge and stow stuff underneath said floor. Other than that he’s fitted a Uniden UHF and upgraded the sound system. “The stereo system has been upgraded completely; speakers, subwoofer and it’s running an Alpine sat-nav system,” says Damian.
A dual battery system resides under the passenger seat and is managed by a Redarc BCDC charger. There’s a 12V power outlet in the rear of the cabin for the fridge.
PERFECT FOR TWO While a short-wheelbase Defender 90 mightn’t be big enough for a family off-roading getaway, Damian says there’s still plenty of space for two. “It’s just me and my girlfriend, and I think for two people it’s the perfect tourer. I think you’ve got as much [cargo] room as a 110 when that’s got all five seats in it.
“My girlfriend loves it. When we first hooked up she told me she loves it, and throughout this whole modifying process she’s been really supportive of it, you know, she’s more than happy to support my hobby and she loves going camping, and when we go up to the High Country she’s basically a really big fan of it.”
“We get to the High Country as often as we can,” says Damian. “We’ve just come back from Fraser Island over Christmas, we’ve been up to the Grampians, we’ve got a Tassie trip planned hopefully in the not too distant future… and then I have my little fun days doing more hardcore stuff on day trips.”
Damian is also of the opinion that 90s are the pick of the Defender range. “I wanted to modify my 90 because there’s not enough of a heavily modified presence in Australia with the 90s,” he says. “This is one of the reasons I have done it. The 90 may not be as practical as the 110, but it’s more fun and it looks better.”
LANDY COMMUNITY So what has Damian learnt from this build? Well, he makes no secret of the fact that he’s learnt a hell of a lot about Landies in a short period of time, thanks to both the people he’s met out and about as well as the wealth of information he’s been able to access online.
“There’s a good community; the Land Rover people all stick together,” says Damian. “It’s been a learning process all through the whole thing, meeting people and talking to various people and experts about what to do and that sort of thing.
“There’s a good forum, the AULRO (Australian Land Rover Owners) forum, that’s just priceless for information, and then there are a couple of Facebook pages with Land Rover guys in Australia who modify them.”
As a result, Damian has built the perfect Defender 90… at least it is for him. With its bulletproof driveline it’s capable of some pretty hardcore off-roading, and with just two occupants it also fulfills its duty as a tourer. But Damian is not finished yet.
“I’ll probably be forever modifying it,” he admits. “Next is the suspension, and I’m also in the process of putting a hot water shower system in there, and I’m planning to put a gullwing window in the rear so I can access the fridge.”
As Damian has found out, catching the Landy Bug is more than an obsession with
a specific make and model of vehicle. “I love the look of it, I love how capable it is, I love how you become a part of this Land Rover cult group,” he enthuses. “You know, you drive past somebody and you wave to each other, without even having to say anything.”
THE Coleman Hot Water On Demand (HWOD) unit is the second generation portable hot water heater from this highly respected outdoor equipment company.
There are two models in the range and we have been using the Elite version for the past few months, which will cost you a hundred bucks or so more than the standard model. While the RRP for the Elite is $549, you’ll get it considerably cheaper if you shop around – we’ve seen it as low as $379.
The unit weighs 8.5kg and packs a big punch in its 42x25x53cm package. While the heater core is made from copper and the water connections are quick-connect brass fittings, the rest of the unit is made from lightweight aluminium and ABS plastic.
A digital display on the front of the Elite shows the battery status of the on-board lithium-ion battery, pilot light activation, water flow, output temperature, and a number of warnings such as low battery and low water flow. Two USB charging points are included and are a handy addition for all those items that seem to rely on USB power these days. The battery can be charged or the unit can run on 12V DC or 240V AC power with the cable adaptors supplied (and which are housed in the heater’s handle).
Two hoses – an inlet hose with pump, which connects to the supplied collapsible water container, and the 2.4-metre-long shower hose, which connects to an adjustable shower head – are included. A mesh bag to hold the shower hose and a bracket to hold the shower head completes the kit.
Once you have charged the internal battery, connected the hoses and gas bottle, and filled the water container, the unit is ready for use. Turn on both the master switch and the power button and ensure water is flowing through the unit. Ignition is automatic once you turn the knob to ‘Pilot’. Then simply adjust the knob to the water temperature required – at ‘Max’ it’s very hot.
Coleman says a normal 438g disposable gas canister will give 150 litres of hot water, but that depends on how cold the water is to start with and how hot you want it. With the price of Coleman canisters often more than $10 per cartridge, it makes a lot of sense to buy a Coleman gas hose that connects to a 9kg gas cylinder. You’ll save money if using the water heater frequently. Plus, the hose will fit more Coleman products than just the water heater.
Due to safety reasons there is no tap or switch to pause the water flow when having a shower, which is a little annoying, as bush camping where water can be difficult to obtain means trying to conserve as much water as possible.
The bush-washing technique – water on, wet yourself down; water off, soap yourself up; water on, rinse yourself off – means you need to have ready access to the heater and the controls.
The flow rate at 2.3L/min (as stated in the spec sheet) means you go through the water in the standard water container fairly quickly. We often used a bucket and simply dropped the pump assembly into the water and it worked fine. You can also connect a garden hose to the unit, if you can find one in the bush, but make sure the water pressure isn’t too high.
An option that could be worth considering is the Coleman carry bag ($80). It not only helps protect the unit, but it keeps all the hoses, associated equipment and Coleman canisters in the one place.
RATED
Available from: www.colemanaustralia.com.au RRP: $549 We say: Lightweight, easy to use, improvement on predecessor.
Tower Rock sits as the highest point in a strange red-rock landscape just north-east of Alice Springs. It’s part of a distinctive pocket of land known as Mac and Rose Chalmers Conservation Park, and although it’s only about 300km from Alice Springs, it’s well off the beaten track.
This article was originally published in the October 2014 issue of 4X4 Australia.
The conservation park is relatively new, created in 2011 when Mac and Rose’s son, Charlie Chalmers, signed a voluntary conservation agreement on pastoral land, as part of a project that helps landowners preserve and protect special areas on their properties. For travellers, it offers a glimpse at what was once a private retreat. It’s also a great place to camp while exploring the Binns Track, which begins at Mount Dare in South Australia and ends more than 2000km north near Timber Creek in the Northern Territory.
We’ve got a bloke by the name of Bill Binns to thank for creating such an awesome track through some of the best landscapes of the Northern Territory. The attractions along the track aren’t mainstream tourist hot spots, and the trails are often remote and challenging. All round, they’re pretty good qualifications that make the Binns Track one of Australia’s best four-wheel drive adventures.
But even if you’re not tackling the Binns, Tower Rock is a worthwhile destination – especially if you want to get off the bitumen. The main access track runs north off the Plenty Highway, about 20km east of Harts Range police station, where the ranges form a magnificent backdrop. From there, it’s 48km to the Mount Swan homestead and a further 20km to the Tower Rock turn-off. Though the Parks and Wildlife Commission of The Northern Territory recommends high clearance four-wheel drives for these dirt roads, there’s nothing particularly difficult to watch out for – unless it’s wet. The locals seem to manage pretty well in their everyday sedans.
From the Tower Rock turnoff, it’s another seven kilometres to the heart of the reserve. It’s along this narrow track that the jumbled red-rock landscape sneaks into view and granite outcrops start to appear through the mulga woodlands. The formations are haphazardly arranged with boulders of all shapes and sizes that balance perfectly together to form strange mounds and ridges. The effect is quite spectacular – made all the more attractive as not too many people know the conservation reserve even exists.
The facilities, or rather lack thereof, suit the remote nature of the reserve. The campground is a small grassy plain with two long-drop dunnies surrounded by hessian for a bit of privacy. And that’s it – except for a near-perfect 360-degree sweep of stunning scenery that begs to be explored.
While a two-wheel vehicle track keeps going for a kilometre or two past the campground, walking is the best way to see the Tower Rock reserve. Walking also provides the best chance to see the different animals and birds that live in the region. One of the reasons Tower Rock was considered as a conservation reserve was that the area supports a diversity of animals, as well as plants – even a few threatened species call this region home.
There are suggested walks that ramble around and through the granite outcrops, but they’re fairly informal. Using a combination of short colour-tipped steel droppers and strategically placed painted arrows, these trails have an element of adventure.
This means tourists are required to keep an eye on the terrain, which is a great way to spot wallabies, or perhaps even a small quail, darting among the boulders. For the most part the walks follow rugged paths, with an ever present temptation to clamber over or around huge boulders to see what’s hiding on the other side, which makes the exertion worthwhile.
If feeling a bit lazy, then there’s an easy walk from the campground to where a special section of the reserve is set aside as a memorial to Mac and Rose Chalmers. Their final resting place is surrounded by white-trunked gums and sheltered by random granite outcrops. It’s a great place to reflect on the beauty of the country.
Surprisingly, in what is essentially an arid landscape, the flora around Tower Rock can be diverse and colourful. Though most plants have adapted to the dry climate with spiky grey-green leaves designed to reduce transpiration, some plants are soft, and others almost flamboyant with their flowering displays.
Many species find a root hold in the crevices and fissures formed by balancing boulders. Other plants spring to full growth only after rain. Fauna can be equally as varied, though ultimately shy and reclusive.
Travellers should be self-reliant in these parts, though at nearby Mount Swan there’s a fair dose of civilisation. This is the home of the Eastern Desert art gallery, where Utopian Aboriginal art is displayed. The works of art by local Aboriginal people are as stunning as the country they live in, with an intricate vibrancy enhanced by singular styles. Some of the works are created under a simple thatched bough shed not far from the homestead, and if you’re there at the right time, bookings can be made to watch the artists work their magic as canvases come alive with colour.
The homestead complex also includes a mini-mart that’s stocked with frozen and shelf-stable goods, take-away food, fuel and even vehicle accessories essential for the outback. It’s a particularly good service for people heading further north along the Binns Track as there’s little in the way of facilities between there and Tennant Creek. But Tower Rock and the surrounding reserve is a good place to linger. By far, its most striking feature is the intensity with which both sunrise and sunset transform the landscape.
As the sun nears the horizon, the rocks start to glow and light up with an energy that’s truly spectacular. The show doesn’t end when the sun is beyond the horizon though, as the granite continues to glow as if to release the heat of the day.
At sunrise, the subdued hues of dawn seem to take forever to develop into real light. The first rays hit the top of Tower Rock and then slowly melt downward, boulder by boulder, as the scenery comes alive. This is also the wake-up time for animals and birds. From camp, wallabies can be seen as they seek out safe, sheltered coves to soak up the warmth – their size putting the granite formations into perspective.
The birds are easier to spot, and small flocks of zebra finches and budgies are attracted to the shrubs and grasses scattered around the campground. As the air warms up, wedge-tailed eagles can be seen as they search for thermals over their domain. The effortless power of these birds is majestic.
The Mac and Rose Conservation Reserve might be small, covering just over 4.7sqkm, but it packs a big punch as a showcase of just how rich this part of the country can be. It’s remote, it’s wild, and it’s a friendly haven for those who love seclusion in the outback.
TRAVEL PLANNER
GETTING THERE Tower Rock is in Mac and Rose Chalmers Conservation Reserve, about 300km north-east of Alice Springs, Northern Territory. The Parks and Wildlife Commission Northern Territory states access is suitable for high clearance 4WDs.
CAMPING Bush camping at Tower Rock is free. Campfires are allowed outside fire restrictions; wood cannot be collected within the reserve. The only facilities are two long-drop toilets.
WHAT TO BRING Prepare to be self-sufficient. Some supplies, plus fuel, are available from the mini-mart at nearby Mount Swan.
ROAD CONDITIONS All roads to Tower Rock are dirt; check road conditions before setting out at www.ntlis.nt.gov.au/roadreport or call 1800 246 199.
CONTACTS Mount Swan/Tower Rock, (08) 8956 9433 Parks and Wildlife Commission Northern Territory, www.parksandwildlife.nt.gov.au
What’s your next off-road destination? Find out and explore.
JEEP has launched its updated Grand Cherokee range in Australia, and it’s headlined by the arrival of the off-road-focused Trailhawk.
The all-new Trailhawk, priced from $74K, debuts in Australia with a 3.0-litre turbo-diesel V6 (184kW/570Nm) mated to an eight-speed automatic transmission.
Thanks to Jeep’s Quadra-Drive II 4×4 system (which features an electronic limited-slip rear diff) and a Quadra-Lift air suspension tune, the trail-ready Jeep has improved wheel articulation and a ground clearance of 260mm – the highest clearance ever for a Grand Cherokee.
The Trailhawk’s belly is afforded protection via four underbody skid plates, while red front tow hooks, a matte black bonnet decal, and neutral grey mirrors and grille give the 4×4 an aesthetic boost.
“The arrival of the new Trailhawk model, with its heightened off-road abilities, is particularly exciting for Australia, a nation whose core values resonate strongly with Jeep’s love of freedom and adventure,” Jeep Australia Director, Guillaume Drelon, said.
Alongside the new Trailhawk, Jeep has also updated the rest of its Grand Cherokee 4×4 range, beginning with the 3.6-litre V6 Laredo (priced from $52,500). At the other end of the spectrum is the 6.4-litre V8 SRT (priced from $91,000).
It is good news for 3.6-litre Pentastar V6-powered variants (Laredo and Limited), as they’ve been injected with a power increase to 213kW, as well as a four per cent fuel-economy improvement.
Drivetrain revisions also include a new electric power steering system and an Eco Mode as part of the eight-speed auto transmission. Plus, a Gen II transmission has been developed for 4×4 EcoDiesel variants.
Further changes to the range include exterior refreshments – new grille, headlamps, front fascia and LED fogs. A new range of 18- and 20-inch wheels are also now available, as well as six new exterior colours.
The Grand Cherokee range introduces LaneSense Lane Departure Warning Plus, Parallel and Perpendicular Park Assist, and Rear Trailer Hitch Camera View. Towing capacity across the board remains at 3500kg. All 4×4 models (except the SRT) now have Jeep’s new Off Road Pages installed within the 8.4-inch Uconnect touchscreen.
“The updated Grand Cherokee range is not only more refined on-road and more capable off-road, we’ve bolstered its safety credentials and made it even better value for money,” Mr Drelon added.
All Jeep models are covered by Jeep’s ‘There & Back Guarantee’.
The updated Grand Cherokee range will hit showrooms in March, 2017.
PRICING
| MODEL | ENGINE | POWER/TORQUE | TRANSMISSION | TRANSMISSION |
| Laredo | 3.6-litre V6 | 213kW/347Nm | 8AT, RWDu00a0 | $47,500 |
| Laredou00a0 | 3.6-litre V6 | 213kW/347Nmu00a0 | 8AT, 4×4 | $52,500 |
| Laredo | 3.6-litre TDV6 | 184kW/570Nmu00a0 | 8AT, 4×4 | $59,000 |
| Limited | 3.6-litre V6 | 213kW/347Nmu00a0 | 8AT, 4×4 | $62,500 |
| Limitedu00a0 | 3.0-litre TDV6 | 184kW/570Nmu00a0 | 8AT, 4×4 | $69,000 |
| Trailhawku00a0 | 3.0-litre TDV6 | 184kW/570Nmu00a0 | 8AT, 4×4 | $74,000 |
| Overlandu00a0 | 3.0-litre TDV6 | 184kW/570Nmu00a0 | 8AT, 4×4 | $80,000 |