THE Kimberley embodies Australia’s last frontier. It reeks of rugged pioneer spirit, resilience and resourcefulness.
It’s a place where necessity is the mother of invention, and rusted relics and scraps get repurposed and reused. It’s a place where the imagination is as epic as the landscape, and true bush mechanics thrive on the challenge of keeping old rigs rolling along red, dirt tracks.
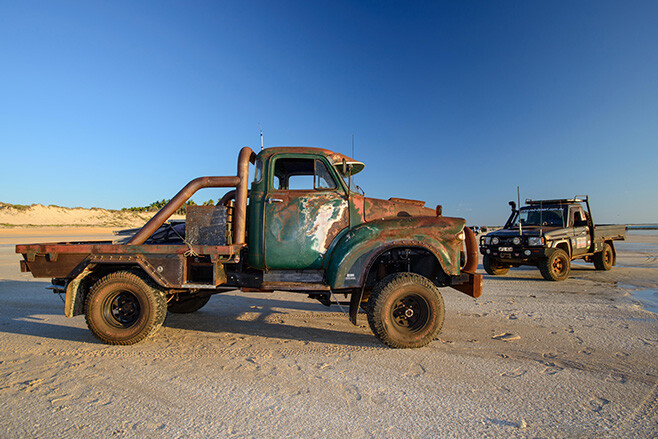
One such relic caught our attention on a recent sojourn to Broome. It cut a Mad Max-esque figure as it rumbled past on Cable Beach, where we first spied it cruise by. As luck would have it, on our last night in Broome, we caught up with owner and builder Rob Bamkin as he was parked up on the beach chilling out at low tide enjoying the magic hour.
His crusty, old 1968 J Series Bedford looked like it had just come from Wolfe Creek, but Rob was a friendly bloke and happy to share his tale of how his mighty rig came to be. We learned it’s as much a Frankenstein as a Mad Max mobile but, either way, it personified typical Kimberley ingenuity and toughness.
Rob first came upon the dilapidated jalopy back in 2005, sitting along with numerous other wrecks behind an old shearing shed on Mt Anderson Station, 160km south-east of Derby.
Returning frequently to Mt Anderson Station whilst working with four young Aboriginal lads on a tourism venture, Rob hatched a plan to get the old girl going as a project, with the aim of one day driving it to the Deni Ute Muster via Alice Springs.
He first had to convince local Jarlmadangah elder Harry Watson to part with her. Old Harry, a legendary stockman who was born on and has lived on Mt Anderson Station all of his 80-plus years, was rather fond of his stash of otherwise redundant metal. But he liked the idea, so a deal was struck to trade an old trailer and ride-on mower for the dilapidated Bedford so as to give her a new lease on life.
Ironically, Rob later learned his dad had worked at Mt Anderson Station as a shearer in 1948, in the very shearing shed where the truck had lay since old Harry had towed it there from nearby Pandanus Park Community in the early ’80s.
Rob finally got the truck to his home in Broome in 2008, where it sat around for another 12 months. He wanted it to be bulletproof – as tough as the Kimberley – and able to belt down the beach, through the creeks and dunes, and survive the rugged outback station tracks.
But the Bedford had no motor, its gearbox was sitting on the front seat, and the original diff was the size of a 13-gallon drum. The master brake cylinder set-up also looked like a gearbox out of a tractor. Rob realised he had a lot of work to do!
Rob wanted 4WD, power steering, disc brakes, air-conditioning and a big motor with loads of power. The only solution was to retrofit and morph the Bedford body onto a more modern platform with the desired running gear.
He measured the chassis rails of a Toyota, then a Nissan and finally his old ’69 F100… it was the perfect width. But understandably, not wanting to scrap his beloved F truck that he’d owned for more than 20 years, Rob started looking for another.
To his amazement, he found a ’78 F100 4×4 with a 6.2-litre Chevy diesel engine only a short drive from where the Bedford had been found. He soon had both vehicles at home and started stripping the Ford of its cab and body.
The blown nine-inch diff was replaced, the Turbo 350 transmission rebuilt, and all-new brakes – including booster, rear shoes, front pads and lines – were fitted. Then came new shocks and ball joints, not to mention a new radiator, water pump, vacuum pump, fuel lines, fuel pump and filter system. Basically, all the usual stuff required to rebirth a nearly-40-year-old vehicle and get it legally mobile yet again.
With those tasks completed it was time for the next challenge of marrying the Bedford cab to the Ford chassis. Rob fabricated new body mounts for both front and rear that, luckily, worked perfectly, ensuring an easy fit. Next up, the Ford F100 steering column and brake booster with pedal and accelerator pedal assembly were fitted with only slight modification needed to slot neatly into the Bedford.
The vehicle needed to comply with the ADRs for the F100. That meant a heater demister (not exactly required in Broome), brake vacuum warning light and buzzer, and two-speed wipers were non-negotiable. The wipers proved to be a major pain in the arse! On the Bedford, the wipers start from the centre and go back and forth, where on the Ford they go from left to right.
The Ford arms under the dash were far too long so Rob had to fabricate an off-set cam and use the old Bedford arms. “It passes ADR and works well enough for the three times a year that it rains in Broome,” Rob quipped.
All the wiring was done by a local auto-electrician, trying to keep specification as close to original as possible. Rob also needed to shorten the tray on the back and fabricate the two spare tyre wells which then form the rear mudguards, tool boxes and battery boxes. He used five-inch truck exhaust mandrels for the rollbar and bullbar then, once all welded up, filled the tubes with expander foam. “And it’s solid,” he laughed!
In keeping with its tough exterior, the cab and hoodliner are finished in functional marine carpet. The original F100 seat fitted in nicely, upholstered now in Kimberley cowhide, and the dash instrument pod sports highly fashionable and durable crocodile skin, a nod to the toothy logs of the Top End.
Prior to starting work, Rob spoke with the WA Department of Transport and engaged a mechanical engineer. On completion, the engineer was flown into Broome (at Rob’s expense) to inspect the vehicle and, whilst impressed, would not pass the truck on account of the one of the injector lines being too close to the steering shaft. So the initial inspection was a fail and the engineer departed Broome, leaving Rob a nice, big, long list that included moving the entire driveline (engine included) more than 25mm to the right.
Another year later the same inspector drove up to Broome for another look and road test, and this time, after sorting out a badly adjusted brake booster, it was finally a pass. It was now a fully compliant, road-registered rig.
Many ask what colour Rob intends to spray the truck, but he has no such plans. He loves that you can see its history, feel its pain, and respect the fact that it is just a tough, old truck for bouncing around the Kimberley.
For Rob, his labour of love is great for regular visits down to Cable Beach for sunset, or up to the Fitzroy River for a fishing trip. It’s been a long time in the making, literally, but now his crusty creation is on the road, and Rob can’t wait to finally point it towards the Deni Ute Muster.
One thing is for sure – it’s unlikely he’ll see another Bedford like his in Deni, or anywhere else for that matter.
TO exit your four-wheel drive and have the full force of the Northern Territory’s heat slap you in the face, as well as spinifex grass piercing your legs as you walk towards a geological wonder, is all part of the extraordinary journey to reach a destination that no aerial photo can quite do justice.
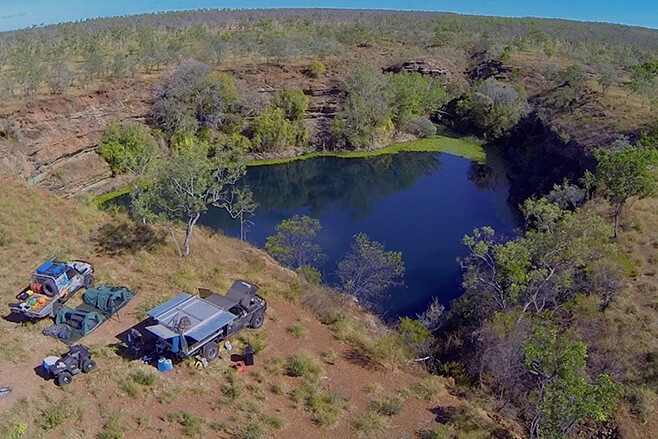
Located in the vast, open rocky country north-west of Borroloola, and guarded by the many tributaries of Batten Creek, lies the Nimbi Nimbi sinkhole.
Borroloola, which is on the Narwinbi Aboriginal Land Trust, is a diverse community approximately seven hours’ drive from Katherine, and it’s also the starting point to access the sinkhole. A permit isn’t required to visit the town of Borroloola.
Heading in an easterly direction from Borroloola towards Batten Creek will prove difficult due to impenetrable black wattle – you would have to be a stubby short of a six pack to scrap your panel work through such unforgiving, intertwined black-wattle scrub.
A more successful track can be found by crossing Batten Creek on the northern side while still on bitumen, then veering west on to a property following old geo survey lines originally constructed for mining exploration. You will need to get permission to use these tracks from www.nlc.org.au
Some of these old survey tracks are extremely hard to pick up due to the time passed since they were originally bulldozed through. Often the only way to decipher them is by looking down the possible track and taking note of the formation of the trees – if there is a clear corridor through the trees this indicates a road was once here.
Some of these survey tracks are still marked on Hema’s map system, but they’re now extremely faint with erosion cavities, overgrown native scrubs and occasional fallen trees to circumnavigate.
Follow these survey tracks until they essentially run out and start dropping south. It’s slow going, with nothing but GPS co-ordinates to follow, and you’ll eventually arrive at Galah Creek. If you have time it’s an ideal place to stop for lunch and throw a lure across the water to try your luck at catching some barramundi. Crocodiles inhabit these waters, so be sure to take caution near the creek banks.
How deep or how dry this crossing is depends on the previous wet season. Forging the creek at this point is the best option, as it offers a natural rock bar to drive across. The exit is a steep, sandy jump up, with undergrowth foliage to dodge at the same time.
The landscape varies from dry, swampy floodplains to scrappy foliage, all of which you must carefully weave through. This country also provides excellent camouflage for buffalo, and you’ll often see evidence of their existence by the muddy wallows they usually bathe in.
The journey from Borroloola to the Nimbi Nimbi sinkhole is only 19km, but it’s not to be taken lightly, as you can easily become disorientated when one clump of trees looks exactly like the next. If you lose sight of the lead vehicle there may be times when sounding the horn is required to locate the direction of the vehicle in front. Good UHF radio contact is also essential.
A solid days’ drive from Borroloola will have you pulling up at the sinkhole as the sun goes down. Almost romantically surrounded by spinifex grass and lightly peppered with low-lying trees, this geological phenomenon sits atop open escarpment country.
Its size is impressive and the layered cliff faces drop down into turquoise-blue water that’ll take your breath away.
Taking a stroll around will reveal a game trail that completely encircles the sinkhole, where cattle have searched to no avail for an entry point to the water’s edge. On the north-west side there is a ravine you can walk down to get closer to the water source, but you’d need to be an adept explorer to descend the final 15 metres.
Scientific studies reveal that sinkholes, like Nimbi Nimbi, are formed from ancient lava tubes, yet little is known on how many lava tubes branch off or the fish that inhabit its waters.
Only experienced 4WDers with extensively set-up vehicles and an expert level of navigational skills should attempt to reach the Nimbi Nimbi sinkhole. Tyre punctures are a very high risk due to needing to forge their own path – up to 15 punctures were relentlessly embedded into the quad-bike tyres throughout the entire trip. For travellers short on time, a helicopter flight to the sinkhole can be arranged from Borroloola.
It’s a hard battle to reach the hidden Nimbi Nimbi sinkhole, but it’s a significant sight that will last forever in your memory.
TRAVEL PLANNER
WHERE: Borroloola is a town in the Northern Territory on the eastern side of the Gulf of Carpentaria, 670km south-east of Katherine.
MAPS: Hema’s Australia Road and 4WD Atlas. Google Earth satellite photos should be downloaded prior to departure.
ACCOMMODATION: King Ash Bay Lodge, Borroloola (call Katie on 0477 294 172). The sinkhole track is completely self-sustaining camping, with no facilities available at all (even the road is optional).
FUEL AND SUPPLIES: Fuel available at AFD Gulf Mini Mart, Borroloola (phone: [08] 8975 8790). This is the first servo as you arrive into town, and Leslie and her crew provide mouth-watering meals for dine-in or takeaway. A small variety of groceries are also available here.
RESTRICTIONS AND PERMITS: No permits are required to visit Borroloola. However, permission from the traditional owners is required to visit the sinkhole. Contact Daniel at NLC Borroloola (phone: [08] 8975 7500).
VEHICLE SET-UP: A high-clearance vehicle is required, and the paintwork will get scratched. Also bring along spare tyres, GPS navigation, recovery equipment and a satellite phone. The trip to the sinkhole isn’t suitable for camper trailers. Experience in remote travel is required, as is being able to use only GPS co-ordinates to navigate. Explorers also need to be self-sufficient when camping, and bring plenty of drinking water, as well as a remote first-aid kit (including snake-bite kit). Don’t travel alone!
GPS LOCATION: The co-ordinates to locate the sinkhole are 12°58’37.39”S and 136°04’09.62”E. Make sure you constantly check your status as you near the co-ordinates to ensure you don’t drive off the ledge if you are approaching when the sun has faded or it’s dark.
This dish can be cooked in a conventional oven, but it works well in a camp oven.
I place the camp oven on a grate well above the fire, over a good bed of coals, and put a small shovel-full of coals on top.
There’s a bit of guesswork: the fire has to be hot enough to gently simmer the rice but not cook it too quickly, and the chicken has to be cooked when the rice is ready.
If using on a gas stovetop or camping stove use a tight lid to keep moisture in the pan so the rice cooks evenly – use foil or baking paper to cover the top of the pan before putting on the lid.
To prevent the top of the chicken from drying out, put baking paper over the top of the chicken and press lightly down; make sure it covers the inside of the pan. This dish is big enough to feed 4 to 6.
INGREDIENTS
750g to 1kg chicken thigh fillets – no bones or skin (I work on 200g to 250g per person)
MARINADE
- 1/3 cup hoisin sauce
- 1/3 cup honey
- 1/3 cup soy sauce
- 1 tblspn sesame oil
- 2 tspns grated ginger (or use jar or tube variety)
- 2 tspns garlic – crushed (or use jar or tube variety)
- 2 cups long grain rice (basmati is good)
- 1 x 400ml coconut milk
- 350ml chicken stock (salt-reduced is better)
- 1 cup peas (either frozen, or reconstituted dehydrated peas)
- Extra hoisin sauce
- 2 or 3 spring onions – finely chopped
- handful fresh coriander leaves – chopped (optional)
- Cut chicken into large pieces (for each thigh cut into three).
- Put all marinade ingredients in a large, plastic zip-lock bag and mix together.
- Add chicken pieces and zip the bag (expelling most of the air). Give the bag and ingredients a good ‘squish’ to make sure chicken and marinade are well mixed.
- Marinade for 24 hours or, at very least, 30 mins.
- When ready to cook, run the rice under cold water until it runs clear. Only do this if you have plenty of water to spare.
- Place rice into camp oven or large pan.
- Add coconut milk and stock and stir well.
- Add peas and stir to mix through. Spread rice evenly over base of pan.
- Remove chicken pieces from marinade and lay evenly over top of rice.
- Cover camp oven tightly with foil, then place lid on and cook (as described above) for 30 to 35 mins.
- Remove and set aside for 10 mins before serving to allow the rice to absorb all liquid.
- Serve with a drizzle of hoisin sauce over the chicken. Sprinkle chopped spring onions and coriander over top of chicken.
- OVEN: If baking at home in the oven, preheat the oven to 200°C and use a reasonable size baking/casserole dish with a lid. Basically, follow the instructions above.
- Rinsing long-grain white rice before cooking removes excess starch, helping it cook more evenly and be less sticky. However, some rice, such as Arborio, is prized for its starchiness in risotto and is never rinsed.
- Burned a pot of rice? No worries! Put a piece of white bread on top of the rice for 5 to 10 mins to draw out that horrible burnt flavour.
THIS is one of those items that has you asking yourself, ‘Why didn’t I think of that?’
The camp cutlery box from Creative Camping Solutions is an easy and basic box to store and carry cutlery when out on the road.
I’d always kept my camp cutlery in a large plastic box, which did the job for years, and the Creative Camping cutlery box does the same thing. However, it is partitioned just like the cutlery drawer in your home kitchen so that everything is kept in place.
Measuring 35 x 27 x 5cm the box can accommodate all cutleries, from large knives to teaspoons, and I’ve even found myself storing small items like a torch.
The box is designed and made in Australia and is of a thick, sturdy plastic that should prove durable over time. The catch holding the lid closed is very secure, so you won’t open the back of your 4×4 to find your knives and forks everywhere. The last thing you want is loose kitchen knives flying around your 4×4 during a rollover or sudden stop.
The cutlery box sells for $25 (plus postage) which is reasonable considering the sturdy construction, and we doubt you’ll find anything similar that is made here in Australia.
The box doesn’t come with cutlery included, but Creative Camping can sell you that – just check its website.
RATED
Available from: www.creativecampingsolutions.com.au RRP: $25 + postage We say: Simple and effective.
LURKING inside the kick panel of your 4×4 is a computer so powerful NASA would have paid millions for it to help put man on the moon.
It controls every single aspect of your 4×4, from the rate the indicators flash right through to how long each injector pulses open, as well as the angle of the blades inside your turbocharger at a given RPM. They’re an incredibly complex bit of kit, so it’s no surprise that when people started pulling them open and rewriting their code it made more than a few people a little nervous. After all, manufacturers have things absolutely perfected, so any modification is a recipe for disaster, right? Not exactly.
To help cut through some of the fog surrounding re-mapping, or flash tuning as it’s sometimes known, we’ve enlisted the help of four of the top diesel-tuning experts currently spinning err… keyboards on late-model diesel engines in Australia: Brendan Cook from Diesel Power Unlimited, Paul Farrell from Geelong Performance Centre, Matt Smith from Just Autos, and Stephen Booth from Power Torque Victoria.
To understand the pros and cons of re-mapping, as opposed to a simple performance chip, it’s important to have a solid understanding of the major differences. Electronic diesel tuning has been around for almost as long as electronic-controlled diesels, and early models were incredibly rudimentary with very little that could actually be changed.
Performance chips were perfect for this, as all they had to do was alter some of the half dozen signals the ECU was getting and the ECU would compensate for it. If the tuner wanted more fuel pressure at the injectors, the chip would tell the ECU there’s less pressure than what is actually there, forcing the ECU to ramp up pressures to compensate.
Rather than improving on the chip-style of tuning previously used, re-mapping is an entirely new way of looking at things with a whole host of benefits. Instead of tricking the computer into behaving how you want it to with a few minor inputs, re-mapping is able to change how the computer itself behaves.
This opens an enormous amount of control for the tuner, allowing them to make the engine perform exactly how they want; not only giving higher power figures on a dyno sheet, but real world driveability too.“Essentially, in a small amount of way, you can change anything your mind can think of,” Matt Smith said. “Anything from EGRs, boost control, boost limiters, variable vane control on the turbo, engine timing, rail-line pressure, torque limiters – there are thousands of individual maps.”
Not unlike an update for your phone that adds new features, the process involves overwriting the information on the existing ECU. “This is achieved by first reading the stock file from the ECU, modifying certain maps and then writing the modified file back into the ECU,” Paul Farrell added.
WHAT TO EXPECT WITH hundreds of maps available and endless ways the tuner can customise them, there’s more to the results than a simple percentage increase in power. There are a few factors you’ll need to take into consideration before trusting your 4×4’s brain to a man with a laptop, namely how much power you’re chasing and how talented your tuner is.
With most modern common-rail turbo-diesel engines you can expect a 20-30 per cent increase in power and torque with just a tune; although many stock components will be the limiting factor.
In the case of 70 Series Cruisers, where owners are routinely chasing upwards of 50-100 per cent more power, turbocharger upgrades, larger injectors, free-flowing exhausts and intakes are all mandatory. With some models requiring significant upgrades, like heavy duty clutches and free-flowing intercoolers with even mild power upgrades, it’s important to speak to your tuner about exactly what you’re chasing and what you hope to achieve while you’re still in the planning stages.
“The modifications all depend on the desired outcome and the engine,” Brendan Cook said. “Some four-cylinder engines really benefit from an exhaust, where some actually lose low-down torque and richen the mixture up.”
Just as important as the tune is who is writing it. “There are a lot of tuners in Australia locked to European tunes (slaves),” Matt Smith told us. “There’s only around half a dozen masters in Australia because the software is so expensive; we’ve got $100,000 worth of software so you need to be an IT guy as well as have a solid understanding of performance. If the shop you’re going to isn’t creating the tunes themselves, who is?”
While the figures in some cases may seem similar to those available with a simple chip, the big difference is in the driveability. “Because we’re working directly with the ECU the response time is cut down,” Brendan said. “The big thing people notice is the throttle response and the low- to mid-range torque. When all the maps are managed correctly you can make the engine really sing when it’s down low, full boost is achievable earlier than with most chips, and a clean-air fuel ratio can be achieved which makes for a steep torque rise.”
The power levels ultimately come down to what the owner wants and how far they’re willing to push their engine. Some tuners claim a fuel consumption decrease of around 10 per cent due to the engine not needing to be pushed as hard, but with so much variance and many owners making use of the additional power it’s really a moot point.
GETTING IT RIGHT WHEN it comes to ensuring the tune controlling your engine is not only powerful but safe, there are a few different schools of thought. On the budget end of the market there’s the set-and-forget crowd who will upload a stock tune and send you on your way. On the custom tune side of things there are a few different ways the tuner will make sure it’s done right.
A dyno, or rolling road that allows the tuner to load the 4×4’s driveline up and simulate driving conditions, is a common sight. One of the big reasons many tuners will use a dyno is the sheer amount of firmware versions available across individual models. “In the PXII Ranger there are five to six different versions,” Matt Smith said. “70 Series Cruisers have 12, so do the 200s, and the Hiluxes have 14 from memory.
They all look the same but they’re slightly different. Sometimes the tunes are easy and go together quickly, other times they’ll have tiny issues that you need to chase and do the tune specifically for the car. I’ve been working on a Hilux at the moment for four hours to get it right, that’s what you pay for.” It’s this back and forth on the dyno that allows the tuner to identify issues like boost spikes, low air-fuel ratios or excessive exhaust gas temperatures that could lead to engine failure.
On the other end of the spectrum Stephen Booth prefers to rig his vehicles with probes and do his testing on the road. “Although a dyno tune is a useful tool they can only simulate full throttle,” he said. “They are great for setting your limits in boost and AFR but they won’t simulate everyday driving. The best dyno is the road. It’s real-world, and a good boost gauge, AFR probe, pyro and OBD logging are the best tools for tuning. And if you’re going to tow a van we’ll whack it on and go tuning so there are no surprises.”
While the high-end shops are split down the middle on the exact type of test and tune methods they’ll use, all are in agreeance it’s an absolutely vital step to ensure the maximum driveability and reliability from your engine. There’s more to a good 4×4 tune than headline figures on a print-out.
WILL IT VOID THE FACTORY WARRANTY WITH how easily modern engines can damage, and how expensive they are to replace, it’s not surprising that warranties are the first question most people will ask about. While some tuners claim their tunes won’t void the factory warranty, things are a little more involved than that. If a modification directly leads to a failure the manufacturer is under no obligation to cover any of the costs associated with the failure. If you have your engine re-mapped they can’t knock you back on a leaky radiator, but injector failure will be an uphill battle. In theory it’s simple enough, but it gets complicated when you try and put a limit on how much the modification can affect things further down the line.
Will a tune void warranty on your injection system, turbocharger, gearbox, driveshafts or diffs? Both OME manufacturers and the Department of Fair Trading were both hesitant to put an exact figure on where the line gets drawn, making the whole thing a minefield to negotiate. That’s the bad news. The good news is most quality tuners will warranty their own work. If they’ve tuned your engine and it goes bang, they’ll identify the issue and if it was their tune the repairs are on them. Stephen offered a pretty simple bit of advice: “Just get it done right the first time and you shouldn’t have to worry about that argument… ever.”
WILL IT DAMAGE MY ENGINE? IT depends on who does it. The same tools that allow a skilled tuner to make a more efficient engine are the same tools that allow a poor tuner to make a catastrophic mess of it all. “As there was with chips, there is with tuning: rogues,” Stephen said. “If your tune was done by a plumber who used to play around with his ski-boat engine and believes the richer the mixture the safer, I would say, yeah, your engine’s done. But if he’s a trade-qualified mechanic and diesel fitter with an in-depth knowledge and can actually explain what boost and torque you should be expecting, I would suggest it won’t damage your engine at all.”
The important factor to consider is that lugging around a dual-cab ute and camping gear isn’t necessarily the most strenuous work these engines have been commissioned to do, so they’re often designed for much tougher jobs and can be pushed harder. “A lot of the engines in other applications, like marine, are actually pushed a lot harder,” Matt added. “The engines are designed to withstand more than what we put them through.
When these engines come from the factory they’re not 100 per cent efficient; if they were we wouldn’t be able to get power out of them. It’s already there. It’s already in the car. The engine is capable of making more power.” In fact, it’s not just marine applications that these engines are often used for. You’ll find various 4×4 powerplants running diesel generators, tug boats and hydraulic equipment all over the world – the 3.2-litre Duratorq engine found in the Ford Ranger is currently in testing for a new fleet of British diesel-electric hybrid trains.
BUY ONCE, CRY ONCE WHILE the thought of putting $1500 cash and your engine’s health on the line may seem daunting, ECU re-mapping is becoming an incredibly common modification and, to be honest, you really do get what you pay for.
So how do you identify someone who is fair dinkum among a crowd of backyard tuners? Unfortunately there’s no tick of approval out the front of any workshop, so it really comes down to using your noggin. Ask the tuner how experienced they are, not only with re-mapping but with your model specifically. You don’t want to be the guinea pig – if they’re not the person writing the tune, ask who is.
A quality slave tune will be leaps and bounds in front of a poorly written custom tune. Most importantly, look at their reputation and how they present themselves. If they’re doing good work you shouldn’t struggle to find people who will sing their praises. After all, re-mapping is about making your 4×4 perform better on- and off-road, and the last thing you need is the drama of going to the wrong place.
THANKS TO
DIESEL POWER UNLIMITED Ph: (07) 4959 3350 W: www.dieselpowerunlimited.com.au
GEELONG PERFORMANCE CENTRE Ph: (03) 5277 2503 W: www.geelongperformance.com.au
JUST AUTOS Ph: (07) 5476 0066 W: www.justautos.net.au
POWER TORQUE VIC Ph: 0417 558 799 W: facebook.com/powertorquevic
Automatic transmission fluid is one of the least thought of items for vehicle maintenance.
This article was originally published in the June 2013 issue of 4X4 Australia.
Even though some manufacturers do schedule a fluid change every 40,000 to 60,000km or so, plenty of others claim that the transmission is ‘sealed for life’. A very short life, I say. Transmission fluid is there to catch the impurities and clutch material as it wears and it’s no good for any transmission to have dirty fluid circulating through it. It should be changed regularly.
This story is meant as a general guide only; you will need your vehicle’s workshop manual, a socket set, an oil drain pan and some mechanical aptitude. You will also need a new transmission filter, either a cork gasket or high-temp silastic and the correct transmission fluid type and quantity.
How to change your Differentials oil
First thing to do is take your vehicle for a drive to warm up the transmission. Then park the vehicle, with the handbrake on and the transmission in Park. Make sure that you have parked on level ground and that the wheels are chocked. Do the job on a calm, still day to avoid debris blowing into your transmission when it’s exposed.
Pull out the dipstick first and set it aside. Then get under the vehicle with your socket set and drain pan. If there is a drain plug, unbolt it with the pan ready to catch the oil. Be careful when you pull out the plug not to burn yourself as the oil will be hot – gloves are a good idea. Some vehicles do not have a transmission drain plug so you have to unbolt the pan and let the oil drain.
Remove the bolts holding the pan in place except for a couple at one end; leave these threaded-in loose and prise away the opposite end of the pan from the transmission housing.
Oil should start pouring out of the side of the transmission pan, so get ready to catch it with the oil drain pan. When the oil coming out is down to a drip, slowly release the remaining bolts and remove the pan, allowing the remaining oil to drain before doing so. Then you either pull down the transmission filter or unbolt it from its fitting position, discard and bolt up, or push into position, a new filter.
How to determine why your engine won’t start
The mating surfaces for the transmission pan and housing must be cleaned so that no old seal remains. Don’t use a metal scraper as it’ll damage the surface and possibly make it difficult to seal up later.
Most transmission pans have magnets attached to them to catch any metallic fragments circulating in the transmission and you should make sure you clean these well before replacing them on the pan.
Some transmissions are sealed with a cork seal while others use a silastic gasket. We chose the latter for this Jeep. With the gasket in place fit the transmission pan to the housing and bolt up loosely. Then tighten the bolts to the specified torque, ensuring you spread the load equally on the gasket by tightening bolts around the pan on opposing sides.
Changing Auto Transmission Fluid – Step-by-step
1. Remove the auto transmission dipstick and set it aside.
2. If fitted, unbolt the drain plug and let transmission fluid drain into oil tray.
3. Remove transmission retaining bolts around the periphery of the transmission pan.
4. Leave a few bolts in loose at one end and let the remaining fluid drain out.
5. The transmission pan removed and the transmission filter exposed.
6. Some filters can be twisted off but this one has to be unbolted before removal.
7. Clean up the pan and scrape off old gasket from the pan and transmission housing.
8. Most pans have magnets like this that will need to be removed and cleaned.
9. Fit the new transmission filter and bolt it into place.
10. Apply a new bead of gasket sealer to the transmission pan then put gasket on.
11. After bolting up the pan, fill transmission with correct amount and type of fluid.
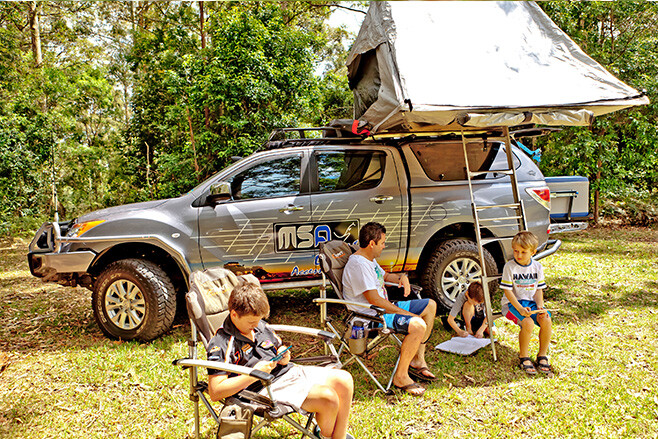
Shane Miles from MSA 4×4 doesn’t do anything by half. Before we had a chance to organise a shoot with him and check out the latest MSA 4×4 company vehicle – a 2012 Mazda BT-50 – Shane and his kids were already on their way to Cape York in it. He had only just finished the modifications to his brand-new tourer the night before.
This article was originally published in the June 2013 issue of 4X4 Australia.
Shane’s passion for four-wheel driving was ignited in the 1970s when he was riding shotgun in his dad’s Land Rovers. This early exposure led to Shane eventually owning a range of four-wheel drives – a Mazda Bravo, an award-winning 75 Series Troopie, an ML Triton, a GU Patrol and a Colorado.
‘Few of those vehicles stayed standard for long. Shane put them through their paces to see where he believed they could be improved and then he set about improving them. His enthusiasm for enhancing his 4X4s’ capabilities over the years – and his desire to always look for a more effective way of doing things – led him to start designing his own products. This output was to, as Shane puts it, “either fill a void in the market or better an existing product”. Shane began selling these products under his own brand, MSA 4×4, in 2000. Originally called Michelle’s Sacs, this company took on its current name six years ago.
With extensive modifications, the BT-50 made it to the Cape and back on last year’s September 14 to 30 trip. Shane gave the Cape a good nudge, pushing the BT-50 to its very limits – and he has stacks of photos to prove it. (Some of them are here in this feature.)
The BT-50 was driven along extreme tracks, including the Palmer River goldfield and down Old Telegraph Track. It took on countless water crossings – wet stuff frequently gushed over the bonnet – and deep-rutted tracks that required a lot of track building. The BT-50 was also winched up steep river banks.
The Cape York line-up included the BT-50, and another MSA 4×4 company vehicle, a Series IV Nissan Patrol. Shane reckons that over the years he has always upgraded his vehicles to match travel requirements and company needs. He ranks the BT-50 as his favourite so far.
“The set-up is awesome, I have had a lot of touring 4X4s and, honestly, a dual-cab ute I really think is the way to go with a lot of cab room, comfortable features and a lot of easily accessible rear storage, load-carrying capacity, towing ability and straight out performance. It really has the best of everything.
“This is the first BT-50 I have owned and I really do love it. After what it was just put through [the Cape and back] it really is a very, very tough ute with a very good level of comfort and safety. “We had the car three days before it went off to have its Cooper tyres fitted and then it didn’t stop from there. Within four weeks everything was fitted, finishing the night before we left for the first big outing to the Cape.”
The BT-50 received a suspension lift via Old Man Emu (OME) 600kg rear springs, OME front coil springs and OME Nitrocharger Sport shocks to soak up the Cape’s worst corrugations. These have excellent load-carrying ability and great wheel travel on badly rutted tracks. The suspension and tyres are a great combo. “After the Cape trip, a set of Airbag Man airbags were fitted in the rear for assistance in towing.
“Being able to stiffen up the rear end under load is extremely handy and reduces sag when the tray is fully loaded and the BT-50 is towing our 1900kg boat.” A set of 33-inch Cooper ST Maxx 285/70R17 tyres were fitted for the trip. “Over the years we have used a hell of a lot of tyre brands on the market and have never found a tyre that can better or even come close to matching these Coopers for traction, puncture-resistance in crap terrain and ability to hang on to the worst of our dirt roads and corrugations at cruising speed.”
The Coopers handled the trip to the Cape with ease and without a single puncture, Shane reckons. “Having a business where you are constantly out touring and testing products along the way, it is imperative that frontal and side protection are installed on the vehicle, it is [of] paramount [importance] to keep the BT-50 in good nick and safe from wildlife.”
For this reason Shane fitted a colour-coded ARB Deluxe winch bar, steel side-steps with side protection rails. “Because they do a damn good job,” he says. “The side protection rails cop a ton of abuse when doing some serious off-roading and do a great job to protect the guards, especially in badly rutted terrain.”
On a 4X4 Australia’s Advertisers’ Weekend with Shane and Chris, it quickly became obvious that the MSA 4×4 lads like to give the hardest way around a red-hot go, so having a winch set-up is handy to keep him out of trouble. Shane opted for a Warn 9.5 XP, fitted with Warn synthetic winch rope. “These winches just pull so damn hard without ever failing, especially when you need it most, you know it will work. The synthetic rope is very safe and so much easier to handle than steel cable.”
A set of Britax HID lights by TJM lights are positioned on the bar. “They give an awesome light output which is very useable, it’s no use having sketchy light for two kilometres, because I can’t see that far anyway.
These lights came in very handy at the Cape on several occasions after the planned days drive quickly turned into night drives to get to a station. “These lights are extremely strong and boast an easily adjustable mount system.”
Shane opted for a recent product from TJM’s range, the company’s rear-step tow bar. “It is very tough and has two step heights to make easier access into the rear of the ute and looks awesome too.” “As a bonus, it allows for a 33-inch spare to be fitted in its original location under the rear of the tray unlike some other rear bars.” Up close, the finish on this bar is spot-on and looks the business with a MSA 4×4 decal as background.
“The BT-50 comes standard with a driver-activated rear locker and it works really well. Believe me, I have used this thing a lot already,” Shane says. ARB has just released a part number for a front locker so as soon as this is available Shane will install it.
On the Cape trip Shane tested the BT-50’s fording ability through numerous water crossings, and the BT-50 prevailed, armed as it was with a Mazda genuine snorkel and protected by a MSA 4×4’s water bra. Shane says the Mazda genuine snorkel looks good and works well. And, with the set up of a water bra plus a good measure of tape in the doors, he’s given every water crossing a go. And, so far, he’s kept his feet dry.
Up top, Shane has a custom aluminium roof-rack designed to keep within the roof-lines and short enough for the Kimberley Mycube roof-top tent to be mounted on the Flexiglass canopy. The canopy has slam-shut rear door and windows, central locking hooked into the vehicle’s remote locking system, LED lighting, good load-carrying ability as standard and is fully lined internally. The canopy has no need for an internal support system to support a roof-top tent either, saving space and weight.
Shane says he chose the Mycube as it packs away lower and shorter than any other tent on the market and sits in well with the BT-50’s roof-line. It is easy to set up and pack up, has LED internal and external lighting, a tropical roof to keep it cool, loads of ventilation and an optional bed warmer.
This BT-50 has a triple battery set-up; starting battery in the factory position, two rear-mounted auxiliary batteries in the rear tray beside the roller drawers. These are charged via a Redarc 12-volt DC-DC charger specially programmed for the BT-50. The car also has a Redarc 200 amp solenoid to join the three batteries for winching, activated by a switch in the cab.
The two auxiliary batteries are 120-amp hour Ultimate batteries, which can handle endless discharges and also work well to winch when needed. There is a Baintech 12-volt monitor and Baintech 12 outlet fuse panel installed with a Baintech low-voltage cut-out to protect the system. The system also has a 240-volt Ctek M300 charger, which does an awesome job keeping the big batteries “conditioned”, Shane reckons. All of this has been fitted in and around a set of ARB Outback System drawers.
All this juice is needed to run the endless amount of gadgets in the BT-50. There are various Baintech 12-volt and USB/iPad outlets and Baintech panels scattered about the car. “These are just awesome looking pieces, they look like they are meant to be there.”
He customised the ARB drawers with a “Shane special” wing kit to allow an ARB maximum-performance twin-motor compressor to sit mounted to the side of the drawers. There is a solenoid and two batteries mounted in the tray beside the drawers. There is a 48-litre poly-water tank, carpeted and mounted in front of the drawers, hooked up to 12-volt Shurflow water pump, with switch and water outlet mounted on the left-hand-side drawer fascia panel. An ARB 60-litre fridge is positioned atop the ARB drawers.
“It’s just a very good fridge packed with every feature I need,” Shane says. The 60-litre fridge’s footprint is longer and skinnier than others and suits the drawer and canopy set-up. “With ARB fridges you never wake up to a fridge that is temperamental and has slept or frozen overnight,” he says.
“Running on the two auxiliary batteries and after its maximum stationary period so far without being charged, of four days in 30°C heat, the battery monitor registered 12.6 volts (about 50 percent discharge) and a constant 1°C on the fridge temperature panel. Pretty damn good.” The fridge is accessed by a MSA 4×4 DS50 drop slide. This well-designed fridge slide is another MSA 4X4 original design – it allows the fridge to fully slide out and then drop to waist height so the user can easily access the fridge’s contents.
Communication with other travellers in your touring group on long trips is essential – this has been taken care of with a GME UHF radio and antenna, fitted with a windscreen-mounted GME external speaker. “We also carry two GME five-watt hand-held radios in the cab, used for recovery operations, to communicate with a spotter and for children’s amusement purposes at camp.”
A Hema Navigator HN6 is mounted to the windscreen. “Hema have obviously been down every piece of dirt track in this country. There has never been a bit of track I haven’t been able to find on Navigator 6. “I also use an iPad with OziExplorer installed for a bigger screen and easier-to-use navigation. It is mounted to a RAM mount. These mounts come from the US, they are a perfect fit and do not move or vibrate.”
While on the shoot with Shane, 4X4 Australia was given the opportunity to check out a new bit of MSA 4×4 kit. It’s a fridge barrier system – essentially a cage around a fridge designed to protect it but still allow the fridge to easily slide out. It also aims to maximise space by storing items above and beside the fridge without affecting travellers’ access to what’s inside of it. The fridge barrier system can be easily removed and flat-packed. (Keep reading 4X4 Australia for more on this exciting product.)
Running a company that relies on him to design and create new products can be as exciting as it is challenging, but Shane’s passion for the bush and innovation makes it a labour of love. “I throw as much abuse at our potential products as possible, my biggest nightmare would be to ruin someone’s holiday after they paid money for a quality product,” he says.
“As long as we live by this quality and standard, our products at MSA 4×4 will always stand up.”
LS engines have become the go-to engine conversion in everything from 4x4s to purpose-built track cars, and they have an almost cult-like following due to their light weight, compact design and explosive power.
In fact, if you had to name just one downside to the LS platform it’d be the multitude of individual names and how they all appear to mean absolutely nothing at all. LS1, LSX, LSA, LS2, LS9 – there are around 40 different flavours of LS engine ranging from 255hp 4.8-litre donks right through to 650+hp 6.2-litre powerhouses – and that’s without even considering the aftermarket options.
LS9 vs LSA: What’s the difference?
To help simplify things, we’ll break it down. The LS platform was the replacement for Chevy’s long-running small-block. When enough individual engine codes started popping up people grouped them into the LS(X) category, but they can be broken up into three distinct families.
Gen III ranges from 1997-2008 and includes the 5.7L LS1, truck-based 6.0L LQ9 and a host of other engines that mean nothing in Australia.
Gen IV ranges from 2007-2017 and brought us the 6.0L LS2 and 6.2L LS3, as well as the supercharged 6.2L LSA and about 20 other versions you’ll never see here.
And 2014+ brought us the Gen V that includes a whole bunch of Corvette engines we’ll never get either. With Gen IVs going down to 260hp, 4.8-litres and Gen III going up to 345hp, 6.0-litres, don’t try and decode any of the numbers – they don’t make sense anyway.
ANYONE hoping for a Ford Bronco and Jeep Wrangler-challenging successor to the FJ Cruiser from Toyota’s FT-4X concept would be sorely disappointed by what was revealed overnight in New York.
Enthusiasts had been penning renderings of a wild new FJ Cruiser for months, but what has come out is a novelty soft-road concept that is more Jeep Renegade than anything else. The bright red tow hooks should be a dead give-away.
Using limp catchphrases such as ‘Casualcore exploration’ and ‘Rugged charm persona’ to sell it, the FT-4X is a showcase of kooky ideas dreamed up by the designers at Toyota’s CALTY Design centre in California, the same studio that brought us the last FJ Cruiser.
“You can really tell that we had a blast designing the FT-4X because it looks fun to use and fun to drive,” described CALTY Studio Chief Designer, Ian Cartabiano. “I love this idea of mechanical satisfaction, because while we’re living in today’s digital world, we took something that’s based on physical movements and made that a large part of what this vehicle is. We want everyone to interact with this car and feel a sense of delight and excitement.”
So the FT-4X is purely a design concept, but the press information does mention it ‘could’ be powered by a low displacement engine and selectable dual range driveline. It is loaded with cool, functional interior quirks, but nothing we haven’t seen before.
The concept is just something to gauge customer feedback to see if there’s any scope for a future model like this. We doubt the reaction from off-road enthusiasts would be too positive, though.
At least the US designers had fun producing the non-functioning concept, but we reckon the Australians at Toyota Australia’s design studio would have had more fun penning, engineering and testing the awesome Tonka concept they showed off to us at an off-road course last month.
BROKEN Hill in the heart of outback New South Wales is an old mining town rich in history and natural beauty.
On a recent escapade in an off-road-ready Isuzu MU-X we ventured a couple of hours’ drive out of town to the Mutawintji National Park, known for its ancient aboriginal art including rock engravings and cave paintings. The area is protected, so guided tours must be booked to gain access.
We also stopped over at the Royal Flying Doctor Service of Australia, the Kinchega Woolshed in Menindee, the Silverton Hotel (of course) and countless museums. The trip was topped off with fascinating natural beauty in all directions.
2017 ARB ELDEE FAMILY EASTER EVENT Never been to Broken Hill? The upcoming 2017 ARB Eldee Family Easter Event provides a fun-filled opportunity to pack the 4×4 and get away with the family this long weekend.
The event allows participants to take their 4x4s on the challenging, yet well-maintained station tracks. Most of the interesting and fun challenges over the three-day event are timed and are based on competency rather than speed.
Kids will be kept entertained with an Easter Egg Hunt on the Sunday – plus there’s also a jumping castle.
Night times will be spent playing trivia, indulging in an ale or two (for the parents), and participating in a complimentary sunset tour.
Spectator packages are available if you don’t want to participate in any of the off-road challenges.
The ARB Eldee Family Easter Event will run from April 14-16.
ELDEE STATION Website: www.eldeestation.com
Phone: (08) 8091 2578