AUSTRALIA has enjoyed a robust and consistent population growth over the past seven years.
At this point in our history, every one minute and 44 seconds a new baby is born. A continuation in the current growth rate will see more than a million people added to the population every three to four years. So, what does this mean to the four-wheel driver who enjoys the unbridled freedom while travelling those dusty outback roads?
Well, the solitude you seek from visiting some of our world class national parks may not deliver the peace and quiet you had pictured. Rather, you may be greeted by a full carpark and busloads of tourists crawling all over the place, already a common reality for the spectacular Litchfield National Park in the Northern Territory.
At only 1500km² in size, it is much smaller than its counterpart Kakadu, but there are dynamic developments on the horizon for this compact national park.
We live in a country famous for such things as a former Prime Minister (Bob Hawke) setting a world record for sculling more than 1.1 litres of beer in 11 seconds, and we are fortunate enough to have a forward-thinking Parks and Wildlife team initiating change in the NT.
More Litchfield
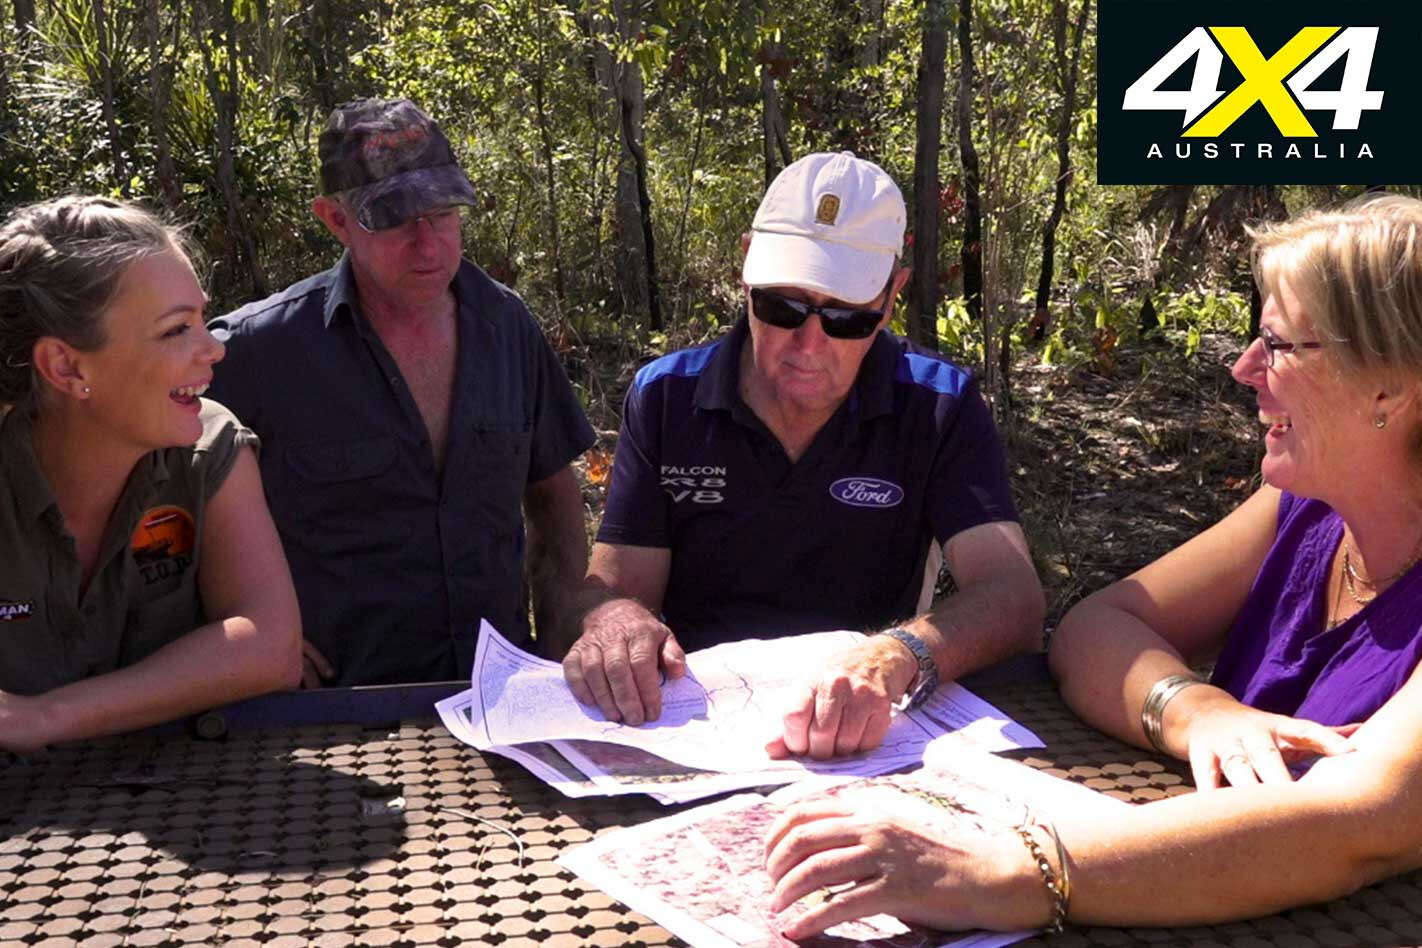
Working together, Parks and Wildlife and the Four Wheel Drive NT organisation have initiated a project committed to opening up the hidden gems of Litchfield NP. It’s refreshing to see both groups immersed in their purpose by assisting each other in this new chapter for Litchfield.
The man responsible for this union is Mal Stewart. An avid four-wheel driver, Territorian and president of Four Wheel Drive NT, his love of everything outdoors has led him to acquire a specific set of skills. His ability to rediscover old tracks is like the camel’s ability to sniff out water up to 80km away.
Some of the old tracks in Litchfield date back to its pastoral days and can still be identified from the air. Mal, with the help of two other NT four-wheel drive clubs, has, over a period of three to four years, put the hard yards in on the ground, unearthing these forgotten tracks.
Along the way they have also been clearing tracks to enable NTPW vehicles to carry out maintenance activities, such as weed poisoning and feral animal control.
In July 2018 I was invited to come and see these new developments. Pondering the preliminary drawings of the future campsites, carparks and picnic areas on the tray of my Land Cruiser, I felt a sense of excitement for what we were about to explore.
The tracks are in their infancy and have only had a dozen club members and a few Parks vehicles over them since their pastoral days, making them difficult to distinguish at times.
Camels Hump
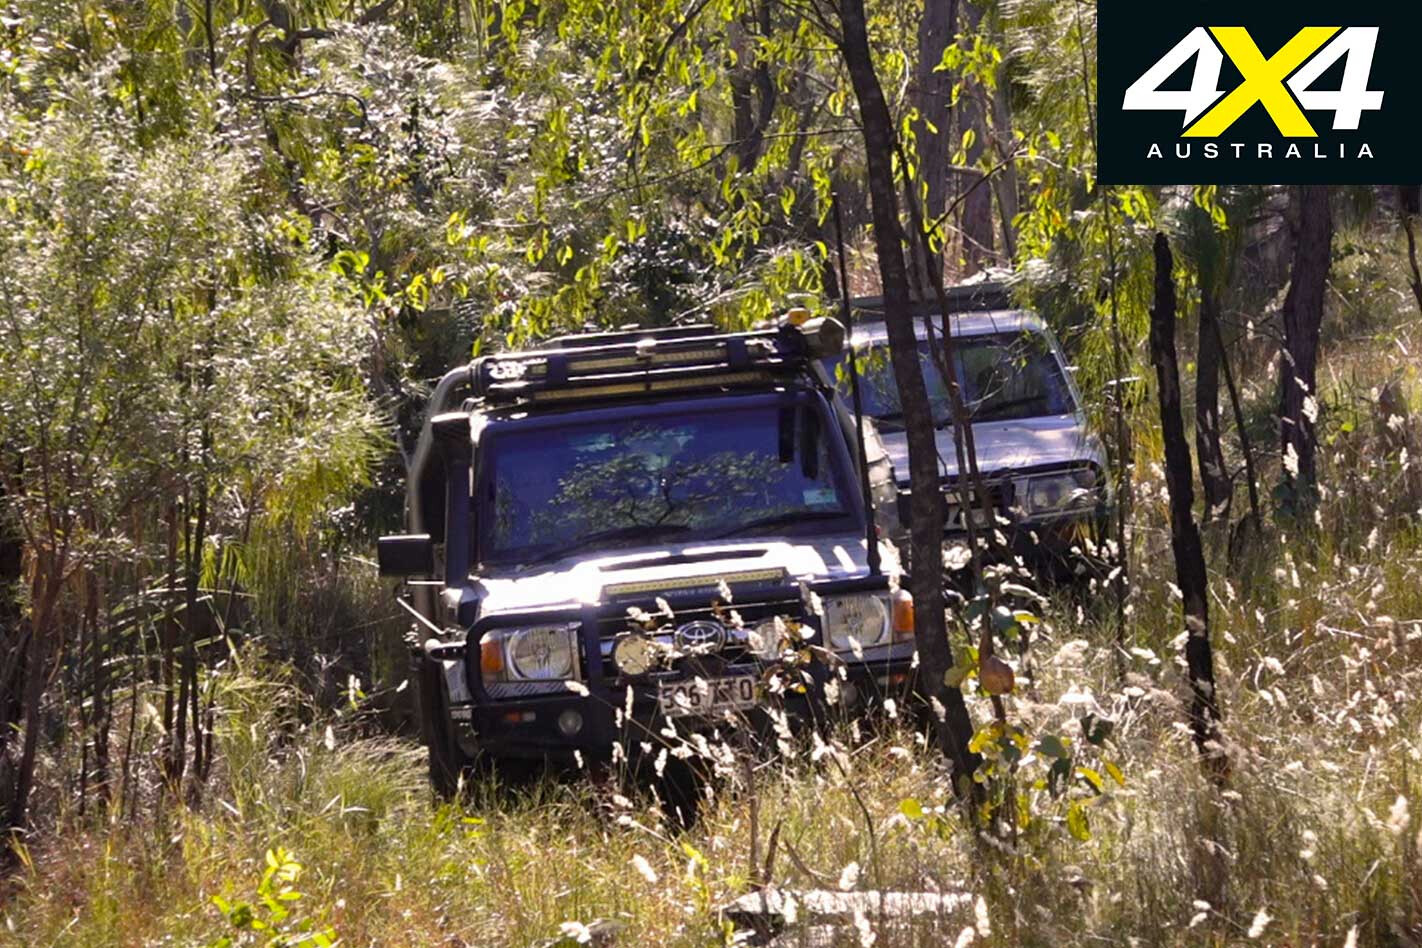
On day one we crept closer in low range to the Camels Hump, west of the Lost City. The terrain holds you captive as you navigate down ancient sandstone steps with hardy native trees clawing at your vehicle. As the name implies, the Camels Hump identifies a section of track you pass through, with a tight corridor of rocks on the backbone of a small ridge.
Approaching this obstacle with trepidation, I spent the next hour in a cold sweat, inching my Land Cruiser and camper-trailer up and over one of nature’s four-wheel drive stumbling blocks.
With help from others, rocks and logs were placed in front of my rear wheels to push my vehicle away from the unforgiving sandstone. With millimetres to spare for the most part, I ran out of luck and space, resulting in a scratch to my rear tray storage box.
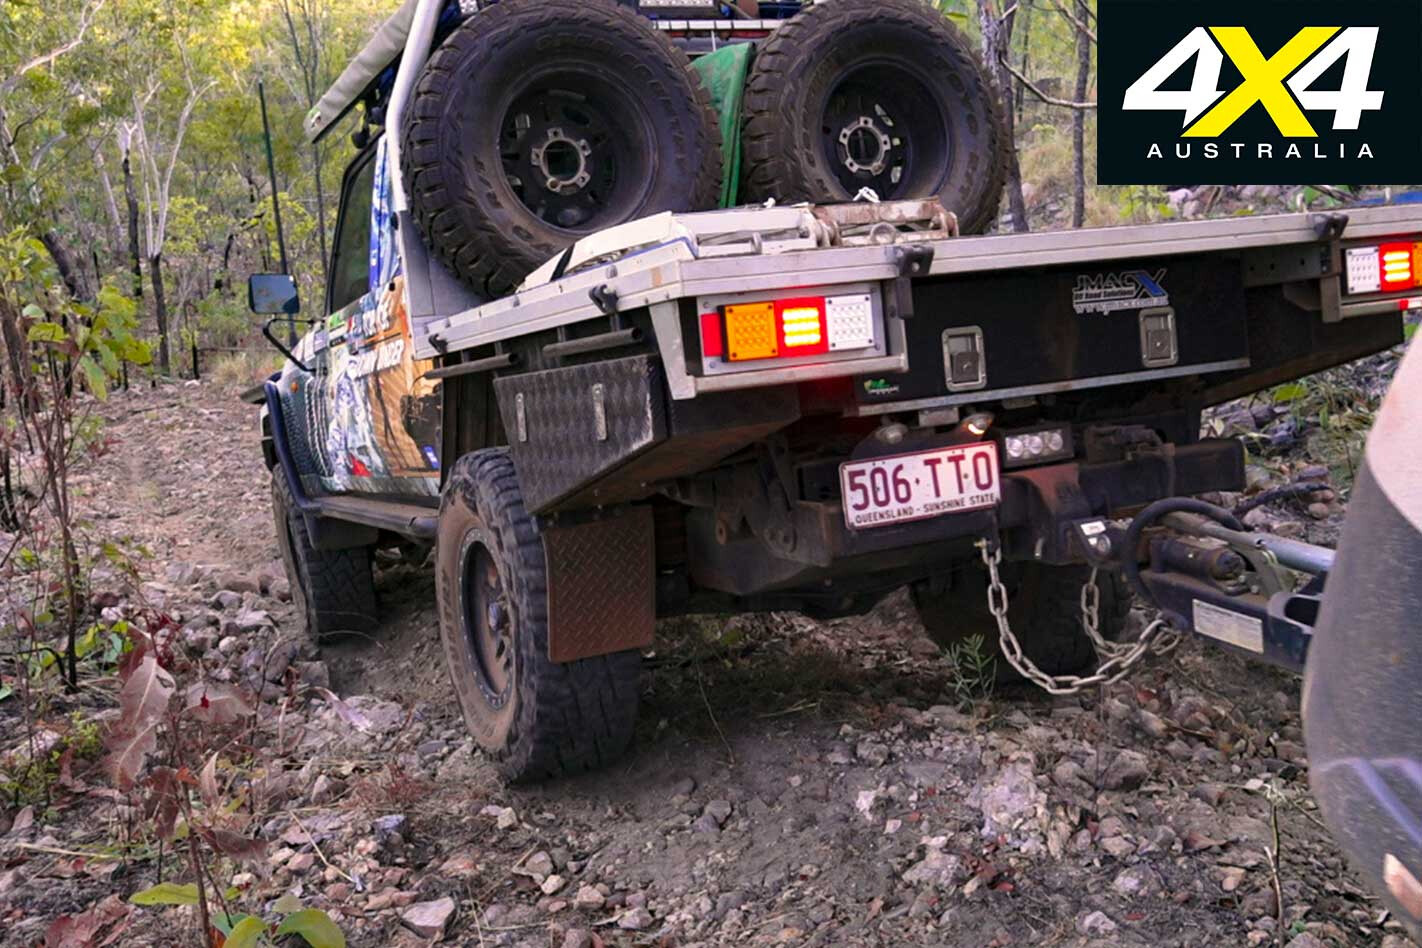
Satisfied with only that scratch and thankfully not missing one side of my camper-trailer, we continued to the last challenge for the day: a steep descent with loose rocks which crumble beneath the tyres, pushing you forwards. Not a great feeling in a Land Cruiser that has a handbrake as a decoration.
I remember thinking at the bottom of the hill, “Gee, that was loose … hope there is another way out of here.” Three full-length winch pulls were required on the way out.
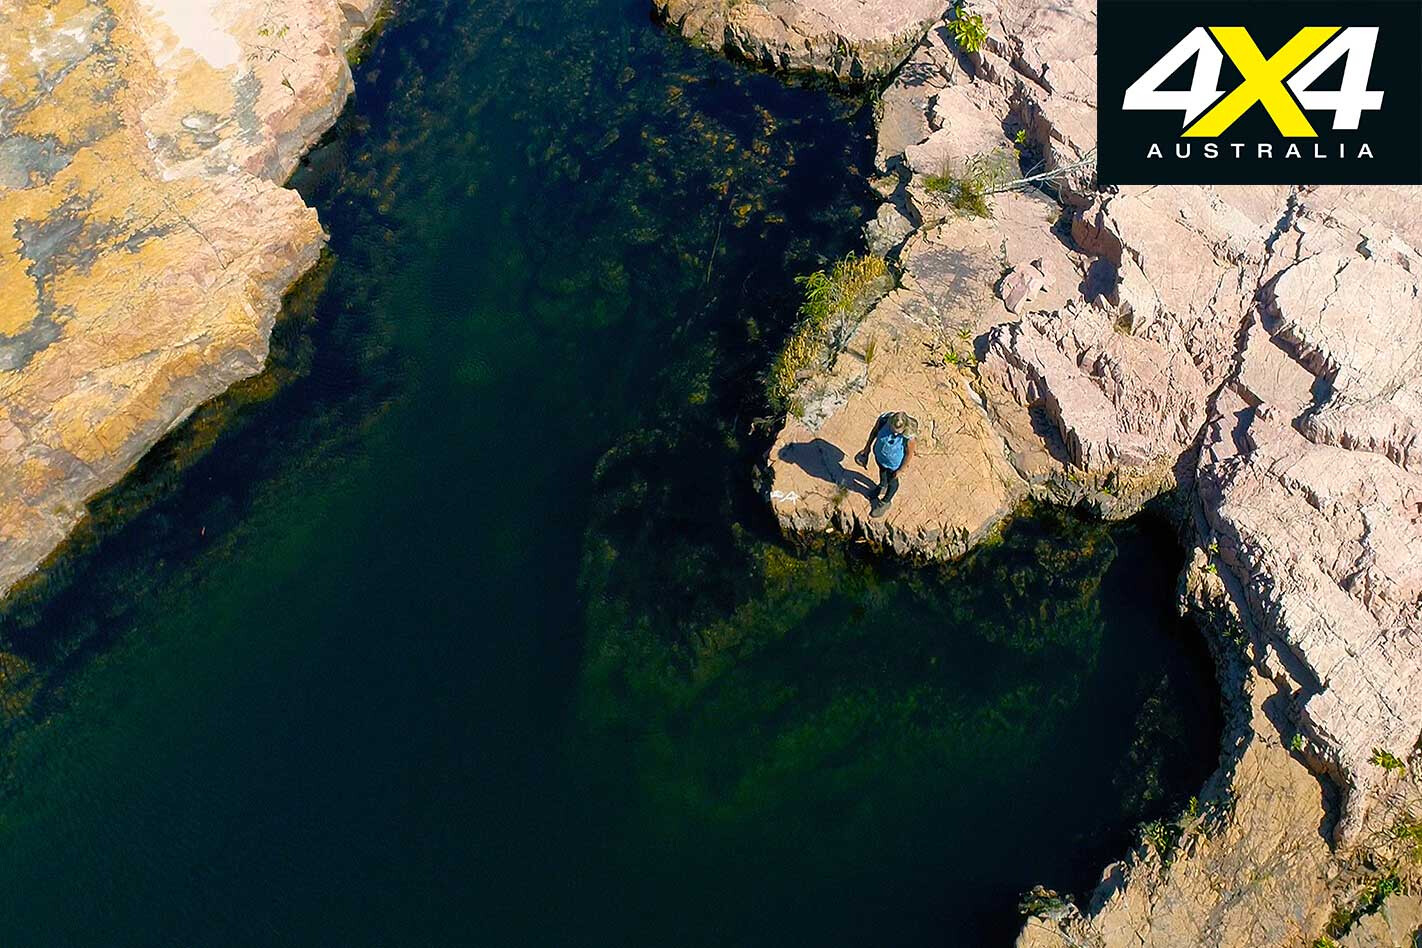
Crystal Springs
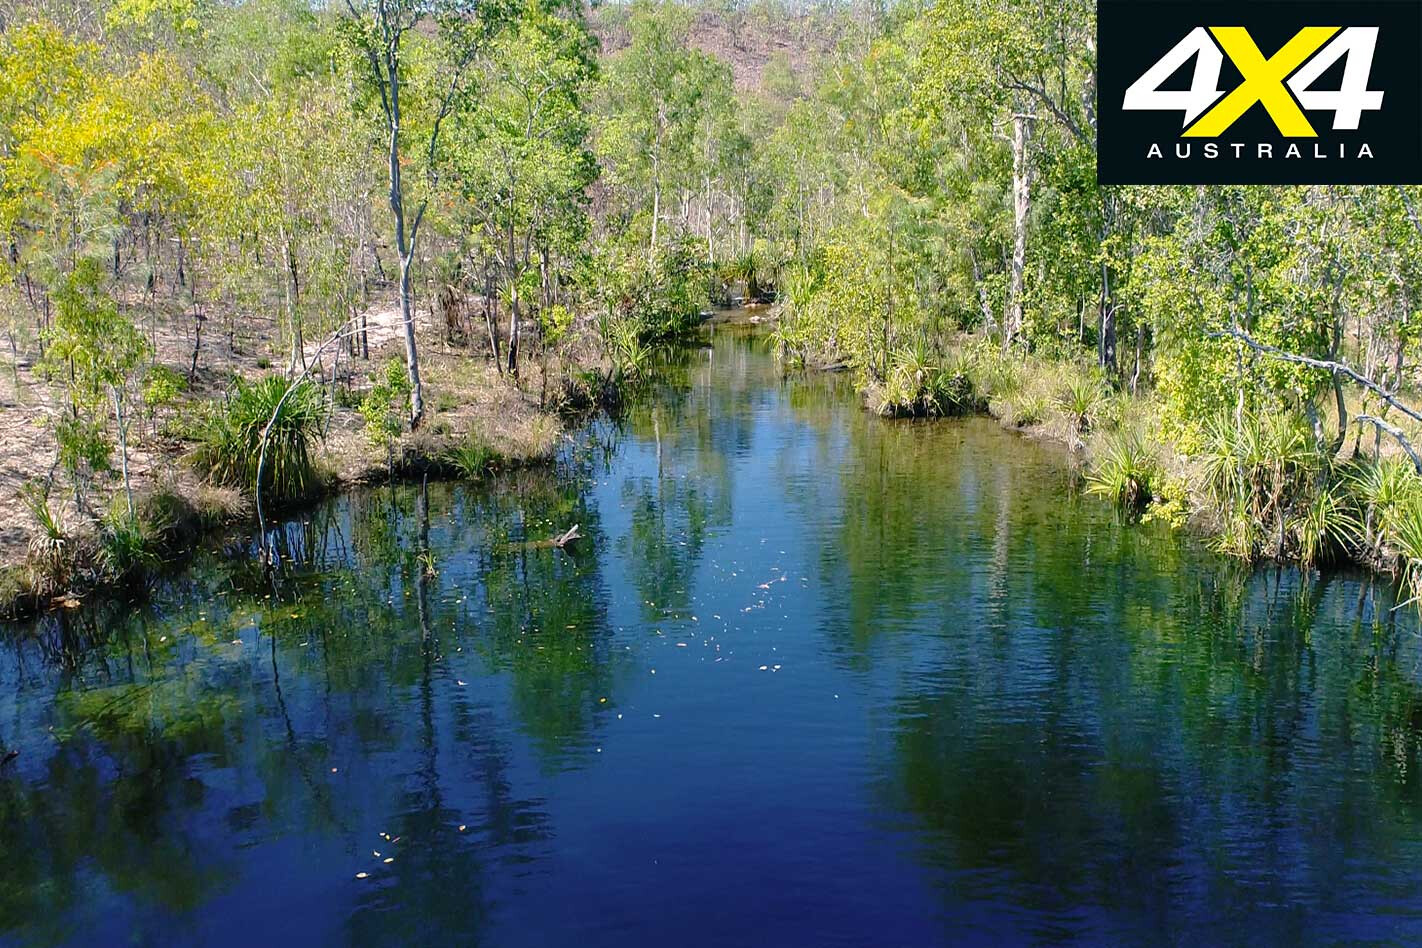
As the shadows lengthened, our three vehicles came to a stop at a place known as Crystal Springs, named by the 4×4 club members because of the beautiful transparent waters that flow through this area. Being a thermal spring made it a very pleasant temperature for a swim along with our dusk happy-hour drinks. This would be our base camp for the next five days as we analysed the nearby areas.
Trekking on foot downstream of Crystal Springs, the creek’s waters eventually flow into the Reynolds River. It’s an inspiring walk, listening to the rustle of the water flowing over the creek bed as you follow alongside it. At the end, don’t dive into the Reynolds River as it may be inhabited with saltwater crocodiles. However, in the pools above, we enjoyed a swim with the occasional yabbie nipping our toes.
Day three involved four-wheel driving to our next point of interest. With the current track conditions, you will need at least two inches of lift to equal the demands of this harsh landscape. After passing through a recently burnt-out section, our vehicles climbed up a rock ledge that led us downhill into a secluded valley.
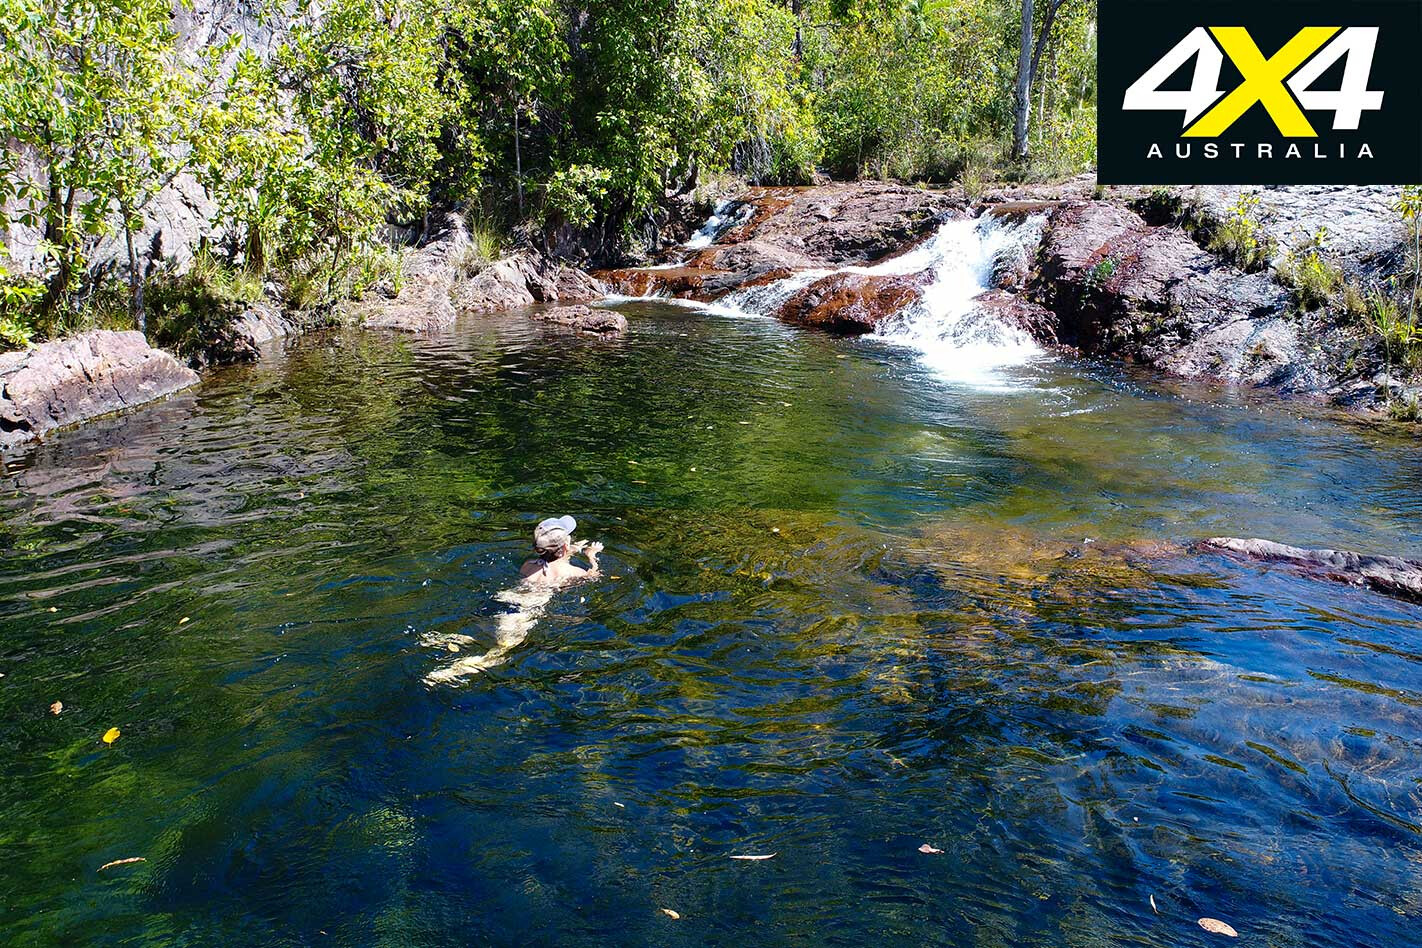
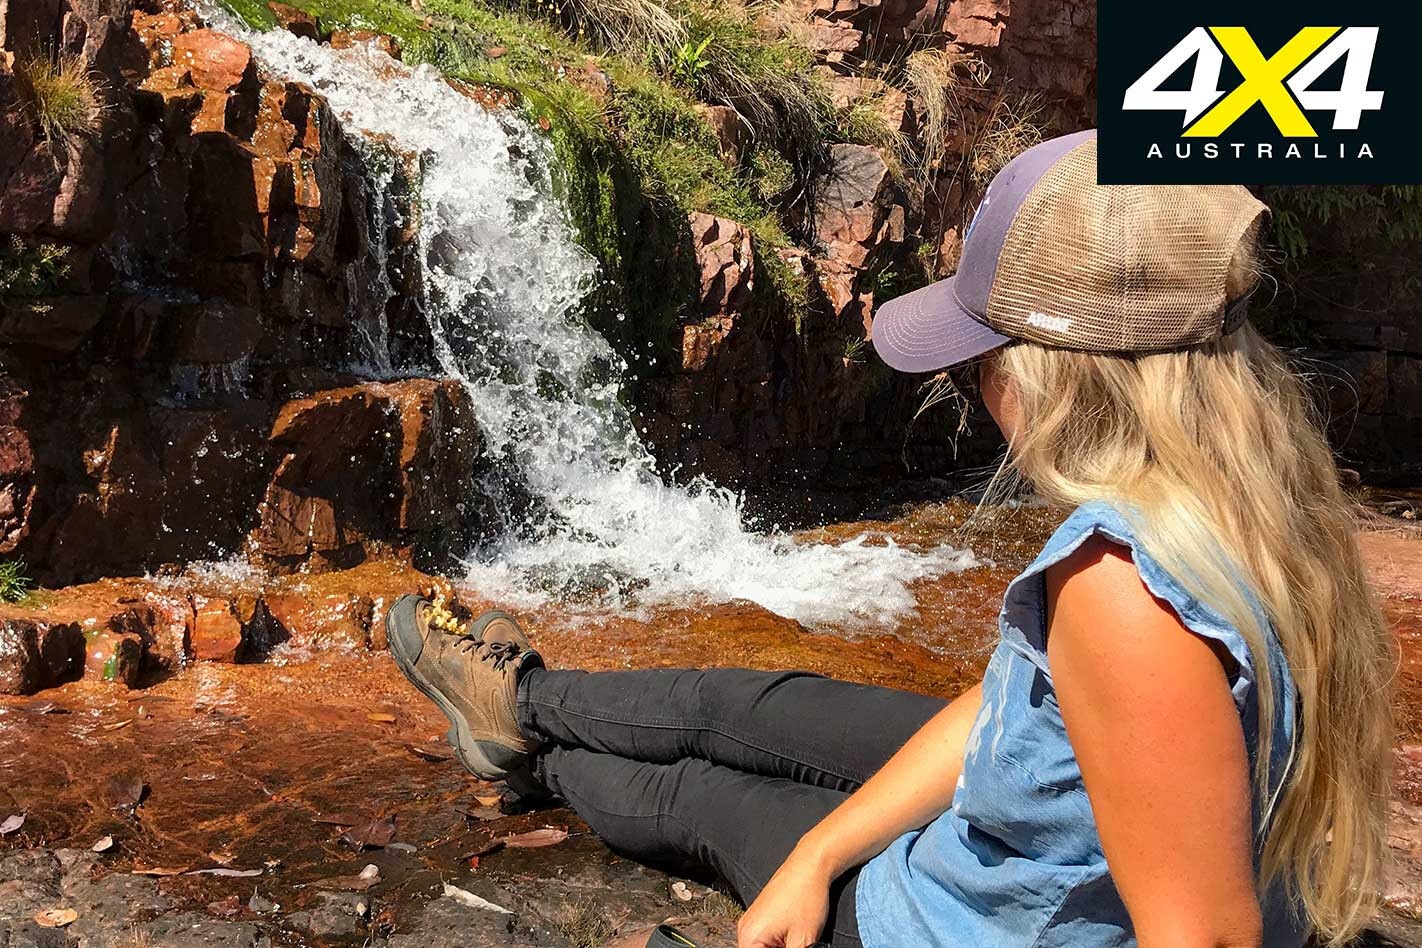
We parked the fourbies in the future carpark area and started our trek to Curtain Falls, which are only a few hundred metres from where you park. But if epic is what you are chasing, keep walking north and you will find the breathtaking pools below the falls of the East Reynolds River.
The lower pool looked too deep and mysterious even for me. Instead, we enjoyed a dip in the top pool, complete with waterfall and not another soul in sight. Climbing up the valley will give you a vantage point of the sprawling Tabletop Range.
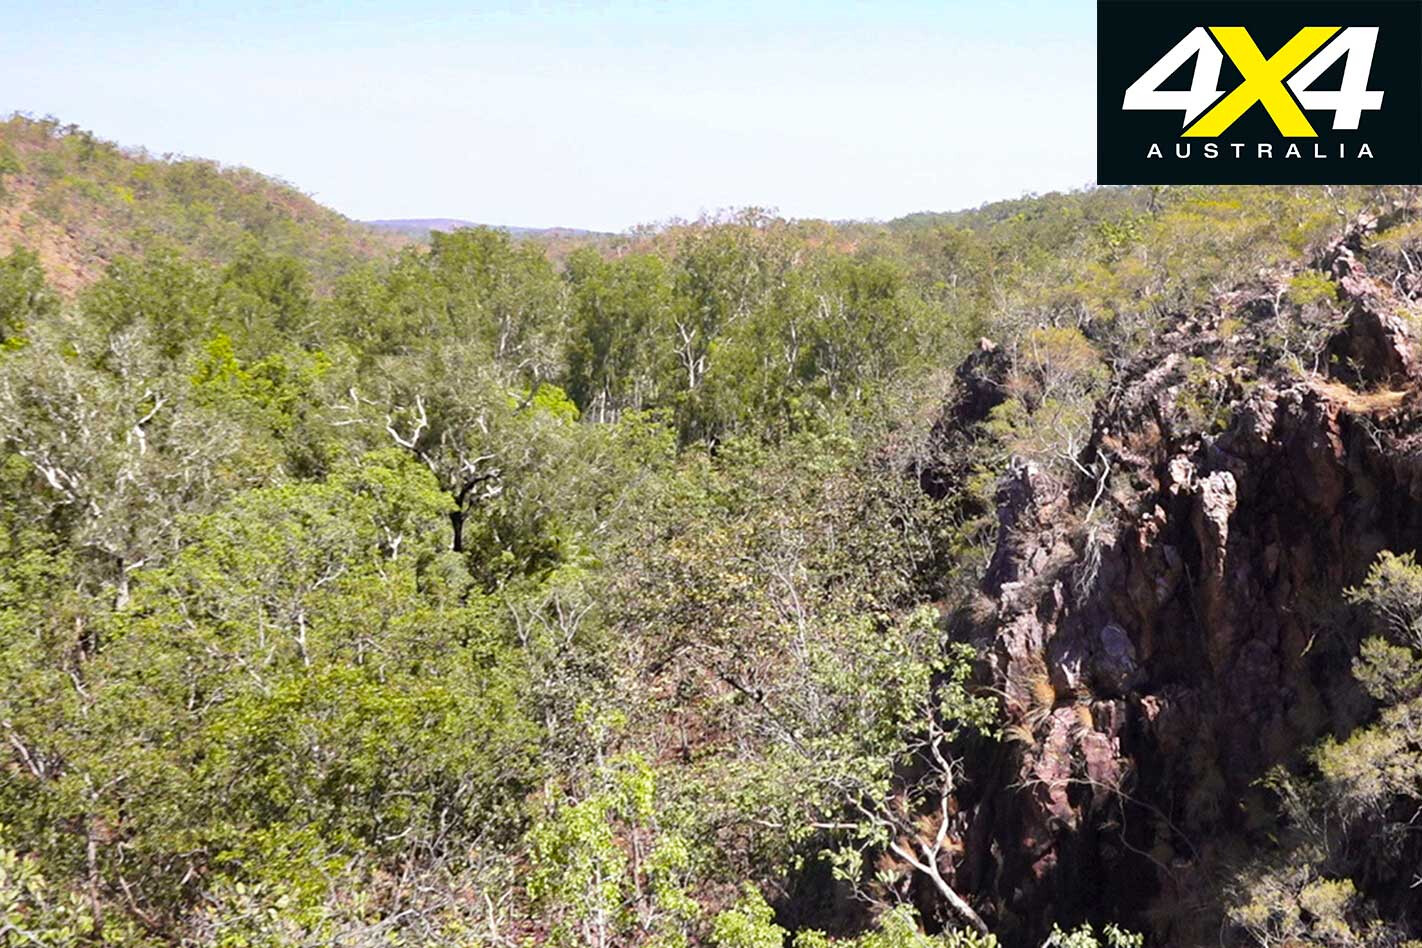
Lightning Gorge
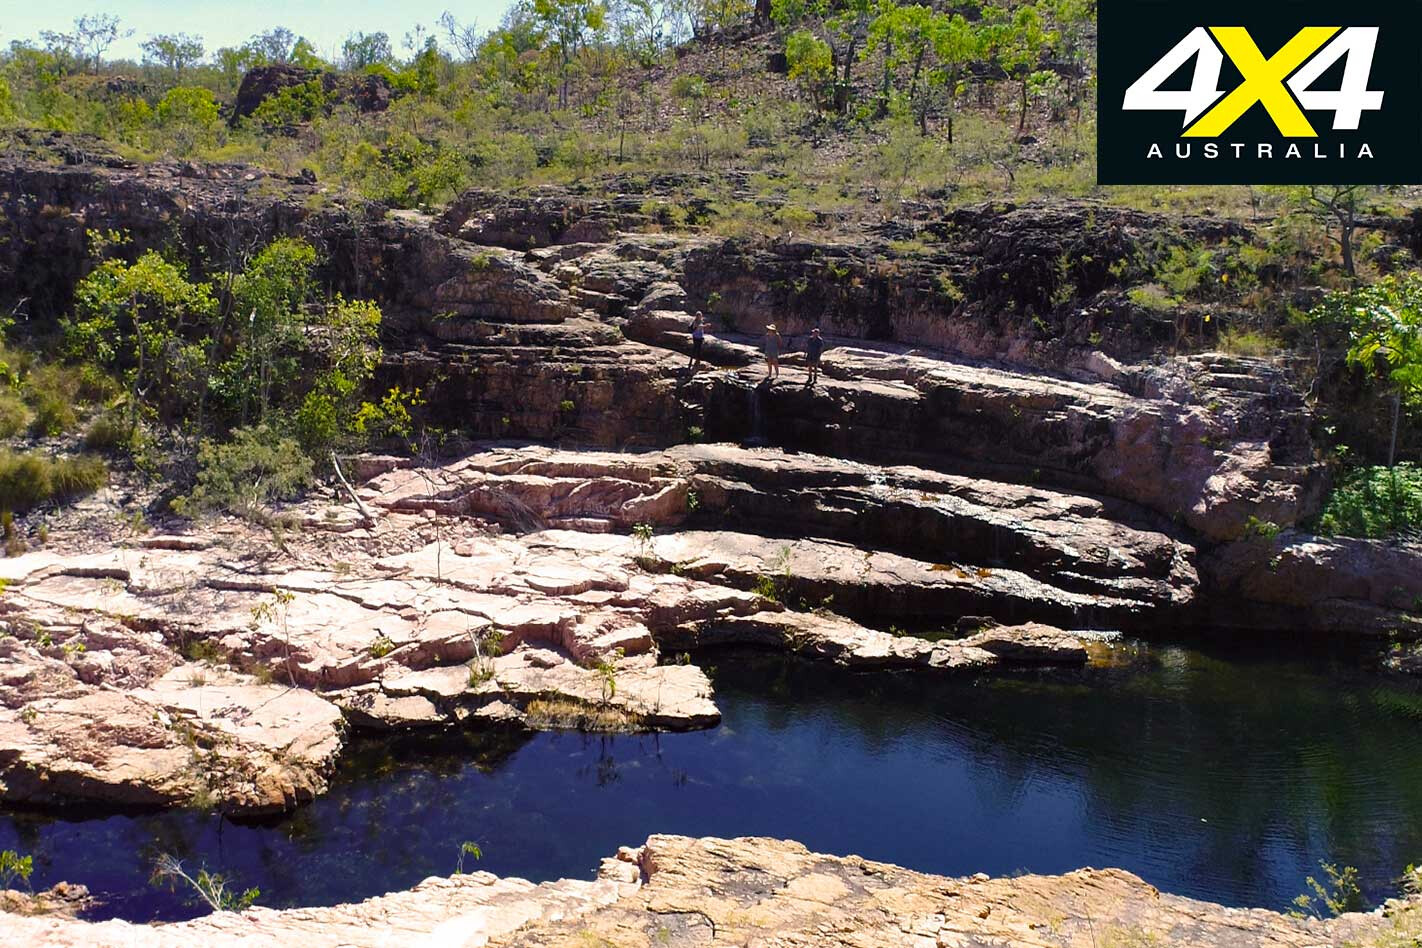
With the light of a new day shimmering down on our camp, we locked the hubs in on day four and headed southwest to a place we have temporarily called Lightning Gorge. All of these future tourist destinations are so new they don’t even have names as yet. Parks are yet to advise on this.
Today’s drive was relatively easy, with a small creek crossing that ejects you onto an open flood plain. The track soon progresses to a high point of scattered escarpment country.
Parking the vehicles, we switch from four wheels to walking boots. Of all the places we have explored in the last few days this is my favourite; it’s beauty is on a grand scale.
From the air the beginnings of the gorge look like a lightning bolt, and with cascading waterfalls and peaceful pools there are acres to explore. The flora and fauna are brimming with life, and with multiple shallow pools this would be an excellent choice for families wanting to evade the dry season heat.
The secret is out
Day five was our ticket out of the secluded gems of Litchfield NP, but they won’t be hidden for long! Part of the $12.1 million invested from the Government Tourism sector will be put towards establishing these destinations on a park map within the next two years.
With more than 370,000 visitors each year, Litchfield will soon spread its wings to encompass five new swimming spots, 40km of new 4×4 tracks, mountain bike tracks, three new campsites and one additional picnic area. Many thanks to Parks and Wildlife and Four Wheel Drive NT’s clubs and their hard-working volunteer members.
Travel Planner
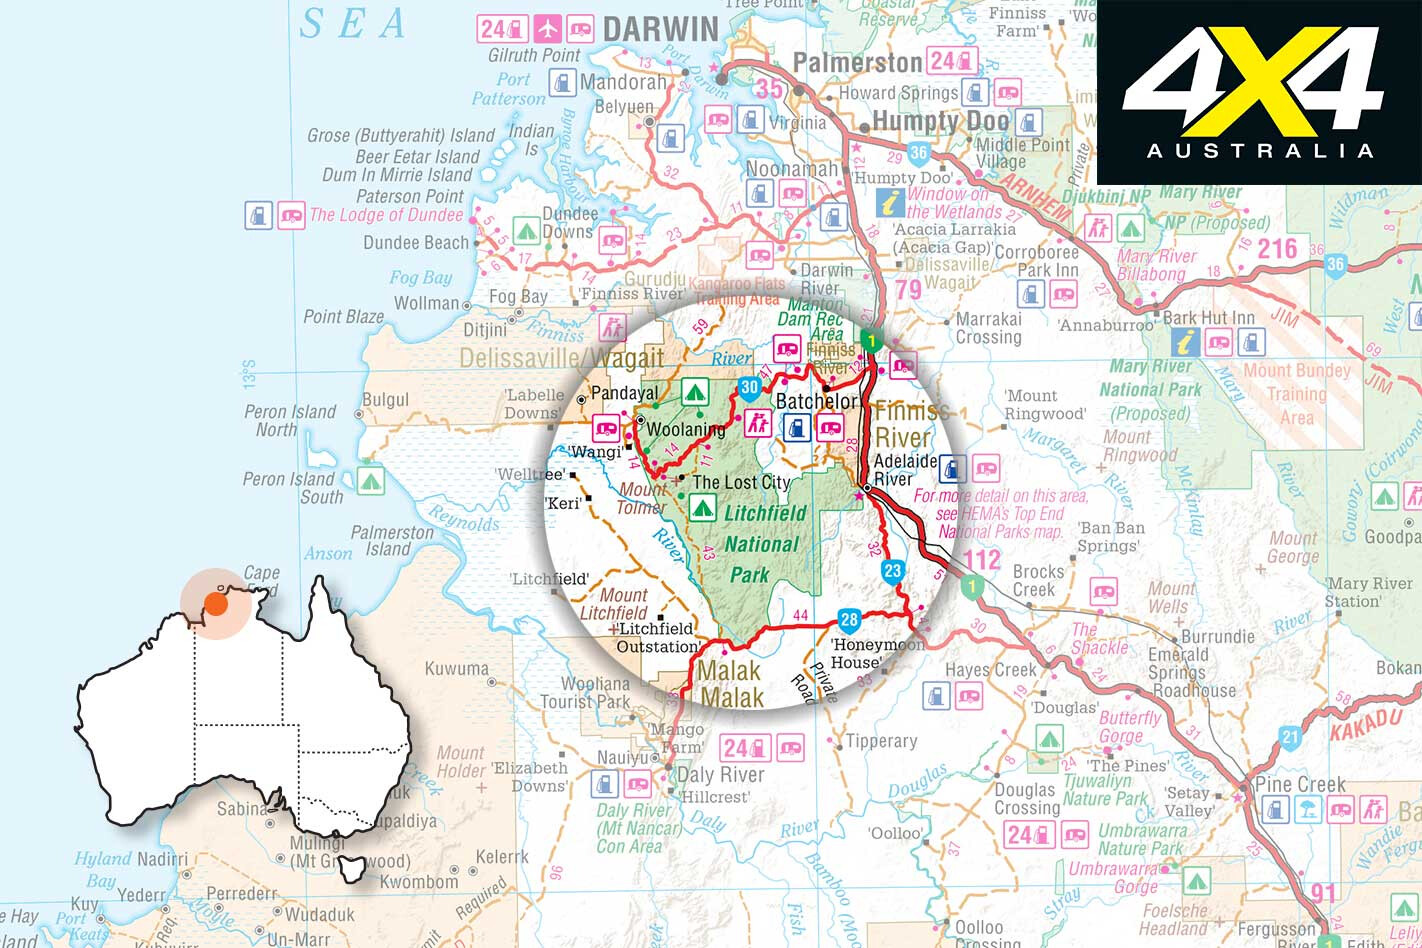
WHERE Litchfield National Park is located approx. 120km southwest of Darwin in the Northern Territory. Travelling the sealed Stuart Highway you will pass through the township of Batchelor, which is the gateway to Litchfield NP.
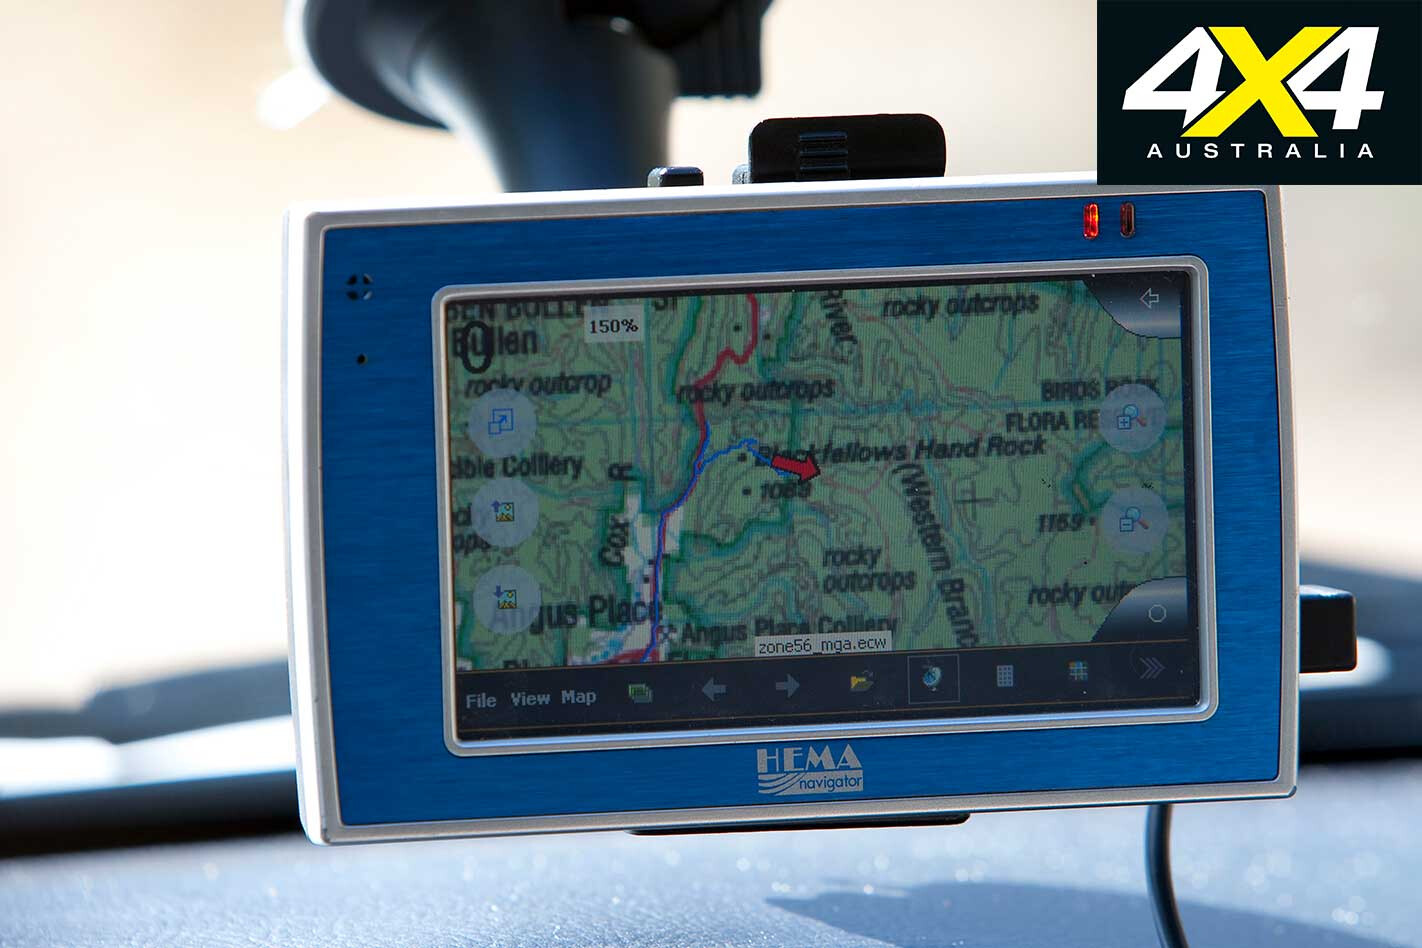
MAPS Hema’s Australia Road and 4WD Atlas.
ACCOMMODATION There are various existing campsites available within the park. However, these new destinations DO NOT have any infrastructure set-up as yet and are not available to the public. The only way to access these new areas is to join one of the local Northern Territory four-wheel drive clubs: Top End 4WD Club and Toyota Landcruiser Club.
Accommodation, dining and camping are also available outside the park at several commercial sites. Generators and caravans are not permitted in some campgrounds. Phone NT Parks & Wildlife: (08) 8999 455

FUEL AND SUPPLIES No fuel is available in the park, however the town of Batchelor provides fuel and grocery supplies. A cafe is also located at the Wangi Centre at Wangi Falls.
RESTRICTIONS AND PERMITS Camping fees are collected at the existing camps on-site and cannot be pre-booked. Camping is on a first come, first served basis. Road conditions may vary shortly after the wet season and can be checked by phoning 1800 246 199 or at www.roadreport.nt.gov.au
*Most of the access tracks and natural features in Litchfield NP shown in this article are not yet open to the public. The recent exploration of this area was mostly carried out by Four Wheel Drive NT and its member clubs as part of the MOU agreement between themselves and the Parks and Wildlife Commission NT.
There are development proposals for many of the sites shown. When they are developed, Parks and Wildlife will provide regulated 4×4 vehicle access for bush-style camping to enable the enjoyment of this beautiful area. Mountain bike and bushwalking tracks are also planned for the area.
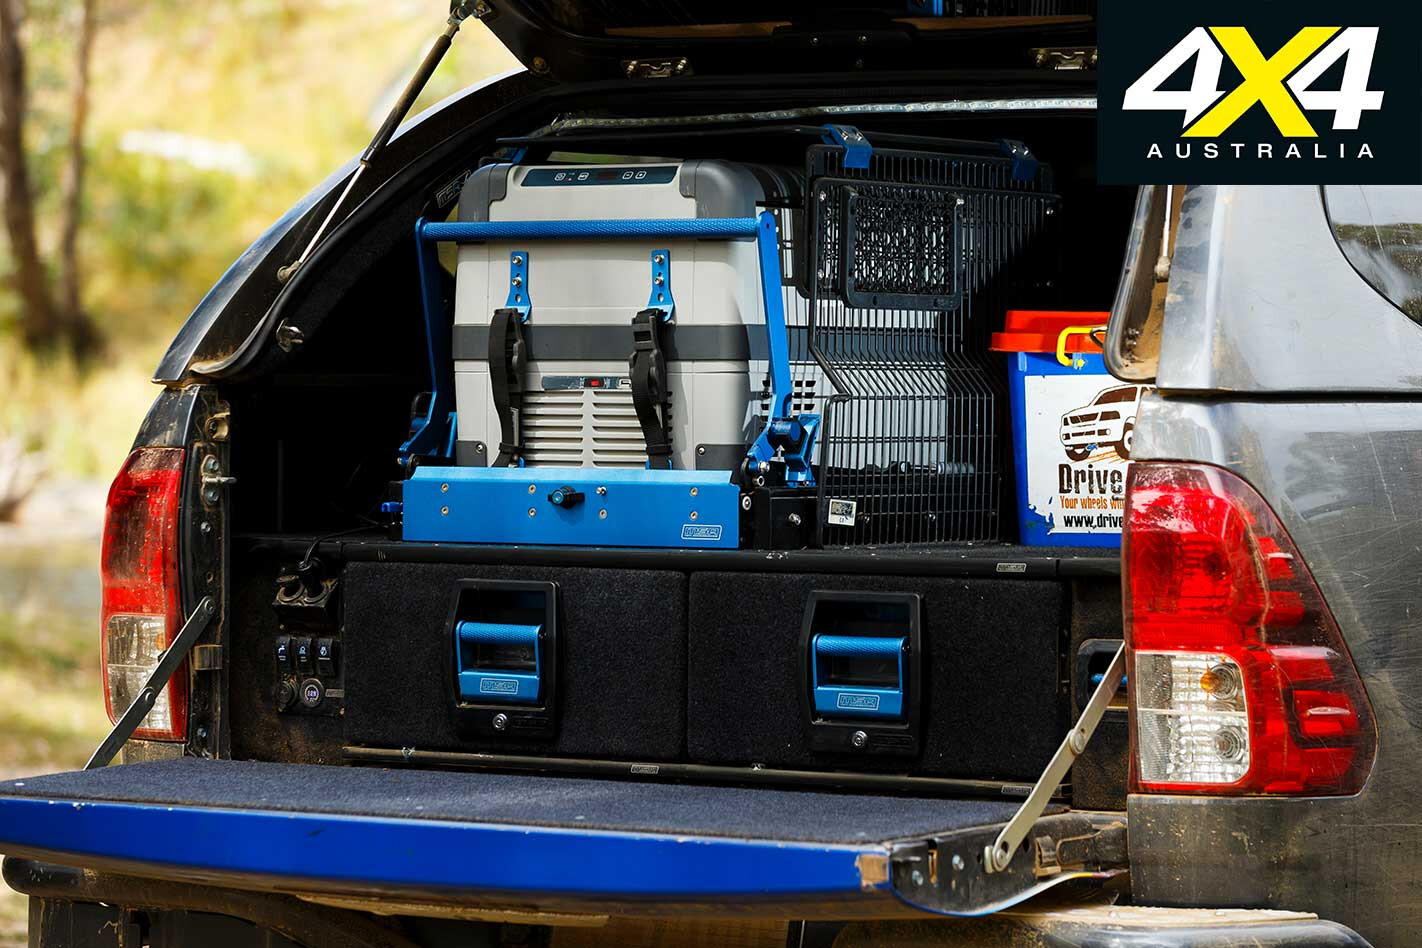
When it comes to packing your 4×4 for an extended adventure you should have two priorities: weight minimisation, and ease of access to equipment and supplies.
The key to keeping weight down is to only take what you need and, where possible, opt for lightweight equipment; while ease of access will depend on what kind of storage systems you fit to your four-wheel drive.
Weighty issue

All vehicles have a maximum payload, which must not be exceeded. In the case of some 4×4 wagons, the payload can be surprisingly low – take the ever-popular Toyota 200 Series LandCruiser, for example, which has a maximum payload capacity ranging from 610kg to 710kg depending on trim level.
Throw in a couple of adults (85kg each), a couple of kids (45kg each) and fit a bullbar, winch and lights (130kg), and that only leaves you with 220-320kg of load capacity for luggage, camping equipment, food, water, extra fuel, tools and spares.
The limited payload capacity of many modern 4×4 wagons is one of the reasons dual-cab 4×4 utes have become so popular, as most have a payload around the 1000kg mark – up to 400kg more than an LC200. Throw a canopy on a ute and you have a pseudo wagon anyway, and one that can carry more gear and keep it safely away from vehicle occupants without the need to fit a cargo barrier.
Lightweight gear
If your vehicle has limited payload then you’ll need to either carry as little as possible or source lightweight gear. Fortunately, there’s plenty of lightweight camping equipment on the market aimed at hikers and bikers, from tents to sleeping bags to cooking equipment. This saves weight and load space compared to gear aimed specifically at the 4×4 market.
When it comes to a portable fridge, see if you can make do with a 40L unit rather than a heavier 80L one. Likewise, 4×4 equipment manufactured from lightweight materials, such as aluminium roof racks and bullbars, will be much lighter than the equivalent steel products, albeit usually more expensive.
Storage options

Whether you drive a wagon or a ute there’s plenty of gear on the market for storing stuff so it stays clean, dry and is easy to access. On the inside of the vehicle you could opt for a drawer system and fridge slide, for example, that will allow you to safely stow equipment and access it easily.
Bear in mind some drawer systems are much heavier than others, and these too will eat into your available payload capacity.
If you’re not keen on fitting a permanently mounted drawer system, plastic space-cases (hard-cases) are a great way to store items such as food, clothes and other supplies. They are available in a range of shapes and sizes, so you should be able to find a combination that easily fits into the back of your vehicle.
Combine these with a cargo barrier and you can stack them to roof height, but remember to keep heavy cases down low and light ones up top. Space cases need to be tied down securely using rated straps and tie-down points.
If you need a roof rack for additional gear, ensure you don’t exceed the vehicle’s roof-load capacity or the rack’s capacity, and try to avoid putting heavy stuff up on the roof as it can be difficult to access.
Add a cargo bag or a roof pod up top and you’ll be able to keep lightweight items such as clothes and bedding dust-free and dry.
Trial and error
When it comes to packing your vehicle there’s no perfect solution, but with experience you’ll soon find out what works best for you. Just remember: don’t overload your vehicle and keep weight as low as possible. Also make sure you can easily access the stuff you use the most, as well as the items you might need in an emergency such as your first-aid kit and recovery equipment.
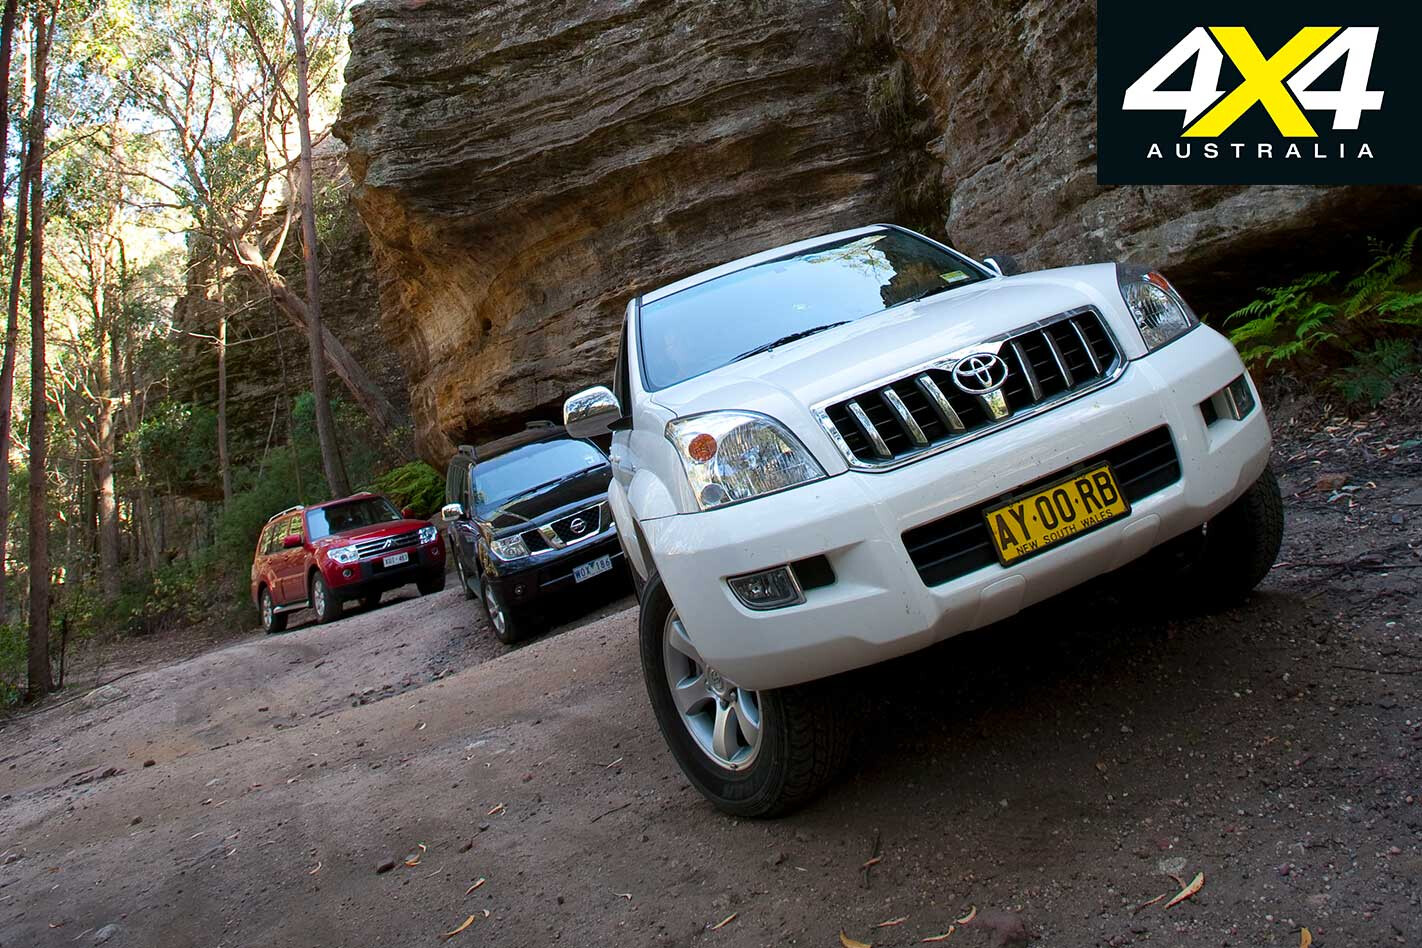
My grandma used to hammer the ‘Three Ps’ into me when I was a kid: Patience, Perseverance and Punctuality – her principles for a successful existence. However, these Three Ps are: Prado, Pajero and Pathfinder – the principals in the medium family wagon market.
This feature was originally published in 4×4 Australia’s April 2009 issue
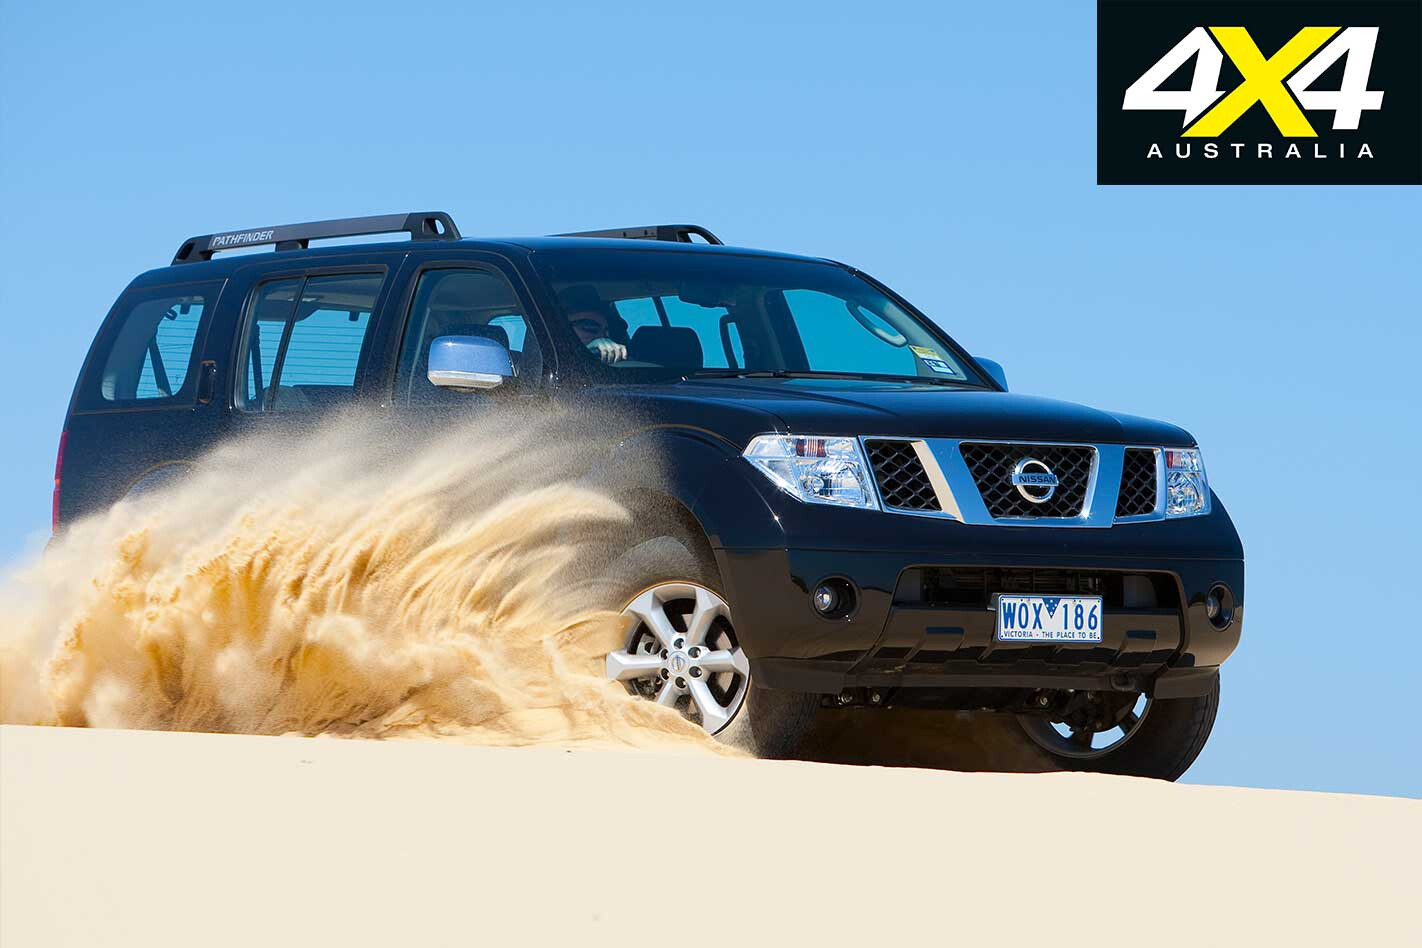
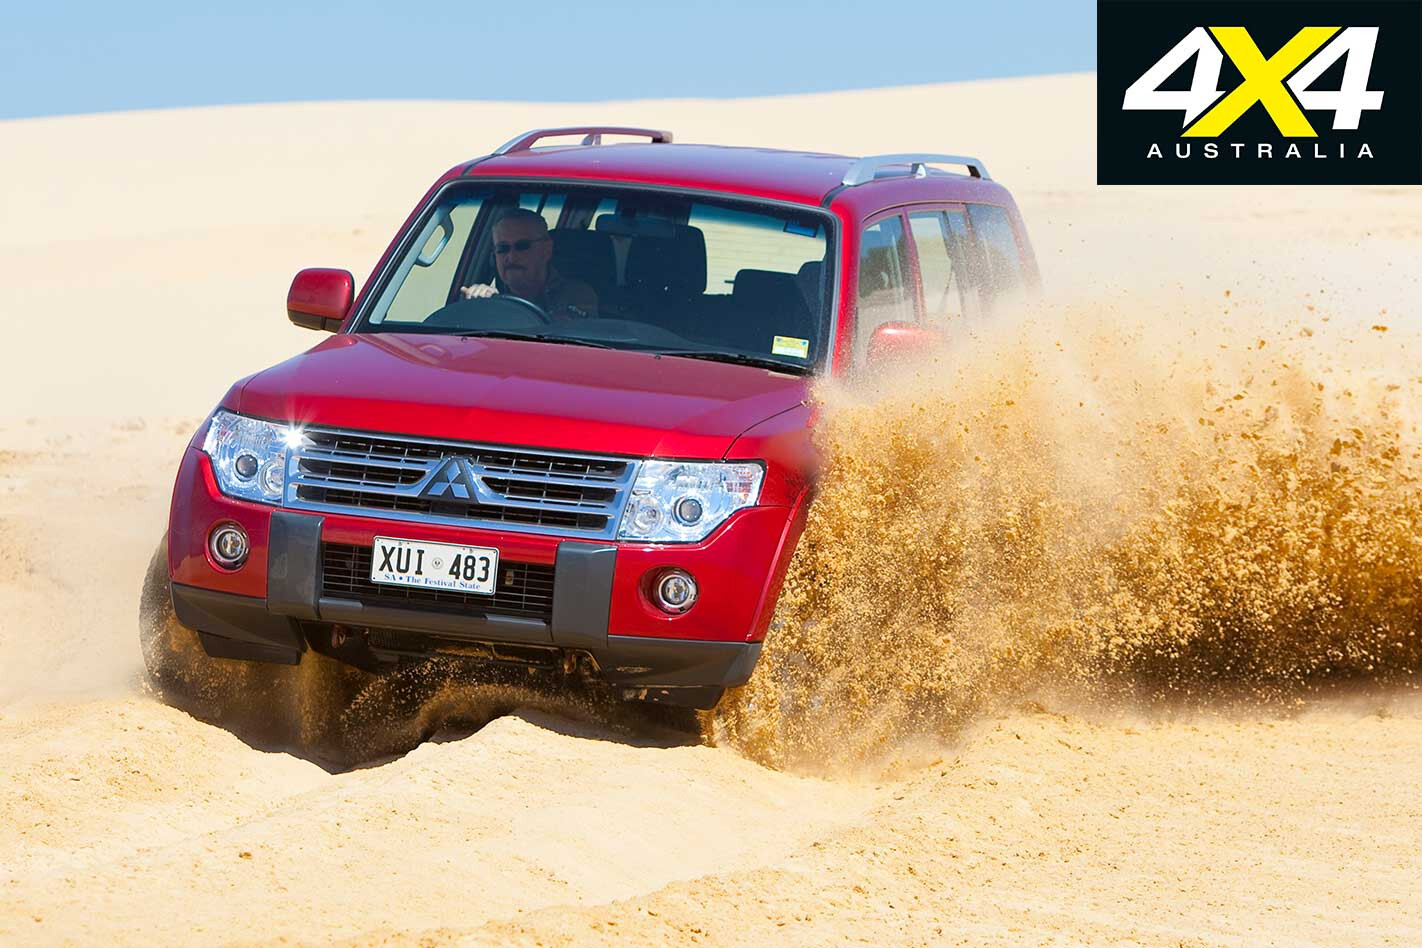
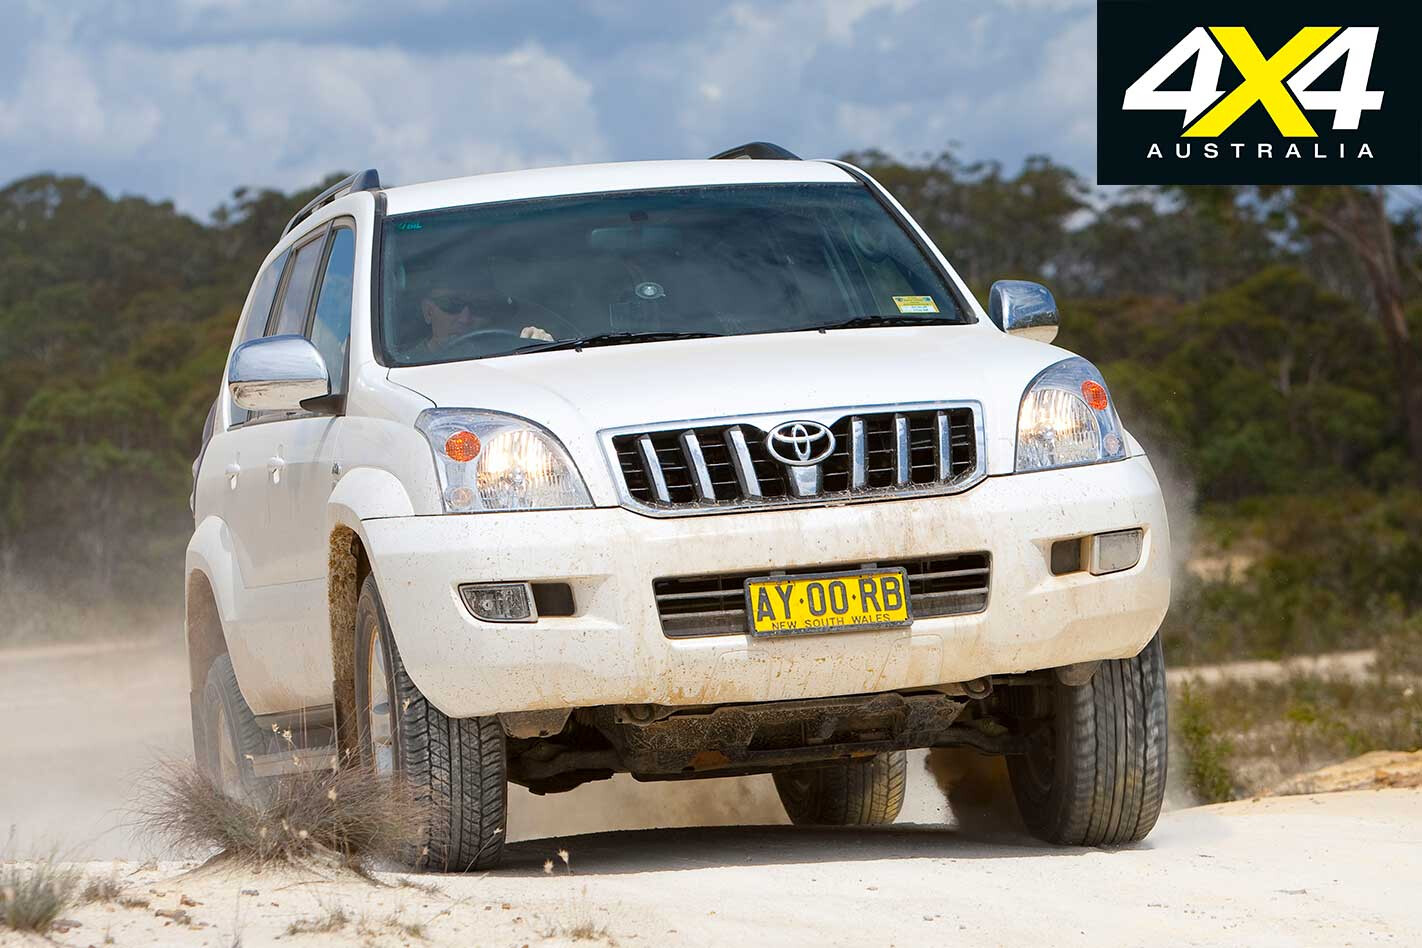
The three top sellers in the medium wagon market are Toyota Prado, the Mitsubishi Pajero and the Nissan Pathfinder. The Prado sold more than double the Pajero’s total last year and the Pajero figures were double the Pathfinder’s, so there’s a clear pecking order in the minds of medium wagon purchasers.
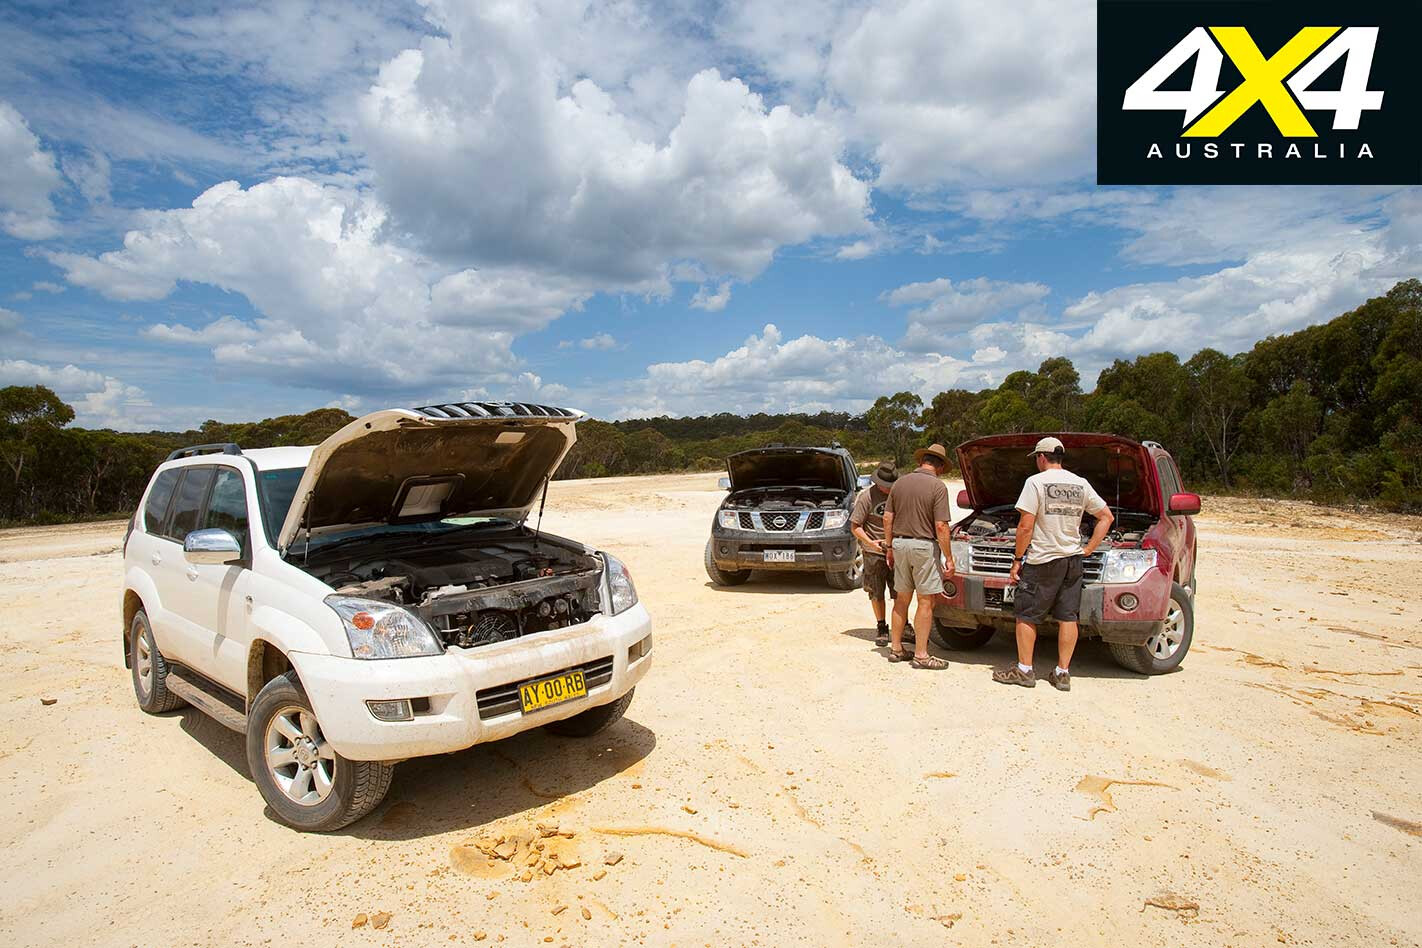
Are buyers right, choosing the Prado over the other two? We took the latest mid-spec, diesel auto trio for an on- and off-road test to find out.
The last time we pitted these three brands together was back in June 2007, when we evaluated the top-spec models. The Prado Grande took the honours in that contest, on the basis that its superb fit and finish, quiet cabin, air rear suspension and traction aids helped justify its luxury price tag.
In comparison the Pajero Exceed and the Pathfinder Ti looked like tricked up versions of base models and they didn’t really offer the same ‘luxury’ feel as the Grande.
This time around we compared the more popular mid-specification models: the Prado GXL, the Pajero GLS and the Pathfinder ST-L. All three were four-cylinder turbo-intercooled diesels, fitted with automatic five-speed transmissions and all were in standard trim.
This ‘nobbled’ the Pajero somewhat, because no off-roader in his or her right mind would buy the new Pajero GLS without opting for the rear axle differential lock – a mere $600 ask.
What you get
There’ll be little change out of 60 grand if you buy the Prado or the Pajero, while the Pathfinder has a recommended retail of $52,990. The Pathfinder is physically smaller than the others and has a smaller engine and less ground clearance, so it’s probably a good call by Nissan to position it under the others’ price points.
The three test wagons were three-row-seat models. Toyota claims its Prado seats eight people – more on that later – while the other two have seven-seat capacity.
As standard equipment, all three feature airconditioning, tilt-only steering wheel adjustment, leather-bound steering wheel, cloth-covered seats, steering wheel audio controls, twin SRS airbags, cruise control, six-speaker AM/FM/CD players, in-glass aerials, power windows, remote central locking and power mirrors, four-wheel discs with ABS/EBD, 17-inch aluminium wheels, side steps and roof rails.
The Prado and the Pathfinder have dual-zone climate control aircon up front and the Pathfinder and the Pajero have all-independent suspension, traction control and stability control, fog lamps, electronic compasses and trip computer displays.
The Pajero has side curtain airbags which are optional on the Prado. Pathfinder buyers looking for additional equipment can opt for the Ti model that’s only slightly more expensive than the Prado GXL and Pajero GLS we tested.
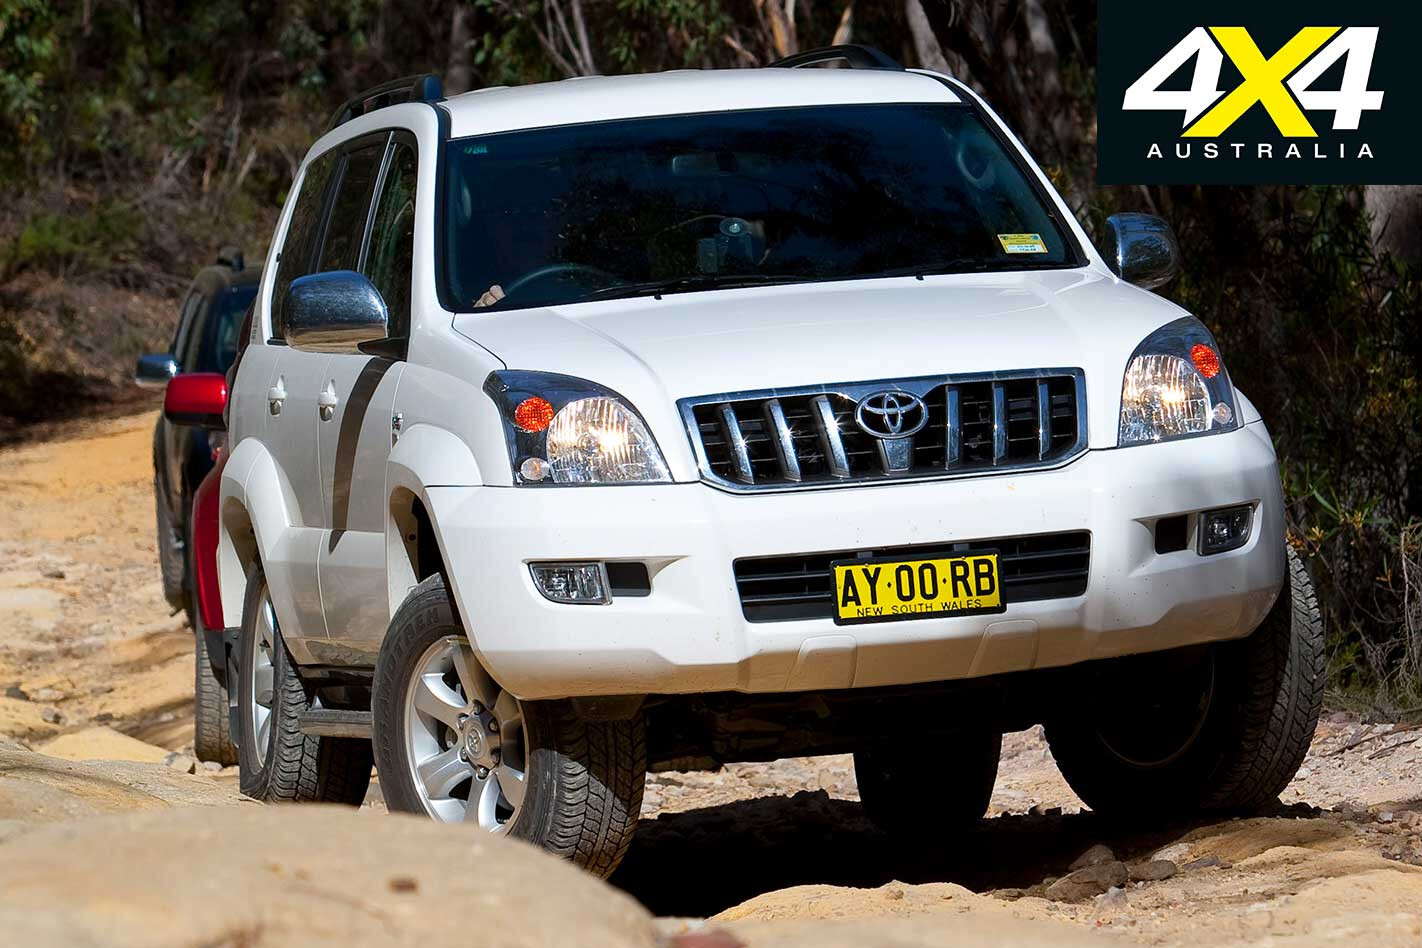
We’ve been criticising the Prado GXL’s equipment levels for many years and that criticism is still valid, despite changes introduced in mid-2006 (upgraded diesel engine with competitive power and torque), in September 2007 (five-speed automatic transmission) and more recently, steering wheel radio controls and MP3 and Bluetooth mobile phone connectivity.
Despite these welcome additions, the Prado is still down on equipment levels when compared with the other two, or even cheap passenger cars for that matter. In GXL spec, Prado has no traction control, no stability control and not even driver’s seat height adjustment.
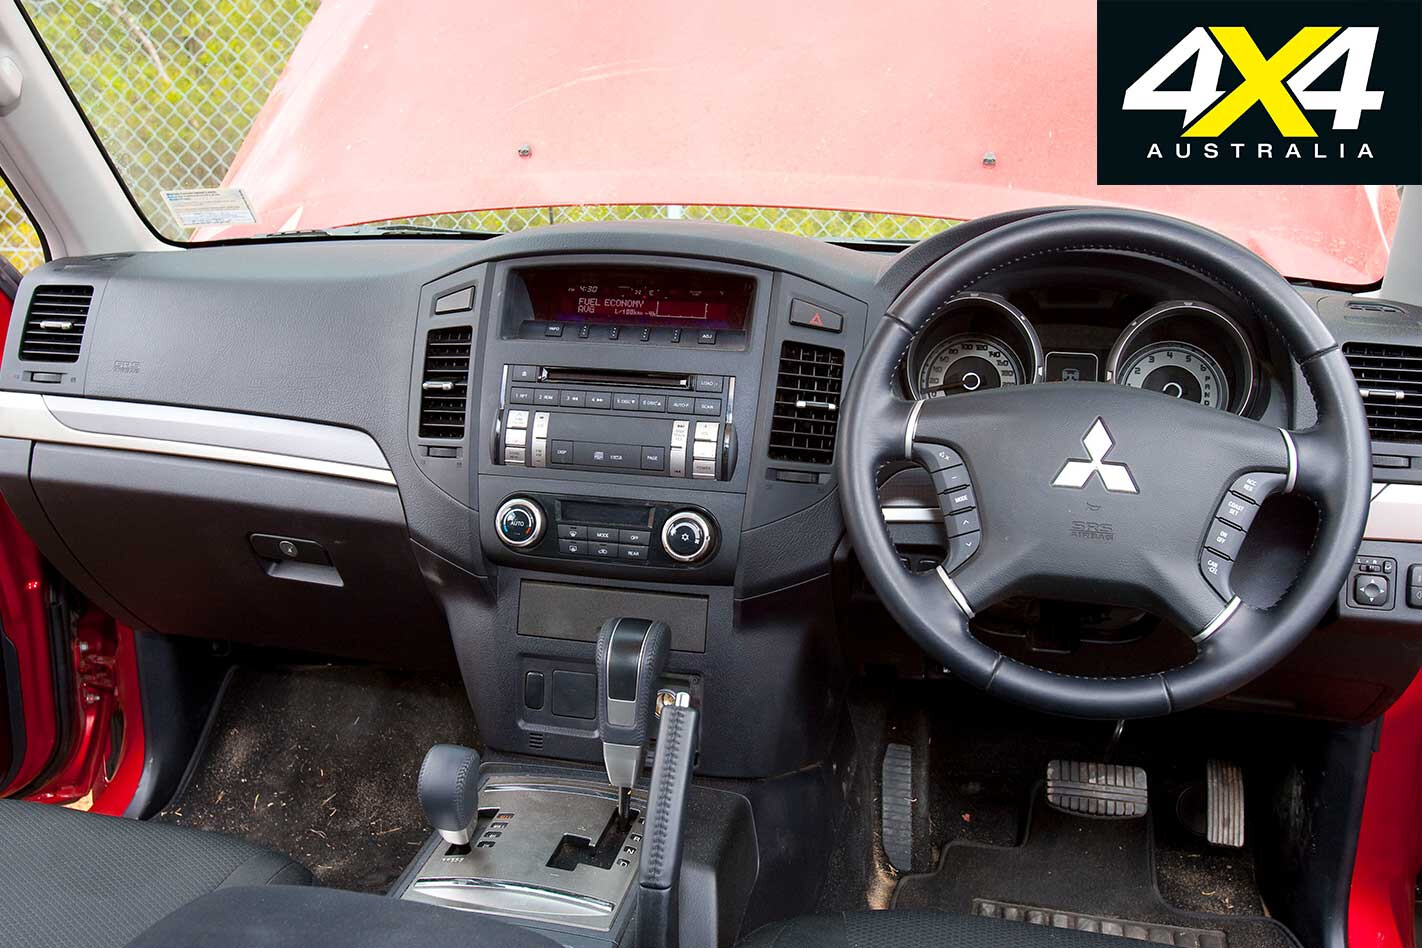
The Inside Story
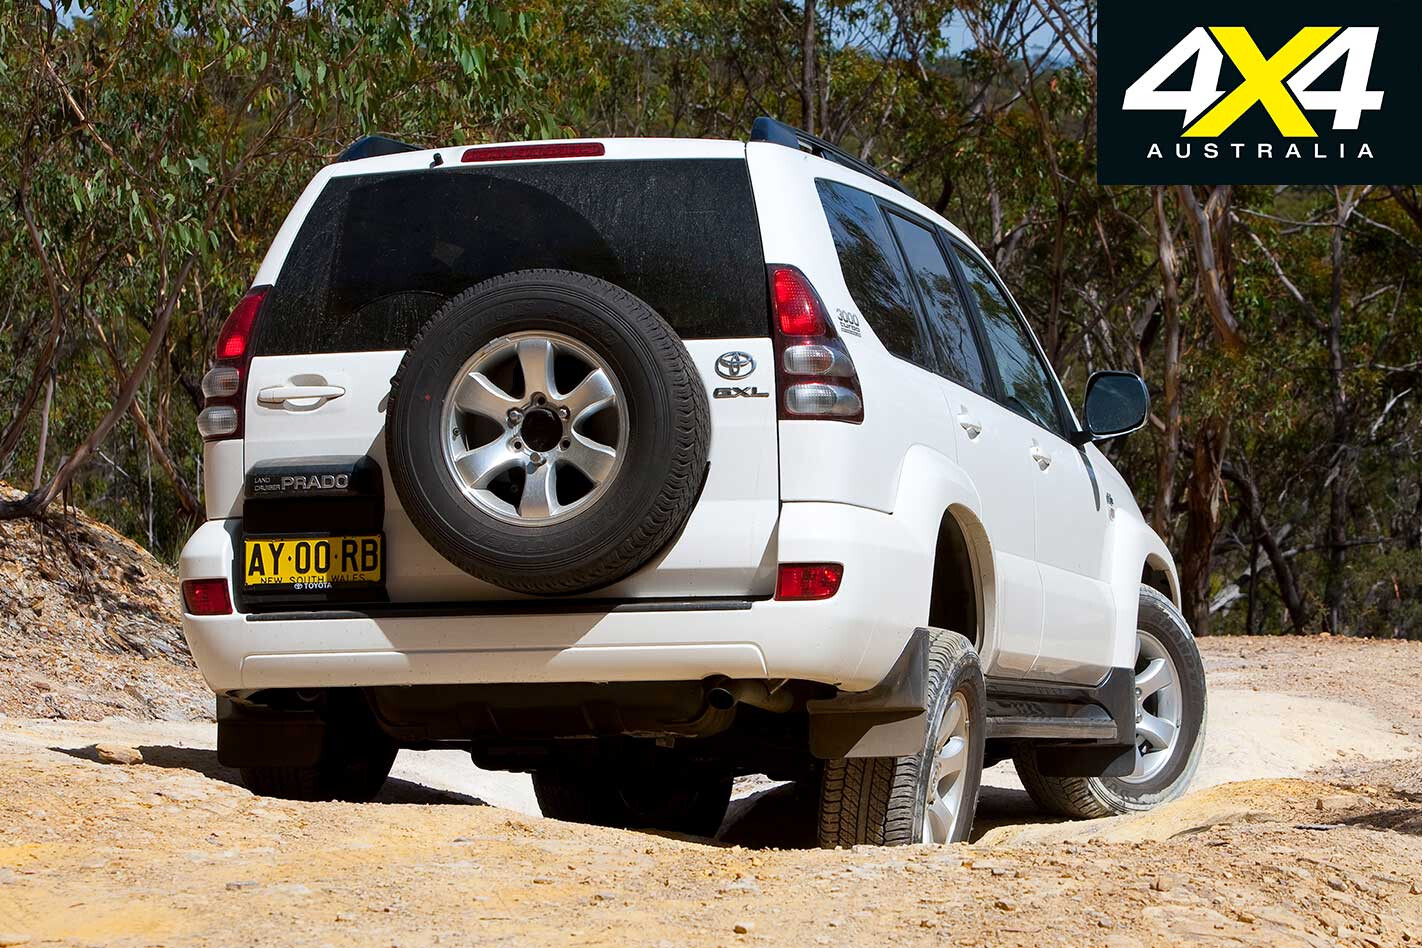
Toyota LandCruiser Prado GXL
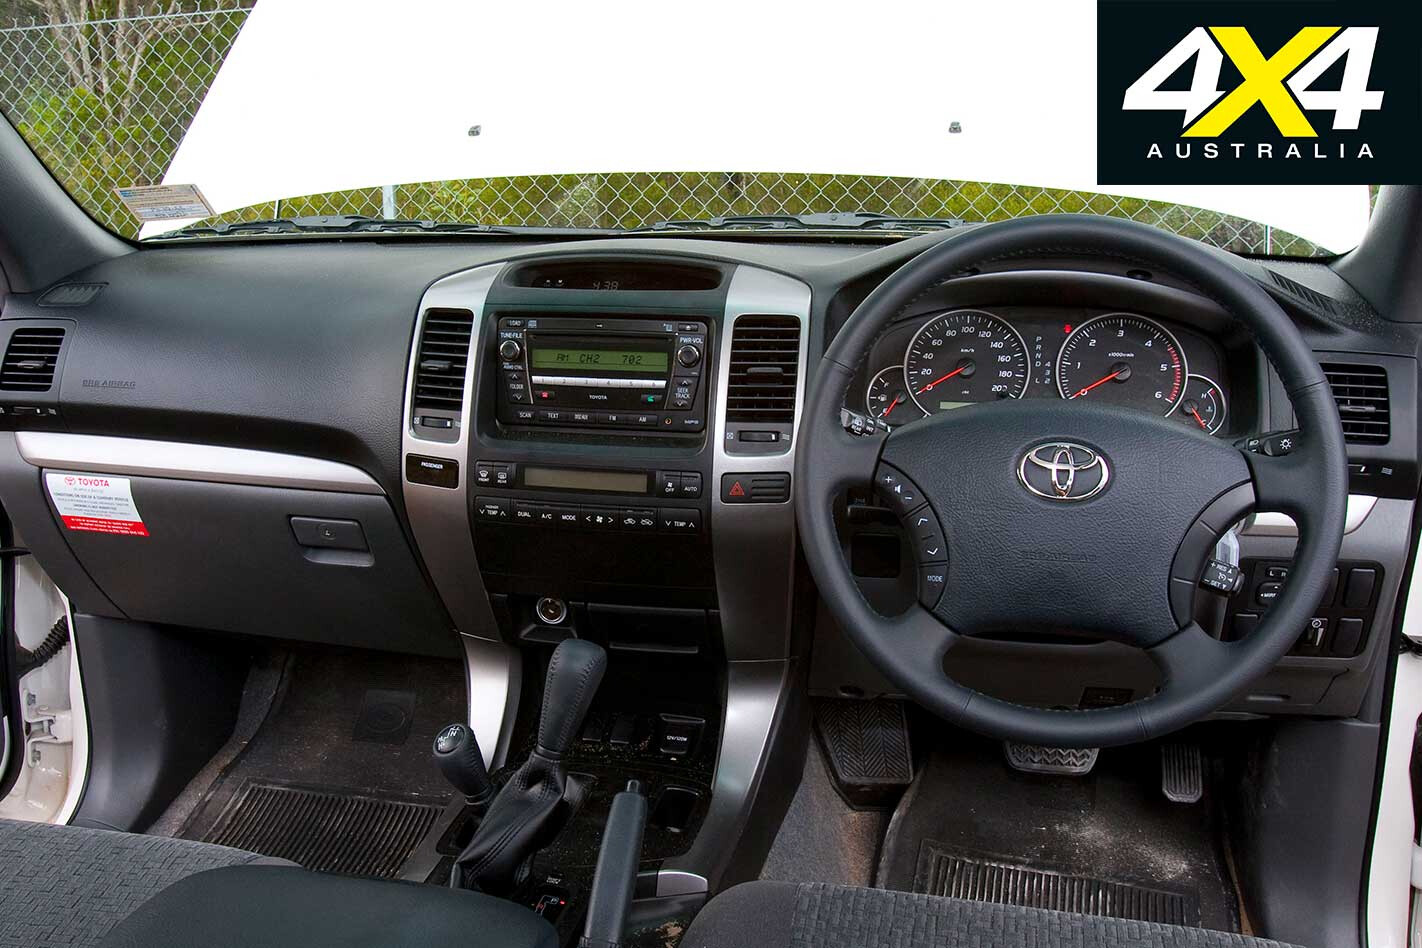
The Prado cabin has the best noise suppression and quality materials, but lacks some basic features you’d expect in this price bracket, such as driver’s seat height and lumbar adjustment. The sound system now has audio controls on the steering wheel and an intuitive bluetooth system for phone connectivity. Dash gauges are big and easy to read. Prado has the biggest centre storage bin.
The second-row seat offers plenty of width for three occupants, but the shape of the seat base in the centre position makes it very uncomfortable. There are airconditioning controls for second-row passengers and vents in the roof lining.
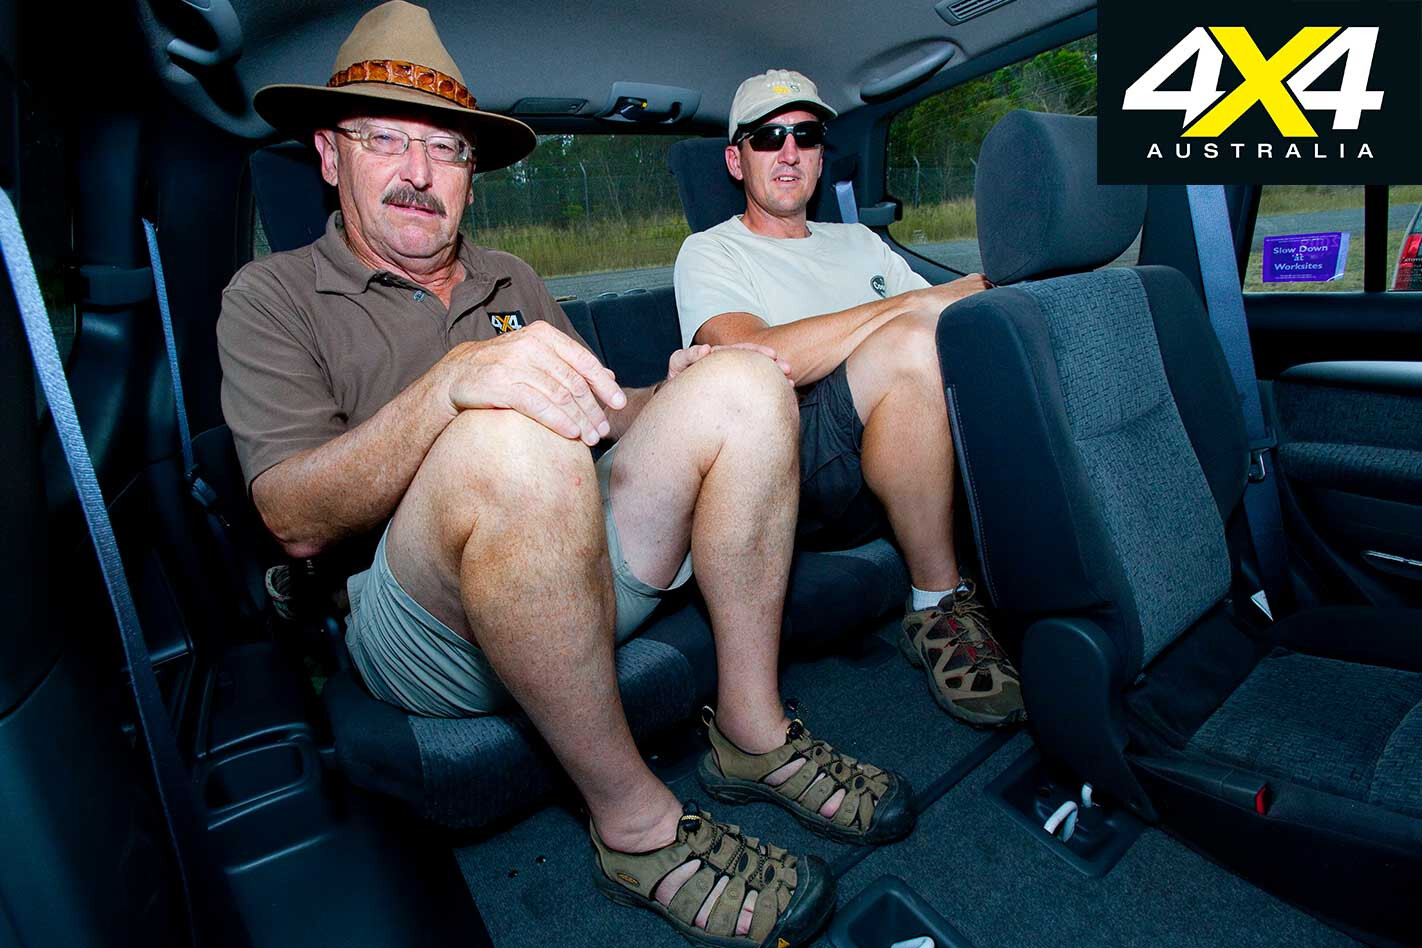
The third-row seats are designed to accommodate three people, but are only suited to small kids. Prado has the least leg room and occupants have to adopt a legs-up position due to the location of the auxiliary fuel tank under the floor. There are air vents in the roof lining. All seats have three-point safety belts and head rests.
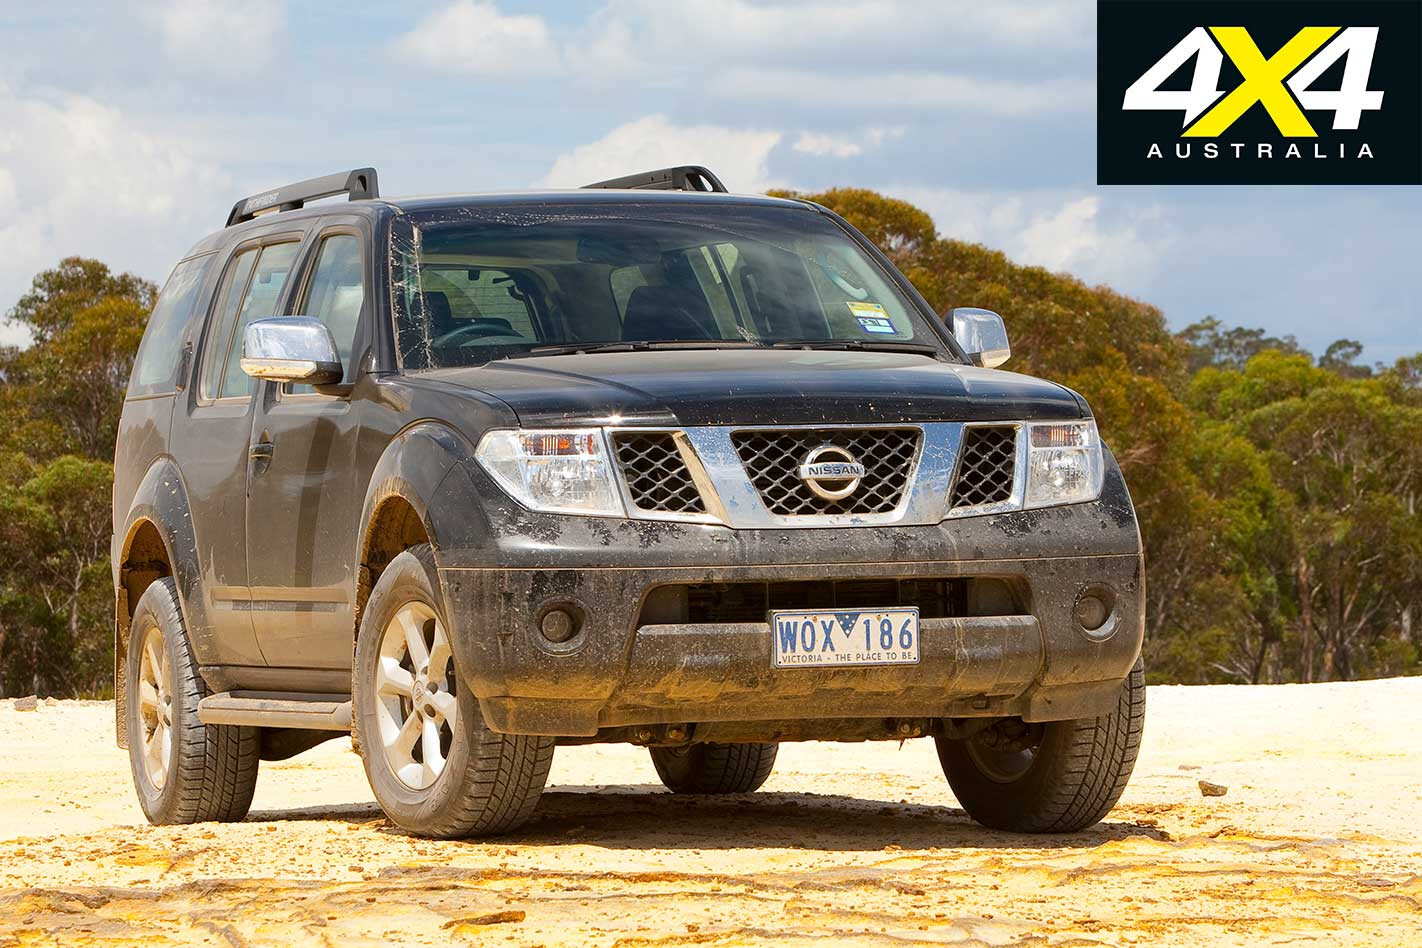
Nissan Pathfinder ST-L
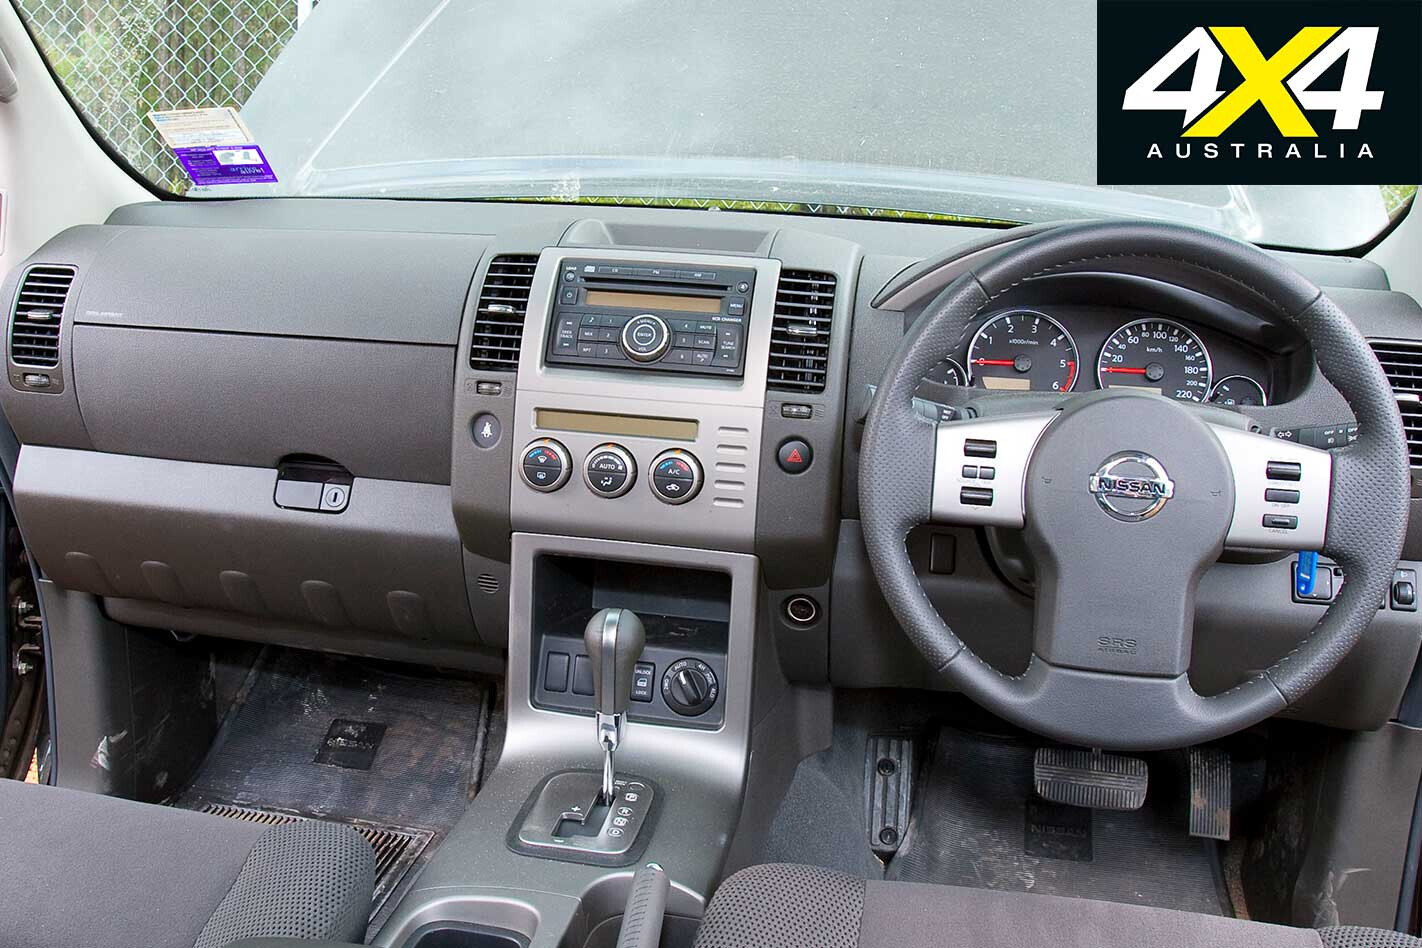
Interior finish in the Pathfinder is no match for the other two vehicles (there are a few rattles around the cabin) but the driver’s seat has seat-height, lumbar and seat-base rake adjustment. There are steering-wheel audio controls and the instruments are basic, functional and easy to read.
Pathfinder’s cabin is narrower than the others but the three-way split/fold seat in the second row offers comfort for all. Access to the rear is good thanks to wide-opening doors but leg room in the second-row is limited. There’s an airconditioning vent in the back of the centre console.
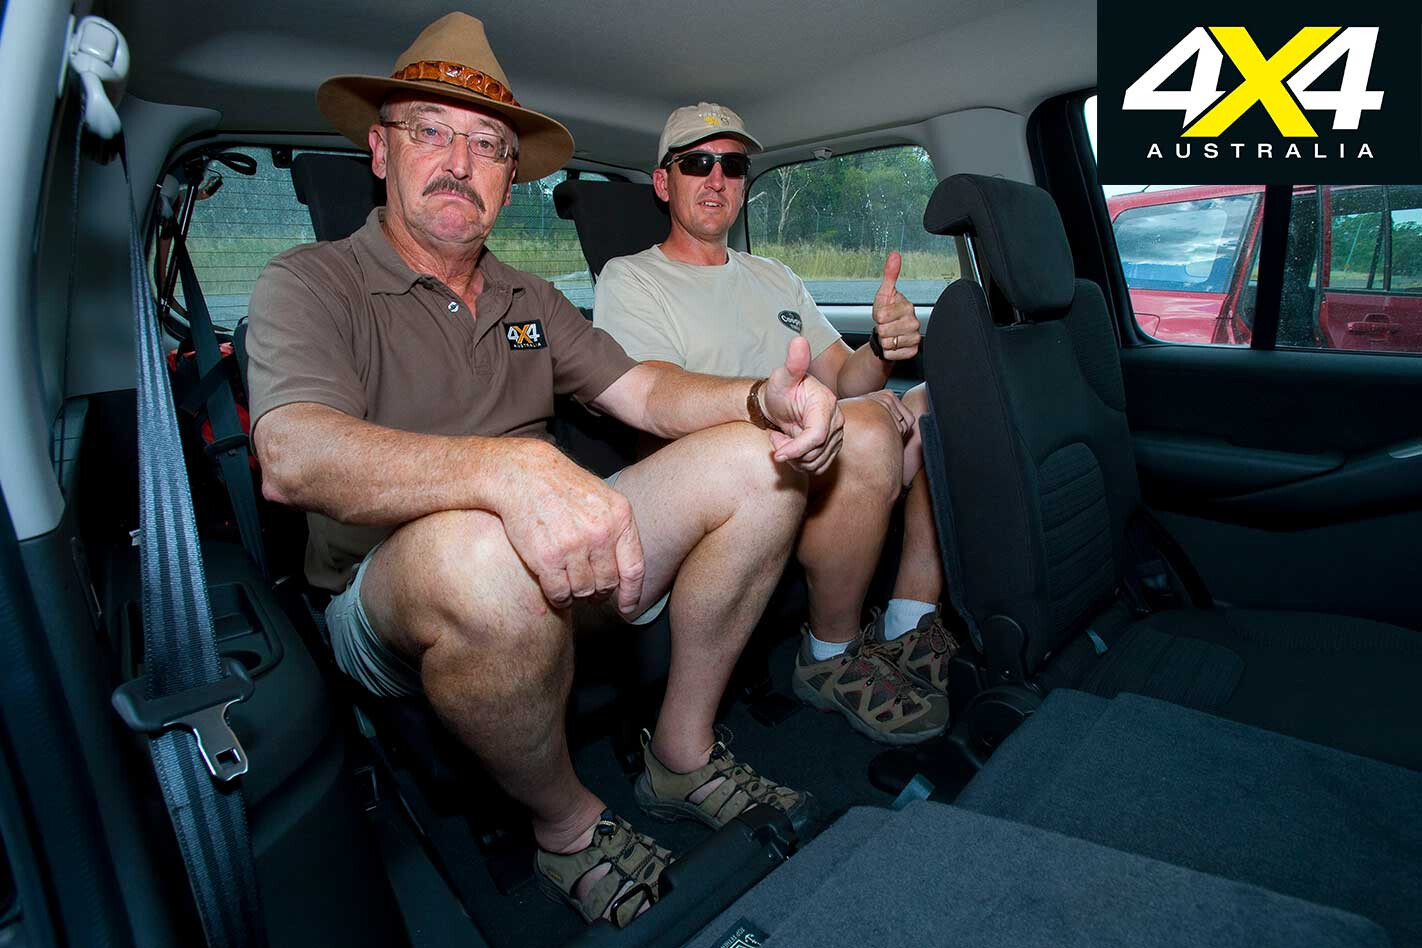
The third-row seats offer the most space with decent head room and good width. The third-row seats “aren’t too upright” and, although you wouldn’t put adults in there on long trips, overall comfort was judged to be “not bad”. Pathfinder offers more cargo space than the others when the third-row seats are in use.
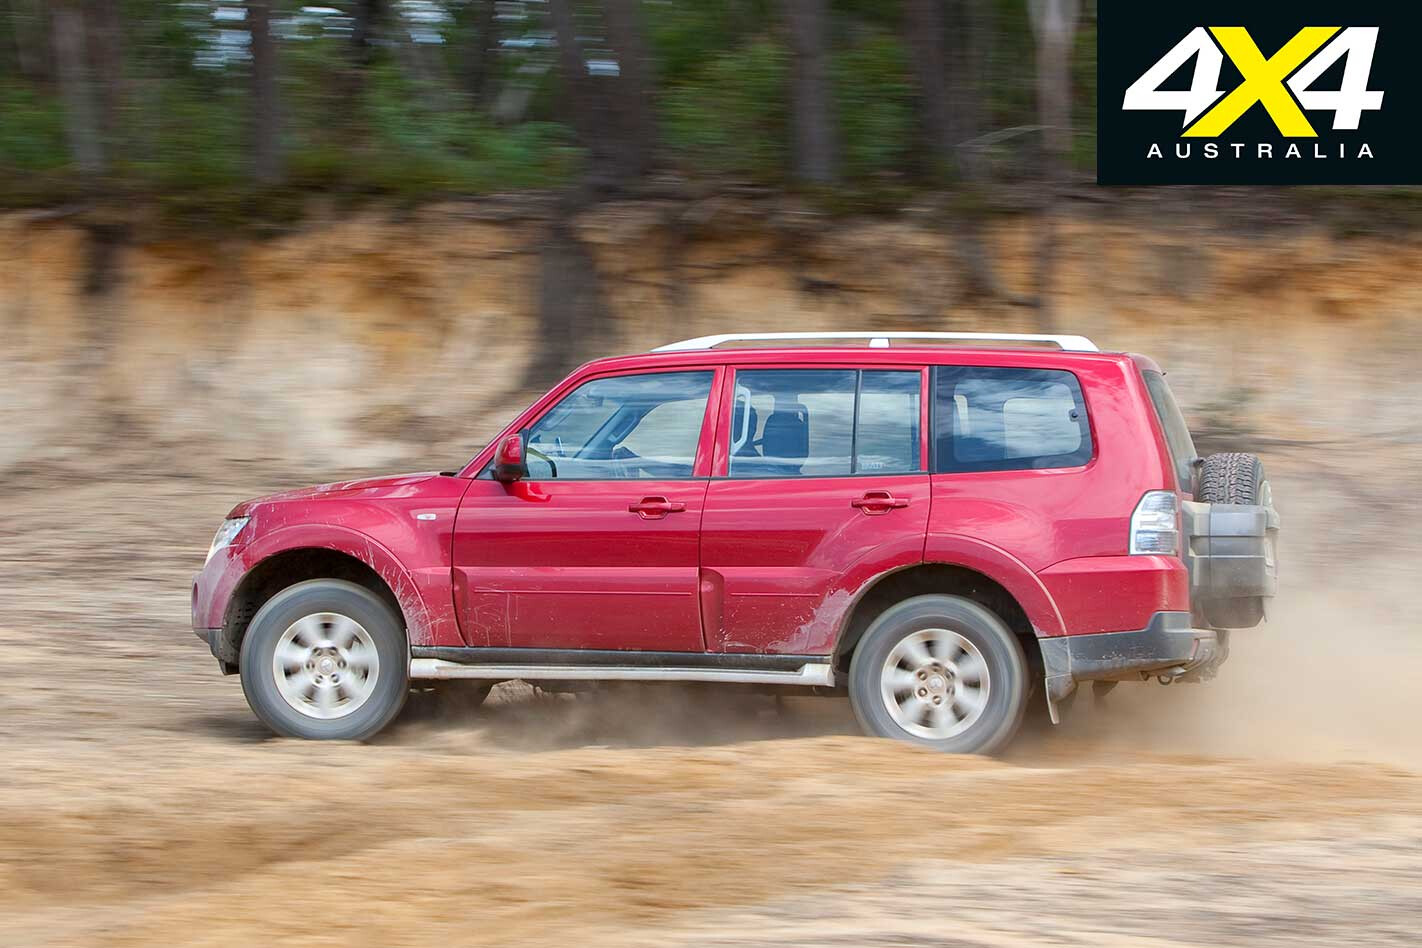
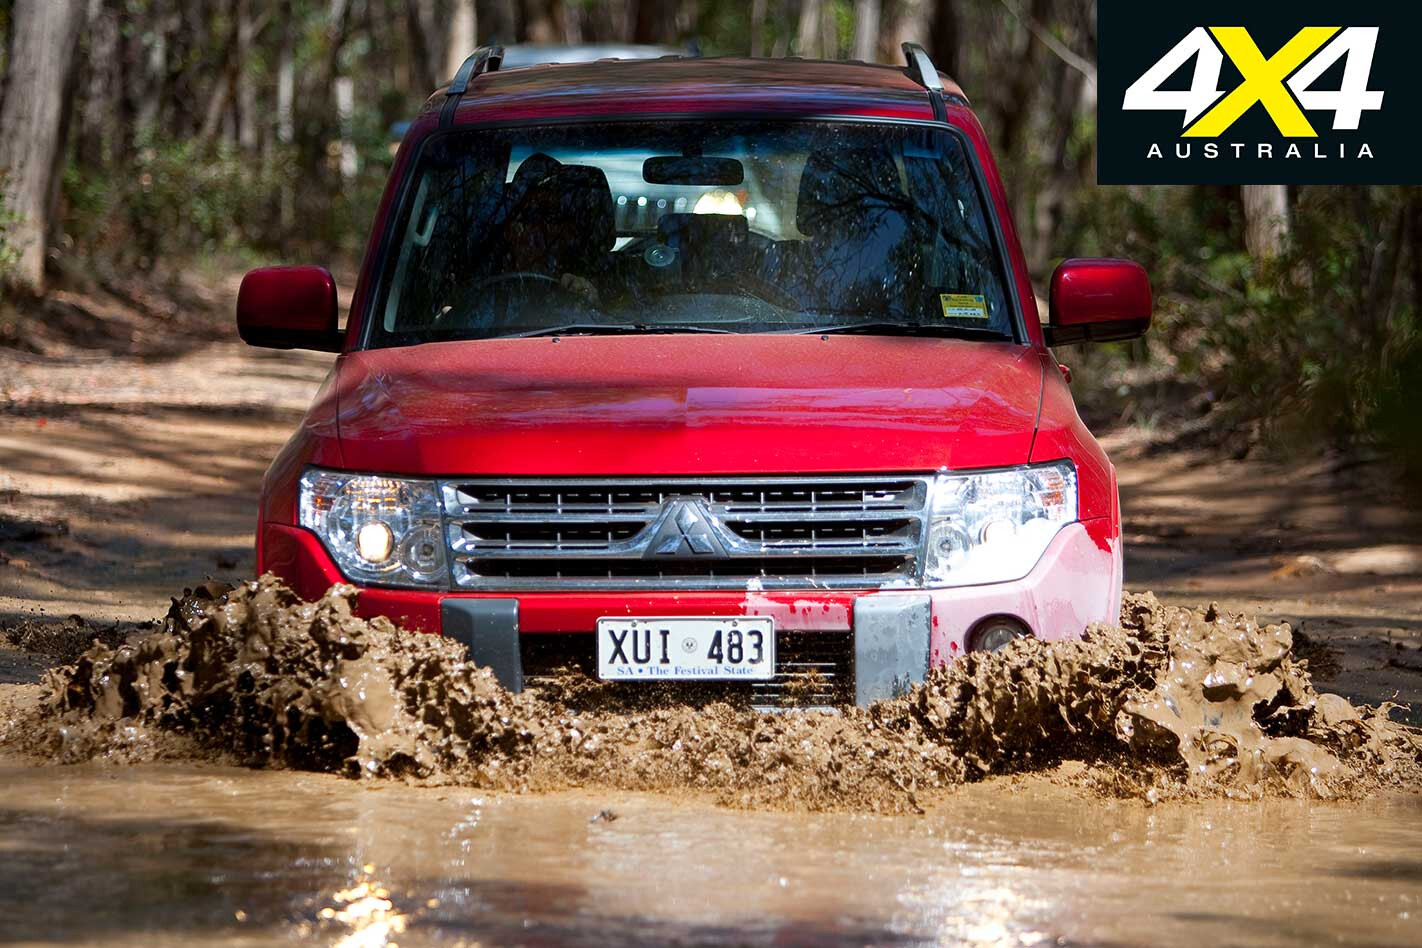
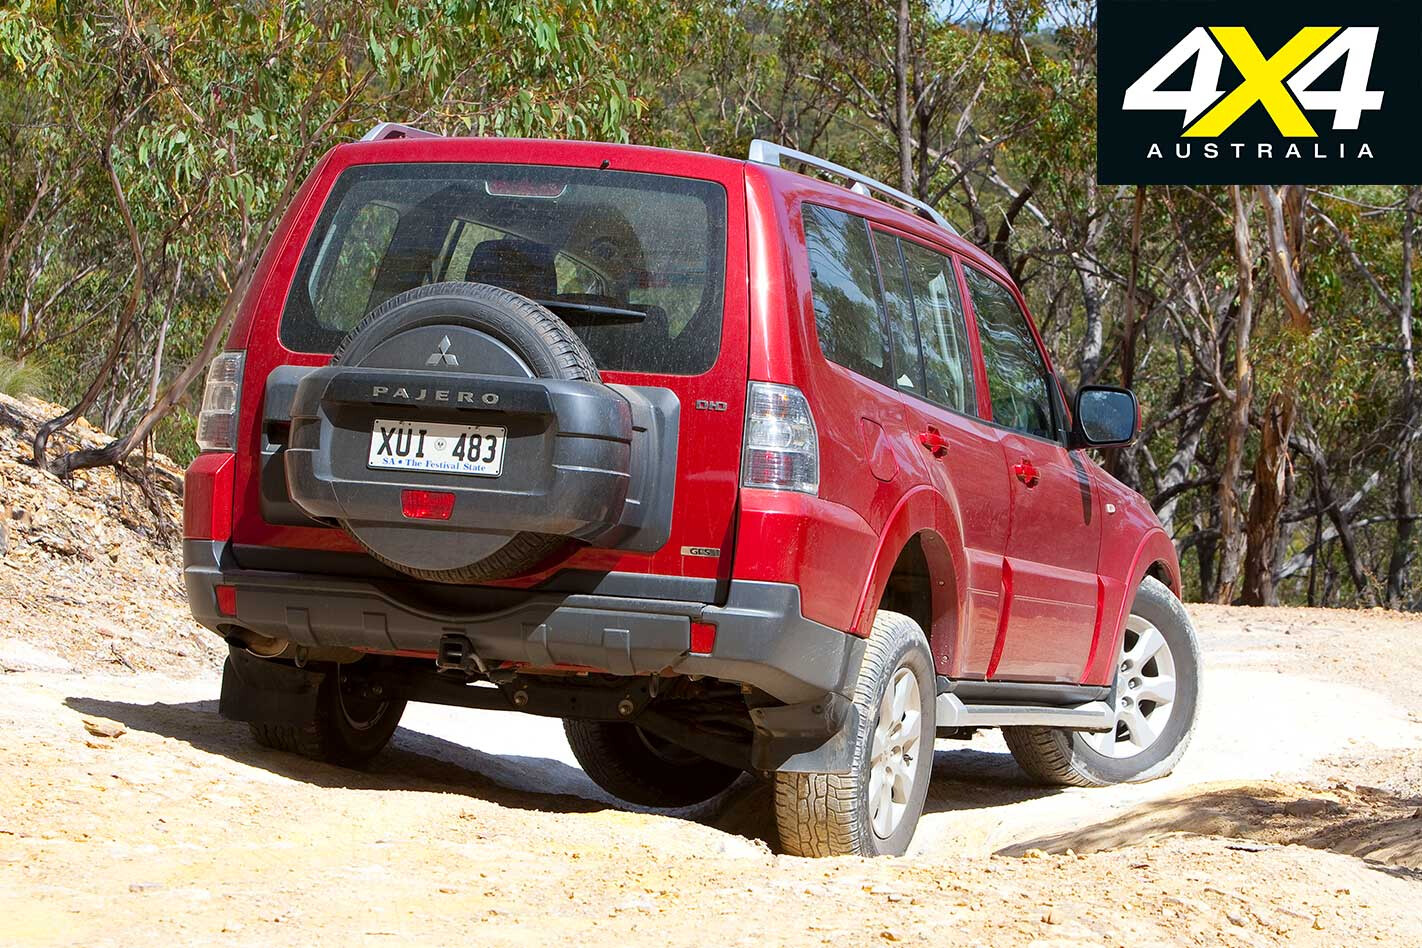
Mitsubishi Pajero GLS
Pajero’s interior offers the most comfortable front seats, the best sound system (with steering wheel controls), a decent-size centre storage bin and quality trim and materials. The dash layout is neat with well positioned controls, but the instrument binnacle is fussy and there was a small but annoying rattle somewhere in the centre console.
Second-row occupants have their own airconditioning control with vents in the roof lining, but air in the back wasn’t as cool as the Prado (it was nearing 40°C outside during the test). Pajero’s back seat offers plenty of width for three people and decent leg and foot room.
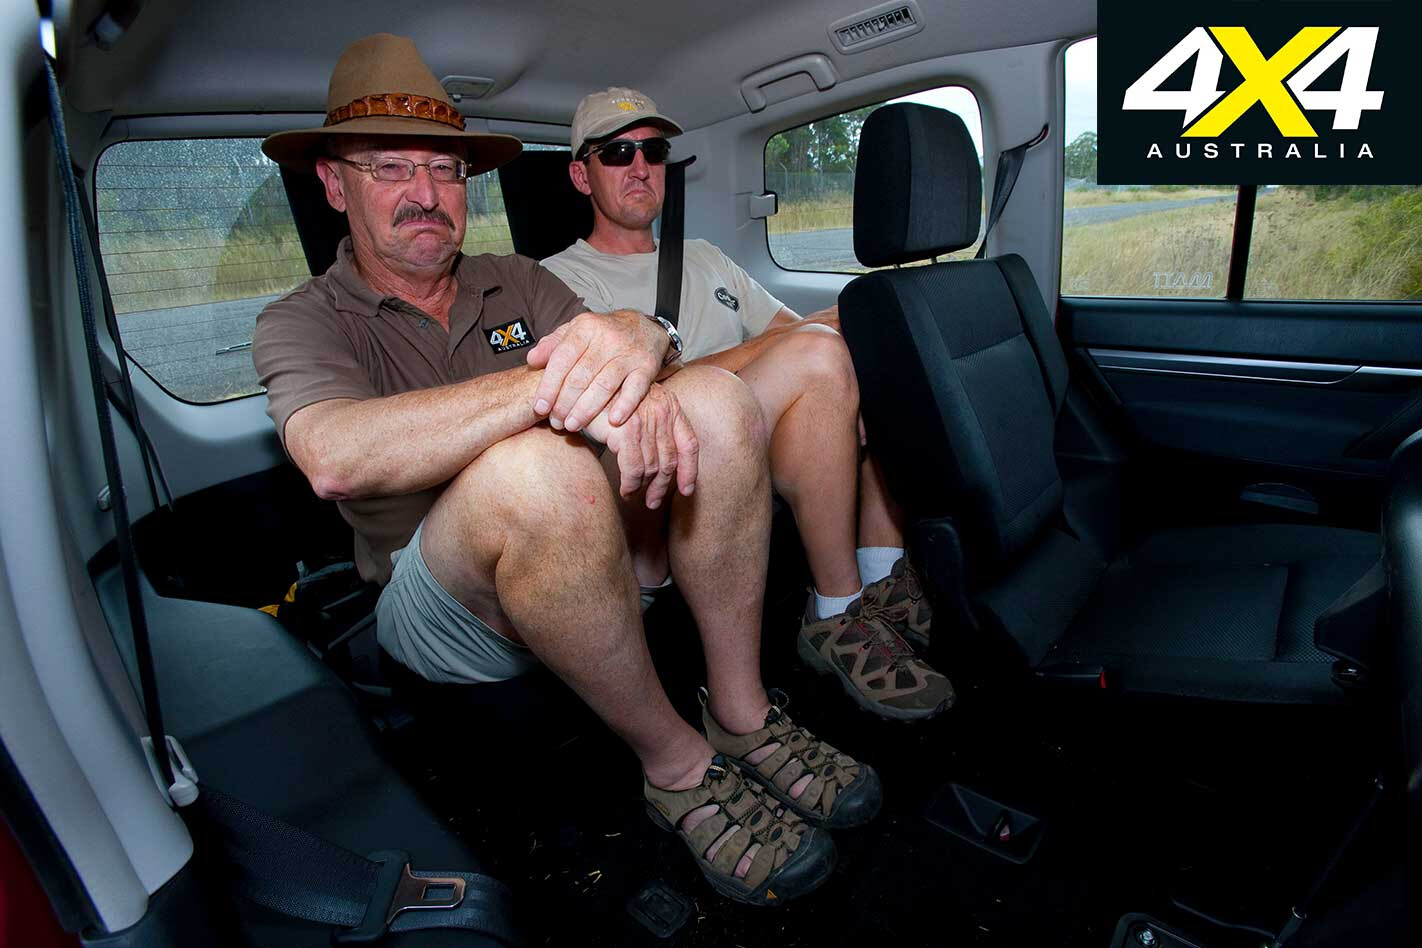
Third-row occupants aren’t afforded much leg room and the seats were judged “too upright” for adults. There’s plenty of width in the back, however, and third-row occupants have airconditioning vents in the roof lining. With the third-row seats in use, there’s not much cargo space left over, although you can use the third-row seats storage area for gear.
Power & Security
Whether they’re for powering fridges, DVD players, iPods or recharging phones, modern family 4X4 wagons need a heap of 12V power outlets.
The Pajero and Pathfinder have three 12V outlets each: one in the dash, one in the centre console and one in the cargo area. Prado has two 12V outlets in the dash and one in the cargo area.
When it comes to securing luggage, the Prado has the best tie-down hooks in the cargo floor. The cast metal hooks in the back of the Pathfinder are weak (we broke one tying down a tool kit) and the Pajero hooks are made of plastic. We recommend a cargo barrier if you don’t intend utilising the third-row seats.
Powertrain & chassis
The Pathfinder was launched in July 2005 and has remained substantially unchanged since then. Despite its relatively small 2.5-litre engine capacity, the Pathfinder’s outputs are still competitive with the Prado’s.
Nissan’s All Mode 4X4 has electric rotary switch selection of drive modes from 4X2, Auto (4X2, rear wheel drive bias), through 4X4 high-range locked, to 4X4 low-range. The automatic main transmission is a ‘tiptronic’ type with an automatic mode and a driver-selectable up and down shift gate.
The Nissan Pathfinder features a separate body-on-chassis design and the suspension is by means of wishbones and coils at all four corners. The Pathfinder’s electronic traction aids are complemented by hill descent control and hill-start assistance, in the form of brake pressure retention.
The Prado was given an engine upgrade in 2006 that just shades the Pathfinder’s outputs. It has a full-time 4X4 transfer case, with driver-lockable Torsen centre differential and lever control of high- and low-range. Prado’s five-speed automatic is controlled by a lever that works in a staggered gate, allowing the driver to hold gears when required.
Chassis is separate and Prado’s suspension is by coil-strut and wishbones up front and five-link control of a coil-sprung live-axle at the rear. The rear differential is fitted with a limited-slip clutch pack.
The Pajero NT has been given an engine upgrade for 2009 and the new figures are considerably better than the other two wagons’ outputs. A new Aisin five-speed automatic transmission, with taller gearing, has been fitted and manual and automatic Pajero five-doors now have 3000kg trailer towing capacity – up 500kg on the Prado and equalling the Pathfinder.
The Pajero has a selectable full-time-4X4 system, allowing the vehicle to be operated as a rear wheel drive or a full-time 4X4. The centre diff distributes torque 33:67 front:rear, but changes that to 50:50 if slippage occurs. The centre diff can be manually locked in high range and is locked in low range.
Although there’s no hill descent control switch, Mitsubishi’s engine brake assist control (EBAC) prevents ‘run-away’ should one or more wheels lose traction when the Pajero is crawling downhill.
Unlike the other two body-on-frame wagons, the Pajero features a monocoque chassis design. Suspension is fully independent with coil springs and wishbones all around.
On-road ride, handling and performance
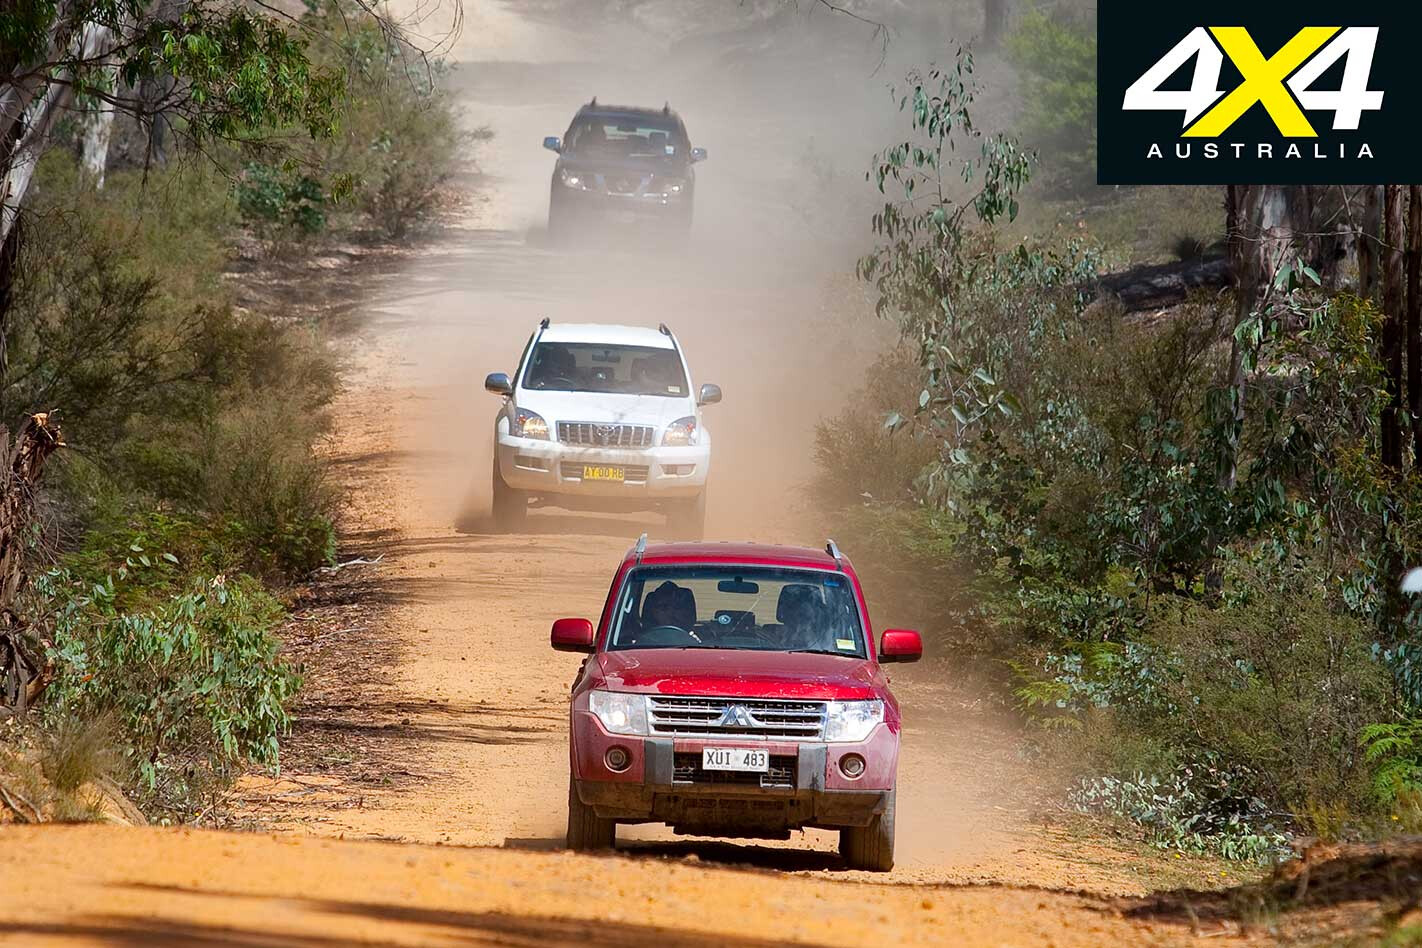
We ran these part-loaded wagons over typical main and back road surfaces, from smooth freeway to corrugated gravel. Tyre pressures were set at 210kPa (30psi).
The new diesel Pajero is much quieter than its predecessors, with about the same cabin noise levels as the Pathfinder, but neither come close to the Prado’s car-like interior ambience.
The Prado has the softest ride quality and by far the best noise, vibration and harshness feedback into the cabin. We can see why buyers who take a Prado for a spin from the dealership come away impressed. However, the Prado pays for this ‘cushiness’ with less directional stability on rough surfaces and vague behaviour through twisting bends. When pushed hard the Prado understeers predictably.
The Pathfinder is at home on smooth surfaces, be they gravel or bitumen, where it handles neutrally, like a sports sedan. But it isn’t very comfortable on lumpy bitumen or corrugated dirt, giving the occupants a shaking.
The Pajero sits between the others, with a firmer ride than the Prado’s, but it’s less jittery over rough stuff than the other two. Pajero’s handling is neutral and reassuring and the steering is direct and offers good feedback.

The performance honours go clearly to the new Pajero, which outpowers the other two by a considerable margin. Our stopwatch figures show that the Pajero blows the others into the weeds in a traffic light grand prix and, more significantly, is much quicker in overtaking ‘roll ons’, meaning the Pajero spends less time on the wrong side of the road. It should be noted that when we tested the vehicles, it was a hot 38°C outside.
As an on-road tourer, the Pajero offers the best ride, handling and performance of the trio.
Off-road
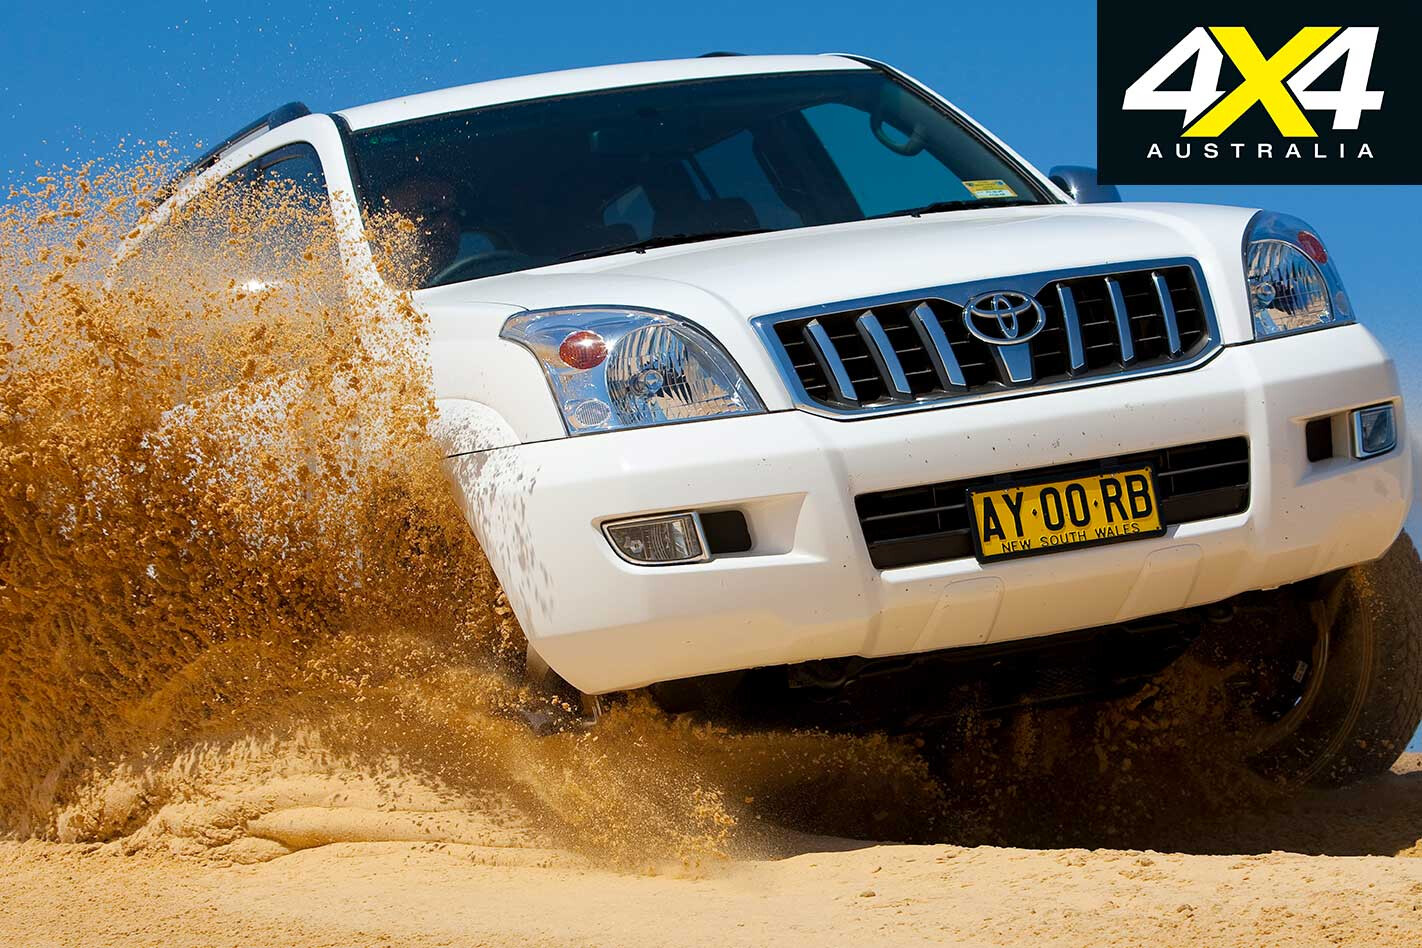
Our off-road testing involved hot, fluffy beach sand and trails that varied from quick tracks to gnarly rock shelf terrain, with the sand often very soft and deep, really testing each vehicle’s traction capabilities.
With tyre pressures dropped to around 100kPa (15 psi) all three vehicles perform well on sand, but the Pathie’s ground clearance is an issue on furrowed beach access tracks.
In the dunes all three have enough rubber on the ground and sufficient diesel grunt to tour pretty much where any sane driver would want them to go. However, the Prado’s lack of traction control saw it stranded mid-turn on the crest of a dune, when one rear wheel lifted clear. Its weak rear LSD protested loudly, so we gave it a gentle tug off the dune top with a snatch strap to get it moving again.
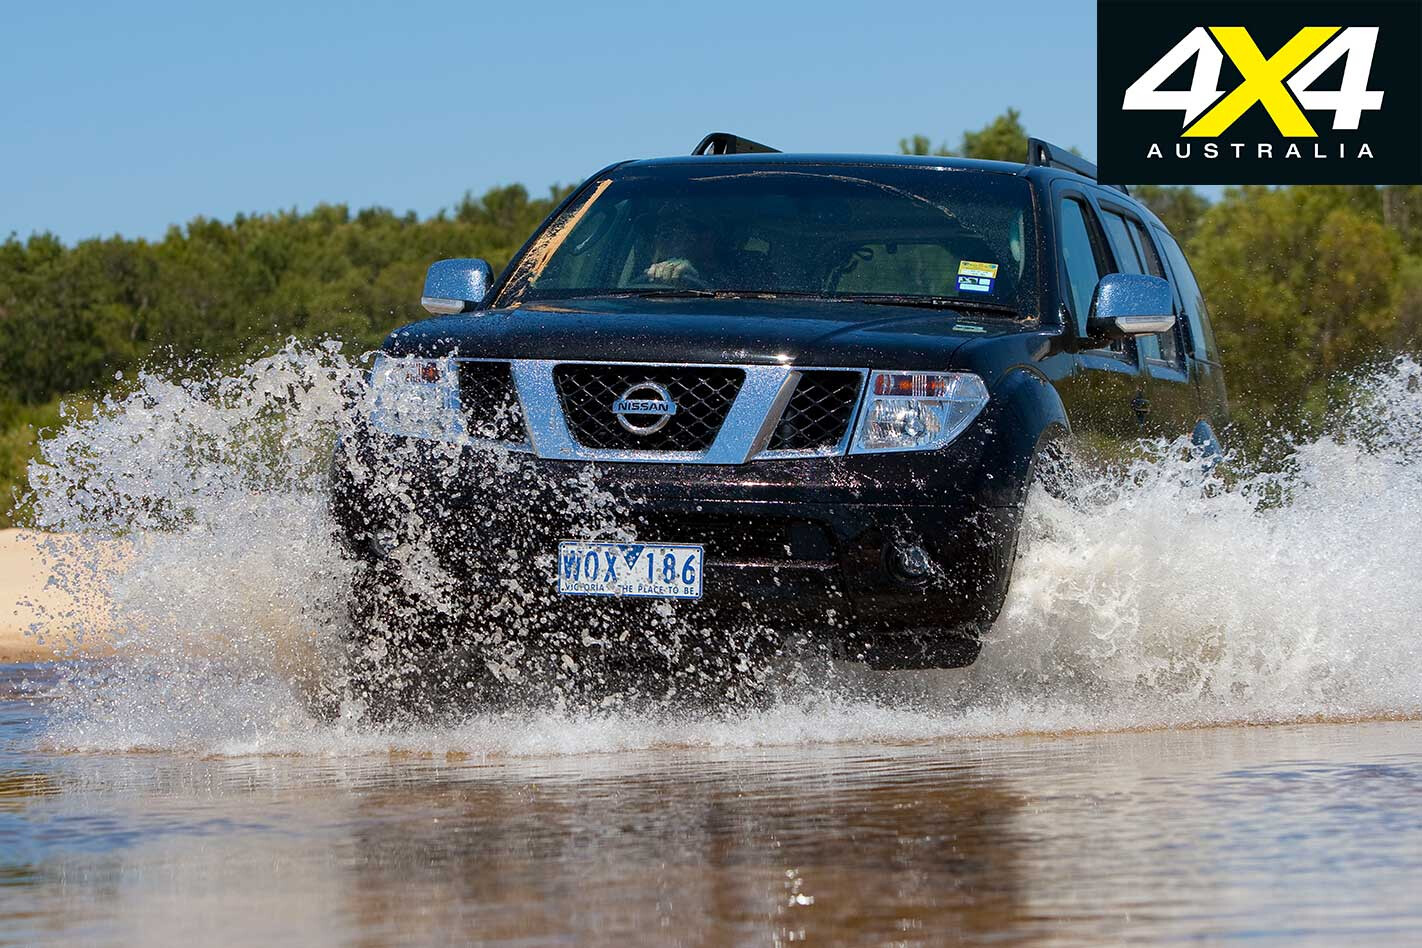
On trails the Pathfinder’s underbody occasionally taps high spots that the other two roll over without contact, its long underbelly can drag itself over steeper obstacles and its traction control isn’t as effective as the Pajero’s. The Nissan’s firmer suspension is also more intrusive on bumpy sand tracks.
The Prado lacks the Pajero’s traction control, but it has much better rear wheel travel and that keeps four wheels on the deck in conditions that saw the Pajero lift a corner. It’s only on very loose or slippery off-road trail sections that the Prado’s lack of electronic traction aids limits where it can follow the Pajero. Had our test Pajero been fitted with the optional rear differential lock, however, the difference would have been even more marked.
All three diesels have acceptable engine braking for machines fitted with automatic transmissions, but the Pathfinder and the Pajero outclass the Prado in downhill speed control. The Pathfinder is fitted with an impressive hill-descent control, activated by a dashboard button, and the Pajero’s automated EBAC is the next best system of this trio.
The Pajero took the overall honours in our off-road testing.
Bushability
As far as fallibles are concerned, tyres are the main offenders. Fortunately, each of these vehicles is shod with 17-inch rubber, so light truck (LT) rated replacements are easily sourced; in town or out bush. For those intending to spend plenty of time off-road, we’d suggest doing a tyre-swap deal at the time of purchase for some more durable rubber.
All three vehicles need protective bar work to shield vulnerable heat exchangers and the Pajero’s front-mounted intercooler. At the same time, the vulnerable side-steps on each of these wagons should be removed and stowed in the garage until trade-in time.
For those not needing the third-row seats, a cargo barrier is an essential bush travel item and should be one of the first things fitted to these vehicles, enhancing safety and maximising available cargo space in each.
A snorkel would be next on the trio’s shopping list. Although the Prado has the most water-resistant standard air intake, it relies on inner mudguard integrity and we’ve heard of Prados ingesting water following the fitment of bar-work that disturbed the inner mudguards. The Pathfinder’s air is also sourced from the inner guard, while the Pajero’s front-facing air intake is particularly partial to a drink.
For powering all your touring gear the Prado and the Pajero have pre-drilled locations for auxiliary batteries, but we’d caution against fitting a hefty volt box to either. Both vehicles are known to suffer from engine bay sheet metal cracking, caused by lead-acid batteries. The ideal under-bonnet battery for these vehicles is a lightweight, spiral-bound, AGM deep-cycle type.
The Prado’s massive 180-litre fuel tank capacity streets the other two. The Pajero and the Pathfinder would need auxiliary tank fitments for serious outback trips – 60-litre auxiliary tanks are available for both vehicles.
None of the three standard suspensions has the capacity to cope with a full load over bush roads and tracks in the long-term, especially when towing. Stronger springs, providing a 50mm lift, and better quality dampers would be our choice for each of these wagons.
Touring Range
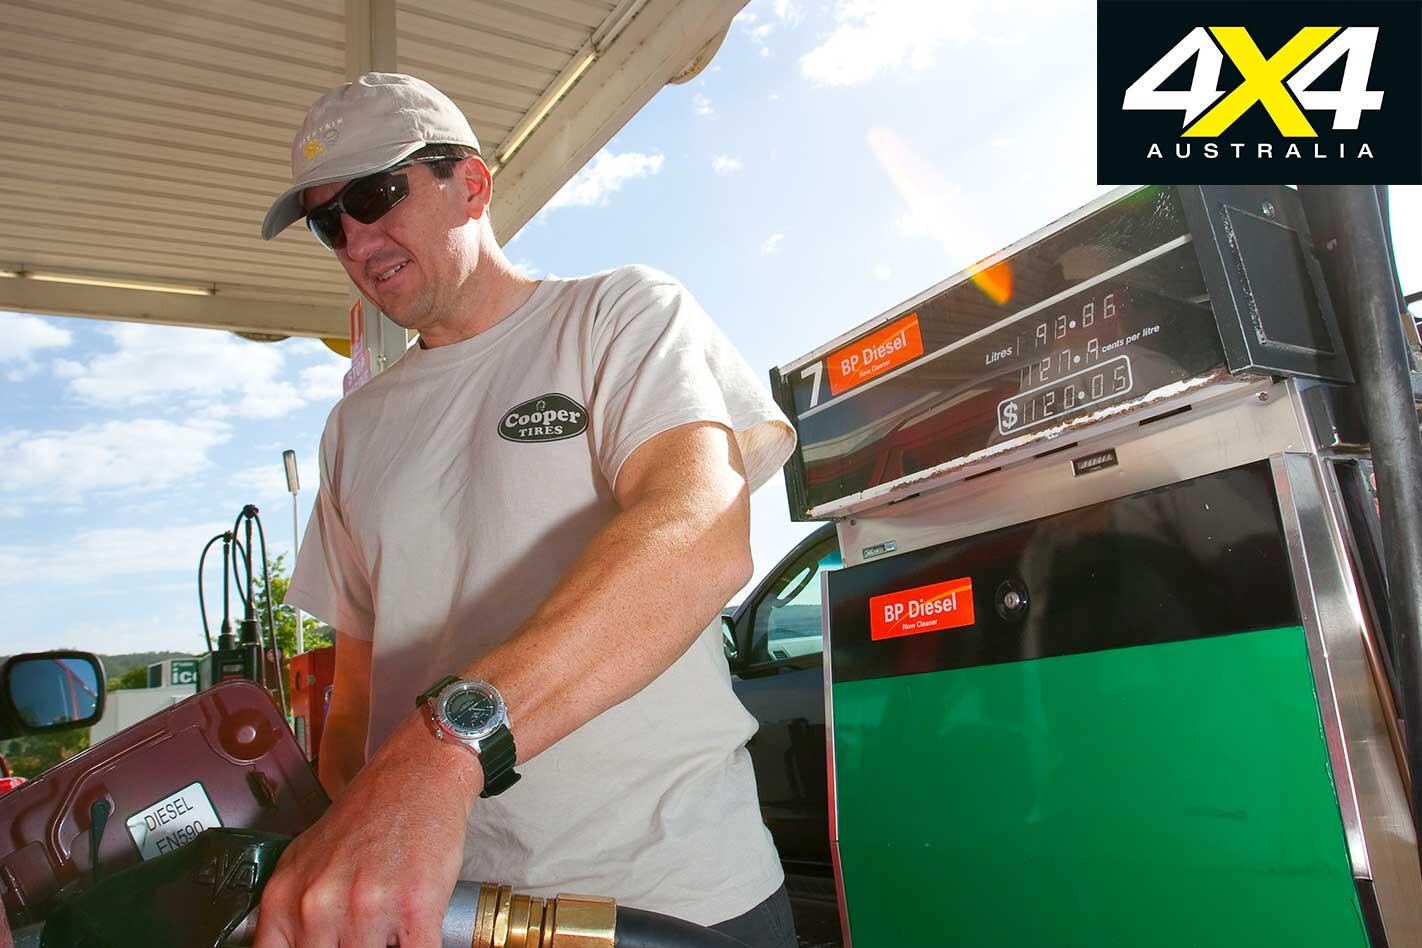
With its 180-litre fuel capacity, the Prado has by far the most impressive standard touring range. On test, the Prado averaged 10.6L/100km, giving an effective touring range of almost 1700km.
Pajero has an 88-litre fuel capacity and used 10.5L/100km on test, offering a range of more than 800km between refills. The Pathfinder has an 80-litre tank and used 11.9L/100km on test, resuting in the shortest touring range of just over 650km.
Despite the heat (close to 40°C), some soft sand driving and repeated acceleration tests during our two-day trip, we were very impressed by the fuel economy of all three vehicles.
Conclusion

Easy: the Pajero GLS. Although still not as quiet and refined as the Prado GXL the Pajero outperforms it on- and off-road.
The Pajero’s higher equipment levels – as well as its more versatile interior, where, unlike Prado, the third-row seats fold into the floor to maximise cargo space – make it better value for money than the Prado.
The Pathfinder ST-L can’t match the others in off-road trail work – and is slightly less roomy – but it’s a good on-road performer, thanks to its torquey donk, and is excellent value for money.
Pathfinder buyers with 60 grand to spend can move up to the Ti model that has top-shelf equipment levels, including leather seats (memory adjustment and heating up front), a sunroof and DVD player in the back to keep the kids entertained.
Specifications
| u00a0 | Mitsubishi Pajero GLS | Nissan Pathfinder ST-L | Toyota Prado GXL |
| Engine | |||
| Type | 3200cc four-cylinder DOHC,u00a0common-rail intercooled turbo-diesel | 2488cc four-cylinder DOHC,u00a0common-rail intercooled turbo-diesel | 2982cc four-cylinder DOHC,u00a0common-rail intercooled turbo-diesel |
| Bore/Stroke | 98.5 x 105.0mm | 89.0 x 100.0mm | 96.0 x 103.0mm |
| Compression | 16.0:1 | 16.5:1 | 17.9:1 |
| Power | 147kW @ 3800rpm | 126kW @ 4000rpm | 127kW @ 3400rpm |
| Torque | 441Nm @ 2000rpm | 403Nm @ 2000rpm | 410Nm @ 1600-2800rpm |
| Transmission | |||
| Type | 5-speed auto | ||
| Ratios (overall) | |||
| 1st | 3.520 (13.789/26.197) | 3.827 (13.540/35.150) | 3.520 (13.760/35.073) |
| 2nd | 2.042 (7.999/15.197) | 2.368 (8.378/21.749) | 2.042 (7.982/20.482) |
| 3rd | 1.400 (5.484/10.419) | 1.520 (5.378/13.961) | 1.400 (5.473/14.043) |
| 4th | 1.000 (3.917/7.442) | 1.000 (3.538/9.185) | 1.000 (3.909/10.030) |
| 5th | 0.716 (2.805/5.329) | 0.834 (2.951/7.660) | 0.716 (2.799/7.182) |
| Reverse | 3.224 (12.628/23.994) | 2.613 (9.245/23.999) | 3.224 (12.026/32.339) |
| Final drive | 3.917:1 | 3.538:1 | 3.909:1 |
| High ratio | 1.000 | ||
| Low ratio | 1.900 | 2.596 | 2.566 |
| Suspension | |||
| Front | Independent, double wishbones, coil springs, gas/oil dampers, stabiliser bar | ||
| Rear | Independent, multi-link, coil springs, gas/oil dampers, stabiliser bar | Live-axle, upper and lower trailing arms, Panhard rod, coil springs, gas/oil dampers, stabiliser bar | |
| Steering | |||
| Type | Power-assisted rack and pinion | ||
| Brakes | |||
| Front | Ventilated discs, ABS, EBD | Ventilated discs, ABS, EBD, BA | |
| Rear | Ventilated discs, ABS, EBD | Ventilated discs, ABS, EBD, BA | |
| Wheels | |||
| Material | Alloy | ||
| Size | 17×7.5J | 17×7.0J | 17×7.5J |
| Tyres | |||
| Type | Yokohama Geolandar | Goodyear Wrangler | Dunlop Grandtrek |
| Size | 265/65R17 112H | 255/65R17 110H | 265/65R17 112S |
| Performance | |||
| 0-80km/h | 10.0sec | 10.6sec | |
| 0-100km/h | 13.8sec | 15.0sec | 15.7sec |
| 80-110km/h | 6.9sec | 9.2sec | |
| Dimensions | |||
| L/W/h | 4900/1875/1900mm | 4740/1850/1865mm | 4850/1875/1905mm |
| Wheelbase | 2780mm | 2850mm | 2790mm |
| Track (f/r) | 1570/1570mm | 1575/1575mm | |
| Turning circle | 11.4m | 11.9m | 11.4m |
| Clearance | 225mm | 211mm | 204mm |
| App/Dep/Ramp | 36.6u00ba/25u00ba/22.5u00ba | 33u00ba/26u00ba/24u00ba | 32u00ba/27u00ba/20u00ba |
| Kerb Weight | 2331kg | 2210kg | 2180kg |
| GVM | 3030kg | 2880kg | 2900kg |
| Payload | 699kg | 670kg | 720kg |
| Fuel Tank | 88 litres, diesel | 80 litres, diesel | 180 litres, diesel |
| Fuel Consumption | 10.5L/100km | 11.9L/100km | 10.6L/100km |
| Towing Capacity | |||
| Braked | 3000kg | 2500kg | |
| Unbraked | 750kg | ||
Choosing the right tyres is one of the most important decisions a four-wheel driver can make, especially when setting up a rig for touring.
Construction
Many new 4x4s are fitted with Passenger Car (P) construction tyres. These may look robust, but they have a light carcass with thin sidewalls and tread area. A light construction helps tyres dissipate heat, aiding tyre life, and gives them flexible sidewalls, aiding ride comfort. Light weight also minimises rotational forces, resulting in improved vehicle acceleration, braking and fuel economy.
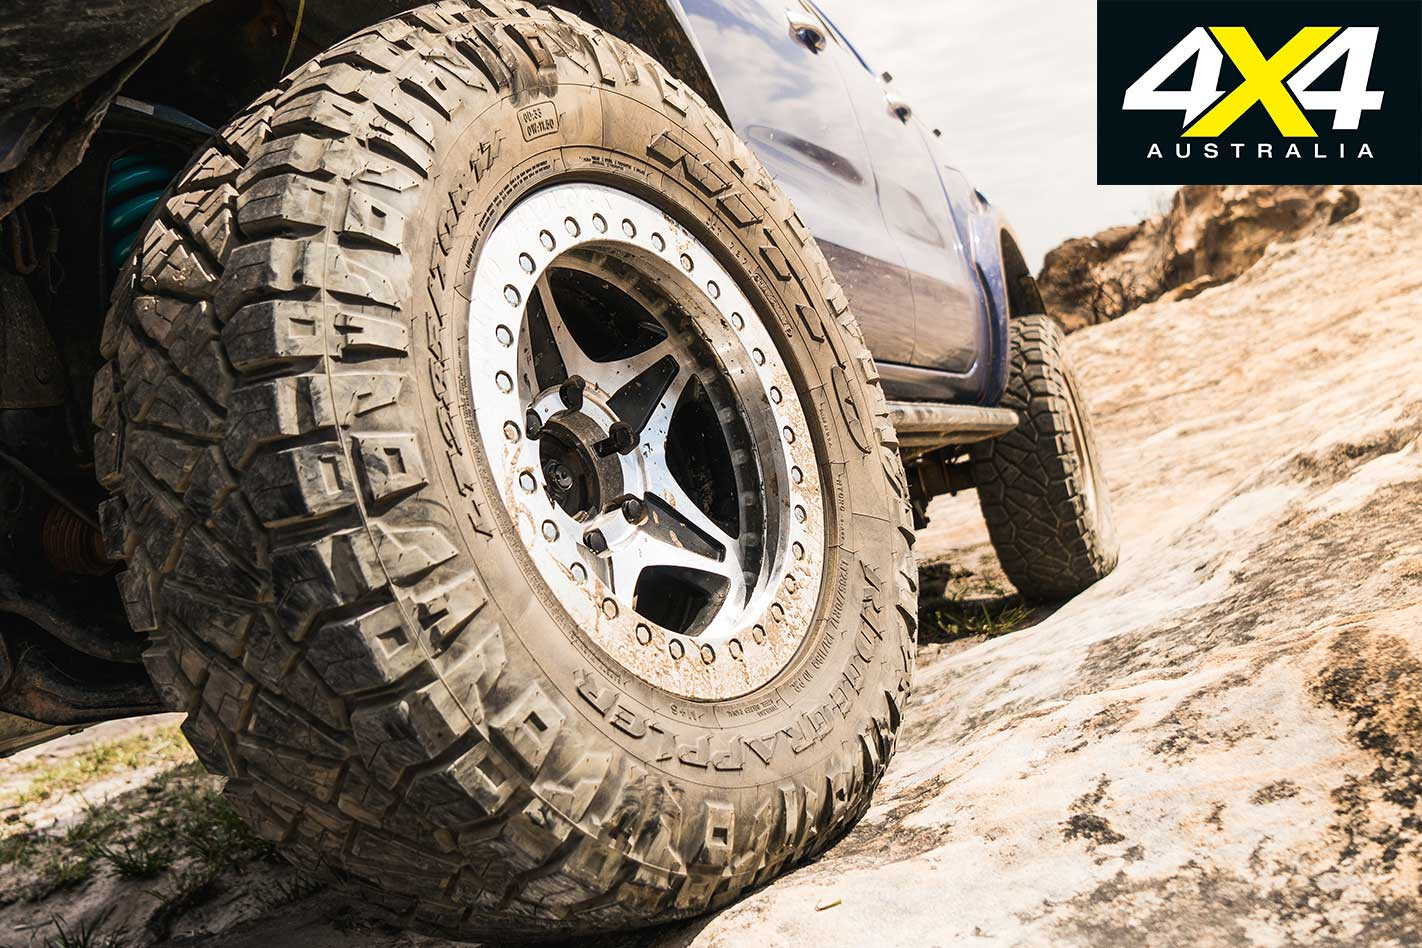
These on-road benefits work against Passenger Car tyres off-road where the light carcass is susceptible to damage from sharp objects. If you’re going to be doing a lot of dirt- or off-road miles, upgrade to Light Truck (LT) construction tyres, as their heavier construction provides better puncture resistance.
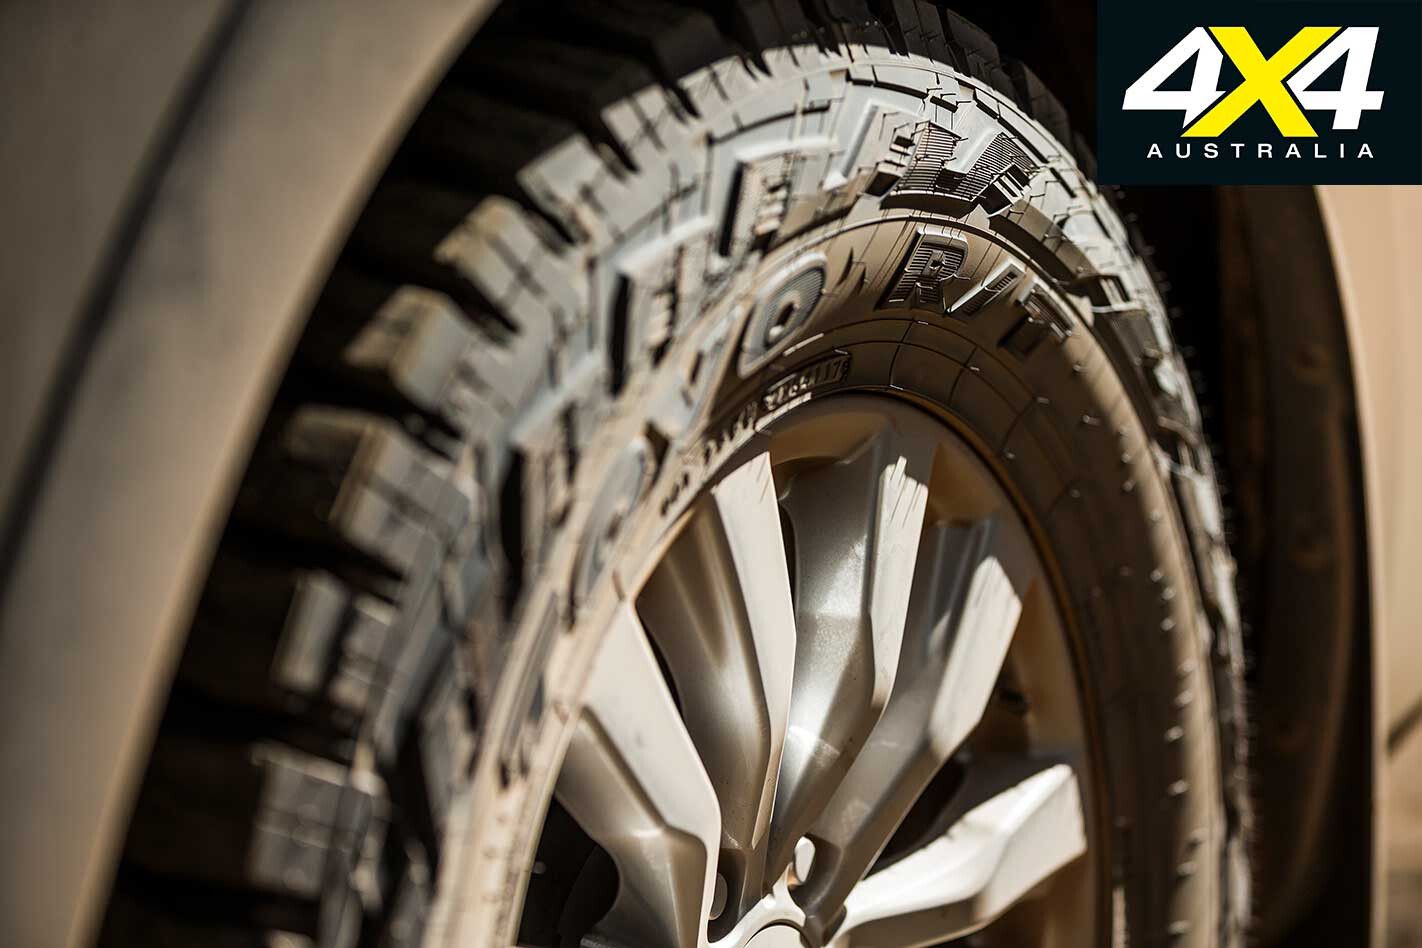
The construction of each tyre type is clearly marked on the sidewall. Passenger Car tyres will be marked with ‘P’ or have no marking at all prior to the size listing (e.g. P265/65R17 or 265/65R17) while Light Truck tyres will be marked with ‘LT’ prior to the size (e.g. LT265/65R17).
In the examples listed, ‘265’ refers to tread width in millimetres; ‘65’ refers to aspect ratio (the depth of the sidewall as a percentage of tread width); ‘R’ refers to radial construction; and ‘17’ refers to wheel diameter (in inches).
Tread Pattern
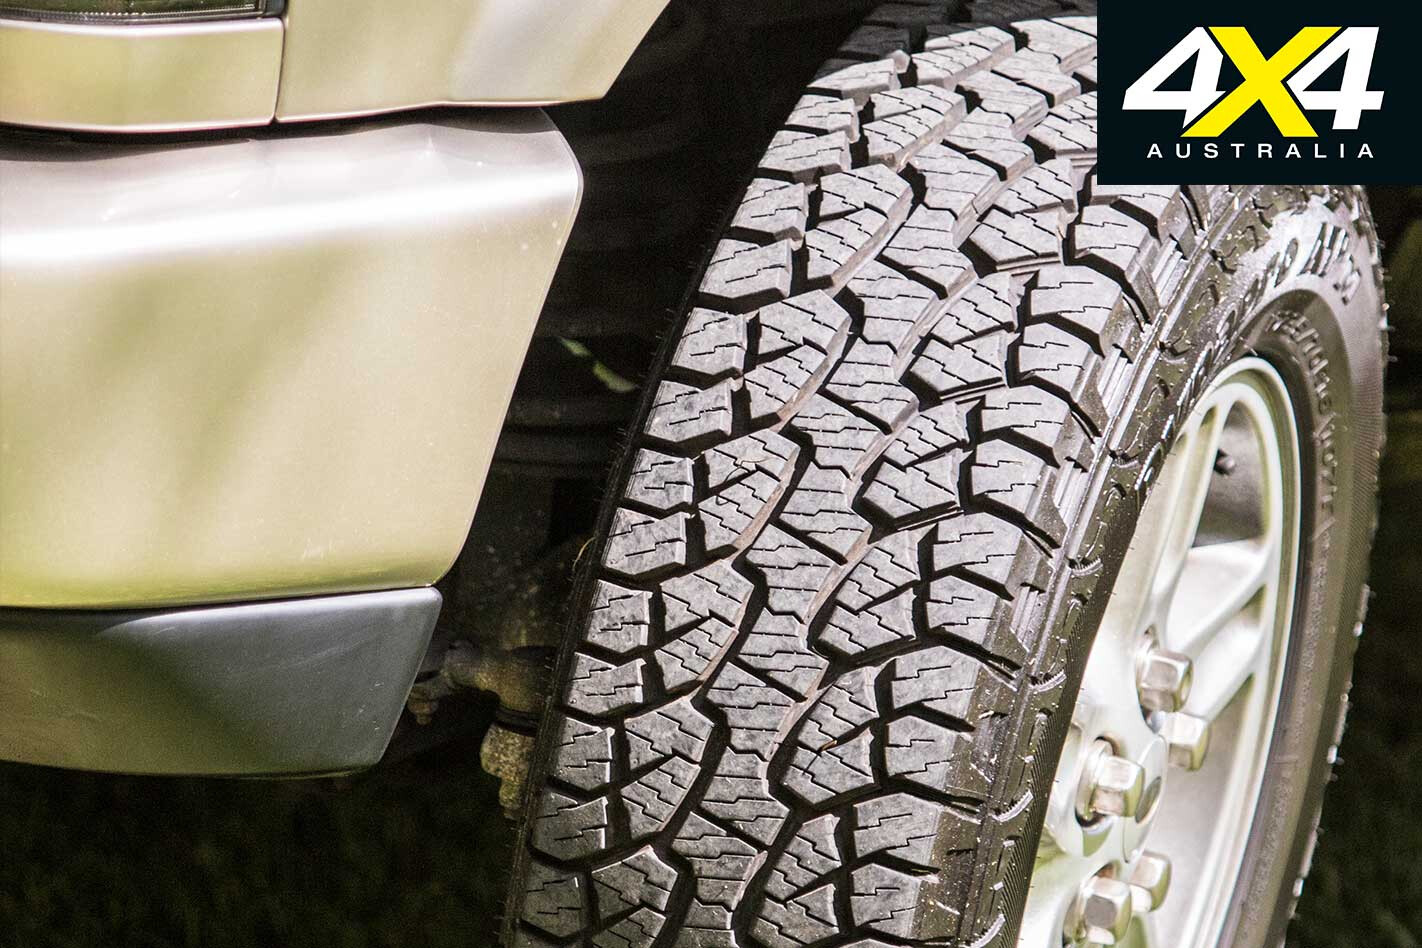
There are many different tread patterns on the market, but they can generally be split into three categories: highway terrain (H/T), all terrain (A/T) and mud terrain (M/T). Choosing the right one to suit your needs will depend on the driving conditions you most likely expect to encounter.
If almost all of your driving will be on sealed roads, H/T tyres will provide the best grip in both dry and wet conditions. They also produce less noise than tyres with a more aggressive tread pattern, and the potential for less rolling resistance can result in better fuel economy and longer tyre life.
On the downside, they will not perform as well off-road; their closed-in tread pattern can struggle to gain purchase and clear away dirt and mud.

At the other end of the scale M/T tyres have wide-open tread blocks that can more readily clear away mud and provide bite in slippery off-road conditions, but they can be noisy on the road and wear faster than H/T or A/T tyres.
A/T tyres are a compromise between highway tyres and muddies and are ideally suited to those who have to travel long distances on the blacktop, as well as a fair bit of off-road driving on the agenda.
Tyre sizes
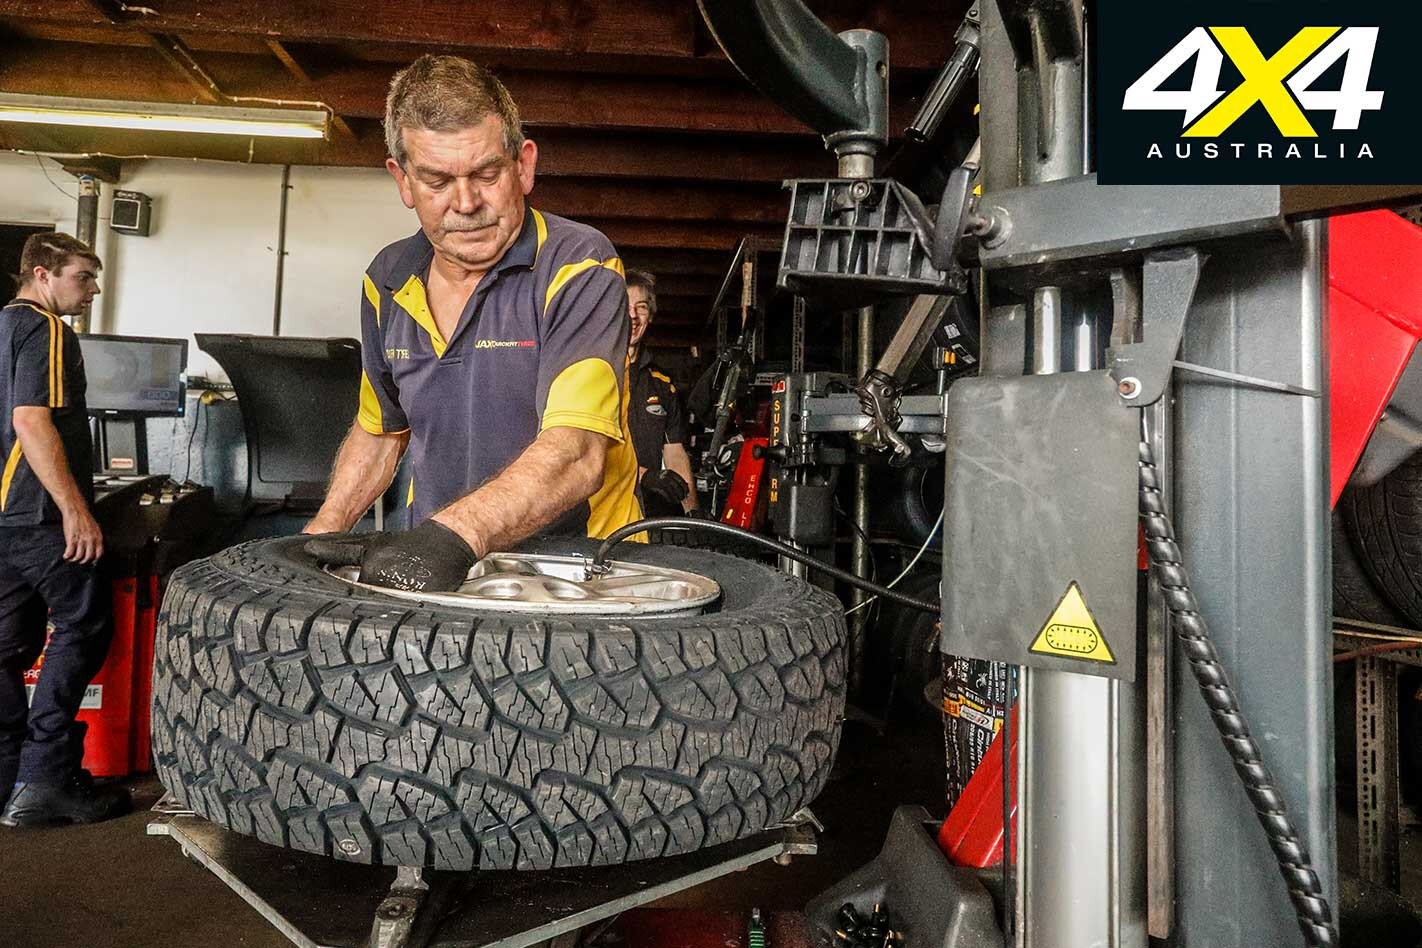
The more common a tyre size the easier it will be to find a replacement in regional areas if you damage one beyond repair. The most common size today is probably the 265/65R17 as fitted to many 4×4 utes, but there are still plenty of 15-inch, 16-inch and even 18-inch L/T tyres around.
If your new vehicle comes standard with flash-looking 20-inch rims, ask the dealer if there’s an alternative size available. Some manufacturers offer a smaller rim diameter as a no-cost option.
Legalities
When it comes to fitting bigger tyres to your 4×4 there are some rules you need to abide by. In most of Australia it’s now accepted that you can raise the height of a vehicle by a total of 75mm – 50mm through suspension and 25mm through a tyre-size increase.
However, before you go up a size, ensure you check with your state governing body and your insurance company. Be aware that larger diameter, heavier tyres affect vehicle gearing and performance.
You can fit a tyre with a lower speed rating than listed on the vehicle’s tyre placard, so long as the driver does not exceed that speed on the road. The lowest speed rating for off-road tyres in Australia is ‘N’ (140km/h).
You must never fit a tyre to your vehicle with a lower load rating than that listed on your vehicle’s tyre placard. Both a tyre’s speed rating and its load index will be marked on the sidewall.
Opposite Lock has more than 75 outlets across Australia and New Zealand and has been in the off-road aftermarket scene for more than 40 years, both manufacturing its own gear (and following that up with fitment services and a nationwide warranty/support program) and on-selling other brands’ equipment. This makes them well placed to offer some sage advice on fitment of accessories to your rig.
For most of us, fitting accessories starts with a bullbar up front; with the dual role of frontal protection plus a place to house your additional lighting, picking the right bar for the job is not as straightforward as you’d think.
The frontal protection and good looks that a bullbar offers is the foundation for what other accessories or upgrades you may want to add, now or in the future, to your vehicle. Things such as underbody protection, suspension, wheels, tyres, lights and communication gear can all affect what type of bar you put on your vehicle.
Opposite Lock covers most of these options with its range of bullbars, starting with its own steel bars (and those made by Outback Accessories), and also alloy ECB bars and Smartbars. The company’s newest steel bar – the Urban Adventure Bar – is an Aussie-designed unit that is nicely styled and more than up to the job.
“When designing the Urban Adventure Bar we wanted to design a bar that would let a customer keep the look of the vehicle they love but still personalise it, whilst performing off-road if required,” said Adam O’Sullivan, General Manager of Opposite Lock.
The Urban Adventure Bar is a full bumper replacement, meaning no cuts to your existing front bumper, and it includes 30W auxiliary flood lights as standard. Other standard kit includes extra auxiliary lighting mounting points and a matte black powdercoated finish.
The bar is built with off-road performance in mind and includes triple underbody plates, increased approach angles and a low-mount winch provision that fits to the vehicle’s chassis.
Like all Oppy Lock engineered and developed bullbars, the Urban Adventure Bar is ADR- and SRS-Airbag compliant and has a two- year warranty. Additional features that maintain the functionality of your vehicle include a tech pack and parking sensor compatibility, hinged number plate brackets, and optional colour coding.
For those after an even tougher-looking bar, the Opposite Lock loop bar fits the bill. The single loop bar ups the frontal protection for your rig’s engine and radiator. Triple loop bars extend this protection to the entire front of the vehicle, including the headlights.
Opposite Lock premium and fleet bar standard inclusions include three CB aerial mounts, recessed LED indicator lenses, low mount winch provision, a matte black finish that can be optionally colour coded, and they’re ADR- and SRS-Airbag compliant. In addition to this, the premium bars include hi-lift jacking points, heavy duty overriders and underbody protection plates.
For the traditionalist, Opposite Lock’s premium steel post bar provides maximum protection qualities and provision for fitment of larger driving lights. For those looking at a bar that provides optimum approach angles for the more challenging driving conditions, John Mitchell, Oppy Lock Product Manager, reckons the Outback Accessories XROX bar is a top option.
“They are aggressively styled, provide unrivalled approach angles and ground clearance with a lower weight than traditional bars, but may not protect the wings of the vehicle in the same way,” John said.
For those keen to avoid the added heft of a full steel bar on the front of their rig, the Oppy Lock teams highly recommends the Aussie-made-and-designed alloy bars from East Coast Bullbars. For the lightest option, the Smartbar roto-moulded polyethylene bullbar offers decent protection without the handicap of weight affecting fuel consumption or your suspension set-up’s performance.
Fitting a bullbar is a big investment for any off-road tourer, so having the advantage of being able to chat to retailers who actually live and breathe the lifestyle makes for a far higher chance of making that final smart choice.
LIKE IT or not, camper-trailers are a mind-bogglingly large part of the 4×4 landscape, and we’re bloody glad for it.
While Facebook experts stand on their soap boxes, emanating a high-pitched shriek about the virtues of simple camping, families all across the country are hitching up their home-away-from-home and travelling to corners of Australia far beyond the reach of social media and the self-proclaimed gatekeepers of the outdoors.
Progress for the sake of progress isn’t always good; but progress to make the great outdoors more accessible? Now that we can get behind.
The catch, and there’s always a catch, is that while nearly all camper-trailers will make camp itself more comfortable, many fall apart as soon as the track of a lifetime becomes little more than a freshly-graded fire trail. At what point does a camper-trailer stop being something that enhances your off-road escapades and start becoming something that hinders them?
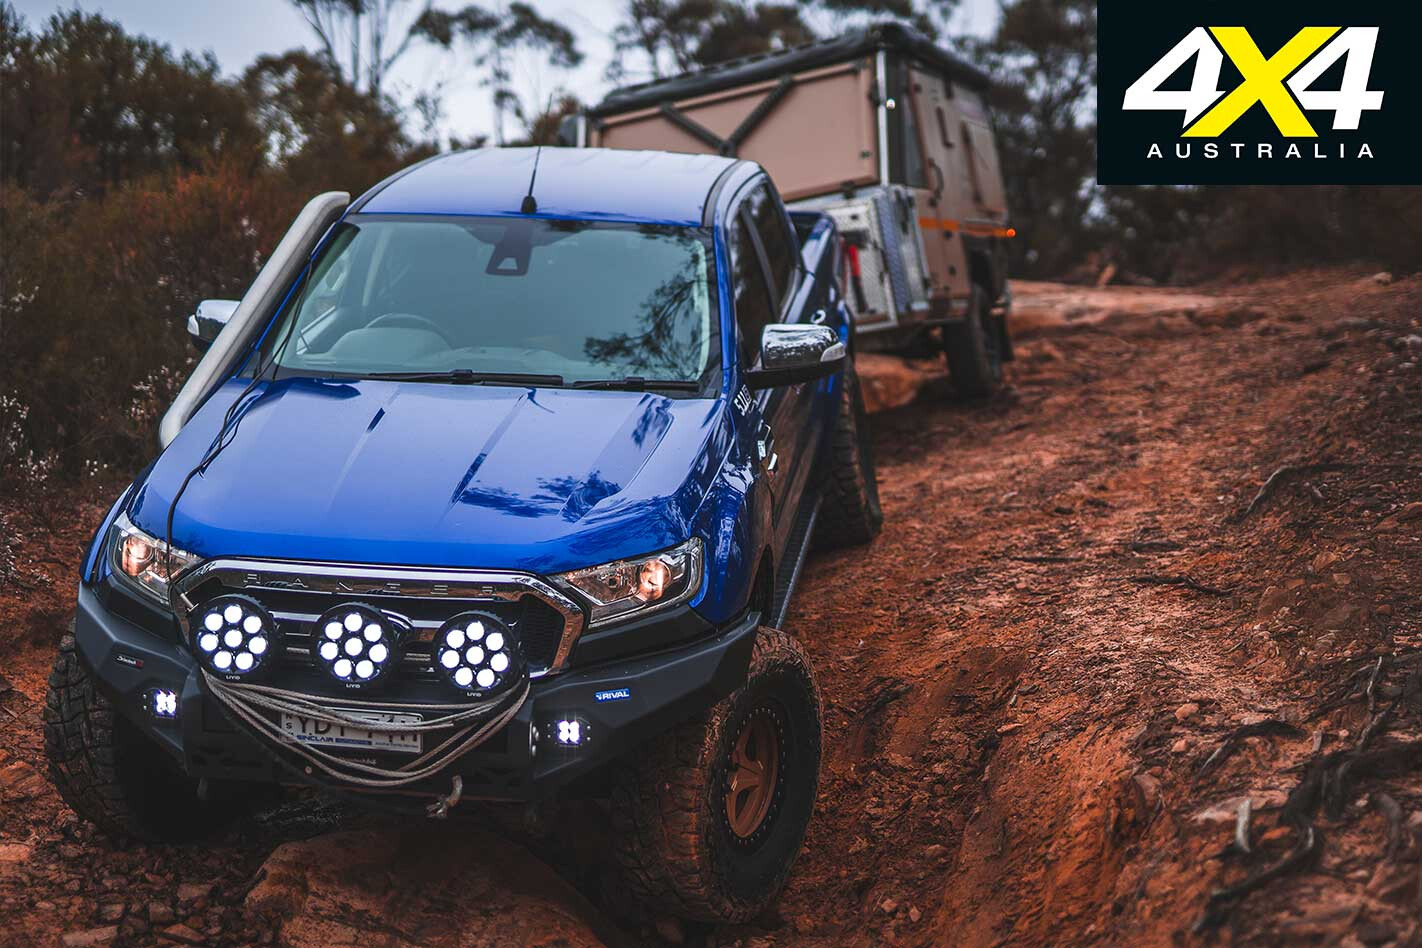
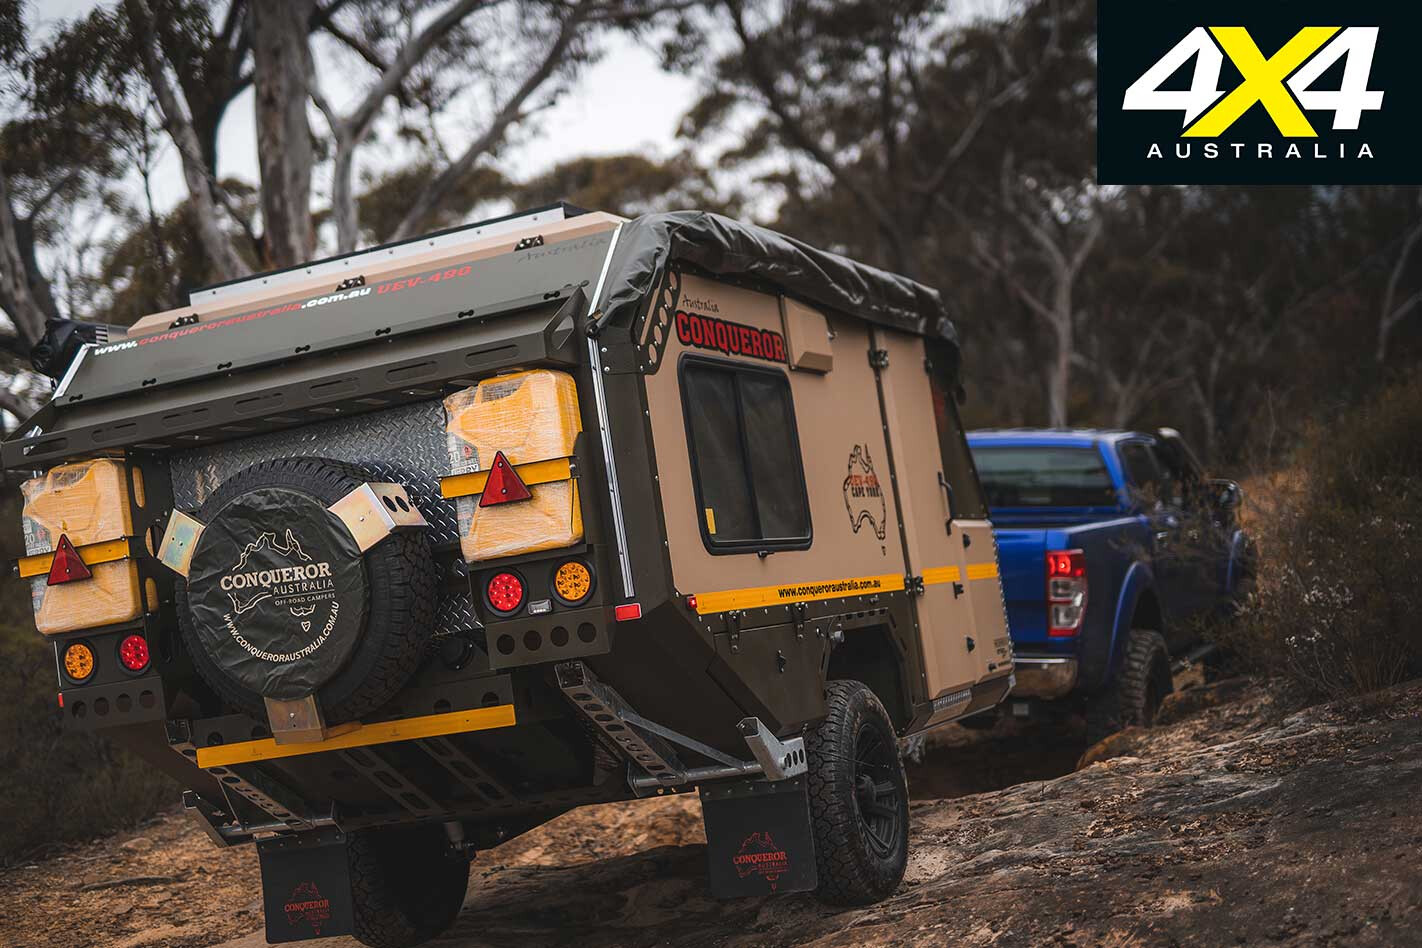
It was this thought floating through our minds as we lined the Conqueror UEV-490 up against rock ledge after rock ledge, mud hole after mud hole and, the biggest torture test imaginable, a pair of children. Would it leave us high and dry when the track turns tough?
First Impressions
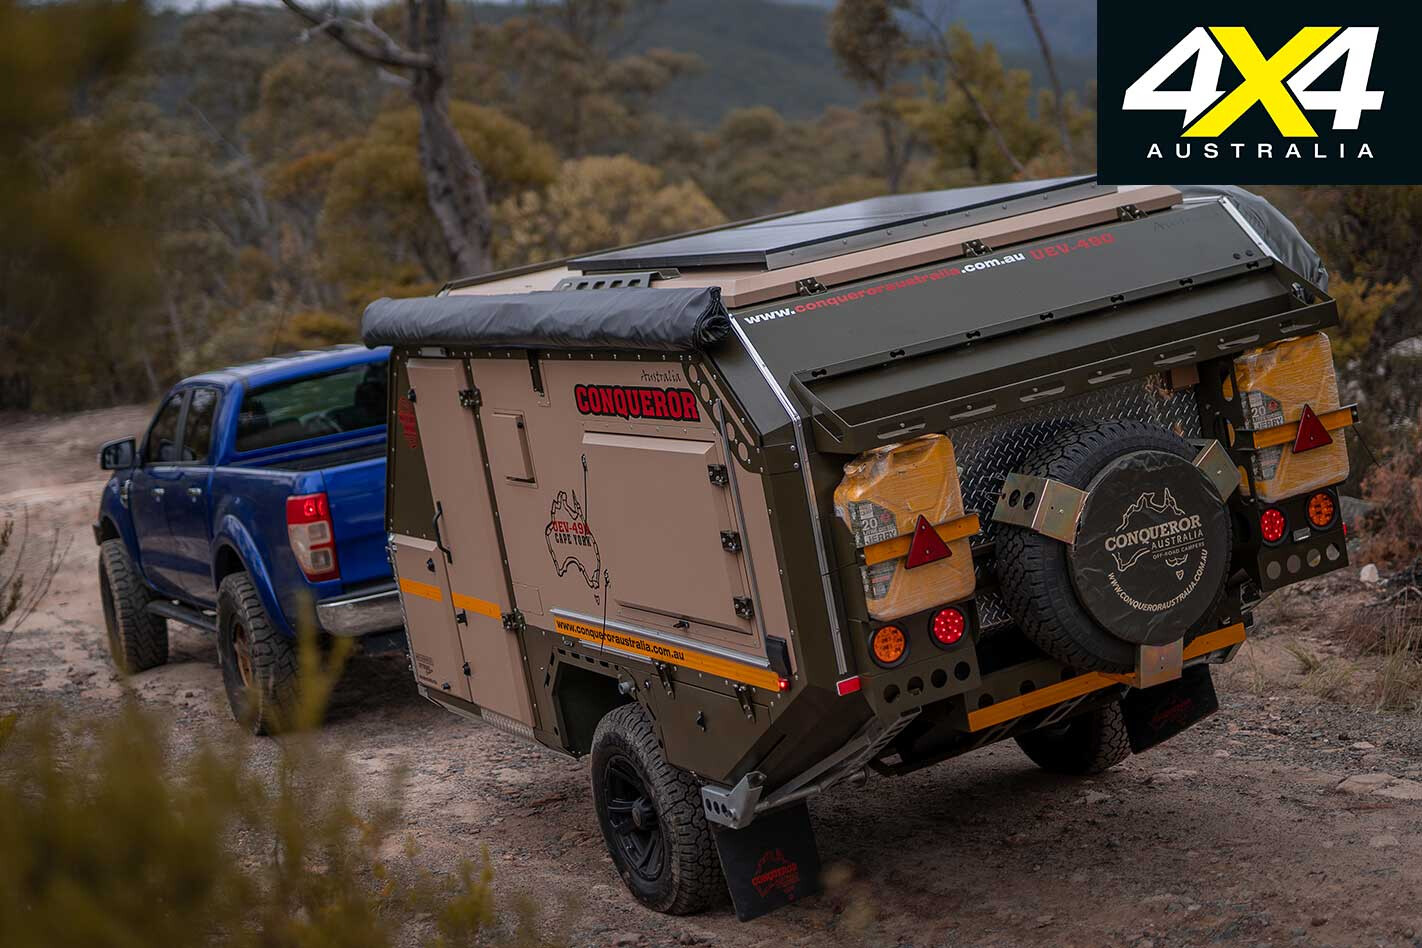
EYEING off the UEV-490’s olive drab-adorned flanks it’s easy to write it off as just another faux-tactical marketing gimmick. But you’d be wrong. Tactically wrong.
While olive drab is the war paint of choice for suburban Rangers adorned with fibreglass and Nike bum bags, the Conqueror has earned its stripes. Hailing from the ‘meaner-than-my-ex-missus’ streets of South Africa, Conqueror has been piecing together off-road trailers for the SA military for the best part of three decades.
Those military underpinnings shine through despite years of polish to make its camper line civilian friendly, and we use the term polish metaphorically; you won’t find a single panel on the Conqueror range with shine.
On closer inspection it starts becoming clear just how much that ‘military tough’ design principle has gone into the line-up. Where many other campers are zapped together in whatever cheapest method the factory concocted, the UEV-490 is a jigsaw puzzle of lightweight panels glued and riveted to the frame to keep weight down and allow just enough flex in the body so it won’t shake itself to pieces on outback corrugations.
Conqueror tells us the panel construction is modular, allowing individual panels to be replaced if damaged rather than writing the camper off. It declined our offer to damage the sides in the interest of science, though. Some people, right?
Prodding further into the camper solidifies those first thoughts. The doors are bunker strong, with heavy-duty hinges bracing one side of the door, while the other is internally lockable should you find your campground under siege by rebel factions.
If you’re starting to build a picture of clever design features mixed with the rugged simplicity of military equipment, you’re on the right track. Imagine a Humvee with a fold-down coffee maker in the gun turret and you’ll be right at home.
The Setup
ALL THE shine and polish in the world is irrelevant in a camper if it requires a troop of Russian contortionists to set up, and to that end the UEV-490 is a bit of a mixed bag. Let us explain.
If you pull up to camp and it’s pouring rain, the set-up time is approximately three seconds. Just enough time to open the door, get in and shut the door. There’s nothing else that needs to be done to jump in for the night on the main bed.
Need more head room? You don’t even need to leave the camper. A simple swing bar unlocks and pushes up for an extra foot of space.
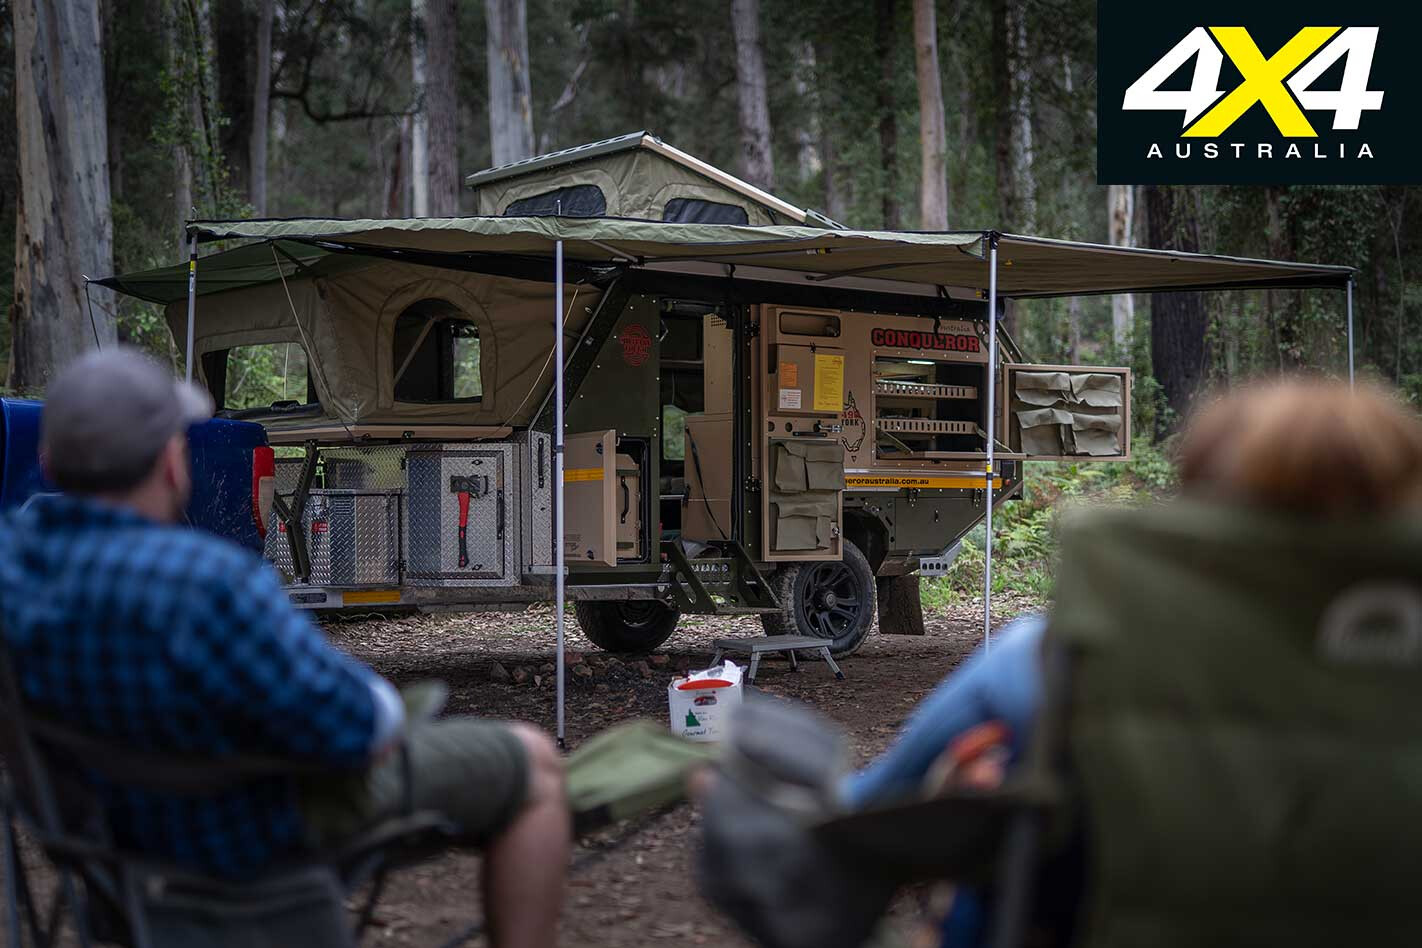
The awning is one of the simplest in camper-trailer-land, too. A batwing arrangement provides coverage front to rear, with most of the poles swinging into place. Two people could easily set the awning up in less than two minutes.
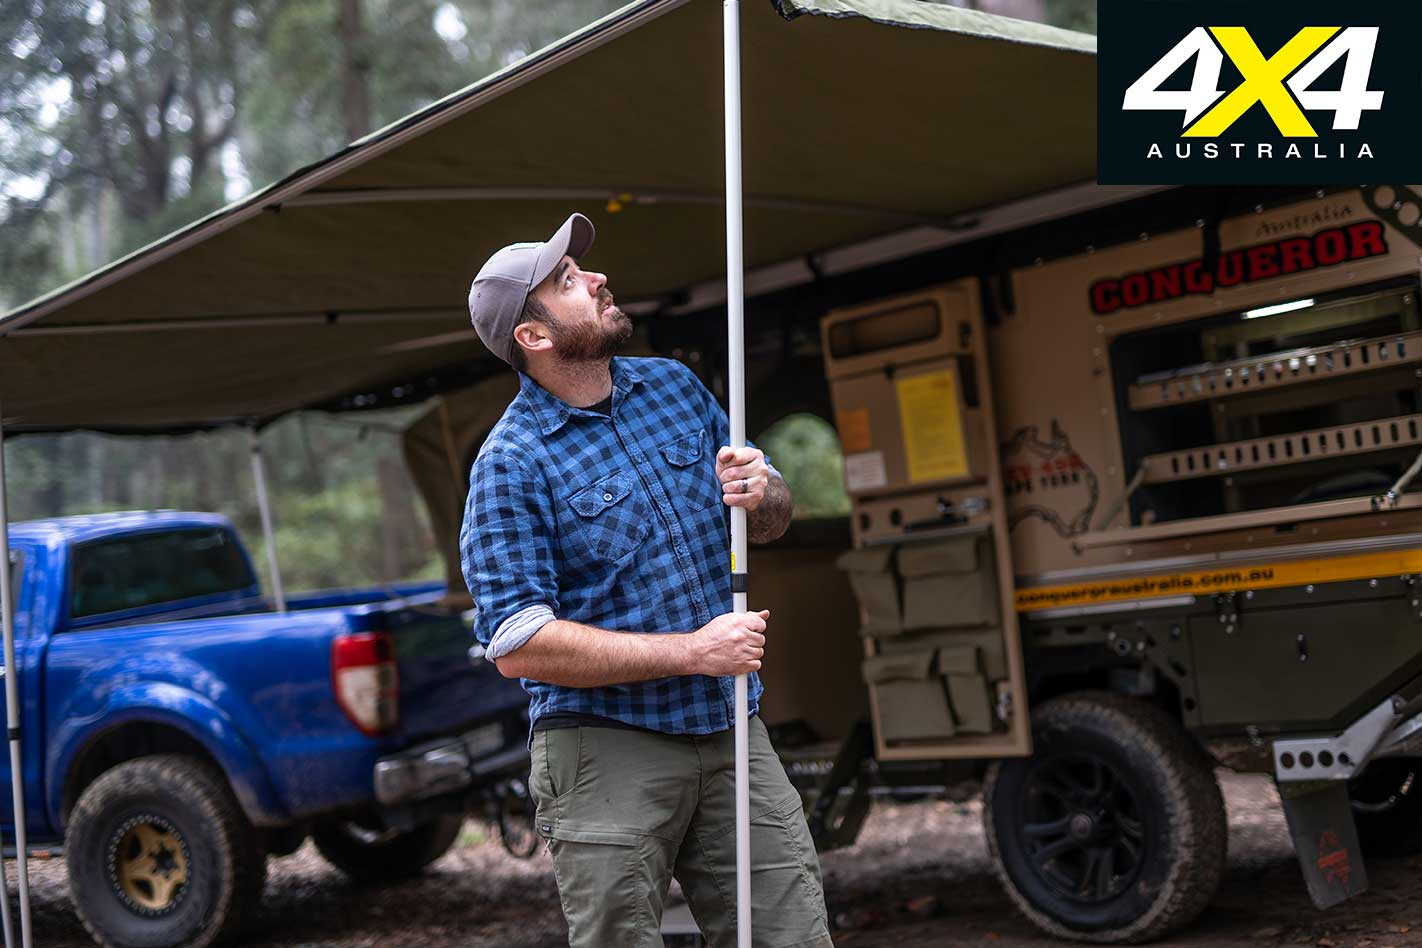
So where does it go south? It’s not so much that things are complicated to do – the exact opposite, actually. Things are incredibly simple to set up, but they’re physically demanding. Those oh-so-cool, kick-into-place stabiliser legs? They require you to jump under the camper and sit down; something that might not be appealing in the cold, the rain, or the mud.
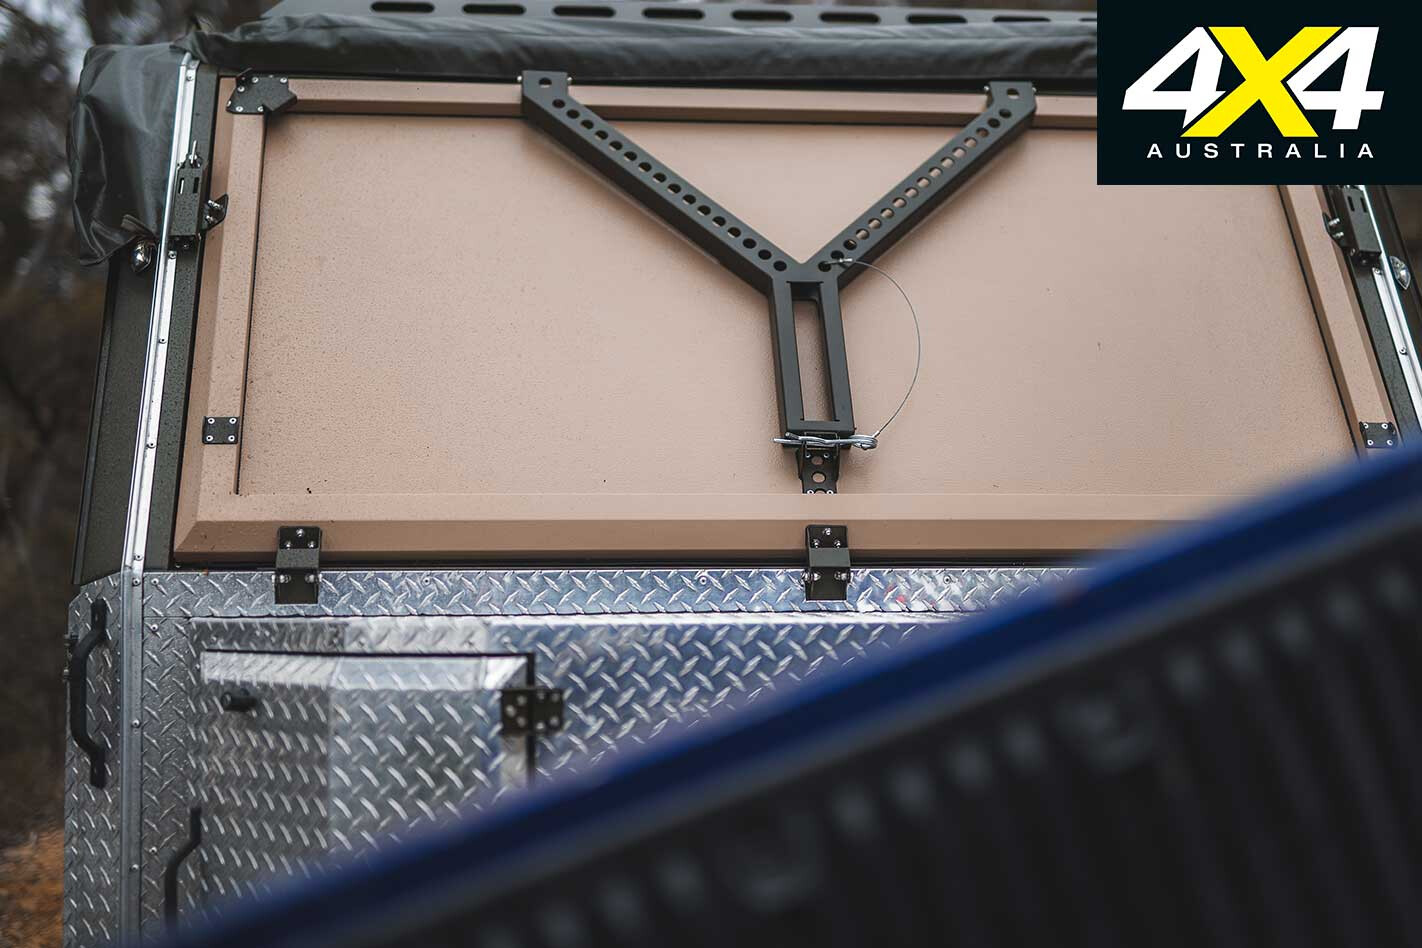
The front bed is another physically involved job, too. You’ll need to climb up on top of the camper’s front storage box to retrieve the poles that hold the tent in place. You’ll also need to put your body weight against the hatch to get the locks open. Then head back inside to unfold the mattress into place. Complicated? Hell no. It’s doable in just a few minutes, but you’ll be working for it.
Liveability & Storage
LOGIC dictates the longer you head bush for, the more stuff you’ll need to carry. Rather than using this as an excuse to cram more junk into every nook and cranny, the Conqueror thinks a little outside the box. Ironic, considering that’s essentially what it is.
Starting from the rear it’s obvious how much thought has gone into each and every aspect to not necessarily make it prettier, but more user-friendly.
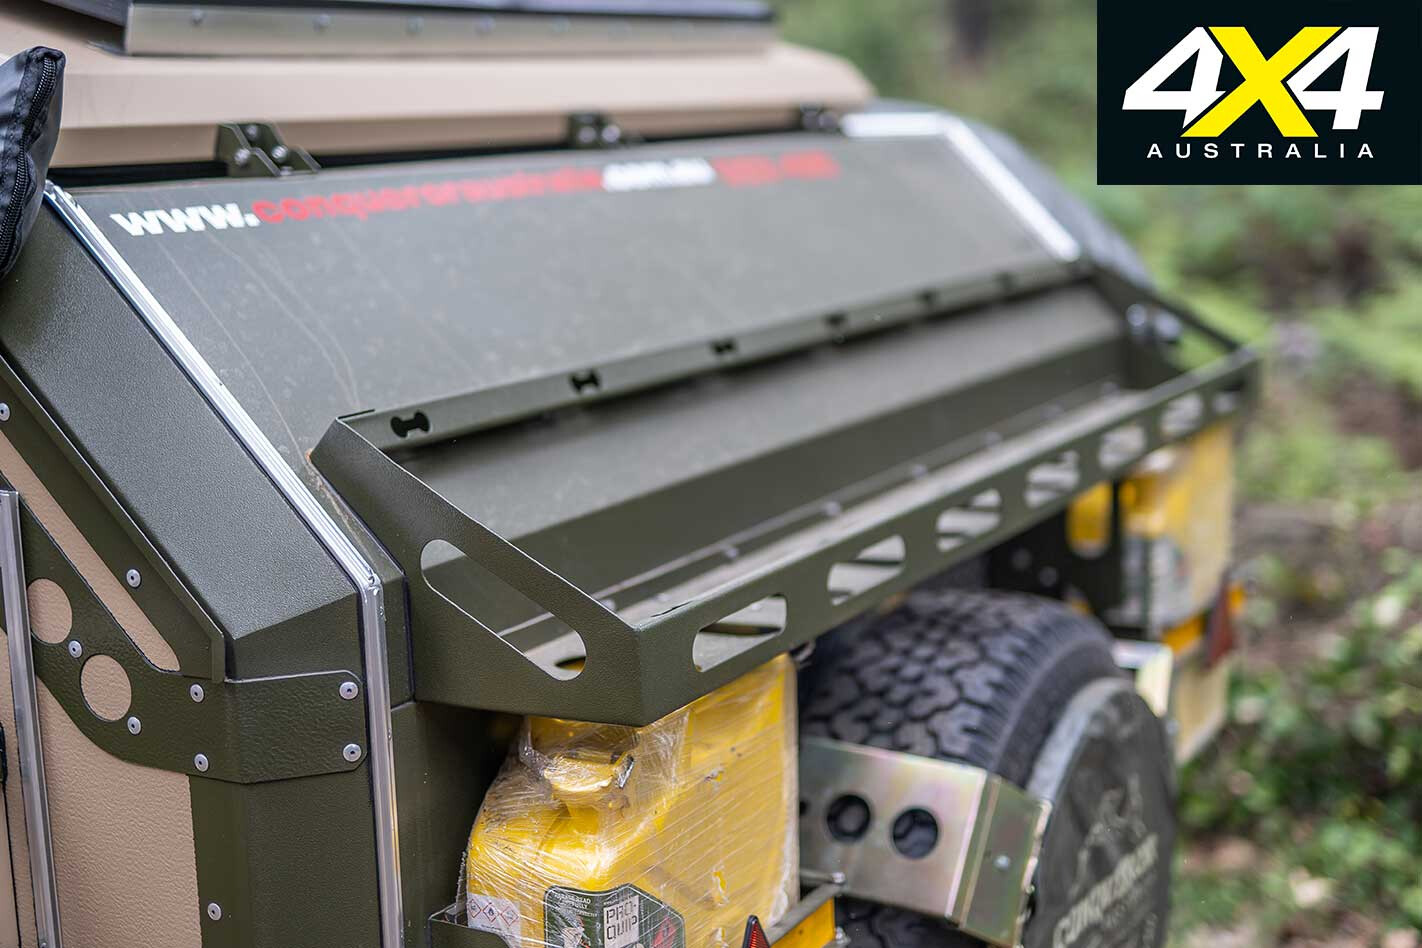
That single spare tyre? Not only does it sit out of the way on the rear, it also serves as a mount for a barbecue plate should you find yourself remote and fresh out of gas. Directly above is a clever rack designed for lugging firewood back to camp and, with the included tie-down points, can be used for just about anything you don’t want stinking up the interior.
Moving down the flanks and the stand-out is the pantry. A few pop locks and you’ve got access to a prep table, three deep shelves and a plethora of canvas pockets perfect for stowing food items. Simple enough? It would be, if the pantry wasn’t also accessible from inside the camper. No more midnight runs in the rain just to grab a packet of chips.
That inside/outside idea has spread to the fridge, too. It both pulls out on the combined fridge/kitchen slide but is also accessible through a hatch under the frontmost bed. Those canvas pockets are used extensively throughout the interior, too, with inbuilt cupboards lining the walls in every direction.
After any more than a few minutes with the UEV-490 it’s immediately clear you’re meant to live outside the camper, too, not just inside it. The driver’s side wall is a de facto bathroom, complete with its own awning and canvas walls. It encompasses the hot and cold shower, water heater, and even a pullout washtub with space for toiletries.

Along the passenger’s side is the meals/prep area. The kitchen stows plates, cutlery, cups and even wine glasses in specially made slots so you’re not lugging around busted Tupperware containers full of mismatched forks. Hey, you can’t expect the Saffas to head bush without matching cutlery, right?
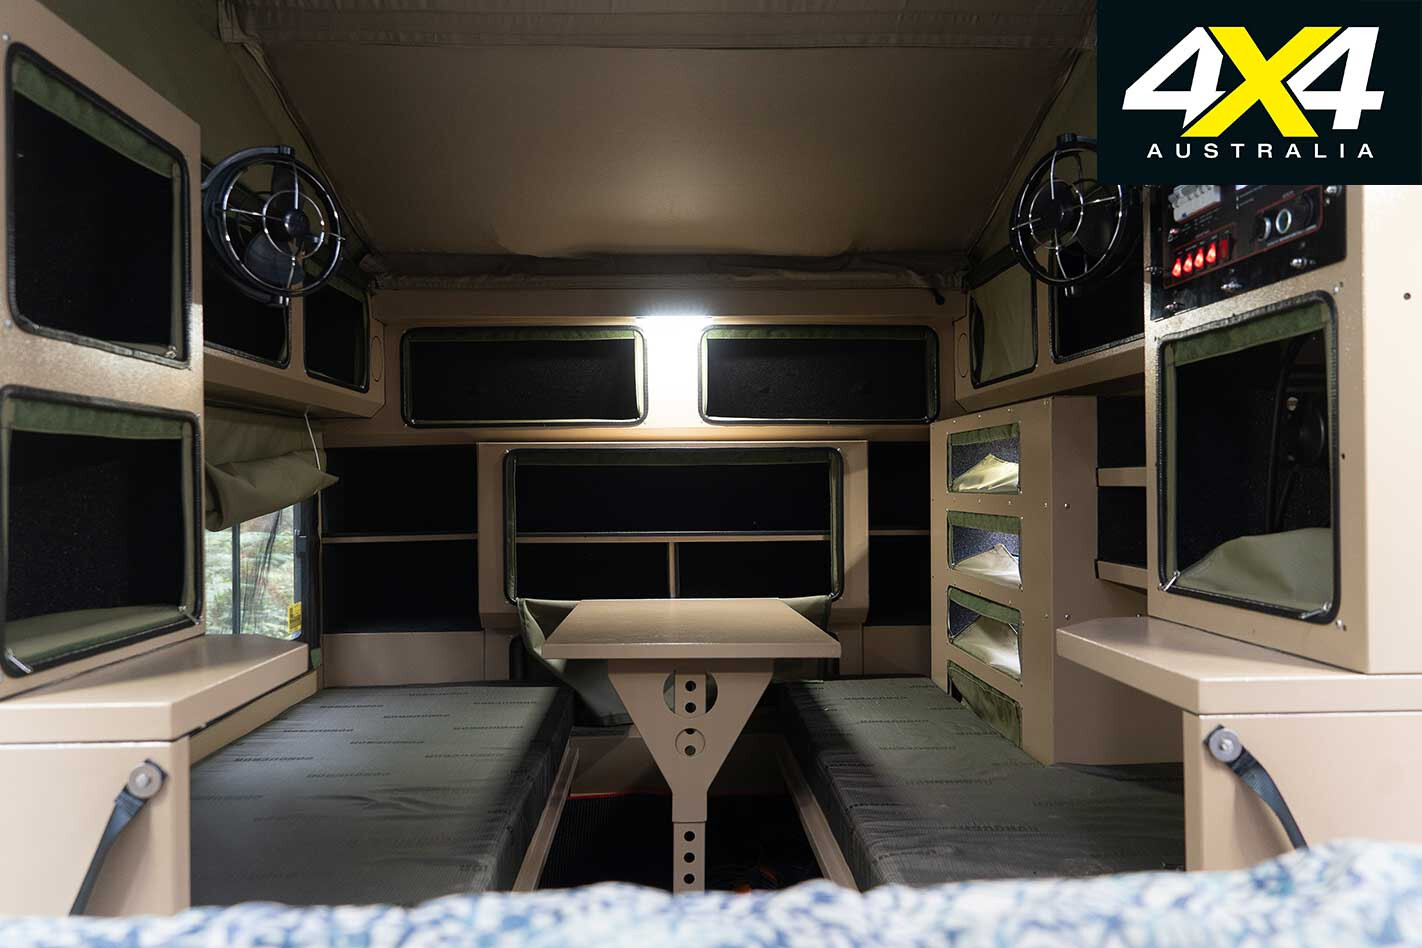
In full-blown camping mode you’ve got a few different internal sleeping options. The main bed is a quasi-king arrangement configured by dropping the internal dining table down between the two bunk-style beds. It’s a straightforward affair, but despite the nearly 2000mm of width, tall people will quickly run out of leg room. The two outside bunks have an overall length of 2000mm, but with a shelf above there’s no room for your feet in the last 400mm. In the middle, a notch in the end leaves the overall length there around 250mm short. At six-feet tall, we couldn’t lie straight in any position.
The second foldout bed didn’t fare much better. Despite its comfortable mattress the overall length of the bed is just 1670mm, leaving almost half our legs hanging off the bed. Admittedly you can lie on an angle, but it does seem like an odd oversight in an otherwise well-thought-out package.
Off-road Credentials
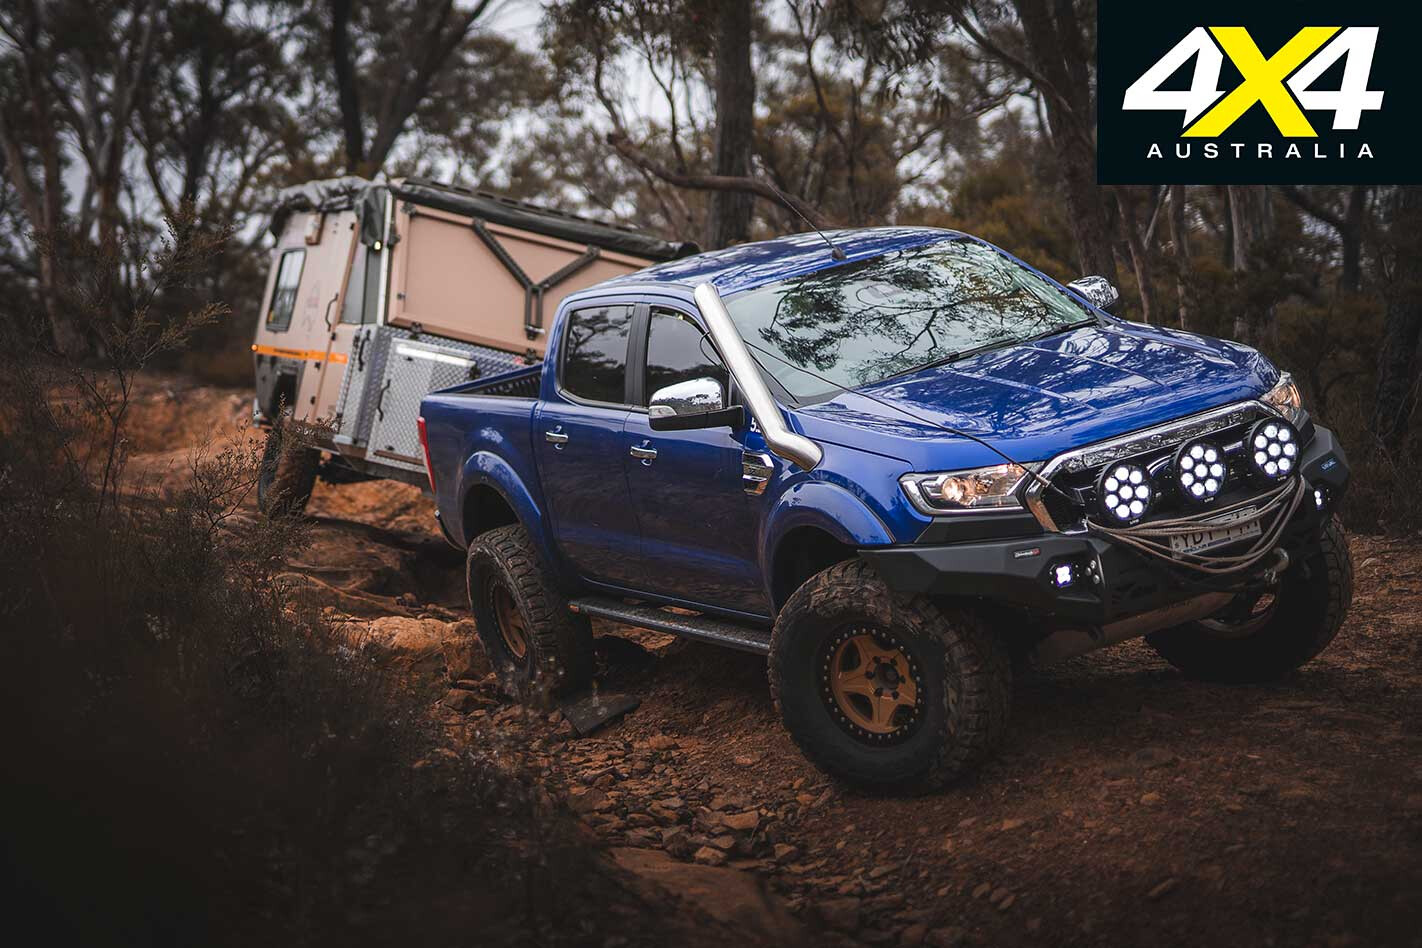
YOU DON’T buy a 79 Series for cruising through suburbia, and you don’t buy a Conqueror to punt down to your local campgrounds. So, how does it hold up when the going gets tough?
The first thing that stood out is just how incredibly stable it is. Despite looking top heavy, it’s incredibly well-balanced and surefooted, in part due to its lightweight construction (around 1500kg empty) but also due to the trick suspension arrangement.
Like most modern campers the UEV-490 runs an independent suspension arrangement. Unlike most modern campers, it’s good. The suspension mounts are integrated high up into the frame, minimising potential anchor points, and the control arms are beefy plate steel rather than box section – with added reinforcements to stop deflection in the arms – and include clever features like suspension-limiting straps to control travel, rather than letting the shock top out.
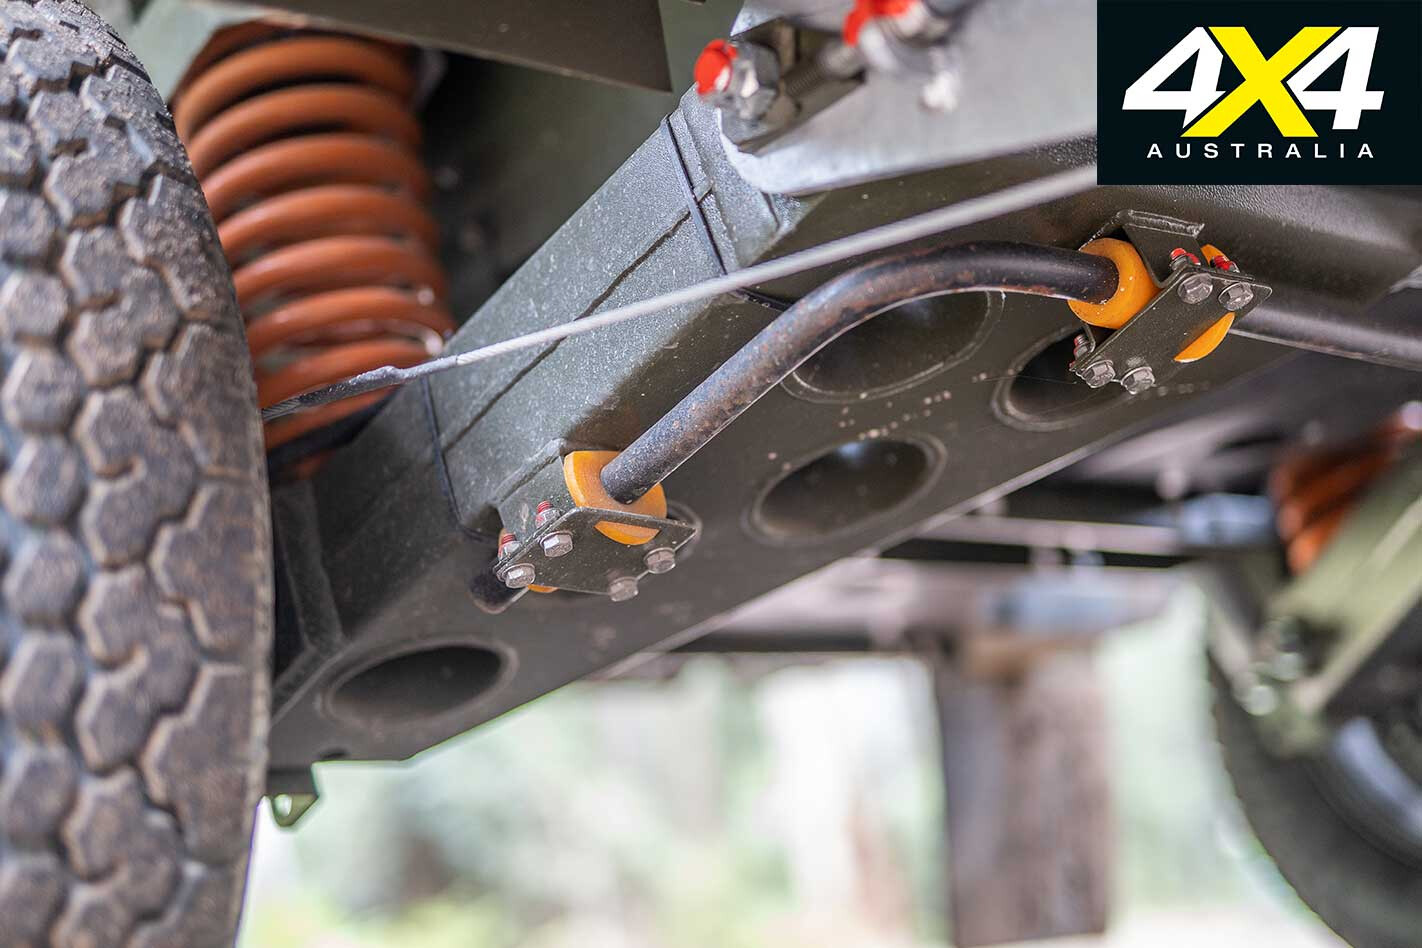
The spindles are replaceable if you happen to break one, and the springs and shocks are name-brand items. But that doesn’t help with the feeling of stability; that comes from the swaybar, the only one of its kind we’ve encountered in a camper trailer. It helps keep the camper level on- and off-road, and it stops the weight-shifting taller campers and caravans can give in off-camber situations.
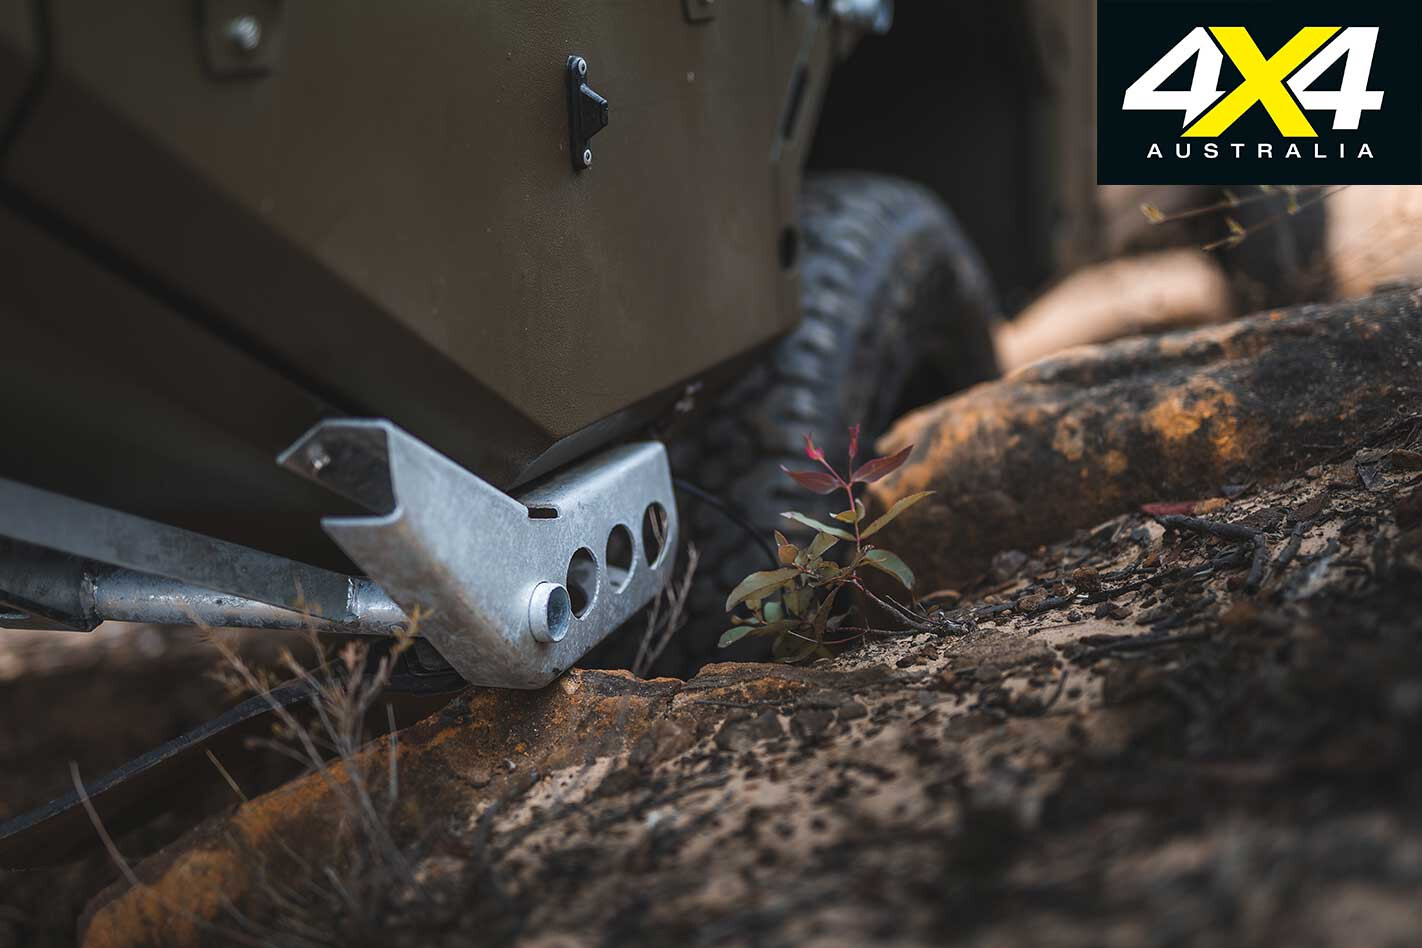
The underside is rust-resistant and will hold up to years of abuse. The raw hot-dip-galvanised finish won’t chip or crack like a powdercoated or painted finish would, and there’s an impressive departure angle with more hot-dip-galvanized plate steel protecting the camper’s flanks; although, we did manage to rip off a mudflap. Sorry, Conqueror.
Self Sufficiency
MAKE no mistake, while the UEV-490 is more than capable of climbing up and down rock ledges all day, where it excels is in the far reaches of the Australian outback, far from civilisation, and even farther from a developed campsite.
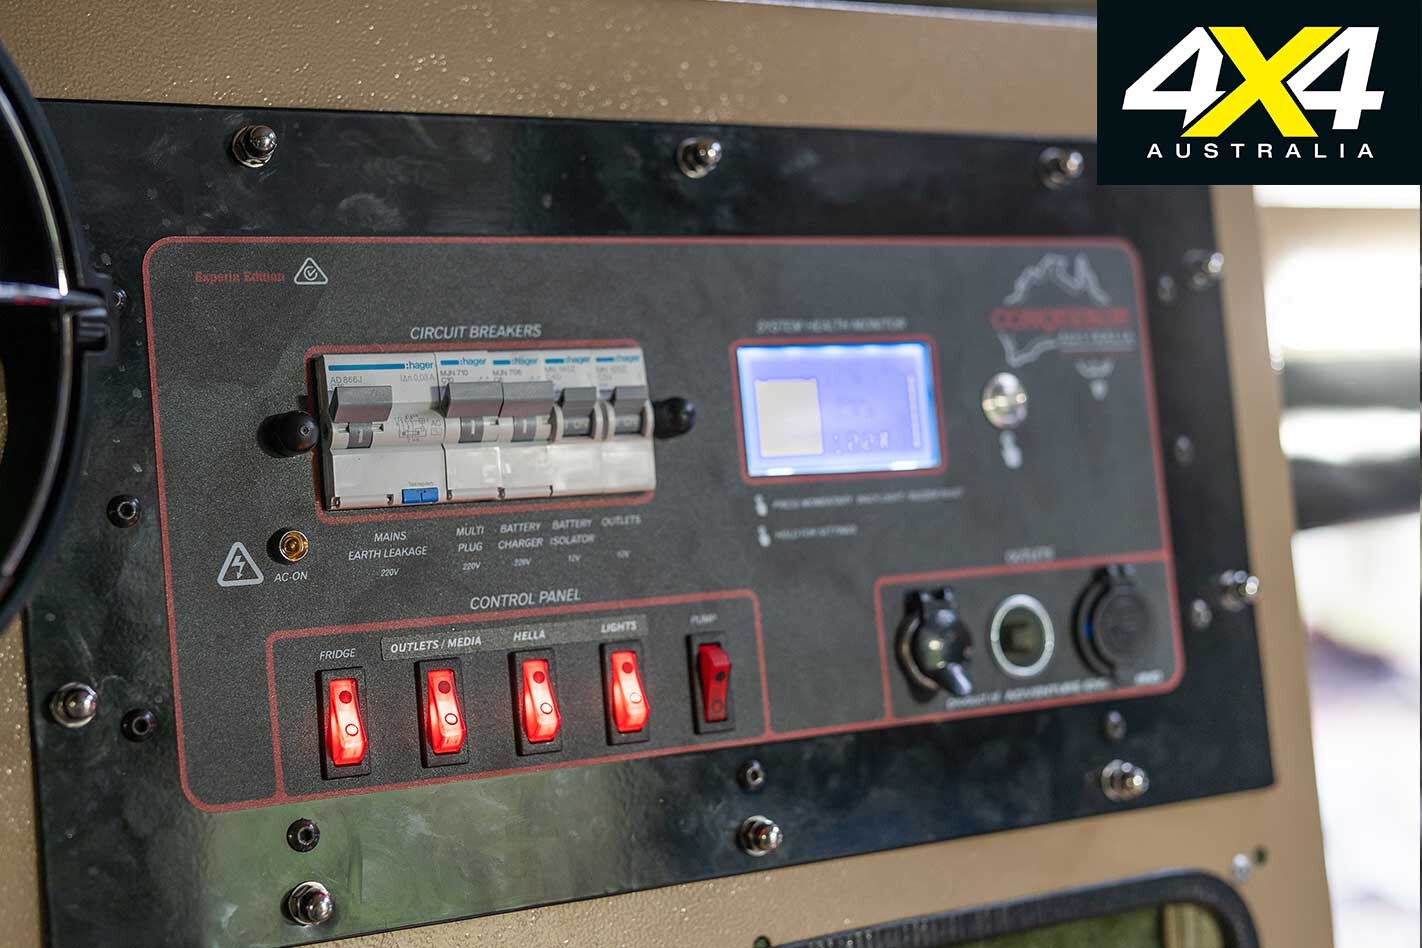
Keeping the lights on and fridge running is 210amp/h worth of power split between dual AGM batteries. They’re controlled through the internal switch panel and fed through either the 15A 240V charger if you’re near mains power, or through the Anderson plug up front; although, you’d be wise to fit a charger on the tow tug’s electrical system to isolate it.
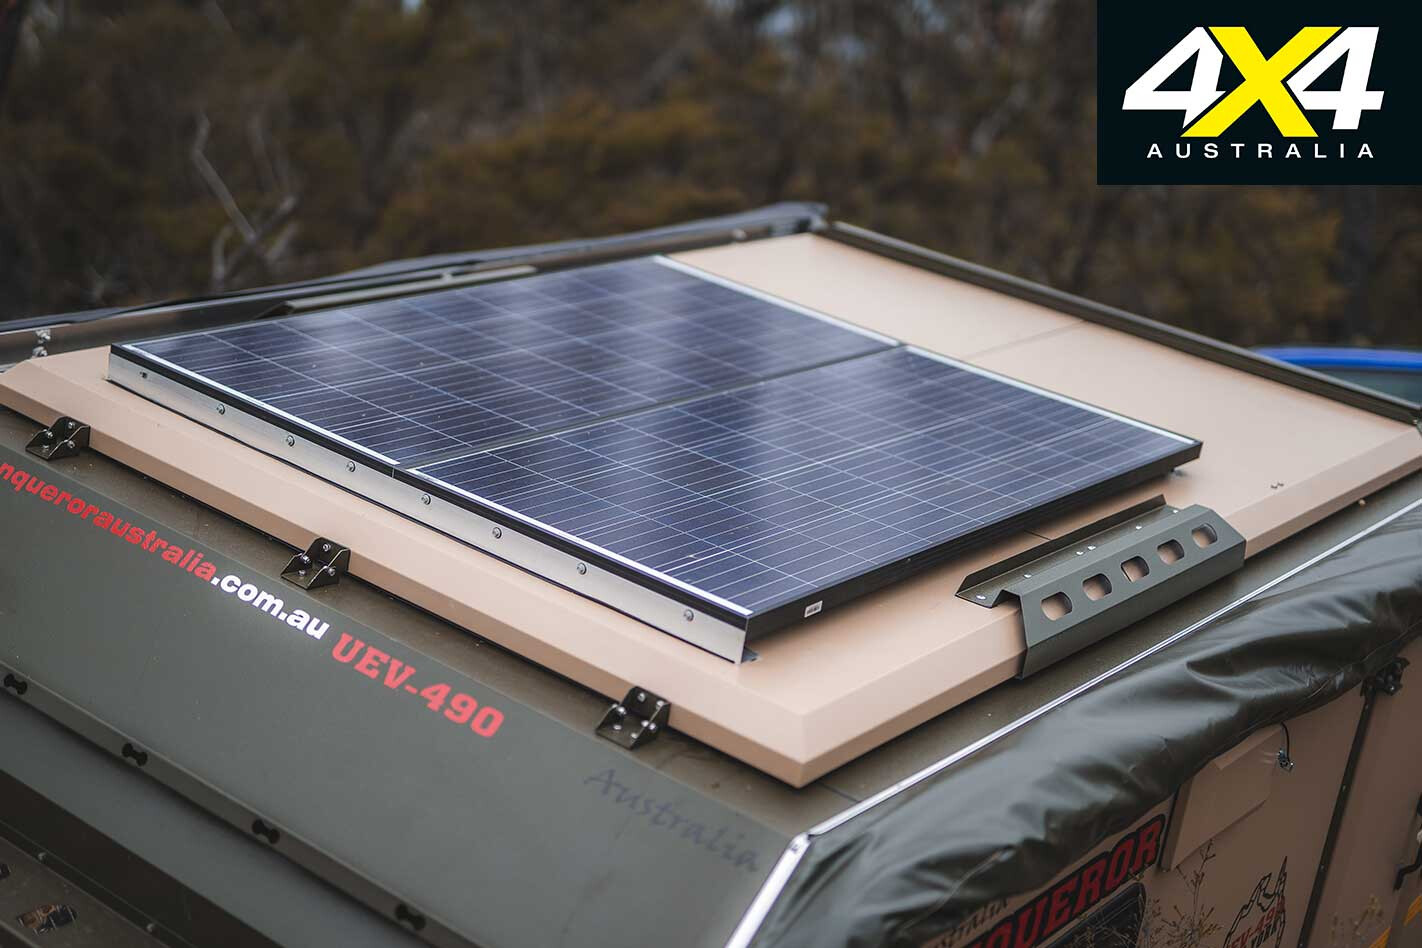
The electrical system powers the extensive LED lighting (inside and out), the twin fans inside, and multiple ciggie and USB power outlets throughout. Options are available to deck the camper out with up to 320W of solar power, additional batteries and 240V inverters.
On the rear of the camper is no less than 135 litres of water split between two food-grade plastic water tanks with a further 40 litres of storage possible in the two jerrycan holders. Water capacity is 175 litres and gives you fresh drinking water, as well as feeding the two basins and shower head via the gas hot-water systems.
Twin 4kg gas bottles provide plenty of fuel for the water system and the two-burner Dometic stove-top. A water filtration system is available as an optional accessory and allows you to refill your water tanks from any nearby stream.
Does it cut the mustard?
THERE’S no such thing as the wrong camper, only the wrong owner. With that in mind there are plenty of wrong owners for the UEV-490. If you’re physically frail, on a low-budget, or after an easy weekend camper, you’re not going to use it to its fullest potential.
If, however, you’re after something more, the UEV-490 might be the best piece of adventure equipment you ever buy. It has an ability to traverse almost any terrain; it’s light enough to not act like too much of an anchor off road; and it even has enough remote touring cred to last as long as your food supplies do. The UEV-490 might just be the excuse you’ve been looking for to disappear past the black stump for a month at a time.
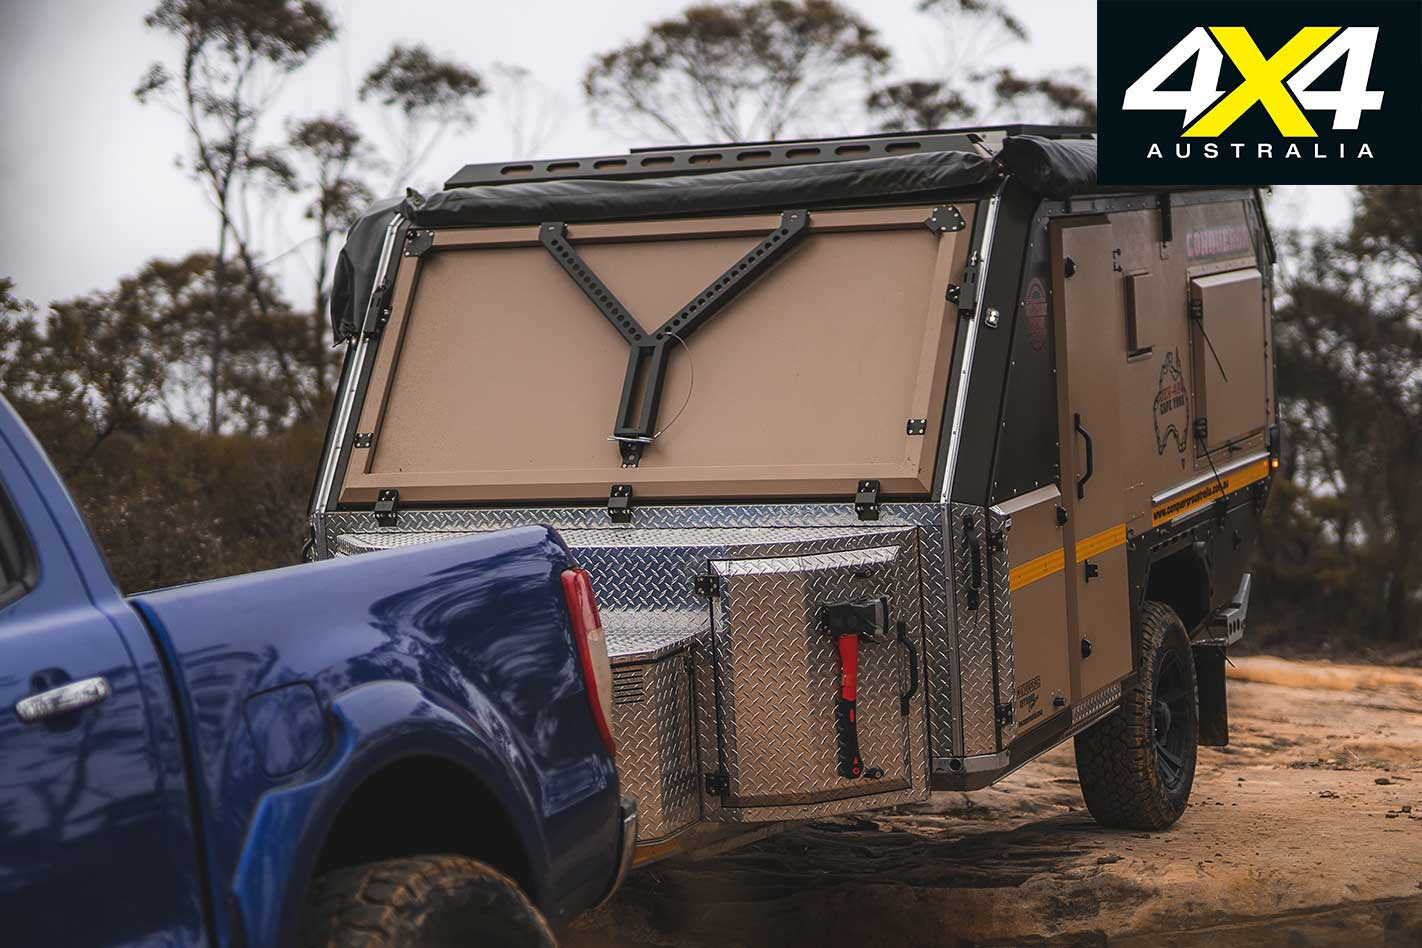
Conquerer UEV-490 camper trailer specifications TARE: 1500kg ATM: 1950kg SUSPENSION: Independent coil spring BRAKES: 12-inch electric COUPLING: Hitchmaster DO35 CHASSIS: Galvanised 100x50x5mm DRAWBAR: Galvanised 100x50x5mm BODY: Galvanised steel WHEEL/TYRE: 16-inch alloy 285/75 MT Tyres BOX SIZE (L/W/h): 4400/2000/2400mm LENGTH: 4900mm TENT SIZE (L/W): 5200/2000mm GAS CYLINDERS: 2x4kg gas bottles included WATER: 1x135L gravity + 12V pump COOKTOP: Two-burner gas KITCHEN: Stainless steel slide-out BATTERY: 2x10⁵amp/h AGM deep cycle PRICE: $69,030
RATINGS Off-road ability: 9/10 Fit for purpose: 8/10 Comforts: 8/10 Self-sufficiency: 9/10 Value for money: 7/10 Ease of use: 8/10 Build quality: 9/10 Innovation: 9/10 Fit & Finish: 8/10 X-Factor: 10/10
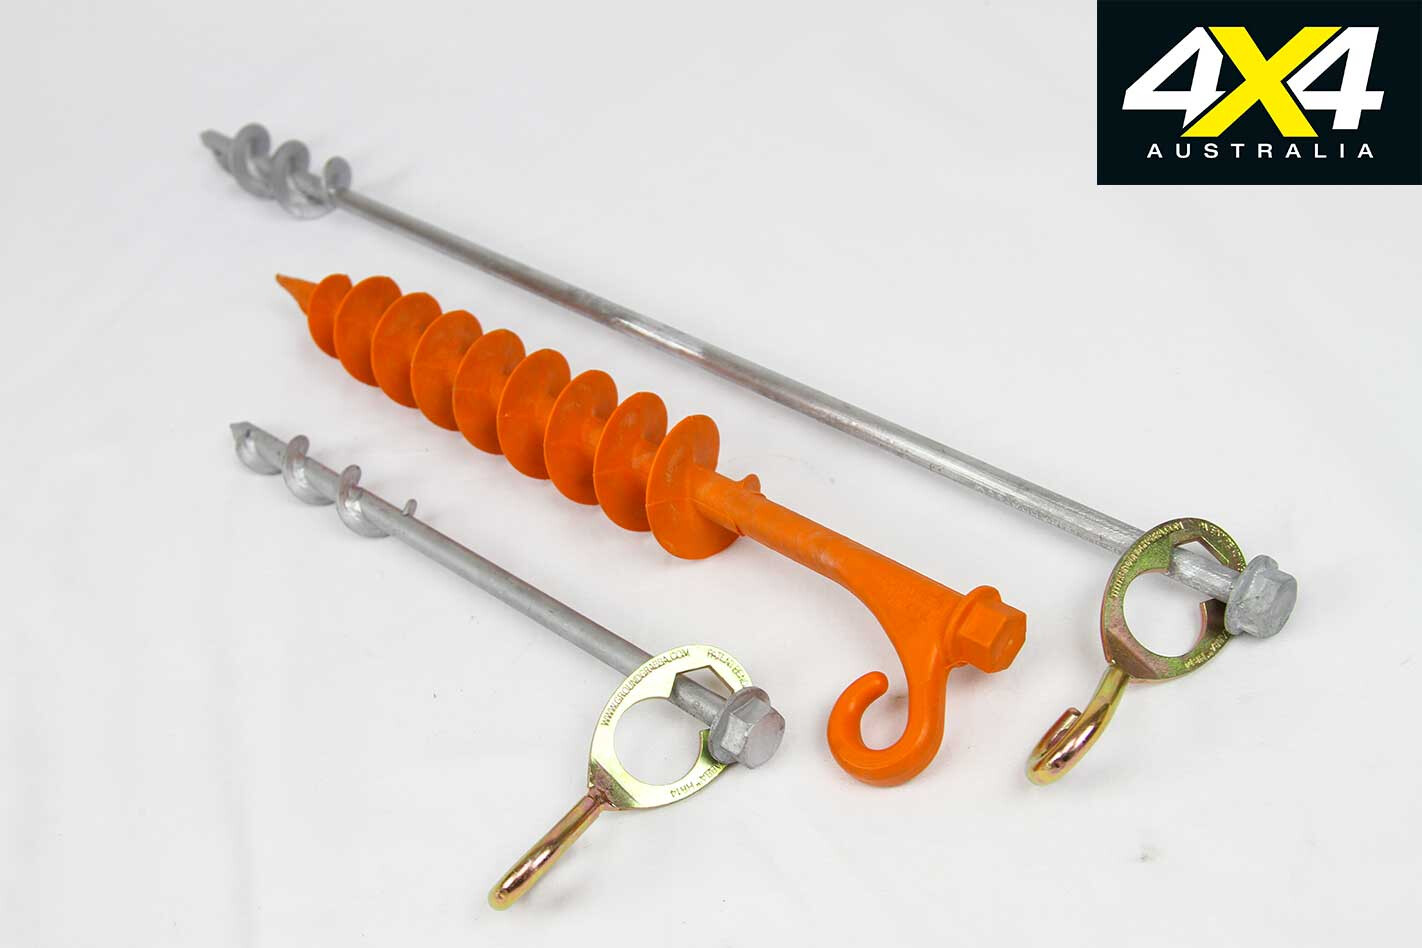
I WILL WAGER that most folk who have hammered tent pegs into hard ground have missed their fair share of strikes, perhaps suffered a few skinned knuckles in the process. This will never happen (well, it shouldn’t) with a screw-in tent peg.
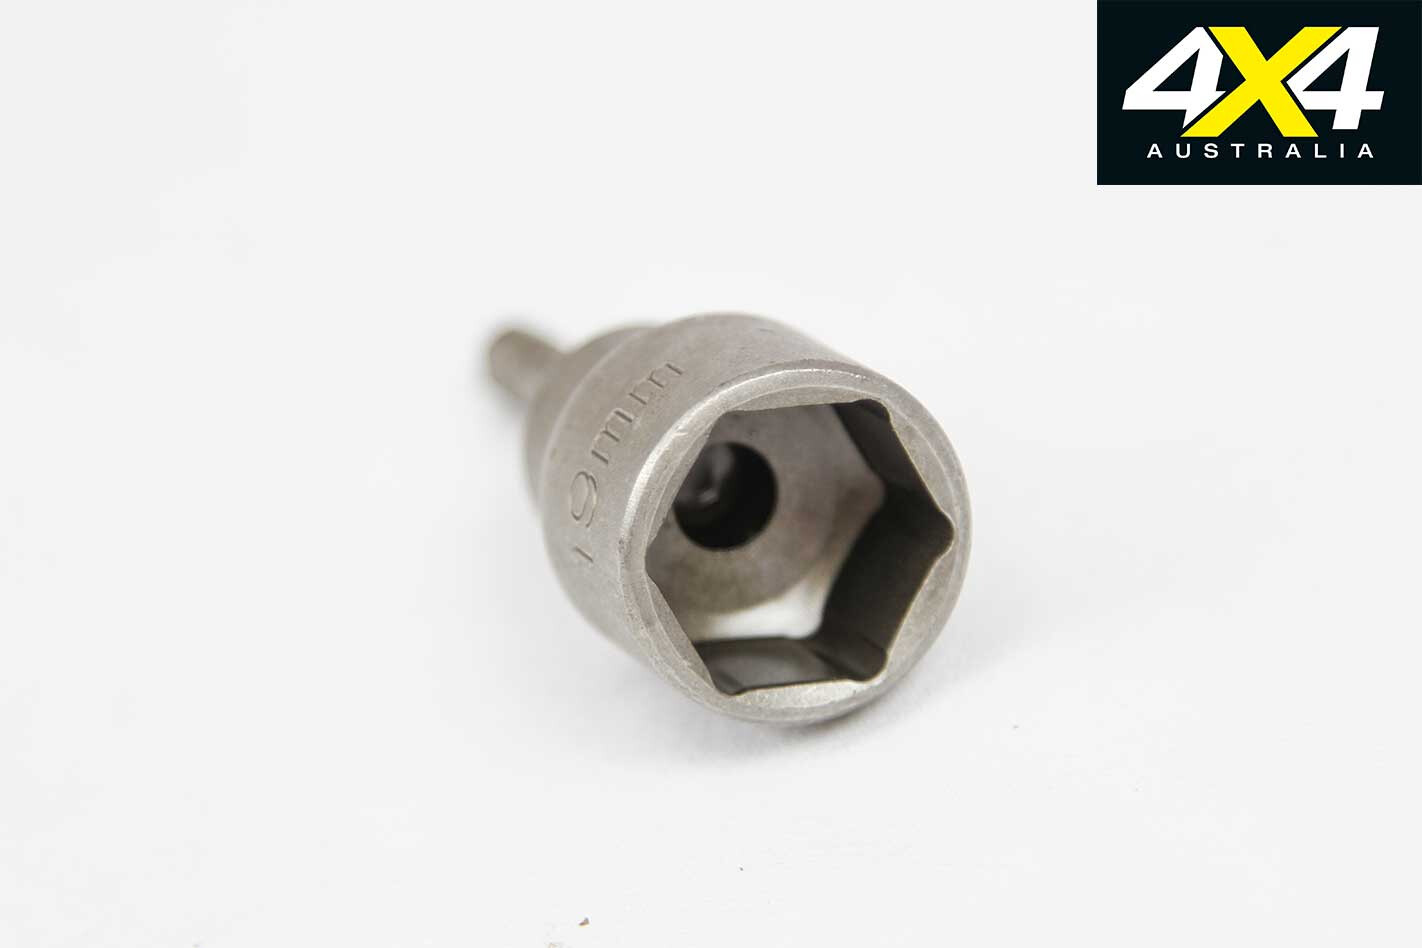
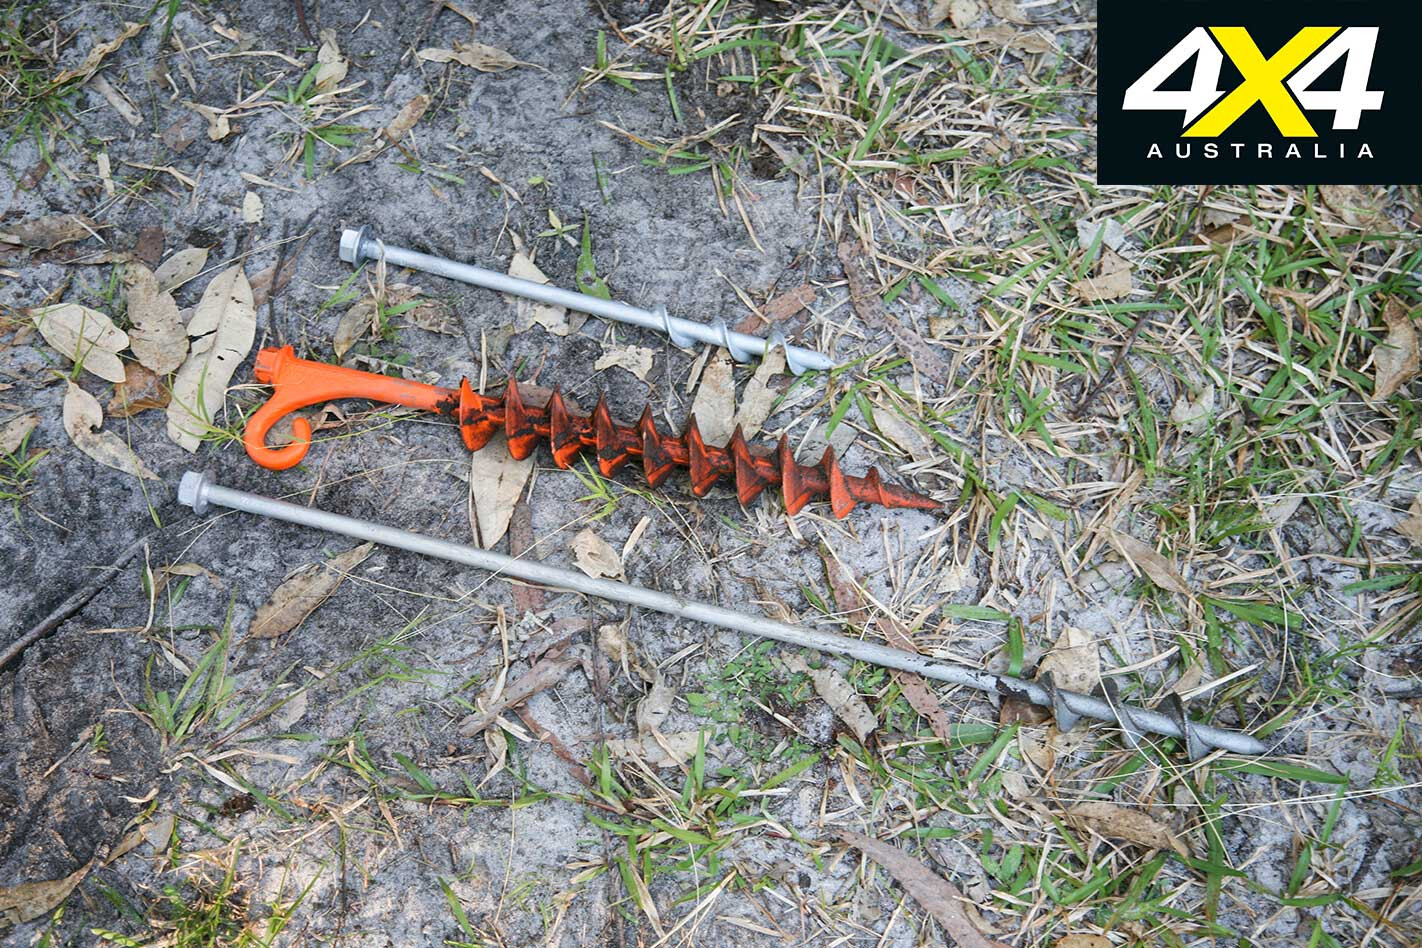
Ground Grabba has all bases covered, with its range of screw-in pegs – three uniquely designed types – incorporating two different-sized steel pegs and one glass-reinforced nylon peg, all of which use a hexagonal head driven by supplied 19mm sockets.
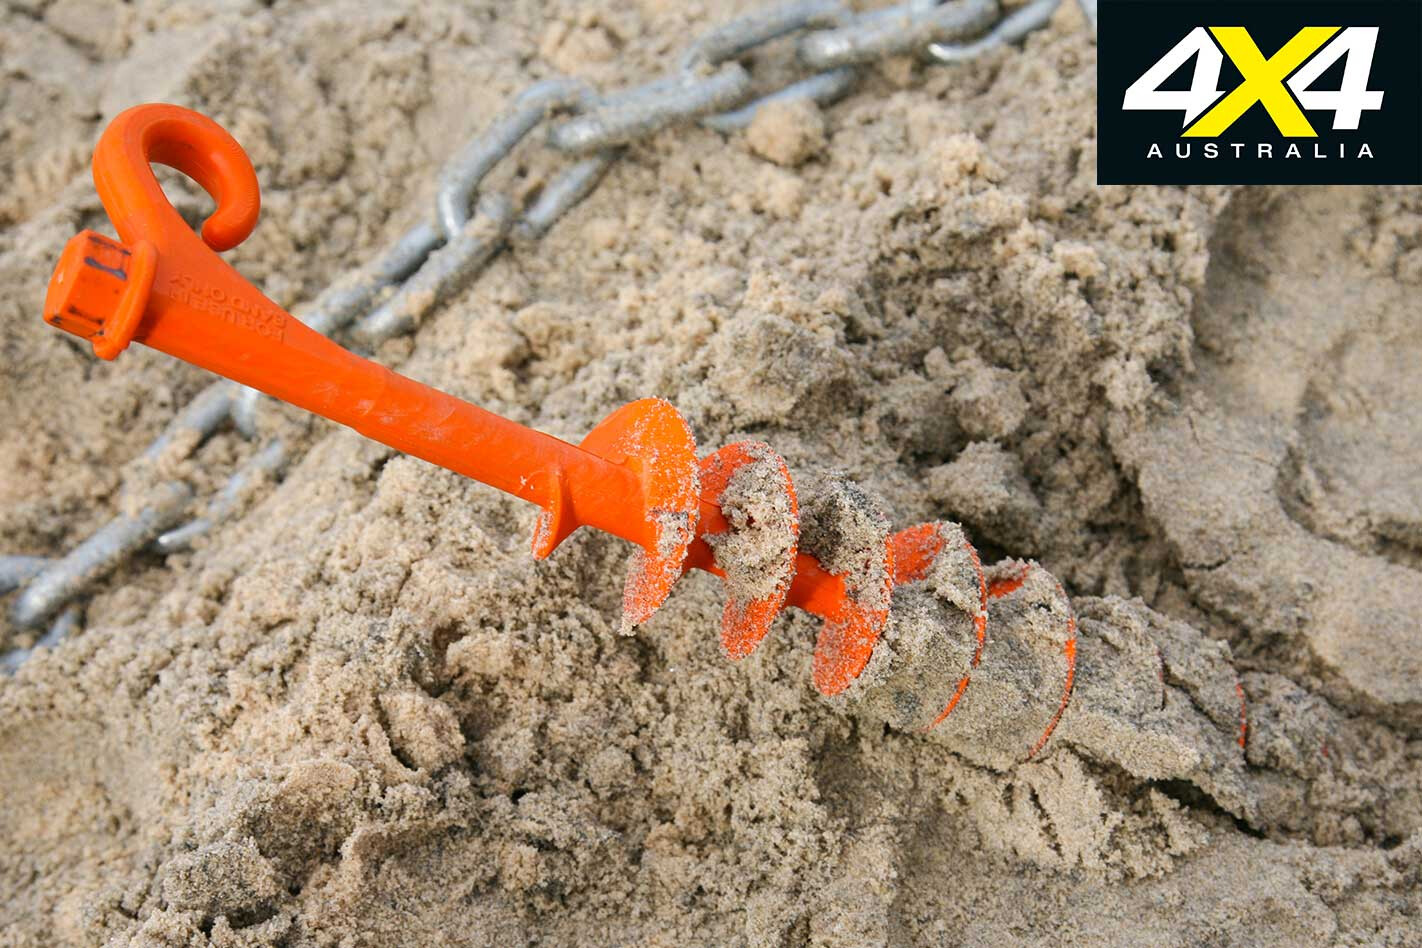
The 400mm-long glass-reinforced unit is classed as a ‘recreational grade’ tent peg for use on beach and sand dunes, and it features large-diameter flutes along the shaft and a moulded, open rope hook.
The two steel units measure 300mm and 600mm long, respectively, both with large-diameter flutes on the lower section of the shaft. A regular drill is fine for inserting and removing the pegs, but a shifter, spanner or ratchet can be used to twist each peg home.
The two steel units require a HexHook Pro hook plate to attach guy ropes, plus each plate incorporates a 19mm hex opening that can be used to tighten or loosen the peg; but it can’t offer the same leverage as a spanner or ratchet handle. The open hook points down to prevent trip hazards, and the plate can be used to open your beer tops – provided the plate isn’t attached to a peg in the ground.
If you are attempting to insert a peg into extremely hard ground, a supplied masonry drill bit can help overcome that situation by pre-drilling the hole. If you strike like lightening (never in the same place twice) perhaps these tent pegs could well save you some time and trouble.
Would I buy ’em? My only gripe with these pegs is the cost compared to a standard hammer-in peg. You could buy a fist-full of old-fashioned steel pegs for the price of one Ground Grabba.
Value for money therefore lies in whether of not you can hammer in a peg or whether you need to rely on a (perhaps) simpler means. Then again, if you need maximum ground-grabbing force, then it’s a no-brainer: Ground Grabbas win by a country mile.
A secondary problem: no drill generally means no drilling. While you can insert the screw-in pegs with a spanner or ratchet, it’ll take time; but if you have a decent torque battery drill with spare batteries, you won’t have a problem. They also take up more space; so if space is a premium, plain old pegs are more compact.
RATED Available from: www.groundgrabba.com.au RRP: Varies, depending on peg style end length. Pros: Fast and easy insertion and removal of pegs. Cons: Relies on high-torque drill (or other means). We Say: Great concept but expensive compared to a standard peg.
ANSWERING a job advert for a bull-mustering gig back in her native state of Queensland, Jillaroo Jess knew she was up for it, but for one thing: she needed a bull buggy.
These vehicles are the toughest of the tough; traditionally FJ40s stripped down to the bare essentials mechanically and, in regards to body panels, they’re then wrapped in protective bar-work and accompanied by the odd tyre or two attached to the sides and front.
Built for purpose

THE FINAL result of the bar-work, chopped roof and attached tyres is akin to a Mad Max-esque rig, but it is all done for a reason. The main task of a bull buggy is to assist in mustering cattle that… err… may actually not want to be mustered.
The bull buggy allows the driver to ‘nudge’ recalcitrant bovines in the direction they’re supposed to go when being mustered, which isn’t always an easy task. These rigs don’t see much in the way of formed tracks – all the work is off-track, deep in the bush – so having to plow through track-free terrain and cop the odd knock or two means the mustering vehicles must be tough enough for those accidental impacts.
They must also be mechanically basic, allowing for an easy bush-fix if the worst does go wrong.
“We can rebuild him…”
FOR JESS, a short-wheelbase Toyota BJ70 was the perfect choice; it’s just a more modern BJ40. A short wheelbase vehicle is ideal for bull-buggy work, as it needs to be highly manoeuvrable for winding through the densely forested areas that runaway cattle like to use as hiding spots.
The BJ’s basic-but-well-proved mechanicals meant there was limited chance of anything failing. To make the blue bruiser even more bombproof, Jess enlisted the help of Terrain Tamer gurus, Allan and Andrew Gray. It was this dynamic duo’s job to get the BJ into the sort of mechanical shape that could cope with the heat, rugged terrain and expected rough treatment.
Jess had to help muster 20,000 cattle, and the job was looking like it would take a couple of months, with long working hours. All things that needed consideration when building a bull buggy, Andrew explained.
“I think the most important part of building a bull buggy is having a decent vehicle to start with,” he said. “I mean, if you start with something that’s rubbish, you’re going to end up with something that’s rubbish. You’ve gotta have a reliable, robust vehicle to start with and then you improve on that.”
For its age, the BJ was in good order – nearly too good, Andrew reckoned. “I actually thought the Cruiser was in too good a nick to chastise,” he laughed. “There’d be collectors crying everywhere at what we did to that car. It did need some work, but it was a really good place to start – it was in excellent nick.”
However, Andrew does remember the first brake test they did, reminding them of the vehicle’s age. “It was entertaining,” he recalled with amusement. “The brakes were abysmal, for lack of a better description. In fact, the best description would be not calling them brakes but saying they offered mild retardation!” And so the build project began…
New lease of working life
ANDREW and Allan had their work cut out for them with the build. The BJ was in good nick but tired, with some 370,000km on the clock, so most mechanical components were well and truly worn-in and in need of replacement. The duo, along with Jess, got stuck in quickly as they were on a short timeline before mustering – 16-hour days were commonplace, and the whole job was done in 12 days.
They raided Terrain Tamer’s (TT) extensive parts list for all the mods and improvements (see Taming The Bull sidebar), starting with the fitment of TT heavy-duty brake pads, high-performance rotors, brake shoes and calipers, to provide vastly improved stopping power (read: it actually stopped).
The blue beast had well and truly settled onto its springs at its advanced age, too, so a TT suspension kit (with a two-inch lift) was fitted, bringing it back to (close to) original standard height.
Engine reliability is paramount with these rigs, so to ensure the donk kept humming along in its advanced age it was rejuvenated with the fitment of TT injectors, water pump, glow plugs, a fan belt kit, an alternator and – perfect for the conditions the rig would be working in – a reconditioned radiator.
Speaking of conditions, due to the challenging tracks and terrain Jess would be negotiating, the team also fitted a TT ELocker kit inside a TT reconditioned diff, with all that traction pushed through TT CVs and axle shafts.
It’s been a little while since the project was finished, but so far so good for both Jess and the BJ – performance has been flawless. It wouldn’t be a stretch to expect this face-lifted and revitalised BJ to see out another few hundred thousand kays.
So what about the owner? As you’d expect, Jess is mega-stoked with how the BJ has turned out, and she’s equally confident ‘Blue Steel’ has plenty of bull-nudging life still in it.
“I’m loving driving my mustering buggy around,” Jess told us. “Blue Steel is probably the flashest in the Top End. I haven’t driven a buggy with so much thought put into it, so I know it’s going to have a long life ahead.”
Taming the bull – Terrain Tamer ELocker Kit – Terrain Tamer Reconditioned Diff – Terrain Tamer Suspension Kit – Terrain Tamer Modified Gearbox – Terrain Tamer Injectors – Terrain Tamer Water Pump – Terrain Tamer Tie Rod Ends – Terrain Tamer Glow Plugs – Terrain Tamer Heavy-Duty Brake Pads – Terrain Tamer High-Performance Rotors – Terrain Tamer Hose Kit – Terrain Tamer Fan Belt Kit – Terrain Tamer Alternator – Reconditioned Radiator – Terrain Tamer Heavy Duty Wheel Bearing Kit – Terrain Tamer Swivel Housing Kit – Terrain Tamer CVs & Axle Shafts – Terrain Tamer Hubs – Terrain Tamer Viscus Coupling – Terrain Tamer Brake Shoes – Terrain Tamer Brake Calipers
Follow the build To follow Andrew, Allan and Jess as they tackle the BJ Bull Buggy build, go to: www.terraintamer.tv
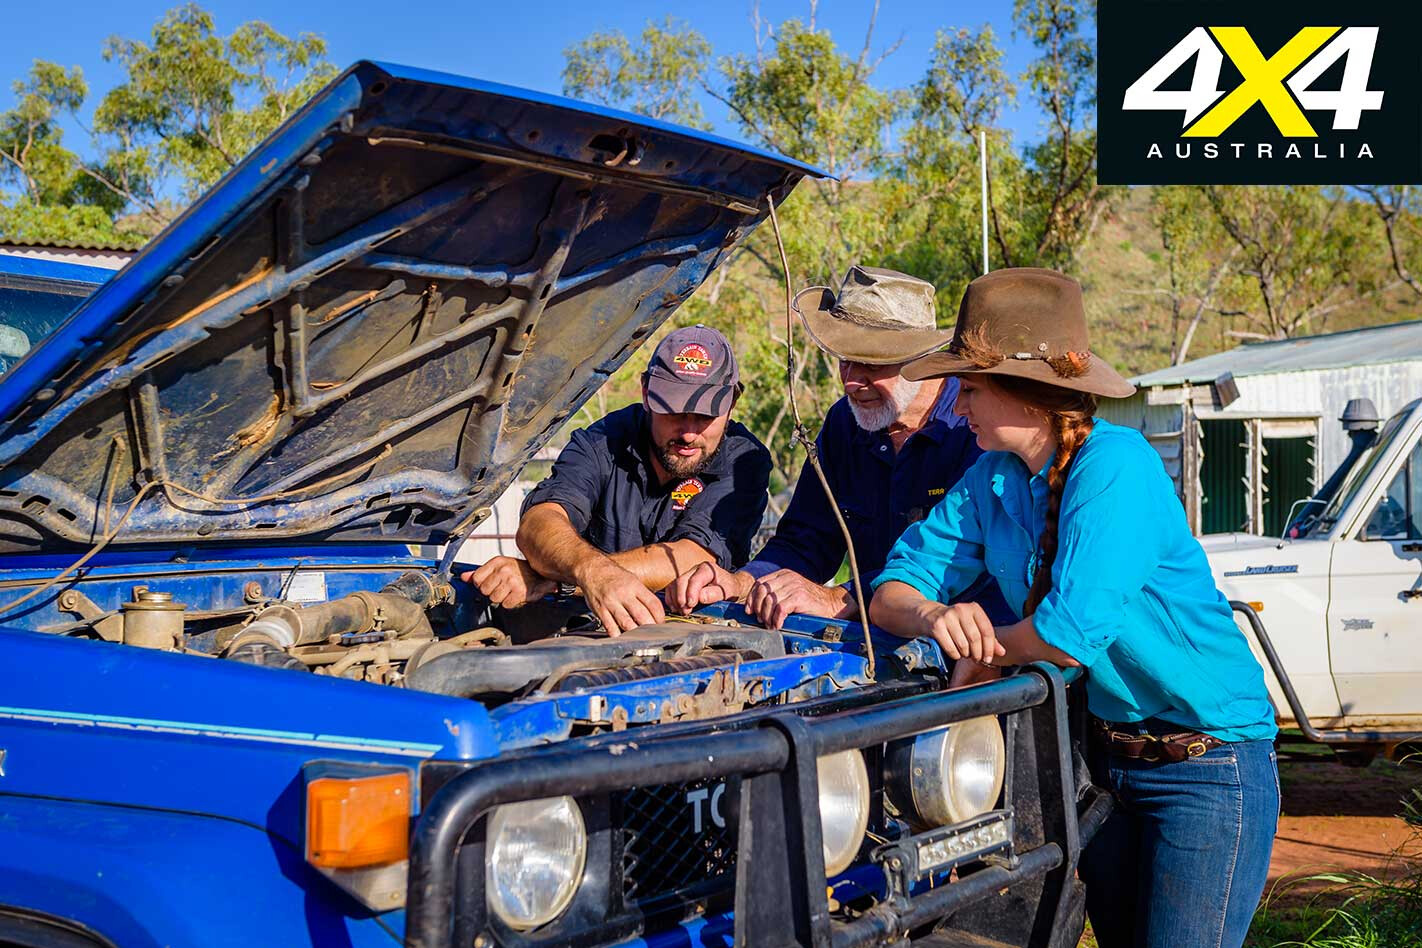
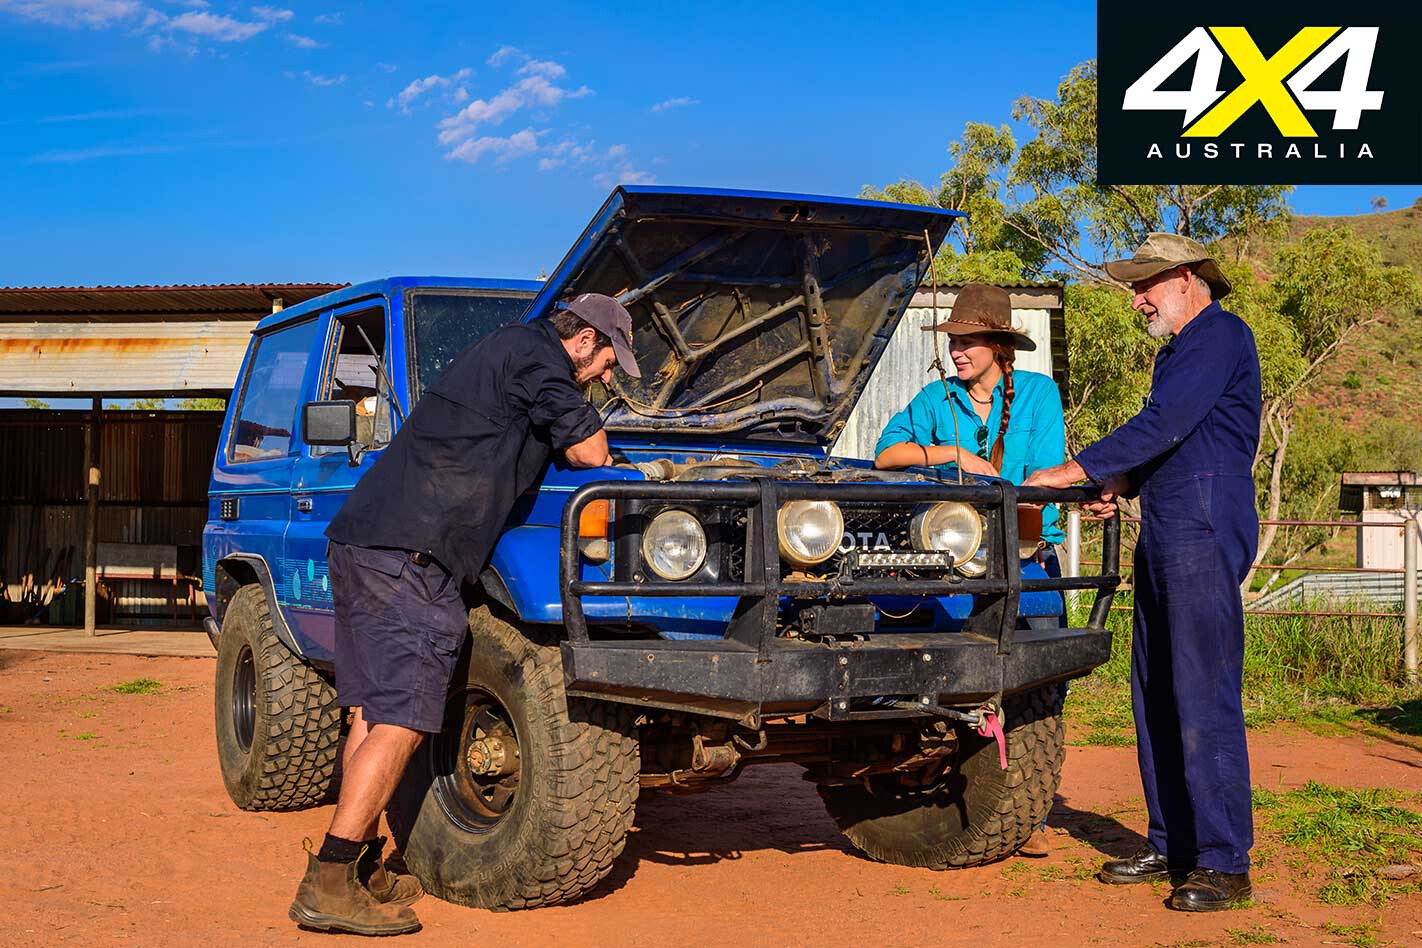
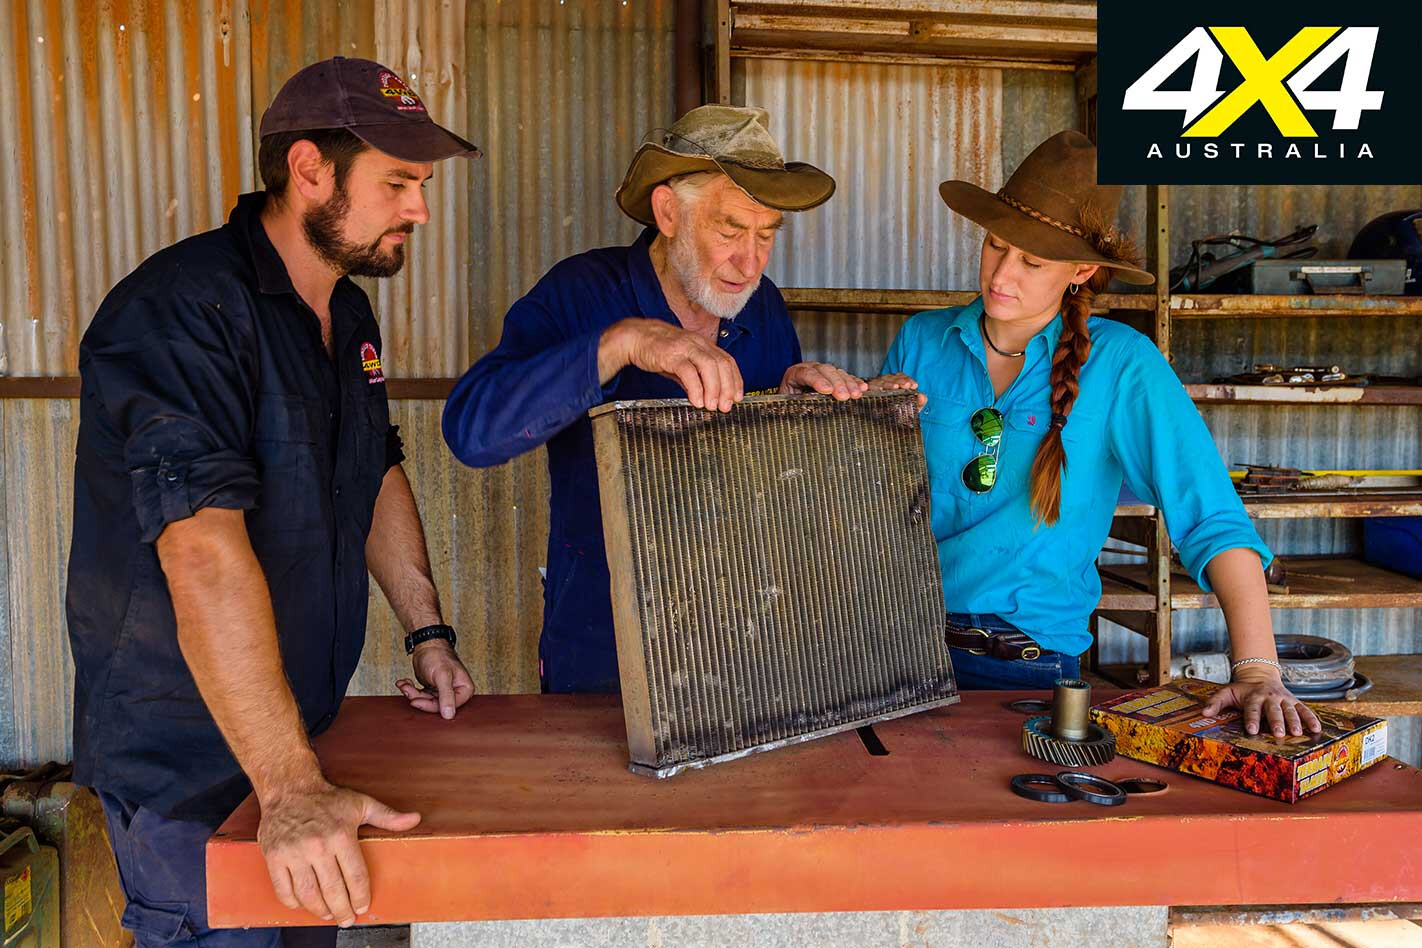
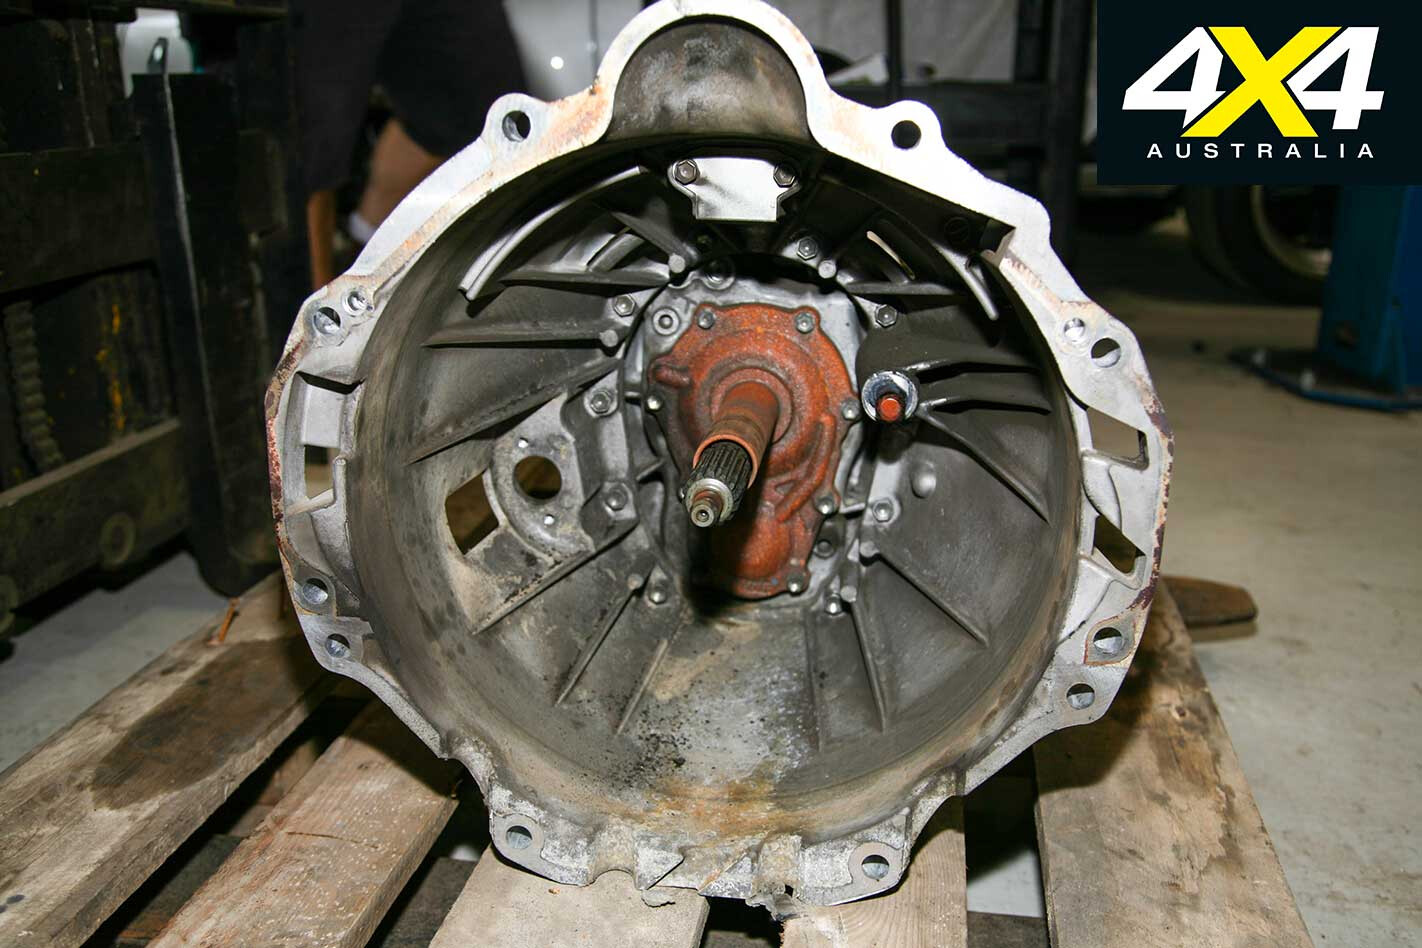
IT STARTED with a squeak. Many thousands of kays ago the 2011 VDJ78R developed a small squeak from where the clutch fork rides on the pivot ball. It was initially ignored, replaced by turning the radio up.
However, the cacophony coming from the mighty Troopy every time the clutch lifted became too much to ignore – there’s only so far you can free-roll with your foot on the clutch. The annoyingly squeaky part wouldn’t cost much to repair or replace, but the whole gearbox needed to be removed to get to it.
The Troopy only had about 60,000km, but with the gearbox out it seemed appropriate to slot in a new clutch; and, just to lighten the wallet further, it also seemed the right time to change the fifth gear ratio to help with long-distance mile munching.
There was a fair amount of procrastination in the ensuing months about the type of clutch to use, as well as whether or not to re-gear the box via one of two methods.
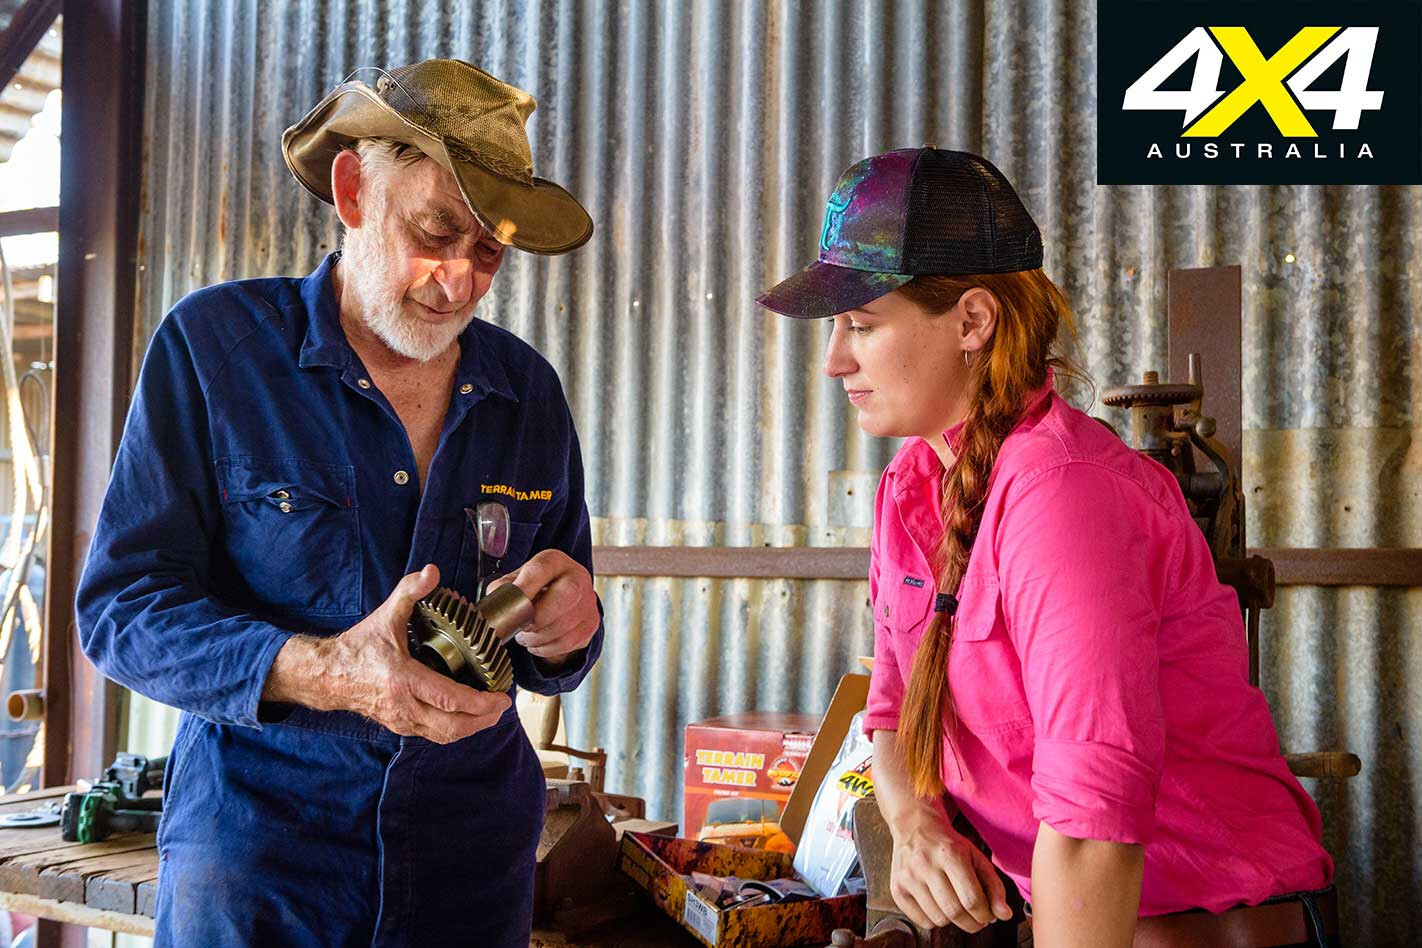
Clutch
OTHER than wanting a heavier-duty clutch with a higher clamping pressure, the major concern was to end up with a foot pedal that wasn’t too heavy or too hard to push in. Many questions thrown at sales staff, owners and anyone else that has ever owned an aftermarket clutch returned mixed answers as to the pedal feel and useability of clutches.
The clutch needed to be easy to use in a daily-driven vehicle (both on- and off-road) and be able to be slipped if needed (even though it’s not good for them) and not take up in an instant.
While the V8 diesel only has a moderate power upgrade via a chip and exhaust, the standard clutches are well-known for not handling too much of a power increase without slipping – this one was slipping slightly, most notably while taking off from a start and towing. It required extra clamping pressure to help handle towing camper trailers and caravans, as well as any future (higher) power upgrades to be thrown at it.
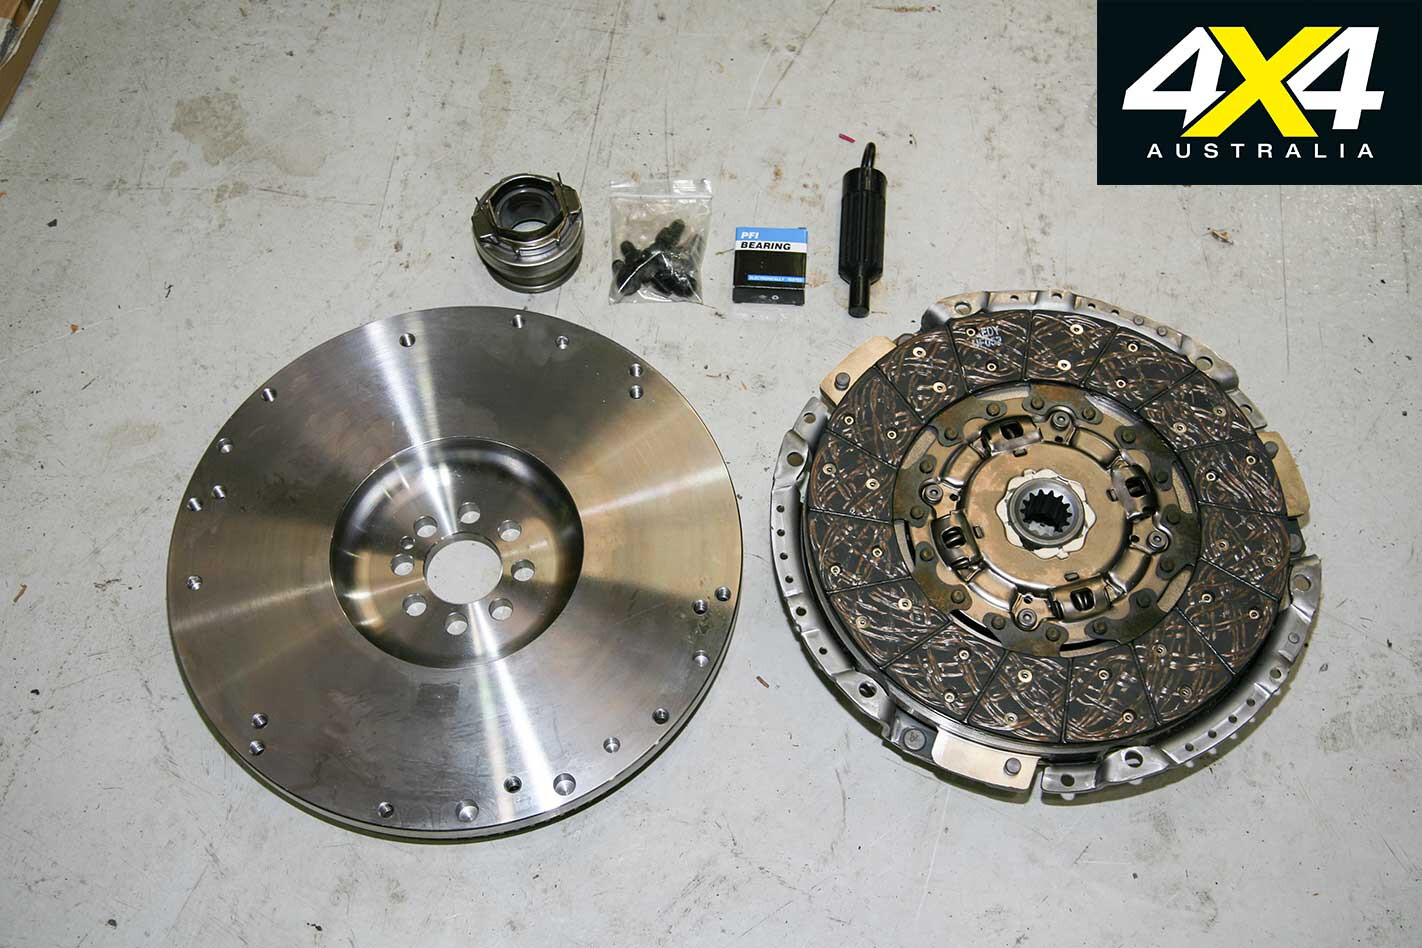
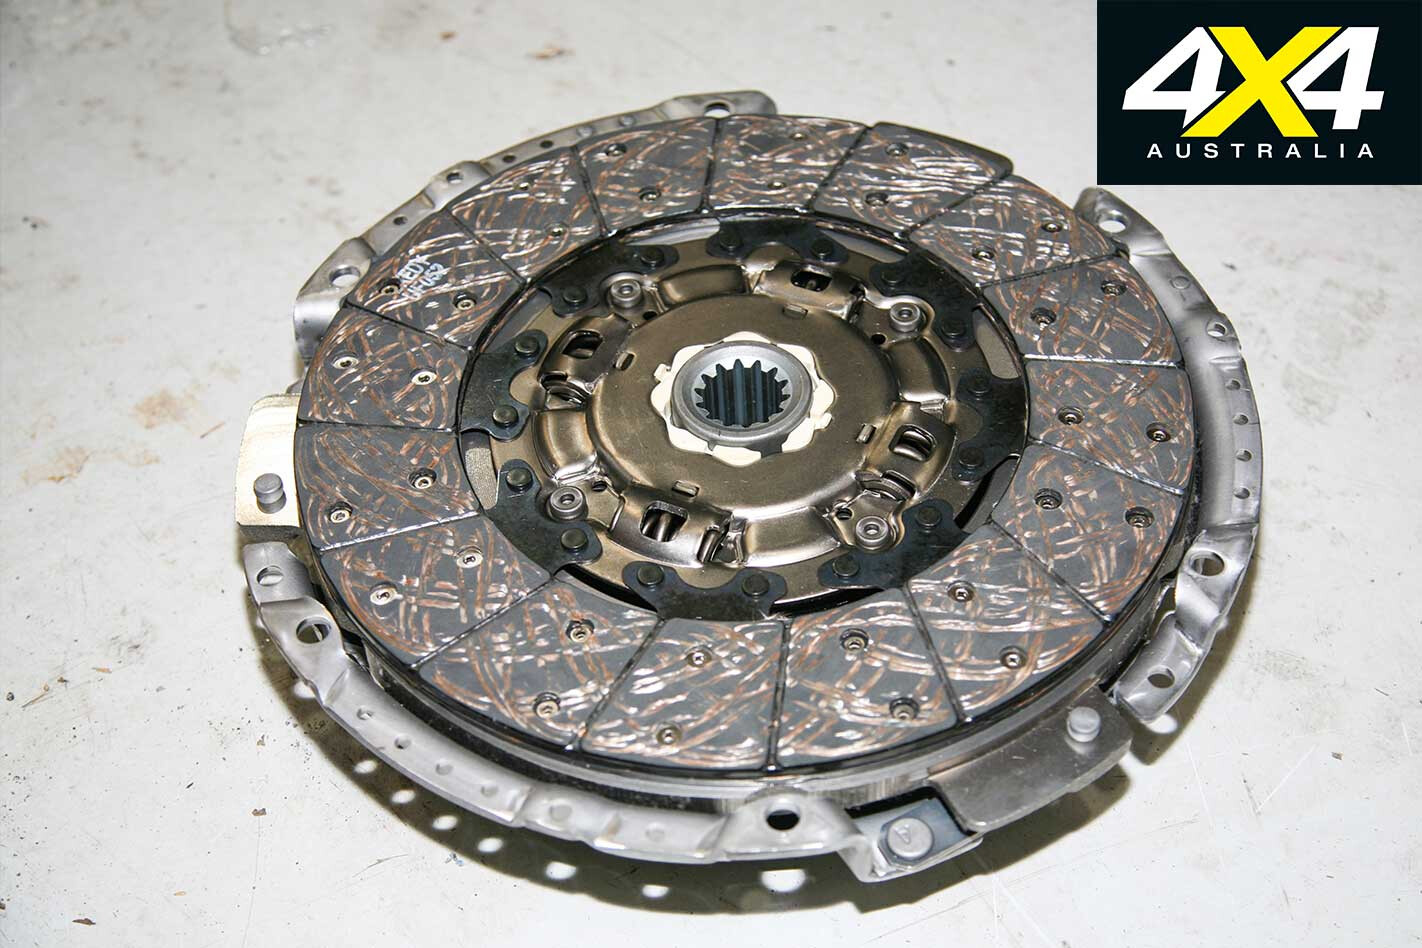
The long search led to NPC Performance Clutches, which manufactures a massive 1300Nm clamping pressure plate and replaces the OE flywheel with its own custom 10-inch billet-steel flywheel unit to achieve superior figures.
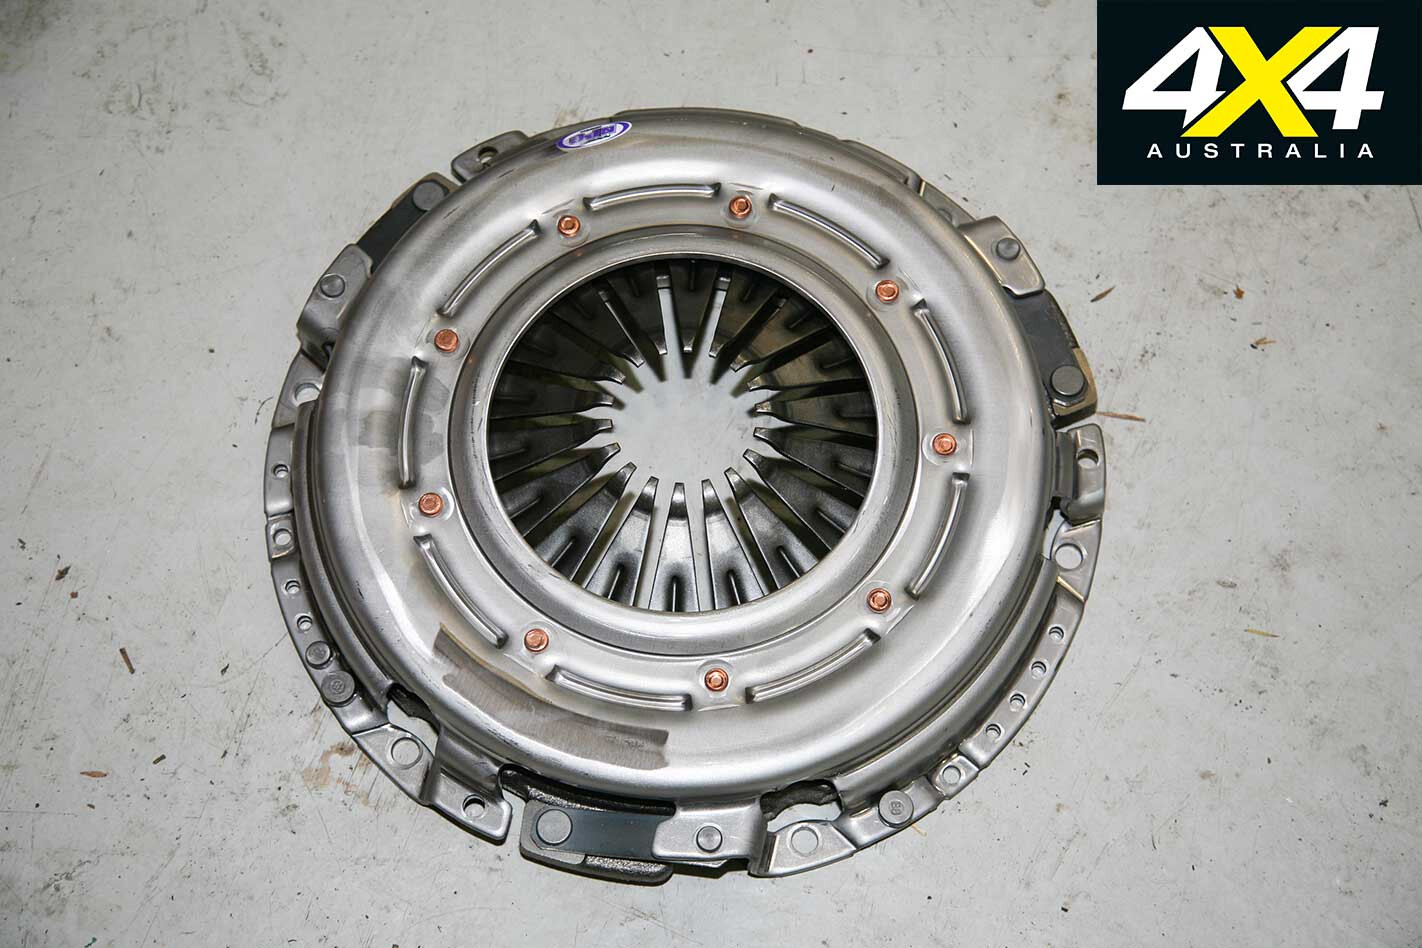
The pressure achieved at the pressure plate fingers is 1300Nm, so the clutch can theoretically handle a twisting pressure (force or torque) of 1300Nm. Comparatively the standard clutch and pressure plate only have to hold back 430Nm of force from the standard engine. That means the NPC unit has roughly three times the amount of clamping pressure than OE.
Some people suggested this was overkill and too expensive, but you’re getting a new custom flywheel to suit the clutch and pressure plate. Right from the get-go the pedal felt slightly lighter than the standard feel, and that easy pedal pushing, combined with the ease of use (it can be slipped if needed) and massive extra clamping pressure, has proven it was worth the extra cash.
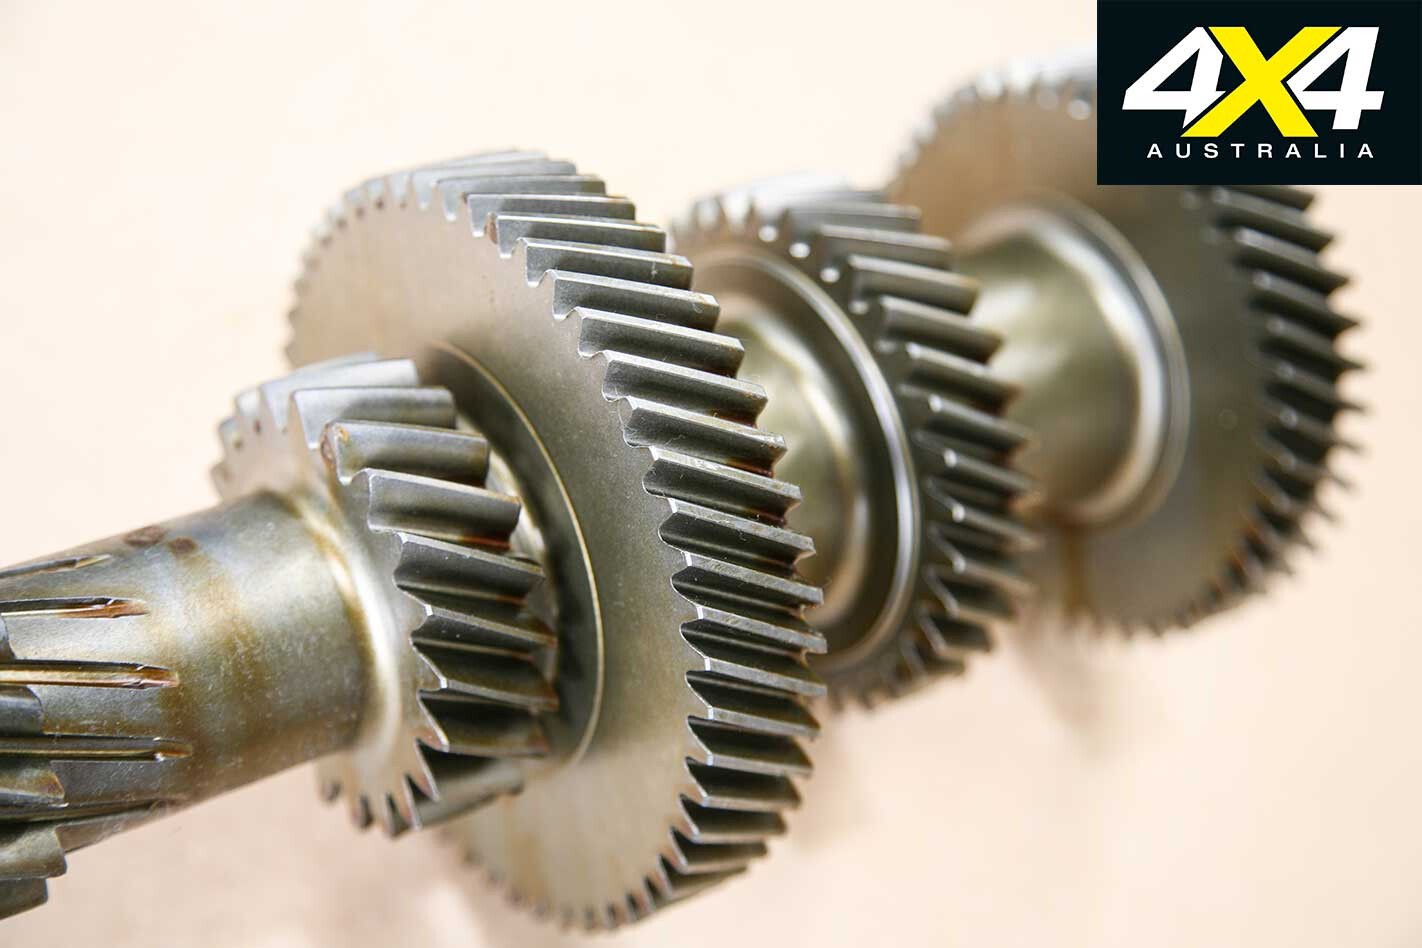
Box re-gear
FIFTH gears on pre-2017 V8 70 Series Cruisers are notoriously short, returning a relatively high-revving and loud long-distance highway drive experience. In 2017, Toyota saw fit to change the 70 Series box ratios of second and fifth cogs by seven and 15 per cent respectively.
A later model (than the 2011 Troopy) box could’ve done the job, but there was little reason to change second gear, as it was already low enough and useable enough for towing and general off-road work.
Enter Terrain Tamer’s modified ratio gear set kit, which leaves second as standard but changes fifth gear by more than 20 per cent. The complete gear set is a one-piece unit comprising first to fifth, plus reverse cogs, and it’s manufactured in Japan utilising hardened steel with a Rockwell rating of 62 – that means it’s damn hard and of high quality.
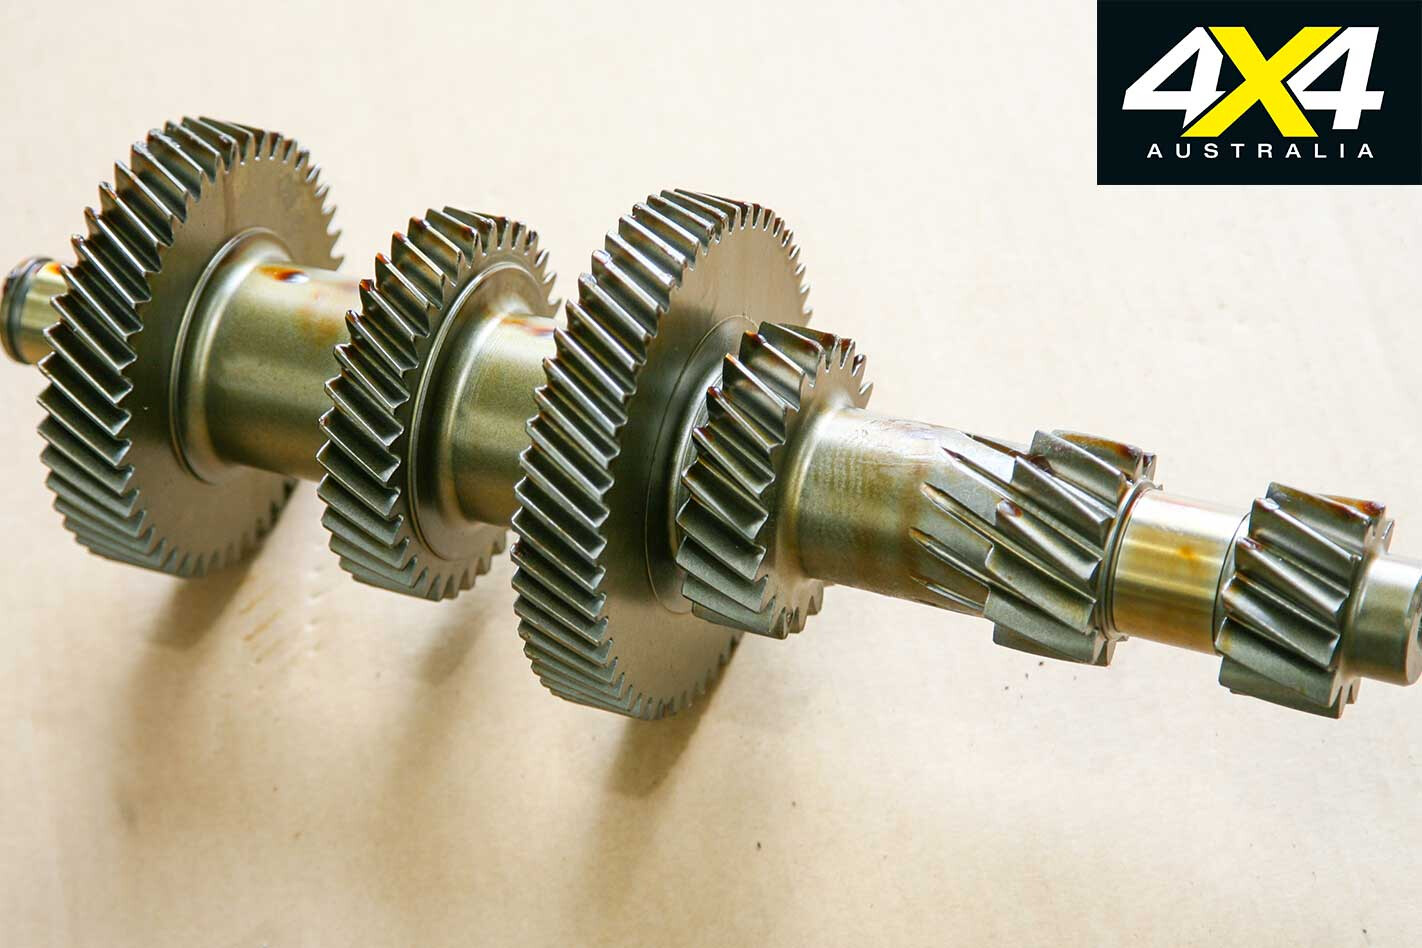
A gearbox mob pulled down the old ’box and stuffed it full of the new Terrain Tamer kit, which effectively changed fifth cog from 0.881 to 0.736 to provide a theoretical change of about 400rpm. That 400rpm may seem like a minimal drop, but the long-term fuel savings will have a positive impact on the bank balance.
The noise difference makes it worth it, too; given 70 Series are commercial vehicles with little to no soundproofing as standard. Obviously this lowering of revs can’t ever convert the Troopy to a 200 Series luxo-barge, but it has helped considerably.
The downsides: any upping of gear ratios puts more stress on the driveline, with the potential over-gearing making the engine labour.
This can cause higher fuel usage and less ability to use that higher gear-set if the engine can’t deliver enough torque at the right revs. Given the LC has a DP Chip that can be turned off, the engine could be tested close to standard (other than the three-inch Taipan XP exhaust system and 33-inch rubber). Indeed, the engine struggled slightly on long and steeper hills, on the highway at 100km/h and 110km/h.
There were occasions when a downshift to fourth was required, which wasn’t the case with standard gearing where fifth was capable. With the DP Chip turned back on and set at position three (which was deemed safe and reliable via the installer), to return 131kW and 747.5Nm, there was little need to fiddle with the gearstick over the same roads.
Towing a camper or caravan would need more downshifting than normal, and that’s where even higher returns of safe tuning will help. That leaves you with a taller fifth that can be used most of the time, but with the occasional downshift to prevent labouring.
While the mods mightn’t pay for themselves for a very long time, the pleasure and security of a quieter cabin via the lower revving engine, as well as a huge clamping pressure clutch with soft feeling pedal, was well worth it.
To date, since fitting the fifth gear upgrade and driven almost 3000km, I’ve managed a fuel consumption average of 13.6L/100km from the big Troopy. While nothing fantastic, what is surprising is that it’s a full 1.0 to 1.5L/100km better than I’ve ever achieved prior to the change. That driving has been predominantly at highway speeds (100 to 110km/h) making most use of the fifth gear change.
Obviously, the more it can be used (at highway speeds), the more savings you’ll achieve. Lower speed driving in lower gears will make no difference, neither will 4x4ing.
Geared down

Standard gearing in my Troopy saw it clocking 2200rpm at 100km/h and 2500rpm at 110km/h; compared to the Terrain Tamer kit returning just 1800 and 2100rpm at 100 and 110km/h. That confirms the theoretical reduction of 400rpm.
A LOT OF people come up to me and say I have the best job in the world, as I get to combine my love of four-wheel driving and exploration with my career … it’s hard to disagree. My journey into the 4×4 industry began well before I was old enough to drive. I have fond memories of when my dad and I used to plan camping trips away, and I was hooked from that early age.
This year has been one to remember, with Ironman 4×4 celebrating 60 years in business as a family-owned Australian company. I often look at the business registration hanging in the head office and wonder what the founder’s thoughts were in 1958 when he registered the business, Jacob Spring Works (JSW).
Today, Ironman 4×4 is still owned by the founders’ children and it would be hard to find a better place to work.
My role as the director of 4×4 products at Ironman 4×4 means I look after the development, engineering and marketing of a large range of products. Together with the team, we have grown our range of products from a suspension-based company to a leader in all 4WD and camping products.
Being a 4WDer first and foremost, I develop our products from the ground-up, taking into account a wide variety of customer requirements and the way a user would want them to work. A lot of the time I come up with the ideas from recent camping trips.
I have been involved in developing many customised products for specialised projects, including Ironman 4×4 products installed on more than 30,000 Ford Rangers for the US Military going into Iraq and Afghanistan, where the vehicles operate in some of the most extreme conditions.
OE accessories have also been developed for Nissan South Africa, and the United National and Police Forces around the world; companies which demand the highest quality products, to avoid downtime.
The best part of my role is undertaking the testing, which involves ensuring the products will do what they are engineered and designed to do. This can take us to some of the most remote parts of Australia or around the world.
I set a philosophy early on when I joined Ironman 4×4, which is that we will not sell a product that I would not use or fit to my own vehicle, because I understand the impact of a product failing during a trip. This is why the design and testing stage of product development is critical.
With the new vehicles adopting advanced technology, we have had to work these technologies into our designs. The bar for the latest Ford Ranger is an example, as we had to incorporate new sensors that control some of the new safety functions, and the new Ranger also includes self-parking and emergency braking.
These functions need to be operational with a bullbar installed in the same manner as they would without a bullbar. This involves an expanded testing regime to ensure the vehicle safety features operate as per the manufacturer’s specification.
Meet the Expert Name: Adam Craze Role: Director 4×4 Products at Ironman 4×4 Experience: 15+ years