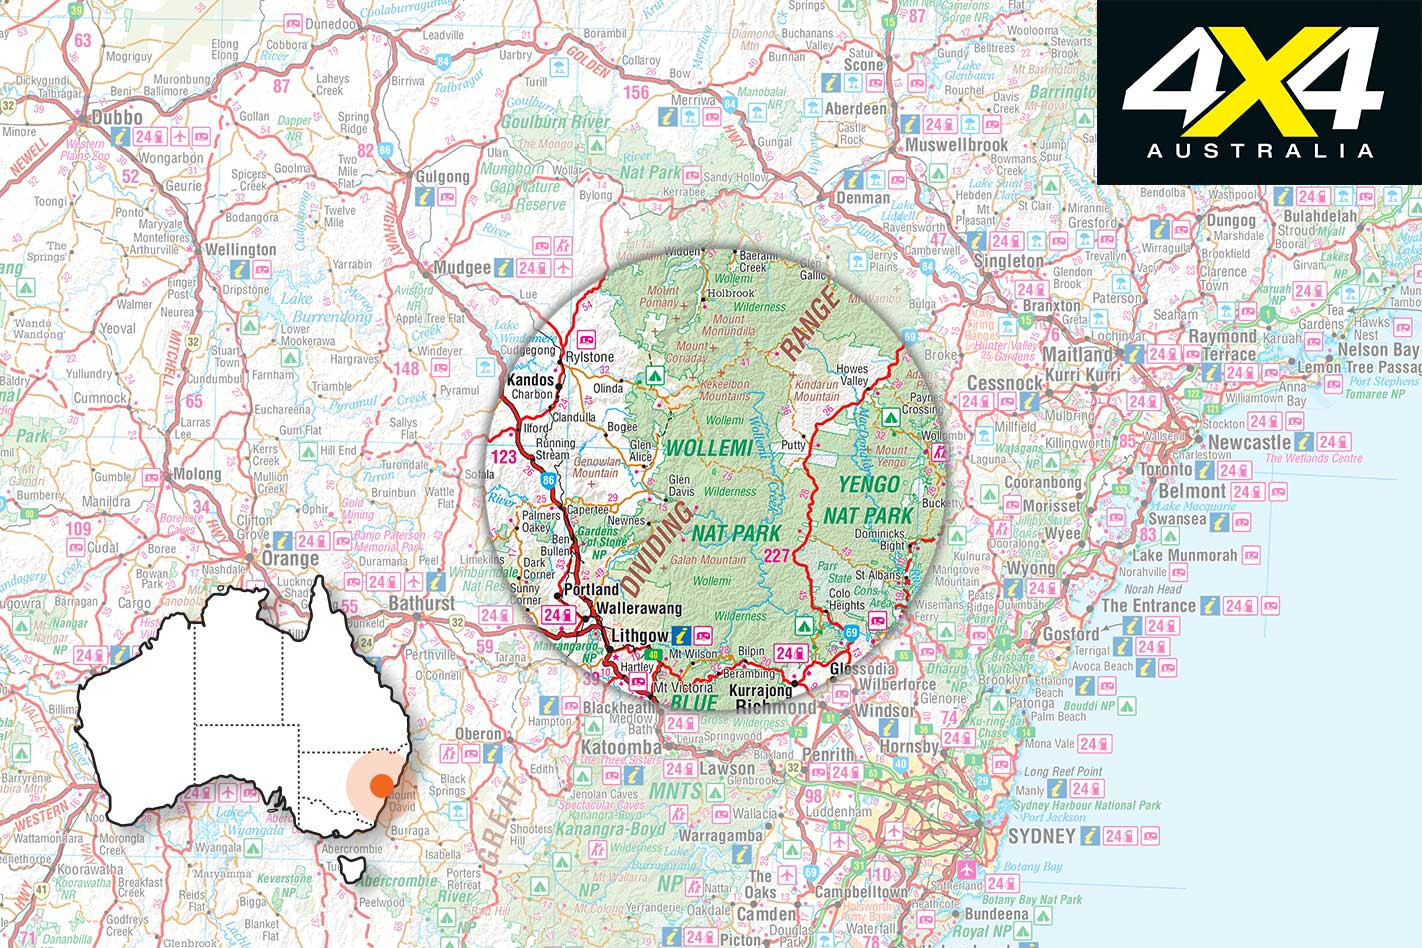
WOLLEMI National Park is a natural wilderness area in the upper reaches of the Blue Mountains and the Hunter region of NSW covering 5000km² and located only a few hours’ drive west of Sydney.
It’s claimed to be the largest wilderness area in NSW and is home to significant Aboriginal features, rare plants (Wollemi Pine was found in 1994 in a remote valley) and numerous animals. The park has many entry points, but as it’s rugged and remote there aren’t a lot of roads that actually run directly through it.
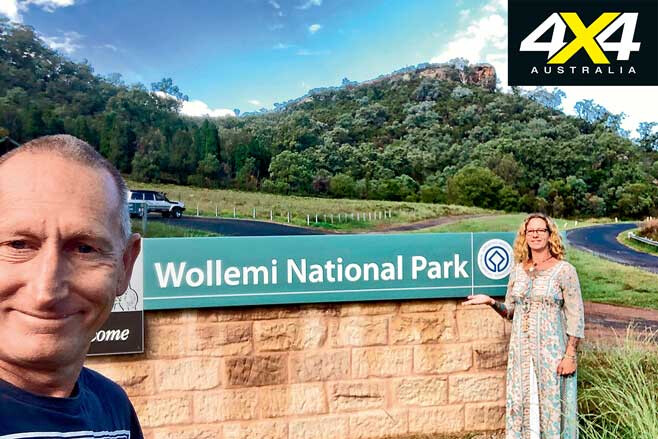
Some of the park’s best features can be found on the Lithgow side, as that’s where the early explorers – like Allan Cunningham, who passed through in 1822 – entered from. The entire area is a natural wonderland with key landmarks including basalt structures formed over millions of years and the Capertree Valley which is the second largest canyon in the world – it’s 1.6km wider than the Grand Canyon, but not as deep.
Indigenous Australians have been living in the area for about 40,000 years, and many sites and caves have been found with handprint and animal stencils; in fact, bush walkers found 200 different shapes in one remote cave.
With so many places to explore in the region it’s essential to put aside more than a couple of days, and our adventure started as soon as we heard about the history of the area’s several abandoned industrial areas and old rail tunnels.
After sourcing local information from Lithgow we headed 45km north along the Castlereagh Highway towards Capertree, and, 35km later – deep in the Capertree Valley – the surrounding mountains started to close in and give way to sheer cliffs. The last 10km of the valley road is unsealed and leads to the now desolate village of Glen Davis.
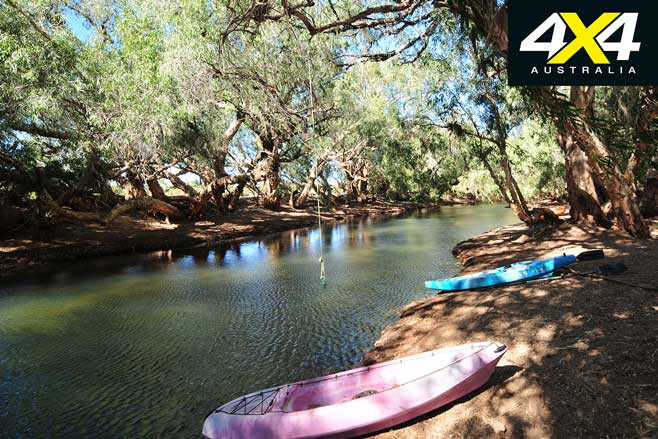
Given the info we received we headed straight to the NP campground of Coorongooba, located beside the Capertree River and within an amphitheatre of huge cliffs. It’s free, you can light a fire, it has pretty good pit toilets, and it’s located on several acres so there’s plenty of room for all.
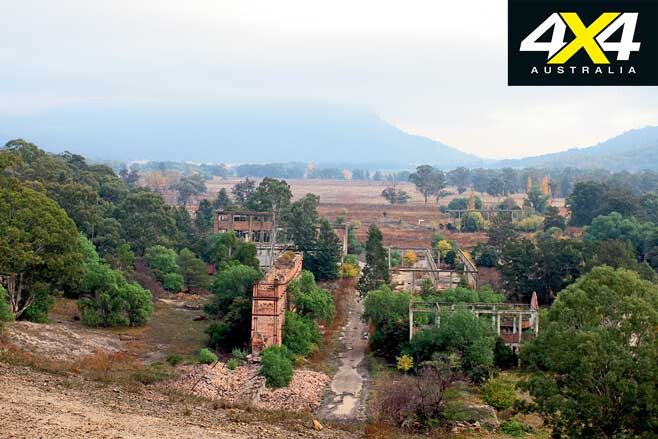
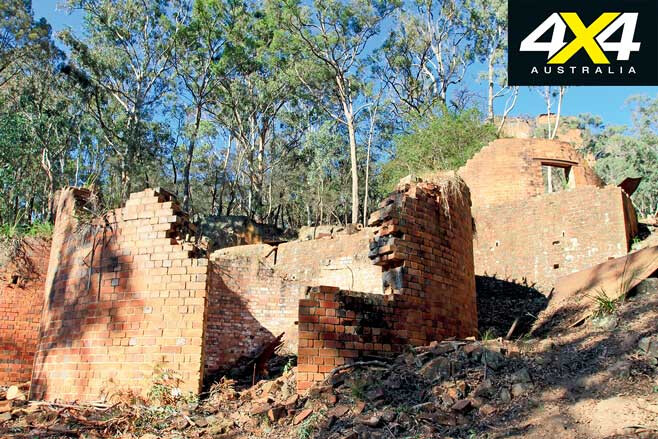
After setting up camp we headed back to the mining ruins just up the road. Signposted as Glen Davis Lookout, a path leads to a view of the works and some stunning sights and, while the Glen Davis operation was fenced off due to OH&S, we were free to wander around other areas and relics. It was a massive operation, with washing plants, workshops and storage bins for the products produced.
However, it’s not until you get to the top of the lookout and see the amount of ash dumps that you realise the enormity of this place – a cableway was used to move ash up to five kilometres away from the worksites.
We spent hours ambling around the ruins, finding mega amounts of steel, relics and building foundations that were all left when the receivers came in and gave the company a few months to close up. When Glen Davis was operating at full steam it was producing 5,000,000 gallons of petroleum per year and the town, with shops, several schools and many churches, was bustling with hundreds of people.
At the time of production a pipeline was built over the mountain some 58km away at Newnes Junction, to huge storage tanks ready to be railed to Sydney. Unfortunately the government at the time pulled the pin for subsidies (around the time of WWII) and the plant slowly closed down. It was estimated there was £4,000,000 worth of gear to be auctioned off after only 20 years of operation; most of it is gone, but there’s still huge amounts of gear to be seen.
Glen Davis wasn’t the only shale-mining operation in the area, though, as Newnes was also set up to pull shale out of the ground. Newnes may only be a few kilometres away as the crow flies, but it’s a 100km trip by road to get there.
Backtracking to Capertree and down into the Wolgan Valley the drive is nothing short of spectacular, with farmlands hugging the base of the gorge mountains. The road finally ends after 34km at the Newnes camping area, where again the camping (with basic facilities) is free.
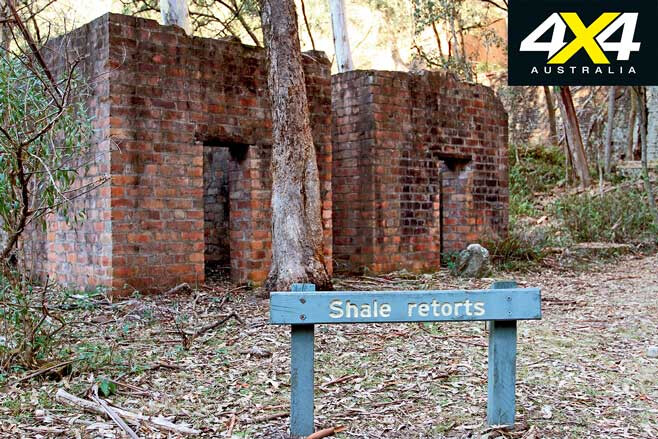
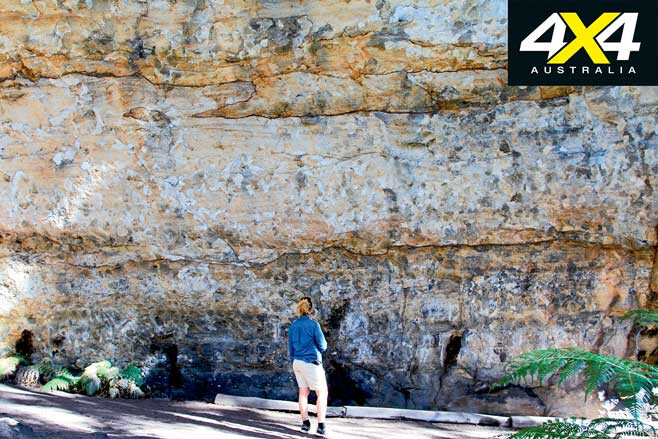
Newnes was set up in 1906 when pockets of shale were found in the adjoining cliffs, but by 1940 operations had shut down. From the campsite there are a few areas that can be explored to highlight the amount of work that went on here; the Pipeline Track, for example, heads along the Wolgan River past many freestanding old chimneys, hospital ruins and outhouses, and then down past the mechanical workshop and along to Shale Mine Number 2.
The history boards state there was a plan to tunnel all the way across to the Glen Davis refinery, but unstable conditions put an end to this. The Pipeline Walking Track eventually leads across the top of the mountain, but be prepared for a six-hour hike.
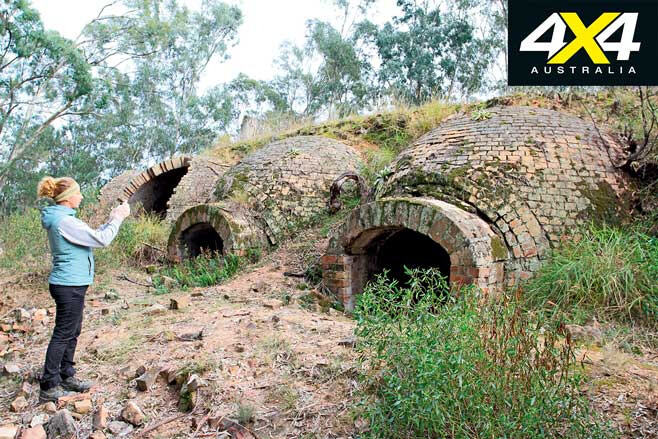
The industrial ruins of Newnes, found by crossing the river, are impressive, with millions of bricks used in buildings, holding tanks, coke ovens, stabilisation walls (up to 60-feet tall), workshops and stairs. A history trail with information boards is the best way to navigate the area as it highlights the best parts: 90 huge coke ovens, 70-metre chimneys (now fallen), workshops with pits, narrow gauge tramlines, water-separating plants, and even a paraffin plant for candles. A day can easily be spent exploring the ruins and the surrounds here.
Another engineering feat achieved at Newnes was a 50km-plus rail line to Lithgow, built to move goods to and from the mine. Due to the ruggedness of the area, however, the rail needed to hug cliffs, have steep inclines and possibly include several tunnels.
Due to heavy loads and the steep inclines, four Shay engines full of torque were shipped from the USA and they were able to stop and start on the severe inclines. The old rail line isn’t visible anymore as steel was pulled up and deployed overseas when WWII was declared, but you can still follow where the line was and see stone walls in place that were needed to prevent the earth from sliding away.
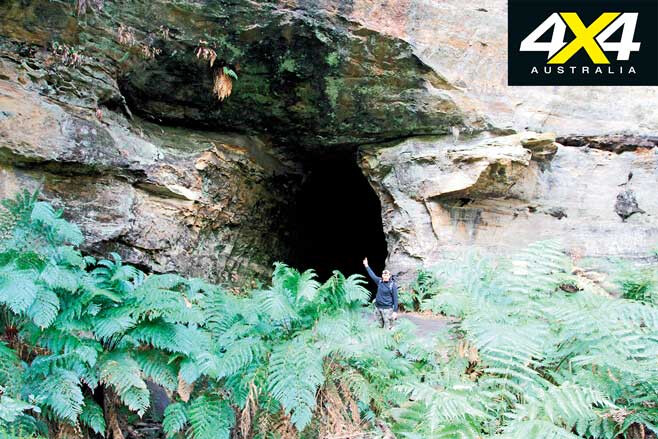
The rail line is a 7km walking trail into the next valley, where you can walk through one of two tunnels that contain millions of glow worms. Those who may find this a bit of a mission can drive within 1km of the tunnel, but unfortunately it’s another 100km loop around to the next valley.
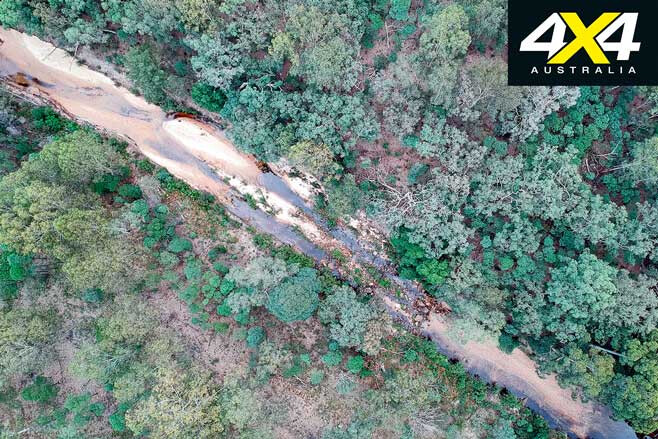
Instead of heading back up the mountain to Lithgow and onto the Glow Worm Tunnel track, we followed Blackfellows Trail to cut off a few kilometres. Popular with local four-wheel drivers we found it was a little busy but for good reason, as it cuts its way past massive beehive-shape rocks, through sharp switchback corners, and meanders along ridgelines.
Turning left onto Glow Worm Tunnel Road and the going got significantly worse with an increase in traffic, but a curved 400-metre tunnel a few kilometres down the road makes this route worthwhile. The only right of way through here is first in, first through, and you’ll definitely need your lights on.
A one-kilometre walking track (which is part of the old rail line) follows a ridgeline, down through rock cutouts and across washed-away bridges. The path, surrounded by tree-fern forests, eventually leads to another 400m long curved tunnel where, without a torch, you’d be mad to enter. It’s pretty rough underfoot, as water trickles through and it’s downhill all the way to the other end. When you’re halfway through, turn off any lights and you should see millions of glow worms lighting up the walls and roof.
More tree ferns line the creek and the rock overhang on the other side. If you have a little more time, walk the sheer cliffs along the track and try to imagine the shale train hugging the rocks. About 300 metres later, the track curves around the cliff to provide monumental views into the Wolgan Valley.
Considering it’s only a few hours’ drive from Sydney, Wollemi NP should be on everyone’s bucket list.
We take a closer look at the many errors made by the Australian motoring industry; plus, HEMA Maps has released a new how-to guide, this time for campers.
Great Aussie Car Fails
Sometime 4X4 Australia contributor and highly regarded motoring journo, Dave Morley, draws on his three decades in automotive media to go behind the scenes of the Australian motoring industry to report on the many mistakes, errors and stuff-ups that, until now, haven’t seen the light of day.
He explains the dodgy behind-the-scenes machinations of the industry that are a combo of cost-cutting, politics and expediency, with the often sad result being the obstruction of a talented industry as it strove to design and build vehicles that were specific to this market.
He also details the story behind how a manufacturer cheated on a fuel consumption test, crash testing debacles and some extremely odd design quirks that, in the case of an odd exhaust, caused its vehicle’s carpets to catch on fire. The many stories inside the book sound too crazy to be true but most definitely are true – and result in a cracking read.
RRP: $35 Website: www.hardiegrantbooks.com
Hema Maps Go-To Guide For Campers
Mapping gurus Hema Maps continue to punch out great maps and guidebooks, with this latest one – Hema’s Go-To Guide for Campers – the perfect example, and following on from the recent release of Hema’s Go-To Guide for Caravans.
The Go-To Guide For Campers is packed with all the essential info and loads of expert advice on what you need to know before hitching up the camper and heading out. Subjects covered include trip planning and preparation, safety, how-to DIY, camper security, maintenance, advice on equipment you’ll need, and plenty of awesome destinations in an easy-to-ready format (accompanied by plenty of aspirational photos). Of course, the guide includes a number of excellent Hema maps.
RRP: $39.95 Website: www.hemamaps.com
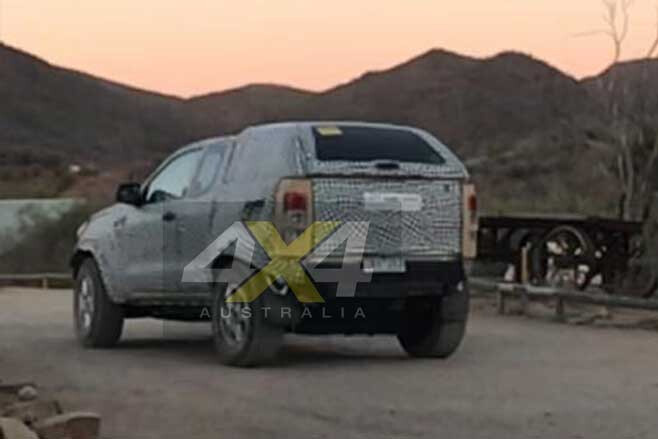
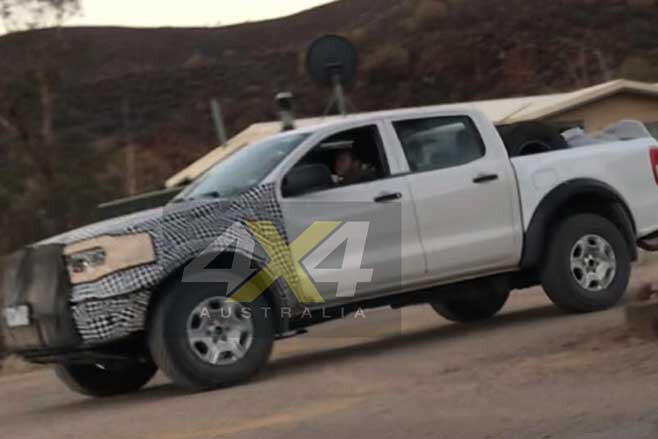
Engineering mules of the all-new 2020 Ford Bronco off-road wagon have been spotted testing in the Australian outback but Ford Australia says this vehicle will not be coming to local showrooms.
The new Bronco is set to launch in the USA in 2020 where it will come as both short-wheelbase three-door and long-wheelbase five-door wagons based on the T6 platform that underpins the Ford Ranger and Everest vehicles.
The Ranger pick-up launched in the USA this year and has so far had a lukewarm reception, which many say is due to its ‘mild’ styling when compared to tougher, boxier full-size pick-up trucks which are so popular in North America.
The US Ranger is based on the same Australian-developed T6 separate-chassis underpinnings as our local Ranger, however it is built in the USA, unlike Aussie-spec Rangers which are made in Thailand.
The 2020 Bronco will come off the same assembly line as the American Rangers when it goes on sale late next year and, like our Ford Everest which comes off the Ranger platform, it will ditch the ute’s leaf spring rear suspension for more compliant and comfortable coil springs.
The Bronco, which was last offered in the USA back in 1996, will come back to market with a bespoke body in both three- and five-door variants and it is believed that these will bring back the boxy designs of the past, unlike the more-rounded Everest wagon. A photo of a covered three-door Bronco released last year certainly backs this theory up, with square lines and large wheel arches clearly evident.
The odd-looking vehicles spotted last week in the Flinders Ranges in South Australia are test mules fitted with Frankenstein-esque bodies comprising Ranger single- and extra-cab front panels, and shortened ute tubs fitted with canopies. The single-cab is on the short wheelbase/three-door chassis and the extra-cab rides on a longer wheelbase which will be the five-door variant.
We’ve seen these test mules previously from spy photographers in the USA but this is the first time they’ve been spotted here in Australia. Ford Australia regularly tests vehicles and components here even if the models are for international markets and not to be sold here, and as the T6 platform was Australian born and bred, it’s no surprise that the T6-based Bronco chassis would be tested here as well.
A left-hand-drive double-cab Ranger with covered-over front sheet-metal was also being tested in the Flinders. The concealed front-end is tipped to be that of the 2020 update model in the USA.
When the 2020 Bronco was first announced, Ford Australia said that it was a US-only model and not for Australia, and when we questioned them about these test mules, they said that nothing has changed in that regard.
It is believed that the new Bronco will also be offered in China and, as well the three- and five-door off-roaders, there will also be a small crossover SUV wearing the Bronco badge. Expected to be built in the same size and style as the diminutive Jeep Renegade, the Baby Bronco, as it has been dubbed, is tipped to ride on a Ford Focus platform.
WE TURNED off the road onto what was not much more than a couple of wheel marks across the bare sand. As we got closer to our planned destination I scanned ahead, keenly looking for the object of our desires. A red dune blocked our way with the two wheel marks heading over it, while the Hema Navigator was indicating the spot we were searching for was before the dune crossing; but I was darned if I could see it.
Willie Rockhole appeared suddenly and almost unexpectedly on the bare plain we had been travelling across. I was anticipating a pile or small hill of natural rock where a rock hole or, more correctly, a gnamma hole, would be found somewhere on its surface.
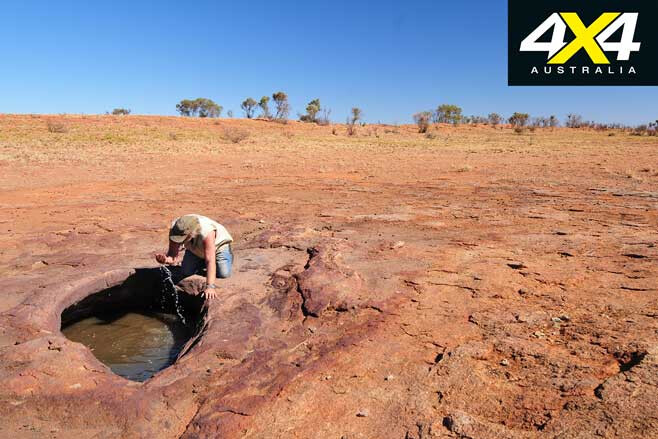
Willie Rockhole was different to that, with the flat rock surface almost completely buried under a veneer of red sand which, on closer inspection, proved to cover quite an area and formed quite a large catchment for the gnamma holes that collected the precious water. Only one of the three rockholes here had water in it, though, and that was the smallest of the group. The largest one, although nearly filled with sand, had wet sand once you dug down a little; and more water could have been obtained, I’m sure.
Later that day I found another gnamma hole, this one on a low hill of rock where a rock lid, or cap stone, could be dragged across the cavity to stop the precious liquid from evaporating so quickly in this dry desert climate.
These isolated treasures were the lifeblood for the wandering bands of local Aboriginal people, their location told in stories handed down over generations. Later, explorers and pioneer graziers relied on them for their journeys of discovery, while today nearly all are unused and forgotten about.
We’d left Marble Bar a week earlier, heading east on the blacktop of Ripon Hills Road. Intrigued by the sign of the Meentheena Veterans Retreat, about 80km east of the Bar and before you cross the Nullagine River, we turned south to check this area out.
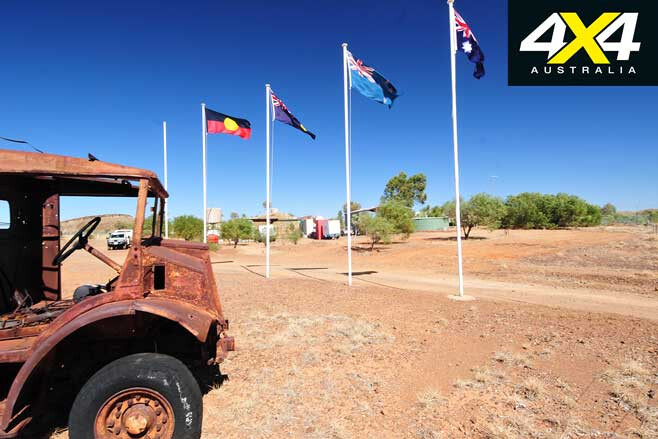
Now part of the Meentheena Conservation Park which covers 290,000ha, the retreat is a well-established camp set up for veterans and located about 6km south of the main road. Here you’ll find camping and powered sites, some accommodation, a great camp kitchen, toilets and showers, and the camp host.
For those who can’t be disconnected from the modern world, an internet connection is available. Not far away and spread along the Nullagine River are a number of delightful campsites, with camping just $15 per night.
There are a number of places to enjoy in the reserve and, with a map from the caretaker, you can visit the original homestead, historic graves, old mine sites, once-important telegraph stations, large, dry sinkholes and caves, as well as the many stretches of water spread along the Nullagine River. It is well worth a visit and is nowhere near as crowded as the more well-known and frequented Carawine Gorge, which is less than 20km away as the crow flies, but a bit farther by road.
Not much farther east the bitumen swings south to Woodie Woodie (and Carawine Gorge), while the route we wanted to take – the wide and very dusty Telfer Mine road – continues east, winding through the Gregory Range. Once through the rugged range we were into low red dunes and the western margin of the Great Sandy Desert.
The track to reach the highlights of the Rudall River NP branches off to the south further eastward, while the mine road swings a little north to skirt around the great open cut, portions of which are visible for the observant traveller. One of the biggest, most productive gold mines in Australia, the surrounding area also produced copper and more gold from other, albeit smaller, workings.
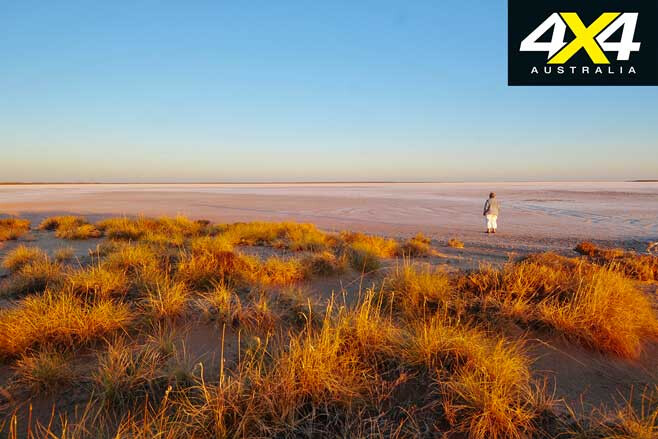
That evening we pulled up on the northern edge of the large saltpan of Lake Dora, which lies within the national park and occasionally gets water from the rarely flowing Rudall River. A family of dingoes were nearby, their den, as I found later, tucked in beneath a patch of thick green bushes and surrounded by a dense curl of spinifex.
The next day we rolled into the small hamlet of Punmu, which is an important but small Martu Aboriginal community; their country taking in much of the Great Sandy Desert region we were travelling across. We couldn’t find anybody to get fuel (maybe we were too early in the morning), so we headed back out the short distance and continued east along the main road.
Stopping for a yarn with a grader driver, we learned he was part of a team of maintenance workers looking after the road on the WA side of the border. Spending three to four weeks at a time there, he returns to Broome for a couple of weeks before doing it all over again. I got the impression he prefers being out in the desert country than in the trendy tourist port.
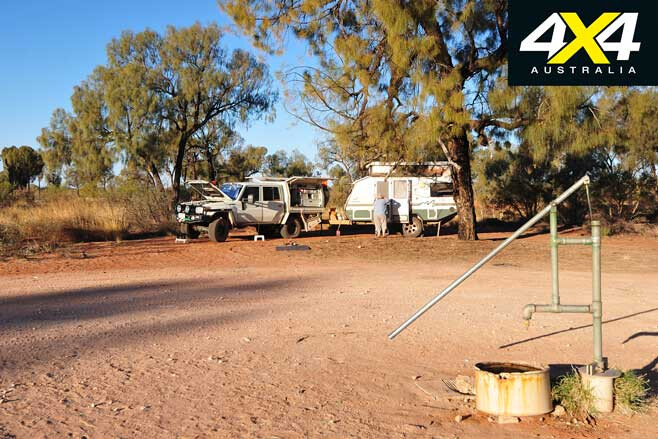
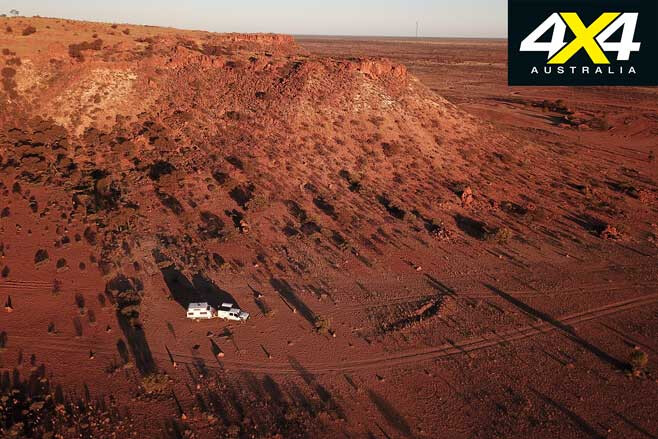
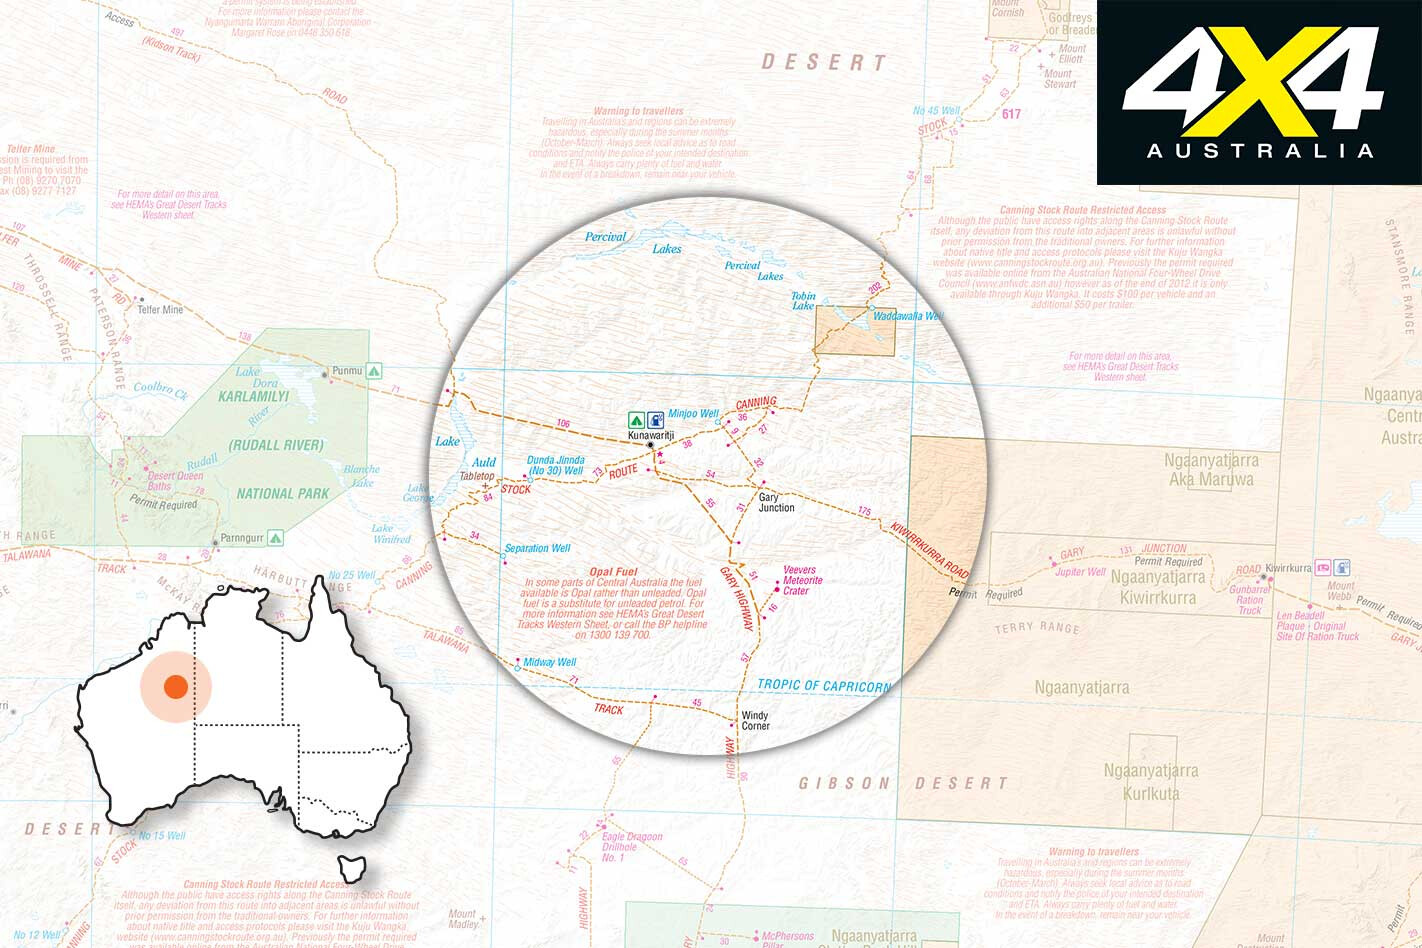
We pushed on, the route taking us around the top of Lake Auld before striking east again and arriving at the Aboriginal community of Kunawarritji at around lunchtime with everything closed. The Canning Stock Route is crossed just east of the village, and we headed up the track a short distance to set up camp at Well 33. Water cascades here from a water tank, which is fed by a slowly spinning windmill; the water forming a small pool, albeit larger than it was when we last visited here 10 years ago.

With camp set up, we cruised back into the community and met the couple who ran the store, organised the ranger programme and looked after the health clinic. This is again mainly a Martu community of about 120 people, with the population varying from a hardy dozen or less during the baking summer to more than 200 if some important business is being discussed. The main community living area is out-of-bounds to most visitors, and the once-vibrant art centre closed; so we took on some fuel and a couple of ice creams and headed back to camp.
The next day we stopped at Gary Junction, where you’ll find one of Len Beadell’s plaques. Len was in charge of the Gunbarrel Road Construction Party (GRCP) that built many of the roads in this vast desert region during the 1950s and ’60s. An avid story teller, he wrote a number of books and his legacy and the tracks he made are used by hundreds of four-wheel drivers every year. You can find out more about this great bloke and his roads at: www.lenbeadell.com.au
A couple of hundred kilometres east we pulled up at Jupiter Well, probably the only marked camping spot on the entire route. While Len and the GRCP had bulldozed the Gary Junction Road in late 1960, the original water point (which is about 150m south of the road) was dug by a National Mapping survey crew in August 1961. That evening one of the surveyors noticed a reflection of Jupiter in the waters of the new well, hence its name.
We found a couple of friends of ours who were heading in the opposite direction, camped beneath a tree; so after the obligatory welcomes, handshakes and swapping track conditions with one another, we had a few beers around the campfire. It’s a pleasant camp (on the north side of the road) surrounded by stately desert oaks, while the new hand pump delivers beautiful fresh water for travellers to enjoy.
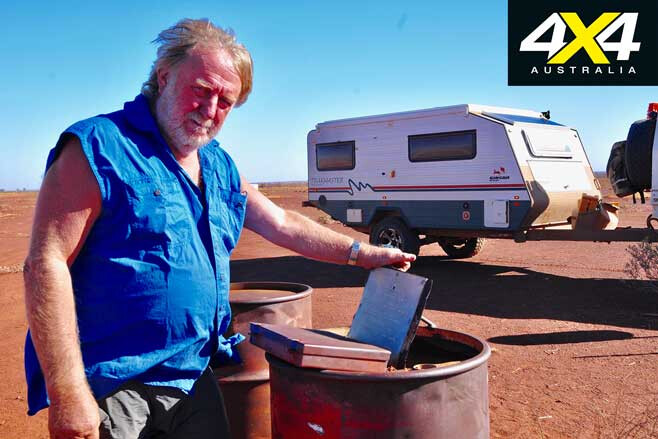
Sadly, someone had recently buried rubbish and a dingo had dug it up, spreading the paper, plastic and rotten vegetables all around. I’m unsure why people don’t burn their rubbish and carry the stuff that can’t burn out with them? Laziness, probably.
The next day we passed a few more Len Beadell markers and wound our way through the Pollock Hills, before taking the short diversion into the Kiwirrkurra Aboriginal community for a sip of fuel and to check out the well-stocked store.
On the edge of the township near the water tower, Len’s old ration truck sits behind a low fence, while a nearby plaque tells its sad story of being burnt out during a long-distance towing operation. Of course, Len’s yarn about it in one of his books is much more dramatic, with a twist or two of Aussie humour thrown in to make it all the more readable.
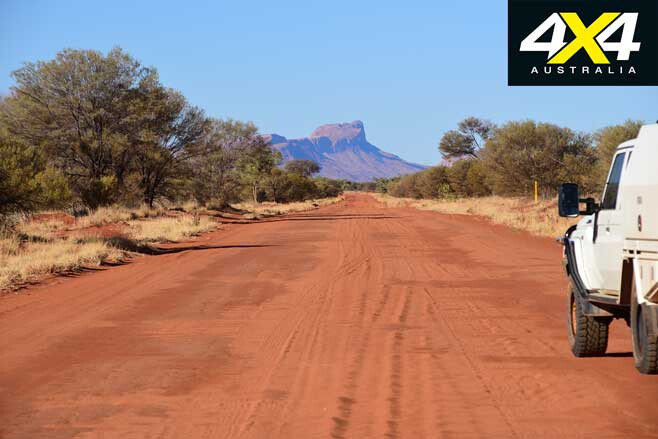
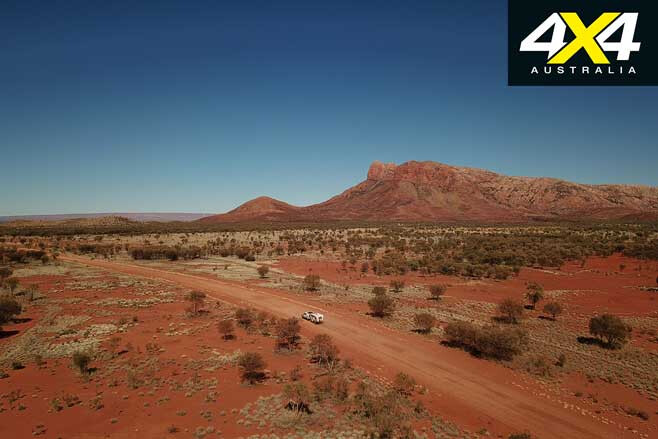
The road continued as before, with a few short sections of minor corrugations to remind you that you were on a dirt road. Passing through the Dovers Hills, Mt Tietkens amongst the Buck Hills came into view a short distance farther on and we pulled up for the evening under the mount’s rocky peak, just short of the WA/NT border.
After crossing the border the high sheer bluff of Mt Leisler came into view, jutting proudly above the flat red sands of the surrounding country. As you travel east from here, there are always some great peaks to admire: Mt Leisler in amongst the Kintore Range; to the north-east is the blue-tinged bulk of Central Mt Wedge; directly in your path, like a beacon, is Mt Liebig; and east of Papunya, as you swing south, Haasts Bluff dominates the road. It’s a great drive.
Back at Kintore Range, we stopped at the relatively large Kintore Aboriginal community to get more fuel and check out the store at this well-run and well-established community. Soon after we passed Sandy Blight Junction and another Len Beadell plaque, before taking the diversion to the previously mentioned Willie Rockhole. Farther east again, in among some rocky hills, we found a lid-covered rock hole with faint circular rock engravings (the circles denoting water), a tell-tale sign I was close to it.
We stopped at Liebig Bore for the evening, a major water supply for the nearby Aboriginal outstation of Warren Creek. Desert country dominated the view to the south and the road showed signs of much more traffic between the numerous Aboriginal communities, with corrugations chattering away and abandoned vehicles forlornly scattered along the edge of the road.
East of Papunya you can either continue on to meet with the Tanami Road or swing south towards Glen Helen; we took the latter as it’s a pleasant drive that traces the southern face of the West MacDonnell Ranges and all the gorges and delights it has to offer.
After stopping near the base of Haasts Bluff and paying homage to old Fred Blakeley, whose ashes were scattered over this sacred Aboriginal peak (with the Aboriginal people’s permission, as Fred was highly respected by them), we pushed on and stopped for the evening at the Finke Two Mile. Here, the river, not far from its source, has Mount Sonder (one of the most impressive peaks of the MacDonnell Ranges) as its backdrop. It’s a camp we always enjoy, with the permanent water and green reeds attracting a host of different birds.
Sadly, we were also back on the blacktop and Alice was less than 150km away. Our adventure for this year across the Gary Junction Road was over, and it’s a drive you’ll all enjoy as well.
Travel Planner
WHERE From Marble Bar to Alice Springs is around 1400km, depending on which way you go east of Papunya.
PERMITS To travel the full length of the Gary Junction Road you need a permit from the Central Lands Council in the NT and the Dept of Aboriginal Affairs in WA. Both are available online and are easily applied for and generally quickly issued.
FUEL The longest distance between fuel stops is 400km from Marble Bar to Punmu. Remember the track is sandy and you’ll use more fuel than you do on the blacktop. Punmu is probably the least reliable fuel stop along the way.
Fuel and limited supplies are available from: Punmu ($3/litre); Kunawarritji ($3.40/litre); Kiwirrkurra ($2.50/litre); Kintore ($2.15/litre); Papunya ($2.04/litre). Papunya is open 24 hours, with payment by credit card only.
MORE INFO The Beadell Roads is an excellent guide, which details all of the Len Beadell-made roads including the Gary Junction Road. Available from Westprint Outback Maps.
BOLLINGER Motors has announced its all-electric B1 and B2 prototypes will officially be revealed to the world on September 26, 2019.
The announcement, made via a video released on the company’s YouTube channel, confirmed that the American brand was closing in on the completion of the prototype ‘trucks’ – their words, not ours.
“The team has been working for 18 weeks now on the two new prototype designs: the all-electric B1 Sport Utility Truck, and the all-electric B2 pick-up truck,” said the video’s voiceover. “Almost five months on the physical builds is coming to a close.”
The four-door B1 SUV and B2 pick-up share the same DNA, with both running a dual motor (one at the front; one at the rear) capable of generating 614hp (458Kw) and 668 ft-lb (906Nm), through a two-speed (Hi/Lo Range) gearbox.
A 120kWh battery pack provides a claimed EPA range of 200 miles (322km). Both have 38.1cm of ground clearance, 25.4cm of wheel travel and towing capacities of 7500lb (3402kg). However, the B2 has slightly less payload capacity 5001lb (2268kg) versus 5201lb (2359kg).
Both vehicles feature all-aluminium body, removable windshields and geared axle hubs, among a heap of features.
For an extensive look at the Bollinger range, stay tuned for the September 26 revelation.
PURPOSE-BUILT isn’t really a complicated concept when it comes to building 4x4s. Things are normally clear cut.
Want to go further? Bigger tyres will fit that purpose. Travel longer? That purpose will need a set of drawers. Comfortable camping? A rooftop tent and roll-out awning will hit that purpose head on.
But what if the purpose is an idea, rather than a thing?
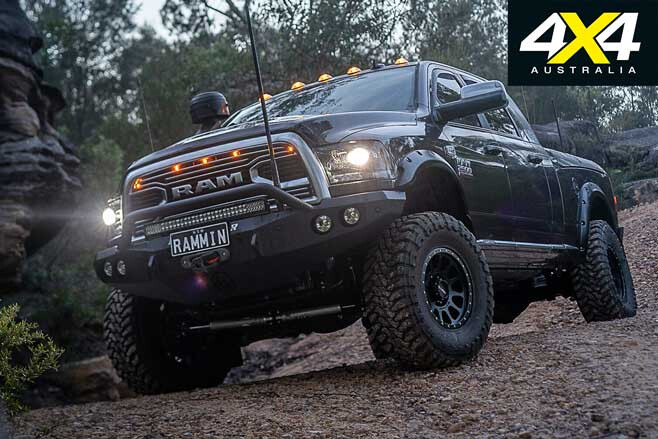
It’s something the owner of this one-of-a-kind Ram 2500 was faced with. Charlie is one of those blokes who always strives for more, and together with his late wife they strived for more for us. Political beliefs aside, it’s clear as day that Australia is losing native species at an unprecedented rate. Together, the pair aimed to do something about it.
They’d set off into the remote reaches of Australia; far beyond phone reception, where the black-top ends and the true wild begins. Through hard graft and harder determination, they’d seek out barren private property to turn into a sanctuary for endangered Australian natives, revegetating one plant at a time out of their own pockets before signing the lot over to all Australians.
Various options were looked at for the pair to not only lay their heads down at night, but also to cope with the rugged terrain they’d be travelling through. Land Cruisers? Not enough room. Land Rovers? Not rugged enough. A dual-cab ute? Not even close. The solution ended up being the pinnacle of off-road workhorses, the toughest of the tough and the strongest of the strong: the Ram 2500.
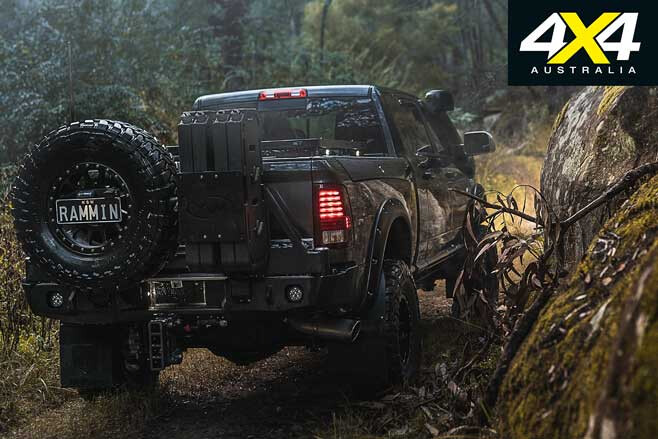
The example you’re looking at has been expertly pieced together by Sydney company Trucks ’N’ Toys, but the base vehicle is one of the most robust platforms on the market: huge live axles, a truck-like turbo-diesel engine, and the most interior space of any 4×4 thanks to the extended Mega Cab option (picture a dual-cab with a space cab on the back). However, this one isn’t the base spec; it’s so much more than that.
Starting from the ground up, Charlie had the guys at Trucks ’N’ Toys source him a top-spec Limited Ram 2500 before putting them to work. Underneath, they’ve completely gutted the standard suspension arrangement to make the Ram work better off-road and ride like a dream.
Starting from the front end, the factory live axle now rides on a full air-ride suspension arrangement from Kelderman. It sits five to six inches higher than stock as a baseline, but with an onboard air system the ride height is easily adjustable in-cab from one-inch over stock up to an eye-watering 10-inch lift if the Ram ever finds itself bellied out.
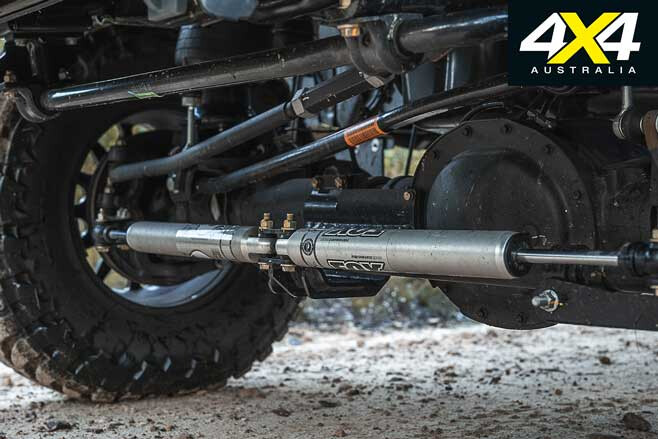
The ride quality is further dialled in with massive 2.5-inch Fox shocks; their remote reservoirs adding additional cooling capacity. There’s a Kelderman twin-steering stabiliser kit running two Fox 2.0 shocks, to reign in the monster of a front axle at high speeds. For context, that’s the size of a shock absorber in a Ranger or Hilux, just to smooth the steering.
In the rear, the Ram 2500 from stock runs a full link and coil arrangement, with disc brakes and a staggeringly large 11.5-inch diff centre. Again, the stock springs have been discarded in favour of a Kelderman air-bag arrangement, although this time it gives ride-height adjustment and, with the options box ticked, can automatically account for towing or tub loads on the rear end and level the vehicle out.
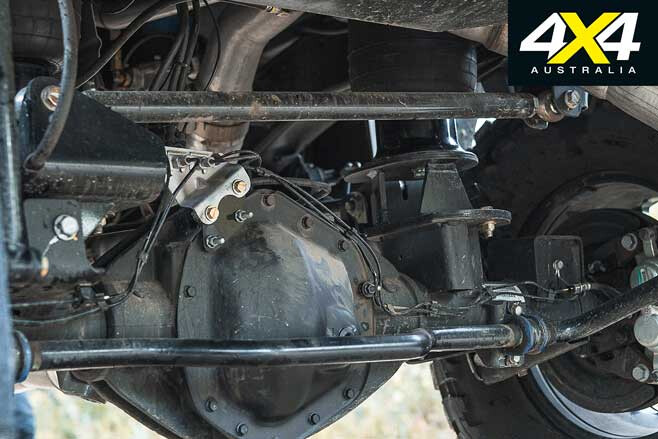
There’s also a matching pair of Fox’s top-dog 2.5-inch body remote res shocks. While Trucks ’N’ Toys were underneath installing the fancy new suspension, Charlie had them pull both diff centres and install some of the largest Air Lockers ARB make, for traction at the push of a button.
In typical US fashion the suspension system is designed for gargantuan tyres, and Charlie’s Ram is no disappointment. He’s kept things thematic with both wheels and tyres waving the Star-Spangled Banner.
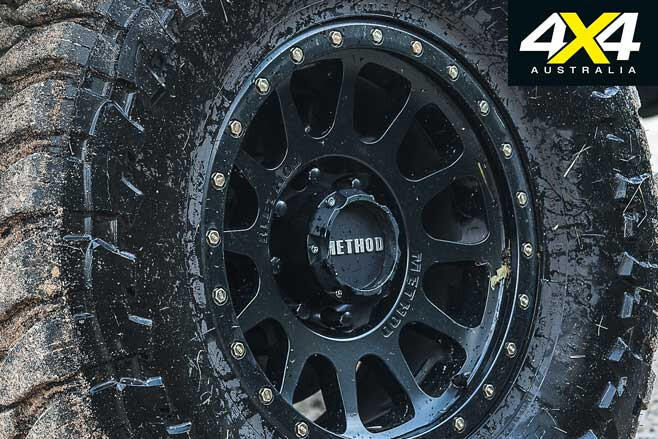
Each corner is shod in Method Race Wheels NV alloys, with their eight-lug design and optional heavy-duty spec giving them a load rating of more than 2000kg each wheel. The tyres are similar overkill compared to typical Australian-delivered gear. The over-sized 37×13.5 R18 mud tyres from Toyo punch in with a 1600kg load rating; 600kg more than a typical 33-inch tyre will bear.
On the outside the Ram’s been decked out head to toe with bush-ready gear. Up front there’s 120kg+ of plate steel hanging off the frame rails, in the form of the Stealth Pre Runner bar from Road Armour.
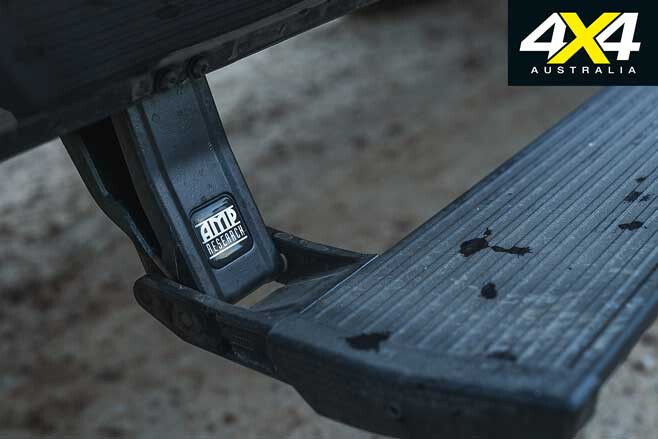
Charlie shoehorned Warn’s heavy hitter 16.5TI-S winch – providing nearly 7500kg worth of pulling power – deep inside the bar, and it’s hinted at only by the Factor 55 fairlead and Flat Link. Moving down the Ram’s flanks are a set of auto-opening electric side steps to make entry and exit an easy affair, while a Front Runner platform rack above the tub opens ample storage options.
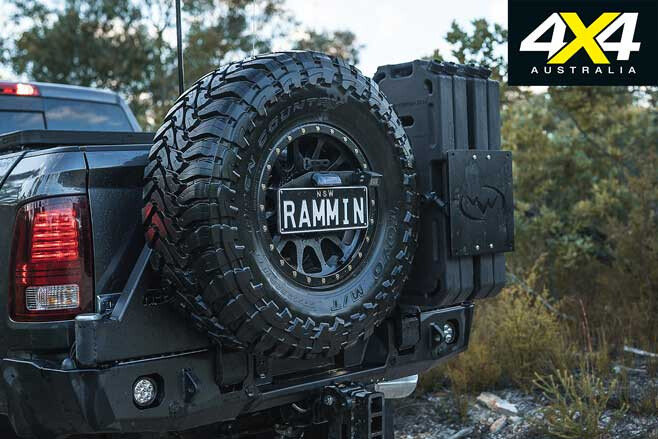
The rear end copped similar treatment, with an up-armour from US-based Expedition One – the enormous rear bar easily housing the 37-inch spare tyre on one swing arm, with the other holding 60 litres of diesel with four RotopaX-style jerrycans.
Moving inside and the Ram’s adorned with an interior more fitting of a Cadillac than a workhorse. The top-spec Limited trim has the Ram decked out from head to toe with leather trim. Front seats are heated, while the rear seats recline into the spacious Mega Cab section.
There are plenty of hidden gadgets inside, too, like the GME UHF and Cel-Fi mobile phone extender, but the real thing of interest to off-roaders is the Switch Pro system. Replacing eight rocker switches and the associated solenoids, the Switch Pro system allows eight user-programmable functions through the one touchpad.
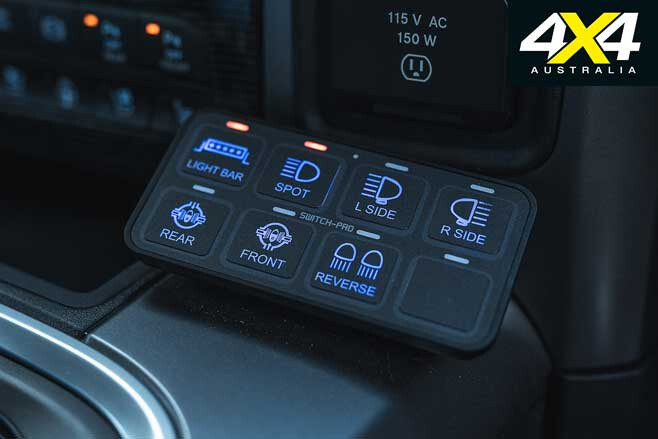
Charlie’s set his up to run the front facing, rear facing, and side facing lights, as well as the front and rear lockers. The whole system can be controlled via a phone app from the comfort of a camp chair, and it can be optioned to control everything from compressors to torque convertor lock-ups and even winch controls.
The one crowning achievement of the whole build is that it’s 100 per cent road legal, passing all lane-change tests, brake tests and swerve tests; not only for the air-ride suspension but also the bigger rolling stock. It might not be the most conventional tourer, but for forging beyond the black stump with nothing but dust in your rear view, it’d be hard to imagine anything else coming close.
Riding on air
WITHOUT a doubt, one of the defining characteristics of Charlie’s Ram is the full air-ride suspension. Despite being relatively new in Australia, it’s a technology that’s been polished for the better part of a decade and may just be the ultimate setup for serious off-roaders.
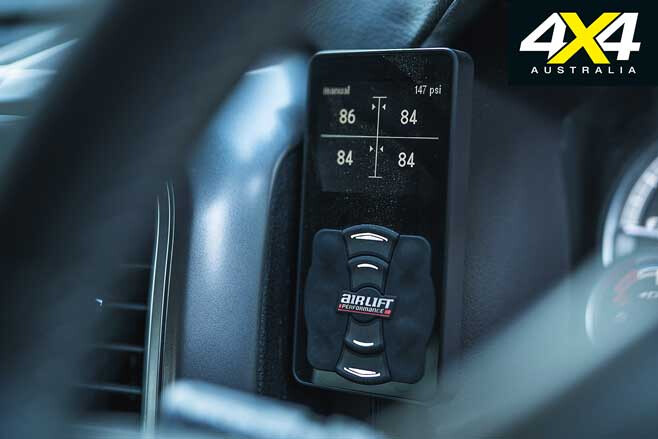
The system is relatively simple. Inflatable, heavy-duty airbags replace the stock coil springs. They’re filled and emptied with electronically controlled valves and fed by an onboard 12V compressor and air-tank.
Want a smooth ride or to lower the ride height? Dump air from the system and the ride will be silky smooth. Need to account for added weight, or looking to clear an obstacle? Pumping compressed air into the bags will stiffen the ride and increase height.
They can be controlled with a simple switch; although, high-end self-levelling systems use a position sensor to automatically compensate for changing loads in the rear.
A TIDY 1958 Land Rover Series I that lined up as one of the headline acts at Shannons Sydney Winter Auction has reportedly fetched a staggering $40,000.
Listed as one of the last examples of its type produced in 1958, the short-wheelbase Land Rover was expected to go for between $25,000-$29,000, but exceeded that amount spectacularly, reflecting an impressive rise in values of early Land Rovers.
This particular example, which was originally delivered to its first owner near Hervey Bay, Queensland, is said to be in original condition and has just 8400 miles (13,500km) showing on its odometer.
Other early 4x4s that have shown healthy increases in value over the past couple of years include WWII Jeeps, Toyota 40 Series Land cruisers and Nissan 60 series (60, G60 and K60) Patrols.
Sign up here for your free weekly report on the world of 4×4 adventures!
THE winners of the Moon Tours’ Cape York trip have just returned from an adventurous, excitement-filled expedition to the Tip of Queensland.
The lucky winners, Jamie and Siobhan (Bon) Thornberry from Seymour, Victoria, won the prize – a guided trip to Cape York worth more than $10K – by registering their details online, before they were randomly plucked from a large pool of entrants.
The couple met up with Trent Moon and his partner Steph, Ron and Viv Moon, and the rest of the crew at Cooktown, where eight vehicles and two camper trailers in total were prepped and readied for the bucket-list trip to begin.
A Cape York trip is not without countless highlights, and this trip was no exception. The convoy passed through Lakefield National Park, pulled the handbrake at Chili Beach, took on the challenging Frenchmen’s Track and tackled the entire length of the OTL track.
Once at the Tip, camp was set up at Somerset, before the convoy ventured to Thursday, Friday and Horn Islands. On the return trip, the convoy traversed the infamous Old Coach Road between Laura and the goldfield town of Maytown, before the trip finished at a private forest camp near Mt Molloy, inland from Cairns.
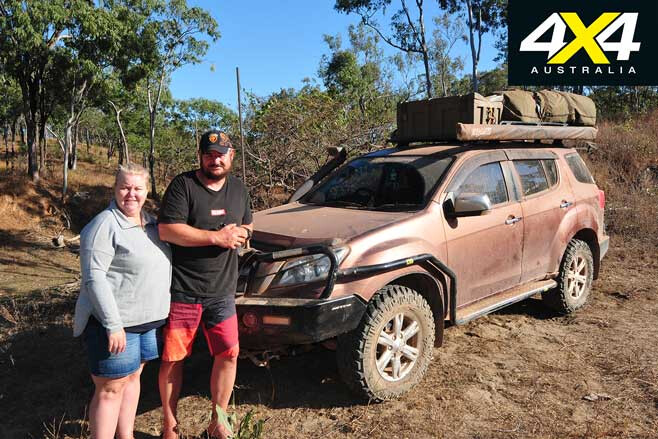
Jamie and Bon’s near brand-new, well-equipped Isuzu MU-X handled near everything with aplomb, but it snapped a CV joint as they ploughed through deep sand on the way to the Jardine River mouth … it had probably suffered on the OTL track, and the deep sand was the final straw. It’s a fairly common issue with the MU-X, but all was not lost as Jamie carried a spare. How’s that for being prepared?
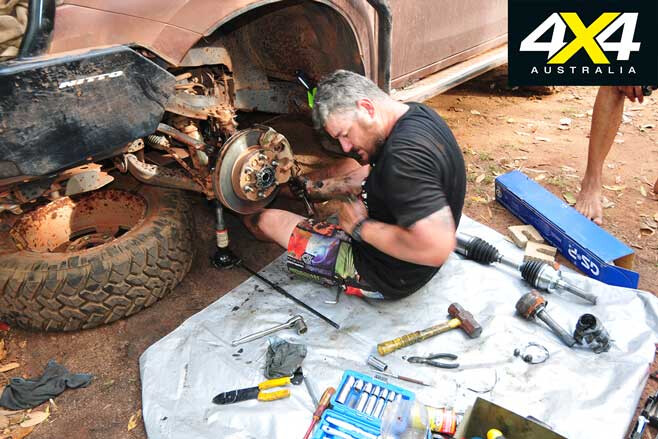
Mind you, a snapped CV joint was the least concerning of the mechanical issues the party encountered along the way: a crook alternator was replaced by Trent and the team at their camp after a quick dash to Weipa for a new one; a crook starter motor went through a full strip-down and a bush repair at Twin Falls; and charging issues between vehicles and camper trailers kept everyone guessing for a while.
A stuffed battery was also replaced; a few tyres rolled off rims by exuberant driving; a few people got bogged; winches were used on a couple of occasions, as were the snatch straps; and there were a few scrapes on side rails and the like, but nothing too serious.
All in all, it was pretty normal Cape York 4×4 adventure. Thanks to Moon Tours (www.moontours.com.au) and Cooper Tyres (www.coopertires.com.au) for their support of the competition.
THE SNATCH strap has been the go-to recovery device for four-wheel drivers for many years – so long as you have another vehicle on hand, a snatch strap is usually the easiest and fastest way to recover a stuck vehicle. But now there’s a new kid on the block that promises to offer all the benefits of a snatch strap but with greater safety, longevity and effectiveness. Enter the kinetic recovery rope.
They haven’t been around for long, but you’ve probably seen kinetic recovery ropes advertised online or even out in the field. Several reputable 4×4 accessory companies already offer versions of this new recovery device, and other big players in the market will no doubt soon have their own branded versions.
But what makes kinetic recovery ropes better than traditional snatch straps? And are the benefits enough to justify the premium price tags, which can be twice as much (or more) than a traditional snatch strap?
Some nine-metre-long kinetic recovery ropes retail for up to $350, which is a helluva lot more than an 8000kg snatch strap that sells for $40, but the extra investment not only buys you greater capacity and longevity, but also more stretch, which can make recovering stuck vehicles both easier and safer.
How do kinetic recovery ropes work?
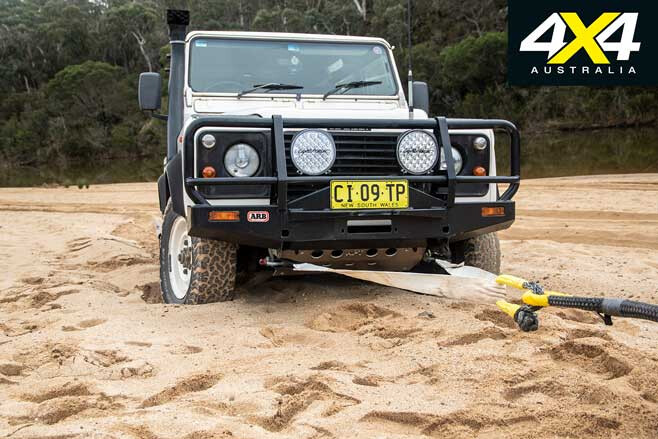
THE principle behind a vehicle recovery using a kinetic recovery rope is the same as a traditional snatch strap. The vehicle being recovered is pulled out of its predicament by another vehicle using the stretchy kinetic recovery rope.
The rope is attached to both vehicles (using rated shackles attached to rated recovery points), then the recovery vehicle gets a run-up and pulls on the rope, which stretches like an elastic band and then contracts, using the stored kinetic energy in the rope to hopefully yank the stuck vehicle out of its bogged state.
Of course, this kind of recovery can only be performed if there are at least two vehicles on hand, and if there’s enough space available for the recovery vehicle to get a good run-up. Additionally, this recovery method should only be employed if the recovery can be performed by pulling the stuck vehicle forwards or backwards, not to either side.
The big difference in how a traditional snatch strap works compared to a kinetic recovery rope is the latter’s additional stretchability. Recovery ropes are claimed to stretch by as much as 30 per cent during a vehicle recovery compared with around 20 per cent for a traditional snatch strap. This results in decreased shock loads on vehicles.
“With standard snatch straps, they only stretch about 20 per cent, whereas you’ll get up around that 30 per cent stretch with kinetic ropes,” says Ryan Rose from Sherpa 4×4. “What that means is when you recover a vehicle there’s a much softer impact.”
There are obvious benefits to having reduced shock loads during a recovery operation, with less strain on the recovery equipment itself as well as less strain on the vehicles involved.
What are traditional snatch straps

TRADITIONAL snatch straps are manufactured from flat nylon webbing and are available in different lengths, widths and capacities. Nine-metre lengths and minimum breaking strengths between 8000 and 11,000kg, with widths between 60 and 100mm, are popular choices for four-wheel drivers.
It’s advisable that the snatch strap’s minimum breaking strength should be between two- to three-times the Gross Vehicle Mass (GVM) of the lightest of the two vehicles involved in the recovery operation.
Snatch straps typically have reinforced eyes at each end to allow fitment of rated shackles for vehicle attachment. To form these eyes, the nylon webbing is looped back onto itself and is stitched together.
Despite the eyes of a snatch strap being reinforced and the stitched areas usually covered by seam-protector sleeves, it is this area of the snatch strap that is the weakest point and therefore most prone to failure on an otherwise undamaged strap.
Vehicle recoveries are performed on a variety of surfaces, and often this can cause significant damage to the unprotected webbing of a snatch strap; which can be nicked or cut on sharp rocks or other obstacles, simply worn on sandstone and the like, or even damaged when inadvertently run over by a vehicle.
If a snatch strap shows signs of obvious damage, it should be retired from service because a failure could be imminent, which could result in damage to vehicles or injury to people.
What are kinetic recovery ropes
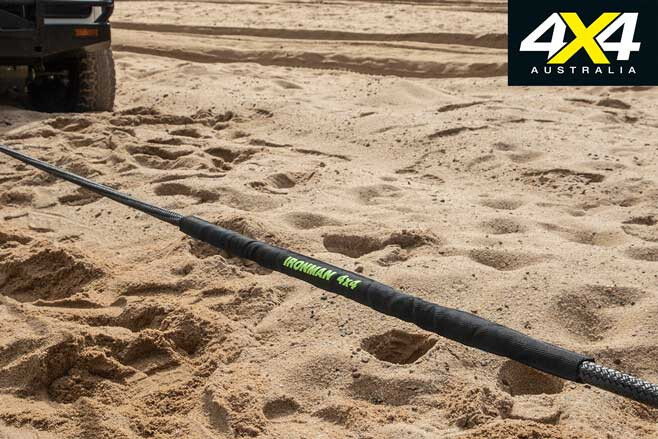
KINETIC recovery ropes are also manufactured from nylon, but in the form of a double-braided rope. The inner nylon core is the stretchy component, and this is protected by a braided nylon outer layer.
“The outer layer is also made from nylon, but it’s a polyamide, a nylon 66 polyamide,” explains Adam Craze from Ironman 4×4. “The outer layer is double-braided and it’s coated to give it resistance to abrasion. While the outer layer also has a bit of stretch, it essentially provides strength to the stretchy core and acts as an outer sheath.”
It’s this abrasion-resistant outer layer that gives kinetic recovery ropes a big advantage over traditional snatch straps, which don’t have any protection over their stretchy nylon webbing.
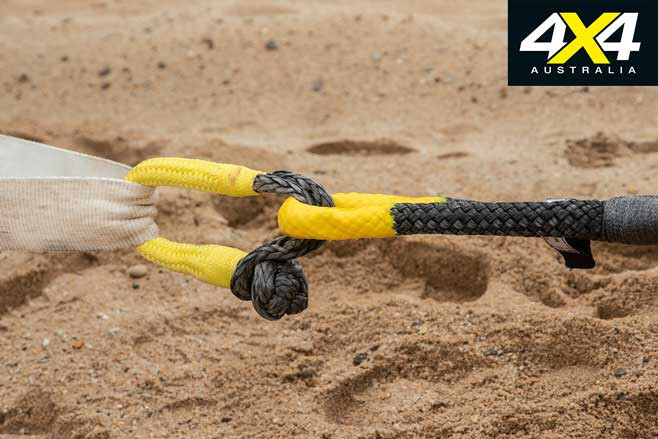
Another big advantage is the way in which the looped ends (the eyes) of a kinetic recovery rope are formed. These ends are spliced together rather than stitched, eliminating the weakest point of a snatch strap.
“Kinetic recovery ropes don’t have any stitching, which takes away that potential failure point,” says Adam Craze. “After a few uses, people forget to check their straps and how many times they’ve been used. Sooner or later a snatch strap will break down. Kinetic recovery ropes will last a lot longer and, like I said, they don’t have that failure point at the stitching, where a snatch strap’s webbing is stitched together.”

Thanks to their double-braided layer construction, there’s no need for the looped ends of a kinetic recovery rope to be reinforced, but most will feature a polyurethane (PU) coating to minimise the occurrence of wear at the point where the rope attaches to a rated shackle.
Just about all of the kinetic recovery ropes we’ve seen have a claimed 30 per cent stretch, which is a substantial 50 per cent greater than the 20 per cent stretch that most traditional snatch-strap manufacturers claim.
As outlined earlier by Sherpa 4×4’s Ryan Rose, this extra stretch results in decreased shock loads on vehicle recovery points and shackles when performing a snatch recovery, which is obviously beneficial for the vehicles involved as well as for overall safety during a vehicle recovery, as there’s less chance of component failure.
Higher rating
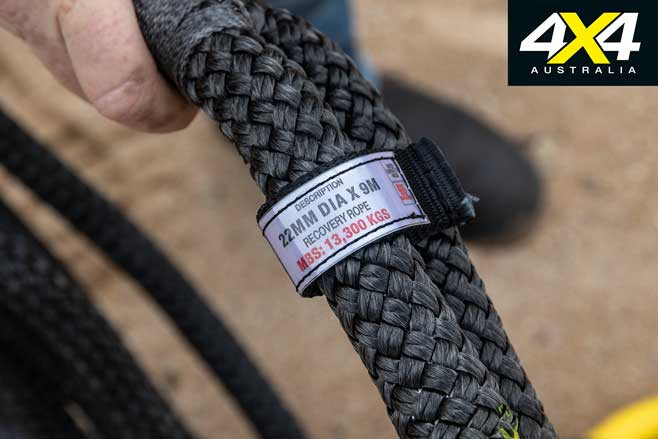
WE TESTED two kinetic recovery ropes for this story. Ironman 4×4 supplied its 9500kg rope and Sherpa 4×4 supplied its 13,300kg rope. Both of these have higher minimum breaking strengths than popular 8000kg snatch straps, but as Ironman 4×4’s Adam Craze explains, that’s really just a sign of the times.
“Vehicles are getting heavier these days and people are loading them up,” explains Adam. “With the extra stretch and the smoothness of the kinetic rope, it can still be used to recover lighter vehicles with a gentle pull but, with heavier and heavier vehicles, you want the higher rating. Many vehicles are up over three tonnes these days, so we think 9500kg is a good place to be.”
Sherpa 4×4’s Ryan Rose agrees and points out that the higher ratings will also have longevity benefits. “They’re rated a lot higher,” he says, “so with normal snatch straps you’re much closer to their breaking limit … everyone’s had a snatch strap break, whereas I personally have never had a kinetic rope break.”
As a result of these higher ratings and their different construction, kinetic recovery ropes are generally slightly heavier than traditional snatch straps, but not by much. For example, Ironman 4×4’s 8000kg snatch strap weighs 2.23kg and its 11,000kg snatch strap weighs 2.86kg.
By contrast, an Ironman 4×4 9500kg kinetic recovery rope weighs 3.18kg in its carry bag, and the Sherpa 4×4 13,300kg kinetic recovery rope weighs 4.74kg in its carry bag.
Other benefits of kinetic recovery ropes
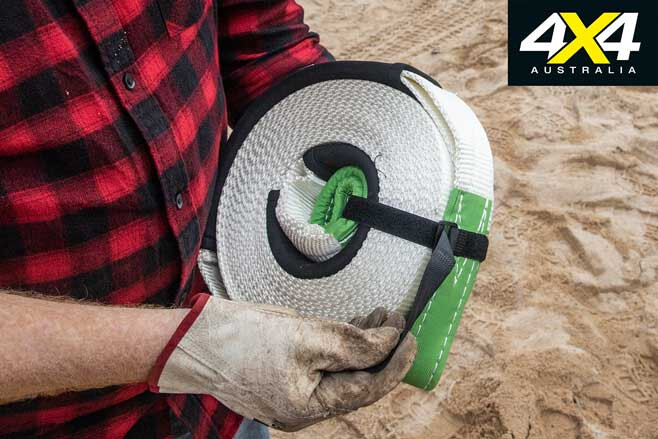
SNATCH straps should be neatly rolled up after use to prevent kinking as the unprotected nylon webbing is prone to damage if not stowed properly, but kinetic recovery ropes can be simply placed into a bag when you’ve finished with them, making handling a much simpler affair. And most kinetic recovery ropes are supplied with a ventilated carry bag (with mesh sections) to allow them to dry if stowed when wet.
“You can just bundle it up and throw it in the bag,” says Adam Craze of the Ironman 4×4 9500kg rope, “whereas most of us roll up our snatch straps and tuck them in somewhere safe. And it’s handy having a bag for a kinetic recovery rope; if it’s wet, the bag is basically open mesh, so it can air out and dry while it’s in the bag.”
Kinetic recovery rope care and maintenance procedures are essentially the same as with a snatch strap, so if muddy it should be hosed clean and allowed to dry; this will minimise the risk of abrasive dirt particles working their way between the nylon braiding and causing premature wear.
It should be pointed out that, just like traditional snatch straps, not all kinetic recovery ropes are created equal. While researching for this story we discovered plenty of ropes for sale online for as little as $120 delivered, but as with all recovery equipment we’d advise against going for the cheap option.
The Ironman 4×4 9500kg rope we tested for this story, for example, retails for $165 and it has been thoroughly tested to ensure it does exactly what it says on the box. “We’ve done a lot of development and testing,” says Adam Craze. “We went through several different versions, several different outer coatings, to try to find a stronger outer coating, and to make sure it does what it’s designed to do. We’ve spent a fair bit of time on development, with testing in the real world and in a NATA (National Association of Testing Authorities, Australia) testing lab, so we can verify everything that we build.”
Recovery points and shackles
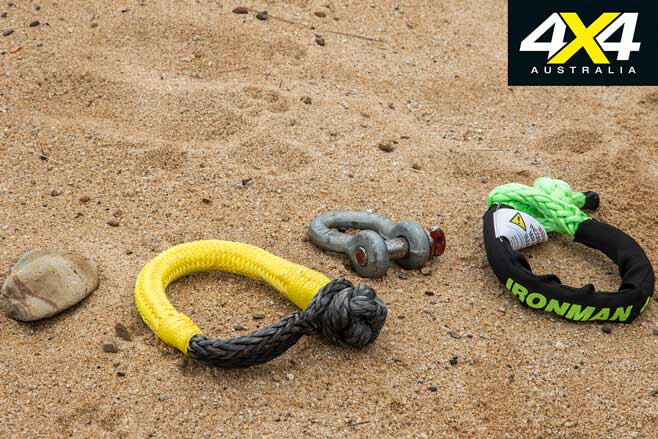
THE looped ends of kinetic recovery ropes are thicker than equivalent traditional snatch straps, so you won’t be able to feed one through a two-inch hitch receiver and use the pin as a recovery point. Instead, you’ll need a dedicated recovery hitch, either fitted with a rated steel shackle or a soft shackle.
If using soft shackles, it’s preferable that the vehicles’ rated recovery points have no sharp edges that could otherwise damage the shackle, even if fitted with an abrasion-resistant sleeve. Soft shackles offer several benefits over traditional steel D-shackles and bow shackles: they are lighter, they float and they are unlikely to cause injury if there’s an equipment failure. Soft shackles can also be used to connect two snatch straps together, whereas a steel shackle should never be used for this purpose.
“We’re always looking for safer and smarter products,” says Adam Craze. “Combining kinetic recovery ropes and soft shackles is a great example of this.”
Kinetic recovery ropes tested
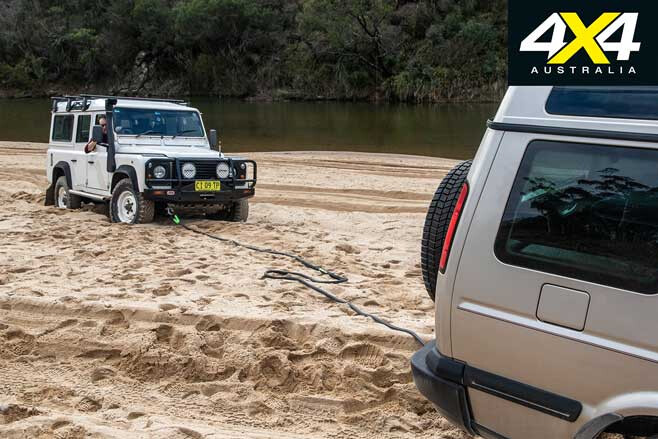
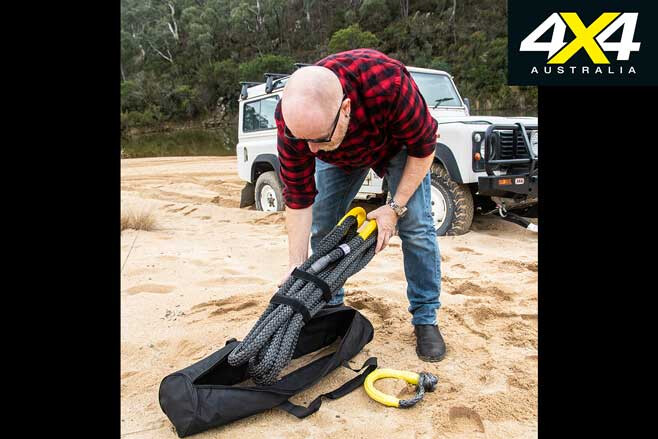
TO VALIDATE the “stretchy” claims made by kinetic rope manufacturers, 4X4 Australia Deputy Editor Justin Walker and I decided to pitch two ropes against two traditional snatch straps. So we found some soft sand, intentionally bogged my Defender and snatched it out using the straps and then the ropes with JW’s Discovery.
Ironically, getting intentionally bogged is always more difficult than becoming accidentally bogged, but on-road tyre pressures, low-range first gear, some super-soft sand and a boot-full of revs soon had the Defender buried.
First up we snatched the Defender out using a new Ironman 4×4 8000kg snatch strap, followed by a new 11,000kg strap. We then trialled the Ironman 4×4 9500kg kinetic recovery rope and the Sherpa 4×4 13,300kg kinetic recovery rope.
The snatch straps worked as predicted, quickly heaving the Defender out of the soft sand with a decent jolt. While the end result was the same using the kinetic ropes, the recovery certainly felt smoother as a result of the extra stretch, even with the heavier duty Sherpa 4×4 rope.
One of the most noticeable benefits of the kinetic recovery ropes was stowing them after use; we just bundled them into their respective bags and threw them in the back of the vehicle. With the snatch straps, we had to roll them up and secure them with the supplied Velcro straps to prevent them from unfurling.
Are kinetic recovery ropes worth it?
Are kinetic recovery ropes better than traditional snatch straps? Yes. Are they worth the extra purchase price? Definitely.
Not only are kinetic recovery ropes more durable than snatch straps, they are also less prone to failure and way more convenient when it comes to packing away after use. Of greater importance, however, they provide a “softer” snatch recovery, which is easier on recovery gear, easier on vehicles and inherently safer.
SINCE THE beginning of this year, we’ve done a couple of remote outback jaunts. Early on we headed along the Anne Beadell Highway, before turning south on a couple of Aboriginal business roads; more recently we crossed the Gary Junction Road from the WA coast to Alice Springs. On both of these trips we travelled distances of up to 1000km between fuel points, and we saw very few travellers.
As we set out on both trips and entered remote country, we came across signs that warned of dire consequences if warnings and advice were not heeded. Most are common-sense; but with common-sense being pretty scarce, the signs are required and I hope people take note of them.

It’s just like peoples’ reliance on mobile phones, as many don’t seem to understand that there are large regions of Australia where mobile phones don’t work … a phone out here is good for taking photos, that’s all. Likewise, a UHF radio is near useless unless you’re travelling with a mate, so take a HF radio, a satphone or a satellite messenger such as a Spot or Garmin inReach.
Also, just because you have the latest whizz-bang vehicle, don’t think you won’t break down. I met two couples on the latest trip who had major computer and/or electronic failures with their almost-brand-new vehicles. One had broken down 200km south of Halls Creek on the Tanami Road, while the other had stopped east of Ayers Rock/Uluru. Both had been recovered by a flat-bed truck, with one going to Broome and the other to Alice Springs for expensive repairs that were to take in excess of two weeks on each occasion. Their holidays were completely stuffed.
In the event of electronic failure it’s essential to have a plan, a way of communication, or a good friend who can tow you to the nearest town or repair place. That’s one of the reasons I always prefer to travel in company; not only for social aspects, but also for the safety side of things if anything goes wrong.
If I’m travelling solo, I have a satphone or HF radio, and I always carry enough gear and have basic knowledge on how to fix most things … except a major electronic failure. The only time I’ve had to call for outside assistance was a few years ago when I was on a remote Aboriginal road north of the Tanami and an electronic box failed.
There was nothing I could do except call for help, and that’s something that still niggles because I’ve always been able to get myself out of trouble. Likewise, I have always carried a heap of water. It’s surprising the number of travellers we have found broken down that don’t have a drop of water between them.
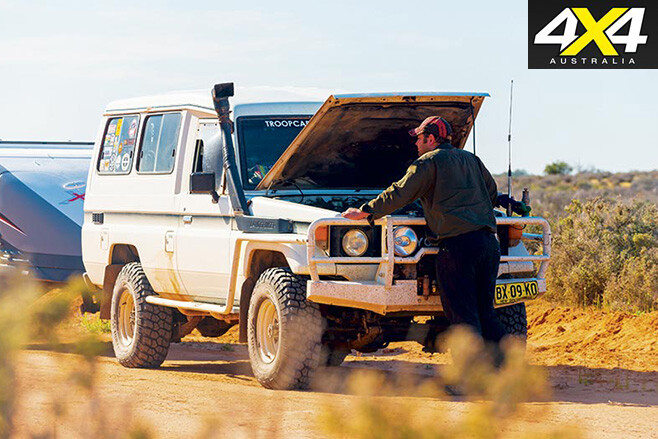
On our latest sojourn we had a tyre disintegrate when I didn’t follow my own preaching of ensuring the tyres were in good nick before we set off. Still, I had three spares – one on the camper and two on the Cruiser, all interchangeable – so while the shredded tyre held us up for a short time, it was nothing too dramatic.
We had a few other minor issues: the sliding bolt latch on the camper’s battery tray broke, allowing the tray to smash the battery door off; and a couple of the plastic hinges broke on the main door of the camper. Before you comment, our Trakmaster caravan is eight years old and has had a rough and varied life, spending much of its time on unsealed roads and lumpy outback tracks.
A length of thin fencing wire fixed the battery slide, while a self-tapper screw fixed the door hinge. Something that took a bit longer to find and fix was a broken wire leading to the Redarc BMS auxiliary battery unit. Still, none of them were major issues and we rolled along through the desert country.
We hope your travels are just as enjoyable, but be prepared with a plan and the right gear just in case something goes wrong.