It’s not often one of the biggest names in off-road tyres releases a new product, so when it happens it is big news.
BFGoodrich has been the tyre of choice for Dakar, Baja and Finke race-winners for decades and is one of the most popular brands chosen by recreational four-wheel drivers. Whether it’s its popular All Terrain or Mud Terrain tyres, BFG has an enviable reputation in the Australian off-road market and around the world.
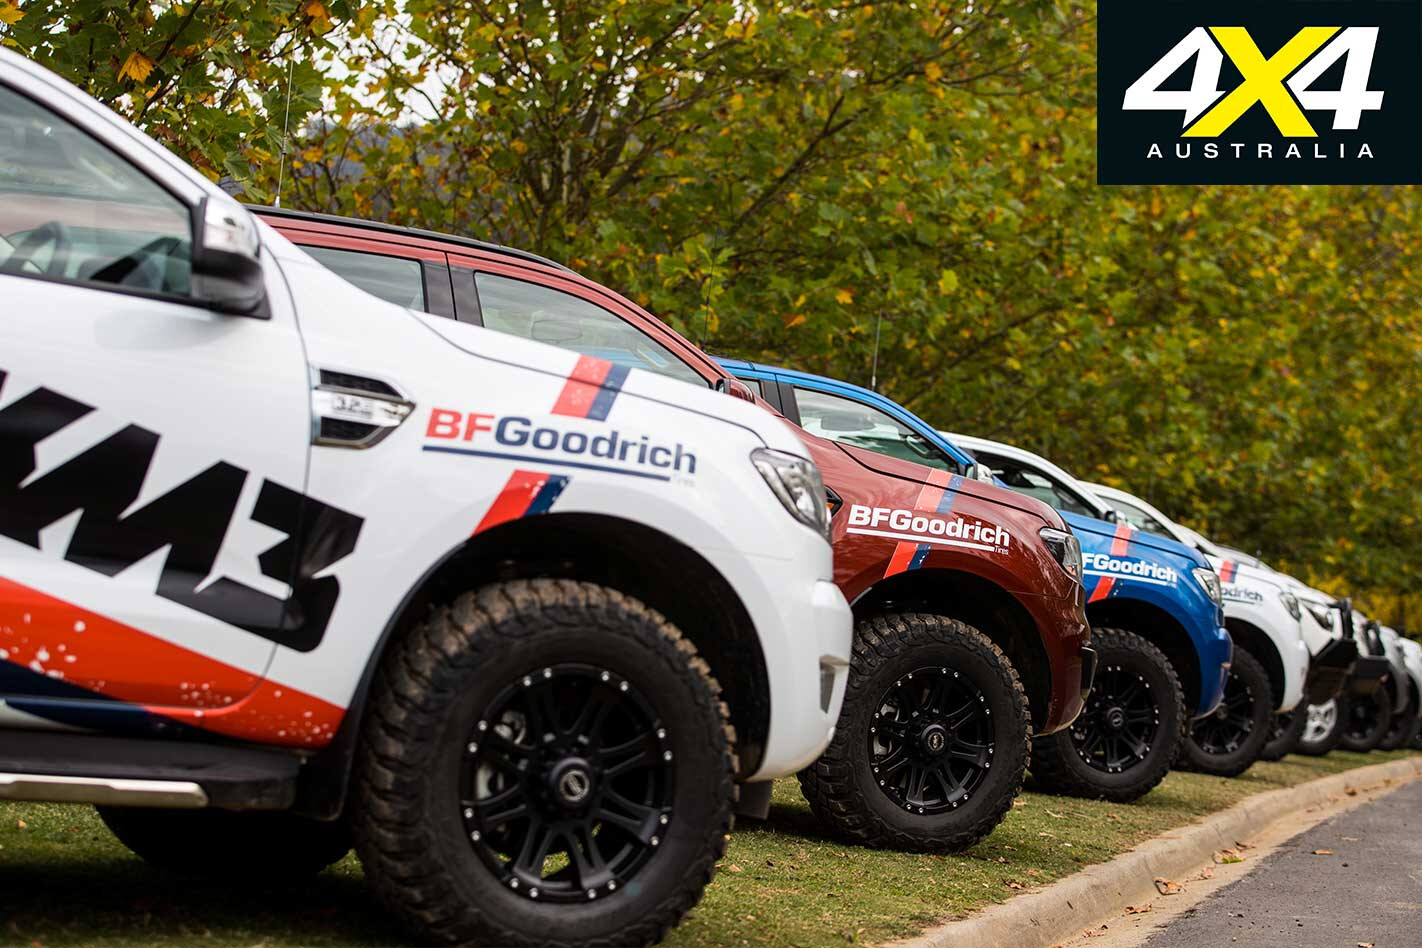
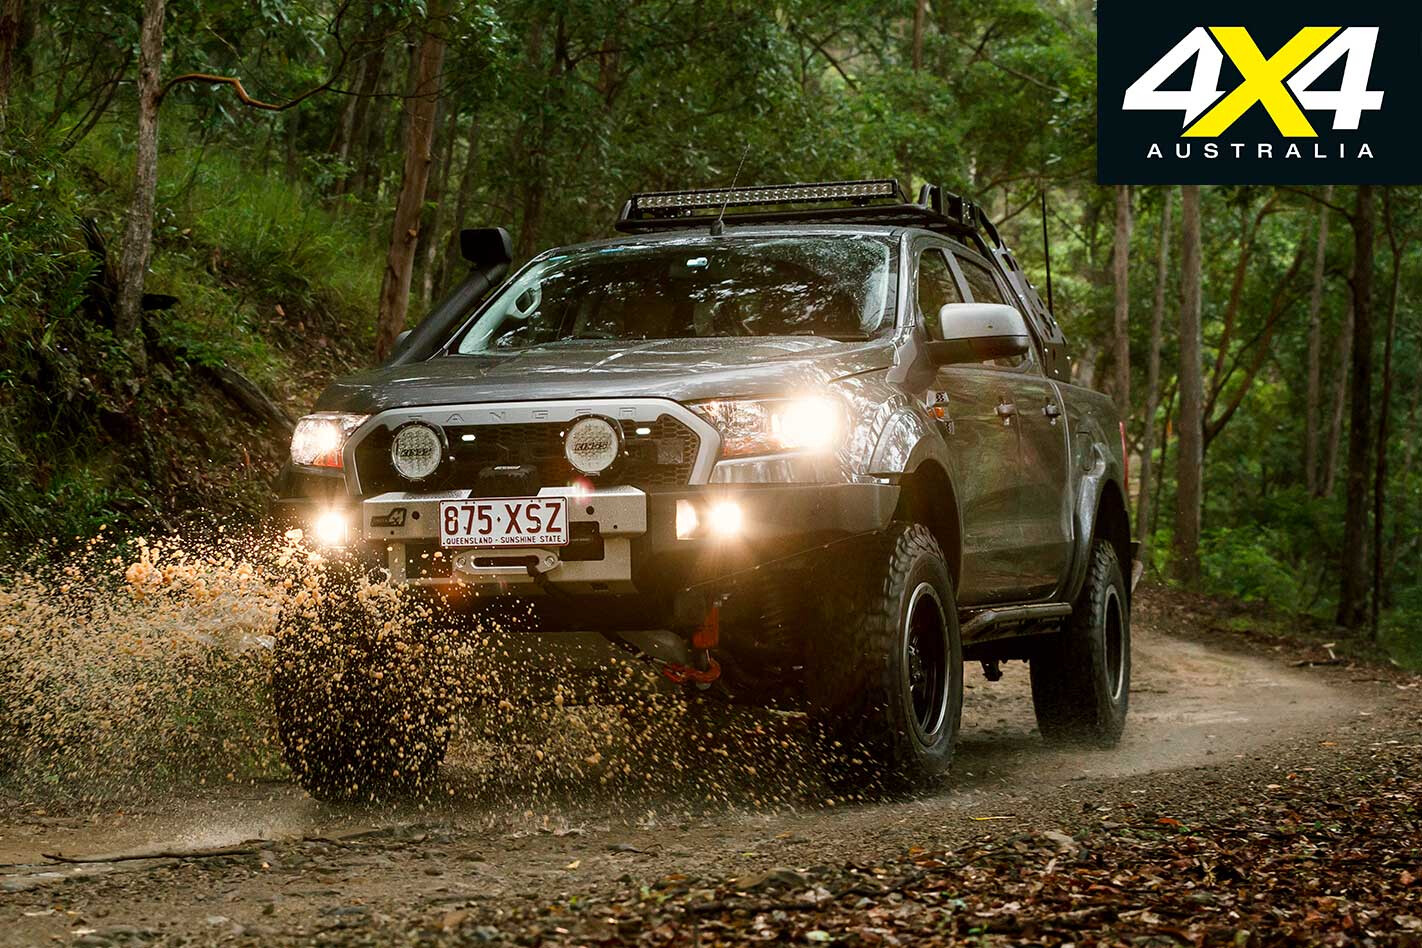
It’s been 12 years since the fourth generation of BFG Muddies, the KM2, was launched, and pre-production prototypes of the KM3 have been spotted around the world and at off-road races for more than 12 months. The production version has finally landed, and BFG chose to do its global launch for the new KM3 right here in Australia, at Victoria’s High Country.
BFG has taken the knowledge gained from years of experience at the highest levels of off-road racing – with a display case full of winners’ trophies to prove it – and applied it to this latest Mud Terrain tyre.
“We designed this tyre for extreme toughness and traction,” said BFG’s global general manager, Harold Phillips, who was in Australia for the launch. “Whether building for off-road fun or for extreme capability to reach outdoor activities, this tyre was made to take drivers anywhere they want to go.”
BUILT TOUGH
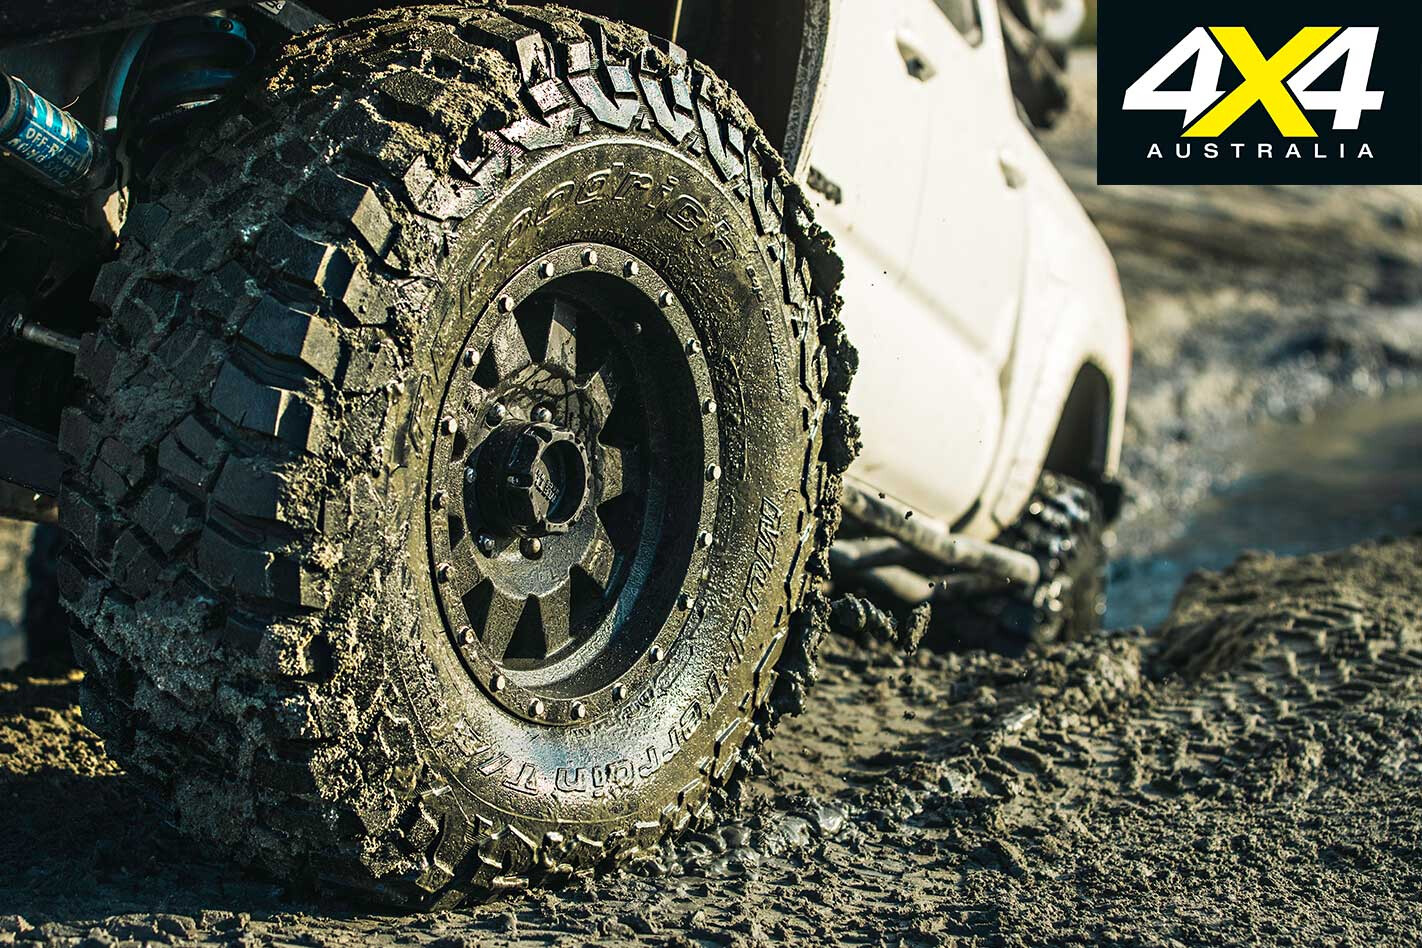
Just because it’s called a Mud Terrain tyre doesn’t mean it’s only good for muddy tracks. Which is just as well, as the High Country in April was dry as a bone with barely a bog to be found.
Mud tyres remain the choice for outback travellers due to their heavy duty construction, excellent traction and ability to disperse stones and mud from the tread face. It’s these qualities that BFG has built on in creating the KM3, using Baja-proven design and technology.
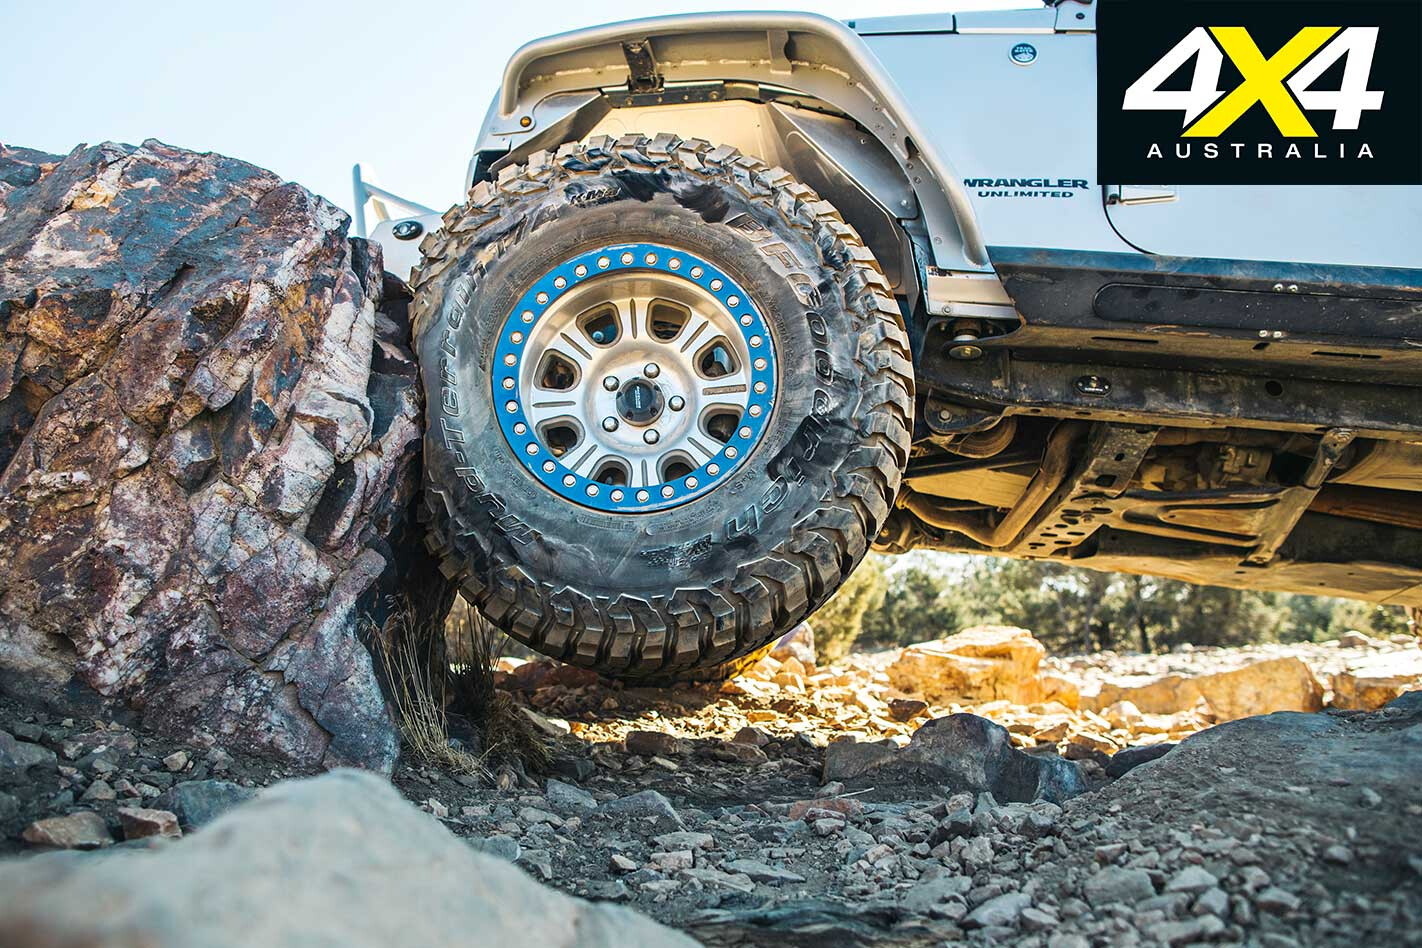
The KM3 uses an extra ply in its ‘CoreGard Max’ sidewalls, to make them more resistant to cut and punctures through the side. This is taken straight from its KR3 off-road racing tyres, as used by Dakar and Baja champions.
BFG claims the new KM3s are 27 per cent tougher in the sidewalls than the KM2s they are replacing, helped in part by an extra layer of reinforcement around where the tread meets the sidewall. This notched shoulder design also aids traction in soft dirt and mud.
Overall traction is improved thanks to a new rubber compound BFG calls Krawl-TEK; funnily enough taken from its Krawler T/A KX tyres that aren’t offered in Australia. Again, motorsport experience was influential in the technology behind the tread compound, as the Krawler T/A has been the winning tyre in Ultra 4 and King of The Hammers competitions.
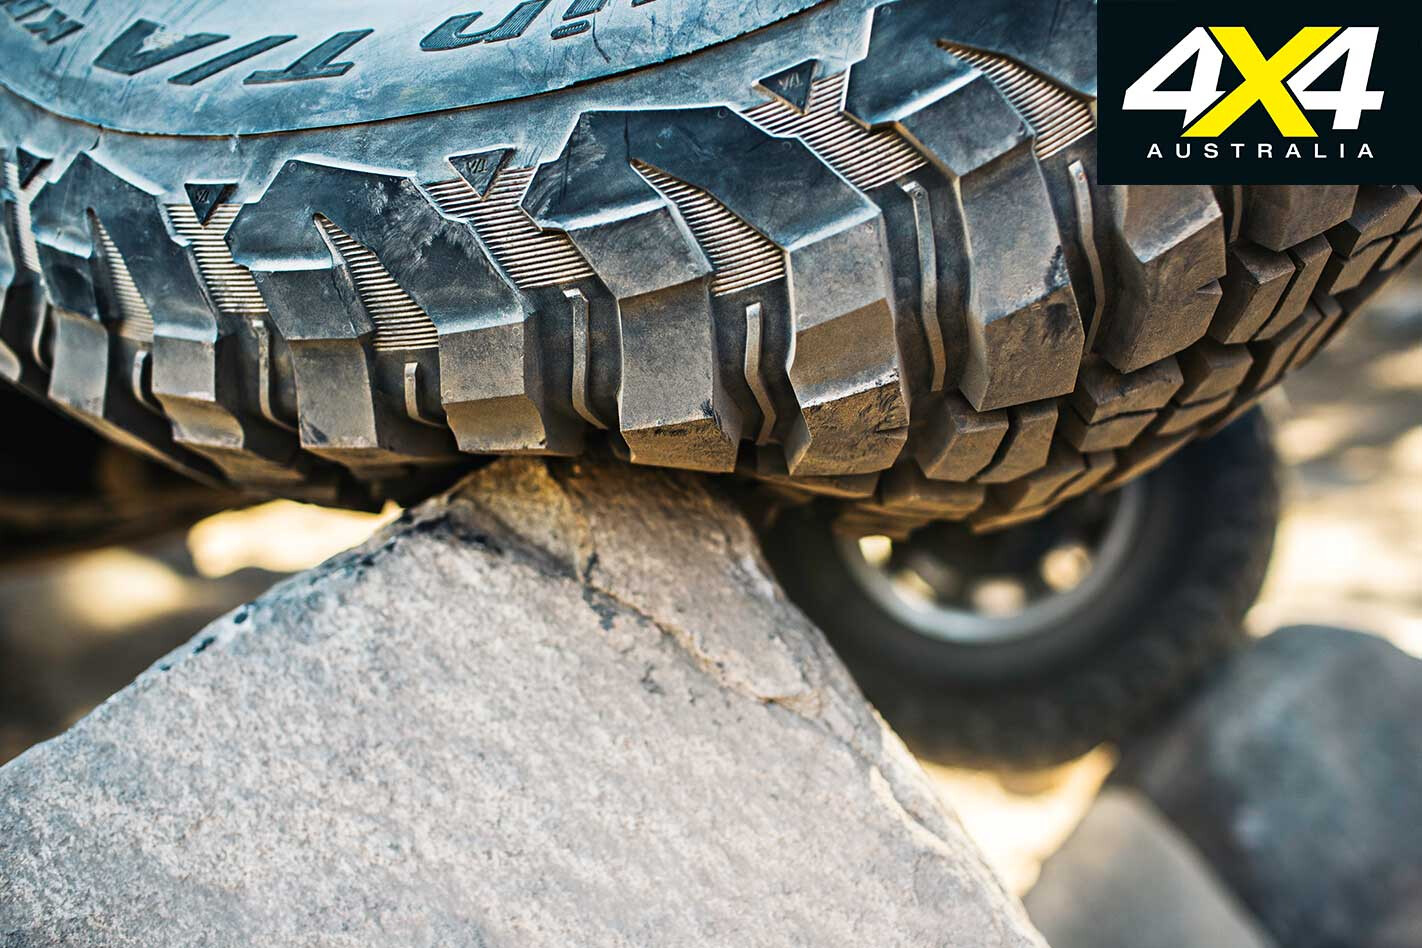
As you would expect of a muddy, the tread pattern is open and chunky. The pattern of the tread blocks is designed to bite into the terrain no matter what angle you’re attacking it from, which is particularly useful on the front axle when you have some steering lock on.
Ridges in between the tread blocks near the shoulder prevent any mud, crud or rocks from getting lodged in there, and any debris is ejected at the next rotation of the tyre. BFG claims the KM3 has five per cent better traction in mud than the KM2.
Linear flex zones in the tread face allow the KM3 to contort and grip rocks and obstacles when running low tyre pressures in more extreme off-road driving, especially when real low and mounted on bead-locked wheels.
ON THE TRACKS
It might not have been muddy, but the High Country provided a great testing ground for the KM3.
Steep, rocky climbs, rutted tracks and patches of wet clay put the tyre through its paces in terrain any Aussie four-wheeler would be familiar with. It also gave the international journalists on the launch a snapshot of some of our best bush country.
On road the KM3 was quiet for a mud terrain tyre, but these were all near-new and we all know muddies get noisier as they wear. The folks at BFG say the BFG is no noisier than the KM2 but wouldn’t claim they are any quieter either.
We couldn’t really comment on the on-road grip and performance, as most of the drive was on gravel or off-road (and that suited us just fine). You don’t buy mud terrains for their on-road performance, and anyone fitting a muddy has to expect characteristics that are noisier and less grippy on-road than an all-terrain or other less aggressive tyre. That’s simply the price you pay for better off-road performance.
Most importantly the BFG KM3 didn’t let us down. Of the dozen or so 4x4s lined up for the two-day High Country drive, no punctures were reported and no-one got stuck on the tracks, in a river or off-road.
BFGoodrich’s new KM3 Mud Terrain tyres will be available in stores come June, initially in 25 popular sizes to cover most tyre needs. By the end of 2019 the KM3 range will expand to 38 sizes to fit wheel rims from 16- to 20-inch diameter. We look forward to testing them on some true outback tracks in the very near future.
SMALL BUT TOUGH
BFGoodrich has a strong following in the UTV/side-by-side market, where its Baja KR2 offering is a race-winner. The brand has now brought the KM3 Mud Terrain tyre to this segment, making it available in three sizes to suit the popular vehicles used for both race and recreational use.
We were able to sample the UTV KM3s on a test track in a Yamaha YXZ1000R, but our limited abilities in this style of vehicle were hardly enough to put them to the test.
The real revelation came alongside Polaris UTV racer Simon Evans as he carved up the berms and blasted around the track in his race-spec RZR. Simon commented that the new tyres are certainly a step up on what he’s been racing on in the past and will give him an advantage in the races ahead.
HERE’S are five reader-submitted 4x4s picks that was recently featured on the May issue of 4×4 Australia.
To get involved post a pic and a description of your rig on our special site here or post it to our Facebook page.
We feature a bunch of readers’ rigs in the magazine each month, where we award one lucky punter with a $200 voucher to spend at Piranha Off Road.
2017 TOYOTA LAND CRUISER 79 SERIES: ANDREW CAUFIELD (4×4 Australia Readers’ Rigs Winner of the Month)
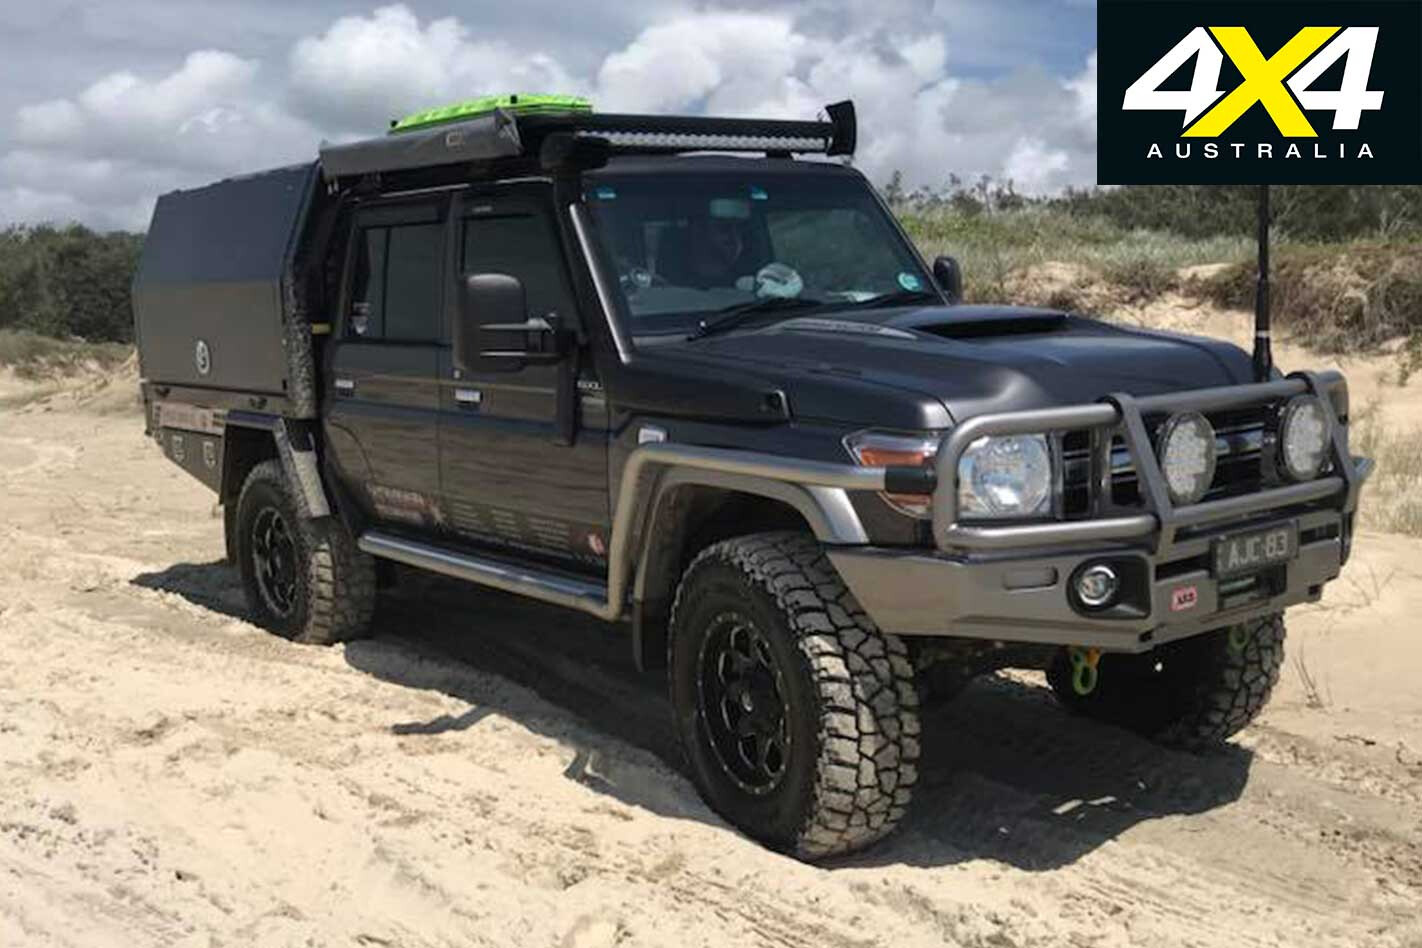
It’s a 2017 model (one of the first few DPF models) and I’ve had it since new (late 2016). It was built as a family tourer for pulling our caravan, and also as a SE Queensland island explorer (Bribie, Straddie, Fraser, etc.).
Mods are extensive and too many to list here, but the main ones are JMACX axle housing replacement, custom-tuned Fox suspension package, 35-inch tyres on 18-inch wheels, custom canopy fit-out and electronics, ECU remap, and a premium Alpine audio setup.
We also have a custom underway water tank setup, plus a long-range fuel tank.
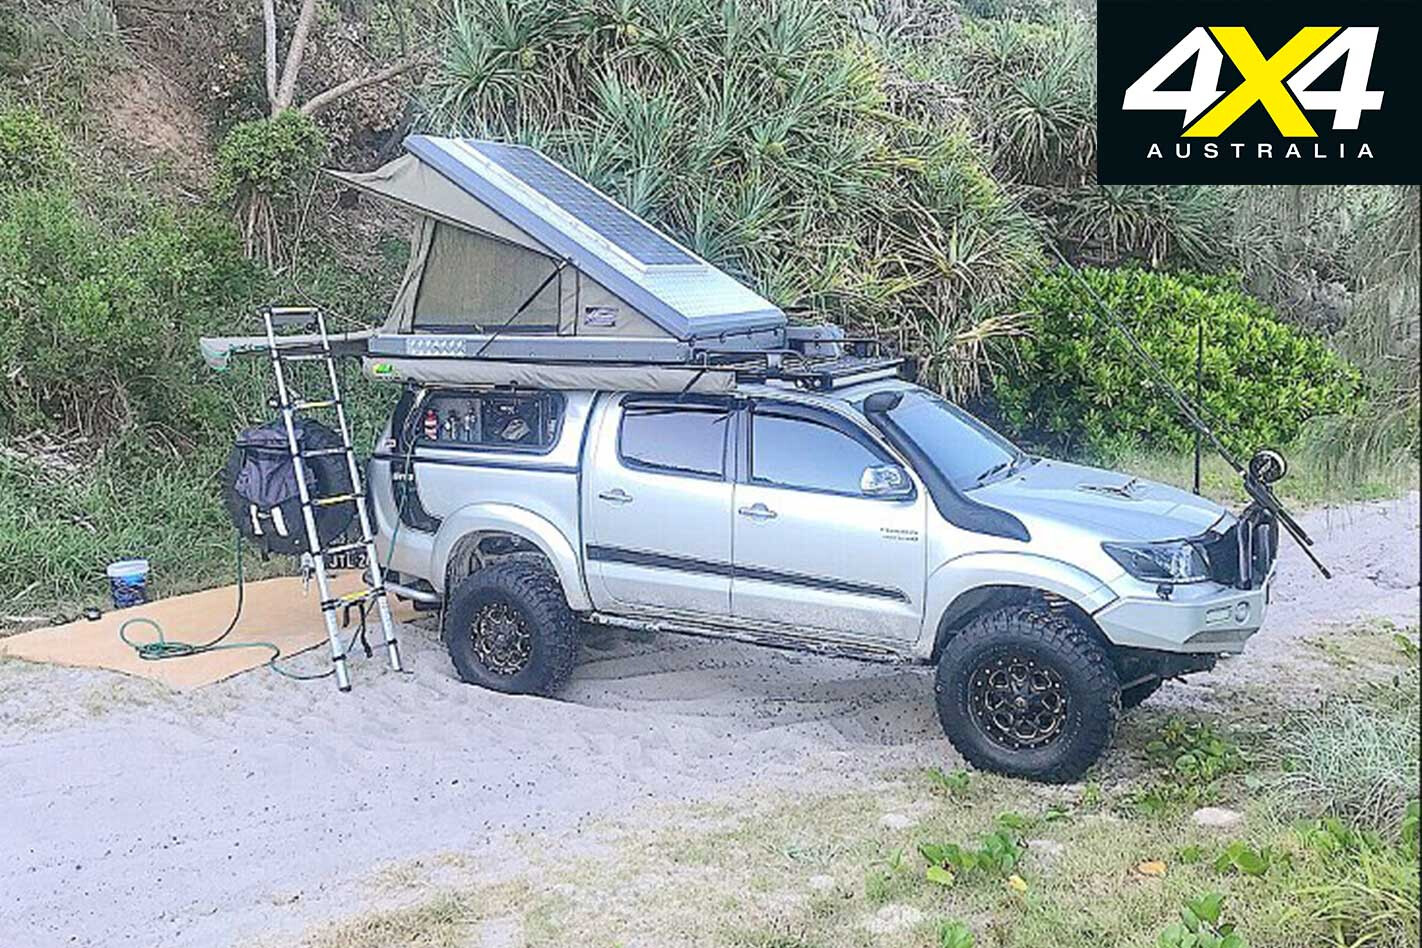
NISSAN D22 NAVARA: ANDREW LAU
It’s been customised for our trip around Oz from the ground up – tyres, suspension, exhaust, chip, tray, and the list goes on.
The tray was built (1800 x 1800mm) with canvas canopy and airbags to level the rear end.
Everything used was to minimise weight. Mostly alloy gear on the front and on top. Nine-stage adjustable Rancho shocks to help when on the black top or rough stuff. Dual batteries installed to run two fridges, plus solar backup and an underbonnet shower to rinse all and sundry.
2015 TOYOTA FJ CRUISER: WINSTON HAWKE
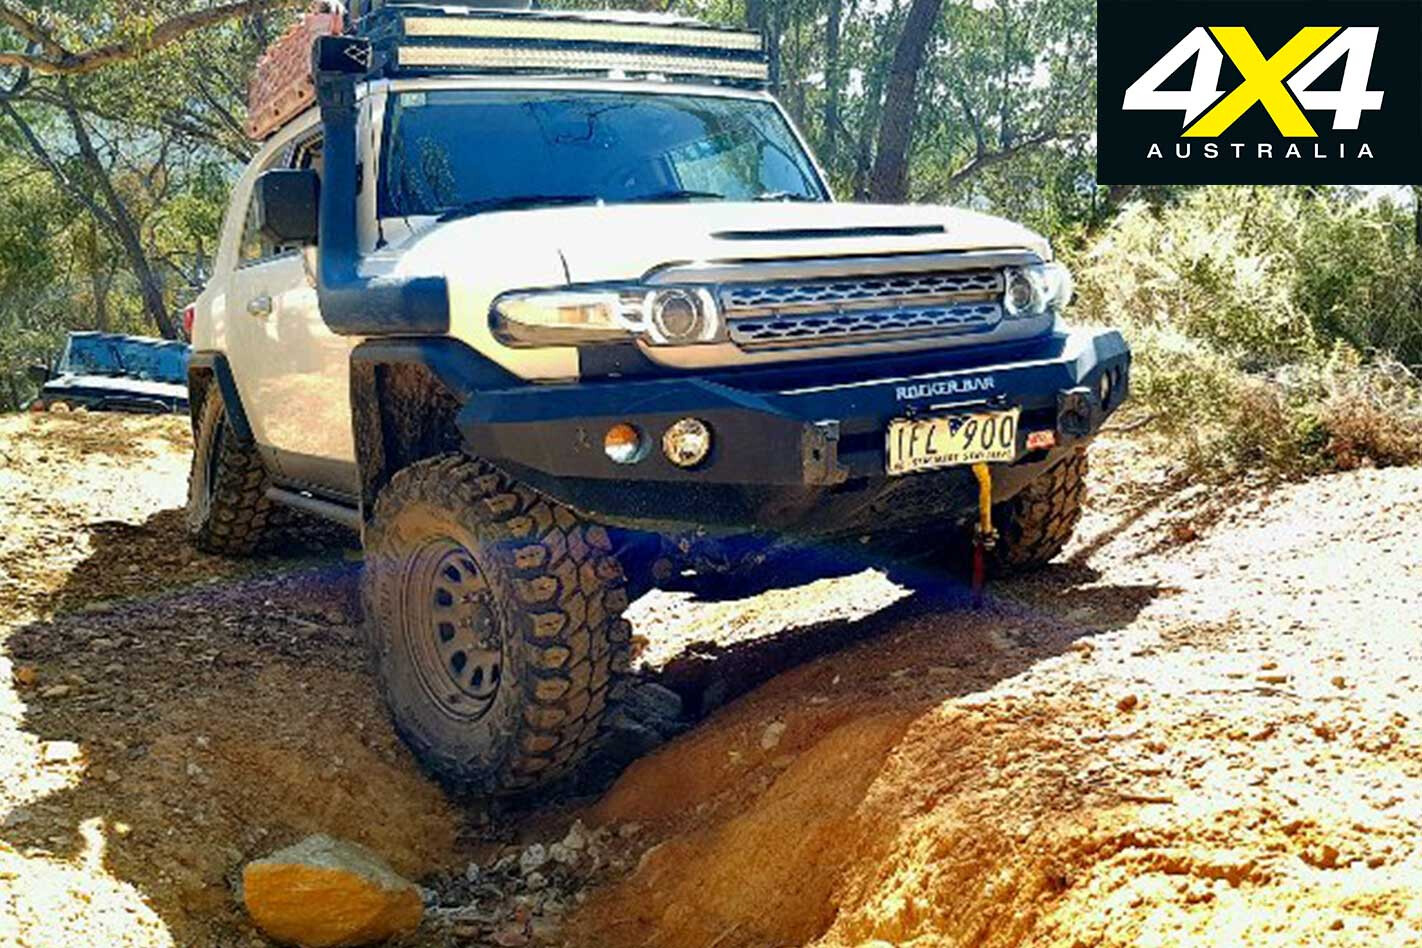
2015 FJ is twin-locked with three-inch lift and rolling on 35s. Took it over from my wife stock and turned it into a very capable IFS rig. It’s driven most of the hardest tracks Victoria has on offer. An underrated vehicle.
2014 TOYOTA HILUX SR5: JEREMY LANDT
It’s a 270hp, 820Nm SR5 Hilux with all the fruit. I bought it brand-new off the showroom floor and have built this up all by myself, with attention to detail.
2005 TOYOTA PRADO GXL: MARK JACKSON
I’ve set it up for touring. It’s got a two-inch lift, dual batteries, ARB bullbar, 12,000lb Ironman winch, Safari snorkel, Outback drawers, custom scrub rails and steps, and 265/70/17 Cooper STTs.
It’s done 400,000km and I’ve owned it since new. My camper trailer has matching Dynamic rims and matching Cooper STT tyres.
At the core of every four-wheel driver is an adventurer. These days, a true adventure is hard to find.
This feature was originally published in 4×4 Australia’s June 2011 issue
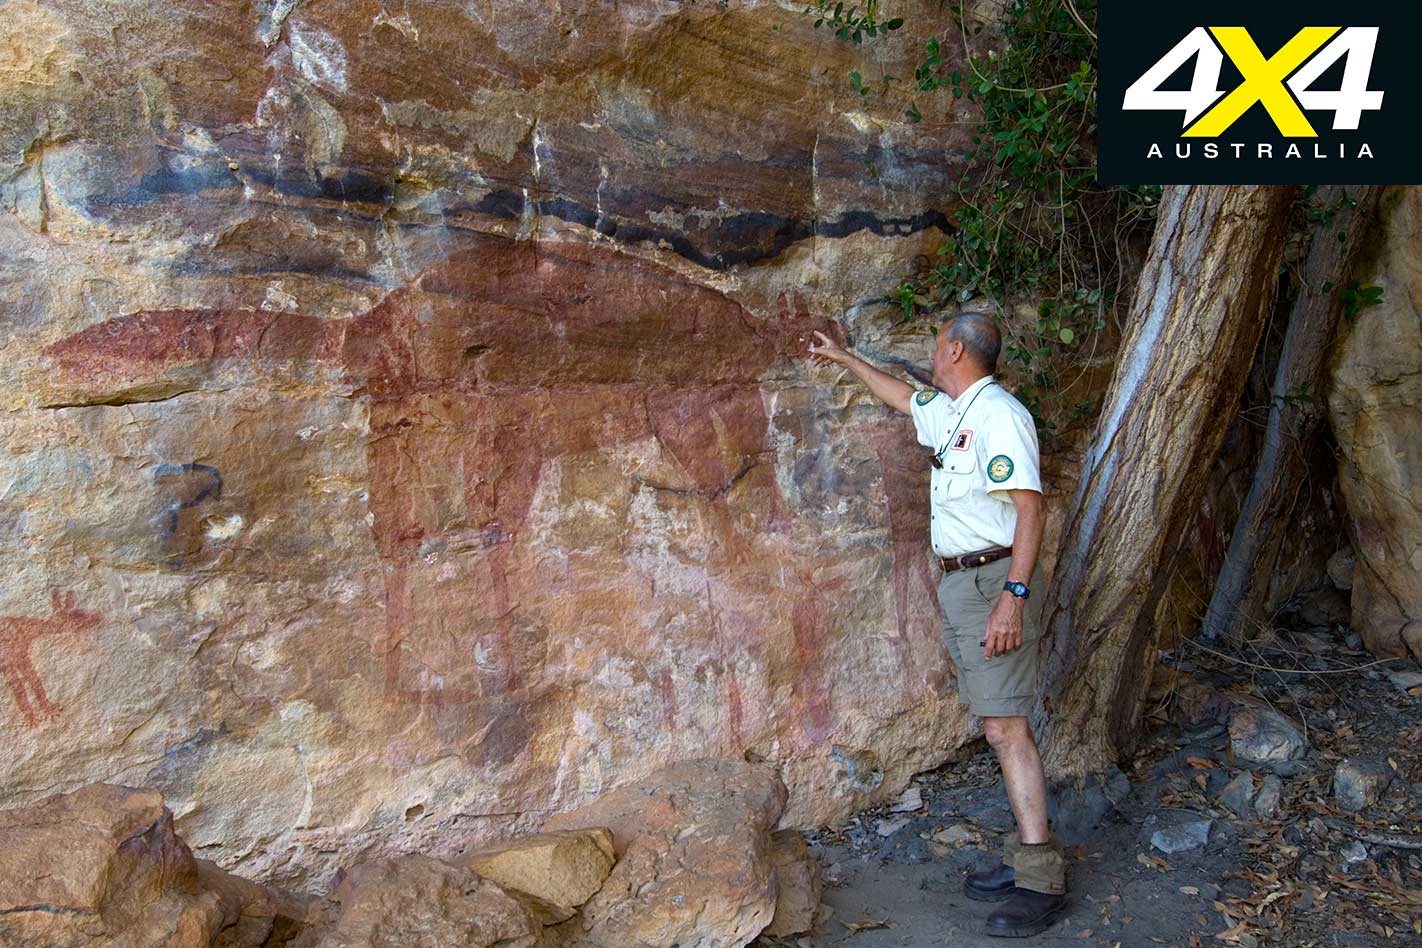
This was not so in the 1950s, when Percy Trezise, an Ansett pilot, would fly over the rugged terrain of southern Cape York and, with a bird’s-eye view, would record likely rock art sites on his charts.
Later, with his friend and collaborator Dick Roughsey, Percy would hike into those areas, finding numerous sites rich in Quinkan rock art. By gaining the trust of the local elders, Percy and Dick learned about the mysterious figures and their stories.
In the 1970s, Percy purchased a block of land where he could return again and again to favoured sites such as Emu Dreaming and Giant Wallaroo. His son, Steve, grew up with the Quinkan rock art, understanding it in the same way the rest of us might know a beloved illustrated book.
So, what does any of this have to do with four-wheel driving? Well, today Steve Trezise manages that same property, Jowalbinna, and, lucky for us, he offers outstanding bush camping near a crocodile-safe stream as well as rock art tours, with a fascinating depth of knowledge.
The perfect introduction to Quinkan Country is at the Quinkan and Regional Cultural Centre, in Laura, where you can learn about the Kuku Yalanji people and their lives with the Quinkan spirits stretching back 30,000 years. This rock art is of such significance that it was rated by UNESCO as one of the ten most important areas in the world.
More salient, though, is the fact that to get to the Jowalbinna campground, you have to travel along a 40km track that deteriorates with every kilometre, and then to get to the sites you have to dip and bend at alarming degrees and angles on a tagalong rock art tour with Steve Trezise.
From Laura, turn south 3km past the roadhouse, following the signs to Jowalbinna via Olive Vale Station. Stop to engage low-range for the soft, sandy sections of the track and for the steep entry and exit creek crossings. Watch for wandering stock.
At 5km from the turn-off, follow the track right, indicated by a small Jowalbinna sign; watch for further signs along the main track. At 10km is your first creek crossing (an easy one), followed by another at 15km with Little Laura River soon running to your right.
The creek crossing at 24km has a steep entry with a rocky bed, and low-range will probably be required. The Jowalbinna airstrip comes up at 31km, and at 36km is the start of at least three steep creek crossings with the last one (39km just before accessing the Jowalbinna Camp) definitely requiring low-range.
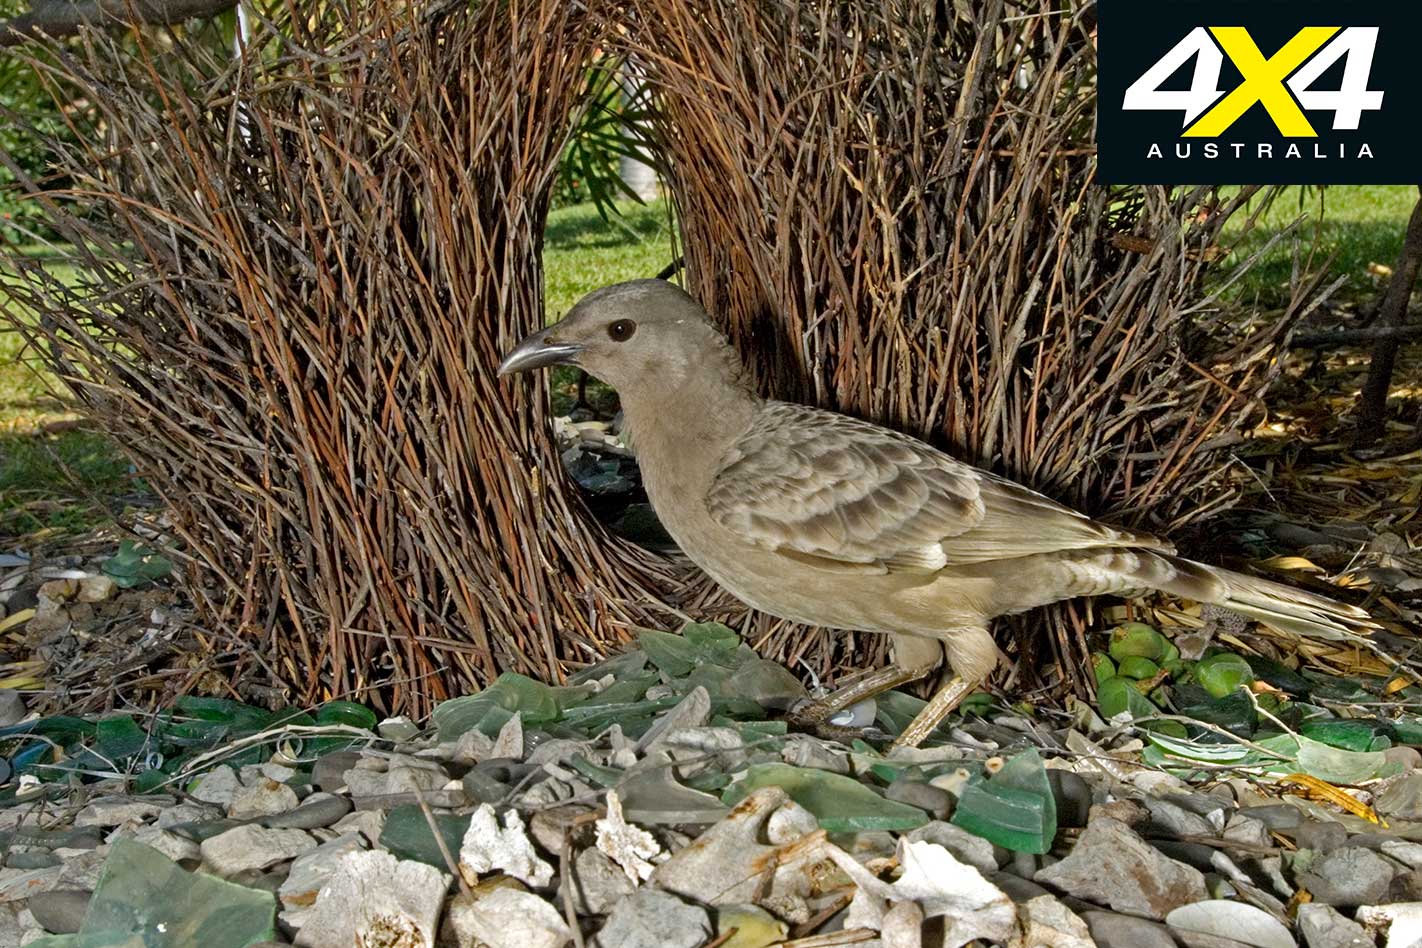
And there you are at the campground. The waterhole at the creek has safe swimming, complete with blue-winged kookaburras peering down from tree branches. Agile wallabies are easily spotted, but shy when approached too closely. Great bowerbirds construct their bowers under bushes. And then there are the rock art tours.
Drive out to the sites with Steve, or tagalong in your own 4X4, for a notched-up version of the track you drove down on. The rock art is superb, and with the unique chance to see it under Steve’s expertise, you’ll find that, to your surprise, art and four-wheel driving do indeed have something in common: Jowalbinna.
Travel Planner
WHEN TO GO Mid-May through September.
DISTANCE 43km from Laura on the Peninsula Developmental Road.
COORDINATES Jowalbinna turn-off: S15°33’04” E144°26’01”. Jowalbinna Camp: S15°46’20” E144°14’48”.
NEAREST SUPPLIES INCLUDING FUEL Cooktown. Lakeland and Laura have fuel and limited supplies.
WHAT TO BRING Everything, including drinking water and emergency supplies, recovery gear, two spares. Ring in advance to book campsites and rock art tours
TRACK DIFFICULTY AND VEHICLE REQUIREMENTS 4X4-only track with deep potholes, sand, steep creek crossings, corrugations and wandering stock. Low-range and high clearance required. Tents or off-road camper trailers only.
CAMPING & ACCOMMODATION Tent and camper trailer camping with toilets and showers, but no power or water. Accommodation and meals available if booked in advance.
CONTACTS Stephen Trezise, phone 07 4060 3236 (guided rock art tours from $45 to $75). See jowalbinna.com.au. Quinkan and Regional Cultural Centre, Laura, quinkancc.com.au or phone 07 4060 3457. RACQ (road conditions), racq.com.au or phone 1300 130 595.
MAPS Hema’s Cape York Atlas and Guide.
FOUR-WHEEL DRIVING Opportunities on return journey for fully-equipped, experienced drivers only: South of Jowalbinna is the extreme Maytown Track. Count on an eight-hour crawl to Maytown (55km) in low-range the entire way, with another three hours to connect with the Peninsula Developmental Road (79km). Emergency plans, supplies and communications are musts. Laura to Cooktown via Old Laura and Battle Camp Road, very rough 138km track.
We’re sure Ford was confident when it released the PX Ranger in 2011, but we also reckon, even at its most optimistic, the Blue Oval couldn’t have foreseen just how popular its 4×4 workhorse would become. After all, it’s not every day a sales champ (Toyota’s Hilux) cops a serious challenge and eventually gets overtaken in overall 4×4 sales.
Since 2011 the Ranger has become synonymous with the surge in 4×4 ute sales, with the result being plenty of off-road tourers using them as their preferred rig, and modifying them to suit.
It’s not that difficult to spot a lifted Ranger with extensive bar-work, canopy and the like, trundling around town on mid-week duties. In fact, you’ve already seen some absolute crackers here on the pages of 4X4 Australia. So much so, that to impress us enough to be featured here, a modified Ranger needs to be truly unique and built for purpose.
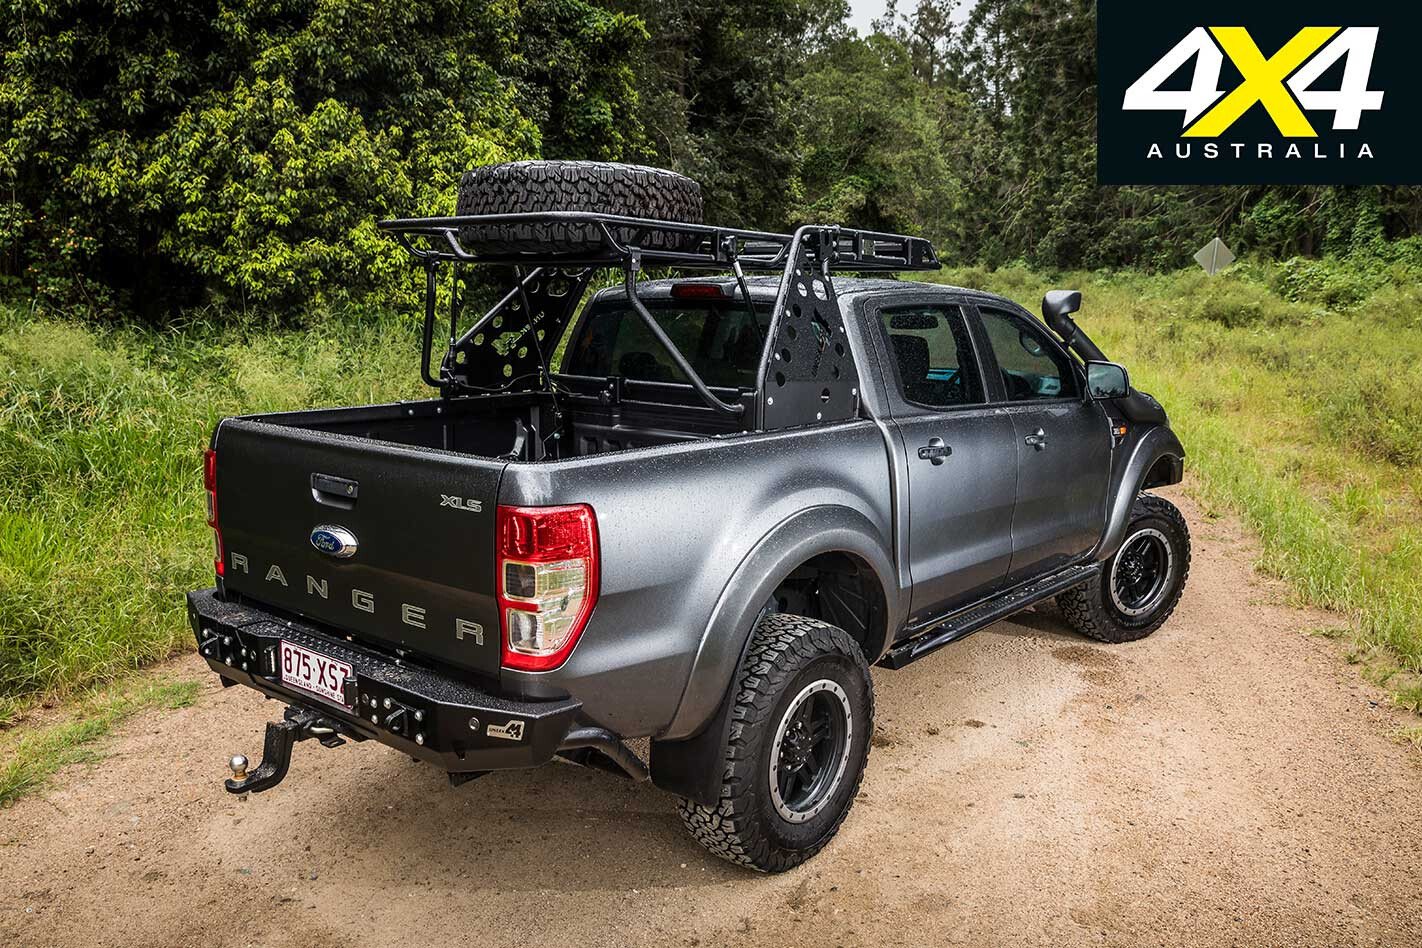
And that’s exactly what Paul, the owner of this immaculate machine, has achieved; drawing on his experience with previous vehicle mods (past 4x4s have included two JKU Wranglers, a GU Patrol and an 80 Series Cruiser) Paul has added some well thought-out and very well executed modifications to his Magnetic Grey Ranger.
THE LOCAL EXPERIENCE Paul was adamant the Ranger had to be “capable off-road, but still a pleasure to drive on-road” so turned to Stuart Murchison, the owner of Murchison Products, for advice. Murchison Products has been distributing 4×4 accessories to the Aussie market for more than 10 years, and Stuart had no hesitation in recommending gear made by Aussie company Uneek 4×4.
This Melbourne-based crew produce some tip-top accessories for a wide range of off-road vehicles and, importantly in this Ranger-crowded scene, its products are (excuse the pun) more unique – and bombproof – than most gear out there.
Opting for Uneek 4×4 gear ensured this Ford workhorse would stand out from its peers and kill it on- and off-road thanks to the Uneek 4×4 team’s knowledge of the demands of Australian off-roading.
FRONT-END LOADER The modification wand has been brandished all over this Ranger, starting at the front where the team at Murchison Products fitted a Uneek 4×4 Crawler bullbar which sits snug – the fitment looks like the Ranger came straight out of the factory with the bar as standard.
There is an optional two-inch grill guard tube that can be affixed atop the bar (it makes a good light mount), but Paul chose not to fit it and we reckon the Ranger’s front end looks far sleeker as a result. The Crawler bullbar is seriously solid but still relatively light in weight, with a mix of 3mm, 4mm and 5mm steel used in its construction.
Up top, a set of LED lights keep the road ahead illuminated, while underneath there’s an ARB bash plate plus two Uneek 4×4 recovery hooks, rated to 3.5-tonne each. Finishing off the recovery gear is a Carbon winch that, Stuart says, weighs in an impressive 12kg lighter than an equivalent model from another manufacturer.
With all this recovery kit adorning the Ranger (there’s another recovery hook on the rear bar), Paul can be assured this Ranger is set up to recover other vehicles and, if the unfortunate ever happens, he has the equipment onboard to tackle a self-recovery.
SUSPENDED ANIMATION With an IFS front end and leaf-spring rear, going for more ground clearance in a dual-cab ute while retaining a good ride and handling is slightly tricky, but Stuart and the team at Murchison had the answer in the form of a kit that mixes US-based product and Aussie components.
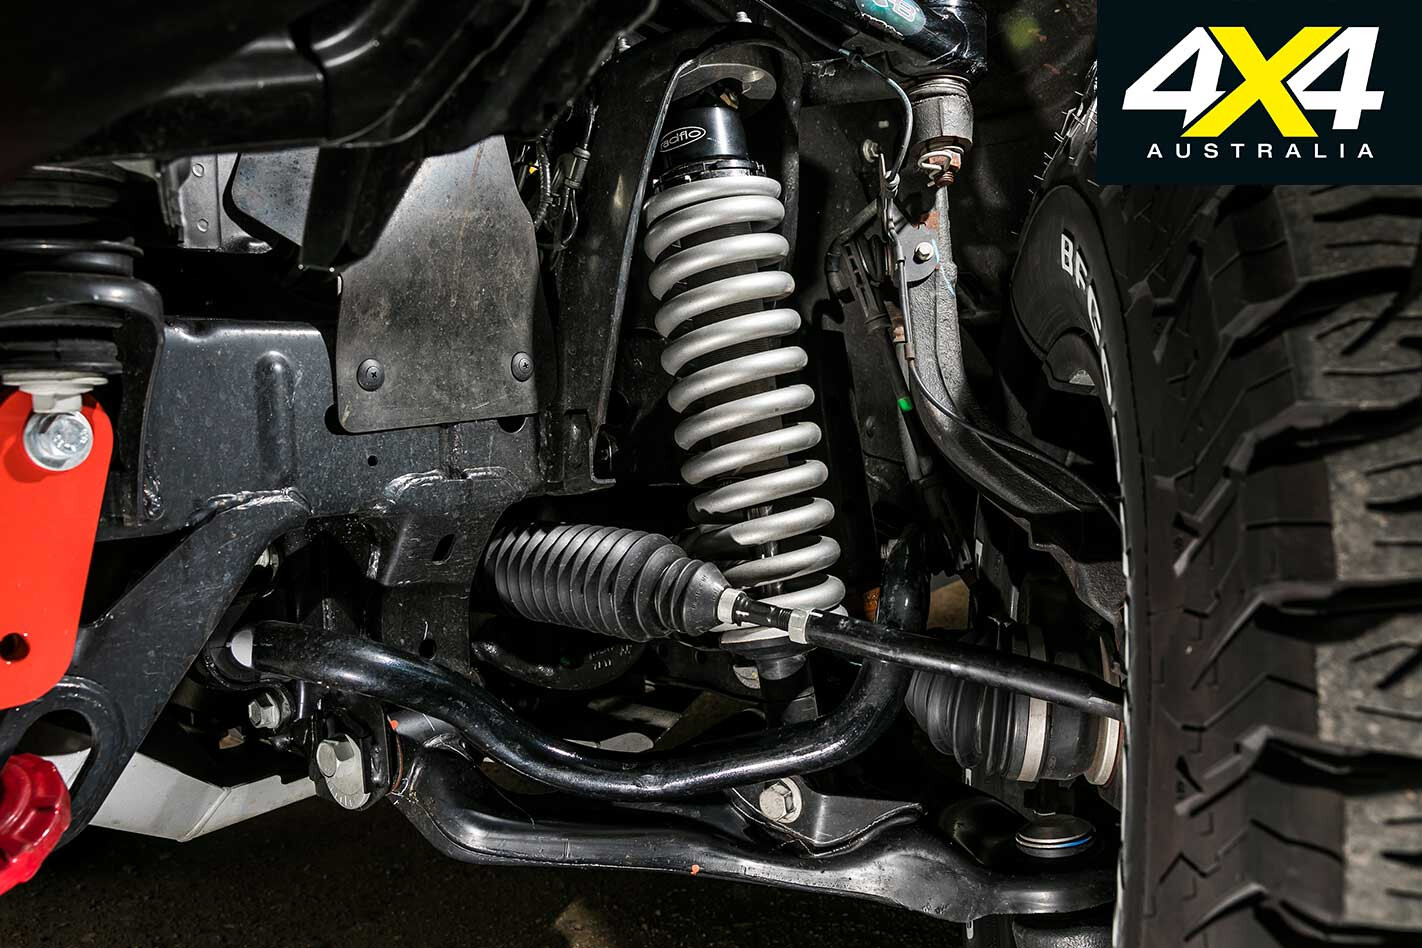
“It’s the Radflo system,” Stuart says. “So, Radflo front coilovers with Eibach coil springs and then, to complete the system at the back, it’s got EFS springs and the Radflo shocks.”
Stuart also points out that with any build the suspension choice comes down to owner discretion, as was the case with Paul’s Ranger. It was always only going to carry a relatively light load with the occasional loading-up of the rear tray, as Paul’s main aim was to gain ground clearance while improving the on- and off-road performance.
Adding that ground clearance is a set of Tuff A.T. T17 wheels shod with chunky BFGoodrich All Terrain T/A LT285/70R17 tyres. The end result is a Ranger that has a relatively aggressive stance (and plenty of clearance) without looking over the top.
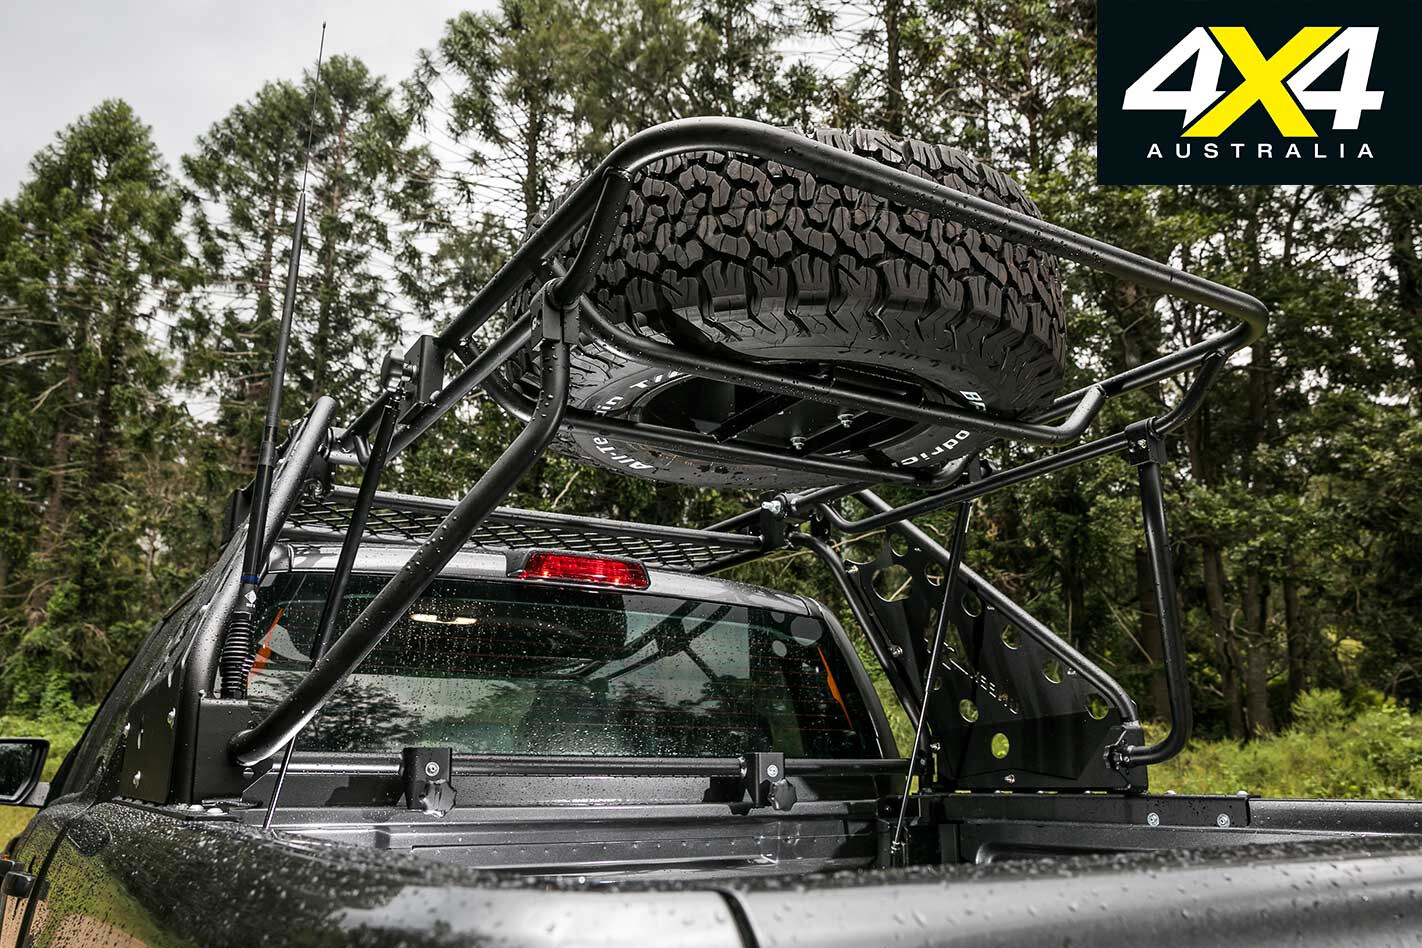
ALL BUSINESS OUT BACK Probably the most noticeable accessory on Paul’s Ranger is the Uneek 4×4 Chase Rack. This replaces the common sports bar seen on a host of 4×4 utes and it adds loads of versatility thanks to the two additional Chase Rack-specific accessories, namely the roof-rack and tyre carrier that Paul has fitted here.
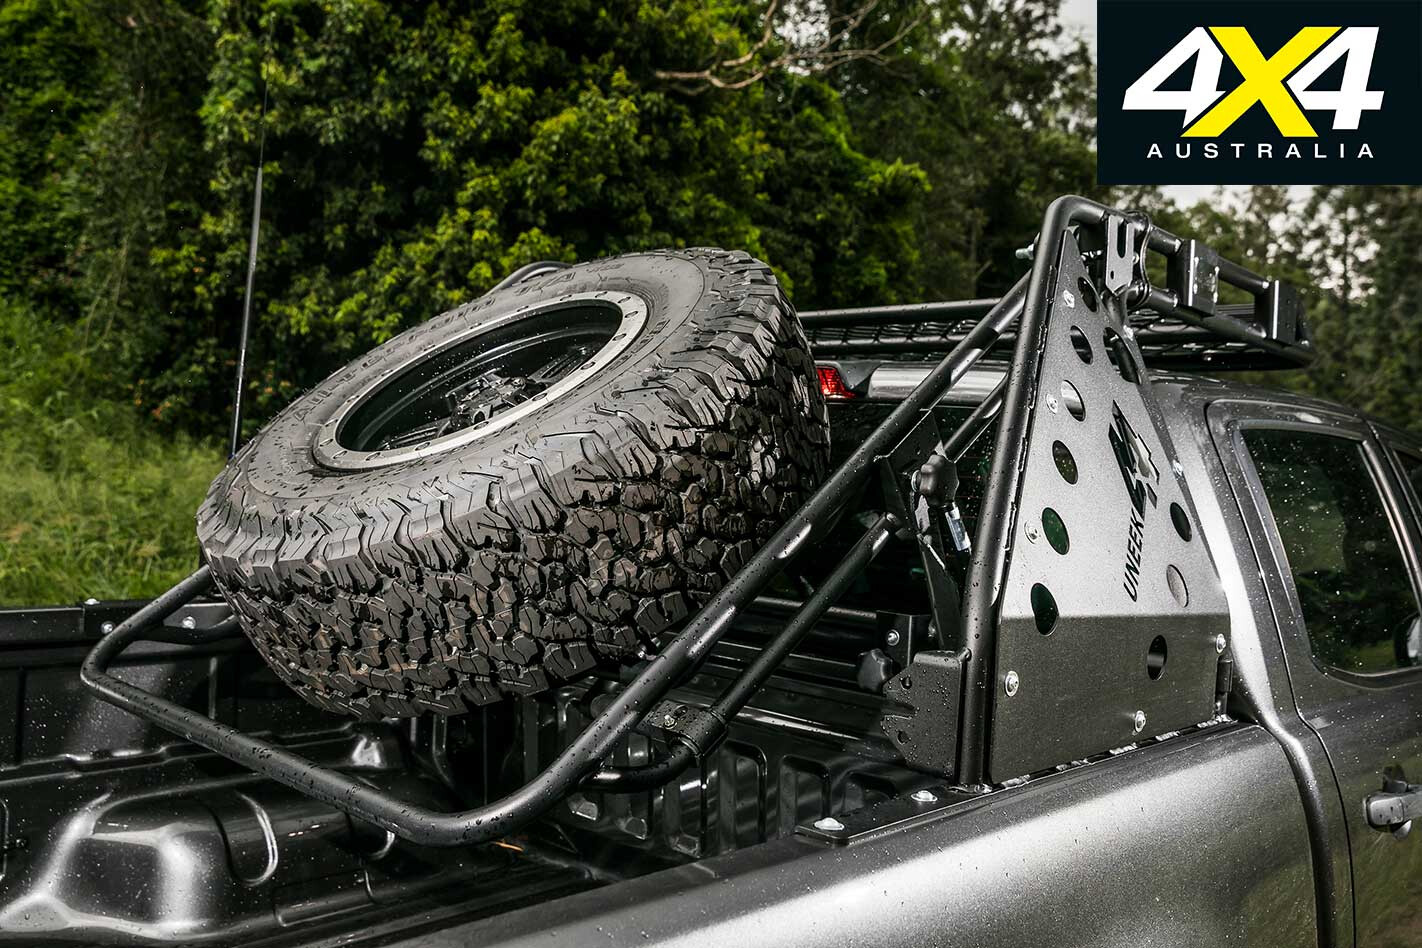
The Chase Rack design is a nod to the ‘chaser’ vehicles seen at desert racing events, but the practicalities are universal; the tyre carrier is hinged so it can be set down when travelling and lifted up when Paul needs to access gear underneath the Chase Rack frame.
This means minimal loss of storage space in the Ranger’s cargo area – plus it just looks damn cool. Add in the roof rack and you’ve got a great external storage system that’s relatively quick to remove if you need to utilise the entire tray-length of the vehicle.
The ‘base’ of the Chase Rack mounts to the tub and includes a neoprene-lined mount point so as to eliminate any chance of the rack damaging the ute tub. The roof-rack component of this setup allows light bar fitment – which Paul has done – and the Uneek 4×4 team has shown its years of tourer-building experience by adding rubber bump stops to the aluminium roof-rack, to ensure any incidental contact between rack and roof over bumpy terrain doesn’t result in a scratched duco.
The base of the Chase Rack is made of light but tough powdercoated aluminium, while the tyre carrier is beefy Aussie steel, also powdercoated and zinc-primed for longevity and corrosion resistance. The tyre carrier can carry up to a 37-inch tyre and utilises a pair of automotive struts for lifting up and down (pivoting on robust urethane bushes).
More impressively, when not carrying a tyre, it may be used as an extension of the roof rack when in the upright position.
The Uneek 4×4 rock sliders increase underbody protection; the heavy-duty steel sliders feature a side-tube that is angled up 30 degrees to aid ground clearance. This doesn’t mean they’re impossible to use when getting in the vehicle, either, thanks to an inbuilt step and a 2mm tread plate for grip.
The Uneek 4×4 rear bar finishes off the back end of the Ranger, with its 3.5-tonne-rated tow hitch and an additional pair of bolt-on tow hooks assuring a reverse-direction recovery is tackled with confidence. The clever use of two-inch tubing around each side of the bar also does a great job of protecting the lower rear sections of the Ranger’s tub.
Again, like the bullbar and rock sliders, this rear bar offers plenty of protection along with a great integrated style that suits the Ranger perfectly.
ALL-ROUNDER DONE RIGHT Besides the fitment of an iDrive throttle module (designed to reduce or eliminate the common delay in throttle response of 4x4s that use a fly-by-wire setup) and a TJM snorkel, the drivetrain has remained relatively untouched – as has the interior – and this again reflects the common-sense approach Paul adopted for this build.
The subtle but effective suspension setup, the clever and versatile tray storage system, sensible wheel and tyre choice, and well-integrated protective accessories make this Ranger a real ‘sleeper’ in regards to its appearance belying its impressive capability.
Just another Ranger? Nah, it’s way more than that.
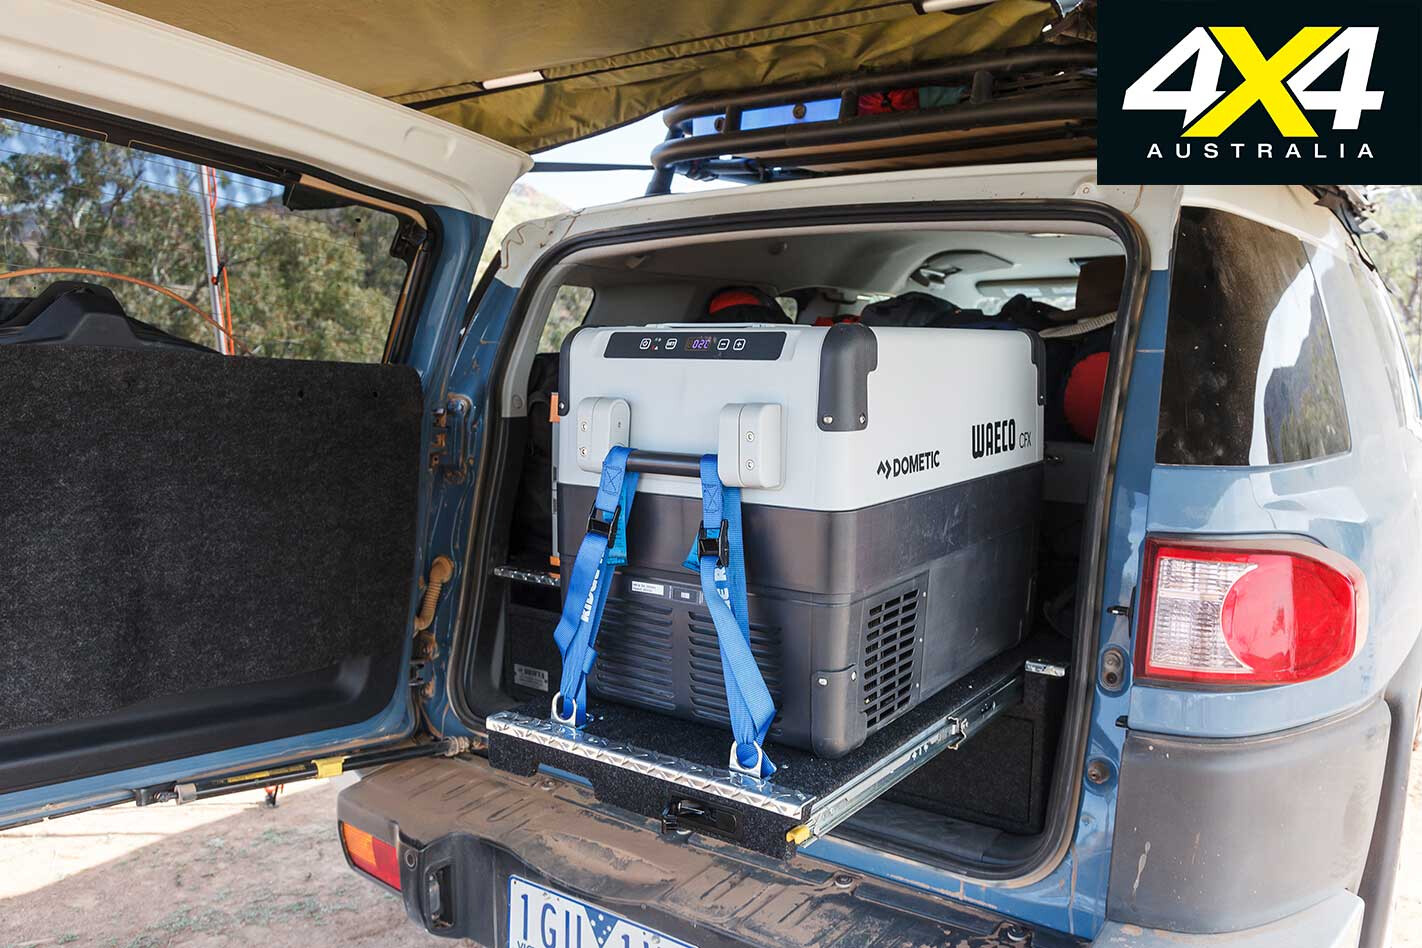
Keeping a fridge powered without draining a starter battery can be a challenge if spending a few days in camp.
Adding a second battery and the associated hardware to your 4×4 is the most common solution, but Waeco has its own alternative. With a new Waeco CFX40 fridge in the FJ Cruiser, we decided to try out Waeco’s RAPS44 battery pack and PS120 solar panels.
The Waeco CFX40 is one of the brand’s latest generation fridge/freezers, so it uses the most up-to-date electronics to deliver reliable and consistent cooling while minimising power usage.
The efficient compressor that powers the CFX40 is controlled by electronic wizardry, including a power monitor that will cut power to the fridge if the power supply drops below a predetermined limit. This is adjustable to three settings to protect a vehicle’s starter battery, if that is what you’re relying on to power the fridge.
It can be set as low as -22°C to freeze the contents, and it can be controlled via an app which also allows you to monitor the temperature.
The internal capacity is 41 litres, big enough to carry 60 cans of beer and tall enough to accept a standard-sized wine bottle standing upright. The lid is easily removable if you have the fridge mounted in the back of a wagon where height limits its opening, and there are sturdy handles at each end that can be used to tie the unit down.
Waeco rates the current draw of the CFX40 at 7amp, so you need to have back-up power if you intend to run the fridge for extended periods from a single battery without running it from the vehicle’s engine.
The FJ Cruiser was running a single battery, so we put Waeco’s RAPS44 battery pack and PS120A solar panels to use as backup.

With most of the use being on the road where the car was running the fridge during the day, we also used it to charge the RAPS while on the road via a 12-volt outlet. This then allowed us to unplug the fridge from the car and plug it into the fully charged RAPS unit, to keep things chilled overnight. Using the RAPS for power also allows you to remove the fridge from the car.
On the few times we were away and camped in the one spot for more than a day or two, we put the solar panel to use. The two-panel folding PS120A unit has an inbuilt regulator and 6.9amp output. The supplied lead has both alligator clips and an Anderson plug, and we used the clips to attach it directly to the terminals on the RAPS44, with the fridge plugged into the RAPS unit.
With careful repositioning of the solar panel throughout the day to keep it pointed at the sun, it allowed us to feed enough charge into the RAPS unit to keep the fridge cool. Keeping the fridge out of the sun also helped, and the handy voltage readout on the RAPS unit informed us how much power it had in store.
Since the test, Waeco has updated the PS120A solar panel to make it more efficient and affordable. It now comes equipped with a heavy-duty 10A three-stage automatic charge that will switch between battery and solar power as necessary, as well as a built-in battery temperature sensor to protect the battery from overheating.
While the trio of Waeco products kept the fridge running and food chilled on our trips, it wasn’t ideal for the FJ Cruiser. The FJ is a compact wagon where space is at a premium.
Carrying the RAPS44, PS120A and the CFX40 posed a challenge on some trips. Sure, we could carry the solar panels in their carry bag on the roof, but not the RAPS44. As such, we will be fitting a dedicated dual-battery system to the car in the near future, as well as look at one of the solar blanket-style panels which are more compact when not in use. The CFX40 fridge is staying.
The space restrictions of the FJ Cruiser limited the use of these products for us, but it doesn’t in any way affect the way they work. All did their job well and could easily be the solution to your 12-volt fridge power needs. The RAPS44 is particularly handy if your 4×4 doesn’t have the space in the engine bay for a traditional dual-battery system or you want the ability to have power away from the car.
RATED Available from: www.dometic.com.au RRP: RAPS44 $379; CFX 40W $1299; PS120A $499 We Say: Chilled food and drinks and reliable power wherever you are.
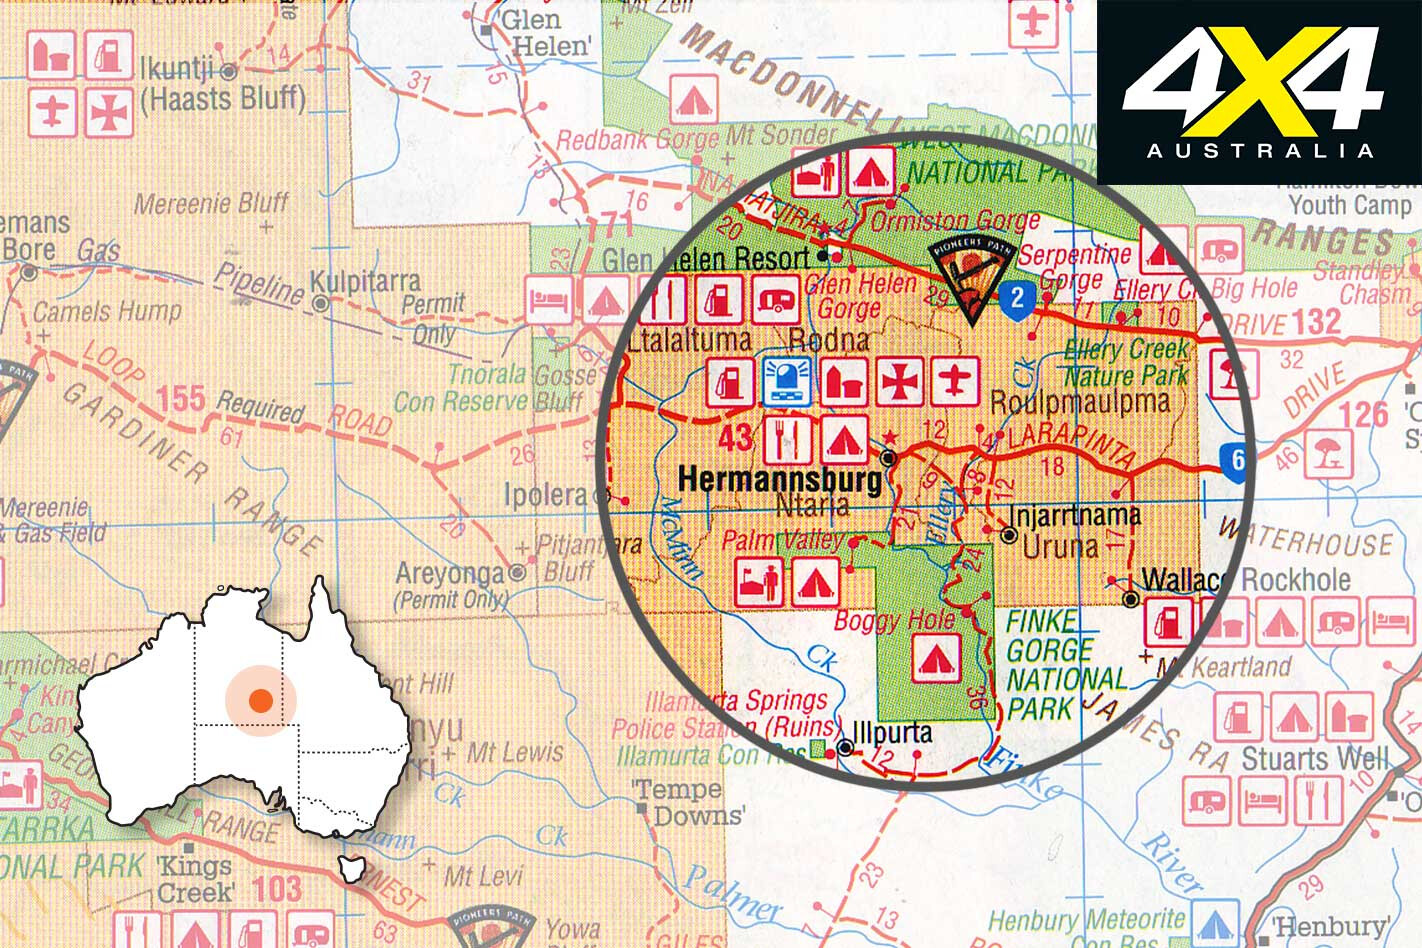
Alice Springs just might be the best town in Australia for four-wheel drivers, with its nearby tracks ranging from moderate to extreme. One of the best has to be the 25km drive from Hermannsburg to Palm Valley in Finke Gorge National Park.
This article was originally published in 4×4 Australia’s January 2011 issue
Turn south off Larapinta Drive and stop at the information sign to drop tyre pressures and engage four-wheel drive. At 4km there is a short, sandy loop on the left, with panoramic landscapes.
Within another kilometre you’ll be driving beside the Finke River with gorge walls to the left; after 3km you’ll cross the rocky river bed where the Finke can rise from bone dry to a height of seven metres. Take care over the grid at the national park boundary, as it is electrified to keep out horses.
Continue for 2km and veer right, leaving the Finke River to travel along Palm Creek for another 2km; watch for the Kalarranga Lookout on the left with a parking area. The information bay describes two walks: the 1.5km return Kalarranga Walk and the 5km return Mpaara Walk. At the very least, complete Kalarranga with its magnificent vistas.
The Palm Valley campground is next at about 1km and it, too, includes a walking track. In fact, some members of the family may prefer to walk along the creek bed into Palm Valley while the driver negotiates the last 5km of underbody-scraping river rock. The Day Use Area (1km along) provides parking, an information bay, toilets, picnic tables and a place to leave trailers, as they are not permitted beyond this point.
From the Day Use Area, walkers can simply enjoy the scenery. Drivers will have to keep their eyes glued to the track, carefully picking their way along the uneven surface that drops abruptly here and there, providing numerous opportunities for some serious axle damage. Pay particular attention to the marker posts and stay within these at all times.
When it is safe to do so, have a look at the groves of endemic cabbage palms to the right, for they give the valley its name. The track ends with a parking and information bay. Don’t pass up the 2km Arankaia (circuit) Walk up to the top of the gorge and, if time allows, the 5km Mpulungkinya Walk is outstanding. This is such a picture-perfect area that, if you are lucky enough to be spending a night or two at the campground, it is well worth doing as many of the walks as possible.
Speaking of picture-perfect, either on the way in or out, take an hour or so to visit the historic Hermannsburg Mission, where Albert Namatjira (the artist) lived. It doesn’t take an art expert to recognise how deeply Namatjira was influenced by the splendid landscapes in the area. A visit to Palm Valley will leave you in no doubt as to why Namatjira and the Arrerente people were so connected to their country.
Travel Planner
WHEN TO GO April to November.
COORDINATES Junction to Finke NP, S23°57’12” E132°46’22”. Palm Valley Campground, S24°03’29” E132°44’38”. Palm Valley, S24°02’52” E132°42’41”.
NEAREST SUPPLIES INCLUDING FUEL Alice Springs; Hermannsburg has fuel and limited supplies.
WHAT TO BRING Everything including emergency supplies, full fuel tank, food, drinking water, all camping gear.
TRACK DIFFICULTY AND VEHICLE REQUIREMENTS Rough 4X4-only track with several loose, sandy creek crossings. Last 4km are extremely rough over uneven rock surface; count on a 30-minute drive. High clearance 4X4 with low-range, two spares, recovery gear, air compressor, tyre gauge. Track is impassable in wet weather.
CAMPING AND ACCOMMODATION Tent and off-road camper trailer camping at Palm Valley (toilets, showers, tables, gas barbecues, cash camping fees, BYO wood in designated fire pits only, no generators) Contact NT Parks and Wildlife Central Australian Tourism, 08 8952 5800 Caravan camping at Ntaria campground, Hermannsburg, 08 8956 7480.
FURTHER INFORMATION Road conditions, 1800 645 199 Outback Vehicle Recovery, 08 8952 1097. Central Australian Tourism, 08 8952 5800.
MAPS Westprint MacDonnell Ranges map, westprint.com.au Hema Central Australia regional map hemamaps.com.au
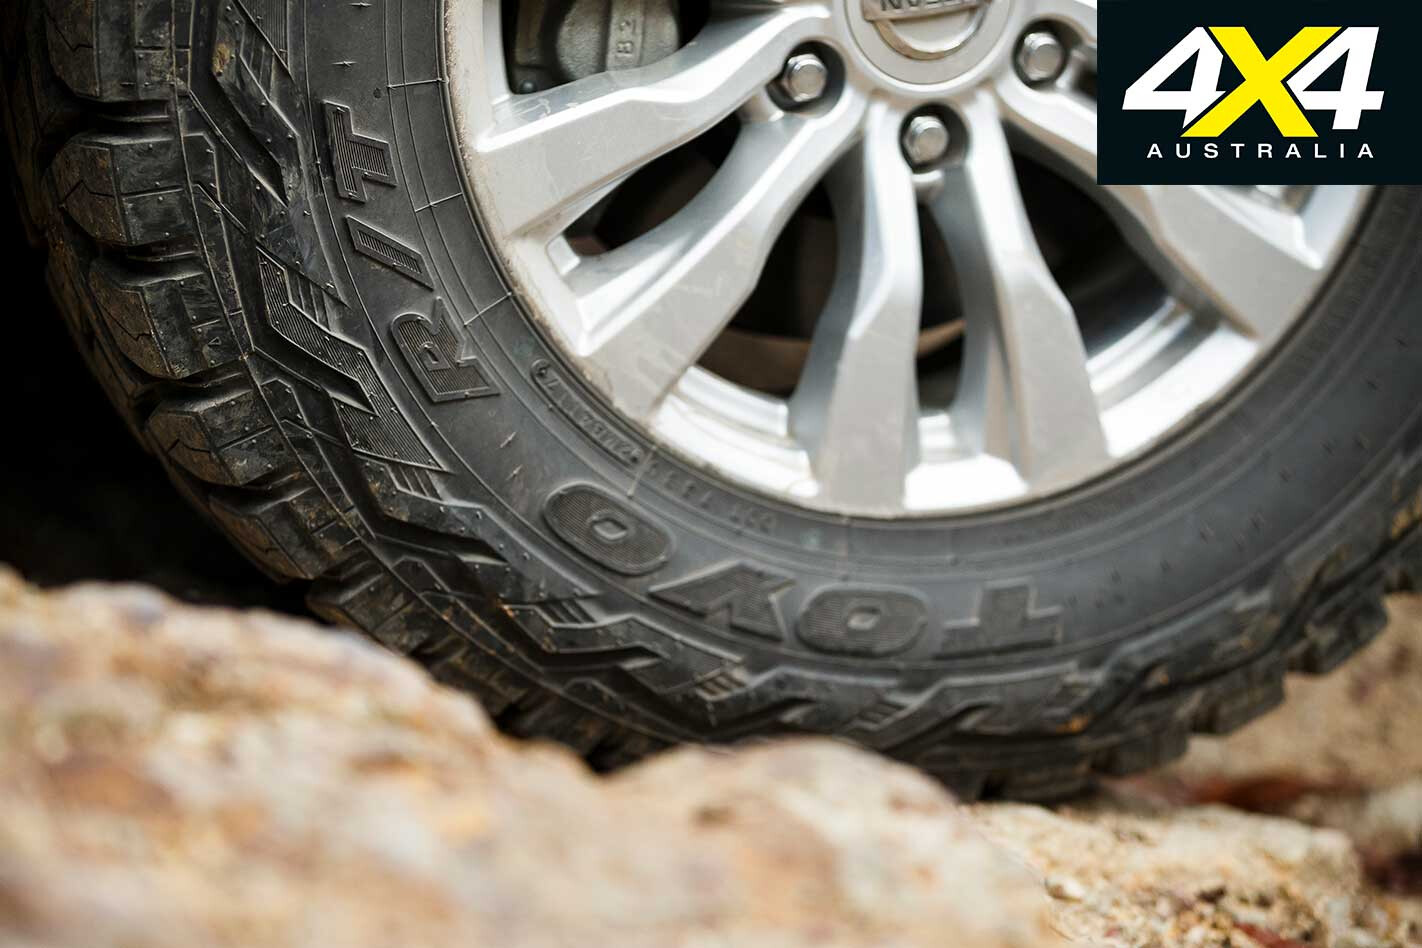
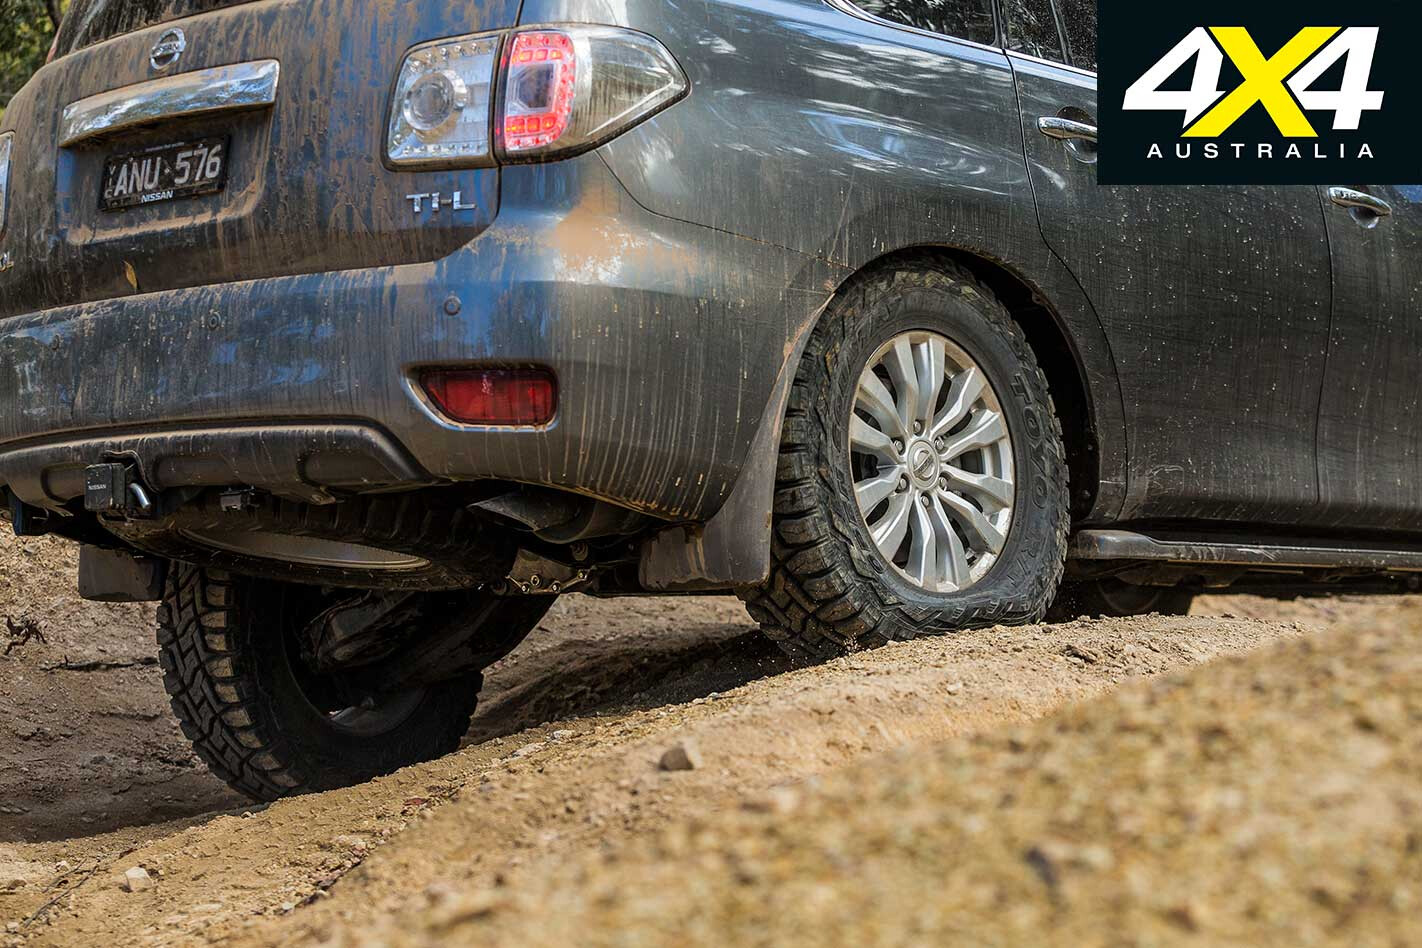
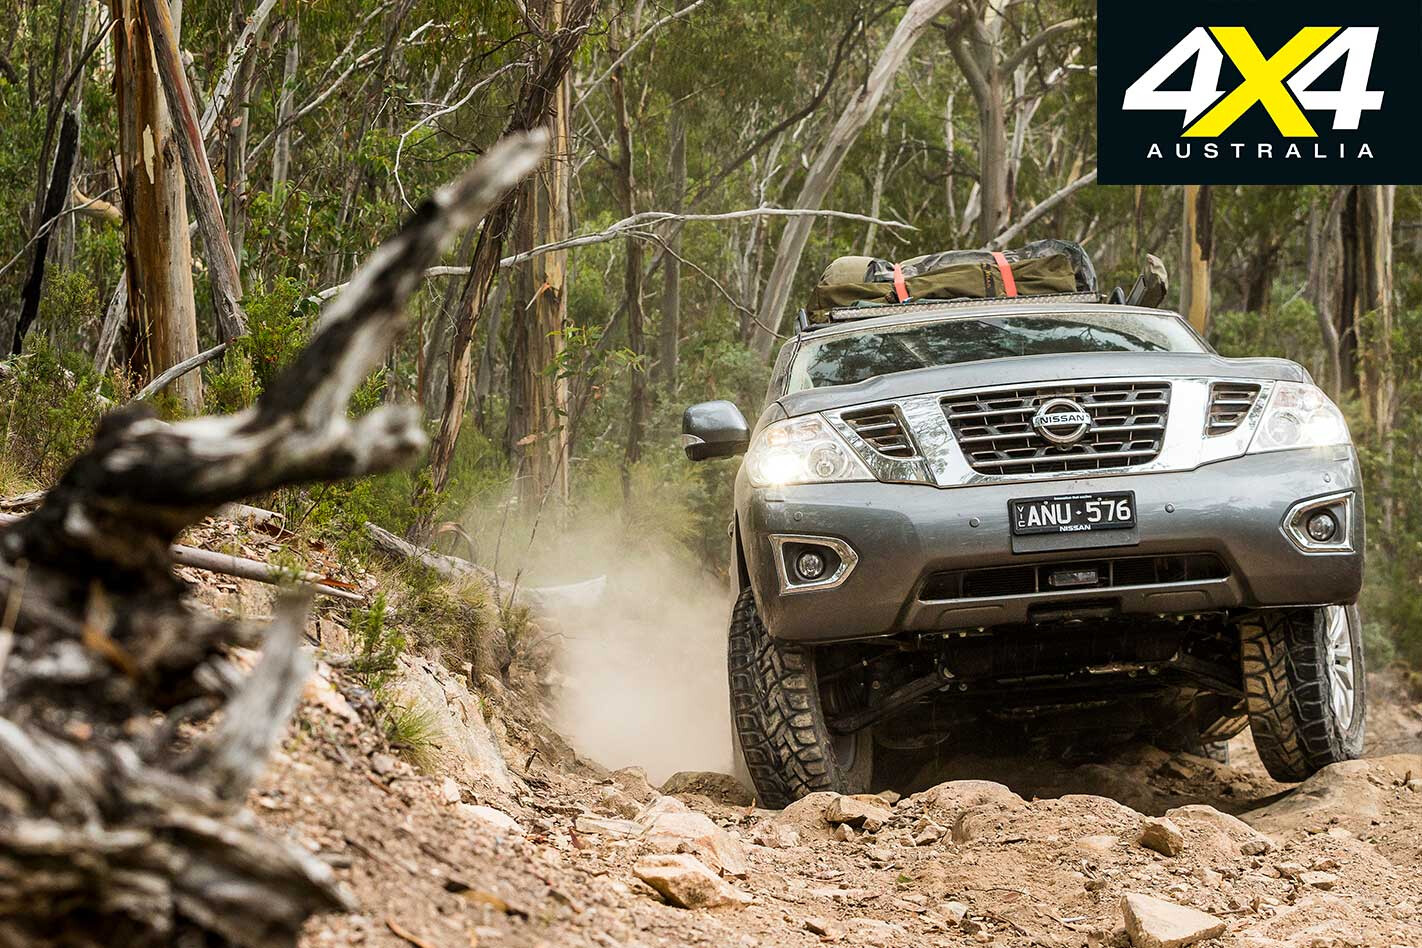
With the Patrol kitted up with its new Toyo Open Country R/T tyres, 40-inch Lightforce light bar and Ironman 4×4 roof rack and awning, we left Melbourne for two weeks of touring in the Victorian High Country.
Our last fuel stop to top up the 140-litre tank was at Bruthen as we headed towards the New South Wales border and, travelling with a bunch of diesel-fuelled 4x4s as we were, the conversation centred on how long the big petrol V8 Nissan would last before it needed a top up.
The Ironman Instant Awning proved its worth on the first night out when dark clouds came over our camp on the Snowy River, and I elected to set up the awning to cover my swag. The threat only amounted to a small shower throughout the night, but I was happy to roll-up the swag nice and dry the next morning.
That day saw us head into the High Country proper, and the Ingeegoodbee Track is a stout initiation to the steep terrain. The long, steep climb is rutted in places, but the Patrol’s V8 was never found wanting for power and the traction control nicely calibrated to address any wheel slip.
The factory side-steps found every erosion humps on the track if you tried to drive straight over them and, unlike the other cars in the convoy that all had suspension lifts, the Patrol best traversed the humps diagonally when possible.
Engine braking is surprisingly good for a petrol engine/auto transmission combination, but when you consider the 5.6-litre capacity of the engine, so it should be. In fact, it is almost too good, as low range first gear is too low for all but the steepest descents, and you need to shift up to second gear and hover over the brake much of the time.
The transmission holds first gear when you want it to, unlike the seven-speed auto in the old TDV6 Navara, which always shifted up at the worst possible moment.
It was on the steep descents, such as Billy Goats Bluff, where I found the Patrol’s throttle control to be annoying. Crawling down in low-first, if I want to increase the speed a bit, I would normally lightly apply a bit of accelerator to bring the revs up to a speed that is both safe and comfortable. But the Nissan’s throttle wouldn’t hold a constant engine speed and flared up, even with steady pedal application.
The only way to speed up was to shift up to second, which always seemed to allow the car to run away, so you needed the brakes. I tried the hill descent control but, like most of these systems, I hated the noise and jerkiness of its operation.
I was keen to see if this was just an issue with this car or if it was common to the Y62, and I was pleased to hear one of the other drivers comment on exactly the same issue before I brought it up. It’s a small blemish on an otherwise polished off-road performance, and it’s certainly not a deal breaker if you’re considering buying one.
What was more annoying was that after three days of driving, mostly in low-range up and downhill all day, the Patrol was getting low on fuel and was the only car in the group that had to break from the trip to find a town and top-up the tank. None of the diesel cars had to do this for another couple of days.
Thankfully the aftermarket has long-range tanks available for the Y62, and I’d be fitting one if this sort of driving would be commonplace.
For the record, our average fuel consumption over the two-week trip was 22.8L/100km, and that included a highway run to Melbourne and back over the weekend in the middle of the trip – swags up on the roof rack did affect the aerodynamics. Our worst figure was 34.0L/100km when we were constantly in low range in the hills.
Fitted with a long-range tank, a lift from On Track 4×4, and some added protection from aftermarket side-steps and a front bar, the Y62 becomes an on- and off-road weapon. Yes, the side-steps were pretty trashed by the end of it, and the paint was scuffed on the lower parts at either end of the front bumper, so perhaps some added clearance and metal protection would be appreciated.
Paint protection would be a good idea, too, as the Y62 copped some pretty bad bush pinstripes while on this trip. A huge thanks to the detailers at American Vehicle Sales for the great work polishing the scratches out.
Follow the journey of 4×4 Shed’s 2017 Nissan Patrol Ti-L – Part 1 – Part 2 – Part 3
4×4 Shed Log: 2017 Nissan Patrol Ti-L Current mileage: 10,674km Date acquired: Dec 2017 Price: $88,990 + ORC Mileage this month: 2314km Average fuel consumption: 22.82L/100km
YOU’D think a bloke who’s been writing stories about 4×4 trip preparation for nigh on 25 years would be pretty good at trip preparation.
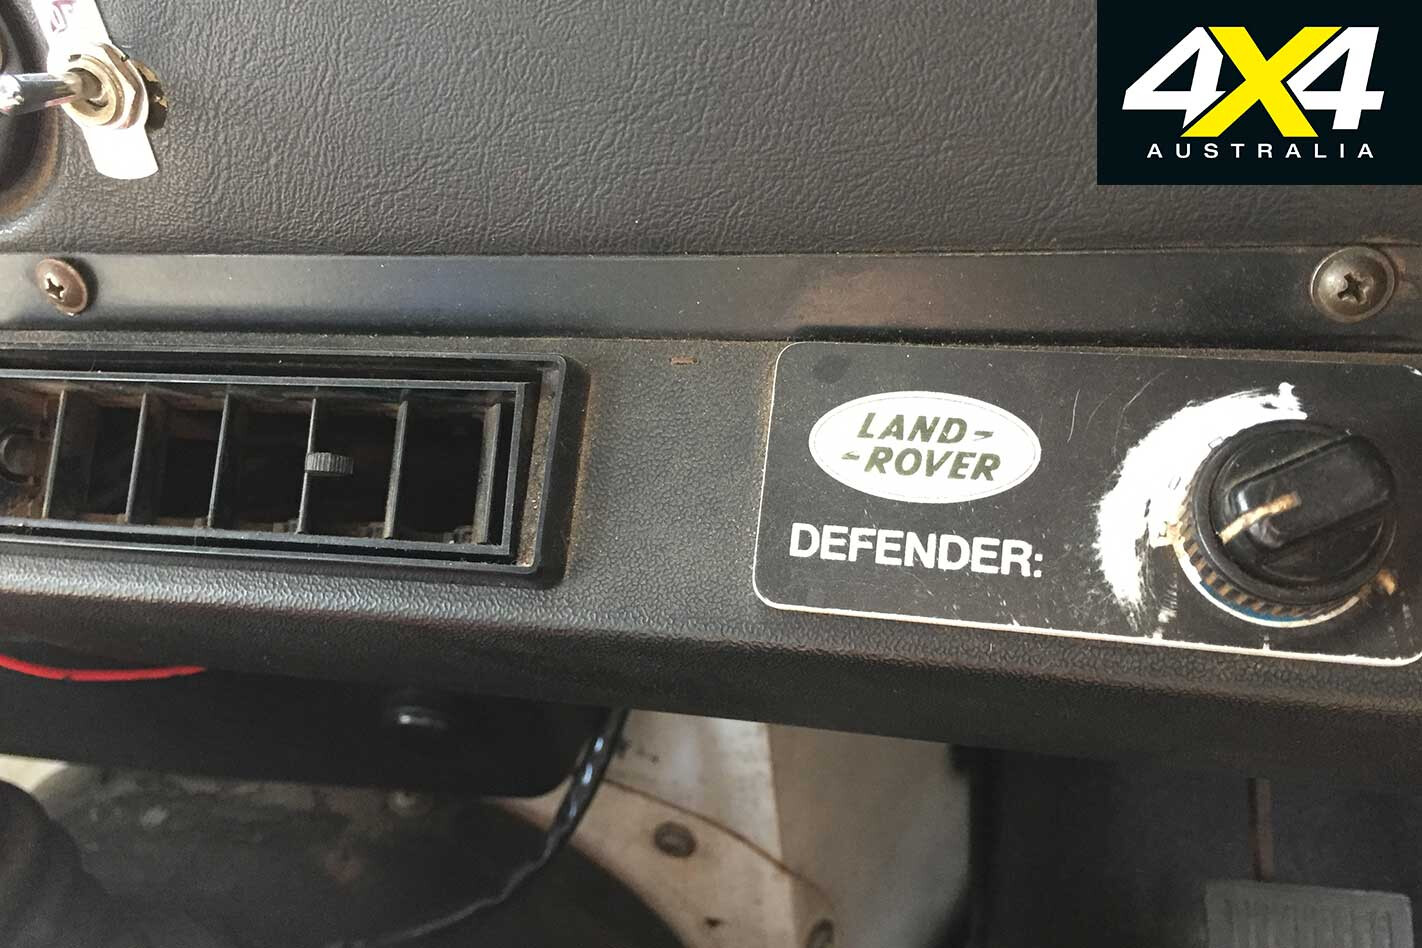
At least that’s what I was thinking as I piloted my Defender along the Barrier Highway towards Cobar – without air-conditioning – as the mercury nudged 38 degrees outside.
I had both window vents open and both front windows wound down, and being in my happy place I was actually quite enjoying the warm breeze. However, I have to admit there was a hell of a lot of heat coming through the floor, with absolutely no insulation between vehicle occupants and the engine, gearbox and transfer case.
I knew my passengers were both wrecked after what had been a long and noisy day in the old Landy. There’s no sound insulation, either, so the constant drone of the engine and driveline is incessantly intrusive, like an annoying, omnipresent being. Oh, and the wind noise is best described as “next level”.
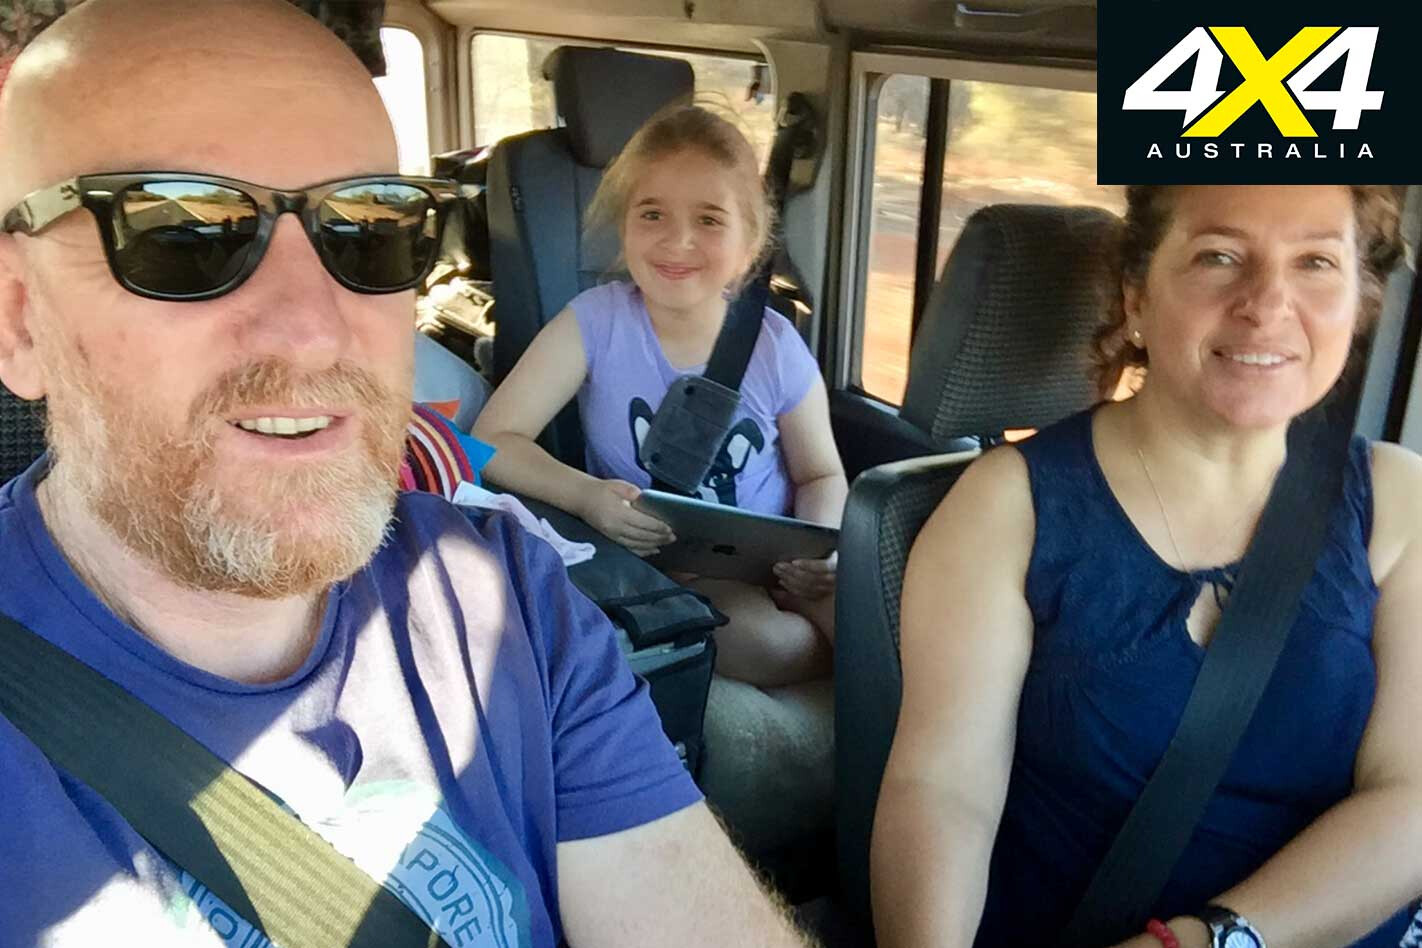
But Renata and Delilah continued to smile … probably for my benefit rather than a feeling of joy or comfort. Either that or they were already daydreaming about the pool they’d soon be soaking in when we reached Cobar.
Ironically, my Defender is fitted with a great bloody big air-conditioning system that hangs down beneath the dash, but it’s buggered. I had intended to have it fixed before we left for the Eldee Easter Festival but I simply ran out of time. And, anyway, I thought there’s not much chance of it being too hot this time of the year. How wrong was I?
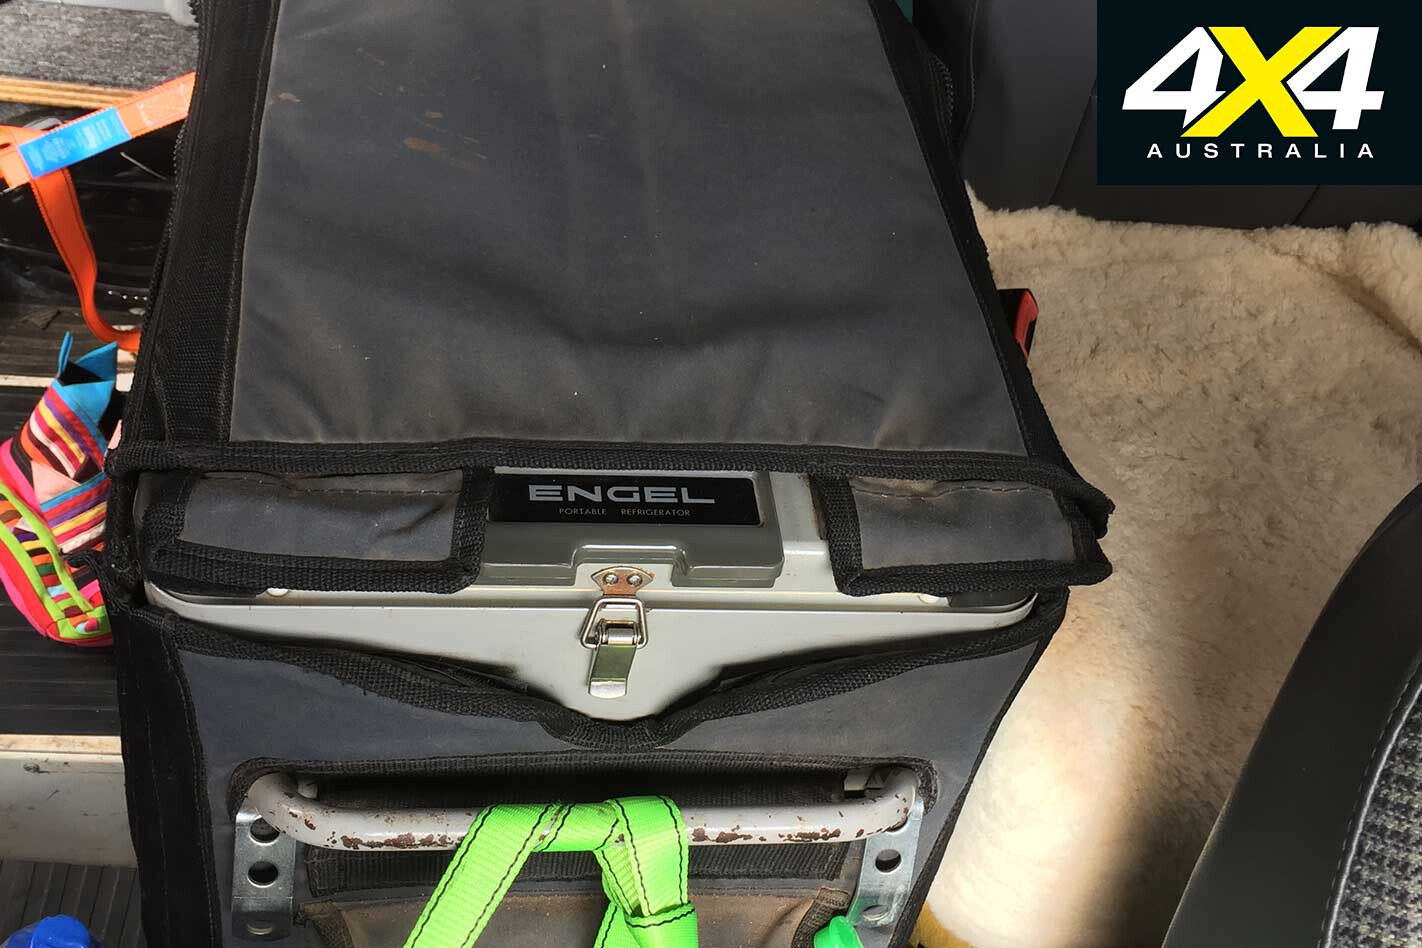
I had a long list of things to do before we packed and headed off: I had to send the Defender off for a service, fit a new steering guard, rewire the driving lights, build a storage system in the cargo area, fit a new head unit and some rear speakers, and, possibly of most importance, fix a niggling problem with my old Engel fridge that saw it switch off intermittently when bumping over rough roads.
I found a spare afternoon to rewire the driving lights, plugging the loom into the driver’s side headlight and re-routing the wires across the engine bay and through the bulkhead to the cabin. Then, a week before ETD, I dropped off my Engel at the local service centre before I took the Defender to the blokes at Roving Mechanical to sort out the service.
While there, they also replaced the rear brakes and fitted an APT steering guard. Unfortunately, I hadn’t left them with enough time to locate and fix the air-conditioning fault.
Running out of time I had a local automotive sound-system mob fit a new head unit and some speakers in the rear. They shall remain unnamed as they did such a crook job and I really can’t think of anything nice to say about them.
With two days left I dropped the Defender off at the local air-conditioning specialist who found the fault to be a hole in the condenser, caused by the bonnet catch, which had been rubbing on it. There was simply no time left to have it fixed before we left.
I checked the forecast for Cobar on the Thursday before Easter and was shocked to see the temperature was going to peak late in the afternoon in NSW’s central west just as we’d be driving through it.
I kept that information to myself as I set about sorting the cargo area and relocating the rear speakers, which took about half a day. Then I received the best news I’d heard all week: the Engel was fixed and ready to go, and it only cost 45 bucks. At least we’d have cold water for the trip, and cold beer at the end of the day.
As expected, Day One was a real struggle, with 800-odd clicks in stifling heat. But for the rest of the trip the weather was quite mild. Nevertheless, I learnt a very valuable lesson during Easter 2018: practice what you preach.
Is your 4×4 a home away from home on the weekends? Then this month’s new 4×4 gear would be just what you are looking for.
From portable pots and pans, mobile network booster, to awnings for you and your doggo, these kits are worthwhile additions on your 4×4 adventure rig.
MSA 4X4 SEAT ORGANISER
The crew at MSA 4X4 continues to churn out top-quality accessories, and this new seat organiser (with lifetime guarantee) is just another example. The seat organiser fits all standard vehicle seats and has been designed to be attached and removed as quickly and easily as possible; adjustable straps and buckles making short work of this process.
The organiser features an internal aluminium frame, so it won’t sag once it is packed full of kids toys and – if the young’uns leave you any space – your own gear. Plus, the heavy-duty canvas material means this thing will withstand plenty of rough treatment.
There are 12 pockets of varying sizes in the organiser, ranging from compact through to pockets that will hold a magazine (4X4 Australia, of course). There’s also a separate seat organiser model with a drop-down table for iPads, books, etc.
RRP: From $108 Website: msa4x4.com.au
REESE TAILGATE PADS
A ute tray is tailor-made for lugging long loads and bikes, and finding a way to eliminate the potential for scratching or damaging the top lip of the tailgate is a priority – and we don’t mean by using a stop-gap solution, such as a towel or blanket over tailgate.
Reese tailgate pads are designed to protect the tailgate (and the load sitting on top of it) from dents, scratches, etc., while also ensuring the load doesn’t slide from side-to-side across the tailgate.
The pads are secured using straightforward strap/buckle attachments and are super-tough; 600-denier heavy-duty weather-resistant fabric is used, in conjunction with an internal soft-foam core, resulting in a protective layer between tailgate and load. There are additional top attachment points to eliminate movement. The pads, available in two sizes, can be purchased from Repco outlets.
RRP: From $50 Website: reeseproducts.com.au
RHINO-RACK BATWING
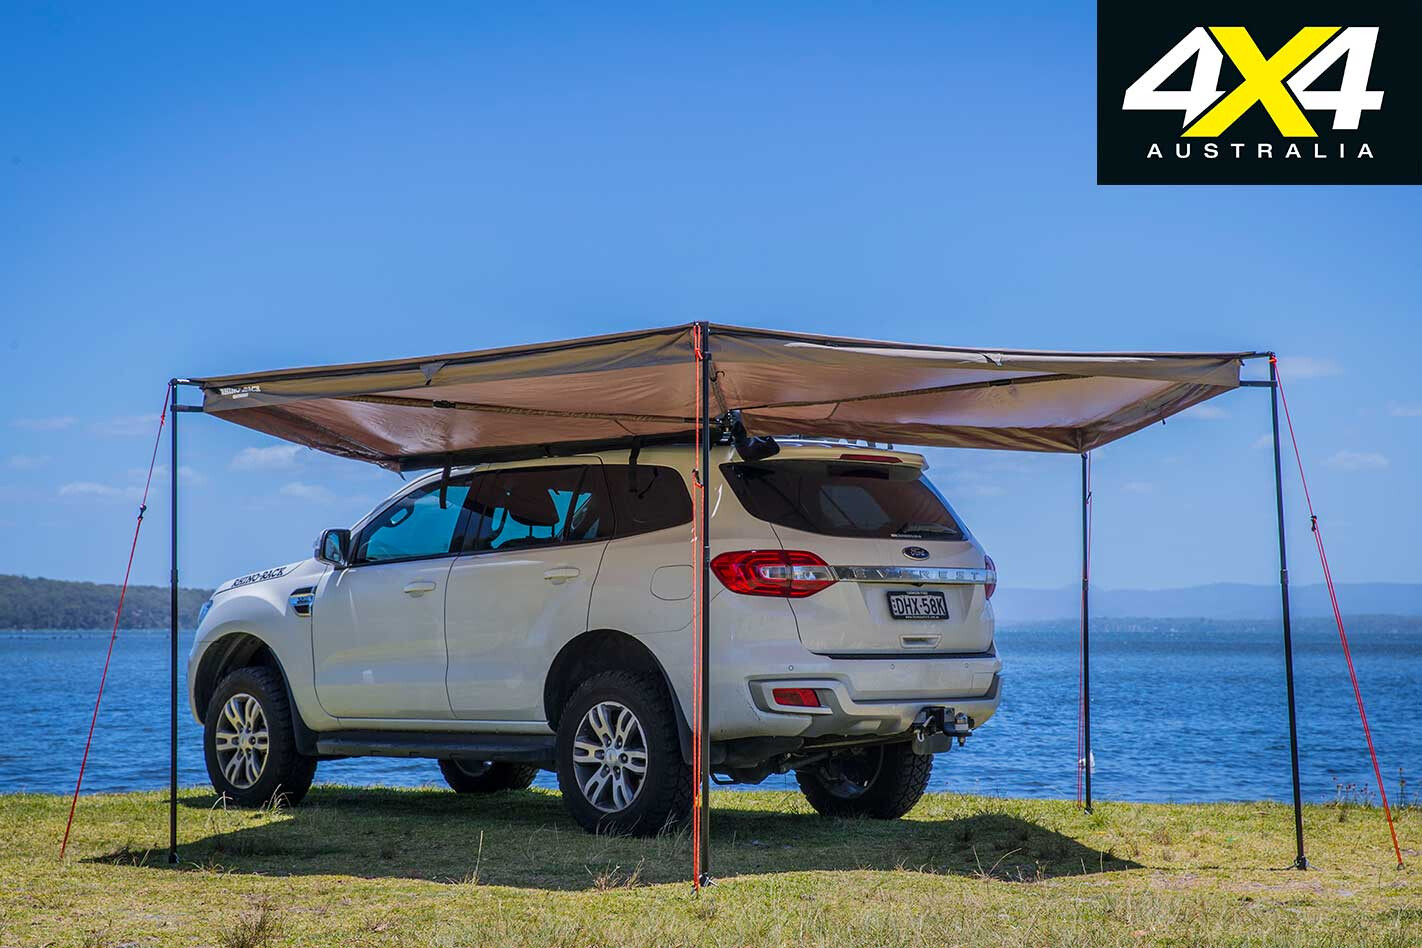
This new awning from Rhino-Rack offers 270 degrees of coverage. The Batwing is very easy to fit thanks to brackets that include a high and low fitting position, eliminating the need for U-bolts or drilling into a roof rack.
Upping the usability factor, the Batwing incorporates integrated poles, twist-grips for height adjustment, and extend to a maximum height of just under 2.3 metres, which means no more ducking down to get to the shade.
Adding further security when set up, the Batwing pole-fittings include two peg holes, and you can also utilise the included eight guy ropes for maximum stability. The heavy-duty rip-stop fabric is water- and mould-resistant and is tested to a UPF50-plus rating. A UV-resistant storage bag is also included.
RRP: $849 Website: rhinorack.com.au
IRONMAN 4X4 RECOVERY POINTS – RANGER/EVEREST
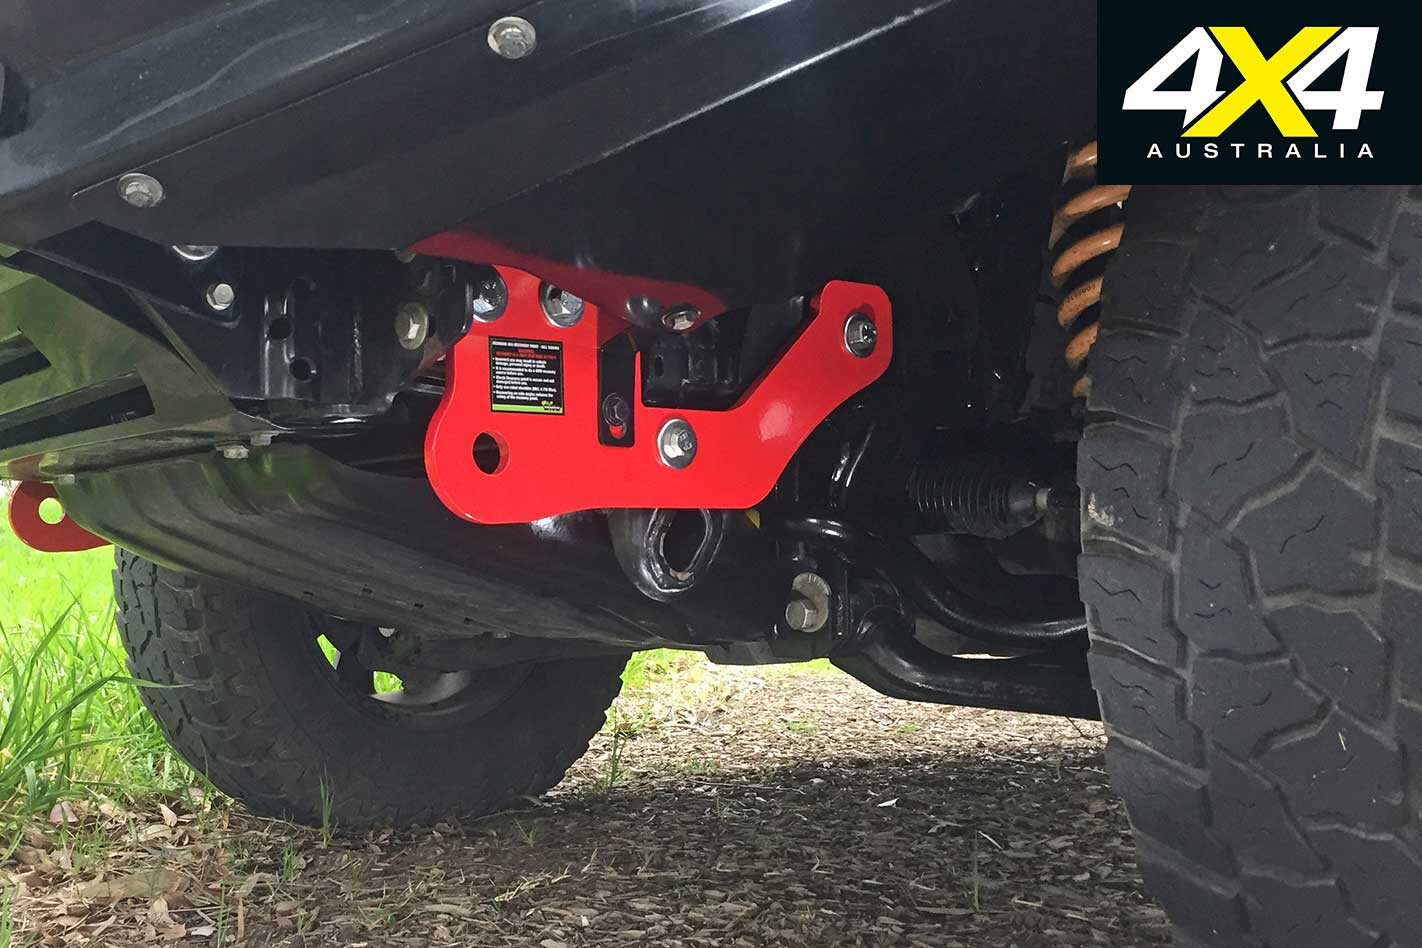
Ironman 4×4’s new recovery points for the Ranger PX/PXII and Everest (2015-onwards) have an individual working load limit of 5000kg and are supplied as a pair.
The recovery points are designed to work with a 4.75-tonne shackle, and an equalisation strap can be used with the two points to distribute load/stress across both sides of the vehicle. The kit includes all the mounting hardware you will need.
The recovery points are NATA-tested and attach directly to the chassis via high-tensile bolts. The bolts have a Geomet coating which lubricates the bolts and assists in rust-resistance, with test periods of 1000 hours under salt spray producing no corrosion.
Website: ironman4x4.com
MR SWAGMAN DOG SWAG
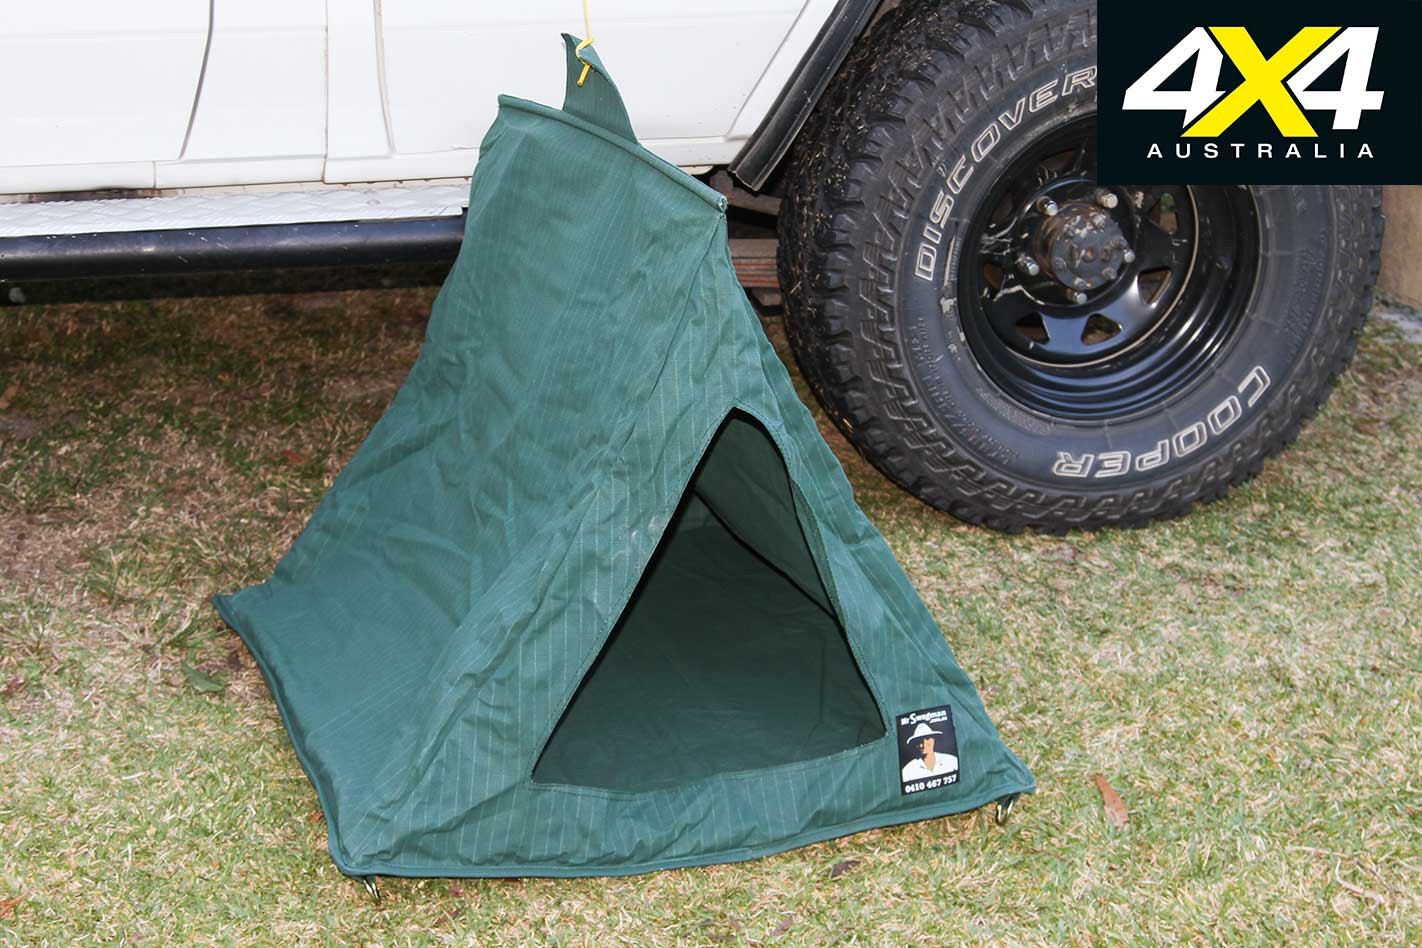
It may sound a tad amusing, but we reckon it’s a brilliant concept, especially for those who do plenty of travel with Fido on board. The Mr Swagman dog swag means you no longer have to pack that hard-shell dog bed or leave him/her outside under the camper trailer/vehicle/caravan for those trips away.
The dog swag is made from 15-ounce rip-stop green canvas, which is rot- and mildew-resistant, waterproof and UV stabilised – it’s the same as what features in Mr Swagman’s premium swag range. It comes complete with a high-density 20mm foam mattress, which is secured under a canvas floor to keep it clean.
Set-up is via a single centre rope (tied to a tree/bullbar, etc.) and you can also use the brass corner rings to secure it to the ground (and/or tie your dog to them). Dimensions are 800mm wide by 800mm deep and 800mm tall (rolled up: 800mm x 100mm diameter), so most pan-lickers should fit in without a worry.
RRP: $140 Website: mrswagman.com.au
CEL-FI CELLMATE
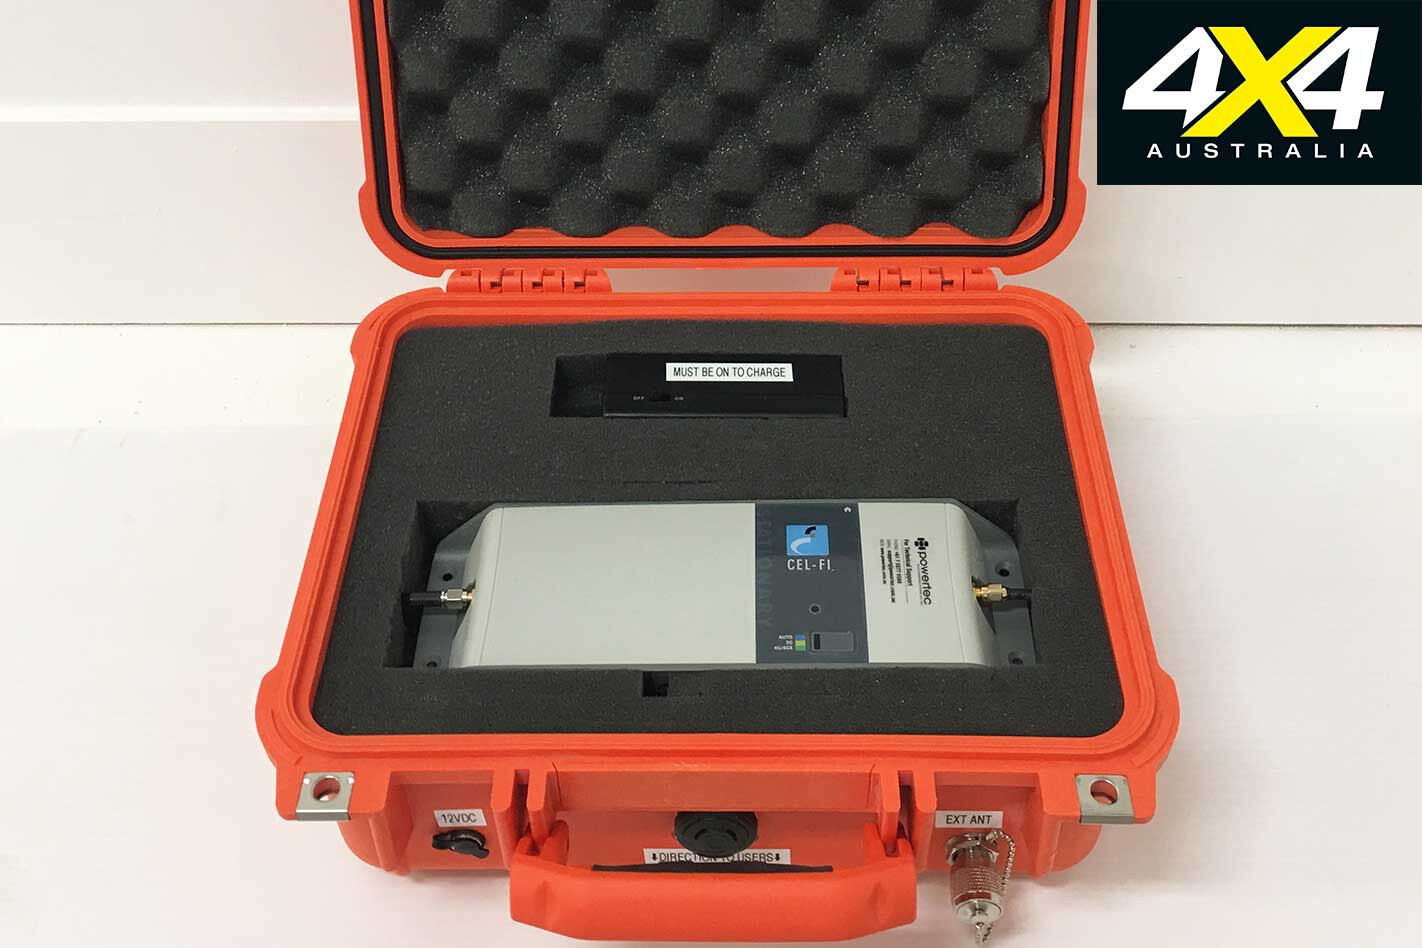
The Cel-Fi team has made its awesome mobile phone repeater – the Cel-Fi GO – mobile, in the true sense of that word, with the release of the new Cellmate.
The Cellmate comprises a Cel-Fi GO housed inside a robust Pelican Case 1400 (IP67 watertight, crushproof and dustproof), allowing users to transfer the unit from vehicle to vehicle (or to a boat, even), compared to the ‘regular’ Cel-Fi GO unit, which is usually hardwired in the vehicle.
The Cel-Fi GO Repeater has been tested, authorised and approved by Telstra for use on its mobile network and is designed to boost a 3G or 4G mobile signal across this network. The Cel-Fi Cellmate includes the repeater, an internal antenna in the base of the case (a separate external antenna is also required), 240V mains power, 12V power and a Cel-Fi backup battery for an additional 10 hours of power.
RRP: $1852.40 Website: powertec.com.au
SEA TO SUMMIT ALPHA SET 4.2
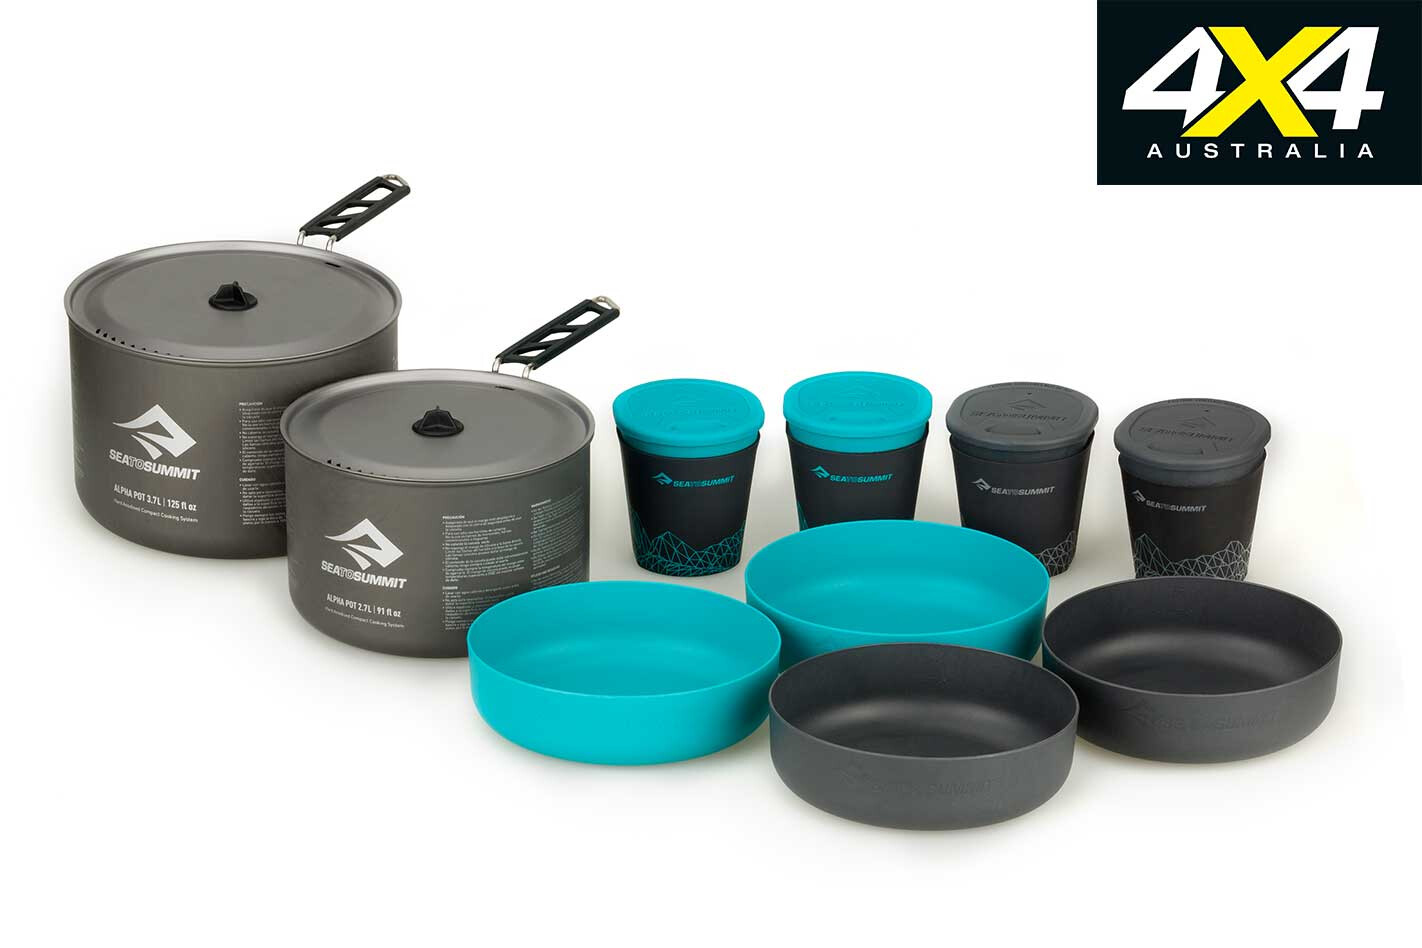
Aussie outdoor brand Sea to Summit has released a cracking lightweight and compact camp kitchen ‘solution’. The Alpha Set 4.2 packs down small (packed size is 135mm x 203mm; complete weight only 1.2kg), with the DeltaLite bowls and Insul mugs nesting inside the pots. The hard-anodised Alpha pots (3.7L and 2.7L) include straining lids and a textured base for stability on the camp stove.
These pots feature a patent-pending Pivot-Lock handle that rotates horizontally and locks in place for a secure grip when you’re using it, and then it can be folded away after use, locking the lid to the pot. The bowls and mugs are made from BPA-free glass-reinforced polypropylene, are easy to wash and are microwave friendly.
The full set includes the two pots, two 1L DeltaLite bowls, two 900ml DeltaLite bowls, and four 350ml DeltaLite Insul mugs.
Website: seatosummit.com
Electricity might play second fiddle to fuel and food in importance on your list of 4×4 trip preparations, but having an ample supply of it on hand can make any journey more enjoyable and even get you out of a tight spot.
So don’t be left out in the dark on your next 4×4 road trip with these handy electrical gadgets.
EFS Vividmax light bar
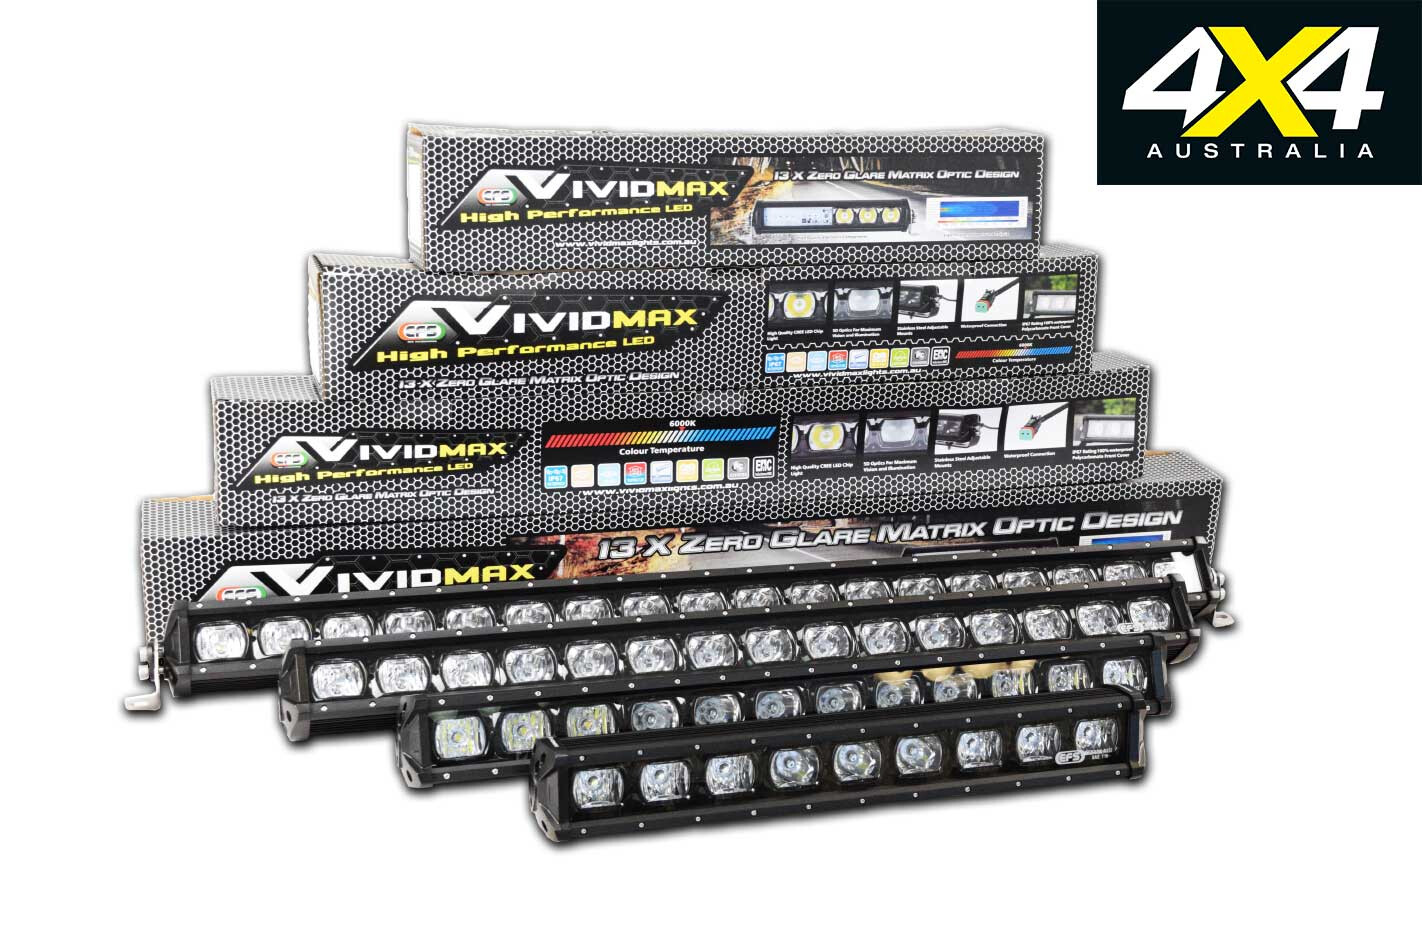
The team at EFS has released a new addition to its accessory range: Vividmax light bars. This light bar is available in four different sizes – 21, 27, 34 and 40-inch – and it uses a super-bright 6000K true white light to illuminate the track ahead of you.
The light bar features top-notch Cree LEDs and it comes with waterproof connectors as well as tough stainless steel mounts and hardware. All models of the light bar incorporate a spread and spot beam and are housed inside a durable aluminium casing that also provides improved heat dissipation when the lights are working.
The light bar is rated IP67 water- and dust-proof and is built to the usual high standards you’d expect from EFS. With a size to suit every vehicle and bullbar mount the Vividmax light bar is well worth considering, especially at a great bang-for-your-bucks price.
RRP: $219 (21-inch 90W); $280 (27-inch 120W); $320 (34-inch 150W); $375 (40-inch 180W) Website: efs4wd.com.au
Barebones Living Trailblazer flashlight
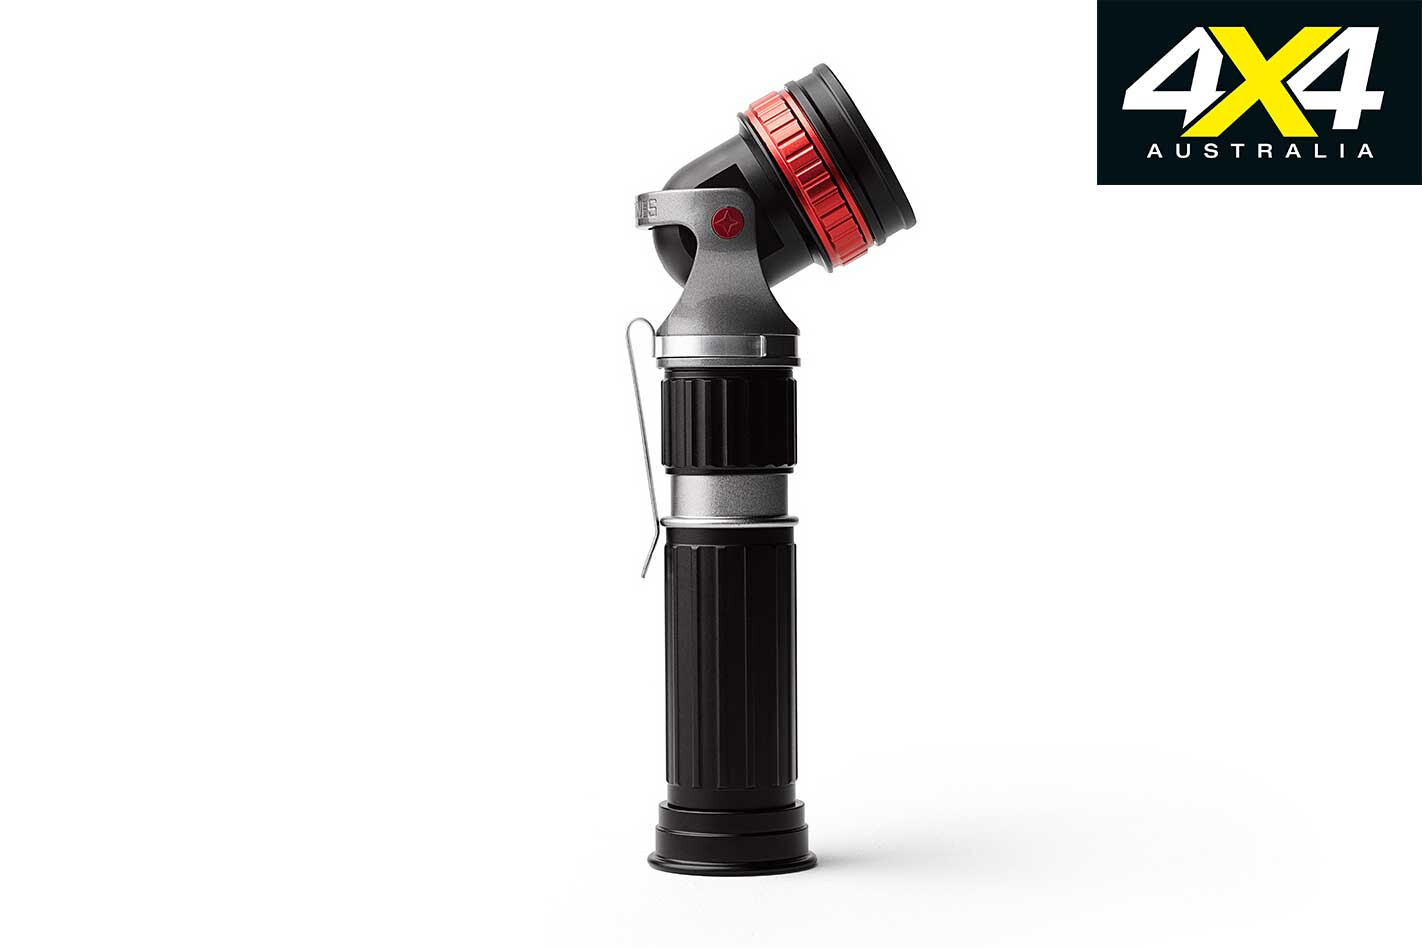
This rugged torch features a 6W LED light that can blast out a maximum 500 lumens of brightness. The torch can maintain this mega-bright output for 2.5 hours. The maximum lighting time is 24 hours when on the lowest (38 lumens) output setting.
The Trailblazer’s construction is of robust aluminium (with steel belt-clip and rubber on/off switch) and it features a telescoping lens and indicators for adjustment of lighting angle and scope (ideal for spotting those possums up the tree with the kids).
The torch is powered by a 16.5Wh lithium-ion rechargeable battery (recharge times are a claimed four to six hours from flat) and measures 234mm long x 54.6mm wide. Also included are a 5V/1A micro-USB input and a 5V/1.5A output.
RRP: $170 Website: amke.com.au
Dometic solar panel
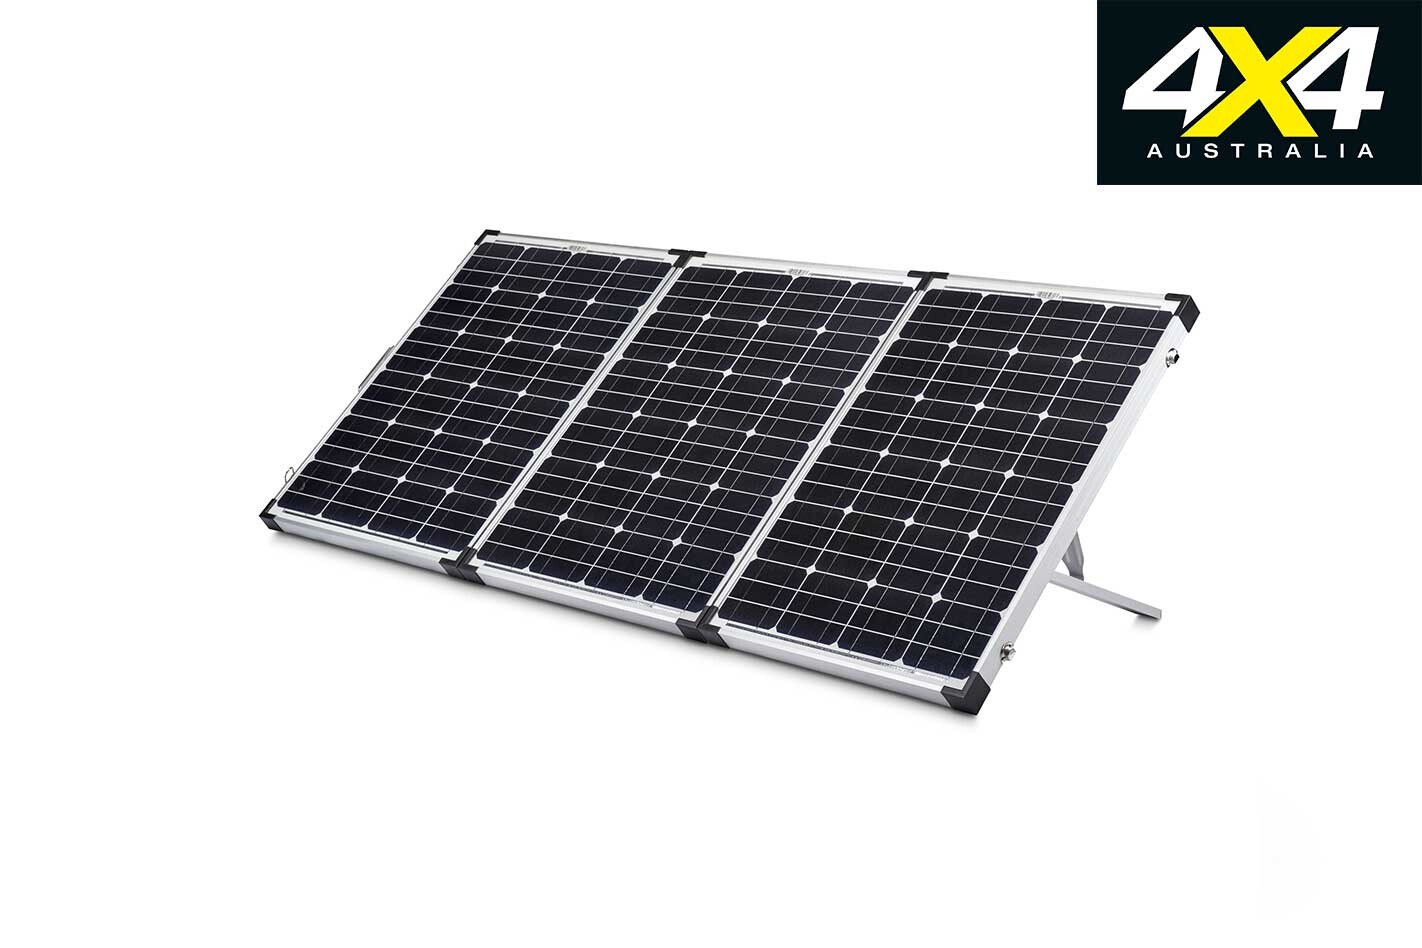
The new PS180A solar panel from power gurus Dometic includes highly efficient monocrystalline panels (more efficient than other tech) for a longer lifespan.
The panel’s heavy duty, three-stage 20amp rated automatic solar charger ensures battery charge is kept at optimum operating levels, thanks to its ability to swap between battery and solar power as needed.
The built-in battery temp sensor ups reliability by keeping track of the temps during operation and making sure there’s no risk of overcharging. The PS180A’s aluminium frame and three adjustable feet make it easy to turn the panel to the ideal angle for maximum input from the sun.
The PS180A is a compact, lightweight unit that, when folded, is stored inside a protective carry bag. Additional features include a five-metre lead, an Anderson plug and alligator clips.
Website: www.dometic.com
Uniden Jumpstart Kit and Power Pack
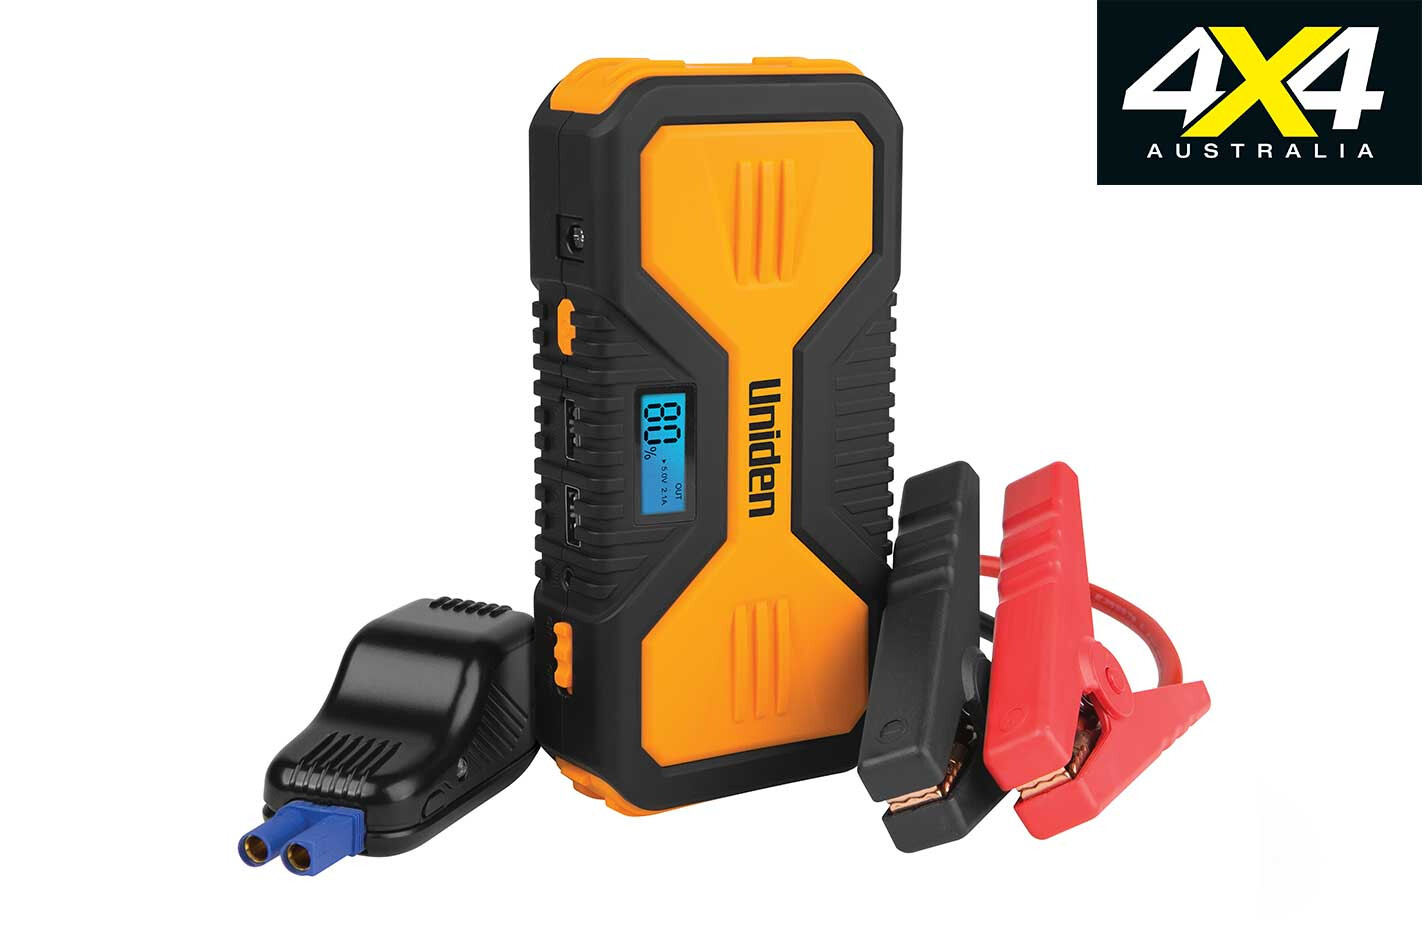
Whether an off-road tourer, camper or boatie (or all three), becoming stranded due to a flat battery can make that fun escape sheer misery.
Uniden’s compact UPP136 jumpstart kit and power pack is a powerful 13,600mAh portable battery pack that includes a set of jump cables, as well as doubling as a charger for handheld gadgets (using the included two-in-one USB cable). The vehicle charge limits are for petrol engines up to 5.0 litres, or a diesel engine up to 3.0 litres.
The UPP136 includes a battery percentage LED indicator and recharged using the AC power adaptor or in transit via the included charge cable. There is an inbuilt spike and surge protector, and the kit includes a three-mode LED flashlight. It has a lifecycle of 1000 discharges.
RRP: $149.95 Website: uniden.com.au
Ledlenser MH10
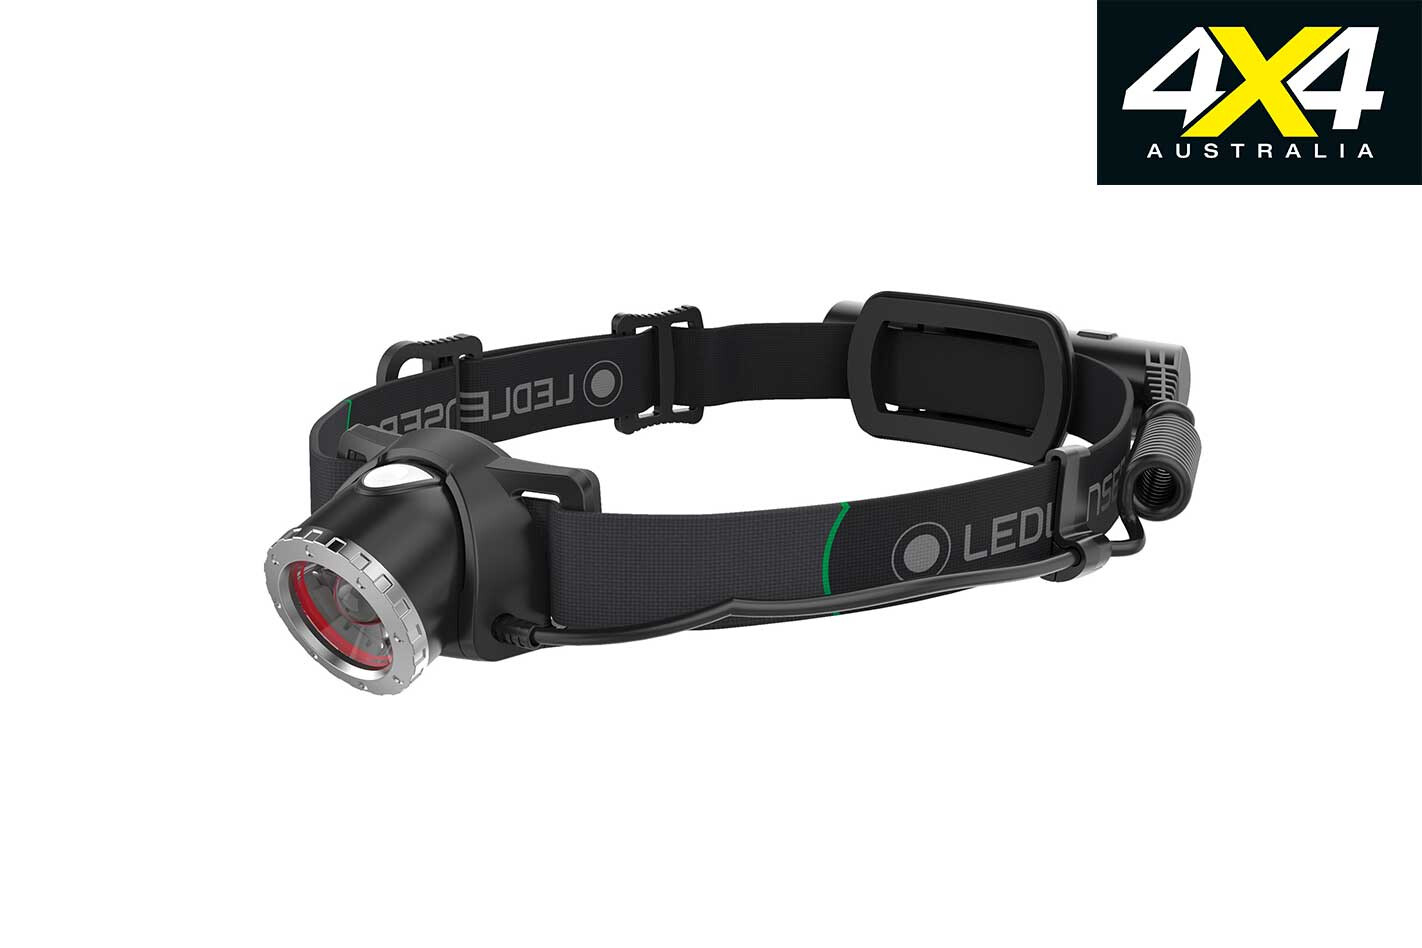
The head-torch gurus at Ledlenser have released the MH10, which promises plenty of lighting grunt (maximum output is 600 lumens), courtesy of its Power LED light source, and a light weight (158g). The MH10 is built tough, too; the removable and washable head strap is over-engineered for durability, while the battery case and pivot-mount light are designed to withstand dust and water.
The MH10 has a maximum run-time of 120 hours, plus an emergency light function for when battery power is low. There are three lighting modes: low power, mid power and power.
The light is easily operated one-handed, thanks to the pivot mount behind the light itself. Changing the focus from flood to spot lighting is also possible one-handed via the ring on the light housing’s outer edge. The hi-tech lithium-ion battery allows for fast recharging (three hours to reach 80 per cent capacity) via USB.
RRP: $174.95 Website: ledlenser.com.au