WHICHEVER of Australia’s eight capital cities you choose as a starting point, travelling to the centre of Australia means thousands of broken white lines, millions of kamikaze insects and enough dust to induce some serious respiratory issues.
If you strategically positioned yourself in Europe, you could cross four or five countries in the same distance it takes you to get from our glistening coastline to our parched red centre, albeit without the toll roads, arrogant French drivers and roadside caffeine hits.
But where exactly is the centre of Australia? That apparently simple process of defining the dead centre of the country could easily lead to some overturned bar stools or spilt amber nectar.
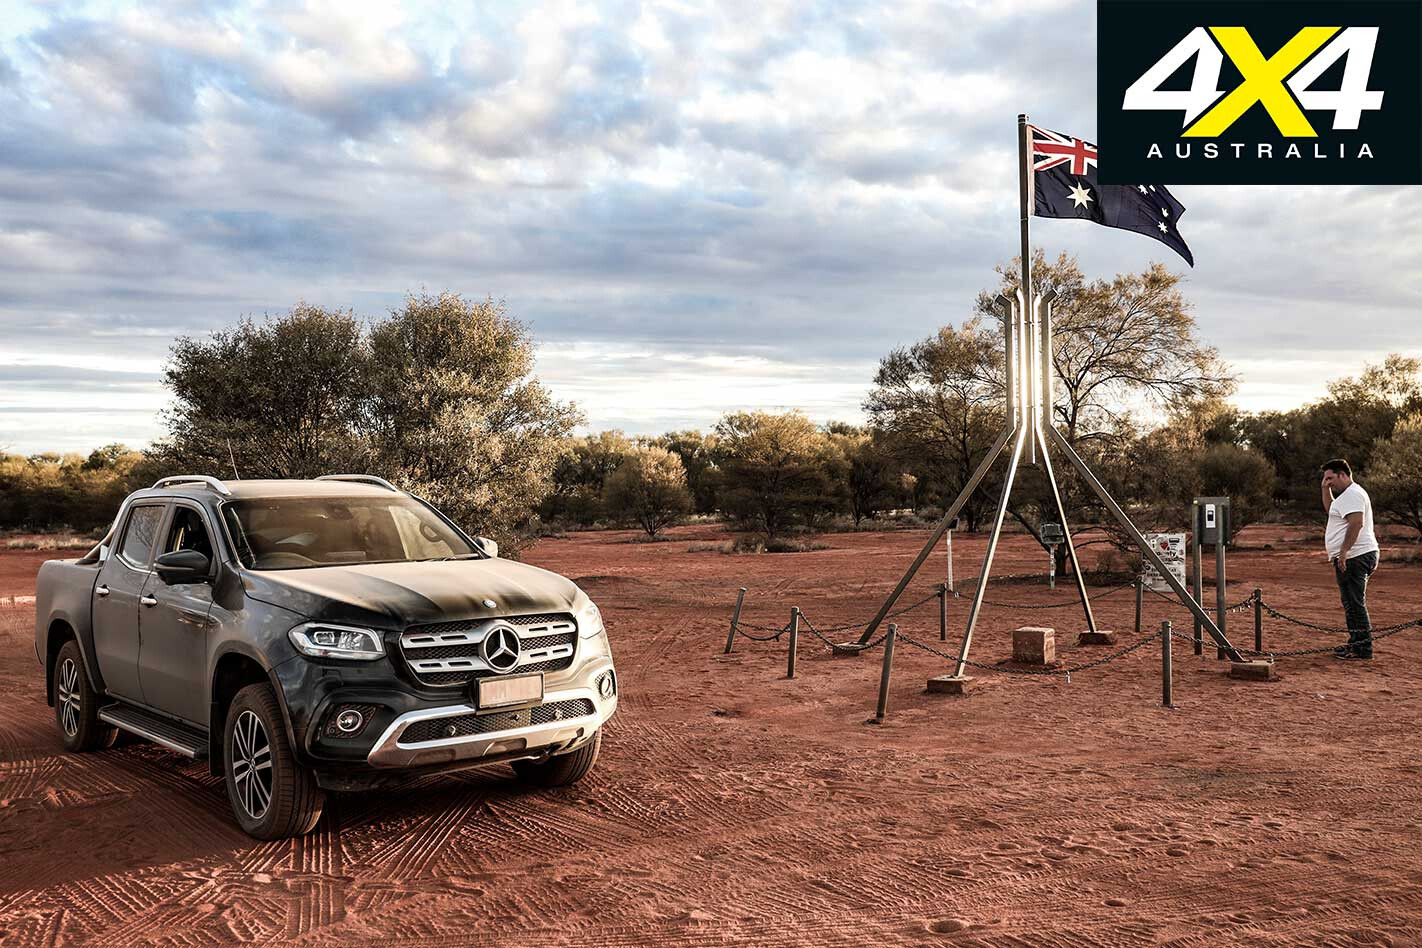
Sure, most travellers will head to Lambert Centre, the result of a 1988 bicentennial project to locate the gravitational centre of our 7,692,024 square kilometres. It even has its own road, complete with clear, concise signs to easily locate it (at least once you’ve covered the first few thousand kays getting to that point). The promise of a snazzy plaque and scale replica of the flagpole on top of Parliament House make it an easy win for adventurers looking to bulk up their Instagram or old-fashioned photo albums.
However, prior to 1988, Lambert Centre wasn’t even on the map. Literally. The centre was somewhere else; or, to be more precise, four places else.
Some quick Googling reveals there are at least five methods that have been used to calculate the centre of Australia over more than a century. All fall in the Northern Territory but are spread over a distance larger than Tasmania, which sort of reinforces that the whole find-the-centre thing isn’t an exact science. They all look pretty close when thumbing through a map, but conceivably a day or more apart once some challenging outback roads enter the equation.
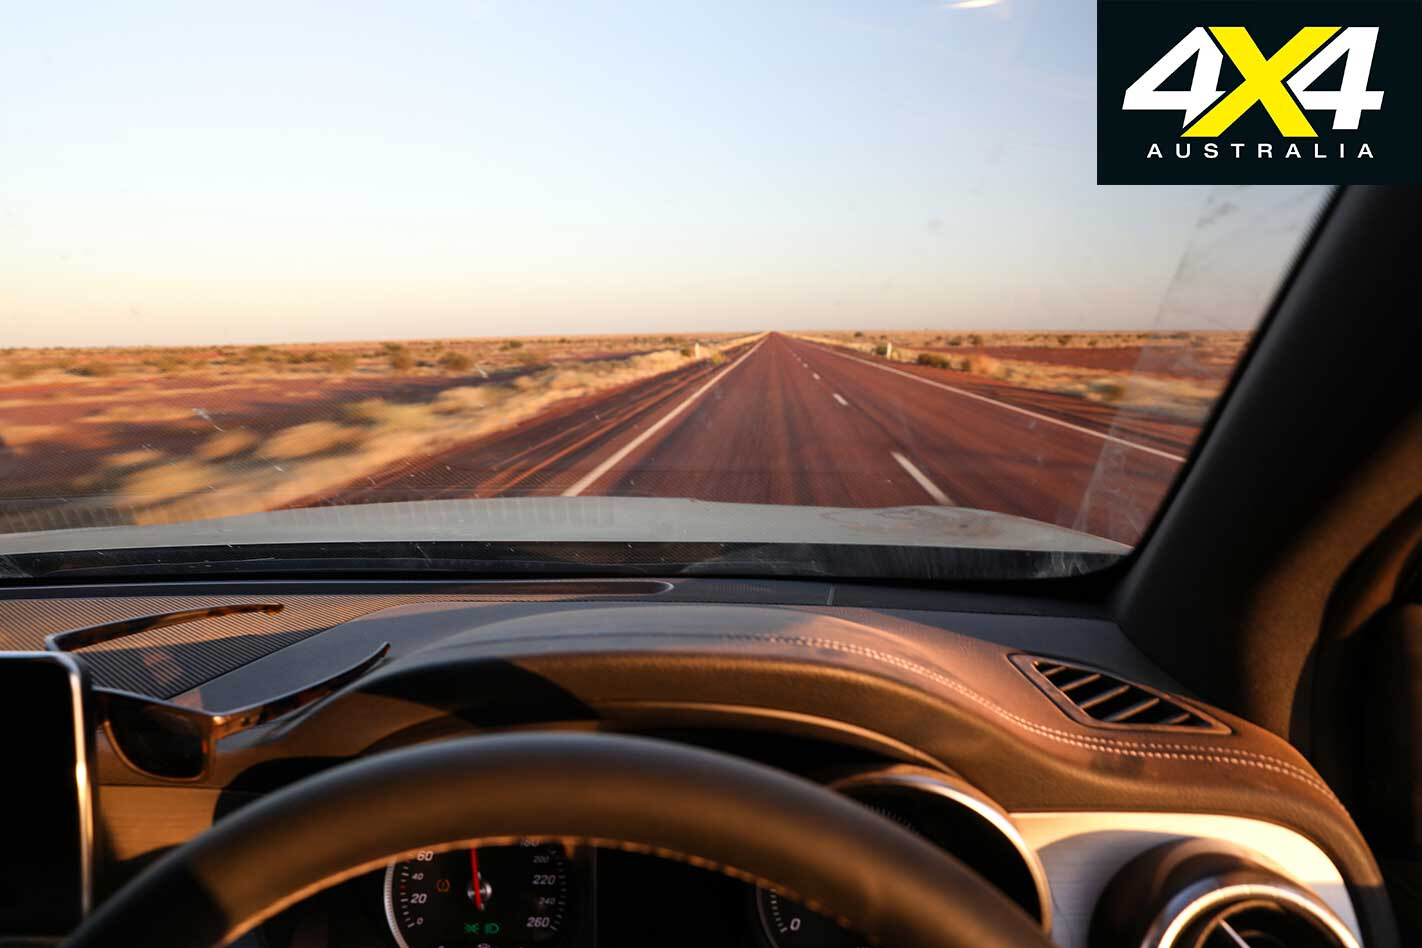
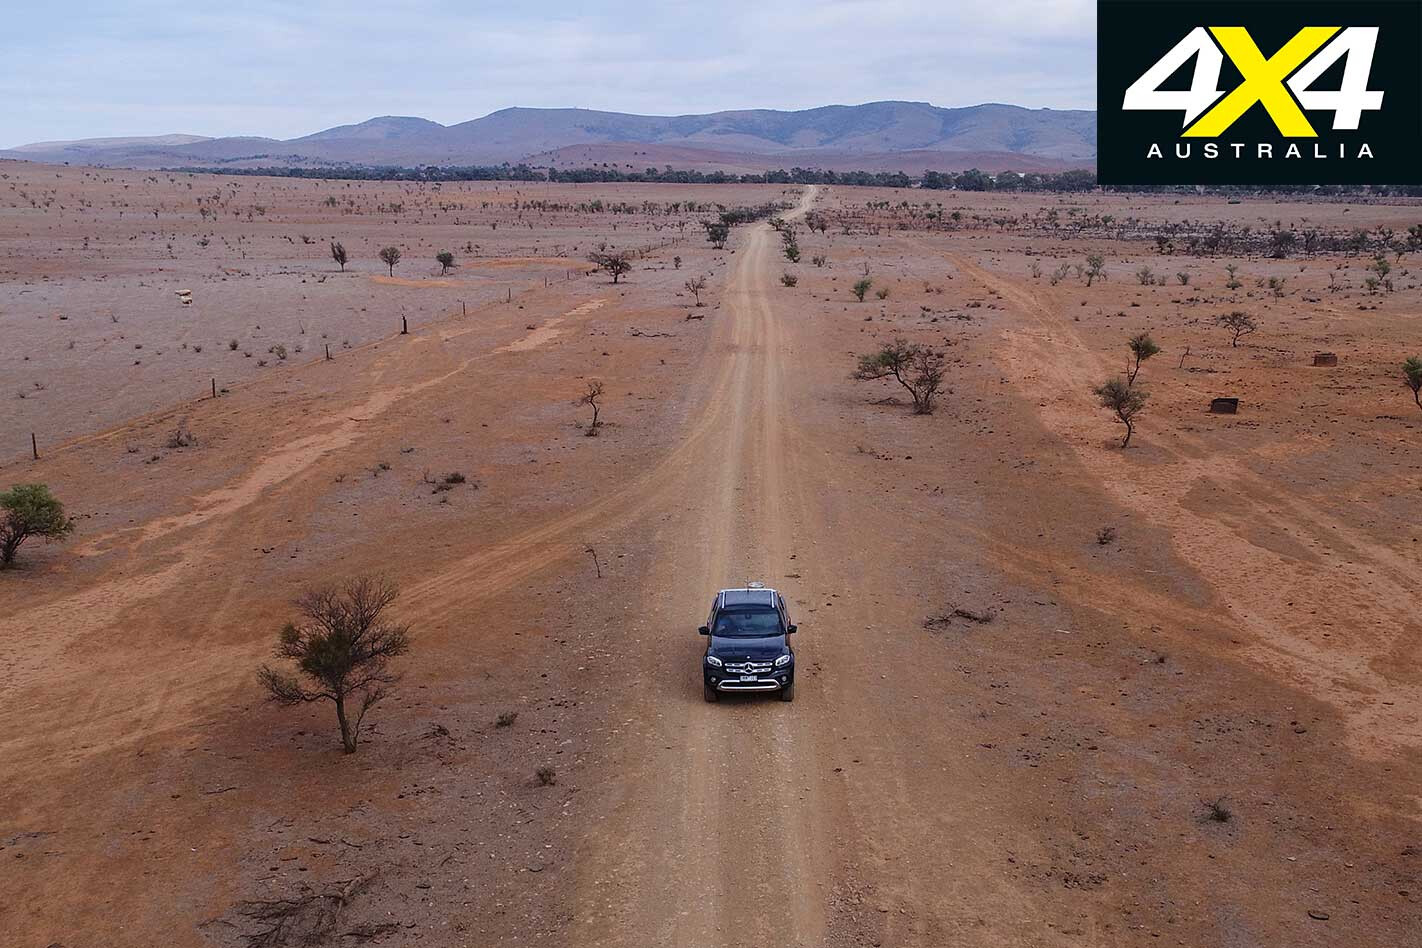
The enormity of the task ahead hits somewhere pounding north along the Stuart Highway, with kangaroos risking their lives for some roadside greenery that is a rare sight in one of the most barren parts of the country. Sure, getting to the Red Centre that consumes a sizeable swathe of Australia’s interior is a big task, but finding the location of five dead centres is next level.
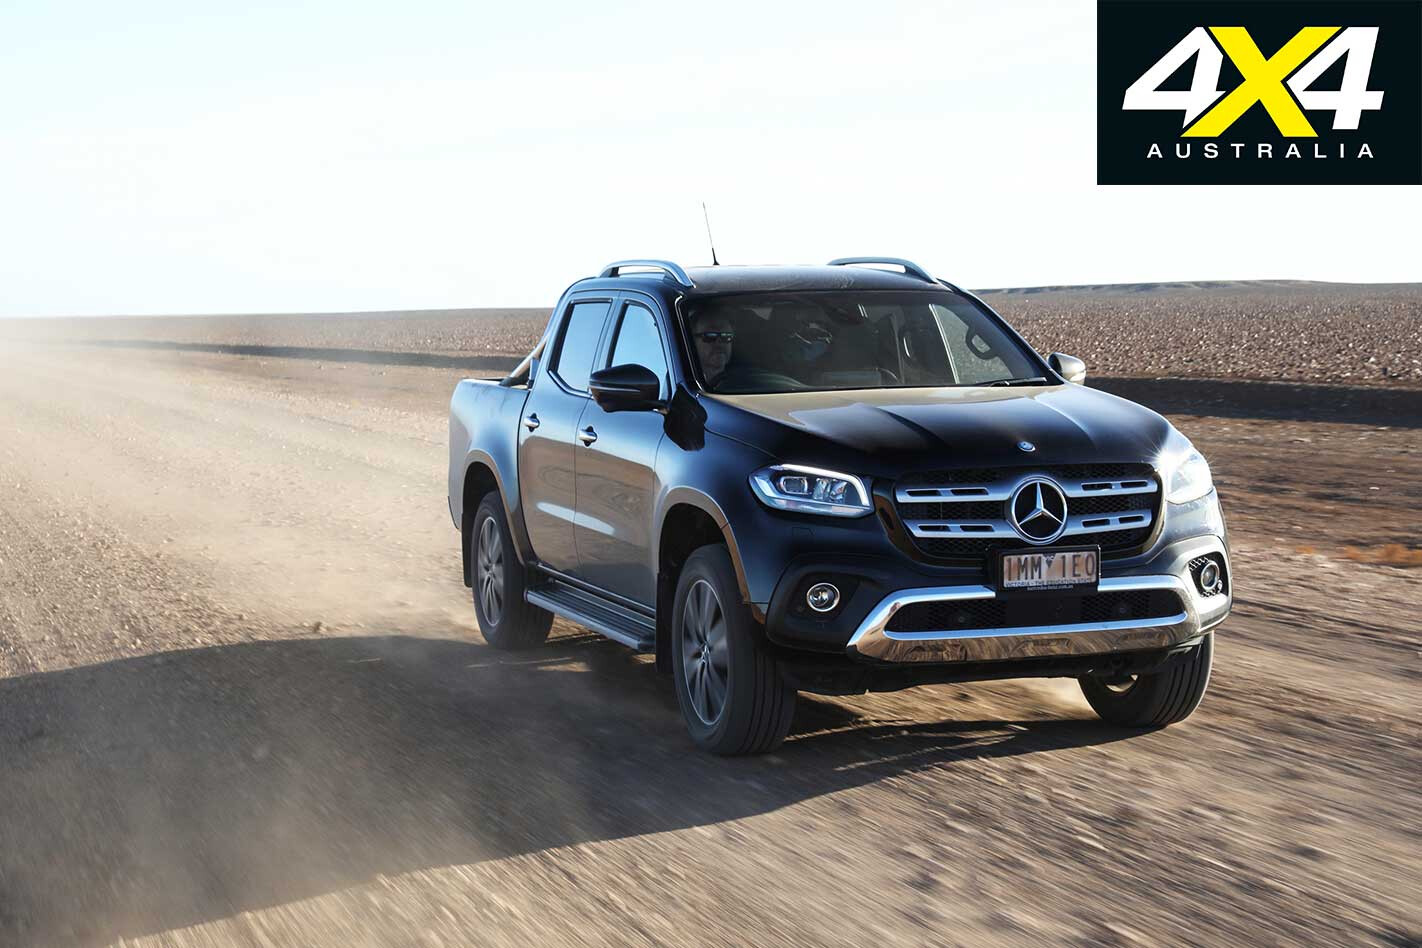
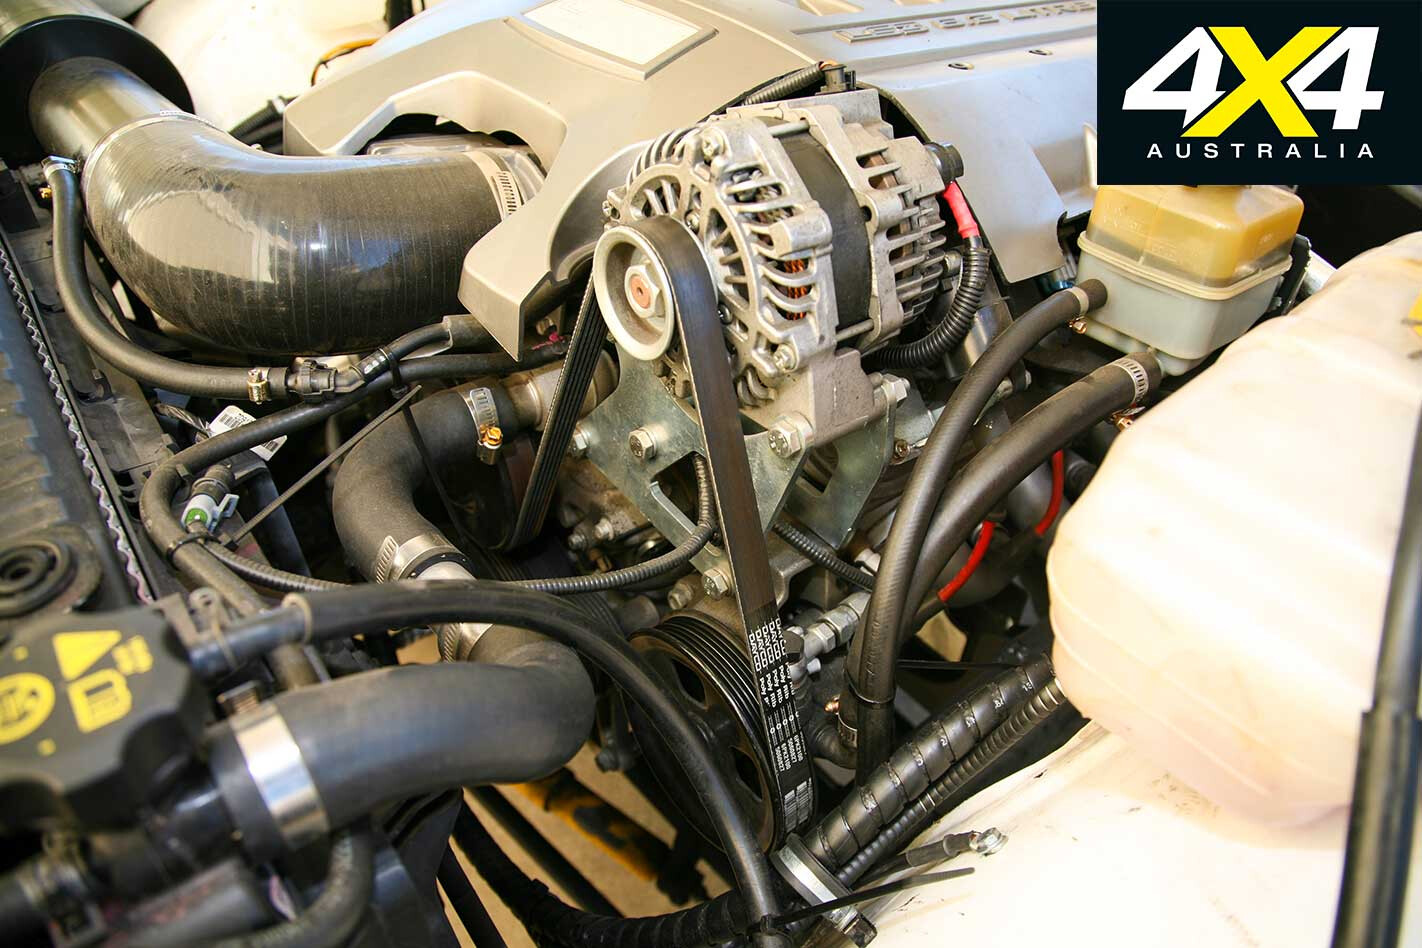
Our weapon of choice is the Mercedes-Benz X-Class ute. Our top-of-the-range X250d tops-out well into $70,000, adding some (real) leather and 19-inch wheels to the already impressive luxury tally. For the 110km/h – and, later, 130km/h – run up the highway it’s a comfy machine, its noise suppression impressive over longer stints. That’s a bigger deal than it may seem, with the lack of white noise a bonus for the many hours spent with cruise control engaged.
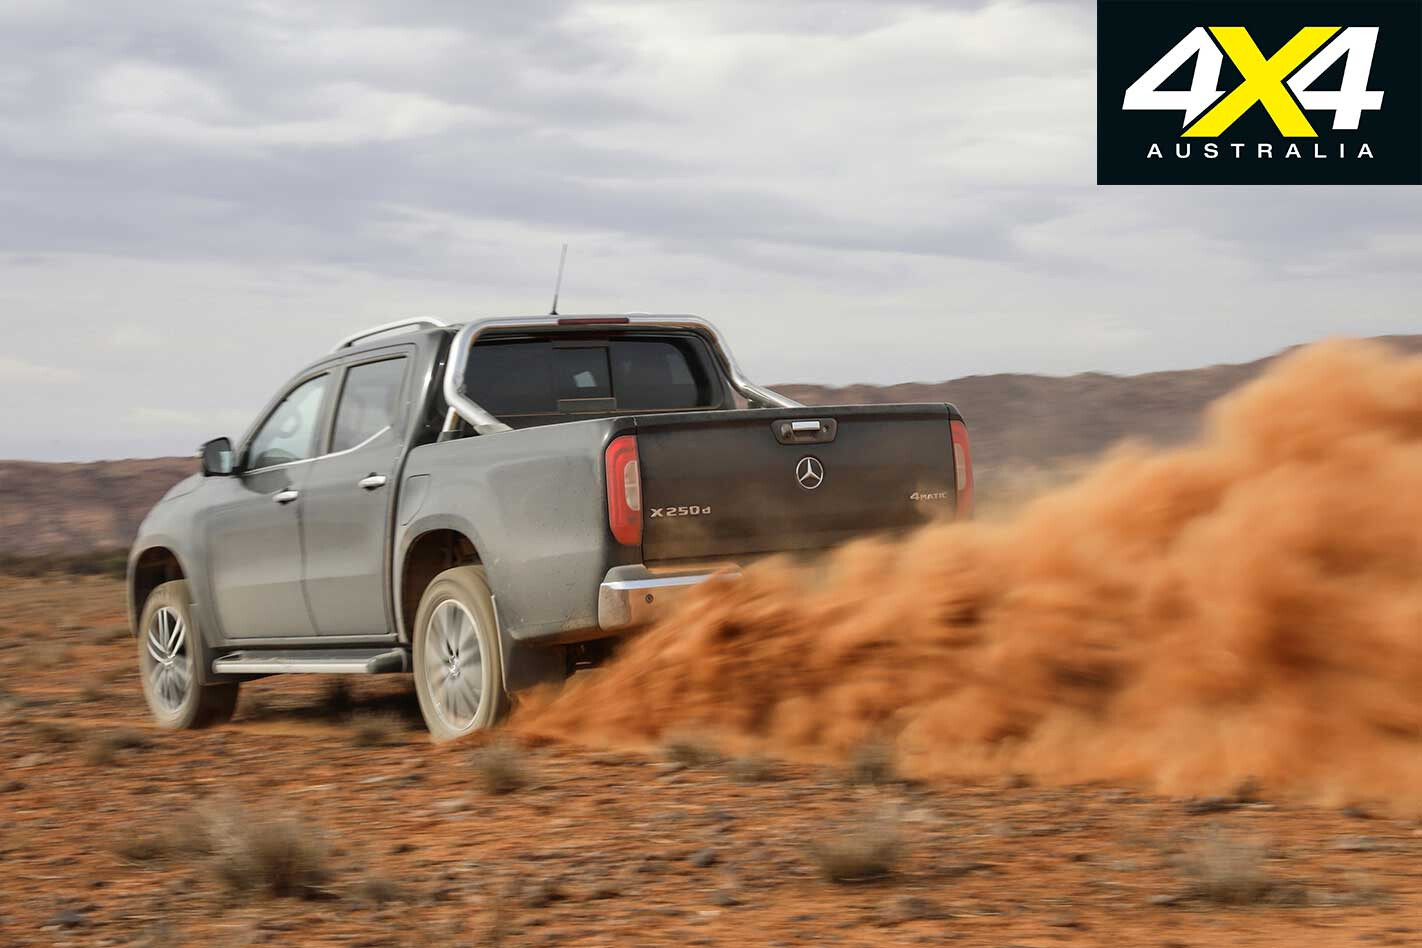
The 2.3-litre twin-turbo engine is also impressively frugal, sipping close to its claimed 7.9 litres per 100km average over the faster sections. It means we can eke almost 1000km from its 80-litre tank, at least when driving it gently. That the fuel light insists on blinking to life 200km before we’re likely to grind to a halt is a tad OTT. Still, at least it allows time for planning ahead.
First stop is Alice Springs, the closest thing we’ve got to a sizeable town in the centre of Australia. With a population approaching 30,000 it’s officially way smaller than the likes of Bendigo, Bathurst, Mildura, Tamworth and Albany – towns that all rate far less of a mention on evening weather reports.
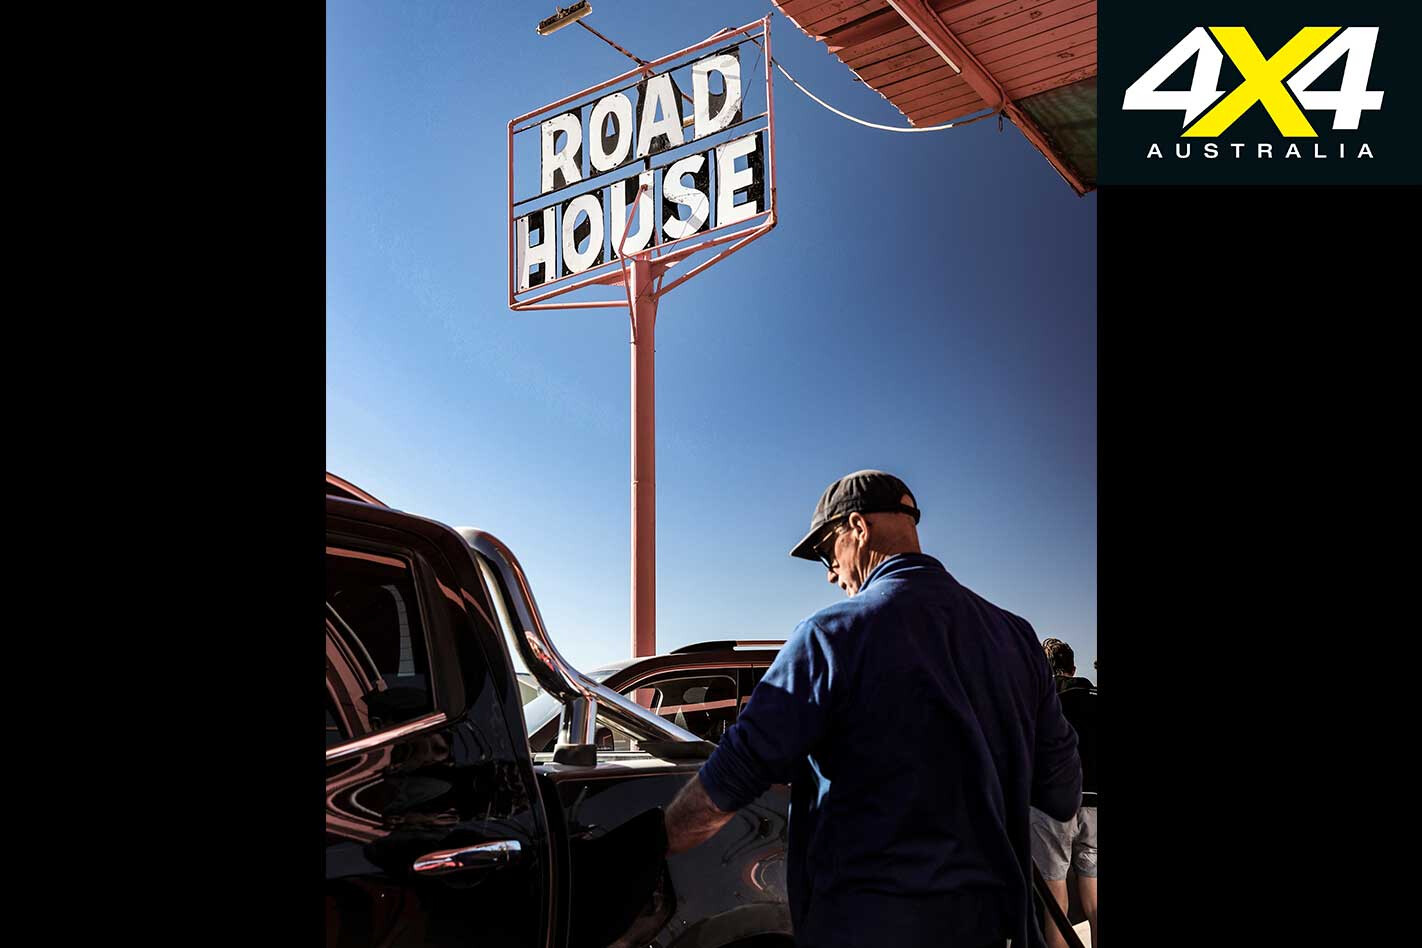
Then again, that’s the advantage of being out on your own. As the most populous place anywhere near the centre of the country, the Alice is a big deal.
After a refuel and refresh we’re heading north, briefly continuing the northerly Stuart run before joining the head of the Tanami Track, which, if you take it along its corrugated length, gets you to the bottom of the Kimberley. We’re not going nearly that far, limited to the first 150-odd kilometres, all of which is surfaced.
The occasional road train makes the slithering, lumpy blacktop appear narrower, forcing a Bridgestone into the dirt to save wing mirrors (and more). The relative steering accuracy and on-road nous of the X-Class is a plus. But it’s an easy drive, at least until we locate our turnoff towards Glen Helen, a public road that doesn’t encroach on Aboriginal land (you can also arrive farther south via the West MacDonnell Ranges; although, check with the Central Land Council as to whether you need a permit).
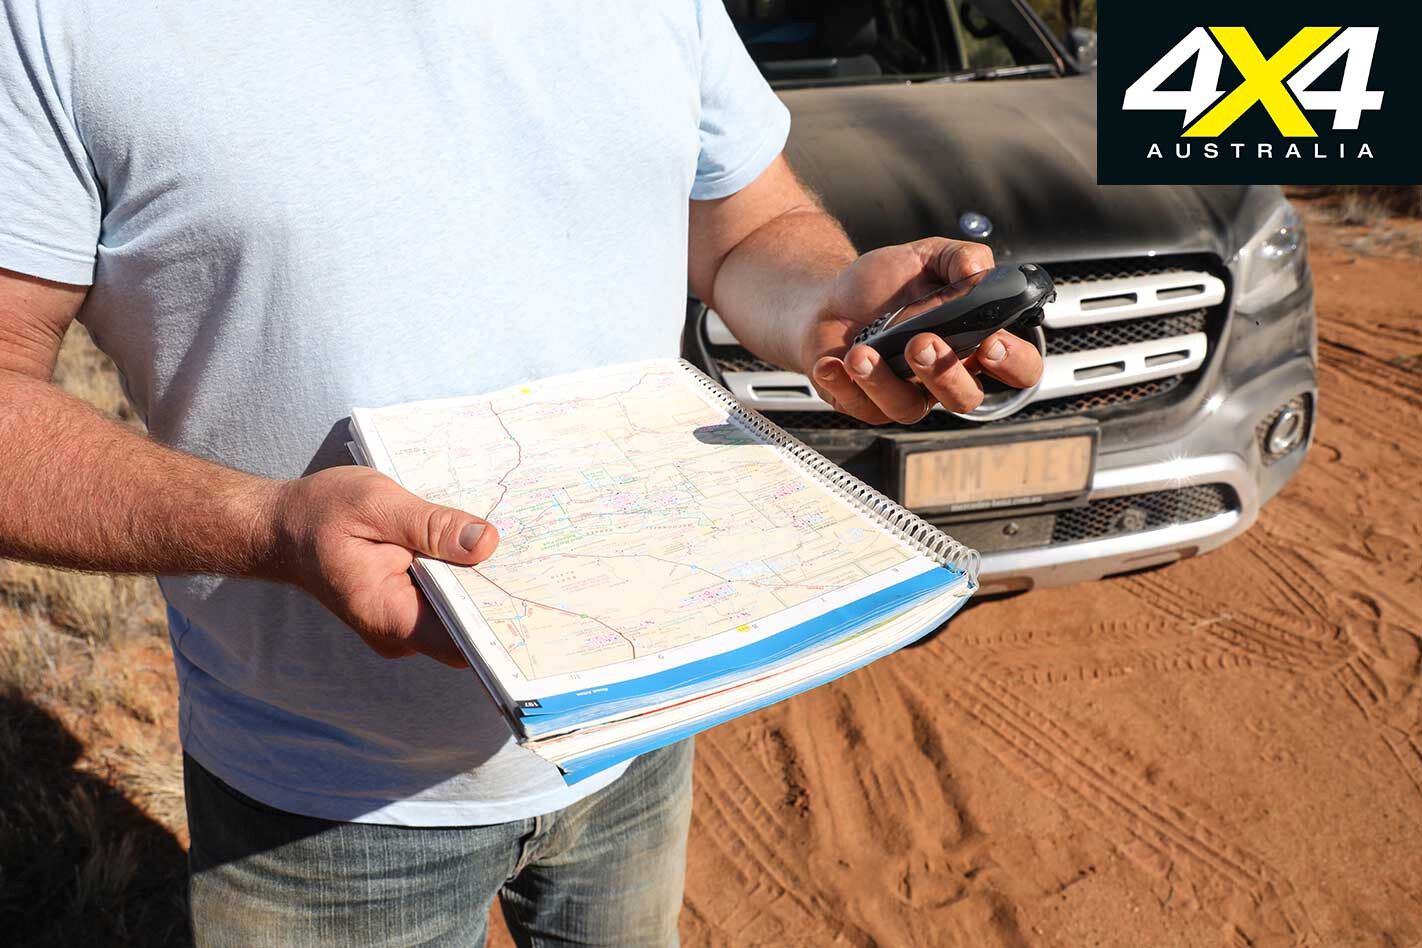
The transition to wide, red dirt surface doesn’t slow speeds much from the main road, our portable GPS reaffirming we’re heading in the right direction towards two of the centres. The ones we’re aiming at are the farthest point from the coastline and the gravity method, each of which is about 10km apart as the crow flies.
While we’re relying purely on GPS and paper maps, before we even left the sanctity of mobile range we spent many hours perusing Google Maps to get a feel for the type of terrain we were heading towards… and to get a better understanding of where we needed to go. None of which can prepare you for a decent puncture, like the one we copped on the relatively high-speed dirt.
It’s generally smooth and flat, but something long and sharp managed to pierce the 19-inch tyre, now beyond repair. Fortunately the full-size spare beneath the tray ensures no lost progress.
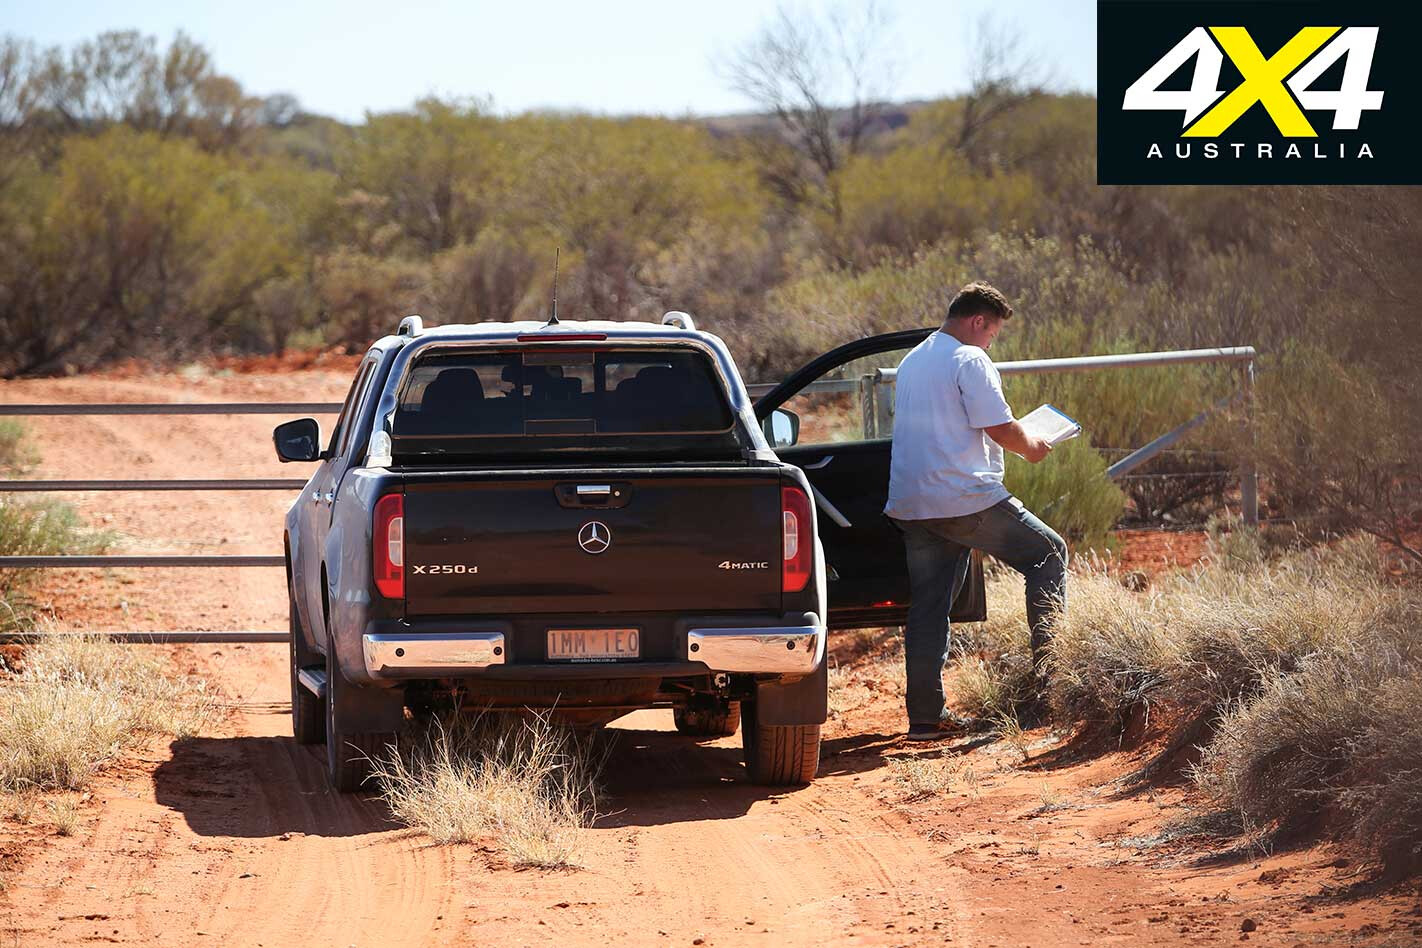
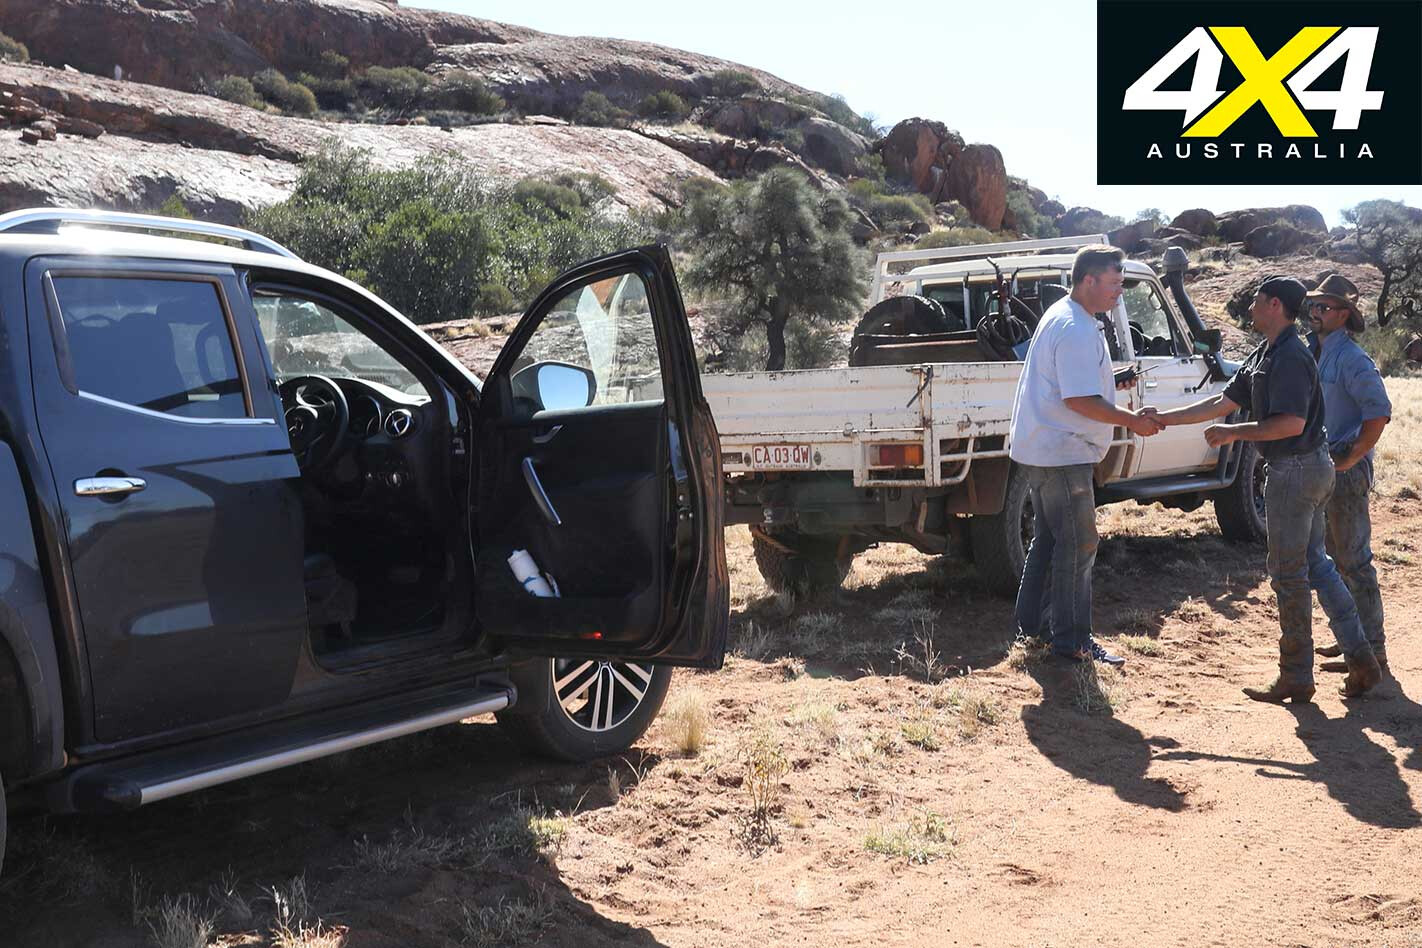
Both our first centres are on leasehold land, part of Derwent Station. If you’re any chance of making it to these centres you’ll need to touch base with them first to arrange access. It’s not guaranteed, especially when mustering is underway, but it at least tempers expectations before you start driving down dead-ends. Besides, it’s easy to take a wrong turn or get lured by the direction the GPS is pointing in – and you’ll do better with directions from the managers of the station.
Don’t expect a welcoming party when your GPS pings to alert you you’re on the spot, though. There’s no fanfare or markers, just the satisfaction you’ve reached two of the centres.
From there it’s backtracking through Alice Springs before heading south on the Stuart Highway in search of the median point. The journey from Alice is an easy 80km run; although, it’s the last couple of kilometres that prove a challenge.
Punching in the GPS coordinates all but confirms these locations were rounded to the nearest minute of latitude and longitude. After all, three of the five centre points don’t nominate seconds, only degrees and minutes. It’s either a massive coincidence or an indication of the accuracy of those earlier centre locations. We’re guessing the latter.
Assuming some rounding has occurred, the actual location could be approximately 700 metres in any direction from the one we’re chasing, which potentially makes the median point more achievable.
Our GPS is suggesting it’s about 2.7km off the main road, but with a locked station gate in front of us, we’re going no farther. Besides, best estimates put it somewhere on top of a hill, and satellite images aren’t giving much away in terms of access roads. So this is as close as we’re going.
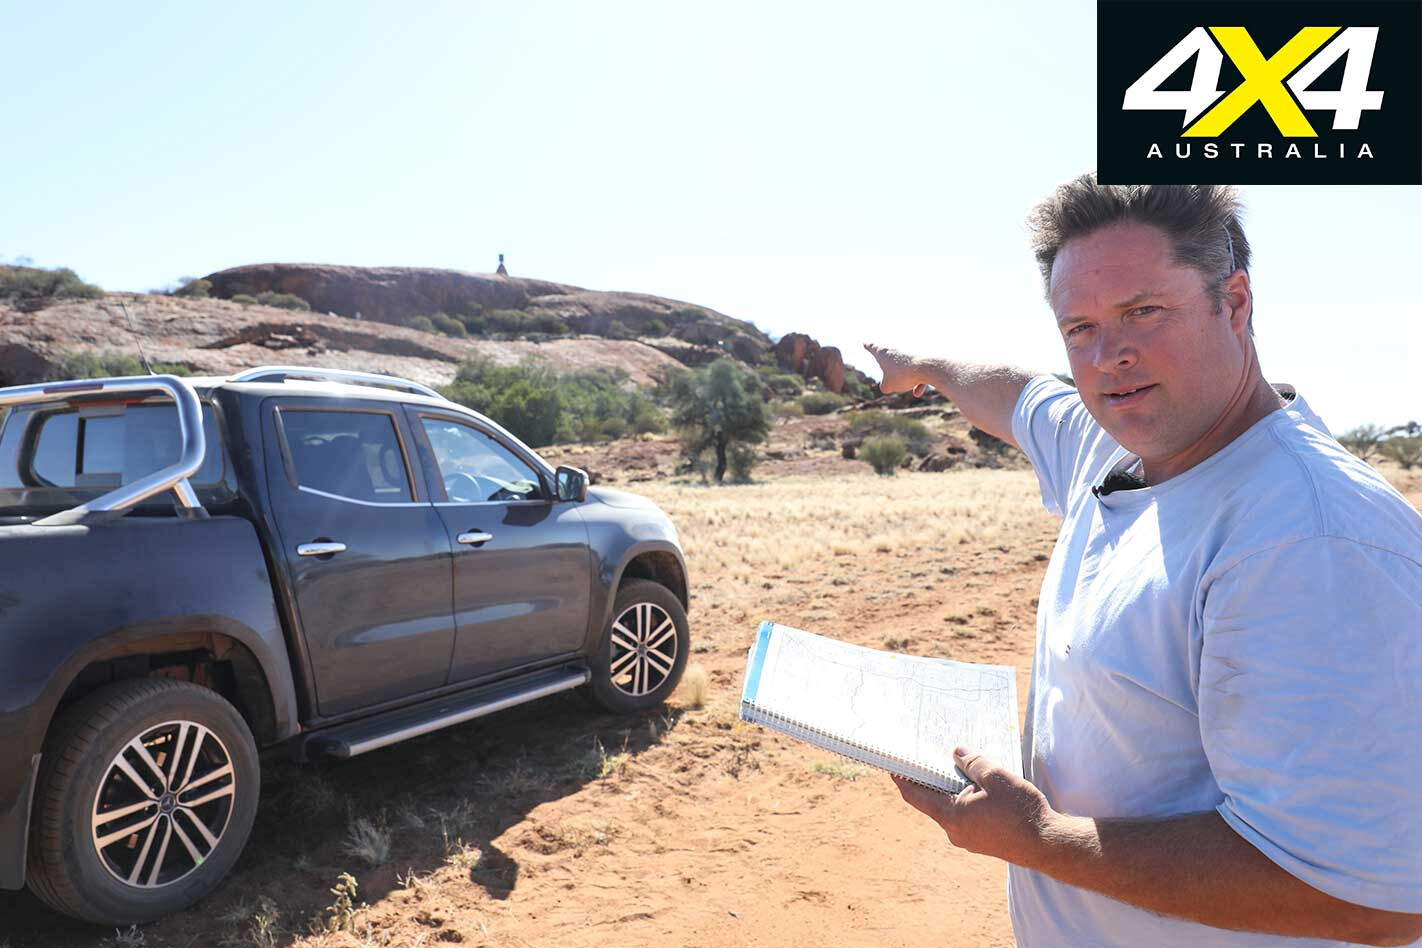
Back on the Stuart heading south and it’s another 230km towards the southernmost centre point, one determined in 1965 and enlisted for surveying duty from 1966. Homing in on the location it’s clear it’ll be somewhere close to the main road, pretty much at the entrance to Mt Cavenagh Station.
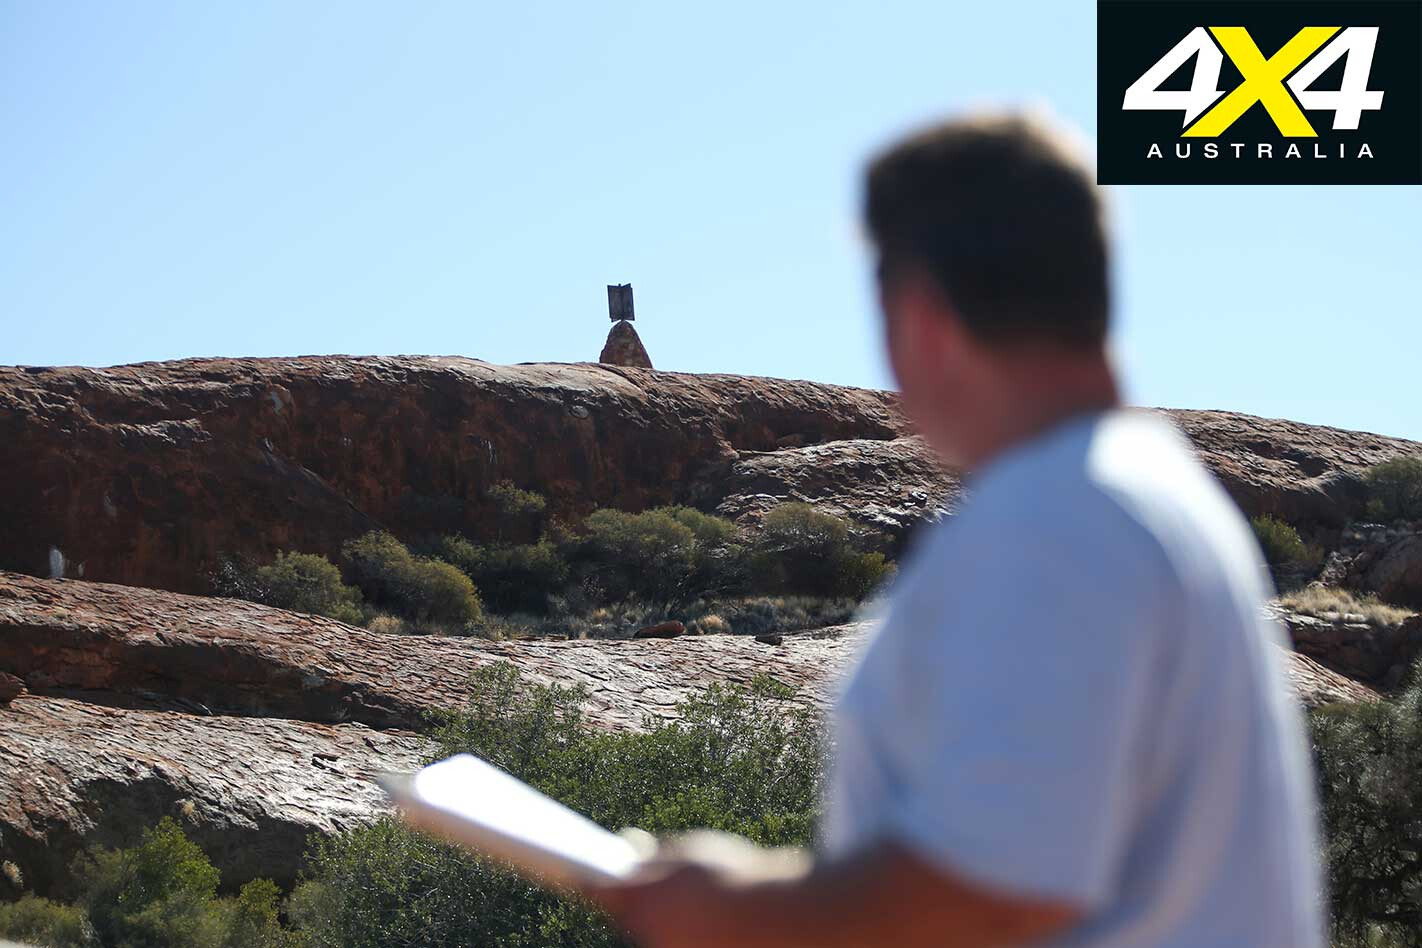
From those gates a keen eye will spot the cairn on top of a small hill, about one kilometre off the Stuart Highway. Bring your binoculars and you’ll get a better view.
However, we want to get closer, so we head towards the homestead not far along a dirt road, meeting some station hands along the way, more than eager to show off their piece of Aussie history. They’re just as interested in a ute sporting a Mercedes-Benz badge, less impressed to hear it’s got Nissan power.
Anyone visiting Mt Cavenagh should call the station ahead of time to ask for permission, and be prepared to fall just short. You’ll only be driving to the base of the hill, a rocky outcrop that no car will be climbing – not even a modified Wrangler. Keen hikers can make a path to the top, though.
For almost 20 years the small collection of rocks with a nondescript plaque attached was used to survey points all over the country. It’s a point of significance largely lost on many of the locals, some of which have no idea it is even there, let alone what it was originally used for.
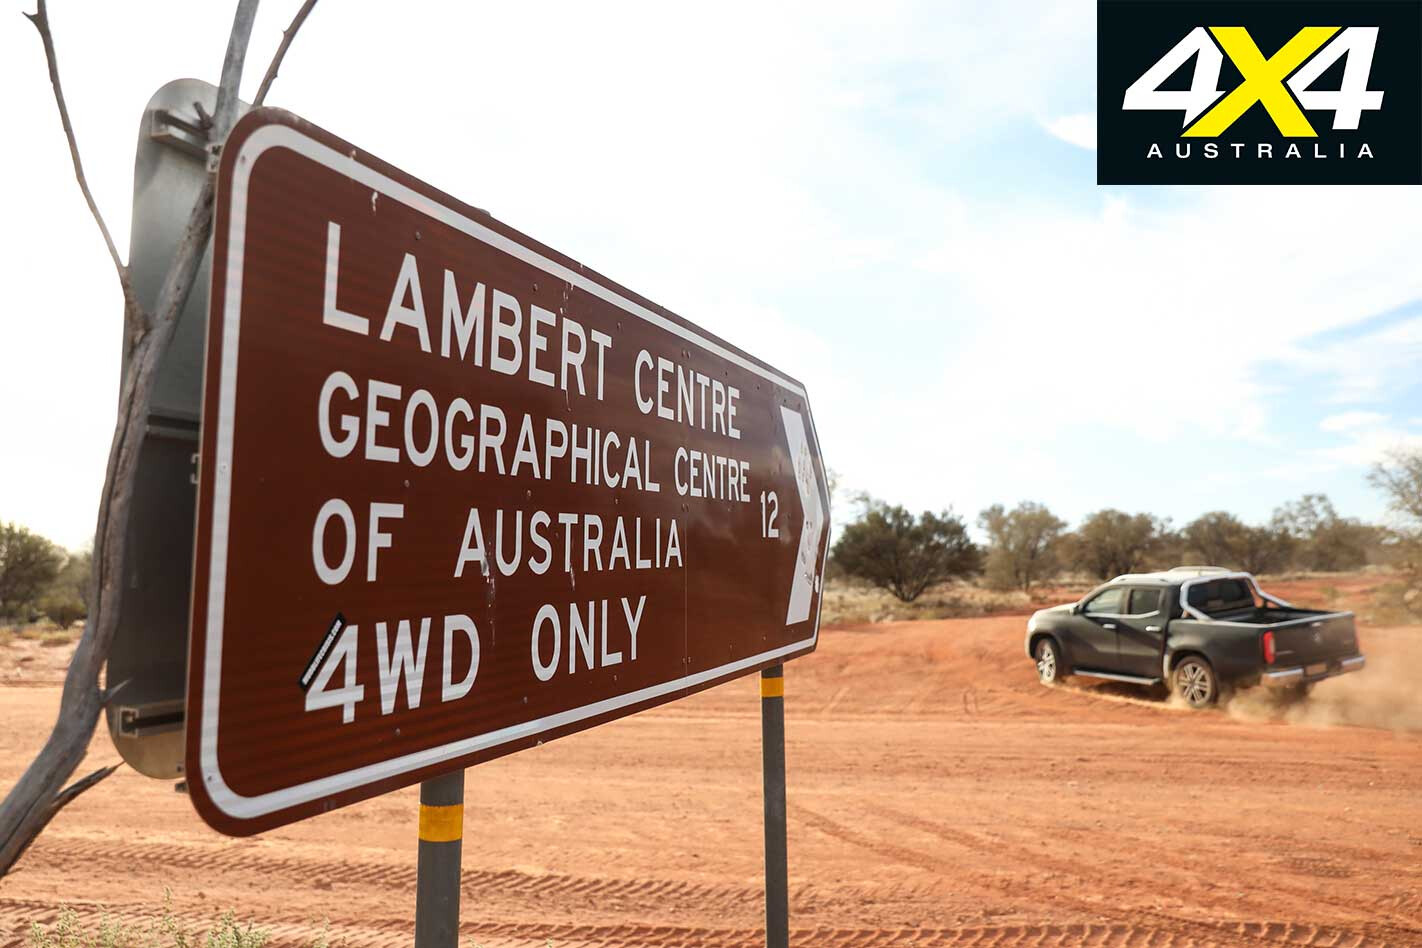
Of course, any journey to the centre of the country must incorporate the most famous of all, Lambert Centre, the last point on our centre-run. It’s a 20km drive north to Kulgera before heading east towards Finke.
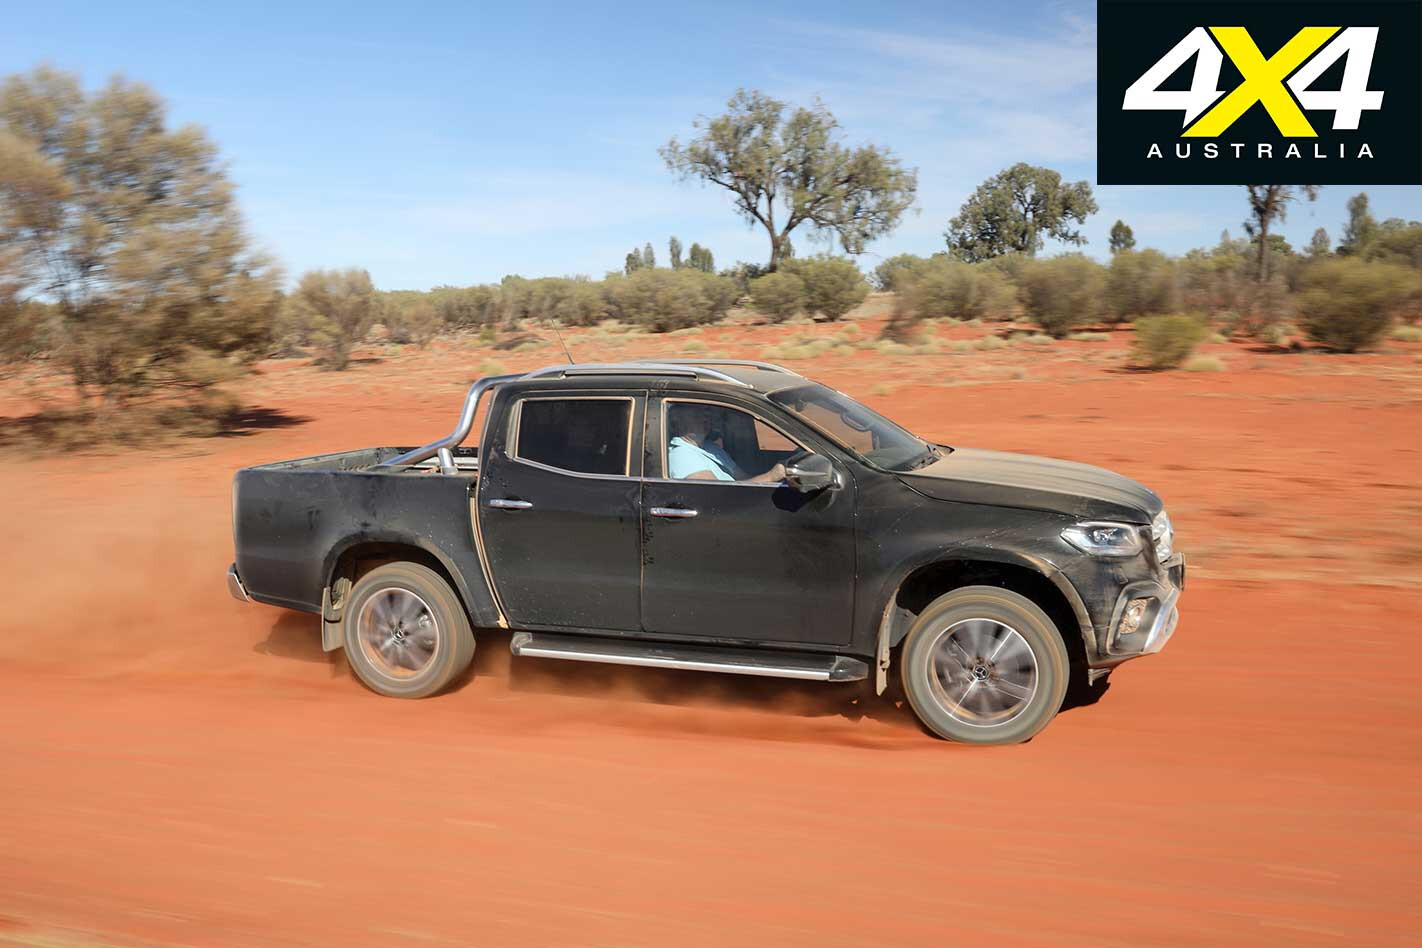
It’s an easy 130km cruise along occasionally choppy dirt to the well-marked turnoff, at which point things get more interesting. Some soft sand and dips on the various tracks that all charge north to the geographic centre of the country will occasionally keep you on your toes.
We engage the part-time four-wheel drive system of the X250d for added traction, its high range comfortably dealing with the easy conditions. Arriving to the clearing at the centre you at least know you’re there, with the miniature flagpole mimicking that on top of our Parliament House some 2100km to the south-east.
If you’re the only ones around, the sprawling campsite isn’t a bad place to set up a tent for the night, with some drop dunnies off to one side.
From there you can be guaranteed a decent drive home, safe in the knowledge you’ve at some point (hopefully) hit the centre of Australia. There’s one giant caveat, though: a final word left to Geoscience Australia, which has a particularly blunt way of deflating you after such a big, centre-punching adventure.
According to the government body’s website: “Officially, there is no centre of Australia.” The reasoning?
“This is because there are many complex but equally valid methods that can determine possible centres of a large, irregularly-shaped area – especially one that is curved by the earth’s surface.”
The curvature of the Earth is a curveball (sorry…) we hadn’t accounted for in our search-for-the-centre expedition. That and the fact that after some 5000km we’re officially no closer to discovering the true centre of Australia – if such a thing exists.
Over to you, 4×4 adventurers.
2018 MERCEDES-BENZ X250d POWER SPECS Price: $68,990 ($73,500 as tested) Engine: 2.3L 4-cylinder twin turbo-diesel Max power: 140kW at 3750rpm Max torque: 450Nm at 1500-2500rpm Gearbox: 7-speed auto 4×4 system: Part-time dual-range Kerb weight: 2161kg GVM: 3500kg Payload: 931kg GCM: 5900kg Fuel tank capacity: 80L Fuel consumption (claimed): 7.9L/100km
The Five Centre Points of Australia
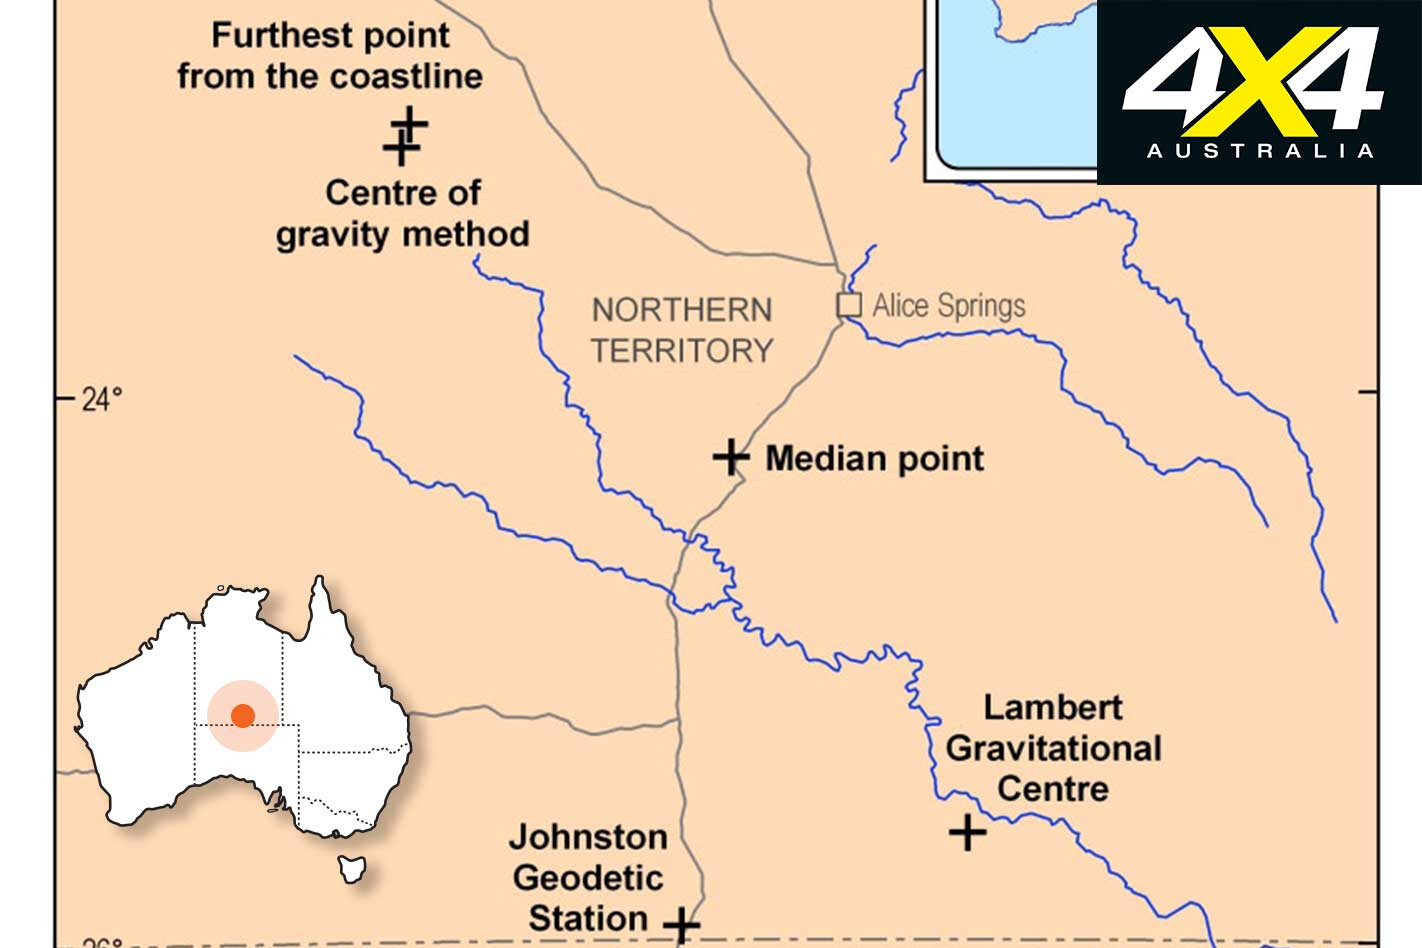
Centre of gravity method Determined using 50,000 equally-weighted points around the mainland Australian border, then calculating the point at which that hypothetical cutout would balance perfectly.
Lambert Centre Otherwise known as the gravitational centre of Australia. It uses similar methodology to the centre of gravity method, but based on the high-tide mark of 24,500 points around the mainland.
Farthest point from the coastline The centre of the largest circle that can be drawn in Australia.Median point The intersection of the mid-point of the longitude and latitude extremes of the country.Johnston Geodetic Station Defined in 1965 and set up in 1966, the trigonometric survey location was set up by the Division of National Mapping as the central reference point. Modern technology, including GPS mapping, has seen modern surveys shift to the more accurate Geocentric Datum of Australia, a moving target that accounts for small movements in tectonic plates.
Centre punch Five thousand kilometres gives you plenty of time to think, especially when every second headline has something to do with Donald Trump, global warming or rising sea levels – or a combination of the three. This got us thinking about the methods used to calculate the centre of the country.
Even a small rise in sea levels could have a large impact on what is considered the centre of Australia. Larger tides in the north, for example, combined with shallow tidal flats, like those seen at Broome, could easily change the defined point of where the coastline starts by many metres, in turn requiring a recalculation of exactly where the centre is. All of which is for another day.
Cody Crocker returned to the winners circle for Polaris at round 5 of the DEWALT SXS Australian Championship held at the Nowra Motoplex, south of Sydney on the weekend. A new addition to the championship in 2018, Nowra served up a high energy track peppered with big table top jumps and tight switchbacks.
Crocker quickly settled into the groove during the five heats, picking up two wins before finishing second in his semi-final. Crocker and Steven Henry went toe to toe in the grand final, with Henry greeting the chequered flag first with Crocker hot on his heels.
However Henry received a ten second penalty for jumping the start, handing the outright win and SXS Turbo Class victory to Cody Crocker in his #619 Polaris RZR Turbo.
Despite the penalty Henry remained on the podium to secure second outright in the #96 CanAm Maverick X3 ahead of Brett Comiskey who held off a hard charging Ewan McClue to round out the podium in third outright in his #51 CanAm.
During the heats #42 Mitch Keyte and #12 Andrew Robertson held the upper hand in the SXS Sport Class. However when the semi finals rolled around it was #17 Tim Liston who played his cards carefully, to land a place in the grand final where he finished 5th outright, rewarding him with the Class win.
Second in class was #42 Mitch Keyte who backed up his SXS Sport Class win in Queensland. While #12 Andrew Robertson rounded out the podium in third.
*Pictured: Tim Liston
#14 Tadamitsu Niihori, #360 Simon Evans, #60 Nathan Weissel and #668 Ivan Skutz all put on spectacular aerial displays, jumping from ramp to ramp on the huge tabletops down the back straight. Picking up three heat wins apiece, Niihori and Evans were both in the hunt for the outright win heading into the final, however their charges were both cut short. Crocker landed on the rear of Niihori damaging his rear suspension, while Evans was forced to retire with a broken ball joint.
The spectacular DEWALT SXS Australian Championship is contested between side-by-side UTVs from brands such as Polaris, Yamaha and Can-Am and provides a great way to get in to an exciting for of motorsport on a budget. The series now heads to Broadford Victoria for the sixth and final round on October 20th!
With a different driver standing on top of the podium at each of the first five rounds, the grand final is set to go right down to the wire. For more information visit sxs-racing.com
It isn’t every day that your colleagues gift you a car as part of your performance review, but for one particular ICON 4×4 customer, he got a special custom-built FJ40 from his business partner.
In a video made to detail this particular FJ40 Baja Edition, Jonathan Ward, founder of ICON 4×4, said it was commissioned for one of ICON’s first clients – named Jimmy – who ordered an FJ45 ute a decade ago.
The person who commissioned this FJ40, however, was Jimmy’s business partner who saw one of ICON’s original custom Baja FJs and made a passing remark that should their business reach “a particular financial threshold”, he will get him one of the Californian-based company’s Baja-inspired creations.
Though Ward says it is likely that Jimmy might have forgotten that remark, his business partner didn’t. Even though ICON no longer builds the Baja Edition 4x4s – as it was a limited edition run produced in conjunction with Score Racing to commemorate an anniversary of the Baja 1000 – Ward made an exception for Jimmy. There are also several key differences to make it more suitable for the road.
While ICON’s original FJ Baja Edition creations were focused for off-road racing and came fitted with racing-spec bucket seats with five-point harnesses, no air-conditioning, and full racecar spec centre console, this FJ40 Baja Edition was built with an eye on everyday usability.
As such, the air-conditioning is retained on the FJ40 Baja, as is the standard centre console and standard front seats with folding rear bench seats. Instead of the bare brushed aluminium bodies on ICON’s original FJ Baja models, the FJ40 Baja is finished in Summit Grey for easier maintenance.
To complement its purposeful appearance, the custom FJ40 is fitted with a Warn Winch, ICON front bumper, and a custom Baja-style cage with the rear bumper deleted to fit the spare wheel carrier that is integrated into the cage.
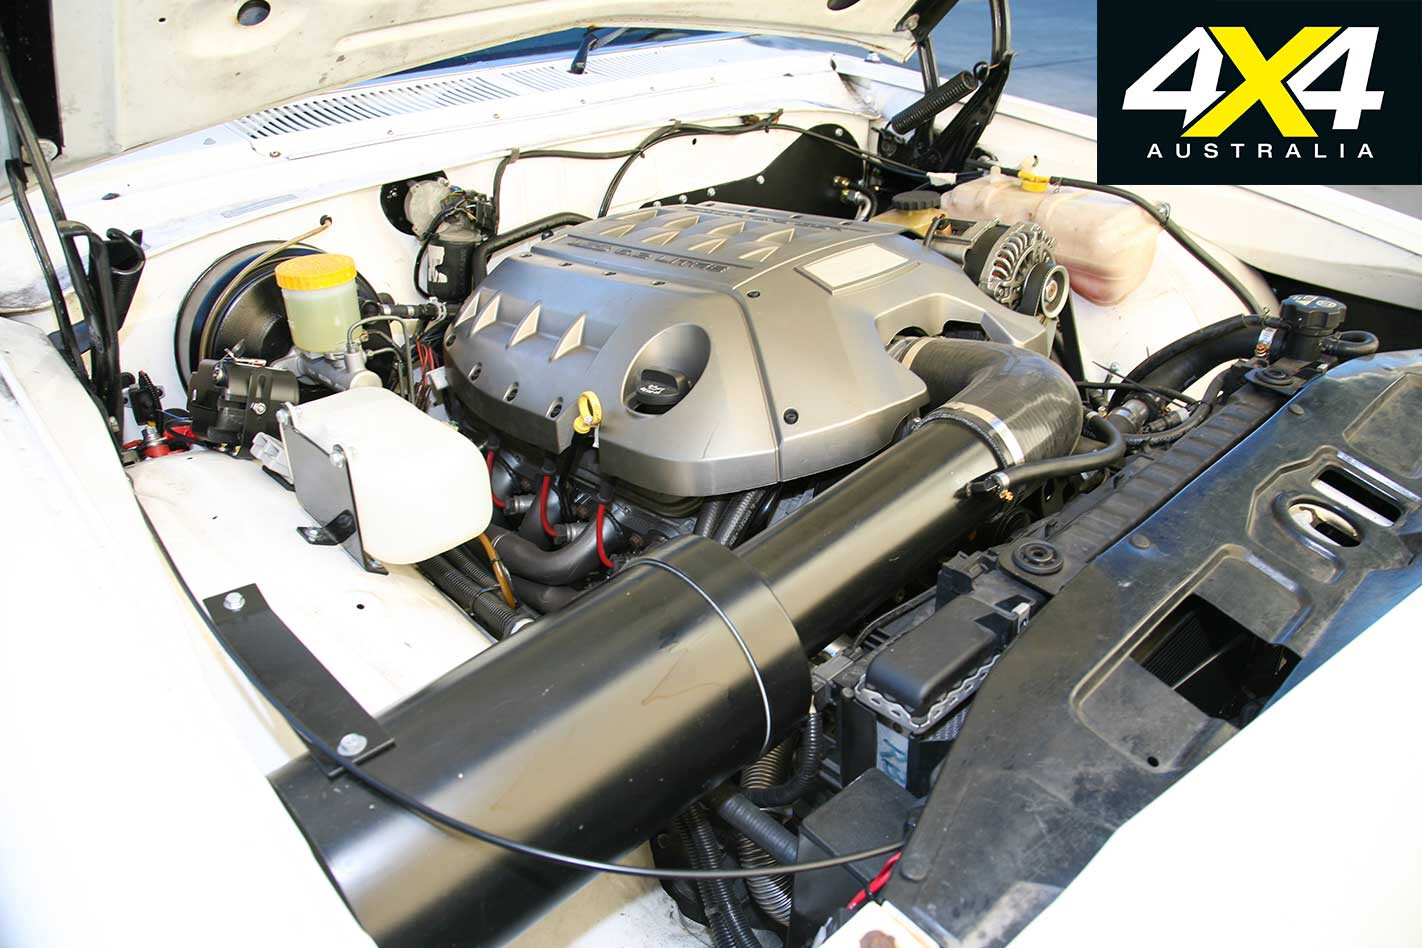
Underneath, the FJ40 Baja Edition mechanicals are brought up to date with all the usual ICON fitments for their custom FJ creations. This includes the 6.2-litre LS3 V8 paired to a 4L65 Hydra-Matic automatic transmission, Advance Adapters Atlas II transfer case for part-time 4WD, coil suspension, Dynatrac axles, ARB locking diff front and rear, and ICON sports brakes by Brembo.
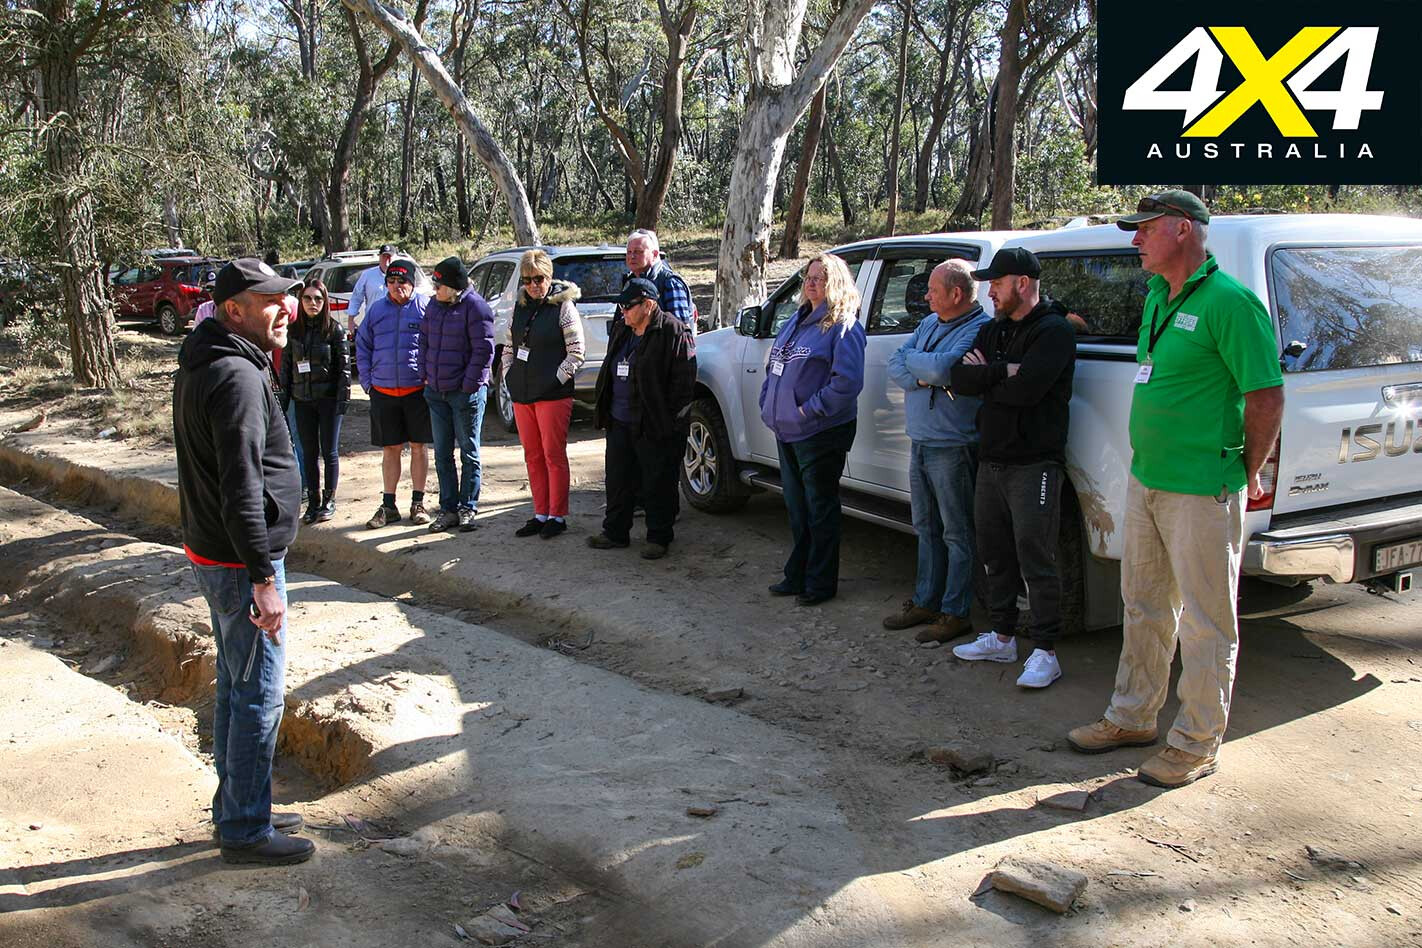
THERE’S no clandestine handshake between members of Isuzu’s I-Venture Club. Neither is there a covert wink, tickle or hug to become an I-Venture Club member.
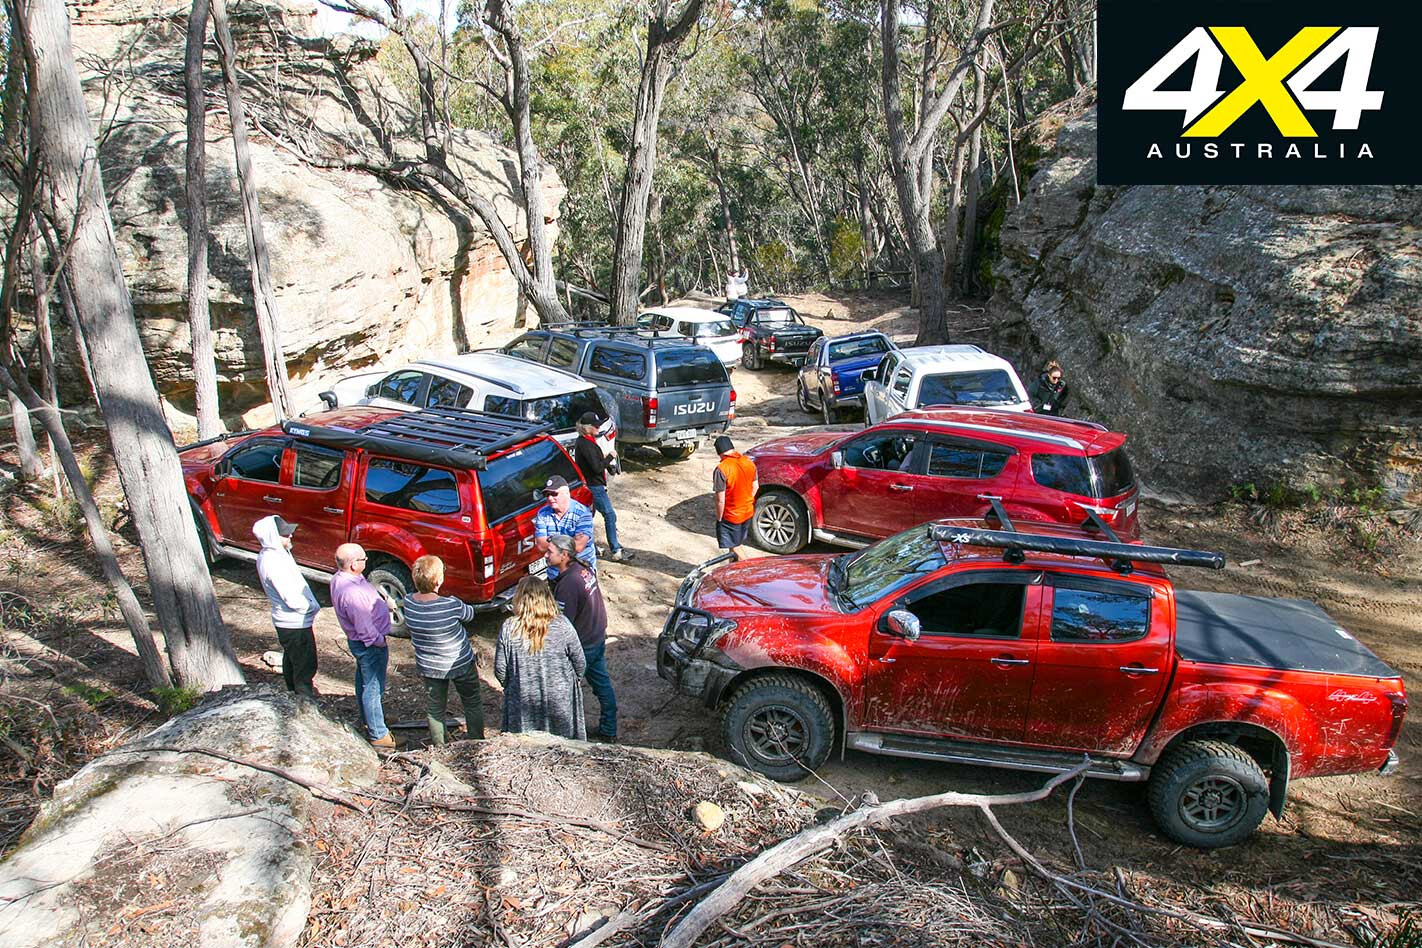
Rather, membership of the increasingly popular Isuzu-backed club is simply by owning one of its 4x4s. After that, invitations are open to beginners and well-travelled drivers to attend one or all of the training and adventure tours, which vary from simple day trips to multi-day affairs.
Regardless of your experience, owners are bound to learn more about their vehicles given the trainers on-hand offer vehicle-specific tips and techniques to help you get the most from your purchase. The professionals offer step-by-step instructions as to what lights you can expect to see on your dash when certain features have been chosen, the exact gear that is best to tackle each obstacle, and the best way to attack those obstacles and remain unscathed.
This Isuzu I-Venture trip kicked off at the Hydro Majestic Hotel in Medlow Bath and headed deep into the Blue Mountains to Gardens of Stone National Park, to view the Lost City and Blackfellows Hand Cave.
We then went on to the historic Newnes Hotel and explored the historic shale works of the region. The majority of this first day was spent instilling confidence in the vehicles of new and inexperienced members. It also offered seasoned drivers a chance to brush up on the more technical details of their vehicles, as well as take in the breathtaking scenery.
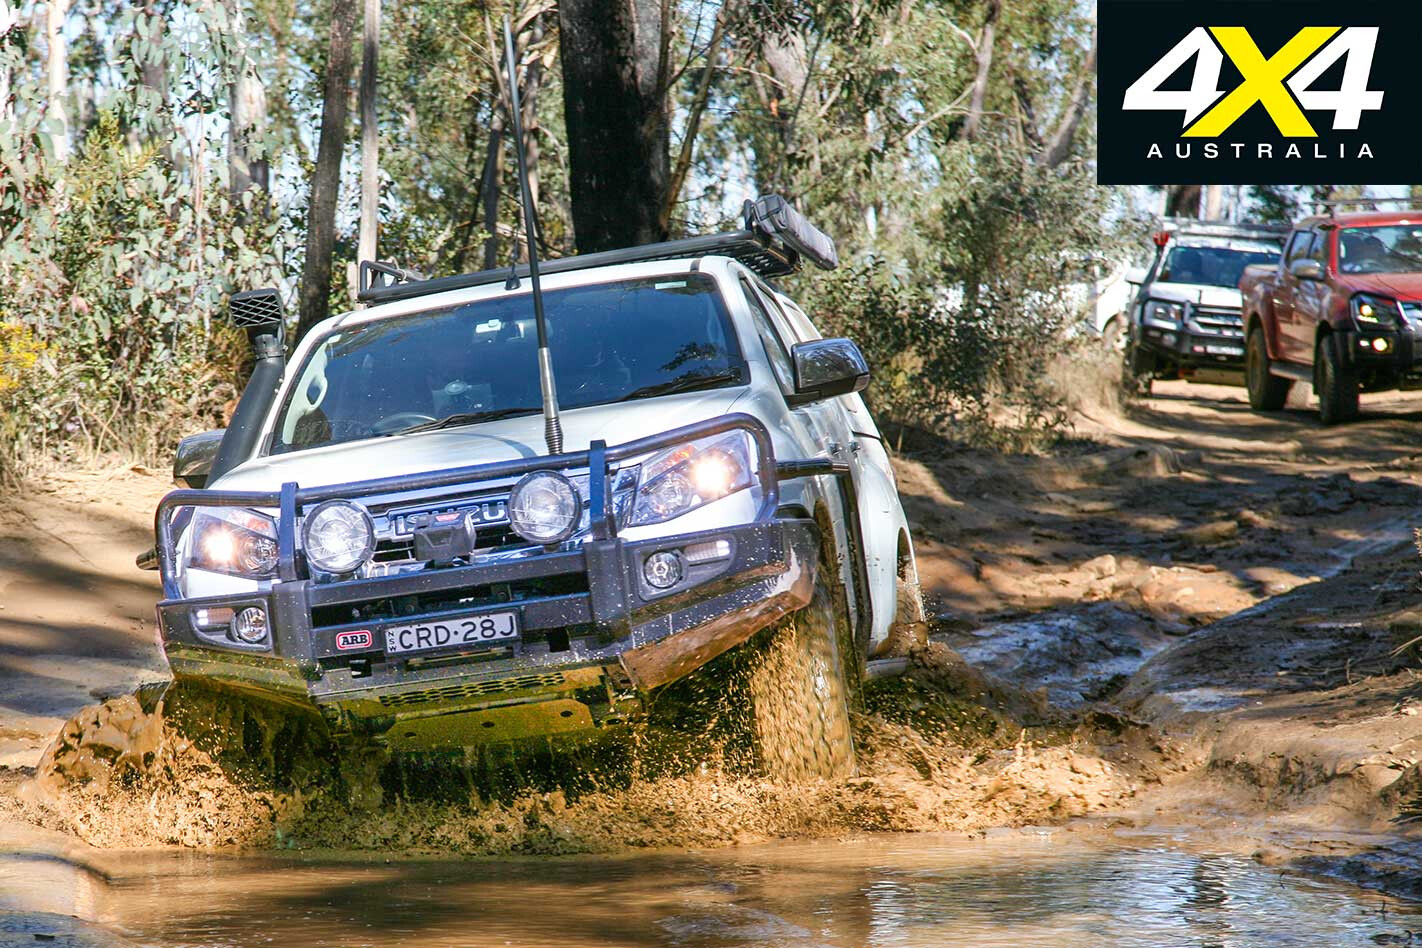
The following day, the 15-vehicle convoy headed to Turon National Park via Sofala and the Turon Trail, with a few lessons on gold panning and detecting provided along the way. Given one member struck gold within a short time, I’ll be heading back to have a crack at finding more.
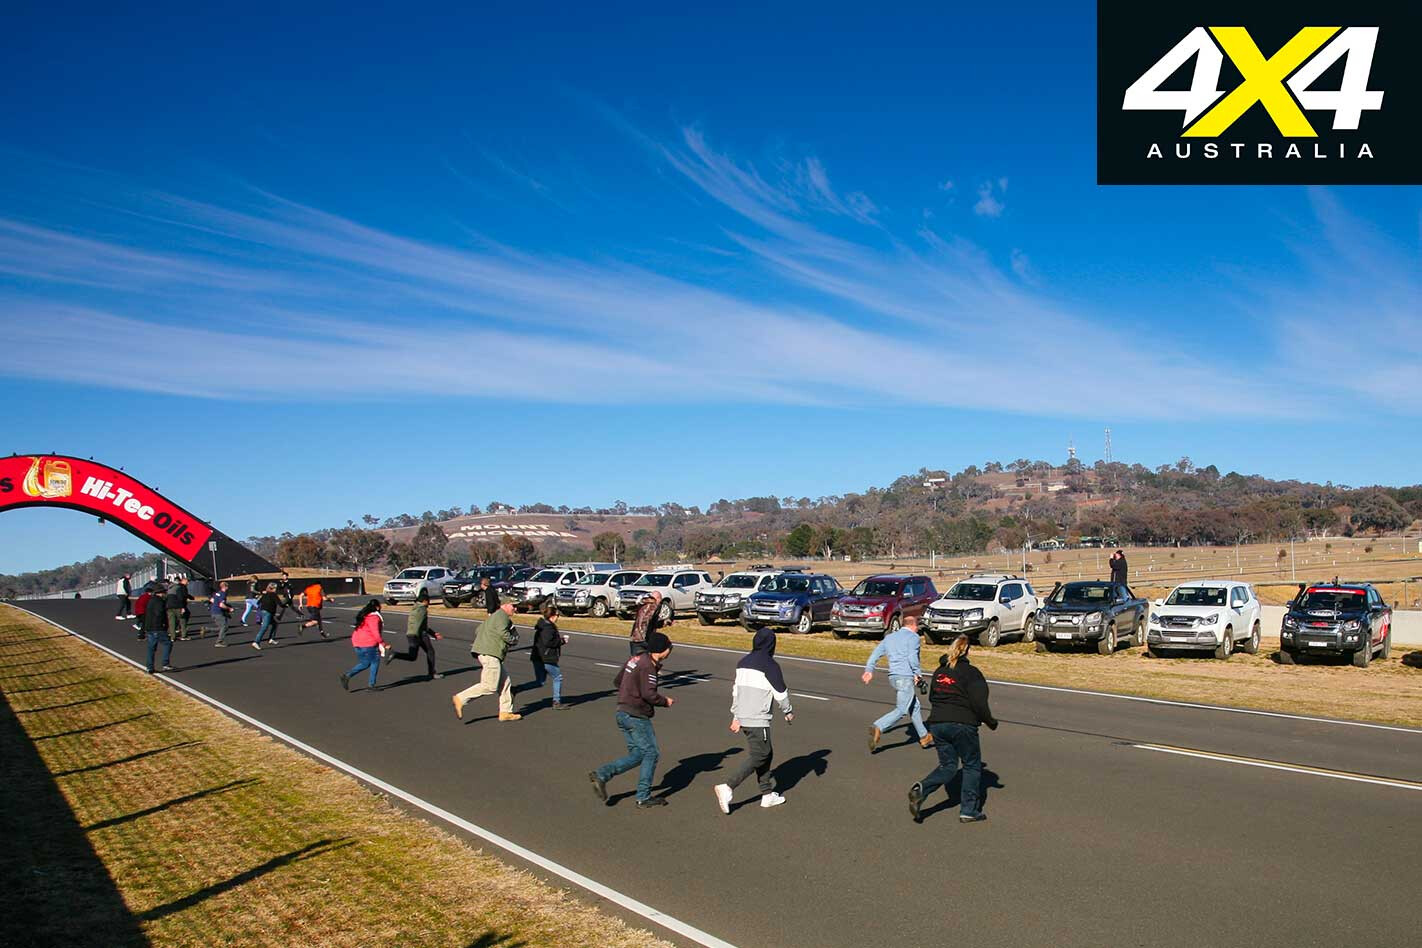
This second day saw our happy crew lob into Bathurst for a few hot laps of Mount Panorama. As the circuit is a public road and has strict 60km/h speed limits, we sadly had to abide by all road rules; but the leisurely lapping still returned plenty of giggles and a tonne of happy snaps.
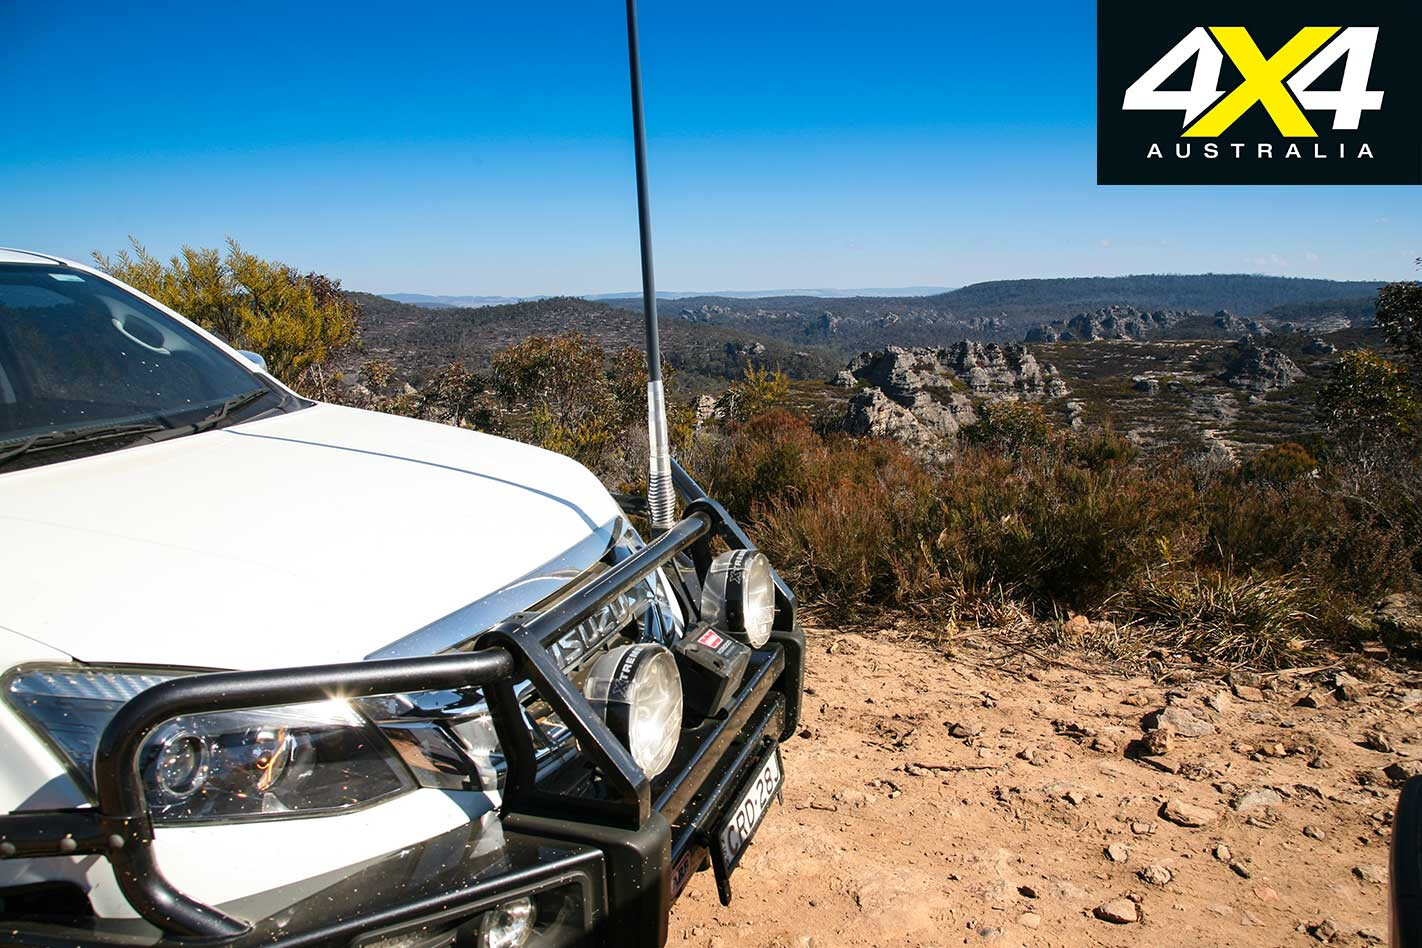
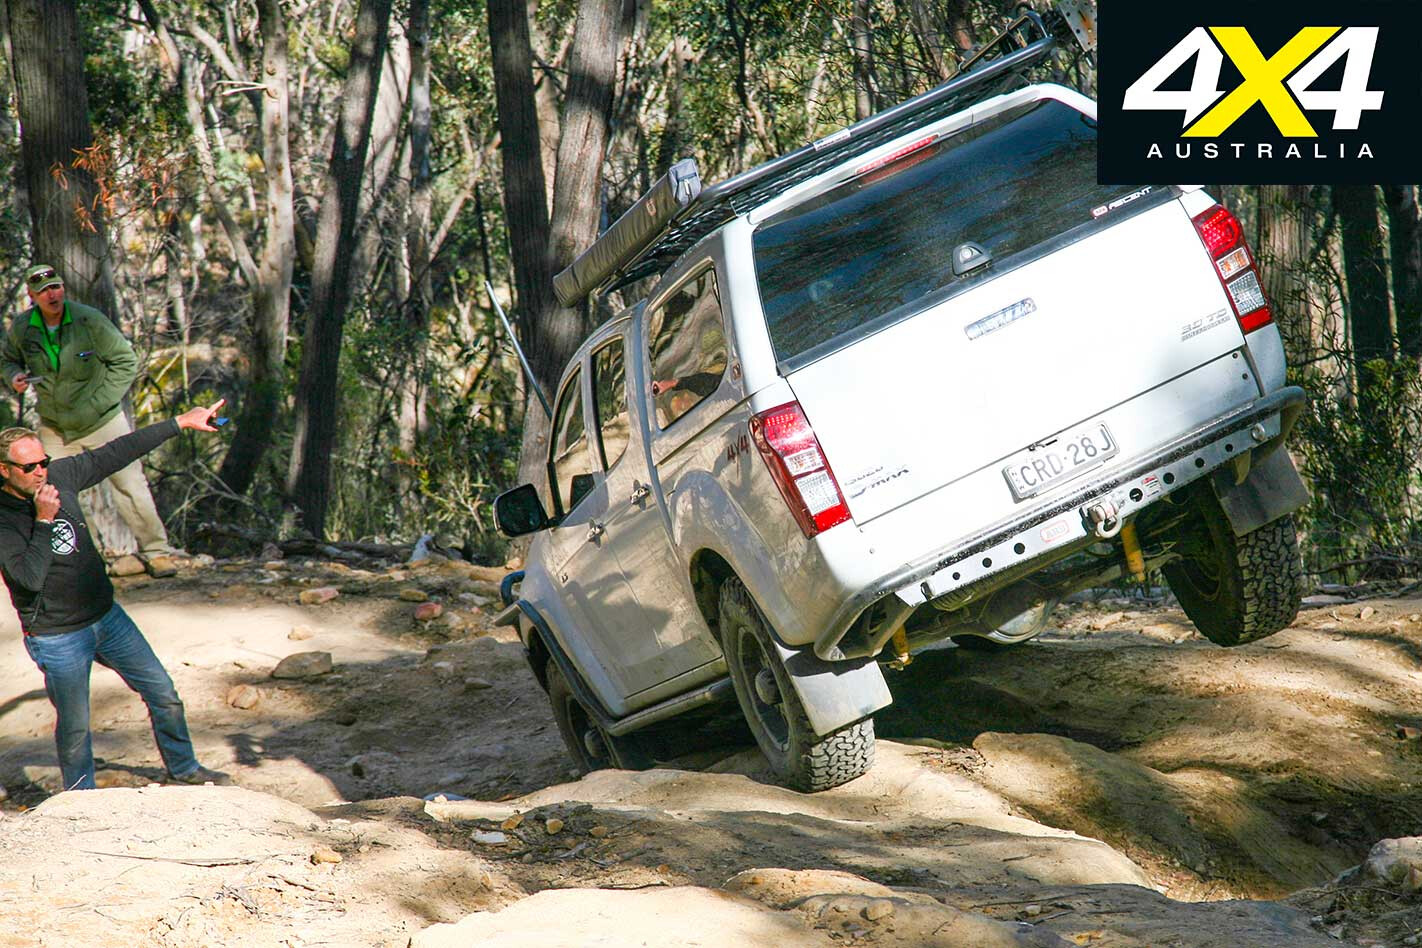
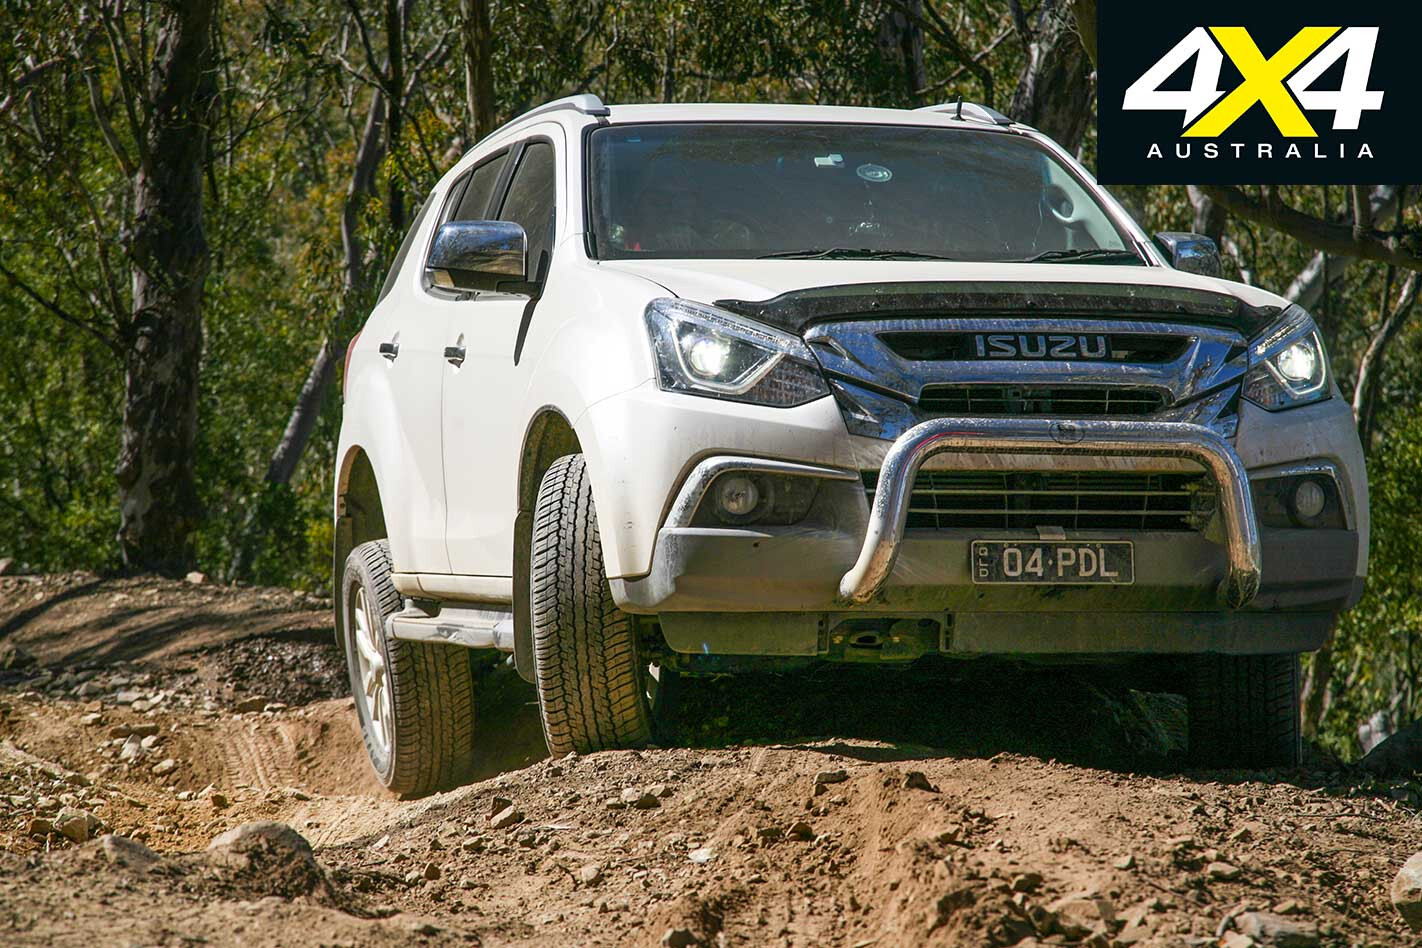
The final day saw our tribe tackling river crossings, steep descents and ascents, and plenty of rock-hopping, rut-straddling and mud-driving; while a few impromptu trackside lessons by our instructor took place while exploring Marrangaroo National Park. We pulled up stumps for the day at the Hampton Hotel.
Given many participants were new to the 4×4 world, there were plenty of white-knuckle moments while tackling the larger rocky ledges. By trip’s end, while no-one was classing themselves as experts, all drivers were feeling more relaxed in the knowledge they could traverse any obstacle they may encounter during their travels.
Drivers of all experience levels will learn something and have a ball on the Isuzu I-Venture trips. So if you’re hankering for some fun and keen to learn more about your Isuzu, you should check out the I-Venture Club website. There are trips in most states of Australia.
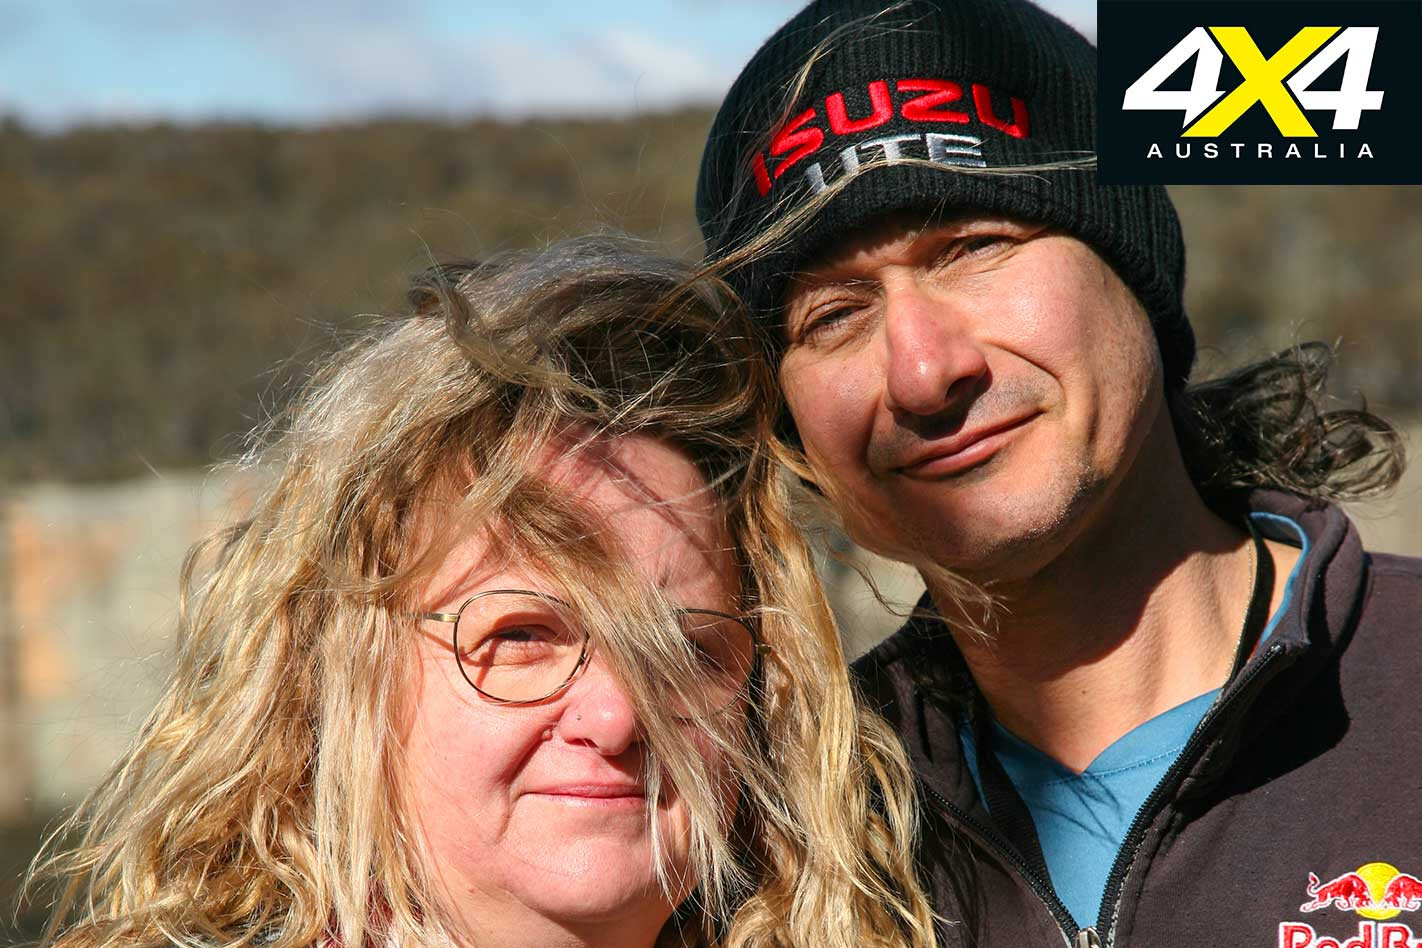
OWNER SPOTLIGHT: PETER AND DEBBIE LYONS – MU-X

PETER and Debbie had zero off-road experience prior to purchasing their MU-X, and they specifically chose this course for the vehicle-specific instructions.
While they wanted a relatively capable off-road vehicle, the reliability and high reputation of the whole vehicle, together with the frugal engine, put the Isuzu above others they considered. Given they have returned 7.0L/100km, they’re extremely happy with their choice of escape machine.
Price point, driving comfort and towing ability were also high priorities given they own an off-road pop-top caravan and are hoping to tackle the big lap after tucking away a few shorter trips.
The fact they could both learn 4WD tips and tricks encouraged them to secure a spot in this Blue Mountains tour, and they were full of compliments at trip’s end.
OWNER SPOTLIGHT: MICHELLE AND DENNIS ZARONIAS – D-MAX
NEITHER Michelle nor Dennis had any off-road driving experience prior to purchasing their D-Max. Their purchase was driven by the reliability and good reputation of the Isuzu brand, along with the sound product knowledge of the sales people.
Both Michelle and Dennis were keen to get behind the wheel so both could learn the fine art of four-wheel driving and figured the I-Venture Club trip would be perfect for them. They currently own a camper-trailer but are considering trading to a caravan for a lap of Australia with their child, so towing ability was also high on their agenda.
To date, they are extremely happy with fuel consumption, and they learned many skills on this trip.
BEHIND THE SCENES
ALL GREAT trips incorporate behind-the-scenes people that ensure the experience runs like clockwork. Emma, Megan and Mark were our Isuzu Ute Australia hosts; David Wilson is a long-term I-Venture Club trainer who has a special knack of passing on his off-road knowledge, both theoretically and practically; and Greg Simpson was our local guide who knows where more gold is in ‘them thar hills!’
TWO CENTS’ WORTH
Isuzu Ute Australia allowed us to drive the MU-X and the D-Max (both the older five-leaf and the updated three-leaf rear-spring version). While the MU-X was great to drive on- and off-road and offered superior rear suspension flex compared to the ute, I enjoyed the D-Max drive and could feel the comfort improvement of the newer three-leaf rear-end.
A slide under both utes saw the five-leaf pack (compared to the three-leaf) incorporating longer main and helper leaves, reputed to utilise stronger and lighter materials. Running empty, the three-leaf is more comfortable and flexes slightly better off-road. How it handles a load or towing would be interesting; hopefully it’s able to handle max weights.
Mark Dutton, an ARB Canberra rep, had an ARB upgraded D-Max which was perfect to see how much extra flex his ute had compared to a stocker. ARB offers three rear-leaf spring packs starting at medium load, then 300 and 600kg constant loads, incorporating five, six and seven leaves respectively, and are more suited to weight carrying.
Another comparison was the rear ARB AirLocker on steep, rocky and rutted tracks, proving how much easier and safer the drive can be compared to the limited off-road workings of the OE traction-control system.
GRANTED, the Tonner has been given the final tick from the engineer – a massive achievement in itself – I expected it to be registered and a few thousand kays down by now. Sadly, that is not the case.
Nothing major has gone wrong; just a long list of minor mechanical parts I want sorted. Plus, we are waiting on that all-important engineer’s report which has to accompany the Tonner when getting the NSW Blue Slip check.
The Tonner starts and drives, but only the engineer has tested it on the road (with trade plates attached). I’ve only driven it around the carpark, and it’s frustrating not being able to ring that LS3 out just a little.
While the Tough Dog foam cell shocks are waiting to be bolted into place, we’ve been working on the coil spring rates and the weight of each four corners of the Tonner. They have a heap of different rates on offer and, while we know the correct set to slot in, I want to reserve judgement until after a few road tests; and that involves getting the vehicle registered first and driving it with both near-empty and full (195L) fuel tanks.
The engineer vetoed my want for dual snorkels, so that left me with the predicament of what type of air-induction system to utilise. I’d originally wanted dual flat-panel filters behind each headlight, but I’ve slimmed back to a single custom-made barrel behind the driver’s side headlight.
That leaves a vacant spot behind the passenger’s side headlight, given I’d relocated the batteries to behind the cabin. Perhaps I can fit an onboard air compressor, a huge train horn or a chicken roaster?
In an attempt to minimise future problems – just in case I have a flat starter battery (mounted behind the cabin) – we’ve put a heavy-duty Anderson plug beneath the bonnet that can be hooked into for a jumpstart if needed. To help access the deep-cycle batteries we’ve allocated power posts in the cabin and near the front of the tray, ready to run leads to my fridge and other 12-volt accessories.

I purchased a set of Superior Engineering Superflex sway bars; we’d installed the rear ages ago and left the front until recently, only to find it didn’t fit directly to the GQ front radius arms. Rather than swap sway bars, we ditched the GQ units for a set of GU radius arms – problem solved and a note to self: never leave fitting custom parts until the last minute.
More for aesthetics than any practical reason, we ditched the dodgy aftermarket engine cover that came with my Maloo R8 in favour of a stock unit; although, we had to do a little chopping to allow for the high-mount alternator conversion to clear it.
We’ve cleverly slotted a Runva 11,000lb winch behind the Holden grille and into a custom-made cradle, but accessing the clutch lever proved a little hard given the winch body doesn’t sit within the main bullbar cross-member like most fitments. Instead, it’s mounted rearwards of that cross-member, effectively directly under part of what was once the radiator-shroud support panel.
By fluke design, cutting a simple hole just large enough to fit my hand through allowed easy access to the clutch lever. The only disadvantage is that you have to pop the bonnet to access it.
I hate seeing winch ropes and hooks dangling or attached to front recovery points while not being used, as it leaves them in a beaut spot to be damaged, especially synthetic rope like I’m using. So, while making a steering protection plate, we’ll incorporate a hidden hook underneath to hold the winch rope while not in use. The worst I’ll have to do is thread it through the fairlead prior to using the winch.
I still have no idea what I’ll eventually do in the tray. Short term: a couple of large toolboxes to offer a little security. Long term: either an alloy canopy or even a slide-on camper unit. There are a couple of black paint patches from previous repairs (driver’s door and plenum panel) so I’ll look into colour-matching a couple of spray cans to clean them up, or maybe I’ll vinyl wrap the whole shebang in bright orange.
Drop back next month for what will (hopefully) be the final huge custom shoot that shows off how damn capable my One Tonner has become.
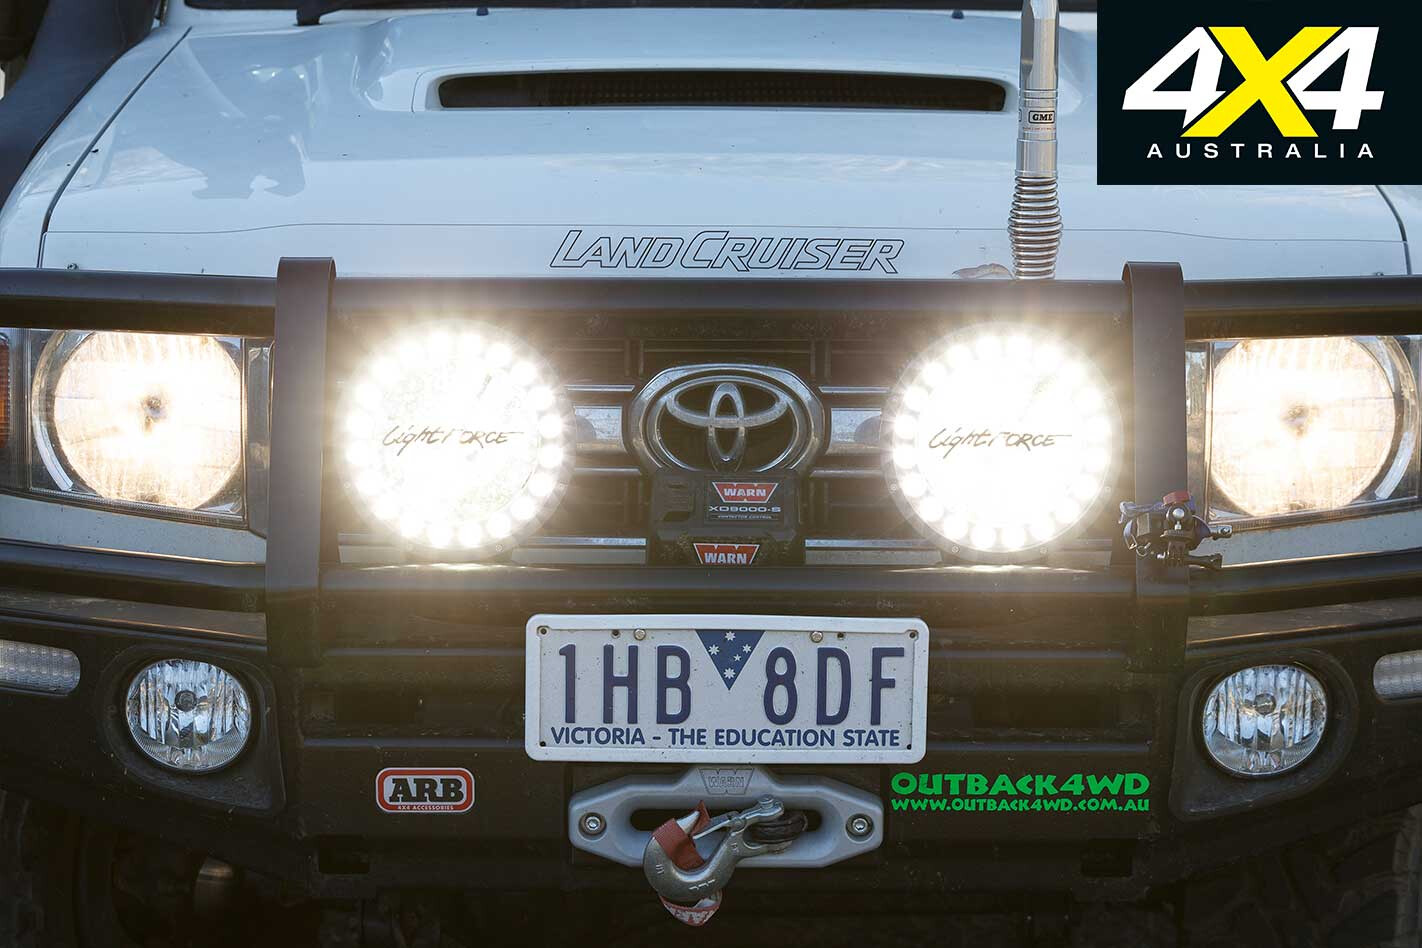
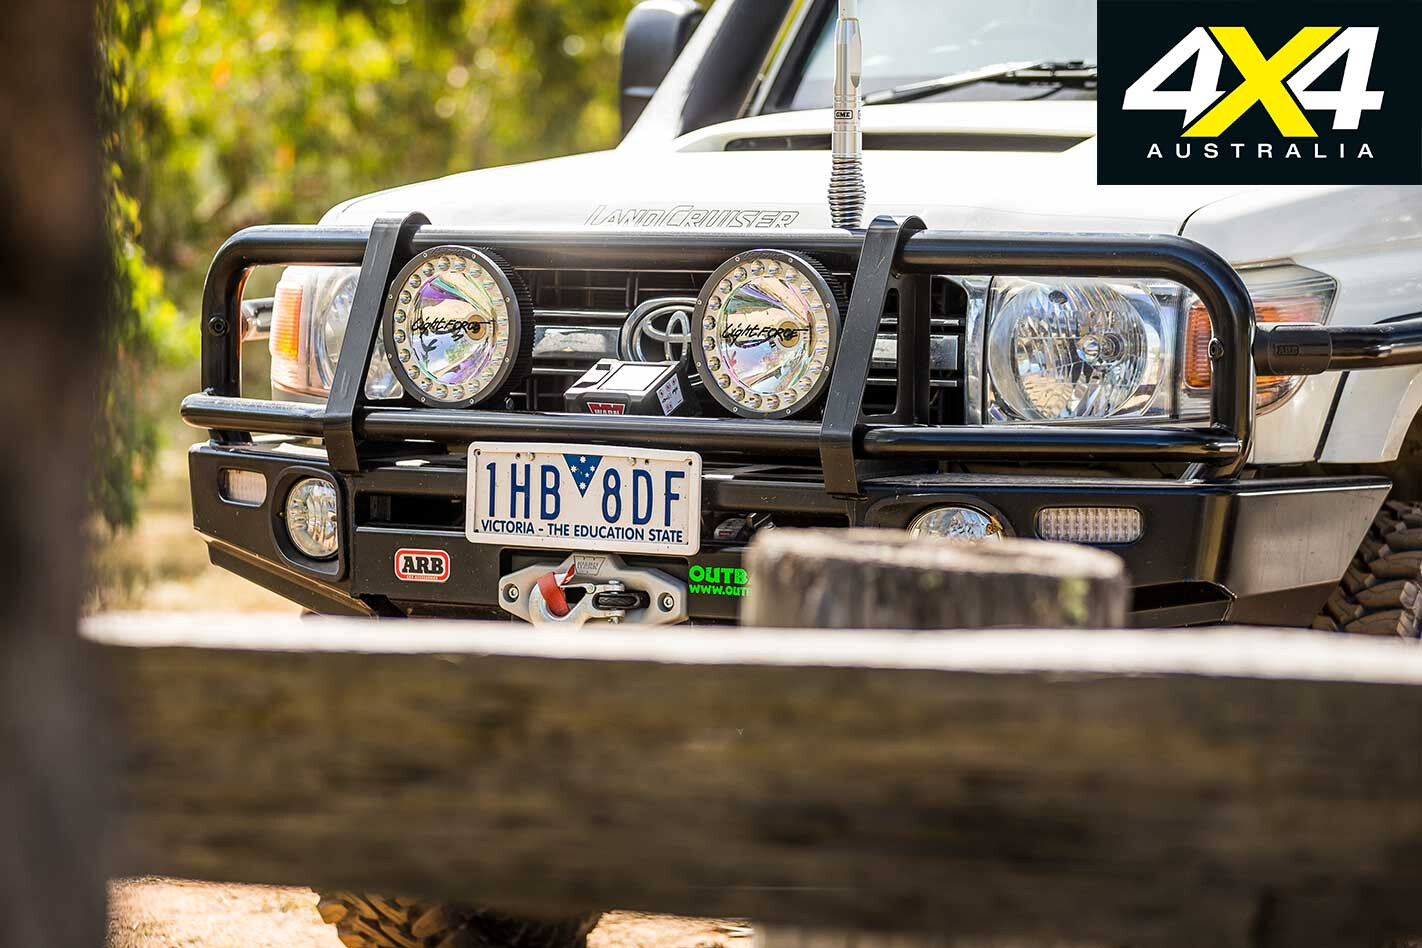
Anyone who owns a Land Rover Defender, Jeep Wrangler, Toyota 60 or 75 Series, or any Patrol up to GQ would agree their standard OEM halogen headlights leave a lot to be desired.
Even on high beam the yellow candles in my Jeep had me leaning out the driver’s window with an LED handheld torch. But replacing the globes with better quality units (or using HID inserts) simply puts superior globe technology into a Neanderthal-styled lens and reflector assembly, so that wasn’t an option.
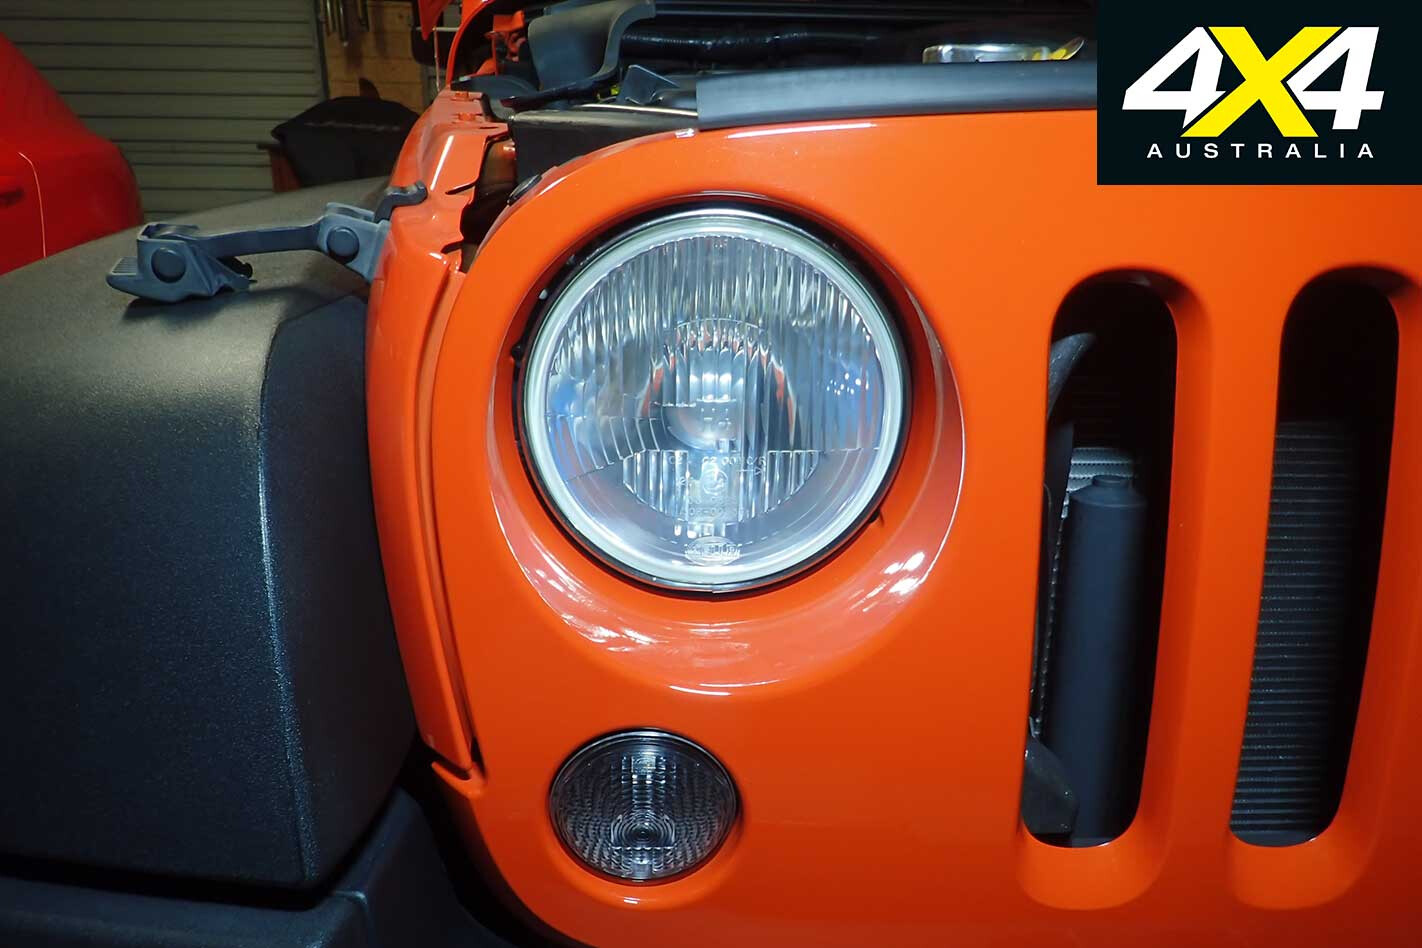
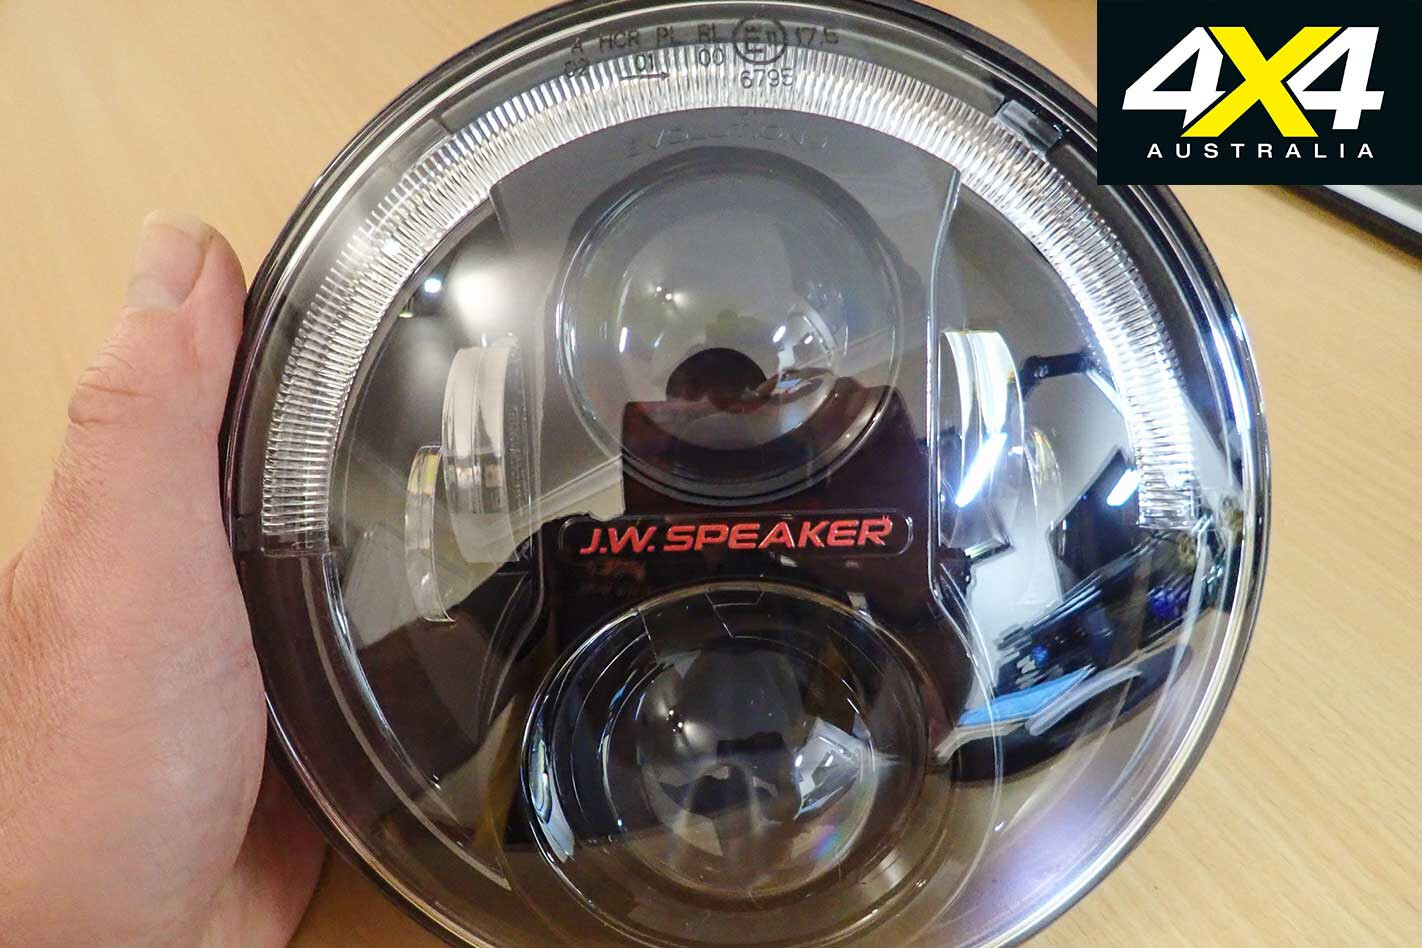
I wanted the best possible light for night driving, with great performance, reliability, a quality build and no gimmicky accessories. After much research I settled on a good ol’ USA brand to adorn my American icon, JW Speaker.
The company is highly respected in the USA for building exceptionally good quality LED lights and, thankfully, JW Speaker has designed a suitable RHD LED upgrade replacement that meets the regulatory Australian Design Rules (ADR) requirements.
The light cannons aren’t just for Defenders, Wranglers, Toyotas and Nissans, either; the JW Speaker 8700 Evolution J2s will give sparkling new eyes to any vehicle in existence that runs a seven-inch round headlight.
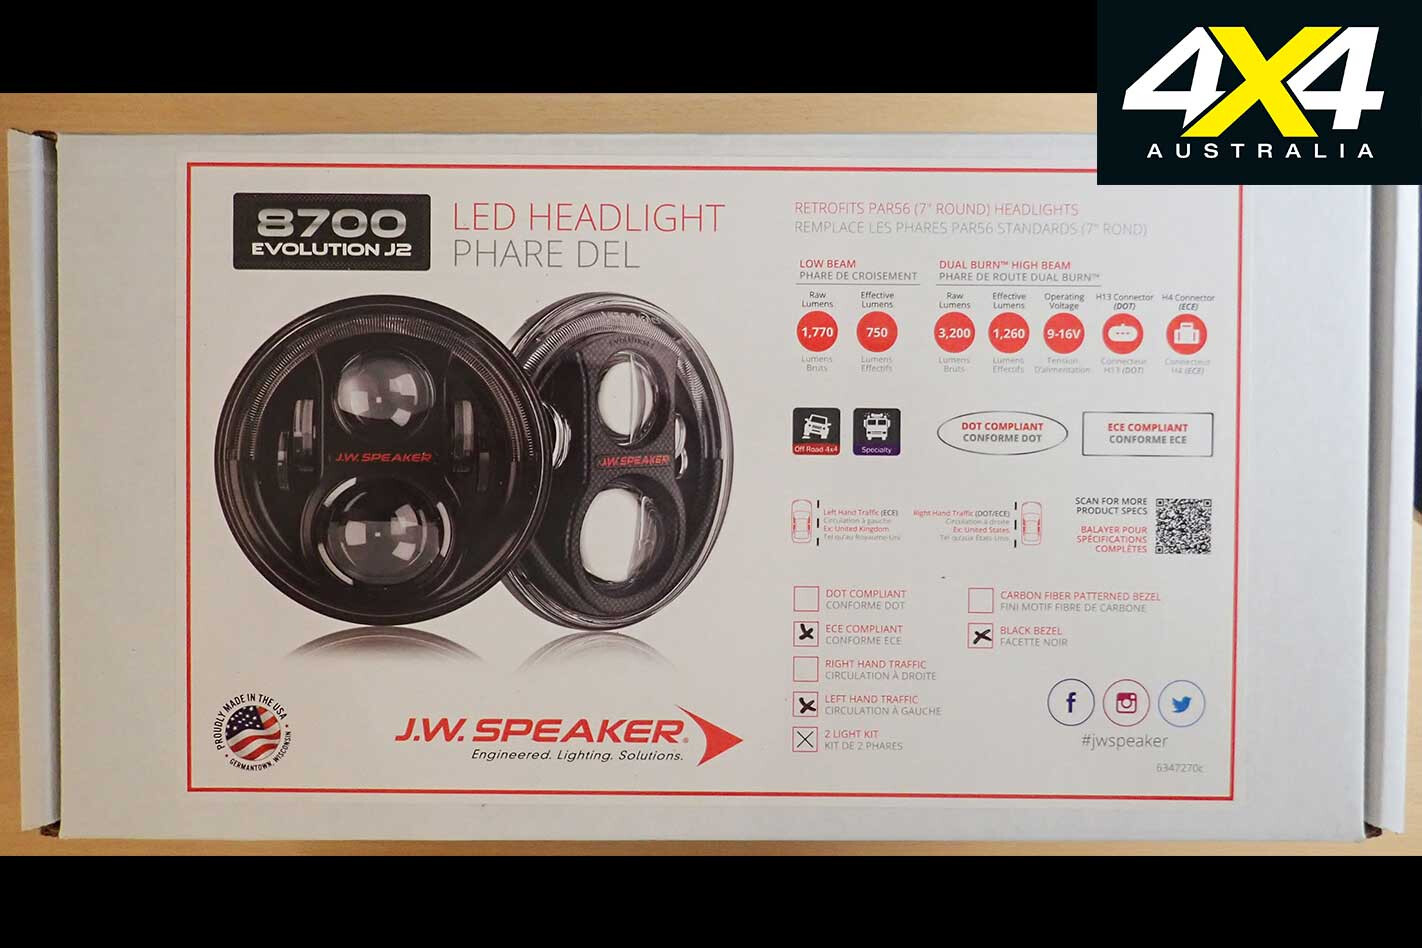
The 8700 J2s got the nod as Wranglers are notorious for LED light conversions having a flickering problem, often requiring an additional harness with a dedicated control unit to alleviate this annoying problem. Not so with the 8700 J2s, as the R&D team took the time to build everything right into the light.
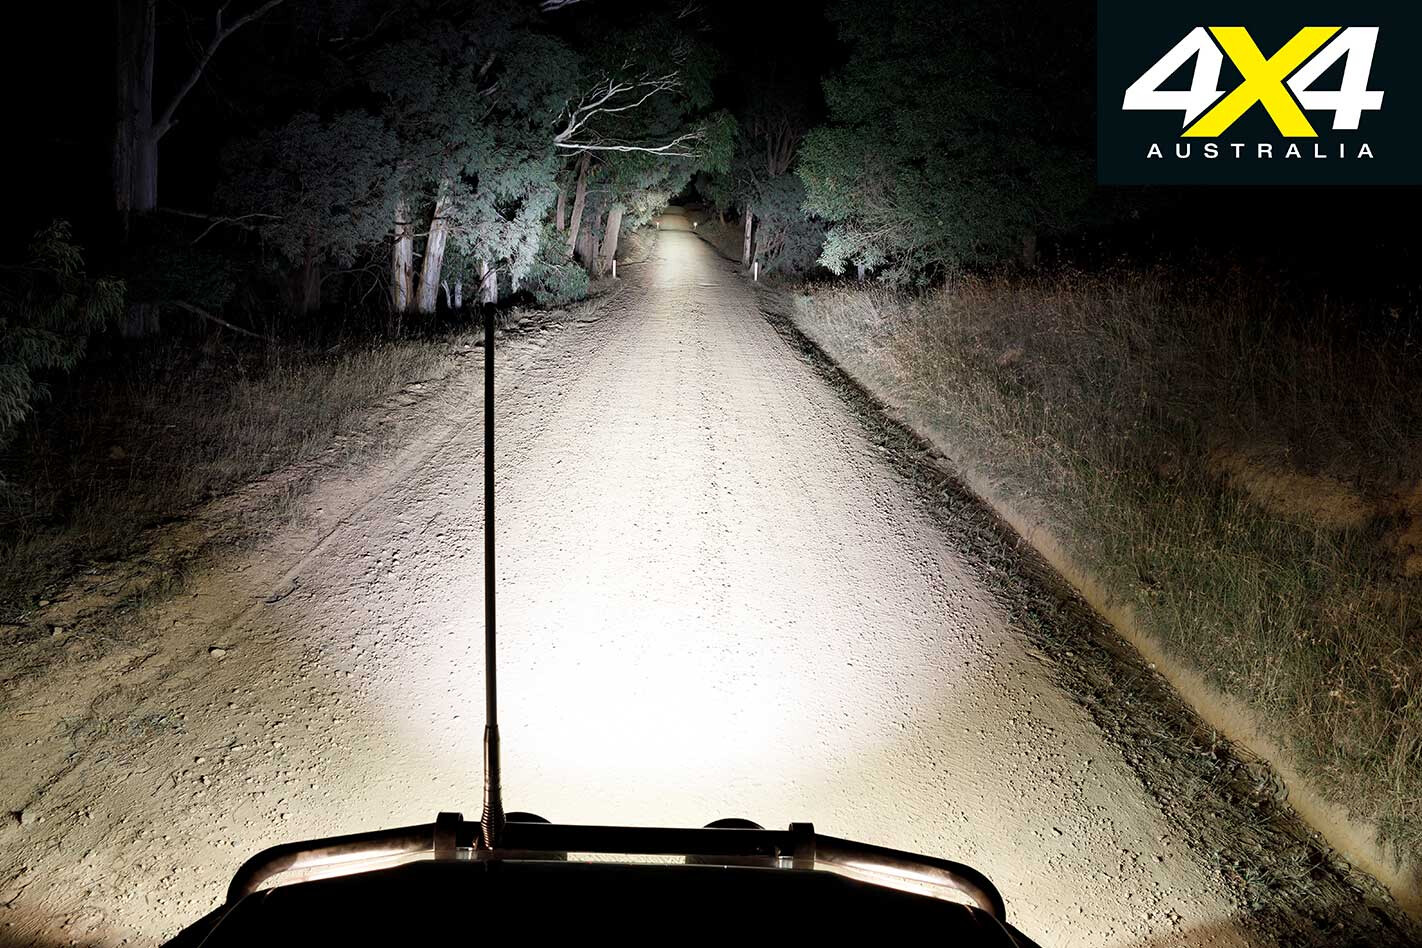
Better yet, the unit’s main wiring harness is mostly plug-and-play, meaning there’s no conversion harness to plug into the factory headlight harness. The other reason was its design construction. JW Speaker use a projector rather than a reflective lens, which allows a very smooth spread of light across the road, with a defined cut-off edge to avoid blinding oncoming drivers – a real plus if you’re running a lifted fourbie.
When choosing lights, don’t be fooled into believing huge output figures are the best way to judge efficiency or performance. Sure, a higher number will mean an improvement in the light intensity, but it’s how well the design optimises that output and translates it into usable distribution and spread that improves forward and peripheral driver visibility.
The 8700 J2s produce 750 effective lumens for low-beam and 1260 for high-beam. This is not to be confused with raw lumens, which is more than twice as much. While not explosive, this is where the 8700 Evolution’s lens design is at the forefront of the game.
Excluding the cool-looking Daytime Running Light (DRL), the light assembly has a separate lens dedicated for low- and high-beam directional focus, as well as a set of D lenses on each side which provide exceptional peripheral lighting.
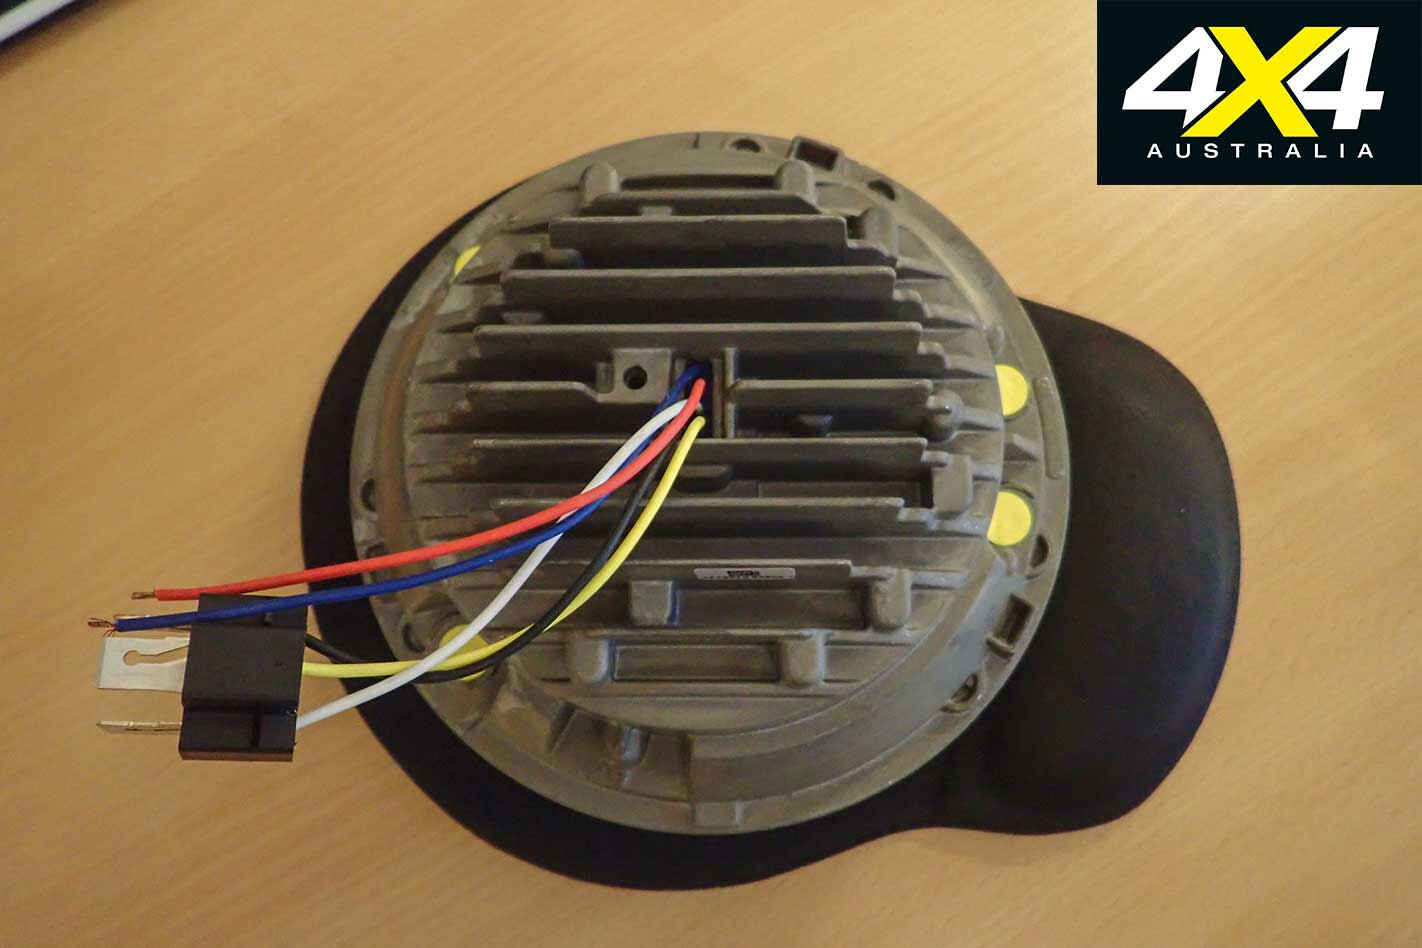
These things aren’t cheap at a RRP of $550 each, but when you scrutinise the attention to detail, design and features you can see construction is first class and there’s a reassuring robustness. They are mounted into a solid heavy-duty die-cast housing with cooling fins to keep temperatures in check, and there’s a clear, unobstructed polycarbonate lens designed to take the knocks from off-road driving.
Solid-state electronic internals mean little chance of a light shaking itself apart over corrugations, and the wiring harness is resin-sealed to the main body, giving them an IP67 rating, which means they are protected from dust and capable of withstanding a decent dunk in water.
These little sparklers also look great. The dark lens and black fascia gives the Wrangler hooded eyes, with intimidating futuristic holographic projector styling.
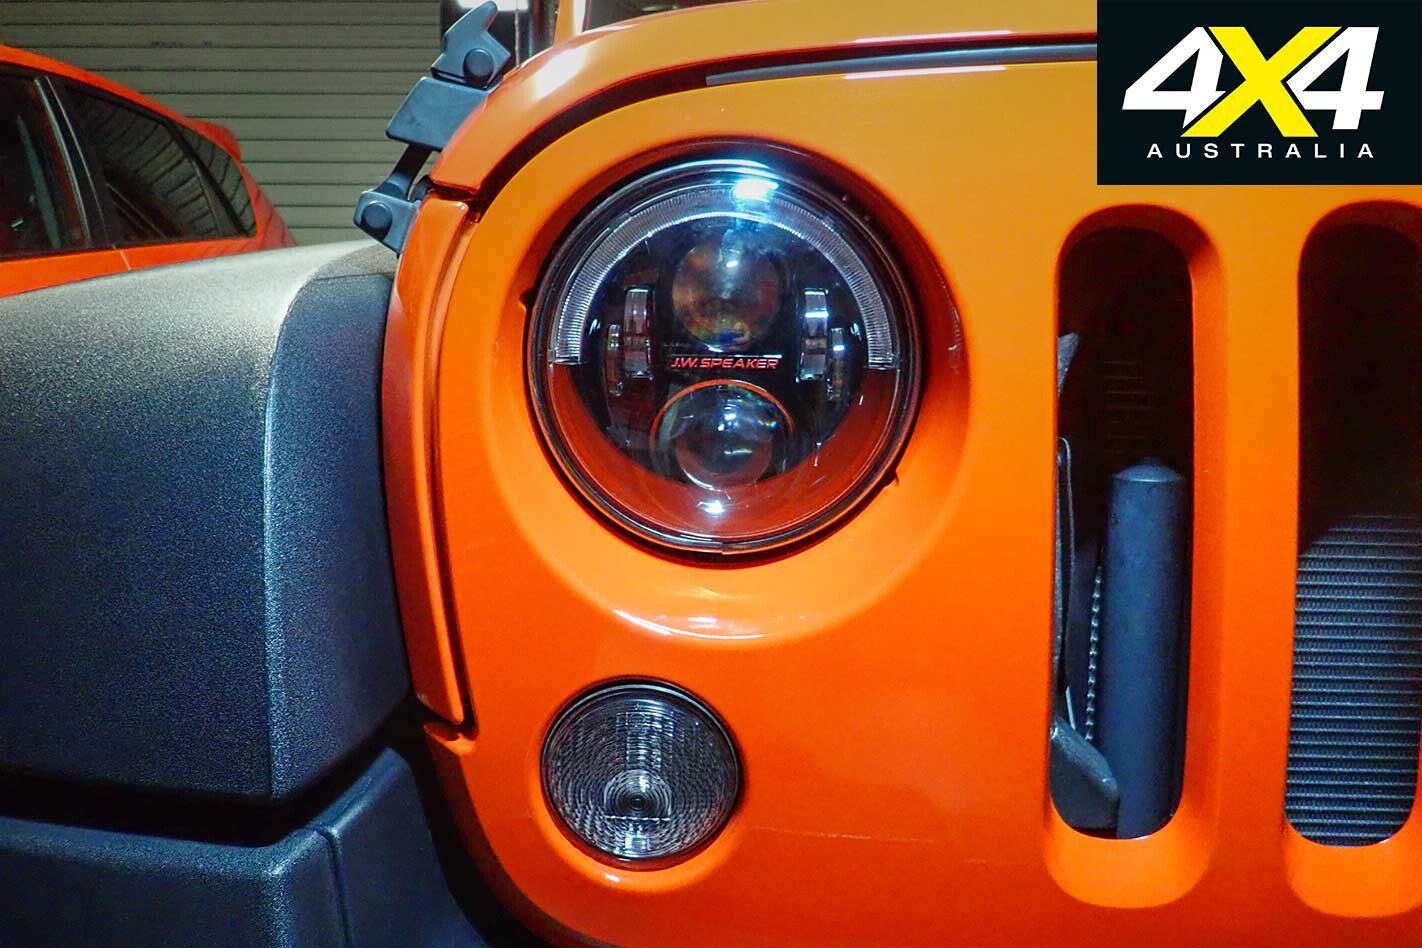
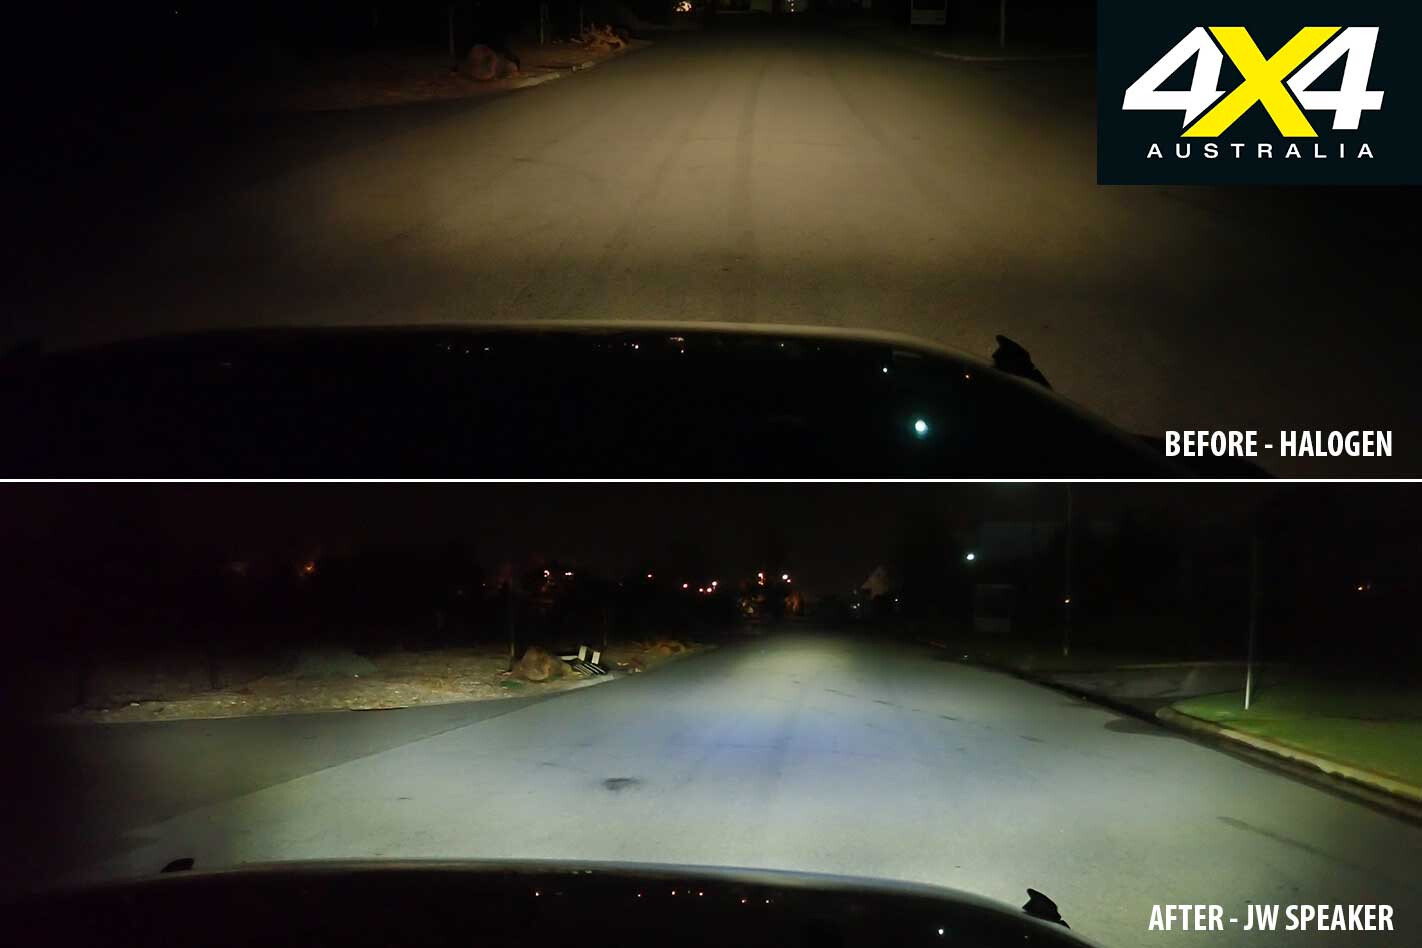
On our first drive, the JW 8700 Evolution J2s were nothing short of stupendous. The visibility on low-beam is astonishing, with brilliant peripheral lighting and clean, crisp illumination of the road. What was also impressive was the depth of illumination, while that clean cut-off point didn’t allow stray light to bleed into the eyes of oncoming drivers.
Hit the high-beam and the dual-burn operation combines both the spread of the low-beam lens and the impressive punch of the dedicated high-beam lens, to reach deep and wide into the darkness ahead.
These lights are costly, but consider what can be spent on good quality driving lights and LED bars. What becomes the better investment: high-quality headlights offering superb illumination, or extreme-powered driving lights for occasional use (and which continue to suffer the mediocre performance of OEM headlights everywhere you drive)? For those on a budget, it should be a no-brainer. Plus, you can always add driving lights later.
If your 4×4 is still running old-styled halogens and you want to lift those antiquated, tired lights to the next level, there’s a whole new world out there you’ve probably never seen before.
RATED Available from: www.jwspeaker.com RRP: $550 each WE SAY: Exxy, but you get what you pay for.
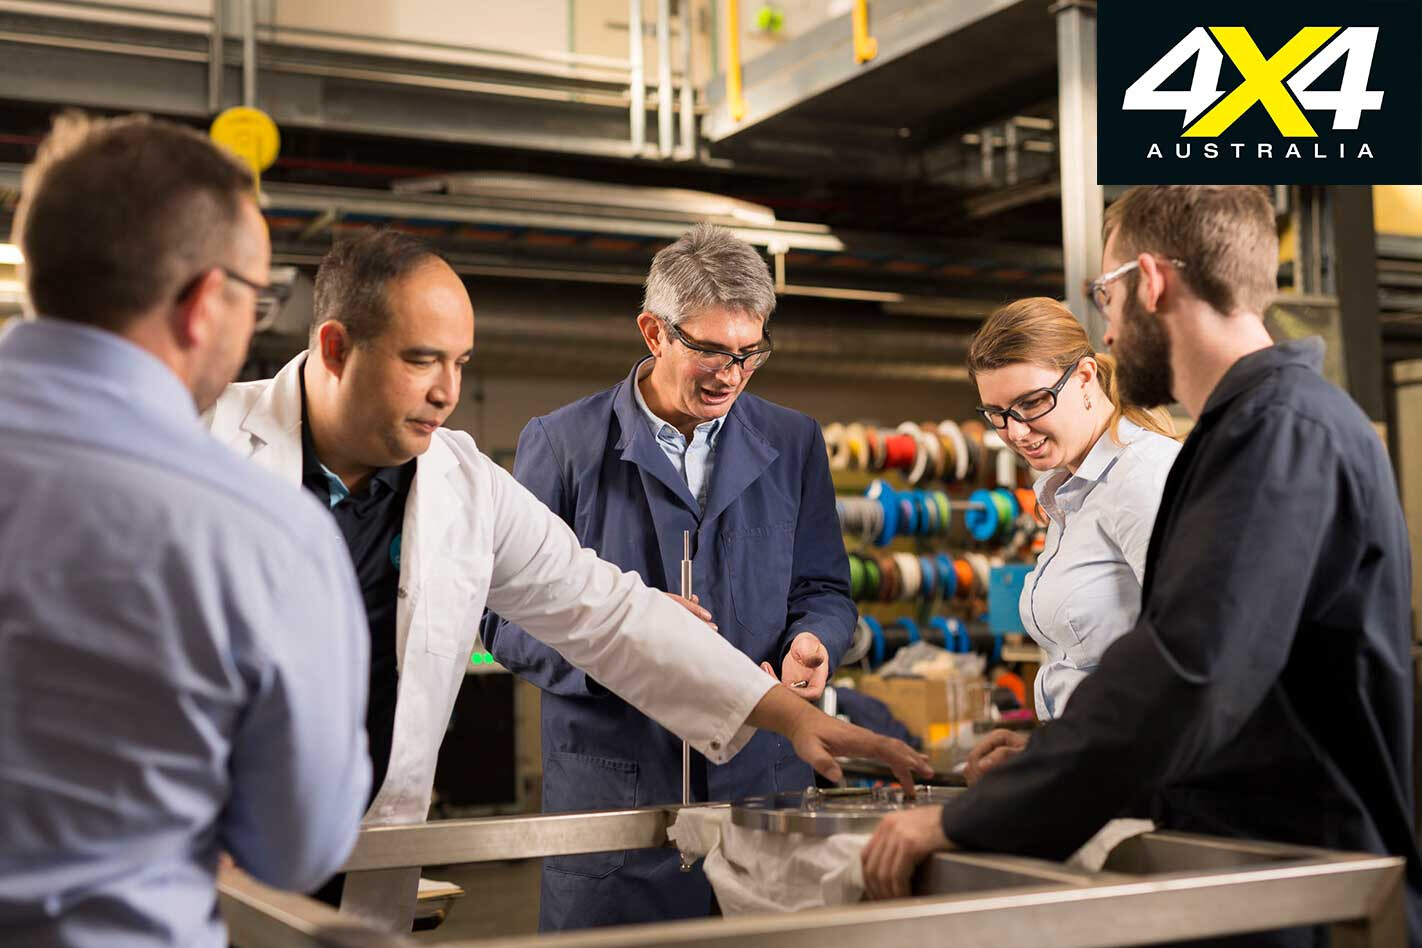
A POTENTIALLY game-changing technological breakthrough by the Australian Commonwealth Scientific and Industrial Research Organisation, better known as the CSIRO, could help hydrogen challenge batteries as the means of powering tomorrow’s electric cars.
Hydrogen has long been touted as a clean and green fossil-fuel replacement for cars, trucks, buses and the like, but it has never really got off the ground.
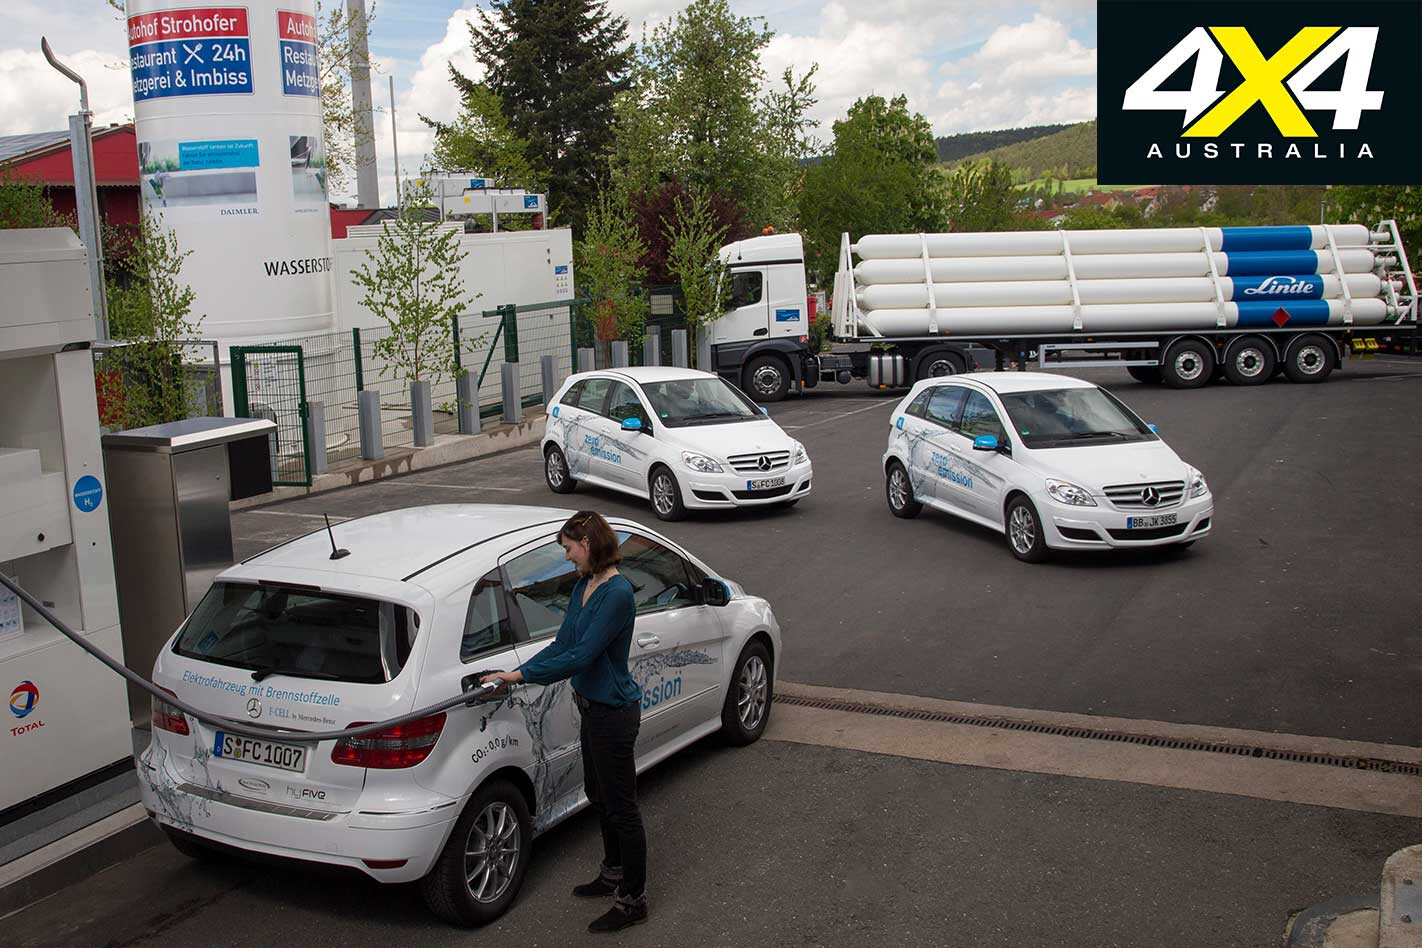
For more than 20 years car manufacturers have been working on hydrogen fuel-cell electric vehicles, but of myriad vehicles that have appeared in concept and prototype form over the years only a handful have made it to production, and then only in minuscule numbers. Hydrogen can also be used directly to fuel internal combustion engines, but this hasn’t gone much beyond the trial stage.
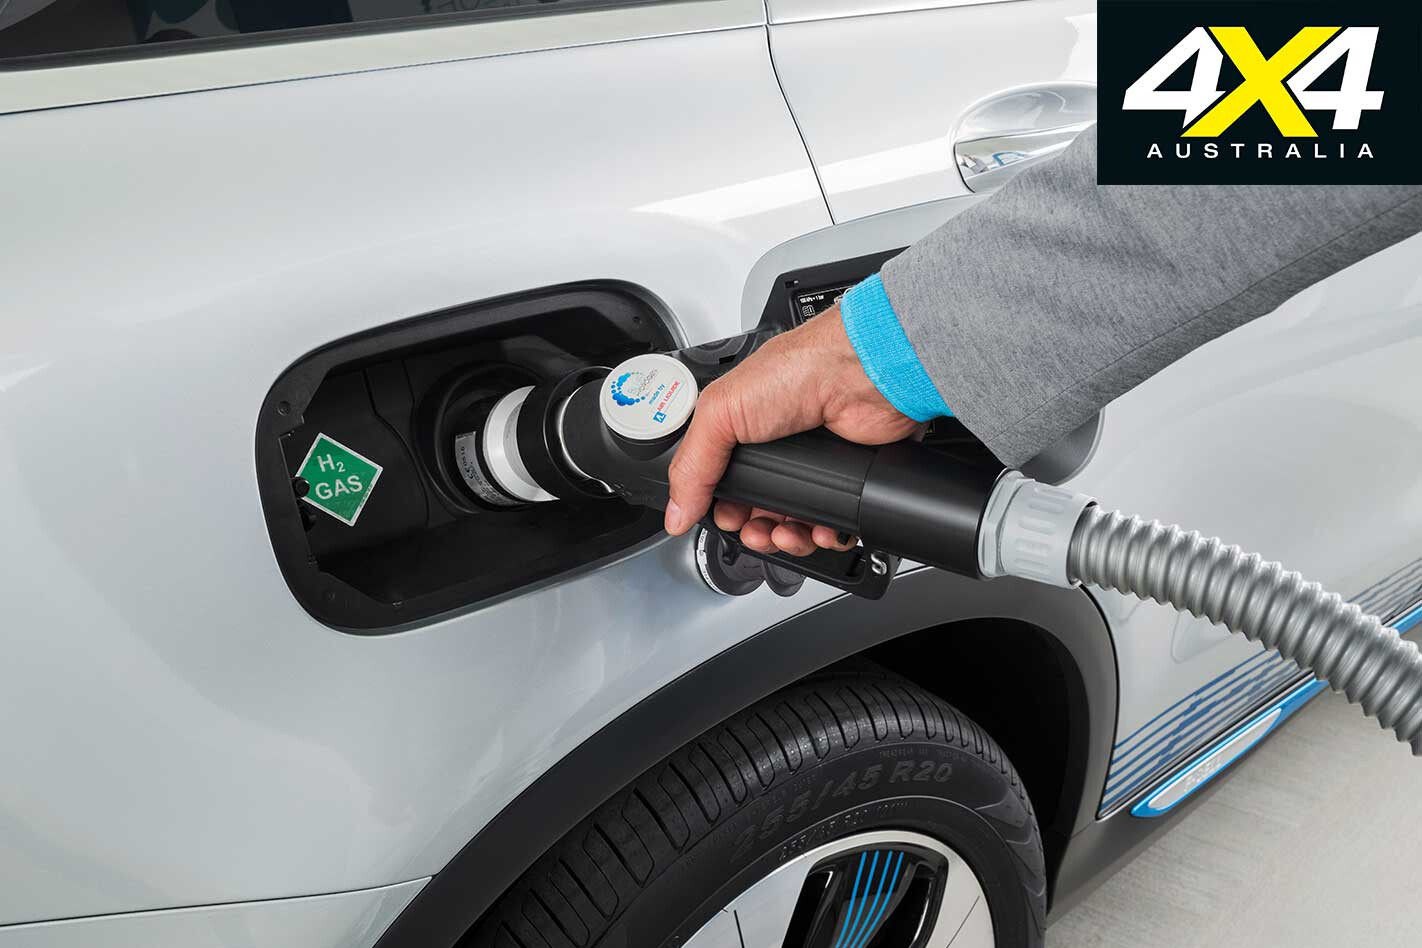
A number of things have held hydrogen back as a vehicle fuel. Fuel cells, which are the key technology in hydrogen-powered vehicles, are expensive to produce; although, they would get cheaper with higher volume production. Fuel cells use hydrogen to produce electricity for the car’s electric motor(s) and don’t emit any pollutants, only water vapour, hence their environmental appeal.
Hydrogen is also expensive to produce by traditional means, but it would be cheaper and cleaner to produce using energy from renewable sources. Last but not least, hydrogen doesn’t currently have a developed distribution infrastructure (to match fossil-fuel service stations) and is difficult to transport and store; although, this is where the CSIRO breakthrough comes into play.
Hydrogen’s transport and storage difficulties stem from the fact it’s an extremely low-density gas and requires very large containers to transport and store it in useful quantities. It’s also highly inflammable.
Transporting and storing it under pressure (to increase the density and therefore the storage/transport efficiency) is expensive and more dangerous, and turning hydrogen into a liquid for transportation isn’t practical given the extremely low temperatures needed.
The CSIRO solution is to store and transport the hydrogen as liquid ammonia. Liquid ammonia can be readily produced from hydrogen and is far easier and more efficient to transport and store than hydrogen.
Once at its distribution point, the ammonia is converted back to hydrogen by the simple expediency of passing the ammonia through a special membrane, which is the key technology behind the CSIRO breakthrough.
Supporters of battery-powered electric vehicles would say all of this is too difficult, but electric vehicles aren’t without their own problems. Most notably they too need an infrastructure of charging stations or charging points, a critical problem exacerbated by the slow charging times and poor range of electric vehicles using current battery technology.
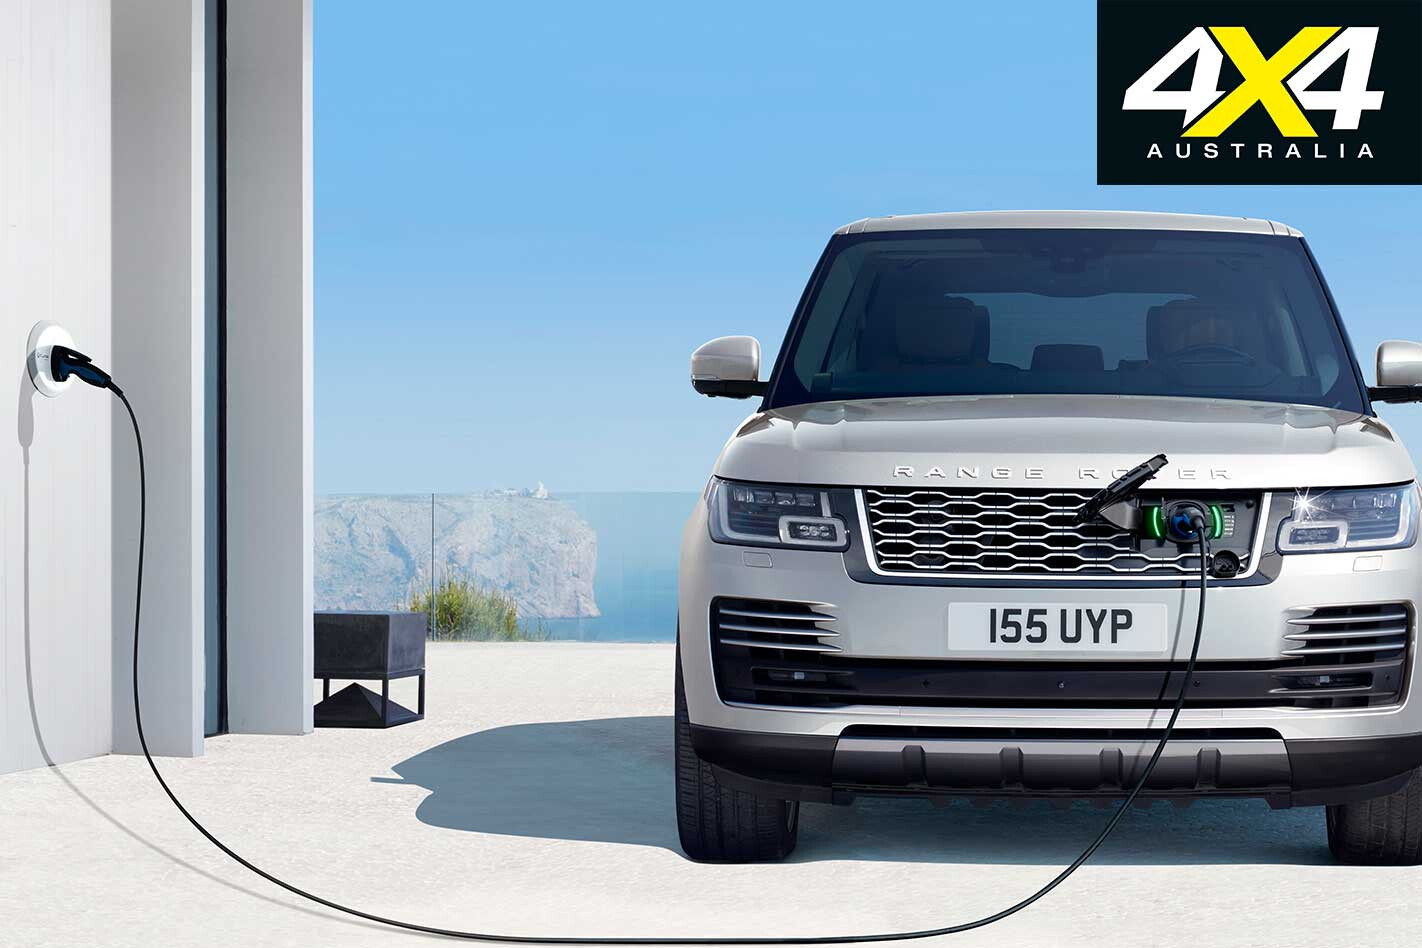
The quick refuelling time of hydrogen fuel-cell electric vehicles compared to the very slow recharge time of battery-powered electric vehicles is a major advantage of hydrogen fuel over battery power. And while the slow recharge time of battery-powered electric vehicles can be overcome in part by overnight recharge at home, this too needs a local infrastructure.
Effectively you need secure parking, preferably off-street, for your charging point, something you can’t easily retrofit to much of the existing residential urban building stock, either houses or units. It’s not just a matter of running an extension cord out your front or back door, so perhaps the future will be a mix of hydrogen fuel-cell and battery technology.
In the meantime fossil-fuel internal-combustion engines have a lot of life in them; more so when mated to energy recouping and recycling systems in so-called ‘hybrids’. In the much-publicised future petrol and diesel bans threatened by various levels of government throughout Europe and elsewhere, hybrids are generally exempt.
THE DL230 HTX driving light is a hybrid light combining HID and LED technology in the one unit, thereby eliminating the need for separate driving lights and light bars and their associated wiring and mounting.
The 70-Watt HID bulb sits within a 170mm reflector and sends a beam of illumination a long way down the road (1768m at one lux), which is more than ample out on the blacktop. On a run up the Stuart Highway the HID section came into its own, warning of obstacles a long way in front of my cruising vehicle.
The 20 LEDs around the circumference of the housing provide an excellent flood-beam pattern, lighting up both sides of the road or track you’re on. I find I use this side of the light much more than the long-range element, probably because we do so much driving on backtracks.
The wide, bright beam lights up the road immediately in front of you (out to a few hundred metres) and is really good at illuminating wayward wildlife that like to stand in the shadows of trees and bushes and leap out on the road in front of you.
The glass-filled nylon composite housing with an extruded aluminium heat sink (to get rid of the heat from the LEDs) comes with an impact-resistant polycarbonate lens. The unit is IP69K rated – which is about as high as you can get for an outdoor light – to stop the ingress of dust, dirt and deep or high-pressure water or steam.
Current draw is 11amp, which the Lightforce wiring harness (an optional extra) easily accounts for. That harness, which is of the very best quality featuring waterproof connectors and the like, also makes it easy to wire the lights into your vehicles – I wouldn’t stuff around with anything less.
The light features thermal overload protection and over-, under- and reverse-voltage protection, which are all excellent features that can protect the light and save you a lot of money. The colour temperature of both sections of the light is 5000 Kelvin, where the light is a bluish white hue. This is where a good light should be, with the colour temp of daylight varying but often within the 5000K to 7000K range.
The large lights measure 230mm in diameter, so they’d struggle to fit on some bullbars; they just fit on the ARB bar I have on my 79 Series Cruiser. The 2.3kg lights require a good mounting system – the Lightforce product provides just that – and once mounted, adjusted and aimed I haven’t had to adjust them, no matter the road or track.
They’ve proven to be robust and reliable under extreme conditions and can handle anything thrown at them.
I’ve driven behind a lot of different driving lights over the years; however, if I’m honest, this is the best, most flexible light I have ever used.
RATED Available from: www.lightforce.com RRP: $799 single light and mounting kit; $120 wiring harness WE SAY: Expensive, but worth every cent.
THIS render you’re ogling recently appeared on Facebook, courtesy of X-Tomi Design, and it has been doing the social rounds since.
Penned by a Hungarian designer, the render fuses a Ford Mustang with a Raptor and is accompanied by a translated caption: “This is what it looks like to mix a Mustang with F-150 Raptors [sic].” It’s definitely not something you see every day, but it’s definitely cool in a weird, quirky way.
X-Tomi Designs has a back-catalogue of bizarre creations, including a Suzuki Vitara Pick-up and a Suzuki Vitara Cabrio. Check out his creations on his blog and Facebook page.
It’s not the first rendering of a Raptor hybrid to surface on the web. The Everest now gets the Raptor powertrain, and the two share the same platform, so it made sense to give Ford’s 2019 Everest the Raptor treatment – which we did, only a few weeks ago.
NARVA Australia is utilising VR (virtual reality) technology to provide customers with an “in-the-field” perspective of its product range.
From the passenger seat, the VR Experience allows consumers to select from Narva’s range of lighting products: Explora Single and Double Optic Drive light bars; Ultima 215 and 175 LEDs (including enhanced optic LEDs); and Ultima 215 HIDs. A conventional headlight is also included to compare the new lights against.
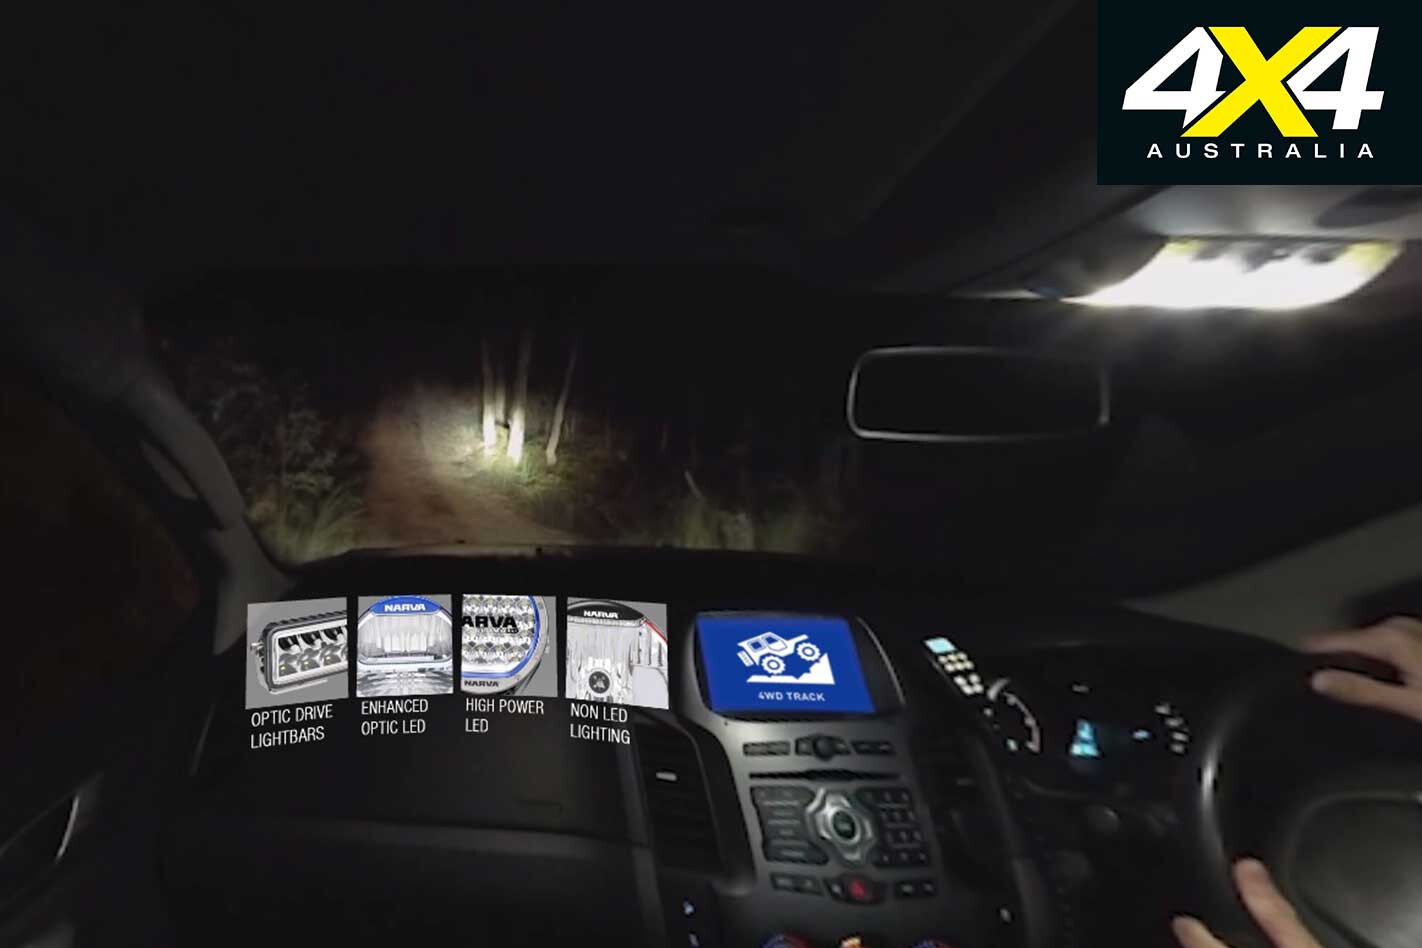
Once a lighting product has been chosen, the Experience then shows how each light illuminates specific environments: highways, dirt roads and 4WD tracks.
Voice guidance and audio information – as well as a graph detailing the light output and range – provide the user with an abundance of product information.
The Experience works by first logging onto the website using a smartphone: www.narva.com.au/vrexperience. Then you simply slide the phone into a VR headset, toggle the settings and you’re as good as gold.
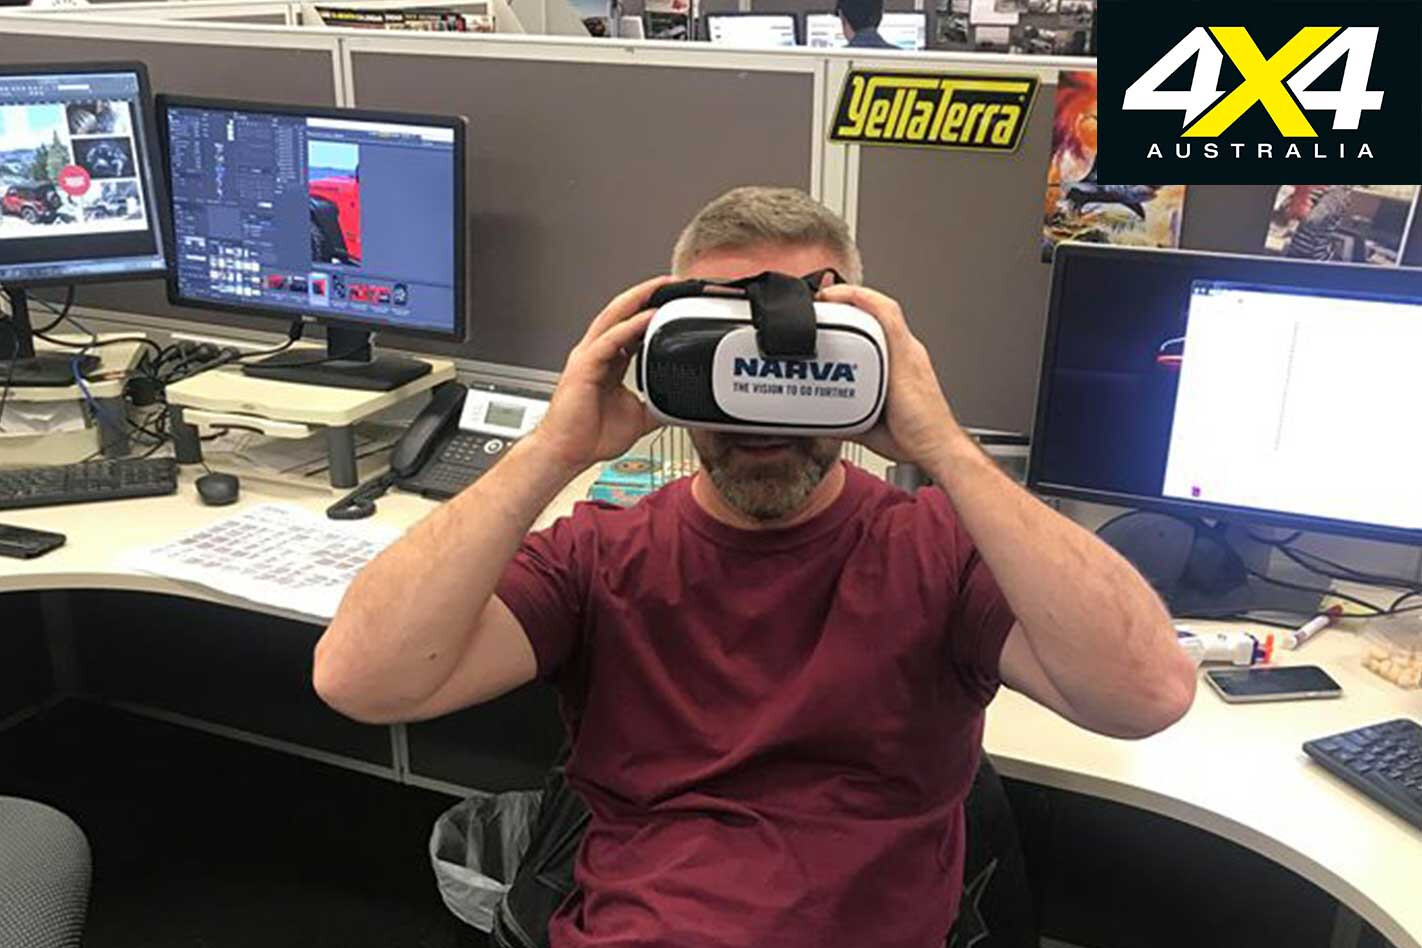
You’ll also be able to strap a VR set to your face at the big 4WD shows around the country. Just head on over to the Narva booth and they’ll sort you out – the crew will be at the upcoming Sydney 4WD and Adventure Show (Western Sydney International Dragway, October 12-14.)
It’s a nifty tool to compare the output of different lighting solutions, and a great way to figure out which light best suits the kind of driving you’re likely to experience.