If you love hitting the bush, towing a camper, or heading off on a weekend 4×4 adventure, picking the right RAM can make all the difference. The 1500, 2500 and 3500 each bring their own mix of power, comfort and load-carrying ability – here’s a look at how they stack up.
RAM 1500: The all-rounder for touring and towing
The RAM 1500, now powered by the 3.0-litre twin-turbo inline-six Hurricane engine, is a versatile pickup for those who want a capable vehicle for towing and touring.
It handles highways, gravel tracks and light bush trails with ease, making it perfect for towing small campers or trailers while carrying gear.
Key specs and features:
Engine: 3.0L Hurricane I6 (313kW/635Nm)
Transmission: 8-speed automatic
Towing Capacity: Up to 4500 kg braked
Payload Capacity: Up to 1100 kg
Suspension: Coil-spring rear
RAM 2500: The pick for heavy-duty 4x4ing and towing campers and caravans
The RAM 2500 is built for serious trips and heavy loads. With its Cummins turbo-diesel engine and reinforced leaf-spring rear suspension, it can handle long overland journeys and haul large slide-on campers and heavy trailers through the toughest Australian tracks.
RAM 3500: Extreme overlanding with massive towing capacity
The RAM 3500 is the go-to choice for extreme overlanding and expedition-style trips. Dual-rear-wheel options, reinforced suspension, and the high-output Cummins diesel make it capable of hauling massive campers or fully loaded expedition rigs safely across remote Australian terrain.
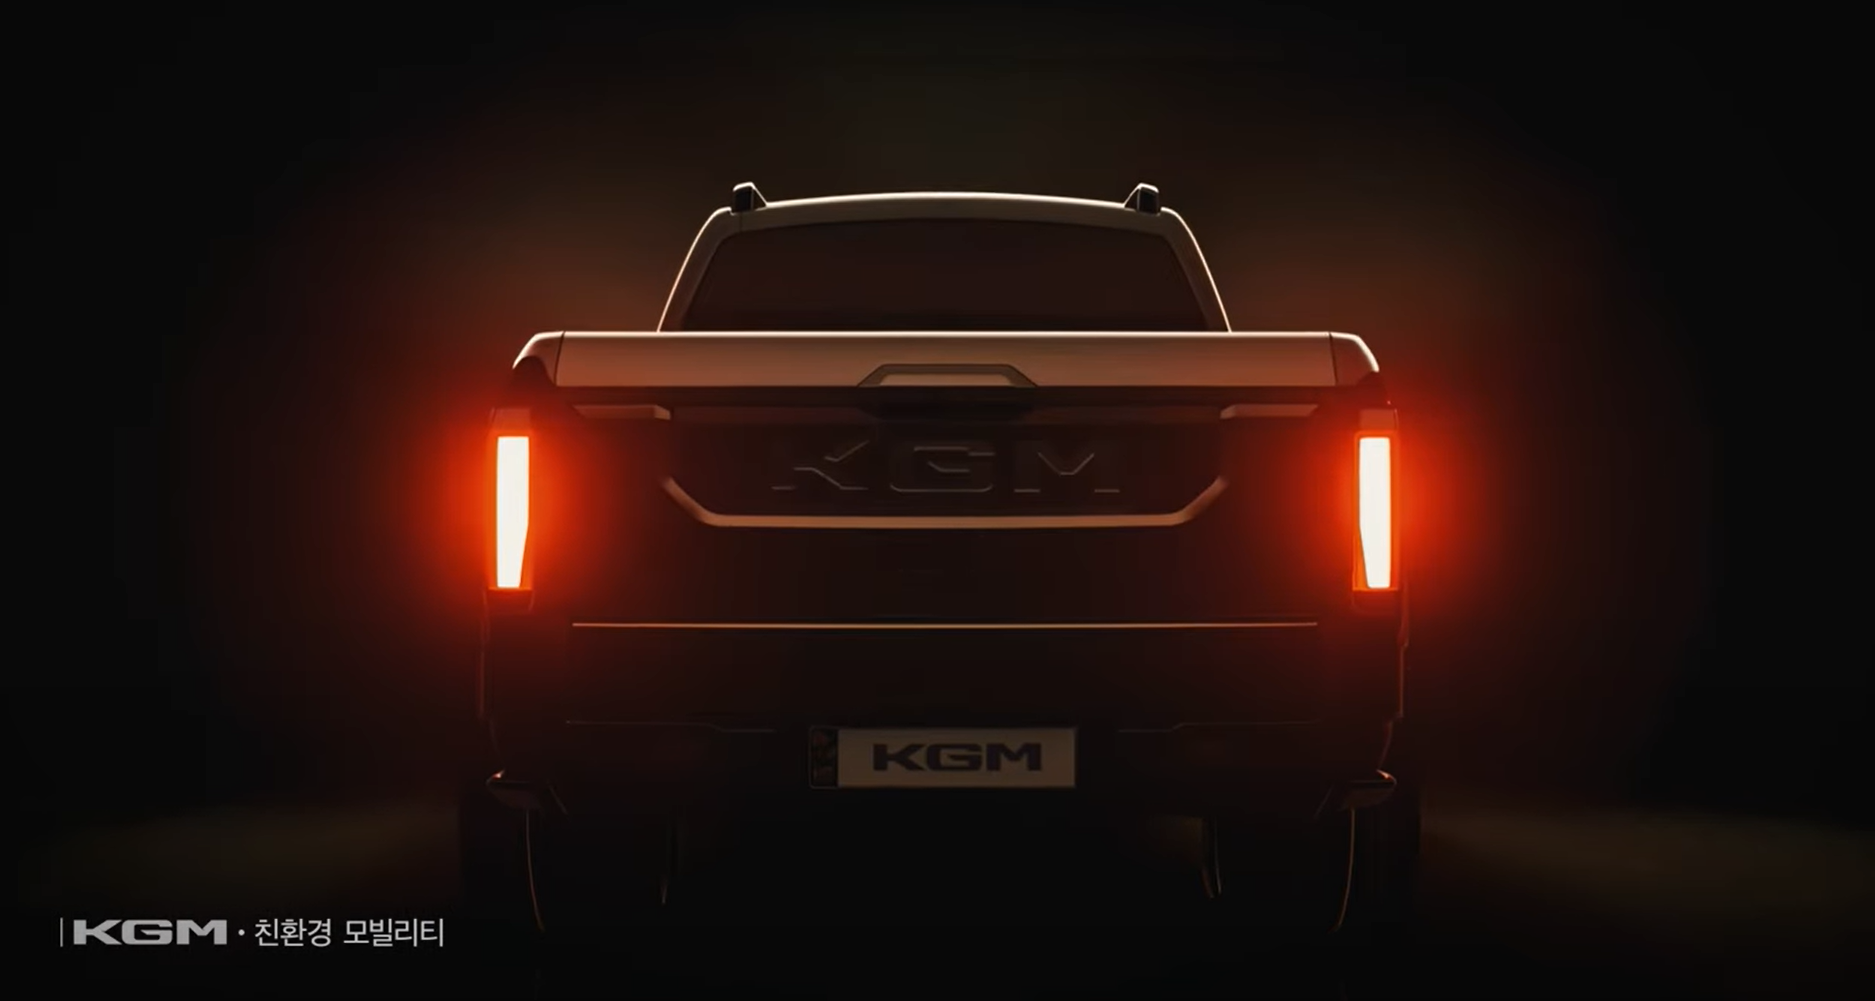
KGM, formerly known as SsangYong, has provided a first look at its next-gen dual-cab ute. Internally codenamed Q300, the model is expected to succeed the current Q200 Musso, which continues to sell in Australia.
The new ute was shown in a short promotional video uploaded to KGM’s official YouTube channel, offering multiple exterior angles and confirming a major shift in design.
The body is more upright and features squarer dimensions than before, with the tray remaining separate from the cab. At the front, segmented LED daytime running lamps are connected by bold C-shaped elements that frame the headlights. A higher-set bonnet and vertical indicators further toughen the appearance, while two-tone alloy wheels add a modern touch.
1
Around the back, the ute carries a heavily reworked tailgate with an embossed KGM logo. Simple vertical tail-lights replace the previous car-like clusters, while the overall shape now leans heavily into a rugged, utilitarian look.
The outgoing Musso continues with a 2.2-litre four-cylinder turbo-diesel producing 133kW and 400Nm, paired with a six-speed auto and a standard 3500kg braked towing capacity. KGM hasn’t confirmed whether the Q300 will retain this powertrain or introduce new options. Given the brand’s push into electrified models, an update seems possible.
2
Interior details weren’t revealed in the YouTube clip, but KGM has been moving toward larger infotainment systems, more advanced driver assistance, and improved materials across its SUV and EV range. It’s reasonable to expect similar upgrades inside the new ute.
The Q300 is expected to launch in Korea before heading to export markets such as Australia. With its tougher stance and more modern design, it represents KGM’s most serious attempt yet to go head-to-head with the Ford Ranger and Toyota HiLux in the hotly contested dual-cab segment.
The Simpson Desert and Cape York remain two of the most popular long-distance four-wheel drive destinations in Australia – and it’s clear that plenty of travellers are out there enjoying this wide brown land.
What has changed in recent years, however, is the level of knowledge and skills many bring when it comes to keeping their vehicle mobile. Back in the good old days, travellers were mostly self-reliant, sorted things out, and kept themselves moving whatever happened. Now, if it’s more complicated than a wheel change, it often gets left for someone else to fix.
Having some mechanical skill is paramount when travelling in remote country. This doesn’t mean repairing a blown engine out in the scrub, but there are plenty of basic things that will help keep a vehicle mobile.
Modern vehicles carry so much electronic equipment that they can be near impossible to fix if something goes wrong with a computer. Still, a scan tool is an essential item, costing only a couple of hundred dollars and often able to detect or even clear fault codes. For most outback travellers, though, the common problems are bent or broken components, along with simple electrical issues.
Bush repairs remain an important part of travel. Steering rods have been reinforced with star pickets and welded, springs replaced, suspensions patched up, chassis cracks repaired, roof racks fixed, fuel tanks sealed, and countless electrical issues traced and solved. These repairs might not be pretty, but they keep vehicles moving.
Too often now, travellers simply give up. Some have abandoned vehicles with broken springs or cracked chassis, waiting for recovery that can take days, when with a little thought and the right gear they could have stayed mobile.
Before heading out on an outback adventure, it pays to learn the basics of the vehicle, buy or download a repair manual, and pack a few essential tools. On the road, check oil, water and leaks daily – or at least every second day – and keep an eye out for loose nuts, brackets or hose clamps. A multimeter is another tool worth carrying, simple to use and capable of solving a host of electrical problems.
Not long ago, choosing a 12V portable compressor was simple – there were only a few options, and you picked one that fit your budget.
Now the market is flooded with models of every size and price. Some pump tyres quickly, while others struggle to inflate even a football. Buying online makes it easy to get a new compressor delivered, but there’s nothing worse than spending a few hundred dollars on one that can’t do the job.
We’ve put together a list of reliable 12V portable compressors – well-known models, lesser-known options, and top-quality units you can only get online!
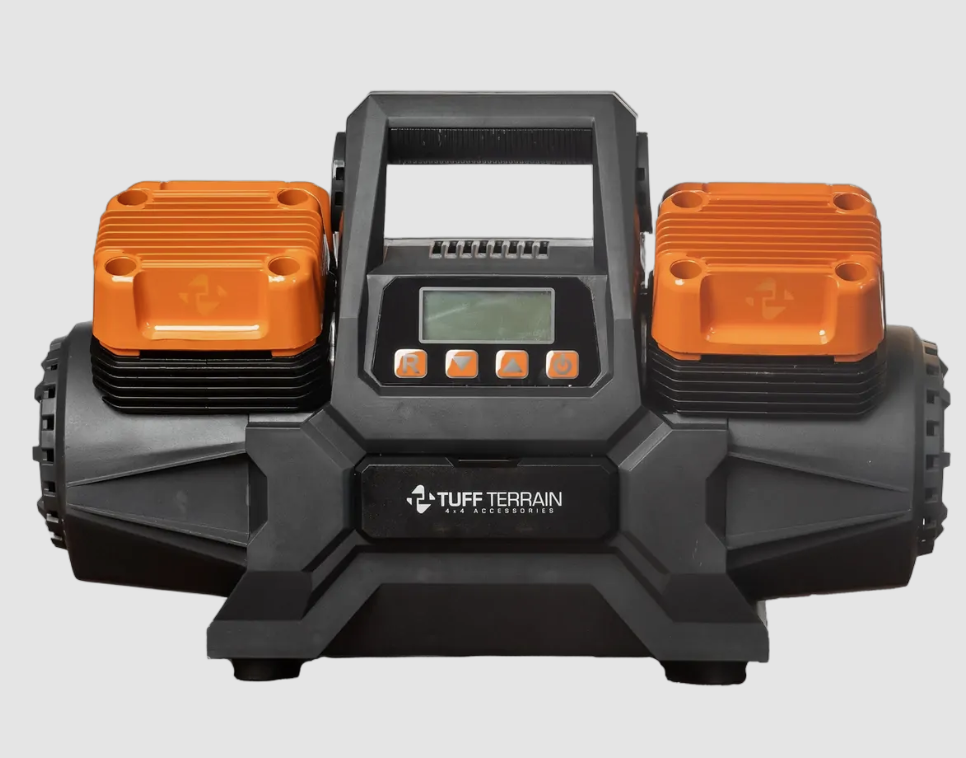
The Tuff Terrain V4 High Output Air Compressor is designed for serious 4WD use, delivering 400LPM at 10psi to get large tyres under control quickly.
It can inflate a 35-inch tyre from 10psi to 40psi in just over 2 minutes, with a digital gauge that allows you to set the exact pressure and automatically stops when your target is reached, eliminating guesswork.
The compressor comes with an 8m hose and twin 1/4″ Nitto fittings, providing easy access to all four corners of most vehicles. It runs on a 12V, 100A setup protected by a 125A fuse, and includes over‑thermal protection for continuous use without risk of overheating. The unit features four 50mm cylinders for fast inflation, and it can be used on the go with a premium carry bag or mounted securely using the included hard‑mount legs.
1
The kit includes the V4 compressor, a digital air gauge with quick-connect fittings, the 8m hose, a premium carry bag with multiple pockets and internal compartments, a spare 125A midi fuse, and four hard‑mount legs, making it a complete solution for keeping your tyres at the right pressure whether on the track, in the bush, or at the beach.
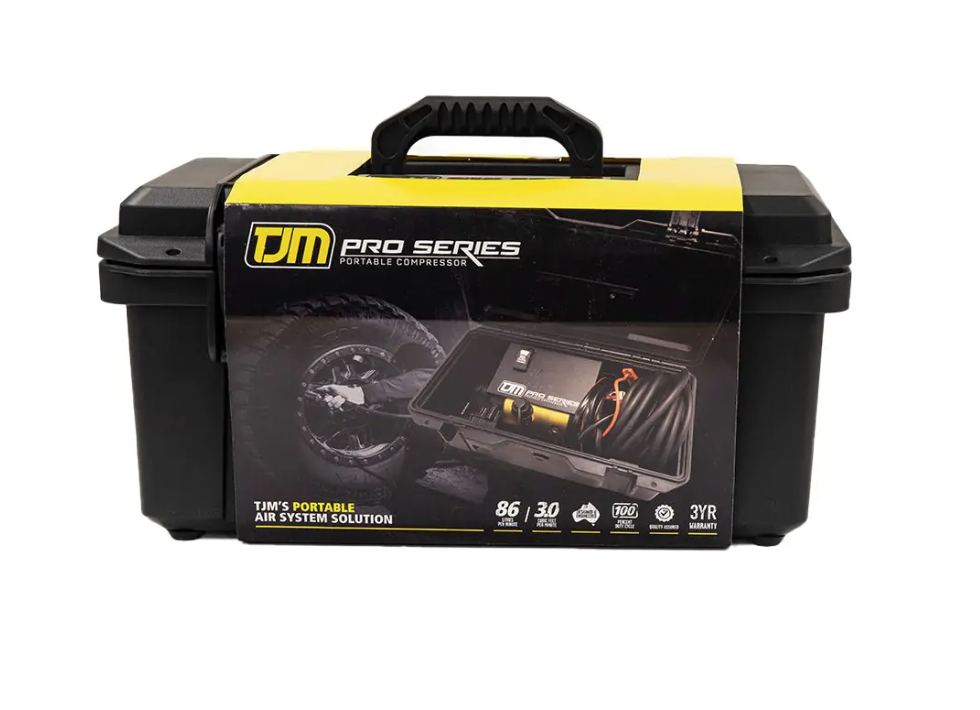
The TJM Pro Series Portable Compressor is a compact, robust air compression solution designed for on-the-go use.
Housed in a durable storage case, it delivers reliable performance with an 86 L/min airflow and an integrated tank, while its patented convection cooling system keeps it running efficiently under tough conditions.
1
Built for convenience and safety, the compressor features a 100% duty cycle, thermal cut-out, and a 2-stage air filter for clean air. It comes complete with a 6m air hose, 2m power cable, and 0.4m battery clamp with 50A Anderson plugs, and is backed by a 3-year warranty, making it ideal for off-road adventures or everyday air compression tasks.
Maximum Current
50A
Maximum Airflow
86L/min
Maximum Pressure
150psi
Hose Length
6m
Pros
86 L/min airflow with 100% duty cycle
Robust cooling and 2-stage air filter
Comes with long hose, power cable, and Anderson plugs
While the older-style single compressor kits are still available from ARB, they’ve recently doubled down and are offering the ARB Twin Portable compressor that comes with a four-litre air tank.
While one of the more expensive options on the list, this is an excellent choice for people undertaking extremely remote trips or who simply never want to buy another 12V compressor ever again. The twin motors incorporate internal thermal protection against extreme temperature damage, while a heavy duty in-line maxi fuse for each motor provides professional circuit protection.
1
The portable kit comes with inflation accessories, a durable carry case, is sealed against dust and moisture, and features an over-pressure safety valve. Plus it’s sealed for moisture and dust-resistance. They’re very quick to pump up your tyres, too.
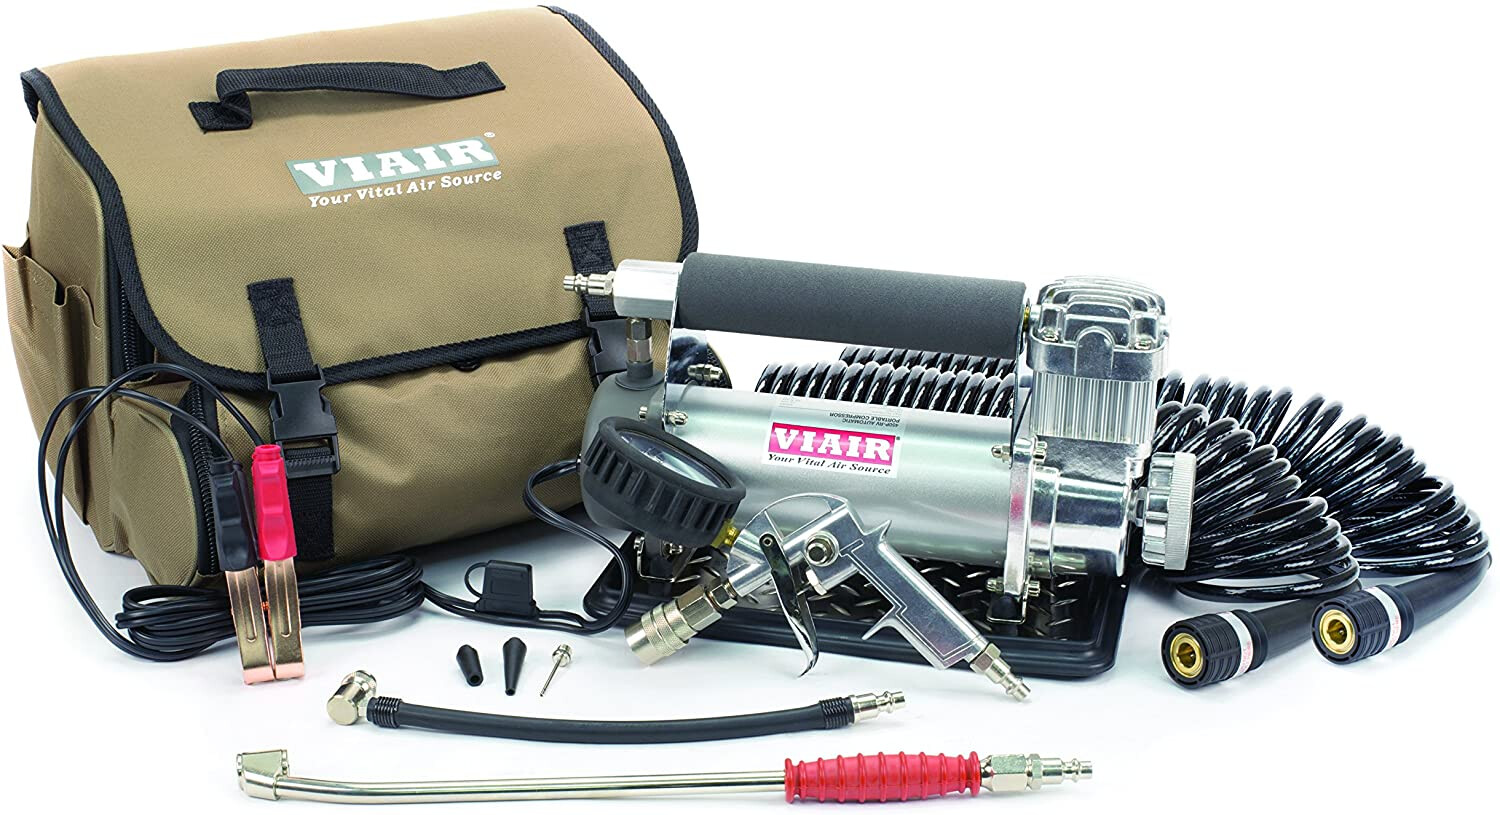
A serious compressor for serious tyre inflation, the Viair 450P range comes with 100-per-cent duty cycle and the ability to pump a 35-inch tyre from 15-30psi in around 3.5 minutes.
1
The unit can be run for an hour straight without rest periods and it pumps up to 150psi, making it ideal for vehicles with larger tyres. As the name suggests, it also comes with an automatic shut-off function which will turn the compressor off when it reaches a pre-set pressure, doing away with the whole back and forth “checking pressures as you fill your tyres” thing, reducing time and effort spent while airing up.
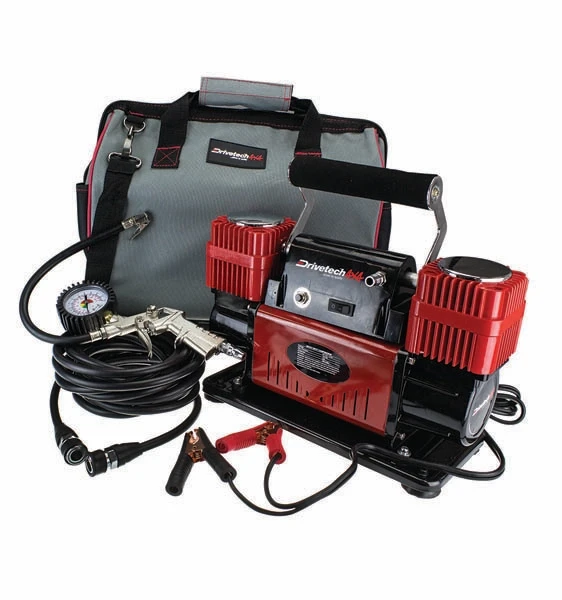
Drivetech 4×4 steps things up in price a little, but it also steps up performance.
1
Utilising a twin-piston design that allows nearly double the performance over a single-piston unit, the Drivetech 4×4 compressor pumps a mammoth 300 litres per minute, to ensure airing up is as quick and painless as possible – nobody wants to be airing up in 40-degree heat or in the middle of a monsoon, so quicker is always better. Features include a pistol grip inflator at the end of an 8M hose, and it is stored in a heavy-duty bag with pockets for accessories.
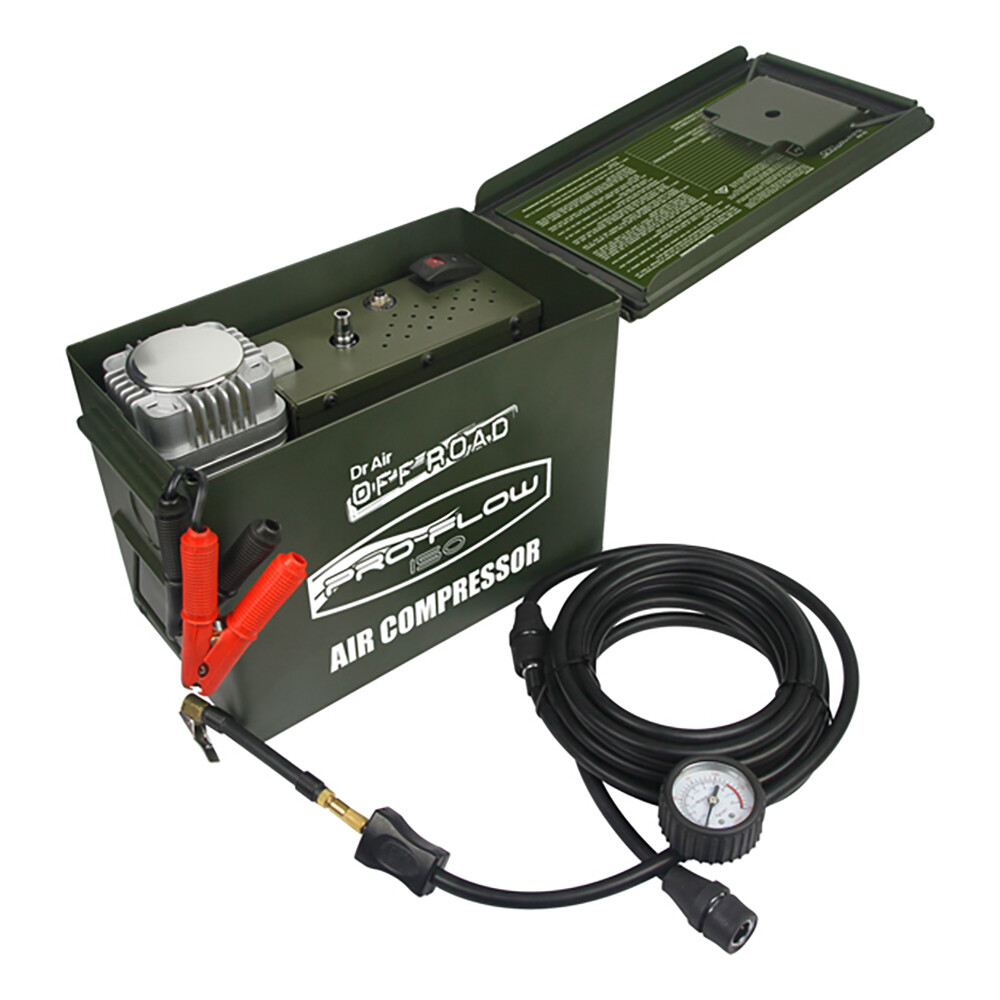
This award-winning Pro-Flow air compressor from Dr Air has been designed for serious off-road use, flowing 150 litres per minute.
1
Featuring a heavy-duty ammo box housing, this is one tough unit with heaps of grunt. It has all the regular features that you’d expect in a compressor at this price point such as thermal overload and circuit breaker protection, and the 150psi output easily inflates the average 4×4 tyre (205/60R16) in around 2.5 minutes.
Roadsafe have built a great reputation for quality over the past decade in Australia, and its compressors seem to be continuing the tradition.
1
This heavy duty product flows 160 litres per minute, so you’ll be back up to road pressures after a day on the tracks in no time. It also has such inclusions as a resettable circuit breaker and thermal overload protection. For a no-frills, entry level compressor for the off-road enthusiast, this is a fantastic option.
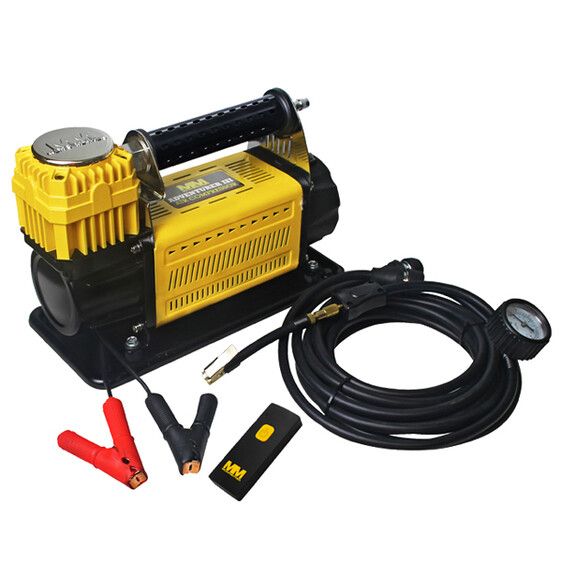
The Mean Mother Adventurer 4 Heavy Duty 12V Air Compressor is packed with plenty of inflation power, delivering an impressive 180 litres per minute of air delivery.
1
It’s equipped with all the standard features you’d expect in a compressor of this quality such as thermal overload and circuit breaker protection, as well as a premium wireless remote control. The remote allows the user to start and stop the inflation process and get accurate tyre pressure readings without having to go back and forth to the compressor to continually turn it off and on. The 150psi output will reportedly inflate an average 4×4 tyre (205/60R16) in around 2.3 minutes, and it comes with a five-year warranty.
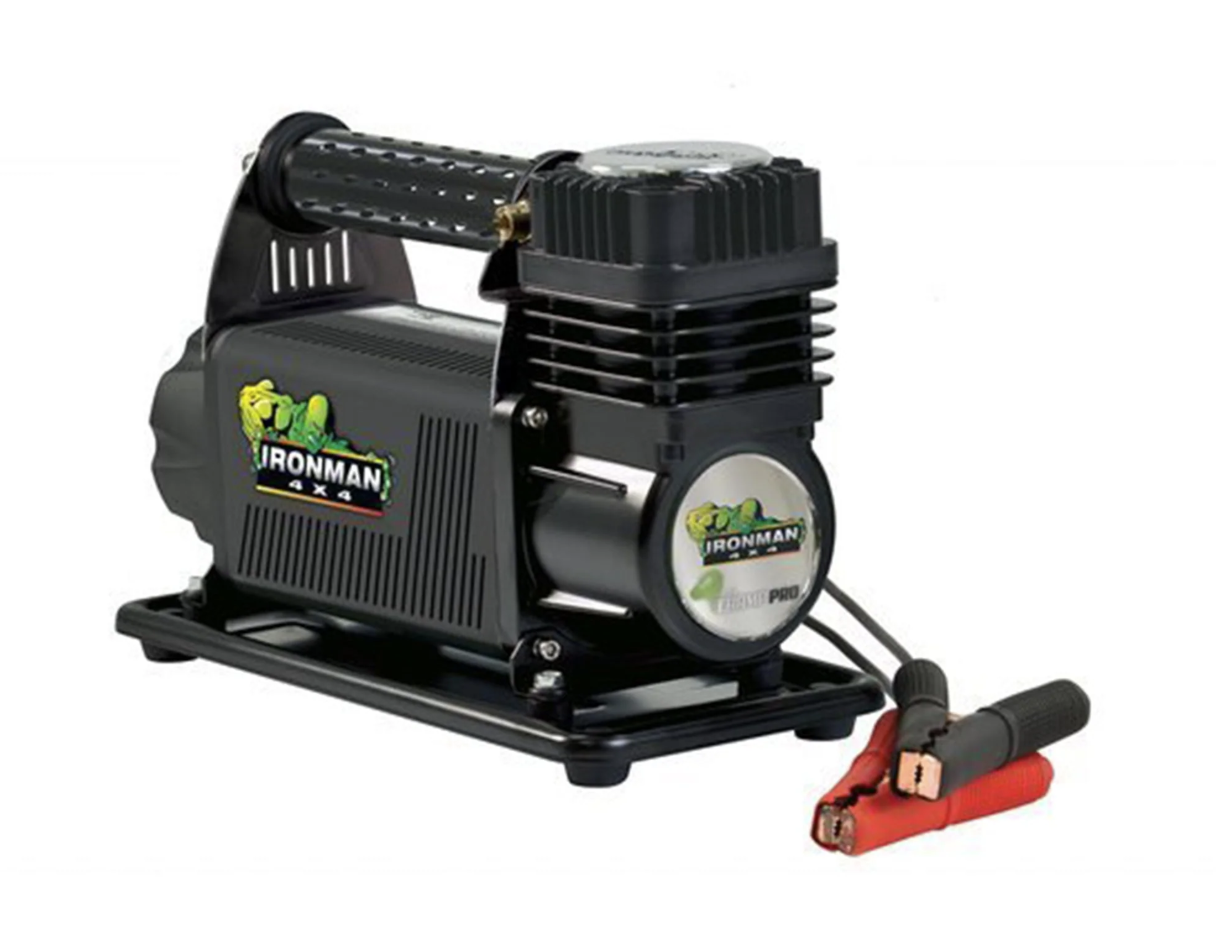
The Ironman 4×4 Air Champ Pro is a 12V heavy-duty portable compressor built for off-road and trade use.
1
Its 540W motor with a 60mm cylinder delivers up to 150 psi and 160 L/min, making it quick and efficient for inflating large tyres or heavy-duty equipment.
Durable and user-friendly, it features an 8 m heat-resistant hose with snap-on quick-release fitting, inline pressure gauge/deflator, anti-vibration feet, and a maintenance-free motor. Dust- and moisture-resistant, it runs on 45 A max current with a 33 % duty cycle at 100 psi, and comes with a heavy-duty carry bag for easy transport.
A portable air compressor is an essential tool for the avid four-wheel driver. There are few products that are ‘must haves’ in the world of 4x4ing, camping and the great outdoors, but an air compressor is definitely one item that should be carried, as it can have so many handy and convenient uses – aside from tyre inflation.
It’s one of the most frequently used accessories, as situations constantly arise beyond the black stump that require a quick tyre-pressure change. They’re light-weight, easy to store, simple to use, and they won’t sting the hip pocket too much – plus, purchase the right attachment and you’ll be inflating your campsite mattress in next to no time.
Gone are the days of over-inflating the spare for emergencies, with a variety of different compressors now on the market. 12-volt electric compressors are by far the popular choice,but there are also engine-driven and battery-operated compressors to suit different needs.
So, if your adventures include traversing sand, dirt, mud, rocks and tarmac, there’s no reason to opt out when it comes to acquiring a portable air compressor.
Price
This is the tough one. We all want to spend as little as possible, but we also want the best out of our gear. We’ve managed to round up a number of compressors that are suitable for 4WD tyre inflation as well as general use around the campsite.
We’ve drawn a line at the units being portable; that is, they must be able to be carried and used from one vehicle to another – not engine-mounted or engine-driven. Of course, most of the compressors you see here can indeed be mounted in your engine bay, under your seats or in your cargo area, but they are all initially portable units.
Maximum pressure
If you want to pump up your tyres to 40-50psi, there’s no point purchasing a compressor that can only inflate low-pressure toys like soccer balls, air beds and kids toys. For low-pressure pumping that requires a large volume of air, all you need is a lower (maximum) pressure pump that has a flow rate as high as possible. Remember all those soccer balls, air beds and toys may have different openings, so be sure to look for varied fitments on the hose outlet.
Without knowing compressors’ internal specifications, there is no way of guessing the flow rates. That will depend on the bore, stroke, rpm, and internal design, as well as other restricting factors such as chuck type, air filter material, wiring gauge and length, and the temperatures reached while running. Just because one compressor seems identical to another, that doesn’t mean it’s the same inside – just like all car engines are not created equal, even though many are rated at the same cubic size!
Duty cycle
It’s important to have a good duty cycle in a compressor. Roughly, the duty cycle is the amount of time the pump is actually working when it’s turned on, compared to the amount of time it’s not working when it needs to cool down. For example, two minutes on followed by two minutes off is not very good when you’re trying to pump something up quickly.
Similarly, a (claimed) 50 percent duty-cycle pump may run for 30 minutes, followed by a long 30-minute wait. Perhaps that’s okay to re-inflate your four tyres after leaving the beach – but will that pump actually do the job within 30 minutes? I’d hate to be waiting another 30 minutes while the compressor cools down before you can finish that last tyre!
Officially, duty cycle should be measured with the compressor pumping at 100psi at an ambient temperature of 22°C. It is calculated by taking the run time and dividing it by the run time plus the off time, then multiplying the result by 100; the final figure is expressed as percentage.
For example: if a compressor is rated at a 25 percent duty cycle, it means it can only (theoretically) run for 10 minutes followed by 30 minutes turned off. So, 10 ÷ (10 + 30) × 100 = 25 per cent duty cycle – not 33 per cent as you might presume (10 ÷ 30 × 100 = 33).
An internal thermal cut-out switch is designed primarily to protect the air compressor’s motor from burning out or overheating. You’ll have no control over this thermal cut off; when the unit heats to a preset temperature, it (in theory) stops, leaving you twiddling your thumbs waiting for it to switch itself back on.
A 100 percent duty-cycle compressor, on the other hand, is great for our 4WD tyres, as well as those of all your mates who line up to use your pump – ’cause theirs keep cutting out!
Put simple, a duty cycle of an air compressor describes how long it can run and how long it needs to rest. “Duty cycle is the amount of continuous running time a compressor has,” Alderwick said. “This must be referenced with an operating temperature, a pressure, and a time period.
“One hundred percent duty cycle means a compressor can run continuously, but it still implies the requirement to stay within the reference conditions, and use outside of those conditions would lower the published duty cycle.”
Look for a duty cycle which allows you to inflate all of your tyres in normal conditions, without having to overwork or rest the compressor.
Why compressed air?
Altering tyre pressures changes the size of a tyre’s footprint, with larger footprints improving traction in softer surfaces like sand and lowering the risk of getting bogged or stuck, and smaller footprints ideal on highway runs.
To ensure tyre pressures are safely, securely, accurately and quickly modulated, it’s essential to have a no-nonsense tool that can be relied upon when the situation dictates.
Sure, pushing a twig on the valve needle may still be an effective way to drop tyre pressures down for a blast on the sand dunes, but these days, anyone who takes their off-roading seriously should be packing a portable air compressor to get the pressure back up.
“Air compressors are absolutely essential, as deflating tyres to tackle specific conditions will help get you out of tough places and with less stress on the vehicle,” ARB’s Shannon Alderwick said. “Having the reliability to inflate those tyres after driving at low pressures will ensure less tyre damage.”
Dip your toes into the air compressor market and you’ll notice there are both single- and twin-piston units available.
The single-piston offerings have been around the traps for yonks, with a tried-and-true formula of tyre inflation, albeit at a slow pace. Still, they’re lightweight, small in size and draw less power than their bigger siblings.
The twin-piston units can pump considerably more litres per minute than singles, yet come with a steeper sticker price and draw more power … but you’ll be back on the tracks far sooner.
The majority of 4x4ers pack and run electric air compressors, with Ironman 4×4’s director of 4×4 products, Adam Craze, telling 4X4 Australia there’s good reason for this.
“They’re portable, fairly cost-effective, you can take them from vehicle to vehicle, and there’s nothing special required to run it,” he said. “Also, most come in a bag with attachments, and they can be mounted permanently.”
It’s this ease-of-use and versatility for remote-area use that appeals to the average punter, with electric compressors available in both fixed mountable and portable configurations.
“Mountable compressors come with a bracket system universal for many configurations … for the most common places in a 4WD,” Alderwick said. “Using pneumatic lines provides the option to expand or change the system configuration with a range of fittings, joiners, and other components to suit any custom build.”
Another benefit of an electric air compressor is that you can reseat a tyre bead if it was to come away from the rim.
Engine-driven compressor
Should you require an even greater flow rate, there are engine-driven air compressors available, which, as the name implies, are mounted to a vehicle’s petrol or diesel engine, to generate an endless supply of compressed air.
One of the main benefits of an engine-driven air compressor is that they provide much greater output than the 12-volt units, are highly efficient and have the ability to stay cool and run for a much longer time. However, as they must be belt-driven, a common problem is finding space for the unit in the busy engine bays of modern vehicles.
Australian company Endless Air began producing compressors back in 1995. Its unit is a five-piston design that runs from a petrol or diesel engine through an electric clutch.
What to look for
Browsing catalgoues for a new air compressor might be an overwhelming task, but there are a few key features to look for when buying one for that next 4×4 trip.
As always, it’s important to establish early on what your off-roading intentions are – will you spend your time blowing up the kids’ pool at a campsite? Or will you be lowering tyre pressures to reach that bucket-list campsite? If the latter, you’ll want a heavy-duty unit that’ll serve its purpose; if the former, well, just get a foot pump.
As well as researching flow rates, max current draws and duty cycles (see pages 98 and 99), there are a number of key cogs that comprise a quality compressor. We asked the experts at Ironman 4×4 and ARB to highlight the key features to look for when buying an air compressor.
“Reliability of components including wiring, connectors and switches to ensure it always works on any occasion,” Alderwick told us, with Craze adding: “Note how long is the hose, what is the duty cycle and how many amps does it draw. (Look at) litres per minute versus the size of your tyres. Also, size for storage. If you have a van, will it reach the camper or van tyres.”
If opting for a twin-piston compressor, keep an eye out for products with twin motors to power the pistons separately, providing further insurance if one piston goes bang.
“This ensures two motors can run independently at full performance while allowing the compressor to continue if there was ever a failure of one motor. The other motor then produces the same qualities as a single ARB compressor,” Alderwick said.
Another consideration – as with any 4×4 aftermarket purchase – is to research the brand you are buying from, specifically warranties, service network and parts availability.
Remember, you get what you pay for. Make an error in judgement and swipe the credit card for a cheap and nasty inferior product, and it might come back to bite you … or catch fire.
“Underrated, poor wiring quality presents a fire risk while in use due to the current requirements of a compressor,” Alderwick said. “Undersized fuse holders holding larger amp fuses result in melted wires and failure. (Plus) no overpressure protection, which in warmer climates produces extreme temperatures, deteriorating seals and can cause fires.”
Alderwick said some companies have been known to publish fraudulent performance specs which could cause failure before reaching claimed limits.
Craze added: “Some products may look the same outside but internally are very different, like plastic gears or pistons.
Some hoses will melt or blow holes due to the heat, or small wiring that doesn’t cope with the power requirement.” Research, research, research!
Flow rate and max current draw
You’re bound to encounter the terms ‘Flow Rate’ and ‘Max Current Draw’ when hunting for a new compressor. Flow rate of an air compressor is the ‘generated litres per minute of the compressed air’, while max current draw is the highest number of amps a manufacturer would expect the compressor to consume under any standard operating conditions.
For example, look through the spec sheets and you might see a flow rate of 70lt/min and a max current draw of 65.5amp, this means it’ll have a flow rate of 70 litres per minute and a max current draw of 65.5 amps.
In relation to max current draw, Alderwick said: “A lower current draw will demand less of the vehicle’s electrical system, however lower currents will often reflect lower performance.”
4X4 Australia has been reviewing four-wheel drive vehicles, aftermarket products and camping gear for more than 40 years. When looking for the best swags in Australia there are some things that are essential to ensure you sleep soundly under the stars.
When we compared each of the swags in the list with hundreds out there we looked at the size, weight, durability and price. We also searched for additional features that make these swags stand out from the rest.
We looked at hundreds of user reviews and drew on our own experience sleeping in swags to make sure our recommendations are for the best on the market.
Disclosure: When you buy through our links, we may earn a commission. We also include products that we do not earn a commission from.
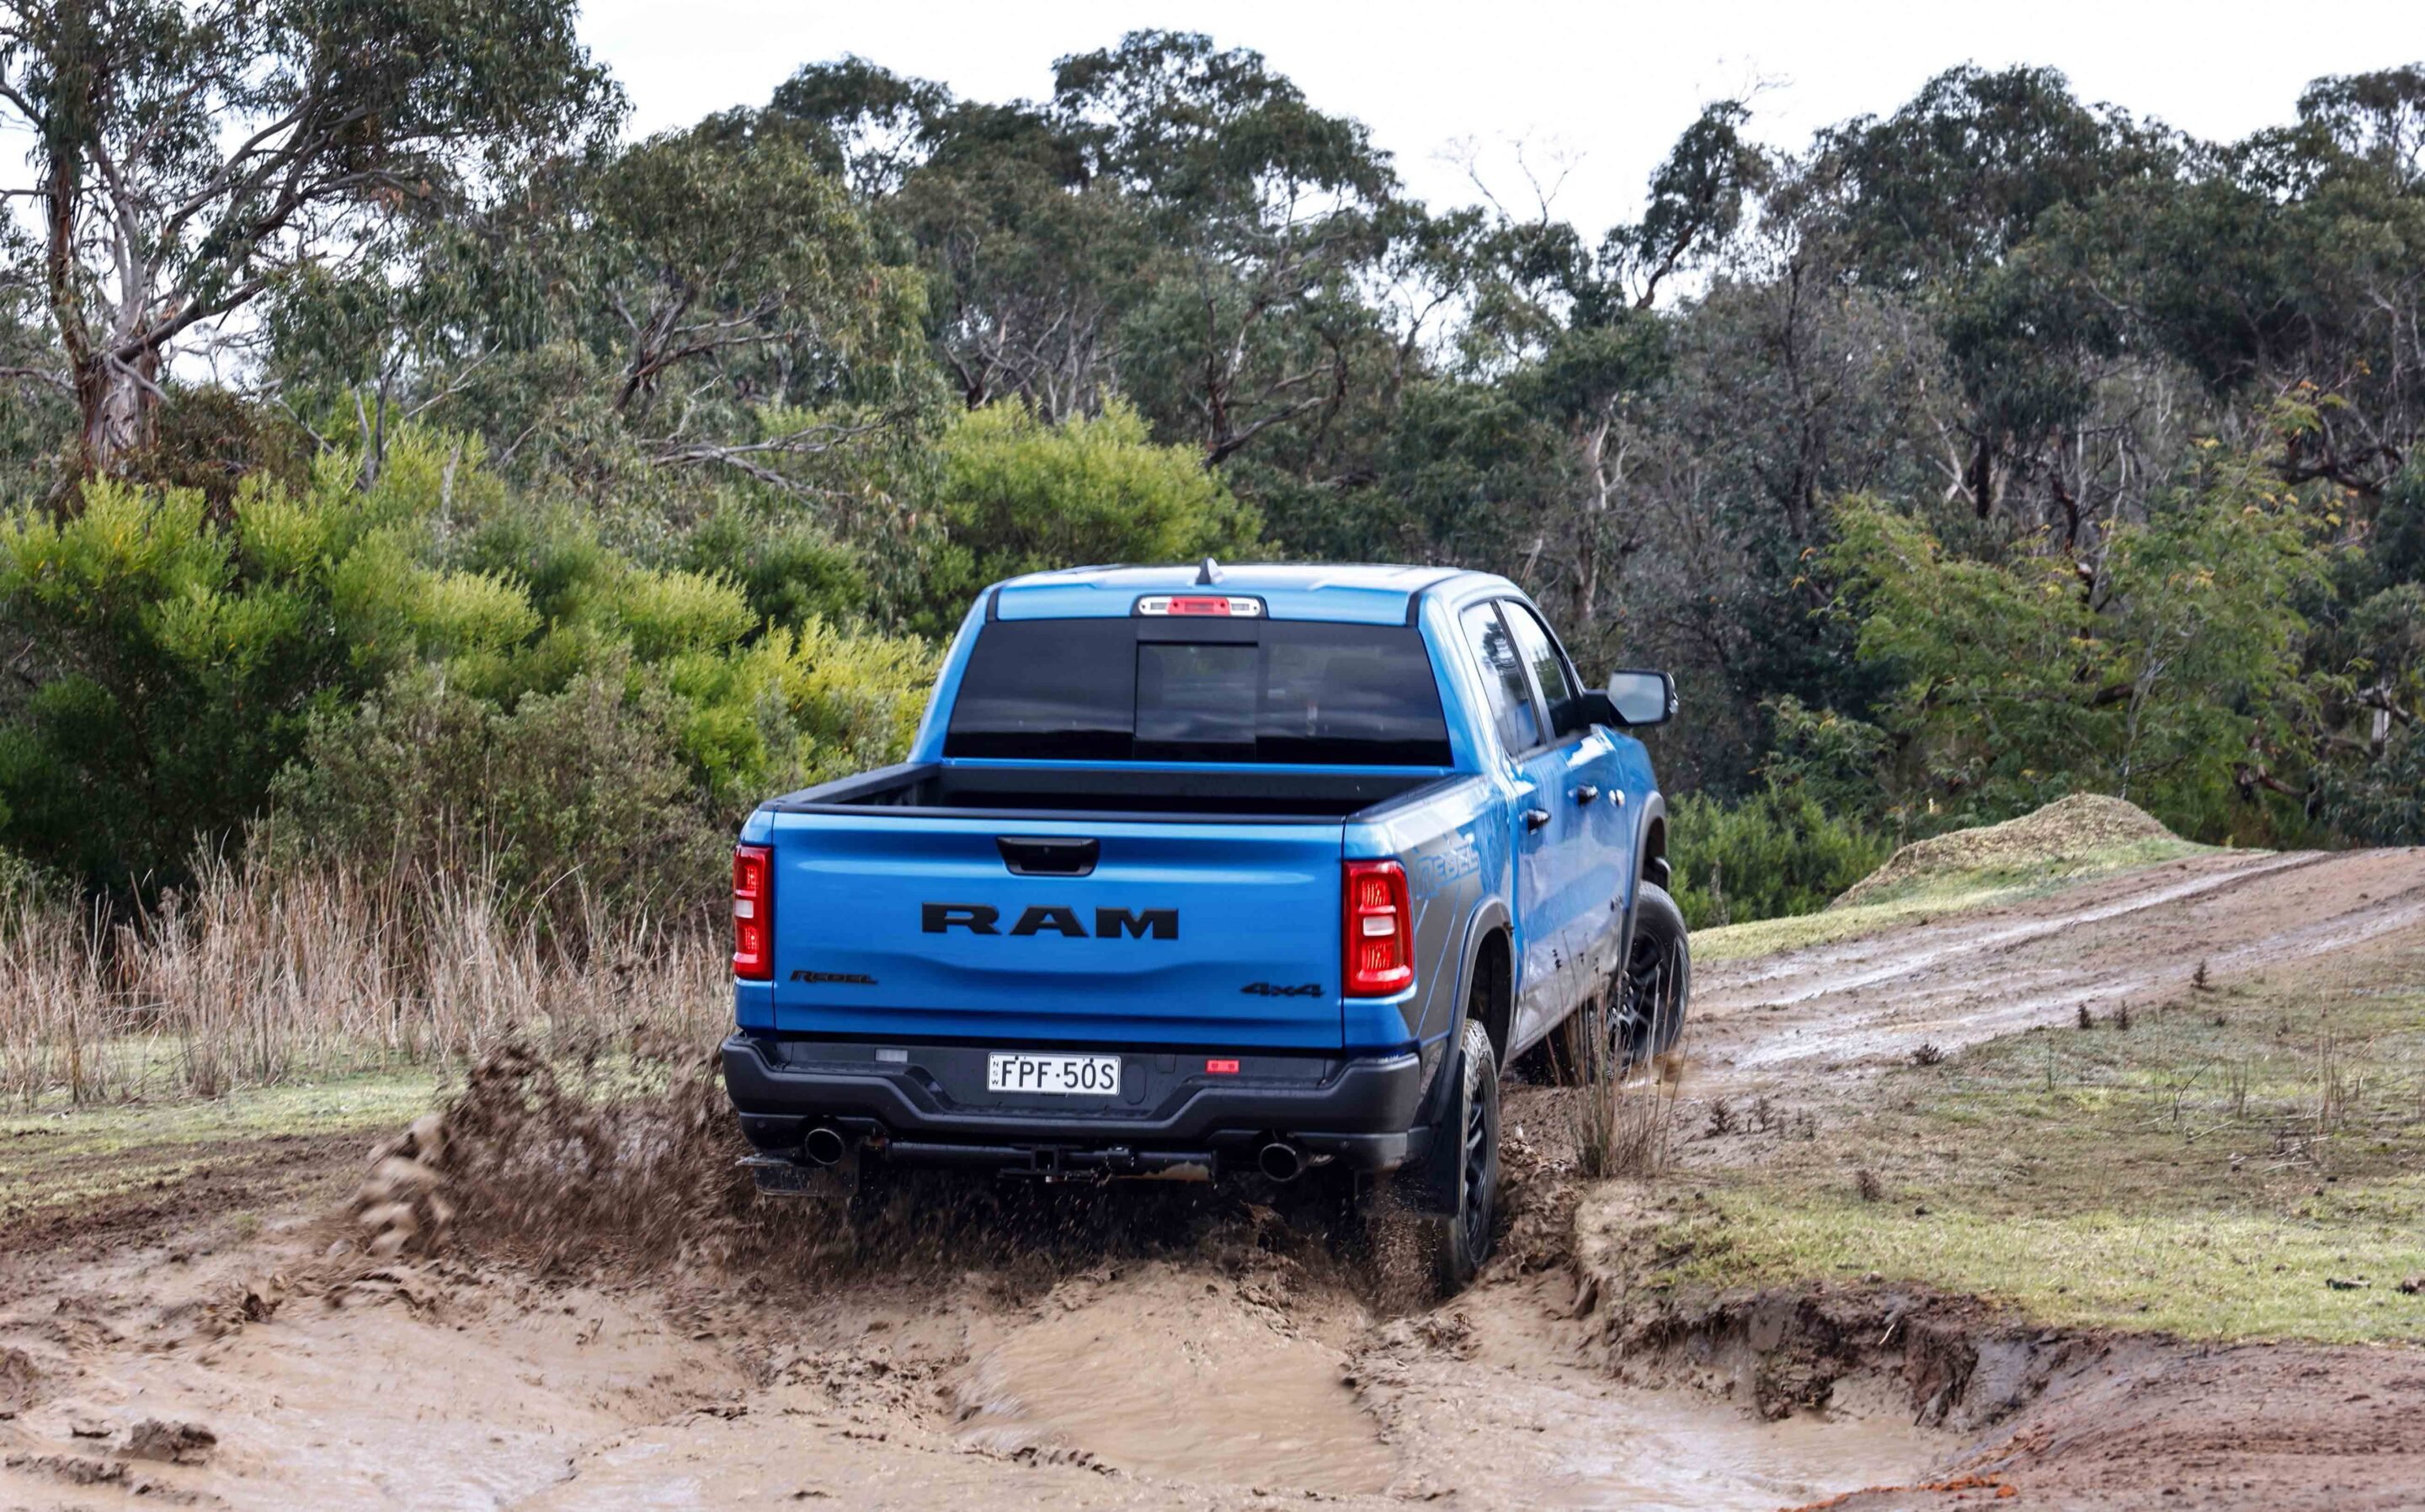
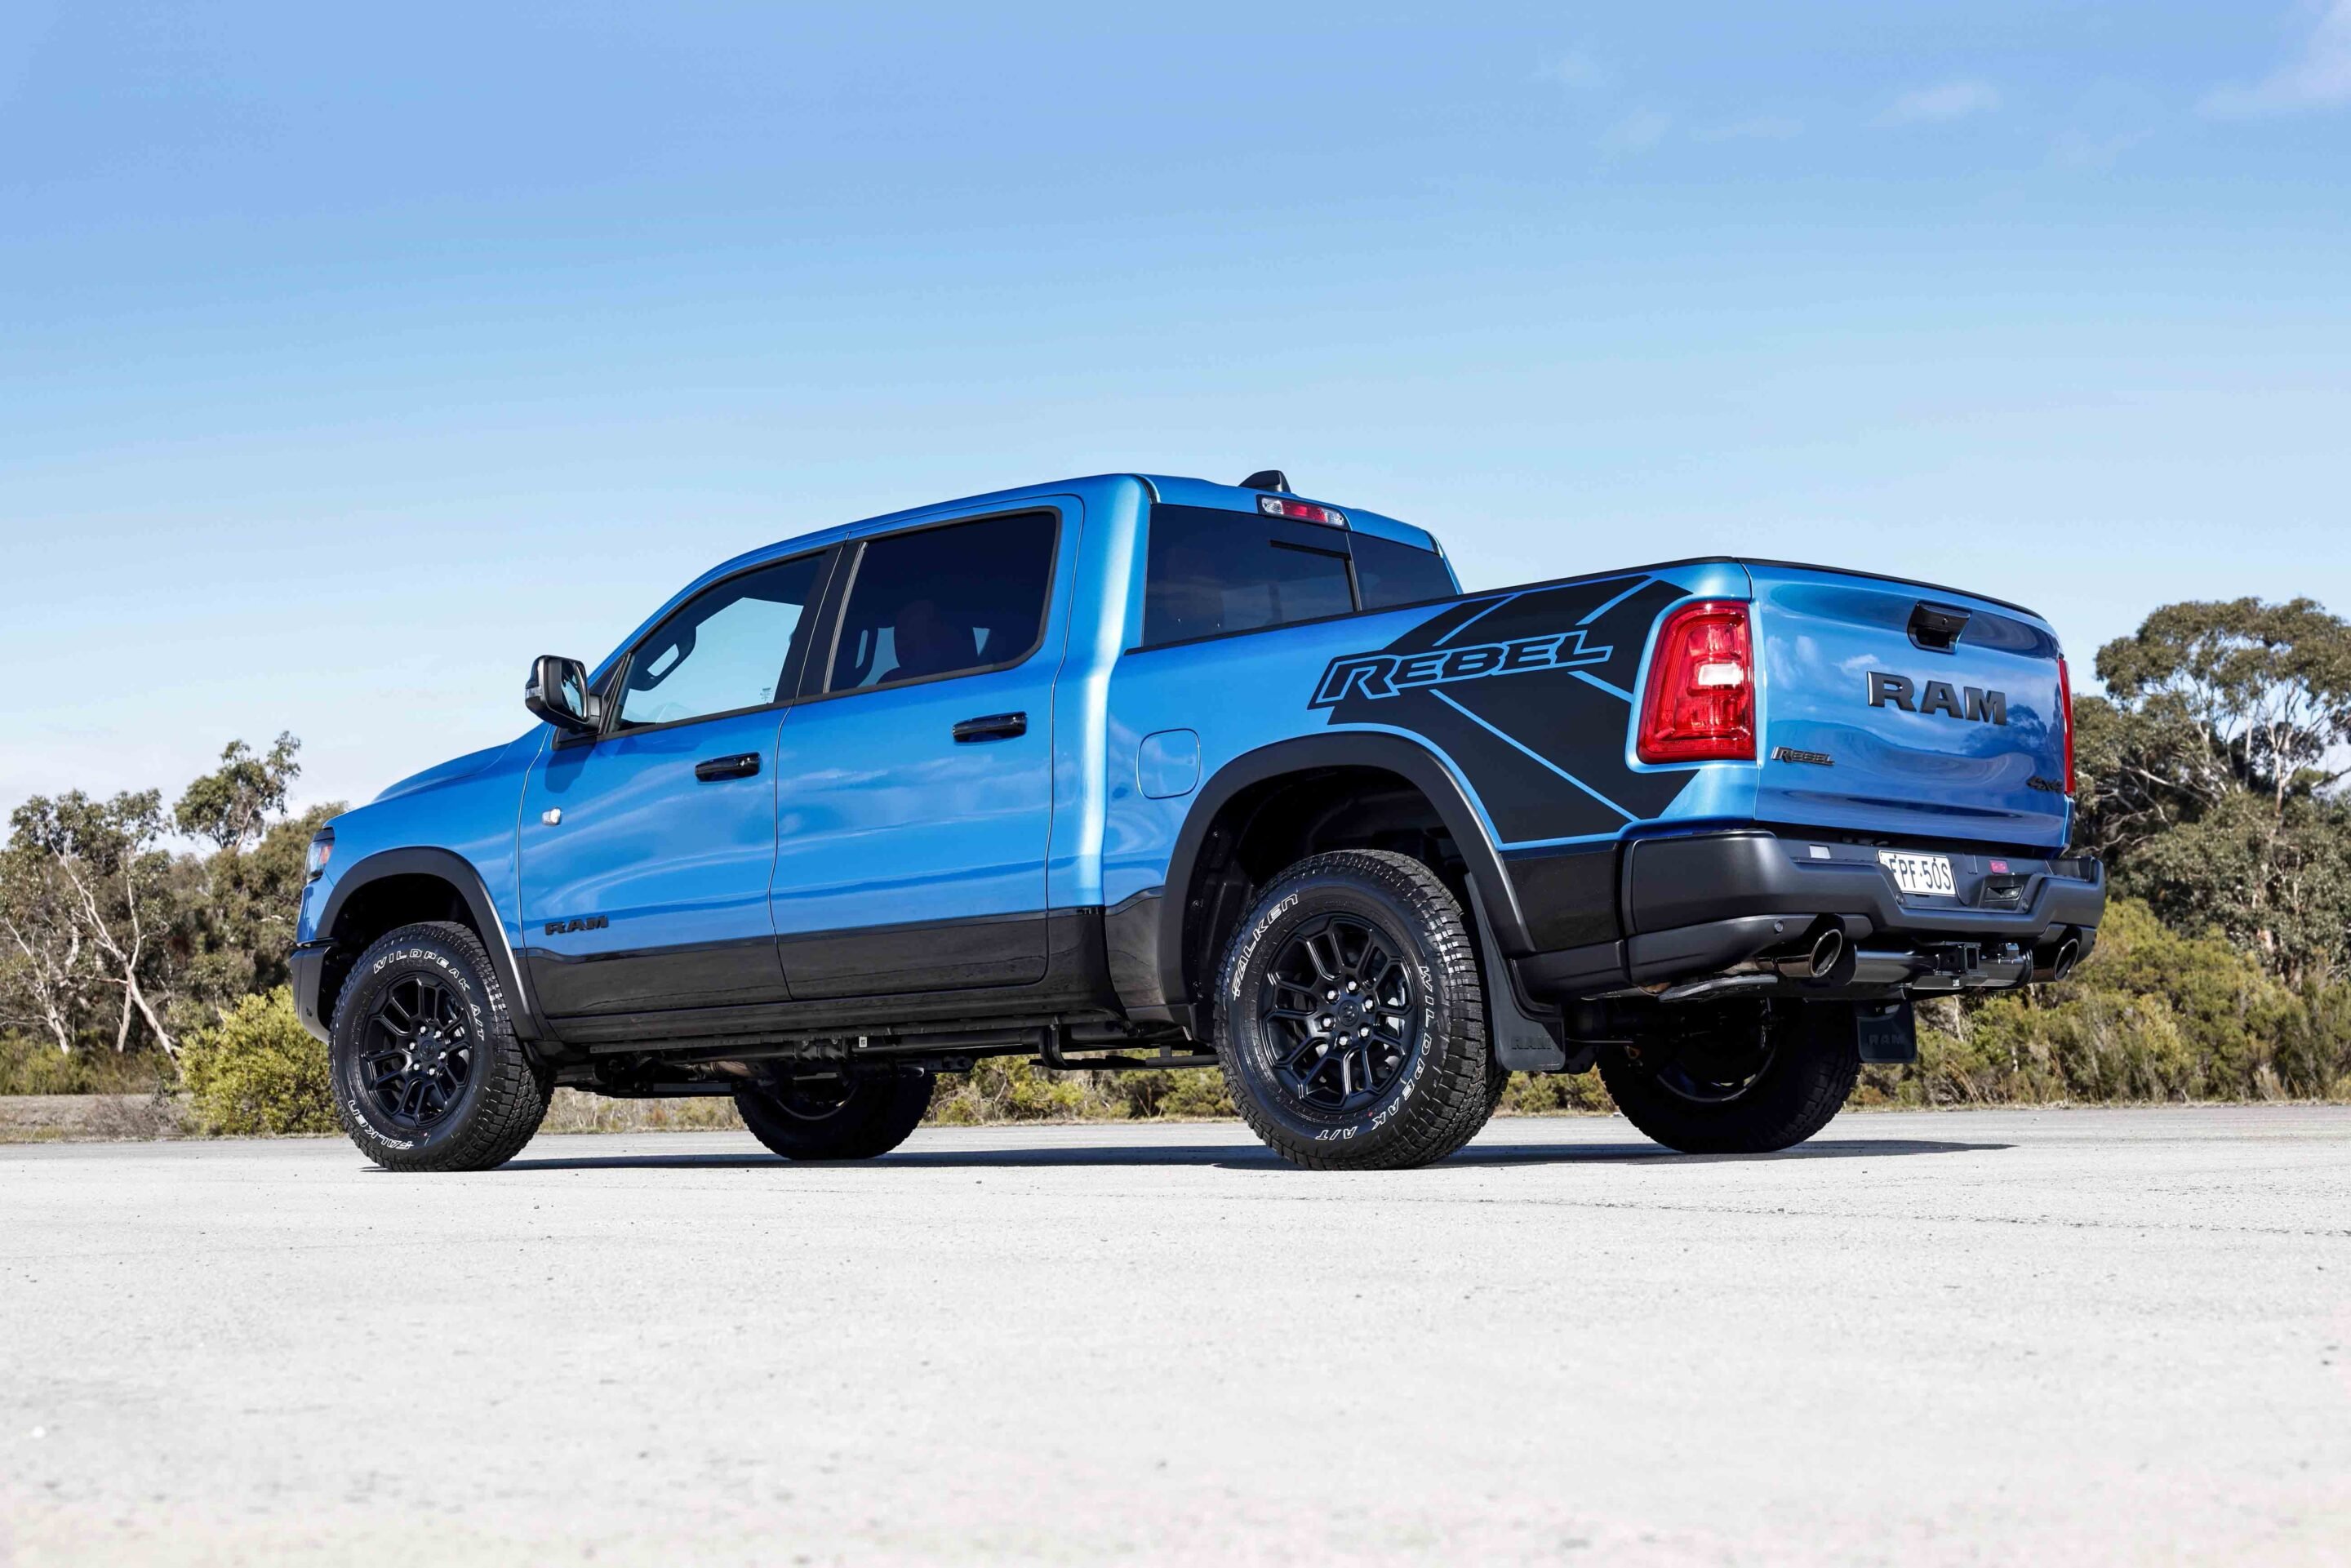
The RAM 1500 Rebel slots in alongside the Laramie and Limited 1500s, bringing a tougher, off-road-focused option for those who actually want to get their truck dirty and make the most of its capability.
Priced from $141,950 plus on-roads, this is the first time the Rebel has been officially offered here through RAM Trucks Australia (RTA), although non-official outlets have sold the US-spec model here previously.
The 1500 Rebel is priced the same as the Laramie Sport at $141,950 plus on-roads, while the HO-powered 1500 Limited tops the range at $159,950 (+ORC).
The 2025 RAM 1500 Rebel comes only with the Standard Output (SO) version of the 3.0-litre twin-turbo Hurricane straight-six, good for 313kW and 635Nm.
The High Output (HO) tune stays exclusive to the flagship Limited, and there’s no Hemi V8 on the cards for Australia… at least for now. Over in the States the Hemi V8 is making a comeback in the 1500, but RTA says there are no immediate plans to bring it back here, with the focus firmly on the new Hurricane engines.
Performance truck fans needn’t stress about missing out on the Hemi or the HO, because the standard Hurricane six packs plenty of punch – more, in fact, than the old V8. It hustles the 1500 Rebel along road and track with ease. Sure, it doesn’t have that trademark Hemi howl, but the new RAM arrives with its own Rebel Yell… even if it’s a quiet one.
1
Like the rest of the DT 1500 range, the Rebel runs an eight-speed auto and dual-range transfer case with a 4×4 Auto mode. That proved handy on the wet launch roads – in 2WD the rear tyres would light up with just a tickle of throttle before the traction control stepped in, but flick it into 4×4 Auto and you could bury your right foot and let the all-paw grip do its thing. The Rebel gets its own 32-inch Falken all-terrains on sensible 18-inch alloys, not the ridiculous 22s you’ll find on the Limited.
While the transmission itself performs flawlessly, the gear selector dial is fussy to use in off-road manoeuvres and far from ideal. The lack of any form of manual gear selection doesn’t help either, particularly off-road and when towing.
On- and off-road capability
The Rebel boosts its off-road prowess with Bilstein dampers controlling the IFS and live-axle, all-coil suspension. The package delivers excellent control of the big dual-cab body and tub both on and off-road, and it rides 25mm higher than other 1500 models for improved ground clearance.
Also new to the 1500 is a Selec-Speed crawl function, which works like crawl control by providing low-speed progress without throttle or brake input from the driver. This is particularly handy in technical off-road terrain, optimising throttle delivery to the tyres with traction and allowing the driver to focus on wheel placement. A selectable locking rear differential adds further capability, while model-specific underbody plates protect the undercarriage from rock rash.
The off-road section of the launch did little to trouble the Rebel, which made light work of the muddy conditions and climbs. On gravel roads and tracks, the Bilstein suspension showed its worth with excellent body control and handling.
2025 Ram 1500 Rebel off-road specs
Approach angle
20.9
Ramp-over angle
19.2
Departure angle
22.2
Ground clearance
242mm
Features and practicality
As with other MY25 RAM 1500 models, the Rebel comes well equipped with features that are optional extras in the US but fitted as standard by RTA.
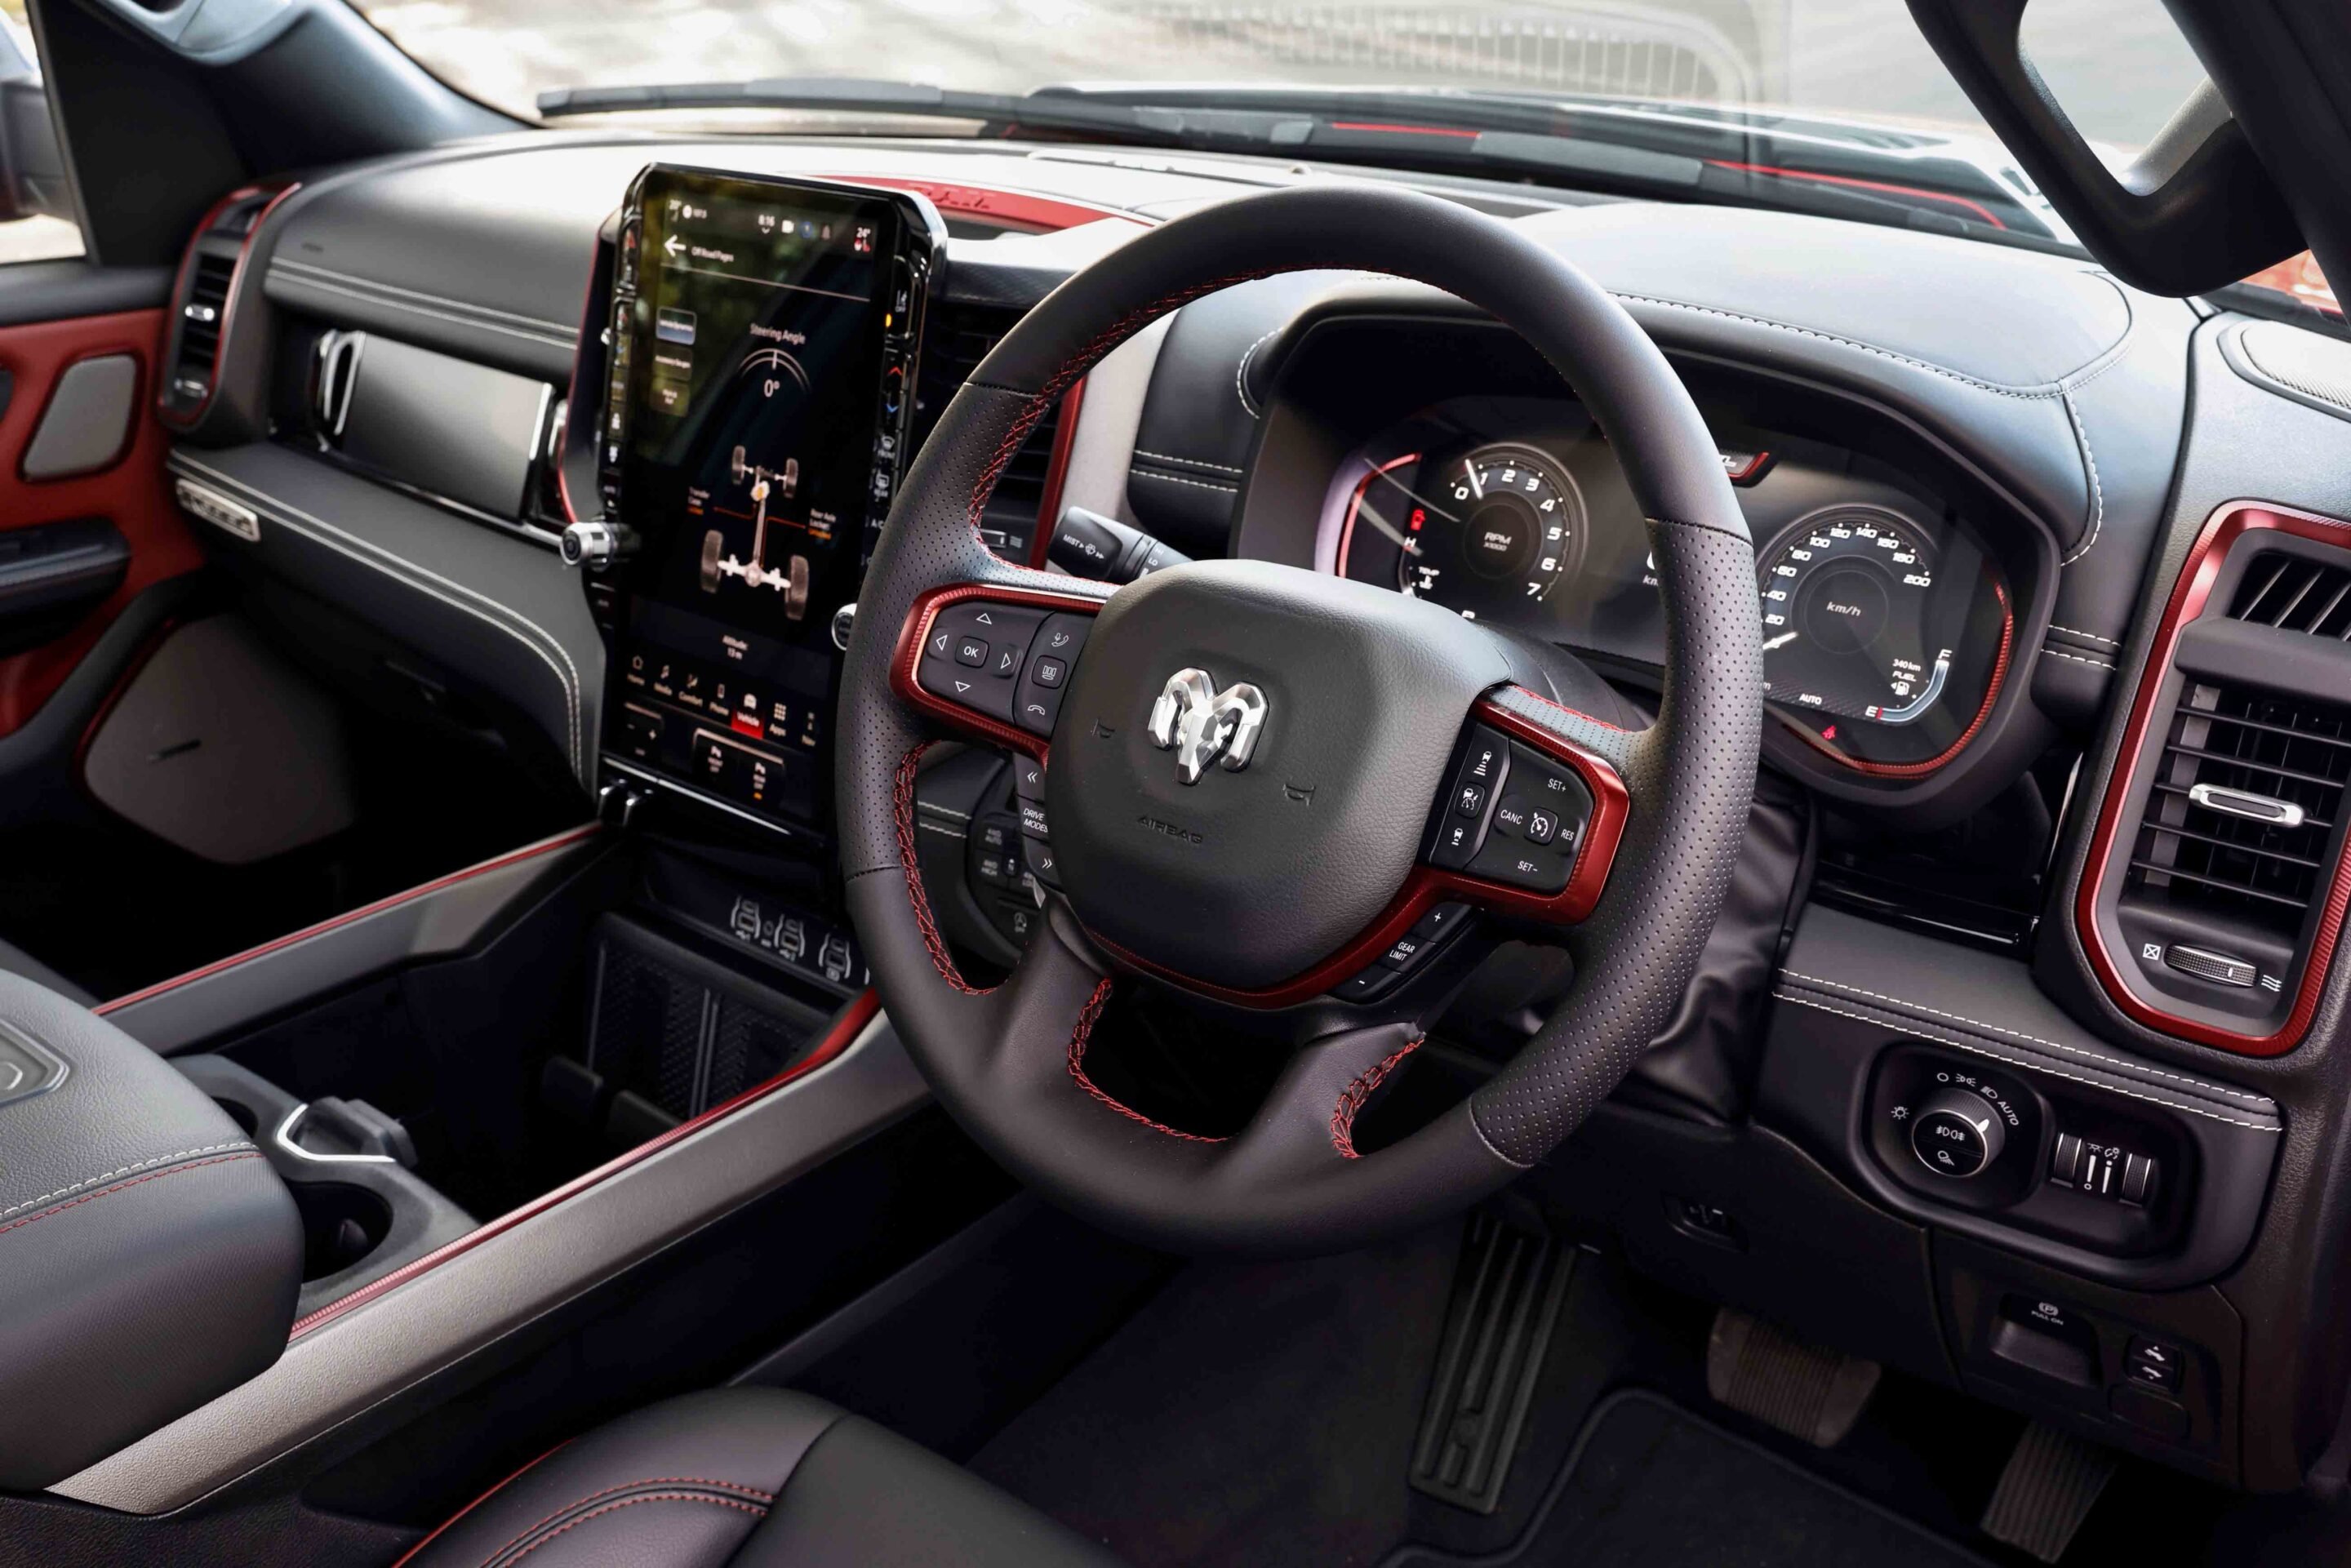
Inside, there’s a massive sunroof, a 19-speaker Harman Kardon sound system, heated leather power-adjustable front seats, and a huge rear seat with cavernous storage underneath. Up front is a 14-inch central multimedia screen, plus a second 10.25-inch screen for the passenger. The passenger display can stream movies or video on the move, as it’s not visible from the driver’s seat. A clever function also lets the passenger search locations on mapping apps and then send them straight to the main screen for the driver.
All of these features make the Rebel’s cabin spacious and luxurious, and a very comfortable place to while away the miles. The Rebel’s interior is set apart from other models with red highlights and stitching, aimed at giving it a sportier appearance – or so they say.
At the back, the Rebel does away with the Rambox storage compartments for a more conventional cargo tub – increasing internal space, which will be a positive for many buyers. The tub still features adjustable tie-down points, a spray-in liner, powered tailgate and a rear step for easier access.
By leaving out features like the Rambox and powered side steps found on other RAM 1500s, the Rebel offers the highest payload in the range at 893kg. Towing capacity is 4500kg with a 70mm ball, or 3500kg with a 50mm.
Verdict
With improved off-road ability – thanks to upgraded suspension, underbody protection and sensible tyre choices – plus full 4500kg towing capacity, strong performance and extra tub space, the Rebel is the RAM 1500 variant that should appeal to plenty of off-road enthusiasts.
The 2025 updates to the DT series ensure the RAM 1500 will remain popular, and the Rebel only broadens its appeal to a wider audience. The Rebel is offered in all-American red, white or blue, each with bold graphics. They may not be to everyone’s taste – but each to their own.
8
Specs
2025 Ram 1500 Rebel specs
Price
$141,950 (+ORC)
Engine
Bi-turbo-petrol I6
Capacity
2993cc
Max power
313kW @ 5200rpm
Max torque
635Nm @ 3500rpm
Transmission
8-speed automatic
4×4 system
On-demand dual range with 4×4 auto mode
Construction
4-door ute on ladder frame chassis
Front suspension
IFS with A-arms and coil springs
Rear suspension
Multi-link live axle with coil springs
Tyres
275/65R18 on alloys
Kerb weight
2642kg
GVM
3505kg
GCM
7711kg
Towing capacity
4.5t (with correct towbar)
Payload
893kg
Seats
5
Fuel tank
98L
ADR fuel consumption
10.74L/100km (combined)
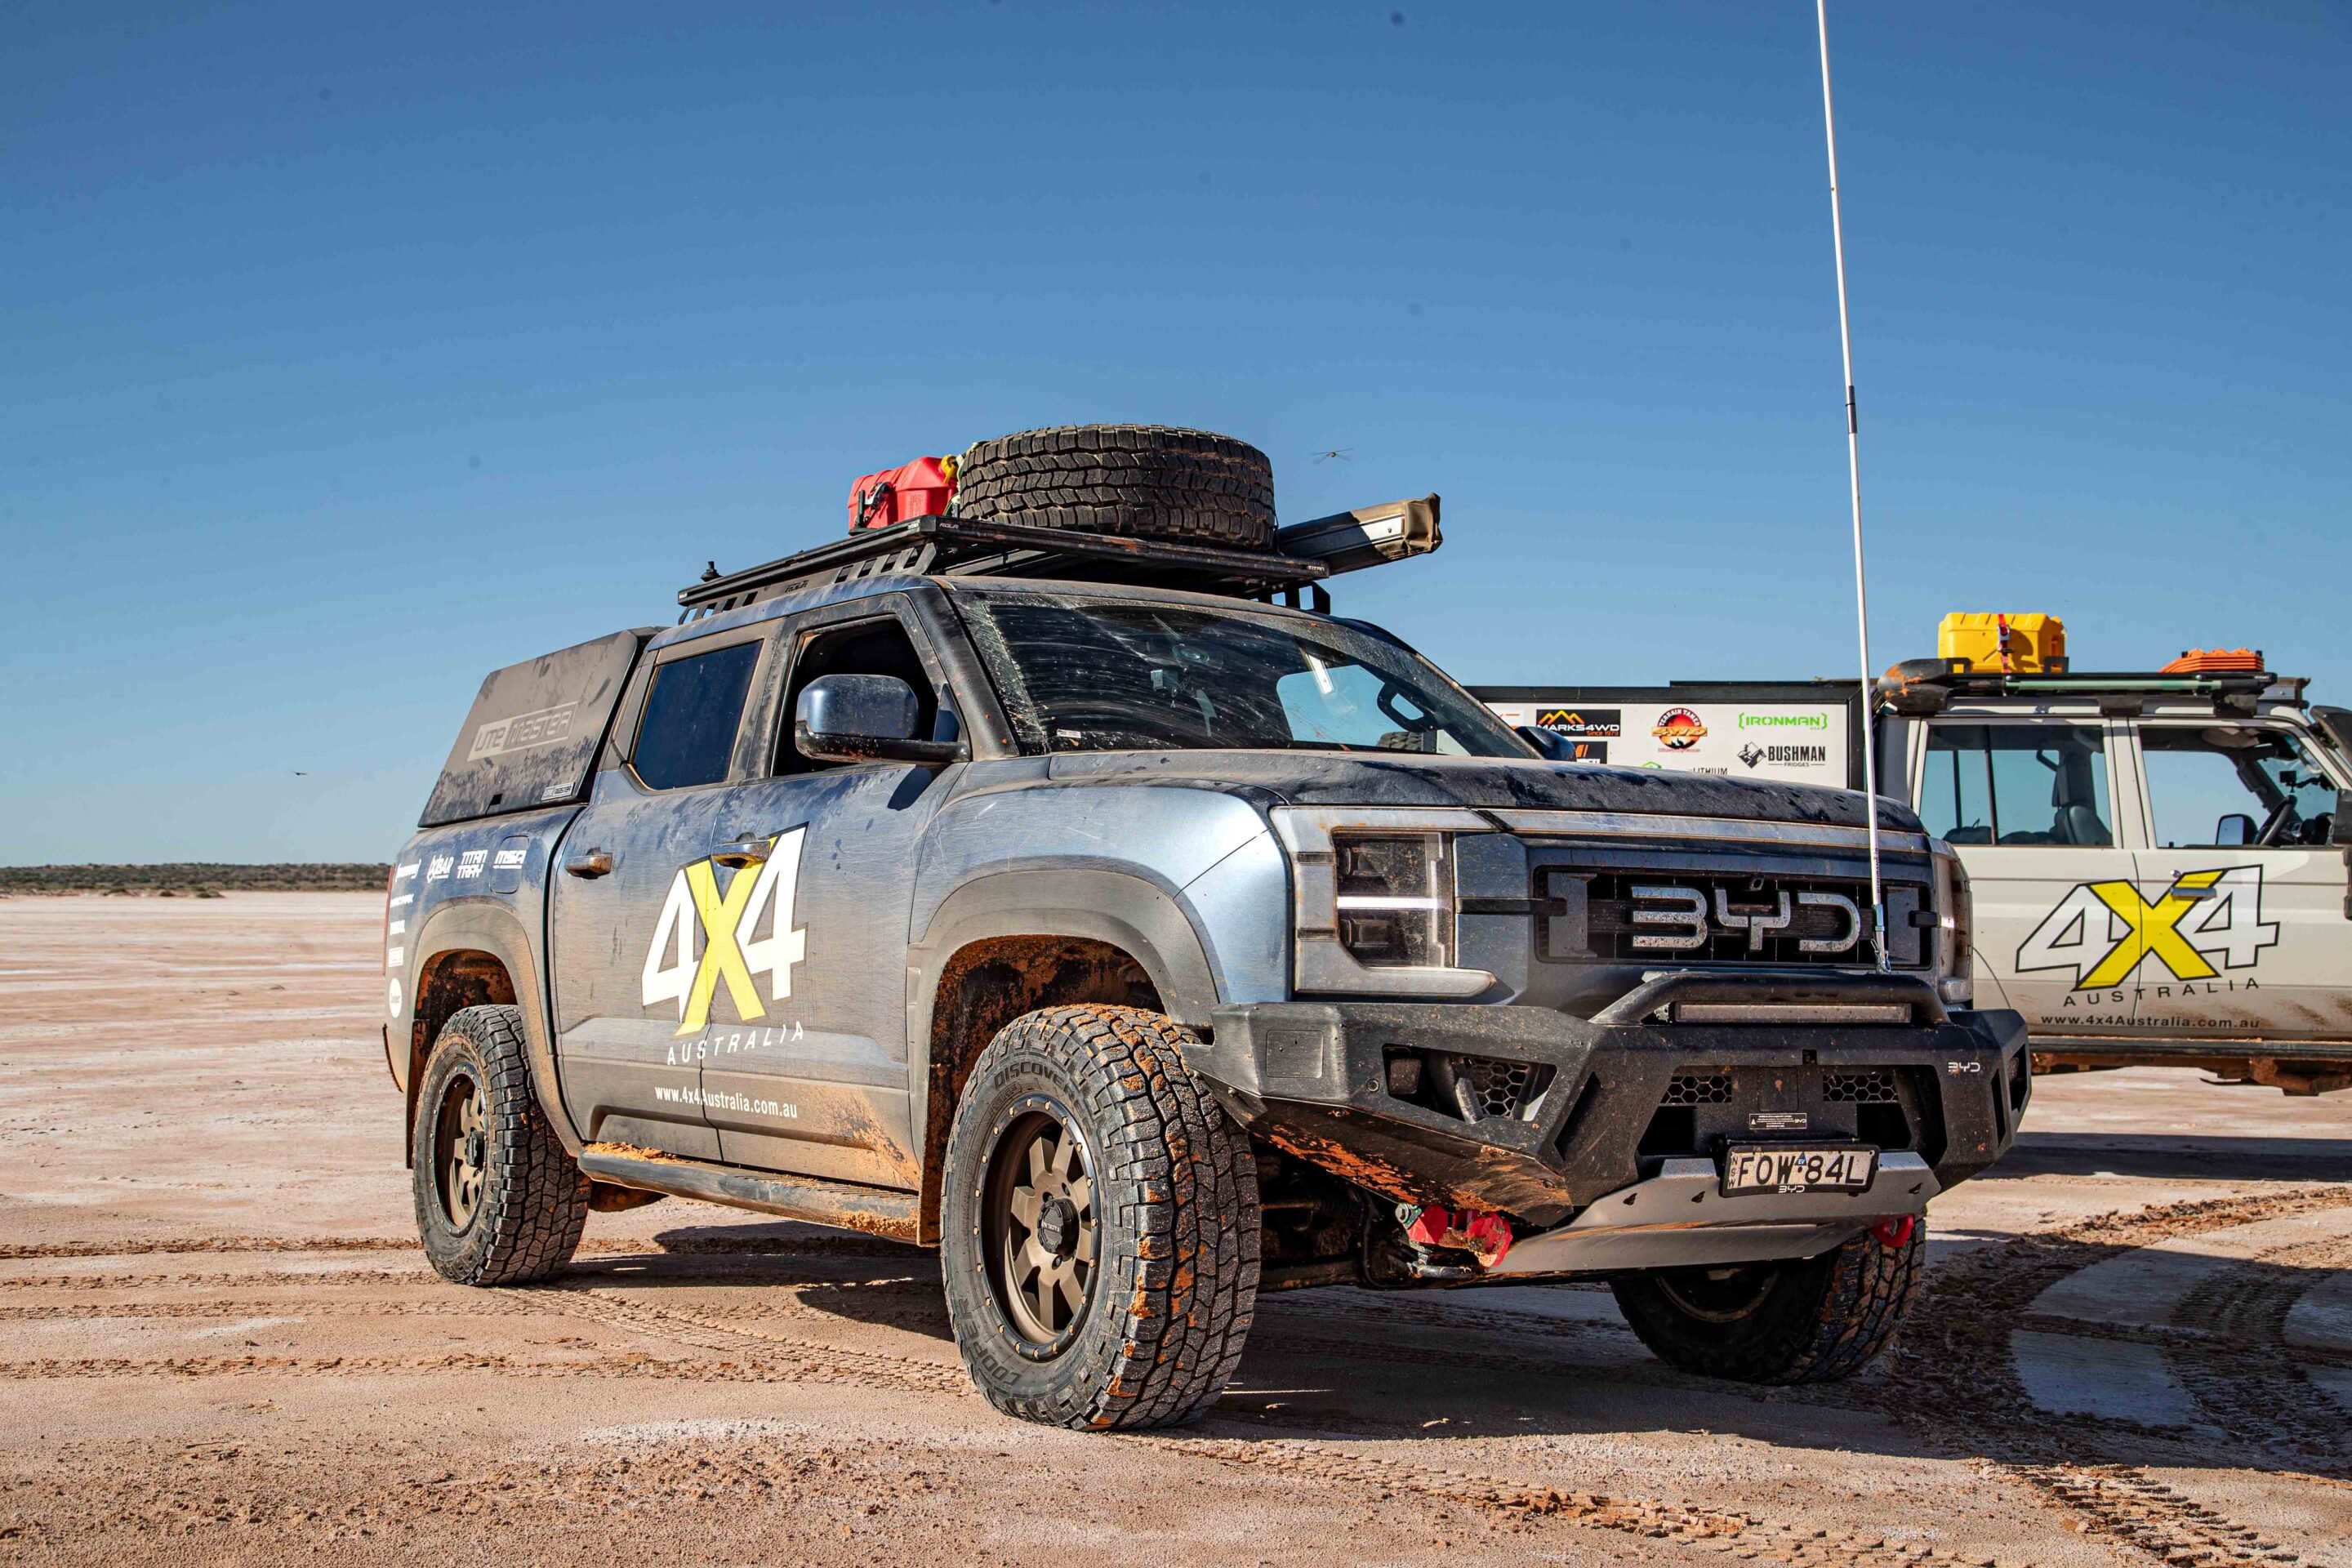
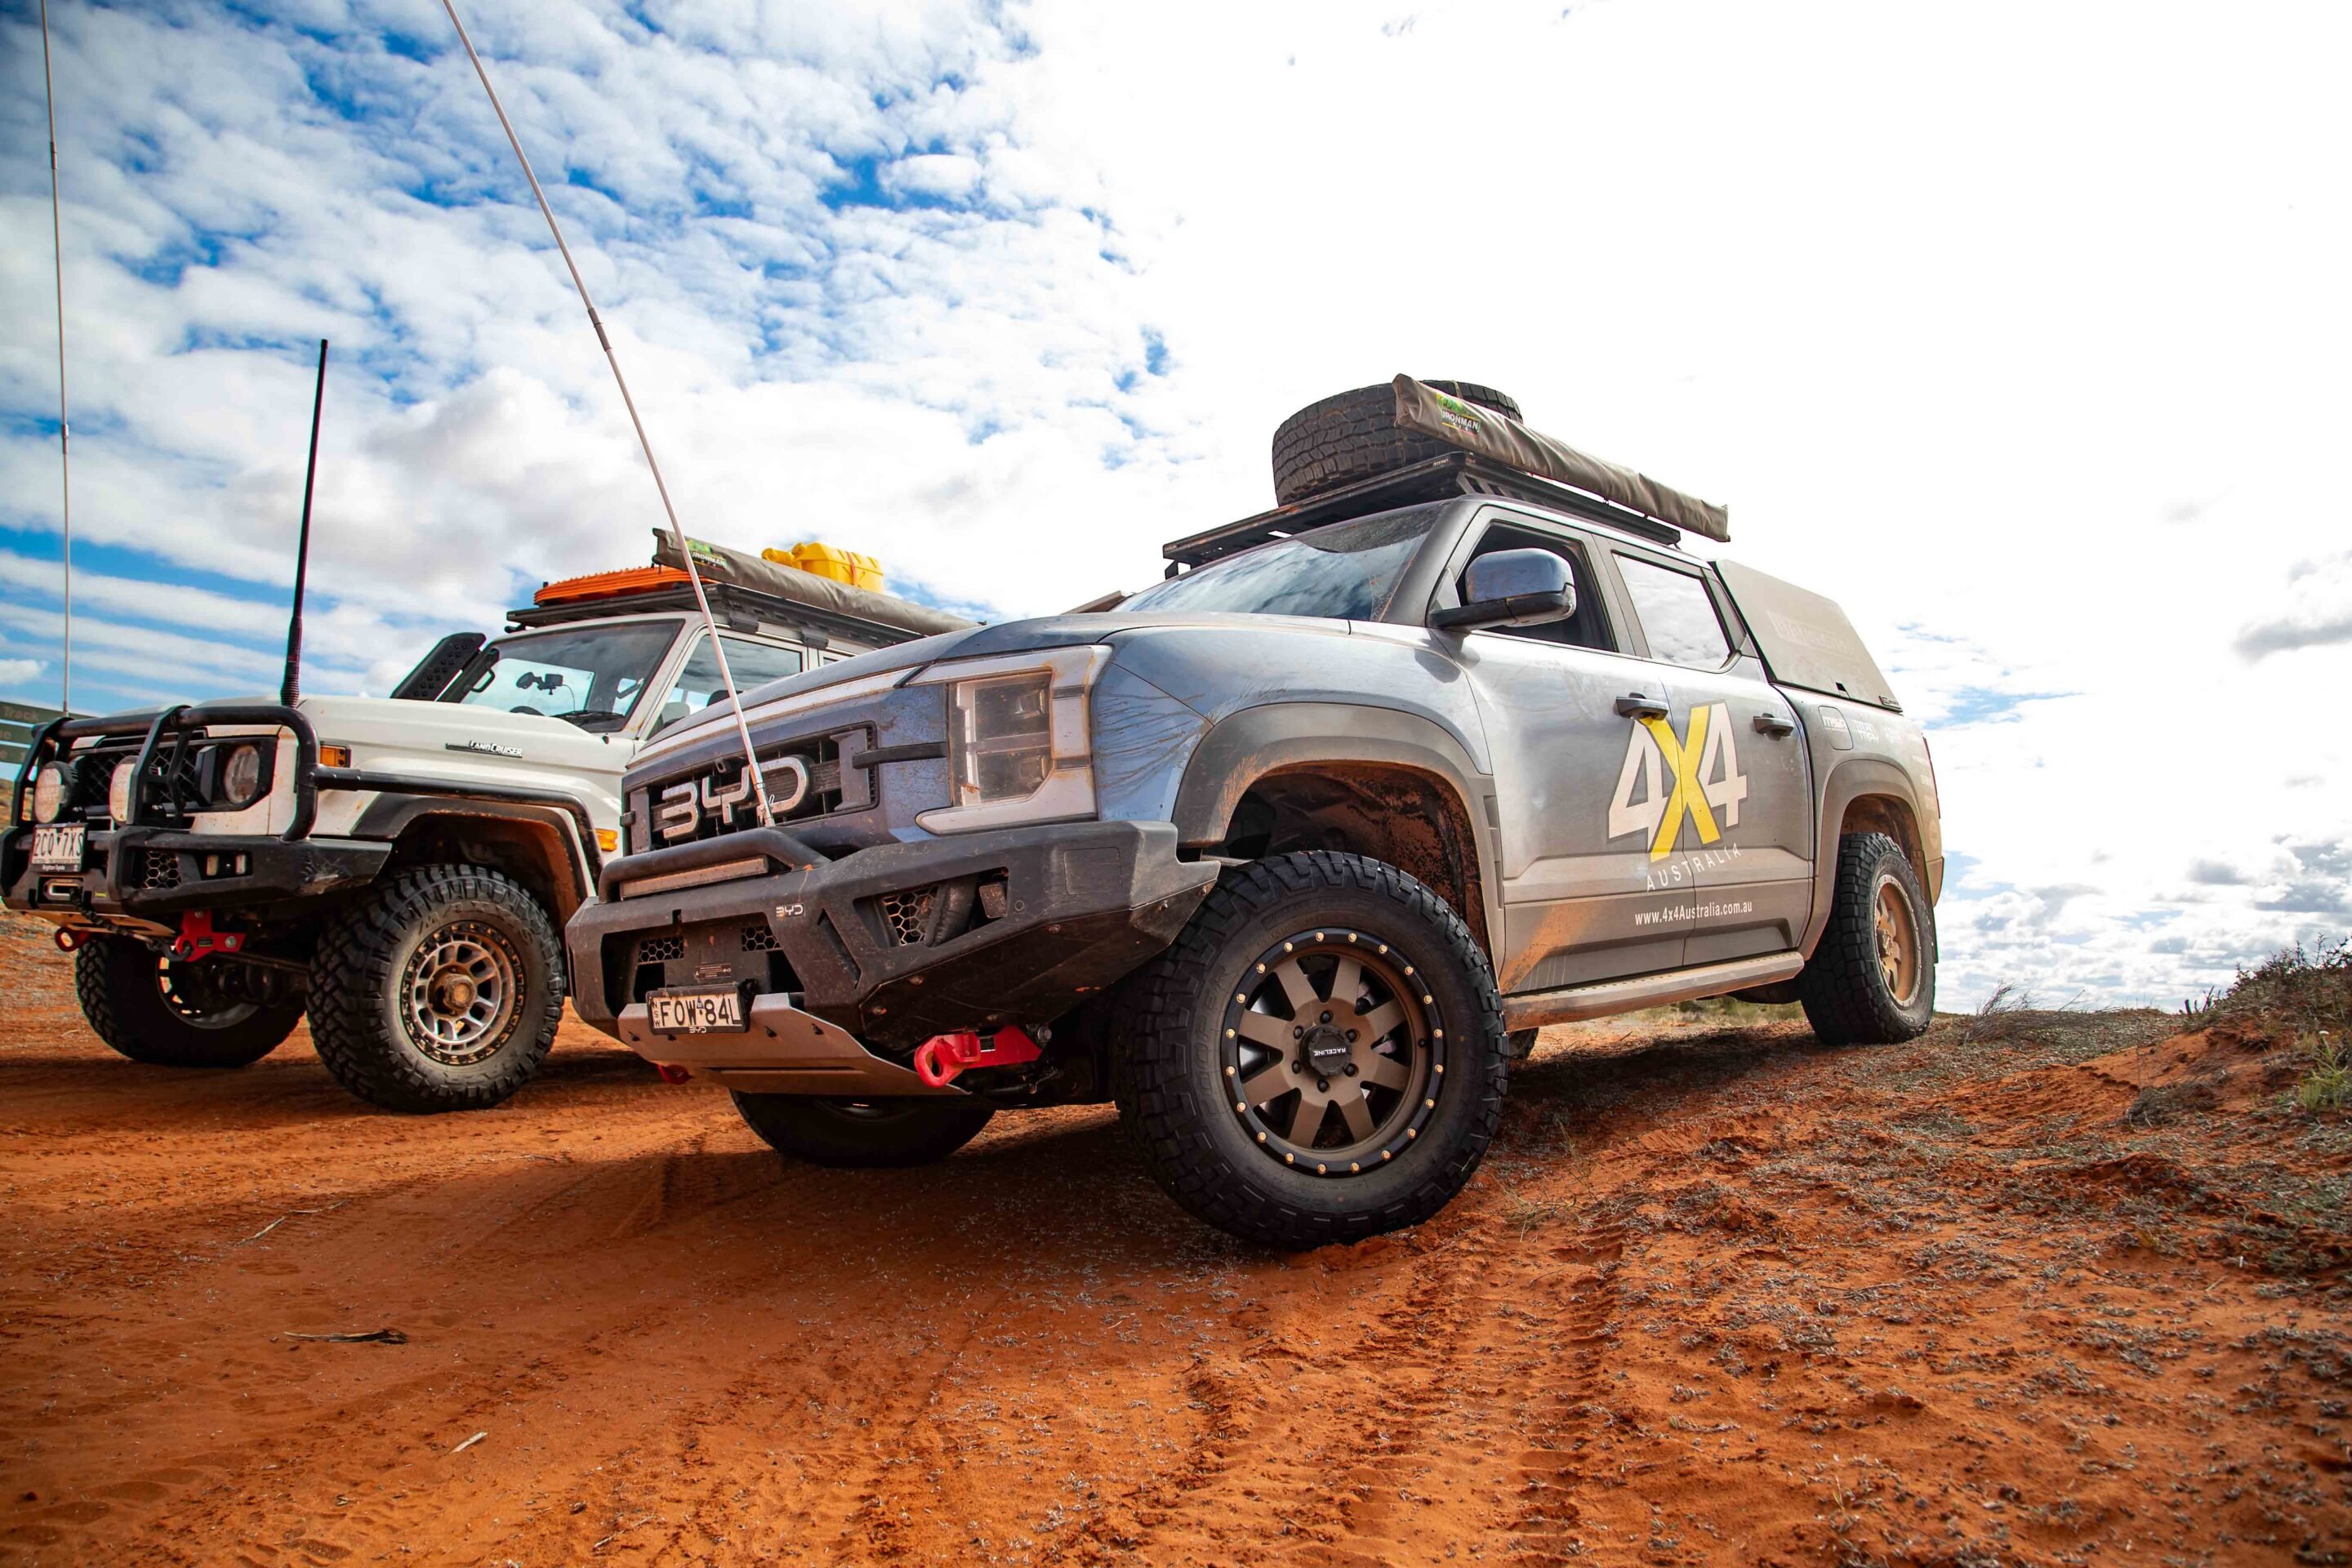
When you roll into the Simpson Desert, you want gear you can trust. No servo around the corner, no tyre shop waiting in Birdsville, and if you shred a sidewall halfway up Big Red… well, that’s a whole day of swearing and digging.
With a fresh set of Cooper Discoverer LT AT3 tyres bolted on, we pointed our BYD Shark north from Melbourne and into the dunes for a proper shakedown. Over 6000 kilometres later – highways, red dirt, gibber plains and the full west-to-east Simpson crossing – the results spoke for themselves.
The run out of Melbourne was all highway hum until the bitumen finally gave way to red dirt. Across the outback highways and into Alice Springs, the tyres stayed quiet, comfortable and predictable – none of the drone you’d expect from a heavy-duty all-terrain.
By the time we reached Alice, the rigs were dusted, the tyres had already covered a couple of thousand kilometres, and the real test was still to come.
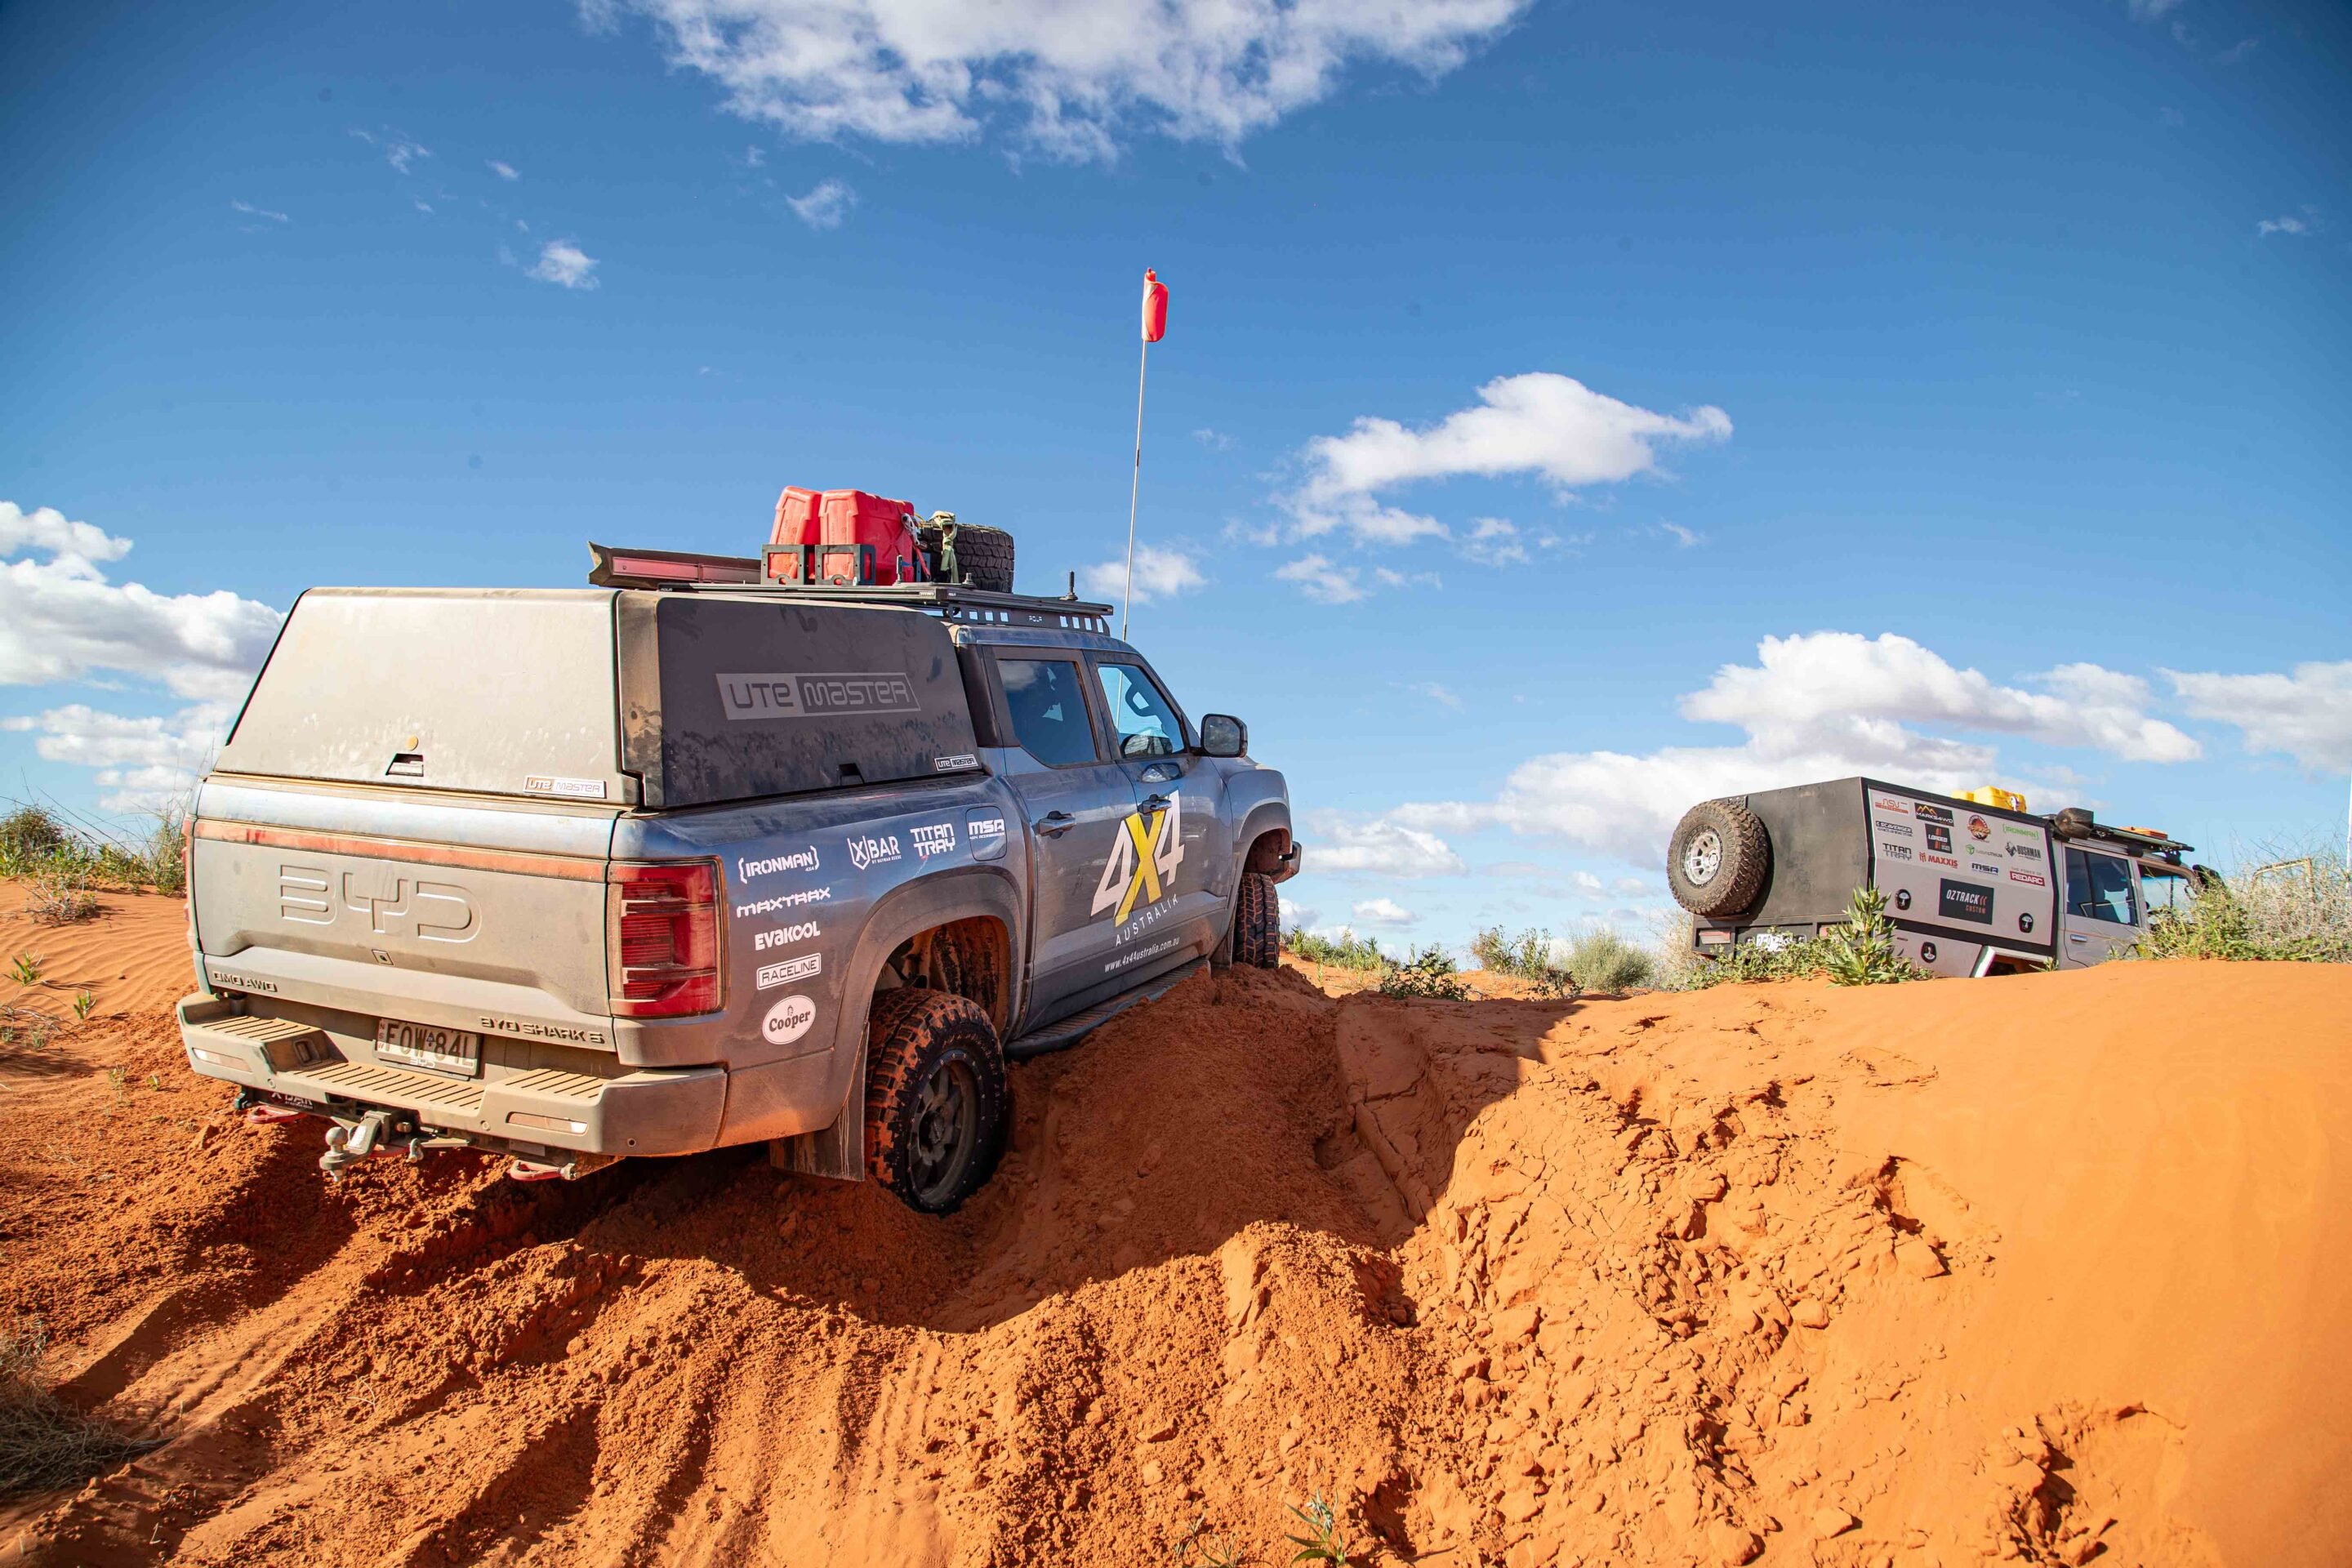
From the outset they looked built for the job – chunky tread, thick sidewalls, and the sort of profile that makes you feel like you’ve brought backup. Aired down to 16-18psi at the start of the desert, they bagged out perfectly, widening the footprint and holding traction without digging down too aggressively. Steering stayed predictable even at low pressures, with no floaty “waterbed wobble” to fight against.
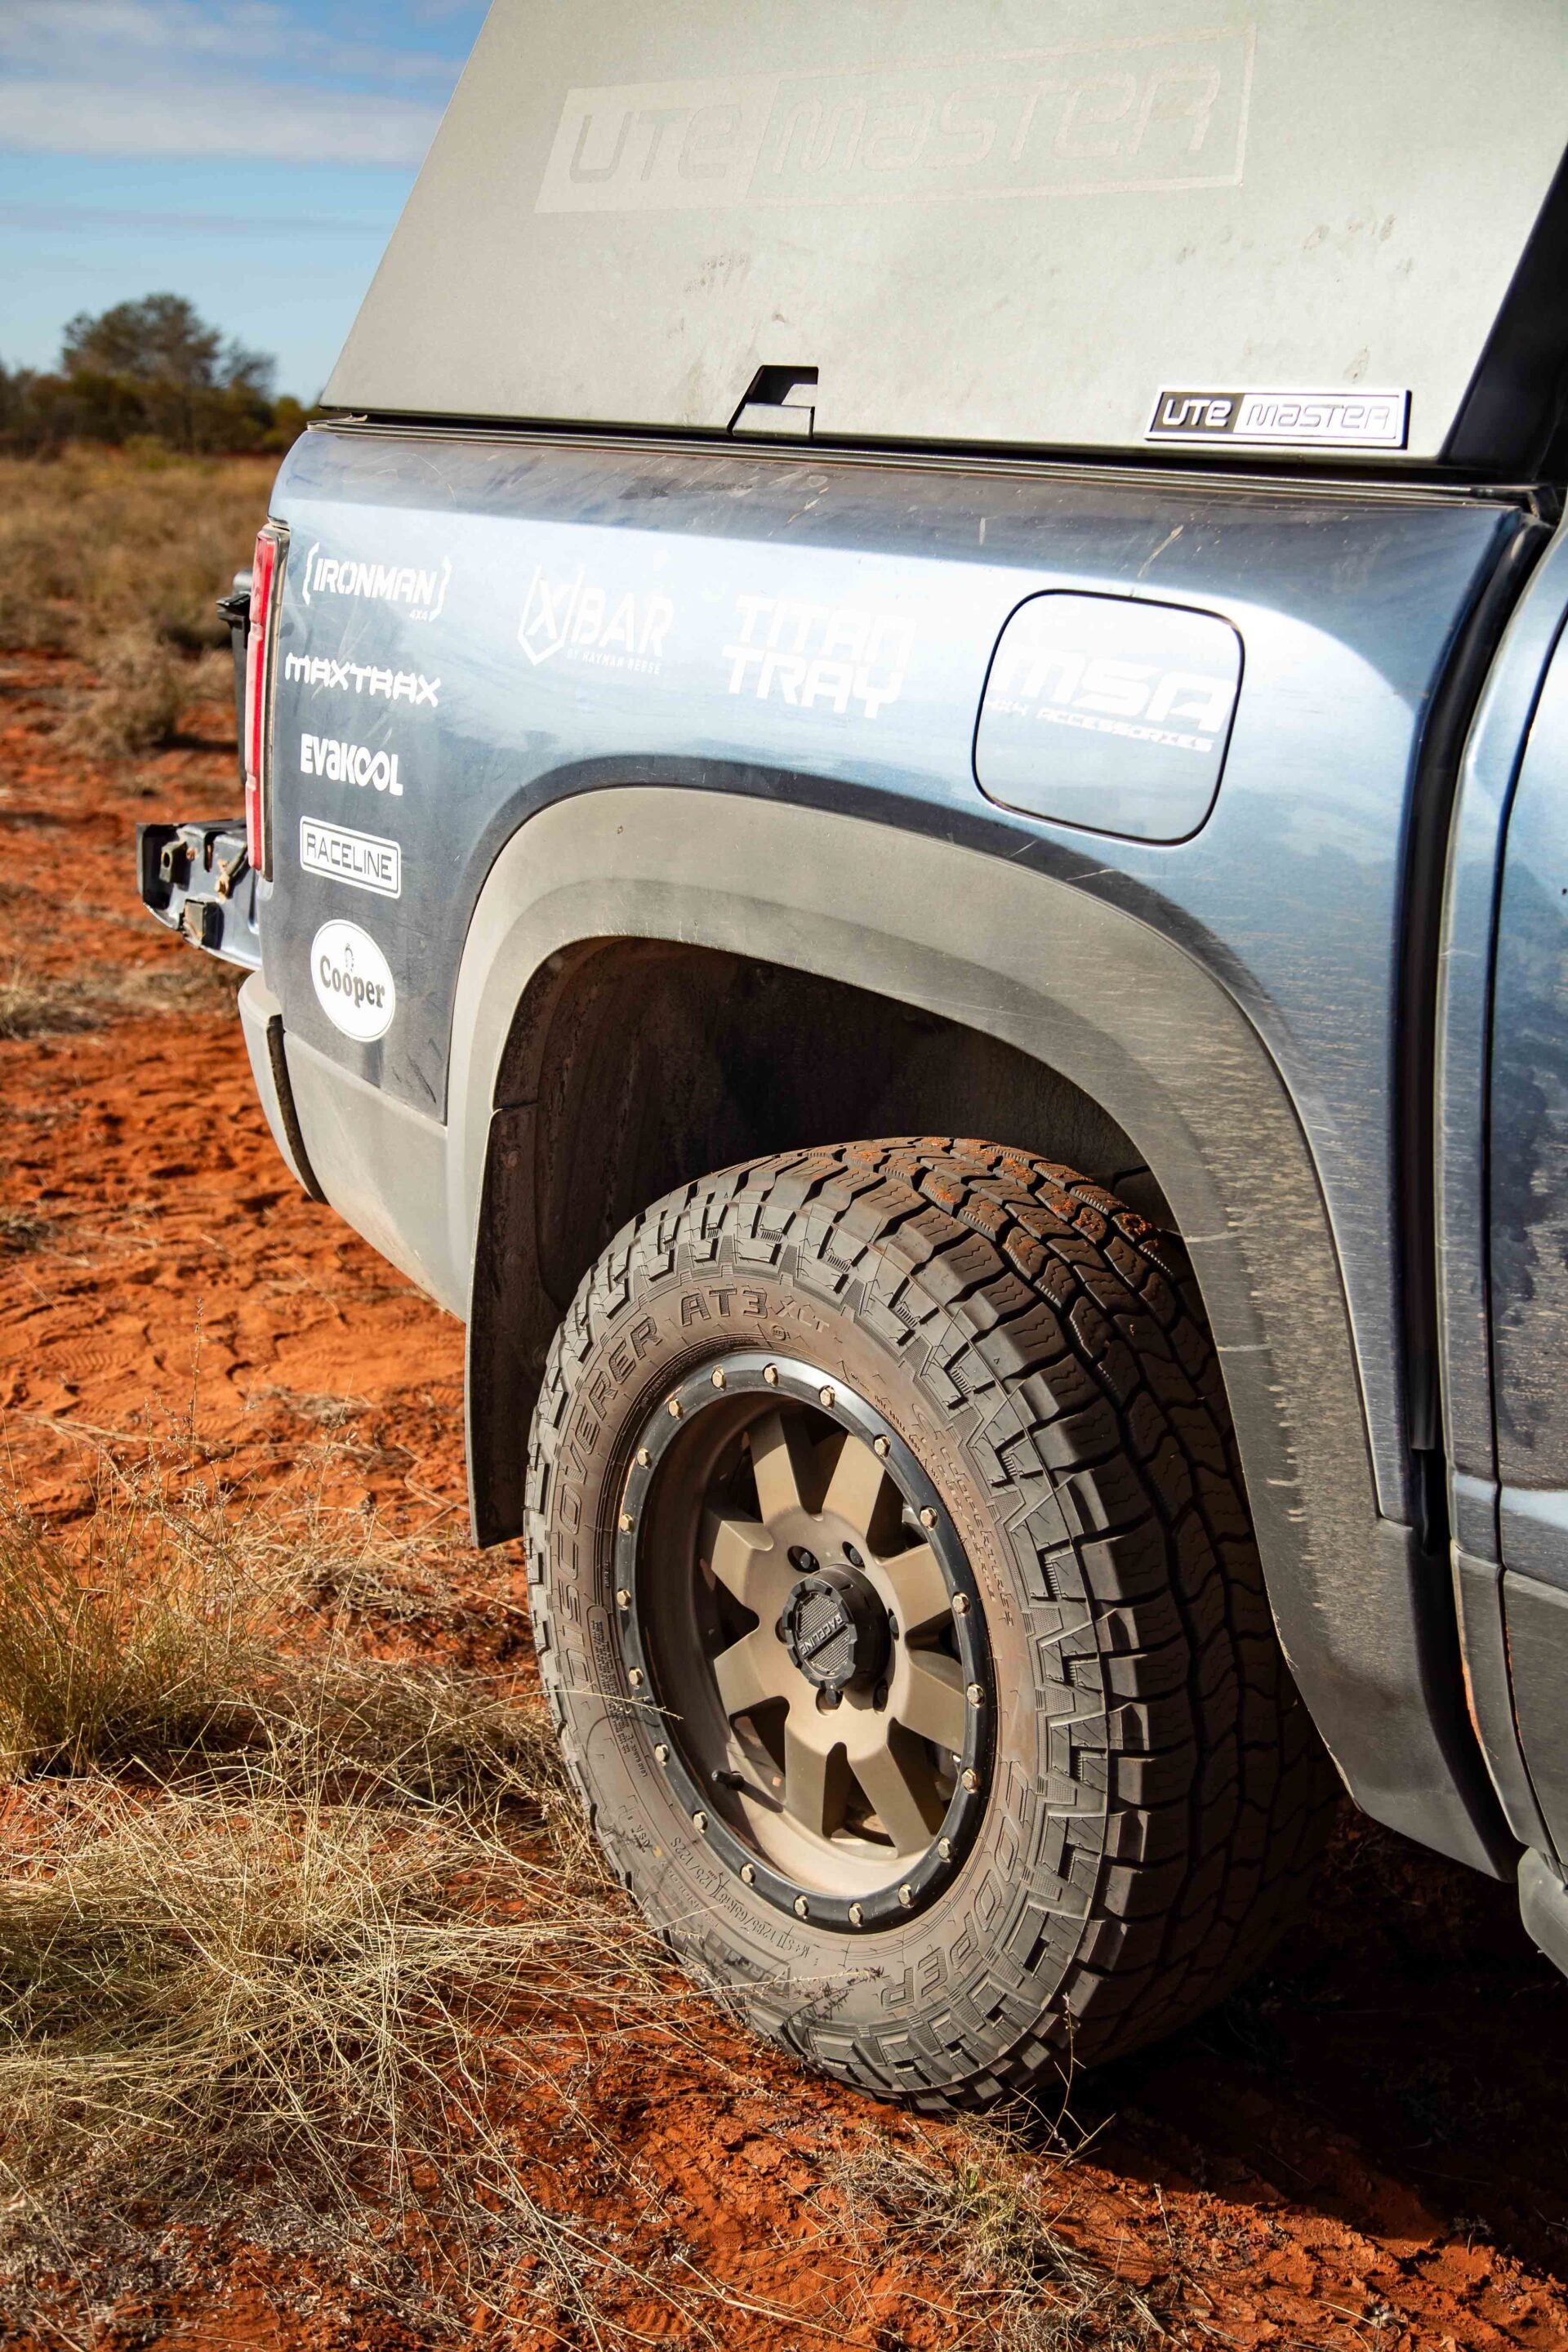
Rocks, sticks, salt pans and endless gibber plains punish rubber relentlessly, but the Discoverer LTs held firm. After roughly 700km of desert driving, they came out without a single puncture. The sidewalls picked up some cosmetic scars – desert rash – but nothing serious enough to halt the convoy or demand a repair kit.
Cresting Big Red and rolling down into Birdsville felt like a rite of passage. After days of soft sand and steep climbs, the tyres were still intact and confidence was high. Parked outside the Birdsville Hotel coated in red dust, they looked like they’d been through a fight – and won.
1
Road manners and the long drive home
After airing back up to 38psi, we braced for the usual all-terrain howl on the run south.
Instead, they stayed relatively quiet and refined – not whisper-silent like a highway tyre, but far more civilised than expected after hammering dunes all week. Ride comfort stayed high, too. Even over long corrugated stretches, there was no harsh vibration through the wheel – a welcome surprise when you’ve got another 2000km to cover back to Melbourne.
This shakedown focused purely on desert conditions – no mud runs, alpine climbs or towing marathons have been thrown at the tyres yet. That’s still to come!
The Discoverer AT3 LT made the Simpson feel almost easy. Strong sidewalls, steady steering, no punctures, and decent highway manners gave us the confidence that we weren’t going to be stranded halfway up a dune. For desert runs and big off-road adventures, they’re a rock-solid choice.
5
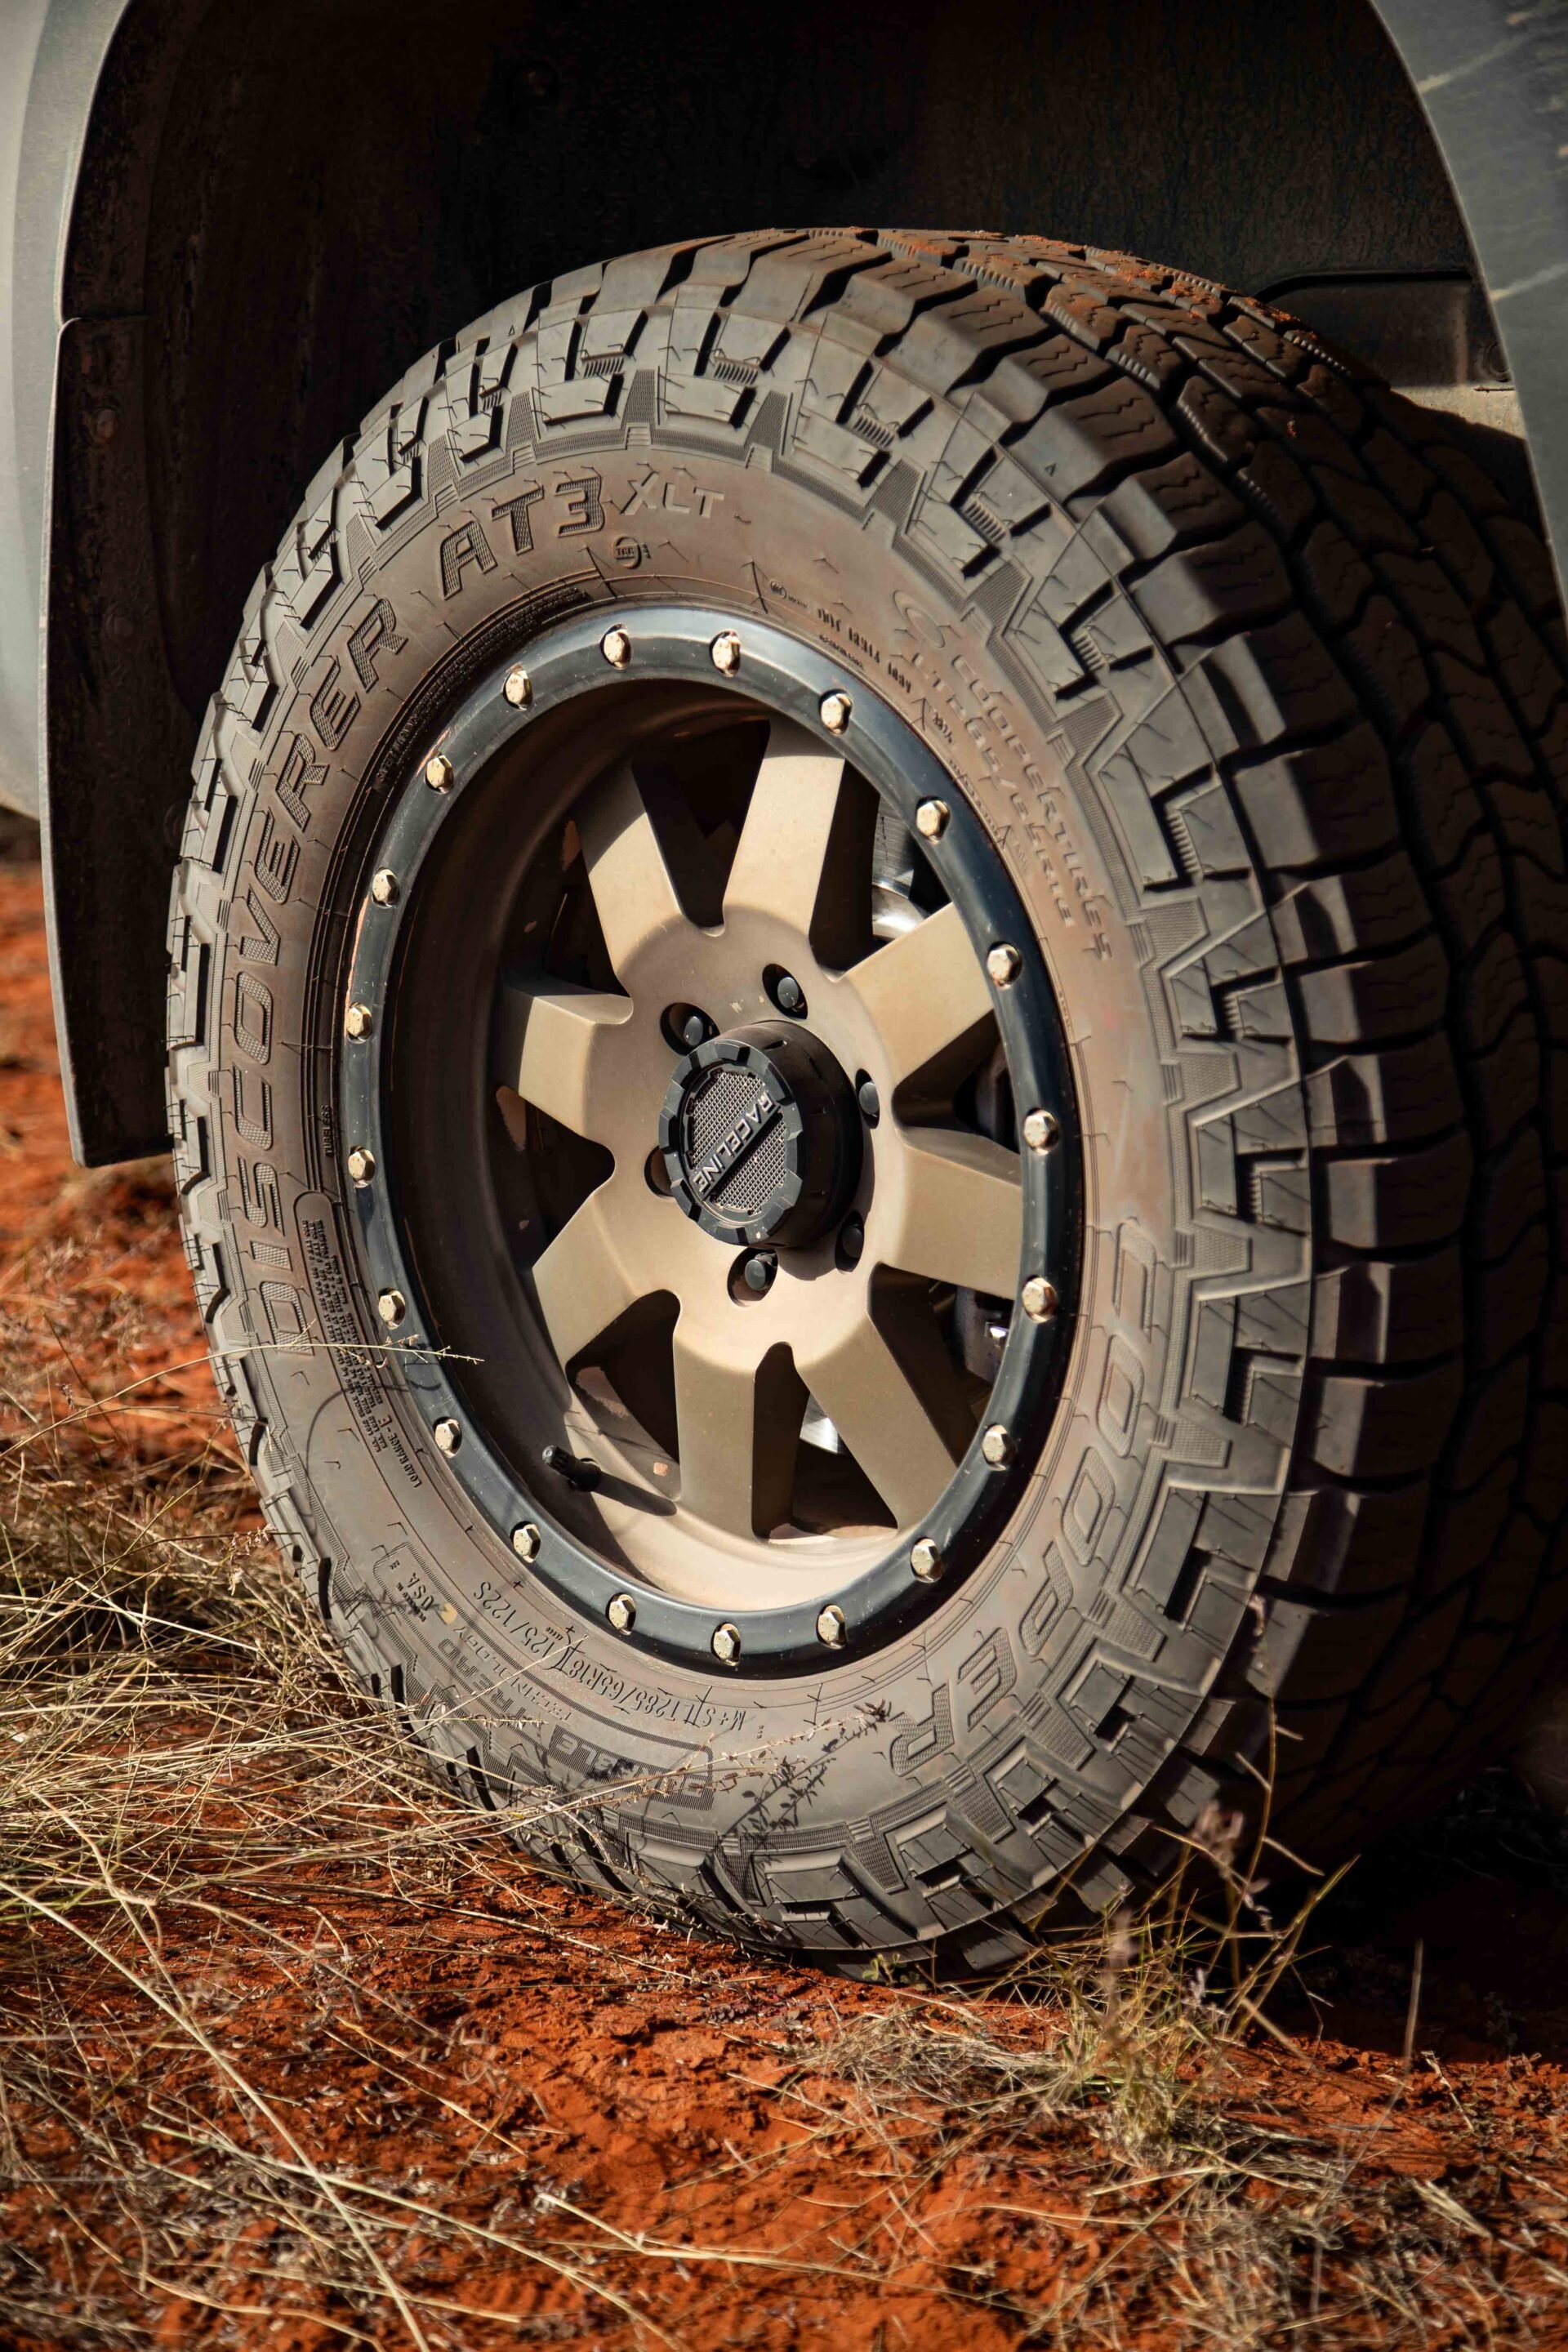
Cooper Discoverer LT specs
Size tested: 285/70R17
Construction: 3-ply sidewall, all-terrain tread
Load rating: LT spec – built for heavy touring rigs
Tyre pressure (sand): 16-18psi
Tyre pressure (road): 38psi
Kilometres covered: 6000+ (including ~700 km of desert driving)
Ram has confirmed it will no longer develop its fully electric 1500 pickup, the 1500 REV, first unveiled at the 2023 New York Auto Show. The decision comes amid a slowdown in demand for full-size battery-electric trucks in North America.
“As demand for full-size battery-electric trucks slows in North America, Stellantis is reassessing its product strategy and will discontinue development of a full-size BEV pickup,” Ram said in an official statement.
Instead, the REV name will now be applied to the range-extended plug-in hybrid previously known as the Ramcharger. “As part of this, Ram is renaming its REEV-powered pickup to Ram 1500 REV (formerly Ramcharger),” the company confirmed.
1
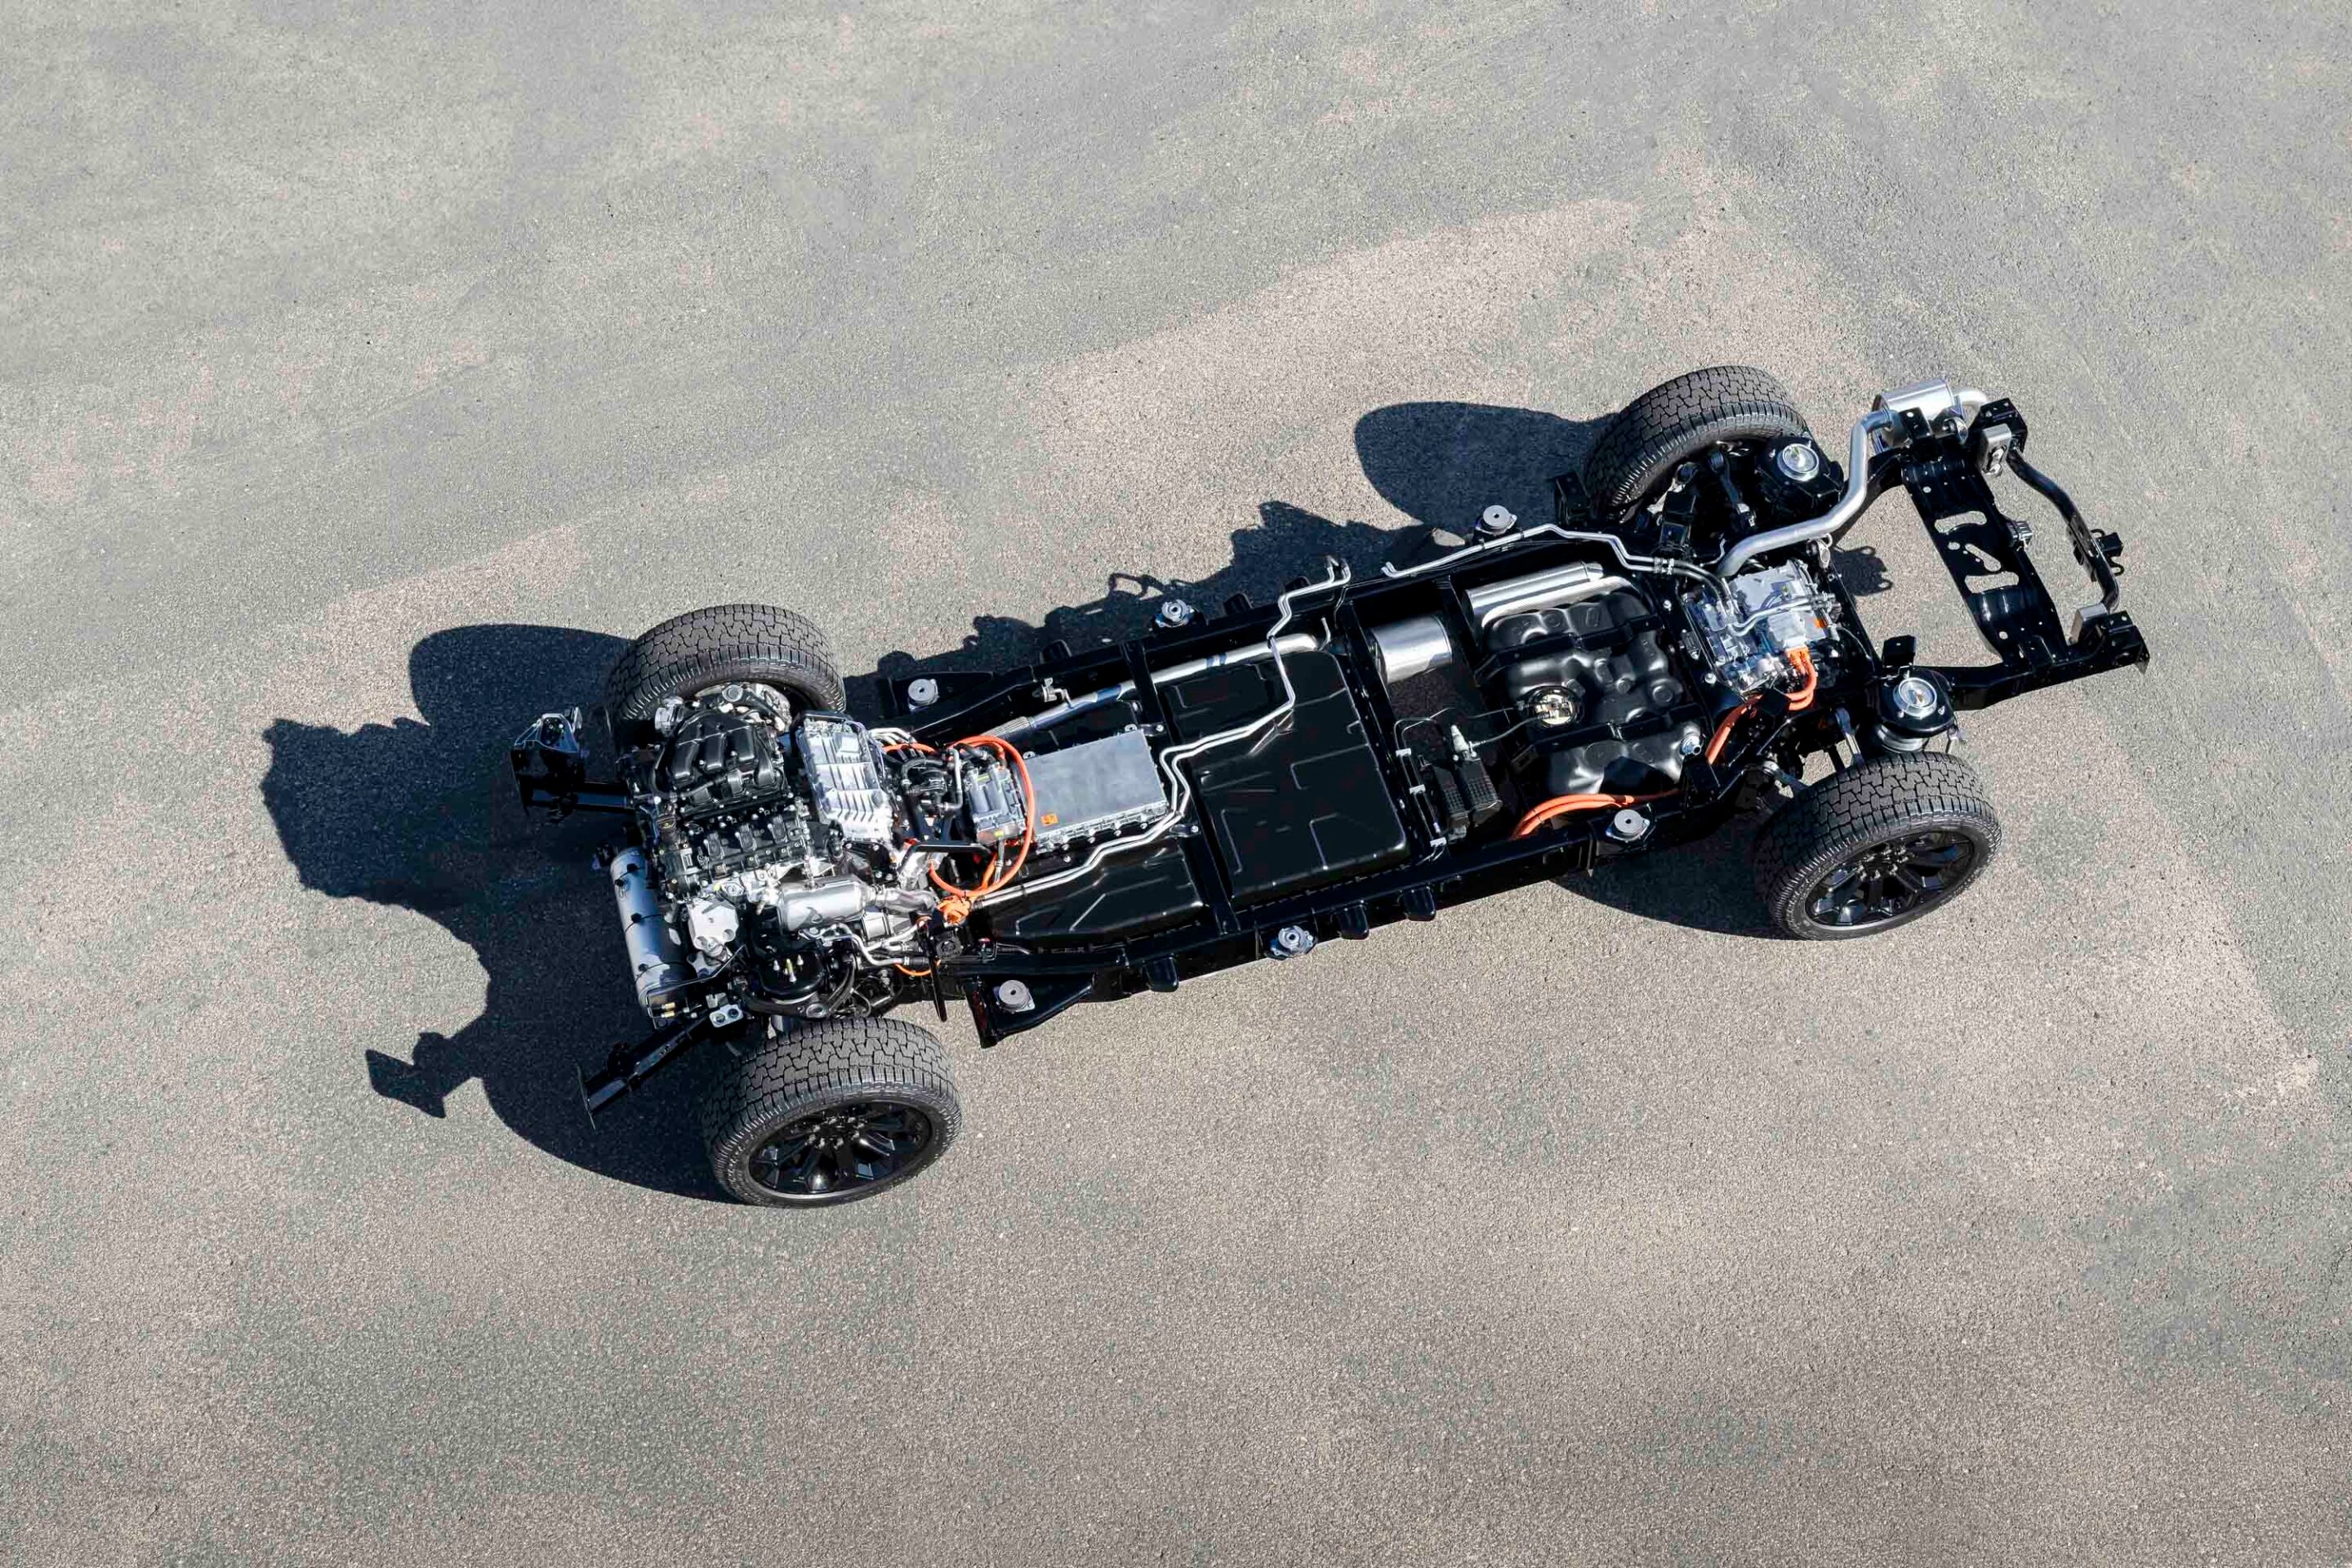
The 1500 REV combines a 3.6-litre Pentastar V6 generator with a 92kWh underfloor battery, powering electric motors at both axles. Total output is 487kW and 834Nm, with a claimed 0-60 mph (0-97 km/h) time of 4.0 seconds. Towing capacity is rated at 6350kg and payload at 1190kg. It also supports DC fast-charging up to 145kW and includes a 7.2kW onboard power panel for tools or camping gear.
“This vehicle will set a new benchmark in the half-ton segment, offering exceptional range, towing capability and payload performance,” Ram said. The 1500 REV targets a combined range of 1110 km and is listed as a 2026 model, with a launch date yet to be confirmed.
The MY25 Australian-spec model is well equipped with the new 313kW/635Nm 3.0-litre twin-turbo Hurricane six-cylinder petrol engine, Bilstein off-road suspension with a one-inch lift, Falken Wildpeak 32-inch all-terrain tyres, underbody skid plates and an electronic locking rear differential.
Ford has recalled 1643 examples of its 2024-2025 Ranger after a software fault was identified that could reduce braking performance.
The issue affects all variants within this model range and stems from the brake boost function, which may not operate as intended. If the problem occurs, drivers may need to apply greater pedal force, and stopping distances could increase significantly, particularly when towing, carrying heavy loads or driving on steep or uneven terrain.
Warning lights for the ABS, ESC and brake system will illuminate on the dash, along with an audible alert, if the fault is active. Drivers are urged to take these warnings seriously, as ignoring them could have serious safety implications.
Reduced braking performance poses a clear safety risk, with a higher chance of collision. For the 4×4 community, the risk is even greater when vehicles are loaded with gear, towing trailers, or navigating off-road tracks where braking distances are more critical.
Ford Australia will contact affected owners and advise them to book their vehicle into a dealership. The fix involves a free software update to restore full braking performance – no other work is required. Owners are encouraged to arrange the update as soon as possible to ensure their Ranger remains safe both on and off the road.
This follows Ford Australia’s recall of its 2021 Everest last week, where a manufacturing defect meant the tow bar hitch may not have been welded to specification. In some cases, the hitch could detach while driving, creating a serious hazard for other road users.
In 1936, Ted Colson carved his name into outback history as the first European to cross the Simpson Desert.
With five camels, two months’ worth of supplies, and his Aboriginal companion, Eringa Peter, Colson left Bloods Creek on the desert’s western fringe and followed the 26th parallel to Birdsville. After a three-day rest, he turned around and made the 900km return trip in just 36 days.
Colson’s pioneering feat barely registered at the time, lost in the noise of a rapidly modernising world. But among four-wheel drivers, his legacy lives on in the Colson Track – a little-known but uniquely rewarding route that cuts deep into the heart of the desert.
1
Starting the Colson Track at Old Andado Station
We kicked off the trip from Old Andado Station. Once home to outback icon Molly Clark, the homestead has been preserved like a time capsule.
A wander through the rooms feels like stepping back into Molly’s life before she relocated to Alice Springs. The station features a fantastic campground with flushing toilets and hot showers – provided the water tank is full.
From Old Andado, we tracked 38km north before detouring into the Mac Clark Conservation Reserve, home to the rare Acacia Peuce. These ancient trees have been around since the dinosaur age, with some standing tall for over 700 years. Bush camping is allowed in the reserve, but there are no facilities, and fires are banned to protect the fragile environment.
1
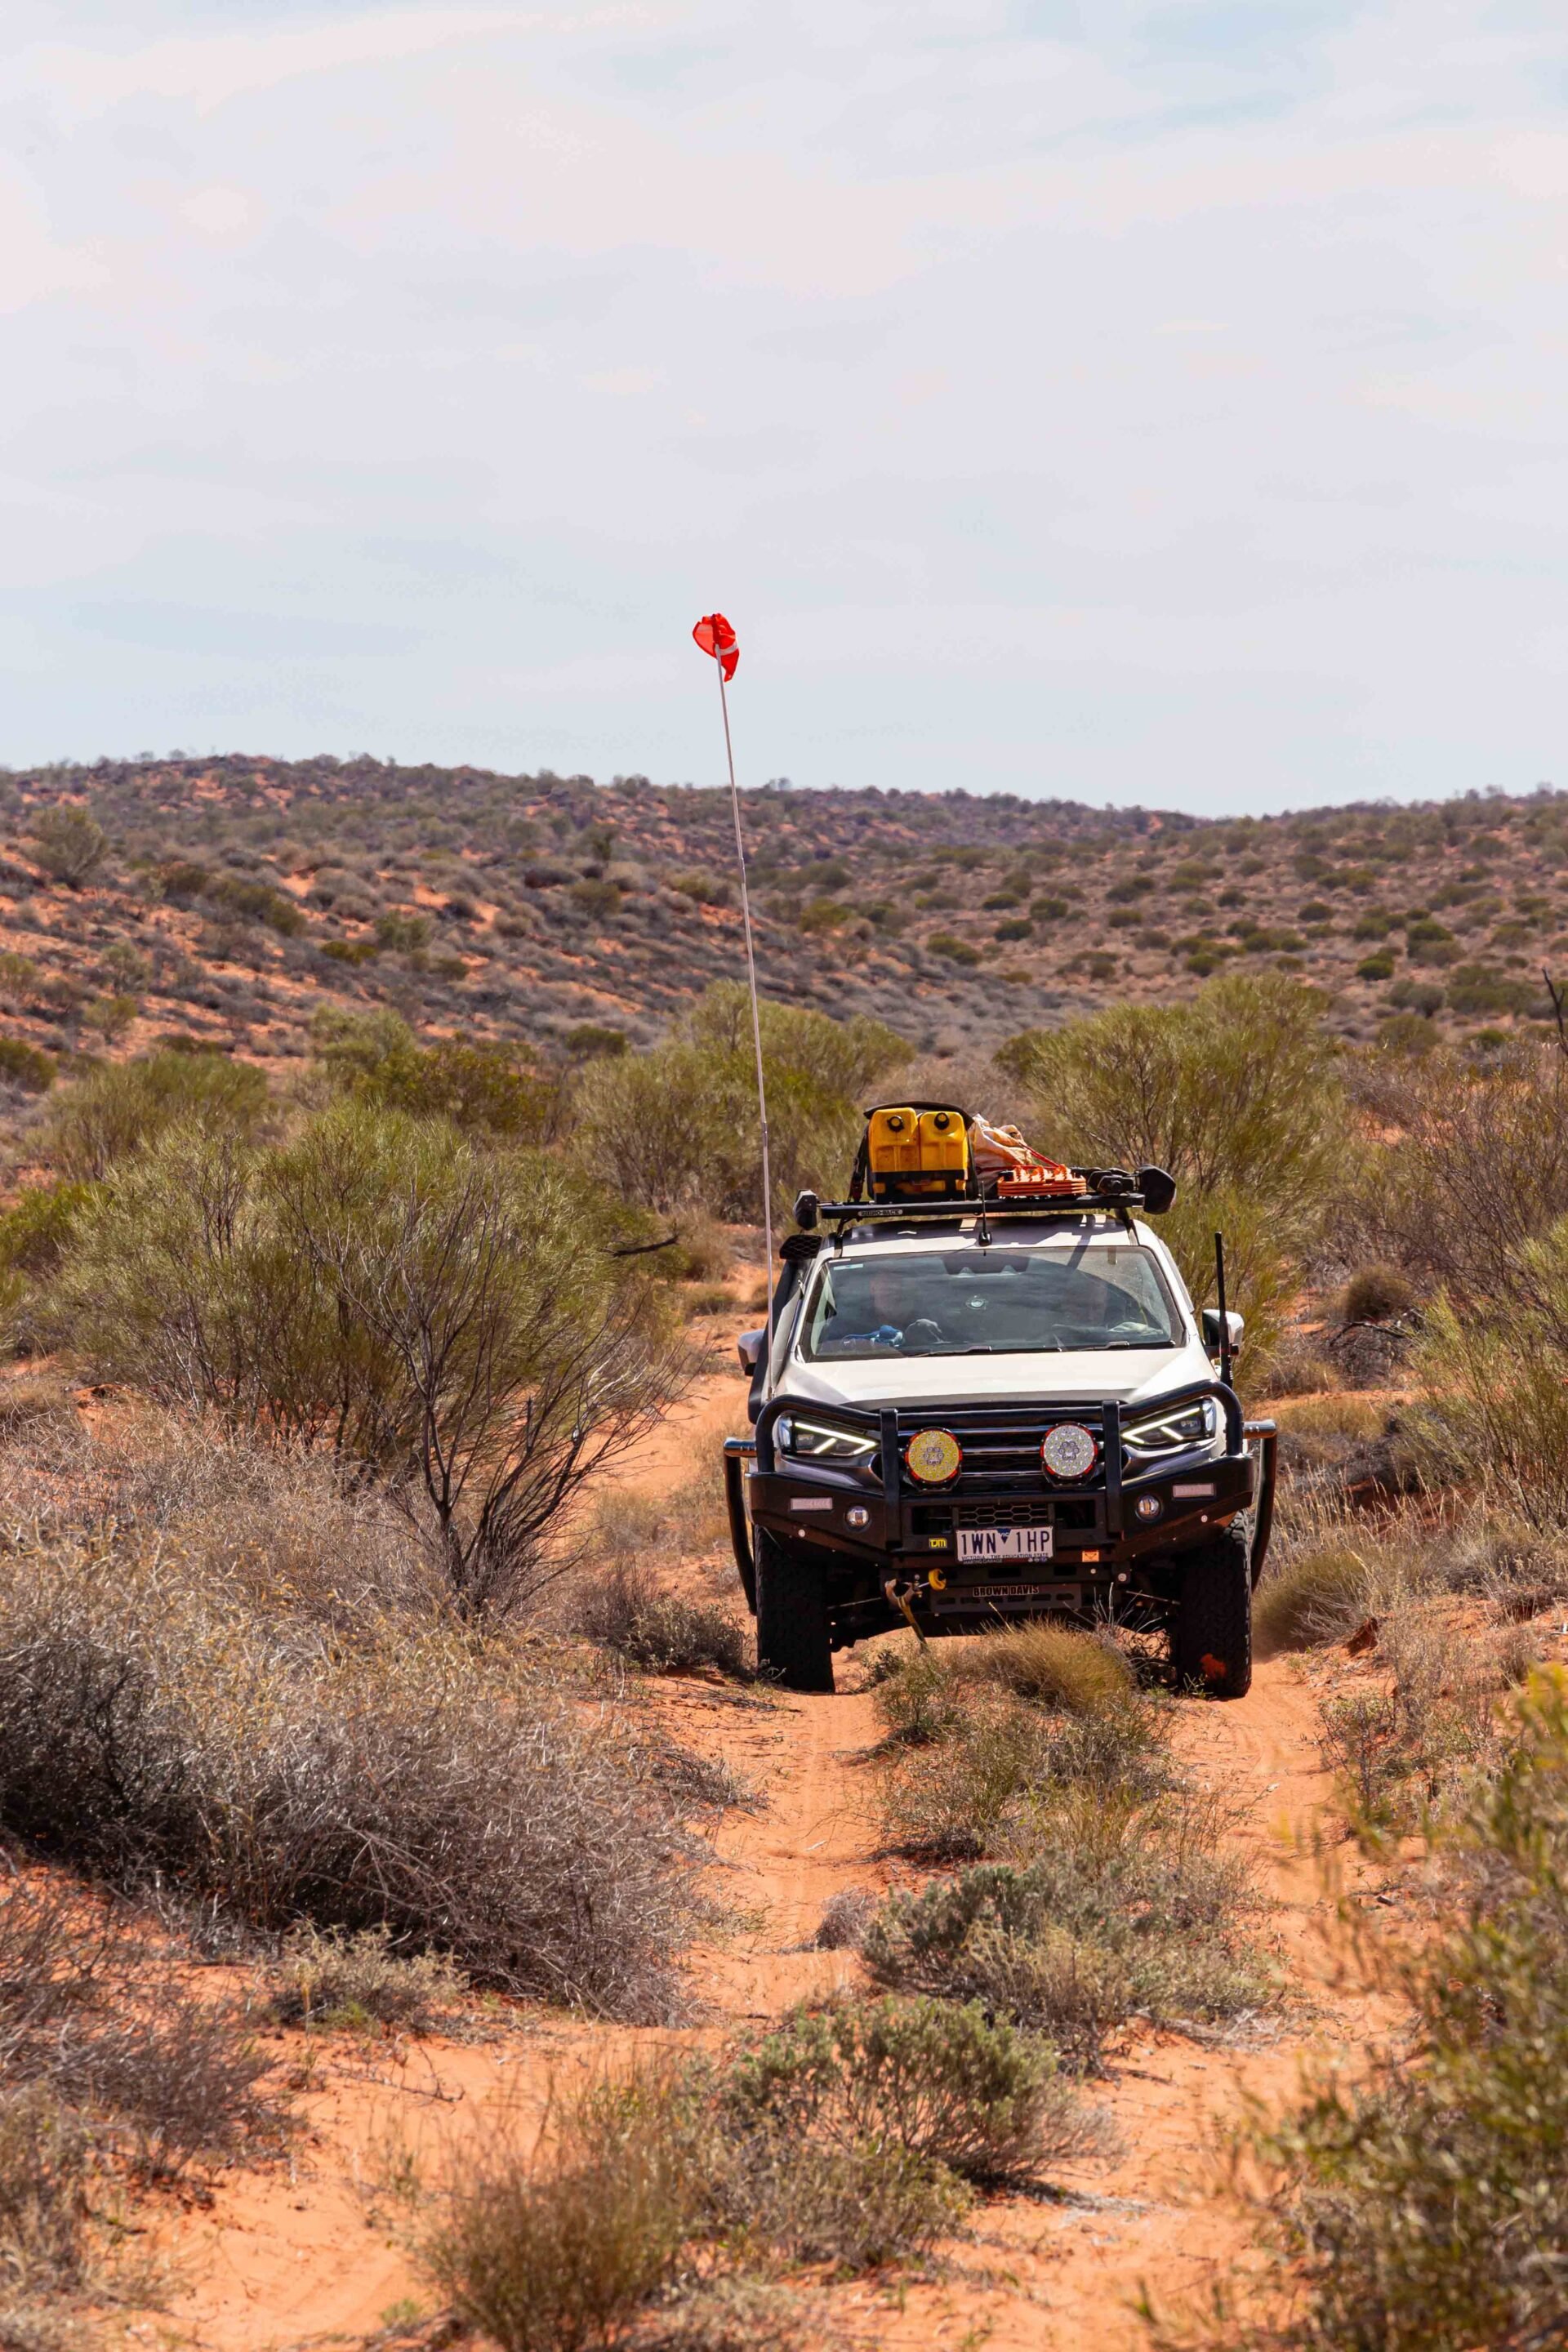
Driving the Madigan Line across the Simpson Desert
Backtracking from the reserve entrance, we turned east onto the Madigan Line. Named after explorer Cecil Madigan, the route follows the path of his 1939 scientific expedition – a camel trek across the Simpson Desert.
The track was heavily corrugated and broken up by countless water diversion humps. After passing Casuarina Swamp and the windmill at East Bore, we hit dune country. Out here, cattle turned up in unexpected places along the rough trail – something to keep an eye out for.
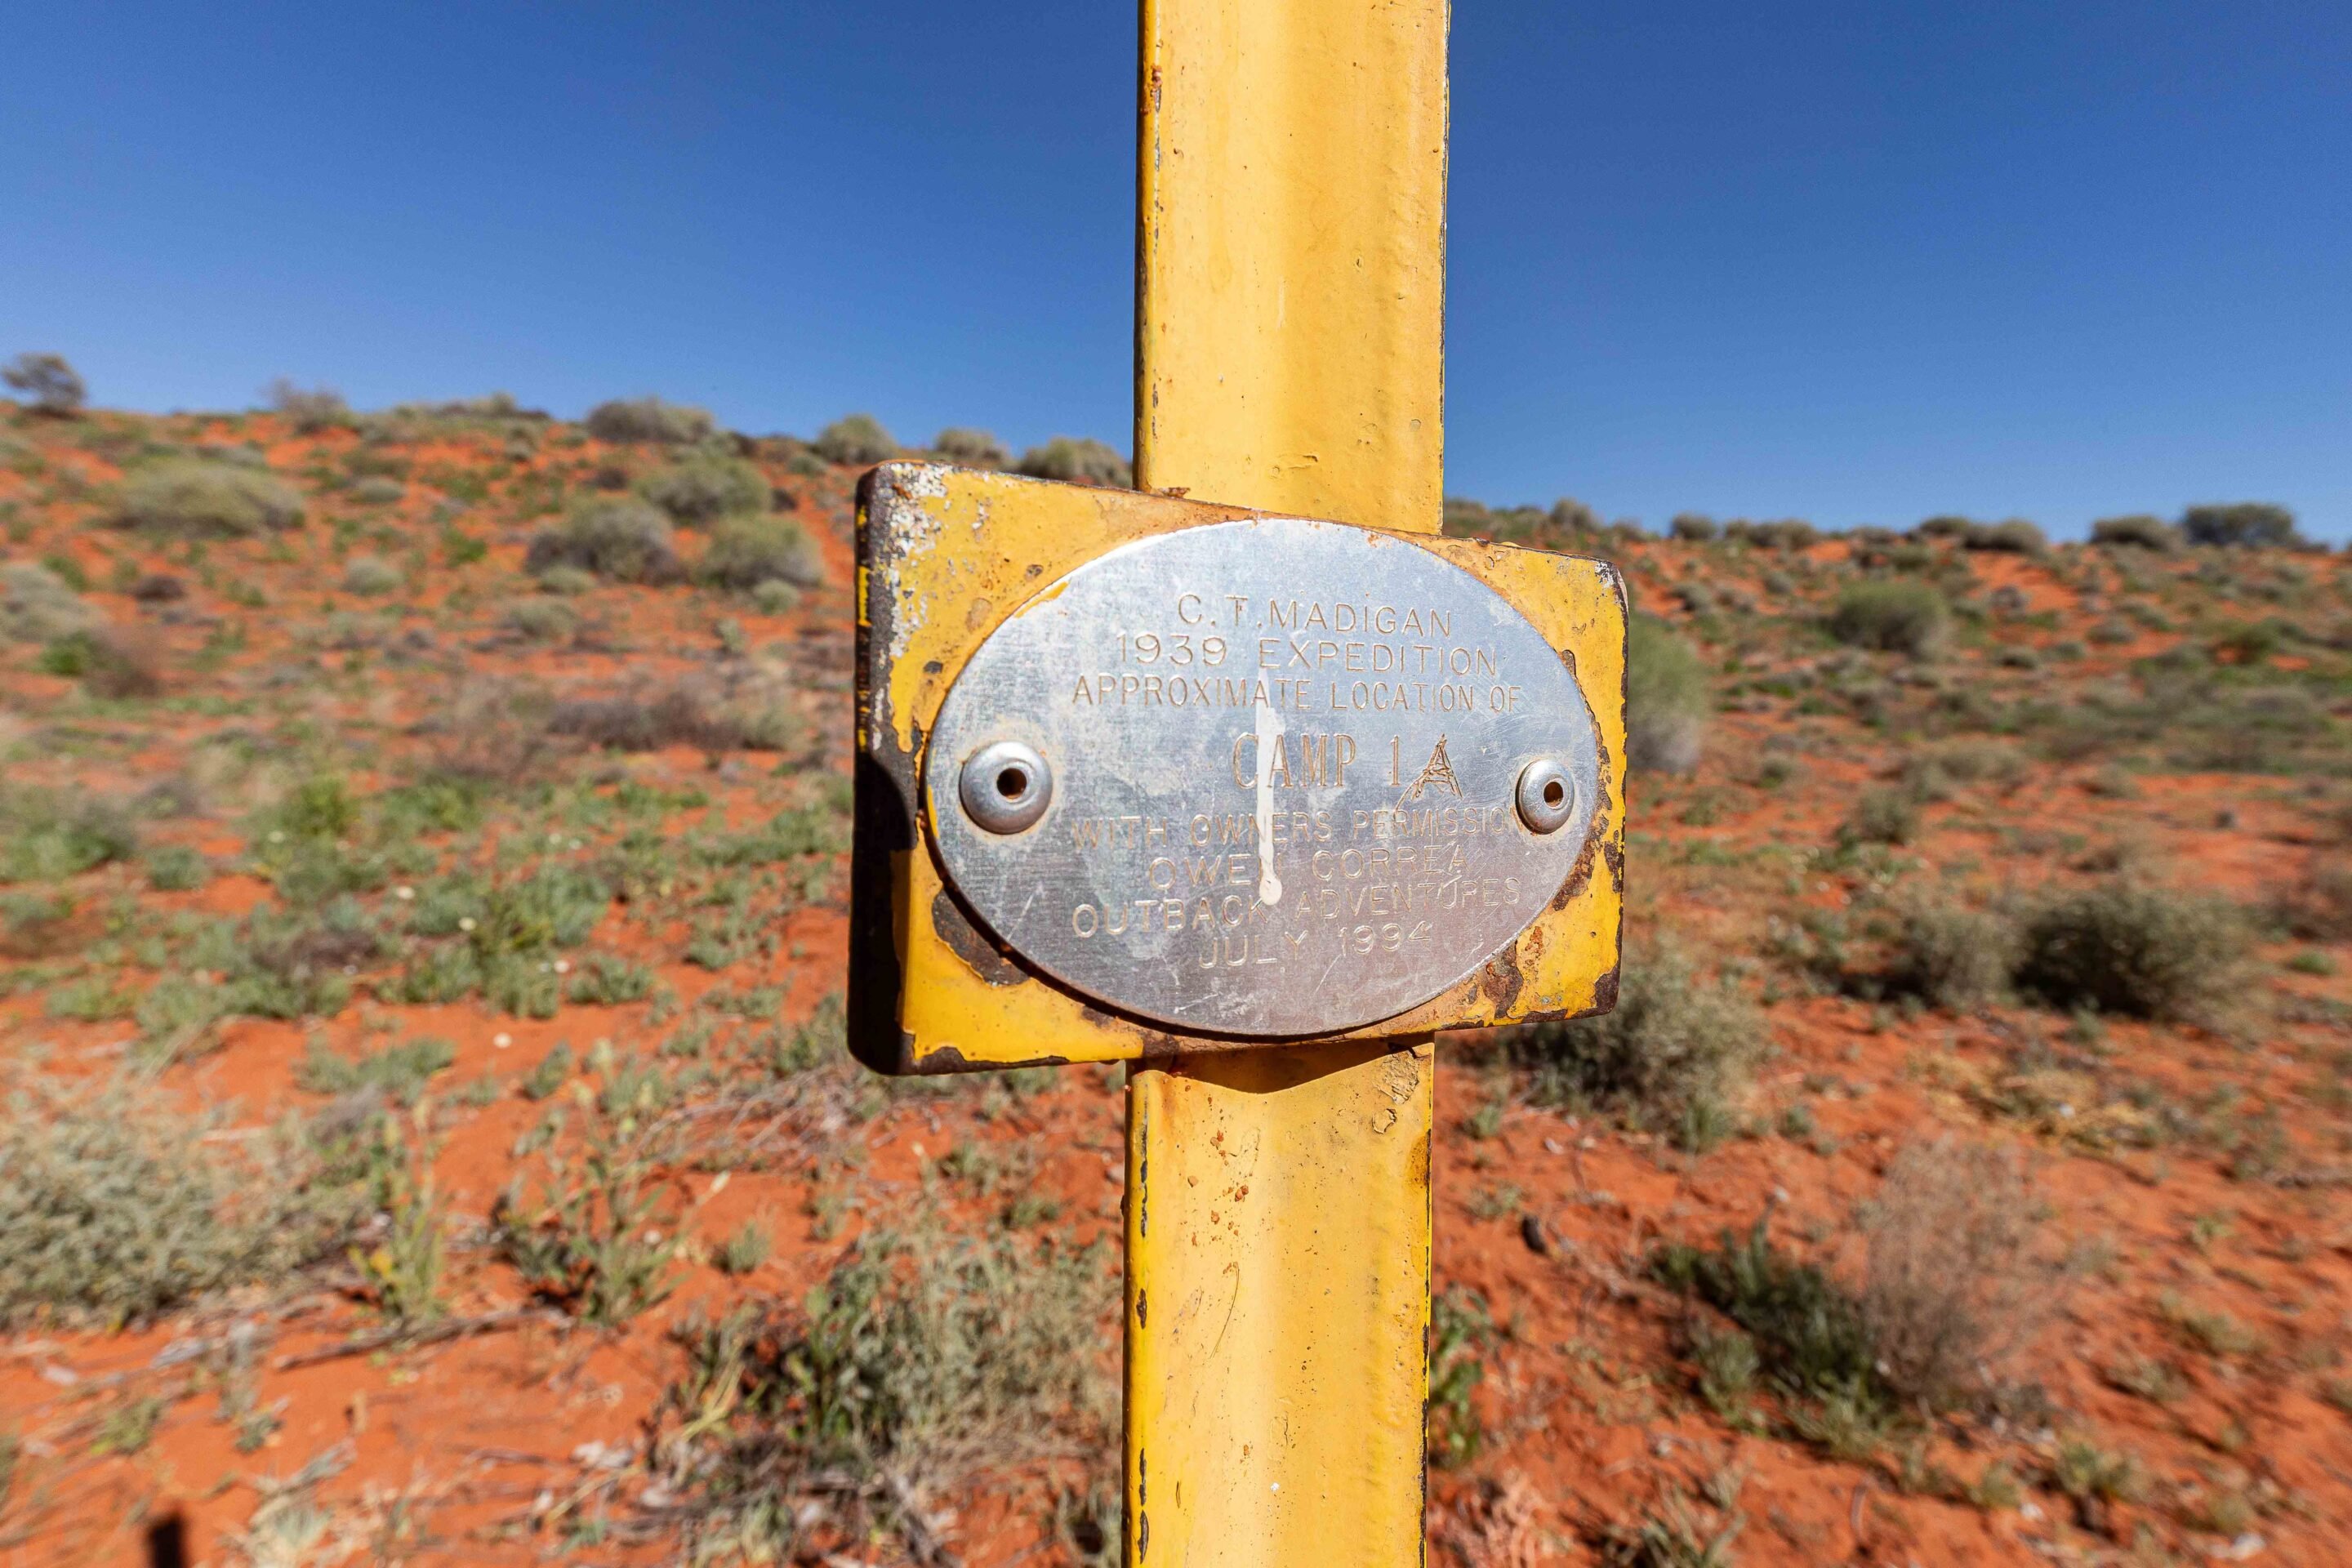
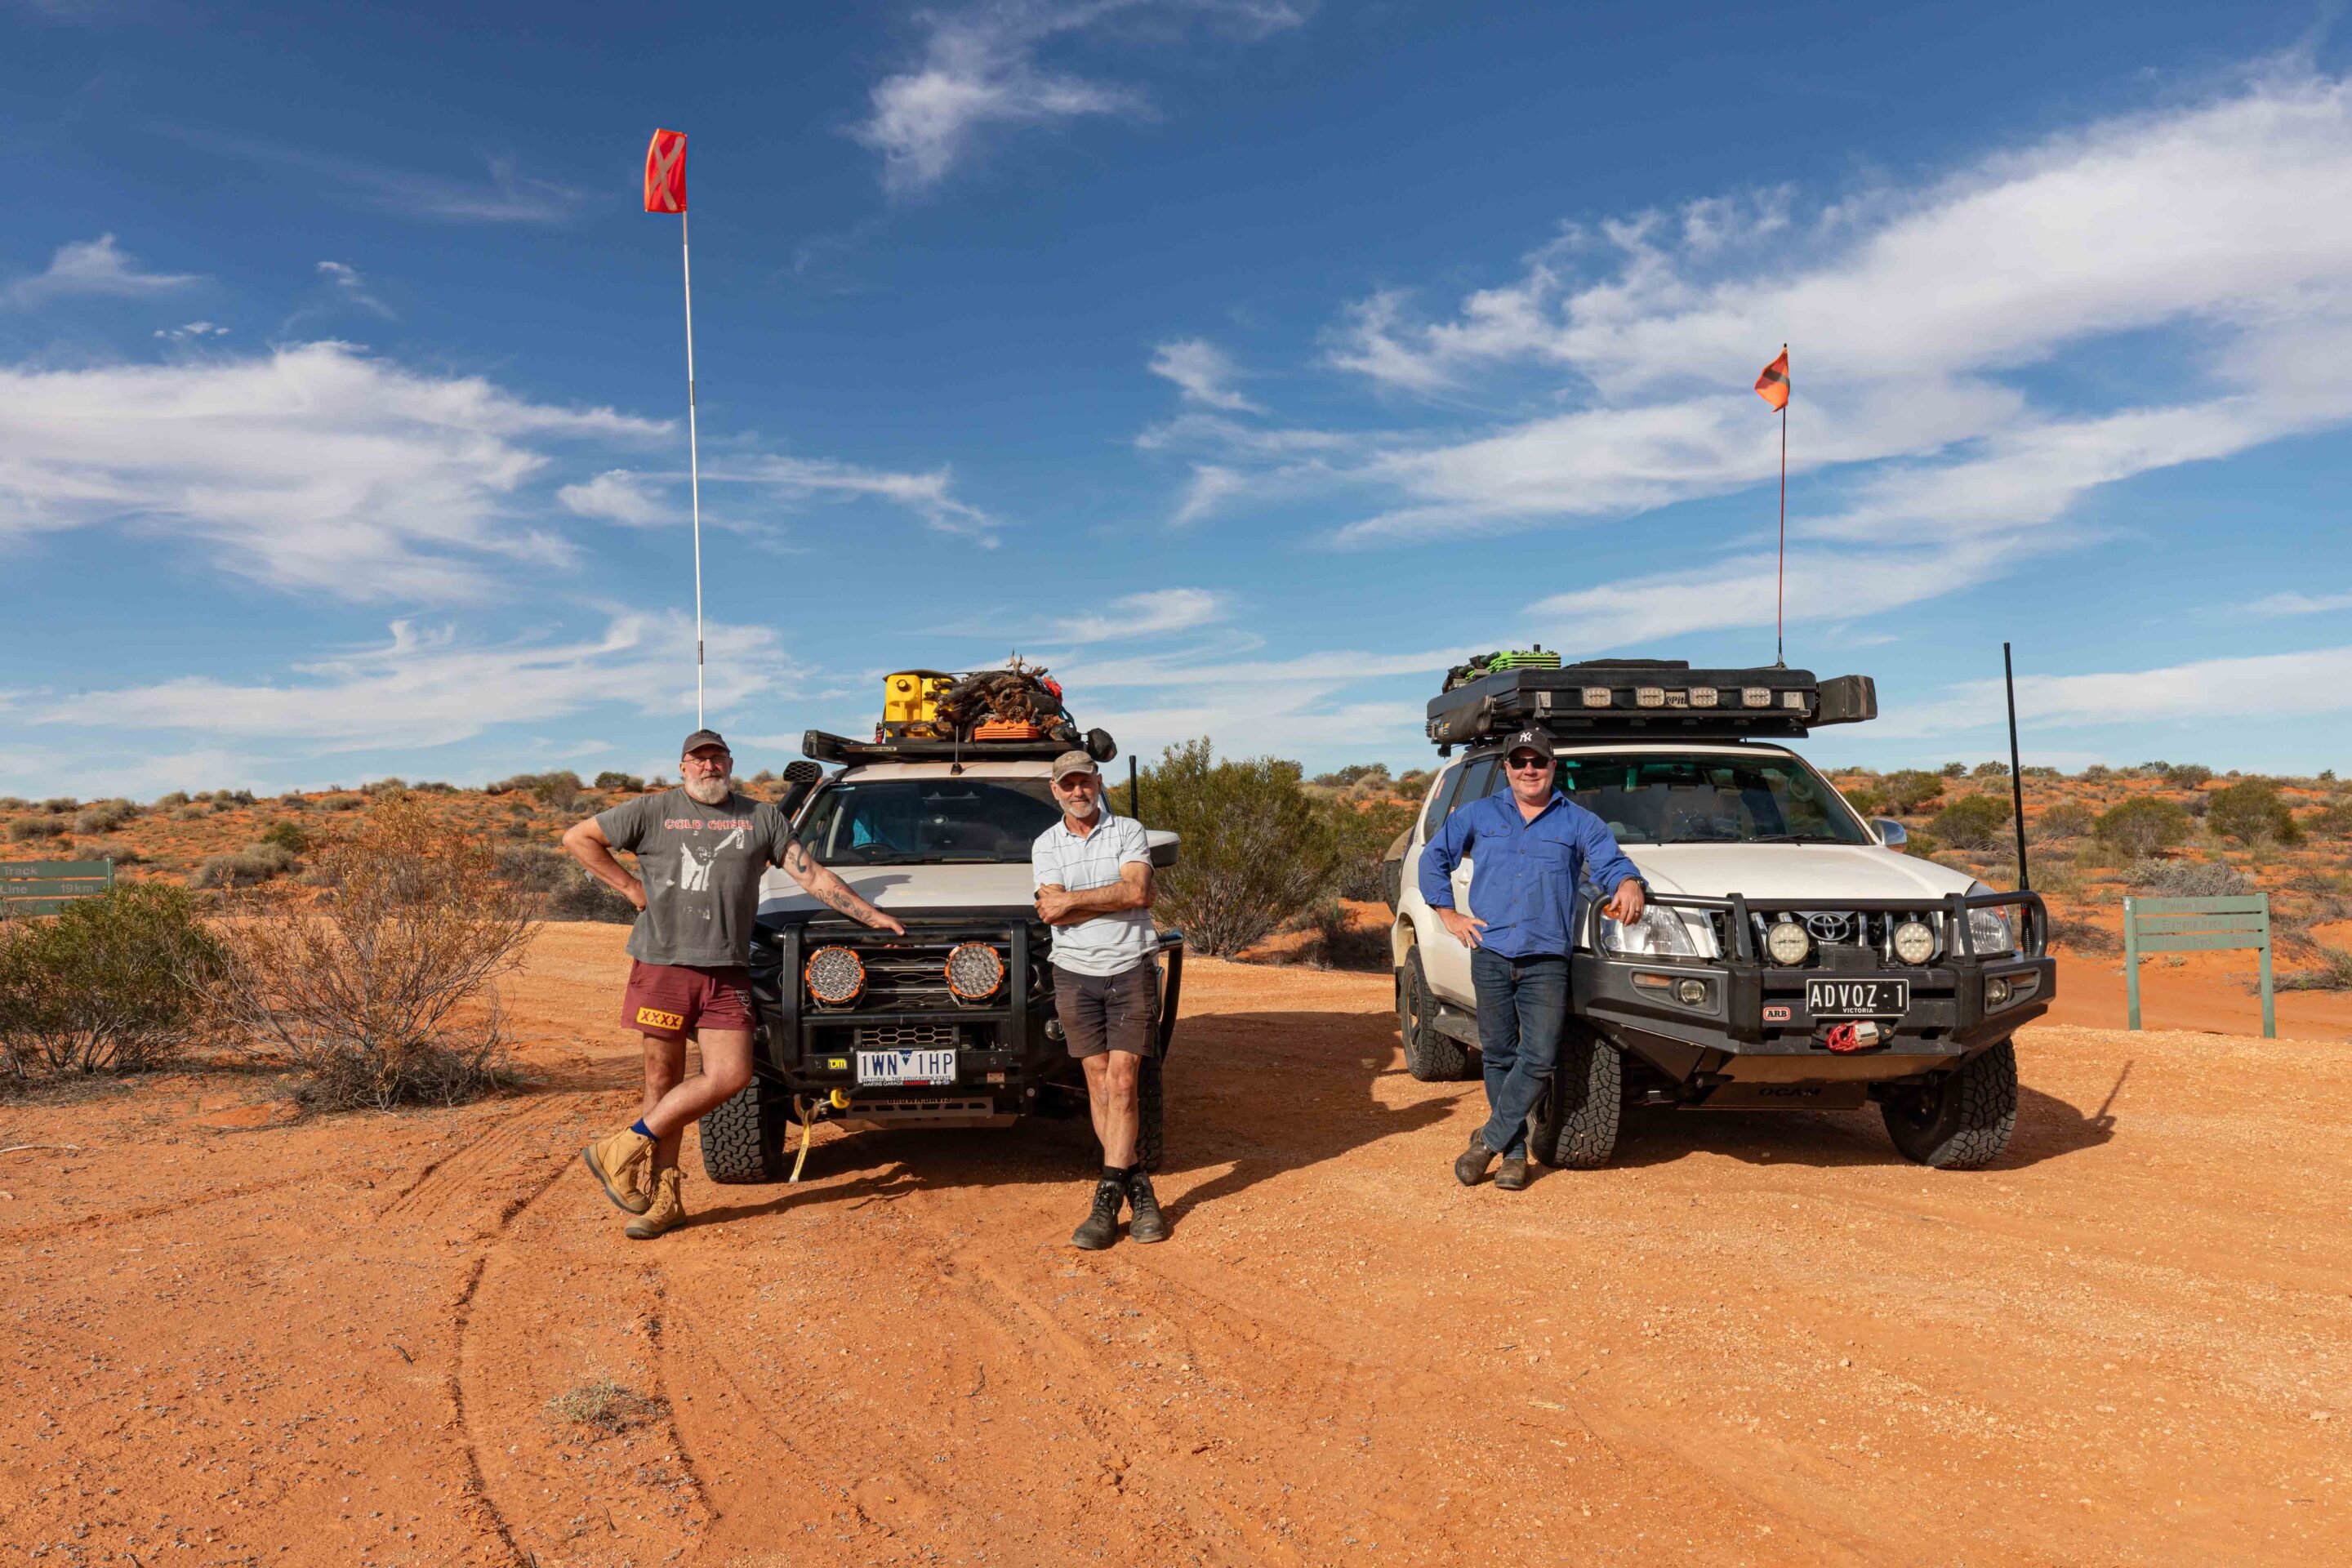
We soon pulled into Madigan Camp 1A. A short track heads west over a dune to Madigan Camp 1, but access is restricted – permits don’t allow travel to Camps 1-4. After grabbing the obligatory camp sign photo, we pushed on towards Marshall Bluff.
2
Tackling Marshall Bluff on the way to the Colson Track
Marshall Bluff is a rugged section of the landscape, characterised by its stony outcrops that jut out dramatically against the sky, creating a striking contrast with the golden sand dunes dotted throughout the area.
As we navigated this challenging terrain, the track narrowed, and the rocky surfaces demanded our full attention and careful manoeuvring. Despite the difficulties, the views were nothing short of breathtaking, offering a vivid snapshot of the ever-changing terrain that unfolded around us, showcasing nature’s diverse beauty.
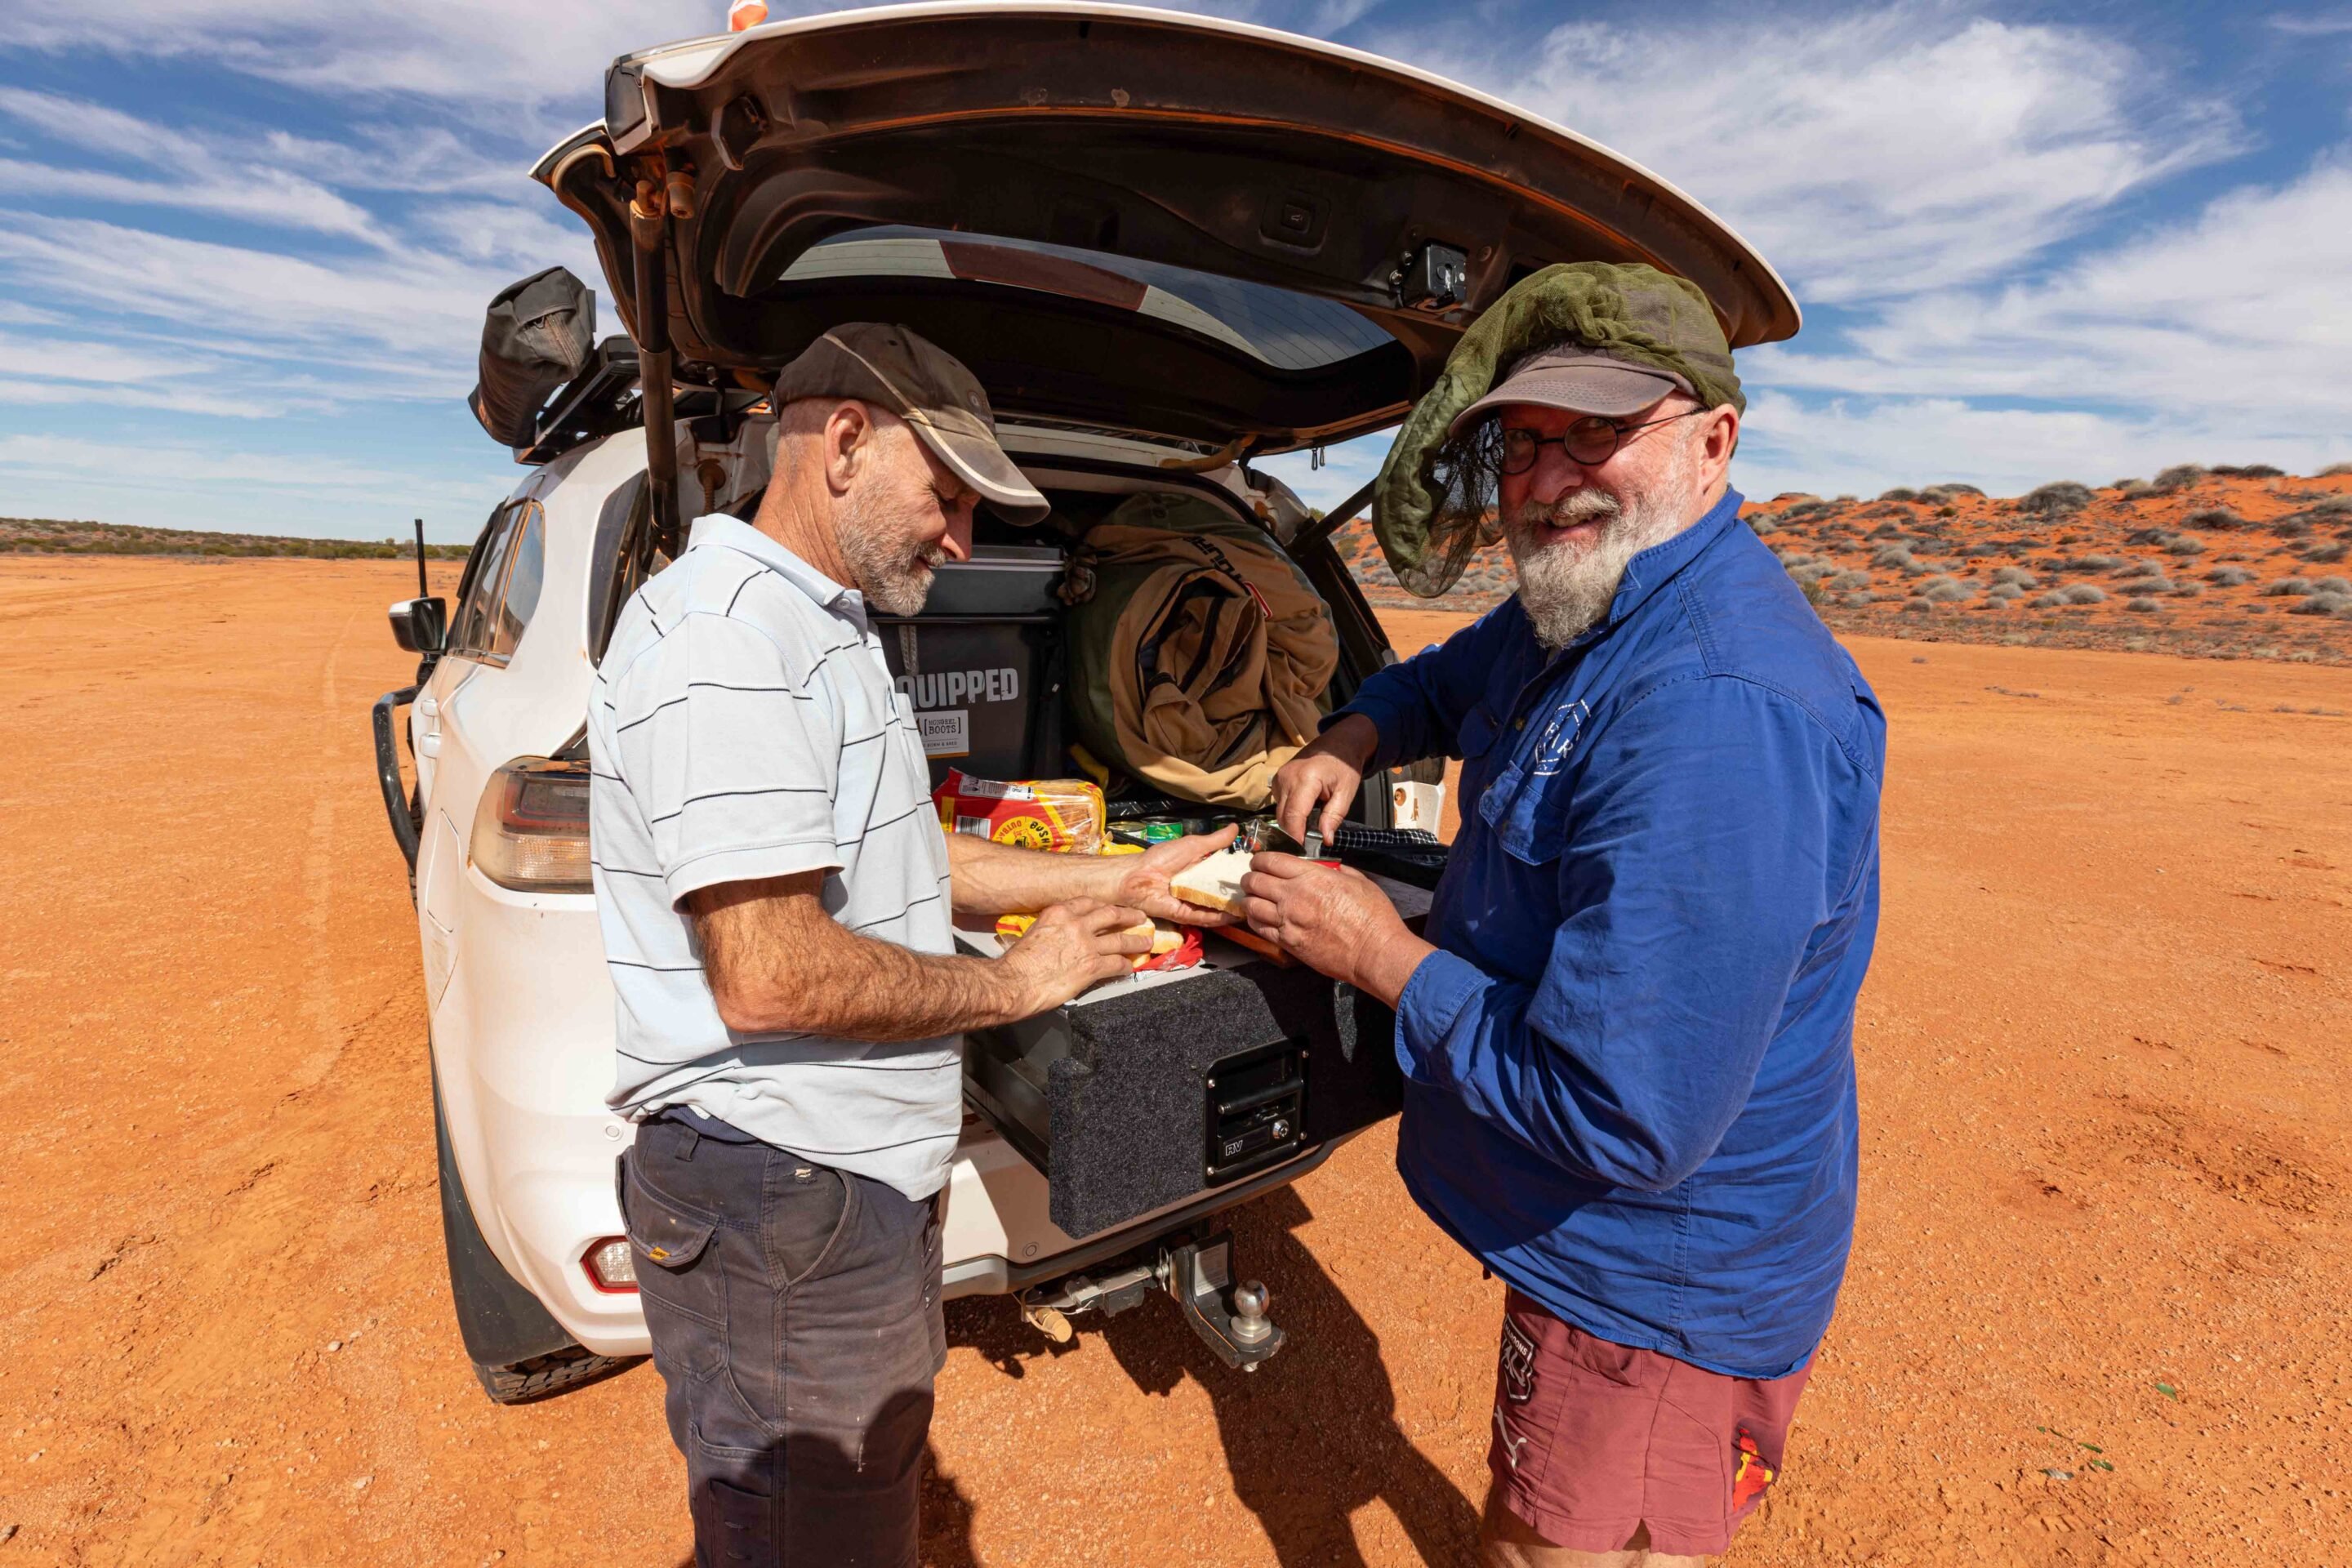
As we made our way back to the plains, the road transitioned once again into a sandy surface, something we had grown accustomed to during our journey. However, the familiar corrugations reappeared, rattling our vehicles as we approached Madigan Camp 5, which is strategically located at the junction with the Colson Track. Here, we decided to stop for a quick lunch, taking a moment to gather our thoughts and energy while contemplating the adventure that lay ahead. Would the Colson Track be reminiscent of the rugged Hay River Track, or would it offer unexpected surprises and challenges?
1
Heading south on the remote Colson Track
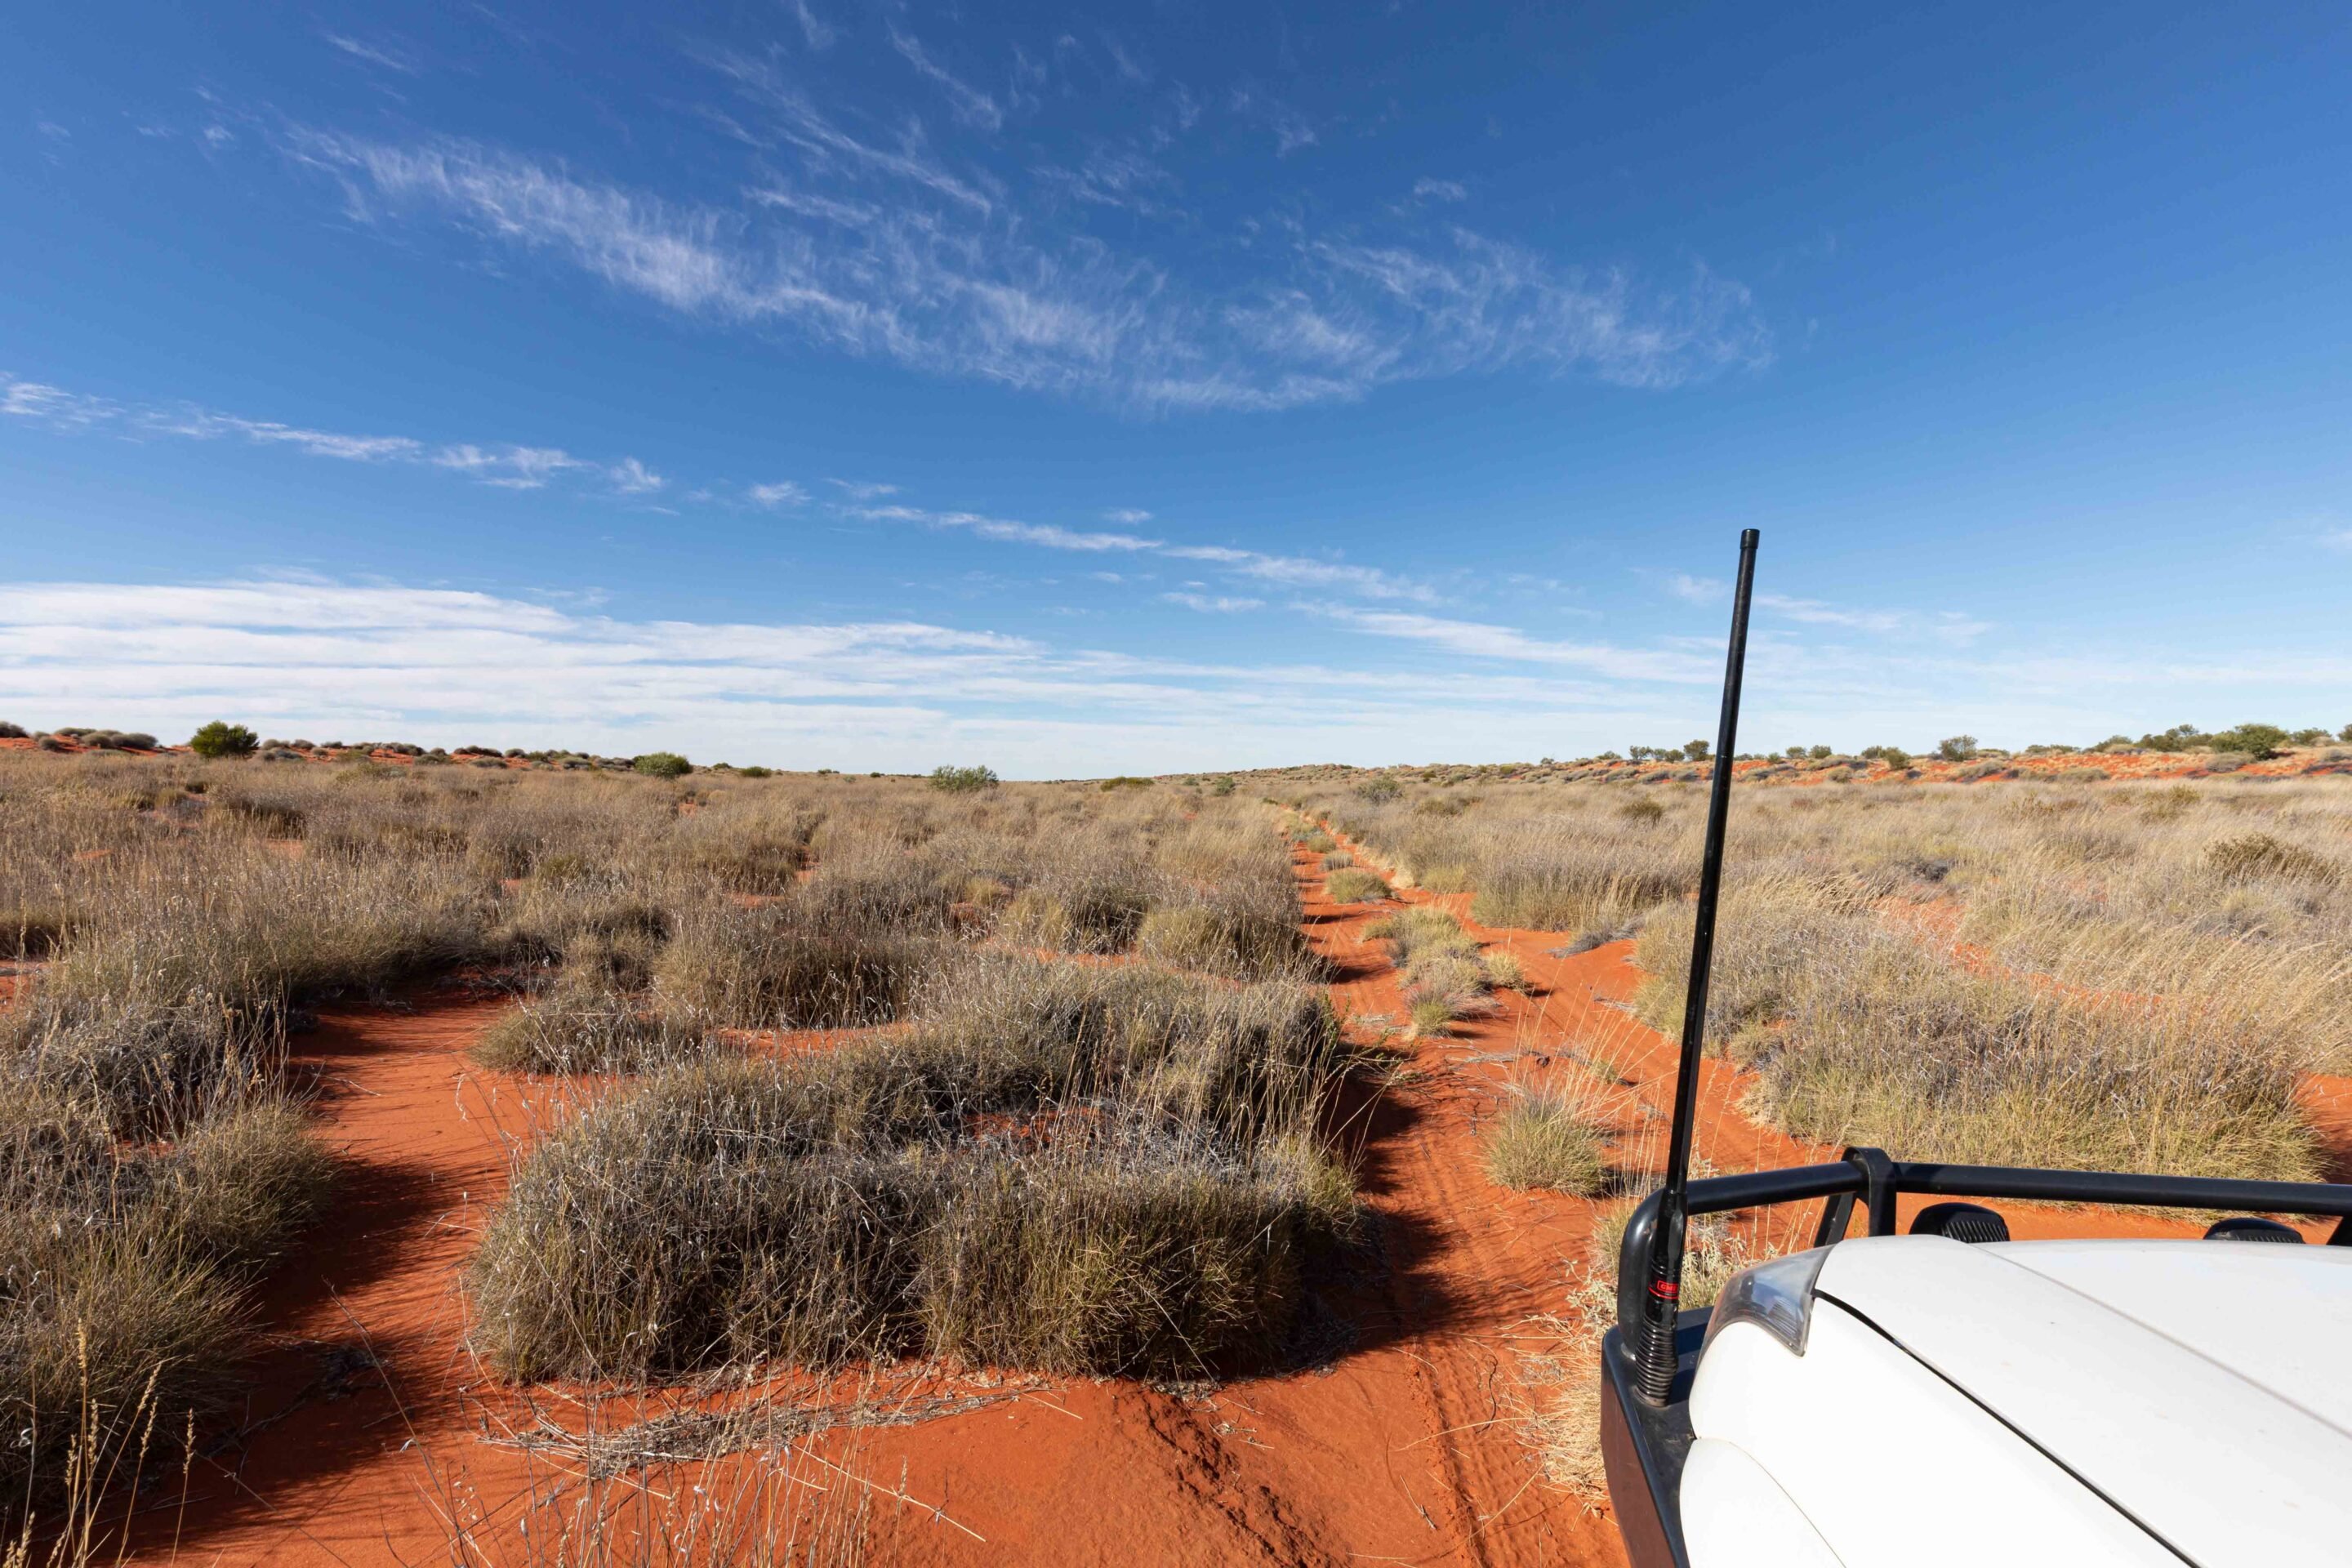
Turning south onto the Colson Track, we immediately sensed a change in atmosphere.
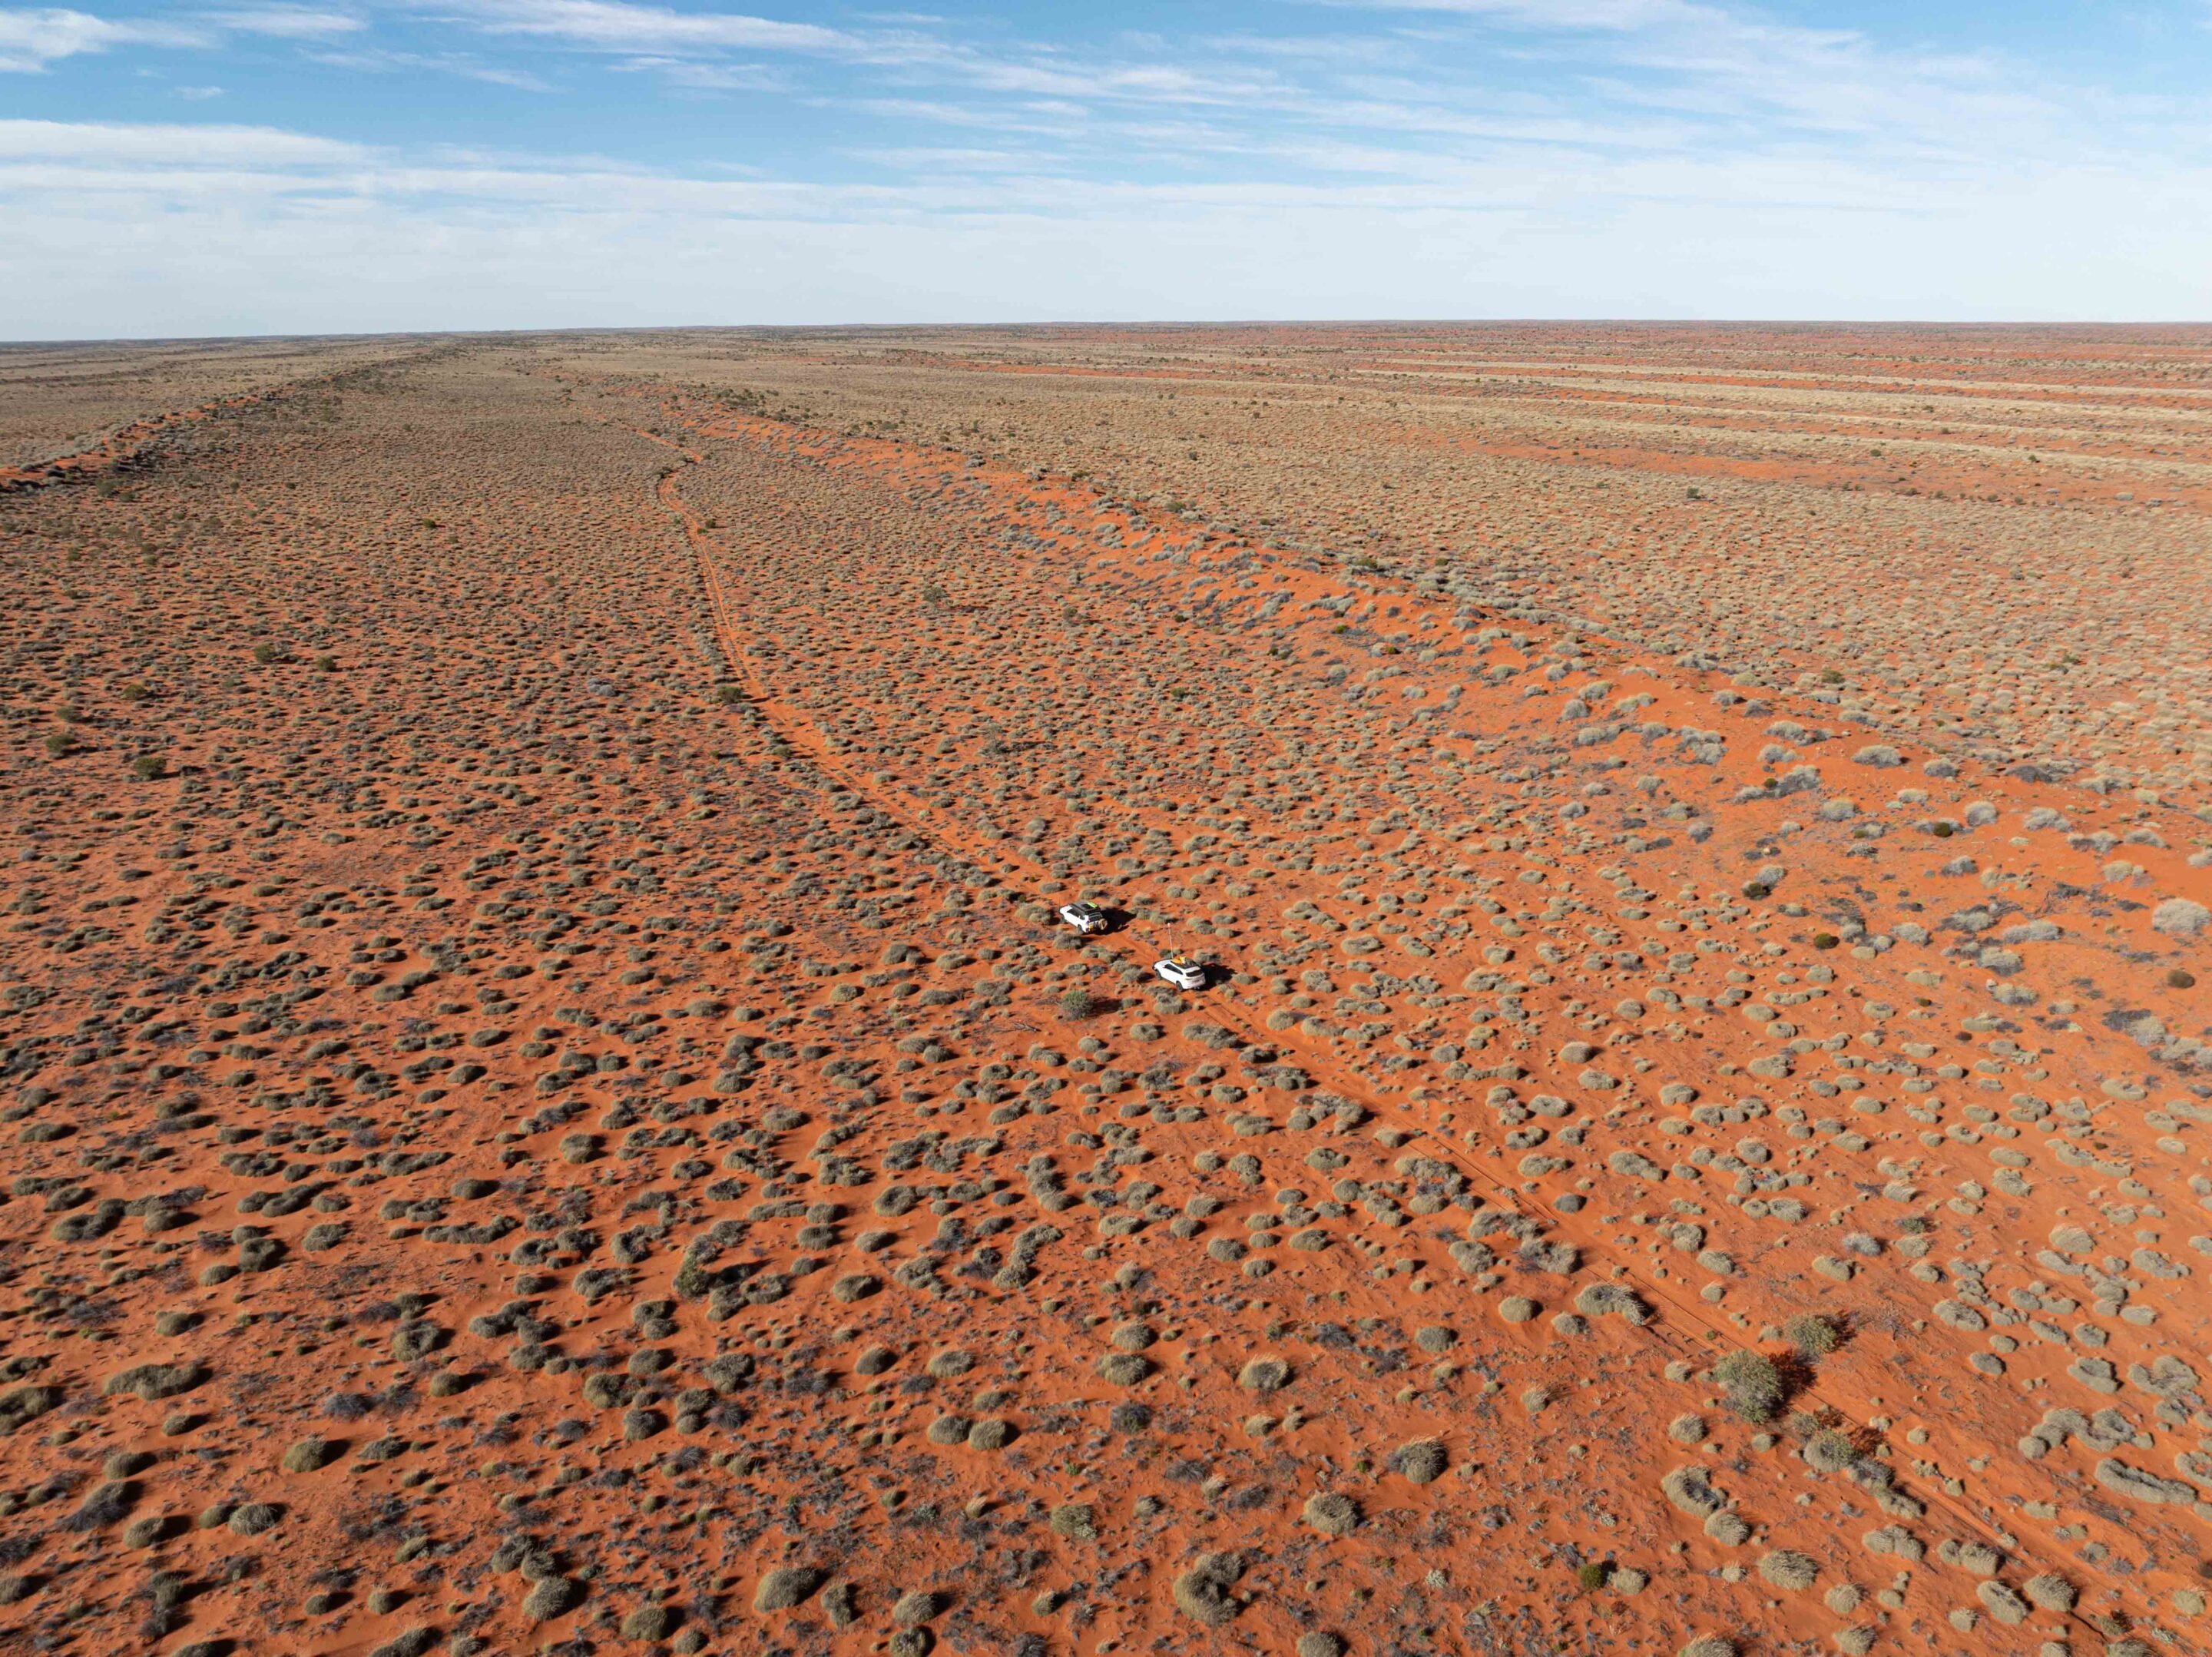
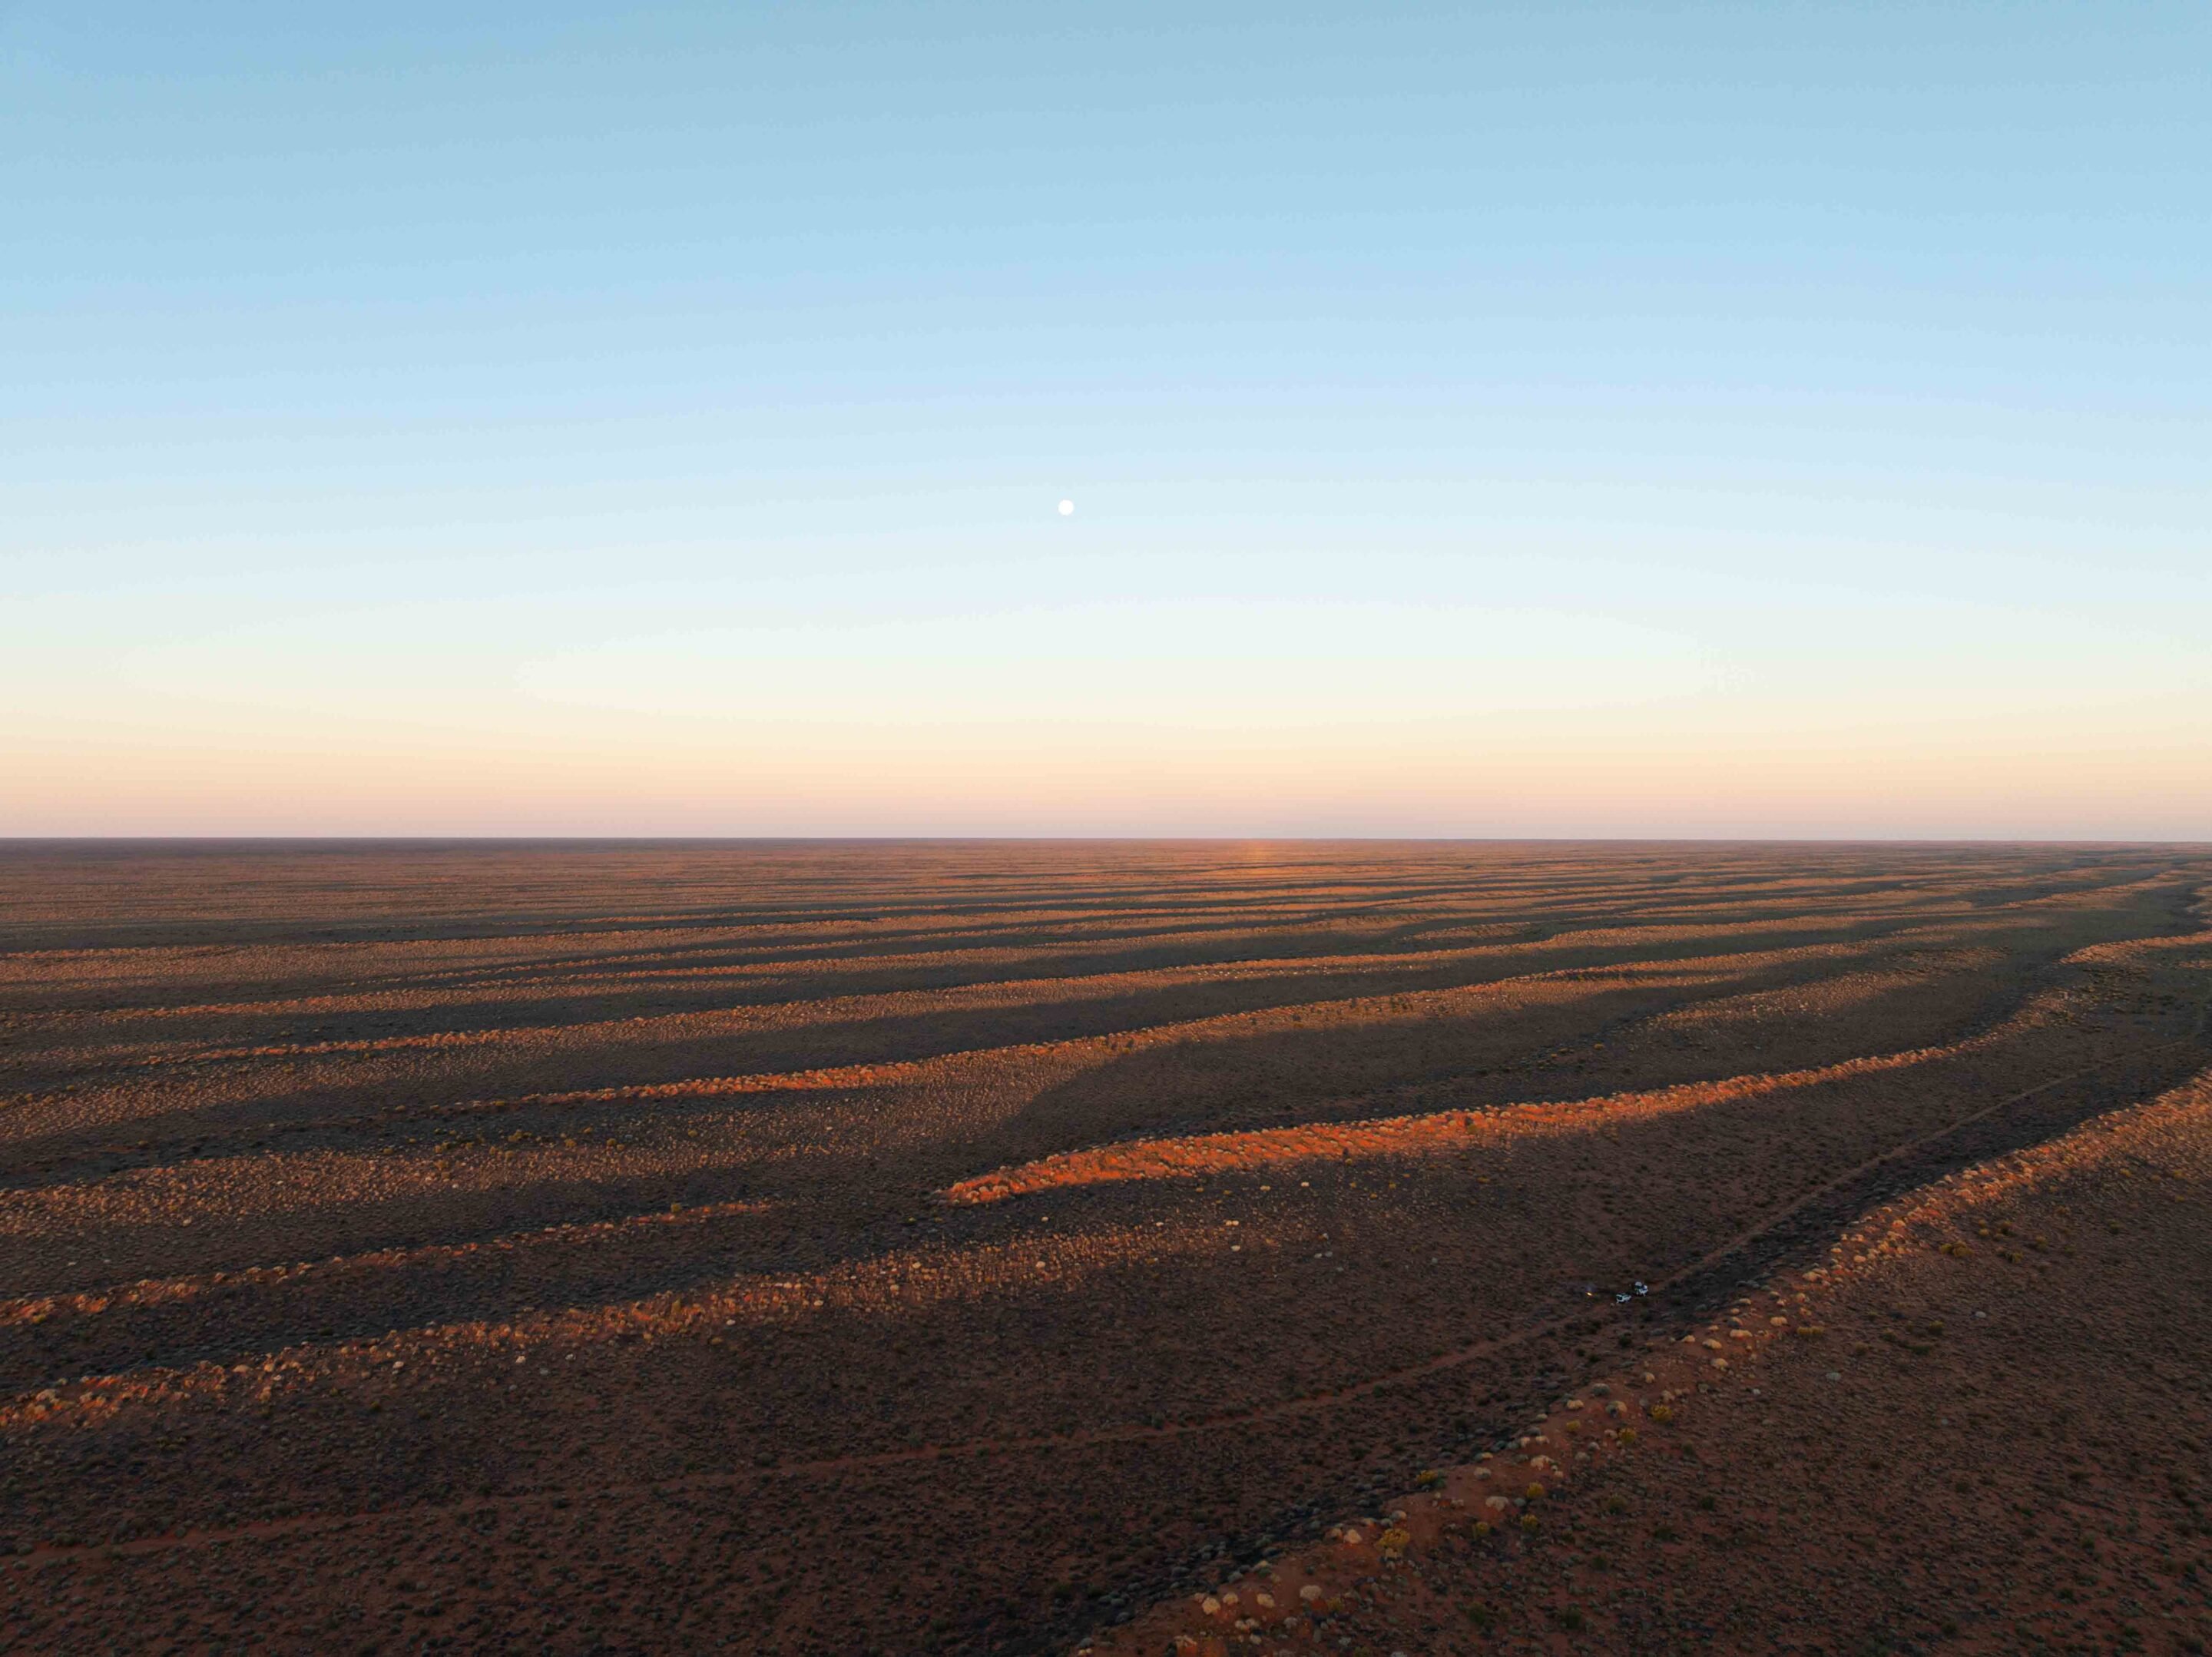
This route, less-travelled and often overlooked, winds its way through the swale nestled between the towering north-south red sand dunes, creating a sense of seclusion and adventure. The terrain was varied, comprising expansive gibber flats that reflected the stark beauty of the outback, claypans that glistened under the sun, and the ever-present spinifex that dominated the landscape with its resilient green hues and sharp blades.
As we ventured further south, the feeling of remoteness intensified. The midsection of the track offered few clearings, and without any designated campgrounds available, we found ourselves pitching our swags right on the track itself. We ensured that we did not disturb the delicate balance of nature around us, mindful of the fragile dunes and the surrounding vegetation that our presence could easily harm.
Dinner that night was simple but satisfying – hot pies out of the Travel Buddy. The flies were relentless, hanging around well after sunset, but the warmth of the fire made up for it. We sat around the flames swapping stories and laughs, soaking in a moment that would stick with us long after the coals went cold.
1
Sunrise on the Colson Track and Outback wildlife encounters
Day two kicked off with a blazing sunrise that lit the sky in orange and pink – a classic outback wake-up call. It was a brisk 5°C, so that first coffee hit the spot. By 7:30am we were back on the track, keen to see what the desert would throw at us next.
The desert was dead quiet – the only sound was the steady crunch of tyres on soft sand. Every now and then we’d spot the faint tracks of dingos or camels that had passed through earlier, a subtle reminder we weren’t alone out here.
This stretch of the Colson Track was a welcome surprise – smooth and easygoing, a rarity out here. With so little traffic, the track was in great nick. No corrugations, no drama – just a winding path through wide fields of old spinifex and scattered desert scrub, showing off the raw beauty of the landscape.
Wildlife was scarce, but we did spot the odd lizard darting across the sand, quick to vanish as we rumbled past. I kept an eye out for the elusive thorny devil, but luck wasn’t with us this time. Still, the day rolled on, and with it came the promise of more surprises in the sand.
1
Crossing spinifex country on the Colson Track
Progress slowed as thick spinifex and hidden root balls filled the ruts, making for a rough and unpredictable ride.
The track rose and dipped with the land, opening up at times to wide claypans and gibber plains stretching to the horizon. These brief changes let us nudge the pace up – but only when the terrain allowed, and always with an eye out for what might come next.
Along the way, we came across a rusted old trailer abandoned beside the track – a curious relic, maybe from an old mining operation or a long-forgotten army expedition. Finds like this spark the imagination and serve as reminders that the desert holds layers of human history, scattered and fading into the sand.
After about four tough hours on the track, the swale opened up, offering more space and better camping options. Around 30km north of the French Line, we rolled onto a wide claypan that felt like a natural lunch stop – a welcome break from the constant pitching and yawing behind the wheel. We stretched our legs, soaked in the stillness, and took a moment to appreciate the sheer scale of the desert stretching out ahead.
1
Colson Track to French Line: Simpson Desert connection
Back on the track, we passed through a grove of old gidgee trees just north of the historic Colson Oil Well.
One tree held a large, empty nest – likely built by a hawk or wedge-tailed eagle, both impressive birds native to this region. Not long after, a healthy-looking dingo trotted along the track ahead. It was a striking sight – lean, alert, and moving with purpose – but it vanished before I could grab a photo.
Crossing from the Northern Territory into South Australia was a non-event – no signposts, just the arrow on the Hema HX2 confirming we’d entered a new state. About 23km later, we hit the junction with the French Line – one of the Simpson’s most iconic crossings. We considered setting up camp in the nearby Gidgee trees, but it was still early. Spirits high, we pushed on, keen to see what else the track had in store.
1
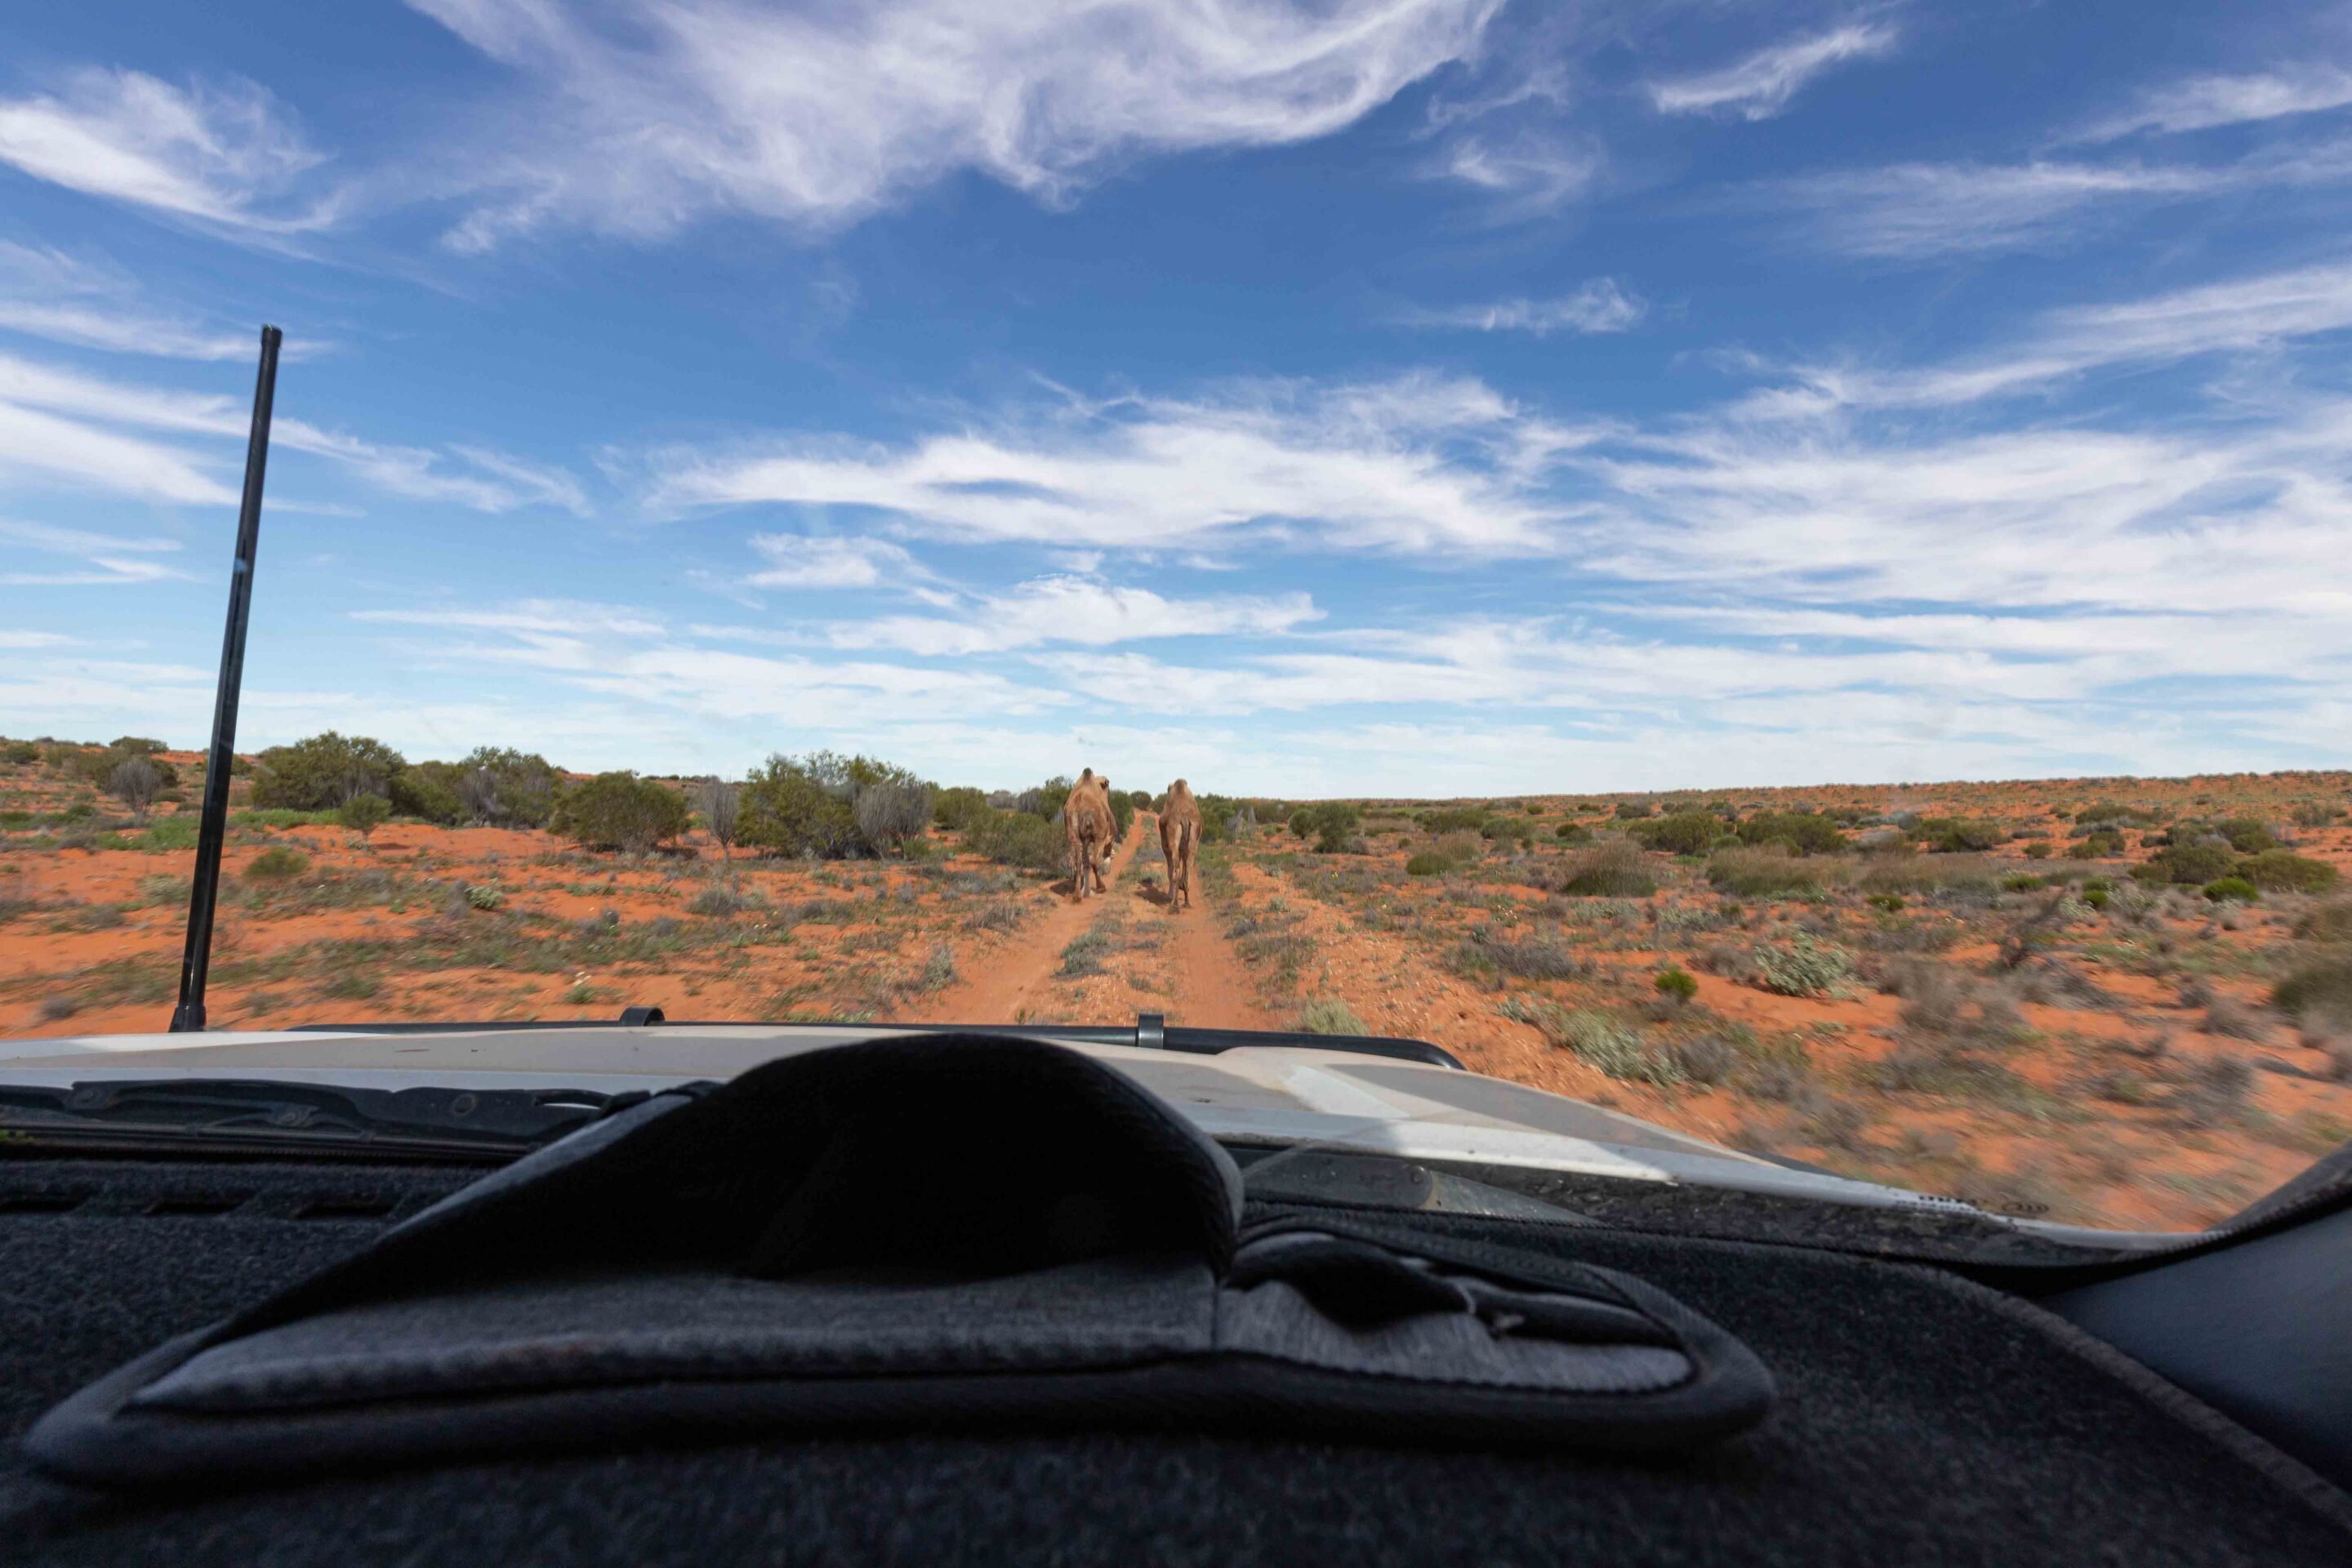
Camels on the Colson Track and reaching the WAA Line
Just when we thought the surprises were finished, three camels appeared in front of us, creating an unexpected yet amusing obstacle.
Two of the camels peeled off quickly, but the third chose to run straight down the track. For nearly 10km, we trailed behind our new companion, its gangly legs moving rhythmically in a comical bounce as it trotted ahead of us. Finally, after what felt like an eternity, it veered off to the side, allowing us to accelerate and regain our momentum. With renewed energy, we pressed forward to reach the end of the Colson Track at its junction with the WAA Line.
Just 19km from the French Line, we pushed on along the Rig Road. As dusk closed in, we made camp on a scenic dune near the famous Lone Gum. It had been a day full of surprises, and as we sat under the stars swapping stories and laughs, we were reminded of just how unpredictable – and rewarding – desert travel can be.
1
History of the Colson Track and Ted Colson’s legacy
Most assume the Colson Track was named after explorer Ted Colson, but there’s a strong case it was actually named after the nearby Colson Oil Well.
The well was drilled close to where Colson passed during his 1936 expedition across the desert near the 26th parallel – the border between Queensland and South Australia. Whatever its true origin, the Colson Track is a fitting tribute to a bold explorer. It calls to today’s adventurers, offering a one-of-a-kind journey through the mesmerising heart of the Simpson Desert.
This vast and arid region showcases not only stunning natural beauty but also the legacy of those who dared to explore its uncharted territories. Each step along the Colson Track allows travellers to appreciate both the history of exploration and the arid landscape that defines this part of Australia.
In that sense, the Colson Track is more than just a line on the map – it’s a living tribute to the grit and determination of explorers like Ted Colson, inviting all who follow it to embrace the spirit of adventure and discovery that defines the outback.
The Colson Track offers a unique perspective on the Simpson Desert that few travellers have the opportunity to experience.
Characterised by its profound isolation, tranquillity – and absence of commercial traffic – this track is ideal for those who are yearning for an authentic desert adventure. It’s not merely about checking off the famous dunes or reaching well-known campsites, but instead immersing oneself in the vastness and stillness of this ancient land.
The colours alone are reason enough to go – vivid orange dunes set against deep cobalt skies, broken by patches of bright green spinifex. It’s a natural masterpiece. While some stretches of the track may feel repetitive, the real reward lies in the experience. Out here, solitude invites reflection, the landscape reveals its quiet beauty slowly, and there’s a deep satisfaction in following the tracks of those who came before – a connection to the desert’s rich, enduring story.
1
Whether you’re chasing the story of Ted Colson or just looking for a lesser-travelled route through the Simpson, the Colson Track delivers a true outback adventure. It demands patience, preparation and a healthy dose of curiosity – but what you get in return is pure desert magic.
Add the Colson Track to your bucket list if you’re after something different to the well-worn French Line or QAA. This isn’t just a route – it’s a journey where the destination is a deeper connection to country, and to the legacy of those who first dared to cross it.
No matter how many new vehicles hit the market, we’re always chasing something different – something built for us and no one else. A rig that stands apart from the crowd, tailored to our needs, not the showroom spec.
Toyota’s 4×4 range is one of the biggest around – surely there’s something for everyone? Not for Graeme. He wanted something different: the comfort of a wagon, the practicality of a ute, and the classic cool of a vintage 80 Series. Oh, and it had to have a V8 – not just any V8, but the twin-turbo diesel from the 200 Series LandCruiser.
Graeme is a farmer in regional Victoria and like most make their living off the land in Australia, he is no stranger to Toyota. There’s always a HiLux or two in the shed or running around the paddocks, and his current fleet also includes a pair of 40th Anniversary 80 Series and a couple of 79 Series workhorses.
1
The 79 Series LandCruiser was too agricultural for the build Graeme had in mind, and the HiLux too small. So he went looking for someone who could bring his vision to life.
Enter Off Track Concepts (OTC) in Cobram, Victoria. Hagen Skinner and the team at OTC have been dropping 1VD V8s into 80 and 100 Series LandCruisers for years, and one of their earlier builds even featured in these pages back in 2024.
“From the first time I contacted Hagen and said that I wanted a chopped 80 with extended chassis and a V8, he just said yes, he could do all that,” recalls Graeme.
The plan was to use one of the anniversary models that Graeme already had but then another one came up that had a better body, ARB bull bar and roof rack, but a dodgy transfer case. And yes, it’s another 1997 40th Anniversary 80 Series.
1
Chassis strip and VDJ engine conversion
As you’d expect from a build that involves an engine swap and stretched wheelbase, the first step was stripping the LandCruiser back to a bare chassis.
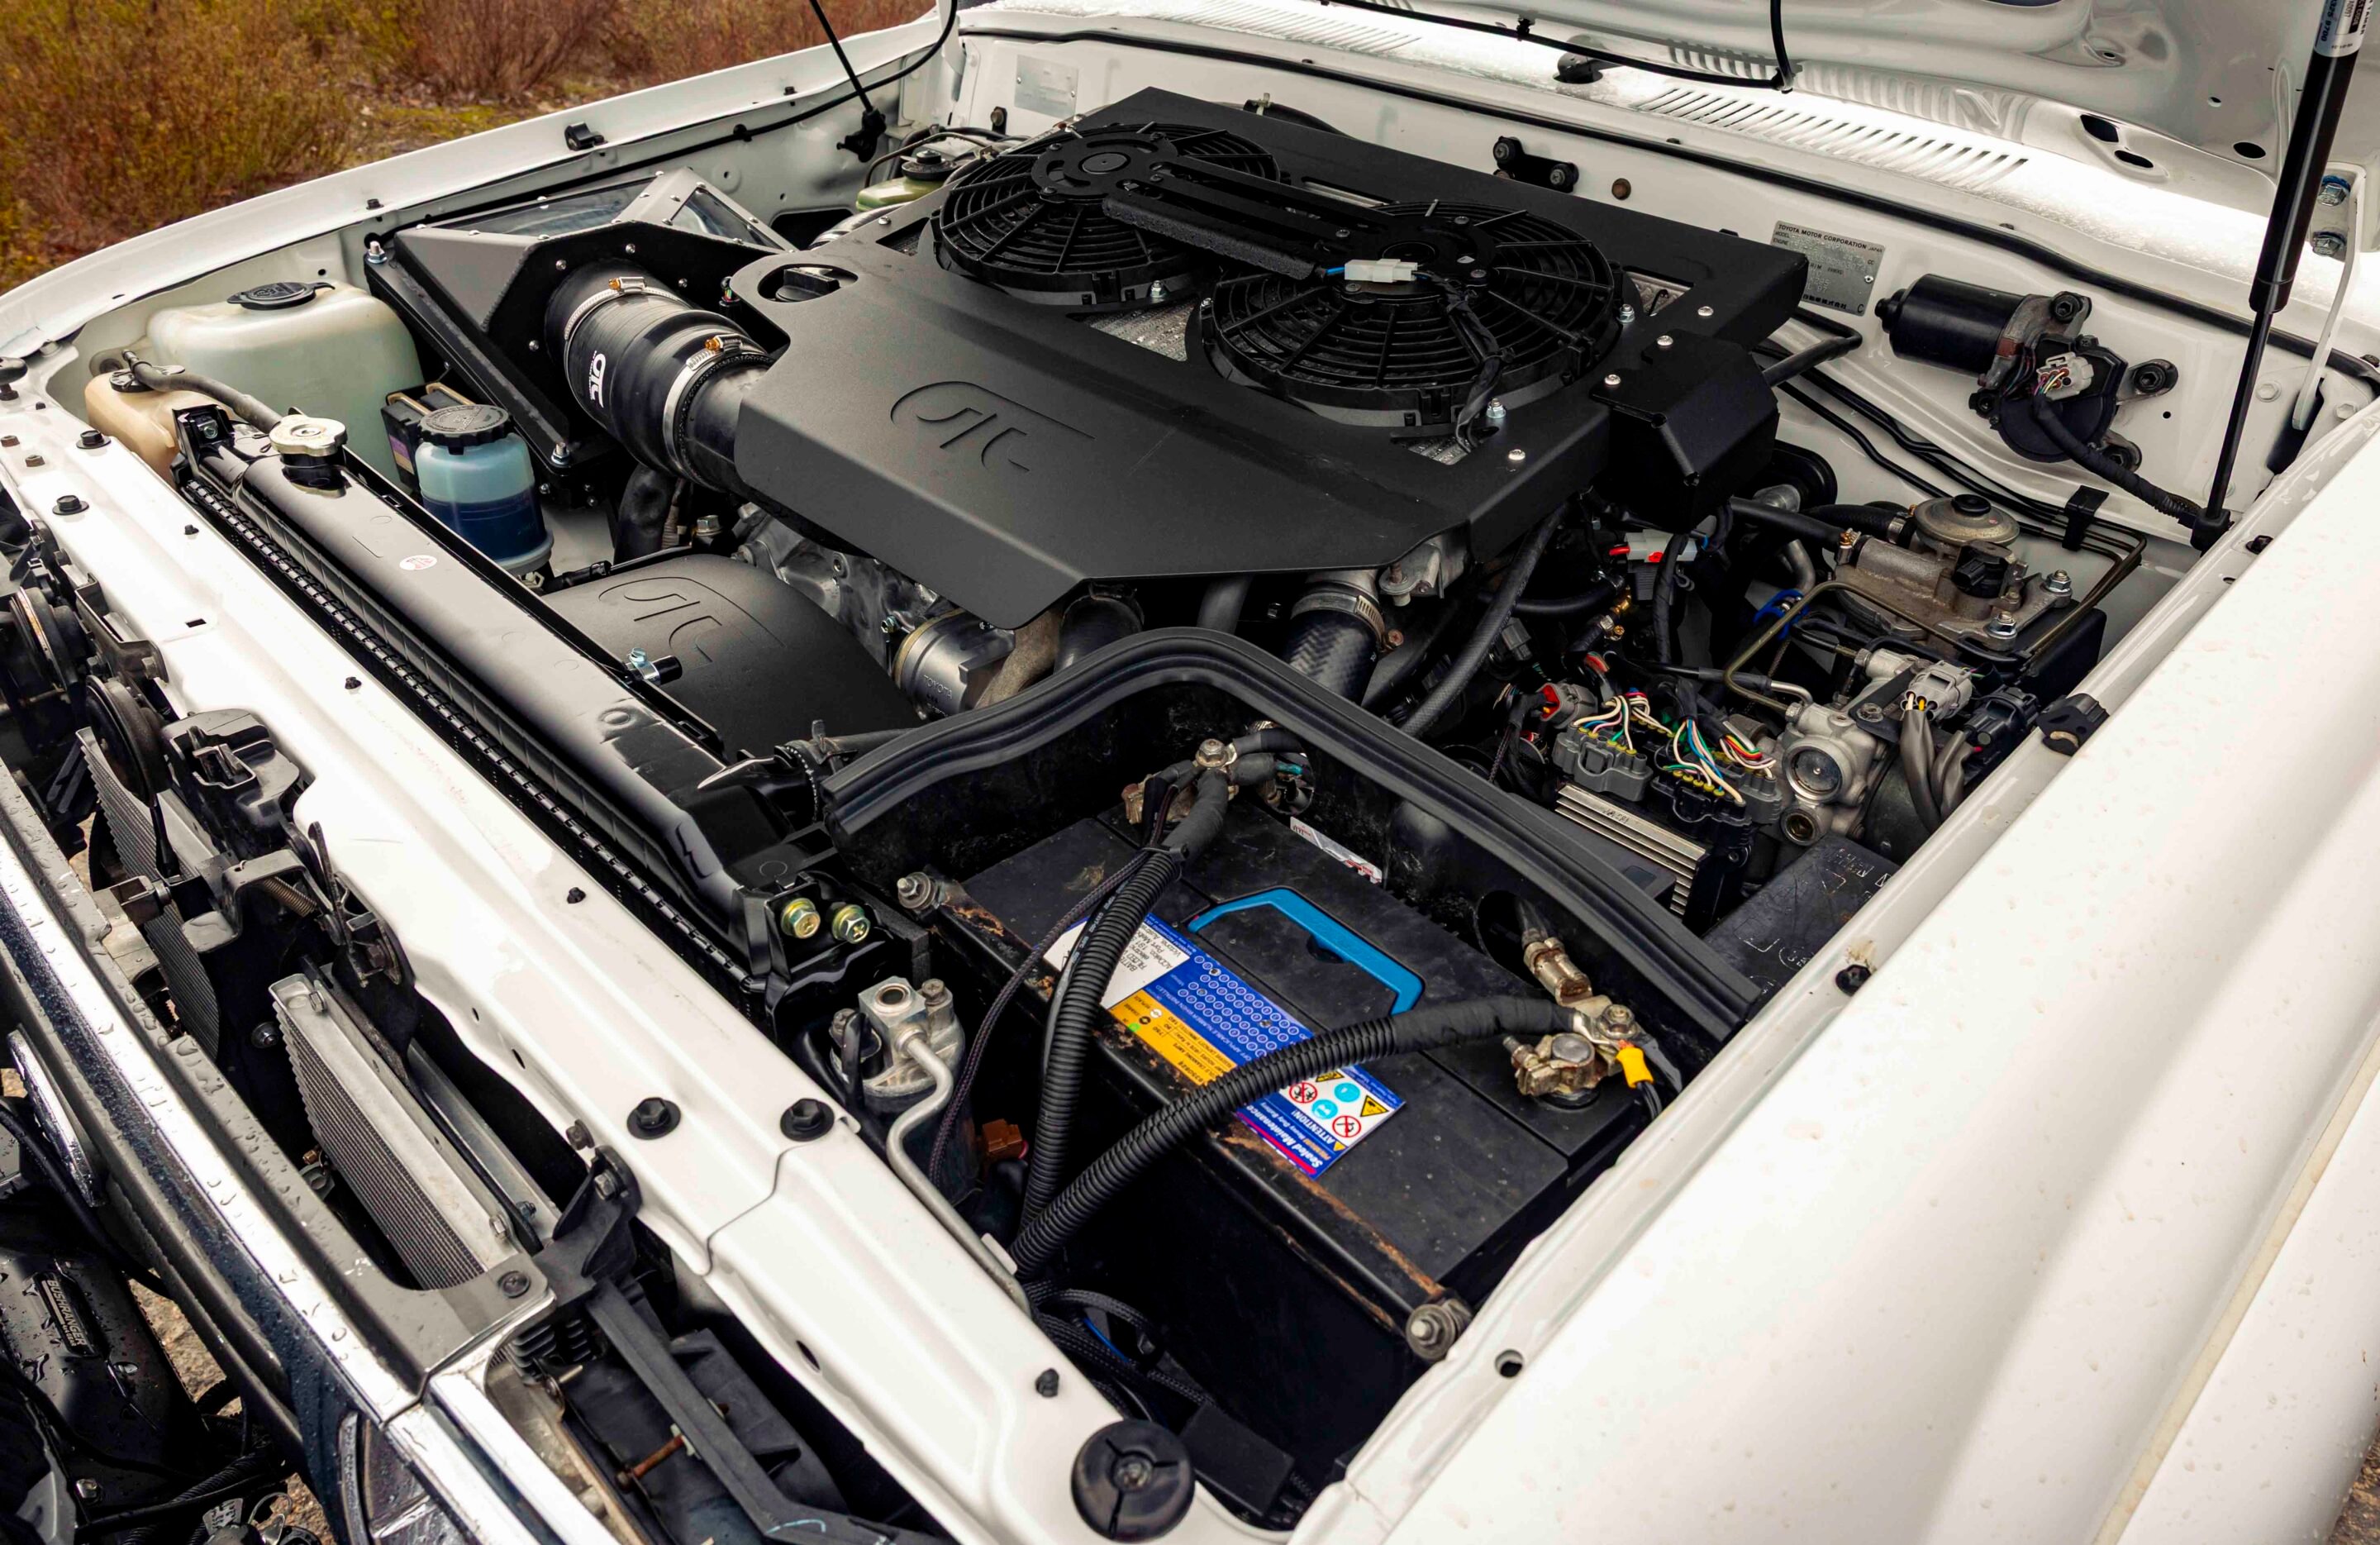
Once that was done, it was time to blast away 28 years of built-up grime before breaking out the cutting tools. The rear of the chassis was lopped off just ahead of the suspension arm mounts, allowing OTC to retain the factory Toyota geometry when the section was reattached 300mm further back. Up front, custom engine mounts were fabricated to house the Toyota V8, and the known weak point around the steering box was reinforced before the entire chassis was finished in two-pack black.
While a donor 200 Series supplied many of the parts for the conversion, its engine was already cooked. So the team sourced a brand-new 1VD from Toyota, along with a new six-speed auto and a 79 Series transfer case. The engine is actually a 79 Series–spec single-turbo unit, chosen because it comes with the correct sump to fit neatly into the 80 Series chassis.
1
A pair of G Turbo Green Wheel turbos were bolted on, supported by a mix of 200 Series and custom-fabricated piping and ancillaries to make everything fit in the 90s-era engine bay. A set of +90 injectors and a custom ECU remap had the 1VD running sweet, and on the dyno it laid down an impressive 1000Nm and 245kW at the tyres.
The engine breathes through an OTC-fabricated airbox and snorkel, while Hagen also custom-built the dual three-inch stainless-steel exhaust. His handiwork continues with the shroud and twin fans mounted to the PWR intercooler.
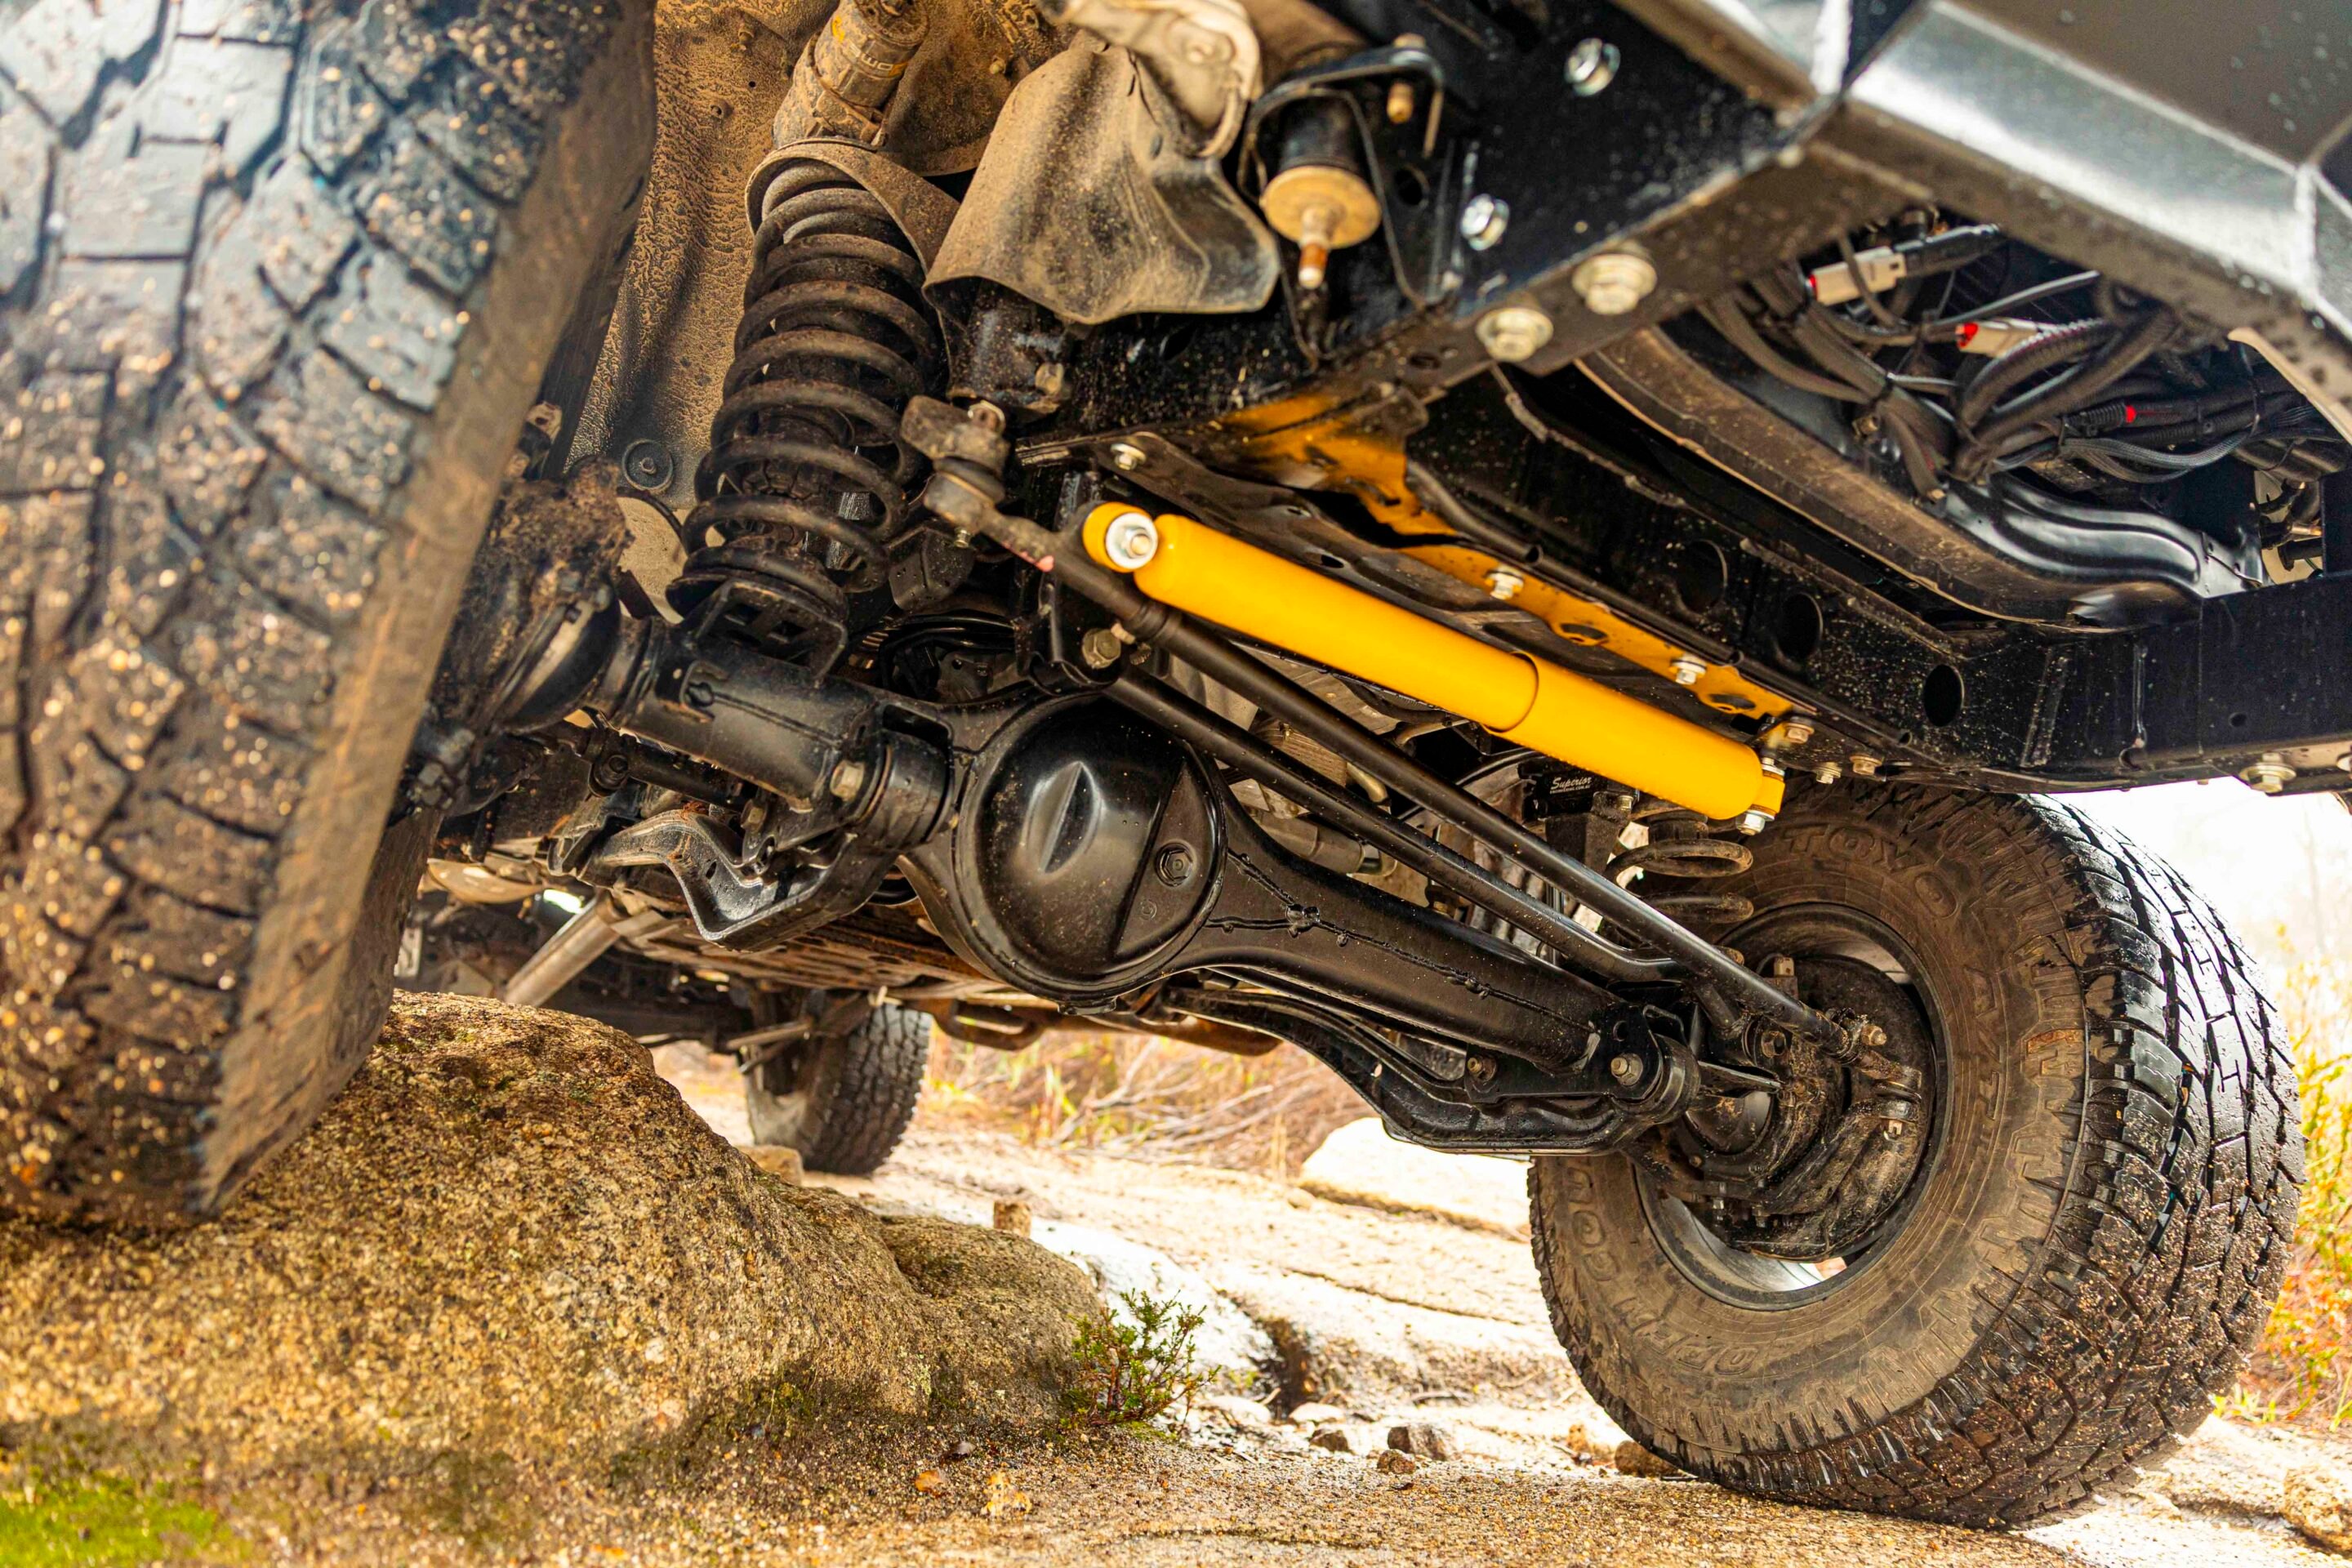
As expected, the 200 Series six-speed auto bolts straight up to the 1VD. At the other end, a Wholesale Automatics adapter mates the transmission to the 79 Series transfer case without fuss. The 80 Series diffs have been refurbished with new bearings seals and hardware including ARB Air Lockers front and rear.
Custom trayback and body modifications
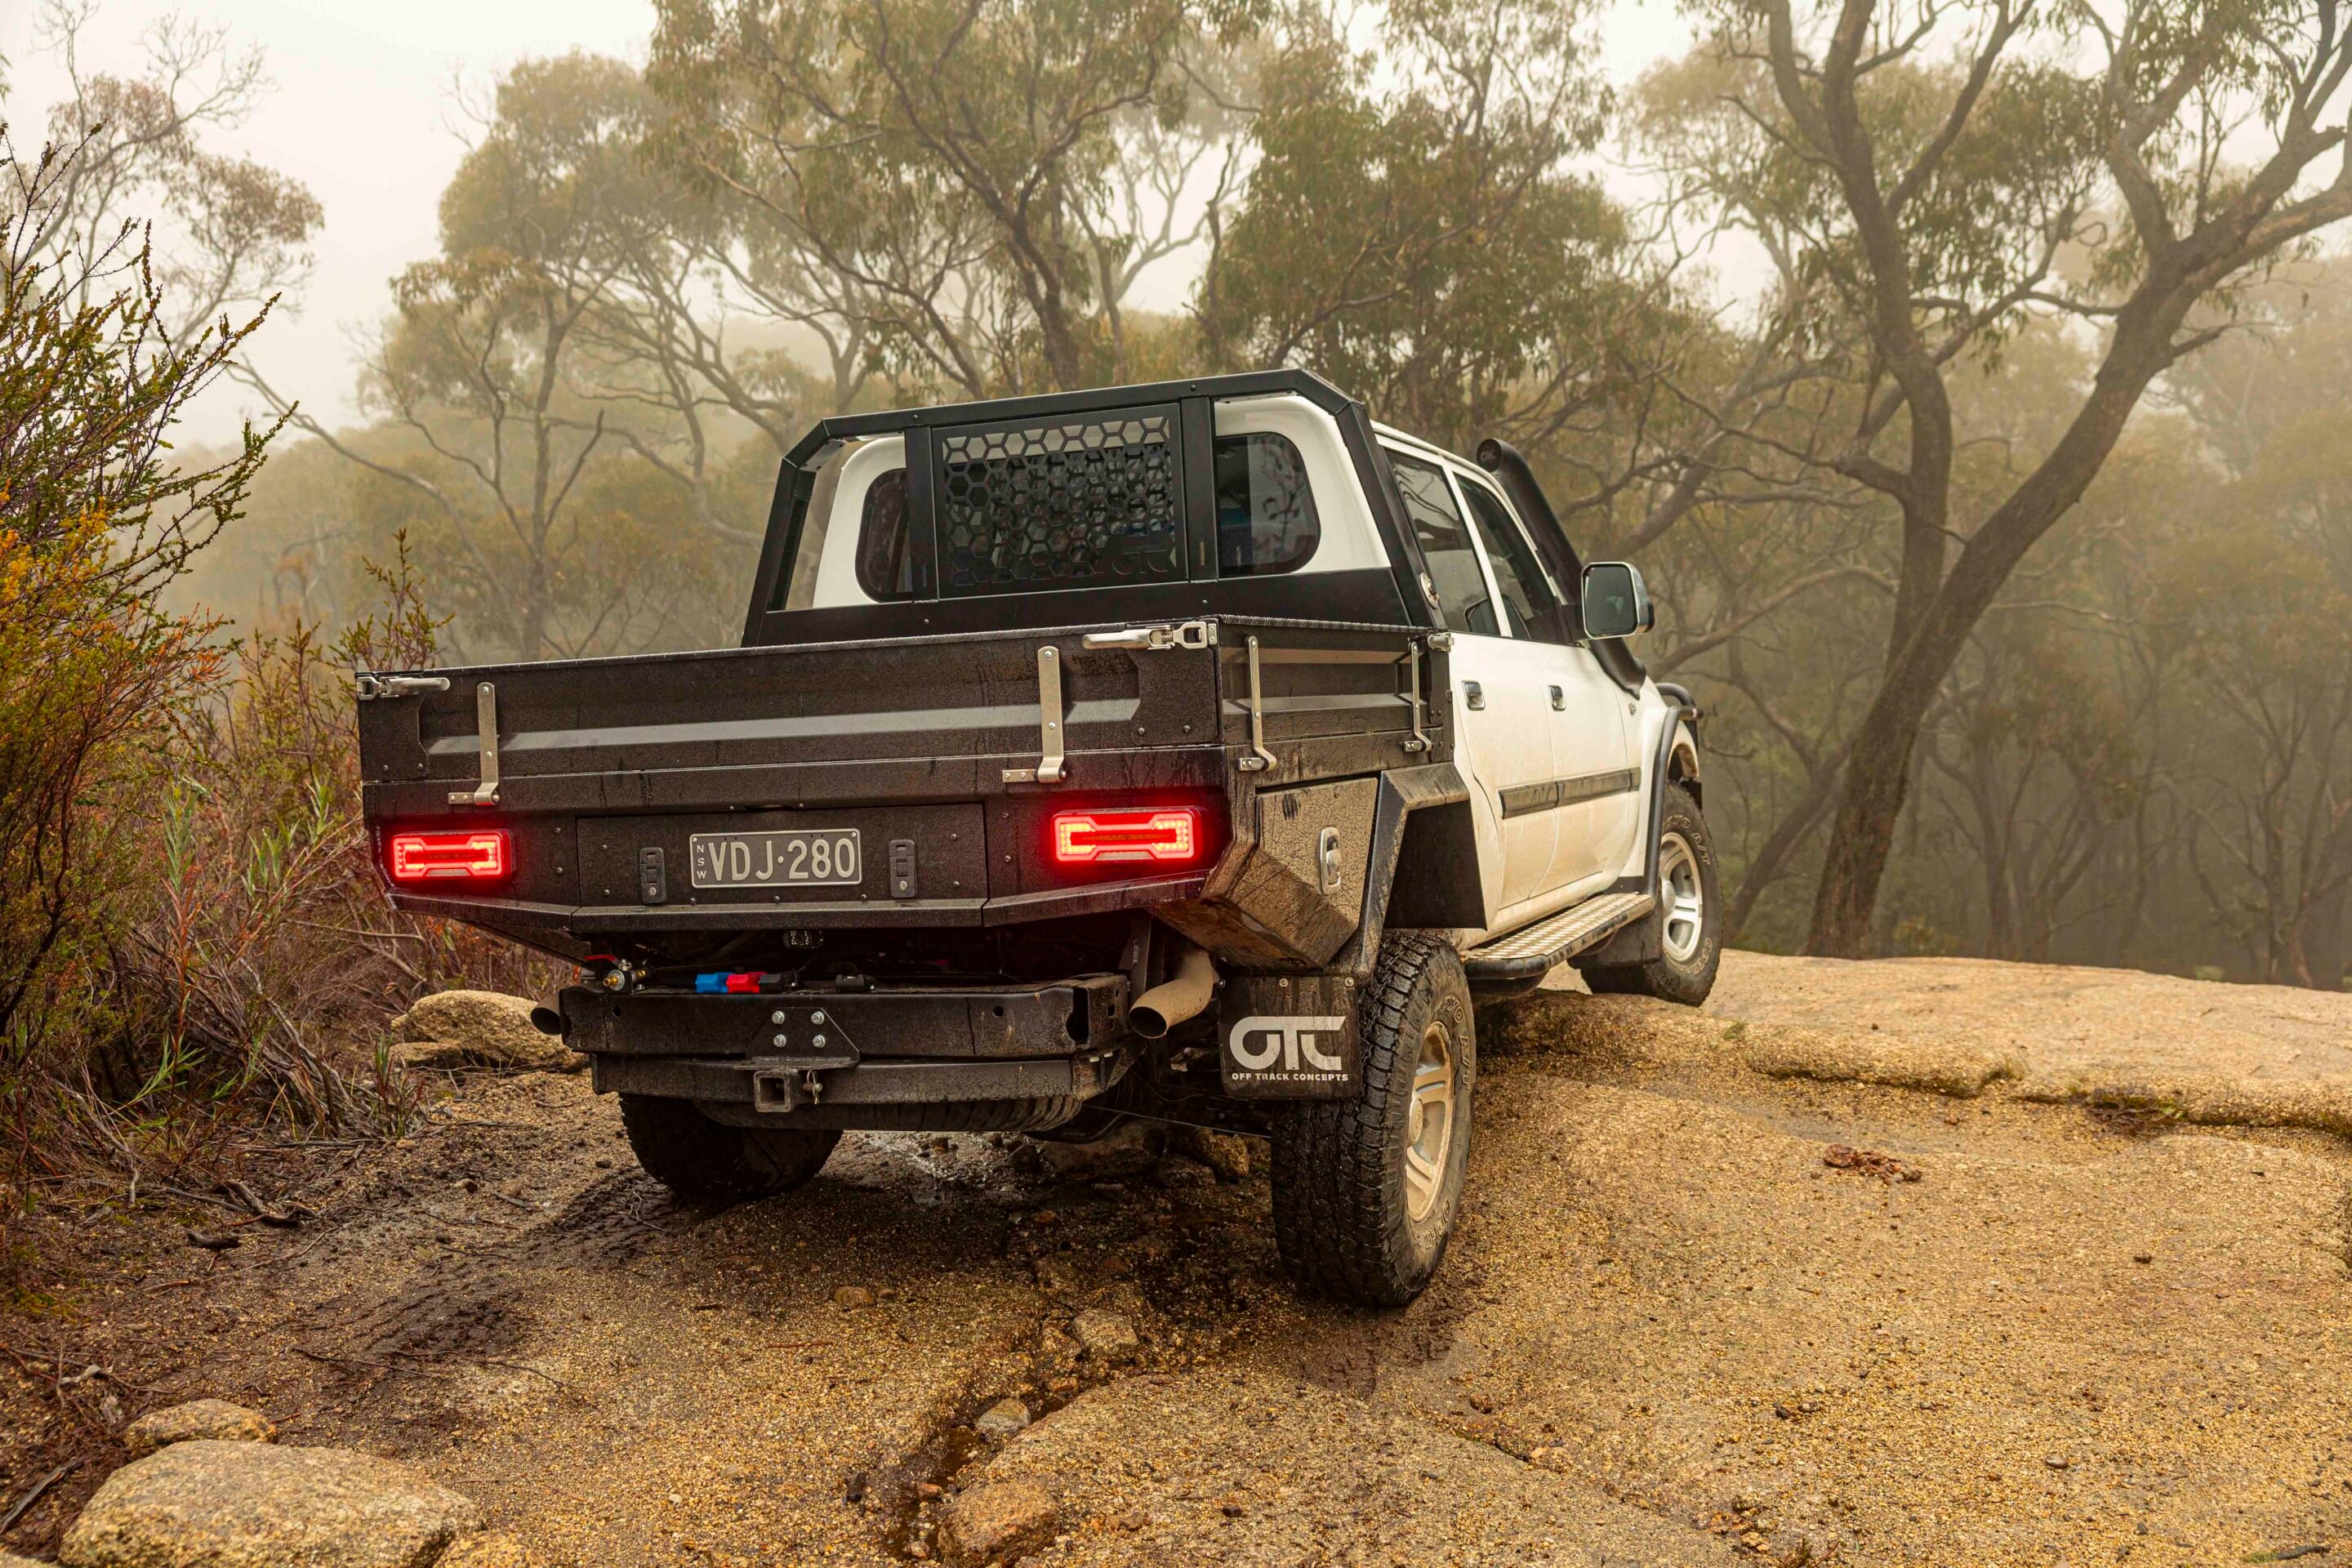
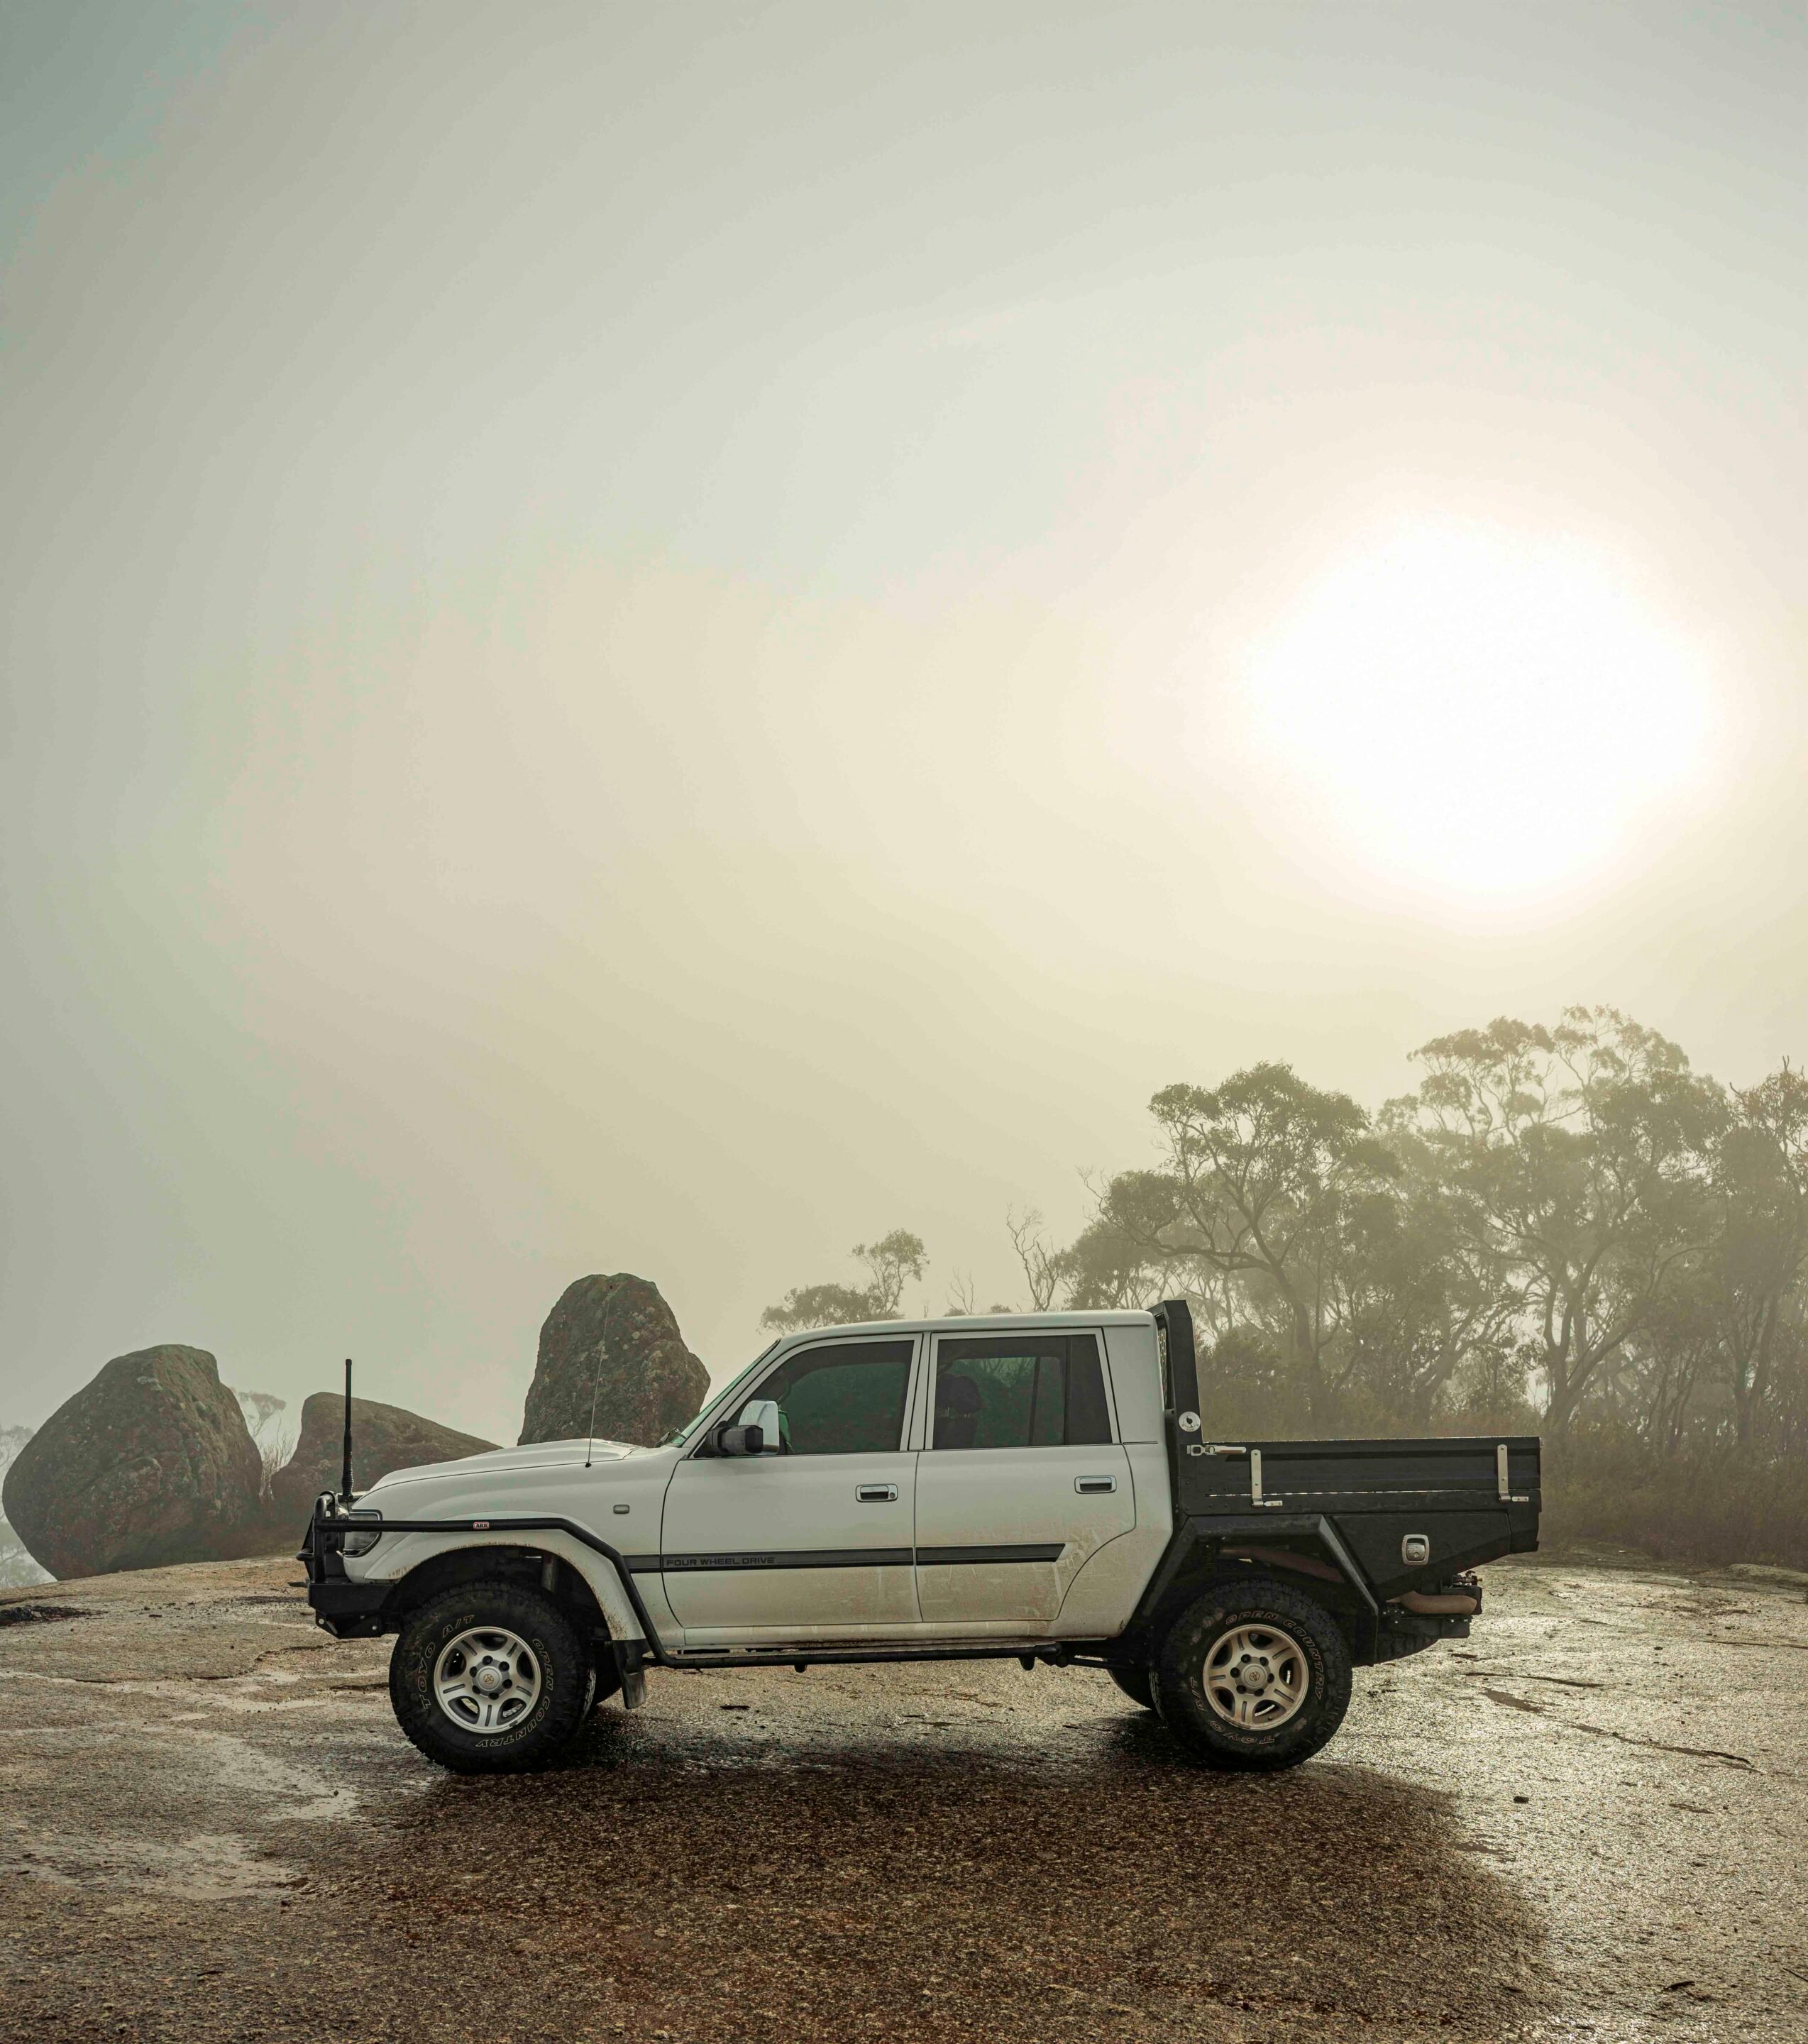
Before the classic 80 Series body could be reunited with its stretched, repowered chassis, the rear section was chopped off behind the back doors. A custom one-piece panel and rear window were fabricated and fitted, sealing it up as a double-cab ute.
Aside from the chopped rear, the only other departure from Toyota’s classic lines is the bonnet. OTC worked its magic here too, grafting the 79 Series bonnet bulge and scoop onto the 80 Series skin to feed the intercooler. It’s a work of art and it looks factory. About the only thing Hagen and the OTC crew didn’t handle was the bodywork and paint. That was outsourced, with the panels tidied up and resprayed in factory white.
Back at the OTC workshop, the aluminium tray was completed and bolted on. Up front, the original ARB bullbar was modified to house a set of ARB Intensity lights, then refitted along with a Bushranger Covert winch and ARB side rails.
22
ARB was also the go-to for the suspension, with a full OME BP-51 setup fitted, along with a twin air compressor neatly mounted in one of the under-tray toolboxes. While the tray-back and modest tyre size suit work duties around Graeme’s property, the Cruiser will also see touring use, so an OTC canopy is on the way for the tray, along with an auxiliary fuel tank to extend the driving range.
Inside, the cabin has been upgraded for touring comfort and functionality. Recaro Specialist L seats hold the driver and front passenger in place, while a Sony head unit brings modern audio and sat-nav capability. A ScanGauge 3 sits in clear view to monitor engine vitals, and the cabin has been fully sound-deadened for a quieter ride.
OTC also built the custom centre console, which houses the 200 Series transmission’s gear shifter alongside the 70 Series transfer case lever. The part-time 4×4 system keeps things simple, even when backed by a thoroughly modern drivetrain. Just because the OEMs didn’t build your dream rig doesn’t mean it can’t exist. With a clear vision and the help of the skilled crew at Off Track Concepts, Graeme brought his dream LandCruiser to life.
It’s a seamless fusion of classic 80 Series charm, modern V8 muscle and the practicality of a tray-back setup ready for work or touring.