Reviews
Gallery2
THE BIGGEST advantage of purchasing complete vehicles to use in any special or oddball project build is that you have access to all the minor, often forgotten, bits and pieces.
MORETonner Files
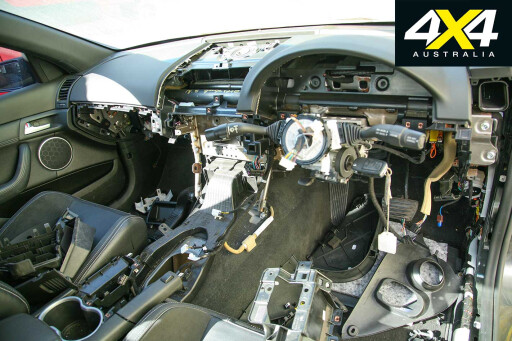
More so electrical components as found in the high-tech Maloo R8 ute; the wiring loom is a major must-have item to ensure the electronically managed and driven engine will work in the mechanically operated old Tonner.
 Those smaller parts have to be sourced the hard way (via scouring the wreckers or online outlets) and often cost a lot more than having them included in the initial purchase package. So, for me, the easiest and most convenient way was to buy three complete vehicles and pick the parts I needed.
The next biggest advantage is the potential return on the unused and unwanted parts. I’m happy to put my hand up and say that I’m trying to build this Tonner project as cheap as possible. I don’t mind, and expect to pay good money for good parts and labour, but saving a few bucks here and there is kinda nice, too.
At the time of writing, I’ve managed to recoup almost three-quarters of the cost of the Maloo R8.
MORELS engine range
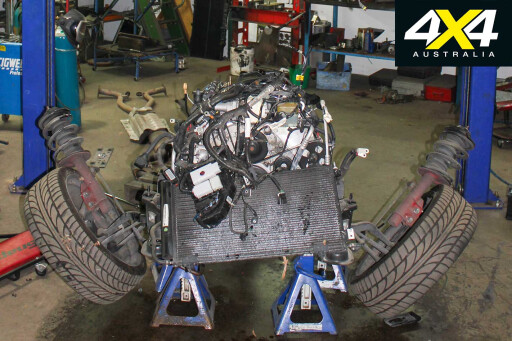
That means, roughly, the 6.2-litre LS3, auto six-speed cog swapper, wiring loom, seats and seat belts, plus a host of smaller parts, have cost me a mere $3000. Not bad compared to rocking up to a wrecker and laying twice or triple that amount down for just the engine.
 As for the GQ, I’ve managed to get almost all my money back by selling the parts off. The 4.2-litre petrol engine and LPG system now reside in a forklift, the doors and front guards have kept other GQs lookin’ pretty, the 33-inch rubber and rims kept another GQ legal on the cheap, some seats were sold off and some are perfect in my kid’s cubby house – priceless!
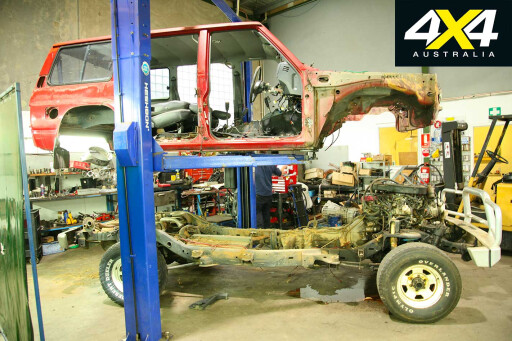
The main GQ cab was pretty rusty at the top rear corners and might be perfect for anyone wanting to do a dual-cab chop on the cheap, so I’ll hold on to that temporarily.
The GQ chassis is to form the main underbody support for my project, which will ride on GQ diffs and coil suspension. I’ll reuse the tilt-adjustable Patrol steering column, which needs to be grafted into the Holden dash, plus I’ve decided on initially using the GQ disc brakes instead of the Maloo HSV stoppers.
While they are not as large in diameter as the Maloo’s, they are adequate and have been given the nod by my engineer, plus can be easily swapped later for upgraded Nissan units if the ‘want’ should appear.
 I’ll admit to not initially knowing the GQ transfer case couldn’t be used in my project, so that caused a small problem. More on that fix in next month’s issue.
So to the GQ sway bars; they had been removed from the 1989 model I purchased, which is often the case for drivers seeking more suspension flex while off-road, and had some head scratching on the best way to fix that problem.
While the easy fix would be to pick up a pair from the wreckers, I wanted more flex than OE units can ever offer. Keeping in mind this whole project must be legally engineered and registered in NSW, I must have sway bars included in the finished package, but don’t really want to be playing around with sway bar disconnects every time I drive off-road.
I left the stripping and parts removal of the Maloo and GQ to Jason and his crew at Total Care 4x4, instead of tackling them myself. While I would have been happy tackling the GQ, I was pretty hesitant in touching the Maloo with all its wiring, not being overly sure what could be tossed or kept.
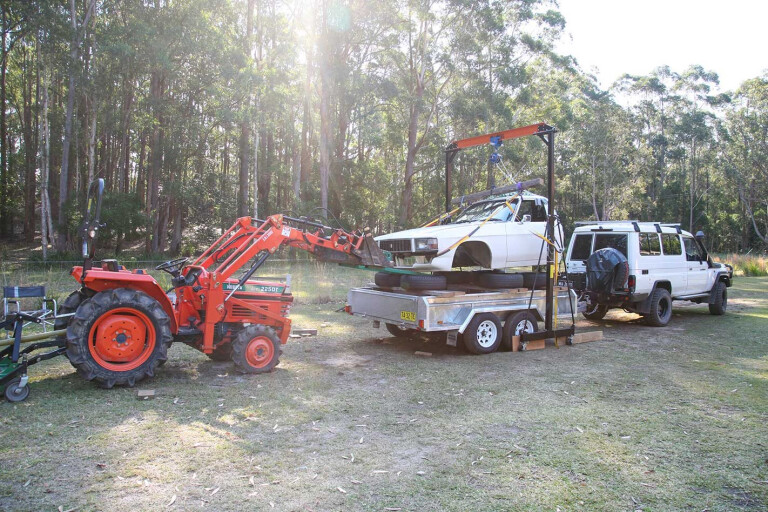
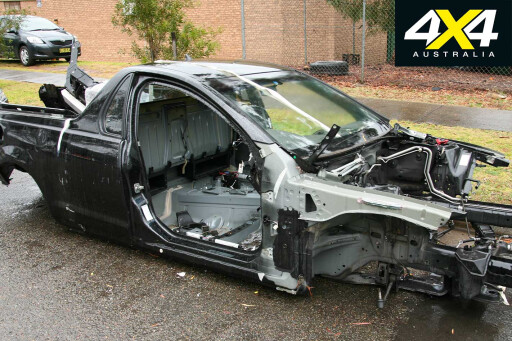 I felt much safer leaving that to experienced hands and dishing out the dollars to have it done right the first time. Not so with the old Holden One Tonner; I stripped that at home by myself in the side paddock, in the dirt, in the sun, over two long days. I do have air tools, plenty of hand tools and the major help of a rolling gantry with chain block to help lift both the alloy tray and cabin off the chassis.
My plan was to lift the cabin clean of the chassis with as much of the interior intact for use later, and leave the engine, gearbox and all other running gear behind.
I’d been driving the Tonner around for a few months and the whole show was working perfectly when I deregistered and stripped it. I’ll either sell it all in parts or whole, or, hmmm, perhaps a nice hot rod shell might magically drop onto it sometime in the future... Here’s where my plan went a little pear-shaped.
I had no problems with removing the cabin and I didn’t drop it when it was six-foot in the air. I easily lifted the cab over the engine to allow the rolling chassis to be pulled out from underneath with the Troopie’s RUNVA winch. That job was made easier by being able to walk around the car while winching an inch at a time using the wireless remote.
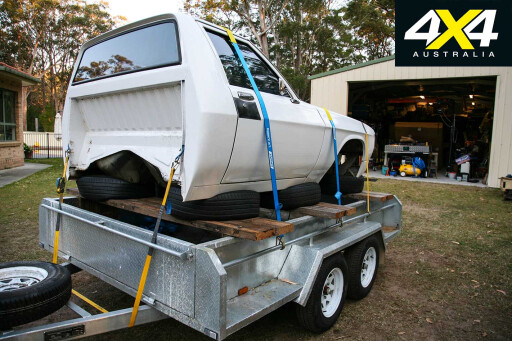
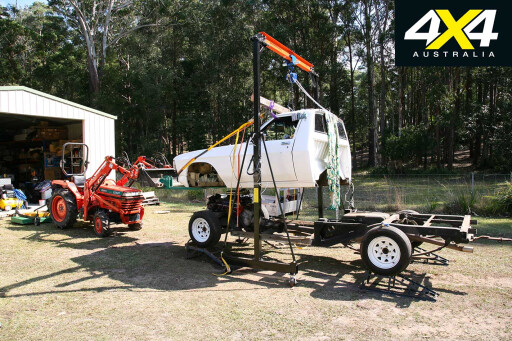 I managed to reverse my 10x6-foot trailer under the dangling cab, only to find the Tonner metal work was a few centimetres wider than the trailer body. My problem-solving 101 sprang into action with a half dozen pieces of hardwood timber from the back of the shed.
Not really knowing how heavy the Tonner cab was and how strong the side panels of my trailer are, I slotted a few timber braces down to the trailer floor to help take the Holden weight without bending my trailer – problem solved in a couple of hours. I figured a handful of old car tyres would be perfect for sitting the Tonner cab on to, to prevent damage during the five-hour transit to Jason’s shop in Sydney.
With the whole show strapped down to half compress the tyres, the stripped Holden didn’t move or get damaged during the drive.
 In preparation for a few later jobs from Steve – my auto sparky at Powers Road Auto Electrical Services in Seven Hills, Sydney – I removed the oil and water temperature sensors from the 308 block to allow him to measure the resistance across them, in order to replicate that power drop in the new system that would combine parts of the old with updated wiring for dash-mounted tell-tales (clever, huh?).
He also requested the fuel sender unit from the old Holden petrol tank in preparation for having a larger custom fuel tank manufactured.
Steve was also relied on to solve a few other wiring issues, along with an easy and effective way of installing air-conditioning into my project. It certainly helps when the people you are dealing with are car enthusiasts, or nuts, and that is how Steve came to easily solve the air-con problem, as he had the exact same product in an old street machine he has been playing with.
 With the three cars stripped, plenty of research and planning, discussions with the engineer, along with me telling Jason exactly what I wanted to achieve and him telling me what was realistically achievable with respect to engineering without costing a motza, the next stage of building my dream 4x4 went into action immediately.
’Til next month, if you have ideas on things like bullbars, trays, canopies or other whacky ideas, I’m all ears. Keep in mind this will be a capable touring 4x4, albeit with a huge engine, that will double as everyday transport. It won’t be a ballistic competition machine, so forget the ultra-high gangly suspension and 44-inch Boggers suggestions.
Please enable JavaScript to view the comments powered by Disqus.
COMMENTS