Gear
Gallery1
For all its beauty and variety, the Australian countryside is also known for its vastness, which can spell serious trouble for any adventurer who find themselves stranded with a broken or damaged 4x4.
With harsh terrain that can bash and break the toughest of components, any overland adventurer who plan to venture deep into the wilderness needs to be prepared to carry out on-site repairs.
In the third and last instalment of our Vehicle Suitcase Guide, Chris Collard, delves into the subject of specialty tools, tyre repair kits, and welding equipment that are essential to carry out emergency repairs where ever you may be. For more advice on the basic essentials for a 4x4 trip, check out Part 1 of this series, while the subject of what tools and spares to pack are covered in this series’ Part 2.
Specialty Tools Suitcase
If you work on your own vehicle you’ll have an advantage in this department. While you are researching forums or tech sites for potential weak links, take note of any specialty tools needed to make the repair. If you learn that you must pull the motor to replace the starter, buy a different vehicle (you never want to be put in that position).
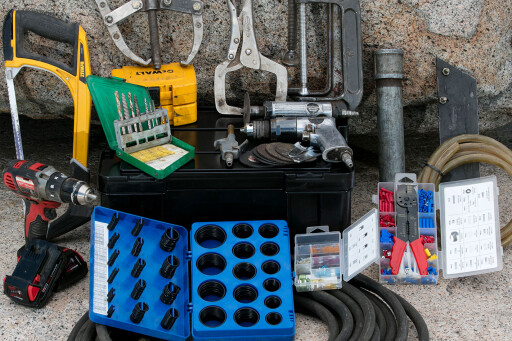 Having said this, there are a host of tools that, if you can dedicate the space to carry them, will eventually be put into service. Many are universal – cordless drill, gear puller, cutoff wheel, grinder, and C-clamps – while others are brand-specific.
Certain brand-specific tools come at a substantial cost if purchased from the dealer, but you can often fabricate your own at a fraction of the price. For example, I mentioned that I carry wheel bearings in my Hilux. They too need a press, but I made a slide hammer that can manage the job. I also created a tool for adjusting ring gear backlash and another for holding the crank in place in order to remove the pulley and main seal.
Takeaway: web forums can be a great source of information on your vehicle.
Specialty Tools Must-Haves:
Specialty tools are applicable for all vehicles. Shown here are large C-clamps, Vise-Grips (C-clamp style), a gear puller, hacksaw, drill bits and EZ-Out set, pneumatic cutoff tool, cordless and pneumatic drills, 50-foot air hose, siphon hose, and O-ring, fuse, and electrical kits.
Chris' Specialty Tools Tips:
1 - Carry specific tools required for your vehicle.
2 - Save money by fabricating specialty tools yourself.
3 - Pneumatic and electric tools will save time and elbow grease.
Chris' Specialty Tools Pack List:
- Drill and bits
- Bolt extractor set and reverse-rotation drill bits
- Die grinder (various disks, wire wheel)
- Pneumatic or electric cut-off tool
- C-clamps (large)
- Gear puller
- Vise-Grips (C-clamp style)
- 5-pound sledgehammer
- Safety goggles
- 50-foot air hose
- Vehicle-specific tools
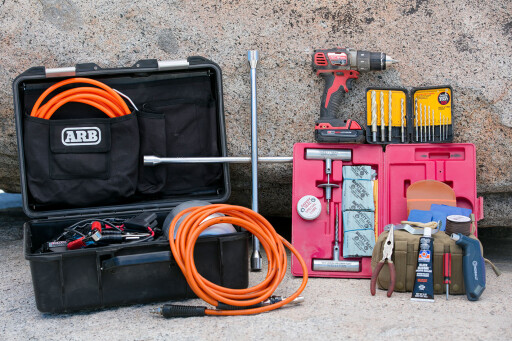
Tyre Repair Suitcase
One of the most common trail repairs is fixing a punctured or slashed tyre. The task can be as simple as removing the interloping nail, screw or pushrod (yes, this has happened), inserting a plug, and re-inflating the tyre. A basics kit should be a premium unit such as those from ARB, Extreme Outback Products or Safety Seal. Avoid the $10 discounts, as the low price reflects the quality – they’re cheap for a reason. Severely slicing a sidewall is not a frequent issue, but having the tools to address this scenario will be more reassuring than going on without a spare.
 While reviewing tyre repair kits last year I found that Extreme Outback and Power Tank options included the surgical implements needed to fix a lacerated tyre (albeit temporarily): patches and cement, scrapers, and stitching material. Use a cordless drill to bore stitch holes; it makes the job easier, safer, and cleaner than using an awl or other pointy object.
A few other must-haves are room temperature vulcanising (RTV) black silicone and Tyrepliers. I’ve removed tyres by various methods (tyre spoons, Hi-Lift jack, the weight of another vehicle), but a set of Tyrepliers can’t be beat. This little dandy makes quick work of preparing a tyre for patching, stitching, or replacing a torn valve stem. It may collect dust for years, but when the time comes you will be glad you have it.
Takeaway: Tyrepliers can save your bacon.
Tyre Repair Kit Tools:
I have two overland vehicles and transfer my ARB CKMTA12 compressor to the one I’m using at the time. The tyre repair kits, one for each rig, are from Safety Seal and Extreme Outback Products.
Chris' Tyre Repair Advice:
1 - Buy a high-quality tyre repair kit.
2 - Add stitching accessories and RTV black silicone.
3 - A stitched tyre is for emergency use only.
Chris' Tyre Repair Kit List:
- Self-vulcanising yarns
- Reaming tool
- Yarn insertion tool
- Lubricant
- Razor blades
- Needle-nose pliers
- Valve stems and cores
- Valve core remover
- Patches (various sizes)
- Rubber cement
- Buffer/scraper
- Cordless drill and bits
- Micro paracord/baling
- Stainless-steel wire
- Large surgical needle
- RTV silicone
- Air gauge
- Air compressor
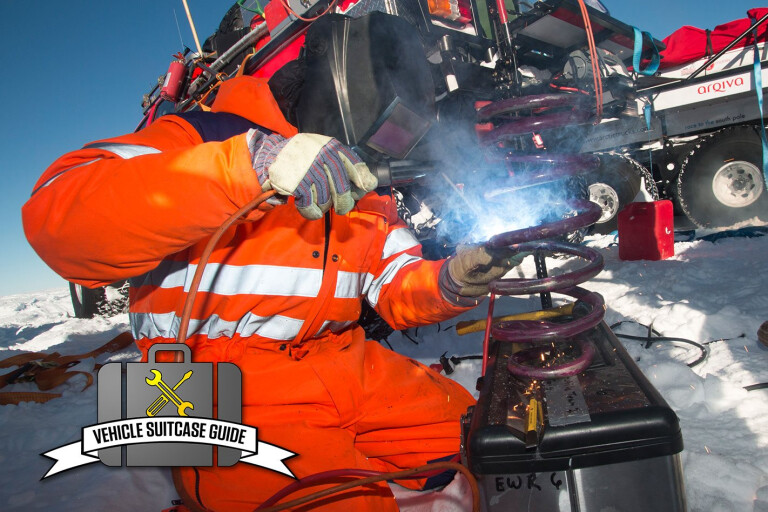
Welding Kit Suitcase
As you read through this section you might think, what good will welding equipment do if I don’t know how to weld? Welding may not be in your skill set (substitute any subject here), but when the need arises there is a good chance that someone in your group – a passerby or local – will know how to run a bead.
 I’m not a great welder, so I always ask the best welder available to perform this type of repair – egos are best left at home. I’ve listed several welding options: batteries, Ready Welder, and Premier Power Welder. The latter is vehicle-based and the crème de la crème of bush tools, while the former two are grab-and-go affairs; the only catch is that you must have at least two batteries available at the repair site.
I’ve used all three systems to repair everything from a cracked frame and separated spring perch, to broken steering components and shock mounts. To keep my welding rod dry I made a storage tube out of ABS pipe.
Takeaway: a basic welding kit can mend a broken frame when torn apart.
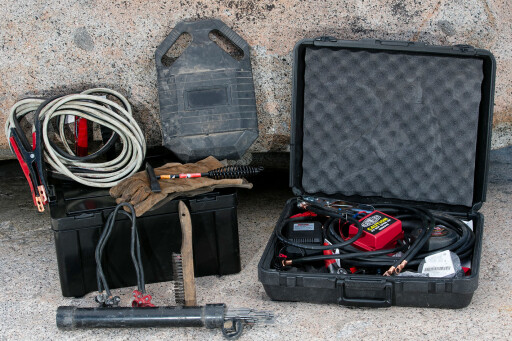
Welding Kit Options:
There are three basic systems for trail welding: the old-school method of two-batteries, jumpers and rod (left); the battery-powered wire-feed Ready Welder (right); and the engine-mounted Premier Power Welder. I carry the first two.
Chris' Welding Kit Tips:
1 - Use a capped ABS pipe container to keep the rods protected.
2 - The best welder should manage the repair.
3 - Multiple batteries are often required for a proper welding jobbie.
Chris' Welding Pack List:
- Ready Welder or Premier Power
- Welder (optional)
- Welding rod (6011, 6014, 7014)
- Storage tube
- Welding shield
- Gloves, brush, hammer
- Battery welding kit: two-gauge cables (two 24-inch) with terminal-mount ends
- Jumper cables or welding leads, two or three 12-volt car batteries
Chris' Words of Wisdom
From an experience standpoint, most of my skills have been learned out of necessity on the trail. As Trail Co-ordinator for Sierra Trek, my crews and I have been confronted with everything from broken frames to pretzeled drivelines. During the past 35 years I’ve amassed a few opinions regarding MacGyver trail fixes and what to bring. When it comes to your rig, I say go light on fluff. Instead, pack as many tools and supplies as you can reasonably fit. My wife, Suzanne, says, “Pack like a Collard, not a Kardashian.”
I’ve heard many people say, “I drive a new vehicle. Why should I carry that stuff?” While this may be true, I can’t tell you the number of times I have provided supplies and equipment to someone who showed up for the party empty-handed.
The funny thing is that I’ve been that guy. Over the years my kit has grown, sometimes to the point of absurdity. That is when I re-evaluate and cull the herd. I pack many items I hope to never need, but the reality is that I’ve used nearly all of it at one point. Each adventure is a learning experience, and I promise you that being as prepared as possible will make your experiences that much sweeter.
Takeaway: prepare like a Boy Scout and don’t pack like a Kardashian.
Please enable JavaScript to view the comments powered by Disqus.
COMMENTS