Gear
Gallery1
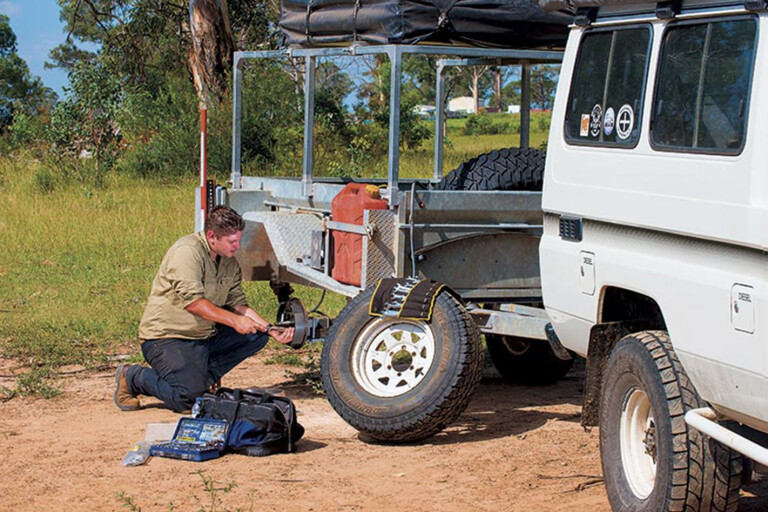
Being stuck on the side of the road with a broken 4WD or camper trailer is the last thing any traveller wants in the middle of nowhere.
Plus, there’s always that real element of worry when you’re trying to figure out what you’re going to do next, not to mention knowing your pride and joy has just let you down. The truth is, mechanical failures are just as much a part of exploring the bush as golden sunsets and toasty warm campfires, so it makes sense to arm yourself with a bit of knowledge to help get you back on track. In most cases, if you can work out a way to limp your set-up to the closest town, you can arrange for more permanent repairs to be carried out.
The immediate problem is getting a busted camper trailer moving again with limited tools and even worse resources at hand.
To help improve the odds of getting your set-up back on the track, here’s a few proven trackside fixer-uppers, ideas and techniques that could save your camper from becoming a permanent ornament in the middle of no-man’s land.
THE BUSTED BEARING SLED
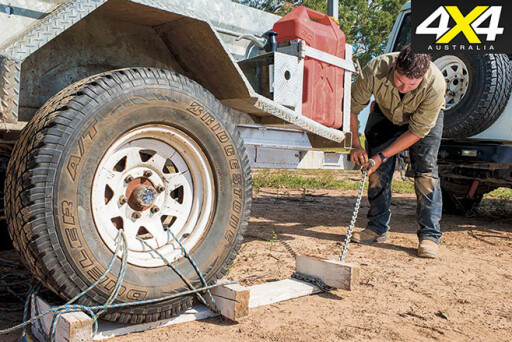 If the entire rotating assembly is immobilised (seized wheel bearing or massive brake assembly failure), your only option may be to build a sled.
The idea is to eliminate the need for the wheel to spin by building a sled and skull-dragging it without damaging the camper any further. V-shaped logs and old car panels make the perfect sled, and a drag chain attached to the front of the camper will stop the sled from sliding behind the wheel.
It’s vital you remember to tie the wheel itself to the sled, too, as this will stop the sled sliding out to the side.
BUSHY'S BEARINGS
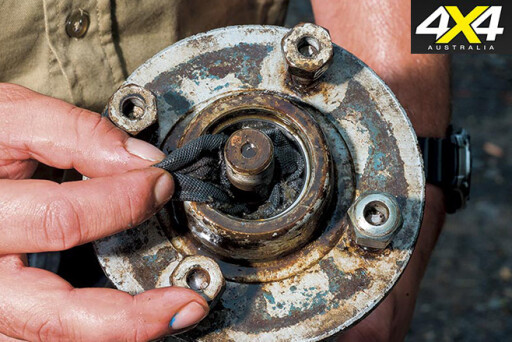
If your wheel bearing has seized and you don’t have a spare, one dead-set last-resort way to keep the wheels turning (slowly) is the old oily rag trick. The main purpose of a wheel bearing is to allow the hub assembly to rotate around the stub axle freely without it actually touching, causing friction and damaging the components.
With that in mind, soaking a few rags in some old engine oil and jamming them between the hub and stub axle can create a bit of a buffered area for the components to stop them rubbing on one another, while allowing them to freely spin. You’ll be limited to crawling speeds and the wheel will still have a fair bit of a wobble, but if there’s no other choice you do what you’ve got to do.
MAKESHIFT BEARING CAP
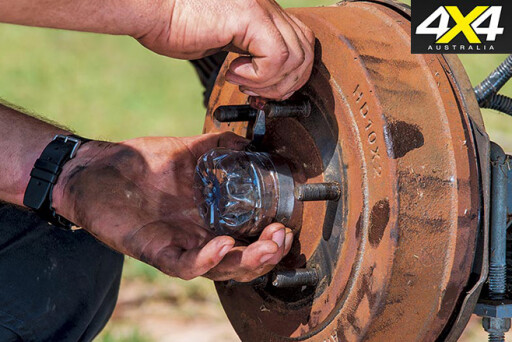
It’s pretty common for bearing dust caps to fall off. The problem is, it then doesn’t take long for dust and water to destroy the bearings once they enter the hub assembly. A quick and easy technique to make a dust cap is to cut an old plastic drink bottle in half and secure it with a hose clamp. Cutting a small slit up the side allows you to adjust the size to suit the hub. The same can be done with aluminium cans and a few cable ties, if push comes to shove.
DAMAGED AUXILIARY PLUG
A smashed up auxiliary plug is a fairly common occurrence on a camper these days. If you’ve still got a few kays of on-road driving to go, you can simply bypass the plugs altogether.
Start by releasing the wires from the terminals from both the trailer’s plug and the vehicle’s plug. Strip the wires back and re-attach them to the corresponding coloured wires by either using crimp terminals, scotch locks or by simply twisting the wires together. Remember to tape each individual wire to avoid short circuits.
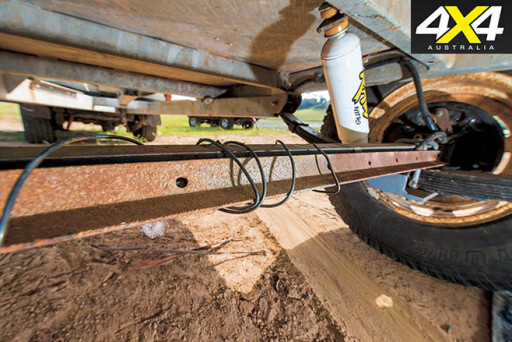
WORN SHOCK ABSORBER BUSHES
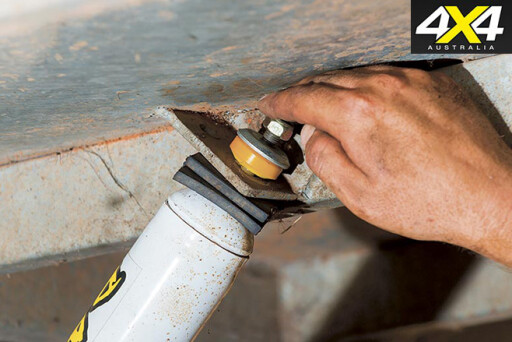
All of those corrugations and wash-outs can play absolute havoc on your shock absorbers’ bushes.
Admittedly, if you completely wear out a shock absorber bush on your leaf-sprung trailer, in most cases you could remove the shock completely to avoid further damage.
However, for coil-sprung suspension, especially on your 4WD, the spring relies on the shock absorber to control and limit its bounce (up or down travel). So if you removed the shock absorber, you would then have to install some type of limiting strap in its place.
The other option is to shim up the free-play between the shock and mount using some leftover rubber. Those tired, old rubber floor mats are perfect; simply cut them up and punch a hole through the middle. The aim is to take up the slack to minimise free-play.
BENT AXLE REPAIRS
If you’ve packed a bit too much weight into your trailer and then headed off on bumpy tracks, you could end up causing a slight bend in the axle. This tends to invert the wheels – often the first sign of trouble you’ll notice.
In more extreme cases the axle can crack and the entire weight of the camper basically buckles the wheels, rendering the camper un-towable.
CREATIVE PANEL BEATING
This is a serious breakage, but the fix is relatively simple. The key is to strengthen the axle by adding some support. An old sleeper or a fencing star picket or two are perfect for the job. Simply jack the axle up so it’s sitting as straight as possible, wire it up tight with some fencing wire and Bob’s your uncle.

SEALING UP HOLES
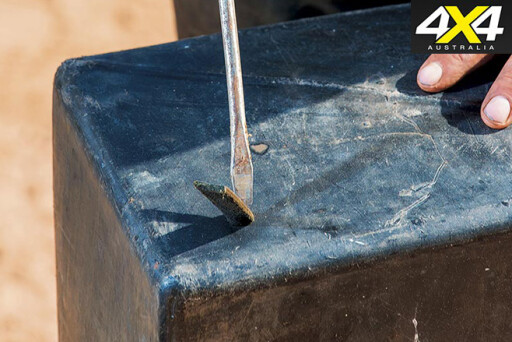
A leaking fuel or water tank is bad news in anybody’s book, but there are some simple and easy ways to patch up a hole. For larger punctures, it’s best to plug the hole first by cramming it with something flexible yet solid, so there’s less gap to fill and seal. One of the best materials to use is leather – an old dog collar or lead does the trick nicely as the leather will swell as it gets soaked, which helps to fill any gaps. If you’ve got a bit of silicon sealant, you can smear it over the plug to help seal up any remaining leaks.
PINHOLE PUNCTURES
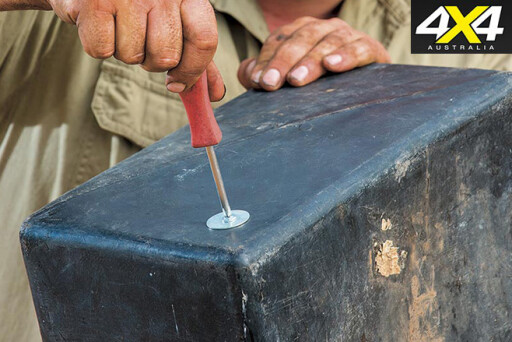
For smaller pinhole type punctures, a self tapper screw could be the saviour. Ideally, the screw’s thread should be slightly larger than the puncture so it can cut its own thread and seal up fairly tightly. A little trick is to wrap a layer of plumbers tape around the thread to help seal it up a bit better. In fact, any tape should help seal the little gaps between the threads. If possible, fit a washer on as well – the larger the washer’s surface area, the larger the sealed area will be.
Please enable JavaScript to view the comments powered by Disqus.
COMMENTS