THE LATEST instalment of Readers’ Rigs features a MWB Nissan Patrol, a neatly modified BT-50 and a bush-capable D-Max, among a heap of fresh-looking rigs.
Check out more Readers’ Rigs here.
Get involved and shoot through some photos of your 4×4 to our Facebook page and, you never know, we may feature it in the mag one day!
1988 GQ MWB NISSAN PATROL – RICHARD GRIFFEY
WHAT IT’S GOT: 4.2L turbo-diesel; Nissan four-speed auto with upgraded valve body; twin Nissan transfer cases with Marks adaptor; rear axle moved back 300mm to make MWB; GU Patrol diffs with 4.8 GU brakes; ARB Air Lockers front and rear with ARB compressor; Superior Engineering Superflex front arms; Superior sway bar disconnects; Superior drag links and tie rods; Three-inch King Springs; TJM shocks; Trail Gear Creeper locks bead lock rims; Federal 37-inch tyres; ARB Bullbar; custom rear bar with wheel holder; custom rock sliders; Warn 9.5 CTI-s winch with synthetic rope in the bullbar; Warn M8000-s winch with synthetic rope in the rear bar; Oz4WD triple row light bar in front bar; Oz4WD seven-inch LED driving lights; Rhino Pioneer roof rack; Oz4WD single row light bar; Eight EVP mini light bars; Oz4WD cross driving lights; Airtech snorkel; Recaro seats; custom long-range tank; two-inch body lift; triple Odyssey batteries; Engel fridge; PWL alloy radiator; and a three-inch Beaudesert Exhaust system.
2012 MAZDA BT-50 – JUSTIN RODNEY
WHAT IT’S GOT: Three-inch Old Man Emu lift kit with 500kg constants; 33-inch BFG muddies; 16-inch Sunraysia steel rims; ARB bullbars; ARB side sliders and sidesteps; Dominator 12,000lb winch; Illuminator nine-inch spot lights; 32-inch LED light bar; LED tray lights; LED light strip for the tray; under-tray tool boxes; 70-litre custom water tank under the tray; high-lift jack and shovel on the roof; Rhino racks and roof basket; Kings side awning; ARB Safari snorkel; Three-inch turbo back exhaust; and a GME UHF system.
2002 90 SERIES TOYOTA LC PRADO 3.0TD – DON KALAPP
WHAT IT’S GOT: Lifted, muddies, snorkel and winch. It exceeded my expectations for a budget 4×4.
ISUZU D-MAX – JASON BARTON
WHAT IT’S GOT: Always more to do, but so far it has a snorkel; turbo timer; Opposite Lock steel winch bar; bash rails with sidesteps; DPChip; HPD catch can; Ironman two-inch lift; scan gauge; Couplertec rustproofing; and an upgraded stereo. It’s mainly a beach driver: Double Island, North Stradbroke and Fraser Island. It’s been on a few coastal mountain trips. More to set-up for a Cape run next year, including a rooftop tent.
2015 MITSUBISHI MN TRITON – JOHN LEE
WHAT IT’S GOT: Suspension is a bit sad, but I’m going to put a two-inch lift with constant 300kg load.
2003 4.8L NISSAN GU PATROL – DEAN BROOKE
WHAT IT’S GOT: I’ve had it for five years; it’s got dual batteries, a homemade rear-wheel carry, jerry cans, rock sliders, 147L long-range tank and a 70L long-range sub tank. Engine was on gas, but no more planning to rebuild and turbo it. It’s done two trips over to Tasmania and it’s been up to Broken Hill.
2014 JEEP WRANGLER – MATT GREENE
WHAT IT’S GOT: I’ve had it since new. It’s got a 2.5-inch AEV lift; AEV geometry brackets; Synergy Manufacturing adjustable track bars; tie rod and drag link; TeraFlex rock crusher bar; Smittybilt 10,000lb x20 winch; Fuel Off-Road ‘Anza’ rims; 33-inch MTs; and an Oricom radio. Next up re-gear for 35s and lockers. Best place is Vic High Country, up Billy Goats and around Moroka Trail.
2016 TOYOTA LAND CRUISER – ALEX SAID
WHAT IT’S GOT: A two-inch suspension lift; four-inch stainless snorkel; three-inch exhaust and tube with heavy duty clutch; and dual batteries, soon to be three. At the moment I’m building a custom alloy canopy. To be honest, it’s been quite boring with touring so far. I really want to hit Fraser Island and Cape York in the not-too-distant future.
JEEP UK has launched a limited edition Renegade, designated the Desert Hawk.
The off-road, trail-capable Desert Hawk is powered by a 170hp (127kW) 2.0-litre MultiJet diesel donk mated to a nine-speed automatic transmission. It comes standard with a Jeep Active Drive Low 4×4 system, with its 20:1 crawl ratio.
Also helping the Jeep Renegade on remote adventures is 8.7 inches (220mm) of ground clearance, skid plates, hill-descent control and 8.1 inches (205mm) of wheel articulation.
A Selec-Terrrain system includes Sand and Rock modes, while the Jeep can ford water to a depth of 19 inches (482mm).
“Designed to enhance Renegade’s already very strong appeal in the UK, and capable of delivering Jeep’s legendary off-road capability, the new Renegade Desert Hawk version is an attractive proposition for buyers,” said Damien Dally, head of brand, Jeep UK.
“Sporting and agile on-road and rugged and capable off it, this limited edition newcomer fits perfectly into Renegade’s highly successful family.”
The desert-inspired Jeep’s rugged appearance is enhanced by 17-inch Low Gloss Black wheels, an exclusive bonnet and rear body panel decals. Colour options include Alpine White, Anvil, Black or – exclusive to the Desert Hawk and what we’d pick – Mojave Sand.
A unique aesthetic addition is the use a Moab desert map logo on the seat base of the exclusive black leather and fabric seats.
Unfortunately, the 100 examples of the Desert Hawk are only available in the UK, and the units, priced from £28,995 ($47,000 approx.) are expected to be snapped up quickly.
‘SALAD isn’t a meal on its own’, we hear you say. And normally we’d agree with that sentiment.
However, Roothy has cobbled together a salad we reckon could leave a belly satisfied.
“It’s essentially an apple and beetroot salad, but with a few tiny, little Roothisms chucked in just to make it something a bit special,” Roothy said.
All you’ll need to whip up this simple and healthy bush meal are a bunch of peeled and chopped apples, an equal quantity of diced beetroot, some beaten walnuts, olive oil, balsamic vinegar, honey and horseradish.
First, fry up some oil in a pan and add the walnuts until they brown. In a separate bowl, add two tablespoons of olive oil, two tablespoons of balsamic vinegar, a few squirts of honey, a teaspoon of horseradish and then stir through.
Put the beetroot, apple and walnut in a serving bowl, then pour the oil/vinegar/honey/horseradish concoction on top. Stir through again before indulging.
“There you go: it gets the kid’s vote of confidence, too. It is good stuff guys – it’s probably even healthy!”
If your belly’s still groaning for more, check out some of these simple bush meals.
I JUST about choked on my coffee when the morning TV news announced that – shock, horror – new cars use more fuel and produce more greenhouse gas than what’s claimed on the government-mandated yellow windscreen label.
The news came off the back of a press release from the AAA, Australia’s peak motoring organisation that represents the various state and territory based motoring ‘clubs’, the NRMA, RACV, RACQ, RAA, RAC, RACT and AANT, names no doubt familiar to most readers.
So how long did the AAA take to work this out?
The fact that the fuel labels, which give a fuel-use figure obtained in a laboratory and not on the road (see breakout), significantly understate real-word fuel use has been well documented for more than half a decade across all sort of motoring publications, both print and online, and even in the general media, TV included.
It’s also something car buyers have noticed, posing questions like “why does my car use more fuel than what is on the windscreen label?” Even Australian Consumers Association via its magazine Choice, which usually doesn’t delve too far into motoring matters – it’s more into washing machines and vacuum cleaners – published a story on it some six years ago.
In its release the AAA said that following the recent Volkswagen ‘scandal’ it commissioned real-world fuel-use and emissions testing to see how the results stacked up again figures obtained in a laboratory setting.
The AAA has released some initial findings, with full results to be published in mid-2017. Predicably it suggests: “It’s critical that real-world testing is introduced to ensure motorists aren’t asked to pay more for regulation that fails to deliver environmental benefit.”
Trouble is, if the AAA bothers to think about it sufficiently, real-world testing is hugely expensive and time consuming compared to laboratory testing, and it’s still flawed. The crux of the matter is that real-world testing lacks 100 per cent accurate repeatability and therefore accurate relativity of fuel use between one model and another, which is a key consumer concern. This is something the current laboratory test delivers.
Don’t believe the fuel consumption labels
The problems with real-world testing are manifest. First you need to do all the testing on days when the temperature, humidity and wind are all identical, as all these atmospheric factors affect fuel consumption, otherwise out goes repeatability. You’ll also need a consistent traffic pattern and identical density for 100 percent repeatability. Good luck with that!
Then you need one test driver, given that different drivers use differing amounts of fuel on identical roads. Even then you’ll have to hope your driver is 100 per cent consistent from one day to the next. Good luck with that, too.
At this point the AAA would probably say that with enough kilometres over enough days and with a sufficiently large team of drivers all the variations will average out. That’s certainly true, but only to a point. You will never get perfect averaging without doing an infinite numbers of tests. That’s a mathematical given. In fact, you’ll never even get close, given there are so many different models and powertrains within any model range.
Fuel Comparison test: Diesel, petrol or LPG?
For example, Australia’s most popular new car, the Toyota Hilux, has four different engines, four different gearboxes and two different drivelines (4×4 and 4×2), not to mention the different cab and body styles, which all affect weight. All up there are more than 30 different Hilux variants, and Toyota lists more than 20 different ADR fuel figures, figures which don’t take long to establish in a laboratory but would take an inordinate amount of time to achieve in real-world tests. However, we know that the ADR test understates real-world figures, so there is a problem here even if the AAA has just woken up to the fact.
Given the different ways people use and drive their cars, and the infinite variety of driving environments and traffic conditions encountered, there will never be a definitive fuel-use figure that everyone will experience with any particular vehicle. Whatever figure you come up with will only ever be a best guess in terms of what any particular owner will experience with their new car.
Despite its shortfalls the ADR test shouldn’t be replaced with real-world testing, as it still has value for its base-line relativity and easy process. In fact, it has to remain the starting point for fuel-use measurement until someone comes up with a more accurate in-lab test.
In the meantime there’s an easy and near instant fix to the label problem given there’s a relatively consistent pattern in the way real-world use differs from the ADR laboratory test. The AAA says “20 per cent on average higher” while pointing out some figures “up to 35 per cent higher”. Back in 2011, 4X4 Australia said, “if you want a general guide, add 15 to 30 per cent to the ADR figure and you’ll probably be somewhere near, if not in, the ballpark”.
Instead of squandering countless more millions on real-world testing, probably paid for in the long run by members or customers of the various motoring organisations that the AAA ‘umbrellas’, the AAA could lobby the Federal Government right now to scrap the current ADR figure and replace it with a ‘real-world estimate’ figure.
How? You simply take the current ADR combined-cycle figure and add 20 per cent. Simple. Job done. It would involve very little cost (just printing new stickers) and would be a generally reliable guide for the consumer. If you want to be a bit more non-specific you could quote an estimated real-world range of ADR plus 15-30 per cent and scrap the current urban, extra-urban and combined-cycle figures that seemingly do more to confuse than inform.
BEHIND THE LABEL
FUEL consumption labels attached to the windscreens of new vehicles sold in Australia were first required by law in 2001 for vehicles up to 2700kg Gross Vehicle Mass (GVM) under the Australian Design Rule (ADR) 81/00. Two years later the ADR was amended to include vehicles up to 3500kg GVM, which bought in medium and heavy 4x4s and light commercials. It was known as 81/01. In 2008, ADR 81/02 added separate ‘urban-cycle’ and ‘extra-urban cycle’ fuel-use components to supplement the existing single-figure ‘combined-cycle’ fuel claim.
To arrive at the ADR figure the vehicle in question is put through a fixed test sequence in a laboratory on rollers. The ‘test’ covers a theoretical 11km and is done in two parts. The first, or urban cycle, consists of a cold start then a series of accelerations, steady speeds, decelerations and idling. The maximum speed is 50km/h, the average speed is 19km/h and the distance ‘covered’ is 4km.
The extra-urban cycle is conducted straight after the urban cycle and consists of approximately half steady-speed driving with the remainder being accelerations, decelerations and some idling. The average speed is 63km/h, with one spike that reaches 120km/h. The total second test ‘distance’ is 7km.
Tallied together the urban and extra-urban figures become the combined-cycle figure.
DANA Australia has officially opened its brand new, state-of-the-art facility in Keysborough, in Melbourne’s south-east.
The new facility, designed from scratch to meet the needs of Dana’s customers, replaces the outgoing Hallam facility. That original site, not far from the new facility, provided driveline solutions for the passenger and commercial vehicles for the past 40 years.
However, due to the ever-changing landscape, particularly with the passenger-car business, Dana has had to shift its focus towards growth and establish a new base.
“With this facility, we’ll be able to combine design, engineering and manufacturing to enable greater efficiencies. Having all of these assets under one roof will aid us in responding to customer needs more quickly, while maintaining high quality, thereby better supporting our customers in achieving their sales and production goals,” Dana President and CEO, Mr Jim Kamsickas said.
“This 10,000 square metre facility will help strengthen relationships we carry with us across the world in commercial vehicle, light vehicle and aftermarket space.
Watch our video: Dana Australia’s Ultimate 60 rear-axle kit
“We believe in Australia, and we’re excited to invest in this industry. We see great things on the horizon,” Mr Kamsickas added.
Dana, in partnership with developers Frasers Property, officially set in motion the production for the new facility with a soil-turning ceremony back in April, 2016.
A goal was set to have the facility in operation by November that year (a rather optimistic 202 days). And, despite the wettest winter in 10 years, the completion date was only pushed back to mid-December.
Anthony Maugeri, the Southern Region General Manager of Frasers Property, said at the opening ceremony, “We’re not just a developer and the relationship finishes here. We’re also the owner and we look forward to a long and prosperous relationship.”
The brand-new Keysborough facility is the first of three new Dana facilities in development across the world, including a new axle manufacturing operation in the USA and a new gear manufacturing plant in Eastern Europe.
In Australia, exciting times are ahead for an industry looking to tackle the increasing popularity of Light Commercial Vehicles. And Dana has the right man in the driver’s seat – Peter Langworthy, Dana Australia’s Managing Director. His hard work has guided the business through this most recent transition, and the future looks bright.
“We’ve got more investments that we’re talking to Dana in the US about. More product that we’ll be releasing to the market for our current customers, but also for future customers,” Mr Langworthy said.
“It’s so important that we retain jobs in this country, it’s so important that we retain customers across our businesses, and that’s what we’re setting out to do.”
Anyone with a yearn for 4×4 adventure could do worse than check out the Border Track in South Australia’s Ngarkat Conservation Park, a remote and surprisingly beautiful part of that state’s Mallee Country.
As its name suggests, the Border Track follows more than 50km of the fence line marking the boundary between Victoria and South Australia. Surveyed in 1850 the border was intended to follow the line of 141 east longitude. The privations suffered by the surveyors who cut this line through what is largely waterless country rivalled the exploits of Burke and Wills, and the party almost lost their lives on three occasions.
One horrific encounter with a bushfire saw one of the surveyors climb down a well to avoid the flames, only to be almost burnt to death by boiling fat dripping down from his dead horse lying in the flames above.
The surveyors started from a marker on a beach near the Gawler River in the south, but on reaching the Murray River in the north they found, to their horror, that their line was 3.6km to the west of the border with New South Wales. One of the surveyors must have been named Murphy because they marked the border with timber stakes in mounds of soil, and shortly after the survey was completed a huge bushfire swept through the Mallee, destroying 200km of markers.
With the country dry and denuded, the mounds (which were principally sand) simply blew away leaving no trace of the surveyors’ herculean efforts. The survey notes were also lost and 64 years of legal argument ensued between Victoria and South Australia over this ribbon of disputed no man’s land. The argument was finally settled in Victoria’s favour in 1914 by London’s Privy Council.
With many tracts of land adjoining the incorrectly marked border having been bought and sold over the intervening years, moving the border was simply too problematic. While the true reason for the survey error was never made public, it seems the most likely cause was the incorrect location of the starting point on the Gawler River.
Today, much of the Ngarkat Conservation Park probably still looks as it did in the 1850s despite failed attempts at farming the land in years gone by. Driving into the park from Bordertown by way of the sealed Ngarkat Highway, it’s difficult not to be underwhelmed.
The flat, sandy country is covered by a uniform cloak of olive green scrub just a few metres high, punctuated here and there by the occasional taller eucalypt. However, someone once said “never judge a book by its cover” and Ngarkat is no exception as the scrub comprises a wide range of flora.
After significant rain, quite impressive stands of wildflowers can spring up to paint the otherwise drab native bush with splashes of vibrant colour. Apart from the occasional kangaroo or emu grazing on the roadside, or delicate tracks in the sand, there is little to be seen in the way of animal life, probably due to the arid climate and lack of surface water.
Birds are another matter altogether and campers can expect to be woken at first light by a cacophony of bird calls as the avian residents proclaim their territorial ownership to all and sundry.
A good place to start exploration of the Park is Pertendi Hut just off the Ngarkat Highway. This restored shepherd’s hut, being little more than four concrete walls, certainly won’t win any architectural prizes; however, it would offer welcome protection in inclement weather. One thing SA Parks seems to generally do better than its interstate counterparts is the provision and maintenance of campground facilities.
While probably not to be taken literally, the Pertendi Hut facilities could be said to be “clean enough to eat your lunch off”. Near the hut a small grove of (introduced) pines provides campers with protection from the elements,while a more expansive cleared area is available for larger groups.
Fire rings are provided, but the park is subject to a blanket fire ban between November and April. From 2017 SA Parks are planning to adopt the absurd system of visitors having to pre-purchase entry and camping permits online. No doubt they will be installing satellite Wi-Fi at all park entry points to enable visitors to comply!
From Pertendi Hut a track east to the border intersects with Centre Track, which is an easy run to the northern boundary of the park near Pine Hut Soak campsite and the start of the Border Track. Tracks in the park are largely unmaintained and, while not particularly corrugated, the undulations worn into the sand (not surprisingly) seem to resonate perfectly with 4×4 suspensions at anything above 15 to 20km/h.
Anyone who has driven the Simpson Desert will soon see many similarities in required driving technique. It takes a little while to get your eye in and be able to pick which undulations are likely to see vehicle passengers thrown upwards, only to crash back down just in time to meet the vehicle’s next leap into the air. In short, the park’s 4×4 tracks are long and slow with some added rock and roll – basically a rollicking beat from start to finish.
The northern half of the Border Track is one way to avoid the possibility of collision between oncoming vehicles on the narrow sandy track that has numerous dunes with blind crests. With tyre pressures reduced to 15psi or less the driving is relatively easy, but a high-clearance 4×4 is a definite advantage. As are good tyres to cope with the occasional deep, soft sand.
During long weekends and school holidays the track experiences a surge in traffic and the face of many dunes can be quite chopped up from preceding drivers who think the only way to the top is by pedal to the metal. In hot, dry weather a degree of momentum may be required, but the track is only open during the cooler and wetter months. If the sand is at all moist most 4x4s won’t experience any difficulty climbing the dunes.
The Border Track can be driven in several hours, but to properly take in the beauty of the park this is a journey best done over a couple of days. That being said, there are only three small campsites available to travellers, and severe penalties exist for anyone caught camping outside of these designated areas. The moral of the story is simple: make camp early or risk missing out and having to face several hours more driving.
Penalties can be severe for those who disobey the regulations. If you think you’re unlikely to be caught out in such a remote area, be warned that both police and parks officers can drop in at any time – as testified to by a 4pm visit to your correspondent’s campsite at The Gums by two police 4x4s.
Two of the track’s campsites, The Pines and The Gums, arguably offer more pleasant camping opportunities than Doggers Hut much further to the south; however, none of the three provide any facilities. The Gums, being roughly halfway along the track and tucked away a couple of hundred metres down a side track, is perhaps the preferred place to overnight.
From the southern end of the track’s one-way section visitors have a choice of travelling west back to Pertendi Hut and the Ngarkat Highway, or continue south out of the park and turn east into Victoria to follow the southern boundary of the Big Desert National Park. Here sand begins to give way to patches of clay and, after rain, the mud larks will be in seventh heaven as they navigate several large bog holes found along here.
This track ends at the Nhill to Murrayville Road, and for anyone whose appetite for sand driving has not been fully sated there is a very expansive campground at Big Billy 40km to the north, where a number of large dunes can be found. Be warned that with Big Billy having 2WD access you can expect it to be very busy during holiday periods.
The Border Track offers an interesting and at times technically challenging 4×4 driving experience less than a day’s drive from either Melbourne or Adelaide.
TRAVEL PLANNER
WHERE Ngarkat Conservation Park is located 70km north of Bordertown and is approximately four hours travelling time from Adelaide or six hours from Melbourne.
WHEN TO TRAVEL The Border Track is closed from November to April. As summer temperatures regularly exceed 40ºC, be sure to visit the park during the cooler months.
STAYING THERE Park entry fees of $10 per vehicle and a camping fee of $12 per vehicle per night apply and are paid on entry. Pine Hut Soak and Pertendi Hut campsites have toilets. Patchy reception can be found near the Park’s northern and southern extremities, but anyone needing a mobile fix can get one in the middle of the Border Track at Hensley Trig, the park’s highest point. In warm weather flies can be chronic, making fly veils a valuable bit of kit.
SUPPLIES The nearest sources of fuel and supplies are Bordertown in the south or Pinnaroo in the north, so make sure you plan ahead before the trip.
ROAD CONDITIONS All tracks within the park are largely unmaintained requiring low tyre pressures (15-20psi) and high clearance 4x4s to cope with sections of deep, soft sand. Carrying a shovel, recovery equipment and traction aids such as MaxTrax is highly recommended. The rough and bumpy Border Track is unsuitable for camper trailers.
MAPS Good quality paper maps and a 4×4 GPS are recommended.
CONTACTS SA Department for Environment and Heritage, Lameroo SA Phone: (08) 8576 3690 Website: National Parks, SA
What’s your next off-road destination? Find out and explore.
A twist on the Greek pastitsio.
INGREDIENTS
- 1 tbs oil
- 1 onion – chopped
- 2 or more tsp minced garlic
- 1-2 tsp minced chilli or paste (or use fresh, finely chopped chilli)
- 1 zucchini – grated
- 1 carrot – grated
- 500g beef mince
- 550g jar pasta sauce (with or without flavourings)
- 2 tsp sugar (can use more or less as it helps take the acidity out of the tomatoes)
- 375g spaghetti – break lengths in half
- 2 cups béchamel sauce (plain or cheesy) – see recipe below
- ½ cup grated Parmesan cheese and/or a mix of cheese
- 4 tbs butter
- 4 tbs plain flour
- 2 cups hot milk
- Salt and pepper (for seasoning)
- Heat the oil in a large pan and sauté the onion, garlic and chilli for a few minutes until softened.
- Add the zucchini and carrot and stir over a medium to high heat until softened.
- Remove and set aside.
- Add a little more oil to the pan, heat and add the mince and cook until browned. Make sure you break up the mince so you don’t have any lumps.
- Add the pasta sauce and sautéed vegetables and mix through.
- Bring to the boil, then reduce the heat to a simmer, cover and cook for about 20 to 30 minutes – the longer you cook it, the more the flavour will develop.
- While the sauce is cooking, cook the spaghetti in a large pan of boiling, salted water until al dente.
- Add the hot cooked spaghetti to the cooked mince sauce and mix well.
- Spoon into an ovenproof, or casserole, dish and gently press the mince mixture down.
- Spoon the béchamel sauce over the top and spread evenly over the mince then sprinkle with cheese.
- Bake in a moderate oven for about 30 minutes or until the top has browned and the ingredients are heated through.
- Melt the butter in a large saucepan and then add the flour.
- Mix well and cook over a very low heat for about 5 minutes – this helps get rid of any ‘floury’ taste in the sauce.
- Add the hot milk at once, and whisk well – adding the hot milk at once means you won’t get lumps.
- Cook over a moderate heat for 5 to 10 minutes until the sauce is thick. Whisk often and add more milk if it gets too thick. But, it does needs to be thick.
- You can add some dried basil, oregano or dried Italian herbs, along with fresh basil or oregano to the mince. You can also add chopped mushrooms and use as many vegetables as you like.
- Béchamel sauce: You can add ½ cup of grated cheese – Parmesan, or a mix of Parmesan, cheddar, mozzarella and provolone. As well as some ground nutmeg.
A RECALL has been issued for more than 1000 second-gen Mazda BT-50s (UP) sold between October 31, 2011 and December 3, 2012. This issue affects only automatic models.
According to the recall report, “there is a possibility that an intermittent Output Shaft Speed Sensor failure may result in an unintended downshift in first gear”.
The obvious safety concern is that this failure could cause abrupt wheel-speed reduction, which may lead to the rear tyres locking up and a loss in vehicle control.
To see if your BT-50 is one of the affected vehicles, check this link.
In September last year, a recall was also issued for Mazda’s BT-50 dual-cab ute (series number: UP0YF1 and UR0YF1) due to a dodgy return spring on the rear folding seatback latch.
This hazard increased the risk of serious injury, as the backseat may shift position during braking if it isn’t secured into position.
Mazda will send a letter in the mail to all owners of affected BT-50s, where they’ll be advised to take their utes to the nearest Mazda dealer for free reparation.
Whether this latest recall impacts the mechanically similar Ford Ranger is as yet unknown.
One of the most common failures on a live axle is the universal joints. Worn universals will often sound like a worn bearing, or you may feel clunking from the front end. The way to test them is to get under the vehicle and check if the uni joints have any play. If the do, then they should be replaced.
There are maintenance free universal joints and also ones that come with a grease fitting – it’s up to you which type to use. Replacing the uni joints is not a difficult job but you do need a large socket to undo the wheel nut and you’ll need access to a large vice to press in the new uni joint caps.
Removing the old uni joints can need a fair bit of hammer action (the ones on this vehicle pictured looked like they were the originals and felt as though they were welded in). When the caps come out, expect to have a lot of needle bearings flying out all over the place – luckily these are not reused so you won’t need to worry about finding them.
When fitting the new uni joints, it can be a bit awkward setting up the vice to press in the caps – otherwise it’s a simple process. Make sure to thoroughly clean the axle and apply a light coating of grease before carefully re-fitting the axle into the diff housing.
01. Loosen wheel nuts, then jack up vehicle and place on support stands. Remove the wheel.
02. Remove split pin and discard. Use a new split pin when reassembling.
03. Remove hub-securing nut. Put a screwdriver in the disc to lock the hub while loosening the nut.
04. Remove brake caliper and secure with wire or a cable tie. Don’t let it hang from the brake hose.
05. Remove the brake disc.
06. Remove the hub. In this case the wheel bearings are integral with the hub.
07. Carefully remove the axle from the differential housing.
08. Remove the four circlips from the universal joint.
09. Place the shaft on a vice and hit it close to the joint until the universal joint cap comes out.
10. Remove the cap , turn the joint over and hammer out the cap on the opposite side.
11. Separate the shafts.
12. Place shaft so exposed joint ends are resting on a vice. Hammer shaft so remaining caps are forced out.
13. The new universal joint and caps. Some come with a grease nipple like this one.
14. Take off the caps and squeeze the new joint into the axle.
15. Press caps into place with a vice. Use same method to fit other two caps. Fit four new clips on uni joint.
16. Grease the axle before carefully refitting it in the diff housing.
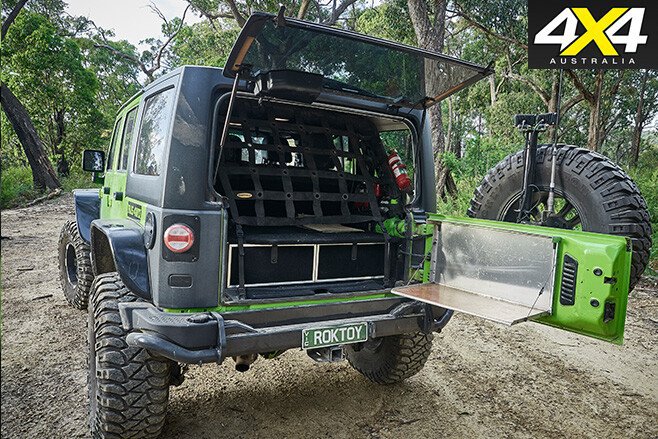
THIS 2013 Jeep JKU Wrangler Rubicon is owner Benn Collings’ weekend warrior.
It’s powered by a stock 3.6-litre Pentastar V6 that breathes through an AUS4WD custom stainless snorkel and an AIRAID MXP air box to generate extra power and improve fuel economy. The factory muffler was replaced by a Hi-Flo unit.
Benn replaced the Rubicon’s D35 front axle with a beefier D44 unit, and it’s fed by a high-angle Teraflex Rzeppa driveshaft. The unit features Poison Spyder diff covers to protect the Yukon 4.56 gears and factory lockers. The axle features EVO 44 Magnum diff sleeves and EVO knuckle and control arm brackets.
The Rubicon utilises a Fox steering damper, a Synergy high-steer flip kit and a Teraflex Panhard relocation bracket. It’s also got Synergy springs, Fox remote reservoir shocks and a Synergy adjustable lower trailing arms.
37in Mickey Thompson MTZ mud terrains wrapped around Mickey Thompson SideBiter II alloy wheels are on each corner.
Also helping when off-road is an ARB Stubby bullbar, Aurora LED light bars, and a Road Runner Offroad low-mount winch (an AUS4WD high-mount Warn will soon be taking its place).
High clearance ‘flat fenders’ from Double Black Offroad run down the Rubicon’s sides, and these are complemented by removable Ranuki Offroad Dirty Flaps and Uneek 4×4 rock sliders.
For complete coverage of this mean and green JKU Wrangler Rubicon – and to read the full list of mods – pick up a copy of 4X4 Australia’s March 2017 issue, in stores now. Also, watch the above video to witness the Jeep in off-road action.